twistfix membrane installation
TRANSCRIPT

6th Floor, 8 Exchange Quay Manchester
222 Regent St London W1B 5TR M3 5EJ
INSTALLATION OF TWISTFIX MEMBRANE PRODUCTS
BASELINE 8
1.1 PREPARATION
Twistfix wall membrane can be installed over a wide range of substrates in varying situations - walls, floors, ceilings, soffits, etc. However, before the system is installed, the area must be assessed to determine what preparation is required:
a) All timber fixtures and other organic material must be removed to prevent risk offungal or bacterial growth behind the System, e.g. skirting boards, timber plates, old wallpaper etc. Structural repairs or works to remove items likely to puncture the membrane must be carried out. If evidence of rot or mould exists, this should be treated. (TWISTFIX Microtech Biocide, Wykabor 10 or Mould Clear Concentrate)
b) If the walls are uneven or areas have deteriorated, any large depressions should belevelled and made good to ensure a solid fixing.
c) When assessing floor applications, consideration should be given to the type of finishthat is required.
The floor must be cleared of oil, loose material and any sharp edges should be levelled out. Any holes or severe depressions should be filled.
When a timber floor is preferred, then more consideration should be given to achieve a flat substrate prior to laying the membrane. This will relieve any undue movement when fitting a final floor finish.
d) The design of the drainage system should be agreed, implemented and tested before

covering by the membrane. The exception to this is where the Aqua Channel is sat above the slab or raft. Flood tests should be made to check the slab or raft is flat and level prior to the installation of the Aqua Channel, but the system can only be fully tested once the floor membrane and some form of resistance to water pressure is placed above the membrane such as temporary boards with bags of ballast or sand placed above, or the finished floor covering.
e) When fixing the system to flat soffits you must ensure that there is a fall to createproper drainage and prevent ponding. Any sagging of the membrane should not be great enough for ponding to take place.
1.2 TOOLS
Minimum Required Good quality 110V SDS hammer drill Mallet or club hammer Stanley Knife with spare blades Cutting shears
Tape measure Long spirit level 8mm & 10mm SDS drill bits Clean rags Trestle staging or scaffold for working at height
Recommended Extra lighting Hot Air Gun
1.3 WALL APPLICATION
The Twistfix wall membrane is fixed with the studs against the wall to create an air/depressurisation gap.
The membrane can be fixed either vertically or horizontally. When making this decision, you will need to take into account the size of the area to be lined, and the height of the walls relative to the width of the membrane. Horizontal fixing requires fewer cuts and jointing but the full roll is very heavy at first. Vertical fixing has very much lighter strips to fix, but requires that each of these is taped back together again. You may find that vertical fixing is easier, but requires more Corner Detail Tape for jointing.

The membrane is fixed to the wall using a Brick Plug fixing. The Brick Plug should have a waterproof seal applied to the collar using a soft rubber sealing washer or Twistfix Rope fitted to the plug for sealing to the wall membrane.
Place the wall membrane in position as level as you can judge by eye. Using a 10mm drill bit, drill through the centre of a stud near the top and edge to a depth greater than the fixing. The fixing is then hammered into the pre-drilled hole until the plug sits flush in the stud. The rubber washer re-seals the hole. Level the membrane using the spirit level or laser level if used, and fix another plug about 2m along at the top of the sheet.
The membrane will now be hanging level to the wall.
If you are fixing horizontally, continue fixing every 2m until you have reached the end of the roll or you have covered all of the wall(s) to be treated. It is very important to regularly check the level. If the membrane is not level, you may well find that the membrane is kinked and looks unsightly, it will also dive down when fitted around corners.

If you are fixing vertically, hang each subsequent sheet by the two fixings as described
above. The subsequent sheet should overlap by at least the width of the flange of the new sheet. You may find it easier to interlock the first stud of the new sheet to the last stud of the last sheet as this helps to keep the new sheet level. The vertical joints have to be sealed with Twistfix Tape. It is easier to apply the tape to the inner surface of the flange of the next sheet. Clean the flange and the face of the last sheet with a clean rag. When you have fixed the new sheet level with the correct overlap, pull off the backing paper from the tape and peel down whilst applying pressure to the flange.
Once all the backing paper has been removed, apply more pressure with the palm of your hand to further seal the whole of the joint. A Hot Air Gun should be used to help sealing in cold or damp conditions.
1.4 FIXING CENTRES
Once the Baseline membrane is hanging off the top fixings the rest of the fixing plugs need to be fixed.
The spacing of these fixings is dependent on the type of wall finish to be used:
Timber battens 400mm centres vertically and 600mm horizontally. Barrel Vaults require tighter centres.
Fixed metal track (Gypliner) 600mm centres vertically and 800mm horizontally. Brick or block walls restrained to the retaining wall using ties should have the fixings at centres to provide the correct number of restraints at the correct centres.

Free standing timber and metal frames and free standing block walls do not require specific fixing centres. In these cases use sufficient fixings to ensure the membrane is neat and tidy and reasonably tight to the wall, especially around corners and reveals.
When fixing the system to flat soffits you must ensure that enough fixings are used to keep the membrane tight to the soffits with no sagging. All fixings should be in line both horizontally and vertically.
1.5 BATTENS
Battens should be pre-treated and of a minimum dimension of 25mm x 38mm although you may find that 25mm x 50mm offers better fixing at the edge of the plasterboard.
The battens can be fixed into the fixing plugs without piercing the membrane, by using 5mm (size 10) self-tapping screws. The plug will take 30mm of screw, so be sure to purchase the correct length for the thickness of batten.
Over-tightening of over length screws can loosen the plug. Be very careful not to puncture the membrane when drilling and fixing the battens. Battens should be fixed so that all plasterboard edges are supported. Use a timber treated batten or treat with a preservative. (Wykabor Cut End) to protect cut battens.
Once the battens are fitted into position, plasterboard can be fixed to them using clout nails or preferably plasterboard screws. Care should be taken not to exceed the depth of the battens with the screws, and thereby puncture the membrane.
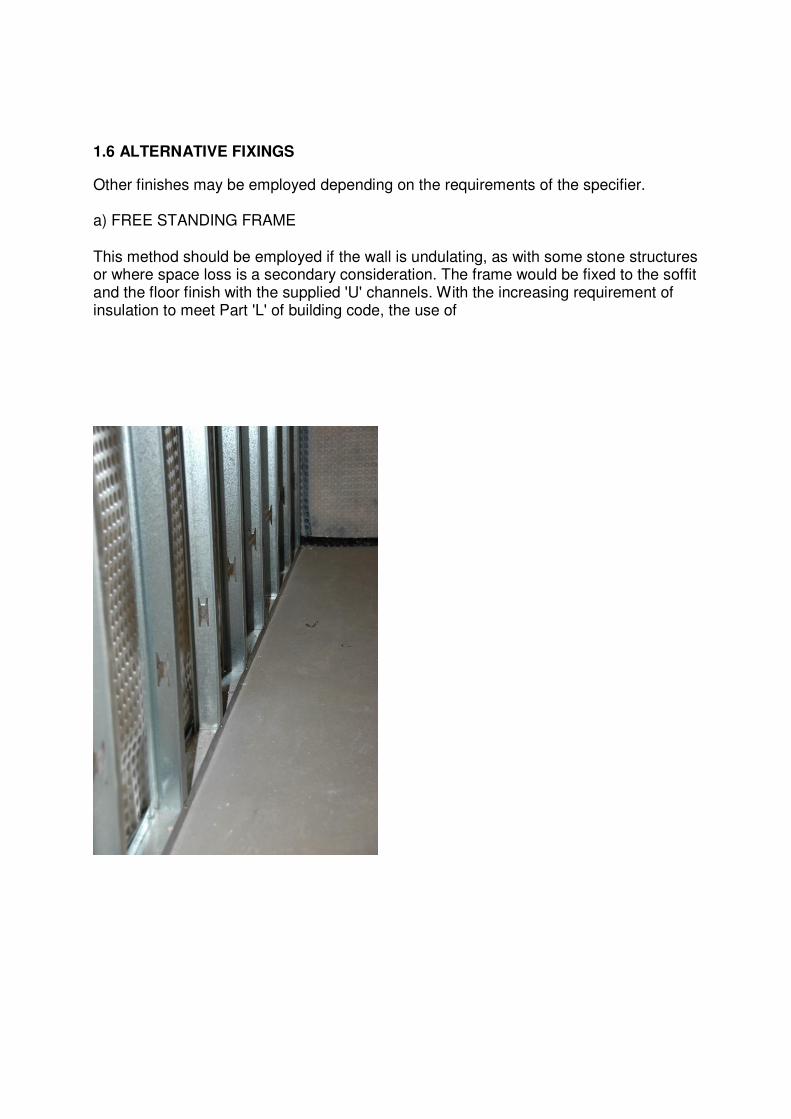
1.6 ALTERNATIVE FIXINGS
Other finishes may be employed depending on the requirements of the specifier.
a) FREE STANDING FRAME
This method should be employed if the wall is undulating, as with some stone structures or where space loss is a secondary consideration. The frame would be fixed to the soffit and the floor finish with the supplied 'U' channels. With the increasing requirement of insulation to meet Part 'L' of building code, the use of

these frames in becoming more popular, the thickness of insulation required is often in excess of the thickness of the frame, and so no wall thickness is not lost when using this method.
Because the frame is free standing and has no relationship with the wall membrane, very few fixings are required and so this wall finish above allows for the fastest and most efficient method of fixing membrane to the wall.
b) PROPRIETARY FIXING SYSTEMS
Fixing systems such as Gypliner or Lafarge can be used with Twistfix membrane. It is also possible to use metal profile systems when constructing new internal walls. These can be fixed without bridging the membrane.
c) INTERNAL BLOCK WALLSIf preferred the system can provide a water and vapour proof barrier, and then be lined with a block or brick inner skin.
1.6 SERVICES
If there are any services through the wall and floor, the membrane can be cut and trimmed around them and the gap filled and sealed using Twistfix Rope and Corner

Detail Tape. If necessary, a patch of membrane or plain DPC (PVC) is laid over and sealed to the service with Twistfix Rope and around its perimeter with Corner Detail Tape. It should be noted that protrusions through the floor slab/raft should be avoided wherever possible as they create weaknesses that allow unnecessary water ingress. The specified floor finish can now be laid directly over the floor membrane, which must not be punctured by any fixings through the floor. When a timber floor finish is preferred you must allow an expansion gap around the wall edge. Speak to the supplier of the floor finish to confirm the correct size of this expansion gap.
1.7 GENERAL
Occasionally, service pipes and other intrusions will interrupt a continuous application of the membrane. In this instance the membrane should be trimmed neatly around the service and sealed using the Twistfix Rope or Corner Detail Tape, or if necessary a combination of both.
FLOOR APPLICATION OF BASELINE 8
2.1 PREPARATION
Please refer to our section on preparation and attend to any preparatory work prior to installation. Always clean both edges of the membrane before making a seal.
2.2 DRAINAGE REQUIREMENT
If Baseline 8 is to be used in a full or part earth-retaining situation, the membrane system must be drained. To comply with BS8102, you must assume that the structure will be subjected to water ingress at some time. Baseline 8 can also be used on the floor in above ground situations to provide isolation from damp floors either as the primary DPM or above green concrete to accelerate the contract program. The concrete will continue to cure below the dry membrane surface allowing for floor finishes to be laid above the membrane much quicker than normal.
2.3 METHODS OF DRAINAGE FOR BASELINE 8 TO THE FLOOR
The drainage must effectively remove all water from below the membrane and take the water to a point of discharge such as a sump chamber or a form of safe natural drainage. Standing water can block the membrane with silt or lime scale so it is important for water to flow uninterrupted to the drainage point.

2.3.1 AQUA DRAIN & AQUA CHANNEL
Aqua Drain & Aqua Channel sits in at the wall/floor junction and collects water from behind the wall membrane and receives water at the wall / floor junction. They are a designed method of removing water as it can interface with sump chambers, stack pipes, gullies, waste pipes etc. Aqua Channel can be serviced by inserting jetting eyes into the system.
2.3.2 CENTRAL DRAINAGE
When a new slab is being laid this presents the opportunity to install a Central Drainage system. A network of 100mm pipe work laid to evacuate water from the slab to a groundwater sump chamber. Please refer to our Technical Drawings guide.
A silification treatment should be applied to new slabs. This will lock in free limes present within the slab. (Twistfix Microseal)

2.4 INSTALLATION OF BASELINE 8 TO THE FLOOR
Starting at one side of the room, unroll the membrane with the studs down and cut to fit the room as one would a carpet. The next membrane width is rolled out so that the flanged edge overlaps onto the edge of the previous roll of membrane. Clean both edges. Twistfix Tape is then applied to the edge of previous roll of membrane with the backing paper still intact. Check the two widths for alignment, with the flange covering the backing paper. Starting from the middle of the joint, remove the backing paper and press down on the joint sealing the two sections together. This process is repeated until all areas are covered.
Seal the floor membrane to the wall membrane using Corner Detail Tape. Refer to Technical Drawings guide.
Where the floor membrane is required to be jointed to horizontal DPC‟ s through internal and external walls, these joints should be sealed with Twistfix Corner Detail
Tape.
Ensure both surfaces are clean and dry before attempting to make these joints. If there are any services up through the floor, the membrane can be cut and trimmed around them, and the gap filled and sealed using the Twistfix range of tapes. If necessary, a patch of membrane or plain DPC (PVC) is laid over and sealed to the service with Twistfix Rope and around its perimeter with Corner Detaill Tape. It should be noted that protrusions through the floor slab should be avoided wherever possible as they create weaknesses that allow unnecessary water ingress.
The specified floor finish can now be laid directly over the floor membrane, which must not be punctured by any fixings through the floor. When a timber floor finish is preferred you must allow an expansion gap around the wall edge. Speak to the supplier of the floor finish to confirm the correct size of this expansion gap.
BASELINE 20
3.1 INSTALLATION OF BASELINE 20 TO THE FLOOR
Where knowledge of the ground conditions including the water table is unclear and condition of the existing slab uncertain, Baseline 20 should be used as either the main floor membrane or as a lost drainage layer with another floor membrane above acting as the vapour control layer.

It is very rare for water to pass through a solid concrete slab or concrete raft, but where the slab or raft is of questionable quality it is possible for water to pass through cracks in a poorly constructed floor. If the quality of the slab is questionable, Baseline 20 should be used.
In „ at risk‟ sites and head height allowing, it is highly recommended to install Baseline 20. This product has an air gap volume equal to 14Ltrs/m2 and a greater resistance tohydrostatic pressure.
Install Baseline 20 as per installation instructions of Baseline 8 across the floor. Section 2.4
Where the Baseline 20 is to be used a lost drainage layer, the membrane is not sealed to the Aquachannel.

INSTALLATION OF SLIMLINE MESH & BASELINE MESH TO THE WALLS
Twistfix mesh membranes are used in both new build and retro fit basements where space is at a premium and or the choice of finish can be render, plaster, or dot and dab plaster board.
It is also used to remediate damp walls and offer insulated finishes on cold external walls above ground.
4.1 PREPERATION
Please refer to the instructions as set out in 1.1
4.2 FIXINGS
Mesh membranes should be fixed to the walls using Twistfix Plaster Plugs. An 8mm drill bit is needed and drill to a depth greater than the length of the plug. In below ground environments plug fixings should be sealed around the collar using preformed waterproof seals or Twistfix Rope subject to how wet the substrate is.
Above ground and on non soil retaining walls Plug fixings do not necessarily need to be sealed.
Fix in a square at 350mm centres, and then fix a plug in the centre of four fixings so it looks like a 5 on a dice. All fixings will then be a maximum of 250mm from each other.
It is essential fixings are no farther apart than this specification to avoid rippling of the membrane and subsequent cracking of the applied finish.
Where a Dot and Dab finish is being applied centres may be reduced to 350mm centres.
4.3 SEALING
Flange to Dimple – Use Twistfix Tape
Dimple to Dimple – Use Twistfix RopeButt to Butt Joint – Use Twistfix Fibre Tape

4.4 DRY LINING
In the remediation of a damp wall mesh membrane can be installed in a dry lining finish. To assist with the drying down of the wall it is recommended to introduce air movement behind the membrane.
On the dry side of the membrane the use of a vapour check plaster board product is recommended to guard against the effects of interstitial condensation.
4.5 FINISHES
Twistfix mesh membrane products can be finished by rendering, plastering or applying dot and dab adhesive grout and plaster board.
Baseline Mesh can be finished in accordance with normal plastering techniques (BS 5492:1990) using proprietary lightweight plasters e.g. Tilcon „ Whitewall‟ , Thistle „ Carlite Bonding‟ , or a 1:1:6 cement:lime:sand render.
NB Manufacturers recommended drying times may vary according to atmospheric conditions.
4.5.1 CEMENT BASED RENDERS
For internal cement renders the mix to be six parts clean sharp sand/one part lime or plasticizer/one part cement. A two-coat application is recommended allowing 7-10 day between coats. Drying time is important because shrinkage cracks may appear. Note: All plasters and renders etc. must be to a minimum total depth of 15mm. The undercoat should be applied with firm pressure to the depth of the studs and cover the mesh and be well scratched by means of a wire scratcher. When the scratch coat has set, the floating coat should be applied to a final overall finish of 15mm and lightly scratched to provide a firm key for the final coat, which should be to a minimum thickness of 3mm.
All plasters and renders should be applied strictly in accordance with the manufacturer's instructions, and good plastering/rendering practice as described in BS5492 and BS5262 Code of Practice.
Do not apply decoration until plaster is thoroughly dry. Note: If plasters other than those specified above are used they will not conform to the Twistfix Company specification and will therefore invalidate any guarantee on the material. If any special renders or plasters are to be considered, technical advice must be sought from the Twistfix technical representative.
For dry lining use a conventional bonding plaster in dabs to a minimum thickness of 8

mm and covering at least 50% of the membrane surface area. After the plastered, dry- lined or rendered surface has dried, the surface can be painted or wallpapered using traditional methods and materials without delay.
VENTILATION
Ventilation is an important requirement of the design of habitable building space, and is necessary for providing a healthy environment for all of the building occupants. Part F (2006) of the Building Regulations 2000 deals with ventilation within buildings. Requirement F1 states that: “ There shall be adequate means of ventilation provided for people in the building” . Ventilation is required for one or more of the following purposes: a. Provision of outside air for breathingb. Dilution and removal of airborne pollutants, including odoursc. Control of excess humidity (arising from water vapour in the indoor air)d. Provision of air for fuel-burning appliances (which is covered under Part J of theBuilding Regulations) Ventilation is increasingly more of an issue because of the requirements of Part L of the Building Regulations 2000 to make houses more air-tight so as to prevent heat loss. The two sections of the Building Regulations appear to be almost at odds with each other resulting in the requirement for mechanical ventilation in most cases. Basements present even more of a problem as natural ventilation, even in older properties not subject to Part L, is a real problem where the living space walls may be earth retaining to all elevations. BS8102 – 1990, the code of practice for the protection of structures against water fromthe ground, mentions the need for ventilation for Grade 4 structures to be used for the storage of hygroscopic materials such as for the archiving of paper documents. Although BS8102 does categorise Grade 3 habitable areas as being ventilated, unfortunately the British Standard pre-dates the current Part F by some sixteen years, and so is not giving advice that is up-to-date. If BS8102 were to be updated today, it would include specific guidance for the forced mechanical ventilation of Grade 3 habitable areas, controlling humidity to around 50% RH. It is unlikely that works to waterproof a basement will comply with Part F unless mechanical ventilation is included, and so we recommend that mechanical ventilation is included within the design of all Twistfix Waterproofing Systems.
5.1 VENTILATION SYSTEMS FOR BASEMENTS
Part F names 4 methods of ventilation:
System 1: Background ventilators and intermittent extract fans. System 2: Passive stack ventilation. System 3: Continuous mechanical extract. System 4: Continuous mechanical supply and extract with heat recovery.

For a dwelling which includes a basement that is connected to the rest of the dwelling above ground by a large permanent opening (e.g. an open stairway), the whole dwelling including the basement should be ventilated and treated as a multi-storey dwelling. If the basement has only a single exposed façade, while the rest of the dwelling above ground has more than one exposed façade, ventilation systems 3 and 4 are preferred. If systems 1 or 2 are to be used, seek expert advice.
For a dwelling which includes a basement that is not connected to the rest of the dwelling above ground by a large permanent opening the basement should be treated separately as a single-storey dwelling above ground. If the basement has no bedrooms, assume it has one bedroom for the purpose of determining ventilation provisions.
For a dwelling which comprises only a basement it should be treated as a single-storey dwelling above ground.
GENERAL
6.1 OVERLAP JOINTS
On walls, Baseline 8 can be fixed either vertically or horizontally. The membrane is overlapped either by the flanged edge or by a minimum of three rows of studs.
6.2 GENERAL
In all cases ensure that membrane overlaps are made so as to provide continuous drainage behind the membrane. Avoid making laps that would allow water to drain onto or to be trapped by the joints.
6.3 REPAIRS TO STUDS
When the wrong stud is drilled in error this can easily be repaired by cleaning out the stud with a clean cloth and plugging it with sealing rope. This can then be covered with a small patch of Corner Detail Tape or plugged with Twistfix Rope.
The same repair can be used where a successful fixing has not been achieved due to drilling into unsound joints or structure. Simply make the repair and re-drill another hole.

6.4 WATERPROOFING PLUG FIXINGS
ABOVE GROUND NON SOIL RETAINING WALL: No waterproof seal required.
ABOVE GROUND SOIL RETAINING WALL: Seal with preformed seal or Rope.
BELOW GROUND BUT DRY SUBSTRATE: Use preformed seal.
BELOW GROUND DAMP SUBSTRATE: Use Twistfix Rope.
BASEMENT PRODUCT GUIDE
PRODUCT WALL FLOOR EXTERNAL
Baseline 8 40m2 & 48m2 40m2 & 48m2
Baseline Mesh 20m2 & 40m2
Slim-line Mesh 30m2 & 60m2
Baseline 20 40m2
Slim-line Floor 40m2
Geotex Triple Layer 40m2
Drainage Channel 2m Lengths
Twistfix Tape 22.5m Rolls
Twistfix Rope 4.75m Rolls
Twistfix Corner Tape 12 & 20m Rolls
Brick plugs 100 & 200
Plaster Plugs Box 250 Box 200

NB: MATERIAL USAGE
Order 1 x roll of Twistfix Tape for every roll of membrane.
If applying battens to Brick plug fixings order enough plugs for 5 every M2 of wall membrane.
Mesh membrane requires plug fixings equal to 10-18 per m2 of membrane depending on whether dot and dab drywall is used or whether render is being applied.
1 x roll of Twistfix Rope will seal 100 plug fixings.