two piece low torque kelly valve - globalmfgusa · two piece low torque kelly valve disassembly and...
TRANSCRIPT

Two Piece Low Torque Kelly Valve
Disassembly and Assembly Procedures Global Manufacturing, Inc. Lafayette, Louisiana USA 70508 Ph (337) 237-1727 Fax (337) 232-9353

Disassembly and Assembly Procedures for Global Manufacturing, Inc. Two Piece Low Torque Kelly Valves
G190r01.doc 3/31/07 Rev. 1
1
SAFETY CONSIDERATIONS
• Safety glasses should be worn along with other protective clothing as required.
• Proper tools and restraining devices (vises, clamps, etc.) should be used to
secure the valve in a safe manner. • Valve maintenance should be performed in a safe and suitable work area as
designated by your supervisor. • Personnel performing these operations should be familiar with Global two
piece low torque kelly valves and their uses. • If unsure of any part of the operation, check with the valve manufacturer
before proceeding. These instructions are intended for disassembly and assembly of Global Manu- facturing, Inc. two piece low torque kelly valves only.
These written procedures are to be used in conjunction with Global Manu- facturing, Inc.’s Two Piece Low Torque Kelly Valve Preventive Maintenance Service Video.

Disassembly and Assembly Procedures for Global Manufacturing, Inc. Two Piece Low Torque Kelly Valves
G190r01.doc 3/31/07 Rev. 1
2
VALVE DISASSEMBLY FIGURE 1 1. Remove the valve from the drillstring. Clean the outside and inside in
preparation for disassembly. 2. Ensure that the valve is in the closed position before beginning
disassembly. 3. Break the service connection and separate the valve body and bottom
sub. FIGURE 2 4. Remove the ball and valve stem from the body. 5. Remove the seat from the body. 6. Remove the seat from the bottom sub. 7. Remove the spring from the bottom sub. 8. Remove the Teflon anti-friction ring and all seals and o-rings. 9. Inspect the o-ring and seal ring grooves on the seat for burrs or scratches. 10. Inspect the ball and stem to ensure that there are no scratches or
excessive wear. 11. Inspect the valve body and bottom sub to ensure that there are no
scratches or excessive wear. 12. Inspect the box & pin threaded connections for excessive wear or
damage.

Disassembly and Assembly Procedures for Global Manufacturing, Inc. Two Piece Low Torque Kelly Valves
Figure 1 G190f01.doc

Disassembly and Assembly Procedures for Global Manufacturing, Inc. Two Piece Low Torque Kelly Valves
Figure 2 G190f02.doc

Disassembly and Assembly Procedures for Global Manufacturing, Inc. Two Piece Low Torque Kelly Valves
G190r01.doc 3/31/07 Rev. 1
3
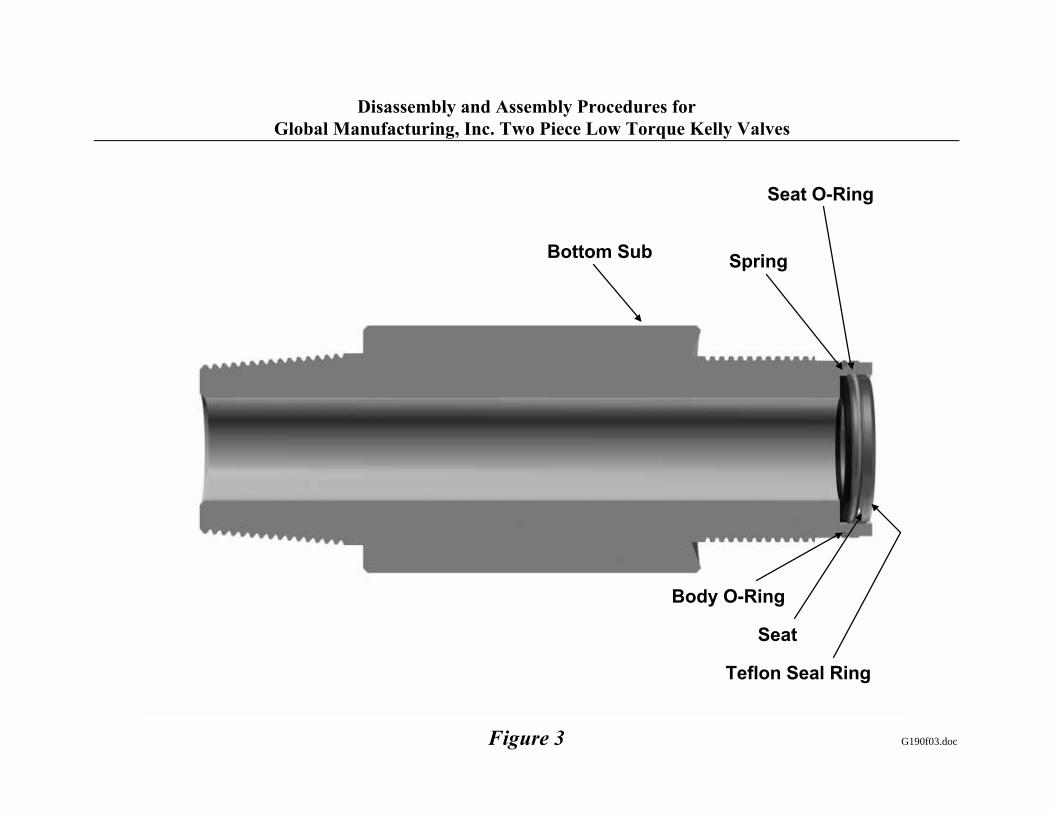
VALVE ASSEMBLY 1. Replace all seals, o-rings and any worn or damaged parts (ball, seats,
body, bottom sub, etc.) FIGURE 3 2. Install the body o-ring on the bottom sub and apply grease to the inside
ridge of the sub. 3. Install the spring on the shoulder inside the sub. The spring should slide
freely into the bore. 4. Apply a high grade lithium based grease to the seat, o-ring, and seal ring.
Install the o-ring and Teflon seal ring on the seat. 5. Gently place the seat in the bottom sub (Teflon seal side out) and tap into
place with a rubber mallet using caution not to damage the Teflon o-ring. 6. Apply pipe dope (containing 40 to 60% by weight of finely powdered
metallic zinc and less than 0.3% active sulfur) to the service connection threads.
FIGURE 4 7. As necessary, use an emery cloth to remove any sharp edges from the
operating stem hole. 8. Apply grease to the valve bore, stem hole, seat, o-ring, and seal ring.
Install the o-ring and seal ring on the seat. 9. Gently place the seat in the body (Teflon seal side out) and tap into place
with a rubber mallet using caution not to damage the Teflon o-ring. 10. Apply grease to the operating stem, o-ring, and seal ring. Install the o-ring
and Teflon anti-friction ring on the operating stem.
Disassembly and Assembly Procedures for Global Manufacturing, Inc. Two Piece Low Torque Kelly Valves
Figure 3 G190f03.doc
Body O-Ring
Bottom Sub Spring
Seat O-Ring
Seat
Teflon Seal Ring

Disassembly and Assembly Procedures for Global Manufacturing, Inc. Two Piece Low Torque Kelly Valves
Figure 4 G190f04.doc
Teflon Seal Ring Seat O-Ring
Body Seat

Disassembly and Assembly Procedures for Global Manufacturing, Inc. Two Piece Low Torque Kelly Valves
G190r01.doc 3/31/07 Rev. 1
4
FIGURE 5 11. Install the operating stem using caution to properly orient the cam flats to
allow the valve to fully open and close. 12. Note the proper orientation for the valve stem in the closed position. FIGURE 6 13. Apply grease to the ball. Insert until resting on the seat with the operating
stem key in the ball groove. 14. Note the proper orientation of the seats (Teflon seal rings toward the ball). 15. Apply pipe dope to the service connection threads. FIGURE 7 16. Screw the bottom sub back onto the valve body until drag is felt. At this
point, rotate the ball and stem 5° to 7° toward full open and hand tighten. 17. Check for smooth operation of the valve by opening and closing the valve. 18. Fully open the valve and ensure that there is no offset between the bore
and the open ball. FIGURE 8 19. Fully close the valve. Rotate the ball and stem 5° to 7° toward full open to
prevent damage to the stem during make-up. 20. Make up the service connection to the manufacturer’s recommended
torque. 21. Test the valve to the manufacturer’s specifications to ensure no leakage. 22. Store the valve in the full open position until installed in the drillstring.

Disassembly and Assembly Procedures for Global Manufacturing, Inc. Two Piece Low Torque Kelly Valves
Figure 5 G190f05.doc
OPEN
OPEN
CLOSE
CLOSE
INCORRECT
CORRECT

Disassembly and Assembly Procedures for Global Manufacturing, Inc. Two Piece Low Torque Kelly Valves
Figure 6 G190f06.doc
Ball Teflon Seal Ring
Seat O-Ring
Teflon Anti-Friction Ring
Stem O-Ring
Stem Seat

Disassembly and Assembly Procedures for Global Manufacturing, Inc. Two Piece Low Torque Kelly Valves
Figure 7 G190f07.doc
5°° to 7°° Offset
OPEN
CLOSE

Disassembly and Assembly Procedures for Global Manufacturing, Inc. Two Piece Low Torque Kelly Valves
Figure 8 G190f08.doc