uce mobile client for android - ocean telecom
TRANSCRIPT

User Guide
UCE Mobile Client for Android
Please read this manual carefully and retain it for future reference.
Copyright © 2016 Ericsson-LG Enterprise Co. Ltd. All Rights Reserved. This material is copyrighted by Ericsson-LG Enterprise Co., Ltd. Any unauthorized reproductions, use or disclosure of this material, or any part thereof, is strictly prohibited and is a violation of Copyright Laws.
Ericsson-LG Enterprise reserves the right to make changes in specifications at any time without notice.
The information furnished by Ericsson-LG Enterprise in this material is believed to be accurate and reliable, but is not warranted to be true in all cases.
Ericsson-LG Enterprise and iPECS are trademarks of Ericsson-LG Enterprise Co. Ltd.
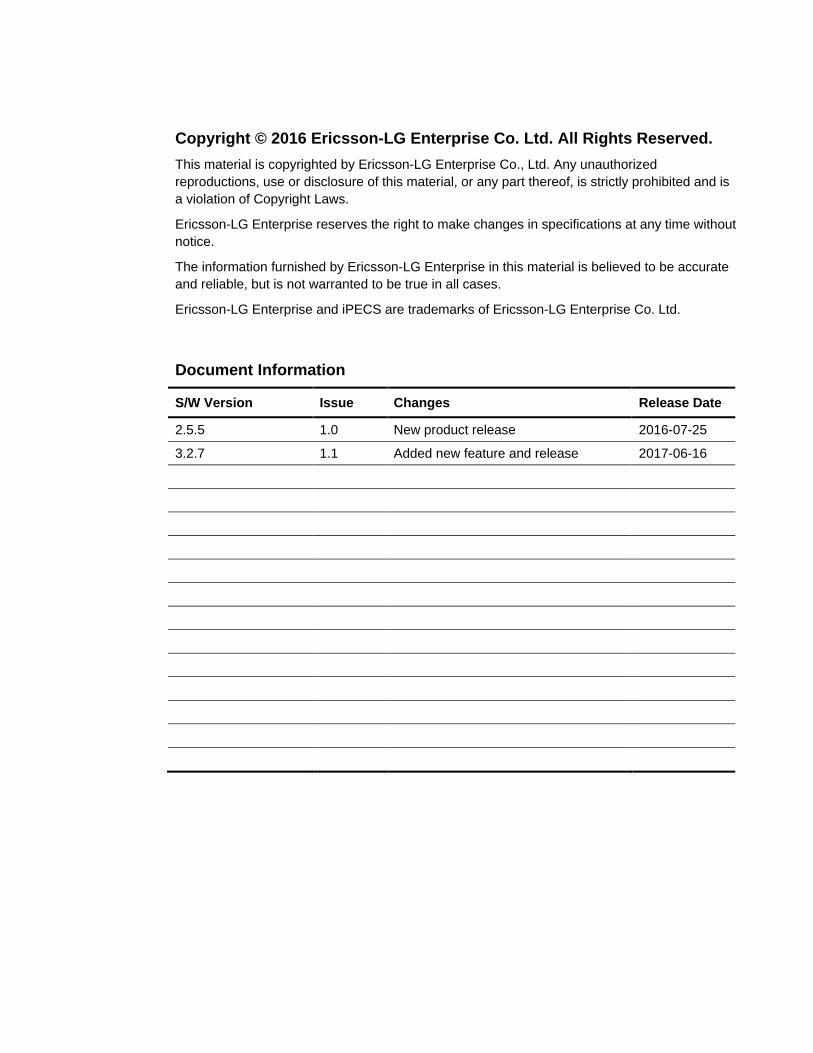
Document Information
S/W Version Issue Changes Release Date
2.5.5 1.0 New product release 2016-07-25
3.2.7 1.1 Added new feature and release 2017-06-16

iPECS UCE Mobile Client for Android User Guide - Issue 1.1 i
Table of Contents
Table of Contents ............................................................................ i
Before Use ....................................................................................... 1About This User Guide ......................................................................................................... 1
Introduction of the document ....................................................................................... 1Organisation of the Document .................................................................................... 1
Document Conventions ........................................................................................................ 1Text formatting ............................................................................................................ 1Explanation of Symbols ............................................................................................... 2
1. Overview ................................................................................ 31.1 Introduction to iPECS UCE ......................................................................................... 3
2. Installation ............................................................................. 42.1 Requirements for Hardware and Operating System ................................................... 4
2.1.1 Hardware .................................................................................................. 42.1.2 Operating System ..................................................................................... 4
2.2 License and Lock Key ................................................................................................. 52.3 UCE Client Installation ................................................................................................ 5
2.3.1 Installation via Google Play Store ............................................................. 52.3.2 UCE Client Execution ............................................................................... 52.3.3 Initial Sign In Setup ................................................................................... 5
2.3.3.1 Sign In Setup ....................................................................................... 62.3.3.2 Option Menu Setup .............................................................................. 7
2.3.4 Sign in ....................................................................................................... 92.3.5 Sign Out .................................................................................................... 92.3.6 Battery Optimization ............................................................................... 10
3. UCE Client Composition .................................................... 113.1 Main Screen Description ........................................................................................... 11
3.1.1 Main Menu .............................................................................................. 113.1.2 Options Menu ......................................................................................... 12
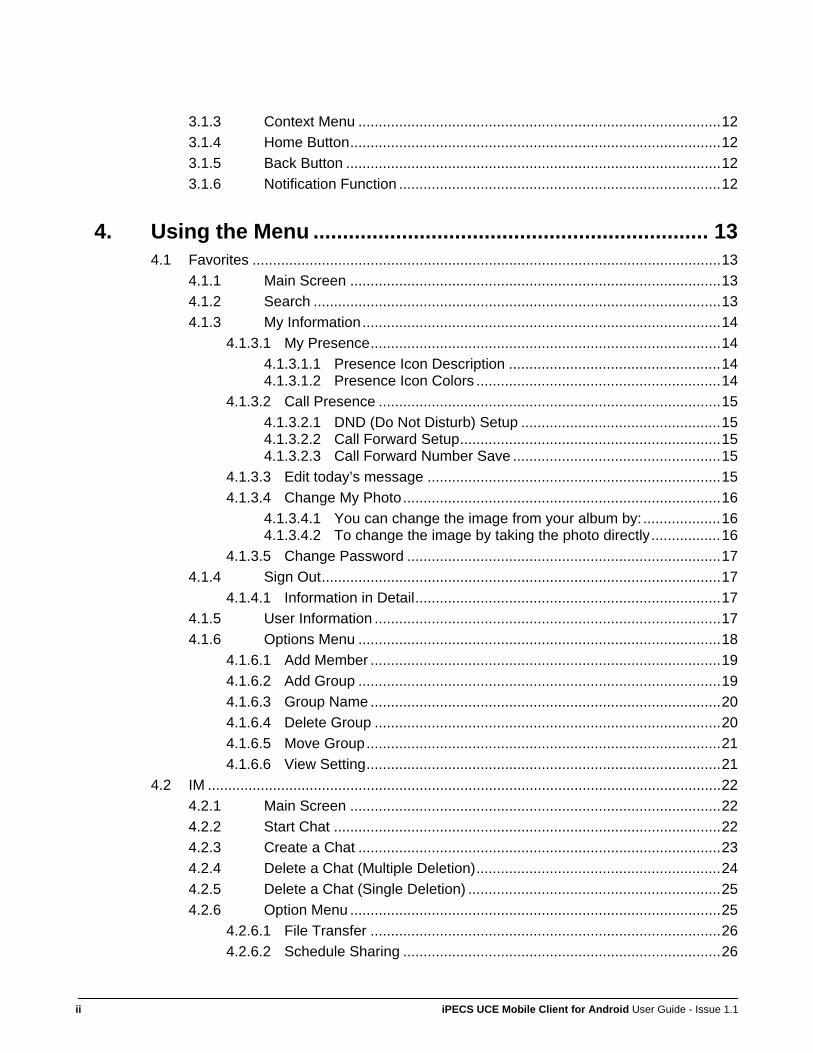
ii iPECS UCE Mobile Client for Android User Guide - Issue 1.1
3.1.3 Context Menu ......................................................................................... 123.1.4 Home Button ........................................................................................... 123.1.5 Back Button ............................................................................................ 123.1.6 Notification Function ............................................................................... 12
4. Using the Menu ................................................................... 134.1 Favorites ................................................................................................................... 13
4.1.1 Main Screen ........................................................................................... 134.1.2 Search .................................................................................................... 134.1.3 My Information ........................................................................................ 14
4.1.3.1 My Presence ...................................................................................... 144.1.3.1.1 Presence Icon Description .................................................... 144.1.3.1.2 Presence Icon Colors ............................................................ 14
4.1.3.2 Call Presence .................................................................................... 154.1.3.2.1 DND (Do Not Disturb) Setup ................................................. 154.1.3.2.2 Call Forward Setup ................................................................ 154.1.3.2.3 Call Forward Number Save ................................................... 15
4.1.3.3 Edit today’s message ........................................................................ 154.1.3.4 Change My Photo .............................................................................. 16
4.1.3.4.1 You can change the image from your album by: ................... 164.1.3.4.2 To change the image by taking the photo directly ................. 16
4.1.3.5 Change Password ............................................................................. 174.1.4 Sign Out .................................................................................................. 17
4.1.4.1 Information in Detail ........................................................................... 174.1.5 User Information ..................................................................................... 174.1.6 Options Menu ......................................................................................... 18
4.1.6.1 Add Member ...................................................................................... 194.1.6.2 Add Group ......................................................................................... 194.1.6.3 Group Name ...................................................................................... 204.1.6.4 Delete Group ..................................................................................... 204.1.6.5 Move Group ....................................................................................... 214.1.6.6 View Setting ....................................................................................... 21
4.2 IM .............................................................................................................................. 224.2.1 Main Screen ........................................................................................... 224.2.2 Start Chat ............................................................................................... 224.2.3 Create a Chat ......................................................................................... 234.2.4 Delete a Chat (Multiple Deletion) ............................................................ 244.2.5 Delete a Chat (Single Deletion) .............................................................. 254.2.6 Option Menu ........................................................................................... 25
4.2.6.1 File Transfer ...................................................................................... 264.2.6.2 Schedule Sharing .............................................................................. 26

iPECS UCE Mobile Client for Android User Guide - Issue 1.1 iii
4.2.6.3 Make a Group Call ............................................................................. 264.2.6.4 Write an iSMS .................................................................................... 264.2.6.5 Share a Memo ................................................................................... 27
4.2.7 Leave Chat ............................................................................................. 274.3 Memo ........................................................................................................................ 28
4.3.1 Main Screen ........................................................................................... 284.3.1.1 Create a Memo .................................................................................. 28
4.3.2 Mark Memo Completed .......................................................................... 284.3.3 Delete Task Memo ................................................................................. 29
4.3.3.1 To Delete Each Item .......................................................................... 294.3.3.2 To Delete All Items ............................................................................ 29
4.3.4 Hide Shared Memo ................................................................................. 294.3.4.1 To Hide Memo ................................................................................... 294.3.4.2 To See the List of Hidden Memos ..................................................... 30
4.3.5 Options Menu ......................................................................................... 314.4 Call ............................................................................................................................ 32
4.4.1 Make a Call ............................................................................................. 324.4.1.1 Call Log ............................................................................................. 32
4.4.2 iSMS ....................................................................................................... 334.4.2.1 Reply iSMS ........................................................................................ 334.4.2.2 Delete iSMS ....................................................................................... 33
4.4.2.2.1 To Delete an Individual Message .......................................... 334.4.2.2.2 To Delete All Items ................................................................ 33
4.4.3 Answer Call ............................................................................................ 344.4.4 Reject Call .............................................................................................. 344.4.5 Hang Up ................................................................................................. 344.4.6 Menu While Being Connected ................................................................ 35
4.4.6.1 Using Speaker ................................................................................... 364.4.6.2 Mute Function .................................................................................... 364.4.6.3 Hold Function .................................................................................... 364.4.6.4 Add Video Call Function .................................................................... 36
4.4.6.4.1 Switch Camera Function ....................................................... 364.4.6.4.2 Show / Hide My Video ........................................................... 374.4.6.4.3 Enable / Disable My Video .................................................... 37
4.4.6.5 Invite Function ................................................................................... 374.4.6.6 Call Transfer ...................................................................................... 37
4.4.7 Call Move Function ................................................................................. 384.4.8 Option Menu ........................................................................................... 38
4.4.8.1 Call-Back ........................................................................................... 384.4.8.1.1 Setting Call-Back ................................................................... 384.4.8.1.2 Using Call-Back ..................................................................... 39
4.4.8.2 Call-Through ...................................................................................... 39

iv iPECS UCE Mobile Client for Android User Guide - Issue 1.1
4.4.8.2.1 Setting Call-Through ............................................................. 394.4.8.2.2 Using Call-Through ............................................................... 39
4.4.8.3 Group Call ......................................................................................... 404.4.9 One Digit Service Functions ................................................................... 40
4.5 Address Book ............................................................................................................ 424.5.1 Organization Chart Screen ..................................................................... 424.5.2 Address Book Screen ............................................................................. 42
4.5.2.1 Public Address Book ......................................................................... 434.5.2.2 Private Address Book ........................................................................ 43
4.5.2.2.1 Private Address Book Synchronization ................................. 434.6 Notice ........................................................................................................................ 44
4.6.1 Notice ..................................................................................................... 444.7 Storage ...................................................................................................................... 45
4.7.1 File Storage Main Screen ....................................................................... 454.7.1.1 Delete File ......................................................................................... 45
4.7.1.1.1 To Delete Individual Files ...................................................... 454.7.1.1.2 To Delete All Files ................................................................. 45
4.8 Schedule ................................................................................................................... 474.8.1 Schedule Main Screen ........................................................................... 474.8.2 View Schedule ........................................................................................ 474.8.3 Register Schedules ................................................................................ 484.8.4 Revise a Schedule .................................................................................. 494.8.5 Delete Schedule ..................................................................................... 49
4.9 Conference ................................................................................................................ 514.9.1 Conference Main Screen ........................................................................ 514.9.2 Create a Conference Room .................................................................... 514.9.3 Delete a Conference Room .................................................................... 524.9.4 Using a Conference Room ..................................................................... 53
5. Environment Configuration ............................................... 555.1 Select Setting Menu .................................................................................................. 55
5.1.1 My Information Setting ............................................................................ 555.1.2 Server Setting ......................................................................................... 565.1.3 Network Setting ...................................................................................... 565.1.4 Call Options Settings .............................................................................. 575.1.5 Dialing Rule ............................................................................................ 585.1.6 Codec Settings ....................................................................................... 585.1.7 Ringtone / Notification Setting ................................................................ 585.1.8 IM Font Size Setting ............................................................................... 585.1.9 Private Contacts Setting ......................................................................... 595.1.10 Audio Quality Settings ............................................................................ 59

iPECS UCE Mobile Client for Android User Guide - Issue 1.1 v
5.1.11 Account Settings ..................................................................................... 595.1.11.1.1 Synchronize Google Account .............................................. 595.1.11.1.2 Add Google Account ........................................................... 595.1.11.1.3 Choosing a Google Account ................................................ 59
5.1.12 Send Log ................................................................................................ 595.1.13 Auto Sign In ............................................................................................ 595.1.14 Auto Start ................................................................................................ 605.1.15 UCE Information ..................................................................................... 605.1.16 Sign Out .................................................................................................. 60
5.2 FMX/FMC Client Main Screen .................................................................................. 615.2.1 FMC Client .............................................................................................. 615.2.2 FMX Client .............................................................................................. 615.2.3 On/Off Duty Settings ............................................................................... 625.2.4 On/Off Duty Auto Setting ........................................................................ 625.2.5 Menu Location ........................................................................................ 63
5.2.5.1 Call Log ............................................................................................. 635.2.5.2 Notice ................................................................................................ 63
Appendix- Useful Information ..................................................... 64Open Source Software Notice ............................................................................................ 64


iPECS UCE Mobile Client for Android User Guide - Issue 1.1 1
Before Use
About This User Guide This guide provides user-related information intended for Android-based UCE Client users.
Introduction of the document This guide introduces iPECS UCE Client for Android and explains how to correctly install and use iPECS UCE Client for Android. The figures and screen captures used in this guide may be changed without notice.
Organisation of the Document This guide consists of a ‘Before Use’ section, five chapters, and an Appendix as listed below.
Before Use
Chapter 1: Overview
Chapter 2: Installation
Chapter 3: UCE Client Composition
Chapter 4: Using Menu
Chapter 5: Environment Configuration
Appendix: Useful Information
Document Conventions This section describes text formatting conventions and important notice formats used in this guide.
Text formatting The narrative text formatting conventions used are as follows:
Convention Description
Bold text indicates a button, menu item, or dialog box option you can Press or select
Italic text a cross-reference, or an important item
UCE Client indicates the iPECS UCE Client for Android

2 iPECS UCE Mobile Client for Android User Guide - Issue 1.1
Explanation of Symbols The following symbols are used in this guide. Information presented with these symbols must be observed.
CAUTION This mark warns of a situation in which light injury or product damage (hardware, software or data) could occur if the instructions are not followed.
NOTE This mark provides additional explanation, emphasis on important information or reference for related information that may be required for proper use of the application.

iPECS UCE Mobile Client for Android User Guide - Issue 1.1 3
1. Overview
This chapter explains the overview and features of iPECS UCE (Unified Communication Enterprise).
1.1 Introduction to iPECS UCE iPECS UCE is an application that supports multi-media communications. Through this application you can use most of the functions that can be found on IP phones.
iPECS UCE supports integrated communications including chats, scheduling, conference and iSMS. The user interface of this application is divided by module units, which are all effectively designed for easy use.
The following are strengths of iPECS UCE:
You can sign in simultaneously via your PC, Android and other iOS operating systems via one account.
Chats or calls are not disrupted during use and all call or chat logs are kept and updated on the server.
The application offers a variety of features required for effective multi-party communications and collaborations.
The application ensures easy compatibility, conversion and provides consultation history records by linking to the Contact Center.
UCE clients may;
Experience difference in audio or video quality according to the environment and quality of the wireless network as well as user policy and content quality of the mobile communications operators.
Users are recommended to use both Wi-Fi and 3G/LTE. Using only 3G/LTE networks may incur data usage expenses or shorten the length of battery use due to standby, voice calls or video calls.
The application does not support any networks other than Wi-Fi and 3G/LTE.

4 iPECS UCE Mobile Client for Android User Guide - Issue 1.1
2. Installation
This chapter explains the requirements for UCE client installations (for hardware and operating system) as well as the installation procedure. The installation process consists of the following three steps;
Step 1: Install UCE client on the user’s mobile phone
Step 2: Set up the initial sign-in for UCE client
Step 3: Sign into both iPECS system and UCE server
Check UCE server IP address or the name of the domain. Register the users account and password for the UCE server and iPECS system before signing into the UCE client.
2.1 Requirements for Hardware and Operating System The mobile phone requirements for the UCE client are as follows, depending on the types and features of the smart phones, which may result in different monitor composition or quality;
2.1.1 Hardware CPU: 1GHz
RAM: 1GB
HDD: 200MB of Flash storage
LCD: min. resolution: 800 x 480
Network supported: Wi-Fi, Cellular data network
Front Camera: Used for video calls
SD Card: Camera, Photo, Package download, for management and mounting of use history.
Terminals: Samsung Galaxy S4, S5, S6, S7, Note 3, Note 4, Note5, LG Optimus G Pro2, G3, G4, G5, V10 and V20.
2.1.2 Operating System Android version 4.0 (Ice Cream Sandwich) ~ 6.0 (Marshmallow)

iPECS UCE Mobile Client for Android User Guide - Issue 1.1 5
2.2 License and Lock Key The iPECS system must have a license to be able to use the UCE client. The UCE server administrator needs to enter the issued lock key via web administration in order for the UCE client to access the UCE server.
iPECS UCE adopts a license method for limiting the number of fixed users. Therefore, the number of UCE client users cannot exceed the number of licenses set on the iPECS system.
NOTE The lock key installation should only be completed by dealer stores authorized by Ericsson-LG Enterprise. For further information, consult those dealer stores authorized by Ericsson-LG Enterprise.
2.3 UCE Client Installation iPECS UCE Client can be downloaded via Google Play Store or UCE Administrator Web. UCE Server UCE administrator instructions must be followed in order to download application via the administrator web.
2.3.1 Installation via Google Play Store The application can be installed for free by downloading it from Google Play Store.
1. Open Play Store on your Android mobile.
2. Type ‘iPECS UCE’ in the search box and press Search.
3. Select iPECS UCE from the search results list.
4. After pressing the ‘Install’ button on the right, press the ‘Agree’ button to continue application installation.
5. When the installation is complete, the shortcut icon for iPECS UCE will appear on the home screen. Press the icon to open iPECS UCE.
2.3.2 UCE Client Execution 1. Select the shortcut icon of iPECS UCE on the home screen once it has been installed.
Push the ‘Home’ button on the mobile phone and the screen will disappear as the UCE client returns background. Users can then use the UCE icon on the main screen of the phone.
2. You can see the guide screen for iPECS UCE.
2.3.3 Initial Sign In Setup When the iPECS UCE client is executed, you can set up several convenient features relating to UCE client sign-in prior to signing in, you can also set up server IP and port via the options menu.

6 iPECS UCE Mobile Client for Android User Guide - Issue 1.1
2.3.3.1 Sign In Setup You can set auto sign in for your device below “My Presence”.
1. Enter your ID and password, only lower-case letters are acceptable for IDs and passwords.
ID: Maximum 64 characters consisting of letters and numbers can be used.
Password: It is recommended that you create a password that is 8 to 14 characters long and includes at least one letter (either upper or lower case), one number and/or special character.
2. Select the item from the list after pressing My Presence.
When My Presence is set, other users can check your status online.
3. You can set convenient features for your sign-ins. Press the checkbox to activate or deactivate the features.
After pressing the button, “My Presence” screen will emerge as described in the image and you can select whatever item you want on the list. Pressing “My Presence” allows you to select your online status as shown in the image to the left.

iPECS UCE Mobile Client for Android User Guide - Issue 1.1 7
You can automatically sign in without having to enter your ID and password once you set up
auto sign in.
2.3.3.2 Option Menu Setup 1. Press Menu ( ) on the upper corner of the user’s mobile phone to set up the option menu.
NOTE The sub menu of the ‘Option Menu’ can be changed depending on the function or screen.
2. Set the server IP and port on the Server Setting screen and press OK. You can see information relating to UCE in UCE Information.

8 iPECS UCE Mobile Client for Android User Guide - Issue 1.1
Consult the UCE Server Administrator for the required information for server settings.
3. Input the server IP and port on the Server Information screen and press OK.
Touch or drag Allow 3G/4G access and you can use other mobile communication networks
including Wi-Fi.
You can specify your own “Retry Count”, this is the number of reconnections required when
changing the network.
Press and drag the switch of LTE Only Mode to use LTE only when you connect to a call.
4. Press UCE Information to get the information, such as Android version in your UCE client

iPECS UCE Mobile Client for Android User Guide - Issue 1.1 9
2.3.4 Sign in 1. Enter your ID and password in each box to sign in.
User ID and password should be created in lower case only. Refer to the “Sign in Setup” in
the manual for further information.
2. Press Sign In after entering your user information.
2.3.5 Sign Out Users can select ‘sign out’ from the Settings Menu to log out from the UCE client.
1. From the 'Favorite' menu, Click 'My information' -> 'Logout'
Press OK when you see the above message box.
2. From the ‘Settings’ menu, Click ‘Logout’

10 iPECS UCE Mobile Client for Android User Guide - Issue 1.1
Press OK when you see the above message box.
2.3.6 Battery Optimization For ANDROID Operating System 6.0+ devices, disable ‘battery optimization’ for normal operation.
1. Click the "OK" button to go to the ‘battery optimization’ menu.
2. The menu may differ from device to device.

iPECS UCE Mobile Client for Android User Guide - Issue 1.1 11
3. UCE Client Composition
This chapter describes the UCE clients main screen and menus supported by UCE, and briefly explains how to use the user menu and variety of options.
3.1 Main Screen Description The UCE client main screen is composed of a status bar, menu tab, search box, my info and presence users list as displayed in the image below.
NOTE Users can see their profile information in ‘My Presence’ as well as other additional information, such as my extension number and today’s messages in the ‘My Info’ option in the settings menu.
3.1.1 Main Menu The main menu is displayed in a horizontal tab at the bottom of the icon screen. The features offered by the UCE client are categorized, you can use the settings menu as well as features including Favorites, IM, Memo, Call, Address Book, Community, Storage, Schedule and Conference.
Search Box: You can type in users in real time for search.
Presence users list is displayed
Fixed Buttons: There are three buttons – Back, Home, Option Menu - at the bottom of the screen that are always available.
Menu Tab: ‘>’ indicates menus not displayed on the screen. You can select hidden menus by using menu tab
Status Bar: You can see received alarm info (left) and phone status (right) as well as the current time.
My Info: User’s presence icon and photo are displayed.

12 iPECS UCE Mobile Client for Android User Guide - Issue 1.1
3.1.2 Options Menu You can set and change numerous options across the UCE client using the options menu. Press at the top of the screen to activate this menu.
NOTE The options menu does not refer to a specific item on the screen but a menu that includes tools applicable to the current screen or application programs currently operating.
3.1.3 Context Menu The context menu includes specific options applicable to the current screen operating and is activated when a certain item is held down for a period of time. Users can set up details for the selected item through this menu.
NOTE The context menu cannot be used in all screens. If an item on a certain screen is not activated, it indicates that the item in question does not have a context menu.
3.1.4 Home Button Press the home button to return to the basic home screen. The UCE client returns to the background status when the home button is pressed. You can re-open the UCE client by pressing the UCE icon on the main screen or by using the Android Phone task manager.
3.1.5 Back Button Press the Back Button to move to the previous screen from the one currently in use.
3.1.6 Notification Function The UCE client icon is displayed on the status bar at the top of the screen, notifying the sign in status in real time.
The function notifies when real time events occur to users, including missed calls, text, chat and administrator messages. You can return to the call screen by selecting the icon on the status bar when you get to the background status during a voice / video call.
Drag down to the bottom of the screen while pressing the status bar at the top of the screen to check notification information.
iPECS UCE Mobile Client for Android User Guide - Issue 1.1 13
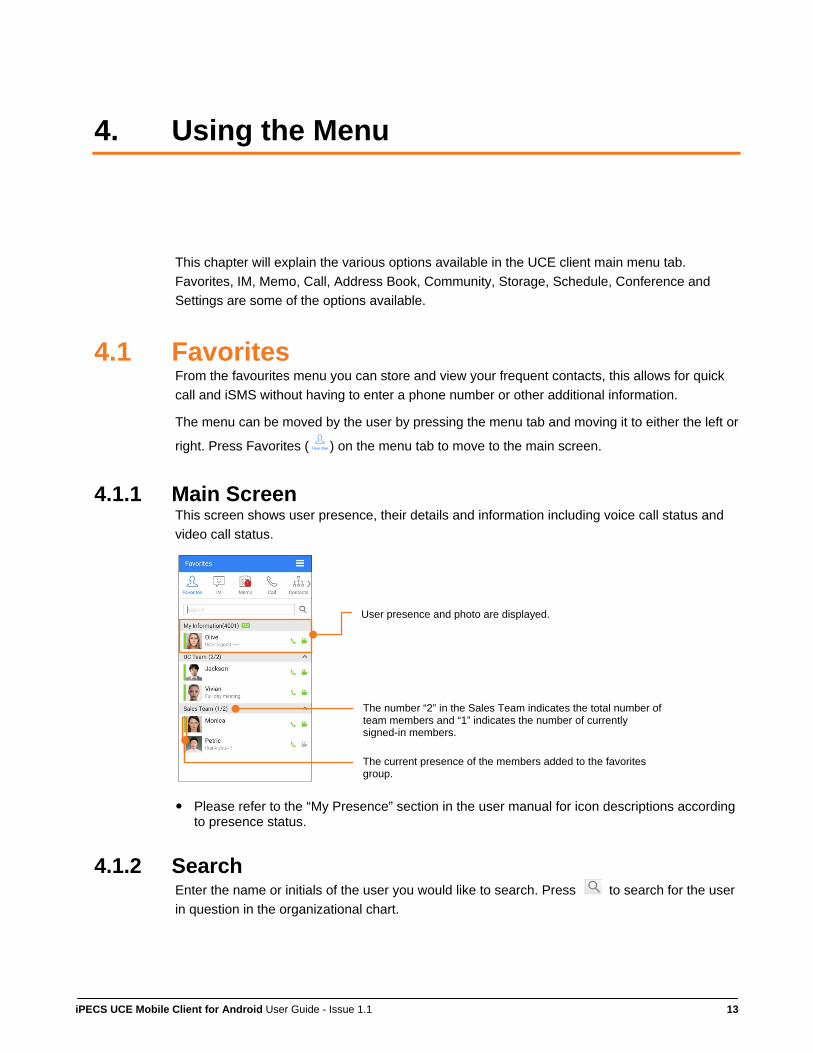
4. Using the Menu
This chapter will explain the various options available in the UCE client main menu tab. Favorites, IM, Memo, Call, Address Book, Community, Storage, Schedule, Conference and Settings are some of the options available.
4.1 Favorites From the favourites menu you can store and view your frequent contacts, this allows for quick call and iSMS without having to enter a phone number or other additional information.
The menu can be moved by the user by pressing the menu tab and moving it to either the left or
right. Press Favorites ( ) on the menu tab to move to the main screen.
4.1.1 Main Screen This screen shows user presence, their details and information including voice call status and video call status.
Please refer to the “My Presence” section in the user manual for icon descriptions according to presence status.
4.1.2 Search Enter the name or initials of the user you would like to search. Press to search for the user in question in the organizational chart.
The number “2” in the Sales Team indicates the total number of team members and “1” indicates the number of currently signed-in members.
User presence and photo are displayed.
The current presence of the members added to the favorites group.

14 iPECS UCE Mobile Client for Android User Guide - Issue 1.1
4.1.3 My Information My Information contains various information relating to the user. From here you can check my presence, call presence, phone status, edit today’s message, change my photo, change password and other detailed information. Press My Information on the favorites main screen, select the item to be set and follow the instructions displayed on the screen.
4.1.3.1 My Presence You can mark or change the user’s current presence. Press My Presence on My Information screen, select an item and press to apply the item.
4.1.3.1.1 Presence Icon Description The presence status and the descriptions are as follows:
Available: Communications immediately available.
Busy: Busy with other tasks and not available for communication.
Out of Office: Out of office and not available for communication.
Be Back Soon: Available for communication soon.
Away from Keyboard: Not available for communication immediately as the user is away.
Engaged: Not available for communication immediately due to engagement.
DND: Communication blocked in advance.
4.1.3.1.2 Presence Icon Colors My Presence icons are differentiated by colors and are displayed in ‘My information’ on the
main screen.
: Online.
: Busy or Engaged.
: Out of Office, Be Back Soon, Away from Keyboard
: DND
iPECS UCE Mobile Client for Android User Guide - Issue 1.1 15
: Offline
NOTE You can select all Presence statuses except “Offline.”
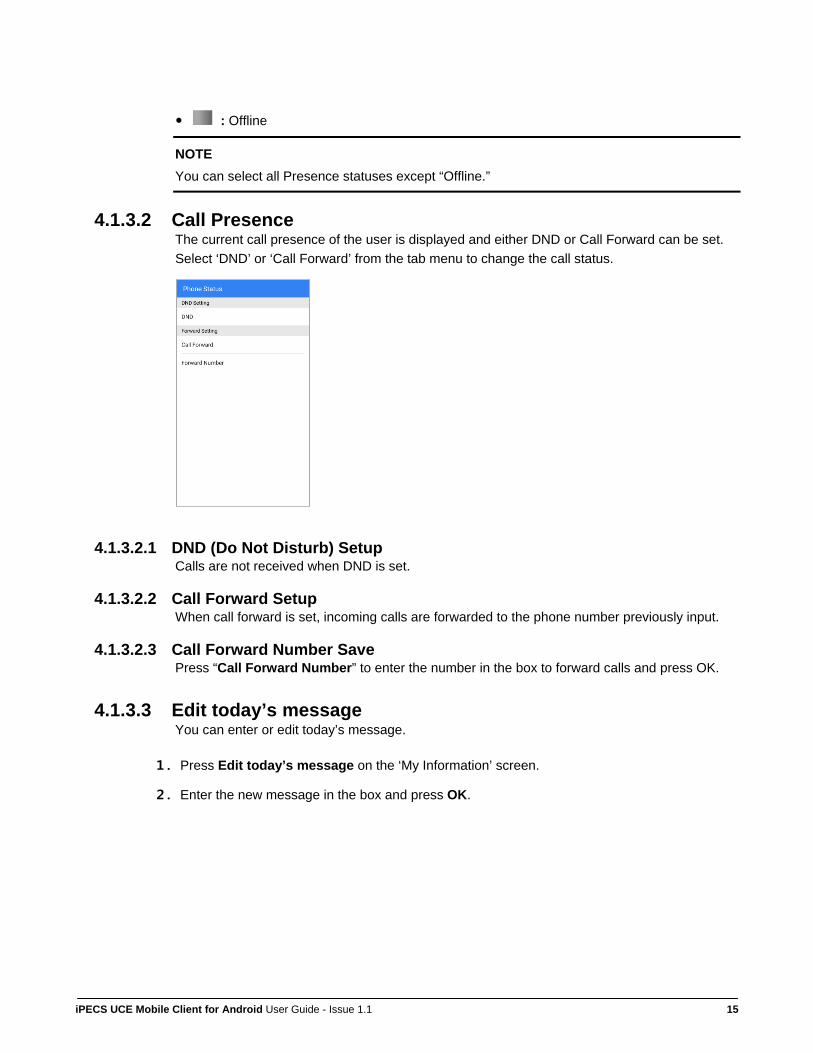
4.1.3.2 Call Presence The current call presence of the user is displayed and either DND or Call Forward can be set. Select ‘DND’ or ‘Call Forward’ from the tab menu to change the call status.
4.1.3.2.1 DND (Do Not Disturb) Setup Calls are not received when DND is set.
4.1.3.2.2 Call Forward Setup When call forward is set, incoming calls are forwarded to the phone number previously input.
4.1.3.2.3 Call Forward Number Save Press “Call Forward Number” to enter the number in the box to forward calls and press OK.
4.1.3.3 Edit today’s message You can enter or edit today’s message.
1. Press Edit today’s message on the ‘My Information’ screen.
2. Enter the new message in the box and press OK.

16 iPECS UCE Mobile Client for Android User Guide - Issue 1.1
4.1.3.4 Change My Photo The photo displayed on the ‘My Information’ screen is shown to others during chat or address book search. To change the photo, Press on Change My Photo to bring up the sub menu and choose from the following options shown below:
Select in Album: You can select the image to set (change) My Photo from the photo folder
Take photo: You can set (change) the image by taking the photo you want directly with phone camera.
Delete photo: You can delete the photo currently set in My Photo.
4.1.3.4.1 You can change the image from your album by: 1. Press Select in Album and you can see the list of photos saved in the cell phone.
2. Select the photo from the list and press Choose to set the image after notification popup.
4.1.3.4.2 To change the image by taking the photo directly 1. Take a photo of the target after pressing Take Photo.
2. Select from the list of newly-taken photos saved in the Android phone and the new image is set after the notification popup.
iPECS UCE Mobile Client for Android User Guide - Issue 1.1 17
NOTE When you change the photo shown on the My Information screen, the size of the selected image will automatically be adjusted. If the size of the attached file exceeds the limit, you will be notified.
4.1.3.5 Change Password The UCE client sends the user ID and password to the UCE server and iPECS system for user
authentication during sign-in process.
1. Press Change Password on My Information screen.
2. Enter the current password.
Press in the box to enter your new password.
3. Enter the new password once again for confirmation and press OK.
Press confirm button to validate the new password.
4. An error message will pop up if the new password is not secure enough.
NOTE It is recommended to set up a more complicated and secure password that will not be vulnerable to hacking attacks.
4.1.4 Sign Out Users can select sign out from the settings menu to log out from UCE client.
Press OK when you see the message box that reads “Want to sign out?”
4.1.4.1 Information in Detail You can check the photo, today’s message and other detailed information about the user by
pressing Information in Detail on the ‘My Information’ screen.
4.1.5 User Information If you select a member registered in your favorites group, you can immediately use functions like call, IM, iSMS and e-mail. You can see the group the member belongs to, their contact details and can also remove the member by deleting them from the favorites group.

18 iPECS UCE Mobile Client for Android User Guide - Issue 1.1
Make a Call (Extension, Mobile phone, Office phone, House phone): Press Call and a screen for dialing emerges. You can switch to speaker, block incoming calls, hold calls, convert to video calls and invite users on the screen. Voice calls can be converted to video calls by pressing the Video icon.
IM: You can start chatting with other users immediately. You can chat simultaneously with as many as 64 people.
iSMS: You can send messages immediately to as many as 64 people.
E-mail: You can send e-mails straight away. Register your e-mail account / ID in advance to use this function on the mobile phone.
Information in Detail: You can check the information of the users in your favorites group by pressing Information in Detail.
Favorites: To add or remove a member from the favorites group, follow the instructions on the screen after pressing in User Information.
4.1.6 Options Menu The Favorites Options Menu includes functions such as Add Member, Add Group, Revise Group Name, Delete Group, Move Group and View Setting.
Press Menu ( ) on the user’s cell phone screen to use option menu.

iPECS UCE Mobile Client for Android User Guide - Issue 1.1 19
4.1.6.1 Add Member You can select members from the list and add them to a favorites group.
1. Press Add Member and an organizational chart, public address book and individual address list will appear.
2. Select a member to add to Favorites, press confirm and the member list screen will appear.
3. Select the group and the member selected will be registered to that group.
4.1.6.2 Add Group To create different groups:
1. Press Add Group.
2. Press OK after entering group name.

20 iPECS UCE Mobile Client for Android User Guide - Issue 1.1
4.1.6.3 Group Name To change the group name:
1. Press Edit Group and the list of created groups will appear.
2. Press the group to revise and a popup box Edit Group Name appears. Enter the new name and press Edit.
The group name is revised.
4.1.6.4 Delete Group To delete a group in the list:
1. Press Delete Group and the list of registered groups will appear.
2. Press the group you wish to delete and a notification message pops up that reads “Do you want to delete this group? Press OK to delete.
Only groups of members who are not registered in the Favorites can be deleted.

iPECS UCE Mobile Client for Android User Guide - Issue 1.1 21
4.1.6.5 Move Group Users can move and change the order of groups on the Favorites list at the main screen.
1. Press Move Group and the list of registered groups will appear.
2. Press and hold the icon to relocate group. Move the group to the location you like
3. Press OK to confirm..
4.1.6.6 View Setting This option allows you to view the users that are online.
1. Press View and a popup will appear allowing you to view all users or signed-in users only.
2. Select the option that you require.
Show all members: You can see all registered members.
Show login members: You can only see members who are currently online.

22 iPECS UCE Mobile Client for Android User Guide - Issue 1.1
4.2 IM For task continuity, users can check instant messages via other terminal devices with the same ID and account. You can check messages received whilst you are offline when you sign in.
Press IM ( ) from the main menu tab to move to the main screen.
4.2.1 Main Screen You can check the member you have been chatting with on the main screen
4.2.2 Start Chat You can check members currently attending chats and invite new members to conversations..
1. Enter IM in the chat box and press Send.
2. Press icon ( ) on the right of the screen and you can see the members currently in the chat.
3. Press Add Member to invite other members to the chat.
4. You can set whether to receive new notification message on chats with “New Message Notification” function.
Press button, this will navigate you to the window where you can select users to chat to.

iPECS UCE Mobile Client for Android User Guide - Issue 1.1 23
4.2.3 Create a Chat You can create new chats for specific purposes with selected members only, check
members participating in the chat or invite new members to the chat.
1. Press at the bottom of the screen.
2. Press Create a Chat and a popup will appear enabling you to choose members.
3. Mark (☑) the names to add to these members to the chat and press OK.
Mark (☑) against the whole team to choose all members at once.
You can chat with as many as 64 people simultaneously.

24 iPECS UCE Mobile Client for Android User Guide - Issue 1.1
4.2.4 Delete a Chat (Multiple Deletion) You can delete all the chats you want simultaneously.
1. Press the Waste Bin Menu on the top right of the screen.
2. Press Leave this Chat to list of all the chats currently created.
3. Select the chats that you want to delete and press confirm.

iPECS UCE Mobile Client for Android User Guide - Issue 1.1 25
4.2.5 Delete a Chat (Single Deletion) You can select individual chats to delete on the chat list.
1. Select the chat list from the IM Main Screen and press and hold for deletion.
2. When a notification message appears that reads “Do you want to leave this chat?” press OK for deletion.
4.2.6 Option Menu The chat option menu has functions such as File Transfer, Schedule, iSMS, Memo and Leave conversation.
Press at the bottom of the chat screen to use the option menu.

26 iPECS UCE Mobile Client for Android User Guide - Issue 1.1
4.2.6.1 File Transfer You can select a photo album or newly-taken photos to send them to chat members online.
1. Press File Transfer to select the mode of transfer and follow the instructions on the screen.
Select from the Album: You can choose a photo from the photo gallery.
Camera: You can take a photo directly with the phone camera and change the photo.
2. Once the transfer starts, you can actually see the file transfer process on the chat screen.
You can drag down the status bar and select the notification message to cancel file transfer.
3. Once file transfer is complete, you can see the uploaded file information on the chat screen and continue chatting.
4.2.6.2 Schedule Sharing Chat participants are automatically added and they can add members to share their schedule
information.
1. Press Scheduling and a popup will appear allowing you to register a schedule.
2. Press the add icon on the right of the screen to add members to share scheduling
information and press Confirm.
3. Enter schedule to share and press Registration.
4.2.6.3 Make a Group Call You can make a group call simultaneously with chat participants online.
1. Press Group Call and a call screen pop-up will appear allowing you to start a group call.
2. Press Conference on the right of the screen to add a new member to the group during the call
and follow the instructions that appears on the screen.
Input Number: You can directly search for users to invite.
Select Destination in Contacts: You can put a check mark and select a name you
want to invite from the address book.
3. Press OK to invite all selected members for a simultaneous group call.
4.2.6.4 Write an iSMS You can send an iSMS to members online.
1. Press Write an iSMS and a screen to write an iSMS appears.
2. Press Send after writing the iSMS.

iPECS UCE Mobile Client for Android User Guide - Issue 1.1 27
4.2.6.5 Share a Memo You can share the details of a task with chat participants online.
1. Press the Create a Memo icon and a screen to register the task appears.
2. Write the content and details of the task and press OK to share that task.
4.2.7 Leave Chat You can leave the chat you are currently participating in. Press Leave conversation and a notification message pops up. Press OK to return to the main screen.
The content of the chat is deleted once you leave.

28 iPECS UCE Mobile Client for Android User Guide - Issue 1.1
4.3 Memo You can share your memos with other users. Users can briefly write about the memo and share with others the details of the memo. You can inform other users about the progression of certain memos by marking them as “In Progress” or “Completed” on the memo list.
Press Memo ( ) on the main menu tab to move to the memo main screen.
4.3.1 Main Screen You can share the details of your memos and you can check the details of other users memos
on this screen. You can check your registered memos on My Memo from the Memo Main
Screen and check other memos on Shared Memo.
4.3.1.1 Create a Memo You can share details of your own and other users memos that are added to the memo list.
1. Press button from the memo main screen
2. Press to add new members to share memos with from the Choose Member screen and press to create a new screen composed by selected members.
You can send memo details simultaneously to as many as 64 people.
3. Enter the subject and the details of the memo to be shared and press OK.
You can check the list of registered memos in My Memo on the memo main screen.
4.3.2 Mark Memo Completed You can mark completed memos separately.
1. Check the memos completed on the memo main screen.
2. Press '' on the left of the task list and the icon will be converted to the “completed” icon.
You can select and check your memos and shared memos.
The icon () indicates memo in progress.

iPECS UCE Mobile Client for Android User Guide - Issue 1.1 29
Members of that memo will also be notified of the completion.
4.3.3 Delete Task Memo You can delete one or a whole memo from the Memo List.
4.3.3.1 To Delete Each Item Press and hold the memo you wish to delete on the memo main screen. A notification message
will pop-up confirming “Delete this memo?”, press OK to delete the memo.
4.3.3.2 To Delete All Items Press on the memo main screen of the phone and select Delete All Items. After the notification message pops up that reads “Delete the whole registered Memo?”, press OK to delete all memos.
4.3.4 Hide Shared Memo You can hide memos registered by others or unhide them according to your needs.
4.3.4.1 To Hide Memo 1. Press “Shared Memo” on the memo main screen.
2. Press Menu ( ) on the phone and select Hide Memo.
3. Press on the right side of the memo name to hide memos created by others.

30 iPECS UCE Mobile Client for Android User Guide - Issue 1.1
Tab the 'Hide' button of the content that you do not want to be displayed.
4.3.4.2 To See the List of Hidden Memos 1. Press Shared Memo on the memo main screen.
2. Press Menu ( ) on the phone and select Unhide Memo.
3. Press on the right of the memo name to unhide.
Tab the 'Show' button of the content that you want to be displayed again.

iPECS UCE Mobile Client for Android User Guide - Issue 1.1 31
4.3.5 Options Menu The Options Menu includes IM, Group Call, iSMS and Schedule. Select the Memos option
menu and follow the instructions given on the screen.
Press Menu ( ) on the phone to use the Options Menu.

32 iPECS UCE Mobile Client for Android User Guide - Issue 1.1
4.4 Call The UCE Client offers call function using SIP linked with the iPECS system. It offers a variety of features from simple call function by dialing or looking through the address book/call log through to hi-tech functions such as call-back and call-through.
Press call ( ) from the main menu tab to move to the call main screen.
4.4.1 Make a Call You can enter the phone number directly in the call screen and press Call to make a call.
Press Call to select the number most recently dialed, and press once more to call the
number.
4.4.1.1 Call Log You can search a maximum of 300 recent recently dialled numbers.
1. Press Call Log and a list of calls and the call types will be displayed.
All Calls: You can see the whole call log.
Entered numbers are displayed. Press the recent call log and the number selected will be displayed.
'(300)' indicates the total number of calls in the Call log.
Erase an incorrect number.
This section displays matching users that are searched.

iPECS UCE Mobile Client for Android User Guide - Issue 1.1 33
Missed Calls: This refers to missed calls out of all the calls on the log.
Incoming Calls: This refers to incoming calls out of all the calls on the log.
Outgoing Calls: This refers to outgoing calls out of all the calls on the log
2. You can make a call immediately by selecting someone to call from the call log
4.4.2 iSMS You can check exchanged iSMS on the list as well as reply to or delete those messages.
4.4.2.1 Reply iSMS 1. Press iSMS and select the message to check information such as the sender, the time sent
and the content of the message.
Indicates iSMS sent out.
Indicates iSMS received.
2. Press Answer to reply to the iSMS received, enter the message in the reply box and press Send.
4.4.2.2 Delete iSMS You can delete individual messages or the whole list of items at once.
4.4.2.2.1 To Delete an Individual Message 1. Press iSMS and hold until it is deleted from the list or press Delete iSMS while checking the
iSMS message.
2. Press Delete All and press OK for deletion after the notification message saying “Do you want to delete the iSMS?” pops up.
4.4.2.2.2 To Delete All Items 1. Press Menu ( ) in the iSMS screen.
2. Press Delete All and press OK for deletion after the notification message saying “Do you want
to delete all iSMS?” pops up.
Press from the selected call log to look up information on the selected member.

34 iPECS UCE Mobile Client for Android User Guide - Issue 1.1
4.4.3 Answer Call Upon incoming call, the caller’s information appears on the information box and the call is connected and received when you press Answer Call.
4.4.4 Reject Call You can reject an incoming call by pressing reject on the screen and choosing a reject call message. Once you have selected a message to send, the call will be ended.
4.4.5 Hang Up Press Hang Up to end call.
The number can be identified by Caller Identification Display function.
Upon incoming call the message “Ringing” is displayed.
The name of the caller, which is registered in the Address Book, is displayed.
iPECS UCE Mobile Client for Android User Guide - Issue 1.1 35
NOTE You can answer or hang up a call if your cell phone is connected to a Bluetooth headset. The iPECS UCE supports the below Bluetooth equipment: 1. Tone+ HBS-900 from LG Electroics: Answer (right button), Hang up (Left Button) 2. Level U, EO-BG920B from Samsung Electroics: Answer, Hang up (right bottom button) 3. BackBeat Go2 from Plextroincs: Answer, Hang up (right center button) 4. Bluetoth car-audio: will be supported soon ※ Please be aware that if you use a Bluetooth headset while using other apps such as the music player, your Bluetooth headset may not work and will default to the music player.
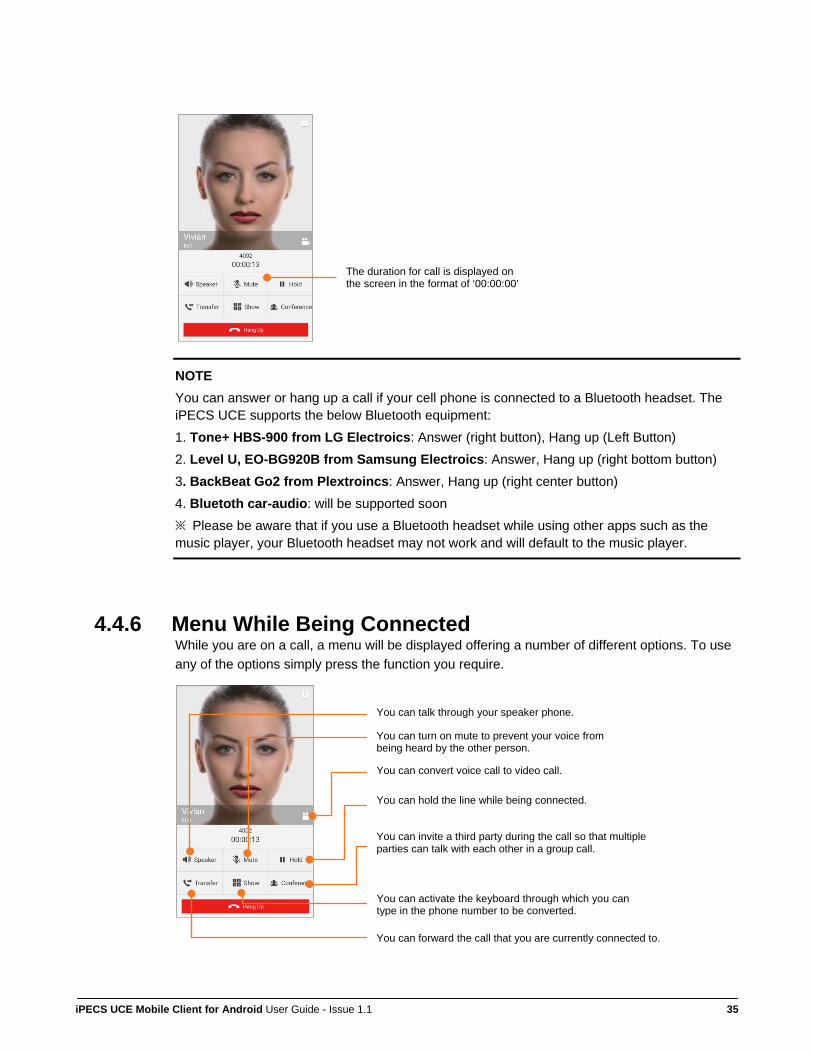
4.4.6 Menu While Being Connected While you are on a call, a menu will be displayed offering a number of different options. To use any of the options simply press the function you require.
The duration for call is displayed on the screen in the format of ‘00:00:00’
You can forward the call that you are currently connected to.
You can talk through your speaker phone.
You can hold the line while being connected.
You can turn on mute to prevent your voice from being heard by the other person.
You can convert voice call to video call.
You can activate the keyboard through which you can type in the phone number to be converted.
You can invite a third party during the call so that multiple parties can talk with each other in a group call.

36 iPECS UCE Mobile Client for Android User Guide - Issue 1.1
NOTE To do individual settings for the screen or mobile phone that has a specific function, the screen unintentionally due to the behavior of the function it can be turned on or off during a call.
4.4.6.1 Using Speaker You can talk to the other person on the line through a speakerphone using an embedded microphone and speaker. However, if you are using the speaker, echo effect may occur depending on the terminal.
1. Press Speaker to talk through the microphone on the phone
2. Press Speaker to turn off the speakerphone function.
4.4.6.2 Mute Function You can activate Mute to prevent your voice from being heard by the other person on the line or deactivate the function.
1. The icon ( ) will appear on the screen when you press Mute whilst talking to the other person
on the line.
2. Press Block Mute to let your voice be heard again.
4.4.6.3 Hold Function Use this function to hold the call you are currently on.
1. Press Hold while you are on the call with the other person
The current call will be held, the screen will display “holding” and the other person on the
line will hear the audio guide saying “please wait a minute while you are being transferred.”
2. Press Hold once more to resume call with the other person on the line.
4.4.6.4 Add Video Call Function The voice call can be converted into video call by pressing the Video icon.
4.4.6.4.1 Switch Camera Function During a video call, you can switch the directions of the camera attached to the terminal
between front and back by pressing. Switch.

iPECS UCE Mobile Client for Android User Guide - Issue 1.1 37
NOTE If you are using the smart phone with dual-rear cameras Switch Camera function may not work.
4.4.6.4.2 Show / Hide My Video Press Show to make shown yourself on the screen and press Hide to make it disappear.
4.4.6.4.3 Enable / Disable My Video If you do not want to show yourself during the video call, press Disable. Press Enable if you
want to show yourself.
NOTE The video call quality may vary depending on the 3G or LTE environment of the communications operator in charge.
4.4.6.5 Invite Function You can invite a third party to a call currently being connected, making it a group call. Dial the phone number of the counterpart or choose the number in the address book to make a group call.
1. Press Conference while you are online.
2. Select the mode of invitation and follow the instructions shown on the screen.
Input Number: You can directly search for the invitee.
Select Destination in Contacts: You can put a check mark and select the name you want to invite from the address book.
4.4.6.6 Call Transfer Call Transfer is a function allowing you to transfer a call that was being connected to someone else.
1. Press Transfer while talking on the phone with the other person.

38 iPECS UCE Mobile Client for Android User Guide - Issue 1.1
The call becomes “Holding” and an audio guide saying “Currently transferring. Please wait a
moment.” will be heard.
2. Select mode of transfer in the number transfer screen and follow the instructions on the screen.
Input Number: You can directly look for someone to transfer the call.
Select Destination in Contacts: You can put a check mark and select the name you want
to invite from the address book.
3. Press OK to end call and complete the call transfer.
Tap cancel and you can cancel transfer before the counterpart answer the phone.
4.4.7 Call Move Function If you are using multiple devices, the call can simply be moved between the PC and Android client by pressing the Call Move button.
4.4.8 Option Menu The Call Option Menu includes Call Log, Call-Back, Call-Through and Group Call functions. Select the option menu you want to use from the Call Function. Press Menu ( ) on the user’s cell phone screen to use option menu.
4.4.8.1 Call-Back Once you make a call, this function allows you to call back and connect to the other person through the system linked to the mobile communications network (3G/4G data network).
4.4.8.1.1 Setting Call-Back 1. To set callback, navigate to Settings > Call Options > Call-back/Call-through > Call- back
Number.
2. Enter your phone number in the My Number setting screen and press OK.
The Call-Back feature will use your cell phone number as default. If you wish to use another
The Call Move function is activated when you are signed into multiple UCE communication devices via one single account simultaneously.

iPECS UCE Mobile Client for Android User Guide - Issue 1.1 39
number you will need to change the number in the “App Settings”.
4.4.8.1.2 Using Call-Back 1. Enter the destination phone number on the dial pad.
2. Select callback from the option menu.
Wait until calls received through the number entered in the setting.
3. Calls are connected when picked up after the bell rings.
4. You can talk on the call after the person on the other end of the line picks up.
No charges will be incurred on the caller’s side if he or she uses Call-Back function.
4.4.8.2 Call-Through When dialed, the information will be delivered to the system via mobile communications
network (3G/4G data network) and the system will make a call with the access number I
entered to the recipient.
4.4.8.2.1 Setting Call-Through 1. Navigate to Settings > Call Options > Call-back/Call-through > Call- through Number.
2. Enter your phone number in the access number setting screen and press OK.
Access number refers to a number for the system when using the call-through function.
Enter the correct system access number that is allocated to the user and can be sent from
outside. Ask the personnel in charge of iPECS about information in detail about the access
number.
4.4.8.2.2 Using Call-Through 1. Enter the phone number of the person to call.
2. Select Call-Through in the options menu.
Once you make a call with the phone number the user entered, the system makes a call for you with the access number you entered and connect to the other person through mobile communications network (3G/4G data network)
3. You hear the ring tone and the call will be connected to the other end of the line.
4. You can talk on the phone once the person at the other end picks up.
You can make an international call through Call-Through with expenses of regular domestic
calls.
NOTE Call-Through is a function to make calls directly using mobile communications network (3G/4G data network) and call-back is a function to receive calls.

40 iPECS UCE Mobile Client for Android User Guide - Issue 1.1
4.4.8.3 Group Call You can make a group call with the members on the Choose Member list.
1. Press Group Call and add (+) members from the Choose Member screen to select (√).
Press the subject of the team to select all team members. You can make a group call with
as many as 64 people simultaneously.
2. Press OK to start a group call.
There are a variety of functions available, these include; Speaker, Mute, Hold, Add Video
Call and Conference.
You cannot use the “Hold” and “Transfer” function while making a group call.
4.4.9 One Digit Service Functions If you make an internal call and the user is busy, you can use One Digit Service functions according to your PBX settings.
Call Back: You can request a call back automatically when the person ends their current
call.

iPECS UCE Mobile Client for Android User Guide - Issue 1.1 41
Camp On: You will be automatically connected to the person you wish to call once they
end their current call.
Voice call waiting request: You will be placed on hold, the other person will be notified
that they have an incoming call.
Intrusion: You can intrude into a call between two other people creating a three-way
phone conversation.
Pilot Hunt: An internal member who is linked as a proxy call group can be connected
through this call function.
Intercept: Allows you to intercept a call between a user and an external party. If you use
the intercept functionality the internal user will be disconnected and your call will be
connected to the external party.

42 iPECS UCE Mobile Client for Android User Guide - Issue 1.1
4.5 Address Book You can conveniently look up phone numbers, IM, iSMS and e-mails in the Address Book. The Address Book contains an organization chart, public address book and private address book.
Organization Chart: All members are categorized by departments. You can find or check the organization which each member belongs to and their address.
Public Address Book: This provides contact details that can be shared among UCE users. Managers can register numbers that can be shared among team members as a way of managing the team.
Private Address Book: Users can register and manage private numbers and contact details.
Press Address Book ( ) in the Main Menu tab to move to the main screen.
4.5.1 Organization Chart Screen In the main Organization Chart screen, all members are categorized by their department or team.
1. Select the department or team that you wish to search on the Organization Chart screen.
2. Select the member name that you have searched to view their user information. You can also view the following options listed below and follow the on-screen instructions.
Extension, IM, iSMS, e-mail: You can directly contact the user via these methods.
User Information: You can check the information of the user you selected.
Add Member to Favorites: You can add a user to your favorites.
4.5.2 Address Book Screen The address book contains a public address book and private address book. All the address books have search functions.
Enter the name of the member that you wish to search in the search box.

iPECS UCE Mobile Client for Android User Guide - Issue 1.1 43
4.5.2.1 Public Address Book Managers can register the phone numbers of certain members that they wish to share among the organization in this Public Address Book. The names of the members are aligned in ascending order, which makes it easier to search.
If the member being searched is not a UCE user, only regular calls (cell phone, office, home phone) and e-mails functions can be used, the remaining functions are not synced.
4.5.2.2 Private Address Book This personal address book can be used to add the phone numbers of private contacts. The names of the members are aligned in ascending order.
You can synchronize the address book of your cell phone to your UCE personal address book. You can choose whether to show the addresses that were synchronized or the cell phone address book, according to personal address book settings in the settings menu.
4.5.2.2.1 Private Address Book Synchronization Address book registered in the cell phone will be synched to UCE. However those addresses logs that have no names or do not have the phone number saved in the phone won’t be synched Private address books can be revised or changed only in PCs and this function is only activated when server private address book is set.
1. Tap the user cell phone’s Menu ( ) in personal address book.
2. Press Address Book Synchronization and press OK upon notification message.
You can choose whether to synchronize personal user pictures when synchronizing.
Enter the name of a member you want to search in the search field and select the result

44 iPECS UCE Mobile Client for Android User Guide - Issue 1.1
4.6 Notice Managers can check the notices sent to team members through this function. Select a notice to check its details.
Press Community ( ) in the Main Menu tab and move to the main screen of the community.
4.6.1 Notice You can read or check the notices sent by managers.
1. Press Notice to see all the registered notices sent by managers.
2. Select the required notice from the list to check the subject, date and the content of the notice.
NOTE The UCE Managers System operator can select the manager screen to select the target recipients to whom the notices should be delivered.
iPECS UCE Mobile Client for Android User Guide - Issue 1.1 45
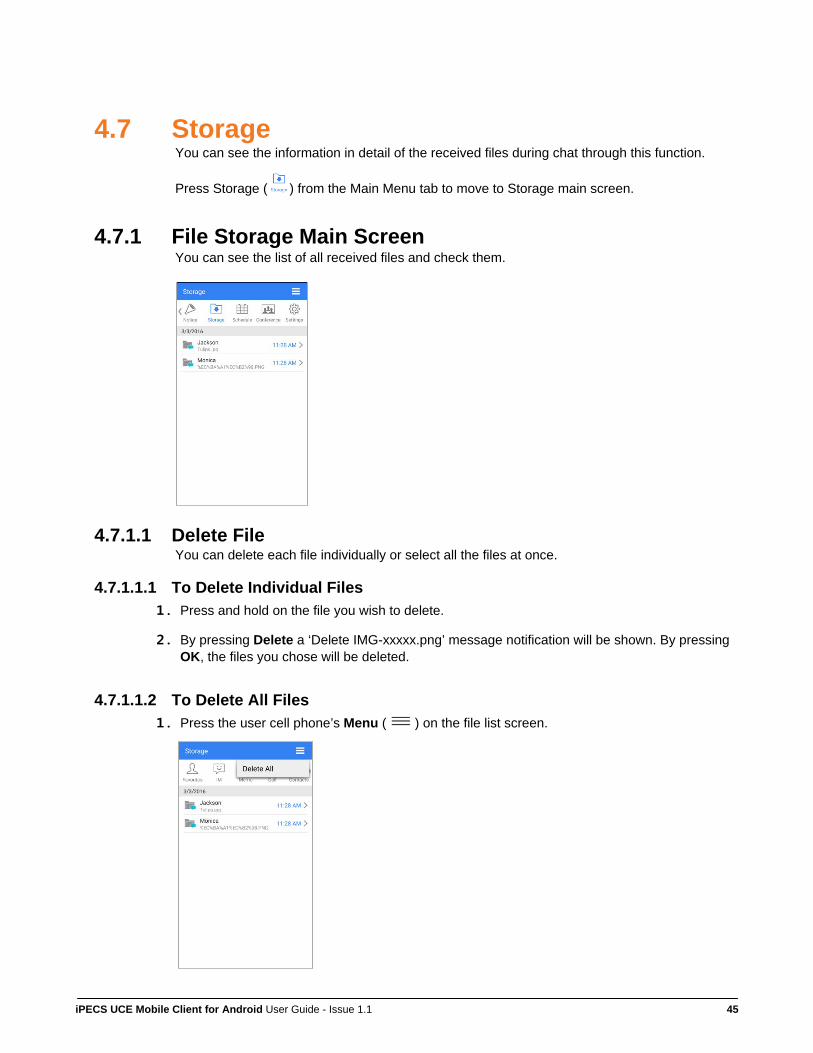
4.7 Storage You can see the information in detail of the received files during chat through this function.
Press Storage ( ) from the Main Menu tab to move to Storage main screen.
4.7.1 File Storage Main Screen You can see the list of all received files and check them.
4.7.1.1 Delete File You can delete each file individually or select all the files at once.
4.7.1.1.1 To Delete Individual Files 1. Press and hold on the file you wish to delete.
2. By pressing Delete a ‘Delete IMG-xxxxx.png’ message notification will be shown. By pressing OK, the files you chose will be deleted.
4.7.1.1.2 To Delete All Files 1. Press the user cell phone’s Menu ( ) on the file list screen.
46 iPECS UCE Mobile Client for Android User Guide - Issue 1.1
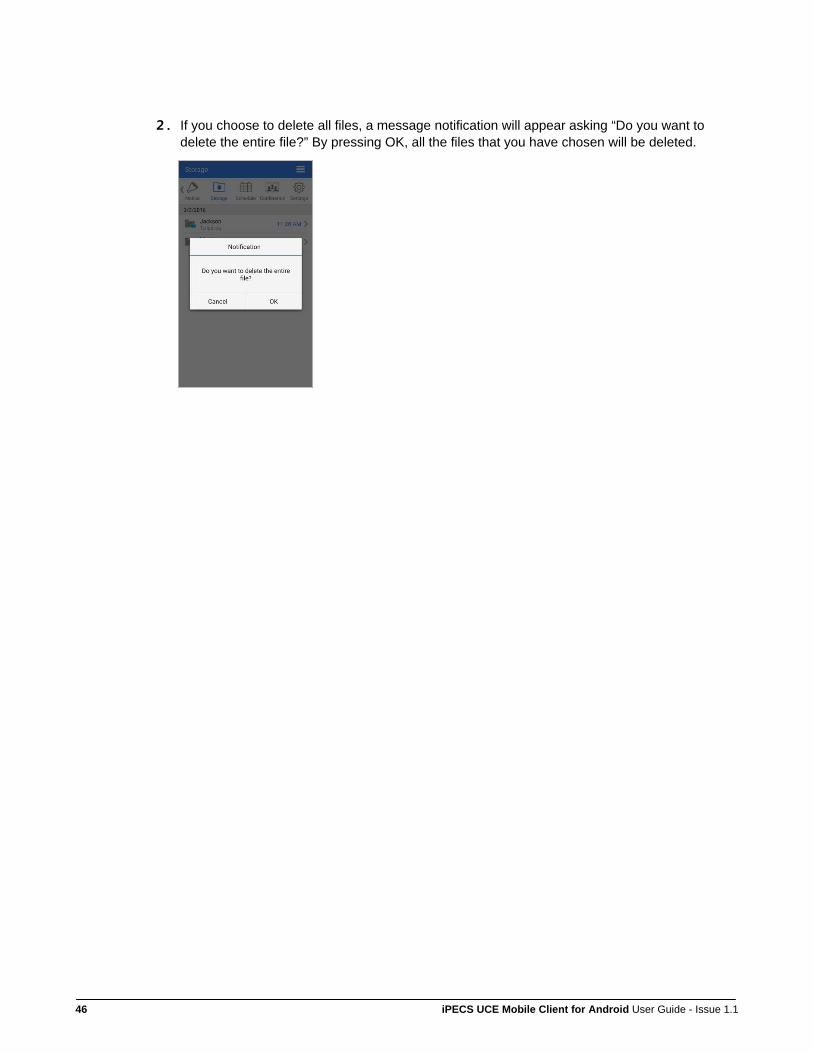
2. If you choose to delete all files, a message notification will appear asking “Do you want to delete the entire file?” By pressing OK, all the files that you have chosen will be deleted.
iPECS UCE Mobile Client for Android User Guide - Issue 1.1 47
4.8 Schedule Tasks can be placed in your calendar, this makes it more convenient to check and share your tasks with other users. You are also able to view tasks shared by other users.
Press Schedule ( ) on the Main Menu Tab to move to the Schedule main screen.
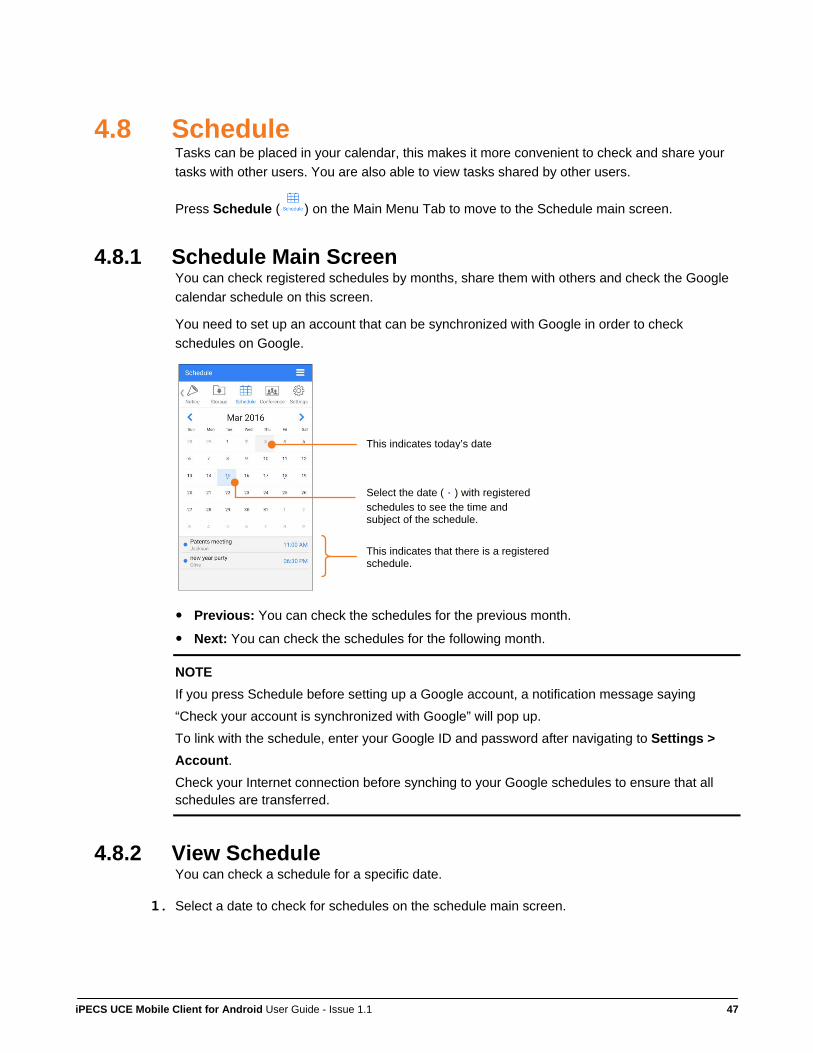
4.8.1 Schedule Main Screen You can check registered schedules by months, share them with others and check the Google calendar schedule on this screen.
You need to set up an account that can be synchronized with Google in order to check schedules on Google.
Previous: You can check the schedules for the previous month.
Next: You can check the schedules for the following month.
NOTE If you press Schedule before setting up a Google account, a notification message saying “Check your account is synchronized with Google” will pop up. To link with the schedule, enter your Google ID and password after navigating to Settings > Account. Check your Internet connection before synching to your Google schedules to ensure that all schedules are transferred.
4.8.2 View Schedule You can check a schedule for a specific date.
1. Select a date to check for schedules on the schedule main screen.
This indicates today’s date
Select the date (ㆍ) with registered schedules to see the time and subject of the schedule.
This indicates that there is a registered schedule.

48 iPECS UCE Mobile Client for Android User Guide - Issue 1.1
The date will turn blue when selected, you will be able to view the time and subject of the
schedule at the bottom of the calendar screen.
If more than one schedule is registered for a date, the schedules are listed in the order of registration time. If you set up the schedule for the whole day, that schedule will appear at the top of the list.
2. Select a specific schedule from the list to view more detailed information.
The detailed information includes the person who registered the schedule, who shares the
schedule, the subject, venue, time and the content of the schedule.
4.8.3 Register Schedules You can register several schedules for the same date. You can either register a new schedule
or add additional schedules for the selected date.
1. Select the date to register (or add) a new schedule from the Main screen and press on the screen.
2. Enter all the necessary details in the UC Schedule screen.

iPECS UCE Mobile Client for Android User Guide - Issue 1.1 49
3. If you want to set Alarm press .
You can choose to set the alarm 5 minutes, 30 minutes, 1 hour, 2 hours, 1 day or 1 week prior to the schedule.
You can set a maximum five alarms. If you want to delete an alarm press next to the alarm time.
4. Press OK to save the schedule.
The schedule registered on the UC schedule registration screen will only be reflected on the UCE schedule and not on Google scheduler.
4.8.4 Revise a Schedule You can revise your registered schedules.
1. Select the date on which the schedule needs to be revised on the Schedule Main screen.
2. Select the schedule from the list and press revise.
3. Press revise button to save the changes to the schedule.
4. A notification will pop up asking‘Edit Schedule?’, press confirm.
4.8.5 Delete Schedule You can delete your registered schedules.
1. Select the date of the schedule that you wish to be deleted from the Schedule Main screen
2. Select the schedule title that you want to delete from the schedule list. If you press Delete a notification will pop up confirming ‘Do you want to delete XXX?’ Press OK to confirm.

50 iPECS UCE Mobile Client for Android User Guide - Issue 1.1

iPECS UCE Mobile Client for Android User Guide - Issue 1.1 51
4.9 Conference The conference function supports the optimal online simultaneous collaboration and conference platform for as many as 64 users registered on iPECS UCE. However, the number of users may vary for video conferences according to MCU setting.
Once a Conference room is created in the UCE PC client, a notification message saying “conference > a conference room is created” will pop up and allow you to participate in the conference.
There are two types of conference; created room and reserved room. The type is discerned by icons on the conference main screen.
Created Conference Room: This conference room is “created” and once it is created, you can use the room immediately. If left unused for more than five minutes after being created, it will automatically be deleted from the list instead of being deleted immediately.
Reserved Conference Room: This conference room is “reserved” and participants can enter the room once the reserved time has passed. The room can be deleted at any time prior to the reserved conference time.
Press Conference ( ) from the Main Menu tab to move to the main screen.
4.9.1 Conference Main Screen You can check the list of conference rooms created in the UCE PC client on this screen.
Voice Conference: You can participate in the conference by audio only.
Video Conference: You can participate in the conference via a video call. An MCU system is required in order to make the video conference possible.
4.9.2 Create a Conference Room You can create a voice conference room.
1. Press in the top left of the main screen.
This icon ( ) indicates a new conference room has been created.
This icon ( ) indicates a created meeting room.
This icon ( ) indicates a reserved meeting room.

52 iPECS UCE Mobile Client for Android User Guide - Issue 1.1
2. Press to add members to the conference and then to create a conference room allowing those selected members to participate.
A maximum of 64 people can be chosen for a conference.
3. Press after selecting the subject, conference creation / reservation date
You can check the status of a previously created or reserved Conference room.
4.9.3 Delete a Conference Room You can delete a reserved voice conference room.
1. Press and hold on the conference room list that you wish to delete.
2. A pop up will appear confirming that you want to delete the conference room, press OK.

iPECS UCE Mobile Client for Android User Guide - Issue 1.1 53
You cannot delete created conference rooms.
4.9.4 Using a Conference Room You can check the list of conference rooms on the Conference main screen and participate in
voice or video conferences with others.
1. Select a conference room item on the Conference list to enter the selected Conference room.
You can use the speaker or mute function while having a conference with the participants.
2. Press Add if you would like to add additional members to the conference.
3. See below methods on how to add members to the conference.
Select a name to view information on the participant.

54 iPECS UCE Mobile Client for Android User Guide - Issue 1.1
Select by Search: You can directly search for a person to invite to the conference.
Select from Address Book: Put a check mark to select a person you want to invite from the address book.
4. Press OK to allow the members to participate in the conference.
5. Press Hang Up to finish the conference.
Press Hang Up to go back to the conference main screen, from that screen you can choose to participate in another conference.
.

iPECS UCE Mobile Client for Android User Guide - Issue 1.1 55
5. Environment Configuration
You can set diverse environment configuration of the UCE client. By setting the environment, you can conveniently use a variety of functions available in this product. This chapter describes how users can set the environment for using the product.
5.1 Select Setting Menu Press Settings ( ) from the Main Menu tab to set the environment and move to the Settings main screen, from here you are able to select the desired sub-menu.
Sub menus contain logout, my information settings, server settings, access settings, dialing rules, codec settings, alarm settings, IM settings, private contact settings, audio quality settings, account settings, auto login of send log, auto start and UCE information.
You can set or revise various environments by selecting an option to check relevant information.
NOTE The items of system setting can be limited depending on the sign in status of UCE client.
5.1.1 My Information Setting You can set or revise various information that registered by the user. Press My Information to access the sub menus and follow the on-screen instructions to make these changes.
56 iPECS UCE Mobile Client for Android User Guide - Issue 1.1
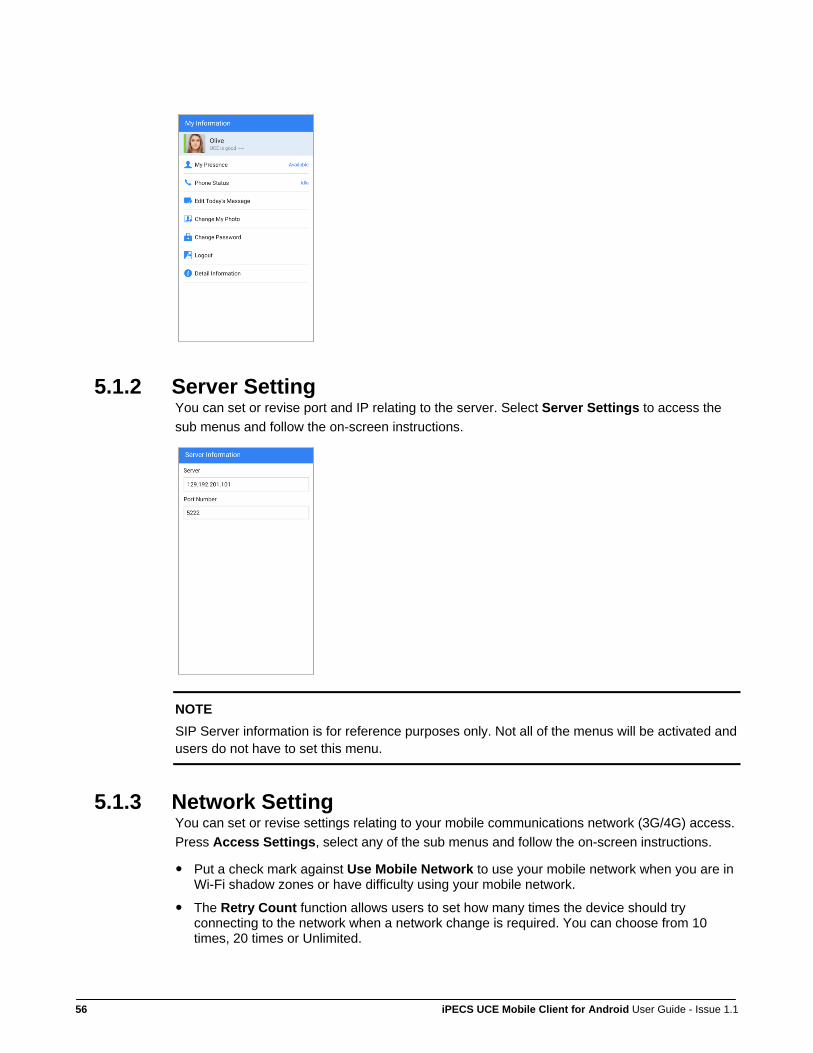
5.1.2 Server Setting You can set or revise port and IP relating to the server. Select Server Settings to access the sub menus and follow the on-screen instructions.
NOTE SIP Server information is for reference purposes only. Not all of the menus will be activated and users do not have to set this menu.
5.1.3 Network Setting You can set or revise settings relating to your mobile communications network (3G/4G) access. Press Access Settings, select any of the sub menus and follow the on-screen instructions.
Put a check mark against Use Mobile Network to use your mobile network when you are in Wi-Fi shadow zones or have difficulty using your mobile network.
The Retry Count function allows users to set how many times the device should try connecting to the network when a network change is required. You can choose from 10 times, 20 times or Unlimited.

iPECS UCE Mobile Client for Android User Guide - Issue 1.1 57
NOTE Expenses may be incurred if you use you mobile communications network depending on your phone plan. The service and delivery quality of voice calls and data via 3G/4G data network is not guaranteed.
5.1.4 Call Options Settings You can set or revise the settings relating to dialing. Press Call Options to access the sub menus and follow the on-screen instructions.
.
Press and drag the switch button of Handover to enable you to remain on a call even if the network changes.
Set Access Number: It is number for switching when using Call-Through function.
Set My Number: Enter My Number in this item to use Call-Back function. If the user inputs phone number of someone else, the call-back will be forwarded to that number.
Dialing Mode: Allows you to select the dialing mode when you make a call.
▶
– VoIP Call: You can dial with a VoIP phone when making a call.
– Mobile Call: You can dial with a mobile phone when making a call
– Ask always: Select between VoIP or mobile phone dialing method from the option
58 iPECS UCE Mobile Client for Android User Guide - Issue 1.1
screen that pops up each time you dial.
5.1.5 Dialing Rule You will need to set codes according to nations or areas as the UCE client should be able to discern whether the call is internal or external when making a call. Press Dialing Rule and select from any of the sub menus, follow the on-screen instructions.
Public Number: It is a code for the public number to use. Enter the number to use when making a call outside
Country Code: It is a code to discern countries from the standard phone number system. Enter the number when making an overseas call.
Area Code: It is a code to discern areas from the standard phone number system. Enter the number when making a call outside your area.
Set Public Number Conditions: It discerns extension numbers. In other words, if the dialing number is 6 digits or more and you want to avoid automatic entering of the public number, enter exception-type number in the Public Number setting before making a call
Voicemail Number: Voicemail number is the number your phone dials when you access your voicemail.
5.1.6 Codec Settings You can set or revise the priorities of the codec you are using for voice or video conference calls. Press Codec Settings and select from any of the sub menus,follow the on-screen instructions.
Codec refers to a technology that combines both a coder that converts audio or video signals into digitals ones and a decoder that does vice versa.
Voice or video quality may vary depending on the type of codec, the UCE client supports the following codec:
– Voice Codec: PCMU, PCMA, G729
– Video Codec: h264(recommended), h263
5.1.7 Ringtone / Notification Setting You can set or revise settings relating to ringtones and message notifications by pressing Notification Settings, selecting from any of the sub menus and following the on-screen instructions.
NOTE The default sound and vibration set within the mobile phone will remain unless set or revised otherwise.
5.1.8 IM Font Size Setting You can set the font size of the Chat Room messages. Press chat room setting and select sub menu you want to set or follow instructions on the screen.

iPECS UCE Mobile Client for Android User Guide - Issue 1.1 59
5.1.9 Private Contacts Setting You can set private contacts for your use. When you set ‘use server contacts’, cell phone contacts and the contacts saved in the server will be synchronized . If you set ‘use cell phone contacts’, the contacts saved in the server will be shown in real time. Press Private Contacts to access sub menus and follow the on-screen instructions.
5.1.10 Audio Quality Settings You can alter the audio quality. Default values are optimal for each cell phone and can be
changed when necessary. Press Auto Quality Settings to access the sub menus and follow
the on-screen instructions.
5.1.11 Account Settings You can set or revise your account so that it can be linked to Google, you can also sync
schedules via this account.
5.1.11.1.1 Synchronize Google Account You are able to synchronize your Google schedule with the UCE schedule by switching on
Google to allow Synchronization
5.1.11.1.2 Add Google Account You can add a Google account in ‘System (or Environment) Settings’ in order to add
additional accounts. Press New Environment and follow the on-screen instructions.
5.1.11.1.3 Choosing a Google Account When one or more Google accounts are added, press the account you wish to synchronize by
navigating to Settings > Account Settings and following the on-screen instructions.
5.1.12 Send Log If there is a problem while using, send an e-mail to developer about the problem via e-mail client that the user set in advance. Press Log Send and follow the on-screen instructions.
5.1.13 Auto Sign In To set auto sign in, put a check mark (☑) to enable this function.

60 iPECS UCE Mobile Client for Android User Guide - Issue 1.1
5.1.14 Auto Start Auto start will execute UCE client automatically while cell phone booting. To set the functions, press and drag the switch button to set it to ON.
NOTE You set the auto start-up, auto login will also be automatically set.
5.1.15 UCE Information You can check the UCE client version installed by pressing UCE Information.
5.1.16 Sign Out Press Sign Out to sign out from the UCE client. Press OK when a notification message
appears asking “Do you want to sign out?”.

iPECS UCE Mobile Client for Android User Guide - Issue 1.1 61
5.2 FMX/FMC Client Main Screen The Mobile, FMX or FMC client will be executed depending on the UCE App mode. This App mode can be changed by the UCE administrator. The FMX or FMC client supports settings for On/Off duty function and location of the notice menu and the call log is moved unlike the mobile client.
NOTE Use the same UCE App mode in the same area (site).
5.2.1 FMC Client You can use chat and menus relating to calls under this mode.
5.2.2 FMX Client You can use menus relating to calls under this mode.
Search Entry Box: You can search users in real time.
My Information : User’s presence icon and photo are displayed
Presence users list is displayed.
Menu Tab: Menus available under FMX mode are displayed
Search Entry Box: You can search users in real time
My Information : User’s presence icon and photo are displayed
Presence users list is displayed.
Menu Tab: Menus are hidden in ‘>’ direction, move the tab to select other functions

62 iPECS UCE Mobile Client for Android User Guide - Issue 1.1
5.2.3 On/Off Duty Settings You can directly set your status to on/off duty with this function.
1. Navigate to: Main Screen > Favorites > My Information.
2. Select On or Off Duty by pressing the button beside On/Off Duty.
Change your presence from offline to online if you are On Duty and deactivate DND if the call presence is DND.
Change your presence to offline when setting Off Duty and change the call presence to DND.
5.2.4 On/Off Duty Auto Setting You can automatically set your On/Off Duty setting with this function.
1. Navigate to: Main Screen > Favorites > My Information.
2. Select On/Off Duty in the Auto Settings menu.
3. Put a check mark (☑)on Auto Set in User Settings.
On/Off Duty setting button

iPECS UCE Mobile Client for Android User Guide - Issue 1.1 63
4. Enter the start and end time of work and press set.
You can set the start and end time of work when Use Auto Setting function is activated.
When the Auto Setting function is activated, the on/off duty check is automatically done on the hours set.
5.2.5 Menu Location
5.2.5.1 Call Log You can press “Call Log” on the main screen to check the call log immediately.
5.2.5.2 Notice You can move to Notice by pressing the Settings tab on the main screen.

64 iPECS UCE Mobile Client for Android User Guide - Issue 1.1
Appendix- Useful Information
This chapter provides information on the use of open source software contract.
Open Source Software Notice The Open Source Software used in this product are listed below. You can obtain a copy of the Open Source Software License from Ericsson-LG Enterprise Web site, http://www.ericssonlg-enterprise.com. Ericsson-LG Enterprise reserves the right to make changes at any time without notice. The Open Source Software used in this product are listed as below.
Open Source License
Google API 3.0 Apache License 2.0
slf4j MIT License
guaba Apache License 2.0
smack Apache License 2.0
picasso Apache License 2.0
simple-xml Apache License 2.0
protobuf Apache License 2.0
additional Common Development and Distribution License 1.1
Ericsson-LG Enterprise offers to provide an open source code on CD-ROM for a charge covering the cost of performing such distribution, such as the cost of media, shipping and handling upon e-mail request to Ericsson-LG Enterprise at [email protected]
This offer is valid for a period of three (3) years from the date of the distribution of this product by Ericsson-LG Enterprise.

www.ericssonlg-enterprise.com © Ericsson-LG Enterprise Co., Ltd. 2016 Posted In Korea
The contents of this document are subject to revision without notice due to continued progress in methodology, design and manufacturing. Ericsson-LG Enterprise shall have no liability for any error or damage of any kind resulting from the use of this document.