uicksteps explore the excel window -...
TRANSCRIPT
PC QuickSteps Getting to Know Your PC 3
109
87
65
43
21
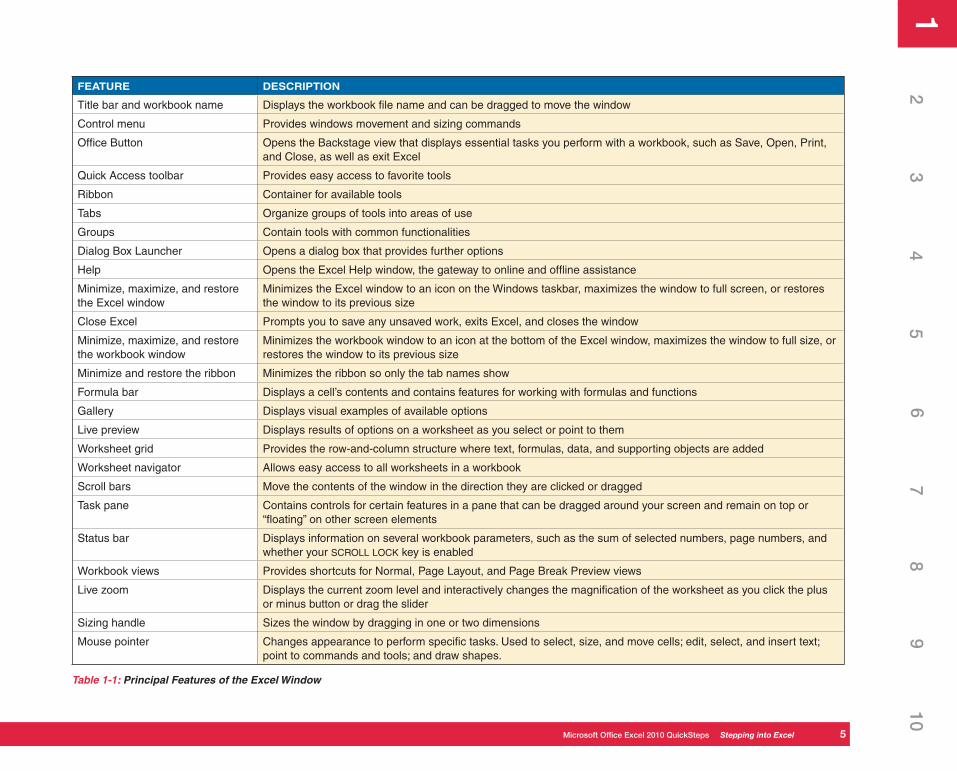
Explore the Excel WindowThe Excel window has many features to aid you in performing calculations, adding visual objects, and formatting your work, as well as performing file management tasks such as saving, printing, and customizing how you want Excel to work for you. These tools (also referred to as commands and tasks) are organized within the ribbon and File menu and support the work you do in the worksheet, the working area of an Excel file (see Figure 1-2), or workbook (workbooks are further described in “Using Workbooks,” later in this chapter). The principal features of the Excel window are introduced in Table 1-1 and are described further in this and other chapters of this book.
Become Familiar with the Ribbon The original menu and toolbar structure used in Office products from the late 1980s and early 1990s (File, Edit, Format, Window, Help, and other menus) was designed in an era of fewer tasks and features and has simply outgrown its usefulness. Microsoft’s solution (starting with Office 2007) to the increased number of feature enhancements is the ribbon, the container at the top of Office program windows for the tools and features you are most likely to use to accomplish the task at hand (see Figure 1-3). The ribbon collects tools you are likely to use in groups. For example, the Font group provides the tools to work with text. Groups are organized into tabs, which bring together the tools to work on broader tasks. For example, the Insert tab contains groups that allow you to add components, such as tables, links, and charts, to your spreadsheet (or slide presentation or document).
Each Office program has a default set of tabs and additional tabs that become available as the context of your work changes. For example, when working on a picture, a Picture Tools-Format tab displays. The ribbon provides more screen real estate so that each of the tools (or commands) in the groups has a labeled button you can click. Depending on the tool, you are then presented with
UICKSTEPSOPENING EXCEL (Continued)
and right-click Microsoft Office Excel
2010. From the context menu, select one
of the following:
• Click Pin To Start Menu to add a
shortcut to the top, or permanent,
area of the Start menu.
• Click Pin To Taskbar to include an
icon on the taskbar next to Start.
• Click Send To and click Desktop
(Create Shortcut) to add a
shortcut on your desktop.
To use the shortcut to start Excel, use whichever of the
following fits your shortcut:
• On the Start menu, click Start and click the Excel
shortcut.
• On the taskbar, click the Excel shortcut.
• On the desktop, double-click the Excel shortcut.
You can see that the taskbar option is the simplest and
most direct.
NOTEThe terms worksheet, sheet, and spreadsheet all refer
to the same row-and-column matrix that comprises
the working area of Excel. These terms are used
interchangeably throughout this book.
1
Microsoft Offi ce Excel 2010 QuickSteps Stepping into Excel 3
ch01.indd 3ch01.indd 3 3/30/10 1:17:43 PM3/30/10 1:17:43 PM
4 PC QuickSteps Getting to Know Your PC
12
34
56
78
910
12
34
56
78
910
12
34
56
78
910
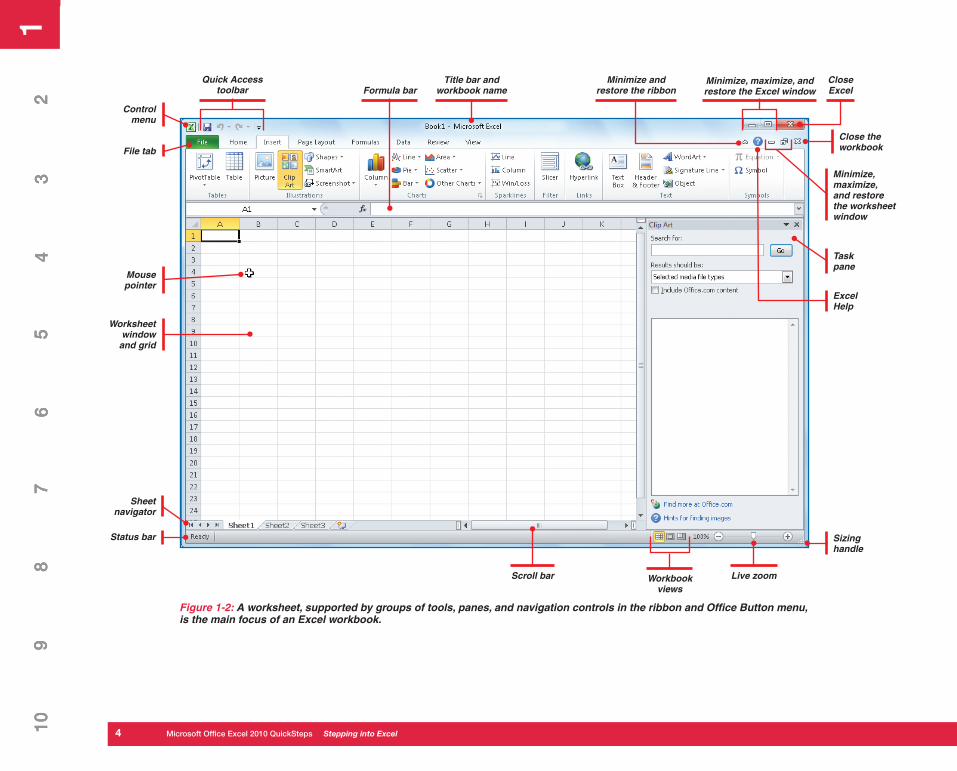
Figure 1-2: A worksheet, supported by groups of tools, panes, and navigation controls in the ribbon and Office Button menu, is the main focus of an Excel workbook.
Workbook views
Status bar
Control menu
Live zoomScroll bar
File tab
Mouse pointer
Worksheet window
and grid
Sheet navigator
Title bar and workbook name
Quick Access toolbar Formula bar
Minimize, maximize, and restore the Excel window
Minimize and restore the ribbon
Close Excel
Close the workbook
Task pane
Sizing handle
Minimize, maximize, and restore the worksheet window
Excel Help
1
4 Microsoft Offi ce Excel 2010 QuickSteps Stepping into Excel
ch01.indd 4ch01.indd 4 3/30/10 1:17:44 PM3/30/10 1:17:44 PM
PC QuickSteps Getting to Know Your PC 5
109
87
65
43
21
FEATURE DESCRIPTION
Title bar and workbook name Displays the workbook file name and can be dragged to move the window
Control menu Provides windows movement and sizing commands
Office Button Opens the Backstage view that displays essential tasks you perform with a workbook, such as Save, Open, Print, and Close, as well as exit Excel
Quick Access toolbar Provides easy access to favorite tools
Ribbon Container for available tools
Tabs Organize groups of tools into areas of use
Groups Contain tools with common functionalities
Dialog Box Launcher Opens a dialog box that provides further options
Help Opens the Excel Help window, the gateway to online and offline assistance
Minimize, maximize, and restore the Excel window
Minimizes the Excel window to an icon on the Windows taskbar, maximizes the window to full screen, or restores the window to its previous size
Close Excel Prompts you to save any unsaved work, exits Excel, and closes the window
Minimize, maximize, and restore the workbook window
Minimizes the workbook window to an icon at the bottom of the Excel window, maximizes the window to full size, or restores the window to its previous size
Minimize and restore the ribbon Minimizes the ribbon so only the tab names show
Formula bar Displays a cell’s contents and contains features for working with formulas and functions
Gallery Displays visual examples of available options
Live preview Displays results of options on a worksheet as you select or point to them
Worksheet grid Provides the row-and-column structure where text, formulas, data, and supporting objects are added
Worksheet navigator Allows easy access to all worksheets in a workbook
Scroll bars Move the contents of the window in the direction they are clicked or dragged
Task pane Contains controls for certain features in a pane that can be dragged around your screen and remain on top or “floating” on other screen elements
Status bar Displays information on several workbook parameters, such as the sum of selected numbers, page numbers, and whether your SCROLL LOCK key is enabled
Workbook views Provides shortcuts for Normal, Page Layout, and Page Break Preview views
Live zoom Displays the current zoom level and interactively changes the magnification of the worksheet as you click the plus or minus button or drag the slider
Sizing handle Sizes the window by dragging in one or two dimensions
Mouse pointer Changes appearance to perform specific tasks. Used to select, size, and move cells; edit, select, and insert text; point to commands and tools; and draw shapes.
Table 1-1: Principal Features of the Excel Window
1
Microsoft Offi ce Excel 2010 QuickSteps Stepping into Excel 5
ch01.indd 5ch01.indd 5 3/30/10 1:17:45 PM3/30/10 1:17:45 PM
6 PC QuickSteps Getting to Know Your PC
12
34
56
78
910
12
34
56
78
910
12
34
56
78
910
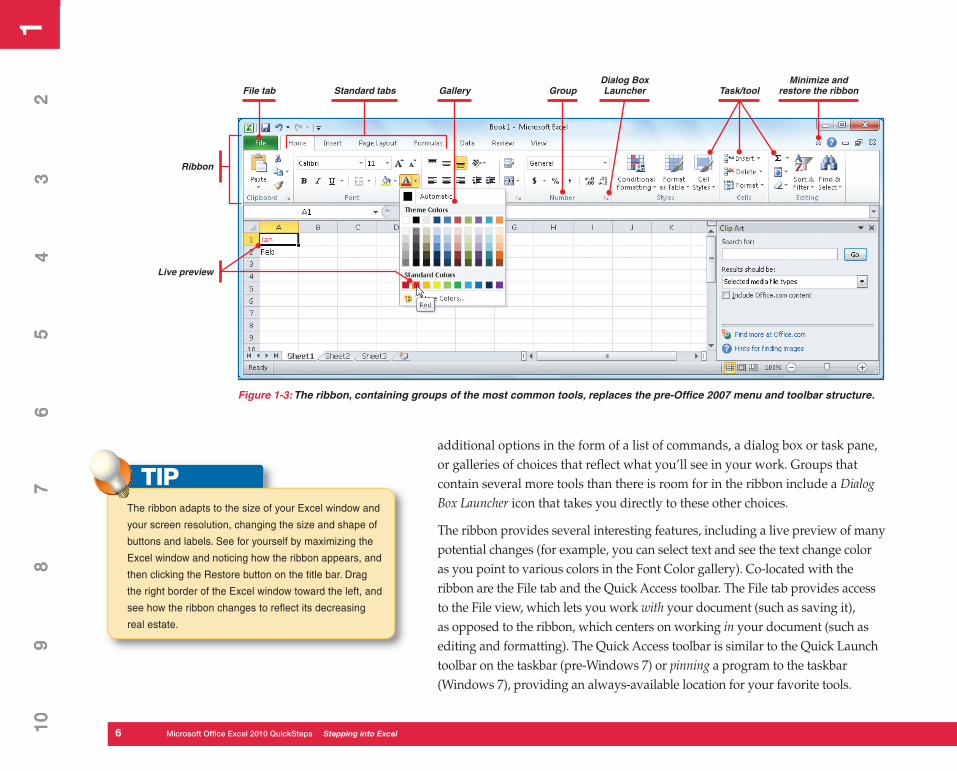
additional options in the form of a list of commands, a dialog box or task pane, or galleries of choices that reflect what you’ll see in your work. Groups that contain several more tools than there is room for in the ribbon include a Dialog Box Launcher icon that takes you directly to these other choices.
The ribbon provides several interesting features, including a live preview of many potential changes (for example, you can select text and see the text change color as you point to various colors in the Font Color gallery). Co-located with the ribbon are the File tab and the Quick Access toolbar. The File tab provides access to the File view, which lets you work with your document (such as saving it), as opposed to the ribbon, which centers on working in your document (such as editing and formatting). The Quick Access toolbar is similar to the Quick Launch toolbar on the taskbar (pre-Windows 7) or pinning a program to the taskbar (Windows 7), providing an always-available location for your favorite tools.
Figure 1-3: The ribbon, containing groups of the most common tools, replaces the pre-Office 2007 menu and toolbar structure.
Standard tabs Gallery GroupDialog Box Launcher
Minimize and restore the ribbonTask/toolFile tab
Ribbon
Live preview
TIPThe ribbon adapts to the size of your Excel window and
your screen resolution, changing the size and shape of
buttons and labels. See for yourself by maximizing the
Excel window and noticing how the ribbon appears, and
then clicking the Restore button on the title bar. Drag
the right border of the Excel window toward the left, and
see how the ribbon changes to reflect its decreasing
real estate.
1
6 Microsoft Offi ce Excel 2010 QuickSteps Stepping into Excel
ch01.indd 6ch01.indd 6 3/30/10 1:17:45 PM3/30/10 1:17:45 PM
PC QuickSteps Getting to Know Your PC 7
109
87
65
43
21
The Quick Access toolbar starts out with a default set of tools, but you can add to it. See the accompanying sections and figures for more information on the ribbon and the other elements of the Excel window.
Work with File ViewExcel 2010 shares with the other Office 2010 programs an improved way that you can easily access the tasks that affect a document, such as opening, closing, printing, and saving from one screen, avoiding the need to open several dialog boxes. This all-encompassing screen is called the File view (which makes sense, seeing as it handles background tasks not directly related to working in the spreadsheet), an example of which is shown in Figure 1-4.
To display the File view:
1. Open Excel using one of the methods described in the “Opening Excel” Quicksteps.
2. Click the File tab, and then click one of the areas of interest on the left of the window.
For example, clicking Print displays the view shown in Figure 1-4 and provides a
document preview and options for printing your work.
3. When finished, click the File tab to return to the Excel window.
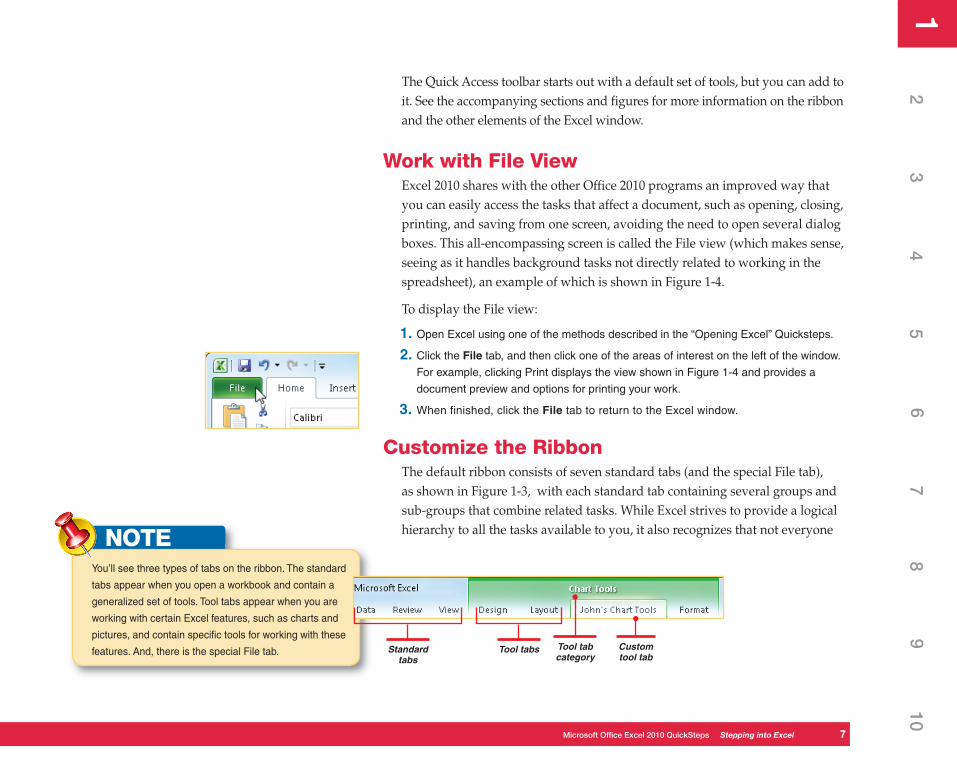
Customize the RibbonThe default ribbon consists of seven standard tabs (and the special File tab), as shown in Figure 1-3, with each standard tab containing several groups and sub-groups that combine related tasks. While Excel strives to provide a logical hierarchy to all the tasks available to you, it also recognizes that not everyone NOTE
You’ll see three types of tabs on the ribbon. The standard
tabs appear when you open a workbook and contain a
generalized set of tools. Tool tabs appear when you are
working with certain Excel features, such as charts and
pictures, and contain specific tools for working with these
features. And, there is the special File tab. Standard tabs
Tool tabs Tool tab category
Custom tool tab
1
Microsoft Offi ce Excel 2010 QuickSteps Stepping into Excel 7
ch01.indd 7ch01.indd 7 3/30/10 1:17:46 PM3/30/10 1:17:46 PM