ukulele · 2015-08-25 · table of contents ix recognising offbeat chord changes..... 68 switching...
TRANSCRIPT


Ukulele Exercises


by Brett McQueen
Ukulele Exercises

Ukulele Exercises For Dummies®
Published by: John Wiley & Sons, Ltd The Atrium, Southern Gate, Chichester, West Sussex
www.wiley.com
This edition first published 2013© 2013 John Wiley & Sons, Ltd, Chichester, West Sussex.Registered officeJohn Wiley & Sons Ltd, The Atrium, Southern Gate, Chichester, West Sussex, PO19 8SQ, United Kingdom For details of our global editorial offices, for customer services and for information about how to apply for permission to reuse the copyright material in this book please see our website at www.wiley.com. The right of the author to be identified as the author of this work has been asserted in accordance with the Copyright, Designs and Patents Act 1988 All rights reserved. No part of this publication may be reproduced, stored in a retrieval system, or transmitted, in any form or by any means, electronic, mechanical, photocopying, recording or otherwise, except as permitted by the UK Copyright, Designs and Patents Act 1988, without the prior permission of the publisher.Wiley publishes in a variety of print and electronic formats and by print-on-demand. Some material included with standard print versions of this book may not be included in e-books or in print-on-demand. If this book refers to media such as a CD or DVD that is not included in the version you purchased, you may download this material at http://booksupport.wiley.com. For more information about Wiley products, visit www.wiley.com.Designations used by companies to distinguish their products are often claimed as trademarks. All brand names and product names used in this book are trade names, service marks, trademarks or registered trademarks of their respective owners. The publisher is not associated with any product or vendor mentioned in this book.
LIMIT OF LIABILITY/DISCLAIMER OF WARRANTY: WHILE THE PUBLISHER AND AUTHOR HAVE USED THEIR BEST EFFORTS IN PREPARING THIS BOOK, THEY MAKE NO REPRESENTATIONS OR WARRANTIES WITH THE RESPECT TO THE ACCURACY OR COMPLETENESS OF THE CONTENTS OF THIS BOOK AND SPECIFICALLY DISCLAIM ANY IMPLIED WARRANTIES OF MERCHANTABILITY OR FITNESS FOR A PARTICULAR PURPOSE. IT IS SOLD ON THE UNDERSTAND-ING THAT THE PUBLISHER IS NOT ENGAGED IN RENDERING PROFESSIONAL SERVICES AND NEITHER THE PUBLISHER NOR THE AUTHOR SHALL BE LIABLE FOR DAMAGES ARISING HEREFROM. IF PROFESSIONAL ADVICE OR OTHER EXPERT ASSISTANCE IS REQUIRED, THE SERVICES OF A COMPETENT PROFESSIONAL SHOULD BE SOUGHT.
For general information on our other products and services, please contact our Customer Care Department within the U.S. at 877-762-2974, outside the U.S. at (001) 317-572-3993, or fax 317-572-4002. For technical support, please visit www.wiley.com/techsupport.For technical support, please visit www.wiley.com/techsupport.A catalogue record for this book is available from the British Library.ISBN 978-1-118-50685-1 (paperback) ISBN 978-1-118-50693-6 (ebk)ISBN 978-1-118-50691-2 (ebk) ISBN 978-1-118-50694-3 (ebk)Printed in Great Britain by CPI Clowes Ltd, Beccles10 9 8 7 6 5 4 3 2 1
Contents at a GlanceIntroduction ................................................................................1
Part I: Getting Started with Ukulele Exercises ...............................7Chapter 1: Preparing to Practise................................................................................................................9Chapter 2: Warming Up for Practice .......................................................................................................15
Part II: Becoming a Better Strummer ..........................................23Chapter 3: Foundations For Strumming ..................................................................................................25Chapter 4: Building a Repertoire of Strumming Patterns .....................................................................33Chapter 5: Taking Strumming Patterns to a Higher Level ....................................................................55Chapter 6: Refining Advanced Strumming Techniques ........................................................................73
Part III: Becoming a Better Fingerpicker .....................................89Chapter 7: Examining Fingerpicking Technique ....................................................................................91Chapter 8: Developing Rhythmic Fingerpicking Patterns ....................................................................97Chapter 9: Improving Your Solo Fingerpicking Skills ..........................................................................117Chapter 10: Taking a Deeper Look at Single-Note Fingerpicking Techniques .................................135
Part IV: Mastering the Ukulele Fretboard ..................................151Chapter 11: Learning the Fretboard with Major Scales ......................................................................153Chapter 12: Taking On Three Minor Scales ..........................................................................................177Chapter 13: Commanding the Fretboard with Chords ........................................................................197Chapter 14: Using Scales to Solo and Improvise ..................................................................................213
Part V: The Part of Tens ...........................................................229Chapter 15: Ten Ways to Improve Your Practice Times ....................................................................231Chapter 16: Ten Tips for Every Performing Ukulele Player ...............................................................235

Table of ContentsIntroduction .................................................................................1
About This Book ........................................................................................................................1Conventions Used in This Book ...............................................................................................2What You’re Not to Read ..........................................................................................................2Foolish Assumptions .................................................................................................................3How This Book Is Organised ....................................................................................................3
Part I: Getting Started with Ukulele Exercises ..............................................................3Part II: Becoming a Better Strummer .............................................................................3Part III: Becoming a Better Fingerpicker .......................................................................4Part IV: Mastering the Ukulele Fretboard .....................................................................4Part V: The Part of Tens ..................................................................................................4
Accessing the Audio Tracks .....................................................................................................4Icons Used in This Book ...........................................................................................................5Where to Go from Here .............................................................................................................5
Part I: Getting Started with Ukulele Exercises ................................7
Chapter 1: Preparing to Practise .........................................................................................9Equipping Yourself with the Right Practice Tools ................................................................9
Tuning up with a chromatic tuner .................................................................................9Keeping time with a metronome ..................................................................................10Tracking your progress with a practice journal ........................................................10
Reviewing Ukulele Notation ...................................................................................................11Deciphering tablature ...................................................................................................11Understanding chord diagrams ...................................................................................12Comprehending neck diagrams ...................................................................................13Reading rhythm charts .................................................................................................13
Chapter 2: Warming Up for Practice .................................................................................15Limbering Up Your Body to Play Ukulele .............................................................................15
Loosening up with stretches ........................................................................................15Relaxing with breathing exercises ...............................................................................16Strengthening your hands with exercises ..................................................................16
Brushing Up on Perfect Playing Posture ..............................................................................17Looking at Some Warm-Up Exercises on the Ukulele .........................................................17
Practising single-note exercises ...................................................................................17Practising chord exercises ...........................................................................................19
Part II: Becoming a Better Strummer ...........................................23
Chapter 3: Foundations For Strumming ............................................................................25Working Out Your Strumming Technique ............................................................................25
Choosing the right strumming technique ...................................................................26Strumming with your index finger ...............................................................................26Strumming with your thumb ........................................................................................27Strumming with four fingers .........................................................................................27
Ukulele Exercises For Dummies viiiGetting Acquainted With the Golden Rules of Strumming .................................................28
Rule #1: Strumming is consistent ................................................................................28Rule #2: Strumming is relaxed ......................................................................................29Rule #3: Strumming is intentional ................................................................................30
Finding the Right Strumming Pattern for Any Song ............................................................30Building a strumming repertoire .................................................................................30Listening to the song .....................................................................................................31Counting the song ..........................................................................................................31Starting with down strums ...........................................................................................31Knowing when to change chords.................................................................................32
Singing and Strumming at the Same Time ............................................................................32Playing the song through without singing ..................................................................32Humming first, singing later .........................................................................................32Simplifying isn’t a bad thing .........................................................................................32
Chapter 4: Building a Repertoire of Strumming Patterns .............................................33Discovering How to Use These Exercises to Become a Better Strummer ........................33Mastering the Universal Strumming Pattern ........................................................................34
Counting along with down strums ...............................................................................34Keeping the beat with up strums .................................................................................35Combining down and up strums ..................................................................................35Application song: ‘Mary Had a Little Lamb’ ...............................................................36
Tackling Common Time Strumming Patterns ......................................................................37Developing eighth note strums ....................................................................................37Building a multi-purpose strumming pattern .............................................................38Practising chord changes on different beats .............................................................39Application song: ‘Jingle Bells’ .....................................................................................40
Making Common Time Strumming Patterns More Interesting ..........................................41Accenting the beat .........................................................................................................42Using syncopation in three different ways .................................................................43Rearranging up strums to create different feels ........................................................45Application song: ‘I’ve Been Working On the Railroad’ ............................................47
Waltzing Along With 3/4 Time Signature Strumming Patterns ..........................................48Practising versatile 3/4 strumming patterns ..............................................................48Application song: ‘Oh My Darling, Clementine’ .........................................................49
Getting More Advanced With 6/8 Time Signature Strumming Patterns ...........................50Developing delightful 6/8 strumming patterns ..........................................................51Application song: ‘O Holy Night’ ..................................................................................52
Chapter 5: Taking Strumming Patterns to a Higher Level .............................................55Getting Groovy With Shuffle Rhythms ..................................................................................55
Finding the pocket with shuffle rhythm exercises ....................................................56‘Swing Low, Sweet Chariot’ ...........................................................................................57
Strumming Faster Without Getting Sloppier ........................................................................58Working on relaxing strumming movements ............................................................58Minimizing wasted strumming motion........................................................................59Drawing up a plan to improve strumming speed ......................................................59‘Hello! Ma Baby’ ..............................................................................................................60
Showing Off Subdivided Strumming Patterns ......................................................................61Souping up your strumming with sixteenth notes ....................................................62Trying out triplet strums ..............................................................................................63Putting the pedal down with speed rhythm exercises .............................................64
Making Your Strumming Dynamic .........................................................................................66Playing loudly and softly ...............................................................................................66Varying rhythmic complexity .......................................................................................67‘Oh! Susanna’ ..................................................................................................................67

ix Table of Contents
Recognising Offbeat Chord Changes .....................................................................................68Switching to chords on offbeats ..................................................................................69Variation on the 12 bar blues .......................................................................................69
Switching Chords Without Interrupting Your Strumming ..................................................70Setting up a chord change ...........................................................................................70‘O Little Town of Bethlehem’ ........................................................................................71
Chapter 6: Refining Advanced Strumming Techniques .................................................73Playing Percussively With Two Muting Techniques ...........................................................73
Developing your ‘chnking’ technique..........................................................................74Figuring out fret hand muting ......................................................................................75‘ Michael, Row the Boat Ashore’ .................................................................................77
Perfecting Alternative Strumming Techniques ....................................................................77Taking on the touch strum ...........................................................................................77‘Billy Boy’ .......................................................................................................................79Improving the thumb ’n strum .....................................................................................80Application song: ‘Rock a Bye Baby’ ...........................................................................82
Wrapping Your Mind Around Rolling Finger Strums ..........................................................83Four finger roll................................................................................................................84Five finger roll ................................................................................................................84Eight Finger Roll .............................................................................................................84Ten Finger Roll ...............................................................................................................85Practising finger roll strumming pattern exercises ...................................................85Application song: ‘Sweet Lei Lehua’ ............................................................................86
Part III: Becoming a Better Fingerpicker ......................................89
Chapter 7: Examining Fingerpicking Technique ............................................................91Practising Two Different Fingerpicking Techniques ...........................................................91
Polishing the four-finger technique .............................................................................92Perfecting the alternating thumb technique ..............................................................93
Looking at the Golden Rules of Fingerpicking .....................................................................94Rule #1: Stay loose .........................................................................................................94Rule #2: Slow and steady wins the race ......................................................................95Rule #3: Repeat, repeat, repeat ....................................................................................95
Chapter 8: Developing Rhythmic Fingerpicking Patterns .............................................97Practising the Four-Finger Picking Technique .....................................................................97
‘Inside-out’ pattern ........................................................................................................98‘Outside-in’ pattern ........................................................................................................99Simultaneous pinched patterns .................................................................................101Patterns in varied rhythms .........................................................................................104‘The Water Is Wide’......................................................................................................107
Practising the Alternating Picking Technique ...................................................................109‘Inside-out’ pattern ......................................................................................................109‘Outside-in’ pattern ......................................................................................................110Simultaneous pinched patterns .................................................................................110Patterns in varied rhythms .........................................................................................112Application song: ‘I Am a Poor Wayfaring Stranger’ ...............................................114
Chapter 9: Improving Your Solo Fingerpicking Skills .................................................117Tackling Solo Fingerstyle Pieces .........................................................................................117
Learning two pieces of music .....................................................................................118Playing Carcassi’s ‘Andantino’ ...................................................................................119
Ukulele Exercises For Dummies xStrengthening Your Fingerpicking with Arpeggio Exercises ............................................120
Trying your hand at ‘p i m’ arpeggios .......................................................................121Playing Tárrega’s ‘Étude in E minor’ .........................................................................125Working through more advanced arpeggios ............................................................127Playing Aguado’s ‘25 Piéces Pour Guitare, no. 17’ ...................................................130
Developing Lightning-Fast Tremolo Technique .................................................................132Tackling three-finger tremolo .....................................................................................132Playing ‘Étude in C major’ ...........................................................................................133Figuring out four-finger tremolo ................................................................................133
Chapter 10: Taking a Deeper Look at Single-Note Fingerpicking Techniques ......135Speeding up Single-Note Passages ......................................................................................135
Practising four alternation techniques .....................................................................136Applying alternation techniques to pieces of music ...............................................137
Articulating Single-Note Passages .......................................................................................140Hammer-on exercises ..................................................................................................141Pull-off exercises ..........................................................................................................142Slide exercises ..............................................................................................................143Bend exercises .............................................................................................................144
Strumming and Fingerpicking for Melody ..........................................................................145Playing ‘Silent Night’ ....................................................................................................146Playing ‘Danny Boy (Londonderry Air)’ ....................................................................147
Part IV: Mastering the Ukulele Fretboard ...................................151
Chapter 11: Learning the Fretboard with Major Scales ..............................................153Taking a Quick Look at the Chromatic Scale .....................................................................154Building a Major Scale ...........................................................................................................155
Learning the major scale interval pattern ................................................................155Creating a major scale in any key ..............................................................................156
Practising Major Scale Patterns in Three Different Keys .................................................158Learning natural notes with C major .........................................................................158Seeing how sharps work with G major ......................................................................161Figuring out flats with F major ...................................................................................164
Getting Your Fingers Moving with Major Scale Sequences ..............................................167Faking Fretboard Knowledge ...............................................................................................170
Recognising fretboard landmarks..............................................................................170Locating the same note on different strings.............................................................171Finding octave notes ...................................................................................................172
Using Major Scales to Play Actual Songs ............................................................................173Playing ‘Angels We Have Heard On High’ .................................................................173Playing ‘When the Saints Go Marching In’ ................................................................174
Chapter 12: Taking On Three Minor Scales ...................................................................177Building a Natural Minor Scale ............................................................................................177
Discovering the natural minor scale interval pattern .............................................178Relating natural minor to major .................................................................................179
Playing the Natural Minor scale ...........................................................................................180Homing In On Harmonic Minor ............................................................................................184Mixing It Up With Melodic Minor .........................................................................................187Practising Five Different Minor Scale Sequences ..............................................................190

xi Table of Contents
Playing Songs Using All Three Minor Scales ......................................................................193Playing ‘O Come, O Come Emmanuel’ .......................................................................193Playing ‘Coventry Carol’ .............................................................................................194Playing ‘Greensleeves’ .................................................................................................195
Chapter 13: Commanding the Fretboard with Chords ..................................................197Building Major and Minor Triads ........................................................................................197
Constructing major triads...........................................................................................198Putting together minor triads ....................................................................................199
Practising Triads Up and Down the Fretboard ..................................................................200Major triad exercises ...................................................................................................201Minor triad exercises ..................................................................................................202Combined triad exercises ...........................................................................................203
Taking Triads and Playing Actual Songs ............................................................................204Playing ‘Red River Valley’ ...........................................................................................205Playing ‘Joy to the World’ ...........................................................................................206
Turning Triads Into Moveable Chord Positions ................................................................207Making moveable major chords.................................................................................207Assembling moveable minor chords .........................................................................208Practising moveable chord progressions .................................................................208
Getting Jazzy with Moveable Seventh Chords ...................................................................209Figuring out dominant seventh chords .....................................................................209Mastering major seventh chords ...............................................................................210Tackling minor seventh chords .................................................................................211Practising jazz chord progressions ...........................................................................211
Chapter 14: Using Scales to Solo and Improvise ..........................................................213Rocking Out with Pentatonic Scales ...................................................................................213
Learning the minor pentatonic scale ........................................................................213Constructing the major pentatonic scale .................................................................214Practising pentatonic scale licks and exercises ......................................................215Playing a rock solo .......................................................................................................217
Expressing Soul with the Blues Scale ..................................................................................218Building the blues scale ..............................................................................................218Practising blues scale licks and exercises ................................................................219Playing a blues solo .....................................................................................................221
Sounding Jazzy with the Bebop Scale .................................................................................221Discovering the dominant bebop scale ....................................................................222Mastering the major bebop scale ..............................................................................223Practising bebop scale licks and exercises ..............................................................224Playing a jazz solo ........................................................................................................226
Part V: The Part of Tens ............................................................229
Chapter 15: Ten Ways to Improve Your Practice Times ..............................................231Setting a Location ..................................................................................................................231Scheduling a Time .................................................................................................................231Creating Time Limits .............................................................................................................232Keeping a Practice Journal ...................................................................................................232Trying Out Different Musical Styles ....................................................................................232Practising with Other People ...............................................................................................232Writing a Song ........................................................................................................................233Working on Active Listening ................................................................................................233Leaving Your Ukulele Out On a Stand .................................................................................233Taking a Break ........................................................................................................................234

Ukulele Exercises For Dummies xiiChapter 16: Ten Tips for Every Performing Ukulele Player ........................................235
Becoming a Better Performer ..............................................................................................235Getting Involved in the Local Music Scene ........................................................................236Finding a Place to Perform ...................................................................................................236Building a Set List of Songs ..................................................................................................236Preparing to Play Before an Audience ................................................................................237Handling Nerves Right Before the Show .............................................................................237Mastering the Art of Focus ...................................................................................................238Remembering to Breathe ......................................................................................................238Engaging With Your Audience .............................................................................................238Being Confident in Yourself ..................................................................................................239
Introduction
W hether you’ve played ukulele for years or just started playing a couple of weeks ago, Ukulele Exercises For Dummies is a practice book for anyone who wants to become a
better ukulele player. With hundreds of exercises and dozens of songs, you have a practice roadmap for improving your chops and becoming a more confident ukulele player. Through the exercises in this book, your fingers will come out stronger and more agile, and your mind will be sharpened and opened up to new and exciting ways of playing the ukulele through the different styles and techniques to which I introduce you.
One of the best parts of the ukulele is that it has such a relaxing, peaceful and joyful aura when played. Because the ukulele originates from Hawaii, some people say it carries the Hawaiian Aloha Spirit. It’s hard to listen to someone play the ukulele and not crack a smile or grin from ear to ear (I dare you to try). In this way, this book isn’t about rigorously practising an overwhelming amount of exercises; it’s about equipping you to go from practice to play-ing those songs that carry the joyful spirit of the ukulele.
About This BookUkulele Exercises For Dummies isn’t necessarily meant to be read from cover to cover like a normal book. The cool thing about this book (if I do say so myself) is that it’s written so you can look over the table of contents and flip to the chapters that cover the techniques and aspects of playing the ukulele that interest you most. In fact, as you practise, you might choose several different exercises to practise at a time from multiple chapters.
At the same time the chapters of this book are organised and developed the way they are for good reasons. When learning about music, different concepts and ideas tend to compound and build on each other. This is only natural, and you should expect it. For example, in Part II ‘Becoming a Better Strummer’, Chapter 3 addresses a lot of foundational ways of thinking and approaching the strumming exercises that come in Chapter 4, 5 and 6. The goal through-out each part of the book is to develop and improve a particular aspect of your technique, so at times, there is a gradual but noticeable progression of growth throughout each chapter. In this way, if you do come across something that seems unfamiliar, flip a few pages back because it was most likely covered a little earlier. When later chapters pull on information taught in earlier chapters, I do my best to include a reference for you.
There are a lot of exercises in this book. The exciting thing about these exercises is that almost all of them are designed so you can come back to them even after you’ve ‘mastered’ the techniques. I say ‘mastered’ because I’ve been playing ukulele my entire life and I still use the exercises in this book in my practise sessions. These exercises will always assist as a way to challenge your fingers and improve your overall playing technique.
Because of the amount of exercises presented throughout this book, avoid tackling all of the exercises from a chapter in one sitting. It’s best to take a couple of exercises from a chapter and spend time practising those for a day, week or month – however much time you need – before moving on. It’s okay to mix and practise exercises from multiple chapters during your practice times, but if you do this, I recommend using a practice journal to write out the things you are practising to keep track of your progress. In Chapter 1, I discuss more about how to use a practice journal.
2 Ukulele Exercises For Dummies
Overall, with this book, I want to help you unlock the parts to playing the ukulele that allow you to approach your playing more creatively and expressively, so you are able to go beyond the pages of this book and be more inspired as a musician and artist. To that end, along with the practice exercises, I include many songs in a variety of popular ukulele styles that you are able to learn and apply your skills.
Conventions Used in This BookOne of the most challenging aspects to learning and progressing at the ukulele can be sifting through the musical terms and lingo that gets thrown around. In this book, when I introduce an important, new term, I italicise the term and follow it with a definition. At the same time, there are a few common terms that show up over and over again that are worth going over since they can be confusing if you’re a relatively new ukulele player.
For example, when I refer to your fretting hand, I’m talking about the hand that forms the chord positions and presses against the strings on the ukulele fretboard. If you’re a right-handed player, your fretting hand is your left hand. If I refer to your strumming hand or pick-ing hand, I’m talking about the hand that strums or plucks the strings. If you are a right-handed player, this is your right hand. For left-handed players, reverse hands.
All of the exercises in this book are written for a ukulele tuned in standard tuning: g-C-E-A. If I refer to the top string of the ukulele, I’m talking about the g-string, and if I refer to the bottom string of the ukulele, I’m talking about the A-string. Additionally, if I refer to the 1st string, I’m talking about the A-string; the 2nd string indicates the E-string; the 3rd string indicates the C-string; and lastly, the 4th string indicates the g-string.
In the context of strumming the ukulele, the terms down and up refer to the direction to strum across the strings. Strumming down requires you to strum starting from the top string to the bottom string. Strumming up requires you to strum starting from the bottom to the top string.
The terms high and low are often used in this book to refer to the pitch and positioning of a note on the ukulele fretboard. When I say a note is played high on the neck, I mean that the note is played on the fretboard of the ukulele closer to the sound hole. If a note is played low on the neck, it is played closer to the headstock. Thus, notes played higher up on the fret-board are higher in pitch, whereas notes played lower on the fretboard are lower in pitch.
There are two separate ways to indicate which fingers are used for an exercise. The numbers 1–4 are used to indicate the fingers in your fretting hand – often used for chord diagrams and in certain music notation. The number 1 indicates the index finger, number 2 the middle finger, number 3 the ring finger and number 4 the little finger (or pinky). When referring to your picking hand, four letters are used. The letter p indicates you pluck the string with your thumb, i indicates the index finger, m indicates the middle finger and a indicates the ring finger. This way of identifying fingers is unpacked more in the pages ahead.
Lastly, in an effort to present the exercises, this book makes use of ukulele tab and notation, chord and scale diagrams, and metronome markings, which are discussed and explained in more detail in Chapter 1.
What You’re Not to ReadEach exercise in this book is created and presented with as much necessary information as possible, so if you wanted, you could play the exercises without having to read the
3 Introduction
surrounding text. At the same time, the explanations surrounding the exercises often give you helpful pointers and help you understand what you’re playing on a deeper level, which gives you the ability to take the concepts behind the exercises and apply them to actual pieces of music.
More importantly, be sure to listen to the audio demonstrations that go along with the exer-cises. The audio is the biggest aspect to this book. These audio recordings provide a demon-stration so you can get a really good, quick idea for how the exercise should sound and feel when you play it. Additionally, you can use these audio examples to play along with me. Notice that I play all of these audio examples to a metronome so you can get an idea of how to practise with a metronome too, if you have one. In Chapter 1, I talk more about using a metronome in your practice.
Foolish AssumptionsYou don’t have to have a lot of experience playing the ukulele in order to use this book. Throughout the book, I provide detailed explanations of the exercises to ensure you’re up to speed with what’s being presented. Still though, because this is a practice book, I try to spend less time talking and more time getting the ukulele in your hands with practice exer-cises. If you need information on things like learning basic chords, tuning the ukulele, or buying a ukulele, I highly recommend checking out Ukulele For Dummies.
The biggest assumption I do make is that you have a soprano, concert, or tenor ukulele that is tuned in standard tuning (g-C-E-A). Unfortunately, if you have a baritone ukulele tuned to D-G-B-E, or if you tune your ukulele to another tuning, you will be unable to follow along with the majority of the exercises presented in this book.
How This Book Is OrganisedThere are three main focuses to this book: strumming, fingerpicking and learning the ukulele fretboard. Within each of these focuses, there are many different techniques to learn and explore. Depending on the technique, each part of the book can look a little different in terms of what kind of exercises are used. Check out the following descriptions to get a bird’s eye view of how this book is organised.
Part I: Getting Started with Ukulele ExercisesI get you up to speed on the things you need to know to get the most out of the exercises in this book. If you’ve been playing ukulele for awhile, chances are some of this information will be familiar for you. In Chapter 1, I recommend and explain the use of three different practice tools that make your practice sessions more productive. I also review how to read ukulele notation and tab, chord diagrams, scale diagrams and rhythm charts, which helps you easily follow along with the exercises in this book. In Chapter 2, you start warming up your fingers and hands with stretches, breathing exercises and strength-building exercises. You also pick up the ukulele and play through several practice exercises.
Part II: Becoming a Better StrummerYou strengthen your rhythm, timing and ability to find the right strumming pattern for any song. Because strumming is a form of rhythm, you learn how to count, feel and play to the
4 Ukulele Exercises For Dummies
beat. I teach you exercises that break down strumming into its simplest parts, and then, I show you how to add to these simple strumming patterns to make them more complex and interesting sounding for your listener. Throughout this part, you learn how to play more than a dozen songs in different styles. By the end of this part, you will be able to build your own strumming patterns that’s right and fits for whatever song you’re playing.
Part III: Becoming a Better FingerpickerThere are a couple of different styles of fingerpicking on the ukulele. The first way is rhythmic fingerpicking (Chapter 8), where you fingerpick a repeating pattern that allows you to pick the chords and sing the melody of a song. The second way is fingerstyle (Chapter 9), where you take beautiful and intricate sounding classical guitar pieces and perform them on ukulele. The third way, which is another form of fingerstyle, is often referred to as solo fingerpicking (Chapter 10), where you fingerpick the melody of a song that is normally sung. Throughout this part, you practise a variety of picking exercises that improve the speed, flexibility and fluidity of your picking hand.
Part IV: Mastering the Ukulele FretboardTo master the ukulele fretboard means to learn the notes of the fretboard and how you relate those notes with one another in meaningful ways to play songs. In this part, you learn how to build major and minor scales across the neck of the ukulele (Chapters 11 and 12), and then you see how those notes relate to one another by building chords in different positions across the ukulele fretboard (Chapter 13). This means you won’t ever have to look at a chord diagram again. You also pick up some soloing techniques in musical styles like rock, blues and jazz (Chapter 14).
Part V: The Part of TensIn case you’re not familiar, in any For Dummies book, there is a special part of the book called the Part of Tens. This part breaks away from the exercises in the rest of the book to give you some extra, free-of-charge tips about improving your practice sessions (Chapter 15) and learning about how to take those steps to taking your ukulele skills and performing for an audience (Chapter 16). Both of these chapters include ten quick tips that you can apply to your ukulele playing today.
Accessing the Audio TracksUkulele Exercises For Dummies comes with 256 audio tracks – each one an essential aid to mastering the songs, techniques and exercises that I cover in the book. If you’ve purchased the paper or e-book version of Ukulele Exercises For Dummies, just go to www.dummies.com/go/ukuleleexercises to access and download these tracks. (If you don’t have inter-net access, call 877-762-2974 within the U.S. or 317-572-3993 outside the U.S.) Each exercise in the book which ties into an audio track has the track number above it in a black box, so you’ll always be able to match what you see on the page to what you’re hearing.

5 Introduction
Icons Used in This BookIn the left-hand margins of this book, you’ll find the following icons:
This icon reminds you of important information that is essential to playing the ukulele. This is the stuff you never want to forget.
Every now and then I go a little deeper in my explanations of certain musical terms, tech-niques, or ideas. This icon indicates interesting information that is a bit more technical. Not essential, but you might find it interesting.
These quick pointers help make the exercises and songs easier to play or understand.
I use this icon to caution you of anything that could cause discomfort, pain or injury to you or your ukulele.
Where to Go from HereFlip right over to Chapter 1 if you need a refresher on some of the basics. To get your hands warmed up and ready to practise, start at Chapter 2 for some stretches and exercises. If you are a relatively new ukulele player, after going over Chapter 1 and 2, I recommend starting at Part II ‘Becoming a Better Strummer’ as this will get you playing some of the ‘staple’ ukulele songs right away. If you’ve been playing ukulele for awhile, or if you already have a pretty specific practice routine, skip around through the book to pick and choose exercises you’d like to add to your routine to improve different aspects of your technique.

6 Ukulele Exercises For Dummies

Part IGetting Started with
Ukulele Exercises
Go to www.dummies.com/go/ukuleleexercises to listen to audio tracks.

In this part . . . ✓ Learn three different practice tools to make your practice
sessions more productive. ✓ Review ukulele tablature and the different sorts of diagram
you’ll come across. ✓ Pick up tips on how to warm up for practice. ✓ Pick up your uke and get started on practice. ✓ Go to www.dummies.com/go/ukuleleexercises to
listen to audio tracks accompanying this book.
Chapter 1
Preparing to PractiseIn This Chapter▶ Looking at three essential practice tools▶ Brushing up on ukulele tab and notation
M any exciting exercises lie ahead in the coming chapters. With your hard work and practice, you’re going to see amazing improvements in your ukulele playing, but
before picking up your ukulele, take a moment to cover some essentials. In this chapter, you discover three helpful practice tools that enable you to get the most out of the exercises in this book, and you review how to read ukulele tab and notation, which allows you to easily follow along with the exercises I present in this book.
Equipping Yourself with the Right Practice Tools
While the following tools aren’t necessary or required to enjoy the exercises in the pages ahead, they can make your practice times more productive and effective.
Tuning up with a chromatic tuner It’s always a good idea to tune up your ukulele every time you practise. Through playing,
and through small changes in temperature and humidity, the strings of the ukulele go out of tune. An in-tune ukulele is always more inspiring to play and listen to than one that is out of tune.
In standard ukulele tuning, from the top to bottom string, a ukulele is tuned to a G note above middle C on the piano, middle C, E above middle C, and A above middle C. In this way, a ukulele is tuned: g-C-E-A (the lower case ‘g’ represents the high g-string).
The ukulele can be tuned in a variety of different ways, but the exercises in this book are cre-ated for ukuleles tuned to standard tuning. To learn more about other ukulele tunings, be sure to check out Ukulele For Dummies by Alistair Wood.
Tuning your ukulele is easy if you have a piano nearby, but more often than not, this isn’t the case. The easiest and most accurate way to tune your ukulele is to use a chromatic tuner. A chromatic tuner is a small, inexpensive, portable electronic device that listens to each string you pluck on the ukulele and tells you whether that string needs to be tuned higher or lower in pitch. I strongly recommend you purchase a chromatic tuner at your local music store, or if you have a smartphone, purchase and download a chromatic tuner app to your device.
10 Part I: Getting Started with Ukulele Exercises
Keeping time with a metronomeA metronome is a small device that helps strengthen your sense of timing (musically referred to as tempo) by producing a short, consistent ‘click’ sound. By lining up your ukulele playing with the ‘click’ of a metronome, you improve your timing and rhythm, which creates a more pleasing sounding performance for your listener. You can buy a metronome at any music store or you can purchase a metronome app for your smartphone. Additionally, some chro-matic tuners are combined with a metronome for just a little bit more money.
Tempo is measured in beats per minute (BPM). Typically, a slow tempo is considered any-where around 40 to 60 BPM and a fast tempo is considered 120 BPM or higher. For some of the exercises and songs in this book, I notate a suggested tempo at the beginning of the figure. In music notation, tempo is often indicated with a quarter note and a number, as shown in the following figure.
These suggested tempos throughout the book should be seen as a goal. If you set your met-ronome at the suggested tempo and you are unable to play the song or exercise that fast, slow down the tempo to a speed that allows you to play without mistakes. Then, gradually increase the speed in small increments to play at the suggested tempo.
While practising, don’t use a metronome all the time. Sometimes the pressure of keeping time with a metronome can create tension in your playing, which works against you. First, spend time practising the exercises and songs in this book without a metronome, and then, to tighten up your timing and rhythm, add in the use of the metronome.
Tracking your progress with a practice journalTruthfully, this book contains a lot of exercises. To get the most out of your practice ses-sions, and to become a better ukulele player, it’s important you’re practising in a focused way. This means it’s best to select a few exercises to work on at a time from different sec-tions of this book. The exercises aren’t meant to be tackled all at once.
I highly recommend using a practice journal to focus your practice sessions, and to prevent yourself from getting overwhelmed. A pen and a notebook will do the trick, or you can create an updatable text file on your personal computer.
Here are a couple of different ways to use a practice journal:
✓ Create a practice plan for the week. For example, one day you might work on a couple of major scale patterns from Chapter 11, then, the next day, select a few rhythmic fin-gerpicking patterns to learn from Chapter 8, and then later on, to cap it off, practise a handful of strumming patterns from Chapter 4. You might mix these things up on the same day, but whatever you decide, write it out, so you know exactly what you’re prac-tising throughout the week.
✓ Identify successes and current challenges. After you practise, take a minute to list out your successes. For example, you might note in your journal, ‘Able to successfully
11 Chapter 1: Preparing to Practise
fingerpick Carcassi’s ‘Andantino’ from Chapter 9 at a moderate tempo.’ In addition, write out challenges, like, ‘Need to work on fretting the notes in measures 7 and 8 of Carcassi’s ‘Andantino’ in Chapter 9.’ By writing these successes and challenges out, you can be encouraged in your practice and identify exactly what you need to work on for the next practice session.
✓ Write out measurable goals. Think about where you want to be in a week, a month, six months, or a year. You might write out things like, ‘I want to learn and memorise all C major scale positions from Chapter 11 in two weeks,’ or, ‘I want to be able to play Tárrega’s ‘Étude in E minor’ from Chapter 9 at 92 BPM in a month.’ The more specific you can be in your goals the more it can inform you about how to structure your prac-tice times and help focus you in practising the things that help you reach your goal.
Throughout the following chapters, I give you some more recommendations for how to use your practice journal. Give it a try and see how it works for you.
Reviewing Ukulele NotationDepending on the concepts and techniques I’m teaching you, the exercises in this book are presented in a few different ways. You don’t need to be a pro at reading music in order to use the exercises and songs in this book, but it is helpful to review some of the basics.
Deciphering tablatureTablature, often just called tab, is a simplified form of musical notation for the ukulele. Unlike regular music notation, tab shows exactly where to play the notes of an exercise or song across the ukulele’s fretboard.
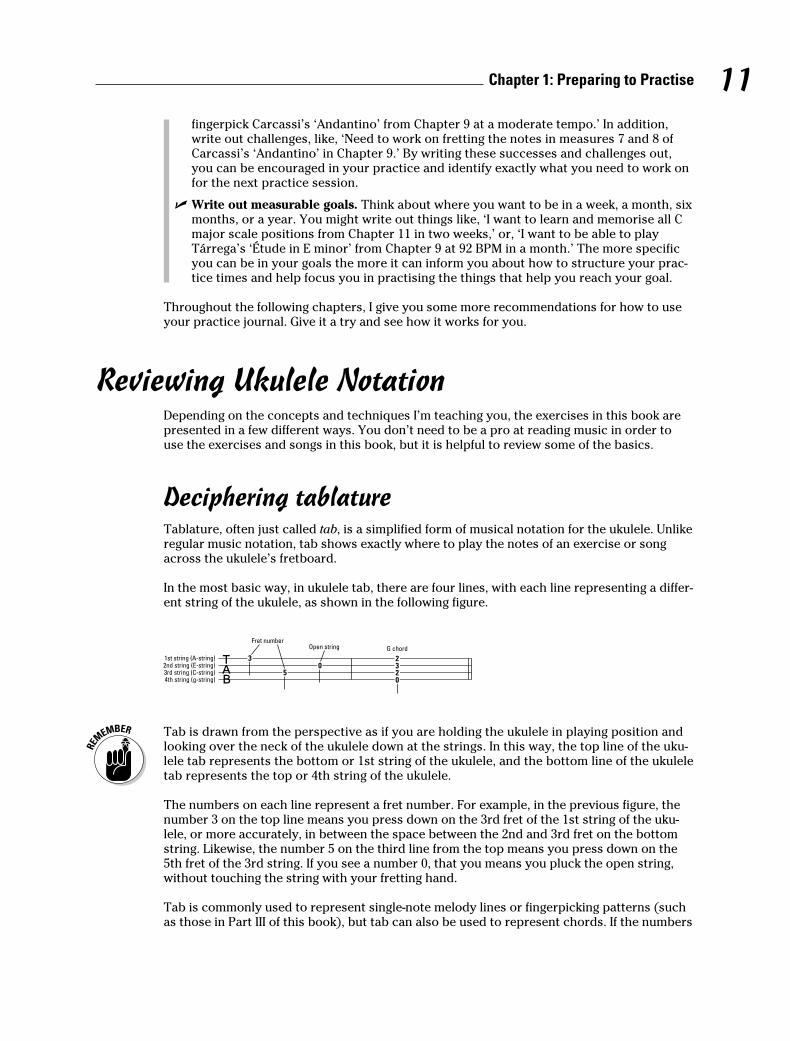
In the most basic way, in ukulele tab, there are four lines, with each line representing a differ-ent string of the ukulele, as shown in the following figure.
Tab is drawn from the perspective as if you are holding the ukulele in playing position and looking over the neck of the ukulele down at the strings. In this way, the top line of the uku-lele tab represents the bottom or 1st string of the ukulele, and the bottom line of the ukulele tab represents the top or 4th string of the ukulele.
The numbers on each line represent a fret number. For example, in the previous figure, the number 3 on the top line means you press down on the 3rd fret of the 1st string of the uku-lele, or more accurately, in between the space between the 2nd and 3rd fret on the bottom string. Likewise, the number 5 on the third line from the top means you press down on the 5th fret of the 3rd string. If you see a number 0, that you means you pluck the open string, without touching the string with your fretting hand.
Tab is commonly used to represent single-note melody lines or fingerpicking patterns (such as those in Part III of this book), but tab can also be used to represent chords. If the numbers
12 Part I: Getting Started with Ukulele Exercises
line up vertically across multiple strings, that means you fret and sound the notes across those strings all at once.
Using tab to represent music is advantageous because of how easy it is to read the notes, but the downside to using tab is that often times tablature doesn’t express note durations, meaning, it can be hard to tell how long to hold certain notes just from a piece of tab. For this reason, and for your benefit, the tab in almost all of the exercises in this book is pre-sented in combination with actual music notation.
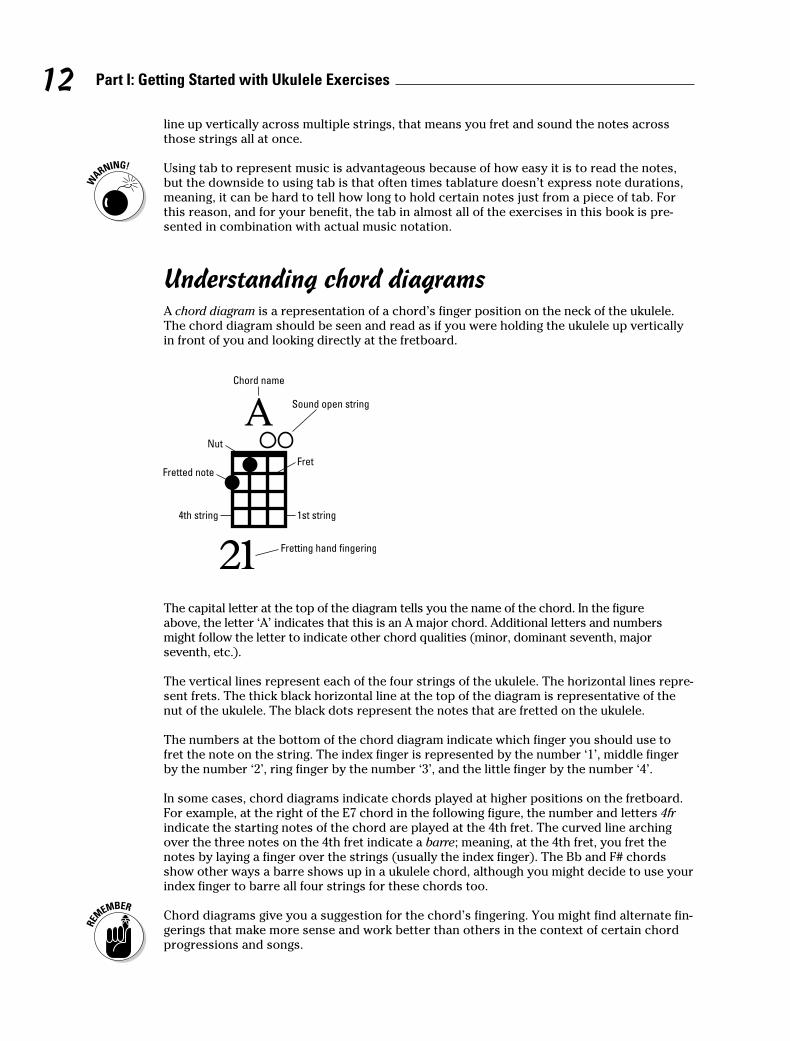
Understanding chord diagramsA chord diagram is a representation of a chord’s finger position on the neck of the ukulele. The chord diagram should be seen and read as if you were holding the ukulele up vertically in front of you and looking directly at the fretboard.
The capital letter at the top of the diagram tells you the name of the chord. In the figure above, the letter ‘A’ indicates that this is an A major chord. Additional letters and numbers might follow the letter to indicate other chord qualities (minor, dominant seventh, major seventh, etc.).
The vertical lines represent each of the four strings of the ukulele. The horizontal lines repre-sent frets. The thick black horizontal line at the top of the diagram is representative of the nut of the ukulele. The black dots represent the notes that are fretted on the ukulele.
The numbers at the bottom of the chord diagram indicate which finger you should use to fret the note on the string. The index finger is represented by the number ‘1’, middle finger by the number ‘2’, ring finger by the number ‘3’, and the little finger by the number ‘4’.
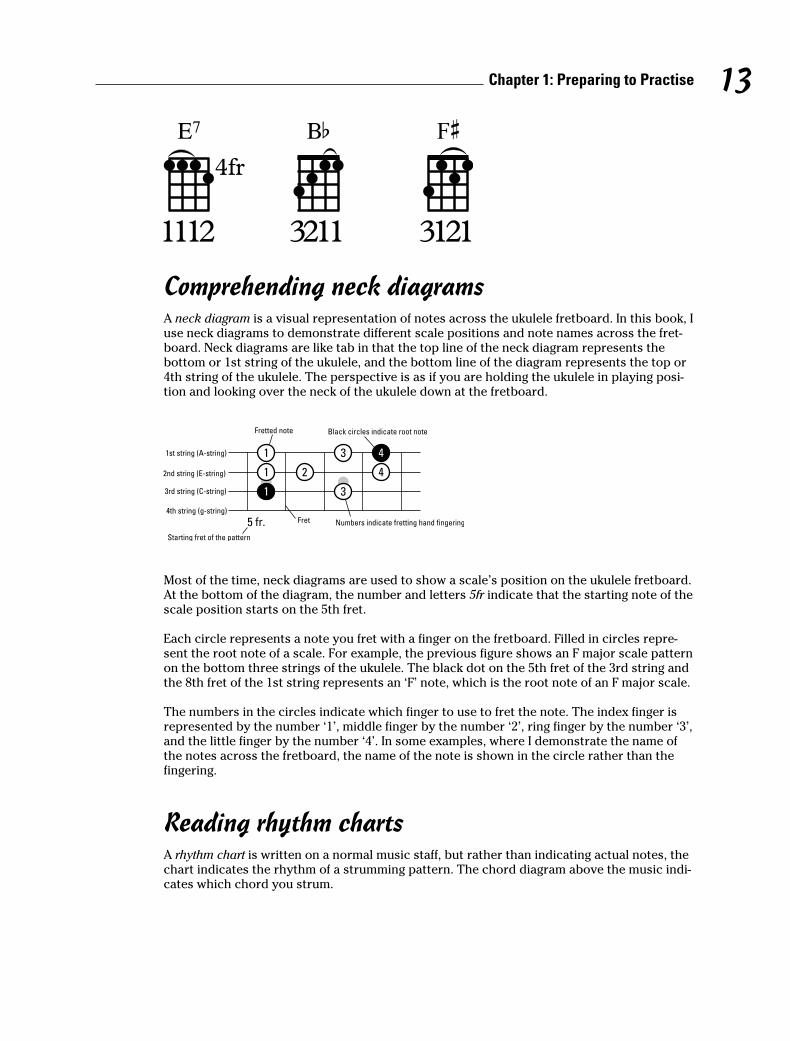
In some cases, chord diagrams indicate chords played at higher positions on the fretboard. For example, at the right of the E7 chord in the following figure, the number and letters 4fr indicate the starting notes of the chord are played at the 4th fret. The curved line arching over the three notes on the 4th fret indicate a barre; meaning, at the 4th fret, you fret the notes by laying a finger over the strings (usually the index finger). The Bb and F# chords show other ways a barre shows up in a ukulele chord, although you might decide to use your index finger to barre all four strings for these chords too.
Chord diagrams give you a suggestion for the chord’s fingering. You might find alternate fin-gerings that make more sense and work better than others in the context of certain chord progressions and songs.
13 Chapter 1: Preparing to Practise
Comprehending neck diagramsA neck diagram is a visual representation of notes across the ukulele fretboard. In this book, I use neck diagrams to demonstrate different scale positions and note names across the fret-board. Neck diagrams are like tab in that the top line of the neck diagram represents the bottom or 1st string of the ukulele, and the bottom line of the diagram represents the top or 4th string of the ukulele. The perspective is as if you are holding the ukulele in playing posi-tion and looking over the neck of the ukulele down at the fretboard.
Most of the time, neck diagrams are used to show a scale’s position on the ukulele fretboard. At the bottom of the diagram, the number and letters 5fr indicate that the starting note of the scale position starts on the 5th fret.
Each circle represents a note you fret with a finger on the fretboard. Filled in circles repre-sent the root note of a scale. For example, the previous figure shows an F major scale pattern on the bottom three strings of the ukulele. The black dot on the 5th fret of the 3rd string and the 8th fret of the 1st string represents an ‘F’ note, which is the root note of an F major scale.
The numbers in the circles indicate which finger to use to fret the note. The index finger is represented by the number ‘1’, middle finger by the number ‘2’, ring finger by the number ‘3’, and the little finger by the number ‘4’. In some examples, where I demonstrate the name of the notes across the fretboard, the name of the note is shown in the circle rather than the fingering.
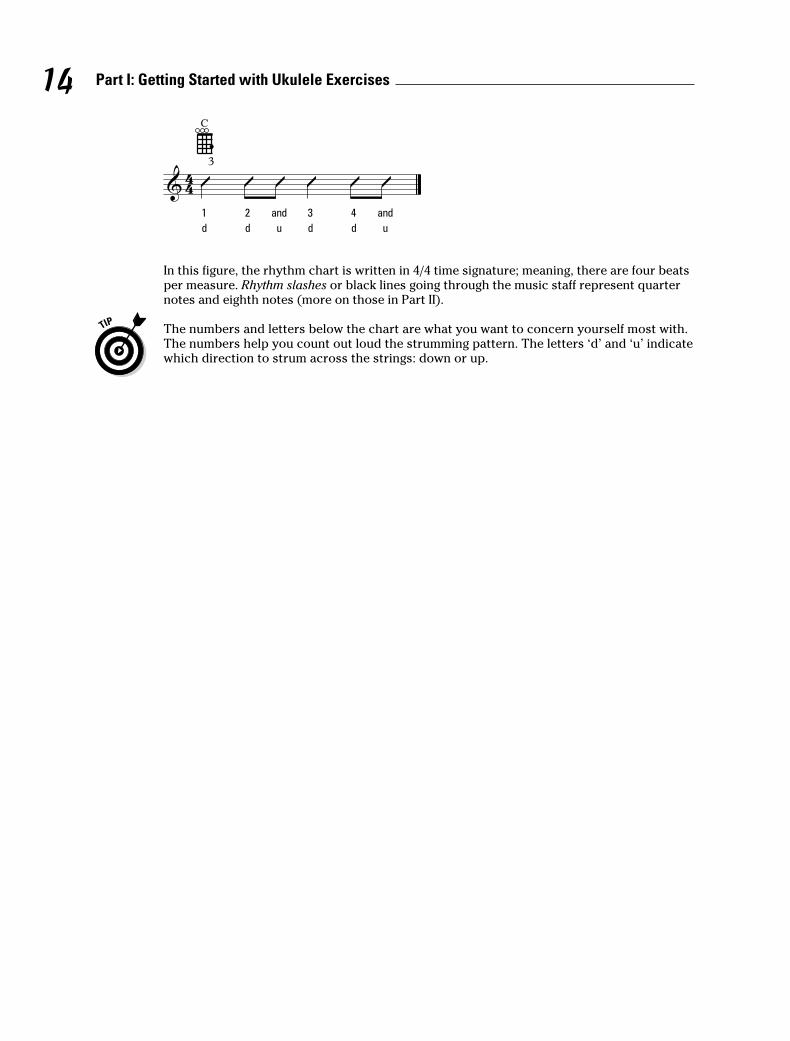
Reading rhythm chartsA rhythm chart is written on a normal music staff, but rather than indicating actual notes, the chart indicates the rhythm of a strumming pattern. The chord diagram above the music indi-cates which chord you strum.
14 Part I: Getting Started with Ukulele Exercises
In this figure, the rhythm chart is written in 4/4 time signature; meaning, there are four beats per measure. Rhythm slashes or black lines going through the music staff represent quarter notes and eighth notes (more on those in Part II).
The numbers and letters below the chart are what you want to concern yourself most with. The numbers help you count out loud the strumming pattern. The letters ‘d’ and ‘u’ indicate which direction to strum across the strings: down or up.