ultra slim led - downloads.kaiserbaas.com · 10 14 16 1. what’s in the box 2. attaching the stand...
TRANSCRIPT

Digital Photo Frame
User Manual
Ultra Slim LED

Pg 2User Manual
Digital Photo Frame Ultra Slim LED
Contents
2
3
4
5
6
7
8
9
10
14
16
1. What’s in the box
2. Attaching the stand
3. Connecting the power
4. Touch button controls
5. Remote control
6. Loading to the on-board memory
7. Playing photos from a USB stick
8. Playing photos from an SD card
9. Photo frame interface
10. Setup menu
11. Technical specifications
1 2

Pg 1 User Manual Pg 2User Manual
Digital Photo Frame Digital Photo FrameUltra Slim LED Ultra Slim LED
1. What’s in the boxThe packaging includes the following contents:
Digital Photo Frame
AC poweradaptor
RemotecontrolUSB
adaptor USB cable
2. Attaching the standThe Digital Photo Frame is supplied with a magnetic stand.
Simply fit the grooves on the stand to the corresponding slots on the base of the photo frame and it will clip easily into place.
2 32

Pg 1 User Manual Pg 2User Manual
Digital Photo Frame Digital Photo FrameUltra Slim LED Ultra Slim LED
3. Connecting the powerTo connect the power to the Digital Photo Frame:
1. Connect the power adaptor to the DC 5V input on the photo frame
2. Connect the power adaptor to a mains power point
4. Touch button controlsThe Digital Photo Frame features touch button controls on the front of the panel, providing easy operation and photo navigation.
A light, simple touch will activate and illuminate the controls.
The buttons are laid out as follows:
Power Up Right
OK/Play/Pause
Setup Down Left Return
4 5
Turn on the Digital Photo Frame by pressing the ‘POWER’ button on the panel or remote control.
Pg 1 User Manual Pg 2User Manual
Digital Photo Frame Digital Photo FrameUltra Slim LED Ultra Slim LED
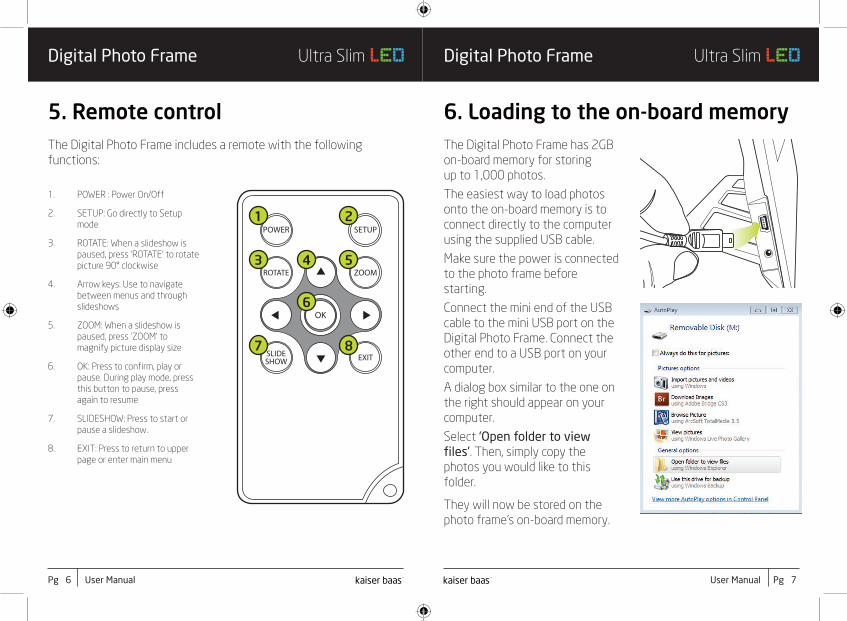
5. Remote controlThe Digital Photo Frame includes a remote with the following functions:
POWER
ROTATE
SLIDESHOW EXIT
SETUP
ZOOM
OK
1. POWER : Power On/Off
2. SETUP: Go directly to Setup mode
3. ROTATE: When a slideshow is paused, press ‘ROTATE’ to rotate picture 90° clockwise
4. Arrow keys: Use to navigate between menus and through slideshows
5. ZOOM: When a slideshow is paused, press ’ZOOM’ to magnify picture display size
6. OK: Press to confirm, play or pause. During play mode, press this button to pause, press again to resume
7. SLIDESHOW: Press to start or pause a slideshow.
8. EXIT: Press to return to upper page or enter main menu
1 2
3 4 5
6
7 8
6. Loading to the on-board memory The Digital Photo Frame has 2GB on-board memory for storing up to 1,000 photos.
The easiest way to load photos onto the on-board memory is to connect directly to the computer using the supplied USB cable.
Make sure the power is connected to the photo frame before starting.
Connect the mini end of the USB cable to the mini USB port on the Digital Photo Frame. Connect the other end to a USB port on your computer.
A dialog box similar to the one on the right should appear on your computer.
Select ‘Open folder to view files’. Then, simply copy the photos you would like to this folder.
They will now be stored on the photo frame’s on-board memory.
6 7

Pg 1 User Manual Pg 2User Manual
Digital Photo Frame Digital Photo FrameUltra Slim LED Ultra Slim LED
7. Playing photos from a USB stickTo display photos on the Digital Photo Frame from a USB stick, first you must copy the files you wish to view from your computer to the USB stick.
Connect the USB stick with your photos to the supplied USB adaptor.
It should clip easily into place.
Connect the other end of the USB adaptor to the mini USB port on the Digital Photo Frame.
A slideshow of your photos will then automatically start.
8. Playing photos from amemory card
To display photos on the Digital Photo Frame from an SD, MMC or MS card, first you must copy the files you wish to view from your computer to the card. Alternatively, you can load photos directly from a digital camera, photo scanner or other photo device that uses a memory card.
Simply remove the card from your computer or digital camera, then insert it into the memory card slot on the Digital Photo Frame with the front of the card facing the front of the photo frame, as shown below:
A slideshow of the photos loaded onto the memory card should automatically start.
8 9

Pg 1 User Manual Pg 2User Manual
Digital Photo Frame Digital Photo FrameUltra Slim LED Ultra Slim LED
9. Photo frame interfaceTurn on the Digital Photo Frame by pressing the power button on the remote control or touch panel. The logo will appear. A slideshow will play automatically if there are pictures on the on-board memory, memory card or USB stick memory.
Use to select (Built-in, USB, SD, MMC or SDHC), then press ‘OK’ to select the device you want.
To play images from a different deviceTo play images from a different device (eg. change from on-board memory to a USB memory stick), press the ‘RETURN’ or ‘EXIT’ button three times to access the menu.
After selecting the device, a menu will appear giving you the option of Photo, File, Calendar or Setup. Press ‘OK’ on Photo to view photos from your chosen device.
A screen will then appear showing thumbnails of the first nine photos on the chosen device. To view a photo full screen, select the photo and press the ‘OK’ button.
Rotate or zoom a photoTo rotate a photo, pause the slideshow, press the ‘ROTATE’ button and the photo will rotate 90 degrees clock-wise.To zoom in on a photo press the ‘ZOOM’ button. The photo will then zoom in. Use the buttons to navigate around the photo.
Both options can also be accessed via the setup menu by pressing the ‘SETUP’ button.
10 11

Pg 1 User Manual Pg 2User Manual
Digital Photo Frame Digital Photo FrameUltra Slim LED Ultra Slim LED
SlideshowIn thumbnail mode, press the ‘OK’ button twice to start a slideshow of the photos with transitions.
Copy / Delete filesIn thumbnail mode, press the ‘SETUP’ button to bring up the copy or delete menu. Select either ‘Copy File’ or ‘Delete File’ using the buttons and select using ‘OK’. The file will now be copied to the frame’s internal memory
File ManagerSelect the ‘FILE’ option from the main menu to bring up the file manager. The file manager lets you delete or copy files on your chosen memory storage. To copy or delete files, press the ‘SETUP’ button to bring up the menu.
CalendarPress Calendar from the main menu, press ‘OK’ to access the calendar with clock. You will see a photo slideshow play on the left. Use the arrow keys to scroll through the dates on the calendar.
12 13

Pg 1 User Manual Pg 2User Manual
Digital Photo Frame Digital Photo FrameUltra Slim LED Ultra Slim LED
To enter the setup menu, select ‘SETUP’ from the main menu and then press ‘OK’. Use to select the item you want to set up. Press ‘OK’ to show the sub menu, select with then press ‘OK’ to confirm. Exit menu at any time by pressing the ‘EXIT’ button.
The menu options are:Language: English, French, Italian, German, Spanish, Greek
Slide mode: Single window, Four windows and Triple windows
Slide speed: 3, 5, 15, 30 seconds, 1, 5, 15, 30 minutes and 1 hour
10. Setup menuTint: Use to select between 0 (lowest) and 40 (highest).
Set time/date: Press ‘OK’ to choose setup items as follows: Year, Month, Date, Hour, Minute, Second, Save time, adjust with , press ‘OK’ to confirm, ‘RETURN’ to quit.
Set Time format: 12 or 24 hour, press ‘OK’, select with , press ‘OK’ to confirm.
Auto Power On: Select a time to automatically turn the frame on.
Auto Power Off: Select a time to automatically turn the frame off.
Format built-in memory: Format (clear) in-built memory.
Reset setting: Select to reset to factory default settings.
Exit: Exit the setup menu.Photo effect: Colour, Mono, Sepia
Slide effect: Random, Split horizontal in/out, Jalousie, Split vertical in/out, Radiation, Surround, Fade, Right/Next refresh, On pan, Roll from down to up, Roll from up to down, Brick
Photo mode: Auto fit, Optimal, full
Display:
Contrast: Use to select between 0 (lowest) and 40 (highest).
Brightness: Use to select between 0 (lowest) and 40 (highest).
Saturation: Use to select between 0 (lowest) and 40 (highest).
14 15

Pg 1 User Manual Pg 2User Manual
Digital Photo Frame Digital Photo FrameUltra Slim LED Ultra Slim LED
Screen size 10 inch
Screen type TFT digital display
Resolution 1024 x 768
Aspect ratio 4:3
Internal memory 2GB
Brightness 200 – 250CD/m²
Contrast 480 – 600:1
Photo file format JPEG
Memory card support MMC, MS, SD, SDHC (maximum 16GB)
USB USB 2.0 Host, Mini USB
Power 5V 1.5A
11. Product specifications
16
