ultracompact, 1 a thermoelectric cooler (tec) driver for ...ultracompact, 1 a thermoelectric cooler...
TRANSCRIPT

Ultracompact, 1 A Thermoelectric Cooler (TEC) Driver for Digital Control Systems
Data Sheet ADN8833
FEATURES Patented high efficiency single inductor architecture Integrated low RDSON MOSFETs for TEC driver TEC voltage and current operation monitoring No external sense resistor required Independent TEC heating and cooling current limit settings Programmable maximum TEC voltage 2 MHz PWM driver switching frequency External synchronization Digital thermal control loop compatible 2.50 V reference output with 1% accuracy Available in a 25-ball, 2.5 mm × 2.5 mm WLCSP or in a
24-lead, 4 mm × 4 mm LFCSP
APPLICATIONS TEC temperature control Optical modules Optical fiber amplifiers Optical networking systems Instruments requiring TEC temperature control
FUNCTIONAL BLOCK DIAGRAM
TEC CURRENTAND VOLTAGE
SENSE AND LIMIT
CONTROLLER
LINEARPOWERSTAGE
ADN8833
PWMPOWERSTAGE
OSCILLATORVOLTAGEREFERENCE
ILIM
VLIM/SD
VTEC ITEC
EN/SYVREF
LDR
SW
SFB
CONTPVIN
PGNDx
VDD
AGND 1290
9-00
1
Figure 1.
GENERAL DESCRIPTION The ADN8833 is a monolithic H-bridge TEC driver with integrated 1 A power MOSFETs. It has a linear power stage with the linear driver (LDR) output and a pulse-width modulation (PWM) power stage with the SW output. Depending on the control voltage at the CONT input, the ADN8833 drives current through a TEC to settle the temperature of a laser diode or a passive component attached to the TEC module to the programmed target temperature.
The control voltage applied to the CONT input is generated by a digital-to-analog converter (DAC) closing the digital proportional, integral, derivative (PID) loop of temperature control system.
The internal 2.5 V reference voltage provides a 1% accurate output that is used to bias a voltage divider network to program the maximum TEC current and voltage limits for both the heating and cooling modes. It can also be a reference voltage for the DAC and the temperature sensing circuit, including a thermistor bridge and an analog-to-digital converter (ADC).
Table 1. TEC Family Models Model MOSFET Thermal Loop Package ADN8831 Discrete Digital/analog LFCSP (CP-32-7) ADN8833 Integrated Digital WLCSP (CB-25-7),
LFCSP (CP-24-15) ADN8834 Integrated Digital/analog WLCSP (CB-25-7),
LFCSP (CP-24-15)
Rev. A Document Feedback Information furnished by Analog Devices is believed to be accurate and reliable. However, no responsibility is assumed by Analog Devices for its use, nor for any infringements of patents or other rights of third parties that may result from its use. Specifications subject to change without notice. No license is granted by implication or otherwise under any patent or patent rights of Analog Devices. Trademarks and registered trademarks are the property of their respective owners.
One Technology Way, P.O. Box 9106, Norwood, MA 02062-9106, U.S.A. Tel: 781.329.4700 ©2015 Analog Devices, Inc. All rights reserved. Technical Support www.analog.com

ADN8833 Data Sheet
Rev. A | Page 2 of 23
TABLE OF CONTENTS Features .............................................................................................. 1
Applications ....................................................................................... 1
Functional Block Diagram .............................................................. 1
General Description ......................................................................... 1
Revision History ............................................................................... 2
Specifications ..................................................................................... 3
Absolute Maximum Ratings ............................................................ 6
Thermal Resistance ...................................................................... 6
ESD Caution .................................................................................. 6
Pin Configurations and Function Descriptions ........................... 7
Typical Performance Characteristics ............................................. 8
Detailed Functional Block Diagram ............................................ 12
Theory of Operation ...................................................................... 13
Digital PID Control .................................................................... 13
Powering the Driver ................................................................... 13
Enable and Shutdown ................................................................ 14
Oscillator Clock Frequency ....................................................... 14
Soft Start on Power-Up .............................................................. 14
TEC Voltage/Current Monitor ................................................. 15
Maximum TEC Voltage Limit .................................................. 15
Maximum TEC Current Limit ................................................. 15
Applications Information .............................................................. 16
Typical Application with Digital PID Using a DAC .............. 16
Thermistor Setup ........................................................................ 16
MOSFET Driver Amplifiers ...................................................... 16
PWM Output Filter Requirements .......................................... 17
Input Capacitor Selection .......................................................... 18
Power Dissipation....................................................................... 18
PCB Layout Guidelines .................................................................. 20
Block Diagrams and Signal Flow ............................................. 20
Guidelines for Reducing Noise and Minimizing Power Loss20
Example PCB Layout Using Two Layers ................................. 21
Outline Dimensions ....................................................................... 23
Ordering Guide .......................................................................... 23
REVISION HISTORY 8/15—Rev. 0 to Rev. A Added 24-Lead LFCSP ....................................................... Universal Changes to Features Section and Table 1 ...................................... 1 Changes to Table 2 ............................................................................ 3 Changes to Table 3 ............................................................................ 6 Added Figure 3; Renumbered Sequentially ................................. 7 Changes to Figure 11 ........................................................................ 9 Changes to Figure 18 and Figure 19 ............................................. 10 Changes to Figure 23 ...................................................................... 12 Changes to Powering the Driver Section and Figure 24 Caption ... 13 Change to Soft Start on Power-Up Section ................................. 14 Changes to Table 7 .......................................................................... 17 Added Table 8; Renumbered Sequentially .................................. 18 Updated Outline Dimensions ....................................................... 23 Changes to Ordering Guide ......................................................... 23 4/15—Revision 0: Initial Version

Data Sheet ADN8833
SPECIFICATIONS VIN = 2.7 V to 5.5 V, TJ = −40°C to +125°C for minimum/maximum specifications, and TA =25°C for typical specifications, unless otherwise noted.
Table 2. Parameter Symbol Test Conditions/Comments Min Typ Max Unit POWER SUPPLY
Driver Supply Voltage VPVIN WLCSP 2.7 5.5 V VPVINL, VPVINS LFCSP 2.7 5.5 V Controller Supply Voltage VVDD 2.7 5.5 V Supply Current IVDD PWM not switching 2.1 3.5 mA Shutdown Current ISD EN/SY = AGND or VLIM/SD = AGND 350 700 µA Undervoltage Lockout (UVLO) VUVLO VVDD rising 2.45 2.55 2.65 V UVLO Hysteresis UVLOHYST 80 90 100 mV
REFERENCE VOLTAGE VVREF IVREF = 0 mA to 10 mA 2.475 2.50 2.525 V LINEAR OUTPUT
Output Voltage VLDR ILDR = 0 A Low 0 V High VPVIN V
Maximum Source Current ILDR_SOURCE TJ = −40°C to +125°C 1.0 A Maximum Sink Current ILDR_SINK TJ = −40°C to +125°C 1.0 A On Resistance ILDR = 0.6 A
P-MOSFET RDS_PL(ON) WLCSP, VPVIN = 5.0 V 35 50 mΩ WLCSP, VPVIN = 3.3 V 44 60 mΩ LFCSP, VPVIN = 5.0 V 50 65 mΩ LFCSP, VPVIN = 3.3 V 55 75 mΩ N-MOSFET RDS_NL(ON) WLCSP, VPVIN = 5.0 V 31 50 mΩ WLCSP, VPVIN = 3.3 V 40 55 mΩ LFCSP, VPVIN = 5.0 V 45 70 mΩ LFCSP, VPVIN = 3.3 V 50 80 mΩ
Leakage Current P-MOSFET ILDR_P_LKG 0.1 10 µA N-MOSFET ILDR_N_LKG 0.1 10 µA
Linear Amplifier Gain ALDR 40 V/V LDR Short-Circuit Threshold ILDR_SH_GNDL LDR short to PGNDL, enter hiccup 2.2 A ILDR_SH_PVIN LDR short to PVIN, enter hiccup −2.2 A Hiccup Cycle THICCUP 15 ms
PWM OUTPUT Output Voltage VSFB ISFB = 0 A
Low 0.06 × VPVIN V High 0.93 × VPVIN V
Maximum Source Current ISW_SOURCE TJ = −40°C to +125°C 1.0 A Maximum Sink Current ISW_SINK TJ = −40°C to +125°C 1.0 A On Resistance ISW = 0.6 A
P-MOSFET RDS_PS(ON) WLCSP, VPVIN = 5.0 V 47 65 mΩ WLCSP, VPVIN = 3.3 V 60 80 mΩ LFCSP, VPVIN = 5.0 V 60 80 mΩ LFCSP, VPVIN = 3.3 V 70 95 mΩ N-MOSFET RDS_NS(ON) WLCSP, VPVIN = 5.0 V 40 60 mΩ WLCSP, VPVIN = 3.3 V 45 65 mΩ LFCSP, VPVIN = 5.0 V 45 75 mΩ LFCSP, VPVIN = 3.3 V 55 85 mΩ
Leakage Current
Rev. A | Page 3 of 23

ADN8833 Data Sheet
Parameter Symbol Test Conditions/Comments Min Typ Max Unit P-MOSFET ISW_P_LKG 0.1 10 µA N-MOSFET ISW_N_LKG 0.1 10 µA
SW Node Rise Time1 tSW_R CSW = 1 nF 1 ns PWM Duty Cycle2 DSW 6 93 % SFB Input Bias Current ISFB 1 2 µA
PWM OSCILLATOR Internal Oscillator Frequency fOSC EN/SY high 1.85 2.0 2.15 MHz EN/SY Input Voltage
Low VEN/SY_ILOW 0.8 V High VEN/SY_IHIGH 2.1 V
External Synchronization Frequency fSYNC 1.85 3.25 MHz Synchronization Pulse Duty Cycle DSYNC 10 90 % EN/SY Rising to PWM Rising Delay tSYNC_PWM 50 ns EN/SY to PWM Lock Time tSY_LOCK Number of SYNC cycles 10 Cycles EN/SY Input Current IEN/SY 0.3 0.5 µA Pull-Down Current 0.3 0.5 µA
DRIVER CONTROL INPUT Input Voltage Range VCONT 0 VVREF V Input Resistance RCONT 40 kΩ Input Capacitance1 CCONT 40 pF
TEC CURRENT LIMIT ILIM Input Voltage Range
Cooling VILIMC 1.3 VVREF − 0.2 V Heating VILIMH 0.2 1.2 V
Current-Limit Threshold Cooling VILIMC_TH VITEC = 0.5 V 1.98 2.0 2.02 V Heating VILIMH_TH VITEC = 2 V 0.48 0.5 0.52 V
ILIM Input Current Heating IILIMH −0.2 +0.2 µA Cooling IILIMC Sourcing current 37.5 40 42.5 µA
Cooling to Heating Current Detection Threshold
ICOOL_HEAT_TH 40 mA
TEC VOLTAGE LIMIT Voltage Limit Gain AVLIM (VLDR − VSFB)/VVLIM 2 V/V VLIM/SD Input Voltage Range1 VVLIM 0.2 VVDD/2 V VLIM/SD Input Current
Cooling IILIMC VOUT2 < VVREF/2 −0.2 +0.2 µA Heating IILIMH VOUT2 > VVREF/2, sinking current 8 10 12.2 µA
TEC CURRENT MEASUREMENT (WLCSP) Current Sense Gain RCS VPVIN = 3.3 V 0.525 V/A VPVIN = 5 V 0.535 V/A Current Measurement Accuracy ILDR_ERROR 700 mA ≤ ILDR ≤ 1 A, VPVIN = 3.3 V −10 +10 % 800 mA ≤ ILDR ≤ 1 A, VPVIN = 5 V −10 +10 % ITEC Voltage Accuracy VITEC_@_700_mA VPVIN = 3.3 V, cooling, VVREF/2 + ILDR × RCS 1.455 1.618 1.779 V
VITEC_@_−700_mA VPVIN = 3.3 V, heating, VVREF/2 − ILDR × RCS 0.794 0.883 0.971 V VITEC_@_800_mA VPVIN = 5 V, cooling, VVREF/2 + ILDR × RCS 1.510 1.678 1.846 V VITEC_@_−800_mA VPVIN = 5 V, heating, VVREF/2 − ILDR × RCS 0.739 0.822 0.905 V
Rev. A | Page 4 of 23

Data Sheet ADN8833
Parameter Symbol Test Conditions/Comments Min Typ Max Unit TEC CURRENT MEASUREMENT (LFCSP)
Current Sense Gain RCS VPVIN = 3.3 V 0.525 V/A VPVIN = 5 V 0.525 V/A Current Measurement Accuracy ILDR_ERROR 700 mA ≤ ILDR ≤ 1 A, VPVIN = 3.3 V −15 +15 % 800 mA ≤ ILDR ≤ 1 A, VPVIN = 5 V −15 +15 % ITEC Voltage Accuracy VITEC_@_700_mA VPVIN = 3.3 V, cooling, VVREF/2 + ILDR × RCS 1.374 1.618 1.861 V VITEC_@_−700_mA VPVIN = 3.3 V, heating, VVREF/2 − ILDR × RCS 0.750 0.883 1.015 V VITEC_@_800_mA VPVIN = 5 V, cooling, VVREF/2 + ILDR × RCS 1.419 1.678 1.921 V VITEC_@_−800_mA VPVIN = 5 V, heating, VVREF/2 − ILDR × RCS 0.705 0.830 0.955 V ITEC Voltage Output Range VITEC ITEC = 0 A 0 VVREF − 0.05 V ITEC Bias Voltage VITEC ILDR = 0 A 1.225 1.250 1.285 V Maximum ITEC Output Current IITEC −2 +2 mA
TEC VOLTAGE MEASUREMENT Voltage Sense Gain AVTEC 0.24 0.25 0.26 V/V Voltage Measurement Accuracy VVTEC_@_1_V VLDR − VSFB = 1 V, VVREF/2 + AVTEC ×
(VLDR − VSFB) 1.475 1.50 1.525 V
VTEC Output Voltage Range VVTEC 0.005 2.625 V VTEC Bias Voltage VVTEC_B VLDR = VSFB 1.225 1.250 1.285 V Maximum VTEC Output Current RVTEC −2 +2 mA
INTERNAL SOFT START Soft Start Time tSS
150
ms VLIM/SD SHUTDOWN
VLIM/SD Low Voltage Threshold VVLIM/SD_THL 0.07 V THERMAL SHUTDOWN
Thermal Shutdown Threshold TSHDN_TH 170 °C Thermal Shutdown Hysteresis TSHDN_HYS 17 °C
1 This specification is guaranteed by design. 2 This specification is guaranteed by characterization.
Rev. A | Page 5 of 23

ADN8833 Data Sheet
ABSOLUTE MAXIMUM RATINGS Table 3. Parameter Rating PVIN to PGNDL (WLCSP) −0.3 V to +5.75 V PVIN to PGNDS (WLCSP) −0.3 V to +5.75 V PVINL to PGNDL (LFCSP) −0.3 V to +5.75 V PVINS to PGNDS (LFCSP) −0.3 V to +5.75 V LDR to PGNDL (WLCSP) −0.3 V to VPVIN LDR to PGNDL (LFCSP) −0.3 V to VPVINL SW to PGNDS −0.3 V to +5.75 V SFB to AGND −0.3 V to VVDD AGND to PGNDL −0.3 V to +0.3 V AGND to PGNDS −0.3 V to +0.3 V VLIM/SD to AGND −0.3 V to VVDD ILIM to AGND −0.3 V to VVDD VREF to AGND −0.3 V to +3 V VDD to AGND −0.3 V to +5.75 V EN/SY to AGND −0.3 V to VVDD ITEC to AGND −0.3 V to +5.75 V VTEC to AGND −0.3 V to +5.75 V Maximum Current
VREF to AGND 20 mA ITEC to AGND 50 mA VTEC to AGND 50 mA
Junction Temperature 125°C Storage Temperature Range −65°C to +150°C Lead Temperature (Soldering, 10 sec) 260°C
Stresses at or above those listed under Absolute Maximum Ratings may cause permanent damage to the product. This is a stress rating only; functional operation of the product at these or any other conditions above those indicated in the operational section of this specification is not implied. Operation beyond the maximum operating conditions for extended periods may affect product reliability.
THERMAL RESISTANCE θJA is specified for the worst-case conditions, that is, a device soldered in a circuit board for surface-mount packages, and is based on a 4-layer standard JEDEC board.
Table 4. Package Type θJA θJC Unit 25-Ball WLCSP 48 0.6 °C/W 24-Lead LFCSP 37 1.65 °C/W
ESD CAUTION
Rev. A | Page 6 of 23

Data Sheet ADN8833
Rev. A | Page 7 of 23
PIN CONFIGURATIONS AND FUNCTION DESCRIPTIONS
A
B
C
D
E
1 2 3 4 5
VLIM/SD
ILIM
VREF
VDD
DNC DNC
CONT
AGND
DNC
EN/SY
DNC
DNC
ITEC
VTEC
SFB
NOTES1. DNC = DO NOT CONNECT. DO NOT CONNECT TO THESE PINS.
SW
LDR
PGNDL
PVIN
PGNDSPGNDS
SW
PVIN
PGNDL
LDR
1290
9-00
2
2.54mm
2.54mm
0.5mmPITCH
ADN8833TOP VIEW
(Not to Scale)
Figure 2. WLCSP Pin Configuration (Top View)
1290
9-10
0
2
1
3
4
5
6
18
17
16
15
14
13VREF
VDD
ILIM
VLIM/SD
CONT
DNC
PGNDS
SW
PVINS
PVINL
LDR
PGNDL
8 9 10 117
EN
/SY
VT
EC
SF
B
ITE
C
12P
GN
DS
AG
ND
20 1921
DN
C
PG
ND
L
DN
C
22D
NC
23D
NC
24D
NC
ADN8833TOP VIEW
(Not to Scale)
NOTES1. DNC = DO NOT CONNECT. DO NOT
CONNECT TO THESE PINS.2. EXPOSED PAD. SOLDER TO THE ANALOG
GROUND PLANE ON THE BOARD
Figure 3. LFCSP Pin Configuration (Top View)
Table 5. Pin Function Descriptions Pin No.
Mnemonic Description WLCSP LFCSP A1, A2 18, 19 PGNDL Power Ground of the Linear TEC Driver. A3 to A5, B3, B4
1, 20 to 24
DNC Do Not Connect. Do not connect to these pins.
B1, B2 17 LDR Output of the Linear TEC Driver. B5 3 VLIM/SD Voltage Limit/Shutdown. This pin sets the cooling and heating TEC voltage limits. When this pin is
pulled low, the device shuts down. C1, C2 N/A1 PVIN Power Input for the TEC Driver. N/A1 16 PVINL Power input for the linear TEC driver N/A1 15 PVINS Power input for the PWM TEC driver C3 11 ITEC TEC Current Output. C4 2 CONT Control Input of the TEC Driver. Apply a control signal from the DAC to this pin to close the thermal loop. C5 4 ILIM Current Limit. This pin sets the TEC cooling and heating current limits. D1, D2 14 SW Switch Node Output of the PWM TEC Driver. D3 9 VTEC TEC Voltage Output. D4 8 EN/SY Enable/Synchronization. Set this pin high to enable the device. An external synchronization clock input
can be applied to this pin. D5 5 VDD Power for the Driver Circuits. E1, E2 12, 13 PGNDS Power Ground of the PWM TEC Driver. E3 10 SFB Feedback of the PWM TEC Driver Output. E4 7 AGND Signal Ground. E5 6 VREF 2.5 V Reference Output. N/A1 0 EP Exposed Pad. Solder to the analog ground plane on the board. 1 N/A means not applicable.
ADN8833 Data Sheet
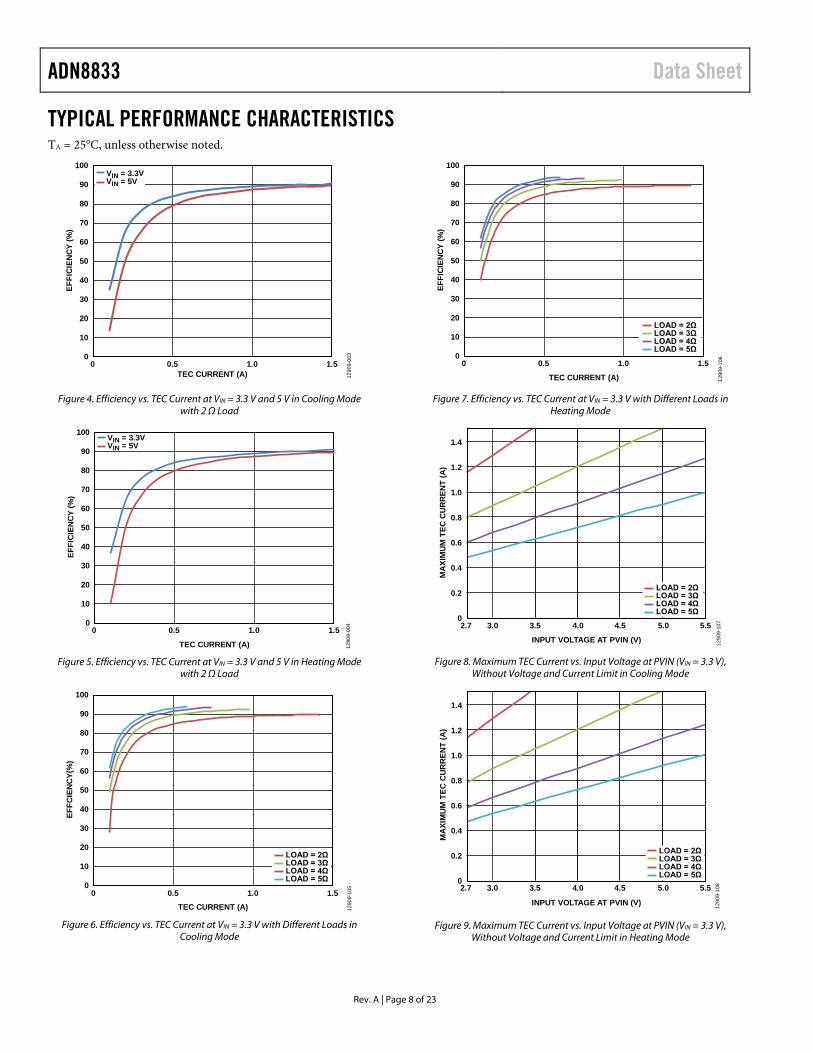
TYPICAL PERFORMANCE CHARACTERISTICS TA = 25°C, unless otherwise noted.
0
10
20
30
40
50
60
70
80
90
100
0 0.5 1.0 1.5
EFFI
CIE
NCY
(%)
TEC CURRENT (A)
VIN = 3.3VVIN = 5V
1290
9-00
3
Figure 4. Efficiency vs. TEC Current at VIN = 3.3 V and 5 V in Cooling Mode with 2 Ω Load
0
10
20
30
40
50
60
70
80
90
100
0 0.5 1.0 1.5
EFFI
CIE
NCY
(%)
TEC CURRENT (A)
VIN = 3.3VVIN = 5V
1290
9-00
4
Figure 5. Efficiency vs. TEC Current at VIN = 3.3 V and 5 V in Heating Mode
with 2 Ω Load
0
10
20
30
40
50
60
70
80
90
100
EFFC
IEN
CY(
%)
TEC CURRENT (A)
LOAD = 2ΩLOAD = 3ΩLOAD = 4ΩLOAD = 5Ω
1290
9-10
5
0 0.5 1.0 1.5
Figure 6. Efficiency vs. TEC Current at VIN = 3.3 V with Different Loads in
Cooling Mode
0
10
20
30
40
50
60
70
80
90
100
EFFI
CIE
NCY
(%)
TEC CURRENT (A)
LOAD = 2ΩLOAD = 3ΩLOAD = 4ΩLOAD = 5Ω
1290
9-10
6
0 0.5 1.0 1.5
Figure 7. Efficiency vs. TEC Current at VIN = 3.3 V with Different Loads in Heating Mode
0
0.2
0.4
0.6
0.8
1.0
1.2
1.4
2.7 5.55.04.54.03.53.0
MA
XIM
UM
TEC
CU
RR
ENT
(A)
INPUT VOLTAGE AT PVIN (V)
LOAD = 2ΩLOAD = 3ΩLOAD = 4ΩLOAD = 5Ω
1290
9-10
7
Figure 8. Maximum TEC Current vs. Input Voltage at PVIN (VIN = 3.3 V), Without Voltage and Current Limit in Cooling Mode
0
0.2
0.4
0.6
0.8
1.0
1.2
1.4
MA
XIM
UM
TEC
CU
RR
ENT
(A)
INPUT VOLTAGE AT PVIN (V)
1290
9-10
82.7 5.55.04.54.03.53.0
LOAD = 2ΩLOAD = 3ΩLOAD = 4ΩLOAD = 5Ω
Figure 9. Maximum TEC Current vs. Input Voltage at PVIN (VIN = 3.3 V), Without Voltage and Current Limit in Heating Mode
Rev. A | Page 8 of 23

Data Sheet ADN8833
VIN = 2.7V AT NO LOADVIN = 3.3V AT NO LOADVIN = 5.5V AT NO LOADVIN = 2.7V AT 5mA LOADVIN = 3.3V AT 5mA LOADVIN = 5.5V AT 5mA LOAD
1.0
–50 0 50AMBIENT TEMPERATURE (°C)
100 150
0.8
0.6
0.4
0.2
0
V REF
ER
RO
R (%
)
–0.2
–0.4
–0.6
–0.8
–1.0
1290
9-11
1
Figure 10. VREF Error vs. Ambient Temperature
0.20
–0.20
–0.15
–0.10
–0.05
0
0.05
0.10
0.15
0 1 2 3 4 5 6 7 8 9 10
V REF
(%)
LOAD CURRENT AT VREF (mA) 1290
9-10
1
VIN = 3.3V, ITEC = 0AVIN = 3.3V, ITEC = 0.5A, COOLINGVIN = 3.3V, ITEC = 0.5A, HEATINGVIN = 5V, ITEC = 0AVIN = 5V, ITEC = 0.5A, COOLINGVIN = 5V, ITEC = 0.5A, HEATING
Figure 11. VREF Load Regulation
–20
–15
–10
–5
0
5
10
15
20
0 0.5 1.0 1.5
ITEC
CU
RR
ENT
REA
DIN
G E
RR
OR
(%)
TEC CURRENT (A)
VIN = 3.3VVIN = 5V
1290
9-01
0
Figure 12. ITEC Current Reading Error vs. TEC Current in Heating Mode
–20
–15
–10
–5
0
5
10
15
20
–1.5 –1.0 –0.5 0
ITEC
CU
RR
ENT
REA
DIN
G E
RR
OR
(%)
TEC CURRENT (A)
VIN = 3.3VVIN = 5V
1290
9-01
3
Figure 13. ITEC Current Reading Error vs. TEC Current in Cooling Mode
–20
–15
–10
–5
0
5
10
15
20
0.5 1.0 1.5 2.0 2.5
VTEC
VO
LTA
GE
REA
DIN
G E
RR
OR
(%)
TEC VOLTAGE (V)
VIN = 3.3VVIN = 5V
1290
9-0 1
1
Figure 14. VTEC Voltage Reading Error vs. TEC Voltage in Cooling Mode
–20
–15
–10
–5
0
5
10
15
20
–2.5 –2.0 –1.5 –1.0 –0.5
VTEC
VO
LTA
GE
REA
DIN
G E
RR
OR
(%)
TEC VOLTAGE (V)
VIN = 3.3VVIN = 5V
1290
9-01
4
Figure 15. VTEC Voltage Reading Error vs. TEC Voltage in Heating Mode
Rev. A | Page 9 of 23

ADN8833 Data Sheet
EN
TEC CURRENT
LDO (TEC–)
PWM (TEC+)
CH1 1V CH2 1V M20.0ms A CH3 800mVT 40ms
CH3 2VCH4 500mA Ω
3
4
1
1290
9-12
1
Figure 16. Typical Enable Waveforms in Cooling Mode, VIN = 3.3 V, Load = 2 Ω, TEC Current = 1 A
Figure 17. Enable Waveforms in Heating Mode, VIN = 3.3 V,
Load = 2 Ω, TEC Current = 1 A
CH1CH3 2.0V BW
20mV BW M400ns A CH3 1.00VT 0.0s
CH2 20mV BW
3
2
1
SW
LDO (TEC+)
PWM (TEC–)
1290
9-10
2
T
Figure 18. Typical Switch and Voltage Ripple Waveforms in Cooling Mode, VIN = 3.3 V, Load = 2 Ω, TEC Current = 1 A
Figure 19. Typical Switch and Voltage Ripple Waveforms in Heating Mode,
VIN = 3.3 V, Load = 2 Ω, TEC Current = 1 A
3
4
2
EN
TEC CURRENT
LDO (TEC+)
PWM (TEC–)
CH1 1V CH2 1V M20.0ms A CH3 800mVT 40ms
CH3 2VCH4 500mA Ω 12
909-
122
CH1CH3 2.0V BW
20mV BW M400ns A CH3 1.00VT 0.0s
CH2 20mV BW
3
2
1
SW
LDO (TEC+)
PWM (TEC–)
1290
9-10
3
T
Rev. A | Page 10 of 23

Data Sheet ADN8833
Figure 20. Cooling to Heating Transition
Figure 21. Zero Crossing TEC Current Zoom in from Heating to Cooling
Figure 22. Zero Crossing TEC Current Zoom in from Cooling to Heating
4
1
CH1 500mV CH2 500mV M10ms A CH4 –8mAT 5.4msCH3 300mA Ω
PWM (TEC–)
TEC CURRENT
LDO (TEC+)
1290
9-11
9
4
1
CH1 500mV CH2 500mV M10ms A CH4 12mAT 5.4msCH4 200mA Ω
PWM (TEC–)
TEC CURRENT
LDO (TEC+)
1290
9-12
0
CH1 500mV CH2 500mV M200ms A CH4 –108mAT –28.000msCH4 200mA Ω
4
1
PWM (TEC–)
TEC CURRENT
LDO (TEC+)
1290
9-11
8
Rev. A | Page 11 of 23

ADN8833 Data Sheet
DETAILED FUNCTIONAL BLOCK DIAGRAM
VBLINEAR
AMPLIFIER
VC
20kΩ
ITEC
1.25V1.25V1.25V
5kΩ
VTEC
20kΩ20kΩ
5kΩ
SFB
CONT
1.25V
VLIM/SD
VC
VB = 2.5V AT VDD > 4.0VVB = 1.5V AT VDD < 4.0V
BAND GAPVOLTAGE
REFERENCE
VB
VREF2.5V
VDD
AGND
TEC VOLTAGELIMIT AND INTERNAL
SOFT START
VDDADN8833
VDD
40µA
10µA
HEATING
TEC CURRENT SENSE
LDRTEC
VOLTAGESENSE
SW
PGNDS
PVIN
PWM POWERSTAGE
PWMMOSFETDRIVER
EN/SY
SFB20kΩ20kΩ
20kΩ
20kΩ
100kΩ
VB
VB
400kΩ80kΩ
PWMMODULATOR
PWMERROR
AMPLIFIER
ILIM
COOLING
ITEC
20kΩ
TECCURRENT
LIMIT
PGNDS
LDR
PGNDL
PVIN
PGNDL
HEATING
COOLING
CLK
SHUTDOWN
0.07V
OSCILLATOR CLK
SHUTDOWN
DEGLITCH
VHIGH ≥ 2.1VVLOW ≤ 0.8V
2kΩ 80kΩ
TEC DRIVERLINEAR POWER
STAGE
1290
9-01
6
+–
+–
Figure 23. Detailed Functional Block Diagram of the ADN8833 in the WLCSP
Rev. A | Page 12 of 23

Data Sheet ADN8833
THEORY OF OPERATION The ADN8833 is a single chip TEC driver that sets and stabilizes a TEC temperature. A control voltage from a DAC applied to the CONT input of the ADN8833 corresponds to the temperature setpoint of the target object attached to the TEC. The ADN8833 controls an internal FET H-bridge whereby the direction of the current fed through the TEC can be either positive (for cooling mode) to pump heat away from the object attached to the TEC, or negative (for heating mode), to pump heat into the object attached to the TEC.
The objective temperature is measured with a thermal sensor attached to the TEC and the sensed temperature (voltage) is fed back to an ADC to close digital thermal control loop of the TEC. For the best overall stability, couple the thermal sensor close to the TEC. In most laser diode modules, a TEC and a NTC thermistor are already mounted in the same package to regulate the laser diode temperature.
The TEC is differentially driven in an H-bridge configuration. The ADN8833 drives its internal MOSFET transistors to provide the TEC current. To further improve the power efficiency of the system, only one side of the H-bridge uses a PWM driver. Only one inductor and one capacitor are required to filter out the switching frequency. The other side of the H-bridge uses a linear output without requiring any additional circuitry. This proprietary config-uration allows the ADN8833 to provide efficiency of >90%. For most applications, a 1 μH inductor, a 10 μF capacitor, and a switching frequency of 2 MHz maintain less than 1% of the worst-case output voltage ripple across a TEC.
The maximum voltage across the TEC and the current flowing through the TEC are set by using the VLIM/SD and ILIM pins. The maximum cooling and heating currents can be set independently to allow asymmetric heating and cooling limits.
For additional details, see the Maximum TEC Voltage Limit section and the Maximum TEC Current Limit section.
DIGITAL PID CONTROL The ADN8833 is used in a software controlled PID loop. An amplifier conditions the signal from the thermistor and connects to an external temperature measurement ADC.
The signal from an external DAC that controls the temperature setpoint is applied to the CONT input pin.
POWERING THE DRIVER The ADN8833 operates at an input voltage range of 2.7 V to 5.5 V that is applied to the VDD pin and the PVIN pin for the WLCSP (or the PVINS pin and PVINL pin for the LFCSP). The VDD pin is the input power for the driver and internal reference. The PVIN input power pins are combined for both the linear and the switching driver. Apply the same input voltage to all power input pins: VDD and PVIN. In some circumstances, an RC low-pass filter can be optionally added between the PVIN for the WLCSP (PVINS and PVINL for the LFCSP) and VDD pins to prevent high frequency noise from entering VDD, as shown in Figure 24. The capacitor and resistor values are typically 10 Ω and 100 nF, respectively.
When configuring power supply to the ADN8833, keep in mind that at high current loads, the input voltage may drop substantially due to a voltage drop on the wires between the front-end power supply and the PVIN for the WLCSP (PVINS and PVINL for the LFCSP) pin. Leave a proper voltage margin when designing the front-end power supply to maintain the performance. Minimize the trace length from the power supply to the PVIN for the WLVSP (PVINS and PVINL for the LFCSP) pin to help mitigate the voltage drop.
ADN8833
L = 1µH
VIN2.7V TO 5.5V
TEC
CONT
VREF
SW
SFB
LDR
PGNDS
AGND
PVIN
VDDILIMVLIM/SD
ITEC
VTEC +
–
THERMISTER
EN/SY
CSW_OUT10µF
CL_OUT0.1µF
CIN10µF
CVDD0.1µF RBP
NTC
TEC DRIVER CONTROL
TEC CURRENT READBACK
TEC VOLTAGE READBACK
2.5V VREF
DAC
TECVOLTAGE
LIMIT
COOLING AND HEATINGTEC CURRENT LIMITS
CVREF0.1µF
PGNDL
2.5V VREF
2.5V VREF
TEMPERATUREREADBACK
ADC
2.5V VREF
FSW = 2MHz
EN
RX
RTH
R
RV1
RV2
RC1 RC2
1290
9-01
7
Figure 24. TEC Driver in a Digital Temperature Control Loop (WLCSP)
Rev. A | Page 13 of 23

ADN8833 Data Sheet
Rev. A | Page 14 of 23
ENABLE AND SHUTDOWN To enable the ADN8833, apply a logic high voltage to the EN/SY pin while the voltage at the VLIM/SD pin is above the maximum shutdown threshold of 0.07 V. If either the EN/SY pin voltage is set to logic low or the VLIM/SD voltage is below 0.07 V, the driver goes into an ultralow current state. The current drawn in shutdown mode is 350 μA typically. Most of the current is consumed by the VREF circuit block, which is always on even when the device is disabled or shut down. The device can also be enabled when an external synchronization clock signal is applied to the EN/SY pin and the voltage at VLIM/SD input is above 0.07 V. Table 6 shows the combinations of the two input signals that are required to enable the ADN8833.
Table 6. Enable Pin Combinations EN/SY Input VLIM/SD Input Driver >2.1 V >0.07 V Enabled Switching between high >2.1 V and low < 0.8 V
>0.07 V Enabled
<0.8 V No effect1 Shutdown Floating No effect1 Shutdown No effect1 ≤0.07 V Shutdown 1 No effect means this signal has no effect in shutting down or in enabling the
device.
OSCILLATOR CLOCK FREQUENCY The ADN8833 has an internal oscillator that generates a 2.0 MHz switching frequency for the PWM output stage. This oscillator is active when the enabled voltage at the EN/SY pin is set to a logic level higher than 2.1 V and the VLIM/SD pin voltage is greater than the shutdown threshold of 0.07 V.
External Clock Operation
The PWM switching frequency of the ADN8833 can be synchronized to an external clock from 1.85 MHz to 3.25 MHz applied to the EN/SY input pin as shown on Figure 25.
EXTERNAL CLOCKSOURCE
ADN8833
AGND
EN/SY
1290
9-01
9
Figure 25. Synchronize to an External Clock
Connecting Multiple ADN8833 Devices
Multiple ADN8833 devices can be driven from a single master clock signal by connecting the external clock source to the EN/SY pin of each slave device. The input ripple can be greatly reduced by operating the ADN8833 devices 180° out of phase from each other by placing an inverter at one of the EN/SY pins, as shown in Figure 26.
ADN8833
ADN8833
EXTERNAL CLOCKSOURCE
AGND
EN/SY
AGND
EN/SY
1290
9-02
0
Figure 26. Multiple ADN8833 Devices Driven from a Master Clock
SOFT START ON POWER-UP The ADN8833 has an internal soft start circuit that generates a ramp with a typical 150 ms profile to minimize inrush current during power-up. The settling time and the final voltage across the TEC depends on the TEC voltage required by the control voltage of voltage loop. The higher the TEC voltage is, the longer it requires to be built up.
When the ADN8833 is first powered up, the linear side discharges the output of any prebias voltage. As soon as the prebias is eliminat-ed, the soft start cycle begins. During the soft start cycle, both the PWM and linear outputs track the internal soft start ramp until they reach midscale, where the control voltage, VC, is equal to the bias voltage, VB. From the midscale voltage, the PWM and linear outputs are then controlled by VC and diverge from each other until the required differential voltage is developed across the TEC or the differential voltage reaches the voltage limit. The voltage developed across the TEC depends on the control point at that moment in time. Figure 27 shows an example of the soft start in cooling mode. Note that, as both the LDR and SFB voltages increase with the soft start ramp and approach VB, the ramp slows down to avoid possible current overshoot at the point where the TEC voltage starts to build up.
VB
LDR
SFB
TIMEDISCHARGE
PREBIASSOFT-STARTBEGINS
TEC VOLTAGEBUILDS UP
REACHVOLTAGE LIMIT
1290
9-02
1
Figure 27. Soft Start Profile in Cooling Mode

Data Sheet ADN8833
Rev. A | Page 15 of 23
TEC VOLTAGE/CURRENT MONITOR The TEC real-time voltage and current are detectable at VTEC and ITEC, respectively.
Voltage Monitor
VTEC is an analog voltage output pin with a voltage proportional to the actual voltage across the TEC. A center VTEC voltage of 1.25 V corresponds to 0 V across the TEC. Convert the voltage at VTEC and the voltage across the TEC using the following equation:
VVTEC = 1.25 V + 0.25 × (VLDR − VSFB)
Current Monitor
ITEC is an analog voltage output pin with a voltage proportional to the actual current through the TEC. A center ITEC voltage of 1.25 V corresponds to 0 A through the TEC. Convert the voltage at ITEC and the current through the TEC using the following equations:
VITEC_COOLING = 1.25 V + ILDR × RCS
where the current sense gain (RCS) is 0.525 V/A.
VITEC_HEATING = 1.25 V − ILDR × RCS
MAXIMUM TEC VOLTAGE LIMIT The maximum TEC voltage is set by applying a voltage divider at the VLIM/SD pin to protect the TEC. The voltage limiter operates bidirectionally and allows the cooling limit to be different from the heating limit.
Using a Resistor Divider to Set the TEC Voltage Limit
Separate voltage limits are set using a resistor divider. The internal current sink circuitry connected to VLIM/SD draws a current when the ADN8833 drives the TEC in a heating direction, which lowers the voltage at VLIM/SD. The current sink is not active when the TEC is driven in a cooling direction; therefore, the TEC heating voltage limit is always lower than the cooling voltage limit.
VLIM/SD
TEC VOLTAGELIMIT ANDINTERNAL
SOFT-START
10µA
HEATING
CLK
DISABLE
VREF
RV1
RV2SW OPEN = VVLIMCSW CLOSED = VVLIMH
1290
9-02
2
Figure 28. Using a Resistor Divider to Set the TEC Voltage Limit
Calculate the cooling and heating limits using the following equations:
VVLIM_COOLING = VREF × RV2/(RV1 + RV2)
where VREF = 2.5 V.
VVLIM_HEATING = VVLIM_COOLING − ISINK_VLIM × RV1||RV2
where ISINK_VLIM = 10 μA.
VTEC_MAX_COOLING = VVLIM_COOLING × AVLIM
where AVLIM = 2 V/V.
VTEC_MAX_HEATING = VVLIM_HEATING × AVLIM
MAXIMUM TEC CURRENT LIMIT To protect the TEC, separate maximum TEC current limits in cooling and heating directions are set by applying a voltage combination at the ILIM pin.
Using a Resistor Divider to Set the TEC Current Limit
The internal current sink circuitry connected to ILIM draws a 40 μA current when the ADN8833 drives the TEC in a cooling direction, which allows a high cooling current. Use the following equations to calculate the maximum TEC currents:
VILIM_HEATING = VREF × RC2/(RC1 + RC2)
where VREF = 2.5 V.
VILIM_COOLING = VILIM_HEATING + ISINK_ILIM × RC1||RC2
where ISINK_ILIM = 40 μA.
CS
COOLINGILIMCOOLINGMAXTEC R
VI
V25.1___
where RCS = 0.525 V/A.
CS
HEATINGILIMHEATINGMAXTEC R
VI _
__
V25.1
VDD
40µA
ILIM
COOLING
ITEC +
–
TECCURRENTLIMIT
VREF
RC1
RC2 SW OPEN = VILIMHSW CLOSED = VILIMC
1290
9-02
3
Figure 29. Using a Resistor Divider to Set the TEC Current Limit
VILIM_HEATING must not exceed 1.2 V and VILIM_COOLING must be more than 1.3 V to leave proper margins between the heating and the cooling modes.

ADN8833 Data Sheet
Rev. A | Page 16 of 23
APPLICATIONS INFORMATION
ADN8833
L = 1µH 0806
VIN = 3.3V
TEC
CONT
VREF
SW
SFB
LDR
PGNDS
AGND
PVIN
VDDILIMVLIM/SD
ITEC
VTEC +
–
THERMISTOR
EN/SY
CL_OUT0.1µF0402
CIN10µF0603
CVDD0.1µF0402
NTC
ENABLE
TEC DRIVER CONTROL
TEMPERATUREREAD-BACK
TEC CURRENTFEEDBACK
TEC VOLTAGEFEEDBACK1MSPS
12-BIT ADC
2.5V REFERENCE
DAC0
VREF
ADC3
ADC2
ADC0
12-BITDAC
ADuC7023
TECVOLTAGE
LIMIT
COOLING AND HEATINGTEC CURRENT LIMITS
P0.0
PGNDL
FSW = 2MHz
10Ω0402
RV1
RV2
RC1 RC2
RX
RTH
RCVREF0.1uF0402
CSW_OUT10µF0603
1290
9-02
7
Figure 30. TEC Driver with Digital PID Based on the ADuC7023
TYPICAL APPLICATION WITH DIGITAL PID USING A DAC The ADN8833 is designed for digital control systems. The thermistor input amplifier and compensation amplifier are to be implemented by the DAC, and the output from the compensation loop is fed to the CONT pin to close the temperature control loop. An example of an application circuit with the ADuC7023 is shown in Figure 30.
THERMISTOR SETUP The thermistor has a nonlinear relationship to temperature; near optimal linearity over a specified temperature range can be achieved with the proper value of RX placed in series with the thermistor.
First, the resistance of the thermistor must be known, where
RLOW = RTH at TLOW RMID = RTH at TMID RHIGH = RTH at THIGH
TLOW and THIGH are the endpoints of the temperature range and TMID is the average. In some cases, with only the β constant available, calculate RTH using the following equation:
RRTH TT
RR11exp
where: RTH is a resistance at T (K). RR is a resistance at TR (K).
Calculate RX using the following equation:
MIDHIGHLOW
HIGHLOWHIGHMIDMIDLOWX RRR
RRRRRRR
22
MOSFET DRIVER AMPLIFIERS The ADN8833 has two separate MOSFET drivers: a switched output or pulse-width modulated (PWM) amplifier, and a high gain linear amplifier. Each amplifier has a pair of outputs that drive the gates of the internal MOSFETs, which, in turn, drive the TEC as shown in Figure 33. A voltage across the TEC is monitored via the SFB and LDR pins. Although both MOSFET drivers achieve the same result, to provide constant voltage and high current, their operation is different. The exact equations for the two outputs are
VLDR = VB − 40(VCONT − 1.25 V)
VSFB = VLDR + 5(VCONT − 1.25 V)
where: VCONT is the voltage at CONT. VB is determined by VVDD as
VB = 1.5 V for VVDD < 4.0 V
VB = 2.5 V for VVDD > 4.0 V
The compensation network that receives the temperature set voltage and the thermistor voltage fed by the input amplifier determines the voltage at CONT. VLDR and VSFB have a low limit of 0 V and an upper limit of VVDD. Figure 31, Figure 32, and Figure 33 show the graphs of these equations.

Data Sheet ADN8833
1290
9-02
4
CONT (V)
LDR
(V)
1.250.750.250 1.75 2.25 2.75–2.5
2.5
7.5
0
5.0
VSYS = 5.0VVSYS = 3.3V
Figure 31. LDR Voltage vs. CONT Voltage
1290
9-02
5
SFB
(V)
CONT (V)
1.250.750.250 1.75 2.25 2.75–2.5
2.5
7.5
0
5.0
VSYS = 5.0VVSYS = 3.3V
Figure 32. SFB Voltage vs. CONT Voltage
–2.5
–5.0
0
+2.5
+5.0
CONT (V)
VSYS = 5.0VVSYS = 3.3V
VTEC
(V)
LDR
– S
FB
1290
9-02
6
1.250.750.250 1.75 2.25 2.75
Figure 33. TEC Voltage vs. CONT Voltage
PWM OUTPUT FILTER REQUIREMENTS A type three compensator internally compensates the PWM amplifier. As the poles and zeros of the compensator are designed by assuming the resonance frequency of the output LC tank being 50 kHz, the selection of the inductor and the capacitor must follow this guideline to ensure system stability.
Inductor Selection
The inductor selection determines the inductor current ripple and loop dynamic response. Larger inductance results in smaller current ripple and slower transient response as smaller inductance results in the opposite performance. To optimize the perfor-mance, a trade-off must be made between transient response speed, efficiency, and component size. Calculate the inductor value with the following equation:
( )LSWIN
OUTSWINOUTSW
IfVVVV
L∆××
×= __ –
where: VSW_OUT is the PWM amplifier output. fSW is the switching frequency (2 MHz by default). ∆IL is the inductor current ripple.
A 1 µH inductor is typically recommended to allow reasonable output capacitor selection while maintaining a low inductor current ripple. If lower inductance is required, a minimum inductor value of 0.68 µH is suggested to ensure that the current ripple is set to a value between 30% and 40% of the maximum load current, which is 1.5 A.
Except for the inductor value, the equivalent dc resistance (DCR) inherent in the metal conductor is also a critical factor for inductor selection. The DCR accounts for most of the power loss on the inductor by DCR× IOUT
2. Using an inductor with high DCR degrades the overall efficiency significantly. In addition, there is a conduct voltage drop across the inductor because of the DCR. When the PWM amplifier is sinking current in cooling mode, this voltage drives the minimum voltage of the amplifier higher than 0.06 × VIN by at least tenth of millivolts. Similarly, the maximum PWM amplifier output voltage is lower than 0.93 × VIN. This voltage drop is proportional to the value of DCR and it reduces the output voltage range at the TEC.
When selecting an inductor, ensure that the saturation current rating is higher than the maximum current peak to prevent saturation. In general, ceramic multilayer inductors are suitable for low current applications due to small size and low DCR. When the noise level is critical, a shielded ferrite inductor may be used to reduce the electromagnetic interference (EMI).
Table 7. Recommended Inductors
Vendor Value Device No. Footprint (mm)
Toko 1.0 µH ± 20%, 2.7 A (typical)
DFE201612P-H-1R0M 2.0 × 1.6
Taiyo Yuden
1.0 µH ± 20%, 2.2 A (typical)
MAKK2016T1R0M 2.0 × 1.6
Murata 1.0 µH ± 20%, 2.3 A (typical)
LQM2MPN1R0MGH 2.0 × 1.6
Rev. A | Page 17 of 23

ADN8833 Data Sheet Capacitor Selection
The output capacitor selection determines the output voltage ripple, transient response, as well as the loop dynamic response of the PWM amplifier output. Use the following equation to select the capacitor:
( )OUTSWIN
OUTSWINOUTSW
VfLVVVV
C∆××××
×=
2__
)(8–
Note that the voltage caused by the product of current ripple, ΔIL, and the capacitor equivalent series resistance (ESR) also add up to the total output voltage ripple. Selecting a capacitor with low ESR can increase overall regulation and efficiency performance.
Table 8. Recommended Capacitors
Vendor Value Device No. Footprint (mm)
Murata 10 µF ± 10%, 10 V
ZRB18AD71A106KE01L 1.6 × 0.8
Murata 10 µF ± 20%, 10 V
GRM188D71A106MA73 1.6 × 0.8
Taiyo Yuden
10 µF ± 20%, 10 V
LMK107BC6106MA-T 1.6 × 0.8
INPUT CAPACITOR SELECTION On the PVIN pin, the amplifiers require an input capacitor to decouple the noise and to provide the transient current to maintain stable input and output voltage. A 10 µF ceramic capacitor rated at 10 V is the minimum recommended value. Increasing the capacitance reduces the switching ripple that couples into the power supply but increases the capacitor size. Because the current at the input terminal of the PWM amplifier is discontinuous, a capacitor with low effective series inductance (ESL) is preferred to reduce voltage spikes.
In most applications, a decoupling capacitor is used in parallel with the input capacitor. The decoupling capacitor is usually a 100 nF ceramic capacitor with very low ESR and ESL, which provides better noise rejection at high frequency bands.
An RC low-pass filter can be optionally added between the PVIN and VDD pins to prevent high frequency noise from entering VDD, as shown in Figure 30. The capacitor and resistor values are typically 10 Ω and 100 nF, respectively.
POWER DISSIPATION This section provides guidelines to calculate the power dissipation of ADN8833. Approximate the total power dissipation in the device by
PLOSS = PPWM + PLINEAR
where: PLOSS is the total power dissipation in the ADN8833. PLINEAR is the power dissipation in the linear regulator.
PWM Regulator Power Dissipation
The PWM power stage is configured as a buck regulator and its dominant power dissipation (PPWM) includes power switch conduction losses (PCOND), switching losses (PSW), and transition losses (PTRAN). Other sources of power dissipation are usually less significant at the high output currents of the application thermal limit and can be neglected in approximation.
Estimate the power dissipation of the buck regulator by
PLOSS = PCOND + PSW + PTRAN
Conduction Loss (PCOND)
The conduction loss consists of two parts: inductor conduction loss (PCOND_L) and power switch conduction loss(PCOND_S).
PCOND = PCOND_L + PCOND_S
Inductor conduction loss is proportional to the DCR of the output inductor, L. Using an inductor with low DCR enhances the overall efficiency performance. Use the following equation to estimate the inductor conduction loss:
PCOND_L = DCR× IOUT2
Power switch conduction losses are caused by the flow of the output current through both the high-side and low-side power switches, each of which has its own internal on resistance (RDSON).
Use the following equation to estimate the amount of power switch conduction loss:
PCOND_S = (RDSON_HS × D + RDSON_LS × (1 − D)) × IOUT2
where: RDSON_HS is the on resistance of the high-side MOSFET. D is the duty cycle (D = VOUT/VIN). RDSON_LS is the on resistance of the low-side MOSFET.
Switching Loss (PSW)
Switching losses are associated with the current drawn by the driver to turn the power devices on and off at the switching frequency. Each time a power device gate is turned on or off, the driver transfers a charge from the input supply to the gate, and then from the gate to ground. Use the following equation to estimate the switching loss:
PSW = (CGATE_HS + CGATE_LS) × VIN2 × fSW
where: CGATE_HS is the gate capacitance of the high-side MOSFET. CGATE_LS is the gate capacitance of the low-side MOSFET. fSW is the switching frequency.
For the ADN8833, the total of (CGATE_HS + CGATE_LS) is approximately 1 nF.
Rev. A | Page 18 of 23

Data Sheet ADN8833 Transition Loss (PTRAN)
Transition losses occur because the high-side MOSFET cannot turn on or off instantaneously. During a switch node transition, the MOSFET provides all the inductor current. The source-to-drain voltage of the MOSFET is half the input voltage, resulting in power loss. Transition losses increase with both load and input voltage and occur twice for each switching cycle. Use the following equation to estimate the transition loss:
PTRAN = 0.5 × VIN × IOUT × (tR + tF) × fSW
where: tR is the rise time of the switch node. tF is the fall time of the switch node.
For the ADN8833, tR and tF are both approximately 1 ns.
Linear Regulator Power Dissipation
The power dissipation of the linear regulator is given by the following equation:
PLINEAR = [(VIN − VOUT) × IOUT] + (VIN × IGND)
where: VIN and VOUT are the input and output voltages of the linear regulator. IOUT is the load current of the linear regulator. IGND is the ground current of the linear regulator.
Power dissipation due to the ground current is generally small and can be ignored for the purposes of this calculation.
Rev. A | Page 19 of 23

ADN8833 Data Sheet
Rev. A | Page 20 of 23
PCB LAYOUT GUIDELINES
TEMPERATURESIGNAL
CONDITIONING
TECVOLTAGELIMITING
TECCURRENTLIMITING
TECVOLTAGESENSING
TECCURRENTSENSING
TECDRIVER
OBJECTTHERMOELECTRICCOOLER(TEC)
TEMPERATUREERROR
COMPENSATION TEMPERATURESENSOR
SOURCE OFELECTRICAL
POWER
TARGETTEMPERATURE
1290
9-03
5
Figure 34. System Block Diagram
BLOCK DIAGRAMS AND SIGNAL FLOW The ADN8833 integrates analog signal conditioning blocks, a load protection block, and a TEC driver power stage all in a single IC. To achieve the best possible circuit performance, attention must be paid to keep noise of the power stage from contaminating the sensitive analog conditioning and protection circuits. In addition, the layout of the power stage must be performed such that the IR losses are minimized to obtain the best possible electrical efficiency.
The system block diagram of the ADN8833 is shown in Figure 34.
GUIDELINES FOR REDUCING NOISE AND MINIMIZING POWER LOSS Each printed circuit board (PCB) layout is unique because of the physical constraints defined by the mechanical aspects of a given design. In addition, several other circuits work in conjunction with the TEC driver; these circuits have their own layout requirements, so there are always compromises that must be made for a given system. However, to minimize noise and keep power losses to a minimum during the PCB layout process, observe the following guidelines.
General PCB Layout Guidelines
Switching noise can interfere with other signals in the system; therefore, the switching signal traces must be placed away from the power stage to minimize the effect. If possible, place the ground plate between the small signal layer and power stage layer as a shield.
Supply voltage drop on traces is also an important consideration because it determines the voltage headroom of the TEC driver at high currents. For example, if the supply voltage from the front-end system is 3.3 V, and the voltage drop on the traces is 0.5 V, PVIN sees only 2.8 V, which limits the maximum voltage of the linear regulator as well as the maximum voltage across the TEC. To mitigate the voltage waste on traces and impedance interconnection, place the ADN8833 and the input decoupling components close to the supply voltage terminal. This placement not only improves the system efficiency, but also provides better regulation performance at the output.
To prevent noise signal from circulating through ground plates, reference all of the sensitive analog signals to AGND and connect AGND to PGNDS using only a single point connection. This ensures that the switching currents of the power stage do not flow into the sensitive AGND node.
PWM Power Stage Layout Guidelines
The PWM power stage consists of a MOSFET pair that forms a switch mode output that switches current from PVIN to the load via an LC filter. The ripple voltage on the PVIN pin is caused by the discontinuous current switched by the PWM side MOSFETs. This rapid switching causes voltage ripple to form at the PVIN input, which must be filtered using a bypass capacitor. Place a 10 μF capacitor as close as possible to the PVIN pin to connect PVIN to PGNDS. Because the 10 μF capacitor is sometimes bulky and has higher ESR and ESL, a 100 nF decoupling capacitor is usually used in parallel with it, placed between PVIN and PGNDS.
Because the decoupling is part of the pulsating current loop, which carries high di/dt signals, the traces must be short and wide to minimize the parasitic inductance. As a result, this capacitor is usually placed on the same side of the board as the ADN8833 to ensure short connections. If the layout requires that 10 μF capacitor be on the opposite side of the PCB, use multiple vias to reduce via impedance.
The layout around the SW node is also critical because it switches between PVIN and ground rapidly, which makes this node a strong EMI source. Keep the copper area that connects the SW node to the inductor small to minimize parasitic capacitance between the SW node and other signal traces. This helps minimize noise on the SW node due to excessive charge injection. However, in high current applications, the copper area may be increased reasonably to provide heat sink and to sustain high current flow.
Connect the ground side of the capacitor in the LC filter as close as possible to PGNDS to minimize the ESL in the return path.

Data Sheet ADN8833 Linear Power Stage Layout Guidelines
The linear power stage consists of a MOSFET pair that forms a linear amplifier, which operates in linear mode for very low output currents, and changes to fully enhanced mode for greater output currents.
Because the linear power stage does not switch currents rapidly like the PWM power stage, it does not generate noise currents. However, the linear power stage still requires a minimum amount of bypass capacitance to decouple its input.
Place a 100 nF capacitor that connects from PVIN to PGNDL as close as possible to the PVIN pin.
EXAMPLE PCB LAYOUT USING TWO LAYERS Figure 35, Figure 36, and Figure 37 show an example ADN8833 WLCSP PCB layout that uses two layers. This layout example achieves a small solution size of approximately 18 mm2 with all of the conditioning circuitry and PID included. Using more layers and blind vias allows the solution size to be reduced even further because more of the discrete components can relocate to the bottom side of the PCB.
RBP
0201
CVD
D02
01
CBU
LK04
02
0201
0201
C
ITEC
VTEC
PGND
VIN
TEC+
TEC–
CONNECT TO GROUND PLANE
CONNECT TO GROUND PLANE
UNITS = (mm)
UN
ITS
= (m
m)
CBU 04
UULK
402
U 0U 4U
L 0805
CSW_OUT0402
CIN_S
CIN_L
4.5
5.0
3.5
4.0
2.5
3.0
1.5
2.0
0.5
1.00R
BP
0201
RB2002201
020120
1
BPBBPR
BRC20201C
VDD
VDD
0201
0220BPB
RC10201
RV20201
RV10201
CL_
OU
T02
01
CVDD
RBP
AGND
CVREF
0201
TEMPSET
PGNDL PGNDL NC NC NC
LDR LDR NC NC VLIM /SD
PVIN PVIN ITEC CONT ILIM
SW SW VTEC EN/SY VDD
PGNDS PGNDS SFB AGND VREF
CIN_S
CIN_L
CVDD
PGNDLPGNDL PGNDLPGNDL NC NC NC
00201
0
L R2020 LDRLDR NCNC NCNC VLIMIM /SDSD
PVINPVIN PVINVINPVIN ECTECITEC NNTCOCOONONT ILIMLIM
00201
0
SW2020 SWSW V EVTEVTEC ENN//SYSY DDVDDVDDVD
PPGNDSPGNDSP PPGNDSPGNDSP SFBSFB AGNDGN EFVVRRERE
3.5
3.0
2.5
1.5
1.0
0.5
0
2.0
CONNECT AGND TOPGNDS ONLY AT ASINGLE POINTAS A STARCONNECTION
1290
9-03
6
Figure 35. Example PCB Layout Using Two Layers (Top and Bottom Layers)
Rev. A | Page 21 of 23

ADN8833 Data Sheet
RC10201
ITEC
VTEC
PGND
VIN
TEC+
TEC-
CONNECT TO GROUND PLANE
CONNECT TO GROUND PLANE
UNITS = (mm)U
NIT
S =
(mm
)
L 0805
CSW_OUT0402
CIN_S
CIN_L
0 0.5
1.0
1.5
2.0
2.5
3.5
3.0
4.0
4.5
5.0
RC20201
RV20201
RV10201
CL_
OU
T02
01
CVDD
RBP
AGND
CVREF0201
TEMPSET
PGNDL PGNDL NC NC NC
LDR LDR NC NC VLIM/SD
PVIN PVIN ITEC CONT ILIM
SW SW VTEC EN/SY VDD
PGNDS PGNDS SFB AGND VREF
CIN_S
CIN_L
CVDD
PGNDL PGNDL NC NC NC
LDR LDR NCNC NCNC VLIMLV M//MMMMSDSD
PV NPVINN PV NPVINN ITECITECC TO TTONTCOCOOON ILIMLIM
SW SW CVTECVTECC ENN//NNN YYSYSYYY DDVDDVDVD
PGNDS PGNDS SFBSF DGNDDAGAGN FV FFVREFREVRE
3.5
3.0
2.5
2.0
1.5
1.0
0.5
0
1290
9-03
7
Figure 36. Example PCB Layout Using Two Layers (Top Layer Only)
RBP
0201
CVD
D02
01VDD
201
RB
CBU
LK04
02U 0
0201
0201
ITEC
VTEC
PGND
VIN
TEC+
TEC–
CONNECT TO GROUND PLANE
CONNECT TO GROUND PLANE
UNITS = (mm)
UN
ITS
= (m
m)
CIN_S
C IN_L
CL_
OU
T02
01
C VDD
R BP
AGND
TEMPSET
0 0.5
1.0
1.5
2.0
2.5
3.5
3.0
4.0
4.5
5.0
3.5
3.0
2.5
1.5
1.0
0.5
0
2.0
1290
9-03
8
Figure 37. Example PCB Layout Using Two Layers (Bottom Layer Only)
Rev. A | Page 22 of 23

Data Sheet ADN8833
OUTLINE DIMENSIONS
06-0
7-20
13-A
PKG
-003
121
A
B
C
D
E
0.6600.6000.540
2.582.54 SQ2.50
12345
BOTTOM VIEW(BALL SIDE UP)
TOP VIEW(BALL SIDE DOWN)
END VIEW
0.3600.3200.280
BALL A1IDENTIFIER
SEATINGPLANE
0.3900.3600.330
COPLANARITY0.05
2.00REF
0.50BSC
0.2700.2400.210
Figure 38. 25-Ball Wafer Level Chip Scale Package [WLCSP]
(CB-25-7) Dimensions shown in millimeters
0.50BSC
0.500.400.30
COMPLIANT TO JEDEC STANDARDS MO-220-WGGD-8.
BOTTOM VIEWTOP VIEW
4.104.00 SQ3.90
SEATINGPLANE
0.800.750.70 0.05 MAX
0.02 NOM
0.20 REF
COPLANARITY0.08
PIN 1INDICATOR
1
24
712
13
18
19
6
FOR PROPER CONNECTION OFTHE EXPOSED PAD, REFER TOTHE PIN CONFIGURATION ANDFUNCTION DESCRIPTIONSSECTION OF THIS DATA SHEET.
12-0
3-20
13-A
0.300.250.18
PIN 1INDICATOR
0.20 MIN
2.702.60 SQ2.50
EXPOSEDPAD
PKG
-004
273
Figure 39. 24-Lead Lead-frame Chip Scale Package [LFCSP_WQ]
4 mm × 4 mm Body, Very Very Thin Quad (CP-24-15)
Dimensions shown in millimeters
ORDERING GUIDE
Model1 Temperature Range2 Package Description Package Option
ADN8833ACBZ-R7 −40°C to +125°C 25-Ball Wafer Level Chip Scale Package [WLCSP] CB-25-7 ADN8833CB-EVALZ 25-Ball WLCSP Evaluation Board: ±1 A TEC Current Limit, 3 V TEC Voltage Limit ADN8833ACPZ-R2 −40°C to +125°C 24-Lead Lead Frame Chip Scale Package [LFCSP_WQ] CP-24-15 ADN8833ACPZ-R7 −40°C to +125°C 24-Lead Lead Frame Chip Scale Package [LFCSP_WQ] CP-24-15 ADN8833CP-EVALZ 24-Lead LFCSP Evaluation Board: ±1 A TEC Current Limit, 3 V TEC Voltage Limit
1 Z = RoHS Compliant Part. 2 Operating junction temperature range. The ambient operating temperature range is −40°C to +85°C.
©2015 Analog Devices, Inc. All rights reserved. Trademarks and registered trademarks are the property of their respective owners. D12909-0-8/15(A)
Rev. A | Page 23 of 23