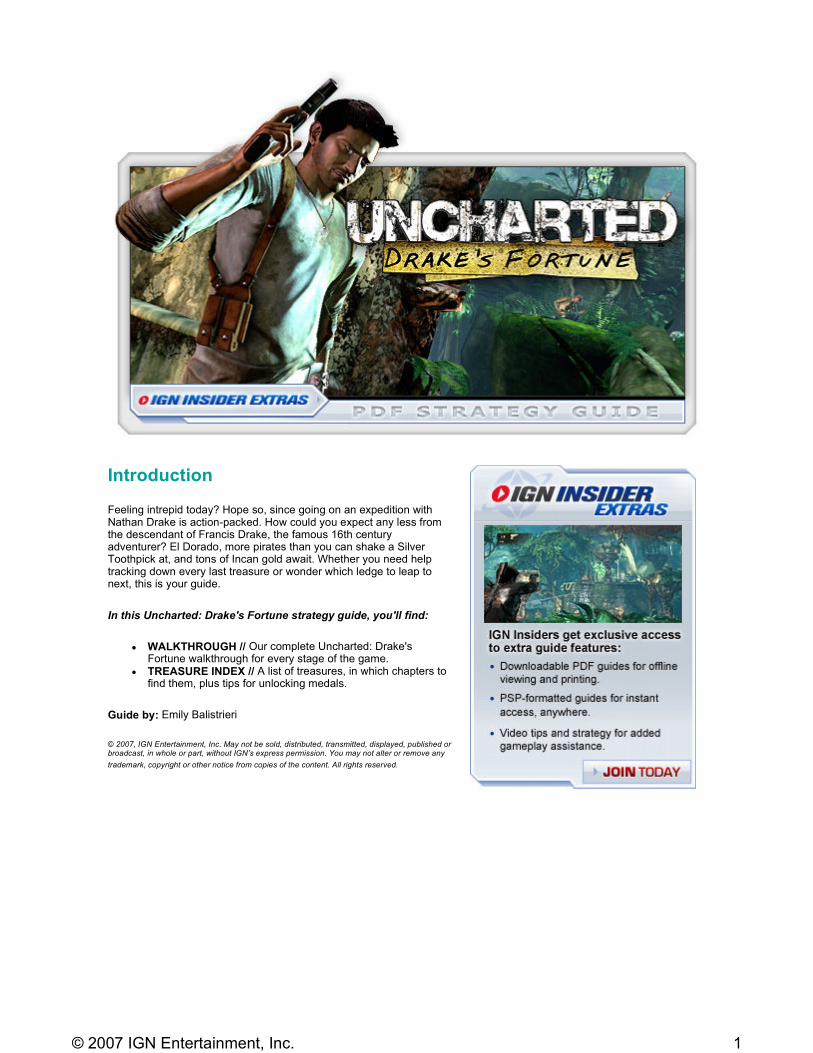
uncharted ignpdf
DESCRIPTION
Uncharted 1TRANSCRIPT
Introduction
Feeling intrepid today? Hope so, since going on an expedition with Nathan Drake is action-packed. How could you expect any less from the descendant of Francis Drake, the famous 16th century adventurer? El Dorado, more pirates than you can shake a Silver Toothpick at, and tons of Incan gold await. Whether you need help tracking down every last treasure or wonder which ledge to leap to next, this is your guide.
In this Uncharted: Drake's Fortune strategy guide, you'll find:
� WALKTHROUGH // Our complete Uncharted: Drake's Fortune walkthrough for every stage of the game.
� TREASURE INDEX // A list of treasures, in which chapters to find them, plus tips for unlocking medals.
Guide by: Emily Balistrieri
© 2007, IGN Entertainment, Inc. May not be sold, distributed, transmitted, displayed, published or broadcast, in whole or part, without IGN’s express permission. You may not alter or remove any
trademark, copyright or other notice from copies of the content. All rights reserved.
1© 2007 IGN Entertainment, Inc.
Uncharted Walkthrough
| Chapter 01 | Chapter 02 | Chapter 03 | Chapter 04 | Chapter 05 | Chapter 06 | Chapter 07 | Chapter 08 | >>
After discovering Drake's lost diary, Nathan and Elena (reporting for a TV show) are attacked by pirates!! Yikes!
Learn how to fight! L1 aims, while R1 fires. Fast and furious combo square square square square, brutal combo square triangle square—as each punch hits. When the color drains from the screen you are dying and should try to find some cover by pressing O near an object big enough. As in most tutorials, using the moves they teach you as they teach you them is generally the best way to proceed.
Sully flies in to save the day and the two boys ditch Elena to have their fun.
01 02 03 04 05 06 07 08 09 >>
Chapter 1: Ambushed
Chapter 2: The Search for El Dorado
Find the Silver Mosaic Inca Earring — If you follow the stream early on (instead of jumping when it gives you the X button prompt), and then head around the corner to the left, a glint should catch your eye.
2© 2007 IGN Entertainment, Inc.
| Chapter 01 | Chapter 02 | Chapter 03 | Chapter 04 | Chapter 05 | Chapter 06 | Chapter 07 | Chapter 08 | >>
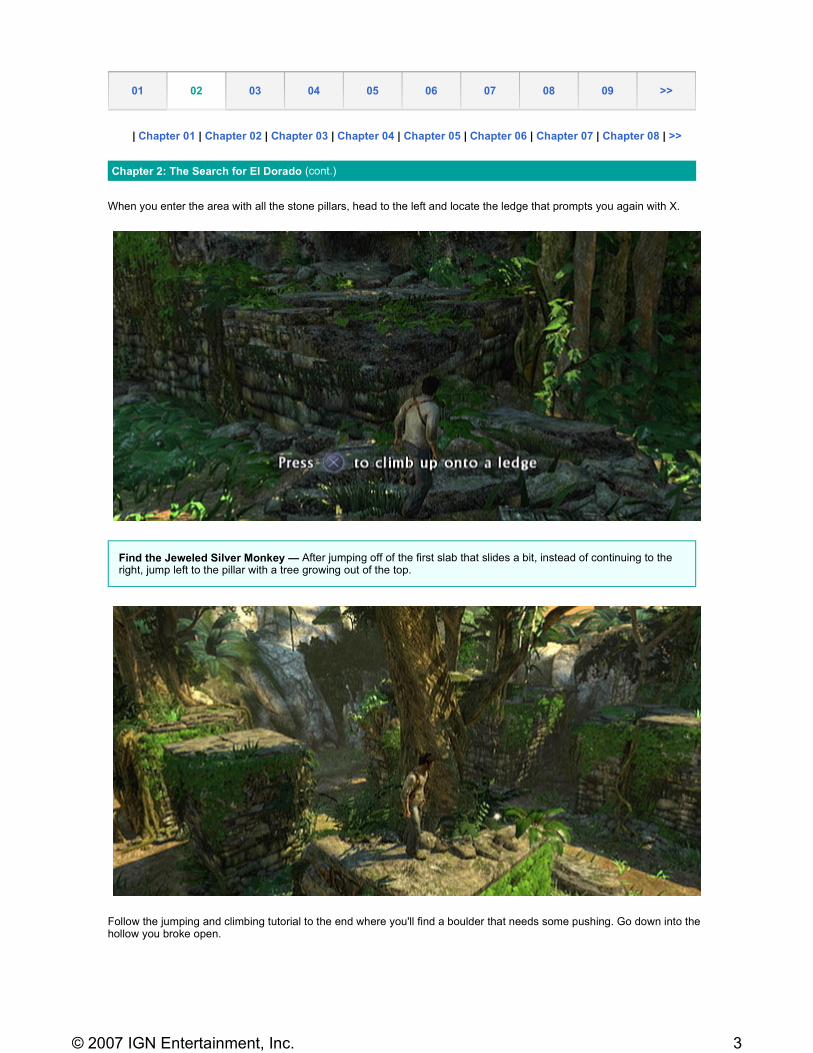
When you enter the area with all the stone pillars, head to the left and locate the ledge that prompts you again with X.
Follow the jumping and climbing tutorial to the end where you'll find a boulder that needs some pushing. Go down into the hollow you broke open.
01 02 03 04 05 06 07 08 09 >>
Chapter 2: The Search for El Dorado (cont.)
Find the Jeweled Silver Monkey — After jumping off of the first slab that slides a bit, instead of continuing to the right, jump left to the pillar with a tree growing out of the top.
3© 2007 IGN Entertainment, Inc.

After the cinematic, shoot out the explosive barrel next to the statue to make a convenient bridge across the crevasse.
Find the Decorated Gold Ring — Before you cross the bridge, carefully step around the pillar all the way on your left. It looks pretty snug up on the hole, but you can inch around.
4© 2007 IGN Entertainment, Inc.
| Chapter 01 | Chapter 02 | Chapter 03 | Chapter 04 | Chapter 05 | Chapter 06 | Chapter 07 | Chapter 08 | >>
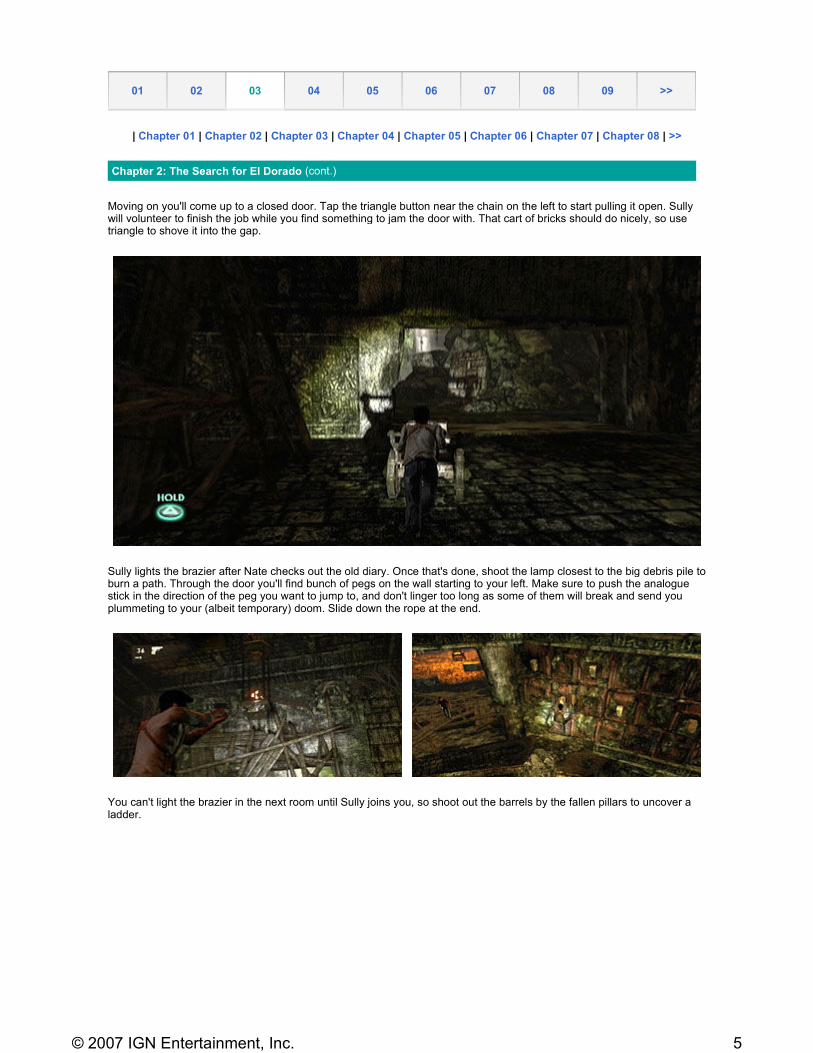
Moving on you'll come up to a closed door. Tap the triangle button near the chain on the left to start pulling it open. Sully will volunteer to finish the job while you find something to jam the door with. That cart of bricks should do nicely, so use triangle to shove it into the gap.
Sully lights the brazier after Nate checks out the old diary. Once that's done, shoot the lamp closest to the big debris pile to burn a path. Through the door you'll find bunch of pegs on the wall starting to your left. Make sure to push the analogue stick in the direction of the peg you want to jump to, and don't linger too long as some of them will break and send you plummeting to your (albeit temporary) doom. Slide down the rope at the end.
You can't light the brazier in the next room until Sully joins you, so shoot out the barrels by the fallen pillars to uncover a ladder.
01 02 03 04 05 06 07 08 09 >>
Chapter 2: The Search for El Dorado (cont.)
5© 2007 IGN Entertainment, Inc.
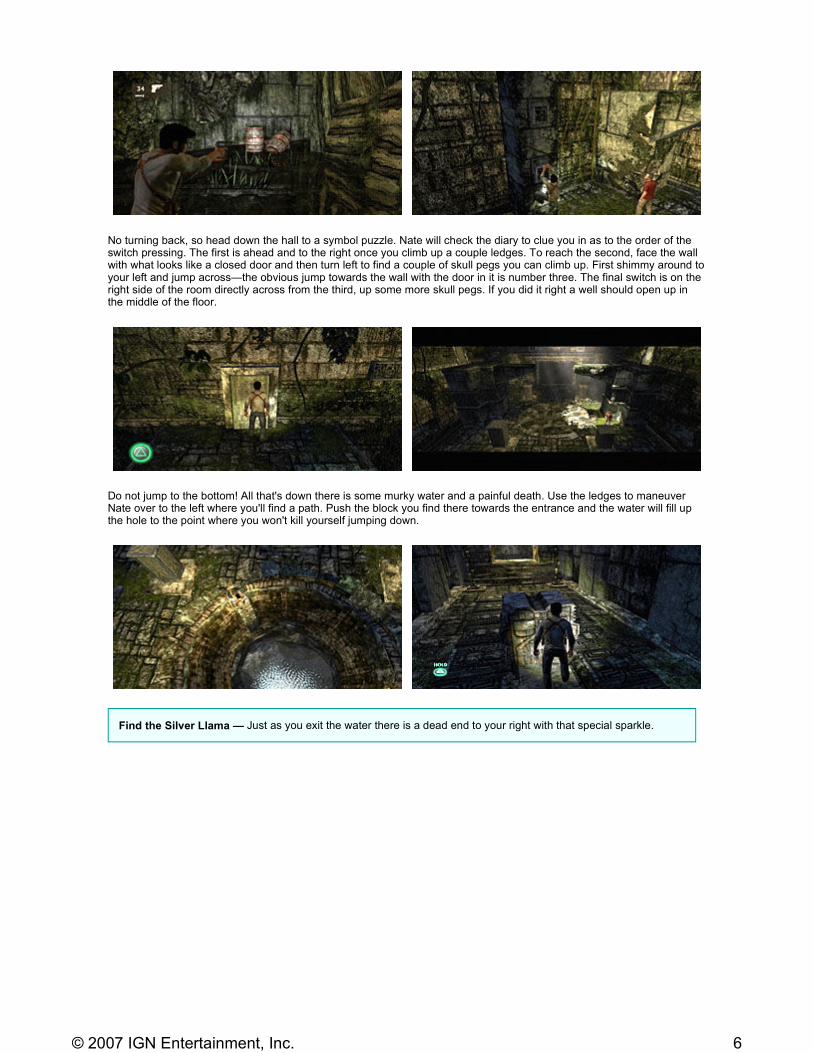
No turning back, so head down the hall to a symbol puzzle. Nate will check the diary to clue you in as to the order of the switch pressing. The first is ahead and to the right once you climb up a couple ledges. To reach the second, face the wall with what looks like a closed door and then turn left to find a couple of skull pegs you can climb up. First shimmy around to your left and jump across—the obvious jump towards the wall with the door in it is number three. The final switch is on the right side of the room directly across from the third, up some more skull pegs. If you did it right a well should open up in the middle of the floor.
Do not jump to the bottom! All that's down there is some murky water and a painful death. Use the ledges to maneuver Nate over to the left where you'll find a path. Push the block you find there towards the entrance and the water will fill up the hole to the point where you won't kill yourself jumping down.
Find the Silver Llama — Just as you exit the water there is a dead end to your right with that special sparkle.
6© 2007 IGN Entertainment, Inc.
| Chapter 01 | Chapter 02 | Chapter 03 | Chapter 04 | Chapter 05 | Chapter 06 | Chapter 07 | Chapter 08 | >>
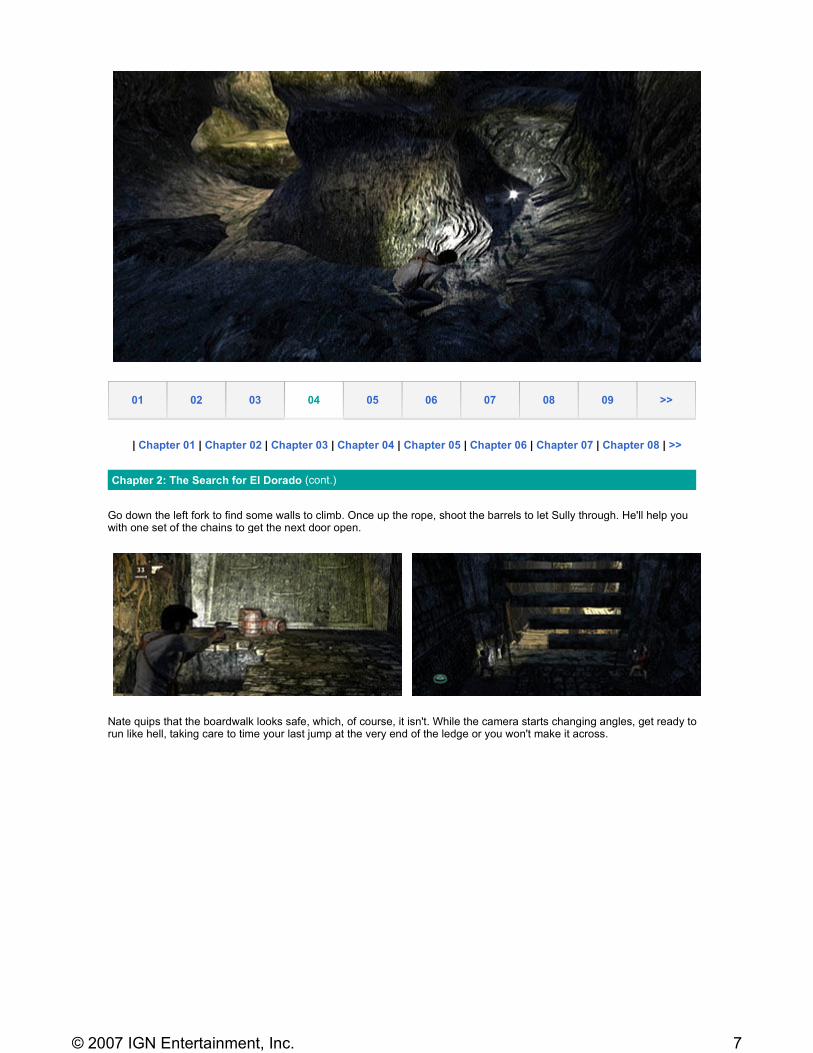
Go down the left fork to find some walls to climb. Once up the rope, shoot the barrels to let Sully through. He'll help you with one set of the chains to get the next door open.
Nate quips that the boardwalk looks safe, which, of course, it isn't. While the camera starts changing angles, get ready to run like hell, taking care to time your last jump at the very end of the ledge or you won't make it across.
01 02 03 04 05 06 07 08 09 >>
Chapter 2: The Search for El Dorado (cont.)
7© 2007 IGN Entertainment, Inc.
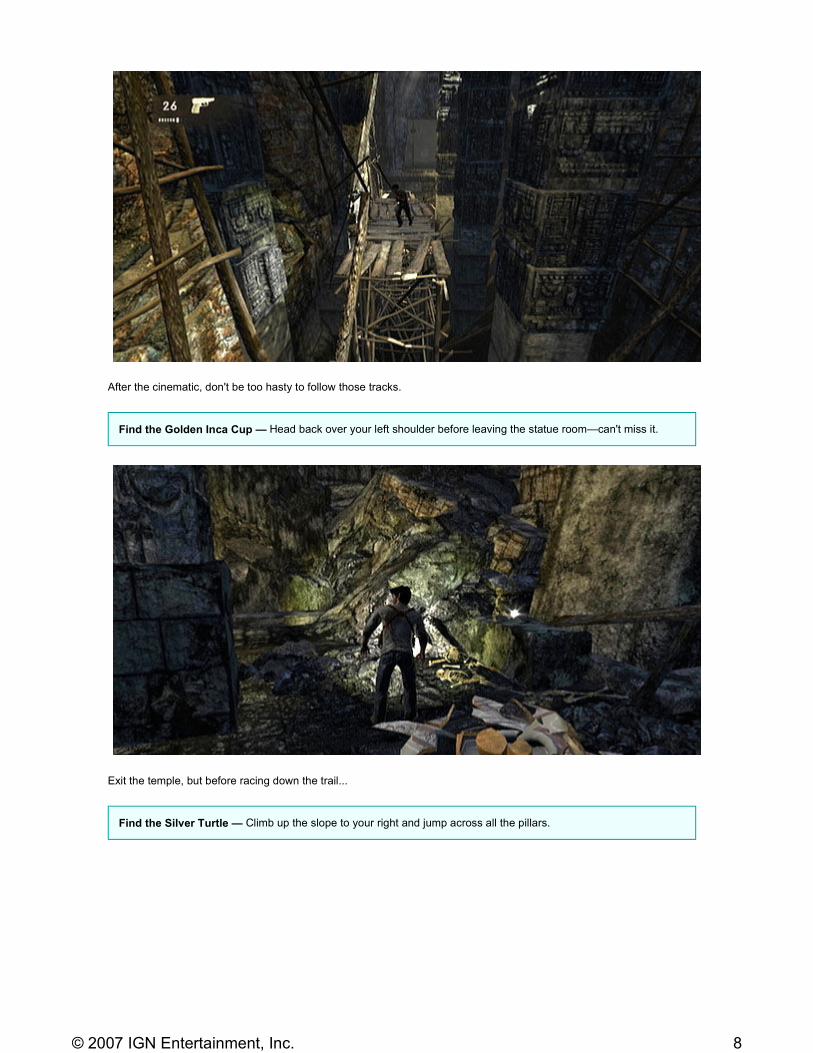
After the cinematic, don't be too hasty to follow those tracks.
Exit the temple, but before racing down the trail...
Find the Golden Inca Cup — Head back over your left shoulder before leaving the statue room—can't miss it.
Find the Silver Turtle — Climb up the slope to your right and jump across all the pillars.
8© 2007 IGN Entertainment, Inc.
U-boat! Head over there, "hinky" though it may seem.
| Chapter 01 | Chapter 02 | Chapter 03 | Chapter 04 | Chapter 05 | Chapter 06 | Chapter 07 | Chapter 08 | >>
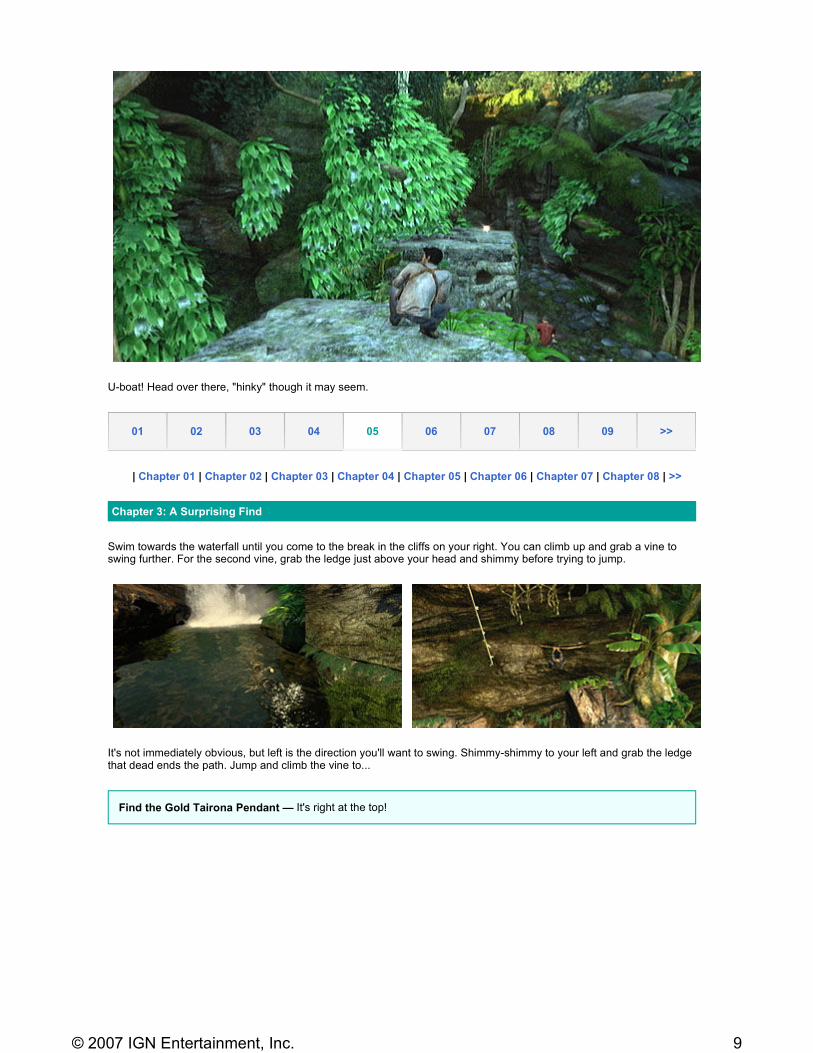
Swim towards the waterfall until you come to the break in the cliffs on your right. You can climb up and grab a vine to swing further. For the second vine, grab the ledge just above your head and shimmy before trying to jump.
It's not immediately obvious, but left is the direction you'll want to swing. Shimmy-shimmy to your left and grab the ledge that dead ends the path. Jump and climb the vine to...
01 02 03 04 05 06 07 08 09 >>
Chapter 3: A Surprising Find
Find the Gold Tairona Pendant — It's right at the top!
9© 2007 IGN Entertainment, Inc.
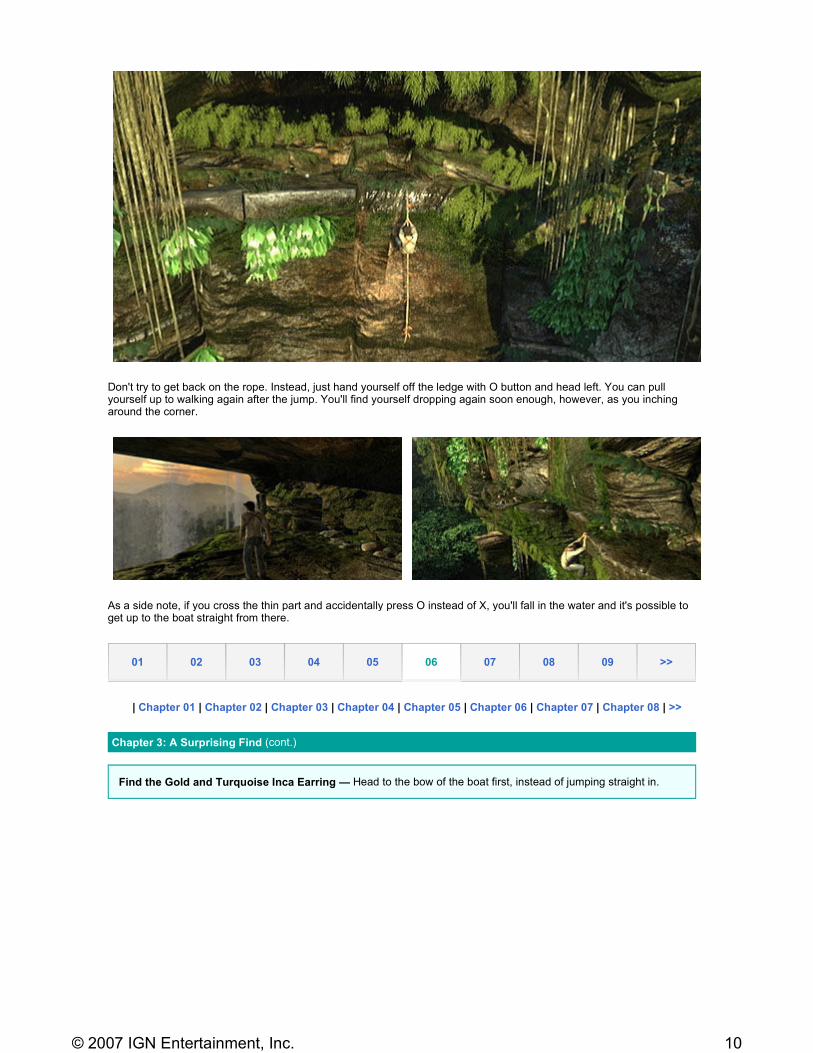
Don't try to get back on the rope. Instead, just hand yourself off the ledge with O button and head left. You can pull yourself up to walking again after the jump. You'll find yourself dropping again soon enough, however, as you inching around the corner.
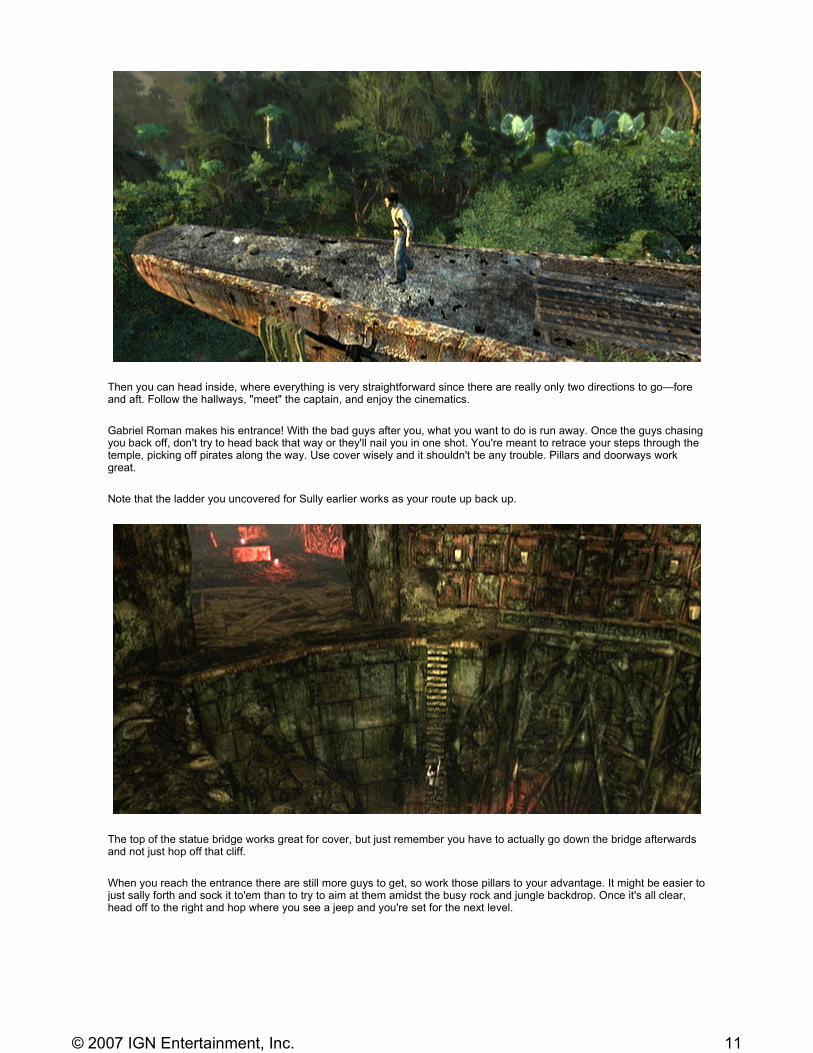
As a side note, if you cross the thin part and accidentally press O instead of X, you'll fall in the water and it's possible to get up to the boat straight from there.
| Chapter 01 | Chapter 02 | Chapter 03 | Chapter 04 | Chapter 05 | Chapter 06 | Chapter 07 | Chapter 08 | >>
01 02 03 04 05 06 07 08 09 >>
Chapter 3: A Surprising Find (cont.)
Find the Gold and Turquoise Inca Earring — Head to the bow of the boat first, instead of jumping straight in.
10© 2007 IGN Entertainment, Inc.
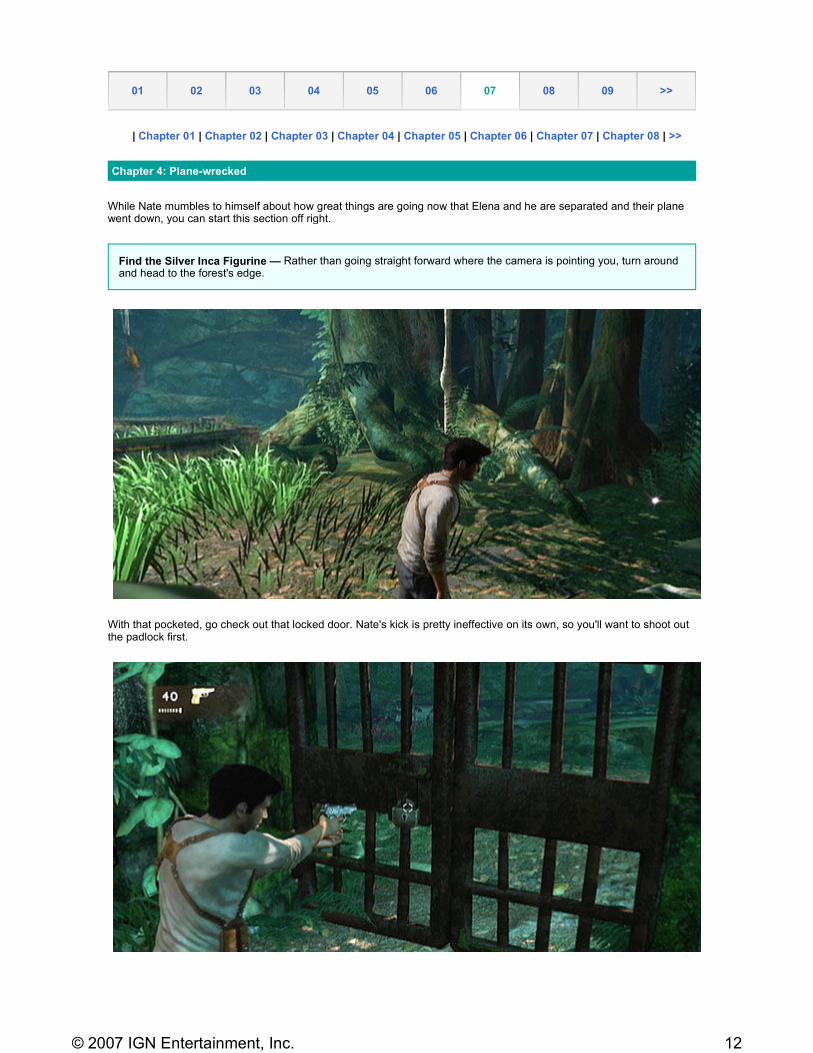
Then you can head inside, where everything is very straightforward since there are really only two directions to go—fore and aft. Follow the hallways, "meet" the captain, and enjoy the cinematics.
Gabriel Roman makes his entrance! With the bad guys after you, what you want to do is run away. Once the guys chasing you back off, don't try to head back that way or they'll nail you in one shot. You're meant to retrace your steps through the temple, picking off pirates along the way. Use cover wisely and it shouldn't be any trouble. Pillars and doorways work great.
Note that the ladder you uncovered for Sully earlier works as your route up back up.
The top of the statue bridge works great for cover, but just remember you have to actually go down the bridge afterwards and not just hop off that cliff.
When you reach the entrance there are still more guys to get, so work those pillars to your advantage. It might be easier to just sally forth and sock it to'em than to try to aim at them amidst the busy rock and jungle backdrop. Once it's all clear, head off to the right and hop where you see a jeep and you're set for the next level.
11© 2007 IGN Entertainment, Inc.
| Chapter 01 | Chapter 02 | Chapter 03 | Chapter 04 | Chapter 05 | Chapter 06 | Chapter 07 | Chapter 08 | >>
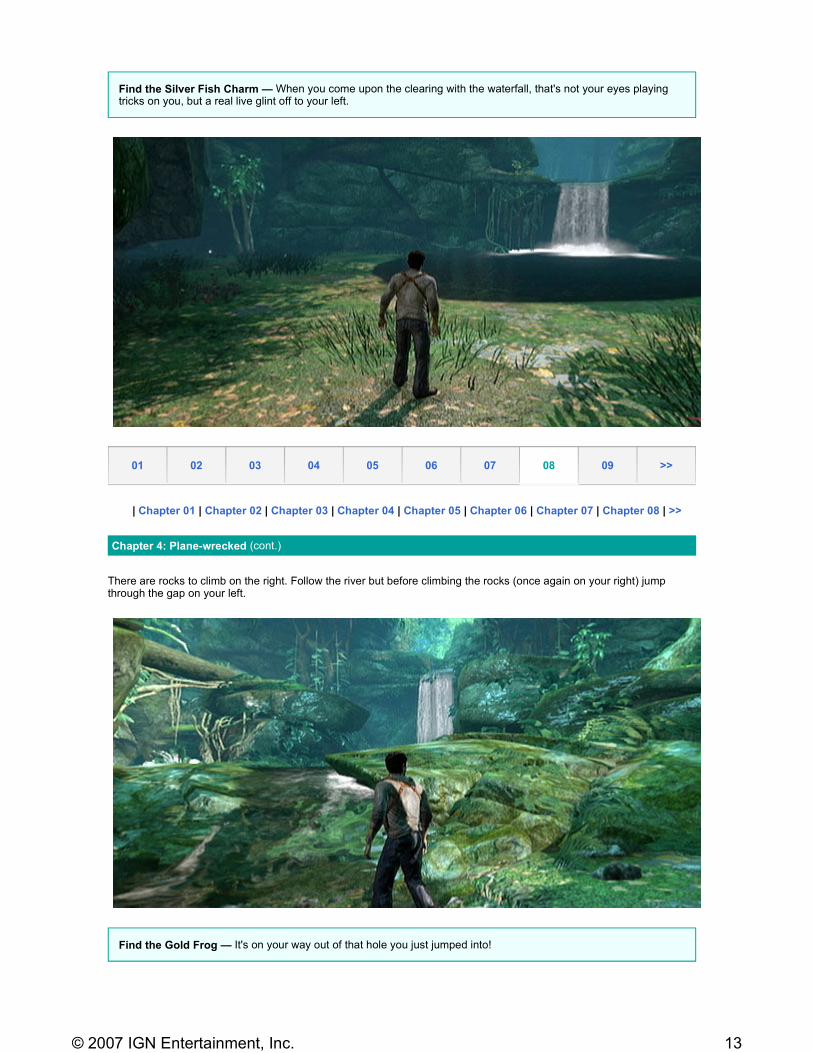
While Nate mumbles to himself about how great things are going now that Elena and he are separated and their plane went down, you can start this section off right.
With that pocketed, go check out that locked door. Nate's kick is pretty ineffective on its own, so you'll want to shoot out the padlock first.
01 02 03 04 05 06 07 08 09 >>
Chapter 4: Plane-wrecked
Find the Silver Inca Figurine — Rather than going straight forward where the camera is pointing you, turn around and head to the forest's edge.
12© 2007 IGN Entertainment, Inc.
| Chapter 01 | Chapter 02 | Chapter 03 | Chapter 04 | Chapter 05 | Chapter 06 | Chapter 07 | Chapter 08 | >>
There are rocks to climb on the right. Follow the river but before climbing the rocks (once again on your right) jump through the gap on your left.
Find the Silver Fish Charm — When you come upon the clearing with the waterfall, that's not your eyes playing tricks on you, but a real live glint off to your left.
01 02 03 04 05 06 07 08 09 >>
Chapter 4: Plane-wrecked (cont.)
Find the Gold Frog — It's on your way out of that hole you just jumped into!
13© 2007 IGN Entertainment, Inc.
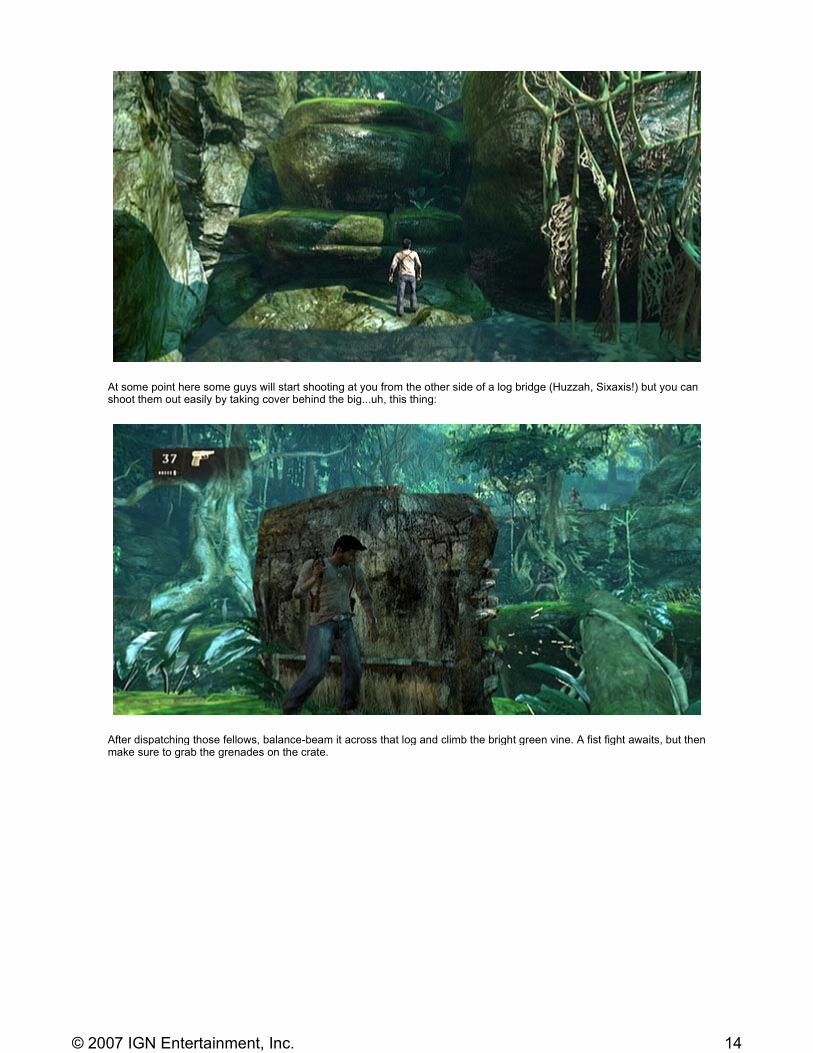
At some point here some guys will start shooting at you from the other side of a log bridge (Huzzah, Sixaxis!) but you can shoot them out easily by taking cover behind the big...uh, this thing:
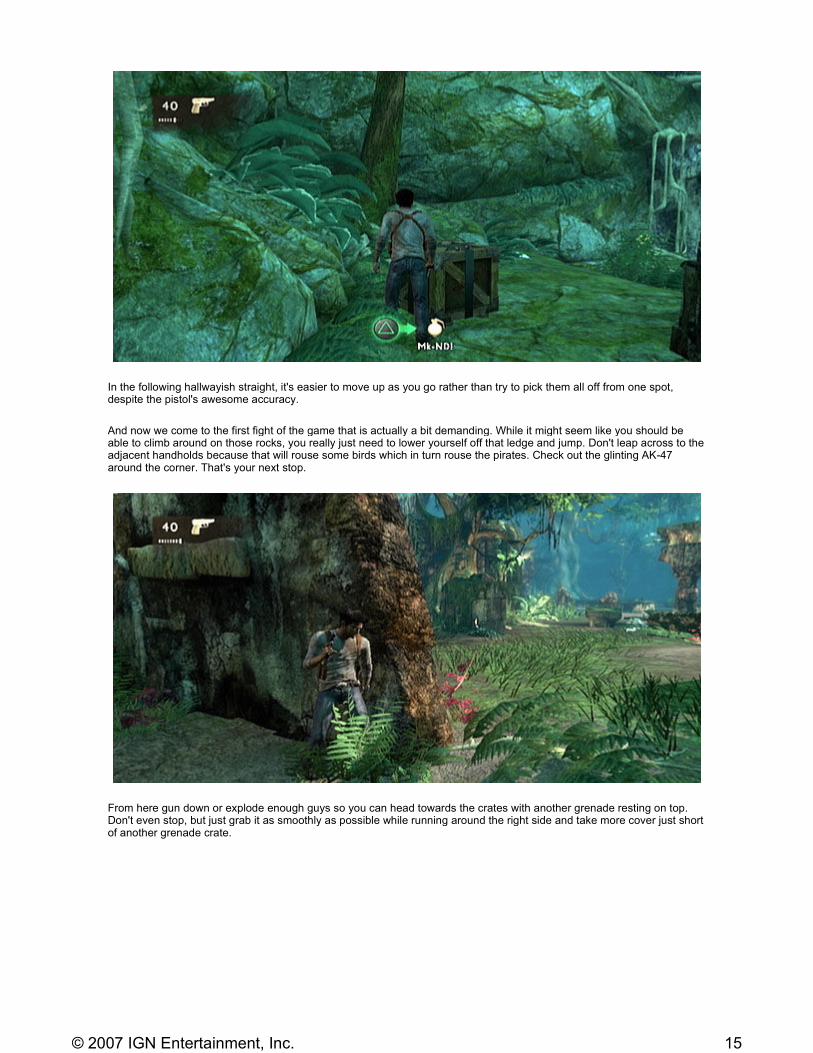
After dispatching those fellows, balance-beam it across that log and climb the bright green vine. A fist fight awaits, but then make sure to grab the grenades on the crate.
14© 2007 IGN Entertainment, Inc.
In the following hallwayish straight, it's easier to move up as you go rather than try to pick them all off from one spot, despite the pistol's awesome accuracy.
And now we come to the first fight of the game that is actually a bit demanding. While it might seem like you should be able to climb around on those rocks, you really just need to lower yourself off that ledge and jump. Don't leap across to the adjacent handholds because that will rouse some birds which in turn rouse the pirates. Check out the glinting AK-47 around the corner. That's your next stop.
From here gun down or explode enough guys so you can head towards the crates with another grenade resting on top. Don't even stop, but just grab it as smoothly as possible while running around the right side and take more cover just short of another grenade crate.
15© 2007 IGN Entertainment, Inc.
| Chapter 01 | Chapter 02 | Chapter 03 | Chapter 04 | Chapter 05 | Chapter 06 | Chapter 07 | Chapter 08 | >>
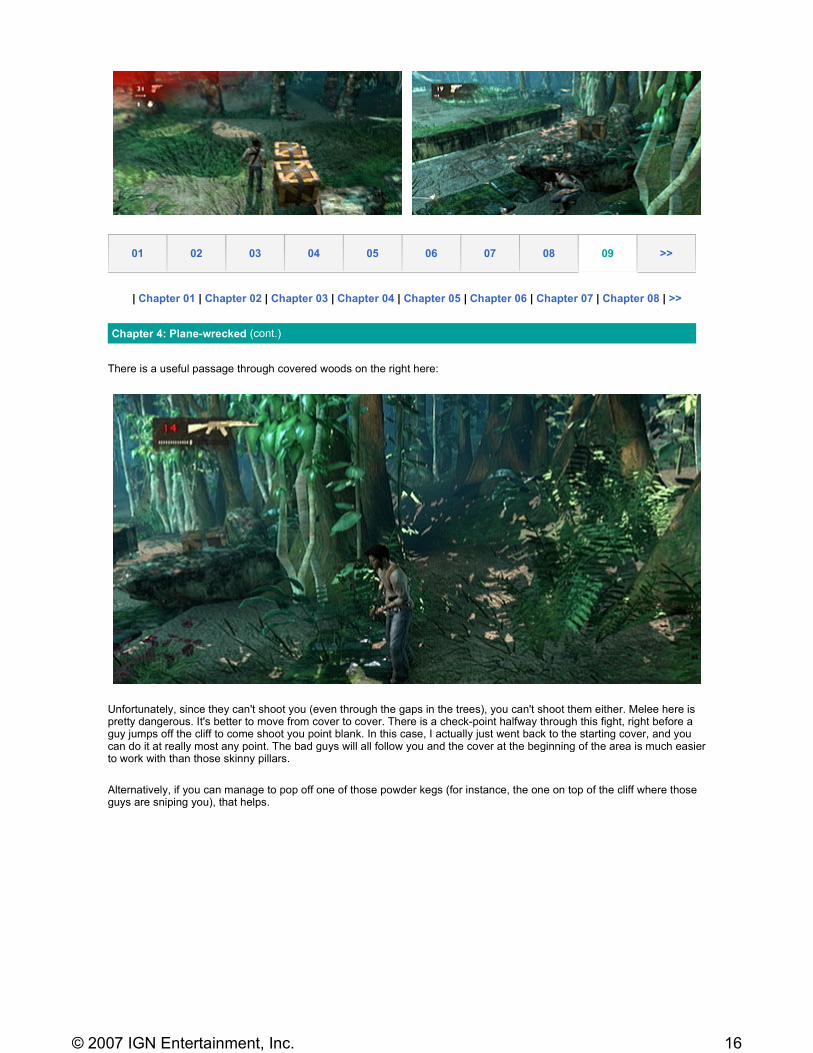
There is a useful passage through covered woods on the right here:
Unfortunately, since they can't shoot you (even through the gaps in the trees), you can't shoot them either. Melee here is pretty dangerous. It's better to move from cover to cover. There is a check-point halfway through this fight, right before a guy jumps off the cliff to come shoot you point blank. In this case, I actually just went back to the starting cover, and you can do it at really most any point. The bad guys will all follow you and the cover at the beginning of the area is much easier to work with than those skinny pillars.
Alternatively, if you can manage to pop off one of those powder kegs (for instance, the one on top of the cliff where those guys are sniping you), that helps.
01 02 03 04 05 06 07 08 09 >>
Chapter 4: Plane-wrecked (cont.)
16© 2007 IGN Entertainment, Inc.
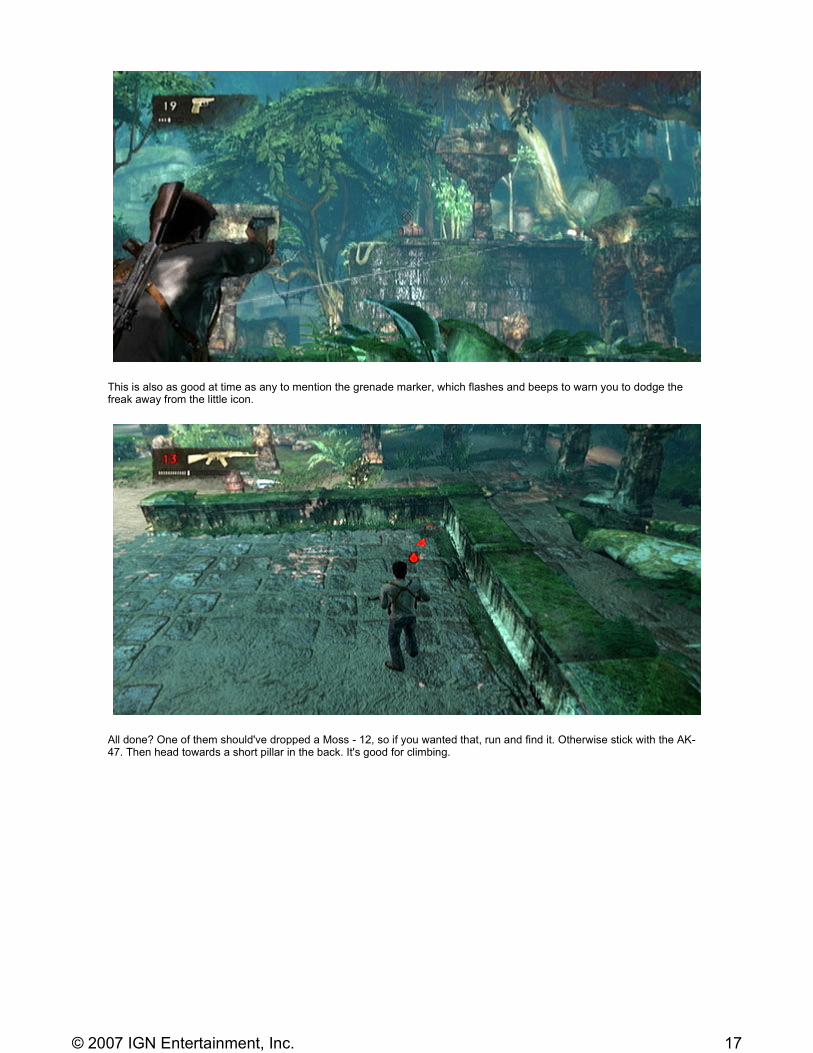
This is also as good at time as any to mention the grenade marker, which flashes and beeps to warn you to dodge the freak away from the little icon.
All done? One of them should've dropped a Moss - 12, so if you wanted that, run and find it. Otherwise stick with the AK-47. Then head towards a short pillar in the back. It's good for climbing.
17© 2007 IGN Entertainment, Inc.
| Chapter 01 | Chapter 02 | Chapter 03 | Chapter 04 | Chapter 05 | Chapter 06 | Chapter 07 | Chapter 08 | >>
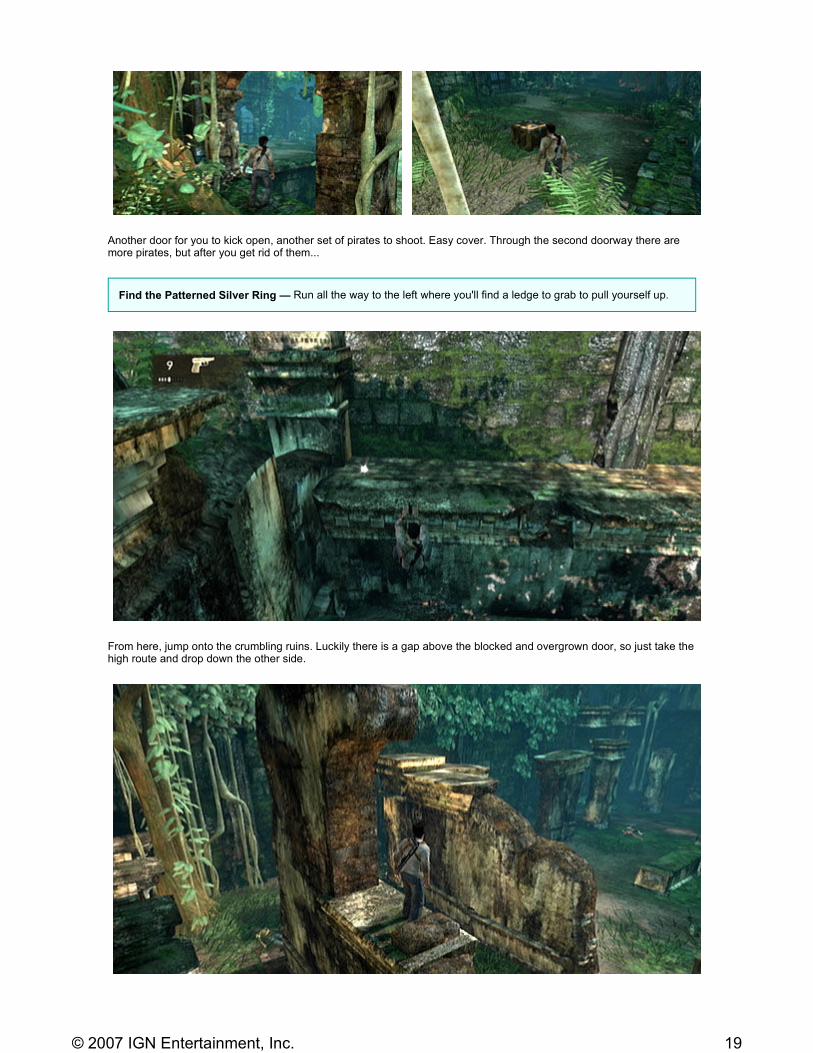
From here you can just cut corners to the right, or head back onto the column tops to jump it. Some ammo and more grenades.
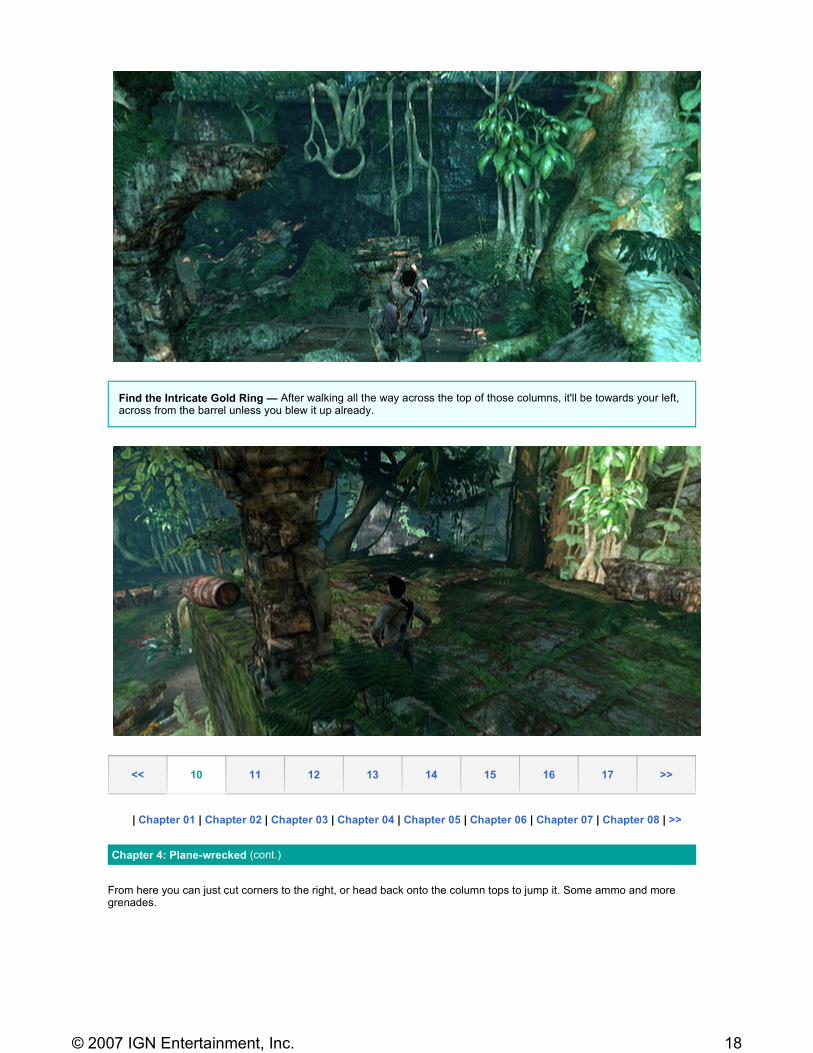
Find the Intricate Gold Ring — After walking all the way across the top of those columns, it'll be towards your left, across from the barrel unless you blew it up already.
<< 10 11 12 13 14 15 16 17 >>
Chapter 4: Plane-wrecked (cont.)
18© 2007 IGN Entertainment, Inc.
Another door for you to kick open, another set of pirates to shoot. Easy cover. Through the second doorway there are more pirates, but after you get rid of them...
From here, jump onto the crumbling ruins. Luckily there is a gap above the blocked and overgrown door, so just take the high route and drop down the other side.
Find the Patterned Silver Ring — Run all the way to the left where you'll find a ledge to grab to pull yourself up.
19© 2007 IGN Entertainment, Inc.
After taking that slight drop, pirates will start shooting at you right away. Hop into cover on the left side of the door way ahead to avoid the guy on the left better. Then once you take them out...
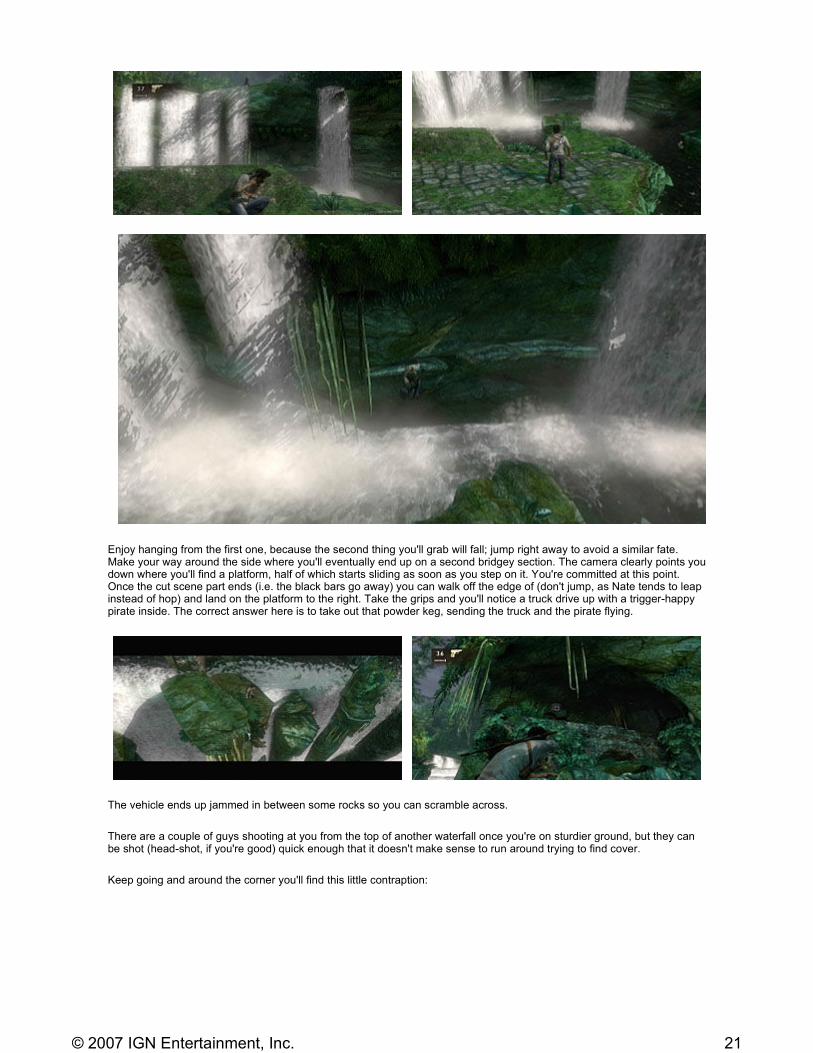
Coming out by the waterfall you can grab some pistol ammo on the left, and then jump to your right—not off into the water or you will die. Continue on to the handholds in the wall and be snappy about it as the last one will collapse. Falling is something you'll have to be careful of during this whole segment, since the current is swift, which equals insta-death.
| Chapter 01 | Chapter 02 | Chapter 03 | Chapter 04 | Chapter 05 | Chapter 06 | Chapter 07 | Chapter 08 | >>
After a brief firefight on the bridgey section, head left towards the waterfalls where you'll find some grips on the wall.
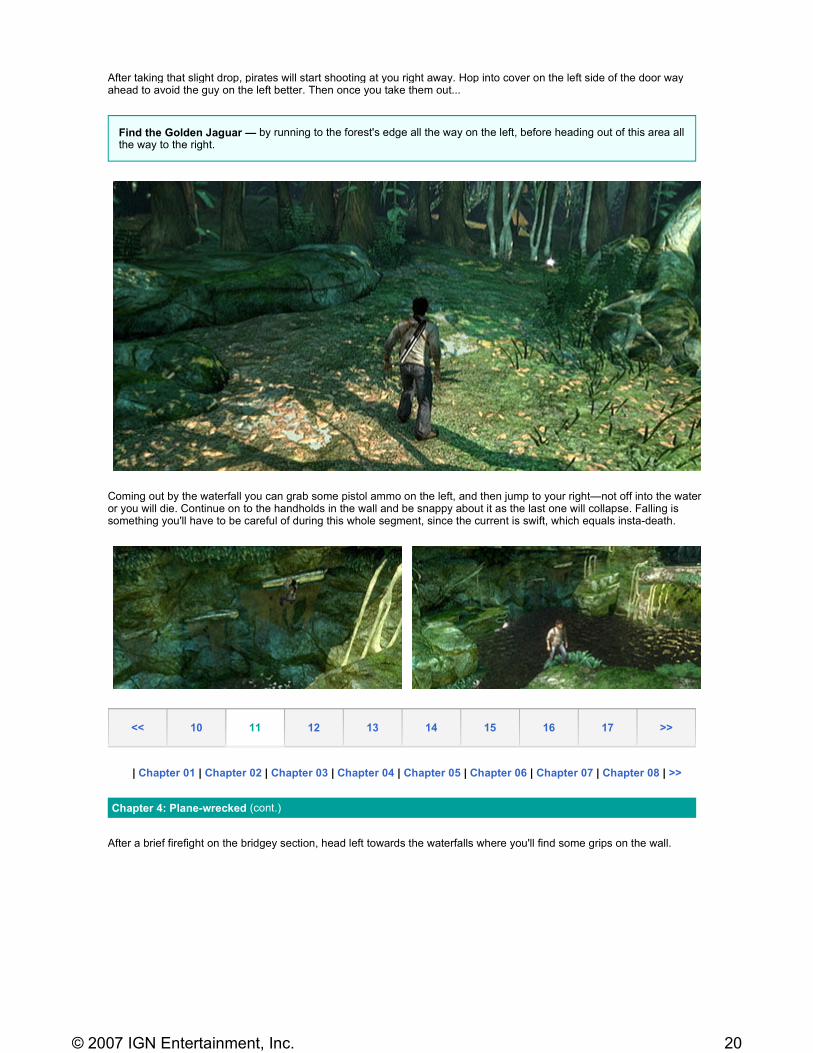
Find the Golden Jaguar — by running to the forest's edge all the way on the left, before heading out of this area all the way to the right.
<< 10 11 12 13 14 15 16 17 >>
Chapter 4: Plane-wrecked (cont.)
20© 2007 IGN Entertainment, Inc.
Enjoy hanging from the first one, because the second thing you'll grab will fall; jump right away to avoid a similar fate. Make your way around the side where you'll eventually end up on a second bridgey section. The camera clearly points you down where you'll find a platform, half of which starts sliding as soon as you step on it. You're committed at this point. Once the cut scene part ends (i.e. the black bars go away) you can walk off the edge of (don't jump, as Nate tends to leap instead of hop) and land on the platform to the right. Take the grips and you'll notice a truck drive up with a trigger-happy pirate inside. The correct answer here is to take out that powder keg, sending the truck and the pirate flying.
The vehicle ends up jammed in between some rocks so you can scramble across.
There are a couple of guys shooting at you from the top of another waterfall once you're on sturdier ground, but they can be shot (head-shot, if you're good) quick enough that it doesn't make sense to run around trying to find cover.
Keep going and around the corner you'll find this little contraption:
21© 2007 IGN Entertainment, Inc.
| Chapter 01 | Chapter 02 | Chapter 03 | Chapter 04 | Chapter 05 | Chapter 06 | Chapter 07 | Chapter 08 | >>
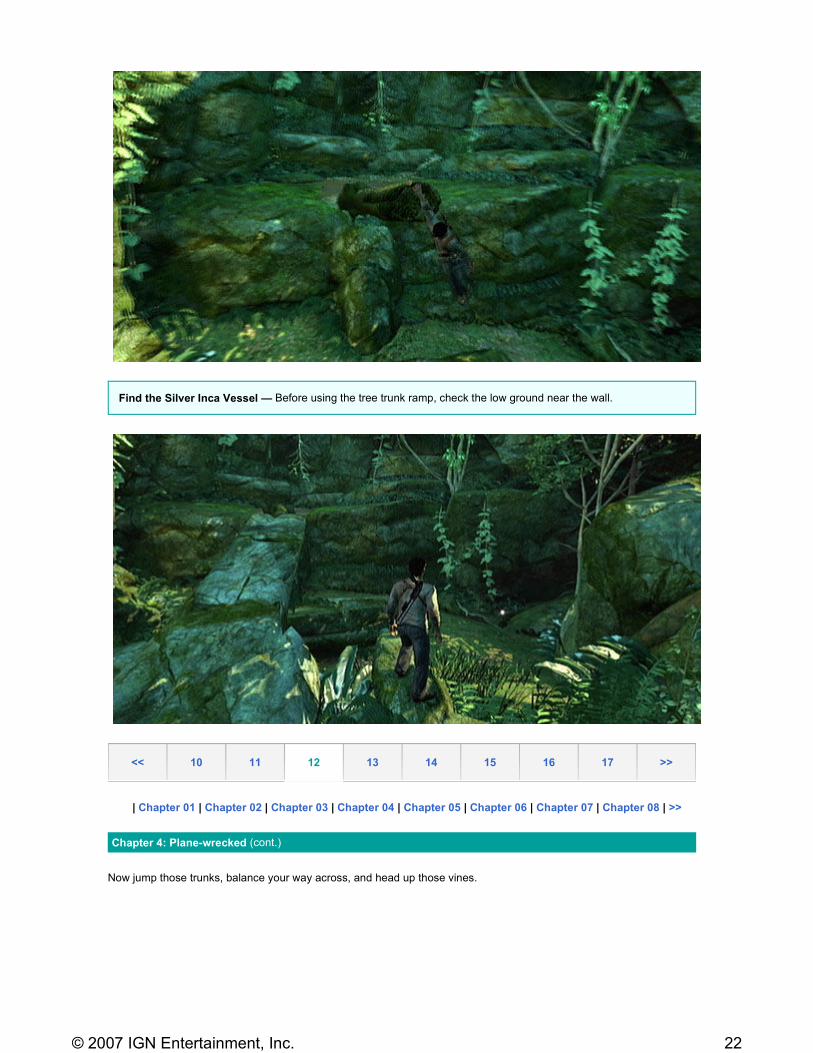
Now jump those trunks, balance your way across, and head up those vines.
Find the Silver Inca Vessel — Before using the tree trunk ramp, check the low ground near the wall.
<< 10 11 12 13 14 15 16 17 >>
Chapter 4: Plane-wrecked (cont.)
22© 2007 IGN Entertainment, Inc.
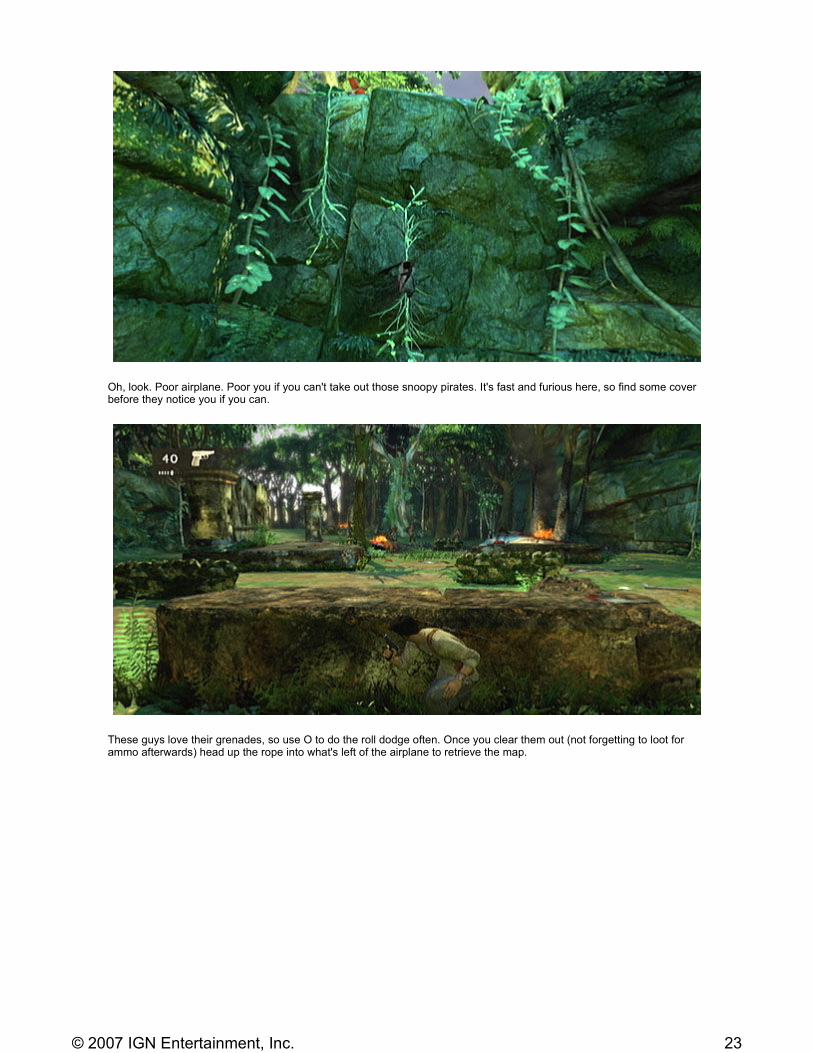
Oh, look. Poor airplane. Poor you if you can't take out those snoopy pirates. It's fast and furious here, so find some cover before they notice you if you can.
These guys love their grenades, so use O to do the roll dodge often. Once you clear them out (not forgetting to loot for ammo afterwards) head up the rope into what's left of the airplane to retrieve the map.
23© 2007 IGN Entertainment, Inc.

For this next fight you will need a sturdy wall and not just one of those little flakey ones. The first couple of waves will come from behind you, but once you finish those they'll start coming from the way you were headed. Pirates will take out the exploding barrels if you don't, and you might as well start using those grenades, too. If a pile of guys rush you, whip out the AK-47.
| Chapter 01 | Chapter 02 | Chapter 03 | Chapter 04 | Chapter 05 | Chapter 06 | Chapter 07 | Chapter 08 | >>
Witness your introduction to the creepy booby-traps and then run along the cliff, jumping as you go. Take care with the isolated rock outcropping, since it will predictably fall. Before rushing in for the next fight...
Find the Golden Toothpick — Right as you go through the door...on your right.
<< 10 11 12 13 14 15 16 17 >>
Chapter 4: Plane-wrecked (cont.)
24© 2007 IGN Entertainment, Inc.
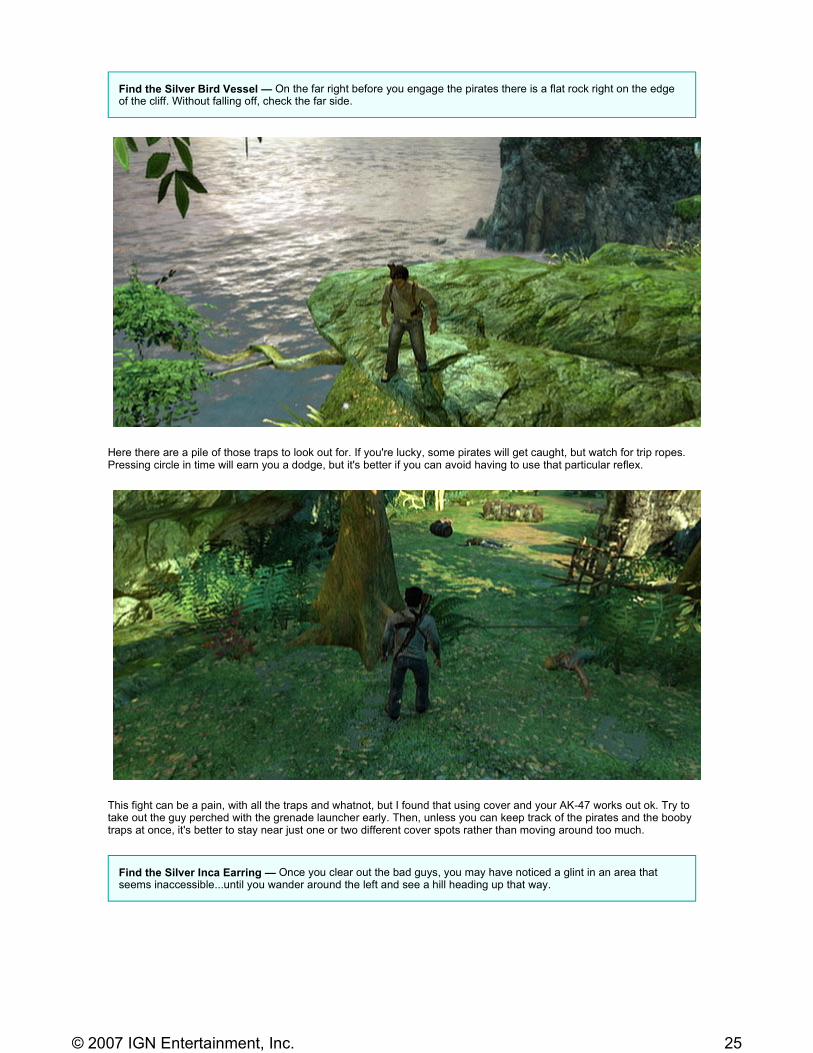
Here there are a pile of those traps to look out for. If you're lucky, some pirates will get caught, but watch for trip ropes. Pressing circle in time will earn you a dodge, but it's better if you can avoid having to use that particular reflex.
This fight can be a pain, with all the traps and whatnot, but I found that using cover and your AK-47 works out ok. Try to take out the guy perched with the grenade launcher early. Then, unless you can keep track of the pirates and the booby traps at once, it's better to stay near just one or two different cover spots rather than moving around too much.
Find the Silver Bird Vessel — On the far right before you engage the pirates there is a flat rock right on the edge of the cliff. Without falling off, check the far side.
Find the Silver Inca Earring — Once you clear out the bad guys, you may have noticed a glint in an area that seems inaccessible...until you wander around the left and see a hill heading up that way.
25© 2007 IGN Entertainment, Inc.
Follow the path along the cliff where you'll find...
| Chapter 01 | Chapter 02 | Chapter 03 | Chapter 04 | Chapter 05 | Chapter 06 | Chapter 07 | Chapter 08 | >>
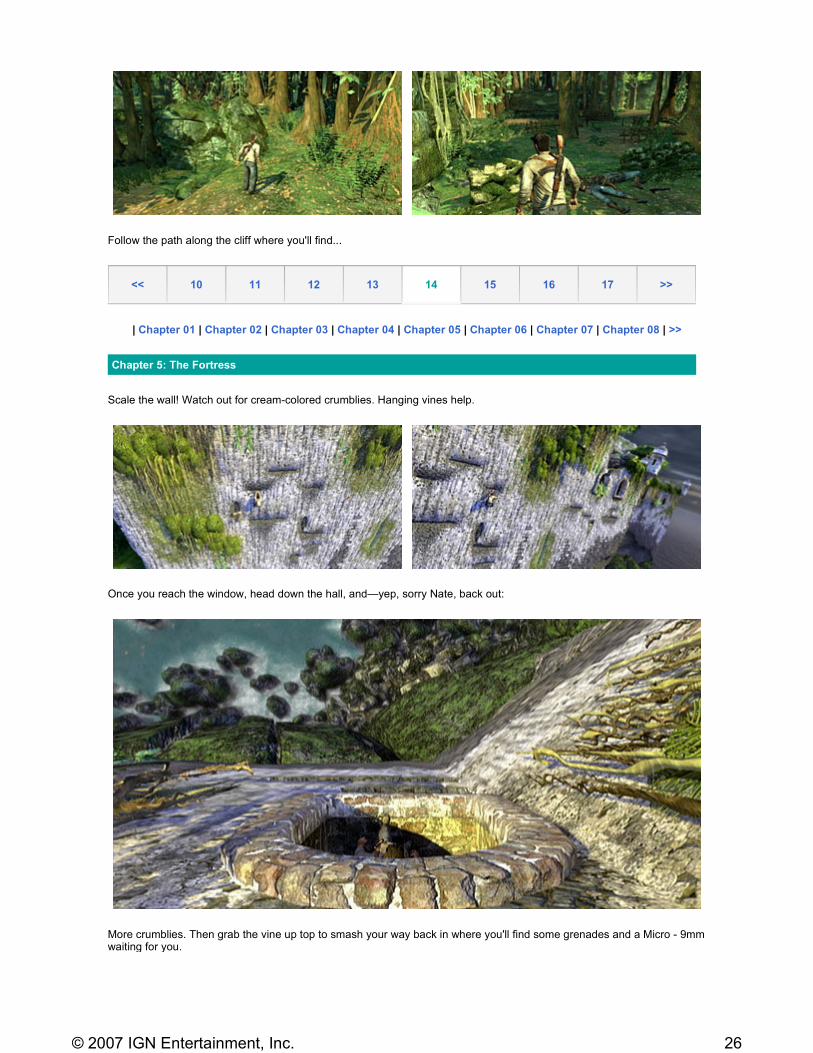
Scale the wall! Watch out for cream-colored crumblies. Hanging vines help.
Once you reach the window, head down the hall, and—yep, sorry Nate, back out:
More crumblies. Then grab the vine up top to smash your way back in where you'll find some grenades and a Micro - 9mm waiting for you.
<< 10 11 12 13 14 15 16 17 >>
Chapter 5: The Fortress
26© 2007 IGN Entertainment, Inc.
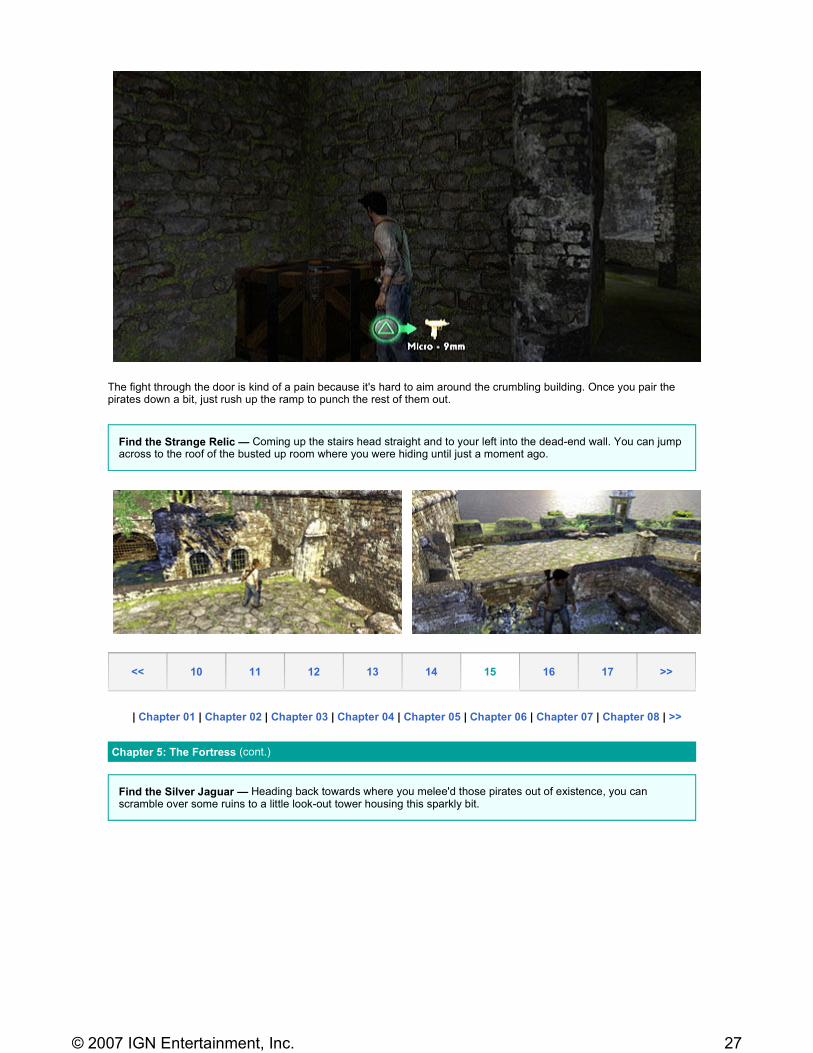
The fight through the door is kind of a pain because it's hard to aim around the crumbling building. Once you pair the pirates down a bit, just rush up the ramp to punch the rest of them out.
| Chapter 01 | Chapter 02 | Chapter 03 | Chapter 04 | Chapter 05 | Chapter 06 | Chapter 07 | Chapter 08 | >>
Find the Strange Relic — Coming up the stairs head straight and to your left into the dead-end wall. You can jump across to the roof of the busted up room where you were hiding until just a moment ago.
<< 10 11 12 13 14 15 16 17 >>
Chapter 5: The Fortress (cont.)
Find the Silver Jaguar — Heading back towards where you melee'd those pirates out of existence, you can scramble over some ruins to a little look-out tower housing this sparkly bit.
27© 2007 IGN Entertainment, Inc.
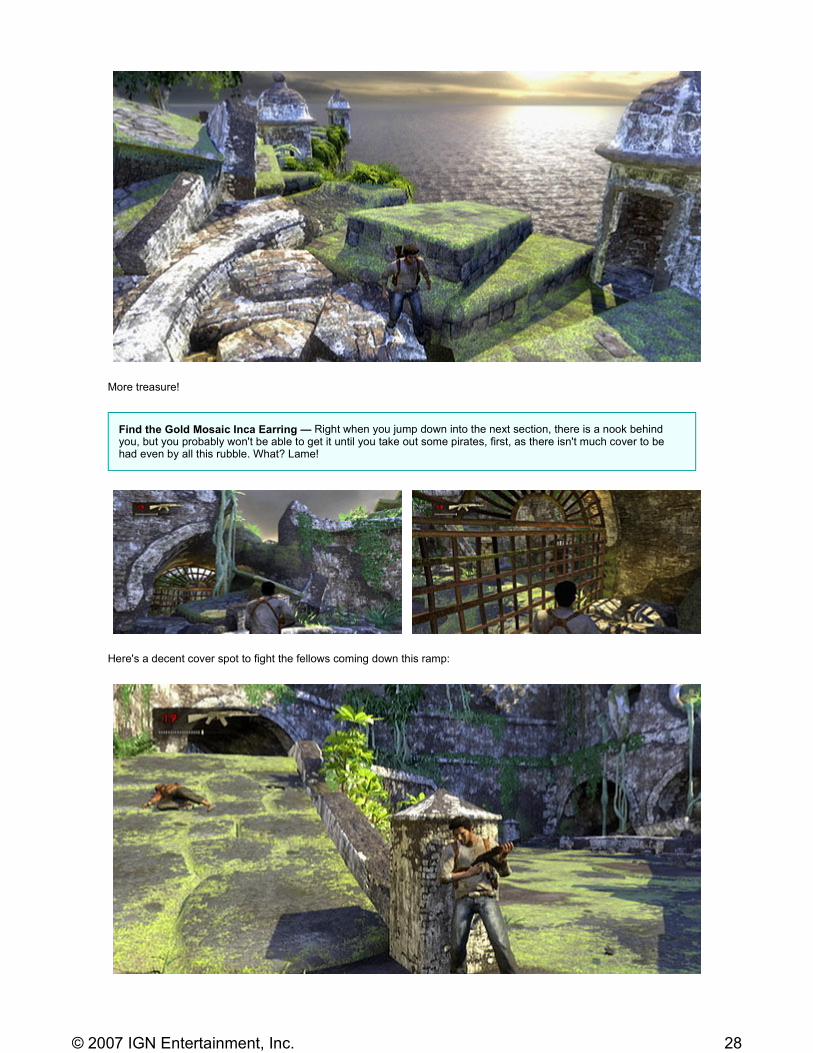
More treasure!
Here's a decent cover spot to fight the fellows coming down this ramp:
Find the Gold Mosaic Inca Earring — Right when you jump down into the next section, there is a nook behind you, but you probably won't be able to get it until you take out some pirates, first, as there isn't much cover to be had even by all this rubble. What? Lame!
28© 2007 IGN Entertainment, Inc.

| Chapter 01 | Chapter 02 | Chapter 03 | Chapter 04 | Chapter 05 | Chapter 06 | Chapter 07 | Chapter 08 | >>
The next room is a little tough because of the guy in the turret gun. If you roll quickly around the room and get sighted-in before he reloads it's not so bad.
You can also use a grenade, but I'd recommend the pistol. After clearing this place out, the most straightforward way to proceed is actually to vault over the boxes behind the turret to find the stairs.
You'll be cued about seven thousand times to hit L2 to look up at Elena's parachute. Head straight over there and climb the tower. She's not around, but if you poke around a bit and climb up into the window there is a zipline to take back down.
Grab the Wes - 44 and shoot the padlock!
<< 10 11 12 13 14 15 16 17 >>
Chapter 5: The Fortress (cont.)
29© 2007 IGN Entertainment, Inc.

Or save it for after you take care of the mess of guys who have reinfested the area with the truck and the turret. There is one particularly handy pillar here that leaves decent shots for both the turret guy and the two exploding barrels.
This gate is open now:
Once inside you'll be greeted by a very excited turret gun. Cover yourself well, and when he's reloading keep moving down the hall. Eventually you will reach a point where you can aim at an exploding barrel right behind him and take the whole ledge out.
30© 2007 IGN Entertainment, Inc.
| Chapter 01 | Chapter 02 | Chapter 03 | Chapter 04 | Chapter 05 | Chapter 06 | Chapter 07 | Chapter 08 | >>
While you're in there, grab the grenades and the M79. You should probably decide whether to keep the AK or the boring pistol, unless you feel confident with 6-9 bullets total until you kill more guys.
<< 10 11 12 13 14 15 16 17 >>
Chapter 5: The Fortress (cont.)
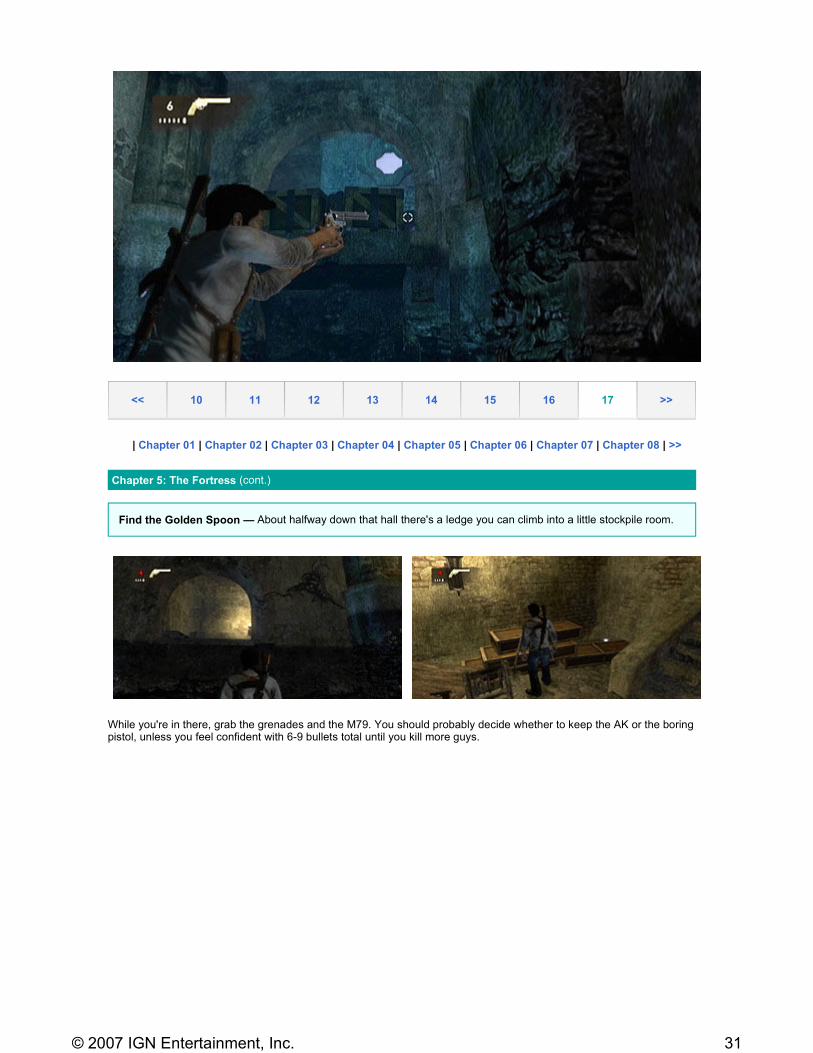
Find the Golden Spoon — About halfway down that hall there's a ledge you can climb into a little stockpile room.
31© 2007 IGN Entertainment, Inc.
Head back by where you shot out the turret gun to climb into the next room. Piles of pirates await. If you have the grenade launcher, you can see if any of them cluster, but it might be handier to have the AK-47. The first piece of cover you see when you run in works well for a while, but some guys will jump practically onto your head if you stay there too long, so you'll have to shuffle over. Watch out for the big dudes with shotguns near the end. Hopefully you have some bullets left, or you can do what I did—throw a blind grenade and pray.
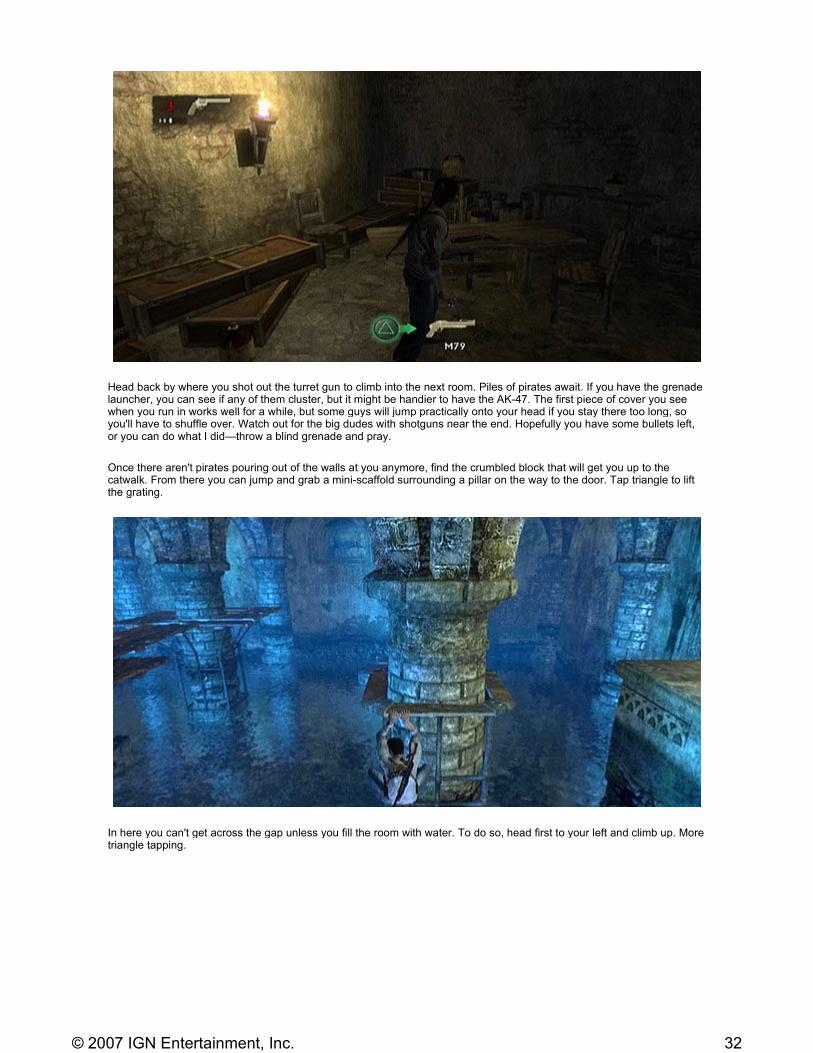
Once there aren't pirates pouring out of the walls at you anymore, find the crumbled block that will get you up to the catwalk. From there you can jump and grab a mini-scaffold surrounding a pillar on the way to the door. Tap triangle to lift the grating.
In here you can't get across the gap unless you fill the room with water. To do so, head first to your left and climb up. More triangle tapping.
32© 2007 IGN Entertainment, Inc.
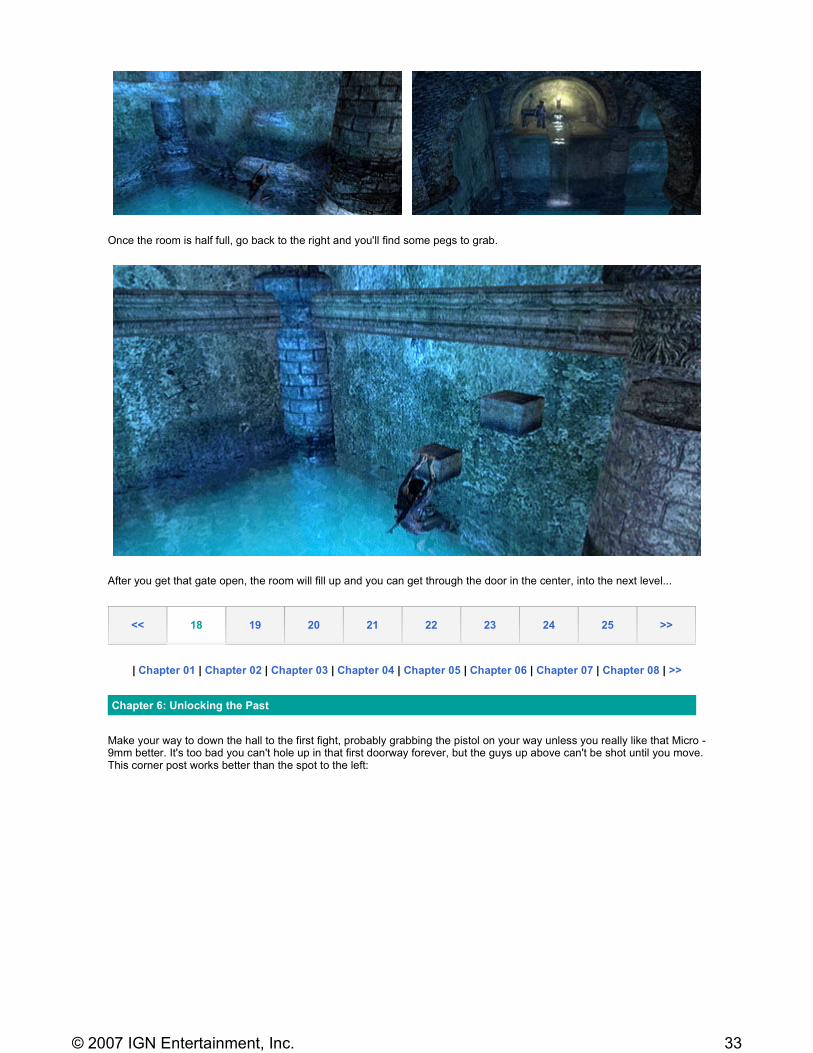
Once the room is half full, go back to the right and you'll find some pegs to grab.
After you get that gate open, the room will fill up and you can get through the door in the center, into the next level...
| Chapter 01 | Chapter 02 | Chapter 03 | Chapter 04 | Chapter 05 | Chapter 06 | Chapter 07 | Chapter 08 | >>
Make your way to down the hall to the first fight, probably grabbing the pistol on your way unless you really like that Micro - 9mm better. It's too bad you can't hole up in that first doorway forever, but the guys up above can't be shot until you move. This corner post works better than the spot to the left:
<< 18 19 20 21 22 23 24 25 >>
Chapter 6: Unlocking the Past
33© 2007 IGN Entertainment, Inc.
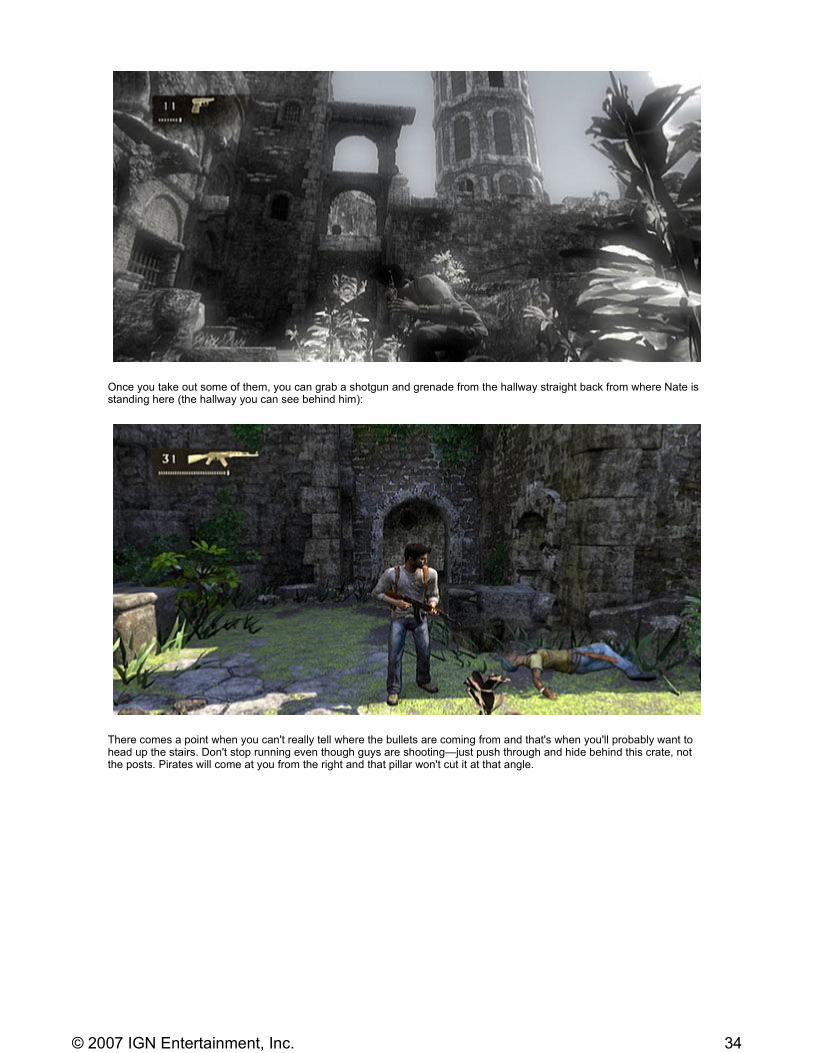
Once you take out some of them, you can grab a shotgun and grenade from the hallway straight back from where Nate is standing here (the hallway you can see behind him):
There comes a point when you can't really tell where the bullets are coming from and that's when you'll probably want to head up the stairs. Don't stop running even though guys are shooting—just push through and hide behind this crate, not the posts. Pirates will come at you from the right and that pillar won't cut it at that angle.
34© 2007 IGN Entertainment, Inc.
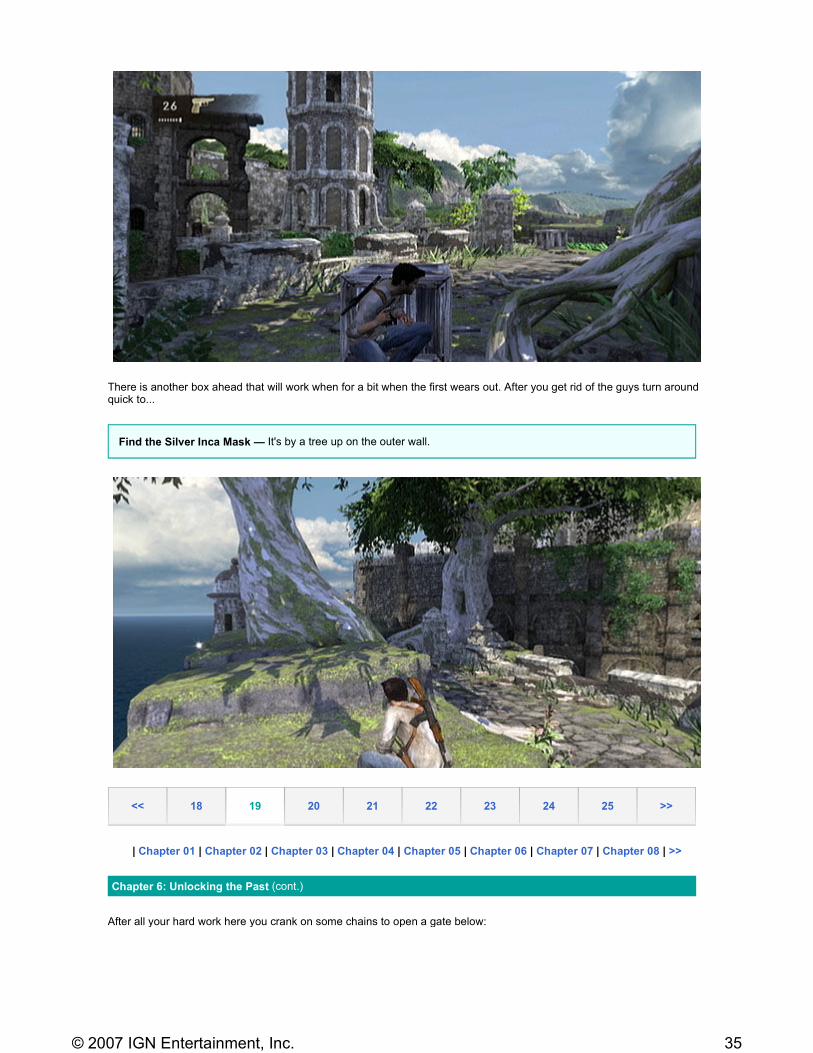
There is another box ahead that will work when for a bit when the first wears out. After you get rid of the guys turn around quick to...
| Chapter 01 | Chapter 02 | Chapter 03 | Chapter 04 | Chapter 05 | Chapter 06 | Chapter 07 | Chapter 08 | >>
After all your hard work here you crank on some chains to open a gate below:
Find the Silver Inca Mask — It's by a tree up on the outer wall.
<< 18 19 20 21 22 23 24 25 >>
Chapter 6: Unlocking the Past (cont.)
35© 2007 IGN Entertainment, Inc.
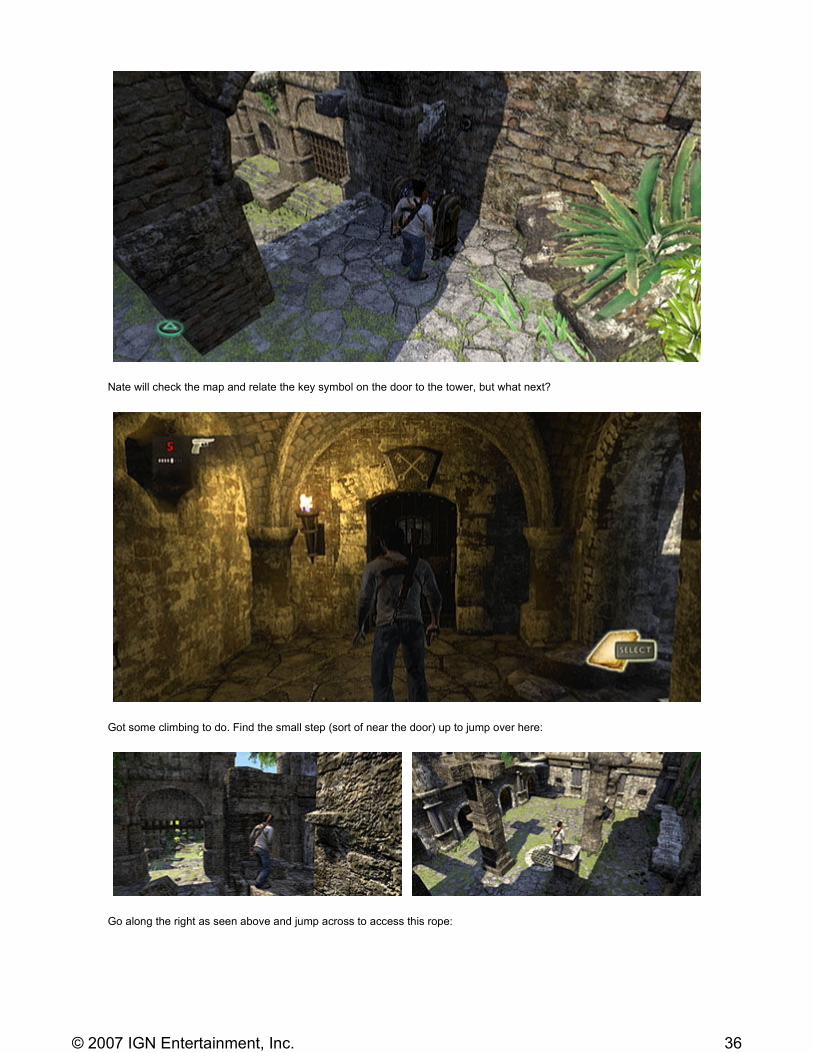
Nate will check the map and relate the key symbol on the door to the tower, but what next?
Got some climbing to do. Find the small step (sort of near the door) up to jump over here:
Go along the right as seen above and jump across to access this rope:
36© 2007 IGN Entertainment, Inc.
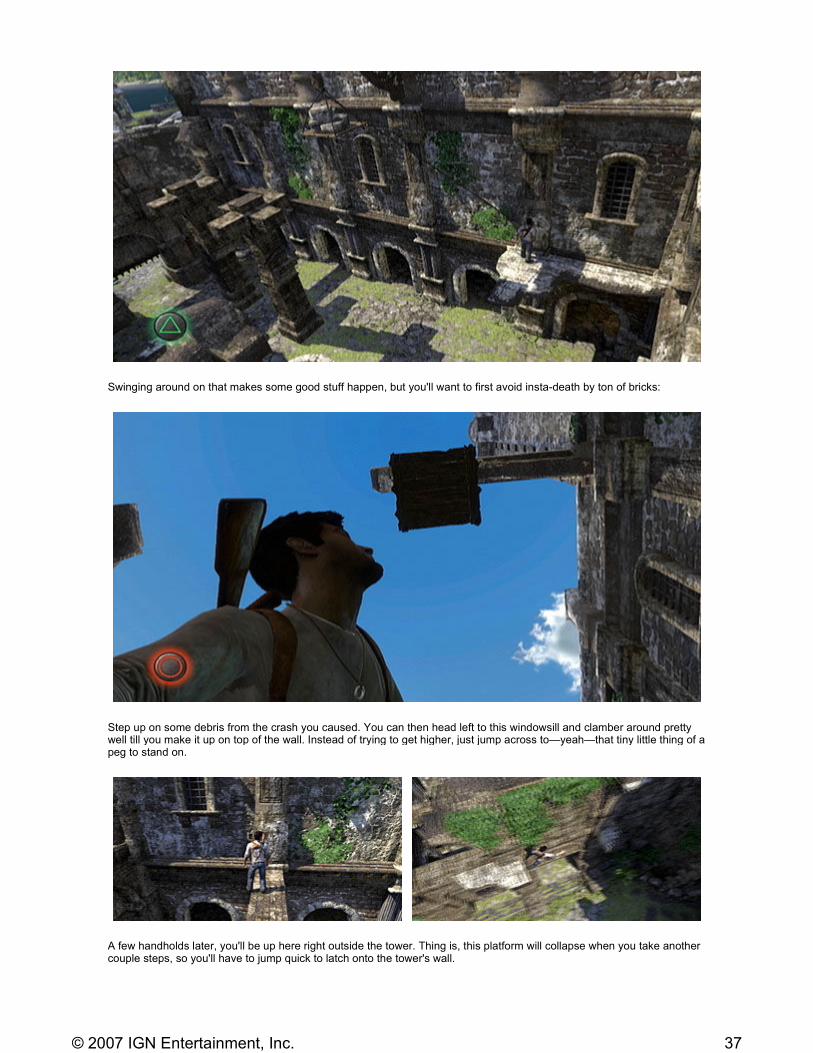
Swinging around on that makes some good stuff happen, but you'll want to first avoid insta-death by ton of bricks:
Step up on some debris from the crash you caused. You can then head left to this windowsill and clamber around pretty well till you make it up on top of the wall. Instead of trying to get higher, just jump across to—yeah—that tiny little thing of a peg to stand on.
A few handholds later, you'll be up here right outside the tower. Thing is, this platform will collapse when you take another couple steps, so you'll have to jump quick to latch onto the tower's wall.
37© 2007 IGN Entertainment, Inc.

| Chapter 01 | Chapter 02 | Chapter 03 | Chapter 04 | Chapter 05 | Chapter 06 | Chapter 07 | Chapter 08 | >>
The tower itself is pretty simple. Just keep jumping up until you can't and then shimmy around. You'll do a little bit of weaving in and out of windows to reach the top.
Once there, grab the key off the skeleton and make your way down the conveniently placed rope:
Now you can open that door with the ham-fisted key symbol over it. Stock up on ammo and grenades before this next courtyard because it's pretty nuts in there.
<< 18 19 20 21 22 23 24 25 >>
Chapter 6: Unlocking the Past (cont.)
38© 2007 IGN Entertainment, Inc.
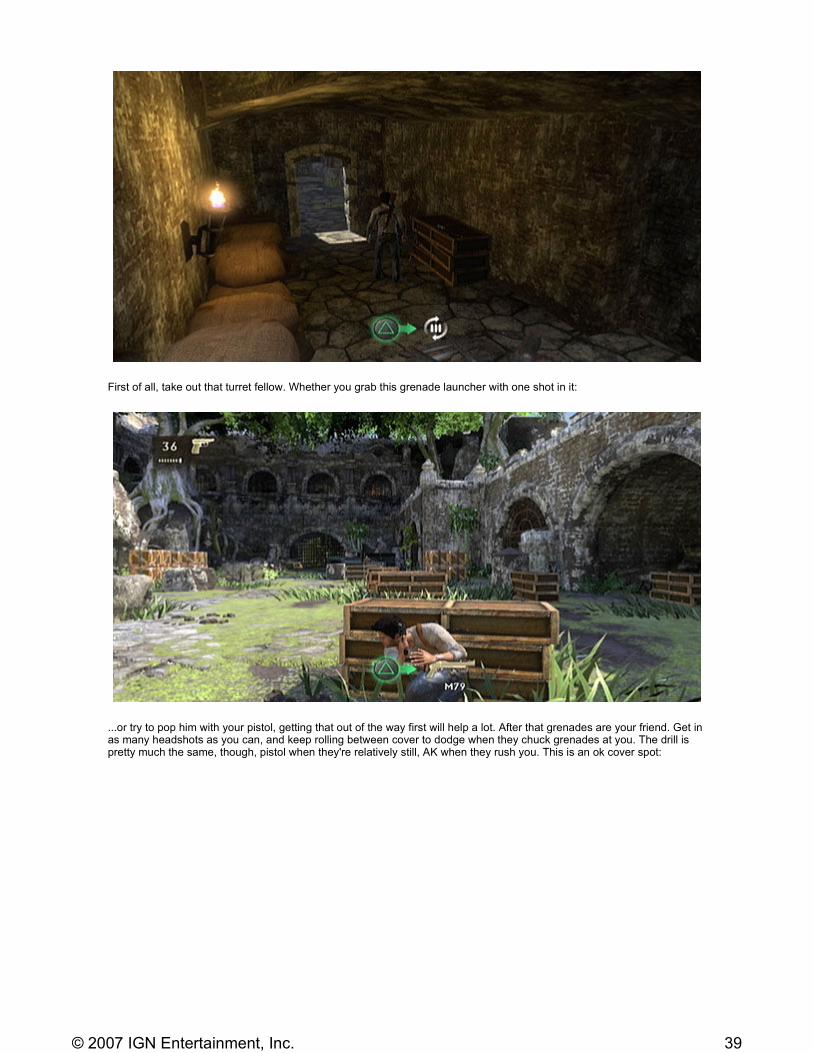
First of all, take out that turret fellow. Whether you grab this grenade launcher with one shot in it:
...or try to pop him with your pistol, getting that out of the way first will help a lot. After that grenades are your friend. Get in as many headshots as you can, and keep rolling between cover to dodge when they chuck grenades at you. The drill is pretty much the same, though, pistol when they're relatively still, AK when they rush you. This is an ok cover spot:
39© 2007 IGN Entertainment, Inc.
| Chapter 01 | Chapter 02 | Chapter 03 | Chapter 04 | Chapter 05 | Chapter 06 | Chapter 07 | Chapter 08 | >>
Then there's a crank back at about the midpoint in the courtyard. If you want a Wes, there's one on the right, but again, six bullets. You're probably better off what you have. Head through the doors and up the stairs where yet another ambush is waiting.
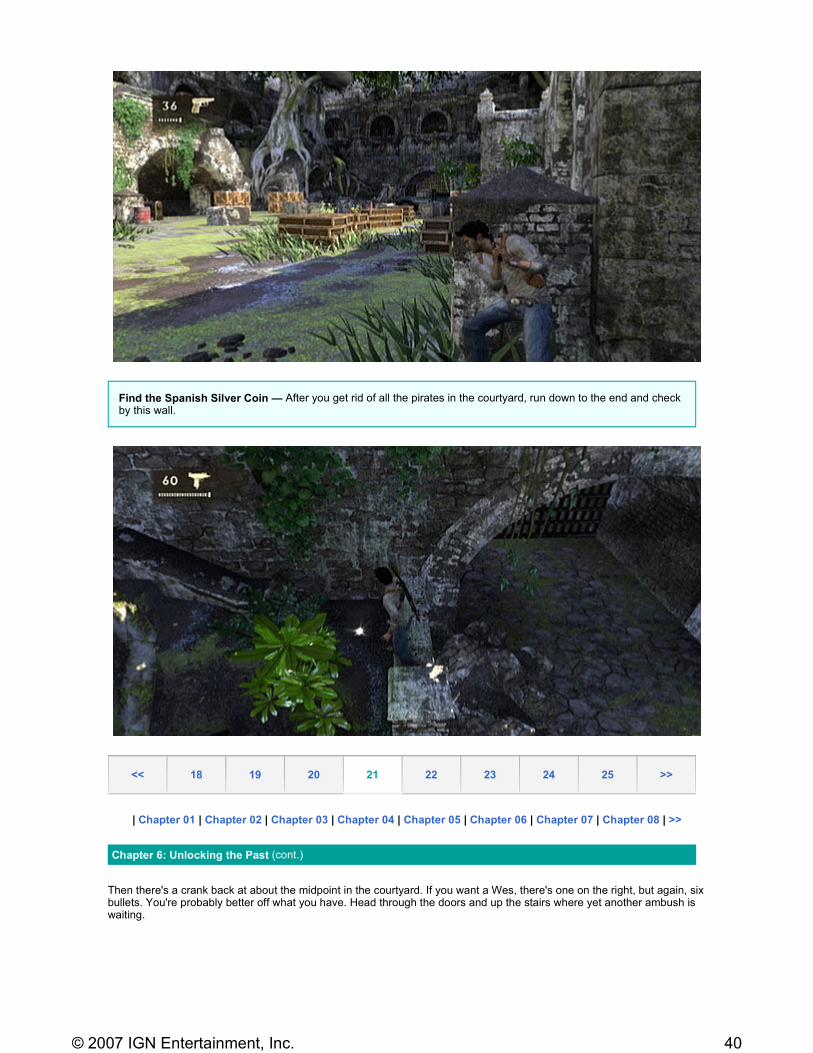
Find the Spanish Silver Coin — After you get rid of all the pirates in the courtyard, run down to the end and check by this wall.
<< 18 19 20 21 22 23 24 25 >>
Chapter 6: Unlocking the Past (cont.)
40© 2007 IGN Entertainment, Inc.
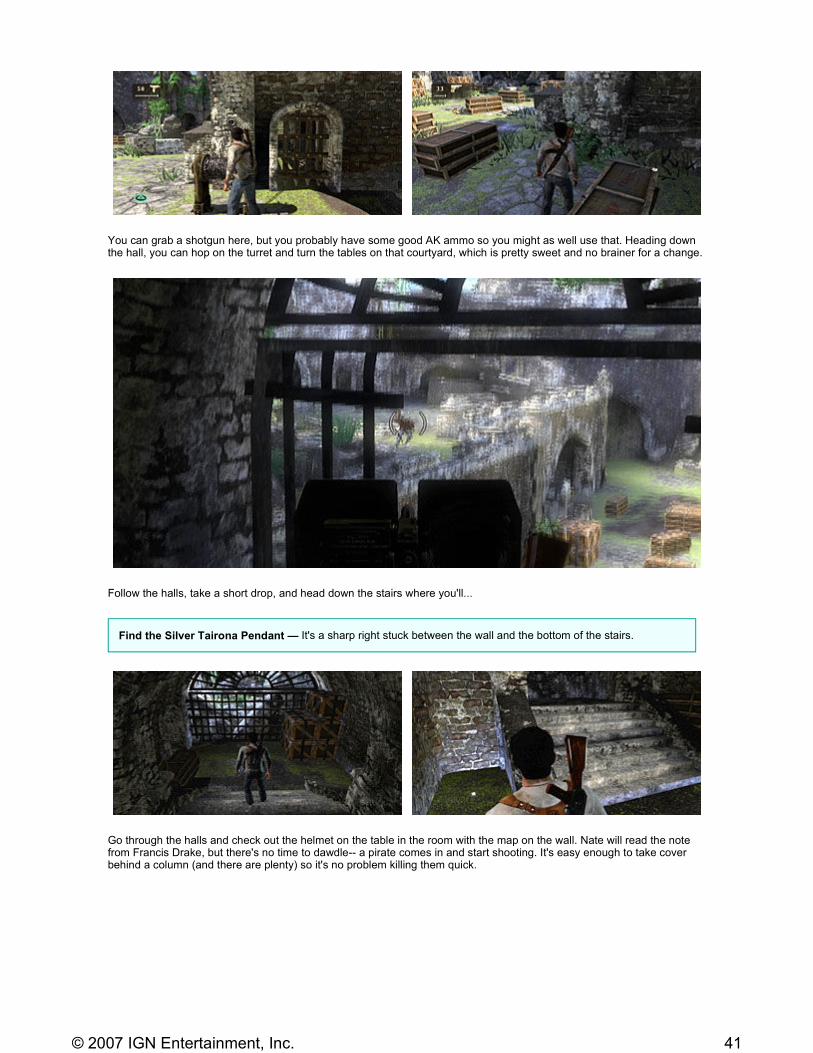
You can grab a shotgun here, but you probably have some good AK ammo so you might as well use that. Heading down the hall, you can hop on the turret and turn the tables on that courtyard, which is pretty sweet and no brainer for a change.
Follow the halls, take a short drop, and head down the stairs where you'll...
Go through the halls and check out the helmet on the table in the room with the map on the wall. Nate will read the note from Francis Drake, but there's no time to dawdle-- a pirate comes in and start shooting. It's easy enough to take cover behind a column (and there are plenty) so it's no problem killing them quick.
Find the Silver Tairona Pendant — It's a sharp right stuck between the wall and the bottom of the stairs.
41© 2007 IGN Entertainment, Inc.
| Chapter 01 | Chapter 02 | Chapter 03 | Chapter 04 | Chapter 05 | Chapter 06 | Chapter 07 | Chapter 08 | >>
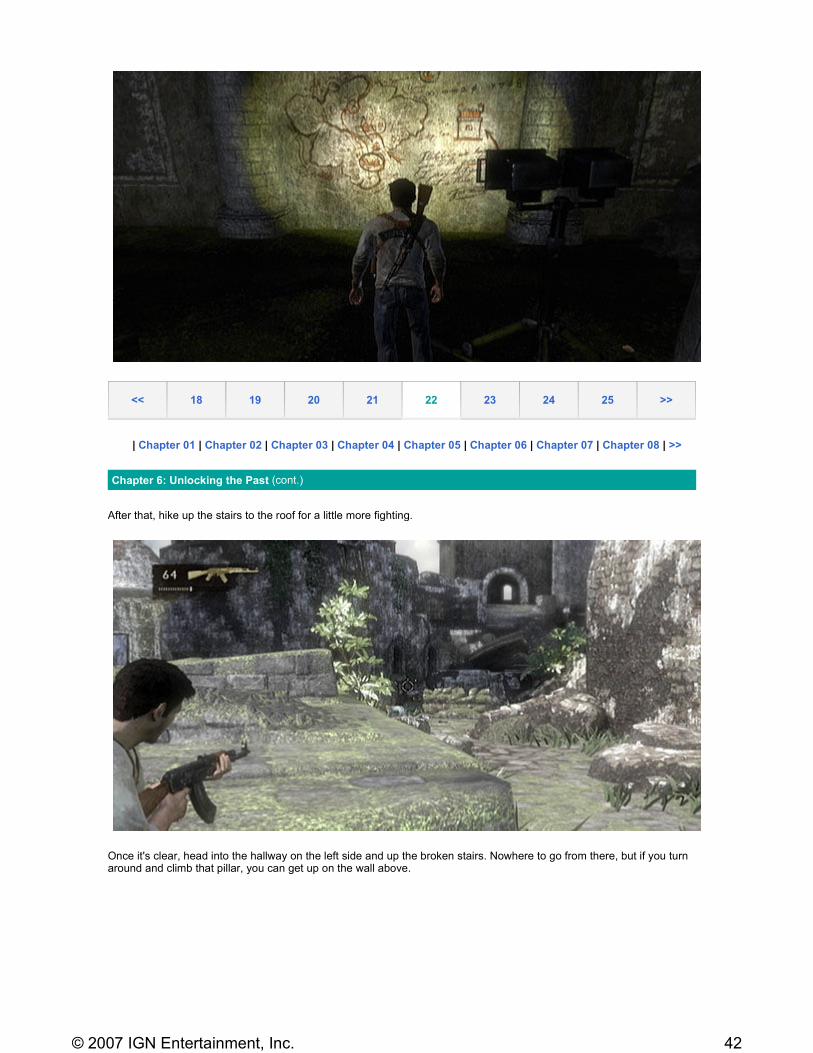
After that, hike up the stairs to the roof for a little more fighting.
Once it's clear, head into the hallway on the left side and up the broken stairs. Nowhere to go from there, but if you turn around and climb that pillar, you can get up on the wall above.
<< 18 19 20 21 22 23 24 25 >>
Chapter 6: Unlocking the Past (cont.)
42© 2007 IGN Entertainment, Inc.
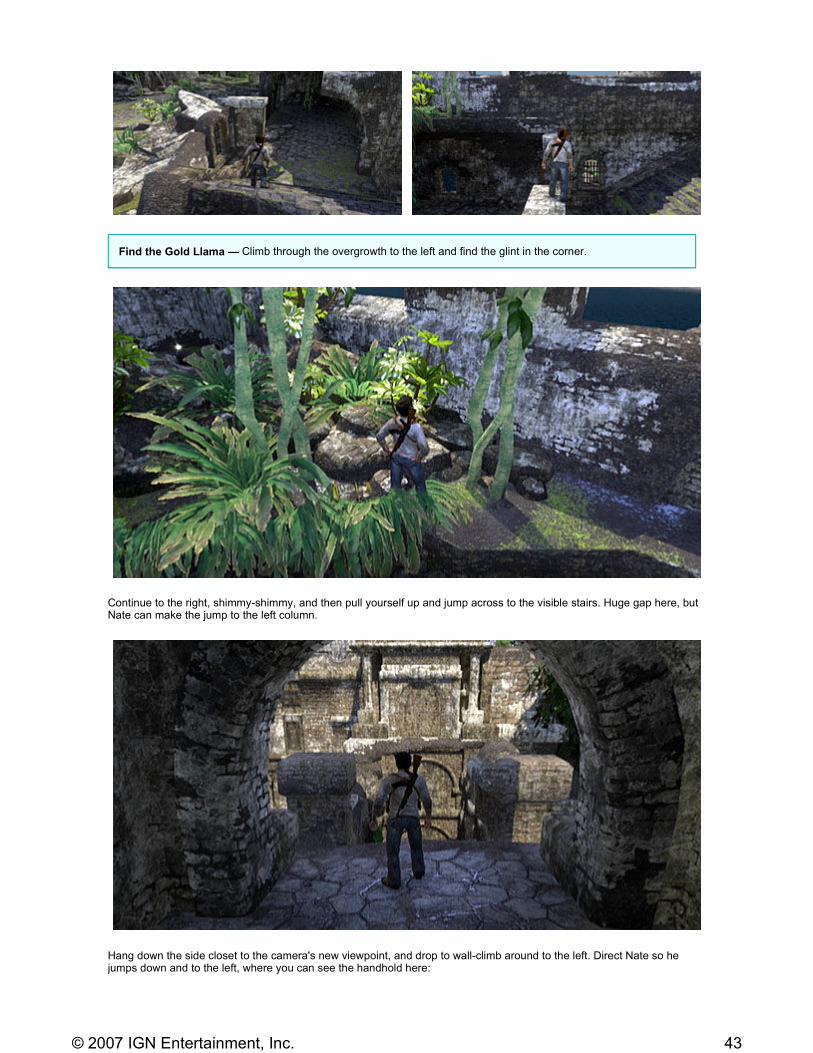
Continue to the right, shimmy-shimmy, and then pull yourself up and jump across to the visible stairs. Huge gap here, but Nate can make the jump to the left column.
Hang down the side closet to the camera's new viewpoint, and drop to wall-climb around to the left. Direct Nate so he jumps down and to the left, where you can see the handhold here:
Find the Gold Llama — Climb through the overgrowth to the left and find the glint in the corner.
43© 2007 IGN Entertainment, Inc.

You'll cross over above the hallway again before jumping up at the end...only to lower yourself over the other side:
Keep moving to the left and you'll end up at this jump, which looks impossible, but don't underestimate our man. Head for the windowsill quick, since that section will crumble.
You've almost done it! Just head up the stairs and prepare for a quick-draw. Nate will spot Elena through a telescope, but there's a dude with a grenade launcher ready to launch HER off the cliff. If you don't shoot him first (the one on the right) you'll...have to try again. Not such a huge deal, but sort of annoying if you're not the best at aiming under pressure. If you succeed, they bust up your balcony, sending you for a bump in the head and a nap in a jail cell...
44© 2007 IGN Entertainment, Inc.
Enter Eddy Raja, who is super-pissed and wants your map. Luckily Elena manages to bust you out of jail. She'll be driving get away while you'll be...
| Chapter 01 | Chapter 02 | Chapter 03 | Chapter 04 | Chapter 05 | Chapter 06 | Chapter 07 | Chapter 08 | >>
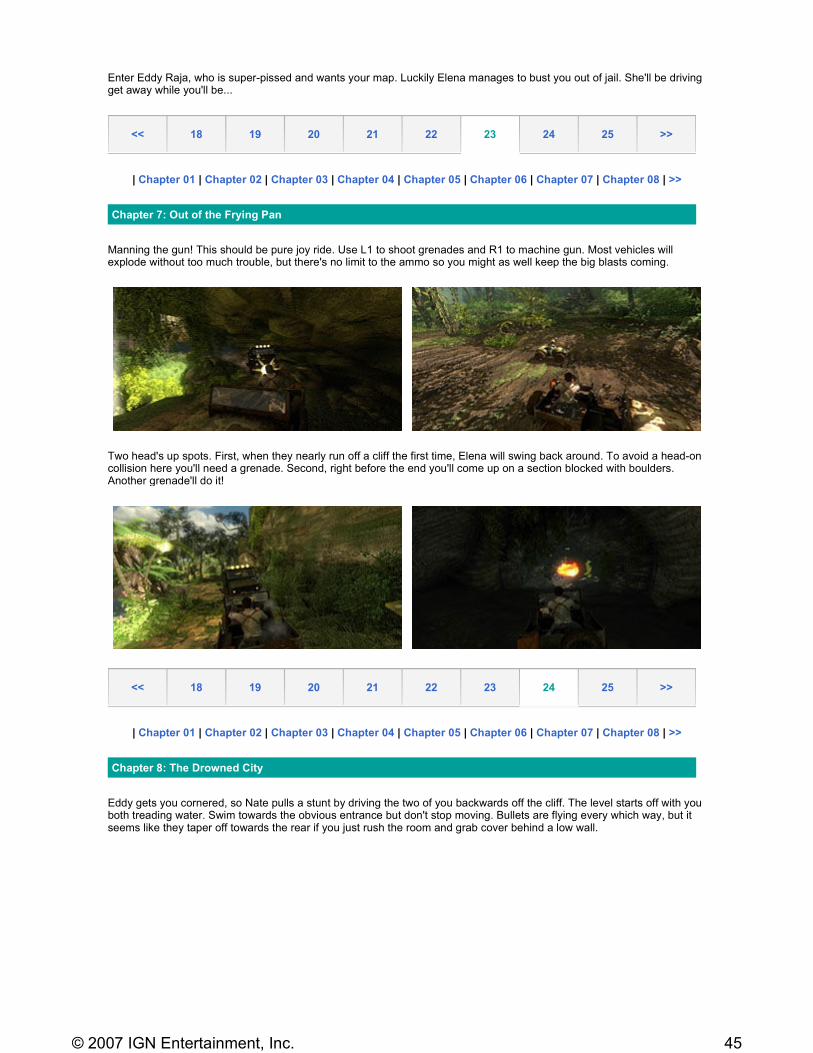
Manning the gun! This should be pure joy ride. Use L1 to shoot grenades and R1 to machine gun. Most vehicles will explode without too much trouble, but there's no limit to the ammo so you might as well keep the big blasts coming.
Two head's up spots. First, when they nearly run off a cliff the first time, Elena will swing back around. To avoid a head-on collision here you'll need a grenade. Second, right before the end you'll come up on a section blocked with boulders. Another grenade'll do it!
| Chapter 01 | Chapter 02 | Chapter 03 | Chapter 04 | Chapter 05 | Chapter 06 | Chapter 07 | Chapter 08 | >>
Eddy gets you cornered, so Nate pulls a stunt by driving the two of you backwards off the cliff. The level starts off with you both treading water. Swim towards the obvious entrance but don't stop moving. Bullets are flying every which way, but it seems like they taper off towards the rear if you just rush the room and grab cover behind a low wall.
<< 18 19 20 21 22 23 24 25 >>
Chapter 7: Out of the Frying Pan
<< 18 19 20 21 22 23 24 25 >>
Chapter 8: The Drowned City
45© 2007 IGN Entertainment, Inc.
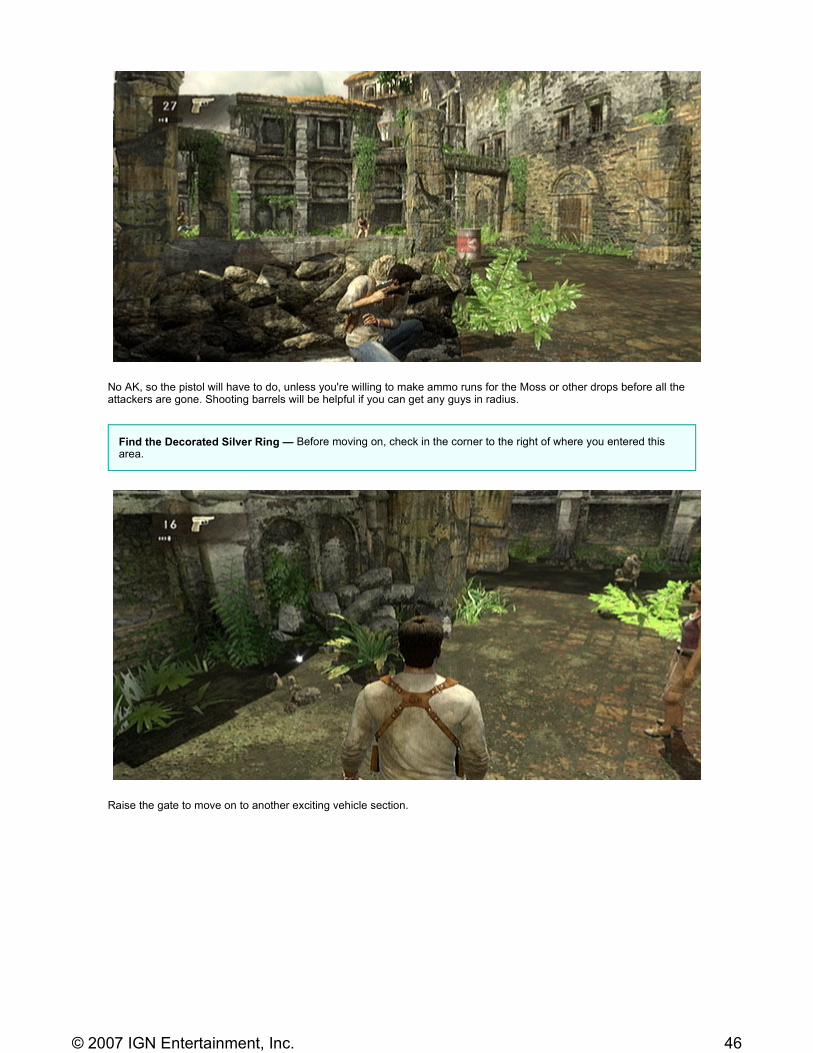
No AK, so the pistol will have to do, unless you're willing to make ammo runs for the Moss or other drops before all the attackers are gone. Shooting barrels will be helpful if you can get any guys in radius.
Raise the gate to move on to another exciting vehicle section.
Find the Decorated Silver Ring — Before moving on, check in the corner to the right of where you entered this area.
46© 2007 IGN Entertainment, Inc.
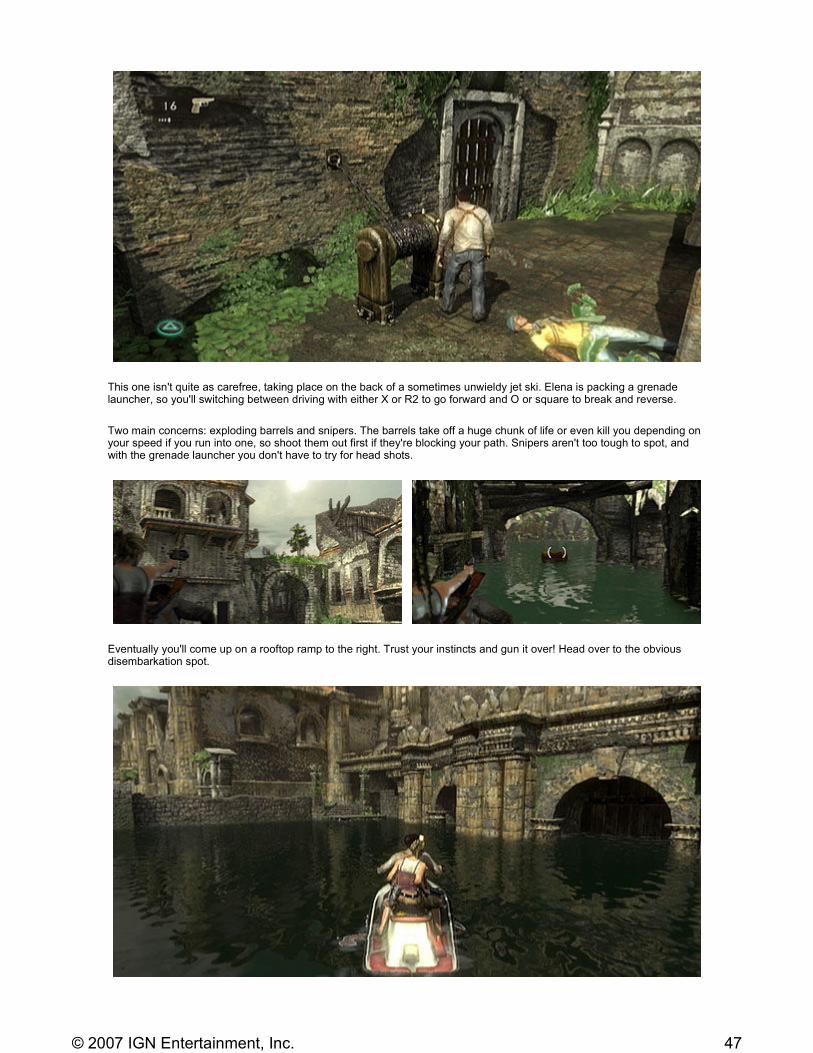
This one isn't quite as carefree, taking place on the back of a sometimes unwieldy jet ski. Elena is packing a grenade launcher, so you'll switching between driving with either X or R2 to go forward and O or square to break and reverse.
Two main concerns: exploding barrels and snipers. The barrels take off a huge chunk of life or even kill you depending on your speed if you run into one, so shoot them out first if they're blocking your path. Snipers aren't too tough to spot, and with the grenade launcher you don't have to try for head shots.
Eventually you'll come up on a rooftop ramp to the right. Trust your instincts and gun it over! Head over to the obvious disembarkation spot.
47© 2007 IGN Entertainment, Inc.
Elena spots a cable leading to the tower you guys are aiming for, and the helpful L2 hint will direct your eyes. Mostly, just get ready for a fight with a bit of a rewind time if you die.
First comes the bridge. This is pretty simple. Plenty of cover to work your way down, and some AK ammo on the way. Don't get cocky, though, because there's a fellow nesting around the next corner with a M79 just waiting to blow your brains out. He's not to hard to get rid of, though, and once you do there are some grenades and ammo near where he was hanging out.
| Chapter 01 | Chapter 02 | Chapter 03 | Chapter 04 | Chapter 05 | Chapter 06 | Chapter 07 | Chapter 08 | >>
A couple other big guns (Moss and Wes) come out among the filler guys in what I guess is the third stage of this fight. Grenades are handy here, and it's never bad to back up and take stock. Better than rushing into a .44 bullet.
<< 18 19 20 21 22 23 24 25 >>
Chapter 8: The Drowned City (cont.)
Find the Silver Frog — Once it's all clear, head to the squared off corner with the rubble in it for some treasure.
48© 2007 IGN Entertainment, Inc.
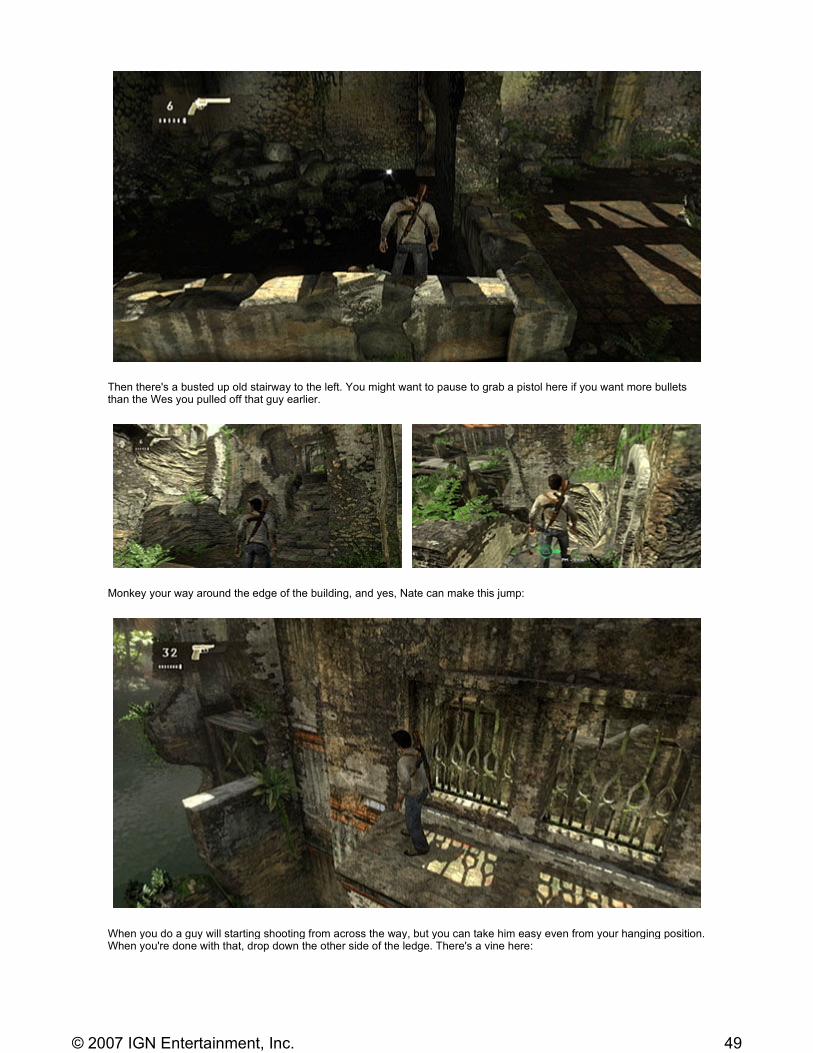
Then there's a busted up old stairway to the left. You might want to pause to grab a pistol here if you want more bullets than the Wes you pulled off that guy earlier.
Monkey your way around the edge of the building, and yes, Nate can make this jump:
When you do a guy will starting shooting from across the way, but you can take him easy even from your hanging position. When you're done with that, drop down the other side of the ledge. There's a vine here:
49© 2007 IGN Entertainment, Inc.
...which you can use to swing to the windowsills. Open the gate there, and Elena will drive up with the jet ski again.
<< | Chapter 09 | Chapter 10 | Chapter 11 | Chapter 12 | Chapter 13 | Chapter 14 | Chapter 15 | >>
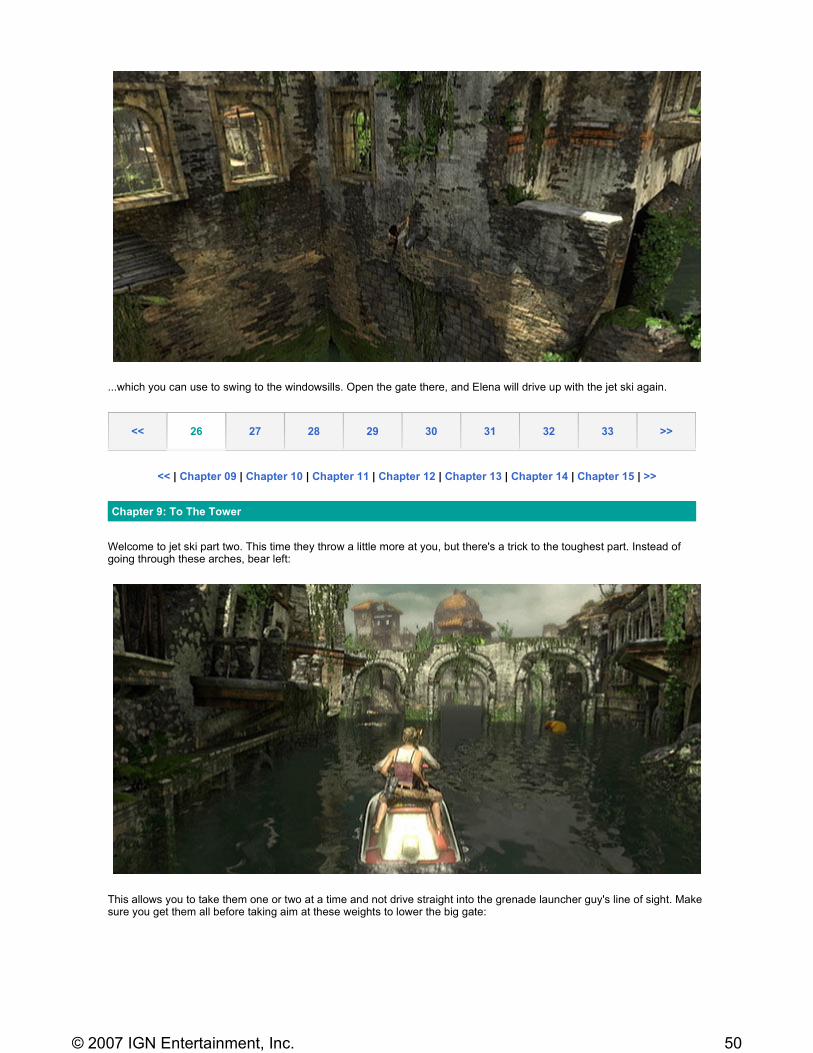
Welcome to jet ski part two. This time they throw a little more at you, but there's a trick to the toughest part. Instead of going through these arches, bear left:
This allows you to take them one or two at a time and not drive straight into the grenade launcher guy's line of sight. Make sure you get them all before taking aim at these weights to lower the big gate:
<< 26 27 28 29 30 31 32 33 >>
Chapter 9: To The Tower
50© 2007 IGN Entertainment, Inc.
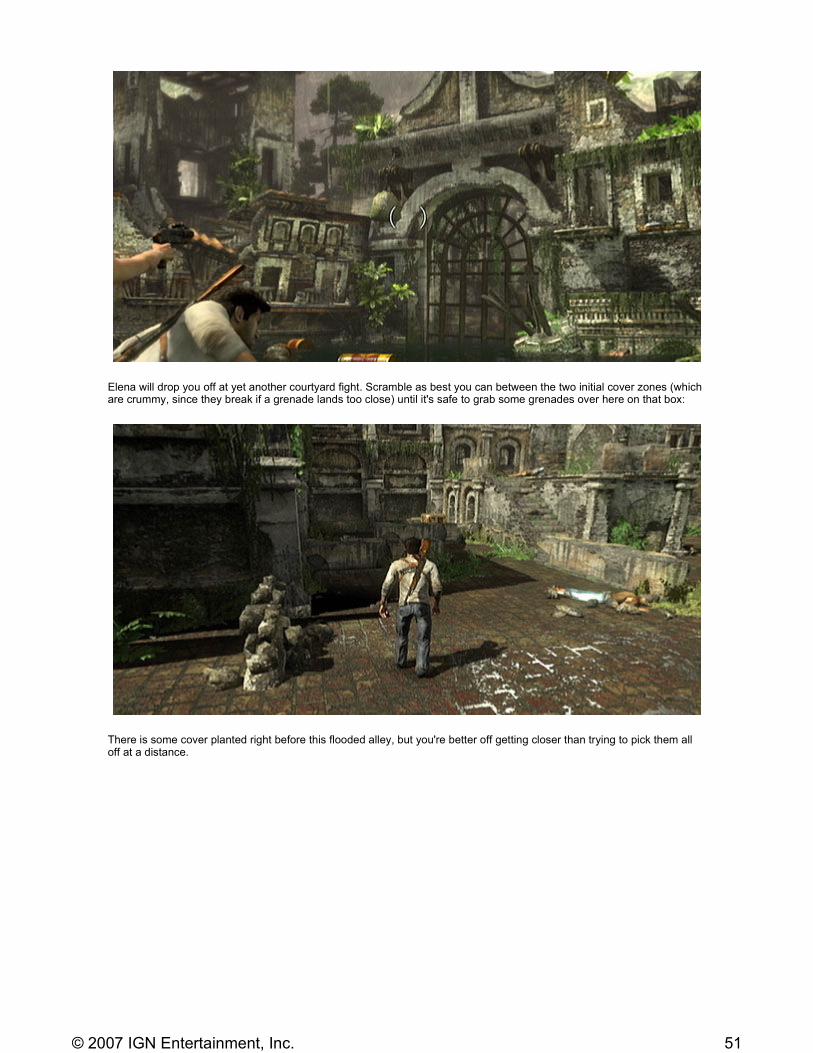
Elena will drop you off at yet another courtyard fight. Scramble as best you can between the two initial cover zones (which are crummy, since they break if a grenade lands too close) until it's safe to grab some grenades over here on that box:
There is some cover planted right before this flooded alley, but you're better off getting closer than trying to pick them all off at a distance.
51© 2007 IGN Entertainment, Inc.
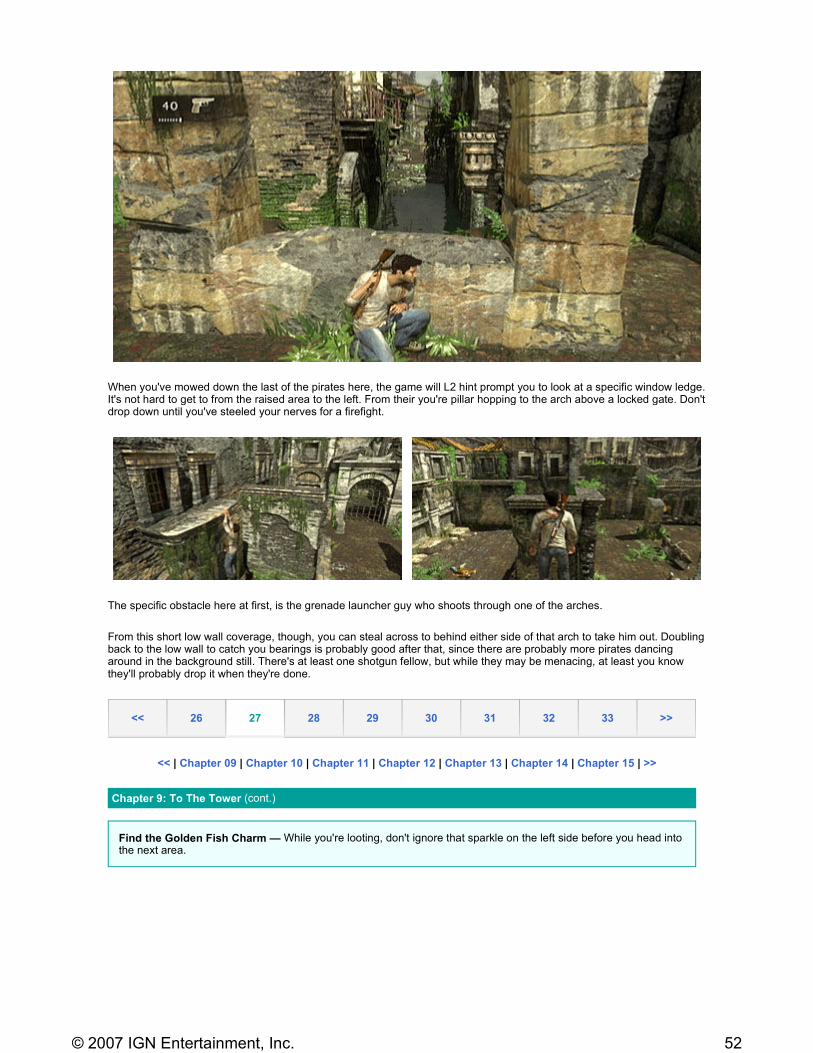
When you've mowed down the last of the pirates here, the game will L2 hint prompt you to look at a specific window ledge. It's not hard to get to from the raised area to the left. From their you're pillar hopping to the arch above a locked gate. Don't drop down until you've steeled your nerves for a firefight.
The specific obstacle here at first, is the grenade launcher guy who shoots through one of the arches.
From this short low wall coverage, though, you can steal across to behind either side of that arch to take him out. Doubling back to the low wall to catch you bearings is probably good after that, since there are probably more pirates dancing around in the background still. There's at least one shotgun fellow, but while they may be menacing, at least you know they'll probably drop it when they're done.
<< | Chapter 09 | Chapter 10 | Chapter 11 | Chapter 12 | Chapter 13 | Chapter 14 | Chapter 15 | >>
<< 26 27 28 29 30 31 32 33 >>
Chapter 9: To The Tower (cont.)
Find the Golden Fish Charm — While you're looting, don't ignore that sparkle on the left side before you head into the next area.
52© 2007 IGN Entertainment, Inc.
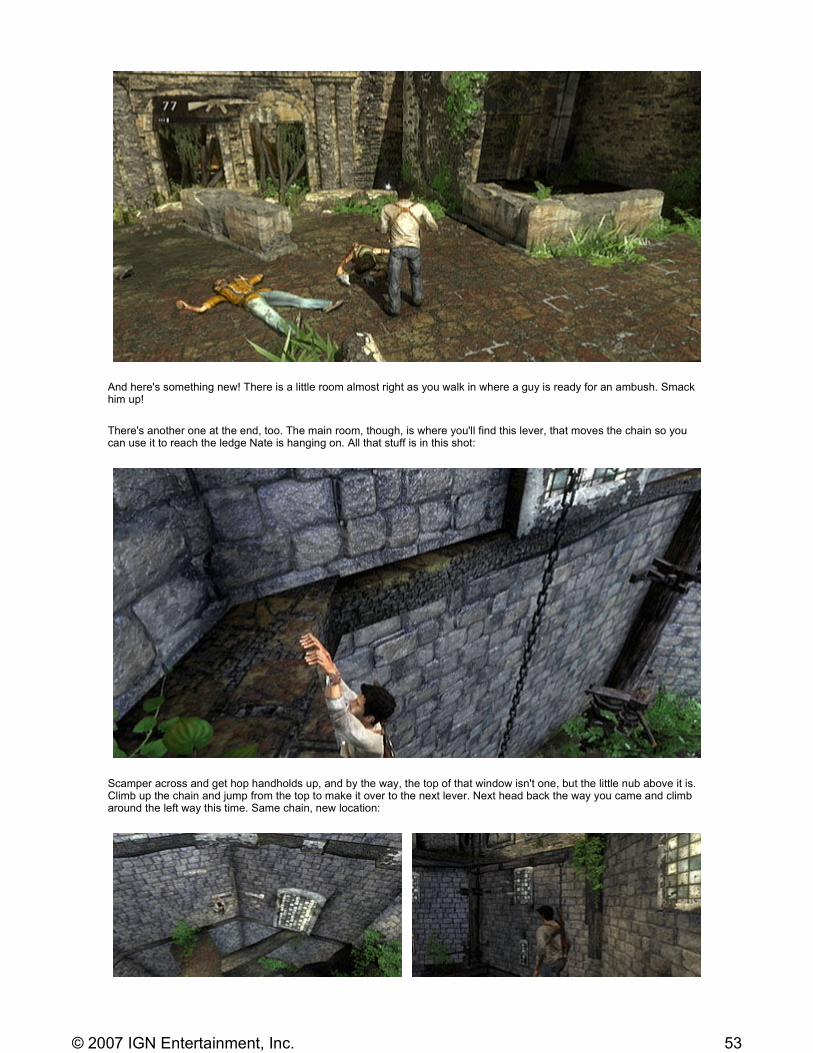
And here's something new! There is a little room almost right as you walk in where a guy is ready for an ambush. Smack him up!
There's another one at the end, too. The main room, though, is where you'll find this lever, that moves the chain so you can use it to reach the ledge Nate is hanging on. All that stuff is in this shot:
Scamper across and get hop handholds up, and by the way, the top of that window isn't one, but the little nub above it is. Climb up the chain and jump from the top to make it over to the next lever. Next head back the way you came and climb around the left way this time. Same chain, new location:
53© 2007 IGN Entertainment, Inc.
For some reason that jump is really tricky, but it's definitely what you'll need to do. Climb all the way up the rope before trying to jump for the handhold to the left. Pirates on the next floor, but there's a big nice chunk of wall for cover. There aren't any guardrails as you head up these stairs and walk across these decrepit floors, so take it easy or Nate'll plummet to his doom. Take the zipline instead. Then head down the stairs to pick up Elena and...
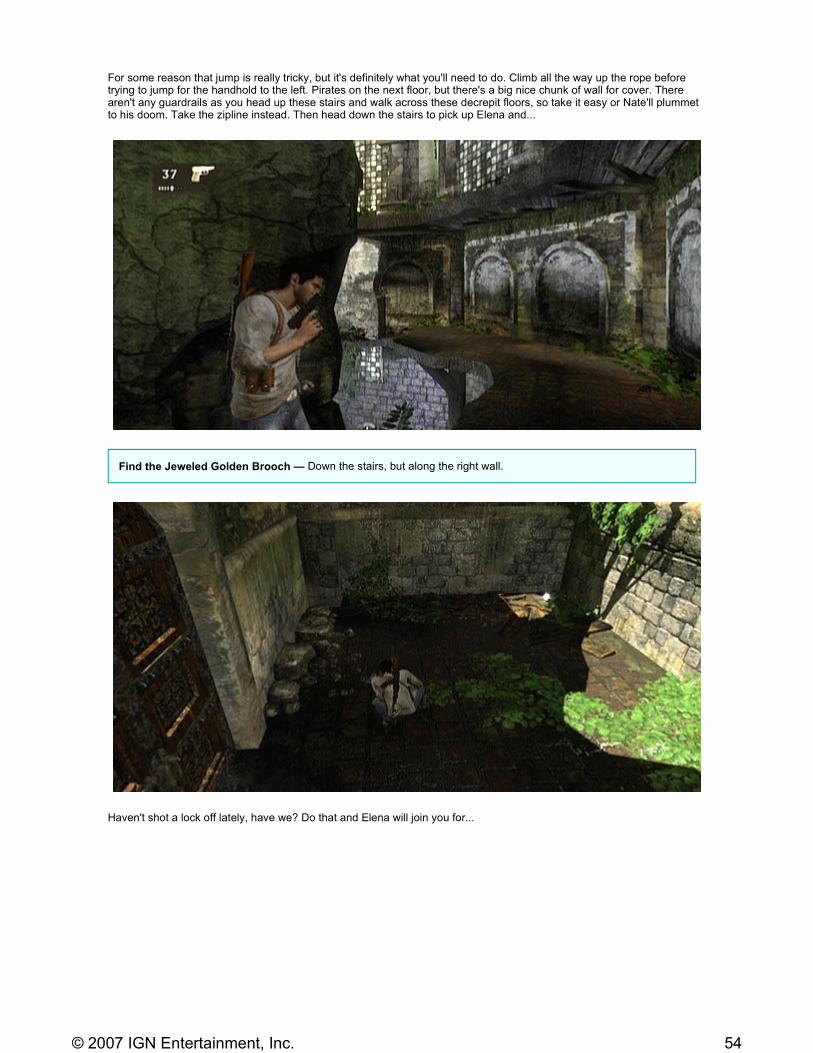
Haven't shot a lock off lately, have we? Do that and Elena will join you for...
Find the Jeweled Golden Brooch — Down the stairs, but along the right wall.
54© 2007 IGN Entertainment, Inc.
<< | Chapter 09 | Chapter 10 | Chapter 11 | Chapter 12 | Chapter 13 | Chapter 14 | Chapter 15 | >>
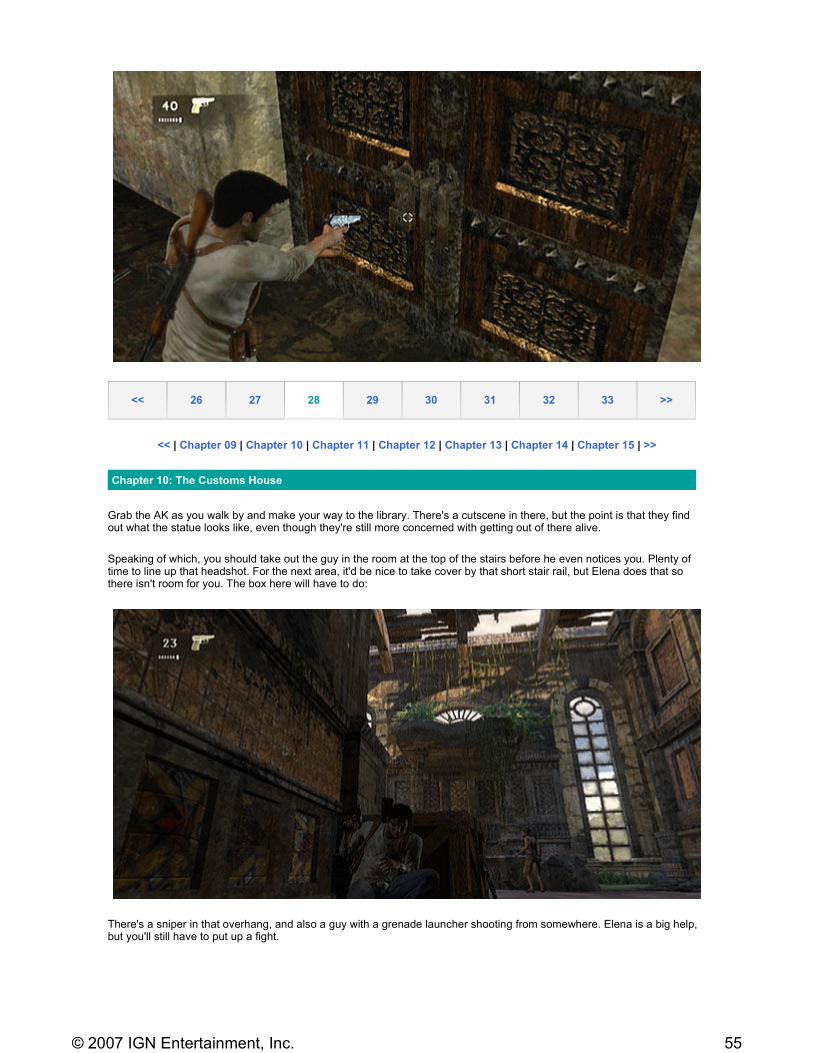
Grab the AK as you walk by and make your way to the library. There's a cutscene in there, but the point is that they find out what the statue looks like, even though they're still more concerned with getting out of there alive.
Speaking of which, you should take out the guy in the room at the top of the stairs before he even notices you. Plenty of time to line up that headshot. For the next area, it'd be nice to take cover by that short stair rail, but Elena does that so there isn't room for you. The box here will have to do:
There's a sniper in that overhang, and also a guy with a grenade launcher shooting from somewhere. Elena is a big help, but you'll still have to put up a fight.
<< 26 27 28 29 30 31 32 33 >>
Chapter 10: The Customs House
55© 2007 IGN Entertainment, Inc.
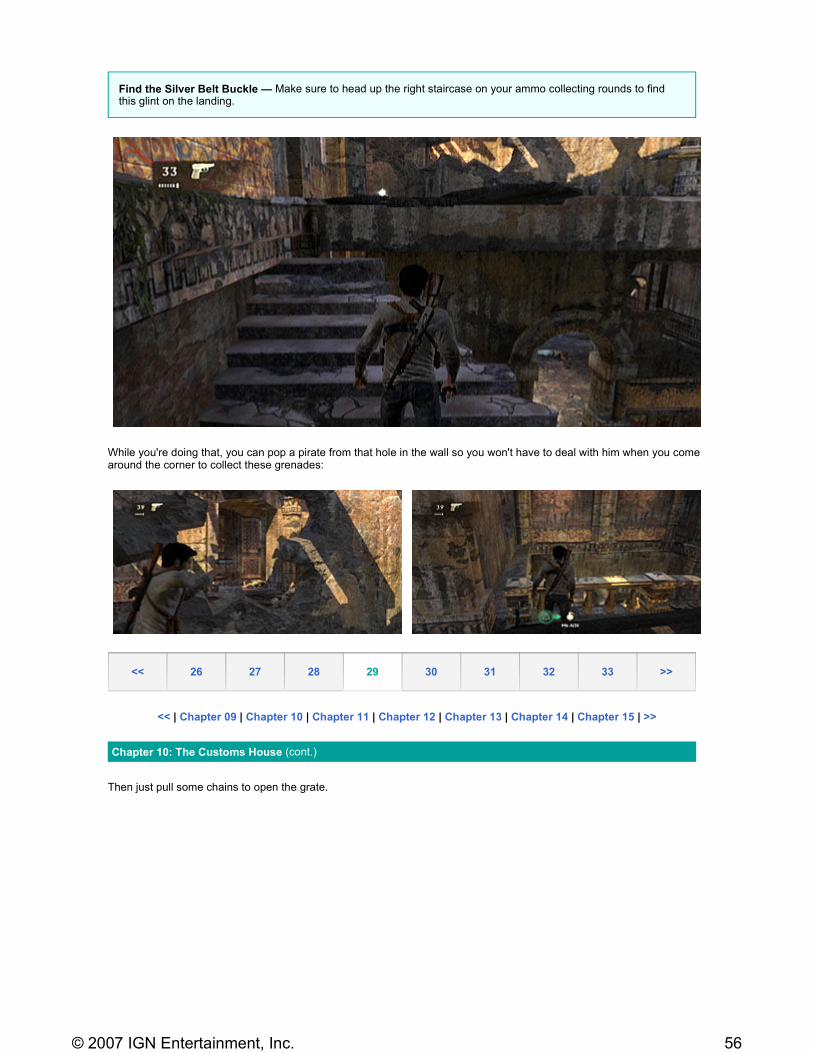
While you're doing that, you can pop a pirate from that hole in the wall so you won't have to deal with him when you come around the corner to collect these grenades:
<< | Chapter 09 | Chapter 10 | Chapter 11 | Chapter 12 | Chapter 13 | Chapter 14 | Chapter 15 | >>
Then just pull some chains to open the grate.
Find the Silver Belt Buckle — Make sure to head up the right staircase on your ammo collecting rounds to find this glint on the landing.
<< 26 27 28 29 30 31 32 33 >>
Chapter 10: The Customs House (cont.)
56© 2007 IGN Entertainment, Inc.
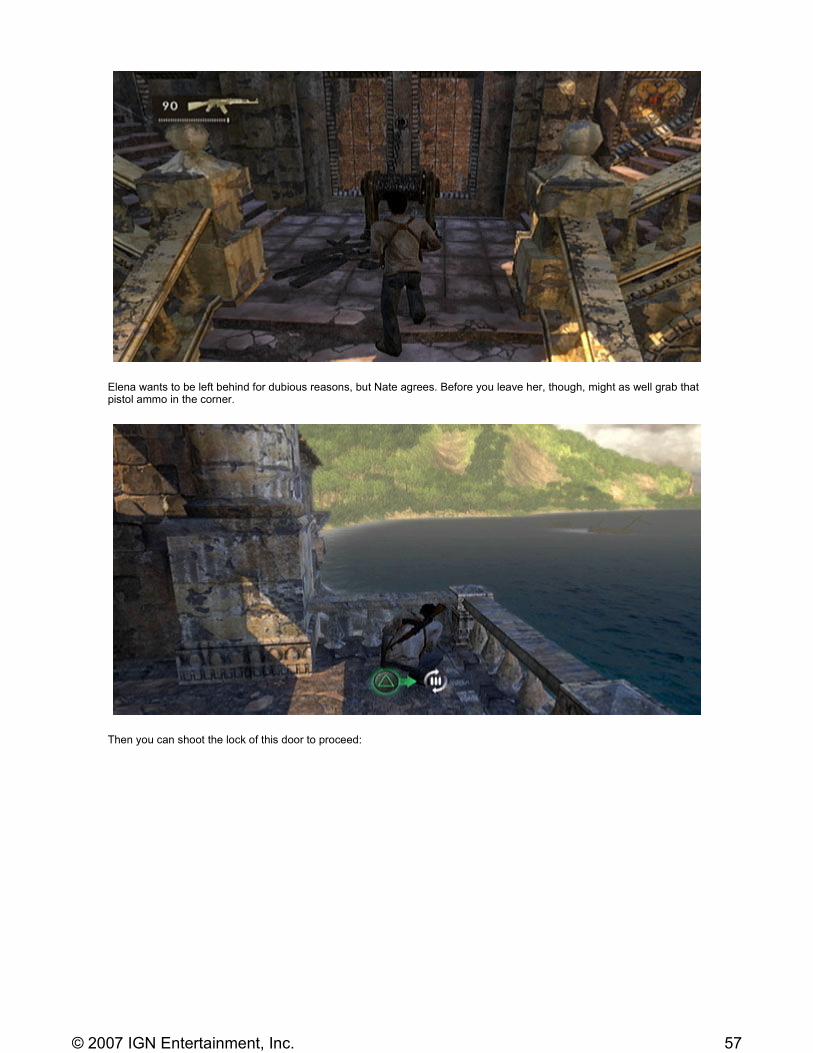
Elena wants to be left behind for dubious reasons, but Nate agrees. Before you leave her, though, might as well grab that pistol ammo in the corner.
Then you can shoot the lock of this door to proceed:
57© 2007 IGN Entertainment, Inc.

Yay for quick-time events! Nate slips on the ledge, so you'll have to push X to get him back on his feet before he falls.
When you continue jumping across some pirates will start shooting you from inside and across the way. There's even a grenade launcher, so you'll want to grab the best cover you can and take care of them instead of trying to just run. To deal with these doors, just shoot the padlock and they'll fall out.
Make that long jump and pull more chains to finish the level.
<< | Chapter 09 | Chapter 10 | Chapter 11 | Chapter 12 | Chapter 13 | Chapter 14 | Chapter 15 | >>
That title is not an understatement. This next area throws guys at you from all angles, plus there's a turret to deal with. Worse, there's no way to get a head-start, since they all somehow show up as you come down the stairs. On second though, don't even go down the stairs, just walk forward like you are going to and jump off before turning. There is a
<< 26 27 28 29 30 31 32 33 >>
Chapter 11: Trapped
58© 2007 IGN Entertainment, Inc.
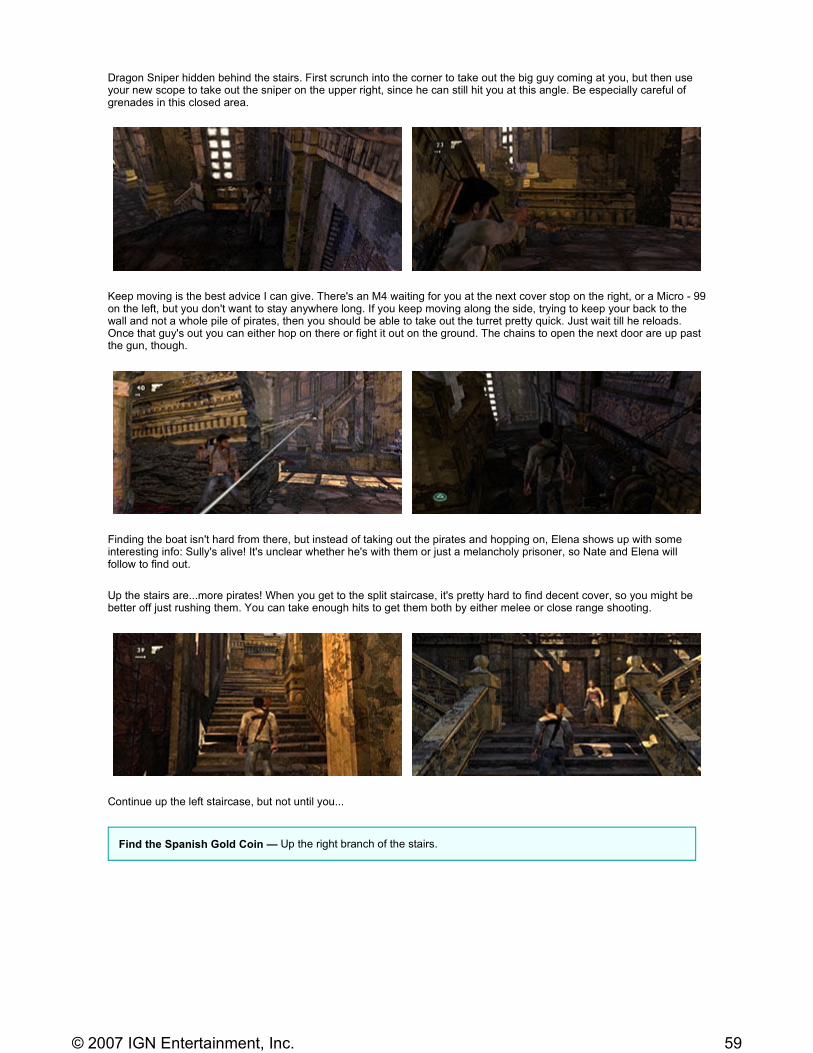
Dragon Sniper hidden behind the stairs. First scrunch into the corner to take out the big guy coming at you, but then use your new scope to take out the sniper on the upper right, since he can still hit you at this angle. Be especially careful of grenades in this closed area.
Keep moving is the best advice I can give. There's an M4 waiting for you at the next cover stop on the right, or a Micro - 99 on the left, but you don't want to stay anywhere long. If you keep moving along the side, trying to keep your back to the wall and not a whole pile of pirates, then you should be able to take out the turret pretty quick. Just wait till he reloads. Once that guy's out you can either hop on there or fight it out on the ground. The chains to open the next door are up past the gun, though.
Finding the boat isn't hard from there, but instead of taking out the pirates and hopping on, Elena shows up with some interesting info: Sully's alive! It's unclear whether he's with them or just a melancholy prisoner, so Nate and Elena will follow to find out.
Up the stairs are...more pirates! When you get to the split staircase, it's pretty hard to find decent cover, so you might be better off just rushing them. You can take enough hits to get them both by either melee or close range shooting.
Continue up the left staircase, but not until you...
Find the Spanish Gold Coin — Up the right branch of the stairs.
59© 2007 IGN Entertainment, Inc.
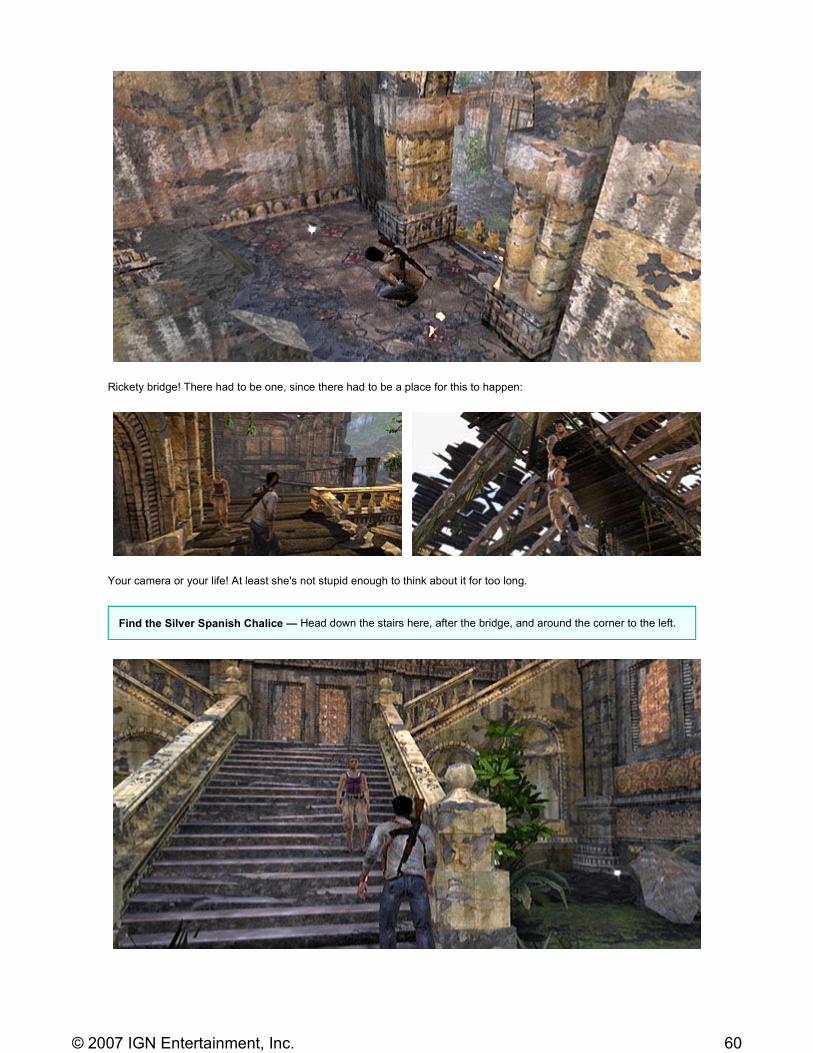
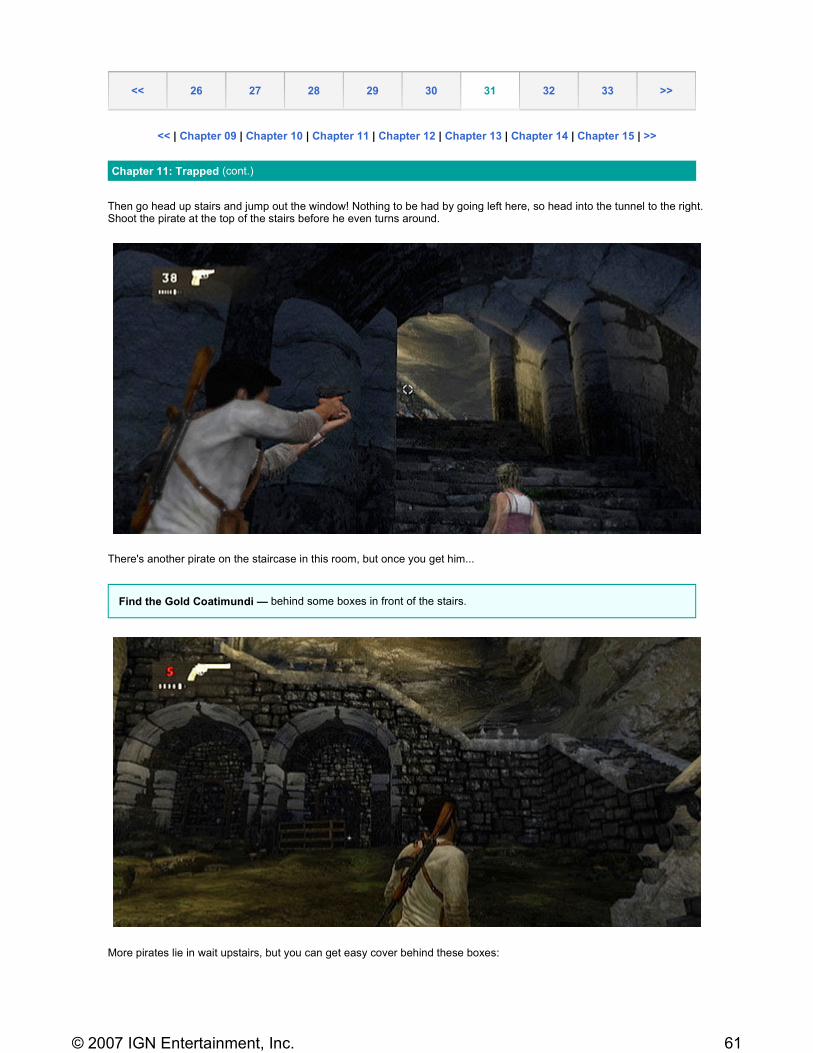
Rickety bridge! There had to be one, since there had to be a place for this to happen:
Your camera or your life! At least she's not stupid enough to think about it for too long.
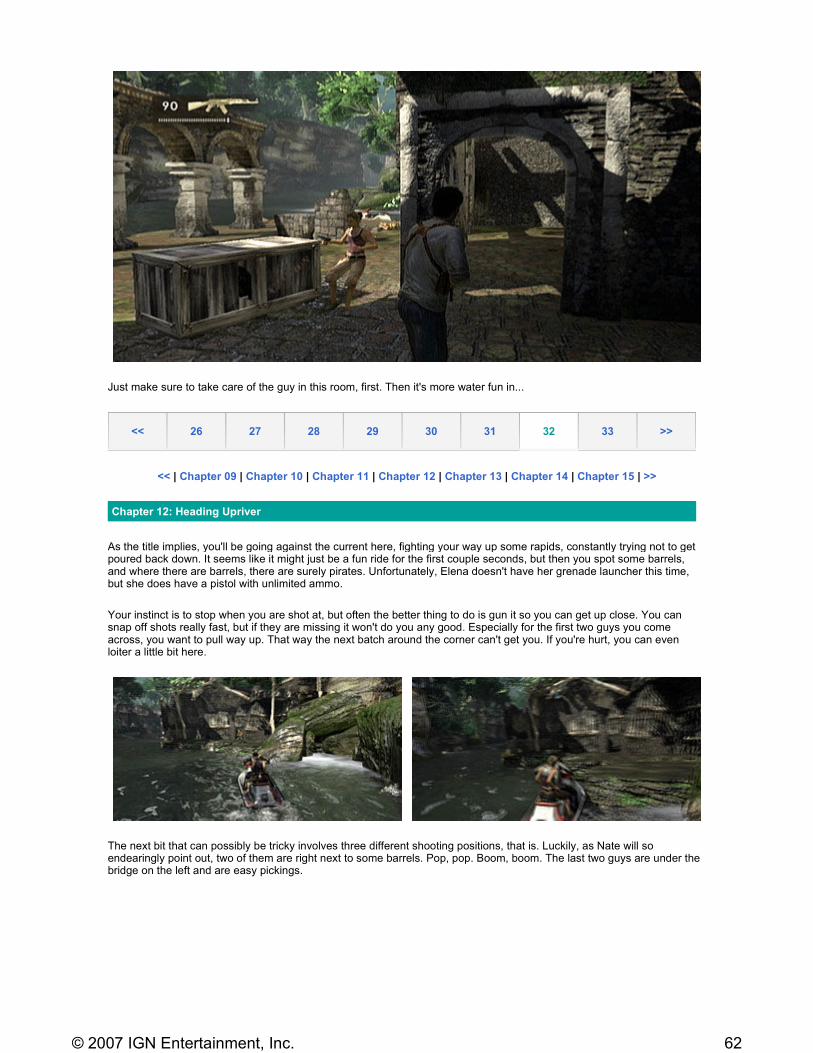
Find the Silver Spanish Chalice — Head down the stairs here, after the bridge, and around the corner to the left.
60© 2007 IGN Entertainment, Inc.
<< | Chapter 09 | Chapter 10 | Chapter 11 | Chapter 12 | Chapter 13 | Chapter 14 | Chapter 15 | >>
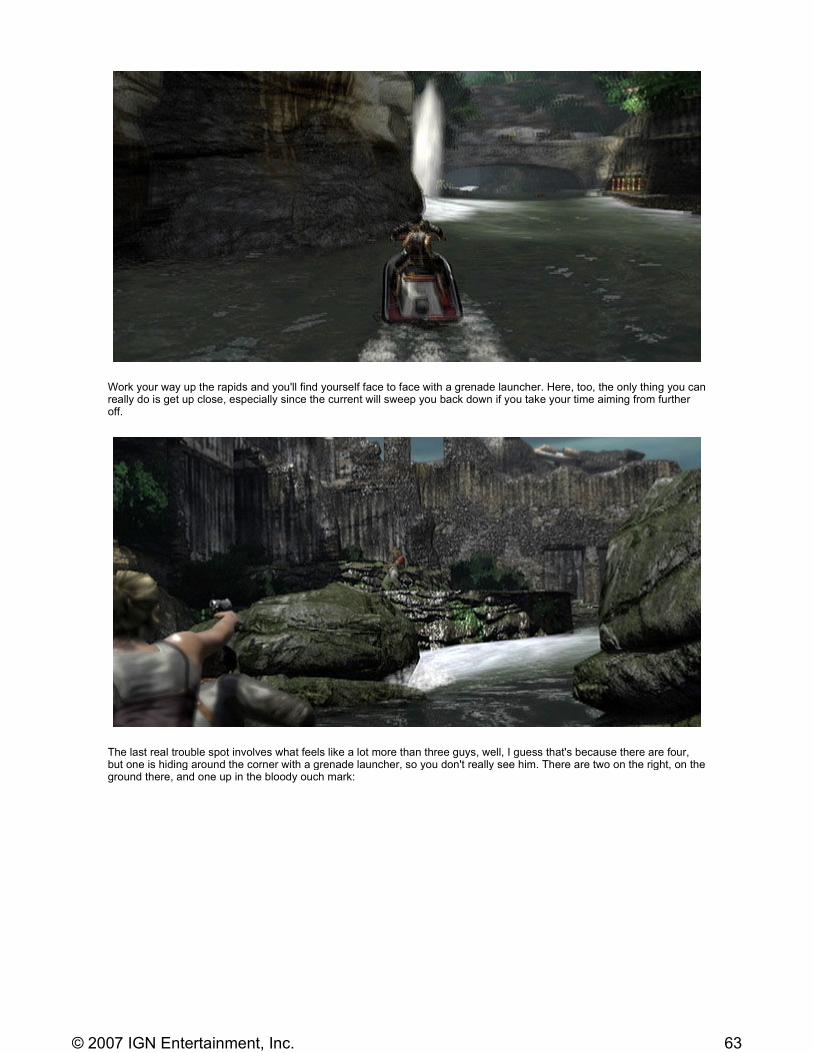
Then go head up stairs and jump out the window! Nothing to be had by going left here, so head into the tunnel to the right. Shoot the pirate at the top of the stairs before he even turns around.
There's another pirate on the staircase in this room, but once you get him...
More pirates lie in wait upstairs, but you can get easy cover behind these boxes:
<< 26 27 28 29 30 31 32 33 >>
Chapter 11: Trapped (cont.)
Find the Gold Coatimundi — behind some boxes in front of the stairs.
61© 2007 IGN Entertainment, Inc.
Just make sure to take care of the guy in this room, first. Then it's more water fun in...
<< | Chapter 09 | Chapter 10 | Chapter 11 | Chapter 12 | Chapter 13 | Chapter 14 | Chapter 15 | >>
As the title implies, you'll be going against the current here, fighting your way up some rapids, constantly trying not to get poured back down. It seems like it might just be a fun ride for the first couple seconds, but then you spot some barrels, and where there are barrels, there are surely pirates. Unfortunately, Elena doesn't have her grenade launcher this time, but she does have a pistol with unlimited ammo.
Your instinct is to stop when you are shot at, but often the better thing to do is gun it so you can get up close. You can snap off shots really fast, but if they are missing it won't do you any good. Especially for the first two guys you come across, you want to pull way up. That way the next batch around the corner can't get you. If you're hurt, you can even loiter a little bit here.
The next bit that can possibly be tricky involves three different shooting positions, that is. Luckily, as Nate will so endearingly point out, two of them are right next to some barrels. Pop, pop. Boom, boom. The last two guys are under the bridge on the left and are easy pickings.
<< 26 27 28 29 30 31 32 33 >>
Chapter 12: Heading Upriver
62© 2007 IGN Entertainment, Inc.
Work your way up the rapids and you'll find yourself face to face with a grenade launcher. Here, too, the only thing you can really do is get up close, especially since the current will sweep you back down if you take your time aiming from further off.
The last real trouble spot involves what feels like a lot more than three guys, well, I guess that's because there are four, but one is hiding around the corner with a grenade launcher, so you don't really see him. There are two on the right, on the ground there, and one up in the bloody ouch mark:
63© 2007 IGN Entertainment, Inc.

The third is almost directly above you on the left, so make sure you hit him before you go around the corner to deal with grenade guy:
After that you're home free. Just gun it through one of those arches and head through the tunnel to disembark near the monastery.
64© 2007 IGN Entertainment, Inc.
<< | Chapter 09 | Chapter 10 | Chapter 11 | Chapter 12 | Chapter 13 | Chapter 14 | Chapter 15 | >>
Kick open the wooden door in the room at the top of the stairs and take cover in the doorway quick, since there are guys waiting.
Then just kick the old metal gate off the door to keep going. Not much to see until you catch up with Elena, so just hike up the stairs. Eek! Another booby trap, except this time it's made at least partially out of...your crashed airplane? What the freak? It's a little eerie, but you'll have to just keep pushing on. Slightly off the beaten path there is a 92FS - 9mm—a better pistol. Is it also a clue?
<< 26 27 28 29 30 31 32 33 >>
Chapter 13: Sanctuary?
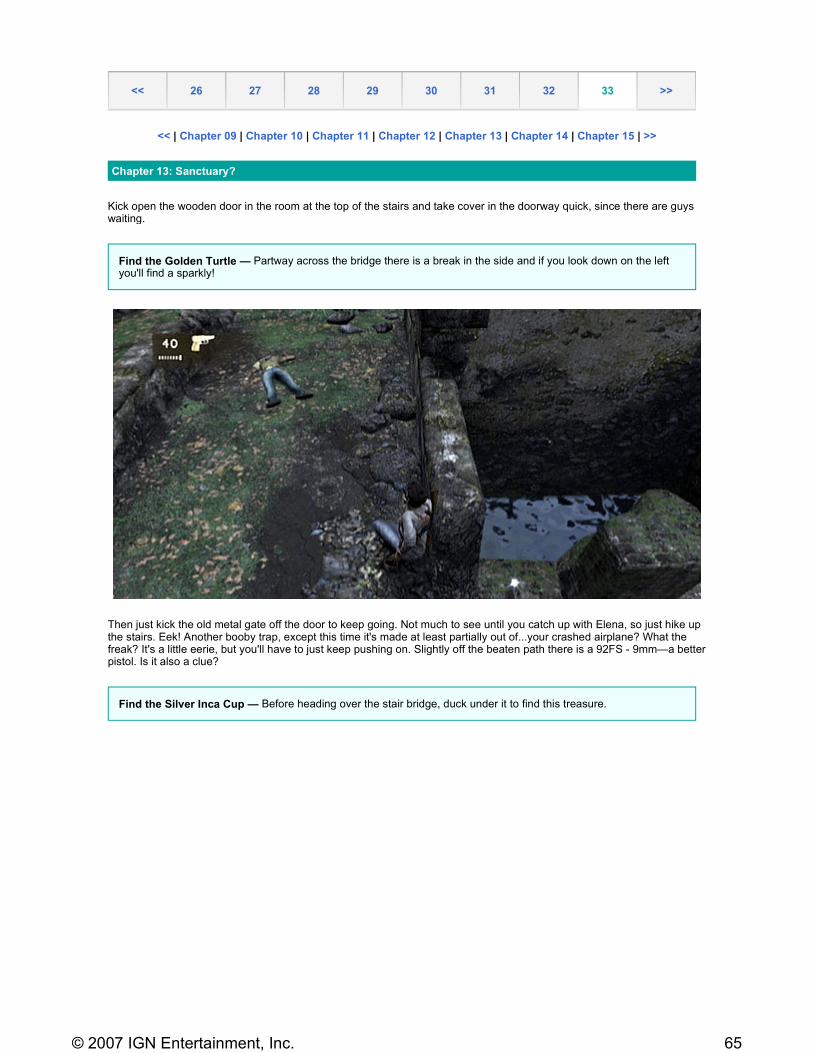
Find the Golden Turtle — Partway across the bridge there is a break in the side and if you look down on the left you'll find a sparkly!
Find the Silver Inca Cup — Before heading over the stair bridge, duck under it to find this treasure.
65© 2007 IGN Entertainment, Inc.
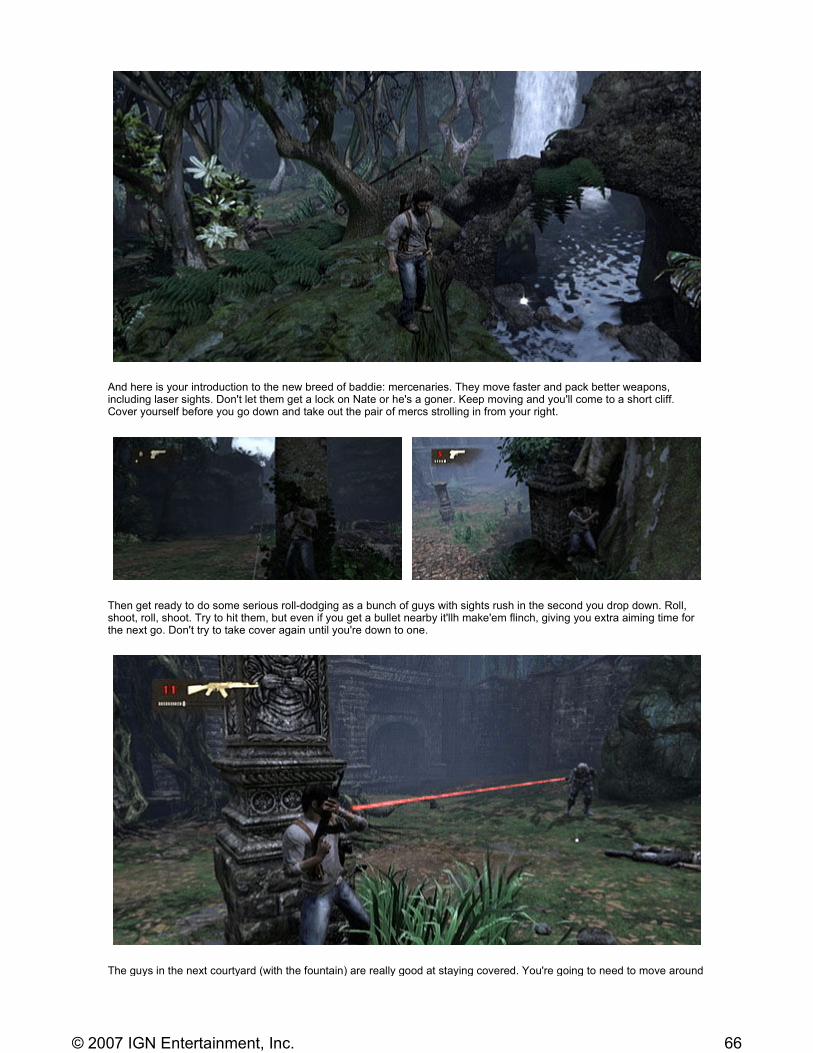
And here is your introduction to the new breed of baddie: mercenaries. They move faster and pack better weapons, including laser sights. Don't let them get a lock on Nate or he's a goner. Keep moving and you'll come to a short cliff. Cover yourself before you go down and take out the pair of mercs strolling in from your right.
Then get ready to do some serious roll-dodging as a bunch of guys with sights rush in the second you drop down. Roll, shoot, roll, shoot. Try to hit them, but even if you get a bullet nearby it'llh make'em flinch, giving you extra aiming time for the next go. Don't try to take cover again until you're down to one.
The guys in the next courtyard (with the fountain) are really good at staying covered. You're going to need to move around
66© 2007 IGN Entertainment, Inc.
a bit to get them all. At least one has a laser sight and at least one other as a new more power shotgun: the SAS-12. Once the area is cleared out, head upstairs to find a way around.
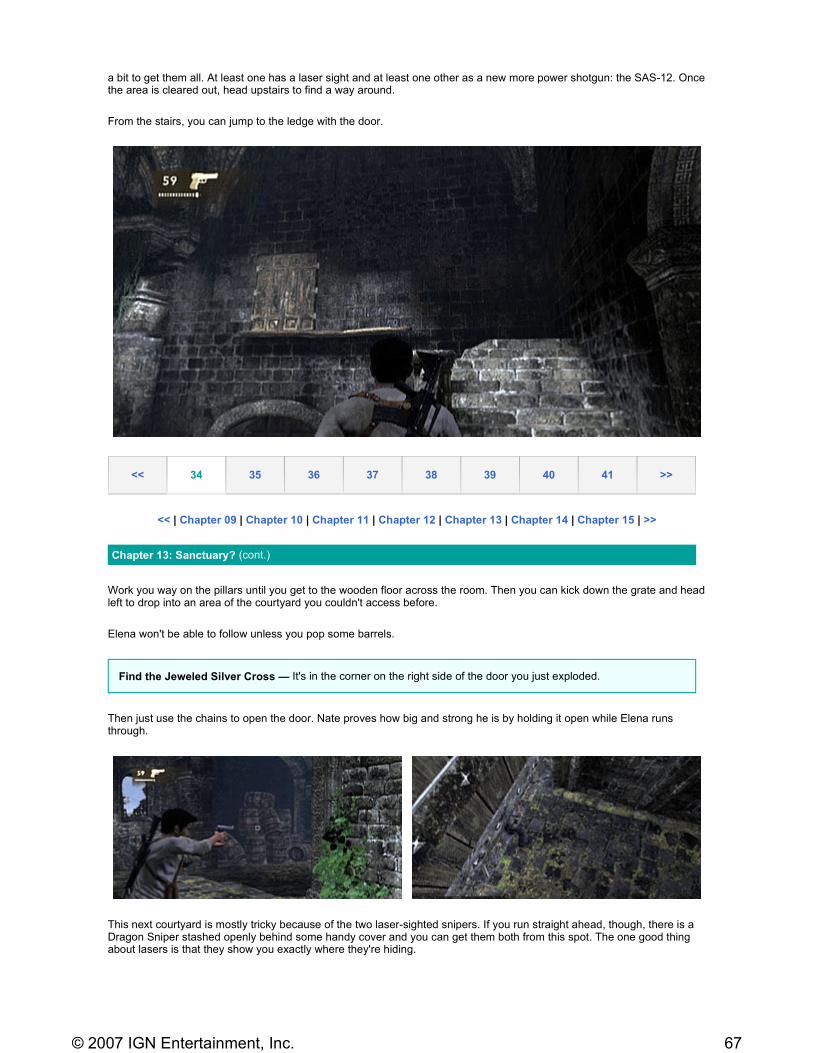
From the stairs, you can jump to the ledge with the door.
<< | Chapter 09 | Chapter 10 | Chapter 11 | Chapter 12 | Chapter 13 | Chapter 14 | Chapter 15 | >>
Work you way on the pillars until you get to the wooden floor across the room. Then you can kick down the grate and head left to drop into an area of the courtyard you couldn't access before.
Elena won't be able to follow unless you pop some barrels.
Then just use the chains to open the door. Nate proves how big and strong he is by holding it open while Elena runs through.
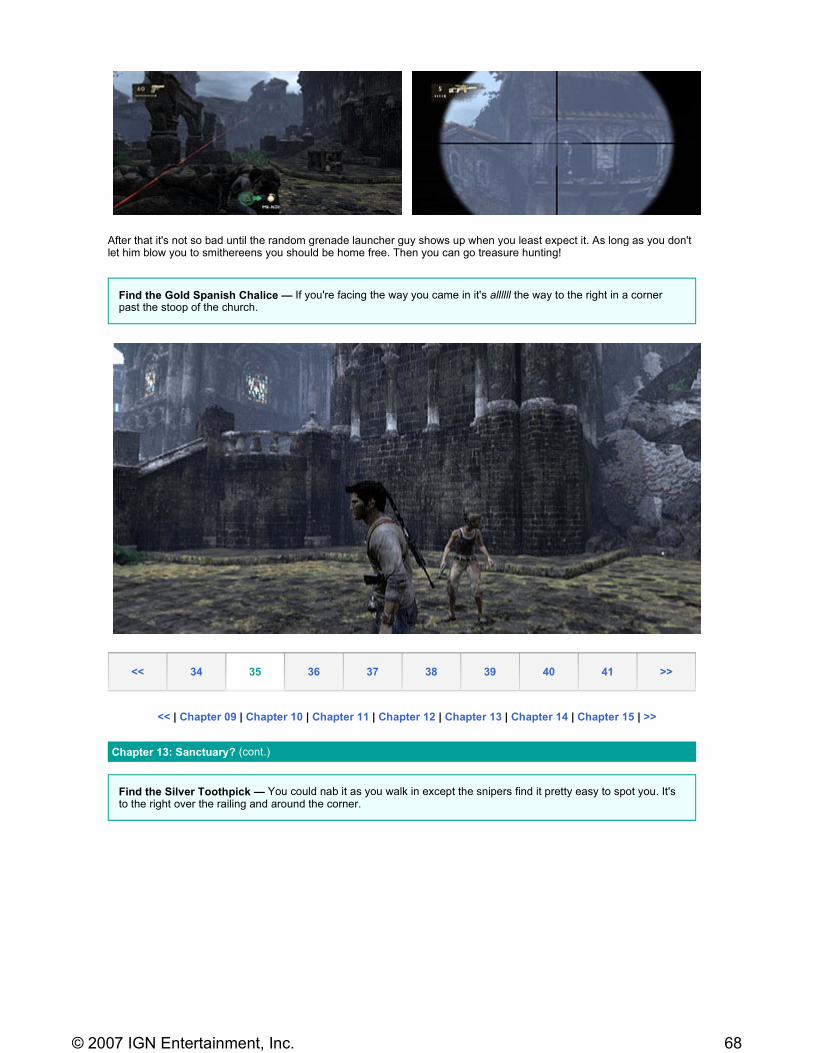
This next courtyard is mostly tricky because of the two laser-sighted snipers. If you run straight ahead, though, there is a Dragon Sniper stashed openly behind some handy cover and you can get them both from this spot. The one good thing about lasers is that they show you exactly where they're hiding.
<< 34 35 36 37 38 39 40 41 >>
Chapter 13: Sanctuary? (cont.)
Find the Jeweled Silver Cross — It's in the corner on the right side of the door you just exploded.
67© 2007 IGN Entertainment, Inc.
After that it's not so bad until the random grenade launcher guy shows up when you least expect it. As long as you don't let him blow you to smithereens you should be home free. Then you can go treasure hunting!
<< | Chapter 09 | Chapter 10 | Chapter 11 | Chapter 12 | Chapter 13 | Chapter 14 | Chapter 15 | >>
Find the Gold Spanish Chalice — If you're facing the way you came in it's allllll the way to the right in a corner past the stoop of the church.
<< 34 35 36 37 38 39 40 41 >>
Chapter 13: Sanctuary? (cont.)
Find the Silver Toothpick — You could nab it as you walk in except the snipers find it pretty easy to spot you. It's to the right over the railing and around the corner.
68© 2007 IGN Entertainment, Inc.
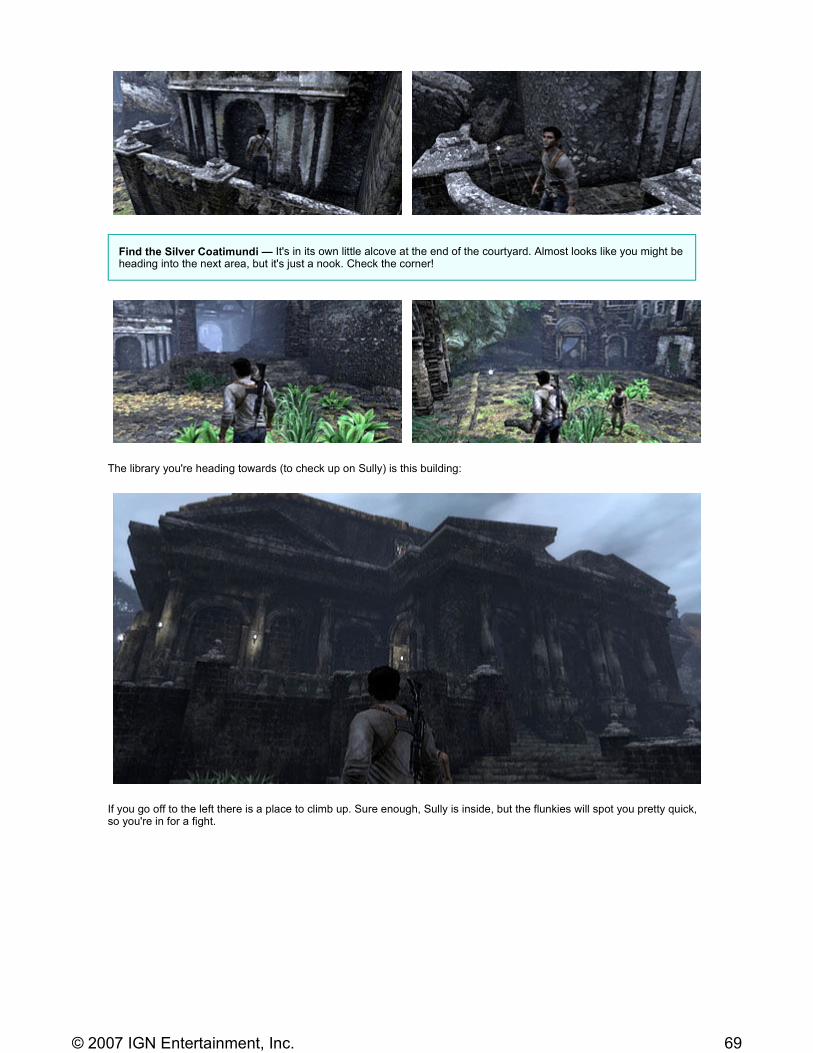
The library you're heading towards (to check up on Sully) is this building:
If you go off to the left there is a place to climb up. Sure enough, Sully is inside, but the flunkies will spot you pretty quick, so you're in for a fight.
Find the Silver Coatimundi — It's in its own little alcove at the end of the courtyard. Almost looks like you might be heading into the next area, but it's just a nook. Check the corner!
69© 2007 IGN Entertainment, Inc.
<< | Chapter 09 | Chapter 10 | Chapter 11 | Chapter 12 | Chapter 13 | Chapter 14 | Chapter 15 | >>
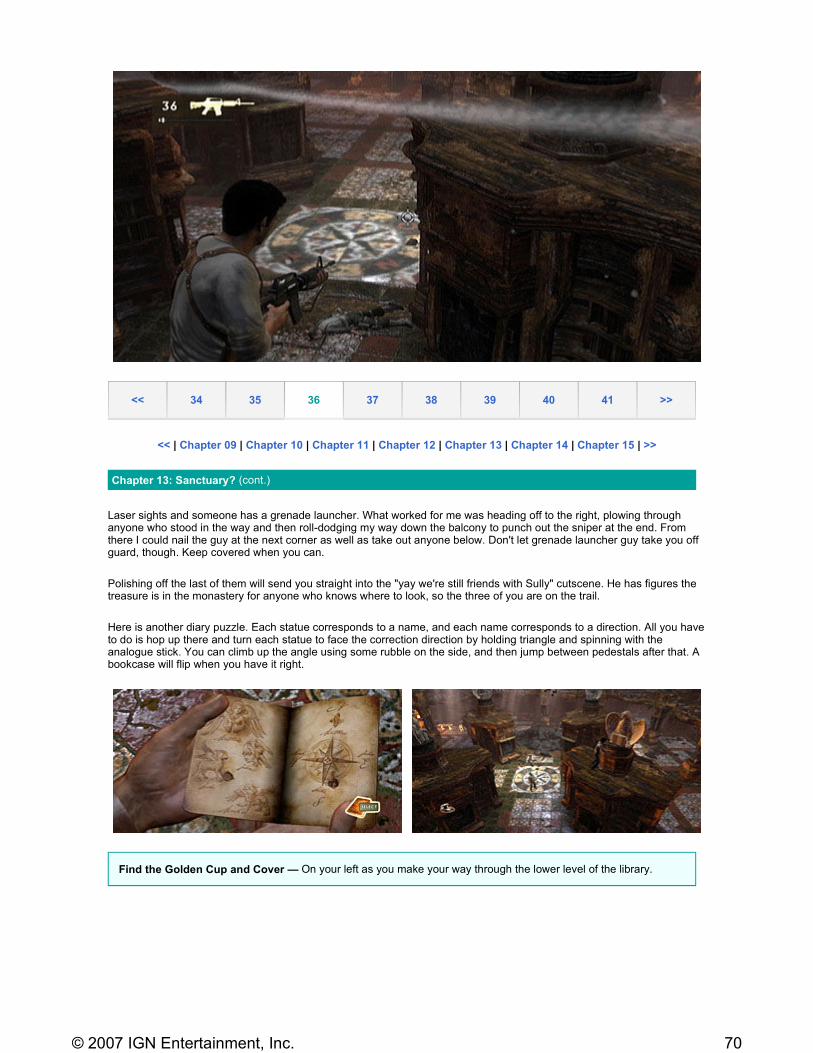
Laser sights and someone has a grenade launcher. What worked for me was heading off to the right, plowing through anyone who stood in the way and then roll-dodging my way down the balcony to punch out the sniper at the end. From there I could nail the guy at the next corner as well as take out anyone below. Don't let grenade launcher guy take you off guard, though. Keep covered when you can.
Polishing off the last of them will send you straight into the "yay we're still friends with Sully" cutscene. He has figures the treasure is in the monastery for anyone who knows where to look, so the three of you are on the trail.
Here is another diary puzzle. Each statue corresponds to a name, and each name corresponds to a direction. All you have to do is hop up there and turn each statue to face the correction direction by holding triangle and spinning with the analogue stick. You can climb up the angle using some rubble on the side, and then jump between pedestals after that. A bookcase will flip when you have it right.
<< 34 35 36 37 38 39 40 41 >>
Chapter 13: Sanctuary? (cont.)
Find the Golden Cup and Cover — On your left as you make your way through the lower level of the library.
70© 2007 IGN Entertainment, Inc.
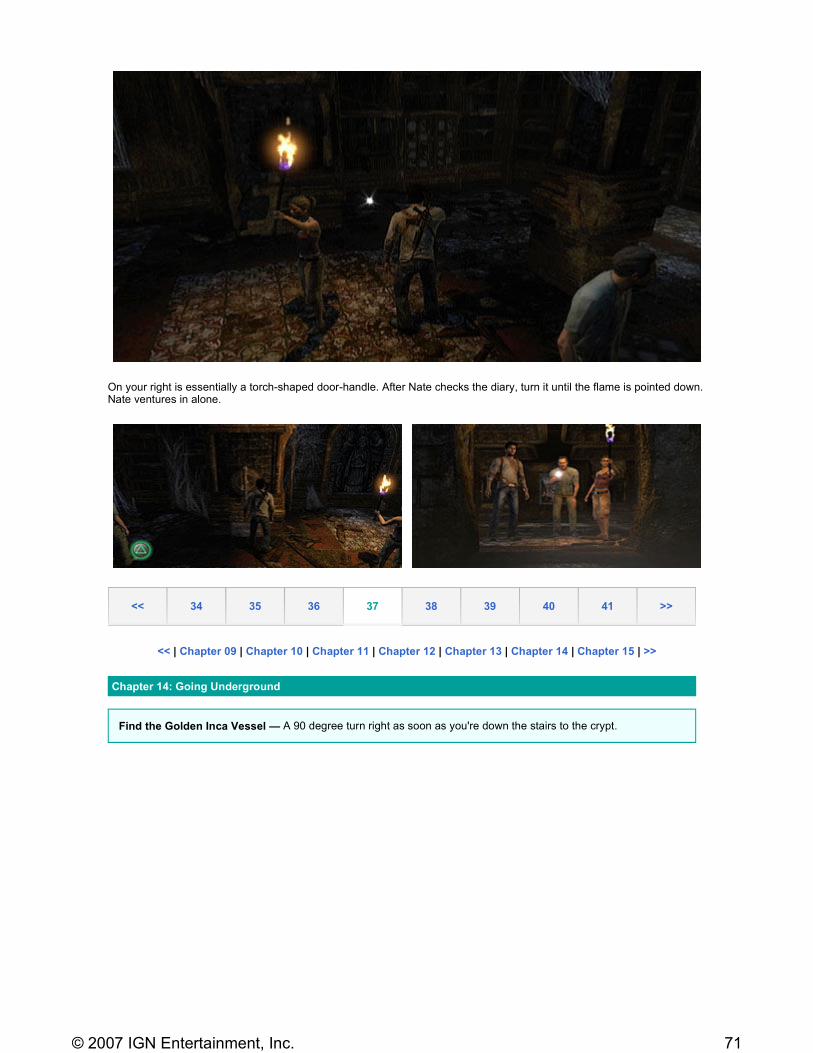
On your right is essentially a torch-shaped door-handle. After Nate checks the diary, turn it until the flame is pointed down. Nate ventures in alone.
<< | Chapter 09 | Chapter 10 | Chapter 11 | Chapter 12 | Chapter 13 | Chapter 14 | Chapter 15 | >>
<< 34 35 36 37 38 39 40 41 >>
Chapter 14: Going Underground
Find the Golden Inca Vessel — A 90 degree turn right as soon as you're down the stairs to the crypt.
71© 2007 IGN Entertainment, Inc.
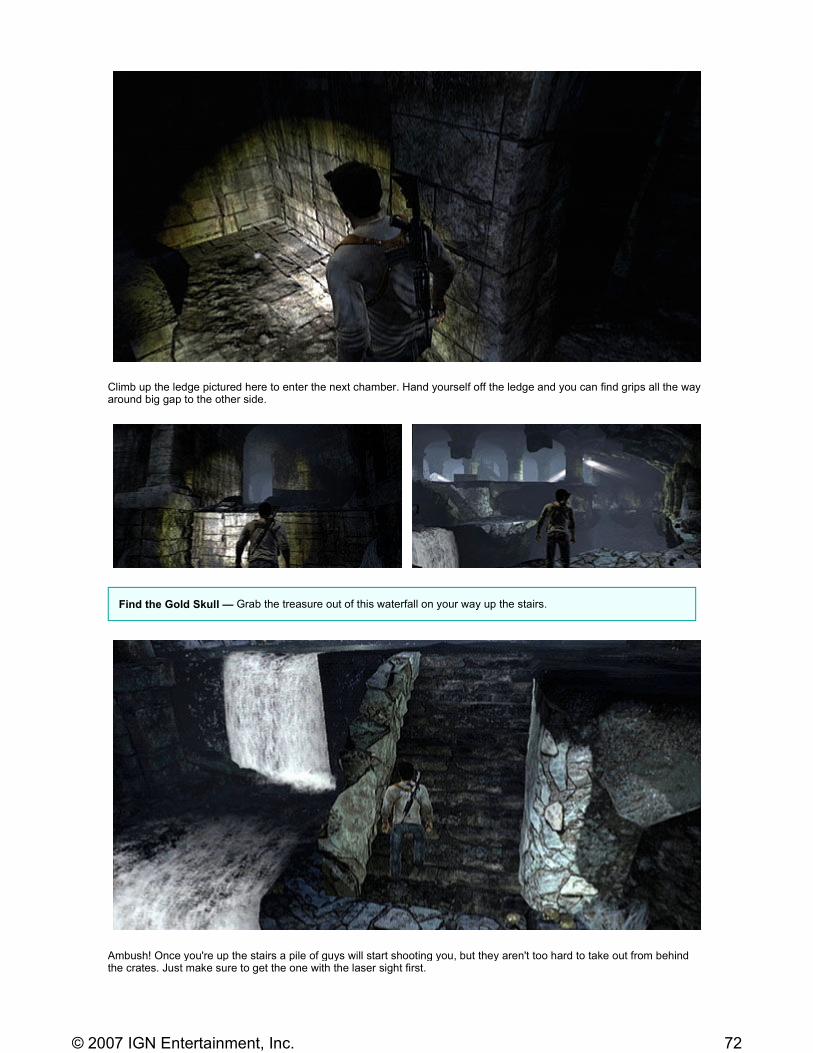
Climb up the ledge pictured here to enter the next chamber. Hand yourself off the ledge and you can find grips all the way around big gap to the other side.
Ambush! Once you're up the stairs a pile of guys will start shooting you, but they aren't too hard to take out from behind the crates. Just make sure to get the one with the laser sight first.
Find the Gold Skull — Grab the treasure out of this waterfall on your way up the stairs.
72© 2007 IGN Entertainment, Inc.
<< | Chapter 09 | Chapter 10 | Chapter 11 | Chapter 12 | Chapter 13 | Chapter 14 | Chapter 15 | >>
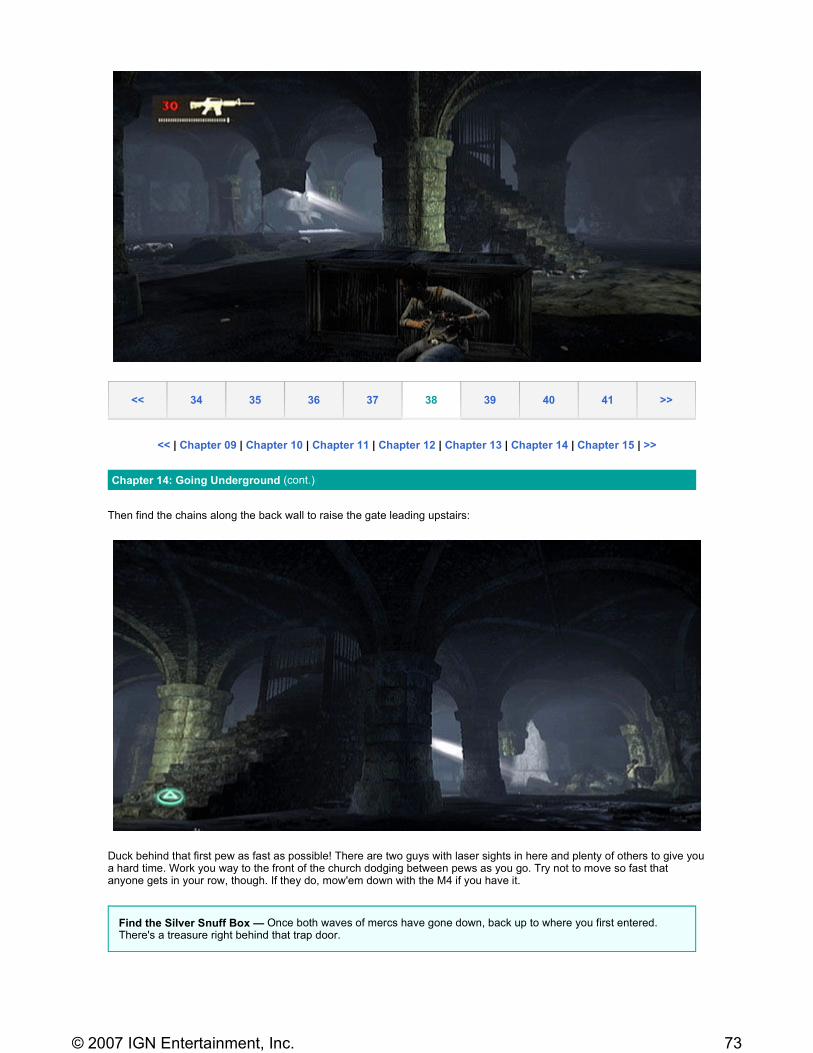
Then find the chains along the back wall to raise the gate leading upstairs:
Duck behind that first pew as fast as possible! There are two guys with laser sights in here and plenty of others to give you a hard time. Work you way to the front of the church dodging between pews as you go. Try not to move so fast that anyone gets in your row, though. If they do, mow'em down with the M4 if you have it.
<< 34 35 36 37 38 39 40 41 >>
Chapter 14: Going Underground (cont.)
Find the Silver Snuff Box — Once both waves of mercs have gone down, back up to where you first entered. There's a treasure right behind that trap door.
73© 2007 IGN Entertainment, Inc.
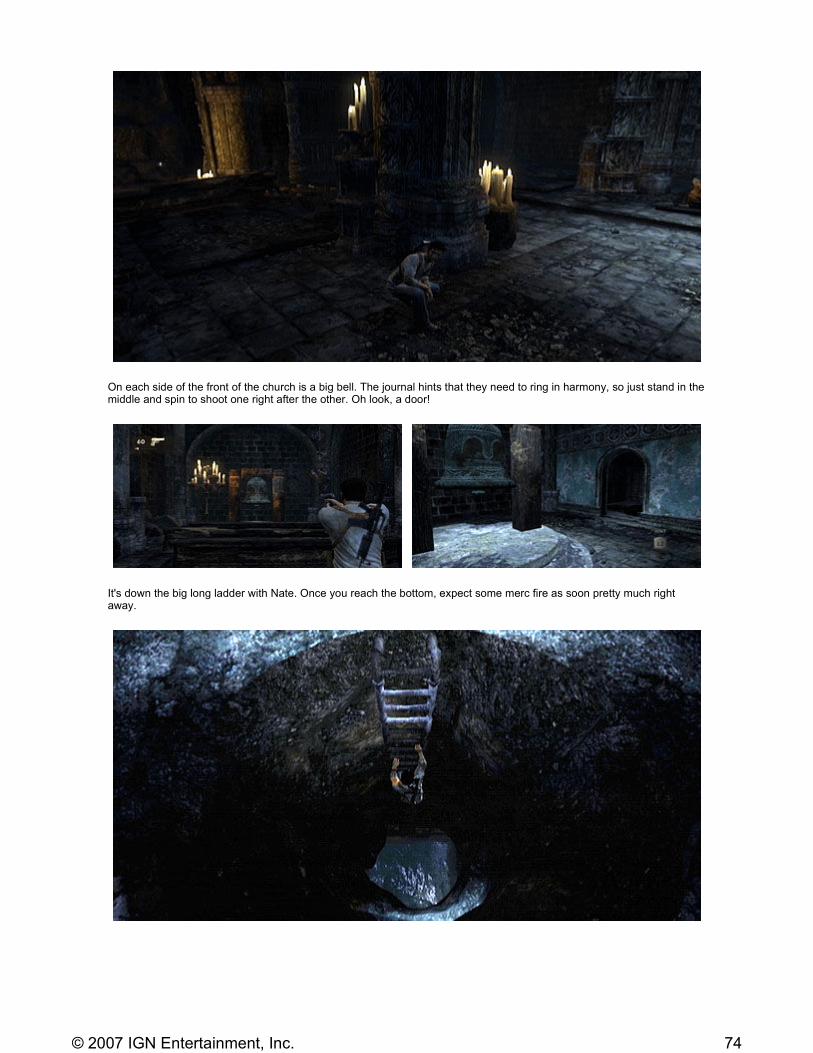
On each side of the front of the church is a big bell. The journal hints that they need to ring in harmony, so just stand in the middle and spin to shoot one right after the other. Oh look, a door!
It's down the big long ladder with Nate. Once you reach the bottom, expect some merc fire as soon pretty much right away.
74© 2007 IGN Entertainment, Inc.
<< | Chapter 09 | Chapter 10 | Chapter 11 | Chapter 12 | Chapter 13 | Chapter 14 | Chapter 15 | >>
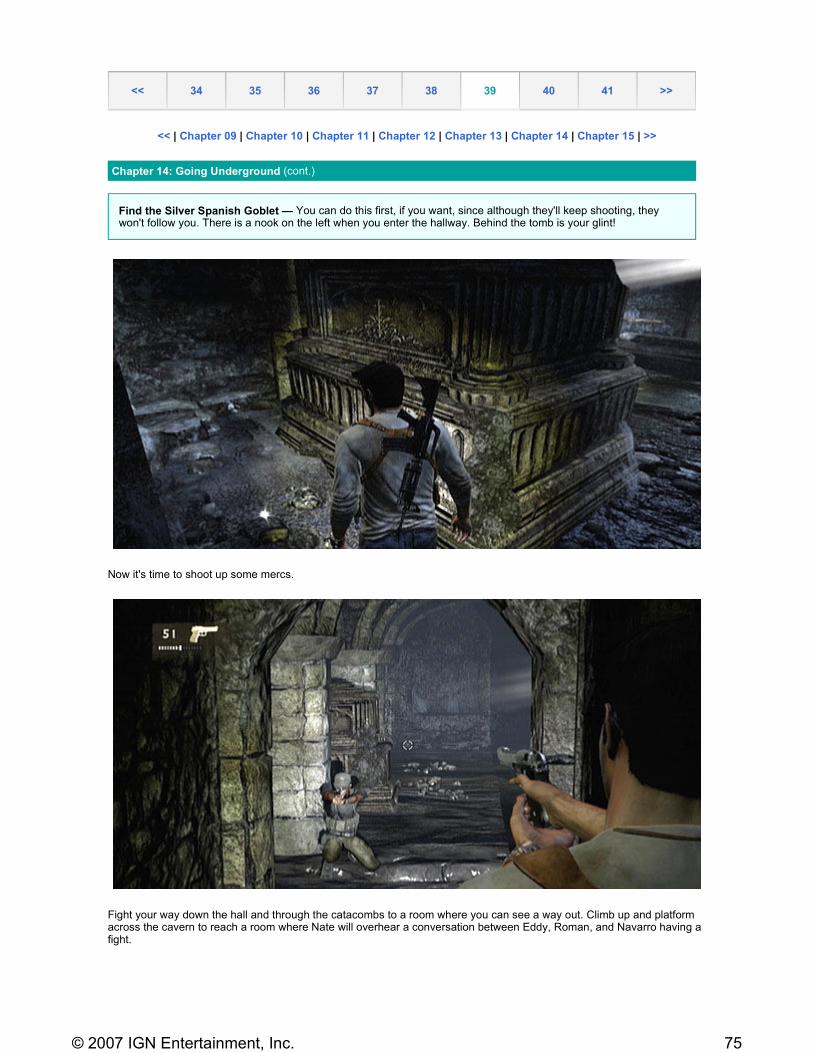
Now it's time to shoot up some mercs.
Fight your way down the hall and through the catacombs to a room where you can see a way out. Climb up and platform across the cavern to reach a room where Nate will overhear a conversation between Eddy, Roman, and Navarro having a fight.
<< 34 35 36 37 38 39 40 41 >>
Chapter 14: Going Underground (cont.)
Find the Silver Spanish Goblet — You can do this first, if you want, since although they'll keep shooting, they won't follow you. There is a nook on the left when you enter the hallway. Behind the tomb is your glint!
75© 2007 IGN Entertainment, Inc.
From there head out the other door, hop across the gap and come down the stairs.
Almost out! Cut through the next room and head up some stairs where there are some chains to wind.
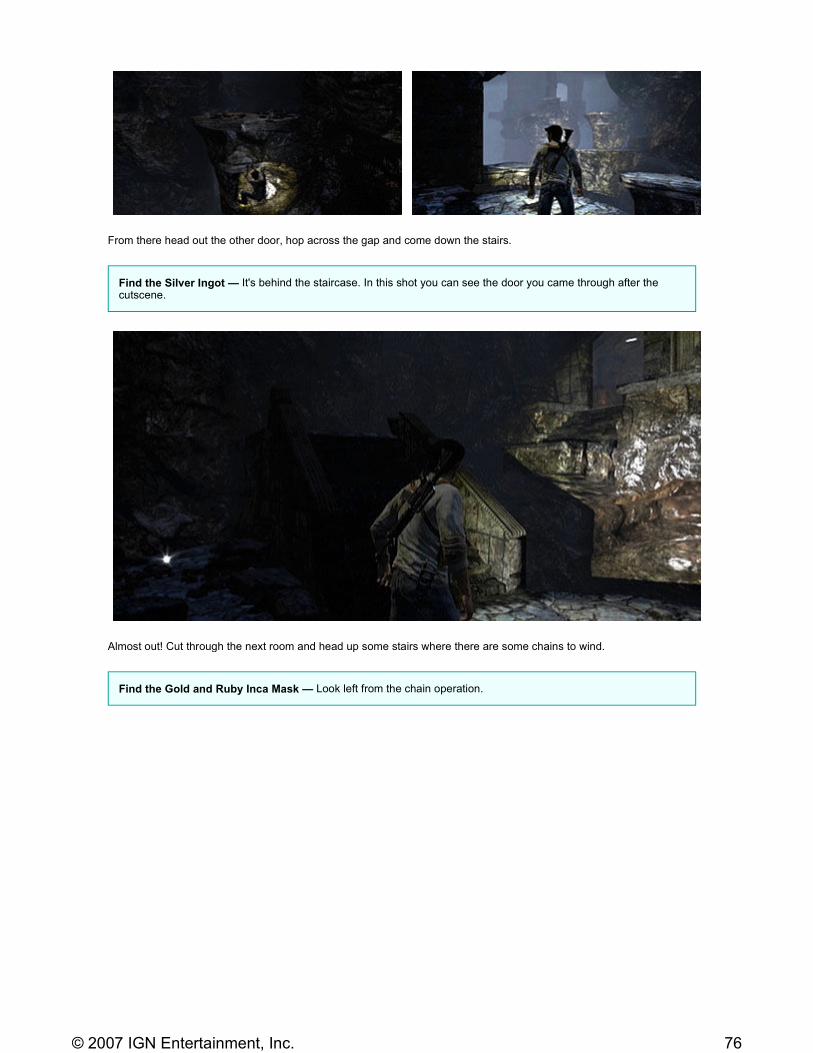
Find the Silver Ingot — It's behind the staircase. In this shot you can see the door you came through after the cutscene.
Find the Gold and Ruby Inca Mask — Look left from the chain operation.
76© 2007 IGN Entertainment, Inc.

<< | Chapter 09 | Chapter 10 | Chapter 11 | Chapter 12 | Chapter 13 | Chapter 14 | Chapter 15 | >>
The door is to the right, but it's locked, so you'll head left and do some climbing.
<< 34 35 36 37 38 39 40 41 >>
Chapter 15: On the Trail of Treasure
Find the Gold Inca Figurine — Veer off right a bit before running up the stairs as you exit the catacombs.
77© 2007 IGN Entertainment, Inc.

This jump looks fishy, but you're aiming for a wall grip, not the rope just yet, so it works out. The second one looks equally fishy, but also is the right away to go.
From here it's pretty much straight up to the window. Once inside, lower yourself and get ready to fight a bit. Some guys rush in as soon as you hit the floor. I fought them while hanging off the ledge—seemed to offer more cover than none at all.
Crouch behind the box in the hall to pick off the rest.
78© 2007 IGN Entertainment, Inc.
<< | Chapter 09 | Chapter 10 | Chapter 11 | Chapter 12 | Chapter 13 | Chapter 14 | Chapter 15 | >>
This is a jump you can totally make:
<< 34 35 36 37 38 39 40 41 >>
Chapter 15: On the Trail of Treasure (cont.)
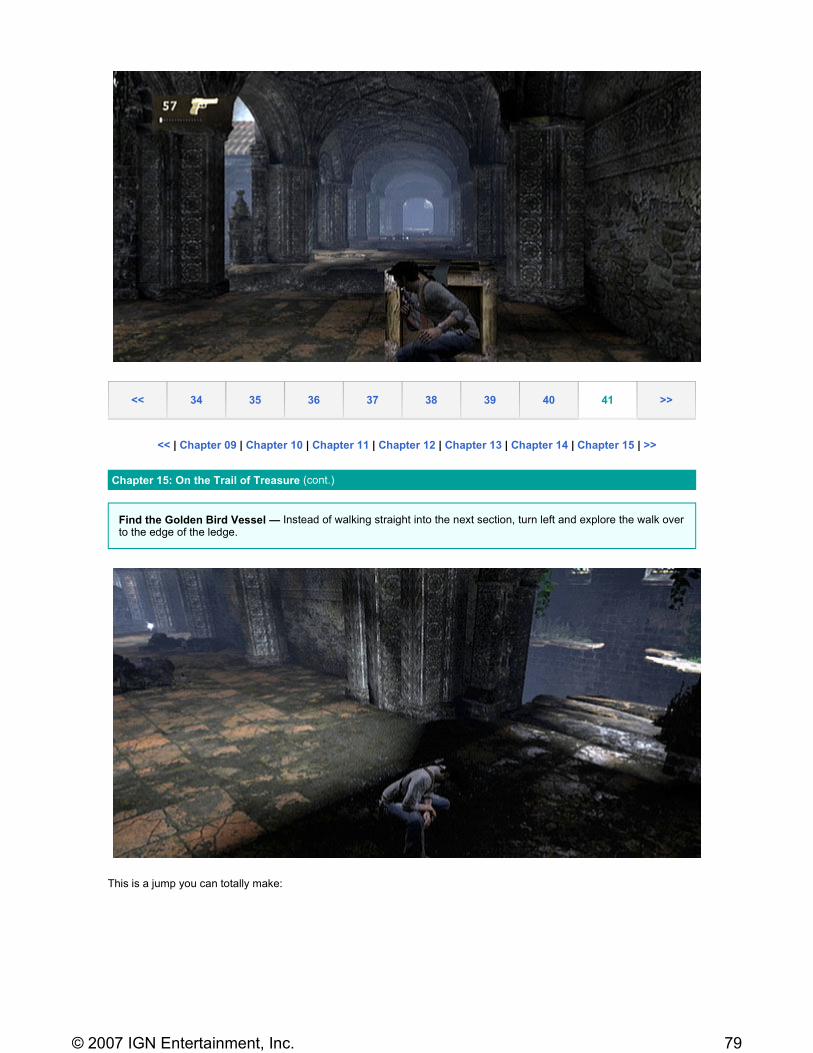
Find the Golden Bird Vessel — Instead of walking straight into the next section, turn left and explore the walk over to the edge of the ledge.
79© 2007 IGN Entertainment, Inc.
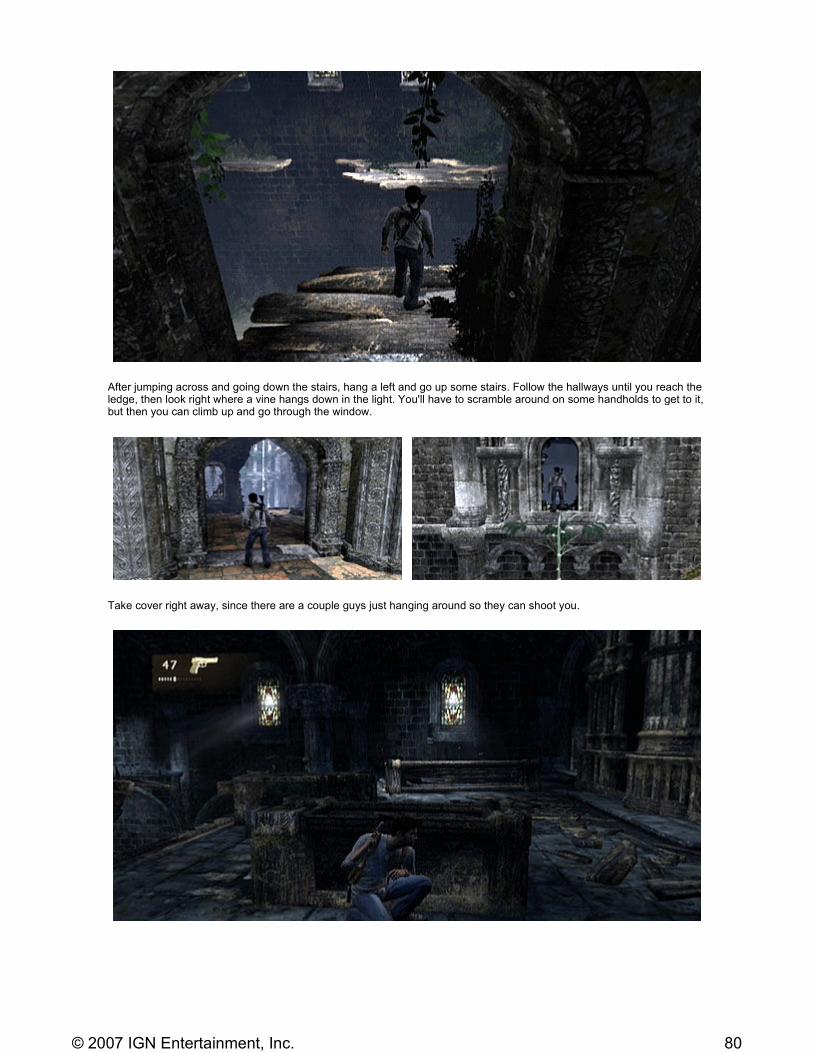
After jumping across and going down the stairs, hang a left and go up some stairs. Follow the hallways until you reach the ledge, then look right where a vine hangs down in the light. You'll have to scramble around on some handholds to get to it, but then you can climb up and go through the window.
Take cover right away, since there are a couple guys just hanging around so they can shoot you.
80© 2007 IGN Entertainment, Inc.
<< | Chapter 09 | Chapter 10 | Chapter 11 | Chapter 12 | Chapter 13 | Chapter 14 | Chapter 15 | >>
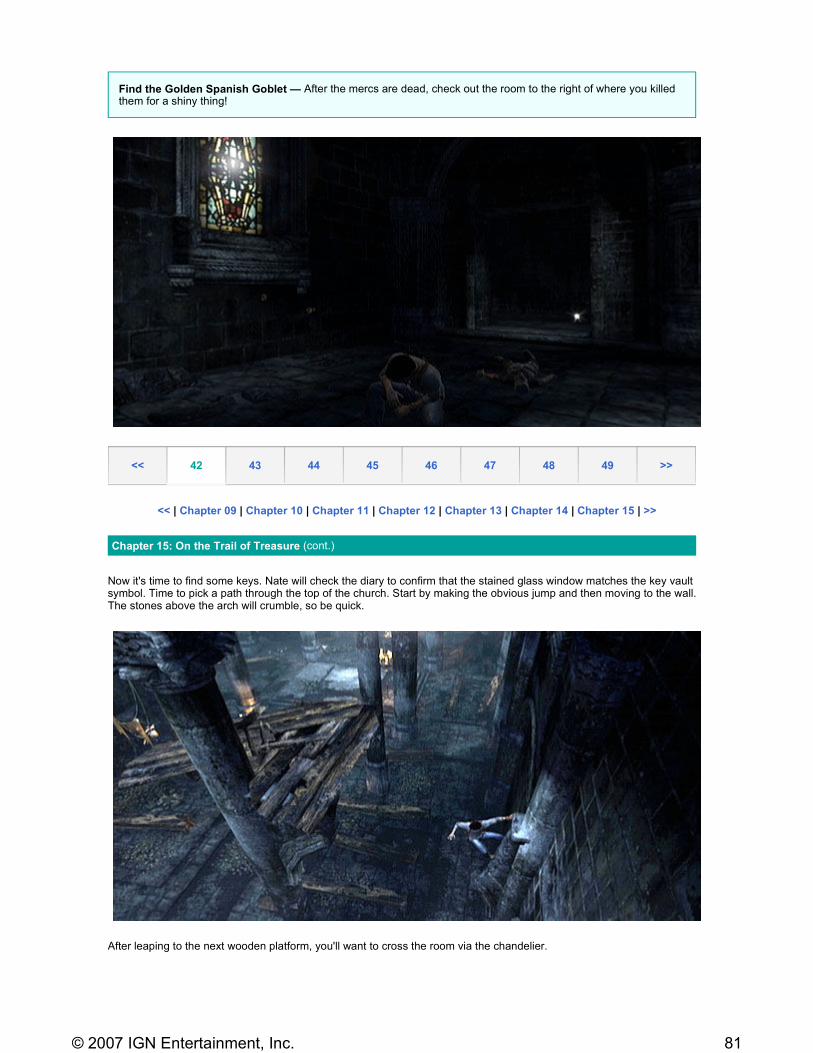
Now it's time to find some keys. Nate will check the diary to confirm that the stained glass window matches the key vault symbol. Time to pick a path through the top of the church. Start by making the obvious jump and then moving to the wall. The stones above the arch will crumble, so be quick.
After leaping to the next wooden platform, you'll want to cross the room via the chandelier.
Find the Golden Spanish Goblet — After the mercs are dead, check out the room to the right of where you killed them for a shiny thing!
<< 42 43 44 45 46 47 48 49 >>
Chapter 15: On the Trail of Treasure (cont.)
81© 2007 IGN Entertainment, Inc.
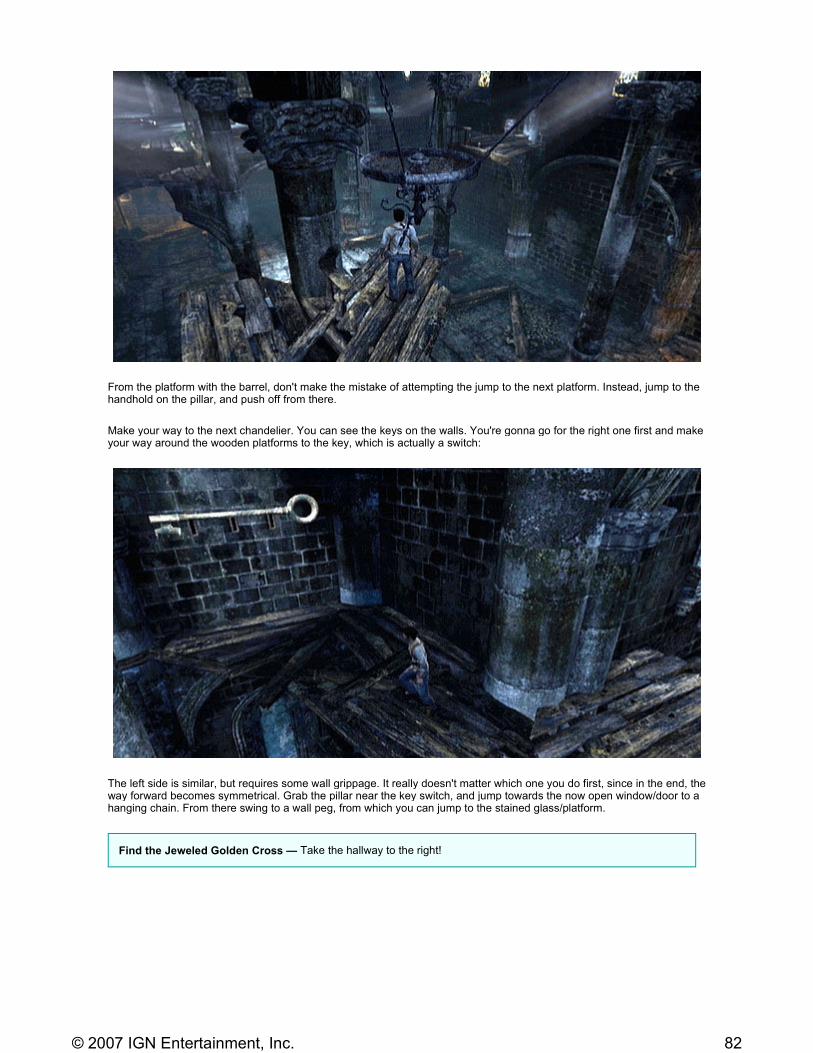
From the platform with the barrel, don't make the mistake of attempting the jump to the next platform. Instead, jump to the handhold on the pillar, and push off from there.
Make your way to the next chandelier. You can see the keys on the walls. You're gonna go for the right one first and make your way around the wooden platforms to the key, which is actually a switch:
The left side is similar, but requires some wall grippage. It really doesn't matter which one you do first, since in the end, the way forward becomes symmetrical. Grab the pillar near the key switch, and jump towards the now open window/door to a hanging chain. From there swing to a wall peg, from which you can jump to the stained glass/platform.
Find the Jeweled Golden Cross — Take the hallway to the right!
82© 2007 IGN Entertainment, Inc.
<< | Chapter 09 | Chapter 10 | Chapter 11 | Chapter 12 | Chapter 13 | Chapter 14 | Chapter 15 | >>
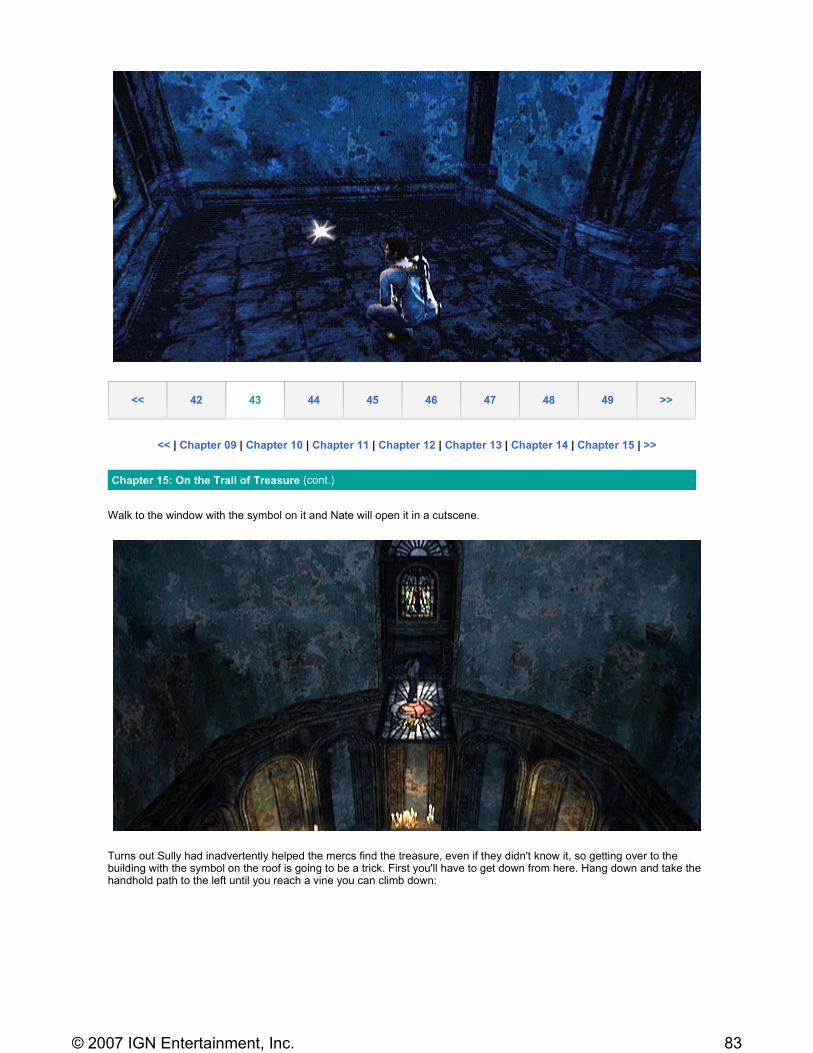
Walk to the window with the symbol on it and Nate will open it in a cutscene.
Turns out Sully had inadvertently helped the mercs find the treasure, even if they didn't know it, so getting over to the building with the symbol on the roof is going to be a trick. First you'll have to get down from here. Hang down and take the handhold path to the left until you reach a vine you can climb down:
<< 42 43 44 45 46 47 48 49 >>
Chapter 15: On the Trail of Treasure (cont.)
83© 2007 IGN Entertainment, Inc.

Right in front of you are some crates with ammo and a...Dragon Sniper. Means you're in for it! There are two laser sights (on the left and right side) and a grenade launcher (somewhere in the middle), plus guys who will chuck grenades by hand (everywhere!) Use the Sniper you picked up to do as much damage as possible. Get at least the two lasers, if not the grenade guy. I managed to pick of the grenade launcher with the pistol, but it wasn't fun.
Find the Silver Skull — Once all the guys are taken care of, go back to the stairs where you came down to the lower level and hug the wall on the right till you find a sparkle behind a little tomb.
Find the Golden Inca Mask — All the way to the right on the second level is a tomb with a barred door. To the left of that is a tombstone and behind it is a the treasure.
84© 2007 IGN Entertainment, Inc.
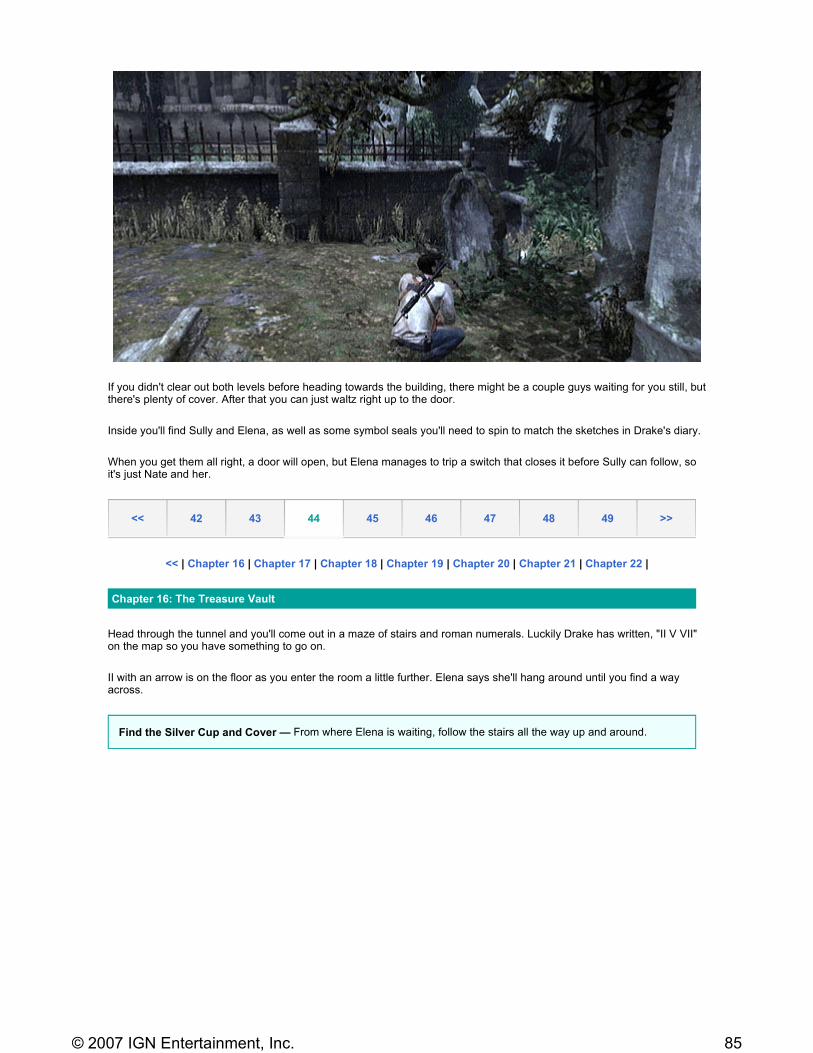
If you didn't clear out both levels before heading towards the building, there might be a couple guys waiting for you still, but there's plenty of cover. After that you can just waltz right up to the door.
Inside you'll find Sully and Elena, as well as some symbol seals you'll need to spin to match the sketches in Drake's diary.
When you get them all right, a door will open, but Elena manages to trip a switch that closes it before Sully can follow, so it's just Nate and her.
<< | Chapter 16 | Chapter 17 | Chapter 18 | Chapter 19 | Chapter 20 | Chapter 21 | Chapter 22 |
Head through the tunnel and you'll come out in a maze of stairs and roman numerals. Luckily Drake has written, "II V VII" on the map so you have something to go on.
II with an arrow is on the floor as you enter the room a little further. Elena says she'll hang around until you find a way across.
<< 42 43 44 45 46 47 48 49 >>
Chapter 16: The Treasure Vault
Find the Silver Cup and Cover — From where Elena is waiting, follow the stairs all the way up and around.
85© 2007 IGN Entertainment, Inc.
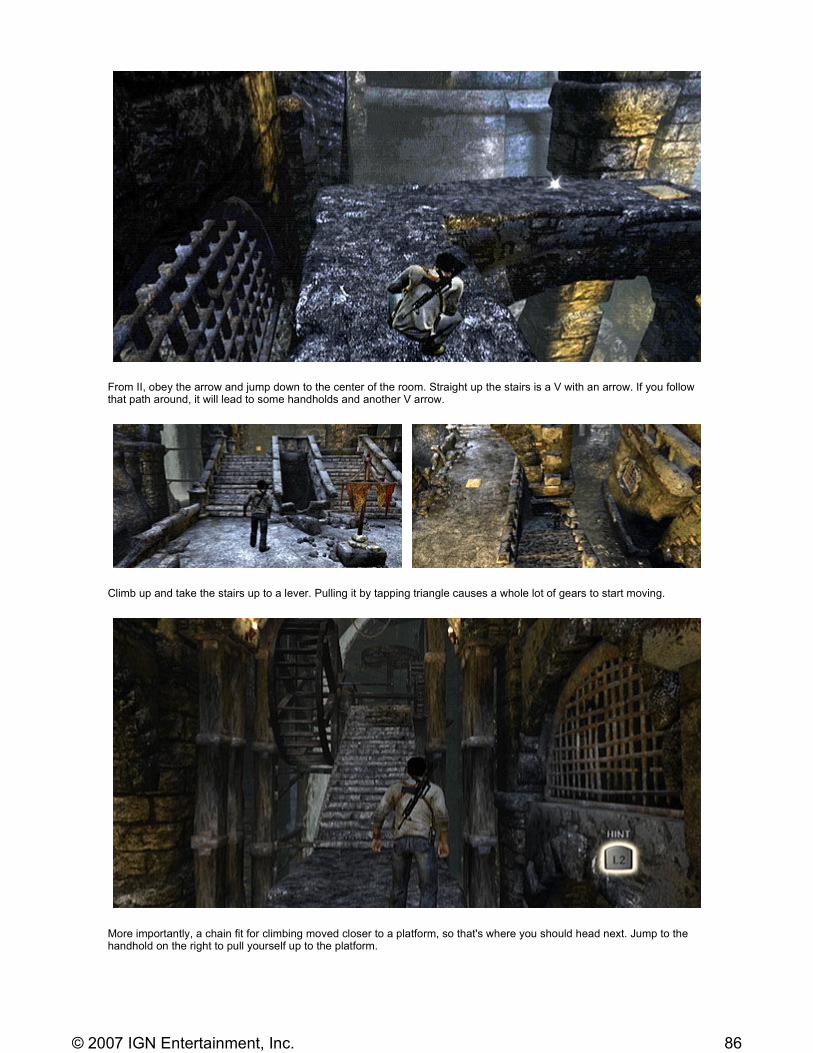
From II, obey the arrow and jump down to the center of the room. Straight up the stairs is a V with an arrow. If you follow that path around, it will lead to some handholds and another V arrow.
Climb up and take the stairs up to a lever. Pulling it by tapping triangle causes a whole lot of gears to start moving.
More importantly, a chain fit for climbing moved closer to a platform, so that's where you should head next. Jump to the handhold on the right to pull yourself up to the platform.
86© 2007 IGN Entertainment, Inc.
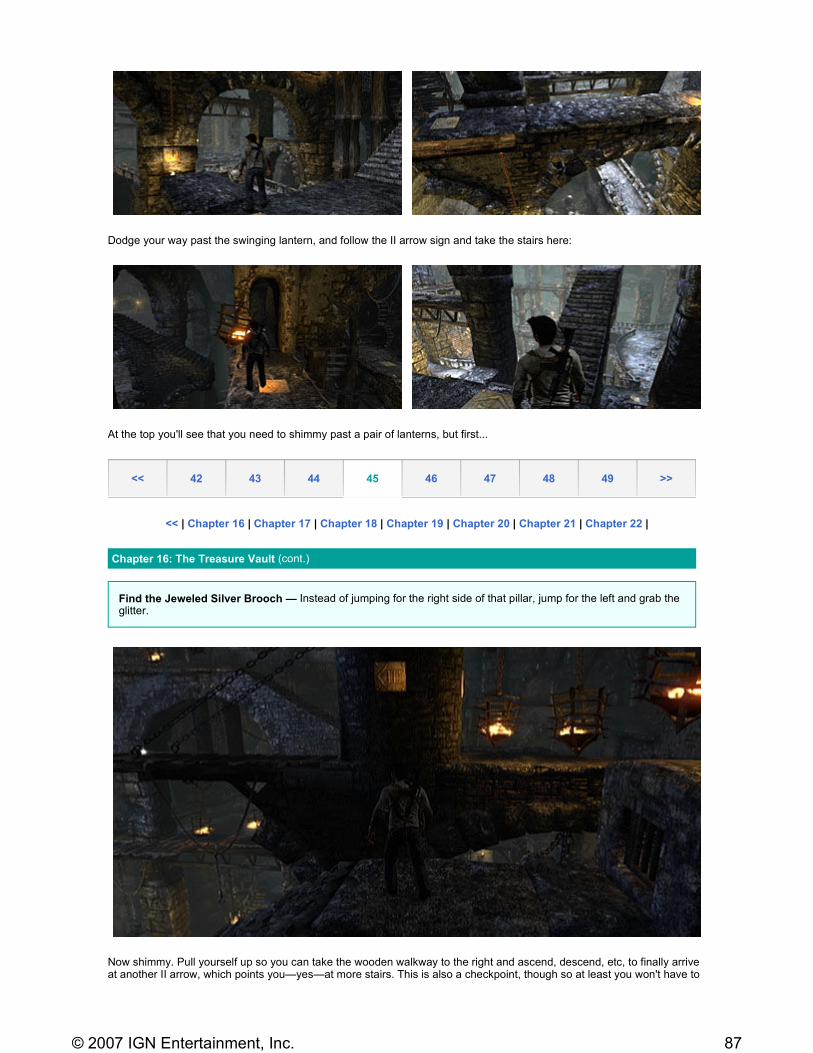
Dodge your way past the swinging lantern, and follow the II arrow sign and take the stairs here:
At the top you'll see that you need to shimmy past a pair of lanterns, but first...
<< | Chapter 16 | Chapter 17 | Chapter 18 | Chapter 19 | Chapter 20 | Chapter 21 | Chapter 22 |
Now shimmy. Pull yourself up so you can take the wooden walkway to the right and ascend, descend, etc, to finally arrive at another II arrow, which points you—yes—at more stairs. This is also a checkpoint, though so at least you won't have to
<< 42 43 44 45 46 47 48 49 >>
Chapter 16: The Treasure Vault (cont.)
Find the Jeweled Silver Brooch — Instead of jumping for the right side of that pillar, jump for the left and grab the glitter.
87© 2007 IGN Entertainment, Inc.
start back by the chain anymore.
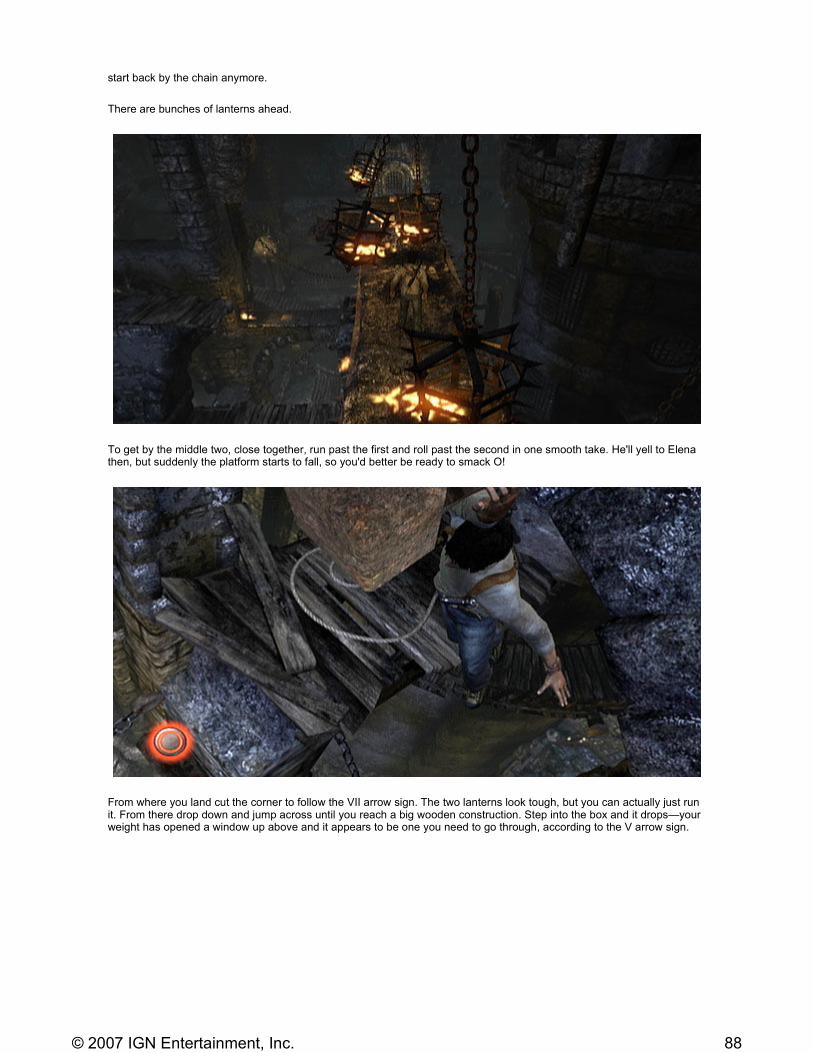
There are bunches of lanterns ahead.
To get by the middle two, close together, run past the first and roll past the second in one smooth take. He'll yell to Elena then, but suddenly the platform starts to fall, so you'd better be ready to smack O!
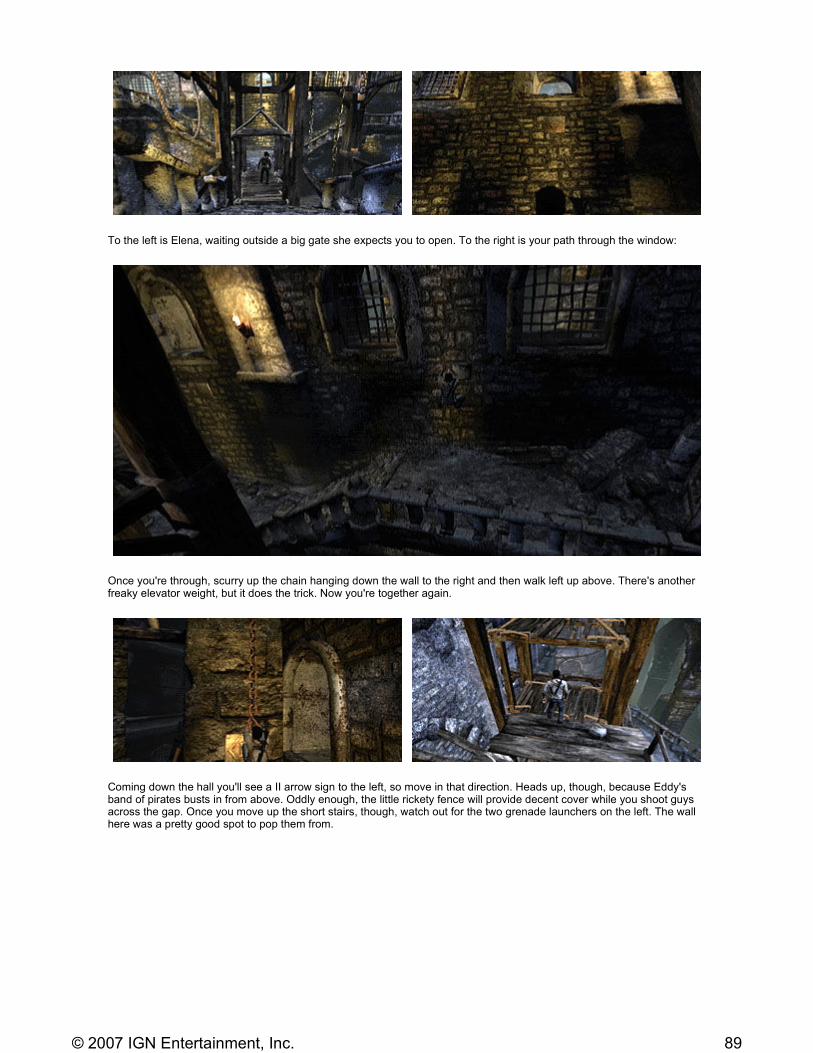
From where you land cut the corner to follow the VII arrow sign. The two lanterns look tough, but you can actually just run it. From there drop down and jump across until you reach a big wooden construction. Step into the box and it drops—your weight has opened a window up above and it appears to be one you need to go through, according to the V arrow sign.
88© 2007 IGN Entertainment, Inc.
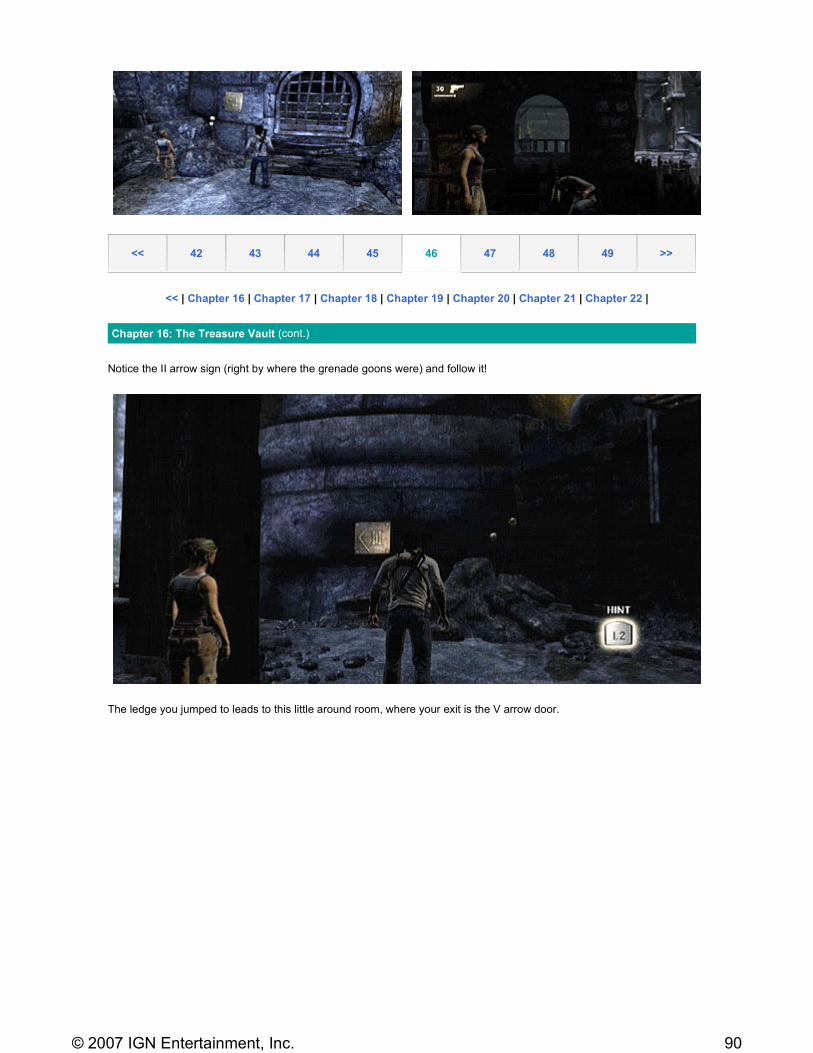
To the left is Elena, waiting outside a big gate she expects you to open. To the right is your path through the window:
Once you're through, scurry up the chain hanging down the wall to the right and then walk left up above. There's another freaky elevator weight, but it does the trick. Now you're together again.
Coming down the hall you'll see a II arrow sign to the left, so move in that direction. Heads up, though, because Eddy's band of pirates busts in from above. Oddly enough, the little rickety fence will provide decent cover while you shoot guys across the gap. Once you move up the short stairs, though, watch out for the two grenade launchers on the left. The wall here was a pretty good spot to pop them from.
89© 2007 IGN Entertainment, Inc.
<< | Chapter 16 | Chapter 17 | Chapter 18 | Chapter 19 | Chapter 20 | Chapter 21 | Chapter 22 |
Notice the II arrow sign (right by where the grenade goons were) and follow it!
The ledge you jumped to leads to this little around room, where your exit is the V arrow door.
<< 42 43 44 45 46 47 48 49 >>
Chapter 16: The Treasure Vault (cont.)
90© 2007 IGN Entertainment, Inc.
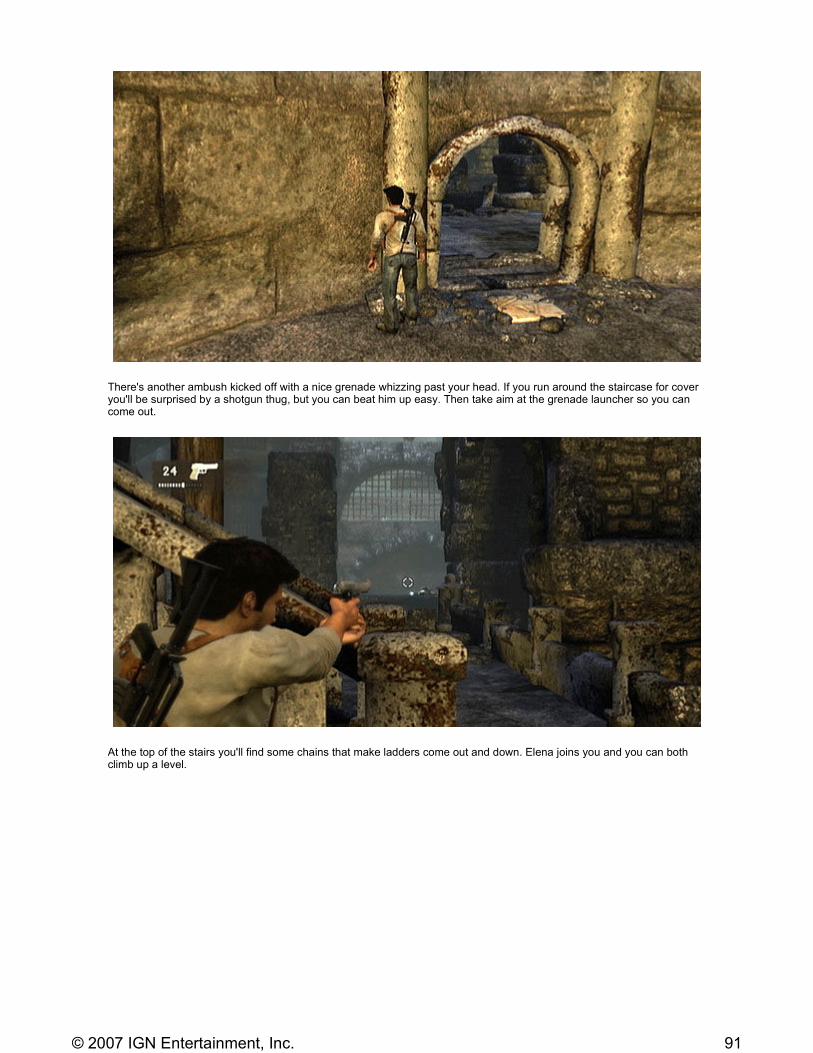
There's another ambush kicked off with a nice grenade whizzing past your head. If you run around the staircase for cover you'll be surprised by a shotgun thug, but you can beat him up easy. Then take aim at the grenade launcher so you can come out.
At the top of the stairs you'll find some chains that make ladders come out and down. Elena joins you and you can both climb up a level.
91© 2007 IGN Entertainment, Inc.
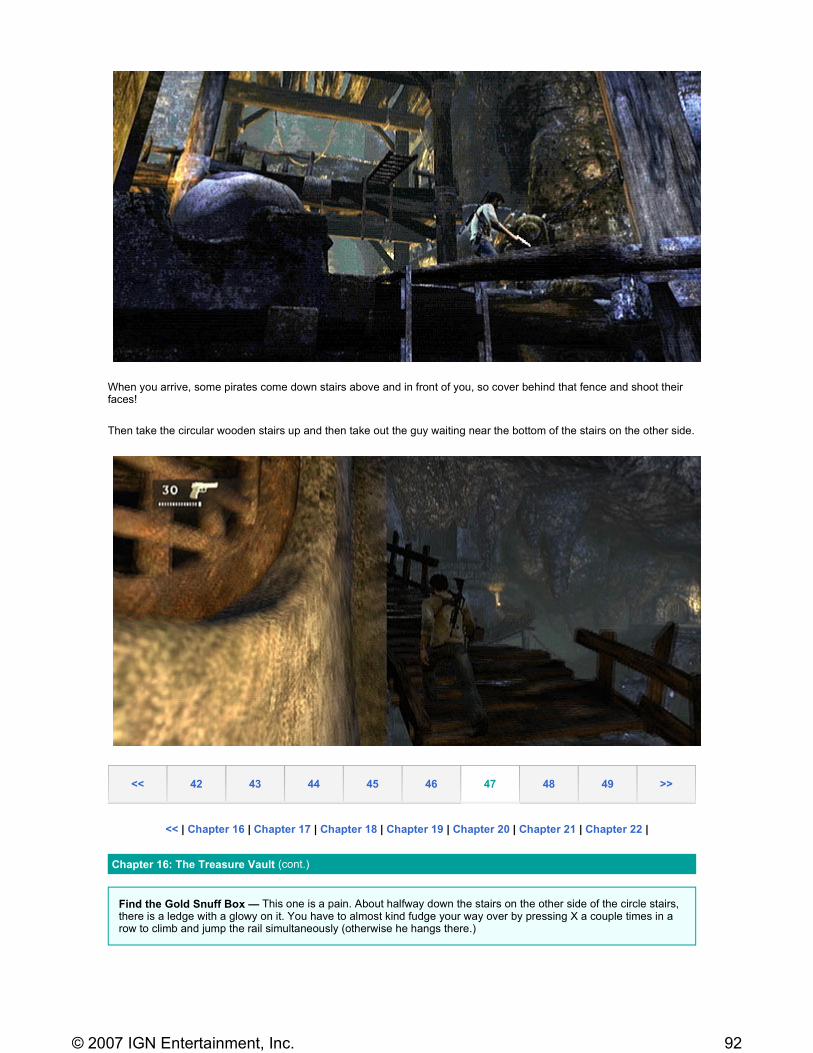
When you arrive, some pirates come down stairs above and in front of you, so cover behind that fence and shoot their faces!
Then take the circular wooden stairs up and then take out the guy waiting near the bottom of the stairs on the other side.
<< | Chapter 16 | Chapter 17 | Chapter 18 | Chapter 19 | Chapter 20 | Chapter 21 | Chapter 22 |
<< 42 43 44 45 46 47 48 49 >>
Chapter 16: The Treasure Vault (cont.)
Find the Gold Snuff Box — This one is a pain. About halfway down the stairs on the other side of the circle stairs, there is a ledge with a glowy on it. You have to almost kind fudge your way over by pressing X a couple times in a row to climb and jump the rail simultaneously (otherwise he hangs there.)
92© 2007 IGN Entertainment, Inc.
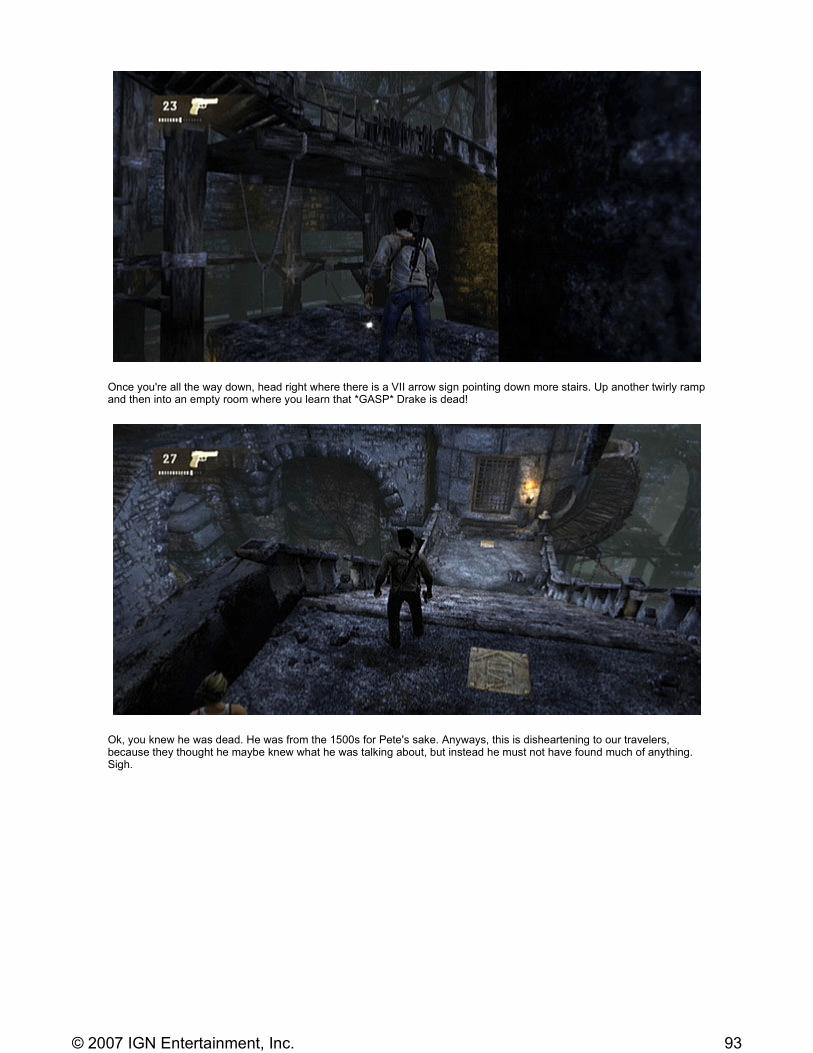
Once you're all the way down, head right where there is a VII arrow sign pointing down more stairs. Up another twirly ramp and then into an empty room where you learn that *GASP* Drake is dead!
Ok, you knew he was dead. He was from the 1500s for Pete's sake. Anyways, this is disheartening to our travelers, because they thought he maybe knew what he was talking about, but instead he must not have found much of anything. Sigh.
93© 2007 IGN Entertainment, Inc.
<< | Chapter 16 | Chapter 17 | Chapter 18 | Chapter 19 | Chapter 20 | Chapter 21 | Chapter 22 |
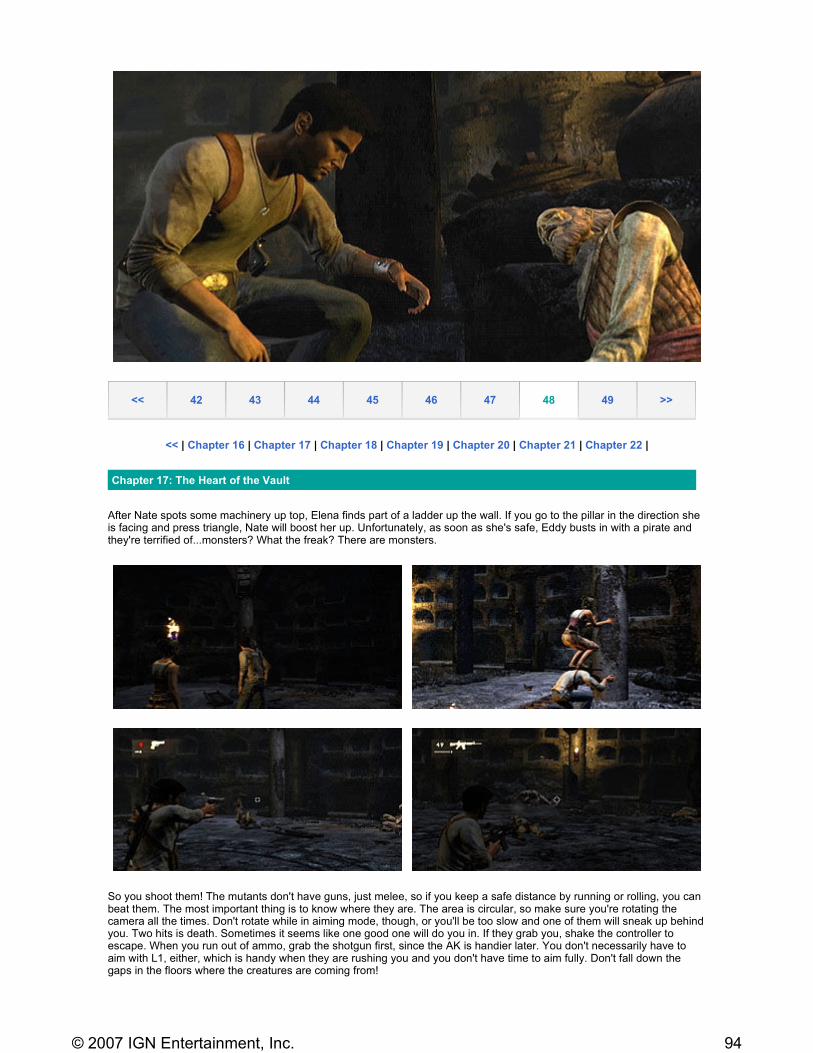
After Nate spots some machinery up top, Elena finds part of a ladder up the wall. If you go to the pillar in the direction she is facing and press triangle, Nate will boost her up. Unfortunately, as soon as she's safe, Eddy busts in with a pirate and they're terrified of...monsters? What the freak? There are monsters.
So you shoot them! The mutants don't have guns, just melee, so if you keep a safe distance by running or rolling, you can beat them. The most important thing is to know where they are. The area is circular, so make sure you're rotating the camera all the times. Don't rotate while in aiming mode, though, or you'll be too slow and one of them will sneak up behind you. Two hits is death. Sometimes it seems like one good one will do you in. If they grab you, shake the controller to escape. When you run out of ammo, grab the shotgun first, since the AK is handier later. You don't necessarily have to aim with L1, either, which is handy when they are rushing you and you don't have time to aim fully. Don't fall down the gaps in the floors where the creatures are coming from!
<< 42 43 44 45 46 47 48 49 >>
Chapter 17: The Heart of the Vault
94© 2007 IGN Entertainment, Inc.
At first Eddy is fighting with you against the greater enemy, but about halfway through he gets pulled into the abyss and you'll have to take out the rest on your own. The AK has less constant reload, so you might want to pick that up now. Luckily Elena comes through with a rope pretty quickly, so you can climb up. Don't grab the ammo in the hallway, just gun it because once those things catch up with you, you're dead.
<< | Chapter 16 | Chapter 17 | Chapter 18 | Chapter 19 | Chapter 20 | Chapter 21 | Chapter 22 |
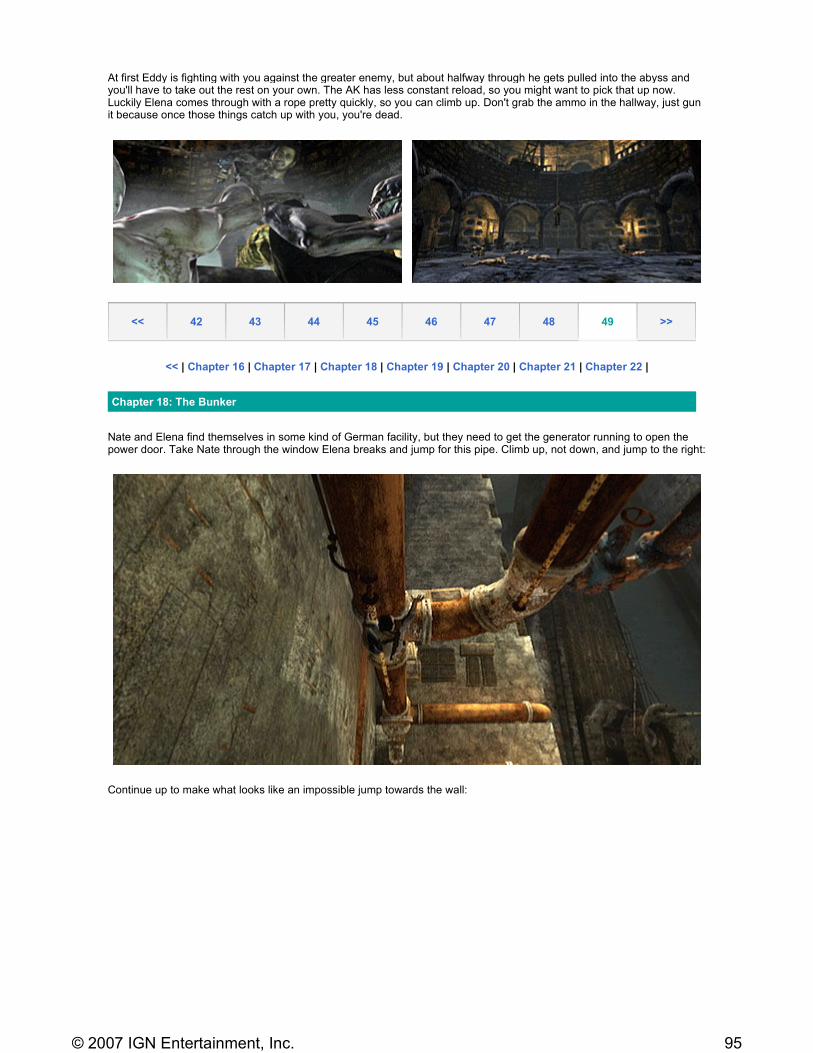
Nate and Elena find themselves in some kind of German facility, but they need to get the generator running to open the power door. Take Nate through the window Elena breaks and jump for this pipe. Climb up, not down, and jump to the right:
Continue up to make what looks like an impossible jump towards the wall:
<< 42 43 44 45 46 47 48 49 >>
Chapter 18: The Bunker
95© 2007 IGN Entertainment, Inc.
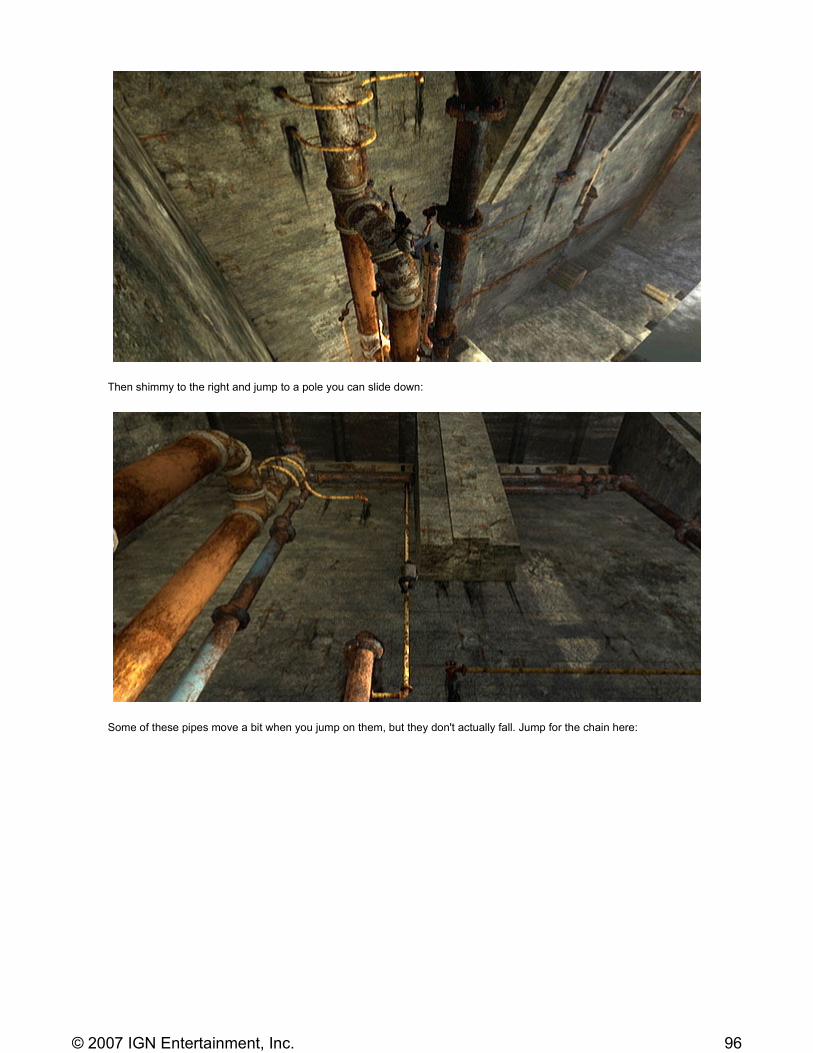
Then shimmy to the right and jump to a pole you can slide down:
Some of these pipes move a bit when you jump on them, but they don't actually fall. Jump for the chain here:
96© 2007 IGN Entertainment, Inc.
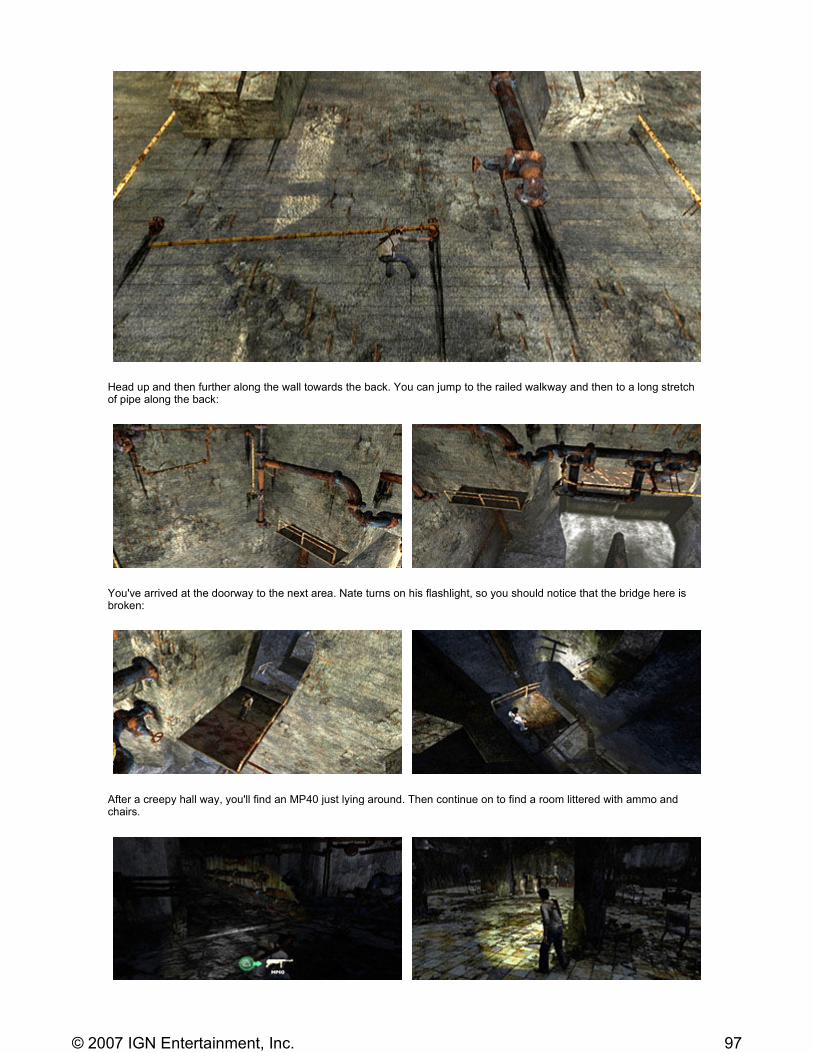
Head up and then further along the wall towards the back. You can jump to the railed walkway and then to a long stretch of pipe along the back:
You've arrived at the doorway to the next area. Nate turns on his flashlight, so you should notice that the bridge here is broken:
After a creepy hall way, you'll find an MP40 just lying around. Then continue on to find a room littered with ammo and chairs.
97© 2007 IGN Entertainment, Inc.
<< | Chapter 16 | Chapter 17 | Chapter 18 | Chapter 19 | Chapter 20 | Chapter 21 | Chapter 22 |
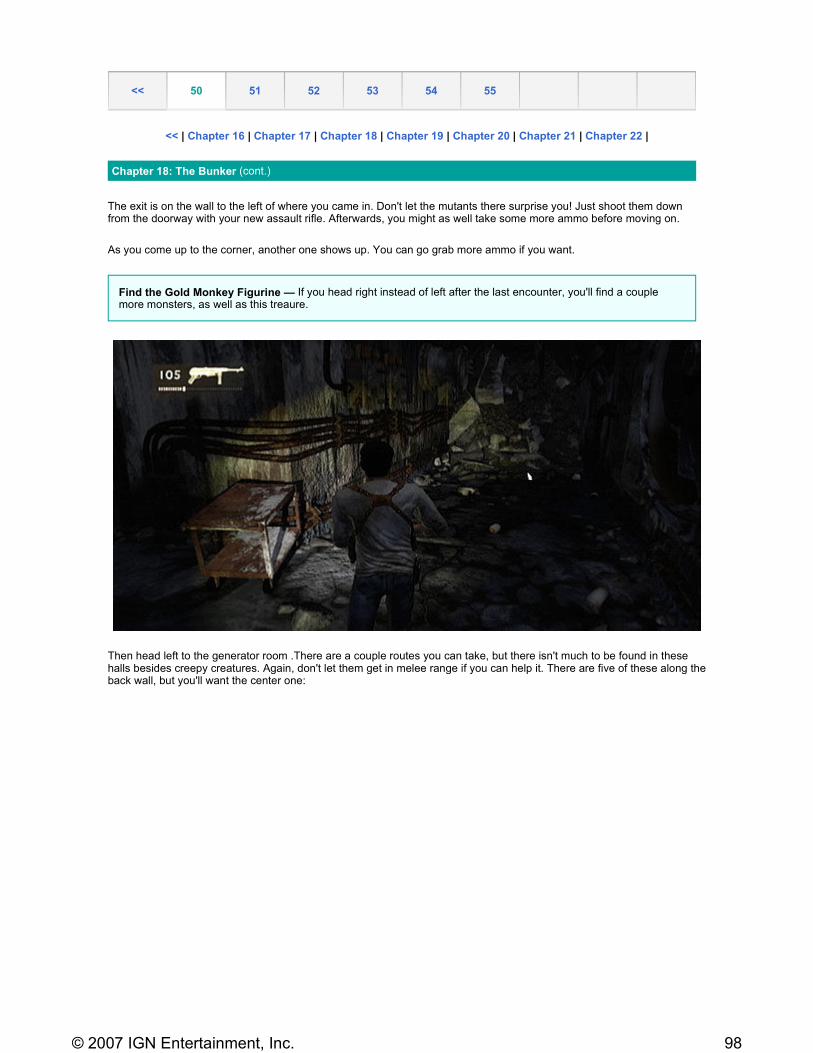
The exit is on the wall to the left of where you came in. Don't let the mutants there surprise you! Just shoot them down from the doorway with your new assault rifle. Afterwards, you might as well take some more ammo before moving on.
As you come up to the corner, another one shows up. You can go grab more ammo if you want.
Then head left to the generator room .There are a couple routes you can take, but there isn't much to be found in these halls besides creepy creatures. Again, don't let them get in melee range if you can help it. There are five of these along the back wall, but you'll want the center one:
<< 50 51 52 53 54 55
Chapter 18: The Bunker (cont.)
Find the Gold Monkey Figurine — If you head right instead of left after the last encounter, you'll find a couple more monsters, as well as this treaure.
98© 2007 IGN Entertainment, Inc.
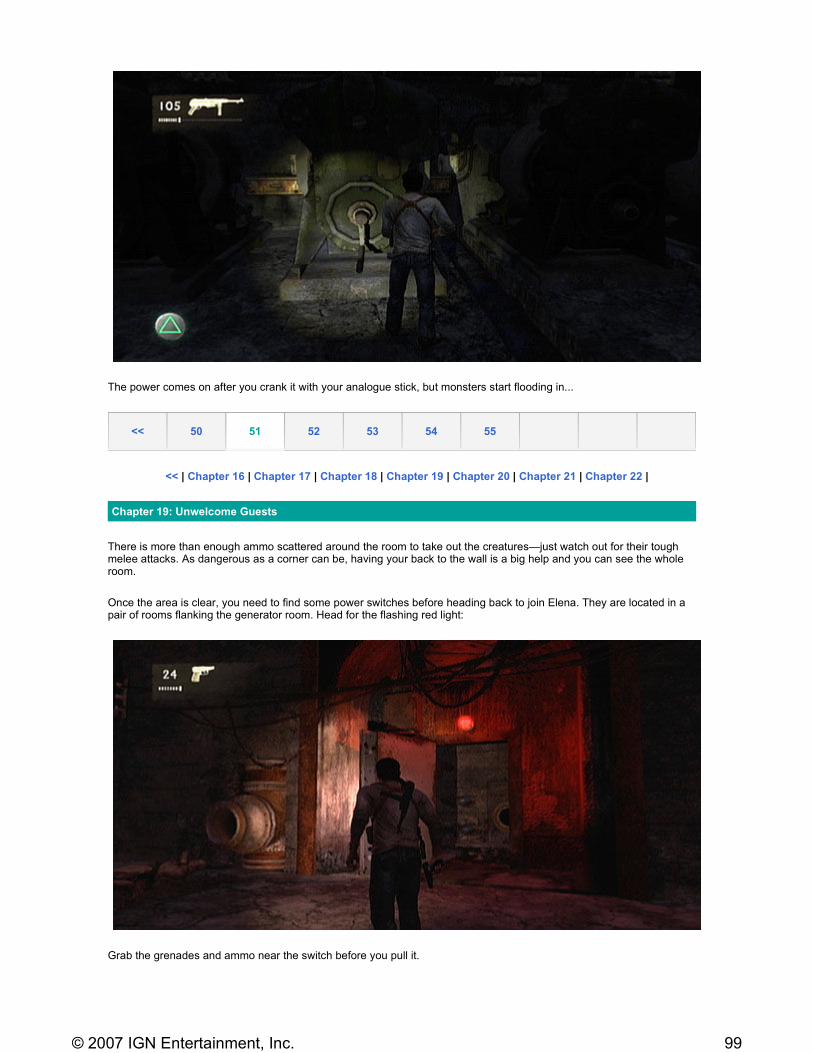
The power comes on after you crank it with your analogue stick, but monsters start flooding in...
<< | Chapter 16 | Chapter 17 | Chapter 18 | Chapter 19 | Chapter 20 | Chapter 21 | Chapter 22 |
There is more than enough ammo scattered around the room to take out the creatures—just watch out for their tough melee attacks. As dangerous as a corner can be, having your back to the wall is a big help and you can see the whole room.
Once the area is clear, you need to find some power switches before heading back to join Elena. They are located in a pair of rooms flanking the generator room. Head for the flashing red light:
Grab the grenades and ammo near the switch before you pull it.
<< 50 51 52 53 54 55
Chapter 19: Unwelcome Guests
99© 2007 IGN Entertainment, Inc.
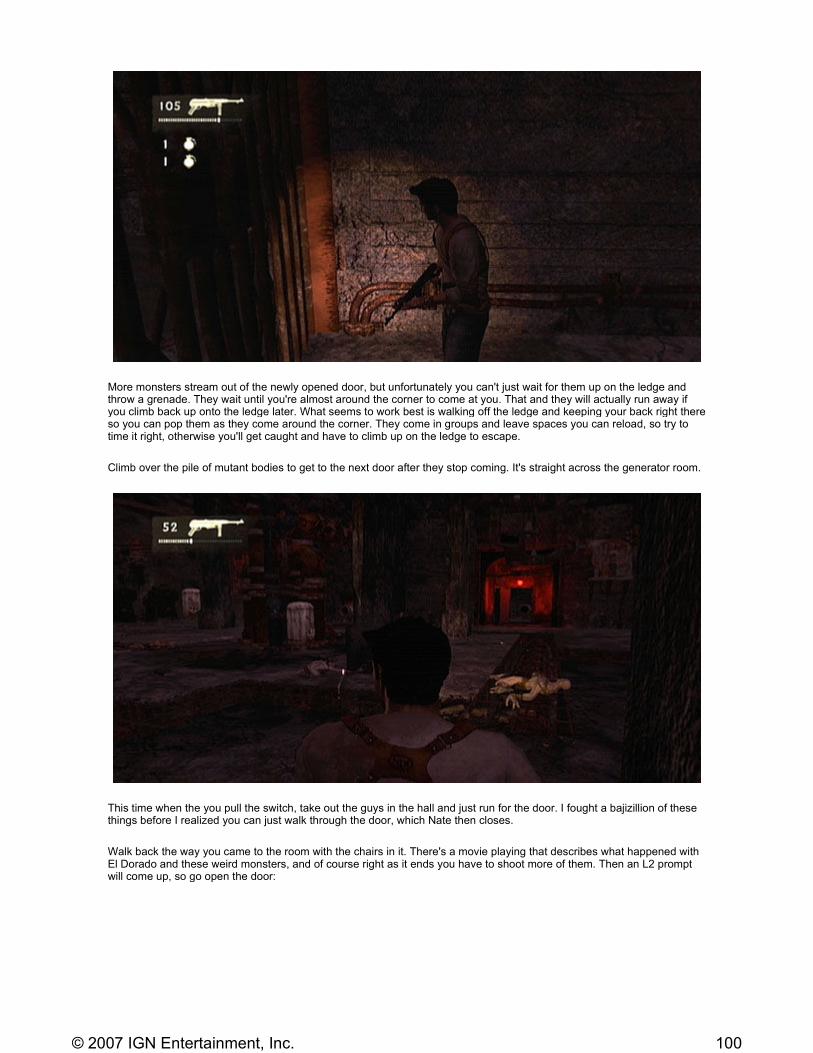
More monsters stream out of the newly opened door, but unfortunately you can't just wait for them up on the ledge and throw a grenade. They wait until you're almost around the corner to come at you. That and they will actually run away if you climb back up onto the ledge later. What seems to work best is walking off the ledge and keeping your back right there so you can pop them as they come around the corner. They come in groups and leave spaces you can reload, so try to time it right, otherwise you'll get caught and have to climb up on the ledge to escape.
Climb over the pile of mutant bodies to get to the next door after they stop coming. It's straight across the generator room.
This time when the you pull the switch, take out the guys in the hall and just run for the door. I fought a bajizillion of these things before I realized you can just walk through the door, which Nate then closes.
Walk back the way you came to the room with the chairs in it. There's a movie playing that describes what happened with El Dorado and these weird monsters, and of course right as it ends you have to shoot more of them. Then an L2 prompt will come up, so go open the door:
100© 2007 IGN Entertainment, Inc.

Continue backtracking and you'll come to a room full of ammo and grenades. Roman will show up in the adjacent area and speak to you over a mic concerning Elena (whom Navarro is manhandling) and the treasure. There's not much Nate can do about any of that from here, though. Right as Roman and his posse head out, though, some mercs show up:
<< | Chapter 16 | Chapter 17 | Chapter 18 | Chapter 19 | Chapter 20 | Chapter 21 | Chapter 22 |
Fight your way down the stairs watching out for both monsters and a laser sighted sniper when you reach the bottom. The sniper can be taken out from a spot hugging the wall before you turn the corner to the left.
<< 50 51 52 53 54 55
Chapter 19: Unwelcome Guests (cont.)
101© 2007 IGN Entertainment, Inc.
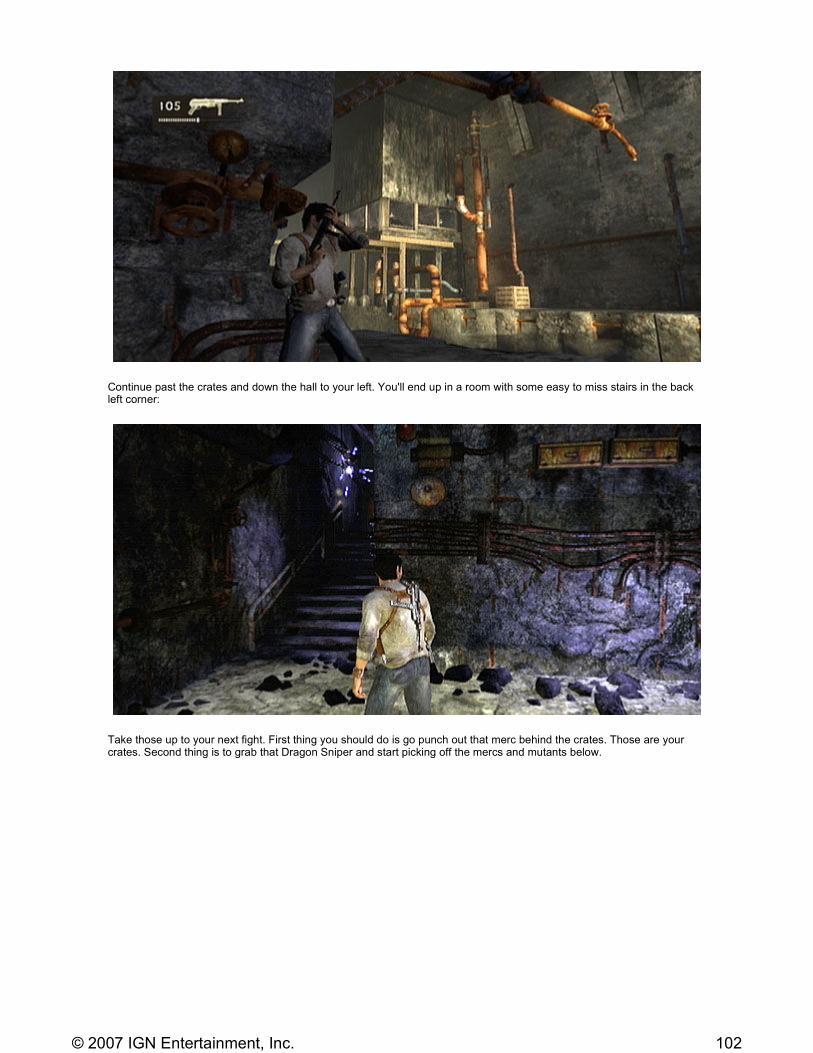
Continue past the crates and down the hall to your left. You'll end up in a room with some easy to miss stairs in the back left corner:
Take those up to your next fight. First thing you should do is go punch out that merc behind the crates. Those are your crates. Second thing is to grab that Dragon Sniper and start picking off the mercs and mutants below.
102© 2007 IGN Entertainment, Inc.
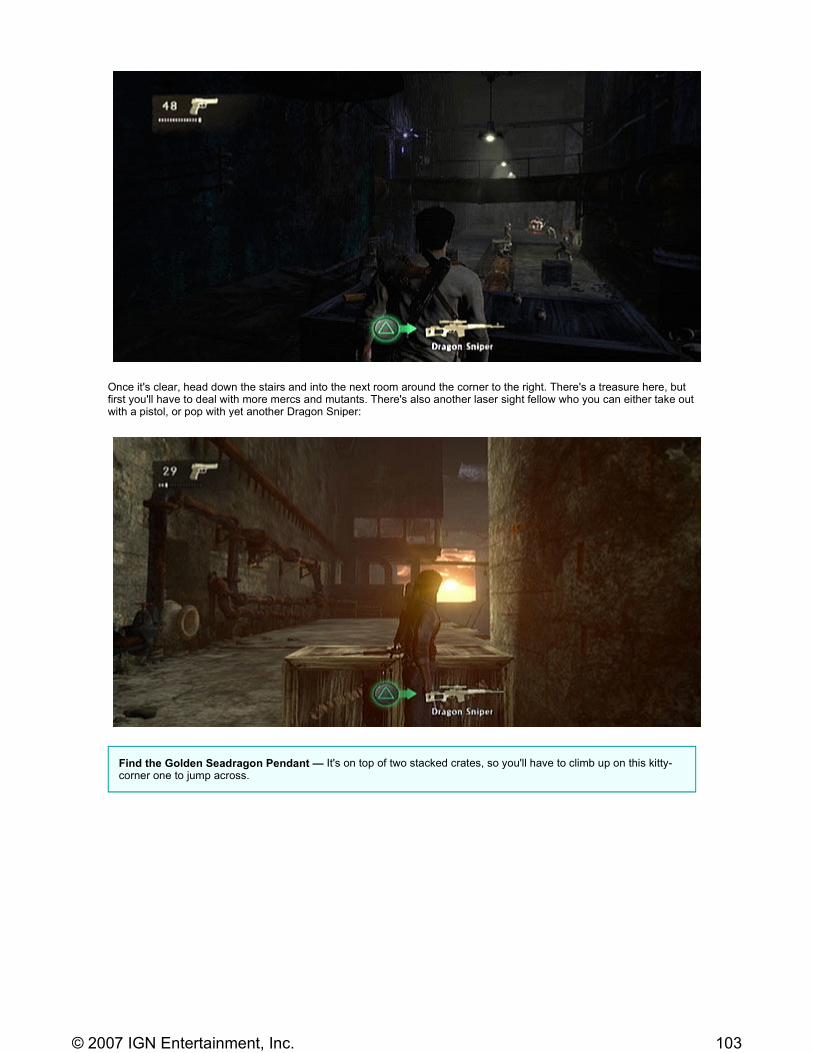
Once it's clear, head down the stairs and into the next room around the corner to the right. There's a treasure here, but first you'll have to deal with more mercs and mutants. There's also another laser sight fellow who you can either take out with a pistol, or pop with yet another Dragon Sniper:
Find the Golden Seadragon Pendant — It's on top of two stacked crates, so you'll have to climb up on this kitty-corner one to jump across.
103© 2007 IGN Entertainment, Inc.
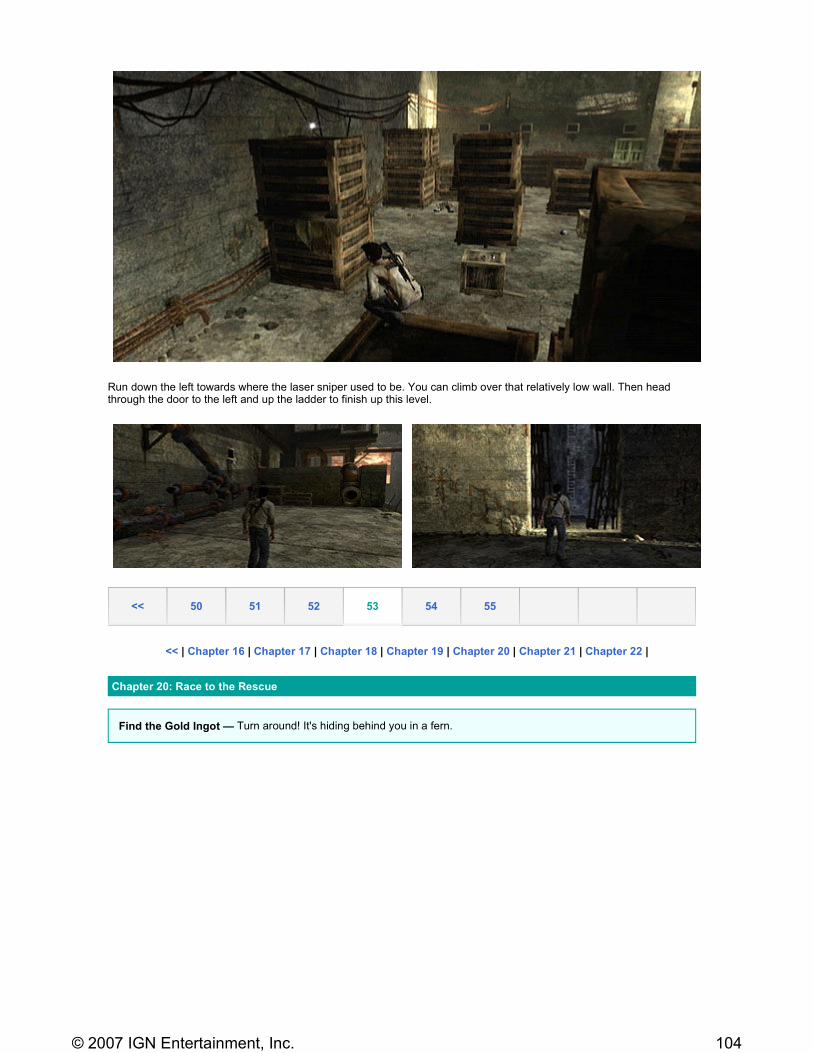
Run down the left towards where the laser sniper used to be. You can climb over that relatively low wall. Then head through the door to the left and up the ladder to finish up this level.
<< | Chapter 16 | Chapter 17 | Chapter 18 | Chapter 19 | Chapter 20 | Chapter 21 | Chapter 22 |
<< 50 51 52 53 54 55
Chapter 20: Race to the Rescue
Find the Gold Ingot — Turn around! It's hiding behind you in a fern.
104© 2007 IGN Entertainment, Inc.
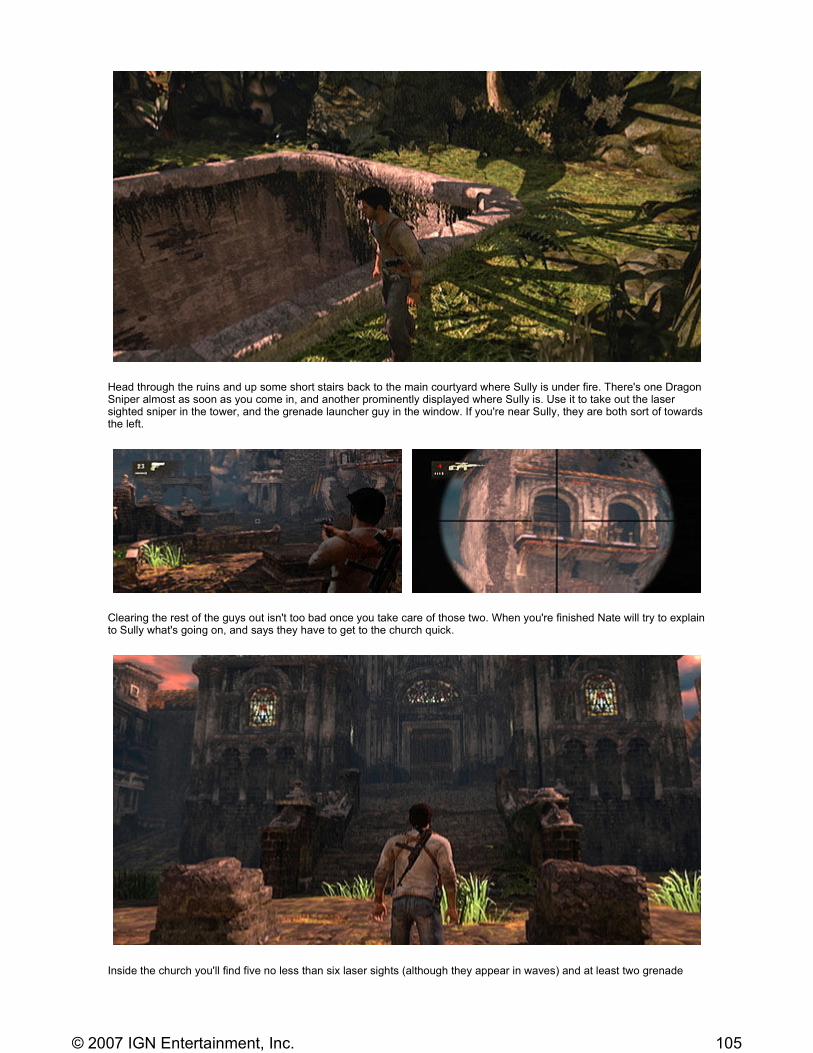
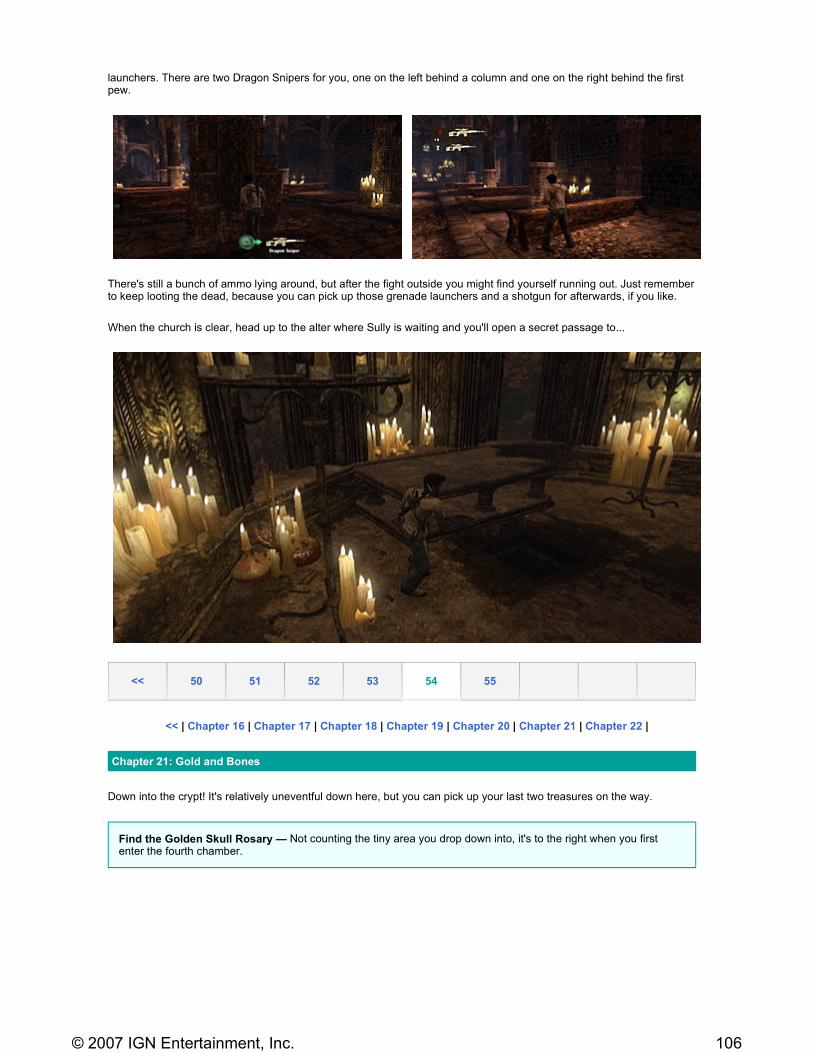
Head through the ruins and up some short stairs back to the main courtyard where Sully is under fire. There's one Dragon Sniper almost as soon as you come in, and another prominently displayed where Sully is. Use it to take out the laser sighted sniper in the tower, and the grenade launcher guy in the window. If you're near Sully, they are both sort of towards the left.
Clearing the rest of the guys out isn't too bad once you take care of those two. When you're finished Nate will try to explain to Sully what's going on, and says they have to get to the church quick.
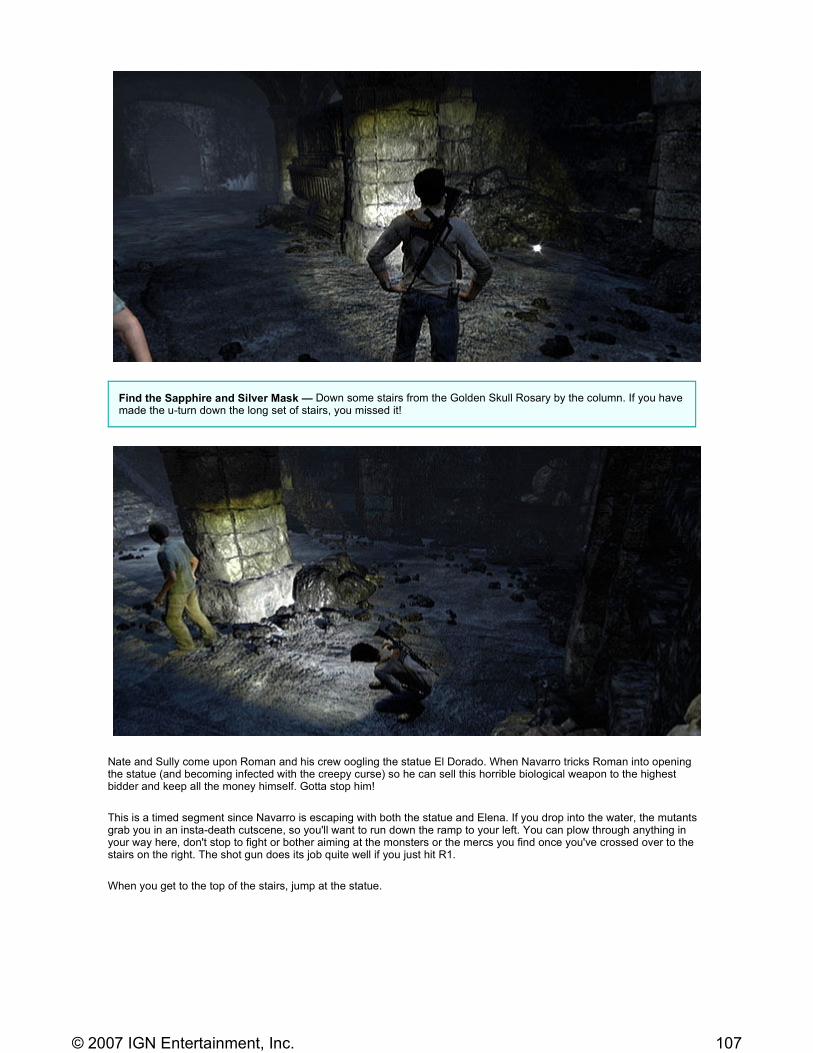
Inside the church you'll find five no less than six laser sights (although they appear in waves) and at least two grenade
105© 2007 IGN Entertainment, Inc.
launchers. There are two Dragon Snipers for you, one on the left behind a column and one on the right behind the first pew.
There's still a bunch of ammo lying around, but after the fight outside you might find yourself running out. Just remember to keep looting the dead, because you can pick up those grenade launchers and a shotgun for afterwards, if you like.
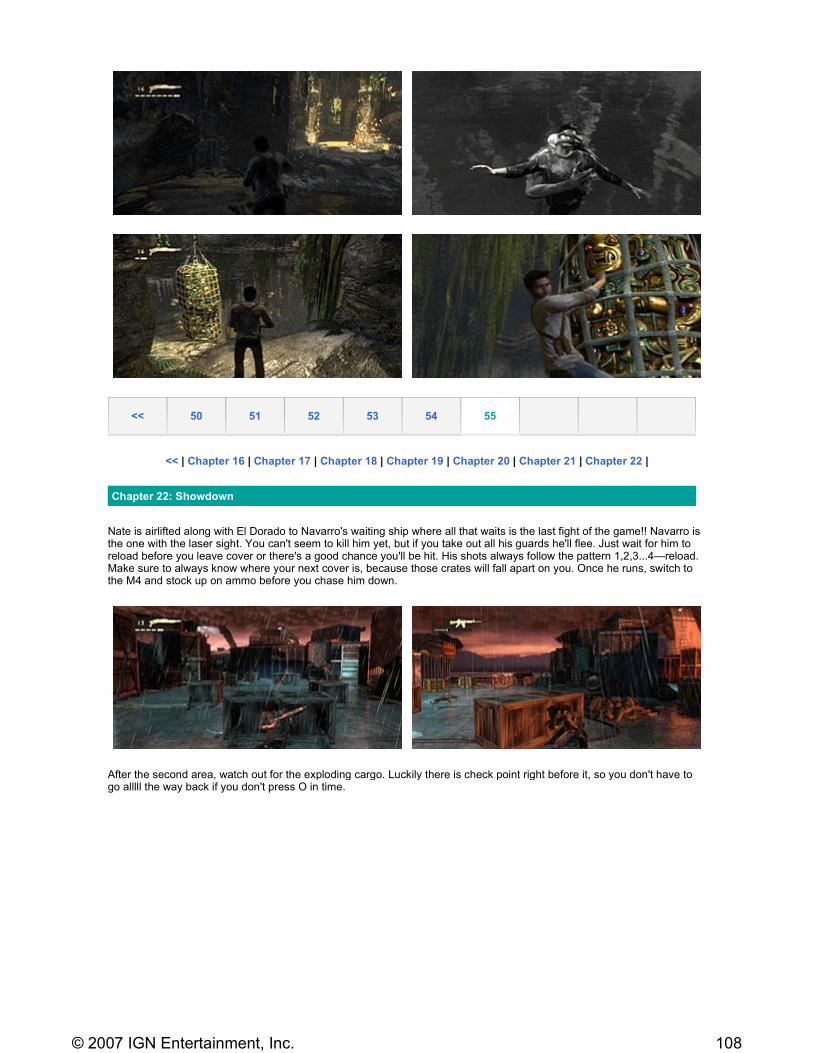
When the church is clear, head up to the alter where Sully is waiting and you'll open a secret passage to...
<< | Chapter 16 | Chapter 17 | Chapter 18 | Chapter 19 | Chapter 20 | Chapter 21 | Chapter 22 |
Down into the crypt! It's relatively uneventful down here, but you can pick up your last two treasures on the way.
<< 50 51 52 53 54 55
Chapter 21: Gold and Bones
Find the Golden Skull Rosary — Not counting the tiny area you drop down into, it's to the right when you first enter the fourth chamber.
106© 2007 IGN Entertainment, Inc.
Nate and Sully come upon Roman and his crew oogling the statue El Dorado. When Navarro tricks Roman into opening the statue (and becoming infected with the creepy curse) so he can sell this horrible biological weapon to the highest bidder and keep all the money himself. Gotta stop him!
This is a timed segment since Navarro is escaping with both the statue and Elena. If you drop into the water, the mutants grab you in an insta-death cutscene, so you'll want to run down the ramp to your left. You can plow through anything in your way here, don't stop to fight or bother aiming at the monsters or the mercs you find once you've crossed over to the stairs on the right. The shot gun does its job quite well if you just hit R1.
When you get to the top of the stairs, jump at the statue.
Find the Sapphire and Silver Mask — Down some stairs from the Golden Skull Rosary by the column. If you have made the u-turn down the long set of stairs, you missed it!
107© 2007 IGN Entertainment, Inc.
<< | Chapter 16 | Chapter 17 | Chapter 18 | Chapter 19 | Chapter 20 | Chapter 21 | Chapter 22 |
Nate is airlifted along with El Dorado to Navarro's waiting ship where all that waits is the last fight of the game!! Navarro is the one with the laser sight. You can't seem to kill him yet, but if you take out all his guards he'll flee. Just wait for him to reload before you leave cover or there's a good chance you'll be hit. His shots always follow the pattern 1,2,3...4—reload. Make sure to always know where your next cover is, because those crates will fall apart on you. Once he runs, switch to the M4 and stock up on ammo before you chase him down.
After the second area, watch out for the exploding cargo. Luckily there is check point right before it, so you don't have to go alllll the way back if you don't press O in time.
<< 50 51 52 53 54 55
Chapter 22: Showdown
108© 2007 IGN Entertainment, Inc.
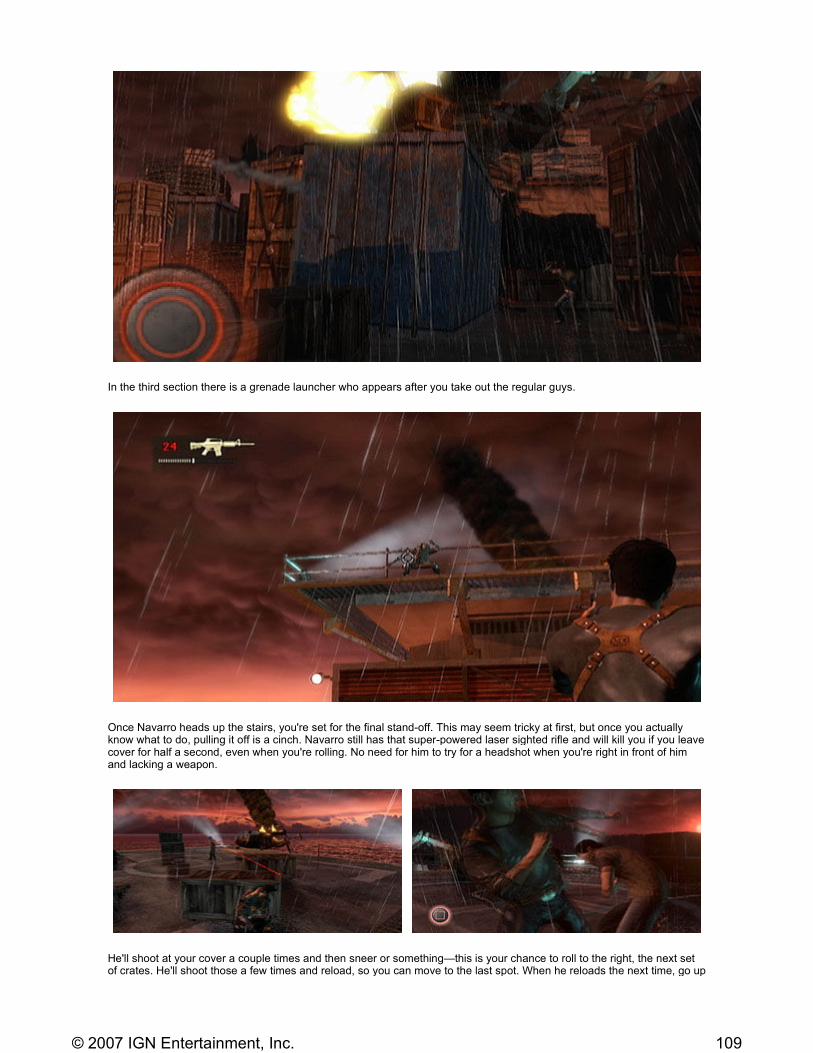
In the third section there is a grenade launcher who appears after you take out the regular guys.
Once Navarro heads up the stairs, you're set for the final stand-off. This may seem tricky at first, but once you actually know what to do, pulling it off is a cinch. Navarro still has that super-powered laser sighted rifle and will kill you if you leave cover for half a second, even when you're rolling. No need for him to try for a headshot when you're right in front of him and lacking a weapon.
He'll shoot at your cover a couple times and then sneer or something—this is your chance to roll to the right, the next set of crates. He'll shoot those a few times and reload, so you can move to the last spot. When he reloads the next time, go up
109© 2007 IGN Entertainment, Inc.
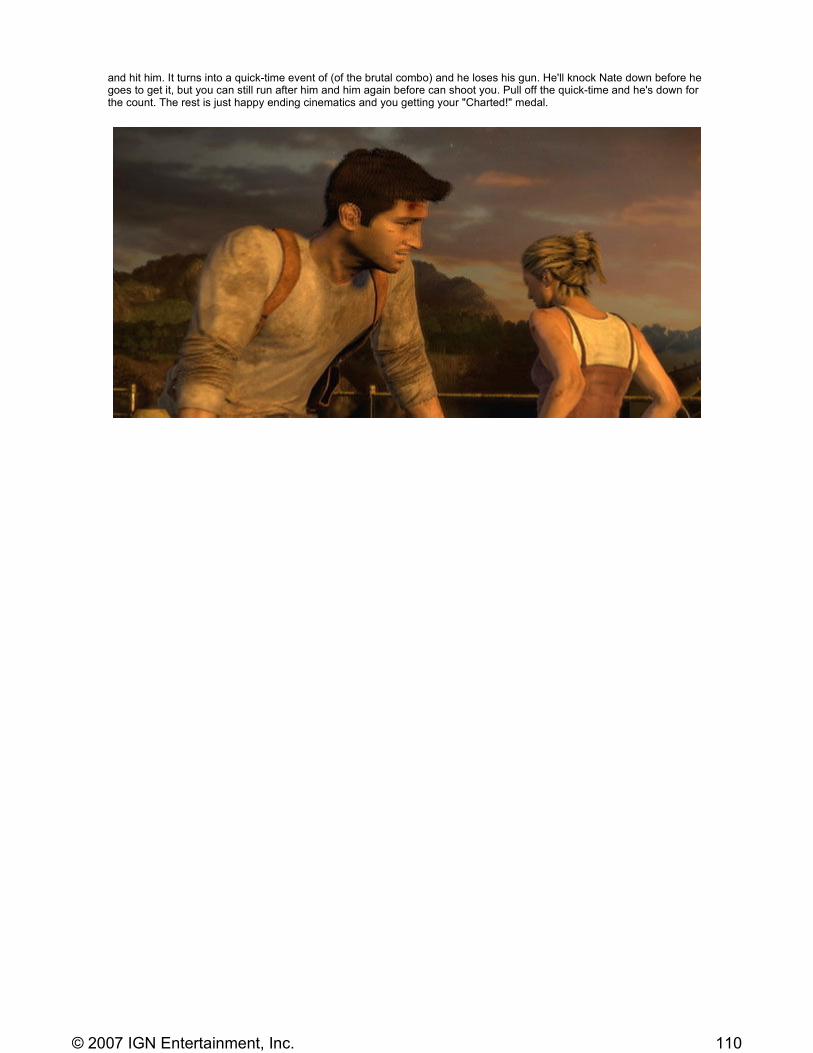
and hit him. It turns into a quick-time event of (of the brutal combo) and he loses his gun. He'll knock Nate down before he goes to get it, but you can still run after him and him again before can shoot you. Pull off the quick-time and he's down for the count. The rest is just happy ending cinematics and you getting your "Charted!" medal.
110© 2007 IGN Entertainment, Inc.
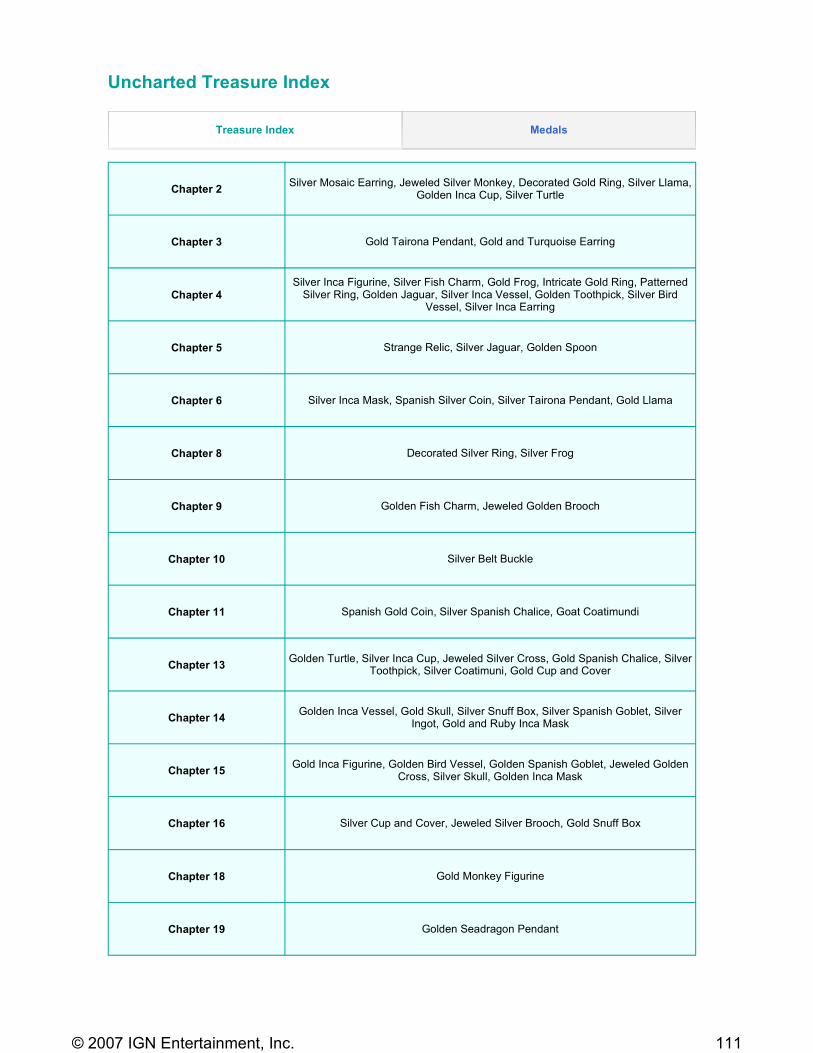
Uncharted Treasure Index
Treasure Index Medals
Chapter 2Silver Mosaic Earring, Jeweled Silver Monkey, Decorated Gold Ring, Silver Llama,
Golden Inca Cup, Silver Turtle
Chapter 3 Gold Tairona Pendant, Gold and Turquoise Earring
Chapter 4Silver Inca Figurine, Silver Fish Charm, Gold Frog, Intricate Gold Ring, Patterned Silver Ring, Golden Jaguar, Silver Inca Vessel, Golden Toothpick, Silver Bird
Vessel, Silver Inca Earring
Chapter 5 Strange Relic, Silver Jaguar, Golden Spoon
Chapter 6 Silver Inca Mask, Spanish Silver Coin, Silver Tairona Pendant, Gold Llama
Chapter 8 Decorated Silver Ring, Silver Frog
Chapter 9 Golden Fish Charm, Jeweled Golden Brooch
Chapter 10 Silver Belt Buckle
Chapter 11 Spanish Gold Coin, Silver Spanish Chalice, Goat Coatimundi
Chapter 13Golden Turtle, Silver Inca Cup, Jeweled Silver Cross, Gold Spanish Chalice, Silver
Toothpick, Silver Coatimuni, Gold Cup and Cover
Chapter 14Golden Inca Vessel, Gold Skull, Silver Snuff Box, Silver Spanish Goblet, Silver
Ingot, Gold and Ruby Inca Mask
Chapter 15Gold Inca Figurine, Golden Bird Vessel, Golden Spanish Goblet, Jeweled Golden
Cross, Silver Skull, Golden Inca Mask
Chapter 16 Silver Cup and Cover, Jeweled Silver Brooch, Gold Snuff Box
Chapter 18 Gold Monkey Figurine
Chapter 19 Golden Seadragon Pendant
111© 2007 IGN Entertainment, Inc.
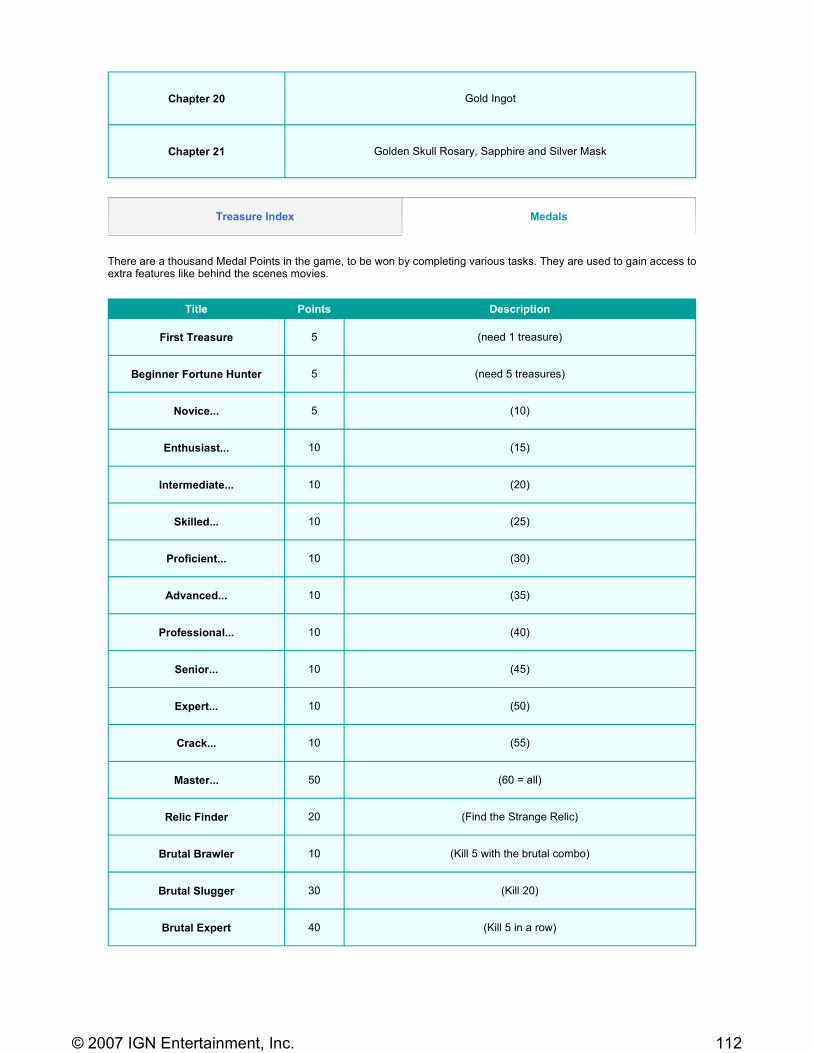
There are a thousand Medal Points in the game, to be won by completing various tasks. They are used to gain access to extra features like behind the scenes movies.
Chapter 20 Gold Ingot
Chapter 21 Golden Skull Rosary, Sapphire and Silver Mask
Treasure Index Medals
Title Points Description
First Treasure 5 (need 1 treasure)
Beginner Fortune Hunter 5 (need 5 treasures)
Novice... 5 (10)
Enthusiast... 10 (15)
Intermediate... 10 (20)
Skilled... 10 (25)
Proficient... 10 (30)
Advanced... 10 (35)
Professional... 10 (40)
Senior... 10 (45)
Expert... 10 (50)
Crack... 10 (55)
Master... 50 (60 = all)
Relic Finder 20 (Find the Strange Relic)
Brutal Brawler 10 (Kill 5 with the brutal combo)
Brutal Slugger 30 (Kill 20)
Brutal Expert 40 (Kill 5 in a row)
112© 2007 IGN Entertainment, Inc.
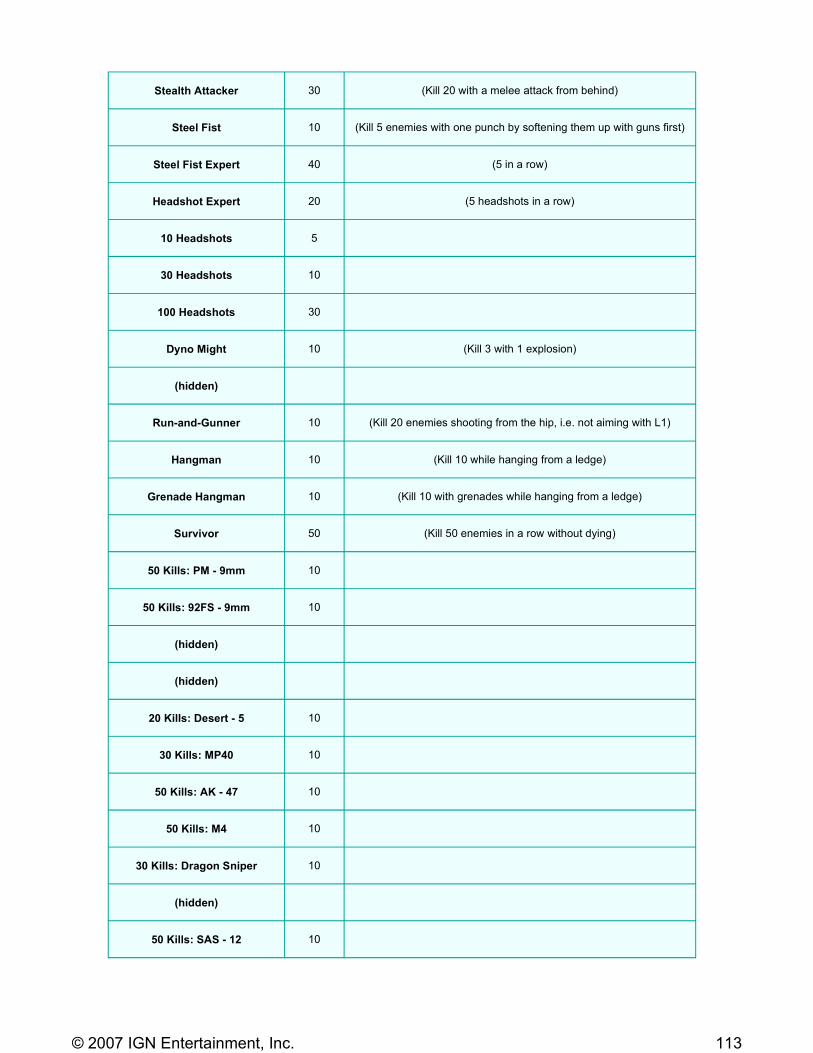
Stealth Attacker 30 (Kill 20 with a melee attack from behind)
Steel Fist 10 (Kill 5 enemies with one punch by softening them up with guns first)
Steel Fist Expert 40 (5 in a row)
Headshot Expert 20 (5 headshots in a row)
10 Headshots 5
30 Headshots 10
100 Headshots 30
Dyno Might 10 (Kill 3 with 1 explosion)
(hidden)
Run-and-Gunner 10 (Kill 20 enemies shooting from the hip, i.e. not aiming with L1)
Hangman 10 (Kill 10 while hanging from a ledge)
Grenade Hangman 10 (Kill 10 with grenades while hanging from a ledge)
Survivor 50 (Kill 50 enemies in a row without dying)
50 Kills: PM - 9mm 10
50 Kills: 92FS - 9mm 10
(hidden)
(hidden)
20 Kills: Desert - 5 10
30 Kills: MP40 10
50 Kills: AK - 47 10
50 Kills: M4 10
30 Kills: Dragon Sniper 10
(hidden)
50 Kills: SAS - 12 10
113© 2007 IGN Entertainment, Inc.
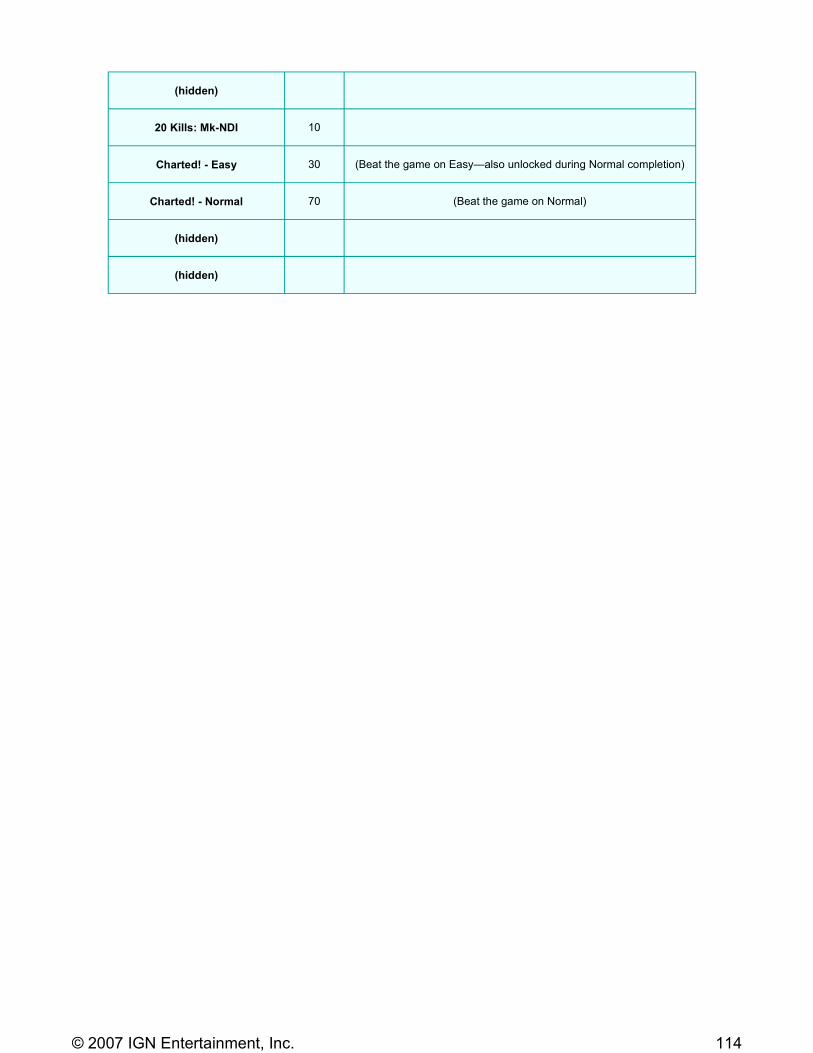
(hidden)
20 Kills: Mk-NDI 10
Charted! - Easy 30 (Beat the game on Easy—also unlocked during Normal completion)
Charted! - Normal 70 (Beat the game on Normal)
(hidden)
(hidden)
114© 2007 IGN Entertainment, Inc.