unit 1: introduction to digital photography | module 2 ...€¦ · 2 unit 1: introduction to...
TRANSCRIPT

1
Course Code: AWQ 4MUnit 1: Introduction to Digital Photography | Module 2: Photo Basics
How To Complete This ModuleYou will work through this module step by step, reading each section and completing any of the activi-
ties in the investigation as well as any formative and summative assignments. Be sure you spend the appro-priate amount of time on each of the activities and assignments.
All of the investigations must be completed properly before this module is considered complete. All formative work will be placed in your portfolio within a separate folder of paper to be evaluated for feedback and assessment of learning skills. Summative work is to be handed in for assessment by the deadline given. Rubrics are provided for evaluation of all summative work.
Good luck with the assignments and remember to ask for help when you encounter problems!
BASICS
PHOTO

2
Course Code: AWQ 4MUnit 1: Introduction to Digital Photography | Module 2: Photo Basics
The Anatomy of a CameraAll cameras have the same basic structure.
Each is simply a light-proof box with film or a light sensor at one end and an opening at the other that lets light in. We will learn some basics about digital SLR or Single Lens Reflex cameras, which allow the photographer the most control over their photog-raphy.
INVESTIGATION
A Viewing SystemEvery camera has some sort of viewer showing
you the scene through the lens or through a series of separate lenses. The best system is one which allows you to see what the lens sees, in other words exactly what will be recorded.
ISO AdjustmentThis adjusts the sensor of your digital camera to
adjust for the amount of available light. This is often set through your menu.
The Shutter SpeedThis setting controls the amount of time the sen-
sor is exposed to light through the lens (set as frac-tions of a second- ie. a shutter speed or 125 means that the sensor is exposed for 1/125th of a second).
The ApertureThis is the adjustable diaphragm that admits
light from the lens to the sensor. In manually adjust-able cameras, this is adjustable and marked as f-stop settings.
The Shutter ButtonThis controls the moveable shield that opens
and closes to permit light to strike the sensor. The speed of the shutter is adjustable to accommodate different light and motion conditions.
The LensThis is the set of specially ground glass pieces that focuses the light rays from the subject to the film. Focus by spinning the lens grip when set to manual focus or press the shutter button halfway when set to auto focus.
Viewing System
Reflex MirrorShutter Button
Settings Wheel
Lens
Digital SLR cameras and some fixed lens digital cameras have the following features.

3
Course Code: AWQ 4MUnit 1: Introduction to Digital Photography | Module 2: Photo Basics
INVESTIGATION
Cross-section view of SLR system.
Viewing System of dSLR CamerasA digital SLR camera has many advantages
over a fixed lens camera. It’s most basic advantage is that it allows the
user to switch to different types of lenses for spe-cific situations. Lens on point and shoot cameras are
YOUR NOTES ON THE CROSS SECTION OF A DIGITAL SLR CAMERA1. 2.
3.
4.
5.
6.
7.
8.
good but can never match the quality of image that a removable lens provides. The second advantage of a dSLR is that it lets the photographer see exactly what the camera sensor will record.
To start to understand a little about how a digital SLR camera works let’s start by looking at its viewing system.

4
Course Code: AWQ 4MUnit 1: Introduction to Digital Photography | Module 2: Photo Basics
AN EXERCISE IN ADJUSTING SHUTTER SPEEDSFor this project you will shoot a number of
photos of a subject in motion using different shutter speeds to make a study of motion.
Materials and PreparationWork in small groups to share a digital SLR
camera or a fixed lens camera that allows you to manually set the shutter speeds. Use the materials below and follow the instructions given to complete this assignment.
You will need:a digital camera that allows manualsettings (fixed lens or dSLR)tripod
If you are using a fixed lens camera you should set it to the shutter priority setting, (usually shows up as Tv). If your camera allows you to set the ISO then set it to 400.
If you are using a dSLR I suggested that you set your ISO to 400 and your white balance to auto. You should also set your shooting mode to the shutter speed priority mode.
If you are not sure yet how to do this ask your teach-er fro help before you set out.
PROJECT: CAPTURING MOTION Project StepsMake your settings for your camera as sug-
gested above then go out to capture the following images.
In this exercise I want you to take a number of photographs that focus on motion using different shutter speeds.
The subjects are totally up to you ... be as creative as you like. You might take pictures of a crowded hallway with one person standing very still as other move around them or you may make a study of moving objects such as photographing someone juggling or make a study of moving water.
1. Try to frame the subject within the view-finder.
2. Focus properly on the main subject and try to pay attention to getting sufficient light on your subject. This may mean moving to a location where the light source is slightly behind you or to your side. You will need to use a tripod when you go with slower shutter speeds.
3. Start with taking shots with a very slow shutter speed, (1 sec.). If you remembered to set your camera mode to shutter priority the camera will adjust the aperture or f-stop to match. With these set-tings you must use a tripod.
4. Continue to record your subjects as you increase the shutter speeds step by step up to a very fast setting, (1/1000th sec.)
5. When you have completed your photo shoot you will up load your images to a computer for pro-cessing and evaluation. Remember to add keywords and make the appropriate adjustments.
6. Select and submit your 25 best images, (from different shutter speeds showing motion in different ways), for evaluation. There should be a minimum of 10 different subjects.
Due Date: _________________________

5
Course Code: AWQ 4MUnit 1: Introduction to Digital Photography | Module 2: Photo Basics
INVESTIGATIONShutter Speed
The shutter on a digital SLR camera can be set to a number of different speeds. The settings repre-sent the amount of time the sensor is exposed to light from the subject.
The shutter speed setting may be set differ-ently on different cameras but often when you are in manual or shutter priority mode it can be set using a spin dial found on top of the camera.
It is extremely important to realize the value of selecting the best shutter speed in conjunction with your aperture setting.
In general slower shutter speeds are used for low light situations when the subject is not moving, and faster shutter speeds are used for bright light and/or subjects which are in motion.
In either case the setting must be compatible with the aperture setting.
YOUR NOTES ON SHUTTER SPEED
the images above show how different shutter speeds capture light and motion

6
Course Code: AWQ 4MUnit 1: Introduction to Digital Photography | Module 2: Photo Basics
INVESTIGATION Shutter Priority vs Manual
There are two settings that allow you to set dif-ferent shutter speeds - the shutter priority mode, (Tv on the settings dial of the Canon cameras) and full manual, (M on the settings dial of the Canon cam-eras).
We will explore the difference between these two settings and look at situations when you would use each. We will also investigate what you can achieve with different shutter speed settings.
YOUR NOTES ON SHUTTER PRIORITY VS MANUAL SHUTTER SPEED SETTINGS
Shutter Priority Mode
Shutter Speed Settings in Manual Mode
Using Different Shutter Speeds
shutter priority is the Tv setting on the dial

7
Course Code: AWQ 4MUnit 1: Introduction to Digital Photography | Module 2: Photo Basics
AN EXERCISE IN ADJUSTING F STOPSFor this project you will get a number of photo-
graphs of a subject using different aperture settings to experiment with bracketing.
Materials and PreparationYou will shoot a number of pictures following a
very specific set of instructions.
You will need:a digital camera that allows manualsettings (fixed lens or dSLR)tripod
If you are using a fixed lens camera you should set it to the manual setting with a shutter speed of 1/60th of a second. If your camera allows you to set the ISO then set it to 400.
If you are using a dSLR I suggested that you set your ISO to 400 and your white balance to auto. You should also set your shooting mode to the manual mode. Set your shutter speed to 1/60th of a second or above then select 5 different f-stops to go with the shutter speed you chose.
If you are not sure yet how to do this ask your teach-er for help before you set out.
PROJECT: BRACKETING Project StepsMake your settings for your camera as sug-
gested above then go out to capture the following images.
In this exercise I want you to take a number of photographs that focus on bracketing to find the perfect exposure. The subject is totally up to you ... be as creative as you like. A suggestion is to take photos of a friend near a natural light source such as a window. Make sure you position your model and the camera in a way to allow light to filter in from the side. It is advisable to use a tripod.
1. Try to frame the subject within the view-finder.
2. Focus properly on the main subject and try to pay attention to getting sufficient light on your sub-ject. This may mean moving to a location where the light source is slightly behind you or to your side.
3. Get your teacher to show you how to use your camera to get a light reading in manual mode for the suggested aperture setting. Set your camera to full manual mode and take shots of your subject using the aperture and shutter settings suggested by the camera.
4. Begin to bracket your exposure by setting and taking shots at two separate settings lower than the f-stop suggested by the camera’s light meter.
5. Take several shots of your subject using two separate settings above the suggested f-stop.
6. Select your 5 sets of your 5 best bracketing attempts, (each of the 5 shots will be at a different aperture setting), 25 images in total to submit for evaluation.
Due Date: _________________________

8
Course Code: AWQ 4MUnit 1: Introduction to Digital Photography | Module 2: Photo Basics
INVESTIGATIONThe Aperture Setting
The aperture setting controls the amount of light that is admitted to the light sensor. The aperture can be set on different cameras in different ways but of-ten on an adjustable camera when you are in manual or aperture priority mode it can be set by spinning a dial at the top of the camera.
Turning the ring one way will allow more light in while turning it the opposite direction will allow less light to reach the sensor. The settings for aper-ture are in a standardized series of f-stops.
these traditional lenses show two different f-stops
these images show the effects of “bracketing” to get the best possible exposure
YOUR NOTES ON F STOPS AND APERTURE SETTINGS

9
Course Code: AWQ 4MUnit 1: Introduction to Digital Photography | Module 2: Photo Basics
INVESTIGATIONAperture Priority vs Manual
As with shutter speed there are two ways to control the aperture - the aperture priority mode, (Av on the settings dial), and the full manual mode.
Aperture settings control the amount of light entering the camera so shutter speeds must be set to accommodate different f-stop or apertures. In aperture priority mode the camera will determine which shutter speed will give the best exposure. In full manual mode you will need to use a light meter to determine the best shutter speed to give the best exposure with the chosen aperture.
YOUR NOTES ON APERTURE PRIORITY VS MANUAL APERTURE SETTINGS
Aperture Priority Mode
Aperture Settings in Manual Mode
aperture priority is the Av setting on the dial
You should always bracket your shots by chang-ing shutter speeds or f-stops to ensure a perfect exposure.
slow shutter speed shows motion GNU Free Documentation License 15 second exposure time

10
Course Code: AWQ 4MUnit 1: Introduction to Digital Photography | Module 2: Photo Basics
AN EXERCISE IN CONTROLLING FOCUSFor this project you will get a number of photo-
graphs of a subject using different aperture settings to experiment with depth of field.
Materials and PreparationYou will shoot a number of pictures following a
very specific set of instructions.
You will need:a digital SLR cameraa lens that allows a low f-stop setting
While using the dSLR I suggested that you set your ISO to 400 and your white balance to auto. You should also set your shooting mode to the aperture priority mode.
If you are not sure yet how to do this ask your teach-er for help before you set out.
Project StepsMake your settings for your camera as sug-
gested above then go out to capture the following images.
PROJECT: DEPTH OF FIELD In this exercise I want you to take a number of photographs that focus on different depths of field. To help exaggerate a narrow depth of field you can use a telephoto or zoom lens and focus on a small detail from a short distance.
The subject is totally up to you ... be as cre-ative as you like. A suggestion is to take photos of a small object or detail.
1. Try to frame the subject within the view-finder.
2. Focus properly on the main subject and try to pay attention to getting sufficient light on your sub-ject. This may mean moving to a location where the light source is slightly behind you or to your side.
3. Start with the lowest aperture setting for your camera. Remember a low f-stop, (about f1.8), will give you a narrow depth of field where only the ob-ject you focus on will be clear. Take several shots of your subject using this aperture setting.
4. Begin to take more shots of your subject as you increase the f-stop settings. Remember as you increase the f-stops you will start to increase your depth of field, so that more and more of your scene will become clear.
5. Make sure you end with several shots at the higher f-stop settings.
6. Select your 5 best images, (each at a different aperture setting), of 5 different subjects, (for a total of 25 images), to submit for evaluation.
Due Date: _________________________

11
Course Code: AWQ 4MUnit 1: Introduction to Digital Photography | Module 2: Photo Basics
INVESTIGATIONDepth of FieldDepth of field can be confusing at first, (where have you heard that before), but with practice you will find yourself making very quick decisions about shutter speed, aperture and depth of field. Basically depth of field refers to the amount of space that will be in focus in your picture.
YOUR NOTES ON DEPTH OF FIELD
For example a wide depth of field would show everything within your picture in sharp focus no matter how close or how far away they are from the camera.
A small depth of field will have only a portion of the image in sharp focus, everything else will be blurry.
The example on the left is an image with an extremely narrow depth of field, the diagram on the right demonstrates how aperture effects depth of field.

12
Course Code: AWQ 4MUnit 1: Introduction to Digital Photography | Module 2: Photo Basics
INVESTIGATIONTypes of LensesA photographic lens is used in conjunction with a camera body and mechanism to make images of objects either on photographic film or electronically. While in principle a simple convex lens will suffice, in practice a compound lens made up of a number of optical lens elements is required to correct (as much as possible) the many optical. A lens may be permanently fixed to a camera, or it may be interchangeable with lenses of different focal lengths, apertures, and other properties.
The two main optical parameters of a pho-tographic lens are the maximum aperture and the focal length. The focal length determines the angle of view, and the size of the image relative to that of the object, while the maximum aperture limits the brightness of the image and the fastest shutter speed usable.
A third consideration is the shortest focal dis-tance - in other words how close you can get to your subject and still focus properly.
YOUR NOTES ON LENS TYPES
NORMAL AND PRIME LENSES
VARIFOCAL VS ZOOM LENS
MACRO LENS
WIDE-ANGLE LENS
TELEPHOTO OR LONG-FOCUS LENS

13
Course Code: AWQ 4MUnit 1: Introduction to Digital Photography | Module 2: Photo Basics
AN EXERCISE IN COMPOSITIONNow its time to take a series of shots that incor-
porate what you have learned about shutter speed, bracketing and depth of field.
MaterialsYou will shoot a number of pictures of a variety
of subjects that attempt to make good use of the rule of thirds.
You will need:a digital camera that allows manualsettings (fixed lens or dSLR)
If you are using a fixed lens camera you should set it to the any of the priority settings. If your camera allows you to set the ISO then set it to 400.
If you are using a dSLR I suggested that you set your ISO to 400 and your white balance to auto. You should also set your camera to any of the priority modes.
If you are not sure yet how to do this ask your teach-er for help before you set out.
PROJECT: RULE OF THIRDS IMAGE LISTMake your settings for your camera as sug-
gested above then go out to capture the following images.
In this exercise I want you to get about 30 - 50 shots of a variety of subjects making good use of the rule of thirds.
The subjects for this portfolio of shot is totally up to you ... be as creative as you like.
1. Try to frame the subject within the view-finder.
2. Focus properly on the main subject and try to pay attention to getting sufficient light on your sub-ject. This may mean moving to a location where the light source is slightly behind you or to your side.
3. Remember to shift your focal point or main subject to one of the four intersection points to create a more interesting and dynamic composition.
4. Select your 25 best images to submit for evaluation. There should be a minimum of 12 dif-ferent subjects.
Due Date: _________________________
14
Course Code: AWQ 4MUnit 1: Introduction to Digital Photography | Module 2: Photo Basics
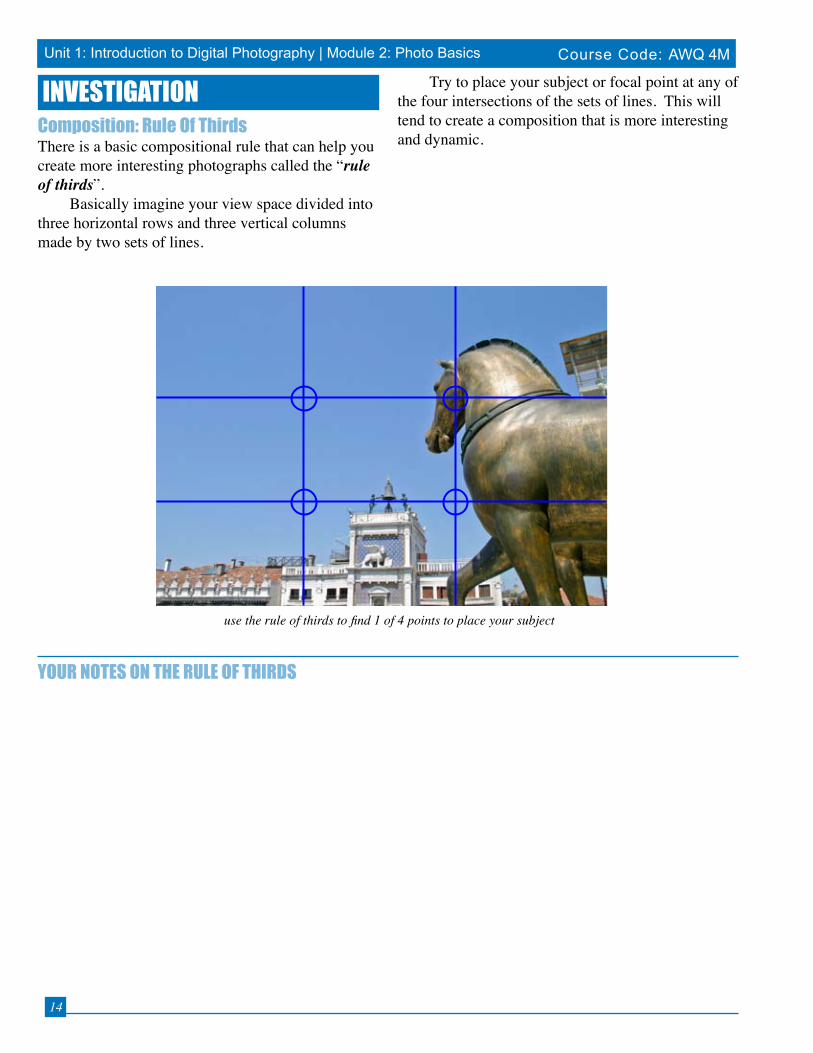
Composition: Rule Of ThirdsThere is a basic compositional rule that can help you create more interesting photographs called the “rule of thirds”.
Basically imagine your view space divided into three horizontal rows and three vertical columns made by two sets of lines.
use the rule of thirds to find 1 of 4 points to place your subject
YOUR NOTES ON THE RULE OF THIRDS
Try to place your subject or focal point at any of the four intersections of the sets of lines. This will tend to create a composition that is more interesting and dynamic.
INVESTIGATION
15
Course Code: AWQ 4MUnit 1: Introduction to Digital Photography | Module 2: Photo Basics
Alternatives to the Rule of Thirds
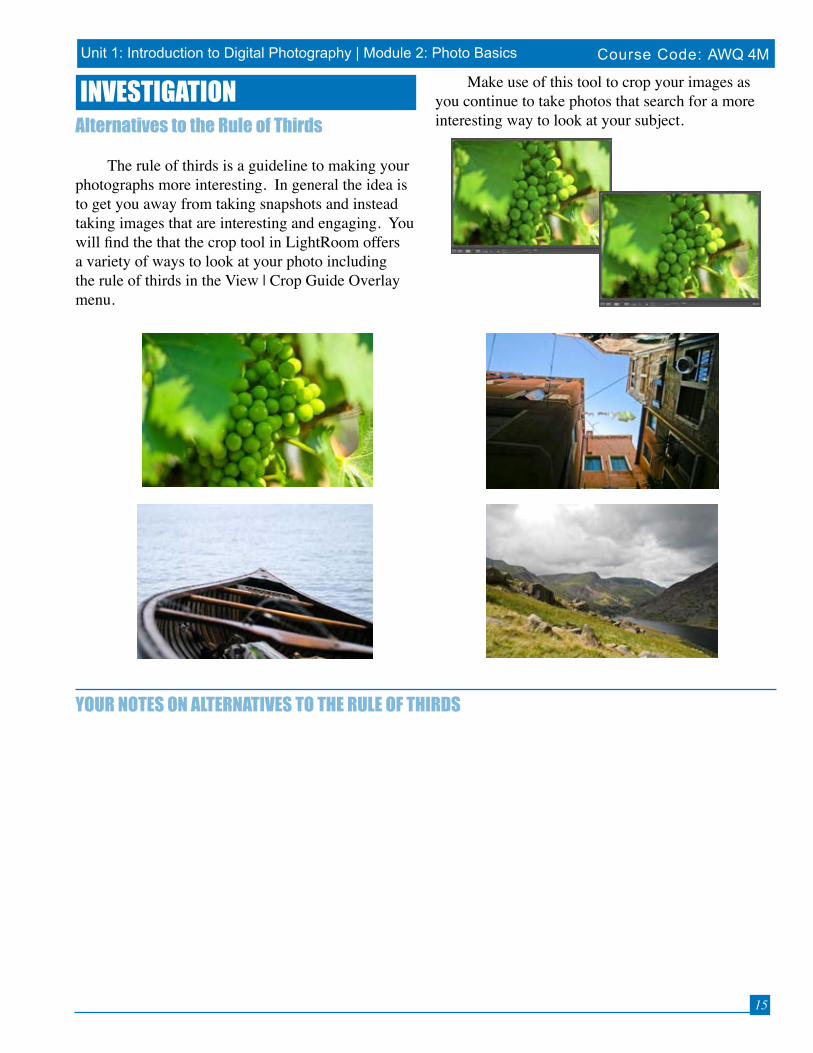
The rule of thirds is a guideline to making your photographs more interesting. In general the idea is to get you away from taking snapshots and instead taking images that are interesting and engaging. You will find the that the crop tool in LightRoom offers a variety of ways to look at your photo including the rule of thirds in the View | Crop Guide Overlay menu.
Make use of this tool to crop your images as you continue to take photos that search for a more interesting way to look at your subject.
INVESTIGATION
YOUR NOTES ON ALTERNATIVES TO THE RULE OF THIRDS

16
Course Code: AWQ 4MUnit 1: Introduction to Digital Photography | Module 2: Photo Basics
AWQ 4M RUBRIC: PHOTO BASICS
COMMENTS
StudentCRITERIA LEVEL 1 LEVEL 2 LEVEL 3 LEVEL 4
Knowledge-knowledge of cam-era operation basics
The Student...demonstrates lim-ited knowledge and understanding of the camera settings
The Student...demonstrates some knowledge and understanding of the camera settings
The Student...demonstrates considerable knowledge and understanding of the camera settings
The Student...demonstrates a thorough knowl-edge and under-standing of the camera settings
- 1 + - 2 + - 3 + - 4 +Thinking and Inquiry-critical and creative thinking skills, good choice of subjects and effective com-positions
The Student...demonstrates limited critical and creative thinking skills
The Student...demonstrates some critical and creative thinking skills
The Student...demonstrates con-siderable critical and creative think-ing skills
The Student...demonstrates a high degree of critical and creative think-ing skills
- 1 + - 2 + - 3 + - 4 +
Communication-communication of information and ideas, effective use of design elements and principles
The Student...demonstrates lim-ited ability to solve artistic problems
The Student...demonstrates some ability to solve artistic problems
The Student...demonstrates considerable abil-ity to solve artistic problems
The Student...solves artistic prob-lems thoroughly
- 1 + - 2 + - 3 + - 4 +
Application-use of camera set-tings and photog-raphy techniques for the use of the medium
The Student...demonstrates limited use of the basic photography skills
The Student...demonstrates some use of the basic photography skills
The Student...demonstrates a con-siderable use of the basic photography skills
The Student...demonstrates thorough use of the basic photography skills

17
Course Code: AWQ 4MUnit 1: Introduction to Digital Photography | Module 2: Photo Basics
This completes our second module on digital photography. You should know have specific knowledge about the settings for the digital SLR camera as well as techniques for capturing motion, bracketing and changing your depth of field. The index below can help you find important terms and concepts from this chapter that can help you with tests and assignments.
IndexAaperture 9Aperture 9, 10
BBracketing 9
DDepth of field 12
Ff-stop 2
Llens 13Lens 2
MMacro Lens 13
Rrule of thirds 15
SShutter 2Shutter Speed 2Single Lens Reflex 2
TTelephoto Lens 13
VVarifocal Lens 13
WWide-Angle Lens 13