unit 1: navigation supplemental materials · recreated using the banner getting started guide, ......
TRANSCRIPT
Unit 1: Navigation
U1_SpplmntlMtrls Supplemental Materials Page 1
Unit 1: Navigation
Supplemental Materials
This document is a compilation of all Job Aids and Printable Versions from
Unit 1: Navigation.

Unit 1: Navigation
Page 2 Supplemental Materials U1_SpplmntlMtrls
Table of Contents
Printable Version: General Menu Navigation: My Banner .............................................................................................. 3 Job Aid – My Banner ......................................................................................................................................................... 5 Job Aid – Naming Conventions ....................................................................................................................................... 10 Job Aid – Form Elements ................................................................................................................................................ 12 Job Aid – Banner Menu Bar ............................................................................................................................................ 14 Job Aid – Keystroke Equivalents .................................................................................................................................... 20 Job Aid – Invoking Common Banner Functions .............................................................................................................. 21 Printable Version: Findginding Data: Query Methods & Query Methods Additional Information .................................. 23 Printable Version: Finding Data: Wildcards .................................................................................................................. 26 Job Aid – Tips and Tricks ................................................................................................................................................ 27 Special Instructions: Browser Settings for Internet Explorer .......................................................................................... 30
Printable Versions contain step by step instructions to perform a procedure. Job Aids contain additional information on a topic, not included in the eLearning tutorial. Because the Job Aids were recreated using the Banner Getting Started Guide, there may be some cases where step-by-step instructions may be included in the Job Aid.

Unit 1: Navigation
U1_SpplmntlMtrls Supplemental Materials Page 3
General Menu Navigation: My Banner
My Banner is a folder where you can place the forms, jobs, menus and QuickFlows that are most important in your daily work. It performs like your Favorites or Bookmarks in Internet Explorer or Mozilla. My Banner is located on the main menu and is tied to your User ID. The My Banner Maintenance Form lets you create and change My Banner. There are several ways to add Banner objects to My Banner: scroll through the object list to find what you want to add, enter the name of the object or query the object list to narrow your search. You can also delete objects from My Banner either one at a time or all at once. The purpose of this Learning Cycle is to demonstrate how to add or delete items from My Banner.
Make a List Before you start building your custom menu, find the forms you want to put in My Banner and then record the form name. If you are new to Banner, this will be the best approach to locate the information needed to build the custom menu.
From the General Menu (GUAGMNU), double-click the Banner folder to display all of the systems, e.g., Student, Financial Aid and General.
For demonstration purposes in the tutorial we opened the Student System and then the General Person Module. Your needs may be different, but the steps will be the same. Open the desired system and then module.
Once you have drilled down to the desired forms, open the ones you would like to add to My Banner. Only one will open at a time.
When each form opens, record the name of the form on a piece of paper; close the form and then open the next.
The form name is found in the title bar and contains seven letters.
The example we used in the tutorial was SPAIDEN.
Continue opening forms and recording the names of the forms until you have selected all of the forms you want to add.
Place the forms in the order you want them to appear in My Banner.
Building My Banner
If you are not on the General Menu, navigate to it.
Open My Banner.
A form icon displays with the message Empty; Select to build.
The My Banner Maintenance GUAPMNU form opens.
Click the pull-down list; it contains the different object types you can select to place on your custom menu.
The left pane located below the pull-down list contains the objects of the selected type.
This list is extremely long and for the most part unfamiliar to the casual user of Banner.
Rather than try to find the objects/forms you want to place on your custom menu from this list, type the form names directly into the Object field.
Click in the first Object field.
Type the first form name from your list into the first field.
Press Tab. Pressing Tab populates the Description field.

Unit 1: Navigation
Page 4 Supplemental Materials U1_SpplmntlMtrls
The Description should look familiar. It was the name next to the form icon on the General Menu that you originally opened when you were making your list.
Repeat the process until you have placed all of your desired forms in your custom menu.
You can change any of the descriptions that you would like, just highlight it, delete it and type in your own description.
Save your work.
From the File menu, select Exit.
You will return to the General Menu.
My Banner will appear to still be empty. Although you saved your changes, they will not appear until the next time you login to Banner.
You have the ability to set your preferences for My Banner to already be open when you login, but we won't show you that here. That will be addressed in Unit 1, Module 7, Learning Cycle 1: Changing Default Expanded Menu.
Organize My Banner
The next time you login to Banner after customizing the My Banner folder, you will notice an addition to the folder...Organize My Banner.
There may come a time when you want to change/add/delete something. Using this icon allows you to do that. You can remove a single object or a group of objects.
Remove a Single Object
Click on the Organize My Banner icon.
Place your cursor in the Object field of the object you want to remove and double-click.
The Description should turn bright blue; this means it is ready to be moved out of your custom folder.
Click the single left-pointing arrow.
The bubble help lets you know you have selected Delete. You really aren't deleting anything; you're just removing it from the custom folder.
The selected object should be removed.
Save your changes.
From the File menu, select Exit.
The changes will take effect the next time you login to Banner
Remove a Multiple Objects
Click on the Organize My Banner icon.
Place your cursor in the Object field of the object you want to remove and double-click.
The Description should turn bright blue; this means it is ready to be moved out of your custom folder.
Repeat these steps until you have highlighted all of the objects you wish to remove.
Click the double left-pointing arrows; the selected objects should be removed.
Save your changes.
From the File menu, select Exit to return to the main menu.
The changes will take effect the next time you login to Banner.
Unit 1: Navigation
U1_SpplmntlMtrls Supplemental Materials Page 5
Job Aid – My Banner
The following was recreated from: Banner Getting Started Guide, May 2006, Release 7.3 My Banner includes the forms, jobs, menus, and QuickFlows that are most important in your daily work. You can access My Banner from the main menu. It is tied to your Oracle user ID. The following forms are used to create and copy My Banner menus:
The My Banner Maintenance Form (GUAPMNU) lets you create and change My Banner.
The My Banner Maintenance and Copy Form (GUTPMNU) lets you copy a My Banner menu to or from another user.
There are several ways to add Banner objects to My Banner:
Enter the name of the object.
Scroll through the object list to find what you want to add.
Query the object list to narrow your search. You can also delete objects from My Banner either one at a time or all at once. In the My Banner eLearning tutorial, you were shown how to enter the name of the object directly onto the Maintenance form and how to delete these objects. A Printable Version of those steps was provided at the end of the tutorial, so we won’t cover those here. This job aid is to show how to scroll through the object list to find what you want to add and how to query the object list to narrow your search.
Using the Object List to Add an Object to My Banner
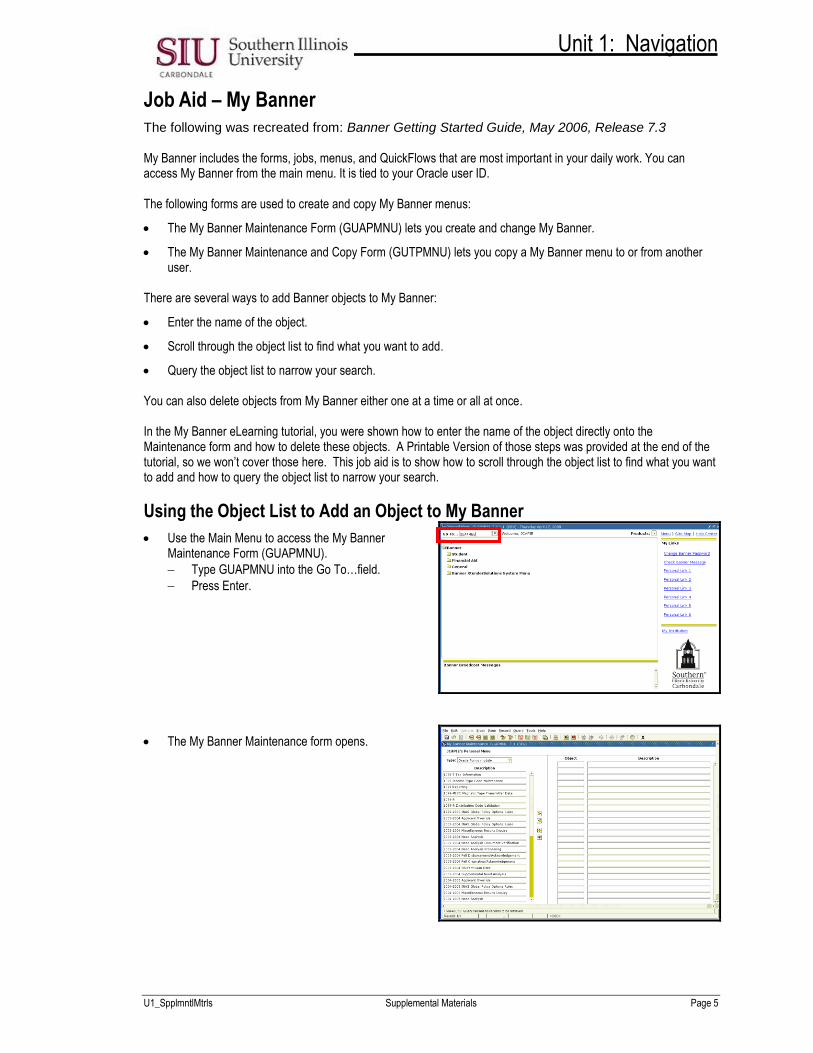
Use the Main Menu to access the My Banner Maintenance Form (GUAPMNU).
Type GUAPMNU into the Go To…field.
Press Enter.
The My Banner Maintenance form opens.

Unit 1: Navigation
Page 6 Supplemental Materials U1_SpplmntlMtrls
Use the pull-down list above the left pane to select the object type you want to display.
The left pane lists the objects of the selected type.
Scroll through the objects.
In the left pane, select each object you want to add to the menu by double-clicking it; you may double- click on several before adding them to the right pane.
When you select an object, the name is highlighted (it turns Blue).
Notes:
You can select objects from multiple object types (for example, a form and a menu) and insert them all at one time.
You can query to reduce the object list. See the instructions later in this Job Aid.
In the screen shot below, we scrolled down the list of objects and selected two. The last record highlighted is #235/2261. At this time there are 2261 records just in this object type (Oracle Forms module). Remember there are six different object types so there are thousands of objects to pick from to place on My Banner. The two objects we selected are now highlighted in blue. Only one is visible, Application Inquiry. The other is Attendance.

Unit 1: Navigation
U1_SpplmntlMtrls Supplemental Materials Page 7
Click in the right pane where you want to place the new menu items.
Click the Insert Selection button in the middle of the form
The selected objects are added to the right pane below the place you clicked.
At this time you have the option to change the object descriptions.
Save your work.

Unit 1: Navigation
Page 8 Supplemental Materials U1_SpplmntlMtrls
Query Objects and Add to My Banner Since there are thousands of objects in Banner that can be placed in My Banner, you might want to consider narrowing your search prior to adding them if you are going to use the Object List to populate My Banner. Use these steps to reduce the list of object names in the left pane. You can add any or all of the matches to My Banner.
Access the My Banner Maintenance Form (GUAPMNU), as previously shown.
Use the pull-down list above the left pane to select the object type you want to query.
Place the cursor in the left pane.
Select the Enter Query function on the Toolbar.
The object list disappears.
Enter the search criteria.
You can use the Oracle wildcards % and _.
Capitalization matters.
Data is matched against the search criteria exactly as you enter them.
Note: In the example on the below, Student Em% was entered.

Unit 1: Navigation
U1_SpplmntlMtrls Supplemental Materials Page 9
Select the Execute Query function from the Toolbar or F8 on the keyboard.
The left pane lists the matching objects.
To add all matches to the menu (if there are 20 matches or less), click in the right pane where you want to place the new menu items.
Then click the Insert All button in the middle of the form.
Save your work. OR
To add selected matches to the menu, select the objects in the left pane by double-clicking each one.
Click in the right pane where you want to place the new menu items.
Then click the Insert button in the middle of the form.
Save your work. Remember: Refer to the eLearning web site, Unit 1, Module 2, Learning Cycle 5: My Banner tutorial for instructions on how to add objects directly to My Banner without using the Object List. This Learning Cycle also gives instructions on how to delete items from My Banner.

Unit 1: Navigation
Page 10 Supplemental Materials U1_SpplmntlMtrls
Job Aid – Naming Conventions
The following tables were recreated from: Banner Getting Started Guide, May 2006, Release 7.3 Banner form, report, job, and table names have the following structure:
Position 1 A Advancement K Work Management T Accounts Receivable
Identifies the
primary system
owning the
form, report,
job, or table.
(See note on
page 1-8.)
B Property Tax L Occupational Tax/License U Utilities
C Courts N Position Control V Voice Response
D Cash Drawer O Customer Contact X Records Indexing
E XtenderSolutions P HR/Payroll/Personnel W
Y
Z
Reserved for client
applications that co-exist
with Banner F Finance Q Electronic Work Queue G General R Financial Aid
I Information Access S Student
Position 2
identifies the
module owning
the form, report,
job, or table.
Advancement (A) Financial Aid (R) HR/Payroll/Personnel (P)
Position Control (N)
A Membership B Budgeting A Application
D Designation C Record Creation B Budget
E Event Management E Electronic Data Exchange C COBRA
F Campaign F Funds Management D Benefit/Deductions
G Pledge and Gift/Pledge
Payment
H History and Transcripts E Employee
J Student Employment H Time Reporting/History
L Label L Logging O Overall
M Prospect Management N Need Analysis P General Person
O Organization O Common Functions R Electronic Approvals
P Constituent/Person P Packaging & Disbursements S Security
S Solicitor Organization R Requirements Tracking T Validation/rule table
T Validation form/table S Student System Shared Data U Utility
U Utility T Validation form/table V Reserved-Can. Solution Ctr.
V Reserved-Can. Solution Ctr. U Utility X Tax Administration
X Expected Matching Gift V Reserved-Can. Solution Ctr.
Finance (F) General (G) Student (S)
A Accounts Payable E Event Management A Admissions
B Budget Development J Job Submission C Catalog
C Cost Accounting L Letter Generation E Support Services
E Electronic Data Interchange O Overall F Registration/Fee Assessment
F Fixed Assets P Purge G General Student
G General Ledger S Security H Grades/Academic History
I Investment Management T Validation form/table I Faculty Load
N Endowment Management U Utility K Reserved-Intntl. UK
O Operations V Reserved-Can. Solution Ctr. L Location Management
P Purchasing/Procurement X Cross product M CAPP
R Research Accounting Accounts Receivable (T) O Overall
S Stores Inventory F Finance Accounts Receivable P Person
T Validation form/table G General Accounts Receivable R Recruiting
U Utility O Overall S Schedule
V Reserved-Can. Solution Ctr. R Research Accounting T Validation form/table
X Archive/Purge S Student Accounts Receivable U Utility
Information Access/Kiosk (I) T Validation form/table V Reserved-Can. Solution Ctr.
R Financial Aid U Utility XtenderSolutions (E)
S Student V Reserved-Can. Solution Ctr. T Validation form/table
X XtenderSolutions

Unit 1: Navigation
U1_SpplmntlMtrls Supplemental Materials Page 11
All Products
W Reserved for client forms or modules used within a Banner application
Y (character in position 1 does not equal W, Y, or Z)
Z
Position 3
identifies the
Advancement (A)
Financial Aid (R)
HR/Payroll/Personnel (P)
Position Control (N)
type of form, A Application form A Application form A Application form
report, job, or B Base table B Base table B Base table
Batch COBOL process table. C Called/list form I Inquiry form
I Inquiry form P Process/report I Inquiry form
P Process/report R Rule table Repeating rules
table Report
P Process
R Repeating rules table R Rule table
Repeating table
Report/process T Temporary table V Validation form View T Temporary table
V Validation form/table
View
V Validation form/table
Finance (F) General (G) Student
A Application form A Application form A Application form
B Base table B Base table
Batch COBOL process
B Base table
I Inquiry form I Inquiry form
M Maintenance form I Inquiry form P Process
Q Query form O Online COBOL process Q Query form
R Rule table
Repeating table Q Query form R Rule table
Repeating table R Rule table/form
Report/process Repeating table
Report/process
Report/process
V Validation form/table
View
V Validation form/table
View T General maintenance
Temporary table Accounts Receivable (T) Information Access/Kiosk (I)
A Application form V Validation form/table
View
R Report
I Inquiry form
P Process XtenderSolutions (E)
Q Query form A Application form
R Report V Validation form/table
V Validation form/table
Positions 4, 5, 6, and 7 uniquely identify the form, report, job, or table.
Examples
GUAIDEN GJRRPTS GTVZIPC
G = General
U = Utility
A = Application
IDEN =
Identification
G = General
J = Job Submission
R = Report
RPTS = Report and Parameter
Information
G = General
T = Validation form/table
V = Validation form/table
ZIPC = ZIP/Postal Code
Note:
The system identifier in position 1 can be one or two characters long.
If the identifier is one character long, the form, report, job, or table name is seven characters long.
If the identifier is two characters long, the name is eight characters long.

Unit 1: Navigation
Page 12 Supplemental Materials U1_SpplmntlMtrls
Job Aid – Form Elements
The following information is from the Banner Getting Started Guide, May 2006, Release 7.3
Iconic Buttons
These buttons are small squares that contain an icon (picture). They represent one or more actions that can be performed for the associated field or record. For example, you can use iconic buttons to copy a record or display a window for entering freeform text.

Unit 1: Navigation
U1_SpplmntlMtrls Supplemental Materials Page 13

Unit 1: Navigation
Page 14 Supplemental Materials U1_SpplmntlMtrls
Job Aid – Banner Menu Bar
The following was recreated from: Banner Getting Started Guide, May 2006, Release 7.3
The Banner menu bar, located at the top of every form, contains pull-down menus.
You can access an option in a pull-down menu at any time, except when you are in a dialog box, alert box, or List of Values (LOV).
If a pull-down menu item is grayed-out, that menu item is currently disabled and cannot be accessed.
To access an option in the menu bar using the mouse:
Click the desired pull-down menu name. Menu items appear.
Click the desired menu item. To access an option in the menu bar using the keyboard:
Press the Alt key. The cursor moves to the menu bar.
Use the right and left arrow keys to highlight the desired pull-down menu name. Then press Enter.
Or
Press the underlined letter for the desired pull-down menu name.
Use the up and down arrow keys to highlight the desired menu item. Then press Enter.
Or
Press the underlined letter for the desired menu item. Note: If the Options menu contains multiple menu items that begin with the same letter, you must use the up and down arrow keys to select the desired menu item.

Unit 1: Navigation
U1_SpplmntlMtrls Supplemental Materials Page 15
File Menu
This pull-down menu contains standard Banner and Oracle functions. The bottom of the menu lists the last forms (up to ten) you accessed in this session. You can select any form in this list to re-access it.
Some of the menu items let you call another form, job, or QuickFlow. When you exit the called object, you return to the object you were previously using.
The functions of this menu are described below.
Direct Access - Displays the Direct Access Form (GUAPARM) used to access a form by its name.
Object Search - Displays the Object Search Form (GUIOBJS) used to search for a menu, form, job, or QuickFlow with part of the name, description, or type.
QucikFlow - Displays the QuickFlow Form (GUAQFLW) used to access a QuickFlow.
Select - Returns you to the calling form and enters the selected value into the field that called the form.
Rollback
Application and inquiry forms - Clears all information (except key information) and returns to the first enterable field in the key block.
Validation forms - Returns to the first enterable field on the form.
Query forms - Returns to the first enterable field on the calling form.
Save - Saves all changes entered since the previous save.
Refresh - Clears the message line.
Print - Prints the current window with the date and time in the title bar.
Exit
Forms and windows – Exits the form or window.
Main menu - Exits Banner.
Query mode – Cancels the query and takes the form out of query mode.
Exit QuickFlow – exits a QuickFlow.
Exit Banner – Dialogue box will open asking for confirmation to Exit.
Return to Menu – returns to the Main Menu.
Preferences - Displays the General User Preferences Maintenance Form (GUAUPRF), which is used to customize Banner for individual users.
List of recently accessed forms: Lets you quickly re-access forms that were previously accessed in this session (up to ten).

Unit 1: Navigation
Page 16 Supplemental Materials U1_SpplmntlMtrls
Edit Menu
This pull-down menu contains the functions used to edit text items.
The functions of this menu are described below.
Cut - Cuts selected text and places it on the clipboard.
Copy - Copies selected text to the clipboard.
Paste - Pastes text from the clipboard to the spot where the cursor is located.
Edit - Displays the Editor window, which is used to enter or update text. You can display this window from most fields. It is particularly useful in long data fields.
Options Menu
This pull-down menu contains navigation options.
Banner is delivered with standard navigation options. Your system administrator can change and add navigation options for your institution. Only those staff members with appropriate security can perform this task.
The functions for this menu are described below.
Note: Up to 24 options can appear in the Options pull-down menu.
Navigation options vary from form-to-form and depend on where the cursor is currently located.
Some options take you to other blocks and windows within the current form.
Other options take you outside the current form to related forms.
Block Menu
This pull-down menu contains the functions used to navigate among the blocks of information on a form.
The functions for this menu are described below.
Next - Moves the cursor the next block that has a least one enterable field.
If the next area is in another window, that window is opened.
Previous - Moves the cursor to the previous block that has at least one enterable field. If the previous block is in another window, that window is opened.
Clear - Clears all information from the current block.
Information is not removed from any records or tables.

Unit 1: Navigation
U1_SpplmntlMtrls Supplemental Materials Page 17
Item Menu
This pull-down menu contains the functions used to navigate among the fields or items on a form.
The functions of this menu are described below.
Previous - Moves the cursor to the previous enterable field in the current block.
Next - Moves the cursor to the next enterable field in the current block. Occasionally, Next Item moves the cursor to the first enterable field in the next block.
Clear - Clears all information from the current field.
Information is not removed from any records or tables.
Duplicate - In a blank row of a repeating record, duplicates the contents of the same field in the previous record and copies it into the new record.
Record Menu
This pull-down menu contains the functions used to work with records on a form.
The functions of this menu are described below.
Previous - Moves the cursor to the first enterable field in the previous record and triggers previous record logic coded into the form.
Next – Moves the cursor to the first enterable field in the next record of the current block and triggers next record logic coded into the form. If the cursor is in the last record, a new record is created.
Scroll Up - Scrolls up the list of repeating records, putting the first displayed record near the bottom of the list.
Scroll Down - Scrolls down the list of repeating records, putting the last displayed record near the top of the list.
Clear - Clears all information from the current record.
Information is not removed from any records or tables.
Remove - Removes all information for the current record. When you Save, the removed information is deleted.
Insert - Inserts a new blank record into the list of existing records.
Duplicate - Duplicates the contents of all fields in the record and copies them into a new record.
Lock - Temporarily locks the contents of the record so no other Banner user can update it. Save, Rollback, and Exit release the lock.

Unit 1: Navigation
Page 18 Supplemental Materials U1_SpplmntlMtrls
Query Menu
This pull-down menu contains the functions used to query information in the database based on specified criteria.
The functions of this menu are described below.
Enter - Puts the form into query mode so you can enter search criteria to see what information is already in the database.
Execute - Searches the database and displays the first set of records that match your search criteria.
Last Criteria - Enters the criteria from your last search.
Cancel - Cancels the query and takes the form out of query mode.
Count Hits - Counts the number of records that match the search criteria and displays that number in the auto hint.
Fetch Next Set - If more records match the search criteria than fit in the window, replaces the current set of displayed records with the next set.
Tools Menu
This pull-down menu contains actions that can be performed with Banner Xtender Solutions, as well as options to submit or release a Workflow.
The functions of this menu are described below.
Banner XtenderSolutions - Puts the form into query mode so you can enter search criteria to
Solutions see what information is already in the database.
Workflow - Searches the database and displays the first set of records that match your search criteria.

Unit 1: Navigation
U1_SpplmntlMtrls Supplemental Materials Page 19
Help Menu
This pull-down menu contains various help tools. The functions of this menu are described below.
Online Help - Displays online information for the current form.
Dynamic Help Query - Displays the Dynamic Help Form (GUAHELP) in query mode, used to display traditional help for a field, block, or form.
Dynamic Help Edit - Displays the Dynamic Help Form (GUAHELP) in edit mode, used to edit traditional help for a field, block, or form. Used to maintain custom information at your institution.
Help (Item Properties) - Displays the Oracle item properties window for the current field.
Show Keys - Displays the Keys list, which lists the functions and equivalent keystrokes available for the current form, window, and field.
List - Displays the List of Values (LOV) for current field, if List of Values appears in the status line.
Display Error - If an Oracle error occurs, displays the code that is in error.
Display ID Image - If the cursor is in an ID field, displays the image associated with the ID, if available.
Calendar - Displays the Calendar.
Calculator - Displays the Calculator.
Extracts Data with Key - Extracts Banner data for the current block, with key data, to a spreadsheet.
Extracts Data no Key - Extracts Banner data for the current block, without key data, to a spreadsheet.
Technical Support - This sub-menu provides access to SQL Trace, optimization mode, and database reconnection features.
About Banner – Displays the About Banner Form (GUAABOT), which identifies the current form, release number, date and time, as well as all legal statements and copyright information for Banner. This form also displays a list of installed Banner products, their release number, and their installation date. This information will be helpful if you need to contact the ActionLine with a question or problem.

Unit 1: Navigation
Page 20 Supplemental Materials U1_SpplmntlMtrls
Job Aid – Keystroke Equivalents
Below is a list of keystroke equivalents for common Banner functions. To display this list within the Banner Modules, click on the Help Menu and select Show Keys.

Unit 1: Navigation
U1_SpplmntlMtrls Supplemental Materials Page 21
Job Aid – Invoking Common Banner Functions
Listed in the table below are the different ways to invoke functions that are common to Banner forms.
The Auto Hint/Status line helps you to choose the next navigation key.
Function To Toobar Button
Menu Command
Keystroke Option
Save or Commit
Save all changes entered since the last save.
File/Save F10
Rollback Clear all information (except key information) and return to the first entry field in the previous block.
File/Rollback Shift + F7
Select Select a record when a query is executed or double-click your choice.
File/Select Shift + F3
Insert Record Insert a record after the current record.
Record/Insert F6
Remove or Delete Record
Remove the current record.
Record/Remove Shift + F6
Enter Query Put the form into query mode allowing search criteria to be entered. Use to see if the information is already in the database.
Query/Enter F7
Execute Query In query mode, searches the database for matching records. Displays matches.
Query/Execute F8
Cancel Query Remove the form from query-mode. Does NOT affect a currently executing query.
Query/Cancel Ctrl + Q
Previous Record
Move the cursor to the first entry field in the current information area
Record/Previous Shift +
Up Arrow
Next Record Move the cursor to the first entry field of the next record current information block. If you are on the last record, a new record is created.
Record/Next Shift +
Down Arrow
Previous Block Move the cursor to the previous information block with at least one entry field. If previous area is in another block window, the window is opened.
Block/Previous Ctrl + Page Up
Next Block Move the cursor to the next information block with at least one entry field. If the next area is in another window, the window is opened.
Block/Next Ctrl + Page
Down
Print Capture and print the current window.
File/Print Shift-F8
Help Displays Banner Help window
Help/ Online Help
Exit Close current window or form. If you are at the opening screen, it exits Banner.
File/Exit Ctrl + Q
Previous Item or Previous
Field
Move the cursor to the previous entry field in the current information area.
None Item/Previous Shift + Tab

Unit 1: Navigation
Page 22 Supplemental Materials U1_SpplmntlMtrls
Function To Toobar Button
Menu Command
Keystroke Option
Next Item or Next Field
Move the cursor to the next entry field in the current information area.
None Item/Next Tab
Duplicate Record
Duplicates the contents of all fields in the record and copies them into a new record.
None Record/Duplicate F3
Calculator Display the Calculator form. If the cursor is currently on a numeric field the resulting value will automatically appear in the field.
None Help/Calculator Double-click in a numeric field.
Calendar Display the Calendar Form. If the cursor is currently on a date field the resulting value will automatically appear in that field.
None Help/Calendar Double-click in
a date field.
Cancel Exit from an Option List, List of Values, Editor window or Dynamic Help; Cancel query mode.
None (Query mode = Query/Cancel)
Esc or Ctrl + Q
Clear Item Delete the information in the current field None Field/Clear Ctrl + U
List of Values Generally, if the field name is in blue, you are provided with a list of possible values for the current field.
None Help/List F9 or double-
click in the field
Search
Displays another form or window to search for a value related to the current field that can often be selected and returned to the associated field.
None
Unit 1: Navigation
U1_SpplmntlMtrls Supplemental Materials Page 23
Finding Data: Query Methods & Query Methods Additional Information
The information covered in Module 5: Learning Cycle 1: Query Methods and Learning Cycle 2: Query Methods – Additional Information has been combined in this document as a guide for end users to use when performing queries in Banner.
Overview
This document provides the steps to perform a query in order to retrieve information from the Banner database.
In Banner, you will perform query functions using query forms, inquiry forms, and application forms.
Some forms will open in query mode (Query form); others will require you to put them in query mode (Inquiry form).
There are three main steps in the Query process.
Place the system in Query Mode
Enter Search Criteria
Execute the Query
The Query Menu functions available and used at different times in the query process are:
Enter
Execute
Last Criteria
Cancel
Count Query Hits
Fetch Next Set
Besides the Query menu, there are Toolbar and keyboard functions that can be used to perform the most common query functions.
Enter Query
Execute Query
Cancel Query
Enter Query
Putting the system in Query Mode readies the system for search criteria to be entered. You will use one of the following methods to put the System in Query mode:
From the Query menu, select Enter.
Click the Enter Query Toolbar button.
Or, press the F7 function key.
Reminder: Some Banner forms open in Query Mode. If the form is already in Query Mode, Enter Query is displayed on the Auto Hint at the bottom of the window.
For these forms, you will skip the first step and proceed with the second step in the query process.
Enter Search Criteria
The second step in the query process is to enter the search criteria. You can input search criteria in one or more fields. The more search criteria entered, the narrower the search.

Unit 1: Navigation
Page 24 Supplemental Materials U1_SpplmntlMtrls
Execute Query
The third step is to Execute the Query. Executing a search in the database displays the first set of records that match the search criteria. Note: This function is only enabled if you are in query mode.
To Execute a search you will perform one of the following functions.
From the Query menu, select the Execute option.
Select the Execute Query Toolbar button.
Press the F8 function key, as noted on the Auto Hint.
All records matching the search criteria entered are retrieved and displayed on the form.
A word of caution: Once you select a record from the query results, that person's information will appear in every form you open from that point forward, during the current Banner session.
To locate another person's record without exiting the Banner session, place your cursor in the ID field and :
From the Block Menu, select Clear
From the Record Menu, select Clear
Press the Delete key on your keyboard
Last Criteria
Sometimes it may be necessary to perform subsequent searches using the previous search criteria. To eliminate keying in the search criteria a second time, the Last Criteria Query menu function can be used.
To invoke Last Criteria.
Put the system in Query Mode, unless it is already there.
From the Query menu, select Last Criteria.
The previous search criteria will appear in the fields, as last entered.
At this point, the search criteria can be changed. Remember, the more search criteria entered, the narrower the search.
The third step is to Execute the search.
Cancel Query
Cancel is a common query function. This option is used to take the form out of query mode.
View the Auto Hint to see if this option is available.
“Ctrl + Q to cancel” will be displayed.
When it becomes necessary to Cancel a query, use one of the following options.
From the Query Menu, select Cancel.
Select the Cancel Query Toolbar button.
From the keyboard, press Ctrl + Q.
View the Auto Hint again to verify, “Query cancelled,” is displayed.

Unit 1: Navigation
U1_SpplmntlMtrls Supplemental Materials Page 25
Count Query Hits
The Count Hits function counts the number of records matching the search criteria, before executing the query.
To use the Count Hits function:
Put the system in query mode, if not already.
Enter Search Criteria.
From the Query menu, select Count Hits.
View the Auto Hint for the number of hits.
When the Count Hits function produces a number, it will display in the Auto Hint. When no number is produced, the reason will also be displayed in the Auto Hint.
You will then determine if you want to Execute or Cancel the query.
Note: The Count Hits function may be designed to perform differently on specific forms. If this applies to one of the forms you will use to perform your job duties, the details will be provided during the instructor-led training session.
Fetch Next Set
Fetch Next Set is a Query function that allows you to call and display the next set of records, when all records matching the search criteria cannot be seen on the screen at one time. Note: This function is enabled only if you are in query mode.
Before using the Fetch Next Set function, you will:
Put the system in query mode.
Enter search criteria.
Execute the query to display the first set of matching records.
To display additional records or the next set of matching records, invoke the Fetch Next Set function:
From the Query menu, select Fetch Next Set.
Viewing the information in the Auto Hint will be helpful when using this function. When the first set of records is on your screen, the record indicator will display Record: 1/?. This will change as additional records are called, i.e., Record: 22/?. When the last record set is called, the “?” changes to reflect the last record number i.e., Record: 43/50.
You can continue to Fetch Next Set until you locate the needed record or to view all records.
In some cases, this process may become too repetitious. To avoid this, shorten the number of records retrieved by entering more specific search criteria.

Unit 1: Navigation
Page 26 Supplemental Materials U1_SpplmntlMtrls
Finding Data: Wildcards
Wildcard characters are used as placeholders in search criteria, when the real characters are unknown. The wildcards you will use are Percent "%" and Underscore "_"
"%" represents any number of unspecified characters.
"_" represents one occurrence of an unspecified character.
Field Search
In the eLearning tutorial, the Go To . . . field was used to perform a search for a form. To search for a form from the Go To . . . field:
Enter a portion of the 7-character name code or description and the “%” wildcard, for an unspecified number characters; or, use “_” as the placeholder for an unknown character.
Press Enter or Tab.
Search Results Window
When a wildcard character is used in a query, the Search Results window displays listing all records in the database that match the search criteria.
For the form search, the Name Code and Description are displayed. The description can be helpful in identifying the correct form.
When necessary, use the scroll bar to locate the needed form.
To retrieve the correct form:
Highlight it.
Then, double-click or click the OK button to select it.
For some searches, a long list of results may be displayed. When this happens, it may be necessary to use the Find field in the Search Results Window to refine the search. The % wildcard may also be used here.
Enter search criteria using "%" in the Find field; then click the Find button to execute the search.
Select the correct record.
Query Forms
You can use wildcard characters on forms where query functions are enabled.
To query:
Put the system in query mode, if not already.
Enter search criteria using wildcards. You can enter as many fields, as desired.
Execute the search.
Following are some examples for using wildcards in queries.
To get results: Enter Search Criteria:
BEGINNING with SPA SPA%
ENDING with "IDEN" %IDEN
CONTAINING “athan” anywhere %athan%
When only one character is unknown Mart_n
When one placeholder and any number of unspecified characters are unknown.
J_ann%

Unit 1: Navigation
U1_SpplmntlMtrls Supplemental Materials Page 27
Job Aid – Tips and Tricks
The following was recreated from: Banner Getting Started Guide, May 2006, Release 7.3 This Job Aid contains some of SunGard Higher Education consultants’ favorite tips for using Banner and teaching new users about it.
Shortcuts for Entering Information
Topic Tip /Trick
System Date
Dates within the current month
Dates within
the current year
Populating records on forms
In most date fields, entering a single, non-numeric character followed by Enter or Tab will display the current date. It’s easy to remember T for Today, or S for System Date. Even special characters work for this shortcut. Forget what today’s date is? Enter a question mark and Banner will tell you.
If you enter a two-digit number in a date field, Banner assumes the current
the current month and year. For example, if the month is May month and the
year 2005, 10-MAY-2005 has the shortcut 10.
If you enter a four-digit number in a date field, Banner assumes the current
the current year. For example, if the year is 2005, 15-JUN-2005 year has the
shortcut 0615.
After entering the SSN, click in the first enterable field, and the record will be
populated.
Note: This shortcut works for about 80% of forms. Remember that you
proceed out of the key block by performing a Next Block
function.
Navigation Shortcuts from the Main Menu
Topic Tip /Trick
Shortcuts in the Go To… field
Enter SITE to navigate to the site map.
Enter TREE to navigate from the site map to the product tree.
Enter REFRESH to:
Refresh your personal menu (My Banner) after making changes on GUAUPRF
Return to the Banner menu even if you are buried deep inside other menus
Refresh the site map Press the up or down arrow keys to navigate to any of the last 10 forms you
accessed. Enter the menu name to expand that menu. Example: *GENJOB” - Expands
the General JOBSUB directory.
Enter EXIT to end your Banner session.

Unit 1: Navigation
Page 28 Supplemental Materials U1_SpplmntlMtrls
Enter the Quickflow name to automatically open the first form in the Quickflow.
Enter a job name and GJACPTL will open and run it.
Enter *PERSONAL to open the My Banner menu.
Enter *MENU to open the Banner menu no matter where you are.
Other Navigation Shortcuts
Topic Tip /Trick
Rollback The Rollback function clears out the record and takes you back to the key block, so you can take another snapshot from the database or enter another ID number.
Shortcut to calendar or calculator
Double-clicking in a number or date field will display the calculator or calendar, respectively.
Queries
Topic Tip /Trick Enter/exit query sequence
You must always perform an Enter Query function before performing an Execute Query function. Even if the form is blank when you access it, you must ensure it is in Enter Query mode.
Re-executing a query
If you have not selected a record after your query, and wish to execute another, you can perform two Enter Query functions in a row, and Banner will retrieve the last set of query criteria you executed.
Wildcards The character _ represents a single character in your query, while the character % represents any number of continuous characters.
Logging In/Out
Topic
Tip /Trick
Enter login
information all
on one line
When logging in, you can enter the username and password all on one
line.
For example: Username: rsmith/yourpassword
instead of
Username: rsmith
Password: yourpassword
Note: If you enter your password in the Username field along with
your name, your password will be visible.
Enter EXIT to
quit Banner
Enter EXIT in the Go To field on the main menu to end your Banner
session.

Unit 1: Navigation
U1_SpplmntlMtrls Supplemental Materials Page 29
Eliminate extra
prompt before
exiting
Clear the Prompt Before Exiting Banner check box on the Display
Options tab of GUAUPRF to eliminate the extra message that verifies
whether you want to quit prior to ending your Banner session.
Error Messages
Topic
Tip /Trick
GUAERRM appears
If the Banner Error Messages Form (GUAERRM) appears, then the error
resulted from an API. This information can be helpful when trying to resolve
the error with your system administrator.
Miscellaneous
Topic
Tip /Trick
Names are
formatted
differently
across
Banner
products
Names in the Name fields on Banner forms may be formatted differently
across Banner products. This is due to different functional areas at your
institution having different needs for displaying and working with name
data.
Quick and
easy pie
chart
Go from a Banner form to a pie chart in four mouse clicks. From the Help
pull-down menu on the main menu, choose the Extract Data No Key option
to create a .csv file that can be opened and formatted using a spreadsheet
program.
Not all forms have a data extract option. Query the Data Extract Option field
on GUAOBJS to determine the forms for which it is available.

Unit 1: Navigation
Page 30 Supplemental Materials U1_SpplmntlMtrls
Special Instructions: Browser Settings for Internet Explorer
Allowing Access from Secure Sites
If your browser has a pop-up blocker enabled, you may want to perform the following steps so that you don’t have to “Allow blocked content…” each time you access the Banner web-site. The steps outlined will work for any trusted web-site.
Navigate to the desired web-site.
Highlight the URL and use the keyboard command, Ctrl + c to copy the URL or make a note of the URL.
For Banner, the web site is http://sis.siu.edu
Note: It is recommended that you use the Copy function. Later you will be required to either Paste or type the URL into a field. If the URL is typed incorrectly, it will not be accepted.
Click on the Tools menu in the IE Browser window and select Internet Options.
The Internet Options window appears.
Click on the Privacy Tab.
Click the Settings button.

Unit 1: Navigation
U1_SpplmntlMtrls Supplemental Materials Page 31
Note: If the Settings button is not enabled (grayed out), look at the Turn on Pop-up Blocker check box.
It should be checked.
If it is not, go ahead and click in it.
This will enable the Settings button.
Click the Settings button, as previously instructed.
The Pop-up Blocker Settings window appears.
Click in the Address of website to allow field.
If you copied the URL, use the keyboard command, Ctrl + v to paste the URL into the field. If you made a note of the URL, type that URL into the field.
Note: If you type the URL incorrectly, it will not be accepted.
The Add button is now enabled.
Click it.

Unit 1: Navigation
Page 32 Supplemental Materials U1_SpplmntlMtrls
You should now see the site you just added in the Allowed sites region of the window.
Click the Close button.
The Internet Options window reappears.
Click OK.
You should return to the browser window.
Now, even though pop-up blocking is turned on, this site will be allowed to pop-up on your display screen whenever you access it.

Unit 1: Navigation
U1_SpplmntlMtrls Supplemental Materials Page 33
Enabling Automatic Prompting for File Downloads
Many of the eLearning tutorials found on this web-site have Job Aids and/or Printable versions available; they have been prepared using Microsoft Office Word 2003. If you are using Internet Explorer as your browser, it must be configured correctly in order to open the documents. Please review the information below to make sure your browser has the necessary features enabled.
Click on the Tools menu in the IE Browser window and select Internet Options.
Click on the Security tab.
Then, click on the Custom level… button.

Unit 1: Navigation
Page 34 Supplemental Materials U1_SpplmntlMtrls
The Security Settings window appears.
Scroll down to the Downloads section – it’s about half-way down the window. Notice the circle on the right.
In the Automatic prompting for file downloads area, click the Enable radio button.
In the File download area, click the Enable radio button.
Click the OK button at the bottom of the Security Settings window.
You may receive a Warning! Window asking if you are sure you want to change the security settings, click Yes.
The Internet Options window reappears.
Click OK.
Your Browser window will reappear.