panasonic unit sa-ht70 sa-ht65 front, ... contact panasonic canada inc. customer care ... 1 pc. for...
TRANSCRIPT
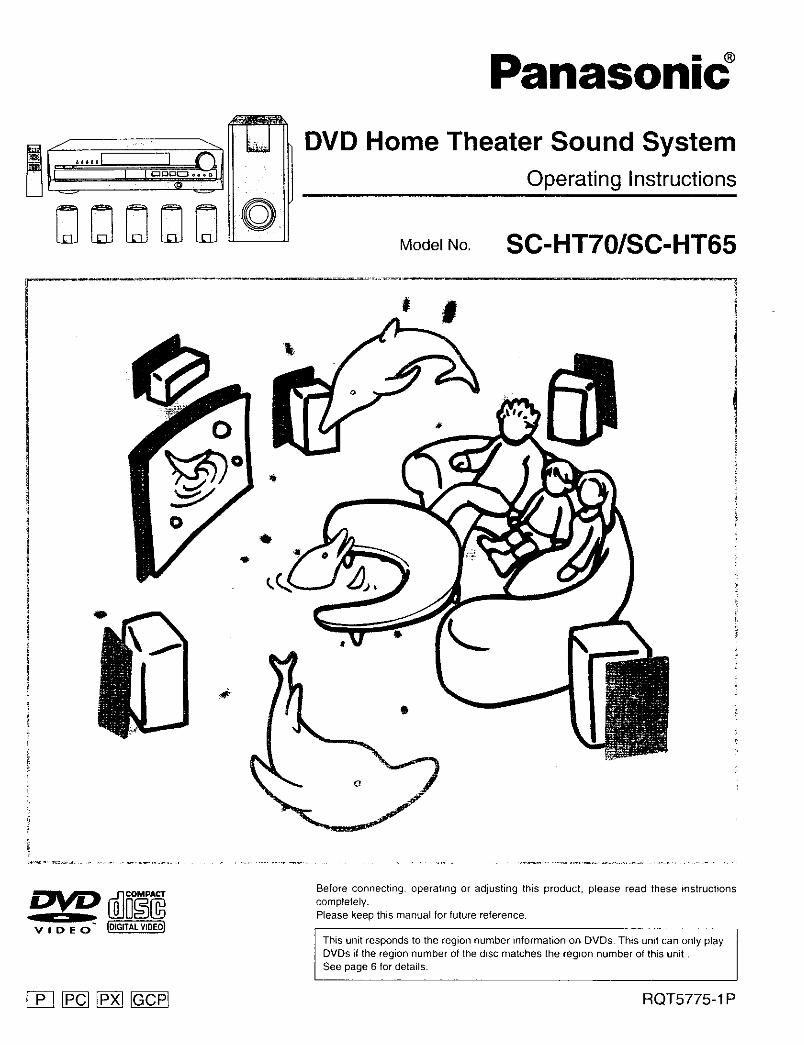
Panasonic
= Operating Instructions
MoeelNo. SO-HT70/SO-HT65
Before connecting, operating or adjusting this product, please read these instructionscompletely.Please keep this manual for future reference.
This unit responds to the region number information on DVDs This unit can only playDVDs if the region number of the disc matches the region number of this unitSee page 6 for details.
RQT5775-1 P

Dear CustomerThank you for purchasing this product.For optimum performance end safety, please read theseinstructions carefully.
System SC-HT70 SC-HT65
Main unit SA-HT70 SA-HT65
Front, center SB-AFC80 SB-AFC80and surround
Speakers
Subwoofer SB-WTO SB-W70
CAUTION!THIS PRODUCT UTILIZES A LASER.USE OF CONTROLS OR ADJUSTMENTS ORPERFORMANCE OF PROCEDURES OTHER THAN THOSESPECIFIED HEREIN MAY RESULT IN HAZARDOUSRADIATION EXPOSURE,DO NOT OPEN COVERS AND DO NOT REPAIR YOURSELF.REFER SERVICING TO QUALIFIED PERSONNEL,
WARNING:TO REDUCE THE RISK OF FIRE, ELECTRICSHOCK OR PRODUCT DAMAGE, DO NOTEXPOSE THIS APPLIANCE TO RAIN,SPLASHING, DRIPPING OR MOISTURE.
CAUTION!DO NOT INSTALL, OR PLACE THIS UNIT, IN A BOOKCASE,BUILT-IN CABINET OR IN ANOTHER CONFINED SPACE.ENSURE THE UNIT IS WELL VENTILATED. TO PREVENT
RISK OF ELECTRIC SHOCK OR FIRE HAZARD DUE TOOVERHEATING, ENSURE THAT CURTAINS AND ANYOTHER MATERIALS DO NOT OBSTRUCT THEVENTILATION VENTS.
- Only the U.S.A. and Canada
CAUTION:TO PREVENT ELECTRIC SHOCK MATCH WIDEBLADE OF PLUG TO WIDE SLOT, FULLYINSERT.
The functions you can use depend on the type of disc you play.These marks are used to indicate which type of disc is explained.
Feature can be used with DVD-Video
Feature can be used with video CD
CO Feature can be used with audio CD
Some features cannot be used even if thesesymbols are indicated.
THE FOLLOWING APPLIES ONLY IN THE U.S.A. AND CANADA
CAUTIONCAUTION:TO REDUCE THE RISK OF ELECTRIC
SHOCK, DO NOT REMOVE SCREWS.NO USER-SERWCEABLE PARTSINSIDE.REFER SERVICING TO QUALIFIEDSERVICE PERSONNEL.
The lightning flash with arrowhead symbol, withinan equilateral triangle, is intended to alert the userto the presence of uninsulated "dangerous voltage"within the product's enclosure that may be ofsufficient magnitude to constitute a risk of electricshock to persons.
The exclamation point within an equilateral triangleis intended to alert the user to the presence ofimportant operating and maintenance (servicing)instructions in the literature accompanying theappliance.
Exceptforthe U.S.A. anU Canada
r- For areas except the U.S.A. and Canada
CAUTION:The AC voltage is different according to the area.Be sure to set the proper voltage in your area before use.(For details, please refer to page !0.)
(Inside of product)
CLASS1LASERPRODUCT
/
/ Back of product
]QT5775

PRECAUTIONS ................................................................ 4
Supplied accessories ...................................................... 5
Type of discs .................................................................... 5Region numbers .............................................................. 6DVD symbols .................................................................... 6Concerning the remote control ...................................... 7Speaker set-up ................................................................ 8Connections .................................................................. 10
Front panel controls ...................................................... 11
Selecting TV screen type .............................................. 13
Timer function ................................................................ 37
Convenient functions .................................................... 38To mute the volume .................................................................. 38To turn off the unit's display ...................................................... 38
TO listen through headphones .................................................. 38Adjusting the bass .................................................................... 38
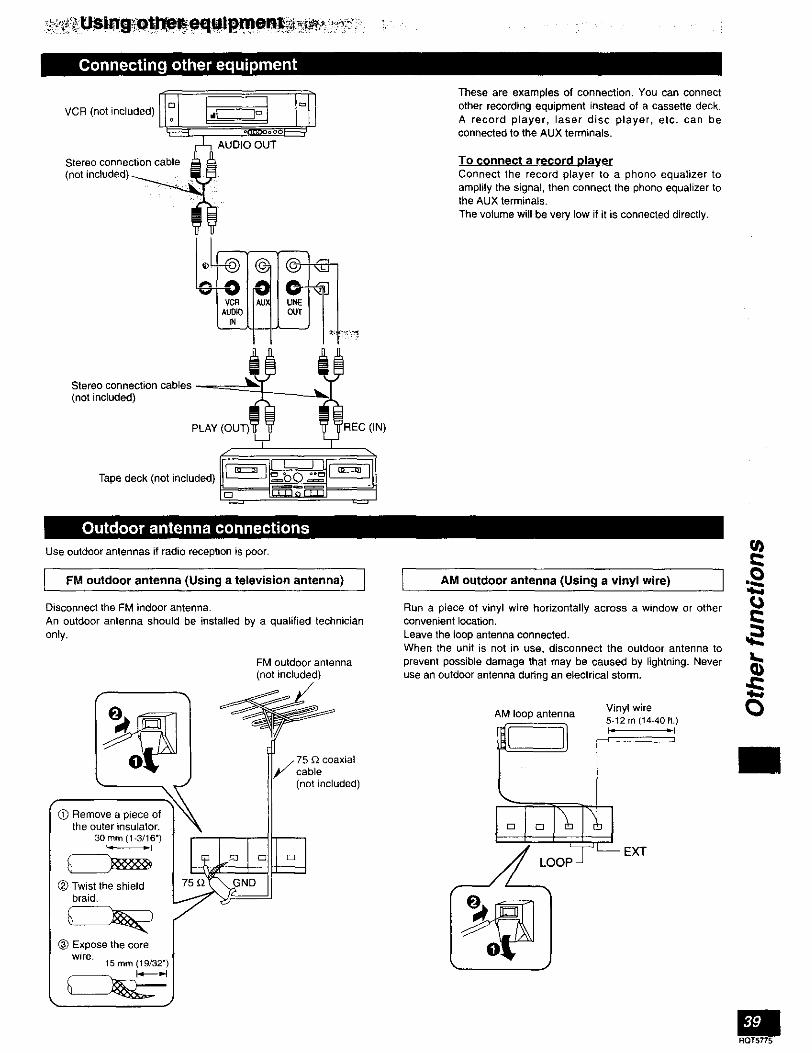
Using other equipment .................................................. 39
Connecting other equipment .................................................... 39Outdoor antenna connections .................................................. 39
Listening to an external source ................................................ 40Recording to other equipment .................................................. 40
Using the remote control with other equipment ........ 41Operating a television .............................................................. 41Operating a video deck ............................................................ 41Changing the remote control code ............................................ 42
Playing discs .................................................................. 14Other methods of play .................................................. 16
Using the resume function to restart play ................................ 16Pause (Still picture) .................................................................. 16Search function ........................................................................ 16
Skip function ............................................................................ 17Frame-by-frame viewing .......................................................... 17Slow-motion play ...................................................................... 17Repeat function ........................................................................ 18Marking a position .................................................................... 19Disc skip .................................................................................... 20Using menus to play ................................................................ 20Changing scundtracks .............................................................. 21Changing subtitle language ...................................................... 22Switching angles ...................................................................... 22Changing the picture quality for movie viewing
(Cinema mode) .................................................................... 23
Starting play from a specific track ............................................ 23Random play ............................................................................ 23Using the Disc Manager ............................................................ 24Program play ............................................................................ 25
Using GUI screens ........................................................ 26GUI icon descriptions ................................................................ 27
Initial settings ................................................................ 43Concerning discs .......................................................... 48Glossary ........................................................................ 49Troubleshooting guide .................................................. 50Maintenance .................................................................. 52
When moving the unit .................................................. 52 rAProduct Service ............................................................ 52Listening caution .......................................................... 52
Specifications ................................................................ 53Warranty (Only for U.S.A.) ............................................ 54 _="=
Servicenter List (U.S.A.) ................................................ 55 _1_
The radio: manual tuning .............................................. 29The radio: preset tuning ................................................ 30
Automaticpresetting ................................................................ 30Selecting channels .................................................................... 30
Sound field .................................................................... 31
Sound field systems and effects you can enjoy with this unit .. 31Enjoying sound with Dolby Digital ............................................ 32Enjoying sound with Dolby Pro Logic ........................................ 32Enjoying sound with SUPER SURROUND .............................. 34To down mix to 2 channels ...................................................... 34
Using the seat position function (SEAT POSITION) ................ 35Using the center focus effect (CENTER FOCUS) .................... 35Sound Field Control effects (SFC) ............................................ 36
ROT5775

• HH GAUTIONS '
Before using this unit please read these operating instructionscarefully. Take special care to follow the warnings indicated on theunit itself as well as the safety suggestions listed below.Afterwards keep them handy for future reference.
1. Power Source -- The unit should be connected to power supply
only of the type described in the operating instructions or asmarked on the unit.
2. Polarization -- ff the unit is equipped with a polarized AC powerplug (a plug having one blade wider than the other), that plug willfit into the AC outlet only one way. This is a safety feature. If youare unable to insert the plug fully into the outlet, try reversing the
plug, If the plug should still fail to fit, contact your electrician toreplace your obsolete outlet. Do not defeat the safety purpose of
the polarized plug.3. Power Cord Protection -- AC power supply cords should be
routed so that they are not likely to be walked on or pinched byitems placed upon or against them. Never take hold of the plugor cord if your hand is wet, and always grasp the plug bodywhen connecting or disconnecting it.
4. Nonuse Periods -- When the unit is not used, turn the poweroff. When left unused for a long period of time, the unit should beunplugged from the household AC outlet.
[1.
Environment 1
Outdoor Antenna Grounding -- If an outside antenna isconnected to the receiver, be sure the antenna system is
grounded so as to provide some protection against voltagesurges and built-up static charges. Section 810 of the NationalElectrical Code, ANSI/NFPA No. 70-1990, provides informationwith respect to proper grounding of the mast and supportingstructure, grounding of the lead-in wire to an antenna dischargeunit, size of grounding conductors, location of antenna-dischargeunit, connection to grounding electrodes, and requirements forthe grounding electrode. See figure below.
ANTENN A
LEAD IN
GROUND WIRE
CLAMP
ANTENNA
DISCHARGE UNIT
(NEC SECTION 810-20)
GROUNDING CONDUCTORS
C SECTION 810.21)GROUND CLAMPS\
\POWER SEJqVlCff GROUNDING
ELECTRODE SYSTEM
(NEC ART 250. PART H)
NEC--NATIONAL ELECTRICAL CODE
2. Water and Moisture --Do not use this unit near water--for
example, near a bathtub, washbowl, swimming pool, or the likeDamp basements should also be avoided.
3,
[1.
Heat --The unit should be situated away from heat sourcessuch as radiators and the like.
It also should not be placed in temperatures less than 5°C (41°F)or greater than 35°C (95°F).Condensation --Moisture may form on the lens in the followingconditions,.•
• immediately after a heater has been turned on.• in a steamy or very humid room.• when the unit is suddenly moved from a cold environment to
a warm one.
If moisture forms inside this unit, it may not operate properly. Tocorrect this problem, turn on the power and wait about one hourfor the moisture to evaporate.
Placement J
Ventilation --The unit should be situated so that its location or
position does not interfere with its proper ventilation, Allow10 cm (4") clearance from the rear of the unit.
2. Foreign Material _are should be taken so that objects do notfall into and liquids are not spilled into the unit. Do not subjectthis unit to excessive smoke, dust, mechanical vibration, orshock.
3. Magnetism --The unit should be situated away from equipmentor devices that generate strong magnetic fields.
4. Stacking --Do not place heavy objects, other than systemcomponents, on top of the unit.
5. Surface--Place the unit on a flat, level surface.6. Carts and Stands --The unit should be used
only with a cart or stand that is recommended bythe manufacturer• The unit and cart combination
should be moved with care. Quick stops,excessive force, and uneven surfaces maycause the unit and cart combination to overturn.
7. Wall or Ceiling Mounting --The unit should not be mounted toa wall or ceiling, unless specified in this operating instructions.
(See page 52 for details.)
Clean the cabinet, panel and controls with a soft cloth lightlymoistened with mild detergent solution.Do not use any type of abrasive pad, scouring powder or solventsuch as alcohol or benzine.
1,
2.
Damage Requiring Service -- The unit should be serviced byqualified service personnel when:(a) The AC power supply cord or the plug has been damaged; or(b) Objects have fallen or liquid has been spilled into the unit; or(c) The unit has been exposed to rain; or(d) The unit does not appear to operate normally or exhibits a
marked change in performance; or(e) The unit has been dropped, or the enclosure damaged.Servicing -- The user should not attempt to service the unitbeyond that described in the operating instructions• All otherservicing should be referred to an authorized service personnel•In the U.S.A., contact the Panasonic Customer Call Center
at 1-800-211-7262, ore-marl [email protected], orweb site (http://www.panasonic.com).In Canada, contact Panasonic Canada Inc. Customer Care
Centre at 1-800-561-5505, orweb site (www.panasonic.ca), oran authorized Servicentre nearest you.
QT5775

Supplied accessories
Please check and identify thesupplied accessories.
(Only for the U.S.A.)To order accessories contact1-800.332.5368 or web site
(http://www.panasonic.com).
[] AC power supply cord ....................... 1 pc.
For the U.S.A. and Canada(RJAO065-A)
For others(RJAOO19-2K)
[] AM loop antenna set (RSAO012) ............... 1 pc.
[] FM indoor antenna (RSAO006-J) ............... 1 pc.
I_ Video connection cable (RJLIP016B15A) ....... 1 pc.
[_ Remote control transmitter (EUR7502X10) ...... 1 pc.
[] Batteries ................................. 2 poe.
[] Speaker feet (RFAO631A-K) ................. 25 feetReplacements sold in sets of 4.
[] Speaker stickers ................... 1 sheet (2 sets)
One set is extra. The sheet cannot be purchased separately.
[] Power plug adaptor (SJP5213-2) ............... 1 pc.
For areas except the U.S.A. and Canada
Use numbers indicated in parentheses when asking for replacementparts.
Type of discs
This system can playback discs bearing any of the marks:
V I D E O [DtGITALVIDE0)DIGFrALAUOIO
This system does not have a DTS decoder so it cannot play audioencoded with DTS.
This system can not play the following discs
• DVD with an
unsuitable regionnumber
• DVD-Audio
• PAL system discs• DVD-ROM• DVD-R
• DVD-RAM • CD*G• +RW • CVD• DVD-RW • SACD• DIVX Video Disc • SVCD• CD-ROM • Photo CD• VSD• CDV
etc.
MP3 playback
You can use this unit play MP3 format audio recorded forpersonal use with a computer, etc.. onto CD-R or CD-RW.Play may not be possible in some cases due to the conditionof the recording. Discs recorded using MP3 differ to CDs inthe following ways.
• Structure of the disc (example)
Title Title
• Starting play from a selected chapterPress the numbered buttons and press [ENTER].Example: Chapter 23 [2]--_[3]--_[ENTER]
(Pressing [>tO/ENTER] is unnecessary.)• Repeat play
You can use chapter repeat or title repeat,• Program play, random play and disc manager
You cannot use program play, random play and discmanager.
• Not compatible with multi-session recordingsIf you record MP3 onto CD-R/CD-RW over a number ofsessions, this unit can play only the recordings made in thefirst session.
• Recordings will not necessarily be played in the order yourecorded them.
The recordings will be reordered according to their titles:numbers in numerical order first, upper case in alphabeticalorder next, and Lowercase in alphabetical order last.
• if you play an MP3 track that includes still picture data, it willtake some time before the music itself starts playing and theelapsed time will not be displayed during this time.
Even after the track starts, the correct play time will not bedisplayed.
ROT5775

l-leglon numbers
Region numbers are allocated to DVD players and software according to where they are sold.DVDs can be played on this unit if their region number is the same or includes the same number, or if the DVD is marked "ALL".Confirm the region number for this unit before choosing discs. The number for this unit is indicated on the rear panel.
ExampleFor the U.S.A., Canada, and units with PX printed
on the outer packaging
e The region number of this unit is "l". O_ _• You can play DVDs marked withlabels containing "1" or "All".
For Latin America @@• The region number of this unit is "4".• You can play DVDs marked with
labels containing "4" or "All".
DVD symbols
These are examples of the symbols shown on DVD jackets.
Region number Region numbers are allocated to DVD players and software according to where they are sold.
_ _ _ ! _ • Latin America: [4]• The U.S.A., Canada and others: [1]
.. DVDs can be played on this unit if their region number is the same or includes the same number, orif the DVD is marked "ALL".
Audio recording method
The left side tells you which method was used for recording.5.1 This example is of a disc that was recorded using Dolby Digital 5.1 channel surround.
SURROUND
Multi-angle C__ This indicates the software was filmed from multiple angles at the same time. The number tells youthe number of angles.
Screen size11_3:11 These symbols tell you which screen format was used to film the software.
AN_r_oRPH_¢Wl0_S RrE N F
_QT5775

R6, AA, UM-3
signal sensor ,i.=;. _
II / \ I o_ ook-o I I_
Transmission window
8_ "o'o0(_ O0
0
About 7 meters (23 feet) infront of the signal sensor.
Concerning the,r mote control
I Use of batteries !
• Align the poles (+ and -) properly when inserting the batteries.Press in and down towards the minus end.
• Do not mix old and new batteries, or batteries of different types•
• Do not recharge ordinary dry cell batteries.• DO not heat or disassemble the batteries. DO not allow them to
contact f_ame or water.• Remove the batteries if the unit is not to be used for a long time.• Do not keep together with metallic objects such as necklaces.• Do not use batteries if the covering has been peeled off.
• Do not use rechargeable type batteries.
Mishandling of batteries can cause electrolyte leakage which candamage items the fluid contacts and may cause a fire.If electrolyte leaks from the batteries, consult your dealer.Wash thoroughly with water if electrolyte comes in contact with anypart of your body.
I Operation notes I
• DO not place obstacles bgtwgen the remote eontm4 signal sensorand remote control unit. :5
• Do not expose the remote control signal sensor to direct sunlightor to the bright light of a fluorescent light.
• Take care to keep the remote control signal sensor and end ofthe remote control unit free from dust.
• If this system is installed in a rack with glass doors, the glass I_ldoors' thickness or color might make it necessary to use the {5remote control a shorter distance from the system.
1To prevent damage j
• Neverplace heavyitemson topof the unit.• Do not disassemble or reconstruct the unit,• Do not spill water or other liquids into the unit.
[] HOW tO open the remote control I
m

Speaker set-up
Refer also to "Speaker set-up", a separate guide included with these operating instructions.
[] ] _ • o 0 • - * .
Attach the stickers to the speaker cords.
(_) - _): Attach stickers 1 to 5 to the cords of the 5 small speakers(2x front, 2 x surround, and 1 x center: SB-AFC80).
_): Attach sticker 6 to the cord of the large speaker(subwoofer: SB-W70).
The small speakers can be set-up either standing or lying down.Attach these rubber feet to prevent vibration causing the speakersto move or fall over.
[](_ Center speaker
(_ Front speaker (left) Ill""ill '"Ill _) Front speaker (right)
/." '., 30oi30_. ® Subwoofer
( .-_ Usteningposition...
_) Surround / ..... 120° '""m (_) Surroundspeaker (left) ,, speaker (right)
, f,-'/
.............................................. s
@-®: Position the speakers as indicated in the diagram usingthe stickers as a guide.
The front, center, and surround speakers should be placed at
approximately the same distance from the listening position. Theangles in the diagram are approximate.
• Place the front left and right speakers (_), _)) either side ofthe television.
• Place the center speaker (_)) near the television, above orbelow it.
• Place the surround speakers (_), (_)) either side of thelistening position, or slightly to the rear, about t meter(3 feet) higher than ear level.
• Put the subwoofer (_)) near the television, on the floor or asturdy shelf so that it won't cause vibration.
• Vibration caused by the center speaker can disrupt the picture ifit is placed directly on the television. Put the center speaker on arack or shelf.
• A superwoofer is located on the side of the subwoofer. Leave10-cm (4") clearance for it to be effective.
[]Speaker cords
• Connect the cords so the numbers on the stickers match thenumbers under the terminals.
• Connect the gray cords with the blue stripe Q to the blueterminals.
• Connect the gray cords without stripes _) to the gray terminals.• Connect the subwoofer's red cord _ to the red terminal and the
black cord (_) to the black terminal
• Ensure the wires of the cords are fully inserted so they do nottouch each other and shod circuit
tip and pull off.
4,_O_X
O Gray or red
_'_'_eBlue or black
"_ "_ Gray with blue stripe or blackGray (no stripe) or red
Front speaker (left)
Front speaker (right)
Surround speaker (left)
Surround speaker (right)
Center speaker
Subwoofer
• After you have completed set-up and connection, wind the excess cord and keep together with siring.• Set the speakers up on an even surface to prevent them from falling. Take proper precautions to prevent
the speakers from falling if you cannel set them up on an even surface.• The speaker nets cannot be removed.
• Keep your speakers at least 10 mm (13/32") away from the system for proper ventilation.
_0T_77_

13Rubber feet (included)
Screw
(not included)I
Rubber feet(included)
30-35 rnm
13/16"to t -3/8")
(9/32" to 23/64')
Attach the standswith these holes.
5 mm (13/64"),
- oo m 00mm
?Plate thicknessplus 7 to 10 mm(plus 9/32" to 25/64")
Speaker stands(not included)
Cloth
I Attaching to a wall 1
[] To attach vertically
[] To attach horizontally
Attachfour rubberfeet to each speaker,ensuringthey do not coverthe holes.
The surface you attach the speakers to must be able to support over5 kg(11 lb.) per screw.
_-- Attaching to speaker stands 1
Ensure the following conditions are met when you purchaseyour speaker stands.• Observe the diameter and length of the screws and the distance
between screws as shown in the diagram,• The stands must be able to support over 5 kg (11 lb.).• The stands must be stable even if the speakers are in a high
position.
] Moving the brand plate I
You can rotate the brand plate if you choose to set up the small
speakers horizontally.
(Prevent damage to the plate by wrapping the end of thescrewdriver with cloth.)Insed the screwdriver under the plate and lift it. Rotate the plate to
the required position.
If irregular coloring occurs on your televisionThese speakers are designed to be used close to a television,but the picture may be affected with some televisions and set-up combinations.If this occurs, turn the television off for about 30 minutes.The television's demagnetizing function should correct theproblem.
If it persists, move the speakers further away from thetelevision,
Notes on speaker use• You can damage your speakers and shorten their useful life
if you play sound at high levels over extended periods.• Reduce the volume in the following cases to avoid damage.
• When playing distorted sound.• When the speakers are receiving howling from a
microphono or record player, noise from FM broadcasts,or continuous signals from an oscillator, test disc, orelectronic instrument.
• When adjusting the sound quality.• When turning the unit on or off.
Positioning for best effectHow you set up your speakers can affect the bass and thesound field. Note the following points.• Place speakers on flat secure bases.• Ptacin 9 speakers too close to floors, walls, and corners can
result in excessive bass. Cover walls and windows with thickCurtain,
Caution• Use the speakers only with the
recommended system. Failure to do so maylead to damage to the amplifier and/or thespeakers, and may result in the risk of fire.Consult a qualified service person ifdamage has occurred or if you experience asudden change in performance.
• Do not attempt to attach these speakers towalls using methods other than thosedescribed in this manual.
L
i

m_0T5775
/
TV (not included)
Connect to listen to thetelevision through this unit.Stereo connection cable
(not included) _
Video connection cable
(included)
Attach to a wail or other surface
with adhesive tape.
FM indoor antenna (included)Tape the antenna to a wall orcolumn, in a position where radiosignals are received with theleast amount of interference.
AM loop antenna (included)After attaching the antenna, turn onthe system and tune in a broadcaststation (I page 29). Then, turn theantenna to the angle of bestreception and least interference.
F
®
AM loop antennaholder (included)
To attach to a wall or other Surface
_, Screw(included)
\VIDE_
To power supply cord /
household (included) For better quality videoAC outlet Connect this cord only S-VIDEO cable
after all other cables andcords are connected. (not included)
The included AC power supply cord is for use with this unit only.Do not use it with other equ)pment.
Make video connections from this unit directly to your television.The picture may not be displayed correctly on your television ifconnections are made through a video deck or a combinationTVNCR due to the copy guard.
TV ]_ VCR SC-HT70/SC-HT65
t O )
FFor areas except the U.S.A. and Canada
Set the voltage.
(Bottom panel)
--127 V_110 V_220 V-230V--240 V
VOLT ADJ
Use a flat-head screwdriver to turn the voltageselector on the bottom of the unit to theappropriate position for the area in which thissystem is used.If the power supply in your area is 115 V or 120 V,please set the voltage selector as follows:• For 115 V: Setto 110V.• For 120 V: Set to 127 V.
If the power plug will not fit your socketuse the power plug adaptor (included).
J

@ @ @ ®
@ @
@®@
@® @ @ @I
,-=_i
.............................................
|_ @
@
@
_ j J[
rm [213...........t.....................................-J...........
I®
No. Name Ref.page
O Standby/on switch (POWER (_/I)Press to switch the unit from on to standby mode or vice versa.
In standby mode, the unit is still consuming a small amount ofpower.
_) Standby/on indicatorWhen the unit is connected to the AC mains supply, thisindicator lights red in standby mode and lights green when theunit is turned on.
(_ Disc select buttons (DISC 1-5) ...................... 14(_ Display(_ Basic operation buttons(_ Dolby Digital indicator (111"1DIGITAL) ............ 32(_ Volume control (VOLUME) ...................... 15, 29® Input select button (SELECTOR) .................. 14(_ Subwoofer level button
(SUBWOOFER LEVEL) .................................. 38Headphones jack (PHONES) .......................... 38
(_ Disc tray(_) Wake timer indicator (WAKE) ........................ 37
No. Name Ref.page
_) Angle indicator ................................................ 22_) General display
DTS indicatorLights when a disc with DTS is loaded.
DVD disc signal indicator .............................. 15@ Surround effect indicators ............................ 35_) SFC mode indicators ...................................... 36_) Repeat indicator .............................................. 18
Program indicator .......................................... 25_) Track/Chapter/All disc indicators .................. 24
Speaker indicators_) Random indicator ............................................ 23
Resume indicator ............................................ 16Sound field system indicators ................ 32, 34
_) DVD disc indicator .......................................... 15Lights whenDVDis loaded.Radio indicator ................................................ 29
(_ Timer indicators .............................................. 37
[']R'_(_ Disc indicator_) Stereo/mono indicator .................................... 29
Pause (Still picture) indicator ........................ 16_) Play indicator .................................................. 15_) MIX 2ch indicator ............................................ 34
Front speakersCenter speakerSurround speakers
Lights when sound is actually coming from the speaker•
Im

® © @ ©
T0P MENU MENU
- ' _":SKIP /_rJ,RCH :
, STOP; PAUSE PLAY i
:- DISGS_P;CHANNEL.VOLUMEMUllN6 i ';
®_T
Front panel Controls
No. Name Ref.page
_) Standby/on switch (_O)FL display button (FL DISPLAY) .................... 38Top menu button (TOP MENU) ...................... 20
_) Cursor and enter buttons_) GUl display button (DISPLAY) ...................... 26_) Basic operation buttons
Disc skip button (DISC SKIP) ........................ 20_) Channel up/down button
(CHANNEL ^, v) ...................................... 30, 41Sound field control button (SFC) .................. 36
_) Initial settings button (ACTION) .............. 13, 43_) Subtitle language select button
(SUB TITLE) .................................................... 22_) Speaker channel select button
(CH SELECT) .................................................. 33Test button (TEST) .......................................... 33Numbered buttons and >_10/enter button(1-9, 0, 210/ENTER)
_) Disc manager button (DISC MANAGER) ...... 24Play mode button (PLAY MODE) ............ 23, 25Cinema button (CINEMA) .............................. 23
<_ TV volume up/down buttons (- TV VOL +) .. 41Timer button (TIMER) ...................................... 37Repeat buttons (REPEAT, A-B REPEAT) ...... 18Cancel button (CANCEL) .......................... 19, 25Disc button (DISC) .................................... 14, 23Sound field and effect buttons ................ 32-35Marker button (MARKER) .............................. 192ch down mix button (MIX 2ch) .................... 34
_) Angle button (ANGLE) .................................... 22Soundtrack language select button(AUDIO) ............................................................ 21
_) Subwoofer level button(SUBWOOFER LEVEL) .................................. 38Volume button (VOLUME +, -) ...................... 33Muting button (MUTING) ................................ 38Return button (RETURN) .................... 13, 26, 43Menu button (MENU) ...................................... 20TV/video select button (TV/ViDEO) ................ 41Input select buttons(AUX, TUNER/BAND, DVD/CD, TV, VCR)TUNER/BAND button is also used to switch radio bands.
_) Equipment buttons and indicatorsSelect the equipment you want to operate.Press [DVD/CD] to operate this unit.Press [VCR] to operate a video cassette recorder.Press [TV] to operate a television.
These buttons light for a few seconds to indicate the remotecontrol mode,
IB_OT5775

:r_r;g_l
1
2
Rat n_ls I_ _ _
3 Video
• SttlIMode _'_1BlackLevelControl
I 4:3Pan& Scan_4:3 Letterbox i
IL 16:9
ACTION%
Selecting TV screen type
Change the setting to suit the aspect ratio of your television.
The menu language is set to English, but you can change it otherlanguages (=_ Display--Menu Language, pages 43-45).
Preparation• Turn on the television and switch the video-input mode on the
television to suit the connection.
1 Press [DVD/CD] to select"DVD/CD"as the source.The unit automatically comes on.
2 Press [ACTION] to display the initialsettings screen on the television.
3 Press [_1] or [1_] to select the video _'*
settings tab.
4 ] or [T] to
.=ct"and pn I_5 ] or [_1 to:
s [ENTER]. _"
:an (Factory setti
have a regular te
the pan and scar
Press [A] or [T] to select
"TV Aspect" and press [ENTER]. I_,
Press [A] or [_'] to select the optionand press [ENTER].
• 4:3 Pan&Scan (Factory setting)Select if you have a regular television and to view 16:9software _ in the pan and scan style (-,. page 47).
• 4:3 Letterbox
Select if you have a regular television and to view 16:9software in the letterbox style (-_ page 47).
• 16:9
Select if you have a widescreen television.
16:9 software prohibited from being shown in the pan andscan style will appear in the letterbox style despite thesetting here.
The video settings screen is shown.
6 Press [ACTION].
To return to the previous screenPress [RETURN].
For your referenceDVDs are recorded in a variety of aspect ratios You can changethe way software is shown on a regular television (4:3_ with theabove operation. If you have a widescreen television (16:9), usethe television's picture modes (-- page 47).
F_OTS776

POWER _/I
DISC 1-DISC 5
2 3
i ,,tl_E W ,
II I n
DVD/CD
'*" DISC
1CD
Preparation• Turn the television on.
• Switch the video input mode on the television to suit the type of
connection you have made (e.g., VIDEO 1).• Press [POWER (_/I] to turn the unit on.
1 Press [SELECTOR] to select"DVD/CD" as the source.The source changes each time you press the button on themain unit.DVD/CD _ FM _AM _ TV_ VCR_ AUX
t IRemote control: Press [DVD/CD].
2 Press [DISC 1]-[DISC 5] to select a
tray.The indicator lights.Play starts if a disc is in the tray• (One-touch play)"NO DISC" is displayed if there is no disc in the tray.Remote control:
Press [DISC] and then the numbered button correspondingto the required tray.
3 Press [__ OPEN/CLOSE] to open thetray and insert a disc.Press again to close and start play. Use this button to openthe tray when removing discs•
(Continued on next page)
1 SELECTOR
2 --- DISC-
0 0 0 0 0
',/ TI T F F I !
3 OPEN,LOSE
Guide for 12 cm discs
Guide for 8 cm discs
im_QT5775

4 5
o,._--- Cursor buttonsand ENTER
n,n_
4_ _1 Lights dudng play. Lights when• _ I _,L_.-_7_:_7, 96 kHz 24 bit
_._x_ "i_ LPCMis,.._,_,,,..._._;detected.
$
Lights if disc Lights when Dolbyis DVD. Digital is detected.
DOWN__Up
; f_ l--If I tl_ IT.l:, _, __t __ "" "'_ f"_ f'_ t t ;
--dB OdB(MIN) (MAX)
4
Playing discs
If play doesn't start after step 3
Press [•] to start play.Remote control: Press [PLAY I_1.
If a menu appears on the television:
• Use the cursor buttons to highlight a title and press[ENTER] on the remote control.
• Use the numbered buttons to select a title.For 10 or over
To select 10: [_>tO/ENTER] --> [1] --> [0]To select 11: [_>tO/ENTER] --_ [1] --->[1]
If the menu continues
Press [_1<] or [IH_t ] on the remote control,
Buttons actually used depend on the disc.
5
Menu items on video CD with playback control (PBC)(-,, page 49) can only be selected with the numberedbuttons.
Adjust the volume.Remote control: Press [VOLUME (+ or -)]
To stop the discsPress [ • ].
Remote control: Press [STOP • ].Resume function is activated (-* page 16).
......................................................................This means the operation is not allowed at that time.
This unit can play CD-DA and video CD format audio CD-R
and CD-RW that have been finalized _ upon completion ofrecording.
It may not be able to play some CD-R or CD-RW due to thecondition of the recording._Finalizing is a process that enables CD-R/CD-RW players to
play audio CD-R and CD-RW.

lU_U _a_
• Q •
O Q_,_ -J_l_,_". _ .... SLOW/SEARCH
am Im_._D, -{;;_; <4, i,i,STOP"--,.._ C59IC5_--.--- p_Y_
° If I Ill•a m _ .:_--- PAUSE II
' _ RESUME : :*
Other methods of play
CD
If you press [ • ] or [STOP • ] during play, the unit remembers theposition,
I_ITo restart play from that point
Press [1_] while "RESUME" is lit,Remote control: Press {PLAY Ib].
r_To review the chapters up to the point where you
stopped play (DVD only)The message "Press PLAY to Preview Chapters" appears for afew seconds before the resume function is activated after
pressing [1_].
Press [1_] while this message is on thescreen and the beginning portions ofeach chapter up to the current one areplayed.Remote control: Press [PLAY I_].
Full play resumes from the point where you stopped play,
[]To cancel the resume function
Press [ i] while "RESUME" is lit.Remote control: Press [STOP • ].
• The position is saved even if the unit is turned off.
• Resume is canceled if the disc tray is opened or if you changediscs•
• Resume does not work if the disc's play time is not displayed.• Chapter preview is not possible with some DVDs.
• Chapter preview may not be activated if you were watchingchapter 1.
Press [I I] during play.Remote control: Press [PAUSE I I].
To resume playPress [1_] or [PLAY I_].
IB:_QT5775
, II
O0
Press and hold [ I<1<1_1<1]or [ IH_IHIH]during play.The speed increases if you press and hold the button. There arefive speeds•
F.<I<I_< : Backward
I_WIHH : Forward
Remote control: Press [SLOW/SEARCH (<< or I_1_)].Each press increases the speed of the search•
TO resume playPress Ill-] or {PLAY I_].
For your reference
• Sound will be heard at speed one when searching forwards.You can turn this Sound Off if required (DVD, VCD only),{! "Audio during Search", page 44)Sound will be heard at all speeds when playing audio Cbs.
• If pressed while playing a video CD with PBC, you may return toa menu screen

,, 0 0_1<1/'44 I.Ib_.l,,_
r @@@ 0
ooe_ @_
tim I_ _- ..... PLAY_
O0
Other methods of play::
CD
Press [1<1<1_<1] or [IH_IHIN ] to skiptracks (-page 49)on CDs and Video CDs,
and chapters/titles (- page49) on DVD video.Remote control: Press [SKIP I_<] or [SKIP _ ].F441_4 : Backward
IH_ : Forward
• Each press increases the number of skips.• The first skip backwards takes you to the beginning of the
current track or chapter.
If pressed while a video CD menu is on the screen, you may returnto the previous menu.
While Paused
Press the cursor buttons [<1] or [1_].• : Backward• : Forward
• The frame changes each time you press a button.• The frames change in succession if you press and hold the
button.
• The frames also advance if you press [11] on the main unit or
[PAUSE I I] on the remote control.
TO resume playPress [•] or [pLAy •].
_b
ta
m/SEARCHYou cannot move backwards with video CD.
While paused
Press [SLOW/SEARCH (<14 or IH_)]..44 : BackwardIt,• : Forward
Each p_ssincreasesthe speed ofthe slow motion. The_ arefivespeeds.
To resume playPress[•]or[PLAY _].
_JF4
You cannot move backwards with video CD.
ROTS_5

PLAY•
II II i A-BREPEAT
DVD
"rv screen
_'- 4.
@
Qrtl
%
vc0;cDDisplay of Display of
the unit -the unit@
!@
i_ , _ "_a_, _ •
Other methods of play
CD
] Repeating chapters, titles, and tracks
Press [REPEAT] during play.Each time you press the button;• DVD
_)"_ C" (CHAPTER REPEAT): Chapters repeated.
(_ "_ T" (TITLE REPEAT): Titles repeated•
Q" _,_ OFF" (REPEAT OFF): Repeat mode canceled.
• Video CD/CD
(_ "A _ ": Repeat entire disc contents._) Original display: Repeat mode canceled.
To cancel repeat playPress [REPEAT] until "OFF" appears on the TV or =€.,._-disappears from the unit's display,
Repeat play does not work with some DVDs, It also doesn't workwith interactive DVDs and video CDs with playback control,
To repeat only your favorite tracksVideo CD and CD only_) Program the tracks you want (-, page 25),
Press [PLAY •].
(_ Press [REPEAT] to display "_".
] Repeating a specific section (A-B REPEAT)
1 Press [A-B REPEAT] during play at
the starting point (A),
2 Press [A-B REPEAT] at the finishing
point (B).
To cancel A-B repeat playPress [A-B REPEAT] until "_,=_, ." is displayed.
• This feature cannot be used if the play time for the DVD is notdisplayed.
• The player automatically determines the end of a title or track aspoint B.
• Subtitles may not appear between A and B.
• A-B repeat is canceled when you stop play.
A__EPEAT
%i ¸ _i:i_;ii£_•:_i:_ii_̧̧i_!
Ii_QT5775

_cl_t,wm ALJX W_I0_O i
-° 2,3,
_ NN _ a
!1No marke_
MARKER
%
Other methods of play
CDThis feature allows you to mark a specific point on a disc so youcan return to it easily at a later time, There are five markersavailable•
It only works if the elapsed playing time of the disc you are playingis shown on the unit's display.
1 Press [MARKER] during play.The marker display appears.
2
mark another position_) Press [<1] or [1_] to change
markers.
(_) Press [ENTER].
Press [ENTER] at the point you wantto mark.
] Recalling a marked position
Press [MARKER].The marker display appears.
Press [<1] or [1_] to highlight therequired marker.
Press [ENTER] to recall the position.
To clear a marker
O Press [MARKER].
_) Press [<] or [1_] to highlight the marker you want to clear and
press [CANCEL].
• The markers only work with the current disc.• This feature can not be used with some DVDs or with video CDs
with PBC.
• Some subtitles may fail to appear around the marker (DVD).• Markers are cleared when the unit is turned off or the disc is
removed or changed•
RQT5775

1
mBG_mm
Numbered i_]"_'_i _
b_.ens..... .:,0© _:
:r_ _-mm tam
DISCSKIP
%
TOPMENU MENU
%
.... Other methods of play_
CD ¸Press [DISC SKIP].Play starts from the beginning of the disc in the next tray.You will skip to tray 1 when the current tray is 5.
[DISC SKIP] does not work during program and random play orwhile the disc manager is on.
By calling up menus during play, you can start from a specific titleor chapter.
Menu content depends on the disc. These operating instructionsdescribe the basic steps.
1 Press [TOP MENU] or [MENU].A menu screen is displayed.(Press again to return to what you were watching with somediscs.)
2 Select an item with the cursor buttons
and press [ENTER] to confirm theselection.You can select items with the numbered buttons with somediscs.
Repeat it when another menu is shown.
DVDs can have several menus. The menu displayed by pressing[TOP MENU] may be different to the menu displayed by pressing[MENU].
The disc'stop menu
I.Title 2 Titl_ 3
Menu I Menu i Menu i
im_QT5775

Cursor buttons
iillllllilill :"
• i
.umberedbuttons .....
: _ ,_-
! -"% "t
AUDIO
AUDIO
%Sour_dtrack number
] .
Some DVDs have more than one soundtrack recorded on them,
such as multiple languages, and you can change soundtracks
during play•
Press [AUDIO] during play.The sound track display appears•The number changes each time you press the button,
The number can also be changed with the cursor buttons (At,or T) _;_or the numbered buttons, :
See page 27 for a key to language abbreviations.
!,
• You can only select languages or sound formats if they have
been recorded on the disc you are playing.• You can also make language settings before play with the ' _,
"Audio" menu (,,,, page 44). (Some discs are designed to start in ' : _,,a certain language despite any changes you make to the unit's _'..p_-.menus,) : ._ ,.._,.;
• Some discs allow changes to soundtracks only by using thediSC'Smenus. , - _,,,_
• "-" or "- -" is displayed instead of the language number inc=rcumstances such as when no language is recorded on theQISC.
] Using this feature with karaoke discs I
You can do the following with karaoke discs.While playing a karaoke disc
Press [AUDIO].
Press the cursor buttons [<], [I,-] to highlight theillustrated icon.
Press the cursor buttons [A], [_] to turn the vocalson or off.
DVD karaoke disc (Solo_ DVD karaoke disc (Duet)
[OFF]:Vocal OFF [OFF]: Vocal OFF[ON]: Vocal ON [Vl+V2}:Vocal 1,2 ON
[Vl]: Vocal 1 only ON
IV2]: Vocal 2 only ONActual d splays depend on the disc.
RQT5775

Q
hTL'_
iB
Cursor bu_ons
SUBTITLE
J
Numberedbuttons
i II
ANGLE
C21
_L)BTIT_E
%Subtle number
Thank you
Some DVDs have more than one subtitle language recorded onthem, and you can change ia_Juage during play.
Press [SUB TITLE] during play.The subtitle display appears.The number changes each time you press the button.
The number can also be changed with the cursor buttons (• or • )or the numbered buttons.
See page 27 for a key to language abbreviations.
To clear/display the subtitles1. Press [SUB TITLE].2. Press rib].3. Press [&} or [_'] to select "ON" Or"OFF".
• There may be a slight delay before subtitles are shown.• You can only select languages if they have been recorded on the
disc you are playing.• You can also make language settings before play with the
"Subtitle" menu (m page 44). (Some discs are designed to startin a certain language despite any changes you make to the unit's
menus.)• Some discs allow changes to subtitle languages only by using
the disc's menus.
• "-" or "- -" is displayed instead of the language number incircumstances such as when no language is recorded on thedisc.
• If the subtitles overlap closed captions recorded on discs, turnthe subtitles off.
ANGLE
%, ANGLE ' ]
- ,
Angle number
-j Some DVDs allow you to view the same scene from different
angles.
Press [ANGLE] during play.The angle display appears.The number changes each time you press the button.
The number can also be changed with the cursor buttons (& or •)or the numbered buttons.
i_rtJ_
• "ANGLE" lights up on the unit's display during scenes withmultiple angles recorded to indicate this feature is available.
• Some discs allow you to set angles before multi-angle scenesare played. Read the instructions that come with the DVD.
• Some discs allow changes to angles only by using the disc'smenus.
BQT5775

l.--.l
I
2
L_
MENU
_]CINEMA
1
CINEMA
% I
1 2 3
_23 C--I_-10_1 (Y.%2 D_C34 5
31 2 3
c-I _1 c-/4 5 6
NSr.4 _C_
7 8 9
->10/ENTER
C21
PLAyMODE
%*" r, ALL DISC 1, i, RANCOM
pLAY
Other methods of play
You can enjoy better pictures by changing the picture quality.
Press [CINEMA].The cinema display appears on the screen.Each time you press the button;C (on) -- N (off)
1
2
3
CD
Press [DISC].
Press [DISC 1]-[DISC 5] to select a disc.
Wait for the disc to change and play to start
Press the numbered buttons to selectthe track.For tracks numbered 10 or over, press [->10/ENTER] then the
two digits.Track no. 10: [_>IO/ENTER] _ [1] --> [0]Track no. 25: [->10/ENTER] -_ [2] --> [5]
• When playing video CDs with PBC, stop the disc then press[STOP • ] again to cancel playback control, then select thetrack number. To restore playback control, stop the disc and
press [MENU].• There are some video CDs with PBC where this will not work.
CDThis mode randomly plays the tracks on the current disc or allloaded discs once each.
While stopped
Press [PLAY MODE] to select"RANDOM" or "RANDOM ALL DISC".Each time you press the button;PRGM _ RANDOM _ RANDOM ALL DISC _ (oN)
PRGM: Program play (-, page 25)RANDOM: Randomly plays the tracks on the current disc.RANDOM ALL DISC: Randomly plays the tracks on atl discs.
"'_ Press [PLAY I_].
To stopPress [STOP • ].Random play is also canceled,
to
m

SKIPI<<1, IHH
1 _m'
• "_
1 2 3
4 5 6
7 8 9
QF-3D
_>10Fr.NTER[__ _
0
F1
Other meth_ls ol_,[_la_ ........ ,
CDThe disc manager allows you to choose one track or disc to play orto play all five discs in succession.
While stopped
Press [DISC MANAGER] to select thedesired method.Each time you press the button;
r _) (1-TRACK): One track play
/_ (1-DISC): Plays one disc.
(_ (ALL-DISC): Plays five discs in succession.L_ (_ (NORMAL): Normal play (Off)
2 Select the disc and track.
When selectina a d15€
Press [DISC] and [DISC 1]-[DISC 5).
When selectina a track
Press the numbered buttons.
For tracks numbered 10 or over, press [_>10/ENTER] thenthe two digits.Track no. 10: [_>t0/ENTER] -_ [1] --_ [0]Track no. 25: [_>t0/ENTER] _ [2] -+ [5]
You can also select the track by pressing [SKIP P<41] and[SKIP IH_I ].
3 Press [PLAY I_].
To cancel disc managerPress [STOP • ].
To play a track or disc repeatedlyPress [REPEAT] during disc manager play.
• You cannot use the disc manager while "RANDOM" or "PRGM"are on.
• When playing video CDs with playback control in the "A" or "ALLDISC" mode, you can play the disc without having to operate thedisc's menus•
• The disc manager sklps any DVDs that are loaded.
3 PLAY
%i ¸ • -_
• i
- I
i ti .- . ¼ _ ALL DISC t¢ . • , i
IQT5775

1
2
(_ " E!FO, O • •
1mum|
CANCEL
PLAYMODE
% _ , n _o_
®
1 2 3
_ C4S_1 _ C4SC$
1 2 3
4 5 6
7 8 9
i _ r; ...... __SC -- m : _
I......1.......1Disc number Track Programmed
number order
Other methods of piay_ :
CDYou can select up to 24 tracks to play in the order you choose.
1 While stopped
Press [PLAY MODE] to select"PRGM".Each time you press the button;
PRGM _ RANDOM _ RANDOM ALL DISC _ (off)i i
2 Q Select the disc by pressing [DISC]and [DISC 1]-[DISC 5].
_) Press the numbered buttons toselect a track.
For tracks numbered t0 or over, press [_>10/ENTER]
then the two digits.Track no. t0: [_>10/ENTER] --> [1] --_ [0]Track no. 25: [210/ENTER] --_ [2] --_ [5]
Repeat these steps to program up to 24 tracks.Step _ is unnecessary when programming tracks on the
same disc. _ :
3 Press [PLAY I_].
To cancel program playAfter stopping play, press [PLAY MODE] so "PRGM" goes out. Theprogram contents are saved.
You can play the same program again if you press [PLAY MODE]so "PRGM" comes on.
To clear the last track
While stopped (Press [STOP • ] to cancel the resume function if itis on.)
Press [CANCEL].
mTo clear the whole programWhile stopped (Press [STOP • ] to cancel the resume function if itis on.)
Press [STOP • ] so "PRGM" goes out. "CLEAR" is displayed toindicate the program is cleared. If "CLEAR" is not displayed, startand stop play, then press [STOP • ] again.
• Discs and tracks the unit cannot find can be programmed but arecanceled during play. This is also the case if you program DVD.
• The program mode is canceled (normal play mode is restored)when you turn the unit off, open the disc tray, or change the inputsource, but the program contents are saved.
pLAy
%ROT5775

;_O Q O _i_,_-0 gO • QI
_. _r,_,fu "" - - - RETURN
I=11 lilll IJ
"|1-
Numberedbuttons
2 0 _
t
usnng uu! screens
GUI (Graphic User Interface) are icons that contain informationabout the disc or unit. These icons allow you to perform operations
by changing this information.
1 Press [DISPLAY].Each time you press the button;
I isc (_UI (Q)
Unit G UI (_)
Shuttle GUI (Q)Originlal display (_)
Actual GUI depend on the disc contents.
2 [Unit GUll only
While the leftmost icon is highlighted
Press [A] or [I'] to select the menu.Each time you press the button;
i Play m;nu (_))
Display menu (O)
Audio menu ((_)Video m_enu(_))
3
4Press [<1] or [1_] to select the item.
Press [A] or [Y] to select the setting.Items with ,,A. or "Y" above and below can be changed by[A], [y]. Other items use different buttons. See pages 27 and28 for details.
For your reference• Some functions cannot be accessed from the stop mode (e.g.
changing the soundtrack language).• press [ENTER] if the setting does not change after pressing
[A], [T].• When numbers are displayed (e.g. title No.), the numbered
buttons are also effective for the setting• When numbers areentered with the numbered buttons, press [ENTER] to registerthe setting.
To clear the GUlPress IRETURN] until the GUI are cleared.
To change the position of the iconsYoucan lower the positionof the iconson thescreen if theyare cut
1. Press [4], [It-] to select the rightmost icon. L_IDI2. Press [A], Iy] to move the icon.
r5775

I Disc GUI i
Icon Content
Title number
ElChapter number
Time (Select a position to startplay by specifying a time with thenumbered buttons.)
Soundtrack language(See [] at right for languageabbreviations.)
Audio signal type(See [] at right for details.)
(Karaoke DVD only)Karaoke vocal on/offSolo: OFF or ONDuet: OFF, V1 + V2, V1 or V2
Subtitle language
B (See [] at right for languageabbreviations,)
Subtitles on/off
_ ON _ OFF
Angle number
[] Audio/Subtitte language
I ENG: EnglishFRA: FrenchDEU: German
t lTA: ItalianESP: Spanish
LNLD: Dutch
SVE: Swedish CHh ChineseNOR: Norwegian KOR: Korean
DAN: Danish I MAL: MalayPOR: Portuguese /VIE: Vietnamese
I RUS: Russian IT :_A: Thai[JPN: Japanese Others
r_ signal type/data
LPCM/nFI Digital: Signal typek (kHz): Sampling frequencyb (bit): Number of bitsch (channel): Number of channels
Example:
1: Subwoofer signal(not displayed if there is no subwoofer signal)
O: No surround1 : Mono surround
2: Stereo surround (left/right)
1: Center
2: Front left + Front right
3: Front left + Front right + Center
m
II
RQT57_=

Unit GUI I
Play menu Display menu
laIcon
m
mm
Content
A-B repeat (=. page 18){ENTER] (start point) -- [ENTER] (finish point)
TO cancel
[;NTER]
Repeat play (-, page 18)
C (Ch_apter)_T (T]tle)_OFF
Marker (w page 19)[ENTER] so the unit is ready to accept marks.
To mark a position[ENTER] (at the desired point)
To mark another position[.], [Ib] _ [ENTER]
To recall a marker
[.], []_] _ [ENTER]
To erase a marker
[41], [1_] -- [CANCEL]
Icon Content
IPB display (m page 49)
Displays the picture type (I/P/B) in the stillpicture mode.ON _ OFF
Audio menu
UIcon Content
(Dolby Digital, 3-channeJ or over only)
Dialogue EnhancerMakes the dialogue in movies easier to hear.ON _ OFF
(Actual results depend on the disc.)
Video menu
Icon Content
Cinema mode (-, page 23)
C: Cinema modeN: Normal mode
I
Shuttle GUI
IconF
Content
D Pause
Slow-motion play
D D .ll : BackwardIw Forward
D Play
Search
m D <1<1:Backward I
_- Forward I
There are five speeds for both backward and forward slow motion
and search
,a;775

POWERS,, 2 3 4
The radio: manual tuning
Preparation• Press [POWER (_,1] to turnthe unit on.
1 Press [SELECTOR] to select "FM" or"AM",Each time the button is pressed;
DVD/CD _ FM -- AM _ TV -- VCR _ AUXJ
FMMODE 1 2 Press [TUNE MODE] to select
1 s 3 Press _o
the fr_
• F _ I'-I _ _--I _:_ ! "TUNED" _,_ r- i i _ Lt.Lt "STEREC
received•
2
4
Each time the button is pressed; MANUAL _ PRESET
Press [TUNING (v or ^)] to select..... _:---_- ...... the frequency of the required station,
"TUNED" is displayed when a radio station is tuned., - _ . "STEREO" is displayed when a stereo FM broadcast is being
Adjust the volume.TUNEMO_
; P,_II'-II_I! If_l f,.I I I II_i LI I"_ L ,
TUNING
_ _ STEREO __ -- --
L LJ
DOWN__UP
: I, I_l f It--I ! "I..1:'_' UL "" "'_E'_"_ tt:
-dB OdB(MIN) (MAX)
Press and hold [TUNING (^ or v)] for a moment until the
frequency starts changing rapidly. The unit begins auto tuning,stopping when it finds a station.
Tuning may stop before a station is found if interference isencountered.
[] If noise is excessive in FM
Press [FM MODE] to display "MONO".• This mode improves sound quality if reception is weak for some
reason, but broadcasts are heard in monaural.• Turn "MONO" off for normal listening. (Press [FM MODE] again.)
Allocation settingsEach country allocates broadcast bands according to their particularsystem.For Latin America:
You can change the AM step. This unit can receive AM broadcastsallocated in 10- or 9-kHz stepsFor the U.S.A., Canada and others:You can change the FM step. This unit can receive FM broadcasts
allocated in 0.1- or 0.2-MHz steps.
Any frequencies that have been preset will be changed by thisprocedure. Be sure to carry out presetting again.
FMMODE :- ...... ----- .......... ----_ ......
:.o.o ,",,TUNED
Press [SELECTOR] to select "FM". Now press and hold[SELECTOR]. After 5 seconds the display changes to show thecurrent lowest frequency. Continue to hold down the button. Afterabout 5 seconds, the minimum frequency changes and the step ischanged at the same timeRepeat this procedure to change the step back.

=ir5775
'5.1
[]
MEMORY
2 31
TUNER/BAND---._,_,II_.,Q_t_ • :
/ sap
V,/k II [_ il ill J
Numbered --,buttons
=ml !_m_1 r_t w_
..._..._...=... _=
i 1 =i
:_ © ©:
SELECTOR
I • LI ' ,
Em Ft f- f- f- T !if--j-;C_fC _ :
3 TUNINGV ,,%
©©I'-I_ I
"4!-
', _'" r r C3 F'l _n . .
The radio: preset tuning
• Tuning is simpler if you preset stations.• You can preset 12 FM and 12 AM stations.Choose either automatic tuning, which presets all the stations thetuner can receive, or manual presetting, which allows you to selectthe stations to preset and the order they are to be preset in.
Do the following once each for FM and AM.
PreparationTune to the frequency where presetting is to begin (.,_page 29).
Press and hold [MEMORY].Release the button when the frequency begins to change.The stations are preset into the channels in ascending order.The last station to be preset is played when presetting is complete.
I Manual presetting
Presetthe stationsone ata time.
_) Press [MEMORY]._) Tune to the required frequency._) Press [MEMORY].
(_) Press [TUNING (v or ^)] to select a channel,_) Press [MEMORY].
The station occupying a channel is erased if another station ispreset in that channel.
1 Press [SELECTOR] to select "FM" or"AM".Each time you press the button;
DVD/CD _ FM _ AM _ TV_ VCR _AUXt
2
3
Press [TUNE MODE] to select"PRESET".Each time the button is pressed; MANUAL _ PRESET
Press [TUNING (v or ^)] to selectpreset channel.
On the remote control
Q Press [TUNER/BAND} to select "FM" or "AM".Press the numbered buttons to select the channel.For channels 10, 11, and 12, press [_>10/ENTER] then the twodigits.10 ch: [>10/ENTER] _ [1] :. [O]11 ch: [_>t0/ENTER} _ [1] --) [1]Or
Press [CHANNEL (^ or v)] to select a channel•

( Sound field system
Dolby Digital
(=_page 32)
J
< Features
f
Dolby Digital is a discrete5.1 channel surround systemdeveloped for cinema use.
This unit automatically recognizesDVDs that have been recorded
with Dolby Digital.
Not all Dolby Digital sources arerecorded with 5.1 channels.
Some sources marked DolbyDigital may be recorded in DolbySurround, a 2 channel system.
J
I
Dolby Pro Logic(,,, page32)
J
Software
F -"
DIGITAL
SUPERSURROUND
(=1page 34)
MOVIE
encoded with DolbYDigitalcan be identified with I•Software
this mark.• DVD
MUSIC
k J
ISound FSpi!!3Control)
Iic is a decoding
system that was developed to geta better sense of presence fromsources encoded with Dolby
Surround. The feeling of positionhas been improved by the additionI
i channel.°fa separate center speaker
J
mode adds surround effectsto movie software that hasn't been
recorded with the above systems.
This mode adds surround effectsto stereo sources.
quality and add
r]['3 [ DOLBY SURROUND ]
Software encoded with DolbySurround can be identified
with this mark.e DVD I
• Video tape• CD• Video CD
\ /
Any stereo sound sourceexcept for the radio.
Other effects )
f
(_) Seat position(_) Center focus
f _
@ Seat position _=
{_) Center focus
-@ Seat position
II
q_) Seat position (- page35)
• This mode helpsmaintain the sound
position even d thelistening positionitself =schanged.
D
[] D
(_) Center focus (- page35)
• This mode makes it seemlike the sound from the
center speaker is comingfrom within the television.You can select one of twolevels.
• The center speakershould be placed abovethe telewsion.
ROT5775

-I1 .
lib DIGITAL
Imm
: cEN_e_ocus_
13Q
, :,' ?2 ,' CEdaRFOCUSBOpFIOLOGIC : ": • : -_"
Playback the source (DVD).
Enjoy a powerful home-theater experience•"DO DIGITAL" and 0O DIGITAL indicator light when Dolby Digitalsignals are detected.
• If the disc contains multiple audio formats (Dolby Digital andDTS, for example) select the soundtrack recorded with DolbyDigital (-_ page 21).
• You can adjust the output level of the speakers if necessary(,,_ page 33).
(When playing DVD, videotapes, and CDs recorded with DolbySurround)Enjoy life-like surround effects.
Press [O0 PRO LOGIC].
To turn off Oolby Pro LogicPress [00 PRO LOGIC].
• You can adjust the output level of the speakers if necessary(-_ page 33).
Dolby Digital only works with DVD recorded with Dolby
Digital. Dolby Pro Logic cannot be used if the source is radio
or f headphones are connected,
775
Manufactured under license from Dolby Laboratories• "Dolby","Pro Logic" and the double-D symbol are trademarks of DctbyLaboratories• Confidential unpublished works.
1992-1997 Dolby Laboratories. All rights reserved.

DVD/CD ---_{'.lllrl||'-][I,II]l|l|l][l]l]
3
glum
_W l= =ali ,!{L ? I 9 =m,..'--".-i|!dl _ i _'IB'" ODPROLOGIC
Ii:l, I I m
Sound field ".,L, , "
Speaker level adjustments
If the level of the speakers appears to be different while listening toa source, sit where you would normally and perform the following toadjust the level of all the speakers to the same apparent level.
Preparations
To ad!ust Dolby DigitalPress [DVD/CD].Turn other sound field systems off.
To adjust Dolby Pro LooicPress [131"1PRO LOGIC}.
Select any source other than the radio.
1 Press [TEST] to output a test signal. ,_The test signal is output inthe following order.
Dolby Digital _i_L: Front speaker (left)C: Center speaker _)
R: Front speaker (right) i[_t,,, I
RS: Surround speaker (right)
LS: Surround speaker (left) '_f_ ,_---_r-_----_._-._._-_-..-tr_Lt,,- _-:.:7_;. _ No signal is output for the subwoofer.
iT -- -- w "lt L.L. T ! ....1_ I t j I LLli_,: -- _ Dolby Pro Logic'Z_"_:-_'=z'_"_":_":_':-_'=;:-';':_-':-2 L: Front speaker (left)
C: Center speakerR: Front speaker (right)
_ -- S: Surround speaker
No signal is output for the subwoofer.
VOLUME
:':.:'-'--.... 2',I/ IllIk I II
,, f _ f-f .j _ : Press [VOLUME (+ or -)] to set the"" "'__f Lf ±t i volume level normally used for
3X
11 I l i"U,
,, L _: F_ "" _'" _f ±t ',
To stop the test signal
Press [TEST].
enjoying the source.
Press [A] or [T] to adjust the level of _"
each speaker to the same apparent
level.
To adjust speaker level during playt, Press [CH SELECT} to select the speaker channel,
In Dolb_
L--C_R_RS_LSI
In Dolbv Pro LOGIC
L --C _R --St
2. Press [&] or [V].
RQT5775

Sound f el_i,._;: :.,_,;_,_: !
[]
• A,V
MIX2_
%MUSIC
1MOVIE
i: _ _" _'_ _'_ '_-',r'_ "
1- STEREO SOUND (off)
Press [SUPER SURROUND].Each time you press the button;
MUSIC -- MOVIE _ STEREO SOUND (off)t J
To cancel super surroundPress [SUPER SURROUND] and select "STEREO SOUND"•
To adjust the level of the surround speakers1. Press [CH SELECT] to selectthespeaker channel.2. Press[i,] or [Yl to adjustthe output level,
This function down mixes 5,1 channel audio signal, like DolbyDigital, to two channels to be output through the front speakers.
Press [MIX 2ch].
To cancel down mix to 2 channels
Press [MIX 2ch].
_775

nmul
ummm
J -E-- _- -IZ3
m---po6moN
%
c_FOCUS
%
Sound field ,__ . _._ _%_
Using this function makes you feel like you are sitting in the idealseating position (in the center of the circle formed by the speakers),even it you cannot due to the layout of your room.
1 Press [SEAT POSITION].
2 While "1_" is flashing
Press the cursor buttons to select a
position.
To cancel seat positionPress [SEAT POSITION] to clear "lw".
You can make the sound of the center speaker seem like it is
coming from within the television. Place the center speaker abovethe television.
Press [CENTER FOCUS].Each time you press the button;
CENTER FOCUS 1 _ CENTER FOCUS 2 _ Original displayL ]
The CENTER FOCUS 2 enhances the effect and makes it easier to
hear dialogue even at low volume.
To cancel center focus
Press [CENTER FOCUS[ to clear "1_".
RQT5775

SF¢
%
Sound field,_J*_,_t_'-_ _ . _: ;.: :-. ;
SFC can be used with any source.There are seven SFC modes,
HEAVY: Adds punch to rock.CLEAR: Clarifies higher sounds.SOFT: Use this setting for background music.DISCO: Produces lengthy reverberations like a disco.LIVE: Adds gloss to vocals.HALL: Expands the sound to make you feel like you were in a hall.FLAT: No effect is added.
The factory setting is HEAVY•
Press [SFC].
To cancel SFC
Press [SFC] to select "FLAT".
5775

POWER I_/I
=EEi'r_ (-.,i_ =}I i I_[i] _ i
.... @
WAKE indicator
TUNER/BAND" °"_'_i "_';
I imer TURC[IOR
IllThere are two timer functions: the sleep timer and the wake timer.They cannot be used together• t'_• Sleep timer:
The unit can be set to turn off after 30, 60, or 90 minutes•The timer is canceled if the unit is turned off.
• Wake timer:
The unit can be set to turn on and start playing the radio or an _Audio CD, 5, 7, or 9 hours after you turn it off.The timer is canceled if the unit is turned on again.
Preparation• Press ]POWER _/I] to turn the unit on.• Select the desired source.
Disc .P_--esess[DVD/CD] to display "DVD/CD, and insert an Audio CD, etc.
Press [TUNER/BAND] to select _FM" or "AM and tune in the ,,_desired station.
1 Press [TIMER] to select the desiredtimer mode.The timer mode changes as follows:
2 Press and hold [TIMER] to select the
required time.The display changes as follows:
• In sleep timer mode:
3_0-- 60 -- 910(minutes) _l
• In wake timer mode:5H _ 7H _ 9H (hours)t J
To cancel the timer
Press fTIMER] until"OFF" is displayed.
RQT5775

!
©,,o.,,/SUBWOOFERLEVEL
O
FLDISPLAY _'_ _ _
_ _ MUTING
! _ _ _,'_ _'_*_--*-SUBWOOFERc,_ ,_ ._., _ _ LEVEL
MUTING
% i'p,,i i i 1" "i- _,_F. tl
EDISP_Y
_,unvenlenz Tunclmons
Press [MUTING]."MUTING" flashes on the display.
To cancel mutingPress [MUTING] or reduce the volume to minimum and raise itagain.
When the system is turned off, the muting operation will beautomatically canceled.
Turning off the display can improve video viewing in a dark or dimlylit room.
Press [FL DISPLAY].
To turn on againPress [FL DISPLAY].
(_)Reduce the volume,(_Connect the headphones to the PHONES jack
and adjust the volume,Audio is automatically switched to stereo (2 channel).If sound is distorted, turn on dynamic range compression
(-_ Audio--D. Range Compression, page 44).
Plug type: 6.3 mm (1/4") stereo
Avoid listening for prolonged periods of time to prevent hearingdamage.
VOLUME
Press [SUBWOOFER LEVEL].Remote control: Press [SUBWOGFER LEVEL[.
Each time you press the button;
0_1_2_3_4t
The factory setting is "4".Sound is not heard from the subwoofer if you select "0".
SUBWOOFERLEVEL
% I-- I I TI I I I I ',, _ ____f _,f -'(
5775
i,
VCR (n°t included) _ i_E_ ___
r_ AUDIO OUT
Stereo connection cable L_J:_
(not included) _
Stereo connection cables(not included)
PLAY (OUT)
Use outdoor antennas if radio reception is poor.
These are examples of connection. You can connectother recording equipment instead of a cassette deck.A record player, laser disc player, etc. can beconnected to the AUX terminals.
To connect a record playerConnect the record player to a phono equalizer toamplify the signal, then connect the phono equalizer tothe AUX terminals.
The volume will be very low if it is connected direcUy.
FM outdoor antenna (Using a television antenna) !
Disconnect the FM indoor antenna.
An outdoor antenna should be installed by a qualified technician
only.
FM outdoor antenna(not included)
Q Remo°uteranPsiuelCaeo°r[ _
3omm11-3/ 6")
* Twist the shield
@ ExPose the core
wire. 15 mm (19/32') |
/ 75 £Zcoaxial/- cable
(not included)
l AM outdoor antenna (Using a vinyl wire)
Run a piece of vinyl wire horizontally across a window or otherconvenient location.
Leave the loop antenna connected.When the unit is not in use, disconnect the outdoor antenna to
prevent possible damage that may be caused by lightning. Neveruse an outdoor antenna during an electrical storm.
AM loop antenna Vinyl wire5-12 rn (14-40 [!.)
Im EXT
ROT5775

1
DVD/CD ........ * * ........ VCR-, • ...... e_ * .
O ..... TV
TUNER/BAND ..... a_-. _) O - "_1_..... AUX
SELECTOR
1
2
Press [SELECTOR] to select "TV","VCR" or "AUX".Each time you press the button;
DVD/CD _ FM _AM _ TV _ VCR _ AUXt J
Remote control: Press [TV], [VCR] or [AUX].
Start the source.
PreparationConnect and prepare the recording equipment (-,, page 39).
1 Press [SELECTOR] to select"DVD/CD", "FM" or "AM".Each time you press the button;
DVD/CD _ FM --AM _ TV-- VCR _ AUXt I
Remote centrel: Press [DVD/CD] or [TUNER/BAND].
2 Begin recording and start the source.
SELECTOR
i775

[]_b Tv
oeoQ_,ee I_/NIDEO
CHANNEL _ _I_II
STOP
CHANNEL pLAy
Numberedbuttons
Switching to TV operation mode
Press [TV].The button lights.The main unitalso switches to TV.
Turning the TV on
Press [_].
Changing channelsPress [CHANNEL (/_ or V )].You can also use the numbered buttons to select the channel.
For channels 10 or over, press [>_t0/ENTER] therl the two digits.10 ch: [_>10/ENTER] _ [1] -_ [0}11 ch: [_>IO/ENTER} _ [11 --_ [1]
Adjusting the volumePress[Iv VOL(- or+)],
Switching the television's video input modePress[TV/VIDEO].
Switching to VCR operation modePress [VCR].The button lights.The main unit also switches to VCR.
Turning the video deck onPress [(_].
Changing channels
Press [CHANNEL (/k or V )].Channels 1 to 10 can also be selected with the numberedbuttons.[0] selects channel 10.
Starting playPress [PLAY I_].
Fast-forwarding and rewinding
Press [SLOW/SEARCH (44 or IH_)],
O
I
To stop playPress[STOP• ].
RQT5_5

Using the remote control with other equipment
Change the remote control code in either of the following circumstances;• If the Panasenic TV or VCR does not operate as a result of a difference in the remote control code.• I| you wish to operate some other make of TV or VCR.
Even after changing the code there may be cases where certain operations cannot be done or operation is not possible at all.
_t_,m _m Aux
_ _ _r
How to change the remote control code
VCR TV
©©Hold down the button corresponding to thecomponent you wish to operate.
Continue to hold the button down and...
I 2 3
Q C214 5 6
C21C-17 8 9
C-30
Aim the remote control at the component you wishto operate and carefully and slowly press thenumbered buttons to enter the appropriate two-digitcode number.(Refer tothetablebelowfor thecodenumber.)
When the two-digit code number is entered, the remote control willautomatically output the on/off signal.
if the remote control has been correctly changed to the code for thecomponent to be operated, the component will be switched ON or OFF.
If there is more than one code number indicated in the code table,
repeat the above procedure until you find a code number for which thepower of the component is switched ON or OFF.
Manufacturer
Panasonic
SonyFisher
G-E
Gold Star
Hitachi
JVC
LXI
MagnavoxMitsubishi
NEC
Philco
PhilipsPioneer
Quasar
Code No.
01,02,2604
14
02,03,07,0907,15
05,07
12
03, o6,07,!0,14,:15
06,07,1!,15,22!0715,16,21
07,15
:06,07
06
;02,10,19
02
TM
Manufacturer
RCA
Sanyo
Sharp
Sylvania
SymphonicToshiba
Zenith
Code No.
03, 07, 09, 13, 23,
24, 2514
08, 2106, 07, 15
17
10,21
18, 20
Manufacturer
Panasonic
Sony
Fisher
Funai
G-E
Gold Star
Hitachi
JVC
LXI
MagnavoxMitsubishiNEC
Phiico
VCR
Code No. Manufacturer
01, 02, 09, 33 Philips
05, 06, 07, 35, 36, Pioneer37 Quasar
13, 14, 15, 18, 34 RCA
08, 30
02, 03, 11 Sanyo
27 Sharp09, 10, 11 Shintom
19, 25, 31, 38, 39, Sylvania
40 Symphonic
10, 13, 14, 15, 18, Toshiba27, 30 Zenith
02, 09, 12
21, 22, 28.2919, 25, 31, 38
02. 09, 12.30
Code No.
02,09, t209
01,02,09,33
02,03,04,0g, 10,
11,12,23,24,26
14,18,34
16,17
32
02,09,12,3030
23,24
20
• To prevent accidental operation, press [DVD/CD} after operation so the unit is ready to operate this unit.
5775

DVD/CD ---*_'- d_"O . O' O
DISC MANAGER--, PLAY MODE
I
initial seulngs
Change the initial settings to suit your preferences and to suit theunit to the environment in which it is being used.These settings are retained in memory until they are changed,even if the unit is turned off.
See pages 44-45 for menu and option details.
PreparationPress [DVD/CD] to select "DVD/CD".
The unit automatically comes on.
1 Press [ACTION].The screen shows the disc menu ((_)) first.
2 Press [_1] or [1_] to select the menu'stab.The screen changes to display the menu.
Disc m_nu (Q)
Video Tenu (_)
Audio menu (_)Display_ menu ((_)
3 Press [&] or [_'] to select the item
you want to change and press
[ENTER]. I_
4 Press [
n'scr"ern'To turn toth_
Press [RETURN]•
Press [&] or [T] to select the optionand press [ENTER].The screen now shews the menu again.
TO return to the previous screen
To exit the initial settings menuPress [ACTION].
• The initial settings cannot be accessed while program mode(-,, page 25) or random mode (-, page 23) is on.Press ]PLAY MODE] to turn the mode off.
• The initial settings cannot be accessed while disc manager(=* page 24) is on.Press [DISC MANAGER] to turn the mode off
O
RQT5775

inlue! semngs
This chart shows the initial settings for this unit.
See page 43 for details on operation.Shaded ilems are the factory settings.
The menu and on-screen message language has been factory pre-set to English. You can change the language by going to "MenuLanguage" in the Display menu.
Main menu Options
Disc English French SpanishOriginal Other _<_-_-"-
Automatic English French
Spanish Other • • • _
English French SpanishOther • • x
Menu
Audio
Choose the preferred audio language.
Subtitle
Choose the preferred subtitle language.
Menus
Choose the preferred language for disc menus.
Ratings
Set a ratings level to limit DVD play.
Setting ratings (When level 8 is selected)8 No Limit 1 to 7 OLock All
Changing ratings (When level 0-7 is selected)
Unlock Player Change Level
Change Password Temporary Unlock
I Video TM Aspect 4:3 Pan & Scan
I"_ _ Choose the setting to suit your television and preference (-, page 13). 4:3 Letterbox
16:9
Still Mode Automatic
Specify the type of picture shown when paused. FieldFrame
Black Level Control Lighter
Change the black level of the picture. Darker
Audio Speaker Setting r_ (Dolby Digital only) Center: 0/1.3/2.6/39/5.3 ms
I Set the delay time for your center and surround speakers (-. page 46). Surround (L/R): 0/5.3/10.6/15.9 ms
D.Range Compression I_ (Oolby Digital only) Off On
Change the dynamic range.Dynamic range is the difference between the loudest sound and thesoftest sound.
Audio during Search _ _ On Off
! Choose whether to have sound during search.
Display Menu Language English Fran_als Espariol
Choose the preferred language for these menus and the on-screen
I messages.
On-Screen Messages On OffChoose whether to show on-screen messages or not.
=ir5775

Changestotheinitialsettingsremainintactaftertheunitisturnedoff.Dothesettingproceduresagaintorestoretotheoriginalsettings.
i
n
', "Other _":
i
"Original":, "Automatic":iii
bP
Level 8:
Level I to 7:
Level O:
Input a code number with the numbered buttons(_, page 46).
The original language of each disc will be selected.
If the language selected for "Audio" is not available,
subtitles of that language will automatically appear if
available on that disc.
i Remarks
Some discs are designed to start in a certain language
despite any changes you make here.
All DVDs can be played. ', • The password screen is shown if you choose levels 0 to 7.
Prohibits play of DVDs with corresponding ratings ', • Select "Level 0" to prevent play of discs that do not haverecorded on them. ratings levels recorded on them.
Prohibits play of all DVDs.
',The password screen is shown when you select "Ratings" if', levels 0 to 7 have been selected.
Field: Less blurred field stiffs are shown. Select if jittering occurs when"Automatic" is selected.
Frame: Sharper frame stills are shown. Select if small text or fine patternscannot be seen clearty when "Automatic" is selected.
When the center/surround speakers cannot be located in the ideal position.
',Turn dynamic range compression on in the following cases.i
, • For clear dialogue when listening at low volume.I • When sound is distorted while playing multi-channet
DVD through two channels (when headphones areconnected or when using the MIX 2CH mode).
I=
ROTS77S

Initial settings
6565: Afar6566: Abkhazian6579: Afrikaans
6577: Ameharic6582: Arabic6583: Assamese
6588: Aymara6590: Azerbaijani6665: Bashkir
6669: Byelorussian6671 : Bulgarian6672: Bihari
6678: Bengal; Bangla6679: Tibetan6682: Breton6765: Catalan6779: Corsican
6783: Czech16789: Welsh6865: Danish
6869: German6890: Bhutan6976: Greek
3978: English3979: Esperanto3983: Spanish3984: Estonian
3985; Basque/'065', Persian7073: Finnish
7074: Fiji
7079: Faroese7082: French7089: Frisian7165: Irish7168: Scots Gaelic7176: Galician7178: Guarani7188: Gujarati7265: Hausa
7273: Hindi7282: Croatian
7285: Hungarian7289: Armenian
7365: Ioterlingua7378: Indonesian7383: Icelandic7384: Italian7387: Hebrew
7465: Japanese7473: Yiddish7487: Javanese
7565: Georgian7575: Kazakh7576: Greenlandic7577: Cambodian7578: Kannada7579: Korean7583: Kashmiri7689: Kurdish
7589: Kirghiz7665: Latin
7678: Lingala7679: Laotian7684: Lithuanian
7686: Lativian, Lettish
7771 : Malagasy7773: Maori7775: Macedonian
7776: Malayalam7778: Mongolian7779: Moldavian7782: Marathi
7783: Malay7784: Maltese
7789: Burmese7865: Nauru
7869: Nepali7878: Dutch
7879: Norwegian7982: Oriya8065: Panlabi8076: Polish
8083: Pashto, Pushto
8084: Portuguese8185: Quechua8277: Rhaeto-Romance8279: Romanian8285: Russian'8365: Sanskrit8368: Sindhi
8372: Serbo-Croatian8373: S ngha ese
8375: Slovak8376: Slovenian3377: Samoan3378: Shona3379: Somali3381 : Albanian3382: Serbian3385: Sundanese3386: Swedish3387: Swahili3465: Tamil
6469: Telugu
3471: Tajik6472: Thai
6473: Tigrinya3475: Turkmen6476: Tagalog
6479: Tonga8482: Turkish8484: Tatar8487: Twi
8575: Ukrainian6582: Urdu8590: Uzbek8673: Vietnamese
8679: Volapi)k8779: Wolof8872: Xhosa8979: Yoruba9072: Chinese9085: Zulu
The sound from speakers can reach the listening position at different times depending on placement. You can allow for this difference by
changing the delay time of the center and surround speakers.
Center speaker delay timeIf D_ _ D2, then set delay time to 0 ms.If D1 > D2, then set delay time as follows.
Difference between D1 and D2 Delay time50 cm 1.3 ms
100 cm 2.6 ms
150 cm 3.9 ms
200 cm 5.3 ms
Ideal position ofr..... the center speaker
L ''_'_ C w R
J :i
_, Da ?
_'_x L8 RS ,'
Ideal position of
_.,_F_..,_ the surround speaker
It is recommended to place allthe speakers inside this circle.
DI: The distance from the front speakerD2: The distance from the center speakerD3: The distance from the surround speaker
Surround speaker delay timeIf D_ _< D3, then set delay time to O ms.If D1 > D3, then set delay time as follows.
Difference between D_ and D3 Delay time200 cm 5.3 ms
' 400 cm 10.6 ms
600 cm 15,9 ms
Center delay time
m8
Surround delay time
r5775

DVD software is recorded in a variety of picture formats, and how they appear on your TV depends on the software, the kind of TV you have,
and the picture mode your TV is set to.• Leilerbox refers to pictures where black bands appear at the top and bottom.• Pan & scan refers to pictures where part of the picture is cut off so it fills the whole screen.
_ Television and
mode
Software format
Wide screen,
pan and scan
Wide screen,
non-pan and scan
Regular (4:3)
Regular (4:3) letterbox
4:3
Edgescutoff
Letterbox
Full screen
Le_erbox
16:9full mode
Full screen
Screen stretched
horizontally
Letterbox with screen
stretched horizontally
16:9zoom mode
Top and bottom cut off
Top and bottom cut off
16:9auto mode
Full screen
Full screen with blackbands on the left and
right
Funscreen Letterbox with extremities
of picture stretched
The names given to the television picture modes depend on the maker of your television. There may also be slight differences in how thep_ctures appear on the screen. Refer to your television's operating instructions for details.
ROT5T/5

',_I
Play surface (shiny side)
Wipe from inside outward.
With this system, you can only play discs having these marks.However, do not use irregular shaped discs. Discs of this sort can
damage the unit.
] Handling precautions I
• If you are taking the disc from a cold to a warm environment,moisture may form on the disc. Wipe with a soft, dry linttree cloth
before using the disc.• Do not write on the label side with a bail-point or other writing
instrument.• Do not use record cleaning sprays, benzine, thinner, static
electricity prevention liquids or any other solvent.• Do not attach labels or stickers to discs. (Do not use discs with
exposed adhesive from tape or left over peeled off stickers.)• DO not use soratch-proof protectors or cover other than those
specified for use with this system,• DO not use discs printed with label printers available on the
market.
Storage precautions 1
Be sure to store discs in their cases to protect them from dust,scratches,and warping.
Do not place or store discs in the following places.• Locations exposed to direct sunlight
• Humid or dusty locations• Locations directly exposed to a heat vent or heating appliance• In the glove compartment or on the rear deck of an automobile
] To prevent damage
Always observe the following points.• Load only 1 disc per tray.• Load discs as shown in figure.• An adaptor is not needed with 8 cm discs (singles).• Set the system on a flat, level surface.
Do not set it on top of magazines, inclined surfaces, etc.• Do not move the system while trays are opening/closing, or
when loaded.
• Do not put anything except discs in trays.• Do not use cleaning discs or discs which are badly warped or
cracked.• Do not use discs with poorly attached labels or stickers.
Adhesive protruding from underneath stickers or left over frompeeled off stickers can cause your stereo to malfunction.
• Do not use irreguJarshaped discs.
m}T5775

Frame
Frames are the still pictures that go
together to make a moving picture. Thereare about thirty frames shown eachsecond.
Field
One frame is made up of two fields. A -._"'_
regular television shows these fields one _ _ -.after the other to create frames. ._"_"=_ _=_==__
i ii ii ,m_ll ii
One fieldFrame still and field still
A still is shown when you pause a moving picture. A frame still ismade up of two alternating fields, so the picture may appearblurred, but overall quality is high. A field still is not blurred, but ithas only half the information of a frame still so picture quality islower.
I/P/B
MPEG 2, the video compression standard adapted for use withDVD, codes frames using these three picture types,I: Intra coded picture (I-picture)This is the standard picture and is a complete picture in itself, Thismeans it has the best picture quality and is the best to use when
adjusting the picture•P: Predictive coded picture (P-picture)This picture is calculated based on past I and P-pictures.B: Bidirectionally-predictive coded picture (B-picture)
This picture is calculated by comparing past and future I and P-pictures so it has the lowest volume of information•
Decoder
A decoder restores the coded audio signals on DVDs to normal.This is called decoding.
Dolby DigitalThis method of coding digital signals was developed by DolbyLaboratories. The signals are highly compressed, enabling a largeamount of information to be recorded on one disc.
Sampling rateThis is the number of samples of sound taken per second duhngconversion to a digital signal. Sampling frequency is expressed inkilohertz (kHz). A high sampling frequency results in a sound closeto the odginal when played back.
PCM (pulse code modulation), Linear PCM
PCM is the usual digital method used for music CDs. DVDs have agreater volume so they use linear PCM, which has a highersampling rate.
Bitstream
This is the digital form of multiple channel audio data (e.g,, 5.1channel) before it is decoded into its various channels•
TrackThis is the smallest division on CD and video CD, and usuallyequates to a single song.
ChapterThis is the smallest division on DVD and is roughly equivalent to atrack.
TitleThis is the largestdivisionon DVD.
Playback control (PBC)This method of controlling disc play is included on version 2.0 video
CDs• You are able to interact with the disc through menus.
=:

Before requesting service, make the below checks. If you are in doubt about some of the check points, or if the remedies indicated in the chart
do not solve the problem:In the U.S.A., contact the Panasonlc Customer Call Center at 1-800-211.7262, or e.mail [email protected], or web
site (http:/iwww.panasonic.corn).In Canada, contact Panasonic Canada Inc. Customer Care Centre at 1-800-561-5505, or web site (www.panasonic.ca), or an authorized
Servicentre nearest you.
No power.
No sound.
Sounds are unfixed or left and
right are reversed,
Humming heard during play.
Sound stops suddenly duringplay.
The unit's display Is off.
"ERROR" is displayed.
"F61" is displayed.
No sound from the subwoofer.
• Ensure the power card is connected.
• Turn the volume up.• Turn muting off.• Check speaker connections.
• Check speaker connections.
• A power cord or fluorescent light is near the cables. Keep other appliancesand cords away from this unit's cables.
• If possible in your area, turn the AC power supply cord's plug or connectorover to reverse the plug's polarity.
• The speaker cords may have shorted. Turn the unit aff and reconnect thecords.
• Press [FL DISPLAY} on the remote control to tum the display on.
• Incorrect operation performed. Read the instructions and try again.
• The speaker cords may have shorted. Turn the unit off and reconnect thecords.
If this does not fix the problem, consult your dealer.
• Check that the subwoofer has not been set to "0".
10
15, 29388
38
38
The radio cannot be tuned in orthere is a lot of noise and
interference.• Adiust the positian of the FM or AM antenna.
• Turn off nearby tetevisions, video decks, and satellite receivers.• Separate the antenna from other cables and leads.• Yau may need an outdoor antenna.
t0
39
la_T5T;5

The display is wrong or playwon't start.
Certain sections cannot be
PlaYed.
Noise Is output when a CD is
played.
!
"D_ NO AUDIO" appears on the
display.
zppears on the display.
"DVD U11" appears on the
display,
"DVO HDR" appears on thedisplay.
"TAKE OUT DISC" appears on thedisplay.
You have forgotten your ratings_assword.
Languages you selected in theinitial settings menu are not usedfor the soundtrack and subtitles.
• The disc may be upside down•• Replace lhe disc if it is scratched, warped, or nonstandard•• Condensation may have formed in the player due to a sudden change in
temperature. Wait about an hour for it to clear and try again.
• Wipe the disc with a soft cloth if it is dirty.
• Check the disc. If it is a DTS CD, it cannot be played.
• This unit is unable to decode DTS signals.
• This unit is unable to decode DTS signals•
• The disc is dirty. Wipe it with a soft cloth.
• A problem has occurred. Turn the unit off and unpeug the AC cord. Wait a
moment and then plug the cord in and turn on the unit again. If the unit is stillnot working correctly, consult your dealer.
• A problem has occurred with the tray mechanism. The tray will openautomatically. Take out the disc and close the tray. The unit will make thedisc changing noises for a few moments and then should operate normally•
• Reset the unit to its original factory settings.Do the following to restore the unit to the condition it was in at the time ofshipment. This dears the ratings settings.Press [ • ] on the main unit and [>10/ENTER] on the remote control at thesame time for about 3 seconds until the message "Initialized" disappearsfrom the television screen.
• The selected languages are not recorded on the DVD or the DVD has beendesigned to automatically play a certain Language.
1448
48
48
77
The remote control doesn't work. !,• Check the batteries are inserted correctly.• Aim the remote control at the main unit and remove obstacles between
them.
• Replace the batteries if they are worn out.• It may be in the TV or VCR operation mode. Press [DVD/CD] to operate this
unit
• If the remote control doesn't operate the television or VCR, try changing thecode. This remote control cannot operate some televisions or VCRs.
12
41,42
m_t_T_77_

If the surfaces are dirtyTo clean this unit, wipe with a soft, dry cloth.If the surfaces are extremely dirty, use a soft cloth d=pped in a soap*and-water soluhon or a weak detergent solution
• Never use alcohol, paint thmner or benzJne to clean thts unrt
• Before using chemically treated cloth, read the instruclbons tha(
came with the cloth carefully
Do not attempt to remove the cover(s) or repair the unit yourselfRefer servicing to quahfted personnel only
[ Product information 1
For product service, product reformation or assistance wdh productoperation, refer to the servlcenter directory
When moving theunit
1 Remove all discs.
2 Press [POWER (b/I] to turn the unit off,
3 Disconnect the AC power cord.
. .. . _ ..I " - ."-.4 _% " -_ • "_,_-..'_ _, "_
@Selecting fine audio equipment such as the unit you've justpurchased is only the start of your musical enjoyment Now it's timeto consider how you can maximize the fun and excitement yourequ=pment offers This manufacturer and the Electrontc IndustriesAssoc_atton's Consumer Electron=cs Group want you to get the mostoul of your equipment by playing d at a safe level. One that lets thesound come through loud and clear without annoying blaring ordJstortlon--and, most importantly, without affecting your sensitivehearing
We recommend you to avoid prolonged exposure to excesswenoise
Sound can be decewlng Over time your heanng "comfort level"adapts to h=gher volumes of sound So what sounds =normal" sanactually be loud and harmful to your heanng.Guard against th_s by setting your equipment at a safe levelBEFORE your hearing adaptsTo establish a safe revel
• Start your volume control at a low sattmg• Slowly increase the sound until you can hear it comfortably and
cleady, and wdhout distortion
Once you have established a comfortable sound level• Set the dral and leave it Ihere
Taking a minute to do this now will help to prevent hearing
damage or loss in the future Affer all, we want you hstenmg for ahfehme
QIQT5775

Specifications
• AMPLIFIER SECTION
(SC-H'r70 for the U.S.A. and Canada)FTC TTL POWER OUTPUT
120 Hz-20 kHz, 1.O% total harmonic distortion
FRONT
CENTER
SURROUND
45 Hz-120 Hz, 1.0 % total harmonic distortion
SUBWOOFER
RMS 1-1L POWER OUTPUT
120 Hz-2O kHz, 10 % total harmonic distortion
FRONT
CENTER
SURROUND
46 Hz-120 Hz, 10 % total harmonic distortion
SUBWOOFER
Input sensitivity/input impedanceAUX
240 W
30 W per ch (6 _2)
3OW (6_)
30 W per ch (6 _)
90 W (6 £2)300 W
36 W per ch (6 Q)
36 W (6 f_)
36 W per ch (6 _)
120 W (6 D)
250 mV, 10 k_2
• FM TUNER SECTIONFrequency range
(For Latin America)
(For the U.S.A., Canada and others)
SensitivityAntenna terminals
• AM TUNER SECTION
Frequency range
IFor Latin America)
(For the U.S.A., Canada and others)
Sensitivity
(For Latin Amarica)S/N 20 de at 999 kNz
(For the U.S.A., Canada and others)S/N 20 dB at 1000 kHz
8750-108.00 MHz (50 kHz steps)
87 9-107 9 MHz (200 kHz steps)
87 5-108.0 MHz (100 kHz steps)
16.3 dBf (1.8 pV, IHF)75 £Z unbalanced
522-1629 kHz (9 kHz steps)
520-1630 kHz (t0 kHz steps)520-1710 kHz (10 kHz steps)
500 pV/m
500 pV/m
• AMPLIFIER SECTION (SC-HT65 for the U.S.A.)FTC l"rL POWER OUTPUT 200 W • SPEAKER SECTION
120 Hz-2O kHz, 1.0 % total harmonic distortionFRONT 28 W per ch (6 _) I Front, center and surround speakers (SB-AFC80) I
CENTER 25 W (6 Q) Type 1 way 1 speaker Rass-ref.
SURROUND 25 W per ch (6 Q) Speaker unit
45 Rz-120 Hz, 1.0 % total harmonic distortion Full range 8 cm (3-1/8") cone type
SUBWOOFER 75 W (6 _) Impedance 6
RMS TrL POWER OUTPUT 250 W Input power
120 Hz-20 kHz, 10 % total harmonic distortion MUSIC 60 W
FRONT 30 W per ch (6 Q) DIN 30 W
CENTER 30 W (6 Q) Sound pressure level 79 dB/W (1,O m)
SURROUND 30 W per ch (6 t_) Frequency range 80 Hz-22 kHz (-16 dR)
45 Hz-120 Hz, 10 % total harmonic distortion 1tO Hz-20 kHz (-10 dB)
SUBWOOFER 100 W (6 {2) Dimensions (WX HX D) 88x 158x 105 mm
Input sensitivity/input impedance (3-15/32" x 8-7/32" x 4-1/8")AUX 250 mY, 10 k£_ Mass 0.8 _ (1,8 lb.)
• AMPLIFIER SECTION (For Latin America and others)RMS TTL POWER OUTPUT 300 W
(10 % total harmonic distortion)FRONT 1 kHz 36 W per ch (6 _)
CENTER 1 kHz 36 W (6 _)
SURROUND 1 kHz 36 W per ch (6 _)
SUBWOOFER 80 Hz 120 W (6 _z)
PMPO TTL POWER OUTPUT 2200 W
DIN TTL POWER OUTPUT 220 W
(1% total harmonic distortion)FRONT 1 kHz 26 W per ch (6 Q)
CENTER 1 kNz 26 W (6 Q)
SURROUND 1 kHz 26 W per ch (6 _2)
SUBWOOFER 80 Hz 90 W (6 _)
Input sensitivity/input impedanceAUX 250 mV, 10 k_
• DISC SECTIONDisc
DVD 8 cm/12 cm single-sided, single-layer
8 cm/12 cm single-sided, double-layer
5 cm/12 cm double-sided, double-layer
(one layer per side)
CD/VCD 8 cm/12 cm (CD-R/RW)
Video
Signal system NTSC
Output level Composite video I Vp p (75 _)
S-video Y 1 Vp p (75 _._)
S-video C 0286 Vp-p (75 _/NTSC)
Audio
Sampling frequencyCD 44.1 kHz
DVD 48 kHz/g6 kHz
Decoding 16120124 bit linearWow and flutter Below measurabte limit
D/A converter Delta-sigma DAC
Pick upBeam Source Semiconductor Laser
WavelengthDVO 658 nm
VCD/CD 790 nm
LSubwoofer (SB-WT0)J
Type I way 1 speaker Bass-tel
Speaker unitWoofer 17 cm (6-3/4") cone type
Impedance 6 Q
Input powerMUSIC 180 WDIN g0 W
Sound pressure level 80 dB/W (!.0 m)
Frequency range 42 Hz-1.5 kRz (-!6 dR)
46 Hz-gOO HZ (-10 dS)
Dimensions (W x H X D) 173 x 315 x 300 mm
(5-13/16" x 12-13/32" × 11-13/16")
Mass 4.0 kg (8 8 Ib)
• GENERAL (For the U.S.A. and Canada)Power supply AC 120 V. 60 HZ
Power consumption 100 W
Standby 025 W
Dimensions (W X H x D) 430 × 114 × 368 mm
(16-15/16" x 4-1/2" × 14-I/2")
Mass 8.4 kg (18 5 Ib )
• GENERAL (For Latin America and others)Power supply AC 110 V/f 27 V/220 V-230 V/240 V, 50/60 Hz
Power consumption 168 W
Standby 080 W
Dimensions (W x H x D) 430 × 114 x 308 mm
(16 15/16"×4-1/2"× 14-1/2")
Mass 8.4 kg (18 5 Ib )
Note:
1. Specifications are subject to change without notice.Mass and dimensions are approximate.
2. Total harmonic distortion is measured by the digital spectrum
analyzer.
,3
RQT5775

Panasonlc Consumer Electronics Company,Division or Matsushita Electric Corporationof America
One Panasonic Way,Secaucus, New Jersey 07094
Panasonic Sales Company, Division of Matsushita ElectricCorporation of Puerto Rico, Inc.Ave. 65 de Inianteria, Kin. 9.5, San Gabriel IndustrialPark, Carolina, Puerto Rico 00985
Panasonic/Technics Audio ProductsLimited Warranty
Panasonic Consumer Electronics Company or Panasonic SalesCompany (collectively referred to as "the warrantor") will repair this productwith new or refurbished parts in the event of a defect in materials orworkmanship, free of charge, in the U.S,A or Puerto Rico as follows (alltime periods start from the date of original purchase):
AUDIO PRODUCTS--labor and parts for one (1) yearALL AUDIO RACKS toabin_--parts only30 days.TECHNICS STAND ALONE SPEAKERS. SUBWOOFER SPEAKERS--
labor and parts tot three (3) years.USa READER-WRITER. PERSONAL COMPUTER CARD ADAPt-
(when applicable)--exchange defective unit with a new or refurbished onefor one (1) year.ACCESSORIES--HEADPHONES. CARTRIDGES. MICROPHONES._--Iabor and paris for ninety (90) days.RECHARGEABLE BATTERIES--(when applicable)--exchange defectiveitem lot new one for ten (10) days. Non-rechargeable batteries are notwarrarbed.SD MEMORY CARDS. RSCHARGEABLE BATT Y_J_P_K_--(whenapplicable)--exchange defective item for new one for ninety (90) days.Non-rechargeable battery packs are not warranted.
Carry*in or mail-in service in the US.A. can be obtained during thewarranty period by contacting a Panasonic Services Company (PASC)Factory Servicenter listed in the Servieentor Directory. Or call toll tree,1-800-211-7269 to locate a PASC authorized Serviceoter. Carry-in ormail-in service in Puerto Rico can be obtained dudng the warranty periodby calling the Panasonic Sales Company telephone number listed in theServicenter Directory.
This warranty is extended only to the original purchaser. A purchasereceipt or other proof of date of origiaal purchase will be required beforewarranty service is rendered,
This warranty only covers failures due to defects in materials andworkmarlship which Occur during normal use arid does not cover normalwear to the stylus (when applicable) or a dealer installed cartridge or
stylus. The warranty does riot cover damages which occur in shipment or
failures which are Caused by products not supplied by Ihe warrantor, orfailures which result from accident, misuse, abuse, neglect, mishandling,
faulty installation, misapplication, set-up a_ustments, maladjustment ofconsumer eonttols, improper operation Or maictenance_ improper antenna,
inadequate signal reception or pick-up, alteration, modification, power linesurge, improper voltage supply, ]ightoing damage, commercial use, such
as; hotel, office, restaurant, or other business or rental use Of toe product,or service by anyone Other than a PABC Factory Servicenter or a PASC
authorized Servicecter, or damage that is att nbulable to acts of God.
LIMITS AND EXCLUSIONS
There are no express warranties except as listed above.THE WARRANTOR SHALL NOT BE LIABLE FOR INCIDENTAL OR
CONSEQUENTIAL DAMAGES RESULTING FROM THE USE OF THIS
PRODUCT, OR ARISING OUT OF ANY BRE_,CH OF THIS WARRANTY,INCLUDING WITHOUT LIMITATION, DAMAGE TO TAPES, RECORDS
OR DISCS, ALL EXPRESS AND IMPLIED WARRANTIES, INCLUDING
THE WARRANTIBS OF MERCHANTABILITY, AND FITNESS FOR APARTICULAR PURPOSE, ARE LIMITED TO THE APPLICABLEWARRANTY PERIOD SET FORTH ABOVE. Some states do not aJIow the
exclusion or limitation of incidental or consequential damages, or
limitations on how long an implied warranty lasts, so the above exclusionsor limitations may not apply to you
This warranty gives you specific legal rights and you may also have
other rights which vary from state to stale.
if a problem with this product develops during or after the warrantyperiod, you may contact your dealer or Servicenter If the problem is not
handled to your satisfaction, then write _o the Consumer Affairs
Department at the company address indicated above
f
If you ship the product
Carefully pack and send it prepaid, adequately insured and preferably in the original carton.Attach a postage-affixed letter, detailing the complaint, to the outside of the carton.
Do NOT send the product to the Executive or Regional Sales offices. They are NOT equipped to make repairs.
J
Customer's Record
Model Dealer'sNo Name
Serial
NO.
or
Code Dealer's
No Address
DaleofPurchase
J
I=iRQT5775

Panasonic Technics
1-800-332-9368 (Customer Orders Only)Panasonic Services Company 20421 84th Avenue South, Kent, WA 98032(6 am to S pm Monday-Friday; 6 am to 10:30 am Saturday; PST)(Visa, MasterCard, Discover Card, American Express, Check)
CALIFORNIA6550 Katella Avenue
Cypress, CA 90630
800 Dubuque AvenueS. San FranciscoCA 94080
20201 Sherman WaySuite 102
Canoga Park, CA 91306
3878 Ruffin RoadSuite A
San Diego, CA 92123
COLORADO
1640 South Abilene StreetSuite D
Aurora, CO 80012
FLORIDA
3700 North 29'hAvenueSuite 102
Hollywood, FL 33020
GEORGIA8655 Roswell RoadSuite 100Atlanta, GA 30350
ILLINOIS9060 Golf RoadNiles, IL 60714
1703 North Randall Road
Elgin, IL 60123(Pick-up/Drop-off only)
MARYLAND62 Mountain RoadGlen Burnie, MD 21061
MASSACHUSETTS60 Glacier DriveSuite G
Westwood, MA 02090
MICHIGAN
37048 Van Dyke Avenue
Sterling Heights, MI 4.6312
MINNESOTA7850-12 th Avenue South
Airport BusinessCenterBloomington, MN 55425
OHIO
2236 Waycross RoadCivic Center Plaza
Forest Park, OH 45240
PENNSYLVANIA2221 Cabot Blvd. WestSuite 8
Langhorne, PA 19047
TEXAS13615 Welch Road
Suite 101Farmers BranchTX 75244
WASHINGTON
20425-84 _ Avenue SouthKent, WA 98032
HAWAII99-859 lwaiwa Street
Aiea, Hawaii 96701Phone (808) 488-I 996
Fax (808) 486-4369
ROT5775

-- THE FOLLOWING APPLIES ONLY IN THE U.S.A. --
CAUTION:This equipment has been tested and found to comply with thelimits for a Class B digital device, pursuant to Part 15 of theFCC Rules.
These limits are designed to provide reasonable protectionagainst harmful interference in a residential installation. Thisequipment generates, uses and can radiate radio frequencyenergy and, if not installed and used in accordance with theinstructions, may cause harmful interference to radiocommunications. However, there is no guarantee thatinterference will not occur in a particular installation. If thisequipment does cause harmful interference to radio or
television reception, which can be determined by turning theequipment off and on, the user is encouraged to try to correctthe interference by one or more of the following measures:• Reorient or relocate the receiving antenna.• Increase the separation between the equipment and receiver.• Connect the equipment into an outlet on a circuit different
from that to which the receiver is connected.
• Consult the dealer or an experienced radio/TV technician forhelp.
Any unauthorized changes or modifications to this equipmentwould void the user's authority to operate this device.
This device complies with Part 15 of the FCC Rules. Operationis subject to the following two conditions: (1) This device maynot cause harmful interference, and (2) this device must acceptany interference received, including interference that may causeundesired operation.
User memo:
DATE OF PURCHASEDEALER NAMEDEALER ADDRESS
TELEPHONE NUMBER
The model number and serial number of this product can befound on either the back or the bottom of the unit.
Please note them in the space provided below and keep forfuture reference.
MODELNUMBER
SERIAL NUMBER
Apparatus Claims of U.S. Patent Nos. 4,631,603, 4,577,216, and 4,819,098, licensed for limited viewing uses only.
This product incorporates copyright protection technology that is protected by method claims of certain U.S. patents and otherintellectual properly rights owned by Macrovision Corporation and other rights owners. Use of this copyright protection technologymust be authorized by Macrovision Corporation, and is intended for home and other limited viewing uses only unless otherwiseauthorized by Macrovision Corporation. Reverse engineering or disassembly is prohibited.
I=_';_11F:ltR r.*_F'J'_e=.l
Panasonic Consumer Electronics Company,Division of Matsushita Electric Corporation of AmericaOne PanasonicWay Secaucus,New Jersey 07094http://www.panasonic.com
Panasonic Sales Company,Division of Matsushita Electric of Puerto Rico, Inc.("PSC")Ave. 65de Infanteria, Kin. 9.5San Gabriel Industrial Park, Carolina,Puerto Rico 00985
Panasonic Canada Inc.
5770 Ambler Drive, Mississauga, Ontario L4W 2T3www.panasonic.ca
Matsushita Electric Industrial Co., Ltd.Osaka 542-8588, Japan
Matsushita Electric Industrial Co., Ltd.Corporate Management Division for the AmericasSales Office for North America
Tokyo Panasonic Sales Section32nd Floor,World Trade Center 4-1, Hamamatsu-cho,2-Chome,Minato-Ku,Tokyo 105-6132,Japan
Panasonic Marketing Europe G.M.B.H. Wiesbaden N.(a Division of Panasonic Marketing G.M.B.H.)Military Sales Department6200 Wiesbaden-Biebrich, Hagenauerstr. 43 Germany
RQT5775-1P©2001 Matsushita Electric Industrial Co., Ltd. F0101YS1031