unit topic: intelligent agents introduction content · unit topic: intelligent agents introduction...
TRANSCRIPT
Centre for Academic and Faculty Enrichment last updated: 7/4/19 Page 1 of 9
Unit Topic: Intelligent Agents
Introduction The Intelligent Agents tool is a powerful and efficient means of communicating with students that will increase student engagement, deepen your impact as a professor, while also reducing your workload. An Intelligent Agent is a process the runs in your DC Connect course that identifies students who have met particular criteria and subsequently sends those students pre-scripted emails to their DC Mail accounts. The criteria, message, timing, and frequency of communication is set by you, the professor. In simpler terms, you are telling DC Connect to automatically email students when they have, or have not done something in DC Connect.
Content This document covers the following topics:
• How to Access the Intelligent Agents Tool • Creating & Managing your Intelligent Agents
o Creating an Intelligent Agent o Setting the Agent Criteria o Setting the Agent Action o Running Your Intelligent Agent o Enabling or Disabling an Intelligent Agent o Deleting an Intelligent Agent
• Intelligent Agents Settings o Setting a Custom From: Name and Reply-To: Email Address
Centre for Academic and Faculty Enrichment last updated: 7/4/19 Page 2 of 9
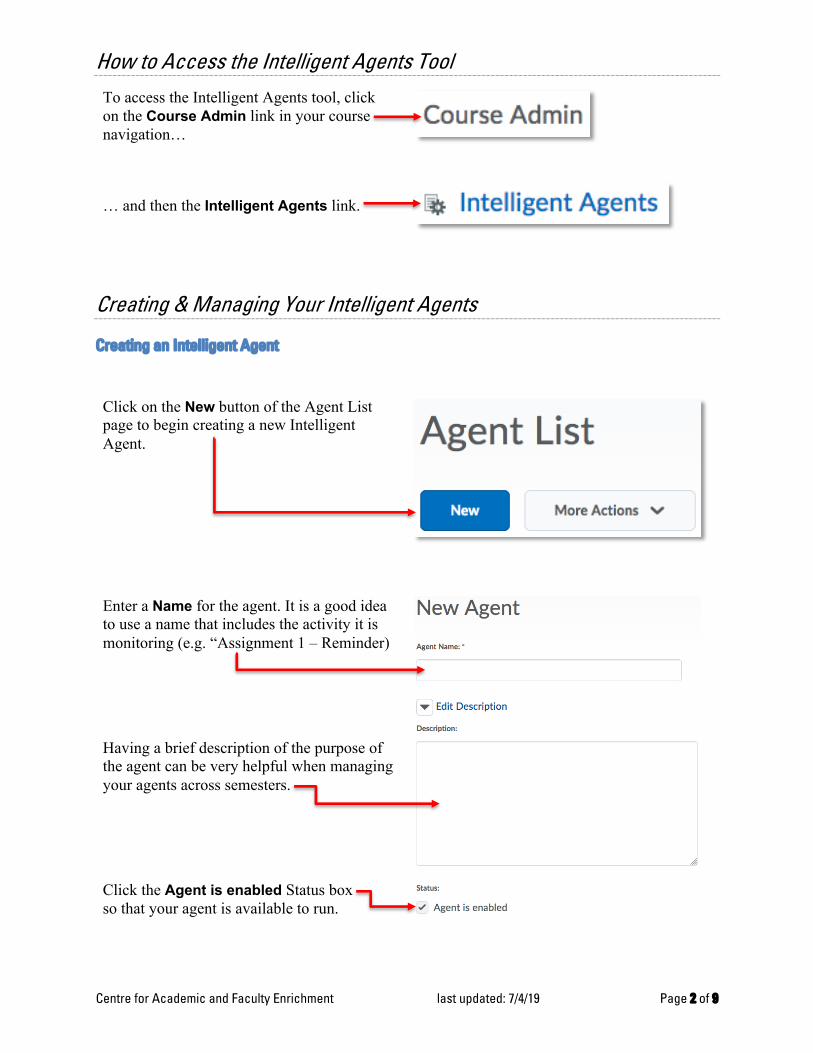
How to Access the Intelligent Agents Tool To access the Intelligent Agents tool, click on the Course Admin link in your course navigation… … and then the Intelligent Agents link.
Creating & Managing Your Intelligent Agents
Creating an Intelligent Agent
Click on the New button of the Agent List page to begin creating a new Intelligent Agent.
Enter a Name for the agent. It is a good idea to use a name that includes the activity it is monitoring (e.g. “Assignment 1 – Reminder) Having a brief description of the purpose of the agent can be very helpful when managing your agents across semesters. Click the Agent is enabled Status box so that your agent is available to run.
Centre for Academic and Faculty Enrichment last updated: 7/4/19 Page 3 of 9
Setting the Agent Criteria
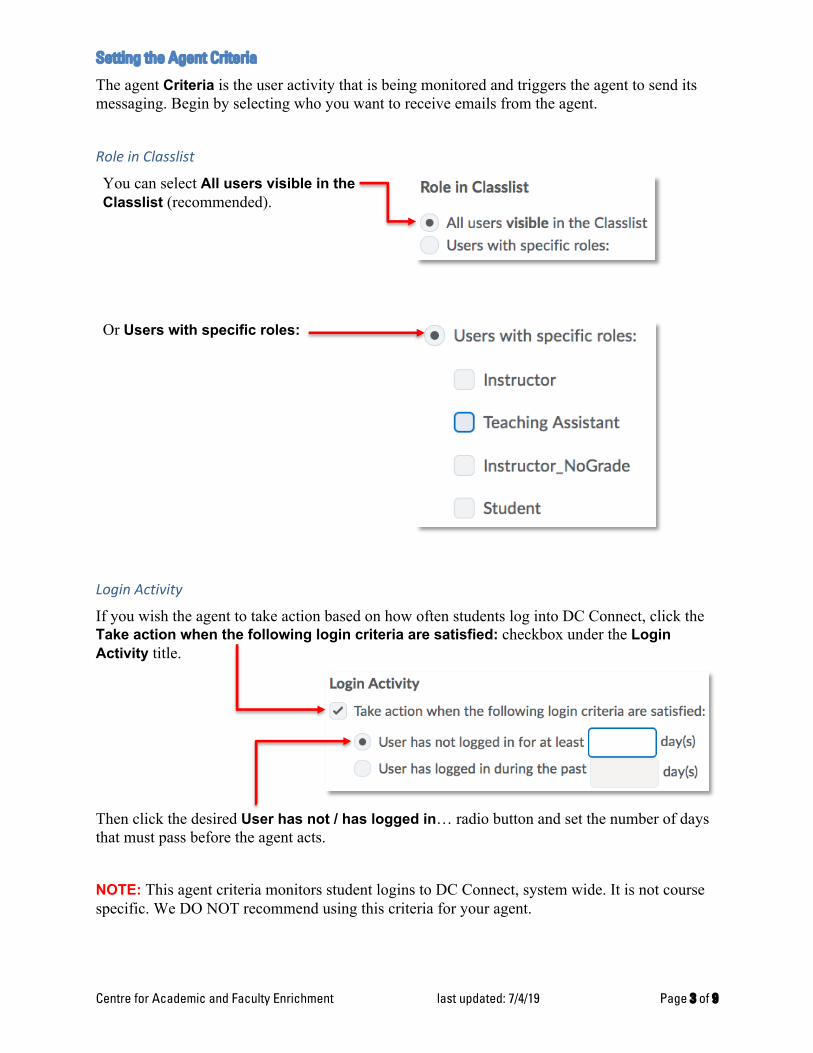
The agent Criteria is the user activity that is being monitored and triggers the agent to send its messaging. Begin by selecting who you want to receive emails from the agent. Role in Classlist
You can select All users visible in the Classlist (recommended).
Or Users with specific roles:
Login Activity
If you wish the agent to take action based on how often students log into DC Connect, click the Take action when the following login criteria are satisfied: checkbox under the Login Activity title.
Then click the desired User has not / has logged in… radio button and set the number of days that must pass before the agent acts. NOTE: This agent criteria monitors student logins to DC Connect, system wide. It is not course specific. We DO NOT recommend using this criteria for your agent.
Centre for Academic and Faculty Enrichment last updated: 7/4/19 Page 4 of 9
Course Activity
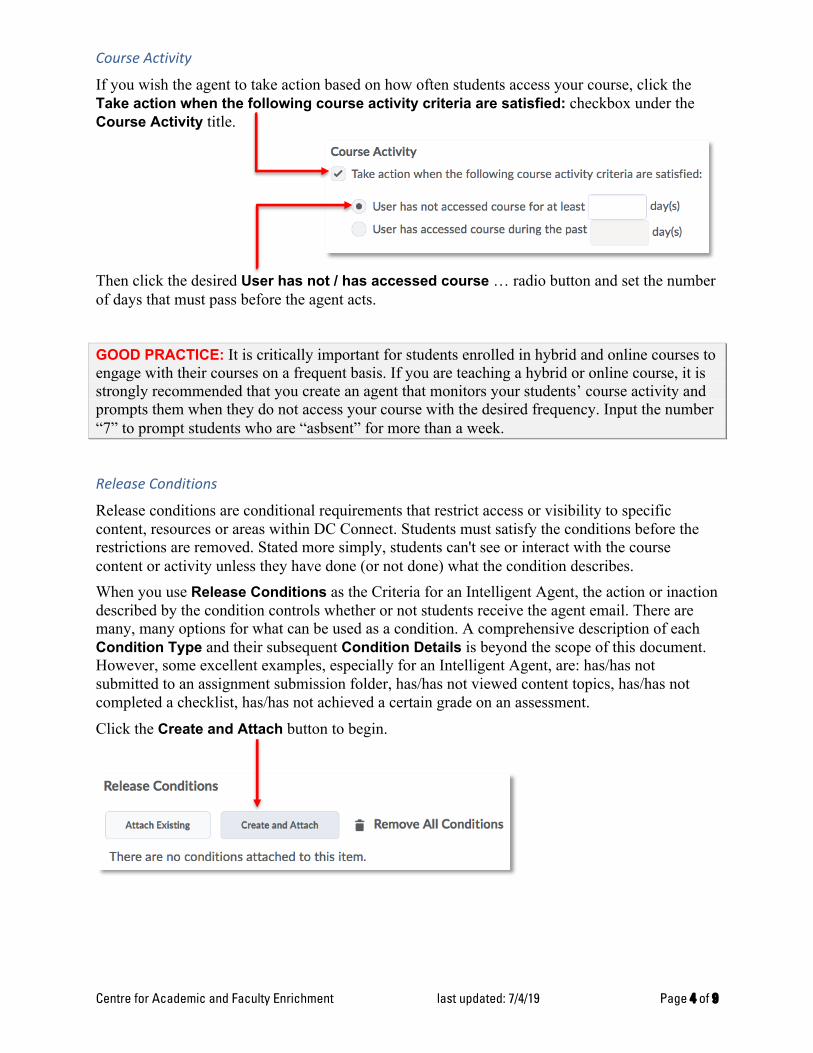
If you wish the agent to take action based on how often students access your course, click the Take action when the following course activity criteria are satisfied: checkbox under the Course Activity title.
Then click the desired User has not / has accessed course … radio button and set the number of days that must pass before the agent acts.
GOOD PRACTICE: It is critically important for students enrolled in hybrid and online courses to engage with their courses on a frequent basis. If you are teaching a hybrid or online course, it is strongly recommended that you create an agent that monitors your students’ course activity and prompts them when they do not access your course with the desired frequency. Input the number “7” to prompt students who are “asbsent” for more than a week.
Release Conditions
Release conditions are conditional requirements that restrict access or visibility to specific content, resources or areas within DC Connect. Students must satisfy the conditions before the restrictions are removed. Stated more simply, students can't see or interact with the course content or activity unless they have done (or not done) what the condition describes. When you use Release Conditions as the Criteria for an Intelligent Agent, the action or inaction described by the condition controls whether or not students receive the agent email. There are many, many options for what can be used as a condition. A comprehensive description of each Condition Type and their subsequent Condition Details is beyond the scope of this document. However, some excellent examples, especially for an Intelligent Agent, are: has/has not submitted to an assignment submission folder, has/has not viewed content topics, has/has not completed a checklist, has/has not achieved a certain grade on an assessment. Click the Create and Attach button to begin.
Centre for Academic and Faculty Enrichment last updated: 7/4/19 Page 5 of 9
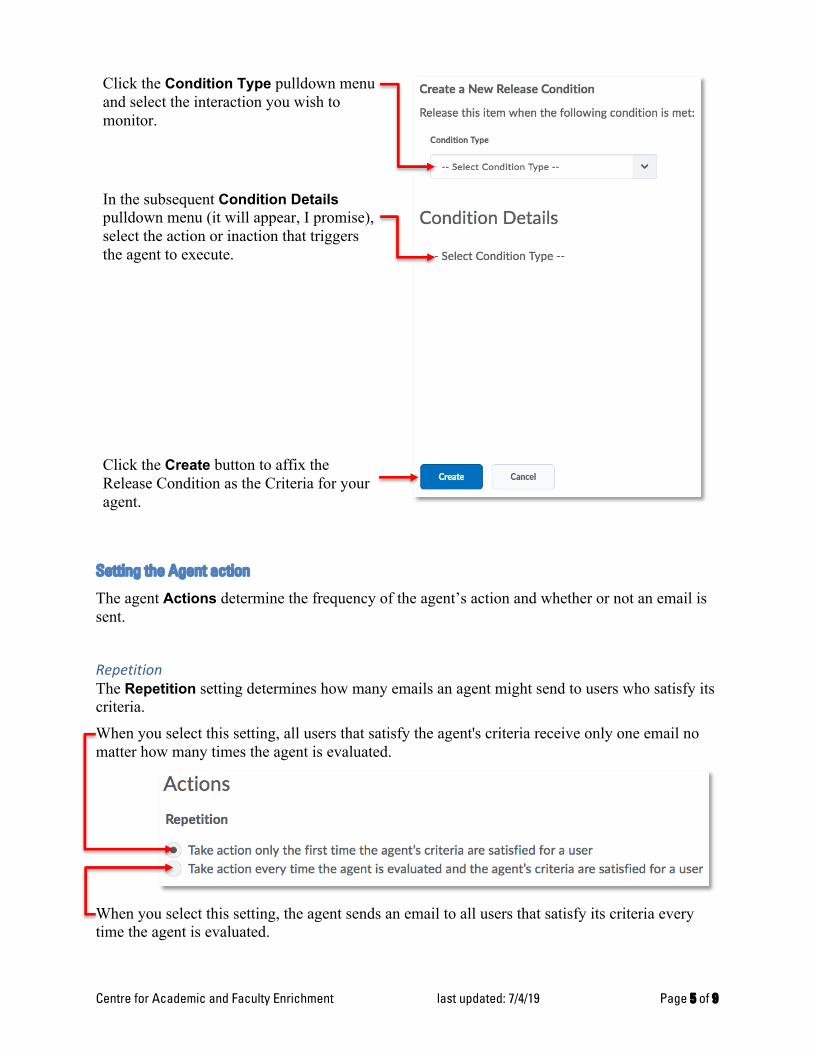
Click the Condition Type pulldown menu and select the interaction you wish to monitor. In the subsequent Condition Details pulldown menu (it will appear, I promise), select the action or inaction that triggers the agent to execute. Click the Create button to affix the Release Condition as the Criteria for your agent.
Setting the Agent action
The agent Actions determine the frequency of the agent’s action and whether or not an email is sent. Repetition The Repetition setting determines how many emails an agent might send to users who satisfy its criteria. When you select this setting, all users that satisfy the agent's criteria receive only one email no matter how many times the agent is evaluated.
When you select this setting, the agent sends an email to all users that satisfy its criteria every time the agent is evaluated.
Centre for Academic and Faculty Enrichment last updated: 7/4/19 Page 6 of 9
Send an Email
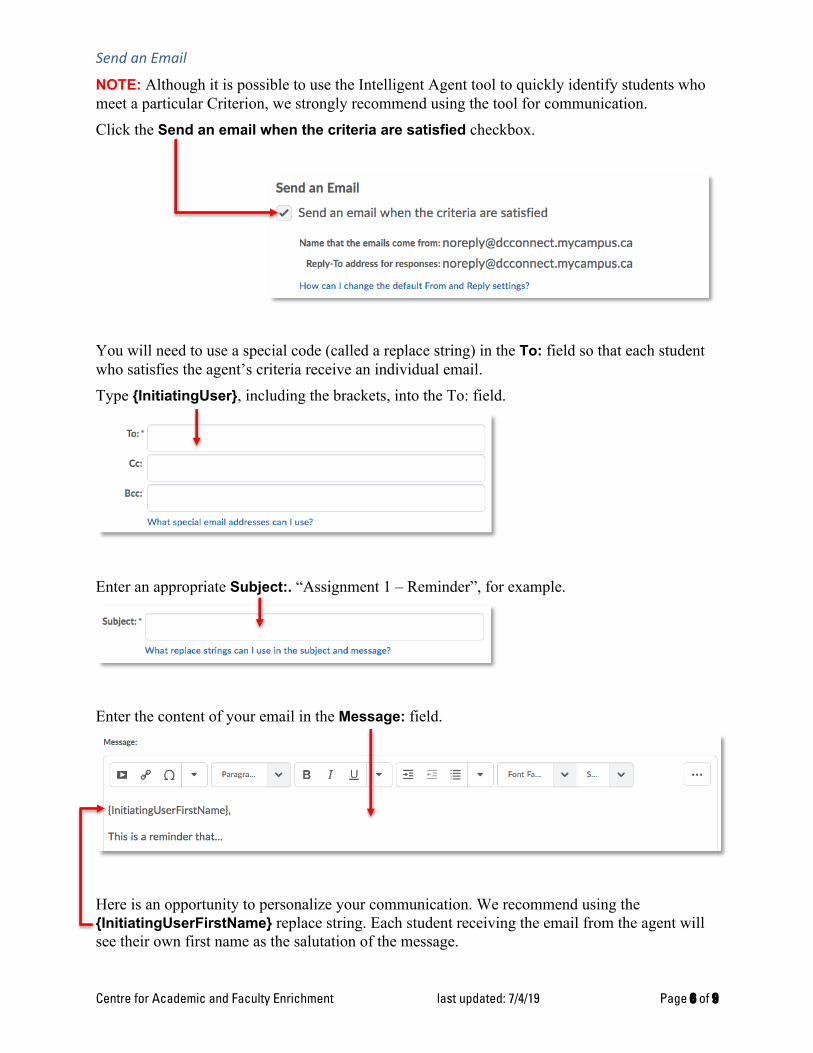
NOTE: Although it is possible to use the Intelligent Agent tool to quickly identify students who meet a particular Criterion, we strongly recommend using the tool for communication. Click the Send an email when the criteria are satisfied checkbox.
You will need to use a special code (called a replace string) in the To: field so that each student who satisfies the agent’s criteria receive an individual email. Type {InitiatingUser}, including the brackets, into the To: field.
Enter an appropriate Subject:. “Assignment 1 – Reminder”, for example.
Enter the content of your email in the Message: field.
Here is an opportunity to personalize your communication. We recommend using the {InitiatingUserFirstName} replace string. Each student receiving the email from the agent will see their own first name as the salutation of the message.
Centre for Academic and Faculty Enrichment last updated: 7/4/19 Page 7 of 9
Running Your Intelligent Agent
There are two ways to run your agent, using a schedule to predetermine when your agent will run and with what frequency, and manually.
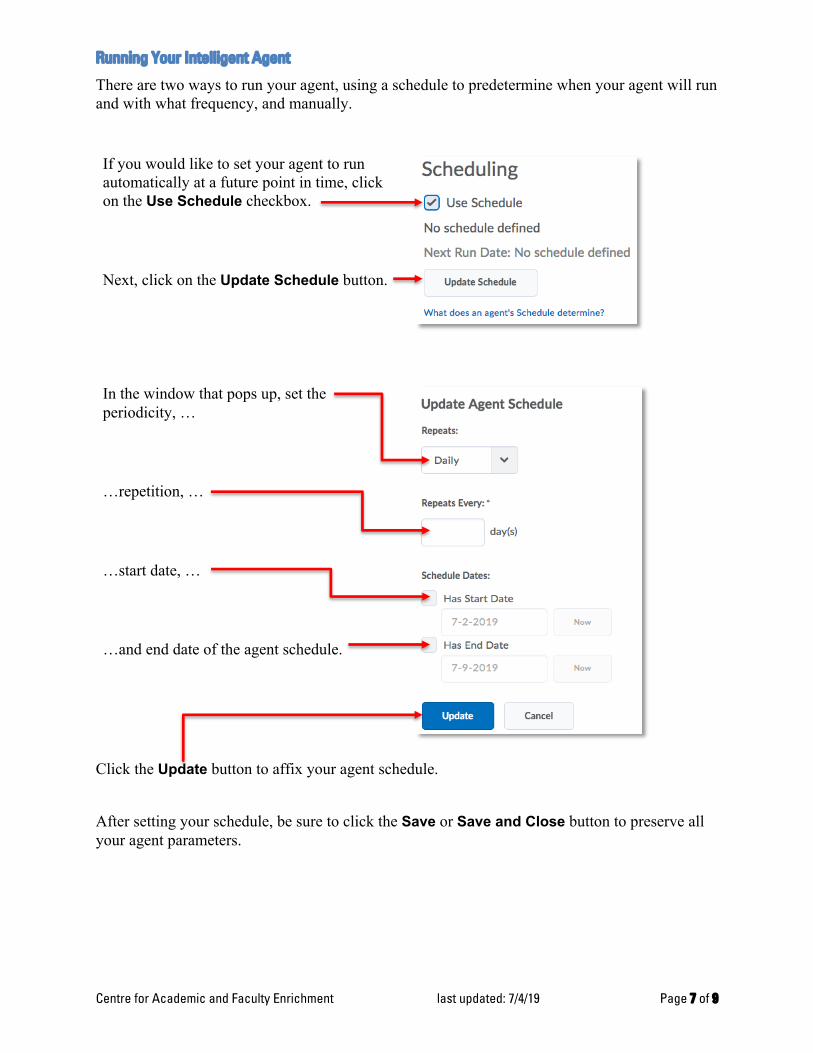
If you would like to set your agent to run automatically at a future point in time, click on the Use Schedule checkbox. Next, click on the Update Schedule button.
In the window that pops up, set the periodicity, … …repetition, … …start date, … …and end date of the agent schedule.
Click the Update button to affix your agent schedule. After setting your schedule, be sure to click the Save or Save and Close button to preserve all your agent parameters.
Centre for Academic and Faculty Enrichment last updated: 7/4/19 Page 8 of 9
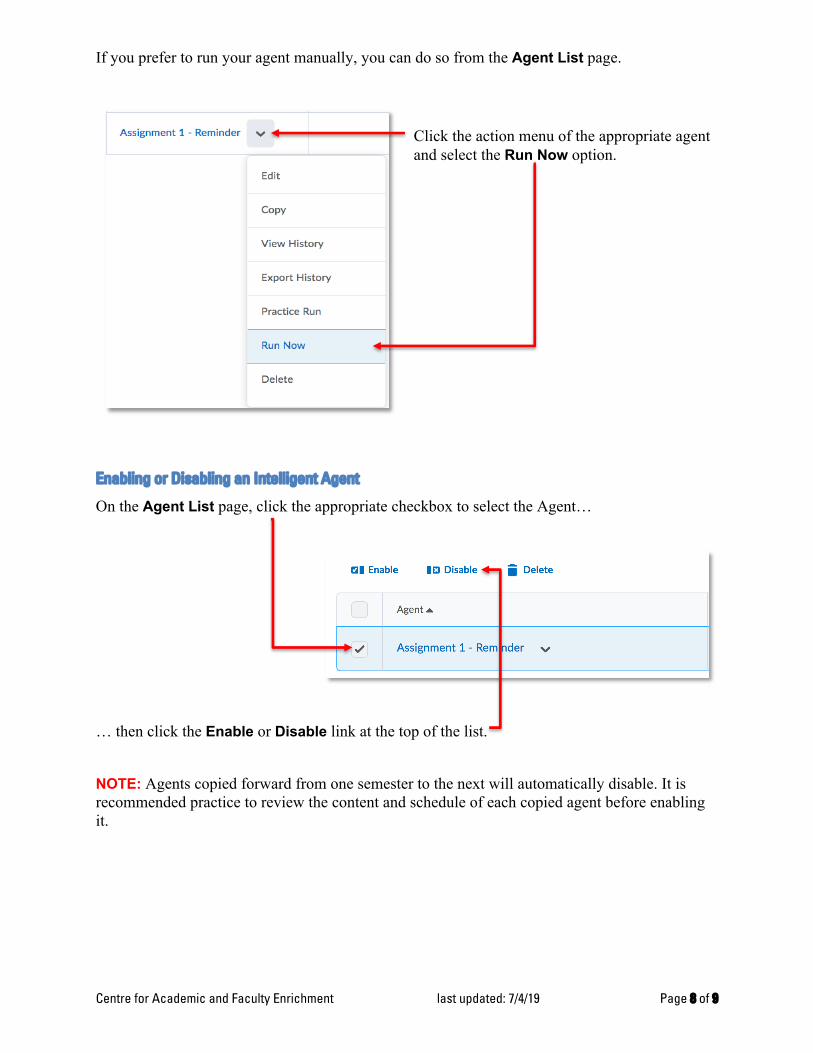
If you prefer to run your agent manually, you can do so from the Agent List page.
Click the action menu of the appropriate agent and select the Run Now option.
Enabling or Disabling an Intelligent Agent
On the Agent List page, click the appropriate checkbox to select the Agent…
… then click the Enable or Disable link at the top of the list. NOTE: Agents copied forward from one semester to the next will automatically disable. It is recommended practice to review the content and schedule of each copied agent before enabling it.
Centre for Academic and Faculty Enrichment last updated: 7/4/19 Page 9 of 9
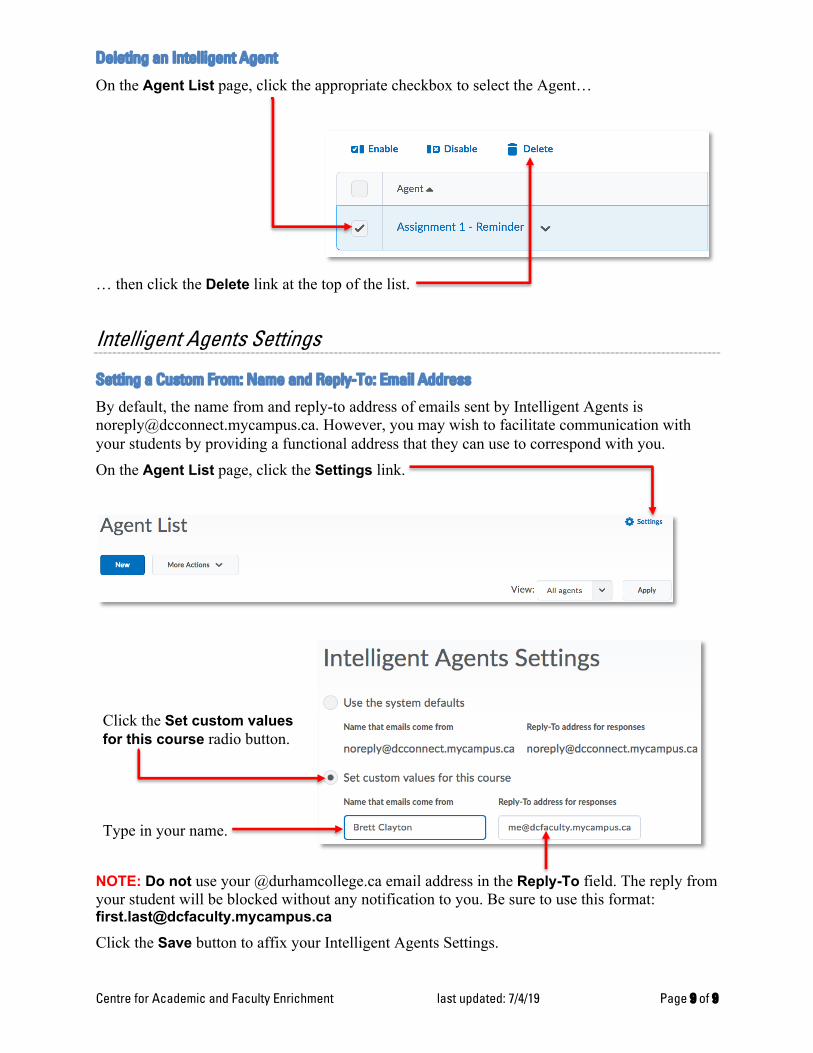
Deleting an Intelligent Agent
On the Agent List page, click the appropriate checkbox to select the Agent…
… then click the Delete link at the top of the list.
Intelligent Agents Settings
Setting a Custom From: Name and Reply-To: Email Address
By default, the name from and reply-to address of emails sent by Intelligent Agents is [email protected]. However, you may wish to facilitate communication with your students by providing a functional address that they can use to correspond with you. On the Agent List page, click the Settings link.
Click the Set custom values for this course radio button. Type in your name.
NOTE: Do not use your @durhamcollege.ca email address in the Reply-To field. The reply from your student will be blocked without any notification to you. Be sure to use this format: [email protected]
Click the Save button to affix your Intelligent Agents Settings.