universal latent workstation (ulw) version 6.4.1 ... · universal latent workstation (ulw) version...
TRANSCRIPT
U. S. Department of Justice
Federal Bureau of Investigation
Criminal Justice Information Services Division
Universal Latent Workstation (ULW)
Version 6.4.1 Supplemental Instructions
October 2015
Prepared by:
Federal Bureau of Investigation
Criminal Justice Information Services Division

2
Contents
ULW INSTRUCTIONS:
1. Comparison Tool Displays Incorrect First Candidate Image ....................................... 3
2. Enable NGI Functionality ............................................................................................ 3
3. Lost Setting Instructions for ULW ............................................................................... 4
4. Request Features Record Errors ................................................................................... 5
5. E0002 ERRL ................................................................................................................ 6
6. L0013 ERRL - A general logic error was detected that is not currently defined......... 7
7. L0014 - ULD failure when submitting Cloned Searches ............................................. 7
8. R0002 ERRL - Deployed NGI Latent Friction Ridge (LFR) system limitations that could
fail ....................................................................................................................................... 8
9. IRR & ULM Fingers display out of order in Latent Editor ......................................... 8
10. Display Name of Designated Repository (NDR = 2.098) ........................................... 9
11. Opening Unsolved Latent Match (ULM) Files via Transaction Manager ................. 10
12. Opening Unsolved Latent Match (ULM) Files without Transaction Manager.......... 12
13. Printing from within Comparison Tool ...................................................................... 13
14. IRQ Resolutions ......................................................................................................... 13
NGI INFORMATION:
15. File Penetration Settings ............................................................................................ 16
16. Finger Position - Search and/or Add to ULF - “Unknown Finger” Defaulted .......... 16
17. More candidates than requested – SRL Response ..................................................... 16
18. Unknown Friction Ridge – Response ........................................................................ 16
19. Supplemental Searches............................................................................................... 17
20. Region of Interest - Minimum and Maximum Size ................................................... 17
21. Legacy Civil Record IRQ Failure .............................................................................. 18
22. ULM Notification Issues ............................................................................................ 18
23. Invalid Image Resolution ........................................................................................... 18
24. Grey, Blank, or Black Images .................................................................................... 19
25. Misaligned Minutiae .................................................................................................. 20
26. Direct Latent Connect users not receiving latent response messages ........................ 20

3
ULW INSTRUCTIONS
1. Comparison Tool Displays Incorrect First Candidate Image
In Comparison Tool (CT), there are random times when the first image displayed in the right-
side candidate window list is not the tenprint image that belongs to that UCN candidate
highlighted. This could inadvertently lead to an erroneous decision.
Workaround:
A. Ensure the candidate list in CT is sorted by rank.
B. For each SRL, the examiner must force CT to "refresh" itself by clicking on a
different candidate (e.g., candidate #2) and then re-selecting candidate #1. After doing
so, the correct candidate #1 image will always be displayed thereafter. Additionally,
users may consider implementing policy whereby the second candidate is always
selected and/or compared prior to the first candidate.
NOTE: This behavior has only been observed when opening comparisons in CT via the
Transaction Manager (TM).
2. Enable NGI Functionality
The following four requirements must be met prior to the FBI enabling your ORI for Next
Generation Identification (NGI) Increment 3 functionality:
1. EBTS version 9.3 plus errata (or greater) compliance - additional EBTS fields are
returned with the NGI latent responses (e.g., 2.2033 CNL field). NOTE: Agencies
updating their information technology infrastructure or transitioning from older
EFTS/EBTS standards are always encouraged to program to the most current EBTS
version available.
2. ORI Authorization - if you are a Direct Latent Connectivity (DLC) agency, the FBI
will enable your specific ORI. If you’re not a DLC agency, the FBI must enable your
conduit’s ORI.
3. Type-15 image capable - ability to handle any transaction containing palms.
4. 50MB incoming email file size - NGI responses are much larger than the average
IAFIS 2MB responses, therefore, your agency’s mail management system should be
able to accept 50MB minimum per file/message.
----------------------------------------
4
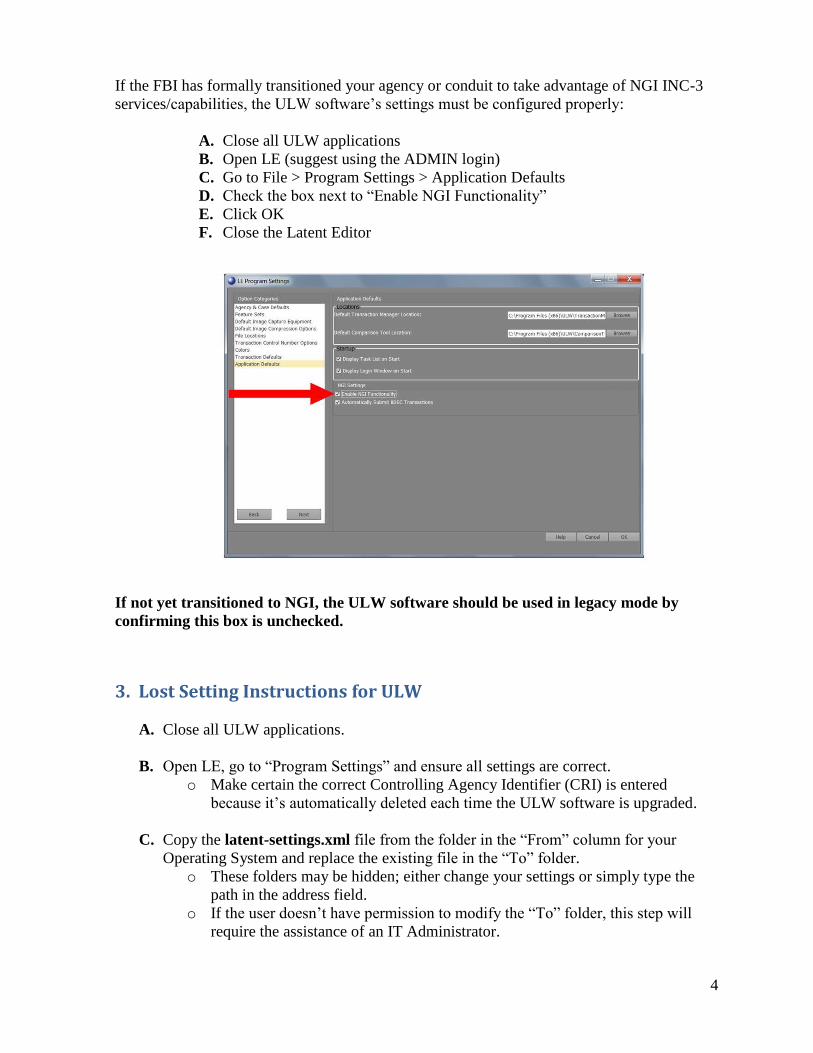
If the FBI has formally transitioned your agency or conduit to take advantage of NGI INC-3
services/capabilities, the ULW software’s settings must be configured properly:
A. Close all ULW applications
B. Open LE (suggest using the ADMIN login)
C. Go to File > Program Settings > Application Defaults
D. Check the box next to “Enable NGI Functionality”
E. Click OK
F. Close the Latent Editor
If not yet transitioned to NGI, the ULW software should be used in legacy mode by
confirming this box is unchecked.
3. Lost Setting Instructions for ULW
A. Close all ULW applications.
B. Open LE, go to “Program Settings” and ensure all settings are correct.
o Make certain the correct Controlling Agency Identifier (CRI) is entered
because it’s automatically deleted each time the ULW software is upgraded.
C. Copy the latent-settings.xml file from the folder in the “From” column for your
Operating System and replace the existing file in the “To” folder.
o These folders may be hidden; either change your settings or simply type the
path in the address field.
o If the user doesn’t have permission to modify the “To” folder, this step will
require the assistance of an IT Administrator.

5
Windows From To XP C:\Documents and Settings\<windowsloginid>\Local
Settings\Application Data\ULW\ LatentEditor\ C:\program files\ULW\
7
Vista
8
C:\Users\<windowsloginid>\AppData\Local\ULW\
LatentEditor\
(64 bit) C:\program files (x86)\ULW\
OR
(32 it) C:\program files\ULW\
D. After the user performs the above step, their default settings will be specific to that
organization/user so when ULW reloads the settings file (in those rare cases), it will be
loading the values specific to the organization/user.
E. If users are also losing settings from CT and TM, please contact
< [email protected] > for assistance.
4. Request Features Record Errors
If users select the 2.095 RFR option on distal submissions, they may receive the following
Latent Transaction Errors (ERRLs) or receive error messages upon opening responses in the
ULW.
ERRLs:
L0013 ERRL - A general logic error was detected that is not currently defined
R0002 ERRL - Deployed NGI Latent Friction Ridge (LFR) system limitations that
could fail (Internal Segment Error)
Error Messages when opening responses in the ULW:
Latent Editor: “Number of minutiae and fingerprint image records
do not correspond; cannot save”
Comparison Tool: “Failed to open EftsFile: [path to file] for the
following reason: Failed to open “EbtsFile: [path to file]”
Comparison Tool: Opens the CT but there is no information and the image
blocks are grey.
Incoming Folder: The transaction may fail to automatically import
into the TM. To verify this is the issue, double-click
on the file. You will receive one of the responses above.

6
Workaround:
Users should uncheck the Request Features Record (2.095 RFR) and resubmit the
transaction. If using ULW v 6.3.6, before submitting, the RFR should be unchecked
for each transaction.
o LE - Text Fields 2.095
o TM - File Penetration Tool
Settings: in ULW v6.4.1, the RFR option can be set to “Never” within the LE
Program Settings > Transaction Defaults.
When performing latent searches using any palm FGP, including “Unknown” codes
18 and 20, the Request Features Record (2.095 RFR) box should always be
unchecked.
If you continue to receive error messages after 2.095 RFR has been unchecked, please
contact < [email protected] > for assistance.
5. E0002 ERRL
“Element T4_FGP with value of 20 contains invalid data”
If the user wants to search NGI palms, one of the following workarounds can be
used (NOTE: When performing latent searches using any palm FGP, including
“Unknown” codes 18 and 20, the Request Features Record (2.095 RFR) box
should always be unchecked).
o Record must be changed from Type-4 to Type-13
o If the original image (e.g., bmp, tif, or jpg) is still available, create a
completely new Type-13 file to search NGI palms
o If the original image cannot be located, a completely new Type-13 file must be
created from the original Type-4 image. The following steps can be used to
export the image embedded in the pre-existing Type-4 image file:
A. In LE, click Open/Import EBTS File button
B. Navigate to the vendor’s file
C. Click YES for Create Feature Set
D. File > Export Image > Export Original Image (or CTRL+E)
E. Save File on desktop
F. Create a new search using this image

7
“Element T9_ROI_ROP- Too many vertices, more than 99 vertices”
Workaround: Redraw the ROI but let go of the mouse button while the mouse is
still ON the image. By doing this, ULW will reduce the ROI to 99 vertices (i.e.,
corners or intersections of a geometric shape). Resubmit the transaction.
6. L0013 ERRL - A general logic error was detected that is not currently defined
It is recommended that when this message is returned, please:
Make certain the Request Features Record (2.095 RFR) box is not checked in the
search file.
Examine the submitted image’s size. If the image size does not meet required
minimums, it is recommended adding white space and resubmitting to NGI.
o LFFS: Minimum sizes are 384 pixels x 384 pixels for 1000 ppi and 192 pixels
x 192 pixels for 500 ppi
o LFIS: minimum sizes are 250 pixels x 250 pixels for 1000 ppi and 125 pixels
x 125 pixels for 500 ppi
If the same message is received a second time, please report the error to the Latent and
Forensic Support Unit < [email protected] > for additional research.
7. L0014 - ULD failure when submitting Cloned Searches
“Cannot perform the ULF delete request for ContributorCaseIdentificationData
[……] because the subject is not present in the ULF.”
To pass NGI validation, the Contributor Case Identifier Extension (2.011 CIX) value
of the Unsolved Latent Delete (ULD) must match the CIX value of the Unsolved
Latent File (ULF) deposit. When it does not exactly match, the ULD fails.
Workarounds:
If you receive an error message for your ULD, generate the ULD from the cloned file
as usual, open the ULD file in LE, change the CIX in the ULD to mirror the CIX in
the cloned file (Record 2b), and submit.
or
Do not add a cloned search file to the ULF. Instead, use the original search to deposit
into the ULF.

8
8. R0002 ERRL - Deployed NGI Latent Friction Ridge (LFR) system limitations that could fail
Users should ensure submission values for Native Scanning Resolution (1.011 NSR) and
Nominal Transmitting Resolution (1.012 NTR) match. If not, errors will be returned.
Workaround:
A. If transaction fails, a new transaction will need to be created
B. Ensure image being imported is at the proper grayscale, 1:1 scale, and its resolution is
either 500 ppi or 1000 ppi
C. Import image
D. Submit as normal
9. IRR & ULM Fingers display out of order in Latent Editor
The LE will display fingers in the order in which NGI returns them - which is not always in
sequentially ascending order. There is no way to manually re-arrange the fingers in LE. See
below example:
To sort the images in ascending/descending order, users must open the Search Results-Latent
(SRL) file in CT and click on “Finger #” at the top of the column. To review a tenprint card
displaying fingers located in the proper sequential order, go to File > View Ten-Print Card.

9
10. Display Name of Designated Repository (NDR = 2.098)
For NGI enabled users, NGI will specify from which repository (e.g., criminal, civil, ULF,
etc.) a candidate was generated. This will assist NGI enabled users with distinguishing FBI
Universal Control Numbers (UCN) candidates. The NDR field will contain the repository’s
numerical designation such as:
1 - Criminal Repository
2 - Civil Repository
3 - ULF Repository
etc.
Transaction Manager:
A. Click the “SRL Preview” tab
B. Right click in one of the headers in the candidate list and select “Show Column
Chooser” from the list
C. Select “Repository Name” in the Column Chooser window, drag it to the header area
of the data grid, and release the mouse to place it
Latent Editor:
A. Make sure the SRL window is active (selected)
B. Click on the “Text Fields” tab
C. Select “Rec 02, 1: Subject Description”
D. Scroll down to “Name of Designated Repository”
or
A. Make sure the SRL window is active (selected)
B. Click on the “File” tab
C. Click on “Summary Output”
D. Scroll down to find the NDR value (NDR can be located within the Candidate
Investigative List [CNL = 2.2033] as subfield “I”)
Comparison Tool:
A. Right click in one of the headers in the candidate list and select “Column Chooser”
from the list
B. Select “NDR” in the Column Chooser window, drag it to the header area of the data
grid, and release the mouse to place it
ULM notification responses will not provide NDR feedback; therefore, users are encouraged
to contact the Latent and Forensic Support Unit < [email protected] > for assistance.
10
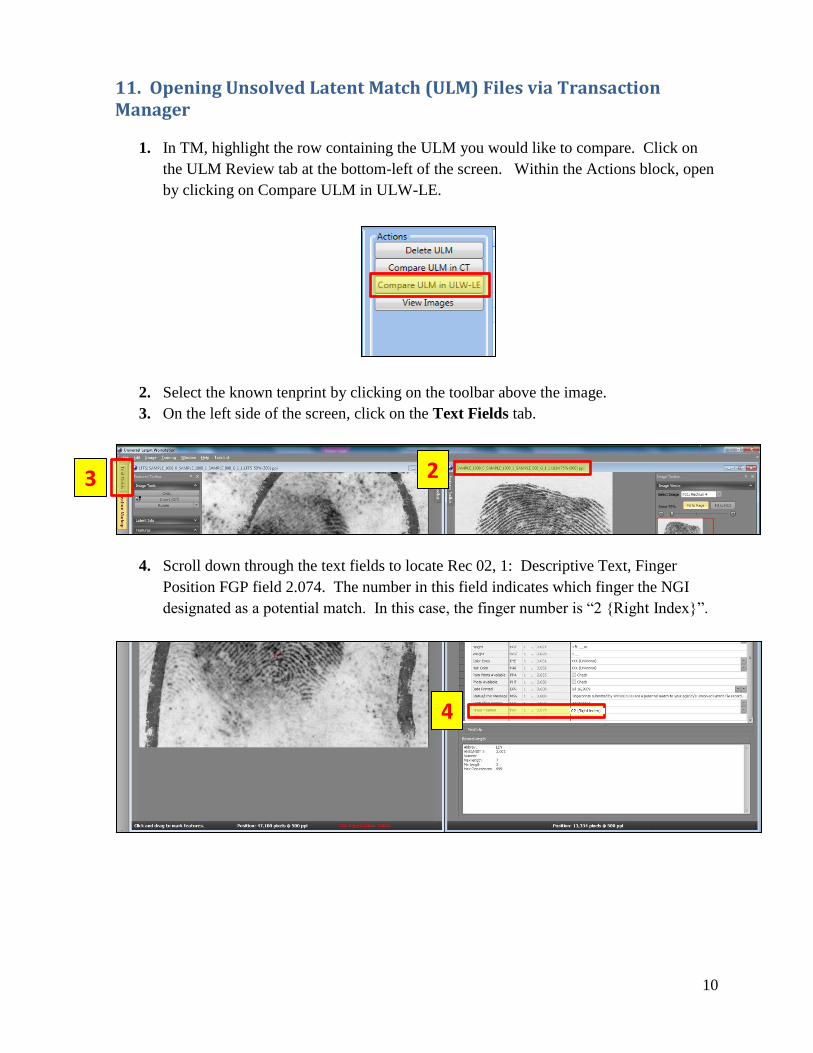
11. Opening Unsolved Latent Match (ULM) Files via Transaction Manager
1. In TM, highlight the row containing the ULM you would like to compare. Click on
the ULM Review tab at the bottom-left of the screen. Within the Actions block, open
by clicking on Compare ULM in ULW-LE.
2. Select the known tenprint by clicking on the toolbar above the image.
3. On the left side of the screen, click on the Text Fields tab.
4. Scroll down through the text fields to locate Rec 02, 1: Descriptive Text, Finger
Position FGP field 2.074. The number in this field indicates which finger the NGI
designated as a potential match. In this case, the finger number is “2 {Right Index}”.
2 3
4

11
5. Select Feature Markup on the left side of the screen to display the tenprint image
again.
6. Click on the Image Toolbar Tab to the right to expand the Image Toolbar. From the
drop down next to “Select Image” in Image Viewer, select the finger number
displayed in the FGP field 2.074.
7. Once the correct finger is displayed, the examiner can begin their comparison.
*NOTE* NGI does not always return a tenprint card’s fingers in numerical order. For
instance, in the below Latent Editor example, finger #2 is third on the list. The examiner must
ensure they’re choosing the correct finger number from the list.
5
6
12
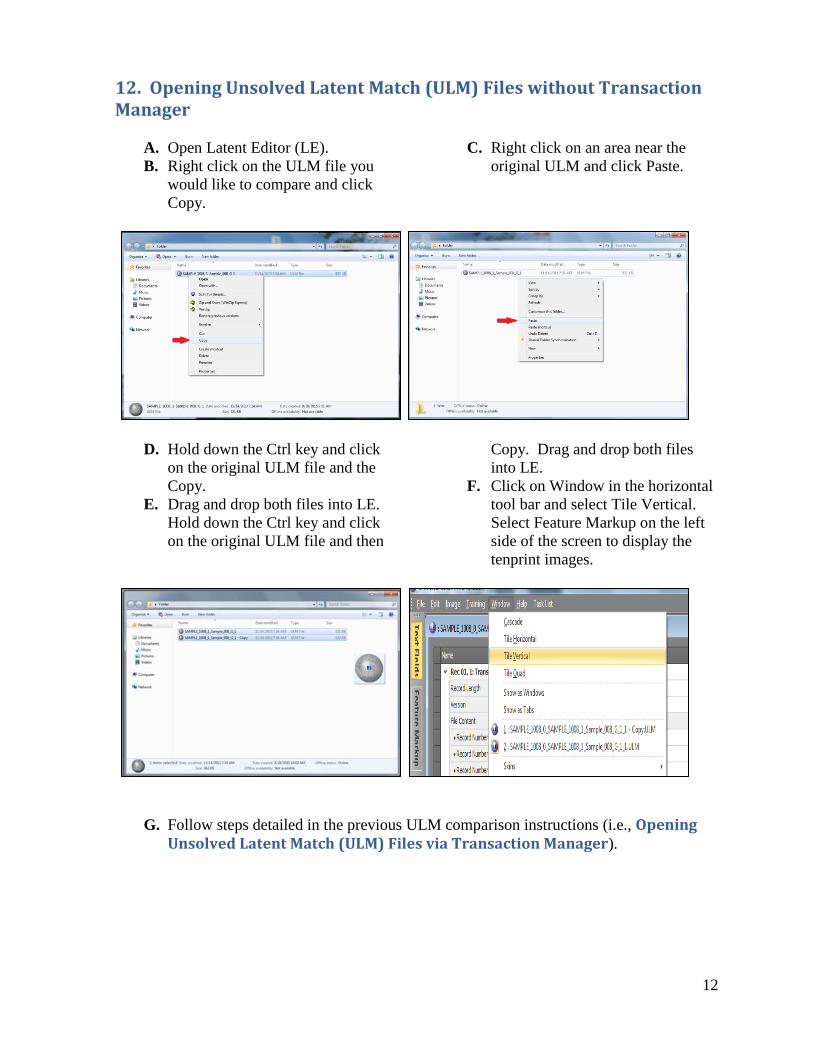
12. Opening Unsolved Latent Match (ULM) Files without Transaction Manager
A. Open Latent Editor (LE).
B. Right click on the ULM file you
would like to compare and click
Copy.
C. Right click on an area near the
original ULM and click Paste.
D. Hold down the Ctrl key and click
on the original ULM file and the
Copy.
E. Drag and drop both files into LE.
Hold down the Ctrl key and click
on the original ULM file and then
Copy. Drag and drop both files
into LE.
F. Click on Window in the horizontal
tool bar and select Tile Vertical.
Select Feature Markup on the left
side of the screen to display the
tenprint images.
G. Follow steps detailed in the previous ULM comparison instructions (i.e., Opening Unsolved Latent Match (ULM) Files via Transaction Manager).

13
13. Printing from within Comparison Tool
When printing from CT, users have experienced an issue whereby the top 1/8 inch or more of
the page is cut off - sometimes also including the Case ID number.
Workaround:
The size of the printed image can be modified by selecting “File” > “Print Preview” >
“Scale” (7th
from the left on the toolbar) > decrease the “Adjust To” to approximately
90% (+/-).
From “Print Preview”, export as a PDF to the desktop. Open the PDF and print.
14. IRQ Resolutions
At this time, Image Request Responses (IRRs) may not return for Image Retrieval
Requests (IRQs) that have Request Features Record (2.095 RFR) checked. If you
received an Image Summary Response (ISR) and no IRR, you need to uncheck RFR
and resubmit.
If you requested palmprints, but received tenprints in your IRR, you need to change
the Image Type to 3-Palmprint.
A. Locate the transaction and select the appropriate Edit button
If associated with a case: If not associated with a case:
14
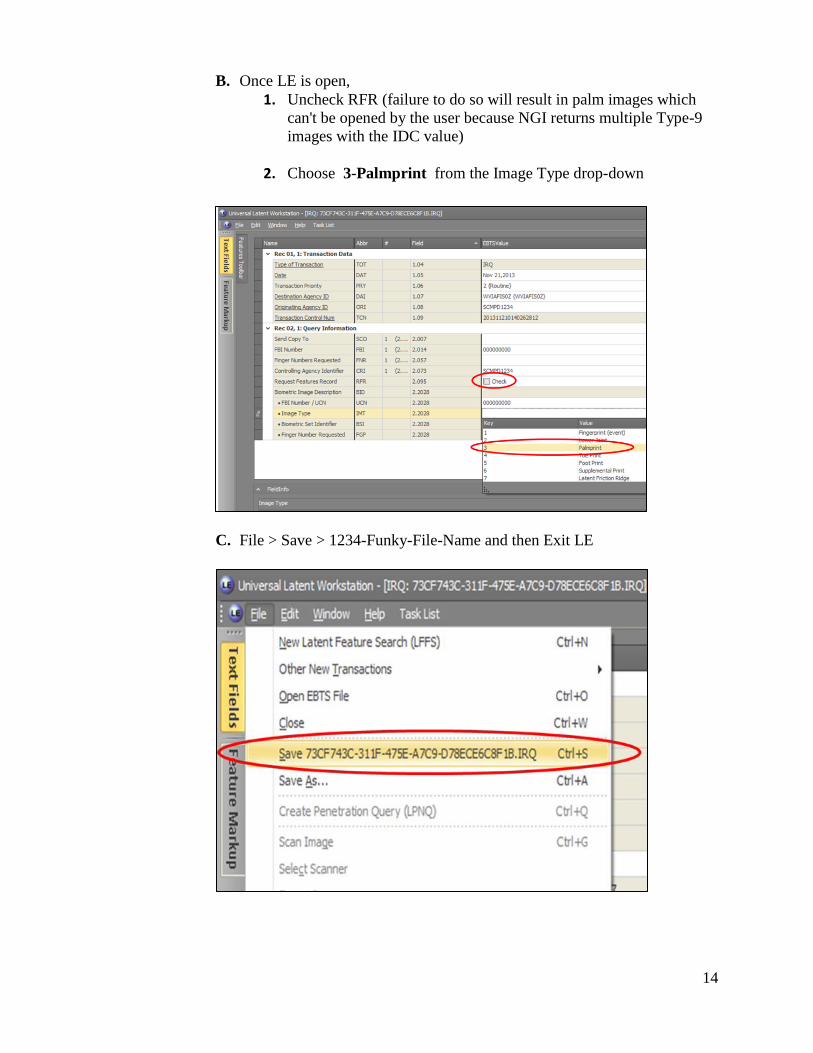
B. Once LE is open,
1. Uncheck RFR (failure to do so will result in palm images which
can't be opened by the user because NGI returns multiple Type-9
images with the IDC value)
2. Choose 3-Palmprint from the Image Type drop-down
C. File > Save > 1234-Funky-File-Name and then Exit LE

15
D. Click the appropriate Submit Button
If associated with a case: If not associated with a case:
E. IRQ is prepared in the Outgoing folder and is ready to be submitted to
NGI via your agency’s standard method of connectivity

16
NGI INFORMATION
15. File Penetration Settings
With NGI, stringent file penetration thresholds are no longer a requirement; however,
penetration rates of 50% or less are recommended. This will decrease NGI response times by
minimizing system resource demands and increase accuracy by reducing the size of the
search gallery.
NOTE: When a user enters a palm submission, the penetration rate remains at 100%. Please
be advised that this is not an error as, currently, penetration rates are unavailable for the
National Palm Print System (NPPS).
16. Finger Position - Search and/or Add to ULF - “Unknown Finger” Defaulted
In the ULW’s File Penetration Tool, the Finger Position of “Unknown Finger” is selected by
default.
If you wish to search and/or deposit to the ULF as a palm value only, open the Finger Tab
and uncheck “Unknown Finger”.
Only for those instances when the examiner is uncertain from which portion of a hand the
latent image is from, should both “Unknown Finger” and “Unknown Palm” be selected.
17. More candidates than requested – SRL Response
The NGI will only return one image per individual UCN within a SRL. When a candidate
list contains one individual listed multiple times, you will only receive the highest ranked
image for that individual UCN. Any subsequent hits to that same individual UCN in the
candidate list will not return an image - instead, a red “X” will appear indicating an image
was not returned for that individual. If you would like to see that particular record, you may
request it from NGI by generating an IRQ using the specific Biometric Set Identifier (BSI).
18. Unknown Friction Ridge – Response
Within the NGI, friction ridges are divided into three types: tenprints, upper palms, and
lower palms. When a user searches more than one type (e.g., "Unknown Friction Ridge"
[2.074 FGP = 18]) and the Number of Candidates Returned (2.079 NCR) is 20, the NGI
returns an "Unknown Friction Ridge" response consisting of 60 total candidates:
17
The first 20 candidates are tenprint
The second 20 candidates are upper palm
The final 20 candidates are lower palm (including writer’s palms)
Any time the NCR is modified, you can still expect to receive three times that number of
candidates within your "Unknown Friction Ridge" response. For example, if NCR is
changed to 10, then:
The first 10 candidates are tenprint
The second 10 candidates are upper palm
The final 10 candidates are lower palm (including writer’s palms)
19. Supplemental Searches
Users should submit searches of the upper palms (2.074 FGP = 26 “Right Upper Palm”
and/or 2.074 FGP = 28 “Left Upper Palm”) when searching finger segments.
20. Region of Interest - Minimum and Maximum Size
Latent Friction Ridge Features Search (LFFS) features searches require that a Region of
Interest (ROI) be designated. When the submitted ROI is too large, the NGI will return an
SRL without images. Users should be aware of the following NGI system design minimum
and maximum limitations:
The maximum ROI for a finger is 1.2" x 1.2". This equates to 600 pixels x 600 pixels
@ 500 ppi, or 1200 pixels x 1200 pixels @ 1000 ppi
The maximum ROI for a palm is 4.8" x 4.8". This equates to 2400 pixels x 2400
pixels @ 500 ppi, or 4800 pixels x 4800 pixels @ 1000 ppi
The minimum ROI for both finger and palm images is .384" x .384". This equates to
192 pixels x 192 pixels at 500 ppi, or 384 pixels x 384 pixels at 1000 ppi
Be cautious of your image size when using the “Entire Image is ROI” option. To determine
the size of your irregular ROI:
A. Click on the CROP button (but do not crop)
B. Draw a rectangle just large enough to contain the ROI
C. Look in the CROP pop-up box - the dimensions of the crop will be displayed
D. Click CANCEL

18
21. Legacy Civil Record IRQ Failure
Legacy civil record image requests (i.e., IRQs) using “V” numbers will fail to return Image
Request Responses (IRRs). Users should report the error to the Latent and Forensic Support
Unit < [email protected] > who will then provide the Civil Record’s new Universal Control
Number (UCN). IRQs using the new UCN should successfully return the IRR.
Additionally, IRRs will not return the subject’s biographic data. You can obtain this
information by contacting the Latent and Forensic Support Unit < [email protected] >
22. ULM Notification Issues
An Unsolved Latent Match (ULM) notification is sent to the owner of an unsolved latent
record when newly submitted criminal, civil, or latent friction ridge searches match the
unsolved latent case image.
If you deposit in the ULF, but have never received a ULM notification, please contact the
Latent and Forensic Support Unit < [email protected] > for assistance.
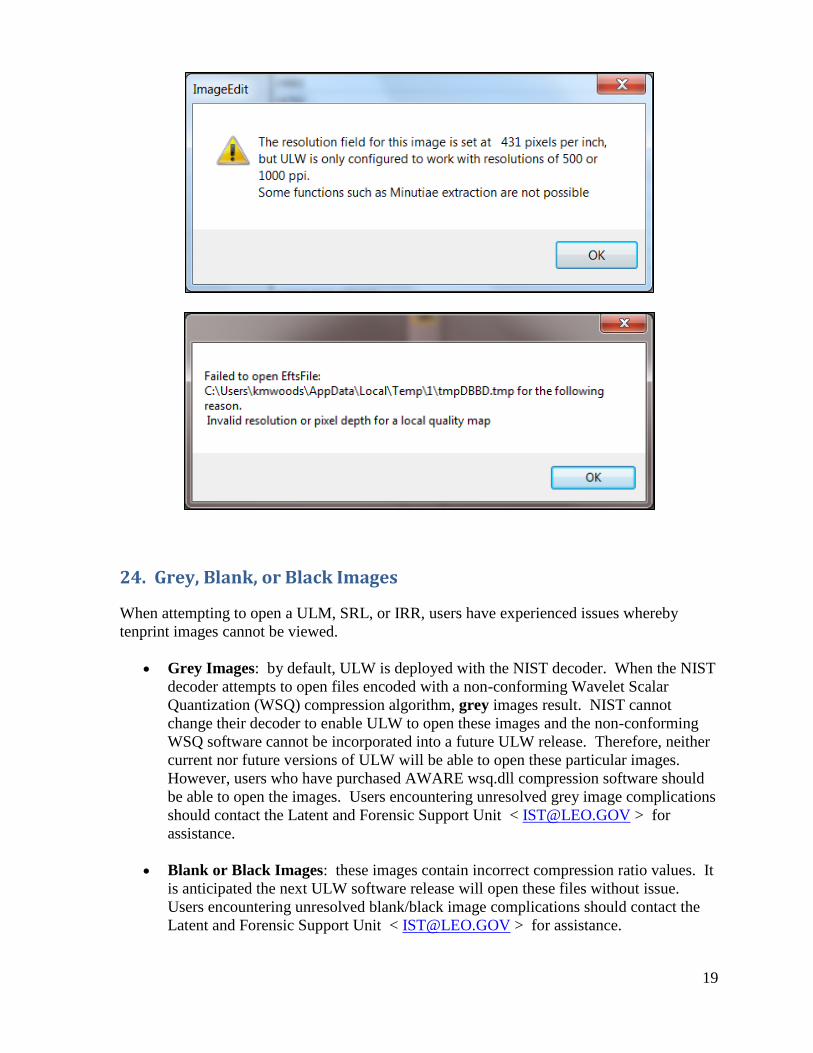
23. Invalid Image Resolution
All of the error messages shown below have been associated with invalid candidate image
resolutions returned in SRLs and IRRs. At this time, the images can be viewed in the
Transaction Manager using View Images and in the Latent Editor (with a pop-up displayed
for every image noting the error). The SRL images cannot be viewed in CT; however, as a
workaround, users can submit an IRQ for the candidate UCN and then use the IRR in the CT
for comparison purposes. See examples below:
19
24. Grey, Blank, or Black Images
When attempting to open a ULM, SRL, or IRR, users have experienced issues whereby
tenprint images cannot be viewed.
Grey Images: by default, ULW is deployed with the NIST decoder. When the NIST
decoder attempts to open files encoded with a non-conforming Wavelet Scalar
Quantization (WSQ) compression algorithm, grey images result. NIST cannot
change their decoder to enable ULW to open these images and the non-conforming
WSQ software cannot be incorporated into a future ULW release. Therefore, neither
current nor future versions of ULW will be able to open these particular images.
However, users who have purchased AWARE wsq.dll compression software should
be able to open the images. Users encountering unresolved grey image complications
should contact the Latent and Forensic Support Unit < [email protected] > for
assistance.
Blank or Black Images: these images contain incorrect compression ratio values. It
is anticipated the next ULW software release will open these files without issue.
Users encountering unresolved blank/black image complications should contact the
Latent and Forensic Support Unit < [email protected] > for assistance.

20
25. Misaligned Minutiae
Instances of misaligned minutiae have been observed in some SRL’s when features are
requested (2.095 RFR = yes). It has been determined that this is an issue resulting from
incorrect Type-1 NSR/NTR compression information being associated with that specific
candidate. When the actual resolution of the image is not accurate, precisely overlaying the
features returned is impossible since the offsets to the minutiae locations are based on the
resolution of the image returned (see example below). Please report the FBI/UCN numbers
of these misaligned minutiae candidates to the Latent and Forensic Support Unit
< [email protected] >.
26. Direct Latent Connect users not receiving latent response messages
Please be cognizant of your Law Enforcement Online (LEO) email capacity as it will
prevent the receipt of NGI latent response messages if you are using Direct Latent
Connect (DLC).
When the incoming LEO mailbox exceeds the 300MB maximum capacity quota, LEO
provides a limited grace period by queueing email for seven days. If the mailbox size is
reduced within that time period, the queued mail will be delivered. After day seven, any
additional emails will not be queued or delivered to the intended recipient. Instead, a failed
delivery message, including the queued email, will be returned to the original sender
indicating a failed email delivery attempt.
To correct, delete any unnecessary items in both the inbox and sent mailbox and, finally,
empty the LEO trash.