universal reprogrammer ii+ user guide v2€¦ · 4. once the setup application has finished,...
TRANSCRIPT

Universal Reprogrammer II+ Quick Start Guide

PLEASE NOTE Universal Reprogrammer II+ interfaces have been carefully designed and tested to comply with OBDII protocols.
However, some vehicle models are not in full compliance with these protocols for various reasons. In addition, the
computer control systems or sensors on any given vehicle may be malfunctioning or out of specification.
While EASE Diagnostics’s testing and the experiences of thousands of Universal Reprogrammer II+ users have
shown the unit to be safe and reliable, there is an inherent risk in using any product that may potentially affect the
operation or drive-ability of your vehicle.
If you are concerned about the operation of your vehicle at any time while using Universal Reprogrammer II+:
* Pull off the roadway immediately or as soon as it is safe to do so.
* Disconnect the Universal Reprogrammer II+ from the OBDII port.
* Consult a licensed mechanic or automobile service center.
Please report any issues or concerns to our Technical Support Department at 570-587-7082. We are open Monday
through Friday, 9:00 a.m. to 5:30 p.m. Eastern Time. We maintain an active database of the feedback we receive,
and your comments can help us continuously improve the product.
COPYRIGHT & TRADEMARKS Copyright 1999-2015 EASE Diagnostics, Inc., All Rights Reserved. MongoosePro, CarDAQ, ScanDAQ, IMclean,
IMready and J2534 ToolBox are registered trademarks of EASE Diagnostics, Inc. All other trademarks and brand
names are the property of their respective owners.
LIMITED WARRANTY EASE Diagnostics, Inc. guarantees that every Universal Reprogrammer II+ is free from physical defects in material
and workmanship under normal use for one year from the date of purchase.
IN NO EVENT SHALL EASE DIAGNOSTICS, INC.'S LIABILITY EXCEED THE PRICE PAID FOR THE PRODUCT. EASE
DIAGNOSTICS SHALL BE EXEMPT FROM ALL OTHER CLAIMS WHETHER BASED UPON DIRECT, INDIRECT, SPECIAL,
INCIDENTAL, OR CONSEQUENTIAL DAMAGES RESULTING FROM THE USE OF THE PRODUCT, ITS ACCOMPANYING
SOFTWARE, OR ITS DOCUMENTATION. EASE Diagnostics, Inc. makes no warranty or representation, expressed,
implied, or statutory, with respect to its products or the contents or use of this documentation and all
accompanying software, and specifically disclaims its quality, performance, merchantability, or fitness for any
particular purpose. EASE Diagnostics, Inc. reserves the right to revise or update its products, software, or
documentation without obligation to notify any individual or entity. Please direct all inquiries to:
EASE Diagnostics, Inc.
187 Commerce Drive
Scott Township, PA 18447 USA
FCC Statement The wireless module has been tested and found to comply with the FCC part 15 and IC RSS-210 rules. These limits
are designed to provide reasonable protection against harmful interference in approved installations. This
equipment generates, uses, and can radiate radio frequency energy and, if not installed and used in accordance
with the instructions, may cause harmful interference to radio communications. However, there is no guarantee
that interference may not occur in a particular installation. This device complies with part 15 of the FCC rules.
Operation is subject to the following two conditions: (1) this device may not cause harmful interference, and (2)
this device must accept any interference received, including interference that may cause undesired operation.
Modifications or changes to this equipment not expressly approved by the part responsible for compliance may
render void the user’s authority to operate this equipment.
Modular Approval, FCC and IC
FCC ID: X3ZBTMOD3
IC: 8828A-MOD3
In accordance with FCC part 15, the SPT2632C1A.AT2 is listed above as a modular transmitter device
Contents
Contents
PLEASE NOTE ............................................................................................................................... 2
COPYRIGHT & TRADEMARKS ............................................................................................ 2
LIMITED WARRANTY ............................................................................................................. 2
FCC Statement ............................................................................................................................. 2
Contents ...................................................................................................................................... 3
Introduction................................................................................................................................. 4
Get to know Universal Reprogrammer II+ .................................................................................. 4
Driver installation ........................................................................................................................ 5
J2534 Toolbox 3 ........................................................................................................................... 9
DrewTech Tech2Win Driver ...................................................................................................... 12
Specifications............................................................................................................................. 13
Technical Support ...................................................................................................................... 14

Introduction Thank you for choosing Universal Reprogrammer II+! Universal Reprogrammer II+ will allow you to re-flash modern vehicle controllers to stock as well as perform dealer level diagnostics on select manufacturer’s vehicles. This Quick Start Guide covers the initial setup, features, and common questions. This manual is always available at http://www.obd2.com. Information for individual manufacturers can be found in the J2534 Toolbox 3 application.
Get to know Universal Reprogrammer II+ Power Protocol Connection Vehicle Cable USB Cable USB Cable Port
Auxiliary Programming Voltage Vehicle Cable Connection
LED Status lights:
Solid Red Blinking Red Solid Green Blinking Green
Power - Firmware error-Call
Tech Support
Device Startup In
progress
Device is Functioning
Protocol - - Connected to
Vehicle
Connected & communicating with
Vehicle
Vehicle Cable Cable Not
connected or
Cable error
- Cable Ok and
Vehicle power
detected.
-
USB Cable Install issue-
Call Tech
Support
- Connected to PC. -

Driver installation 1. Insert the CD included with your Universal Reprogrammer II+ into your PC. You will need to
have an internet connection to get the latest drivers. If your PC does not have a Disk Drive,
please go to http://www.obd2.com/ to get the Universal Reprogrammer II+ Installer.
2. Run the Setup application, check the box next to “I accept the terms…” and click install.
3. The Setup application will install the Universal Reprogrammer II+ Drivers, the J2534 Toolbox 3
and the Tech2Win driver on your PC.
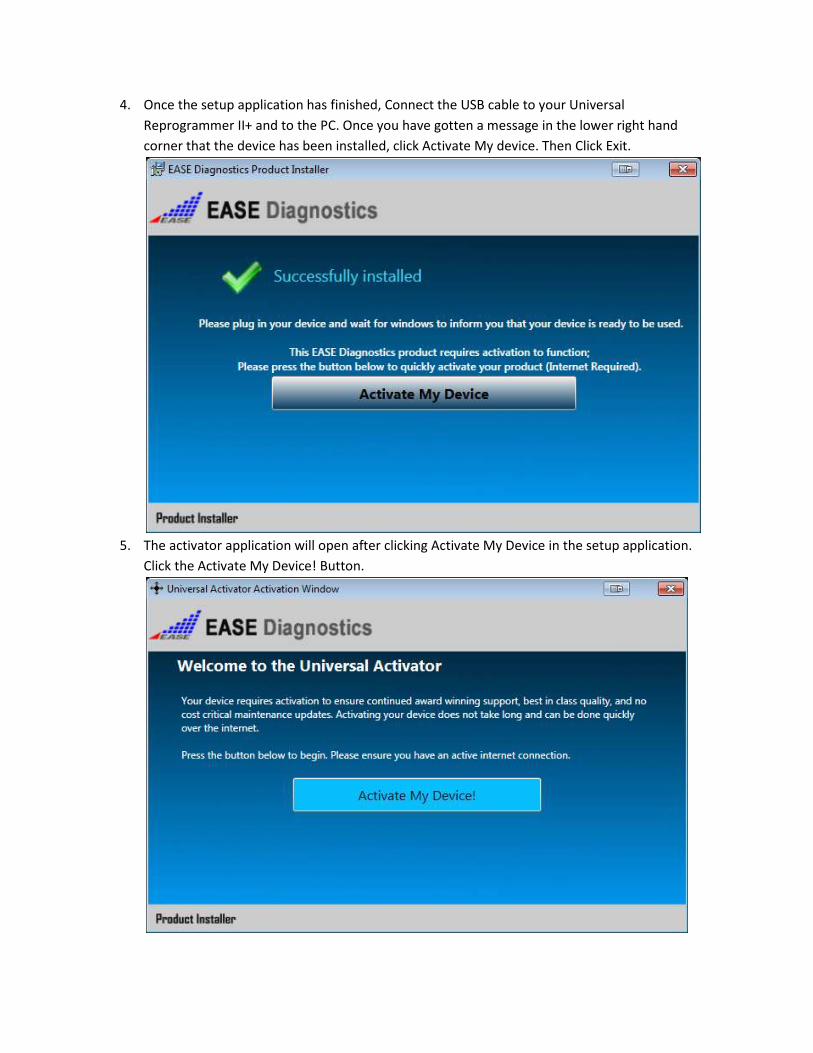
4. Once the setup application has finished, Connect the USB cable to your Universal
Reprogrammer II+ and to the PC. Once you have gotten a message in the lower right hand
corner that the device has been installed, click Activate My device. Then Click Exit.
5. The activator application will open after clicking Activate My Device in the setup application.
Click the Activate My Device! Button.

6. Select the interface you want to activate and click Continue.
7. Enter your information and Click Continue.

8. Select your type of business and level of programming experience, then select the OEMs you are
planning to support. Click Continue once you are done.
9. Unplug your Universal Reprogrammer II+ from your PC and click OK.
10. Plug your Universal Reprogrammer II+ back into your PC, and click OK.

11. Your device has been successfully activates, click close application.
J2534 Toolbox 3 1. Double Click the J2534 Toolbox 3 Icon on the Desktop.
2. Select your interface from the drop down and click Auto Login.

3. The Toolbox will open with 6 tabs available. The first is General, it has news, current OEM
concerns, and training broadcast invitations. The sales tab is connected to the Drew Tech
website.
4. The Diagnostics tab has basic Diagnostic functions, as well as links, information and videos about
all OEMs that currently provide Diagnostics via J2534.

5. The flashing Tab has contains the information pertaining to OEM J2534 reflashing including links,
information, walkthroughs, and some helper functions.
6. The Support tab has functions to check driver installation, vehicle communication, update your
device, create debug logs, and contact Technical Support.
7. The Training tab includes videos of installing and using OEM J2534 applications with EASE
Diagnostics products.
Tech2Win Driver The Tech2Win driver allows technicians to use the Universal Reprogrammer II+ as an interface for the
Tech2Win application. If you experience concerns, the first place you can check the status and
configuration by following the instructions below:
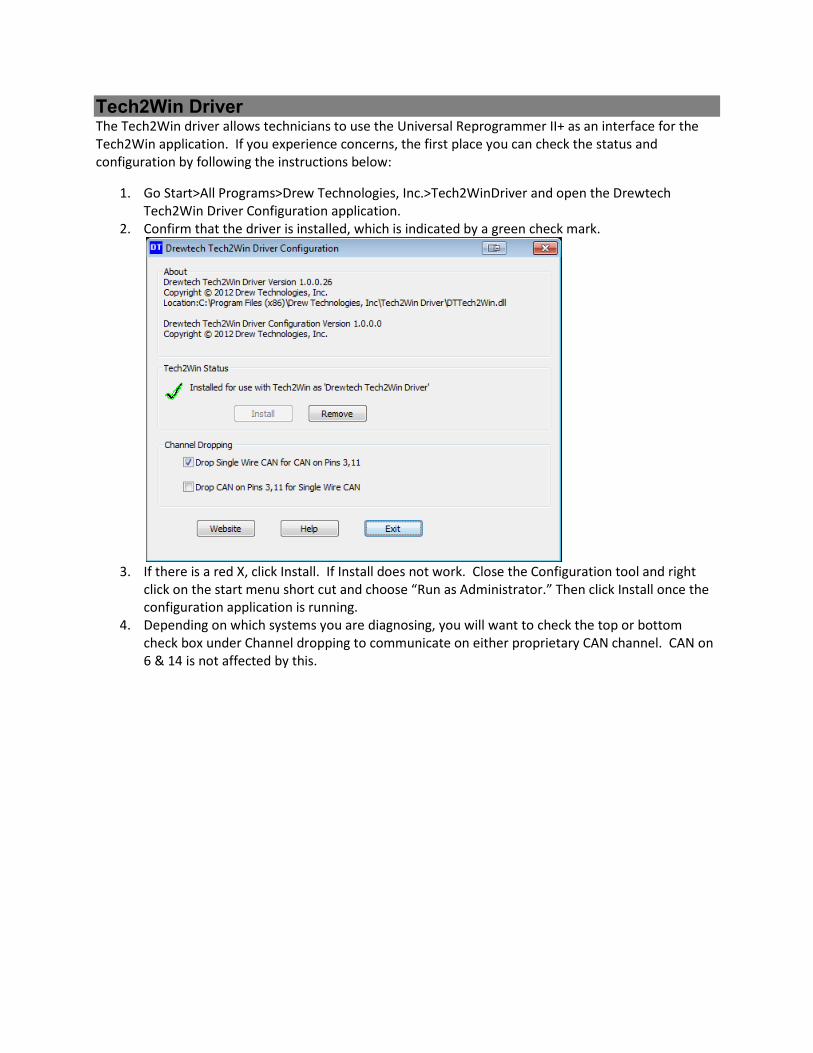
1. Go Start>All Programs>Drew Technologies, Inc.>Tech2WinDriver and open the Drewtech
Tech2Win Driver Configuration application.
2. Confirm that the driver is installed, which is indicated by a green check mark.
3. If there is a red X, click Install. If Install does not work. Close the Configuration tool and right
click on the start menu short cut and choose “Run as Administrator.” Then click Install once the
configuration application is running.
4. Depending on which systems you are diagnosing, you will want to check the top or bottom
check box under Channel dropping to communicate on either proprietary CAN channel. CAN on
6 & 14 is not affected by this.

Bluetooth If you have ordered a Bluetooth equipped Universal Reprogrammer II+, you will have an antenna and
Bluetooth USB dongle included. Ease Diagnostics supports Bluetooth Diagnostics, but will not provide
support for module programming done via Bluetooth. To setup your Universal Reprogrammer II+ to
communicate with your PC, you will need to perform several steps listed below:
1. Thread the antenna onto the gold stud labeled “Wireless” on the back faceplate of the Universal
Reprogrammer II+ between the “Aux” and “Vehicle Cable” ports.
2. Insert the USB Bluetooth Dongle into a known good USB port on your PC and allow Windows to
install the drivers for it.
3. Plug the vehicle cable into your Universal Reprogrammer II+ and a vehicle.
4. The Power LED and Car LED will be lit up Solid green. The Wireless LED is will be flashing a
different shade of green.
5. For Windows 10, skip to step 10. Windows 7, Once the driver installation reports complete,
Right click the BlueTooth icon in your system tray in the lower right corner.
6. Click Add a device.
7. Click “Universal Reprogrammer II+-######” where the ##### corresponds to the serial number
on the bottom of the case.
8. Click next.
9. Enter “2534” if prompted for the PIN code.
10. Windows 10. Once the driver installation reports complete, Right click the BlueTooth icon in
your system tray in the lower right corner.
11. Click Add a Bluetooth Device.
12. Wait until you see “Universal Reprogrammer II+-######” where ##### corresponds to the serial
number on the bottom of the case.
13. Click Pair.
14. Enter “2534” if prompted for a PIN code.
Specifications Supported Protocols
• CAN Bus (capable of ISO 15765, GMLAN, J1939, and ISO14229)
• 2nd CAN (Dual or Single Wire)
• Ford SCP (J1850PWM)
• GM Class2 (J1850VPW)
• KWP2000 (ISO9141/14230)
• Chrysler SCI (J2610)
• Compliant to SAE J2534 (Feb 2002) and SAE J2534-1 (Dec 2004)
• Compliant to ISO 22900-1 MVCI physical layer
• Programming voltage on J1962 pin 6, 9, 11, 12, 13, 14 or Aux
• Ground pin 9
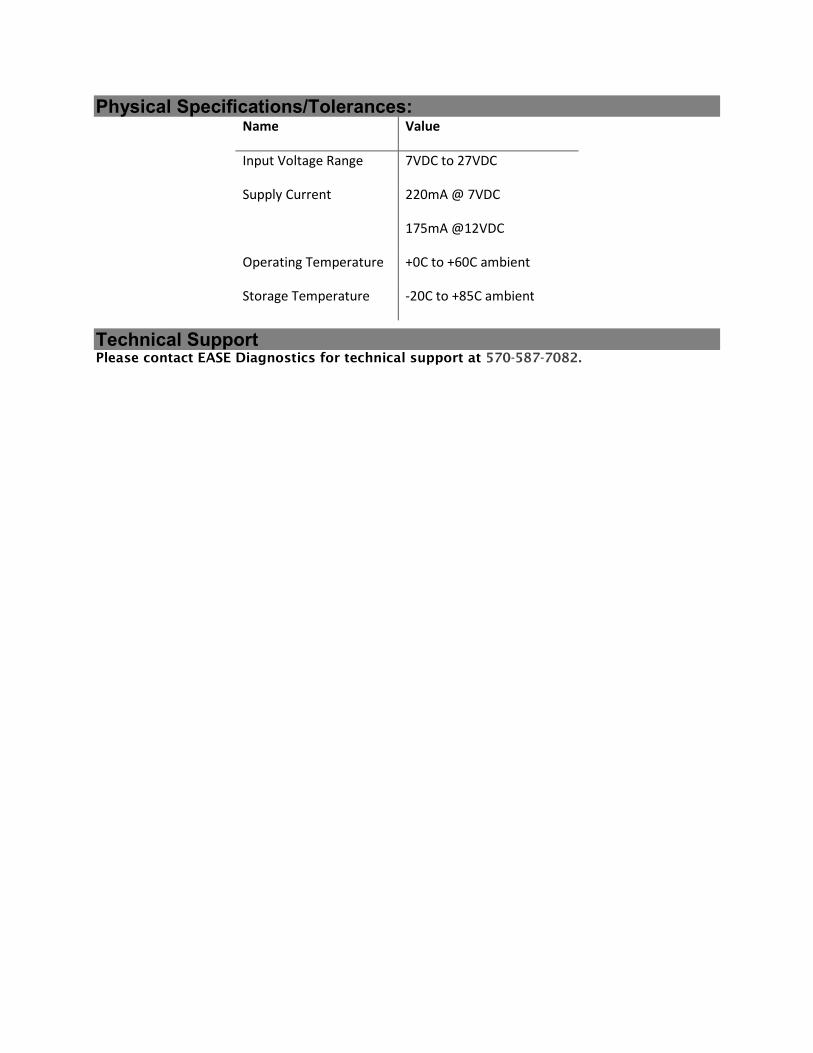
Physical Specifications/Tolerances: Name Value
Input Voltage Range 7VDC to 27VDC
Supply Current 220mA @ 7VDC
175mA @12VDC
Operating Temperature +0C to +60C ambient
Storage Temperature -20C to +85C ambient
Technical Support Please contact EASE Diagnostics for technical support at 570-587-7082.