university of british columbia cpsc 111, intro to computation jan-apr 2006 tamara munzner 1...
TRANSCRIPT

1
University of British ColumbiaCPSC 111, Intro to Computation
Jan-Apr 2006
Tamara Munzner
Graphical User Interfaces
Lecture 24, Tue Apr 4 2006
http://www.cs.ubc.ca/~tmm/courses/cpsc111-06-spr
based on slides by Kurt Eiselt

2
News
Midterm solutions going out at end of week Final batch of Assignment 2s ready to hand
back after class Assignment 3 due Friday Apr 7, 5pm Remember Wed 11am office hours, CSLC
Final exam: Mon Apr 24, 3:30pm, HEBB TH

3
Review Session
Grad TA Karen Parker will run review session before exam time not set yet, post your exam times on the
bboard thread and she'll minimize confliects check bboard later for announcement on
time/place

4
Recap: Inheritance Class Hierarchy
Is base class something that you would ever want to instantiate itself?
GenericVendingMachine
CokeMachine
CokeMachine2000
French FryMachine
is-a is-a
is-a
CokeMachineUA
is-a
PizzaMachine
BeerMachine
is-a is-a

5
Recap: Abstract Classes Abstract class: not completely implemented
serve as place holders in class hierarchy partial description inherited by all descendants
Usually contains one or more abstract methods has no definition: specifies method that should be implemented
by subclasses just has header, does not provide actual implementation for
that method Abstract class uses abstract methods to specify what
interface to descendant classes must look like without providing implementation details for methods that
make up interface descendent classes supply additional information so that
instantiation is meaningful

6
Recap: Interfaces vs. Abstract Classes
Use abstract class with inheritance to initiate a hierarchy of more specialized classes
Use interface to say, "I need to be able to call methods with these signatures in your class."
Use an interface for some semblance of multiple inheritance
from Just Java 2 by Peter van der Linden

7
Objectives
Taste of what's under the hood with graphical programming note: taste, not mastery!

8
Reading
This week: Chapter 5.1, 5.2, 11.5, 12.1, 12.2, 12.3

9
Simple Graphics
This week is all about very simple graphics in Java. What we'll talk about aren't necessarily fundamental computing concepts like loops, arrays, inheritance, and polymorphism, which surface in all sorts of different computing contexts.
This stuff will be Java-specific and may not translate well to other programming languages.

10
Simple Graphics
The good news is that you might find graphics more fascinating than Coke Machines.
The bad news is that Java graphics can become tedious very quickly.
11
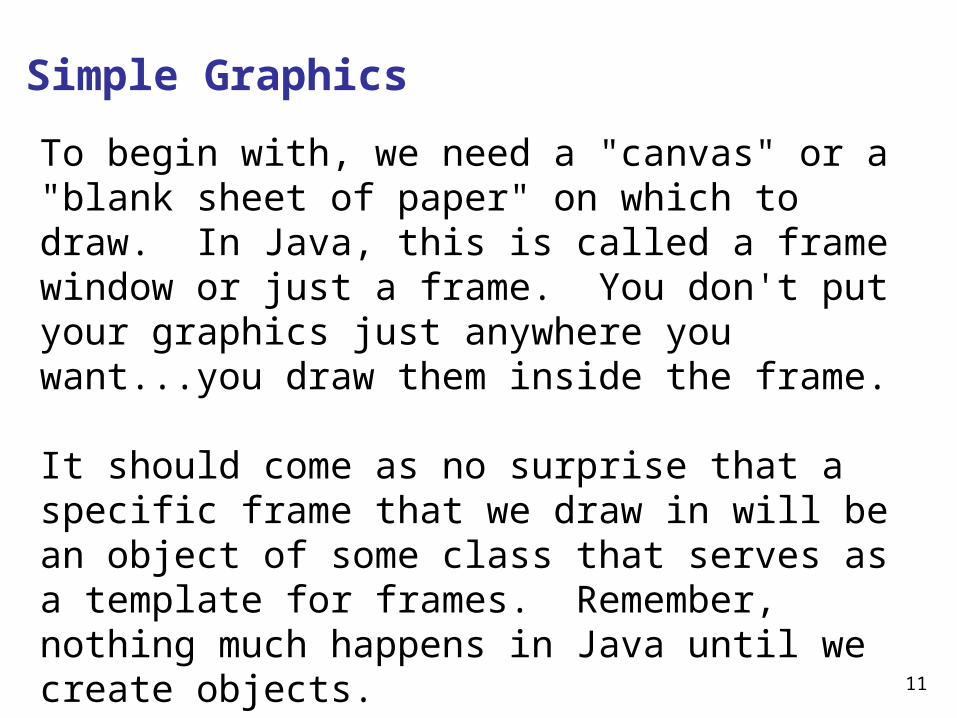
Simple Graphics
To begin with, we need a "canvas" or a "blank sheet of paper" on which to draw. In Java, this is called a frame window or just a frame. You don't put your graphics just anywhere you want...you draw them inside the frame.
It should come as no surprise that a specific frame that we draw in will be an object of some class that serves as a template for frames. Remember, nothing much happens in Java until we create objects.

12
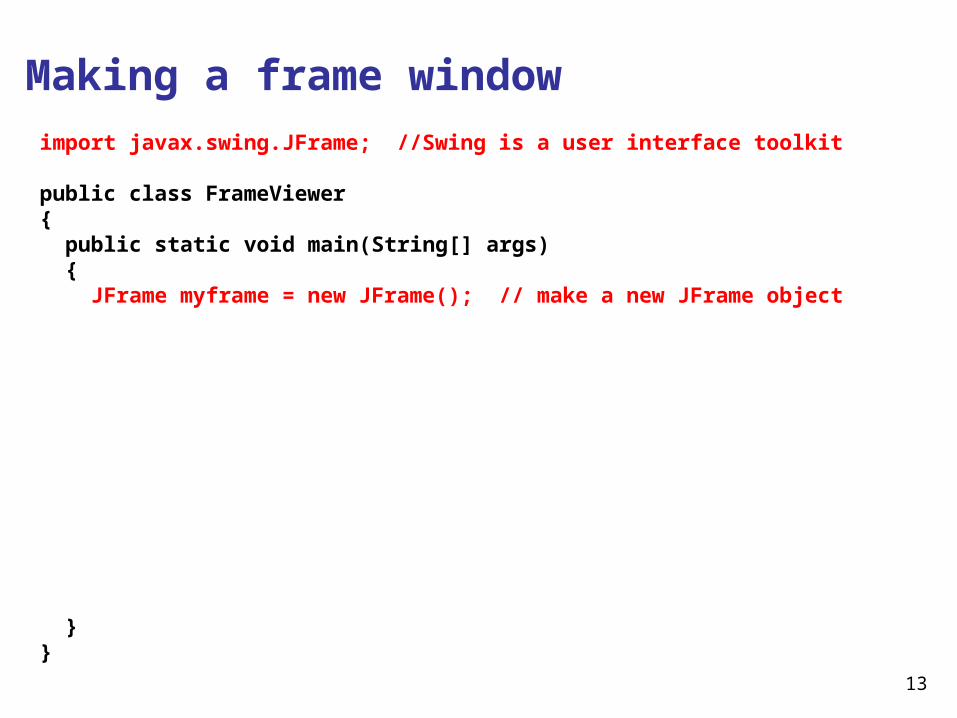
Making a frame window
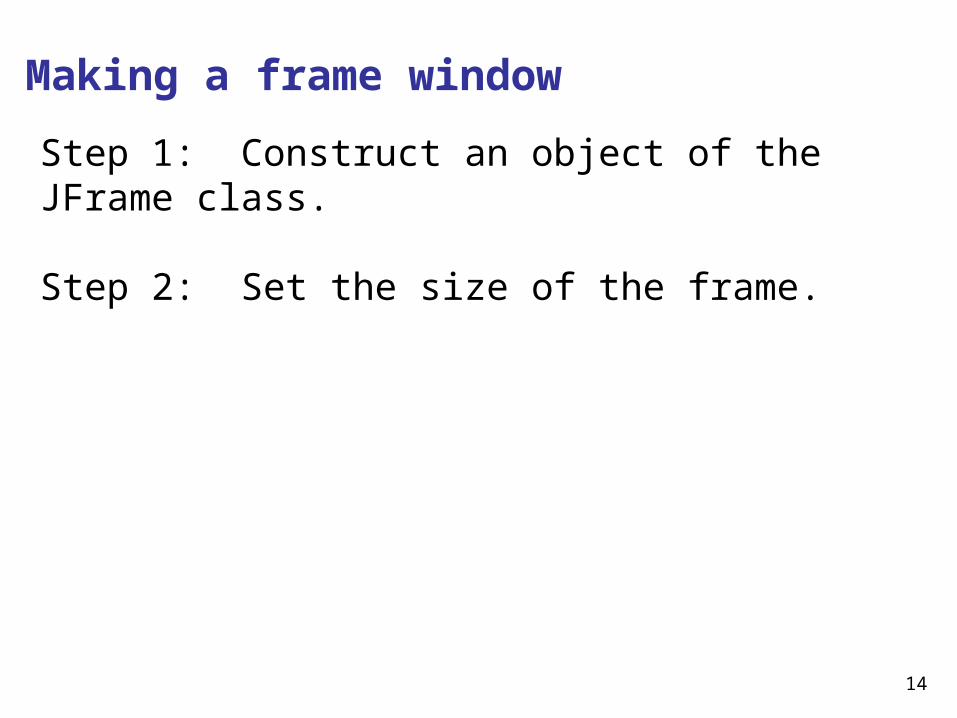
Step 1: Construct an object of the JFrame class.
13
Making a frame window
import javax.swing.JFrame; //Swing is a user interface toolkit
public class FrameViewer{ public static void main(String[] args) { JFrame myframe = new JFrame(); // make a new JFrame object
}}
14
Making a frame window
Step 1: Construct an object of the JFrame class.
Step 2: Set the size of the frame.

15
Making a frame window
import javax.swing.JFrame;
public class FrameViewer{ public static void main(String[] args) { JFrame myframe = new JFrame(); // make a new JFrame object final int F_WIDTH = 300; // 300 pixels wide final int F_HEIGHT = 400; // 400 pixels high myframe.setSize(F_WIDTH, F_HEIGHT);
}}

16
Making a frame window
Step 1: Construct an object of the JFrame class.
Step 2: Set the size of the frame.
Step 3: Set the title of the frame to appear in the title bar (title bar will be blank if no title is set).

17
Making a frame window
import javax.swing.JFrame;
public class FrameViewer{ public static void main(String[] args) { JFrame myframe = new JFrame(); // make a new JFrame object final int F_WIDTH = 300; // 300 pixels wide final int F_HEIGHT = 400; // 400 pixels high myframe.setSize(F_WIDTH, F_HEIGHT); myframe.setTitle("My Frame"); // this is optional
}}

18
Making a frame window
Step 1: Construct an object of the JFrame class.
Step 2: Set the size of the frame.
Step 3: Set the title of the frame to appear in the title bar (title bar will be blank if no title is set).
Step 4: Set the default close operation. When the user clicks the close button, the program stops running.

19
Making a frame window
import javax.swing.JFrame;
public class FrameViewer{ public static void main(String[] args) { JFrame myframe = new JFrame(); // make a new JFrame object final int F_WIDTH = 300; // 300 pixels wide final int F_HEIGHT = 400; // 400 pixels high myframe.setSize(F_WIDTH, F_HEIGHT); myframe.setTitle("My Frame"); // this is optional myframe.setDefaultCloseOperation(JFrame.EXIT_ON_CLOSE);
}}

20
Making a frame window
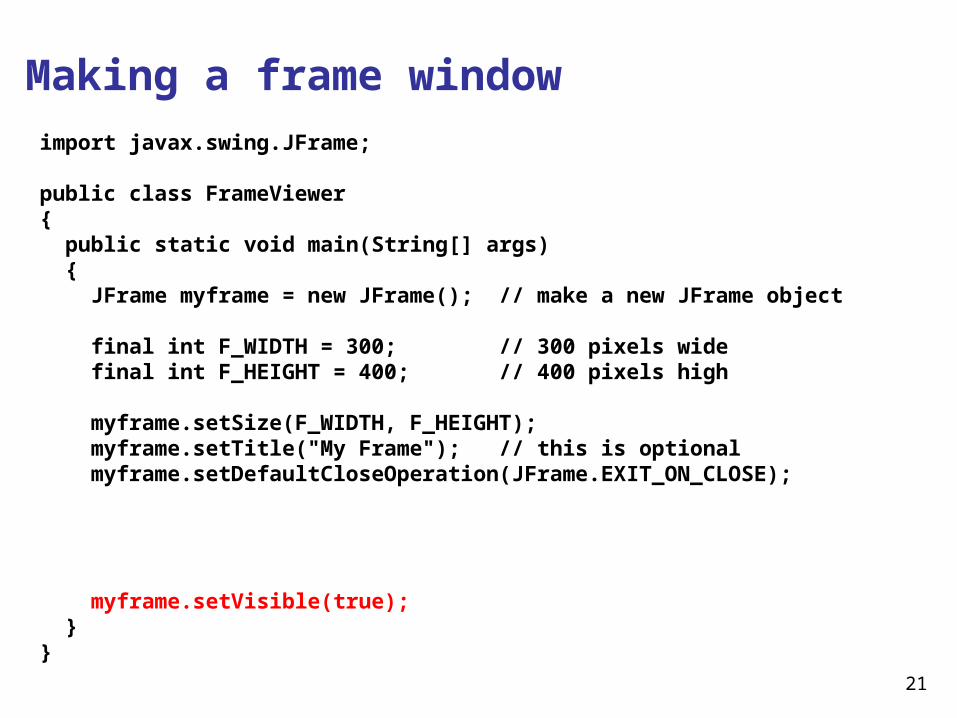
Step 1: Construct an object of the JFrame class.
Step 2: Set the size of the frame.
Step 3: Set the title of the frame to appear in the title bar (title bar will be blank if no title is set).
Step 4: Set the default close operation. When the user clicks the close button, the program stops running.
Step 5: Make the frame visible.
21
Making a frame window
import javax.swing.JFrame;
public class FrameViewer{ public static void main(String[] args) { JFrame myframe = new JFrame(); // make a new JFrame object final int F_WIDTH = 300; // 300 pixels wide final int F_HEIGHT = 400; // 400 pixels high myframe.setSize(F_WIDTH, F_HEIGHT); myframe.setTitle("My Frame"); // this is optional myframe.setDefaultCloseOperation(JFrame.EXIT_ON_CLOSE);
myframe.setVisible(true); }}

22
Making a frame window
import javax.swing.JFrame;
public class FrameViewer{ public static void main(String[] args) { JFrame myframe = new JFrame(); // make a new JFrame object final int F_WIDTH = 300; // 300 pixels wide final int F_HEIGHT = 400; // 400 pixels high myframe.setSize(F_WIDTH, F_HEIGHT); myframe.setTitle("My Frame"); // this is optional myframe.setDefaultCloseOperation(JFrame.EXIT_ON_CLOSE);
// when it's time to draw something in the frame, // we'll do it here
myframe.setVisible(true); }}

23
Making a frame window> java FrameViewer

24
Now let's draw something
Wait, hold on. We don't draw anything. We create component objects (of course) and add them to the frame we've created.
We make our own component in the Swing user interface toolkit by extending the blank component called JComponent to make a RectangleComponent.
The paintComponent() method is inherited from JComponent, then we override the method with our own definition that makes a couple of rectangles.
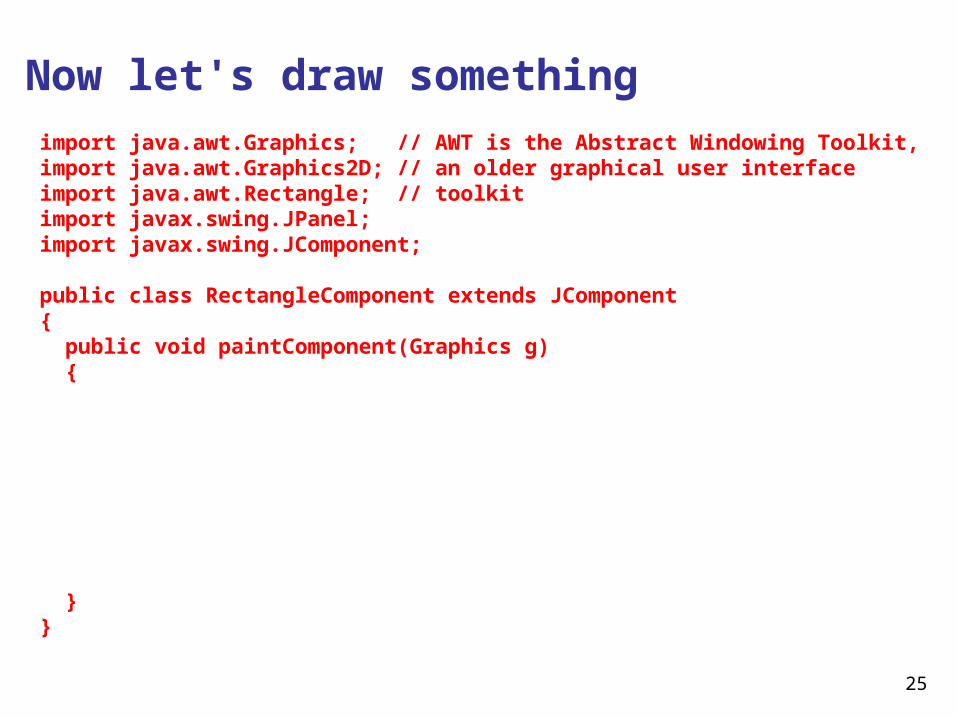
25
Now let's draw something
import java.awt.Graphics; // AWT is the Abstract Windowing Toolkit,import java.awt.Graphics2D; // an older graphical user interfaceimport java.awt.Rectangle; // toolkitimport javax.swing.JPanel;import javax.swing.JComponent;
public class RectangleComponent extends JComponent{ public void paintComponent(Graphics g) {
}}
26
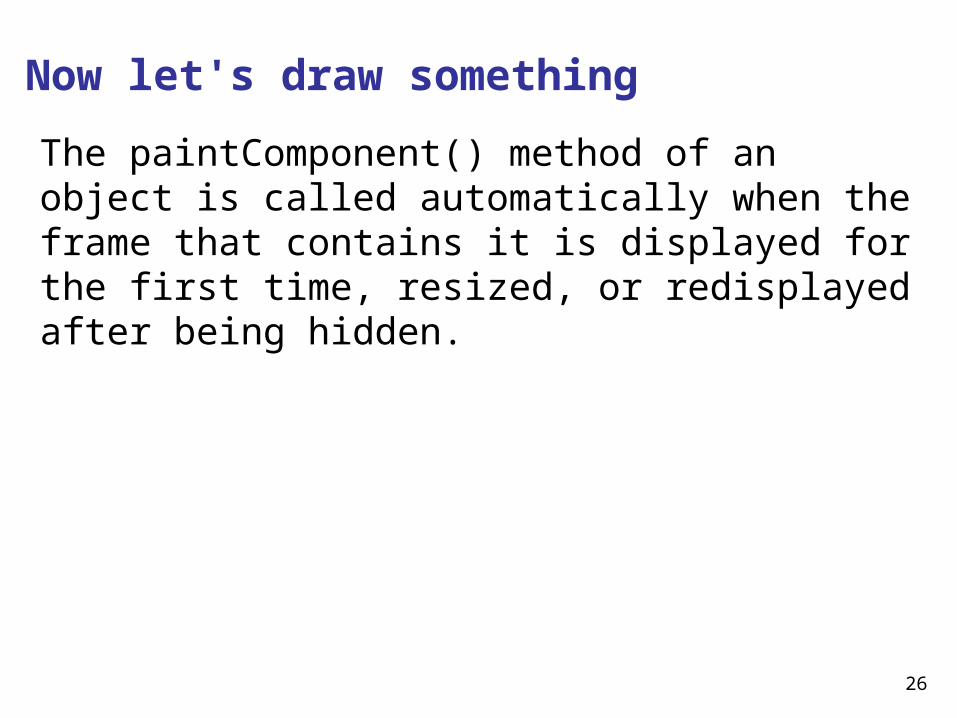
Now let's draw something
The paintComponent() method of an object is called automatically when the frame that contains it is displayed for the first time, resized, or redisplayed after being hidden.
27
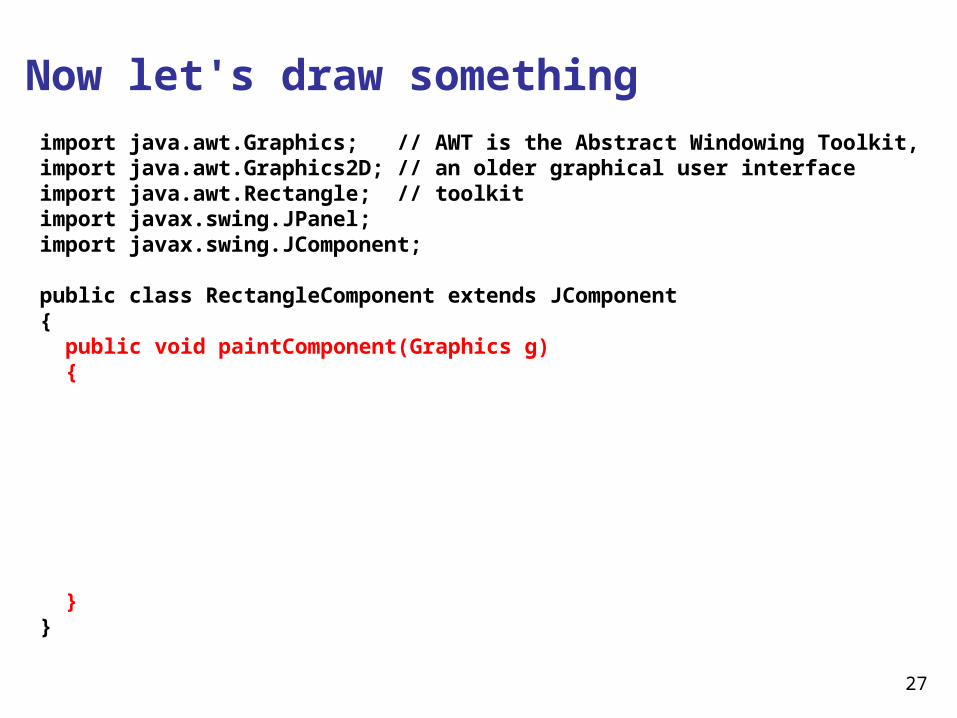
Now let's draw something
import java.awt.Graphics; // AWT is the Abstract Windowing Toolkit,import java.awt.Graphics2D; // an older graphical user interfaceimport java.awt.Rectangle; // toolkitimport javax.swing.JPanel;import javax.swing.JComponent;
public class RectangleComponent extends JComponent{ public void paintComponent(Graphics g) {
}}
28
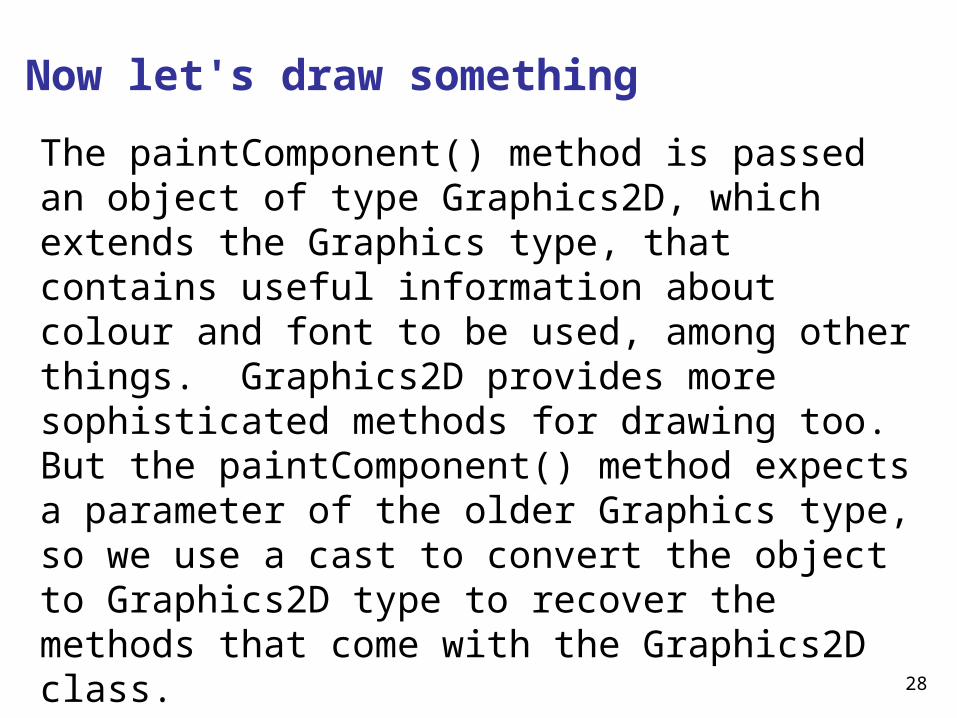
Now let's draw something
The paintComponent() method is passed an object of type Graphics2D, which extends the Graphics type, that contains useful information about colour and font to be used, among other things. Graphics2D provides more sophisticated methods for drawing too.But the paintComponent() method expects a parameter of the older Graphics type, so we use a cast to convert the object to Graphics2D type to recover the methods that come with the Graphics2D class.

29
Now let's draw something
import java.awt.Graphics; // AWT is the Abstract Windowing Toolkit,import java.awt.Graphics2D; // an older graphical user interfaceimport java.awt.Rectangle; // toolkitimport javax.swing.JPanel;import javax.swing.JComponent;
public class RectangleComponent extends JComponent{ public void paintComponent(Graphics g) { Graphics2D g2 = (Graphics2D) g;
}}

30
Now let's draw something
Now we draw a box. We give the X- and Y- coordinates of the upper left hand corner of the box, along with its width and height in pixels (i.e. picture elements).

31
Now let's draw something
import java.awt.Graphics; // AWT is the Abstract Windowing Toolkit,import java.awt.Graphics2D; // an older graphical user interfaceimport java.awt.Rectangle; // toolkitimport javax.swing.JPanel;import javax.swing.JComponent;
public class RectangleComponent extends JComponent{ public void paintComponent(Graphics g) { Graphics2D g2 = (Graphics2D) g;
Rectangle box = new Rectangle(5, 10, 50, 75); g2.draw(box);
}}
32
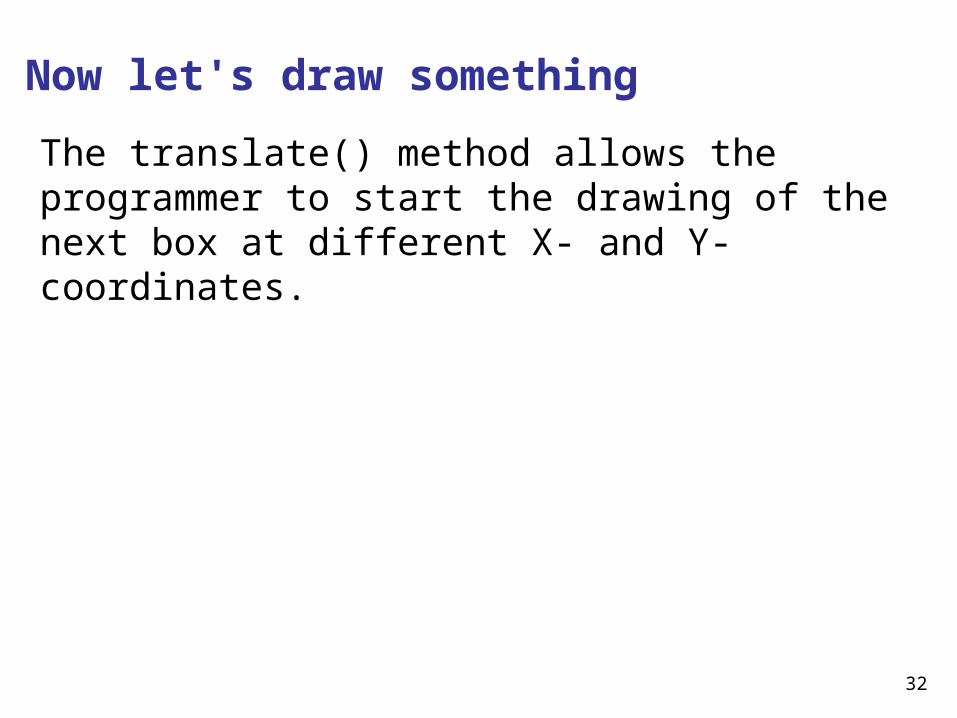
Now let's draw something
The translate() method allows the programmer to start the drawing of the next box at different X- and Y-coordinates.
33
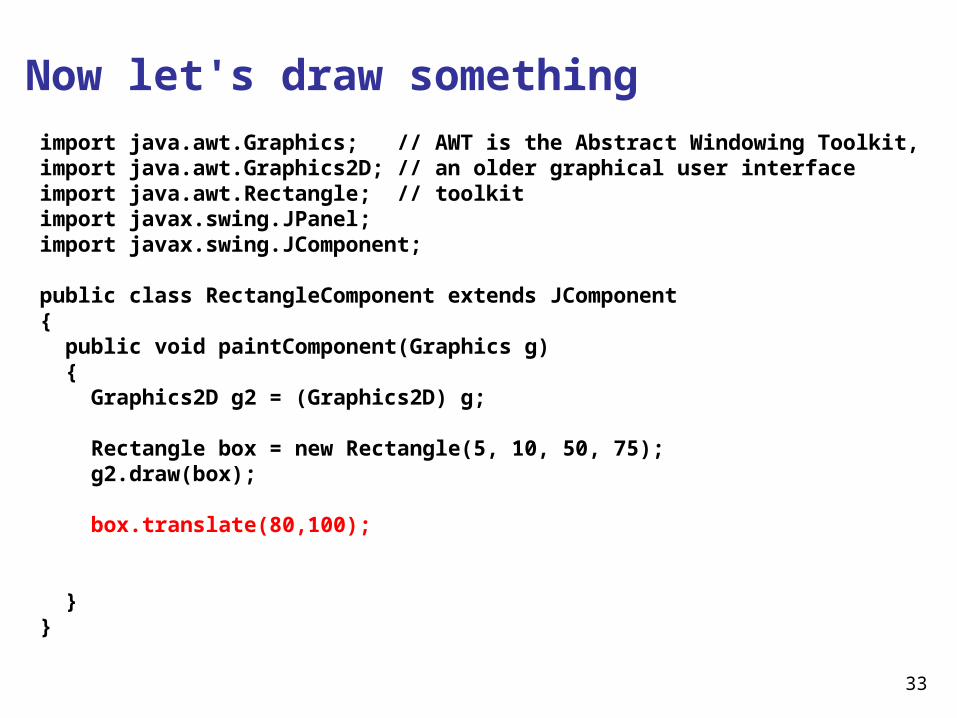
Now let's draw something
import java.awt.Graphics; // AWT is the Abstract Windowing Toolkit,import java.awt.Graphics2D; // an older graphical user interfaceimport java.awt.Rectangle; // toolkitimport javax.swing.JPanel;import javax.swing.JComponent;
public class RectangleComponent extends JComponent{ public void paintComponent(Graphics g) { Graphics2D g2 = (Graphics2D) g; Rectangle box = new Rectangle(5, 10, 50, 75); g2.draw(box);
box.translate(80,100); }}
34
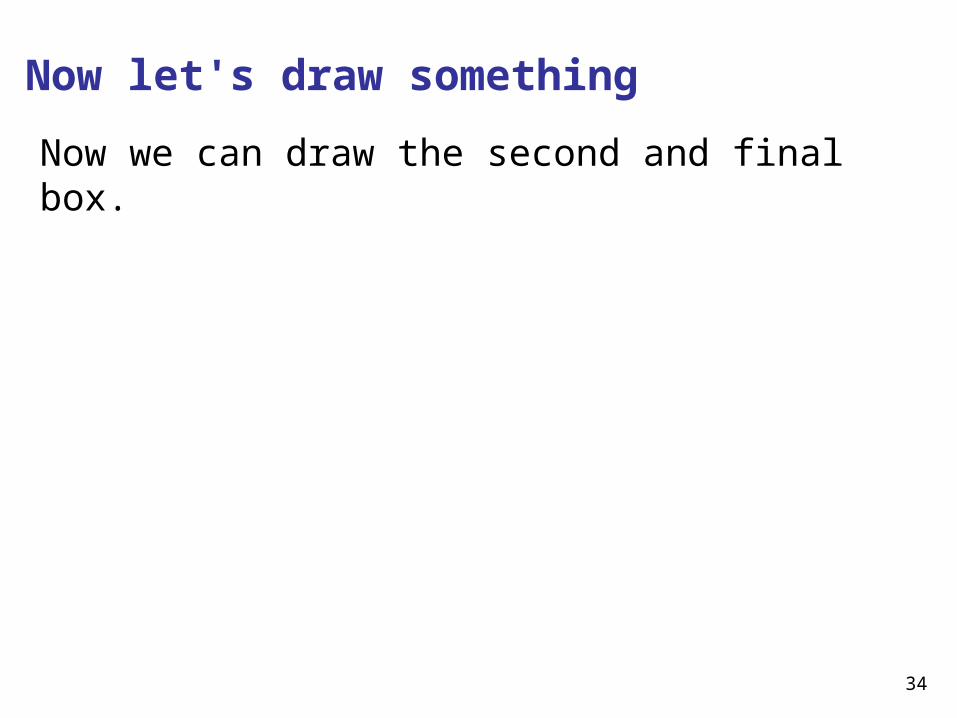
Now let's draw something
Now we can draw the second and final box.

35
Now let's draw something
import java.awt.Graphics; // AWT is the Abstract Windowing Toolkit,import java.awt.Graphics2D; // an older graphical user interfaceimport java.awt.Rectangle; // toolkitimport javax.swing.JPanel;import javax.swing.JComponent;
public class RectangleComponent extends JComponent{ public void paintComponent(Graphics g) { Graphics2D g2 = (Graphics2D) g; Rectangle box = new Rectangle(5, 10, 50, 75); g2.draw(box);
box.translate(80,100); g2.draw(box); }}

36
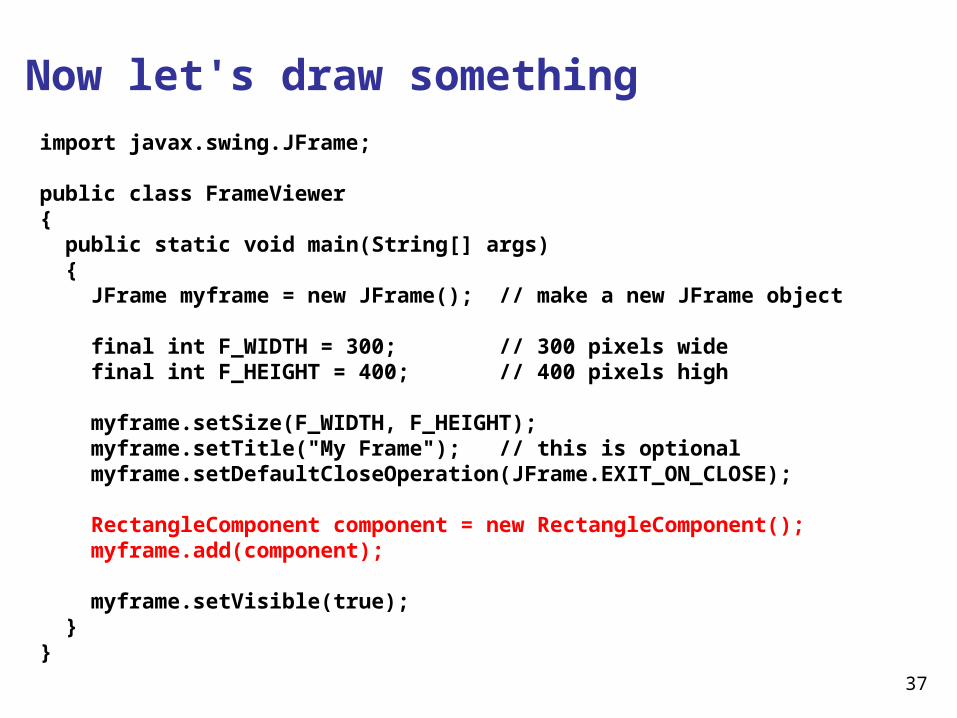
Now let's draw something
One more thing: we have to add the rectangle component to our frame object.
37
Now let's draw something
import javax.swing.JFrame;
public class FrameViewer{ public static void main(String[] args) { JFrame myframe = new JFrame(); // make a new JFrame object final int F_WIDTH = 300; // 300 pixels wide final int F_HEIGHT = 400; // 400 pixels high myframe.setSize(F_WIDTH, F_HEIGHT); myframe.setTitle("My Frame"); // this is optional myframe.setDefaultCloseOperation(JFrame.EXIT_ON_CLOSE);
RectangleComponent component = new RectangleComponent(); myframe.add(component);
myframe.setVisible(true); }}
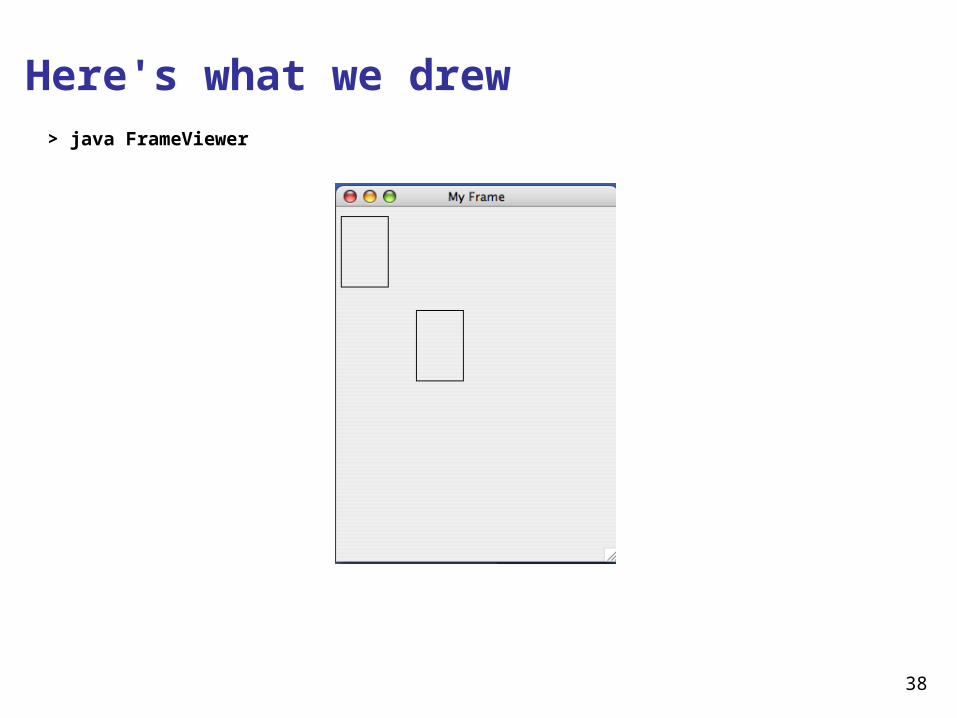
38
Here's what we drew> java FrameViewer

39
Questions?

40
Graphical user interfaces (GUIs)The graphical user interface allows us to interact with our programs through mouse movements, button clicks, key presses, and so on.
Your Windows or Macintosh operating system provides you with a GUI so you don't have to remember all sorts of instructions to type at the command line.

41
Graphical user interfaces (GUIs)The graphical user interface allows us to interact with our programs through mouse movements, button clicks, key presses, and so on.
Your Windows or Macintosh operating system provides you with a GUI so you don't have to remember all sorts of instructions to type at the command line.
Here's a GUI you've seen meuse many times.
42
Event handlingHow do we make a GUI in Java? We install event listeners.
An event listener is an object that belongs to a class which you define. The methods in your event listener contain the instructions to be executed when the events occur.
Any event listener is specific to an event source. For example, you'd have one kind of event listener to respond to the click of a button on your mouse, and another to respond to the press of a key on your keyboard.
When an event occurs, the event source calls the appropriate methods of all associated event listeners.

43
Event handlingHere comes an example, straight from your book. This example is a simple program that prints a message when a button is clicked.
An event listener that responds to button clicks must belong to a class that implements the ActionListener interface. That interface, supplied by the Abstract Windowing Toolkit (AWT), looks like this:
public interface ActionListener{ void actionPerformed(ActionEvent event);}
Java uses the event parameter to pass details about the event. We don't need to worry about it.

44
Event handlingHere's what our example class that implements the ActionListener interface looks like:
import java.awt.event.ActionEvent;import java.awt.event.ActionListener;
public class ClickListener implements ActionListener{ public void actionPerformed(ActionEvent event) { System.out.println("I was clicked."); }}
The actionPerformed() method contains the instructions we want to be executed when our button is clicked.

45
Event handlingNext we'll see a program that tests our ClickListener class. It looks very much like the program we wrote earlier.
First we create a frame window object so we have a place to put the button that we want to click.
46
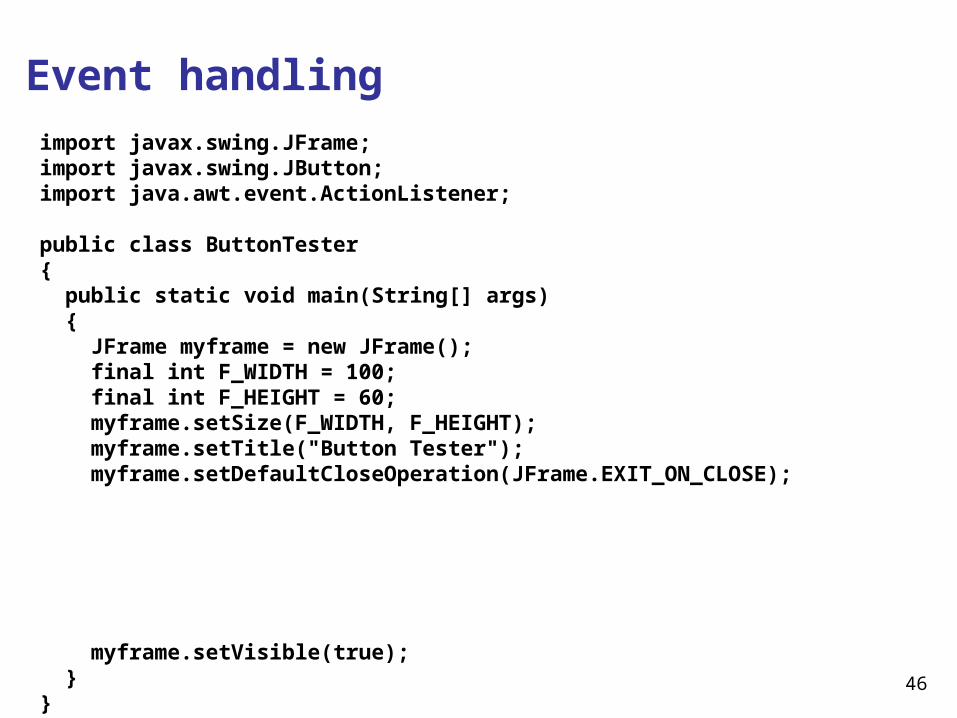
Event handling
import javax.swing.JFrame;import javax.swing.JButton;import java.awt.event.ActionListener;
public class ButtonTester{ public static void main(String[] args) { JFrame myframe = new JFrame(); final int F_WIDTH = 100; final int F_HEIGHT = 60; myframe.setSize(F_WIDTH, F_HEIGHT); myframe.setTitle("Button Tester"); myframe.setDefaultCloseOperation(JFrame.EXIT_ON_CLOSE);
myframe.setVisible(true); }}

47
Event handlingNext we'll see a program that tests our ClickListener class. It looks very much like the program we wrote earlier.
First we create a frame window object so we have a place to put the button that we want to click.
Then we create a button object and add it to the frame, just like the rectangles before.

48
Event handling
import javax.swing.JFrame;import javax.swing.JButton;import java.awt.event.ActionListener;
public class ButtonTester{ public static void main(String[] args) { JFrame myframe = new JFrame(); final int F_WIDTH = 100; final int F_HEIGHT = 60; myframe.setSize(F_WIDTH, F_HEIGHT); myframe.setTitle("Button Tester"); myframe.setDefaultCloseOperation(JFrame.EXIT_ON_CLOSE); JButton button = new JButton("Click me!"); myframe.add(button);
myframe.setVisible(true); }}

49
Event handlingNext we'll see a program that tests our ClickListener class. It looks very much like the program we wrote earlier.
First we create a frame window object so we have a place to put the button that we want to click.
Then we create a button object and add it to the frame, just like the rectangles before.
Finally we create an event listener object called ClickListener and attach it to the button we just made.

50
Event handling
import javax.swing.JFrame;import javax.swing.JButton;import java.awt.event.ActionListener;
public class ButtonTester{ public static void main(String[] args) { JFrame myframe = new JFrame(); final int F_WIDTH = 100; final int F_HEIGHT = 60; myframe.setSize(F_WIDTH, F_HEIGHT); myframe.setTitle("Button Tester"); myframe.setDefaultCloseOperation(JFrame.EXIT_ON_CLOSE); JButton button = new JButton("Click me!"); myframe.add(button); ActionListener listener = new ClickListener(); button.addActionListener(listener); myframe.setVisible(true); }}

51
Event handling
> java ButtonTester
52
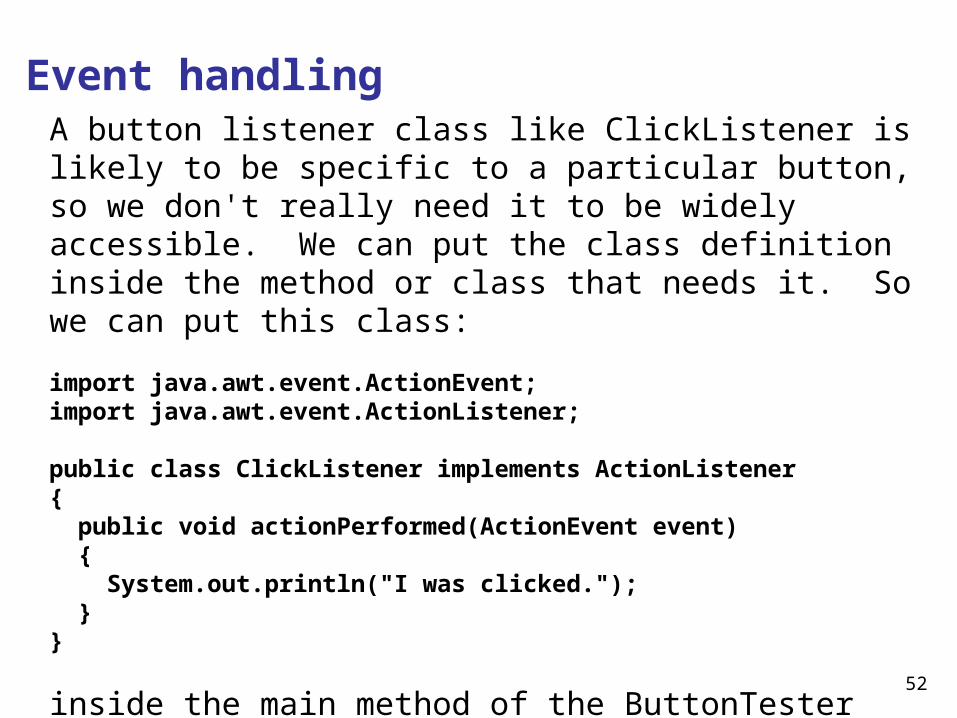
Event handlingA button listener class like ClickListener is likely to be specific to a particular button, so we don't really need it to be widely accessible. We can put the class definition inside the method or class that needs it. So we can put this class:
import java.awt.event.ActionEvent;import java.awt.event.ActionListener;
public class ClickListener implements ActionListener{ public void actionPerformed(ActionEvent event) { System.out.println("I was clicked."); }}
inside the main method of the ButtonTester class as an inner class.

53
Event handling
import javax.swing.JFrame;import javax.swing.JButton;import java.awt.event.ActionListener;import java.awt.event.ActionEvent; // note this addition
public class ButtonTester2{ public static void main(String[] args) { JFrame myframe = new JFrame(); final int F_WIDTH = 100; final int F_HEIGHT = 60; myframe.setSize(F_WIDTH, F_HEIGHT); myframe.setTitle("Button Tester"); myframe.setDefaultCloseOperation(JFrame.EXIT_ON_CLOSE); JButton button = new JButton("Click me!"); myframe.add(button);

54
Event handling
class ClickListener implements ActionListener { public void actionPerformed(ActionEvent event) { System.out.println("I was clicked."); } }
ActionListener listener = new ClickListener(); button.addActionListener(listener); myframe.setVisible(true); }}

55
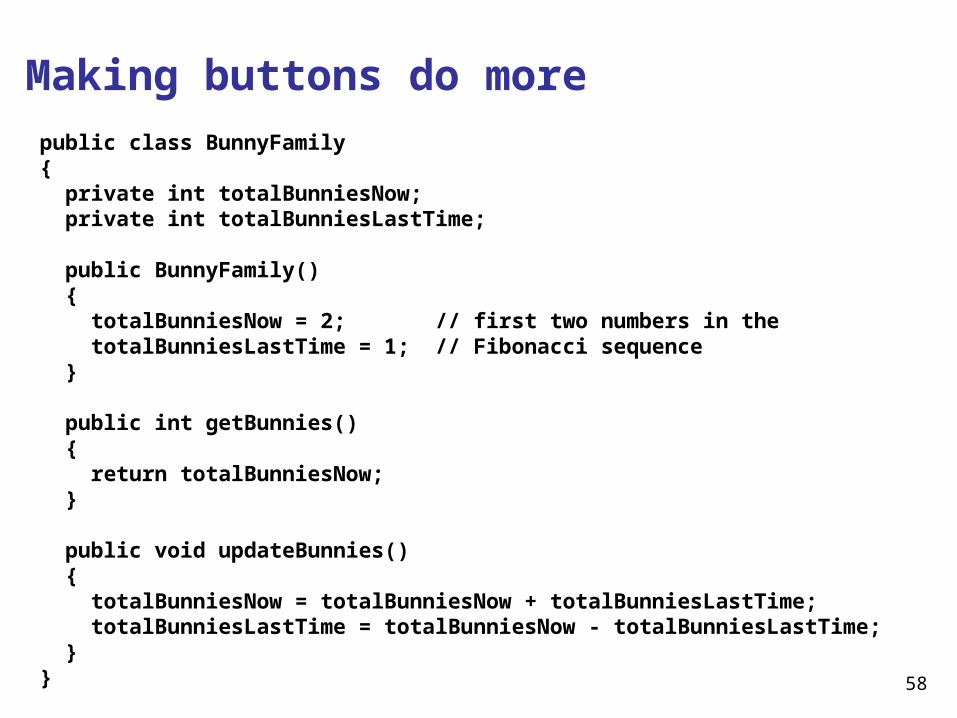
Making buttons do moreThis next example is from the book too, but I've changed the BankAccount class to the BunnyFamily class. Why? Because everybody likes bunnies.
Let's say we want to compute the growth in the number of bunnies in my bunny family through successive clicks of a button. (OK, it's a stretch, but it's still better than the boring bank account example.)
We'd start with a BunnyFamily class, of course. It has a method for retrieving the number of bunnies in the family, and another method for increasing the number of bunnies according to the Fibonacci numbers.

56
Fibonacci numbersLeonardo Pisano (1170 - 1250), also known as Fibonacci, came up with a model of growth in an idealised bunny (really) population.
Assuming that in the first month there is just one newly-born pairnew-born pairs become fertile from their second montheach month every fertile pair spawns a new pair, andthe bunnies never die
Then if we have A pairs of fertile and newly-born bunnies in month N and we have B pairs in month N+1, then in month N+2 we'll have A+B pairs.

57
Fibonacci numbersThe numbers for our purposes are 2, 3, 5, 8, 13, 21, 34 and so on.
Fibonacci was wrong about the growth of bunny populations, but his numbers live on in mathematical history.
58
Making buttons do more
public class BunnyFamily{ private int totalBunniesNow; private int totalBunniesLastTime; public BunnyFamily() { totalBunniesNow = 2; // first two numbers in the totalBunniesLastTime = 1; // Fibonacci sequence } public int getBunnies() { return totalBunniesNow; } public void updateBunnies() { totalBunniesNow = totalBunniesNow + totalBunniesLastTime; totalBunniesLastTime = totalBunniesNow - totalBunniesLastTime; }}
59
Making buttons do moreWe start by importing everything but the proverbial kitchen sink. Then we create our frame window.

60
Making buttons do more
import java.awt.event.ActionEvent;import java.awt.event.ActionListener;import javax.swing.JButton;import javax.swing.JFrame;import javax.swing.JLabel;import javax.swing.JPanel;import javax.swing.JTextField;
public class BunnyGrowthViewer{ public static void main (String[] args) { JFrame frame = new JFrame(); frame.setSize(400, 100); frame.setDefaultCloseOperation(JFrame.EXIT_ON_CLOSE); JButton button = new JButton("Add Bunnies"); final BunnyFamily mybunnies = new BunnyFamily();
61
Making buttons do moreWe start by importing everything but the proverbial kitchen sink. Then we create our frame window.
Next we create the button object.

62
Making buttons do more
import java.awt.event.ActionEvent;import java.awt.event.ActionListener;import javax.swing.JButton;import javax.swing.JFrame;import javax.swing.JLabel;import javax.swing.JPanel;import javax.swing.JTextField;
public class BunnyGrowthViewer{ public static void main (String[] args) { JFrame frame = new JFrame(); frame.setSize(400, 100); frame.setDefaultCloseOperation(JFrame.EXIT_ON_CLOSE); JButton button = new JButton("Add Bunnies"); final BunnyFamily mybunnies = new BunnyFamily();

63
Making buttons do moreWe start by importing everything but the proverbial kitchen sink. Then we create our frame window.
Next we create the button object.
Now we instantiate a BunnyFamily and call the object mybunnies. Why is it final? Because inner classes can access local variables from the surrounding scope only if the variables are final, and we're going to want to access some local variables from the surrounding scope inside the inner class. (Note that final doesn't keep the internal state of the mybunnies object from changing...it only means that once mybunnies holds a reference to a particular BunnyFamily object, mybunnies cannot then be assigned a different reference.)

64
Making buttons do more
import java.awt.event.ActionEvent;import java.awt.event.ActionListener;import javax.swing.JButton;import javax.swing.JFrame;import javax.swing.JLabel;import javax.swing.JPanel;import javax.swing.JTextField;
public class BunnyGrowthViewer{ public static void main (String[] args) { JFrame frame = new JFrame(); frame.setSize(400, 100); frame.setDefaultCloseOperation(JFrame.EXIT_ON_CLOSE); JButton button = new JButton("Add Bunnies"); final BunnyFamily mybunnies = new BunnyFamily();
65
Making buttons do moreWe need a user interface component that displays a message containing the current number of bunnies. Such a component is called a label. Here's how it's created...

66
Making buttons do more
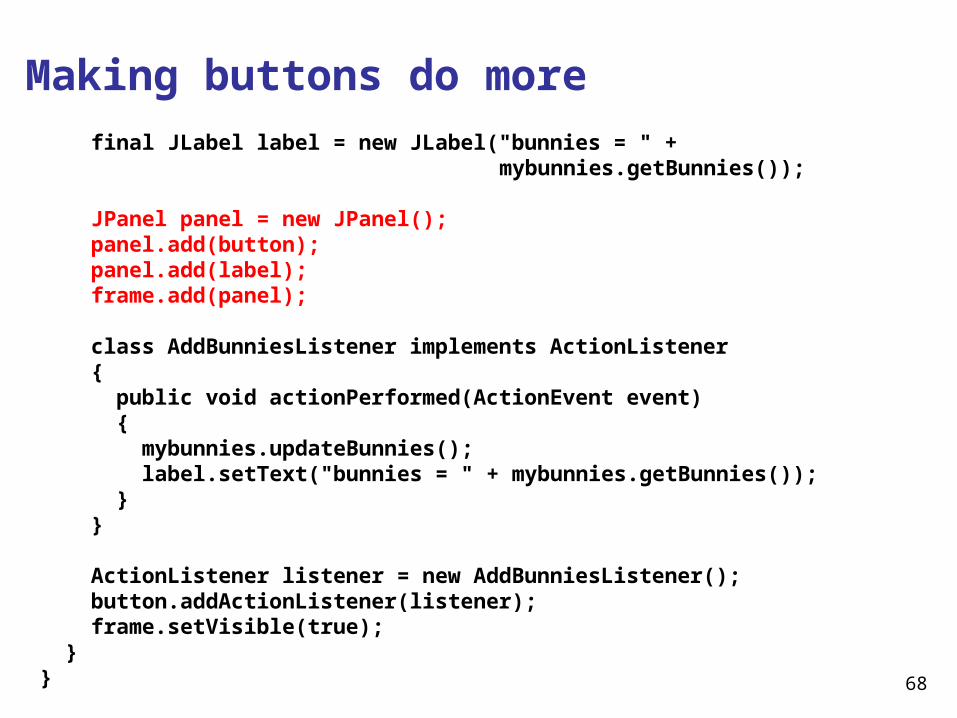
final JLabel label = new JLabel("bunnies = " + mybunnies.getBunnies());
JPanel panel = new JPanel(); panel.add(button); panel.add(label); frame.add(panel); class AddBunniesListener implements ActionListener { public void actionPerformed(ActionEvent event) { mybunnies.updateBunnies(); label.setText("bunnies = " + mybunnies.getBunnies()); } } ActionListener listener = new AddBunniesListener(); button.addActionListener(listener); frame.setVisible(true); }}
67
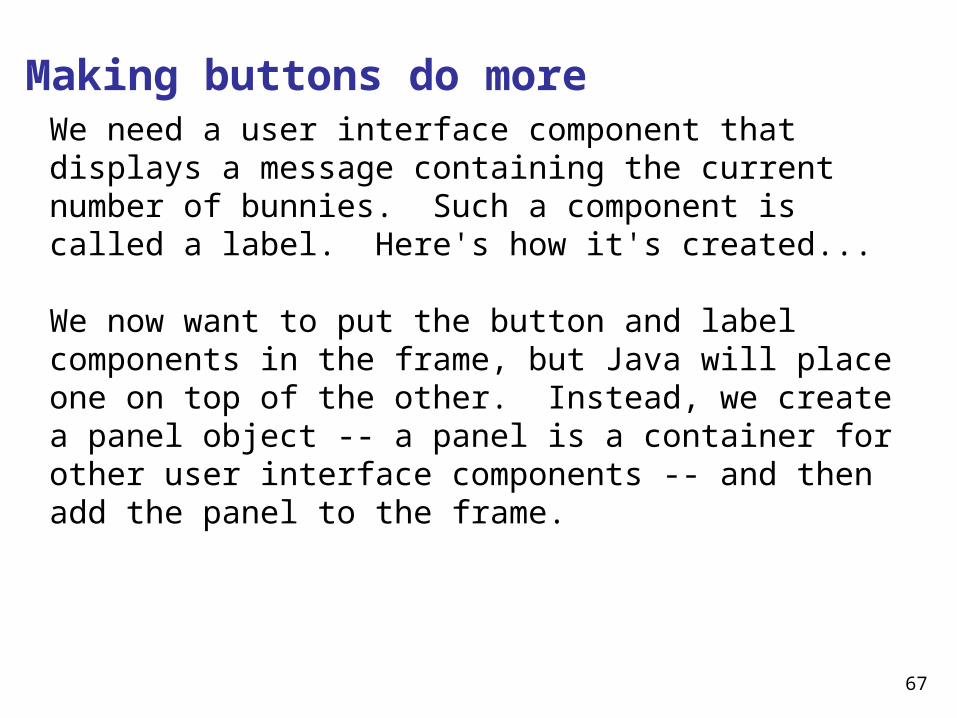
Making buttons do moreWe need a user interface component that displays a message containing the current number of bunnies. Such a component is called a label. Here's how it's created...
We now want to put the button and label components in the frame, but Java will place one on top of the other. Instead, we create a panel object -- a panel is a container for other user interface components -- and then add the panel to the frame.
68
Making buttons do more
final JLabel label = new JLabel("bunnies = " + mybunnies.getBunnies());
JPanel panel = new JPanel(); panel.add(button); panel.add(label); frame.add(panel); class AddBunniesListener implements ActionListener { public void actionPerformed(ActionEvent event) { mybunnies.updateBunnies(); label.setText("bunnies = " + mybunnies.getBunnies()); } } ActionListener listener = new AddBunniesListener(); button.addActionListener(listener); frame.setVisible(true); }}
69
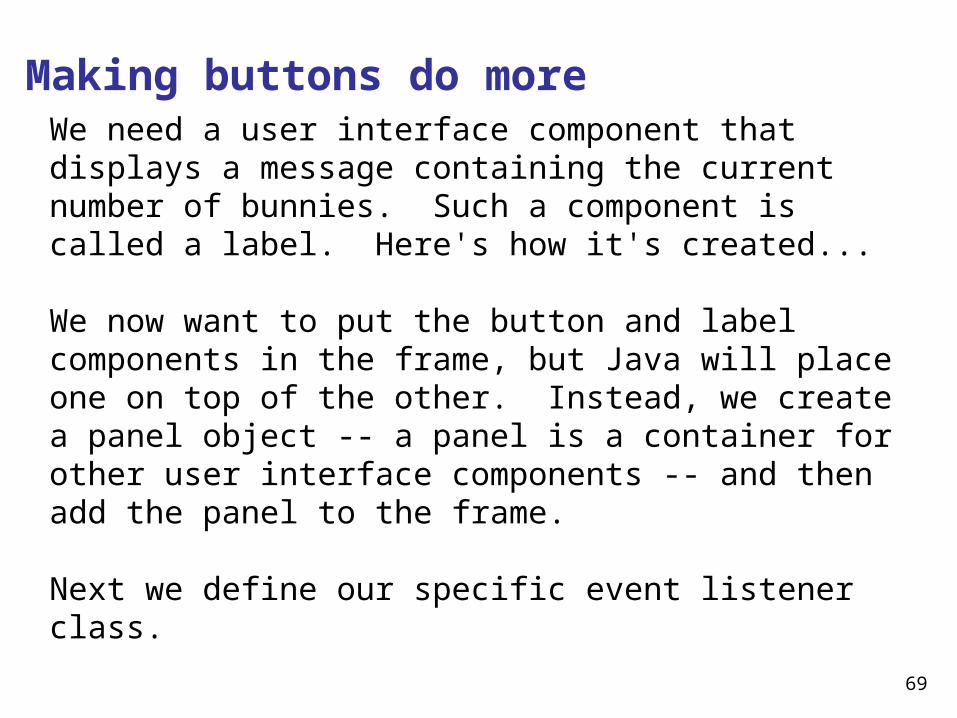
Making buttons do moreWe need a user interface component that displays a message containing the current number of bunnies. Such a component is called a label. Here's how it's created...
We now want to put the button and label components in the frame, but Java will place one on top of the other. Instead, we create a panel object -- a panel is a container for other user interface components -- and then add the panel to the frame.
Next we define our specific event listener class.
70
Making buttons do more
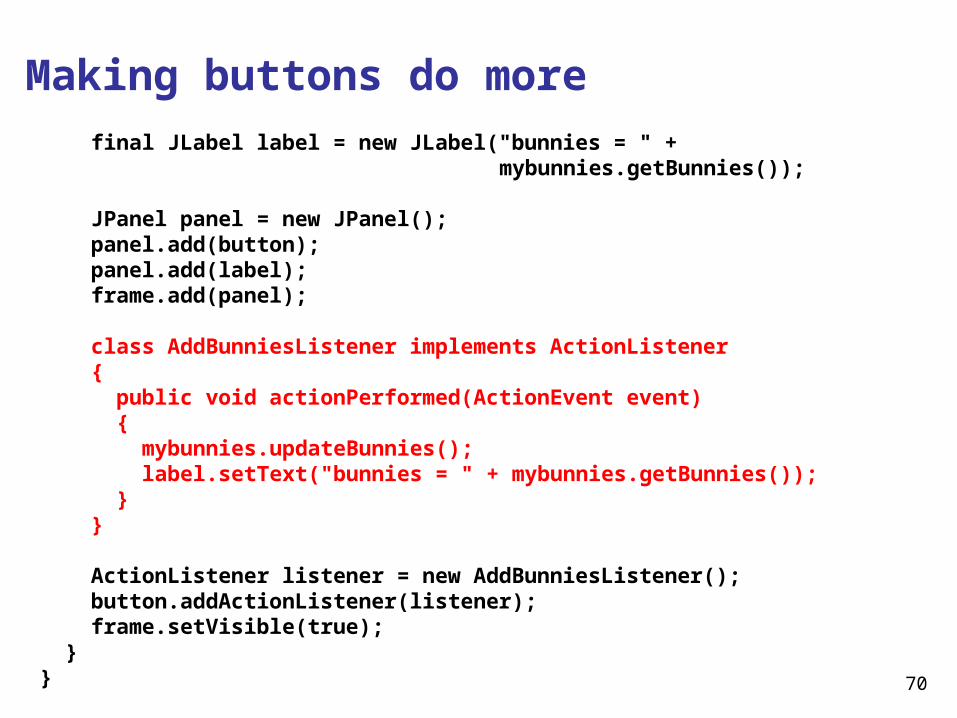
final JLabel label = new JLabel("bunnies = " + mybunnies.getBunnies());
JPanel panel = new JPanel(); panel.add(button); panel.add(label); frame.add(panel); class AddBunniesListener implements ActionListener { public void actionPerformed(ActionEvent event) { mybunnies.updateBunnies(); label.setText("bunnies = " + mybunnies.getBunnies()); } } ActionListener listener = new AddBunniesListener(); button.addActionListener(listener); frame.setVisible(true); }}

71
Making buttons do moreWe need a user interface component that displays a message containing the current number of bunnies. Such a component is called a label. Here's how it's created...
We now want to put the button and label components in the frame, but Java will place one on top of the other. Instead, we create a panel object -- a panel is a container for other user interface components -- and then add the panel to the frame.
Next we define our specific event listener class.
Then we create an event listener object and associate it with the button. Finally, we make sure that everything is visible.
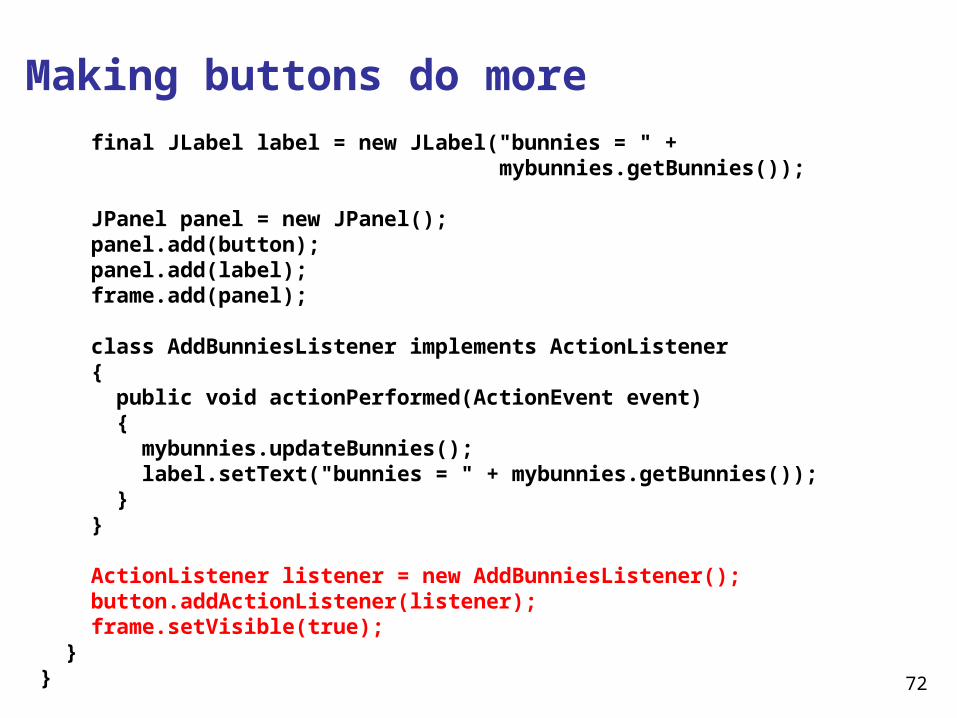
72
Making buttons do more
final JLabel label = new JLabel("bunnies = " + mybunnies.getBunnies());
JPanel panel = new JPanel(); panel.add(button); panel.add(label); frame.add(panel); class AddBunniesListener implements ActionListener { public void actionPerformed(ActionEvent event) { mybunnies.updateBunnies(); label.setText("bunnies = " + mybunnies.getBunnies()); } } ActionListener listener = new AddBunniesListener(); button.addActionListener(listener); frame.setVisible(true); }}