up-x300 operation-manual front-end gb - sharp.eu · 7 1 prior to operating the pos terminal how to...
TRANSCRIPT

POS TERMINAL
FRONT END INSTRUCTION MANUAL
UP-X300MODEL

1
INTRODUCTIONThank you very much for your purchase of the SHARP POS Terminal Model UP-X300. This UP-X300POS terminal operation manual explains the operation procedure of UP-X300 which is used as aterminal in the POS system.Please read this manual carefully before operating your machine in order to gain full understanding.Please keep this manual for future reference. It will help you if you encounter any operational problems.
For handling the hardware, please read the SHARP POS Terminal Model UP-X300 HARDWAREmanual.Handling precautions, parts names and functions are included in the hardware manual.

2
CONTENTSINTRODUCTION································································································································ 1CONTENTS ······································································································································· 2SYSTEM CONFIGURATION ············································································································· 6
Peripherals connectable ································································································ 6Printer sharing ··············································································································· 6Multilingual remote printer ····························································································· 6Receipt ON/OFF function ······························································································ 6
1 Prior to Operating the POS Terminal ···················································································· 7How to use the touch panel ···································································································· 7Operator display screen configuration ···················································································· 8
Screen transition ············································································································ 8Screens·························································································································· 9Areas configuring screens ··························································································· 12
Viewing the customer display (option) ·················································································· 17Screen save mode ················································································································ 17Adjusting backlight brightness ······························································································ 17Key list (excepting item and combo keys) ············································································ 18
2 Prior to Making Item Entries ································································································ 22General operation flow for daily registration ········································································· 22Error Warning ······················································································································· 23Clerk sign-on/sign-off operation ···························································································· 25
Sign-on operation ········································································································ 25Sign-off operation ········································································································ 26Message for clerk (Electronic mail function) ································································ 26Special password ········································································································ 27Reason code ··············································································································· 27
Starting cash memory ··········································································································· 28
3 Item Entries ··························································································································· 29Single item entries ················································································································ 29
Direct PLU entries········································································································ 29PLU code entries ········································································································· 29EAN entries·················································································································· 30Searching objective PLUs by names ··········································································· 30
Repeat entries ······················································································································ 31Repeat round entries ············································································································ 32Multiplication entries ············································································································· 33
Direct PLU entries········································································································ 33PLU code entries ········································································································· 33EAN entries·················································································································· 34Using PLU name search function ················································································ 34
Split-pricing entries ··············································································································· 35Direct PLU entries········································································································ 35PLU code entries ········································································································· 36EAN entries·················································································································· 36Using PLU name search function ················································································ 36
Single Item Cash Sale (SICS)/Single Item Finalize (SIF) entries ········································· 37SICS entries················································································································· 37SIF entries ··················································································································· 37
Scale entries ························································································································· 38Manual scale entries ···································································································· 38Auto scale entries ········································································································ 38
3
Non-turnover sales ··············································································································· 39PLU Menu entries ················································································································· 39Modifier PLUs ······················································································································· 40Promotion Function··············································································································· 41
Mix and match function ································································································ 41Automatic modifier ······································································································· 42Happy hour ·················································································································· 42
Link PLU entries ··················································································································· 43Combo meal entries ·············································································································· 44Set PLU entries ····················································································································· 45With/Without entries ·············································································································· 46Condiment entries ················································································································· 47
How to make multiple entries ······················································································ 48How condiment item prices are printed: ······································································ 50Dessert feature ············································································································ 51
Price shift by menu ··············································································································· 52Department shift ··················································································································· 52WASTE mode ······················································································································· 53PLU/EAN learning function ··································································································· 54Price inquiry (view) function ·································································································· 55Price change function ··········································································································· 56Countdown items (86 item) ··································································································· 58Recipe guidance ··················································································································· 61
4 Display of Subtotal ··············································································································· 62Subtotal ························································································································ 62Difference subtotal (Differ ST) ····················································································· 62
5 Finalization of Transaction ··································································································· 63Direct finalization ········································································································· 63Amount tendering ········································································································ 63
6 Computation of VAT (Value Added Tax) /Tax ······································································ 64VAT/tax system ····················································································································· 64VAT shift entries ···················································································································· 66
7 Auxiliary Entries ···················································································································· 67Refund ·································································································································· 67Return ··································································································································· 67Discount or Premium entries using a discount key ······························································· 68
Discount/Premium for items ························································································ 68BOGO entry ················································································································· 68Discount/Premium for total amount ············································································· 68
Discount or Premium entries using a percent key ································································ 69Discount/Premium for items ························································································ 69Discount/Premium for total amount ············································································· 69
Group discount/premium ······································································································ 70Group discount ············································································································ 70Group discount shift ····································································································· 70
8 Payment Treatment ··············································································································· 71Handling tips ························································································································· 71
Tip-in entries ················································································································ 71Tip editing ···················································································································· 72Tip paid entries ············································································································ 72Tip transfer ··················································································································· 73
Currency exchange··············································································································· 74Received-on-Account (RA) entry ·························································································· 75
4
Paid-out (PO) entry ··············································································································· 76No sale (exchange) ··············································································································· 77Transferring cash ·················································································································· 77Cashing a cheque ················································································································· 77Service charge ······················································································································ 78VIP sales ······························································································································· 78Gratuity ································································································································· 78
9 Text Entries ···························································································································· 79Free text entries ···················································································································· 79Address entries ····················································································································· 81
10 Correction ······························································································································ 82Item void using the [-] key ····································································································· 82Check/Subtotal void ·············································································································· 84Changing quantity using the [+] key ····················································································· 85Correction after finalizing a transaction - Void mode ···························································· 86
11 Customer Management ········································································································ 87
12 Guest Control ························································································································ 91General overview for guest control ······················································································· 92Floor planning ······················································································································· 93Table setting·························································································································· 95
How to look at table icon on the graphical layout screen ············································ 95How to control a table layout screen ··········································································· 97How to change a room ······························································································ 100
Searching a suitable table for guests using automatic table search function ····················· 101Managing the waiting list ···································································································· 102
Modifying the waiting list ···························································································· 103Managing guests ················································································································ 104
Opening a table on the graphical table layout screen to receive a new orderand reorder ················································································································ 104Opening a table by entering table number ································································ 106Opening a table in use on the open table list ···························································· 107Changing a table to be served on the registration screen ········································· 108Changing check number ···························································································· 109Entering a number of guests manually ······································································ 110Closing a table temporally ························································································· 110Closing a table - Finalizing a guest check ································································· 110Table alert ·················································································································· 110Transaction migration ································································································ 111
Deposit entries ···················································································································· 112Bill totalizing/Bill transfer ····································································································· 113
Bill totalizing/Bill transfer in the same room ······························································· 113Bill totalizing/Bill transfer over a room ······································································· 114
Bill separating ····················································································································· 116How to operate the B.S. screen ················································································· 116Transferring an item ··································································································· 117Splitting multiple items ······························································································· 118Splitting an item ········································································································· 119Splitting a check by specified amount of money ························································ 120Splitting a check by a number of a group ·································································· 121Remerging split checks (bills) ···················································································· 122Direct payment in a BS screen ·················································································· 122
Transferring open tables (guest checks) to another clerk ··················································· 123Recalling data of closed tables(guest checks) ···································································· 124

5
13 Employee Function ············································································································· 125Employee log-on/log off ······································································································ 125Employee’s working time recording ···················································································· 127
Time-in operation ······································································································· 127Break-in operation ····································································································· 128Break-out operation ··································································································· 129Time-out operation ····································································································· 130
Editing employee’s time record ··························································································· 131Sales for employees ··········································································································· 134Supervisor clerk ·················································································································· 135Overlapped clerk entry ········································································································ 136
Remote automatic clerk sign-off ················································································ 136
14 Special Printing Function ··································································································· 137After transaction receipt/Copy receipt printing- Receipt printer ·········································· 137Validation printing - Slip printer ··························································································· 137Check printing (CHEQUE EURO and English check) - Slip printer ···································· 138
CHEQUE EURO ········································································································ 138English cheque ·········································································································· 138
Printer rerouting ·················································································································· 139Electronic journal ················································································································ 140Journal printing - Journal printer ························································································· 140Receipt printing on a remote printer ··················································································· 141
Sort shift function ······································································································· 141Hold and go function ·································································································· 141
Receipt printing style shift function ····················································································· 142Printing bills ························································································································ 143Guest check copy ··············································································································· 145Entertainment bill ················································································································ 146
15 Macro Key Entries ··············································································································· 147
16 Training Function ················································································································ 148Bill void function ·················································································································· 148
17 Compulsory Cash/Cheque Declaration ············································································ 149
18 Close Session (EOS) ·········································································································· 150
19 Terminal Programming ······································································································· 151Downloading POS programming data ················································································ 151Changing programming settings ························································································· 152
Programming list ········································································································ 152Changing tare ············································································································ 152
20 Reading (X) and Resetting (Z) of Daily Sales Totals ························································ 154
21 Receipts Printed on the Remote Printer ··········································································· 158Type of Receipts ················································································································· 158
Addition receipt type ·································································································· 158Single/double receipt type ························································································· 159Addition + single receipt type ····················································································· 159Double addition receipt type ······················································································ 160Double (addition + single) receipt type ······································································ 160
6
SYSTEM CONFIGURATIONYour POS terminal may be connected to a server (POS server) and other POS terminals unless yourPOS terminal is used as a stand-alone POS terminal. Also, various peripherals such as a printer,barcode scanner and magnet card reader may be connected with your POS terminal. Please refer tothe following list for the peripherals connectable with your POS terminal. For the applicable peripheralmodels, please contact your authorized SHARP dealer.
■ Peripherals connectable
Line displayMagnetic card readerDrawerPOS printerScaleBarcode scannerKitchen video monitor*Coin dispenser*Drink dispenser*CCTV*EFT*PMS*MEUKeyboardMouse
* Peripherals available in some countries only
■ Printer sharing
Generally it is not necessary for each POS terminal to have a bill printer, receipt printer, report printerjournal printer and/or remote printer (kitchen printer). Multiple POS terminals can share those printersusing the network.
■ Multilingual remote printer
For a remote printer, each item can have three kinds of texts; standard text, second language text andbit map text. Therefore, item text may vary depending on programming.
■ Receipt ON/OFF function
You can disable receipt printing in the REG mode to save paper using the receipt function. To disablereceipt printing, press the [RCPT] key.

7
1 Prior to Operating the POSTerminal
How to use the touch panelThe operator display of the POS terminal is a touch panel. So, the operations can be performed bytouching the panel (keys, items, buttons, etc. on the screen) of the operator display.To touch the panel, use your finger or a stylus. Never apply excessive force when touching the displayand never use any sharp-pointed objects including your fingernails on the display.In order to display another window or to scroll to another window, touch an arrow as shown in theexample below.
To display theprevious window
To display thenext window
To display thenext key window
To display theprevious bar
To scroll down
To scroll up

8
3
2
Turning ON / [CLK#]/[EMP#]
Initial screen for log-in
Job menu screen
Graphical table layput screen
Sign-on:Clerk code ➞ [CLK#]
*
Log-on:Employee code ➞ [EMPLOYEE#]
Log-off: [EXIT]
Registration screen
1
Table list screen
[JOB MENU]
[SCREEN#]
To change screen
Table selection ( ➞ [ORDER] )
Operator display screen configurationYour POS terminal provides five kinds of screens for the operator display, and each screen consists ofsome areas. In this section, general information about the screens and areas are provided.However, please note that since each screen can be created for your specific use, screensincluding area layout, area size, key name, key layout, key size, etc. shown in this manual are allexamples. For the keys available on the POS terminal there is a list in the key section. For thesamples in this manual, the default captions on the key list are used. Please refer to the key listsection for details.
■ Screen transition
Your POS terminal has various kinds of screen, and they can transit as follows:
* Depending on programmnig, a graphical table layout screen or a registrationscreen appears.

9
NOTE
Wall paper can be displayed if it is set.
■ Screens
The POS terminal provides the following four kinds of screens to execute various functions. The detailsof each part of each screen is described in the subsequent section.
Initial screen
The screen that is displayed when you turn on the POS terminal and when you make a sign-offoperation.
Information/status area
Scroll messagewindow area
Numeric key pad
Job entry menu screen
The screen that contains a variety of special functions such as time-in, time-out for employees. Thescreen can be accessed by touching the [JOB MENU] key or when an employee’s log-on operation isperformed.
Information/status area
Job menu keywindows

10
Table layout screen
The screen to access tables for guest checks. Graphical table layout screen and open table list belongto this screen. You can go to the graphical table layout screen by sign-on operation or by touching the[TABLE LAYOUT] key, and the open table list by touching the [TABLE LIST] key.
Graphical tablelayout window
Graphical table layout screen
Information/status area
Function keywindow
Open table list
11
Multiple numbers of the registration screens can exist on your POS terminal, and can be accessed byentering a number and touching the [SCREEN #] key.An item window may be changed automatically according to the preset time zones, such as lunch timeand dinner time. The window can also be changed manually by entering a target menu number andtouching the [MENU#] key.
Registration screen
The screen for item registration, payment and other functions.You can go to a registration screen by executing a sign-on operation or by touching the [ORDER] key.
Receipt window
Information/status area
Key window
Key window
Key window
12
■ Areas configuring screens
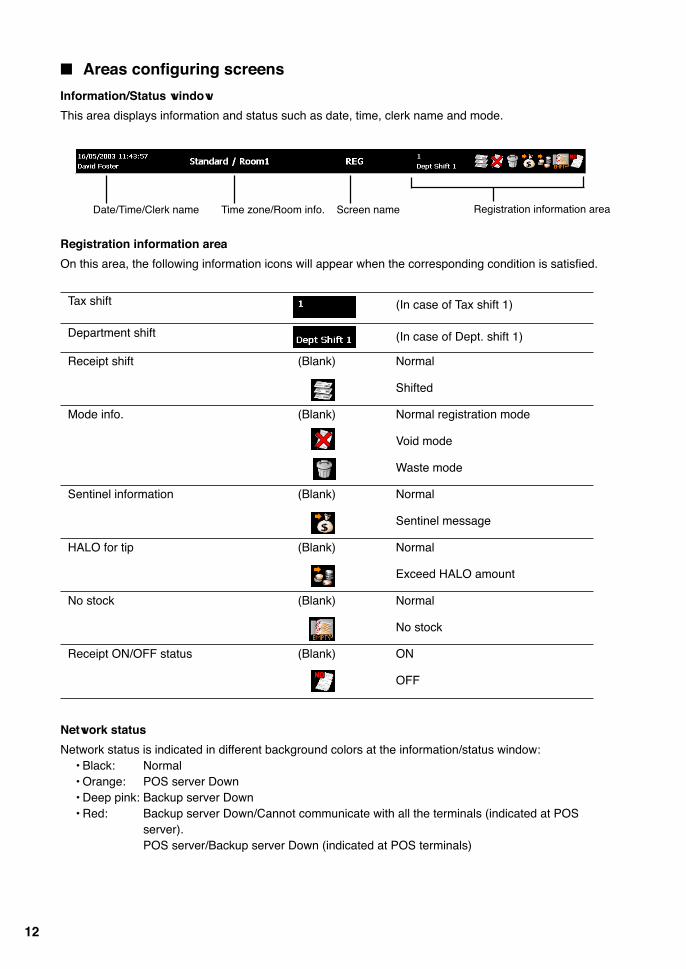
Information/Status window
This area displays information and status such as date, time, clerk name and mode.
Registration information area
On this area, the following information icons will appear when the corresponding condition is satisfied.
Date/Time/Clerk name Time zone/Room info. Screen name Registration information area
Network status
Network status is indicated in different background colors at the information/status window: • Black: Normal • Orange: POS server Down • Deep pink: Backup server Down • Red: Backup server Down/Cannot communicate with all the terminals (indicated at POS
server).POS server/Backup server Down (indicated at POS terminals)
Tax shift (In case of Tax shift 1)
Department shift (In case of Dept. shift 1)
Receipt shift (Blank) Normal
Shifted
Mode info. (Blank) Normal registration mode
Void mode
Waste mode
Sentinel information (Blank) Normal
Sentinel message
HALO for tip (Blank) Normal
Exceed HALO amount
No stock (Blank) Normal
No stock
Receipt ON/OFF status (Blank) ON
OFF
13
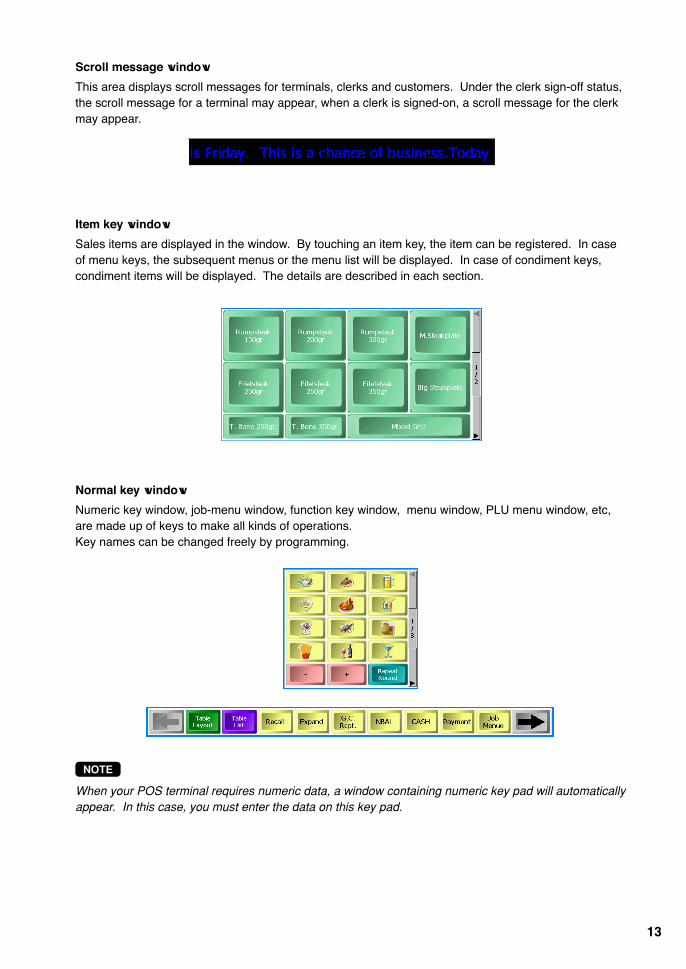
Normal key window
Numeric key window, job-menu window, function key window, menu window, PLU menu window, etc,are made up of keys to make all kinds of operations.Key names can be changed freely by programming.
Item key window
Sales items are displayed in the window. By touching an item key, the item can be registered. In caseof menu keys, the subsequent menus or the menu list will be displayed. In case of condiment keys,condiment items will be displayed. The details are described in each section.
NOTE
When your POS terminal requires numeric data, a window containing numeric key pad will automaticallyappear. In this case, you must enter the data on this key pad.
Scroll message window
This area displays scroll messages for terminals, clerks and customers. Under the clerk sign-off status,the scroll message for a terminal may appear, when a clerk is signed-on, a scroll message for the clerkmay appear.

14
Receipt window
The receipt window appears only on registration screens.
Receipt window expand function
Previously ordered items in guest check may be summarized, but it is possible to view the detail of theitems by touching the [EXPAND] key.
Previouscheck key
Table # key Check # key
Item area - quantity, item name andamount are displayed.
Slider
Separation line - previous order andnew order may be separated with theline (depending on programming).
Total area
Next check key
Multiplication info. and other info.during registration operation are
displayed at the bottom line.

15
Pop-up window
When data entry is required to execute the function you selected by touching a key, for example, whenyou touch the [NAME/ADDR] key to enter the name and address of a guest, a pop-up window willappear automatically. Enter the necessary information using the keyboard or keypad appeared, and/oror select (touch) an option when options are listed.
To cancel the operation (close the window without setting), touch the [Cancel] or [Exit] (variesdepending on a pop-up window).
Abbreviation used on the pop-up window
ESC Escape key
BS Back space key
CL Clear key
Ins Insert key
Del Delete key
up Up arrow key
It Left arrow key
dn Down arrow key
rt Right arrow key
Pgup Page up key
Pgdown Page down key
Data entryThe white column is selected for dataentry. To select other column, touch
the column.
OptionsTouch an option for the selection.
Down arrow keyTouch the arrow, the pull-down menuwill appear.

16
Table layout window
The table layout window has graphical table layout and table list window, which appear on the tablelayout screen only.
Open table list window
Graphical table layout window

17
Viewing the customer display (option)The UP-X300 has no standard customer display. However, the pole type or integrated type customerdisplay can be attached. On the customer display, sales item, price, payment information andmessages for customer may be displayed. The message is scrolled from the right to left on the display.
Screen save modeTo save the electrical power or the display’s life, your POS terminal is provided with a screen savefunction. Your POS terminal goes into the screen save mode when the POS terminal is left idle for anextended period of time. To exit the screen save mode, touch any key. If programmed, a secret codeentry window may appear to prompt a start-up secret code.
Adjusting backlight brightnessYou can adjust backlight brightness of your POS terminal and also make the setting if the backlight isturned off when the machine goes into the screen save mode. Touch the [Back Light] key, the followingwindow will open.
Move the slider to the left to make the screen darker, or to the right to make lighter, To turn off thebacklight automatically in the screen save mode, check the Auto Off check box.To complete the settings, touch [OK].

18
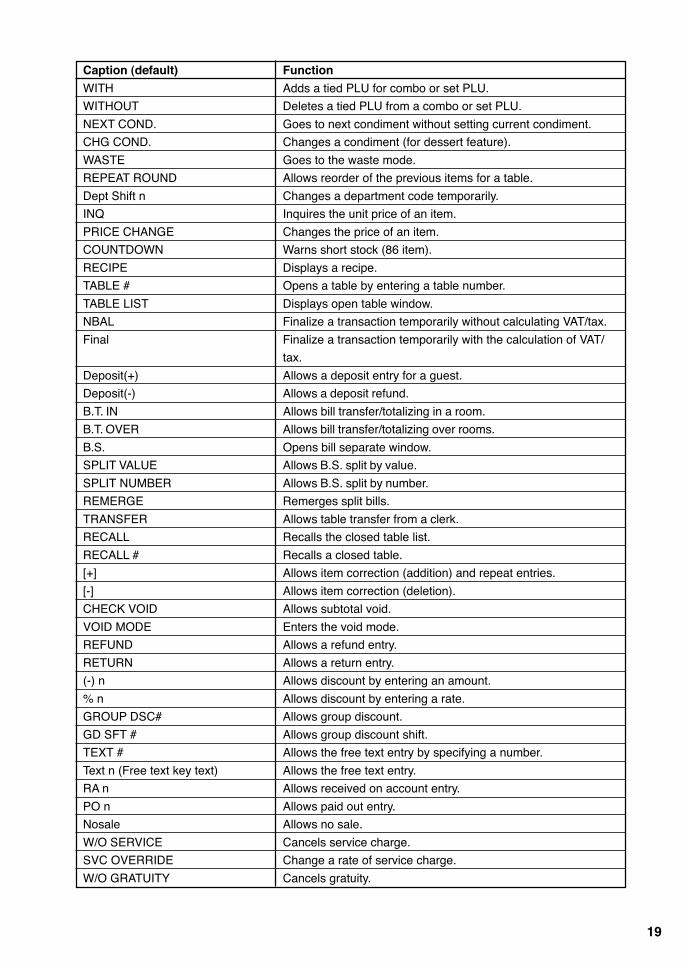
Key list (except item and combo keys)
Caption (default) Function
0 thru 9 Used to enter a numeric data. (0 thru 9)
00 Used to enter a numeric data. (00)
000 Used to enter a numeric data. (000)
1/2 Used to enter a 1/2
. Used to enter a fractional part.
CL Used to clear the entered data (amounts/rates/parameters,
etc.) and the error state.
Used as a backspace key.
CANCEL Used to cancel your current operation or menu or return to
previous menu.
ENTER Used to select item/menu or entered data.
(X) Used to enter quantity.
TABLE LAYOUT Goes to the table layout screen.
TABLE LIST Goes to the open table list screen.
ORDER Goes to the default registration screen.
JOB MENU Goes to the job menu screen.
ROOM# Goes to a selected room.
SCREEN# Goes to a selected screen.
MENU# Goes to selected time zone
EXPAND Changes registration window display.
Goes to the previous page.
➡ Goes to the following page.
ZOOM Enlarges a table layout.
REPORT Goes to sales report printing.
EOS Performs end of session.
JOIN Joins a table to another table.
AVAILABILITY Makes a table available/unavailable (toggle key).
RESERVATION Makes table reservation.
NAME/ADDR Changes a guest name/address.
WAITING Displays the waiting list.
GUEST Finds a table suitable for number of a group of guests. / Enters
a number of guests.
FLOOR PLAN Sets a floor plan.
SECTION Sets employee for each section.
SMOKING Smoking status(smoking/non-smoking) key
PLU/SUB Specifies a PLU code entered.
PLU Name Searches PLU item by name.
SCALE Allows a scale entry.
OPEN TARE Allows tare weight entry.
Modifier n Uses a modifier PLU instead of normal PLU.
UPSIZE Changes a combo meal to a large size.
RDSIZE Changes a combo meal to a small size.
➡
➡
➡
→
19
Caption (default) Function
WITH Adds a tied PLU for combo or set PLU.
WITHOUT Deletes a tied PLU from a combo or set PLU.
NEXT COND. Goes to next condiment without setting current condiment.
CHG COND. Changes a condiment (for dessert feature).
WASTE Goes to the waste mode.
REPEAT ROUND Allows reorder of the previous items for a table.
Dept Shift n Changes a department code temporarily.
INQ Inquires the unit price of an item.
PRICE CHANGE Changes the price of an item.
COUNTDOWN Warns short stock (86 item).
RECIPE Displays a recipe.
TABLE # Opens a table by entering a table number.
TABLE LIST Displays open table window.
NBAL Finalize a transaction temporarily without calculating VAT/tax.
Final Finalize a transaction temporarily with the calculation of VAT/
tax.
Deposit(+) Allows a deposit entry for a guest.
Deposit(-) Allows a deposit refund.
B.T. IN Allows bill transfer/totalizing in a room.
B.T. OVER Allows bill transfer/totalizing over rooms.
B.S. Opens bill separate window.
SPLIT VALUE Allows B.S. split by value.
SPLIT NUMBER Allows B.S. split by number.
REMERGE Remerges split bills.
TRANSFER Allows table transfer from a clerk.
RECALL Recalls the closed table list.
RECALL # Recalls a closed table.
[+] Allows item correction (addition) and repeat entries.
[-] Allows item correction (deletion).
CHECK VOID Allows subtotal void.
VOID MODE Enters the void mode.
REFUND Allows a refund entry.
RETURN Allows a return entry.
(-) n Allows discount by entering an amount.
% n Allows discount by entering a rate.
GROUP DSC# Allows group discount.
GD SFT # Allows group discount shift.
TEXT # Allows the free text entry by specifying a number.
Text n (Free text key text) Allows the free text entry.
RA n Allows received on account entry.
PO n Allows paid out entry.
Nosale Allows no sale.
W/O SERVICE Cancels service charge.
SVC OVERRIDE Change a rate of service charge.
W/O GRATUITY Cancels gratuity.

20
Caption (default) Function
CASH TIP In Allows tip entry by cash.
Non Cash TIP In Allows tip entry by check/charge.
Tip Paid Allows payment of tip to an employee.
EDIT TIP Allows to edit tip amount.
Tip Transfer Allows tip transfer/split.
MDSE SBTL (For US tax system)
SBTL Obtains a subtotal.
TAX n SBTL (For US tax system)
TAX SHIFT(Tax Shift n) Allows a tax shift.
DIFF SBTL Obtains difference subtotal.
TAX (For US tax system)
Subtotal VAT Calculates VAT/tax.
M-TAX (For US tax system)
EX n Allows finalization by a foreign currency.
Cash n Allows cash n finalization.
Check n Allows check n finalization.
Charge n (Credit n) Allows credit n finalization.
Cash Transfer Allows a cash transfer to check or credit.
Hotel Transfer Allows a hotel transfer.
GC BALANCE Allows gift card balance.
EXIT Allows to log off.
EMPLOYEE # Allows to enter an employee number.
CLK n Allows a clerk code entry.
CLK # Allows to enter a clerk number.
TIME IN Allows employees time-in operation.
TIME OUT Allows employees time-out operation.
BREAK IN Allows employees break-in operation (salary is not paid during
break in).
PAID BRK IN Allows employees break-in operation (salary is paid during
break in).
BREAK OUT Allows employee break-out operation.
TIME EDIT Allows time edit for employees.
BAL Allows to check balance for employee sales.
EMPL SALES Allows sales for employees.
Emp. Charge Allows charge sales for employees.
Cust. Charge Allows charge sales for customers.
RCPT Allows a receipt print.
RCPT SW Allows a receipt print on/off.
VP Allows a validation print.
CHECK PRINT Allows a check print.
SORT SHIFT Allows a sort shift.
KP HOLD Allows to hold a menu order to remote printer.
KP GO Allows to release a held menu order to remote printer.
RCP SF Allows a receipt shift.
21
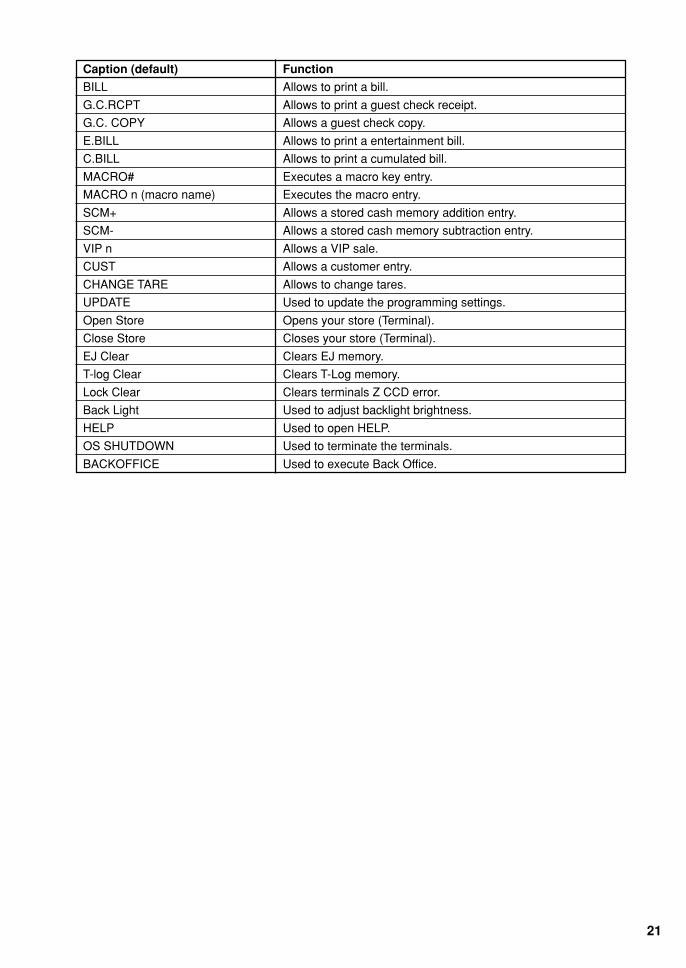
Caption (default) Function
BILL Allows to print a bill.
G.C.RCPT Allows to print a guest check receipt.
G.C. COPY Allows a guest check copy.
E.BILL Allows to print a entertainment bill.
C.BILL Allows to print a cumulated bill.
MACRO# Executes a macro key entry.
MACRO n (macro name) Executes the macro entry.
SCM+ Allows a stored cash memory addition entry.
SCM- Allows a stored cash memory subtraction entry.
VIP n Allows a VIP sale.
CUST Allows a customer entry.
CHANGE TARE Allows to change tares.
UPDATE Used to update the programming settings.
Open Store Opens your store (Terminal).
Close Store Closes your store (Terminal).
EJ Clear Clears EJ memory.
T-log Clear Clears T-Log memory.
Lock Clear Clears terminals Z CCD error.
Back Light Used to adjust backlight brightness.
HELP Used to open HELP.
OS SHUTDOWN Used to terminate the terminals.
BACKOFFICE Used to execute Back Office.
22
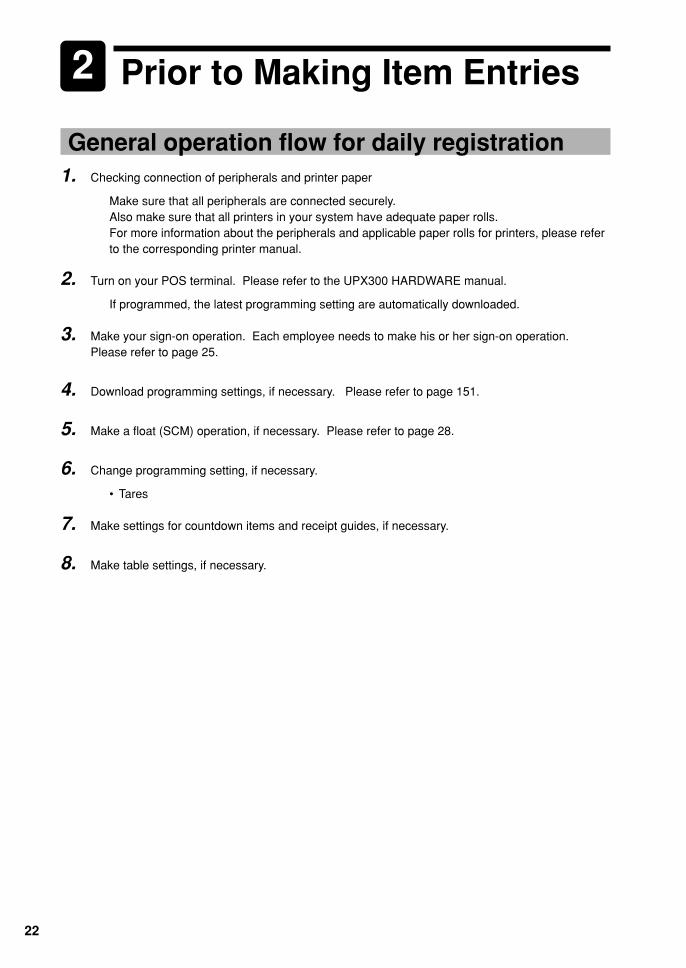
2 Prior to Making Item Entries
General operation flow for daily registration1. Checking connection of peripherals and printer paper
Make sure that all peripherals are connected securely.Also make sure that all printers in your system have adequate paper rolls.For more information about the peripherals and applicable paper rolls for printers, please referto the corresponding printer manual.
2. Turn on your POS terminal. Please refer to the UPX300 HARDWARE manual.
If programmed, the latest programming setting are automatically downloaded.
3. Make your sign-on operation. Each employee needs to make his or her sign-on operation.Please refer to page 25.
4. Download programming settings, if necessary. Please refer to page 151.
5. Make a float (SCM) operation, if necessary. Please refer to page 28.
6. Change programming setting, if necessary.
• Tares
7. Make settings for countdown items and receipt guides, if necessary.
8. Make table settings, if necessary.

23
Error WarningWhen an error occurs on your POS terminal, an error message will appear on the operator display. Fordisplayed error messages, there are two options: Error messages are displayed with the [OK] key,touching the [OK] key makes the message clear. Another option is that an error message disappearsautomatically.
When an error occurs relating to open EFT transaction, master down or the similar conditions related tocommunication control of external devices, the corresponding error message reappears in regularintervals until the problem is resolved.
In the following examples, your POS terminal will go into an error state accompanied with a warningbeep and the error message on the display. Clear the error state by touching the [OK] key and take theproper action.
• When you make an error in key operation:Clear the error and try the entry again.
• When you make an entry beyond a programmed amount entry limit:Check to see if the entered amount is correct. If it is correct, contact your manager.
• When an including-tax subtotal exceeds eight digits:Delete the subtotal by touching the [CL] key and touch a media key to finalize the transaction.
Drawer open alarm
When a specified time has elapsed with the drawer opened, an alarm buzzer sounds to warn theoperator to close the drawer. When the operator closes the drawer, the buzzer will stop.
Memory full warning
When the memory capacity becomes low, the warning message “Insufficient Memory Please call yoursupplier” will appear. Click [OK] to close the window. Then please call your supplier.You can continue operation even after the warning message is displayed until the following memory fullerror is displayed.
Memory full error
When the memory capacity becomes full, the error message “Insufficient Memory. Please call yoursupplier.” with full memory name (memory full/object store full/CF full) will appear. Click [OK] to closethe window. Then please call your supplier immediately.Registration operation is prohibited after the error message is displayed. Make a finalization operation,if necessary.
• When T-Log/EJ/Closed Transaction memory gets fullDepending on programming, registration operation is prohibited. Make a finalization operation, ifnecessary.In case you can continue registration operation, the new data of registration will be abandon.In case the T-Log/EJ gets full at your server system, you cannot continue registration operation.In all cases, please call your manager.
• When GLU/Customer/Employee Sales memory gets fullThe registration is prohibited. Please call your manager.

24
• When Drink Dispenser Missoperation memory gets fullThe registration of drink dispenser debit is prohibited. Please call your manager.
• When Reg Buffer gets fullThe registration is prohibited. Please call your manager.
• When PLU memory gets fullThe registration is prohibited. Please call your manager.
Emergency lock clear
You can clear the following lock status manually. When a lock status occurs, please refer to thefollowing procedure:
Open store Making the terminal “open store” status.Procedure: ➞ [Open Store]
Close store Making the terminal “close store” status.Procedure: ➞ [Close Store]
EJ clear Clearing the EJ memory, and clearing EJ memory full error.Procedure: ➞ [EJ Clear]
T-Log clear Clearing the T-Log memory, and clearing T-Log memory full error.Procedure: ➞ [T-log Clear]
Terminal Z CCD Clearing Terminal Z CCD error.lock clear Procedure: ➞ [Lock Clear]
When POS server is down
When your POS server is down, your POS terminal will display the window to select [Retry] or[Shutdown]. Select either option.You cannot operate your POS terminal until your POS server is recovered.

25
Clerk sign-on/sign-off operation■ Sign-on operation
Prior to item entry, the clerk will be compelled to enter his or her assigned clerk code. However, thismay not be necessary if the POS terminal has been programmed for the clerk code entry as re-designation mode.
NOTE
Your POS terminal provides three systems for the sign-on/off operation; clerk code entry, contactlessclerk key and WMF clerk key systems.Clerk code entry system: Clerks can be assigned by entering his or her clerk code in advance.Clerk direct key system: Clerks can be assigned by touching his or her direct clerk key.Contactless clerk key system: Clerks can be assigned by setting corresponding contactless clerk keys.
Any registration cannot be performed unless a contactless clerk key isset.
WMF clerk key system: Clerks can be assigned by inserting WMF clerk keys. (ContinentalEurope only)
(Clerk code entry system)
1. Enter your clerk code, and touch [CLK#] or insert or set your clerk key.
2. Enter your password, if necessary.
In case of code entry
3. Enter the drawer number you use, if necessary.

26
■ Message for clerk (Electronic mail function)
When a clerk got a mail, the following window will appear.
To close the window, touch [Cancel].To delete the message, touch [Delete].To print the message, touch [Print].
■ Sign-off operation
A signed-on clerk may be automatically signed off after finalizing a transaction. If not, the clerk shouldmake a sign-off operation when he or she finish his or her operation. Use the following procedure.
If another clerk is signed on while a clerk is signed on, the latter will automatically be signed off, unlessthe overlapped clerk entry is allowed. For details of overlapped clerk function please refer to theoverlapped clerk entry section.
Touch the [CLK #] key, your POS terminal will go to a sign-on status waiting for other clerk code entry.Or remove your clerk key.
Touch [Open], a message window will appear.
27
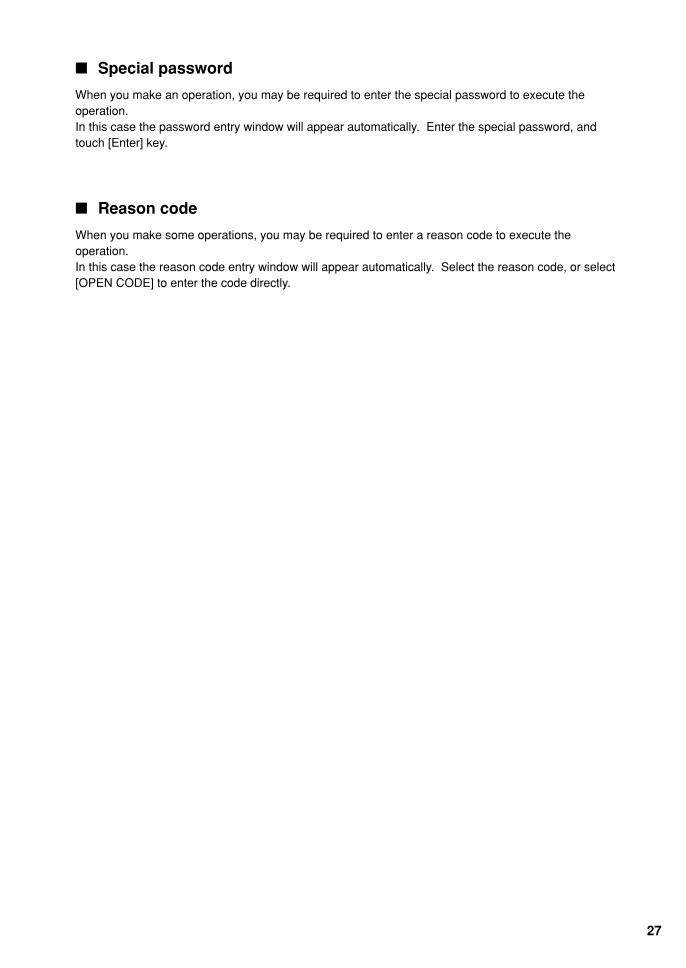
■ Reason code
When you make some operations, you may be required to enter a reason code to execute theoperation.In this case the reason code entry window will appear automatically. Select the reason code, or select[OPEN CODE] to enter the code directly.
■ Special password
When you make an operation, you may be required to enter the special password to execute theoperation.In this case the password entry window will appear automatically. Enter the special password, andtouch [Enter] key.

28
Starting cash memoryYou may be required to enter the float amount (starting cash memory) in the drawer before startingentry operations. The amount should be discriminated from the sales amount when reports aregenerated, or in case of cash/cheque declaration is compulsory (please refer to CCD section fordetails), that amount should be omitted from the total amount of money for cash/cheque declaration.When the amount entry is compulsory, you cannot start item entries unless you make the entry.Use the [SCM+] key to add an amount, and the [SCM-] key to deduct an amount.
1. Touch the [SCM+] or [SCM-] key. The SCM+ or SCM- window appear.
2. Enter a SCM value with a kind of tender.
NOTE
Any entry cannot be made so that the SCM total is negative.

29
3 Item Entries
Single item entries■ Direct PLU entries
Only preset entry is allowed:
➞ [Direct PLU key]
Only open entry is allowed:
➞ Unit price ➞ [Direct PLU key]
➞ [Direct PLU key] ➞ (Key pad appears) ➞ Unit price ➞ [ENTER]
Preset and open entries are allowed:
➞ [Direct PLU key] ➞ (Key pad appears) ➞ [ENTER] (For preset price entry)
➞ [Direct PLU key] ➞ (Key pad appears) ➞ Unit price ➞ [ENTER] (For open price entry)
NOTE
• Unit price: Within the programmed HALO/LALO• You can display preset unit price during sales operation. For operation details, please refer to “Price
inquiry (view) function”.
■ PLU code entries
Only preset entry is allowed:
➞ PLU code ➞ [PLU/SUB]
Only open entry is allowed:
➞ PLU code ➞ [PLU/SUB] ➞ (Key pad appears) ➞ Unit price ➞ [ENTER]
Preset and open entries are allowed:
➞ PLU code ➞ [PLU/SUB] ➞ (Key pad appears) ➞ [ENTER] (For preset price entry)
➞ PLU code ➞ [PLU/SUB] ➞ (Key pad appears) ➞ Unit price➞ [ENTER] (For open price entry)
NOTE
• When PLUs for which the unit price has been programmed as zero are entered, only the salesquantity is added.
• You can display preset unit price during sales operation. For operation details, please refer to “Priceinquiry (view) function”.

30
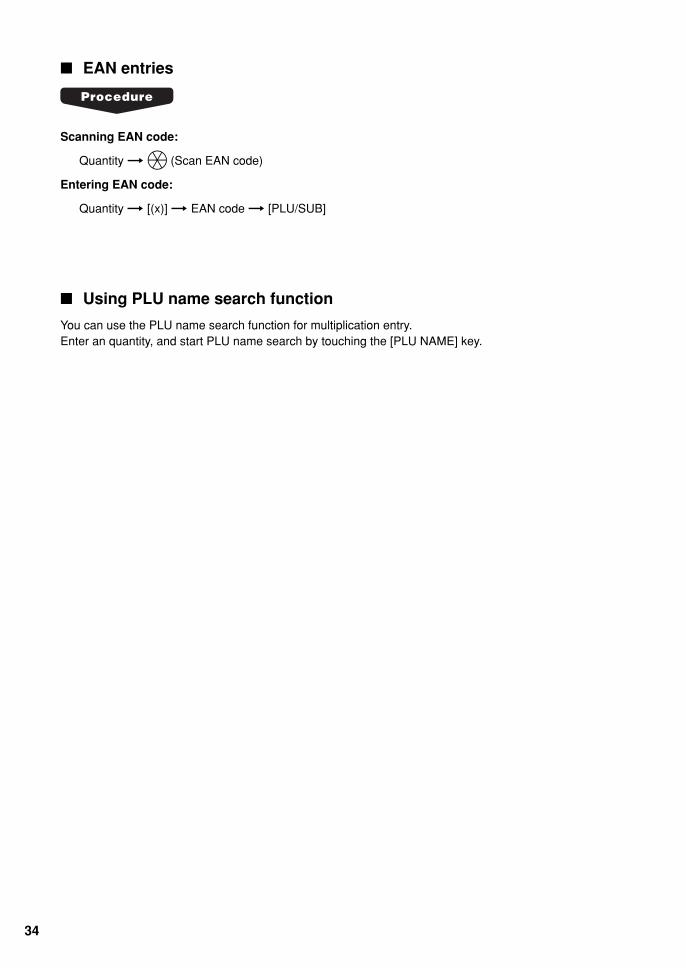
■ EAN entries
Scanning EAN code: ÄEntering EAN code: EAN code ➞ [PLU/SUB]
NOTE
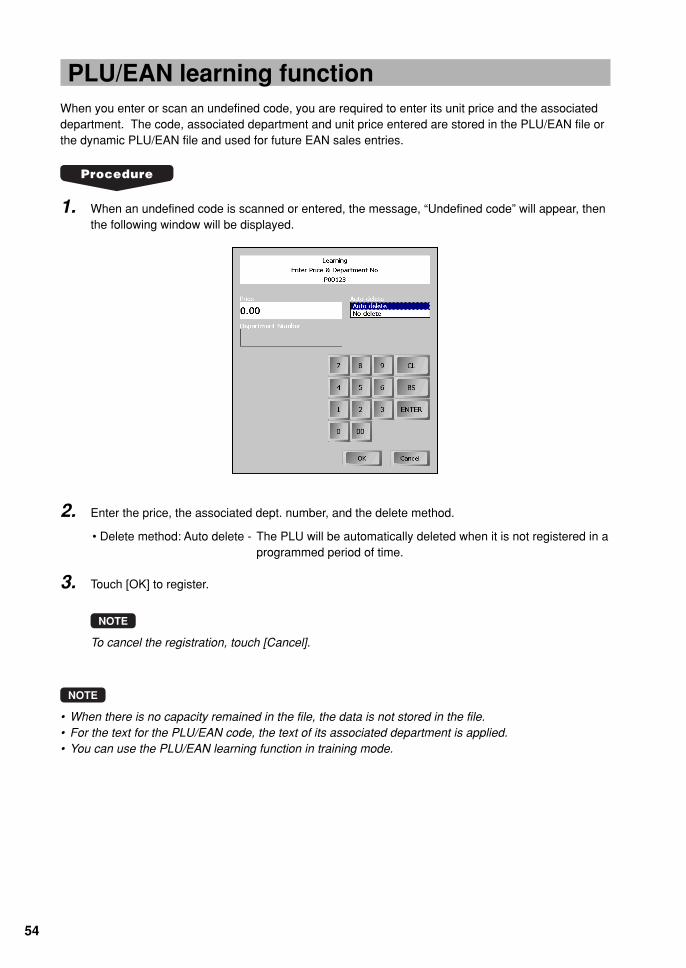
• When scanning or entering an undefined code, your POS terminal will go into the learning functionmode if the learning function is allowed. For details of the learning function, please refer to “PLU/EANlearning function”.
• You can display preset unit price during sales operation. For operation details, please refer to “Priceinquiry (view) function”.
■ Searching objective PLUs by names
You can search for an item (PLU) by entering the item name or a part of the item name.
1. Touch the [PLU NAME] key to display the PLU search window.
2. Enter an item name using the key pad displayed and touch [OK] to display a PLU list.
*: A PLU list may have a drop box to allow PLU Menu selection. (Please refer to “PLU Menu entries”section for details of PLU Menu.)
*

31
Repeat entriesYou can use this function for repetitive entries of the same items.
Touch an item on the receipt window and touch the [+] key. You can repeat touching the [+] key to adesired number.
NOTE
• You can sort the list by name or the code. Touch the column title “Code” or “Name”.
3. Select an item and touch [Enter].

32
Repeat round entriesThis function is intended for a bar tender to accomplish reorder entries simply by touching a single key,when a guest or a group of a guest reorders drinks.
You can enter reordered items based on the last order by touching the [REPEAT ROUND] key.For example, it is assumed that beer, whiskey and wine are preprogrammed so that the repeat round isallowed, and when the following orders are done, the registration are conducted as follows.
Order (key entry) Registered items
First order [Beer] 1 x Beer
[Whiskey] 1 x Whiskey
2 [Pizza] 2 x Pizza
Second order [REPEAT ROUND] 1 x Beer
1 x Whiskey
[Wine] 1 x Wine
Third order [REPEAT ROUND] 1 x Beer
1 x Whiskey
1 x Wine
NOTE
• Repeat round operation of refund and return items is not allowed.• Repeat round operation of scale item is not allowed.• Item discount is ignored at repeat round entry.

33
Multiplication entriesUse this feature when you need to enter two or more the same items.This feature helps you when you sell a large quantity of items or need to enter quantities that containdecimals.
■ Direct PLU entries
Only preset entry is allowed:
➞ Quantity ➞ [Direct PLU key]
Only open entry is allowed:
➞ Quantity ➞ [(x)] ➞ Unit price ➞ [Direct PLU key]
Preset and open entries are allowed:
➞ Quantity ➞ [Direct PLU key] ➞ (Key pad appears) ➞ [ENTER] (For preset price entry)
➞ Quantity ➞ [Direct PLU key] ➞ (Key pad appears) ➞ Unit price ➞ [ENTER] (For open price entry)
NOTE
• Quantity: Up to four-digit integer + three-digit decimal• Unit price: Within the programmed HALO/LALO• Quantity x unit price: Up to eight digits
■ PLU code entries
Only preset entry is allowed:
➞ Quantity ➞ [(x)] ➞ PLU code ➞ [PLU/SUB]
Only open entry is allowed:
➞ Quantity ➞ [(x)] ➞ PLU code ➞ [PLU/SUB] ➞ (Key pad appears) ➞ Unit price ➞ [ENTER]
Preset and open entries are allowed:
➞ Quantity ➞ [(x)] ➞ PLU code ➞ [PLU/SUB] ➞ (Key pad appears) ➞ [ENTER](For preset price entry)
➞ Quantity ➞ [(x)] ➞ PLU code ➞ [PLU/SUB] ➞ (Key pad appears) ➞ Unit price ➞ [ENTER](For open price entry)
NOTE
• Quantity: Up to four-digit integer + three-digit decimal• Unit price: Within the programmed HALO/LALO• Quantity x unit price: Up to eight digits
34
■ EAN entries
Scanning EAN code:
Quantity ➞ Ä (Scan EAN code)
Entering EAN code:
Quantity ➞ [(x)] ➞ EAN code ➞ [PLU/SUB]
■ Using PLU name search function
You can use the PLU name search function for multiplication entry.Enter an quantity, and start PLU name search by touching the [PLU NAME] key.

35
Split-pricing entriesYou will use this function when your customer wants to purchase more or less than the base quantity ofa loose item.
■ Direct PLU entries
Only preset entry is allowed:
➞ Selling q’ty ➞ [(x)] ➞ Base q’ty ➞ [Direct PLU key]
Only open entry is allowed:
➞ Selling q’ty ➞ [(x)] ➞ Base q’ty ➞ [(x)] ➞ Unit price per base q’ty ➞ [Direct PLU key]
Preset and open entries are allowed:
➞ Selling q’ty ➞ [(x)] ➞ Base q’ty ➞ [Direct PLU key] ➞ (Key pad appears) ➞ [ENTER](For preset price entry)
➞ Selling q’ty ➞ [(x)] ➞ Base q’ty ➞ [Direct PLU key] ➞ (Key pad appears) ➞➞ Unit price per base q’ty ➞ [ENTER] (For open price entry)
NOTE
• When you use a base quantity programmed, skip entering base quantity (➞ Base q’ty /➞ Base q’ty ➞ [(x)] ).
• Quantity: Up to four-digit integer + three-digit decimal• Base quantity: Up to two digits integer

36
■ EAN entries
Scanning EAN code:
➞ Selling q’ty ➞ [(x)] ➞ Base q’ty ➞ [(x)] ➞ Ä (Scan EAN code)
Entering EAN code:
➞ Selling q’ty ➞ [(x)] ➞ Base q’ty ➞ [(x)] ➞ EAN code ➞ [PLU/SUB]
NOTE
• When you use a base quantity programmed, skip entering base quantity (➞ Base q’ty ➞ [(x)] ).• Quantity: Up to four-digit integer + three-digit decimal• Base quantity: Up to two digits integer
■ Using PLU name search function
You can use the PLU name search function for split-pricing entry.Make selling quantity and base quantity entries (selling q'ty ➞ [(x)] ➞ base q'ty ➞ [(x)]), and startPLU name search by touching the [PLU NAME] key.
■ PLU code entries
Only preset entry is allowed:
➞ Selling q’ty ➞ [(x)] ➞ Base q’ty ➞ [(x)] ➞ PLU code ➞ [PLU/SUB]
Only open entry is allowed:
➞ Selling q’ty ➞ [(x)] ➞ Base q’ty ➞ [(x)] ➞ PLU code ➞ [PLU/SUB] ➞➞ (Key pad appears) ➞ Unit price ➞ [ENTER]
Preset and open entries are allowed:
➞ Selling q’ty➞ [(x)] ➞ Base q’ty ➞ [(x)] ➞ PLU code ➞ [PLU/SUB] ➞ (Key pad appears) ➞ ➞[ENTER] (For preset price entry)
➞ Selling q’ty ➞ [(x)] ➞ Base q’ty ➞ [(x)] ➞ PLU code ➞ [PLU/SUB] ➞ ➞ (Key pad appears) ➞ Unit price ➞ [ENTER] (For open price entry)
NOTE
• When you use a base quantity programmed, skip entering base quantity (➞ Base q’ty ➞ [(x)] ).• Quantity: Up to four-digit integer + three-digit decimal• Base quantity: Up to two digits integer

37
Single Item Cash Sale (SICS)/Single ItemFinalize (SIF) entries
The operation is the same as that for normal PLU/EAN entries.
■ SICS entries
• This function is useful when a sale is for only one item and is for cash; such as a newspaper. Thisfunction is applicable only to those items that have been programmed for SICS.
• The transaction is finalized and the drawer opens as soon as you touch the direct PLU (item) key.• If a sale of an item set for SICS follows one that is not set for SICS, the transaction does not finalize
and results in a normal sale.
■ SIF entries
• If a sale of an item set for SIF follows one that is not set for SIF, the transaction is finalizedimmediately as a cash sale.
• Like the SICS function, this function is available for single-item cash settlement.

38
Scale entriesYou have a choice of either manual or automatic method for scale entry.If the first method is chosen, the clerk needs to enter the reading of the scale manually. If the secondone is chosen, the weight is automatically read from the connected scale (option) and appears on thePOS terminal display. For the refund entry, only manual scale entries is allowed.
■ Manual scale entries
➞ Net weight ➞ [SCALE] ➞ Base weight ➞ [(x)] ➞ (Single item entry)
• Net weight: 5 digits (2 digits integer + 3 digits decimal) or 2 digits (2 digits integer) dependingon programming
• Base weight: 2 digits• When you use the base weight programmed for the PLU, skip the base weight entry (➞ Base
weight ➞ [(x)]).• Repeat and multiplication entry are not allowed.• For a refund or return entry, touch the [REFUND] or [RETURN] key at any timing (except the
last position) in the key sequence.
■ Auto scale entries
With open tare weight entry
➞ [OPEN TARE] ➞ Tare weight ➞ [SCALE] ➞ Base weight ➞ [(x)] ➞ (Single item entry)
Using preset tare weight
➞ Tare table number ➞ [SCALE] ➞ Base weight ➞ [(x)] ➞ (Single item entry)
• When you use a base weight programmed for the PLU, skip the base weight entry (➞ Baseweight ➞ [(x)]).
• When you use the tare table number programmed for the PLU, skip the tare table numberentry (➞ Tare table number).
• When scale entry is compulsory for the PLU, it is not necessary to touch the [SCALE] key.
To issue a tare weight receipt
➞ [OPEN TARE] ➞ Tare weight ➞ [SCALE] ➞ [CASH n]

39
PLU Menu entriesYour POS terminal can have hierarchical categories as PLU menues.
For example, it is assumed that your POS terminal is programmed as;Main category: Drink (PLU menu)Sub category: Wine, Beer and Soft (PLU menu linked to Drink)Item: Tea, Coffee, and Orange Juice (Item PLUs linked to Soft)
When you touch Drink, the sub category names, Wine, Beer and Soft will appear.When you touch Soft, the item names , Tea, Coffee, and Orange Juice will appear.When you touch Tea, that is an item PLU, the registration will be finalized.
NOTE
• When all PLU Menu items cannot be displayed on a screen, use the scroll operation.
Non-turnover salesThis function is used to perform transactions in cash but not report as turnover as is the case whenflowers are ordered in a restaurant. In this case, a clerk pays the bill and turnover and non-turnoversales are handled in the same transaction.It is performed by entering an item (PLU) belonging to the department.

40
Modifier PLUsThe modifier function is used in pubs and restaurants for a quick and easy registration of reduced orincreased item sizes.
One PLU (original PLU) can have a maximum of 99 modifier PLUs . When a modifier key ([MODIFIER1] - [MODIFIER 99]) is pressed before or after (depending on programming) an item (original PLU) isentered, the modifier PLU is registered instead of the original PLU.
For example, it is assumed that the following programming is done:PLU 1 (original PLU): Unit price - 2.00
Item/key label - [Whiskey]Modifier table 1
PLU 100 (modifier PLU listed in modifier table 1 for PLU 1):Unit price - 2.50Item label - Whiskey Rock
[MODIFIER 1] key label: [Rock]Modifier key operation: After original key
When you touch the [Whiskey] and [Rock] is touched in this sequence, “Whiskey Rock” is registered.
NOTE
• When this function is used, stock quantity is subtracted from the stock quantity of the original PLU,while calculation of item quantity and amount are applied to the modifier PLU.

41
Promotion FunctionYour POS terminal provides three promotion functions; mix and match, automatic modifier and happyhour functions. The operation is the same as for normal item entries.You can program time conditions for executing promotion function; start/end date, time, day of week,month of year)
■ Mix and match function
This function is convenient for matching several items, such as value meals, and for selling items in alump and give a discount.For a discount, amount discount, % discount, free product, discount of the cheapest item and discountof selling price (such as “buy any four items at a selling price of 5.00”) are available.
Your POS terminal may display message for mix-match, such as “buy 3, get 1 free.” to guide you topromote a mix and match selling.
Your POS terminal gives you two type of mix and match function; unconditional assort type (global type)and set settling type (individual type).Global type allows a discount when items as many as the trip level programmed are sold among thePLUs programmed.Individual type allows a discount when each PLU programmed is sold as many as the correspondingPLU trip level.
The mix-match discounts are applied automatically when all those conditions are met during theprogrammed time.
Unconditional assort type (global type)
It is assumed the following is programmed for a mix-match.Promotion type: Amount discountMix & match type: Global typeDiscount amount: 1.00Trip level: 3PLU items: PLU 1 (2.30), PLU 2 (3.10) and PLU 3 (2.50)
Sale 1 PLU 1 2.30PLU 2 3.10PLU 3 2.50Subtotal 7.90Discount -1.00Total 6.90
Sale 2 PLU 1 2.30PLU 2 3.10PLU 2 3.10Subtotal 8.50Discount -1.00Total 7.50

42
Set selling type (individual type)
It is assumed the following is programmed for a mix-match.Promotion type: Amount discountMix & match type: Individual typeDiscount amount: 1.00PLU items: PLU 1 (2.30), PLU 2 (3.10) and PLU 3 (2.50)Trip level: 1 for PLU 1, 1 for PLU 2 and 2 for PLU 3
Sale 1 PLU 1 2.30PLU 2 3.10PLU 3 2.50PLU 3 2.50Subtotal 10.40Discount -1.00Total 9.40
Sale 2 PLU 1 2.30PLU 2 3.10PLU 2 3.10PLU 3 2.50Subtotal 11.00Total 11.00(Discount is not applied.)
■ Automatic modifier
If any modifier PLU is programmed for a promotion, modifier function is automatically realized withoutpressing a modifier key when the time conditions programmed for promotion are satisfied. For details ofmodifier PLUs, please refer to the “Modifier PLUs” section.
■ Happy hour
Each PLU can have a maximum of 20 happy hour prices (happy hour price #1 through #20). If anyhappy hour price number is programmed for a promotion, the happy hour price is automaticallyregistered instead of normal price when the time conditions programmed for promotion are satisfied.
43
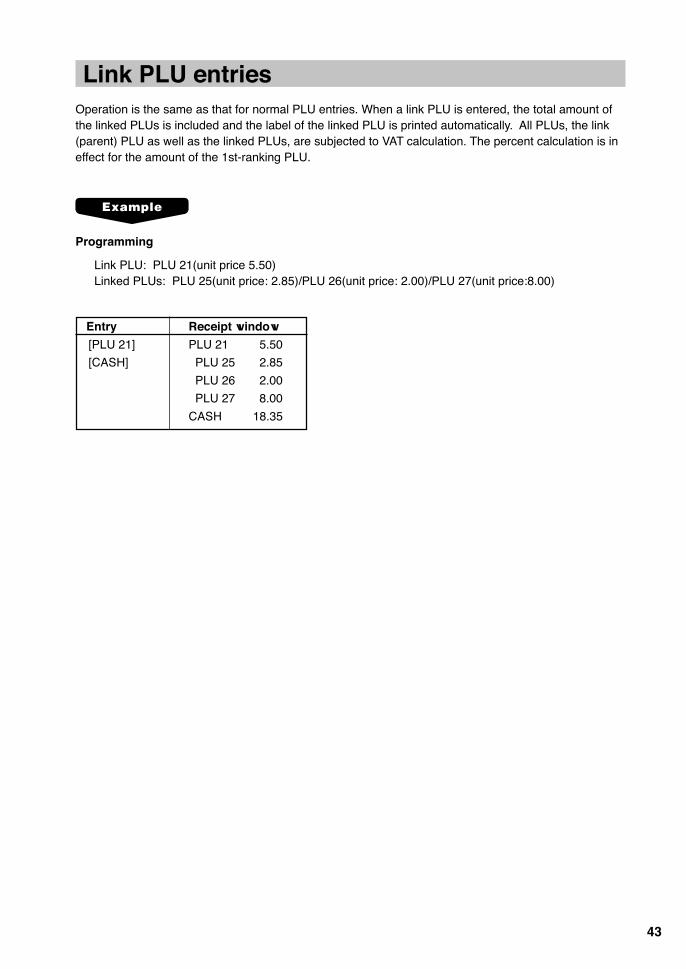
Link PLU entriesOperation is the same as that for normal PLU entries. When a link PLU is entered, the total amount ofthe linked PLUs is included and the label of the linked PLU is printed automatically. All PLUs, the link(parent) PLU as well as the linked PLUs, are subjected to VAT calculation. The percent calculation is ineffect for the amount of the 1st-ranking PLU.
Programming
Link PLU: PLU 21(unit price 5.50)Linked PLUs: PLU 25(unit price: 2.85)/PLU 26(unit price: 2.00)/PLU 27(unit price:8.00)
Entry Receipt window
[PLU 21] PLU 21 5.50
[CASH] PLU 25 2.85
PLU 26 2.00
PLU 27 8.00
CASH 18.35

44
Combo meal entriesOperation is the same as that for normal PLU entries.When a combo meal is registered using a combo key such as HAMBURG SET, the items linked to thecombo meal are all registered automatically. The sum of all adjusted prices for the combo entrybecomes the combo meal price.
Adding to normal adjusted prices for a combo meal, up charge and reduced charge prices are availableto enable large size and small size items registration.
NOTE
• With/Without entries are available during a combo meal entry. For the details, please refer to “With/Without entries”.
It is assumed the following prices and texts are programmed for combo 1 key.
Key text of the combo 1 key: HAMBURG SET
Tied PLU Normal price/text Up charge price/text Reduced charge price/text
PLU 1 5.00/Hamburg 6.00/Hamburg Large 3.50/Hamburg Small
PLU 10 1.00/Potato 1.10/Potato Large 0.90/Potato Small
PLU 20 2.00/Soup 2.20/Soup Large 1.80/Soup Small
For normal registration: Touch the [HAMBURG SET].
HAMBURG SET 8.00 Hamburg Potato Soup
For up-charge registration: Touch the [HAMBURG SET] and the [UPSIZE] in this order.
HAMBURG SET 9.30 Hamburg Large Potato Large Soup Large
For reduced-charge registration: Touch the [HAMBURG SET] and the [RDSIZE] in this order.
HAMBURG SET 6.20 Hamburg Small Potato Small Soup Small
NOTE
When combo meal is registered, quantity totalizer of the combo PLU and amount totalizer of each PLUare updated.
45
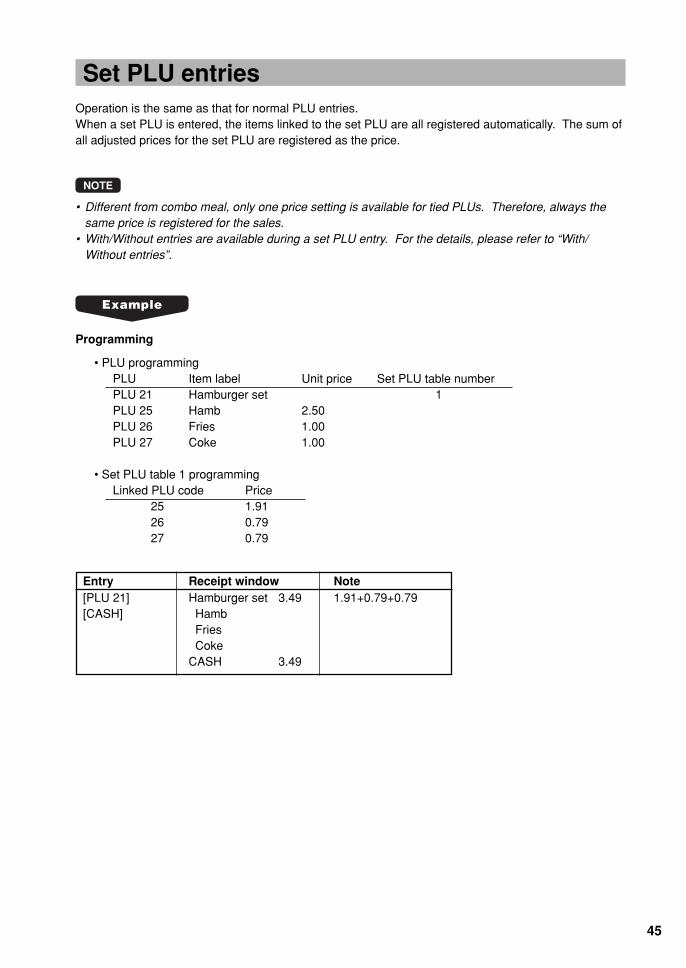
Set PLU entriesOperation is the same as that for normal PLU entries.When a set PLU is entered, the items linked to the set PLU are all registered automatically. The sum ofall adjusted prices for the set PLU are registered as the price.
NOTE
• Different from combo meal, only one price setting is available for tied PLUs. Therefore, always thesame price is registered for the sales.
• With/Without entries are available during a set PLU entry. For the details, please refer to “With/Without entries”.
Programming
• PLU programmingPLU Item label Unit price Set PLU table numberPLU 21 Hamburger set 1PLU 25 Hamb 2.50PLU 26 Fries 1.00PLU 27 Coke 1.00
• Set PLU table 1 programmingLinked PLU code Price
25 1.9126 0.7927 0.79
Entry Receipt window Note[PLU 21] Hamburger set 3.49 1.91+0.79+0.79[CASH] Hamb
Fries CokeCASH 3.49

46
With/Without entriesThis function is used to add or delete tied PLU(s) to or from a combo/set PLU entered to allow a specialrequest by a guest or to meet other situations, such as removing tomato from a dish in a restaurant.To realize this function, use the [WITH] key to add one of the tied PLUs to combo/set PLU, and the[WITHOUT] key to delete one of the tied PLUs to combo/set PLU.
Using the [WITH] key
1. Enter a combo or set PLU.
2. Select the combo or set PLU on the receipt window. The item will be highlighted.
3. Touch the [WITH] key. The corresponding tied PLUs will be displayed.
4. Enter a PLU to add.
Using the [WITHOUT] key
1. Enter a combo or set PLU.
2. Select the tied PLU to be removed. The item will be highlighted.
3. Touch the [WITHOUT] key.
47
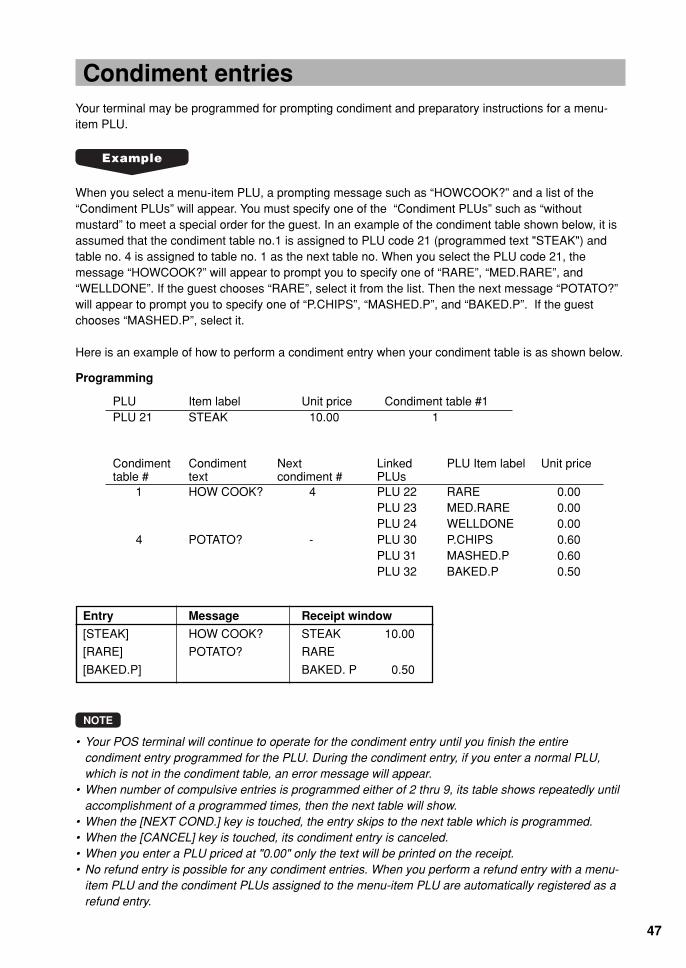
Condiment entriesYour terminal may be programmed for prompting condiment and preparatory instructions for a menu-item PLU.
When you select a menu-item PLU, a prompting message such as “HOWCOOK?” and a list of the“Condiment PLUs” will appear. You must specify one of the “Condiment PLUs” such as “withoutmustard” to meet a special order for the guest. In an example of the condiment table shown below, it isassumed that the condiment table no.1 is assigned to PLU code 21 (programmed text "STEAK") andtable no. 4 is assigned to table no. 1 as the next table no. When you select the PLU code 21, themessage “HOWCOOK?” will appear to prompt you to specify one of “RARE”, “MED.RARE”, and“WELLDONE”. If the guest chooses “RARE”, select it from the list. Then the next message “POTATO?”will appear to prompt you to specify one of “P.CHIPS”, “MASHED.P”, and “BAKED.P”. If the guestchooses “MASHED.P”, select it.
Here is an example of how to perform a condiment entry when your condiment table is as shown below.
Entry Message Receipt window
[STEAK] HOW COOK? STEAK 10.00
[RARE] POTATO? RARE
[BAKED.P] BAKED. P 0.50
Programming
PLU Item label Unit price Condiment table #1PLU 21 STEAK 10.00 1
Condiment Condiment Next Linked PLU Item label Unit pricetable # text condiment # PLUs
1 HOW COOK? 4 PLU 22 RARE 0.00PLU 23 MED.RARE 0.00PLU 24 WELLDONE 0.00
4 POTATO? - PLU 30 P.CHIPS 0.60PLU 31 MASHED.P 0.60PLU 32 BAKED.P 0.50
NOTE
• Your POS terminal will continue to operate for the condiment entry until you finish the entirecondiment entry programmed for the PLU. During the condiment entry, if you enter a normal PLU,which is not in the condiment table, an error message will appear.
• When number of compulsive entries is programmed either of 2 thru 9, its table shows repeatedly untilaccomplishment of a programmed times, then the next table will show.
• When the [NEXT COND.] key is touched, the entry skips to the next table which is programmed.• When the [CANCEL] key is touched, its condiment entry is canceled.• When you enter a PLU priced at "0.00" only the text will be printed on the receipt.• No refund entry is possible for any condiment entries. When you perform a refund entry with a menu-
item PLU and the condiment PLUs assigned to the menu-item PLU are automatically registered as arefund entry.

48
■ How to make multiple entries
For a multiplication entry for a condiment menu, the registration should be either of single or multipleentry methods. (Depending on programming)
Single entry method
Condiment items for a menu must be entered one by one as shown below.
Entry Message Receipt window Note
3 [STEAK] HOW COOK? For the first steak
[RARE] POTATO?
[BAKED.P] 1xSTEAK
RARE
BAKED. P
HOW COOK? For the second steak
[WELLDONE] POTATO?
[MASHED.P] 1xSTEAK
WELLDONE
MASHED. P
HOW COOK? For the third steak
[MED.RARE] POTATO?
[MASHED.P] 1xSTEAK
MED.RARE
MASHED. P

49
Multiplication item entry
Condiment items can be entered by a condiment items by using multiplication entry.
Entry Message Receipt window Note
3 [STEAK] 1xSTEAK
1xSTEAK
1xSTEAK
HOW COOK?
2[RARE] 1xSTEAK
[WELLDONE] RARE
1xSTEAK
RARE
1xSTEAK
WELLDONE
POTATO?
2[BAKED.P] Selecting item
[ENTER] * 1xSTEAK
RARE
BAKED. P
1xSTEAK
RARE
BAKED. P
POTATO?
[MASHED.P] 1xSTEAK It is not necessary to select the
RARE last item.
BAKED. P
1xSTEAK
RARE
BAKED. P
1xSTEAK
WELLDONE
MASHED.P
* From the second condiment item, touch the [ENTER] key to continue selecting condiment items forother guests.

50
■ How condiment item prices are printed:
The price of each condiment item is either rolled-up to the condiment menu price or printedindependently (depending on condiment table programming).
Programming
PLU Item label Unit price Condiment table #1PLU 21 HAMB SET 6.50 1
Condiment Condiment Pricing Next Linked PLU Item label Unit pricetable # text condiment # PLU
1 POTATO? Added to Parent 4 PLU 30 P.CHIPS 0.50PLU 31 MASHED.P 0.50PLU 32 BAKED.P 0.50
4 SOUP? Individual - PLU 40 ONION SOUP 3.00PLU 41 CORN SOUP 3.00
Entry Printing Note
[HAMB SET] 1 HAMB SET 7.00 Potato price is added. (6.50+0.50)
[BAKED.P] 1 BAKED.P Price is not printed.
[ONION SOUP] 1 ONION SOUP 3.00 Price is printed.
[CASH] CASH 10.00
■ Dessert feature
When a set meal including dessert(s) is ordered, the desserts may be ordered after finishing a maindish. In case a dummy dessert is included in a condiment tables for the set menu, you once enterdummy desserts and can enter desserts later as free items of charge.
Programming
PLU Item label Price Condiment table #PLU 21 TODAY’S SPECIAL 15.00 2PLU 15 Cake 2.00 -
Condiment Next Dessert Linked PLU Item label Pricetable # condiment # function PLU
2 3 PLU 11 Onion Soup 0.00PLU 12 Corn Soup 0.00
3 6 PLU 50 Dessert 0.006 - Yes PLU 15 Cake 0.00
PLU 16 Ice cream 0.00

51
Entry Receipt window Note
1 [TABLE #] Table selection
[TODAY'S SPECIAL] 1 TODAY'S SPECIAL 15.00 Condiment entry
[Onion Soup] 1 Onion Soup
[Dessert] 1 Dessert 2 dummy desserts are entered.
[TODAY'S SPECIAL] 1 TODAY'S SPECIAL 15.00
[Corn Soup] 1 Corn Soup
[Dessert] 1 Dessert
[NBAL] Temporary finalization
* For reorder
1 [TABLE #] 1 TODAY'S SPECIAL 15.00 Table recall
1 Onion Soup
1 Dessert
1 TODAY'S SPECIAL 15.00
1 Corn Soup
1 Dessert
Touch the line of Dessert 1 TODAY'S SPECIAL 15.00
1 Onion Soup
1 Dessert
1 TODAY'S SPECIAL 15.00
1 Corn Soup
1 Dessert
[Change Condiment] Condiment keys are displayed.
[Ice Cream] 1 TODAY'S SPECIAL 15.00
1 Onion Soup
1 Ice Cream Insetead of Dessert, Ice Cream
1 TODAY'S SPECIAL 15.00 is registered.
1 Corn Soup
1 Dessert

52
Price shift by menuThe preset price of each PLU is changed automatically by preset hourly range for valid menu (e.g.morning time/lunch time etc.). The prices for the menu can also be changed manually be pressing the[MENU#] key. Your POS terminal provides a maximum of five prices (5 menus having different prices,one for general time zone, and others for special time zones).
To shift to the target price menu: Time zone number (1-4) ➞ [MENU#]
Department shiftThis shift can change the preset department to which a PLU belongs temporarily. When the [DEPTSHIFT n] key is entered at the start of a transaction, the department codes to which all PLUs used in thetransaction belong are changed to those which have been assigned to the [DEPT SHIFT n] key used.

53
WASTE modeThis mode is used to throw away an article which has already been prepared and is no longerserviceable.
1. Touch the [WASTE] key. The POS terminal will enter to the WASTE mode. (The trash can iconappears at the information/status window.)
2. Enter items to be wasted. (Please refer to item registration section.)
3. Touch the [WASTE] key again to quit the WASTE mode.
NOTE
• PLU entries are only allowed in the WASTE mode, and direct and indirect void operations are alsoallowed in this mode.
• When a WASTE mode transaction is finalized, the drawer does not open.• The consecutive number is incremented every WASTE mode transaction.• When the WASTE mode is activated by touching the [WASTE] key, the mode icon (trash can) is
displayed.• Condiment compulsory may be ignored depending on programming.
54
PLU/EAN learning functionWhen you enter or scan an undefined code, you are required to enter its unit price and the associateddepartment. The code, associated department and unit price entered are stored in the PLU/EAN file orthe dynamic PLU/EAN file and used for future EAN sales entries.
1. When an undefined code is scanned or entered, the message, “Undefined code” will appear, thenthe following window will be displayed.
2. Enter the price, the associated dept. number, and the delete method.
• Delete method: Auto delete - The PLU will be automatically deleted when it is not registered in aprogrammed period of time.
3. Touch [OK] to register.
NOTE
To cancel the registration, touch [Cancel].
NOTE
• When there is no capacity remained in the file, the data is not stored in the file.• For the text for the PLU/EAN code, the text of its associated department is applied.• You can use the PLU/EAN learning function in training mode.
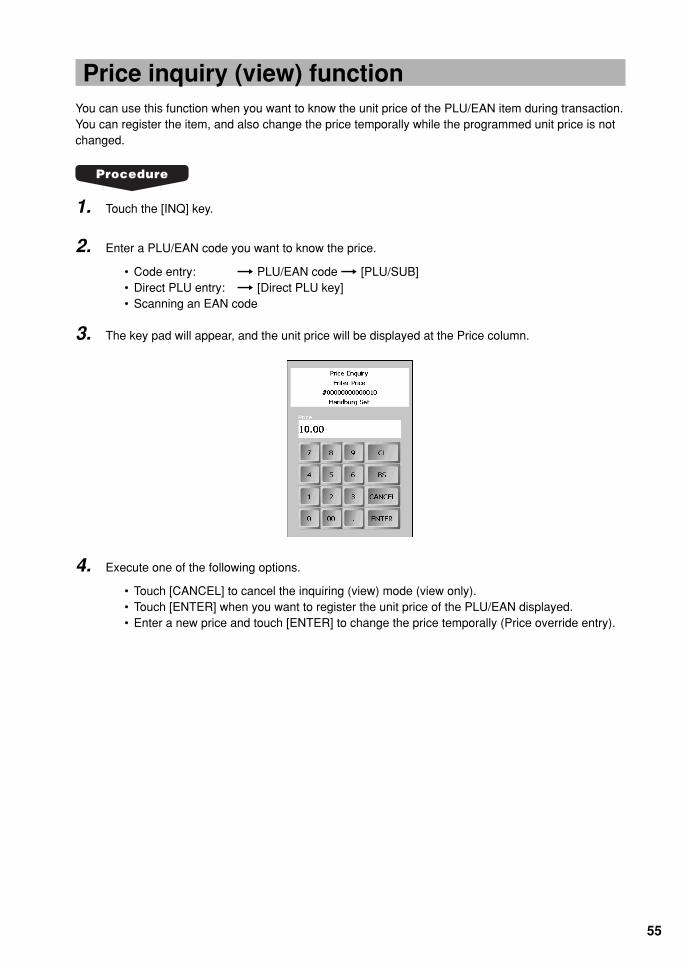
55
Price inquiry (view) functionYou can use this function when you want to know the unit price of the PLU/EAN item during transaction.You can register the item, and also change the price temporally while the programmed unit price is notchanged.
1. Touch the [INQ] key.
2. Enter a PLU/EAN code you want to know the price.
• Code entry: ➞ PLU/EAN code ➞ [PLU/SUB]• Direct PLU entry: ➞ [Direct PLU key]• Scanning an EAN code
3. The key pad will appear, and the unit price will be displayed at the Price column.
4. Execute one of the following options.
• Touch [CANCEL] to cancel the inquiring (view) mode (view only).• Touch [ENTER] when you want to register the unit price of the PLU/EAN displayed.• Enter a new price and touch [ENTER] to change the price temporally (Price override entry).

56
Price change functionYou can use this function when you need to change the unit price or associated department of a PLU/EAN item.
There are two methods for change:1. Price change modeYou can change the preset price and/or the associated department of a PLU/EAN item permanently.
2. Changing price during a transactionWhen you find a wrong price and/or associated department upon transaction, you can correct them atthe time of transaction. With the entry of new price and/or associated department, the preset price and/or associated department is automatically changed to the new price and/or associated department. Thechanged price/associated department is valid until the operation for the End of the Day.
NOTE
• In case price change functiuon is prohibited for the item by programming, the warning message“Change Inhibited Product” will appear. Touch the [CL] key to cancel.
Price change mode
1. Touch the [PRICE CHANGE] key.
2. Enter an objective item.
• Code entry: ➞ PLU/EAN code ➞ [PLU/SUB]• Direct PLU entry: ➞ [Direct PLU key]• Scanning an EAN code
3. The key pad will appear, and the unit price and the associated department code will be displayedat the Price and Department# columns respectively.
4. Execute one of the following options.
• Touch [Cancel] to cancel the price change mode.• Enter a new price and/or associated department code, and touch [OK]. The new price and/or
associated department code are registered.

57
Changing price during a transaction
1. Enter an objective item.
• Code entry: ➞ PLU/EAN code ➞ [PLU/SUB]• Direct PLU entry: ➞ [Direct PLU key]• Scanning an EAN code
2. If the PLU has a wrong price, touch the [PRICE CHANGE] key.
3. The key pad will appear, and the unit price and the associated department code will be displayedat the Price and Department# columns respectively.
4. Execute one of the following options.
• Touch [Cancel] to cancel the price change mode.• Enter a new price and/or associated department number, and touch [OK] The new price and/
or associated department number are registered.
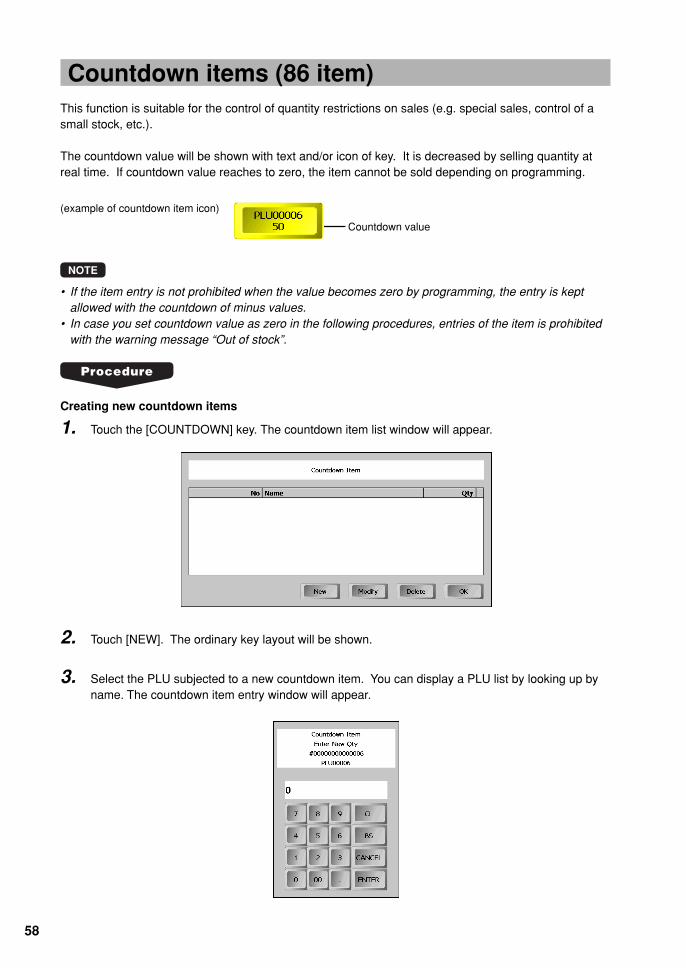
58
Countdown items (86 item)This function is suitable for the control of quantity restrictions on sales (e.g. special sales, control of asmall stock, etc.).
The countdown value will be shown with text and/or icon of key. It is decreased by selling quantity atreal time. If countdown value reaches to zero, the item cannot be sold depending on programming.
Creating new countdown items
1. Touch the [COUNTDOWN] key. The countdown item list window will appear.
2. Touch [NEW]. The ordinary key layout will be shown.
3. Select the PLU subjected to a new countdown item. You can display a PLU list by looking up byname. The countdown item entry window will appear.
NOTE
• If the item entry is not prohibited when the value becomes zero by programming, the entry is keptallowed with the countdown of minus values.
• In case you set countdown value as zero in the following procedures, entries of the item is prohibitedwith the warning message “Out of stock”.
(example of countdown item icon)
Countdown value

59
4. Enter a quantity of the item, and touch [ENTER]. The item and stock number appear in thecountdown item window.
5. Repeat from step 2 to create another new countdown item, if necessary.
To finish the operation, touch [OK].
Modifying countdown values
1. Touch the [COUNTDOWN] key.
2. The countdown item list window will appear.
3. Select a PLU to be modified and touch [Modify]. The countdown item entry window will appear.
60
4. Enter a new quantity of the item, and touch [ENTER]. The item and the new quantity appear in thecountdown item window.
5. Repeat from step 2 to modify another countdown item, if necessary.
To finish the operation, touch [OK].
Deleting countdown items
1. Touch [COUNTDOWN] key.
2. The countdown item list window will appears.
3. Select a PLU to be deleted and touch [Delete]. The selected PLU will be deleted from the list.
4. Repeat from step 2 to delete another new countdown item, if necessary.
To finish the operation, touch [OK].
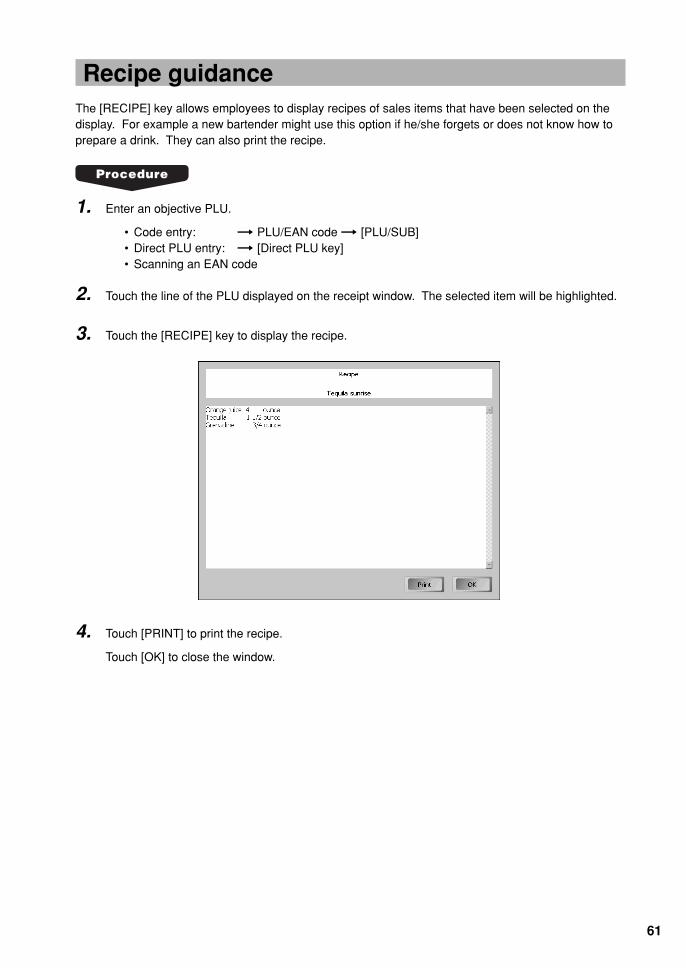
61
Recipe guidanceThe [RECIPE] key allows employees to display recipes of sales items that have been selected on thedisplay. For example a new bartender might use this option if he/she forgets or does not know how toprepare a drink. They can also print the recipe.
1. Enter an objective PLU.
• Code entry: ➞ PLU/EAN code ➞ [PLU/SUB]• Direct PLU entry: ➞ [Direct PLU key]• Scanning an EAN code
2. Touch the line of the PLU displayed on the receipt window. The selected item will be highlighted.
3. Touch the [RECIPE] key to display the recipe.
4. Touch [PRINT] to print the recipe.
Touch [OK] to close the window.

62
4 Display of SubtotalYour POS terminal provides the following types of subtotals:
■ Subtotal
Touch the [SUBTOTAL] key at any point during a transaction. The sales subtotal including tax willappear in the receipt window.
■ Difference subtotal (Differ ST)
Touch the [DIFFER SBTL] key at any point during a transaction. When you touch it first, the subtotal ofall entries which have been made is displayed and printed. If you touch it second, you will get thesubtotal of entries which have been made after the first subtotal. Taxes are calculated each time youtouch the [DIFF SBTL] key, and taxes and taxable subtotals are displayed and printed on the receipt.
NOTE
When the transaction of zero sales subtotal is finalized, the drawer will remain closed.

63
5 Finalization of TransactionThe following types of media; cash, cheque and credit, can be used for the finalization oftransaction, and the direct finalization and the amount tendering are available. When acustomer gives the exact amount of money, you can finalize the transaction without enteringtendered amount (direct finalization). When a customer gives a larger amount than thesales amount, or gives multiple media, such as cash and credit, you must finalize byentering the amount tendered.
■ Direct finalization
Touch a corresponding media key; [CASH n], [CHECK n] or [CREDIT n]. The sales amount appears onthe operator and customer display. Also the drawer opens and the receipt is issued, if programmed.
NOTE
• The direct finalization of cash or cheque is disallowed after a short tendering operation.• The direct charge function is allowed when its media is programmed for prohibited tendering.• The direct check function is disallowed when the sales subtotal (full subtotal) is zero or negative.
■ Amount tendering
Enter the tendered amount, and touch a corresponding media key; [CASH n], [CHECK n] or[CREDIT n].
When the tendered amount is equal to or larger than the sales amount, the change due appears on theoperator and customer display. Also the drawer opens and the receipt is issued, if programmed.
When the tendered amount is smaller, “DUE” is displayed at the bottom line of the receipt window. Incase another registration is started under the short tender, the error message “Insufficient PaymentAmount” appears on the operator and customer display. Touch [CL], and repeat the operation until thedeficit becomes zero.
NOTE
• The credit tendering is allowed when its media is programmed for compulsive tendering.• The amount tendering is disallowed when the sales subtotal (full subtotal) is zero or negative.• The amount tendering for the partial payment (short tendering) may be allowed. (Depending on
programming)

64
6 Computation of VAT (ValueAdded Tax) /Tax
VAT/tax systemThe POS terminal supports up to 10 different tax definitions.Your POS terminal provides percent rate tax calculation and tax amount entry method.
For the percent calculation, the following formula are applied for VAT or tax calculation on each taxablesubtotal (taxable 1 through taxable 10).
Tax calculating equation: Tax amount = (taxable subtotal) x tax rate / 100VAT calculating equation: Tax amount = (tax rate) x (taxable subtotal) / (100 + tax rate)
The rounding depends on programming.
Also automatic calculation (for percent rate calculation only) and manual calculation are applied for thesystem. The automatic calculation, at settlement, automatically calculates VAT/tax for taxable 1 throughtaxable 10 subtotals by using the corresponding programmed percentages.For manual calculation, please refer to the procedure below.
Manual calculation on the basis of the preset VAT/tax rates
➞ [SBTL VAT] ➞
Manual VAT rate entry using the numeric keys
➞ VAT rate ➞ [SBTL VAT]
Manual VAT/tax amount entry using the numeric keys
➞ VAT/tax amount ➞ [Manual TAX]

65
If programmed, VAT/tax assignment is printed at the fixed right position of the amount on the receiptand bill as follows:
VAT1/tax1 - AVAT2/tax2 - BVAT3/tax3 - CVAT4/tax4 - DVAT5/tax5 - EVAT6/tax6 - FVAT7/tax7 - CVAT8/tax8 - DVAT9/tax9 - EVAT10/tax10 - F
When the multiple VAT/tax is assigned to a PLU, a smaller number of the VAT/tax will be printed.

66
VAT shift entriesThis feature is intended to shift the tax status of a particular item to another tax status.“VAT item shift” and “VAT transaction shift” are available to shift a tax status.
VAT item shift
The tax status of one item only is shifted. You can use one or more tax shift keys.
VAT transaction shift
Tax status of all sales items are shifted. By touching the [TAX SHIFT n] key during a transaction, youcan shift tax status, and touching the key again, you can return to the normal status.
Automatic VAT shift operation
VAT shift operation may be activated automatically under the following situations:• Automatic VAT shift by clerk
The VAT shift is performed automatically by programmed VAT shift status for each clerk.• Automatic VAT shift by media keys
The VAT shift is performed automatically by programmed VAT shift status for each media.• Automatic VAT shift by terminal
The VAT shift is performed automatically by programmed VAT shift status for each terminal.
Manual VAT shift operation
For the manual VAT shift operation, take the following procedures:
For the VAT item shift, touch the [TAX SHIFT n] key to activate the VAT shift prior to entering ofPLU/EAN concerned.For the VAT transaction shift, touch the [TAX SHIFT n] key at the end of a transaction.

67
ReturnWhen a returned item (normally an item that can be resold) is received, use the [RETURN] key.Make a return item registration after touching the [RETURN] key at any timing during the registration.
7 Auxiliary Entries
RefundWhen a refund item (normally an item that cannot be resold) is received, use the [REFUND] key.Make a refund item registration after touching the [REFUND] key at any timing during the registration.

68
Discount or Premium entries using a discount keyYour POS terminal allows you to deduct or add a certain amount less than a programmed upper limitfrom individual items and to a total amount.
NOTE
• Not all items allow discount/premium. The items subjected to discount/premium are limited byprogramming.
• Also not all clerks are allowed discount/premium operation.• The upper limit of a discount/premium amount depends on programming.
■ Discount/Premium for items
1. Make an item entry.
2. Enter a discount/premium amount and touch a discount key ([(-)n]).
When you use the preset discount amount (if programmed), touch a discount key withoutentering a discount amount.
NOTE
• To make a discount/premium operation for an item already registered, touch the item subjected to thediscount/premium first, then operate step 2 above.
■ BOGO (Buy one get one) entry
In case that the bogo entry is allowed for an item, the item will be automatically discounted when it isregistered.
■ Discount/Premium for total amount
1. Make item entries.
2. Touch the [SBTL] key.
3. Enter a discount/premium amount and touch a discount key ([(-)n]).
When you use the preset discount amount (if programmed), touch a discount key withoutentering a discount amount.

69
Discount or Premium entries using a percent keyYour POS terminal can make percent calculations (discount and premium) with the use of percent keys([% n]).
NOTE
• Not all items allow discount/premium. The items subjected to discount/premium are limited byprogramming.
Also not all clerks are allowed discount/premium operation.• The upper limit of a percent rate depends on programming.
■ Discount/Premium for items
1. Make an item entry.
2. Enter a percent rate for discount/premium and touch a percent key ([(%)n]).
When you use the preset percent rate (if programmed), touch a percent key without entering apercent rate.
NOTE
• To make a discount/premium operation for an item already registered, touch the item subjected to thediscount/premium first, then operate step 2 above.
■ Discount/Premium for total amount
1. Make item entries.
2. Touch the [SBTL] key.
3. Enter a percent rate for discount/premium and touch a percent key ([(%)n]).
When you use the preset percent rate (if programmed), touch a percent key without entering apercent rate.

70
Group discount/premiumYour POS terminal gives you group discount/premium method. Items belonging to a discount/premiumgroup are subjected to discount/premium, and discount/premium is performed according to theprogrammed percentage.Use the following procedure for group discount/premium operation.
■ Group discount
1. Enter a group discount number and touch the [GROUP DSC#] key.
NOTE
Group discount/premium may be performed automatically at finalization depending on programming.
■ Group discount shift
By using the [GD SFT#], you can shift a discount group number.Enter a group number and touch the [GD SFT#] key before starting target item entries.
Checking subtotal of items subjected to group discount
Enter a group number and touch the [GD SFT#] key and the [SBTL] key in this order. The windowappears.

71
8 Payment Treatment
Handling tipsYour POS terminal provides tip-in, tip-editing, tip-transfer and tip-paid functions for treating tips. Readthough this section for handling tips.
■ Tip-in entries
Your POS terminal allows entries of tips that your guests give to clerks in cash or other media (chequeor credit). Also depending on programming, over-tendered amount may be automatically received as atip.The tip-in entry assumes that it is carried out in the following system:• Tip paid by a guest to a clerk is entered in the POS terminal by tip entry, and the restaurant pays the
tip amount to the clerk later in cash.• Tip amount entry to the POS terminal is normally performed by a clerk.
The entry is allowed before payment operation is performed. After the tip entry is performed, item entryis not allowed. The transaction operation must be finalized by payment operation. Two types of tip, cashtip and non-cash (credit or cheque) tip, are not allowed to be mixed in entry during one transactionoperation.
Cash tip entry
In a transaction in which cash tip entry is made, when payment operation is started, the process is asfollows:Cash tender (which may be foreign money) is compulsory until total cash tender exceeds or equals tocash tip amount. Then, cheque (or credit) tender operation is allowed.
Non-cash tip entry
In a transaction in which non-cash tip entry is made, when payment operation is started, the process isas follows:Cheque (or credit) tender is compulsory until total cheque (or credit) tender exceeds or equals to non-cash tip amount. Then, cash tender operation is allowed.
Cash tip entry
➞ Tip amount ➞ [CASH TIP IN] ➞
Non-cash tip entry
➞ Tip amount ➞ [NON-CASH TIP IN] ➞
NOTE
• If the tip entered exceeds the HALO amount, your POS terminal requests a confirmation of the tipamount.
• When the tip totalizer exceeds the HALO amount, your POS terminal show the special indicator.
72
■ Tip editing
This function is used for entering tip amounts after finalizing a guest check transaction. This function isavailable when the guest check transaction is finalized in credit tender, and also when the tip is paid incredit tender. The transaction number or bill number which is issued when the [SRVC] or [FINAL] key istouched in guest check entry must be used in order to identify the guest to edit or add tip amount. Forthe operation, touch the [EDIT TIP] key. When the display prompt appears, enter the bill number ortransaction number and tip amount. In case that the payment was done by multiple credit cards, thewindow to specify the target credit type for which the tip editing should be done will be displayed afterentering the bill number or transaction number.
■ Tip paid entries
This operation is used when tips that guests have paid by using credit card are paid to respective clerksin cash. To perform a tip paid entry, make sure the target clerk is assigned, and touch the [TIP PAID]key. The clerk currently assigned is subjected to the tip payment.
NOTE
When the tip amount remains unchanged in Individual Server Resetting, the tip paid function isautomatically executed and tip receipt is issued to the report printer prior to report printing.

73
■ Tip transfer
This function is used to transfer tip amount from one clerk to another to share a tip with others. All or apart of tip amount can be transferred to another clerk.
1. Make sure the clerk whose the tip should be shared is logged-on.
2. Touch the [TIP TRANSFER] key to display a tip transfer window.
3. Select an employee to whom the tip is transferred, then enter the tip amount to be shared andtouch [ENTER] for each cash and non-cash tip. After the entries, touch [OK].

74
Currency exchangeYour POS terminal allows payment entries in a foreign currency (totally nine different foreign currenciesare available.) Pressing an exchange key creates a subtotal in foreign currency. Cash ([CASH 1] or[CASH 2]) alone can be handled after currency exchange.
1. Touch the [EX n] key. The sales amount will appear in foreign currency at the receipt window.
2. Enter an amount tendered in foreign currency, and touch a cash key. The finalization operation isperformed.
If you receive the exact amount, directly touch a cash key.To cancel the operation, touch [CL] key.
NOTE
• When the amount tendered is short, its equivalent in deficit is shown in domestic currency.• Change amount will be displayed in domestic currency.• Credit and cheque tendering for exchange 1 may be available when EURO status is B or C. For
details of EURO status, please refer to “EURO Migration Function”.
Case of opening foreign currency drawer:
• At the timing of issuing receipt after tendering exchange amount.• At the timing of issuing X/Z report (included CCD)• The Exchange drawer open function is executed. When the EXCHANGE(n) key is touched simply out
of transaction, the foreign currency drawer is opened.

75
Received-on-Account (RA) entryReceived-on-account entry is available in the following two methods depending on programming:• Cash-only entry; cash is only available.• Mixed entry; mixed entries of cash, cheque and credit are available. Discount/premium using [% n] or
[(-) n] key is available once on the mixed entry.
Cash-only entry
1. Enter RA amount (max. 8 digits, varies depending on HALO programming) and touch a RA ([RAn]) key.
Mixed entry
1. Enter RA amount (max. 8 digits, varies depending on HALO programming) and touch a RA key.
To cancel, touch the [-] key.
2. Make a discount/premium entry if necessary: Enter a discount/premium rate/amount if necessary,and touch a [% n] or [(-) n] key.
3. Make a media key finalization operation: Enter an amount and touch a media key ([CASHn],[CHECKn], [CREDITn]).
4. Repeat the step 3 until the amount reaches to RA amount.
If an amount entry is omitted, the remained amount is registered, and the transaction willfinalize.
NOTE
RA entry is not allowed during other operation, such as a sales entry.

76
Paid-out (PO) entryPaid-out entry is available in the following two methods depending on programming:• Cash-only entry; cash is only available.• Mixed entry; mixed entries of cash, cheque and credit are available.
Cash-only entry
1. Enter PO amount (max. 8 digits, varies depending on HALO programming) and touch a PO ([POn]) key.
Mixed entry
1. Touch a PO key.
2. Enter a PO amount (max. 8 digits, varies depending on HALO programming).
3. Touch the corresponding media key ([CASHn], [CHECKn], [CREDITn]).
4. Repeat steps 2 and 3 if necessary.
5. To finish PO entry, touch the PO key touched in step 1 again.
NOTE
PO entry is not allowed during other operation, such as a sales entry.
77
No sale (exchange)To open the drawer without any sales entry, use a cash key or the [Nosale] key depending onprogramming.
Transferring cashThis function is used to change cash sales amount for credit or cheque sales amount. For example, youcan use this function in the following situation: You finalize a transaction by cash to issue a bill to showthe guest, and the guest pays by credit. Then you can use this function by changing the cash sale to acredit sale.
➞ Amount ➞ [CASH TRANS] ➞ [CHECK n] or [CREDIT n]
NOTE
• The totalizers of cash, cheque and credit sales are corrected accordingly.
Cashing a chequeTo cash a cheque, follow the procedure below. Availability of this function depends on thecorresponding programming.
➞ Amount ➞ [CHECK n] ➞

78
VIP salesThis function is used for transactions for important guests.Your POS terminal goes to the VIP sale mode when the [VIP n] key is touched at the beginning oftransaction. In the VIP sale mode, the items which are preset as VIP sale available can be registeredand the amount is reduced to zero.The VIP sale mode is canceled automatically upon completion of the transaction entries.
➞ [VIP n] ➞ item entries ➞ finalization
Service chargeWhen the payment operation is made for sales registrations, the service charge amount may beautomatically calculated and printed according to the programming settings.
When a service charge is involved in the payment amount, you can remove the service charge or canchange the service charge rate, if necessary. Touch the [W/O SERVICE] key to remove, and enter anew rate or amount and touch the [SVC OVERRIDE] key to change to the rate or amount.
GratuityCalculation
When the payment operation is made for sales registrations, the gratuity amount obtained based on theprogrammed percent rate or amount may be automatically calculated.You can program a tax status for gratuity.
Exemption
Your POS terminal allows you to exempt a customer from the gratuity by touching the [W/O GRATUITY]key prior to a payment operation.
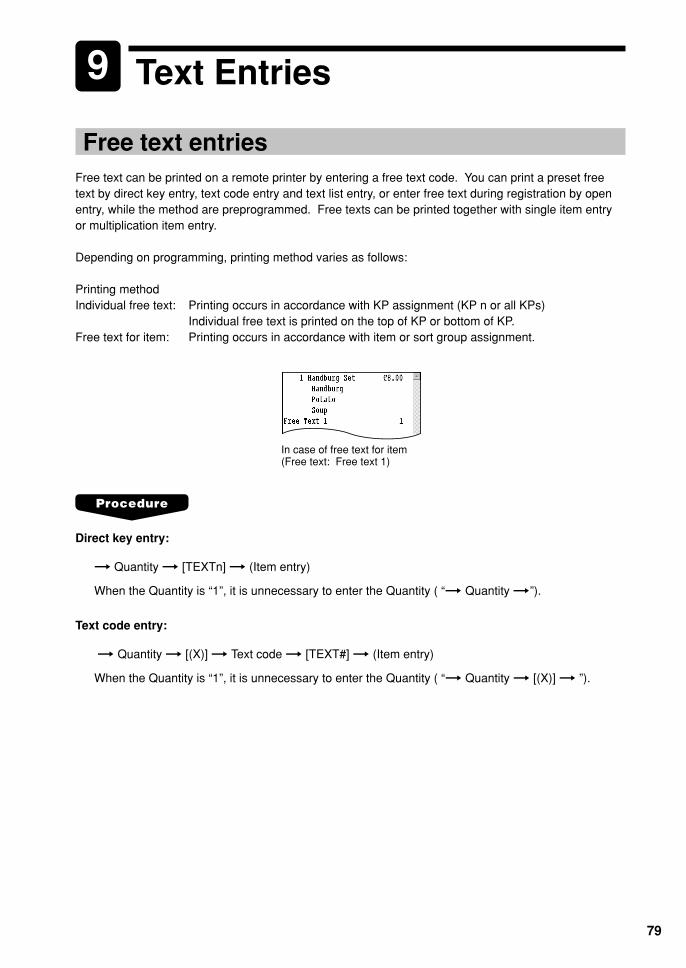
79
9 Text Entries
Free text entriesFree text can be printed on a remote printer by entering a free text code. You can print a preset freetext by direct key entry, text code entry and text list entry, or enter free text during registration by openentry, while the method are preprogrammed. Free texts can be printed together with single item entryor multiplication item entry.
Depending on programming, printing method varies as follows:
Printing methodIndividual free text: Printing occurs in accordance with KP assignment (KP n or all KPs)
Individual free text is printed on the top of KP or bottom of KP.Free text for item: Printing occurs in accordance with item or sort group assignment.
In case of free text for item(Free text: Free text 1)
Direct key entry:
➞ Quantity ➞ [TEXTn] ➞ (Item entry)
When the Quantity is “1”, it is unnecessary to enter the Quantity ( “➞ Quantity ➞”).
Text code entry:
➞ Quantity ➞ [(X)] ➞ Text code ➞ [TEXT#] ➞ (Item entry)
When the Quantity is “1”, it is unnecessary to enter the Quantity ( “➞ Quantity ➞ [(X)] ➞ ”).

80
Text list entry:
(FREE TEXT list window appears)
➞ Quantity ➞ [(X)] ➞ [TEXT#] ➞ Select a target text ➞ (Item entry)
When the Quantity is “1”, it is unnecessary to enter the Quantity ( “➞ Quantity ➞ [(X)] ➞ ”).
Open entry:
(FREE TEXT window appears)
➞ Quantity ➞ [TEXT n] ➞ Enter or change text and touch [OK] .
When the Quantity is “1”, it is unnecessary to enter the Quantity ( “➞ Quantity ➞ [(X)] ➞ ”).

81
Address entriesThe name and address of a guest can be entered during a transaction. The name and address of theguest are printed on a bill.
1. Press the [NAME/ADDR] key. The ADDRESS ENTRY window will be displayed.
2. Enter the address and name of the guest, and touch [OK].
To cancel the entry, touch [CANCEL].

82
10 Correction
Item void using the [-] keyThe [-] key allows you to void items. The last item, past items and printed items can be voided.
To void an item:
1. Touch the line of an item to be voided. The selected item will be highlighted.
2. Touch the [-] key. The item will be voided.
In case of multiple number of quantity are registered for the item, the quantity will bedecreased by one every time you touch the [-] key.To void multiple quantity, you can enter the number and touch the [-] key.
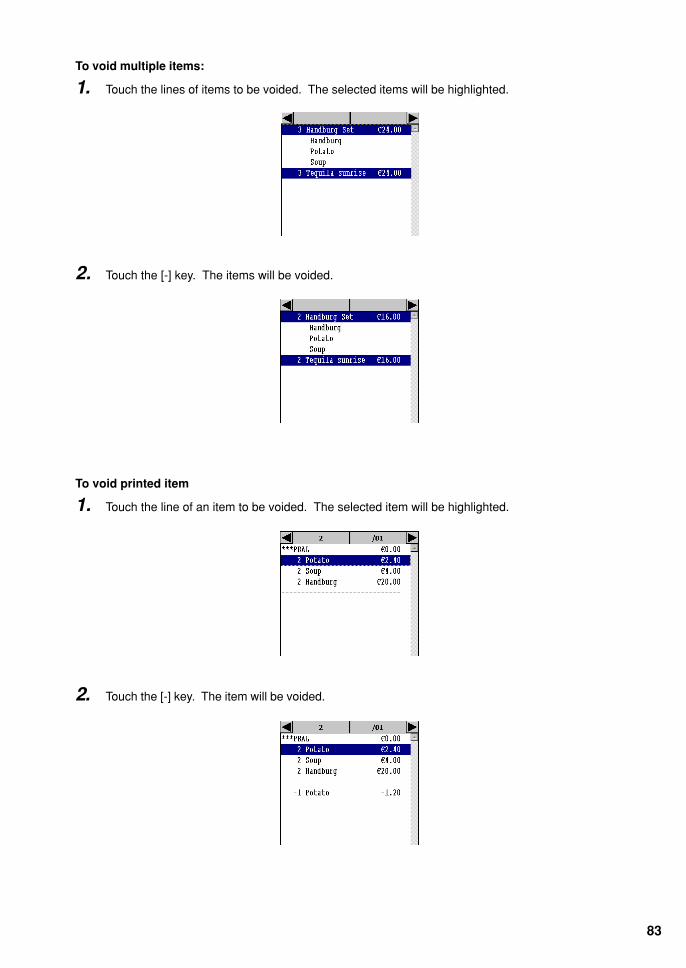
83
To void multiple items:
1. Touch the lines of items to be voided. The selected items will be highlighted.
2. Touch the [-] key. The items will be voided.
2. Touch the [-] key. The item will be voided.
To void printed item
1. Touch the line of an item to be voided. The selected item will be highlighted.

84
Check/Subtotal voidIn order to cancel all of the items registered, perform a check void. In case of you open a table for theguest, perform a check void immediately after re-opening the table.Under the table control, in order to cancel only newly entered items after re-opening a check, perform asubtotal void.
Check void: In order to void all items
Under the table control, firstly open the table.
1. Touch the subtotal area of the check to be voided.
2. Touch the [CHECK VOID] key. Confirmation message will be appear.
3. Touch the [Yes] to void the check.
To cancel the check void, press the [NO].
Subtotal void: In order to void a registration of item(s) after re-opening a table
1. Touch the subtotal area of the check including items to be voided.
2. Touch the [-] key.
PLU 1-3 are canceled (subtotal void).
➝
All items are canceled (check void).
➝
PLU 4-6 are canceled (subtotal void).
➝
New orderPLU 1PLU 2PLU 3[NBAL]/[FINAL]
ReorderPLU 4PLU 5PLU 6CASH

85
Changing quantity using the [+] keyThe [+] key allows you to add quantity of registered items. The last item, past items and printed itemscan be added.
To add an item
1. Touch the line of an item to be added. The selected item will be highlighted.
2. Touch the [+] key. Quantity one is added to the item.
To add multiple quantity, you can enter the number and touch the [+] key.
To add multiple items
1. Touch the lines of items to be added. The selected items will be highlighted.
2. Touch the [+] key. Quantity one is added to each of the selected items.
To add printed item
1. Touch the line of an item to be added. The selected item will be highlighted.
2. Touch the [+] key. The same item is newly registered.

86
Correction after finalizing a transaction - Void modeWhen you need to void incorrect entries that clerks cannot correct (incorrect entries that are found afterfinalizing a transaction or cannot be corrected by using the [-] key), enter the void mode by touching the[VOID mode] key, and repeat the entries that are recorded on an incorrect receipt.Your POS terminal automatically returns to the normal mode when a valid finalization key is operated.
NOTE
You cannot enter the void mode during a transaction.

87
11 Customer Management
Your POS terminal can provide customer management functions.To enable the customer management function, you have three options:
• Entering the customer code assigned to a customer• Swiping a customer card• Scanning a barcode (customer code)
You can enter the customer code at any point during a transaction.
After a customer code entry, following operations only are allowed:• Item registration• Payment• Received-on-account• No sale• Subtotal void
For new customersNormally customer information (name, code and address) are previously set by the programming.However, you can enter a new customer information during transaction using customer learningfunction. Use the following procedure.
1. Touch the [CUST] key, the following window will appear.
You can directly enter a customer code and touch the [CUST] code to display the followingwindow. Go to step 3.
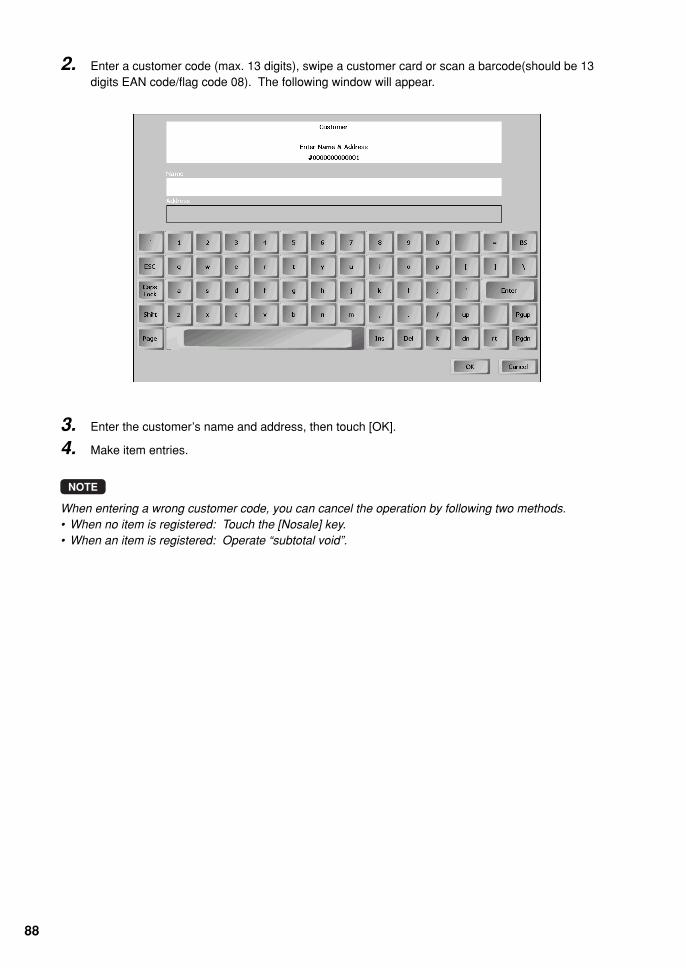
88
3. Enter the customer’s name and address, then touch [OK].
4. Make item entries.
NOTE
When entering a wrong customer code, you can cancel the operation by following two methods.• When no item is registered: Touch the [Nosale] key.• When an item is registered: Operate “subtotal void”.
2. Enter a customer code (max. 13 digits), swipe a customer card or scan a barcode(should be 13digits EAN code/flag code 08). The following window will appear.

89
To recall a customer information by entering the customer code
1. Touch the [CUST] key. The customer code entry window will appear.
2. Enter a customer code, swipe a customer card or scan a barcode. The customer name willappear on the receipt window (bottom line).
3. Make item entries.
NOTE
When entering a wrong customer code, you can cancel the operation by following two methods.• When no item is registered: Touch the [Nosale] key.• When an item is registered: Operate “subtotal void”.
To recall a customer information by looking up by name
1. Touch the [CUST] key. The customer code entry window will appear.
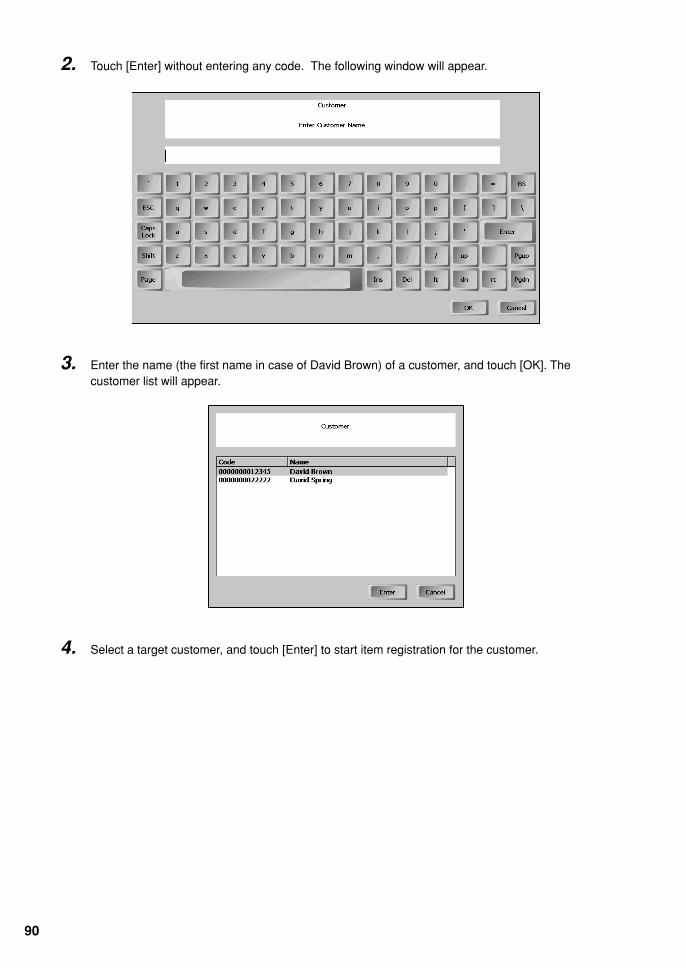
90
2. Touch [Enter] without entering any code. The following window will appear.
3. Enter the name (the first name in case of David Brown) of a customer, and touch [OK]. Thecustomer list will appear.
4. Select a target customer, and touch [Enter] to start item registration for the customer.

91
12 Guest Control
Your POS terminal manages guests using tables. A group of tables are viewed and managed as aroom, and a group of rooms are controlled by a revenue center. Transaction data is consolidated byeach revenue center.You can view the tables in a room on the graphical table layout screen. Touch the [TABLE LAYOUT]key to display a table layout screen.
NOTE
The default room displayed may vary depending on clerks, and also tables that can be managed maybe limited depending on clerks, since tables that a clerk is in charge of may vary.Depending on programming, the sections you are in charge of may be displayed using a specific color.
Room-1Indoor
Room-2Teras
Revenue Center-2Bar
Revenue Center-1Dining

92
General overview for guest controlFloor planningAllocating clerks to time zone and sections, or make a change
Table settingDisplaying a room where the tables you are in charge are included
• Checking table reservation status / Reserving a table for a guest• Joining tables• Changing smoking/non-smoking status• Changing table availability
Searching a suitable table for guests using automatic search functionUsing a waiting list
Guest managementOpening a table for guests to receive orders, that is, to make item registration
• Using the graphical table layout screen• Entering table number• Using the table list• Using migration operation
Temporally closing a guest checkReopening a guest check for receiving reorderMaking a finalization operationPayment control before receiving payment (finalization operation)
• Receiving deposit• Refund deposit• Separating bill• Remerging separated bills• Check number change• Recalling data of closed tables to receive additional order or make corrections.
For clerks,• Transferring open tables in charge to another clerks• Using table alert function
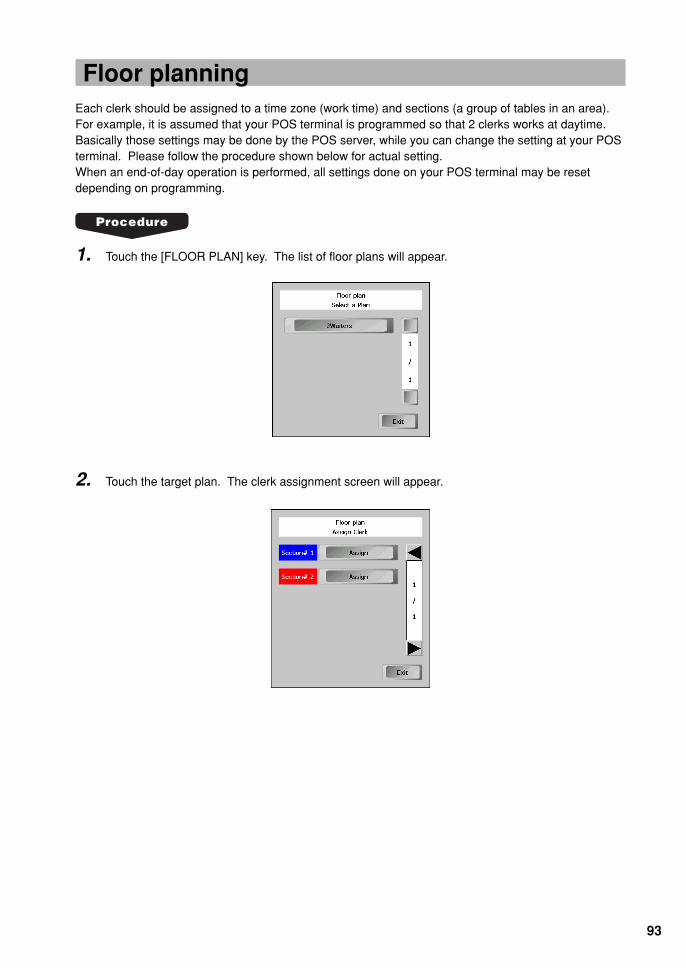
93
Floor planningEach clerk should be assigned to a time zone (work time) and sections (a group of tables in an area).For example, it is assumed that your POS terminal is programmed so that 2 clerks works at daytime.Basically those settings may be done by the POS server, while you can change the setting at your POSterminal. Please follow the procedure shown below for actual setting.When an end-of-day operation is performed, all settings done on your POS terminal may be resetdepending on programming.
1. Touch the [FLOOR PLAN] key. The list of floor plans will appear.
2. Touch the target plan. The clerk assignment screen will appear.

94
4. Select clerks to be assigned and touch [OK].
5. Repeat the steps 3 and 4 if necessary.
6. Touch [OK] after the selection. You will return to the screen in step 2. Touch [Exit] to finish.
Changing a clerk in charge of a section using the [SECTION] keyTo change a clerk assigned to a section to other clerk, for example in case that the assigned clerk is offsick, you can use the [SECTION] key to display the clerk assignment screen directly.On the screen, follow the steps from the step 3 shown above to change a clerk.
3. Touch [Assign] of a target section. The clerk list will appear.
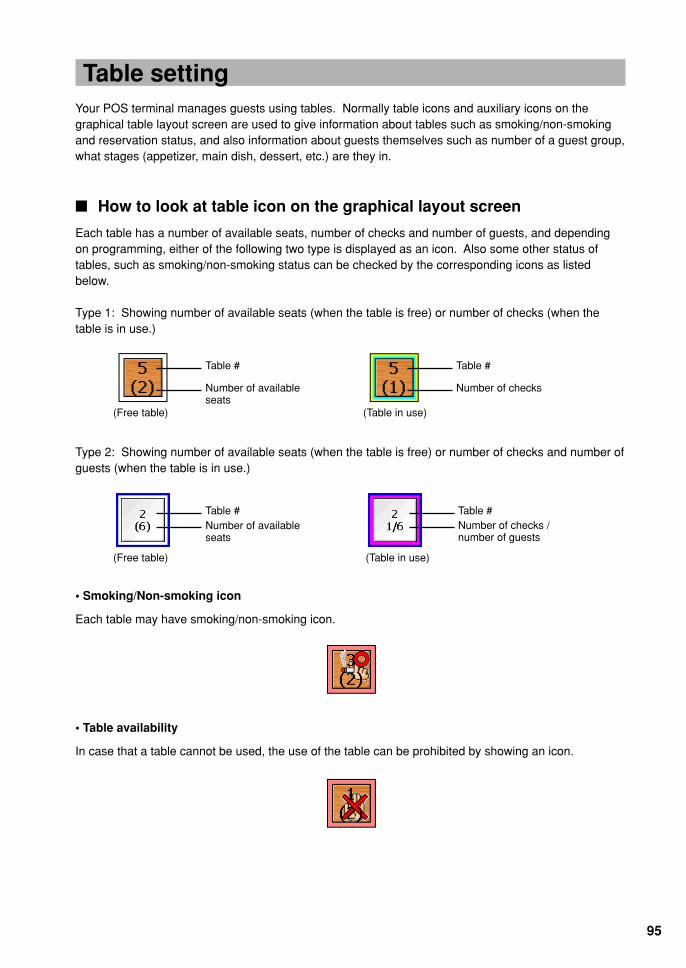
95
Table settingYour POS terminal manages guests using tables. Normally table icons and auxiliary icons on thegraphical table layout screen are used to give information about tables such as smoking/non-smokingand reservation status, and also information about guests themselves such as number of a guest group,what stages (appetizer, main dish, dessert, etc.) are they in.
■ How to look at table icon on the graphical layout screen
Each table has a number of available seats, number of checks and number of guests, and dependingon programming, either of the following two type is displayed as an icon. Also some other status oftables, such as smoking/non-smoking status can be checked by the corresponding icons as listedbelow.
Type 1: Showing number of available seats (when the table is free) or number of checks (when thetable is in use.)
Type 2: Showing number of available seats (when the table is free) or number of checks and number ofguests (when the table is in use.)
• Smoking/Non-smoking icon
Each table may have smoking/non-smoking icon.
Table #
Number of checks
(Table in use)(Free table)
Table #
Number of availableseats
(Free table)
Table #Number of availableseats
(Table in use)
Table #Number of checks /number of guests
• Table availability
In case that a table cannot be used, the use of the table can be prohibited by showing an icon.
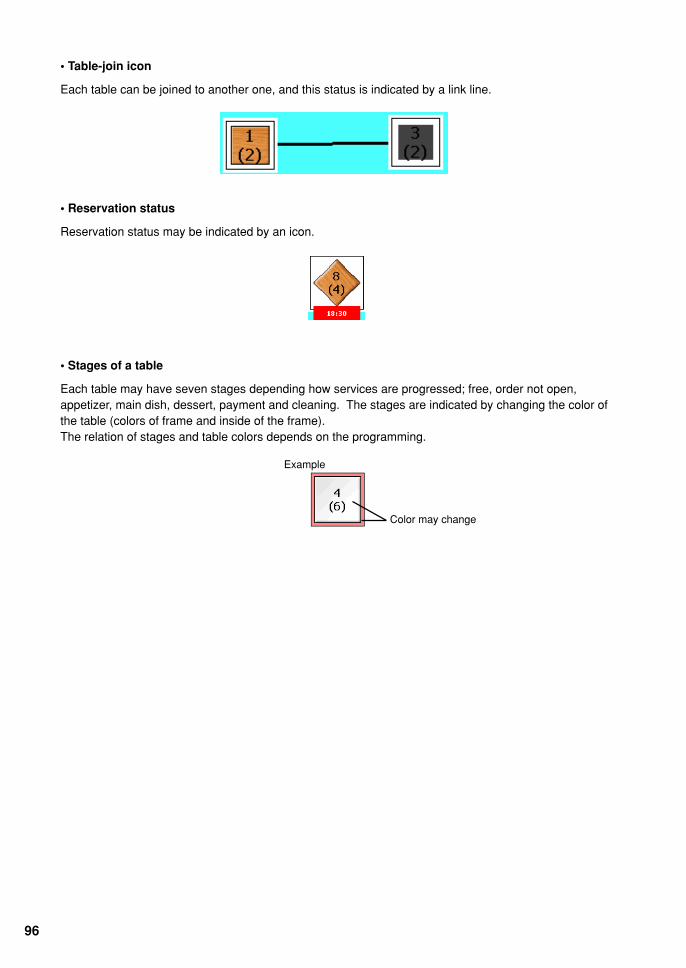
96
• Reservation status
Reservation status may be indicated by an icon.
• Stages of a table
Each table may have seven stages depending how services are progressed; free, order not open,appetizer, main dish, dessert, payment and cleaning. The stages are indicated by changing the color ofthe table (colors of frame and inside of the frame).The relation of stages and table colors depends on the programming.
Example
Color may change
• Table-join icon
Each table can be joined to another one, and this status is indicated by a link line.

97
■ How to control a table layout screen
Based on the table status, you can control tables using the following functions:
Zooming the table layout screen
You can zoom any position of the table layout screen you want to enlarge. That screen will be enlarged4 times focusing on that position.
Touch an area (other than a table) to be enlarged, then touch the [ZOOM] key.Touch the [ZOOM] key again to cancel the zooming. The screen will return its original size.
Joining tables
When a table is joined to another, you can control the joined table on the table layout screen.There are two method to join tables depending on programming as shown below. After joining tables,the table will be in open status; ready to accept orders.
In the touch only mode:
To join a table to another for the first time: [JOIN] ➞ Table ➞ Table
To join a new table to a joined table: [JOIN] ➞ New table ➞ Joined table
To release joined table: [JOIN] ➞ Joined table to be released
In the touch and order mode:
To join a table to another for the first time: Table ➞ [JOIN] ➞ Table
To join a new table to a joined table: New table ➞ [JOIN] ➞ Joined table
To release joined table: Joined table to be released ➞ [JOIN]
Prohibiting use of tables (Table availability)
Touch the [AVAILABILITY] key and touch the table you want to prohibit using.To cancel the prohibited status, make the same operation. The operation toggles the status of tableavailability.
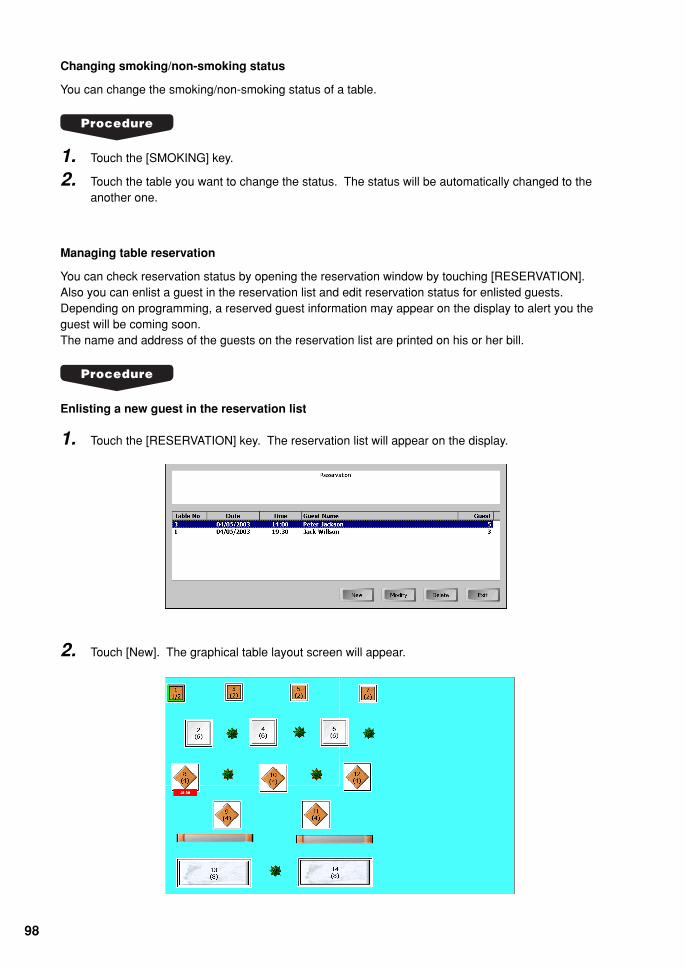
98
Changing smoking/non-smoking status
You can change the smoking/non-smoking status of a table.
1. Touch the [SMOKING] key.
2. Touch the table you want to change the status. The status will be automatically changed to theanother one.
Managing table reservation
You can check reservation status by opening the reservation window by touching [RESERVATION].Also you can enlist a guest in the reservation list and edit reservation status for enlisted guests.Depending on programming, a reserved guest information may appear on the display to alert you theguest will be coming soon.The name and address of the guests on the reservation list are printed on his or her bill.
Enlisting a new guest in the reservation list
1. Touch the [RESERVATION] key. The reservation list will appear on the display.
2. Touch [New]. The graphical table layout screen will appear.

99
3. Touch the target table to be reserved. The reservation window where the details are entered willappear.
4. Enter the information of the guest; reservation date, time(hour/minute), number of guests (guestnumber) and name, and also address and phone number if necessary. After entering necessaryinformation, touch [OK]. The reservation list will appear again.
5. To exit from the reservation window, touch [Exit]. The graphical table layout screen will appear.
6. Make sure that the table reservation you newly entered is correct.
Table newly reserved

100
■ How to change a room
Changing a table to be served in the registration screen
1. Touch the [ROOM #] key. The Room window will appear.
2. Select a revenue center and a room.
Editing the reservation table
1. Touch the [RESERVATION] key. The reservation list will appear on the display.
2. To modify, select the target reservation to be modified and touch [Modify]. The reservationwindow will appear.
To delete, select the target reservation to be deleted and touch [Delete]. The confirmation windowwill appear. Touch [Yes] for deletion. The selected reservation will be deleted.
3. For modification, edit the necessary information, and touch [OK] when completed. Thereservation list will appear again.
4. To exit from the reservation window, touch [Exit].
When you open a reserved table:
When you open a reserved table, a warning message, such as “This table is reserved at 15:00. Are yousure you want to continue?” will appear on the screen.Touch [Continue] to receive orders, or touch [Cancel] to cancel.

101
Searching a suitable table for guests usingautomatic table search function
When a guest or a group of guests comes, you can search a suitable table for the number of guest withsmoking or non-smoking selection on the table layout screen.
1. Touch the [GUEST] key. The Auto Table Search window will appear.
2. Enter the number of guests using ten keys.
3. Touch [Smoking] or [No Smoking].
The table layout screen will appear automatically and a suitable table for the guests will behighlighted.
NOTE
When there is no table available for the guests, the warning message will appear. Click [OK].Then the waiting list window will open automatically. For the managing the waiting list, pleaserefer to the following section.
4. When the table is acceptable, touch the highlighted table.When you select another table for the guest, just touch the table.
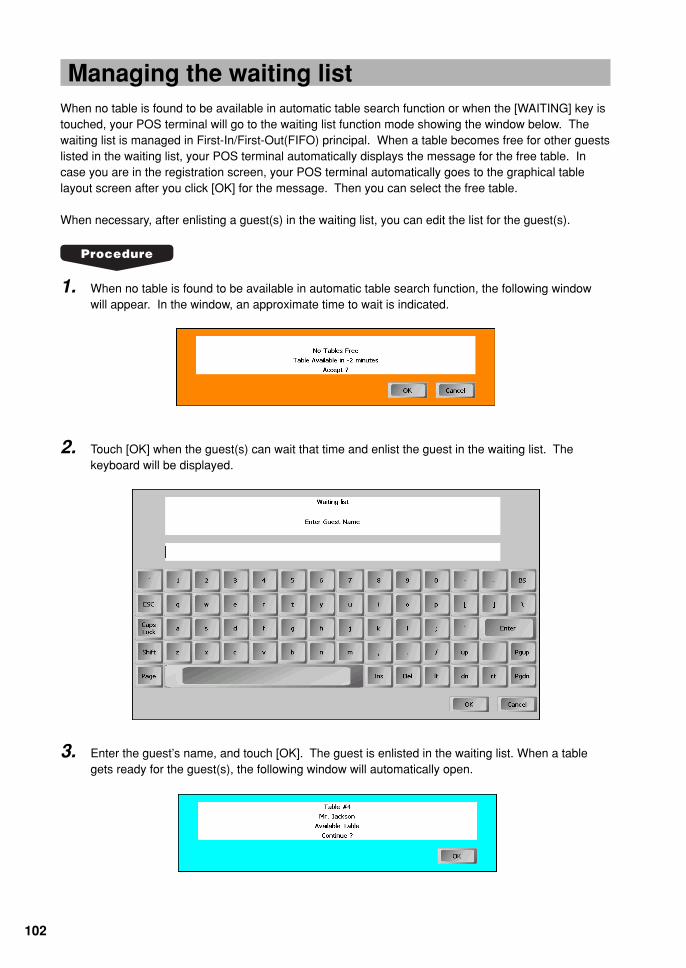
102
Managing the waiting listWhen no table is found to be available in automatic table search function or when the [WAITING] key istouched, your POS terminal will go to the waiting list function mode showing the window below. Thewaiting list is managed in First-In/First-Out(FIFO) principal. When a table becomes free for other guestslisted in the waiting list, your POS terminal automatically displays the message for the free table. Incase you are in the registration screen, your POS terminal automatically goes to the graphical tablelayout screen after you click [OK] for the message. Then you can select the free table.
When necessary, after enlisting a guest(s) in the waiting list, you can edit the list for the guest(s).
1. When no table is found to be available in automatic table search function, the following windowwill appear. In the window, an approximate time to wait is indicated.
2. Touch [OK] when the guest(s) can wait that time and enlist the guest in the waiting list. Thekeyboard will be displayed.
3. Enter the guest’s name, and touch [OK]. The guest is enlisted in the waiting list. When a tablegets ready for the guest(s), the following window will automatically open.

103
4. Touch [OK]. The table layout screen will appear and the table available for the guest(s) will behighlighted.
5. If the table is OK, touch the [ORDER] key to receive orders.
■ Modifying the waiting list
You can modify a number of guests and/or smoking status for a guest enlisted in the waiting list, andalso can delete an enlisted guest from the list.
1. Touch the [WAITING] key. The waiting list will appear.
To delete a guest from the list:
2. Select the line and touch [Delete]. The guest will be deleted from the list.
3. Touch [Exit] to exit.
To modify:
2. Select the line and touch [Modify]. The following window will appear.
3. Change the number of guests if necessary, and touch either [Smoking] or [No Smoking].
To cancel, touch [Cancel].

104
Managing guestsFor managing guests, your POS terminal provides various guest functions, such as room change, tablechange, bill separation, not only accepting orders and payments. All these functions can be performedby opening a table allocated for a guest or a group of guests.Normally you can open tables on a graphical table layout screen which is displayed when the [TABLELAYOUT] key is touched, or when a sign-on operation is performed (depending on programming).Also you can open a table by entering table number, and in order to open a table in use on the opentable list for reorder. Please refer to each section for the details.
Your POS terminal provides two ways to open a table for performing the guest functions ([B.S.], [JOIN],[B.T. IN], [BILL] etc. except [ORDER]), and either one is set for each clerk.Type 1: A table opens when the table is touched. To perform a guest functions, the corresponding
function key must be touched prior to opening the table.Type 2: A table is opened when a function key including the order key is touched after the table is
touched.
NOTE
• You can perform the guest functions via. a graphical table layout screen or open table list.
■ Opening a table on the graphical table layout screen to receive a neworder and reorder
1. Touch the [TABLE LAYOUT] key, the graphical table layout screen will appear.
When programmed, the graphical table layout screen will automatically appear when you make asign-on operation.
NOTE
If necessary, change a room using the [ROOM#] key.
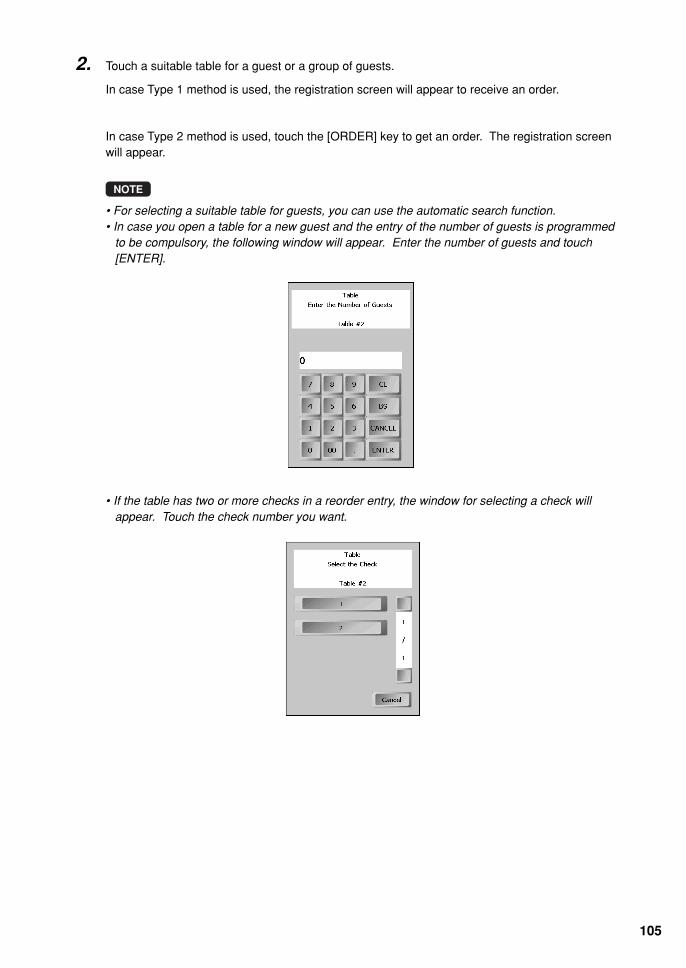
105
2. Touch a suitable table for a guest or a group of guests.
In case Type 1 method is used, the registration screen will appear to receive an order.
In case Type 2 method is used, touch the [ORDER] key to get an order. The registration screenwill appear.
NOTE
• For selecting a suitable table for guests, you can use the automatic search function.• In case you open a table for a new guest and the entry of the number of guests is programmed
to be compulsory, the following window will appear. Enter the number of guests and touch[ENTER].
• If the table has two or more checks in a reorder entry, the window for selecting a check willappear. Touch the check number you want.

106
■ Opening a table by entering table number
1. Change a room, if necessary.
2. Touch the [TABLE #] key or touch the table number area of the receipt window. The followingwindow will appear.
3. Enter a target table number and also enter a target check number if necessary in the followingmanner.
For example: Table number 1: 1 [ENTER]or 1 (touch table number area)
Table number 25 and check number 2: 25.2 [ENTER]
NOTE
• In case you open a table for a new guest and the entry of the number of guests is programmedto be compulsory, the following window will appear. Enter the number of guests and touch[ENTER].
Table number area

107
■ Opening a table in use on the open table list
Each clerk can display all the tables that are currently opened by the clerk on the table list. You canselect a table out of the list for reorder and payment, and also bill separation and table transfer whichare described later.
NOTE
Supervisors can see all opened tables.
1. Touch the [TABLE LIST] key, the open table list will open.
2. Touch the target table line to select the table.
In case Type 1 method is assigned, the registration screen will appear to receive a reorder.
In case Type 2 method is assigned, touch the [ORDER] key to get a reorder. The registrationscreen will appear.
Room number
Number of guests
Amount
Service time
Clerk code/name
Table number/checknumber

108
■ Changing a table to be served on the registration screen
You can directly change a table to be served on the registration screen without displaying the tablescreen.Follow the procedure below.
1. Touch the table number area. The table # window will appear.
2. Enter the target table number and touch [ENTER]. The current table will be temporarily closed,and the receipt window for the target table will appear.
NOTE Short cut
You can enter a target table number and touch the [Table#] key or the table number area when youchange a table in the same room.
Table number area

109
2. Select a target check number.
Method 2
1. Touch the previous or next check key. The check number will be increased or decreased everytime you touch the previous or next check key.
■ Changing check number
Method 1
1. Touch a check number area. The table window will appear.
Check number area
Next check keyPrevious check key

110
■ Entering a number of guests manually
You can enter a number of guests seated on a table using the [GUEST] key when the table is open.The entry is compulsory when you open a table in case the entry is set to compulsory by programming.For the entry, enter a number of guests and touch the [GUEST] key when the table is open.
NOTE
• If a table is not open, the [GUEST] key is used for automatic table search function.
■ Closing a table temporally
To close a table temporally, use the [NBAL] or [FINAL] key.When the [NBAL] key is used, the POS terminal does not calculate tax when a transaction operation isperformed. When the [FINAL] key is used, the POS terminal always calculate tax.Therefore, it is recommended to use the [NBAL] key when entering orders, and the [FINAL] key whenclaiming payment. The [FINAL] key is used when printing a total amount including tax on a bill.
■ Closing a table - Finalizing a guest check
For the settlement of a guest check, open the target table and finalize the guest check using a mediakey. Your POS terminal provides bill separation functions for a convenience of variety of guests’payment. When necessary, please refer to the bill sections later in this section.
It is recommended to print a bill to show it to the guest. Depending on programming, you must print abill before finalizing a guest check using a media key.
■ Table alert
When a programmed period of time has elapsed after a temporary finalization by the [NBAL] or [FINAL]key, a table may start blinking on the graphical table layout screen or a table transaction line ishighlighted in red in order to alert you to check the table if the everything is fine.The table alert counter is created when the table reopens.

111
■ Transaction migration
Your POS terminal allows you to migrate transactions which are registered without opening tables totransactions with tables opened for the guests. For example, after a guest has a drink at a bar, he hasa meal at a table. His transaction at the bar can be migrated into one of guest checks which arecontrolled by opening tables.
1. When necessary, change the room.
2. Enter the table number and touch the table number area (top of registration window). Or,touch the table number area at the top of a receipt window, the window for selecting a tablenumber will appear. Enter the target table number and touch [ENTER].
The items registered are migrated to the receipt of the table.
NOTE
The transaction migration can be operated before payment operation was made.

112
Deposit entriesDeposit refers to a prepayment on a guest check. It can be received in cash, by cheque or credit.A received deposit can be refunded by touching the [DEPO RFND] key. You cannot attempt to refundan amount larger than deposit balance.
Deposit is available for regular customer accounts, and possible for normal tables.
Deposit
1. Enter a deposit amount, and touch the [DEPO +] key.
2. Touch a [CASH n], [CHECK n], or [CREDIT n] key, which is the deposit media.
Deposit refund
1. Enter a deposit refund amount, and touch the [DEPO -] key.
2. Touch a [CASH n], [CHECK n], or [CREDIT n] key, which is the media of the deposit refund.
NOTE
A deposit operation can be mixed with the sales (order) entry in a new check or reorder entry operation.

113
Bill totalizing/Bill transferThe [B.T.] key is used to totalize multiple bills when, for example, a particular guest pays not only his orher bill, but also the bills of other guests (bill totalizing), and also used to change a bill number toanother (bill transfer).
■ Bill totalizing/Bill transfer in the same room
- Graphical layout screen
1. Touch the [B.T. IN] key.
2. Touch one or more source tables to be moved. The tables will be highlighted.
3. Touch the [B.T. IN] key again.
4. Touch a destination table. The registration screen will be shown.
- Open table list
1. Touch the [B.T. IN] key.
2. Touch one or more source table to be moved. The tables will be highlighted.
3. Touch the [B.T. IN] key again. The table # window will appear.
4. Enter a destination table number, and touch [ENTER]. The registration screen will be shown.
- Numeric table number entry
1. Touch the [B.T. IN] key.
2. Touch the [Table #] key. The Table # window will open.
3. Enter the source table number to be moved and touch [ENTER].
4. Touch the [B.T. IN] key again. The Table # window will appear.
5. Enter a destination table number and touch [ENTER]. The registration screen will be shown.

114
- Registration screen
1. Open the source table to be moved. The registration screen will appear.
2. Touch the [B.T. IN] key. The Table # window will appear.
3. Enter a destination table number and touch [ENTER]. The registration screen will be shown.
■ Bill totalizing/Bill transfer over a room
- Graphical layout screen
1. Touch the [B.T. OVER] key.
2. Touch one or more source tables to be moved. The tables will be highlighted.
3. Touch the [B.T. OVER] key again. The room selection window will appear.
4. Select a revenue center and a room. The graphical table layout will be shown.
5. Touch a destination table. The registration screen will be shown.

115
- Open table list
1. Touch the [B.T. OVER] key.
2. Touch one or more source table to be moved. The tables will be highlighted.
3. Touch the [B.T. OVER] key again. The room selection window will appear.
4. Select a revenue center and a room. The registration screen will appear.
- Numeric table number entry
1. Touch the [B.T. OVER] key.
2. Touch the [Table #] key. The Table # window will open.
3. Enter the source table number to be moved and touch [ENTER].
4. Touch the [B.T. OVER] key again. The room selection window will appear.
5. Select a revenue center and a room. The Table # window will appear.
6. Enter a destination table number, and touch [ENTER]. The registration screen will be shown.
- Registration screen
1. Open the source table to be moved. The registration screen will appear.
2. Touch the [B.T. OVER] key. The room selection window will appear.
3. Select a revenue center and a room. The Table # window will appear.
4. Enter a destination table number, and touch [ENTER]. The registration screen will be shown.

116
Bill separatingThis function is used when each guest of a group pays his or her own order. With this function, you canselect some items from a guest check to another guest check in the same table or of another table. Thebill can be separated only under the same revenue center.
To separate checks, your POS terminal provides several options. And all options can be performedfrom the Bill Separation (B.S.) screen.
■ How to operate the B.S. screen
To open the B.S. screen:
On the graphical table layout screen or the open table list screen, touch the [B.S.] key and touch a tablewhose check is to be separated in case of Type 1 method, or touch a table whose check is to beseparated, and touch the [B.S.] key in case of Type 2 method.On the registration screen, open a table by entering the table number after touching the table numberarea of the receipt window and touch the [B.S.] key.The original check is displayed at the check#1 column.
To close the BS window:
Touch the [B.S.] key again.
To change a table and/or a check on the BS screen:
Touch a table# area, the table # window will open. On the window, enter a new table number.
Table number/Check number
Total window area

117
To change checks to be displayed using the previous/next buttons:
Touch a next or previous button, the BS screen will be scrolled to right or left.
NOTE
The check #1 column does not scrolled.
To select a target check:
Touch the total window area of a target check. The selected check will be highlighted to notice you thatcheck is selected.After you selected a check, you can make operations for the check, such as reorder and payment.
■ Transferring an item
In case that the ordered number of a target item to be transferred is one, a simple Drag and Dropoperation makes an item can transfer the item to another check.

118
■ Splitting multiple items
In case that the ordered number of a target item to be transferred is a multiple number, the followingnumber boxes appears automatically when you drag the target item to a destination check. Drag theitem to the box having the number you want to split and drop it there. The number of the items aretransferred to the destination check.

119
■ Splitting an item
In case that the ordered number of a target item is one and it should be split among a group of guests,such as a bottle of wine, firstly touch the total window area(s) of destination check(s). The selectedcheck(s) will be highlighted. Then operate a drag and drop operation for a target item to the highlightedarea.The quantity after a split an item will shown like, 1/2 or 1/3.

120
■ Splitting a check by specified amount of money
A check can be split into two checks by specifying amount of money. The amount is used as a targetamount for a new check. You can repeat this operation.
NOTE
• Tax is always calculated each time this operation is performed.• Additional ordering is acceptable.
1. Touch the [SPLIT VALUE] key. The following bill separation window will appear.
2. Enter a target amount, and touch [ENTER].
Based on the target amount, the check will be split and a new check will be created.

121
2. Enter a number, and touch [ENTER ].
Based on the number, the check will be split and a new check(s) will be created.
■ Splitting a check by a number of a group
A check can be split by a number, such as a group number. All items of the check are divided by thenumber. The remains are added to the original check number.
1. Touch the [SPLIT NUMBER] key. The following bill separation window will appear.
In case “3” was entered.

122
■ Remerging split checks (bills)
It is possible to remerge split checks. Touch the [REMERGE] key, checks will be remerged.
■ Direct payment in a BS screen
On a BS screen, you can make a payment operation. Select a check and make a payment operation.
Check 02 payment has done.
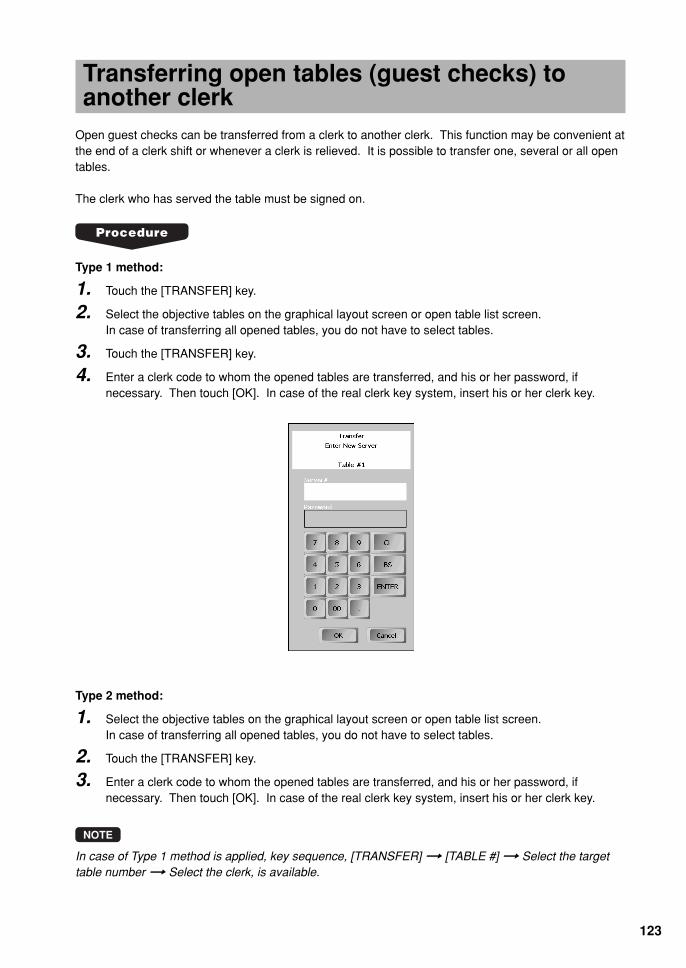
123
Transferring open tables (guest checks) toanother clerk
Open guest checks can be transferred from a clerk to another clerk. This function may be convenient atthe end of a clerk shift or whenever a clerk is relieved. It is possible to transfer one, several or all opentables.
The clerk who has served the table must be signed on.
Type 1 method:
1. Touch the [TRANSFER] key.
2. Select the objective tables on the graphical layout screen or open table list screen.In case of transferring all opened tables, you do not have to select tables.
3. Touch the [TRANSFER] key.
4. Enter a clerk code to whom the opened tables are transferred, and his or her password, ifnecessary. Then touch [OK]. In case of the real clerk key system, insert his or her clerk key.
Type 2 method:
1. Select the objective tables on the graphical layout screen or open table list screen.In case of transferring all opened tables, you do not have to select tables.
2. Touch the [TRANSFER] key.
3. Enter a clerk code to whom the opened tables are transferred, and his or her password, ifnecessary. Then touch [OK]. In case of the real clerk key system, insert his or her clerk key.
NOTE
In case of Type 1 method is applied, key sequence, [TRANSFER] ➞ [TABLE #] ➞ Select the targettable number ➞ Select the clerk, is available.
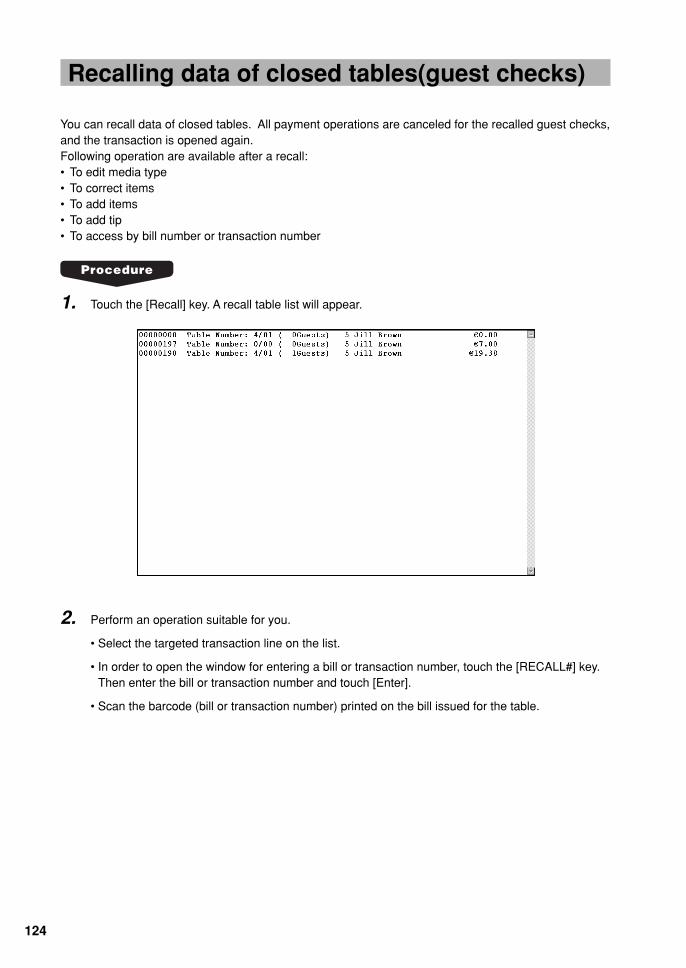
124
Recalling data of closed tables(guest checks)
You can recall data of closed tables. All payment operations are canceled for the recalled guest checks,and the transaction is opened again.Following operation are available after a recall:• To edit media type• To correct items• To add items• To add tip• To access by bill number or transaction number
1. Touch the [Recall] key. A recall table list will appear.
2. Perform an operation suitable for you.
• Select the targeted transaction line on the list.
• In order to open the window for entering a bill or transaction number, touch the [RECALL#] key.Then enter the bill or transaction number and touch [Enter].
• Scan the barcode (bill or transaction number) printed on the bill issued for the table.
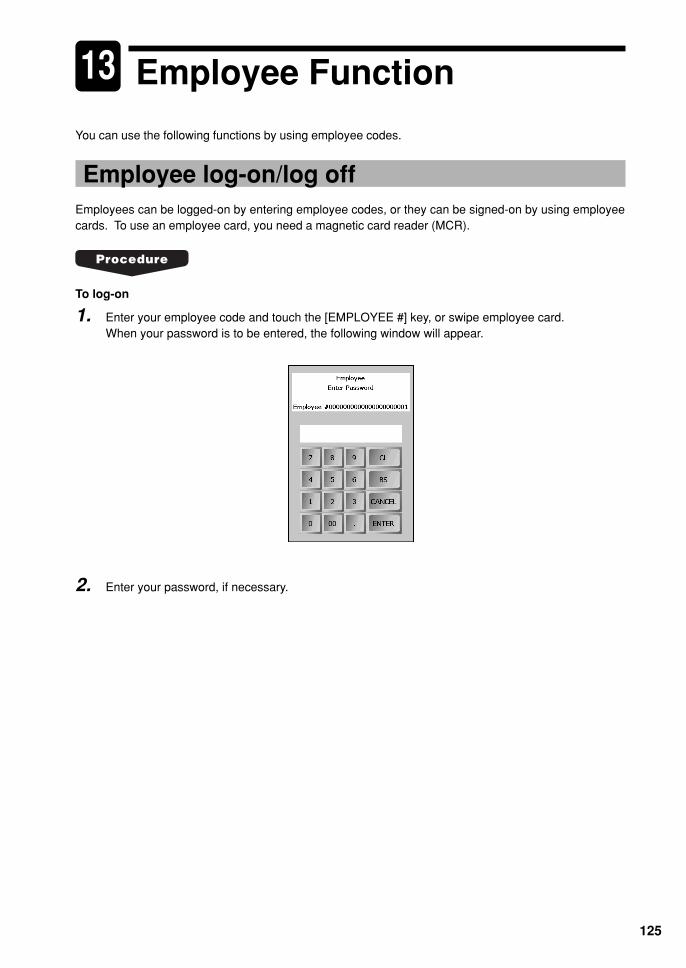
125
13 Employee Function
You can use the following functions by using employee codes.
Employee log-on/log offEmployees can be logged-on by entering employee codes, or they can be signed-on by using employeecards. To use an employee card, you need a magnetic card reader (MCR).
To log-on
1. Enter your employee code and touch the [EMPLOYEE #] key, or swipe employee card.When your password is to be entered, the following window will appear.
2. Enter your password, if necessary.
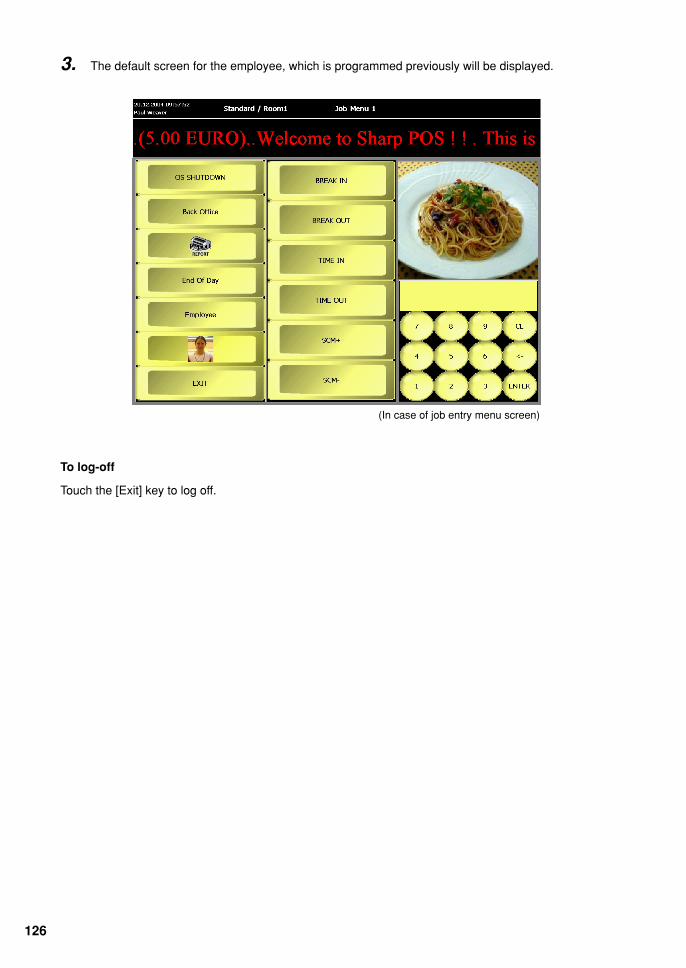
126
3. The default screen for the employee, which is programmed previously will be displayed.
To log-off
Touch the [Exit] key to log off.
(In case of job entry menu screen)

127
Employee’s working time recordingYou can manage your working time; time-in, time-out, break-in and break-out time.The working time can be recorded by the following operations:
■ Time-in operation
1. Touch the [TIME IN] key. The time-in window will appear.
If you has already signed-on, the POS terminal will directly display time-in message shown in step2.
2. Enter your employee code or swipe your employee card, and if necessary enter your password.Then touch [OK]. The time-in message will appear.
3. Touch [OK].
When you want to print the time, touch [Print].
NOTE
When your POS terminal is programmed so that the message window is displayed automatically, themessage window of electronic mail will open automatically.
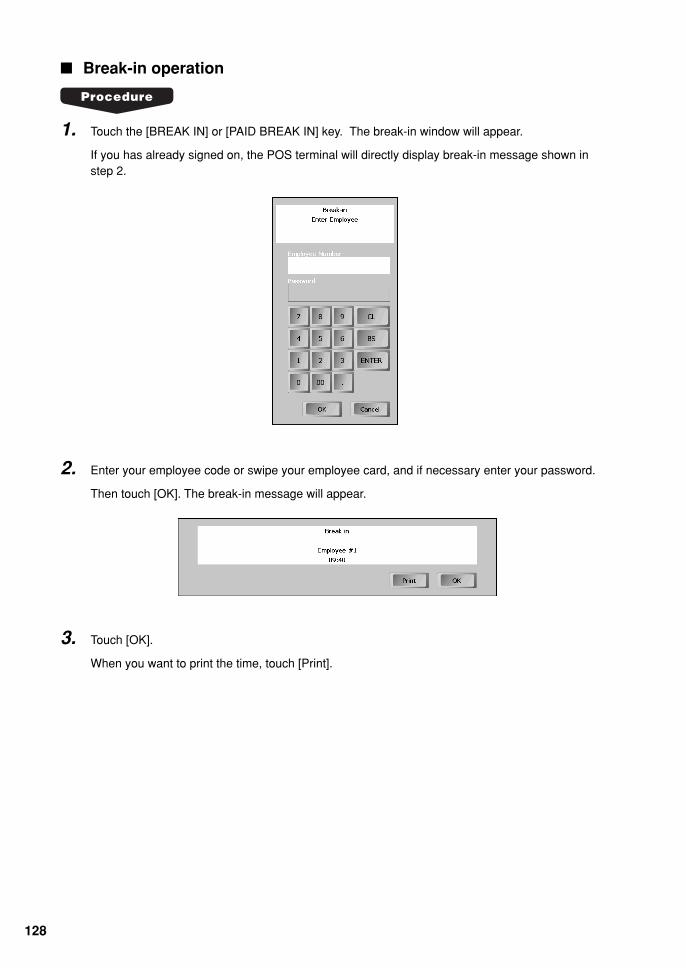
128
■ Break-in operation
1. Touch the [BREAK IN] or [PAID BREAK IN] key. The break-in window will appear.
If you has already signed on, the POS terminal will directly display break-in message shown instep 2.
2. Enter your employee code or swipe your employee card, and if necessary enter your password.
Then touch [OK]. The break-in message will appear.
3. Touch [OK].
When you want to print the time, touch [Print].

129
2. Enter your employee code or swipe your employee card, and if necessary enter your password.
Then touch [OK]. The break-out message will appear.
■ Break-out operation
1. Touch the [BREAK OUT] key. The break-out window will appear.
If you had already signed on, the POS terminal will directly display break-out message shown instep 2.
3. Touch [OK].
When you want to print the time, touch [Print].

130
1. Touch the [TIME OUT] key. The time-out window will appear.
If you has already signed-on, the POS terminal will directly display time-out message shown instep 2.
■ Time-out operation
2. Enter your employee code or swipe your employee card, and if necessary enter your password.
Then touch [OK]. The time-in message will appear.
3. Touch [OK].
When you want to print the time, touch [Print].
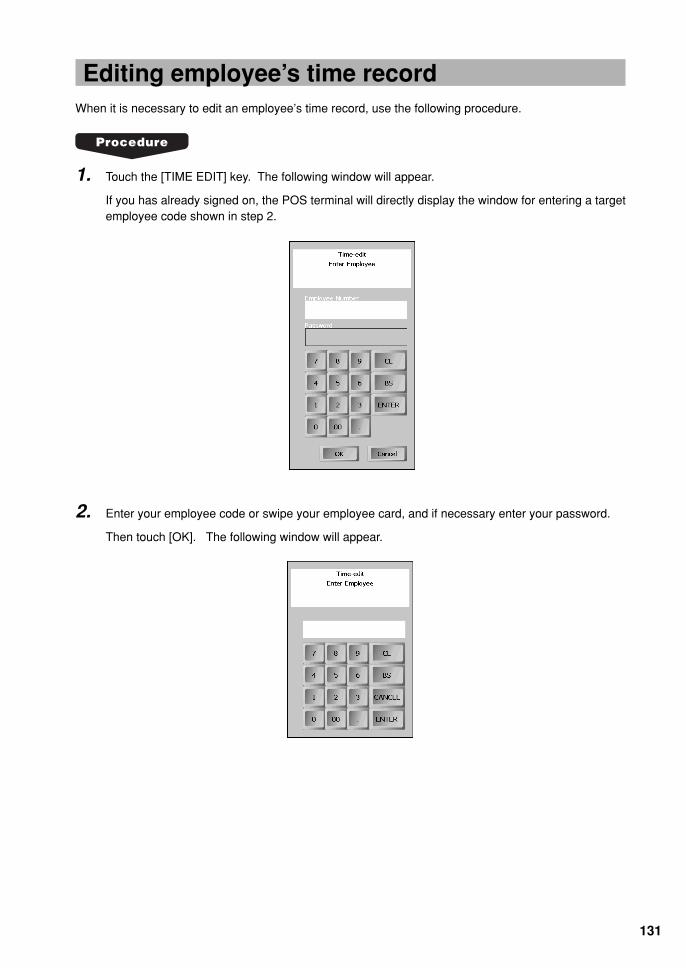
131
Editing employee’s time recordWhen it is necessary to edit an employee’s time record, use the following procedure.
1. Touch the [TIME EDIT] key. The following window will appear.
If you has already signed on, the POS terminal will directly display the window for entering a targetemployee code shown in step 2.
2. Enter your employee code or swipe your employee card, and if necessary enter your password.
Then touch [OK]. The following window will appear.

132
4. Specify the date to be edited.
Change the date on the date column, or display a calendar by touching the arrow key on the datecolumn, and click the target date on the calendar. To change the month, click the right or leftarrow.
After specifying the date, touch [OK]. The window for editing time will appear.
3. Enter the target employee code for whom time is to be edit, or swipe his or her employee card.
Calendar
Date to be editedCurrent date is displayed as the
default.

133
5. To modify time:
Touch the line to be modified and touch [Modify]. The following window will appear.
Change the time. To change the minute, touch the minute column. After the setting, touch [OK].Time edit window will appear again with new setting.
To make a new setting:
Touch [New]. The following window will appear.
The time category you selected
Current setting (Hour - Minute)
Touch the down arrow key. The pull-down menu for selecting a time category will appear. Touchthe target time category.
Then set the time (hour/minute). To change the minute, touch the minute column. After thesetting, touch [OK].
Time edit window will appear again with new setting.
To delete a time setting:
Touch the line to be deleted and touch [Delete]. The selected time setting will be deleted.

134
Sales for employeesSales for employees can be managed by entering employee codes. The sales shall be finalized bycredit.
1. Touch the [EMPL SALES] key. The following window will appear.
2. Enter the employee code for whom sales registration is performed, or swipe his or her employeecard. Then touch [ENTER]. The employee code and name will appear in the receipt window.
3. Make item registrations.
4. For finalization of the transaction, touch the [EMPL CHARGE] key.
NOTE
• When sales exceeds the programmed employee sales limitation, over limit error will occur.• During an employee sales registration, his or her balance of employee charge can be checked by
[BAL].
135
Supervisor clerkThis function is used to substitute a supervisor clerk for an ordinary clerk. The supervisor clerk canmake entry as an ordinary clerk by assigning the ordinary clerk code. You can use the supervisor clerkfunction only for substituting for an ordinary clerk.
1. Enter your clerk code, and touch the [CLK#] key, or insert your real key.
2. Enter your password, if necessary.
3. Open the target table(s). The supervisor can access all opened tables.
Or, enter the responsible clerk code to open a new table or to make operations other than tablecontrol or guest check.

136
Overlapped clerk entryThis function allows switching from one clerk to another clerk and to interrupt the first clerks entry.When a clerk key other than the one currently in operation is pressed during a transaction operation, theentries made thereafter are treated as different clerk sales.
No item is printed on a receipt during an entry operation while the overlapped clerk function is enabled,though printed on the journal. When the payment is completed, the receipt will issued.
Clerk 1 Clerk 2 Clerk 3 NOTE(for customer A) (for customer B) (for customer C)
[CLK 1] The entry by clerk1 is started.50 [PLU 1] PLU 1 50
200 [PLU 2] PLU 2 200[CLK 2] Clerk change (1 to 2), interrupt
initiated350 [PLU 3] PLU 2 350
[CLK 3] Clerk change (2 to 3), interruptinitiated
400 [PLU 4] PLU 4 400[CASH] CASH 400 The transaction by clerk3 is
Receipt is issued finished.[CLK 1] TOTAL 250
500 [CASH] CASH 500CHANGE 250Receipt issued Clerk change (3 to 1), entry
restarted, transaction finished.
■ Remote automatic clerk sign-off
In a network system, a clerk will be automatically signed off when the same clerk signs on at anotherterminal. The availability of this function depends on the programming setting.
137
14 Special Printing Function
Printers may be connected with your POS terminal. Depending on the printers connected with yourPOS terminal, please refer to below for special printing function.
After transaction receipt/Copy receipt printing-Receipt printer
If your customer wants a receipt after you have finalized a transaction with the receipt ON-OFF functionin the “OFF” status (no receipting), touch the [RCPT] key for receipting. Your POS terminal can alsoprint a copy receipt when the receipt ON-OFF function is in the “ON” status.
Validation printing - Slip printerThe POS terminal can perform validation printing when it is connected to a slip printer. Total amountvalidation printing and item validation printing are both available.In case of a check or credit finalization, the corresponding VP message may be printed.
1. Set a validation slip to the slip printer.
2. Touch the [VP] key. The validation printing will start.
NOTE
Programmed compulsory validation printing can be overridden by performing the following operation.Touch the [CANCEL] key and the [VP] key in this sequence.

138
Check printing (CHEQUE EURO and Englishcheque) - Slip printer
The POS terminal can perform check printing (CHEQUE EURO and English cheque) when it isconnected with the slip printer (SHARP model TM-295 for CHEQUE EURO, and SHARP model TM-295or TM-U950 for English cheque).
■ CHEQUE EURO
1. Set a validation slip to the slip printer (TM-295).
2. Enter a check payment amount, and touch a cheque key and the [CHECK PRINT] key in thisorder. The amount will be printed on a slip.
■ English cheque
1. Set a validation slip to the slip printer (TM-295).
2. Make item registration
3. Enter an amount (less than five digits) to be printed, and touch the [CHECK PRINT] key.
When printing the full subtotal, touch the [CHECK PRINT] key without entering an amount.
4. Make the finalization operation using the [TL], [CHECK n] or [CREDIT n] key.
NOTE
The check finalization which has the amount less than the check print amount (the amount entered inthe step 3) causes an error.

139
Printer reroutingAll printers can be rerouted to any other printer, like from a receipt printer to remote printer.When any error occurs at a printer, a window will appear to prompt you to select another printer forrerouting.
For rerouting, select a printer.
To retry printing on the error printer, touch the [Retry] key.To store printing data, touch the [Store] key. The POS terminal stores printing data and prints when theerror printer was recovered.

140
Electronic journalThis function is intended to record the journal data in the electronic journal file (memory) instead ofjournal paper. Also this data is used instead of Transaction Log data. All transaction data and operationlog is logged into the electronic journal file.
On your POS server, the data for one day are stored.Multifilter (time, items, revenue center, time zone, clerk amount, transaction number, media, discountsand terminal) and open entry filter (text search) are allowed.
Journal printing - Journal printerYour POS terminal may not print plus department and plus PLU entries on the journal printer(depending on the programming), while the following items are always printed on the journal printer.• Refund/Return entry• Item (-)/item % entry• Coupon like PLU• Hash/Non-turnover item• Item void entry• Each entry except dept./PLU entry

141
Receipt printing on a remote printer■ Sort shift function
Registered items are printed on remote printers according to their sort groups.You can temporarily change the group number of an item to be registered by using the [S.SFT] key. Ifthe [S.SFT] key is used for a link, combo, or condiment PLU, the sort group numbers of all items arechanged.
1. Enter a new sort group number (01-99), and touch the [S.SFT] key.
2. Make an item entry.
NOTE
When “00” is entered as a sort group number, the item is printed immediately at registration.
■ Hold and go function
This function allows you to hold an order or an item of an order until the guest is ready to receive order.For example, you may use this function to hold a dessert so that it is not served until a main dish hascompleted.Items which is under the holding status are indicated by the symbol “P” on the receipt window.
Hold and go for all items in a transaction (the whole order):To hold, touch the [KP HOLD] key.To release the holding status, touch the [KP GO] key.
Hold and go for an item in a transaction:To hold, touch an item to be held, and touch the [KP HOLD] key.To release the holding status, touch the item, and touch the [KP GO] key.
AUTO delay
If a delay time is programmed, the held item(s) will be printed automatically when the time has elapsedafter a clerk exits the table subjected to the order.

142
Receipt printing style shift functionReceipt printing style can be temporarily shifted from S/D to Addition or from Addition to S/D by usingthe [RCP SF] key.When the receipt printing style is programmed to S/D, the style is changed to Addition, and it isprogrammed to Addition, the style is changed to S/D.The printing style will return to programmed type after issuance of one receipt or by using the [RCP SF]key again.
When sorted receipt is programmed, the receipt-shifted receipt also has effective sorted receipt. At thistime, Item of Group N0.0 is issued by S/D receipt on a remote printer.
Touch the [RCP SF] key at any time within a transaction.
143
Printing billsThis function is used for issuing the bill to the guest. Your POS terminal can print bills on the bill printeror the receipt printer.When bill printing is compulsory for table guest checks, and a paper is inserted, bills are automaticallyprinted.
1. Touch the [C.BILL] key, if necessary.
2. Touch the [BILL] key to print a bill.
Touch the [G.C.RCPT] key to print bill on receipt.
3. Touch the same key again to make a copy.
NOTE
This function is available immediately after the finalization of transaction (including after touching the[NBAL] key.)
Reprinting bills
After a temporary finalization using the [FINAL] key, it is possible to print a bill on both a slip printer and/or a roll printer. Every time a bill is printed after the FINAL operation, the bill is reprinted and allcontents of a guest check are printed from a beginning. After the text of “REPRINT” and reprint counterare printed on the reprinted bill.
NOTE
• This function is applied to both FINAL and other media.• This function is enabled only when the clerk is allowed to print a bill duplicately.
Printing bills after NBAL (Intermediate guest check reading)
After a temporary finalization using SRVC(NBAL) key, the [BILL] or [G.C.RCPT] key acts asintermediate guest check reading. The contents of guest check are printed on a bill printer and/orreceipt printer. On the bill, the text of “INTERMED.” is printed to indicate it is a intermediate bill.
Printing bills before finalizing a guest check
Depending on programming, you are required to print a bill before finalizing a guest check using amedia key. This function is intended to show a printed bill to the guest for the payment.

144
Guest information printing on bill
The name and address of a guest entered for table reservation can be printed on a bill. Also you canenter the name and address of a guest in a transaction by using the [NAME/ADDR] key. Please refer tothe text entry section for the entry.
Bills on journal
When a bill is printed, a copy of the bill is printed on journal at the same time. However, the print formatof a bill on journal depends on the journal format.
NOTE
Consecutive number is not printed on the copy on the journal, but the bill consecutive number is printed.You can trace the bill later by the bill number.
Bar code printing on bill
Bar code is printed on a bill for recall transaction by scanning a bar code.Touch the [RECALL] key, and scan the barcode on the bill.
145
Guest check copyYou can use this function when you want to take a copy of guest check.Touch the [G.C.COPY] key and make a desired entry.
➞ [G.C. COPY] ➞ item entry ➞ finalization ➞ (Bill/G.C.RCPT/RCPT) ➞
NOTE
• The guest check copy has nothing to do with the memory.• The operation is the same as normal entry. But the validation printing is disabled and the drawer does
not open.

146
Entertainment billThis function is used to print sales data on guest checks (Entertainment bill) on a receipt printer or billprinter. (Continental Europe only)
NOTE
• When a bill printer is not assigned, an entertainment bill is printed at a receipt printer.• When an assigned bill printer uses one sheet paper (TM-295), an entertainment bill is printed at a
receipt printer.• When an assigned bill printer used roll paper (TM-U210, TM-T85/88), an entertainment bill is printed
at the bill printer automatically.• Print format varies depending on the programming.
➞ [E.BILL]
147
15 Macro Key Entries
You can achieve many different key sequences automatically with a single operation.For this function your POS terminal allows you to use a magnetic card reader (MCR), a barcodescanner, the [MACRO #] key and the direct macro ([MACRO n] ) keys. You can make the entriesanytime during item registration.
Using the [MACRO #] key
Enter the target automatic sequencing number and touch the [MACRO #] key.
Using the [MACRO n] key
Touch the target macro key.
Using a barcode scanner
Scan the target barcode.
Using a MCR
Swipe the target magnetic card.
NOTE
When the [CR] key is included in a macro, it works as a pause key. The sequence will stop at the clearkey and enter into the pause mode. Then you can start manual key entries. When the same automatickey is touched again, the pause mode will be terminated and the sequence will be resumed.
148
16 Training Function
The training function is used when a clerk practices POS terminal operations.When a clerk set in training is selected, the POS terminal automatically enters the training functionmode. When a clerk not set in training is selected, the POS terminal automatically enters the ordinaryregistration mode.
The training operations are valid for key operations in all modes.A mark or message with which you can identify as a training receipt (such as “TRAINING”) is printed onevery receipt which is issued in the training mode.
The journal print completely stops in the training mode. The consecutive number is not updated. Thepreceding number is repeated in printing.
The memory in clerk is updated in the training mode. Other memories are not updated.
The table numbers which are opened in the training mode are also printed on the table report. In thiscase, those tables are distinguished from others by the character of “T”. The data of training tables arenot added to the total.
The reading and resetting of training clerks is printed on the clerk reports. However, the sales total oftraining clerks is not included in the clerk total on the full clerk report.
Bill void functionThis function allows to voiding a bill that has been issued already for training. The voided bill is removedfrom a bill report, and the voided bill number is reused for a new bill.
Bill number ➞ [-] ➞ [G.C.RCPT] or [BILL]

149
17 Compulsory Cash/ChequeDeclaration
If your POS terminal has been programmed for compulsory cash/check declaration, you must declarecash/cheque in drawer in advance according to the type of the declaration when you take a individual orall clerk Z report or a terminal report Z, which depends on programming.For the declaration, there are two methods, preset type and open type. In the preset type, unit amountare preset, so you only select tender types and quantity, while you must additionally enter unit amount inthe open type.
1. When CCD entry is compulsory, the window will appear for the declaration of cash/check in thedrawer.
2. In case preset type is selected:Select a tender type, and enter the quantity, or enter quantity and select the tender type. Amountand total are calculated automatically.
In case open type is selected:Select a tender type, and enter the unit amount and quantity. Then new record will be created.Amount and total are calculated automatically.
NOTE
• Incorrect entry can be cleared by the [ ] or [CL].• Total amount includes domestic currency amount and foreign currency amount converted to the
domestic currency.
3. A clerk or terminal report will be issued.
→

150
18 Close Session (EOS)Close session closes the terminal. Close session may be performed automatically at the preset time, orcan be performed manually.
When a close session is executed, the following Z reports may be issued automatically.• Transaction report• Item report• Hourly report
NOTE
For details of Z reports, please refer to "Reading (X) and Resetting (Z) of Daily Sales Total" section.
To perform close session manually, touch the [EOS] key.

151
19 Terminal Programming
Downloading POS programming dataProgramming data set by the POS sever (Back Office) may be downloaded to your POS terminalautomatically or manually depending on the programming setting.When the programming data is downloaded, all the terminals connected to the POS server are updated.
Automatic downloading
When you turn on your POS terminal, all programming data is copied from the POS sever to theterminal.Also any change done at the POS sever are downloaded real time: The change is applied after thecurrent open receipt is finalized, and automatic broadcast is applied every 10 seconds if the terminal isbusy.
Manual downloading
Programming data is downloaded when the [UPDATE] key is touched.

152
2. Select the PLU for which tare is to be changed, and touch [OK]. The following window will appear.
■ Changing tare
When it is necessary to change a plate/package for packaging, use the following procedure to changethe tare number. This change affects all terminals in the same revenue center and is valid until theoperation of end of session.
1. Touch the [CHANGE TARE] key. The tare list window will appear.
Changing programming settingsAll programming settings necessary for your POS terminal are done at the POS sever. However, on theterminal you can temporarily change some programming settings depending your need.
■ Programming list
Price change Use price change function. New price are distributed to all satellites.EAN/PLU creation Use EAN/PLU learning function.Customer creation Use customer learning function.Low stock entry Use countdown item function.Changing tare See the procedure below.
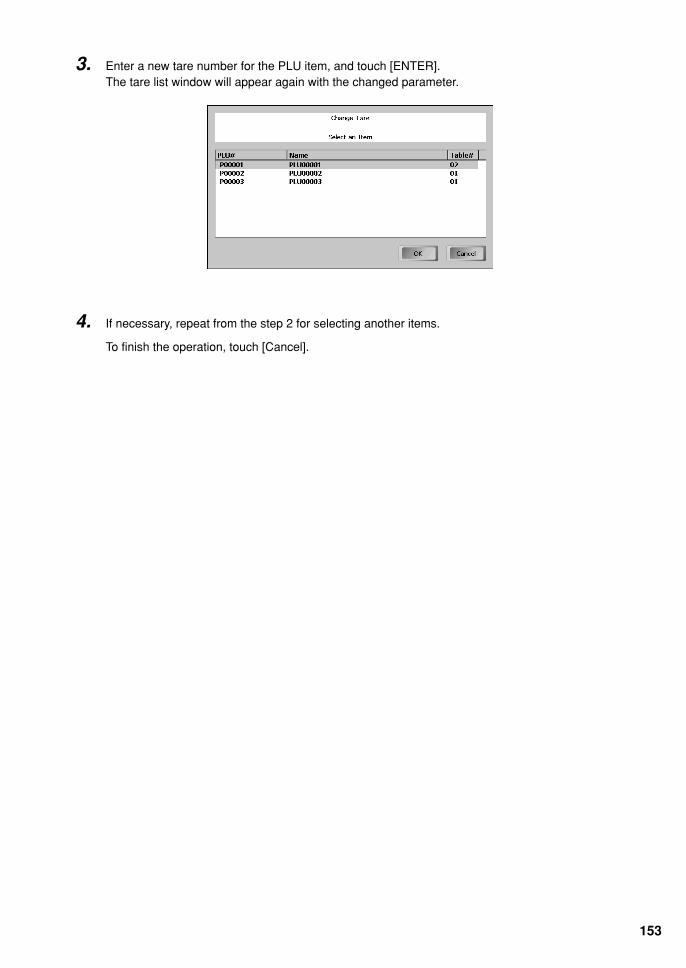
153
3. Enter a new tare number for the PLU item, and touch [ENTER].The tare list window will appear again with the changed parameter.
4. If necessary, repeat from the step 2 for selecting another items.
To finish the operation, touch [Cancel].
154
20 Reading (X) and Resetting (Z)of Daily Sales Totals
You can take reading and resetting reports of daily sales totals. Those operations can be performed byissuing daily sales reports. For the issuance, you may
• display on the operator display.• print on a printer• both display on the operator display and print on a printer.
• Use the reading function (X) when you need to take the reading of daily sales information enteredafter the last resetting. You can take this reading any number of times. It does not affect the POSterminal memory.
• Use the resetting function (Z) when you need to clear the POS terminal memory. Resetting prints allsales information and clears the entire memory except for the GT1, reset count, and consecutivenumber.
NOTE
Displaying or printing format depends on programming.
Report list
Report title FilterX Z
At the close session
Available report in each mode
Yes
Yes
Yes
Yes
Yes
Yes
Yes
Yes
Yes
Yes
Yes
Yes
Yes
Yes
Transaction report
Department
Department Markdown
Group total
Item report (PLU Items)
Groups
Departments
Groups
Departments
Groups
PLU Groups
Departments
Item Range
*1
*1: With CCD report if compulsory
155
Report title FilterX Z
At the closesession
Available report in each mode
Yes
Yes
Yes
Yes
Yes
Yes
Yes
Yes
Yes
Yes
Yes
Yes
Yes
Yes
Yes
Yes
Yes
Yes
Yes
Yes
Yes
Yes
Yes
Yes
Yes
Yes
Yes
Yes
Yes
Item Report by Time Zone
Theoretical Food Cost%
report
Simple Stock report
Hourly reports *2
PLU Hourly reports *2
Sales by terminal report
Clerk report (individual)
Clerk report (all)
Clerk Summary report
Tefra by Employee code
report
Tefra by Employee name
report
EJ report
DD Error report
DD Reset report
PLU Groups
Departments
Item Range
PLU Groups
Departments
Item Range
Revenue Center
PLU Groups
Departments
Item Range
Time range
Time range
Clerk
Clerk
Time range
Clerk
Medias
*1: With CCD report if compulsory*2: Time slice setting : 15, 30 or 60 minutes is also available*3: All sysytem
*3
*3
*3
*3
*3
*1
NOTE
Transaction report, item report, hourly report and PLU hourly report may be printed automatically at theclose session. For details of close session, please refer to the close session section.

156
1. Touch the [REPORT] key. The report window will appear.
2. Select a target report and touch [X] or [Z]. Filter layout will be shown.
In case of the Department X report
In case of the Department Z report
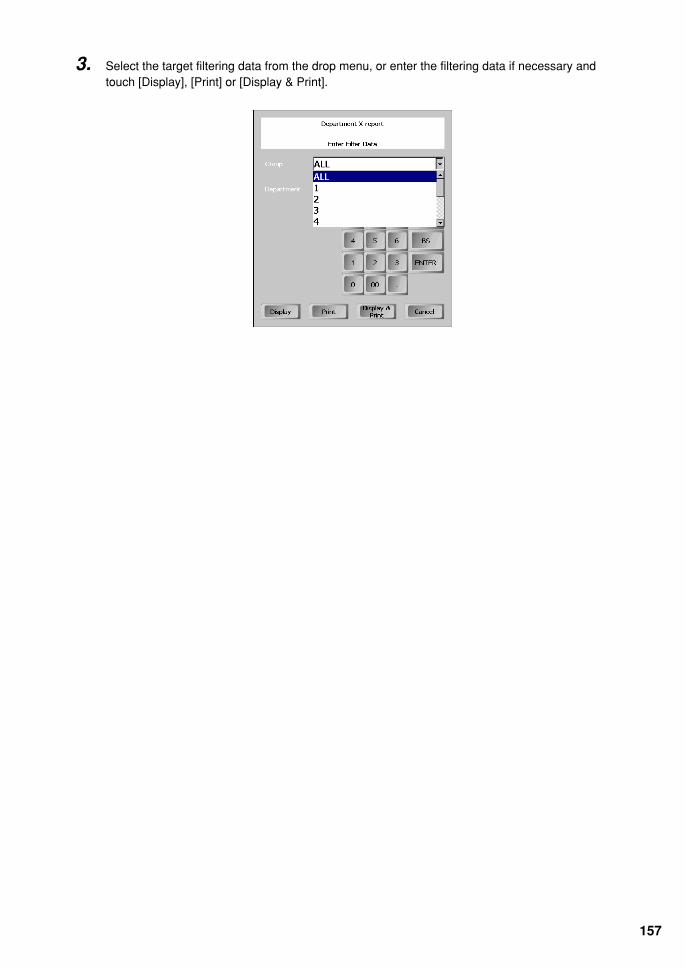
157
3. Select the target filtering data from the drop menu, or enter the filtering data if necessary andtouch [Display], [Print] or [Display & Print].
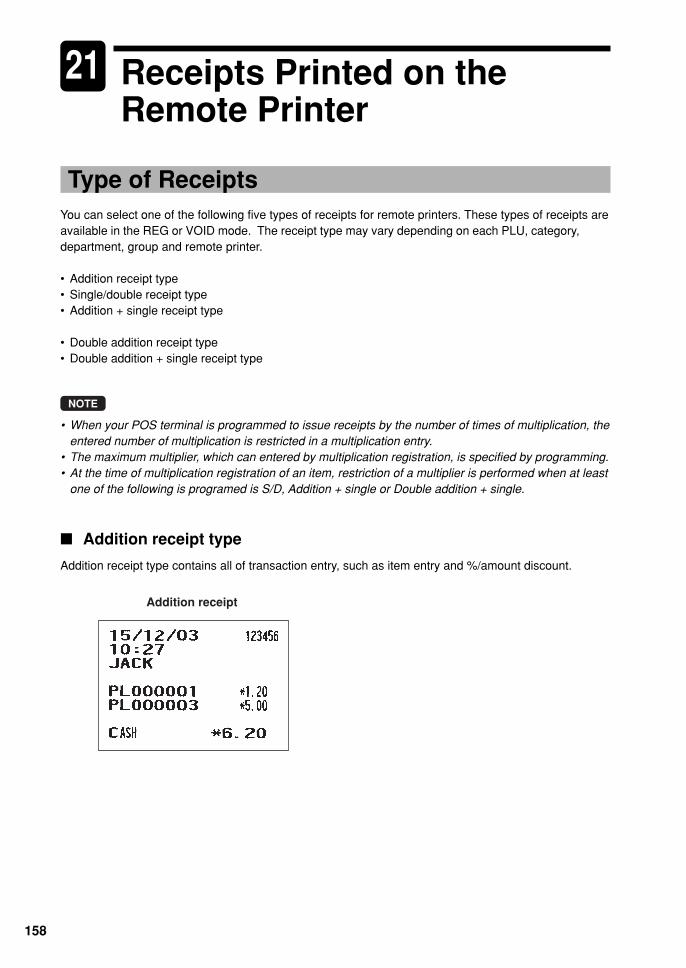
158
21 Receipts Printed on theRemote Printer
Type of ReceiptsYou can select one of the following five types of receipts for remote printers. These types of receipts areavailable in the REG or VOID mode. The receipt type may vary depending on each PLU, category,department, group and remote printer.
• Addition receipt type• Single/double receipt type• Addition + single receipt type
• Double addition receipt type• Double addition + single receipt type
NOTE
• When your POS terminal is programmed to issue receipts by the number of times of multiplication, theentered number of multiplication is restricted in a multiplication entry.
• The maximum multiplier, which can entered by multiplication registration, is specified by programming.• At the time of multiplication registration of an item, restriction of a multiplier is performed when at least
one of the following is programed is S/D, Addition + single or Double addition + single.
■ Addition receipt type
Addition receipt type contains all of transaction entry, such as item entry and %/amount discount.
Addition receipt
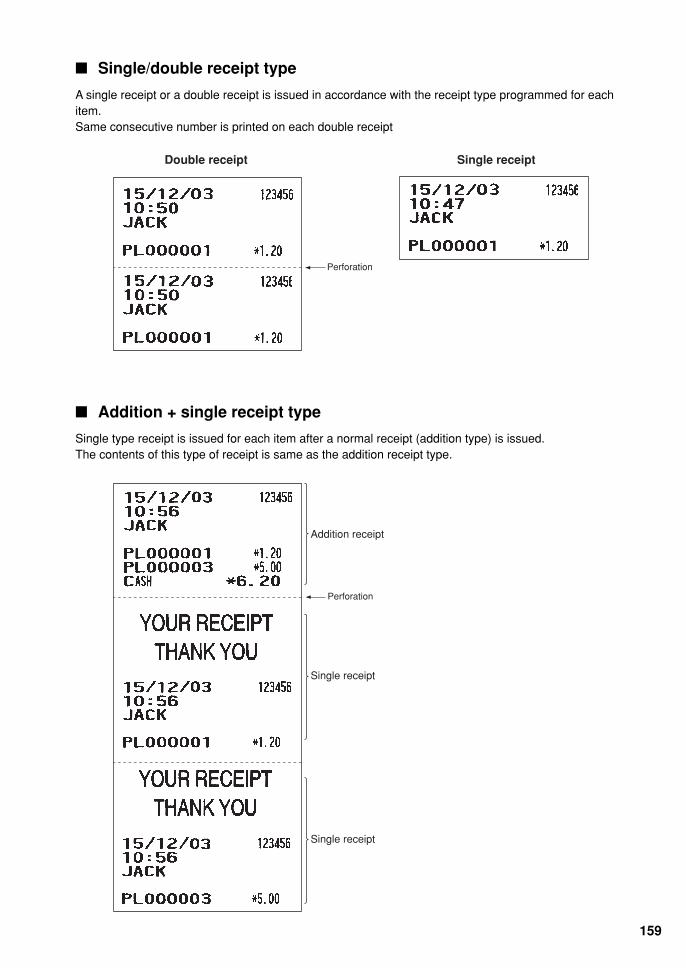
159
■ Single/double receipt type
A single receipt or a double receipt is issued in accordance with the receipt type programmed for eachitem.Same consecutive number is printed on each double receipt
■ Addition + single receipt type
Single type receipt is issued for each item after a normal receipt (addition type) is issued.The contents of this type of receipt is same as the addition receipt type.
Double receipt Single receipt
Perforation
Single receipt
Single receipt
Addition receipt
Perforation
160
■ Double addition receipt type
The contents of this type of receipt is same as the addition receipt type.However, the same receipt will be issued two times.
■ Double (addition + single) receipt type
The contents of this type of receipt is same as the (addition + single) receipt type. However, the samereceipt will be issued two times.Same consecutive number is printed on both issues.

SHARP CORPORATION
XXXXXXXXXX➀