update - where to start with yii
TRANSCRIPT
Chapter 2 – Your First Yii Application
This chapter is a starter step to learning the Yii framework. You will be building a Hello World
application but with a kick to learn your way around the framework using the integrated Yiic tool,
figuring out how models, views and controllers all tie together. It’s based off the tutorial I made as my
first introduction to the Yii framework myself; it’s called “Where to Start with Yii”.
This chapter will provide all the code for you and show you where to place it. There is nothing
complex in the logic behind how it works, so everyone including beginners should have no problem
understanding what’s going on. If you know how to operate the Yiic shell and have coded in the Yii
framework building your own classes and tying in controller-model pairs, then you could safely skip this
section without being lost or confused on how to work through the rest of the guide. If you’re looking to
dive right into the website step by step guide, you’ll want to jump to chapter 3 anyway.
Note: This section is based off of an earlier tutorial I made, which may be more in depth and useful to
you with its simplicity. If you would prefer to check it out, check the resources below.1
Planning If you’re familiar with programming languages, then you probably know that the famous Hello World
application is nothing more than printing out that string statement with the language. As such you’re
probably thinking, what on earth is there to plan about that? Well you’re right in regards that Hello
World really is that simple, but unfortunately to build on it and make it a “get to know” sort of
application to the framework means you’re going to have to go up, around and out of your way just to
do the simple things. If you can’t see what I mean now, don’t kill yourself because it really is a different
way of thinking on how to do an application so simple. However the fundamental learning’s you’ll build
will help you build much more complex applications later. So let’s dig in.
What we’re going to build here is a model that gets manipulated by a controller. That seems so
overkill for “Hello World” but the reason why it’s a good idea is because every application you will build
in Yii will be with a model that gets manipulated by a controller. So why not make it something simple?
Now before you pluck your brains out because of this suggestion, yes this is a complete waste of effort
and code lines to do something so simple. However the emphasis is not on the efficiency of the code but
more on learning the framework and you can’t put a time limit or effort limit on that.
Now because this is a simple application and Hello World merely does just print out Hello World, I’ve
added a modification allowing you to edit the message that gets printed. So this will help add to the
learning phases of the framework; but enough chit chat, let’s get our hands dirty.
1 http://www.sterlingsavvy.com/tutorials/index.php
Getting Started
Now before you start any application (and this one is no exception) you should plan out your goals to
achieve the application. This means understanding what resources you’ll need (how many models, how
many controllers, views etc.) and building them or for future implementation of them. This will not
always be so easy to see and do and often you’ll find yourself building new resources on the fly which
will mean going back to modify already existing resources. We’re going to try and teach you how to
avoid this but some things are inevitable.
When you look at this simple hello world application, you have to think about what it is you’re trying
to do and what you’ll need to do it. Sometimes I find it helps having paper and a pen around to collect
your logic together to figure out what it is you’re doing. For this example, we’re going to need to create
a model and a controller. The model will hold the information about the message and the controller
would operate the action to display it, just like a normal model-controller relationship.
So I named MessageController.php as my controller file and Message.php as my model file. Please
note I have not coded nor created these files yet, we’ll get to that shortly. Now to go one step further I
have noted that our MessageController has two actions, show message and edit message. With our
Message model, I established that we will have a variable to define the message, a variable to define an
author and a rule set that state that when the action edit is called, form fields message and author are
required.
A little side note: rules exists to models specifically. They allow you to define certain trigger events to
happen at certain times or with certain variables. These can include the length of a variable (a
username), if two variables match or compare (passwords), when a variable is required for input (email
address on registration). There are many different applications to the rules feature of a model and we’ll
explore them later more in depth.
Getting back on track let me just say that that’s it for the planning. One model, one controller, 2
actions, 2 attributes and a set of rules doesn’t seem like much. Once again very overboard however by
teaching yourself to approach all problems this way you will ensure that when you do develop complex
Yii applications you will do it with precision and properly.
Yiic Now that we have planned out our course of action for our small application, we can proceed to
operate with the powers of the Yii framework. Our first stop will be the integrated command console
tool Yiic. This tool will become mighty useful to you as it will speed up the tedious work of templates.
The best part about the Yiic is that it’s customizable (we’ll investigate that later) in which you can help
make your projects move more quickly by having custom templates made.
Ok so before we begin you’ll need to navigate to your local root folder. Since command prompt
access is usually only available to local machines we’re making the assumption you’re on your own
developing machine and have your own web server setup done. If you don’t have one set up you can
always take a look online on how to set up your own personal web server.
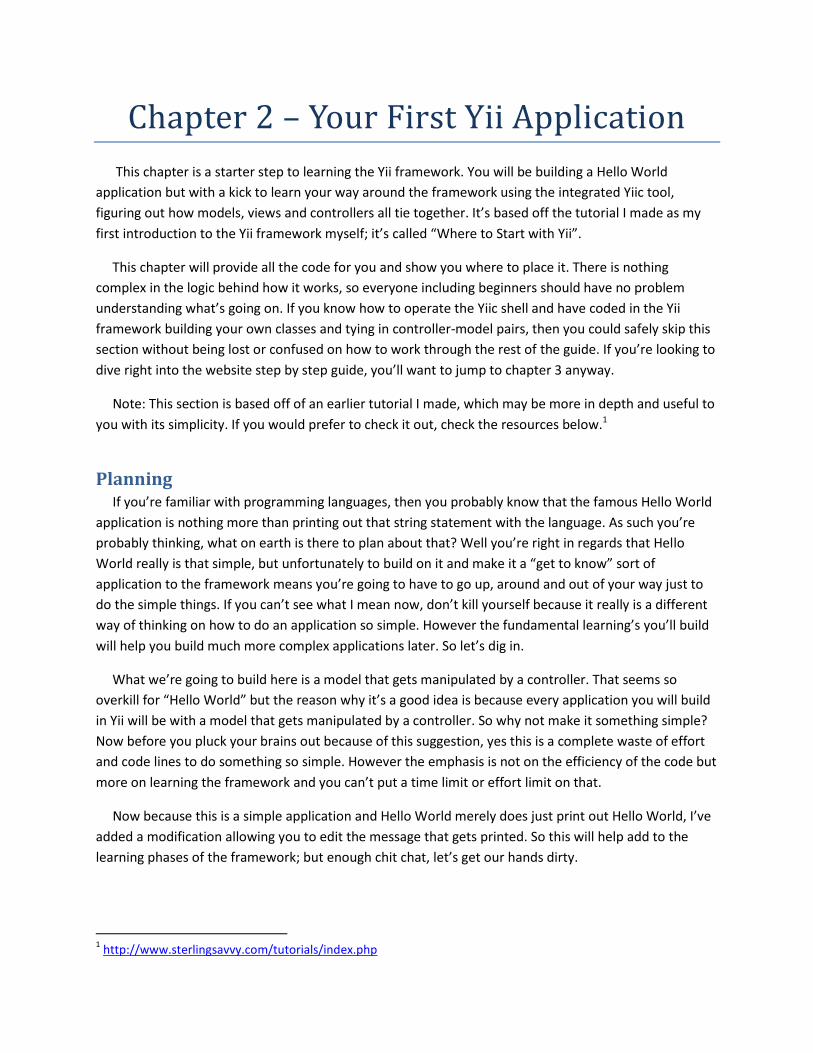
From this point on, that local root folder will be our reference to web root. Open up a command
prompt window and navigate to your root folder.
Step 1 Navigating to your web root folder
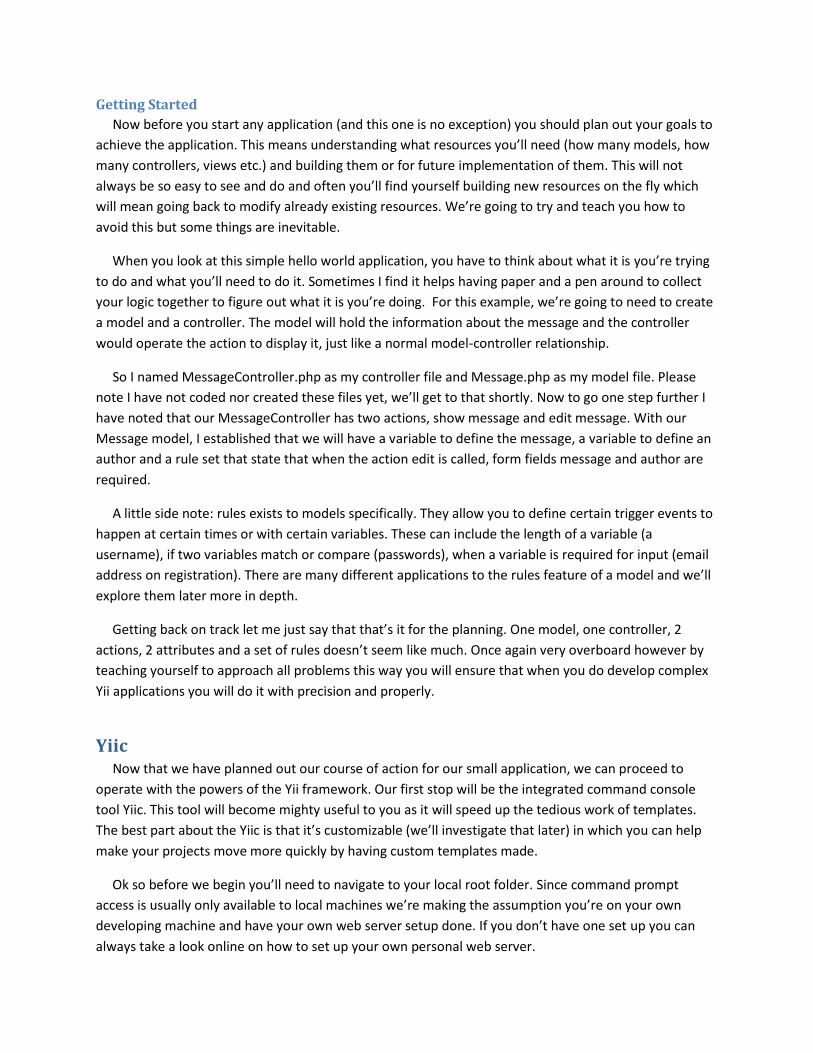
Now based on personal experience, I find it easier to build Yii applications from the root folder as
opposed to navigating to the Yii framework folder and then trying to build the application backwards in
folder hierarchy. So with that in mind, let’s take step two: building a template webapp. With your root
folder as your directory type the following command in the prompt:
.\yii\framework\yiic webapp test
Now to describe what just happened. \yii\framework refers to the folder in which the Yii framework
is actually in (for you this may be different but most people with common sense make the folder yii and
then have the framework inside it, easier to remember). \yiic calls the Yiic tool with the parameters
webapp (which makes a template web application). Finally test refers to the folder our template web
application will be made in. Test will be located within your local root folder because that’s where we
currently are. Once you process this command you’ll be asked yes or no to create the directory. Choose
yes.
Step 2 Making the webapp template
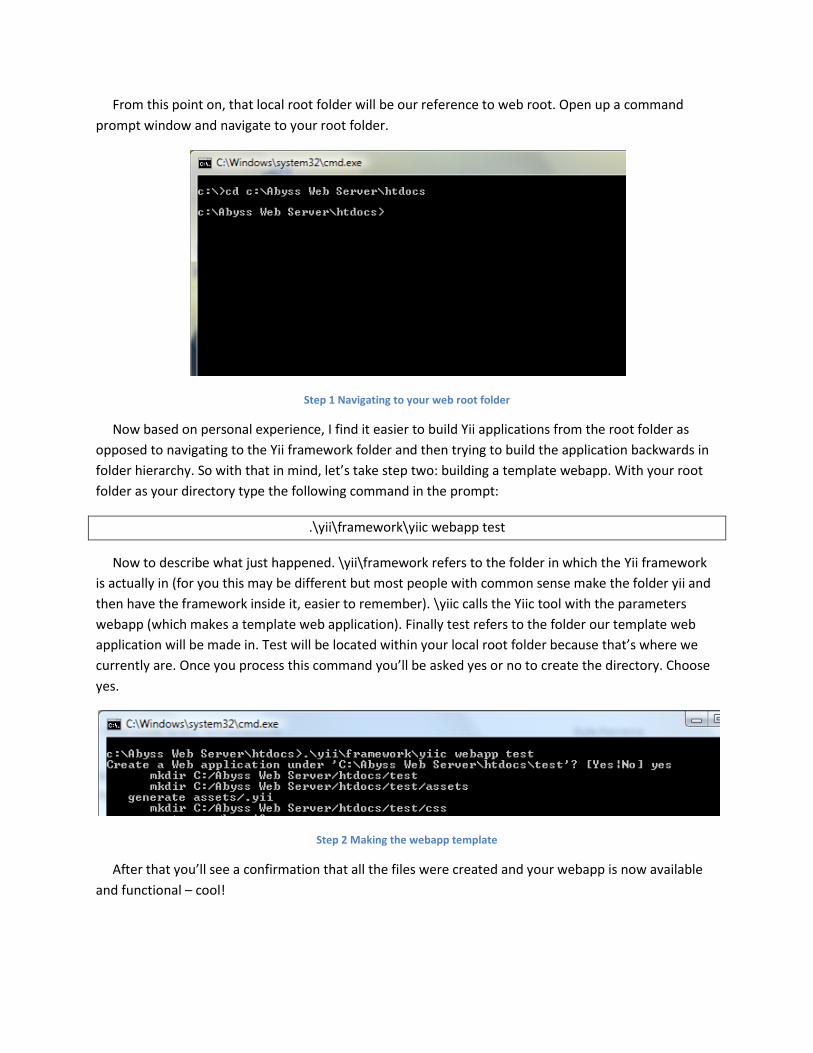
After that you’ll see a confirmation that all the files were created and your webapp is now available
and functional – cool!
Step 3 Webapp template created
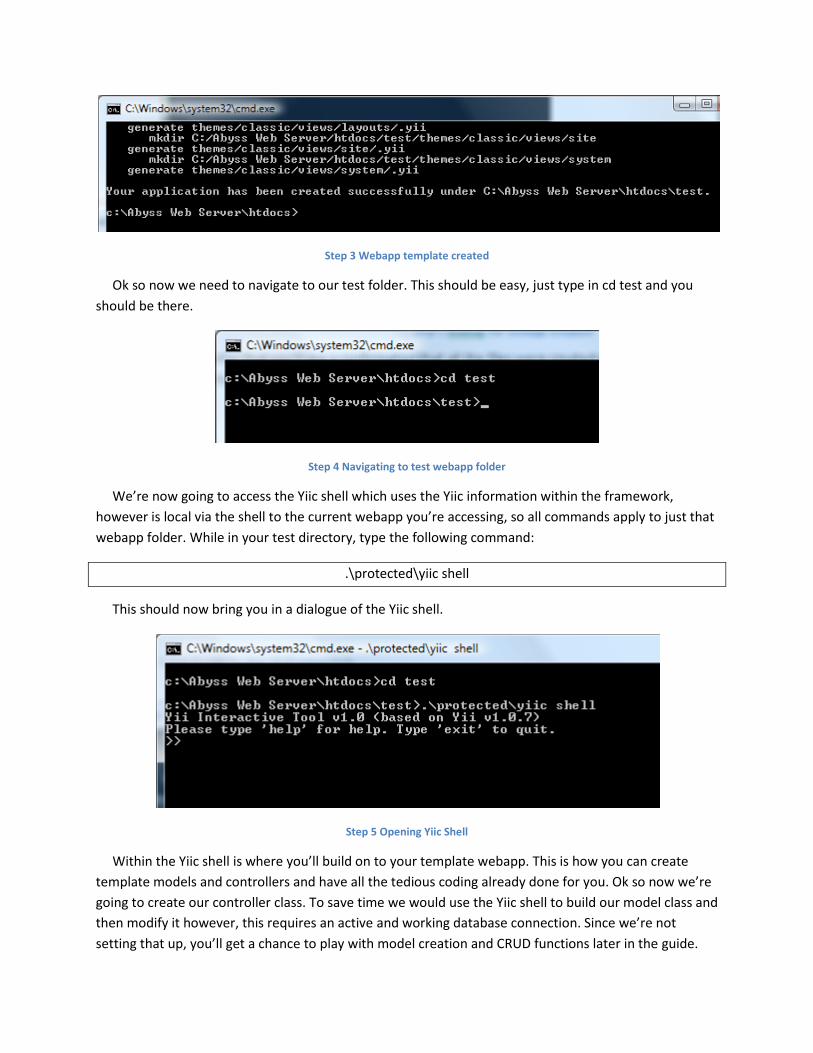
Ok so now we need to navigate to our test folder. This should be easy, just type in cd test and you
should be there.
Step 4 Navigating to test webapp folder
We’re now going to access the Yiic shell which uses the Yiic information within the framework,
however is local via the shell to the current webapp you’re accessing, so all commands apply to just that
webapp folder. While in your test directory, type the following command:
.\protected\yiic shell
This should now bring you in a dialogue of the Yiic shell.
Step 5 Opening Yiic Shell
Within the Yiic shell is where you’ll build on to your template webapp. This is how you can create
template models and controllers and have all the tedious coding already done for you. Ok so now we’re
going to create our controller class. To save time we would use the Yiic shell to build our model class and
then modify it however, this requires an active and working database connection. Since we’re not
setting that up, you’ll get a chance to play with model creation and CRUD functions later in the guide.
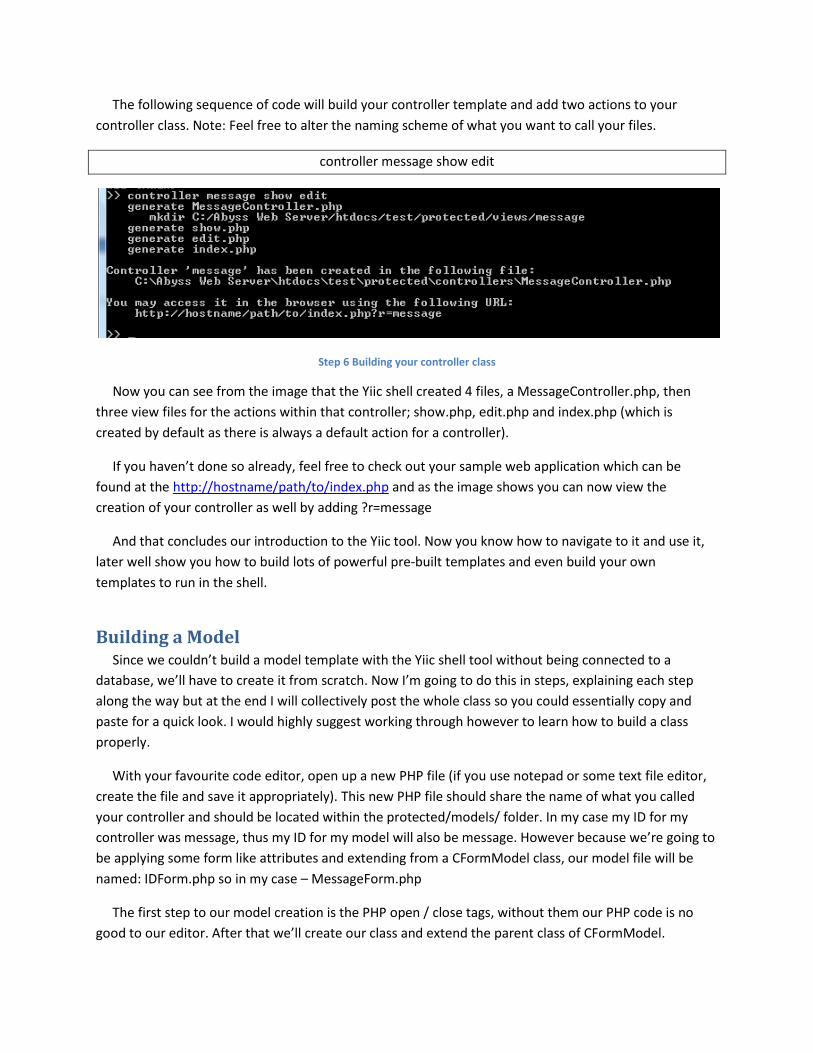
The following sequence of code will build your controller template and add two actions to your
controller class. Note: Feel free to alter the naming scheme of what you want to call your files.
controller message show edit
Step 6 Building your controller class
Now you can see from the image that the Yiic shell created 4 files, a MessageController.php, then
three view files for the actions within that controller; show.php, edit.php and index.php (which is
created by default as there is always a default action for a controller).
If you haven’t done so already, feel free to check out your sample web application which can be
found at the http://hostname/path/to/index.php and as the image shows you can now view the
creation of your controller as well by adding ?r=message
And that concludes our introduction to the Yiic tool. Now you know how to navigate to it and use it,
later well show you how to build lots of powerful pre-built templates and even build your own
templates to run in the shell.
Building a Model Since we couldn’t build a model template with the Yiic shell tool without being connected to a
database, we’ll have to create it from scratch. Now I’m going to do this in steps, explaining each step
along the way but at the end I will collectively post the whole class so you could essentially copy and
paste for a quick look. I would highly suggest working through however to learn how to build a class
properly.
With your favourite code editor, open up a new PHP file (if you use notepad or some text file editor,
create the file and save it appropriately). This new PHP file should share the name of what you called
your controller and should be located within the protected/models/ folder. In my case my ID for my
controller was message, thus my ID for my model will also be message. However because we’re going to
be applying some form like attributes and extending from a CFormModel class, our model file will be
named: IDForm.php so in my case – MessageForm.php
The first step to our model creation is the PHP open / close tags, without them our PHP code is no
good to our editor. After that we’ll create our class and extend the parent class of CFormModel.
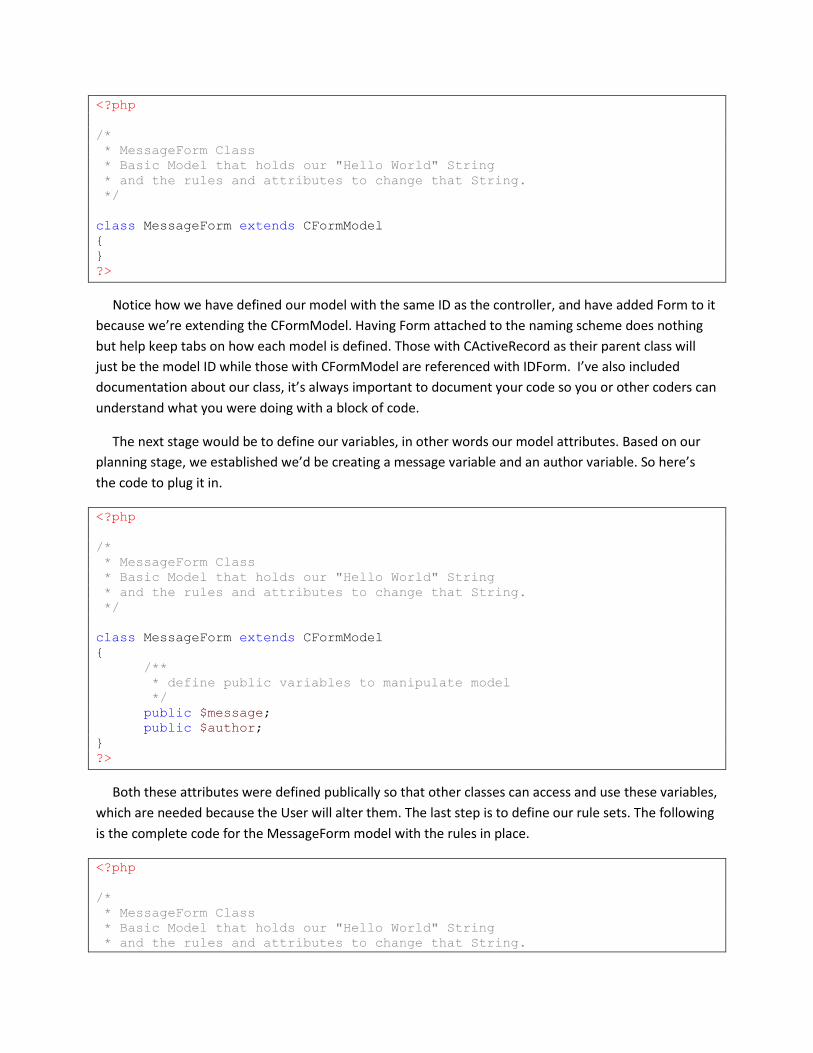
<?php
/*
* MessageForm Class
* Basic Model that holds our "Hello World" String
* and the rules and attributes to change that String.
*/
class MessageForm extends CFormModel
{
}
?>
Notice how we have defined our model with the same ID as the controller, and have added Form to it
because we’re extending the CFormModel. Having Form attached to the naming scheme does nothing
but help keep tabs on how each model is defined. Those with CActiveRecord as their parent class will
just be the model ID while those with CFormModel are referenced with IDForm. I’ve also included
documentation about our class, it’s always important to document your code so you or other coders can
understand what you were doing with a block of code.
The next stage would be to define our variables, in other words our model attributes. Based on our
planning stage, we established we’d be creating a message variable and an author variable. So here’s
the code to plug it in.
<?php
/*
* MessageForm Class
* Basic Model that holds our "Hello World" String
* and the rules and attributes to change that String.
*/
class MessageForm extends CFormModel
{
/**
* define public variables to manipulate model
*/
public $message;
public $author;
}
?>
Both these attributes were defined publically so that other classes can access and use these variables,
which are needed because the User will alter them. The last step is to define our rule sets. The following
is the complete code for the MessageForm model with the rules in place.
<?php
/*
* MessageForm Class
* Basic Model that holds our "Hello World" String
* and the rules and attributes to change that String.
*/
class MessageForm extends CFormModel
{
/**
* define public variables to manipulate model
*/
public $message;
public $author;
/**
* @return array validation rules for model attributes.
*/
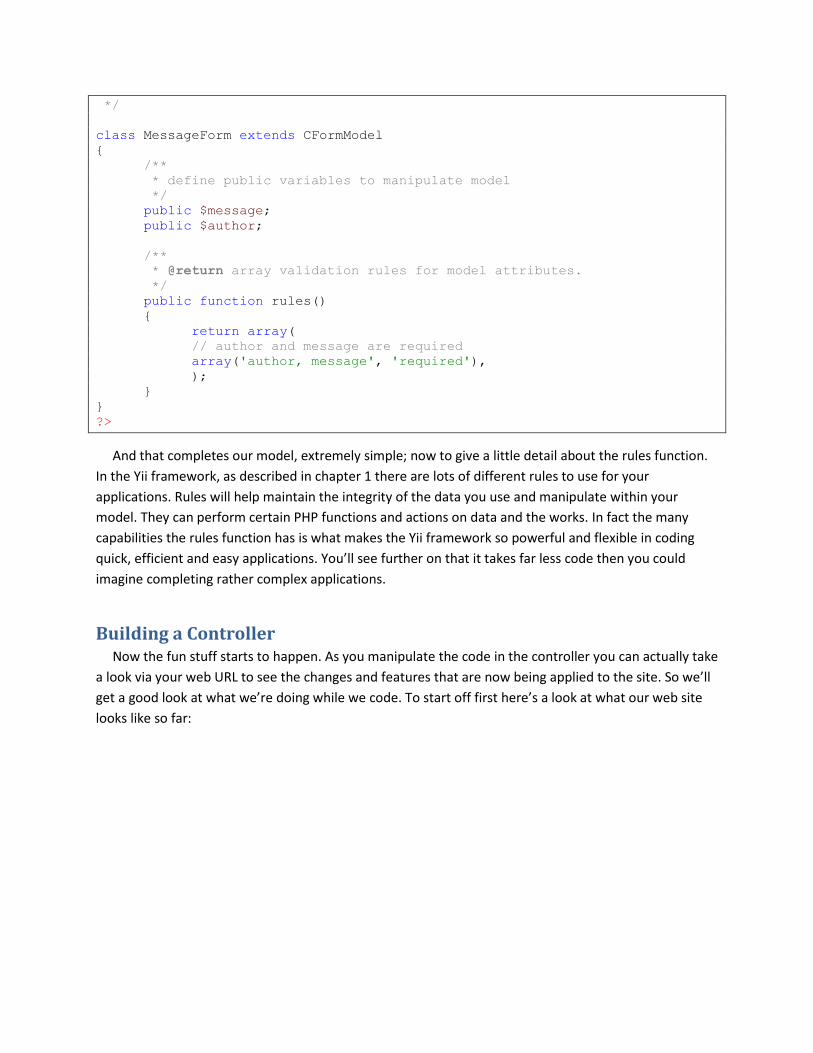
public function rules()
{
return array(
// author and message are required
array('author, message', 'required'),
);
}
}
?>
And that completes our model, extremely simple; now to give a little detail about the rules function.
In the Yii framework, as described in chapter 1 there are lots of different rules to use for your
applications. Rules will help maintain the integrity of the data you use and manipulate within your
model. They can perform certain PHP functions and actions on data and the works. In fact the many
capabilities the rules function has is what makes the Yii framework so powerful and flexible in coding
quick, efficient and easy applications. You’ll see further on that it takes far less code then you could
imagine completing rather complex applications.
Building a Controller Now the fun stuff starts to happen. As you manipulate the code in the controller you can actually take
a look via your web URL to see the changes and features that are now being applied to the site. So we’ll
get a good look at what we’re doing while we code. To start off first here’s a look at what our web site
looks like so far:
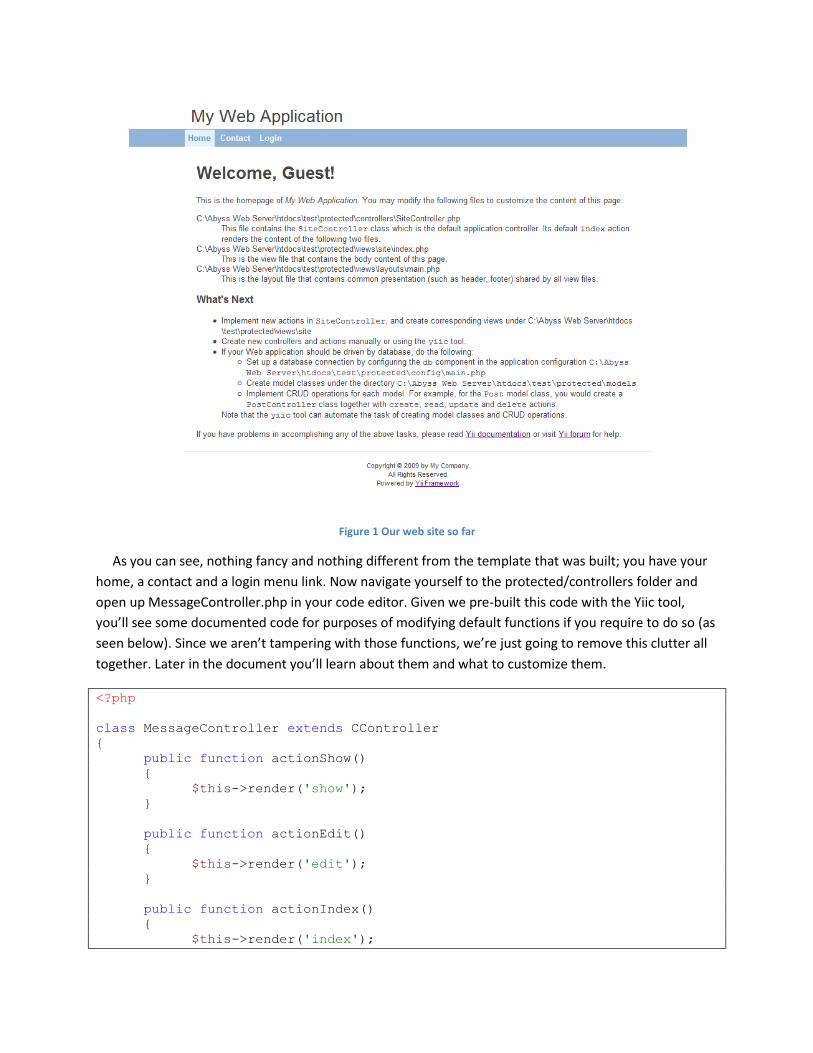
Figure 1 Our web site so far
As you can see, nothing fancy and nothing different from the template that was built; you have your
home, a contact and a login menu link. Now navigate yourself to the protected/controllers folder and
open up MessageController.php in your code editor. Given we pre-built this code with the Yiic tool,
you’ll see some documented code for purposes of modifying default functions if you require to do so (as
seen below). Since we aren’t tampering with those functions, we’re just going to remove this clutter all
together. Later in the document you’ll learn about them and what to customize them.
<?php
class MessageController extends CController
{
public function actionShow()
{
$this->render('show');
}
public function actionEdit()
{
$this->render('edit');
}
public function actionIndex()
{
$this->render('index');
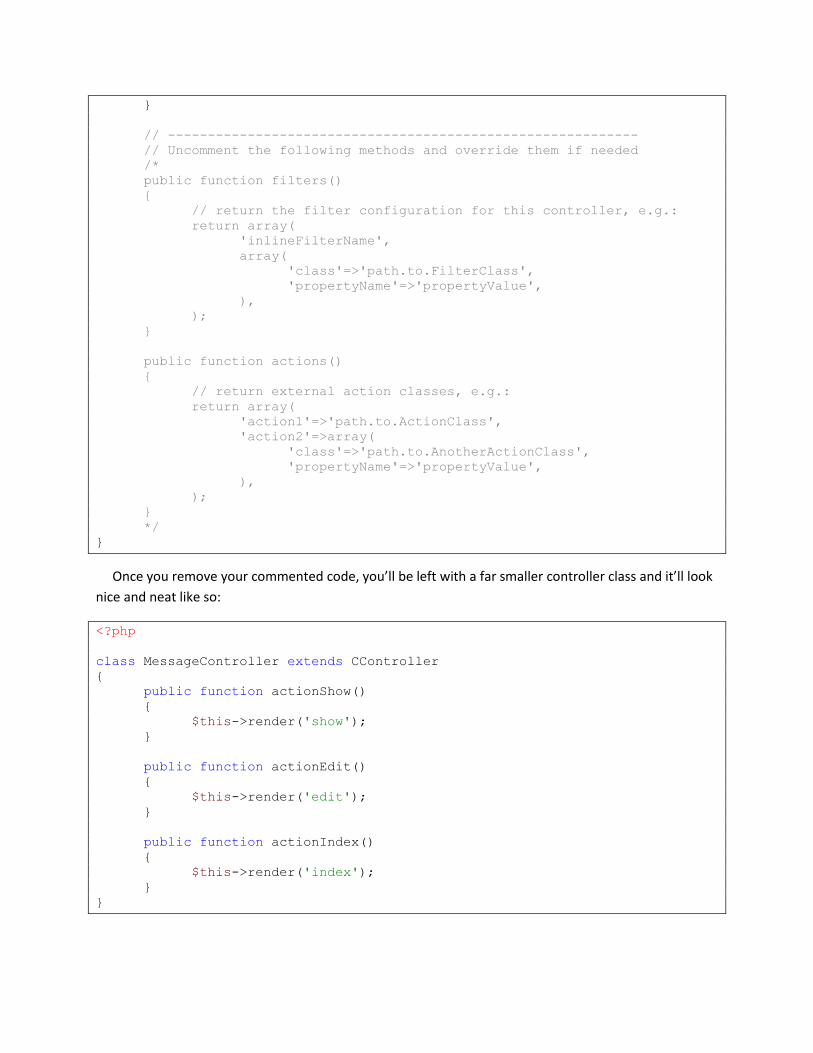
}
// -----------------------------------------------------------
// Uncomment the following methods and override them if needed
/*
public function filters()
{
// return the filter configuration for this controller, e.g.:
return array(
'inlineFilterName',
array(
'class'=>'path.to.FilterClass',
'propertyName'=>'propertyValue',
),
);
}
public function actions()
{
// return external action classes, e.g.:
return array(
'action1'=>'path.to.ActionClass',
'action2'=>array(
'class'=>'path.to.AnotherActionClass',
'propertyName'=>'propertyValue',
),
);
}
*/
}
Once you remove your commented code, you’ll be left with a far smaller controller class and it’ll look
nice and neat like so:
<?php
class MessageController extends CController
{
public function actionShow()
{
$this->render('show');
}
public function actionEdit()
{
$this->render('edit');
}
public function actionIndex()
{
$this->render('index');
}
}
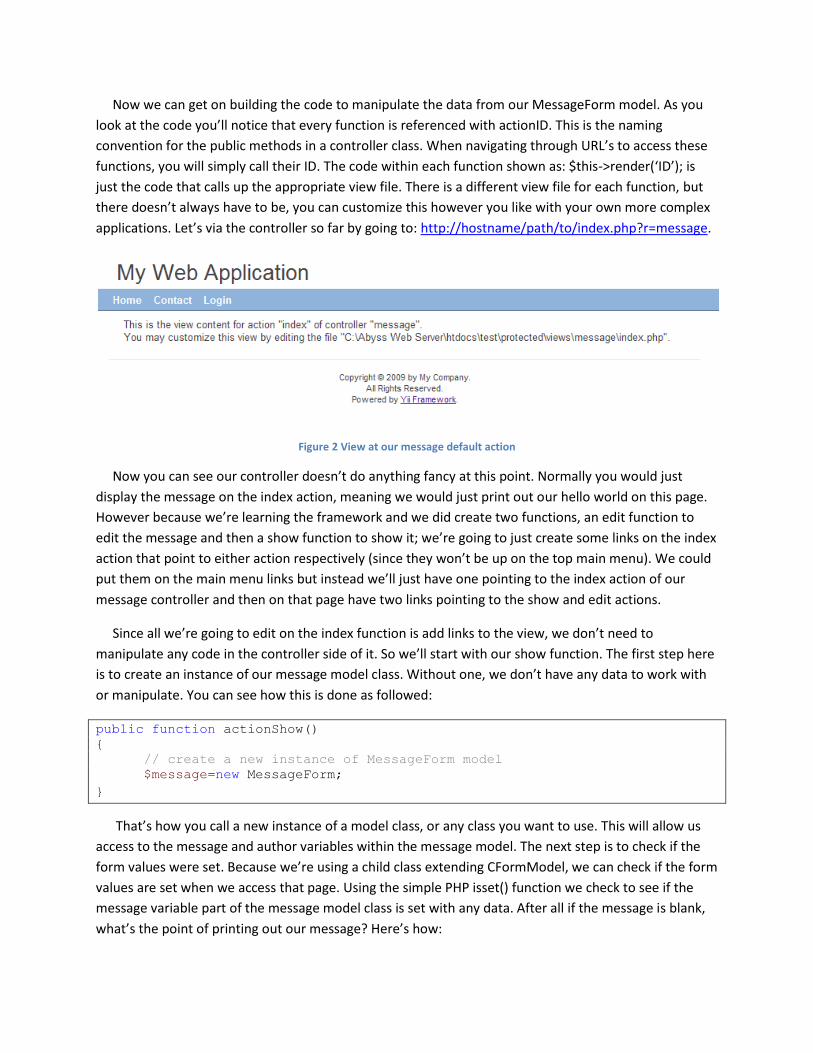
Now we can get on building the code to manipulate the data from our MessageForm model. As you
look at the code you’ll notice that every function is referenced with actionID. This is the naming
convention for the public methods in a controller class. When navigating through URL’s to access these
functions, you will simply call their ID. The code within each function shown as: $this->render(‘ID’); is
just the code that calls up the appropriate view file. There is a different view file for each function, but
there doesn’t always have to be, you can customize this however you like with your own more complex
applications. Let’s via the controller so far by going to: http://hostname/path/to/index.php?r=message.
Figure 2 View at our message default action
Now you can see our controller doesn’t do anything fancy at this point. Normally you would just
display the message on the index action, meaning we would just print out our hello world on this page.
However because we’re learning the framework and we did create two functions, an edit function to
edit the message and then a show function to show it; we’re going to just create some links on the index
action that point to either action respectively (since they won’t be up on the top main menu). We could
put them on the main menu links but instead we’ll just have one pointing to the index action of our
message controller and then on that page have two links pointing to the show and edit actions.
Since all we’re going to edit on the index function is add links to the view, we don’t need to
manipulate any code in the controller side of it. So we’ll start with our show function. The first step here
is to create an instance of our message model class. Without one, we don’t have any data to work with
or manipulate. You can see how this is done as followed:
public function actionShow()
{
// create a new instance of MessageForm model
$message=new MessageForm;
}
That’s how you call a new instance of a model class, or any class you want to use. This will allow us
access to the message and author variables within the message model. The next step is to check if the
form values were set. Because we’re using a child class extending CFormModel, we can check if the form
values are set when we access that page. Using the simple PHP isset() function we check to see if the
message variable part of the message model class is set with any data. After all if the message is blank,
what’s the point of printing out our message? Here’s how:
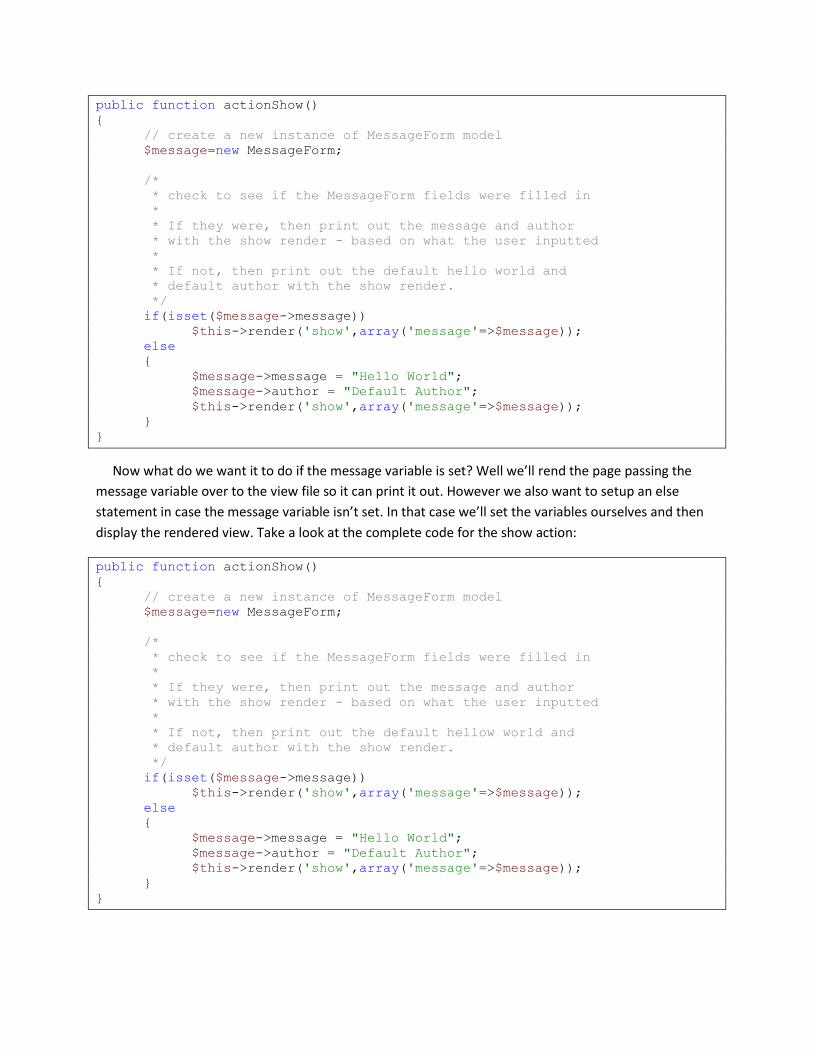
public function actionShow()
{
// create a new instance of MessageForm model
$message=new MessageForm;
/*
* check to see if the MessageForm fields were filled in
*
* If they were, then print out the message and author
* with the show render - based on what the user inputted
*
* If not, then print out the default hello world and
* default author with the show render.
*/
if(isset($message->message))
$this->render('show',array('message'=>$message));
else
{
$message->message = "Hello World";
$message->author = "Default Author";
$this->render('show',array('message'=>$message));
}
}
Now what do we want it to do if the message variable is set? Well we’ll rend the page passing the
message variable over to the view file so it can print it out. However we also want to setup an else
statement in case the message variable isn’t set. In that case we’ll set the variables ourselves and then
display the rendered view. Take a look at the complete code for the show action:
public function actionShow()
{
// create a new instance of MessageForm model
$message=new MessageForm;
/*
* check to see if the MessageForm fields were filled in
*
* If they were, then print out the message and author
* with the show render - based on what the user inputted
*
* If not, then print out the default hellow world and
* default author with the show render.
*/
if(isset($message->message))
$this->render('show',array('message'=>$message));
else
{
$message->message = "Hello World";
$message->author = "Default Author";
$this->render('show',array('message'=>$message));
}
}
So now you could go and check out the URL to see your changes. However unfortunately I lied to you
earlier a little bit. While we are changing our controller class and the changes will alter how we see our
page or what it does more specifically, until we alter the view files respectively for those actions you
won’t see much change. The only difference is if we had of did a CRUD operation in which case default
view files are already made with pretty looking features, or even if we copied one of the already made
form views (from login form or the contact form) from the template. Since we didn’t do either, we’ll
have to wait till we modify our view files to see our changes. But don’t be fooled! We completed a lot
already and set up our function to print out our default Hello World.
The next stage is to edit our final action, the edit action. This will be different in regards that we won’t
just be assigning variables and displaying them accordingly. Instead we have to establish if the form is
set, and if it’s not display it. The following code is the full edit action:
public function actionEdit()
{
// create a new instance of MessageForm model
$message=new MessageForm;
/*
* check to see if All the fileds are filled in on the form
* if so proceed to assign the values to the variables in
* the message model (author and message)
*
* If they validate (no errors) then render the show page
* with the new data values
*
* If there's errors, return to the edit form showing the
* errors
*
* Finally if the form wasn't set then we render the edit
* page so that the user can input field values.
*/
if(isset($_POST['MessageForm']))
{
$message->attributes=$_POST['MessageForm'];
if($message->validate())
$this->render('show',array('message'=>$message));
else
$this->render('edit', array('message'=>$message));
}
else
$this->render('edit', array('message'=>$message));
}
Rather than code step by step, this action here is the full action because it would be easier to explain
to you what’s going on and why if you see the big picture. To break it down you have your instance
declaration of the MessageForm model class. After that you set yourself up with your first if statement.
Like before this if statement uses the isset() function of PHP, however because Yii has built in integration
with this, it recognizes that instead of looking for just one field or variable, it checks all the variable fields
associated with the MessageForm class. If nothing is set, then the action displays the edit render page so
the user can fill out the form.
If the fields were filled out then we assign all the field values to the attributes of the MessageForm
model class. This works similar to the way the isset function did on all the fields, it pulls all the fields and
transfers the data to the appropriate variables based on naming convention. After we have set all the
variables with the data from the form, we call the model class’s validate function. This is a default
function that can be overridden to alter what it does, but essentially it checks to see if every value
entered meets the criteria of the rules set in the model class.
Remember those rules we set? The ones that said the author and the message variables are
required? This is where it comes into play. If when the validate function is called, those variables do not
have some sort of input in them, the validate function will return false. In the event it does, our code re-
displays the edit render page with the error fields highlighted (thanks to Yii’s Ajax features). If the
validate function passes (meaning all our rules were met) then the show page is rendered instead,
rending the new values of our MessageForm attributes.
And that completes our controller class. Now we are ready to display our action packed application.
One thing to note however, we did not make a database setup and these variables are not stored in a
database. Once you change from the page of the edit or show actions, the message will be erased and
replaced with the default message the next time the show page is accessed. This isn’t a big issue since
this application was only meant to show you the framework however don’t get confused when you
notice it doesn’t store your messages for later keeping.
Building a View Ok so now the fun stuff starts to happen. I would have posted an image of our web site so far,
however nothing changed graphically so you’d be very upset. Well that’s about to change when we
tamper with our view files. As you remember from chapter 1, view files hold the presentation logic; they
define how to display a page and data. If you navigate to the protected/views/message folder you’ll see
we have three view files to customize. So let’s get started.
The first view file we’ll fix up will be the index view. This is because we’ll be able to access the other
two views via links from this index view as opposed to having to type in the links manually. When you
open up the view file you’ll see the sample text that was presented to us earlier when we navigated to
the message default action on our URL. Deleted everything so that way it’s a clean file and then code the
following into your view file:
<h1>Welcome</h1>
<p> To view our message go to <?php echo CHtml::link('Here',
array('message/show'))?> </p>
<p> To edit our message go to <?php echo CHtml::link('Here',
array('message/edit'))?> </p>
Nothing fancy, just two links pointing to the show and edit functions. However you do get a glimpse
of the power of the Yii framework with it’s easy to build URL scheme. Sure echo CHtml::link(‘’. Array(‘’))
?> might seem like a lot longer than <a href=’’></a> however this method is cleaner because the
framework knows that in the array ‘message/show’ actually means head to index.php?r=message/show.
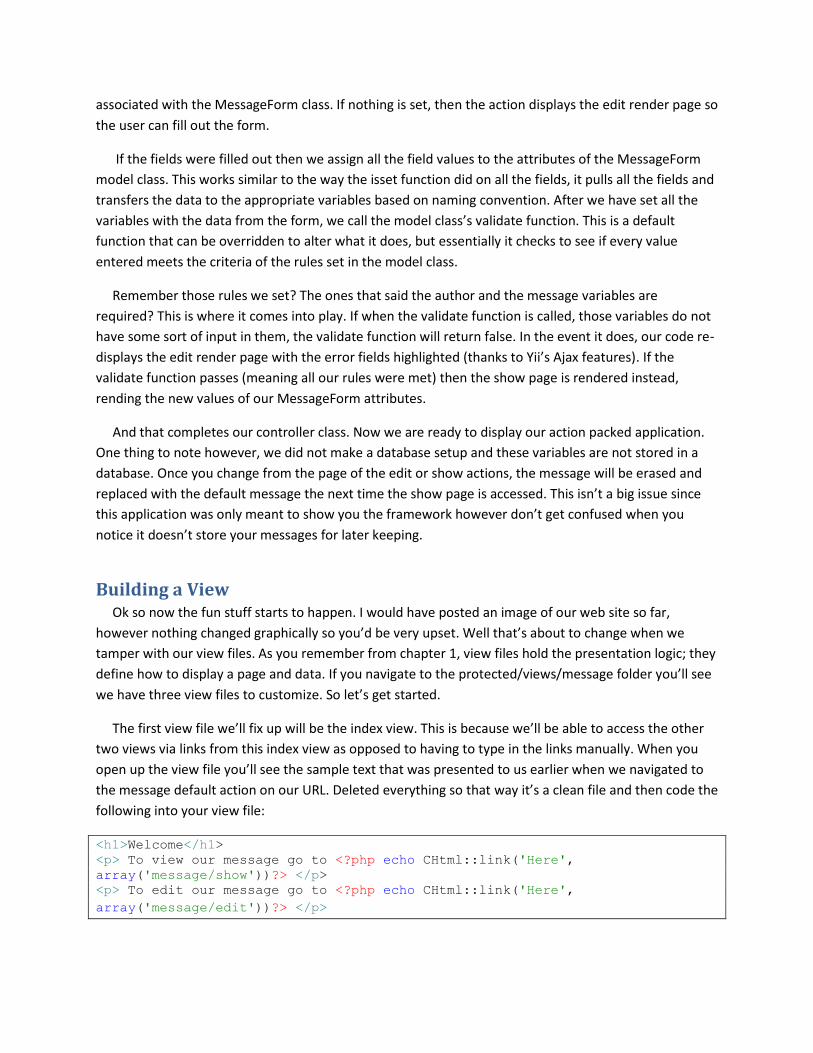
That doesn’t seem like much of an advantage now, but when you start building more links and
complex ones, you’ll see how useful that feature actually becomes. Now we can check to see how our
web site change, Oh Boy! Navigate to http://hostname/path/to/index.php?r=message and voila!
Figure 3 Voila! Our default message action
Nothing fancy once again of course but you can see some change and some progress. As soon as we
fix up the view files for the edit and show actions you’ll be saying this is the greatest page in my
application! Ok maybe not that excitedly but still, you’ll be impressed with what you did and how easy it
was to do.
Next we’ll tackle the show action since it’s already got the setup to print out the default hello world
string. Opening up the show view file you’ll see the same text that was there in the index file, remove all
of it as well because we’re going to replace it with the following code:
<?php $this->pageTitle=Yii::app()->name . ' - Show Message'; ?>
<p><?php echo CHtml::link('Back', array('/message')?> </p>
<h1>Our Message</h1>
<p>
<?php echo $message->author; ?>
- "
<?php echo $message->message; ?>
"
</p>
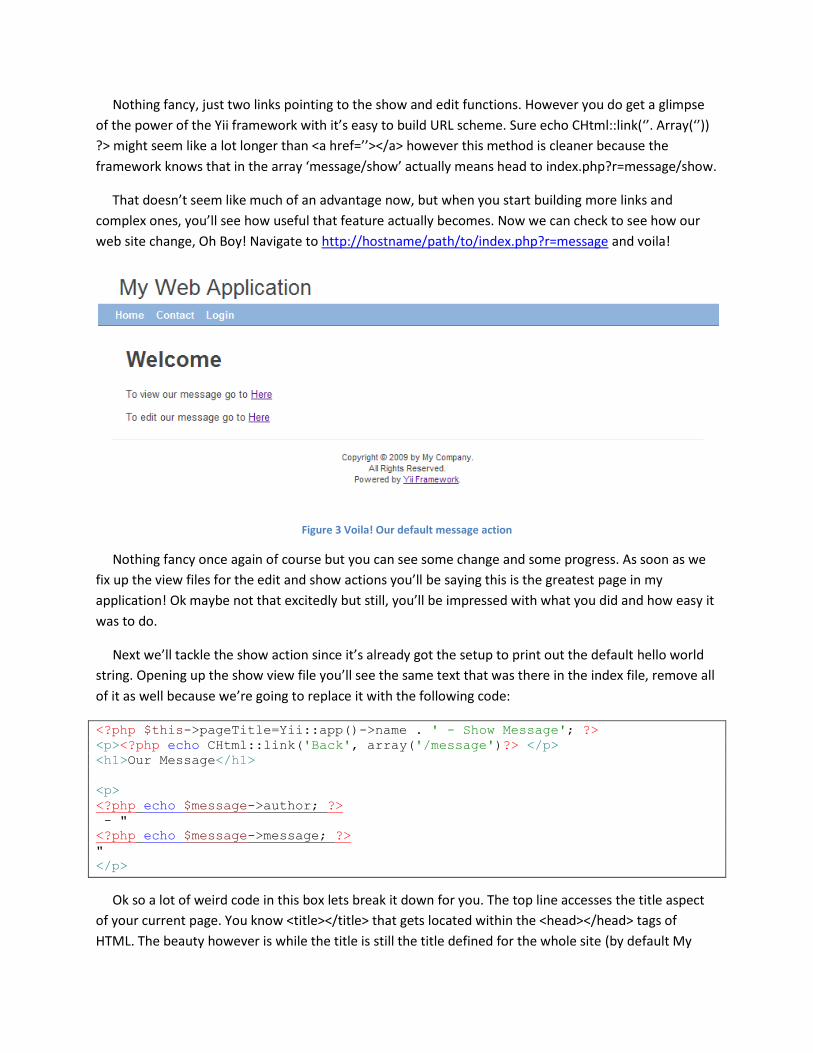
Ok so a lot of weird code in this box lets break it down for you. The top line accesses the title aspect
of your current page. You know <title></title> that gets located within the <head></head> tags of
HTML. The beauty however is while the title is still the title defined for the whole site (by default My
Web Application) this feature allows us to add our own custom message for the specific page after that.
So in our case the page now becomes My Web Application – Show Message. Pretty cool! The next line is
another link that basically just offers you the option to go back to the message index, makes navigation
easier. Finally we have our title and then two lines that access the variables within the MessageForm
model class. Remember that instance of the model we created with the variable $message? Well when
you call $message (since we passed it to the render files) you can access the variables respectively, or
even functions within the model class. This is a trait of OOP. So to conclude here, the first line prints the
author then a space and a dash then another space and of course our message – it’s formatted to look
like a quote. That’s it! Here’s a view of the site now:
Figure 4 View of our Show action
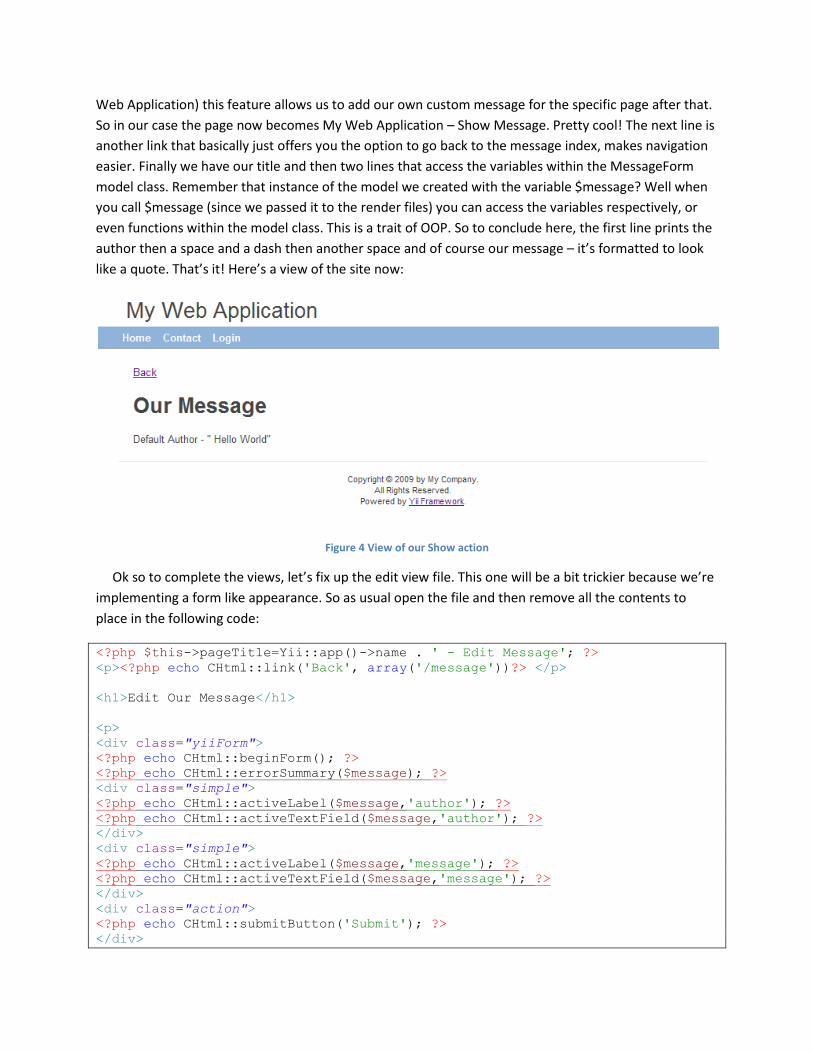
Ok so to complete the views, let’s fix up the edit view file. This one will be a bit trickier because we’re
implementing a form like appearance. So as usual open the file and then remove all the contents to
place in the following code:
<?php $this->pageTitle=Yii::app()->name . ' - Edit Message'; ?>
<p><?php echo CHtml::link('Back', array('/message'))?> </p>
<h1>Edit Our Message</h1>
<p>
<div class="yiiForm">
<?php echo CHtml::beginForm(); ?>
<?php echo CHtml::errorSummary($message); ?>
<div class="simple">
<?php echo CHtml::activeLabel($message,'author'); ?>
<?php echo CHtml::activeTextField($message,'author'); ?>
</div>
<div class="simple">
<?php echo CHtml::activeLabel($message,'message'); ?>
<?php echo CHtml::activeTextField($message,'message'); ?>
</div>
<div class="action">
<?php echo CHtml::submitButton('Submit'); ?>
</div>
<?php echo CHtml::endForm(); ?>
</div><!-- yiiForm -->
</p>
Ok so to break down our final coded file. Just like with the show file, we have our title page setup
again just with Edit Message this time and of course you have the back link again. After that we now
have our form setup.
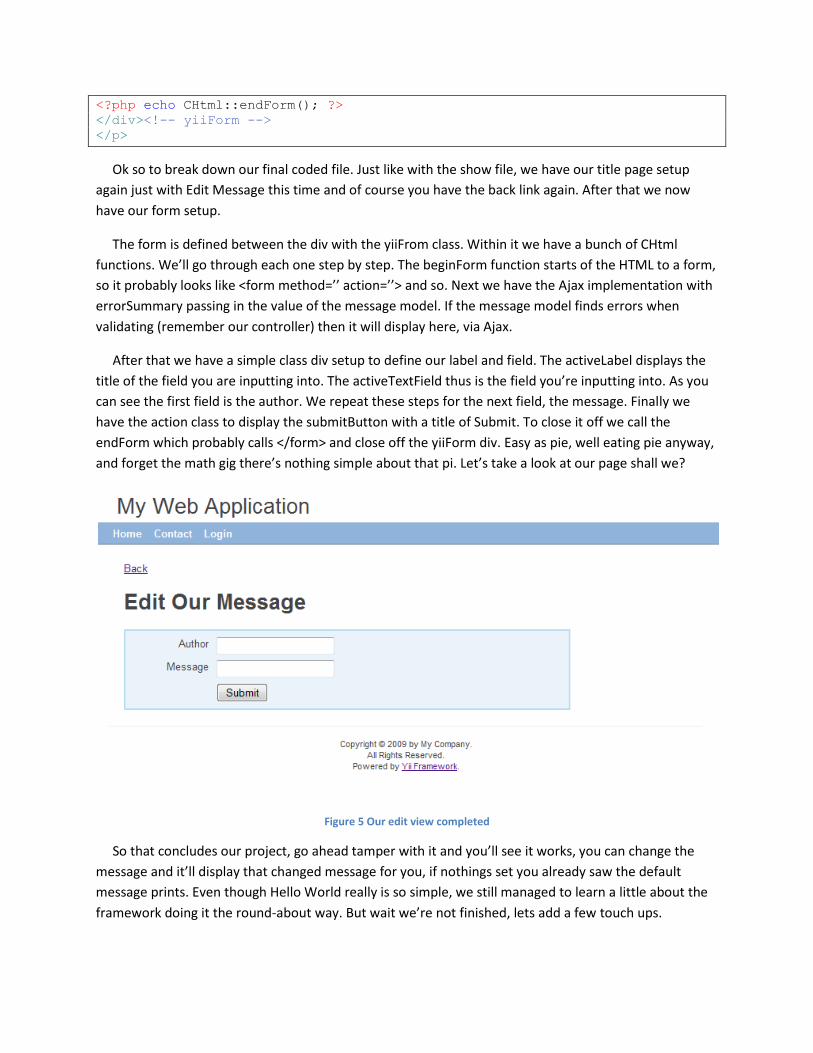
The form is defined between the div with the yiiFrom class. Within it we have a bunch of CHtml
functions. We’ll go through each one step by step. The beginForm function starts of the HTML to a form,
so it probably looks like <form method=’’ action=’’> and so. Next we have the Ajax implementation with
errorSummary passing in the value of the message model. If the message model finds errors when
validating (remember our controller) then it will display here, via Ajax.
After that we have a simple class div setup to define our label and field. The activeLabel displays the
title of the field you are inputting into. The activeTextField thus is the field you’re inputting into. As you
can see the first field is the author. We repeat these steps for the next field, the message. Finally we
have the action class to display the submitButton with a title of Submit. To close it off we call the
endForm which probably calls </form> and close off the yiiForm div. Easy as pie, well eating pie anyway,
and forget the math gig there’s nothing simple about that pi. Let’s take a look at our page shall we?
Figure 5 Our edit view completed
So that concludes our project, go ahead tamper with it and you’ll see it works, you can change the
message and it’ll display that changed message for you, if nothings set you already saw the default
message prints. Even though Hello World really is so simple, we still managed to learn a little about the
framework doing it the round-about way. But wait we’re not finished, lets add a few touch ups.
Touching Up Our Application Everything is complete, so what else do we need to add? Well sure the application is done but unless
you want to navigate to index.php?r=message everytime, I’d say we have one more job to do. That’s
right, we’re going to put a main menu button up linking to our message page.
The main menu can be accessed from the protected/views/layout folder and opening up the
main.php file. You’re going to have to navigate yourself to this section:
<div id="mainmenu">
<?php $this->widget('application.components.MainMenu',array(
'items'=>array(
array('label'=>'Home', 'url'=>array('/site/index')),
array('label'=>'Contact', 'url'=>array('/site/contact')),
array('label'=>'Login', 'url'=>array('/site/login'),
'visible'=>Yii::app()->user->isGuest),
array('label'=>'Logout', 'url'=>array('/site/logout'),
'visible'=>!Yii::app()->user->isGuest)
),
)); ?>
</div><!-- mainmenu -->
Now we’ll add our button. You can add yours wherever you’d like on the menu list, but I think I’m
going to place mine after the index page like followed:
<div id="mainmenu">
<?php $this->widget('application.components.MainMenu',array(
'items'=>array(
array('label'=>'Home', 'url'=>array('/site/index')),
array('label'=>'Our Message', 'url'=>array('/message/index')),
array('label'=>'Contact', 'url'=>array('/site/contact')),
array('label'=>'Login', 'url'=>array('/site/login'),
'visible'=>Yii::app()->user->isGuest),
array('label'=>'Logout', 'url'=>array('/site/logout'),
'visible'=>!Yii::app()->user->isGuest)
),
)); ?>
</div><!-- mainmenu -->
And that folks is all she wrote. Congratulations and check out your final site product where you can
now navigate to your message and edit it. I hope you enjoyed this little learner’s stage to the Yii
framework and enjoy the more complex site building features to come in this guide.
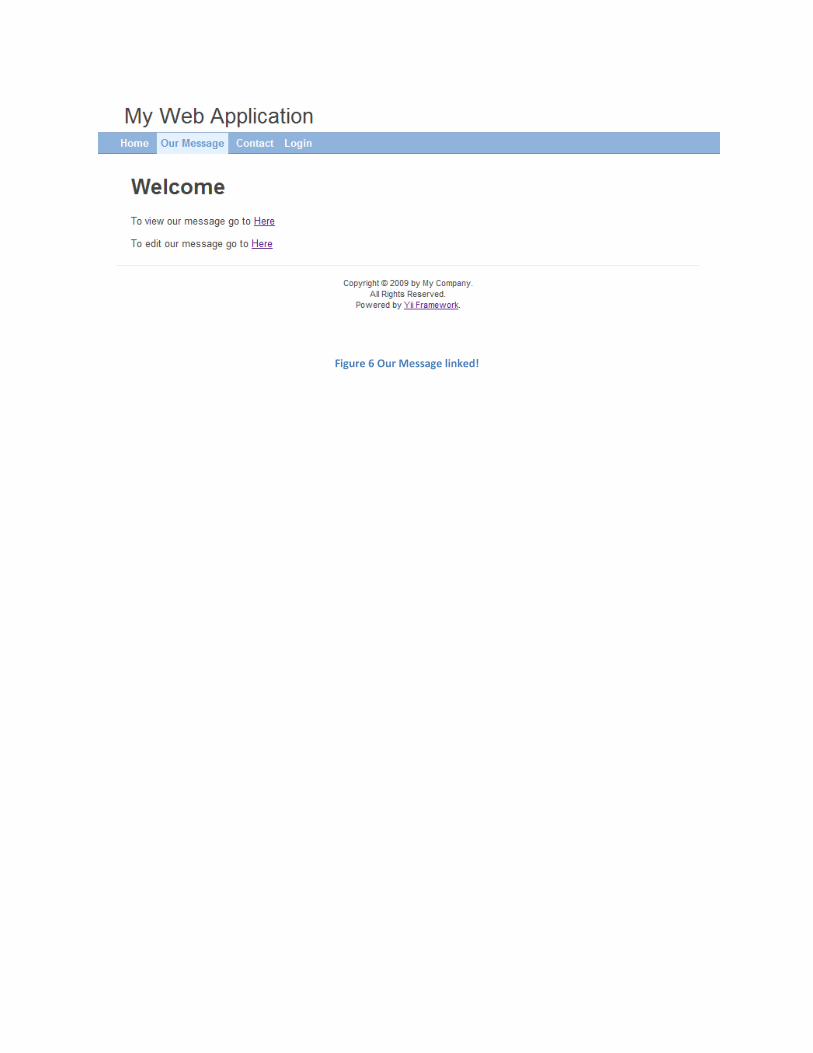
Figure 6 Our Message linked!