updated accuwage user guide based on validation · web viewtitle updated accuwage user guide based...
TRANSCRIPT

AccuWage 2016 Help Guide
Electronic Wage Reporting System
AccuWage 2016Help Guide
For Official Use Only
02/12/2016
1
AccuWage 2016 Help Guide
TABLE OF CONTENTS
1. Introduction 5
2. Required Configuration 52.1 WAGE REPORT CRITERIA 52.2 MINIMUM SYSTEM CONFIGURATION 62.3 ACCUWAGE USER PROFILE 6
3. Using AccuWage with Assistive Devices 7
4. Starting the Application 7
5. Screen Elements 8
6. Keyboard Shortcuts 10
7. Menu Options 11
8. Set User Preferences 14
9. Starting the Test 15
10. Testing Process 16
11. Completed Tests 17
12. Test Results Screen 18
13. Test Results screen (Filtered for Critical and Error messages only)22
14. Test Results screen (Filtered for Alert and Info messages only) 23
15. Upload to BSO Acknowledgement 25
16. View Tested Records features 2616.1 VIEWING ADDITIONAL DATA IN COLUMNS 2616.2 VIEWING ADDITIONAL LINES IN THE LIST 2616.3 USING THE SCROLL BAR 2716.4 SELECTING RECORDS 2716.5 CHANGING COLUMN WIDTH 27
17. Tested Records Screen 2817.1 VIEWING ISSUES ON THE TESTED RECORDS SCREEN 2817.2 VIEW TESTED RECORDS – WITH TOOLTIP TEXT 2917.3 VIEWING FILES EXCEEDING 5,000 RECORDS 30
18. View/Print HTML Test Report 3118.1 PRINT THE HTML TEST REPORT3218.2 SAVING THE HTML TEST REPORT 33
19. Correcting Issues 3319.1 SUGGESTED STEPS FOR CORRECTING ISSUES CAUSED BY MISSING OR INCORRECT DATA
34
2

AccuWage 2016 Help Guide
19.2 SUGGESTED STEPS FOR CORRECTING CRITICAL ISSUES 34
20. View Last Test Results 35
21. Contents 36
22. About 37
23. Exiting AccuWage 37
24. Unexpected Error 38
25. Glossary of Terms 39
3

AccuWage 2016 Help Guide
List of Figures8Figure 1: Welcome screen 8Figure 2: Test Menu options 11Figure 3: View Menu options 12Figure 4: Help Menu options 13Figure 5: User Preferences screen 14Figure 6: File Dialog box – Choosing the Wage Record to Test 15Figure 7: Progress Bar 16Figure 8: Test Completed, Ready to Connect to BSO? 17Figure 9: Test Completed – not able to submit yet 17Figure 10: Test Results screen 18Figure 11: Test Results screen filtered for Critical and Error messages only 22Figure 12: Test Results screen filtered for Alert and Info messages only 23Figure 13: Test Results screen filtered for Alert and Info messages only –BSO enabled 24Figure 14: Upload to BSO Acknowledgement pop-up 25Figure 15: Tested Records screen 26Figure 16: Tested Records screen with issues highlighted 28Figure 17: View Tested Records with Tooltip Text 29Figure 18: Tested Records screen for over 5,000 records 30Figure 19: Test Report screen 31Figure 20: Test Report screen – print options 32Figure 21: Test Report screen – Save option 33Figure 22: View Last Test Results – results saved 35Figure 23: View Last Test Results – no previous test results saved 36Figure 24: About AccuWage Information 37Figure 25: Test Failed due to an unexpected error 38
4
AccuWage 2016 Help Guide
1. IntroductionThe AccuWage application allows the Annual Wage Report (AWR) submitters to test the accuracy of wage reports prior to sending them to the Social Security Administration (SSA) for processing. The AccuWage application checks both the W-2 and W-2C wage reports to ensure they comply with Publication 42-007: Specifications for Filing Forms W-2 Electronically (EFW2) or Publication 42-014: Specifications for Filing Forms W-2C Electronically (EFW2C). The application provides reports listing all issues found in the wage report. The wage report cannot be edited using the AccuWage software. The submitter can create a new EFW2/EFW2C file or correct the existing EFW2/EFW2C file that generated the issues. The wage report can be repeatedly retested until all the issues are corrected.
IMPORTANT: The AccuWage application identifies many, but not all, wage submission issues. For example, AccuWage does not verify names and Social Security Numbers (SSNs). The likelihood of submission rejection, though not eliminated, is greatly reduced when using this application.
2. Required ConfigurationSSA recommends that all wage report submitters meet the criteria listed in the Wage Report Criteria and Minimum System Configuration sections before using the AccuWage application.
2.1 Wage Report CriteriaWage reports must be in the EFW2/EFW2C format. If you need assistance with this,please see http://www.socialsecurity.gov/employer/EFW2&EFW2C.htm
5

AccuWage 2016 Help Guide
2.2 Minimum System Configuration
Processor: 1 GHz or higher processor Display: Screen resolution of 800x600 or greater Memory: Minimum of 512 MB of RAM Java Runtime: Java Runtime Environment (JRE) version 7 update 6 or higher Browser:
Internet Explorer version 9.0 or higher with Active X and Java SSV helper enabled Firefox version 40 with the Java plugin
Operating System: Windows Vista, Windows 7, Windows 8.1, Windows 10 Disk Space: The processing of large EFW2 files requires approximately 30 MB of
hard disk space and processing of large EFW2C files requires approximately 60 MB of hard disk space per every 50,000 records
Java Control Panel settings: Security Tab: “Enable Java Content in the browser” must be selected. General Tab: Access “Temporary Files Settings” window by clicking the
“Settings...” button and ensure that “Keep temporary files on my computer” is selected
2.3 AccuWage User ProfileSome AccuWage network users report receiving error messages when downloading and installing the software or when they attempt to run the AccuWage program.
Keep in mind that the profile of the user is an important consideration:
You must be logged on to a computer with an account that has administrative rights.A regular user account may not have the necessary permissions to download, install and
run the AccuWage software.Have your Local Area Network (LAN) coordinator review your access settings.
3. Using AccuWage with Assistive Devices
6

AccuWage 2016 Help Guide
Section 508 of the Rehabilitation Act requires Federal agencies to make their electronic and information technology accessible to people with disabilities.
SSA recommends that people using assistive devices download the version of AccuWage titled ‘Download AccuWage – 2016 Tax Year (compatible with Assistive Software)’ found on the AccuWage Software Webpage under Quick Links on the right hand side of the page. SSA recommends that people using assistive devices and keyboard–only users navigate the AccuWage application with the following:
Use the keyboard shortcuts rather than the command buttons. The First time entering a table, please select “insert and right arrow”. After the
first time entering a table, please use the arrow keys. Use the View/Print HTML Test Report function (see the View/Print HTML Test
Report section) to read the report on the screen. This screen is easier to navigate with assistive devices than the Test Results screen (see the Test Results Screen section).
4. Starting the ApplicationThe installation process creates a folder for storing the AccuWage application under the C:drive. For systems running Windows Vista, Windows 7 or 8 an application shortcut icon is automatically created on the desktop and in the Start menu under Programs.
To start the AccuWage application: Click on the AccuWage desktop icon for the Welcome screen to appear; or Click on the Start menu and then on the AccuWage application under Programs. The
Welcome screen appears.
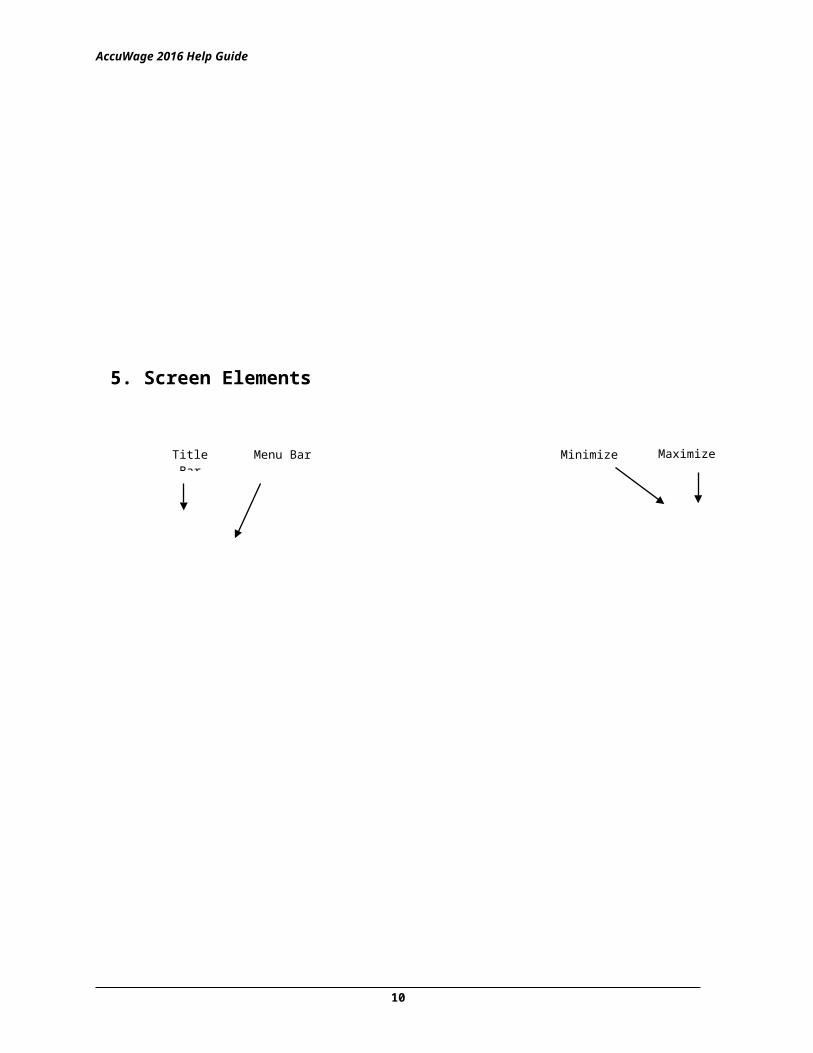
5. Screen Elements
7

AccuWage 2016 Help Guide
Figure 1: Welcome screen
Title BarThe Title bar named ‘AccuWage Tax Year 2016’ is located at the top of the screen. The Title bar identifies the function of the screen and provides access to the Minimize, Maximize and Close buttons.
Menu BarThe Menu bar contains the Test, View and Help options. Menu options can be selected using the mouse to point to the desired selection and click the left mouse button one time.
Minimize ButtonThe Minimize button reduces the application to its smallest size.
8
Close Button
Title Bar Menu Bar Maximize ButtonMinimize Button
Command Buttons

AccuWage 2016 Help Guide
Maximize ButtonThe Maximize button enlarges the application to its largest size.
Close ButtonThe Close button closes the application.
Command ButtonsThe Command buttons move you through the application.
6. Keyboard Shortcuts
9
AccuWage 2016 Help Guide
Keyboard – Press Alt and the underlined letter of the menu option simultaneously. For example: to access Test, press Alt and T at the same time.
Below is a list of the Menu Bar Shortcuts for the Test, View and Help options:
Menu Bar Shortcut OptionsSubmission Type Radio
ButtonsTest (Alt+T) View (Alt+V) Help (Alt+H)
Alt+W – W-2 (Regulars) Alt+T/Alt+S – Start Testing Alt+V/Alt+D – View Tested Records
Alt+H/Alt +C – Contents
Alt+E – W-2C (Corrections)
Alt+T/Alt+L – View Last Test Results
Alt+V/Alt +R – View Test Results
Alt+H/Alt +A – About
Alt+T/Alt+U – Upload to BSO
Alt+V/Alt +P – View/Print HTML Test Report
Alt+T/Alt+P – Set User PreferencesAlt+T/Alt+X – Exit
Note: In AccuWage TY16, the user can hold the Alt key without releasing it and press the assigned keys, for example T and then S for ‘Start Testing’, but that is in fact the same as pressing Alt+T and then Alt+S. So the above key combination notation is accurate.
Command ButtonsThe Command buttons are located on the right side of the application window. There are two types of command buttons:
Enabled – Enabled buttons are available for use and the button text is black; andDisabled – Disabled buttons are not available and the button text is light gray.
Command button availability depends on user actions. For example if wage records have not been tested, the View Tested Records button is disabled.
Below is a list of the Command Button Shortcuts:
Submission Type Radio ButtonsThe Submission Type Radio buttons are located at the top right hand corner of the application. Select W-2 (Regulars) to test the EFW2 file and W-2c (Corrections) to test the EFW2C file.
10
Command Button Shortcut OptionsCtrl+W W-2 (Regulars) Ctrl+E W-2C (Corrections)Ctrl+N Start TestingCtrl+T View Tested RecordsCtrl+R View Test ResultsCtrl+P View/Print HTML Test ReportCtrl+L View Last Test ResultsCtrl+U Upload to BSO
F1 Help Contents

AccuWage 2016 Help Guide
7. Menu Options
Figure 2: Test Menu options
Please refer to Section 9 for additional information concerning Start Testing.Please refer to Section 20 for additional information concerning View Last Test Results.Please refer to Section 15 for additional information concerning Upload to BSO.Please refer to Section 8 for additional information concerning Set User Preferences.Please refer to Section 23 for additional information concerning Exiting the application.
11

AccuWage 2016 Help Guide
Figure 3: View Menu options
Please refer to Section 16 for additional information concerning View Tested Records.Please refer to Section 12 for additional information concerning View Test Results.Please refer to Section 18 for additional information concerning View/Print HTML Test Report.
12

AccuWage 2016 Help Guide
Figure 4: Help Menu options
Please refer to Section 21 for additional information concerning Contents.Please refer to Section 22 for additional information concerning About.
13

AccuWage 2016 Help Guide
8. Set User PreferencesYou reach Set User Preferences from the Test Menu dropdown.
The number of issues allowed before AccuWage stops testing can be set to a number from 1 to 25,000 by the user with a default setting of 500.
To set the error limit: Click on Test on the Menu bar of the AccuWage Welcome screen. Click on Set User Preferences in the drop-down box. In the Set Error Limit dialog box, enter the maximum number of errors that
AccuWage will find before the application stops testing. Click the Save button to continue, or Restore Defaults to return to 500 or Cancel to
exit without changing the value.Note: Any Error Limit set will remain for all tests run in the application until it is changed to another number or changed back to default.
To save the last test results: Select Yes button to store last test results on your hard drive Select No button to disable the “View Last Test Results” feature Click the Save button to continue, or Restore Defaults to return to Yes or Cancel to
exit without changing the value.
Figure 5: User Preferences screen
NOTE: If the maximum number of errors allowed is reached, checking continues until the end of the specific record that put you over the limit. For example, if you set 10 errors as your limit and the RA record has zero errors, the RE has 6 and the RW has 8, the file would stop processing after the RW record. 14 errors is the total errors noted. This occurs even though your preference is set to 10. As always, if a Critical Issue is encountered, the file would stop processing immediately.
14

AccuWage 2016 Help Guide
9. Starting the Test1. Select either W-2 (Regulars) or W-2C (Corrections) depending on which type of file
you are going to run in the application. 2. Click the Start Testing button on the right side of the Welcome screen or select Test
and Start Testing from the drop-down menu. 3. The Please Enter File Name to be Tested dialog box will appear.4. From the left window, select the drive where the wage reports are stored. 5. Locate the folder/directory where the wage reports are stored.6. Double click the wage report file when it appears.7. Click the Open button or double-click the file name to open the file.
Figure 6: File Dialog box – Choosing the Wage Record to Test
15

AccuWage 2016 Help Guide
10. Testing Process
Figure 7: Progress Bar
After the wage report is selected, testing begins automatically and the Progress Bar will appear across the right bottom of the screen. The Progress Bar displays the record number currently being processed along with an estimate of how far the file still has to process. When the Progress Bar reaches the end of the box, testing is complete, unless a Critical Issue is encountered prior to reaching the end of the file. A “testing failed due to Critical Error on Record XX” message will appear if that occurs.
16
Progress Bar

AccuWage 2016 Help Guide
11. Completed TestsIf the submitted file is 100% correct, a pop-up message box will appear.
Figure 8: Test Completed, Ready to Connect to BSO?
If BSO is accepting files for the current tax year and the user receives this message, the user is able, by clicking Yes, to go directly to the BSO login screen to begin the process of uploading the file.
Figure 9: Test Completed – not able to submit yet
If BSO is not accepting files for the current tax year and a user is checking a file through AccuWage, the following popup will display. The user will not be able to upload the completed file at that time.
17

AccuWage 2016 Help Guide
12. Test Results Screen
When testing is completed (or stopped due to a Critical Issue) but the file is not 100% issue-free, the Test Results screen is automatically displayed. This is your first opportunity to see the test results.
Figure 10: Test Results screen
18
Testing Status bar
Issues that need correcting are
listed here
Horizontal Scroll Bar
Issue Filter
Record Selector
Button disabled as file did not finish processing due to Critical Issue.
Example: This file tested and noted certain issues on 4 records but stopped on Record 5 due to a critical issue.
Record Summary

AccuWage 2016 Help Guide
Record Summary
The Record Summary describes how many records have been tested and how many of those records have issues.
Record List
The Record list displays tested records that contain issues. It is used to locate and select records that need further examination.
The Record list contains the following columns: Record – displays the numbers of the records that have one (or more) issues; Issues – displays the number of issues in that record; Record Data – displays the data in the record, starting with the first position of the
record
Issue Filter
There are now four different issue levels that AccuWage identifies.
Critical – If a Critical issue (like record sequencing, record length or over the error limit as defined in your User Preferences) is identified within the file, processing will immediately stop. You must correct the critical issue(s) prior to submitting the file to Business Services Online (BSO).
Error – An Error message will not stop processing of the file, however, it is mandatory to fix this issue before proceeding to the Business Services Online (BSO) webpage to upload the file. The Upload to BSO button on the right side of the screen will be grayed-out and you will be unable to select it until the Error is corrected.
19

AccuWage 2016 Help Guide
Alert – An Alert message will not stop processing of the file. It is highly recommended that each Alert is reviewed and corrected if appropriate. The Upload to BSO button on the right side of the screen will be enabled.
Informational (Info) – An Informational message will not stop processing of the file. It is highly recommended that each Info message is reviewed and corrected. The Upload to BSO button on the right side of the screen will be enabled.
The default filter displays all four levels, however, simply unchecking particular categories will remove it from the Issues for Selected Record section. It does not remove the issue from the file.
The filter shows all issues for the entire file, not by record. For record-level information, click on a particular record. See Section 16 - View Tested Records for further explanation.
Issue(s) for Selected Record Grid
The Issue(s) for Selected Record grid displays detailed information for the record selected in the Record list. It contains the following columns:
Level – displays which type of issue is present; values are critical, error, alert or infoReference – displays the field nameUser Entry – displays the field data inside brackets Description – displays the error message and data specifications.
20

AccuWage 2016 Help Guide
Testing Status Bar
This provides status of whether any of the four issue levels were identified in the file (critical, error, alert or info.) If a critical issue is encountered, testing terminates. This error must be corrected in order to continue testing.
If the file only has Alerts or Info (which still should be corrected prior to processing) messages, the message in this section would read “File has run 100% complete.”
Scroll Bars
The Record list, the Issues for Selected Records grid and the Testing Status bar contain scroll bars. Scroll bars are used for viewing additional information in these lists. There are two types of scroll bars: horizontal and vertical.
21

AccuWage 2016 Help Guide
13. Test Results screen (Filtered for Critical and Error messages only)
Figure 11: Test Results screen filtered for Critical and Error messages only
Please Note: For the Upload to BSO button to be enabled, there can be no Critical or Error category issues in this file. The user would need to correct these types of issues before the Upload to BSO button is enabled.
In this screen shot example, testing stopped on 5 th record due to a Critical issue. In those 4 previously tested records, there were 4 errors, 2 Alerts and 4 Info issues too.
22
Critical Error
Upload to BSO is disabled

AccuWage 2016 Help Guide
14. Test Results screen (Filtered for Alert and Info messages only)
Figure 12: Test Results screen filtered for Alert and Info messages only
This is the same file as Figure 11 with filters for Alert and Info issues only. You see that there is still 1 Critical and 4 Errors on this file but the only ones filtered (and therefore listed) are the Alert and Info issues. Due to Critical and Error issues remaining, the Upload to BSO button remains disabled.
23
Alert Info
Upload to BSO is disabled

AccuWage 2016 Help Guide
Figure 13: Test Results screen filtered for Alert and Info messages only –BSO enabled
Please Note: For the Upload to BSO button to be enabled, there can be no Critical or Error category issues in this file. Otherwise, even though the Alert and Info messages are filtered, the Upload to BSO button would not be enabled.
24
Alert Info
Upload to BSO enabled

AccuWage 2016 Help Guide
15. Upload to BSO Acknowledgement
Figure 14: Upload to BSO Acknowledgement pop-up
The user must click the “I Agree” box before the “OK” button will be enabled. This message acknowledges that there are no Critical or Error messages but there are either Alerts and/or Informational messages remaining in the submission. These issues could potentially cause your file to be returned.
25

AccuWage 2016 Help Guide
16. View Tested Records features
Figure 15: Tested Records screen
To reach this screen, select the View Tested Records button on the right column. To view additional data (e.g., records, descriptions, data or errors), use the techniques outlined below. The instructions presented can be applied to the Records list and Fields in Record list on both the Test Results and Tested Records screens.
16.1 Viewing Additional Data in Columns1. Place the mouse cursor on the right scroll arrow below the list.1. Left-click the mouse. Additional data appears in the last column of the list.
16.2 Viewing Additional Lines in the List1. Place the mouse cursor on the down scroll arrow to the right of the list.2. Left-click the mouse. Another line appears at the bottom of the list.
26
Column Divider
UpScrollArrow
DownScrollArrow
Left Scroll
RightScrollArrow
Scroll Bar

AccuWage 2016 Help Guide
16.3 Using the Scroll BarUse the scroll bar instead of the scroll arrows to browse through a list quickly. The scroll bar can be used for both vertical and horizontal movement.
1. Place the mouse cursor over the scroll bar. 2. Left-click the mouse and hold it down.3. Drag the scroll bar down vertically or across horizontally.4. Release the mouse when the desired data is visible.
16.4 Selecting Records1. Decide which record you want to view from the Records list. 2. Left-click the mouse anywhere in that record. The field information appears in the
Fields in Record grid. If there are any issues, that field will be highlighted in yellow.
16.5 Changing Column WidthIf all text is not completely visible in the columns of the Test Results or Tested Records screens, the user can increase the column width to make more data visible.
1. Place the mouse cursor over the column divider. 2. The cursor will change to left and right arrows.3. Left-click the mouse and hold it down.4. Drag the column divider to the right and release the mouse when the desired amount
of text is visible.
27

AccuWage 2016 Help Guide
17. Tested Records ScreenIf issues are found in the submission, they can be reviewed by selecting the View Tested Records button. The top of the Tested Records screen displays the Records list. The Fields in Record list provides a different view of the data that can be helpful in identifying field errors.
Figure 16: Tested Records screen with issues highlighted
17.1 Viewing Issues on the Tested Records ScreenWhen selecting a record, the entire record is displayed in the Fields in Record list with errors highlighted in yellow. Review the field name and data to determine issue solution. If further guidance is needed, please refer back to the EFW2/EFW2C for field specifications.
28
Record List
Fields with issues
highlightedfor easy
identification
Records with Issues
Record with no issues

AccuWage 2016 Help Guide
17.2 View Tested Records – with tooltip text
Figure 17: View Tested Records with Tooltip Text
To quickly view a record or field in its entirety, place and hold the mouse pointer over the record or field. When the mouse pointer is positioned over the description, a pop-up box with the full record or field appears.
29

AccuWage 2016 Help Guide
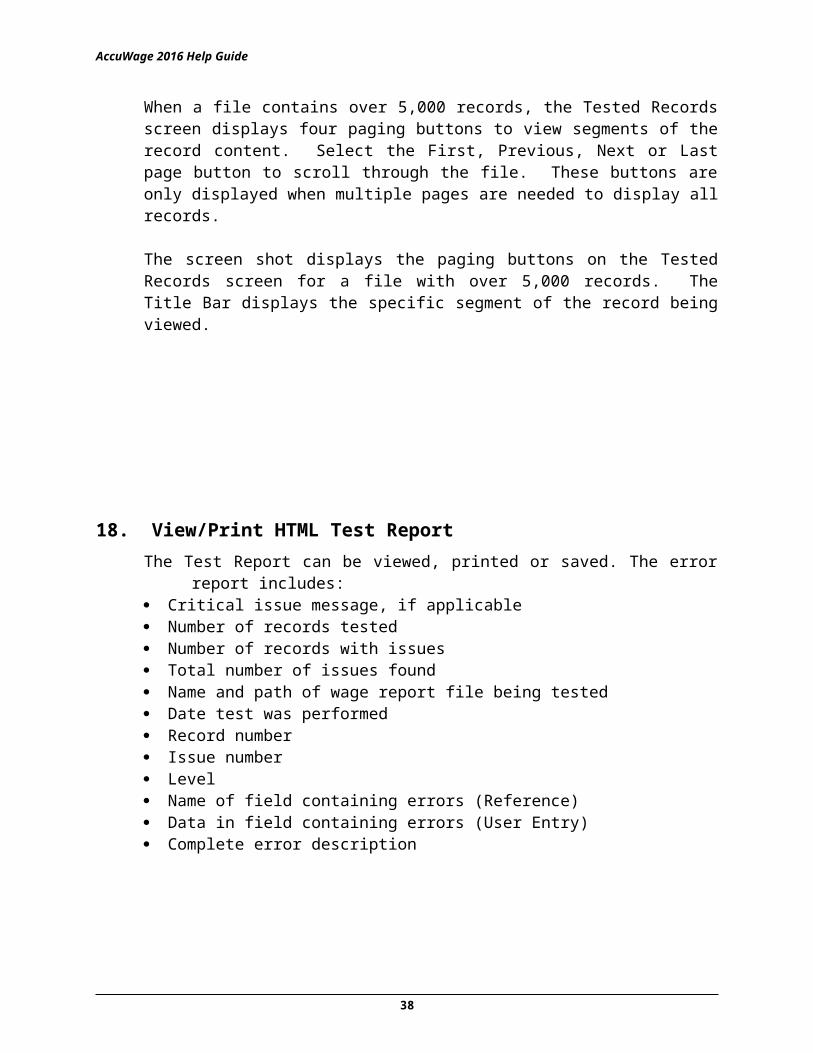
17.3 Viewing Files Exceeding 5,000 Records
Figure 18: Tested Records screen for over 5,000 records
When a file contains over 5,000 records, the Tested Records screen displays four paging buttons to view segments of the record content. Select the First, Previous, Next or Last page button to scroll through the file. These buttons are only displayed when multiple pages are needed to display all records.
The screen shot displays the paging buttons on the Tested Records screen for a file with over 5,000 records. The Title Bar displays the specific segment of the record being viewed.
30
The four paging buttons

AccuWage 2016 Help Guide
18. View/Print HTML Test ReportThe Test Report can be viewed, printed or saved. The error report includes: Critical issue message, if applicable Number of records tested Number of records with issues Total number of issues found Name and path of wage report file being tested Date test was performed Record number Issue number Level Name of field containing errors (Reference) Data in field containing errors (User Entry) Complete error description
Figure 19: Test Report screen
31

AccuWage 2016 Help Guide
18.1 Print the HTML Test Report
Figure 20: Test Report screen – print options
There are two ways to print the Test Report: 1. The first way to print is within the Test Report itself. Click the Print button. A
window will appear asking what pages you want to print.2. The second way to print the Test Report is to use the print feature in your browser.
32

AccuWage 2016 Help Guide
18.2 Saving the HTML Test Report
To save the Test Report: 1. Go to Page and click the Save As button from the dropdown menu. The Save
Webpage dialog box would appear. 2. Enter the file name and select the file destination.3. Select Webpage, Complete as the type.4. Click “Save” and you should have saved the Test Report to the desired location.
Figure 21: Test Report screen – Save option
19. Correcting IssuesThe AccuWage application is used for testing wage reports and cannot be used to update or modify the original wage report. You must make corrections to the original file.
33

AccuWage 2016 Help Guide
19.1 Suggested Steps for Correcting Issues Caused by Missing or Incorrect Data1. View issue messages in the Issue(s) for Selected Record Detail list or View/Print
HTML Test Report.2. Determine which fields need to be changed. 3. Access the original file to correct the original data.4. Test again with AccuWage software using the amended file.
19.2 Suggested Steps for Correcting Critical IssuesCritical AccuWage issues cause testing to immediately terminate and must be corrected before continuing. They are shown in the Testing Status display located at the bottom of the Test Results screen. Critical issues can be corrected by following the steps described in the Suggested Steps for Correcting Issues Caused by Missing or Incorrect Data section above.
34

AccuWage 2016 Help Guide
20. View Last Test Results
AccuWage provides the ability to open and view the last report that was tested. Before a last report can be viewed, the following actions must have occurred:1. AccuWage was opened. 2. Under Set User Preferences, Do you want to save last test results must be set to Yes3. A wage report with an error was tested.4. AccuWage was exited.5. AccuWage was re-opened.
Figure 22: View Last Test Results – results saved
The View Last Test Results button can be opened from the Welcome screen or from the Test Menu. When the View Last Test Results button is clicked, AccuWage opens the last wage report tested if it is still stored on the PC.
35
View Last Test Results from Test
Menu
View Last Test Results
from Welcome
Screen
View Last Test Results
is grayed out from
Test Menu

AccuWage 2016 Help Guide
Figure 23: View Last Test Results – no previous test results saved
If you have never previously saved a file, the View Last Test Results is grayed out.
21. ContentsContents will appear under the Help menu on the Welcome screen or on the BSO Home page. It is the link to the Help Guide.
36
View Last Test Results
is grayed out from Welcome
Screen

AccuWage 2016 Help Guide
22. About
Figure 24: About AccuWage Information
About provides information concerning the Version number of AccuWage.
23. Exiting AccuWageThere are three options for exiting AccuWage:
Click the standard Windows close button (the small red “x” in the upper right hand corner of the screen)
Click Exit under Test on the Menu bar. Click Control+Q
37
AccuWage 2016 Help Guide
24. Unexpected Error
Figure 25: Test Failed due to an unexpected error
This popup will appear if there is an unexpected system error.
38

AccuWage 2016 Help Guide
25. Glossary of Terms
AccuWageThe name of the application used to test EFW2 and EFW2C wage reports.
AgentAn organization authorized to submit wage and tax reports for one or more employers.
AlertAn issue type received on the Test Results screen that will not stop processing. It is highly recommended that each Alert is reviewed and corrected, if appropriate, before proceeding to the Business Services Online (BSO) webpage to upload the file.
AWRAnnual Wage Reporting. The process by which employers report the earnings and taxes of their employees.
BSOBusiness Services Online. An online service for employers to submit wage data directly to SSA using a PC with an Internet connection.
CharacterA letter, number or punctuation symbol.
Critical An issue type received on the Test Results screen caused by an incorrectly formatted record sequence, record length or over the error limit (as defined by your User Preferences) that causes AccuWage to immediately stop testing a wage report. You must correct this issue type before continuing to use AccuWage.
Error An issue type received on the Test Results screen that will not stop processing of the wage file, however, it is mandatory to fix this issue before proceeding to the Business Services Online (BSO) webpage to upload the file.
EFW2A publication distributed by SSA containing specifications for the Electronic Filing of W-2 information.
EFW2CA publication distributed by SSA containing specifications for the Electronic Filing of W-2c Information.
HTML Hypertext Markup Language for publishing hypertext on the World Wide Web.
39

AccuWage 2016 Help Guide
InformationalAn issue type received on the Test Results screen that will not stop processing of the wage file. It is highly recommended that each informational issue is reviewed and corrected, if appropriate, before proceeding to the Business Services Online (BSO) webpage to upload the file.
InternetAn international network of public or private networks that can be used by employers or submitters to download the AccuWage application.
JAVA A high-level programming language used by AccuWage.
JREThe Java Runtime Environment. Provides the libraries and other components to run applications written in the Java programming language.
LANLocal Area Network. A group of computers and associated devices that share a common communications line or wireless link and typically share the resources of a single processor or server.
MegabyteA unit of computer storage capacity. Approximately one million bytes.
RAMRandom Access Memory. Primary storage of data or program instructions that can directly access any randomly chosen location in the same amount of time.
SSAThe Social Security Administration.
SSNSocial Security Number. A nine-digit number assigned by SSA.
SubmitterA person, organization or reporting agent submitting wage reports to SSA.
Wage ReportAnnual W-2 or W2-C wage and tax reports submitted to SSA for processing.
40