upgrade your caravan: technical the accessories...
TRANSCRIPT
Upgrade your caravan: The accessories guaranteed make your holiday easier, smoother and safer
BROUGHT TO YOU BY
withoutahitch.com.au
withoutahitch.com.au
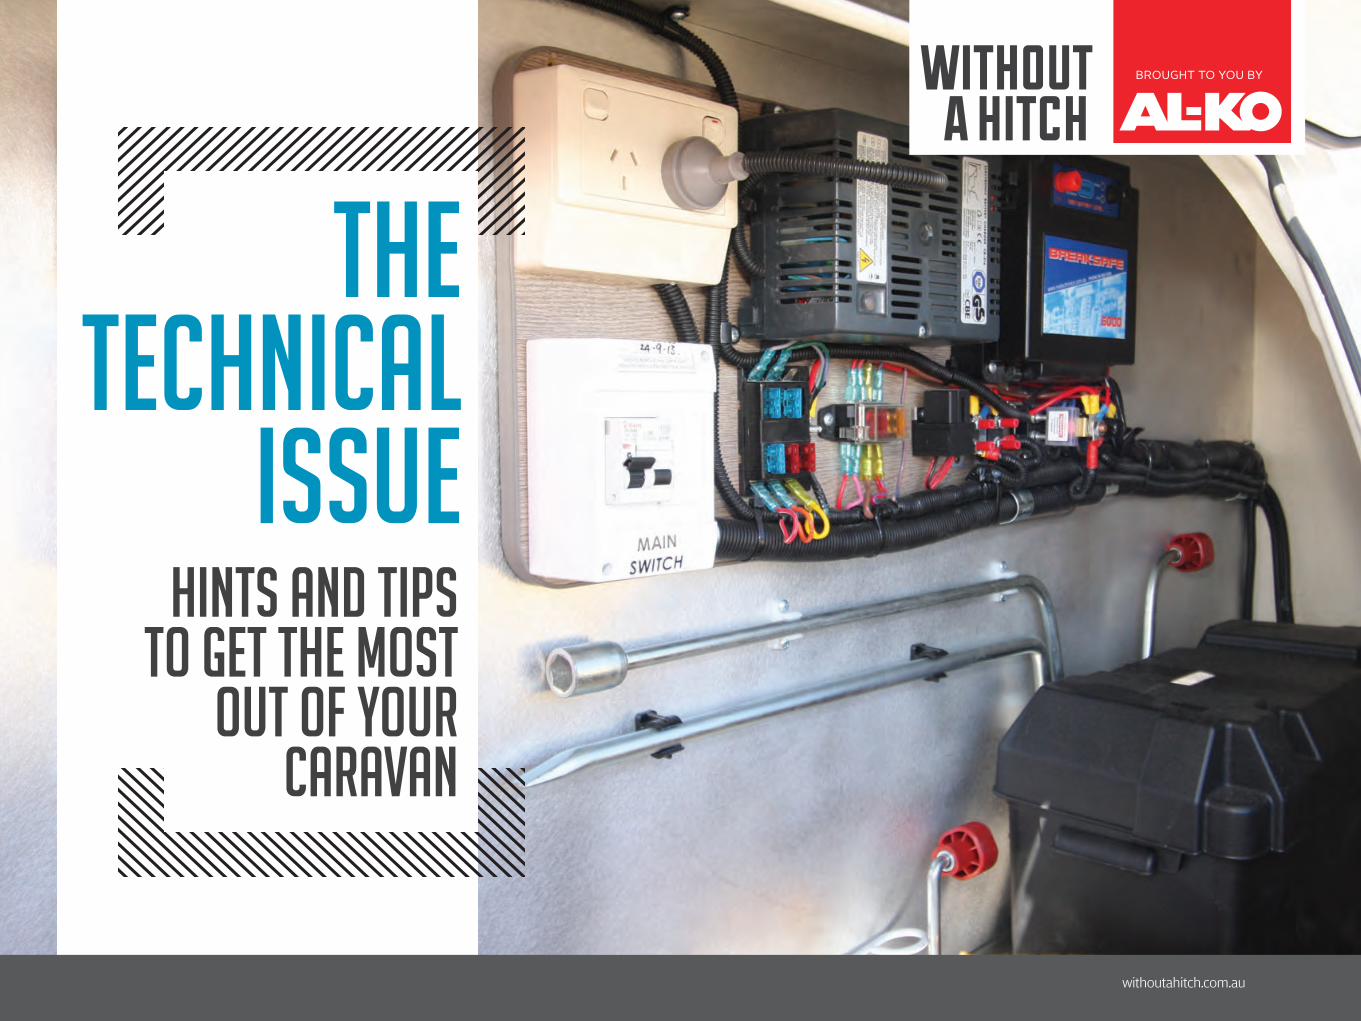
the technical
issueHints and tips
to get the most out of your
caravan
contents
TOWING CAPACITY. 03
TOWBALL WEIGHT 05
HITCHING UP 07
SAFE TOWING01
15
0805
12
Upgrade your caravan: The accessories guaranteed make your holiday easier, smoother and safer
BROUGHT TO YOU BY
withoutahitch.com.au
Owning a caravan involves much more than simply hitching up and disappearing into the sunset on a Friday afternoon. A caravan is a serious piece of machinery made up of numerous technical components whose performance can either make or break your holiday.
In this E-Book, The Technical Issue, you’ll find loads of useable information, advice and tips on how to get the most out of your caravan. We look at the technical side of towing safely, the ways in which RV technology can enhance your holiday experience and how to ensure your caravan’s electrical system is working at its best.
When your van and its components are performing at their best you’ll have a relaxing, fuss-free holiday. After all, that’s what it’s all about.
THE TECHNICAL ISSUE
lifestyle02
ELECTRICAL03
SECURING YOUR CARAVAN AWNING. 08
SETTING TYRE PRESSURES 10
RE-GREASING CARAVAN WHEEL
BEARINGS 12
HOW TO FIT AN ANDERSON PLUG. 15
UNDERSTANDING CARAVAN
ELECTRICAL SYSTEMS 18
withoutahitch.com.au12
withoutahitch.com.au
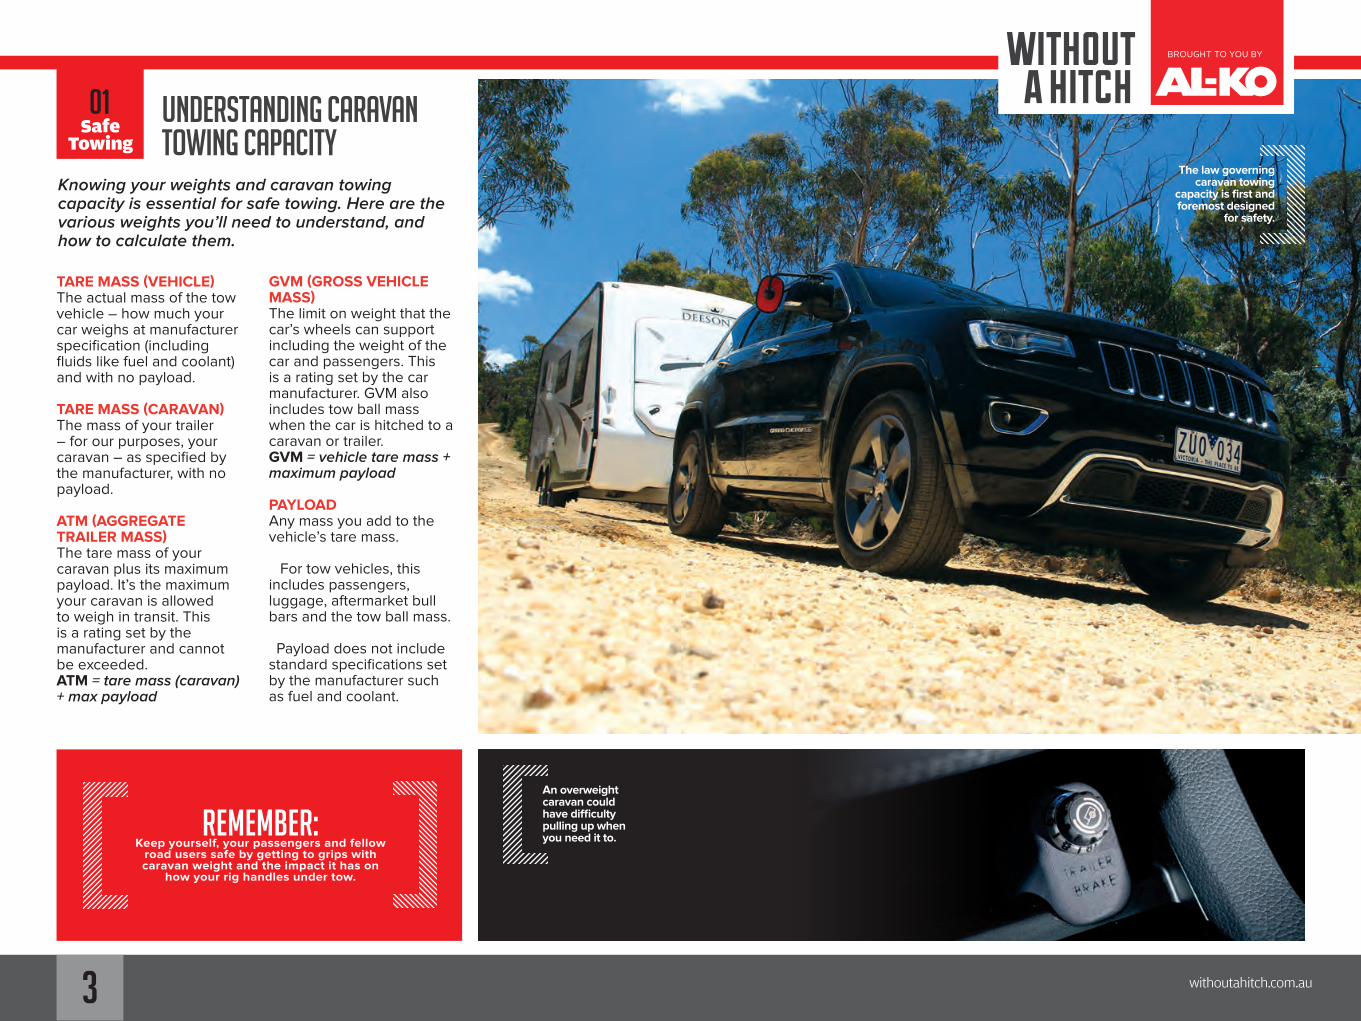
An overweight caravan could have difficulty pulling up when you need it to.
Knowing your weights and caravan towing capacity is essential for safe towing. Here are the various weights you’ll need to understand, and how to calculate them.
TARE MASS (VEHICLE)The actual mass of the tow vehicle – how much your car weighs at manufacturer specification (including fluids like fuel and coolant) and with no payload.
TARE MASS (CARAVAN)The mass of your trailer – for our purposes, your caravan – as specified by the manufacturer, with no payload.
ATM (AGGREGATE TRAILER MASS)The tare mass of your caravan plus its maximum payload. It’s the maximum your caravan is allowed to weigh in transit. This is a rating set by the manufacturer and cannot be exceeded. ATM = tare mass (caravan) + max payload
GVM (GROSS VEHICLE MASS)The limit on weight that the car’s wheels can support including the weight of the car and passengers. This is a rating set by the car manufacturer. GVM also includes tow ball mass when the car is hitched to a caravan or trailer. GVM = vehicle tare mass + maximum payload
PAYLOADAny mass you add to the vehicle’s tare mass.
For tow vehicles, this includes passengers, luggage, aftermarket bull bars and the tow ball mass.
Payload does not include standard specifications set by the manufacturer such as fuel and coolant.
UNDERSTANDING CARAVAN TOWING CAPACITY
Upgrade your caravan: The accessories guaranteed make your holiday easier, smoother and safer
BROUGHT TO YOU BY
withoutahitch.com.au
01Safe
TowingThe law governing
caravan towing capacity is first and foremost designed
for safety.
REMEMBER:Keep yourself, your passengers and fellow
road users safe by getting to grips with caravan weight and the impact it has on
how your rig handles under tow.
withoutahitch.com.au3

withoutahitch.com.au
An overweight van will sit low on its
wheels, which can negatively affect
handling.
MAXIMUM PAYLOAD (CARAVAN)The maximum weight that can be loaded into the caravan for towing.
This does not include the weight of people inhabiting the caravan while stationery, but does need to take into account water, gas and accessories you’ve added to the caravan since purchasing it.
This rating is set by the manufacturer and cannot be exceeded.Maximum payload = ATM – tare mass (caravan) – tow ball mass
TBM (TOW BALL MASS)The mass exerted on the tow ball by your fully packed caravan. When your caravan is hitched, this mass is included in your tow vehicle’s payload.
GTM (GROSS TRAILER MASS)The maximum weight of the loaded caravan that can be supported by its wheels, not counting the portion supported by the car when hitched – or jockey wheel when parked. This rating is set by the manufacturer and cannot be exceeded. GTM = ATM – tow ball mass
GCM (GROSS COMBINED MASS)The gross combined mass is a combination of the maximum allowed mass of the trailer and the maximum allowed mass of the vehicle. It’s rare that you’ll need to consider this one. GCM = GTM + GVM
Upgrade your caravan: The accessories guaranteed make your holiday easier, smoother and safer
BROUGHT TO YOU BY
withoutahitch.com.au
01Safe
Towing
You’ll find the tare, ATM, TBM and GTM
stamped on the vehicle identification
number (VIN) plate.
Gross vehicle mass (GVM) takes into account not only the towball mass,
but also the total mass of luggage and passengers
in the vehicle.
Weight ratings set by manufacturers, cannot
be exceeded
4
withoutahitch.com.au
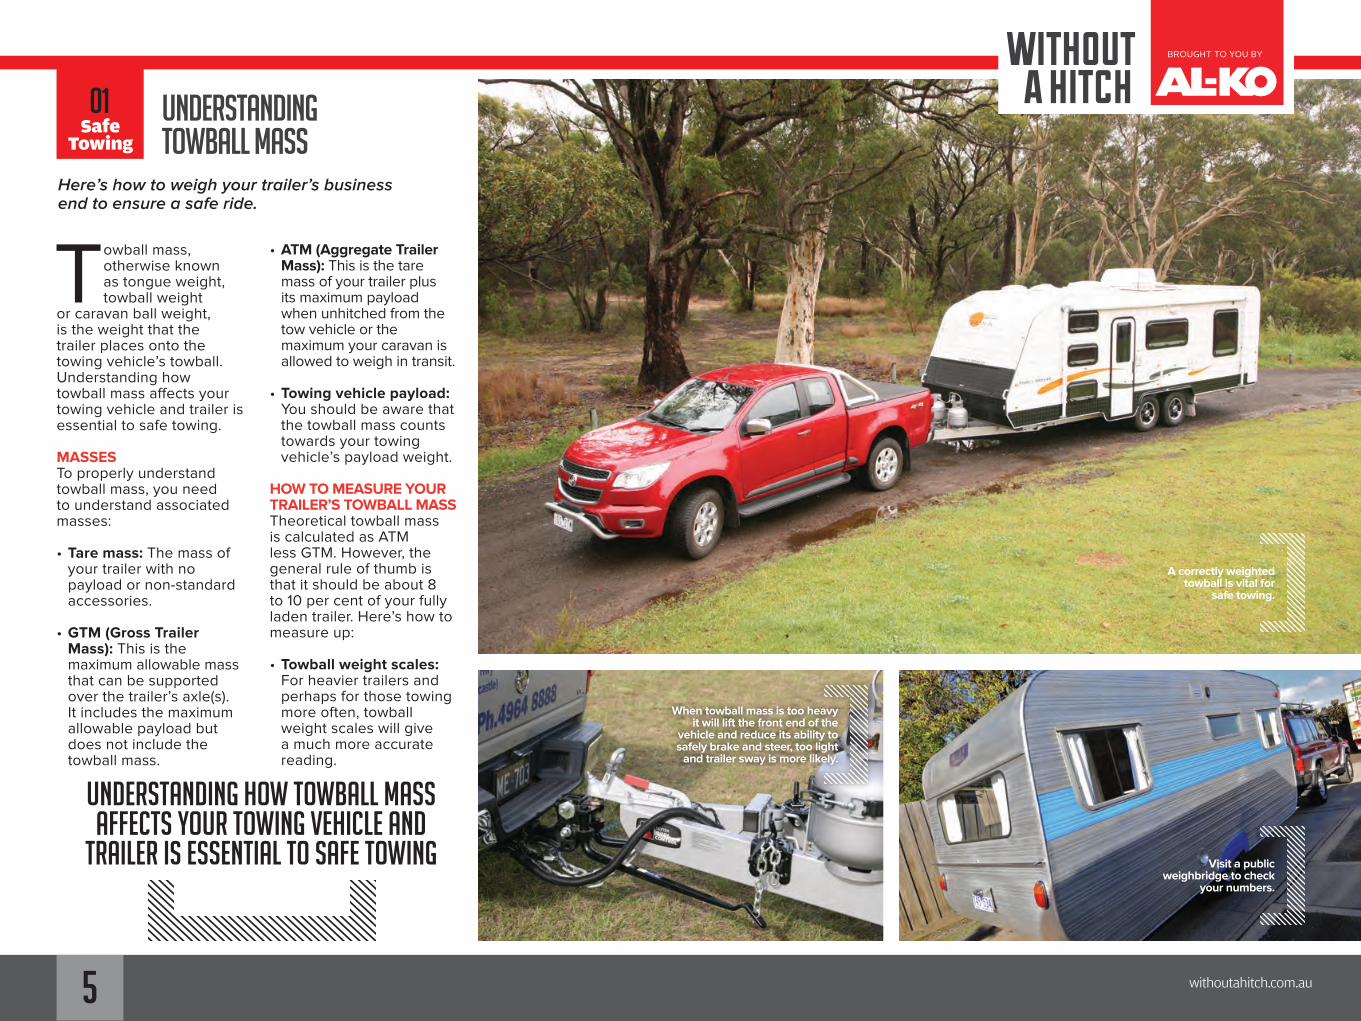
Visit a public weighbridge to check
your numbers.
A correctly weighted towball is vital for
safe towing.
When towball mass is too heavy it will lift the front end of the
vehicle and reduce its ability to safely brake and steer, too light
and trailer sway is more likely.
UNDERSTANDING TOWBALL MASS
Upgrade your caravan: The accessories guaranteed make your holiday easier, smoother and safer
BROUGHT TO YOU BY
withoutahitch.com.au
01Safe
Towing
Towball mass, otherwise known as tongue weight, towball weight
or caravan ball weight, is the weight that the trailer places onto the towing vehicle’s towball. Understanding how towball mass affects your towing vehicle and trailer is essential to safe towing.
MASSESTo properly understand towball mass, you need to understand associated masses:
• Tare mass: The mass of your trailer with no payload or non-standard accessories.
• GTM (Gross Trailer Mass): This is the maximum allowable mass that can be supported over the trailer’s axle(s). It includes the maximum allowable payload but does not include the towball mass.
• ATM (Aggregate Trailer Mass): This is the tare mass of your trailer plus its maximum payload when unhitched from the tow vehicle or the maximum your caravan is allowed to weigh in transit.
• Towing vehicle payload: You should be aware that the towball mass counts towards your towing vehicle’s payload weight.
HOW TO MEASURE YOUR TRAILER’S TOWBALL MASSTheoretical towball mass is calculated as ATM less GTM. However, the general rule of thumb is that it should be about 8 to 10 per cent of your fully laden trailer. Here’s how to measure up:
• Towball weight scales: For heavier trailers and perhaps for those towing more often, towball weight scales will give a much more accurate reading.
Here’s how to weigh your trailer’s business end to ensure a safe ride.
Understanding how towball mass affects your towing vehicle and
trailer is essential to safe towing
5

withoutahitch.com.au
• Weighbridge: Sit your uncoupled trailer’s jockey wheel on a weighbridge with the wheels off the weighbridge. This is called ‘split-weighing’.
SAFE TOWINGCorrect towball mass is critical to safe towing. Too heavy and it will lift the front end of the vehicle and reduce its ability to safely brake and steer, too light and trailer sway is more likely. Here are ways that you can change your towball mass:
• Remove or redistribute your payload: Sometimes it can be as simple as moving your payload from the front of the trailer back over the axle or the trailer’s centre of gravity. Otherwise, you may have to reduce the payload altogether.
• Install a weight distribution hitch: In more extreme cases where you can’t affect the position of the payload, such as boats and caravans, a weight distribution hitch can shift the towball mass to the vehicle’s centre of gravity.
Upgrade your caravan: The accessories guaranteed make your holiday easier, smoother and safer
BROUGHT TO YOU BY
withoutahitch.com.au
01Safe
Towing
TIPS:Towball mass is
just as important as the weight over the trailer’s axle. Knowing what it
is and how to deal with it will ensure
you’re pulling your load safely.
To weigh your van’s towball, invest in a
set of towball weight scales or visit a public
weighbridge.
Having a clear understanding of your van’s weight will help you select the right tow vehicle for the job.
6
withoutahitch.com.au
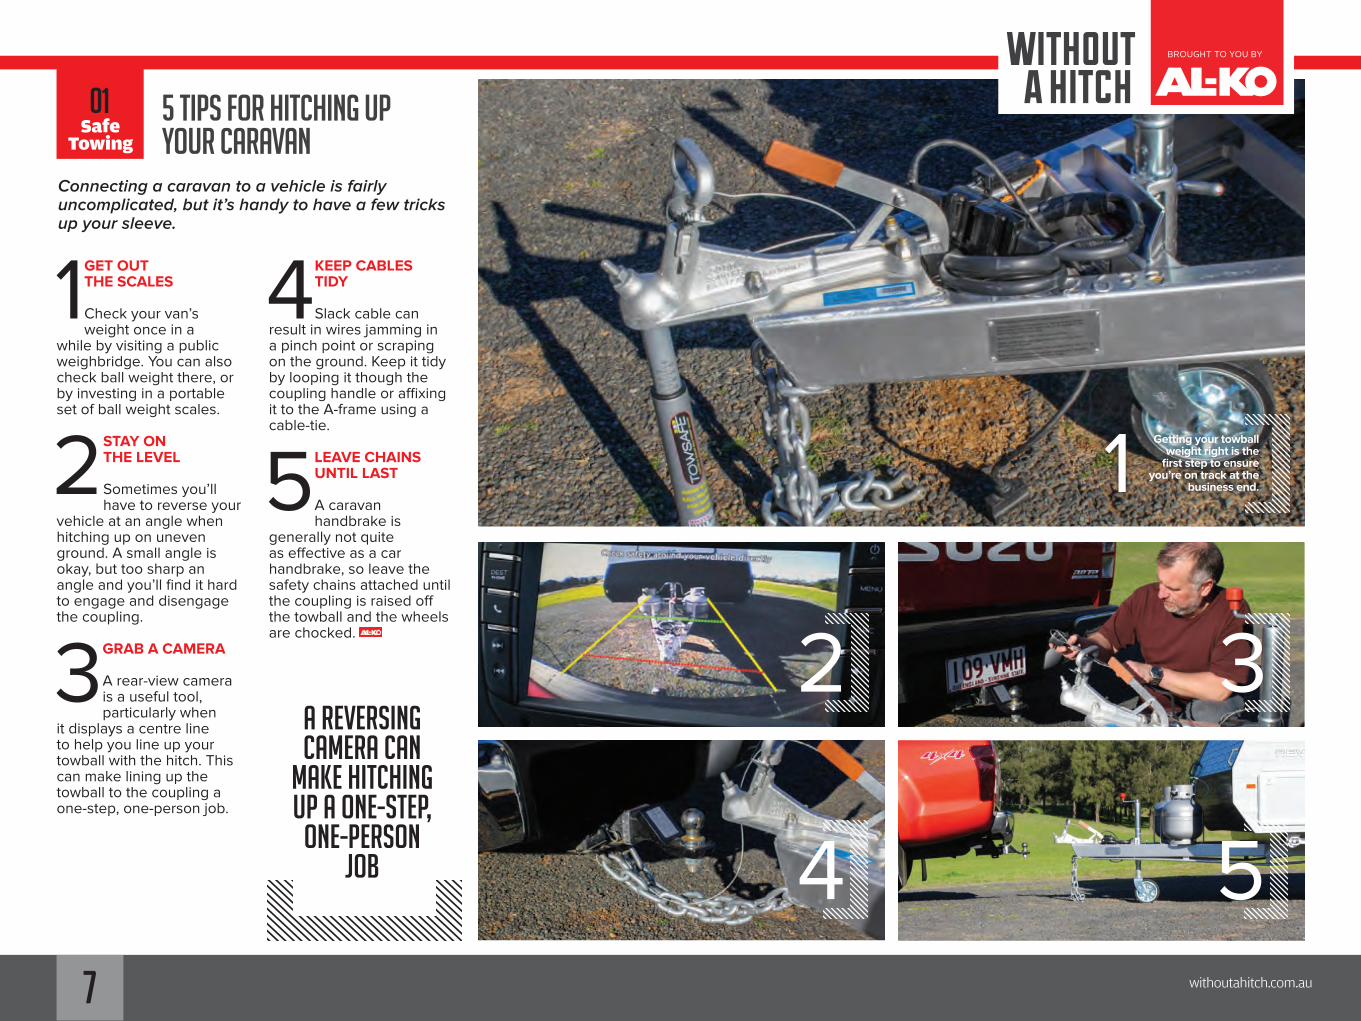
1GET OUT THE SCALES
Check your van’s weight once in a
while by visiting a public weighbridge. You can also check ball weight there, or by investing in a portable set of ball weight scales.
2STAY ON THE LEVEL
Sometimes you’ll have to reverse your
vehicle at an angle when hitching up on uneven ground. A small angle is okay, but too sharp an angle and you’ll find it hard to engage and disengage the coupling.
3 GRAB A CAMERA
A rear-view camera is a useful tool, particularly when
it displays a centre line to help you line up your towball with the hitch. This can make lining up the towball to the coupling a one-step, one-person job.
4 KEEP CABLES TIDY Slack cable can
result in wires jamming in a pinch point or scraping on the ground. Keep it tidy by looping it though the coupling handle or affixing it to the A-frame using a cable-tie.
5 LEAVE CHAINS UNTIL LAST
A caravan handbrake is
generally not quite as effective as a car handbrake, so leave the safety chains attached until the coupling is raised off the towball and the wheels are chocked.
1
5 TIPS FOR HITCHING UP YOUR CARAVAN
Upgrade your caravan: The accessories guaranteed make your holiday easier, smoother and safer
BROUGHT TO YOU BY
withoutahitch.com.au
Connecting a caravan to a vehicle is fairly uncomplicated, but it’s handy to have a few tricks up your sleeve.
2 3
4 5
A reversing camera can
make hitching up a one-step,
one-person job
01Safe
Towing
Getting your towball weight right is the
first step to ensure you’re on track at the
business end.
7

withoutahitch.com.au
Awnings can be damaged easily, but setting them up in a certain way will provide the best protection from the elements. Here’s how.
7 STEPS TO secure YOUR CARAVAN’S AWNING
Upgrade your caravan: The accessories guaranteed make your holiday easier, smoother and safer
BROUGHT TO YOU BY
withoutahitch.com.au
02Lifestyle
1Remove the awning arm covers and safety straps. The former keep
the arms clean and prevents stone chips in transit, while the latter ensures the awning is not able to unroll if the clips fail.
2Unscrew the locking knobs on the awning arms and unclip
the awning arms, before switching the safety lever at the right end of the barrel to the ‘open’ position.
3 Use the black strap to unfurl the awning completely, or as far
as you desire. Having this strap as close to the middle of the barrel as possible will ensure the least stress on the ratchet.
4Pull the awning rafter arms out until they lock. If the awning
is being erected by one person, it is best to raise one side halfway first, allowing the ‘lock’ button to rest in one of the holes. Then raise the other side completely, and return to raise the first side completely. This reduces stress on the mechanism. If there are two of you, the arms can be raised together.
2
3
4
1Even in calm
weather it’s a good idea to tie
guy ropes to each end of the roller barrel. Strong wind can come all
of a sudden, so it’s best to be
ready
withoutahitch.com.au8
withoutahitch.com.au
Upgrade your caravan: The accessories guaranteed make your holiday easier, smoother and safer
BROUGHT TO YOU BY
withoutahitch.com.au
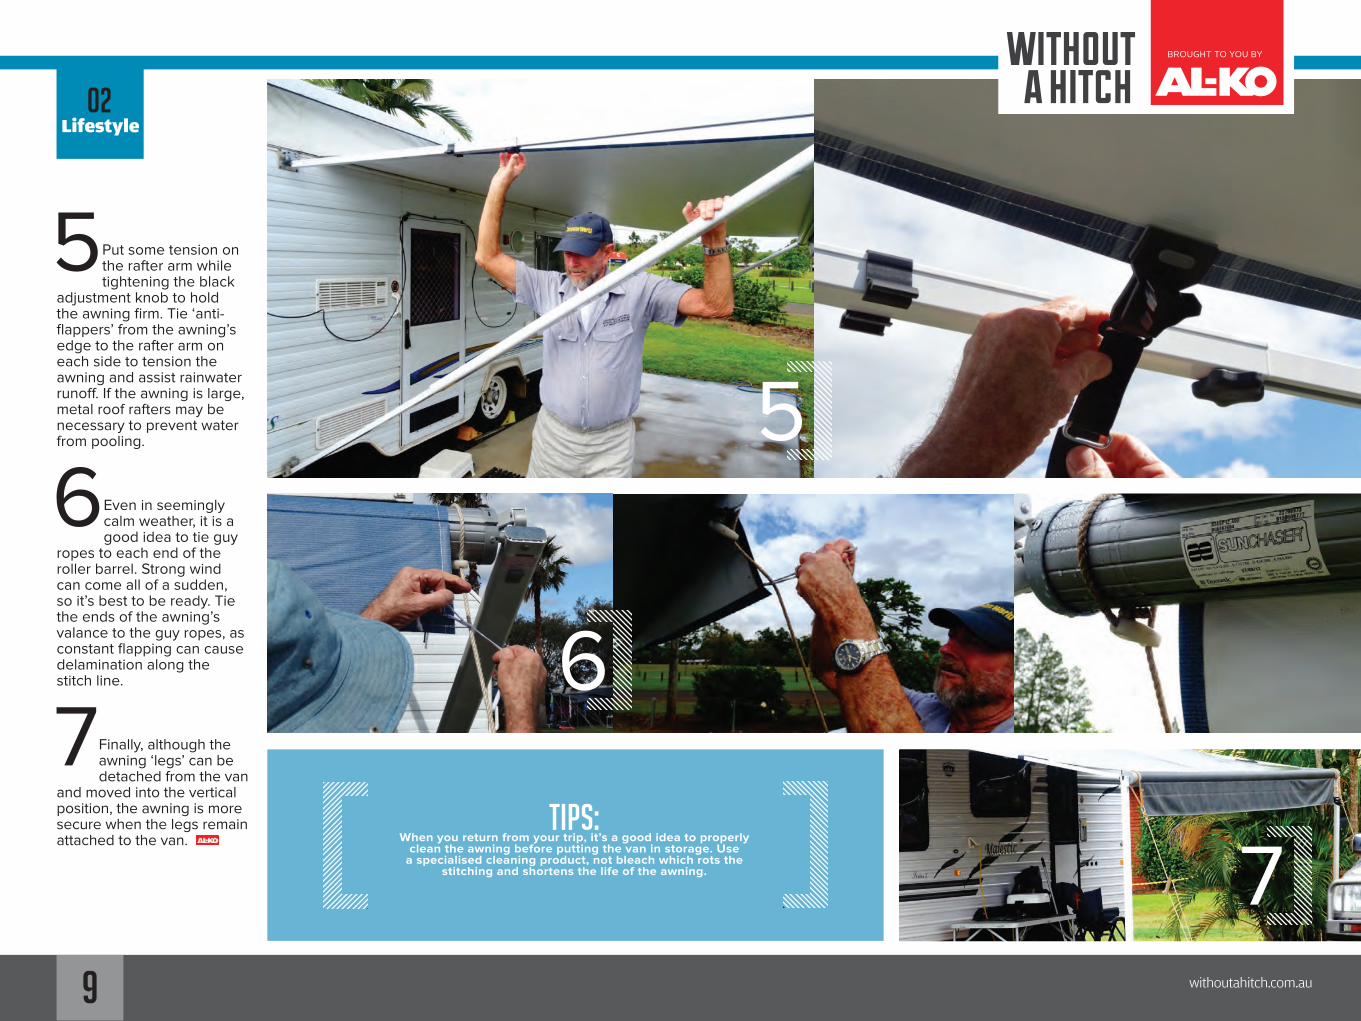
5Put some tension on the rafter arm while tightening the black
adjustment knob to hold the awning firm. Tie ‘anti-flappers’ from the awning’s edge to the rafter arm on each side to tension the awning and assist rainwater runoff. If the awning is large, metal roof rafters may be necessary to prevent water from pooling.
6Even in seemingly calm weather, it is a good idea to tie guy
ropes to each end of the roller barrel. Strong wind can come all of a sudden, so it’s best to be ready. Tie the ends of the awning’s valance to the guy ropes, as constant flapping can cause delamination along the stitch line.
7Finally, although the awning ‘legs’ can be detached from the van
and moved into the vertical position, the awning is more secure when the legs remain attached to the van.
5
6
tyre pressuresNobis expedi vellibe archicium, occatus, vel et assi doloribus,
cor sinvel imintemodis diorem.
tips:When you return from your trip, it’s a good idea to properly
clean the awning before putting the van in storage. Use a specialised cleaning product, not bleach which rots the
stitching and shortens the life of the awning. 7
02Lifestyle
9
withoutahitch.com.au
Maintaining correct tyre pressures on a caravan is vitally important. If the pressure is too high you risk a puncture, if it’s too low you risk instability on the road. Here’s how to check that your caravan is running the correct tyre pressure.
HOW TO CORRECTLY SET YOUR CARAVAN’S TYRE PRESSURE
Upgrade your caravan: The accessories guaranteed make your holiday easier, smoother and safer
BROUGHT TO YOU BY
withoutahitch.com.au
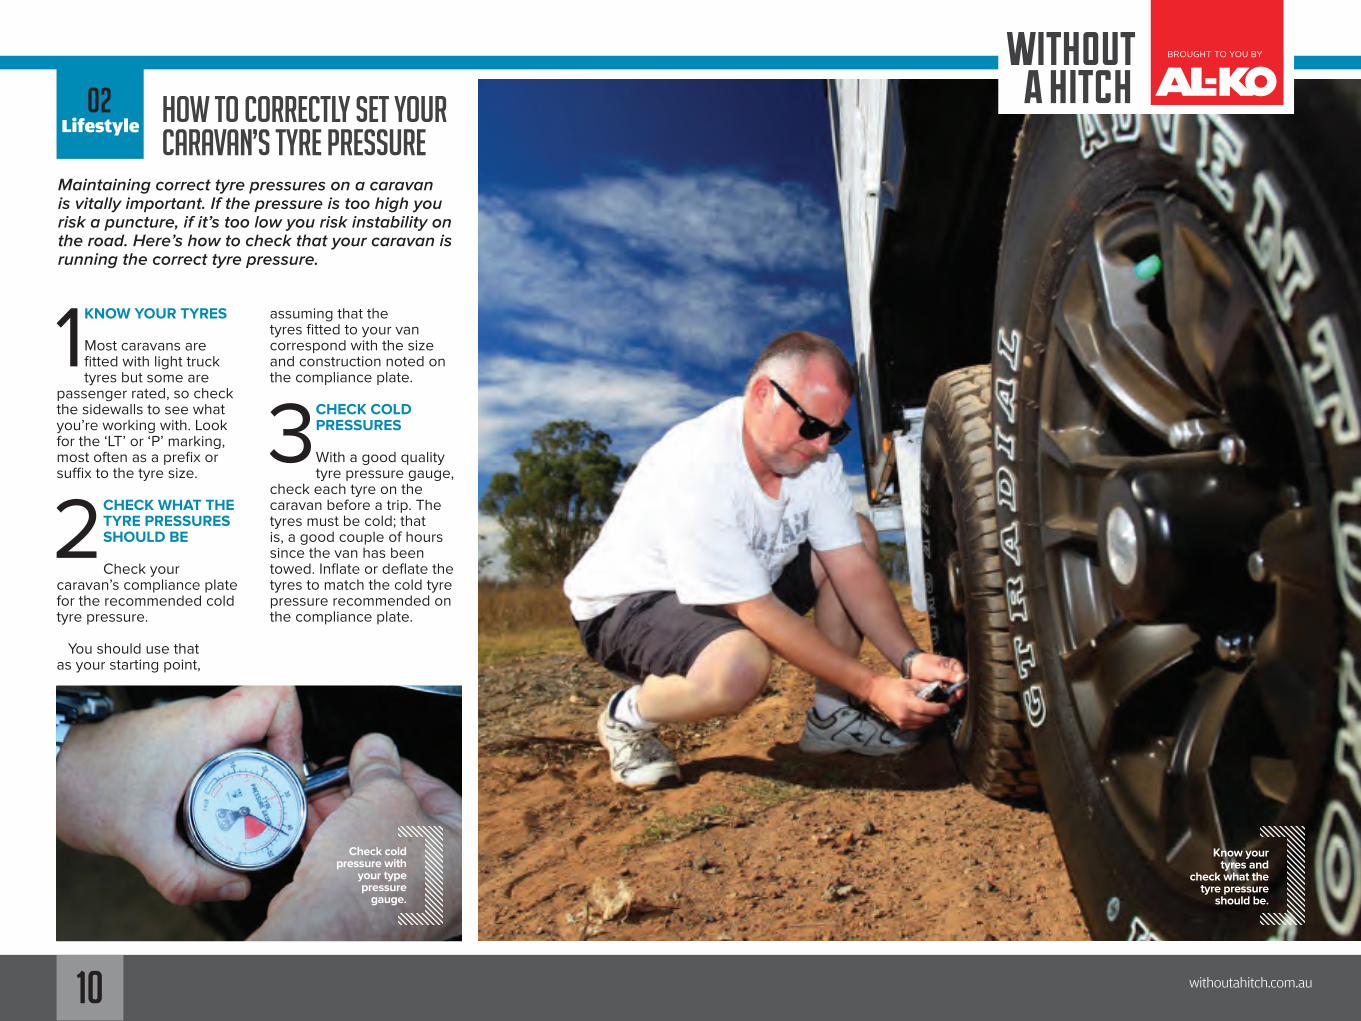
1KNOW YOUR TYRES
Most caravans are fitted with light truck tyres but some are
passenger rated, so check the sidewalls to see what you’re working with. Look for the ‘LT’ or ‘P’ marking, most often as a prefix or suffix to the tyre size.
2CHECK WHAT THE TYRE PRESSURES SHOULD BE
Check your caravan’s compliance plate for the recommended cold tyre pressure.
You should use that as your starting point,
assuming that the tyres fitted to your van correspond with the size and construction noted on the compliance plate.
3CHECK COLD PRESSURES
With a good quality tyre pressure gauge,
check each tyre on the caravan before a trip. The tyres must be cold; that is, a good couple of hours since the van has been towed. Inflate or deflate the tyres to match the cold tyre pressure recommended on the compliance plate.
Know your tyres and
check what the tyre pressure
should be.
Check cold pressure with
your type pressure
gauge.
02Lifestyle
10
withoutahitch.com.au
Adjust pressures if neccessary
Upgrade your caravan: The accessories guaranteed make your holiday easier, smoother and safer
BROUGHT TO YOU BY
withoutahitch.com.au
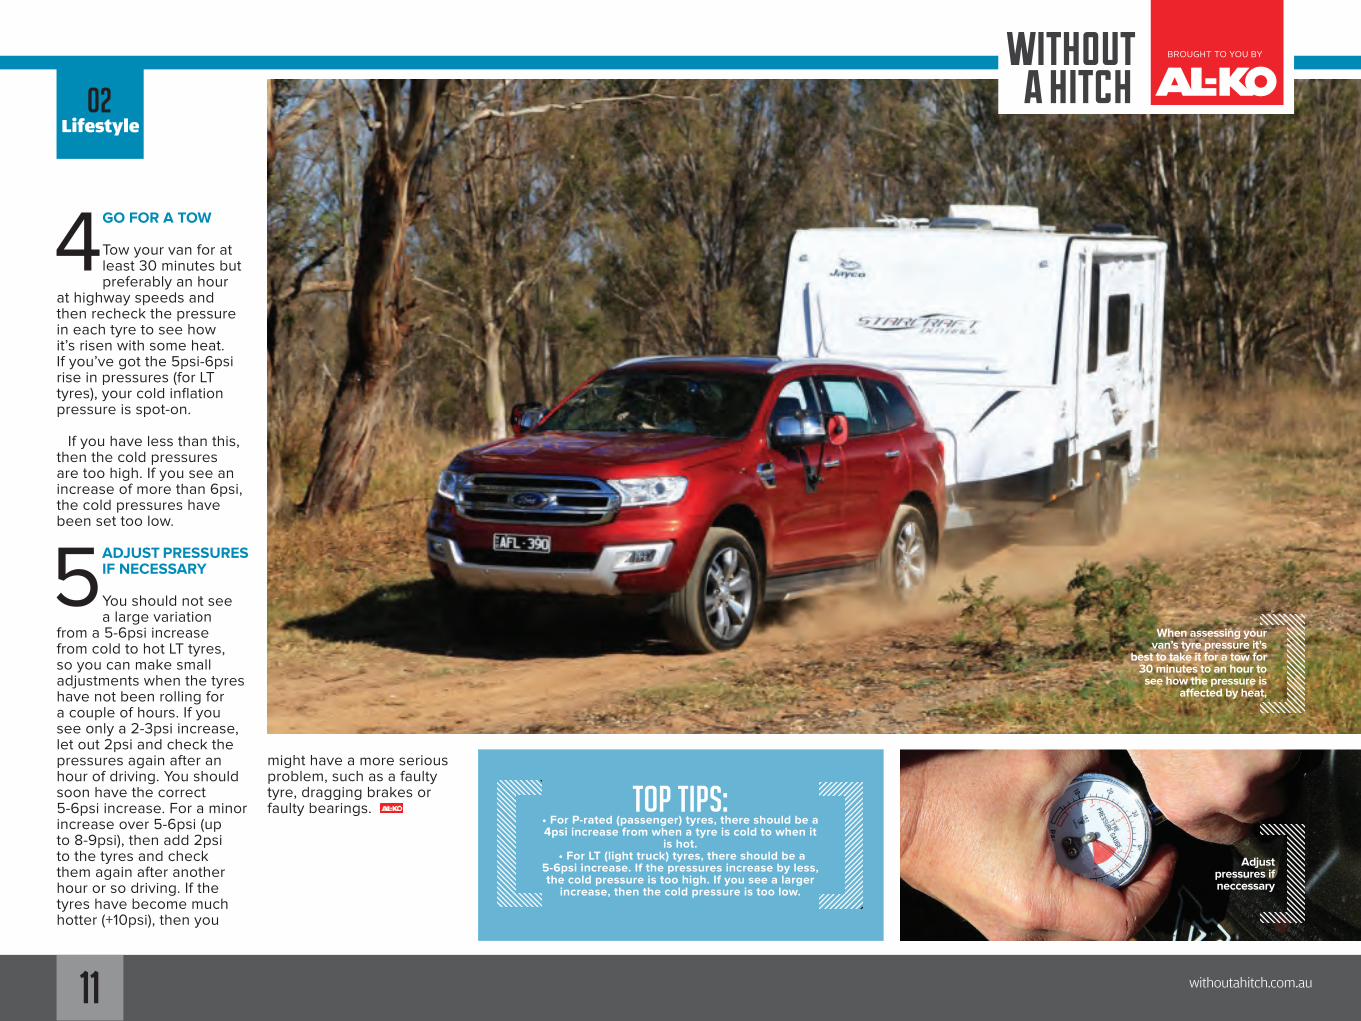
4GO FOR A TOW
Tow your van for at least 30 minutes but preferably an hour
at highway speeds and then recheck the pressure in each tyre to see how it’s risen with some heat. If you’ve got the 5psi-6psi rise in pressures (for LT tyres), your cold inflation pressure is spot-on.
If you have less than this, then the cold pressures are too high. If you see an increase of more than 6psi, the cold pressures have been set too low.
5ADJUST PRESSURES IF NECESSARY
You should not see a large variation
from a 5-6psi increase from cold to hot LT tyres, so you can make small adjustments when the tyres have not been rolling for a couple of hours. If you see only a 2-3psi increase, let out 2psi and check the pressures again after an hour of driving. You should soon have the correct 5-6psi increase. For a minor increase over 5-6psi (up to 8-9psi), then add 2psi to the tyres and check them again after another hour or so driving. If the tyres have become much hotter (+10psi), then you
might have a more serious problem, such as a faulty tyre, dragging brakes or faulty bearings. TOP TIPS:
• For P-rated (passenger) tyres, there should be a 4psi increase from when a tyre is cold to when it
is hot. • For LT (light truck) tyres, there should be a
5-6psi increase. If the pressures increase by less, the cold pressure is too high. If you see a larger
increase, then the cold pressure is too low.
When assessing your van’s tyre pressure it’s
best to take it for a tow for 30 minutes to an hour to see how the pressure is
affected by heat,
02Lifestyle
11
withoutahitch.com.au
A caravan’s wheel bearings will eventually need to be re-greased, so here’s a step-by-step guide to help you out.
HOW TO RE-GREASE YOUR CARAVAN’S WHEEL BEARINGS
Upgrade your caravan: The accessories guaranteed make your holiday easier, smoother and safer
BROUGHT TO YOU BY
withoutahitch.com.au
Wheel bearings get a workout on any caravan and should be
checked and re-greased every 10,000km, or 12 months. You’ll need a new split-pin and a bearing seal for each axle, and be prepared to replace the inner and outer bearings if they are pitted or worn.
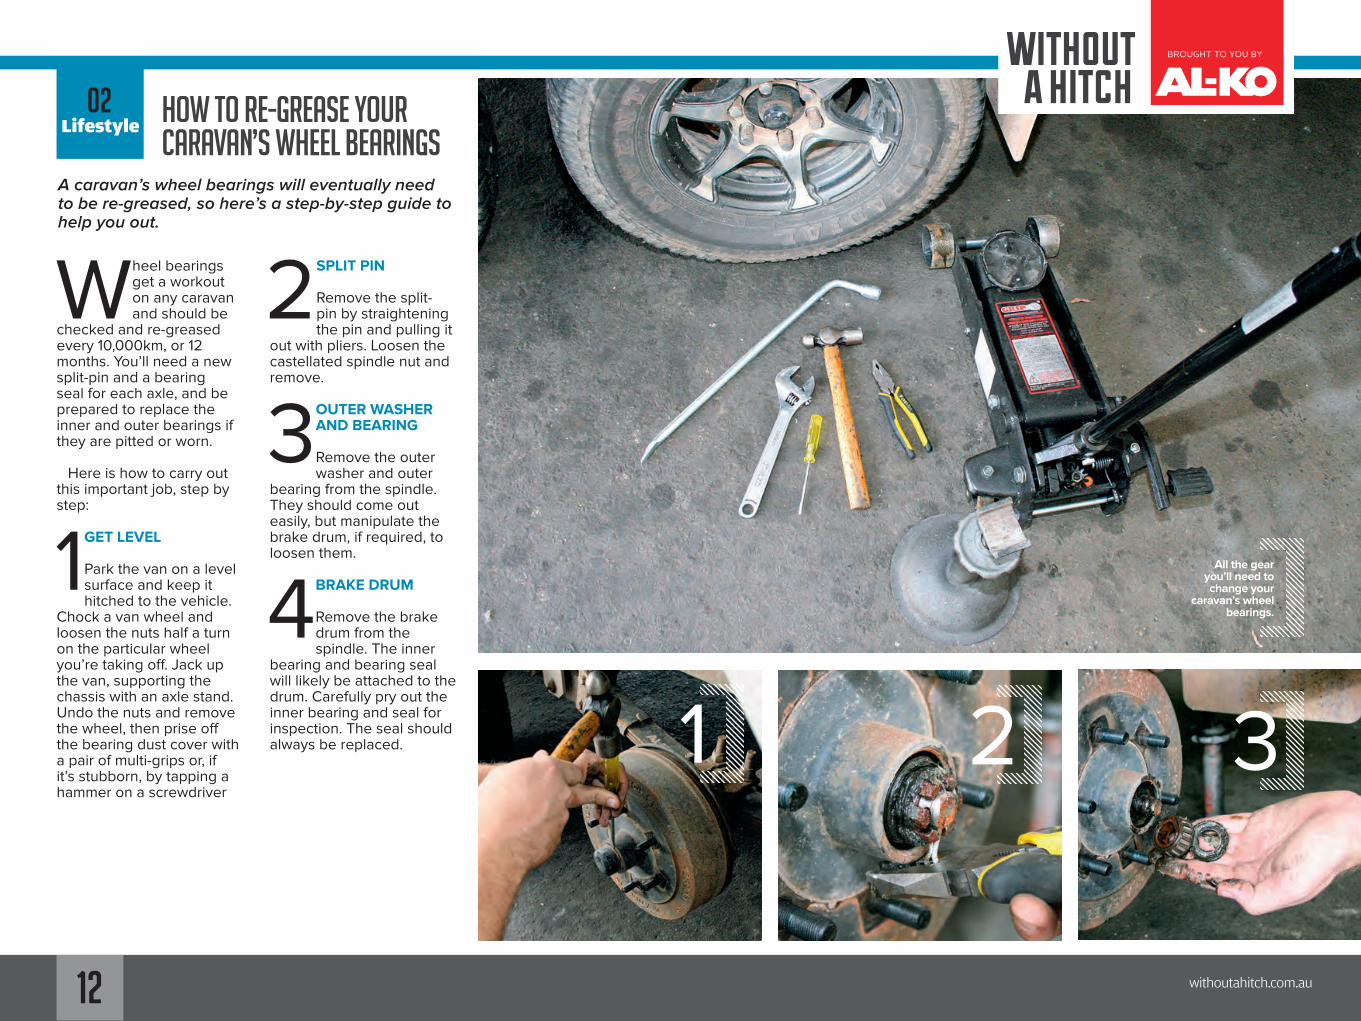
Here is how to carry out this important job, step by step:
1GET LEVEL
Park the van on a level surface and keep it hitched to the vehicle.
Chock a van wheel and loosen the nuts half a turn on the particular wheel you’re taking off. Jack up the van, supporting the chassis with an axle stand. Undo the nuts and remove the wheel, then prise off the bearing dust cover with a pair of multi-grips or, if it’s stubborn, by tapping a hammer on a screwdriver
2SPLIT PIN
Remove the split-pin by straightening the pin and pulling it
out with pliers. Loosen the castellated spindle nut and remove.
3OUTER WASHER AND BEARING
Remove the outer washer and outer
bearing from the spindle. They should come out easily, but manipulate the brake drum, if required, to loosen them.
4BRAKE DRUM
Remove the brake drum from the spindle. The inner
bearing and bearing seal will likely be attached to the drum. Carefully pry out the inner bearing and seal for inspection. The seal should always be replaced. 32
All the gear you’ll need to change your
caravan’s wheel bearings.
1
02Lifestyle
12
withoutahitch.com.au
Upgrade your caravan: The accessories guaranteed make your holiday easier, smoother and safer
BROUGHT TO YOU BY
withoutahitch.com.au
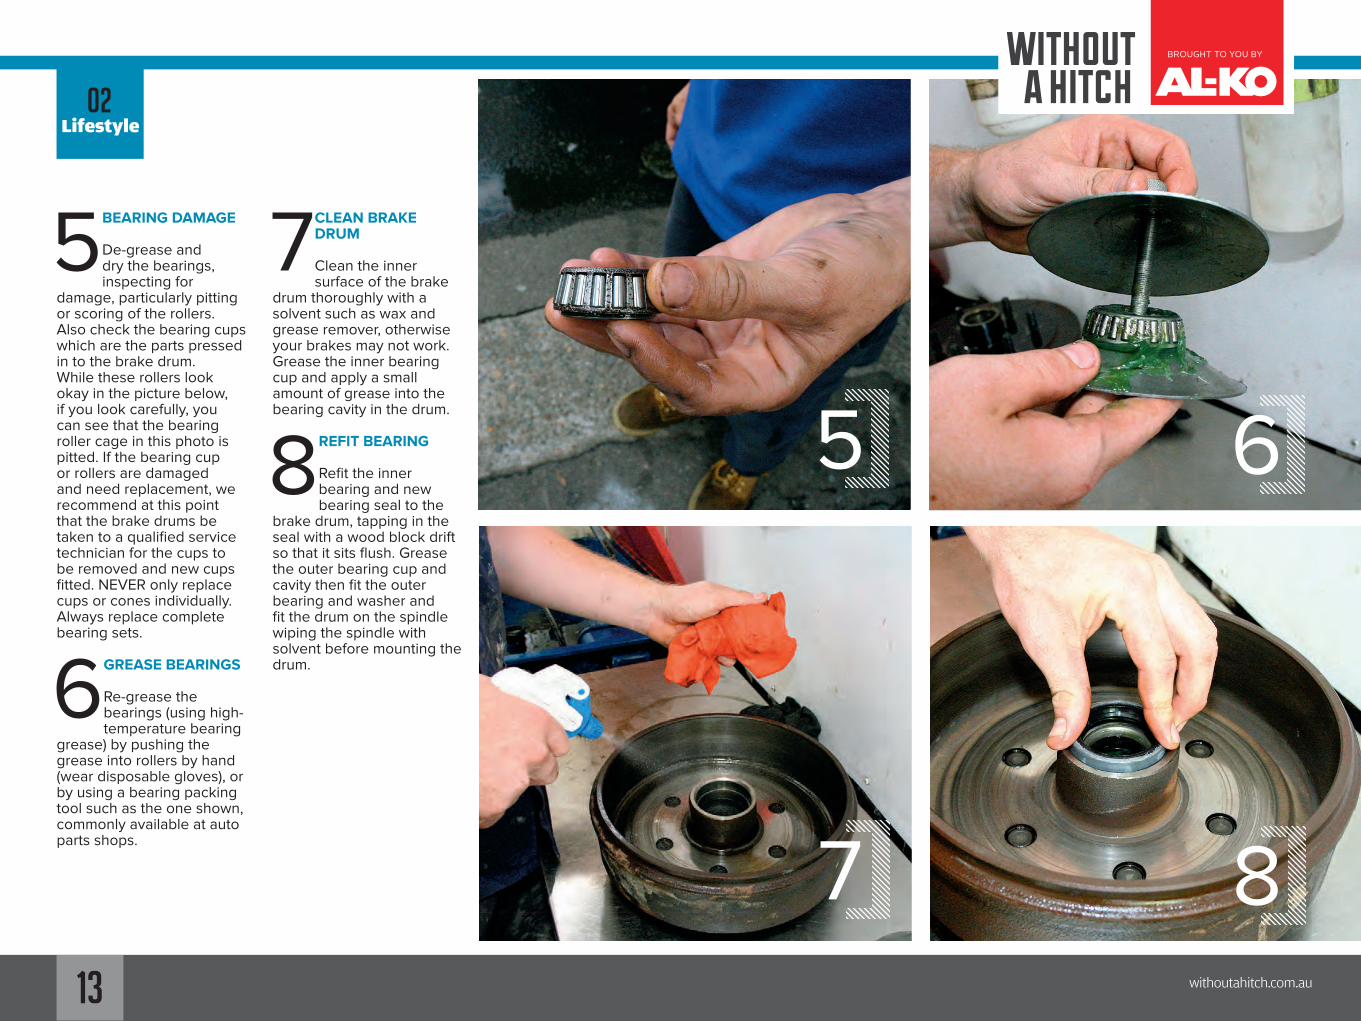
5BEARING DAMAGE
De-grease and dry the bearings, inspecting for
damage, particularly pitting or scoring of the rollers. Also check the bearing cups which are the parts pressed in to the brake drum. While these rollers look okay in the picture below, if you look carefully, you can see that the bearing roller cage in this photo is pitted. If the bearing cup or rollers are damaged and need replacement, we recommend at this point that the brake drums be taken to a qualified service technician for the cups to be removed and new cups fitted. NEVER only replace cups or cones individually. Always replace complete bearing sets.
6GREASE BEARINGS
Re-grease the bearings (using high-temperature bearing
grease) by pushing the grease into rollers by hand (wear disposable gloves), or by using a bearing packing tool such as the one shown, commonly available at auto parts shops.
7CLEAN BRAKE DRUM
Clean the inner surface of the brake
drum thoroughly with a solvent such as wax and grease remover, otherwise your brakes may not work. Grease the inner bearing cup and apply a small amount of grease into the bearing cavity in the drum.
8REFIT BEARING
Refit the inner bearing and new bearing seal to the
brake drum, tapping in the seal with a wood block drift so that it sits flush. Grease the outer bearing cup and cavity then fit the outer bearing and washer and fit the drum on the spindle wiping the spindle with solvent before mounting the drum.
65
87
02Lifestyle
13

withoutahitch.com.au
Upgrade your caravan: The accessories guaranteed make your holiday easier, smoother and safer
BROUGHT TO YOU BY
withoutahitch.com.au
9 REFIT AND TIGHTEN
Tighten the castellated spindle
nut, firmly with a wrench whilst rotating the drum. Back off the castellated spindle nut and check for end play. Ideally, you should feel a slight amount of backwards and forwards end play (0–0.25mm). Drop in the new split pin at this point but do not bend it over. You may wish to refit the wheel; it will be easier to spin than just the brake drum, and will give you a better feel of when the bearing is too tight. Once you’re happy with the amount of end play on the bearings, secure the split-pin, locking it in place by ensuring the head of the pin is seated and bending one half of the ‘split’ section towards you, along the spindle. Using pliers, cut the section of the un bent leg of the pin where it protrudes past the spindle. Tap the dust cap back on.
10 WHEEL CHECK
Fit the wheel (if you haven’t already done
so) and tighten the nuts in the correct diagonal sequence enough so that the wheel is secure on the hub. Spin the wheel to ensure it’s moving freely, then grab the top and bottom and see if there is any movement. If the wheel is binding, you may have overtightened the bearings and need to loosen to the next pin hole. If not tight enough, the wheel will have excessive ‘end play’ in it. If you do not need to recheck bearing tension, return the wheel to the ground, remove the jack/axle stand and torque the wheel nuts to the manufacturers recommendation. Check wheel nut tension again after 100km.
9
10If the wheel is binding, you may have overtightened the bearings and need
to loosen to the next pin hole
remember: When it comes to
wheel bearings, never only replace cups or cones individually.
Always replace complete bearing sets.
02Lifestyle
14

withoutahitch.com.au
Maximise your charging abilities when underway by fitting an Anderson plug to your towing vehicle.
How To Fit An Anderson Plug
Upgrade your caravan: The accessories guaranteed make your holiday easier, smoother and safer
BROUGHT TO YOU BY
withoutahitch.com.au
03Electrical
An Anderson plug will allow your van to charge while you’re driving and will
ensure adequate voltage for the smooth running of your fridge – assuming the
correct wire width is used.
Gone are the days of running your van’s fridge on gas while underway; we
know now how dangerous that is. But to run your van’s 12V appliances and charge its batteries while towing, an Anderson plug is required to reduce voltage drop.
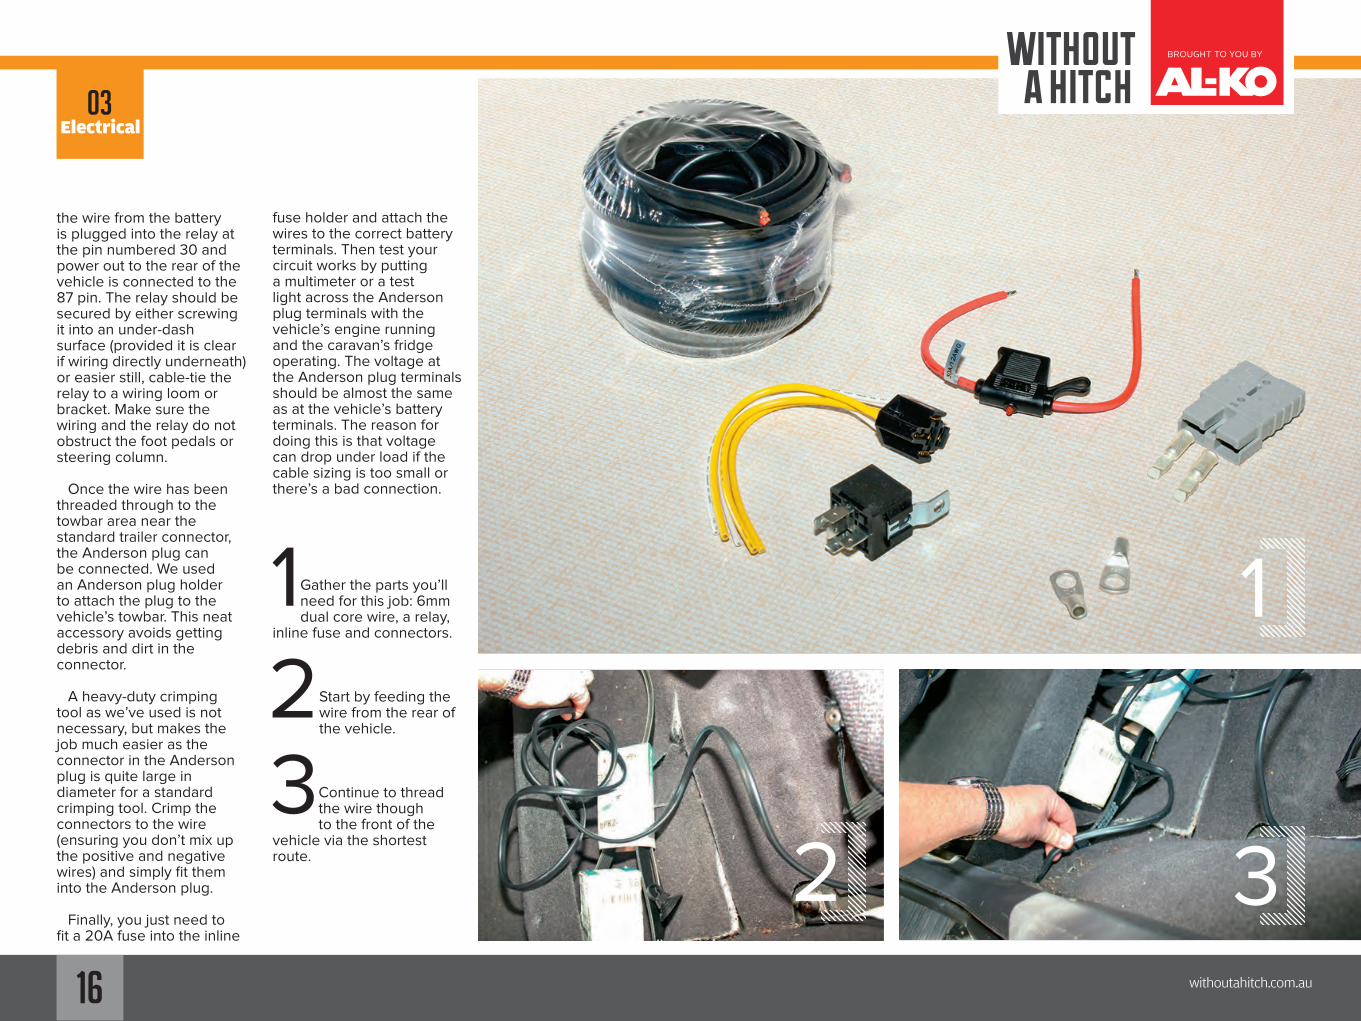
DOWN TO THE WIREThe trick is to pump as much power into the fridge and your van’s batteries as you can. You’ll need a run a cable with a minimum width of 6mm directly from the vehicle’s battery which, in Australian measurements, means 4.5-5mm of copper wire surrounded by 1-1.5mm of insulation. This width is suitable if you’re running no more than 6m of wire, but if you need to run more you should increase wire diameter or risk too much voltage drop.
GETTING EQUIPPEDOnce you’ve figured out the diameter and length of wire you require, you will need to consider the connection between vehicle and van. The standard fitment these days is the 50A Anderson plug, favoured for its ability to carry plenty of current. The other components needed include an inline
fuse or a reset breaker switch and it is a good idea to fit a relay so that the plug is only powered on the vehicle’s accessory circuit to avoid battery drain when the vehicle isn’t running. Another solution is to fit a dual battery system with a switchover solenoid.
GETTING STARTEDBegin by threading the wire though the vehicle, either by running the wire underneath the vehicle alongside or in the chassis rail into the engine bay, or by running it inside the vehicle under the carpet and though the firewall into the engine bay. Start at the rear of the vehicle rather than at the engine bay to avoid threading 6m of wire through a tight access grommet in the firewall.
Once you’ve routed the wire to the battery (but not yet connected), you can connect the inline fuse or reset breaker. While an inline fuse, once it blows, makes the circuit inoperative, it is probably a safer option than using a reset breaker, which will keep on tripping and resetting the circuit if there is a constant short.
The inline fuse wire is
crimped to the positive (red) wire of the dual-core 6mm wire and an eyelet is crimpled to the other end to fit to the battery’s positive terminal. Don’t make any connections to the battery now – that will be the final thing to do with this job. Crimp an eyelet connector to the negative (black) wire of the 6mm dual-core wire which will later be fitted to the negative battery terminal.
If you’re fitting a relay to make the power source only operate when the vehicle is on (or in the accessories position) it can be fitted along the dual-core wire wherever a 12V accessory power feed can be sourced. Often wagons have a 12V accessories plug in the cargo area that can be tapped into, but for this project we took the accessory power feed from a 12V source in the centre console (the cigarette lighter) to activate the relay. We hooked up this accessories power source to the connection pin numbered 86 on the relay and earthed it through the pin numbered 85.
The dual core 6mm wire is cut here and with connectors crimped on,
withoutahitch.com.au15
withoutahitch.com.au
the wire from the battery is plugged into the relay at the pin numbered 30 and power out to the rear of the vehicle is connected to the 87 pin. The relay should be secured by either screwing it into an under-dash surface (provided it is clear if wiring directly underneath) or easier still, cable-tie the relay to a wiring loom or bracket. Make sure the wiring and the relay do not obstruct the foot pedals or steering column.
Once the wire has been threaded through to the towbar area near the standard trailer connector, the Anderson plug can be connected. We used an Anderson plug holder to attach the plug to the vehicle’s towbar. This neat accessory avoids getting debris and dirt in the connector.
A heavy-duty crimping tool as we’ve used is not necessary, but makes the job much easier as the connector in the Anderson plug is quite large in diameter for a standard crimping tool. Crimp the connectors to the wire (ensuring you don’t mix up the positive and negative wires) and simply fit them into the Anderson plug.
Finally, you just need to fit a 20A fuse into the inline
fuse holder and attach the wires to the correct battery terminals. Then test your circuit works by putting a multimeter or a test light across the Anderson plug terminals with the vehicle’s engine running and the caravan’s fridge operating. The voltage at the Anderson plug terminals should be almost the same as at the vehicle’s battery terminals. The reason for doing this is that voltage can drop under load if the cable sizing is too small or there’s a bad connection.
1Gather the parts you’ll need for this job: 6mm dual core wire, a relay,
inline fuse and connectors.
2 Start by feeding the wire from the rear of the vehicle.
3 Continue to thread the wire though to the front of the
vehicle via the shortest route.
Upgrade your caravan: The accessories guaranteed make your holiday easier, smoother and safer
BROUGHT TO YOU BY
withoutahitch.com.au
1
2 3
03Electrical
16
withoutahitch.com.au
Upgrade your caravan: The accessories guaranteed make your holiday easier, smoother and safer
BROUGHT TO YOU BY
withoutahitch.com.au
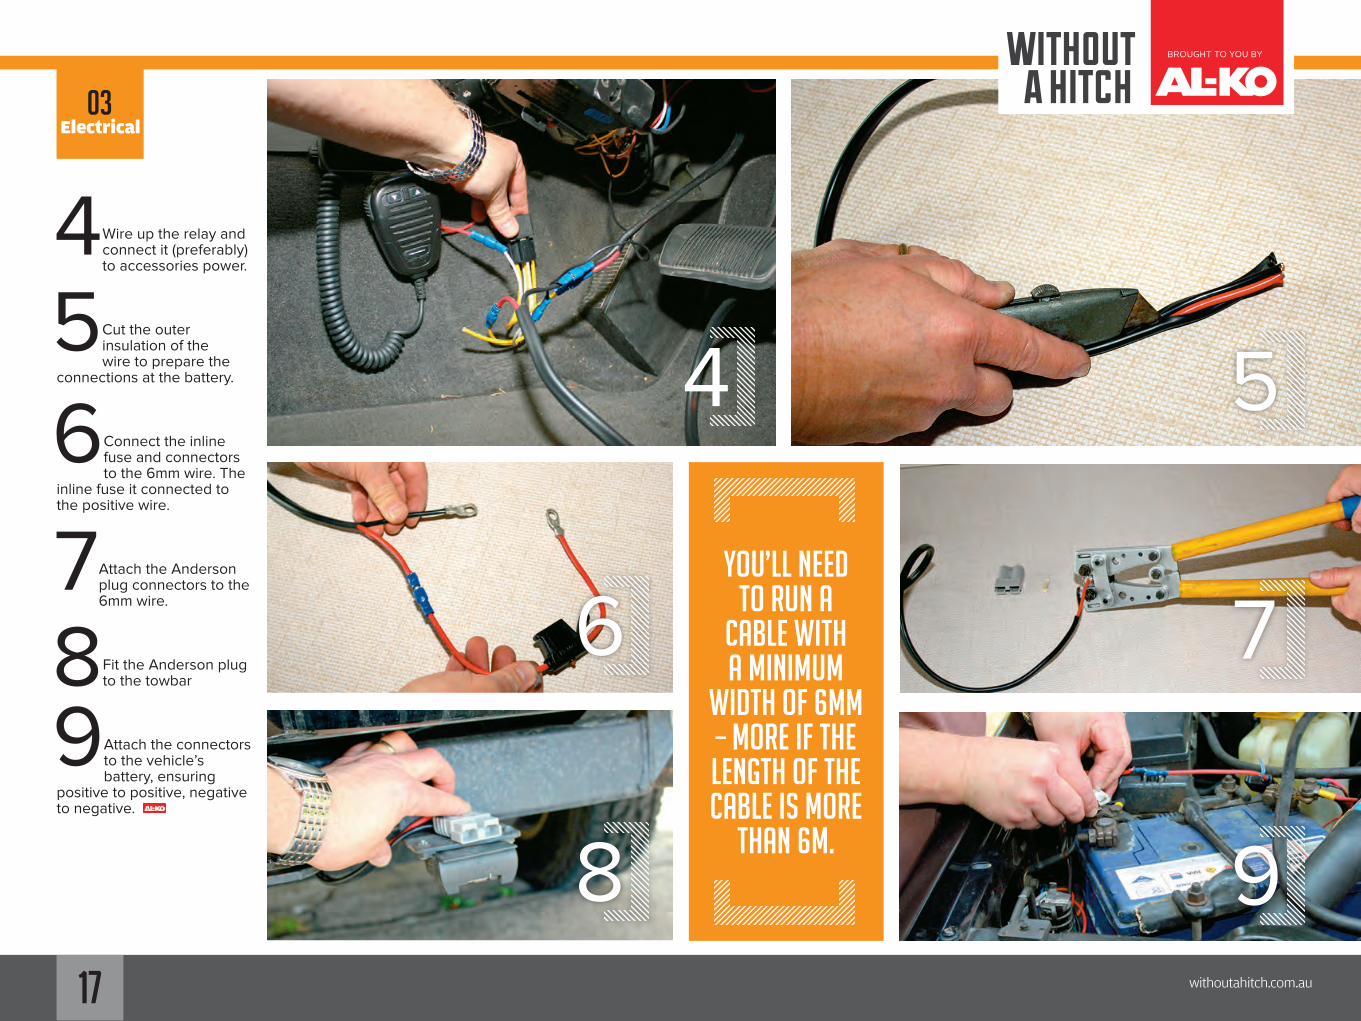
4 Wire up the relay and connect it (preferably) to accessories power.
5 Cut the outer insulation of the wire to prepare the
connections at the battery.
6 Connect the inline fuse and connectors to the 6mm wire. The
inline fuse it connected to the positive wire.
7 Attach the Anderson plug connectors to the 6mm wire.
8 Fit the Anderson plug to the towbar
You’ll need to run a
cable with a minimum
width of 6mm – more if the length of the cable is more
than 6m.
4 5
6 7
8 9
03Electrical
9Attach the connectors to the vehicle’s battery, ensuring
positive to positive, negative to negative.
17

withoutahitch.com.au
Upgrade your caravan: The accessories guaranteed make your holiday easier, smoother and safer
BROUGHT TO YOU BY
withoutahitch.com.au
There is a lot to understand when it comes to motorhome and caravan electrical systems. Here’s the low down.
UNDERSTANING CARAVAN ELECTRICAL SYSTEMS
MAINS SUPPLYMost RVs come with two voltage systems: a 12V battery supply and a 240V mains supply. The latter allows you to run appliances such as air-conditioners, microwaves and battery chargers.
For mains power, all RVs should have a 15A-rated cable, which will have a larger earth pin than what you’ll find on a standard 10A household extension lead.
It is not a legal requirement to have power leads ‘tagged and tested’ but it’s not a bad idea to have them checked annually. Damaged power leads can be lethal and even a simple and thorough visual inspection is quite easy to do – look for nicks, cuts or abrasions in the insulation and, if in doubt, replace the lead or have it professionally checked.
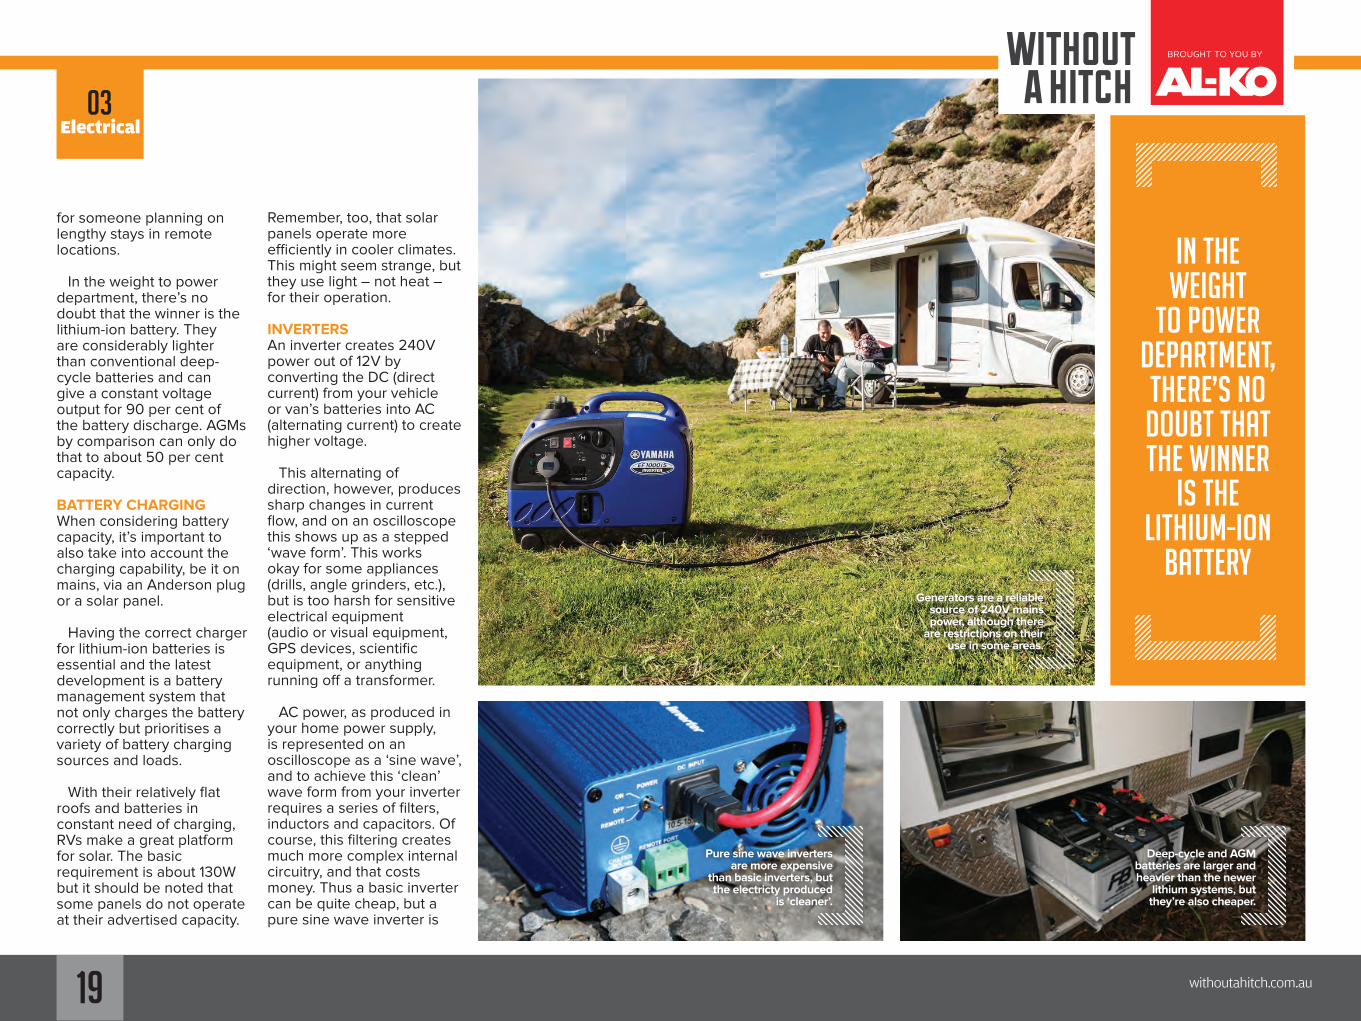
GENERATORSGenerators are a reliable source of 240V mains power and are available for RV use mostly in the ranges of 1kVA to 2.4kVA, as generators of these outputs are quite portable. For RV use, the best choice is an inverter generator,
which produces a sine wave that matches mains power and is therefore suitable for electronically sensitive devices.
However, there are plenty of places where generator use is restricted or banned altogether and that may well reduce their appeal.
BATTERIESStarting with the heart of any 12V system is the humble battery. There are essentially two types: the vehicle’s starter battery, and everything else. The latter includes lead acid deep-cycle batteries, Absorbed Glass Mat (AGM) batteries and, more recently, lithium-ion batteries.
The most obvious difference between deep-cycle, AGM and lithium-ion batteries is the cost, but you get what you pay for.
Conventional deep-cycle batteries are cheaper than AGM batteries but the latter is charged more easily and can be discharged further without damage. For a traveller who mostly stays in caravan parks, a deep-cycle battery should suffice. But an AGM battery would be a better investment
RVs are powered by both 12V and 240V systems,
meaning you can run appliances away from
mains power.
To connect to 240V power you’ll need a 15A-rated cable; this has a larger
‘earth pin’ than a standard household cable.
It is not a legal requirement to have power leads ‘tagged and tested’
but it’s not a bad idea to have them checked annually
03Electrical
18
withoutahitch.com.au
Upgrade your caravan: The accessories guaranteed make your holiday easier, smoother and safer
BROUGHT TO YOU BY
withoutahitch.com.au
for someone planning on lengthy stays in remote locations.
In the weight to power department, there’s no doubt that the winner is the lithium-ion battery. They are considerably lighter than conventional deep-cycle batteries and can give a constant voltage output for 90 per cent of the battery discharge. AGMs by comparison can only do that to about 50 per cent capacity.
BATTERY CHARGINGWhen considering battery capacity, it’s important to also take into account the charging capability, be it on mains, via an Anderson plug or a solar panel.
Having the correct charger for lithium-ion batteries is essential and the latest development is a battery management system that not only charges the battery correctly but prioritises a variety of battery charging sources and loads.
With their relatively flat roofs and batteries in constant need of charging, RVs make a great platform for solar. The basic requirement is about 130W but it should be noted that some panels do not operate at their advertised capacity.
Remember, too, that solar panels operate more efficiently in cooler climates. This might seem strange, but they use light – not heat – for their operation.
INVERTERSAn inverter creates 240V power out of 12V by converting the DC (direct current) from your vehicle or van’s batteries into AC (alternating current) to create higher voltage.
This alternating of direction, however, produces sharp changes in current flow, and on an oscilloscope this shows up as a stepped ‘wave form’. This works okay for some appliances (drills, angle grinders, etc.), but is too harsh for sensitive electrical equipment (audio or visual equipment, GPS devices, scientific equipment, or anything running off a transformer.
AC power, as produced in your home power supply, is represented on an oscilloscope as a ‘sine wave’, and to achieve this ‘clean’ wave form from your inverter requires a series of filters, inductors and capacitors. Of course, this filtering creates much more complex internal circuitry, and that costs money. Thus a basic inverter can be quite cheap, but a pure sine wave inverter is
Generators are a reliable source of 240V mains power, although there
are restrictions on their use in some areas.
In the weight
to power department, there’s no doubt that the winner
is the lithium-ion
battery
03Electrical
Deep-cycle and AGM batteries are larger and heavier than the newer
lithium systems, but they’re also cheaper.
Pure sine wave inverters are more expensive
than basic inverters, but the electricty produced
is ‘cleaner’.
19
withoutahitch.com.au
Upgrade your caravan: The accessories guaranteed make your holiday easier, smoother and safer
BROUGHT TO YOU BY
withoutahitch.com.au
much dearer, though the electricity they produce is a more perfect sine wave than you will see from your home power supply.
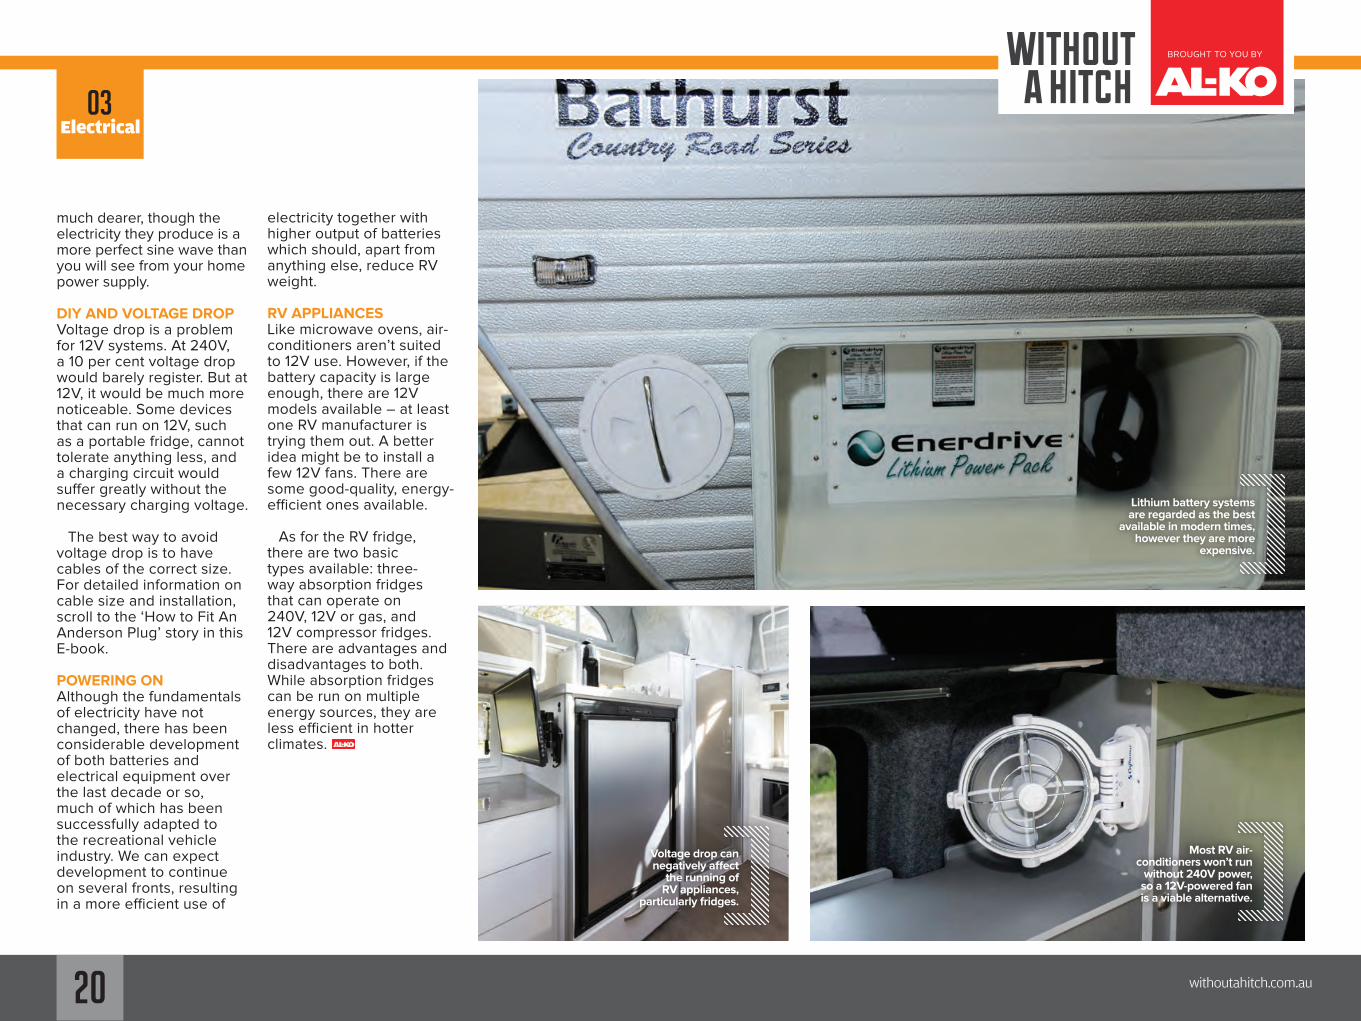
DIY AND VOLTAGE DROPVoltage drop is a problem for 12V systems. At 240V, a 10 per cent voltage drop would barely register. But at 12V, it would be much more noticeable. Some devices that can run on 12V, such as a portable fridge, cannot tolerate anything less, and a charging circuit would suffer greatly without the necessary charging voltage.
The best way to avoid voltage drop is to have cables of the correct size. For detailed information on cable size and installation, scroll to the ‘How to Fit An Anderson Plug’ story in this E-book.
POWERING ONAlthough the fundamentals of electricity have not changed, there has been considerable development of both batteries and electrical equipment over the last decade or so, much of which has been successfully adapted to the recreational vehicle industry. We can expect development to continue on several fronts, resulting in a more efficient use of
electricity together with higher output of batteries which should, apart from anything else, reduce RV weight.
RV APPLIANCESLike microwave ovens, air-conditioners aren’t suited to 12V use. However, if the battery capacity is large enough, there are 12V models available – at least one RV manufacturer is trying them out. A better idea might be to install a few 12V fans. There are some good-quality, energy-efficient ones available.
As for the RV fridge, there are two basic types available: three-way absorption fridges that can operate on 240V, 12V or gas, and 12V compressor fridges. There are advantages and disadvantages to both. While absorption fridges can be run on multiple energy sources, they are less efficient in hotter climates.
Most RV air-conditioners won’t run
without 240V power, so a 12V-powered fan is a viable alternative.
Lithium battery systems are regarded as the best
available in modern times, however they are more
expensive.
Voltage drop can negatively affect
the running of RV appliances,
particularly fridges.
03Electrical
20

AL-KO INTERNATIONAL PTY LTD
67-91 Nathan Road
Dandenong South,
Victoria 3175 Australia
P: (61) 3 9767 3700
F: (61) 3 9767 3799 www.alko.com.au