upsi epayment user manual
TRANSCRIPT
UPSI ePayment Portal
ePayment Portal
USER MANUAL
Prepared by:
ICT Center
Universiti Pendidikan Sultan Idris
Version 1.0, January 2012
UPSI ePayment Portal
UPSI ePayment Portal User Manual
1-1
CONTENT
1. TUITION FEE ............................................................................................................... 1-2
2. FINE ............................................................................................................................. 2-9
3. SEMINAR/CONFERENCE.......................................................................................... 3-17
4. BOOKS ....................................................................................................................... 4-24
5. PRODUCTS ................................................................................................................ 5-31
6. PAYMENT GATEWAY ............................................................................................... 6-38
7. MULTIPLE ITEMS IN A TRANSACTION .................................................................. 7-44
UPSI ePayment Portal
UPSI ePayment Portal User Manual
1-2
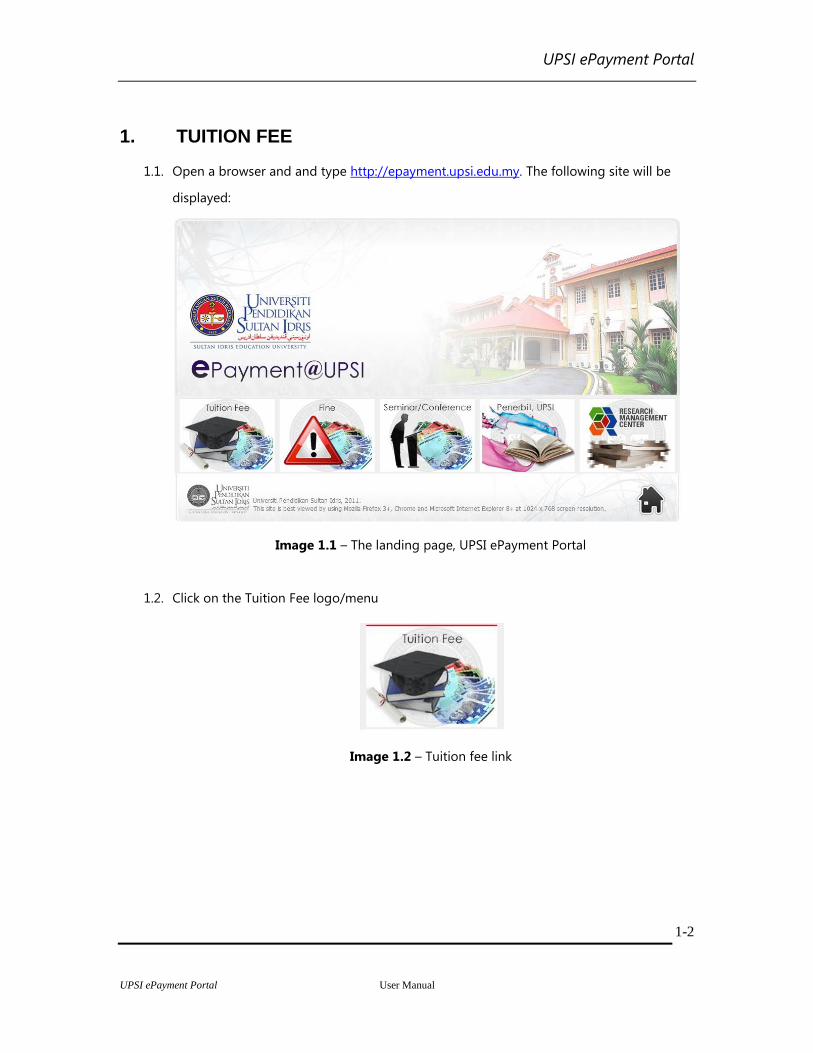
1. TUITION FEE
1.1. Open a browser and and type http://epayment.upsi.edu.my. The following site will be
displayed:
Image 1.1 – The landing page, UPSI ePayment Portal
1.2. Click on the Tuition Fee logo/menu
Image 1.2 – Tuition fee link
UPSI ePayment Portal
UPSI ePayment Portal User Manual
1-3
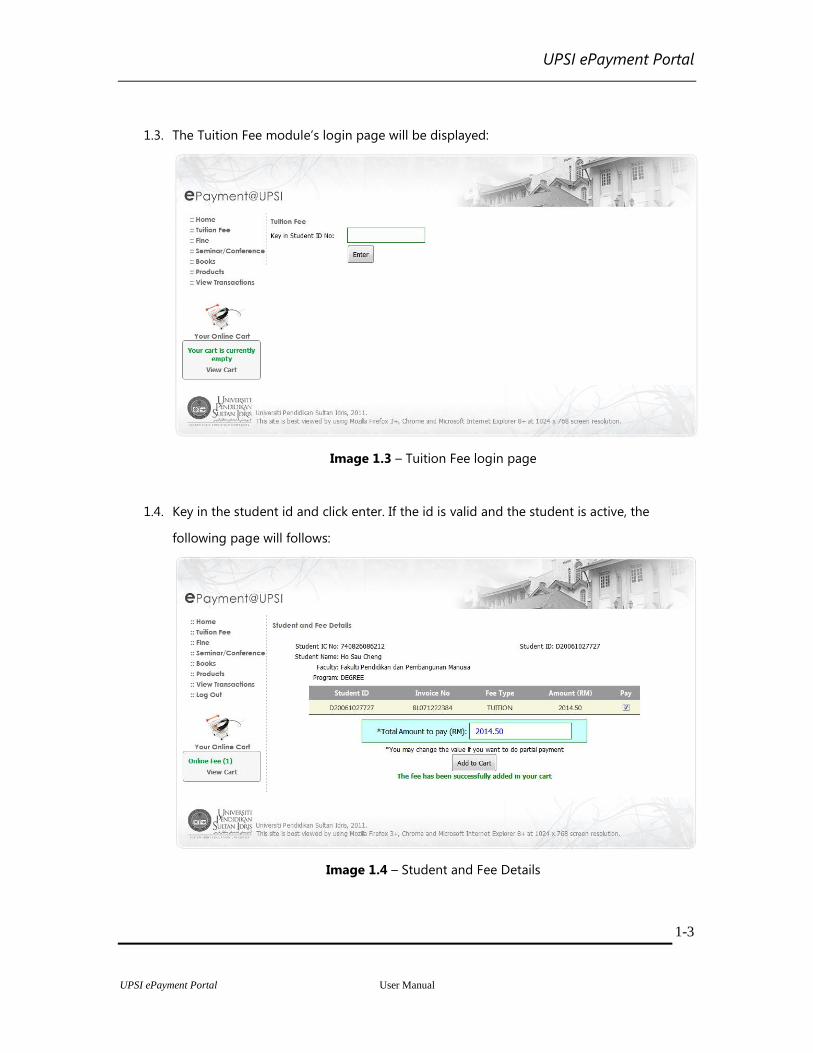
1.3. The Tuition Fee module’s login page will be displayed:
Image 1.3 – Tuition Fee login page
1.4. Key in the student id and click enter. If the id is valid and the student is active, the
following page will follows:
Image 1.4 – Student and Fee Details
UPSI ePayment Portal
UPSI ePayment Portal User Manual
1-4
1.5. To pay a fee, select the fee by checking the fee Pay checkbox’s. The amount of the
selected fee will be displayed at the Total Amount to pay (RM) textfield. The amount can
be edited if partial payment is intended.
1.6. Click on Add to Cart button to add the fee in the cart. If the action is succesful, a
message will be displayed and the cart will be updated.
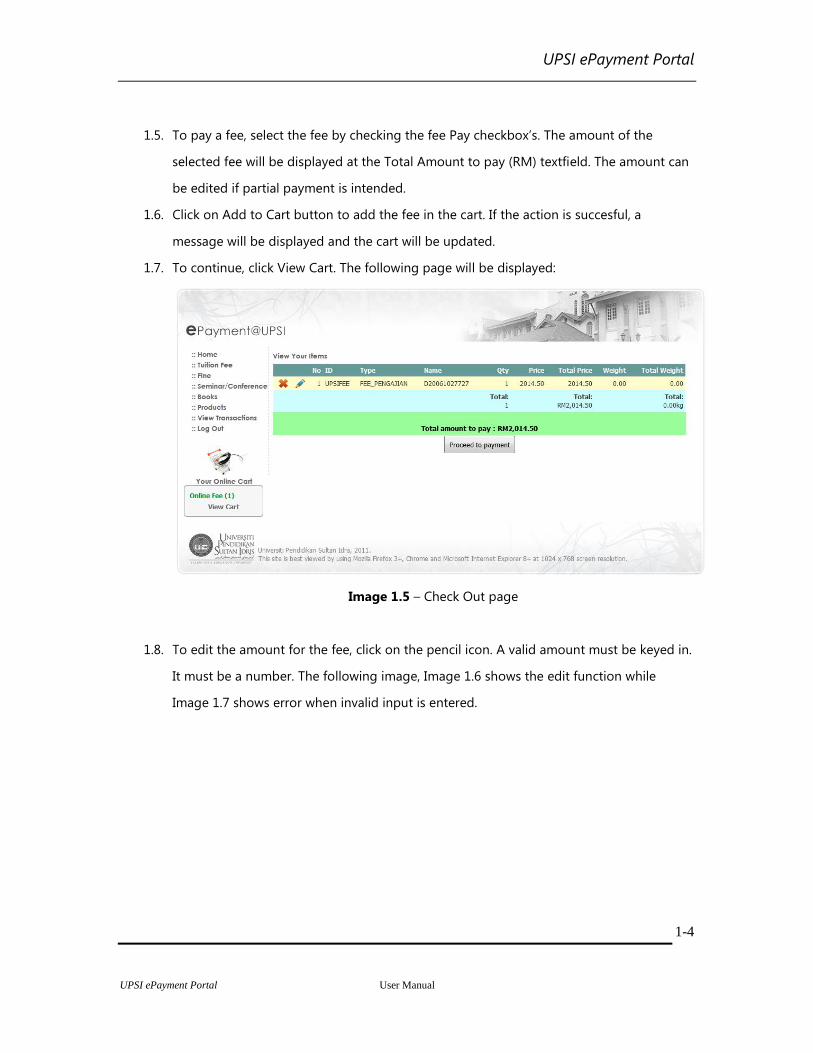
1.7. To continue, click View Cart. The following page will be displayed:
Image 1.5 – Check Out page
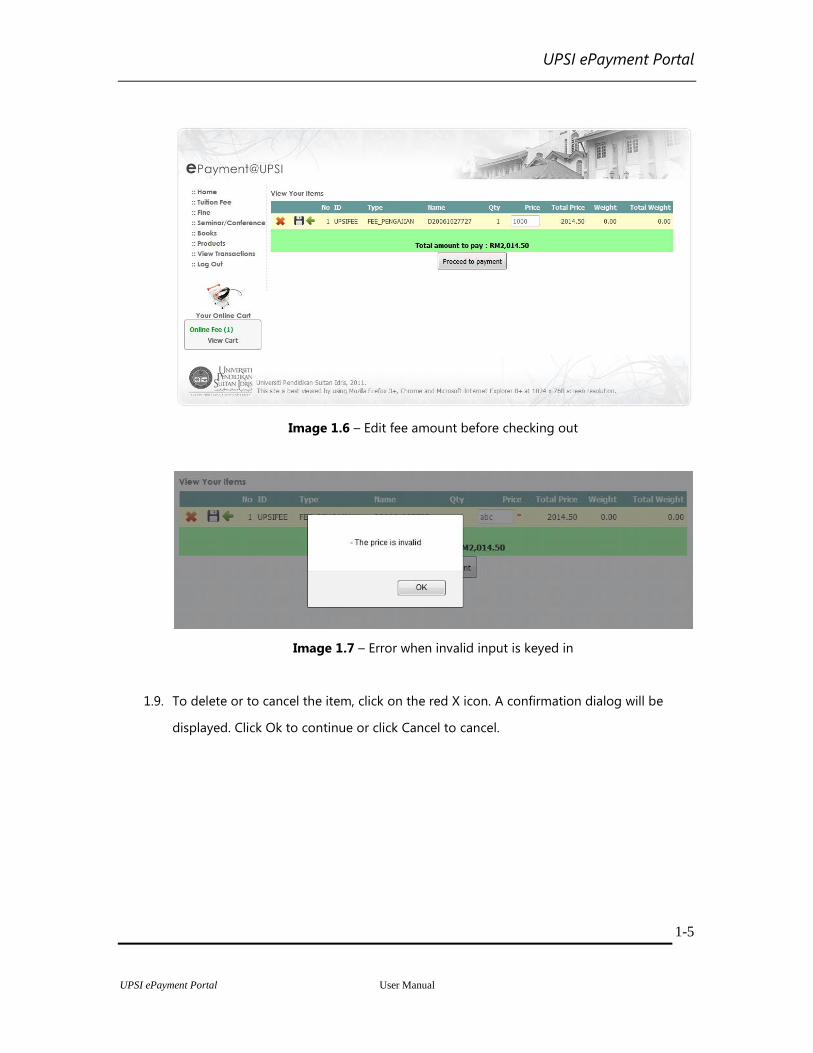
1.8. To edit the amount for the fee, click on the pencil icon. A valid amount must be keyed in.
It must be a number. The following image, Image 1.6 shows the edit function while
Image 1.7 shows error when invalid input is entered.
UPSI ePayment Portal
UPSI ePayment Portal User Manual
1-5
Image 1.6 – Edit fee amount before checking out
Image 1.7 – Error when invalid input is keyed in
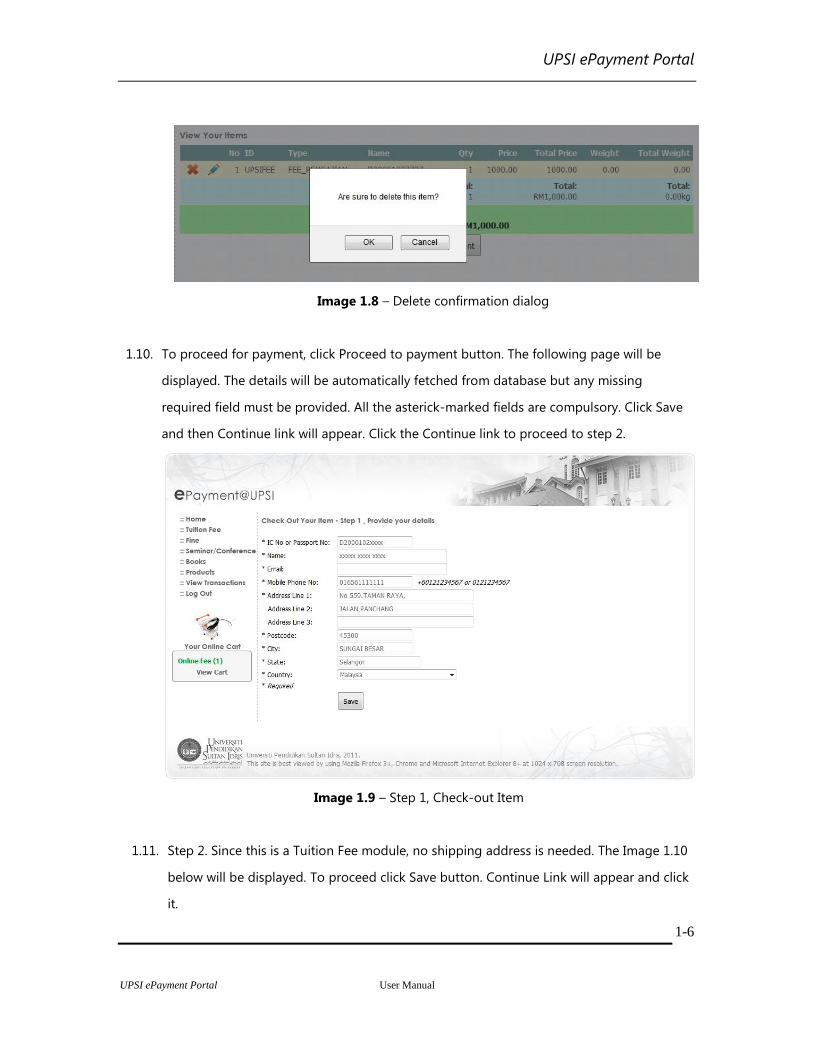
1.9. To delete or to cancel the item, click on the red X icon. A confirmation dialog will be
displayed. Click Ok to continue or click Cancel to cancel.
UPSI ePayment Portal
UPSI ePayment Portal User Manual
1-6
Image 1.8 – Delete confirmation dialog
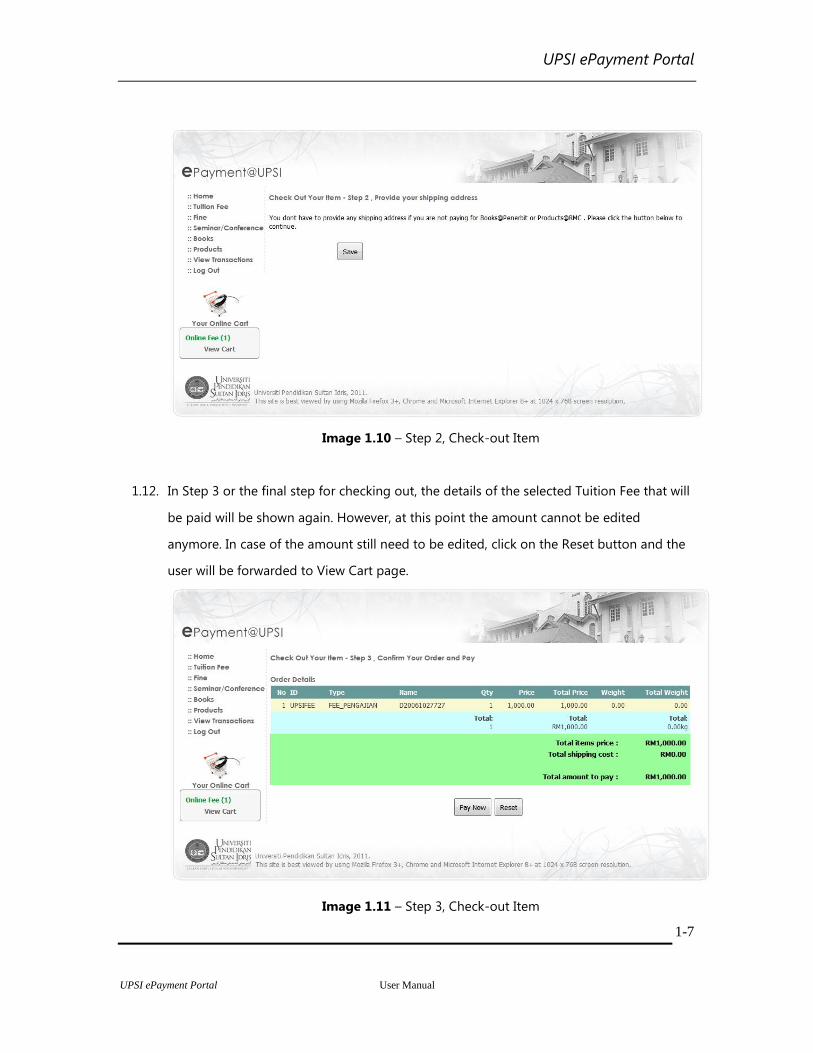
1.10. To proceed for payment, click Proceed to payment button. The following page will be
displayed. The details will be automatically fetched from database but any missing
required field must be provided. All the asterick-marked fields are compulsory. Click Save
and then Continue link will appear. Click the Continue link to proceed to step 2.
Image 1.9 – Step 1, Check-out Item
1.11. Step 2. Since this is a Tuition Fee module, no shipping address is needed. The Image 1.10
below will be displayed. To proceed click Save button. Continue Link will appear and click
it.
UPSI ePayment Portal
UPSI ePayment Portal User Manual
1-7
Image 1.10 – Step 2, Check-out Item
1.12. In Step 3 or the final step for checking out, the details of the selected Tuition Fee that will
be paid will be shown again. However, at this point the amount cannot be edited
anymore. In case of the amount still need to be edited, click on the Reset button and the
user will be forwarded to View Cart page.
Image 1.11 – Step 3, Check-out Item
UPSI ePayment Portal
UPSI ePayment Portal User Manual
1-8
1.13. Click Pay Now button and the user will be forwarded to Payment Gateway. Please refer to
Payment Gateway in the chapter 6 for the further steps.
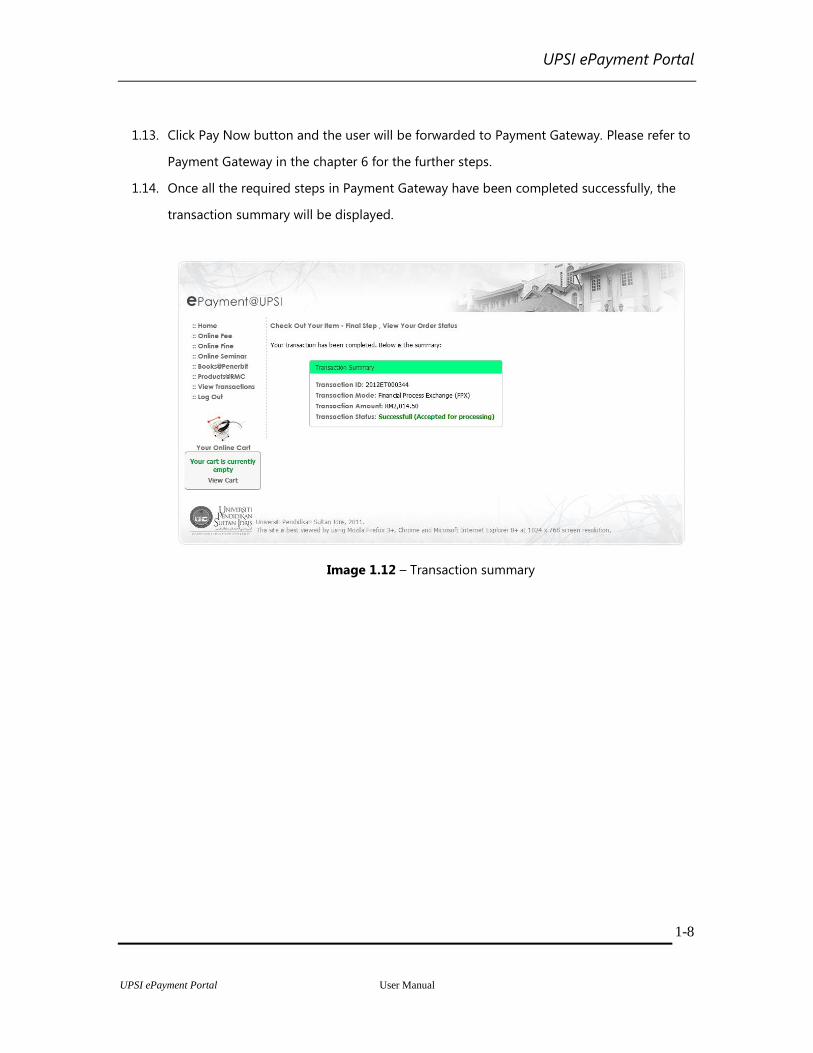
1.14. Once all the required steps in Payment Gateway have been completed successfully, the
transaction summary will be displayed.
Image 1.12 – Transaction summary
UPSI ePayment Portal
UPSI ePayment Portal User Manual
2-9
2. FINE
2.1. Open a browser and and type http://epayment.upsi.edu.my. The following site will be
displayed:
Image 2.1 – The landing page, UPSI ePayment Portal
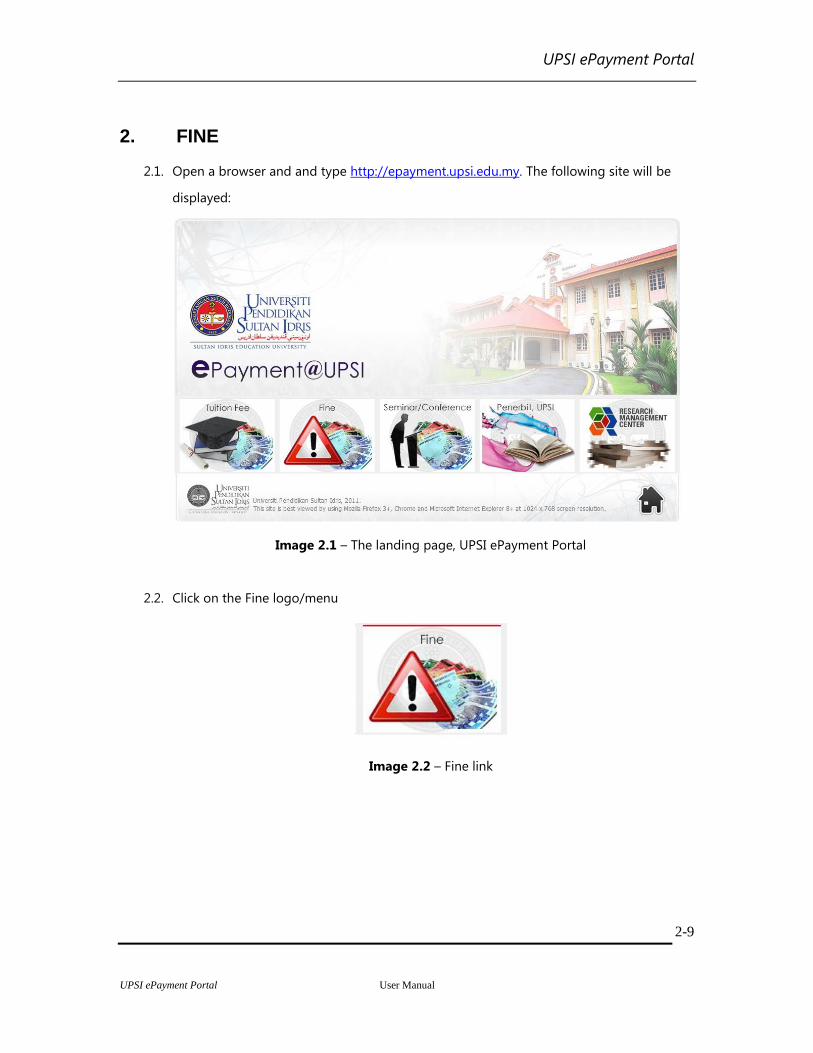
2.2. Click on the Fine logo/menu
Image 2.2 – Fine link

UPSI ePayment Portal
UPSI ePayment Portal User Manual
2-10
2.3. The Fine module’s login page will be displayed:
Image 2.3 – Tuition Fee login page
2.4. Key in the student id and click enter. If the id is valid and the student is active, the
following sub menu will be displayed. Please select either one of the option.
Image 2.4 – Student and Fee Details
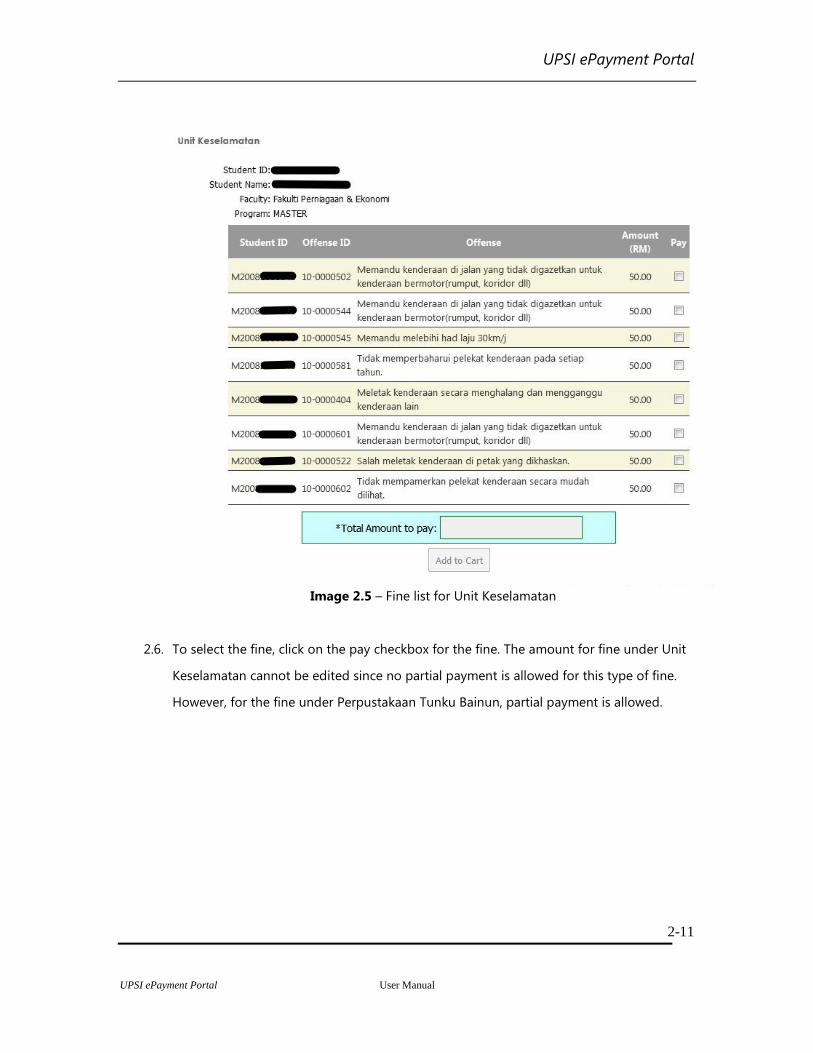
2.5. If any link is choosen and the student has the related fine, the fine will be displayed in a
list as in Image 2.5.
UPSI ePayment Portal
UPSI ePayment Portal User Manual
2-11
Image 2.5 – Fine list for Unit Keselamatan
2.6. To select the fine, click on the pay checkbox for the fine. The amount for fine under Unit
Keselamatan cannot be edited since no partial payment is allowed for this type of fine.
However, for the fine under Perpustakaan Tunku Bainun, partial payment is allowed.
UPSI ePayment Portal
UPSI ePayment Portal User Manual
2-12
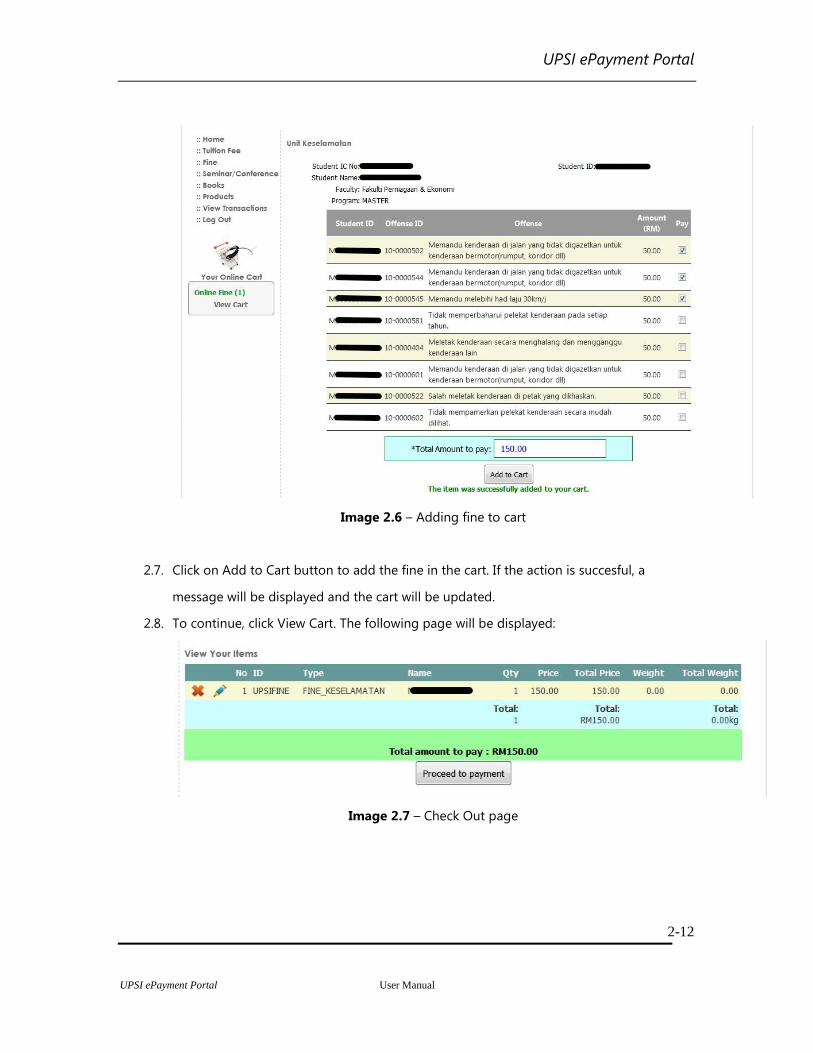
Image 2.6 – Adding fine to cart
2.7. Click on Add to Cart button to add the fine in the cart. If the action is succesful, a
message will be displayed and the cart will be updated.
2.8. To continue, click View Cart. The following page will be displayed:
Image 2.7 – Check Out page

UPSI ePayment Portal
UPSI ePayment Portal User Manual
2-13
2.9. To delete or to cancel the item, click on the red X icon. A confirmation dialog will be
displayed. Click Ok to continue or click Cancel to cancel.
Image 2.8 – Delete confirmation dialog (Sample based on Tuition Fee case)
UPSI ePayment Portal
UPSI ePayment Portal User Manual
2-14
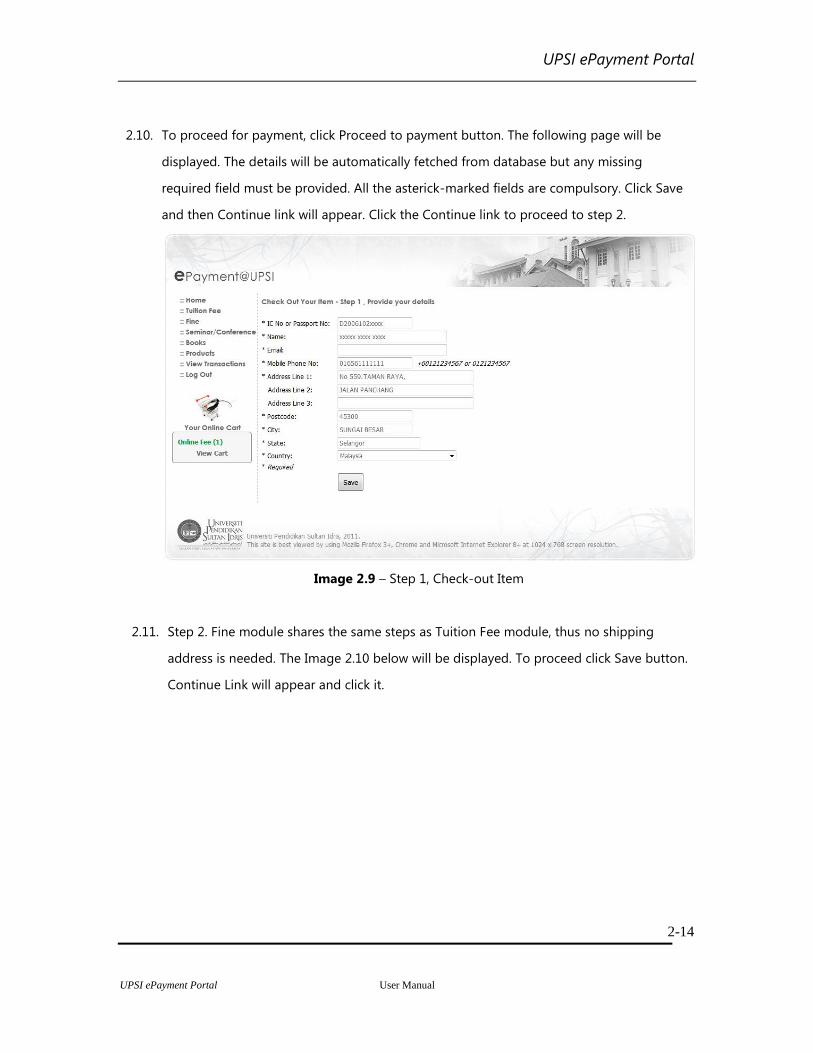
2.10. To proceed for payment, click Proceed to payment button. The following page will be
displayed. The details will be automatically fetched from database but any missing
required field must be provided. All the asterick-marked fields are compulsory. Click Save
and then Continue link will appear. Click the Continue link to proceed to step 2.
Image 2.9 – Step 1, Check-out Item
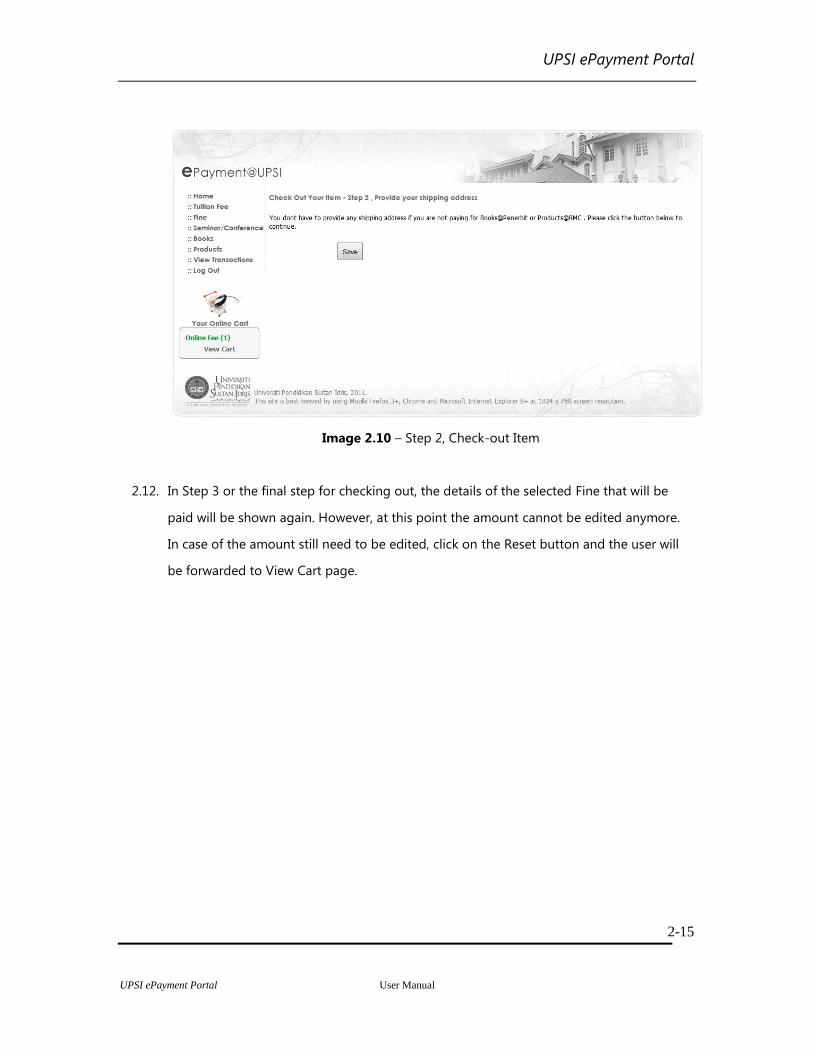
2.11. Step 2. Fine module shares the same steps as Tuition Fee module, thus no shipping
address is needed. The Image 2.10 below will be displayed. To proceed click Save button.
Continue Link will appear and click it.
UPSI ePayment Portal
UPSI ePayment Portal User Manual
2-15
Image 2.10 – Step 2, Check-out Item
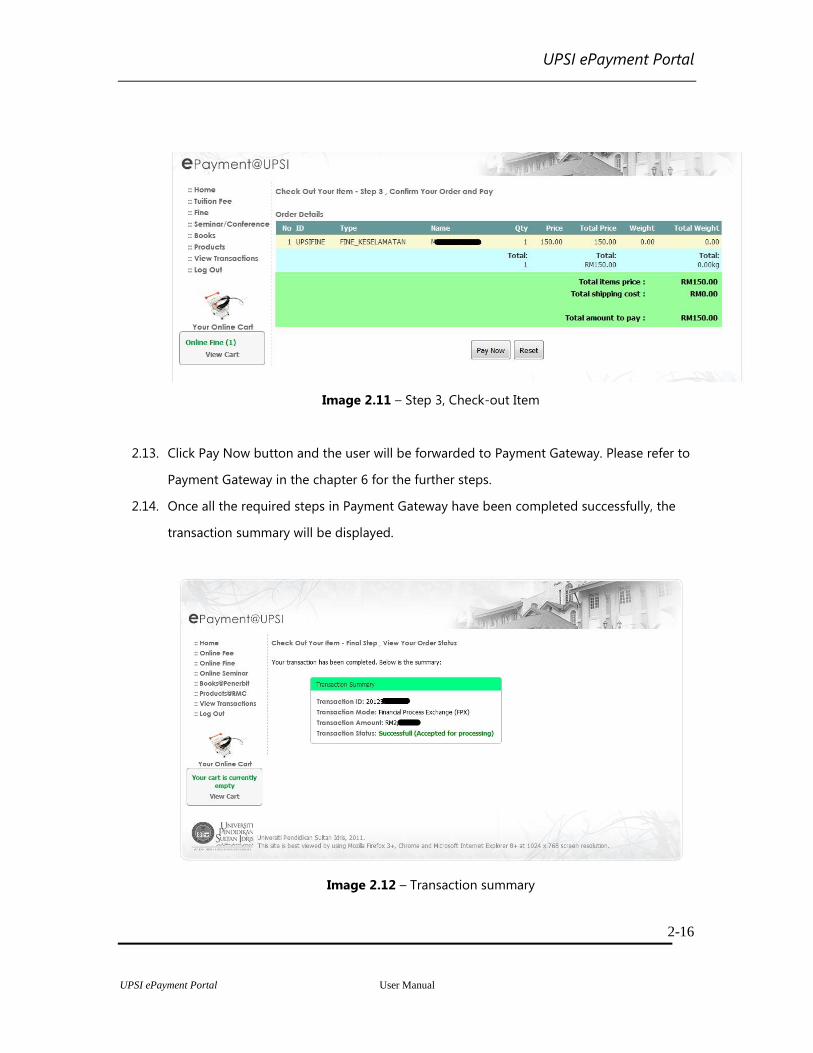
2.12. In Step 3 or the final step for checking out, the details of the selected Fine that will be
paid will be shown again. However, at this point the amount cannot be edited anymore.
In case of the amount still need to be edited, click on the Reset button and the user will
be forwarded to View Cart page.
UPSI ePayment Portal
UPSI ePayment Portal User Manual
2-16
Image 2.11 – Step 3, Check-out Item
2.13. Click Pay Now button and the user will be forwarded to Payment Gateway. Please refer to
Payment Gateway in the chapter 6 for the further steps.
2.14. Once all the required steps in Payment Gateway have been completed successfully, the
transaction summary will be displayed.
Image 2.12 – Transaction summary
UPSI ePayment Portal
UPSI ePayment Portal User Manual
3-17
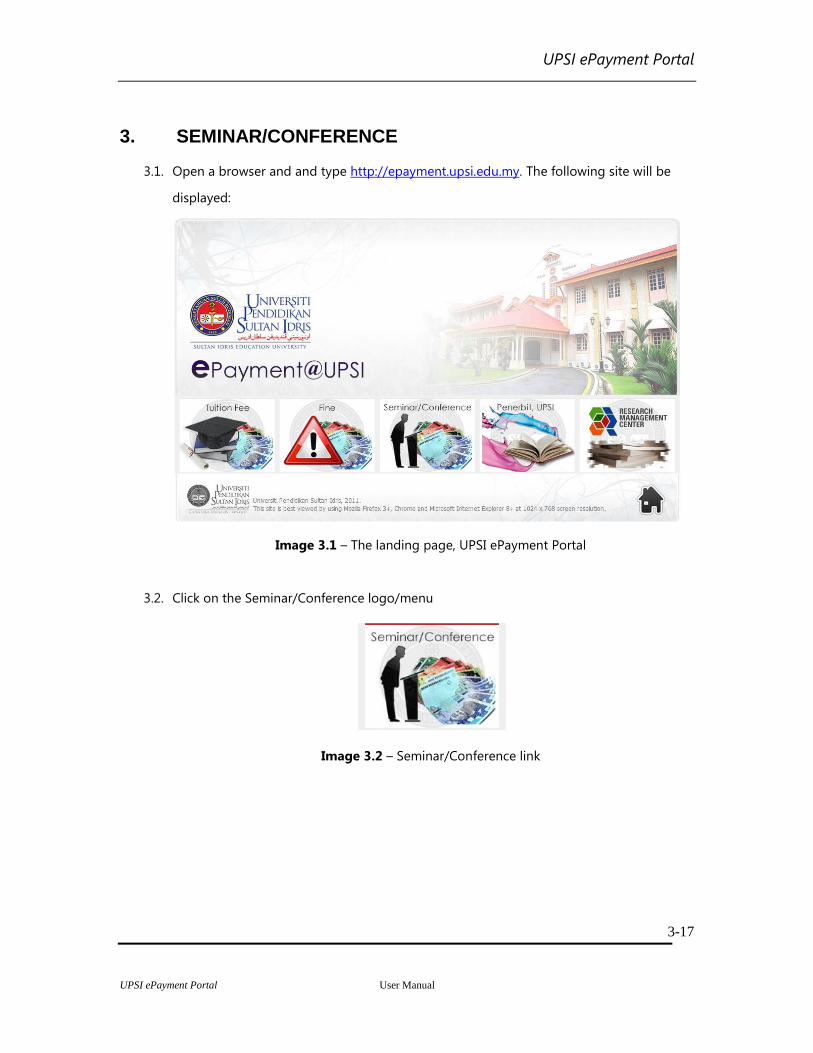
3. SEMINAR/CONFERENCE
3.1. Open a browser and and type http://epayment.upsi.edu.my. The following site will be
displayed:
Image 3.1 – The landing page, UPSI ePayment Portal
3.2. Click on the Seminar/Conference logo/menu
Image 3.2 – Seminar/Conference link
UPSI ePayment Portal
UPSI ePayment Portal User Manual
3-18
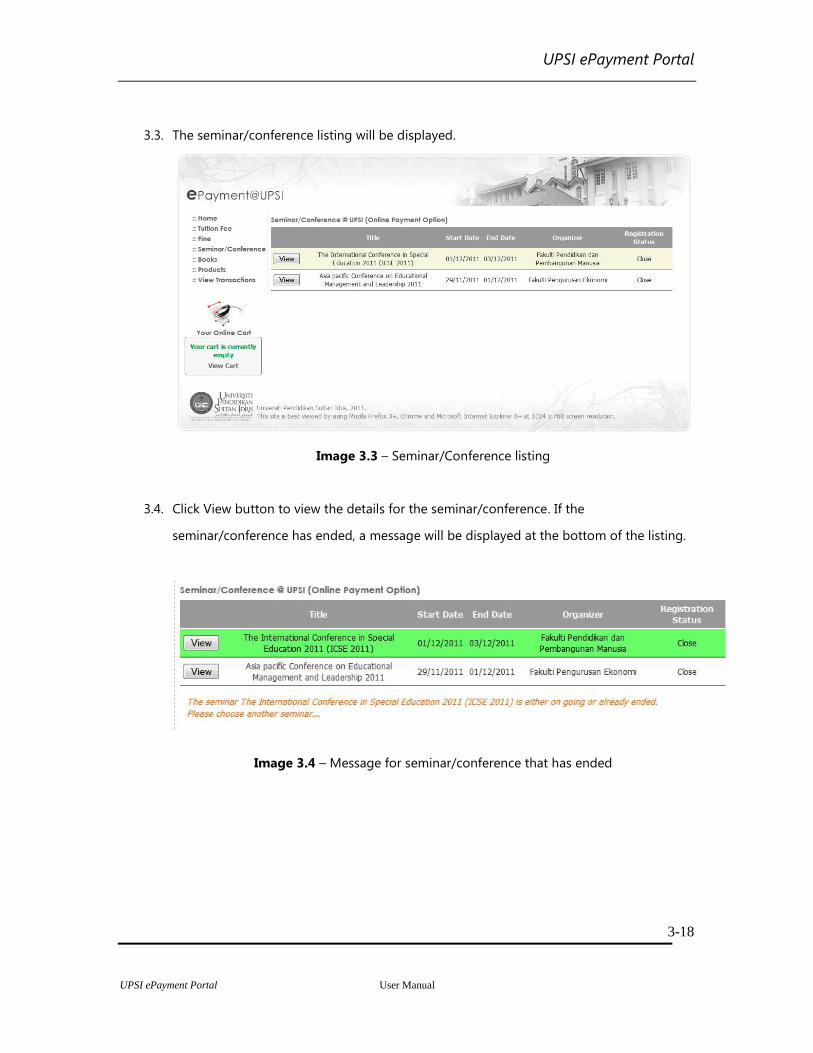
3.3. The seminar/conference listing will be displayed.
Image 3.3 – Seminar/Conference listing
3.4. Click View button to view the details for the seminar/conference. If the
seminar/conference has ended, a message will be displayed at the bottom of the listing.
Image 3.4 – Message for seminar/conference that has ended
UPSI ePayment Portal
UPSI ePayment Portal User Manual
3-19
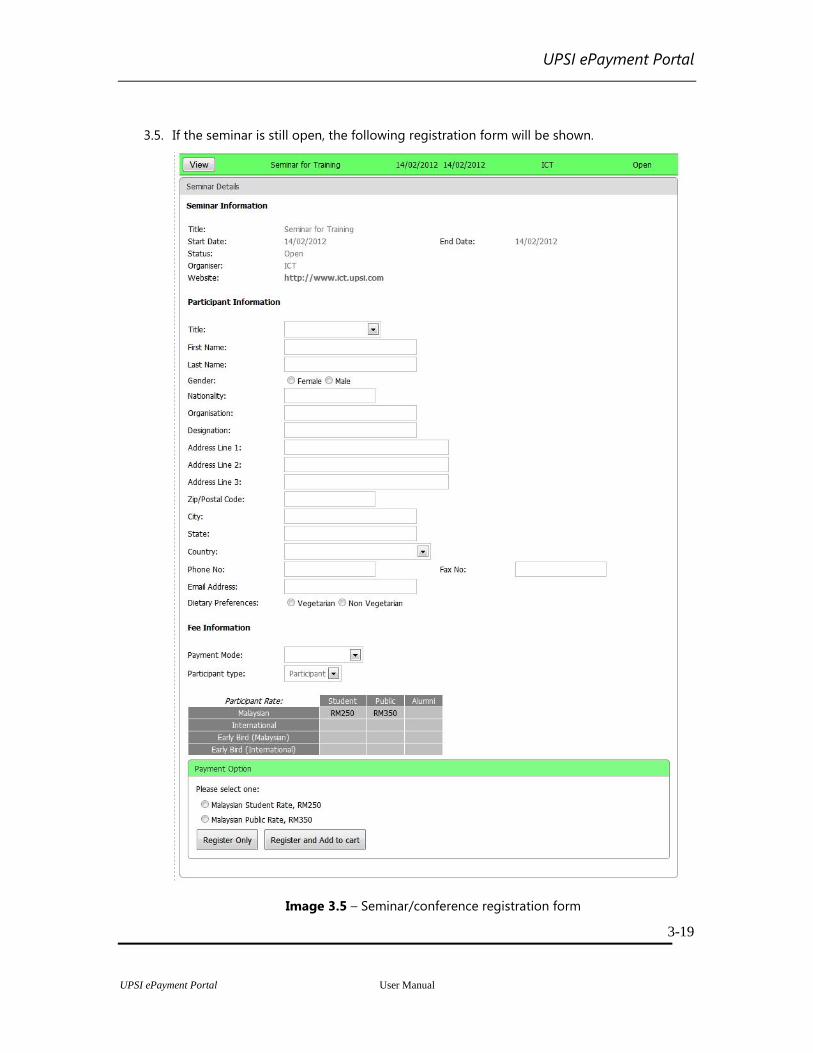
3.5. If the seminar is still open, the following registration form will be shown.
Image 3.5 – Seminar/conference registration form
UPSI ePayment Portal
UPSI ePayment Portal User Manual
3-20
3.6. Fill out the form and click Register Only button to register to the seminar/conference
without payment or click Register and Add to cart button to register and later pay the
seminar registration fee via the Payment Gateway.
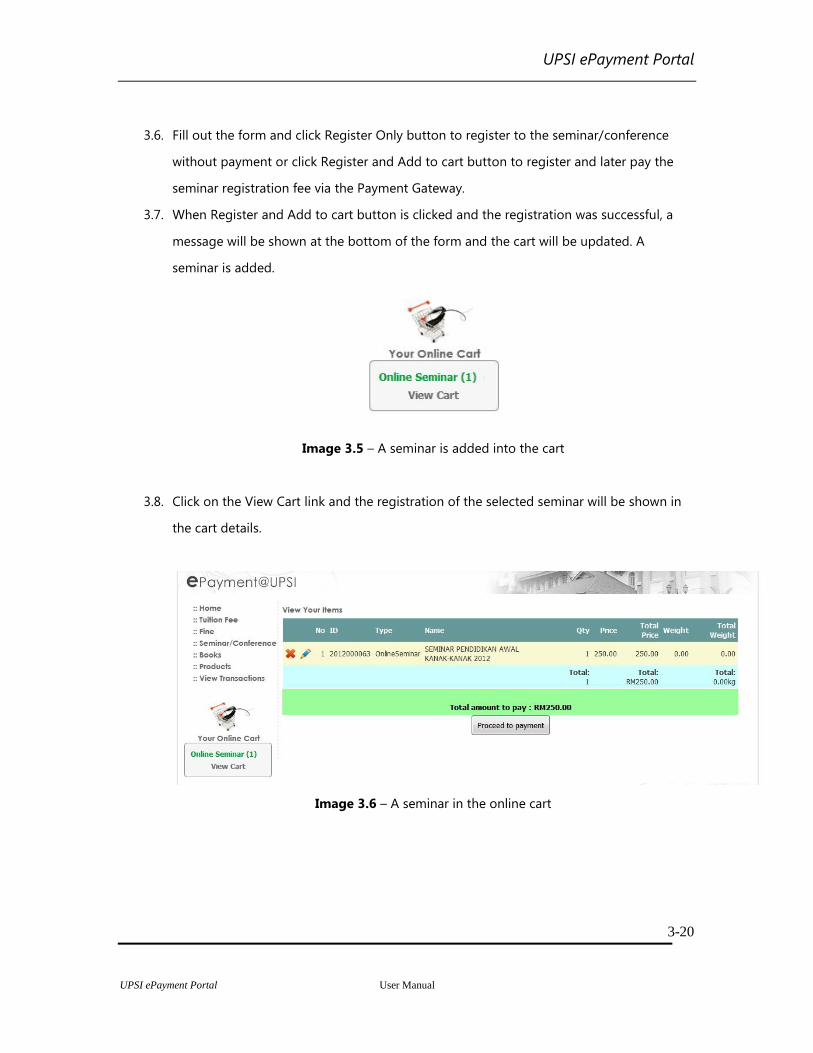
3.7. When Register and Add to cart button is clicked and the registration was successful, a
message will be shown at the bottom of the form and the cart will be updated. A
seminar is added.
Image 3.5 – A seminar is added into the cart
3.8. Click on the View Cart link and the registration of the selected seminar will be shown in
the cart details.
Image 3.6 – A seminar in the online cart

UPSI ePayment Portal
UPSI ePayment Portal User Manual
3-21
3.9. To proceed for payment, click Proceed to payment button. The following page will be
displayed. The details will be automatically fetched from database but any missing
required field must be provided. All the asterick-marked fields are compulsory. Click Save
and then Continue link will appear. Click the Continue link to proceed to step 2.
Image 3.7 – Step 1, Check-out Item
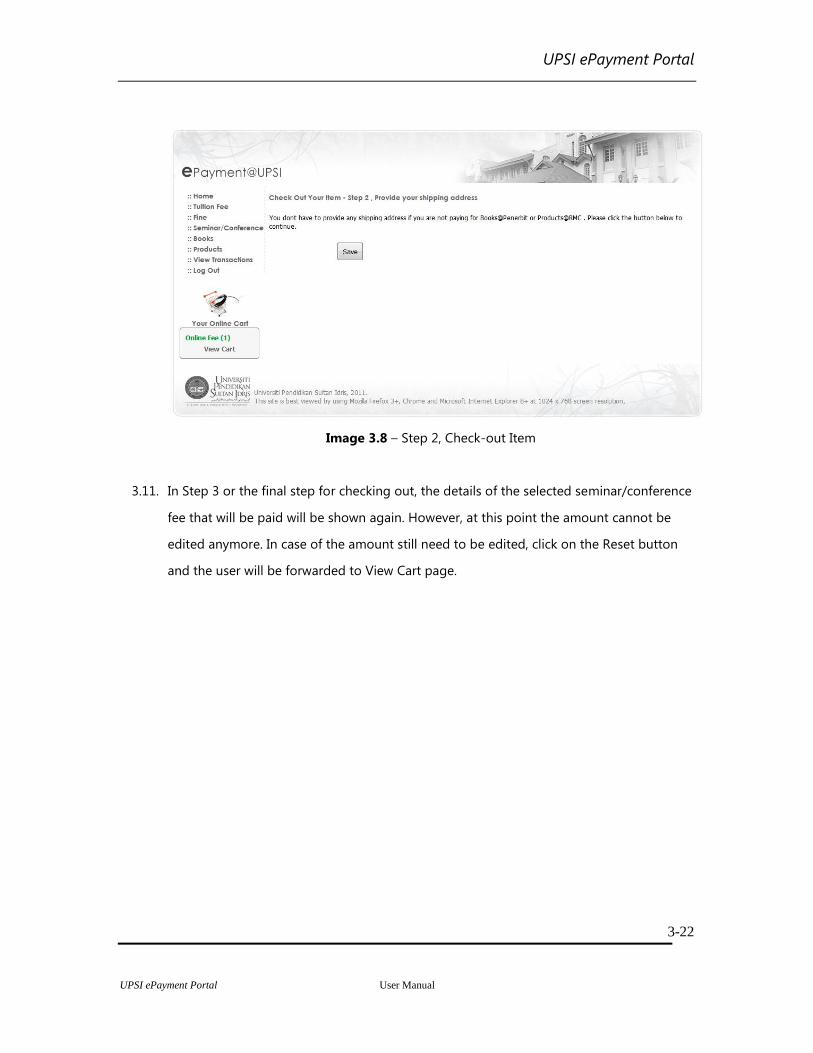
3.10. Step 2. Seminar/conference module also shares the same steps as Tuition Fee module,
thus no shipping address is needed. The Image 3.8 below will be displayed. To proceed
click Save button. Continue Link will appear and click it.
UPSI ePayment Portal
UPSI ePayment Portal User Manual
3-22
Image 3.8 – Step 2, Check-out Item
3.11. In Step 3 or the final step for checking out, the details of the selected seminar/conference
fee that will be paid will be shown again. However, at this point the amount cannot be
edited anymore. In case of the amount still need to be edited, click on the Reset button
and the user will be forwarded to View Cart page.

UPSI ePayment Portal
UPSI ePayment Portal User Manual
3-23
Image 3.9 – Step 3, Check-out Item
3.12. Click Pay Now button and the user will be forwarded to Payment Gateway. Please refer to
Payment Gateway in the chapter 6 for the further steps.
3.13. Once all the required steps in Payment Gateway have been completed successfully, the
transaction summary will be displayed.
Image 3.10 – Transaction summary
UPSI ePayment Portal
UPSI ePayment Portal User Manual
4-24
4. BOOKS
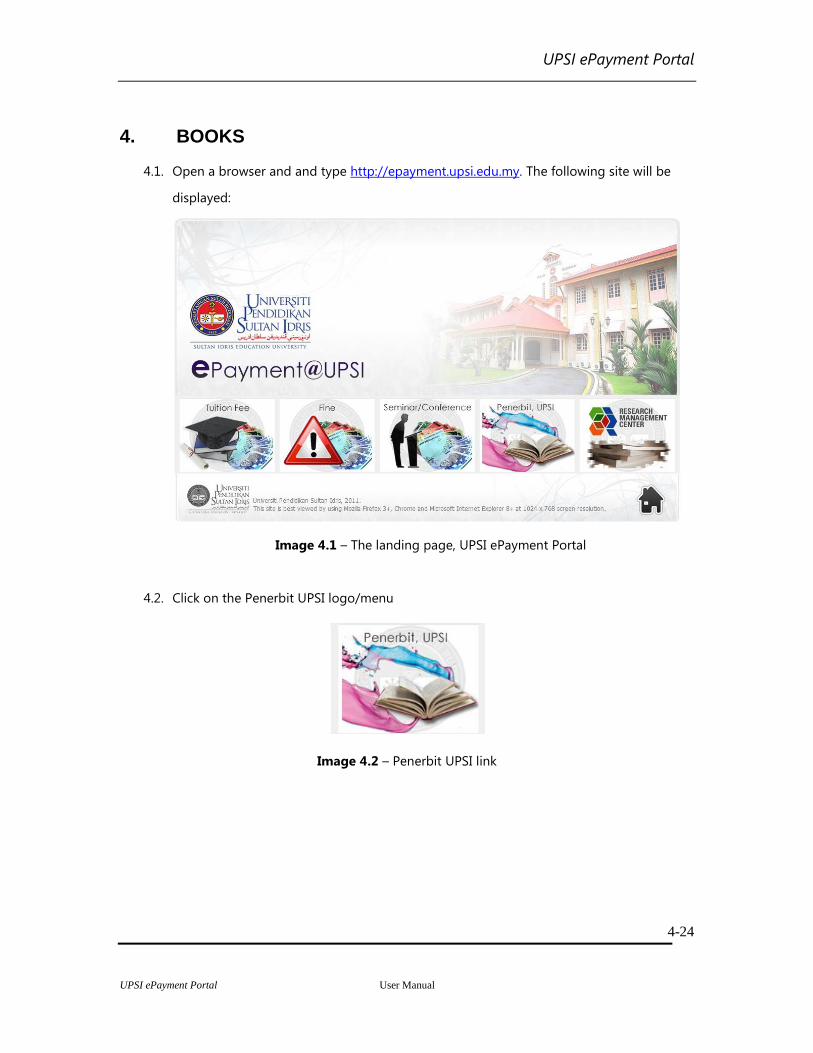
4.1. Open a browser and and type http://epayment.upsi.edu.my. The following site will be
displayed:
Image 4.1 – The landing page, UPSI ePayment Portal
4.2. Click on the Penerbit UPSI logo/menu
Image 4.2 – Penerbit UPSI link
UPSI ePayment Portal
UPSI ePayment Portal User Manual
4-25
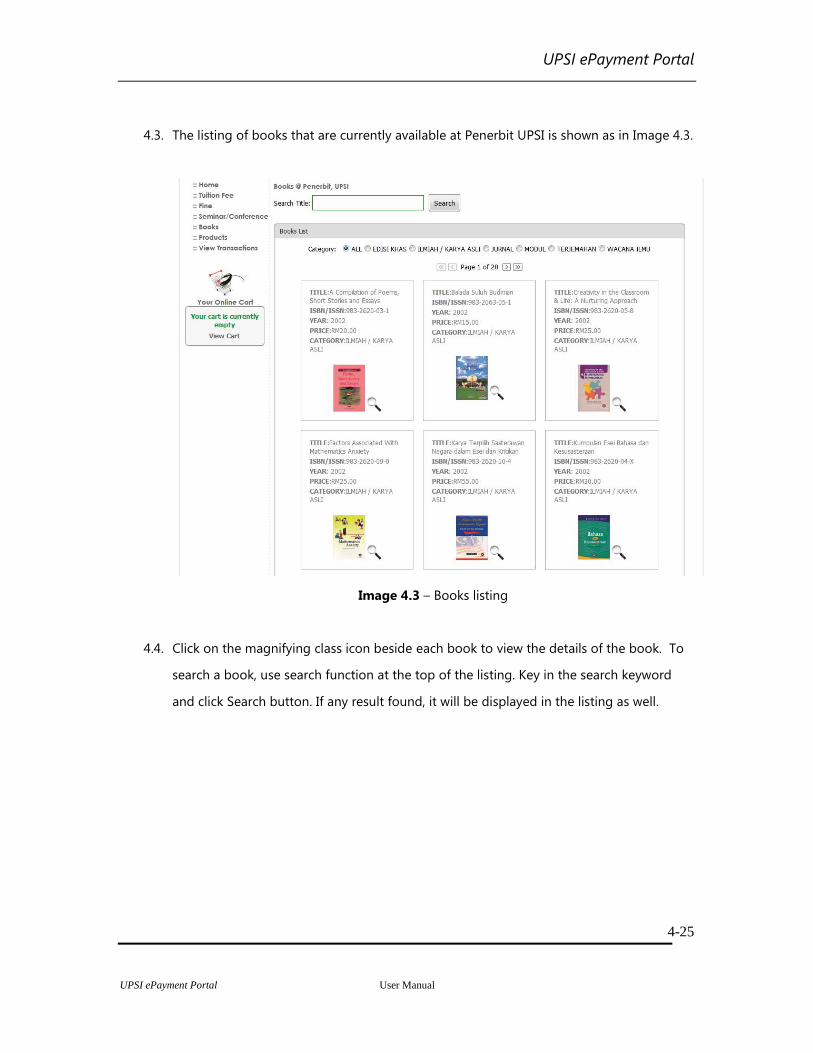
4.3. The listing of books that are currently available at Penerbit UPSI is shown as in Image 4.3.
Image 4.3 – Books listing
4.4. Click on the magnifying class icon beside each book to view the details of the book. To
search a book, use search function at the top of the listing. Key in the search keyword
and click Search button. If any result found, it will be displayed in the listing as well.
UPSI ePayment Portal
UPSI ePayment Portal User Manual
4-26
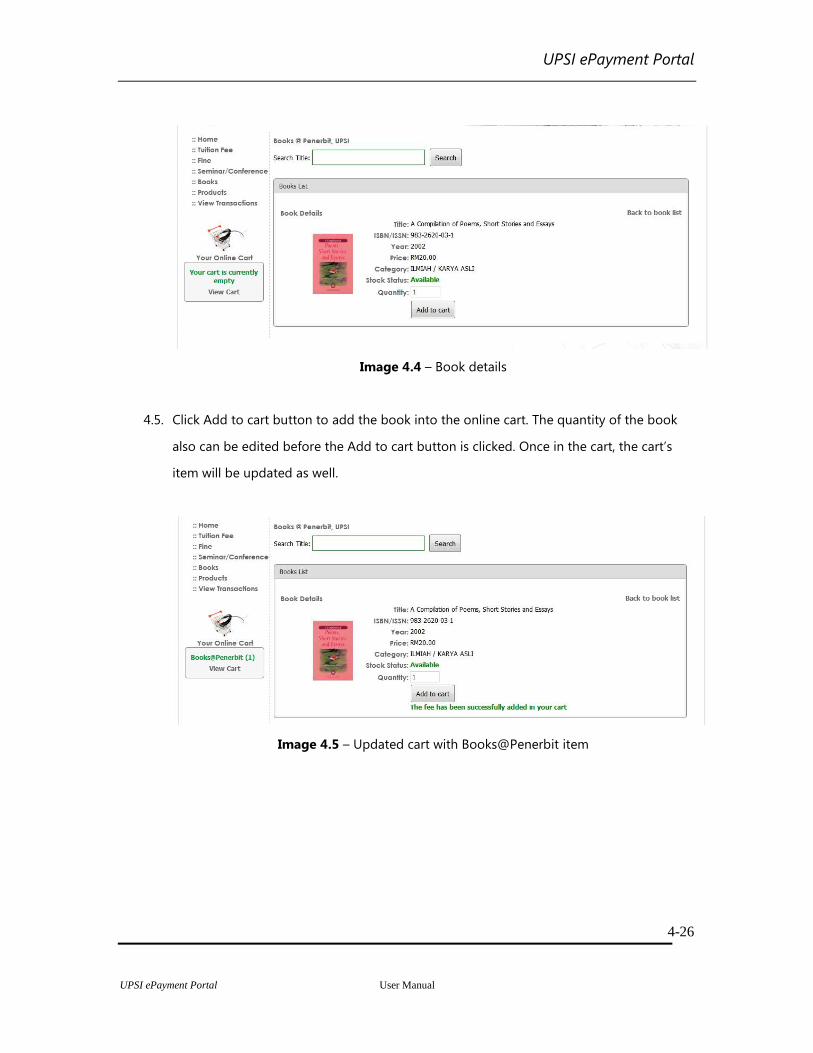
Image 4.4 – Book details
4.5. Click Add to cart button to add the book into the online cart. The quantity of the book
also can be edited before the Add to cart button is clicked. Once in the cart, the cart’s
item will be updated as well.
Image 4.5 – Updated cart with Books@Penerbit item
UPSI ePayment Portal
UPSI ePayment Portal User Manual
4-27
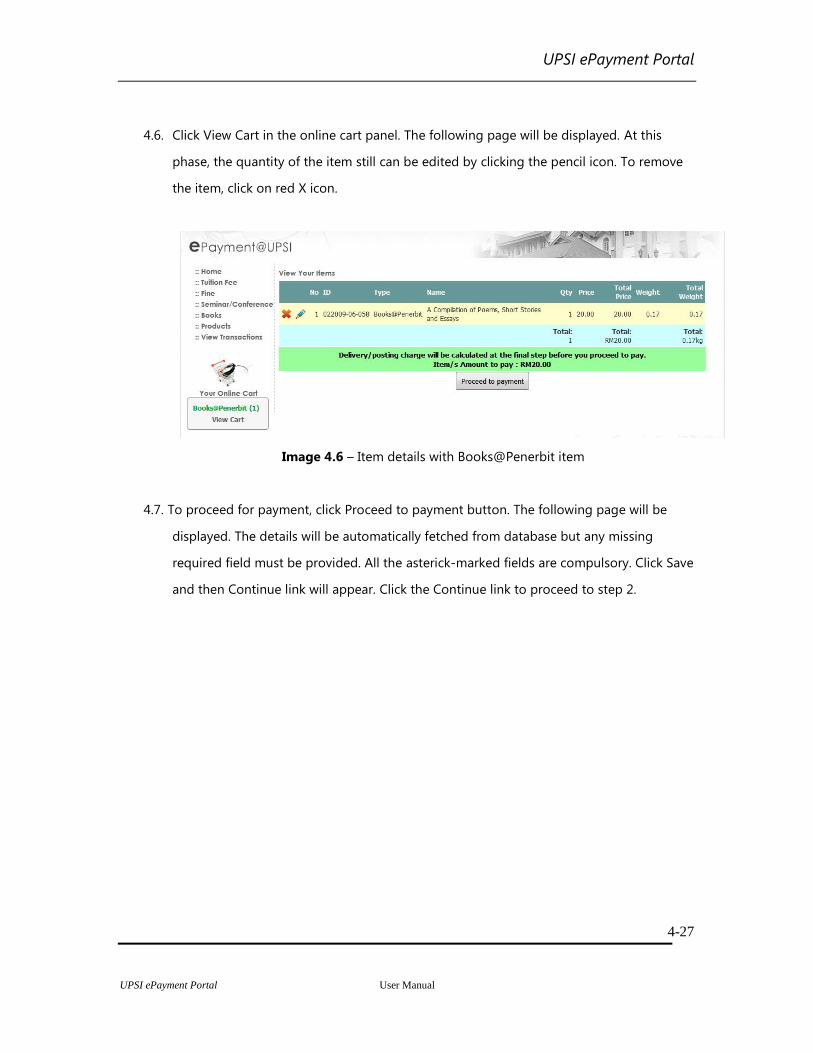
4.6. Click View Cart in the online cart panel. The following page will be displayed. At this
phase, the quantity of the item still can be edited by clicking the pencil icon. To remove
the item, click on red X icon.
Image 4.6 – Item details with Books@Penerbit item
4.7. To proceed for payment, click Proceed to payment button. The following page will be
displayed. The details will be automatically fetched from database but any missing
required field must be provided. All the asterick-marked fields are compulsory. Click Save
and then Continue link will appear. Click the Continue link to proceed to step 2.

UPSI ePayment Portal
UPSI ePayment Portal User Manual
4-28
Image 4.7 – Step 1, Check-out Item
4.8. Step 2. When buying a book or a product, shipping address is needed. User has the
option of using the same profile address as shipping address or key in the new shipping
address. The Image 4.8 below will be displayed. To proceed click Save button. Continue
Link will appear and click it.
Image 4.8 – Step 2, Check-out Item
UPSI ePayment Portal
UPSI ePayment Portal User Manual
4-29
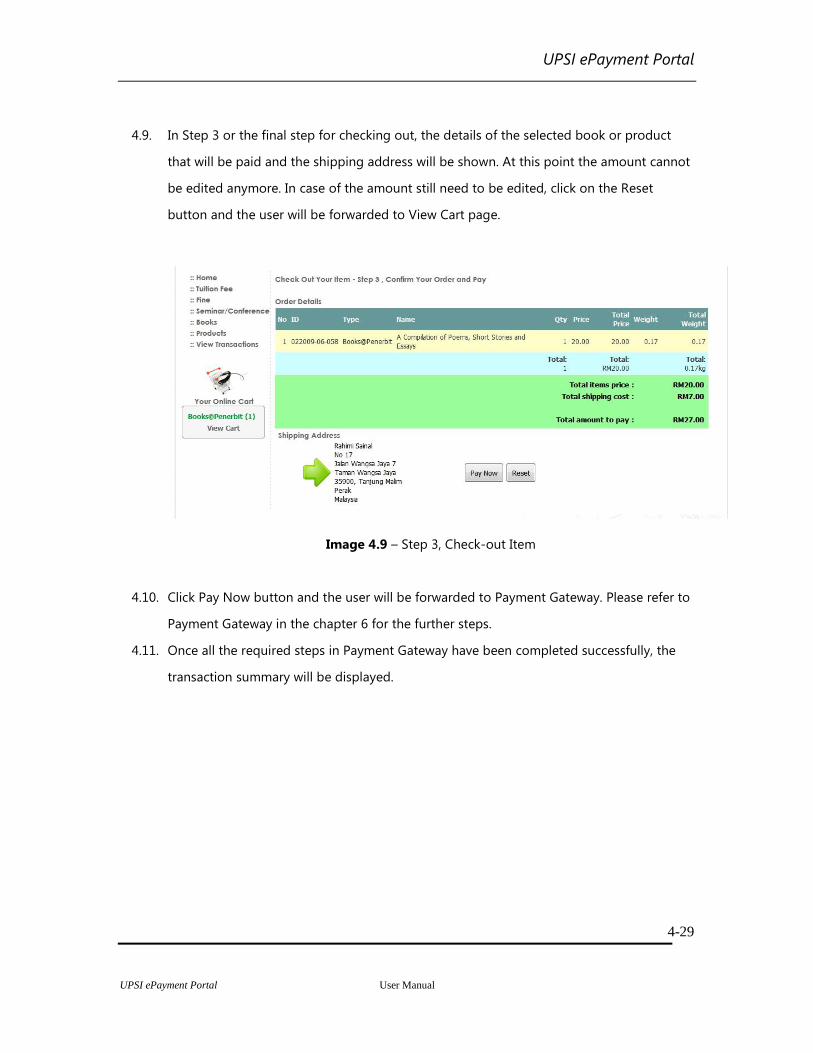
4.9. In Step 3 or the final step for checking out, the details of the selected book or product
that will be paid and the shipping address will be shown. At this point the amount cannot
be edited anymore. In case of the amount still need to be edited, click on the Reset
button and the user will be forwarded to View Cart page.
Image 4.9 – Step 3, Check-out Item
4.10. Click Pay Now button and the user will be forwarded to Payment Gateway. Please refer to
Payment Gateway in the chapter 6 for the further steps.
4.11. Once all the required steps in Payment Gateway have been completed successfully, the
transaction summary will be displayed.

UPSI ePayment Portal
UPSI ePayment Portal User Manual
4-30
Image 4.10 – Transaction summary
UPSI ePayment Portal
UPSI ePayment Portal User Manual
5-31
5. PRODUCTS
5.1. Open a browser and and type http://epayment.upsi.edu.my. The following site will be
displayed:
Image 5.1 – The landing page, UPSI ePayment Portal
5.2. Click on the Research Management Center logo/menu
Image 5.2 – Research Management Center link
UPSI ePayment Portal
UPSI ePayment Portal User Manual
5-32
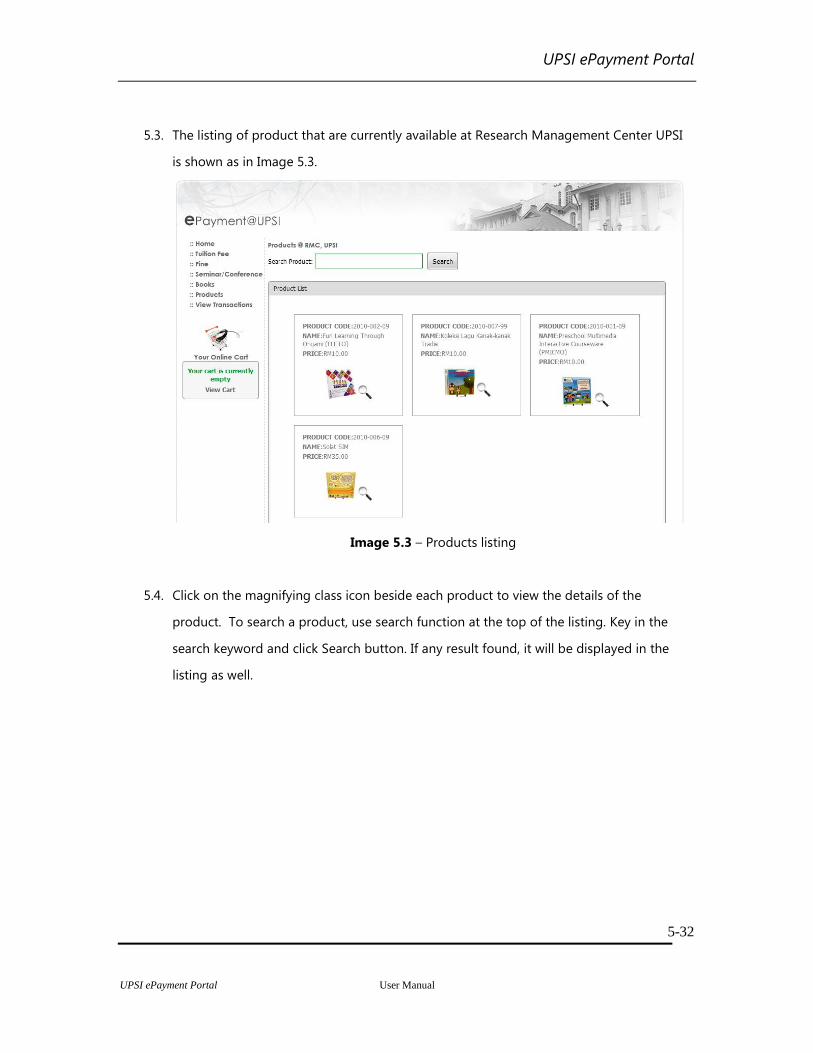
5.3. The listing of product that are currently available at Research Management Center UPSI
is shown as in Image 5.3.
Image 5.3 – Products listing
5.4. Click on the magnifying class icon beside each product to view the details of the
product. To search a product, use search function at the top of the listing. Key in the
search keyword and click Search button. If any result found, it will be displayed in the
listing as well.
UPSI ePayment Portal
UPSI ePayment Portal User Manual
5-33
Image 5.4 – Product details
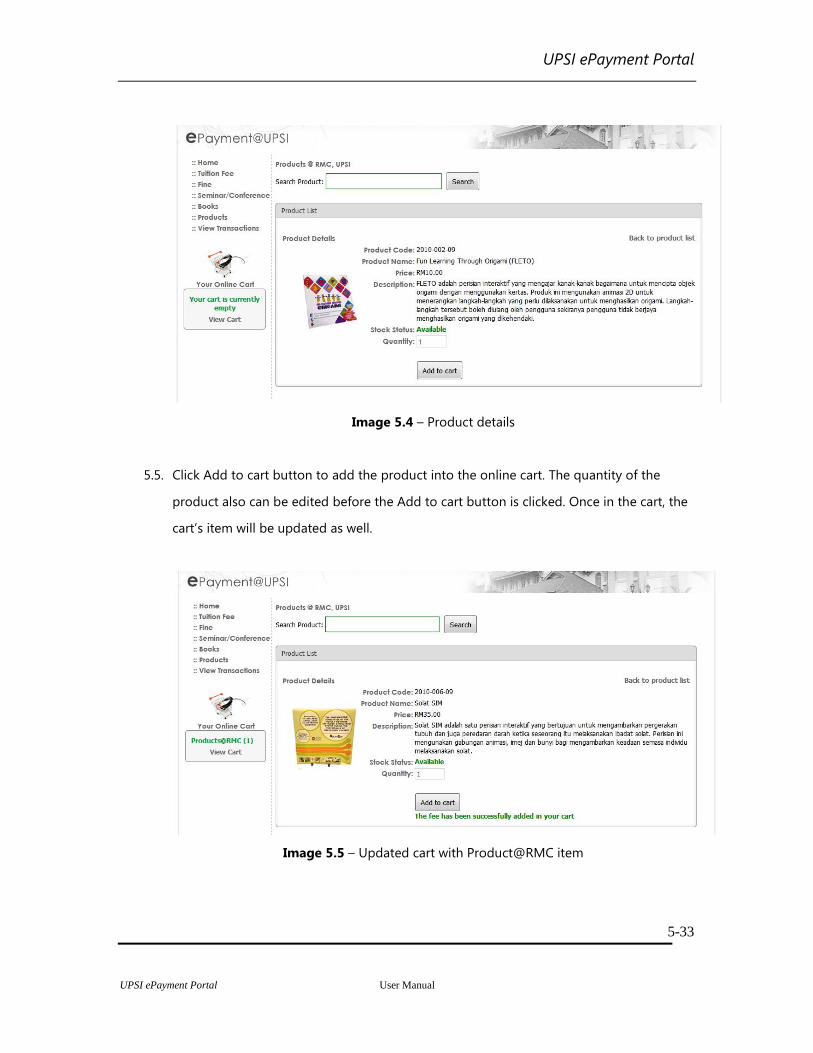
5.5. Click Add to cart button to add the product into the online cart. The quantity of the
product also can be edited before the Add to cart button is clicked. Once in the cart, the
cart’s item will be updated as well.
Image 5.5 – Updated cart with Product@RMC item
UPSI ePayment Portal
UPSI ePayment Portal User Manual
5-34
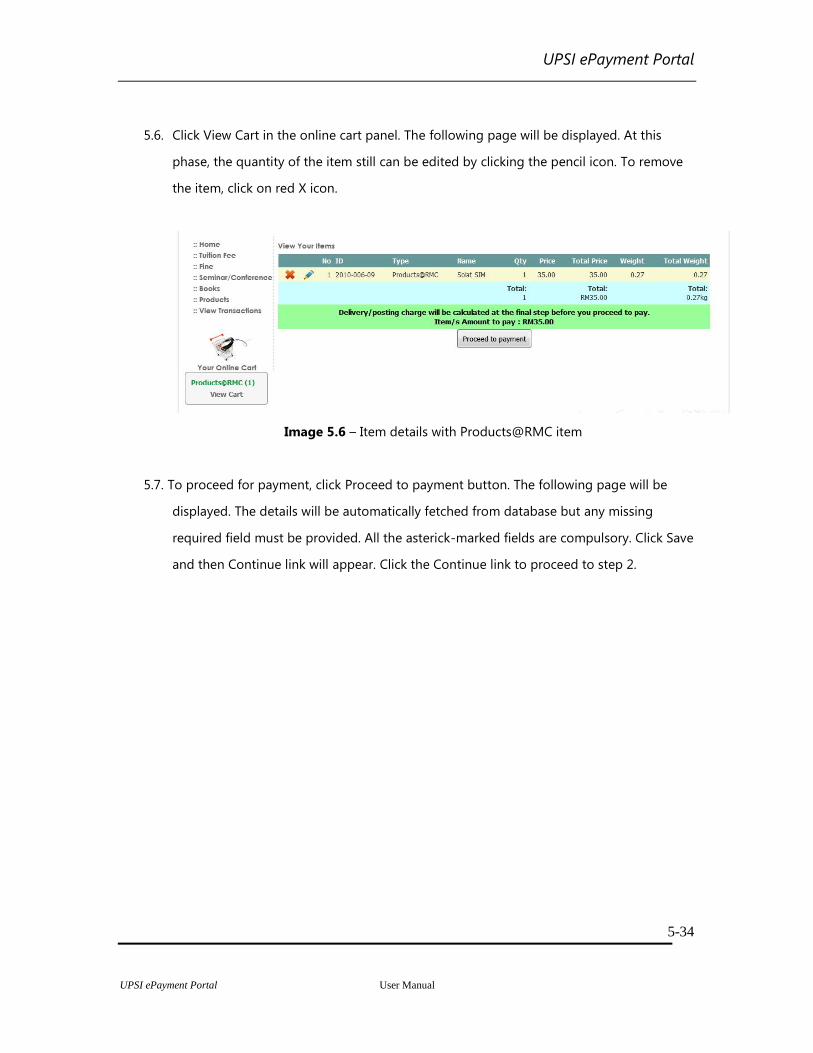
5.6. Click View Cart in the online cart panel. The following page will be displayed. At this
phase, the quantity of the item still can be edited by clicking the pencil icon. To remove
the item, click on red X icon.
Image 5.6 – Item details with Products@RMC item
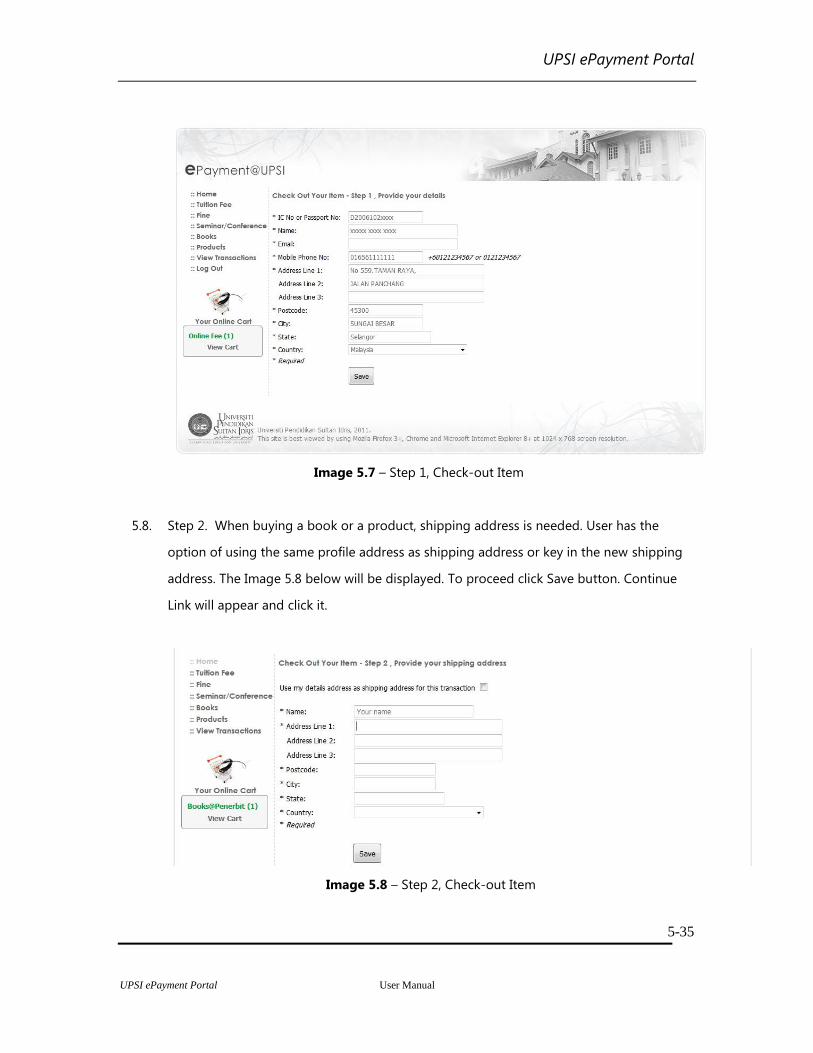
5.7. To proceed for payment, click Proceed to payment button. The following page will be
displayed. The details will be automatically fetched from database but any missing
required field must be provided. All the asterick-marked fields are compulsory. Click Save
and then Continue link will appear. Click the Continue link to proceed to step 2.
UPSI ePayment Portal
UPSI ePayment Portal User Manual
5-35
Image 5.7 – Step 1, Check-out Item
5.8. Step 2. When buying a book or a product, shipping address is needed. User has the
option of using the same profile address as shipping address or key in the new shipping
address. The Image 5.8 below will be displayed. To proceed click Save button. Continue
Link will appear and click it.
Image 5.8 – Step 2, Check-out Item
UPSI ePayment Portal
UPSI ePayment Portal User Manual
5-36
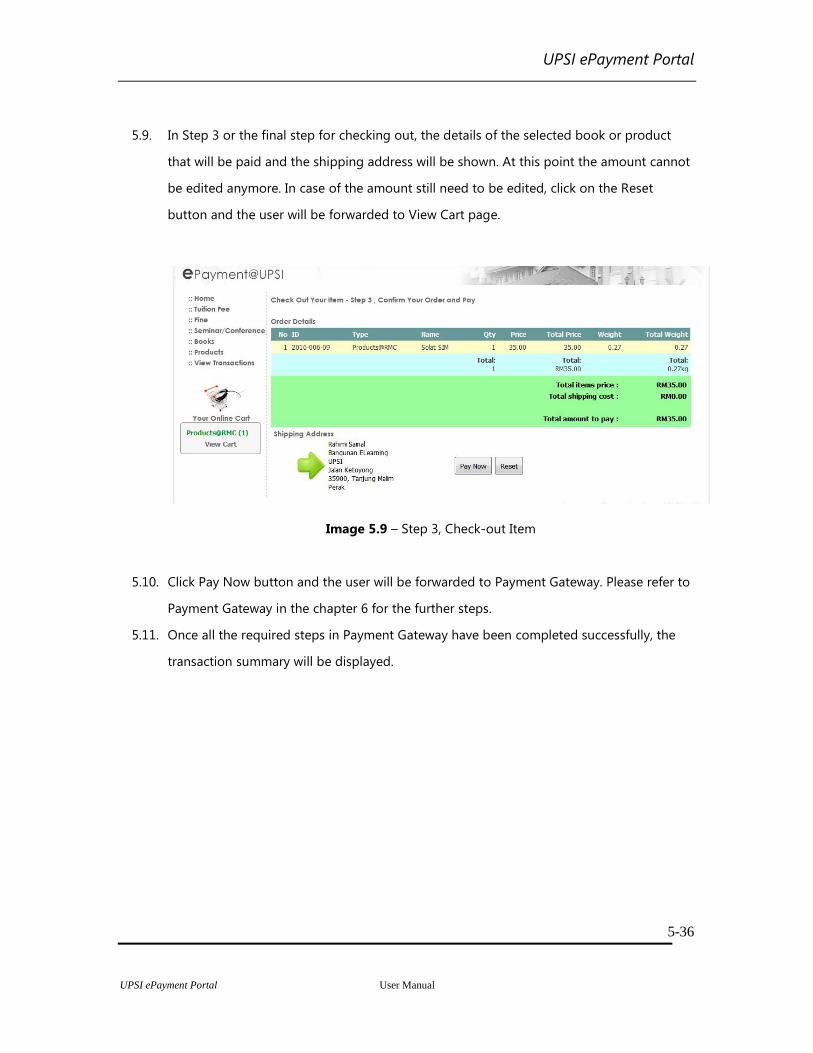
5.9. In Step 3 or the final step for checking out, the details of the selected book or product
that will be paid and the shipping address will be shown. At this point the amount cannot
be edited anymore. In case of the amount still need to be edited, click on the Reset
button and the user will be forwarded to View Cart page.
Image 5.9 – Step 3, Check-out Item
5.10. Click Pay Now button and the user will be forwarded to Payment Gateway. Please refer to
Payment Gateway in the chapter 6 for the further steps.
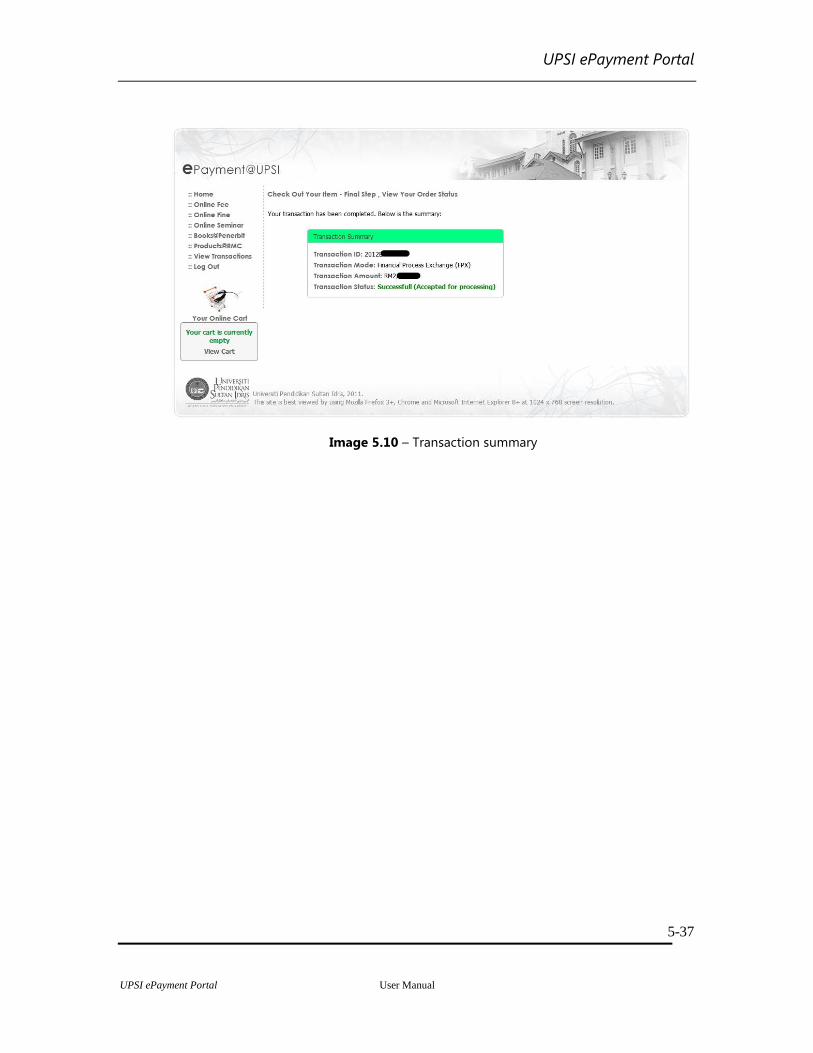
5.11. Once all the required steps in Payment Gateway have been completed successfully, the
transaction summary will be displayed.
UPSI ePayment Portal
UPSI ePayment Portal User Manual
5-37
Image 5.10 – Transaction summary
UPSI ePayment Portal
UPSI ePayment Portal User Manual
6-38
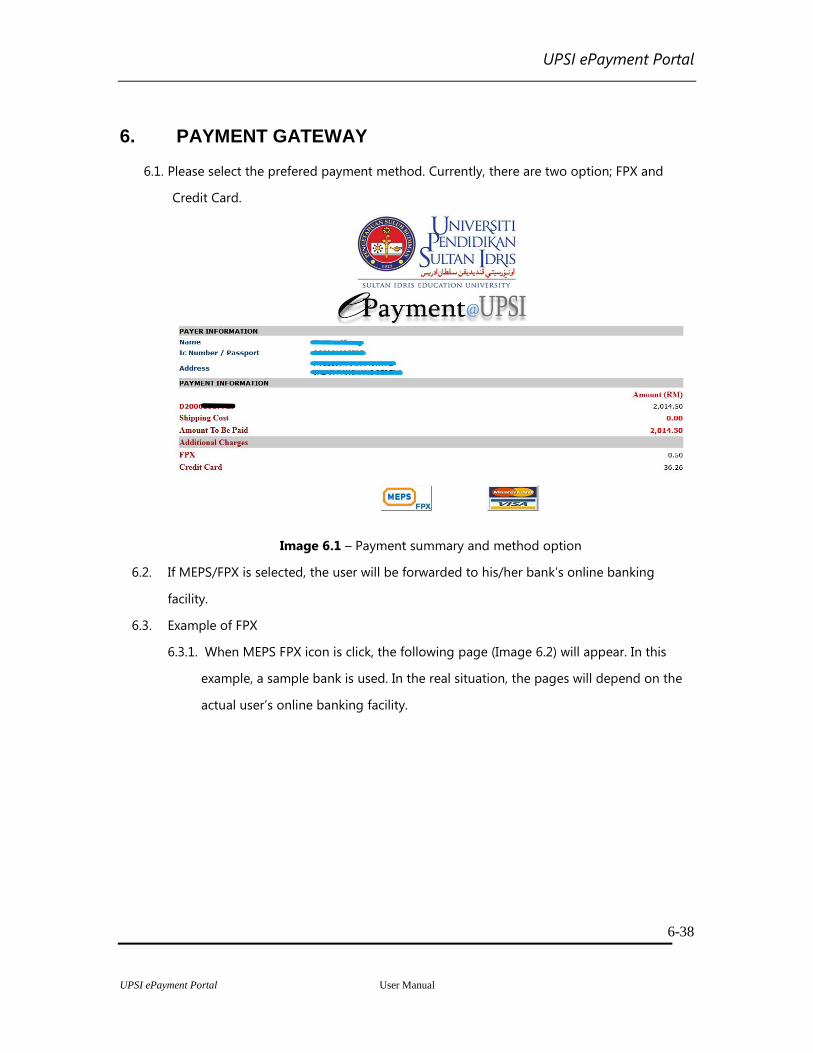
6. PAYMENT GATEWAY
6.1. Please select the prefered payment method. Currently, there are two option; FPX and
Credit Card.
Image 6.1 – Payment summary and method option
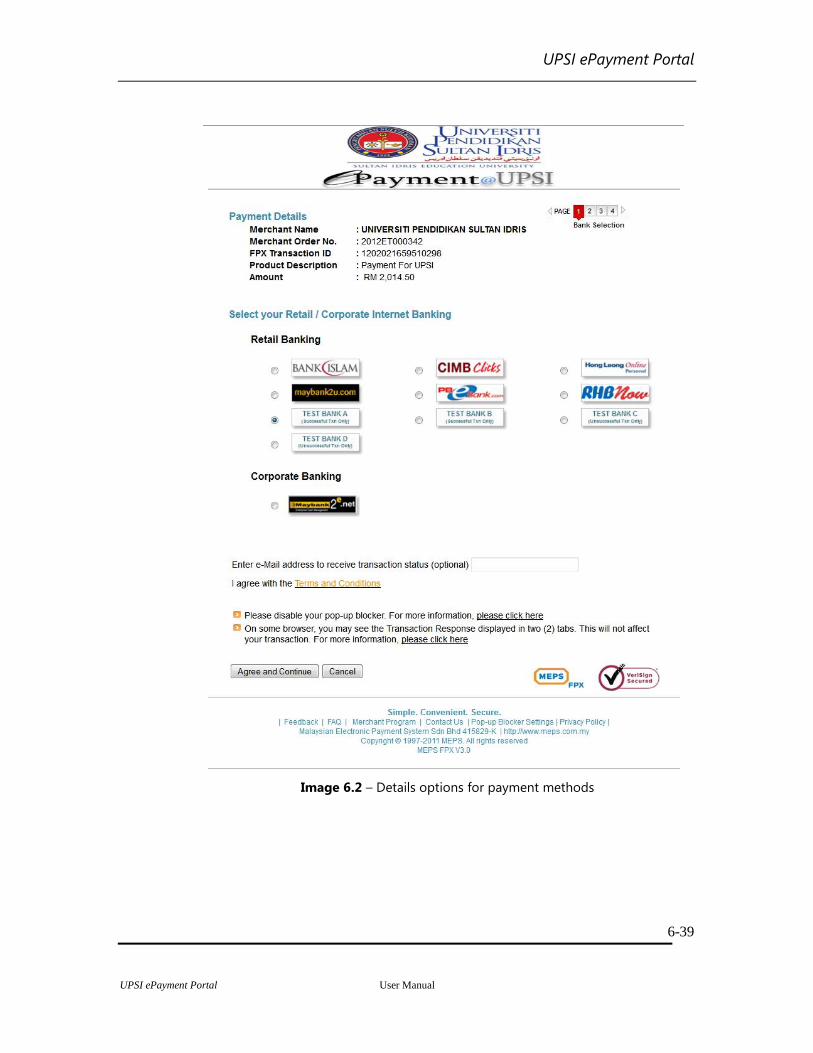
6.2. If MEPS/FPX is selected, the user will be forwarded to his/her bank’s online banking
facility.
6.3. Example of FPX
6.3.1. When MEPS FPX icon is click, the following page (Image 6.2) will appear. In this
example, a sample bank is used. In the real situation, the pages will depend on the
actual user’s online banking facility.
UPSI ePayment Portal
UPSI ePayment Portal User Manual
6-39
Image 6.2 – Details options for payment methods
UPSI ePayment Portal
UPSI ePayment Portal User Manual
6-40
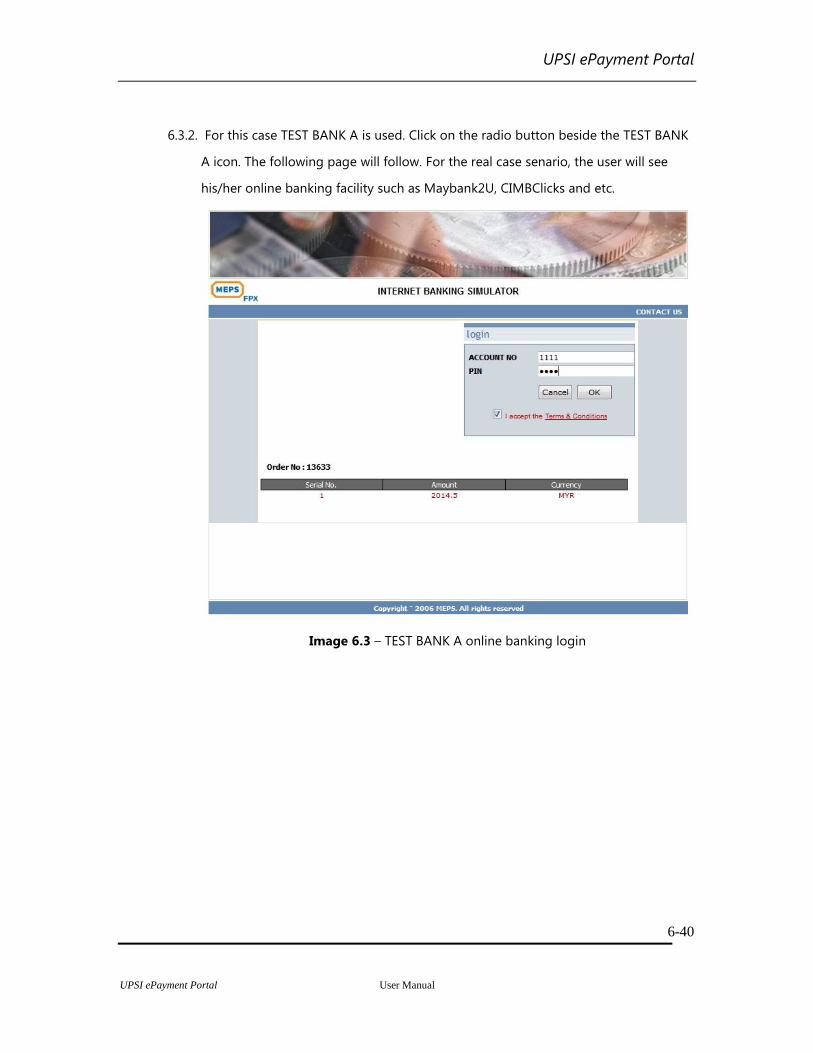
6.3.2. For this case TEST BANK A is used. Click on the radio button beside the TEST BANK
A icon. The following page will follow. For the real case senario, the user will see
his/her online banking facility such as Maybank2U, CIMBClicks and etc.
Image 6.3 – TEST BANK A online banking login
UPSI ePayment Portal
UPSI ePayment Portal User Manual
6-41
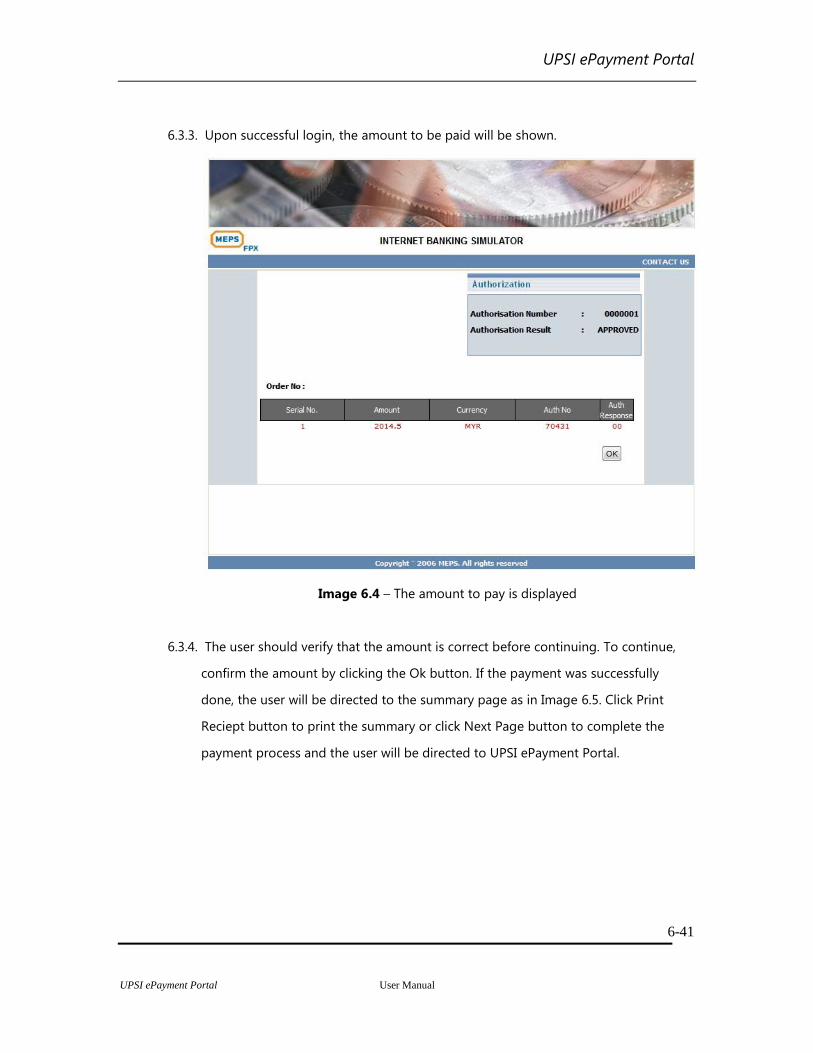
6.3.3. Upon successful login, the amount to be paid will be shown.
Image 6.4 – The amount to pay is displayed
6.3.4. The user should verify that the amount is correct before continuing. To continue,
confirm the amount by clicking the Ok button. If the payment was successfully
done, the user will be directed to the summary page as in Image 6.5. Click Print
Reciept button to print the summary or click Next Page button to complete the
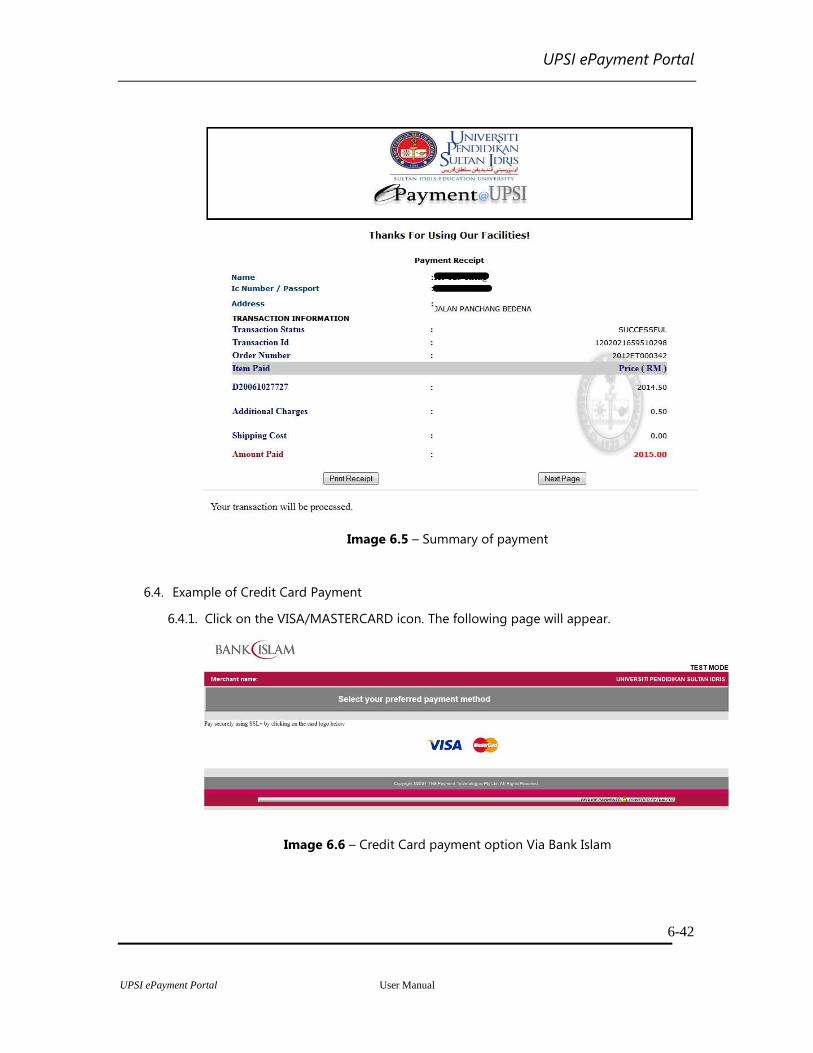
payment process and the user will be directed to UPSI ePayment Portal.
UPSI ePayment Portal
UPSI ePayment Portal User Manual
6-42
Image 6.5 – Summary of payment
6.4. Example of Credit Card Payment
6.4.1. Click on the VISA/MASTERCARD icon. The following page will appear.
Image 6.6 – Credit Card payment option Via Bank Islam
UPSI ePayment Portal
UPSI ePayment Portal User Manual
6-43
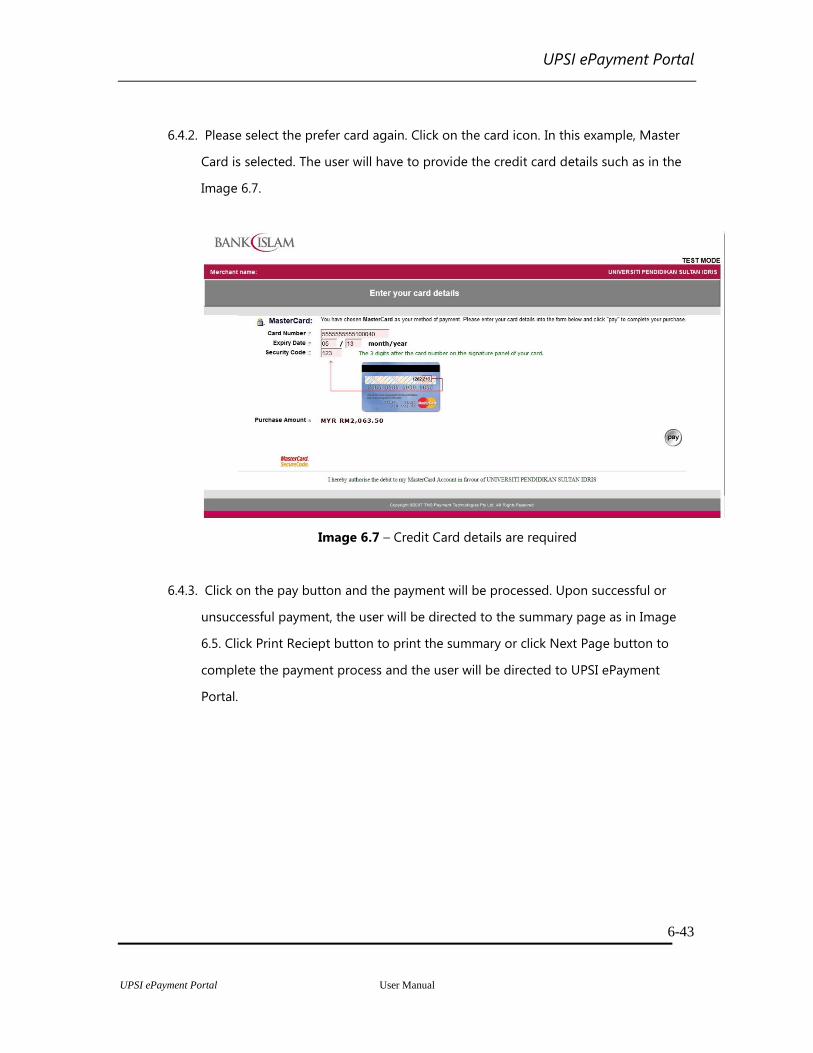
6.4.2. Please select the prefer card again. Click on the card icon. In this example, Master
Card is selected. The user will have to provide the credit card details such as in the
Image 6.7.
Image 6.7 – Credit Card details are required
6.4.3. Click on the pay button and the payment will be processed. Upon successful or
unsuccessful payment, the user will be directed to the summary page as in Image
6.5. Click Print Reciept button to print the summary or click Next Page button to
complete the payment process and the user will be directed to UPSI ePayment
Portal.
UPSI ePayment Portal
UPSI ePayment Portal User Manual
7-44
7. MULTIPLE ITEMS IN A TRANSACTION
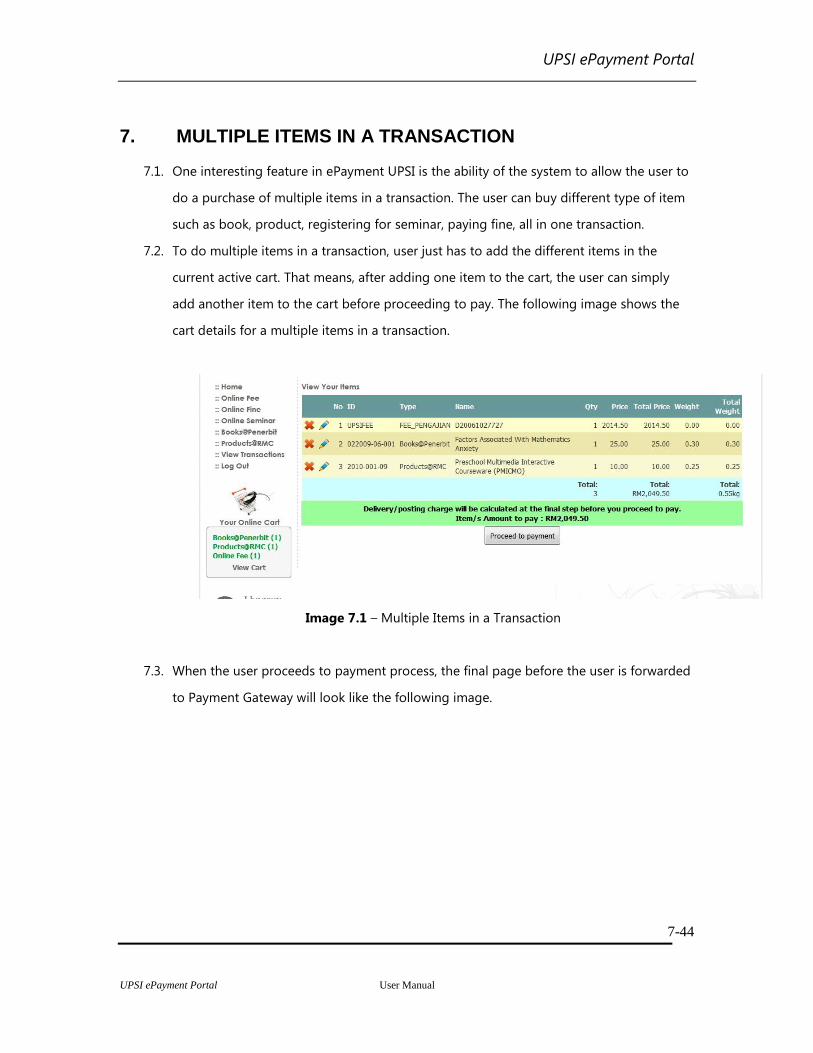
7.1. One interesting feature in ePayment UPSI is the ability of the system to allow the user to
do a purchase of multiple items in a transaction. The user can buy different type of item
such as book, product, registering for seminar, paying fine, all in one transaction.
7.2. To do multiple items in a transaction, user just has to add the different items in the
current active cart. That means, after adding one item to the cart, the user can simply
add another item to the cart before proceeding to pay. The following image shows the
cart details for a multiple items in a transaction.
Image 7.1 – Multiple Items in a Transaction
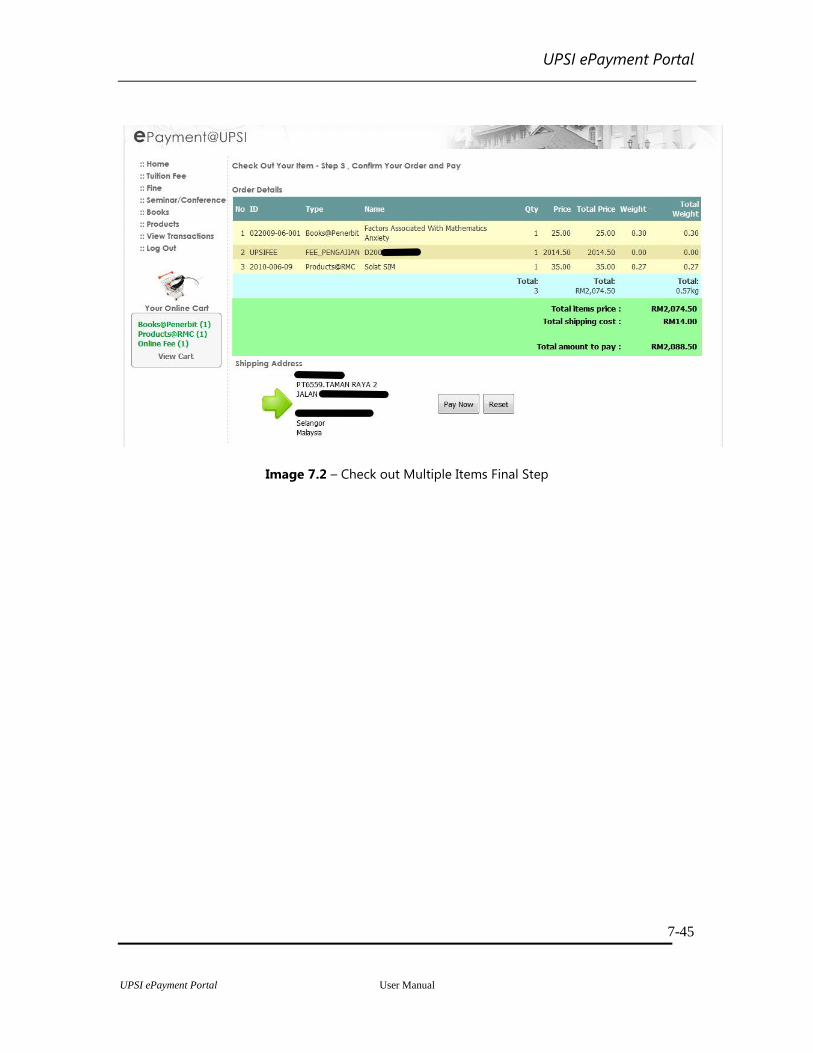
7.3. When the user proceeds to payment process, the final page before the user is forwarded
to Payment Gateway will look like the following image.
UPSI ePayment Portal
UPSI ePayment Portal User Manual
7-45
Image 7.2 – Check out Multiple Items Final Step