us-edi early development instrument · the early development instrument (edi) is an instrument...
TRANSCRIPT

DRAFT
US-EDI
Early Development Instrument A Population Based Measure for Communities
School District Portal
User’s Manual
The UCLA Center for Healthier Children, Families and Communities, under license from McMaster University, is implementing the Early Development Instrument with its sub licensees in the US. The EDI is the copyright of McMaster University and must not be copied, distributed or used in any way without
the prior consent of UCLA or McMaster University For questions regarding licensing, email: [email protected]
© McMaster University, The Offord Centre for Child Studies
January 12, 2010

CONTENTS
1. US-EDI System Overview ........................................................................................................ 2
1.1) Users.................................................................................................................................................. 3 1.2) Roles.................................................................................................................................................. 3 1.3) Data Structure and Flow................................................................................................................... 6
2. Accessing the EDI System ........................................................................................................ 7
2.1) Sending UCLA District Contact Information ................................................................................... 7 2.2) Registration E-Mail ........................................................................................................................... 7 2.3) First Login......................................................................................................................................... 7 2.4) Entering District Portal ..................................................................................................................... 9 2.5) Accepting Electronic Consent to use the system............................................................................... 9 2.6) District Portal .................................................................................................................................. 10 2.7) Control Tabs.................................................................................................................................... 10
2.7.1) Profile Tab ...............................................................................................................................................10 2.7.2) Users Tab .................................................................................................................................................11 2.7.3) Data Tab...................................................................................................................................................11 2.7.4) Custom Questions Tab.............................................................................................................................12 2.7.5) Reports Tab..............................................................................................................................................12 2.7.6) FAQ Tab ..................................................................................................................................................12 2.7.7) Links Tab .................................................................................................................................................12
3. Entering Class Lists and Creating User Accounts............................................................... 13 3.1) Option 1: Uploading District Excel File Directly into District Portal............................................. 13 3.2) Option 2: Sending Excel File to UCLA via Email.......................................................................... 16 3.3) Option 3: Manually Entering District, School and Class Data........................................................ 17
4. Managing User Accounts ....................................................................................................... 22
5. Monitoring EDI Completion Rates ....................................................................................... 23
6. Accessing Resources and Reports.......................................................................................... 23
7. Conditions of Data Confidentiality and Sharing ................................................................. 24 Appendix A - EDI Data Template for District Upload into the US-EDI ............................................... 25 Appendix B – District Upload Data Schema.......................................................................................... 26 Appendix C - EDI Sample Data Spreadsheet for Input Data ................................................................. 27 Appendix D - State Codes ...................................................................................................................... 29

School District Portal User’s Guide Page 2 DRAFT January 12, 2010
1. US-EDI System Overview This User’s Guide describes the organization and the use of the web-based version of EDI system, called the US-EDI. The Early Development Instrument (EDI) is an instrument developed by Drs. Dan Offord and Magdalena Janus of the School Readiness to Learn Project at the Offord Centre for Studies of Child Studies, McMaster University. It has been licensed by UCLA for use in the United States of America. EDI measures children’s readiness to learn at school in five general domains identified in the literature: physical health and well-being; social knowledge and competence; emotional health/maturity; language and cognitive development; and general knowledge and communi-cation skills. The instrument is completed by kindergarten teachers in the second half of a school year. The UCLA Center for Healthier Children, Families and Communities, under license from McMaster University, is implementing the Early Development Instrument with its sub licensees in the US. The EDI is the copyright of McMaster University and must not be copied, distributed or used in any way without the prior consent of UCLA or McMaster University. The UCLA Center for Healthier Children, Families and Communities is serving as the national repository of the EDI data in the United States. The EDI is part of a national initiative called Transforming Early Childhood Community Systems (TECCS) which represents a partnership between UCLA Center for Healthier Children, Families and Communities and the United Way Worldwide. TECCS is a system for identifying local needs and crafting solutions in collaboration with local leaders—all while promoting accountability and accelerating our national understanding of what’s needed to bring children to school healthy and ready to learn. TECCS has three core components:
1. Mapping community school readiness needs using the Early Development Instrument (EDI)
2. Working with Local Leaders to Develop and Implement Solutions 3. Accelerating knowledge and sharing best practices
For all questions including those regarding licensing, please email: [email protected]. The EDI has been in use in Canada since 1999 using a paper-based system and computerized spreadsheets to collect and manage EDI data. The US-EDI is the electronic version of EDI which uses web technology over the Internet. There are three types of users in the e-EDI: 1) District Administrators; 2) District IT Administrators; and 3) Teachers. Users are identified by the username (their unique e-mail address) and a confidential password. In the US-EDI, the District Administrator arranges for and gathers data about the participating Schools, Teachers and Students and has three options for loading this information into the US-EDI District Portal (explained in detail later). The US-EDI performs certain consistency checks and once the checks have passed successfully, the system is available to the Teachers. A Teacher User Manual is available for all teacher related US-EDI data entry. The Teachers can update the student EDI Questionnaires for their classes on-line.

School District Portal User’s Guide Page 3 DRAFT January 12, 2010
The US-EDI offers considerable flexibility for data entry and management. Data can be entered in various stages so that the teacher is not required to complete everything in one session. Data entry is intuitive requiring very little typing skills or knowledge of computers. When the records for a specific student are completed, the teacher indicates this by clicking on Lock the Record, which prevents any further modifications to it. When all records have been locked, the EDI Statistician can export data for analysis. If for some reason the teacher decides to go back and alter any data already locked, he/she must contact the EDI District Administrator, who has the option of Unlocking records for further changes. The District Administrator, however, cannot alter any records. Several summary reports are available online to review the records for an individual student, a class, or a school. The class summary report and the school summary report provide a quick indication of what percentage of data has been completed. This allows the District Administrator and the EDI District Administrator to monitor progress easily. Once data has been collected and exported, the EDI Statistician performs data analysis. The following fall, each District is provided with confidential individual school level reports (for schools with more than one classroom) and a copy of the community profile which is a publicly available report. 1.1) Users There are three types of users in the e-EDI, District Administrators, District IT Administrators and Teachers. Each category can have multiple individuals with their own usernames. Users are identified by the username (their unique e-mail address) and a password. Passwords can only be changed by the users. If the user forgets his/her confidential password, the login will fail, but the system will offer to mail a temporary password by e-mail, which must be changed upon first login. The EDI District Administrator can also initiate e-mailing the password to a teacher. The District Administrator has access to all administrative screens in the system, except EDI Questionnaire entry screens, while the Teacher has limited access only to his/her own classes of students. The Teacher can enter EDI Questionnaire data for his/her students. The Teacher can also add new students. 1.2) Roles The District Administrator’s and District IT Administrator’s roles are to: 1.2.1) Accept (or Not Accept) the electronic consent/agreement/certification to adhere to
conditions of the license. Only those who consent can proceed to use the e-EDI system. Users view and print the consent form with the name of district and name of district administrator uploaded into form.

School District Portal User’s Guide Page 4 DRAFT January 12, 2010
1.2.2) Register their district level information: Full contact information for district level EDI Administrator (required), district IT contact, and research staff contact (optional); languages required for EDI parent consent forms; and other basic district level.
1.2.3) View and print various EDI resources. 1.2.4) Customize 5 blank questions at end of survey (with the understanding that the response
options would need to be pre-set and remain the same). 1.2.5) Prepare the district and teacher class lists for teacher data entry using ONE of three
options:
a. District performs an automated upload of district excel file directly into District Portal (school, teacher and child level data) ;
b. District sends excel file to UCLA via email (school, teacher and child level data); c. District Administrator enters school and teacher information and then teachers enter
child level information at a later date. 1.2.6) After the selection is made under 1.2.5, the system will lead the District Administrator
through the requisite prompts, as applicable, to make the system ready for teachers. (e.g. Data upload prompts, auto-generated emails requesting data transfer to UCLA, or instructions emailed to all participating teachers on how to enter the student class list data.
1.2.7) View/Edit information about District, Schools, Teachers, Classes, and Students. 1.2.8) Status reports on EDI completion rates by school, class, and teacher. 1.2.9) Ability to query in reports for specific schools, classrooms and teachers. 1.2.10) EDI Certificate/Thank you memo auto generated when all data from project is complete
and submitted. 1.2.11) Access links to web for national project information and resources. 1.2.12) View/print School Reports and Community Profile report generated and posted by
UCLA Center for Healthier Children, Families and Communities.
The Teacher’s roles are limited to: 1.2.13) Teachers enter the Teacher Portal using their username and passwords provided by the
District Portal 1.2.14) Accept (or Not Accept) the electronic teacher consent form. Only those who consent
can proceed to use the e-EDI system. Users view and print the consent form with the name of district and name of district administrator uploaded into form.
1.2.15) View and print various EDI resources. 1.2.16) Completion of EDI questionnaires. If the district chooses option (a) or (b) from 1.2.5
listed above to enter the class list, then teachers can proceed to view and use their class list preloaded by the district to complete and EDI on each child in their class. If the district chooses option (c) from 1.2.5, then the teacher will first need to build their own student class list from scratch and then complete an EDI on each child in their class. Building a class list requires that the teacher enter each child’s Student ID, School name; Teacher name (or ID); and Class name (or ID).
1.2.17) Create additional student records 1.2.18) Review the EDI questionnaire data entered for a student in summary form. 1.2.19) Review class data to determine which student records have been completed and which
are yet to be entered.
School District Portal User’s Guide Page 5 DRAFT January 12, 2010
1.2.20) Lock student EDI questionnaires to indicate that no more changes will be made and the questionnaires are now available for export and analysis.
1.2.21) Change his/her own password. 1.2.22) Fill out Teacher profile and feedback form

1.3) Data Structure and Flow The hierarchy of data in the e-EDI is illustrated in Figure 1. Each box represents a screen and how it relates to the next or previous screen. US-EDI allows easy navigation through this hierarchy as most screens have buttons to go to the lower level or the higher level screens. Lower level data can exist only if the parent is present, i.e. the District must exist before School data for that District can be entered.
Checklist
Teacher Feedback
Form
Section C
Section B
Section A Section D
Section E
Fig. 1 - Hierarchy of data in e-EDI
Child
School
Teacher
District
Class
There can be multiple Districts Each District can have many schools Each school can have multiple teachers Each teacher has one teacher profile and may have multiple classes Each class has many students Each child can have only one EDI questionnaire (with 6 sections)
Please Note: Deleting data at any level, automatically deletes all the lower level data. For example, if you delete a teacher, all the related classes, Children and their EDI data is deleted. Use Deletion with great care.
School District Portal User’s Guide Page 6 DRAFT January 12, 2010

2. Accessing the EDI System 2.1) Sending UCLA District Contact Information In order to generate a user account for the District Administrator and the District IT Administrator, it is first necessary for the District to send UCLA the relevant District Contact Information: full names, email addresses, and phone numbers from each school district administrator. Please send this information to [email protected]. 2.2) Registration E-Mail After UCLA has created the District Administrators’ user accounts, the District Administrators will receive an e-mail at the e-mail address provided to UCLA with a temporary password:
In the email, a link is provided to access the e-EDI along with the requisite username and password. The username is the individual’s email address. The password is temporary and must be changed upon first login for security reasons. 2.3) First Login The first time you log in, you can use the link provided in the registration email. For all subsequent logins, you can access the e-EDI system through the World Wide Web by typing in the URL: http://usedi.ucla.edu/admin This will open up the Administrative Section US-EDI. Click on Login button on the far right (see next page).
School District Portal User’s Guide Page 7 DRAFT January 12, 2010

School District Portal User’s Guide Page 8 DRAFT January 12, 2010
The buttons on the top left provide more detailed description of the US-EDI system and additional resources and assistance available to you:
Use your e-mail address and password from the e-mail you received to login, If you did not receive the e-mail or misplaced it, you can type your e-mail address in the box above and the system will re-assign you a temporary password, which will be e-mailed to you. On your first login, you will be asked to change your password. Choose this password carefully (something easy to remember, but difficult for others to guess).

The next step for the first time user is to read and complete the Electronic Consent to use the system, which is automatically presented on the first login after you have selected the district. 2.4) Entering District Portal Select the desired district, from the drop-down list of district(s) available to you, as follows:
2.5) Accepting Electronic Consent to use the system The first time only, when you select a District, you will be presented a Consent Form, which you need to read and accept before you can access the US-EDI system:
School District Portal User’s Guide Page 9 DRAFT January 12, 2010

2.6) District Portal You are now ready to work in the District Portal. This is also where you will find yourself on your subsequent logins as the Consent Form is presented only once for each District.
When finished, please click on Logout (top right). If there has been no activity for 15 minutes, the system automatically saves any changes made and closes the session for security reasons. 2.7) Control Tabs
School District Portal User’s Guide Page 10 DRAFT January 12, 2010
Note the control Tabs available to the District Administrator to drill down into various options:
2.7.1) Profile Tab Profile Tab simply shows basic information about the current District. The IDs in this tab are generated by UCLA. Please take a note the “District ID” as you will need to use this ID during the data upload process discussed later. Later in this manual we’ll show you how to edit the district name and state information.

2.7.2) Users Tab The Users Tab lists the user accounts that have been set up for the district. This is also where new user accounts are created and changed (added, edited, locked, etc). Though user accounts for teachers are listed and managed here, teachers do not have access to the District Portal. Only the District Administrator and the District IT Administrator have access to the District Portal.
(Later, this manual reviews how the District Administrator can create new or edit existing users at various levels, activate/inactivate them and reset their passwords, if necessary). 2.7.3) Data Tab Data tab enables you to view and edit the schools and classes, e.g. This is also the tab that will be used to upload class lists (discussed later)
School District Portal User’s Guide Page 11 DRAFT January 12, 2010

2.7.4) Custom Questions Tab This tab enables the District Administrator to enter up to five questions specific to this distract that will be presented to the teachers under Section E of US e-EDI questionnaires. For each question, it is possible to select the type of responses to be presented, ranging from a simple Yes/No response to selecting a number from 1 to 10, as illustrated below:
2.7.5) Reports Tab Reports tab will provide access to future reports (under construction). 2.7.6) FAQ Tab Frequently Asked Questions (FAQ) with answers will be available under this tab. (under construction). 2.7.7) Links Tab This tab will provide useful links to EDI related websites and resources. (under construction).
School District Portal User’s Guide Page 12 DRAFT January 12, 2010

3. Entering Class Lists and Creating User Accounts Districts prepare teacher class lists for teacher data entry using ONE of three options: 1. District performs an automated upload of district excel file directly into District Portal
(school, teacher and child level data); 2. District sends excel file to UCLA via email (school, teacher and child level data); 3. District data enters school and teacher information in the District Portal and then teachers
enter child level information at a later date in the Teacher Portal. These three methods are described in detail below. 3.1) Option 1: Uploading District Excel File Directly into District Portal Data on schools, teachers, classes and children can be prepared by the District using an Excel Spreadsheet provided in the District Portal. The excel spreadsheet is created by the district using a local computer and then visually verified and saved before it is uploaded into the US-EDI system. You must have Microsoft Excel (v. 2003 or higher) installed on your computer to work on the spreadsheet. By uploading the excel file, the US-EDI system will create user accounts and class lists for all the participating teachers. This process involves downloading the template spreadsheet, filling it out, saving it locally and then uploading it into the US-EDI: Step 1: Download the template of the blank spreadsheet that includes data headings from the
US-EDI website. Login to the website as a District Administrator or District IT Administrator and click on Data tab:
School District Portal User’s Guide Page 13 DRAFT January 12, 2010

This will open the data management screen.
Click on Import button then the Download Template button to initiate download:
Depending upon the web-browser you are using, you will get an opportunity to open the template (provided you have Microsoft Excel installed), or to save it in a desired location.
When you open the spreadsheet, you will see a blank spreadsheet with the following column headings (see a larger picture in Appendix A):
If you click on the Schema tab, you will open another spreadsheet which is the data dictionary and provides details on each data item, coding scheme, etc. Please refer to Appendix B for the District Upload Data Schema.
School District Portal User’s Guide Page 14 DRAFT January 12, 2010

Step 2: Complete the excel spreadsheet filling out data under each column ensuring that correct codes are used. The data items are describe in detail in a Data Dictionary in Appendix B.
The Teacher E-Mail (t_email) is critical as it will be used as a login ID to create teacher user accounts However, all other fields can be edited or corrected later.
An example of a small completed Spreadsheet appears in Appendix C.
Step 3: Upload the excel spreadsheet into US-EDI system. Login as District Administrator (or District IT Administrator) and select the District for which you wish to upload the data.
Here are some important things to know about the upload process:
1. In order for uploaded data to be correctly linked to your district, please ensure that the district_id column in the spreadsheet corresponds to the code found in the District Profile screen (see Section 2.7.1).
2. The upload process checks to see if a Teacher has already been registered into e-EDI. If
not, the system creates a new Teacher ID (the Teacher’s E-Mail address) and password and automatically mails to invitation to the teacher to login to e-EDI.
3. If the upload process finds a school, teacher, class or student already in the system, it
simply overwrites the data with the new information.
4. If there is other new information (school, class, students), then those records are simply inserted.
School District Portal User’s Guide Page 15 DRAFT January 12, 2010

School District Portal User’s Guide Page 16 DRAFT January 12, 2010
5. The upload process never deletes any data records.
6. After the upload is completed, US-EDI provides a summary indicating how many records were processed and if any errors were found.
7. In case of any errors, simply correct the erroneous records and repeat the upload process.
Data records will not be duplicated as a result of multiple uploads; they would simply be replaced by new information.
3.2) Option 2: Sending Excel File to UCLA via Email (School, teacher and child level data) If you are unsure of loading the data yourself or have technical problems you are unable to resolve with the technical help available to you, simply email the excel spreadsheet as an attachment and any pertinent information to the US-EDI team at UCLA at the following e-mail address: [email protected] The US-EDI team will review the spreadsheet for data consistency and upload it on to the system. You will receive an e-mail message confirming the status of your data.
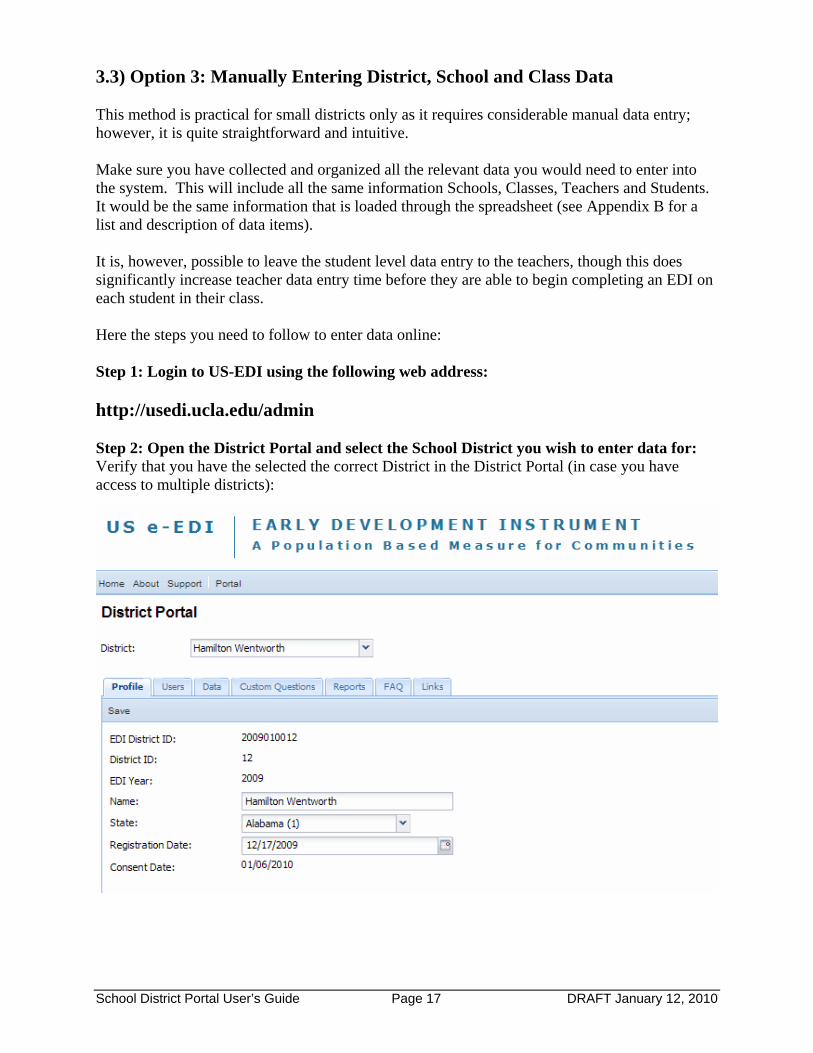
3.3) Option 3: Manually Entering District, School and Class Data This method is practical for small districts only as it requires considerable manual data entry; however, it is quite straightforward and intuitive. Make sure you have collected and organized all the relevant data you would need to enter into the system. This will include all the same information Schools, Classes, Teachers and Students. It would be the same information that is loaded through the spreadsheet (see Appendix B for a list and description of data items). It is, however, possible to leave the student level data entry to the teachers, though this does significantly increase teacher data entry time before they are able to begin completing an EDI on each student in their class. Here the steps you need to follow to enter data online: Step 1: Login to US-EDI using the following web address: http://usedi.ucla.edu/admin Step 2: Open the District Portal and select the School District you wish to enter data for: Verify that you have the selected the correct District in the District Portal (in case you have access to multiple districts):
School District Portal User’s Guide Page 17 DRAFT January 12, 2010

Step 3: Follow the steps illustrated below to create a School:
This opens a pop-up screen to enter details about the new school:
School District Portal User’s Guide Page 18 DRAFT January 12, 2010

Step 4: Follow the steps illustrated below to create a Class:
Fill in the pop-up screen with the details of the class:
School District Portal User’s Guide Page 19 DRAFT January 12, 2010

Step 5: Follow the steps illustrated below to create a Teacher:
Note: If you check on Send Activation Email, a message will be sent out to the Teacher inviting her/him to login and start entering EDI data. You may wish to wait until all data has been created and verified before you activate the teachers at a later time.
School District Portal User’s Guide Page 20 DRAFT January 12, 2010

Step 6: Follow the steps illustrated below to create a Student (Child). Reminder; It is, possible to skip this section and leave the student level data entry to the teachers, though this does significantly increase teacher data entry time before they are able to begin completing an EDI on each student in their class.
File out the pop-up screen for each child to be added:
School District Portal User’s Guide Page 21 DRAFT January 12, 2010
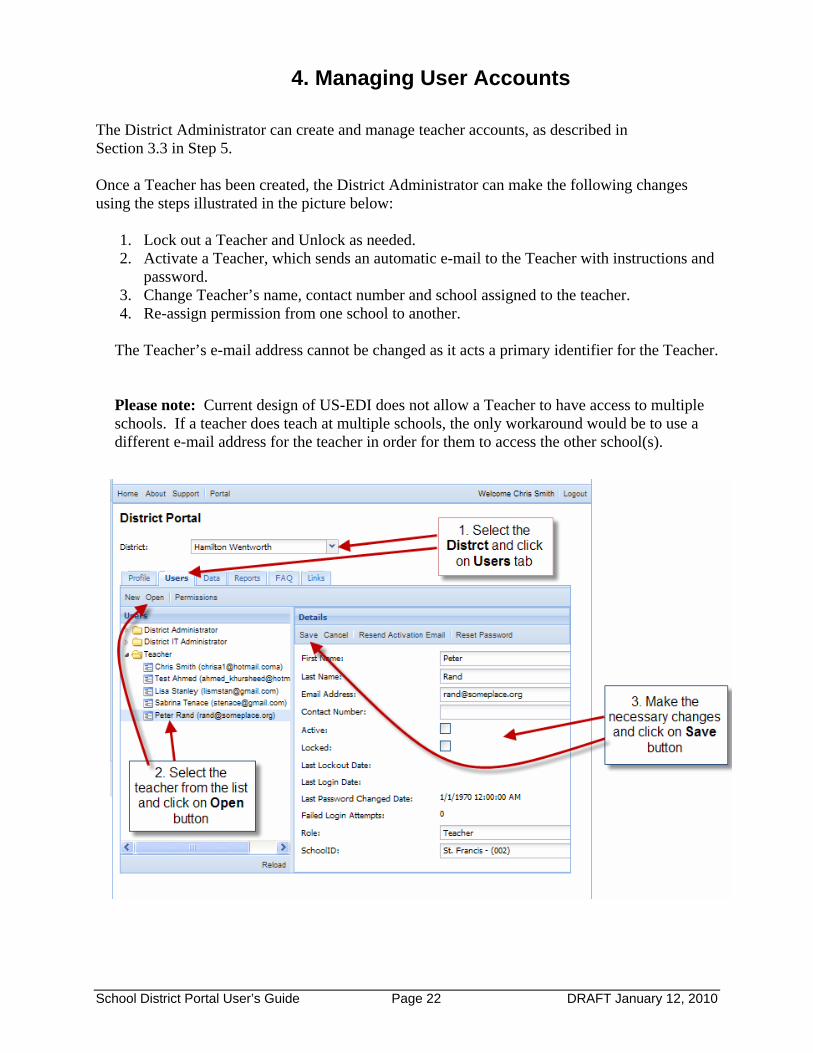
4. Managing User Accounts The District Administrator can create and manage teacher accounts, as described in Section 3.3 in Step 5. Once a Teacher has been created, the District Administrator can make the following changes using the steps illustrated in the picture below:
1. Lock out a Teacher and Unlock as needed. 2. Activate a Teacher, which sends an automatic e-mail to the Teacher with instructions and
password. 3. Change Teacher’s name, contact number and school assigned to the teacher. 4. Re-assign permission from one school to another.
The Teacher’s e-mail address cannot be changed as it acts a primary identifier for the Teacher. Please note: Current design of US-EDI does not allow a Teacher to have access to multiple schools. If a teacher does teach at multiple schools, the only workaround would be to use a different e-mail address for the teacher in order for them to access the other school(s).
School District Portal User’s Guide Page 22 DRAFT January 12, 2010

School District Portal User’s Guide Page 23 DRAFT January 12, 2010
5. Monitoring EDI Completion Rates (To be added)
6. Accessing Resources and Reports (To be added)

School District Portal User’s Guide Page 24 DRAFT January 12, 2010
7. Conditions of Data Confidentiality and Sharing Student IDs, child date of birth, and home address are collected, however they are only used for internal purposes and never reported out to any group. The student IDs and the DOB are used to facilitate teacher data entry since these variables are uploaded by the district in the US-EDI software for teachers to access as class lists when they log in to the teacher portal using their secure and confidential password. The child’s home address is uploaded into the US-EDI software by the district and used by UCLA to generate aggregated GIS maps of the EDI data. A few other notes on appropriate uses of the data:
• No child names are ever collected in the system. • Teacher names and emails are collected but are never accessible to UCLA. They are only
accessible in the system by the districts and teachers. • UCLA only reports data in aggregate for groups of children - data is never report on
individual children or classrooms. • UCLA will upload the data to conduct the data analysis and provide aggregated
information at the school, district, and community levels of aggregation. Data will not be reported at the individual child, class or teacher level. School data will only be reported in schools with more than one participating class.
• Data files will be kept in a secure, password-protected location at the UCLA Center for Healthier Children, Families and Communities.
• UCLA will provide the de-identified data file (stripped of any unique identifiers to the publishers of the EDI, at the Offord Centre for Child Studies at McMaster. The Offord Centre maintains the international repository for analysis and research involving only high levels of aggregation. The data is stripped of the student ID, date of birth (replaced with age) and address information (replaced with a geocoded variable).
• UCLA will upon request, provide the district (which has capacity to keep the data confidential and secured in accordance with applicable privacy laws and regulations), with the de-identified data file relating to individual EDI scores, free of charge.
• UCLA will not provide the de-identified data to any other party (except the District and the Offord Centre) without the prior consent of the district and the UCLA IRB.

Appendix A - EDI Data Template for District Upload into the US-EDI
An electronic version of an empty spreadsheet, the EDI Data Template, can be downloaded from the US-EDI by clicking on the Download Template button in the Data Import screen. See Section 3.1 for further details. Please refer to Appendix B for the District Upload Data Schema for a data dictionary (or schema) which provides details on each data item, coding scheme, etc. Once the template is downloaded, this spreadsheet can be filled out by the district and then uploaded directly into US-EDI system. Alternatively, it can be e-mailed to UCLA for uploading into e-EDI. Emails should go to [email protected] An example of a filled out spreadsheet ready for import is shown in Appendix C. Note: This Excel spreadsheet is slightly modified so that headings appear vertically to print it on a single page. EDI Data Template
A B C D E F G H I J K L M N O P Q
dist
rict_
id
scho
ol_r
clas
s_id
scho
ol_type
scho
ol_t
ype_
ift_
last
nam
e
t_fir
stna
me
t_em
ail
classtim
e_sd
stud
entid
res_
addr
ess
res_
city
zip_
sd
zip_
exte
n_sd
dob_
sd
abse
nces
_sd
sick
_sd
School District Portal User’s Guide Page 25 DRAFT
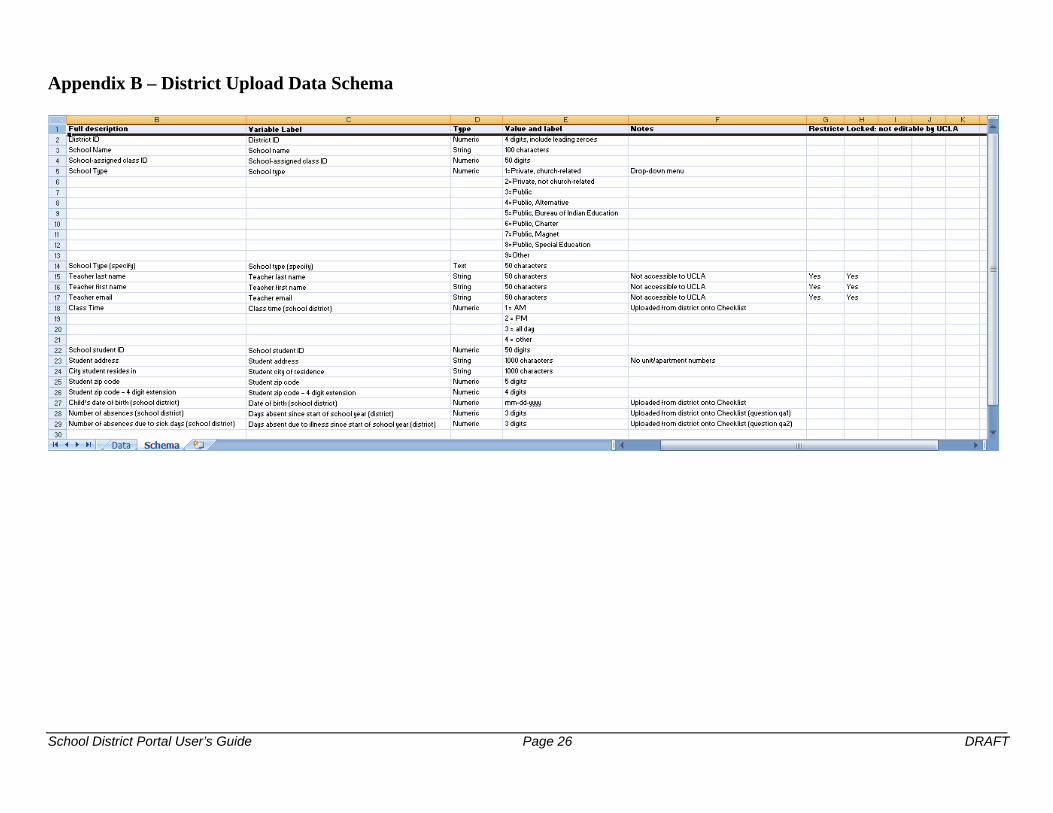
Appendix B – District Upload Data Schema
School District Portal User’s Guide Page 26 DRAFT

School District Portal User’s Guide Page 27 DRAFT
Appendix C - EDI Sample Data Spreadsheet for Input Data This is an example of a data spreadsheet filled out by the District Administrator, consisting of two schools, teachers, classes and students from a single District. All data must be carefully entered and must be complete and error-free before a successful import can be done. The spreadsheet is split over two tables in order to print it on paper. Sample Excel Spreadsheet for data import: A B C D E F G H district_id school_r class_id school_type school_type_specify t_lastname t_firstname t_email 12 Test Data School 1 1 2 Tenace Sabrina [email protected] Test Data School 1 1 2 Tenace Sabrina [email protected] Test Data School 1 1 2 Farago Leslie [email protected] Test Data School 1 2 9 tester Farago Leslie [email protected] Test Data School 1 3 3 Renner Andrew [email protected] Test Data School 1 3 3 Renner Andrew [email protected] Test Data School 1 1 1 Farago Leslie [email protected] Test Data School 2 1 1 Smith John [email protected]
I J K
L M N O P Q classtime_sd studentid res_address res_city zip_sd zip_exten_sd dob_sd absences_sd sick_sd 1 1 12 Juniper Stoney Creek 12345 123 13-11-2009 1 2 1 2 test tester 12345 123 01-01-2000 1 1 2 3 tester tester 12345 123 01-11-2000 1 0 3 1 13-12-2002 4 1 4 2 1 1 tester tester 12345 123 01-01-2000 1 1 1 1

School District Portal User’s Guide Page 29 DRAFT
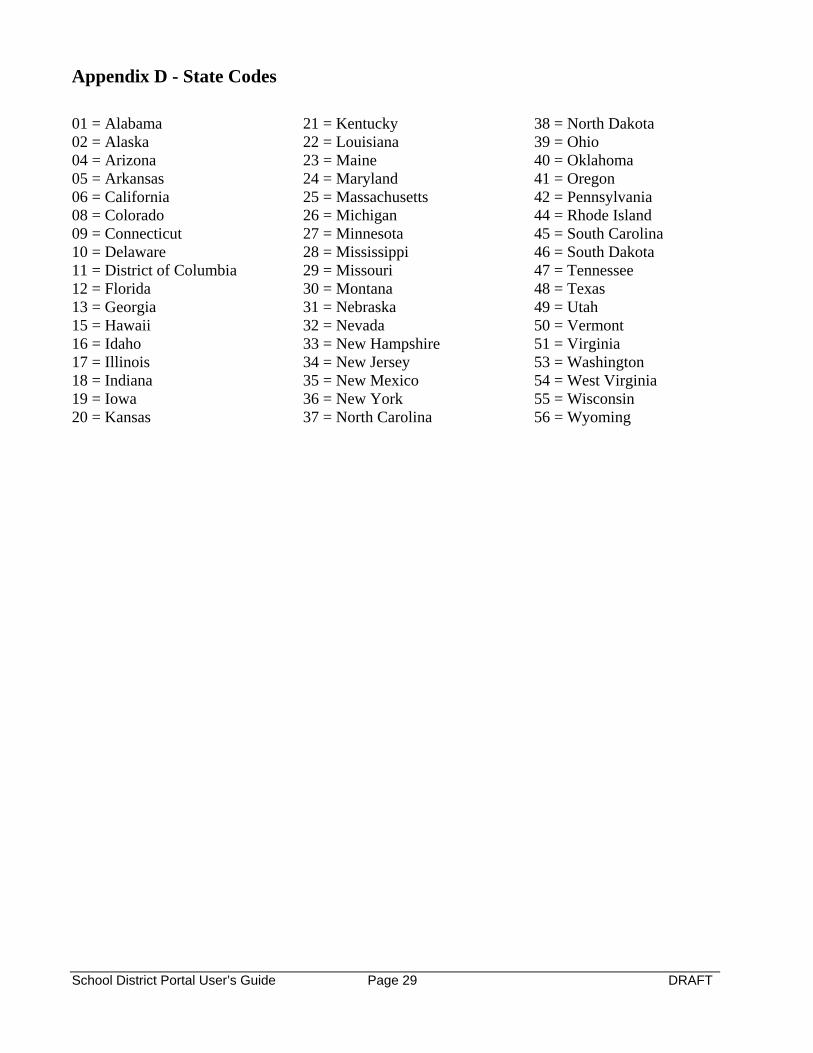
Appendix D - State Codes
01 = Alabama 02 = Alaska 04 = Arizona 05 = Arkansas 06 = California 08 = Colorado 09 = Connecticut 10 = Delaware 11 = District of Columbia 12 = Florida 13 = Georgia 15 = Hawaii 16 = Idaho 17 = Illinois 18 = Indiana 19 = Iowa 20 = Kansas
21 = Kentucky 22 = Louisiana 23 = Maine 24 = Maryland 25 = Massachusetts 26 = Michigan 27 = Minnesota 28 = Mississippi 29 = Missouri 30 = Montana 31 = Nebraska 32 = Nevada 33 = New Hampshire 34 = New Jersey 35 = New Mexico 36 = New York 37 = North Carolina
38 = North Dakota 39 = Ohio 40 = Oklahoma 41 = Oregon 42 = Pennsylvania 44 = Rhode Island 45 = South Carolina 46 = South Dakota 47 = Tennessee 48 = Texas 49 = Utah 50 = Vermont 51 = Virginia 53 = Washington 54 = West Virginia 55 = Wisconsin 56 = Wyoming