usb driver setup guide usb gps receiver - haicom · this file provides windows 2000 ... type:...
TRANSCRIPT
There is a small bug between Microsoft XP and Prolific USB driver.
Please plug in the USB GPS AFTER install the USB driver.
Also, plug in the USB GPS AFTER the computer completed the boosting.
If you plug in the USB GPS when the computer boosting, the computer will assume the USB GPS as a USB mouse.
As a result, the mouse cursor will moving around.
USB Driver Setup Guide
USB GPS Receiver
USB Driver Setup Guide
USB GPS Receiver

A.INTRODUCTION OF GPS USB DRIVER FILES
B.WINDOWS 98 INTERFACE
1. Install GPS USB Driver
2. Check Enable COM Port Number
3. Remove GPS USB Driver
C.WINDOWS XP INTERFACE
1. Install GPS USB Driver
2. Check Enable COM Port Number
3. Remove GPS USB Driver
D.CHANGE COM PORT NUMBER
APPLICATION PROGRAM
E.IMPORTANT REMARK
.......... 1
.......................................... 4
.............................................. 4
.............................. 10
..........................................16
.........................................17
..............................................17
.............................20
..........................................27
..........................................28
................................................32

1
A. Introduction of GPS USB Driver Files
The USB GPS driver group consists of 6 files.
Files Name
DRemover98_2K.exe
Serwpl.inf
Win2K\ser2pl.sys
Win98_ME\ser9pl.sys
Win98_ME\serspl.inf
Win98_ME\serspl.vxd
Description of Specific Property
Type: Application
This execution file removes
GPS USB driver from the PC.
Type: Setup Information
This file provides major setup
information.
Type: System File
This file provides Windows 2000
and Windows XP hardware specific
interface.
Type: System File
This file provides Windows 98 and
Windows Millennium hardware
specific interface.
Type: Setup Information
This file provides Windows 98 and
Windows Millennium setup
information
Type: Virtual Device Driver
This file is virtual device driver.

2
Figure 1: Screen of GPS USB Driver Group
Figure 2: Screen of GPS USB Driver Win 2000 and Win XP
System File

3
Figure 3:
Screen of GPS USB Driver Win 98 and Win ME Group

4
B.Windows 98 Interface
1. Install GPS USB Driver
Before the installation of GPS USB driver, there are three
procedures required.
The first thing is to turn on PC in the Windows environment.
The second thing is to copy USB driver into HDD. The third
thing is to plug the GPS receiver into the USB port of PC
and then follow the installation guide.

5
Step 1:
Click the "Next" button
Figure 4:
Win 98 Automatic Installation Driver Screen
6
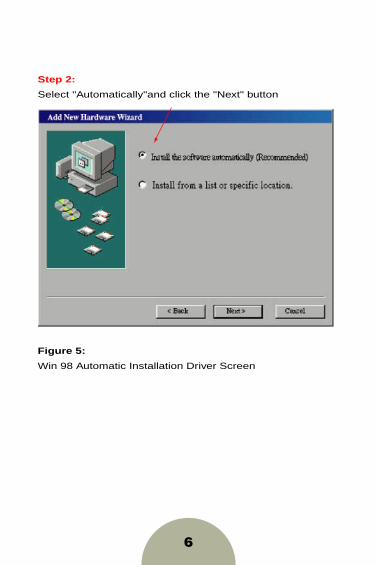
Step 2:
Select "Automatically"and click the "Next" button
Figure 5:
Win 98 Automatic Installation Driver Screen

7
Step 3:
Specific driver location and click the "Next"button
Figure 6:
Win 98 Automatic Installation Driver Screen

8
Step 4:
Click the "Next"button
Figure 7:
Win 98 Automatic Installation Driver Screen

9
Step 5:
Click the "Finish"button
Figure 8:
Win 98 Automatic Installation Driver Screen
10
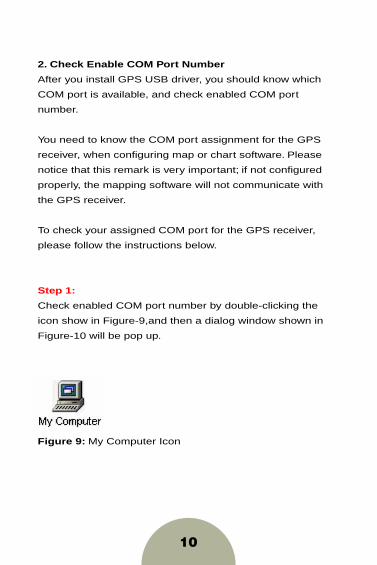
2. Check Enable COM Port Number
After you install GPS USB driver, you should know which
COM port is available, and check enabled COM port
number.
You need to know the COM port assignment for the GPS
receiver, when configuring map or chart software. Please
notice that this remark is very important; if not configured
properly, the mapping software will not communicate with
the GPS receiver.
To check your assigned COM port for the GPS receiver,
please follow the instructions below.
Step 1:
Check enabled COM port number by double-clicking the
icon show in Figure-9,and then a dialog window shown in
Figure-10 will be pop up.
Figure 9: My Computer Icon

11
Step 2:
Double-click the "Control Panel" icon
Figure 10:
My Computer Screen

12
Step 3:
Double-click the "System" icon
Figure 11:
Control Panel Screen

13
Step 4:
Press"Device Manager" button
Figure 12:
System Properties Screen

14
Step 5:
Slect "USB to Serial Port" (COM3) and click "Propertes"
button
Figure 13:
System Properties Screen

15
Step 6:
Browse COM3 properties
Figure 14:
System Properties Screen

16
3. Remove GPS USB Driver
If you want to update the USB driver, you should remove
existing driver and install new one.
Step 1:
Remove GPS USB driver by double-clicking the icon show
in Figure-15. A dialog window shown in Figure-16 will be
pop up.
Figure 15:
GPS USB Driver Remove Icon
Step 2:
Click "OK" button
Figure 16: Remove Driver Screen
Step 3:
Click "Yes"
Figure 17: Driver Remove Warning Screen
17
C. Windows XP Interface
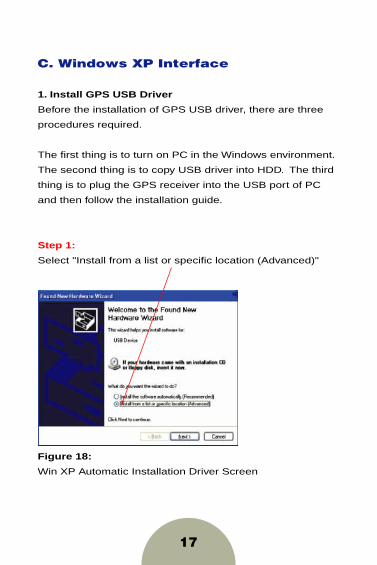
1. Install GPS USB Driver
Before the installation of GPS USB driver, there are three
procedures required.
The first thing is to turn on PC in the Windows environment.
The second thing is to copy USB driver into HDD. The third
thing is to plug the GPS receiver into the USB port of PC
and then follow the installation guide.
Step 1:
Select "Install from a list or specific location (Advanced)"
Figure 18:
Win XP Automatic Installation Driver Screen

18
Step 2: Select "Include this location in the search" OR
"Browse" to specific GPS USB driver location
Figure 19: Win XP Automatic Installation Driver Screen
Step 3: Click "Continue Anyway" button
Figure 20: Win XP Automatic Installation Driver Screen

19
Step 4:
Finish screen
Figure 21:
Win XP Automatic Installation Driver Screen
Step 3:
Click "Continue Anyway"
button
Figure 22:
Win XP Automatic Installation Driver Screen
20
2. Check Enable COM Port Number
After you install GPS USB driver, you should know which
COM port is available, and check enabled COM port
number.
You need to know the COM port assignment for the GPS
receiver, when configuring map or chart software. Please
notice that this remark is very important; if not confingured
properly, the mapping software will not communicate with
the GPS receiver.
TO check your assigned COM port for the GPS receiver,
please follow the instructions below.
Step 1:
Check enabled COM port number by clicking "Start" Ü
clicking "Control Panel" Ü double-clicking "System" icon

21
Step 2:
Select "Hardware"
Figure 23:
System Properties Screen

22
Step 3:
Select "Device Manager"
Figure 24:
System Properties Screen

23
Step 4:
Select Ports (COM&LPT)
Figure
25: Device Manager Screen

24
Step 5:
Select COM4
Figure 26:
Device Manager Screen

25
Step 6:
Select "Driver"
Figure 27:
USB-to-Serial Bridge Screen
26
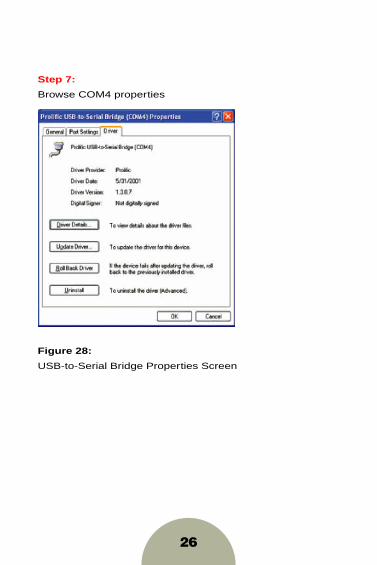
Step 7:
Browse COM4 properties
Figure 28:
USB-to-Serial Bridge Properties Screen

27
3 Remove GPS USB Driver
If you want to update the USB driver, you should remove
existing driver and install new one.
Step 1:
Remove GPS USB driver by double-clicking the icon show
in Figure-29. A dialog window shown in Figure-30 will be
pop up.
Figure 29:
GPS USB Driver remove icon
Step 2:
Click "OK" button
Figure 30:
Remove Driver Screen
Step 3:
Click "Yes" button
Figure 31:
Driver Remove Warning Screen

28
D. Change COM Port Number Application Program
If the notebook assigns COM number to COM5, then can to
execute SetCOM.exe for COM number change.

29
Step 1:
For change COM port number assign by double-clicking the
icon show in Figure-32, and then small icon shown in
Figure-34 will be pop up.
Figure 32:
SetCOM.exe Icon
Figure 33:
Start bar on the right-below corner of screen
Figure 34:
Start bar on the right-below corner of screen
30
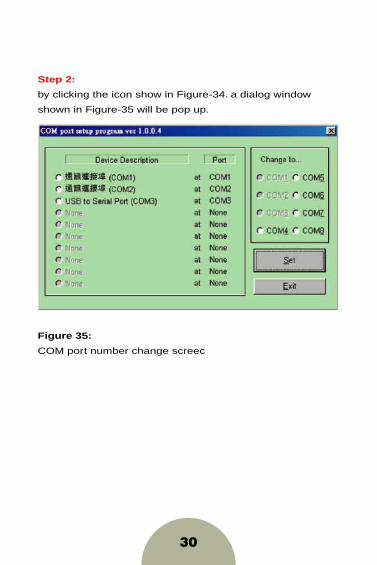
Step 2:
by clicking the icon show in Figure-34. a dialog window
shown in Figure-35 will be pop up.
Figure 35:
COM port number change screec

31
Step 3:
for example change COM3 become COM4, first Click COM3
and COM4 then Click "Set" button
Figure 36:
COM port number change screec
Step 4:
Click "Yes" button
Figure 37:
Notification Screen
32
E. Important Remarks
1.If y our system is Windows Millennium, please refer to
Windows 98 installation guide. If your system is Windows
2000, please refer to Windows XP installation guide.
2. If you follow the steps but the GPS receiver doesn't work,
please try to unplug the GPS receiver from the USB port,
wait for 5~8 seconds, and re-plug the GPS receiver into
your PC.
3. Occasionally the mouse cursor does not work properly
when you run the Win2000 and Win XP, and this situation
is owing to Win2000 and Win XP operating system
instead of the GPS receiver. Microsoft announces that
this situation is "the serial device may be detected as a
serial mouse in Win2000 and Win XP".

33
4. If y our GPS receiver is recognized as a Microsoft
serial mouse, there are two ways and you can choose
either one to solve the problem. The first is to unplug the
GPS receiver from PC, wait for 5~8 seconds, and re-plug
the GPS receiver into your PC. The second is to disable
this serial mouse; you can follow the step-by-step
instructions below.
Should you have any additional question regarding the
operation of USB GPS receiver, please feel free to contact
your correspondent sales representative. It is important that
you record what problems you encounter and what error
messages occur at that point, so that the technical support
people can detect your problems more efficiently.
Click "start" click "Control Panel" double-click
"system" icon click "Hardware" click "Device
Manager" click "Mouse" select the wrong mouse
click your real mouse right button disable the wrong
mouse.