uscutter - material loading guide - support guide is designed to assist with the proper installation...
TRANSCRIPT

This guide is designed to assist with the proper installation and orientation of vinyl material in your
USCutter friction feed vinyl cutter. A friction feed cutter utilizes “pinch-rollers” which apply pressure
against the vinyl and holds the material tightly against the feed-rollers. The “feed-rollers” underneath
the pinch-rollerss move the material forward and back through the machine.
STEP #1: Loading your vinyl material
Begin by ensuring the pinch-rollers on the cutter are in
the up position. You will find the pinch-roller levers in the
back of the cutter. Lifting or lowering the pinch-roller
lever will engage or dis-engage the pinch-roller.
You will know that the pinch-rollers are in the up position when you
can observe a gap between the cutting deck and the rubber wheels
of the pinch-roller (see Figure 2). You can change the position of the
pinch-rollers by lifting them to the up positions and sliding them
along the rail.
Figure 1
Figure 2
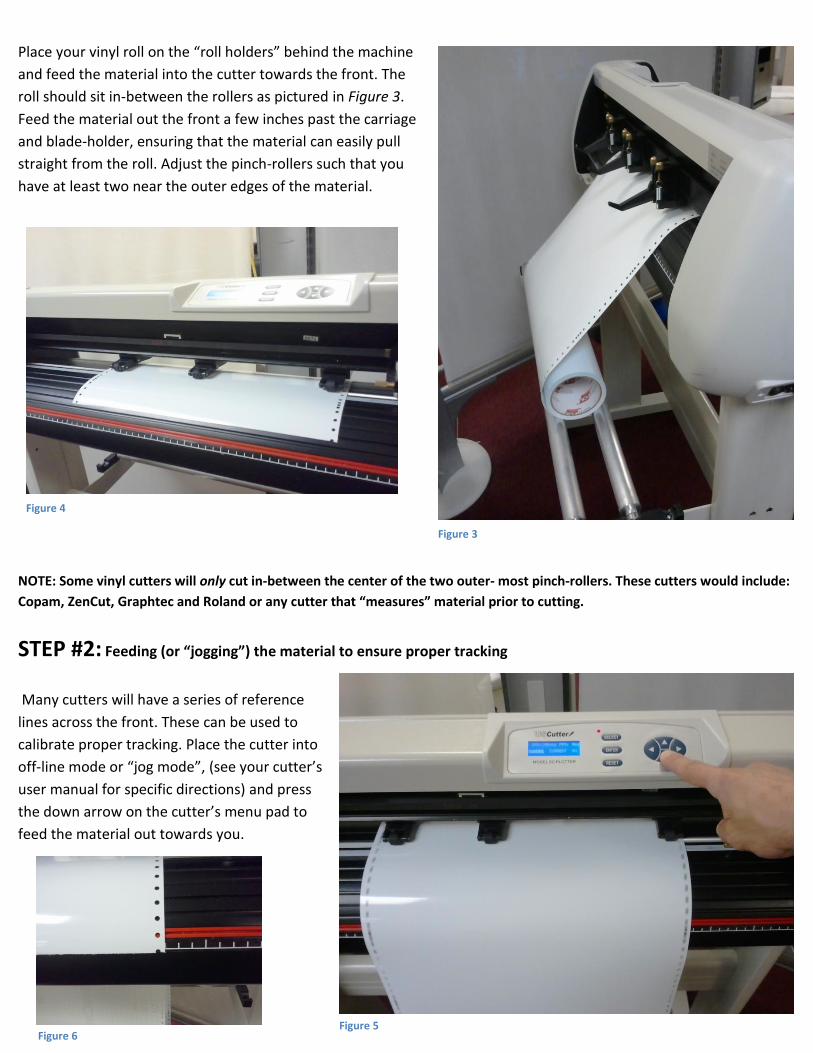
Place your vinyl roll on the “roll holders” behind the machine
and feed the material into the cutter towards the front. The
roll should sit in-between the rollers as pictured in Figure 3.
Feed the material out the front a few inches past the carriage
and blade-holder, ensuring that the material can easily pull
straight from the roll. Adjust the pinch-rollers such that you
have at least two near the outer edges of the material.
NOTE: Some vinyl cutters will only cut in-between the center of the two outer- most pinch-rollers. These cutters would include:
Copam, ZenCut, Graphtec and Roland or any cutter that “measures” material prior to cutting.
STEP #2: Feeding (or “jogging”) the material to ensure proper tracking
Many cutters will have a series of reference
lines across the front. These can be used to
calibrate proper tracking. Place the cutter into
off-line mode or “jog mode”, (see your cutter’s
user manual for specific directions) and press
the down arrow on the cutter’s menu pad to
feed the material out towards you.
Figure 3
Figure 4
Figure 5 Figure 6

The vinyl should feed relatively straight, with only a slight amount of shift or movement to the left or right. A certain
amount of shift in the vinyl may be acceptable, depending on the size and type of graphic that you’re cutting as it won’t
affect the final production of the graphic. Typically if you can achieve a shift variance of ¼” when feeding the material
out 5 feet or more; there is no need to re-adjust the material.
How to correct improper tracking:
STEP #1: Pinch-roller positioning
If your vinyl shifts drastically to the left or
right when feeding, the first thing to
check is the pinch-roller positions. Most
vinyl cutters will have specific places
where the pinch-rollers cannot be
placed. These positions may or may not
be clearly marked. The best method to
follow is simply to ensure that the pinch-
rollers are placed directly above the
knurled part of the feed-rollers. In image
Figure 7, you can see that there is a
“break” in the feed-roller. This break is
identified by a white sticker and a pinch-
roller will not function properly if placed
in this position. In the image you can also
see that the pinch-rollers are positioned
to the right side of that break and are
fully atop the knurled feed roller bar.
In image Figure 8 shows a pinch-roller placed
improperly. The vinyl material would shift dramatically
in this scenario, as the material would not be able to
move freely in that position. Be sure to observe the
feed-rollers prior to placing the material in the cutter
to ensure proper placement of your pinch-rollers.
Figure 7
Figure 8

STEP #2: Correcting the tracking
Although the vinyl may appear to be loaded squarely, it takes only a slight skew to create a noticeable shift. Feed the
material out towards you and pay close attention to which direction the material shifts.
If the material shifts and feeds more to the right: Roll the material back to the home origin. Lift the center and right
most pinch-rollers but keep the left most pinch-roller down to act as a pivot point. Push the right side of the material
back in towards the cutter a small amount, then feed the material back out towards you and test to see if the
adjustment has corrected the tracking. Repeat this process until the material is tracking straight enough for your
purposes.
If the material shifts and feeds more to the left: Roll the material back to the home origin. Lift the center and left most
pinch-rollers but keep the right most pinch-roller down to act as a pivot point. Push the left side of the material in
towards the cutter a small amount, then feed the material back out towards you and test to see if the adjustment has
corrected the tracking. Repeat this process until the material is tracking straight enough for your purposes.
Figure 10 Figure 9
Figure 11 Figure 12
Now that the material is loaded properly
and tracking squarely, you should be ready
to send a cut!
For your information:
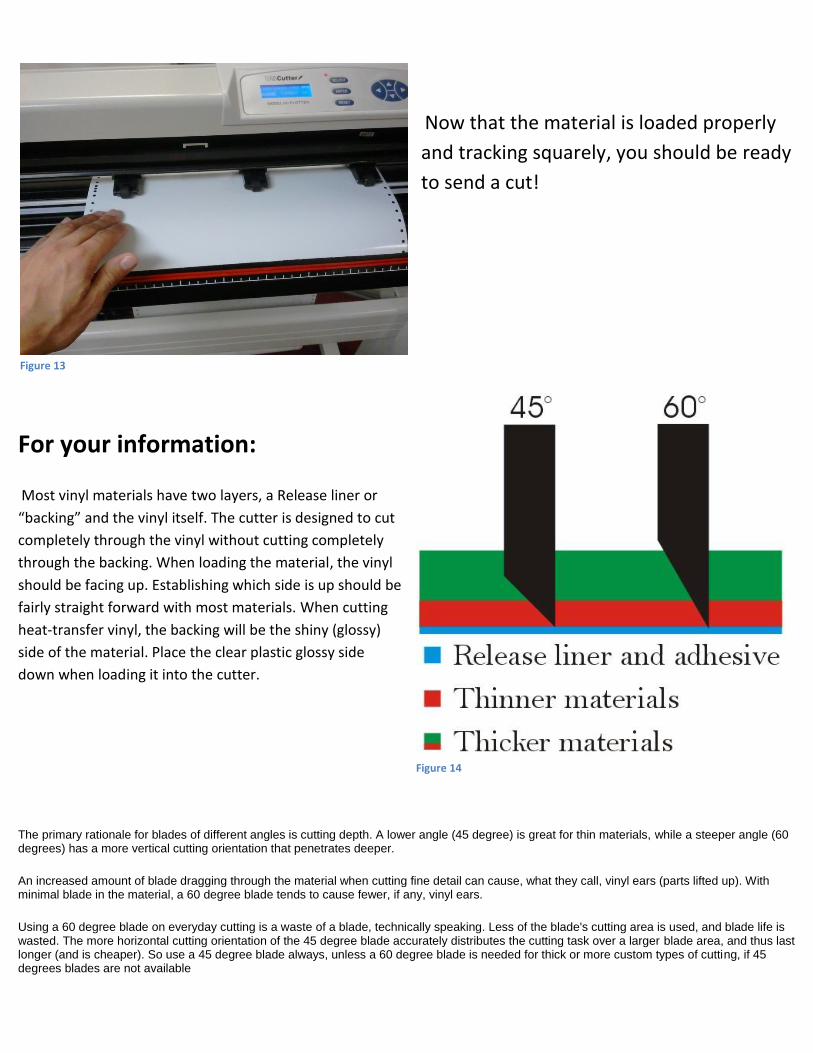
Most vinyl materials have two layers, a Release liner or
“backing” and the vinyl itself. The cutter is designed to cut
completely through the vinyl without cutting completely
through the backing. When loading the material, the vinyl
should be facing up. Establishing which side is up should be
fairly straight forward with most materials. When cutting
heat-transfer vinyl, the backing will be the shiny (glossy)
side of the material. Place the clear plastic glossy side
down when loading it into the cutter.
The primary rationale for blades of different angles is cutting depth. A lower angle (45 degree) is great for thin materials, while a steeper angle (60 degrees) has a more vertical cutting orientation that penetrates deeper.
An increased amount of blade dragging through the material when cutting fine detail can cause, what they call, vinyl ears (parts lifted up). With minimal blade in the material, a 60 degree blade tends to cause fewer, if any, vinyl ears.
Using a 60 degree blade on everyday cutting is a waste of a blade, technically speaking. Less of the blade's cutting area is used, and blade life is wasted. The more horizontal cutting orientation of the 45 degree blade accurately distributes the cutting task over a larger blade area, and thus last longer (and is cheaper). So use a 45 degree blade always, unless a 60 degree blade is needed for thick or more custom types of cutting, if 45 degrees blades are not available
Figure 13
Figure 14