user guide for cisco secure acs for windows server
TRANSCRIPT
Corporate HeadquartersCisco Systems, Inc.170 West Tasman DriveSan Jose, CA 95134-1706USAhttp://www.cisco.comTel: 408 526-4000
800 553-NETS (6387)Fax: 408 526-4100
User Guide for Cisco Secure ACSfor Windows Server
Customer Order Number: DOC-7814696=Text Part Number: 78-14696-01

THE SPECIFICATIONS AND INFORMATION REGARDING THE PRODUCTS IN THIS MANUAL ARE SUBJECT TO CHANGE WITHOUT NOTICE. ALL STATEMENTS, INFORMATION, AND RECOMMENDATIONS IN THIS MANUAL ARE BELIEVED TO BE ACCURATE BUT ARE PRESENTED WITHOUT WARRANTY OF ANY KIND, EXPRESS OR IMPLIED. USERS MUST TAKE FULL RESPONSIBILITY FOR THEIR APPLICATION OF ANY PRODUCTS.
THE SOFTWARE LICENSE AND LIMITED WARRANTY FOR THE ACCOMPANYING PRODUCT ARE SET FORTH IN THE INFORMATION PACKET THAT SHIPPED WITH THE PRODUCT AND ARE INCORPORATED HEREIN BY THIS REFERENCE. IF YOU ARE UNABLE TO LOCATE THE SOFTWARE LICENSE OR LIMITED WARRANTY, CONTACT YOUR CISCO REPRESENTATIVE FOR A COPY.
The Cisco implementation of TCP header compression is an adaptation of a program developed by the University of California, Berkeley (UCB) as part of UCB’s public domain version of the UNIX operating system. All rights reserved. Copyright © 1981, Regents of the University of California.
NOTWITHSTANDING ANY OTHER WARRANTY HEREIN, ALL DOCUMENT FILES AND SOFTWARE OF THESE SUPPLIERS ARE PROVIDED “AS IS” WITH ALL FAULTS. CISCO AND THE ABOVE-NAMED SUPPLIERS DISCLAIM ALL WARRANTIES, EXPRESSED OR IMPLIED, INCLUDING, WITHOUT LIMITATION, THOSE OF MERCHANTABILITY, FITNESS FOR A PARTICULAR PURPOSE AND NONINFRINGEMENT OR ARISING FROM A COURSE OF DEALING, USAGE, OR TRADE PRACTICE.
IN NO EVENT SHALL CISCO OR ITS SUPPLIERS BE LIABLE FOR ANY INDIRECT, SPECIAL, CONSEQUENTIAL, OR INCIDENTAL DAMAGES, INCLUDING, WITHOUT LIMITATION, LOST PROFITS OR LOSS OR DAMAGE TO DATA ARISING OUT OF THE USE OR INABILITY TO USE THIS MANUAL, EVEN IF CISCO OR ITS SUPPLIERS HAVE BEEN ADVISED OF THE POSSIBILITY OF SUCH DAMAGES.
User Guide for Cisco Secure ACS for Windows ServerCopyright © 2002, Cisco Systems, Inc.All rights reserved.
CCIP, the Cisco Arrow logo, the Cisco Powered Network mark, the Cisco Systems Verified logo, Cisco Unity, Follow Me Browsing, FormShare, Internet Quotient, iQ Breakthrough, iQ Expertise, iQ FastTrack, the iQ Logo, iQ Net Readiness Scorecard, Networking Academy, ScriptShare, SMARTnet, TransPath, and Voice LAN are trademarks of Cisco Systems, Inc.; Changing the Way We Work, Live, Play, and Learn, Discover All That’s Possible, The Fastest Way to Increase Your Internet Quotient, and iQuick Study are service marks of Cisco Systems, Inc.; and Aironet, ASIST, BPX, Catalyst, CCDA, CCDP, CCIE, CCNA, CCNP, Cisco, the Cisco Certified Internetwork Expert logo, Cisco IOS, the Cisco IOS logo, Cisco Press, Cisco Systems, Cisco Systems Capital, the Cisco Systems logo, Empowering the Internet Generation, Enterprise/Solver, EtherChannel, EtherSwitch, Fast Step, GigaStack, IOS, IP/TV, LightStream, MGX, MICA, the Networkers logo, Network Registrar, Packet, PIX, Post-Routing, Pre-Routing, RateMUX, Registrar, SlideCast, StrataView Plus, Stratm, SwitchProbe, TeleRouter, and VCO are registered trademarks of Cisco Systems, Inc. and/or its affiliates in the U.S. and certain other countries.
All other trademarks mentioned in this document or Web site are the property of their respective owners. The use of the word partner does not imply a partnership relationship between Cisco and any other company. (0206R)

78-14696-01, Version 3.1
C O N T E N T S
Preface xxv
Document Objective xxv
Audience xxv
Organization xxvi
Conventions xxviii
Related Documentation xxix
Obtaining Documentation xxx
World Wide Web xxx
Documentation CD-ROM xxx
Ordering Documentation xxx
Documentation Feedback xxxi
Obtaining Technical Assistance xxxi
Cisco.com xxxi
Technical Assistance Center xxxii
Cisco TAC Web Site xxxii
Cisco TAC Escalation Center xxxiii
C H A P T E R 1 Overview of Cisco Secure ACS 1-1
The Cisco Secure ACS Paradigm 1-1
Cisco Secure ACS Specifications 1-2
System Performance Specifications 1-3
Cisco Secure ACS Windows Services 1-4
AAA Server Functions and Concepts 1-5
Cisco Secure ACS and the AAA Client 1-5
iiiUser Guide for Cisco Secure ACS for Windows Server

Contents
AAA Protocols—TACACS+ and RADIUS 1-6
TACACS+ 1-6
RADIUS 1-6
Authentication 1-7
Authentication Considerations 1-8
Authentication and User Databases 1-8
Authentication Protocol-Database Compatibility 1-9
Passwords 1-10
Other Authentication-Related Features 1-15
Authorization 1-15
Max Sessions 1-16
Dynamic Usage Quotas 1-17
Shared Profile Components 1-17
Support for Cisco Device-Management Applications 1-18
Other Authorization-Related Features 1-19
Accounting 1-20
Other Accounting-Related Features 1-20
Administration 1-21
HTTP Port Allocation for Remote Administrative Sessions 1-21
Network Device Groups 1-22
Other Administration-Related Features 1-22
Cisco Secure ACS HTML Interface 1-23
About the Cisco Secure ACS HTML Interface 1-23
HTML Interface Security 1-24
HTML Interface Layout 1-25
Uniform Resource Locator for the HTML Interface 1-26
Network Environments and Remote Administrative Sessions 1-27
Remote Administrative Sessions and HTTP Proxy 1-27
Remote Administrative Sessions through Firewalls 1-28
Remote Administrative Sessions through a NAT Gateway 1-28
ivUser Guide for Cisco Secure ACS for Windows Server
78-14696-01, Version 3.1

Contents
Accessing the HTML Interface 1-29
Logging Off the HTML Interface 1-29
Online Help and Online Documentation 1-30
Using Online Help 1-30
Using the Online Documentation 1-31
C H A P T E R 2 Deploying Cisco Secure ACS 2-1
Basic Deployment Requirements for Cisco Secure ACS 2-2
System Requirements 2-2
Hardware Requirements 2-2
Operating System Requirements 2-2
Third-Party Software Requirements 2-3
Network Requirements 2-4
Basic Deployment Factors for Cisco Secure ACS 2-5
Network Topology 2-5
Dial-Up Topology 2-5
Wireless Network 2-8
Remote Access using VPN 2-11
Remote Access Policy 2-13
Security Policy 2-14
Administrative Access Policy 2-14
Separation of Administrative and General Users 2-16
Database 2-17
Number of Users 2-17
Type of Database 2-17
Network Latency and Reliability 2-18
Suggested Deployment Sequence 2-18
vUser Guide for Cisco Secure ACS for Windows Server
78-14696-01, Version 3.1

Contents
C H A P T E R 3 Setting Up the Cisco Secure ACS HTML Interface 3-1
Interface Design Concepts 3-2
User-to-Group Relationship 3-2
Per-User or Per-Group Features 3-2
User Data Configuration Options 3-3
Defining New User Data Fields 3-3
Advanced Options 3-4
Setting Advanced Options for the Cisco Secure ACS User Interface 3-6
Protocol Configuration Options for TACACS+ 3-7
Setting Options for TACACS+ 3-9
Protocol Configuration Options for RADIUS 3-10
Setting Protocol Configuration Options for IETF RADIUS Attributes 3-15
Setting Protocol Configuration Options for Non-IETF RADIUS Attributes 3-16
C H A P T E R 4 Setting Up and Managing Network Configuration 4-1
About Network Configuration 4-2
About Distributed Systems 4-3
AAA Servers in Distributed Systems 4-3
Default Distributed System Settings 4-4
Proxy in Distributed Systems 4-4
Fallback on Failed Connection 4-6
Character String 4-6
Stripping 4-6
Proxy in an Enterprise 4-7
Remote Use of Accounting Packets 4-7
Other Features Enabled by System Distribution 4-8
Network Device Searches 4-8
Network Device Search Criteria 4-9
Searching for Network Devices 4-10
viUser Guide for Cisco Secure ACS for Windows Server
78-14696-01, Version 3.1
Contents
AAA Client Configuration 4-11
AAA Client Configuration Options 4-11
Adding a AAA Client 4-15
Editing a AAA Client 4-18
Deleting a AAA Client 4-19
AAA Server Configuration 4-20
AAA Server Configuration Options 4-21
Adding a AAA Server 4-23
Editing a AAA Server 4-25
Deleting a AAA Server 4-27
Network Device Group Configuration 4-27
Adding a Network Device Group 4-28
Assigning an Unassigned AAA Client or AAA Server to an NDG 4-29
Reassigning a AAA Client or AAA Server to an NDG 4-30
Renaming a Network Device Group 4-31
Deleting a Network Device Group 4-31
Proxy Distribution Table Configuration 4-32
About the Proxy Distribution Table 4-32
Adding a New Proxy Distribution Table Entry 4-33
Sorting the Character String Match Order of Distribution Entries 4-35
Editing a Proxy Distribution Table Entry 4-35
Deleting a Proxy Distribution Table Entry 4-36
C H A P T E R 5 Setting Up and Managing Shared Profile Components 5-1
About Shared Profile Components 5-1
Downloadable PIX ACLs 5-2
About Downloadable PIX ACLs 5-2
Downloadable PIX ACL Configuration 5-4
Adding a Downloadable PIX ACL 5-4
viiUser Guide for Cisco Secure ACS for Windows Server
78-14696-01, Version 3.1

Contents
Editing a Downloadable PIX ACL 5-5
Deleting a Downloadable PIX ACL 5-5
Network Access Restrictions 5-6
About Network Access Restrictions 5-6
Shared Network Access Restrictions Configuration 5-8
Adding a Shared Network Access Restriction 5-9
Editing a Shared Network Access Restriction 5-11
Deleting a Shared Network Access Restriction 5-13
Command Authorization Sets 5-13
About Command Authorization Sets 5-14
About Pattern Matching 5-15
Command Authorization Sets Configuration 5-16
Adding a Command Authorization Set 5-16
Editing a Command Authorization Set 5-19
Deleting a Command Authorization Set 5-20
C H A P T E R 6 Setting Up and Managing User Groups 6-1
User Group Setup Features and Functions 6-2
Default Group 6-2
Group TACACS+ Settings 6-2
Common User Group Settings 6-3
Enabling VoIP Support for a User Group 6-4
Setting Default Time-of-Day Access for a User Group 6-5
Setting Callback Options for a User Group 6-6
Setting Network Access Restrictions for a User Group 6-7
Setting Max Sessions for a User Group 6-11
Setting Usage Quotas for a User Group 6-13
Configuration-specific User Group Settings 6-15
Setting Token Card Settings for a User Group 6-16
viiiUser Guide for Cisco Secure ACS for Windows Server
78-14696-01, Version 3.1

Contents
Setting Enable Privilege Options for a User Group 6-18
Enabling Password Aging for the CiscoSecure User Database 6-20
Enabling Password Aging for Users in Windows Databases 6-25
Setting IP Address Assignment Method for a User Group 6-27
Assigning a Downloadable PIX ACL to a Group 6-28
Configuring TACACS+ Settings for a User Group 6-29
Configuring a Shell Command Authorization Set for a User Group 6-31
Configuring a PIX Command Authorization Set for a User Group 6-33
Configuring Device-Management Command Authorization for a User Group 6-35
Configuring IETF RADIUS Settings for a User Group 6-37
Configuring Cisco IOS/PIX RADIUS Settings for a User Group 6-38
Configuring Cisco Aironet RADIUS Settings for a User Group 6-39
Configuring Ascend RADIUS Settings for a User Group 6-41
Configuring Cisco VPN 3000 Concentrator RADIUS Settings for a User Group 6-42
Configuring Cisco VPN 5000 Concentrator RADIUS Settings for a User Group 6-43
Configuring Microsoft RADIUS Settings for a User Group 6-45
Configuring Nortel RADIUS Settings for a User Group 6-46
Configuring Juniper RADIUS Settings for a User Group 6-48
Configuring BBSM RADIUS Settings for a User Group 6-49
Configuring Custom RADIUS VSA Settings for a User Group 6-50
Group Setting Management 6-51
Listing Users in a User Group 6-52
Resetting Usage Quota Counters for a User Group 6-52
Renaming a User Group 6-53
Saving Changes to User Group Settings 6-53
ixUser Guide for Cisco Secure ACS for Windows Server
78-14696-01, Version 3.1
Contents
C H A P T E R 7 Setting Up and Managing User Accounts 7-1
User Setup Features and Functions 7-2
About User Databases 7-2
Basic User Setup Options 7-4
Adding a Basic User Account 7-5
Setting Supplementary User Information 7-7
Setting a Separate CHAP/MS-CHAP/ARAP Password 7-8
Assigning a User to a Group 7-9
Setting User Callback Option 7-10
Assigning a User to a Client IP Address 7-11
Setting Network Access Restrictions for a User 7-12
Setting Max Sessions Options for a User 7-16
Setting User Usage Quotas Options 7-18
Setting Options for User Account Disablement 7-20
Assigning a PIX ACL to a User 7-21
Advanced User Authentication Settings 7-22
TACACS+ Settings (User) 7-22
Configuring TACACS+ Settings for a User 7-23
Configuring a Shell Command Authorization Set for a User 7-25
Configuring a PIX Command Authorization Set for a User 7-28
Configuring Device Management Command Authorization for a User 7-30
Configuring the Unknown Service Setting for a User 7-32
Advanced TACACS+ Settings (User) 7-33
Setting Enable Privilege Options for a User 7-33
Setting TACACS+ Enable Password Options for a User 7-35
Setting TACACS+ Outbound Password for a User 7-36
RADIUS Attributes 7-37
Setting IETF RADIUS Parameters for a User 7-38
Setting Cisco IOS/PIX RADIUS Parameters for a User 7-39
Setting Cisco Aironet RADIUS Parameters for a User 7-40
xUser Guide for Cisco Secure ACS for Windows Server
78-14696-01, Version 3.1
Contents
Setting Ascend RADIUS Parameters for a User 7-42
Setting Cisco VPN 3000 Concentrator RADIUS Parameters for a User 7-43
Setting Cisco VPN 5000 Concentrator RADIUS Parameters for a User 7-45
Setting Microsoft RADIUS Parameters for a User 7-46
Setting Nortel RADIUS Parameters for a User 7-48
Setting Juniper RADIUS Parameters for a User 7-49
Setting BBSM RADIUS Parameters for a User 7-51
Setting Custom RADIUS Attributes for a User 7-52
User Management 7-53
Listing All Users 7-54
Finding a User 7-54
Disabling a User Account 7-55
Deleting a User Account 7-56
Resetting User Session Quota Counters 7-57
Resetting a User Account after Login Failure 7-58
Saving User Settings 7-59
C H A P T E R 8 Establishing Cisco Secure ACS System Configuration 8-1
Service Control 8-2
Determining the Status of Cisco Secure ACS Services 8-2
Stopping, Starting, or Restarting Services 8-2
Logging 8-3
Date Format Control 8-3
Setting the Date Format 8-4
Local Password Management 8-5
Configuring Local Password Management 8-7
xiUser Guide for Cisco Secure ACS for Windows Server
78-14696-01, Version 3.1
Contents
CiscoSecure Database Replication 8-9
About CiscoSecure Database Replication 8-9
Replication Process 8-12
Replication Frequency 8-14
Important Implementation Considerations 8-15
Database Replication Versus Database Backup 8-16
Database Replication Logging 8-17
Replication Options 8-17
Replication Components Options 8-17
Outbound Replication Options 8-18
Inbound Replication Options 8-20
Implementing Primary and Secondary Replication Setups on Cisco Secure ACSes 8-20
Configuring a Secondary Cisco Secure ACS 8-21
Replicating Immediately 8-24
Scheduling Replication 8-26
Disabling CiscoSecure Database Replication 8-29
Database Replication Event Errors 8-29
RDBMS Synchronization 8-29
About RDBMS Synchronization 8-30
Users 8-31
User Groups 8-32
Network Configuration 8-32
Custom RADIUS Vendors and VSAs 8-33
RDBMS Synchronization Components 8-33
About CSDBSync 8-33
About the accountActions Table 8-34
Cisco Secure ACS Database Recovery Using the accountActions Table 8-36
Reports and Event (Error) Handling 8-37
Preparing to Use RDBMS Synchronization 8-37
xiiUser Guide for Cisco Secure ACS for Windows Server
78-14696-01, Version 3.1

Contents
Considerations for Using CSV-Based Synchronization 8-38
Preparing for CSV-Based Synchronization 8-39
Configuring a System Data Source Name for RDBMS Synchronization 8-40
RDBMS Synchronization Options 8-41
RDBMS Setup Options 8-41
Synchronization Scheduling Options 8-42
Synchronization Partners Options 8-42
Performing RDBMS Synchronization Immediately 8-43
Scheduling RDBMS Synchronization 8-44
Disabling Scheduled RDBMS Synchronizations 8-46
Cisco Secure ACS Backup 8-47
About Cisco Secure ACS Backup 8-47
Backup File Locations 8-48
Directory Management 8-48
Components Backed Up 8-48
Reports of Cisco Secure ACS Backups 8-49
Backup Options 8-49
Performing a Manual Cisco Secure ACS Backup 8-50
Scheduling Cisco Secure ACS Backups 8-50
Disabling Scheduled Cisco Secure ACS Backups 8-51
Cisco Secure ACS System Restore 8-52
About Cisco Secure ACS System Restore 8-52
Backup File Names and Locations 8-53
Components Restored 8-54
Reports of Cisco Secure ACS Restorations 8-54
Restoring Cisco Secure ACS from a Backup File 8-54
Cisco Secure ACS Active Service Management 8-55
System Monitoring 8-56
System Monitoring Options 8-56
Setting Up System Monitoring 8-57
xiiiUser Guide for Cisco Secure ACS for Windows Server
78-14696-01, Version 3.1
Contents
Event Logging 8-58
Setting Up Event Logging 8-58
IP Pools Server 8-59
About IP Pools Server 8-60
Allowing Overlapping IP Pools or Forcing Unique Pool Address Ranges 8-61
Refreshing the AAA Server IP Pools Table 8-62
Adding a New IP Pool 8-63
Editing an IP Pool Definition 8-64
Resetting an IP Pool 8-65
Deleting an IP Pool 8-66
IP Pools Address Recovery 8-67
Enabling IP Pool Address Recovery 8-67
VoIP Accounting Configuration 8-68
Configuring VoIP Accounting 8-68
Cisco Secure ACS Certificate Setup 8-69
Background on Protocols and Certification 8-69
Digital Certificates 8-69
About the EAP-TLS Protocol 8-70
About the PEAP Protocol 8-72
Installing a Cisco Secure ACS Server Certificate 8-74
Adding a Certificate Authority Certificate 8-76
Editing the Certificate Trust List 8-77
Generating a Certificate Signing Request 8-78
Updating or Replacing a Cisco Secure ACS Certificate 8-80
Global Authentication Setup 8-81
Configuring Authentication Options 8-81
xivUser Guide for Cisco Secure ACS for Windows Server
78-14696-01, Version 3.1
Contents
C H A P T E R 9 Working with Logging and Reports 9-1
Logging Formats 9-1
Special Logging Attributes 9-2
Update Packets In Accounting Logs 9-4
About Cisco Secure ACS Logs and Reports 9-4
Accounting Logs 9-5
Dynamic Administration Reports 9-7
Viewing the Logged-in Users Report 9-8
Deleting Logged-in Users 9-9
Viewing the Disabled Accounts Report 9-10
Cisco Secure ACS System Logs 9-11
Configuring the Administration Audit Log 9-12
Working with CSV Logs 9-13
CSV Log File Names 9-13
CSV Log File Locations 9-13
Enabling or Disabling a CSV Log 9-14
Viewing a CSV Report 9-15
Configuring a CSV Log 9-16
Working with ODBC Logs 9-19
Preparing for ODBC Logging 9-19
Configuring a System Data Source Name for ODBC Logging 9-20
Configuring an ODBC Log 9-20
Remote Logging 9-23
About Remote Logging 9-23
Implementing Centralized Remote Logging 9-24
Remote Logging Options 9-25
Enabling and Configuring Remote Logging 9-26
Disabling Remote Logging 9-28
xvUser Guide for Cisco Secure ACS for Windows Server
78-14696-01, Version 3.1
Contents
Service Logs 9-28
Services Logged 9-29
Configuring Service Logs 9-30
C H A P T E R 10 Setting Up and Managing Administrators and Policy 10-1
Administrator Accounts 10-1
About Administrator Accounts 10-2
Administrator Privileges 10-3
Adding an Administrator Account 10-6
Editing an Administrator Account 10-8
Unlocking a Locked Out Administrator Account 10-10
Deleting an Administrator Account 10-11
Access Policy 10-11
Access Policy Options 10-12
Setting Up Access Policy 10-14
Session Policy 10-16
Session Policy Options 10-16
Setting Up Session Policy 10-17
Audit Policy 10-18
C H A P T E R 11 Working with User Databases 11-1
CiscoSecure User Database 11-2
About the CiscoSecure User Database 11-2
User Import and Creation 11-3
About External User Databases 11-4
Authenticating with External User Databases 11-5
External User Database Authentication Process 11-6
Windows NT/2000 User Database 11-7
What’s Supported with Windows NT/2000 User Databases 11-8
xviUser Guide for Cisco Secure ACS for Windows Server
78-14696-01, Version 3.1
Contents
The Cisco Secure ACS Authentication Process with Windows NT/2000 User Databases 11-9
Trust Relationships 11-9
Windows Dial-up Networking Clients 11-10
Windows Dial-up Networking Clients with a Domain Field 11-10
Windows Dial-up Networking Clients without a Domain Field 11-11
Windows Authentication 11-11
User-Changeable Passwords with Windows NT/2000 User Databases 11-13
Preparing Users for Authenticating with Windows NT/2000 11-14
Configuring a Windows NT/2000 External User Database 11-14
Generic LDAP 11-16
Cisco Secure ACS Authentication Process with a Generic LDAP User Database 11-17
Multiple LDAP Instances 11-17
LDAP Organizational Units and Groups 11-18
Domain Filtering 11-18
LDAP Failover 11-20
Successful Previous Authentication with the Primary LDAP Server 11-21
Unsuccessful Previous Authentication with the Primary LDAP Server 11-21
LDAP Configuration Options 11-22
Configuring a Generic LDAP External User Database 11-28
Novell NDS Database 11-33
About Novell NDS User Databases 11-34
User Contexts 11-35
Novell NDS External User Database Options 11-36
Configuring a Novell NDS External User Database 11-37
ODBC Database 11-39
What is Supported with ODBC User Databases 11-40
Cisco Secure ACS Authentication Process with an ODBC External User Database 11-41
xviiUser Guide for Cisco Secure ACS for Windows Server
78-14696-01, Version 3.1
Contents
Preparing to Authenticate Users with an ODBC-Compliant Relational Database 11-42
Implementation of Stored Procedures for ODBC Authentication 11-43
Type Definitions 11-44
Microsoft SQL Server and Case-Sensitive Passwords 11-44
Sample Routine for Generating a PAP Authentication SQL Procedure 11-45
Sample Routine for Generating an SQL CHAP Authentication Procedure 11-46
PAP Authentication Procedure Input 11-46
PAP Procedure Output 11-47
CHAP/MS-CHAP/ARAP Authentication Procedure Input 11-48
CHAP/MS-CHAP/ARAP Procedure Output 11-48
Result Codes 11-49
Configuring a System Data Source Name for an ODBC External User Database 11-50
Configuring an ODBC External User Database 11-51
LEAP Proxy RADIUS Server Database 11-54
Configuring a LEAP Proxy RADIUS Server External User Database 11-55
Token Server User Databases 11-57
About Token Servers and Cisco Secure ACS 11-57
Token Servers and ISDN 11-58
RADIUS-Enabled Token Servers 11-59
About RADIUS-Enabled Token Servers 11-59
Token Server RADIUS Authentication Request and Response Contents 11-60
Configuring a RADIUS Token Server External User Database 11-60
RSA SecurID Token Servers 11-64
Configuring an RSA SecurID Token Server External User Database 11-65
Deleting an External User Database Configuration 11-66
xviiiUser Guide for Cisco Secure ACS for Windows Server
78-14696-01, Version 3.1
Contents
C H A P T E R 12 Administering External User Databases 12-1
Unknown User Processing 12-1
Known, Unknown, and Discovered Users 12-2
General Authentication Request Handling and Rejection Mode 12-3
Authentication Request Handling and Rejection Mode with the Windows NT/2000 User Database 12-4
Windows Authentication with a Domain Specified 12-5
Windows Authentication with Domain Omitted 12-6
Performance of Unknown User Authentication 12-7
Added Latency 12-7
Authentication Timeout Value on AAA clients 12-7
Network Access Authorization 12-8
Unknown User Policy 12-8
Database Search Order 12-9
Configuring the Unknown User Policy 12-9
Turning off External User Database Authentication 12-11
Database Group Mappings 12-11
Group Mapping by External User Database 12-12
Creating a Cisco Secure ACS Group Mapping for a Token Server, ODBC Database, or LEAP Proxy RADIUS Server Database 12-13
Group Mapping by Group Set Membership 12-14
Group Mapping Order 12-15
No Access Group for Group Set Mappings 12-15
Default Group Mapping for Windows NT/2000 12-16
Creating a Cisco Secure ACS Group Mapping for Windows NT/2000, Novell NDS, or Generic LDAP Groups 12-16
Editing a Windows NT/2000, Novell NDS, or Generic LDAP Group Set Mapping 12-18
Deleting a Windows NT/2000, Novell NDS, or Generic LDAP Group Set Mapping 12-20
xixUser Guide for Cisco Secure ACS for Windows Server
78-14696-01, Version 3.1
Contents
Deleting a Windows NT/2000 Domain Group Mapping Configuration 12-20
Changing Group Set Mapping Order 12-21
RADIUS-Based Group Specification 12-22
A P P E N D I X A Troubleshooting Information for Cisco Secure ACS A-1
Administration Issues A-2
Browser Issues A-3
Cisco IOS Issues A-3
Database Issues A-5
Dial-in Connection Issues A-6
Debug Issues A-10
Proxy Issues A-11
Installation and Upgrade Issues A-11
MaxSessions Issues A-12
Report Issues A-12
Third-Party Server Issues A-13
PIX Firewall Issues A-13
User Authentication Issues A-14
TACACS+ and RADIUS Attribute Issues A-16
A P P E N D I X B TACACS+ Attribute-Value Pairs B-1
Cisco IOS AV Pair Dictionary B-1
TACACS+ AV Pairs B-2
TACACS+ Accounting AV Pairs B-4
A P P E N D I X C RADIUS Attributes C-1
Cisco IOS Dictionary of RADIUS AV Pairs C-2
xxUser Guide for Cisco Secure ACS for Windows Server
78-14696-01, Version 3.1
Contents
Cisco IOS/PIX Dictionary of RADIUS VSAs C-5
Cisco VPN 3000 Concentrator Dictionary of RADIUS VSAs C-7
Cisco VPN 5000 Concentrator Dictionary of RADIUS VSAs C-11
Cisco Building Broadband Service Manager Dictionary of RADIUS VSA C-12
IETF Dictionary of RADIUS AV Pairs C-12
Microsoft MPPE Dictionary of RADIUS VSAs C-27
Ascend Dictionary of RADIUS AV Pairs C-30
Nortel Dictionary of RADIUS VSAs C-42
Juniper Dictionary of RADIUS VSAs C-43
A P P E N D I X D Cisco Secure ACS Command-Line Database Utility D-1
Location of CSUtil.exe and Related Files D-2
CSUtil.exe Syntax D-2
CSUtil.exe Options D-3
Backing Up Cisco Secure ACS with CSUtil.exe D-4
Restoring Cisco Secure ACS with CSUtil.exe D-5
Creating a CiscoSecure User Database D-7
Creating a Cisco Secure ACS Database Dump File D-8
Loading the Cisco Secure ACS Database from a Dump File D-9
Compacting the CiscoSecure User Database D-11
User and AAA Client Import Option D-13
Importing User and AAA Client Information D-13
User and AAA Client Import File Format D-15
About User and AAA Client Import File Format D-15
ONLINE or OFFLINE Statement D-15
ADD Statements D-16
UPDATE Statements D-18
DELETE Statements D-20
xxiUser Guide for Cisco Secure ACS for Windows Server
78-14696-01, Version 3.1

Contents
ADD_NAS Statements D-21
DEL_NAS Statements D-22
Import File Example D-23
Exporting User List to a Text File D-23
Exporting Group Information to a Text File D-24
Exporting Registry Information to a Text File D-25
Decoding Error Numbers D-26
Recalculating CRC Values D-27
User-Defined RADIUS Vendors and VSA Sets D-27
About User-Defined RADIUS Vendors and VSA Sets D-28
Adding a Custom RADIUS Vendor and VSA Set D-28
Deleting a Custom RADIUS Vendor and VSA Set D-30
Listing Custom RADIUS Vendors D-31
Exporting Custom RADIUS Vendor and VSA Sets D-32
RADIUS Vendor/VSA Import File D-33
About the RADIUS Vendor/VSA Import File D-33
Vendor and VSA Set Definition D-34
Attribute Definition D-35
Enumeration Definition D-37
Example RADIUS Vendor/VSA Import File D-38
A P P E N D I X E Cisco Secure ACS and Virtual Private Dial-up Networks E-1
VPDN Process E-1
A P P E N D I X F RDBMS Synchronization Import Definitions F-1
accountActions Specification F-1
accountActions Format F-2
accountActions Mandatory Fields F-3
accountActions Processing Order F-4
xxiiUser Guide for Cisco Secure ACS for Windows Server
78-14696-01, Version 3.1
Contents
Action Codes F-4
Action Codes for Setting and Deleting Values F-5
Action Codes for Creating and Modifying User Accounts F-7
Action Codes for Initializing and Modifying Access Filters F-15
Action Codes for Modifying TACACS+ and RADIUS Group and User Settings F-19
Action Codes for Modifying Network Configuration F-25
Cisco Secure ACS Attributes and Action Codes F-33
User-Specific Attributes F-33
User-Defined Attributes F-35
Group-Specific Attributes F-36
An Example of accountActions F-37
A P P E N D I X G Cisco Secure ACS Internal Architecture G-1
Windows 2000 Services G-1
Windows 2000 Registry G-2
CSAdmin G-2
CSAuth G-3
CSDBSync G-4
CSLog G-4
CSMon G-4
Monitoring G-5
Recording G-6
Notification G-7
Response G-7
CSTacacs and CSRadius G-8
IN D E X
xxiiiUser Guide for Cisco Secure ACS for Windows Server
78-14696-01, Version 3.1

Contents
xxivUser Guide for Cisco Secure ACS for Windows Server
78-14696-01, Version 3.1
Preface
This section discusses the objectives, audience, and organization of the Cisco Secure Access Control Server (Cisco Secure ACS) for Windows Server version 3.1 User Guide.
Document ObjectiveThis document will help you configure and use Cisco Secure ACS and its features and utilities.
AudienceThis publication is for system administrators who use Cisco Secure ACS and who set up and maintain accounts and dial-in network security.
xxvUser Guide for Cisco Secure ACS for Windows Server
78-14696-01, Version 3.1
PrefaceOrganization
OrganizationThe Cisco Secure ACS user guide is organized into the following chapters:
• Chapter 1, “Overview of Cisco Secure ACS.” An overview of Cisco Secure ACS and its features, network diagrams, and system requirements.
• Chapter 2, “Deploying Cisco Secure ACS.” A guide to deploying Cisco Secure ACS that includes requirements, options, trade-offs, and suggested sequences.
• Chapter 3, “Setting Up the Cisco Secure ACS HTML Interface.” Concepts and procedures regarding how to use the Interface Configuration section of Cisco Secure ACS to configure the user interface.
• Chapter 4, “Setting Up and Managing Network Configuration.” Concepts and procedures for establishing Cisco Secure ACS network configuration and building a distributed system.
• Chapter 5, “Setting Up and Managing Shared Profile Components.” Concepts and procedures regarding Cisco Secure ACS shared profile components: network access restrictions and device command sets.
• Chapter 6, “Setting Up and Managing User Groups.” Concepts and procedures for establishing and maintaining Cisco Secure ACS user groups.
• Chapter 7, “Setting Up and Managing User Accounts.” Concepts and procedures for establishing and maintaining Cisco Secure ACS user accounts.
• Chapter 8, “Establishing Cisco Secure ACS System Configuration.” Concepts and procedures regarding the System Configuration section of Cisco Secure ACS.
• Chapter 9, “Working with Logging and Reports.” Concepts and procedures regarding Cisco Secure ACS logging and reports.
• Chapter 10, “Setting Up and Managing Administrators and Policy.” Concepts and procedures for establishing and maintaining Cisco Secure ACS administrators.
xxviUser Guide for Cisco Secure ACS for Windows Server
78-14696-01, Version 3.1
PrefaceOrganization
• Chapter 11, “Working with User Databases.” Concepts and procedures for establishing user databases.
• Chapter 12, “Administering External User Databases.” Concepts and procedures for administering and maintaining user databases external to Cisco Secure ACS.
This guide also comprises the following appendixes:
• Appendix A, “Troubleshooting Information for Cisco Secure ACS.” How to identify and solve certain problems you might have with Cisco Secure ACS.
• Appendix B, “TACACS+ Attribute-Value Pairs.” A list of supported TACACS+ AV pairs and accounting AV pairs.
• Appendix C, “RADIUS Attributes.” A list of supported RADIUS AV pairs and accounting AV pairs.
• Appendix D, “Cisco Secure ACS Command-Line Database Utility.” Instructions for using the database import utility, CSUtil, to import an ODBC database, and back up, maintain, or restore the Cisco Secure ACS database.
• Appendix E, “Cisco Secure ACS and Virtual Private Dial-up Networks.” An introduction to Virtual Private Dial-up Networks (VPDN), including stripping and tunneling, with instructions for enabling VPDN on Cisco Secure ACS.
• Appendix F, “RDBMS Synchronization Import Definitions.” A list of import definitions, for use with the RDBMS Synchronization feature.
• Appendix G, “Cisco Secure ACS Internal Architecture.” A description of Cisco Secure ACS architectural components.
xxviiUser Guide for Cisco Secure ACS for Windows Server
78-14696-01, Version 3.1

PrefaceConventions
ConventionsThis guide uses the following typographical conventions:
Tip Means the following information will help you solve a problem. The tip information might not be troubleshooting or even an action, but could be useful information.
Note Means reader take note. Notes contain helpful suggestions or references to materials not covered in the manual.
Caution Means reader be careful. In this situation, you might do something that could result in equipment damage, loss of data, or a breach in your network security.
Warning Means danger. You are in a situation that could cause bodily injury. Before you work on any equipment, you must be aware of the hazards involved with electrical circuitry and be familiar with standard practices for preventing accidents. To see translated versions of the warning, refer to the Regulatory Compliance and Safety document that accompanied the device.
Table 1 Typographic Conventions
Convention Meaning
Italics Introduces new or important terminology and variable input for commands.
Script Denotes paths, file names, and example screen output. Also denotes Secure Script translations of security policy decision trees.
Bold Identifies special terminology and options that should be selected during procedures.
xxviiiUser Guide for Cisco Secure ACS for Windows Server
78-14696-01, Version 3.1

PrefaceRelated Documentation
Related DocumentationIncluded in the Cisco Secure ACS HTML interface are two sources of information:
• Online Help contains information for each associated page in the Cisco Secure ACS HTML interface.
• Online Documentation is a complete copy of the User Guide for Cisco Secure ACS for Windows Server.
We recommend that you read Release Notes for Cisco Secure ACS for Windows Server Version 3.1. While a printed copy of this document comes with Cisco Secure ACS, check Cisco.com for the most recent version.
You should also read the README.TXT file for additional important information.
Cisco Secure ACS includes an installation guide, Installation Guide for Cisco Secure ACS for Windows Server, to help you install the software efficiently and correctly.
Installation and User Guide for Cisco Secure ACS User-Changeable Passwords contains information on installing and configuring the optional user-changeable password feature.
You can find other product literature, including white papers, data sheets, and product bulletins, at http://www.cisco.com/warp/public/cc/pd/sqsw/sq/prodlit/index.shtml.
You should refer to the documentation that came with your AAA clients for more information about those products. You might also want to consult the Cisco Systems publication Cisco Systems’ Internetworking Terms and Acronyms.
xxixUser Guide for Cisco Secure ACS for Windows Server
78-14696-01, Version 3.1

PrefaceObtaining Documentation
Obtaining DocumentationThese sections explain how to obtain documentation from Cisco Systems.
World Wide WebYou can access the most current Cisco documentation on the World Wide Web at this URL:
• http://www.cisco.com
Translated documentation is available at this URL:
• http://www.cisco.com/public/countries_languages.shtml
Documentation CD-ROMCisco documentation and additional literature are available in a Cisco Documentation CD-ROM package, which is shipped with your product. The Documentation CD-ROM is updated monthly and may be more current than printed documentation. The CD-ROM package is available as a single unit or as an annual subscription.
Ordering DocumentationYou can order Cisco documentation in these ways:
• Registered Cisco.com users (Cisco direct customers) can order Cisco product documentation from the Networking Products MarketPlace:
http://www.cisco.com/cgi-bin/order/order_root.pl
• Registered Cisco.com users can order the Documentation CD-ROM through the online Subscription Store:
http://www.cisco.com/go/subscription
• Nonregistered Cisco.com users can order documentation through a local account representative by calling Cisco Systems Corporate Headquarters (California, U.S.A) at 408 526-7208 or, in North America, by calling 800 553-NETS(6387)
xxxUser Guide for Cisco Secure ACS for Windows Server
78-14696-01, Version 3.1
PrefaceObtaining Technical Assistance
Documentation FeedbackYou can submit comments electronically on Cisco.com. In the Cisco Documentation home page, click the Fax or Email option in the “Leave Feedback” section at the bottom of the page.
You can e-mail your comments to [email protected].
You can submit your comments by mail by using the response card behind the front cover of your document or by writing to the following address:
Cisco Systems, Inc. Attn: Document Resource Connection 170 West Tasman Drive San Jose, CA 95134-9883
We appreciate your comments.
Obtaining Technical AssistanceCisco provides Cisco.com as a starting point for all technical assistance. Customers and partners can obtain online documentation, troubleshooting tips, and sample configurations from online tools by using the Cisco Technical Assistance Center (TAC) Web Site. Cisco.com registered users have complete access to the technical support resources on the Cisco TAC Web Site.
Cisco.comCisco.com is the foundation of a suite of interactive, networked services that provides immediate, open access to Cisco information, networking solutions, services, programs, and resources at any time, from anywhere in the world.
Cisco.com is a highly integrated Internet application and a powerful, easy-to-use tool that provides a broad range of features and services to help you with these tasks:
• Streamline business processes and improve productivity
• Resolve technical issues with online support
• Download and test software packages
xxxiUser Guide for Cisco Secure ACS for Windows Server
78-14696-01, Version 3.1
PrefaceObtaining Technical Assistance
• Order Cisco learning materials and merchandise
• Register for online skill assessment, training, and certificate programs
If you want to obtain customized information and service, you can self-register on Cisco.com. To access Cisco.com, go to this URL:
http://www.cisco.com
Technical Assistance CenterThe Cisco Technical Assistance Center (TAC) is available to all customers who need technical assistance with a Cisco product, technology, or solution. Two levels of support are available: the Cisco TAC Web Site and the Cisco TAC Escalation Center.
Cisco TAC inquiries are categorized according to the urgency of the issue:
• Priority level 4 (P4)—You need information or assistance concerning Cisco product capabilities, product installation, or basic product configuration.
• Priority level 3 (P3)—Your network performance is degraded. Network functionality is noticeably impaired, but most business operations continue.
• Priority level 2 (P2)—Your production network is severely degraded, affecting significant aspects of business operations. No workaround is available.
• Priority level 1 (P1)—Your production network is down, and a critical impact to business operations will occur if service is not restored quickly. No workaround is available.
The Cisco TAC resource that you choose is based on the priority of the problem and the conditions of service contracts, when applicable.
Cisco TAC Web Site
You can use the Cisco TAC Web Site to resolve P3 and P4 issues yourself, saving both cost and time. The site provides around-the-clock access to online tools, knowledge bases, and software. To access the Cisco TAC Web Site, go to this URL:
http://www.cisco.com/tac
xxxiiUser Guide for Cisco Secure ACS for Windows Server
78-14696-01, Version 3.1

PrefaceObtaining Technical Assistance
All customers, partners, and resellers who have a valid Cisco service contract have complete access to the technical support resources on the Cisco TAC Web Site. The Cisco TAC Web Site requires a Cisco.com login ID and password. If you have a valid service contract but do not have a login ID or password, go to this URL to register:
http://www.cisco.com/register/
If you are a Cisco.com registered user, and you cannot resolve your technical issues by using the Cisco TAC Web Site, you can open a case online by using the TAC Case Open tool at this URL:
http://www.cisco.com/tac/caseopen
If you have Internet access, we recommend that you open P3 and P4 cases through the Cisco TAC Web Site.
Cisco TAC Escalation Center
The Cisco TAC Escalation Center addresses priority level 1 or priority level 2 issues. These classifications are assigned when severe network degradation significantly impacts business operations. When you contact the TAC Escalation Center with a P1 or P2 problem, a Cisco TAC engineer automatically opens a case.
To obtain a directory of toll-free Cisco TAC telephone numbers for your country, go to this URL:
http://www.cisco.com/warp/public/687/Directory/DirTAC.shtml
Before calling, please check with your network operations center to determine the level of Cisco support services to which your company is entitled: for example, SMARTnet, SMARTnet Onsite, or Network Supported Accounts (NSA). When you call the center, please have available your service agreement number and your product serial number.
xxxiiiUser Guide for Cisco Secure ACS for Windows Server
78-14696-01, Version 3.1
PrefaceObtaining Technical Assistance
xxxivUser Guide for Cisco Secure ACS for Windows Server
78-14696-01, Version 3.1
User Guide for 78-14696-01, Version 3.1
C H A P T E R 1
Overview of Cisco Secure ACSThis chapter provides an overview of Cisco Secure Access Control Server (Cisco Secure ACS) for Windows Server version 3.1. It contains the following sections:
• The Cisco Secure ACS Paradigm, page 1-1
• Cisco Secure ACS Specifications, page 1-2
• AAA Server Functions and Concepts, page 1-5
• Cisco Secure ACS HTML Interface, page 1-23
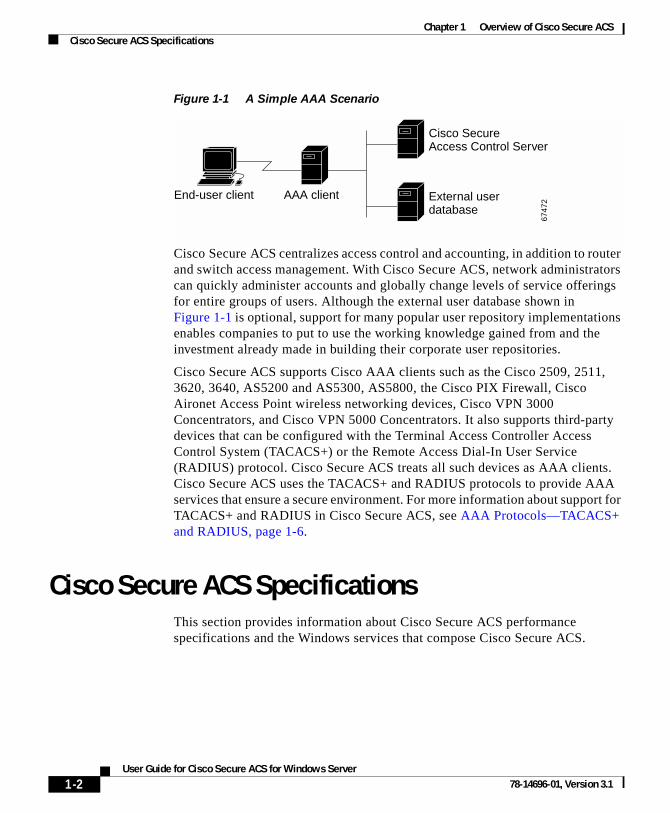
The Cisco Secure ACS ParadigmCisco Secure ACS provides authentication, authorization, and accounting (AAA—pronounced “triple A”) services to network devices that function as AAA clients, such as a network access server, PIX Firewall, or router. The AAA client in Figure 1-1 represents any such device that provides AAA client functionality and uses one of the AAA protocols supported by Cisco Secure ACS.
1-1Cisco Secure ACS for Windows Server
Chapter 1 Overview of Cisco Secure ACSCisco Secure ACS Specifications
Figure 1-1 A Simple AAA Scenario
Cisco Secure ACS centralizes access control and accounting, in addition to router and switch access management. With Cisco Secure ACS, network administrators can quickly administer accounts and globally change levels of service offerings for entire groups of users. Although the external user database shown in Figure 1-1 is optional, support for many popular user repository implementations enables companies to put to use the working knowledge gained from and the investment already made in building their corporate user repositories.
Cisco Secure ACS supports Cisco AAA clients such as the Cisco 2509, 2511, 3620, 3640, AS5200 and AS5300, AS5800, the Cisco PIX Firewall, Cisco Aironet Access Point wireless networking devices, Cisco VPN 3000 Concentrators, and Cisco VPN 5000 Concentrators. It also supports third-party devices that can be configured with the Terminal Access Controller Access Control System (TACACS+) or the Remote Access Dial-In User Service (RADIUS) protocol. Cisco Secure ACS treats all such devices as AAA clients. Cisco Secure ACS uses the TACACS+ and RADIUS protocols to provide AAA services that ensure a secure environment. For more information about support for TACACS+ and RADIUS in Cisco Secure ACS, see AAA Protocols—TACACS+ and RADIUS, page 1-6.
Cisco Secure ACS SpecificationsThis section provides information about Cisco Secure ACS performance specifications and the Windows services that compose Cisco Secure ACS.
6747
2
End-user client AAA client
Cisco SecureAccess Control Server
External userdatabase
1-2User Guide for Cisco Secure ACS for Windows Server
78-14696-01, Version 3.1
Chapter 1 Overview of Cisco Secure ACSCisco Secure ACS Specifications
System Performance SpecificationsThe performance capabilities of Cisco Secure ACS are largely dependent upon the Windows server it is installed upon, your network topology and network management, the selection of user databases, and other factors. For example, Cisco Secure ACS can perform many more authentications per second if it is using its internal user database and running on a 2.1-GHz Pentium IV server on a 1 GB Ethernet backbone than it can if it is using an external user database and running on a 550-MHz Pentium III server on a 10 MB LAN.
For more information about the expected performance of Cisco Secure ACS in your network setting, contact your Cisco sales representative. The following items are general answers to common system performance questions. The performance of Cisco Secure ACS in your network depends on your specific environment and AAA requirements.
• Maximum users supported by the CiscoSecure user database—There is no theoretical limit to the number of users the CiscoSecure user database can support. We have successfully tested Cisco Secure ACS with databases in excess of 100,000 users. The practical limit for a single Cisco Secure ACS authenticating against all its databases, internal and external, is 300,000 to 500,000 users. This number increases significantly if the authentication load is spread across a number of replicated Cisco Secure ACS servers.
• Transactions per second—Authentication and authorization transactions per second is dependent on many factors, most of which are external to Cisco Secure ACS. For example, high network latency in communication with an external user database lowers the transactions per second that Cisco Secure ACS can perform.
• Maximum number of AAA clients supported—Cisco Secure ACS can support AAA services for approximately 5000 AAA client configurations. This limitation is primarily a limitation of the Cisco Secure ACS HTML interface. Performance of the HTML interface degrades when Cisco Secure ACS has more than approximately 5000 AAA client configurations. However, a AAA client configuration in Cisco Secure ACS can represent more than one physical network device, provided that the network devices use the same AAA protocol and use the same shared secret. If you make use of this ability, the number of actual AAA clients supported approaches 20,000.
1-3User Guide for Cisco Secure ACS for Windows Server
78-14696-01, Version 3.1
Chapter 1 Overview of Cisco Secure ACSCisco Secure ACS Specifications
If your network has several thousand AAA clients, we recommend using multiple Cisco Secure ACSes and assigning no more than 5000 AAA clients to each Cisco Secure ACS. For example, if you have 20,000 AAA clients, you could use four Cisco Secure ACSes and divide the AAA client load among them so that no single Cisco Secure ACS manages more than 5000 AAA client configurations. If you use replication to propagate configuration data among Cisco Secure ACSes, limit replication of AAA client data to Cisco Secure ACSes that serve the same set of AAA clients.
Cisco Secure ACS Windows ServicesCisco Secure ACS operates as a set of Windows 2000 services and controls the authentication, authorization, and accounting of users accessing networks.
When you install Cisco Secure ACS on your server, the installation adds several Windows services. The services provide the core of Cisco Secure ACS functionality. For a full discussion of each service, see Appendix G, “Cisco Secure ACS Internal Architecture.” The Cisco Secure ACS services on your Cisco Secure ACS server include the following:
• CSAdmin—Provides the HTML interface for administration of Cisco Secure ACS.
• CSAuth—Provides authentication services.
• CSDBSync—Provides synchronization of the CiscoSecure user database with an external RDBMS application.
• CSLog—Provides logging services, both for accounting and system activity.
• CSMon—Provides monitoring, recording, and notification of Cisco Secure ACS performance, and includes automatic response to some scenarios.
• CSTacacs—Provides communication between TACACS+ AAA clients and the CSAuth service.
• CSRadius—Provides communication between RADIUS AAA clients and the CSAuth service.
Each module can be started and stopped individually from within the Microsoft Service Control Panel or as a group from within the Cisco Secure ACS HTML interface. For information about stopping and starting Cisco Secure ACS services, see Service Control, page 8-2.
1-4User Guide for Cisco Secure ACS for Windows Server
78-14696-01, Version 3.1
Chapter 1 Overview of Cisco Secure ACSAAA Server Functions and Concepts
AAA Server Functions and ConceptsCisco Secure ACS is a AAA server, providing authentication, authorization, and accounting services to network devices that can act as AAA clients.
As a AAA server, Cisco Secure ACS incorporates many technologies to render AAA services to AAA clients. Understanding Cisco Secure ACS requires knowledge of many of these technologies. To address the most significant aspects, this section contains the following topics:
• Cisco Secure ACS and the AAA Client, page 1-5
• AAA Protocols—TACACS+ and RADIUS, page 1-6
• Authentication, page 1-7
• Authorization, page 1-15
• Accounting, page 1-20
• Administration, page 1-21
Cisco Secure ACS and the AAA ClientA AAA client is software running on a network device that enables the network device to defer authentication, authorization, and logging (accounting) of user sessions to a AAA server. AAA clients must be configured to direct all end-user client access requests to Cisco Secure ACS for authentication of users and authorization of service requests. Using the TACACS+ or RADIUS protocol, the AAA client sends authentication requests to Cisco Secure ACS. Cisco Secure ACS verifies the username and password using the user databases it is configured to query. Cisco Secure ACS returns a success or failure response to the AAA client, which permits or denies user access, based on the response it receives. When the user authenticates successfully, Cisco Secure ACS sends a set of authorization attributes to the AAA client. The AAA client then begins forwarding accounting information to Cisco Secure ACS.
When the user has successfully authenticated, a set of session attributes can be sent to the AAA client to provide additional security and control of privileges, otherwise known as authorization. These attributes might include the IP address pool, access control list, or type of connection (for example, IP, IPX, or Telnet). More recently, networking vendors are expanding the use of the attribute sets returned to cover an increasingly wider aspect of user session provisioning.
1-5User Guide for Cisco Secure ACS for Windows Server
78-14696-01, Version 3.1
Chapter 1 Overview of Cisco Secure ACSAAA Server Functions and Concepts
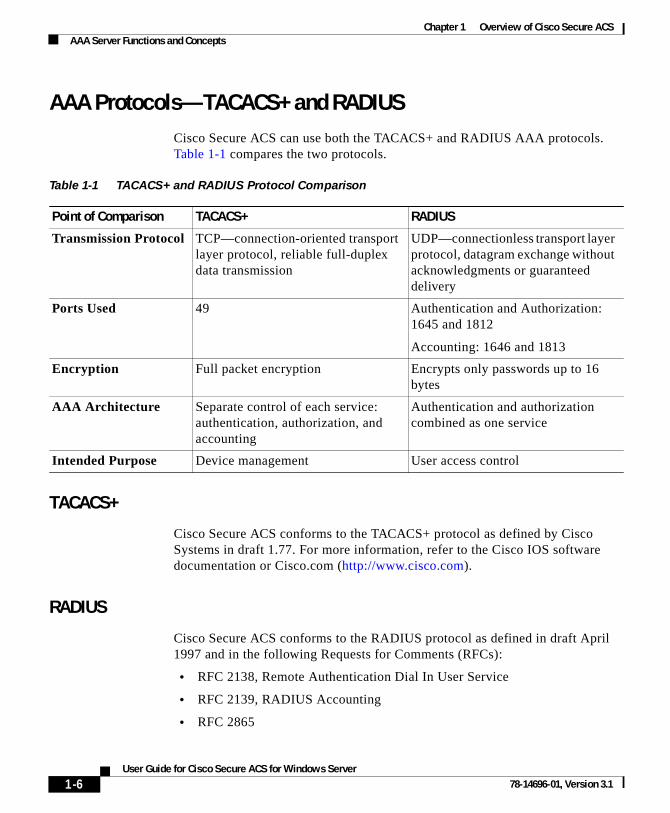
AAA Protocols—TACACS+ and RADIUSCisco Secure ACS can use both the TACACS+ and RADIUS AAA protocols. Table 1-1 compares the two protocols.
TACACS+
Cisco Secure ACS conforms to the TACACS+ protocol as defined by Cisco Systems in draft 1.77. For more information, refer to the Cisco IOS software documentation or Cisco.com (http://www.cisco.com).
RADIUS
Cisco Secure ACS conforms to the RADIUS protocol as defined in draft April 1997 and in the following Requests for Comments (RFCs):
• RFC 2138, Remote Authentication Dial In User Service
• RFC 2139, RADIUS Accounting
• RFC 2865
Table 1-1 TACACS+ and RADIUS Protocol Comparison
Point of Comparison TACACS+ RADIUS
Transmission Protocol TCP—connection-oriented transport layer protocol, reliable full-duplex data transmission
UDP—connectionless transport layer protocol, datagram exchange without acknowledgments or guaranteed delivery
Ports Used 49 Authentication and Authorization: 1645 and 1812
Accounting: 1646 and 1813
Encryption Full packet encryption Encrypts only passwords up to 16 bytes
AAA Architecture Separate control of each service: authentication, authorization, and accounting
Authentication and authorization combined as one service
Intended Purpose Device management User access control
1-6User Guide for Cisco Secure ACS for Windows Server
78-14696-01, Version 3.1
Chapter 1 Overview of Cisco Secure ACSAAA Server Functions and Concepts
• RFC 2866
• RFC 2867
• RFC 2868
The ports used for authentication and accounting have changed in RADIUS RFC documents. To support both the older and newer RFCs, Cisco Secure ACS accepts authentication requests on port 1645 and port 1812. For accounting, Cisco Secure ACS accepts accounting packets on port 1646 and 1813.
In addition to support for standard IETF RADIUS attributes, Cisco Secure ACS includes support for RADIUS vendor-specific attributes (VSAs). We have predefined the following RADIUS VSAs in Cisco Secure ACS:
• Cisco IOS/PIX
• Cisco VPN 3000
• Cisco VPN 5000
• Ascend
• Juniper
• Microsoft
• Nortel
Cisco Secure ACS also supports up to 10 RADIUS VSAs that you define. After you define a new RADIUS VSA, you can use it as you would one of the RADIUS VSAs that come predefined in Cisco Secure ACS. In the Network Configuration section of the Cisco Secure ACS HTML interface, you can configure a AAA client to use a user-defined RADIUS VSA as its AAA protocol. In Interface Configuration, you can enable user-level and group-level attributes for user-defined RADIUS VSAs. In User Setup and Group Setup, you can configure the values for enabled attributes of a user-defined RADIUS VSA.
For more information about creating user-defined RADIUS VSAs, see Custom RADIUS Vendors and VSAs, page 8-33.
AuthenticationAuthentication determines user identity and verifies the information. Traditional authentication uses a name and a fixed password. More modern and secure methods use technologies such as CHAP and one-time passwords (OTPs). Cisco Secure ACS supports a variety of these authentication methods.
1-7User Guide for Cisco Secure ACS for Windows Server
78-14696-01, Version 3.1
Chapter 1 Overview of Cisco Secure ACSAAA Server Functions and Concepts
There is a fundamental implicit relationship between authentication and authorization. The more authorization privileges granted to a user, the stronger the authentication should be. Cisco Secure ACS supports this relationship by providing various methods of authentication.
Authentication Considerations
Username and password is the most popular, simplest, and least expensive method used for authentication. No special equipment is required. This is a popular method for service providers because of its easy application by the client. The disadvantage is that this information can be told to someone else, guessed, or captured. Simple unencrypted username and password is not considered a strong authentication mechanism but can be sufficient for low authorization or privilege levels such as Internet access.
To reduce the risk of password capturing on the network, use encryption. Client and server access control protocols such as TACACS+ and RADIUS encrypt passwords to prevent them from being captured within a network. However, TACACS+ and RADIUS operate only between the AAA client and the access control server. Before this point in the authentication process, unauthorized persons can obtain clear-text passwords, such as the communication between an end-user client dialing up over a phone line or an ISDN line terminating at a network access server, or over a Telnet session between an end-user client and the hosting device.
Network administrators who offer increased levels of security services, and corporations that want to lessen the chance of intruder access resulting from password capturing, can use an OTP. Cisco Secure ACS supports several types of OTP solutions, including PAP for Point-to-Point Protocol (PPP) remote-node login. Token cards are considered one of the strongest OTP authentication mechanisms.
Authentication and User Databases
Cisco Secure ACS supports a variety of user databases. It supports the CiscoSecure user database and several external user databases, including the following:
• Windows NT/2000 User Database
• Generic LDAP
1-8User Guide for Cisco Secure ACS for Windows Server
78-14696-01, Version 3.1

Chapter 1 Overview of Cisco Secure ACSAAA Server Functions and Concepts
• Novell NetWare Directory Services (NDS)
• Open Database Connectivity (ODBC)-compliant relational databases
• CRYPTOCard token server
• SafeWord token server
• PassGo token server
• RSA SecureID token server
• ActivCard token server
• Vasco token server
In addition to the token servers listed above, Cisco Secure ACS supports any token server that provides a RADIUS server interface. For more information about token server support, see Token Server User Databases, page 11-57.
Authentication Protocol-Database Compatibility
The various password protocols supported by Cisco Secure ACS for authentication are supported unevenly by the various databases supported by Cisco Secure ACS. Table 1-2 on page 1-9 provides a reference of the password protocols supported by the various databases. For more information about the password protocols supported by Cisco Secure ACS, see Passwords, page 1-10.
Table 1-2 Authentication Protocol and User Database Compatibility
Database ASCII PAP CHAP ARAP
MS- CHAP v.1
MS- CHAP v.2 LEAP
EAP -MD5
EAP-TLS
PEAP (EAP-GTC)
Cisco Secure ACS Yes Yes Yes Yes Yes Yes Yes Yes Yes No
Windows SAM Yes Yes No No Yes Yes Yes No No Yes
Windows AD Yes Yes No No Yes Yes Yes No Yes Yes
LDAP Yes Yes No No No No No No Yes Yes
Novell NDS Yes Yes No No No No No No No Yes
ODBC Yes Yes Yes Yes Yes Yes Yes Yes No Yes
LEAP Proxy RADIUS Server
Yes Yes No No Yes Yes Yes No No No
1-9User Guide for Cisco Secure ACS for Windows Server
78-14696-01, Version 3.1

Chapter 1 Overview of Cisco Secure ACSAAA Server Functions and Concepts
Passwords
Cisco Secure ACS supports many common password protocols:
• ASCII/PAP
• CHAP
• MS-CHAP
• LEAP
• EAP-MD5
• EAP-TLS
• PEAP(EAP-GTC)
• ARAP
Passwords can be processed using these password authentication protocols based on the version and type of security control protocol used (for example, RADIUS or TACACS+) and the configuration of the AAA client and end-user client. The following sections outline the different conditions and functions of password handling.
RSA Yes Yes No No No No No No No Yes
ActivCard Yes Yes No No No No No No No Yes
CRYPTOCard Yes Yes No No No No No No No Yes
PassGo Yes Yes No No No No No No No Yes
Safeword Yes Yes No No No No No No No Yes
Vasco Yes Yes No No No No No No No Yes
RADIUS Token Server
Yes Yes No No No No No No No Yes
Table 1-2 Authentication Protocol and User Database Compatibility (continued)
Database ASCII PAP CHAP ARAP
MS- CHAP v.1
MS- CHAP v.2 LEAP
EAP -MD5
EAP-TLS
PEAP (EAP-GTC)
1-10User Guide for Cisco Secure ACS for Windows Server
78-14696-01, Version 3.1
Chapter 1 Overview of Cisco Secure ACSAAA Server Functions and Concepts
In the case of token servers, Cisco Secure ACS acts as a client to the token server, using either its proprietary API or its RADIUS interface, depending on the token server. For more information, see About Token Servers and Cisco Secure ACS, page 11-57.
Different levels of security can be concurrently used with Cisco Secure ACS for different requirements. The basic user-to-network security level is PAP. Although it represents the unencrypted security, PAP does offer convenience and simplicity for the client. PAP allows authentication against the Windows NT/2000 database. With this configuration, users need to log in only once. CHAP allows a higher level of security for encrypting passwords when communicating from an end-user client to the AAA client. You can use CHAP with the CiscoSecure user database. ARAP support is included to support Apple clients.
Comparing PAP, CHAP, and ARAP
PAP, CHAP, and ARAP are authentication protocols used to encrypt passwords. However, each protocol provides a different level of security.
• PAP—Uses clear-text passwords (that is, unencrypted passwords) and is the least sophisticated authentication protocol. If you are using the Windows NT/2000 user database to authenticate users, you must use PAP password encryption or MS-CHAP.
• CHAP—Uses a challenge-response mechanism with one-way encryption on the response. CHAP enables Cisco Secure ACS to negotiate downward from the most secure to the least secure encryption mechanism, and it protects passwords transmitted in the process. CHAP passwords are reusable. If you are using the CiscoSecure user database for authentication, you can use either PAP or CHAP. CHAP does not work with the Windows NT/2000 user database.
• ARAP—Uses a two-way challenge-response mechanism. The AAA client challenges the end-user client to authenticate itself, and the end-user client challenges the AAA client to authenticate itself.
1-11User Guide for Cisco Secure ACS for Windows Server
78-14696-01, Version 3.1
Chapter 1 Overview of Cisco Secure ACSAAA Server Functions and Concepts
MS-CHAP
Cisco Secure ACS supports Microsoft Challenge-Handshake Authentication Protocol (MS-CHAP) for user authentication. Differences between MS-CHAP and standard CHAP are the following:
• The MS-CHAP Response packet is in a format compatible with Microsoft Windows NT/2000, Windows 95/98/ME/XP, and LAN Manager 2.x. The MS-CHAP format does not require the authenticator to store a clear-text or reversibly encrypted password.
• MS-CHAP provides an authentication-retry mechanism controlled by the authenticator.
• MS-CHAP provides additional failure codes in the Failure packet Message field.
For more information on MS-CHAP, refer to RFC draft-ietf-pppext-mschap-00.txt, RADIUS Attributes for MS-CHAP Support.
EAP Support
The Extensible Authentication Protocol (EAP), based on the IETF 802.1x, is an end-to-end framework that allows the creation of authentication types without the necessity of changing the implementation of the AAA clients. For more information about EAP, go to PPP Extensible Authentication Protocol (EAP) RFC 2284.
Cisco Secure ACS supports the following varieties of EAP:
• EAP-MD5—An EAP protocol that does not support mutual authentication.
• EAP-TLS—EAP incorporating Transport Layer Security. For more information, see EAP-TLS Deployment Guide for Wireless LAN Networks and About the EAP-TLS Protocol, page 8-70.
• LEAP—A Network-EAP protocol that supports mutual authentication.
• PEAP—Protected EAP, which is implemented with EAP-Generic Token Card (GTC). For more information, see About the PEAP Protocol, page 8-72.
The architecture of Cisco Secure ACS is extensible with regard to EAP; additional varieties of EAP will be supported as those protocols mature.
1-12User Guide for Cisco Secure ACS for Windows Server
78-14696-01, Version 3.1
Chapter 1 Overview of Cisco Secure ACSAAA Server Functions and Concepts
Basic Password Configurations
There are several basic password configurations:
Note These configurations are all classed as inbound authentication.
• Single password for ASCII/PAP/CHAP/MS-CHAP/ARAP—This is the most convenient method for both the administrator when setting up accounts and the user when obtaining authentication. However, because the CHAP password is the same as the PAP password, and the PAP password is transmitted in clear text during an ASCII/PAP login, there is the chance that the CHAP password can be compromised.
• Separate passwords for ASCII/PAP and CHAP/MS-CHAP/ARAP—For a higher level of security, users can be given two separate passwords. If the ASCII/PAP password is compromised, the CHAP/ARAP password can remain secure.
• External user database authentication—For authentication by an external user database, the user does not need a password stored in the CiscoSecure user database. Instead, Cisco Secure ACS records which external user database it should query to authenticate the user.
Advanced Password Configurations
Cisco Secure ACS supports the following advanced password configurations:
• Inbound passwords—Passwords used by most Cisco Secure ACS users. These are supported by both the TACACS+ and RADIUS protocols. They are held internally to the CiscoSecure user database and are not usually given up to an external source if an outbound password has been configured.
• Outbound passwords—The TACACS+ protocol supports outbound passwords that can be used, for example, when a AAA client has to be authenticated by another AAA client and end-user client. Passwords from the CiscoSecure user database are then sent back to the second AAA client and end-user client.
• Token caching—When token caching is enabled, ISDN users can connect (for a limited time) a second B Channel using the same OTP entered during original authentication. For greater security, the B-Channel authentication request from the AAA client should include the OTP in the username value
1-13User Guide for Cisco Secure ACS for Windows Server
78-14696-01, Version 3.1

Chapter 1 Overview of Cisco Secure ACSAAA Server Functions and Concepts
(for example, Fredpassword) while the password value contains an ASCII/PAP/ARAP password. The TACACS+ and RADIUS servers then verify that the token is still cached and validate the incoming password against either the single ASCII/PAP/ARAP or separate CHAP/ARAP password, depending on the configuration the user employs.
The TACACS+ SENDAUTH feature enables a AAA client to authenticate itself to another AAA client or an end-user client via outbound authentication. The outbound authentication can be PAP, CHAP, or ARAP. With outbound authentication, the Cisco Secure ACS password is given out. By default, ASCII/PAP or CHAP/ARAP password is used, depending on how this has been configured; however, we recommend that the separate SENDAUTH password be configured for the user so that Cisco Secure ACS inbound passwords are never compromised.
If you want to use outbound passwords and maintain the highest level of security, we recommend that you configure users in the CiscoSecure user database with an outbound password that is different from the inbound password.
Password Aging
With Cisco Secure ACS you can choose whether and how you want to employ password aging. Control for password aging may reside either in the CiscoSecure user database, or in a Windows NT/2000 user database. Each password aging mechanism differs as to requirements and setting configurations.
The password aging feature controlled by the CiscoSecure user database enables you force users to change their passwords under any of the following conditions:
• After a specified number of days.
• After a specified number of logins.
• The first time a new user logs in.
For information on the requirements and configuration of the password aging feature controlled by the CiscoSecure user database, see Enabling Password Aging for the CiscoSecure User Database, page 6-20.
The Windows NT/2000-based password aging feature enables you to control the following password aging parameters:
• Maximum password age in days.
• Minimum password age in days.
1-14User Guide for Cisco Secure ACS for Windows Server
78-14696-01, Version 3.1
Chapter 1 Overview of Cisco Secure ACSAAA Server Functions and Concepts
The methods and functionality of Windows password aging differ according to whether you are using Windows NT or Windows 2000 and whether you employ Active Directory (AD) or Security Accounts Manager (SAM). For information on the requirements and configuration of the Windows-based password aging feature, see Enabling Password Aging for Users in Windows Databases, page 6-25.
User-Changeable Passwords
With Cisco Secure ACS, you can install a separate program that enables users to change their passwords by using a web-based utility. For more information about installing user-changeable passwords, see the Installation and User Guide for Cisco Secure ACS User-Changeable Passwords.
Other Authentication-Related Features
In addition to the authentication-related features discussed in this section, the following features are provided by Cisco Secure ACS:
• Authentication of unknown users with external user databases (see Unknown User Processing, page 12-1).
• Microsoft Windows Callback feature (see Setting User Callback Option, page 7-10).
• Ability to configure user accounts, including passwords, using an external data source (see About RDBMS Synchronization, page 8-30).
• Ability for external users to authenticate via an enable password (see Setting TACACS+ Enable Password Options for a User, page 7-35).
• Proxy of authentication requests to other AAA servers (see Proxy in Distributed Systems, page 4-4).
• Configurable character string stripping from proxied authentication requests (see Stripping, page 4-6).
AuthorizationAuthorization determines what a user is allowed to do. Cisco Secure ACS can send user profile policies to a AAA client to determine the network services the user can access. You can configure authorization to give different users and
1-15User Guide for Cisco Secure ACS for Windows Server
78-14696-01, Version 3.1

Chapter 1 Overview of Cisco Secure ACSAAA Server Functions and Concepts
groups different levels of service. For example, standard dial-up users might not have the same access privileges as premium customers and users. You can also differentiate by levels of security, access times, and services.
The Cisco Secure ACS access restrictions feature enables you to permit or deny logins based on time-of-day and day-of-week. For example, you could create a group for temporary accounts that can be disabled on specified dates. This would make it possible for a service provider to offer a 30-day free trial. The same authorization could be used to create a temporary account for a consultant with login permission limited to Monday through Friday, 9 A.M. to 5 P.M.
You can restrict users to a service or combination of services such as PPP, AppleTalk Remote Access (ARA), Serial Line Internet Protocol (SLIP), or EXEC. After a service is selected, you can restrict Layer 2 and Layer 3 protocols, such as IP and IPX, and you can apply individual access lists. Access lists on a per-user or per-group basis can restrict users from reaching parts of the network where critical information is stored or prevent them from using certain services such as File Transfer Protocol (FTP) or Simple Network Management Protocol (SNMP).
One fast-growing service being offered by service providers and adopted by corporations is a service authorization for Virtual Private Dial-Up Networks (VPDNs). Cisco Secure ACS can provide information to the network device for a specific user to configure a secure tunnel through a public network such as the Internet. The information can be for the access server (such as the home gateway for that user) or for the home gateway router to validate the user at the customer premises. In either case, Cisco Secure ACS can be used for each end of the VPDN.
Max Sessions
Max Sessions is a useful feature for organizations that need to limit the number of concurrent sessions available to either a user or a group:
• User Max Sessions—For example, an Internet service provider can limit each account holder to a single session.
• Group Max Sessions—For example, an enterprise administrator can allow the remote access infrastructure to be shared equally among several departments and limit the maximum number of concurrent sessions for all users in any one department.
1-16User Guide for Cisco Secure ACS for Windows Server
78-14696-01, Version 3.1
Chapter 1 Overview of Cisco Secure ACSAAA Server Functions and Concepts
In addition to simple User and Group Max Sessions control, Cisco Secure ACS enables the administrator to specify a Group Max Sessions value and a group-based User Max Sessions value; that is, a User Max Sessions value based on the group membership of the user. For example, an administrator can allocate a Group Max Sessions value of 50 to the group “Sales” and also limit each member of the “Sales” group to 5 sessions each. This way no single member of a group account would be able to use more than 5 sessions at any one time, but the group could still have up to 50 active sessions.
For more information about the Max Sessions feature, see Setting Max Sessions for a User Group, page 6-11, and Setting Max Sessions Options for a User, page 7-16.
Dynamic Usage Quotas
Cisco Secure ACS enables you to define network usage quotas for users. Using quotas, you can limit the network access of each user in a group or of individual users. You define quotas by duration of sessions or the total number of sessions. Quotas can be either absolute or based on daily, weekly, or monthly periods. To grant access to users who have exceeded their quotas, you can reset session quota counters as needed.
To support time-based quotas, we recommend enabling accounting update packets on all AAA clients. If update packets are not enabled, the quota is updated only when the user logs off and the accounting stop packet is received from the AAA client. If the AAA client through which the user is accessing your network fails, the session information is not updated. In the case of multiple sessions, such as with ISDN, the quota would not be updated until all sessions terminate, which means that a second channel will be accepted even if the first channel has exhausted the quota allocated to the user.
For more information about usage quotas, see Setting Usage Quotas for a User Group, page 6-13, and Setting User Usage Quotas Options, page 7-18.
Shared Profile Components
Cisco Secure ACS provides a means for specifying authorization profile components that you can apply to multiple user groups and users. For example, you may have multiple user groups that have identical network access restrictions. Rather than configuring the network access restrictions several times, once per
1-17User Guide for Cisco Secure ACS for Windows Server
78-14696-01, Version 3.1
Chapter 1 Overview of Cisco Secure ACSAAA Server Functions and Concepts
group, you can configure a network access restriction set in the Shared Profile Components section of the HTML interface, and then configure each group to use the network access restriction set you created.
For information about the types of shared profile components supported by Cisco Secure ACS, see About Shared Profile Components, page 5-1.
Support for Cisco Device-Management Applications
Cisco Secure ACS supports Cisco device-management applications, such as Management Center for PIX Firewall, by providing command authorization for network users who are using the management application to configure managed network devices. Support for command authorization for management application users is accomplished by using unique command authorization set types for each management application configured to use Cisco Secure ACS for authorization.
Cisco Secure ACS uses TACACS+ to communicate with management applications. For a management application to communicate with Cisco Secure ACS, the management application must be configured in Cisco Secure ACS as a AAA client that uses TACACS+. Also, you must provide the device-management application with a valid administrator name and password. When a management application initially communicates with Cisco Secure ACS, these requirements ensure the validity of the communication. For information about configuring a AAA client, see AAA Client Configuration, page 4-11. For information about administrator accounts, see Administrator Accounts, page 10-1.
Additionally, the administrator used by the management application must have the Create New Device Command Set Type privilege enabled. When a management application initially communicates with Cisco Secure ACS, it dictates to Cisco Secure ACS the creation of a device command set type, which appears in the Shared Profile Components section of the HTML interface. It also dictates a custom service to be authorized by TACACS+. The custom service appears on the TACACS+ (Cisco IOS) page in the Interface Configuration section of the HTML interface. For information about enabling TACACS+ services, see Protocol Configuration Options for TACACS+, page 3-7. For information about device command-authorization sets for management applications, see Command Authorization Sets, page 5-13.
After the management application has dictated the custom TACACS+ service and device command-authorization set type to Cisco Secure ACS, you can configure command-authorization sets for each role supported by the management
1-18User Guide for Cisco Secure ACS for Windows Server
78-14696-01, Version 3.1
Chapter 1 Overview of Cisco Secure ACSAAA Server Functions and Concepts
application and apply those sets to user groups that contain network administrators or to individual users who are network administrators. For information about configuring a command-authorization set, see Command Authorization Sets Configuration, page 5-16. For information about applying a shared device command-authorization set to a user group, see Configuring Device-Management Command Authorization for a User Group, page 6-35. For information about applying a shared device command-authorization set to a user, see Configuring Device Management Command Authorization for a User, page 7-30.
Other Authorization-Related Features
In addition to the authorization-related features discussed in this section, the following features are provided by Cisco Secure ACS:
• Group administration of users, with support for up to 500 groups (see Chapter 6, “Setting Up and Managing User Groups”).
• Ability to map a user from an external user database to a specific Cisco Secure ACS group (see Database Group Mappings, page 12-11).
• Ability to disable an account after a number of failed attempts, specified by the administrator (see Setting Options for User Account Disablement, page 7-20).
• Ability to disable an account on a specific date (see Setting Options for User Account Disablement, page 7-20).
• Ability to restrict time-of-day and day-of-week access (see Setting Default Time-of-Day Access for a User Group, page 6-5).
• Ability to restrict network access based on remote address caller line identification (CLID) and dialed number identification service (DNIS) (see Setting Network Access Restrictions for a User Group, page 6-7).
• IP Pools for IP address assignment of end-user client hosts (see Setting IP Address Assignment Method for a User Group, page 6-27).
• Per-user and per-group TACACS+ or RADIUS attributes (see Advanced Options, page 3-4).
• Support for Voice over IP (VoIP), including configurable logging of accounting data (see Enabling VoIP Support for a User Group, page 6-4).
1-19User Guide for Cisco Secure ACS for Windows Server
78-14696-01, Version 3.1
Chapter 1 Overview of Cisco Secure ACSAAA Server Functions and Concepts
AccountingAAA clients use the accounting functions provided by the RADIUS and TACACS+ protocols to communicate relevant data for each user session to the AAA server for recording. Cisco Secure ACS writes accounting records to a comma-separated value (CSV) log file or ODBC database, depending upon your configuration. You can easily import these logs into popular database and spreadsheet applications for billing, security audits, and report generation. Among the types of accounting logs you can generate are the following:
• TACACS+ Accounting—Lists when sessions start and stop; records AAA client messages with username; provides caller line identification information; records the duration of each session.
• RADIUS Accounting—Lists when sessions stop and start; records AAA client messages with username; provides caller line identification information; records the duration of each session.
• Administrative Accounting—Lists commands entered on a network device with TACACS+ command authorization enabled.
For more information about Cisco Secure ACS logging capabilities, see Chapter 9, “Working with Logging and Reports.”
Other Accounting-Related Features
In addition to the accounting-related features discussed in this section, the following features are provided by Cisco Secure ACS:
• Centralized logging, allowing several Cisco Secure ACS servers to forward their accounting data to a remote Cisco Secure ACS server (see Remote Logging, page 9-23).
• Configurable supplementary user ID fields for capturing additional information in logs (see User Data Configuration Options, page 3-3).
• Configurable logs, allowing you to capture as much information as needed (see Accounting Logs, page 9-5).
1-20User Guide for Cisco Secure ACS for Windows Server
78-14696-01, Version 3.1
Chapter 1 Overview of Cisco Secure ACSAAA Server Functions and Concepts
AdministrationTo configure, maintain, and protect its AAA functionality, Cisco Secure ACS provides a flexible administration scheme. You can perform nearly all administration of Cisco Secure ACS through its HTML interface.
You can access the HTML interface from computers other than the Cisco Secure ACS server. This enables remote administration of Cisco Secure ACS. For more information about the HTML interface, including steps for accessing the HTML interface, see Cisco Secure ACS HTML Interface, page 1-23.
HTTP Port Allocation for Remote Administrative Sessions
The HTTP port allocation feature allows you to configure the range of TCP ports used by Cisco Secure ACS for remote administrative HTTP sessions (that is, administrative sessions conducted by a browser running on a computer other than the Cisco Secure ACS server). Narrowing this range with the HTTP port allocation feature reduces the risk of unauthorized access to your network by a port open for administrative sessions.
We do not recommend that you administer Cisco Secure ACS through a firewall. Doing so requires that you configure the firewall to permit HTTP traffic over the range of HTTP administrative session ports that Cisco Secure ACS uses. While narrowing this range reduces the risk of unauthorized access, a greater risk of attack remains if you allow administration of Cisco Secure ACS from outside a firewall. A firewall configured to permit HTTP traffic over the Cisco Secure ACS administrative port range must also permit HTTP traffic through port 2002, because this is the port a remote web browser must access to initiate an administrative session.
Note A broad HTTP port range could create a security risk. To prevent accidental discovery of an active administrative port by unauthorized users, keep the HTTP port range as narrow as possible. Cisco Secure ACS tracks the IP address associated with each remote administrative session. An unauthorized user would have to impersonate, or “spoof”, the IP address of the legitimate remote host to make use of the active administrative session HTTP port.
1-21User Guide for Cisco Secure ACS for Windows Server
78-14696-01, Version 3.1
Chapter 1 Overview of Cisco Secure ACSAAA Server Functions and Concepts
For information about configuring the HTTP port allocation feature, see Access Policy, page 10-11.
Network Device Groups
With a network device group (NDG), you can view and administer a collection of AAA clients and AAA servers as a single logical group. To simplify administration, you can assign each group a convenient name that can be used to refer to all devices within that group. This creates two levels of network devices within Cisco Secure ACS—discrete devices such as an individual router, access server, AAA server, or PIX Firewall, and NDGs, which are named collections of AAA clients and AAA servers.
A network device can belong to only one NDG at a time.
Using NDGs enables an organization with a large number of AAA clients spread across a large geographical area to logically organize its environment within Cisco Secure ACS to reflect the physical setup. For example, all routers in Europe could belong to a group named Europe; all routers in the United States could belong to a US group; and so on. This would be especially convenient if the AAA clients in each region were administered along the same divisions. Alternatively, the environment could be organized by some other attribute such as divisions, departments, business functions, and so on.
You can assign a group of users to an NDG. For more information on NDGs, see Network Device Group Configuration, page 4-27.
Other Administration-Related Features
In addition to the administration-related features discussed in this section, the following features are provided by Cisco Secure ACS:
• Ability to define different privileges per administrator (see Administrator Accounts, page 10-1).
• Ability to log administrator activities (see Cisco Secure ACS System Logs, page 9-11).
• Ability to view a list of logged-in users (see Dynamic Administration Reports, page 9-7).
1-22User Guide for Cisco Secure ACS for Windows Server
78-14696-01, Version 3.1
Chapter 1 Overview of Cisco Secure ACSCisco Secure ACS HTML Interface
• CSMonitor service, providing monitoring, notification, logging, and limited automated failure response (see Cisco Secure ACS Active Service Management, page 8-55).
• Ability to automate configuration of users, groups, network devices, and custom RADIUS VSAs (see RDBMS Synchronization, page 8-29).
• Replication of CiscoSecure user database components to other Cisco Secure ACS servers (see CiscoSecure Database Replication, page 8-9).
• Scheduled and on-demand Cisco Secure ACS system backups (see Cisco Secure ACS Backup, page 8-47).
• Ability to restore Cisco Secure ACS configuration, user accounts, and group profiles from a backup file (see Cisco Secure ACS System Restore, page 8-52).
Cisco Secure ACS HTML InterfaceThis section discusses the Cisco Secure ACS HTML interface and provides procedures for using it. This section contains the following topics:
• About the Cisco Secure ACS HTML Interface, page 1-23
• HTML Interface Layout, page 1-25
• Uniform Resource Locator for the HTML Interface, page 1-26
• Network Environments and Remote Administrative Sessions, page 1-27
• Accessing the HTML Interface, page 1-29
• Logging Off the HTML Interface, page 1-29
• Online Help and Online Documentation, page 1-30
About the Cisco Secure ACS HTML InterfaceAfter installing Cisco Secure ACS, you configure and administer it through the HTML interface. The HTML interface enables you to easily modify Cisco Secure ACS configuration from any connection on your LAN or WAN.
1-23User Guide for Cisco Secure ACS for Windows Server
78-14696-01, Version 3.1
Chapter 1 Overview of Cisco Secure ACSCisco Secure ACS HTML Interface
The Cisco Secure ACS HTML interface is designed to be viewed using a web browser. The design primarily uses HTML, along with some Java functions, to enhance ease of use. This design keeps the interface responsive and straightforward. The inclusion of Java requires that the browser used for administrative sessions supports Java. For a list of supported browsers, see the Release Notes. The latest revision to the Release Notes is posted on Cisco.com (http://www.cisco.com).
The HTML interface not only makes viewing and editing user and group information possible, it also enables you to restart services, add remote administrators, change AAA client information, back up the system, view reports from anywhere on the network, and more. The reports track connection activity, show which users are logged in, list failed authentication and authorization attempts, and show administrators’ recent tasks.
HTML Interface Security
Accessing the HTML interface requires a valid administrator name and password. The Cisco Secure ACS Login page encrypts the administrator credentials before sending them to Cisco Secure ACS.
Administrative sessions timeout after a configurable length of idle time. Regardless, we recommend that you log out of the HTML interface after each session. For information about logging out of Cisco Secure ACS, see Logging Off the HTML Interface, page 1-29. For information about configuring the idle timeout feature, see Access Policy, page 10-11.
You can enable secure socket layer (SSL) for administrative sessions. This ensures that all communication between the web browser and Cisco Secure ACS is encrypted. Your browser must support SSL. You can enable this feature on the Access Policy Setup page in the Administration Control section. For more information about enabling SSL for HTML interface security, see Access Policy, page 10-11.
1-24User Guide for Cisco Secure ACS for Windows Server
78-14696-01, Version 3.1

Chapter 1 Overview of Cisco Secure ACSCisco Secure ACS HTML Interface
HTML Interface LayoutThe HTML interface has three vertical partitions, known as frames:
• Navigation Bar—The gray frame on the left of the browser window, the navigation bar contains the task buttons. Each button changes the configuration area (see below) to a unique section of the Cisco Secure ACS application, such as the User Setup section or the Interface Configuration section. This frame does not change; it always contains the following buttons:
– User Setup—Add and edit user profiles.
– Group Setup—Configure network services and protocols for groups of users.
– Shared Profile Components—Add and edit network access restriction and command authorization sets, to be applied to users and groups.
– Network Configuration—Add and edit network access devices and configure distributed systems.
– System Configuration—Configure database information and accounting.
– Interface Configuration—Display or hide product features and options to be configured.
– Administration Control—Define and configure access policies.
– External User Databases—Configure external databases for authentication.
– Reports and Activity—Display accounting and logging information.
– Online Documentation—View the User Guide for Cisco Secure ACS for Windows Server.
• Configuration Area—The frame in the middle of the browser window, the configuration area displays web pages that belong to one of the sections represented by the buttons in the navigation bar. The configuration area is where you add, edit, or delete information. For example, you configure user information in this frame on the User Setup Edit page.
Note Most pages have a Submit button at the bottom. Click Submit to confirm your changes. If you do not click Submit, changes are not saved.
1-25User Guide for Cisco Secure ACS for Windows Server
78-14696-01, Version 3.1
Chapter 1 Overview of Cisco Secure ACSCisco Secure ACS HTML Interface
• Display Area—The frame on the right of the browser window, the display area shows one of the following options:
– Online Help—Displays basic help about the page currently shown in the configuration area. This help does not offer in-depth information, rather it gives some basic information about what can be accomplished in the middle frame. For more detailed information, click Section Information at the bottom of the page to go to the applicable part of Online Documentation.
– Reports or Lists—Displays lists or reports, including accounting reports. For example, in User Setup you can show all usernames that start with a specific letter. The list of usernames beginning with a specified letter is displayed in this section. The usernames are hyperlinks to the specific user configuration, so clicking the name enables you to edit that user.
– System Messages—Displays messages after you click Submit if you have typed in incorrect or incomplete data. For example, if the information you entered in the Password box does not match the information in the Confirm Password box in the User Setup section, Cisco Secure ACS displays an error message here. The incorrect information remains in the configuration area so that you can retype and resubmit the information correctly.
Uniform Resource Locator for the HTML InterfaceThe HTML interface is available by web browser at one of the following uniform resource locators (URLs):
• http://IP address:2002
• http://hostname:2002
where IP address is the dotted decimal IP address of the computer running Cisco Secure ACS and hostname is the hostname of the computer running Cisco Secure ACS.
1-26User Guide for Cisco Secure ACS for Windows Server
78-14696-01, Version 3.1
Chapter 1 Overview of Cisco Secure ACSCisco Secure ACS HTML Interface
From the server on which Cisco Secure ACS is installed, you can also use the following URLs:
• http://127.0.0.1:2002
• http://hostname:2002
where hostname is the hostname of the computer running Cisco Secure ACS.
Network Environments and Remote Administrative SessionsWe recommend that remote administrative sessions take place without the use of an HTTP proxy server, without a firewall between the remote browser and Cisco Secure ACS, and without a NAT gateway between the remote browser and Cisco Secure ACS. Because these limitations are not always practical, we included the following topics regarding these remote administration scenarios:
• Remote Administrative Sessions and HTTP Proxy, page 1-27
• Remote Administrative Sessions through Firewalls, page 1-28
• Remote Administrative Sessions through a NAT Gateway, page 1-28
Remote Administrative Sessions and HTTP Proxy
Cisco Secure ACS does not support HTTP proxy for remote administrative sessions. If the browser used for a remote administrative session is configured to use a proxy server, Cisco Secure ACS sees the administrative session originating from the IP address of the proxy server rather than from the actual address of the remote workstation. Remote administrative session tracking assumes each browser resides on a workstation with a unique IP.
Also, IP filtering of proxied administrative sessions has to be based on the IP address of the proxy server rather than the IP address of the workstation. This conflicts with administrative session communication that does use the actual IP address of the workstation. For more information about IP filtering of remote administrative sessions, see Access Policy, page 10-11.
For these reasons, we do not recommend performing administrative sessions using a web browser that is configured to use a proxy server. Administrative sessions using a proxy-enabled web browser is not tested. If your web browser is configured to use a proxy server, disable HTTP proxying when attempting remote Cisco Secure ACS administrative sessions.
1-27User Guide for Cisco Secure ACS for Windows Server
78-14696-01, Version 3.1

Chapter 1 Overview of Cisco Secure ACSCisco Secure ACS HTML Interface
Remote Administrative Sessions through Firewalls
In the case of firewalls that do not perform network address translation (NAT), remote administrative sessions conducted across the firewall can require additional configuration of Cisco Secure ACS and the firewall. This is because Cisco Secure ACS assigns a random HTTP port at the beginning of a remote administrative session.
To allow remote administrative sessions from browsers outside a firewall that protects Cisco Secure ACS, the firewall must permit HTTP traffic across the range of ports that Cisco Secure ACS is configured to use. You can control the HTTP port range using the HTTP port allocation feature. For more information about the HTTP port allocation feature, see HTTP Port Allocation for Remote Administrative Sessions, page 1-21.
While administering Cisco Secure ACS through a firewall that is not performing NAT is possible, we do not recommend that you administer Cisco Secure ACS through a firewall. For more information, see HTTP Port Allocation for Remote Administrative Sessions, page 1-21.
Remote Administrative Sessions through a NAT Gateway
We do not recommend conducting remote administrative sessions across a network device performing NAT. If the administrator runs a browser on a workstation behind a NAT gateway, Cisco Secure ACS receives the HTTP requests from the public IP address of the NAT device, which conflicts with the workstation private IP address, included in the content of the HTTP requests. Cisco Secure ACS does not permit this.
If Cisco Secure ACS is behind a NAT gateway and the URL used to access the HTML interface specifies the Windows 2000 server running Cisco Secure ACS by its hostname, remote administrative sessions operate correctly, provided that DNS is functioning correctly on your network or that workstations used to access the HTML interface have a hosts file entry for the Windows server that runs Cisco Secure ACS.
If the URL used to access the HTML interface specifies the Windows 2000 server running Cisco Secure ACS by its IP address, you could configure the gateway to forward all connections to port 2002 to Cisco Secure ACS, using the same port. Additionally, all the ports allowed using the HTTP port allocation feature would have to be similarly mapped. We have not tested such a configuration and do not recommend implementing it.
1-28User Guide for Cisco Secure ACS for Windows Server
78-14696-01, Version 3.1

Chapter 1 Overview of Cisco Secure ACSCisco Secure ACS HTML Interface
Accessing the HTML InterfaceRemote administrative sessions always require that you log in using a valid administrator name and password, as configured in the Administration Control section. If the Allow automatic local login check box is cleared on the Sessions Policy Setup page in the Administration Control section, Cisco Secure ACS requires a valid administrator name and password for administrative sessions accessed from a browser on the Cisco Secure ACS server.
To access the HTML interface, follow these steps:
Step 1 Open a web browser. For a list of supported web browsers, see the Release Notes for the version of Cisco Secure ACS you are accessing. The latest revision to the Release Notes is posted on Cisco.com (http://www.cisco.com).
Step 2 In the Address or Location bar in the web browser, type the applicable URL. For a list of possible URLs, see Uniform Resource Locator for the HTML Interface, page 1-26.
Step 3 If the Cisco Secure ACS for Windows 2000/NT Login page appears, follow these steps:
a. In the Username box, type a valid Cisco Secure ACS administrator name.
b. In the Password box, type the password for the administrator name you specified.
c. Click Login.
Result: The Cisco Secure ACS for Windows 2000 initial page appears.
Logging Off the HTML InterfaceWhen you are finished using the HTML interface, we recommend that you log off. While Cisco Secure ACS can timeout unused administrative sessions, logging off prevents unauthorized access by someone using the browser after you or by unauthorized persons using the HTTP port left open to support the administrative session.
To log off the Cisco Secure ACS HTML interface, click the Logoff button.
1-29User Guide for Cisco Secure ACS for Windows Server
78-14696-01, Version 3.1
Chapter 1 Overview of Cisco Secure ACSCisco Secure ACS HTML Interface
Note The Logoff button appears in the upper right corner of the browser window, except on the initial page, where it appears in the upper left of the configuration area.
Online Help and Online DocumentationWe provide two sources of information in the HTML interface:
• Online Help—Contains basic information about the page shown in the configuration area.
• Online Documentation—Contains the entire user guide.
Using Online Help
Online help is the default content in the display area. For every page that appears in the configuration area, there is a corresponding online help page. At the top of each online help page is a list of topics covered by that page.
To jump from the top of the online help page to a particular topic, click the topic name in the list at the top of the page.
There are three icons that appear on many pages in Cisco Secure ACS:
• Question Mark—Many subsections of the pages in the configuration area contain an icon with a question mark. To jump to the applicable topic in an online help page, click the question mark icon.
• Section Information—Many online help pages contain a Section Information icon at the bottom of the page. To view an applicable section of the online documentation, click the Section Information icon.
• Back to Help—Wherever you find a online help page with a Section Information icon, the corresponding page in the configuration area contains a Back to Help icon. If you have accessed the online documentation by clicking a Section Information icon and want to view the online help page again, click the Back to Help icon.
1-30User Guide for Cisco Secure ACS for Windows Server
78-14696-01, Version 3.1
Chapter 1 Overview of Cisco Secure ACSCisco Secure ACS HTML Interface
Using the Online Documentation
The Cisco Secure ACS online documentation is the user guide for Cisco Secure ACS. The user guide provides information about the configuration, operation, and concepts of Cisco Secure ACS. The information presented in the online documentation is as current as the release date of the Cisco Secure ACS version you are using. For the most up-to-date documentation about Cisco Secure ACS, please go to http://www.cisco.com.
Tip Click Section Information on any online help page to view online documentation relevant to the section of the HTML interface you are using.
To access online documentation, follow these steps:
Step 1 In the Cisco Secure ACS HTML interface, click Online Documentation.
Tip To open the online documentation in a new browser window, right-click Online Documentation, and then click Open Link in New Window (for Microsoft Internet Explorer) or Open in New Window (for Netscape Navigator).
Result: The table of contents opens in the configuration area.
Step 2 If you want to select a topic from the table of contents, scroll through the table of contents and click the applicable topic.
Result: The online documentation for the topic selected appears in the display area.
Step 3 If you want to select a topic from the index, follow these steps:
a. Click [Index].
Result: The index appears in the display area.
b. Scroll through the index to find an entry for the topic you are researching.
Tip Use the lettered shortcut links to jump to a particular section of the index.
Result: Entries appear with numbered links after them. The numbered links lead to separate instances of the entry topic.
1-31User Guide for Cisco Secure ACS for Windows Server
78-14696-01, Version 3.1
Chapter 1 Overview of Cisco Secure ACSCisco Secure ACS HTML Interface
c. Click an instance number for the desired topic.
Result: The online documentation for the topic selected appears in the display area.
Step 4 If you want to print the online documentation, click in the display area, and then click Print in the navigation bar of your browser.
1-32User Guide for Cisco Secure ACS for Windows Server
78-14696-01, Version 3.1
User Guide for 78-14696-01, Version 3.1
C H A P T E R 2
Deploying Cisco Secure ACSDeployment of Cisco Secure Access Control Server (Cisco Secure ACS) for Windows Server version 3.1 can be complex and iterative, depending on the specific implementation required. This chapter provides insight into the deployment process and presents a collection of factors that you should consider before deploying Cisco Secure ACS.
The complexity of deploying Cisco Secure ACS reflects the evolution of AAA servers in general, and the advanced capabilities, flexibility, and features of Cisco Secure ACS in particular. AAA was conceived originally to provide a centralized point of control for user access via dial-up services. As user databases grew and the locations of AAA clients became more dispersed, more capability was required of the AAA server. Regional, and then global, requirements became common. Today, Cisco Secure ACS is required to provide AAA services for dial-up access, dial-out access, wireless, VLAN access, firewalls, VPN concentrators, administrative controls, and more. The list of external databases supported has also continued to grow and the use of multiple databases, as well as multiple Cisco Secure ACSes, has become more common. Regardless of the scope of your Cisco Secure ACS deployment, the information contained in this chapter should prove valuable. If you have deployment questions that are not addressed in this guide, contact your Cisco technical representative for assistance.
This chapter contains the following sections:
• Basic Deployment Requirements for Cisco Secure ACS, page 2-2
• Basic Deployment Factors for Cisco Secure ACS, page 2-5
• Suggested Deployment Sequence, page 2-18
2-1Cisco Secure ACS for Windows Server
Chapter 2 Deploying Cisco Secure ACSBasic Deployment Requirements for Cisco Secure ACS
Basic Deployment Requirements for Cisco Secure ACS
This section details the minimum requirements you must meet to be able to successfully deploy Cisco Secure ACS. The following topics are covered:
• System Requirements, page 2-2
– Hardware Requirements, page 2-2
– Operating System Requirements, page 2-2
– Third-Party Software Requirements, page 2-3
• Network Requirements, page 2-4
System RequirementsYour Cisco Secure ACS server must meet the minimum hardware and software requirements detailed in the following sections.
Hardware Requirements
Your Cisco Secure ACS server must meet the following minimum hardware requirements:
• Pentium III processor, 550 MHz or faster.
• 256 MB of RAM.
• At least 250 MB of free disk space. If you are running your database on the same machine, more disk space is required.
• Minimum graphics resolution of 256 colors at 800 x 600 lines.
Operating System Requirements
The server that runs Cisco Secure ACS should use an English-language version of Windows 2000 Server with Service Pack 3 installed.
2-2User Guide for Cisco Secure ACS for Windows Server
78-14696-01, Version 3.1
Chapter 2 Deploying Cisco Secure ACSBasic Deployment Requirements for Cisco Secure ACS
Note Both the operating system and the applicable service pack must be English-language versions.
Windows service packs can be applied either before or after installing Cisco Secure ACS. If you do not install a required service pack before installing Cisco Secure ACS, the Cisco Secure ACS installation program may warn you that the required service pack is not present on your server. If you receive a service pack message, continue the installation, and then install the required service pack before starting user authentication with Cisco Secure ACS.
Note Beginning with Cisco Secure ACS version 3.1, we no longer support running Cisco Secure ACS on a Windows NT 4.0 server. For information about upgrading the operating system of a server running Cisco Secure ACS, see the Installation Guide for Cisco Secure ACS for Windows Server, version 3.1.
For the latest information about tested operating systems and service packs, see the Release Notes. The latest version of the Release Notes are posted on Cisco.com atthe following URL:
http://www.cisco.com/univercd/cc/td/doc/product/access/acs_soft/csacs4nt/
Third-Party Software Requirements
The Windows server that runs Cisco Secure ACS must have a compatible browser installed. We tested Cisco Secure ACS with English-language versions of the following browsers on Microsoft Windows operating systems:
• Microsoft Internet Explorer 5.5 and 6.0
• Netscape Communicator 6.2
Note To use a web browser to access the Cisco Secure ACS HTML interface, you must enable both Java and JavaScript in the browser. Also, the web browser must not be configured to use a proxy server. For more information about other network environment factors that affect access to the HTML interface, see Network Environments and Remote Administrative Sessions, page 1-27.
2-3User Guide for Cisco Secure ACS for Windows Server
78-14696-01, Version 3.1
Chapter 2 Deploying Cisco Secure ACSBasic Deployment Requirements for Cisco Secure ACS
For the latest information about tested browsers and other third-party applications, see the Release Notes. The latest version of the Release Notes are posted on Cisco.com at http://www.cisco.com/univercd/cc/td/doc/product/access/acs_soft/csacs4nt/index.htm.
Network RequirementsYour network should meet the following requirements before you begin deploying Cisco Secure ACS.
• For full TACACS+ and RADIUS support on Cisco IOS devices, AAA clients must run Cisco IOS Release 11.2 or later.
• Non-Cisco IOS AAA clients must be configured with TACACS+ and/or RADIUS.
• Dial-in, VPN, or wireless clients must be able to connect to the applicable AAA clients.
• The computer running Cisco Secure ACS must be able to ping all AAA clients.
• Gateway devices between AAA clients and Cisco Secure ACS must permit communication over the ports needed to support the applicable AAA protocol (RADIUS or TACACS+). For information about ports used by AAA protocols, see AAA Protocols—TACACS+ and RADIUS, page 1-6.
• Make sure a compatible web browser is installed on the computer that runs Cisco Secure ACS. For more information, see Third-Party Software Requirements, page 2-3.
• To have Cisco Secure ACS use the Grant Dial-in Permission to User feature in Windows when authorizing network users, enable this option for the applicable user accounts in the relevant Active Directory or Windows Security Accounts Manager (SAM) database.
2-4User Guide for Cisco Secure ACS for Windows Server
78-14696-01, Version 3.1
Chapter 2 Deploying Cisco Secure ACSBasic Deployment Factors for Cisco Secure ACS
Basic Deployment Factors for Cisco Secure ACSGenerally, the ease in deploying Cisco Secure ACS is directly related to the complexity of the implementation planned and the degree to which you have defined your policies and requirements. This section presents some basic factors you should consider before you begin implementing Cisco Secure ACS.
This section includes the following topics:
• Network Topology, page 2-5
• Remote Access Policy, page 2-13
• Security Policy, page 2-14
• Administrative Access Policy, page 2-14
• Database, page 2-17
• Network Latency and Reliability, page 2-18
Network TopologyHow your enterprise network is configured is likely to be the most important factor in deploying Cisco Secure ACS. While an exhaustive treatment of this topic is beyond the scope of this guide, this section details how the growth of network topology options has made Cisco Secure ACS deployment decisions more complex.
When AAA was created, network access was restricted to either devices directly connected to the LAN or remote devices gaining access via modem. Today, enterprise networks can be complex and, thanks to tunneling technologies, can be widely geographically dispersed.
Dial-Up Topology
In the traditional model of dial-up access (a PPP connection), a user employing a modem or ISDN connection is granted access to an intranet via a network access server (NAS) functioning as a AAA client. Users may be able to connect via only a single AAA client as in a small business, or have the option of numerous geographically dispersed AAA clients.
2-5User Guide for Cisco Secure ACS for Windows Server
78-14696-01, Version 3.1

Chapter 2 Deploying Cisco Secure ACSBasic Deployment Factors for Cisco Secure ACS
In the small LAN environment, see Figure 2-1, network architects typically place a single Cisco Secure ACS internal to the AAA client, protected from outside access by means of a firewall and the AAA client. In this environment, the user database is usually small, there are few devices that require access to the Cisco Secure ACS for AAA, and any database replication is limited to a secondary Cisco Secure ACS as a backup.
Figure 2-1 Small Dial-up Network
In a larger dial-in environment, a single Cisco Secure ACS installation with a backup may be suitable, too. The suitability of this configuration depends on network and server access latency. Figure 2-2 shows an example of a large dial-in arrangement. In this scenario the addition of a backup Cisco Secure ACS is a recommended addition.
Network
Cisco SecureAccess Control
Server 6348
6
Server-baseddial access
PSTNModem
2-6User Guide for Cisco Secure ACS for Windows Server
78-14696-01, Version 3.1
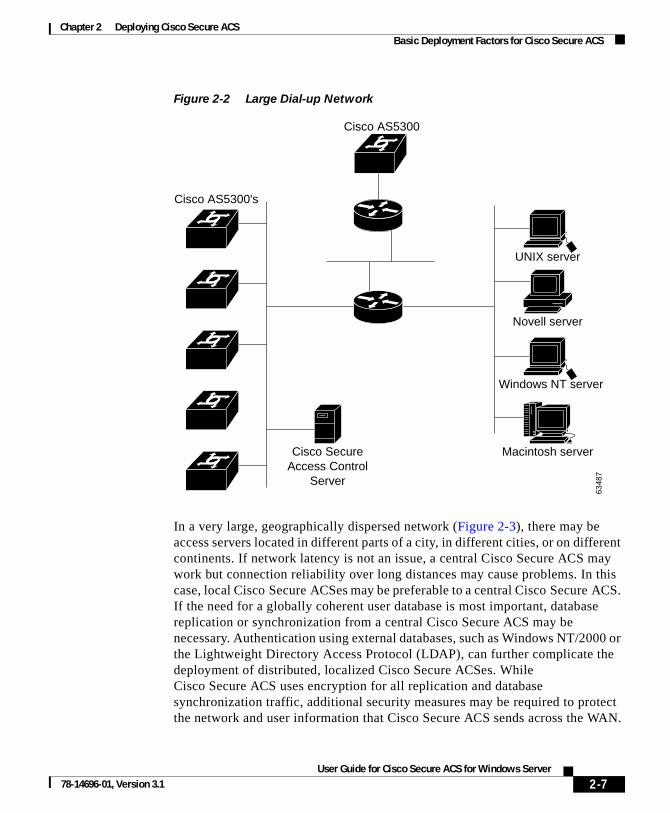
Chapter 2 Deploying Cisco Secure ACSBasic Deployment Factors for Cisco Secure ACS
Figure 2-2 Large Dial-up Network
In a very large, geographically dispersed network (Figure 2-3), there may be access servers located in different parts of a city, in different cities, or on different continents. If network latency is not an issue, a central Cisco Secure ACS may work but connection reliability over long distances may cause problems. In this case, local Cisco Secure ACSes may be preferable to a central Cisco Secure ACS. If the need for a globally coherent user database is most important, database replication or synchronization from a central Cisco Secure ACS may be necessary. Authentication using external databases, such as Windows NT/2000 or the Lightweight Directory Access Protocol (LDAP), can further complicate the deployment of distributed, localized Cisco Secure ACSes. While Cisco Secure ACS uses encryption for all replication and database synchronization traffic, additional security measures may be required to protect the network and user information that Cisco Secure ACS sends across the WAN.
6348
7
Cisco AS5300's
Macintosh server
Novell server
UNIX server
Windows NT server
Cisco SecureAccess Control
Server
Cisco AS5300
2-7User Guide for Cisco Secure ACS for Windows Server
78-14696-01, Version 3.1
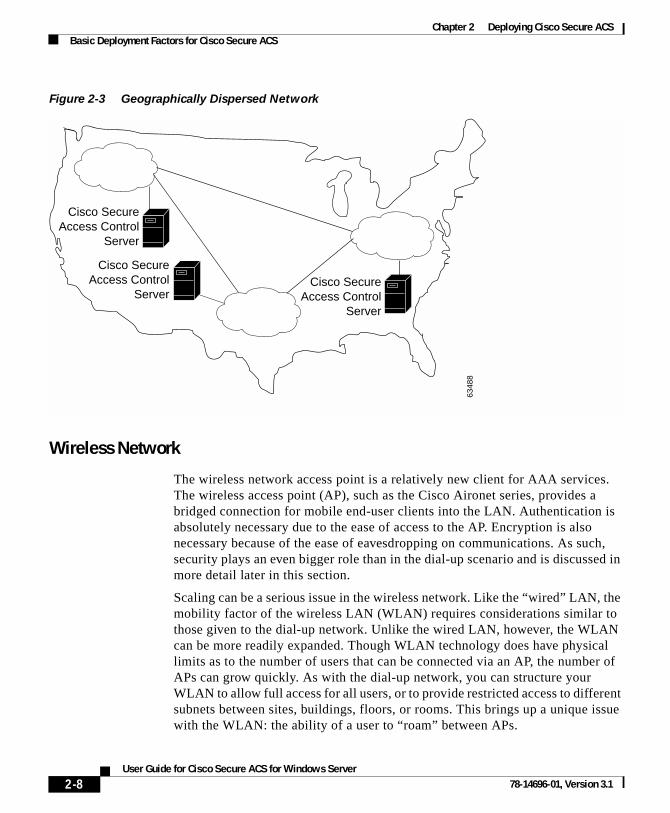
Chapter 2 Deploying Cisco Secure ACSBasic Deployment Factors for Cisco Secure ACS
Figure 2-3 Geographically Dispersed Network
Wireless Network
The wireless network access point is a relatively new client for AAA services. The wireless access point (AP), such as the Cisco Aironet series, provides a bridged connection for mobile end-user clients into the LAN. Authentication is absolutely necessary due to the ease of access to the AP. Encryption is also necessary because of the ease of eavesdropping on communications. As such, security plays an even bigger role than in the dial-up scenario and is discussed in more detail later in this section.
Scaling can be a serious issue in the wireless network. Like the “wired” LAN, the mobility factor of the wireless LAN (WLAN) requires considerations similar to those given to the dial-up network. Unlike the wired LAN, however, the WLAN can be more readily expanded. Though WLAN technology does have physical limits as to the number of users that can be connected via an AP, the number of APs can grow quickly. As with the dial-up network, you can structure your WLAN to allow full access for all users, or to provide restricted access to different subnets between sites, buildings, floors, or rooms. This brings up a unique issue with the WLAN: the ability of a user to “roam” between APs.
Cisco SecureAccess Control
Server
Cisco SecureAccess Control
ServerCisco Secure
Access ControlServer
6348
8
2-8User Guide for Cisco Secure ACS for Windows Server
78-14696-01, Version 3.1

Chapter 2 Deploying Cisco Secure ACSBasic Deployment Factors for Cisco Secure ACS
In the simple WLAN, there may be a single AP installed (Figure 2-4). Because there is only one AP, the primary issue is security. In this environment, there is generally a small user base and few network devices to worry about. Providing AAA services to the other devices on the network does not cause any significant additional load on the Cisco Secure ACS.
Figure 2-4 Simple WLAN
In the LAN where a number of APs are deployed, as in a large building or a campus environment, your decisions on how to deploy Cisco Secure ACS become a little more involved. Though Figure 2-5 shows all APs on the same LAN, they may be distributed throughout the LAN, connected via routers, switches, and so on. In the larger, geographical distribution of WLANs, deployment of Cisco Secure ACS is similar to that of large regional distribution of dial-up LANs (Figure 2-3).
Network
Cisco SecureAccess Control Server
Cisco Aironet AP
6348
9
2-9User Guide for Cisco Secure ACS for Windows Server
78-14696-01, Version 3.1

Chapter 2 Deploying Cisco Secure ACSBasic Deployment Factors for Cisco Secure ACS
Figure 2-5 Campus WLAN
This is particularly true when the regional topology is the campus WLAN. This model starts to change when you deploy WLANs in many small sites that more resemble the simple WLAN shown in Figure 2-4. This model may apply to a chain of small stores distributed throughout a city or state, nationally, or globally (Figure 2-6).
6349
0
Macintosh server
Cisco Aironet APs
Novell server
UNIX server
Windows NT server
Cisco SecureAccess Control
Server
Dial-up connection
2-10User Guide for Cisco Secure ACS for Windows Server
78-14696-01, Version 3.1
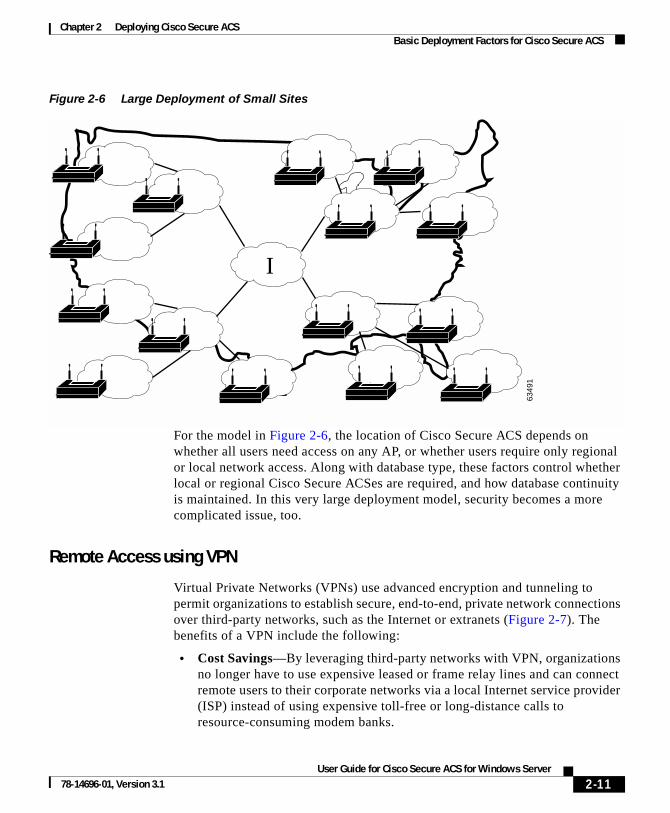
Chapter 2 Deploying Cisco Secure ACSBasic Deployment Factors for Cisco Secure ACS
Figure 2-6 Large Deployment of Small Sites
For the model in Figure 2-6, the location of Cisco Secure ACS depends on whether all users need access on any AP, or whether users require only regional or local network access. Along with database type, these factors control whether local or regional Cisco Secure ACSes are required, and how database continuity is maintained. In this very large deployment model, security becomes a more complicated issue, too.
Remote Access using VPN
Virtual Private Networks (VPNs) use advanced encryption and tunneling to permit organizations to establish secure, end-to-end, private network connections over third-party networks, such as the Internet or extranets (Figure 2-7). The benefits of a VPN include the following:
• Cost Savings—By leveraging third-party networks with VPN, organizations no longer have to use expensive leased or frame relay lines and can connect remote users to their corporate networks via a local Internet service provider (ISP) instead of using expensive toll-free or long-distance calls to resource-consuming modem banks.
I
6349
1
2-11User Guide for Cisco Secure ACS for Windows Server
78-14696-01, Version 3.1

Chapter 2 Deploying Cisco Secure ACSBasic Deployment Factors for Cisco Secure ACS
• Security—VPNs provide the highest level of security using advanced encryption and authentication protocols that protect data from unauthorized access.
• Scalability—VPNs allow corporations to use remote access infrastructure within ISPs; therefore, corporations can add a large amount of capacity without adding significant infrastructure.
• Compatibility with Broadband Technology—VPNs allow mobile workers, telecommuters, and day extenders to take advantage of high-speed, broadband connectivity, such as DSL and cable, when gaining access to their corporate networks, providing workers significant flexibility and efficiency.
Figure 2-7 Simple VPN Configuration
There are two types of VPN access into a network:
• Site-to-Site VPNs—Extend the classic WAN by providing large-scale encryption between multiple fixed sites such as remote offices and central offices, over a public network, such as the Internet.
• Remote Access VPNs—Permit secure, encrypted connections between mobile or remote users and their corporate networks via a third-party network, such as an ISP, via VPN client software.
Generally speaking, site-to-site VPNs can be viewed as a typical WAN connection and are not usually configured to use AAA to secure the initial connection and are likely to use the device-oriented IPSec tunneling protocol. Remote Access VPNs, however, are similar to classic remote connection technology (modem/ISDN) and lend themselves to using the AAA model effectively (Figure 2-8).
VPN concentrator
Cisco SecureAccess Control Server
Network WAN
Tunnel
6349
2
2-12User Guide for Cisco Secure ACS for Windows Server
78-14696-01, Version 3.1
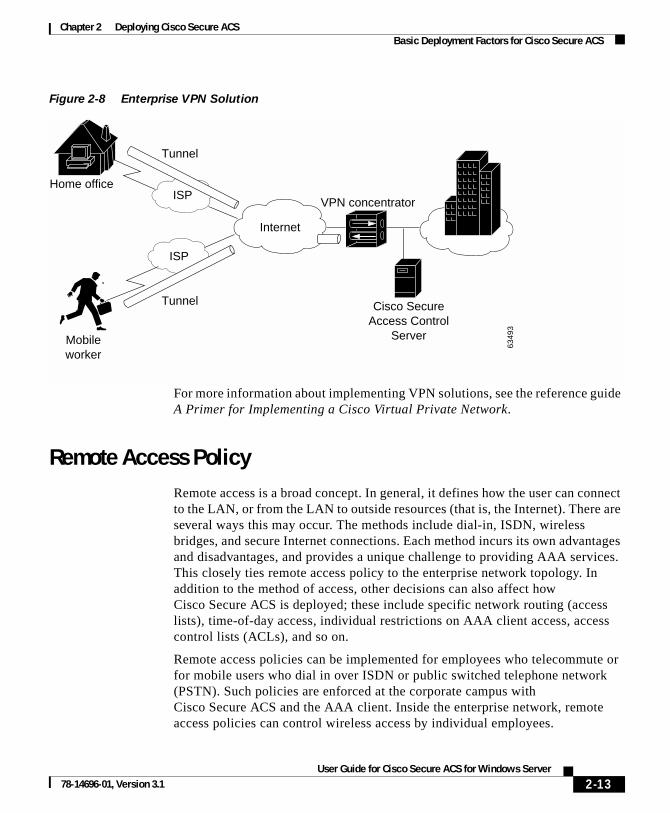
Chapter 2 Deploying Cisco Secure ACSBasic Deployment Factors for Cisco Secure ACS
Figure 2-8 Enterprise VPN Solution
For more information about implementing VPN solutions, see the reference guide A Primer for Implementing a Cisco Virtual Private Network.
Remote Access PolicyRemote access is a broad concept. In general, it defines how the user can connect to the LAN, or from the LAN to outside resources (that is, the Internet). There are several ways this may occur. The methods include dial-in, ISDN, wireless bridges, and secure Internet connections. Each method incurs its own advantages and disadvantages, and provides a unique challenge to providing AAA services. This closely ties remote access policy to the enterprise network topology. In addition to the method of access, other decisions can also affect how Cisco Secure ACS is deployed; these include specific network routing (access lists), time-of-day access, individual restrictions on AAA client access, access control lists (ACLs), and so on.
Remote access policies can be implemented for employees who telecommute or for mobile users who dial in over ISDN or public switched telephone network (PSTN). Such policies are enforced at the corporate campus with Cisco Secure ACS and the AAA client. Inside the enterprise network, remote access policies can control wireless access by individual employees.
Internet
ISP
ISP
Tunnel
Tunnel
6349
3
VPN concentrator
Cisco SecureAccess Control
Server
Home office
Mobileworker
2-13User Guide for Cisco Secure ACS for Windows Server
78-14696-01, Version 3.1

Chapter 2 Deploying Cisco Secure ACSBasic Deployment Factors for Cisco Secure ACS
Cisco Secure ACS remote access policy provides control by using central authentication and authorization of remote users. The CiscoSecure user database maintains all user IDs, passwords, and privileges. Cisco Secure ACS access policies can be downloaded in the form of ACLs to network access servers such as the Cisco AS5300 Network Access Server, or by allowing access during specific periods, or on specific access servers.
The remote access policy is part of the overall corporate security policy.
Security PolicyWe recommend that every organization that maintains a network develop a security policy for the organization. The sophistication, nature, and scope of your security policy directly affect how you deploy Cisco Secure ACS.
For more information about developing and maintaining a comprehensive security policy, refer to the following documents:
• Network Security Policy: Best Practices White Paper
• Delivering End-to-End Security in Policy-Based Networks
• Cisco IOS Security Configuration Guide
Administrative Access PolicyManaging a network is a matter of scale. Providing a policy for administrative access to network devices depends directly on the size of the network and the number of administrators required to maintain the network. Local authentication on a network device can be performed, but it is not scalable. The use of network management tools can help in large networks, but if local authentication is used on each network device, the policy usually consists of a single login on the network device.This does not promote adequate network device security. Using Cisco Secure ACS allows a centralized administrator database, and administrators can be added or deleted at one location. TACACS+ is the recommended AAA protocol for controlling AAA client administrative access because of its ability to provide per-command control (command authorization) of AAA client administrator access to the device. RADIUS is not well-suited for this purpose because of the one-time transfer of authorization information at time of initial authentication.
2-14User Guide for Cisco Secure ACS for Windows Server
78-14696-01, Version 3.1
Chapter 2 Deploying Cisco Secure ACSBasic Deployment Factors for Cisco Secure ACS
The type of access is also an important consideration. If there are to be different administrative access levels to the AAA clients, or if a subset of administrators is to be limited to certain systems, Cisco Secure ACS can be used with command authorization per network device to restrict network administrators as necessary. To use local authentication restricts the administrative access policy to no login on a device or using privilege levels to control access. Controlling access by means of privilege levels is cumbersome and not very scalable. This requires that the privilege levels of specific commands are altered on the AAA client device and specific privilege levels are defined for the user login. It is also very easy to create more problems by editing command privilege levels. Using command authorization on Cisco Secure ACS does not require that you alter the privilege level of controlled commands. The AAA client sends the command to Cisco Secure ACS to be parsed and Cisco Secure ACS determines whether the administrator has permission to use the command. The use of AAA allows authentication on any AAA client to any user on Cisco Secure ACS and facilitates the limitation of access to these devices on a per-AAA client basis.
A small network with a small number of network devices may require only one or two individuals to administer it. Local authentication on the device is usually sufficient. If you require more granular control than that which authentication can provide, some means of authorization is necessary. As discussed earlier, controlling access using privilege levels can be cumbersome. Cisco Secure ACS reduces this problem.
In large enterprise networks, with many devices to administer, the use of Cisco Secure ACS becomes a practical necessity. Because administration of many devices requires a larger number of network administrators, with varying levels of access, the use of local control is simply not a viable way of keeping track of network device configuration changes required when changing administrators or devices. The use of network management tools, such as CiscoWorks 2000, helps to ease this burden, but maintaining security is still an issue. Because Cisco Secure ACS can comfortably handle up to 100,000 users, the number of network administrators that Cisco Secure ACS supports is rarely an issue. If there is a large remote access population using RADIUS for AAA support, the corporate IT team should consider separate TACACS+ authentication using Cisco Secure ACS for the administrative team.This would isolate the general user population from the administrative team and reduce the likelihood of inadvertent access to network devices. If this is not a suitable solution, using TACACS+ for administrative (shell/exec) logins, and RADIUS for remote network access, provides sufficient security for the network devices.
2-15User Guide for Cisco Secure ACS for Windows Server
78-14696-01, Version 3.1
Chapter 2 Deploying Cisco Secure ACSBasic Deployment Factors for Cisco Secure ACS
Separation of Administrative and General Users
It is important to keep the general network user from accessing network devices. Even though the general user may not intend to gain unauthorized access, inadvertent access could accidentally disrupt network access. AAA and Cisco Secure ACS provide the means to separate the general user from the administrative user.
The easiest, and recommended, method to perform such separation is to use RADIUS for the general remote access user and TACACS+ for the administrative user. An issue that arises is that an administrator may also require remote network access, like the general user. If you use Cisco Secure ACS this poses no problem. The administrator can have both RADIUS and TACACS+ configurations in Cisco Secure ACS. Using authorization, RADIUS users can have PPP (or other network access protocols) set as the permitted protocol. Under TACACS+, only the administrator would be configured to allow shell (exec) access.
For example, if the administrator is dialing into the network as a general user, a AAA client would use RADIUS as the authenticating/authorizing protocol and the PPP protocol would be authorized. In turn, if the same administrator remotely connects to a AAA client to make configuration changes, the AAA client would use the TACACS+ protocol for authentication/authorization. Because this administrator is configured on Cisco Secure ACS with permission for shell under TACACS+, he would be authorized to log in to that device. This does require that the AAA client have two separate configurations on Cisco Secure ACS, one for RADIUS and one for TACACS+. An example of a AAA client configuration under IOS that effectively separates PPP and shell logins follows:
aaa new-model tacacs-server host ip-address tacacs-server key secret-key radius-server host ip-address radius-server key secret-key aaa authentication ppp default group radius aaa authentication login default group tacacs+ local aaa authentication login console none aaa authorization network default group radius aaa authorization exec default group tacacs+ none aaa authorization command 15 default group tacacs+ none username user password password line con 0 login authentication console
2-16User Guide for Cisco Secure ACS for Windows Server
78-14696-01, Version 3.1
Chapter 2 Deploying Cisco Secure ACSBasic Deployment Factors for Cisco Secure ACS
Conversely, if a general user attempts to use his or her remote access to log in to a network device, Cisco Secure ACS checks and approves the username and password, but the authorization process would fail because that user would not have credentials that allow shell/exec access to the device.
DatabaseAside from topological considerations, the user database is one of the most influential factors involved in making deployment decisions for Cisco Secure ACS. The size of the user base, distribution of users throughout the network, access requirements, and type of user database contribute to how Cisco Secure ACS is deployed.
Number of Users
Cisco Secure ACS is designed for the enterprise environment, comfortably handling 100,000 users. This is usually more than adequate for a corporation. In an environment that exceeds these numbers, the user base would typically be geographically dispersed, which lends itself to the use of more than one Cisco Secure ACS configuration. A WAN failure could render a local network inaccessible because of the loss of the authentication server. In addition to this issue, reducing the number of users that a single Cisco Secure ACS handles improves performance by lowering the number of logins occurring at any given time and by reducing the load on the database itself.
Type of Database
Cisco Secure ACS supports a number of database options, including the CiscoSecure user database or using remote authentication with any of the external databases supported. For more information about database options, types, and features, see Authentication and User Databases, page 1-8, or Chapter 11, “Working with User Databases,” or Chapter 12, “Administering External User Databases.” Each database option has its own advantages and limitations in scalability and performance.
2-17User Guide for Cisco Secure ACS for Windows Server
78-14696-01, Version 3.1
Chapter 2 Deploying Cisco Secure ACSSuggested Deployment Sequence
Network Latency and ReliabilityNetwork latency and reliability are also important factors in how you deploy Cisco Secure ACS. Delays in authentication can result in timeouts at the end-user client or the AAA client.
The general rule for large, extended networks, such as a globally dispersed corporation, is to have at least one Cisco Secure ACS deployed in each region. This may not be adequate without a reliable, high-speed connection between sites. Many corporations use secure VPN connections between sites so that the Internet provides the link. This saves time and money but it does not provide the speed and reliability that a dedicated frame relay or T1 link provides. If reliable authentication service is critical to business functionality, such as retail outlets with cash registers that are linked by a wireless LAN, the loss of WAN connection to a remote Cisco Secure ACS could be catastrophic.
The same issue can be applied to an external database used by Cisco Secure ACS. The database should be deployed close enough to Cisco Secure ACS to ensure reliable and timely access. Using a local Cisco Secure ACS with a remote database can result in the same problems as using a remote Cisco Secure ACS. Another possible problem in this scenario is that a user may experience timeout problems. The AAA client would be able to contact Cisco Secure ACS, but Cisco Secure ACS would wait for a reply that might be delayed or never arrive from the external user database. If the Cisco Secure ACS were remote, the AAA client would time out and try an alternative method to authenticate the user, but in the latter case, it is likely the end-user client would time out first.
Suggested Deployment SequenceWhile there is no single process for all Cisco Secure ACS deployments, you should consider following the sequence, keyed to the high-level functions represented in the navigation toolbar. Also bear in mind that many of these deployment activities are iterative in nature; you may find that you repeatedly return to such tasks as interface configuration as your deployment proceeds.
• Configure Administrators—You should configure at least one administrator at the outset of deployment; otherwise, there is no remote administrative access and all configuration activity must be done from the server. You should also have a detailed plan for establishing and maintaining an administrative policy.
2-18User Guide for Cisco Secure ACS for Windows Server
78-14696-01, Version 3.1

Chapter 2 Deploying Cisco Secure ACSSuggested Deployment Sequence
For more information about setting up administrators, see Chapter 10, “Setting Up and Managing Administrators and Policy.”
• Configure the Cisco Secure ACS HTML Interface—You can configure the Cisco Secure ACS HTML interface to show only those features and controls that you intend to use. This makes using Cisco Secure ACS less difficult than it would be if you had to contend with multiple parts of the HTML interface that you do not plan to use. The price of this convenience can sometimes be frustration that features and controls do not appear because you failed to configure them in the Interface Configuration section. For guidance on configuring the HTML interface, see Interface Design Concepts, page 3-2.
For information about configuring particular aspects of the HTML interface, see the following sections of the interface configuration chapter:
– User Data Configuration Options, page 3-3
– Advanced Options, page 3-4
– Protocol Configuration Options for TACACS+, page 3-7
– Protocol Configuration Options for RADIUS, page 3-10
• Configure System—There are more than a dozen functions within the System Configuration section to be considered, from setting the format for the display of dates and password validation to configuring settings for database replication and RDBMS synchronization. These functions are detailed in Chapter 8, “Establishing Cisco Secure ACS System Configuration.” Of particular note during initial system configuration is setting up the logs and reports to be generated by Cisco Secure ACS; for more information, see Chapter 9, “Working with Logging and Reports.”
• Configure Network—You control distributed and proxied AAA functions in the Network Configuration section of the HTML interface. From here, you establish the identity, location, and grouping of AAA clients and servers, and determine what authentication protocols each is to use. For more information, see Chapter 4, “Setting Up and Managing Network Configuration.”
• Configure External User Database—During this phase of deployment you must decide whether and how you intend to implement an external database to establish and maintain user authentication accounts. Typically, this decision is made according to your existing network administration
2-19User Guide for Cisco Secure ACS for Windows Server
78-14696-01, Version 3.1
Chapter 2 Deploying Cisco Secure ACSSuggested Deployment Sequence
mechanisms. For information about the types of databases Cisco Secure ACS supports and instructions for establishing them, see Chapter 11, “Working with User Databases.”
Along with the decision to implement an external user database (or databases), you should have detailed plans that specify your requirements for Cisco Secure ACS database replication, backup, and synchronization. These aspects of configuring CiscoSecure user database management are detailed in Chapter 8, “Establishing Cisco Secure ACS System Configuration.”
• Configure Shared Profile Components—With most aspects of network configuration already established and before configuring user groups, you should configure your Shared Profile Components. When you set up and name the network access restrictions and command authorization sets you intend to employ, you lay out an efficient basis for specifying user group and single user access privileges. For more information about Shared Profile Components, see Chapter 5, “Setting Up and Managing Shared Profile Components.”
• Configure Groups—Having previously configured any external user databases you intend to employ, and before configuring your user groups, you should decide how to implement two other Cisco Secure ACS features related to external user databases: unknown user processing and database group mapping. For more information, see Unknown User Processing, page 12-1, and Database Group Mappings, page 12-11. Then, you can configure your user groups with a complete plan of how Cisco Secure ACS is to implement authorization and authentication. For more information, see Chapter 6, “Setting Up and Managing User Groups.”
• Configure Users—With groups established, you can establish user accounts. It is useful to remember that a particular user can belong to only one user group, and that settings made at the user level override settings made at the group level. For more information, see Chapter 7, “Setting Up and Managing User Accounts.”
• Configure Reports—Using the Reports and Activities section of the Cisco Secure ACS HTML interface, you can specify the nature and scope of logging that Cisco Secure ACS performs. For more information, see Chapter 9, “Working with Logging and Reports.”
2-20User Guide for Cisco Secure ACS for Windows Server
78-14696-01, Version 3.1
User Guide for 78-14696-01, Version 3.1
C H A P T E R 3
Setting Up the Cisco Secure ACS HTML InterfaceEase of use is the overriding design principle of the HTML interface in the Cisco Secure Access Control Server (Cisco Secure ACS) for Windows Server version 3.1. Cisco Secure ACS presents intricate concepts of network security from the perspective of an administrator. The Interface Configuration section of Cisco Secure ACS enables you to configure the Cisco Secure ACS HTML interface—you can tailor the interface to simplify the screens you will use by hiding the features that you do not use and by adding fields for your specific configuration.
This chapter presents the details of configuring the Cisco Secure ACS interface through four topics:
• User Data Configuration Options, page 3-3
• Advanced Options, page 3-4
• Protocol Configuration Options for TACACS+, page 3-7
• Protocol Configuration Options for RADIUS, page 3-10
Note We recommend that you return to this section to review and confirm your initial settings. While it is logical to begin your Cisco Secure ACS configuration efforts with configuring the interface, sometimes a section of the HTML interface that you initially believed should be hidden from view may later require configuration from within this section.
3-1Cisco Secure ACS for Windows Server
Chapter 3 Setting Up the Cisco Secure ACS HTML InterfaceInterface Design Concepts
Tip If a section of the Cisco Secure ACS HTML interface appears to be “missing” or “broken”, return to the Interface Configuration section and confirm that the particular section has been activated.
Interface Design ConceptsBefore you begin to configure the Cisco Secure ACS HTML interface for your particular configuration, you should understand a few basic precepts of the system’s operation. The information in the following sections is necessary for effective interface configuration.
User-to-Group RelationshipA user can belong to only one group at a time. As long as there are no conflicting attributes, users inherit group settings.
Note If a user profile has an attribute configured differently from the same attribute in the group profile, the user setting always overrides the group setting.
If a user has a unique configuration requirement, you can make that user a part of a group and set unique requirements on the User Setup page, or you can assign that user to his or her own group.
Per-User or Per-Group FeaturesYou can configure most features at both group and user levels, with the following exceptions:
• User level only—Static IP address, password, and expiration.
• Group level only—Password aging and time-of-day/day-of-week restrictions.
3-2User Guide for Cisco Secure ACS for Windows Server
78-14696-01, Version 3.1
Chapter 3 Setting Up the Cisco Secure ACS HTML InterfaceUser Data Configuration Options
User Data Configuration OptionsThe Configure User Defined Fields page enables you to add (or edit) up to five fields for recording information on each user. The fields you define in this section subsequently appear in the Supplementary User Information section at the top of the User Setup page. For example, you could add the user’s company name, telephone number, department, billing code, and so on. You can also include these fields in the accounting logs. For more information about the accounting logs, see About Cisco Secure ACS Logs and Reports, page 9-4. For information on the data fields that compose the user data options, see User-Defined Attributes, page F-35.
Defining New User Data FieldsTo configure new user data fields, follow these steps:
Step 1 Click Interface Configuration, and then click User Data Configuration.
Result: The Configure User Defined Fields page appears. Check boxes in the Display column indicate which fields are configured to appear in the Supplementary User Information section at the top of the User Setup page.
Step 2 Select a check box in the Display column.
Step 3 In the corresponding Field Title box, type a title for the new field.
Step 4 To configure another field, repeat Step 2 and Step 3.
Step 5 When you have finished configuring new user data fields, click Submit.
Tip You can change the title of a field by editing the text in the Field Title box and then clicking Submit. For the change to take effect, you must restart the Cisco Secure ACS services by clicking Restart at the bottom of the Service Control page in the System Configuration section and then stopping and restarting the CSAdmin service by using the Services section of the Administrative Tools folder in Windows Control Panel. Restarting Cisco Secure ACS-related Windows services should be done during off hours because it briefly interrupts authentication, authorization, and accounting.
3-3User Guide for Cisco Secure ACS for Windows Server
78-14696-01, Version 3.1

Chapter 3 Setting Up the Cisco Secure ACS HTML InterfaceAdvanced Options
Advanced OptionsThe Advanced Options page enables you to determine which advanced features Cisco Secure ACS displays. You can simplify the pages displayed in other areas of the Cisco Secure ACS HTML interface by hiding advanced features that you do not use.
Caution Disabling an advanced feature in the Interface Configuration section does not affect anything except the display of that feature in the HTML interface. Settings made while an advanced feature was displayed remain in effect when that advanced feature is no longer displayed. Further, the interface displays any advanced feature that has non-default settings, even if you have configured that advanced feature to be hidden. If you later disable the feature or delete its settings, Cisco Secure ACS hides the advanced feature. The only exception is the Network Device Groups feature. Regardless of whether Network Device Groups are in use, they are hidden when deselected on the Advanced Options page.
The advanced option features include the following:
• Per-User TACACS+/RADIUS Attributes—When selected, this feature enables TACACS+/RADIUS attributes to be set at a per-user level, in addition to being set at the group level.
• User-Level Shared Network Access Restrictions—When selected, this feature enables the Shared Profile Component network access restrictions (NARs) options on the User Setup page. These options allow you to apply previously configured, named, IP-based and CLID/DNIS-based NARs at the user level. For information on defining a NAR, or NAR set, within Shared Profile Components, see Shared Network Access Restrictions Configuration, page 5-8.
• User-Level Network Access Restrictions—When selected, this feature enables the two sets of options for defining user-level, IP-based and CLI/DNIS-based NARs on the User Setup page.
• User-Level Downloadable ACLs—When selected, this feature enables the Downloadable ACLs (access control lists) section on the User Setup page.
• Default Time-of-Day/Day-of-Week Specification—When selected, this feature enables the default time-of-day/day-of-week access settings grid on the Group Setup page.
3-4User Guide for Cisco Secure ACS for Windows Server
78-14696-01, Version 3.1
Chapter 3 Setting Up the Cisco Secure ACS HTML InterfaceAdvanced Options
• Group-Level Shared Network Access Restrictions—When selected, this feature enables the Shared Profile Component NAR options on the Group Setup page. These options allow you to apply previously configured, named, IP-based and CLID/DNIS-based NARs at the group level. For information on defining a NAR, or NAR set, within Shared Profile Components, see Shared Network Access Restrictions Configuration, page 5-8.
• Group-Level Network Access Restrictions—When selected, this feature enables the two sets of options for defining group-level, IP-based and CLI/DNIS-based NARs on the Group Setup page.
• Group-Level Downloadable ACLs—When selected, this feature enables the Downloadable ACLs section on the Group Setup page.
• Group-Level Password Aging—When selected, this feature enables the Password Aging section on the Group Setup page. The Password Aging feature enables you to force users to change their passwords.
• Max Sessions—When selected, this feature enables the Max Sessions section on the User Setup and Group Setup pages. The Max Sessions option sets the maximum number of simultaneous connections for a group or a user.
• Usage Quotas—When selected, this feature enables the Usage Quotas sections on the User Setup and Group Setup pages. The Usage Quotas option sets one or more quotas for usage by a group or a user.
• Distributed System Settings—When selected, this feature displays the AAA server and proxy table on the Network Interface page. If the tables have information other than the defaults in them, they always appear.
• Remote Logging—When selected, this feature enables the Remote Logging feature on the Logging page of the System Configuration section.
• Cisco Secure ACS Database Replication—When selected, this feature enables the Cisco Secure ACS database replication information on the System Configuration page.
• RDBMS Synchronization—When selected, this feature enables the RDBMS (Relational Database Management System) Synchronization option on the System Configuration page. If RDBMS Synchronization is configured, this option always appears.
• IP Pools—When selected, this feature enables the IP Pools Address Recovery and IP Pools Server options on the System Configuration page.
3-5User Guide for Cisco Secure ACS for Windows Server
78-14696-01, Version 3.1

Chapter 3 Setting Up the Cisco Secure ACS HTML InterfaceAdvanced Options
• Network Device Groups—When selected, this option enables network device groups (NDGs). When NDGs are enabled, the Network Configuration section and parts of the User Setup and Group Setup pages change to enable you to manage groups of network devices (AAA clients or AAA servers). This feature is useful if you have many devices to administer.
• Voice over IP (VoIP) Group Settings—When selected, this feature enables the VoIP option on the Group Setup page.
• Voice-over-IP (VoIP) Accounting Configuration—When selected, this feature enables the VoIP Accounting Configuration option on the System Configuration page. This option is used to determine the logging format of RADIUS VoIP accounting packets.
• ODBC Logging—When selected, this feature enables the ODBC logging sections on the Logging page of the System Configuration section.
Setting Advanced Options for the Cisco Secure ACS User Interface
To set advanced options for the Cisco Secure ACS HTML interface, follow these steps:
Step 1 Click Interface Configuration, and then click Advanced Options.
Result: The Advanced Options table appears.
Step 2 Select each option that you want displayed (enabled) in the Cisco Secure ACS HTML interface.
Caution Disabling an advanced feature in the Interface Configuration section does not affect anything except the display of that feature in the HTML interface. Settings made while an advanced feature was displayed remain in effect when that advanced feature is no longer displayed. Further, the interface displays any advanced feature that has non-default settings, even if you have configured that advanced feature to be hidden. If you later disable the feature or delete its settings, Cisco Secure ACS hides the advanced feature. The only exception is the Network Device Groups feature. Regardless of whether Network Device Groups are in use, they are hidden when deselected on the Advanced Options page.
3-6User Guide for Cisco Secure ACS for Windows Server
78-14696-01, Version 3.1
Chapter 3 Setting Up the Cisco Secure ACS HTML InterfaceProtocol Configuration Options for TACACS+
Step 3 When you have finished making selections, click Submit.
Result: Cisco Secure ACS alters the contents of various sections of the HTML interface according to the selections you have made.
Protocol Configuration Options for TACACS+The TACACS+ (Cisco) page details the configuration of the Cisco Secure ACS HTML interface for TACACS+ settings. The interface settings enable you to display or hide TACACS+ administrative and accounting options. You can simplify the HTML interface by hiding the features that you do not use.
The TACACS+ (Cisco) page comprises three distinct areas, as follows:
Tip The default interface setting presents a single column of check boxes, at the group level only, for selecting TACACS+ Services Settings and New Service Settings. To view two columns of check boxes that enable you to configure settings at the Group level or the User level, you must have enabled the Per-user TACACS+/RADIUS Attributes option on the Advanced Options page of Interface Configuration section.
• TACACS+ Services Settings—In this area is a list of the most commonly used services and protocols for TACACS+. You select each TACACS+ service that you want to appear as a configurable option on either the User Setup page or Group Setup page.
• New Services—In this area you can enter any services or protocols particular to your network configuration.
Note If you have configured Cisco Secure ACS to interact with device management applications for other Cisco products, such as a Management Center for PIX Firewall, Cisco Secure ACS may display new TACACS+ services as dictated by these device management applications. To ensure the proper functioning of Cisco Secure ACS, of device management applications with which
3-7User Guide for Cisco Secure ACS for Windows Server
78-14696-01, Version 3.1
Chapter 3 Setting Up the Cisco Secure ACS HTML InterfaceProtocol Configuration Options for TACACS+
Cisco Secure ACS interacts, and of the Cisco network devices managed by those applications, do not change or delete automatically generated TACACS+ service types.
• Advanced Configuration Options—In this area you can add more detailed information for even more tailored configurations.
The four items you can choose to hide or display are as follows:
– Advanced TACACS+ Features—This option displays or hides the Advanced TACACS+ Options section on the User Setup page. These options include Privilege Level Authentication and Outbound Password Configuration for SENDPASS and SENDAUTH clients, such as routers.
– Display a Time-of-Day access grid for every TACACS+ service where you can override the default Time-of-Day settings—If this option is selected, a grid appears on the User Setup page that enables you to override the TACACS+ scheduling attributes on the Group Setup page.
You can control the use of each TACACS+ service by the time of day and day of week. For example, you can restrict Exec (Telnet) access to business hours but permit PPP-IP access at any time.
The default setting is to control time-of-day access for all services as part of authentication. However, you can override the default and display a time-of-day access grid for every service. This keeps user and group setup easy to manage, while making this feature available for the most sophisticated environments. This feature applies only to TACACS+ because TACACS+ can separate the authentication and authorization processes. RADIUS time-of-day access applies to all services. If both TACACS+ and RADIUS are used simultaneously, the default time-of-day access applies to both. This provides a common method to control access regardless of the access control protocol.
– Display a window for each service selected in which you can enter customized TACACS+ attributes—If this option is selected, an area appears on the User Setup and Group Setup pages that enables you to enter custom TACACS+ attributes.
Cisco Secure ACS can also display a custom command field for each service. This text field enables you to make specialized configurations to be downloaded for a particular service for users in a particular group.
3-8User Guide for Cisco Secure ACS for Windows Server
78-14696-01, Version 3.1
Chapter 3 Setting Up the Cisco Secure ACS HTML InterfaceProtocol Configuration Options for TACACS+
You can use this feature to send many TACACS+ commands to the access device for the service, provided that the device supports the command, and that the command syntax is correct. This feature is disabled by default, but you can enable it the same way you enable attributes and time-of-day access.
– Display enable Default (Undefined) Service Configuration—If this check box is selected, an area appears on the User Setup and Group Setup pages that enables you to permit unknown TACACS+ services, such as Cisco Discovery Protocol (CDP).
Note This option should be used by advanced system administrators only.
Note Customized settings at the user level take precedence over settings at the group level.
Setting Options for TACACS+This procedure enables you to display or hide TACACS+ administrative and accounting options. It is unlikely that you will use every service and protocol available for TACACS+. Displaying each would make setting up a user or group cumbersome. To simplify setup, you can use the TACACS+ (Cisco IOS) Edit page to customize the services and protocols that appear.
To configure the user interface for TACACS+ options, follow these steps:
Note The Cisco Secure ACS HTML interface displays any protocol option that is enabled or has non-default values, even if you have configured that protocol option to be hidden. If you later disable the option or delete its value and the protocol option is configured to be hidden, Cisco Secure ACS hides the protocol option. This behavior prevents Cisco Secure ACS from hiding active settings.
Step 1 Click Interface Configuration, and then click TACACS+ (Cisco IOS).
Result: The TACACS+ (Cisco) page appears.
3-9User Guide for Cisco Secure ACS for Windows Server
78-14696-01, Version 3.1

Chapter 3 Setting Up the Cisco Secure ACS HTML InterfaceProtocol Configuration Options for RADIUS
Step 2 In the TACACS+ Services table, select the check box for each TACACS+ service you want displayed on the applicable setup page.
Step 3 To add new services and protocols, follow these steps:
a. In the New Services section of the TACACS+ Services table, type in any Service and Protocol to be added.
Note If you have configured Cisco Secure ACS to interact with device management applications for other Cisco products, such as a Management Center for PIX Firewall, Cisco Secure ACS may display new TACACS+ services as dictated by these device management applications. To ensure the proper functioning of Cisco Secure ACS, of device management applications with which Cisco Secure ACS interacts, and of the Cisco network devices managed by those applications, do not change or delete automatically generated TACACS+ service types.
b. Select the appropriate check box to select those that should be displayed for configuration either under User Setup, or Group Setup, or both.
Step 4 In the Advanced Configurations Options section, select the check boxes of the display options you want to enable.
Step 5 When you have finished setting TACACS+ interface display options, click Submit.
Result: The selections made in this procedure determine what TACACS+ options Cisco Secure ACS displays in other sections of the HTML interface.
Protocol Configuration Options for RADIUSIt is unlikely that you would want to install every attribute available for every protocol. Displaying each would make setting up a user or group very cumbersome. To simplify setup, this section allows you to customize the attributes that are displayed. For a list of supported RADIUS AV pairs and accounting AV pairs, see Appendix C, “RADIUS Attributes.”
3-10User Guide for Cisco Secure ACS for Windows Server
78-14696-01, Version 3.1
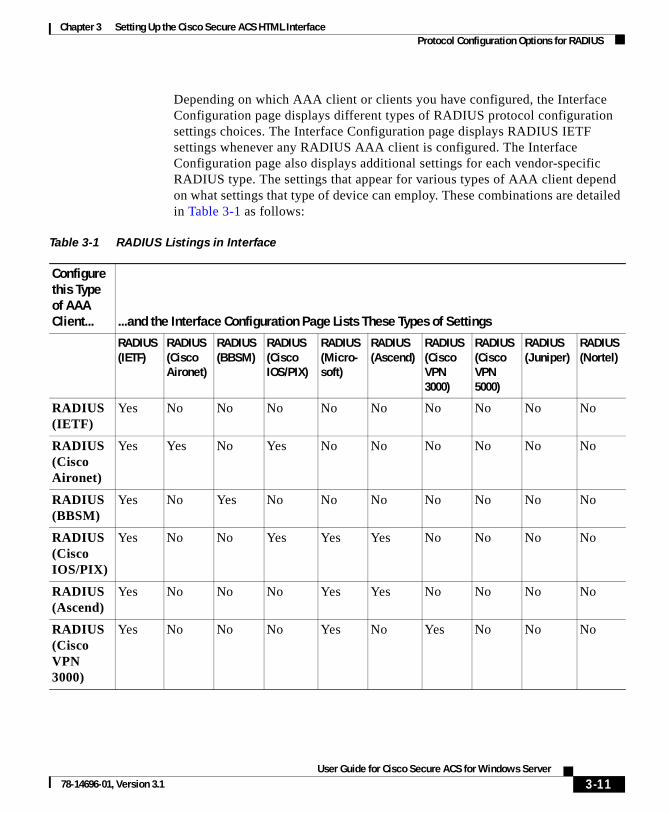
Chapter 3 Setting Up the Cisco Secure ACS HTML InterfaceProtocol Configuration Options for RADIUS
Depending on which AAA client or clients you have configured, the Interface Configuration page displays different types of RADIUS protocol configuration settings choices. The Interface Configuration page displays RADIUS IETF settings whenever any RADIUS AAA client is configured. The Interface Configuration page also displays additional settings for each vendor-specific RADIUS type. The settings that appear for various types of AAA client depend on what settings that type of device can employ. These combinations are detailed in Table 3-1 as follows:
Table 3-1 RADIUS Listings in Interface
Configure this Type of AAA Client... ...and the Interface Configuration Page Lists These Types of Settings
RADIUS (IETF)
RADIUS (Cisco Aironet)
RADIUS (BBSM)
RADIUS (Cisco IOS/PIX)
RADIUS (Micro-soft)
RADIUS (Ascend)
RADIUS (Cisco VPN 3000)
RADIUS (Cisco VPN 5000)
RADIUS (Juniper)
RADIUS (Nortel)
RADIUS (IETF)
Yes No No No No No No No No No
RADIUS (Cisco Aironet)
Yes Yes No Yes No No No No No No
RADIUS (BBSM)
Yes No Yes No No No No No No No
RADIUS (Cisco IOS/PIX)
Yes No No Yes Yes Yes No No No No
RADIUS (Ascend)
Yes No No No Yes Yes No No No No
RADIUS (Cisco VPN 3000)
Yes No No No Yes No Yes No No No
3-11User Guide for Cisco Secure ACS for Windows Server
78-14696-01, Version 3.1
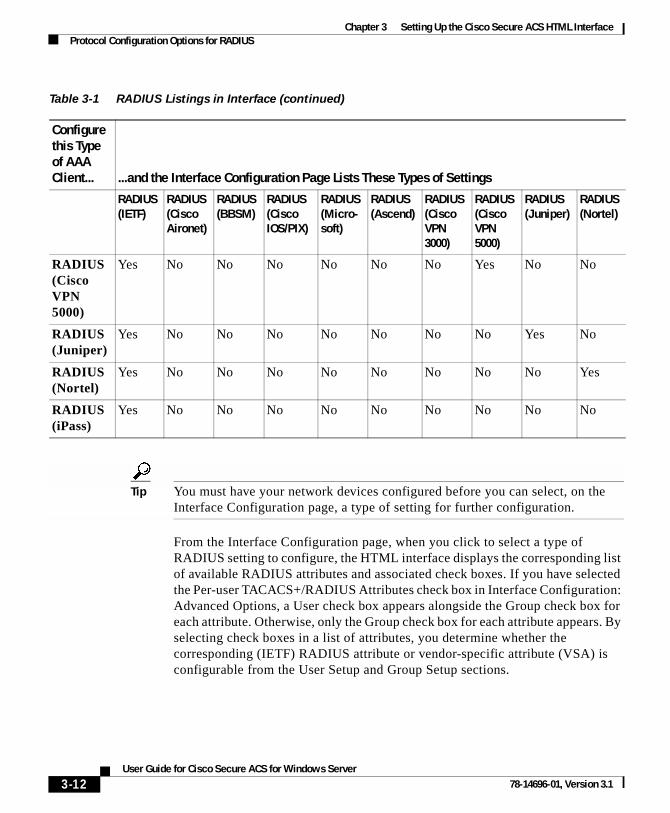
Chapter 3 Setting Up the Cisco Secure ACS HTML InterfaceProtocol Configuration Options for RADIUS
Tip You must have your network devices configured before you can select, on the Interface Configuration page, a type of setting for further configuration.
From the Interface Configuration page, when you click to select a type of RADIUS setting to configure, the HTML interface displays the corresponding list of available RADIUS attributes and associated check boxes. If you have selected the Per-user TACACS+/RADIUS Attributes check box in Interface Configuration: Advanced Options, a User check box appears alongside the Group check box for each attribute. Otherwise, only the Group check box for each attribute appears. By selecting check boxes in a list of attributes, you determine whether the corresponding (IETF) RADIUS attribute or vendor-specific attribute (VSA) is configurable from the User Setup and Group Setup sections.
RADIUS (Cisco VPN 5000)
Yes No No No No No No Yes No No
RADIUS (Juniper)
Yes No No No No No No No Yes No
RADIUS (Nortel)
Yes No No No No No No No No Yes
RADIUS (iPass)
Yes No No No No No No No No No
Table 3-1 RADIUS Listings in Interface (continued)
Configure this Type of AAA Client... ...and the Interface Configuration Page Lists These Types of Settings
RADIUS (IETF)
RADIUS (Cisco Aironet)
RADIUS (BBSM)
RADIUS (Cisco IOS/PIX)
RADIUS (Micro-soft)
RADIUS (Ascend)
RADIUS (Cisco VPN 3000)
RADIUS (Cisco VPN 5000)
RADIUS (Juniper)
RADIUS (Nortel)
3-12User Guide for Cisco Secure ACS for Windows Server
78-14696-01, Version 3.1

Chapter 3 Setting Up the Cisco Secure ACS HTML InterfaceProtocol Configuration Options for RADIUS
Details regarding the types of RADIUS settings pages follow:
• (IETF) RADIUS Settings—This page lists attributes available for (IETF) RADIUS.
These standard (IETF) RADIUS attributes are available for any network device configuration when using RADIUS. If you want to use IETF attribute number 26 (for VSAs), select Interface Configuration and then RADIUS for the vendors whose network devices you use. Attributes for (IETF) RADIUS and the VSA for each RADIUS network device vendor supported by Cisco Secure ACS appear in User Setup or Group Setup.
Note The RADIUS (IETF) attributes are shared with RADIUS VSAs. You must configure the first RADIUS attributes from RADIUS (IETF) for the RADIUS vendor.
The Tags to Display Per Attribute option (located under Advanced Configuration Options) enables you to specify how many values to display for tagged attributes on the User Setup and Group Setup pages. Examples of tagged attributes include [064]Tunnel-Type and [069]Tunnel-Password.
For detailed procedural information, see Setting Protocol Configuration Options for IETF RADIUS Attributes, page 3-15.
• RADIUS (Cisco IOS/PIX) Settings—This section allows you to enable the specific attributes for RADIUS (Cisco IOS/PIX). Selecting the first attribute listed under RADIUS (Cisco IOS/PIX), 026/009/001, displays an entry field under User Setup and/or Group Setup in which any TACACS+ commands can be entered to fully leverage TACACS+ in a RADIUS environment. For detailed procedural information, see Setting Protocol Configuration Options for Non-IETF RADIUS Attributes, page 3-16.
• RADIUS (Cisco Aironet) Settings—This section allows you to enable the specific attribute for RADIUS (Cisco Aironet). The single Cisco Aironet RADIUS VSA, Cisco-Aironet-Session-Timeout, is a specialized implementation of the IETF RADIUS Session-Timeout attribute (27). When Cisco Secure ACS responds to an authentication request from a Cisco Aironet Access Point and the Cisco-Aironet-Session-Timeout attribute is configured, Cisco Secure ACS sends to the wireless device this value in the IETF Session-Timeout attribute. This enables you to provide different session
3-13User Guide for Cisco Secure ACS for Windows Server
78-14696-01, Version 3.1
Chapter 3 Setting Up the Cisco Secure ACS HTML InterfaceProtocol Configuration Options for RADIUS
timeout values for wireless and wired end-user clients. For detailed procedural information, see Setting Protocol Configuration Options for Non-IETF RADIUS Attributes, page 3-16.
• RADIUS (Ascend) Settings—From this section you enable the RADIUS VSAs for RADIUS (Ascend). This page appears if you have configured a RADIUS (Ascend) or a RADIUS (Cisco IOS/PIX) device. For detailed procedures, see Setting Protocol Configuration Options for Non-IETF RADIUS Attributes, page 3-16.
• RADIUS (Cisco VPN 3000) Settings—From this section you enable the RADIUS VSAs for RADIUS (Cisco VPN 3000). For detailed procedures, see Setting Protocol Configuration Options for Non-IETF RADIUS Attributes, page 3-16.
• RADIUS (Cisco VPN 5000) Settings—From this section you enable the RADIUS VSAs for RADIUS (Cisco VPN 5000). For detailed procedures, see Setting Protocol Configuration Options for Non-IETF RADIUS Attributes, page 3-16.
• RADIUS (Microsoft) Settings—From this section you enable the RADIUS VSAs for RADIUS (Microsoft). This page appears if you configure a RADIUS (Ascend), or a RADIUS (VPN 3000), or a RADIUS (Cisco IOS/PIX) device. For detailed procedures, see Setting Protocol Configuration Options for Non-IETF RADIUS Attributes, page 3-16.
• RADIUS (Nortel) Settings—From this section you enable the RADIUS VSAs for RADIUS (Nortel). For detailed procedures, see Setting Protocol Configuration Options for Non-IETF RADIUS Attributes, page 3-16.
• RADIUS (Juniper) Settings—From this section you enable the RADIUS VSAs for RADIUS (Juniper). For detailed procedures, see Setting Protocol Configuration Options for Non-IETF RADIUS Attributes, page 3-16.
• RADIUS (BBSM) Settings—From this section you enable the RADIUS VSAs for RADIUS “Building Broadband Service Manger” (BBSM). For detailed procedures, see Setting Protocol Configuration Options for Non-IETF RADIUS Attributes, page 3-16.
While Cisco Secure ACS ships with these listed VSAs prepackaged, it also enables you to define and configure custom attributes for any VSA set not already contained in Cisco Secure ACS. If you have configured a custom VSA and a corresponding AAA client, from the Interface Configuration section you can select the custom VSA and then set the options for how particular attributes
3-14User Guide for Cisco Secure ACS for Windows Server
78-14696-01, Version 3.1
Chapter 3 Setting Up the Cisco Secure ACS HTML InterfaceProtocol Configuration Options for RADIUS
appear as configurable options on the User Setup or Group Setup page. For information about creating user-defined RADIUS VSAs, see Custom RADIUS Vendors and VSAs, page 8-33.
Setting Protocol Configuration Options for IETF RADIUS Attributes
This procedure enables you to hide or display any of the standard IETF RADIUS attributes for configuration from other portions of the Cisco Secure ACS HTML interface.
Note If the Per-user TACACS+/RADIUS Attributes check box in Interface Configuration: Advanced Options is selected, a User check box appears alongside the Group check box for each attribute.
Note Each selected IETF RADIUS attribute must be supported by all your network devices using RADIUS.
To set protocol configuration options for IETF RADIUS attributes, follow these steps:
Step 1 Click Interface Configuration, and then click RADIUS (IETF).
Result: The RADIUS (IETF) page appears.
Step 2 For each IETF RADIUS attribute that you want to appear as a configurable option on the User Setup or Group Setup page, select the corresponding check box.
Note Each attribute selected must be supported by your RADIUS network devices.
Step 3 To specify how many values to display for tagged attributes on the User Setup and Group Setup pages, select the Tags to Display Per Attribute option, and then select a value from the corresponding list. Examples of tagged attributes are [064] Tunnel-Type and [069] Tunnel-Password.
3-15User Guide for Cisco Secure ACS for Windows Server
78-14696-01, Version 3.1
Chapter 3 Setting Up the Cisco Secure ACS HTML InterfaceProtocol Configuration Options for RADIUS
Step 4 When you have finished selecting the attributes, click Submit at the bottom of the page.
Result: Each IETF RADIUS attribute that you selected appears as a configurable option on the User Setup or Group Setup page, as applicable.
Setting Protocol Configuration Options for Non-IETF RADIUS Attributes
This procedure enables you to hide or display various RADIUS VSAs for configuration from the User Setup and Group Setup portions of the Cisco Secure ACS HTML interface.
To set protocol configuration options for a set of RADIUS VSAs, follow these steps:
Step 1 Click Interface Configuration.
Step 2 Click one of the RADIUS VSA set types displayed, for example, RADIUS (Ascend).
Result: The page listing the selected set of available RADIUS VSAs appears.
Note If the Per-user TACACS+/RADIUS Attributes check box in Interface Configuration: Advanced Options is selected, a User check box appears alongside the Group check box for each attribute.
Step 3 For each RADIUS VSA that you want to appear as a configurable option on the User Setup or Group Setup page, select the corresponding check box.
Note Each attribute selected must be supported by your RADIUS network devices.
3-16User Guide for Cisco Secure ACS for Windows Server
78-14696-01, Version 3.1
Chapter 3 Setting Up the Cisco Secure ACS HTML InterfaceProtocol Configuration Options for RADIUS
Step 4 Click Submit at the bottom of the page.
Result: According to your selections, the RADIUS VSAs appear on the User Setup or Group Setup pages, or both, as a configurable option.
3-17User Guide for Cisco Secure ACS for Windows Server
78-14696-01, Version 3.1

Chapter 3 Setting Up the Cisco Secure ACS HTML InterfaceProtocol Configuration Options for RADIUS
3-18User Guide for Cisco Secure ACS for Windows Server
78-14696-01, Version 3.1
User Guide for 78-14696-01, Version 3.1
C H A P T E R 4
Setting Up and Managing Network ConfigurationThis chapter details concepts and procedures for configuring Cisco Secure Access Control Server (Cisco Secure ACS) for Windows Server version 3.1 to interact with AAA clients and servers and for establishing a distributed system. It includes the following sections:
• About Network Configuration, page 4-2
• About Distributed Systems, page 4-3
• Proxy in Distributed Systems, page 4-4
• Network Device Searches, page 4-8
• AAA Client Configuration, page 4-11
• AAA Server Configuration, page 4-20
• Network Device Group Configuration, page 4-27
• Proxy Distribution Table Configuration, page 4-32
4-1Cisco Secure ACS for Windows Server
Chapter 4 Setting Up and Managing Network ConfigurationAbout Network Configuration
About Network ConfigurationThe appearance of the opening page you see when you click Network Configuration differs according to the network configuration selections you made in the Interface Configuration section. The four tables that may appear in the Network Configuration section are as follows:
• AAA Clients—This table lists each AAA client that is configured on the network, together with its IP address and associated protocol.
If you are using network device groups (NDGs), this table does not appear on the initial page, but is accessed through the Network Device Group table. For more information about this interface configuration, see Advanced Options, page 3-4.
• AAA Servers—This table lists each AAA server that is configured on the network together with its IP address and associated type.
If you are using NDGs, this table does not appear on the initial page, but is accessed through the Network Device Groups table. For more information about this interface configuration, see Advanced Options, page 3-4.
• Network Device Groups—This table lists the name of each NDG that has been configured, and the number of AAA clients and AAA servers assigned to each NDG. If you are using NDGs, the AAA Clients table and AAA Servers table do not appear on the opening page. To configure a AAA client or AAA server, you must click the name of the NDG to which the device is assigned. If the newly configured device is not assigned to an NDG, it belongs to the (Not Assigned) group.
This table appears only when you have configured the interface to use NDGs. For more information about this interface configuration, see Advanced Options, page 3-4.
• Proxy Distribution Table—You can use the Proxy Distribution Table to configure proxy capabilities including “domain” stripping. For more information, see Proxy Distribution Table Configuration, page 4-32.
This table appears only when you have configured the interface to enable Distributed Systems Settings. For more information about this interface configuration, see Advanced Options, page 3-4.
4-2User Guide for Cisco Secure ACS for Windows Server
78-14696-01, Version 3.1

Chapter 4 Setting Up and Managing Network ConfigurationAbout Distributed Systems
About Distributed SystemsCisco Secure ACS can be used in a distributed system; that is, multiple Cisco Secure ACS servers and authentication, authorization, and accounting (AAA) servers can be configured to communicate with one another as primary, backup, client, or peer systems. This enables you to use powerful features such as the following:
• Proxy
• Fallback on failed connection
• CiscoSecure database replication
• Remote and centralized logging
AAA Servers in Distributed Systems“AAA server” is the generic term for an access control server (ACS), and the two terms are often used interchangeably. AAA servers are used to determine who can access the network and what services are authorized for each user. The AAA server stores a profile containing authentication and authorization information for each user. Authentication information validates user identity, and authorization information determines what network services a user is permitted to use. A single AAA server can provide concurrent AAA services to many dial-up access servers, routers, and firewalls. Each network device can be configured to communicate with a AAA server. This makes it possible to centrally control dial-up access, and to secure network devices from unauthorized access.
These types of access control have unique authentication and authorization requirements. With Cisco Secure ACS, system administrators can use a variety of authentication methods that are used with different degrees of authorization privileges.
Completing the AAA functionality, Cisco Secure ACS serves as a central repository for accounting information. Each user session granted by Cisco Secure ACS can be fully accounted for, and its accounting information can be stored in the server. This accounting information can be used for billing, capacity planning, and security audits.
4-3User Guide for Cisco Secure ACS for Windows Server
78-14696-01, Version 3.1
Chapter 4 Setting Up and Managing Network ConfigurationProxy in Distributed Systems
Note If the fields mentioned in this section do not appear in the Cisco Secure ACS HTML interface, enable them by clicking Interface Configuration, clicking Advanced Options, and then selecting the Distributed System Settings check box.
Default Distributed System SettingsYou use both the AAA Servers table and the Proxy Distribution Table to establish distributed system settings. The parameters configured within these tables create the foundation to enable multiple Cisco Secure ACS servers to be configured to work with one another. Each table contains a Cisco Secure ACS entry for itself. In the AAA Servers table, the only AAA server initially listed is itself; the Proxy Distribution Table lists an initial entry of (Default), which displays how the local Cisco Secure ACS is configured to handle each authentication request locally.
You can configure additional AAA servers in the AAA Servers table. This enables these devices to become available in the HTML interface so that they can be configured for other distributed features such as proxy, CiscoSecure user database replication, remote logging, and RDBMS synchronization. For information about configuring additional AAA servers, see Adding a AAA Server, page 4-23.
Proxy in Distributed SystemsProxy is a powerful feature that enables you to use Cisco Secure ACS for authentication in a network that uses more than one AAA server. Using proxy, Cisco Secure ACS automatically forwards an authentication request from a AAA client to another AAA server. After the request has been successfully authenticated, the authorization privileges that have been configured for the user on the remote AAA server are passed back to the original Cisco Secure ACS, where the AAA client applies the user profile information for that session.
Proxy provides a useful service to users, such as business travelers, who dial in to a network device other than the one they normally use and would otherwise be authenticated by a “foreign” AAA server. To use proxy, you must first click Interface Configuration, click Advanced Options, and then select the Distributed System Settings check box.
4-4User Guide for Cisco Secure ACS for Windows Server
78-14696-01, Version 3.1
Chapter 4 Setting Up and Managing Network ConfigurationProxy in Distributed Systems
Whether, and where, an authentication request is to be forwarded is defined in the Proxy Distribution Table on the Network Configuration page. You can use multiple Cisco Secure ACS servers throughout your network. For information about configuring the Proxy Distribution Table, see Proxy Distribution Table Configuration, page 4-32.
Cisco Secure ACS employs character strings defined by the administrator to determine whether an authentication request should be processed locally or forwarded, and to where. When an end user dials in to the network device and Cisco Secure ACS finds a match for the character string defined in the Proxy Distribution Table, Cisco Secure ACS forwards the authentication request to the associated remote AAA server.
Note When a Cisco Secure ACS receives a TACACS+ authentication request forwarded by proxy, any Network Access Restrictions for TACACS+ requests are applied to the IP address of the forwarding AAA server, not to the IP address of the originating AAA client.
Note When a Cisco Secure ACS proxies to a second Cisco Secure ACS, the second Cisco Secure ACS responds to the first using only IETF attributes, no VSAs, when it recognizes the first Cisco Secure ACS as a AAA server. Alternatively, you can configure an Cisco Secure ACS to be seen as a AAA client by the second Cisco Secure ACS; in this case, the second Cisco Secure ACS responses include the RADIUS VSAs for whatever RADIUS vendor is specified in the AAA client definition table entry—in the same manner as any other AAA client.
For example, a Cisco Secure ACS receives an authentication request for [email protected], where “@corporate.com” is a character string defined in the server distribution table as being associated with another specific AAA server. The Cisco Secure ACS receiving the authentication request for [email protected] then forwards the request to the AAA server with which that character string is associated. The entry in the Proxy Distribution Table defines the association.
Administrators with geographically dispersed networks can configure and manage the user profiles of employees within their immediate location or building. This enables the administrator to manage the policies of just their users and allows all authentication requests from other users within the company to be forwarded to their respective AAA server for authentication. Not every user
4-5User Guide for Cisco Secure ACS for Windows Server
78-14696-01, Version 3.1
Chapter 4 Setting Up and Managing Network ConfigurationProxy in Distributed Systems
profile needs to reside on every AAA server. This saves administration time and server space, and facilitates end users receiving the same privileges regardless of which access device they connect through.
Fallback on Failed ConnectionYou can configure the order in which Cisco Secure ACS checks remote AAA servers when a failure of the network connection to the primary AAA server has occurred. If an authentication request cannot be sent to the first listed server, because of a network failure for example, the next listed server is checked. This continues, in order, down the list until a AAA server handles the authentication request. (Failed connections are detected by failure of the nominated server to respond within a specified time period. That is, the request is timed out.) If Cisco Secure ACS cannot connect to any server in the list, authentication fails.
Character String
Cisco Secure ACS forwards authentication requests using a configurable set of characters with a delimiter, such as dots (.), slashes (/), or hyphens (-). When configuring the Cisco Secure ACS character string to match, you must specify whether the character string is the prefix or suffix. For example, you can use “domain.us” as a suffix character string in username*domain.us, where * represents any delimiter. An example of a prefix character string is domain.*username, where the * would be used to detect the “/” character.
Stripping
Stripping allows Cisco Secure ACS to remove, or strip, the matched character string from the username. When you enable stripping, Cisco Secure ACS examines each authentication request for matching information. When Cisco Secure ACS finds a match by character string in the Proxy Distribution Table, as described in the example under Proxy in Distributed Systems, page 4-4, Cisco Secure ACS strips off the character string if you have configured it to do so. For example, in the proxy example that follows, the character string that accompanies the username establishes the ability to forward the request to another AAA server. If the user must enter the user ID of [email protected] to be forwarded correctly to the AAA server for authentication, Cisco Secure ACS might find a match on the “@corporate.com” character string, and strip the
4-6User Guide for Cisco Secure ACS for Windows Server
78-14696-01, Version 3.1
Chapter 4 Setting Up and Managing Network ConfigurationProxy in Distributed Systems
“@corporate.com”, leaving a username of just “mary” which may be the username format that the destination AAA server requires to identify the correct entry in its database.
Proxy in an EnterpriseThis section presents a scenario of proxy used in an enterprise system. Mary is an employee with an office in the corporate headquarters in Los Angeles. Her username is [email protected]. When Mary needs access to the network, she accesses the network locally and authenticates her username and password. Because Mary works in the Los Angeles office, her user profile, which defines her authentication and authorization privileges, resides on the local Los Angeles AAA server. However, Mary occasionally travels to a division within the corporation in New York, where she still needs to access the corporate network to get her e-mail and other files. When Mary is in New York, she dials in to the New York office and logs in as [email protected]. Her username is not recognized by the New York Cisco Secure ACS, but the Proxy Distribution Table contains an entry, “@la.corporate.com”, to forward the authentication request to the Los Angeles Cisco Secure ACS. Because the username and password information for Mary reside on that AAA server, when she authenticates correctly, the authorization parameters assigned to her are applied by the AAA client in the New York office.
Remote Use of Accounting Packets When proxy is employed, Cisco Secure ACS can dispatch AAA accounting packets in one of three ways:
• Log them locally
• Forward them to the destination AAA server
• Log them locally and forward copies to the destination AAA server
Sending accounting packets to the remote Cisco Secure ACS offers several benefits. When Cisco Secure ACS is configured to send accounting packets to the remote AAA server, the remote AAA server logs an entry in the accounting report for that session on the destination server. Cisco Secure ACS also caches the user connection information and adds an entry in the List Logged on Users report. You can then view the information for users that are currently connected. Because the
4-7User Guide for Cisco Secure ACS for Windows Server
78-14696-01, Version 3.1
Chapter 4 Setting Up and Managing Network ConfigurationNetwork Device Searches
accounting information is being sent to the remote AAA server, even if the connection fails, you can view the Failed Attempts report to troubleshoot the failed connection.
Sending the accounting information to the remote AAA server also enables you to use the Max Sessions feature. The Max Sessions feature uses the Start and Stop records in the accounting packet. If the remote AAA server is a Cisco Secure ACS and the Max Sessions feature is implemented, you can track the number of sessions allowed for each user or group.
You can also choose to have Voice over IP (VoIP) accounting information logged remotely, either appended to the RADIUS Accounting log, in a separate VoIP Accounting log, or both.
Other Features Enabled by System DistributionBeyond basic proxy and fallback features, configuring a Cisco Secure ACS to interact with distributed systems enables several other features that are beyond the scope of this chapter. These features include the following:
• Replication—For more information, see CiscoSecure Database Replication, page 8-9.
• RDBMS synchronization—For more information, see RDBMS Synchronization, page 8-29.
• Remote and centralized logging—For more information, see Remote Logging, page 9-23.
Network Device SearchesYou can search for any network device configured in the Network Configuration section of the Cisco Secure ACS HTML interface.
4-8User Guide for Cisco Secure ACS for Windows Server
78-14696-01, Version 3.1
Chapter 4 Setting Up and Managing Network ConfigurationNetwork Device Searches
Network Device Search CriteriaYou can specify search criteria for network device searches. Cisco Secure ACS provides the following search criteria:
• Name—The name assigned to the network device in Cisco Secure ACS. You can use asterisks (*) as wildcard characters. For example, if you wanted to find all devices whose name starts with the letter M, you would enter “M*” or “m*”. Name-based searches are case insensitive. If you do not want to search based on device name, you can leave the Name box blank or you can put only an asterisk in the Name box.
• IP Address—The IP address specified for the network device in Cisco Secure ACS. For each octet in the address, you have three options, as follows:
– Number—You can specify a number, for example, 10.3.157.98.
– Numeric Range—You can specify the low and high numbers of the range in the octet, separated by a hyphen, for example, 10.3.157.10-50.
– Wildcard—You can use an asterisk (*) to match all numbers in that octet, for example, 10.3.157.*.
Cisco Secure ACS allows any octet or octets in the IP Address box to be a number, a numeric range, or an asterisk, for example 172.16-31.*.*.
• Type—The device type, as specified by the AAA protocol it is configured to use, or the kind of AAA server it is. If you do not want to limit the search based on device type, select Any from the Type list.
• Device Group—The NDG the device is assigned to. This search criterion only appears if you have enabled Network Device Groups on the Advanced Options page in the Interface Configuration section. If you do not want to limit the search based on NDG membership, select Any from the Device Group list.
4-9User Guide for Cisco Secure ACS for Windows Server
78-14696-01, Version 3.1
Chapter 4 Setting Up and Managing Network ConfigurationNetwork Device Searches
Searching for Network DevicesTo search for a network device, follow these steps:
Step 1 In the navigation bar, click Network Configuration.
Result: The Network Configuration page opens.
Step 2 Click Search.
Result: The Search for Network Devices page appears. In the configuration area, the controls for setting search criteria appear above the search results for the most recent search previously conducted for this session, if any.
Tip When you leave the Search for Network Devices page, Cisco Secure ACS retains your search criteria and results for the duration of the current administrative session. Until you log out of Cisco Secure ACS, you can return to the Search for Network Devices page to view your most recent search criteria and results.
Step 3 Set the criteria for a device search. For information about search criteria, see Network Device Search Criteria, page 4-9.
Tip To reset the search criteria to default settings, click Clear.
Step 4 Click Search.
Result: A table lists each network device configured in Cisco Secure ACS that matches the search criteria you specified. If Cisco Secure ACS did not find a matching network device, the message “No Search Results” appears.
The table listing matching network devices includes the device name, IP address, and type. If you have enabled Network Device Groups on the Advanced Options page in the Interface Configuration Section, the table also includes the NDG of each matching network device.
Tip You can sort the table rows by whichever column you like, in either ascending or descending order. Click a column title once to sort the rows by the entries in that column in ascending order. Click the column a second time to sort the rows by the entries in that column in descending order.
4-10User Guide for Cisco Secure ACS for Windows Server
78-14696-01, Version 3.1
Chapter 4 Setting Up and Managing Network ConfigurationAAA Client Configuration
Step 5 If you want to view the configuration settings for a network device found by the search, click the network device name in the Name column of the table of matching network devices.
Result: Cisco Secure ACS displays the applicable setup page. For information about the AAA Client Setup page, see AAA Client Configuration Options, page 4-11. For information about the AAA Server Setup page, see AAA Server Configuration Options, page 4-21.
Step 6 If you want to download a file containing the search results in a comma-separated value format, click Download and use your browser to save the file to a location and file name of your choice.
Step 7 If you want to search again using different criteria, repeat Step 3 and Step 4.
AAA Client ConfigurationIn this guide we use the term AAA client comprehensively to signify the device through which or to which service access is being attempted. This is the RADIUS or TACACS+ client device, and may comprise network access servers (NASes), PIX Firewalls, routers, or any other RADIUS or TACACS+ hardware/software client.
Details on working with AAA clients are given in the following sections:
• AAA Client Configuration Options, page 4-11
• Adding a AAA Client, page 4-15
• Editing a AAA Client, page 4-18
• Deleting a AAA Client, page 4-19
AAA Client Configuration OptionsA AAA client configuration enables Cisco Secure ACS to interact with the network devices the configuration represents. A network device that does not have a corresponding configuration in Cisco Secure ACS, or whose configuration in Cisco Secure ACS is incorrect, does not receive AAA services from Cisco Secure ACS.
4-11User Guide for Cisco Secure ACS for Windows Server
78-14696-01, Version 3.1
Chapter 4 Setting Up and Managing Network ConfigurationAAA Client Configuration
The Add AAA Client and AAA Client Setup pages include the following options:
• AAA Client Hostname—The name you assign to the AAA client configuration. Each AAA client configuration can represent multiple network devices; thus, the AAA client hostname configured in Cisco Secure ACS is not required to match the hostname configured on a network device. We recommend that you adopt a descriptive, consistent naming convention for AAA client hostnames. Maximum length for a AAA client hostname is 32 characters.
Note After you submit the AAA client hostname, you cannot change it. If you want to use a different name for a AAA client, delete the AAA client configuration and create a AAA client configuration using the new name.
• AAA Client IP Address—At a minimum, a single IP address of a AAA client. If you want a AAA client configuration in Cisco Secure ACS to represent multiple network devices, you can specify multiple IP addresses. Separate each IP address by pressing Enter.
In each IP address you specify, you have three options for each octet in the address, as follows:
– Number—You can specify a number, for example, 10.3.157.98.
– Numeric Range—You can specify the low and high numbers of the range in the octet, separated by a hyphen, for example, 10.3.157.10-50.
– Wildcard—You can use an asterisk (*) to match all numbers in that octet, for example, 10.3.157.*.
Cisco Secure ACS allows any octet or octets in the IP Address box to be a number, a numeric range, or an asterisk, for example 172.16-31.*.*.
• Key—The shared secret of the AAA client. Maximum length for a AAA client key is 32 characters.
For correct operation, the key must be identical on the AAA client and Cisco Secure ACS. Keys are case sensitive. Because shared secrets are not synchronized, it is easy to make mistakes when entering them on network devices and Cisco Secure ACS. If the shared secret does not match, Cisco Secure ACS discards all packets from the network device.
4-12User Guide for Cisco Secure ACS for Windows Server
78-14696-01, Version 3.1

Chapter 4 Setting Up and Managing Network ConfigurationAAA Client Configuration
Note If the AAA client represents multiple network devices, the key must be identical on all network devices represented by the AAA client.
• Network Device Group—The name of the NDG to which this AAA client should belong. To make the AAA client independent of NDGs, use the Not Assigned selection.
Note This option does not appear if you have not configured Cisco Secure ACS to use NDGs. To enable NDGs, click Interface Configuration, click Advanced Options, and then select the Network Device Groups check box.
• Authenticate Using—The AAA protocol to be used for communications with the AAA client. The Authenticate Using list includes Cisco IOS TACACS+ and several vendor-specific implementations of RADIUS. If you have configured user-defined RADIUS vendors and VSAs, those vendor-specific RADIUS implementations appear on the list also. For information about creating user-defined RADIUS VSAs, see Custom RADIUS Vendors and VSAs, page 8-33.
The Authenticate Using list always contains the following selections:
– TACACS+ (Cisco IOS)—The Cisco IOS TACACS+ protocol, which is the standard choice when using Cisco Systems access servers, routers, and firewalls. If the AAA client is a Cisco device-management application, such as Management Center for PIX Firewall, you must use this option.
– RADIUS (Cisco Aironet)—RADIUS using Cisco Aironet VSAs. Select this option if the network device is a Cisco Aironet Access Point used by users authenticating with LEAP or EAP-TLS. When Cisco Secure ACS receives an authentication request from a RADIUS (Cisco Aironet) AAA client, Cisco Secure ACS first attempts authentication by using LEAP; if this fails, Cisco Secure ACS fails over to EAP-TLS.
Using this option enables Cisco Secure ACS to send the wireless network device a different session timeout value for user sessions than Cisco Secure ACS sends to wired end-user clients.
4-13User Guide for Cisco Secure ACS for Windows Server
78-14696-01, Version 3.1
Chapter 4 Setting Up and Managing Network ConfigurationAAA Client Configuration
Note If all authentication requests from a particular Cisco Aironet Access Point are PEAP or EAP-TLS requests, use RADIUS (IETF) instead of RADIUS (Cisco Aironet). Cisco Secure ACS cannot support PEAP authentication using the RADIUS (Cisco Aironet) protocol.
– RADIUS (Cisco BBMS)—RADIUS using Cisco BBMS VSAs. Select this option if the network device is a Cisco BBMS network device supporting authentication via RADIUS.
– RADIUS (Cisco IOS/PIX)—RADIUS using Cisco IOS/PIX VSAs. This option enables you to pack commands sent to a Cisco IOS AAA client. The commands are defined in the Group Setup section. Select this option for RADIUS environments in which key TACACS+ functions are required to support Cisco IOS equipment.
– RADIUS (Cisco VPN 3000)—RADIUS using Cisco VPN 3000 VSAs. Select this option if the network device is a Cisco VPN 3000 series Concentrator.
– RADIUS (Cisco VPN 5000)—RADIUS using Cisco VPN 5000 VSAs. Select this option if the network device is a Cisco VPN 5000 series Concentrator.
– RADIUS (IETF)—IETF-standard RADIUS, using no VSAs. Select this option if the AAA client represents RADIUS-enabled devices from more than one manufacturer and you want to use standard IETF RADIUS attributes. If the AAA client represents a Cisco Aironet Access Point used only by users authenticating with PEAP or EAP-TLS, this is also the protocol to select.
– RADIUS (Ascend)—RADIUS using Ascend RADIUS VSAs. Select this option if the network device is an Ascend network device supporting authentication via RADIUS.
– RADIUS (Juniper)—RADIUS using Juniper RADIUS VSAs. Select this option if the network device is a Juniper network device supporting authentication via RADIUS.
4-14User Guide for Cisco Secure ACS for Windows Server
78-14696-01, Version 3.1

Chapter 4 Setting Up and Managing Network ConfigurationAAA Client Configuration
– RADIUS (Nortel)—RADIUS using Nortel RADIUS VSAs. Select this option if the network device is a Nortel network device supporting authentication via RADIUS.
– RADIUS (iPass)—RADIUS for AAA clients using iPass RADIUS. Select this option if the network device is an iPass network device supporting authentication via RADIUS. iPass RADIUS is identical to IETF RADIUS.
• Single Connect TACACS+ AAA Client (Record stop in accounting on failure)—If you select TACACS+ (Cisco IOS) from the Authenticate Using list, you can use this option to specify that Cisco Secure ACS use a single TCP connection for all TACACS+ communication with the AAA client, rather than a new one for every TACACS+ request. In single connection mode, multiple requests from a network device are multiplexed over a single TCP session.
Note If TCP connections between Cisco Secure ACS and the AAA client are unreliable, do not use this feature.
• Log Update/Watchdog Packets from this AAA Client—Enables logging of update, or watchdog, packets. Watchdog packets are interim packets sent periodically during a session. They serve to enable an approximation of session length if the AAA client fails and, thereby, no stop packet is received to mark the end of the session.
• Log RADIUS Tunneling Packets from this AAA Client—Enables logging of RADIUS tunneling accounting packets. Packets are recorded in the RADIUS Accounting reports of Reports and Activity.
Adding a AAA ClientYou can use this procedure to add a AAA client configuration.
Before You Begin
For descriptions of the options available while adding a AAA client configuration, see AAA Client Configuration Options, page 4-11.
4-15User Guide for Cisco Secure ACS for Windows Server
78-14696-01, Version 3.1
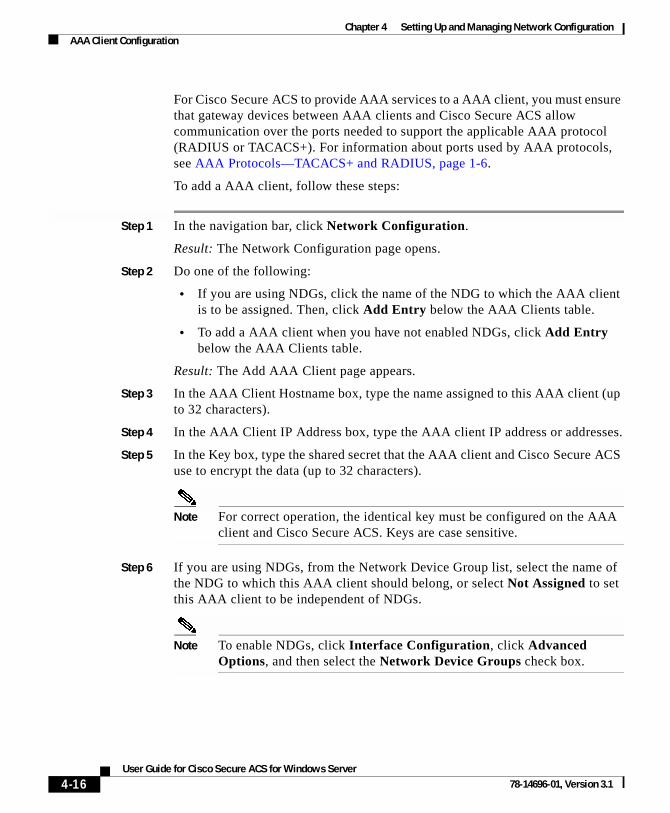
Chapter 4 Setting Up and Managing Network ConfigurationAAA Client Configuration
For Cisco Secure ACS to provide AAA services to a AAA client, you must ensure that gateway devices between AAA clients and Cisco Secure ACS allow communication over the ports needed to support the applicable AAA protocol (RADIUS or TACACS+). For information about ports used by AAA protocols, see AAA Protocols—TACACS+ and RADIUS, page 1-6.
To add a AAA client, follow these steps:
Step 1 In the navigation bar, click Network Configuration.
Result: The Network Configuration page opens.
Step 2 Do one of the following:
• If you are using NDGs, click the name of the NDG to which the AAA client is to be assigned. Then, click Add Entry below the AAA Clients table.
• To add a AAA client when you have not enabled NDGs, click Add Entry below the AAA Clients table.
Result: The Add AAA Client page appears.
Step 3 In the AAA Client Hostname box, type the name assigned to this AAA client (up to 32 characters).
Step 4 In the AAA Client IP Address box, type the AAA client IP address or addresses.
Step 5 In the Key box, type the shared secret that the AAA client and Cisco Secure ACS use to encrypt the data (up to 32 characters).
Note For correct operation, the identical key must be configured on the AAA client and Cisco Secure ACS. Keys are case sensitive.
Step 6 If you are using NDGs, from the Network Device Group list, select the name of the NDG to which this AAA client should belong, or select Not Assigned to set this AAA client to be independent of NDGs.
Note To enable NDGs, click Interface Configuration, click Advanced Options, and then select the Network Device Groups check box.
4-16User Guide for Cisco Secure ACS for Windows Server
78-14696-01, Version 3.1
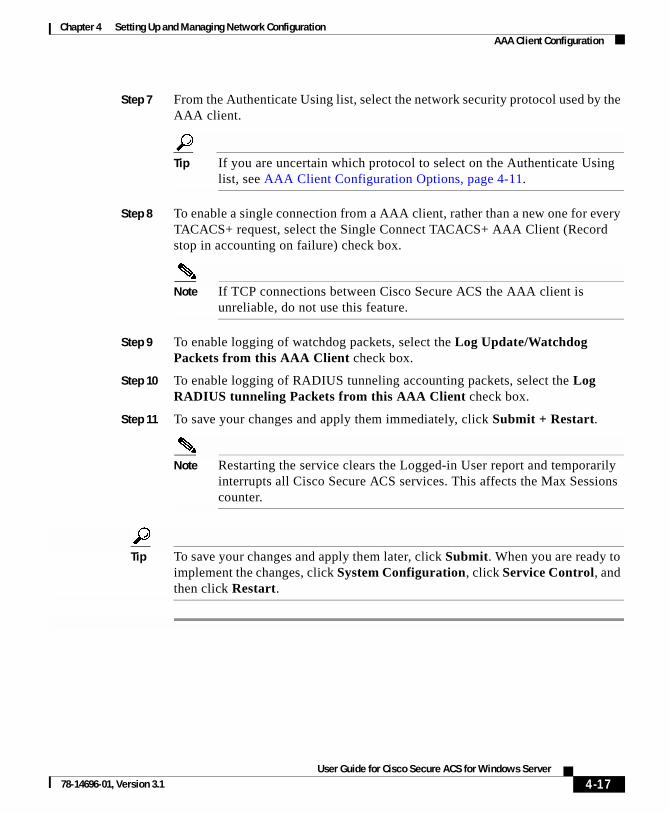
Chapter 4 Setting Up and Managing Network ConfigurationAAA Client Configuration
Step 7 From the Authenticate Using list, select the network security protocol used by the AAA client.
Tip If you are uncertain which protocol to select on the Authenticate Using list, see AAA Client Configuration Options, page 4-11.
Step 8 To enable a single connection from a AAA client, rather than a new one for every TACACS+ request, select the Single Connect TACACS+ AAA Client (Record stop in accounting on failure) check box.
Note If TCP connections between Cisco Secure ACS the AAA client is unreliable, do not use this feature.
Step 9 To enable logging of watchdog packets, select the Log Update/Watchdog Packets from this AAA Client check box.
Step 10 To enable logging of RADIUS tunneling accounting packets, select the Log RADIUS tunneling Packets from this AAA Client check box.
Step 11 To save your changes and apply them immediately, click Submit + Restart.
Note Restarting the service clears the Logged-in User report and temporarily interrupts all Cisco Secure ACS services. This affects the Max Sessions counter.
Tip To save your changes and apply them later, click Submit. When you are ready to implement the changes, click System Configuration, click Service Control, and then click Restart.
4-17User Guide for Cisco Secure ACS for Windows Server
78-14696-01, Version 3.1
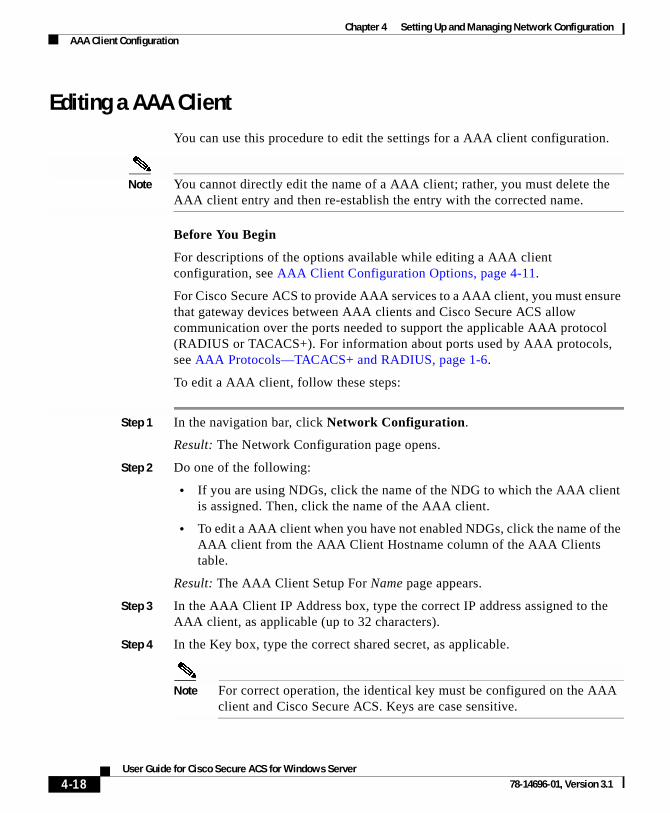
Chapter 4 Setting Up and Managing Network ConfigurationAAA Client Configuration
Editing a AAA ClientYou can use this procedure to edit the settings for a AAA client configuration.
Note You cannot directly edit the name of a AAA client; rather, you must delete the AAA client entry and then re-establish the entry with the corrected name.
Before You Begin
For descriptions of the options available while editing a AAA client configuration, see AAA Client Configuration Options, page 4-11.
For Cisco Secure ACS to provide AAA services to a AAA client, you must ensure that gateway devices between AAA clients and Cisco Secure ACS allow communication over the ports needed to support the applicable AAA protocol (RADIUS or TACACS+). For information about ports used by AAA protocols, see AAA Protocols—TACACS+ and RADIUS, page 1-6.
To edit a AAA client, follow these steps:
Step 1 In the navigation bar, click Network Configuration.
Result: The Network Configuration page opens.
Step 2 Do one of the following:
• If you are using NDGs, click the name of the NDG to which the AAA client is assigned. Then, click the name of the AAA client.
• To edit a AAA client when you have not enabled NDGs, click the name of the AAA client from the AAA Client Hostname column of the AAA Clients table.
Result: The AAA Client Setup For Name page appears.
Step 3 In the AAA Client IP Address box, type the correct IP address assigned to the AAA client, as applicable (up to 32 characters).
Step 4 In the Key box, type the correct shared secret, as applicable.
Note For correct operation, the identical key must be configured on the AAA client and Cisco Secure ACS. Keys are case sensitive.
4-18User Guide for Cisco Secure ACS for Windows Server
78-14696-01, Version 3.1
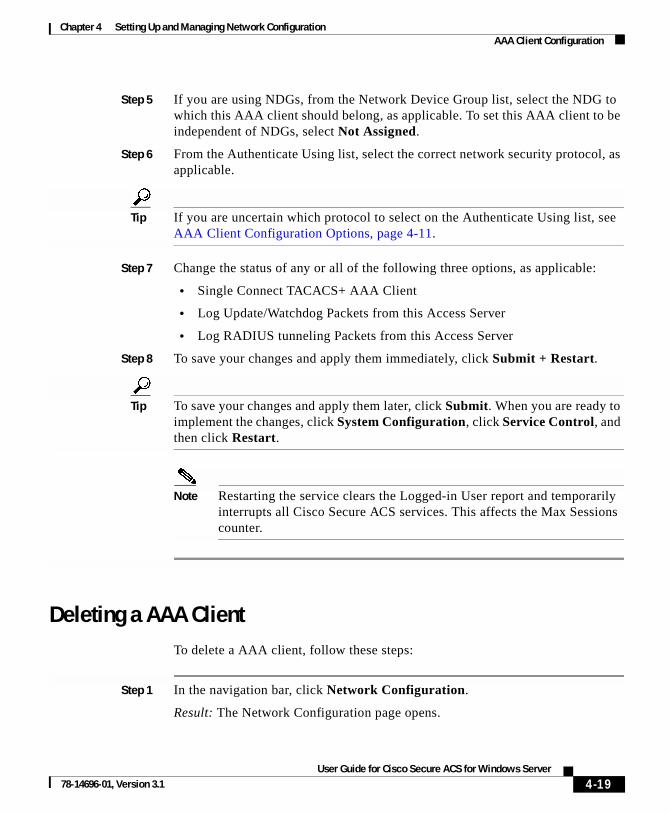
Chapter 4 Setting Up and Managing Network ConfigurationAAA Client Configuration
Step 5 If you are using NDGs, from the Network Device Group list, select the NDG to which this AAA client should belong, as applicable. To set this AAA client to be independent of NDGs, select Not Assigned.
Step 6 From the Authenticate Using list, select the correct network security protocol, as applicable.
Tip If you are uncertain which protocol to select on the Authenticate Using list, see AAA Client Configuration Options, page 4-11.
Step 7 Change the status of any or all of the following three options, as applicable:
• Single Connect TACACS+ AAA Client
• Log Update/Watchdog Packets from this Access Server
• Log RADIUS tunneling Packets from this Access Server
Step 8 To save your changes and apply them immediately, click Submit + Restart.
Tip To save your changes and apply them later, click Submit. When you are ready to implement the changes, click System Configuration, click Service Control, and then click Restart.
Note Restarting the service clears the Logged-in User report and temporarily interrupts all Cisco Secure ACS services. This affects the Max Sessions counter.
Deleting a AAA ClientTo delete a AAA client, follow these steps:
Step 1 In the navigation bar, click Network Configuration.
Result: The Network Configuration page opens.
4-19User Guide for Cisco Secure ACS for Windows Server
78-14696-01, Version 3.1
Chapter 4 Setting Up and Managing Network ConfigurationAAA Server Configuration
Step 2 Do one of the following:
• If you are using NDGs, click the name of the NDG to which the AAA client is assigned. Then, click the AAA client hostname in the AAA Clients table.
• To delete a AAA client when you have not enabled NDGs, click the AAA client hostname in the AAA Clients table.
Result: The AAA Client Setup for the Name page appears.
Step 3 To delete the AAA client and have the deletion take effect immediately, click Delete + Restart.
Note Restarting Cisco Secure ACS services clears the Logged-in User report and temporarily interrupts all Cisco Secure ACS services. As an alternative to restarting when you delete a AAA client, you can click Delete. However, when you do this, the change does not take effect until you restart the system. To restart the system, click System Configuration, click Service Control, and then click Restart.
Result: A confirmation dialog box appears.
Step 4 Click OK.
Result: Cisco Secure ACS restarts AAA services and the AAA client is deleted.
AAA Server ConfigurationThis section presents procedures for configuring AAA servers in the Cisco Secure ACS HTML interface. For additional information about AAA servers, see AAA Servers in Distributed Systems, page 4-3.
To configure distributed system features for a given Cisco Secure ACS server, you must first define the other AAA server(s).
Tip If the AAA Servers table does not appear, click Interface Configuration, click Advanced Options, and then select the Distributed System Settings check box.
4-20User Guide for Cisco Secure ACS for Windows Server
78-14696-01, Version 3.1

Chapter 4 Setting Up and Managing Network ConfigurationAAA Server Configuration
Details on working with AAA servers are given in the following topics:
• AAA Server Configuration Options, page 4-21
• Adding a AAA Server, page 4-23
• Editing a AAA Server, page 4-25
• Deleting a AAA Server, page 4-27
AAA Server Configuration OptionsA AAA server configuration enables Cisco Secure ACS to interact with the AAA server that the configuration represents. A AAA server that does not have a corresponding configuration in Cisco Secure ACS, or whose configuration in Cisco Secure ACS is incorrect, does not receive AAA services from Cisco Secure ACS, such as proxied authentication requests. Also, several distributed systems features require that the other Cisco Secure ACSes included in the distributed system be represented in the AAA Servers table. For more information about distributed systems features, see About Distributed Systems, page 4-3.
The Add AAA Server and AAA Server Setup pages include the following options:
• AAA Server Name—The name you assign to the AAA server configuration. The AAA server hostname that is configured in Cisco Secure ACS does not have to match the hostname configured on a network device. We recommend that you adopt a descriptive, consistent naming convention for AAA server names. Maximum length for a AAA server name is 32 characters.
Note After you submit the AAA server name, you cannot change it. If you want to use a different name for a AAA server, delete the AAA server configuration and create a AAA server configuration using the new name.
• AAA Server IP Address—The IP address of the AAA server, in dotted, four octet format. For example, 10.77.234.3.
4-21User Guide for Cisco Secure ACS for Windows Server
78-14696-01, Version 3.1
Chapter 4 Setting Up and Managing Network ConfigurationAAA Server Configuration
• Key—The shared secret of the AAA server. Maximum length for a AAA server key is 32 characters.
For correct operation, the key must be identical on the remote AAA server and Cisco Secure ACS. Keys are case sensitive. Because shared secrets are not synchronized, it is easy to make mistakes when entering them upon remote AAA servers and Cisco Secure ACS. If the shared secret does not match, Cisco Secure ACS discards all packets from the remote AAA server.
• Network Device Group—The name of the NDG to which this AAA server should belong. To make the AAA server independent of NDGs, use the Not Assigned selection.
Note This option does not appear if you have not configured Cisco Secure ACS to use NDGs. To enable NDGs, click Interface Configuration, click Advanced Options, and then select the Network Device Groups check box.
• Log Update/Watchdog Packets from this remote AAA Server—Enables logging of update, or watchdog, packets from AAA clients that are forwarded by the remote AAA server to this Cisco Secure ACS. Watchdog packets are interim packets sent periodically during a session. They provide you with an approximate session length if a AAA client fails and, therefore, no stop packet is received to mark the end of the session.
• AAA Server Type—
– RADIUS—Select this option if the remote AAA server is configured using any type of RADIUS protocol.
– TACACS+—Select this option if the remote AAA server is configured using the TACACS+ protocol.
– Cisco Secure ACS—Select this option if the remote AAA server is another Cisco Secure ACS. This enables you to configure features that are only available with other Cisco Secure ACS servers, such as CiscoSecure user database replication and remote logging.
Note The remote Cisco Secure ACS must be using version 2.1 or later.
4-22User Guide for Cisco Secure ACS for Windows Server
78-14696-01, Version 3.1

Chapter 4 Setting Up and Managing Network ConfigurationAAA Server Configuration
• Traffic Type—The Traffic Type list defines the direction in which traffic to and from the remote AAA server is permitted to flow from this Cisco Secure ACS. The list includes the following options:
– Inbound—The remote AAA server accepts requests that have been forwarded to it and does not forward the request to another AAA server. Select this option if you do not want to permit any authentication requests to be forwarded from the remote AAA server.
– Outbound—The remote AAA server sends out authentication requests but does not receive them. If a Proxy Distribution Table entry is configured to proxy authentication requests to a AAA server that is configured for Outbound, the authentication request is not sent.
– Inbound/Outbound—The remote AAA server forwards and accepts authentication requests. This allows the selected server to handle authentication requests in any manner defined in the distribution tables.
Adding a AAA ServerBefore You Begin
For descriptions of the options available while adding a remote AAA server configuration, see AAA Server Configuration Options, page 4-21.
For Cisco Secure ACS to provide AAA services to a remote AAA server, you must ensure that gateway devices between the remote AAA server and Cisco Secure ACS permit communication over the ports that support the applicable AAA protocol (RADIUS or TACACS+). For information about ports used by AAA protocols, see AAA Protocols—TACACS+ and RADIUS, page 1-6.
To add and configure a AAA server, follow these steps:
Step 1 In the navigation bar, click Network Configuration.
Result: The Network Configuration page opens.
4-23User Guide for Cisco Secure ACS for Windows Server
78-14696-01, Version 3.1
Chapter 4 Setting Up and Managing Network ConfigurationAAA Server Configuration
Step 2 Do one of the following:
• If you are using NDGs, click the name of the NDG to which the AAA server is to be assigned. Then, click Add Entry below the [name] AAA Servers table.
• To add a AAA server when you have not enabled NDGs, below the AAA Servers table, click Add Entry.
Result: The Add AAA Server page appears.
Step 3 In the AAA Server Name box, type a name for the remote AAA server (up to 32 characters).
Step 4 In the AAA Server IP Address box, type the IP address assigned to the remote AAA server.
Step 5 In the Key box, type the shared secret that the remote AAA server and the Cisco Secure ACS use to encrypt the data (up to 32 characters).
Note The key is case sensitive. If the keys between the two AAA servers are not identical when authentication is forwarded, the request is incorrectly encrypted and authentication fails.
Step 6 From the Network Device Group list, select the NDG to which this AAA server belongs.
Note To enable NDGs, click Interface Configuration, click Advanced Options, and then click Network Device Groups.
Step 7 To enable watchdog packets, select the Log Update/Watchdog Packets from this remote AAA Server check box.
Step 8 From the AAA Server Type list, select the AAA server type applicable to the remote AAA server. If the remote AAA server is another Cisco Secure ACS, identify it as such by selecting CiscoSecure ACS.
Step 9 From the Traffic Type list, select the type of traffic you want to permit between the remote AAA server and Cisco Secure ACS.
4-24User Guide for Cisco Secure ACS for Windows Server
78-14696-01, Version 3.1
Chapter 4 Setting Up and Managing Network ConfigurationAAA Server Configuration
Step 10 To save your changes and apply them immediately, click Submit + Restart.
Tip To save your changes and apply them later, click Submit. When you are ready to implement the changes, click System Configuration, click Service Control, and then click Restart.
Note Restarting the service clears the Logged-in User report and temporarily interrupts all Cisco Secure ACS services. This affects the Max Sessions counter and resets it to zero.
Editing a AAA ServerUse this procedure to edit the settings for a AAA server that you have previously configured.
Note You cannot edit the name of a AAA server. To rename a AAA server, you must delete the existing AAA server and then add a new server entry with the new name.
Before You Begin
For descriptions of the options available while editing a remote AAA server configuration, see AAA Server Configuration Options, page 4-21.
For Cisco Secure ACS to provide AAA services to a remote AAA server, you must ensure that gateway devices between the remote AAA server and Cisco Secure ACS permit communication over the ports that support the applicable AAA protocol (RADIUS or TACACS+). For information about ports used by AAA protocols, see “AAA Protocols—TACACS+ and RADIUS” section on page 1-6.
4-25User Guide for Cisco Secure ACS for Windows Server
78-14696-01, Version 3.1

Chapter 4 Setting Up and Managing Network ConfigurationAAA Server Configuration
To edit a AAA server, follow these steps:
Step 1 In the navigation bar, click Network Configuration.
Result: The Network Configuration page opens.
Step 2 Do one of the following:
• If you are using NDGs, click the name of the NDG to which the AAA server is assigned. Then, in the AAA Servers table, click the name of the AAA server to be edited.
• If you have not enabled NDGs, in the AAA Servers table, click the name of the AAA server to be edited.
Result: The AAA Server Setup for X page appears.
Step 3 Enter or select new settings for one or more of the following fields:
• AAA Server IP Address
• Key
• Log Update/Watchdog Packets from this remote AAA Server
• AAA Server Type
• Traffic Type
Step 4 To save your changes and apply them immediately, click Submit + Restart.
Tip To save your changes and apply them later, click Submit. When you are ready to implement the changes, click System Configuration, click Service Control, and then click Restart.
Note Restarting the service clears the Logged-in User report and temporarily interrupts all Cisco Secure ACS services. This affects the Max Sessions counter and resets it to zero.
4-26User Guide for Cisco Secure ACS for Windows Server
78-14696-01, Version 3.1

Chapter 4 Setting Up and Managing Network ConfigurationNetwork Device Group Configuration
Deleting a AAA ServerTo delete a AAA server, follow these steps:
Step 1 In the navigation bar, click Network Configuration.
Result: The Network Configuration page opens.
Step 2 Do one of the following:
• If you are using NDGs, click the name of the NDG to which the AAA server is assigned. Then, click the AAA server name in the AAA Servers table.
• If you have not enabled NDGs, click the AAA server name in the AAA Servers table.
Result: The AAA Server Setup for X page appears.
Step 3 To delete the AAA server and have the deletion take effect immediately, click Delete + Restart.
Note Restarting the service clears the Logged-in User report and temporarily interrupts all Cisco Secure ACS services. As an alternative to restarting when you delete a AAA server, in the preceding step you can click Delete. However, when you do this, the change does not take effect until you restart the system, which you can do by clicking System Configuration, clicking Service Control, and then clicking Restart.
Result: A confirmation dialog box appears.
Step 4 Click OK.
Result: Cisco Secure ACS performs a restart and the AAA server is deleted.
Network Device Group Configuration Network Device Grouping is an advanced feature that enables you to view and administer a collection of network devices as a single logical group. To simplify administration, you can assign each group a name that can be used to refer to all devices within that group. This creates two levels of network devices within
4-27User Guide for Cisco Secure ACS for Windows Server
78-14696-01, Version 3.1
Chapter 4 Setting Up and Managing Network ConfigurationNetwork Device Group Configuration
Cisco Secure ACS—single discrete devices such as an individual router or network access server, and an NDG; that is, a collection of routers or AAA servers.
Caution To see the Network Device Groups table in the HTML interface, you must have the Network Device Groups option selected on the Advanced Options page of the Interface Configuration section. Unlike in other areas of Interface Configuration, it is possible to remove from sight an active NDG if you deselect the Network Device Groups option. Therefore, if you choose to configure NDGs, make sure you leave the Network Device Groups option selected on the Advanced Option page.
This section contains the following procedures for working with NDGs:
• Adding a Network Device Group, page 4-28
• Assigning an Unassigned AAA Client or AAA Server to an NDG, page 4-29
• Reassigning a AAA Client or AAA Server to an NDG, page 4-30
• Renaming a Network Device Group, page 4-31
• Deleting a Network Device Group, page 4-31
Adding a Network Device GroupYou can assign users or groups of users to NDGs. For more information, see one of the following sections:
• Setting TACACS+ Enable Password Options for a User, page 7-35
• Setting Enable Privilege Options for a User Group, page 6-18
To add an NDG, follow these steps:
Step 1 In the navigation bar, click Network Configuration.
Result: The Network Configuration page opens.
4-28User Guide for Cisco Secure ACS for Windows Server
78-14696-01, Version 3.1

Chapter 4 Setting Up and Managing Network ConfigurationNetwork Device Group Configuration
Step 2 Under the Network Device Groups table, click Add Entry.
Tip If the Network Device Groups table does not appear, click Interface Configuration, click Advanced Options, and then select Network Device Groups.
Step 3 In the Network Device Group Name box, type the name of the new NDG.
Tip The maximum name length is 24 characters. Quotation marks (“) and commas (,) are not allowed. Spaces are allowed.
Step 4 Click Submit.
Result: The Network Device Groups table displays the new NDG.
Step 5 To populate the newly established NDG with AAA clients or AAA servers, perform one or more of the following procedures, as applicable:
• Adding a AAA Client, page 4-15
• Adding a AAA Server, page 4-23
• Assigning an Unassigned AAA Client or AAA Server to an NDG, page 4-29
• Reassigning a AAA Client or AAA Server to an NDG, page 4-30
Assigning an Unassigned AAA Client or AAA Server to an NDGYou use this procedure to assign an unassigned AAA client or AAA server to an NDG. Before you begin this procedure, you should have already configured the client or server and it should appear in the Not Assigned AAA Clients or Not Assigned AAA Servers table.
To assign a network device to an NDG, follow these steps:
Step 1 In the navigation bar, click Network Configuration.
Result: The Network Configuration page opens.
4-29User Guide for Cisco Secure ACS for Windows Server
78-14696-01, Version 3.1
Chapter 4 Setting Up and Managing Network ConfigurationNetwork Device Group Configuration
Step 2 In the Network Device Groups table, click Not Assigned.
Tip If the Network Device Groups table does not appear, click Interface Configuration, click Advanced Options, and then select the Network Device Groups check box.
Step 3 Click the name of the network device you want to assign to an NDG.
Step 4 From the Network Device Groups list, select the NDG to which you want to assign the AAA client or AAA server.
Step 5 Click Submit.
Result: The client or server is assigned to an NDG.
Reassigning a AAA Client or AAA Server to an NDGTo reassign a AAA client or AAA server to a new NDG, follow these steps:
Step 1 In the navigation bar, click Network Configuration.
Result: The Network Configuration page opens.
Step 2 In the Network Device Groups table, click the name of the current group of the network device.
Step 3 In either the AAA Clients table or AAA Servers table, as applicable, click the name of the client or server you want to assign to a new NDG.
Step 4 From the Network Device Group list, select the NDG to which you want to reassign the network device.
Step 5 Click Submit.
Result: The network device is assigned to the NDG you selected.
4-30User Guide for Cisco Secure ACS for Windows Server
78-14696-01, Version 3.1

Chapter 4 Setting Up and Managing Network ConfigurationNetwork Device Group Configuration
Renaming a Network Device GroupTo rename an NDG, follow these steps:
Step 1 In the navigation bar, click Network Configuration.
Result: The Network Configuration page opens.
Step 2 In the Network Device Groups table, click the NDG that you want to rename.
Tip If the Network Device Groups table does not appear, click Interface Configuration, click Advanced Options, and then select the Network Device Groups check box.
Step 3 At the bottom of the page, click Rename.
Result: The Rename Network Device Group page appears.
Step 4 In the Network Device Group Name box, type the new name (up to 24 characters).
Step 5 Click Submit.
Result: The name of the NDG is changed.
Deleting a Network Device GroupTo delete an NDG, follow these steps:
Step 1 In the navigation bar, click Network Configuration.
Result: The Network Configuration page opens.
Step 2 In the Network Device Groups table, click the NDG that you want to delete.
Tip If the Network Device Groups table does not appear, click Interface Configuration, click Advanced Options, and then select the Network Device Groups check box.
4-31User Guide for Cisco Secure ACS for Windows Server
78-14696-01, Version 3.1
Chapter 4 Setting Up and Managing Network ConfigurationProxy Distribution Table Configuration
Step 3 At the bottom of the page, click Delete Group.
Result: A confirmation dialog box appears.
Step 4 Click OK.
Result: The NDG is deleted and its name is removed from the Network Device Groups table.
Proxy Distribution Table ConfigurationThis section begins with a description of the Proxy Distribution Table and then details the following Proxy Distribution Table configuration procedures:
• Adding a New Proxy Distribution Table Entry, page 4-33
• Sorting the Character String Match Order of Distribution Entries, page 4-35
• Editing a Proxy Distribution Table Entry, page 4-35
• Deleting a Proxy Distribution Table Entry, page 4-36
About the Proxy Distribution TableIf you have Distributed Systems Settings enabled, when you click Network Configuration, you will see the Proxy Distribution Table.
Tip To enable Distributed Systems Settings in the Cisco Secure ACS, click Interface Configuration, click Advanced Options, and then select the Distributed System Settings check box.
The Proxy Distribution Table includes entries that show the character strings on which to proxy, the AAA servers to proxy to, whether to strip the character string, and where to send the accounting information (Local/Remote, Remote, or Local). For more information about the proxy feature, see Proxy in Distributed Systems, page 4-4.
4-32User Guide for Cisco Secure ACS for Windows Server
78-14696-01, Version 3.1
Chapter 4 Setting Up and Managing Network ConfigurationProxy Distribution Table Configuration
The entries you define and place in the Proxy Distribution Table can be considered turnstiles for each authentication request that Cisco Secure ACS receives from the AAA client. The authentication request is defined in the Proxy Distribution Table according to where it is to be forwarded. If a match to an entry in the Proxy Distribution Table that contains proxy information is found, Cisco Secure ACS forwards the request to the appropriate AAA server.
The Character String column in the Proxy Distribution Table always contains an entry of “(Default)”. The “(Default)” entry matches authentication requests received by the local Cisco Secure ACS that do not match any other defined character strings. While you cannot change the character string definition for the “(Default)” entry, you can change the distribution of authentication requests matching the “(Default)” entry. At installation, the AAA server associated with the “(Default)” entry is the local Cisco Secure ACS. It can sometimes be easier to define strings that match authentication requests to be processed locally rather than defining strings that match authentication requests to be processed remotely. In such a case, associating the “(Default)” entry with a remote AAA server permits you to configure your Proxy Distribution Table with the more easily written entries.
Adding a New Proxy Distribution Table Entry
To create a Proxy Distribution Table entry, follow these steps:
Step 1 In the navigation bar, click Network Configuration.
Result: The Network Configuration page opens.
Step 2 Under the Proxy Distribution Table, click Add Entry.
Note If the Proxy Distribution Table does not appear, click Interface Configuration, click Advanced Options, and then select the Distributed System Settings check box.
Step 3 In the Character String box, type the string of characters, including the delimiter to forward on when users dial in to be authenticated. For example, .uk.
Note Angle brackets (< and >) cannot be used.
4-33User Guide for Cisco Secure ACS for Windows Server
78-14696-01, Version 3.1
Chapter 4 Setting Up and Managing Network ConfigurationProxy Distribution Table Configuration
Step 4 From the Position list, select Prefix if the character string you typed appears at the beginning of the username or Suffix if the character string appears at the end of the username.
Step 5 From the Strip list, select Yes if the character string you entered is to be stripped off the username, or select No if it is to be left intact.
Step 6 In the AAA Servers column, select the AAA server you want to use for proxy. Click —> (right arrow button) to move it to the Forward To column.
Tip You can also select additional AAA servers to use for backup proxy if the prior servers fail. To set the order of AAA servers, in the Forward To column, click the name of the applicable server and click Up or Down to move it into the position you want.
Tip If the AAA server you want to use is not listed, click Network Configuration, click AAA Servers, click Add Entry and complete the applicable information.
Step 7 From the Send Accounting Information list, select one of the following areas to which to report accounting information:
• Local—Keep accounting packets on the local Cisco Secure ACS.
• Remote—Send accounting packets to the remote Cisco Secure ACS.
• Local/Remote—Keep accounting packets on the local Cisco Secure ACS and send them to the remote Cisco Secure ACS.
Tip This information is especially important if you are using the Max Sessions feature to control the number of connections a user is allowed. Max Sessions depends on accounting start and stop records, and where the accounting information is sent determines where the Max Sessions counter is tracked. The Failed Attempts log and the Logged in Users report are also affected by where the accounting records are sent.
Step 8 When you finish, click Submit or Submit + Restart.
4-34User Guide for Cisco Secure ACS for Windows Server
78-14696-01, Version 3.1

Chapter 4 Setting Up and Managing Network ConfigurationProxy Distribution Table Configuration
Sorting the Character String Match Order of Distribution Entries
You can use this procedure to set the priority by which Cisco Secure ACS searches character string entries in the Proxy Distribution Table when users dial in.
To determine the order by which Cisco Secure ACS searches entries in the Proxy Distribution Table, follow these steps:
Step 1 In the navigation bar, click Network Configuration.
Result: The Network Configuration page opens.
Step 2 Below the Proxy Distribution Table, click Sort Entries.
Tip Before you sort the entries, you must have configured at least two unique Proxy Distribution Table entries in addition to the default table entry.
Step 3 Select the character string entry to reorder, and then click Up or Down to move its position to reflect the search order you want.
Step 4 When you finish sorting, click Submit or Submit + Restart.
Editing a Proxy Distribution Table Entry
To edit a Proxy Distribution Table entry, follow these steps:
Step 1 In the navigation bar, click Network Configuration.
Result: The Network Configuration page opens.
Step 2 In the Character String column of the Proxy Distribution Table, click the distribution entry you want to edit.
Result: The Edit Proxy Distribution Entry page appears.
4-35User Guide for Cisco Secure ACS for Windows Server
78-14696-01, Version 3.1

Chapter 4 Setting Up and Managing Network ConfigurationProxy Distribution Table Configuration
Step 3 Edit the entry as necessary.
Tip For information about the parameters that make up a distribution entry, see Adding a New Proxy Distribution Table Entry, page 4-33.
Step 4 When you finish editing the entry, click Submit or Submit + Restart.
Deleting a Proxy Distribution Table Entry
To delete a Proxy Distribution Table entry, follow these steps:
Step 1 In the navigation bar, click Network Configuration.
Result: The Network Configuration page opens.
Step 2 In the Character String column of the Proxy Distribution Table, click the distribution entry you want to delete.
Result: The Edit Proxy Distribution Entry page appears.
Step 3 Click Delete.
Result: A confirmation dialog box appears.
Step 4 Click OK.
Result: The distribution entry is deleted from the Proxy Distribution Table.
4-36User Guide for Cisco Secure ACS for Windows Server
78-14696-01, Version 3.1
User Guide for 78-14696-01, Version 3.1
C H A P T E R 5
Setting Up and Managing Shared Profile ComponentsThis chapter addresses the Cisco Secure Access Control Server (Cisco Secure ACS) for Windows Server version 3.1 features found in the Shared Profile Components section of the HTML interface. It contains the following sections:
• About Shared Profile Components, page 5-1
• Downloadable PIX ACLs, page 5-2
• Network Access Restrictions, page 5-6
• Command Authorization Sets, page 5-13
About Shared Profile ComponentsThe Shared Profile Components section enables you to develop and name reusable, shared sets of authorization components which may be applied to one or more users or groups of users and referenced by name within their profiles. These include network access restrictions (NARs), command authorization sets, and downloadable PIX ACLs.
The Shared Profile Components section of Cisco Secure ACS addresses the scalability of selective authorization. Shared profile components can be configured once and then applied to many users or groups. Without this ability, flexible and comprehensive authorization could only be accomplished by explicitly configuring the authorization of each user group for each possible
5-1Cisco Secure ACS for Windows Server

Chapter 5 Setting Up and Managing Shared Profile ComponentsDownloadable PIX ACLs
command on each possible device. Creating and applying these named shared profile components (access restrictions, command sets, and ACLs) makes it unnecessary to repeatedly enter long lists of devices or commands when defining network access parameters.
Shared profile components also enable Cisco Secure ACS to authorize a command on behalf of another device or devices. Their scalability extends to the following capabilities:
• A way to determine the list of commands a user could issue against one or more devices in the network.
• A way to determine the list of devices on which a particular user may execute a particular command.
Downloadable PIX ACLsThis section describes downloadable PIX ACLs followed by detailed instructions for configuring and managing them.
About Downloadable PIX ACLsDownloadable PIX ACLs enable you to enter an ACL once, in Cisco Secure ACS, and then load that ACL to any number of PIX Firewalls that authenticate using the Cisco IOS/PIX protocol. This is far more efficient than directly entering the ACL into each PIX Firewall via its CLI. No additional configuration of the PIX Firewall is necessary after it has been configured to undertake authorization using RADIUS.
5-2User Guide for Cisco Secure ACS for Windows Server
78-14696-01, Version 3.1
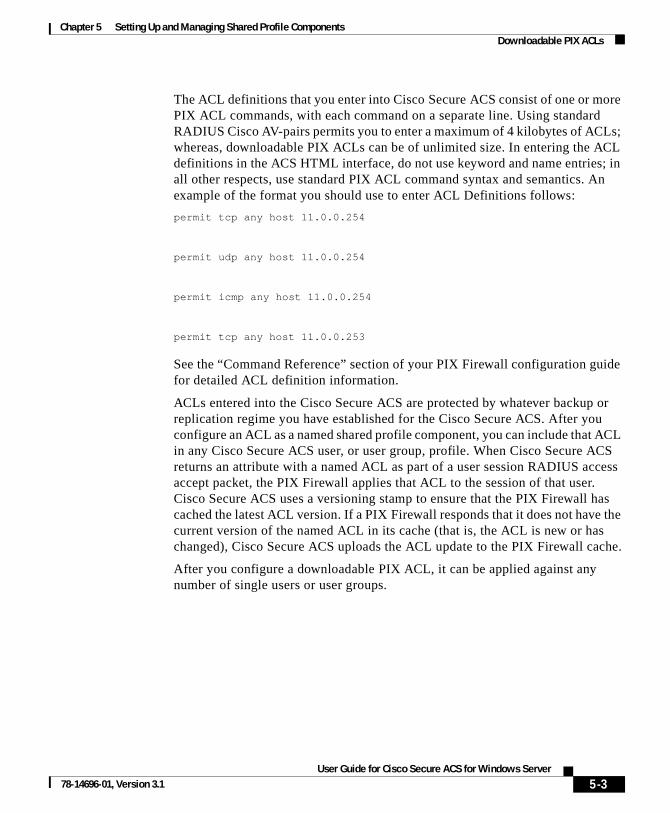
Chapter 5 Setting Up and Managing Shared Profile ComponentsDownloadable PIX ACLs
The ACL definitions that you enter into Cisco Secure ACS consist of one or more PIX ACL commands, with each command on a separate line. Using standard RADIUS Cisco AV-pairs permits you to enter a maximum of 4 kilobytes of ACLs; whereas, downloadable PIX ACLs can be of unlimited size. In entering the ACL definitions in the ACS HTML interface, do not use keyword and name entries; in all other respects, use standard PIX ACL command syntax and semantics. An example of the format you should use to enter ACL Definitions follows:
permit tcp any host 11.0.0.254
permit udp any host 11.0.0.254
permit icmp any host 11.0.0.254
permit tcp any host 11.0.0.253
See the “Command Reference” section of your PIX Firewall configuration guide for detailed ACL definition information.
ACLs entered into the Cisco Secure ACS are protected by whatever backup or replication regime you have established for the Cisco Secure ACS. After you configure an ACL as a named shared profile component, you can include that ACL in any Cisco Secure ACS user, or user group, profile. When Cisco Secure ACS returns an attribute with a named ACL as part of a user session RADIUS access accept packet, the PIX Firewall applies that ACL to the session of that user. Cisco Secure ACS uses a versioning stamp to ensure that the PIX Firewall has cached the latest ACL version. If a PIX Firewall responds that it does not have the current version of the named ACL in its cache (that is, the ACL is new or has changed), Cisco Secure ACS uploads the ACL update to the PIX Firewall cache.
After you configure a downloadable PIX ACL, it can be applied against any number of single users or user groups.
5-3User Guide for Cisco Secure ACS for Windows Server
78-14696-01, Version 3.1
Chapter 5 Setting Up and Managing Shared Profile ComponentsDownloadable PIX ACLs
Downloadable PIX ACL ConfigurationThis section contains the following procedures:
• Adding a Downloadable PIX ACL, page 5-4
• Editing a Downloadable PIX ACL, page 5-5
• Deleting a Downloadable PIX ACL, page 5-5
Adding a Downloadable PIX ACL
To add a downloadable PIX ACL, follow these steps:
Step 1 In the navigation bar, click Shared Profile Components.
Result: The Shared Profile Components page appears.
Step 2 Click Downloadable PIX ACLs.
Step 3 Click Add.
Result: The Downloadable PIX ACLs page appears.
Step 4 In the Name: box, type the name of the new PIX ACL.
Note The name of a PIX ACL may contain up to 32 characters. The name may contain spaces; but it cannot contain leading, trailing, or multiple spaces, or the following characters: - [ ] / —
Step 5 In the Description: box, type a description of the new PIX ACL.
Step 6 In the ACL Definitions box, type the new PIX ACL definitions.
Note In entering the ACL definitions in the ACS HTML interface, you do not use keyword and name entries; rather, you begin with a permit/deny keyword. For an example of the proper format of the ACL definitions, see About Downloadable PIX ACLs, page 5-2.
5-4User Guide for Cisco Secure ACS for Windows Server
78-14696-01, Version 3.1
Chapter 5 Setting Up and Managing Shared Profile ComponentsDownloadable PIX ACLs
Step 7 When you have completed specifying the PIX ACL, click Submit.
Result: Cisco Secure ACS enters the new PIX ACL, which takes effect immediately. That is, it is available to be sent to any PIX Firewall that is attempting authentication of a user who has that ACL name as part of his or her user or group profile. For information on assigning a user or a group to a PIX ACL, see Assigning a PIX ACL to a User, page 7-21, or Assigning a Downloadable PIX ACL to a Group, page 6-28.
Editing a Downloadable PIX ACL
To edit a downloadable PIX ACL, follow these steps:
Step 1 In the navigation bar, click Shared Profile Components.
Result: The Shared Profile Components page appears.
Step 2 Click Downloadable PIX ACLs.
Result: The Downloadable PIX ACLs table appears.
Step 3 In the Name column, click the PIX ACL you want to edit.
Result: The Downloadable PIX ACLs page appears with information displayed for the selected ACL.
Step 4 Edit the Name or Description or ACL Definitions information, as applicable.
Step 5 When you have finished editing the information for the PIX ACL, click Submit.
Result: Cisco Secure ACS re-enters the PIX ACL with the new information, which takes effect immediately.
Deleting a Downloadable PIX ACL
Before You Begin
You should remove the association of a PIX ACL with any user, or user group, profile before deleting the PIX ACL.
5-5User Guide for Cisco Secure ACS for Windows Server
78-14696-01, Version 3.1
Chapter 5 Setting Up and Managing Shared Profile ComponentsNetwork Access Restrictions
To delete a PIX ACL, follow these steps:
Step 1 In the navigation bar, click Shared Profile Components.
Result: The Shared Profile Components page appears.
Step 2 Click Downloadable PIX ACLs.
Step 3 Click the name of the downloadable PIX ACL you want to edit.
Result: The Downloadable PIX ACLs page appears with information displayed for the selected PIX ACL.
Step 4 At the bottom of the page, click Delete.
Result: A dialog box warns you that you are about to delete a PIX ACL.
Step 5 To confirm that you intend to delete the PIX ACL, click OK.
Result: The selected PIX ACL is deleted.
Network Access RestrictionsThis section describes network access restrictions (NARs) and provides detailed instructions for configuring and managing shared NARs.
About Network Access RestrictionsNARs enable you to define additional authorization and authentication conditions that must be met before a user can access the network. Cisco Secure ACS applies these conditions using information from attributes sent by your AAA clients. Although there are several ways you can set up NARs, they all are based on matching attribute information sent by a AAA client. Therefore, you must understand the format and content of the attributes your AAA clients send if you want to employ effective NARs.
5-6User Guide for Cisco Secure ACS for Windows Server
78-14696-01, Version 3.1
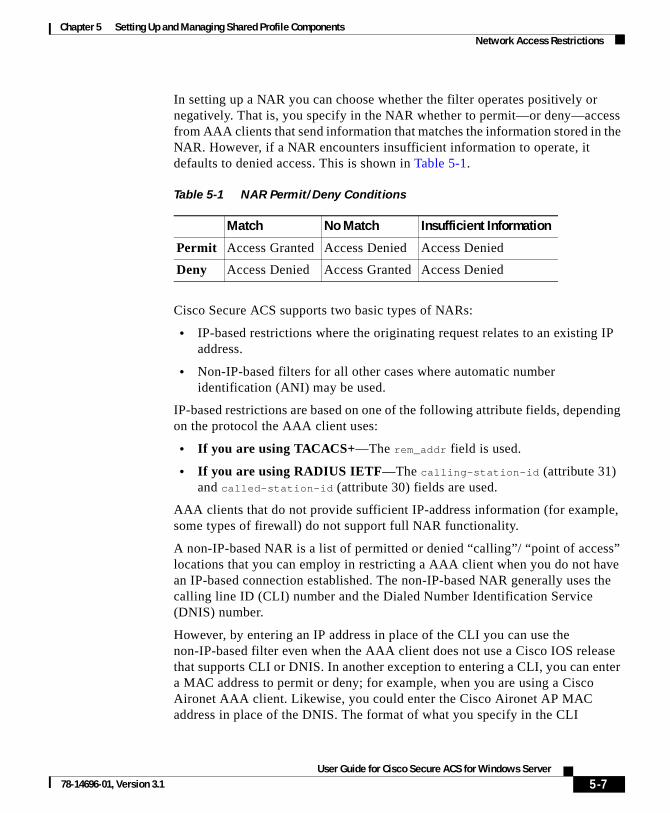
Chapter 5 Setting Up and Managing Shared Profile ComponentsNetwork Access Restrictions
In setting up a NAR you can choose whether the filter operates positively or negatively. That is, you specify in the NAR whether to permit—or deny—access from AAA clients that send information that matches the information stored in the NAR. However, if a NAR encounters insufficient information to operate, it defaults to denied access. This is shown in Table 5-1.
Cisco Secure ACS supports two basic types of NARs:
• IP-based restrictions where the originating request relates to an existing IP address.
• Non-IP-based filters for all other cases where automatic number identification (ANI) may be used.
IP-based restrictions are based on one of the following attribute fields, depending on the protocol the AAA client uses:
• If you are using TACACS+—The rem_addr field is used.
• If you are using RADIUS IETF—The calling-station-id (attribute 31) and called-station-id (attribute 30) fields are used.
AAA clients that do not provide sufficient IP-address information (for example, some types of firewall) do not support full NAR functionality.
A non-IP-based NAR is a list of permitted or denied “calling”/ “point of access” locations that you can employ in restricting a AAA client when you do not have an IP-based connection established. The non-IP-based NAR generally uses the calling line ID (CLI) number and the Dialed Number Identification Service (DNIS) number.
However, by entering an IP address in place of the CLI you can use the non-IP-based filter even when the AAA client does not use a Cisco IOS release that supports CLI or DNIS. In another exception to entering a CLI, you can enter a MAC address to permit or deny; for example, when you are using a Cisco Aironet AAA client. Likewise, you could enter the Cisco Aironet AP MAC address in place of the DNIS. The format of what you specify in the CLI
Table 5-1 NAR Permit/Deny Conditions
Match No Match Insufficient Information
Permit Access Granted Access Denied Access Denied
Deny Access Denied Access Granted Access Denied
5-7User Guide for Cisco Secure ACS for Windows Server
78-14696-01, Version 3.1
Chapter 5 Setting Up and Managing Shared Profile ComponentsNetwork Access Restrictions
box—CLI, IP address, or MAC address—must match the format of what you receive from your AAA client. You can determine this format from your RADIUS Accounting Log.
When specifying a NAR you may use asterisks (*) as wildcards for any value, or as part of any value to establish a range. All the values/conditions in a NAR specification must be met for the NAR to restrict access; that is, the values are “ANDed”.
Note When an authentication request is forwarded by proxy to a Cisco Secure ACS, any NARs for TACACS+ requests are applied to the IP address of the forwarding AAA server, not to the IP address of the originating AAA client.
You can define a NAR for, and apply it to, a specific user or user group. For more information on this, see Setting Network Access Restrictions for a User, page 7-12, or Setting Network Access Restrictions for a User Group, page 6-7. However, in the Shared Profile Components section of Cisco Secure ACS you can create and name a shared NAR without directly citing any user or user group. You give the shared NAR a name that can be referenced in other parts of the Cisco Secure ACS HTML interface. Then, when you set up users or user groups, you can select none, one, or multiple shared restrictions to be applied. When you specify the application of multiple shared NARs to a user or user group, you choose one of two access criteria: either “All selected filters must permit”, or “Any one selected filter must permit”.
Shared access restrictions are kept in the CiscoSecure user database. You can use the Cisco Secure ACS backup and restore features to back up and restore them. You can also replicate the shared access restrictions, along with other configurations, to secondary Cisco Secure ACSes.
Shared Network Access Restrictions ConfigurationYou can configure multiple shared NARs to restrict access to particular AAA clients, all AAA clients, or to named NDGs.
5-8User Guide for Cisco Secure ACS for Windows Server
78-14696-01, Version 3.1
Chapter 5 Setting Up and Managing Shared Profile ComponentsNetwork Access Restrictions
This section contains the following procedures:
• Adding a Shared Network Access Restriction, page 5-9
• Editing a Shared Network Access Restriction, page 5-11
• Deleting a Shared Network Access Restriction, page 5-13
Adding a Shared Network Access Restriction
To add a shared NAR, follow these steps:
Step 1 In the navigation bar, click Shared Profile Components.
Result: The Shared Profile Components page appears.
Step 2 Click Network Access Restrictions.
Step 3 Click Add.
Result: The Network Access Restriction page appears.
Step 4 In the Name box, type a name for the new shared NAR.
Note The name can contain up to 32 characters. Leading and trailing spaces are not allowed. Names cannot contain the following four characters: [ ] , /
Step 5 In the Description box, type a description of the new shared NAR.
Step 6 To permit or deny access based on IP addressing, follow these steps:
Note This step is performed for IP-based restrictions where an IP connection exists. For other restriction types, see About Network Access Restrictions, page 5-6.
a. Select the Define IP-based access descriptions check box.
b. To specify whether you are listing addresses that are permitted or denied, from the Table Defines list, select the applicable value.
5-9User Guide for Cisco Secure ACS for Windows Server
78-14696-01, Version 3.1
Chapter 5 Setting Up and Managing Shared Profile ComponentsNetwork Access Restrictions
c. Select or type the applicable information in each of the following boxes:
• AAA Client—Select All AAA clients, or the name of the network device group (NDG), or the individual AAA client, to which access is permitted or denied.
• Port—Type the number of the port that you want to permit or deny access to. You can use the wildcard asterisk (*) to permit or deny access to all ports on the selected AAA client.
• Src IP Address—Type the IP address to filter on when performing access restrictions. You can type multiple entries separated by a comma or use the wildcard asterisk (*) to specify all IP addresses.
d. Click enter.
Result: The AAA client, port, and address information appears as a line item in the table.
e. To enter additional IP-based line items, repeat Step c and Step d.
Step 7 To permit or deny access based on calling location or values other than an established IP address, follow these steps:
a. Select the Define CLI/DNIS based access restrictions check box.
b. To specify whether you are listing addresses that are permitted or denied, from the Table Defines list, select the applicable value.
c. To specify the applicability of this NAR, from the AAA Client list, select one of the following values:
• The name of the NDG
• The name of the particular AAA client
• All AAA clients
Tip Only NDGs that you have already configured are listed.
5-10User Guide for Cisco Secure ACS for Windows Server
78-14696-01, Version 3.1
Chapter 5 Setting Up and Managing Shared Profile ComponentsNetwork Access Restrictions
d. To specify the information that this NAR should filter on, type values in the following boxes, as applicable:
Tip You can type an asterisk (*) as a wildcard to specify “all” as a value or within a range.
• Port—Type the number of the port to filter on.
• CLI—Type the CLI number to filter on. You can also use this box to restrict access based on values other than CLIs, such as an IP address or MAC address; for information, see About Network Access Restrictions, page 5-6.
• DNIS—Type the number being dialed into to filter on.
e. Click enter.
Result: The information specifying the NAR line item appears in the table.
f. To enter additional non-IP based NAR line items, repeat Step c through Step e.
Step 8 When you are finished defining the shared NAR, click Submit.
Result: Cisco Secure ACS saves the named shared NAR and lists it in the Network Access Restriction Sets table.
Editing a Shared Network Access Restriction
To edit a shared network access restriction, follow these steps:
Step 1 In the navigation bar, click Shared Profile Components.
Result: The Shared Profile Components page appears.
Step 2 Click Network Access Restrictions.
Result: The Network Access Restrictions table appears.
Step 3 In the Name column, click the shared NAR you want to edit.
Result: The Network Access Restriction page appears with information displayed for the selected NAR.
5-11User Guide for Cisco Secure ACS for Windows Server
78-14696-01, Version 3.1

Chapter 5 Setting Up and Managing Shared Profile ComponentsNetwork Access Restrictions
Step 4 To edit the Name or Description of the filter, type and delete information, as applicable.
Step 5 To edit a line item in the IP-based access restrictions table, follow these steps:
a. Double-click the line item that you want to edit.
Result: Information for the line item is removed from the table and written to the boxes below the table.
b. Edit the information, as applicable.
c. Click enter.
Result: The edited information for this line item is written to the IP-based access restrictions table.
Step 6 To remove a line item from the IP-based access restrictions table, follow these steps:
a. Select the line item.
b. Below the table, click remove.
Result: The line item is removed from the IP-based access restrictions table.
Step 7 To edit a line item in the CLI/DNIS access restrictions table, follow these steps:
a. Double-click the line item that you want to edit.
Result: Information for the line item is removed from the table and written to the boxes below the table.
b. Edit the information, as applicable.
c. Click enter.
Result: The edited information for this line item is written to the CLI/DNIS access restrictions table.
Step 8 To remove a line item from the CLI/DNIS access restrictions table, follow these steps:
a. Select the line item.
b. Below the table, click remove.
Result: The line item is removed from the CLI/DNIS access restrictions table.
5-12User Guide for Cisco Secure ACS for Windows Server
78-14696-01, Version 3.1
Chapter 5 Setting Up and Managing Shared Profile ComponentsCommand Authorization Sets
Step 9 When you have finished editing the line items that make up the filter, click Submit.
Result: Cisco Secure ACS re-enters the filter with the new information, which takes effect immediately.
Deleting a Shared Network Access Restriction
To delete a shared network access restriction, follow these steps:
Step 1 In the navigation bar, click Shared Profile Components.
Result: The Shared Profile Components page appears.
Step 2 Click Network Access Restrictions.
Step 3 Click the Name of the shared NAR you want to delete.
Result: The Network Access Restriction page appears with information displayed for the selected NAR.
Step 4 At the bottom of the page, click Delete.
Result: A dialog box warns you that you are about to delete a shared NAR.
Step 5 To confirm that you want to delete the shared NAR, click OK.
Result: The selected shared NAR is deleted.
Command Authorization SetsThis section describes command authorization sets and pattern matching and provides detailed instructions for configuring and managing them.
5-13User Guide for Cisco Secure ACS for Windows Server
78-14696-01, Version 3.1
Chapter 5 Setting Up and Managing Shared Profile ComponentsCommand Authorization Sets
About Command Authorization SetsCommand authorization sets provide a central mechanism to control the authorization of each command on each network device. This greatly enhances the scalability and manageability of setting authorization restrictions. In Cisco Secure ACS, the default command authorization sets include the Shell Command Authorization Sets and the PIX Command Authorization Sets. Cisco device-management applications, such as Management Center for PIX Firewall, may be enabled to instruct ACS to support additional command authorization set types.
To offer fine-grained control of device-hosted, administrative Telnet sessions, a network device using TACACS+ can request authorization for each command line before its execution. You can define a set of commands that are either permitted or denied for execution by a particular user on a given device. Cisco Secure ACS has further enhanced this capability as follows:
• Reusable Named Command Authorization Sets—Without directly citing any user or user group, you can create a named set of command authorizations. You can define several command authorization sets, each delineating different access profiles. For example, a “Help desk” command authorization set could permit access to high level browsing commands, such as “show run”, and deny any configuration commands. An “All network engineers” command authorization set could contain a limited list of permitted commands for any network engineer in the enterprise. A “Local network engineers” command authorization set could permit all commands, including IP-address configuration.
• Fine Configuration Granularity—You can create associations between named command authorization sets and NDGs. Thus, you are able to define different access profiles for users depending on which network devices they access. You can associate the same named command authorization set with more than one NDG and use it for more than one user group. Cisco Secure ACS enforces data integrity. Named command authorization sets are kept in the CiscoSecure user database. You can use the Cisco Secure ACS backup and restore features to backup and restore them. You can also replicate command authorization sets to secondary Cisco Secure ACSes along with other configuration data.
For command authorization set types that support Cisco device-management applications, the benefits of using command authorization sets are similar. You can enforce authorization of various privileges in a device-management
5-14User Guide for Cisco Secure ACS for Windows Server
78-14696-01, Version 3.1
Chapter 5 Setting Up and Managing Shared Profile ComponentsCommand Authorization Sets
application by applying command authorization sets to Cisco Secure ACS groups that contain users of the device-management application. The Cisco Secure ACS groups can correspond to different roles within the device-management application and you can apply different command authorization sets to each group, as applicable.
For information on assigning command authorization sets, see the following procedures:
• Shell Command Authorization Sets—See either of the following:
– Configuring a Shell Command Authorization Set for a User Group, page 6-31
– Configuring a Shell Command Authorization Set for a User, page 7-25
• PIX Command Authorization Sets—See either of the following:
– Configuring a PIX Command Authorization Set for a User Group, page 6-33
– Configuring a PIX Command Authorization Set for a User, page 7-28
• Device Management Command Authorization Sets—See either of the following:
– Configuring Device-Management Command Authorization for a User Group, page 6-35
– Configuring Device Management Command Authorization for a User, page 7-30
About Pattern MatchingFor permit/deny command arguments, Cisco Secure ACS applies pattern matching. That is, the argument permit wid matches any argument that contains the string wid. Thus, for example, permit wid would allow not only the argument wid but also the arguments anywid and widget.
To limit the extent of pattern matching you can add the following expressions:
• dollarsign ($)—Expresses that the argument must end with what has gone before. Thus permit wid$ would match against wid or anywid, but not widget.
• caret (^)—Expresses that the argument must begin with what follows. Thus permit ^wid would match against wid or widget, but not against anywid.
5-15User Guide for Cisco Secure ACS for Windows Server
78-14696-01, Version 3.1
Chapter 5 Setting Up and Managing Shared Profile ComponentsCommand Authorization Sets
You can combine these expressions to specify absolute matching. In the example given, you would use permit ^wid$ to ensure that only wid was permitted, and not anywid or widget.
Command Authorization Sets ConfigurationThis section contains the following procedures:
• Adding a Command Authorization Set, page 5-16
• Editing a Command Authorization Set, page 5-19
• Deleting a Command Authorization Set, page 5-20
Adding a Command Authorization Set
To add a command authorization set, follow these steps:
Step 1 In the navigation bar, click Shared Profile Components.
Result: The Shared Profile Components page lists the command authorization set types available. These always include Shell Command Authorization Sets and may include others, such as command authorization set types that support Cisco device-management applications.
Step 2 Click one of the listed command authorization set types, as applicable.
Result: The selected Command Authorization Sets table appears.
Step 3 Click Add.
Result: The applicable Command Authorization Set page appears. Depending upon the type of command authorization set you are adding, the contents of the page vary. Below the Name and Description boxes, Cisco Secure ACS displays either additional boxes or an expandable checklist tree. The expandable checklist tree appears for device command set types that support a Cisco device-management application.
5-16User Guide for Cisco Secure ACS for Windows Server
78-14696-01, Version 3.1

Chapter 5 Setting Up and Managing Shared Profile ComponentsCommand Authorization Sets
Step 4 In the Name box, type a name for the command authorization set
Note The set name can contain up to 32 characters. Names cannot contain the following characters: # ? " * > < Leading and trailing spaces are not allowed.
Step 5 In the Description box, type a description of the command authorization set.
Step 6 If Cisco Secure ACS displays an expandable checklist tree below the Name and Description boxes, use the checklist tree to specify the actions permitted by the command authorization set. To do so, follow these steps:
a. To expand a checklist node, click the plus (+) symbol to its left.
b. To enable an action, select its check box. For example, to enable a Device View action, select the View check box under the Device checklist node.
Tip Selecting an expandable check box node selects all the check boxes within that node. Selecting the first check box in the checklist tree selects all check boxes in the checklist tree.
c. To enable other actions in this command authorization set, repeat Step a and Step b, as needed.
Step 7 If Cisco Secure ACS displays additional boxes below the Name and Description boxes, use the boxes to specify the commands and arguments permitted or denied by the command authorization set. To do so, follow these steps:
a. To specify how Cisco Secure ACS should handle unmatched commands, select either the Permit or Deny option, as applicable.
Note The default setting is Deny.
b. In the box just above the Add Command button, type a command that is to be part of the set.
Caution Enter the full command word; if you use command abbreviations, authorization control may not function.
5-17User Guide for Cisco Secure ACS for Windows Server
78-14696-01, Version 3.1
Chapter 5 Setting Up and Managing Shared Profile ComponentsCommand Authorization Sets
Note Enter only the command portion of the command/argument string here. Arguments are added only after the command is listed. For example, with the command/argument string “show run” you would type only the command show.
c. Click Add Command.
Result: The typed command is added to the command list box.
d. To add an argument to a command, in the command list box, select the command and then type the argument in the box to the right of the command.
Note The correct format for arguments is <permit | deny> <argument>. For example, with the command show already listed, you might enter permit run as the argument.
Tip You can list several arguments for a single command by pressing Enter between arguments.
e. To allow arguments, which you have not listed, to be effective with this command, select the Permit Unmatched Args check box.
f. To add other commands to this command authorization set, repeat Step a through Step e.
Step 8 When you finish creating the command authorization set, click Submit.
Result: Cisco Secure ACS displays the name and description of the new command authorization set in the applicable Command Authorization Sets table.
5-18User Guide for Cisco Secure ACS for Windows Server
78-14696-01, Version 3.1
Chapter 5 Setting Up and Managing Shared Profile ComponentsCommand Authorization Sets
Editing a Command Authorization Set
To edit a command authorization set, follow these steps:
Step 1 In the navigation bar, click Shared Profile Components.
Result: The Shared Profile Components page lists the command authorization set types available.
Step 2 Click a command authorization set type, as applicable.
Result: The selected Command Authorization Sets table appears.
Step 3 From the Name column, click the name of the set you want to change.
Result: Information for the selected set appears on the applicable Command Authorization Set page.
Step 4 If an expandable checklist tree appears below the Name and Description boxes, you can do any or all of the following:
• To expand a checklist node, click the plus (+) symbol to its left. To collapse an expanded checklist node, click the minus (-) symbol to its left.
• To enable an action, select its check box. For example, to enable a Device View action, select the View check box under the Device checklist node.
Tip Selecting an expandable check box node selects all the check boxes within that node. Selecting the first check box in the checklist tree selects all check boxes in the checklist tree.
• To disable an action, clear its check box. For example, to disable a Device View action, clear the View check box under the Device checklist node.
5-19User Guide for Cisco Secure ACS for Windows Server
78-14696-01, Version 3.1
Chapter 5 Setting Up and Managing Shared Profile ComponentsCommand Authorization Sets
Step 5 If additional boxes appear below the Name and Description boxes, you can do any or all of the following:
• To change the set Name or Description, edit the words in the corresponding box.
• To remove a command from the set, from the Matched Commands list, select the command, and then click Remove Command.
• To edit arguments of a command, from the command list box, select the command and then type changes to the arguments in the box to the right of the command list box.
Step 6 When you finish editing the set, click Submit.
Deleting a Command Authorization Set
To delete a command authorization set, follow these steps:
Step 1 In the navigation bar, click Shared Profile Components.
Result: The Shared Profile Components page lists the command authorization set types available.
Step 2 Click a command authorization set type, as applicable.
Result: The selected Command Authorization Sets table appears.
Step 3 From the Name column, click the name of the command set you want to delete.
Result: Information for the selected set appears on the applicable Command Authorization Set page.
Step 4 Click Delete.
Result: A dialog box warns you that you are about to delete a command authorization set.
Step 5 To confirm that you want to delete that command authorization set, click OK.
Result: Cisco Secure ACS displays the applicable Command Authorization Sets table. The command authorization set is no longer listed.
5-20User Guide for Cisco Secure ACS for Windows Server
78-14696-01, Version 3.1
User Guide for 78-14696-01, Version 3.1
C H A P T E R 6
Setting Up and Managing User GroupsThis chapter provides information about setting up and managing user groups in Cisco Secure Access Control Server (Cisco Secure ACS) for Windows Server version 3.1 to control authorization. Cisco Secure ACS enables you to group together network users for more efficient administration. Each user can belong to only one group in Cisco Secure ACS. You can establish up to 500 different groups to effect different levels of authorization.
Cisco Secure ACS also supports external database group mapping; that is, if your external user database distinguishes user groups, these groups can be mapped into Cisco Secure ACS. And if the external database does not support groups, you can map all users from that database to a Cisco Secure ACS user group. For information about external database mapping, see Database Group Mappings, page 12-11.
Before you configure Group Setup, you should understand how this section functions. Cisco Secure ACS dynamically builds the Group Setup section interface depending on the configuration of your network devices and the security protocols being used. That is, what you see under Group Setup is affected by both your system’s network configuration and your settings in the Interface Configuration section.
This chapter contains the following sections:
• User Group Setup Features and Functions, page 6-2—This section is an overview of the features you find within Group Setup.
• Common User Group Settings, page 6-3—This section details procedures that you typically would perform regardless of your particular network security configuration.
6-1Cisco Secure ACS for Windows Server
Chapter 6 Setting Up and Managing User GroupsUser Group Setup Features and Functions
• Configuration-specific User Group Settings, page 6-15—This section details procedures that you would perform only as applicable to your particular network security configuration.
• Group Setting Management, page 6-51—This section includes basic administrative procedures, such as determining the users in a group or renaming a group.
User Group Setup Features and FunctionsThe Group Setup section of the Cisco Secure ACS HTML interface is the centralized location for operations regarding user group configuration and administration. For information about network device groups (NDGs), see Network Device Group Configuration, page 4-27.
Default Group If you have not configured group mapping for an external user database, Cisco Secure ACS assigns users who are authenticated by the Unknown User Policy to the Default Group the first time they log in. The privileges and restrictions for the default group are applied to first-time users. If you have upgraded from a previous version of Cisco Secure ACS and kept your database information, Cisco Secure ACS retains the group mappings you configured before upgrading.
Group TACACS+ Settings Cisco Secure ACS enables a full range of settings for TACACS+ at the group level. If a AAA client has been configured to use TACACS+ as the security control protocol, you can configure standard service protocols, including PPP IP, PPP LCP, ARAP, SLIP, and Shell (exec), to be applied for the authorization of each user who belongs to a particular group.
Note You can also configure TACACS+ settings at the individual user level. User-level settings always override group level settings.
6-2User Guide for Cisco Secure ACS for Windows Server
78-14696-01, Version 3.1

Chapter 6 Setting Up and Managing User GroupsCommon User Group Settings
Cisco Secure ACS also enables you to enter and configure new TACACS+ services. For information about how to configure a new TACACS+ service to appear on the group setup page, see Protocol Configuration Options for TACACS+, page 3-7.
If you have configured Cisco Secure ACS to interact with a Cisco device-management application, new TACACS+ services may appear automatically, as needed, to support the device-management application. For more information about Cisco Secure ACS interaction with device-management applications, see Support for Cisco Device-Management Applications, page 1-18.
You can use the Shell Command Authorization Set feature to configure TACACS+ group settings. This feature enables you to apply shell commands to a particular user group in the following ways:
• Assign a shell command authorization set, which you have already configured, for any network device.
• Assign a shell command authorization set, which you have already configured, to particular NDGs.
• Permit or deny specific shell commands, which you define, on a per-group basis.
For more information about shell command authorization sets, see Chapter 5, “Setting Up and Managing Shared Profile Components.”
Common User Group SettingsThis section presents the basic activities you perform when configuring a new user group. This section contains the following procedures:
• Enabling VoIP Support for a User Group, page 6-4
• Setting Default Time-of-Day Access for a User Group, page 6-5
• Setting Callback Options for a User Group, page 6-6
• Setting Network Access Restrictions for a User Group, page 6-7
• Setting Max Sessions for a User Group, page 6-11
• Setting Usage Quotas for a User Group, page 6-13
6-3User Guide for Cisco Secure ACS for Windows Server
78-14696-01, Version 3.1
Chapter 6 Setting Up and Managing User GroupsCommon User Group Settings
Enabling VoIP Support for a User Group
Note If this feature does not appear, click Interface Configuration, click Advanced Options, and then select the Voice-over-IP (VoIP) Group Settings check box.
Perform this procedure to enable support for the null password function of VoIP. This enables users to authenticate (session or telephone call) on only the user ID (telephone number).
When you enable VoIP at the group level, all users in this group become VoIP users, and the user IDs are treated similarly to a telephone number. VoIP users do not need to enter passwords to authenticate.
Caution Enabling VoIP disables password authentication and most advanced settings, including password aging and protocol attributes.
To enable VoIP support for a group, follow these steps:
Step 1 In the navigation bar, click Group Setup.
Result: The Group Setup Select page opens.
Step 2 From the Group list, select the group you want to configure for VoIP support, and then click Edit Settings.
Result: The Group Settings page displays the name of the group at its top.
Step 3 In the Voice-over-IP Support table, select the check box labeled This is a Voice-over-IP (VoIP) group - and all users of this group are VoIP users.
Step 4 To save the group settings you have just made, click Submit.For more information, see Saving Changes to User Group Settings, page 6-53.
Step 5 To continue, and specify other group settings, perform other procedures in this chapter, as applicable.
6-4User Guide for Cisco Secure ACS for Windows Server
78-14696-01, Version 3.1
Chapter 6 Setting Up and Managing User GroupsCommon User Group Settings
Setting Default Time-of-Day Access for a User Group
Note If this feature does not appear, click Interface Configuration, click Advanced Options, and then select the Default Time-of-Day / Day-of-Week Specification check box.
To define the times during which users in a particular group are permitted or denied access, follow these steps:
Step 1 In the navigation bar, click Group Setup.
Result: The Group Setup Select page opens.
Step 2 From the Group list, select a group, and then click Edit Settings.
Result: The Group Settings page displays the name of the group at its top.
Step 3 In the Default Time-of-Day Access Settings table, select the Set as default Access Times check box.
Note You must select the Set as default Access Times check box to limit access based on time or day.
Result: Times at which the system permits access are highlighted in green on the day and hour matrix.
Note The default sets accessibility during all hours.
Step 4 In the day and hour matrix, click the times at which you do not want to permit access to members of this group.
Tip Clicking times of day on the graph deselects those times; clicking again reselects them. At any time, you can click Clear All to clear all hours, or you can click Set All to select all hours.
6-5User Guide for Cisco Secure ACS for Windows Server
78-14696-01, Version 3.1
Chapter 6 Setting Up and Managing User GroupsCommon User Group Settings
Step 5 To save the group settings you have just made, click Submit.
For more information, see Saving Changes to User Group Settings, page 6-53.
Step 6 To continue specifying other group settings, perform other procedures in this chapter, as applicable.
Setting Callback Options for a User GroupCallback is a command string that is passed back to the access server. You can use callback strings to initiate a modem to call the user back on a specific number for added security or reversal of line charges. There are three options, as follows:
• No callback allowed—Disables callback for users in this group. This is the default setting.
• Dialup client specifies callback number—Allows the dialup client to specify the callback number. The dialup client must support RFC 1570, PPP LCP Extensions.
• Use Microsoft NT/2000 Callback settings (where possible)—Uses the Microsoft Windows NT/2000 callback settings. If a Windows account for a user resides in a remote domain, the domain in which Cisco Secure ACS resides must have a two-way trust with that domain for the Microsoft NT/2000 callback settings to operate for that user.
To set callback options for a user group, follow these steps:
Step 1 In the navigation bar, click Group Setup.
Result: The Group Setup Select page opens.
Step 2 Select a group from the Group list, and then click Edit Settings.
Result: The Group Settings page displays the name of the group at its top.
Step 3 In the Callback table, select one of the following three options:
• No callback allowed
• Dialup client specifies callback number
• Use Microsoft NT/2000 Callback settings (where possible)
6-6User Guide for Cisco Secure ACS for Windows Server
78-14696-01, Version 3.1
Chapter 6 Setting Up and Managing User GroupsCommon User Group Settings
Step 4 To save the group settings you have just made, click Submit.
For more information, see Saving Changes to User Group Settings, page 6-53.
Step 5 To continue specifying other group settings, perform other procedures in this chapter, as applicable.
Setting Network Access Restrictions for a User GroupThe Network Access Restrictions table in Group Setup enables you to apply network access restrictions (NARs) in three distinct ways:
• Apply existing shared NARs by name.
• Define IP-based group access restrictions to permit or deny access to a specified AAA client or to specified ports on a AAA client when an IP connection has been established.
• Define CLI/DNIS-based group NARs to permit or deny access to either, or both, the calling line ID (CLI) number or the Dialed Number Identification Service (DNIS) number used.
Note You can also use the CLI/DNIS-based access restrictions area to specify other values. For more information, see About Network Access Restrictions, page 5-6.
Typically, you define (shared) NARs from within the Shared Components section so that these restrictions can be applied to more than one group or user. For more information, see Shared Network Access Restrictions Configuration, page 5-8. You must have enabled the Group-Level Shared Network Access Restriction check box on the Advanced Options page of the Interface Configuration section for these options to appear in the Cisco Secure ACS HTML interface.
However, Cisco Secure ACS also enables you to define and apply a NAR for a single group from within the Group Setup section. You must have enabled the Group-Level Network Access Restriction setting under the Advanced Options page of the Interface Configuration section for single group IP-based filter options and single group CLI/DNIS-based filter options to appear in the Cisco Secure ACS HTML interface.
6-7User Guide for Cisco Secure ACS for Windows Server
78-14696-01, Version 3.1
Chapter 6 Setting Up and Managing User GroupsCommon User Group Settings
Note When an authentication request is forwarded by proxy to a Cisco Secure ACS server, any NARs for TACACS+ requests are applied to the IP address of the forwarding AAA server, not to the IP address of the originating AAA client.
To set NARs for a user group, follow these steps:
Step 1 In the navigation bar, click Group Setup.
Result: The Group Setup Select page opens.
Step 2 From the Group list, select a group, and then click Edit Settings.
Result: The Group Settings page displays the name of the group at its top.
Step 3 To apply a previously configured shared NAR to this group, follow these steps:
Note To apply a shared NAR, you must have configured it under Network Access Restrictions in the Shared Profile Components section. For more information, see Shared Network Access Restrictions Configuration, page 5-8.
a. Select the Only Allow network access when check box.
b. To specify whether one or all shared NARs must apply for a member of the group to be permitted access, select one of the following options:
• All selected shared NARS result in permit
• Any one selected shared NAR results in permit
c. Select a shared NAR name in the Shared NAR list, and then click --> (right arrow button) to move the name into the Selected Shared NARs list.
Tip To view the server details of the shared NARs you have selected to apply, you can click either View IP NAR or View CLID/DNIS NAR, as applicable.
6-8User Guide for Cisco Secure ACS for Windows Server
78-14696-01, Version 3.1
Chapter 6 Setting Up and Managing User GroupsCommon User Group Settings
Step 4 To define and apply a NAR, for this particular user group, that permits or denies access to this group based on IP address, or IP address and port, follow these steps:
Tip You should define most NARs from within the Shared Components section so that the restrictions can be applied to more than one group or user. For more information, see Shared Network Access Restrictions Configuration, page 5-8.
a. In the Per Group Defined Network Access Restrictions section of the Network Access Restrictions table, select the Define IP-based access restrictions check box.
b. To specify whether the subsequent listing specifies permitted or denied IP addresses, from the Table Defines list, select either Permitted Calling/Point of Access Locations or Denied Calling/Point of Access Locations.
c. Select or enter the information in the following boxes:
• AAA Client—Select either All AAA Clients or the name of the NDG or the name of the individual AAA client to which to permit or deny access.
• Port—Type the number of the port to which to permit or deny access. You can use the wildcard asterisk (*) to permit or deny access to all ports on the selected AAA client.
• Address—Type the IP address or addresses to filter on when performing access restrictions. You can use the wildcard asterisk (*).
d. Click Enter.
Result: The specified the AAA client, port, and address information appears in the NAR Access Control list.
Step 5 To permit or deny access to this user group based on calling location or values other than an established IP address, follow these steps:
a. Select the Define CLI/DNIS-based access restrictions check box.
b. To specify whether the subsequent listing specifies permitted or denied values, from the Table Defines list, select one of the following:
• Permitted Calling/Point of Access Locations
• Denied Calling/Point of Access Locations
6-9User Guide for Cisco Secure ACS for Windows Server
78-14696-01, Version 3.1

Chapter 6 Setting Up and Managing User GroupsCommon User Group Settings
c. From the AAA Client list, select either All AAA Clients or the name of the NDG or the name of the particular AAA client to which to permit or deny access.
d. Complete the following boxes:
Note You must type an entry in each box. You can use the wildcard asterisk (*) for all or part of a value. The format you use must match the format of the string you receive from your AAA client. You can determine this format from your RADIUS Accounting Log.
• PORT—Type the number of the port to which to permit or deny access. You can use the wildcard asterisk (*) to permit or deny access to all ports.
• CLI—Type the CLI number to which to permit or deny access. You can use the wildcard asterisk (*) to permit or deny access based on part of the number or all numbers.
Tip This is also the selection to use if you want to restrict access based on other values, such as a Cisco Aironet client MAC address. For more information, see About Network Access Restrictions, page 5-6.
• DNIS—Type the DNIS number to restrict access based on the number into which the user will be dialing. You can use the wildcard asterisk (*) to permit or deny access based on part of the number or all numbers.
Tip This is also the selection to use if you want to restrict access based on other values, such as a Cisco Aironet AP MAC address. For more information, see About Network Access Restrictions, page 5-6.
e. Click Enter.
Result: The information, specifying the AAA client, port, CLI, and DNIS appears in the list.
6-10User Guide for Cisco Secure ACS for Windows Server
78-14696-01, Version 3.1
Chapter 6 Setting Up and Managing User GroupsCommon User Group Settings
Step 6 To save the group settings you have just made, click Submit.
For more information, see Saving Changes to User Group Settings, page 6-53.
Step 7 To continue specifying other group settings, perform other procedures in this chapter, as applicable.
Setting Max Sessions for a User Group
Note If this feature does not appear, click Interface Configuration, click Advanced Options, and then select the Max Sessions check box.
Perform this procedure to define the maximum number of sessions available to a group, or to each user in a group, or both. The settings are as follows:
• Sessions available to group—Sets the maximum number of simultaneous connections for the entire group.
• Sessions available to users of this group—Sets the maximum number of total simultaneous connections for each user in this group.
Tip As an example, Sessions available to group is set to 10 and Sessions available to users of this group is set to 2. If each user is using the maximum 2 simultaneous sessions, no more than 5 users can log in.
Note A session is any type of connection supported by RADIUS or TACACS+, such as PPP, NAS prompt, Telnet, ARAP, IPX/SLIP.
Note The default setting for group Max Sessions is Unlimited for both the group and the user within the group.
6-11User Guide for Cisco Secure ACS for Windows Server
78-14696-01, Version 3.1
Chapter 6 Setting Up and Managing User GroupsCommon User Group Settings
To configure the max sessions settings for a user group, follow these steps:
Step 1 In the navigation bar, click Group Setup.
Result: The Group Setup Select page opens.
Step 2 From the Group list, select a group, and then click Edit Settings.
Result: The Group Settings page displays the name of the group at its top.
Step 3 In the Max Sessions table, under Sessions available to group, select one of the following options:
• Unlimited—Select to allow this group an unlimited number of simultaneous sessions. (This effectively disables Max Sessions.)
• n—Type the maximum number of simultaneous sessions to allow this group.
Step 4 In the lower portion of the Max Sessions table, under Sessions available to users of this group, select one of the following two options:
• Unlimited—Select to allow each individual in this group an unlimited number of simultaneous sessions. (This effectively disables Max Sessions.)
• n—Type the maximum number of simultaneous sessions to allow each user in this group.
Note Settings made in User Setup override group settings. For more information, see Setting Max Sessions Options for a User, page 7-16.
Step 5 To save the group settings you have just made, click Submit.
For more information, see Saving Changes to User Group Settings, page 6-53.
Step 6 To continue specifying other group settings, perform other procedures in this chapter, as applicable.
6-12User Guide for Cisco Secure ACS for Windows Server
78-14696-01, Version 3.1

Chapter 6 Setting Up and Managing User GroupsCommon User Group Settings
Setting Usage Quotas for a User Group
Note If this feature does not appear, click Interface Configuration, click Advanced Options, and then select the Usage Quotas check box.
Perform this procedure to define usage quotas for members of a group. Session quotas affect each user of a group individually, not the group collectively. You can set quotas for a given period in two ways:
• By total duration of session
• By the total number of sessions
If you make no selections in the Usage Quotas section for a group, no usage quotas are enforced on users assigned to that group, unless you configure usage quotas for the individual users.
Note The Usage Quotas section on the Group Settings page does not show usage statistics. Usage statistics are available only on the settings page for an individual user. For more information, see Setting User Usage Quotas Options, page 7-18.
When a user exceeds his or her assigned quota, Cisco Secure ACS denies that user access upon attempting to start a session. If a quota is exceeded during a session, Cisco Secure ACS allows the session to continue.
You can reset the usage quota counters for all users of a group from the Group Settings page. For more information about resetting usage quota counters for a whole group, see Resetting Usage Quota Counters for a User Group, page 6-52.
Tip To support time-based quotas, we recommend enabling accounting update packets on all AAA clients. If update packets are not enabled, the quota is updated when the user logs off. If the AAA client through which the user is accessing your network fails, the quota is not updated. In the case of multiple sessions, such as with ISDN, the quota is not updated until all sessions terminate. This means that a second channel will be accepted even if the first channel has exhausted the quota for the user.
6-13User Guide for Cisco Secure ACS for Windows Server
78-14696-01, Version 3.1
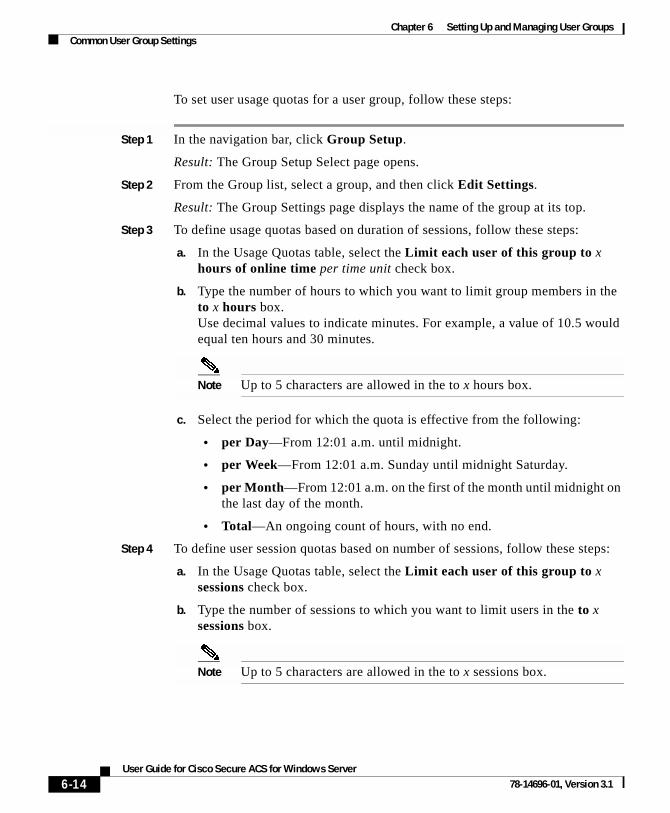
Chapter 6 Setting Up and Managing User GroupsCommon User Group Settings
To set user usage quotas for a user group, follow these steps:
Step 1 In the navigation bar, click Group Setup.
Result: The Group Setup Select page opens.
Step 2 From the Group list, select a group, and then click Edit Settings.
Result: The Group Settings page displays the name of the group at its top.
Step 3 To define usage quotas based on duration of sessions, follow these steps:
a. In the Usage Quotas table, select the Limit each user of this group to x hours of online time per time unit check box.
b. Type the number of hours to which you want to limit group members in the to x hours box. Use decimal values to indicate minutes. For example, a value of 10.5 would equal ten hours and 30 minutes.
Note Up to 5 characters are allowed in the to x hours box.
c. Select the period for which the quota is effective from the following:
• per Day—From 12:01 a.m. until midnight.
• per Week—From 12:01 a.m. Sunday until midnight Saturday.
• per Month—From 12:01 a.m. on the first of the month until midnight on the last day of the month.
• Total—An ongoing count of hours, with no end.
Step 4 To define user session quotas based on number of sessions, follow these steps:
a. In the Usage Quotas table, select the Limit each user of this group to x sessions check box.
b. Type the number of sessions to which you want to limit users in the to x sessions box.
Note Up to 5 characters are allowed in the to x sessions box.
6-14User Guide for Cisco Secure ACS for Windows Server
78-14696-01, Version 3.1

Chapter 6 Setting Up and Managing User GroupsConfiguration-specific User Group Settings
c. Select the period for which the session quota is effective from the following:
• per Day—From 12:01 a.m. until midnight.
• per Week—From 12:01 a.m. Sunday until midnight Saturday.
• per Month—From 12:01 a.m. on the first of the month until midnight on the last day of the month.
• Total—An ongoing count of session, with no end.
Step 5 To save the group settings you have just made, click Submit.
For more information, see Saving Changes to User Group Settings, page 6-53.
Step 6 To continue specifying other group settings, perform other procedures in this chapter, as applicable.
Configuration-specific User Group SettingsThis section details procedures that you perform only as applicable to your particular network security configuration. For instance, if you have no token server configured, you do not have to set token card settings for each group.
This section contains the following procedures:
• Setting Token Card Settings for a User Group, page 6-16
• Setting Enable Privilege Options for a User Group, page 6-18
• Enabling Password Aging for the CiscoSecure User Database, page 6-20
• Enabling Password Aging for Users in Windows Databases, page 6-25
• Setting IP Address Assignment Method for a User Group, page 6-27
• Assigning a Downloadable PIX ACL to a Group, page 6-28
• Configuring TACACS+ Settings for a User Group, page 6-29
• Configuring a Shell Command Authorization Set for a User Group, page 6-31
• Configuring a PIX Command Authorization Set for a User Group, page 6-33
• Configuring Device-Management Command Authorization for a User Group, page 6-35
• Configuring IETF RADIUS Settings for a User Group, page 6-37
6-15User Guide for Cisco Secure ACS for Windows Server
78-14696-01, Version 3.1
Chapter 6 Setting Up and Managing User GroupsConfiguration-specific User Group Settings
• Configuring Cisco IOS/PIX RADIUS Settings for a User Group, page 6-38
• Configuring Cisco Aironet RADIUS Settings for a User Group, page 6-39
• Configuring Ascend RADIUS Settings for a User Group, page 6-41
• Configuring Cisco VPN 3000 Concentrator RADIUS Settings for a User Group, page 6-42
• Configuring Cisco VPN 5000 Concentrator RADIUS Settings for a User Group, page 6-43
• Configuring Microsoft RADIUS Settings for a User Group, page 6-45
• Configuring Nortel RADIUS Settings for a User Group, page 6-46
• Configuring Juniper RADIUS Settings for a User Group, page 6-48
• Configuring BBSM RADIUS Settings for a User Group, page 6-49
Note When a vendor-specific variety of RADIUS is configured for use by network devices, the RADIUS (IETF) attributes are available because they are the base set of attributes, used as the first 74 attributes for all RADIUS vendors.
The content of these subsections is dynamic and based on two factors as follows:
• For a particular protocol to be listed, a AAA client must be configured to authenticate using that protocol. For more information, see AAA Client Configuration, page 4-11.
• The specific attributes for a particular protocol must be configured for display at the group level. For more information, see Protocol Configuration Options for TACACS+, page 3-7, or Protocol Configuration Options for RADIUS, page 3-10.
Setting Token Card Settings for a User Group
Note If this section does not appear, configure a token server. Then, click External User Databases, click Database Configuration, and then add the applicable token card server.
6-16User Guide for Cisco Secure ACS for Windows Server
78-14696-01, Version 3.1
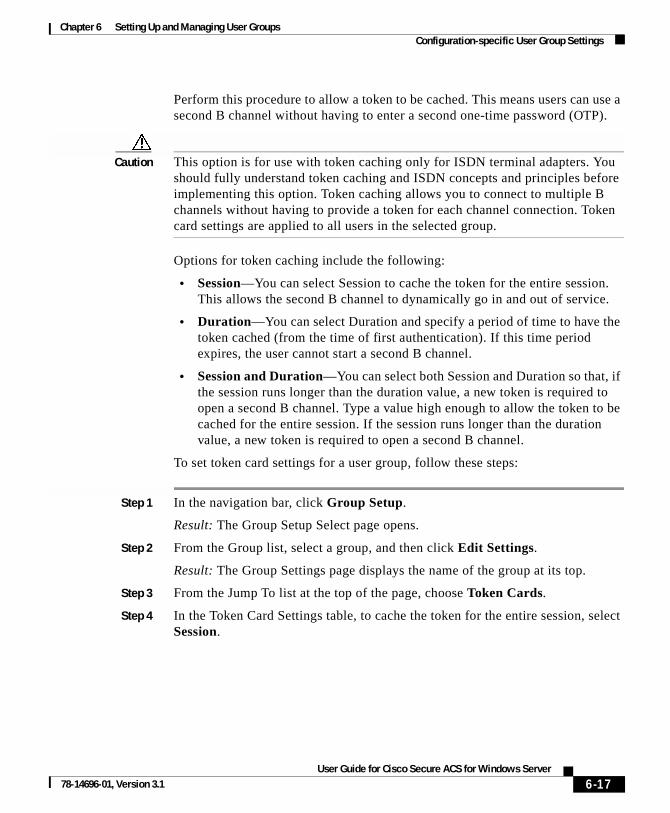
Chapter 6 Setting Up and Managing User GroupsConfiguration-specific User Group Settings
Perform this procedure to allow a token to be cached. This means users can use a second B channel without having to enter a second one-time password (OTP).
Caution This option is for use with token caching only for ISDN terminal adapters. You should fully understand token caching and ISDN concepts and principles before implementing this option. Token caching allows you to connect to multiple B channels without having to provide a token for each channel connection. Token card settings are applied to all users in the selected group.
Options for token caching include the following:
• Session—You can select Session to cache the token for the entire session. This allows the second B channel to dynamically go in and out of service.
• Duration—You can select Duration and specify a period of time to have the token cached (from the time of first authentication). If this time period expires, the user cannot start a second B channel.
• Session and Duration—You can select both Session and Duration so that, if the session runs longer than the duration value, a new token is required to open a second B channel. Type a value high enough to allow the token to be cached for the entire session. If the session runs longer than the duration value, a new token is required to open a second B channel.
To set token card settings for a user group, follow these steps:
Step 1 In the navigation bar, click Group Setup.
Result: The Group Setup Select page opens.
Step 2 From the Group list, select a group, and then click Edit Settings.
Result: The Group Settings page displays the name of the group at its top.
Step 3 From the Jump To list at the top of the page, choose Token Cards.
Step 4 In the Token Card Settings table, to cache the token for the entire session, select Session.
6-17User Guide for Cisco Secure ACS for Windows Server
78-14696-01, Version 3.1
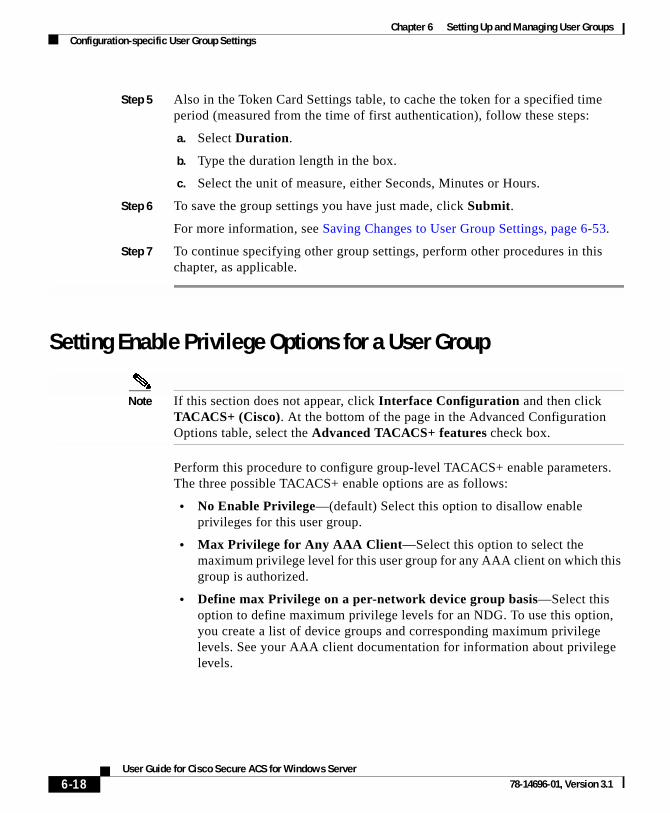
Chapter 6 Setting Up and Managing User GroupsConfiguration-specific User Group Settings
Step 5 Also in the Token Card Settings table, to cache the token for a specified time period (measured from the time of first authentication), follow these steps:
a. Select Duration.
b. Type the duration length in the box.
c. Select the unit of measure, either Seconds, Minutes or Hours.
Step 6 To save the group settings you have just made, click Submit.
For more information, see Saving Changes to User Group Settings, page 6-53.
Step 7 To continue specifying other group settings, perform other procedures in this chapter, as applicable.
Setting Enable Privilege Options for a User Group
Note If this section does not appear, click Interface Configuration and then click TACACS+ (Cisco). At the bottom of the page in the Advanced Configuration Options table, select the Advanced TACACS+ features check box.
Perform this procedure to configure group-level TACACS+ enable parameters. The three possible TACACS+ enable options are as follows:
• No Enable Privilege—(default) Select this option to disallow enable privileges for this user group.
• Max Privilege for Any AAA Client—Select this option to select the maximum privilege level for this user group for any AAA client on which this group is authorized.
• Define max Privilege on a per-network device group basis—Select this option to define maximum privilege levels for an NDG. To use this option, you create a list of device groups and corresponding maximum privilege levels. See your AAA client documentation for information about privilege levels.
6-18User Guide for Cisco Secure ACS for Windows Server
78-14696-01, Version 3.1

Chapter 6 Setting Up and Managing User GroupsConfiguration-specific User Group Settings
Note To define levels in this manner, you must have configured the option in Interface Configuration; if you have not done so already, click Interface Configuration, click Advanced Settings, and then select the Network Device Groups check box.
If you are using NDGs, this option lets you configure the NDG for enable-level mapping rather than having to do it for each user in the group.
To set enable privilege options for a user group, follow these steps:
Step 1 In the navigation bar, click Group Setup.
Result: The Group Setup Select page opens.
Step 2 From the Group list, select a group, and then click Edit Settings.
Result: The Group Settings page displays the name of the group at its top.
Step 3 From the Jump To list at the top of the page, choose Enable Options.
Step 4 Do one of the following:
• To disallow enable privileges for this user group, select the No Enable Privilege option.
• To set the maximum privilege level for this user group, for any ACS on which this group is authorized, select the Max Privilege for Any Access Server option. Then, select the maximum privilege level from the list.
• To define the maximum NDG privilege level for this user group, select the Define max Privilege on a per-network device group basis option. Then, from the lists, select the NDG and a corresponding privilege level. Finally, click Add Association.
Result: The association of NDG and maximum privilege level appears in the table.
Step 5 To save the group settings you have just made, click Submit.
For more information, see Saving Changes to User Group Settings, page 6-53.
Step 6 To continue specifying other group settings, perform other procedures in this chapter, as applicable.
6-19User Guide for Cisco Secure ACS for Windows Server
78-14696-01, Version 3.1
Chapter 6 Setting Up and Managing User GroupsConfiguration-specific User Group Settings
Enabling Password Aging for the CiscoSecure User DatabaseThe password aging feature of Cisco Secure ACS enables you to force users to change their passwords under one or more of the following conditions:
• After a specified number of days (age-by-date rules)
• After a specified number of logins (age-by-uses rules)
• The first time a new user logs in (password change rule)
Varieties of Password Aging Supported by Cisco Secure ACS
Cisco Secure ACS supports four distinct password aging mechanisms, as follows:
• EAP-GTC Windows NT/2000 Password Aging—Users must be in the Windows NT/2000 database and be using a Microsoft client that supports EAP, such as Windows XP. For information on the requirements and configuration of this password aging mechanism, see Enabling Password Aging for Users in Windows Databases, page 6-25.
• RADIUS-based Windows NT/2000 Password Aging—Users must be in the Windows NT/2000 database and be using the Windows Dial-up Networking (DUN) client. For information on the requirements and configuration of this password aging mechanism, see Enabling Password Aging for Users in Windows Databases, page 6-25.
• Password Aging for Device-hosted Sessions—Users must be in the CiscoSecure user database, the AAA client must be running TACACS+, and the connection must use Telnet. You can control the ability of users to change passwords during a device-hosted Telnet session. You can also control whether Cisco Secure ACS propagates passwords changed by this feature. For more information, see Local Password Management, page 8-5.
• Password Aging for Transit Sessions—Users must be in the CiscoSecure user database. Users must be using the Windows 95/98/ME, Windows NT 3.51, Windows NT 4.0, Windows 2000 DUN client, or another PPP dialup client. Further, the end-user client must have CiscoSecure Authentication Agent (CAA) installed in Windows 95/98/ME or Windows NT/2000.
Tip The CAA software is available at http://www.cisco.com.
6-20User Guide for Cisco Secure ACS for Windows Server
78-14696-01, Version 3.1

Chapter 6 Setting Up and Managing User GroupsConfiguration-specific User Group Settings
Also, to run password aging for transit sessions, the AAA client can be running either RADIUS or TACACS+; and the AAA client must be using Cisco IOS Release 11.2.7 or later and be configured to send a watchdog accounting packet (aaa accounting new-info update) with the IP address of the calling station. (Watchdog packets are interim packets sent periodically during a session. They provide an approximate session length in the event that the AAA client fails and, thereby, no stop packet is received to mark the end of the session.)
You can control whether Cisco Secure ACS propagates passwords changed by this feature. For more information, see Local Password Management, page 8-5.
Cisco Secure ACS supports password aging using the RADIUS protocol under MS CHAP versions 1 and 2. Cisco Secure ACS does not support password aging over Telnet connections using the RADIUS protocol.
Caution If a user with a RADIUS connection tries to make a Telnet connection to the AAA client during or after the password aging warning or grace period, the change password option does not appear, and the user account is expired.
Password Aging Feature Settings
This section details only the Password Aging for Device-hosted Sessions and Password Aging for Transit Sessions mechanisms. For information on the Windows NT/2000 Password Aging mechanism, and the Windows 2000 DUN client, see Enabling Password Aging for Users in Windows Databases, page 6-25. For information on configuring local password validation options, see Local Password Management, page 8-5.
The password aging feature in Cisco Secure ACS has the following major and minor options:
• Apply age-by-date rules—Selecting this check box configures Cisco Secure ACS to determine password aging by date. The age-by-date rules contain the following settings:
– Active period—The number of days users will be allowed to log in before being prompted to change their passwords. For example, if you enter 20, users can use their passwords for 20 days without being prompted to change them. The default Active period is 20 days.
6-21User Guide for Cisco Secure ACS for Windows Server
78-14696-01, Version 3.1
Chapter 6 Setting Up and Managing User GroupsConfiguration-specific User Group Settings
– Warning period—The number of days users will be notified to change their passwords. The existing password can be used, but the Cisco Secure ACS presents a warning indicating that the password must be changed and displays the number of days left before the password expires. For example, if you enter 5 in this box and 20 in the Active period box, users will be notified to change their passwords on the 21st through 25th days.
– Grace period—The number of days to provide as the user grace period. The grace period allows a user to log in once to change the password. The existing password can be used one last time after the number of days specified in the active and warning period fields has been exceeded. Then, a dialog box warns the user that the account will be disabled if the password is not changed, and enables the user to change it. Continuing with the examples above, if you allow a 5-day grace period, a user who did not log in during the active and warning periods would be permitted to change passwords up to and including the 30th day. However, even though the grace period is set for 5 days, a user is allowed only one attempt to change the password when the password is in the grace period. Cisco Secure ACS displays the “last chance” warning only once. If the user does not change the password, this login is still permitted, but the password expires, and the next authentication is denied. An entry is logged in the Failed-Attempts log, and the user must contact an administrator to have the account reinstated.
Note All passwords expire at midnight, not the time at which they were set.
• Apply age-by-uses rules—Selecting this check box configures Cisco Secure ACS to determine password aging by the number of logins. The age-by-uses rules contain the following settings:
– Issue warning after x logins—The number of the login upon which Cisco Secure ACS begins prompting users to change their passwords. For example, if you enter 10, users are allowed to log in 10 times without a change-password prompt. On the 11th login, they are prompted to change their passwords.
Tip To allow users to log in an unlimited number of times without changing their passwords, type -1.
6-22User Guide for Cisco Secure ACS for Windows Server
78-14696-01, Version 3.1

Chapter 6 Setting Up and Managing User GroupsConfiguration-specific User Group Settings
– Require change after x logins—The number of the login after which to notify users that they must to change their passwords. Continuing with the previous example, if this number is set to 12, users receive prompts requesting them to change their passwords on their 11th and 12th login attempts. On the 13th login attempt, they receive a prompt telling them that they must change their passwords. If users do not change their passwords now, their accounts expire and they cannot log in. This number must be greater than the Issue warning after x login number.
Tip To allow users to log in an unlimited number of times without changing their passwords, type -1.
• Apply password change rule—Selecting this check box forces new users to change their passwords the first time they log in.
• Generate greetings for successful logins—Selecting this check box enables a Greetings message to display whenever users log in successfully via the CAA client. The message contains up-to-date password information specific to this user account.
The password aging rules are not mutually exclusive; a rule is applied for each check box that is selected. For example, users can be forced to change their passwords every 20 days, and every 10 logins, and to receive warnings and grace periods accordingly.
If no options are checked, passwords never expire.
Unlike most other parameters, which have corresponding settings at the user level, password aging parameters are configured only on a group basis.
Users who fail authentication because they have not changed their passwords and have exceeded their grace periods are logged in the Failed Attempts log. The accounts expire and appear in the Accounts Disabled list.
Before You Begin
• Verify that your AAA client is running the TACACS+ or RADIUS protocol. (TACACS+ only supports password aging for device-hosted sessions.)
• Set up your AAA client to perform authentication and accounting using the same protocol, either TACACS+ RADIUS.
6-23User Guide for Cisco Secure ACS for Windows Server
78-14696-01, Version 3.1
Chapter 6 Setting Up and Managing User GroupsConfiguration-specific User Group Settings
• Verify that you have configured your password validation options. For more information, see Local Password Management, page 8-5.
• Set up your AAA client to use Cisco IOS Release 11.2.7 or later and to send a watchdog accounting packet (aaa accounting new-info update) with the IP address of the calling station.
To set password aging rules for a user group, follow these steps:
Step 1 In the navigation bar, click Group Setup.
Result: The Group Setup Select page opens.
Step 2 From the Group list, select a group, and then click Edit Settings.
Result: The Group Settings page displays the name of the group at its top.
Step 3 From the Jump To list at the top of the page, choose Password Aging.
Result: The Password Aging Rules table appears.
Step 4 To set password aging by date, select the Apply age-by-date rules check box and type the number of days for the following options, as applicable:
• Active period
• Warning period
• Grace period
Note Up to 5 characters are allowed in each field.
Step 5 To set password aging by use, select the Apply age-by-uses rules check box and type the number of logins for each of the following options, as applicable:
• Issue warning after x logins
• Require change after x logins
Note Up to 5 characters are allowed in each field.
Step 6 To force the user to change the password on the first login after an administrator has changed it, select the Apply password change rule check box.
Step 7 To enable a Greetings message display, select the Generate greetings for successful logins check box.
6-24User Guide for Cisco Secure ACS for Windows Server
78-14696-01, Version 3.1

Chapter 6 Setting Up and Managing User GroupsConfiguration-specific User Group Settings
Step 8 To save the group settings you have just made, click Submit.
For more information, see Saving Changes to User Group Settings, page 6-53.
Step 9 To continue specifying other group settings, perform other procedures in this chapter, as applicable.
Enabling Password Aging for Users in Windows DatabasesCisco Secure ACS supports two types of password aging for users in Windows databases. Both types of Windows password aging mechanisms are separate and distinct from the other Cisco Secure ACS password aging mechanisms. For information on the requirements and settings for the password aging mechanisms that control users in the CiscoSecure user database, see Enabling Password Aging for the CiscoSecure User Database, page 6-20.
Note You can run both the Windows NT/2000 Password Aging and the Cisco Secure ACS Password Aging for Transit Sessions mechanisms concurrently, provided that the users authenticate from the two different databases.
The two types of password aging in Windows databases are as follows:
• RADIUS-based password aging—RADIUS-based password aging depends upon the RADIUS AAA protocol to send and receive the password change messages. Requirements for implementing the RADIUS-based Windows password aging mechanism include the following:
– Communication between Cisco Secure ACS and the AAA client must be using RADIUS.
– The AAA client must support MS CHAP password aging in addition to MS CHAP authentication.
– Users must be in a Windows NT/2000 database.
– Users must be using the Windows DUN client.
– You must enable MS CHAP version 1 or MS CHAP version 2, or both, in the Windows NT/2000 configuration within the External User Databases section.
6-25User Guide for Cisco Secure ACS for Windows Server
78-14696-01, Version 3.1
Chapter 6 Setting Up and Managing User GroupsConfiguration-specific User Group Settings
Tip For information on enabling MS CHAP for password changes, see Configuring a Windows NT/2000 External User Database, page 11-14. For information on enabling MS CHAP in System Configuration, see Global Authentication Setup, page 8-81.
• EAP-GTC password aging—EAP-GTC password aging depends upon the PEAP(EAP-GTC) authentication protocol to send and receive the password change messages. Requirements for implementing the EAP-GTC Windows password aging mechanism include the following:
– The AAA client must support EAP.
– Users must be in a Windows NT/2000 database.
– Users must be using an EAP-compliant Microsoft client, such as Windows XP.
– You must enable PEAP on the Global Authentication Configuration page within the System Configuration section.
Tip For information on enabling PEAP in System Configuration, see Global Authentication Setup, page 8-81.
Users whose Windows accounts reside in “remote” domains (that is, not the domain within which Cisco Secure ACS is running) can only use the Windows-based password aging if they supply their domain names.
The methods and functionality of Windows password aging differ according to whether you are using Windows NT or Windows 2000, and whether you employ Active Directory (AD) or Security Accounts Manager (SAM). Setting password aging for users in the Windows NT/2000 database is only one part of the larger task of setting security policies in Windows. For comprehensive information on Windows procedures, refer to your Windows NT/2000 system documentation.
6-26User Guide for Cisco Secure ACS for Windows Server
78-14696-01, Version 3.1
Chapter 6 Setting Up and Managing User GroupsConfiguration-specific User Group Settings
Setting IP Address Assignment Method for a User GroupPerform this procedure to configure the way Cisco Secure ACS assigns IP addresses to users in the group. The four possible methods are as follows:
• No IP address assignment—No IP address is assigned to this group.
• Assigned by dialup client—Use the IP address that is configured on the dialup client network settings for TCP/IP.
• Assigned from AAA Client pool—The IP address is assigned by an IP address pool assigned on the AAA client.
• Assigned from AAA server pool—The IP address is assigned by an IP address pool assigned on the AAA server.
To set an IP address assignment method for a user group, follow these steps:
Step 1 In the navigation bar, click Group Setup.
Result: The Group Setup Select page opens.
Step 2 From the Group list, select a group, and then click Edit Settings.
Result: The Group Settings page displays the name of the group at its top.
Step 3 From the Jump To list at the top of the page, choose IP Address Assignment.
Step 4 In the IP Assignment table, do one of the following:
• Select No IP address assignment.
• Select Assigned by dialup client.
• Select Assigned from AAA Client pool. Then, type the AAA client IP pool name.
• Select Assigned from AAA pool. Then, select the AAA server IP pool name in the Available Pools list and click —> (right arrow button) to move the name into the Selected Pools list.
Note If there is more than one pool in the Selected Pools list, the users in this group are assigned to the first available pool in the order listed.
6-27User Guide for Cisco Secure ACS for Windows Server
78-14696-01, Version 3.1
Chapter 6 Setting Up and Managing User GroupsConfiguration-specific User Group Settings
Tip To change the position of a pool in the list, select the pool name and click Up or Down until the pool is in the position you want.
Step 5 To save the group settings you have just made, click Submit.
For more information, see Saving Changes to User Group Settings, page 6-53.
Step 6 To continue specifying other group settings, perform other procedures in this chapter, as applicable.
Assigning a Downloadable PIX ACL to a GroupThe Downloadable ACLs feature enables you to assign a PIX ACL at the group level.
Note You must have established one or more PIX ACLs before attempting to assign one. For instructions on how to add a downloadable PIX ACL using the Shared Profile Components section of the Cisco Secure ACS HTML interface, see Adding a Downloadable PIX ACL, page 5-4.
Tip The Downloadable ACLs table does not appear if it has not been enabled. To enable the Downloadable ACLs table, click Interface Configuration, click Advanced Options, and then select the Group-Level Downloadable ACLs check box.
To assign a downloadable PIX ACL to a group, follow these steps:
Step 1 In the navigation bar, click Group Setup.
Result: The Group Setup Select page opens.
Step 2 From the Group list, select a group, and then click Edit Settings.
Result: The Group Settings page displays the name of the group at its top.
Step 3 From the Jump To list at the top of the page, choose Downloadable ACLs.
6-28User Guide for Cisco Secure ACS for Windows Server
78-14696-01, Version 3.1
Chapter 6 Setting Up and Managing User GroupsConfiguration-specific User Group Settings
Step 4 Under the Downloadable ACLs section, click the Assign PIX ACL check box.
Step 5 Select a PIX ACL from the list.
Step 6 To save the group settings you have just made, click Submit.
For more information, see Saving Changes to User Group Settings, page 6-53.
Step 7 To continue specifying other group settings, perform other procedures in this chapter, as applicable.
Configuring TACACS+ Settings for a User Group Perform this procedure to configure and enable the service/protocol parameters to be applied for the authorization of each user who belongs to the group. For information on how to configure settings for the Shell Command Authorization Set, see Configuring a Shell Command Authorization Set for a User Group, page 6-31.
Note To display or hide additional services or protocols, click Interface Configuration, click TACACS+ (Cisco IOS), and then select or clear items in the group column, as applicable.
To configure TACACS+ settings for a user group, follow these steps:
Step 1 In the navigation bar, click Group Setup.
Result: The Group Setup Select page opens.
Step 2 From the Group list, select a group, and then click Edit Settings.
Result: The Group Settings page displays the name of the group at its top.
Step 3 From the Jump To list at the top of the page, choose TACACS+.
Result: The system displays the TACACS+ Settings table section.
6-29User Guide for Cisco Secure ACS for Windows Server
78-14696-01, Version 3.1
Chapter 6 Setting Up and Managing User GroupsConfiguration-specific User Group Settings
Step 4 To configure services and protocols in the TACACS+ Settings table to be authorized for the group, follow these steps:
a. Select one or more service/protocol check boxes (for example, PPP IP or ARAP).
b. Under each service/protocol that you selected in Step a, select attributes and then type in the corresponding values, as applicable, to further define authorization for that service/protocol.
To employ custom attributes for a particular service, you must select the Custom attributes check box under that service, and then specify the attribute/value in the box below the check box.
For more information about attributes, see Appendix B, “TACACS+ Attribute-Value Pairs,” or your AAA client documentation.
Tip For ACLs and IP address pools, the name of the ACL or pool as defined on the AAA client should be entered. (An ACL is a list of Cisco IOS commands used to restrict access to or from other devices and users on the network.)
Note Leave the attribute value box blank if the default (as defined on the AAA client) should be used.
Note You can define and download an ACL. Click Interface Configuration, click TACACS+ (Cisco IOS), and then select Display a window for each service selected in which you can enter customized TACACS+ attributes. A box opens under each service/protocol in which you can define an ACL.
Step 5 To allow all services to be permitted unless specifically listed and disabled, you can select the Default (Undefined) Services check box under the Checking this option will PERMIT all UNKNOWN Services table.
Warning This is an advanced feature and should only be used by administrators who understand the security implications.
6-30User Guide for Cisco Secure ACS for Windows Server
78-14696-01, Version 3.1
Chapter 6 Setting Up and Managing User GroupsConfiguration-specific User Group Settings
Step 6 To save the group settings you have just made, click Submit.
For more information, see Saving Changes to User Group Settings, page 6-53.
Step 7 To continue specifying other group settings, perform other procedures in this chapter, as applicable.
Configuring a Shell Command Authorization Set for a User GroupUse this procedure to specify the shell command authorization set parameters for a group. There are four options:
• None—No authorization for shell commands.
• Assign a Shell Command Authorization Set for any network device—One shell command authorization set is assigned, and it applies to all network devices.
• Assign a Shell Command Authorization Set on a per Network Device Group Basis—Enables you to associate particular shell command authorization sets to be effective on particular NDGs.
• Per Group Command Authorization—Enables you to permit or deny specific Cisco IOS commands and arguments at the group level.
Note This feature requires that you have previously configured a shell command authorization set. For detailed steps, see Command Authorization Sets Configuration, page 5-16.
To specify shell command authorization set parameters for a user group, follow these steps:
Step 1 In the navigation bar, click Group Setup.
Result: The Group Setup Select page opens.
Step 2 From the Group list, select a group, and then click Edit Settings.
Result: The Group Settings page displays the name of the group at its top.
6-31User Guide for Cisco Secure ACS for Windows Server
78-14696-01, Version 3.1

Chapter 6 Setting Up and Managing User GroupsConfiguration-specific User Group Settings
Step 3 From the Jump To list at the top of the page, choose TACACS+.
Result: The system displays the TACACS+ Settings table section.
Step 4 Use the vertical scrollbar to scroll to the Shell Command Authorization Set feature area.
Step 5 To prevent the application of any shell command authorization set, select (or accept the default of) the None option.
Step 6 To assign a particular shell command authorization set to be effective on any configured network device, follow these steps:
a. Select the Assign a Shell Command Authorization Set for any network device option.
b. Then, from the list directly below that option, select the shell command authorization set you want applied to this group.
Step 7 To create associations that assign a particular shell command authorization set to be effective on a particular NDG, for each association, follow these steps:
a. Select the Assign a Shell Command Authorization Set on a per Network Device Group Basis option.
b. Select a Device Group and a corresponding Command Set.
Tip You can select a Command Set that will be effective for all Device Groups, that are not otherwise assigned, by assigning that set to the <default> Device Group.
c. Click Add Association.
Result: The associated NDG and shell command authorization set appear in the table.
Step 8 To define the specific Cisco IOS commands and arguments to be permitted or denied at the group level, follow these steps:
a. Select the Per Group Command Authorization option.
b. Under Unmatched Cisco IOS commands, select either Permit or Deny.
If you select Permit, users can issue all commands not specifically listed. If you select Deny, users can issue only those commands listed.
6-32User Guide for Cisco Secure ACS for Windows Server
78-14696-01, Version 3.1
Chapter 6 Setting Up and Managing User GroupsConfiguration-specific User Group Settings
c. To list particular commands to be permitted or denied, select the Command check box and then type the name of the command, define its arguments using standard permit or deny syntax, and select whether unlisted arguments should be permitted or denied.
Warning This is a powerful, advanced feature and should be used by an administrator skilled with Cisco IOS commands. Correct syntax is the responsibility of the administrator. For information on how Cisco Secure ACS uses pattern matching in command arguments, see About Pattern Matching, page 5-15.
Tip To enter several commands, you must click Submit after specifying a command. A new command entry box appears below the box you just completed.
Configuring a PIX Command Authorization Set for a User GroupUse this procedure to specify the PIX command authorization set parameters for a user group. There are three options:
• None—No authorization for PIX commands.
• Assign a PIX Command Authorization Set for any network device—One PIX command authorization set is assigned, and it applies all network devices.
• Assign a PIX Command Authorization Set on a per Network Device Group Basis—Particular PIX command authorization sets are to be effective on particular NDGs.
6-33User Guide for Cisco Secure ACS for Windows Server
78-14696-01, Version 3.1

Chapter 6 Setting Up and Managing User GroupsConfiguration-specific User Group Settings
Before You Begin
• Ensure that a AAA client has been configured to use TACACS+ as the security control protocol.
• On the TACACS+ (Cisco) page of Interface Configuration section, ensure that the PIX Shell (pixShell) option is selected in the Group column.
• Ensure that you have already configured one or more PIX command authorization sets. For detailed steps, see Command Authorization Sets Configuration, page 5-16.
To specify PIX command authorization set parameters for a user group,
Step 1 In the navigation bar, click Group Setup.
Result: The Group Setup Select page opens.
Step 2 From the Group list, select a group, and then click Edit Settings.
Result: The Group Settings page displays the name of the group at its top.
Step 3 From the Jump To list at the top of the page, choose TACACS+.
Result: The system displays the TACACS+ Settings table section.
Step 4 Scroll down to the PIX Command Authorization Set feature area within the TACACS+ Settings table.
Step 5 To prevent the application of any PIX command authorization set, select (or accept the default of) the None option.
Step 6 To assign a particular PIX command authorization set to be effective on any configured network device, follow these steps:
a. Select the Assign a PIX Command Authorization Set for any network device option.
b. From the list directly below that option, select the PIX command authorization set you want applied to this user group.
Step 7 To create associations that assign a particular PIX command authorization set to be effective on a particular NDG, for each association, follow these steps:
a. Select the Assign a PIX Command Authorization Set on a per Network Device Group Basis option.
b. Select a Device Group and an associated Command Set.
6-34User Guide for Cisco Secure ACS for Windows Server
78-14696-01, Version 3.1
Chapter 6 Setting Up and Managing User GroupsConfiguration-specific User Group Settings
c. Click Add Association.
Result: The associated NDG and PIX command authorization set appear in the table.
Note To remove or edit an existing PIX command authorization set association, you can select the association from the list, and then click Remove Association.
Configuring Device-Management Command Authorization for a User Group
Use this procedure to specify the device-management command authorization set parameters for a group. Device-management command authorization sets support the authorization of tasks in Cisco device-management applications that are configured to use Cisco Secure ACS for authorization. There are three options:
• None—No authorization is performed for commands issued in the applicable Cisco device-management application.
• Assign a device-management application for any network device—For the applicable device-management application, one command authorization set is assigned, and it applies to management tasks on all network devices.
• Assign a device-management application on a per Network Device Group Basis—For the applicable device-management application, this option enables you to apply command authorization sets to specific NDGs, so that it affects all management tasks on the network devices belonging to the NDG.
Note This feature requires that you have configured a command authorization set for the applicable Cisco device-management application. For detailed steps, see Command Authorization Sets Configuration, page 5-16.
6-35User Guide for Cisco Secure ACS for Windows Server
78-14696-01, Version 3.1
Chapter 6 Setting Up and Managing User GroupsConfiguration-specific User Group Settings
To specify device-management application command authorization for a user group, follow these steps:
Step 1 In the navigation bar, click Group Setup.
Result: The Group Setup Select page opens.
Step 2 From the Group list, select a group, and then click Edit Settings.
Result: The Group Settings page displays the name of the group at its top.
Step 3 From the Jump To list at the top of the page, choose TACACS+.
Result: The system displays the TACACS+ Settings table section.
Step 4 Use the vertical scrollbar to scroll to the device-management application feature area, where device-management application is the name of the applicable Cisco device-management application.
Step 5 To prevent the application of any command authorization set for the applicable device-management application, select the None option.
Step 6 To assign a particular command authorization set that affects device-management application actions on any network device, follow these steps:
a. Select the Assign a device-management application for any network device option.
b. Then, from the list directly below that option, select the command authorization set you want applied to this group.
Step 7 To create associations that assign a particular command authorization set that affects device-management application actions on a particular NDG, for each association, follow these steps:
a. Select the Assign a device-management application on a per Network Device Group Basis option.
b. Select a Device Group and a corresponding device-management application.
c. Click Add Association.
Result: The associated NDG and command authorization set appear in the table.
6-36User Guide for Cisco Secure ACS for Windows Server
78-14696-01, Version 3.1
Chapter 6 Setting Up and Managing User GroupsConfiguration-specific User Group Settings
Configuring IETF RADIUS Settings for a User GroupThese parameters appear only when both the following are true:
• A AAA client has been configured to use one of the RADIUS protocols in Network Configuration.
• Group-level RADIUS attributes have been enabled on the RADIUS (IETF) page in the Interface Configuration section of the HTML interface.
RADIUS attributes are sent as a profile for each user from Cisco Secure ACS to the requesting AAA client. To display or hide any of these attributes, see Protocol Configuration Options for RADIUS, page 3-10. For a list and explanation of RADIUS attributes, see Appendix C, “RADIUS Attributes”. For more information about how your AAA client uses RADIUS, refer to your AAA client vendor documentation.
To configure IETF RADIUS attribute settings to be applied as an authorization for each user in the current group, follow these steps:
Step 1 In the navigation bar, click Group Setup.
Result: The Group Setup Select page opens.
Step 2 From the Group list, select a group, and then click Edit Settings.
Result: The Group Settings page displays the name of the group at its top.
Step 3 From the Jump To list at the top of the page, choose RADIUS (IETF).
Step 4 For each IETF RADIUS attribute you need to authorize for the current group, select the check box next to the attribute and then define the authorization for the attribute in the field or fields next to it.
Step 5 To save the group settings you have just made, click Submit.
For more information, see Saving Changes to User Group Settings, page 6-53.
Step 6 To configure the vendor-specific attributes (VSAs) for any RADIUS network device vendor supported by Cisco Secure ACS, see the appropriate section:
• Configuring Cisco IOS/PIX RADIUS Settings for a User Group, page 6-38
• Configuring Cisco Aironet RADIUS Settings for a User Group, page 6-39
• Configuring Ascend RADIUS Settings for a User Group, page 6-41
• Configuring Cisco VPN 3000 Concentrator RADIUS Settings for a User Group, page 6-42
6-37User Guide for Cisco Secure ACS for Windows Server
78-14696-01, Version 3.1
Chapter 6 Setting Up and Managing User GroupsConfiguration-specific User Group Settings
• Configuring Cisco VPN 5000 Concentrator RADIUS Settings for a User Group, page 6-43
• Configuring Microsoft RADIUS Settings for a User Group, page 6-45
• Configuring Nortel RADIUS Settings for a User Group, page 6-46
• Configuring Juniper RADIUS Settings for a User Group, page 6-48
• Configuring BBSM RADIUS Settings for a User Group, page 6-49
Step 7 To continue specifying other group settings, perform other procedures in this chapter, as applicable.
Configuring Cisco IOS/PIX RADIUS Settings for a User GroupThe Cisco IOS/PIX RADIUS parameters appear only when both the following are true:
• A AAA client has been configured to use RADIUS (Cisco IOS/PIX) in Network Configuration.
• Group-level RADIUS (Cisco IOS/PIX) attributes have been enabled in Interface Configuration: RADIUS (Cisco IOS/PIX).
Cisco IOS/PIX RADIUS represents only the Cisco VSAs. You must configure both the IETF RADIUS and Cisco IOS/PIX RADIUS attributes.
Note To hide or display Cisco IOS/PIX RADIUS attributes, see Setting Protocol Configuration Options for Non-IETF RADIUS Attributes, page 3-16. A VSA applied as an authorization to a particular group persists, even when you remove or replace the associated AAA client; however, if you have no AAA clients of this (vendor) type configured, the VSA settings do not appear in the group configuration interface.
6-38User Guide for Cisco Secure ACS for Windows Server
78-14696-01, Version 3.1
Chapter 6 Setting Up and Managing User GroupsConfiguration-specific User Group Settings
To configure and enable Cisco IOS/PIX RADIUS attributes to be applied as an authorization for each user in the current group, follow these steps:
Step 1 Before you configure Cisco IOS/PIX RADIUS attributes, be sure your IETF RADIUS attributes are configured properly. For more information about setting IETF RADIUS attributes, see Configuring IETF RADIUS Settings for a User Group, page 6-37.
Step 2 For the Cisco attributes, determine the attributes to be authorized for the group by selecting the check box next to the attribute, and then type the commands (such as TACACS+ commands) to be packed as a RADIUS VSA.
Step 3 To save the group settings you have just made, click Submit.
For more information, see Saving Changes to User Group Settings, page 6-53.
Step 4 To continue specifying other group settings, perform other procedures in this chapter, as applicable.
Configuring Cisco Aironet RADIUS Settings for a User GroupThe Cisco Aironet RADIUS VSA appears only when both the following are true:
• A AAA client has been configured to use RADIUS (Cisco Aironet) in Network Configuration.
• The group-level RADIUS (Cisco Aironet) attribute has been enabled in Interface Configuration: RADIUS (Cisco Aironet).
The single Cisco Aironet RADIUS VSA, Cisco-Aironet-Session-Timeout, is a specialized implementation of the IETF RADIUS Session-Timeout attribute (27). When Cisco Secure ACS responds to an authentication request from a Cisco Aironet Access Point and the Cisco-Aironet-Session-Timeout attribute is configured, Cisco Secure ACS sends to the wireless device this value in the IETF Session-Timeout attribute. The Cisco Aironet RADIUS VSA enables you to provide one session timeout value for wireless end-user clients and a different session timeout value for wired end-user clients.
6-39User Guide for Cisco Secure ACS for Windows Server
78-14696-01, Version 3.1
Chapter 6 Setting Up and Managing User GroupsConfiguration-specific User Group Settings
Note To hide or display the Cisco Aironet RADIUS VSA, see Setting Protocol Configuration Options for Non-IETF RADIUS Attributes, page 3-16. A VSA applied as an authorization to a particular group persists, even when you remove or replace the associated AAA client; however, if you have no AAA clients of this (vendor) type configured, the VSA settings do not appear in the group configuration interface.
To configure and enable the Cisco Aironet RADIUS attribute to be applied as an authorization for each user in the current group, follow these steps:
Step 1 Confirm that your IETF RADIUS attributes are configured properly. For more information about setting IETF RADIUS attributes, see Configuring IETF RADIUS Settings for a User Group, page 6-37.
Step 2 In the navigation bar, click Group Setup.
Result: The Group Setup Select page opens.
Step 3 From the Group list, select a group, and then click Edit Settings.
Result: The Group Settings page displays the name of the group at its top.
Step 4 From the Jump To list at the top of the page, choose RADIUS (Cisco Aironet).
Step 5 In the Cisco Aironet RADIUS Attributes table, select the [5842\001] Cisco-Aironet-Session-Timeout check box.
Step 6 In the [5842\001] Cisco-Aironet-Session-Timeout box, type the session timeout value (in seconds) that Cisco Secure ACS is to send in the IETF RADIUS Session-Timeout (27) attribute when the AAA client is configured in Network Configuration to use the RADIUS (Cisco Aironet) authentication option. The recommended value is 600 seconds.
For more information about the IETF RADIUS Session-Timeout attribute, see Appendix C, “RADIUS Attributes,” or your AAA client documentation.
Step 7 To save the group settings you have just made, click Submit.
For more information, see Saving Changes to User Group Settings, page 6-53.
Step 8 To continue specifying other group settings, perform other procedures in this chapter, as applicable.
6-40User Guide for Cisco Secure ACS for Windows Server
78-14696-01, Version 3.1
Chapter 6 Setting Up and Managing User GroupsConfiguration-specific User Group Settings
Configuring Ascend RADIUS Settings for a User GroupThe Ascend RADIUS parameters appear only when both the following are true:
• A AAA client has been configured to use RADIUS (Ascend) or RADIUS (Cisco IOS/PIX) in Network Configuration.
• Group-level RADIUS (Ascend) attributes have been enabled in Interface Configuration: RADIUS (Ascend).
Ascend RADIUS represents only the Ascend proprietary attributes. You must configure both the IETF RADIUS and Ascend RADIUS attributes. Proprietary attributes override IETF attributes.
The default attribute setting displayed for RADIUS is Ascend-Remote-Addr.
Note To hide or display Ascend RADIUS attributes, see Setting Protocol Configuration Options for Non-IETF RADIUS Attributes, page 3-16. A VSA applied as an authorization to a particular group persists, even when you remove or replace the associated AAA client; however, if you have no AAA clients of this (vendor) type configured, the VSA settings do not appear in the group configuration interface.
To configure and enable Ascend RADIUS attributes to be applied as an authorization for each user in the current group, follow these steps:
Step 1 Confirm that your IETF RADIUS attributes are configured properly. For more information about setting IETF RADIUS attributes, see Configuring IETF RADIUS Settings for a User Group, page 6-37.
Step 2 In the navigation bar, click Group Setup.
Result: The Group Setup Select page opens.
Step 3 From the Group list, select a group, and then click Edit Settings.
Result: The Group Settings page displays the name of the group at its top.
Step 4 From the Jump To list at the top of the page, choose RADIUS (Ascend).
Step 5 In the Ascend RADIUS Attributes table, determine the attributes to be authorized for the group by selecting the check box next to the attribute. Be sure to define the authorization for that attribute in the field next to it. For more information about attributes, see Appendix C, “RADIUS Attributes,” or your AAA client documentation.
6-41User Guide for Cisco Secure ACS for Windows Server
78-14696-01, Version 3.1

Chapter 6 Setting Up and Managing User GroupsConfiguration-specific User Group Settings
Step 6 To save the group settings you have just made, click Submit.
For more information, see Saving Changes to User Group Settings, page 6-53.
Step 7 To continue specifying other group settings, perform other procedures in this chapter, as applicable.
Configuring Cisco VPN 3000 Concentrator RADIUS Settings for a User Group
The Cisco VPN 3000 Concentrator RADIUS attribute configurations appear only if both the following are true:
• A AAA client has been configured to use RADIUS (Cisco VPN 3000) in Network Configuration.
• Group-level RADIUS (Cisco VPN 3000) attributes have been enabled on the RADIUS (Cisco VPN 3000) page of the Interface Configuration section.
Cisco VPN 3000 Concentrator RADIUS represents only the Cisco VPN 3000 Concentrator VSA. You must configure both the IETF RADIUS and Cisco VPN 3000 Concentrator RADIUS attributes.
Note To hide or display Cisco VPN 3000 Concentrator RADIUS attributes, see Setting Protocol Configuration Options for Non-IETF RADIUS Attributes, page 3-16. A VSA applied as an authorization to a particular group persists, even when you remove or replace the associated AAA client; however, if you have no AAA clients of this (vendor) type configured, the VSA settings do not appear in the group configuration interface.
To configure and enable Cisco VPN 3000 Concentrator RADIUS attributes to be applied as an authorization for each user in the current group, follow these steps:
Step 1 Confirm that your IETF RADIUS attributes are configured properly.
For more information about setting IETF RADIUS attributes, see Configuring IETF RADIUS Settings for a User Group, page 6-37.
6-42User Guide for Cisco Secure ACS for Windows Server
78-14696-01, Version 3.1
Chapter 6 Setting Up and Managing User GroupsConfiguration-specific User Group Settings
Step 2 In the navigation bar, click Group Setup.
Result: The Group Setup Select page opens.
Step 3 From the Group list, select a group, and then click Edit Settings.
Result: The Group Settings page displays the name of the group at its top.
Step 4 From the Jump To list at the top of the page, choose RADIUS (Cisco VPN 3000).
Step 5 In the Cisco VPN 3000 Concentrator RADIUS Attributes table, determine the attributes to be authorized for the group by selecting the check box next to the attribute. Further define the authorization for that attribute in the field next to it.
For more information about attributes, see Appendix C, “RADIUS Attributes,” or the documentation for network devices using RADIUS.
Step 6 To save the group settings you have just made, click Submit.
For more information, see Saving Changes to User Group Settings, page 6-53.
Step 7 To continue specifying other group settings, perform other procedures in this chapter, as applicable.
Configuring Cisco VPN 5000 Concentrator RADIUS Settings for a User Group
The Cisco VPN 5000 Concentrator RADIUS attribute configurations display only when both the following are true:
• A network device has been configured to use RADIUS (Cisco VPN 5000) in Network Configuration.
• Group-level RADIUS (Cisco VPN 5000) attributes have been enabled on the RADIUS (Cisco VPN 5000) page of the Interface Configuration section.
Cisco VPN 5000 Concentrator RADIUS represents only the Cisco VPN 5000 Concentrator VSA. You must configure both the IETF RADIUS and Cisco VPN 5000 Concentrator RADIUS attributes.
Note To hide or display Cisco VPN 5000 Concentrator RADIUS attributes, see Setting Protocol Configuration Options for Non-IETF RADIUS Attributes, page 3-16. A VSA applied as an authorization to a particular group persists, even when you
6-43User Guide for Cisco Secure ACS for Windows Server
78-14696-01, Version 3.1
Chapter 6 Setting Up and Managing User GroupsConfiguration-specific User Group Settings
remove or replace the associated AAA client; however, if you have no AAA clients of this (vendor) type configured, the VSA settings do not appear in the group configuration interface.
To configure and enable Cisco VPN 5000 Concentrator RADIUS attributes to be applied as an authorization for each user in the current group, follow these steps:
Step 1 Confirm that your IETF RADIUS attributes are configured properly.
For more information about setting IETF RADIUS attributes, see Configuring IETF RADIUS Settings for a User Group, page 6-37.
Step 2 In the navigation bar, click Group Setup.
Result: The Group Setup Select page opens.
Step 3 From the Group list, select a group, and then click Edit Settings.
Result: The Group Settings page displays the name of the group at its top.
Step 4 From the Jump To list at the top of the page, choose RADIUS (Cisco VPN 5000).
Step 5 In the Cisco VPN 5000 Concentrator RADIUS Attributes table, select the attributes that should be authorized for the group by selecting the check box next to the attribute. Further define the authorization for each attribute in the field next to it.
For more information about attributes, see Appendix C, “RADIUS Attributes,” or the documentation for network devices using RADIUS.
Step 6 To save the group settings you have just made, click Submit.
For more information, see Saving Changes to User Group Settings, page 6-53.
Step 7 To continue specifying other group settings, perform other procedures in this chapter, as applicable.
6-44User Guide for Cisco Secure ACS for Windows Server
78-14696-01, Version 3.1
Chapter 6 Setting Up and Managing User GroupsConfiguration-specific User Group Settings
Configuring Microsoft RADIUS Settings for a User GroupMicrosoft RADIUS provides VSAs supporting MPPE, which is an encryption technology developed by Microsoft to encrypt PPP links. These PPP connections can be via a dial-in line, or over a VPN tunnel. The Microsoft RADIUS attribute configurations appear only when both the following are true:
• A network device has been configured in Network Configuration that uses a RADIUS protocol that supports the Microsoft RADIUS VSA.
• Group-level Microsoft RADIUS attributes have been enabled on the RADIUS (Microsoft) page of the Interface Configuration section.
The following Cisco Secure ACS RADIUS protocols support the Microsoft RADIUS VSA:
• Cisco IOS/PIX
• Cisco VPN 3000
• Ascend
Microsoft RADIUS represents only the Microsoft VSA. You must configure both the IETF RADIUS and Microsoft RADIUS attributes.
Note To hide or display Microsoft RADIUS attributes, see Setting Protocol Configuration Options for Non-IETF RADIUS Attributes, page 3-16. A VSA applied as an authorization to a particular group persists, even when you remove or replace the associated AAA client; however, if you have no AAA clients of this (vendor) type configured, the VSA settings do not appear in the group configuration interface.
To configure and enable Microsoft RADIUS attributes to be applied as an authorization for each user in the current group, follow these steps:
Step 1 Confirm that your IETF RADIUS attributes are configured properly.
For more information about setting IETF RADIUS attributes, see Configuring IETF RADIUS Settings for a User Group, page 6-37.
Step 2 In the navigation bar, click Group Setup.
Result: The Group Setup Select page opens.
6-45User Guide for Cisco Secure ACS for Windows Server
78-14696-01, Version 3.1
Chapter 6 Setting Up and Managing User GroupsConfiguration-specific User Group Settings
Step 3 From the Group list, select a group, and then click Edit Settings.
Result: The Group Settings page displays the name of the group at its top.
Step 4 From the Jump To list at the top of the page, choose RADIUS (Microsoft).
Step 5 In the Microsoft RADIUS Attributes table, specify the attributes to be authorized for the group by selecting the check box next to the attribute. Where applicable, further define the authorization for that attribute in the field next to it. For more information about attributes, see Appendix C, “RADIUS Attributes”, or the documentation for network devices using RADIUS.
Note The MS-CHAP-MPPE-Keys attribute value is autogenerated by Cisco Secure ACS; there is no value to set in the HTML interface.
Step 6 To save the group settings you have just made, click Submit.
For more information, see Saving Changes to User Group Settings, page 6-53.
Step 7 To continue specifying other group settings, perform other procedures in this chapter, as applicable.
Configuring Nortel RADIUS Settings for a User GroupThe Nortel RADIUS attribute configurations appear only when both the following are true:
• A network device has been configured in Network Configuration that uses a RADIUS protocol that supports the Nortel RADIUS VSA.
• Group-level Nortel RADIUS attributes have been enabled on the RADIUS (Nortel) page of the Interface Configuration section.
Nortel RADIUS represents only the Nortel VSA. You must configure both the IETF RADIUS and Nortel RADIUS attributes.
6-46User Guide for Cisco Secure ACS for Windows Server
78-14696-01, Version 3.1
Chapter 6 Setting Up and Managing User GroupsConfiguration-specific User Group Settings
Note To hide or display Nortel RADIUS attributes, see Setting Protocol Configuration Options for Non-IETF RADIUS Attributes, page 3-16. A VSA applied as an authorization to a particular group persists, even when you remove or replace the associated AAA client; however, if you have no AAA clients of this (vendor) type configured, the VSA settings do not appear in the group configuration interface.
To configure and enable Nortel RADIUS attributes to be applied as an authorization for each user in the current group, follow these steps:
Step 1 Confirm that your IETF RADIUS attributes are configured properly.
For more information about setting IETF RADIUS attributes, see Configuring IETF RADIUS Settings for a User Group, page 6-37.
Step 2 In the navigation bar, click Group Setup.
Result: The Group Setup Select page opens.
Step 3 From the Group list, select a group, and then click Edit Settings.
Result: The Group Settings page displays the name of the group at its top.
Step 4 From the Jump To list at the top of the page, choose RADIUS (Nortel).
Step 5 In the Nortel RADIUS Attributes table, specify the attributes to be authorized for the group by selecting the check box next to the attribute. Where applicable, further define the authorization for that attribute in the field next to it. For more information about attributes, see Appendix C, “RADIUS Attributes”, or the documentation for network devices using RADIUS.
Note The MS-CHAP-MPPE-Keys attribute value is autogenerated by Cisco Secure ACS; there is no value to set in the HTML interface.
Step 6 To save the group settings you have just made, click Submit.
For more information, see Saving Changes to User Group Settings, page 6-53.
Step 7 To continue specifying other group settings, perform other procedures in this chapter, as applicable.
6-47User Guide for Cisco Secure ACS for Windows Server
78-14696-01, Version 3.1

Chapter 6 Setting Up and Managing User GroupsConfiguration-specific User Group Settings
Configuring Juniper RADIUS Settings for a User GroupJuniper RADIUS represents only the Juniper VSA. You must configure both the IETF RADIUS and Juniper RADIUS attributes.
Note To hide or display Juniper RADIUS attributes, see Setting Protocol Configuration Options for Non-IETF RADIUS Attributes, page 3-16. A VSA applied as an authorization to a particular group persists, even when you remove or replace the associated AAA client; however, if you have no AAA clients of this (vendor) type configured, the VSA settings do not appear in the group configuration interface.
To configure and enable Juniper RADIUS attributes to be applied as an authorization for each user in the current group, follow these steps:
Step 1 Confirm that your IETF RADIUS attributes are configured properly.
For more information about setting IETF RADIUS attributes, see Configuring IETF RADIUS Settings for a User Group, page 6-37.
Step 2 In the navigation bar, click Group Setup.
Result: The Group Setup Select page opens.
Step 3 From the Group list, select a group, and then click Edit Settings.
Result: The Group Settings page displays the name of the group at its top.
Step 4 From the Jump To list at the top of the page, choose RADIUS (Juniper).
Step 5 In the Juniper RADIUS Attributes table, specify the attributes to be authorized for the group by selecting the check box next to the attribute. Where applicable, further define the authorization for that attribute in the field next to it. For more information about attributes, see Appendix C, “RADIUS Attributes”, or the documentation for network devices using RADIUS.
Note The MS-CHAP-MPPE-Keys attribute value is autogenerated by Cisco Secure ACS; there is no value to set in the HTML interface.
Step 6 To save the group settings you have just made, click Submit.
For more information, see Saving Changes to User Group Settings, page 6-53.
6-48User Guide for Cisco Secure ACS for Windows Server
78-14696-01, Version 3.1
Chapter 6 Setting Up and Managing User GroupsConfiguration-specific User Group Settings
Step 7 To continue specifying other group settings, perform other procedures in this chapter, as applicable.
Configuring BBSM RADIUS Settings for a User GroupBBSM RADIUS represents only the BBSM RADIUS VSA. You must configure both the IETF RADIUS and BBSM RADIUS attributes.
Note To hide or display BBSM RADIUS attributes, see Setting Protocol Configuration Options for Non-IETF RADIUS Attributes, page 3-16. A VSA applied as an authorization to a particular group persists, even when you remove or replace the associated AAA client; however, if you have no AAA clients of this (vendor) type configured, the VSA settings do not appear in the group configuration interface.
To configure and enable BBSM RADIUS attributes to be applied as an authorization for each user in the current group, follow these steps:
Step 1 Confirm that your IETF RADIUS attributes are configured properly.
For more information about setting IETF RADIUS attributes, see Configuring IETF RADIUS Settings for a User Group, page 6-37.
Step 2 In the navigation bar, click Group Setup.
Result: The Group Setup Select page opens.
Step 3 From the Group list, select a group, and then click Edit Settings.
Result: The Group Settings page displays the name of the group at its top.
Step 4 From the Jump To list at the top of the page, choose RADIUS (BBSM).
6-49User Guide for Cisco Secure ACS for Windows Server
78-14696-01, Version 3.1

Chapter 6 Setting Up and Managing User GroupsConfiguration-specific User Group Settings
Step 5 In the BBSM RADIUS Attributes table, specify the attribute to be authorized for the group by selecting the check box next to the attribute. Where applicable, further define the authorization for that attribute in the field next to it. For more information about attributes, see Appendix C, “RADIUS Attributes,” or the documentation for network devices using RADIUS.
Note The MS-CHAP-MPPE-Keys attribute value is autogenerated by Cisco Secure ACS; there is no value to set in the HTML interface.
Step 6 To save the group settings you have just made, click Submit.
For more information, see Saving Changes to User Group Settings, page 6-53.
Step 7 To continue specifying other group settings, perform other procedures in this chapter, as applicable.
Configuring Custom RADIUS VSA Settings for a User GroupUser-defined, custom Radius VSA configurations appear only when all the following are true:
• You have defined and configured the custom RADIUS VSAs. (For information about creating user-defined RADIUS VSAs, see Custom RADIUS Vendors and VSAs, page 8-33.)
• A network device has been configured in Network Configuration that uses a RADIUS protocol that supports the custom VSA.
• Group-level custom RADIUS attributes have been enabled on the RADIUS (Name) page of the Interface Configuration section.
You must configure both the IETF RADIUS and the custom RADIUS attributes.
To configure and enable custom RADIUS attributes to be applied as an authorization for each user in the current group, follow these steps:
Step 1 Confirm that your IETF RADIUS attributes are configured properly.
For more information about setting IETF RADIUS attributes, see Configuring IETF RADIUS Settings for a User Group, page 6-37.
6-50User Guide for Cisco Secure ACS for Windows Server
78-14696-01, Version 3.1

Chapter 6 Setting Up and Managing User GroupsGroup Setting Management
Step 2 In the navigation bar, click Group Setup.
Result: The Group Setup Select page opens.
Step 3 From the Group list, select a group, and then click Edit Settings.
Result: The Group Settings page displays the name of the group at its top.
Step 4 From the Jump To list at the top of the page, choose RADIUS (custom name).
Step 5 In the RADIUS (custom name) Attributes table, specify the attributes to be authorized for the group by selecting the check box next to the attribute. Where applicable, further define the authorization for that attribute in the field next to it. For more information about attributes, see Appendix C, “RADIUS Attributes,” or the documentation for network devices using RADIUS.
Note The MS-CHAP-MPPE-Keys attribute value is autogenerated by Cisco Secure ACS; there is no value to set in the HTML interface.
Step 6 To save the group settings you have just made, click Submit.
For more information, see Saving Changes to User Group Settings, page 6-53.
Step 7 To continue specifying other group settings, perform other procedures in this chapter, as applicable.
Group Setting ManagementThis section describes how to use the Cisco Secure ACS Group Setup section to perform a variety of managerial tasks.
This section contains the following procedures:
• Listing Users in a User Group, page 6-52
• Resetting Usage Quota Counters for a User Group, page 6-52
• Renaming a User Group, page 6-53
• Saving Changes to User Group Settings, page 6-53
6-51User Guide for Cisco Secure ACS for Windows Server
78-14696-01, Version 3.1
Chapter 6 Setting Up and Managing User GroupsGroup Setting Management
Listing Users in a User GroupTo list all users in a specified group, follow these steps:
Step 1 In the navigation bar, click Group Setup.
Result: The Group Setup Select page opens.
Step 2 From the Group list, select the group.
Step 3 Click Users in Group.
Result: The User List page for the particular group selected opens in the display area.
Step 4 To open a user account (to view, modify, or delete a user), click the name of the user in the User List.
Result: The User Setup page for the particular user account selected appears.
Resetting Usage Quota Counters for a User GroupYou can reset the usage quota counters for all members of a group, either before or after a quota has been exceeded.
To reset usage quota counters for all members of a user group, follow these steps:
Step 1 In the navigation bar, click Group Setup.
Result: The Group Setup Select page opens.
Step 2 From the Group list, select the group.
Step 3 In the Usage Quotas section, select the On submit reset all usage counters for all users of this group check box.
Step 4 Click Submit at the bottom of the browser page.
Result: The usage quota counters for all users in the group are reset. The Group Setup Select page appears.
6-52User Guide for Cisco Secure ACS for Windows Server
78-14696-01, Version 3.1
Chapter 6 Setting Up and Managing User GroupsGroup Setting Management
Renaming a User GroupTo rename a user group, follow these steps:
Step 1 In the navigation bar, click Group Setup.
Result: The Group Setup Select page opens.
Step 2 From the Group list, select the group.
Step 3 Click Rename Group.
Result: The Renaming Group: Group Name page appears.
Step 4 Type the new name in the Group field. Group names cannot contain angle brackets (< or >).
Step 5 Click Submit.
Note The group remains in the same position in the list. The number value of the group is still associated with this group name. Some utilities, such as the database import utility, use the numeric value associated with the group.
Result: The Select page opens with the new group name selected.
Saving Changes to User Group SettingsAfter you have completed configuration for a group, be sure to save your work.
To save the configuration for the current group, follow these steps:
Step 1 To save your changes and apply them later, click Submit. When you are ready to implement the changes, click System Configuration, and then click Service Control, and click Restart.
Tip To save your changes and apply them immediately, click Submit + Restart.
6-53User Guide for Cisco Secure ACS for Windows Server
78-14696-01, Version 3.1
Chapter 6 Setting Up and Managing User GroupsGroup Setting Management
Result: The group attributes are applied and services are restarted. The Edit page opens.
Note Restarting the service clears the Logged-in User Report and temporarily interrupts all Cisco Secure ACS services. This affects the Max Sessions counter.
Step 2 To verify that your changes were applied, select the group and click Edit Settings. View the settings.
6-54User Guide for Cisco Secure ACS for Windows Server
78-14696-01, Version 3.1
User Guide for 78-14696-01, Version 3.1
C H A P T E R 7
Setting Up and Managing User AccountsThis chapter provides information about setting up and managing user accounts in Cisco Secure Access Control Server (Cisco Secure ACS) for Windows Server version 3.1.
Note Settings at the user level override settings configured at the group level.
Before you configure User Setup, you should understand how this section functions. Cisco Secure ACS dynamically builds the User Setup section interface depending on the configuration of your AAA client and the security protocols being used. That is, what you see under User Setup is affected by both your system configuration and your settings in the Interface Configuration section.
This chapter contains the following sections:
• User Setup Features and Functions, page 7-2—An overview of the User Setup section functionality.
• About User Databases, page 7-2—Information about user databases.
• Basic User Setup Options, page 7-4—Information and step-by-step procedures regarding the many basic settings and options that are available when configuring a user account in the Cisco Secure ACS.
7-1Cisco Secure ACS for Windows Server
Chapter 7 Setting Up and Managing User AccountsUser Setup Features and Functions
• Advanced User Authentication Settings, page 7-22—Details on the steps necessary to configure a user account for authentication outside the system using the TACACS+ or RADIUS protocol options.
• User Management, page 7-53—Information about viewing, disabling, and resetting user accounts.
User Setup Features and FunctionsThe User Setup section of the Cisco Secure ACS HTML interface is the centralized location for all operations regarding user account configuration and administration.
From within the User Setup section, you can perform the following tasks:
• View a list of all users in the CiscoSecure user database
• Find a user
• Add a user
• Assign the user to a group, including Voice over IP (VoIP) Groups
• Edit user account information
• Establish or change user authentication type
• Configure callback information for the user
• Set network access restrictions (NARs) for the user
• Configure Advanced Settings
• Set the maximum number of concurrent sessions (Max Sessions) for the user
• Disable or re-enable the user account
• Delete the user
About User DatabasesCisco Secure ACS authenticates users against one of several possible databases, including its CiscoSecure user database. Regardless of which database you configure Cisco Secure ACS to use when authenticating a user, all users have accounts within the CiscoSecure user database, and authorization of users is
7-2User Guide for Cisco Secure ACS for Windows Server
78-14696-01, Version 3.1
Chapter 7 Setting Up and Managing User AccountsAbout User Databases
always performed against the user records in the CiscoSecure user database. The following list details the basic user databases used and provides links to greater details on each:
• CiscoSecure user database—Authenticates a user from the local CiscoSecure user database. For more information, see CiscoSecure User Database, page 11-2.
Tip The following authentication types appear in the HTML interface only when the corresponding external user database has been configured in the Database Configuration area of the External User Databases section.
• Windows NT/2000—Authenticates a user with an existing account in the Windows NT/2000 user database located in the local domain or in domains configured in the Windows NT/2000 user database. For more information, see Windows NT/2000 User Database, page 11-7.
• Generic LDAP—Authenticates a user from a Generic LDAP external user database. For more information, see Generic LDAP, page 11-16.
• Novell NDS—Authenticates a user using Novell NetWare Directory Services (NDS). For more information, see Novell NDS Database, page 11-33.
• ODBC Database—Authenticates a user from an Open Database Connectivity-compliant database server. For more information, see ODBC Database, page 11-39.
• LEAP Proxy RADIUS Server Database—Authenticates a user from an LEAP Proxy RADIUS server. For more information, see “LEAP Proxy RADIUS Server Database” section on page 11-54.
• Token Server—Authenticates a user from a token server database. Cisco Secure ACS supports the use of a variety of token servers for the increased security provided by one-time passwords. For more information, see Token Server User Databases, page 11-57
7-3User Guide for Cisco Secure ACS for Windows Server
78-14696-01, Version 3.1

Chapter 7 Setting Up and Managing User AccountsBasic User Setup Options
Basic User Setup OptionsThis section presents the basic activities you perform when configuring a new user. At its most basic level, configuring a new user requires only three steps, as follows:
• Specify a name.
• Specify either a method for remote password authentication or, for authentication via the CiscoSecure user database, a password.
• Submit the information.
For detailed procedural information, see Adding a Basic User Account, page 7-5.
What other procedures you perform when setting up new user accounts is a function both of the complexity of your network and of the granularity of control you desire. The other basic procedures detailed in this section include the following:
• Setting Supplementary User Information, page 7-7
• Setting a Separate CHAP/MS-CHAP/ARAP Password, page 7-8
• Assigning a User to a Group, page 7-9
• Setting User Callback Option, page 7-10
• Assigning a User to a Client IP Address, page 7-11
• Setting Network Access Restrictions for a User, page 7-12
• Setting Max Sessions Options for a User, page 7-16
• Setting User Usage Quotas Options, page 7-18
• Setting Options for User Account Disablement, page 7-20
• Assigning a PIX ACL to a User, page 7-21
Beyond these basic user setup options, there are also procedures for configuring a user account for authentication via TACACS+ and RADIUS; these procedures are located in Advanced User Authentication Settings, page 7-22.
Note The steps for editing user account settings are essentially identical to those used when adding a user account but, to edit, you navigate directly to the field or fields to be changed. You cannot edit the name associated with a user account; to change a username you must delete the user account and establish another.
7-4User Guide for Cisco Secure ACS for Windows Server
78-14696-01, Version 3.1
Chapter 7 Setting Up and Managing User AccountsBasic User Setup Options
Bear in mind two things when setting up new user accounts:
• You must have configured a AAA client or external database to assign a user to.
• You must enable most options from within the Interface Configuration section so they appear in User Setup.
Adding a Basic User AccountThis procedure details the minimum steps necessary to add a new user account to the CiscoSecure user database.
To add a user account, follow these steps:
Step 1 In the navigation bar, click User Setup.
Result: The User Setup Select page opens.
Step 2 Type a name in the User box.
Note The username can contain up to 32 characters. Names cannot contain the following special characters: # ? " * > < Leading and trailing spaces are not allowed.
Step 3 Click Add/Edit.
Result: The User Setup Edit page opens. The username being added is at the top of the page.
Step 4 Ensure that the Account Disabled check box is cleared.
Note Alternatively, you can select the Account Disabled check box to create a user account that is disabled, and enable the account at another time.
7-5User Guide for Cisco Secure ACS for Windows Server
78-14696-01, Version 3.1
Chapter 7 Setting Up and Managing User AccountsBasic User Setup Options
Step 5 Under Password Authentication in the User Setup table, select the applicable authentication type from the list.
Tip The authentication types that appear reflect the databases that you have configured in the Database Configuration area of the External User Databases section.
Step 6 Specify a single CiscoSecure PAP password by typing it in the first set of Password and Confirm Password boxes.
Note Up to 32 characters are allowed each for the Password box and the Confirm Password box.
Tip The CiscoSecure PAP password is also used for CHAP/MS-CHAP/ARAP if the Separate CHAP/MS-CHAP/ARAP check box is not selected.
Tip You can configure the AAA client to ask for a PAP password first and then a CHAP or MS-CHAP password so that when users dial in using a PAP password, they will authenticate. For example, the following line in the AAA client configuration file causes the AAA client to enable CHAP after PAP:
ppp authentication pap chap
Step 7 Do one of the following:
• To finish configuring the user account options and establish the user account, click Submit.
• To continue to specify the user account options, perform other procedures in this chapter, as applicable.
7-6User Guide for Cisco Secure ACS for Windows Server
78-14696-01, Version 3.1
Chapter 7 Setting Up and Managing User AccountsBasic User Setup Options
Tip For lengthy account configurations, you can click Submit before continuing. This will prevent loss of information you have already entered if an unforeseen problem occurs.
Setting Supplementary User InformationSupplementary User Information can contain up to five fields that you configure. The default configuration includes two fields: Real Name and Description.
For information about how to display and configure these optional fields, see User Data Configuration Options, page 3-3.
To enter optional information into the Supplementary User Information table, follow these steps:
Step 1 Perform Step 1 through Step 3 of Adding a Basic User Account, page 7-5.
Result: The User Setup Edit page opens. The username being added or edited is at the top of the page.
Step 2 Complete each box that appears in the Supplementary User Info table.
Note Up to 128 characters are allowed each for the Real Name and the Description boxes.
Step 3 Do one of the following:
• If you are finished configuring the user account options, click Submit to record the options.
• To continue to specify the user account options, perform other procedures in this chapter, as applicable.
7-7User Guide for Cisco Secure ACS for Windows Server
78-14696-01, Version 3.1

Chapter 7 Setting Up and Managing User AccountsBasic User Setup Options
Setting a Separate CHAP/MS-CHAP/ARAP PasswordSetting a separate CHAP/MS-CHAP/ARAP password adds more security to Cisco Secure ACS authentication. However, you must have a AAA client configured to support the separate password.
To allow the user to authenticate using a CHAP, MS-CHAP, or ARAP password, instead of the PAP password in the CiscoSecure user database, follow these steps:
Step 1 Perform Step 1 through Step 3 of Adding a Basic User Account, page 7-5.
Result: The User Setup Edit page opens. The username being added or edited is at the top of the page.
Step 2 Select the Separate CHAP/MS-CHAP/ARAP check box in the User Setup table.
Step 3 Specify the CHAP/MS-CHAP/ARAP password to be used by typing it in each of the second set of Password/Confirm boxes under the Separate (CHAP/MS-CHAP/ARAP) check box.
Note Up to 32 characters are allowed each for the Password box and the Confirm Password box.
Note These Password and Confirm Password boxes are only required for authentication by the Cisco Secure ACS database. Additionally, if a user is assigned to a VoIP (null password) group, and the optional password is also included in the user profile, the password is not used until the user is re-mapped to a non-VoIP group.
Step 4 Do one of the following:
• If you are finished configuring the user account options, click Submit to record the options.
• To continue to specify the user account options, perform other procedures in this chapter, as applicable.
7-8User Guide for Cisco Secure ACS for Windows Server
78-14696-01, Version 3.1
Chapter 7 Setting Up and Managing User AccountsBasic User Setup Options
Assigning a User to a GroupA user can only belong to one group in Cisco Secure ACS. The user inherits the attributes and operations assigned to his or her group. However, in the case of conflicting settings, the settings at the user level override the settings configured at the group level.
By default, users are assigned to the Default Group. Users who authenticate via the Unknown User method and who are not mapped to an existing Cisco Secure ACS group are also assigned to the Default Group.
Alternatively, you can choose not to map a user to a particular group, but rather, to have the group mapped by an external authenticator. For external user databases from which Cisco Secure ACS can derive group information, you can associate the group memberships—defined for the users in the external user database—to specific Cisco Secure ACS groups. For more information, see Database Group Mappings, page 12-11.
To assign a user to a group, follow these steps:
Step 1 Perform Step 1 through Step 3 of Adding a Basic User Account, page 7-5.
Result: The User Setup Edit page opens. The username being added or edited appears at the top of the page.
Step 2 From the Group to which user is assigned list in the User Setup table, select the group to which you want to assign the user.
Tip Alternatively, you can scroll up in the list to select the Mapped By External Authenticator option.
Step 3 Do one of the following:
• If you are finished configuring the user account options, click Submit to record the options.
• To continue to specify the user account options, perform other procedures in this chapter, as applicable.
7-9User Guide for Cisco Secure ACS for Windows Server
78-14696-01, Version 3.1
Chapter 7 Setting Up and Managing User AccountsBasic User Setup Options
Setting User Callback OptionCallback is a command string that is passed to the access server. You can use a callback string to initiate a modem to call the user back on a specific number for added security or reversal of line charges.
To set the user callback option, follow these steps:
Step 1 Perform Step 1 through Step 3 of Adding a Basic User Account, page 7-5.
Result: The User Setup Edit page opens. The username being added or edited appears at the top of the page.
Step 2 Under Callback in the User Setup table, select the applicable option. Choices include the following:
• Use group setting—Select if you want this user to use the setting for the group.
• No callback allowed—Select to disable callback for this user.
• Callback using this number—Select and type the complete number, including area code if necessary, on which to always call back this user.
Note The maximum character length for the callback number is 199 characters.
• Dialup client specifies callback number—Select to enable the Windows 95/98/ME or Windows NT/2000 dialup client to specify the callback number.
• Use Microsoft NT/2000 callback settings—Select to use the settings specified for Windows NT/2000 callback. If a Windows account for a user resides in a remote domain, the domain in which Cisco Secure ACS resides must have a two-way trust with that domain for the Microsoft NT/2000 callback settings to operate for that user.
Note The dial-in user must have configured software that supports callback.
7-10User Guide for Cisco Secure ACS for Windows Server
78-14696-01, Version 3.1
Chapter 7 Setting Up and Managing User AccountsBasic User Setup Options
Step 3 Do one of the following:
• If you are finished configuring the user account options, click Submit to record the options.
• To continue to specify the user account options, perform other procedures in this chapter, as applicable.
Assigning a User to a Client IP AddressTo assign a user to a client IP address, follow these steps:
Step 1 Perform Step 1 through Step 3 of Adding a Basic User Account, page 7-5.
Result: The User Setup Edit page opens. The username being added or edited is at the top of the page.
Step 2 Under Client IP Address Assignment in the User Setup table, select the applicable option. Choices include the following:
Note The IP address assignment in User Setup overrides the IP address assignment in Group Setup.
• Use group settings—Select this option to use the IP address group assignment.
• No IP address assignment—Select this option to override the group setting if you do not want an IP address returned by the client.
• Assigned by dialup client—Select this option to use the IP address dialup client assignment.
• Assign static IP address—Select this option and type the IP address in the box (up to 15 characters), if a specific IP address should be used for this user.
Note If the IP address is being assigned from a pool of IP addresses or by the dialup client, leave the Assign IP address box blank.
7-11User Guide for Cisco Secure ACS for Windows Server
78-14696-01, Version 3.1
Chapter 7 Setting Up and Managing User AccountsBasic User Setup Options
• Assigned by AAA client pool—Select this option and type the AAA client IP pool name in the box, if this user is to have the IP address assigned by an IP address pool configured on the AAA client.
• Assigned from AAA pool—Select this option and type the applicable pool name in the box, if this user is to have the IP address assigned by an IP address pool configured on the AAA server. Select the AAA server IP pool name from the Available Pools list, and then click --> (right arrow button) to move the name into the Selected Pools list. If there is more than one pool in the Selected Pools list, the users in this group are assigned to the first available pool in the order listed. To move the position of a pool in the list, select the pool name and click Up or Down until the pool is in the position you want.
Step 3 Do one of the following:
• If you are finished configuring the user account options, click Submit to record the options.
• To continue to specify the user account options, perform other procedures in this chapter, as applicable.
Setting Network Access Restrictions for a UserThe Network Access Restrictions table in the Advanced Settings area of User Setup enables you to set NARs in three distinct ways:
• Apply existing shared NARs by name.
• Define IP-based access restrictions to permit or deny user access to a specified AAA client or to specified ports on a AAA client when an IP connection has been established.
• Define CLI/DNIS-based access restrictions to permit or deny user access based on the CLI/DNIS used.
Note You can also use the CLI/DNIS-based access restrictions area to specify other values. For more information, see About Network Access Restrictions, page 5-6.
7-12User Guide for Cisco Secure ACS for Windows Server
78-14696-01, Version 3.1
Chapter 7 Setting Up and Managing User AccountsBasic User Setup Options
Typically, you define (shared) NARs from within the Shared Components section so that these restrictions can be applied to more than one group or user. For more information, see Shared Network Access Restrictions Configuration, page 5-8. You must have selected the User-Level Shared Network Access Restriction check box on the Advanced Options page of the Interface Configuration section for this set of options to appear in the Cisco Secure ACS HTML interface.
However, Cisco Secure ACS also enables you to define and apply a NAR for a single user from within the User Setup section. You must have enabled the User-Level Network Access Restriction setting under the Advanced Options page of the Interface Configuration section for single user IP-based filter options and single user CLI/DNIS-based filter options to appear in the Cisco Secure ACS HTML interface.
Note When an authentication request is forwarded by proxy to a Cisco Secure ACS, any NARs for TACACS+ requests are applied to the IP address of the forwarding AAA server, not to the IP address of the originating AAA client.
To set NARs for a user, follow these steps:
Step 1 Perform Step 1 through Step 3 of Adding a Basic User Account, page 7-5.
Result: The User Setup Edit page opens. The username being added or edited is at the top of the page.
Step 2 To apply a previously configured shared NAR to this user, follow these steps:
Note To apply a shared NAR, you must have configured it under Network Access Restrictions in the Shared Profile Components section. For more information, see Shared Network Access Restrictions Configuration, page 5-8.
a. Select the Only Allow network access when check box.
b. To specify whether one or all shared NARs must apply for the user to be permitted access, select one of the following two options, as applicable:
• All selected NARS result in permit
• Any one selected NAR results in permit
7-13User Guide for Cisco Secure ACS for Windows Server
78-14696-01, Version 3.1
Chapter 7 Setting Up and Managing User AccountsBasic User Setup Options
c. Select a shared NAR name in the NARs list, and then click —> (right arrow button) to move the name into the Selected NARs list.
Tip To view the server details of the shared NARs you have selected to apply, you can click either View IP NAR or View CLID/DNIS NAR, as applicable.
Step 3 To define and apply a NAR, for this particular user, that permits or denies this user access based on IP address, or IP address and port, follow these steps:
Tip You should define most NARs from within the Shared Components section so that they can be applied to more than one group or user. For more information, see Shared Network Access Restrictions Configuration, page 5-8.
a. In the Network Access Restrictions table, under Per User Defined Network Access Restrictions, select the Define IP-based access restrictions check box.
b. To specify whether the subsequent listing specifies permitted or denied IP addresses, from the Table Defines list, select one of the following:
• Permitted Calling/Point of Access Locations
• Denied Calling/Point of Access Locations
c. Select or enter the information in the following boxes:
• AAA Client—Select All AAA Clients, or the name of a network device group (NDG), or the name of the individual AAA client, to which to permit or deny access.
• Port—Type the number of the port to which to permit or deny access. You can use the wildcard asterisk (*) to permit or deny access to all ports on the selected AAA client.
• Address—Type the IP address or addresses to use when performing access restrictions. You can type multiple entries separated by a comma or use the wildcard asterisk (*).
7-14User Guide for Cisco Secure ACS for Windows Server
78-14696-01, Version 3.1
Chapter 7 Setting Up and Managing User AccountsBasic User Setup Options
d. Click enter.
Result: The specified AAA client, port, and address information appears in the table above the AAA Client list.
Step 4 To permit or deny this user access based on calling location or values other than an established IP address, follow these steps:
a. Select the Define CLI/DNIS based access restrictions check box.
b. To specify whether the subsequent listing specifies permitted or denied values, from the Table Defines list, select one of the following:
• Permitted Calling/Point of Access Locations
• Denied Calling/Point of Access Locations
c. Complete the following boxes:
Note You must make an entry in each box. You can use the wildcard asterisk (*) for all or part of a value. The format you use must match the format of the string you receive from your AAA client. You can determine this format from your RADIUS Accounting Log.
• AAA Client—Select All AAA Clients, or the name of the NDG, or the name of the individual AAA client, to which to permit or deny access.
• PORT—Type the number of the port to which to permit or deny access. You can use the wildcard asterisk (*) to permit or deny access to all ports.
• CLI—Type the CLI number to which to permit or deny access. You can use the wildcard asterisk (*) to permit or deny access based on part of the number.
Tip This is also the selection to use if you want to restrict access based on other values such as a Cisco Aironet client MAC address. For more information, see About Network Access Restrictions, page 5-6.
• DNIS—Type the DNIS number to which to permit or deny access. Use this to restrict access based on the number into which the user will be dialing. You can use the wildcard asterisk (*) to permit or deny access based on part of the number.
7-15User Guide for Cisco Secure ACS for Windows Server
78-14696-01, Version 3.1
Chapter 7 Setting Up and Managing User AccountsBasic User Setup Options
Tip This is also the selection to use if you want to restrict access based on other values such as a Cisco Aironet AP MAC address. For more information, see About Network Access Restrictions, page 5-6.
d. Click enter.
Result: The information, specifying the AAA client, port, CLI, and DNIS appears in the table above the AAA Client list.
Step 5 Do one of the following:
• If you are finished configuring the user account options, click Submit to record the options.
• To continue to specify the user account options, perform other procedures in this chapter, as applicable.
Setting Max Sessions Options for a UserThe Max Sessions feature enables you to set the maximum number of simultaneous connections permitted for this user. For Cisco Secure ACS purposes, a session is considered any type of user connection supported by RADIUS or TACACS+, for example PPP, or Telnet, or ARAP. Note, however, that accounting must be enabled on the AAA client for Cisco Secure ACS to be aware of a session. All session counts are based on user and group names only. Cisco Secure ACS does not support any differentiation by type of session—all sessions are counted as the same. To illustrate, a user with a Max Session count of 1 who is dialed in to a AAA client with a PPP session will be refused a connection if that user then tries to Telnet to a location whose access is controlled by the same Cisco Secure ACS.
Note Each Cisco Secure ACS server holds its own Max Sessions counts. There is no mechanism for Cisco Secure ACS to share Max Sessions counts across multiple servers. Therefore, if two Cisco Secure ACS servers are set up as a mirror pair with the workload distributed between them, they will have completely independent views of the Max Sessions totals.
7-16User Guide for Cisco Secure ACS for Windows Server
78-14696-01, Version 3.1
Chapter 7 Setting Up and Managing User AccountsBasic User Setup Options
Tip If the Max Sessions table does not appear, click Interface Configuration, click Advanced Options, and then select the Max Sessions check box.
To set max sessions options for a user, follow these steps:
Step 1 Perform Step 1 through Step 3 of Adding a Basic User Account, page 7-5.
Result: The User Setup Edit page opens. The username being added or edited is at the top of the page.
Step 2 In the Max Sessions table, under Sessions available to user, select one of the following three options:
• Unlimited—Select to allow this user an unlimited number of simultaneous sessions. (This effectively disables Max Sessions.)
• n—Select and then type the maximum number of simultaneous sessions to allow this user.
• Use group setting—Select to use the Max Sessions value for the group.
Note The default setting is Use group setting.
Note User Max Sessions settings override the group Max Sessions settings. For example, if the group Sales has a Max Sessions value of only 10, but a user in the group Sales, John, has a User Max Sessions value of Unlimited, John is still allowed an unlimited number of sessions.
Step 3 Do one of the following:
• If you are finished configuring the user account options, click Submit to record the options.
• To continue to specify the user account options, perform other procedures in this chapter, as applicable.
7-17User Guide for Cisco Secure ACS for Windows Server
78-14696-01, Version 3.1
Chapter 7 Setting Up and Managing User AccountsBasic User Setup Options
Setting User Usage Quotas OptionsYou can define usage quotas for individual users. You can limit users in one or both of two ways:
• By total duration of sessions for the period selected
• By the total number of sessions for the period selected
For Cisco Secure ACS purposes, a session is considered any type of user connection supported by RADIUS or TACACS+, for example PPP, or Telnet, or ARAP. Note, however, that accounting must be enabled on the AAA client for Cisco Secure ACS to be aware of a session. If you make no selections in the Session Quotas section for an individual user, Cisco Secure ACS applies the session quotas of the group to which the user is assigned.
Note If the User Usage Quotas feature does not appear, click Interface Configuration, click Advanced Options, and then select the Usage Quotas check box.
Tip The Current Usage table under the User Usage Quotas table on the User Setup Edit page displays usage statistics for the current user. The Current Usage table lists both online time and sessions used by the user, with columns for daily, weekly, monthly, and total usage. The Current Usage table appears only on user accounts that you have established; that is, it does not appear during initial user setup.
For a user who has exceeded his quota, Cisco Secure ACS denies him access upon his next attempt to start a session. If a quota is exceeded during a session, Cisco Secure ACS allows the session to continue. If a user account has been disabled because the user has exceeded usage quotas, the User Setup Edit page displays a message stating that the account has been disabled for this reason.
You can reset the session quota counters on the User Setup page for a user. For more information about resetting usage quota counters, see Resetting User Session Quota Counters, page 7-57.
To support time-based quotas, we recommend enabling accounting update packets on all AAA clients. If update packets are not enabled, the quota is updated only when the user logs off. If the AAA client through which the user is accessing your network fails, the quota is not updated. In the case of multiple sessions, such
7-18User Guide for Cisco Secure ACS for Windows Server
78-14696-01, Version 3.1
Chapter 7 Setting Up and Managing User AccountsBasic User Setup Options
as with ISDN, the quota is not updated until all sessions terminate, which means that a second channel will be accepted even if the first channel has exhausted the quota allocated to the user.
To set usage quota options for a user, follow these steps:
Step 1 Perform Step 1 through Step 3 of Adding a Basic User Account, page 7-5.
Result: The User Setup Edit page opens. The username being added or edited is at the top of the page.
Step 2 In the Usage Quotas table, select Use these settings.
Step 3 To define a usage quota based on duration of sessions for a user, follow these steps:
a. Select the Limit user to x hours of online time check box.
b. Type the number of hours (up to 10 characters) to which you want to limit the user in the Limit user to x hours of online time box. Use decimal values to indicate minutes. For example, a value of 10.5 would equal 10 hours and 30 minutes.
c. Select the period for which you want to enforce the time usage quota:
• per Day—From 12:01 a.m. until midnight.
• per Week—From 12:01 a.m. Sunday until midnight Saturday.
• per Month—From 12:01 a.m. on the first of the month until midnight on the last day of the month.
• Absolute—A continuous, open-ended count of hours.
Step 4 To define usage quotas based on the number of sessions for a user, follow these steps:
a. Select the Limit user to x sessions check box.
b. Type the number of sessions (up to 10 characters) to which you want to limit the user in the Limit user to x sessions box.
c. Select the period for which you want to enforce the session usage quota:
• per Day—From 12:01 a.m. until midnight.
• per Week—From 12:01 a.m. Sunday until midnight Saturday.
7-19User Guide for Cisco Secure ACS for Windows Server
78-14696-01, Version 3.1
Chapter 7 Setting Up and Managing User AccountsBasic User Setup Options
• per Month—From 12:01 a.m. on the first of the month until midnight on the last day of the month.
• Absolute—A continuous, open-ended count of hours.
Setting Options for User Account DisablementThe Account Disable feature defines the circumstances upon which a user account is disabled.
Note Do not confuse this feature with account expiration due to password aging. Password aging is defined for groups only, not for individual users. Also note that this feature is distinct from the Account Disabled check box. For instructions on how to disable a user account, see Disabling a User Account, page 7-55.
Note If the user is authenticated with a Windows NT/2000 external user database, this expiration information is in addition to the information in the Windows NT/2000 user account. Changes here do not alter settings configured in Windows NT/2000.
To set options for user account disablement, follow these steps:
Step 1 Perform Step 1 through Step 3 of Adding a Basic User Account, page 7-5.
Result: The User Setup Edit page opens. The username being added or edited is at the top of the page.
Step 2 Do one of the following:
a. Select the Never option to keep the user account always enabled.
Note This is the default setting.
7-20User Guide for Cisco Secure ACS for Windows Server
78-14696-01, Version 3.1
Chapter 7 Setting Up and Managing User AccountsBasic User Setup Options
b. Select the Disable account if option to disable the account under specific circumstances. Then, specify one or both of the circumstances under the following boxes:
• Date exceeds—Select the Date exceeds: check box. Then select the month and type the date (two characters) and year (four characters) on which to disable the account.
Note The default is 30 days after the user is added.
• Failed attempts exceed—Select the Failed attempts exceed check box and then type the number of consecutive unsuccessful login attempts to allow before disabling the account.
Note The default is 5.
Step 3 Do one of the following:
• If you are finished configuring the user account options, click Submit to record the options.
• To continue to specify the user account options, perform other procedures in this chapter, as applicable.
Assigning a PIX ACL to a UserThe Downloadable ACLs feature enables you to assign a PIX Access Control List (ACL) at the user level. You must have established one or more PIX ACLs before attempting to assign one. For instructions on how to configure a downloadable PIX ACL using the Shared Profile Components section of the Cisco Secure ACS HTML interface, see Adding a Downloadable PIX ACL, page 5-4.
Note The Downloadable ACLs table does not appear if it has not been enabled. To enable the Downloadable ACLs table, click Interface Configuration, click Advanced Options, and then select the User-Level Downloadable ACLs check box.
7-21User Guide for Cisco Secure ACS for Windows Server
78-14696-01, Version 3.1
Chapter 7 Setting Up and Managing User AccountsAdvanced User Authentication Settings
To assign a downloadable PIX ACL to a user account, follow these steps:
Step 1 Perform Step 1 through Step 3 of Adding a Basic User Account, page 7-5.
Result: The User Setup Edit page opens. The username being added and edited is at the top of the page.
Step 2 Under the Downloadable ACLs section, click the Assign PIX ACL: check box.
Step 3 Select a PIX ACL from the list.
Step 4 Do one of the following:
• If you are finished configuring the user account options, click Submit to record the options.
• To continue to specify the user account options, perform other procedures in this chapter, as applicable.
Advanced User Authentication SettingsThis section presents the activities you perform to configure user-level TACACS+ and RADIUS enable parameters.
This section contains the following subsections:
• TACACS+ Settings (User), page 7-22
• Advanced TACACS+ Settings (User), page 7-33
• RADIUS Attributes, page 7-37
TACACS+ Settings (User)The TACACS+ Settings section permits you to enable and configure the service/protocol parameters to be applied for the authorization of a user. This section contains the following procedures:
• Configuring TACACS+ Settings for a User, page 7-23
• Configuring a Shell Command Authorization Set for a User, page 7-25
• Configuring a PIX Command Authorization Set for a User, page 7-28
7-22User Guide for Cisco Secure ACS for Windows Server
78-14696-01, Version 3.1
Chapter 7 Setting Up and Managing User AccountsAdvanced User Authentication Settings
• Configuring Device Management Command Authorization for a User, page 7-30
• Configuring the Unknown Service Setting for a User, page 7-32
Configuring TACACS+ Settings for a UserYou can use this procedure to configure TACACS+ settings at the user level for the following service/protocols:
• PPP IP
• PPP IPX
• PPP Multilink
• PPP Apple Talk
• PPP VPDN
• PPP LCP
• ARAP
• Shell (exec)
• PIX Shell (pixShell)
• SLIP
You can also enable any new TACACS+ services that you may have configured. Because having all service/protocol settings display within the User Setup section would be cumbersome, you choose what settings to hide or display at the user level when you configure the interface. For more information about setting up new or existing TACACS+ services in the Cisco Secure ACS HTML interface, see Protocol Configuration Options for TACACS+, page 3-7.
If you have configured Cisco Secure ACS to interact with a Cisco device-management application, new TACACS+ services may appear automatically, as needed to support the device-management application. For more information about Cisco Secure ACS interaction with device-management applications, see Support for Cisco Device-Management Applications, page 1-18.
For more information about attributes, see Appendix B, “TACACS+ Attribute-Value Pairs,” or your AAA client documentation. For information on assigning a PIX ACL, see Assigning a PIX ACL to a User, page 7-21.
7-23User Guide for Cisco Secure ACS for Windows Server
78-14696-01, Version 3.1

Chapter 7 Setting Up and Managing User AccountsAdvanced User Authentication Settings
Before You Begin
• For the TACACS+ service/protocol configuration to be displayed, a AAA client must have been configured to use TACACS+ as the security control protocol.
• In the Advanced Options section of Interface Configuration, ensure that the Per-user TACACS+/RADIUS Attributes check box is selected.
To configure TACACS+ settings for a user, follow these steps:
Step 1 Click Interface Configuration and then click TACACS+ (Cisco IOS). In the TACACS+ Services table, under the heading User, ensure that the check box is selected for each service/protocol you want to configure.
Step 2 Perform Step 1 through Step 3 of Adding a Basic User Account, page 7-5.
Result: The User Setup Edit page opens. The username being added or edited is at the top of the page.
Step 3 Scroll down to the TACACS+ Settings table and select the bold service name check box to enable that protocol; for example (PPP IP).
Step 4 To enable specific parameters within the selected service, select the check box next to a specific parameter and then do one of the following, as applicable:
• Select the Enabled check box.
• Specify a value in the corresponding attribute box.
To specify ACLs and IP address pools, enter the name of the ACL or pool as defined on the AAA client. Leave the box blank if the default (as defined on the AAA client) should be used. For more information about attributes, see Appendix B, “TACACS+ Attribute-Value Pairs,” or your AAA client documentation. For information on assigning a PIX ACL, see Assigning a PIX ACL to a User, page 7-21.
Tip An ACL is a list of Cisco IOS commands used to restrict access to or from other devices and users on the network.
Step 5 To employ custom attributes for a particular service, select the Custom attributes check box under that service, and then specify the attribute/value in the box below the check box.
7-24User Guide for Cisco Secure ACS for Windows Server
78-14696-01, Version 3.1
Chapter 7 Setting Up and Managing User AccountsAdvanced User Authentication Settings
Step 6 Do one of the following:
• If you are finished configuring the user account options, click Submit to record the options.
• To continue to specify the user account options, perform other procedures in this chapter, as applicable.
Configuring a Shell Command Authorization Set for a UserUse this procedure to specify the shell command authorization set parameters for a user. You can choose one of five options:
• None—There is no authorization for shell commands.
• Group—For this user, the group-level shell command authorization set applies.
• Assign a Shell Command Authorization Set for any network device—One shell command authorization set is assigned, and it applies all network devices.
• Assign a Shell Command Authorization Set on a per Network Device Group Basis—Particular shell command authorization sets are to be effective on particular NDGs. When you select this option, you create the table that lists what NDG associates with what shell command authorization set.
• Per User Command Authorization—Enables you to permit or deny specific Cisco IOS commands and arguments at the user level.
Before You Begin
• Ensure that a AAA client has been configured to use TACACS+ as the security control protocol.
• In the Advanced Options section of Interface Configuration, ensure that the Per-user TACACS+/RADIUS Attributes check box is selected.
7-25User Guide for Cisco Secure ACS for Windows Server
78-14696-01, Version 3.1
Chapter 7 Setting Up and Managing User AccountsAdvanced User Authentication Settings
• In the TACACS+ (Cisco) section of Interface Configuration, ensure that the Shell (exec) option is selected in the User column.
• Ensure that you have already configured one or more shell command authorization sets. For detailed steps, see Command Authorization Sets Configuration, page 5-16.
To specify shell command authorization set parameters for a user, follow these steps:
Step 1 Perform Step 1 through Step 3 of Adding a Basic User Account, page 7-5.
Result: The User Setup Edit page opens. The username being added or edited is at the top of the page.
Step 2 Scroll down to the TACACS+ Settings table and to the Shell Command Authorization Set feature area within it.
Step 3 To prevent the application of any shell command authorization set, select (or accept the default of) the None option.
Step 4 To assign the shell command authorization set at the group level, select the As Group option.
Step 5 To assign a particular shell command authorization set to be effective on any configured network device, follow these steps:
a. Select the Assign a Shell Command Authorization Set for any network device option.
b. Then, from the list directly below that option, select the shell command authorization set you want applied to this user.
Step 6 To create associations that assign a particular shell command authorization set to be effective on a particular NDG, for each association, follow these steps:
a. Select the Assign a Shell Command Authorization Set on a per Network Device Group Basis option.
b. Select a Device Group and an associated Command Set.
c. Click Add Association.
Tip You can also select which command set applies to network device groups that are not listed simply by associating that command set with the NDG <default> listing.
7-26User Guide for Cisco Secure ACS for Windows Server
78-14696-01, Version 3.1

Chapter 7 Setting Up and Managing User AccountsAdvanced User Authentication Settings
Result: The NDG or NDGs and associated shell command authorization set or sets appear paired in the table.
Step 7 To define the specific Cisco IOS commands and arguments to be permitted or denied for this user, follow these steps:
a. Select the Per User Command Authorization option.
b. Under Unmatched Cisco IOS commands, select either Permit or Deny.
If you select Permit, the user can issue all commands not specifically listed. If you select Deny, the user can issue only those commands listed.
c. To list particular commands to be permitted or denied, select the Command check box and then type the name of the command, define its arguments using standard permit or deny syntax, and select whether unlisted arguments are to be permitted or denied.
Warning This is a powerful, advanced feature and should be used by an administrator skilled with Cisco IOS commands. Correct syntax is the responsibility of the administrator. For information on how Cisco Secure ACS uses pattern matching in command arguments, see About Pattern Matching, page 5-15.
Tip To enter several commands, you must click Submit after specifying a command. A new command entry box appears below the box you just completed.
Step 8 Do one of the following:
• If you are finished configuring the user account options, click Submit to record the options.
• To continue to specify the user account options, perform other procedures in this chapter, as applicable.
7-27User Guide for Cisco Secure ACS for Windows Server
78-14696-01, Version 3.1
Chapter 7 Setting Up and Managing User AccountsAdvanced User Authentication Settings
Configuring a PIX Command Authorization Set for a UserUse this procedure to specify the PIX command authorization set parameters for a user. There are four options:
• None—No authorization for PIX commands.
• Group—For this user, the group-level PIX command authorization set applies.
• Assign a PIX Command Authorization Set for any network device—One PIX command authorization set is assigned, and it applies to all network devices.
• Assign a PIX Command Authorization Set on a per Network Device Group Basis—Particular PIX command authorization sets are to be effective on particular NDGs.
Before You Begin
• Ensure that a AAA client has been configured to use TACACS+ as the security control protocol.
• In the Advanced Options section of Interface Configuration, ensure that the Per-user TACACS+/RADIUS Attributes check box is selected.
• In the TACACS+ (Cisco) section of Interface Configuration, ensure that the PIX Shell (pixShell) option is selected in the User column.
• Ensure that you have already configured one or more PIX command authorization sets. For detailed steps, see Command Authorization Sets Configuration, page 5-16.
To specify PIX command authorization set parameters for a user, follow these steps:
Step 1 Perform Step 1 through Step 3 of Adding a Basic User Account, page 7-5.
Result: The User Setup Edit page opens. The username being added or edited is at the top of the page.
Step 2 Scroll down to the TACACS+ Settings table and to the PIX Command Authorization Set feature area within it.
Step 3 To prevent the application of any PIX command authorization set, select (or accept the default of) the None option.
7-28User Guide for Cisco Secure ACS for Windows Server
78-14696-01, Version 3.1
Chapter 7 Setting Up and Managing User AccountsAdvanced User Authentication Settings
Step 4 To assign the PIX command authorization set at the group level, select the As Group option.
Step 5 To assign a particular PIX command authorization set to be effective on any configured network device, follow these steps:
a. Select the Assign a PIX Command Authorization Set for any network device option.
b. From the list directly below that option, select the PIX command authorization set you want applied to this user.
Step 6 To create associations that assign a particular PIX command authorization set to be effective on a particular NDG, for each association, follow these steps:
a. Select the Assign a PIX Command Authorization Set on a per Network Device Group Basis option.
b. Select a Device Group and an associated Command Set.
c. Click Add Association.
Result: The associated NDG and PIX command authorization set appear in the table.
Step 7 Do one of the following:
• If you are finished configuring the user account options, click Submit to record the options.
• To continue to specify the user account options, perform other procedures in this chapter, as applicable.
7-29User Guide for Cisco Secure ACS for Windows Server
78-14696-01, Version 3.1
Chapter 7 Setting Up and Managing User AccountsAdvanced User Authentication Settings
Configuring Device Management Command Authorization for a User
Use this procedure to specify the device management command authorization set parameters for a user. Device management command authorization sets support the authorization of tasks in Cisco device-management applications that are configured to use Cisco Secure ACS for authorization. You can choose one of four options:
• None—No authorization is performed for commands issued in the applicable Cisco device-management application.
• Group—For this user, the group-level command authorization set applies for the applicable device-management application.
• Assign a device-management application for any network device—For the applicable device-management application, one command authorization set is assigned, and it applies to management tasks on all network devices.
• Assign a device-management application on a per Network Device Group Basis—For the applicable device-management application, this option enables you to apply command authorization sets to specific NDGs, so that it affects all management tasks on the network devices belonging to the NDG.
Before You Begin
• Ensure that a AAA client has been configured to use TACACS+ as the security control protocol.
• In the Advanced Options section of Interface Configuration, ensure that the Per-user TACACS+/RADIUS Attributes check box is selected.
• In the TACACS+ (Cisco) section of Interface Configuration, ensure that, under New Services, the new TACACS+ service corresponding to the applicable device-management application is selected in the User column.
• If you want to apply command authorization sets, ensure that you have already configured one or more device management command authorization sets. For detailed steps, see Command Authorization Sets Configuration, page 5-16.
7-30User Guide for Cisco Secure ACS for Windows Server
78-14696-01, Version 3.1

Chapter 7 Setting Up and Managing User AccountsAdvanced User Authentication Settings
To specify device-management application command authorization for a user, follow these steps:
Step 1 Perform Step 1 through Step 3 of Adding a Basic User Account, page 7-5.
Result: The User Setup Edit page opens. The username being added or edited is at the top of the page.
Step 2 Scroll down to the TACACS+ Settings table and to the applicable device-management command authorization feature area within it.
Step 3 To prevent the application of any command authorization for actions performed in the applicable device-management application, select (or accept the default of) the None option.
Step 4 To assign command authorization for the applicable device-management application at the group level, select the As Group option.
Step 5 To assign a particular command authorization set that affects device-management application actions on any network device, follow these steps:
a. Select the Assign a device-management application for any network device option.
b. Then, from the list directly below that option, select the command authorization set you want applied to this user.
Step 6 To create associations that assign a particular command authorization set that affects device-management application actions on a particular NDG, for each association, follow these steps:
a. Select the Assign a device-management application on a per Network Device Group Basis option.
b. Select a Device Group and an associated device-management application.
c. Click Add Association.
Result: The associated NDG and command authorization set appear in the table.
7-31User Guide for Cisco Secure ACS for Windows Server
78-14696-01, Version 3.1
Chapter 7 Setting Up and Managing User AccountsAdvanced User Authentication Settings
Step 7 Do one of the following:
• If you are finished configuring the user account options, click Submit to record the options.
• To continue to specify the user account options, perform other procedures in this chapter, as applicable.
Configuring the Unknown Service Setting for a UserIf you want TACACS+ AAA clients to permit unknown services, you can select the Default (Undefined) Services check box under Checking this option will PERMIT all UNKNOWN Services.
To configure the Unknown Service setting for a user, follow these steps:
Step 1 Perform Step 1 through Step 3 of Adding a Basic User Account, page 7-5.
Result: The User Setup Edit page opens. The username being added or edited is at the top of the page.
Step 2 Scroll down to the table under the heading Checking this option will PERMIT all UNKNOWN Services.
Step 3 To allow TACACS+ AAA clients to permit unknown services for this user, select the Default (Undefined) Services check box.
Step 4 Do one of the following:
• If you are finished configuring the user account options, click Submit to record the options.
• To continue to specify the user account options, perform other procedures in this chapter, as applicable.
7-32User Guide for Cisco Secure ACS for Windows Server
78-14696-01, Version 3.1
Chapter 7 Setting Up and Managing User AccountsAdvanced User Authentication Settings
Advanced TACACS+ Settings (User) The information presented in this section applies when you have a AAA client with TACACS+ configured.
Tip If the Advanced TACACS+ Settings (User) table does not appear, click Interface Configuration, click TACACS+ (Cisco IOS), and then click Advanced TACACS+ Features.
Details on configuring user options with the Advanced TACACS+ Settings are presented in the following three procedures:
• Setting Enable Privilege Options for a User, page 7-33
• Setting TACACS+ Enable Password Options for a User, page 7-35
• Setting TACACS+ Outbound Password for a User, page 7-36
Setting Enable Privilege Options for a User
You use TACACS+ Enable Control with Exec session to control administrator access. Typically, you use it for router management control. From the following four options, you can select and specify the privilege level you want a user to have.
• Use Group Level Setting—Sets the privileges for this user as those configured at the group level.
• No Enable Privilege—Disallows enable privileges for this user.
Note This is the default setting.
• Max Privilege for any AAA Client—Enables you to select from a list the maximum privilege level that will apply to this user on any AAA client on which this user is authorized.
• Define Max Privilege on a per-Network Device Group Basis—Enables you to associate maximum privilege levels to this user in one or more NDGs.
7-33User Guide for Cisco Secure ACS for Windows Server
78-14696-01, Version 3.1
Chapter 7 Setting Up and Managing User AccountsAdvanced User Authentication Settings
Note For information about privilege levels, refer to your AAA client documentation.
Tip You must configure NDGs from within Interface Configuration before you can assign user privilege levels to them.
To select and specify the privilege level for a user, follow these steps:
Step 1 Perform Step 1 through Step 3 of Adding a Basic User Account, page 7-5.
Result: The User Setup Edit page opens. The username being added or edited is at the top of the page.
Step 2 Under TACACS+ Enable Control in the Advanced TACACS+ Settings table, select one of the four privilege options, as follows:
• Use Group Level Setting
• No Enable Privilege
Note (No Enable Privilege is the default setting; when setting up an new user account, it should already be selected.)
• Max Privilege for Any Access Server
• Define Max Privilege on a per-Network Device Group Basis
Step 3 If you selected Max Privilege for Any Access Server in Step 2, select the appropriate privilege level from the corresponding list.
Step 4 If you selected Define Max Privilege on a per-Network Device Group Basis in Step 2, perform the following steps to define the privilege levels on each NDG, as applicable:
a. From the Device Group list, select a device group.
Note You must have already configured a device group for it to be listed.
b. From the Privilege list, select a privilege level to associate with the selected device group.
7-34User Guide for Cisco Secure ACS for Windows Server
78-14696-01, Version 3.1
Chapter 7 Setting Up and Managing User AccountsAdvanced User Authentication Settings
c. Click Add Association.
Result: An entry appears in the table, associating the device group with a particular privilege level.
d. Repeat Step a through Step c for each device group you want to associate to this user.
Tip To delete an entry, select the entry and then click Remove Associate.
Step 5 Do one of the following:
• If you are finished configuring the user account options, click Submit to record the options.
• To continue to specify the user account options, perform other procedures in this chapter, as applicable.
Setting TACACS+ Enable Password Options for a User
When setting the TACACS+ Enable Password Options for a user, you have three options to chose from:
• Use CiscoSecure PAP password
• Use external database password
• Use separate password
To set the options for the TACACS+ Enable password, follow these steps:
Step 1 Perform Step 1 through Step 3 of Adding a Basic User Account, page 7-5.
Result: The User Setup Edit page opens. The username being added or edited is at the top of the page.
7-35User Guide for Cisco Secure ACS for Windows Server
78-14696-01, Version 3.1
Chapter 7 Setting Up and Managing User AccountsAdvanced User Authentication Settings
Step 2 Do one of the following:
• To use the information configured in the Password Authentication section, select Use CiscoSecure PAP password.
Note For information about basic password setup, see Adding a Basic User Account, page 7-5.
• To use an external database password, select Use external database password, and then choose from the list the database that authenticates the enable password for this user.
Note The list of databases displays only the databases that you have configured. For more information, see About External User Databases, page 11-4.
• To use a separate password, click Use separate password, and then type and retype to confirm a control password for this user. This password is used in addition to the regular authentication.
Step 3 Do one of the following:
• If you are finished configuring the user account options, click Submit to record the options.
• To continue to specify the user account options, perform other procedures in this chapter, as applicable.
Setting TACACS+ Outbound Password for a User
The TACACS+ outbound password enables a AAA client to authenticate itself to another AAA client via outbound authentication. The outbound authentication can be PAP, CHAP, MS-CHAP, or ARAP, and results in the Cisco Secure ACS password being given out. By default, the user ASCII/PAP or CHAP/MS-CHAP/ARAP password is used. To prevent compromising inbound passwords, you can configure a separate SENDAUTH password.
7-36User Guide for Cisco Secure ACS for Windows Server
78-14696-01, Version 3.1
Chapter 7 Setting Up and Managing User AccountsAdvanced User Authentication Settings
Caution Use an outbound password only if you are familiar with the use of a TACACS+ SendAuth/OutBound password.
To set a TACACS+ outbound password for a user, follow these steps:
Step 1 Perform Step 1 through Step 3 of Adding a Basic User Account, page 7-5.
Result: The User Setup Edit page opens. The username being added or edited is at the top of the page.
Step 2 Type and retype to confirm a TACACS+ outbound password for this user.
Step 3 Do one of the following:
• If you are finished configuring the user account options, click Submit to record the options.
• To continue to specify the user account options, perform other procedures in this chapter, as applicable.
RADIUS AttributesYou can configure user attributes for RADIUS authentication either generally, at the IETF level, or for vendor-specific attributes (VSAs) on a vendor-by-vendor basis. For general attributes, see Setting IETF RADIUS Parameters for a User, page 7-38. Cisco Secure ACS ships with many popular VSAs already loaded and available to configure and apply. For information about creating additional, custom RADIUS VSAs, see Custom RADIUS Vendors and VSAs, page 8-33.
To configure the VSA for one of the RADIUS network device vendors supported by Cisco Secure ACS, refer to the appropriate procedure as follows:
• Setting Cisco IOS/PIX RADIUS Parameters for a User, page 7-39
• Setting Cisco Aironet RADIUS Parameters for a User, page 7-40
• Setting Ascend RADIUS Parameters for a User, page 7-42
• Setting Cisco VPN 3000 Concentrator RADIUS Parameters for a User, page 7-43
7-37User Guide for Cisco Secure ACS for Windows Server
78-14696-01, Version 3.1

Chapter 7 Setting Up and Managing User AccountsAdvanced User Authentication Settings
• Setting Cisco VPN 5000 Concentrator RADIUS Parameters for a User, page 7-45
• Setting Microsoft RADIUS Parameters for a User, page 7-46
• Setting Nortel RADIUS Parameters for a User, page 7-48
• Setting Juniper RADIUS Parameters for a User, page 7-49
• Setting BBSM RADIUS Parameters for a User, page 7-51
To configure custom VSAs, see Setting Custom RADIUS Attributes for a User, page 7-52.
Setting IETF RADIUS Parameters for a User
RADIUS attributes are sent as a profile for the user from Cisco Secure ACS to the requesting AAA client.
These parameters display only if all the following are true:
• A AAA client has been configured to use one of the RADIUS protocols in Network Configuration.
• The Per-user TACACS+/RADIUS Attributes check box is selected under Advanced Options in the Interface Configuration section.
• User-level IETF RADIUS attributes have been enabled under RADIUS (IETF) in the Interface Configuration section.
Note To display or hide any of these attributes in the HTML interface, see Protocol Configuration Options for RADIUS, page 3-10.
Note For a list and explanation of RADIUS attributes, see Appendix C, “RADIUS Attributes,” or the documentation for your particular network device using RADIUS.
7-38User Guide for Cisco Secure ACS for Windows Server
78-14696-01, Version 3.1
Chapter 7 Setting Up and Managing User AccountsAdvanced User Authentication Settings
To configure IETF RADIUS attribute settings to be applied as an authorization for the current user, follow these steps:
Step 1 Perform Step 1 through Step 3 of Adding a Basic User Account, page 7-5.
Result: The User Setup Edit page opens. The username being added or edited is at the top of the page.
Step 2 In the IETF RADIUS table, for each attribute that you need to authorize for the current user, select the check box next to the attribute and then further define the authorization for the attribute in the box or boxes next to it, as applicable.
Step 3 Do one of the following:
• If you are finished configuring the user account options, click Submit to record the options.
• To continue to specify the user account options, perform other procedures in this chapter, as applicable.
Setting Cisco IOS/PIX RADIUS Parameters for a User
The Cisco IOS RADIUS parameters appear only if all the following are true:
• A AAA client has been configured to use RADIUS (Cisco IOS/PIX) in Network Configuration.
• The Per-user TACACS+/RADIUS Attributes check box is selected under Advanced Options in the Interface Configuration section.
• User-level RADIUS (Cisco IOS/PIX) attributes have been enabled under RADIUS (Cisco IOS/PIX) in the Interface Configuration section.
Note To hide or display the Cisco IOS RADIUS VSA, see Setting Protocol Configuration Options for Non-IETF RADIUS Attributes, page 3-16. A VSA applied as an authorization to a particular user persists, even when you remove or replace the associated AAA client; however, if you have no AAA clients of this (vendor) type configured, the VSA settings do not appear in the user configuration interface.
7-39User Guide for Cisco Secure ACS for Windows Server
78-14696-01, Version 3.1
Chapter 7 Setting Up and Managing User AccountsAdvanced User Authentication Settings
Cisco IOS RADIUS represents only the Cisco IOS VSAs. You must configure both the IETF RADIUS and Cisco IOS RADIUS attributes.
To configure and enable Cisco IOS RADIUS attributes to be applied as an authorization for the current user, follow these steps:
Step 1 Perform Step 1 through Step 3 of Adding a Basic User Account, page 7-5.
Result: The User Setup Edit page opens. The username being added or edited is at the top of the page.
Step 2 Before configuring Cisco IOS RADIUS attributes, be sure your IETF RADIUS attributes are configured properly. For more information about setting IETF RADIUS attributes, see Setting IETF RADIUS Parameters for a User, page 7-38.
Step 3 In the Cisco IOS/PIX RADIUS Attributes table, to specify the attributes to be authorized for the user, follow these steps:
a. Select the [009\001] cisco-av-pair attribute check box.
b. Type the commands (such as TACACS+ commands) to be packed as a RADIUS VSA.
c. Continue to select and define attributes, as applicable.
Step 4 Do one of the following:
• If you are finished configuring the user account options, click Submit to record the options.
• To continue to specify the user account options, perform other procedures in this chapter, as applicable.
Setting Cisco Aironet RADIUS Parameters for a User
The Cisco Aironet RADIUS parameters appear only if all the following are true:
• A AAA client has been configured to use RADIUS (Cisco Aironet) in Network Configuration.
• The Per-user TACACS+/RADIUS Attributes check box is selected under Advanced Options in the Interface Configuration section.
• User-level RADIUS (Cisco Aironet) attribute has been enabled under RADIUS (Cisco Aironet) in the Interface Configuration section.
7-40User Guide for Cisco Secure ACS for Windows Server
78-14696-01, Version 3.1
Chapter 7 Setting Up and Managing User AccountsAdvanced User Authentication Settings
The single Cisco Aironet RADIUS VSA, Cisco-Aironet-Session-Timeout, is a specialized implementation of the IETF RADIUS Session-Timeout attribute (27). When Cisco Secure ACS responds to an authentication request from a Cisco Aironet Access Point and the Cisco-Aironet-Session-Timeout attribute is configured, Cisco Secure ACS sends to the wireless device this value in the IETF Session-Timeout attribute. This enables you to provide different session timeout values for wireless and wired end-user clients.
Note To hide or display the Cisco Aironet RADIUS VSA, see Setting Protocol Configuration Options for Non-IETF RADIUS Attributes, page 3-16. A VSA applied as an authorization to a particular user persists, even when you remove or replace the associated AAA client; however, if you have no AAA clients of this (vendor) type configured, the VSA settings do not appear in the user configuration interface.
To configure and enable the Cisco Aironet RADIUS attribute to be applied as an authorization for the current user, follow these steps:
Step 1 Perform Step 1 through Step 3 of Adding a Basic User Account, page 7-5.
Result: The User Setup Edit page opens. The username being added or edited is at the top of the page.
Step 2 Before configuring Cisco Aironet RADIUS attributes, be sure your IETF RADIUS attributes are configured properly. For more information about setting IETF RADIUS attributes, see Setting IETF RADIUS Parameters for a User, page 7-38.
Step 3 In the Cisco Aironet RADIUS Attributes table, select the [5842\001] Cisco-Aironet-Session-Timeout check box.
Step 4 In the [5842\001] Cisco-Aironet-Session-Timeout box, type the session timeout value (in seconds) that Cisco Secure ACS is to send in the IETF RADIUS Session-Timeout (27) attribute when the AAA client is configured in Network Configuration to use the RADIUS (Cisco Aironet) authentication option. The recommended value is 600 seconds.
For more information about the IETF RADIUS Session-Timeout attribute, see Appendix C, “RADIUS Attributes,” or your AAA client documentation.
7-41User Guide for Cisco Secure ACS for Windows Server
78-14696-01, Version 3.1
Chapter 7 Setting Up and Managing User AccountsAdvanced User Authentication Settings
Step 5 Do one of the following:
• If you are finished configuring the user account options, click Submit to record the options.
• To continue to specify the user account options, perform other procedures in this chapter, as applicable.
Setting Ascend RADIUS Parameters for a User
The Ascend RADIUS parameters appear only if all the following are true:
• A AAA client has been configured to use RADIUS (Ascend) in Network Configuration.
• The Per-user TACACS+/RADIUS Attributes check box is selected under Advanced Options in the Interface Configuration section.
• User-level RADIUS (Ascend) attributes you want to apply have been enabled under RADIUS (Ascend) in the Interface Configuration section.
Ascend RADIUS represents only the Ascend proprietary attributes. You must configure both the IETF RADIUS and Ascend RADIUS attributes. Proprietary attributes override IETF attributes.
The default attribute setting displayed for RADIUS is Ascend-Remote-Addr.
Note To hide or display Ascend RADIUS attributes, see Setting Protocol Configuration Options for Non-IETF RADIUS Attributes, page 3-16. A VSA applied as an authorization to a particular user persists, even when you remove or replace the associated AAA client; however, if you have no AAA clients of this (vendor) type configured, the VSA settings do not appear in the user configuration interface.
To configure and enable Ascend RADIUS attributes to be applied as an authorization for the current user, follow these steps:
Step 1 Perform Step 1 through Step 3 of Adding a Basic User Account, page 7-5.
Result: The User Setup Edit page opens. The username being added or edited is at the top of the page.
7-42User Guide for Cisco Secure ACS for Windows Server
78-14696-01, Version 3.1
Chapter 7 Setting Up and Managing User AccountsAdvanced User Authentication Settings
Step 2 Before configuring Ascend RADIUS attributes, be sure your IETF RADIUS attributes are configured properly. For more information about setting IETF RADIUS attributes, see Setting IETF RADIUS Parameters for a User, page 7-38.
Step 3 In the Ascend RADIUS Attributes table, to specify the attributes that should be authorized for the user, follow these steps:
a. Select the check box next to the particular attribute.
b. Further define the authorization for that attribute in the box next to it.
c. Continue to select and define attributes, as applicable.
For more information about attributes, see Appendix C, “RADIUS Attributes,” or your AAA client documentation.
Step 4 Do one of the following:
• If you are finished configuring the user account options, click Submit to record the options.
• To continue to specify the user account options, perform other procedures in this chapter, as applicable.
Setting Cisco VPN 3000 Concentrator RADIUS Parameters for a User
The Cisco VPN 3000 Concentrator RADIUS attribute configurations appear only if all the following are true:
• A AAA client has been configured to use RADIUS (Cisco VPN 3000) in Network Configuration.
• The Per-user TACACS+/RADIUS Attributes check box is selected under Advanced Options in the Interface Configuration section.
• User-level RADIUS (Cisco VPN 3000) attributes you want to apply have been enabled under RADIUS (Cisco VPN 3000) in the Interface Configuration section.
Cisco VPN 3000 Concentrator RADIUS represents only the Cisco VPN 3000 Concentrator VSA. You must configure both the IETF RADIUS and Cisco VPN 3000 Concentrator RADIUS attributes.
7-43User Guide for Cisco Secure ACS for Windows Server
78-14696-01, Version 3.1
Chapter 7 Setting Up and Managing User AccountsAdvanced User Authentication Settings
Note To hide or display Cisco VPN 3000 Concentrator RADIUS attributes, see Setting Protocol Configuration Options for Non-IETF RADIUS Attributes, page 3-16. A VSA applied as an authorization to a particular user persists, even when you remove or replace the associated AAA client; however, if you have no AAA clients of this (vendor) type configured, the VSA settings do not appear in the user configuration interface.
To configure and enable Cisco VPN 3000 Concentrator RADIUS attributes to be applied as an authorization for the current user, follow these steps:
Step 1 Perform Step 1 through Step 3 of Adding a Basic User Account, page 7-5.
Result: The User Setup Edit page opens. The username being added or edited is at the top of the page.
Step 2 Before configuring Cisco VPN 3000 Concentrator RADIUS attributes, be sure your IETF RADIUS attributes are configured properly.
For more information about setting IETF RADIUS attributes, see Setting IETF RADIUS Parameters for a User, page 7-38.
Step 3 In the Cisco VPN 3000 Concentrator Attribute table, to specify the attributes that should be authorized for the user, follow these steps:
a. Select the check box next to the particular attribute.
b. Further define the authorization for that attribute in the box next to it.
c. Continue to select and define attributes, as applicable.
For more information about attributes, see Appendix C, “RADIUS Attributes,” or your AAA client documentation.
Step 4 Do one of the following:
• If you are finished configuring the user account options, click Submit to record the options.
• To continue to specify the user account options, perform other procedures in this chapter, as applicable.
7-44User Guide for Cisco Secure ACS for Windows Server
78-14696-01, Version 3.1

Chapter 7 Setting Up and Managing User AccountsAdvanced User Authentication Settings
Setting Cisco VPN 5000 Concentrator RADIUS Parameters for a User
The Cisco VPN 5000 Concentrator RADIUS attribute configurations display only if all the following are true:
• A AAA client has been configured to use RADIUS (Cisco VPN 5000) in Network Configuration.
• The Per-user TACACS+/RADIUS Attributes check box is selected under Advanced Options in the Interface Configuration section.
• User-level RADIUS (Cisco VPN 5000) attributes you want to apply have been enabled under RADIUS (Cisco VPN 5000) in the Interface Configuration section.
Cisco VPN 5000 Concentrator RADIUS represents only the Cisco VPN 5000 Concentrator VSA. You must configure both the IETF RADIUS and Cisco VPN 5000 Concentrator RADIUS attributes.
Note To hide or display Cisco VPN 5000 Concentrator RADIUS attributes, see Setting Protocol Configuration Options for Non-IETF RADIUS Attributes, page 3-16. A VSA applied as an authorization to a particular user persists, even when you remove or replace the associated AAA client; however, if you have no AAA clients of this (vendor) type configured, the VSA settings do not appear in the user configuration interface.
To configure and enable Cisco VPN 5000 Concentrator RADIUS attributes to be applied as an authorization for the current user, follow these steps:
Step 1 Perform Step 1 through Step 3 of Adding a Basic User Account, page 7-5.
Result: The User Setup Edit page opens. The username being added or edited is at the top of the page.
Step 2 Before configuring Cisco VPN 5000 Concentrator RADIUS attributes, be sure your IETF RADIUS attributes are configured properly. For more information about setting IETF RADIUS attributes, see Setting IETF RADIUS Parameters for a User, page 7-38.
7-45User Guide for Cisco Secure ACS for Windows Server
78-14696-01, Version 3.1
Chapter 7 Setting Up and Managing User AccountsAdvanced User Authentication Settings
Step 3 In the Cisco VPN 5000 Concentrator Attribute table, to specify the attributes that should be authorized for the user, follow these steps:
a. Select the check box next to the particular attribute.
b. Further define the authorization for that attribute in the box next to it.
c. Continue to select and define attributes, as applicable.
For more information about attributes, see Appendix C, “RADIUS Attributes,” or your AAA client documentation.
Step 4 Do one of the following:
• If you are finished configuring the user account options, click Submit to record the options.
• To continue to specify the user account options, perform other procedures in this chapter, as applicable.
Setting Microsoft RADIUS Parameters for a User
Microsoft RADIUS provides VSAs supporting Microsoft Point-to-Point Encryption (MPPE), which is an encryption technology developed by Microsoft to encrypt point-to-point (PPP) links. These PPP connections can be via a dial-in line, or over a Virtual Private Network (VPN) tunnel. The Microsoft RADIUS attribute configurations display only if both the following are true:
• A AAA client has been configured in Network Configuration that uses a RADIUS protocol that supports the Microsoft RADIUS VSA.
• The Per-user TACACS+/RADIUS Attributes check box is selected under Advanced Options in the Interface Configuration section.
• The user-level RADIUS (Microsoft) attributes you want to apply have been enabled under RADIUS (Microsoft) in the Interface Configuration section.
The following Cisco Secure ACS RADIUS protocols support the Microsoft RADIUS VSA:
• Cisco IOS
• Cisco VPN 3000
• Cisco VPN 5000
• Ascend
7-46User Guide for Cisco Secure ACS for Windows Server
78-14696-01, Version 3.1
Chapter 7 Setting Up and Managing User AccountsAdvanced User Authentication Settings
Microsoft RADIUS represents only the Microsoft VSA. You must configure both the IETF RADIUS and Microsoft RADIUS attributes.
Note To hide or display Microsoft RADIUS attributes, see Setting Protocol Configuration Options for Non-IETF RADIUS Attributes, page 3-16. A VSA applied as an authorization to a particular user persists, even when you remove or replace the associated AAA client; however, if you have no AAA clients of this (vendor) type configured, the VSA settings do not appear in the user configuration interface.
To configure and enable Microsoft RADIUS attributes to be applied as an authorization for the current user, follow these steps:
Step 1 Perform Step 1 through Step 3 of Adding a Basic User Account, page 7-5.
Result: The User Setup Edit page opens. The username being added or edited is at the top of the page.
Step 2 Before configuring Cisco IOS RADIUS attributes, be sure your IETF RADIUS attributes are configured properly. For more information about setting IETF RADIUS attributes, see Setting IETF RADIUS Parameters for a User, page 7-38.
Step 3 In the Microsoft RADIUS Attributes table, to specify the attributes that should be authorized for the user, follow these steps:
a. Select the check box next to the particular attribute.
b. Further define the authorization for that attribute in the box next to it.
c. Continue to select and define attributes, as applicable.
For more information about attributes, see Appendix C, “RADIUS Attributes,” or your AAA client documentation.
Note The MS-CHAP-MPPE-Keys attribute value is autogenerated by Cisco Secure ACS; there is no value to set in the HTML interface.
7-47User Guide for Cisco Secure ACS for Windows Server
78-14696-01, Version 3.1
Chapter 7 Setting Up and Managing User AccountsAdvanced User Authentication Settings
Step 4 Do one of the following:
• If you are finished configuring the user account options, click Submit to record the options.
• To continue to specify the user account options, perform other procedures in this chapter, as applicable.
Setting Nortel RADIUS Parameters for a User
The Nortel RADIUS parameters appear only if all the following are true:
• A AAA client has been configured to use RADIUS (Nortel) in Network Configuration.
• The Per-user TACACS+/RADIUS Attributes check box is selected under Advanced Options in the Interface Configuration section.
• User-level RADIUS (Nortel) attributes you want to apply have been enabled under RADIUS (Nortel) in the Interface Configuration section.
Nortel RADIUS represents only the Nortel proprietary attributes. You must configure both the IETF RADIUS and Nortel RADIUS attributes. Proprietary attributes override IETF attributes.
Note To hide or display Nortel RADIUS attributes, see Setting Protocol Configuration Options for Non-IETF RADIUS Attributes, page 3-16. A VSA applied as an authorization to a particular user persists, even when you remove or replace the associated AAA client; however, if you have no AAA clients of this (vendor) type configured, the VSA settings do not appear in the user configuration interface.
To configure and enable Nortel RADIUS attributes to be applied as an authorization for the current user, follow these steps:
Step 1 Perform Step 1 through Step 3 of Adding a Basic User Account, page 7-5.
Result: The User Setup Edit page opens. The username being added or edited is at the top of the page.
7-48User Guide for Cisco Secure ACS for Windows Server
78-14696-01, Version 3.1
Chapter 7 Setting Up and Managing User AccountsAdvanced User Authentication Settings
Step 2 Before configuring Nortel RADIUS attributes, be sure your IETF RADIUS attributes are configured properly. For more information about setting IETF RADIUS attributes, see Setting IETF RADIUS Parameters for a User, page 7-38.
Step 3 In the Nortel RADIUS Attributes table, to specify the attributes that should be authorized for the user, follow these steps:
a. Select the check box next to the particular attribute.
b. Further define the authorization for that attribute in the box next to it.
c. Continue to select and define attributes, as applicable.
For more information about attributes, see Appendix C, “RADIUS Attributes,” or your AAA client documentation.
Step 4 Do one of the following:
• If you are finished configuring the user account options, click Submit to record the options.
• To continue to specify the user account options, perform other procedures in this chapter, as applicable.
Setting Juniper RADIUS Parameters for a User
The Juniper RADIUS parameters appear only if all the following are true:
• A AAA client has been configured to use RADIUS (Juniper) in Network Configuration.
• The Per-user TACACS+/RADIUS Attributes check box is selected under Advanced Options in the Interface Configuration section.
• User-level RADIUS (Juniper) attributes you want to apply have been enabled under RADIUS (Juniper) in the Interface Configuration section.
Juniper RADIUS represents only the Juniper proprietary attributes. You must configure both the IETF RADIUS and Juniper RADIUS attributes. Proprietary attributes override IETF attributes.
7-49User Guide for Cisco Secure ACS for Windows Server
78-14696-01, Version 3.1

Chapter 7 Setting Up and Managing User AccountsAdvanced User Authentication Settings
Note To hide or display Juniper RADIUS attributes, see Setting Protocol Configuration Options for Non-IETF RADIUS Attributes, page 3-16. A VSA applied as an authorization to a particular user persists, even when you remove or replace the associated AAA client; however, if you have no AAA clients of this (vendor) type configured, the VSA settings do not appear in the user configuration interface.
To configure and enable Juniper RADIUS attributes to be applied as an authorization for the current user, follow these steps:
Step 1 Perform Step 1 through Step 3 of Adding a Basic User Account, page 7-5.
Result: The User Setup Edit page opens. The username being added or edited is at the top of the page.
Step 2 Before configuring Juniper RADIUS attributes, be sure your IETF RADIUS attributes are configured properly. For more information about setting IETF RADIUS attributes, see Setting IETF RADIUS Parameters for a User, page 7-38.
Step 3 In the Juniper RADIUS Attributes table, to specify the attributes that should be authorized for the user, follow these steps:
a. Select the check box next to the particular attribute.
b. Further define the authorization for that attribute in the box next to it.
c. Continue to select and define attributes, as applicable.
For more information about attributes, see Appendix C, “RADIUS Attributes,” or your AAA client documentation.
Step 4 Do one of the following:
• If you are finished configuring the user account options, click Submit to record the options.
• To continue to specify the user account options, perform other procedures in this chapter, as applicable.
7-50User Guide for Cisco Secure ACS for Windows Server
78-14696-01, Version 3.1
Chapter 7 Setting Up and Managing User AccountsAdvanced User Authentication Settings
Setting BBSM RADIUS Parameters for a User
The BBSM RADIUS parameters appear only if all the following are true:
• A AAA client has been configured to use RADIUS (BBSM) in Network Configuration.
• The Per-user TACACS+/RADIUS Attributes check box is selected under Advanced Options in the Interface Configuration section.
• User-level RADIUS (BBSM) attributes you want to apply have been enabled under RADIUS (BBSM) in the Interface Configuration section.
BBSM RADIUS represents only the BBSM proprietary attributes. You must configure both the IETF RADIUS and BBSM RADIUS attributes. Proprietary attributes override IETF attributes.
Note To hide or display BBSM RADIUS attributes, see Setting Protocol Configuration Options for Non-IETF RADIUS Attributes, page 3-16. A VSA applied as an authorization to a particular user persists, even when you remove or replace the associated AAA client; however, if you have no AAA clients of this (vendor) type configured, the VSA settings do not appear in the user configuration interface.
To configure and enable BBSM RADIUS attributes to be applied as an authorization for the current user, follow these steps:
Step 1 Perform Step 1 through Step 3 of Adding a Basic User Account, page 7-5.
Result: The User Setup Edit page opens. The username being added or edited is at the top of the page.
Step 2 Before configuring BBSM RADIUS attributes, be sure your IETF RADIUS attributes are configured properly. For more information about setting IETF RADIUS attributes, see Setting IETF RADIUS Parameters for a User, page 7-38.
Step 3 In the BBSM RADIUS Attributes table, to specify the attributes that should be authorized for the user, follow these steps:
a. Select the check box next to the particular attribute.
b. Further define the authorization for that attribute in the box next to it.
c. Continue to select and define attributes, as applicable.
7-51User Guide for Cisco Secure ACS for Windows Server
78-14696-01, Version 3.1
Chapter 7 Setting Up and Managing User AccountsAdvanced User Authentication Settings
For more information about attributes, see Appendix C, “RADIUS Attributes,” or your AAA client documentation.
Step 4 Do one of the following:
• If you are finished configuring the user account options, click Submit to record the options.
• To continue to specify the user account options, perform other procedures in this chapter, as applicable.
Setting Custom RADIUS Attributes for a User
Custom RADIUS parameters appear only if all the following are true:
• You have defined and configured the custom RADIUS VSAs. (For information about creating user-defined RADIUS VSAs, see Custom RADIUS Vendors and VSAs, page 8-33.)
• A AAA client has been configured in Network Configuration that uses a RADIUS protocol that supports the custom VSA.
• The Per-user TACACS+/RADIUS Attributes check box is selected under Advanced Options in the Interface Configuration section.
• User-level RADIUS (custom name) attributes you want to apply have been enabled under RADIUS (custom name) in the Interface Configuration section.
You must configure both the IETF RADIUS and the custom RADIUS attributes. Proprietary attributes override IETF attributes.
To configure and enable custom RADIUS attributes to be applied as an authorization for the current user, follow these steps:
Step 1 Perform Step 1 through Step 3 of Adding a Basic User Account, page 7-5.
Result: The User Setup Edit page opens. The username being added or edited is at the top of the page.
Step 2 Before configuring custom RADIUS attributes, be sure your IETF RADIUS attributes are configured properly. For more information about setting IETF RADIUS attributes, see Setting IETF RADIUS Parameters for a User, page 7-38.
7-52User Guide for Cisco Secure ACS for Windows Server
78-14696-01, Version 3.1

Chapter 7 Setting Up and Managing User AccountsUser Management
Step 3 In the RADIUS custom name Attributes table, to specify the attributes that should be authorized for the user, follow these steps:
a. Select the check box next to the particular attribute.
b. Further define the authorization for that attribute in the box next to it, as required.
c. Continue to select and define attributes, as applicable.
For more information about attributes, see Appendix C, “RADIUS Attributes,” or your AAA client documentation.
Step 4 Do one of the following:
• If you are finished configuring the user account options, click Submit to record the options.
• To continue to specify the user account options, perform other procedures in this chapter, as applicable.
User ManagementThis section describes how to use the Cisco Secure ACS User Setup section to perform a variety of user account managerial tasks.
This section contains the following procedures:
• Listing All Users, page 7-54
• Finding a User, page 7-54
• Disabling a User Account, page 7-55
• Deleting a User Account, page 7-56
• Resetting User Session Quota Counters, page 7-57
• Resetting a User Account after Login Failure, page 7-58
• Saving User Settings, page 7-59
7-53User Guide for Cisco Secure ACS for Windows Server
78-14696-01, Version 3.1
Chapter 7 Setting Up and Managing User AccountsUser Management
Listing All UsersThe Cisco Secure ACS User List displays all user accounts (enabled and disabled). The list includes, for each user, the username, status, and the group to which the user belongs.
Usernames are displayed in the order in which they were entered into the database. This list cannot be sorted.
To view a list of all user accounts, follow these steps:
Step 1 In the navigation bar, click User Setup.
Result: The User Setup Select page opens.
Step 2 Click List All Users.
Result: In the display area on the right, the User List appears.
Step 3 To view or edit the information for an individual user, click the username in the right window.
Result: The user account information appears.
Finding a UserTo find a user, follow these steps:
Step 1 In the navigation bar, click User Setup.
Result: The User Setup Select page opens.
Step 2 Type the name in the User box, and then click Find.
Tip You can use wildcard characters (*) in this box.
7-54User Guide for Cisco Secure ACS for Windows Server
78-14696-01, Version 3.1

Chapter 7 Setting Up and Managing User AccountsUser Management
Tip To display a list of usernames that begin with a particular letter or number, click the letter or number in the alphanumeric list. A list of users whose names begin with that letter or number opens in the display area on the right.
Result: The username, status (enabled or disabled), and group to which the user belongs appear in the display area on the right.
Step 3 To view or edit the information for the user, click the username in the display area on the right.
Result: The user account information appears.
Disabling a User AccountThis procedure details how to manually disable a user account in the CiscoSecure user database.
Note To configure the conditions by which a user account will automatically be disabled, see Setting Options for User Account Disablement, page 7-20.
Note This is not to be confused with account expiration due to password aging. Password aging is defined for groups only, not for individual users.
To disable a user account, follow these steps:
Step 1 In the navigation bar, click User Setup.
Result: The User Setup Select page opens.
Step 2 In the User box, type the name of the user whose account is to be disabled.
Step 3 Click Add/Edit.
Result: The User Setup Edit page opens. The username being edited is at the top of the page.
7-55User Guide for Cisco Secure ACS for Windows Server
78-14696-01, Version 3.1
Chapter 7 Setting Up and Managing User AccountsUser Management
Step 4 Select the Account Disabled check box.
Step 5 Click Submit at the bottom of the page.
Result: The specified user account is disabled.
Deleting a User Account
Caution If you are authenticating using the Unknown User policy, you must also delete the user account from the external user database. This prevents the username from being automatically re-added to the CiscoSecure user database the next time the user attempts to log in.
To delete a user account, follow these steps:
Step 1 Click User Setup.
Result: The User Setup Select page of the HTML interface opens.
Step 2 In the User box, type the complete username to be deleted.
Note Alternatively, you can click List All Users and then select the user from the list that appears.
Step 3 Click Add/Edit.
Step 4 At the bottom of the User Setup page, click Delete.
Note The Delete button appears only when you are editing user information, not when you are adding a username.
Result: A popup window appears that asks you to confirm the user deletion.
7-56User Guide for Cisco Secure ACS for Windows Server
78-14696-01, Version 3.1
Chapter 7 Setting Up and Managing User AccountsUser Management
Step 5 Click OK.
Result: The user account is removed from the CiscoSecure user database.
Resetting User Session Quota CountersYou can reset the session quota counters for a user either before or after the user exceeds a quota.
To reset user usage quota counters, follow these steps:
Step 1 Click User Setup.
Result: The Select page of the HTML interface opens.
Step 2 In the User box, type the complete username of the user whose session quota counters you are going to reset.
Note Alternatively, you can click List All Users and then select the user from the list that appears.
Step 3 Click Add/Edit.
Step 4 In the Session Quotas section, select the Reset All Counters on submit check box.
Step 5 Click Submit at the bottom of the browser page.
Result: The session quota counters are reset for this user. The User Setup Select page appears.
7-57User Guide for Cisco Secure ACS for Windows Server
78-14696-01, Version 3.1
Chapter 7 Setting Up and Managing User AccountsUser Management
Resetting a User Account after Login FailurePerform this procedure when an account is disabled because the failed attempts count has been exceeded during an unsuccessful user attempt to log in.
To reset a user account after login failure, follow these steps:
Step 1 Click User Setup.
Result: The User Setup Select page of the HTML interface opens.
Step 2 In the User box, type the complete username of the account to be reset.
Note Alternatively, you can click List All Users and then select the user from the list that appears.
Step 3 Click Add/Edit.
Step 4 In the Account Disable table, select the Reset current failed attempts count on submit check box, and then click Submit.
Result: The Failed attempts since last successful login: counter resets to 0 (zero) and the system re-enables the account.
Note This counter shows the number of unsuccessful login attempts since the last time this user logged in successfully.
Note If the user authenticates with a Windows NT/2000 external user database, this expiration information is in addition to the information in the Windows NT/2000 user account. Changes here do not alter settings configured in Windows NT/2000.
7-58User Guide for Cisco Secure ACS for Windows Server
78-14696-01, Version 3.1
Chapter 7 Setting Up and Managing User AccountsUser Management
Saving User SettingsAfter you have completed configuration for a user, be sure to save your work.
To save the configuration for the current user, follow these steps:
Step 1 To save the user account configuration, click Submit.
Step 2 To verify that your changes were applied, type the username in the User box and click Add/Edit, and then review the settings.
7-59User Guide for Cisco Secure ACS for Windows Server
78-14696-01, Version 3.1

Chapter 7 Setting Up and Managing User AccountsUser Management
7-60User Guide for Cisco Secure ACS for Windows Server
78-14696-01, Version 3.1
User Guide for 78-14696-01, Version 3.1
C H A P T E R 8
Establishing Cisco Secure ACS System ConfigurationThis chapter addresses the features found in the System Configuration section of Cisco Secure Access Control Server (Cisco Secure ACS) for Windows Server version 3.1.
It contains the following topics:
• Service Control, page 8-2
• Logging, page 8-3
• Date Format Control, page 8-3
• Local Password Management, page 8-5
• CiscoSecure Database Replication, page 8-9
• RDBMS Synchronization, page 8-29
• Cisco Secure ACS Backup, page 8-47
• Cisco Secure ACS System Restore, page 8-52
• Cisco Secure ACS Active Service Management, page 8-55
• IP Pools Server, page 8-59
• IP Pools Address Recovery, page 8-67
• VoIP Accounting Configuration, page 8-68
• Cisco Secure ACS Certificate Setup, page 8-69
• Global Authentication Setup, page 8-81
8-1Cisco Secure ACS for Windows Server
Chapter 8 Establishing Cisco Secure ACS System ConfigurationService Control
Service ControlCisco Secure ACS uses several Windows services. The Service Control page provides basic status information about the services, and enables you to configure the service log files and to stop or restart the services. For more information about Cisco Secure ACS services, see Appendix G, “Cisco Secure ACS Internal Architecture.”
This section contains detailed procedural information regarding the following activities:
• Determining the Status of Cisco Secure ACS Services, page 8-2
• Stopping, Starting, or Restarting Services, page 8-2
You can also configure Cisco Secure ACS service logs. For more information, see Configuring Service Logs, page 9-30.
Determining the Status of Cisco Secure ACS ServicesYou can determine whether Cisco Secure ACS services are running or stopped by accessing the Service Control page.
To determine the status of Cisco Secure ACS services, follow these steps:
Step 1 In the navigation bar, click System Configuration.
Step 2 Click Service Control.
Result: The status of the services appears in the CiscoSecure ACS on hostname table, where hostname is the name of the Cisco Secure ACS.
Stopping, Starting, or Restarting ServicesYou can stop, start, or restart Cisco Secure ACS services as needed. This achieves the same result as starting and stopping Cisco Secure ACS services from within Windows Control panel. This procedure stops, starts, or restarts the Cisco Secure ACS services except for CSAdmin, which is responsible for the HTML interface.
8-2User Guide for Cisco Secure ACS for Windows Server
78-14696-01, Version 3.1

Chapter 8 Establishing Cisco Secure ACS System ConfigurationLogging
Note If the CSAdmin service needs to be restarted, you can do so using the Control Panel Services applet; however, it is best to allow Cisco Secure ACS to handle the services because there are dependencies in the order in which the services are started.
To stop, start, or restart Cisco Secure ACS services, follow these steps:
Step 1 In the navigation bar, click System Configuration.
Step 2 Click Service Control.
Result: The status of the services appears in the CiscoSecure ACS on hostname table, where hostname is the name of the Cisco Secure ACS.
If the services are running, the Restart and Stop buttons appear at the bottom of the page.
If the services are stopped, the Start button appears at the bottom of the page.
Step 3 Click Stop, Start, or Restart, as applicable.
Result: The status of Cisco Secure ACS services changes to the state appropriate to the button you clicked.
LoggingYou can configure Cisco Secure ACS to generate logs for administrative and accounting events, depending on the protocols and options you have enabled. For more information, including configuration steps, see Chapter 9, “Working with Logging and Reports.”
Date Format ControlCisco Secure ACS allows for one of two possible date formats in its logs, reports, and administrative interface. You can choose either a month/day/year format or a day/month/year format.
8-3User Guide for Cisco Secure ACS for Windows Server
78-14696-01, Version 3.1
Chapter 8 Establishing Cisco Secure ACS System ConfigurationDate Format Control
Setting the Date Format
Note If you have reports that were generated before you changed the date format, be sure to move or rename them to avoid conflicts. For example, if you are using the month/day/year format, Cisco Secure ACS assigns the name 2001-07-12.csv to a report generated on July 12, 2001. If you subsequently change to the day/month/year format, on December 7, 2001, Cisco Secure ACS creates a file also named 2001-07-12.csv and overwrites the existing file.
To set the date format, follow these steps:
Step 1 In the navigation bar, click System Configuration.
Step 2 Click Date Format Control.
Result: Cisco Secure ACS displays the Date Format Selection table.
Step 3 Select a date format option.
Step 4 Click Submit & Restart.
Result: Cisco Secure ACS restarts its services and implements the date format you selected.
Note For the new date format to be seen in the HTML interface reports, you must restart the connection to the Cisco Secure ACS. Click the Logoff button (a button with an X) in the upper-right corner of the browser window.
8-4User Guide for Cisco Secure ACS for Windows Server
78-14696-01, Version 3.1
Chapter 8 Establishing Cisco Secure ACS System ConfigurationLocal Password Management
Local Password ManagementYou use the Local Password Management page to configure settings that apply to managing passwords stored in the CiscoSecure user database. It contains the following three sections:
• Password Validation Options—These settings enable you to configure validation parameters for user passwords. Cisco Secure ACS enforces these rules when an administrator changes a user password in the CiscoSecure user database and when a user attempts to change passwords using the CiscoSecure Authentication Agent applet.
Note Password validation options apply only to user passwords stored in the CiscoSecure user database. They do not apply to passwords in user records kept in external user databases nor do they apply to enable or admin passwords for Cisco IOS network devices.
The password validation options are listed below:
– Password length between X and Y characters—Enforces that password lengths be between the values specified in the X and Y boxes, inclusive. Cisco Secure ACS supports passwords up to 32 characters long.
– Password may not contain the username—Requires that a user password does not contain the username anywhere within it.
– Password is different from the previous value—Requires a new user password to be different from the previous password.
– Password must be alphanumeric—Requires a user password to contain both letters and numbers.
• Remote Change Password—These settings enable you to configure whether Telnet password change is enabled and, if it is enabled, whether Cisco Secure ACS immediately sends the updated user data to its replication partners.
8-5User Guide for Cisco Secure ACS for Windows Server
78-14696-01, Version 3.1
Chapter 8 Establishing Cisco Secure ACS System ConfigurationLocal Password Management
The remote change password options are listed below:
– Disable TELNET Change Password against this ACS and return the following message to the users telnet session—When selected, this option disables the ability to perform password changes during a Telnet session hosted by a TACACS+ AAA client. Users who submit a password change receive the text message that you type in the corresponding box.
– Upon remote user password change, immediately propagate the change to selected replication partners—This setting determines whether Cisco Secure ACS sends to its replication partners any passwords changed during a Telnet session hosted by a TACACS+ AAA client, by the CiscoSecure Authentication Agent, or by the User-Changeable Passwords web interface. The Cisco Secure ACSes configured as this Cisco Secure ACS’s replication partners are listed below this check box.
This feature depends upon having the CiscoSecure Database Replication feature configured properly; however, replication scheduling does not apply to propagation of changed password information. Cisco Secure ACS sends changed password information immediately, regardless of replication scheduling.
Changed password information is replicated only to Cisco Secure ACSes that are properly configured to receive replication data from this Cisco Secure ACS. The automatically triggered cascade setting for the CiscoSecure Database Replication feature does not cause Cisco Secure ACSes that receive changed password information to send it to their replication partners.
For more information about CiscoSecure Database Replication, see CiscoSecure Database Replication, page 8-9.
• Password Change Log File Management—These settings enable you to configure how Cisco Secure ACS handles log files generated for the User Password Change report. For more information about this report, see Cisco Secure ACS System Logs, page 9-11.
The log file management options for the User Password Changes Log are listed below:
– Generate New File—You can specify the frequency at which Cisco Secure ACS creates a User Password Changes Log file: daily, weekly, monthly, or after the log reaches a size in kilobytes that you specify.
8-6User Guide for Cisco Secure ACS for Windows Server
78-14696-01, Version 3.1
Chapter 8 Establishing Cisco Secure ACS System ConfigurationLocal Password Management
– Manage Directory—You can specify whether Cisco Secure ACS controls the retention of log files. If enabled, this feature enables you to specify either the maximum number of files to retain or the maximum age of files to retain. If the maximum number of files is exceeded, Cisco Secure ACS deletes the oldest log file. If the maximum age of a file is exceeded, Cisco Secure ACS deletes the file.
Configuring Local Password ManagementTo configure password validation options, follow these steps:
Step 1 In the navigation bar, click System Configuration.
Step 2 Click Local Password Management.
Result: The Local Password Management page appears.
Step 3 Under Password Validation Options, follow these steps:
a. In Password length between X and Y characters, type the minimum valid number of characters for a password in the X box (up to 2 characters).
b. In Password length between X and Y characters, type the maximum valid number of characters for a password in the Y box (up to 2 characters).
c. If you want to disallow passwords that contain the username, select the Password may not contain the username check box.
d. If you want to require that a user password must be different than the previous user password, select the Password is different from the previous value check box.
e. If you want to require that passwords must contain both letters and numbers, select the Password must be alphanumeric check box.
Step 4 Under Remote Change Password, follow these steps:
a. If you want to enable user password changes in Telnet sessions, clear the Disable TELNET Change Password against this ACS and return the following message to the users telnet session check box.
b. If you want to disable user password changes in Telnet sessions, select the Disable TELNET Change Password against this ACS and return the following message to the users telnet session check box.
8-7User Guide for Cisco Secure ACS for Windows Server
78-14696-01, Version 3.1

Chapter 8 Establishing Cisco Secure ACS System ConfigurationLocal Password Management
c. In the box below the Disable TELNET Change Password against this ACS and return the following message to the users telnet session check box, type a message that users should see when attempting to change a password in a Telnet session and when the Telnet password change feature has been disabled (Step b).
d. If you want Cisco Secure ACS to send changed password information immediately after a user has changed a password, select the Upon remote user password change, immediately propagate the change to selected replication partners check box.
Tip The Cisco Secure ACSes that receive the changed password information list below the “Upon remote user password change, immediately propagate the change to selected replication partners” check box.
Step 5 If you want Cisco Secure ACS to generate a new User Password Changes log file at a regular interval, select one of the following options:
• Every day—Cisco Secure ACS generates a new User Password Changes log file at the start of each day.
• Every week—Cisco Secure ACS generates a new User Password Changes log file at the start of each week.
• Every month—Cisco Secure ACS generates a new User Password Changes log file at the start of each month.
Step 6 If you want Cisco Secure ACS to generate a new User Password Changes log file when the current file reaches a specific size, select the When size is greater than X KB option and type the file size threshold, in kilobytes, in the X box.
Step 7 If you want to manage which User Password Changes log files Cisco Secure ACS keeps, follow these steps:
a. Select the Manage Directory check box.
b. If you want to limit the number of User Password Changes log files Cisco Secure ACS retains, select the Keep only the last X files option and type the number of files you want Cisco Secure ACS to retain in the X box.
c. If you want to limit how old User Password Changes log files retained by Cisco Secure ACS can be, select the Delete files older than X days option and type the number of days for which Cisco Secure ACS should retain a User Password Changes log file before deleting it.
8-8User Guide for Cisco Secure ACS for Windows Server
78-14696-01, Version 3.1

Chapter 8 Establishing Cisco Secure ACS System ConfigurationCiscoSecure Database Replication
Step 8 Click Submit.
Result: Cisco Secure ACS restarts its services and implements the settings you specified.
CiscoSecure Database ReplicationThis section provides information about the CiscoSecure Database Replication feature, including procedures for implementing this feature and configuring the Cisco Secure ACSes involved. This section contains the following topics:
• About CiscoSecure Database Replication, page 8-9
• Important Implementation Considerations, page 8-15
• Database Replication Versus Database Backup, page 8-16
• Database Replication Logging, page 8-17
• Replication Options, page 8-17
• Implementing Primary and Secondary Replication Setups on Cisco Secure ACSes, page 8-20
• Configuring a Secondary Cisco Secure ACS, page 8-21
• Replicating Immediately, page 8-24
• Scheduling Replication, page 8-26
• Disabling CiscoSecure Database Replication, page 8-29
• Database Replication Event Errors, page 8-29
About CiscoSecure Database ReplicationDatabase replication creates mirror systems of Cisco Secure ACSes by duplicating parts of the primary Cisco Secure ACS setup to one or more secondary Cisco Secure ACSes. You can configure your AAA clients to use these secondary Cisco Secure ACSes if the primary Cisco Secure ACS fails or is unreachable. With a secondary Cisco Secure ACS whose CiscoSecure database is a replica of the CiscoSecure database on the primary Cisco Secure ACS, if the
8-9User Guide for Cisco Secure ACS for Windows Server
78-14696-01, Version 3.1
Chapter 8 Establishing Cisco Secure ACS System ConfigurationCiscoSecure Database Replication
primary Cisco Secure ACS goes out of service, incoming requests are authenticated without network downtime, provided that your AAA clients are configured to failover to the secondary Cisco Secure ACS.
Database replication allows you to do the following:
• Select the parts of the primary Cisco Secure ACS configuration to be replicated.
• Control the timing of the replication process, including creating schedules
• Export selected configuration items from the primary Cisco Secure ACS.
• Securely transport selected configuration data from the primary Cisco Secure ACS to one or more secondary Cisco Secure ACSes.
• Update the secondary Cisco Secure ACSes to create matching configurations.
The following items cannot be replicated:
• IP pool definitions (for more information, see About IP Pools Server, page 8-60)
• Cisco Secure ACS certificate and private key files
• External user database configuration
• Unknown user group mapping configuration
• User-defined RADIUS dictionaries (for more information, see Important Implementation Considerations, page 8-15)
• Settings on the ACS Service Management page in the System Configuration section
• All external user database configurations
• All logging configurations
• RDBMS Synchronization settings
• Third-party software, such as Novell Requestor or RSA ACE client software
8-10User Guide for Cisco Secure ACS for Windows Server
78-14696-01, Version 3.1
Chapter 8 Establishing Cisco Secure ACS System ConfigurationCiscoSecure Database Replication
With regard to database replication, we make the following distinctions about Cisco Secure ACSes:
• Primary Cisco Secure ACS—A Cisco Secure ACS that sends replicated CiscoSecure database components to other Cisco Secure ACSes.
• Secondary Cisco Secure ACS—A Cisco Secure ACS that receives replicated CiscoSecure database components from a primary Cisco Secure ACS. In the HTML interface, these are identified as replication partners.
A Cisco Secure ACS can be both a primary Cisco Secure ACS and a secondary Cisco Secure ACS, provided that it is not configured to be a secondary Cisco Secure ACS to a Cisco Secure ACS for which it performs as a primary Cisco Secure ACS.
Note Bidirectional replication, wherein an Cisco Secure ACS both sends database components to and receives database components from the same remote Cisco Secure ACS, is not supported. Replication fails if an Cisco Secure ACS is configured to replicate to and from the same Cisco Secure ACS.
Note All Cisco Secure ACSes involved in replication must run the same release of the Cisco Secure ACS software. For example, if the primary Cisco Secure ACS is running Cisco Secure ACS version 3.0, all secondary Cisco Secure ACSes should be running Cisco Secure ACS version 3.0. Because patch releases can introduce significant changes to the CiscoSecure database, we strongly recommend that Cisco Secure ACSes involved in replication use the same patch level, too.
8-11User Guide for Cisco Secure ACS for Windows Server
78-14696-01, Version 3.1
Chapter 8 Establishing Cisco Secure ACS System ConfigurationCiscoSecure Database Replication
Replication Process
This topic describes the process of database replication, including the interaction between a primary Cisco Secure ACS and each of its secondary Cisco Secure ACSes.
1. The database replication process begins when the primary Cisco Secure ACS contacts the secondary Cisco Secure ACS. In this initial connection, the following four events occur:
a. The two Cisco Secure ACSes perform mutual authentication based upon the shared secret of the primary Cisco Secure ACS. If authentication fails, replication fails.
Note On the secondary Cisco Secure ACS, the AAA Servers table entry for the primary Cisco Secure ACS must have the same shared secret that the primary Cisco Secure ACS has for itself in its own AAA Servers table entry. The secondary Cisco Secure ACS’s shared secret is irrelevant.
b. The secondary Cisco Secure ACS verifies that it is not configured to replicate to the primary Cisco Secure ACS. If it is, replication is aborted. Cisco Secure ACS does not support bidirectional replication, wherein an Cisco Secure ACS can act as both a primary and a secondary Cisco Secure ACS to the same remote Cisco Secure ACS.
c. The primary Cisco Secure ACS verifies that the version of Cisco Secure ACS that the secondary Cisco Secure ACS is running is the same as its own version of Cisco Secure ACS. If not, replication fails.
d. The primary Cisco Secure ACS compares the list of database components it is configured to replicate with the list of database components the secondary Cisco Secure ACS is configured to replicate. The primary Cisco Secure ACS only replicates those database components that it is configured to send and that the secondary Cisco Secure ACS is configured to receive. If the secondary Cisco Secure ACS is not configured to receive any of the components that the primary Cisco Secure ACS is configured to send, the database replication fails.
8-12User Guide for Cisco Secure ACS for Windows Server
78-14696-01, Version 3.1
Chapter 8 Establishing Cisco Secure ACS System ConfigurationCiscoSecure Database Replication
2. After the primary Cisco Secure ACS has determined which components to send to the secondary Cisco Secure ACS, the replication process continues on the primary Cisco Secure ACS as follows:
a. The primary Cisco Secure ACS stops its authentication and creates a copy of the CiscoSecure database components that it is configured to replicate. During this step, if AAA clients are configured properly, those that usually use the primary Cisco Secure ACS failover to another Cisco Secure ACS.
b. The primary Cisco Secure ACS resumes its authentication service. It also compresses and encrypts the copy of its database components for transmission to the secondary Cisco Secure ACS.
c. The primary Cisco Secure ACS transmits the compressed, encrypted copy of its database components to the secondary Cisco Secure ACS. This transmission occurs over a TCP connection, using port 2000. The TCP session uses a 128-bit encrypted, Cisco-proprietary protocol.
3. After the preceding events on the primary Cisco Secure ACS, the database replication process continues on the secondary Cisco Secure ACS as follows:
a. The secondary Cisco Secure ACS receives the compressed, encrypted copy of the CiscoSecure database components from the primary Cisco Secure ACS. After transmission of the database components is complete, the secondary Cisco Secure ACS uncompresses the database components.
b. The secondary Cisco Secure ACS stops its authentication service and replaces its database components with the database components it received from the primary Cisco Secure ACS. During this step, if AAA clients are configured properly, those that usually use the secondary Cisco Secure ACS failover to another Cisco Secure ACS.
c. The secondary Cisco Secure ACS resumes its authentication service.
Cisco Secure ACS can act as both a primary Cisco Secure ACS and a secondary Cisco Secure ACS. Figure 8-1 shows a cascading replication scenario. Server 1 acts only as a primary Cisco Secure ACS, replicating to servers 2 and 3, which act as secondary Cisco Secure ACSes. After replication from server 1 to server 2 has completed, server 2 acts as a primary Cisco Secure ACS while replicating to servers 4 and 5. Similarly, server 3 acts as a primary Cisco Secure ACS while replicating to servers 6 and 7.
8-13User Guide for Cisco Secure ACS for Windows Server
78-14696-01, Version 3.1
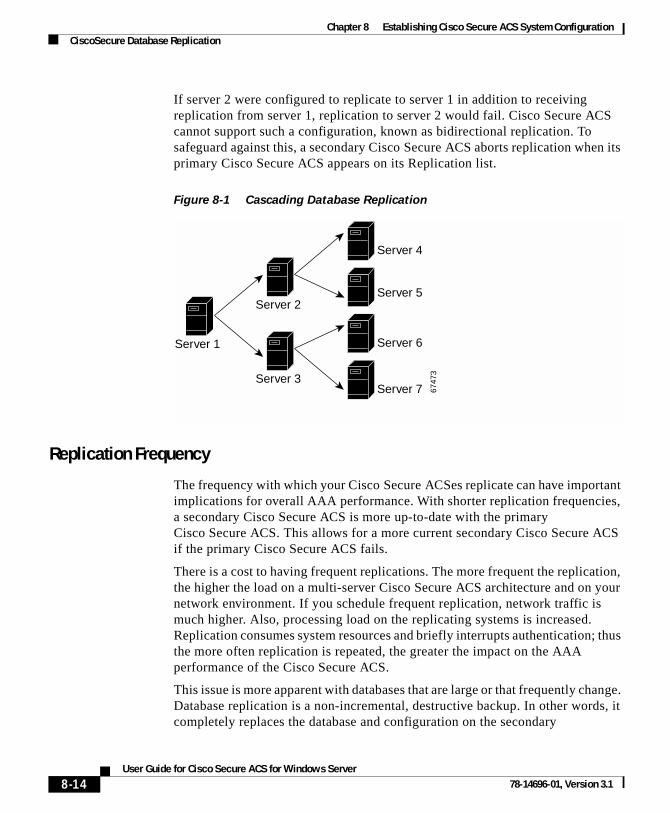
Chapter 8 Establishing Cisco Secure ACS System ConfigurationCiscoSecure Database Replication
If server 2 were configured to replicate to server 1 in addition to receiving replication from server 1, replication to server 2 would fail. Cisco Secure ACS cannot support such a configuration, known as bidirectional replication. To safeguard against this, a secondary Cisco Secure ACS aborts replication when its primary Cisco Secure ACS appears on its Replication list.
Figure 8-1 Cascading Database Replication
Replication Frequency
The frequency with which your Cisco Secure ACSes replicate can have important implications for overall AAA performance. With shorter replication frequencies, a secondary Cisco Secure ACS is more up-to-date with the primary Cisco Secure ACS. This allows for a more current secondary Cisco Secure ACS if the primary Cisco Secure ACS fails.
There is a cost to having frequent replications. The more frequent the replication, the higher the load on a multi-server Cisco Secure ACS architecture and on your network environment. If you schedule frequent replication, network traffic is much higher. Also, processing load on the replicating systems is increased. Replication consumes system resources and briefly interrupts authentication; thus the more often replication is repeated, the greater the impact on the AAA performance of the Cisco Secure ACS.
This issue is more apparent with databases that are large or that frequently change. Database replication is a non-incremental, destructive backup. In other words, it completely replaces the database and configuration on the secondary
6747
3
Server 1
Server 2
Server 3
Server 4
Server 5
Server 6
Server 7
8-14User Guide for Cisco Secure ACS for Windows Server
78-14696-01, Version 3.1
Chapter 8 Establishing Cisco Secure ACS System ConfigurationCiscoSecure Database Replication
Cisco Secure ACS every time it runs. Therefore, a large database results in substantial amounts of data being transferred, and the processing overhead can also be large.
Important Implementation ConsiderationsYou should consider several important points when you implement the CiscoSecure Database Replication feature:
• Cisco Secure ACS only supports database replication to other Cisco Secure ACSes. All Cisco Secure ACSes participating in CiscoSecure database replication must run the same version of Cisco Secure ACS. We strongly recommend that Cisco Secure ACSes involved in replication use the same patch level, too.
• You must ensure correct configuration of the AAA Servers table in all Cisco Secure ACSes involved in replication.
– In its AAA Servers table, a primary Cisco Secure ACS must have for each of its secondary Cisco Secure ACS an accurately configured entry.
– In its AAA Servers table, a secondary Cisco Secure ACS must have for each of its primary Cisco Secure ACSes an accurately configured entry.
– On a primary Cisco Secure ACS and all its secondary Cisco Secure ACSes, the AAA Servers table entries for the primary Cisco Secure ACS must have identical shared secrets.
• Only suitably configured, valid Cisco Secure ACSes can be secondary Cisco Secure ACSes. To configure a secondary Cisco Secure ACS for database replication, see Configuring a Secondary Cisco Secure ACS, page 8-21.
• Replication to secondary Cisco Secure ACSes takes place sequentially in the order listed in the Replication list under Replication Partners on the CiscoSecure Database Replication page.
• A secondary Cisco Secure ACS receiving replicated components must be configured to accept database replication from the primary Cisco Secure ACS. To configure a secondary Cisco Secure ACS for database replication, see Configuring a Secondary Cisco Secure ACS, page 8-21.
8-15User Guide for Cisco Secure ACS for Windows Server
78-14696-01, Version 3.1
Chapter 8 Establishing Cisco Secure ACS System ConfigurationCiscoSecure Database Replication
• Cisco Secure ACS does not support bidirectional database replication. The secondary Cisco Secure ACS receiving the replicated components verifies that the primary Cisco Secure ACS is not on its Replication list. If not, the secondary Cisco Secure ACS accepts the replicated components. If so, it rejects the components.
• To replicate user-defined RADIUS vendor and vendor-specific attribute (VSA) configurations, user-defined RADIUS vendor and VSA definitions to be replicated must be identical on primary and secondary Cisco Secure ACSes, including the RADIUS vendor slots that the user-defined RADIUS vendors occupy. For more information about user-defined RADIUS vendors and VSAs, see Custom RADIUS Vendors and VSAs, page 8-33.
Database Replication Versus Database BackupDo not confuse database replication with system backup. Database replication does not replace System Backup. While both features protect against partial or complete server loss, each feature addresses the issue in a different way.
System Backup archives data into a format that you can later use to restore the configuration if the system fails or the data becomes corrupted. The backup data is stored on the local hard drive and can be copied and removed from the system for long-term storage. You can store several generations of database backup files.
CiscoSecure Database Replication enables you to copy various components of the CiscoSecure database to other Cisco Secure ACSes. This can help you plan a failover AAA architecture and can reduce the complexity of your configuration and maintenance tasks. While it is unlikely, it is possible that CiscoSecure Database Replication can propagate a corrupted database to the Cisco Secure ACSes that generate your backup files.
Caution Because the possibility of replicating a corrupted database always exists, we strongly recommend that you implement a backup plan, especially in mission-critical environments. For more information about backing up Cisco Secure ACS or the CiscoSecure database, see Cisco Secure ACS Backup, page 8-47, and Appendix D, “Cisco Secure ACS Command-Line Database Utility.”
8-16User Guide for Cisco Secure ACS for Windows Server
78-14696-01, Version 3.1
Chapter 8 Establishing Cisco Secure ACS System ConfigurationCiscoSecure Database Replication
Database Replication LoggingCisco Secure ACS logs all replication events—whether successful or not—in two files:
• The Windows Event Log
• The Database Replication report
To view the Windows Event Log, use the Windows administration utilities. You can view recent reports in the Reports and Activity section of Cisco Secure ACS.
For more information about Cisco Secure ACS reports, see Chapter 9, “Working with Logging and Reports.”
Replication OptionsThe Cisco Secure ACS HTML interface provides three sets of options for configuring CiscoSecure Database Replication:
• Replication Components Options, page 8-17
• Outbound Replication Options, page 8-18
• Inbound Replication Options, page 8-20
Replication Components Options
You can specify both the CiscoSecure database components that a Cisco Secure ACS sends as a primary Cisco Secure ACS and the components that it receives as a secondary Cisco Secure ACS.
Note The CiscoSecure database components received by a secondary Cisco Secure ACS overwrite the CiscoSecure database components on the secondary Cisco Secure ACS. Any information unique to the overwritten database component is lost.
8-17User Guide for Cisco Secure ACS for Windows Server
78-14696-01, Version 3.1
Chapter 8 Establishing Cisco Secure ACS System ConfigurationCiscoSecure Database Replication
The Replication Components table on the CiscoSecure Database Replication page presents the options that control which components are replicated; these options are as follows:
• User and group database—Replicate information for groups and users.
• Network Configuration Device tables—Replicate the AAA Servers tables and the AAA Clients tables in the Network Configuration section. This also controls whether network device groups are replicated.
• Distribution table—Replicate the Proxy Distribution Table in the Network Configuration section.
• Interface configuration—Replicate Advanced Options settings, RADIUS settings, and TACACS+ settings from the Interface Configuration section.
• Interface security settings—Replicate administrators and security information for the Cisco Secure ACS HTML interface.
• Password validation settings—Replicate password validation settings.
If mirroring the entire database with a secondary Cisco Secure ACS might send confidential information, such as the Proxy Distribution Table, you can configure the primary Cisco Secure ACS to send only a specific category of database information.
Outbound Replication Options
In the Outbound Replication table on the CiscoSecure Database Replication page, you can schedule outbound replication and you can specify the secondary Cisco Secure ACSes for this primary Cisco Secure ACS.
• Scheduling Options—You can specify when CiscoSecure database replication occurs. The options that control when replication occurs appear in the Scheduling section of Outbound Replication table and are as follows:
– Manually—Cisco Secure ACS does not perform automatic database replication.
– Automatically Triggered Cascade—Cisco Secure ACS performs database replication to the configured list of secondary Cisco Secure ACSes when database replication from a primary Cisco Secure ACS completes. This enables you to build a propagation hierarchy of Cisco Secure ACS, relieving a primary Cisco Secure ACS
8-18User Guide for Cisco Secure ACS for Windows Server
78-14696-01, Version 3.1
Chapter 8 Establishing Cisco Secure ACS System ConfigurationCiscoSecure Database Replication
from the burden of propagating the replicated components to every other Cisco Secure ACS. For an illustration of cascade replication, see Figure 8-1.
– Every X minutes—Cisco Secure ACS performs, on a set frequency, database replication to the configured list of secondary Cisco Secure ACSes. The unit of measurement is minutes, with a default update frequency of 60 minutes.
– At specific times...—Cisco Secure ACS performs, at the time specified in the day and hour graph, database replication to the configured list of secondary Cisco Secure ACSes. The minimum interval is one hour, and the replication takes place on the hour selected.
• Partner Options—You can specify the secondary Cisco Secure ACSes for this primary Cisco Secure ACS. The options that control the secondary Cisco Secure ACSes to which a primary Cisco Secure ACS replicates appear in the Partners section of the Outbound Replication table.
Note The items in the AAA Server and Replication lists reflect the AAA servers configured in the AAA Servers table in Network Configuration. To make a particular Cisco Secure ACS available as a secondary Cisco Secure ACS, you must first add that Cisco Secure ACS to the AAA Servers table of the primary Cisco Secure ACS.
– AAA Server—This list represents the secondary Cisco Secure ACSes that this primary Cisco Secure ACS does not send replicated components to.
– Replication—This list represents the secondary Cisco Secure ACSes that this primary Cisco Secure ACS does send replicated components to.
Note Cisco Secure ACS does not support bidirectional database replication. A secondary Cisco Secure ACS receiving replicated components verifies that the primary Cisco Secure ACS is not on its Replication list. If not, the secondary Cisco Secure ACS accepts the replicated components. If so, it rejects the components.
8-19User Guide for Cisco Secure ACS for Windows Server
78-14696-01, Version 3.1
Chapter 8 Establishing Cisco Secure ACS System ConfigurationCiscoSecure Database Replication
Inbound Replication Options
You can specify the primary Cisco Secure ACSes for which a secondary Cisco Secure ACS. This option appears in the Inbound Replication table on the CiscoSecure Database Replication page.
The Accept replication from list controls which Cisco Secure ACSes the current Cisco Secure ACS does accept replicated components from. The list contains the following options:
• Any Known CiscoSecure ACS Server—If this option is selected, Cisco Secure ACS accepts replicated components from any Cisco Secure ACS configured in the AAA Servers table in Network Configuration.
• Other AAA servers—The list displays all the AAA servers configured in the AAA Servers table in Network Configuration. If a specific AAA server name is selected, Cisco Secure ACS accepts replicated components only from the Cisco Secure ACS specified.
Note Cisco Secure ACS does not support bidirectional database replication. A secondary Cisco Secure ACS receiving replicated components verifies that the primary Cisco Secure ACS is not on its Replication list. If not, the secondary Cisco Secure ACS accepts the replicated components. If so, it rejects the components.
For more information about the AAA Servers table in Network Configuration, see AAA Server Configuration, page 4-20.
Implementing Primary and Secondary Replication Setups on Cisco Secure ACSes
If you implement a replication scheme that uses cascading replication, the Cisco Secure ACS configured to replicate only when it has received replicated components from another Cisco Secure ACS acts both as a primary Cisco Secure ACS and as a secondary Cisco Secure ACS. First, it acts as a secondary Cisco Secure ACS while it receives replicated components, and then it
8-20User Guide for Cisco Secure ACS for Windows Server
78-14696-01, Version 3.1
Chapter 8 Establishing Cisco Secure ACS System ConfigurationCiscoSecure Database Replication
acts as a primary Cisco Secure ACS while it replicates components to other Cisco Secure ACS servers. For an illustration of cascade replication, see Figure 8-1.
To implement primary and secondary replication setups on Cisco Secure ACSes, follow these steps:
Step 1 On each secondary Cisco Secure ACS, follow these steps:
a. In the Network Configuration section, add the primary Cisco Secure ACS to the AAA Servers table.
For more information about adding entries to the AAA Servers table, see AAA Server Configuration, page 4-20.
b. Configure the secondary Cisco Secure ACS to receive replicated components. For instructions, see Configuring a Secondary Cisco Secure ACS, page 8-21.
Step 2 On the primary Cisco Secure ACS, follow these steps:
a. In the Network Configuration section, add each secondary Cisco Secure ACS to the AAA Servers table.
For more information about adding entries to the AAA Servers table, see AAA Server Configuration, page 4-20.
b. If you want to replicate according to a schedule, at intervals, or whenever the primary Cisco Secure ACS has received replicated components from another Cisco Secure ACS, see Scheduling Replication, page 8-26.
c. If you want to initiate replication immediately, see Replicating Immediately, page 8-24.
Configuring a Secondary Cisco Secure ACS
Note If this feature does not appear, click Interface Configuration, click Advanced Options, and select the CiscoSecure ACS Database Replication check box. Also, verify that the Distributed System Settings check box is selected; if not, select the Distributed System Settings check box.
8-21User Guide for Cisco Secure ACS for Windows Server
78-14696-01, Version 3.1
Chapter 8 Establishing Cisco Secure ACS System ConfigurationCiscoSecure Database Replication
The CiscoSecure Database Replication feature requires that you configure specific Cisco Secure ACSes to act as secondary Cisco Secure ACSes. The components that a secondary Cisco Secure ACS is to receive must be explicitly specified, as must be its primary Cisco Secure ACS.
Replication is always initiated by the primary Cisco Secure ACS. For more information about sending replication components, see Replicating Immediately, page 8-24, or Scheduling Replication, page 8-26.
Caution The CiscoSecure database components received by a secondary Cisco Secure ACS overwrite the CiscoSecure database components on the secondary Cisco Secure ACS. Any information unique to the overwritten database component is lost.
Before You Begin
Ensure correct configuration of the AAA Servers table in the secondary Cisco Secure ACS. This secondary Cisco Secure ACS must have an entry in its AAA Servers table for each of its primary Cisco Secure ACSes. Also, the AAA Servers table entry for each primary Cisco Secure ACS must have the same shared secret that the primary Cisco Secure ACS has for its own entry in its AAA Servers table. For more information about the AAA Servers table, see AAA Server Configuration, page 4-20.
To configure a Cisco Secure ACS to be a secondary Cisco Secure ACS, follow these steps:
Step 1 Log in to the HTML interface on the secondary Cisco Secure ACS.
Step 2 In the navigation bar, click System Configuration.
Step 3 Click CiscoSecure Database Replication.
Result: The Database Replication Setup page appears.
Step 4 In the Replication Components table, select the Receive check box for each database component to be received from a primary Cisco Secure ACS.
For more information about replication components, see Replication Components Options, page 8-17.
8-22User Guide for Cisco Secure ACS for Windows Server
78-14696-01, Version 3.1

Chapter 8 Establishing Cisco Secure ACS System ConfigurationCiscoSecure Database Replication
Step 5 Make sure that no Cisco Secure ACS that the secondary Cisco Secure ACS is to receive replicated components from is included in the Replication list. If so, select the primary Cisco Secure ACS in the Replication list and click the <-- (left arrow) to move it to the AAA Servers list.
Note Cisco Secure ACS does not support bidirectional database replication. A secondary Cisco Secure ACS receiving replicated components verifies that the primary Cisco Secure ACS is not on its Replication list. If not, the secondary Cisco Secure ACS accepts the replicated components. If so, it aborts replication.
Step 6 If the secondary Cisco Secure ACS is to receive replication components from only one primary Cisco Secure ACS, from the Accept replication from list, select the other Cisco Secure ACS name.
The primary Cisco Secure ACSes available in the Accept replication from list are determined by the AAA Servers table in the Network Configuration section. For more information about the AAA Servers table, see AAA Server Configuration, page 4-20.
Note On the primary Cisco Secure ACS and all secondary Cisco Secure ACSes, the AAA Servers table entries for the primary Cisco Secure ACS must have identical shared secrets.
Step 7 If the secondary Cisco Secure ACS is to receive replication components from more than one primary Cisco Secure ACS, from the Accept replication from list, select Any Known CiscoSecure ACS Server.
The Any Known CiscoSecure ACS Server option is limited to the Cisco Secure ACSes listed in the AAA Servers table in Network Configuration.
Note For each primary Cisco Secure ACS for this secondary Cisco Secure ACS, on both the primary and secondary Cisco Secure ACS, the AAA Servers table entries for the primary Cisco Secure ACS must have identical shared secrets.
8-23User Guide for Cisco Secure ACS for Windows Server
78-14696-01, Version 3.1
Chapter 8 Establishing Cisco Secure ACS System ConfigurationCiscoSecure Database Replication
Step 8 Click Submit.
Result: Cisco Secure ACS saves the replication configuration, and at the frequency or times you specified, Cisco Secure ACS begins accepting the replicated components from the other Cisco Secure ACSes you specified.
Replicating ImmediatelyYou can manually start database replication.
Note Replication cannot occur until you have configured at least one secondary Cisco Secure ACS. For more information about configuring a secondary Cisco Secure ACS, see Configuring a Secondary Cisco Secure ACS, page 8-21.
Before You Begin
For each secondary Cisco Secure ACS that this Cisco Secure ACS is to send replicated components to, ensure that you have completed the steps in Configuring a Secondary Cisco Secure ACS, page 8-21.
Ensure correct configuration of the AAA Servers table in the primary Cisco Secure ACS. This primary Cisco Secure ACS must have an accurately configured entry in its AAA Servers table for each of its secondary Cisco Secure ACSes. For more information about the AAA Servers table, see AAA Server Configuration, page 4-20.
To initiate database replication immediately, follow these steps:
Step 1 Log in to the HTML interface on the primary Cisco Secure ACS.
Step 2 In the navigation bar, click System Configuration.
8-24User Guide for Cisco Secure ACS for Windows Server
78-14696-01, Version 3.1
Chapter 8 Establishing Cisco Secure ACS System ConfigurationCiscoSecure Database Replication
Step 3 Click CiscoSecure Database Replication.
Note If this feature does not appear, click Interface Configuration, click Advanced Options, and select the CiscoSecure ACS Database Replication check box. Also, verify that the Distributed System Settings check box is selected; if not, select the Distributed System Settings check box.
Result: The Database Replication Setup page appears.
Step 4 For each CiscoSecure database component you want to replicate to a secondary Cisco Secure ACS, under Replication Components, select the corresponding Send check box.
Step 5 For each secondary Cisco Secure ACS that you want the primary Cisco Secure ACS server to replicate its select components to, select the secondary Cisco Secure ACS server from the AAA Servers list, and then click --> (right arrow button).
Tip If you want to remove a secondary Cisco Secure ACSes from the Replication list, select the secondary Cisco Secure ACS in the Replication list, and then click <-- (left arrow button).
Note Cisco Secure ACS does not support bidirectional database replication. A secondary Cisco Secure ACS receiving replicated components verifies that the primary Cisco Secure ACS is not on its Replication list. If not, the secondary Cisco Secure ACS accepts the replicated components. If so, it rejects the components.
Step 6 At the bottom of the browser window, click Replicate Now.
Result: Cisco Secure ACS saves the replication configuration. Cisco Secure ACS immediately begins sending replicated database components to the secondary Cisco Secure ACSes you specified.
8-25User Guide for Cisco Secure ACS for Windows Server
78-14696-01, Version 3.1

Chapter 8 Establishing Cisco Secure ACS System ConfigurationCiscoSecure Database Replication
Scheduling ReplicationYou can schedule when a primary Cisco Secure ACS sends its replicated database components to a secondary Cisco Secure ACS. For more information about replication scheduling options, see Outbound Replication Options, page 8-18.
Note Replication cannot occur until the secondary Cisco Secure ACSes are configured properly. For more information, see Configuring a Secondary Cisco Secure ACS, page 8-21.
Before You Begin
For each secondary Cisco Secure ACS of this primary Cisco Secure ACS, ensure that you have completed the steps in Configuring a Secondary Cisco Secure ACS, page 8-21.
Ensure correct configuration of the AAA Servers table of this primary Cisco Secure ACS. For each secondary Cisco Secure ACS of this primary Cisco Secure ACS, this Cisco Secure ACS must have an accurately configured entry in its AAA Servers table. For more information about the AAA Servers table, see AAA Server Configuration, page 4-20.
To schedule when a primary Cisco Secure ACS replicates to its secondary Cisco Secure ACSes, follow these steps:
Step 1 Log in to the HTML interface on the primary Cisco Secure ACS.
Step 2 In the navigation bar, click System Configuration.
Step 3 Click CiscoSecure Database Replication.
Note If this feature does not appear, click Interface Configuration, click Advanced Options, and select the CiscoSecure ACS Database Replication check box. Also, verify that the Distributed System Settings check box is selected; if not, select the Distributed System Settings check box.
Result: The Database Replication Setup page appears.
8-26User Guide for Cisco Secure ACS for Windows Server
78-14696-01, Version 3.1

Chapter 8 Establishing Cisco Secure ACS System ConfigurationCiscoSecure Database Replication
Step 4 To specify which CiscoSecure database components the primary Cisco Secure ACS should send to its secondary Cisco Secure ACSes, under Replication Components, select the corresponding Send check box for each database component to be sent.
For more information about replicated database components, see Replication Components Options, page 8-17.
Step 5 To have the primary Cisco Secure ACS send replicated database components to its secondary Cisco Secure ACSes at regular intervals, under Replication Scheduling, select the Every X minutes option and in the X box type the length of the interval at which Cisco Secure ACS should perform replication (up to 7 characters).
Note Because Cisco Secure ACS is momentarily shut down during replication, a short replication interval may cause frequent failover of your AAA clients to other Cisco Secure ACSes. If AAA clients are not configured to failover to other Cisco Secure ACSes, the brief interruption in authentication service may prevent users from authenticating. For more information, see Replication Frequency, page 8-14.
Step 6 If you want to schedule times at which the primary Cisco Secure ACS sends its replicated database components to its secondary Cisco Secure ACSes, follow these steps:
a. In the Outbound Replication table, select the At specific times option.
b. In the day and hour graph, click the times at which you want Cisco Secure ACS to perform replication.
Tip Clicking times of day on the graph selects those times; clicking again clears them. At any time you can click Clear All to clear all hours, or you can click Set All to select all hours.
Step 7 If you want to have this Cisco Secure ACS send replicated database components immediately upon receiving replicated database components from another Cisco Secure ACS, select the Automatically triggered cascade option.
8-27User Guide for Cisco Secure ACS for Windows Server
78-14696-01, Version 3.1

Chapter 8 Establishing Cisco Secure ACS System ConfigurationCiscoSecure Database Replication
Note If you specify the Automatically triggered cascade option, you must configure another Cisco Secure ACS to act as a primary Cisco Secure ACS server to this server; otherwise, this Cisco Secure ACS never replicates to its secondary Cisco Secure ACSes.
Step 8 You must specify the secondary Cisco Secure ACSes that this Cisco Secure ACS should replicate to. To do so, follow these steps:
Note Cisco Secure ACS does not support bidirectional database replication. A secondary Cisco Secure ACS receiving replicated database components verifies that the primary Cisco Secure ACS is not on its Replication list. If not, the secondary Cisco Secure ACS accepts the replicated database components. If so, it rejects the components. For more information about replication partners, see Inbound Replication Options, page 8-20.
a. In the Outbound Replication table, from the AAA Servers list, select the name of a secondary Cisco Secure ACS to which you want the primary Cisco Secure ACS to send its selected replicated database components.
Note The secondary Cisco Secure ACSes available in the AAA Servers list are determined by the AAA Servers table in Network Configuration. For more information about the AAA Servers table, see AAA Server Configuration, page 4-20.
b. Click —> (right arrow button).
Result: The selected secondary Cisco Secure ACS moves to the Replication list.
c. Repeat Step a and Step b for each secondary Cisco Secure ACS to which you want the primary Cisco Secure ACS to send its selected replicated database components.
Step 9 Click Submit.
Result: Cisco Secure ACS saves the replication configuration you created.
8-28User Guide for Cisco Secure ACS for Windows Server
78-14696-01, Version 3.1

Chapter 8 Establishing Cisco Secure ACS System ConfigurationRDBMS Synchronization
Disabling CiscoSecure Database ReplicationYou can disable scheduled CiscoSecure database replications without losing the schedule itself. This allows you to cease scheduled replications temporarily and later resume them without having to re-enter the schedule information.
To disable CiscoSecure database replication, follow these steps:
Step 1 Log in to the HTML interface on the primary Cisco Secure ACS.
Step 2 In the navigation bar, click System Configuration.
Step 3 Click CiscoSecure Database Replication.
Result: The Database Replication Setup page appears.
Step 4 In the Replication Components table, clear all check boxes.
Step 5 In the Outbound Replication table, select the Manually option.
Step 6 Click Submit.
Result: Cisco Secure ACS does not permit any replication to or from this Cisco Secure ACS server.
Database Replication Event ErrorsThe Database Replication report contains messages indicating errors that occur during replication. For more information about the Database Replication report, see Cisco Secure ACS System Logs, page 9-11.
RDBMS SynchronizationThis section provides information about the RDBMS Synchronization feature, including procedures for implementing this feature, within both Cisco Secure ACS and the external data source involved. This section contains the following topics:
• About RDBMS Synchronization, page 8-30
• RDBMS Synchronization Components, page 8-33
8-29User Guide for Cisco Secure ACS for Windows Server
78-14696-01, Version 3.1
Chapter 8 Establishing Cisco Secure ACS System ConfigurationRDBMS Synchronization
• Cisco Secure ACS Database Recovery Using the accountActions Table, page 8-36
• Reports and Event (Error) Handling, page 8-37
• Preparing to Use RDBMS Synchronization, page 8-37
• Considerations for Using CSV-Based Synchronization, page 8-38
• Configuring a System Data Source Name for RDBMS Synchronization, page 8-40
• RDBMS Synchronization Options, page 8-41
• Performing RDBMS Synchronization Immediately, page 8-43
• Scheduling RDBMS Synchronization, page 8-44
• Disabling Scheduled RDBMS Synchronizations, page 8-46
About RDBMS SynchronizationThe RDBMS Synchronization feature enables you to update the CiscoSecure user database with information from an ODBC-compliant data source. The ODBC-compliant data source can be the RDBMS database of a third-party application. It can also be an intermediate file or database that a third-party system updates. Regardless of where the file or database resides, Cisco Secure ACS reads the file or database via the ODBC connection. You can also regard RDBMS Synchronization as an API—much of what you can configure for a user, group, or device through the Cisco Secure ACS HTML interface, you can alternatively maintain through this feature. RDBMS Synchronization supports addition, modification, and deletion for all data items it can access.
You can configure synchronization to occur on a regular schedule. You can also perform synchronizations manually, updating the CiscoSecure user database on demand.
Synchronization performed by a single Cisco Secure ACS can update the internal databases of other Cisco Secure ACSes, so that you only need configure RDBMS Synchronization on one Cisco Secure ACS. Cisco Secure ACSes listen on TCP port 2000 for synchronization data. RDBMS Synchronization communication between Cisco Secure ACSes is encrypted using 128-bit encrypted, proprietary algorithm.
8-30User Guide for Cisco Secure ACS for Windows Server
78-14696-01, Version 3.1
Chapter 8 Establishing Cisco Secure ACS System ConfigurationRDBMS Synchronization
The topics in this section provide an overview of the kinds of configuration that RDBMS Synchronization can automate. You specify the actions in a relational database table or text file named accountActions. For more information about accountActions, see About the accountActions Table, page 8-34. For specific information about all actions that RDBMS Synchronization can perform, see Appendix F, “RDBMS Synchronization Import Definitions.”
Users
Among the user-related configuration actions that RDBMS Synchronization can perform are the following:
• Adding users
• Deleting users
• Setting passwords
• Setting user group memberships
• Setting Max Sessions parameters
• Setting network usage quota parameters
• Configuring command authorizations
• Configuring network access restrictions
• Configuring time-of-day/day-of-week access restrictions
• Assigning IP addresses
• Specifying outbound RADIUS attribute values
• Specifying outbound TACACS+ attribute values
Note For specific information about all actions that RDBMS Synchronization can perform, see Appendix F, “RDBMS Synchronization Import Definitions.”
8-31User Guide for Cisco Secure ACS for Windows Server
78-14696-01, Version 3.1
Chapter 8 Establishing Cisco Secure ACS System ConfigurationRDBMS Synchronization
User Groups
Among the group-related configuration actions that RDBMS Synchronization can perform are the following:
• Setting Max Sessions parameters
• Setting network usage quota parameters
• Configuring command authorizations
• Configuring network access restrictions
• Configuring time-of-day/day-of-week access restrictions
• Specifying outbound RADIUS attribute values
• Specifying outbound TACACS+ attribute values
Note For specific information about all actions that RDBMS Synchronization can perform, see Appendix F, “RDBMS Synchronization Import Definitions.”
Network Configuration
Among the network device-related configuration actions that RDBMS Synchronization can perform are the following:
• Adding AAA clients
• Deleting AAA clients
• Setting AAA client configuration details
• Adding AAA servers
• Deleting AAA servers
• Setting AAA server configuration details
• Adding and configuring Proxy Distribution Table entries
Note For specific information about all actions that RDBMS Synchronization can perform, see Appendix F, “RDBMS Synchronization Import Definitions.”
8-32User Guide for Cisco Secure ACS for Windows Server
78-14696-01, Version 3.1

Chapter 8 Establishing Cisco Secure ACS System ConfigurationRDBMS Synchronization
Custom RADIUS Vendors and VSAs
RDBMS Synchronization enables you to configure custom RADIUS vendors and VSAs. In addition to supporting a set of predefined RADIUS vendors and vendor-specific attributes (VSAs), Cisco Secure ACS supports RADIUS vendors and VSAs that you define. Vendors you add must be IETF-compliant; therefore, all VSAs that you add must be sub-attributes of IETF RADIUS attribute number 26.
You can define up to ten custom RADIUS vendors. Cisco Secure ACS allows only one instance of any given vendor, as defined by the unique vendor IETF ID number and by the vendor name.
Note For specific information about all actions that RDBMS Synchronization can perform, see Appendix F, “RDBMS Synchronization Import Definitions.”
RDBMS Synchronization ComponentsThe RDBMS Synchronization feature comprises two components:
• CSDBSync—A dedicated Windows service that performs automated user and group account management services for Cisco Secure ACS.
• accountActions Table—The data object that holds information used by CSDBSync to update the CiscoSecure user database.
About CSDBSync
The CSDBSync service uses an ODBC system data source name (DSN) to access the accountActions table. See Figure 8-2. This service looks specifically for a table named “accountActions”. Synchronization events fail if CSDBSync cannot access the accountActions table.
8-33User Guide for Cisco Secure ACS for Windows Server
78-14696-01, Version 3.1
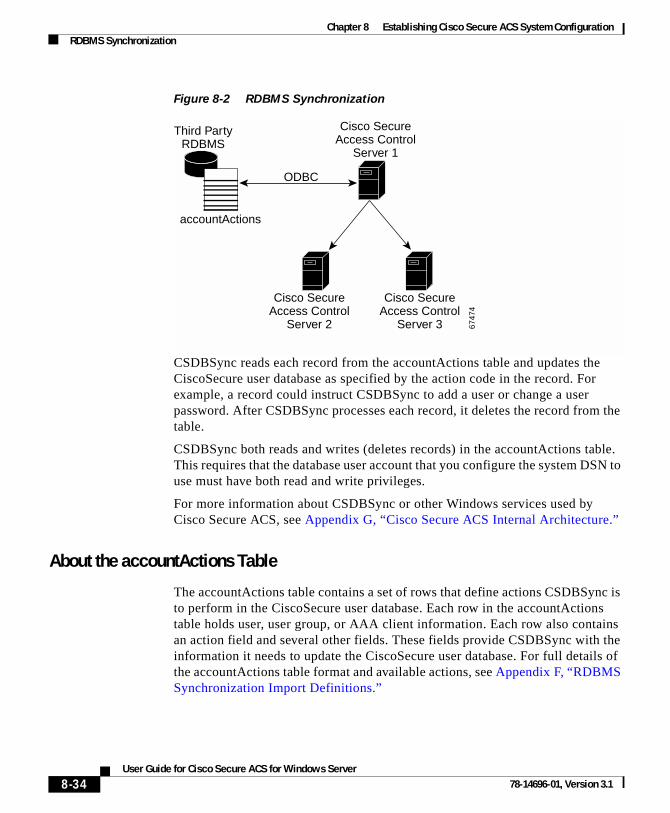
Chapter 8 Establishing Cisco Secure ACS System ConfigurationRDBMS Synchronization
Figure 8-2 RDBMS Synchronization
CSDBSync reads each record from the accountActions table and updates the CiscoSecure user database as specified by the action code in the record. For example, a record could instruct CSDBSync to add a user or change a user password. After CSDBSync processes each record, it deletes the record from the table.
CSDBSync both reads and writes (deletes records) in the accountActions table. This requires that the database user account that you configure the system DSN to use must have both read and write privileges.
For more information about CSDBSync or other Windows services used by Cisco Secure ACS, see Appendix G, “Cisco Secure ACS Internal Architecture.”
About the accountActions Table
The accountActions table contains a set of rows that define actions CSDBSync is to perform in the CiscoSecure user database. Each row in the accountActions table holds user, user group, or AAA client information. Each row also contains an action field and several other fields. These fields provide CSDBSync with the information it needs to update the CiscoSecure user database. For full details of the accountActions table format and available actions, see Appendix F, “RDBMS Synchronization Import Definitions.”
6747
4
Cisco SecureAccess Control
Server 2
Cisco SecureAccess Control
Server 1
accountActions
Third PartyRDBMS
ODBC
Cisco SecureAccess Control
Server 3
8-34User Guide for Cisco Secure ACS for Windows Server
78-14696-01, Version 3.1
Chapter 8 Establishing Cisco Secure ACS System ConfigurationRDBMS Synchronization
The database containing the accountActions table must support a multi-threaded ODBC driver. This is required to prevent problems in the event that Cisco Secure ACS and the third-party system attempt to access the accountActions table simultaneously.
Cisco Secure ACS includes files to help you create your accountActions table for several common formats. You can find these files on the Cisco Secure ACS in the following location, assuming a default installation of Cisco Secure ACS:
C:\Program Files\CiscoSecure ACS vx.x\CSDBSync\Databases
The Databases directory contains the following subdirectories:
• Access—Contains the file CiscoSecure Transactions.mdb.
CiscoSecure Transactions.mdb contains a preconfigured accountActions table. When you install Cisco Secure ACS, the installation routine creates a system DSN named CiscoSecure DBSync. This system DSN is configured to communicate with CiscoSecure Transactions.mdb.
Note By default, the username and password for the CiscoSecure Transactions.mdb database are set to null. To increase the security of RDBMS synchronizations performed using this database, change the username and password, both in the CiscoSecure Transactions.mdb database and in Cisco Secure ACS. Any other processes that access the CiscoSecure Transactions.mdb database should be changed to use the new username and password, too.
• CSV—Contains the files accountactions and schema.ini.
The accountactions file is the accountActions table in a comma-separated value file. The schema.ini file provides the Microsoft ODBC text file driver with the information it needs to access the accountactions file.
• Oracle 7—Contains the files accountActions.sql and testData.sql.
The accountActions.sql file contains the Oracle 7 SQL procedure needed to generate an accountActions table. The testData.sql file contains Oracle 7 SQL procedures for updating the accountActions table with sample transactions that CSDBSync can process.
8-35User Guide for Cisco Secure ACS for Windows Server
78-14696-01, Version 3.1
Chapter 8 Establishing Cisco Secure ACS System ConfigurationRDBMS Synchronization
• Oracle 8—Contains the files accountActions.sql and testData.sql.
The accountActions.sql file contains the Oracle 8 SQL procedure needed to generate an accountActions table. The testData.sql file contains Oracle 8 SQL procedures for updating the accountActions table with sample transactions that CSDBSync can process.
• SQL Server 6.5—Contains the files accountActions.sql and testData.sql.
The accountActions.sql file contains the Microsoft SQL Server 6.5 SQL procedure needed to generate an accountActions table. The testData.sql file contains Microsoft SQL Server 6.5 SQL procedures for updating the accountActions table with sample transactions that CSDBSync can process.
Cisco Secure ACS Database Recovery Using the accountActions Table
Because the RDBMS Synchronization feature deletes each record in the accountActions table after processing the record, the accountActions table can be considered a transaction queue. The RDBMS Synchronization feature does not maintain a transaction log/audit trail. If a log is required, the external system that adds records to the accountActions table must create it. Unless the external system can recreate the entire transaction history in the accountActions table, we recommend that you construct a transaction log file for recovery purposes. To do this, create a second table that is stored in a safe location and backed up regularly. In that second table, mirror all the additions and updates to records in the accountActions table.
If the database is large, it is not practical to replay all transaction logs to synchronize the CiscoSecure user database with the third-party system. Instead, create regular backups of the CiscoSecure user database and replay the transaction logs from the time of most recent backup to bring the CiscoSecure user database back in synchronization with the third-party system. For information on creating backup files, see Cisco Secure ACS Backup, page 8-47.
Replaying transaction logs that slightly predate the checkpoint does not damage the CiscoSecure user database, although some transactions might be invalid and reported as errors. As long as the entire transaction log is replayed, the CiscoSecure user database is consistent with the database of the external RDBMS application.
8-36User Guide for Cisco Secure ACS for Windows Server
78-14696-01, Version 3.1
Chapter 8 Establishing Cisco Secure ACS System ConfigurationRDBMS Synchronization
Reports and Event (Error) HandlingThe CSDBSync service provides event and error logging. For more information about the RDBMS Synchronization log, see Cisco Secure ACS System Logs, page 9-11. For more information about the CSDBSync service log, see Service Logs, page 9-28.
During manual synchronizations, Cisco Secure ACS provides visual alerts to notify you of problems that occurred during synchronization.
Preparing to Use RDBMS SynchronizationSynchronizing the CiscoSecure user database using data from the accountActions table requires that you complete several steps external to Cisco Secure ACS before you configure the RDBMS Synchronization feature within Cisco Secure ACS. If you are planning to use a CSV file as your accountActions table, also see Considerations for Using CSV-Based Synchronization, page 8-38.
To prepare to use RDBMS Synchronization, follow these steps:
Step 1 Determine where you want to create the accountActions table and in what format. For more information about the accountActions table, see About the accountActions Table, page 8-34. For details on the format and content of the accountActions table, see Appendix F, “RDBMS Synchronization Import Definitions.”
Step 2 Create your accountActions table.
Step 3 Configure your third-party system to generate records and update the accountActions table with them. This will most likely involve creating stored procedures that write to the accountActions table at a triggered event; however, the mechanism for maintaining your accountActions table is unique to your implementation. If the third-party system you are using to update the accountActions table is a commercial product, for assistance, refer to the documentation supplied by your third-party system vendor.
For information about the format and content of the accountActions table, see Appendix F, “RDBMS Synchronization Import Definitions.”
8-37User Guide for Cisco Secure ACS for Windows Server
78-14696-01, Version 3.1
Chapter 8 Establishing Cisco Secure ACS System ConfigurationRDBMS Synchronization
Step 4 Validate your third-party system to ensure that it updates the accountActions table properly. Rows generated in the accountActions table must be valid. For details on the format and content of the accountActions table, see Appendix F, “RDBMS Synchronization Import Definitions.”
Note After testing that the third-party system updates the accountActions table properly, discontinue updating the accountActions table until after you have completed Step 5 and Step 6.
Step 5 Set up a system DSN on the Cisco Secure ACS. For steps, see Configuring a System Data Source Name for RDBMS Synchronization, page 8-40.
Step 6 Schedule RDBMS synchronization in Cisco Secure ACS. For steps, see Scheduling RDBMS Synchronization, page 8-44.
Step 7 Configure your third-party system to begin updating the accountActions table with information to be imported into the CiscoSecure user database.
Step 8 Confirm that RDBMS synchronization is operating properly by monitoring the RDBMS Synchronization report in the Reports and Activity section. For more information about the RDBMS Synchronization log, see Cisco Secure ACS System Logs, page 9-11.
Also, monitor the CSDBSync service log. For more information about the CSDBSync service log, see Service Logs, page 9-28.
Considerations for Using CSV-Based SynchronizationThe behavior of the Microsoft ODBC driver for text files creates additional considerations if you are planning to use a CSV-based accountActions table. The Microsoft ODBC driver for text files always operates in a read-only mode. It cannot delete records from a CSV accountActions table. Because of this, synchronization events initiated or scheduled in the HTML interface never release the CSV file, so the updates to the accountActions table from your third-party system fail.
The solution is to initiate synchronization events from a script, such as a DOS batch file. In the script, RDBMS synchronization is initiated with the CSDBSync -run command.
8-38User Guide for Cisco Secure ACS for Windows Server
78-14696-01, Version 3.1

Chapter 8 Establishing Cisco Secure ACS System ConfigurationRDBMS Synchronization
Assuming a default installation, CSDBSync.exe is installed at:
C:\Program Files\CiscoSecure ACS vx.x\CSDBSync
You can write a script that uses the CSDBsync command. You can schedule times when the script is run by using the Windows at command. For information about the at command, please refer to your Microsoft Windows documentation.
Also, due to limitations of the Microsoft ODBC text file driver, using the CSV format requires a change to the accountactions CSV file shipped with Cisco Secure ACS and to Cisco Secure ACS configuration. For more information, see Preparing for CSV-Based Synchronization, page 8-39.
Preparing for CSV-Based Synchronization
If you want to use a CSV file for your accountActions table, some additional configuration is necessary. This is because the Microsoft ODBC CSV driver cannot access the accountActions table unless the file has a .csv file extension.
To prepare for RDBMS synchronization using a CSV file, follow these steps:
Step 1 Rename the accountactions CSV file installed on your Cisco Secure ACS server to accountactions.csv.
Assuming a default installation of Cisco Secure ACS, the accountactions file is at the following location:
C:\Program Files\CiscoSecure ACS vx.x\CSDBSync\Databases\CSV
Where x.x refers to the version of your Cisco Secure ACS.
Step 2 Edit the Windows Registry:
a. Access the following key:
HKEY_LOCAL_MACHINE\SOFTWARE\Cisco\CiscoAAAvx.x\CSDBSync
b. Change the OdbcUpdateTable value from AccountActions to accountactions.csv.
c. Save your changes to the registry.
8-39User Guide for Cisco Secure ACS for Windows Server
78-14696-01, Version 3.1
Chapter 8 Establishing Cisco Secure ACS System ConfigurationRDBMS Synchronization
Step 3 At a DOS prompt, follow these steps:
a. Type:
net stop CSDBSync
and than press Enter.
b. Type:
net start CSDBSync
and then press Enter.
Result: The Microsoft ODBC CSV driver can now access the accountActions CSV file properly.
Configuring a System Data Source Name for RDBMS Synchronization
On the Cisco Secure ACS, a system DSN must exist for Cisco Secure ACS to access the accountActions table. If you plan to use the CiscoSecure Transactions.mdb Microsoft Access database provided with Cisco Secure ACS, you can use the CiscoSecure DBSync system DSN rather than creating one.
For more information about the CiscoSecure Transactions.mdb file, see Preparing to Use RDBMS Synchronization, page 8-37.
To create a system DSN for use with RDBMS synchronization, follow these steps:
Step 1 In Windows Control Panel, double-click the ODBC Data Sources icon.
Step 2 In the ODBC Data Source Administrator window, click the System DSN tab.
Step 3 Click Add.
Step 4 Select the driver you need to use with your new DSN, and then click Finish.
Result: A dialog box displays fields requiring information specific to the ODBC driver you selected.
Step 5 In the Data Source Name box, type a descriptive name for the DSN.
8-40User Guide for Cisco Secure ACS for Windows Server
78-14696-01, Version 3.1

Chapter 8 Establishing Cisco Secure ACS System ConfigurationRDBMS Synchronization
Step 6 Complete the other fields required by the ODBC driver you selected. These fields may include information such as the IP address of the server on which the ODBC-compliant database runs.
Step 7 Click OK.
Result: The name you assigned to the DSN appears in the System Data Sources list.
Step 8 Close the ODBC window and Windows Control Panel.
Result: The system DSN to be used by Cisco Secure ACS to access your accountActions table is created on your Cisco Secure ACS.
RDBMS Synchronization OptionsThe RDBMS Synchronization Setup page, available from System Configuration, provides control of the following items:
• RDBMS Setup Options, page 8-41—Defines how Cisco Secure ACS accesses the accountActions table.
• Synchronization Scheduling Options, page 8-42—Defines when synchronization occurs.
• Synchronization Partners Options, page 8-42—Defines which Cisco Secure ACSes are synchronized with data from the accountActions table.
RDBMS Setup Options
The RDBMS Synchronization feature provides the following RDBMS setup options:
• Data Source—Specifies which of all the system DSNs available on the Cisco Secure ACS is to be used to access the accountActions table.
• Username—Specifies the username Cisco Secure ACS should use to access the database that contains the accountActions table.
8-41User Guide for Cisco Secure ACS for Windows Server
78-14696-01, Version 3.1
Chapter 8 Establishing Cisco Secure ACS System ConfigurationRDBMS Synchronization
Note The database user account specified by the username must have sufficient privileges to read and write to the accountActions table.
• Password—Specifies the password Cisco Secure ACS uses to access the database that contains the accountActions table.
Synchronization Scheduling Options
The RDBMS Synchronization feature provides the following scheduling options:
• Manually—Cisco Secure ACS does not perform automatic RDBMS synchronization.
• Every X minutes—Cisco Secure ACS performs synchronization on a set frequency. The unit of measurement is minutes, with a default update frequency of 60 minutes.
• At specific times...—Cisco Secure ACS performs synchronization at the time specified in the day and hour graph. The minimum interval is one hour, and the synchronization takes place on the hour selected.
Synchronization Partners Options
The RDBMS Synchronization feature provides the following synchronization partners options:
• AAA Server—This list represents the AAA servers configured in the AAA Servers table in Network Configuration for which the Cisco Secure ACS does not perform RDBMS synchronization.
• Synchronize—This list represents the AAA servers configured in the AAA Servers table in Network Configuration for which the Cisco Secure ACS does perform RDBMS synchronization.
For more information about the AAA Servers table in Network Configuration, see AAA Server Configuration, page 4-20.
8-42User Guide for Cisco Secure ACS for Windows Server
78-14696-01, Version 3.1
Chapter 8 Establishing Cisco Secure ACS System ConfigurationRDBMS Synchronization
Performing RDBMS Synchronization ImmediatelyYou can manually start an RDBMS synchronization event.
To perform manual RDBMS synchronization, follow these steps:
Step 1 In the navigation bar, click System Configuration.
Step 2 Click RDBMS Synchronization.
Note If this feature does not appear, click Interface Configuration, click Advanced Options, and then select the RDBMS Synchronization check box.
Result: The RDBMS Synchronization Setup page appears.
Step 3 To specify options in the RDBMS Setup table, follow these steps:
Note For more information about RDBMS setup, see RDBMS Setup Options, page 8-41.
a. From the Data Source list, select the system DSN you configured to communicate with the database that contains your accountActions table.
For more information about configuring a system DSN for use with RDBMS Synchronization, see Configuring a System Data Source Name for RDBMS Synchronization, page 8-40.
b. In the Username box, type the username for a database user account that has read/write access to the accountActions table.
c. In the Password box, type the password for the username specified in the Step b.
Result: Cisco Secure ACS has the information necessary to access the accountActions table.
Note You do not have to select Manually under Replication Scheduling. For more information, see Disabling Scheduled RDBMS Synchronizations, page 8-46.
8-43User Guide for Cisco Secure ACS for Windows Server
78-14696-01, Version 3.1
Chapter 8 Establishing Cisco Secure ACS System ConfigurationRDBMS Synchronization
Step 4 For each Cisco Secure ACS that you want this Cisco Secure ACS to update with data from the accountActions table, select the Cisco Secure ACS in the AAA Servers list, and then click —> (right arrow button).
Result: The selected Cisco Secure ACS appears in the Synchronize list.
Step 5 To remove Cisco Secure ACSes from the Synchronize list, select the Cisco Secure ACS in the Synchronize list, and then click <— (left arrow button).
Result: The selected Cisco Secure ACS appears in the AAA Servers list.
Step 6 At the bottom of the browser window, click Synchronize Now.
Result: Cisco Secure ACS immediately begins a synchronization event. To check the status of the synchronization, view the RDBMS Synchronization report in Reports and Activity.
Scheduling RDBMS SynchronizationYou can schedule when a Cisco Secure ACS performs RDBMS synchronization.
To schedule when a Cisco Secure ACS performs RDBMS synchronization, follow these steps:
Step 1 In the navigation bar, click System Configuration.
Step 2 Click RDBMS Synchronization.
Note If this feature does not appear, click Interface Configuration, click Advanced Options, and then select the RDBMS Synchronization check box.
Result: The RDBMS Synchronization Setup page appears.
8-44User Guide for Cisco Secure ACS for Windows Server
78-14696-01, Version 3.1

Chapter 8 Establishing Cisco Secure ACS System ConfigurationRDBMS Synchronization
Step 3 To specify options in the RDBMS Setup table, follow these steps:
Note For more information about RDBMS setup, see RDBMS Setup Options, page 8-41.
a. From the Data Source list, select the system DSN you configured to communicate with the database that contains your accountActions table.
For more information about configuring a system DSN for use with RDBMS Synchronization, see Configuring a System Data Source Name for RDBMS Synchronization, page 8-40.
b. In the Username box, type the username for a database user account that has read/write access to the accountActions table.
c. In the Password box, type the password for the username specified in the Step b.
Step 4 To have this Cisco Secure ACS perform RDBMS synchronization at regular intervals, under Synchronization Scheduling, select the Every X minutes option and in the X box type the length of the interval at which Cisco Secure ACS should perform synchronization (up to 7 characters).
Step 5 To schedule times at which this Cisco Secure ACS performs RDBMS synchronization, follow these steps:
a. Under Synchronization Scheduling, select the At specific times option.
b. In the day and hour graph, click the times at which you want Cisco Secure ACS to perform replication.
Tip Clicking times of day on the graph selects those times; clicking again clears them. At any time you can click Clear All to clear all hours, or you can click Set All to select all hours.
8-45User Guide for Cisco Secure ACS for Windows Server
78-14696-01, Version 3.1

Chapter 8 Establishing Cisco Secure ACS System ConfigurationRDBMS Synchronization
Step 6 For each Cisco Secure ACS you want to synchronize with data from the accountActions table, follow these steps:
Note For more information about synchronization targets, see Inbound Replication Options, page 8-20.
a. In the Synchronization Partners table, from the AAA Servers list, select the name of a Cisco Secure ACS that you want this Cisco Secure ACS to update with data from the accountActions table.
Note The Cisco Secure ACSes available in the AAA Servers list is determined by the AAA Servers table in Network Configuration, with the addition of the name of the current Cisco Secure ACS server. For more information about the AAA Servers table, see AAA Server Configuration, page 4-20.
b. Click —> (right arrow button).
Result: The selected Cisco Secure ACS moves to the Synchronize list.
Note At least one Cisco Secure ACS must be in the Synchronize list. This includes the server on which you are configuring RDBMS Synchronization. RDBMS Synchronization does not automatically include the internal database of the current server.
Step 7 Click Submit.
Result: Cisco Secure ACS saves the RDBMS synchronization schedule you created.
Disabling Scheduled RDBMS SynchronizationsYou can disable scheduled RDBMS synchronization events without losing the schedule itself. This allows you to end scheduled synchronizations and resume them later without having to re-create the schedule.
8-46User Guide for Cisco Secure ACS for Windows Server
78-14696-01, Version 3.1
Chapter 8 Establishing Cisco Secure ACS System ConfigurationCisco Secure ACS Backup
To disable scheduled RDBMS synchronizations, follow these steps:
Step 1 In the navigation bar, click System Configuration.
Step 2 Click RDBMS Synchronization.
Result: The RDBMS Synchronization Setup page appears.
Step 3 Under Synchronization Scheduling, select the Manually option.
Step 4 Click Submit.
Result: Cisco Secure ACS does not perform scheduled RDBMS synchronizations.
Cisco Secure ACS BackupThis section provides information about the Cisco Secure ACS Backup feature, including procedures for implementing this feature. This section contains the following topics:
• About Cisco Secure ACS Backup, page 8-47
• Backup File Locations, page 8-48
• Directory Management, page 8-48
• Components Backed Up, page 8-48
• Reports of Cisco Secure ACS Backups, page 8-49
• Performing a Manual Cisco Secure ACS Backup, page 8-50
• Scheduling Cisco Secure ACS Backups, page 8-50
• Disabling Scheduled Cisco Secure ACS Backups, page 8-51
About Cisco Secure ACS BackupThe ACS Backup process backs up your Cisco Secure ACS system information to a file on the local hard drive. You can manually back up the Cisco Secure ACS system. You can also establish automated backups that occur at regular intervals or at selected days of the week and times. Maintaining backup files can minimize
8-47User Guide for Cisco Secure ACS for Windows Server
78-14696-01, Version 3.1
Chapter 8 Establishing Cisco Secure ACS System ConfigurationCisco Secure ACS Backup
downtime if system information becomes corrupt or is misconfigured. We recommend copying the files to the hard drive on another system in case the hardware fails on the primary system.
For information about using a backup file to restore Cisco Secure ACS, see Cisco Secure ACS System Restore, page 8-52.
Backup File LocationsThe default directory for backup files is the following:
drive:\path\CSAuth\System Backups
where drive is the local drive where you installed Cisco Secure ACS and path is the path from the root of drive to the Cisco Secure ACS directory. For example, if you installed Cisco Secure ACS version 3.0 in the default location, the default backup location would be c:\Program Files\CiscoSecure ACS v3.0\CSAuth\System Backups.
The filename given to a backup is determined by Cisco Secure ACS. For more information about filenames assigned to backup files generated by Cisco Secure ACS, see Backup File Names and Locations, page 8-53.
Directory ManagementYou can configure the number of backup files to keep and the number of days after which backup files are deleted. The more complex your configuration and the more often you back up the system, the more diligent we recommend you be about clearing out old databases from the Cisco Secure ACS hard drive.
Components Backed UpThe ACS System Backup utility backs up the Cisco Secure ACS user database and information from the Windows Registry that is relevant to Cisco Secure ACS. The user database backup includes all user information, such as username, password, and other authentication information, including server certificates and the certificate trust list. The Windows Registry information includes any system information that is stored in the Windows Registry, such as NDG information, AAA client configuration, and administrator accounts.
8-48User Guide for Cisco Secure ACS for Windows Server
78-14696-01, Version 3.1
Chapter 8 Establishing Cisco Secure ACS System ConfigurationCisco Secure ACS Backup
Reports of Cisco Secure ACS BackupsWhen a system backup takes place, whether it was manually generated or scheduled, the event is logged in the Administration Audit report and the ACS Backup and Restore report. You can view recent reports in the Reports and Activity section of Cisco Secure ACS.
For more information about Cisco Secure ACS reports, see Chapter 9, “Working with Logging and Reports.”
Backup OptionsThe ACS System Backup Setup page contains the following configuration options:
• Manually—Cisco Secure ACS does not perform automatic backups. When this option is selected, you can only perform a backup by following the steps in Performing a Manual Cisco Secure ACS Backup, page 8-50.
• Every X minutes—Cisco Secure ACS performs automatic backups on a set frequency. The unit of measurement is minutes, with a default backup frequency of 60 minutes.
• At specific times...—Cisco Secure ACS performs automatic backups at the time specified in the day and hour graph. The minimum interval is one hour, and the backup takes place on the hour selected.
• Directory—The directory where Cisco Secure ACS writes the backup file. The directory must be specified by its full path on the Windows server that runs Cisco Secure ACS, such as c:\acs-bups.
• Manage Directory—Defines whether Cisco Secure ACS deletes older backup files. Using the following options, you can specify how Cisco Secure ACS determines which log files to delete:
– Keep only the last X files—Cisco Secure ACS retains the most recent backup files, up to the number of files specified. When the number of files specified is exceeded, Cisco Secure ACS deletes the oldest files.
– Delete files older than X days—Cisco Secure ACS deletes backup files that are older than the number of days specified. When a backup file grows older than the number of day specified, Cisco Secure ACS deletes it.
8-49User Guide for Cisco Secure ACS for Windows Server
78-14696-01, Version 3.1
Chapter 8 Establishing Cisco Secure ACS System ConfigurationCisco Secure ACS Backup
Performing a Manual Cisco Secure ACS BackupYou can backup Cisco Secure ACS whenever you want, without scheduling the backup.
To perform an immediate backup of Cisco Secure ACS, follow these steps:
Step 1 In the navigation bar, click System Configuration.
Step 2 Click ACS Backup.
Result: The ACS System Backup Setup page appears.
Step 3 In the Directory box under Backup Location, type the drive and path to the directory on a local hard drive where you want the backup file to be written.
Step 4 Click Backup Now.
Result: Cisco Secure ACS immediately begins a backup.
Scheduling Cisco Secure ACS BackupsYou can schedule Cisco Secure ACS backups to occur at regular intervals or on selected days of the week and times.
To schedule the times at which Cisco Secure ACS performs a backup, follow these steps:
Step 1 In the navigation bar, click System Configuration.
Step 2 Click ACS Backup.
Result: The ACS System Backup Setup page appears.
Step 3 To schedule backups at regular intervals, under ACS Backup Scheduling, select the Every X minutes option and in the X box type the length of the interval at which Cisco Secure ACS should perform backups.
Note Because Cisco Secure ACS is momentarily shut down during backup, if the backup interval is too frequent, users might be unable to authenticate.
8-50User Guide for Cisco Secure ACS for Windows Server
78-14696-01, Version 3.1
Chapter 8 Establishing Cisco Secure ACS System ConfigurationCisco Secure ACS Backup
Step 4 To schedule backups at specific times, follow these steps:
a. Under ACS Backup Scheduling, select the At specific times option.
b. In the day and hour graph, click the times at which you want Cisco Secure ACS to perform a backup.
Tip Clicking times of day on the graph selects those times; clicking again clears them. At any time you can click Clear All to clear all hours, or you can click Set All to select all hours.
Step 5 To change the location where Cisco Secure ACS writes backup files, type the drive letter and path in the Directory box.
Step 6 To manage which backup files Cisco Secure ACS keeps, follow these steps:
a. Select the Manage Directory check box.
b. To limit the number of backup files Cisco Secure ACS retains, select the Keep only the last X files option and type in the X box the number of files you want Cisco Secure ACS to retain.
c. To limit how old backup files retained by Cisco Secure ACS can be, select the Delete files older than X days option and type the number of days for which Cisco Secure ACS should retain a backup file before deleting it.
Step 7 Click Submit.
Result: Cisco Secure ACS implements the backup schedule you configured.
Disabling Scheduled Cisco Secure ACS BackupsYou can disable scheduled Cisco Secure ACS backups without losing the schedule itself. This allows you to end scheduled backups and resume them later without having to re-create the schedule.
8-51User Guide for Cisco Secure ACS for Windows Server
78-14696-01, Version 3.1
Chapter 8 Establishing Cisco Secure ACS System ConfigurationCisco Secure ACS System Restore
To disable a scheduled backup, follow these steps:
Step 1 In the navigation bar, click System Configuration.
Step 2 Click ACS Backup.
Result: The ACS System Backup Setup page appears.
Step 3 Under ACS Backup Scheduling, select the Manual option.
Step 4 Click Submit.
Result: Cisco Secure ACS does not continue any scheduled backups. You can still perform manual backups as needed.
Cisco Secure ACS System RestoreThis section provides information about the Cisco Secure ACS System Restore feature, including procedures for restoring your Cisco Secure ACS from a backup file. This section contains the following topics:
• About Cisco Secure ACS System Restore, page 8-52
• Backup File Names and Locations, page 8-53
• Components Restored, page 8-54
• Reports of Cisco Secure ACS Restorations, page 8-54
• Restoring Cisco Secure ACS from a Backup File, page 8-54
About Cisco Secure ACS System RestoreThe ACS System Restore feature enables you to restore your system configuration from backup files generated by the ACS Backup feature. This feature helps minimize downtime if Cisco Secure ACS system information becomes corrupted or is misconfigured.
The ACS System Restore feature only works with backup files generated by a Cisco Secure ACS running an identical Cisco Secure ACS version and patch level.
8-52User Guide for Cisco Secure ACS for Windows Server
78-14696-01, Version 3.1
Chapter 8 Establishing Cisco Secure ACS System ConfigurationCisco Secure ACS System Restore
Backup File Names and LocationsThe ACS System Restore feature restores the Cisco Secure ACS user database and Cisco Secure ACS Windows Registry information from a file that was created by the ACS Backup feature. Cisco Secure ACS writes backup files only on the local hard drive. You can restore from any backup file you select. For example, you can restore from the latest backup file, or if you suspect that the latest backup was incorrect, you can select an earlier backup file to restore from.
The backup directory is selected when you schedule backups or perform a manual backup. The default directory for backup files is the following:
drive:\path\CSAuth\System Backups
where drive is the local drive where you installed Cisco Secure ACS and path is the path from the root of drive to the Cisco Secure ACS directory. For example, if you installed Cisco Secure ACS version 3.0 in the default location, the default backup location would be:
c:\Program Files\CiscoSecure ACS v3.0\CSAuth\System Backups
Cisco Secure ACS creates backup files using the date and time format:
dd-mmm-yyyy hh-nn-ss.dmp
where:
• dd is the date the backup started
• mmm is the month, abbreviated in alphabetic characters
• yyyy is the year
• hh is the hour, in 24-hour format
• nn is the minute
• ss is the second at which the backup started
For example, if Cisco Secure ACS started a backup on October 13, 1999, 11:41:35 a.m., Cisco Secure ACS would generate a backup file named:
13-Oct-1999 11-41-35.dmp
If you are not sure of the location of the latest backup file, check your scheduled backup configuration on the ACS Backup page.
8-53User Guide for Cisco Secure ACS for Windows Server
78-14696-01, Version 3.1

Chapter 8 Establishing Cisco Secure ACS System ConfigurationCisco Secure ACS System Restore
Components RestoredYou can select the components to restore: the user and group databases, the system configuration, or both.
Reports of Cisco Secure ACS RestorationsWhen a Cisco Secure ACS system restoration takes place, the event is logged in the Administration Audit report and the ACS Backup and Restore report. You can view recent reports in the Reports and Activity section of Cisco Secure ACS.
For more information about Cisco Secure ACS reports, see Chapter 9, “Working with Logging and Reports.”
Restoring Cisco Secure ACS from a Backup FileYou can perform a system restoration of Cisco Secure ACS whenever needed.
Note Using the Cisco Secure ACS System Restore feature restarts all Cisco Secure ACS services and logs out all administrators.
To restore Cisco Secure ACS from a backup file generated by the Cisco Secure ACS Backup feature, follow these steps:
Step 1 In the navigation bar, click System Configuration.
Step 2 Click ACS Restore.
Result: The ACS System Restore Setup page appears.
The Directory box displays the drive and path to the backup directory most recently configured in the Directory box on the ACS Backup page.
Beneath the Directory box, Cisco Secure ACS displays the backup files in the current backup directory. If no backup files exist, <No Matching Files> appears in place of filenames.
8-54User Guide for Cisco Secure ACS for Windows Server
78-14696-01, Version 3.1
Chapter 8 Establishing Cisco Secure ACS System ConfigurationCisco Secure ACS Active Service Management
Step 3 To change the backup directory, type the new drive and path to the backup directory in the Directory box, and then click OK.
Result: Cisco Secure ACS displays the backup files, if any, in the backup directory you specified.
Step 4 In the list below the Directory box, select the backup file you want to use to restore Cisco Secure ACS.
Step 5 To restore user and group database information, select the User and Group Database check box.
Step 6 To restore system configuration information, select the CiscoSecure ACS System Configuration check box.
Step 7 Click Restore Now.
Result: Cisco Secure ACS displays a confirmation dialog box indicating that performing the restoration will restart Cisco Secure ACS services and log out all administrators.
Step 8 To continue with the restoration, click OK.
Result: Cisco Secure ACS restores the system components specified using the backup file you selected. The restoration should require several minutes to complete, depending on which components you selected to restore and the size of your database.
When the restoration is complete, you can log in again to Cisco Secure ACS.
Cisco Secure ACS Active Service ManagementACS Active Service Management is an application-specific service monitoring tool that is tightly integrated with ACS. The ACS Active Service Management comprises two features:
• System Monitoring, page 8-56
• Event Logging, page 8-58
8-55User Guide for Cisco Secure ACS for Windows Server
78-14696-01, Version 3.1
Chapter 8 Establishing Cisco Secure ACS System ConfigurationCisco Secure ACS Active Service Management
System MonitoringCisco Secure ACS system monitoring enables you to determine how often Cisco Secure ACS tests its authentication and accounting processes, and to determine what automated actions it takes should tests detect a failure of these processes. Cisco Secure ACS accomplishes system monitoring with the CSMon service. For more information about the CSMon service, see CSMon, page G-4.
System Monitoring Options
You have the following options for configuring system monitoring:
• Test login process every X minutes—Controls whether or not Cisco Secure ACS tests its login process. The value in the X box defines, in minutes, how often Cisco Secure ACS tests its login process. The default frequency is once per minute, which is also the most frequent testing interval possible.
When this option is enabled, at the interval defined, Cisco Secure ACS tests authentication and accounting. If the test fails, after four unsuccessful re-tries Cisco Secure ACS performs the action identified in the If no successful authentications are recorded list and logs the event.
• If no successful authentications are recorded—Specifies what action Cisco Secure ACS takes if it detects that its test login process failed. This list contains several built-in actions and reflects actions that you define. The items beginning with asterisks (*) are predefined actions.
– *Restart All—Restart all Cisco Secure ACS services.
– *Restart RADIUS/TACACS+—Restart only the RADIUS and TACACS+ services.
– *Reboot—Reboot Cisco Secure ACS.
8-56User Guide for Cisco Secure ACS for Windows Server
78-14696-01, Version 3.1
Chapter 8 Establishing Cisco Secure ACS System ConfigurationCisco Secure ACS Active Service Management
– Custom actions—You can define other actions for Cisco Secure ACS to take upon failure of the login process. Cisco Secure ACS can execute a batch file or executable upon the failure of the login process. To make a batch or executable file available in the on failure list, place the file in the following directory:
drive:\path\CSMon\Scripts
where drive is the local drive where you installed Cisco Secure ACS and path is the path from the root of drive to the Cisco Secure ACS directory.
– Take No Action—Leave Cisco Secure ACS operating as is.
• Generate event when an attempt is made to log in to a disabled account—Specifies whether Cisco Secure ACS generates a log entry when a user attempts to log in to your network using a disabled account.
• Log all events to the NT Event log—Specifies whether Cisco Secure ACS generates a Windows event log entry for each exception event.
• Email notification of event—Specifies whether Cisco Secure ACS sends an e-mail notification for each event.
– To—The e-mail address that notification e-mail is sent to. For example, [email protected].
– SMTP Mail Server—The simple mail transfer protocol (SMTP) server that Cisco Secure ACS should use to send notification e-mail. You can identify the SMTP server either by its hostname or by its IP address.
Setting Up System Monitoring
To setup Cisco Secure ACS System Monitoring, follow these steps:
Step 1 In the navigation bar, click System Configuration.
Step 2 Click ACS Service Management.
Result: The ACS Active Service Management Setup page appears.
Step 3 To have Cisco Secure ACS test the login process, follow these steps:
a. Select the Test login process every X minutes check box.
b. Type in the X box the number of minutes (up to 3 characters) that should pass between each login process test.
8-57User Guide for Cisco Secure ACS for Windows Server
78-14696-01, Version 3.1
Chapter 8 Establishing Cisco Secure ACS System ConfigurationCisco Secure ACS Active Service Management
c. From the If no successful authentications are recorded list, select the action Cisco Secure ACS should take when the login test fails five successive times.
Step 4 To have Cisco Secure ACS generate a Windows event when a user attempts to log in to your network using a disabled account, select the Generate event when an attempt is made to log in to a disabled account check box.
Step 5 If you want to set up event logging, see Setting Up Event Logging, page 8-58.
Step 6 If you are done setting up Cisco Secure ACS Service Management, click Submit.
Result: Cisco Secure ACS implements the service management settings you made.
Event LoggingThe Event Logging feature enables you to configure whether Cisco Secure ACS logs events to the Windows event log and whether Cisco Secure ACS generates an e-mail when an event occurs. Cisco Secure ACS uses the System Monitoring feature to detect the events to be logged. For more information about system monitoring, see System Monitoring Options, page 8-56.
Setting Up Event Logging
To view the Windows event log, choose Start > Programs > Administrative Tools > Event Viewer. For more information about the Windows event log or Event Viewer, refer to your Microsoft Windows documentation.
To setup Cisco Secure ACS event logging, follow these steps:
Step 1 In the navigation bar, click System Configuration.
Step 2 Click ACS Service Management.
Result: The ACS Active Service Management Setup page appears.
Step 3 To have Cisco Secure ACS send all events to the Windows event log, select Log all events to the Windows Event log.
8-58User Guide for Cisco Secure ACS for Windows Server
78-14696-01, Version 3.1
Chapter 8 Establishing Cisco Secure ACS System ConfigurationIP Pools Server
Step 4 To have Cisco Secure ACS send an e-mail when an event occurs, follow these steps:
a. Select the Email notification of event check box.
b. In the To box, type the e-mail address (up to 200 characters) to which Cisco Secure ACS should send event notification e-mail.
Note Do not use underscores in the e-mail addresses you type in this box.
c. In the SMTP Mail Server box, type the hostname (up to 200 characters) of the sending e-mail server.
Note The SMTP mail server must be operational and must be available from the Cisco Secure ACS.
Step 5 If you want to set up system monitoring, see Setting Up System Monitoring, page 8-57.
Step 6 If you are done setting up Cisco Secure ACS Service Management, click Submit.
Result: Cisco Secure ACS implements the service management settings you made.
IP Pools ServerThis section provides information about the IP Pools feature, including procedures for creating and maintaining IP pools. This section contains the following topics:
• About IP Pools Server, page 8-60
• Allowing Overlapping IP Pools or Forcing Unique Pool Address Ranges, page 8-61
• Refreshing the AAA Server IP Pools Table, page 8-62
• Adding a New IP Pool, page 8-63
• Editing an IP Pool Definition, page 8-64
8-59User Guide for Cisco Secure ACS for Windows Server
78-14696-01, Version 3.1
Chapter 8 Establishing Cisco Secure ACS System ConfigurationIP Pools Server
• Resetting an IP Pool, page 8-65
• Deleting an IP Pool, page 8-66
About IP Pools ServerIf you are using VPNs you may have to overlap IP address assignments; that is, it may be advantageous for a PPTP tunnel client within a given tunnel to use the same IP address as that used by another PPTP tunnel client in a different tunnel. The IP Pools Server feature enables you to assign the same IP address to multiple users, provided that the users are being tunnelled to different home gateways for onward routing beyond the boundaries of your own network. This means you can conserve your IP address space without having to resort to using illegal addresses. When you enable this feature, Cisco Secure ACS dynamically issues IP addresses from the IP pools you have defined by number or name. You can configure up to 999 IP pools, for approximately 255,000 users.
If you are using IP pooling and proxy, all accounting packets are proxied so that the Cisco Secure ACS that is assigning the IP addresses can confirm whether an IP address is already in use.
Note IP pool definitions are not replicated by the CiscoSecure Database Replication feature; however, user and group assignments to IP pools are replicated. By not replicating IP pool definitions, Cisco Secure ACS avoids inadvertently assigning an IP address that a replication partner has already assigned to a different workstation. To support IP pools in a AAA environment that uses replication, you must manually configure each secondary Cisco Secure ACS to have IP pools with names identical to the IP pools defined on the primary Cisco Secure ACS.
To use IP pools, the AAA client must have network authorization (in IOS, aaa authorization network) and accounting (in IOS, aaa accounting) enabled.
Note To use the IP Pools feature, you must set up your AAA client to perform authentication and accounting using the same protocol—either TACACS+ or RADIUS.
8-60User Guide for Cisco Secure ACS for Windows Server
78-14696-01, Version 3.1
Chapter 8 Establishing Cisco Secure ACS System ConfigurationIP Pools Server
For information on assigning a group or user to an IP pool, see Setting IP Address Assignment Method for a User Group, page 6-27, or Assigning a User to a Client IP Address, page 7-11.
Allowing Overlapping IP Pools or Forcing Unique Pool Address Ranges
Cisco Secure ACS provides automated detection of overlapping pools.
Note To use overlapping pools, you must be using RADIUS with VPN, and you cannot be using Dynamic Host Configuration Protocol (DHCP).
You can determine whether overlapping IP pools are allowed by checking which button appears below the AAA Server IP Pools table:
• Allow Overlapping Pool Address Ranges—Indicates that overlapping IP pool address ranges are not allowed. Clicking this button allows IP address ranges to overlap between pools.
• Force Unique Pool Address Range—Indicates that overlapping IP pool address ranges are allowed. Clicking this button prevents IP address ranges from overlapping between pools.
To allow overlapping IP pools or to force unique pool address ranges, follow these steps:
Step 1 In the navigation bar, click System Configuration.
Step 2 Click IP Pools Server.
Note If this feature does not appear, click Interface Configuration, click Advanced Options, and then select the IP Pools check box.
Result: The AAA Server IP Pools table lists any IP pools you have configured, their address ranges, and the percentage of pooled addresses in use.
8-61User Guide for Cisco Secure ACS for Windows Server
78-14696-01, Version 3.1

Chapter 8 Establishing Cisco Secure ACS System ConfigurationIP Pools Server
Step 3 If you want to allow overlapping IP pool address ranges, follow these steps:
a. If the Allow Overlapping Pool Address Ranges button appears, click that button.
Result: Cisco Secure ACS allows overlapping IP pool address ranges.
b. If the Force Unique Pool Address Range button appears, do nothing.
Cisco Secure ACS already allows overlapping IP pool address ranges.
Step 4 If you want to deny overlapping IP pool address ranges, follow these steps:
a. If the Allow Overlapping Pool Address Ranges button appears, do nothing.
Cisco Secure ACS already does not permit overlapping IP pool address ranges.
b. If the Force Unique Pool Address Range button appears, click that button.
Result: Cisco Secure ACS does not permit overlapping IP pool address ranges.
Refreshing the AAA Server IP Pools TableYou can refresh the AAA Server IP Pools table. This allows you to get the latest usage statistics for your IP pools.
To refresh the AAA Server IP Pools table, follow these steps:
Step 1 In the navigation bar, click System Configuration.
Step 2 Click IP Pools Server.
Result: The AAA Server IP Pools table lists any IP pools you have configured, their address ranges, and the percentage of pooled addresses in use.
Step 3 Click Refresh.
Result: Cisco Secure ACS updates the percentages of pooled addresses in use.
8-62User Guide for Cisco Secure ACS for Windows Server
78-14696-01, Version 3.1
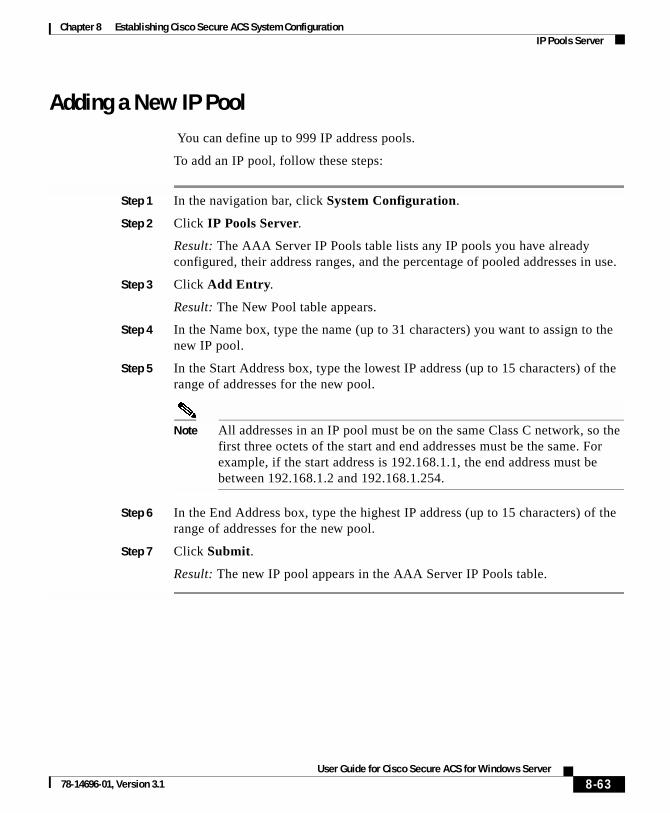
Chapter 8 Establishing Cisco Secure ACS System ConfigurationIP Pools Server
Adding a New IP Pool You can define up to 999 IP address pools.
To add an IP pool, follow these steps:
Step 1 In the navigation bar, click System Configuration.
Step 2 Click IP Pools Server.
Result: The AAA Server IP Pools table lists any IP pools you have already configured, their address ranges, and the percentage of pooled addresses in use.
Step 3 Click Add Entry.
Result: The New Pool table appears.
Step 4 In the Name box, type the name (up to 31 characters) you want to assign to the new IP pool.
Step 5 In the Start Address box, type the lowest IP address (up to 15 characters) of the range of addresses for the new pool.
Note All addresses in an IP pool must be on the same Class C network, so the first three octets of the start and end addresses must be the same. For example, if the start address is 192.168.1.1, the end address must be between 192.168.1.2 and 192.168.1.254.
Step 6 In the End Address box, type the highest IP address (up to 15 characters) of the range of addresses for the new pool.
Step 7 Click Submit.
Result: The new IP pool appears in the AAA Server IP Pools table.
8-63User Guide for Cisco Secure ACS for Windows Server
78-14696-01, Version 3.1

Chapter 8 Establishing Cisco Secure ACS System ConfigurationIP Pools Server
Editing an IP Pool DefinitionTo edit an IP pool definition, follow these steps:
Step 1 In the navigation bar, click System Configuration.
Step 2 Click IP Pools Server.
Result: The AAA Server IP Pools table lists any IP pools you have configured, their address ranges, and the percentage of pooled addresses in use.
Step 3 Click the name of the IP pool you need to edit.
Result: The name pool table appears, where name is the name of the IP pool you selected. The In Use field displays how many IP addresses in this pool are allocated to a user. The Available field displays how many IP addresses are unallocated to users.
Step 4 To change the name of the pool, in the Name box, type the name (up to 31 characters) to which you want to change the IP pool.
Step 5 To change the starting address of the pool range of IP addresses, in the Start Address box, type the lowest IP address (up to 15 characters) of the new range of addresses for the pool.
Note All addresses in an IP pool must be on the same Class C network, so the first three octets of the start and end addresses must be the same. For example, if the start address is 192.168.1.1, the end address must be between 192.168.1.2 and 192.168.1.254.
Step 6 To change the ending address of the pool range of IP addresses, in the End Address box, type the highest IP address (up to 15 characters) of the new range of addresses for the pool.
Step 7 Click Submit.
Result: The edited IP pool appears in the AAA Server IP Pools table.
8-64User Guide for Cisco Secure ACS for Windows Server
78-14696-01, Version 3.1

Chapter 8 Establishing Cisco Secure ACS System ConfigurationIP Pools Server
Resetting an IP PoolThe Reset function recovers IP addresses within an IP pool when there are “dangling” connections. A dangling connection occurs when a user disconnects and Cisco Secure ACS does not receive an accounting stop packet from the applicable AAA client. If the Failed Attempts log in Reports and Activity shows a large number of “Failed to Allocate IP Address For User” messages, consider using the Reset function to reclaim all allocated addresses in this IP pool.
Note Using the Reset function to reclaim all allocated IP addresses in a pool can result in users being assigned addresses that are already in use.
To reset an IP pool and reclaim all its IP addresses, follow these steps:
Step 1 In the navigation bar, click System Configuration.
Step 2 Click IP Pools Server.
Result: The AAA Server IP Pools table lists any IP pools you have configured, their address ranges, and the percentage of pooled addresses in use.
Step 3 Click the name of the IP pool you need to reset.
Result: The name pool table appears, where name is the name of the IP pool you selected. The In Use field displays how many IP addresses in this pool are assigned to a user. The Available field displays how many IP addresses are not assigned to users.
Step 4 Click Reset.
Result: Cisco Secure ACS displays a dialog box indicating the possibility of assigning users addresses that are already in use.
Step 5 To continue resetting the IP pool, click OK.
Result: The IP pool is reset. All its IP addresses are reclaimed. In the In Use column of the AAA Server IP Pools table, zero percent of the IP pool addresses are assigned to users.
8-65User Guide for Cisco Secure ACS for Windows Server
78-14696-01, Version 3.1
Chapter 8 Establishing Cisco Secure ACS System ConfigurationIP Pools Server
Deleting an IP Pool
Note If you delete an IP pool that has users assigned to it, those users cannot authenticate until you edit the user profile and change their IP assignment settings. Alternatively, if the users receive their IP assignment based on group membership, you can edit the user group profile and change the IP assignment settings for the group.
To delete an IP pool, follow these steps:
Step 1 In the navigation bar, click System Configuration.
Step 2 Click IP Pools Server.
Result: The AAA Server IP Pools table lists any IP pools you have configured, their address ranges, and the percentage of pooled addresses in use.
Step 3 Click the name of the IP pool you need to delete.
Result: The name pool table appears, where name is the name of the IP pool you selected. The In Use column displays how many IP addresses in this pool are assigned to a user. The Available column displays how many IP addresses are not assigned to users.
Step 4 Click Delete.
Result: Cisco Secure ACS displays a dialog box to confirm that you want to delete the IP pool.
Step 5 To delete the IP pool, click OK.
Result: The IP pool is deleted. The AAA Server IP Pools table does not list the deleted IP pool.
8-66User Guide for Cisco Secure ACS for Windows Server
78-14696-01, Version 3.1
Chapter 8 Establishing Cisco Secure ACS System ConfigurationIP Pools Address Recovery
IP Pools Address Recovery The IP Pools Address Recovery feature enables you to recover assigned IP addresses that have not been used for a specified period of time. You must configure an accounting network on the AAA client for Cisco Secure ACS to reclaim the IP addresses correctly.
Enabling IP Pool Address RecoveryTo enable IP pool address recovery, follow these steps:
Step 1 In the navigation bar, click System Configuration.
Step 2 Click IP Pools Address Recovery.
Note If this feature does not appear, click Interface Configuration, click Advanced Options, and then select the IP Pools check box.
Result: The IP Address Recovery page appears.
Step 3 Select the Release address if allocated for longer than X hours check box and in the X box type the number of hours (up to 4 characters) after which Cisco Secure ACS should recover assigned, unused IP addresses.
Step 4 Click Submit.
Result: Cisco Secure ACS implements the IP pools address recovery settings you made.
8-67User Guide for Cisco Secure ACS for Windows Server
78-14696-01, Version 3.1

Chapter 8 Establishing Cisco Secure ACS System ConfigurationVoIP Accounting Configuration
VoIP Accounting ConfigurationThe VoIP Accounting Configuration feature enables you to specify which accounting logs receive VoIP accounting data. There are three options for VoIP accounting:
• Send to both RADIUS and VoIP Accounting Log Targets—Cisco Secure ACS appends VoIP accounting data to the RADIUS accounting data and logs it separately to a CSV file. To view the data, you can use either RADIUS Accounting or VoIP Accounting under Reports and Activity.
• Send only to VoIP Accounting Log Targets—Cisco Secure ACS only logs VoIP accounting data to a CSV file. To view the data, you can use VoIP Accounting under Reports and Activity.
• Send only to RADIUS Accounting Log Targets—Cisco Secure ACS only appends VoIP accounting data to the RADIUS accounting data. To view the data, you can use RADIUS Accounting under Reports and Activity.
Configuring VoIP Accounting
Note The VoIP Accounting Configuration feature does not enable VoIP accounting. To enable VoIP accounting, see Chapter 9, “Working with Logging and Reports.”
To configure VoIP accounting, follow these steps:
Step 1 In the navigation bar, click System Configuration.
Step 2 Click VoIP Accounting Configuration.
Note If this feature does not appear, click Interface Configuration, click Advanced Options, and then select the Voice-over-IP (VoIP) Accounting Configuration check box.
Result: The VoIP Accounting Configuration page appears. The Voice-over-IP (VoIP) Accounting Configuration table displays the options for VoIP accounting.
8-68User Guide for Cisco Secure ACS for Windows Server
78-14696-01, Version 3.1

Chapter 8 Establishing Cisco Secure ACS System ConfigurationCisco Secure ACS Certificate Setup
Step 3 Select the VoIP accounting option you want.
Step 4 Click Submit.
Result: Cisco Secure ACS implements the VoIP accounting configuration you specified.
Cisco Secure ACS Certificate SetupThis section contains the following topics:
• Background on Protocols and Certification, page 8-69
• Installing a Cisco Secure ACS Server Certificate, page 8-74
• Adding a Certificate Authority Certificate, page 8-76
• Editing the Certificate Trust List, page 8-77
• Generating a Certificate Signing Request, page 8-78
Background on Protocols and CertificationCisco Secure ACS uses EAP-TLS and PEAP authentication protocols in combination with digital certification to ensure the protection and validity of authentication information. Digital certification, EAP-TLS, and PEAP are described in the topics that follow.
Digital Certificates
The ACS Certificate Setup section is used to install digital certificates to support EAP-TLS and PEAP authentication, as well as to support HTTPS protocol for secure access to the Cisco Secure ACS HTML interface. Cisco Secure ACS employs the X.509 v3 digital certificate standard. Certificate files must be in either Base64-encoded X.509 format or DER-encoded binary X.509 format. Also, Cisco Secure ACS supports manual certificate enrollment.
8-69User Guide for Cisco Secure ACS for Windows Server
78-14696-01, Version 3.1
Chapter 8 Establishing Cisco Secure ACS System ConfigurationCisco Secure ACS Certificate Setup
Digital certificates are useful because they do not require the sharing of secrets nor stored database credentials, can be scaled and trusted over large deployments, and can serve as a method of authentication that is stronger and more secure than shared secret systems. Mutual trust requires that Cisco Secure ACS have an installed certificate that can be verified by end-user clients.
About the EAP-TLS Protocol
EAP and TLS are both IETF RFC standards. The EAP protocol, an improvement over the point-to-point protocol (PPP), extends the network by providing new methods for carrying initial authentication information, specifically, EAPOL (the encapsulation of EAP over LANs as established by IEEE 802.1X).TLS provides a way to use certificates for both user authentication and for dynamic ephemeral session key generation. For more detailed information on EAP, TLS, and EAP-TLS, refer to the following IETF RFCs: PPP Extensible Authentication Protocol (EAP) RFC 2284, The TLS Protocol RFC 2246 and PPP EAP TLS Authentication Protocol RFC 2716.
A user who is authenticated using EAP-TLS can then be mapped to user or group authorization information kept in the CiscoSecure user database, or in a Windows 2000 or generic LDAP Directory Server.
Also, to accomplish secure Cisco Aironet connectivity, EAP-TLS generates a dynamic, per-user, per-connection, unique session key.
EAP-TLS requires support from both the end client and the AAA client. An example of an EAP-TLS client includes the Windows XP operating system; EAP-TLS compliant AAA clients include Cisco 802.1x-enabled switch platforms (such as the Catalyst 6000 product line), and Cisco Aironet Wireless solutions. To support EAP-TLS, Cisco Secure ACS must operate with an X.509 v3 digital certificate.
TLS authentications require two elements of trust. The first element of trust is when the TLS negotiation establishes end-user trust by validating, through RSA signature verifications, that the user possesses a keypair signed by a certificate. This verifies that the end user is the legitimate keyholder for a given digital certificate and the corresponding user identification contained in the certificate. However, trusting that a user possesses a certificate only provides a username/keypair binding. The second element of trust is to use a third-party signature (usually from a CA) that verifies the information in a certificate. This third-party binding is similar to the real world equivalent of the seal on a passport.
8-70User Guide for Cisco Secure ACS for Windows Server
78-14696-01, Version 3.1
Chapter 8 Establishing Cisco Secure ACS System ConfigurationCisco Secure ACS Certificate Setup
You trust the passport because you trust the preparation and identity checking that the particular country’s passport office made when creating that passport. You trust digital certificates by installing the root certificate CA signature.
If Cisco Secure ACS receives traffic from a wireless AP that has the wrong shared secret, the error message logged in to the failed attempts log reads “EAP request has invalid signature.” Three conditions that might cause this to occur are the following:
• The wrong signature is being used
• A RADIUS packet was corrupted in transit
• Cisco Secure ACS is being attacked
After EAP-TLS authentication successfully concludes, Cisco Secure ACS must verify that the claimed identity (presented in the EAP Identity response) corresponds to the certificate presented by the user. Cisco Secure ACS can accomplish this verification in two ways:
• Certificate Name Comparison—Based on the name in the certificate.
• Certificate Binary Comparison—Between the user certificate stored in the user object in the LDAP server or Active Directory and the certificate presented by the user during EAP-TLS authentication.
Note If you use certificate binary comparison, the user certificate must be stored in Active Directory or an LDAP server, using a binary format. Also, the attribute storing the certificate must be named “usercertificate”.
When you set up EAP-TLS, you can select the criterion (one or both) that Cisco Secure ACS uses. For more information, see Configuring Authentication Options, page 8-81.
8-71User Guide for Cisco Secure ACS for Windows Server
78-14696-01, Version 3.1

Chapter 8 Establishing Cisco Secure ACS System ConfigurationCisco Secure ACS Certificate Setup
EAP-TLS Limitations
The Cisco Secure ACS implementation of EAP-TLS has the following limitations:
• Server certificate format—Server and CA certificates must be in either Base64-encoded X.509 format or DER-encoded binary X.509 format.
• LDAP attribute for binary comparison—If you configure Cisco Secure ACS to perform binary comparison of user certificates, the user certificate must be stored in Active Directory or an LDAP server, using a binary format. Also, the attribute storing the certificate must be named “usercertificate”.
• Windows server type—If you want to use Active Directory to authenticate users with EAP-TLS, Cisco Secure ACS must be installed on a domain controller rather than a member server.
About the PEAP Protocol
The PEAP (Protected EAP) protocol is a client-server security architecture. PEAP provides stronger security, greater extensibility, and support for one-time token authentication. PEAP has been posted as an IETF Internet Draft by RSA, Cisco, and Microsoft and is available at http://www.ietf.org/internet-drafts/draft-josefsson-pppext-eap-tls-eap-02.txt.
PEAP operates with two phrases. The first phase—server authentication—comprises a handshake and the establishment of and SSL tunnel. User authentication occurs in the second phase using a new EAP type that is protected by the SSL tunnel previously established.
PEAP uses TLS to authenticate the network infrastructure through the TLS Handshake protocol, to protect user credentials in transit by means of the TLS Record Protocol, and to generate cryptographic keying material using the TLS-defined pseudo-random function (PRF) functionality. PEAP uses the same encapsulation as EAP-TLS; however, whereas EAP-TLS ends after the TLS Handshake Protocol is complete, PEAP continues, encapsulating another EAP negotiation and authentication conversation within the TLS Record Protocol. This encapsulation ensures the cryptographic protection of the second EAP conversation. The authentication type negotiated during the second conversation may be any valid (for example, “Generic Token Card (GTC)”) EAP type. After the second EAP conversation is complete, the EAP-Success (or EAP-Failure, as
8-72User Guide for Cisco Secure ACS for Windows Server
78-14696-01, Version 3.1

Chapter 8 Establishing Cisco Secure ACS System ConfigurationCisco Secure ACS Certificate Setup
the case may be) message is returned to the end-user client in the clear. If authentication is successful, cryptographic keys are derived using the TLS PRF. Session keys never transit the network.
As compared to LEAP, PEAP is a major step forward in data security. After phase 1 of PEAP is established, all data is encrypted; this includes all username information that, with LEAP, is sent in cleartext. User identity is only sent through the secure (SSL) tunnel. The initial identity, which is sent in the clear, is the MAC address with the word “PEAP_” as a prefix. Further, by avoiding the requirement for MSCHAP usernames and passwords that is found in LEAP, PEAP can support a wider range of user databases.For more information regarding what protocols are compatible with the different databases, see Authentication Protocol-Database Compatibility, page 1-9.
PEAP Limitations
The Cisco Secure ACS implementation of PEAP has the following limitations:
• External Databases Only—PEAP only supports external user databases. The CiscoSecure user database cannot support PEAP authentication; therefore, only users who have an account in a supported external user database can authenticate with PEAP.
• Unknown User Processing—Enabling unknown user processing is strictly required to support PEAP authentication. Cisco Secure ACS uses unknown user processing during phase 1 of PEAP authentication, when the username is not known to Cisco Secure ACS. For more information about the Unknown User Policy, see Unknown User Processing, page 12-1.
Note Unknown user processing can introduce large latencies during authentication. Be sure to configure the Unknown User Policy page to account for this possibility. For more information, see Database Search Order, page 12-9.
8-73User Guide for Cisco Secure ACS for Windows Server
78-14696-01, Version 3.1
Chapter 8 Establishing Cisco Secure ACS System ConfigurationCisco Secure ACS Certificate Setup
Installing a Cisco Secure ACS Server CertificatePerform this procedure to install (that is, enroll) a server certificate for your Cisco Secure ACS. You can perform certificate enrollment to support EAP-TLS and PEAP authentication, as well as to support HTTPS protocol for GUI access to Cisco Secure ACS.
Before You Begin
You must have a server certificate for your Cisco Secure ACS before you can install it. With Cisco Secure ACS, certificate files must be in Base64-encoded X.509. If you do not already have a server certificate in storage, you can use the procedure in Generating a Certificate Signing Request, page 8-78, or any other means, to obtain a certificate for installation.
If you want to use a server certificate from local machine storage, we recommend that you read Extensible Authentication Protocol Transport Layer Security Deployment Guide for Wireless LAN Networks, available on the Cisco Secure ACS CD and at http://www.cisco.com/warp/public/cc/pd/sqsw/sq/tech/index.shtml. This white paper provides information about how to add a certificate to machine storage and how to configure a Microsoft certification authority server for use with Cisco Secure ACS.
To install an existing certificate for use on Cisco Secure ACS, follow these steps:
Step 1 In the navigation bar, click System Configuration.
Step 2 Click ACS Certificate Setup.
Step 3 Click Install ACS Certificate.
Result: Cisco Secure ACS displays the Install ACS Certificate page.
Step 4 You must specify whether Cisco Secure ACS reads the certificate from a specified file or uses a certificate already in storage on the local machine. Do one of the following:
• To specify that Cisco Secure ACS reads the certificate from a specified file, select the Read certificate from file option, and then type the full directory path and filename of the certificate file in the Certificate file box.
8-74User Guide for Cisco Secure ACS for Windows Server
78-14696-01, Version 3.1
Chapter 8 Establishing Cisco Secure ACS System ConfigurationCisco Secure ACS Certificate Setup
• To specify that Cisco Secure ACS uses a particular existing certificate from local machine certificate storage, select the Use certificate from storage option, and then type the certificate CN (common name/subject name) in the Certificate CN box.
Tip Type the certificate CN only; omit the cn= prefix.
Step 5 If you generated the request using Cisco Secure ACS, in the Private key file box, type the full directory path and name of the file that contains the private key.
Note If the certificate was installed in storage with the private key, you do not have the private key file and do not need to type it.
Tip This is the private key associated with the server certificate.
Step 6 In the Private key password box, type the private key password.
Tip If you used Cisco Secure ACS to generate the certificate signing request, this is the value you entered in Private key password on the Generate Certificate Signing Request page. If the private key file is unencrypted, leave this box empty.
Step 7 Click Submit.
Result: To show that the certificate setup is complete, Cisco Secure ACS displays the Installed Certificate Information table, which contains the following certificate information:
• Issued to: certificate subject
• Issued by: CA common name
• Valid from:
• Valid to:
• Validity
8-75User Guide for Cisco Secure ACS for Windows Server
78-14696-01, Version 3.1
Chapter 8 Establishing Cisco Secure ACS System ConfigurationCisco Secure ACS Certificate Setup
Adding a Certificate Authority CertificateUse this procedure to add new certificate authority (CA) certificates to Cisco Secure ACS’s local certificate storage.
Note If the clients and Cisco Secure ACS are getting their certificates from the same CA, you do not need to perform this procedure because Cisco Secure ACS automatically trusts the CA that issued its certificate.
When a user’s certificate is from an unknown CA (that is, one that is different from the CA that certifies the Cisco Secure ACS), you must specifically configure Cisco Secure ACS to trust that CA or authentication fails. Until you perform this procedure to explicitly extend trust by adding another CA, Cisco Secure ACS only recognizes certificates from the CA that issued its own certificate.
Configuring Cisco Secure ACS to trust a specific CA is a two-step process that comprises both this procedure of adding a CA’s certificate and the procedure in Editing the Certificate Trust List, page 8-77, where you signify that the particular CA is to be trusted. (Cisco Secure ACS comes preconfigured with a list of popular CAs, none of which are enabled until you explicitly signify trustworthiness.)
To add a certificate authority’s certificate to your local storage, follow these steps:
Step 1 In the navigation bar, click System Configuration.
Step 2 Click ACS Certificate Setup.
Step 3 Click ACS Certification Authority Setup.
Result: Cisco Secure ACS displays the CA Operations table on the Certification Authorities Setup page.
Step 4 In the CA certificate file box, type the full path and filename for the certificate you want to use.
Step 5 Click Submit.
Result: The new CA certificate is added to local certificate storage. And, if it is not already there, the name of the CA that issued the certificate is placed on the CTL.
8-76User Guide for Cisco Secure ACS for Windows Server
78-14696-01, Version 3.1
Chapter 8 Establishing Cisco Secure ACS System ConfigurationCisco Secure ACS Certificate Setup
Tip To use this new CA certificate to authenticate users, you must edit the certificate trust list to signify that this CA is trusted. For more information, see Editing the Certificate Trust List, page 8-77.
Editing the Certificate Trust ListCisco Secure ACS uses the CTL to verify the client certificates. For a CA to be trusted by Cisco Secure ACS, its certificate must be installed, and the Cisco Secure ACS administrator must explicitly configure the CA as trusted by editing the CTL.
Note The single exception to the requirement that a CA must be explicitly signified as trustworthy occurs when the clients and Cisco Secure ACS are getting their certificates from the same CA. You do not need to add this CA to the CTL because Cisco Secure ACS automatically trusts the CA that issued its certificate.
How you edit your CTL determines the type of trust model you have. Many use a restricted trust model wherein very few, privately controlled CAs are trusted. This model provides the highest level of security but restricts adaptability and scalability. The alternative, an open trust model, allows for more CAs or public CAs. This open trust model trades off increased security for greater adaptability and scalability.
We recommend that you fully understand the implications of your trust model before editing the CTL in Cisco Secure ACS.
Use this procedure to configure CAs on your CTL as trusted or not trusted. Before a CA can be configured as trusted on the CTL, you must have added the CA to the local machine certificate storage; for more information, see Adding a Certificate Authority Certificate, page 8-76. If a user’s certificate is from a CA that you have not specifically configured Cisco Secure ACS to trust, authentication fails.
8-77User Guide for Cisco Secure ACS for Windows Server
78-14696-01, Version 3.1
Chapter 8 Establishing Cisco Secure ACS System ConfigurationCisco Secure ACS Certificate Setup
To edit the CTL, follow these steps:
Step 1 In the navigation bar, click System Configuration.
Step 2 Click Cisco Secure ACS Certificate Setup.
Step 3 Click Edit Certificate Trust List.
Result: The Edit the Certificate Trust List (CTL) table appears.
Warning Adding a public CA, which you do not control, to your CTL, may reduce your system security.
Step 4 To configure a CA on your CTL as trusted, select the corresponding check box.
Tip You can select, or deselect, as many CAs as you want. Deselecting a CA’s check box configures the CA as not trusted.
Step 5 Click Submit.
Result: Cisco Secure ACS configures the specified CA (or CAs) as trusted or not trusted in accordance with selecting or deselecting check boxes.
Generating a Certificate Signing RequestYou can use Cisco Secure ACS to generate a certificate signing request (CSR). After you generate a CSR, you can submit it to a certificate authority (CA) to obtain your certificate. You perform this procedure to generate the CSR for future use with a certificate enrollment tool.
Note If you already have a server certificate, you do not need to use this portion of the ACS Certificate Setup page.
8-78User Guide for Cisco Secure ACS for Windows Server
78-14696-01, Version 3.1

Chapter 8 Establishing Cisco Secure ACS System ConfigurationCisco Secure ACS Certificate Setup
To generate a certificate signing request, follow these steps:
Step 1 In the navigation bar, click System Configuration.
Step 2 Click ACS Certificate Setup.
Step 3 Click Generate Certificate Signing Request.
Result: Cisco Secure ACS displays the Generate new request table on the Generate Certificate Signing Request page.
Step 4 In the Certificate subject box, type cn= followed by the name that you would like to use as subject name in this ACS certificate, for example, cn=ACSWireless.
Step 5 In the Private key file box, type the full directory path and name of the file in which the private key is saved, for example, c:\privateKeyFile.pem.
Step 6 In the Private key password box, type the private key password (that you have invented).
Step 7 In the Retype private key password box, retype the private key password.
Step 8 From the Key length list, select the length of the key to be used.
Tip The choices for Key length are 512 or 1024 bits. The default and more secure choice is 1024 bits.
Step 9 From the Digest to sign with list, select the digest (or hashing algorithm).
Tip The choices for Digest to sign with are MD2, MD5, SHA, and SHA1. The default is SHA1.
8-79User Guide for Cisco Secure ACS for Windows Server
78-14696-01, Version 3.1
Chapter 8 Establishing Cisco Secure ACS System ConfigurationCisco Secure ACS Certificate Setup
Step 10 Click Submit.
Result: Cisco Secure ACS displays a CSR in the display area, on the right, under a banner that reads: “Now your certificate signing request is ready. You can copy and paste it into any certification authority enrollment
tool.”
Tip You can copy and paste this certificate to the online enrollment tool of any CA.
Updating or Replacing a Cisco Secure ACS CertificateUse this procedure to update or replace an existing Cisco Secure ACS certificate that is out-of-date or out-of-order.
Warning This procedure eliminates your existing Cisco Secure ACS certificate.
To install a new ACS certificate, follow these steps:
Step 1 In the navigation bar, click System Configuration.
Step 2 Click ACS Certificate Setup.
Result: Cisco Secure ACS displays the Installed Certificate Information table on the ACS Certificate Setup page.
Note If your Cisco Secure ACS has not already been enrolled with a certificate, you do not see the Installed Certificate Information table. Rather, you see the Install new certificate table. If this is the case, you can proceed to Step 5.
Step 3 Click Enroll New Certificate.
Result: A confirmation dialog box appears.
Step 4 To confirm that you intend to enroll a new certificate, click OK.
Result: The existing Cisco Secure ACS certificate is removed.
8-80User Guide for Cisco Secure ACS for Windows Server
78-14696-01, Version 3.1
Chapter 8 Establishing Cisco Secure ACS System ConfigurationGlobal Authentication Setup
Step 5 You can now install the replacement certificate in the same manner as an original certificate. For detailed steps, see Installing a Cisco Secure ACS Server Certificate, page 8-74.
Global Authentication SetupUse the Global Authentication Setup page to specify the settings for all EAP and MS-CHAP authentication requests.
Configuring Authentication OptionsUse this procedure to select and configure how Cisco Secure ACS handles options for authentication. In particular, use this procedure to specify and configure the varieties of EAP that you allow, and to specify whether you allow either MS-CHAP Version 1 or MS-CHAP Version 2, or both.
For more information on the EAP-TLS Protocol, see About the EAP-TLS Protocol, page 8-70; for more information on the PEAP protocol, see About the PEAP Protocol, page 8-72. For details regarding how various password protocols are supported by the various databases, see Authentication Protocol-Database Compatibility, page 1-9.
To configure authentication options, follow these steps:
Step 1 In the navigation bar, click System Configuration.
Step 2 Click Global Authentication Setup.
Result: Cisco Secure ACS displays the Global Authentication Setup page.
Step 3 If you want to allow PEAP, follow these steps:
a. In the EAP Configuration table, select the Allow PEAP check box.
b. In the PEAP client initial display message: box, type the message you want displayed during PEAP authentication. The message has a limit of 60 characters.
8-81User Guide for Cisco Secure ACS for Windows Server
78-14696-01, Version 3.1
Chapter 8 Establishing Cisco Secure ACS System ConfigurationGlobal Authentication Setup
Tip The PEAP client initial display message is the first challenge a user of a PEAP client sees when attempting authentication. It should direct the user on what to do next, for example, “Enter your passcode.”
c. In the PEAP session timeout (minutes) box, type the maximum PEAP session length you want to allow users, in minutes.
Note PEAP supports a session resume feature. The session resume feature allows users to reauthenticate without entering a password provided that the session has not timed out. If the end-user client is restarted, the user must enter a password even if the session timeout interval has not ended.
Step 4 If you want to allow EAP-TLS, follow these steps:
a. In the EAP Configuration table, select the Allow EAP-TLS check box.
b. Select the appropriate radio button to specify whether EAP-TLS should require Certificate name comparison, Certificate binary comparison, or Either comparison type.
Note If you select Either comparison type, Cisco Secure ACS first compares the certificate name and, if necessary, then performs the certificate binary comparison.
Step 5 If you want to allow EAP-MD5, in the EAP Configuration table select the Allow EAP-MD5 check box.
Step 6 To enable MS-CHAP authentication, in the MS-CHAP Configuration table, select the check box(es) that correspond to each MS-CHAP version you want to use:
• Allow MS-CHAP Version 1 Authentication
• Allow MS-CHAP Version 2 Authentication
8-82User Guide for Cisco Secure ACS for Windows Server
78-14696-01, Version 3.1
Chapter 8 Establishing Cisco Secure ACS System ConfigurationGlobal Authentication Setup
Note You can select both check boxes to allow MS-CHAP authentication with either version; and likewise, at any time you can deselect one or both check boxes to disable the corresponding MS-CHAP authentication version.
Step 7 Click Submit + Restart.
Result: Cisco Secure ACS restarts its services and implements the authentication configuration options you selected.
8-83User Guide for Cisco Secure ACS for Windows Server
78-14696-01, Version 3.1

Chapter 8 Establishing Cisco Secure ACS System ConfigurationGlobal Authentication Setup
8-84User Guide for Cisco Secure ACS for Windows Server
78-14696-01, Version 3.1
User Guide for 78-14696-01, Version 3.1
C H A P T E R 9
Working with Logging and ReportsCisco Secure Access Control Server (Cisco Secure ACS) for Windows Server version 3.1 produces a variety of logs and provides a way to view most of these logs in the Cisco Secure ACS HTML interface as HTML reports. This chapter contains the following topics about logging:
• Logging Formats, page 9-1
• Special Logging Attributes, page 9-2
• Update Packets In Accounting Logs, page 9-4
• About Cisco Secure ACS Logs and Reports, page 9-4
• Working with CSV Logs, page 9-13
• Working with ODBC Logs, page 9-19
• Remote Logging, page 9-23
• Service Logs, page 9-28
Logging FormatsCisco Secure ACS logs a variety of user and system activities. Depending on the log, and how you have configured Cisco Secure ACS, logs can be recorded in one of two formats:
• Comma-separated value (CSV) files—The CSV format records data in columns separated by commas. This format is easily imported into a variety of third-party applications, such as Microsoft Excel or Microsoft Access. After data from a CSV file is imported into such applications, you can prepare
9-1Cisco Secure ACS for Windows Server

Chapter 9 Working with Logging and ReportsSpecial Logging Attributes
charts or perform queries, such as determining how many hours a user was logged in to the network during a given period. For information about how to use a CSV file in a third-party application such as Microsoft Excel, please see the documentation supplied by the third-party vendor. You can access the CSV files either on the Cisco Secure ACS server hard drive or by downloading the CSV file from the HTML interface. For more information about downloading the CSV file from the HTML interface, see Viewing a CSV Report, page 9-15.
• ODBC-compliant database tables—ODBC logging enables you to configure Cisco Secure ACS to log directly in an ODBC-compliant relational database, where it is stored in tables, one table per log. After the data is exported to the relational database, you can use the data however you need. For more information about querying the data in your relational database, refer to the documentation supplied by the relational database vendor.
For information about the formats available for a specific log, see About Cisco Secure ACS Logs and Reports, page 9-4.
Special Logging AttributesAmong the many attributes that Cisco Secure ACS can record in its logs, a few are of special importance. The following list explains the special logging attributes provided by Cisco Secure ACS.
• User Attributes—These logging attributes appear in the Attributes list for any log configuration page. Cisco Secure ACS lists them using their default names: Real Name, Description, User Field 3, User Field 4, and User Field 5. If you change the name of a user-defined attribute, the default name rather than the new name still appears in the Attributes list.
The content of these attributes is determined by the values entered in the corresponding fields in the user account. For more information about user attributes, see User Data Configuration Options, page 3-3.
• ExtDB Info—If the user is authenticated with an external user database, this attribute contains a value returned by the database. In the case of a Windows NT/2000 user database, this attribute contains the name of the domain that authenticated the user.
• Access Device—The name of the AAA client sending the logging data to Cisco Secure ACS.
9-2User Guide for Cisco Secure ACS for Windows Server
78-14696-01, Version 3.1

Chapter 9 Working with Logging and ReportsSpecial Logging Attributes
• Network Device Group—The network device group to which the access device (AAA client) belongs.
• Filter Information—The result of network access restrictions (NARs) applied to the user, if any. The message in this field indicates whether all applicable NARs permitted the user access, all applicable NARs denied the user access, or more specific information about which NAR denied the user access. If no NARs apply to the user, this logging attribute notes that no NARs were applied.
The Filter Information attribute is available for Passed Authentication and Failed Attempts logs.
• Device Command Set—The name of the device command set, if any, that was used to satisfy a command authorization request.
The Device Command Set attribute is available for Failed Attempts logs.
• Remote Logging Result—Whether a forwarded accounting packet is successfully processed by a remote logging service. This attribute is useful for determining which accounting packets, if any, may not have been logged by a central logging service. It is dependent upon the receipt of an acknowledgment message from the remote logging service. The acknowledgment message indicates that the remote logging service properly processed the accounting packet in the manner that the remote logging service is configured to do. A value of Remote-logging-successful indicates that the remote logging service successfully processed the accounting packet. A value of Remote-logging-failed indicates that the remote logging service did not process the accounting packet successfully.
Note Cisco Secure ACS cannot determine how a remote logging service is configured to process accounting packets that it is forwarded. For example, if a remote logging service is configured to discard accounting packets, it discards a forwarded accounting packet and responds to Cisco Secure ACS with an acknowledgment message, causing Cisco Secure ACS to write a value of Remote-logging-successful in the Remote Logging Result attribute in the local log that records the account packet.
9-3User Guide for Cisco Secure ACS for Windows Server
78-14696-01, Version 3.1

Chapter 9 Working with Logging and ReportsUpdate Packets In Accounting Logs
Update Packets In Accounting LogsWhenever you configure Cisco Secure ACS to record accounting data for user sessions, Cisco Secure ACS records start and stop packets. If you want, you can configure Cisco Secure ACS to record update packets, too. In addition to providing interim accounting information during a user session, update packets drive password expiry messages via CiscoSecure Authentication Agent. In this use, the update packets are referred to as watchdog packets.
Note To record update packets in Cisco Secure ACS accounting logs, you must configure your AAA clients to send the update packets. For more information about configuring your AAA client to send update packets, refer to the documentation for your AAA clients.
• Logging Update Packets Locally—To log update packets on the local Cisco Secure ACS server, enable the Log Update/Watchdog Packets from this Access Server option for each AAA client in Network Configuration.
For more information on setting this option for a AAA client, see Adding a AAA Client, page 4-15.
• Logging Update Packets Remotely—To log update packets on a remote logging server, enable the Log Update/Watchdog Packets from this remote AAA Server option for the remote server AAA Server table entry on the local Cisco Secure ACS server.
For more information on setting this option for a AAA server, see Adding a AAA Server, page 4-23.
About Cisco Secure ACS Logs and ReportsThe logs that Cisco Secure ACS provides can be divided into four groups:
• Accounting Logs, page 9-5
• Dynamic Administration Reports, page 9-7
• Cisco Secure ACS System Logs, page 9-11
• Service Logs, page 9-28
9-4User Guide for Cisco Secure ACS for Windows Server
78-14696-01, Version 3.1

Chapter 9 Working with Logging and ReportsAbout Cisco Secure ACS Logs and Reports
This section contains information about the first three groups. For information about service logs, see Service Logs, page 9-28.
Accounting LogsAccounting logs contain information about the use of remote access services by users. By default, these logs are available in CSV format. With the exception of the Passed Authentications log, you can also configure Cisco Secure ACS to export the data for these logs to an ODBC-compliant relational database that you configure to store the log data. Table 9-1 describes all accounting logs.
In the HTML interface, all accounting logs can be enabled, configured, and viewed. Table 9-2 contains information about what you can do in the Cisco Secure ACS HTML interface regarding accounting logs.
Table 9-1 Accounting Log Descriptions
Log Description
TACACS+ Accounting Contains the following information:
• User sessions stop and start times
• AAA client messages with username
• Caller line identification information
• Session duration
TACACS+ Administration Lists configuration commands entered on a AAA client using TACACS+ (Cisco IOS). Particularly if you use Cisco Secure ACS to perform command authorization, we recommend that you use this log.
Note To use the TACACS+ Administration log, you must configure TACACS+ AAA clients to perform command accounting with Cisco Secure ACS.
9-5User Guide for Cisco Secure ACS for Windows Server
78-14696-01, Version 3.1

Chapter 9 Working with Logging and ReportsAbout Cisco Secure ACS Logs and Reports
RADIUS Accounting Contains the following information:
• User sessions stop and start times
• AAA client messages with username
• Caller line identification information
• Session duration
You can configure Cisco Secure ACS to include accounting for Voice over IP (VoIP) in the RADIUS Accounting log, in a separate VoIP accounting log, or in both places.
VoIP Accounting Contains the following information:
• VoIP session stop and start times
• AAA client messages with username
• Caller line identification (CLID) information
• VoIP session duration
You can configure Cisco Secure ACS to include accounting for VoIP in this separate VoIP accounting log, in the RADIUS Accounting log, or in both places.
Failed Attempts Lists authentication and authorization failures with an indication of the cause.
Passed Authentications Lists successful authentication requests. This log is not dependent upon accounting packets from your AAA clients, so it is available even if your AAA clients do not support RADIUS accounting or if you have disabled accounting on your AAA clients.
Note The Passed Authentications log cannot be configured using an ODBC format.
Table 9-1 Accounting Log Descriptions (continued)
Log Description
9-6User Guide for Cisco Secure ACS for Windows Server
78-14696-01, Version 3.1
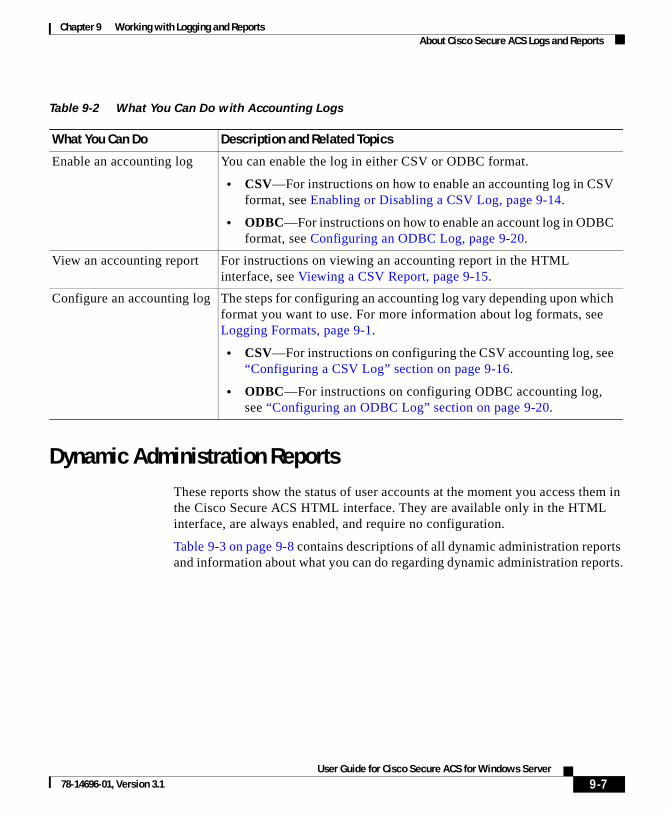
Chapter 9 Working with Logging and ReportsAbout Cisco Secure ACS Logs and Reports
Dynamic Administration ReportsThese reports show the status of user accounts at the moment you access them in the Cisco Secure ACS HTML interface. They are available only in the HTML interface, are always enabled, and require no configuration.
Table 9-3 on page 9-8 contains descriptions of all dynamic administration reports and information about what you can do regarding dynamic administration reports.
Table 9-2 What You Can Do with Accounting Logs
What You Can Do Description and Related Topics
Enable an accounting log You can enable the log in either CSV or ODBC format.
• CSV—For instructions on how to enable an accounting log in CSV format, see Enabling or Disabling a CSV Log, page 9-14.
• ODBC—For instructions on how to enable an account log in ODBC format, see Configuring an ODBC Log, page 9-20.
View an accounting report For instructions on viewing an accounting report in the HTML interface, see Viewing a CSV Report, page 9-15.
Configure an accounting log The steps for configuring an accounting log vary depending upon which format you want to use. For more information about log formats, see Logging Formats, page 9-1.
• CSV—For instructions on configuring the CSV accounting log, see “Configuring a CSV Log” section on page 9-16.
• ODBC—For instructions on configuring ODBC accounting log, see “Configuring an ODBC Log” section on page 9-20.
9-7User Guide for Cisco Secure ACS for Windows Server
78-14696-01, Version 3.1
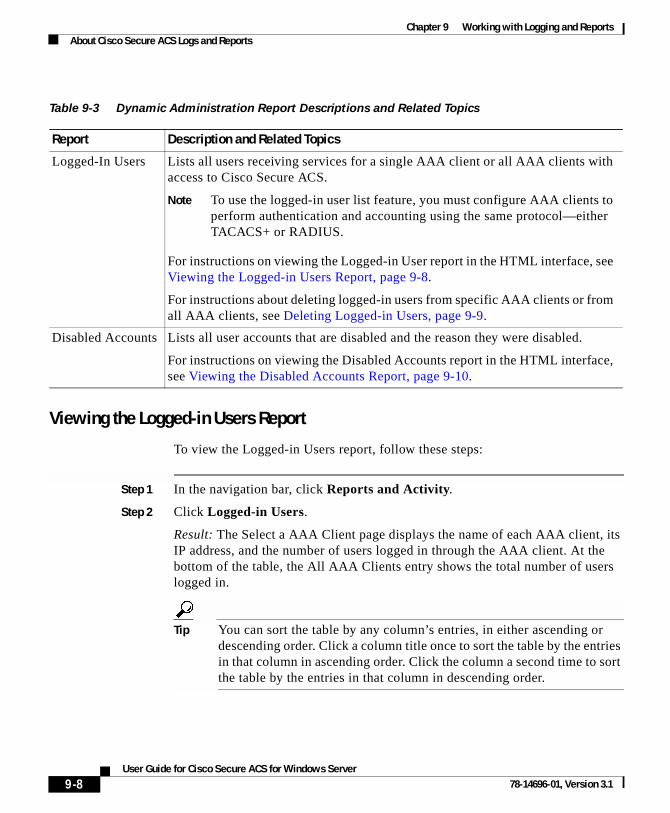
Chapter 9 Working with Logging and ReportsAbout Cisco Secure ACS Logs and Reports
Viewing the Logged-in Users Report
To view the Logged-in Users report, follow these steps:
Step 1 In the navigation bar, click Reports and Activity.
Step 2 Click Logged-in Users.
Result: The Select a AAA Client page displays the name of each AAA client, its IP address, and the number of users logged in through the AAA client. At the bottom of the table, the All AAA Clients entry shows the total number of users logged in.
Tip You can sort the table by any column’s entries, in either ascending or descending order. Click a column title once to sort the table by the entries in that column in ascending order. Click the column a second time to sort the table by the entries in that column in descending order.
Table 9-3 Dynamic Administration Report Descriptions and Related Topics
Report Description and Related Topics
Logged-In Users Lists all users receiving services for a single AAA client or all AAA clients with access to Cisco Secure ACS.
Note To use the logged-in user list feature, you must configure AAA clients to perform authentication and accounting using the same protocol—either TACACS+ or RADIUS.
For instructions on viewing the Logged-in User report in the HTML interface, see Viewing the Logged-in Users Report, page 9-8.
For instructions about deleting logged-in users from specific AAA clients or from all AAA clients, see Deleting Logged-in Users, page 9-9.
Disabled Accounts Lists all user accounts that are disabled and the reason they were disabled.
For instructions on viewing the Disabled Accounts report in the HTML interface, see Viewing the Disabled Accounts Report, page 9-10.
9-8User Guide for Cisco Secure ACS for Windows Server
78-14696-01, Version 3.1
Chapter 9 Working with Logging and ReportsAbout Cisco Secure ACS Logs and Reports
Step 3 Do one of the following:
• To see a list of all users logged in, click All AAA Clients.
• To see a list of users logged in through a particular AAA client, click the name of the AAA client.
Result: Cisco Secure ACS displays a table of users logged in, including the following information:
• Date and Time
• User
• Group
• Assigned IP
• Port
• Source AAA Client
Tip You can sort the table by the entries in any column, in either ascending or descending order. Click a column title once to sort the table by the entries in that column, in ascending order. Click the column a second time to sort the table by the entries that column in descending order.
Deleting Logged-in Users
From a Logged-in Users Report, you can instruct Cisco Secure ACS to delete users logged into a specific AAA client. When a user session terminates without a AAA client sending an accounting stop packet to the Cisco Secure ACS server, the Logged-in Users Report continues to show the user. Deleting logged-in users from a AAA client ends the accounting for those user sessions.
Note Deleting logged-in users only ends the Cisco Secure ACS accounting record of users logged in to a particular AAA client. It does not terminate active user sessions, nor does it affect user records.
9-9User Guide for Cisco Secure ACS for Windows Server
78-14696-01, Version 3.1

Chapter 9 Working with Logging and ReportsAbout Cisco Secure ACS Logs and Reports
To delete logged-in users, follow these steps:
Step 1 In the navigation bar, click Reports and Activity.
Step 2 Click Logged-in Users.
Result: The Select a AAA Client page displays the name of each AAA client, its IP address, and the number of users logged in through the AAA client. At the bottom of the table, the All AAA Clients entry shows the total number of users logged in.
Step 3 Click the name of the AAA client whose users you want to delete from the Logged-in Users report.
Result: Cisco Secure ACS displays a table of all users logged in through the AAA client. The Purge Logged in Users button appears below the table.
Step 4 Click Purge Logged in Users.
Result: Cisco Secure ACS displays a message, indicating the number of users purged from the report and the IP address of the AAA client.
Viewing the Disabled Accounts Report
To view the Disabled Accounts report, follow these steps:
Step 1 In the navigation bar, click Reports and Activity.
Step 2 Click Disabled Accounts.
Result: The Select a user account to edit page displays disabled user accounts, the account status, and the group to which the user account is assigned.
Step 3 To edit a user account listed, in the User column, click the username.
Result: Cisco Secure ACS opens the user account for editing.
For more information about editing a user account, see Basic User Setup Options, page 7-4.
9-10User Guide for Cisco Secure ACS for Windows Server
78-14696-01, Version 3.1
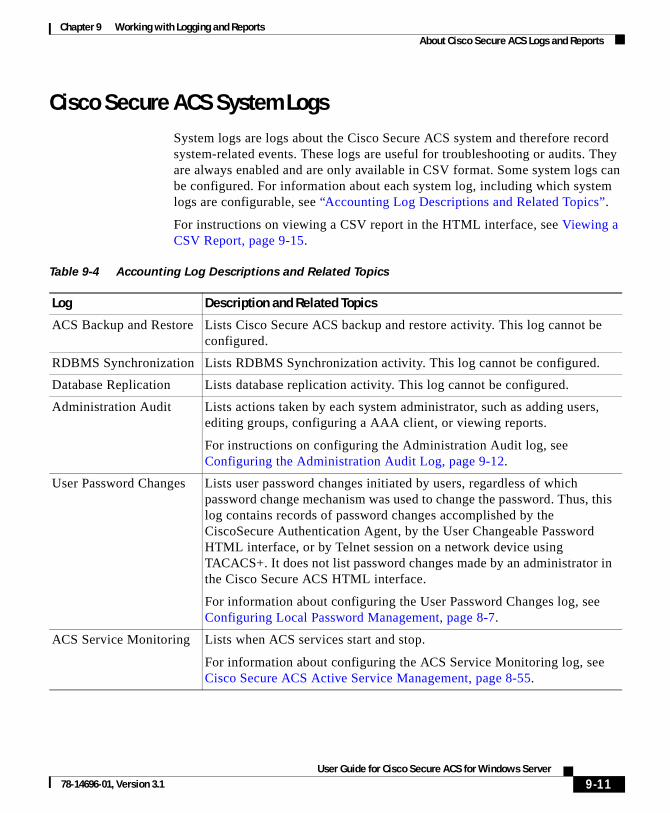
Chapter 9 Working with Logging and ReportsAbout Cisco Secure ACS Logs and Reports
Cisco Secure ACS System LogsSystem logs are logs about the Cisco Secure ACS system and therefore record system-related events. These logs are useful for troubleshooting or audits. They are always enabled and are only available in CSV format. Some system logs can be configured. For information about each system log, including which system logs are configurable, see “Accounting Log Descriptions and Related Topics”.
For instructions on viewing a CSV report in the HTML interface, see Viewing a CSV Report, page 9-15.
Table 9-4 Accounting Log Descriptions and Related Topics
Log Description and Related Topics
ACS Backup and Restore Lists Cisco Secure ACS backup and restore activity. This log cannot be configured.
RDBMS Synchronization Lists RDBMS Synchronization activity. This log cannot be configured.
Database Replication Lists database replication activity. This log cannot be configured.
Administration Audit Lists actions taken by each system administrator, such as adding users, editing groups, configuring a AAA client, or viewing reports.
For instructions on configuring the Administration Audit log, see Configuring the Administration Audit Log, page 9-12.
User Password Changes Lists user password changes initiated by users, regardless of which password change mechanism was used to change the password. Thus, this log contains records of password changes accomplished by the CiscoSecure Authentication Agent, by the User Changeable Password HTML interface, or by Telnet session on a network device using TACACS+. It does not list password changes made by an administrator in the Cisco Secure ACS HTML interface.
For information about configuring the User Password Changes log, see Configuring Local Password Management, page 8-7.
ACS Service Monitoring Lists when ACS services start and stop.
For information about configuring the ACS Service Monitoring log, see Cisco Secure ACS Active Service Management, page 8-55.
9-11User Guide for Cisco Secure ACS for Windows Server
78-14696-01, Version 3.1
Chapter 9 Working with Logging and ReportsAbout Cisco Secure ACS Logs and Reports
Configuring the Administration Audit Log
To configure the Administrative Audit log, follow these steps:
Step 1 In the navigation bar, click Administration Control.
Step 2 Click Audit Policy.
Result: The Audit Policy Setup page appears.
Step 3 To generate a new Administrative Audit CSV file at a regular interval, select one of the following options:
• Every day—Cisco Secure ACS generates a new Administrative Audit CSV file at the start of each day.
• Every week—Cisco Secure ACS generates a new Administrative Audit CSV file at the start of each week.
• Every month—Cisco Secure ACS generates a new Administrative Audit CSV file at the start of each month.
Step 4 To generate a new Administrative Audit CSV file when the current file reaches a specific size, select the When size is greater than X KB option and type the file size threshold in kilobytes in the X box.
Step 5 To manage which Administrative Audit CSV files Cisco Secure ACS keeps, follow these steps:
a. Select the Manage Directory check box.
b. To limit the number of Administrative Audit CSV files Cisco Secure ACS retains, select the Keep only the last X files option and type in the X box the number of files you want Cisco Secure ACS to retain.
c. To limit how old Administrative Audit CSV files retained by Cisco Secure ACS can be, select the Delete files older than X days option and type the number of days for which Cisco Secure ACS should retain a Administrative Audit CSV file before deleting it.
Step 6 Click Submit.
Result: Cisco Secure ACS saves and implements the Administrative Audit log settings you specified.
9-12User Guide for Cisco Secure ACS for Windows Server
78-14696-01, Version 3.1
Chapter 9 Working with Logging and ReportsWorking with CSV Logs
Working with CSV LogsThis section contains the following topics:
• CSV Log File Names, page 9-13
• Enabling or Disabling a CSV Log, page 9-14
• Viewing a CSV Report, page 9-15
• Configuring a CSV Log, page 9-16
CSV Log File NamesWhen you access a report in Reports and Activity, Cisco Secure ACS lists the CSV files in chronological order, with the current CSV file at the top of the list. The current file is named log.csv, where log is the name of the log.
Older files are named in the following format:
logyyyy-mm-dd.csv
where
log is the name of the log.
yyyy is the year the CSV file was started.
mm is the month the CSV file was started, in numeric characters.
dd is the date the CSV file was started.
For example, a Database Replication log file that was generated on October 13, 2002, would be named Database Replication 2002-10-13.csv.
CSV Log File LocationsBy default, Cisco Secure ACS keeps log files in directories unique to the log. The HTML interface enables you to configure the log file location for some logs while the location for other log files is not configurable. The default directories for all logs are within sysdrive:\Program Files\CiscoSecure ACS vx.x. For the subdirectory of this location for a specific log, see Table 9-5.
9-13User Guide for Cisco Secure ACS for Windows Server
78-14696-01, Version 3.1
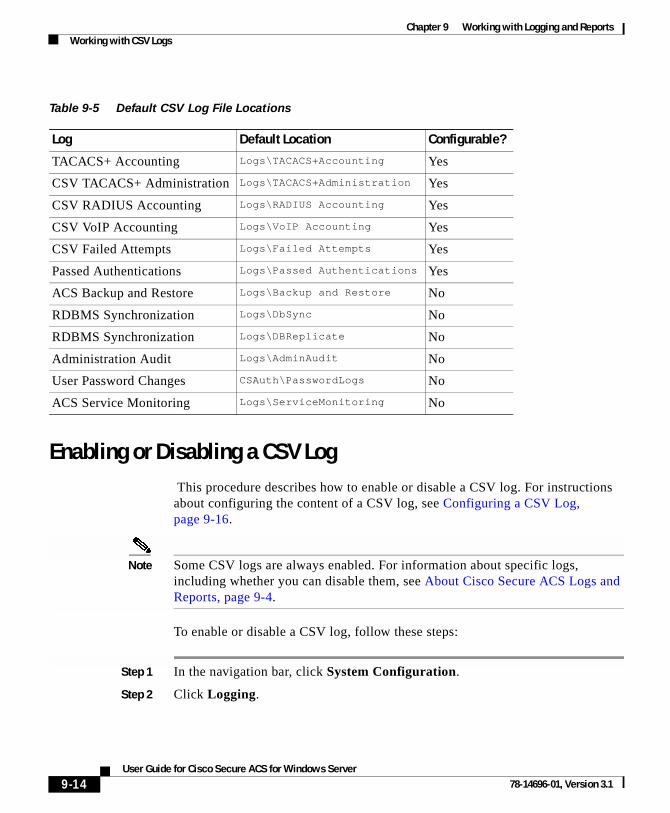
Chapter 9 Working with Logging and ReportsWorking with CSV Logs
Enabling or Disabling a CSV Log This procedure describes how to enable or disable a CSV log. For instructions about configuring the content of a CSV log, see Configuring a CSV Log, page 9-16.
Note Some CSV logs are always enabled. For information about specific logs, including whether you can disable them, see About Cisco Secure ACS Logs and Reports, page 9-4.
To enable or disable a CSV log, follow these steps:
Step 1 In the navigation bar, click System Configuration.
Step 2 Click Logging.
Table 9-5 Default CSV Log File Locations
Log Default Location Configurable?
TACACS+ Accounting Logs\TACACS+Accounting Yes
CSV TACACS+ Administration Logs\TACACS+Administration Yes
CSV RADIUS Accounting Logs\RADIUS Accounting Yes
CSV VoIP Accounting Logs\VoIP Accounting Yes
CSV Failed Attempts Logs\Failed Attempts Yes
Passed Authentications Logs\Passed Authentications Yes
ACS Backup and Restore Logs\Backup and Restore No
RDBMS Synchronization Logs\DbSync No
RDBMS Synchronization Logs\DBReplicate No
Administration Audit Logs\AdminAudit No
User Password Changes CSAuth\PasswordLogs No
ACS Service Monitoring Logs\ServiceMonitoring No
9-14User Guide for Cisco Secure ACS for Windows Server
78-14696-01, Version 3.1
Chapter 9 Working with Logging and ReportsWorking with CSV Logs
Step 3 Click the name of the CSV log you want to enable.
Result: The CSV log Comma-Separated Values File Configuration page appears, where log is the name of the CSV log you selected.
Step 4 To enable the log, under Enable Logging, select the Log to CSV log report check box, where log is the name of the CSV log you selected in Step 3.
Step 5 To disable the log, under Enable Logging, clear the Log to CSV report log check box, where log is the name of the CSV log you selected in Step 3.
Step 6 Click Submit.
Result: If you enabled the log, Cisco Secure ACS begins logging information for the log selected. If you disabled the log, Cisco Secure ACS stops logging information for the log selected.
Viewing a CSV ReportWhen you select Logged-in Users or Disabled Accounts, a list of logged-in users or disabled accounts appears in the display area, which is the frame on the right side of the web browser. For all other types of reports, a list of applicable reports appears. Files are listed in chronological order, with the most recent file at the top of the list. The reports are named and listed by the date on which they were created; for example, a report ending with 2002-10-13.csv was created on October 13, 2002.
Files in CSV format can be imported into spreadsheets using most popular spreadsheet application software. Refer to your spreadsheet software documentation for instructions.
You can download the CSV file for any CSV report you view in Cisco Secure ACS. The procedure below includes steps for doing so.
To view a CSV report, follow these steps:
Step 1 In the navigation bar, click Reports and Activity.
Step 2 Click the name of the CSV report you want to view.
Result: On the right side of the browser, Cisco Secure ACS lists the current CSV report file name and the file names of any old CSV report files.
9-15User Guide for Cisco Secure ACS for Windows Server
78-14696-01, Version 3.1
Chapter 9 Working with Logging and ReportsWorking with CSV Logs
Tip You can configure how Cisco Secure ACS handles old CSV report files. For more information, see Configuring a CSV Log, page 9-16.
Step 3 Click the CSV report file name whose contents you want to view.
Result: If the CSV report file contains information, the information appears in the display area.
Tip You can sort the table by any entries in the column, in either ascending or descending order. Click a column title once to sort the table by that column’s entries in ascending order. Click the column a second time to sort the table by the entries in that column in descending order.
Tip To check for newer information in the current CSV report, click Refresh.
Step 4 If you want to download the CSV log file for the report you are viewing, follow these steps:
a. Click Download.
Result: Your browser displays a dialog box for accepting and saving the CSV file.
b. Choose a location to save the CSV file and save the file.
Configuring a CSV LogThis procedure describes how to configure the content of a CSV log. For instructions to enable or disable a CSV log, see Enabling or Disabling a CSV Log, page 9-14.
The logs to which this procedure applies are as follows:
• TACACS+ Accounting
• TACACS+ Administration
9-16User Guide for Cisco Secure ACS for Windows Server
78-14696-01, Version 3.1

Chapter 9 Working with Logging and ReportsWorking with CSV Logs
• RADIUS Accounting
• VoIP Accounting
• Failed Attempts
• Passed Authentications
Note The ACS Backup and Restore, RDBMS Synchronization, and Database Replication CSV logs cannot be configured.
You can configure several aspects of a CSV log:
• Log content—You can select which data attributes are included in the log.
• Log generation frequency—You can determine whether a new log is started after a specific length of time or when the current CSV file reaches a particular size.
• CSV file location—You can specify where on the local hard drive Cisco Secure ACS writes the CSV file.
• CSV file retention—You can specify how many old CSV files Cisco Secure ACS maintains or set a maximum number of files it is to retain.
To configure a CSV log, follow these steps:
Step 1 In the navigation bar, click System Configuration.
Step 2 Click Logging.
Step 3 Click the name of the CSV log you want to enable.
Result: The CSV log Comma-Separated Values File Configuration page appears, where log is the name of the CSV log you selected.
The Select Columns To Log table contains two lists, Attributes and Logged Attributes. The attributes in the Logged Attributes list appear on the log selected.
Step 4 To add an attribute to the log, select the attribute in the Attributes list, and then click —> (right arrow button).
Result: The attribute moves to the Logged Attributes list.
Tip Use the vertical scroll bar to find attributes not visible in the list box.
9-17User Guide for Cisco Secure ACS for Windows Server
78-14696-01, Version 3.1

Chapter 9 Working with Logging and ReportsWorking with CSV Logs
Step 5 To remove an attribute from the log, select the attribute in the Logged Attributes list, and then click <— (left arrow button).
Result: The attribute moves to the Attributes list.
Tip Use the vertical scroll bar to find attributes not visible in the list.
Step 6 To set the attributes in the Logged Attributes list back to the default selections, at the bottom of the browser window, click Reset Columns.
Step 7 To generate a new CSV file at a regular interval, select one of the following options:
• Every day—Cisco Secure ACS generates a new CSV file at the start of each day.
• Every week—Cisco Secure ACS generates a new CSV file at the start of each week.
• Every month—Cisco Secure ACS generates a new CSV file at the start of each month.
Step 8 To generate a new CSV file when the current file reaches a specific size, select the When size is greater than X KB option and type the file size threshold, in kilobytes, in the X box.
Step 9 To manage which CSV files Cisco Secure ACS keeps, follow these steps:
a. Select the Manage Directory check box.
b. To limit the number of CSV files Cisco Secure ACS retains, select the Keep only the last X files option and type the number of files you want Cisco Secure ACS to retain in the X box.
c. To limit how old CSV files retained by Cisco Secure ACS can be, select the Delete files older than X days option and type the number of days for which Cisco Secure ACS should retain a CSV file before deleting it.
Step 10 Click Submit.
Result: Cisco Secure ACS implements the CSV log configuration that you specified.
9-18User Guide for Cisco Secure ACS for Windows Server
78-14696-01, Version 3.1

Chapter 9 Working with Logging and ReportsWorking with ODBC Logs
Working with ODBC LogsThis section contains procedures for the following topics:
• Preparing for ODBC Logging, page 9-19
• Configuring a System Data Source Name for ODBC Logging, page 9-20
• Configuring a CSV Log, page 9-16
Preparing for ODBC LoggingTo prepare for ODBC logging, there are several steps you must complete. After you have prepared for ODBC logging, you can configure individual ODBC logs.
To prepare for ODBC logging, follow these steps:
Step 1 Set up the relational database to which you want to export logging data. For more information, refer to your relational database documentation.
Step 2 Set up a system data source name (DSN) on the Cisco Secure ACS server. For instructions, see Configuring a System Data Source Name for ODBC Logging, page 9-20.
Step 3 Enable ODBC logging in the Cisco Secure ACS HTML interface:
a. In the navigation bar, click Interface Configuration.
b. Click Advanced Options.
c. Select the ODBC Logging check box.
d. Click Submit.
Result: Cisco Secure ACS enables the ODBC logging feature. On the Logging page, in the System Configuration section, Cisco Secure ACS displays links for configuring ODBC logs.
Result: You can now configure individual ODBC logs. For instructions, see Configuring an ODBC Log, page 9-20.
9-19User Guide for Cisco Secure ACS for Windows Server
78-14696-01, Version 3.1

Chapter 9 Working with Logging and ReportsWorking with ODBC Logs
Configuring a System Data Source Name for ODBC Logging On the computer running Cisco Secure ACS, you must create a system DSN for Cisco Secure ACS to communicate with the relational database that is to store your logging data.
To create a system DSN for use with ODBC logging, follow these steps:
Step 1 In Windows Control Panel, double-click ODBC Data Sources.
Step 2 In the ODBC Data Source Administrator page, click the System DSN tab.
Step 3 Click Add.
Step 4 Select the driver you need to use with your new DSN, and then click Finish.
Result: A dialog box displays fields requiring information specific to the ODBC driver you selected.
Step 5 Type a descriptive name for the DSN in the Data Source Name box.
Step 6 Complete the other fields required by the ODBC driver you selected. These fields may include information such as the IP address of the server on which the ODBC-compliant relational database runs.
Step 7 Click OK.
Step 8 Close the ODBC window and Windows Control Panel.
Result: The System DSN to be used by Cisco Secure ACS for communicating with the relational database is created on the computer running Cisco Secure ACS. The name you assigned to the DSN appears in the Data Source list on each ODBC log configuration page.
Configuring an ODBC Log The logs to which this procedure applies are as follows:
• TACACS+ Accounting
• TACACS+ Administration
• RADIUS Accounting
9-20User Guide for Cisco Secure ACS for Windows Server
78-14696-01, Version 3.1
Chapter 9 Working with Logging and ReportsWorking with ODBC Logs
• VoIP Accounting
• Failed Attempts
Note Before you can configure an ODBC log, you must prepare for ODBC logging. For more information, see Preparing for ODBC Logging, page 9-19.
To configure an ODBC log, follow these steps:
Step 1 In the navigation bar, click System Configuration.
Step 2 Click Logging.
Step 3 Click the name of the ODBC log you want to enable.
Result: The ODBC log Configuration page appears, where log is the name of the ODBC log you selected.
The Select Columns To Log table contains two lists: Attributes and Logged Attributes. When you first access the ODBC configuration page for a log, the Logged Attributes list contains the default set of attributes. Cisco Secure ACS includes in the log only those attributes that are in the Logged Attributes list.
Step 4 Specify the attributes that you want Cisco Secure ACS to send to the relational database:
a. To add an attribute to the log, select the attribute in the Attributes list, and then click —> (right arrow button).
Result: The attribute moves to the Logged Attributes list.
Tip Use the vertical scroll bar to find attributes not visible in the list box.
b. To remove an attribute from the log, select the attribute in the Logged Attributes list, and then click <— (left arrow button).
Result: The attribute moves to the Attributes list.
Tip Use the vertical scroll bar to find attributes not visible in the list box.
c. To set the attributes in the Logged Attributes list back to the default selections, click Reset Columns.
9-21User Guide for Cisco Secure ACS for Windows Server
78-14696-01, Version 3.1
Chapter 9 Working with Logging and ReportsWorking with ODBC Logs
Step 5 In the ODBC Connection Settings table, configure Cisco Secure ACS to communicate with the ODBC database. To do so, follow these steps:
a. From the Data Source list, select the system DSN you created to allow Cisco Secure ACS to send ODBC logging data to your relational database.
b. In the Username box, type the username of a user account in your relational database (up to 80 characters).
Note The user must have sufficient privileges in the relational database to write the ODBC logging data to the appropriate table.
c. In the Password box, type the password (up to 80 characters) for the relational database user account you specified in Step b.
d. In the Table Name box, type the name (up to 80 characters) of the table to which you want ODBC logging data appended.
Step 6 Click Submit.
Result: Cisco Secure ACS saves the log configuration.
Step 7 Click the name of the ODBC log you are configuring.
Result: Cisco Secure ACS displays the ODBC log configuration page again.
Step 8 Click Show Create Table.
Result: The right side of the browser displays an SQL create table statement for Microsoft SQL Server. The table name is the name specified in the Table Name box. The column names are the attributes specified in the Logged Attributes list.
Note The generated SQL is valid for Microsoft SQL Server only. If you are using another relational database, refer to your relational database documentation for information about writing a command to create a table.
Step 9 Using the information provided in the generated SQL, create a table in your relational database for this ODBC log.
Note For ODBC logging to work, the table name and the column names must match exactly the names in the generated SQL.
9-22User Guide for Cisco Secure ACS for Windows Server
78-14696-01, Version 3.1
Chapter 9 Working with Logging and ReportsRemote Logging
Step 10 Continuing in Cisco Secure ACS, access the configuration page for the ODBC log you are configuring:
a. In the navigation bar, click System Configuration.
b. Click Logging.
c. Click the name of the ODBC log you are configuring.
Result: The ODBC log Configuration page appears, where log is the name of the ODBC log you selected.
Step 11 Select the Log to ODBC log report check box, where log is the name of the ODBC log you selected.
Step 12 Click Submit.
Result: Cisco Secure ACS begins sending logging data to the relational database table specified, using the system DSN you configured.
Remote LoggingThis section discusses remote logging capabilities of Cisco Secure ACS. It contains the following topics:
• About Remote Logging, page 9-23
• Remote Logging Options, page 9-25
• Implementing Centralized Remote Logging, page 9-24
• Enabling and Configuring Remote Logging, page 9-26
• Disabling Remote Logging, page 9-28
About Remote LoggingThe Remote Logging feature enables you to centralize accounting logs generated by multiple Cisco Secure ACSes. You can configure each Cisco Secure ACS to point to one Cisco Secure ACS that is to be used as a central logging server. The central logging Cisco Secure ACS still performs AAA functions, but it also is the repository for accounting logs it receives. For more information about Cisco Secure ACS accounting logs, see Accounting Logs, page 9-5.
9-23User Guide for Cisco Secure ACS for Windows Server
78-14696-01, Version 3.1
Chapter 9 Working with Logging and ReportsRemote Logging
The Remote Logging feature enables Cisco Secure ACS to send accounting data received from AAA clients directly to the CSLog service on the remote logging server, where the accounting data is written to the logs. The logging server generates the accounting logs in the formats it is configured to use—CSV and ODBC—regardless of the local logging configuration on the Cisco Secure ACSes sending the data to the central logging server.
Cisco Secure ACS listens on TCP port 2001 for remote logging communication. Remote logging data is encrypted by a 128-bit proprietary algorithm.
Note The Remote Logging feature does not affect the forwarding of accounting data for proxied authentication requests. Cisco Secure ACS only applies Remote Logging settings to accounting data for sessions authenticated by proxy when accounting data for sessions authenticated by proxy is logged locally. For more information about proxied authentication requests and accounting data for sessions authenticated by proxy, see Proxy Distribution Table Configuration, page 4-32.
Implementing Centralized Remote LoggingBefore You Begin
Make sure that gateway devices between remote Cisco Secure ACSes and the central logging Cisco Secure ACS permit the central logging Cisco Secure ACS to receive data on TCP port 2001.
To implement centralized remote logging, follow these steps:
Step 1 On a Windows 2000 server that you want to use to store centralized logging data, install Cisco Secure Access Control Server (Cisco Secure ACS) for Windows Server version 3.1. For information about installing Cisco Secure ACS, see the Installation Guide for Cisco Secure ACS for Windows Server.
Step 2 In the Cisco Secure ACS running on the central logging server, follow these steps:
a. Configure the accounting logs as needed. All accounting data sent to the central logging server will be recorded in the way you configure accounting logs on this Cisco Secure ACS. For information about accounting logs, see Accounting Logs, page 9-5.
9-24User Guide for Cisco Secure ACS for Windows Server
78-14696-01, Version 3.1

Chapter 9 Working with Logging and ReportsRemote Logging
Accounting logs can be recorded in either CSV or ODBC format. For information about configuring CSV logs, see Working with CSV Logs, page 9-13. For information about configuring ODBC logs, see Working with ODBC Logs, page 9-19.
b. Add to the AAA Servers table each Cisco Secure ACS that the central logging server is to receive accounting data from. For more information, see AAA Server Configuration, page 4-20.
Note If the central logging server is to log watchdog and update packets for a Cisco Secure ACS, be sure that the Log Update/Watchdog Packets from this remote AAA Server check box is selected for that Cisco Secure ACS in the AAA Servers table.
Step 3 For each Cisco Secure ACS that is to send its accounting data to the central logging server, follow these steps:
a. Add the central logging server to the AAA Servers table in Network Configuration. For more information, see AAA Server Configuration, page 4-20.
b. Enable remote logging. For more information, see Enabling and Configuring Remote Logging, page 9-26.
Step 4 If you want to create other central logging servers, for use either as secondary servers or as mirrored logging servers, perform Step 1 through Step 3 for each additional server.
Remote Logging OptionsCisco Secure ACS provides the remote logging options listed below. These options appear on the Remote Logging Setup page.
• Do not log Remotely—Cisco Secure ACS writes accounting data for locally authenticated sessions only to the local logs that are enabled.
• Log to all selected remote log services—Cisco Secure ACS sends accounting data for locally authenticated sessions to all Cisco Secure ACSes in the Selected Log Services list.
9-25User Guide for Cisco Secure ACS for Windows Server
78-14696-01, Version 3.1
Chapter 9 Working with Logging and ReportsRemote Logging
• Log to subsequent remote log services on failure—Cisco Secure ACS sends accounting data for locally authenticated sessions to the first Cisco Secure ACS that is operational in the Selected Log Services list. This behavior enables you to configure one or more backup central logging servers so that no accounting data is lost if the first central logging server fails or is otherwise unavailable to Cisco Secure ACS.
• Remote Log Services—This list represents the Cisco Secure ACSes configured in the Remote Agents table in Network Configuration to which the Cisco Secure ACS server does not send accounting data for locally authenticated sessions.
• Selected Log Services—This list represents the Cisco Secure ACSes configured in the Remote Agents table in Network Configuration to which Cisco Secure ACS does send accounting data for locally authenticated sessions.
Enabling and Configuring Remote Logging
Note Before configuring the Remote Logging feature on a Cisco Secure ACS, make sure that you have configured your central logging Cisco Secure ACS. For more information, see Implementing Centralized Remote Logging, page 9-24.
To enable and configure remote logging, follow these steps:
Step 1 To enable the Remote Logging feature in the HTML interface, follow these steps:
a. Click Interface Configuration.
b. Click Advanced Options.
c. Select the Remote Logging check box.
d. Click Submit.
Result: Cisco Secure ACS displays the Remote Logging link on the Logging page in the System Configuration section.
Step 2 Click System Configuration.
Step 3 Click Logging.
Result: The Logging Configuration page appears.
9-26User Guide for Cisco Secure ACS for Windows Server
78-14696-01, Version 3.1

Chapter 9 Working with Logging and ReportsRemote Logging
Step 4 Click Remote Logging.
Step 5 Select the applicable remote logging option:
a. To send the accounting information for this Cisco Secure ACS to more than one Cisco Secure ACS, select the Log to all selected remote log services option.
b. To send the accounting information for this Cisco Secure ACS server to one Cisco Secure ACS, select the Log to subsequent remote log services on failure option.
Note Use the Log to subsequent remote log services on failure option when you want to configure Cisco Secure ACS to send accounting data to a second remote Cisco Secure ACS if the first Cisco Secure ACS fails.
Step 6 For each remote Cisco Secure ACS you want to have in the Selected Log Services list, follow these steps:
a. In the Remote Log Services list, select the name of a Cisco Secure ACS to which you want to send accounting data for locally authenticated sessions.
Note The Cisco Secure ACSes available in the Remote Log Services list is determined by the AAA Servers table in Network Configuration. For more information about the AAA Servers table, see AAA Server Configuration, page 4-20.
b. Click —> (right arrow button) to move the selected Cisco Secure ACS to the Selected Log Services list.
Step 7 To assign an order to the servers in the Selected Log Services list, click Up and Down to move selected Cisco Secure ACSes until you have created the order you need.
Note If the Log to subsequent remote log services on failure option is selected, Cisco Secure ACS logs to the first accessible Cisco Secure ACS in the Selected Log Services list.
9-27User Guide for Cisco Secure ACS for Windows Server
78-14696-01, Version 3.1
Chapter 9 Working with Logging and ReportsService Logs
Step 8 Click Submit.
Result: Cisco Secure ACS saves and implements the remote logging configuration you specified.
Disabling Remote LoggingBy disabling the Remote Logging feature, you prevent Cisco Secure ACS from sending its accounting information to a central logging Cisco Secure ACS.
To disable remote logging, follow these steps:
Step 1 In the navigation bar, click System Configuration.
Step 2 Click Logging.
Step 3 Click Remote Logging.
Step 4 Select the Do not log Remotely option.
Step 5 Click Submit.
Result: Cisco Secure ACS no longer sends its accounting information for locally authenticated sessions to remote logging servers.
Service LogsService logs are considered diagnostic logs and are used for troubleshooting or debugging purposes only. These logs are not intended for general use by Cisco Secure ACS administrators; instead, they are mainly sources of information for Cisco support personnel. Service logs contain a record of all Cisco Secure ACS service actions and activities. Cisco Secure ACS generates these logs whenever the services are running, regardless of whether the administrative interface is started, and regardless of whether you are using the service. For example, RADIUS service logs are created even if you are not using the RADIUS protocol in your network.
9-28User Guide for Cisco Secure ACS for Windows Server
78-14696-01, Version 3.1
Chapter 9 Working with Logging and ReportsService Logs
For more information about Cisco Secure ACS services, see Appendix G, “Cisco Secure ACS Internal Architecture.”
Services LoggedCisco Secure ACS generates logs for the following services:
• CSAdmin
• CSAuth
• CSDBSync
• CSLog
• CSMon
• CSRadius
• CSTacacs
These files are located in the \Logs subdirectory of the applicable service directory. For example, the following is the default directory for the CiscoSecure authentication service:
c:\Program Files\CiscoSecure ACS vx.x\CSAuth\Logs
The most recent debug log is named as follows:
SERVICE.log
where SERVICE is the name of the applicable service.
Older debug logs are named with the year, month, and date they were created. For example, a file created on July 13, 1999, would be named as follows:
SERVICE 1999-07-13.log
where SERVICE is the name of the applicable service.
If you selected the Day/Month/Year format, the file would be named as follows:
SERVICE 13-07-1999.log
9-29User Guide for Cisco Secure ACS for Windows Server
78-14696-01, Version 3.1
Chapter 9 Working with Logging and ReportsService Logs
Configuring Service LogsYou can configure how Cisco Secure ACS generates and manages the service log file. The options for configuring the service log file are listed below.
• Level of detail—You can set the service log file to contain one of three levels of detail:
– None—No log file is generated.
– Low—Only start and stop actions are logged.
– Full—All services actions are logged.
• Generate new file—You can control how often a new service log file is created:
– Every Day—Cisco Secure ACS generates a new log file at 12:01 A.M. local time every day.
– Every Week—Cisco Secure ACS generates a new log file at 12:01 A.M. local time every Sunday.
– Every Month—Cisco Secure ACS generates a new log file at 12:01 A.M. on the first day of every month.
– When Size is Greater than x KB—Cisco Secure ACS generates a new log file after the current service log file reaches the size specified, in kilobytes, by x.
• Manage Directory—You can control how long service log files are kept:
– Keep only the last x files—Cisco Secure ACS retains up to the number of files specified by x.
– Delete files older than x days—Cisco Secure ACS retains only those service logs that are not older than the number of days specified by x.
To configure how Cisco Secure ACS generates and manages the service log file, follow these steps:
Step 1 In the navigation bar, click System Configuration.
Step 2 Click Service Control.
Result: The status of the services appears in the CiscoSecure ACS on hostname table, where hostname is the name of the Cisco Secure ACS server.
9-30User Guide for Cisco Secure ACS for Windows Server
78-14696-01, Version 3.1
Chapter 9 Working with Logging and ReportsService Logs
Step 3 To disable the service log file, under Level of detail, select the None option.
Result: After you click Restart, Cisco Secure ACS does not generate new service logs file.
Step 4 To configure how often Cisco Secure ACS creates a service log file, select one of the options under Generate New File.
Note Settings under Generate New File have no effect if you selected None under Level of detail.
Step 5 To manage which service log files Cisco Secure ACS keeps, follow these steps:
a. Select the Manage Directory check box.
b. To limit the number of service log files Cisco Secure ACS retains, select the Keep only the last X files option and in the X box type the number of files you want Cisco Secure ACS to retain.
c. To limit how old service log files retained by Cisco Secure ACS can be, select the Delete files older than X days option and in the X box type the number of days for which Cisco Secure ACS should retain a service log file before deleting it.
Step 6 Click Restart.
Result: Cisco Secure ACS restarts its services and implements the service log settings you specified.
9-31User Guide for Cisco Secure ACS for Windows Server
78-14696-01, Version 3.1

Chapter 9 Working with Logging and ReportsService Logs
9-32User Guide for Cisco Secure ACS for Windows Server
78-14696-01, Version 3.1
User Guide for 78-14696-01, Version 3.1
C H A P T E R10
Setting Up and Managing Administrators and PolicyThis chapter addresses the Cisco Secure Access Control Server (Cisco Secure ACS) for Windows Server version 3.1 features found in the Administration Control section of the HTML interface. It contains the following sections:
• Administrator Accounts, page 10-1
• Access Policy, page 10-11
• Session Policy, page 10-16
• Audit Policy, page 10-18
Administrator AccountsThis section provides details about Cisco Secure ACS administrators. It contains the following topics:
• About Administrator Accounts, page 10-2
• Administrator Privileges, page 10-3
• Adding an Administrator Account, page 10-6
• Editing an Administrator Account, page 10-8
• Unlocking a Locked Out Administrator Account, page 10-10
• Deleting an Administrator Account, page 10-11
10-1Cisco Secure ACS for Windows Server

Chapter 10 Setting Up and Managing Administrators and PolicyAdministrator Accounts
About Administrator AccountsAdministrators are the only users of the Cisco Secure ACS HTML interface. To access the Cisco Secure ACS HTML interface from a browser run elsewhere than on the Cisco Secure ACS Windows server itself, you must log in to Cisco Secure ACS using an administrative account. If your Cisco Secure ACS is so configured, you may need to log in to Cisco Secure ACS even in a browser run on the Cisco Secure ACS Windows server. For more information about automatic local logins, see Session Policy, page 10-16.
Note Cisco Secure ACS administrator accounts are unique to Cisco Secure ACS. They are not related to other administrator accounts, such as Windows users with administrator privileges.
In the HTML interface, an administrator can configure any of the features provided in Cisco Secure ACS; however, the ability to access various parts of the HTML interface can be limited by revoking privileges to those parts of the HTML interface that a given administrator is not allowed to access.
For example, you may want to limit access to the Network Configuration section of the HTML interface to administrators whose responsibilities include network management. To do so, you would only select the Network Configuration privilege for applicable administrator accounts. For more information about administrator privileges, see Administrator Privileges, page 10-3.
Cisco Secure ACS administrator accounts have no correlation with Cisco Secure ACS user accounts or username and password authentication. Cisco Secure ACS stores accounts created for authentication of network service requests and those created for Cisco Secure ACS administrative access in separate internal databases.
10-2User Guide for Cisco Secure ACS for Windows Server
78-14696-01, Version 3.1
Chapter 10 Setting Up and Managing Administrators and PolicyAdministrator Accounts
Administrator PrivilegesYou can grant appropriate privileges to each Cisco Secure ACS administrator by assigning privileges on an administrator-by-administrator basis. You control privileges by selecting the options from the Administrator Privileges table on the Add Administrator or Edit Administrator pages. These options are listed below:
• User and Group Setup—Contains the following privilege options for the User Setup and Group Setup sections of the HTML interface:
– Add/Edit users in these groups—Enables the administrator to add or edit users and to assign users to the groups in the Editable groups list.
– Setup of these groups—Enables the administrator to edit the settings for the groups in the Editable groups list.
– Available Groups—Lists the user groups for which the administrator does not have edit privileges and to which the administrator cannot add users.
– Editable Groups—Lists the user groups for which the administrator does have edit privileges and to which the administrator can add users.
• Shared Profile Components—Contains the following privilege options for the Shared Profile Components section of the HTML interface:
– Network Access Restriction Sets—Allows the administrator full access to the Network Access Restriction Sets feature.
– Downloadable ACLs—Allows the administrator full access to the Downloadable PIX ACLs feature.
– Create New Device Command Set Type—Allows the administrator account to be used as valid credentials by another Cisco application for adding new device command set types. New device command set types that are added to Cisco Secure ACS using this privilege appear in the Shared Profile Components section of the HTML interface.
– Shell Command Authorization Sets—Allows the administrator full access to the Shell Command Authorization Sets feature.
– PIX Command Authorization Sets—Allows the administrator full access to the PIX Command Authorization Sets feature.
10-3User Guide for Cisco Secure ACS for Windows Server
78-14696-01, Version 3.1
Chapter 10 Setting Up and Managing Administrators and PolicyAdministrator Accounts
Note Additional command authorization set privilege options may appear, if other Cisco network management applications, such as CiscoWorks2000, have updated the configuration of Cisco Secure ACS.
• Network Configuration—Allows the administrator full access to the features in the Network Configuration section of the HTML interface.
• System Configuration...—Contains the privilege options for the features found in the System Configuration section of the HTML interface. For each of the following features, enabling the option allows the administrator full access to the feature.
– Service Control—For more information about this feature, see Service Control, page 8-2.
– Date/Time Format Control—For more information about this feature, see Date Format Control, page 8-3.
– Logging Control—For more information about this feature, see Logging, page 8-3.
– Local Password Management—For more information about this feature, see Local Password Management, page 8-5.
– DB Replication—For more information about this feature, see CiscoSecure Database Replication, page 8-9.
– RDBMS Synchronization—For more information about this feature, see RDBMS Synchronization, page 8-29.
– IP Pool Address Recovery—For more information about this feature, see IP Pools Address Recovery, page 8-67.
– IP Pool Server Configuration—For more information about this feature, see IP Pools Server, page 8-59.
– ACS Backup—For more information about this feature, see Cisco Secure ACS Backup, page 8-47.
– ACS Restore—For more information about this feature, see Cisco Secure ACS System Restore, page 8-52.
– ACS Service Management—For more information about this feature, see Cisco Secure ACS Active Service Management, page 8-55.
10-4User Guide for Cisco Secure ACS for Windows Server
78-14696-01, Version 3.1

Chapter 10 Setting Up and Managing Administrators and PolicyAdministrator Accounts
– VoIP Accounting Configuration—For more information about this feature, see VoIP Accounting Configuration, page 8-68.
– ACS Certificate Setup—For more information about this feature, see Cisco Secure ACS Certificate Setup, page 8-69.
– Global Authentication Setup—For more information about this feature, see Global Authentication Setup, page 8-81.
• Interface Configuration—Allows the administrator full access to the features in the Interface Configuration section of the HTML interface.
• Administration Control—Allows the administrator full access to the features in the Administration Control section of the HTML interface.
• External User Databases—Allows the administrator full access to the features in the External User Databases section of the HTML interface.
• Reports & Activity—Contains the privilege options for the reports and features found in the Reports and Activity section of the HTML interface. For each of the following features, enabling the option allows the administrator full access to the feature.
– TACACS+ Accounting—For more information about this report, see Accounting Logs, page 9-5.
– TACACS+ Administration—For more information about this report, see Accounting Logs, page 9-5.
– RADIUS Accounting—For more information about this report, see Accounting Logs, page 9-5.
– VoIP Accounting—For more information about this report, see Accounting Logs, page 9-5.
– Passed Authentications—For more information about this report, see Accounting Logs, page 9-5.
– Failed Attempts—For more information about this report, see Accounting Logs, page 9-5.
– Logged-in Users—For more information about this report, see Dynamic Administration Reports, page 9-7.
– Purge of Logged-in Users—For more information about this feature, see Deleting Logged-in Users, page 9-9.
– Disabled Accounts—For more information about this report, see Dynamic Administration Reports, page 9-7.
10-5User Guide for Cisco Secure ACS for Windows Server
78-14696-01, Version 3.1
Chapter 10 Setting Up and Managing Administrators and PolicyAdministrator Accounts
– ACS Backup and Restore—For more information about this report, see Dynamic Administration Reports, page 9-7.
– DB Replication—For more information about this report, see Dynamic Administration Reports, page 9-7.
– RDBMS Synchronization—For more information about this report, see Dynamic Administration Reports, page 9-7.
– Administration Audit—For more information about this report, see Dynamic Administration Reports, page 9-7.
– ACS Service Monitor—For more information about this report, see Dynamic Administration Reports, page 9-7.
– User Change Password—For more information about this report, see Dynamic Administration Reports, page 9-7.
Adding an Administrator AccountBefore You Begin
For descriptions of the options available while adding an administrator account, see Administrator Privileges, page 10-3.
To add a Cisco Secure ACS administrator account, follow these steps:
Step 1 In the navigation bar, click Administration Control.
Step 2 Click Add Administrator.
Result: The Add Administrator page appears.
Step 3 Complete the boxes in the Administrator Details table:
a. In the Administrator Name box, type the login name (up to 32 characters) for the new Cisco Secure ACS administrator account.
b. In the Password box, type the password (up to 32 characters) for the new Cisco Secure ACS administrator account.
c. In the Confirm Password box, type the password a second time.
10-6User Guide for Cisco Secure ACS for Windows Server
78-14696-01, Version 3.1
Chapter 10 Setting Up and Managing Administrators and PolicyAdministrator Accounts
Step 4 To select all privileges, including user group editing privileges for all user groups, click Grant All.
Result: All privileges options are selected. All user groups move to the Editable groups list.
Tip To clear all privileges, including user group editing privileges for all user groups, click Revoke All.
Step 5 To grant user and user group editing privileges, follow these steps:
a. Select the desired check boxes under User & Group Setup.
b. To move a user group to the Editable groups list, select the group in the Available groups list, and then click --> (right arrow button).
Result: The selected group moves to the Editable groups list.
c. To remove a user group from the Editable groups list, select the group in the Editable groups list, and then click <-- (left arrow button).
Result: The selected group moves to the Available groups list.
d. To move all user groups to the Editable groups list, click >>.
Result: The user groups in the Available groups list move to the Editable groups list.
e. To remove all user groups from the Editable groups list, click <<.
Result: The user groups in the Editable groups list move to the Available groups list.
Step 6 To grant any of the remaining privilege options, in the Administrator Privileges table, select the applicable check boxes.
Step 7 Click Submit.
Result: Cisco Secure ACS saves the new administrator account. The new account appears in the list of administrator accounts on the Administration Control page.
10-7User Guide for Cisco Secure ACS for Windows Server
78-14696-01, Version 3.1

Chapter 10 Setting Up and Managing Administrators and PolicyAdministrator Accounts
Editing an Administrator AccountYou can edit a Cisco Secure ACS administrator account to change the privileges granted to the administrator. You can effectively disable an administrator account by revoking all privileges.
Note You cannot change the name of an administrator account; however, you can delete an administrator account and then create an account with the new name. For information about deleting an administrator account, see Deleting an Administrator Account, page 10-11. For information about creating an administrator account, see Adding an Administrator Account, page 10-6.
For information about the administrative privilege options, see Administrator Privileges, page 10-3.
Before You Begin
For descriptions of the options available while editing an administrator account, see Administrator Privileges, page 10-3.
To edit Cisco Secure ACS administrator account privileges, follow these steps:
Step 1 In the navigation bar, click Administration Control.
Result: Cisco Secure ACS displays the Administration Control page.
Step 2 Click the name of the administrator account whose privileges you want to edit.
Result: The Edit Administrator name page appears, where name is the name of the administrator account you just selected.
Step 3 To change the administrator password, follow these steps:
a. In the Password box, double-click the asterisks, and then type the new password (up to 32 characters) for the administrator.
Result: The new password replaces the existing, masked password.
b. In the Confirm Password box, double-click the asterisks, and then type the new administrator password a second time.
Result: The new password is effective immediately after you click Submit in Step 9.
10-8User Guide for Cisco Secure ACS for Windows Server
78-14696-01, Version 3.1

Chapter 10 Setting Up and Managing Administrators and PolicyAdministrator Accounts
Step 4 If the Reset current failed attempts count check box appears below the Confirm Password box and you want to allow the administrator whose account you are editing to access the Cisco Secure ACS HTML interface, select the Reset current failed attempts count check box.
Note If the Reset current failed attempts count check box appears below the Confirm Password box, the administrator cannot access Cisco Secure ACS unless you complete Step 4. For more information about re-enabling an administrator account, see Unlocking a Locked Out Administrator Account, page 10-10.
Step 5 To select all privileges, including user group editing privileges for all user groups, click Grant All.
Result: All privileges options are selected. All user groups move to the Editable groups list.
Step 6 To clear all privileges, including user group editing privileges for all user groups, click Revoke All.
Result: All privileges options are cleared. All user groups move to the Available groups list.
Step 7 To grant user and user group editing privileges, follow these steps:
a. Under User & Group Setup, select the applicable check boxes.
b. To move all user groups to the Editable groups list, click >>.
Result: The user groups in the Available groups list move to the Editable groups list.
c. To move a user group to the Editable groups list, select the group in the Available groups list, and then click --> (right arrow button).
Result: The selected group moves to the Editable groups list.
d. To remove all user groups from the Editable groups list, click <<.
Result: The user groups in the Editable groups list move to the Available groups list.
e. To remove a user group from the Editable groups list, select the group in the Editable groups list, and then click <— (left arrow button).
Result: The selected group moves to the Available groups list.
10-9User Guide for Cisco Secure ACS for Windows Server
78-14696-01, Version 3.1
Chapter 10 Setting Up and Managing Administrators and PolicyAdministrator Accounts
Step 8 To grant any remaining privilege options, select the applicable check boxes in the Administrator Privileges table.
Step 9 To revoke any remaining privilege options, clear the applicable check boxes in the Administrator Privileges table.
Step 10 Click Submit.
Result: Cisco Secure ACS saves the changes to the administrator account.
Unlocking a Locked Out Administrator AccountCisco Secure ACS disables the accounts of administrators who have attempted to access the Cisco Secure ACS HTML interface and have provided an incorrect password in more successive attempts than is specified in on the Session Policy Setup page. Until the failed attempts counter for a disabled administrator account is reset, the administrator cannot access the HTML interface.
For more information about configuring how many successive failed login attempts can occur before Cisco Secure ACS disables an administrator account, see Session Policy, page 10-16.
To reset the failed attempts count for an administrator, follow these steps:
Step 1 In the navigation bar, click Administration Control.
Result: Cisco Secure ACS displays the Administration Control page.
Step 2 Click the name of the administrator account whose account you want to re-enable.
Result: The Edit Administrator name page appears, where name is the name of the administrator account you just selected.
If the Reset current failed attempts count check box appears below the Confirm Password box, the administrator account cannot access the HTML interface.
Step 3 Select the Reset current failed attempts count check box.
Step 4 Click Submit.
Result: Cisco Secure ACS saves the changes to the administrator account.
10-10User Guide for Cisco Secure ACS for Windows Server
78-14696-01, Version 3.1

Chapter 10 Setting Up and Managing Administrators and PolicyAccess Policy
Deleting an Administrator AccountYou can delete a Cisco Secure ACS administrator account when you no longer need it. We recommend deleting any unused administrator accounts.
To delete a Cisco Secure ACS administrator account, follow these steps:
Step 1 In the navigation bar, click Administration Control.
Result: Cisco Secure ACS displays the Administration Control page.
Step 2 In the Administrators table, click the name of the administrator account that you want to delete.
Result: The Edit Administrator name page appears, where name is the name of the administrator account you just selected.
Step 3 Click Delete.
Result: Cisco Secure ACS displays a confirmation dialog box.
Step 4 Click OK.
Result: Cisco Secure ACS deletes the administrator account. The Administrators table on the Administration Control page no longer lists administrator account that you deleted.
Access PolicyThe Access Policy feature affects access to the Cisco Secure ACS HTML interface. You can limit access by IP address and by the TCP port range used for administrative sessions. You can also enable secure socket layer (SSL) for access to the HTML interface.
This section contains the following topics:
• Access Policy Options, page 10-12
• Setting Up Session Policy, page 10-17
10-11User Guide for Cisco Secure ACS for Windows Server
78-14696-01, Version 3.1

Chapter 10 Setting Up and Managing Administrators and PolicyAccess Policy
Access Policy OptionsYou can configure the following options on the Access Policy Setup page:
• IP Address Filtering—Contains the following IP address filtering options:
– Allow all IP addresses to connect—Allow access to the HTML interface from any IP address.
– Allow only listed IP addresses to connect—Allow access to the HTML interface only from IP addresses inside the address range(s) specified in the IP Address Ranges table.
– Reject connections from listed IP addresses—Allow access to the HTML interface only from IP addresses outside the address range(s) specified in the IP Address Ranges table.
• IP Address Ranges—The IP Address Ranges table contains ten rows for configuring IP address ranges. The ranges are always inclusive; that is, the range includes the start and end IP addresses. The IP addresses entered to define a range must differ only in the last octet (Class C format).
The IP Address Ranges table contains one column of each of the following boxes:
– Start IP Address—Defines the lowest IP address of the range specified in the current row.
– End IP Address—Defines the highest IP address of the range specified in the current row.
• HTTP Port Allocation—Contains the following options for configuring TCP ports used for remote access to the HTML interface.
– Allow any TCP ports to be used for Administration HTTP Access—Allow the ports used by administrative HTTP sessions to include the full range of TCP ports.
– Restrict Administration Sessions to the following port range From Port X to Port Y—Restrict the ports used by administrative HTTP sessions to the range specified in the X and Y boxes, inclusive. The size of the range specified determines the maximum number of concurrent administrative sessions.
10-12User Guide for Cisco Secure ACS for Windows Server
78-14696-01, Version 3.1
Chapter 10 Setting Up and Managing Administrators and PolicyAccess Policy
Cisco Secure ACS uses port 2002 to start all administrative sessions. You do not need to include port 2002 in the port range. Also, Cisco Secure ACS does not allow you to define an HTTP port range that consists only of port 2002. Your port range must consist of at least one port other than port 2002.
A firewall configured to permit HTTP traffic over the Cisco Secure ACS administrative port range must also permit HTTP traffic through port 2002, because this is the port a web browser must access to initiate an administrative session.
Note We do not recommend allowing administration of Cisco Secure ACS from outside a firewall. If you do choose to allow access to the HTML interface from outside a firewall, keep the HTTP port range as narrow as possible. This can help prevent accidental discovery of an active administrative port by unauthorized users. An unauthorized user would have to impersonate, or “spoof,” the IP address of a legitimate host to make use of the active administrative session HTTP port.
– Secure Socket Layer Setup—The Use HTTPS Transport for Administration Access check box defines whether Cisco Secure ACS uses secure socket layer protocol to encrypt HTTP traffic between the CSAdmin service and a web browser used to access the HTML interface. When this option is enabled, HTTP traffic sending the Cisco Secure ACS logon page is not encrypted. After the administrator logs in, all subsequent communication is encrypted with SSL, as reflected by the URLs, which begin with HTTPS. Additionally, most browsers include an indicator for when a connection is SSL-encrypted.
Note Administrator credentials are always encrypted at login. Cisco Secure ACS never sends administrator login credentials in clear text.
To enable SSL, you must have completed the steps in Installing a Cisco Secure ACS Server Certificate, page 8-74, and Adding a Certificate Authority Certificate, page 8-76.
10-13User Guide for Cisco Secure ACS for Windows Server
78-14696-01, Version 3.1

Chapter 10 Setting Up and Managing Administrators and PolicyAccess Policy
Setting Up Access PolicyFor information about access policy options, see Access Policy Options, page 10-12.
To set up Cisco Secure ACS Access Policy, follow these steps:
Step 1 In the navigation bar, click Administration Control.
Result: Cisco Secure ACS displays the Administration Control page.
Step 2 Click Access Policy.
Result: The Access Policy Setup page appears.
Step 3 To allow remote access to the HTML interface from any IP address, in the IP Address Filtering table, select the Allow all IP addresses to connect option.
Step 4 To allow remote access to the HTML interface only from IP addresses within a range or ranges of IP addresses, follow these steps:
a. In the IP Address Filtering table, select the Allow only listed IP addresses to connect option.
b. For each IP address range from within which you want to allow remote access to the HTML interface, complete one row of the IP Address Ranges table. In the Start IP Address box, type the lowest IP address (up to 16 characters) in the range. In the End IP Address box, type the highest IP address (up to 16 characters) in the range. Use dotted decimal format.
Note The IP addresses entered to define a range must differ only in the last octet.
Step 5 To allow remote access to the HTML interface only from IP addresses outside a range or ranges of IP addresses, follow these steps:
a. In the IP Address Filtering table, select the Reject connections from listed IP addresses option.
b. For each IP address range from outside which you want to allow remote access to the HTML interface, complete one row of the IP Address Ranges table. Type the lowest IP address (up to 16 characters) in the range in the Start IP Address box. Type the highest IP address (up to 16 characters) in the range in the End IP Address box.
10-14User Guide for Cisco Secure ACS for Windows Server
78-14696-01, Version 3.1
Chapter 10 Setting Up and Managing Administrators and PolicyAccess Policy
Note The IP addresses entered to define a range must differ only in the last octet.
Step 6 If you want to allow Cisco Secure ACS to use any valid TCP port for administrative sessions, either local or remote, under HTTP Port Allocation, select the Allow any TCP ports to be used for Administration HTTP Access option.
Step 7 If you want to allow Cisco Secure ACS to use only a specified range of TCP ports for administrative sessions, follow these steps:
a. Under HTTP Port Allocation, select the Restrict Administration Sessions to the following port range From Port X to Port Y option.
b. In the X box type the lowest TCP port (up to 5 characters) in the range.
c. In the Y box type the highest TCP port (up to 5 characters) in the range.
Step 8 If you want to enable SSL encryption of administrator access to the HTML interface, under Secure Socket Layer Setup, select the Use HTTPS Transport for Administration Access check box.
Note To enable SSL, you must have completed the steps in Installing a Cisco Secure ACS Server Certificate, page 8-74, and Adding a Certificate Authority Certificate, page 8-76.
Step 9 Click Submit.
Result: Cisco Secure ACS saves and begins enforcing the access policy settings.
If you have enabled SSL, at the next administrator login, Cisco Secure ACS begins using HTTPS. Any current administrator sessions are unaffected.
10-15User Guide for Cisco Secure ACS for Windows Server
78-14696-01, Version 3.1

Chapter 10 Setting Up and Managing Administrators and PolicySession Policy
Session PolicyThe Session Policy feature controls various aspects of Cisco Secure ACS administrative sessions. This section contains the following topics:
• Session Policy Options, page 10-16
• Setting Up Session Policy, page 10-17
Session Policy OptionsYou can configure the following options on the Session Policy Setup page:
• Session idle timeout (minutes)—Defines the time in minutes that an administrative session, local or remote, must remain idle before Cisco Secure ACS terminates the connection. This parameter applies to the Cisco Secure ACS administrative session in the browser only. It does not apply to an administrative dial-up session.
An administrator whose administrative session is terminated receives a dialog box asking whether or not the administrator wants to continue. If the administrator chooses to continue, Cisco Secure ACS starts a new administrative session.
• Allow Automatic Local Login—Enables administrators to start an administrative session without logging in if they are using a browser on the computer running Cisco Secure ACS. Such administrative sessions are conducted using a default administrator account named “local_login”. The local_login administrator account has all privileges. Local administrative sessions with automatic local login are recorded in the Administrative Audit report under the local_login administrator name.
Note If there are no administrator accounts defined, no administrator name and password is required to access Cisco Secure ACS locally. This prevents you from accidentally locking yourself out of Cisco Secure ACS.
10-16User Guide for Cisco Secure ACS for Windows Server
78-14696-01, Version 3.1

Chapter 10 Setting Up and Managing Administrators and PolicySession Policy
• Respond to Invalid IP Address Connections—Enables an error message in response to attempts to start a remote administrative session using an IP address that is invalid according to the IP address ranges configured in Access Policy. Disabling this option can help prevent unauthorized users from discovering your Cisco Secure ACS server.
• Lock out Administrator after X successive failed attempts—Enables Cisco Secure ACS to lock out an administrator after a number of successive failed attempts to log in to the HTML interface. The number of successive attempts is specified in the X box. If this check box is selected, the X box cannot be set to zero. If this check box is not selected, Cisco Secure ACS allows unlimited successive failed login attempts by an administrator.
Setting Up Session PolicyFor information about session policy options, see Session Policy Options, page 10-16.
To setup Cisco Secure ACS Session Policy, follow these steps:
Step 1 In the navigation bar, click Administration Control.
Result: Cisco Secure ACS displays the Administration Control page.
Step 2 Click Session Policy.
Result: The Session Policy Setup page appears.
Step 3 To define the number of minutes of inactivity after which Cisco Secure ACS ends an administrative session, in the Session idle timeout (minutes) box, type the number of minutes (up to 4 characters).
Step 4 Set the automatic local login policy:
a. To allow administrators to log in to Cisco Secure ACS locally without using their administrator names and passwords, select the Allow Automatic Local Login check box.
b. To require administrators to log in to Cisco Secure ACS locally using their administrator names and passwords, clear the Allow Automatic Local Login check box.
10-17User Guide for Cisco Secure ACS for Windows Server
78-14696-01, Version 3.1
Chapter 10 Setting Up and Managing Administrators and PolicyAudit Policy
Step 5 Set the invalid IP address response policy:
a. To configure Cisco Secure ACS to respond with a message when an administrative session is requested from an invalid IP address, select the Respond to invalid IP address connections check box.
b. To configure Cisco Secure ACS to send no message when an administrative session is requested from an invalid IP address, clear the Respond to invalid IP address connections check box.
Step 6 Set the failed administrative login attempts policy:
a. To enable Cisco Secure ACS to lock out an administrator after a specified number of successive failed administrative login attempts, select the Lock out Administrator after X successive failed attempts check box.
b. In the X box, type how many successive failed login attempts can occur before Cisco Secure ACS locks out an administrator.
Note If the Lock out Administrator after X successive failed attempts check box is selected, the X box cannot be set to zero and cannot exceed 4 characters.
Step 7 Click Submit.
Result: Cisco Secure ACS saves and begins enforcing the session policy settings you made.
Audit PolicyThe Audit Policy feature controls the generation of the Administrative Audit log.
For more information about enabling, viewing, or configuring the Administrative Audit log, see Cisco Secure ACS System Logs, page 9-11.
10-18User Guide for Cisco Secure ACS for Windows Server
78-14696-01, Version 3.1
User Guide for 78-14696-01, Version 3.1
C H A P T E R 11
Working with User DatabasesCisco Secure Access Control Server (Cisco Secure ACS) for Windows Server version 3.1 authenticates users against one of several possible databases, including its internal database. You can configure Cisco Secure ACS to authenticate users with more than one type of database. This flexibility enables you to use user accounts data collected in different locations without having to explicitly import the users from each external user database into the CiscoSecure user database. It also enables you to apply different databases to different types of users, depending on the security requirements associated with user authorizations on your network. For example, a common configuration is to use a Windows 2000/NT user database for standard network users and a token server for network administrators.
This chapter contains the following sections:
• CiscoSecure User Database, page 11-2
• About External User Databases, page 11-4
• Windows NT/2000 User Database, page 11-7
• Generic LDAP, page 11-16
• Novell NDS Database, page 11-33
• ODBC Database, page 11-39
• LEAP Proxy RADIUS Server Database, page 11-54
• Token Server User Databases, page 11-57
• Deleting an External User Database Configuration, page 11-66
For information about the Unknown User Policy and group mapping features, see Chapter 12, “Administering External User Databases.”
11-1Cisco Secure ACS for Windows Server
Chapter 11 Working with User DatabasesCiscoSecure User Database
CiscoSecure User DatabaseThe CiscoSecure user database is the database internal to Cisco Secure ACS. It supports authentication using ASCII, PAP, CHAP, MS-CHAP, ARAP, LEAP, EAP-MD5, EAP-TLS, and PEAP(EAP-GTC).
The CiscoSecure user database is crucial for the authorization process. Regardless of whether a user is authenticated by the internal user database or by an external user database, Cisco Secure ACS authorizes network services for users based upon group membership and specific user settings found in the CiscoSecure user database. Thus, all users authenticated by Cisco Secure ACS, even those authenticated by an external user database, have an account in the CiscoSecure user database.
About the CiscoSecure User DatabaseThe CiscoSecure user database draws information from a number of data sources, including a memory-mapped, hash-indexed file, VarsDB.MDB (in Microsoft Jet database format), and the Windows Registry. VarsDB.MDB uses an index and tree structure, so searches can occur logarithmically rather than linearly, thus yielding very fast lookup times. This enables the CiscoSecure user database to authenticate users quickly.
Unless you have configured Cisco Secure ACS to authenticate users with an external user database, Cisco Secure ACS uses usernames and passwords in the CiscoSecure user database during authentication. For more information about specifying an external user database for authentication of a user, see Adding a Basic User Account, page 7-5.
11-2User Guide for Cisco Secure ACS for Windows Server
78-14696-01, Version 3.1
Chapter 11 Working with User DatabasesCiscoSecure User Database
User Import and CreationThere are five ways to create user accounts in the CiscoSecure user database in Cisco Secure ACS for Windows 2000 Servers. Of these, RDBMS Synchronization and CSUtil.exe support importing user accounts from external sources.
• Cisco Secure ACS HTML interface—The HTML interface provides the ability to create user accounts manually, one user at a time. Regardless of how a user account was created, you can edit a user account by using the HTML interface. For detailed steps, see Adding a Basic User Account, page 7-5.
• Unknown User Policy—The Unknown User Policy enables Cisco Secure ACS to add users automatically when a user without an account in the CiscoSecure user database is found in an external user database. The creation of a user account in the CiscoSecure user database occurs only when the user attempts to access the network and is successfully authenticated by an external user database. For more information, see Chapter 12, “Administering External User Databases.”
If you use Unknown User Policy, you can also configure group mappings so that each time a user added to the CiscoSecure user database by Unknown User Policy is authenticated, the user group assignment is made dynamically. For some external user database types, user group assignment is based on group membership in the external user database. For other database types, all users authenticated by a given database are assigned to a single Cisco Secure ACS user group. For more information about group mapping, see Database Group Mappings, page 12-11.
• RDBMS Synchronization—RDBMS Synchronization enables you to create large numbers of user accounts and to configure many settings for user accounts. We recommend using this feature whenever you need to import users by bulk; however, setting up RDBMS Synchronization for the first time requires several important decisions and time to implement them. For more information, see RDBMS Synchronization, page 8-29.
• CSUtil.exe—The CSUtil.exe command-line utility provides a simple means of creating basic user accounts. When compared to RDBMS Synchronization, its functionality is limited; however, it is simple to prepare for importing basic user accounts and assigning users to groups. For more information, see Appendix D, “Cisco Secure ACS Command-Line Database Utility.”
11-3User Guide for Cisco Secure ACS for Windows Server
78-14696-01, Version 3.1
Chapter 11 Working with User DatabasesAbout External User Databases
• Database Replication—Database Replication creates user accounts on a secondary Cisco Secure ACS by overwriting all existing user accounts on a secondary Cisco Secure ACS with the user accounts from the primary Cisco Secure ACS. Any user accounts unique to a secondary Cisco Secure ACS are lost in the replication. For more information, see CiscoSecure Database Replication, page 8-9.
About External User DatabasesYou can configure Cisco Secure ACS to forward authentication of users to one external user database or more. Support for external user databases means that Cisco Secure ACS does not require that you create duplicate user entries in the CiscoSecure user database. In organizations in which a substantial user database already exists, Cisco Secure ACS can leverage the work already invested in building the database without any additional input.
In addition to performing authentication for network access, Cisco Secure ACS can perform authentication for TACACS+ enable privileges using external user databases. For more information about TACACS+ enable passwords, see Setting TACACS+ Enable Password Options for a User, page 7-35.
Note You can only use external users databases to authenticate users and to determine which group Cisco Secure ACS assigns a user to. The CiscoSecure user database, internal to Cisco Secure ACS, provides all authorization services. With few exceptions, Cisco Secure ACS cannot retrieve authorization data from external user databases. Exceptions are noted where applicable in the discussions of specific databases in this chapter. For more information about group mapping for unknown users, see Database Group Mappings, page 12-11.
Users can be authenticated using the following databases.
• Windows NT/2000 User Database
• Generic LDAP
• Novell NetWare Directory Services (NDS)
• Open Database Connectivity (ODBC)-compliant relational databases
• LEAP Proxy RADIUS servers
11-4User Guide for Cisco Secure ACS for Windows Server
78-14696-01, Version 3.1
Chapter 11 Working with User DatabasesAbout External User Databases
• RSA SecureID token servers
• RADIUS-based token servers, including:
– ActivCard token servers
– CRYPTOCard token servers
– Vasco token servers
– PassGo token servers
– SafeWord token servers
– Generic RADIUS token servers
For Cisco Secure ACS to interact with an external user database, Cisco Secure ACS requires an API for third-party authentication source. The Cisco Secure ACS communicates with the external user database using the API. For Windows NT/2000 and Generic LDAP, the program interface for the external authentication is local to Cisco Secure ACS. In these cases, no further components are required.
In the case of Novell NDS authentication, Novell Requestor must be installed on the same Windows server as Cisco Secure ACS.
In the case of ODBC authentication sources, in addition to the Windows ODBC interface, the third-party ODBC driver must be installed on the Cisco Secure ACS Windows server.
To communicate with an RSA token server, you must have installed software components provided by RSA.
For RADIUS-based token servers, such as ActivCard, CRYPTOCard, PassGo, SafeWord, and Vasco, the standard RADIUS interface serves as the third-party API.
Authenticating with External User DatabasesAuthenticating users with an external user database requires more than configuring Cisco Secure ACS to communicate with an external user database. Performing one of the configuration procedures for an external database that are provided in this chapter does not on its own instruct Cisco Secure ACS to authenticate any users with that database.
11-5User Guide for Cisco Secure ACS for Windows Server
78-14696-01, Version 3.1

Chapter 11 Working with User DatabasesAbout External User Databases
After you have configured Cisco Secure ACS to communicate with an external user database, you can configure Cisco Secure ACS to authenticate users with the external user database in one of two ways:
• By Specific User Assignment—You can configure Cisco Secure ACS to authenticate specific users with an external user database. To do this, the user must exist in the CiscoSecure user database and the Password Authentication list in User Setup must be set to the external user database that Cisco Secure ACS should use to authenticate the user.
While setting the Password Authentication for every user account is time consuming, this method of determining which users are authenticated with an external user database is secure because it requires explicit definition of who should authenticate using the external user database. In addition, the users may be placed in the desired Cisco Secure ACS group and thereby receive the applicable access profile.
• By Unknown User Policy—You can configure Cisco Secure ACS to attempt authentication of users not found in the CiscoSecure user database by using an external user database. Users do not need to be defined in the CiscoSecure user database for this method. For more information about the Unknown User Policy, see Unknown User Processing, page 12-1.
You can also configure Cisco Secure ACS with both methods above; these two methods are not mutually exclusive.
External User Database Authentication ProcessWhen Cisco Secure ACS attempts user authentication with an external user database, it forwards the user credentials to the external user database. The external user database either passes or fails the authentication request from Cisco Secure ACS. Upon receiving the response from the external user database, Cisco Secure ACS instructs the requesting AAA client to grant or deny the user access, depending upon the response from the external user database.
The specifics of the method used to communicate with the external user database vary with the database type. For LDAP and Novell NDS, Cisco Secure ACS uses TCP connections. For Windows NT/2000 user databases, Cisco Secure ACS uses the authentication API provided in the Windows operating system. With the exception of RSA token servers, Cisco Secure ACS communicates with token servers using RADIUS. For RSA token servers, Cisco Secure ACS acts an RSA client in order to use the RSA proprietary interface.
11-6User Guide for Cisco Secure ACS for Windows Server
78-14696-01, Version 3.1
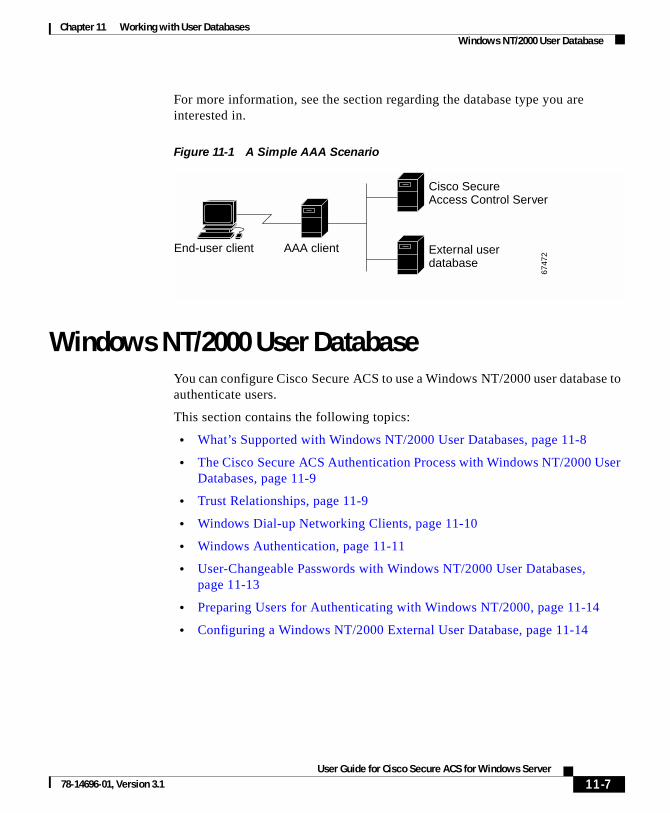
Chapter 11 Working with User DatabasesWindows NT/2000 User Database
For more information, see the section regarding the database type you are interested in.
Figure 11-1 A Simple AAA Scenario
Windows NT/2000 User DatabaseYou can configure Cisco Secure ACS to use a Windows NT/2000 user database to authenticate users.
This section contains the following topics:
• What’s Supported with Windows NT/2000 User Databases, page 11-8
• The Cisco Secure ACS Authentication Process with Windows NT/2000 User Databases, page 11-9
• Trust Relationships, page 11-9
• Windows Dial-up Networking Clients, page 11-10
• Windows Authentication, page 11-11
• User-Changeable Passwords with Windows NT/2000 User Databases, page 11-13
• Preparing Users for Authenticating with Windows NT/2000, page 11-14
• Configuring a Windows NT/2000 External User Database, page 11-14
6747
2
End-user client AAA client
Cisco SecureAccess Control Server
External userdatabase
11-7User Guide for Cisco Secure ACS for Windows Server
78-14696-01, Version 3.1
Chapter 11 Working with User DatabasesWindows NT/2000 User Database
What’s Supported with Windows NT/2000 User DatabasesCisco Secure ACS supports the use of Windows external user databases for the following features:
• Authentication—Cisco Secure ACS supports ASCII, PAP, MS-CHAP (versions 1 and 2), LEAP, and PEAP(EAP-GTC) authentication with Windows NT 4.0 Security Accounts Manager (SAM) database or a Windows 2000 Active Directory database. Cisco Secure ACS also supports EAP-TLS authentication with a Windows 2000 Active Directory database. Other authentication protocols are not supported with Windows NT/2000 external user databases.
Note Authentication protocols not supported with Windows NT/2000 external user databases may be supported by a different external user database. For more information about authentication protocols and the external database types that support them, see Authentication Protocol-Database Compatibility, page 1-9.
• Group Mapping for Unknown Users—Cisco Secure ACS supports group mapping for unknown users by requesting group membership information from Windows user databases. For more information about group mapping for users authenticated with a Windows user database, see Group Mapping by Group Set Membership, page 12-14.
• Password-Aging—Cisco Secure ACS supports password aging for users authenticated by a Windows user database. For more information, see User-Changeable Passwords with Windows NT/2000 User Databases, page 11-13.
• Dial-in Permissions—Cisco Secure ACS supports use of dial-in permissions from Windows user databases. For more information, see Preparing Users for Authenticating with Windows NT/2000, page 11-14.
• Callback Settings—Cisco Secure ACS supports use of callback settings from Windows user databases. For information about configuring Cisco Secure ACS to use Windows callback settings, see Setting User Callback Option, page 7-10.
11-8User Guide for Cisco Secure ACS for Windows Server
78-14696-01, Version 3.1
Chapter 11 Working with User DatabasesWindows NT/2000 User Database
The Cisco Secure ACS Authentication Process with Windows NT/2000 User Databases
Cisco Secure ACS forwards user credentials to a Windows NT/2000 database by passing the user credentials to the Windows operating system of the server that Cisco Secure ACS runs on. The Windows NT/2000 database either passes or fails the authentication request from Cisco Secure ACS. Upon receiving the response from the Windows NT/2000 database, Cisco Secure ACS instructs the requesting AAA client to grant or deny the user access, depending upon the response from the Windows NT/2000 database.
Cisco Secure ACS grants authorization based on the Cisco Secure ACS group to which the user is assigned. While the group to which a user is assigned can be determined by information from the Windows NT/2000 database, it is Cisco Secure ACS that grants authorization privileges.
To further control access by a user from within the Windows NT User Manager or the Windows 2000 Active Directory Users and Computers, you can configure Cisco Secure ACS to also check the setting for granting dialin permission to the user. This setting is labeled “Grant dialin permission to user” in Windows NT and “Allow access” in the Remote Access Permission area in Windows 2000. If this feature is disabled for the user, access is not permitted, even if the username and password are typed correctly.
Trust RelationshipsCisco Secure ACS can take advantage of trust relationships that have been established between Windows NT/2000 domains. If the domain that contains Cisco Secure ACS trusts another domain, Cisco Secure ACS can authenticate users whose accounts reside in the other domain. Cisco Secure ACS can also reference the Grant dialin permission to user setting across trusted domains.
Note If Cisco Secure ACS is running on a member server rather than a domain controller, taking advantage of trust relationships depends upon proper configuration of Cisco Secure ACS at installation. For more information, see “Windows Authentication from a Member Server” in Installing Cisco Secure ACS for Windows 2000/NT Servers.
11-9User Guide for Cisco Secure ACS for Windows Server
78-14696-01, Version 3.1
Chapter 11 Working with User DatabasesWindows NT/2000 User Database
If your domains are Windows 2000 domains, Cisco Secure ACS can take advantage of indirect trusts for Windows authentication. Consider the example of Windows 2000 domains A, B, and C, where Cisco Secure ACS resides on a Windows 2000 server in domain A. Domain A trusts domain B, but no trust relationship is established between domain A and domain C. If domain B trusts domain C, the Cisco Secure ACS server in domain A can authenticate users whose accounts reside in domain C, making use of the indirect trust of domain C.
For more information on trust relationships, refer to your Microsoft Windows NT/2000 documentation.
Windows Dial-up Networking ClientsThe dial-up networking clients for Windows NT/2000/XP Professional and Windows 95/98/Millennium Edition (ME)/XP Home enable users to connect to your network remotely, but the fields provided differ.
Windows Dial-up Networking Clients with a Domain Field
If users dial in to your network using the dial-up networking client provided with Windows NT, Windows 2000, or Windows XP Professional, three fields appear:
• username—Type your username.
• password—Type your password.
• domain—Type your valid domain name.
Note For more information about the implications of completing or leaving the domain box blank, see Windows Authentication, page 11-11.
11-10User Guide for Cisco Secure ACS for Windows Server
78-14696-01, Version 3.1
Chapter 11 Working with User DatabasesWindows NT/2000 User Database
Windows Dial-up Networking Clients without a Domain Field
If users access your network using the dial-up networking client provided with Windows 95, Windows 98, Windows ME, or Windows XP Home, two fields appear:
• username—Type your username.
Note You can also prefix your username with the name of the domain you want to log in to. For more information about the implications of prefixing or not prefixing the domain name before the username, see Windows Authentication, page 11-11.
• password—Type your password.
Windows AuthenticationWhile different versions of Windows provide different methods of specifying a domain name, the effect of providing or not providing the domain name while logging in is the same. The most reliable method of authenticating users against a specific domain is to require users to submit the domains they should be authenticated against along with their usernames.
With the dial-up networking client provided with Windows NT, Windows 2000, and Windows XP Professional, submitting a domain name is accomplished by typing the domain name in the domain field (or selecting it from the drop-down list). With the dial-up networking client provided with Windows 95, Windows 98, Windows ME, and Windows XP Home, this is accomplished by submitting the username in the fully qualified format. Users submitting a fully qualified username must enter the domain name before their username in the following format:
DOMAIN_NAME\USER_NAME
For example, user Mary Smith (msmith) in Domain10 would enter the following:
Domain10\msmith
Another reason to provide the username in the format shown above is if a user is included in more than one domain. In this case, the privileges assigned upon authentication will be those associated with the account in the first domain with a
11-11User Guide for Cisco Secure ACS for Windows Server
78-14696-01, Version 3.1

Chapter 11 Working with User DatabasesWindows NT/2000 User Database
matching username and password. This also illustrates the importance of removing usernames from a domain when the privileges associated with the user are no longer required.
Tip Entering the domain name can speed up authentication, because authentication is directed to a specific domain rather than depending upon Windows to search through the local domain and all trusted domains until it finds the username.
Note Cisco Secure ACS does not support the user@domain (UPN) format of qualified usernames when authenticating users with Windows user databases of any type, including local and domain SAM databases and Active Directory databases.
If you do not specify a domain name when typing the username, Cisco Secure ACS submits the username to the Windows operating system on the server than runs Cisco Secure ACS. If Windows does not find the username in its local domain database, it then checks all trusted domains. If Cisco Secure ACS runs on a member server and the username is not found in trusted domains, Windows also checks its local accounts database. Windows attempts to authenticate a user with the first occurrence of the username that it finds.
Note If the credentials submitted by the user do not match the credentials associated with the first matching username that Windows finds, authentication fails. Thus, if different users in different domains share the same exact username, logging in with a non-domain-qualified username can result in inadvertent authentication failure.
Use of the Domain List is not required to support Windows authentication, but it can alleviate authentication failures caused by non-domain-qualified usernames. If you have configured the Domain List in the Windows NT/2000 User Database Configuration page of the External User Databases section, Cisco Secure ACS submits the username and password to each domain in the list in a fully qualified format until it successfully authenticates the user. If Cisco Secure ACS has tried each domain listed in the Domain List or if no trusted domains have been configured in the Domain List, Cisco Secure ACS stops attempting to authenticate the user and does not grant that user access.
11-12User Guide for Cisco Secure ACS for Windows Server
78-14696-01, Version 3.1
Chapter 11 Working with User DatabasesWindows NT/2000 User Database
Note If your Domain List contains domains and your Windows SAM or Active Directory user databases are configured to lock out users after a number of failed attempts, users can be inadvertently locked out because Cisco Secure ACS tries each domain in the Domain List explicitly, resulting in failed attempts for identical usernames that reside in different domains.
User-Changeable Passwords with Windows NT/2000 User Databases
For network users who are authenticated by a Windows NT/2000 user database, Cisco Secure ACS supports the user-changeable passwords upon password expiration. You can enable this feature in the MS-CHAP Settings on the Windows NT/2000 User Database Configuration page in the External User Databases section. Using this feature in your network requires the following:
• Users must be present in the Windows NT/2000 user database.
• User accounts in Cisco Secure ACS must specify the Windows NT/2000 user database for authentication.
• End-user clients must be MS-CHAP compatible, such as the Windows dial-up networking client.
• The AAA client that the end-user clients connect to must use RADIUS for authentication requests sent to Cisco Secure ACS.
• The AAA client that the end-user clients connect to must support MS-CHAP.
When the conditions above are met and this feature is enabled, users receive a dialog box prompting them to change their passwords upon their first successful authentication after their passwords have expired. The dialog box is the same as presented to users by Windows when a user with an expired password accesses a network via a remote access server.
11-13User Guide for Cisco Secure ACS for Windows Server
78-14696-01, Version 3.1
Chapter 11 Working with User DatabasesWindows NT/2000 User Database
Preparing Users for Authenticating with Windows NT/2000Before using the Windows NT/2000 user database for authentication, follow these steps:
Step 1 Make sure the username exists in the Windows NT/2000 user database.
Step 2 In the Windows NT User Manager or in Windows 2000 Active Directory Users and Computers, clear the following User Properties check boxes:
• User must change password at next logon
• Account disabled
Step 3 If you want to control dial-in access from within Windows NT, click Dial-in and select Grant dialin permission to user. In Windows 2000, access the User Properties dialog box, select the Dial-In tab, and in the Remote Access area, click Allow access. You must also configure the option to reference this feature under Database Group Mappings in the External User Databases section of Cisco Secure ACS.
Configuring a Windows NT/2000 External User DatabaseTo configure Cisco Secure ACS to authenticate users against the Windows NT/2000 user database in the trusted domains of your network, follow these steps:
Step 1 In the navigation bar, click External User Databases.
Step 2 Click Database Configuration.
Result: Cisco Secure ACS displays a list of all possible external user database types.
Step 3 Click Windows NT/2000.
Result: If no Windows NT/2000 database configuration exists, the Database Configuration Creation table appears. Otherwise, the External User Database Configuration page appears.
11-14User Guide for Cisco Secure ACS for Windows Server
78-14696-01, Version 3.1
Chapter 11 Working with User DatabasesWindows NT/2000 User Database
Step 4 If you are creating a configuration, follow these steps:
a. Click Create New Configuration.
b. Type a name for the new configuration for Windows NT/2000 authentication in the box provided, or accept the default name in the box.
c. Click Submit.
Result: Cisco Secure ACS lists the new configuration in the External User Database Configuration table.
Step 5 Click Configure.
Result: The Windows NT/2000 User Database Configuration page appears.
Step 6 To restrict network access to users who have Windows dialin permission, select the Grant dialin permission to user check box.
Note Windows dialin permission is enabled in the Dialin section of user properties in Windows NT and on the Dial-In tab of the user properties in Windows 2000.
Step 7 If you want Cisco Secure ACS to authenticate explicitly using each trusted Windows domain for usernames that are not domain-qualified, select the domains you want Cisco Secure ACS to use to authenticate unqualified usernames in the Available Domains list and move them to the Domain List list by clicking —>.
Note Configuring the Domain List list is optional. For more information about the Domain List, see Windows Authentication, page 11-11.
Caution If your Domain List contains domains and your Windows SAM or Active Directory user databases are configured to lock out users after a number of failed attempts, users can be inadvertently locked out because Cisco Secure ACS tries each domain in the Domain List explicitly, resulting in failed attempts for identical usernames that reside in different domains.
11-15User Guide for Cisco Secure ACS for Windows Server
78-14696-01, Version 3.1
Chapter 11 Working with User DatabasesGeneric LDAP
Step 8 In the MS-CHAP table, follow these steps:
a. To support for authentication, select the check boxes for the applicable MS-CHAP versions.
b. To enable password changes, select the check boxes for the applicable MS-CHAP versions.
Step 9 Click Submit.
Result: Cisco Secure ACS saves the Windows NT/2000 user database configuration you created. You can now add it to your Unknown User Policy or assign specific user accounts to use this database for authentication. For more information about the Unknown User Policy, see Unknown User Processing, page 12-1. For more information about configuring user accounts to authenticate using this database, see Chapter 7, “Setting Up and Managing User Accounts.”
Generic LDAPCisco Secure ACS supports ASCII, PAP, EAP-TLS, and PEAP(EAP-GTC) authentication via generic Lightweight Directory Access Protocol (LDAP) databases, such as Netscape Directory Services. Other authentication protocols are not supported with LDAP external user databases.
Note Authentication protocols not supported with LDAP databases may be supported by another type of external user database. For more information about authentication protocols and the external database types that support them, see Authentication Protocol-Database Compatibility, page 1-9.
Cisco Secure ACS supports group mapping for unknown users by requesting group membership information from LDAP user databases. For more information about group mapping for users authenticated with an LDAP user database, see Group Mapping by Group Set Membership, page 12-14.
Configuring Cisco Secure ACS to authenticate against an LDAP database has no effect on the configuration of the LDAP database. To manage your LDAP database, see your LDAP database documentation.
11-16User Guide for Cisco Secure ACS for Windows Server
78-14696-01, Version 3.1
Chapter 11 Working with User DatabasesGeneric LDAP
This section contains the following topics:
• Cisco Secure ACS Authentication Process with a Generic LDAP User Database, page 11-17
• Multiple LDAP Instances, page 11-17
• LDAP Organizational Units and Groups, page 11-18
• Domain Filtering, page 11-18
• LDAP Failover, page 11-20
• LDAP Configuration Options, page 11-22
• Configuring a Generic LDAP External User Database, page 11-28
Cisco Secure ACS Authentication Process with a Generic LDAP User Database
Cisco Secure ACS forwards the username and password to an LDAP database using a TCP connection on a port that you specify. The LDAP database either passes or fails the authentication request from Cisco Secure ACS. Upon receiving the response from the LDAP database, Cisco Secure ACS instructs the requesting AAA client to grant or deny the user access, depending upon the response from the LDAP server.
Cisco Secure ACS grants authorization based on the Cisco Secure ACS group to which the user is assigned. While the group to which a user is assigned can be determined by information from the LDAP server, it is Cisco Secure ACS that grants authorization privileges.
Multiple LDAP InstancesYou can create more than one LDAP configuration in Cisco Secure ACS. By creating more than one LDAP configuration with different IP address or port settings, you can configure Cisco Secure ACS to authenticate using different LDAP servers or using different databases on the same LDAP server. Each primary server IP address and port configuration, along with the secondary server IP address and port configuration, forms an LDAP instance that corresponds to one Cisco Secure ACS LDAP configuration instance.
11-17User Guide for Cisco Secure ACS for Windows Server
78-14696-01, Version 3.1
Chapter 11 Working with User DatabasesGeneric LDAP
Cisco Secure ACS does not require that each LDAP instance corresponds to a unique LDAP database. You can have more than one LDAP configuration set to access the same database. This is useful when your LDAP database contains more than one subtree for users or groups. Because each LDAP configuration supports only one subtree directory for users and one subtree directory for groups, you must configure separate LDAP instances for each user directory subtree and group directory subtree combination for which Cisco Secure ACS should submit authentication requests.
For each LDAP instance, you can add or leave it out of the Unknown User Policy. For more information, see Unknown User Processing, page 12-1.
For each LDAP instance, you can establish unique group mapping. For more information, see Group Mapping by Group Set Membership, page 12-14.
Multiple LDAP instances is also important when you use domain filtering. For more information, see Domain Filtering, page 11-18.
LDAP Organizational Units and GroupsLDAP groups do not need to have the same name as their corresponding Cisco Secure ACS groups. The LDAP group can be mapped to a Cisco Secure ACS group with any name you want to assign. For more information about how your LDAP database handles group membership, see your LDAP database documentation. For more information on LDAP group mappings and Cisco Secure ACS, see Database Group Mappings, page 12-11.
Domain FilteringUsing domain filtering, you can control which LDAP instance is used to authenticate a user based on domain-qualified usernames. Domain filtering is based on parsing the characters either at the beginning or end of a username submitted for authentication. Domain filtering provides you with greater control over the LDAP instance that Cisco Secure ACS submits any given user authentication request to. You also have control of whether usernames are submitted to an LDAP server with their domain qualifiers intact.
For example, when EAP-TLS authentication is initiated by a Windows XP client, Cisco Secure ACS receives the username in username@domainname format. When PEAP authentication is initiated by a Cisco Aironet end-user client,
11-18User Guide for Cisco Secure ACS for Windows Server
78-14696-01, Version 3.1
Chapter 11 Working with User DatabasesGeneric LDAP
Cisco Secure ACS receives username without a domain qualifier. If both clients are to be authenticated with an LDAP database that stores usernames without domain qualifiers, Cisco Secure ACS can strip the domain qualifier. If separate user accounts are maintained in the LDAP database—both domain-qualified and non-domain-qualified user accounts—Cisco Secure ACS can pass usernames to the LDAP database without domain filtering.
If you choose to make use of domain filtering, each LDAP configuration you create in Cisco Secure ACS can perform domain filtering in one of two ways:
• Limiting users to one domain—Per each LDAP configuration in Cisco Secure ACS, you can require that Cisco Secure ACS only attempts to authenticate usernames that are qualified with a specific domain name. This corresponds to the “Only process usernames that are domain qualified” option on the LDAP Configuration page. For more information about this option, see LDAP Configuration Options, page 11-22.
With this option, each LDAP configuration is limited to one domain and to one type of domain qualification. You can specify whether Cisco Secure ACS strips the domain qualification before submitting the username to an LDAP server. If the LDAP server stores usernames in a domain-qualified format, you should not configure Cisco Secure ACS to strip domain qualifiers.
Limiting users to one domain is useful when the LDAP server stores usernames differently per domain, either by user context or by how the username is stored in Cisco Secure ACS—domain qualified or non-domain qualified. The end-user client or AAA client must submit the username to Cisco Secure ACS in a domain-qualified format, otherwise Cisco Secure ACS cannot determine the user’s domain and does not attempt to authenticate the user with the LDAP configuration that uses this form of domain filtering.
• Allowing any domain but stripping domain qualifiers—Per each LDAP configuration in Cisco Secure ACS, you can configure Cisco Secure ACS to attempt to strip domain qualifiers based on common domain-qualifier delimiting characters. This corresponds to the “Process all usernames after stripping domain name and delimiter” option on the LDAP Configuration page. For more information about this option, see LDAP Configuration Options, page 11-22.
Cisco Secure ACS supports both prefixed and suffixed domain qualifiers. A single LDAP configuration can attempt to strip both prefixed and suffixed domain qualifiers; however, you can only specify one delimiting character
11-19User Guide for Cisco Secure ACS for Windows Server
78-14696-01, Version 3.1
Chapter 11 Working with User DatabasesGeneric LDAP
each for prefixed and suffixed domain qualifiers. To support more than one type of domain-qualifier delimiting character, you can create more than one LDAP configuration in Cisco Secure ACS.
Allowing usernames of any domain but stripping domain qualifiers is useful when the LDAP server stores usernames in a non-domain qualified format but the AAA client or end-user client submits the username to Cisco Secure ACS in a domain-qualified format.
Note With this option, Cisco Secure ACS submits usernames that are non-domain qualified, too. Usernames are not required to be domain qualified to be submitted to an LDAP server.
LDAP FailoverCisco Secure ACS supports failover between a primary server and secondary LDAP server. In the context of LDAP authentication with Cisco Secure ACS, failover applies when an authentication request fails because Cisco Secure ACS could not connect to an LDAP server, such as when the server is down or is otherwise unreachable by Cisco Secure ACS. To use this feature, you must define the primary and secondary LDAP servers on the LDAP Database Configuration page. Also, you must select the On Timeout Use Secondary check box. For more information about configuring an LDAP external user database, see Configuring a Generic LDAP External User Database, page 11-28.
If the On Timeout Use Secondary check box is selected, and if the first LDAP server that Cisco Secure ACS attempts to contact cannot be reached, Cisco Secure ACS always attempts to contact the other LDAP server. The first server Cisco Secure ACS attempts to contact may not always be the primary LDAP server. Instead, the first LDAP server that Cisco Secure ACS attempts to contact depends on the previous LDAP authentication attempt and on the value specified in the Failback Retry Delay box.
11-20User Guide for Cisco Secure ACS for Windows Server
78-14696-01, Version 3.1
Chapter 11 Working with User DatabasesGeneric LDAP
Successful Previous Authentication with the Primary LDAP Server
If, on the previous LDAP authentication attempt, Cisco Secure ACS successfully connected to the primary LDAP server, Cisco Secure ACS attempts to connect to the primary LDAP server. If Cisco Secure ACS cannot connect to the primary LDAP server, Cisco Secure ACS attempts to connect to the secondary LDAP server.
If Cisco Secure ACS cannot connect with either LDAP server, Cisco Secure ACS stops attempting LDAP authentication for the user. If the user is an unknown user, Cisco Secure ACS tries the next external user database listed in the Unknown User Policy list. For more information about the Unknown User Policy list, see Unknown User Processing, page 12-1.
Unsuccessful Previous Authentication with the Primary LDAP Server
If, on the previous LDAP authentication attempt, Cisco Secure ACS could not connect to the primary LDAP server, whether Cisco Secure ACS first attempts to connect to the primary server or secondary LDAP server for the current authentication attempt depends on the value in the Failback Retry Delay box. If the Failback Retry Delay box is set to 0 (zero), Cisco Secure ACS always attempts to connect to the primary LDAP server first. And if Cisco Secure ACS cannot connect to the primary LDAP server, Cisco Secure ACS then attempts to connect to the secondary LDAP server.
If the Failback Retry Delay box is set to a number other than zero, Cisco Secure ACS determines how many minutes have passed since the last authentication attempt using the primary LDAP server occurred. If more minutes have passed than the value specified in the Failback Retry Delay box, Cisco Secure ACS attempts to connect to the primary LDAP server first. And if Cisco Secure ACS cannot connect to the primary LDAP server, Cisco Secure ACS then attempts to connect to the secondary LDAP server.
If fewer minutes have passed than the value specified in the Failback Retry Delay box, Cisco Secure ACS attempts to connect to the secondary LDAP server first. And if Cisco Secure ACS cannot connect to the secondary LDAP server, Cisco Secure ACS then attempts to connect to the primary LDAP server.
11-21User Guide for Cisco Secure ACS for Windows Server
78-14696-01, Version 3.1
Chapter 11 Working with User DatabasesGeneric LDAP
If Cisco Secure ACS cannot connect to either LDAP server, Cisco Secure ACS stops attempting LDAP authentication for the user. If the user is an unknown user, Cisco Secure ACS tries the next external user database listed in the Unknown User Policy list. For more information about the Unknown User Policy list, see Unknown User Processing, page 12-1.
LDAP Configuration OptionsThe LDAP Database Configuration page contains many options, presented in three tables:
• Domain Filtering—This table contains options for domain filtering. The settings in this table affect all LDAP authentication performed using this configuration, regardless of whether the authentication is handled by the primary or secondary LDAP server. For more information about domain filtering, see Domain Filtering, page 11-18.
This table contains the following options:
– Process all usernames—When this option is selected, Cisco Secure ACS does not perform domain filtering on usernames before submitting them to the LDAP server for authentication.
– Only process usernames that are domain qualified—When this option is selected, Cisco Secure ACS only attempts authentication for usernames that are domain qualified for a single domain. You must specify the type of domain qualifier and the domain in the “Qualified by” and Domain options. Cisco Secure ACS only submits usernames that are qualified in the method specified in the “Qualified by” option and that are qualified with the username specified in the Domain Qualifier box. You can also specify whether Cisco Secure ACS removes the domain qualifier from usernames before submitting them to an LDAP server.
– Qualified by—When “Only process usernames that are domain qualified” is selected, this option specifies the type of domain qualification. If you select Prefix, Cisco Secure ACS only processes usernames that begin with the characters specified in the Domain Qualifier box. If you select Suffix, Cisco Secure ACS only processes usernames that end in the characters specified in the Domain Qualifier box.
11-22User Guide for Cisco Secure ACS for Windows Server
78-14696-01, Version 3.1
Chapter 11 Working with User DatabasesGeneric LDAP
Note Regardless of the domain qualifier type selected, the domain name must match the domain specified in the Domain Qualifier box.
– Domain Qualifier—When “Only process usernames that are domain qualified” is selected, this option specifies the domain name and delimiting character that must qualify usernames so Cisco Secure ACS can submit the username to an LDAP server. The Domain box accepts up to 512 characters; however, only one domain name and its delimiting character are permitted.
For example, if the domain name is “mydomain”, the delimiting character is “@”, and Suffix is selected on the “Qualified by” list, the Domain box should contain “@mydomain”. If the domain name is “radioman”, the delimiting character is “\”, and Prefix is selected on the “Qualified by” list, the Domain Qualifier box should contain “yourdomain\”.
– Strip domain before submitting username to LDAP server—When “Only process usernames that are domain qualified” is selected, this option specifies whether Cisco Secure ACS removes the domain qualifier and its delimiting character before submitting a username to an LDAP server. For example, if the username is “[email protected]”, the stripped username is “jwiedman”.
– Process all usernames after stripping domain name and delimiter—When this option is selected, Cisco Secure ACS submits all usernames to an LDAP server after attempting to strip domain names. Usernames that are not domain qualified are processed, too. Domain name stripping occurs as specified by the following two options.
– Strip starting characters through the last X character—When “Process all usernames after stripping domain name and delimiter” is selected, this option specifies that Cisco Secure ACS attempts to strip a prefixed domain qualifier. If, in the username, Cisco Secure ACS finds the delimiter character that is specified in the X box, it strips all characters from the beginning of the username through the delimiter character. If the username contains more than one of the character specified in the X box, Cisco Secure ACS strips characters through the last occurrence of the delimiter character.
11-23User Guide for Cisco Secure ACS for Windows Server
78-14696-01, Version 3.1
Chapter 11 Working with User DatabasesGeneric LDAP
For example, if the delimiter character is “\” and the username is “DOMAIN\echamberlain”, Cisco Secure ACS submits “echamberlain” to an LDAP server.
Note The X box cannot contain the following special characters: # ? " * > < Cisco Secure ACS does not allow these characters in usernames; therefore, if any of these characters are in the X box, stripping fails.
– Strip ending characters through the first Y character—When “Process all usernames after stripping domain name and delimiter” is selected, this option specifies that Cisco Secure ACS attempts to strip a suffixed domain qualifier. If, in the username, Cisco Secure ACS finds the delimiter character that is specified in the Y box, it strips all characters from the delimiter character through the end of the username. If the username contains more than one of the character specified in the Y box, Cisco Secure ACS strips characters starting with the first occurrence of the delimiter character.
For example, if the delimiter character is “@” and the username is “jwiedman@domain”, then Cisco Secure ACS submits “jwiedman” to an LDAP server.
Note The X box cannot contain the following special characters: # ? " * > < Cisco Secure ACS does not allow these characters in usernames; therefore, if any of these characters are in the X box, stripping fails.
• Common LDAP Configuration—This table contains options that apply to all LDAP authentication performed using this configuration. Cisco Secure ACS uses the settings in this section regardless of whether the authentication is handled by the primary or secondary LDAP server. This table contains the following options:
– User Directory Subtree—The distinguished name (DN) for the subtree that contains all users. For example:
ou=organizational unit[,ou=next organizational unit]o=corporation.com
11-24User Guide for Cisco Secure ACS for Windows Server
78-14696-01, Version 3.1
Chapter 11 Working with User DatabasesGeneric LDAP
If the tree containing users is the base DN, type:
o=corporation.com
or
dc=corporation,dc=com
as applicable to your LDAP configuration. For more information, refer to your LDAP database documentation.
– Group Directory Subtree—The DN for the subtree that contains all groups. For example:
ou=organizational unit[,ou=next organizational unit]o=corporation.com
If the tree containing groups is the base DN, type:
o=corporation.com
or
dc=corporation,dc=com
as applicable to your LDAP configuration. For more information, refer to your LDAP database documentation.
– UserObjectType—The name of the attribute in the user record that contains the username. You can obtain this attribute name from your Directory Server. For more information, refer to your LDAP database documentation. Cisco Secure ACS provides default values that reflect the default configuration of a Netscape Directory Server. Confirm all values for these fields with your LDAP server configuration and documentation.
– UserObjectClass—The value of the LDAP “objectType” attribute that identifies the record as a user. Often, user records have several values for the objectType attribute, some of which are unique to the user, some of which are shared with other object types. This box should contain a value that is not shared.
– GroupObjectType—The name of the attribute in the group record that contains the group name.
– GroupObjectClass—A value of the LDAP “objectType” attribute in the group record that identifies the record as a group.
11-25User Guide for Cisco Secure ACS for Windows Server
78-14696-01, Version 3.1

Chapter 11 Working with User DatabasesGeneric LDAP
– Group Attribute Name—The name of the attribute of the group record that contains the list of user records that are a member of that group.
– Server Timeout—The number of seconds Cisco Secure ACS waits for a response from an LDAP server before determining that the connection with that server has failed.
– On Timeout Use Secondary—Whether Cisco Secure ACS performs failover of LDAP authentication attempts. For more information about the LDAP failover feature, see LDAP Failover, page 11-20.
– Failback Retry Delay—The number of minutes after the primary LDAP server fails to authenticate a user that Cisco Secure ACS resumes sending authentication requests to the primary LDAP server first. A value of 0 (zero) causes Cisco Secure ACS to always use the primary LDAP server first.
• Primary and Secondary LDAP Servers—The Primary LDAP Server table and the Secondary LDAP Server table enable you to identify the LDAP servers and make settings that are unique to each. The Secondary LDAP Server table does not need to be completed if you do not intend to use LDAP failover. These tables contain the following options:
– Hostname—The name or IP address of the server that is running the LDAP software. If you are using DNS on your network, you can type the hostname instead of the IP address.
– Port—The TCP/IP port number on which the LDAP server is listening. The default is 389, as stated in the LDAP specification. If you do not know the port number, you can find this information by viewing those properties on the LDAP server. If you want to use secure authentication, port 636 is usually used.
– LDAP Version—Whether Cisco Secure ACS uses LDAP version 3 or version 2 to communicate with your LDAP database. If this check box is selected, Cisco Secure ACS uses LDAP version 3. If it is not selected, Cisco Secure ACS uses LDAP version 2.
– Security—Whether Cisco Secure ACS uses SSL to provide more secure communication with the LDAP server. If you do not enable SSL, user credentials are passed to the LDAP server in clear text.
11-26User Guide for Cisco Secure ACS for Windows Server
78-14696-01, Version 3.1

Chapter 11 Working with User DatabasesGeneric LDAP
– Certificate Database Path—The path to the cert7.db file. This file must contain the certificates for the server to be queried and the trusted CA. You can use a Netscape web browser to generate cert7.db files. For information about generating a cert7.db file, refer to Netscape documentation.
To perform secure authentication using SSL, you must provide a cert7.db certificate database file. Cisco Secure ACS requires a certificate database so that it can establish the SSL connection. The certificate database must be local to the Cisco Secure ACS Windows server.
Cisco Secure ACS requires a cert7.db certificate database file for each LDAP server you configure. For example, to support users distributed in multiple LDAP trees, you could configure two LDAP instances in Cisco Secure ACS that would communicate with the same LDAP servers. Each LDAP instance would have a primary and secondary LDAP server. Even though the two LDAP configurations share the same primary server, each LDAP configuration requires that you download a certificate database file to Cisco Secure ACS.
Note The database must be a cert7.db certificate database file. No other filename is supported.
– Admin DN—The DN of the administrator; that is, the LDAP account which, if bound to, permits searches for all required users under the User Directory Subtree. It must contain the following information about your LDAP server:
uid=user id,[ou=organizational unit,][ou=next organizational unit]o=organization
where user id is the username, organizational unit is the last level of the tree, and next organizational unit is the next level up the tree.
For example:
uid=joesmith,ou=members,ou=administrators,o=cisco
– Password—The password for the administrator account specified in the Admin DN box. Password case sensitivity is determined by the LDAP server.
11-27User Guide for Cisco Secure ACS for Windows Server
78-14696-01, Version 3.1
Chapter 11 Working with User DatabasesGeneric LDAP
Configuring a Generic LDAP External User DatabaseCreating a generic LDAP configuration provides Cisco Secure ACS information that enables it to pass authentication requests to an LDAP database. This information reflects the way you have implemented your LDAP database and does not dictate how your LDAP database is configured or functions. For information about your LDAP database, refer to your LDAP documentation.
Before You Begin
For information about the options on the LDAP Database Configuration page, see LDAP Configuration Options, page 11-22.
To configure Cisco Secure ACS to use the LDAP User Database, follow these steps:
Step 1 In the navigation bar, click External User Databases.
Step 2 Click Database Configuration.
Result: Cisco Secure ACS displays a list of all possible external user database types.
Step 3 Click Generic LDAP.
Note The user authenticates against only one LDAP database.
Result: If no LDAP database configuration exists, only the Database Configuration Creation table appears. Otherwise, in addition to the Database Configuration Creation table, the External User Database Configuration table appears.
Step 4 If you are creating a configuration, follow these steps:
a. Click Create New Configuration.
b. Type a name for the new configuration for generic LDAP in the box provided.
c. Click Submit.
Result: Cisco Secure ACS lists the new configuration in the External User Database Configuration table.
11-28User Guide for Cisco Secure ACS for Windows Server
78-14696-01, Version 3.1
Chapter 11 Working with User DatabasesGeneric LDAP
Step 5 Under External User Database Configuration, select the name of the LDAP database you need to configure.
Note If only one LDAP configuration exists, the name of that configuration appears instead of the list. Proceed to Step 6.
Step 6 Click Configure.
Caution If you click Delete, the configuration of the selected LDAP database is deleted.
Step 7 If you do not want Cisco Secure ACS to filter LDAP authentication requests by username, under Domain Filtering, select Process all usernames.
Step 8 If you want to limit authentications processed by this LDAP configuration to usernames with a specific domain qualification, follow these steps:
Note For information about domain filtering, see Domain Filtering, page 11-18.
a. Under Domain Filtering, select Only process usernames that are domain qualified.
b. From the “Qualified by” list, select the applicable type of domain qualification, either Suffix or Prefix. Only one type of domain qualification is supported per LDAP configuration.
For example, if you want this LDAP configuration to authenticate usernames that begin with a specific domain name, select Prefix. If you want this LDAP configuration to authenticate usernames that end with a specific domain name, select Suffix.
c. In the Domain Qualifier box, type the name of the domain that you want this LDAP configuration to authenticate usernames for. Include the delimiting character that separates the user ID from the domain name. Be sure that the delimiting character appears in the applicable position: at the end of the domain name if Prefix is selected on the “Qualified by” list; at the beginning of the domain name if Suffix is selected on the “Qualified by” list.
Only one domain name is supported per LDAP configuration. You can type up to 512 characters.
11-29User Guide for Cisco Secure ACS for Windows Server
78-14696-01, Version 3.1
Chapter 11 Working with User DatabasesGeneric LDAP
d. If you want Cisco Secure ACS to remove the domain qualifier before submitting it to the LDAP database, select the Strip domain before submitting username to LDAP server check box.
e. If you want Cisco Secure ACS to pass the username to the LDAP database without removing the domain qualifier, clear the Strip domain before submitting username to LDAP server check box.
Step 9 If you want to enable Cisco Secure ACS to strip domain qualifiers from usernames before submitting them to an LDAP server, follow these steps:
Note For information about domain filtering, see Domain Filtering, page 11-18.
a. Under Domain Filtering, select Process all usernames after stripping domain name and delimiter.
b. If you want Cisco Secure ACS to strip prefixed domain qualifiers, select the Strip starting characters through the last X character check box, and then type the domain-qualifier delimiting character in the X box.
Note The X box cannot contain the following special characters: # ? " * > < If any of these characters are in the X box, stripping fails.
c. If you want Cisco Secure ACS to strip suffixed domain qualifiers, select the Strip ending characters from the first X character check box, and then type the domain-qualifier delimiting character in the X box.
Note The X box cannot contain the following special characters: # ? " * > < If any of these characters are in the X box, stripping fails.
Step 10 Under Common LDAP Configuration, in the User Directory Subtree box, type the DN of the tree containing all your users.
Step 11 In the Group Directory Subtree box, type the DN of the subtree containing all your groups.
11-30User Guide for Cisco Secure ACS for Windows Server
78-14696-01, Version 3.1
Chapter 11 Working with User DatabasesGeneric LDAP
Step 12 In the User Object Type box, type the name of the attribute in the user record that contains the username. You can obtain this attribute name from your Directory Server. For more information, refer to your LDAP database documentation.
Note The default values in the UserObjectType and following fields reflect the default configuration of the Netscape Directory Server. Confirm all values for these fields with your LDAP server configuration and documentation.
Step 13 In the User Object Class box, type the value of the LDAP “objectType” attribute that identifies the record as a user. Often, user records have several values for the objectType attribute, some of which are unique to the user, some of which are shared with other object types. Select a value that is not shared.
Step 14 In the GroupObjectType box, type the name of the attribute in the group record that contains the group name.
Step 15 In the GroupObjectClass box, type a value of the LDAP “objectType” attribute in the group record that identifies the record as a group.
Step 16 In the GroupAttributeName box, type the name of the attribute of the group record that contains the list of user records who are a member of that group.
Step 17 In the Server Timeout box, type the number of seconds Cisco Secure ACS waits for a response from an LDAP server before determining that the connection with that server has failed.
Step 18 To enable failover of LDAP authentication attempts, select the On Timeout Use Secondary check box. For more information about the LDAP failover feature, see LDAP Failover, page 11-20.
Step 19 In the Failback Retry Delay box, type the number of minutes after the primary LDAP server fails to authenticate a user that Cisco Secure ACS resumes sending authentication requests to the primary LDAP server first.
Note To specify that Cisco Secure ACS should always use the primary LDAP server first, type 0 (zero) in the Failback Retry Delay box.
11-31User Guide for Cisco Secure ACS for Windows Server
78-14696-01, Version 3.1

Chapter 11 Working with User DatabasesGeneric LDAP
Step 20 For the Primary LDAP Server and Secondary LDAP Server tables, follow these steps:
Note If you did not select the On Timeout Use Secondary check box, you do not need to complete the options in the Secondary LDAP Server table.
a. In the Hostname box, type the name or IP address of the server that is running the LDAP software. If you are using DNS on your network, you can type the hostname instead of the IP address.
b. In the Port box, type the TCP/IP port number on which the LDAP server is listening. The default is 389, as stated in the LDAP specification. If you do not know the port number, you can find this information by viewing those properties on the LDAP server. If you want to use secure authentication, port 636 is usually used.
c. To specify that Cisco Secure ACS should use LDAP version 3 to communicate with your LDAP database, select the LDAP Version check box. If the LDAP Version check box is not selected, Cisco Secure ACS uses LDAP version 2.
d. The username and password credentials are normally passed over the network to the LDAP directory in clear text. To enhance security, select the Use secure authentication check box.
e. In the Certificate Database Path box, type the path to the cert7.db file, which contains the certificates for the server to be queried and the trusted CA.
f. The Admin DN box requires the fully qualified (DN) of the administrator; that is, the LDAP account which, if bound to, permits searches for all required users under the User Directory Subtree.
In the Admin DN box, type the following information from your LDAP server:
uid=user id,[ou=organizational unit,][ou=next organizational unit]o=organization
where user id is the username
organizational unit is the last level of the tree
next organizational unit is the next level up the tree.
11-32User Guide for Cisco Secure ACS for Windows Server
78-14696-01, Version 3.1
Chapter 11 Working with User DatabasesNovell NDS Database
For example:
uid=joesmith,ou=members,ou=administrators,o=cisco
Tip If you are using Netscape DS as your LDAP software, you can copy this information from the Netscape Console.
For more information, refer to your LDAP database documentation.
g. In the Password box, type the password for the administrator account specified in the Admin DN box. Password case sensitivity is determined by the server.
Step 21 Click Submit.
Result: Cisco Secure ACS saves the generic LDAP configuration you created. You can now add it to your Unknown User Policy or assign specific user accounts to use this database for authentication. For more information about the Unknown User Policy, see Unknown User Processing, page 12-1. For more information about configuring user accounts to authenticate using this database, see Chapter 7, “Setting Up and Managing User Accounts.”
Novell NDS DatabaseCisco Secure ACS supports user authentication with Novell NetWare Directory Services (NDS) servers.
This section contains the following topics:
• About Novell NDS User Databases, page 11-34
• User Contexts, page 11-35
• Novell NDS External User Database Options, page 11-36
• Configuring a Novell NDS External User Database, page 11-37
11-33User Guide for Cisco Secure ACS for Windows Server
78-14696-01, Version 3.1
Chapter 11 Working with User DatabasesNovell NDS Database
About Novell NDS User DatabasesCisco Secure ACS supports ASCII, PAP, and PEAP(EAP-GTC) authentication with Novell NetWare Directory Services (NDS) servers. To use NDS authentication, you must have a Novell NDS database. Other authentication protocols are not supported with Novell NDS external user databases.
Note Authentication protocols not supported with Novell NDS external user databases may be supported by another type of external user database. For more information about authentication protocols and the external database types that support them, see Authentication Protocol-Database Compatibility, page 1-9.
Cisco Secure ACS supports group mapping for unknown users by requesting group membership information from Novell NDS user databases. For more information about group mapping for users authenticated with a Novell NDS user database, see Group Mapping by Group Set Membership, page 12-14.
Note Aside from user group membership information, Cisco Secure ACS retrieves no user settings from Novell NDS databases; however, Cisco Secure ACS enforces password restrictions, login restrictions, time restrictions, and account restrictions for each user. Cisco Secure ACS accomplishes this by interpreting authentication responses received from a Novell NDS database. Cisco Secure ACS does not enforce address restrictions.
Configuring Cisco Secure ACS to authenticate against an NDS database does not affect the configuration of the NDS database. To manage your NDS database, refer to your NDS database documentation.
Some versions of Novell NDS provide standard LDAP implementations. If your Novell NDS supports standard LDAP and you have implemented standard LDAP, you should configure a Cisco Secure ACS generic LDAP external user database to authenticate users defined in your Novell NDS. For more information about generic LDAP external user databases, see Generic LDAP, page 11-16.
To authenticate users with a Novell NDS database, Cisco Secure ACS depends upon Novell Requestor. Novell Requestor must be installed on the same Windows server as Cisco Secure ACS. You can download the Requestor software from the Novell website. For more information, refer to your Novell and Microsoft documentation.
11-34User Guide for Cisco Secure ACS for Windows Server
78-14696-01, Version 3.1
Chapter 11 Working with User DatabasesNovell NDS Database
For users to authenticate against a Novell NDS database, Cisco Secure ACS must be correctly configured to recognize the Novell NDS structure. Cisco Secure ACS supports up to twenty trees. Each tree has several containers, and each container can have several contexts. NDS trees can be thought of as similar to Windows NT/2000 domains. For a user to authenticate against a Novell NDS context, a user object must exist, and the password must be able to log the name into the tree.
User ContextsYou must supply one or more contexts when you configure Cisco Secure ACS to authenticate with an NDS database; however, users can supply an additional portion of the full context that defines their fully-qualified usernames. In other words, if none of the contexts in the list of contexts contains a username submitted for authentication, the username must specify exactly how they are subordinate to the contexts in the list of contexts. The user specifies the manner in which a username is subordinate to a context by providing the additional context information needed to uniquely identify the user in the NDS database.
Consider the following example tree:
[Root] whose treename=ABC OU=ABC-Company
OU=salesCN=Agamemnon
OU=marketingCN=OdysseusOU=marketing-research
CN=PenelopeOU=marketing-product
CN=Telemachus
If the context list configured in Cisco Secure ACS were:
ABC-Company,sales.ABC-Company
Agamemnon would successfully authenticate if he submitted “Agamemnon.sales” as his username. If he submitted only “Agamemnon”, authentication would fail.
Table 11-1 lists the users given in the example tree and the username with context that would allow each user to authenticate successfully.
11-35User Guide for Cisco Secure ACS for Windows Server
78-14696-01, Version 3.1

Chapter 11 Working with User DatabasesNovell NDS Database
Novell NDS External User Database OptionsYou create and maintain configurations for Novell NDS database authentication on the NDS Authentication Support page in Cisco Secure ACS. This page enables you to add a configuration for a Novell NDS tree, change existing tree configurations, and delete existing tree configurations in a single submission to the Cisco Secure ACS web server. Cisco Secure ACS displays information for each tree configured, plus a blank section for creating a tree. The configuration items presented for each tree are as follows:
• Add New Tree—Appears only on the blank form for new trees. Selecting this check box confirms that you want to add a new tree.
• Delete Tree—Appears only on existing tree configurations. Selecting this check box indicates that you want to delete the tree configuration when you click Submit.
• Test Login—Selecting this check box causes Cisco Secure ACS to test the administrative login of the tree to the Novell server when you click Submit.
• Tree Name—Appears only on the blank form for new trees. The name of the Novell NDS tree against which Cisco Secure ACS should authenticate users.
• Administrator Username—The fully qualified, typeless username for the administrator of the Novell server. For example:
admin.Chicago.Corporation
• Administrator Password—The password for the administrator of the Novell server.
Table 11-1 Example Usernames with Contexts
User Valid Username With Context
Agamemnon Agamemnon
Odysseus Odysseus.marketing
Penelope Penelope.marketing-research.marketing
Telemachus Telemachus.marketing-product.marketing
11-36User Guide for Cisco Secure ACS for Windows Server
78-14696-01, Version 3.1
Chapter 11 Working with User DatabasesNovell NDS Database
• Context List—The full context list with each context specified in canonical, typeless form; that is, remove the o= and ou= and separate each part of the context using a period (.). You can enter more than one context list. If you do, separate them with a comma. For example, if your Organization is Corporation, your Organization Name is Chicago, and you want to enter two Context names, Marketing and Engineering, you would type:
Engineering.Chicago.Corporation, Marketing.Chicago.Corporation
You do not need to add users in the Context List box.
Note Users can provide a portion of their context when they login. For more information, see User Contexts, page 11-35.
Configuring a Novell NDS External User DatabaseYou can allow users to enter their own context as part of the login process.
Creating an Novell NDS database configuration is a process that provides Cisco Secure ACS information that enables it to pass authentication requests to an NDS database. This information reflects the way you have implemented your NDS database and does not dictate how your NDS database is configured or functions. For information about your NDS database, refer to your Novell NDS documentation.
Before You Begin
The Novell Requestor Software for Novell NDS must be installed on the same Windows NT server as Cisco Secure ACS. If the Novell Requestor Software for Novell NDS is not on the same Windows NT server as Cisco Secure ACS, you cannot complete this procedure.
To configure Novell NDS authentication, follow these steps:
Step 1 See your Novell NetWare administrator to get the names and other information on the Tree, Container, and Context.
Step 2 In the navigation bar, click External User Databases.
Step 3 Click Database Configuration.
Result: Cisco Secure ACS lists all possible external user database types.
11-37User Guide for Cisco Secure ACS for Windows Server
78-14696-01, Version 3.1
Chapter 11 Working with User DatabasesNovell NDS Database
Step 4 Click Novell NDS.
Result: If no Novell NDS database has yet been configured, the Database Configuration Creation page appears. Otherwise, the External User Database Configuration page appears.
Step 5 If you are creating a configuration, follow these steps:
a. Click Create New Configuration.
b. Type a name for the new configuration for Novell NDS Authentication in the box provided.
c. Click Submit.
Result: Cisco Secure ACS lists the new configuration in the External User Database Configuration table.
Step 6 Click Configure.
Caution If you click Delete, the Cisco Secure ACS configuration for your Novell NDS database is deleted.
Result: The NDS Authentication Support page appears. The NDS Authentication Support page enables you to add a configuration for an Novell NDS tree, change existing tree configurations, and delete existing tree configurations.
For more information about the content of the NDS Authentication Support page, see Novell NDS External User Database Options, page 11-36.
Step 7 To add a new tree configuration, complete the fields in the blank form at the bottom of the NDS Authentication Support page.
Note You must select the Add Tree check box to confirm that you want to create a tree configuration.
Step 8 To change an existing tree configuration, edit the values you need to change.
Note The name of a tree is not changeable. If you need to change a tree name, click Delete Tree? on the misnamed tree section and click Submit. Then, add a new tree with the same configuration data as the deleted, misnamed tree, making sure the tree name is correct before clicking Submit.
11-38User Guide for Cisco Secure ACS for Windows Server
78-14696-01, Version 3.1
Chapter 11 Working with User DatabasesODBC Database
Step 9 To delete an existing tree configuration, select the Delete Tree check box.
Step 10 Click Submit.
Result: Cisco Secure ACS saves the NDS configuration you created. You can add it to your Unknown User Policy or assign specific user accounts to use this database for authentication. For more information about the Unknown User Policy, see Unknown User Processing, page 12-1. For more information about configuring user accounts to authenticate using this database, see Chapter 7, “Setting Up and Managing User Accounts.”
ODBC DatabaseAs with Windows NT/2000 database support, Cisco Secure ACS ODBC-compliant relational database support enables you to make use of existing user records held in an external ODBC-compliant relational database. Configuring Cisco Secure ACS to authenticate against an ODBC-compliant relational database does not affect the configuration of the relational database. To manage your relational database, refer to your relational database documentation.
The Windows ODBC feature enables you to create a data source name (DSN), which specifies the database and other important parameters necessary for communicating with the database. Among the parameters you provide are the username and password required for the ODBC driver to gain access to your ODBC-compliant relational database.
This section contains the following topics:
• What is Supported with ODBC User Databases, page 11-40
• Cisco Secure ACS Authentication Process with an ODBC External User Database, page 11-41
• Preparing to Authenticate Users with an ODBC-Compliant Relational Database, page 11-42
• Implementation of Stored Procedures for ODBC Authentication, page 11-43
• Microsoft SQL Server and Case-Sensitive Passwords, page 11-44
• Sample Routine for Generating a PAP Authentication SQL Procedure, page 11-45
11-39User Guide for Cisco Secure ACS for Windows Server
78-14696-01, Version 3.1
Chapter 11 Working with User DatabasesODBC Database
• Sample Routine for Generating an SQL CHAP Authentication Procedure, page 11-46
• PAP Authentication Procedure Input, page 11-46
• PAP Procedure Output, page 11-47
• CHAP/MS-CHAP/ARAP Authentication Procedure Input, page 11-48
• CHAP/MS-CHAP/ARAP Procedure Output, page 11-48
• Result Codes, page 11-49
• Configuring a System Data Source Name for an ODBC External User Database, page 11-50
• Configuring an ODBC External User Database, page 11-51
What is Supported with ODBC User DatabasesCisco Secure ACS supports the use of ODBC external user databases for the following features:
• Authentication—Cisco Secure ACS supports ASCII, PAP, ARAP, CHAP, MS-CHAP (versions 1 and 2), LEAP, EAP-MD5, and PEAP(EAP-GTC) authentication using a relational database via the ODBC authenticator feature. Other authentication protocols are not supported with ODBC external user databases.
Note Authentication protocols not supported with ODBC external user databases may be supported by another type of external user database. For more information about authentication protocols and the external database types that support them, see Authentication Protocol-Database Compatibility, page 1-9.
• Group Specification—Cisco Secure ACS supports group assignment for users authenticated by an ODBC user database. Authentication queries to the ODBC database must contain the group number you want to assign a user to. For unknown users authenticated by an ODBC user database, group specification overrides group mapping.
11-40User Guide for Cisco Secure ACS for Windows Server
78-14696-01, Version 3.1
Chapter 11 Working with User DatabasesODBC Database
For more information about expected query output, see PAP Procedure Output, page 11-47, and CHAP/MS-CHAP/ARAP Procedure Output, page 11-48.
• Group Mapping for Unknown Users—Cisco Secure ACS supports group mapping for unknown users by requesting group membership information from Windows user databases. For more information about group mapping for users authenticated with a Windows user database, see Group Mapping by Group Set Membership, page 12-14.
Cisco Secure ACS Authentication Process with an ODBC External User Database
Cisco Secure ACS forwards user authentication requests to an ODBC database in either of the two following scenarios. The first scenario is when the user account in the CiscoSecure user database lists an ODBC database configuration as the authentication method. The second is when the user is unknown to the CiscoSecure user database and the Unknown User Policy dictates that an ODBC database is the next external user database to try.
In either case, Cisco Secure ACS forwards the username and password to the ODBC database via an ODBC connection. The ODBC database either passes or fails the authentication request from Cisco Secure ACS. The relational database must have a stored procedure that queries the appropriate tables and returns values to Cisco Secure ACS. If the returned values indicate that the username and password provided are valid, Cisco Secure ACS instructs the requesting AAA client to grant the user access; otherwise, Cisco Secure ACS denies the user access (Figure 11-2). Upon receiving the response from the ODBC database, Cisco Secure ACS instructs the requesting AAA client to grant or deny the user access, depending upon the response from the ODBC database.
11-41User Guide for Cisco Secure ACS for Windows Server
78-14696-01, Version 3.1

Chapter 11 Working with User DatabasesODBC Database
Figure 11-2 Using the ODBC Database for Authentication
Cisco Secure ACS grants authorization based on the Cisco Secure ACS group to which the user is assigned. While the group to which a user is assigned can be determined by information from the ODBC database using a process known as “group specification”, it is Cisco Secure ACS that grants authorization privileges.
Cisco Secure ACS passes the user information to the relational database via the ODBC connection. The relational database must have a stored procedure that queries the appropriate tables and returns values to Cisco Secure ACS. If the returned values indicate that the username and password provided are valid, Cisco Secure ACS grants the user access. Otherwise, Cisco Secure ACS denies the user access (Figure 11-2).
Preparing to Authenticate Users with an ODBC-Compliant Relational Database
Authenticating users with an ODBC-compliant relational database requires that you complete several significant steps external to Cisco Secure ACS before configuring Cisco Secure ACS with an ODBC external user database.
CiscoSecureACS
RDBMSODBC"Unknownuser"
interface
Name, pap password
Chap/Arap password,authen result,
acct info
Pap authentication
(MS) Chap/Arap Extraction
1675
2
11-42User Guide for Cisco Secure ACS for Windows Server
78-14696-01, Version 3.1

Chapter 11 Working with User DatabasesODBC Database
To prepare for authenticating with an ODBC-compliant relational database, follow these steps:
Step 1 Install the database software on its server. For more information, refer to the relational database documentation.
Step 2 Create the database to hold the usernames and passwords. The database name is irrelevant to Cisco Secure ACS, so you can name the database however you like.
Step 3 Create the table or tables that will hold the usernames and passwords for your users. The table names are irrelevant to Cisco Secure ACS, so you can name the tables and columns however you like.
Step 4 Write the stored procedures intended to return the required authentication information to Cisco Secure ACS. For more information about these stored procedures, see Implementation of Stored Procedures for ODBC Authentication, page 11-43.
Step 5 Set up a system DSN on the Cisco Secure ACS server. For steps, see Configuring a System Data Source Name for an ODBC External User Database, page 11-50.
Step 6 Configure Cisco Secure ACS to authenticate users with an ODBC database. For steps, see Configuring an ODBC External User Database, page 11-51.
Implementation of Stored Procedures for ODBC AuthenticationWhen you configure Cisco Secure ACS to authenticate users against an ODBC-compliant relational database, you must create a stored procedure to perform the necessary query and return the values that Cisco Secure ACS expects. Cisco Secure ACS supports ODBC authentication for PAP or CHAP/MS-CHAP/ARAP protocols; however, the method of authentication differs for these two sets of protocols.
Authentication for PAP protocol occurs within the relational database; that is, if the stored procedure finds a record with both the username and the password matching the input, the user is considered authenticated.
Authentication for CHAP/MS-CHAP/ARAP occurs within Cisco Secure ACS. The stored procedure returns the fields for the record with a matching username, including the password. Cisco Secure ACS confirms or denies authentication based on the values returned from the procedure.
11-43User Guide for Cisco Secure ACS for Windows Server
78-14696-01, Version 3.1

Chapter 11 Working with User DatabasesODBC Database
To support the two protocols, Cisco Secure ACS provides different input to, and expects different output from, the ODBC authentication request. This requires a separate stored procedure in the relational database to support each protocol.
The Cisco Secure ACS product CD provides “stub” routines for creating a procedure in either Microsoft SQL Server or an Oracle database. You can either modify a copy of these routines to create your stored procedure or write your own. Example routines for creating PAP and CHAP/MS-CHAP/ARAP authentication stored procedures in SQL Server are given in Sample Routine for Generating a PAP Authentication SQL Procedure, page 11-45, and Sample Routine for Generating an SQL CHAP Authentication Procedure, page 11-46.
The following sections provide reference information about Cisco Secure ACS data types versus SQL data types, PAP authentication procedure inputs and outputs, CHAP/MS-CHAP/ARAP authentication procedure inputs and outputs, and expected result codes. You can use this information while writing your authentication stored procedures in your relational database.
Type Definitions
The Cisco Secure ACS types and their matching SQL types are as follows:
• Integer—SQL_INTEGER
• String—SQL_CHAR or SQL_VARCHAR
Microsoft SQL Server and Case-Sensitive PasswordsIf you want your passwords to be case sensitive and are using Microsoft SQL Server as your ODBC-compliant relational database, configure your SQL Server to accommodate this feature. If your users are authenticating using PPP via PAP or Telnet login, the password might not be case sensitive, depending on how the case-sensitivity option is set on the SQL Server. For example, an Oracle database will default to case sensitive, whereas Microsoft SQL Server defaults to case insensitive. However, in the case of CHAP/ARAP, the password is case sensitive if the CHAP stored procedure is configured.
For example, with Telnet or PAP authentication, the passwords cisco or CISCO or CiScO will all work if the SQL Server is configured to be case insensitive.
11-44User Guide for Cisco Secure ACS for Windows Server
78-14696-01, Version 3.1
Chapter 11 Working with User DatabasesODBC Database
For CHAP/ARAP, the passwords cisco or CISCO or CiScO are not the same, regardless of whether or not the SQL Server is configured for case-sensitive passwords.
Sample Routine for Generating a PAP Authentication SQL Procedure
The following example routine creates a procedure named CSNTAuthUserPap in Microsoft SQL Server, the default procedure used by Cisco Secure ACS for PAP authentication. Table and column names that could vary for your database schema are presented in variable text. For your convenience, the Cisco Secure ACS product CD includes a stub routine for creating a procedure in either SQL Server or Oracle. For more information about data type definitions, procedure parameters, and procedure results, see ODBC Database, page 11-39.
if exists (select * from sysobjects where id = object_id (`dbo.CSNTAuthUserPap’) and sysstat & 0xf = 4) drop procedure dbo.CSNTAuthUserPap GO
CREATE PROCEDURE CSNTAuthUserPap @username varchar(64), @pass varchar(255) AS SET NOCOUNT ON IF EXISTS( SELECT usernameFROM usersWHERE username = @username AND csntpassword = @pass ) SELECT 0,csntgroup,csntacctinfo,"No Error" FROM usersWHERE username = @username ELSE SELECT 3,0,"odbc","ODBC Authen Error"
GO GRANT EXECUTE ON dbo.CSNTAuthUserPap TO ciscosecure GO
11-45User Guide for Cisco Secure ACS for Windows Server
78-14696-01, Version 3.1
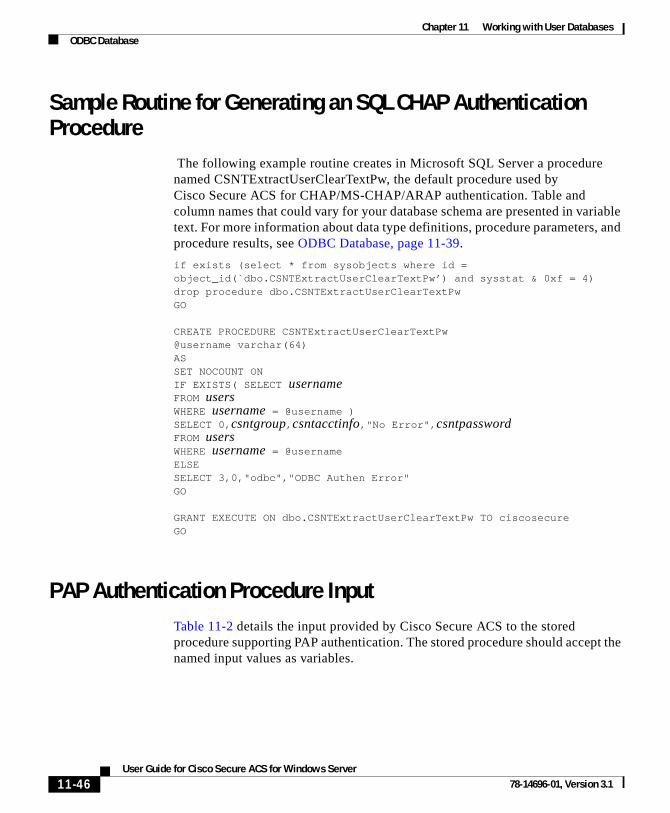
Chapter 11 Working with User DatabasesODBC Database
Sample Routine for Generating an SQL CHAP Authentication Procedure
The following example routine creates in Microsoft SQL Server a procedure named CSNTExtractUserClearTextPw, the default procedure used by Cisco Secure ACS for CHAP/MS-CHAP/ARAP authentication. Table and column names that could vary for your database schema are presented in variable text. For more information about data type definitions, procedure parameters, and procedure results, see ODBC Database, page 11-39.
if exists (select * from sysobjects where id = object_id(`dbo.CSNTExtractUserClearTextPw’) and sysstat & 0xf = 4) drop procedure dbo.CSNTExtractUserClearTextPw GO
CREATE PROCEDURE CSNTExtractUserClearTextPw @username varchar(64) AS SET NOCOUNT ON IF EXISTS( SELECT usernameFROM usersWHERE username = @username ) SELECT 0,csntgroup,csntacctinfo,"No Error",csntpasswordFROM usersWHERE username = @username ELSE SELECT 3,0,"odbc","ODBC Authen Error" GO
GRANT EXECUTE ON dbo.CSNTExtractUserClearTextPw TO ciscosecure GO
PAP Authentication Procedure InputTable 11-2 details the input provided by Cisco Secure ACS to the stored procedure supporting PAP authentication. The stored procedure should accept the named input values as variables.
11-46User Guide for Cisco Secure ACS for Windows Server
78-14696-01, Version 3.1
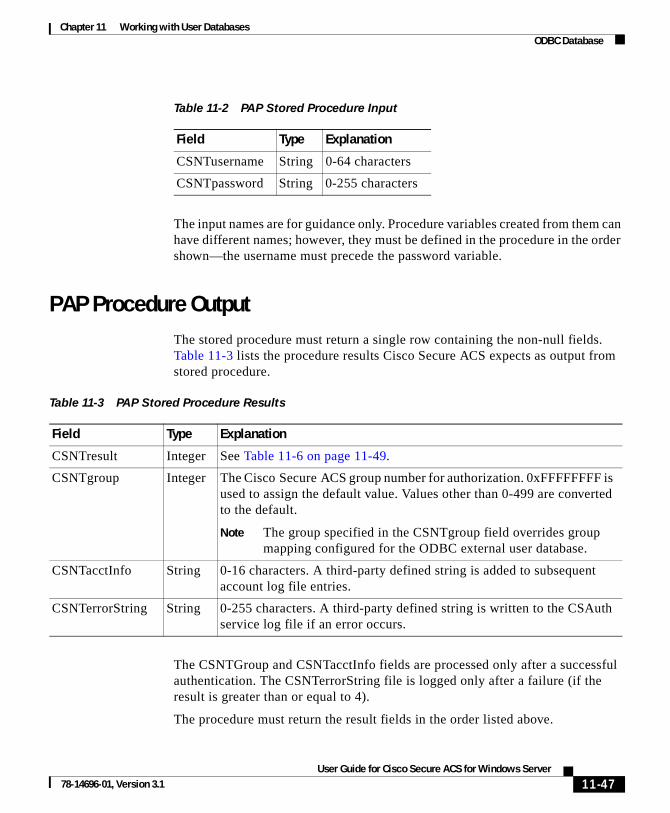
Chapter 11 Working with User DatabasesODBC Database
The input names are for guidance only. Procedure variables created from them can have different names; however, they must be defined in the procedure in the order shown—the username must precede the password variable.
PAP Procedure OutputThe stored procedure must return a single row containing the non-null fields. Table 11-3 lists the procedure results Cisco Secure ACS expects as output from stored procedure.
The CSNTGroup and CSNTacctInfo fields are processed only after a successful authentication. The CSNTerrorString file is logged only after a failure (if the result is greater than or equal to 4).
The procedure must return the result fields in the order listed above.
Table 11-2 PAP Stored Procedure Input
Field Type Explanation
CSNTusername String 0-64 characters
CSNTpassword String 0-255 characters
Table 11-3 PAP Stored Procedure Results
Field Type Explanation
CSNTresult Integer See Table 11-6 on page 11-49.
CSNTgroup Integer The Cisco Secure ACS group number for authorization. 0xFFFFFFFF is used to assign the default value. Values other than 0-499 are converted to the default.
Note The group specified in the CSNTgroup field overrides group mapping configured for the ODBC external user database.
CSNTacctInfo String 0-16 characters. A third-party defined string is added to subsequent account log file entries.
CSNTerrorString String 0-255 characters. A third-party defined string is written to the CSAuth service log file if an error occurs.
11-47User Guide for Cisco Secure ACS for Windows Server
78-14696-01, Version 3.1
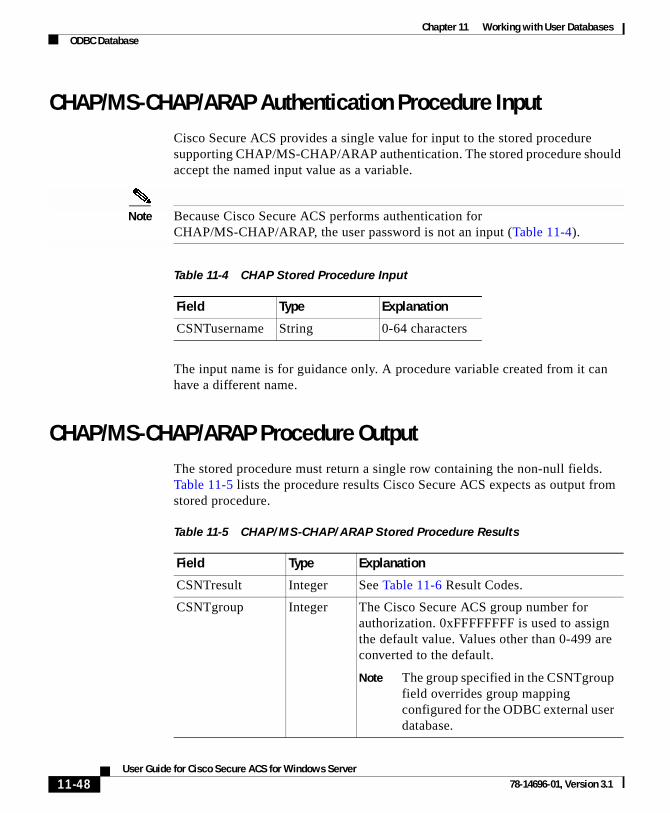
Chapter 11 Working with User DatabasesODBC Database
CHAP/MS-CHAP/ARAP Authentication Procedure InputCisco Secure ACS provides a single value for input to the stored procedure supporting CHAP/MS-CHAP/ARAP authentication. The stored procedure should accept the named input value as a variable.
Note Because Cisco Secure ACS performs authentication for CHAP/MS-CHAP/ARAP, the user password is not an input (Table 11-4).
The input name is for guidance only. A procedure variable created from it can have a different name.
CHAP/MS-CHAP/ARAP Procedure OutputThe stored procedure must return a single row containing the non-null fields. Table 11-5 lists the procedure results Cisco Secure ACS expects as output from stored procedure.
Table 11-4 CHAP Stored Procedure Input
Field Type Explanation
CSNTusername String 0-64 characters
Table 11-5 CHAP/MS-CHAP/ARAP Stored Procedure Results
Field Type Explanation
CSNTresult Integer See Table 11-6 Result Codes.
CSNTgroup Integer The Cisco Secure ACS group number for authorization. 0xFFFFFFFF is used to assign the default value. Values other than 0-499 are converted to the default.
Note The group specified in the CSNTgroup field overrides group mapping configured for the ODBC external user database.
11-48User Guide for Cisco Secure ACS for Windows Server
78-14696-01, Version 3.1
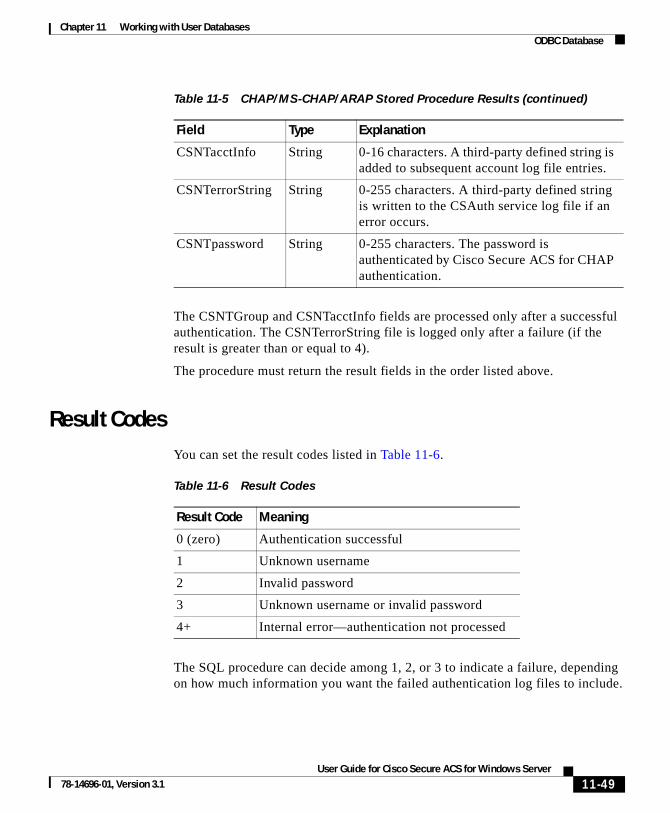
Chapter 11 Working with User DatabasesODBC Database
The CSNTGroup and CSNTacctInfo fields are processed only after a successful authentication. The CSNTerrorString file is logged only after a failure (if the result is greater than or equal to 4).
The procedure must return the result fields in the order listed above.
Result CodesYou can set the result codes listed in Table 11-6.
The SQL procedure can decide among 1, 2, or 3 to indicate a failure, depending on how much information you want the failed authentication log files to include.
CSNTacctInfo String 0-16 characters. A third-party defined string is added to subsequent account log file entries.
CSNTerrorString String 0-255 characters. A third-party defined string is written to the CSAuth service log file if an error occurs.
CSNTpassword String 0-255 characters. The password is authenticated by Cisco Secure ACS for CHAP authentication.
Table 11-5 CHAP/MS-CHAP/ARAP Stored Procedure Results (continued)
Field Type Explanation
Table 11-6 Result Codes
Result Code Meaning
0 (zero) Authentication successful
1 Unknown username
2 Invalid password
3 Unknown username or invalid password
4+ Internal error—authentication not processed
11-49User Guide for Cisco Secure ACS for Windows Server
78-14696-01, Version 3.1
Chapter 11 Working with User DatabasesODBC Database
A return code of 4 or higher results in an authentication error event. These errors do not increment per-user failed attempt counters. Additionally, error codes are returned to the AAA client so it can distinguish between errors and failures and, if configured to do so, fall back to a backup AAA server.
Successful or failed authentications are not logged; general Cisco Secure ACS logging mechanisms apply. In the event of an error (CSNTresult equal to or less than 4), the contents of the CSNTerrorString are written to the Windows Event Log under the Application Log.
Configuring a System Data Source Name for an ODBC External User Database
On the Cisco Secure ACS server, you must create a system DSN for Cisco Secure ACS to communicate with the relational database.
To create a system DSN for use with an ODBC external user database, follow these steps:
Step 1 In Windows Control Panel, double-click the ODBC Data Sources icon.
Step 2 In the ODBC Data Source Administrator window, click the System DSN tab.
Step 3 Click Add.
Step 4 Select the driver you need to use with your new DSN, and then click Finish.
Result: A dialog box displays fields requiring information specific to the ODBC driver you selected.
Step 5 Type a descriptive name for the DSN in the Data Source Name box.
Step 6 Complete the other fields required by the ODBC driver you selected. These fields may include information such as the IP address of the server on which the ODBC-compliant database runs.
Step 7 Click OK.
Result: The name you assigned to the DSN appears in the System Data Sources list.
11-50User Guide for Cisco Secure ACS for Windows Server
78-14696-01, Version 3.1

Chapter 11 Working with User DatabasesODBC Database
Step 8 Close the ODBC window and Windows Control Panel.
Result: The system DSN to be used by Cisco Secure ACS for communication with the relational database is created on your Cisco Secure ACS server.
Configuring an ODBC External User Database Creating an ODBC database configuration provides Cisco Secure ACS information that enables it to pass authentication requests to an ODBC-compliant relational database. This information reflects the way you have implemented your relational database and does not dictate how your relational database is configured or functions. For information about your relational database, refer to your relational documentation.
Note Before performing this procedure, you should have completed the steps in Preparing to Authenticate Users with an ODBC-Compliant Relational Database, page 11-42.
To configure Cisco Secure ACS for ODBC authentication, follow these steps:
Step 1 In the navigation bar, click External User Databases.
Step 2 Click Database Configuration.
Result: Cisco Secure ACS lists all possible external user database types.
Step 3 Click External ODBC Database.
Step 4 If you are creating a configuration, follow these steps:
a. Click Create New Configuration.
b. Type a name for the new configuration for ODBC authentication in the box provided, or accept the default name in the box.
c. Click Submit.
Result: Cisco Secure ACS lists the new configuration in the External User Database Configuration table.
Step 5 Click Configure.
11-51User Guide for Cisco Secure ACS for Windows Server
78-14696-01, Version 3.1
Chapter 11 Working with User DatabasesODBC Database
Step 6 From the System DSN list, select the DSN that is configured on the Cisco Secure ACS server to communicate with the ODBC-compliant relational database you want to use.
Note If you have not configured on the Cisco Secure ACS server a DSN for the relational database, do so before completing these steps. For more information about creating a DSN for Cisco Secure ACS ODBC authentication, see Configuring a System Data Source Name for an ODBC External User Database, page 11-50.
Step 7 In the DSN Username box, type the username required to perform transactions with your ODBC database.
Step 8 In the DSN Password box, type the password required to perform transactions with your ODBC database.
Step 9 In the DSN Connection Retries box, type the number of times Cisco Secure ACS should try to connect to the ODBC database before timing out. The default is 3.
Note If you have connection problems when Windows starts, increase this value.
Step 10 To change the ODBC worker thread count, in the ODBC Worker Threads box, type the number of ODBC worker threads. The maximum thread count is 10. The default is 1.
Note Increase the ODBC worker thread count only if the ODBC driver you are using is certified thread safe. For example, the Microsoft Access ODBC driver is not thread safe and can cause Cisco Secure ACS to become unstable if multiple threads are used. Where possible, Cisco Secure ACS queries the driver to find out if it is thread safe. The thread count to use is a factor of how long the DSN takes to execute the procedure and the rate at which authentications are required.
11-52User Guide for Cisco Secure ACS for Windows Server
78-14696-01, Version 3.1

Chapter 11 Working with User DatabasesODBC Database
Step 11 From the DSN Procedure Type list, select the type of output your relational database provides. Different databases return different output:
• Returns Recordset—The database returns a raw record set in response to an ODBC query. Microsoft SQL Server responds in this manner.
• Returns Parameters—The database returns a set of named parameters in response to an ODBC query. Oracle databases respond in this manner.
Step 12 To support PAP authentication with the ODBC database, follow these steps:
a. Select the Support PAP authentication check box.
b. In the PAP SQL Procedure box, type the name of the PAP SQL procedure routine that runs on the ODBC server. The default value in this box is CSNTAuthUserPap. If you named the PAP SQL procedure something else, change this entry to match the name given to the PAP SQL procedure. For more information and an example routine, see Sample Routine for Generating a PAP Authentication SQL Procedure, page 11-45.
Note If you enabled PAP authentication, the PAP authentication SQL procedure must exist on the ODBC database and must have the exact name specified in the PAP SQL Procedure box. If it does not, be sure to create it in the ODBC database before attempting to authenticate users against the ODBC database.
Step 13 To support CHAP authentication with the ODBC database, follow these steps:
a. Select the Support CHAP/MS-CHAP/ARAP Authentication check box.
b. In the CHAP SQL Procedure box, type the name of the CHAP SQL procedure routine on the ODBC server. The default value in this box is CSNTExtractUserClearTextPw. If you named the CHAP SQL procedure something else, change this entry to match the name given to the CHAP SQL procedure. For more information and an example routine, see Sample Routine for Generating an SQL CHAP Authentication Procedure, page 11-46.
Note If you enabled CHAP/MS-CHAP/ARAP authentication, the CHAP authentication SQL procedure must exist on the ODBC database and must have the exact name specified in the PAP SQL Procedure box. If it does not, be sure to create it in the ODBC database before attempting to authenticate users against the ODBC database.
11-53User Guide for Cisco Secure ACS for Windows Server
78-14696-01, Version 3.1
Chapter 11 Working with User DatabasesLEAP Proxy RADIUS Server Database
Step 14 Click Submit.
Result: Cisco Secure ACS saves the ODBC configuration you created. You can add it to your Unknown User Policy or assign specific user accounts to use this database for authentication. For more information about the Unknown User Policy, see Unknown User Processing, page 12-1. For more information about configuring user accounts to authenticate using this database, see Chapter 7, “Setting Up and Managing User Accounts.”
LEAP Proxy RADIUS Server DatabaseFor Cisco Secure ACS-authenticated users accessing your network via Cisco Aironet devices, Cisco Secure ACS supports ASCII, PAP, MS-CHAP (versions 1 and 2), LEAP, and EAP-TLS authentication with a proxy RADIUS server. Other authentication protocols are not supported with LEAP Proxy RADIUS Server databases.
Note Authentication protocols not supported with LEAP Proxy RADIUS Server databases may be supported by another type of external user database. For more information about authentication protocols and the external database types that support them, see Authentication Protocol-Database Compatibility, page 1-9.
Cisco Secure ACS uses MS-CHAP version 1 for LEAP Proxy RADIUS Server authentication. To manage your proxy RADIUS database, refer to your RADIUS database documentation.
Lightweight extensible authentication protocol (LEAP) proxy RADIUS server authentication allows you to authenticate users against existing Kerberos databases that support MS-CHAP authentication. You can use the LEAP Proxy RADIUS Server database to authenticate users with any third-party RADIUS server that supports MS-CHAP authentication.
11-54User Guide for Cisco Secure ACS for Windows Server
78-14696-01, Version 3.1

Chapter 11 Working with User DatabasesLEAP Proxy RADIUS Server Database
Note The third-party RADIUS server must return Microsoft Point-to-Point Encryption (MPPE) keys in the Microsoft RADIUS vendor-specific attribute (VSA) MSCHAP-MPPE-Keys (VSA 12). If the third-party RADIUS server does not return the MPPE keys, the authentication fails and is logged in the Failed Attempts log.
Cisco Secure ACS supports RADIUS-based group specification for users authenticated by LEAP Proxy RADIUS Server databases. RADIUS-based group specification overrides group mapping. For more information, see RADIUS-Based Group Specification, page 12-22.
Cisco Secure ACS supports group mapping for unknown users authenticated by LEAP Proxy RADIUS Server databases. Group mapping is only applied to an unknown user if RADIUS-based group specification did not occur. For more information about group mapping users authenticated by a LEAP Proxy RADIUS Server database, see Group Mapping by External User Database, page 12-12.
Configuring a LEAP Proxy RADIUS Server External User DatabaseYou should install and configure your proxy RADIUS server before configuring Cisco Secure ACS to authenticate users with it. For information about installing the proxy RADIUS server, refer to the documentation included with your RADIUS server.
To configure LEAP proxy RADIUS authentication, follow these steps:
Step 1 In the navigation bar, click External User Databases.
Step 2 Click Database Configuration.
Result: Cisco Secure ACS lists all possible external user database types.
Step 3 Click LEAP Proxy RADIUS Server.
Result: If no LEAP Proxy RADIUS Server configuration exists, only the Database Configuration Creation table appears. Otherwise, in addition to the Database Configuration Creation table, the External User Database Configuration table appears.
11-55User Guide for Cisco Secure ACS for Windows Server
78-14696-01, Version 3.1
Chapter 11 Working with User DatabasesLEAP Proxy RADIUS Server Database
Step 4 If you are creating a configuration, follow these steps:
a. Click Create New Configuration.
b. Type a name for the new configuration for the LEAP Proxy RADIUS Server in the box provided, or accept the default name in the box.
c. Click Submit.
Result: Cisco Secure ACS lists the new configuration in the External User Database Configuration table.
Step 5 Under External User Database Configuration, select the name of the LEAP Proxy RADIUS Server database you need to configure.
Note If only one LEAP Proxy RADIUS Server configuration exists, the name of that configuration appears instead of the list. Proceed to Step 6.
Step 6 Click Configure.
Step 7 In the following boxes, type the required information:
• Primary Server Name/IP—IP address of the primary proxy RADIUS server.
• Secondary Server Name/IP—IP address of the secondary proxy RADIUS server.
• Shared Secret—The shared secret of the proxy RADIUS server. This must be identical to the shared secret with which the proxy RADIUS server is configured.
• Authentication Port—The UDP port over which the proxy RADIUS server conducts authentication sessions. If the LEAP Proxy RADIUS server is installed on the same Windows server as Cisco Secure ACS, this port should not be the same port used by Cisco Secure ACS for RADIUS authentication. For more information about the ports used by Cisco Secure ACS for RADIUS, see RADIUS, page 1-6.
• Timeout (seconds):—The number of seconds Cisco Secure ACS waits before sending notification to the user that the authentication attempt has timed out.
11-56User Guide for Cisco Secure ACS for Windows Server
78-14696-01, Version 3.1

Chapter 11 Working with User DatabasesToken Server User Databases
• Retries—The number of authentication attempts Cisco Secure ACS makes before failing over to the secondary proxy RADIUS server.
• Failback Retry Delay (minutes)—The number of minutes after which Cisco Secure ACS attempts authentications using a failed primary proxy RADIUS server.
Note If both the primary and the secondary servers fail, Cisco Secure ACS alternates between both servers until one responds.
Step 8 Click Submit.
Result: Cisco Secure ACS saves the proxy RADIUS token server database configuration you created. You can add it to your Unknown User Policy or assign specific user accounts to use this database for authentication. For more information about the Unknown User Policy, see Unknown User Processing, page 12-1. For more information about configuring user accounts to authenticate using this database, see Chapter 7, “Setting Up and Managing User Accounts.”
Token Server User DatabasesCisco Secure ACS supports the use of token servers for the increased security provided by one-time passwords (OTPs). This section includes the following topics:
• About Token Servers and Cisco Secure ACS, page 11-57
• RADIUS-Enabled Token Servers, page 11-59
• RSA SecurID Token Servers, page 11-64
About Token Servers and Cisco Secure ACSCisco Secure ACS provides ASCII, PAP, and PEAP(EAP-GTC) authentication using token servers. Other authentication protocols are not supported with token server databases.
11-57User Guide for Cisco Secure ACS for Windows Server
78-14696-01, Version 3.1
Chapter 11 Working with User DatabasesToken Server User Databases
Note Authentication protocols not supported with token server databases may be supported by another type of external user database. For more information about authentication protocols and the external database types that support them, see Authentication Protocol-Database Compatibility, page 1-9.
Requests from the AAA client are first sent to Cisco Secure ACS. If Cisco Secure ACS has been configured to authenticate against a token server and finds the username, it forwards the authentication request to the token server. If it does not find the username, Cisco Secure ACS checks the database configured to authenticate unknown users. If the request for authentication is passed, the appropriate authorizations are forwarded to the AAA client along with the approved authentication. Cisco Secure ACS then maintains the accounting information.
Cisco Secure ACS acts as a client to the token server. For all token servers except RSA SecurID, Cisco Secure ACS accomplishes this using the RADIUS interface of the token server. For more information about Cisco Secure ACS support of token servers with a RADIUS interface, see RADIUS-Enabled Token Servers, page 11-59.
For RSA SecurID, Cisco Secure ACS uses an RSA proprietary API. For more information about Cisco Secure ACS support of RSA SecurID token servers, see RSA SecurID Token Servers, page 11-64.
Token Servers and ISDN
Cisco Secure ACS supports token caching for ISDN terminal adapters and routers. One inconvenience of using token cards for OTP authentication with ISDN is that each B channel requires its own OTP. Therefore, a user must enter at least 2 OTPs, plus any other login passwords, such as those for Windows NT/2000 networking. If the terminal adapter supports the ability to turn on and off the second B channel, users might have to enter many OTPs each time the second B channel comes into service.
Cisco Secure ACS caches the token to help make the OTPs easier for users. This means that if a token card is being used to authenticate a user on the first B channel, a specified period can be set during which the second B channel can come into service without requiring the user to enter another OTP. To lessen the risk of unauthorized access to the second B channel, you can limit the time the second B channel is up. Furthermore, you can configure the second B channel to
11-58User Guide for Cisco Secure ACS for Windows Server
78-14696-01, Version 3.1
Chapter 11 Working with User DatabasesToken Server User Databases
use the CHAP password specified during the first login to further lessen the chance of a security problem. When the first B channel is dropped, the cached token is erased.
RADIUS-Enabled Token ServersThis section describes Cisco Secure ACS support for token servers that provide a standard RADIUS interface.
About RADIUS-Enabled Token Servers
Cisco Secure ACS can support token servers using the RADIUS server built into the token server. Rather than using the proprietary API of the vendor, Cisco Secure ACS sends standard RADIUS authentication requests to the RADIUS authentication port on the token server. The token servers supported through their RADIUS servers are as follows:
• ActivCard
• CRYPTOCard
• Vasco
• SafeWord
• PassGo
Note PassGo was formerly known as AXENT.
• Any IETF RFC 2865-compliant token server
You can create multiple instances of each of these token server types in Cisco Secure ACS. For information about configuring Cisco Secure ACS to authenticate users with one of these token servers, see Configuring a RADIUS Token Server External User Database, page 11-60.
Cisco Secure ACS provides a means for specifying a user group assignment in the RADIUS response from the RADIUS-enabled token server. Group specification always takes precedence over group mapping. For more information, see RADIUS-Based Group Specification, page 12-22.
11-59User Guide for Cisco Secure ACS for Windows Server
78-14696-01, Version 3.1
Chapter 11 Working with User DatabasesToken Server User Databases
Cisco Secure ACS also supports mapping users authenticated by a RADIUS-enabled token server to a single group. Group mapping only occurs if group specification does not occur. For more information, see Group Mapping by External User Database, page 12-12.
Token Server RADIUS Authentication Request and Response Contents
When Cisco Secure ACS forwards an authentication request to a RADIUS-enabled token server, the RADIUS authentication request contains the following attributes:
• User-Name (RADIUS attribute 1)
• User-Password (RADIUS attribute 2)
• NAS-IP-Address (RADIUS attribute 4)
• NAS-Port (RADIUS attribute 5)
• NAS-Identifier (RADIUS attribute 32)
Cisco Secure ACS expects to receive one of the following three responses:
• access-accept—No attributes are required; however, the response can indicate the Cisco Secure ACS group to which the user should be assigned. For more information, see RADIUS-Based Group Specification, page 12-22.
• access-reject—No attributes required.
• access-challenge—Attributes required, per IETF RFC, are as follows:
– State (RADIUS attribute 24)
– Reply-Message (RADIUS attribute 18)
Configuring a RADIUS Token Server External User Database
Use this procedure to configure ActivCard, CRYPTOCard, Vasco, Safeword, PassGo, and RADIUS Token Server external user databases in Cisco Secure ACS.
Before You Begin
You should install and configure your RADIUS token server before configuring Cisco Secure ACS to authenticate users with it. For information about installing the RADIUS token server, refer to the documentation included with your token server.
11-60User Guide for Cisco Secure ACS for Windows Server
78-14696-01, Version 3.1
Chapter 11 Working with User DatabasesToken Server User Databases
To configure Cisco Secure ACS to authenticate users with a ActivCard token server, CRYPTOCard token server, Vasco token server, Safeword token server, PassGo token server, or generic RADIUS Token Sever, follow these steps:
Step 1 In the navigation bar, click External User Databases.
Step 2 Click Database Configuration.
Result: Cisco Secure ACS lists all possible external user database types. The external user databases that represent RADIUS-enabled token servers are as follows:
• ActivCard
• CRYPTOCard
• RADIUS Token Server
• Vasco
• SafeWord
• PassGo
Note PassGo was formerly known as AXENT.
Step 3 Click the link for the applicable RADIUS-enabled token server.
Result: The Database Configuration Creation table appears. If at least one configuration exists for the selected external user database type, the External User Database Configuration table also appears.
Step 4 If you are creating a configuration, follow these steps:
a. Click Create New Configuration.
b. Type a name for the new configuration for the RADIUS-enabled token server in the box provided, or accept the default name in the box.
c. Click Submit.
Result: Cisco Secure ACS lists the new configuration in the External User Database Configuration table.
11-61User Guide for Cisco Secure ACS for Windows Server
78-14696-01, Version 3.1
Chapter 11 Working with User DatabasesToken Server User Databases
Step 5 Under External User Database Configuration, select the name of the RADIUS-enabled token server you need to configure.
Note If only one RADIUS-enabled token server configuration exists, the name of that configuration appears instead of the list. Proceed to Step 6.
Step 6 Click Configure.
Step 7 In the RADIUS Configuration table, type the required information in the following boxes:
• Primary Server Name/IP—The hostname or IP address of the primary RADIUS token server. If you provide the hostname, the hostname must be resolvable by DNS.
• Secondary Server Name/IP—The hostname or IP address of the secondary RADIUS token server. If you provide the hostname, the hostname must be resolvable by DNS.
• Shared Secret—The shared secret of the RADIUS server. This must be identical to the shared secret with which the RADIUS token server is configured.
• Authentication Port—The UDP port over which the RADIUS server conducts authentication sessions. If the RADIUS token server is installed on the same Windows server as Cisco Secure ACS, this port should not be the same port used by Cisco Secure ACS for RADIUS authentication. For more information about the ports used by Cisco Secure ACS for RADIUS, see RADIUS, page 1-6.
Note For Cisco Secure ACS to send RADIUS OTP messages to a RADIUS-enabled token server, you must ensure that gateway devices between the RADIUS-enabled token server and Cisco Secure ACS allow communication over the UDP port specified in the Authentication Port box.
• Timeout (seconds):—The number of seconds Cisco Secure ACS waits for a response from the RADIUS token server before retrying the authentication request.
11-62User Guide for Cisco Secure ACS for Windows Server
78-14696-01, Version 3.1
Chapter 11 Working with User DatabasesToken Server User Databases
• Retries—The number of authentication attempts Cisco Secure ACS makes before failing over to the secondary RADIUS token server.
• Failback Retry Delay (minutes)—The number of minutes that Cisco Secure ACS sends authentication requests to the secondary server when the primary server has failed. When this duration is ended, Cisco Secure ACS reverts to sending authentication requests to the primary server.
Note If both the primary and the secondary servers fail, Cisco Secure ACS alternates between both servers until one responds.
Step 8 If you want to support token users performing a shell login to a TACACS+ AAA client, you must configure the options in the TACACS+ Shell Configuration table. Do one of the following:
a. If you want Cisco Secure ACS to present a custom prompt for tokens, select Static (sync and async tokens), and then type in the Prompt box the prompt that Cisco Secure ACS will present.
For example, if you type “Enter your PassGo token:” in the Prompt box, users receive an “Enter your PassGo token” prompt rather than a password prompt.
Note If some tokens submitted to this server are synchronous tokens, you must use the Static (sync and async tokens) option.
b. If you want Cisco Secure ACS to send the token server a password to trigger a challenge, select From Token Server (async tokens only), and then, in the Password box, type the password that Cisco Secure ACS will forward to the token server.
For example, if the token server requires the string “challengeme” in order to evoke a challenge, you should type “challengeme” in the Password box. Users receive a username prompt and a challenge prompt.
Tip Most token servers accept a blank password as the trigger to send a challenge prompt.
11-63User Guide for Cisco Secure ACS for Windows Server
78-14696-01, Version 3.1
Chapter 11 Working with User DatabasesToken Server User Databases
Note You should only use the From Token Server (async tokens only) option if all tokens submitted to this token server are asynchronous tokens.
Step 9 Click Submit.
Result: Cisco Secure ACS saves the RADIUS token server database configuration you created. You can add it to your Unknown User Policy or assign specific user accounts to use this database for authentication. For more information about the Unknown User Policy, see Unknown User Processing, page 12-1. For more information about configuring user accounts to authenticate using this database, see Chapter 7, “Setting Up and Managing User Accounts.”
RSA SecurID Token ServersCisco Secure ACS supports ASCII, PAP, and PEAP(EAP-GTC) authentication for RSA SecurID token servers. Other authentication protocols are not supported with RSA SecurID external user databases.
Note Authentication protocols not supported with RSA SecurID databases may be supported by another type of external user database. For more information about authentication protocols and the external database types that support them, see Authentication Protocol-Database Compatibility, page 1-9.
Cisco Secure ACS supports mapping users authenticated by a RSA token server to a single group. For more information, see Group Mapping by External User Database, page 12-12.
Cisco Secure ACS supports PPP (ISDN and async) and Telnet for RSA SecurID token servers. It does so by acting as a token-card client to the RSA SecurID token server. This requires that RSA token-card client software must be installed on the Cisco Secure ACS Windows 2000 server. The following procedure includes steps required to install the RSA client correctly on the Cisco Secure ACS Windows 2000 server.
11-64User Guide for Cisco Secure ACS for Windows Server
78-14696-01, Version 3.1
Chapter 11 Working with User DatabasesToken Server User Databases
Configuring an RSA SecurID Token Server External User Database
Cisco Secure ACS supports the RSA SecurID token server custom interface for authentication of users. You can create only one RSA SecurID configuration within Cisco Secure ACS.
Before You Begin
You should install and configure your RSA SecurID token server before configuring Cisco Secure ACS to authenticate users with it. For information about installing the RSA SecurID server, refer to the documentation included with your token server.
Make sure you have the RSA ACE Client for Windows 2000 software.
To configure Cisco Secure ACS to authenticate users with an RSA token server, follow these steps:
Step 1 Install the RSA client on the Cisco Secure ACS server:
a. Log in to the Cisco Secure ACS Windows server with administrative privileges.
b. Run the Setup program of the ACE Client software, following setup instructions provided by RSA.
Note Do not restart your Windows server when installation is complete.
c. Locate the ACE Server data directory, for example, /sdi/ace/data.
d. Get the file named sdconf.rec and place it in your Windows directory: %SystemRoot%\system32.
For example:
\winnt\system32
e. Make sure the ACE server hostname is in the Windows local host file:
\Windows directory\system32\drivers\etc\hosts
f. Restart your Windows server.
g. Verify connectivity by running the Test Authentication function of your ACE client application. You can run this from Control Panel.
Step 2 In the navigation bar, click External User Databases.
11-65User Guide for Cisco Secure ACS for Windows Server
78-14696-01, Version 3.1

Chapter 11 Working with User DatabasesDeleting an External User Database Configuration
Step 3 Click Database Configuration.
Result: Cisco Secure ACS lists all possible external user database types.
Step 4 Click RSA SecurID Token Server.
Result: If no RSA SecurID token server configuration exists, the Database Configuration Creation table appears. Otherwise, the External User Database Configuration page appears.
Step 5 If you are creating a configuration, follow these steps:
a. Click Create New Configuration.
b. Type a name for the new configuration for the RSA SecurID token server in the box provided, or accept the default name in the box.
c. Click Submit.
Result: Cisco Secure ACS lists the new configuration in the External User Database Configuration table.
Step 6 Click Configure.
Result: Cisco Secure ACS displays the name of the token server and the path to the authenticator DLL. This information confirms that Cisco Secure ACS can contact the RSA client. You can add the RSA SecurID external user database to your Unknown User Policy or assign specific user accounts to use this database for authentication. For more information about the Unknown User Policy, see Unknown User Processing, page 12-1. For more information about configuring user accounts to authenticate using this database, see Chapter 7, “Setting Up and Managing User Accounts.”
Deleting an External User Database ConfigurationIf you no longer need a particular external user database configuration, you can delete it from Cisco Secure ACS.
To delete an external user database configuration, follow these steps:
Step 1 In the navigation bar, click External User Databases.
Step 2 Click Database Configuration.
11-66User Guide for Cisco Secure ACS for Windows Server
78-14696-01, Version 3.1
Chapter 11 Working with User DatabasesDeleting an External User Database Configuration
Result: Cisco Secure ACS lists all possible external user database types.
Step 3 Click the external user database type for which you want to delete a configuration.
Result: The External User Database Configuration table appears.
Step 4 If a list appears in the External User Database Configuration table, select the configuration you want to delete. Otherwise, proceed to Step 5.
Step 5 Click Delete.
Result: A confirmation dialog box appears.
Step 6 Click OK to confirm that you want to delete the selected external user database configuration.
Result: The external user database configuration you selected is deleted from Cisco Secure ACS.
11-67User Guide for Cisco Secure ACS for Windows Server
78-14696-01, Version 3.1

Chapter 11 Working with User DatabasesDeleting an External User Database Configuration
11-68User Guide for Cisco Secure ACS for Windows Server
78-14696-01, Version 3.1
User Guide for 78-14696-01, Version 3.1
C H A P T E R12
Administering External User DatabasesAfter you have configured Cisco Secure Access Control Server (Cisco Secure ACS) for Windows Server version 3.1 to communicate with an external user database, you can decide how to implement other Cisco Secure ACS features related to external user databases. To address these features, this chapter contains the following sections:
• Unknown User Processing, page 12-1
• Database Group Mappings, page 12-11
For information about the databases supported by Cisco Secure ACS and how to configure Cisco Secure ACS to communicate with an external user database, see Chapter 11, “Working with User Databases.”
Unknown User ProcessingUnknown users are users who are not listed in the Cisco Secure ACS database. The Unknown User feature is a form of authentication forwarding. In essence, this feature is an extra step in the authentication process. In this additional step of the authentication process, if the username does not exist in the Cisco Secure ACS database, Cisco Secure ACS forwards the authentication request of an incoming username and password to external databases with which it is configured to communicate.
12-1Cisco Secure ACS for Windows Server
Chapter 12 Administering External User DatabasesUnknown User Processing
The Unknown User feature enables Cisco Secure ACS to use a variety of external databases in addition to its own internal database to authenticate incoming user requests. With this feature, Cisco Secure ACS provides the foundation for a basic single sign-on capability by integrating network and host-level access control. Because the incoming usernames and passwords of users dialing in can be authenticated with external user databases, there is no need for the network administrator to maintain a duplicate list within Cisco Secure ACS. This provides two advantages to the Cisco Secure ACS administrator:
• Eliminates the necessity of entering every user multiple times
• Prevents data-entry errors that are inherent to manual procedures
Known, Unknown, and Discovered Users The Unknown User feature implements three categories of users in Cisco Secure ACS.
• Known Users—Users explicitly added, either manually or automatically, into the Cisco Secure ACS database.
These are users added through User Setup in the HTML interface, by the RDBMS Synchronization feature, by the Database Replication feature, or by the CSUtil.exe utility. For more information about CSUtil.exe, see Appendix D, “Cisco Secure ACS Command-Line Database Utility.”
Cisco Secure ACS attempts to authenticate a known user with the single database that the user is associated with. If the user database is the CiscoSecure user database and the user does not represent a Voice over IP (VoIP) user account, a password is required for the user. If the user database is an external user database or if the user represents a VoIP user account, Cisco Secure ACS does not have to store a user password in the CiscoSecure user database.
• Unknown Users—Users who have no account entry in the CiscoSecure user database.
Such users never have previously authenticated with Cisco Secure ACS. If the Unknown User Policy is configured, Cisco Secure ACS attempts to authenticate these users with external user databases.
• Discovered Users—Users whose accounts were created in the CiscoSecure user database when Cisco Secure ACS successfully authenticated them using the Unknown User Policy. When Cisco Secure ACS creates a discovered user,
12-2User Guide for Cisco Secure ACS for Windows Server
78-14696-01, Version 3.1
Chapter 12 Administering External User DatabasesUnknown User Processing
the user account contains only the username, a Password Authentication list setting that reflects the external user database that authenticated the user, and a “Group to which the user is assigned” list setting of Mapped By External Authenticator, which enables group mapping. Using the Cisco Secure ACS HTML interface, you can further configure the user account as needed. For example, after a discovered user is created in Cisco Secure ACS, you can assign user-specific network access restrictions to the discovered user.
Note Cisco Secure ACS does not import passwords for a discovered user; rather, Cisco Secure ACS creates the user account with the Password Authentication list set to the external user database that originally authenticated the user.
All discovered users were once unknown users. The authentication process for discovered users is identical to the authentication process for known users who are authenticated with external user databases and whose Cisco Secure ACS group membership is determined by group mapping.
Note We recommend removing a username from a database when the privileges associated with that username are no longer required.
General Authentication Request Handling and Rejection ModeIf you have configured the Unknown User Policy in Cisco Secure ACS, Cisco Secure ACS attempts to authenticate users as follows:
1. Cisco Secure ACS checks its internal user database. If the user exists in the CiscoSecure user database (that is, is a known or discovered user), Cisco Secure ACS tries to authenticate the user with the specified password type against the specified database. Authentication for that user either passes or fails, depending on other procedures in the normal authentication process.
2. If the user does not exist in the CiscoSecure user database (that is, is an unknown user), Cisco Secure ACS tries each configured external database in the order specified in the Selected Databases list. If the user passes authentication against one of the external databases, Cisco Secure ACS automatically adds the user to the CiscoSecure user database, with a pointer
12-3User Guide for Cisco Secure ACS for Windows Server
78-14696-01, Version 3.1

Chapter 12 Administering External User DatabasesUnknown User Processing
to use the password type and database that succeeded on this authentication attempt. Users added by unknown user processing are flagged as such within the CiscoSecure user database and are called discovered users.
The next time the discovered user tries to authenticate, Cisco Secure ACS authenticates the user against the database that was successful the first time. Discovered users are treated the same as known users.
3. If the unknown user fails authentication with all configured external databases, the user is not added to the CiscoSecure user database, and the authentication request is rejected.
Because usernames in the CiscoSecure user database must be unique, Cisco Secure ACS supports a single instance of any given username across all the databases it is configured to use. For example, assume every external user database contains a user account with the username John. Each account is for a different user, but they each, coincidentally, have the same username. After the first John attempts to access the network and has authenticated through the unknown user process, Cisco Secure ACS retains a discovered user account for that John and only that John. Now, Cisco Secure ACS tries to authenticate subsequent attempts by any user named John using the same external user database that originally authenticated John. Assuming their passwords are different than the password for the John who authenticated first, the other Johns are unable to access the network.
Note The scenario given above is handled differently if the user accounts with identical usernames exist in separate Windows domains. For more information, see Authentication Request Handling and Rejection Mode with the Windows NT/2000 User Database, page 12-4.
Authentication Request Handling and Rejection Mode with the Windows NT/2000 User Database
Because it is a native Windows application, Cisco Secure ACS treats authentication with a Windows NT/2000 user database as a special case. Windows can provide added functionality to the remote access authentication process. Perhaps the most important aspect of this added functionality is support for multiple occurrences of the same username across the trusted domains against which Cisco Secure ACS authenticates access requests.
12-4User Guide for Cisco Secure ACS for Windows Server
78-14696-01, Version 3.1
Chapter 12 Administering External User DatabasesUnknown User Processing
Cisco Secure ACS communicates with the Windows operating system of the Cisco Secure ACS server to perform authentications. Windows uses its built-in facilities to forward the authentication requests to the appropriate domain controller. There are two possible scenarios to consider:
• Authentication requests in which the domain name is supplied
• Authentication requests in which the domain name is omitted
Windows Authentication with a Domain Specified
When a domain name is supplied as part of a authentication request, Cisco Secure ACS detects that a domain name was supplied and tries the authentication credentials against the specified domain. The dial-up networking clients provided with various Windows versions differ in the method by which users can specify their domains. For more information, see Windows Dial-up Networking Clients, page 11-10.
If the domain controller rejects the authentication request, Cisco Secure ACS logs the request as a failed attempt.
For Windows 95, Windows 98, Windows ME, and Windows XP Home, the dial-up networking client provided with Windows only allows users to specify their domains by submitting the usernames in a domain-qualified format, that is, DOMAIN\username. Using a domain-qualified username allows Cisco Secure ACS to differentiate a user from multiple instances of the same username in different domains. For unknown users who provide domain-qualified usernames and who are authenticated by a Windows NT/2000 database, Cisco Secure ACS creates their user accounts in the CiscoSecure user database in the form DOMAIN\username. The combination of username and domain makes this user unique in the Cisco Secure ACS database.
Note Cisco Secure ACS does not support the user@domain form of qualified usernames.
It is possible for unknown user processing to create more than one user account for the same network user. For example, if a user provides a domain-qualified username and successfully authenticates, Cisco Secure ACS creates an account in the format DOMAIN\username. If the same user successfully authenticates without prefixing the domain name to the username, Cisco Secure ACS creates an account in the format username. If you rely on groups rather than individual user
12-5User Guide for Cisco Secure ACS for Windows Server
78-14696-01, Version 3.1

Chapter 12 Administering External User DatabasesUnknown User Processing
settings, both accounts should receive the same privileges. Regardless of whether the user prefixes the domain name, group mapping will assign the user to the same Cisco Secure ACS user group, because both Cisco Secure ACS user accounts correspond to a single Windows user account.
Windows Authentication with Domain Omitted
If a domain identifier is not supplied as part of the authentication process, the Windows operating system of the server running Cisco Secure ACS follows a more complex authentication order that Cisco Secure ACS cannot control. Though the order of resources used can differ, when searching for a non-domain qualified username, Windows usually follows the order in the list below
• The local domain controller
• The domain controllers in any trusted domains
• If Cisco Secure ACS runs on a member server, the local accounts database
Windows attempts to authenticate the user with the first account it finds whose username matches the one passed to Windows by Cisco Secure ACS. Whether authentication fails or succeeds, Windows does not search for other accounts with the same username; therefore, Windows can fail to authenticate a user who supplies valid credentials because Windows may check the supplied credentials against the wrong account that coincidentally has an identical username.
You can circumvent this difficulty by using the Domain List in the Cisco Secure ACS configuration for the Windows NT/2000 database. If you have configured the Domain List with a list of trusted domains, Cisco Secure ACS submits the username and password to each domain in the list, using a domain-qualified format, until Cisco Secure ACS successfully authenticates the user or until Cisco Secure ACS has tried each domain listed in the Domain List.
Note If your network has multiple occurrences of a username across domains (for example, every domain has a user called Administrator) or if users dialing in do not provide their domains as part of their authentication credentials, be sure to configure the Domain List for the Windows NT/2000 database in the External User Databases section. If not, only the user whose account Windows happens to check first authenticates successfully. The Domain List is the only way that Cisco Secure ACS controls the order in which Windows checks domains. The
12-6User Guide for Cisco Secure ACS for Windows Server
78-14696-01, Version 3.1

Chapter 12 Administering External User DatabasesUnknown User Processing
most reliable method of supporting multiple instances of a username across domains is to require users to supply their domain memberships as part of the authentication request.
Performance of Unknown User AuthenticationProcessing authentication requests for unknown users requires slightly more time than processing authentication requests for known users. This small delay may require additional configuration on the AAA clients through which unknown users may attempt to access your network.
Added Latency
Adding external databases against which to process unknown users can significantly increase the time needed for each individual authentication. At best, the time needed for each authentication is the time taken by the external database to authenticate, plus some latency for Cisco Secure ACS processing. In some circumstances (for example, when using a Windows NT/2000 user database), the extra latency introduced by an external database can be as much as tens of seconds. If you have configured multiple databases, this number is multiplied by the time taken for each one to complete.
You can account for added latency by setting the order of databases. If you are using an authentication protocol that is particularly time sensitive, such as PEAP, we recommend configuring unknown user processing to attempt authentication first with the database most likely to contain unknown users using the time-sensitive protocol. For more information, see Database Search Order, page 12-9.
Authentication Timeout Value on AAA clients
Be sure to increase the AAA client timeout to accommodate the longer authentication time required for Cisco Secure ACS to pass the authentication request to the external databases. If the AAA client timeout value is not set high enough to account for the delay required by unknown user authentication, the AAA client times out the request and every unknown user authentication fails.
12-7User Guide for Cisco Secure ACS for Windows Server
78-14696-01, Version 3.1

Chapter 12 Administering External User DatabasesUnknown User Processing
The default AAA client timeout value is 5 seconds. If you have Cisco Secure ACS configured to search through several databases or if your databases are large, you might need to increase this value in your AAA client configuration file. For more information, refer to your Cisco IOS documentation.
Network Access Authorization While the Unknown User Policy allows authentication requests to be forwarded to external user databases, all responsibility for the authorization parameters provided to the AAA client remains with Cisco Secure ACS. External user databases provide authentication services, and Cisco Secure ACS then provides the additional authorization information that is sent to the AAA client in the RADIUS or TACACS+ response packet. For more information about assignment of user authorization, see Database Group Mappings, page 12-11.
Unknown User PolicyYou can configure how Cisco Secure ACS processes unknown users on the Configure Unknown User Policy page, in the External User Databases section of the HTML interface. The Configure Unknown User Policy page contains the following fields:
• Unknown User Policy—Defines what action Cisco Secure ACS takes if it does not find a matching username in its database. There are two options for controlling the Unknown User Policy:
– Fail the attempt—Disables unknown user processing. Cisco Secure ACS rejects authentication requests for any user not found in the CiscoSecure user database.
– Check the following external user databases—Enables unknown user processing. Cisco Secure ACS uses databases in the Selected Databases list to authenticate users that are not found in the CiscoSecure user database.
• External Databases—Lists the external user databases that Cisco Secure ACS does not use to authenticate unknown users.
12-8User Guide for Cisco Secure ACS for Windows Server
78-14696-01, Version 3.1
Chapter 12 Administering External User DatabasesUnknown User Processing
• Selected Databases—Lists the external user databases that Cisco Secure ACS uses to authenticate an unknown user (if the Check the following external user databases option is selected). Cisco Secure ACS attempts authentication using the selected databases one at a time in the order specified. For more information about the significance of the order of selected databases, see Database Search Order, page 12-9.
For more information about configuring your Unknown User Policy, see Configuring the Unknown User Policy, page 12-9.
Database Search Order
You can configure the order in which Cisco Secure ACS checks the selected external databases when Cisco Secure ACS attempts to authenticate unknown users. If the first database in the Selected Databases list fails the authentication request for the unknown user, Cisco Secure ACS checks the next database listed, and so on down the Selected Databases list, in the order listed, until the user authenticates or until Cisco Secure ACS has tried all the databases listed. Authentication with a Windows NT/2000 database is more complex. (For more information about Windows NT/2000 authentication, see The Cisco Secure ACS Authentication Process with Windows NT/2000 User Databases, page 11-9.) If Cisco Secure ACS does not find the user in any of the listed databases, authentication fails.
The order in which the databases appear in the Selected Databases list is important. To determine how to order databases in the Selected Databases list, follow these recommendations:
• Place databases that will allow most authentications to succeed as near to the top of the list as possible.
• Place databases associated with particularly time-sensitive AAA clients or authentication protocols as near to the top of the list as possible.
For example, if wireless LAN users access your network with PEAP, arrange the databases in the Selected Databases list so that unknown user processing takes less than the timeout value specified on the Cisco Aironet Access Point.
Configuring the Unknown User Policy
In Cisco Secure ACS, an unknown user is defined as a user for whom no account has been created within the Cisco Secure ACS database.
12-9User Guide for Cisco Secure ACS for Windows Server
78-14696-01, Version 3.1

Chapter 12 Administering External User DatabasesUnknown User Processing
To specify how Cisco Secure ACS should handle users who are not in the Cisco Secure ACS database, follow these steps:
Step 1 In the navigation bar, click External User Databases.
Step 2 Click Unknown User Policy.
Step 3 To deny authentication requests for any unknown user, select the Fail the attempt option.
Step 4 To allow authentication requests for unknown users, follow these steps:
a. Select the Check the following external user databases option.
b. For each database you need Cisco Secure ACS to use when attempting to authenticate unknown users, select the database in the External Databases list and click —> (right arrow button) to move it to the Selected Databases list. To remove a database from the Selected Databases list, select the database, and then click <— (left arrow button) to move it back to the External Databases list.
c. To assign the order in which Cisco Secure ACS should use the selected external databases when attempting to authenticate an unknown user, click a database name in the Selected Databases list and click Up or Down to move it into the position you want.
Tip Place at the top of the list databases that are most likely to authenticate unknown users or those databases that are associated with AAA clients or authentications protocols that are particularly time-sensitive, such as PEAP.
d. Repeat Step a through Step c until the selected databases are in the order needed.
Step 5 Click Submit.
Result: Cisco Secure ACS saves and implements the Unknown User Policy configuration you created. Cisco Secure ACS attempts to authenticate unknown users using the databases in the order listed in the Selected Databases list.
12-10User Guide for Cisco Secure ACS for Windows Server
78-14696-01, Version 3.1

Chapter 12 Administering External User DatabasesDatabase Group Mappings
Turning off External User Database Authentication
You can configure Cisco Secure ACS so that users who are not in the Cisco Secure ACS database are not permitted to authenticate.
To turn off external user database authentication, follow these steps:
Step 1 In the navigation bar, click External User Databases.
Step 2 Click Unknown User Policy.
Step 3 Select the Fail the attempt option.
Step 4 Click Submit.
Result: Unknown user processing is halted. Cisco Secure ACS does not allow unknown users to authenticate with external user databases.
Database Group MappingsThe Database Group Mapping feature in the External User Databases section enables you to associate unknown users with a Cisco Secure ACS group for assigning authorization profiles. For external user databases from which Cisco Secure ACS can derive group information, you can associate the group memberships defined for the users in the external user database to specific Cisco Secure ACS groups. For Windows NT/2000 user databases, group mapping is further specified by domain, because each domain maintains its own user database. For Novell NDS user databases, group mapping is further specified by trees, because Cisco Secure ACS supports multiple trees in a single Novell NDS user database.
In addition to the Database Group Mapping feature, for some database types, Cisco Secure ACS supports RADIUS-based group specification.
This section contains the following topics:
• Group Mapping by External User Database, page 12-12
• Group Mapping by Group Set Membership, page 12-14
• RADIUS-Based Group Specification, page 12-22
12-11User Guide for Cisco Secure ACS for Windows Server
78-14696-01, Version 3.1
Chapter 12 Administering External User DatabasesDatabase Group Mappings
Group Mapping by External User DatabaseYou can map an external database to a Cisco Secure ACS group. Unknown users who authenticate using the specified database automatically belong to, and inherit the authorizations of, the group. For example, you could configure Cisco Secure ACS so that all unknown users who authenticate with a certain token server database belong to a group called Telecommuters. You could then assign a group setup that is appropriate for users who are working away from home, such as MaxSessions=1. Or you could configure restricted hours for other groups, but give unrestricted access to Telecommuters group members.
While you can configure Cisco Secure ACS to map all unknown users found in any external user database type to a single Cisco Secure ACS group, the following external user database types are the external user database types whose users you can only map to a single Cisco Secure ACS group:
• ODBC
• LEAP Proxy RADIUS server
• ActivCard token server
• PassGo token server
• CRYPTOCard token server
• RADIUS token server
• RSA SecurID token server
• SafeWord token server
• Vasco token server
For a subset of the external user database types listed above, group mapping by external database type is overridden on a user-by-user basis when the external user database specifies a Cisco Secure ACS group with its authentication response. Cisco Secure ACS supports specification of group membership for the following external user database types:
• LEAP Proxy RADIUS server
• ActivCard token server
• CRYPTOCard token server
• RADIUS token server
• Vasco token server
12-12User Guide for Cisco Secure ACS for Windows Server
78-14696-01, Version 3.1
Chapter 12 Administering External User DatabasesDatabase Group Mappings
For more information about specifying group membership for users authenticated with one of these database types, see RADIUS-Based Group Specification, page 12-22.
Additionally, users authenticated by an ODBC external user database can also be assigned to a specified Cisco Secure ACS group. Group specification by ODBC database authentication overrides group mapping. For more information about specifying group membership for users authenticated with an ODBC database, see ODBC Database, page 11-39.
Creating a Cisco Secure ACS Group Mapping for a Token Server, ODBC Database, or LEAP Proxy RADIUS Server Database
To set or change a token server, ODBC, or LEAP Proxy RADIUS Server database group mapping, follow these steps:
Step 1 In the navigation bar, click External User Databases.
Step 2 Click Database Group Mappings.
Step 3 Click the name of the token server, LEAP Proxy RADIUS Server, or ODBC database configuration for which you want to configure a group mapping.
Result: The Define Group Mapping table appears.
Step 4 From the Select a default group for database list, click the group to which users authenticated with this database should be assigned.
Tip The Select a default group for database list displays the number of users assigned to each group.
Step 5 Click Submit.
Result: Cisco Secure ACS assigns unknown and discovered users authenticated by the external database type you selected in Step 3 to the Cisco Secure ACS group selected in Step 4. For users authenticated by an ODBC, CRYPTOCard, Safeword, ActivCard, Vasco, PassGo, or LEAP Proxy RADIUS Server database, the mapping is only applied as a default if those databases did not specify a Cisco Secure ACS group for the user.
12-13User Guide for Cisco Secure ACS for Windows Server
78-14696-01, Version 3.1
Chapter 12 Administering External User DatabasesDatabase Group Mappings
Note For more information about group specification for RADIUS token servers, see RADIUS-Based Group Specification, page 12-22. For more information about group specification for ODBC databases, see Cisco Secure ACS Authentication Process with an ODBC External User Database, page 11-41.
Group Mapping by Group Set MembershipYou can create group mappings for some external user databases based on the combination of external user database groups to which users belong. The following are the external user database types for which you can create group mappings based on group set membership:
• Windows NT/2000
• Novell NDS
• Generic LDAP
Note Windows NT/2000 databases are defined by domain name.
When you configure a Cisco Secure ACS group mapping based on group set membership, you can add one or many external user database groups to the set. For Cisco Secure ACS to map a user to the specified Cisco Secure ACS group, the user must match all external user database groups in the set.
As an example, you could configure a group mapping for users who belong to both the Engineering and Tokyo groups and a separate one for users who belong to both Engineering and London. You could then configure separate group mappings for the combinations of Engineering-Tokyo and Engineering-London and configure different access times for the Cisco Secure ACS groups to which they map. You could also configure a group mapping that only included the Engineering group that would map other members of the Engineering group who were not members of Tokyo or London.
12-14User Guide for Cisco Secure ACS for Windows Server
78-14696-01, Version 3.1
Chapter 12 Administering External User DatabasesDatabase Group Mappings
Group Mapping Order
Cisco Secure ACS always maps users to a single Cisco Secure ACS group, yet a user can belong to more than one group set mapping. For example, a user, John, could be a member of the group combination Engineering and California, and at the same time be a member of the group combination Engineering and Managers. If there are Cisco Secure ACS group set mappings for both these combinations, Cisco Secure ACS has to determine to which group John should be assigned.
Cisco Secure ACS prevents conflicting group set mappings by assigning a mapping order to the group set mappings. When a user authenticated by an external user database is to be assigned to a Cisco Secure ACS group, Cisco Secure ACS starts at the top of the list of group mappings for that database. Cisco Secure ACS checks the user group memberships in the external user database against each group mapping in the list sequentially. Upon finding the first group set mapping that matches the external user database group memberships of the user, Cisco Secure ACS assigns the user to the Cisco Secure ACS group of that group mapping and terminates the mapping process.
Clearly, the order of group mappings is important because it affects the network access and services allowed to users. When defining mappings for users who belong to multiple groups, make sure they are in the correct order so that users are granted the correct group settings.
For example, a user, Mary, is assigned to the three-group combination of Engineering, Marketing, and Managers. Mary should be granted the privileges of a manager rather than an engineer. Mapping A assigns users who belong to all three groups Mary is in to Cisco Secure ACS Group 2. Mapping B assigns users who belong to the Engineering and Marketing groups to Cisco Secure ACS Group 1. If Mapping B is listed first, Cisco Secure ACS authenticates Mary as a user of Group 1, and she is be assigned to Group 1, rather than Group 2 like managers should be.
No Access Group for Group Set Mappings
To prevent remote access for users assigned a group by a particular group set mapping, assign the group to the Cisco Secure ACS No Access group. For example, you could assign all members of an external user database group “Contractors” to the No Access group so they could not dial in to the network remotely.
12-15User Guide for Cisco Secure ACS for Windows Server
78-14696-01, Version 3.1
Chapter 12 Administering External User DatabasesDatabase Group Mappings
Default Group Mapping for Windows NT/2000
For Windows NT/2000 user databases, Cisco Secure ACS includes the ability to define a default group mapping. If no other group mapping matches an unknown user authenticated by a Windows NT/2000 user database, Cisco Secure ACS assigns the user to a group based on the default group mapping.
Configuring the default group mapping for Windows NT/2000 user databases is the same as editing an existing group mapping, with one exception. When editing the default group mapping for Windows NT/2000, instead of selecting a valid domain name on the Domain Configurations page, select \DEFAULT.
For more information about editing an existing group mapping, see Editing a Windows NT/2000, Novell NDS, or Generic LDAP Group Set Mapping, page 12-18.
Creating a Cisco Secure ACS Group Mapping for Windows NT/2000, Novell NDS, or Generic LDAP Groups
To map a Windows NT/2000, Novell NDS, or generic LDAP group to a Cisco Secure ACS group, follow these steps:
Step 1 In the navigation bar, click External User Databases.
Step 2 Click Database Group Mappings.
Step 3 Click the external user database name for which you want to configure a group mapping.
Result: If you are mapping a Windows NT/2000 group set, the Domain Configurations table appears. If you are mapping an NDS group set, the NDS Trees table appears. Otherwise, the Group Mappings for database Users table appears.
Step 4 If you are mapping a Windows NT/2000 group set for a new domain, follow these steps:
a. Click New configuration.
Result: The Define New Domain Configuration page appears.
b. If the Windows domain for which you want to create a group set mapping configuration appears in the Detected domains list, select the name of the domain.
12-16User Guide for Cisco Secure ACS for Windows Server
78-14696-01, Version 3.1
Chapter 12 Administering External User DatabasesDatabase Group Mappings
Tip To clear your domain selection, click Clear Selection.
c. If the Windows domain for which you want to create a group set mapping does not appear in the Detected domains list, type the name of a trusted Windows NT/2000 domain in the Domain box.
d. Click Submit.
Result: The new Windows NT/2000 domain appears in the list of domains in the Domain Configurations page.
Step 5 If you are mapping a Windows NT/2000 group set, click the domain name for which you want to configure a group set mapping.
Result: The Group Mappings for Domain: domainname table appears.
Step 6 If you are mapping a Novell NDS group set, click the name of the Novell NDS tree for which you want to configure group set mappings.
Result: The Group Mappings for NDS Users table appears.
Step 7 Click Add Mapping.
Result: The Create new group mapping for database page opens. The group list displays group names derived from the external user database.
Step 8 For each group to be added to the group set mapping, select the name of the applicable external user database group in the group list, and then click Add to selected.
Note A user must match all the groups in the Selected list so that Cisco Secure ACS can use this group set mapping to map the user to a Cisco Secure ACS group; however, a user can also belong to other groups (in addition to the groups listed) and still be mapped to a Cisco Secure ACS group.
Tip To remove a group from the mapping, select the name of the group in the Selected list, and then click Remove from selected.
Result: The Selected list shows all the groups that a user must belong to in order to be mapped to a Cisco Secure ACS group.
12-17User Guide for Cisco Secure ACS for Windows Server
78-14696-01, Version 3.1
Chapter 12 Administering External User DatabasesDatabase Group Mappings
Step 9 In the CiscoSecure group list, select the name of the Cisco Secure ACS group to which you want to map users who belong to all the external user database groups in the Selected list.
Note You can also select <No Access>. For more information about the <No Access> group, see No Access Group for Group Set Mappings, page 12-15.
Step 10 Click Submit.
Result: The group set you mapped to the Cisco Secure ACS list appears at the bottom of the database groups column.
Note The asterisk at the end of each set of groups indicates that users authenticated with the external user database can belong to other groups besides those in the set.
Editing a Windows NT/2000, Novell NDS, or Generic LDAP Group Set Mapping
You can change the Cisco Secure ACS group to which a group set mapping is mapped.
Note The external user database groups of an existing group set mapping cannot be edited. If you want to add or remove external user database groups from the group set mapping, delete the group set mapping and create one with the revised set of groups.
To edit a Windows NT/2000, Novell NDS, or generic LDAP group mapping, follow these steps:
Step 1 In the navigation bar, click External User Databases.
Step 2 Click Database Group Mappings.
12-18User Guide for Cisco Secure ACS for Windows Server
78-14696-01, Version 3.1
Chapter 12 Administering External User DatabasesDatabase Group Mappings
Step 3 Click the external user database name for which you want to edit a group set mapping.
Result: If you are editing a Windows NT/2000 group set mapping, the Domain Configurations table appears. If you are editing an NDS group set mapping, the NDS Trees table appears. Otherwise, the Group Mappings for database Users table appears.
Step 4 If you are editing a Windows NT/2000 group set mapping, click the domain name for which you want to edit a group set mapping.
Result: The Group Mappings for Domain: domainname table appears.
Step 5 If you are editing a Novell NDS group set mapping, click the name of the Novell NDS tree for which you want to edit a group set mapping.
Result: The Group Mappings for NDS Users table appears.
Step 6 Click the group set mapping to be edited.
Result: The Edit mapping for database page opens. The external user database group or groups included in the group set mapping appear above the CiscoSecure group list.
Step 7 From the CiscoSecure group list, select the name of the group to which the set of external database groups should be mapped, and then click Submit.
Note You can also select <No Access>. For more information about the <No Access> group, see No Access Group for Group Set Mappings, page 12-15.
Step 8 Click Submit.
Result: The Group Mappings for database page opens again with the changed group set mapping listed.
12-19User Guide for Cisco Secure ACS for Windows Server
78-14696-01, Version 3.1
Chapter 12 Administering External User DatabasesDatabase Group Mappings
Deleting a Windows NT/2000, Novell NDS, or Generic LDAP Group Set Mapping
You can delete individual group set mappings.
To delete a Windows NT/2000, Novell NDS, or generic LDAP group mapping, follow these steps:
Step 1 In the navigation bar, click External User Databases.
Step 2 Click Database Group Mappings.
Step 3 Click the external user database configuration whose group set mapping you need to delete.
Result: If you are deleting a Windows NT/2000 group set mapping, the Domain Configurations table appears. If you are deleting an NDS group set mapping, the NDS Trees table appears. Otherwise, the Group Mappings for database Users table appears.
Step 4 If you are deleting a Windows NT/2000 group set mapping, click the domain name whose group set mapping you want to delete.
Result: The Group Mappings for Domain: domainname table appears.
Step 5 If you are deleting a Novell NDS group set mapping, click the name of the Novell NDS tree whose group set mapping you want to delete.
Result: The Group Mappings for NDS Users table appears.
Step 6 Click the group set mapping you want to delete.
Step 7 Click Delete.
Result: Cisco Secure ACS displays a confirmation dialog box.
Step 8 Click OK in the confirmation dialog box.
Result: Cisco Secure ACS deletes the selected external user database group set mapping.
Deleting a Windows NT/2000 Domain Group Mapping Configuration
You can delete an entire group mapping configuration for a Windows NT/2000 domain. When you delete a Windows domain group mapping configuration, all group set mappings in the configuration are deleted.
12-20User Guide for Cisco Secure ACS for Windows Server
78-14696-01, Version 3.1
Chapter 12 Administering External User DatabasesDatabase Group Mappings
To delete a Windows NT/2000 group mapping, follow these steps:
Step 1 In the navigation bar, click External User Databases.
Step 2 Click Database Group Mappings.
Step 3 Click the name of the Windows NT/2000 external user database.
Step 4 Click the domain name whose group set mapping you want to delete.
Step 5 Click Delete Configuration.
Result: Cisco Secure ACS displays a confirmation dialog box.
Step 6 Click OK in the confirmation dialog box.
Result: Cisco Secure ACS deletes the selected external user database group mapping configuration.
Changing Group Set Mapping Order
You can change the order in which Cisco Secure ACS checks group set mappings for users authenticated by Windows NT/2000, Novell NDS, and generic LDAP databases. To order group mappings, you must have already mapped them. For more information about creating group mappings, see Creating a Cisco Secure ACS Group Mapping for Windows NT/2000, Novell NDS, or Generic LDAP Groups, page 12-16.
To change the order of group mappings for a Windows NT/2000, Novell NDS, or generic LDAP group mapping, follow these steps:
Step 1 In the navigation bar, click External User Databases.
Step 2 Click Database Group Mappings.
Step 3 Click the external user database name for which you want to configure group set mapping order.
Result: If you are ordering Windows NT/2000 group set mappings, the Domain Configurations table appears. If you are ordering NDS group set mappings, the NDS Trees table appears. Otherwise, the Group Mappings for database Users table appears.
12-21User Guide for Cisco Secure ACS for Windows Server
78-14696-01, Version 3.1
Chapter 12 Administering External User DatabasesDatabase Group Mappings
Step 4 If you are configuring Windows NT/2000 group mapping order, click the domain name for which you want to configure group set mapping order.
Result: The Group Mappings for Domain: domainname table appears.
Step 5 If you are configuring Novell NDS group set mapping order, click the name of the Novell NDS tree for which you want to configure group set mapping order.
Result: The Group Mappings for NDS Users table appears.
Step 6 Click Order mappings.
Note The Order mappings button appears only if more than one group set mapping exists for the current database.
Result: The Order mappings for database page appears. The group mappings for the current database appear in the Order list.
Step 7 Select the name of a group set mapping you want to move, and then click Up or Down until it is in the position you want.
Step 8 Repeat Step 7 until the group mappings are in the order you need.
Step 9 Click Submit.
Result: The Group Mappings for database page displays the group set mappings in the order you defined.
RADIUS-Based Group SpecificationFor some types of external user databases, Cisco Secure ACS supports the assignment of users to specific Cisco Secure ACS groups based upon the RADIUS authentication response from the external user database. This is provided in addition to the unknown user group mapping described in Group Mapping by External User Database, page 12-12. RADIUS-based group specification overrides group mapping. The database types that support RADIUS-based group specification are as follows:
• LEAP Proxy RADIUS server
• CRYPTOCard token server
• PassGo token server
12-22User Guide for Cisco Secure ACS for Windows Server
78-14696-01, Version 3.1
Chapter 12 Administering External User DatabasesDatabase Group Mappings
• Safeword token server
• ActivCard token server
• Vasco token server
• RADIUS token server
Cisco Secure ACS supports per-user group mapping for users authenticated with a LEAP Proxy RADIUS Server database. This is provided in addition to the default group mapping described in Group Mapping by External User Database, page 12-12.
To enable per-user group mapping, configure the external user database to return authentication responses that contain the Cisco IOS/PIX RADIUS attribute 1, [009\001] cisco-av-pair with the following value:
ACS:CiscoSecure-Group-Id = N
where N is the Cisco Secure ACS group number (0 through 499) to which Cisco Secure ACS should assign the user. For example, if the LEAP Proxy RADIUS Server authenticated a user and included the following value for the Cisco IOS/PIX RADIUS attribute 1, [009\001] cisco-av-pair:
ACS:CiscoSecure-Group-Id = 37
Cisco Secure ACS assigns the user to group 37 and applies authorization associated with group 37.
12-23User Guide for Cisco Secure ACS for Windows Server
78-14696-01, Version 3.1

Chapter 12 Administering External User DatabasesDatabase Group Mappings
12-24User Guide for Cisco Secure ACS for Windows Server
78-14696-01, Version 3.1

User Guide for 78-14696-01, Version 3.1
A
P P E N D I X A Troubleshooting Information for Cisco Secure ACSThis appendix provides information about certain basic problems and describes how to resolve them.
Scan the column on the left to identify the condition that you are trying to resolve, and then carefully go through each corresponding recovery action offered in the column on the right.
A-1Cisco Secure ACS for Windows Server

Appendix A Troubleshooting Information for Cisco Secure ACSAdministration Issues
Administration IssuesCondition Recovery Action
Remote administrator cannot bring up the Cisco Secure ACS HTML interface in a browser or receives a warning that access is not permitted.
• Ping Cisco Secure ACS to confirm connectivity.
• Verify that the remote administrator is using a valid administrator name and password that has already been added in Administration Control.
• Verify that Java functionality is enabled in the browser.
• Determine whether the remote administrator is trying to administer Cisco Secure ACS through a firewall, through a device performing network address translation, or from a browser configured to use an HTTP proxy server. For more information about accessing the HTML interface in these networking scenarios, see Network Environments and Remote Administrative Sessions, page 1-27.
Unauthorized users can log in. Reject listed IP addresses is selected, but no start or stop IP addresses are listed. Go to Administrator Control: Access Policy and specify the Start IP Address and Stop IP Address.
Restart Services does not work. The system is not responding. To manually restart services, from the Windows Start menu, choose Control Panel > Services. Click CSAdmin, and then Stop, and then Start.
Cannot install Novell NDS database authentication.
Make sure Novell Requestor is installed on the same Windows server as is Cisco Secure ACS.
No remote administrators can log in.
Allow only listed IP addresses to connect is selected, but no start or stop IP addresses are listed. Go to Administrator Control: Access Policy and specify the Start IP Address and Stop IP Address.
Administrator configured for event notification is not receiving e-mail.
Make sure that the SMTP server name is correct. If the name is correct, make sure that the Cisco Secure ACS server can ping the SMTP server or can send e-mail via a third-party e-mail software package. Make sure you have not used underscores in the e-mail address.
A-2User Guide for Cisco Secure ACS for Windows Server
78-14696-01, Version 3.1

Appendix A Troubleshooting Information for Cisco Secure ACSBrowser Issues
Browser Issues
Cisco IOS Issues
Condition Recovery Action
The browser cannot bring up the Cisco Secure ACS HTML interface.
Open Internet Explorer or Netscape Navigator and choose Help > About to determine the version of the browser. See System Requirements, page 2-2, for a list of browsers supported by Cisco Secure ACS and the release notes for known issues with a particular browser version.
For information about various network scenarios that affect remote administrative sessions, see Network Environments and Remote Administrative Sessions, page 1-27.
The browser displays the Java message that your session connection is lost.
Check the idle timeout value for remote administrators. This is in the Administration Control window. Increase the value as needed.
Administrator database appears corrupted.
The remote Netscape client is caching the password. If you specify an incorrect password, it is cached. When you attempt to re-authenticate with the correct password, the incorrect password is sent. Clear the cache before attempting to re-authenticate or close the browser and open a new session.
Condition Recovery Action
Under EXEC Commands, Cisco IOS commands are not being denied when checked.
• Examine the Cisco IOS configuration at the AAA client. If it is not already present, add the following Cisco IOS command to the AAA client configuration:
aaa authorization command <0-15> default group TACACS+
• The correct syntax for the arguments in the text box is permitargument or denyargument.
Administrator has been locked out of the AAA client because of an incorrect configuration set up in the AAA client.
Try to connect directly to the AAA client at the console port. If that is not successful, consult your AAA client documentation or go to Cisco.com regarding password recovery procedures on your AAA client. For the appropriate URL, see Cisco.com, page xxxi.
A-3User Guide for Cisco Secure ACS for Windows Server
78-14696-01, Version 3.1
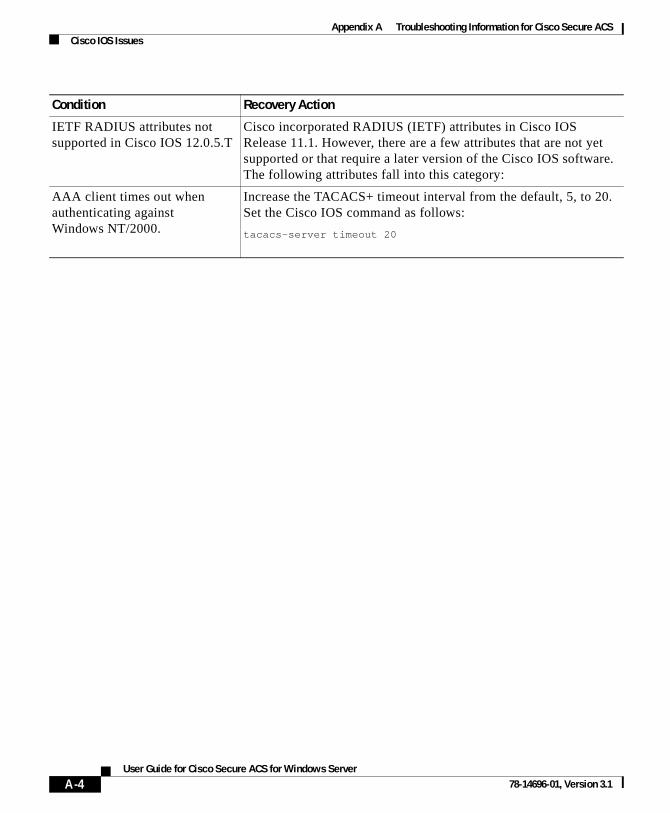
Appendix A Troubleshooting Information for Cisco Secure ACSCisco IOS Issues
IETF RADIUS attributes not supported in Cisco IOS 12.0.5.T
Cisco incorporated RADIUS (IETF) attributes in Cisco IOS Release 11.1. However, there are a few attributes that are not yet supported or that require a later version of the Cisco IOS software. The following attributes fall into this category:
AAA client times out when authenticating against Windows NT/2000.
Increase the TACACS+ timeout interval from the default, 5, to 20. Set the Cisco IOS command as follows:
tacacs-server timeout 20
Condition Recovery Action
A-4User Guide for Cisco Secure ACS for Windows Server
78-14696-01, Version 3.1
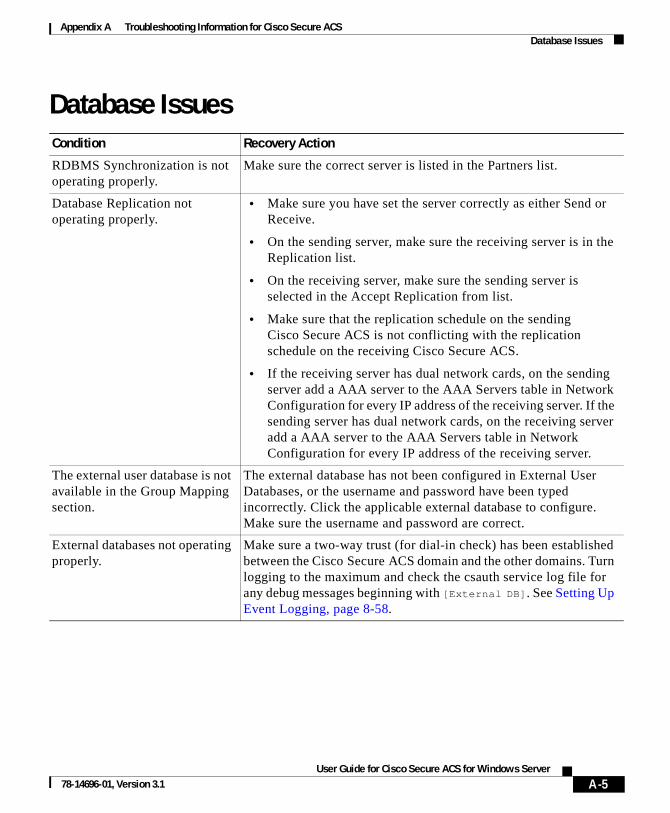
Appendix A Troubleshooting Information for Cisco Secure ACSDatabase Issues
Database IssuesCondition Recovery Action
RDBMS Synchronization is not operating properly.
Make sure the correct server is listed in the Partners list.
Database Replication not operating properly.
• Make sure you have set the server correctly as either Send or Receive.
• On the sending server, make sure the receiving server is in the Replication list.
• On the receiving server, make sure the sending server is selected in the Accept Replication from list.
• Make sure that the replication schedule on the sending Cisco Secure ACS is not conflicting with the replication schedule on the receiving Cisco Secure ACS.
• If the receiving server has dual network cards, on the sending server add a AAA server to the AAA Servers table in Network Configuration for every IP address of the receiving server. If the sending server has dual network cards, on the receiving server add a AAA server to the AAA Servers table in Network Configuration for every IP address of the receiving server.
The external user database is not available in the Group Mapping section.
The external database has not been configured in External User Databases, or the username and password have been typed incorrectly. Click the applicable external database to configure. Make sure the username and password are correct.
External databases not operating properly.
Make sure a two-way trust (for dial-in check) has been established between the Cisco Secure ACS domain and the other domains. Turn logging to the maximum and check the csauth service log file for any debug messages beginning with [External DB]. See Setting Up Event Logging, page 8-58.
A-5User Guide for Cisco Secure ACS for Windows Server
78-14696-01, Version 3.1
Appendix A Troubleshooting Information for Cisco Secure ACSDial-in Connection Issues
Dial-in Connection IssuesCondition Recovery Action
A dial-in user cannot connect to the AAA client.
No record of the attempt appears in either the TACACS+ or RADIUS Accounting Report (in the Reports & Activity section, click TACACS+ Accounting or RADIUS Accounting or Failed Attempts).
Examine the Cisco Secure ACS Reports or AAA client Debug output to narrow the problem to a system error or a user error. Confirm the following:
• The dial-in user was able to establish a connection and ping the Windows 2000 server before Cisco Secure ACS was installed. If the dial-in user could not, the problem is related to a AAA client/modem configuration, not Cisco Secure ACS.
• LAN connections for both the AAA client and the Windows 2000 server supporting Cisco Secure ACS are physically connected.
• IP address of the AAA client in the Cisco Secure ACS configuration is correct.
• IP address of Cisco Secure ACS in AAA client configuration is correct.
• TACACS+ or RADIUS key in both AAA client and Cisco Secure ACS are identical (case sensitive).
• The command ppp authentication pap is entered for each interface, if the Windows NT/2000 user database is being used.
• The command ppp authentication chap pap is entered for each interface, if the Cisco Secure ACS database is being used.
• The AAA and TACACS+ or RADIUS commands are correct in the AAA client. The necessary commands are listed in the following:
Program Files\CiscoSecure ACS vx.x\TacConfig.txt
Program Files\CiscoSecure ACS vx.x\RadConfig.txt.
• The Cisco Secure ACS Services are running (CSAdmin, CSAuth, CSDBSync CSLog, CSRadius, CSTacacs) on the Windows 2000 server.
A-6User Guide for Cisco Secure ACS for Windows Server
78-14696-01, Version 3.1

Appendix A Troubleshooting Information for Cisco Secure ACSDial-in Connection Issues
A dial-in user is unable to connect to the AAA client.
The Windows NT/2000 user database is being used for authentication.
A record of a failed attempt appears in the Failed Attempts Report (in the Reports & Activity section, click Failed Attempts).
The user information is not correctly configured for authentication in Windows NT/2000 or Cisco Secure ACS.
From the Windows NT User Manager or Windows 2000 Active Directory Users and Computers, confirm the following:
• The username and password are configured in the Windows NT User Manager or Windows 2000 Active Directory Users and Computers.
• The User Properties window does not have User Must Change Password at Login enabled.
• The User Properties window does not have Account Disabled selected.
• The User Properties for the dial-in window does not have Grant dial-in permission to user disabled, if Cisco Secure ACS is using this option for authenticating.
From within the Cisco Secure ACS confirm the following:
• If the username has already been entered into Cisco Secure ACS, a Windows NT/2000 database configuration is selected in the Password Authentication list in User Setup for the user.
• If the username has already been entered into Cisco Secure ACS, the Cisco Secure ACS group to which the user is assigned has the correct authorization enabled (such as IP/PPP, IPX/PPP or Exec/Telnet). Be sure to click Submit + Restart if a change has been made.
• The user expiration information in the Windows NT/2000 database has not caused failed authentication. For troubleshooting purposes, disable password expiry for the user in the Windows NT/2000 database.
Click External User Databases, and click List All Databases Configured, and then make sure that the database configuration for Windows NT/2000 is listed.
Check the Unknown User Policy to make sure that Fail the Attempt is not selected.
Select the Selected Databases check box in the Unknown User Policy page in the External User Databases section.
Verify that the Windows NT/2000 group that the user belongs to has not been mapped to No Access.
Condition Recovery Action
A-7User Guide for Cisco Secure ACS for Windows Server
78-14696-01, Version 3.1
Appendix A Troubleshooting Information for Cisco Secure ACSDial-in Connection Issues
A dial-in user is unable to connect to the AAA client.
The CiscoSecure user database is being used for authentication.
A record of a failed attempt is displayed in the Failed Attempts Report (in the Reports & Activity section, click Failed Attempts).
From within Cisco Secure ACS confirm the following:
• The username has been entered into Cisco Secure ACS.
• CiscoSecure user database is selected on the Password Authentication list and a password has been entered in User Setup for the user.
• The Cisco Secure ACS group to which the user is assigned has the correct authorization enabled (such as IP/PPP, IPX/PPP or Exec/Telnet). Be sure to click Submit + Restart if a change has been made.
• Expiration information has not caused failed authentication. Set to Expiration: Never for troubleshooting.
A dial-in user is unable to connect to the AAA client; however, a Telnet connection can be authenticated across the LAN.
This isolates the problem to one of three areas:
• Line/modem configuration problem. Review the documentation that came with your modem and verify that the modem is properly configured.
• The user is not assigned to a group that has the correct authorization rights. Authorization rights can be modified under Group Setup or User Setup. User settings override group settings.
• The Cisco Secure ACS or TACACS+ or RADIUS configuration is not correct in the AAA client. The necessary commands are listed in the following:
Program Files\CiscoSecure ACS vx.x\TacConfig.txt
Program Files\CiscoSecure ACS vx.x\RadConfig.txt
Program Files\CiscoSecure ACS vx.x\README.TXT
You can additionally verify Cisco Secure ACS connectivity as follows:
• Telnet to the access server from a workstation connected to the LAN.
• A successful authentication for Telnet confirms that Cisco Secure ACS is working with the AAA client.
Condition Recovery Action
A-8User Guide for Cisco Secure ACS for Windows Server
78-14696-01, Version 3.1
Appendix A Troubleshooting Information for Cisco Secure ACSDial-in Connection Issues
A dial-in user is unable to connect to the AAA client, and a Telnet connection cannot be authenticated across the LAN.
Determine if the Cisco Secure ACS is receiving the request. This can be done by viewing the Cisco Secure ACS reports. Based on what does not appear in the reports and which database is being used, troubleshoot the problem based on one of the following:
• Line/modem configuration problem. Review the documentation that came with your modem and verify that the modem is properly configured.
• The user does not exist in the Windows NT/2000 user database or the CiscoSecure user database and might not have the correct password. Authentication parameters can be modified under User Setup.
• The Cisco Secure ACS or TACACS+ or RADIUS configuration is not correct in the AAA client. The necessary commands are listed in the following:
Program Files\CiscoSecure ACS vx.x\TacConfig.txt
Program Files\CiscoSecure ACS vx.x\RadConfig.txt
Program Files\CiscoSecure ACS vx.x\README.TXT
Condition Recovery Action
A-9User Guide for Cisco Secure ACS for Windows Server
78-14696-01, Version 3.1
Appendix A Troubleshooting Information for Cisco Secure ACSDebug Issues
Debug IssuesCondition Recovery Action
When you run debug aaa authentication on the AAA client, Cisco Secure ACS returns a failure message.
The configurations of the AAA client or Cisco Secure ACS are likely to be at fault.
From within Cisco Secure ACS confirm the following:
Cisco Secure ACS is receiving the request. This can be done by viewing the Cisco Secure ACS reports. What does or does not appear in the reports may provide indications that your Cisco Secure ACS is misconfigured.
From the AAA client, confirm the following:
• The command ppp authentication pap is entered for each interface if authentication against the Windows NT/2000 user database is being used.
• The command ppp authentication chap pap is entered for each interface if authentication against the CiscoSecure user database is being used.
• The AAA and TACACS+ or RADIUS configuration is correct in the AAA client. The necessary commands are listed in the following:
Program Files\CiscoSecure ACS vx.x\TacConfig.txt
Program Files\CiscoSecure ACS vx.x\RadConfig.txt
Program Files\CiscoSecure ACS vx.x\README.TXT
When you run debug aaa authentication and debug aaa authorization on the AAA client, Cisco Secure ACS returns a PASSfor authentication, but returns a FAIL for authorization.
This problem occurs because authorization rights are not correctly assigned.
From Cisco Secure ACS User Setup, confirm that the user is assigned to a group that has the correct authorization rights. Authorization rights can be modified under Group Setup or User Setup. User settings override group settings.
If a specific attribute for TACACS+ or RADIUS is not displayed within the Group Setup section, this might indicate it has not been enabled in Interface Configuration: TACACS+ (Cisco IOS) or RADIUS.
A-10User Guide for Cisco Secure ACS for Windows Server
78-14696-01, Version 3.1

Appendix A Troubleshooting Information for Cisco Secure ACSProxy Issues
Proxy Issues
Installation and Upgrade Issues
Condition Recovery Action
Proxy fails. Make sure that the direction on the remote server is set to Incoming/Outgoing or Incoming, and that the direction on the authentication forwarding server is set to Incoming/Outgoing or Outgoing.
Make sure the shared secret (key) matches the shared secret of one or both Cisco Secure ACS servers.
Make sure the character string and delimiter match the stripping information configured in the Proxy Distribution Table, and the position is set correctly to either Prefix or Suffix.
One or more servers is down, or no fallback server is configured. Go to Network Configuration and configure a fallback server. Fallback servers are used only under the following circumstances:
• The remote Cisco Secure ACS is down.
• One or more services (CSTacacs, CSRadius, or CSAuth) are down.
• The secret key is misconfigured.
• Inbound/Outbound messaging is misconfigured.
Condition Recovery Action
The following error message appears when you try to upgrade or uninstall Cisco Secure ACS:
The following file is invalid or the data is corrupted “DelsL1.isu”
From the Windows Registry, delete the following Registry key:
HKEY_LOCAL_MACHINE\SOFTWARE\Microsoft\Windows\CurrentVersion\Uninstall\CiscoSecure
All previous accounting logs are missing. When reinstalling or upgrading the Cisco Secure ACS software, these files are deleted unless they have been moved to an alternative directory location.
A-11User Guide for Cisco Secure ACS for Windows Server
78-14696-01, Version 3.1
Appendix A Troubleshooting Information for Cisco Secure ACSMaxSessions Issues
MaxSessions Issues
Report Issues
Condition Recovery Action
MaxSessions over VPDN is not working. The use of MaxSessions over VPDN is not supported.
User MaxSessions fluctuates or is unreliable. Services were restarted, possibly because the connection between the Cisco Secure ACS and the AAA client is unstable. Clear the Single Connect TACACS+ AAA Client check box.
Condition Recovery Action
The active.csv report is blank. You changed protocol configurations recently.
Whenever protocol configurations change, the existing active.csv report file is renamed to yyyy-mm-dd.csv, and a new, blank active.csv report is generated
A report is blank. Make sure you have selected Log to reportname Report under System Configuration: Logging: Log Target: reportname. You must also set Network Configuration: servername: Access Server Type to CiscoSecure ACS for Windows NT.
No Unknown User information is included in reports.
The Unknown User database was changed. Accounting reports will still contain unknown user information.
Two entries are logged for one user session.
Make sure that the remote logging function is not configured to send accounting packets to the same location as the Send Accounting Information fields in the Proxy Distribution Table.
After you have changed the date format, the Logged-In User list and CSAdmin log still display old format dates.
Restart the csadmin services by clicking X in the upper right corner of the HTML interface.
A-12User Guide for Cisco Secure ACS for Windows Server
78-14696-01, Version 3.1
Appendix A Troubleshooting Information for Cisco Secure ACSThird-Party Server Issues
Third-Party Server Issues
PIX Firewall Issues
Condition Recovery Action
You cannot successfully implement the RSA token server.
1. Log in to the Windows 2000 server on which Cisco Secure ACS is installed. (Make sure your login account has administrative privileges.)
2. Make sure the RSA Client software is installed on the same Windows 2000 server as the Cisco Secure ACS.
3. Follow the setup instructions. Do not restart at the end of the installation.
4. Get the file named sdconf.rec located in the /data directory of the RSA ACE server.
5. Place sdconf.rec on the Windows 2000 server in the %SystemRoot%\system32 directory.
6. Make sure you can ping the machine that is running the ACE server by hostname. (You might need to add the machine in the lmhosts file.)
7. Verify that support for RSA is enabled in External User Database: Database Configuration in the Cisco Secure ACS.
8. Run Test Authentication from the Windows 2000 server control panel for the ACE/Client application.
9. From Cisco Secure ACS, install the token server.
Condition Recovery Action
Remote administrator cannot bring up Cisco Secure ACS from his or her browser or receives a warning that access is not permitted.
If Network Address Translation is enabled on the PIX Firewall, administration through the firewall cannot work.
To administer Cisco Secure ACS through a firewall, you must configure an HTTP port range in System Configuration: Access Policy. The PIX Firewall must be configured to permit HTTP traffic over all ports included in the range specified in Cisco Secure ACS. For more information, see Access Policy, page 10-11.
A-13User Guide for Cisco Secure ACS for Windows Server
78-14696-01, Version 3.1

Appendix A Troubleshooting Information for Cisco Secure ACSUser Authentication Issues
User Authentication IssuesCondition Recovery Action
After the administrator removes the Check NT Callback setting from External User Databases: Database Configuration: Windows NT/2000: Configuration, Windows NT/2000 database users can still dial in and apply the Callback string configured under the Windows NT/2000 user database.
Restart Cisco Secure ACS services. For steps, see Stopping, Starting, or Restarting Services, page 8-2.
Callback is not working. Ensure that callback works on the AAA client when using local authentication. Then add AAA authentication.
User authentication fails when using PAP. Outbound PAP is not enabled. If the Failed Attempts report shows that you are using outbound PAP, go to Interface Configuration and select the Per-User Advanced TACACS+ Features check box. Then, go to User Setup: Advanced TACACS+ Settings. Click TACACS+ Enable Control and type and confirm the password in the TACACS+ Outbound Password box.
Unknown users are not authenticated. Go to External User Databases: Unknown User Policy. Click Check the following external user databases. From the External Databases list, select the database(s) against which to authenticate unknown users. Click —> (right arrow button) to add the database to the Selected Databases list. Click Up or Down to move the database into the desired position in the authentication hierarchy.
If you are using the Cisco Secure ACS Unknown User feature, external databases can authenticate using only PAP.
User did not inherit settings from new group. Users moved to a new group inherit new group settings but they keep their existing user settings. Manually change the settings in User Settings.
A-14User Guide for Cisco Secure ACS for Windows Server
78-14696-01, Version 3.1

Appendix A Troubleshooting Information for Cisco Secure ACSUser Authentication Issues
User can authenticate but authorizations are different from expected.
Different vendors use different AV pairs. AV pairs not used in one vendor protocol are ignored by another vendor protocol.
Make sure the user settings reflect the correct vendor protocol; for example, Cisco RADIUS.
User cannot log in. Re-enable the user account or reset the failed attempts counter.
Authentication fails. The retry interval is too short. (The default is 5 seconds.) Increase the retry interval (tacacs-server timeout 20) on the AAA client to 20 or greater.
Check the Failed Attempts report.
Condition Recovery Action
A-15User Guide for Cisco Secure ACS for Windows Server
78-14696-01, Version 3.1
Appendix A Troubleshooting Information for Cisco Secure ACSTACACS+ and RADIUS Attribute Issues
TACACS+ and RADIUS Attribute IssuesCondition Recovery Action
TACACS+ and RADIUS attributes do not appear on the Group Setup page.
Ensure that you have at least one RADIUS or TACACS+ AAA client configured in the Network Configuration section and that, in the Interface Configuration section, you have enabled the attributes you need to configure.
Note Some attributes are not customer-configurable in Cisco Secure ACS; instead, their values are set by Cisco Secure ACS.
Beginning with Cisco Secure ACS version 2.3, some TACACS+ attributes no longer appear on the Group Setup page. This is because IP pools and callback supersede the following attributes:
TACACS+
addraddr-poolcallback-dialstring
Ascend RADIUS
8, Framed-IP-Address19, Callback-Number 218, Ascend-Assign-IP-Pool
Additionally, these attributes cannot be set via database synchronization, and ip:addr=n.n.n.n is not allowed as a Cisco vendor-specific attribute.
Novell NDS or Generic LDAP Group Mapping not working correctly.
Make sure you have correctly configured Group Mapping for the applicable database. For more information, see Database Group Mappings, page 12-11.
A-16User Guide for Cisco Secure ACS for Windows Server
78-14696-01, Version 3.1
User Guide for 78-14696-01, Version 3.1
A
P P E N D I X B TACACS+ Attribute-Value PairsCisco Secure Access Control Server (Cisco Secure ACS) for Windows Server version 3.1 supports Terminal Access Controller Access Control System (TACACS+) attribute-value (AV) pairs. You can enable different AV pairs for any supported attribute value.
Cisco IOS AV Pair DictionaryBefore selecting TACACS+ AV pairs for Cisco Secure ACS, confirm that your AAA client is running Cisco IOS Release 11.2 or later. Earlier versions of Cisco IOS work with Cisco Secure ACS but do not fully support the TACACS+ features in Cisco Secure ACS.
Note If you specify a given AV pair in Cisco Secure ACS, you must also enable the corresponding AV pair in the Cisco IOS software running on the AAA client. Therefore, you must consider which AV pairs your Cisco IOS release supports. If Cisco Secure ACS sends an AV pair to the AAA client that the Cisco IOS software does not support, that attribute is not implemented.
For more information on TACACS+ AV pairs, refer to Cisco IOS documentation for the release of Cisco IOS running on your AAA clients.
Note All TACACS+ values are strings. The concept of value “type” does not exist in TACACS+ as it does in Remote Access Dial-In User Service (RADIUS).
B-1Cisco Secure ACS for Windows Server

Appendix B TACACS+ Attribute-Value PairsCisco IOS AV Pair Dictionary
TACACS+ AV Pairs
Note Beginning with Cisco Secure ACS 2.3, some TACACS+ attributes no longer appear on the Group Setup page. This is because IP pools and callback supersede the following attributes:
addr addr-pool callback-dialstring
Additionally, these attributes cannot be set via database synchronization, and ip:addr=n.n.n.n is not allowed as a Cisco vendor-specific attribute (VSA).
Cisco Secure ACS supports many TACACS+ AV pairs. For descriptions of these attributes, refer to Cisco IOS documentation for the release of Cisco IOS running on your AAA clients. TACACS+ AV Pairs supported in Cisco Secure ACS are as follows:
• acl=
• addr=
• addr-pool=
• autocmd=
• callback-dialstring
• callback-line
• callback-rotary
• cmd-arg=
• cmd=
• dns-servers=
• gw-password
• idletime=
• inacl#n
• inacl=
• interface-config=
B-2User Guide for Cisco Secure ACS for Windows Server
78-14696-01, Version 3.1

Appendix B TACACS+ Attribute-Value PairsCisco IOS AV Pair Dictionary
• ip-addresses
• link-compression=
• load-threshold=n
• max-links=n
• nas-password
• nocallback-verify
• noescape=
• nohangup=
• old-prompts
• outacl#n
• outacl=
• pool-def#n
• pool-timeout=
• ppp-vj-slot-compression
• priv-lvl=
• protocol=
• route
• route#n
• routing=
• rte-ftr-in#n
• rte-ftr-out#n
• sap#n
• sap-fltr-in#n
• sap-fltr-out#n
• service=
• source-ip=
• timeout=
• tunnel-id
B-3User Guide for Cisco Secure ACS for Windows Server
78-14696-01, Version 3.1

Appendix B TACACS+ Attribute-Value PairsCisco IOS AV Pair Dictionary
• wins-servers=
• zonelist=
TACACS+ Accounting AV PairsCisco Secure ACS supports many TACACS+ accounting AV pairs. For descriptions of these attributes, see Cisco IOS documentation for the release of Cisco IOS running on your AAA clients. TACACS+ accounting AV pairs supported in Cisco Secure ACS are as follows:
• bytes_in
• bytes_out
• cmd
• data-rate
• disc-cause
• disc-cause-ext
• elapsed_time
• event
• mlp-links-max
• mlp-sess-id
• nas-rx-speed
• nas-tx-speed
• paks_in
• paks_out
• port
• pre-bytes-in
• pre-bytes-out
• pre-paks-in
• pre-paks-out
• pre-session-time
• priv_level
B-4User Guide for Cisco Secure ACS for Windows Server
78-14696-01, Version 3.1
Appendix B TACACS+ Attribute-Value PairsCisco IOS AV Pair Dictionary
• protocol
• reason
• service
• start_time
• stop_time
• task_id
• timezone
• xmit-rate
B-5User Guide for Cisco Secure ACS for Windows Server
78-14696-01, Version 3.1

Appendix B TACACS+ Attribute-Value PairsCisco IOS AV Pair Dictionary
B-6User Guide for Cisco Secure ACS for Windows Server
78-14696-01, Version 3.1
User Guide for 78-14696-01, Version 3.1
A
P P E N D I X C RADIUS AttributesCisco Secure Access Control Server (Cisco Secure ACS) for Windows Server version 3.1 supports many RADIUS attributes. This appendix lists the standard attributes, vendor-proprietary attributes, vendor-specific attributes supported by Cisco Secure ACS for the following vendor implementations of RADIUS:
• Cisco IOS RADIUS
• Cisco VPN 3000 Concentrator RADIUS
• Cisco VPN 5000 Concentrator RADIUS
• Cisco Building Broadband Service Manager RADIUS
• Microsoft RADIUS
• Ascend RADIUS
• Nortel RADIUS
• Juniper RADIUS
• Internet Engineering Task Force (IETF) RADIUS
You can enable different attribute-value (AV) pairs for IETF RADIUS and for any supported vendor. This appendix provides information about the following RADIUS AV pairs:
• Cisco IOS Dictionary of RADIUS AV Pairs, page C-2
• Cisco IOS/PIX Dictionary of RADIUS VSAs, page C-5
• Cisco VPN 3000 Concentrator Dictionary of RADIUS VSAs, page C-7
• Cisco VPN 5000 Concentrator Dictionary of RADIUS VSAs, page C-11
C-1Cisco Secure ACS for Windows Server
Appendix C RADIUS AttributesCisco IOS Dictionary of RADIUS AV Pairs
• Cisco Building Broadband Service Manager Dictionary of RADIUS VSA, page C-12
• IETF Dictionary of RADIUS AV Pairs, page C-12
• Microsoft MPPE Dictionary of RADIUS VSAs, page C-27
• Ascend Dictionary of RADIUS AV Pairs, page C-30
• Nortel Dictionary of RADIUS VSAs, page C-42
• Juniper Dictionary of RADIUS VSAs, page C-43
Cisco IOS Dictionary of RADIUS AV PairsCisco Secure ACS supports Cisco IOS RADIUS AV pairs. Before selecting AV pairs for Cisco Secure ACS, confirm that your AAA client is a compatible release of Cisco IOS or compatible AAA client software. For more information, see System Requirements, page 2-2.
Note If you specify a given AV pair on Cisco Secure ACS, the corresponding AV pair must be implemented in the Cisco IOS software running on the network device. Always take into consideration which AV pairs your Cisco IOS release supports. If Cisco Secure ACS sends an AV pair that the Cisco IOS software does not support, the attribute is not implemented.
Note Because IP pools and callback supersede them, the following RADIUS attributes do not appear on the Group Setup page:
8, Framed-IP-Address 19, Callback-Number 218, Ascend-Assign-IP-Pool
None of these attributes can be set via RDBMS Synchronization.
Table C-1 lists the supported Cisco IOS RADIUS AV pairs.
C-2User Guide for Cisco Secure ACS for Windows Server
78-14696-01, Version 3.1
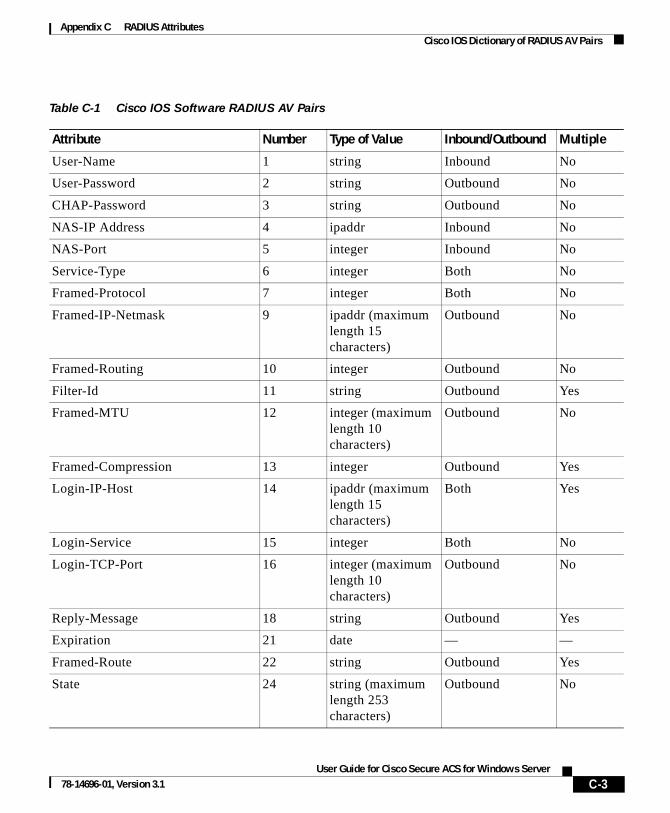
Appendix C RADIUS AttributesCisco IOS Dictionary of RADIUS AV Pairs
Table C-1 Cisco IOS Software RADIUS AV Pairs
Attribute Number Type of Value Inbound/Outbound Multiple
User-Name 1 string Inbound No
User-Password 2 string Outbound No
CHAP-Password 3 string Outbound No
NAS-IP Address 4 ipaddr Inbound No
NAS-Port 5 integer Inbound No
Service-Type 6 integer Both No
Framed-Protocol 7 integer Both No
Framed-IP-Netmask 9 ipaddr (maximum length 15 characters)
Outbound No
Framed-Routing 10 integer Outbound No
Filter-Id 11 string Outbound Yes
Framed-MTU 12 integer (maximum length 10 characters)
Outbound No
Framed-Compression 13 integer Outbound Yes
Login-IP-Host 14 ipaddr (maximum length 15 characters)
Both Yes
Login-Service 15 integer Both No
Login-TCP-Port 16 integer (maximum length 10 characters)
Outbound No
Reply-Message 18 string Outbound Yes
Expiration 21 date — —
Framed-Route 22 string Outbound Yes
State 24 string (maximum length 253 characters)
Outbound No
C-3User Guide for Cisco Secure ACS for Windows Server
78-14696-01, Version 3.1

Appendix C RADIUS AttributesCisco IOS Dictionary of RADIUS AV Pairs
Class 25 string Outbound Yes
Vendor specific 26 string Outbound Yes
Session-Timeout 27 integer (maximum length 10 characters)
Outbound No
Idle-Timeout 28 integer (maximum length 10 characters)
Outbound No
Called-Station-ID 30 string Inbound No
Calling-Station-ID 31 string Inbound No
Login-LAT-Service 33 string (maximum length 253 characters)
Inbound No
Acct-Status-Type 40 integer Inbound No
Acct-Delay-Time 41 integer Inbound No
Acct-Input-Octets 42 integer Inbound No
Acct-Output-Octets 43 integer Inbound No
Acct-Session-ID 44 string Inbound No
Acct-Authentic 45 integer Inbound No
Acct-Session-Time 46 integer Inbound No
Acct-Input-Packets 47 integer Inbound No
Acct-Output-Packets 48 integer Inbound No
Acct-Terminate-Cause 49 integer Inbound No
NAS-Port-Type 61 integer Inbound No
NAS-Port-Limit 62 integer (maximum length 10 characters)
Both No
Table C-1 Cisco IOS Software RADIUS AV Pairs (continued)
Attribute Number Type of Value Inbound/Outbound Multiple
C-4User Guide for Cisco Secure ACS for Windows Server
78-14696-01, Version 3.1

Appendix C RADIUS AttributesCisco IOS/PIX Dictionary of RADIUS VSAs
Cisco IOS/PIX Dictionary of RADIUS VSAsCisco Secure ACS supports Cisco IOS/PIX vendor-specific attributes (VSAs). The vendor ID for this Cisco RADIUS Implementation is 009. Table C-2 lists the supported Cisco IOS/PIX RADIUS VSAs.
Note For a discussion of Cisco IOS/PIX RADIUS VSA 1, cisco-av-pair, see AV pair 26 in Table C-6.
Note For details about the Cisco IOS H.323 VSAs, refer to Cisco IOS Voice-over-IP documentation.
Note For details about the Cisco IOS Node Route Processor-Service Selection Gateway VSAs (VSAs 250, 251, and 252), refer to Cisco IOS documentation.
Table C-2 Cisco IOS/PIX RADIUS VSAs
Attribute Number Type of Value Inbound/Outbound Multiple
cisco-av-pair 1 string Both Yes
cisco-nas-port 2 string Inbound No
cisco-h323-remote-address 23 string Inbound No
cisco-h323-conf-id 24 string Inbound No
cisco-h323-setup-time 25 string Inbound No
cisco-h323-call-origin 26 string Inbound No
cisco-h323-call-type 27 string Inbound No
cisco-h323-connect-time 28 string Inbound No
cisco-h323-disconnect-time 29 string Inbound No
cisco-h323-disconnect-cause 30 string Inbound No
cisco-h323-voice-quality 31 string Inbound No
cisco-h323-gw-id 33 string Inbound No
C-5User Guide for Cisco Secure ACS for Windows Server
78-14696-01, Version 3.1

Appendix C RADIUS AttributesCisco IOS/PIX Dictionary of RADIUS VSAs
cisco-h323-incoming-conn-id 35 string Inbound No
cisco-h323-credit-amount 101 string (maximum length 247 characters)
Outbound No
cisco-h323-credit-time 102 string (maximum length 247 characters)
Outbound No
cisco-h323-return-code 103 string (maximum length 247 characters)
Outbound No
cisco-h323-prompt-id 104 string (maximum length 247 characters)
Outbound No
cisco-h323-day-and-time 105 string (maximum length 247 characters)
Outbound No
cisco-h323-redirect-number 106 string (maximum length 247 characters)
Outbound No
cisco-h323-preferred-lang 107 string (maximum length 247 characters)
Outbound No
cisco-h323-redirect-ip-addr 108 string (maximum length 247 characters)
Outbound No
cisco-h323-billing-model 109 string (maximum length 247 characters)
Outbound No
cisco-h323-currency 110 string (maximum length 247 characters)
Outbound No
Table C-2 Cisco IOS/PIX RADIUS VSAs (continued)
Attribute Number Type of Value Inbound/Outbound Multiple
C-6User Guide for Cisco Secure ACS for Windows Server
78-14696-01, Version 3.1
Appendix C RADIUS AttributesCisco VPN 3000 Concentrator Dictionary of RADIUS VSAs
Cisco VPN 3000 Concentrator Dictionary of RADIUS VSAs
Cisco Secure ACS supports Cisco VPN 3000 RADIUS VSAs. The vendor ID for this Cisco RADIUS Implementation is 3076. Table C-3 lists the supported Cisco VPN 3000 Concentrator RADIUS VSAs.
Note Some of the RADIUS VSAs supported by Cisco VPN 3000 Concentrators are interdependent. Before you implement them, we recommend that you refer to Cisco VPN 3000-series Concentrator documentation.
cisco-ssg-account-info 250 string (maximum length 247 characters)
Outbound No
cisco-ssg-service-info 251 string (maximum length 247 characters)
Both No
cisco-ssg-control-info 253 string (maximum length 247 characters)
Both No
Table C-2 Cisco IOS/PIX RADIUS VSAs (continued)
Attribute Number Type of Value Inbound/Outbound Multiple
Table C-3 Cisco VPN 3000 Concentrator RADIUS VSAs
Attribute Number Type of Value Inbound/Outbound Multiple
CVPN3000-Access-Hours 1 string (maximum length 247 characters)
Outbound No
CVPN3000-Simultaneous-Logins 2 integer (maximum length 10 characters)
Outbound No
C-7User Guide for Cisco Secure ACS for Windows Server
78-14696-01, Version 3.1
Appendix C RADIUS AttributesCisco VPN 3000 Concentrator Dictionary of RADIUS VSAs
CVPN3000-Primary-DNS 5 ipaddr (maximum length 15 characters)
Outbound No
CVPN3000-Secondary-DNS 6 ipaddr (maximum length 15 characters)
Outbound No
CVPN3000-Primary-WINS 7 ipaddr (maximum length 15 characters)
Outbound No
CVPN3000-Secondary-WINS 8 ipaddr (maximum length 15 characters)
Outbound No
CVPN3000-SEP-Card-Assignment 9 integer Outbound No
CVPN3000-Tunneling-Protocols 11 integer Outbound No
CVPN3000-IPSec-Sec-Association 12 string (maximum length 247 characters)
Outbound No
CVPN3000-IPSec-Authentication 13 integer Outbound No
CVPN3000-IPSec-Banner1 15 string (maximum length 247 characters)
Outbound No
CVPN3000-IPSec-Allow-Passwd-Store
16 integer Outbound No
CVPN3000-Use-Client-Address 17 integer Outbound No
CVPN3000-PPTP-Encryption 20 integer Outbound No
CVPN3000-L2TP-Encryption 21 integer Outbound No
CVPN3000-IPSec-Split-Tunnel-List
27 string (maximum length 247 characters)
Outbound No
Table C-3 Cisco VPN 3000 Concentrator RADIUS VSAs (continued)
Attribute Number Type of Value Inbound/Outbound Multiple
C-8User Guide for Cisco Secure ACS for Windows Server
78-14696-01, Version 3.1

Appendix C RADIUS AttributesCisco VPN 3000 Concentrator Dictionary of RADIUS VSAs
CVPN3000-IPSec-Default-Domain 28 string (maximum length 247 characters)
Outbound No
CVPN3000-IPSec-Split-DNS-Names
29 string (maximum length 247 characters)
Outbound No
CVPN3000-IPSec-Tunnel-Type 30 integer Outbound No
CVPN3000-IPSec-Mode-Config 31 integer Outbound No
CVPN3000-IPSec-User-Group-Lock
33 integer Outbound No
CVPN3000-IPSec-Over-UDP 34 integer Outbound No
CVPN3000-IPSec-Over-UDP-Port 35 integer (maximum length 10 characters)
Outbound No
CVPN3000-IPSec-Banner2 36 string (maximum length 247 characters)
Outbound No
CVPN3000-PPTP-MPPC-Compression
37 integer Outbound No
CVPN3000-L2TP-MPPC-Compression
38 integer Outbound No
CVPN3000-IPSec-IP-Compression 39 integer Outbound No
CVPN3000-IPSec-IKE-Peer-ID-Check
40 integer Outbound No
CVPN3000-IKE-Keep-Alives 41 integer Outbound No
CVPN3000-IPSec-Auth-On-Rekey 42 integer Outbound No
CVPN3000-Required-Client-Firewall-Vendor-Code
45 integer (maximum length 10 characters)
Outbound No
Table C-3 Cisco VPN 3000 Concentrator RADIUS VSAs (continued)
Attribute Number Type of Value Inbound/Outbound Multiple
C-9User Guide for Cisco Secure ACS for Windows Server
78-14696-01, Version 3.1
Appendix C RADIUS AttributesCisco VPN 3000 Concentrator Dictionary of RADIUS VSAs
CVPN3000-Required-Client-Firewall-Product-Code
46 integer (maximum length 10 characters)
Outbound No
CVPN3000-Required-Client-Firewall-Description
47 string (maximum length 247 characters)
Outbound No
CVPN3000-Require-HW-Client-Auth
48 integer Outbound No
CVPN3000-Require-Individual-User-Auth
49 integer Outbound No
CVPN3000-Authenticated-User-Idle-Timeout
50 integer (maximum length 10 characters)
Outbound No
CVPN3000-Cisco-IP-Phone-Bypass
51 integer Outbound No
CVPN3000-User-Auth-Server-Name
52 string (maximum length 247 characters)
Outbound No
CVPN3000-User-Auth-Server-Port 53 integer (maximum length 10 characters)
Outbound No
CVPN3000-User-Auth-Server-Secret
54 string (maximum length 247 characters)
Outbound No
CVPN3000-IPSec-Split-Tunneling-Policy
55 integer Outbound No
CVPN3000-IPSec-Required-Client-Firewall-Capability
56 integer Outbound No
CVPN3000-IPSec-Client-Firewall-Filter-Name
57 string (maximum length 247 characters)
Outbound No
Table C-3 Cisco VPN 3000 Concentrator RADIUS VSAs (continued)
Attribute Number Type of Value Inbound/Outbound Multiple
C-10User Guide for Cisco Secure ACS for Windows Server
78-14696-01, Version 3.1

Appendix C RADIUS AttributesCisco VPN 5000 Concentrator Dictionary of RADIUS VSAs
Cisco VPN 5000 Concentrator Dictionary of RADIUS VSAs
Cisco Secure ACS supports the Cisco VPN 5000 RADIUS VSAs. The vendor ID for this Cisco RADIUS Implementation is 255. Table C-4 lists the supported Cisco VPN 5000 Concentrator RADIUS VSAs.
CVPN3000-IPSec-Client-Firewall-Filter-Optional
58 integer Outbound No
CVPN3000-IPSec-Backup-Servers 59 integer Outbound No
CVPN3000-IPSec-Backup-Server-List
60 string (maximum length 247 characters)
Outbound No
CVPN3000-MS-Client-Intercept-DHCP-Configure-Message
62 integer Outbound No
CVPN3000-MS-Client-Subnet-Mask
63 ipaddr (maximum length 15 characters)
Outbound No
CVPN3000-Allow-Network-Extension-Mode
64 integer Outbound No
CVPN3000-Strip-Realm 135 integer Outbound No
Table C-3 Cisco VPN 3000 Concentrator RADIUS VSAs (continued)
Attribute Number Type of Value Inbound/Outbound Multiple
Table C-4 Cisco VPN 5000 Concentrator RADIUS VSAs
Attribute Number Type of Value Inbound/Outbound Multiple
CVPN5000-Tunnel-Throughput 001 integer Inbound No
CVPN5000-Client-Assigned-IP 002 string Inbound No
CVPN5000-Client-Real-IP 003 string Inbound No
C-11User Guide for Cisco Secure ACS for Windows Server
78-14696-01, Version 3.1
Appendix C RADIUS AttributesCisco Building Broadband Service Manager Dictionary of RADIUS VSA
Cisco Building Broadband Service Manager Dictionary of RADIUS VSA
Cisco Secure ACS supports a Cisco Building Broadband Service Manager (BBSM) RADIUS VSA. The vendor ID for this Cisco RADIUS Implementation is 5263. Table C-5 lists the supported Cisco BBSM RADIUS VSA.
IETF Dictionary of RADIUS AV PairsTable C-6 lists the supported RADIUS (IETF) attributes. If the attribute has a security server-specific format, the format is specified.
CVPN5000-VPN-GroupInfo 004 string (maximum length 247 characters)
Outbound No
CVPN5000-VPN-Password 005 string (maximum length 247 characters)
Outbound No
CVPN5000-Echo 006 integer Inbound No
CVPN5000-Client-Assigned-IPX 007 integer Inbound No
Table C-4 Cisco VPN 5000 Concentrator RADIUS VSAs (continued)
Attribute Number Type of Value Inbound/Outbound Multiple
Table C-5 Cisco BBSM RADIUS VSA
Attribute NumberType of Value Inbound/Outbound Multiple
CBBSM-Bandwidth 001 integer Both No
C-12User Guide for Cisco Secure ACS for Windows Server
78-14696-01, Version 3.1

Appendix C RADIUS AttributesIETF Dictionary of RADIUS AV Pairs
Table C-6 RADIUS (IETF) Attributes
Attribute Number DescriptionType of Value
Inbound/Outbound Multiple
User-Name 1 Name of the user being authenticated.
string Inbound No
User-Password 2 User password or input following an access challenge. Passwords longer than 16 characters are encrypted using IETF Draft #2 or later specifications.
string Outbound No
CHAP-Password 3 PPP (Point-to-Point Protocol) CHAP (Challenge Handshake Authentication Protocol) response to an Access-Challenge.
string Outbound No
NAS-IP Address 4 IP address of the AAA client that is requesting authentication.
ipaddr Inbound No
C-13User Guide for Cisco Secure ACS for Windows Server
78-14696-01, Version 3.1

Appendix C RADIUS AttributesIETF Dictionary of RADIUS AV Pairs
NAS-Port 5 Physical port number of the AAA client that is authenticating the user. The AAA client port value (32 bits) consists of one or two 16-bit values, depending on the setting of the RADIUS server extended portnames command. Each 16-bit number is a 5-digit decimal integer interpreted as follows:
• For asynchronous terminal lines, async network interfaces, and virtual async interfaces, the value is 00ttt, where ttt is the line number or async interface unit number.
• For ordinary synchronous network interfaces, the value is 10xxx.
• For channels on a primary-rate ISDN (Integrated Services Digital Network) interface, the value is 2ppcc.
• For channels on a basic rate ISDN interface, the value is 3bb0c.
• For other types of interfaces, the value is 6nnss.
integer Inbound No
Table C-6 RADIUS (IETF) Attributes (continued)
Attribute Number DescriptionType of Value
Inbound/Outbound Multiple
C-14User Guide for Cisco Secure ACS for Windows Server
78-14696-01, Version 3.1

Appendix C RADIUS AttributesIETF Dictionary of RADIUS AV Pairs
Service-Type 6 Type of service requested or type of service to be provided:
• In a request:
– Framed—For known PPP or SLIP (Serial Line Internet Protocol) connection.
– Administrative User—For enable command.
• In a response:
– Login—Make a connection.
– Framed—Start SLIP or PPP.
– Administrative User—Start an EXEC or enable ok.
– Exec User—Start an EXEC session.
integer Both No
Framed-Protocol 7 Framing to be used for framed access.
integer Both No
Framed-IP-Address
8 Address to be configured for the user.
— — —
Framed-IP-Netmask
9 IP netmask to be configured for the user when the user is a router to a network. This AV results in a static route being added for Framed-IP-Address with the mask specified.
ipaddr (maximum length 15 characters)
Outbound No
Table C-6 RADIUS (IETF) Attributes (continued)
Attribute Number DescriptionType of Value
Inbound/Outbound Multiple
C-15User Guide for Cisco Secure ACS for Windows Server
78-14696-01, Version 3.1
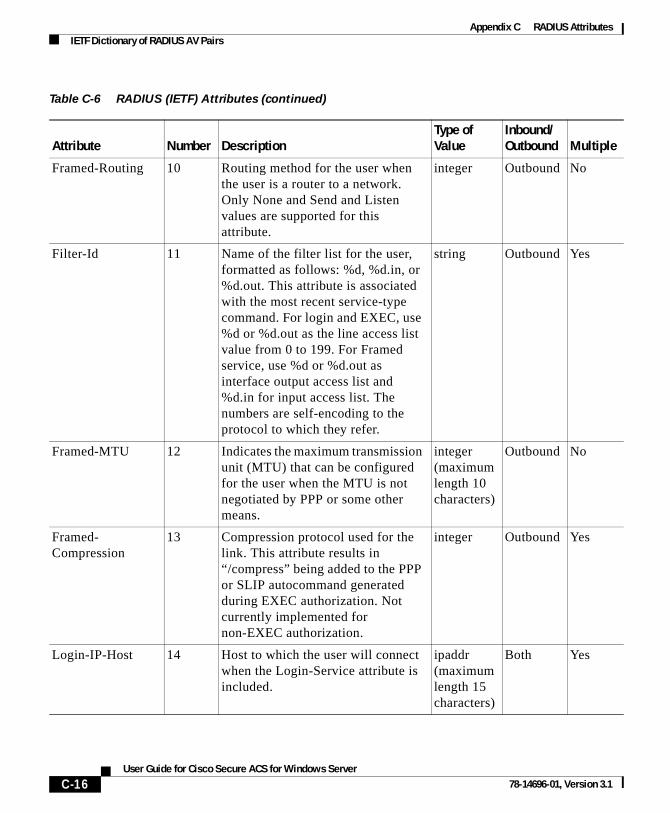
Appendix C RADIUS AttributesIETF Dictionary of RADIUS AV Pairs
Framed-Routing 10 Routing method for the user when the user is a router to a network. Only None and Send and Listen values are supported for this attribute.
integer Outbound No
Filter-Id 11 Name of the filter list for the user, formatted as follows: %d, %d.in, or %d.out. This attribute is associated with the most recent service-type command. For login and EXEC, use %d or %d.out as the line access list value from 0 to 199. For Framed service, use %d or %d.out as interface output access list and %d.in for input access list. The numbers are self-encoding to the protocol to which they refer.
string Outbound Yes
Framed-MTU 12 Indicates the maximum transmission unit (MTU) that can be configured for the user when the MTU is not negotiated by PPP or some other means.
integer (maximum length 10 characters)
Outbound No
Framed-Compression
13 Compression protocol used for the link. This attribute results in “/compress” being added to the PPP or SLIP autocommand generated during EXEC authorization. Not currently implemented for non-EXEC authorization.
integer Outbound Yes
Login-IP-Host 14 Host to which the user will connect when the Login-Service attribute is included.
ipaddr (maximum length 15 characters)
Both Yes
Table C-6 RADIUS (IETF) Attributes (continued)
Attribute Number DescriptionType of Value
Inbound/Outbound Multiple
C-16User Guide for Cisco Secure ACS for Windows Server
78-14696-01, Version 3.1
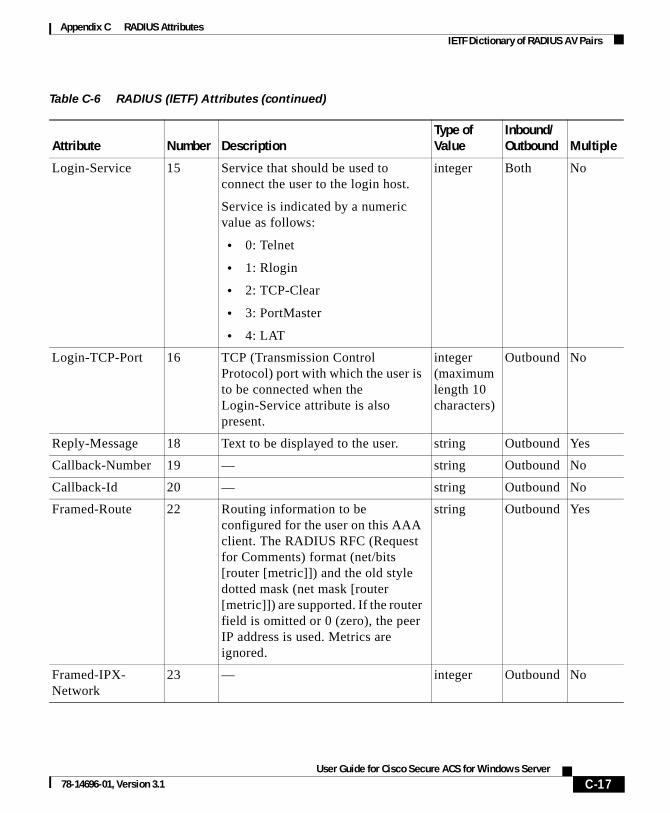
Appendix C RADIUS AttributesIETF Dictionary of RADIUS AV Pairs
Login-Service 15 Service that should be used to connect the user to the login host.
Service is indicated by a numeric value as follows:
• 0: Telnet
• 1: Rlogin
• 2: TCP-Clear
• 3: PortMaster
• 4: LAT
integer Both No
Login-TCP-Port 16 TCP (Transmission Control Protocol) port with which the user is to be connected when the Login-Service attribute is also present.
integer (maximum length 10 characters)
Outbound No
Reply-Message 18 Text to be displayed to the user. string Outbound Yes
Callback-Number 19 — string Outbound No
Callback-Id 20 — string Outbound No
Framed-Route 22 Routing information to be configured for the user on this AAA client. The RADIUS RFC (Request for Comments) format (net/bits [router [metric]]) and the old style dotted mask (net mask [router [metric]]) are supported. If the router field is omitted or 0 (zero), the peer IP address is used. Metrics are ignored.
string Outbound Yes
Framed-IPX-Network
23 — integer Outbound No
Table C-6 RADIUS (IETF) Attributes (continued)
Attribute Number DescriptionType of Value
Inbound/Outbound Multiple
C-17User Guide for Cisco Secure ACS for Windows Server
78-14696-01, Version 3.1
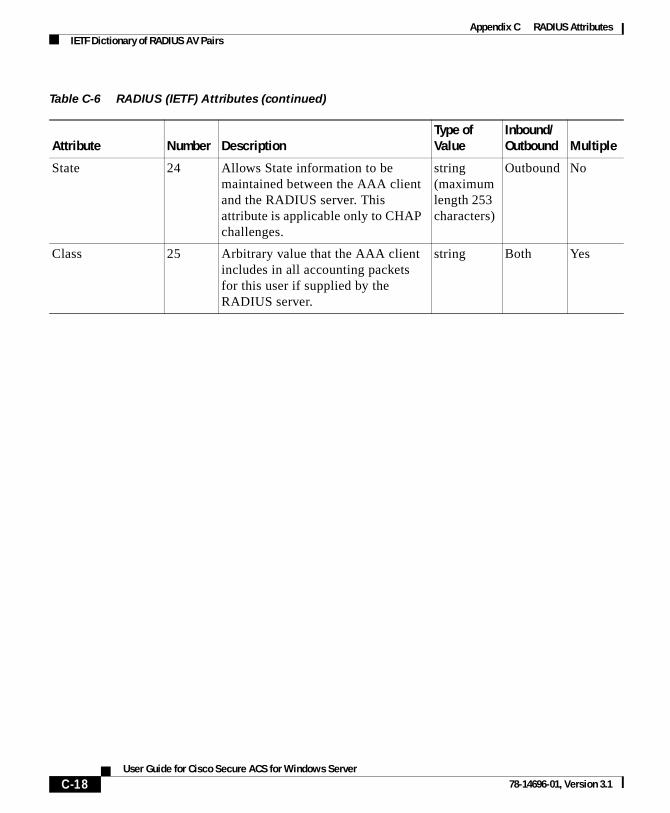
Appendix C RADIUS AttributesIETF Dictionary of RADIUS AV Pairs
State 24 Allows State information to be maintained between the AAA client and the RADIUS server. This attribute is applicable only to CHAP challenges.
string (maximum length 253 characters)
Outbound No
Class 25 Arbitrary value that the AAA client includes in all accounting packets for this user if supplied by the RADIUS server.
string Both Yes
Table C-6 RADIUS (IETF) Attributes (continued)
Attribute Number DescriptionType of Value
Inbound/Outbound Multiple
C-18User Guide for Cisco Secure ACS for Windows Server
78-14696-01, Version 3.1

Appendix C RADIUS AttributesIETF Dictionary of RADIUS AV Pairs
Vendor-Specific 26 Allows vendors to support their own extended attributes. The Cisco RADIUS implementation supports one vendor-specific option using the format recommended in the specification. The Cisco vendor-ID is 9, and the supported option is vendor-type 1, cisco-avpair. The value is a string of the format:
protocol:attribute sep value
protocol is a value of the Cisco protocol attribute for a particular type of authorization. Attribute and value are an appropriate AV pair defined in the Cisco TACACS+ specification, and “sep” is “=” for mandatory attributes and “*” for optional attributes. This allows the full set of TACACS+ authorization features to be used for RADIUS. The following is an example:
cisco-avpair= "ip:addr-pool=first" cisco-avpair= "shell:priv-lvl=15"
The first example causes the Cisco multiple named IP address pools feature to be activated during IP authorization (during PPP IPCP address assignment). The second example causes a user of a device-hosted administrative session to have immediate access to EXEC commands.
string Outbound Yes
Table C-6 RADIUS (IETF) Attributes (continued)
Attribute Number DescriptionType of Value
Inbound/Outbound Multiple
C-19User Guide for Cisco Secure ACS for Windows Server
78-14696-01, Version 3.1
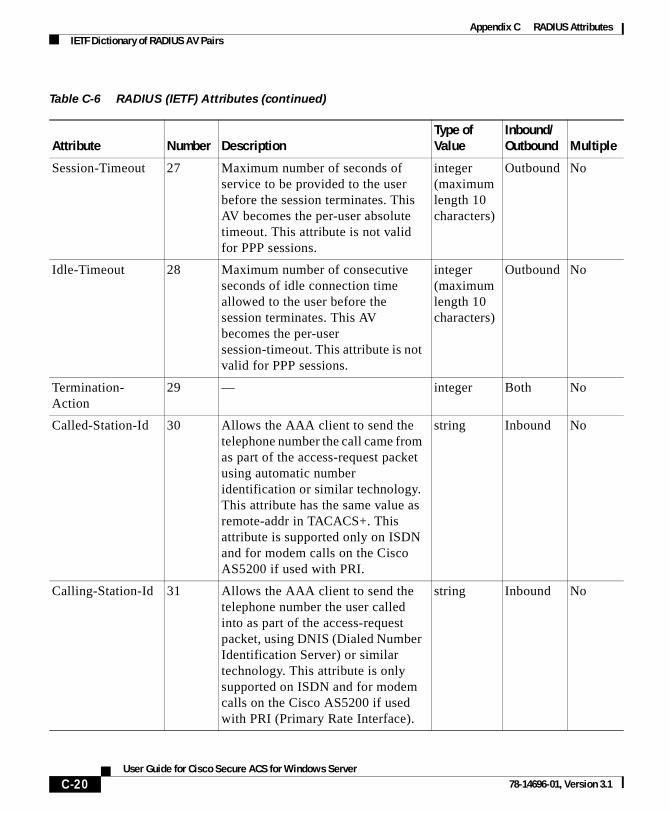
Appendix C RADIUS AttributesIETF Dictionary of RADIUS AV Pairs
Session-Timeout 27 Maximum number of seconds of service to be provided to the user before the session terminates. This AV becomes the per-user absolute timeout. This attribute is not valid for PPP sessions.
integer (maximum length 10 characters)
Outbound No
Idle-Timeout 28 Maximum number of consecutive seconds of idle connection time allowed to the user before the session terminates. This AV becomes the per-user session-timeout. This attribute is not valid for PPP sessions.
integer (maximum length 10 characters)
Outbound No
Termination-Action
29 — integer Both No
Called-Station-Id 30 Allows the AAA client to send the telephone number the call came from as part of the access-request packet using automatic number identification or similar technology. This attribute has the same value as remote-addr in TACACS+. This attribute is supported only on ISDN and for modem calls on the Cisco AS5200 if used with PRI.
string Inbound No
Calling-Station-Id 31 Allows the AAA client to send the telephone number the user called into as part of the access-request packet, using DNIS (Dialed Number Identification Server) or similar technology. This attribute is only supported on ISDN and for modem calls on the Cisco AS5200 if used with PRI (Primary Rate Interface).
string Inbound No
Table C-6 RADIUS (IETF) Attributes (continued)
Attribute Number DescriptionType of Value
Inbound/Outbound Multiple
C-20User Guide for Cisco Secure ACS for Windows Server
78-14696-01, Version 3.1
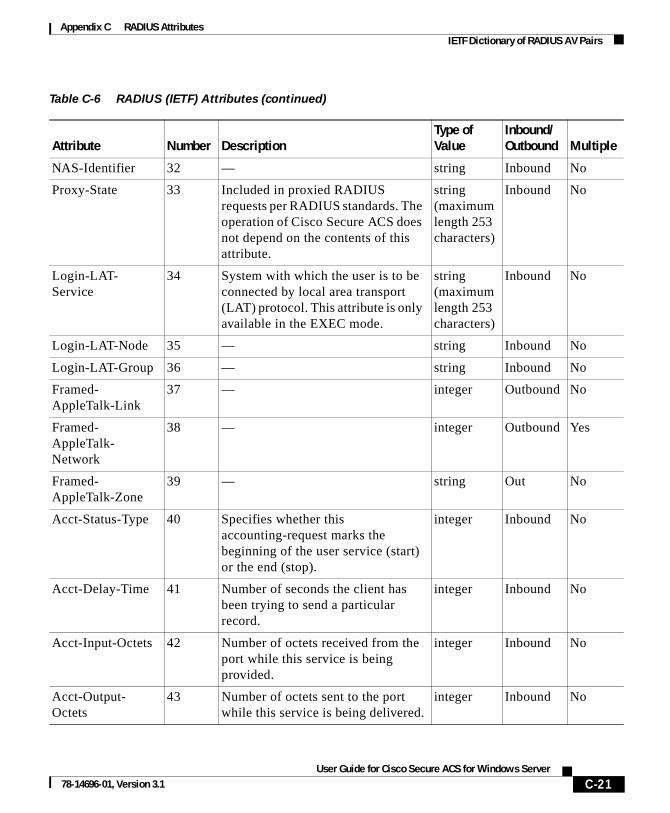
Appendix C RADIUS AttributesIETF Dictionary of RADIUS AV Pairs
NAS-Identifier 32 — string Inbound No
Proxy-State 33 Included in proxied RADIUS requests per RADIUS standards. The operation of Cisco Secure ACS does not depend on the contents of this attribute.
string (maximum length 253 characters)
Inbound No
Login-LAT-Service
34 System with which the user is to be connected by local area transport (LAT) protocol. This attribute is only available in the EXEC mode.
string (maximum length 253 characters)
Inbound No
Login-LAT-Node 35 — string Inbound No
Login-LAT-Group 36 — string Inbound No
Framed-AppleTalk-Link
37 — integer Outbound No
Framed-AppleTalk-Network
38 — integer Outbound Yes
Framed-AppleTalk-Zone
39 — string Out No
Acct-Status-Type 40 Specifies whether this accounting-request marks the beginning of the user service (start) or the end (stop).
integer Inbound No
Acct-Delay-Time 41 Number of seconds the client has been trying to send a particular record.
integer Inbound No
Acct-Input-Octets 42 Number of octets received from the port while this service is being provided.
integer Inbound No
Acct-Output-Octets
43 Number of octets sent to the port while this service is being delivered.
integer Inbound No
Table C-6 RADIUS (IETF) Attributes (continued)
Attribute Number DescriptionType of Value
Inbound/Outbound Multiple
C-21User Guide for Cisco Secure ACS for Windows Server
78-14696-01, Version 3.1
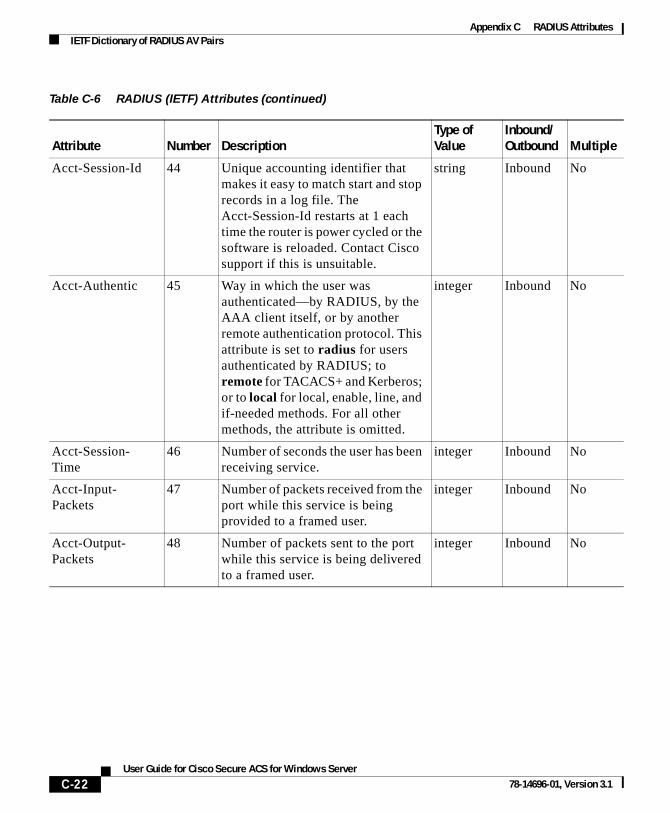
Appendix C RADIUS AttributesIETF Dictionary of RADIUS AV Pairs
Acct-Session-Id 44 Unique accounting identifier that makes it easy to match start and stop records in a log file. The Acct-Session-Id restarts at 1 each time the router is power cycled or the software is reloaded. Contact Cisco support if this is unsuitable.
string Inbound No
Acct-Authentic 45 Way in which the user was authenticated—by RADIUS, by the AAA client itself, or by another remote authentication protocol. This attribute is set to radius for users authenticated by RADIUS; to remote for TACACS+ and Kerberos; or to local for local, enable, line, and if-needed methods. For all other methods, the attribute is omitted.
integer Inbound No
Acct-Session-Time
46 Number of seconds the user has been receiving service.
integer Inbound No
Acct-Input-Packets
47 Number of packets received from the port while this service is being provided to a framed user.
integer Inbound No
Acct-Output-Packets
48 Number of packets sent to the port while this service is being delivered to a framed user.
integer Inbound No
Table C-6 RADIUS (IETF) Attributes (continued)
Attribute Number DescriptionType of Value
Inbound/Outbound Multiple
C-22User Guide for Cisco Secure ACS for Windows Server
78-14696-01, Version 3.1
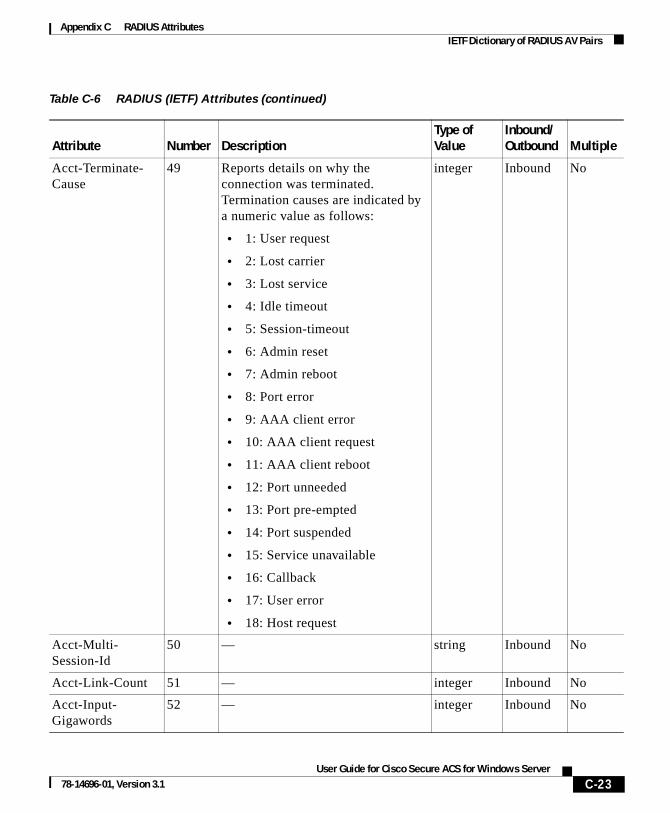
Appendix C RADIUS AttributesIETF Dictionary of RADIUS AV Pairs
Acct-Terminate-Cause
49 Reports details on why the connection was terminated. Termination causes are indicated by a numeric value as follows:
• 1: User request
• 2: Lost carrier
• 3: Lost service
• 4: Idle timeout
• 5: Session-timeout
• 6: Admin reset
• 7: Admin reboot
• 8: Port error
• 9: AAA client error
• 10: AAA client request
• 11: AAA client reboot
• 12: Port unneeded
• 13: Port pre-empted
• 14: Port suspended
• 15: Service unavailable
• 16: Callback
• 17: User error
• 18: Host request
integer Inbound No
Acct-Multi-Session-Id
50 — string Inbound No
Acct-Link-Count 51 — integer Inbound No
Acct-Input-Gigawords
52 — integer Inbound No
Table C-6 RADIUS (IETF) Attributes (continued)
Attribute Number DescriptionType of Value
Inbound/Outbound Multiple
C-23User Guide for Cisco Secure ACS for Windows Server
78-14696-01, Version 3.1

Appendix C RADIUS AttributesIETF Dictionary of RADIUS AV Pairs
Acct-Output-Gigawords
53 — integer Inbound No
Event-Timestamp 55 — date Inbound No
CHAP-Challenge 60 — string Inbound No
NAS-Port-Type 61 Indicates the type of physical port the AAA client is using to authenticate the user. Physical ports are indicated by a numeric value as follows:
• 0: Asynchronous
• 1: Synchronous
• 2: ISDN-Synchronous
• 3: ISDN-Asynchronous (V.120)
• 4: ISDN- Asynchronous (V.110)
• 5: Virtual
integer Inbound No
Port-Limit 62 Sets the maximum number of ports to be provided to the user by the network access server.
integer (maximum length 10 characters)
Both No
Login-LAT-Port 63 — string Both No
Tunnel-Type 64 — tagged integer
Both Yes
Tunnel-Medium-Type
65 — tagged integer
Both Yes
Tunnel-Client-Endpoint
66 — tagged string
Both Yes
Tunnel-Server-Endpoint
67 — Tagged string
Both Yes
Table C-6 RADIUS (IETF) Attributes (continued)
Attribute Number DescriptionType of Value
Inbound/Outbound Multiple
C-24User Guide for Cisco Secure ACS for Windows Server
78-14696-01, Version 3.1

Appendix C RADIUS AttributesIETF Dictionary of RADIUS AV Pairs
Acct-Tunnel-Connection
68 — string Inbound No
Tunnel-Password 69 — tagged string
Both Yes
ARAP-Password 70 — string Inbound No
ARAP-Features 71 — string Outbound No
ARAP-Zone-Access
72 — integer Outbound No
ARAP-Security 73 — integer Inbound No
ARAP-Security-Data
74 — string Inbound No
Password-Retry 75 — integer Internal use only
No
Prompt 76 — integer Internal use only
No
Connect-Info 77 — string Inbound No
Configuration-Token
78 — string Internal use only
No
EAP-Message 79 — string Internal use only
No
Message-Authenticator
80 — string Outbound No
Tunnel-Private-Group-ID
81 — tagged string
Both Yes
Tunnel-Assignment-ID
82 — tagged string
Both Yes
Tunnel-Preference 83 — tagged integer
Both No
Acct-Interim-Interval
85 — integer Outbound No
Table C-6 RADIUS (IETF) Attributes (continued)
Attribute Number DescriptionType of Value
Inbound/Outbound Multiple
C-25User Guide for Cisco Secure ACS for Windows Server
78-14696-01, Version 3.1
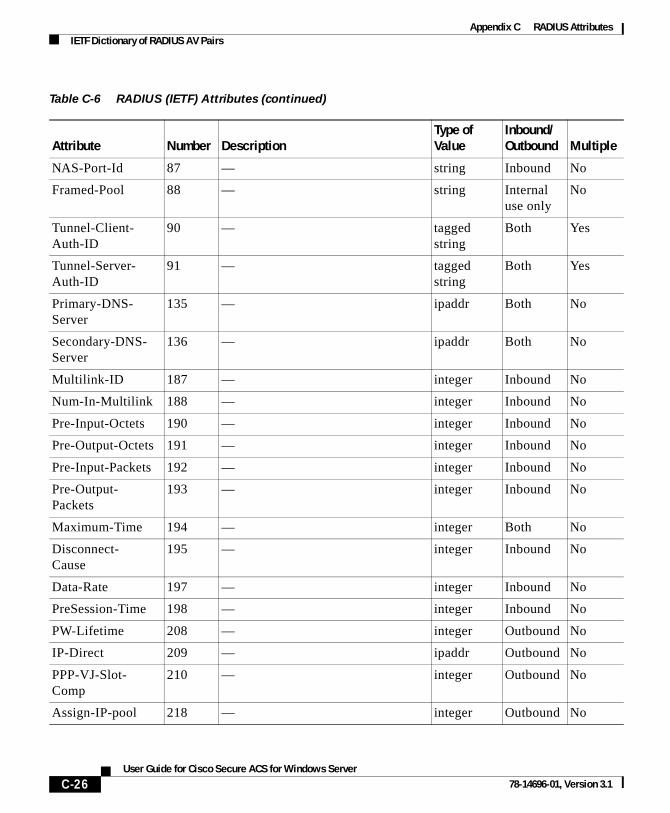
Appendix C RADIUS AttributesIETF Dictionary of RADIUS AV Pairs
NAS-Port-Id 87 — string Inbound No
Framed-Pool 88 — string Internal use only
No
Tunnel-Client-Auth-ID
90 — tagged string
Both Yes
Tunnel-Server-Auth-ID
91 — tagged string
Both Yes
Primary-DNS-Server
135 — ipaddr Both No
Secondary-DNS-Server
136 — ipaddr Both No
Multilink-ID 187 — integer Inbound No
Num-In-Multilink 188 — integer Inbound No
Pre-Input-Octets 190 — integer Inbound No
Pre-Output-Octets 191 — integer Inbound No
Pre-Input-Packets 192 — integer Inbound No
Pre-Output-Packets
193 — integer Inbound No
Maximum-Time 194 — integer Both No
Disconnect-Cause
195 — integer Inbound No
Data-Rate 197 — integer Inbound No
PreSession-Time 198 — integer Inbound No
PW-Lifetime 208 — integer Outbound No
IP-Direct 209 — ipaddr Outbound No
PPP-VJ-Slot-Comp
210 — integer Outbound No
Assign-IP-pool 218 — integer Outbound No
Table C-6 RADIUS (IETF) Attributes (continued)
Attribute Number DescriptionType of Value
Inbound/Outbound Multiple
C-26User Guide for Cisco Secure ACS for Windows Server
78-14696-01, Version 3.1
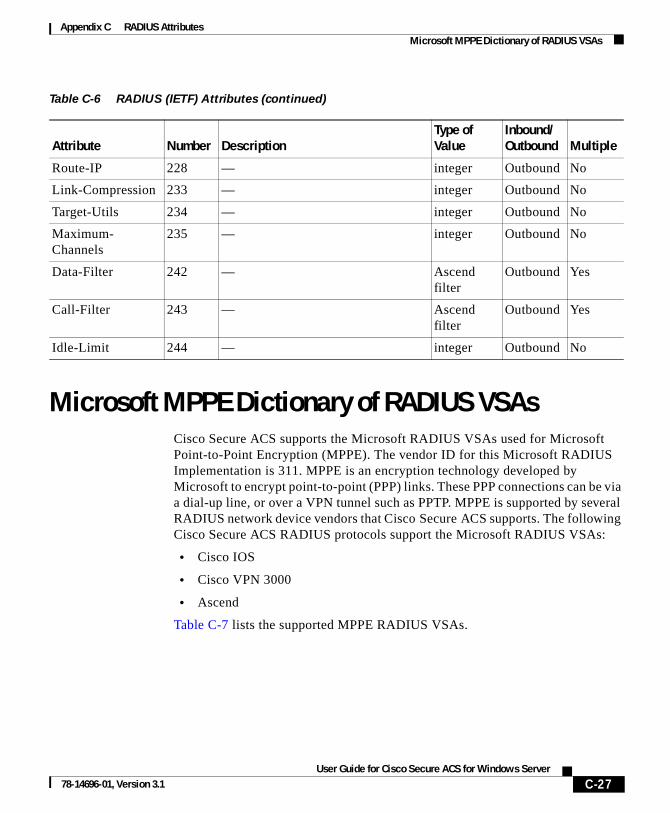
Appendix C RADIUS AttributesMicrosoft MPPE Dictionary of RADIUS VSAs
Microsoft MPPE Dictionary of RADIUS VSAsCisco Secure ACS supports the Microsoft RADIUS VSAs used for Microsoft Point-to-Point Encryption (MPPE). The vendor ID for this Microsoft RADIUS Implementation is 311. MPPE is an encryption technology developed by Microsoft to encrypt point-to-point (PPP) links. These PPP connections can be via a dial-up line, or over a VPN tunnel such as PPTP. MPPE is supported by several RADIUS network device vendors that Cisco Secure ACS supports. The following Cisco Secure ACS RADIUS protocols support the Microsoft RADIUS VSAs:
• Cisco IOS
• Cisco VPN 3000
• Ascend
Table C-7 lists the supported MPPE RADIUS VSAs.
Route-IP 228 — integer Outbound No
Link-Compression 233 — integer Outbound No
Target-Utils 234 — integer Outbound No
Maximum-Channels
235 — integer Outbound No
Data-Filter 242 — Ascend filter
Outbound Yes
Call-Filter 243 — Ascend filter
Outbound Yes
Idle-Limit 244 — integer Outbound No
Table C-6 RADIUS (IETF) Attributes (continued)
Attribute Number DescriptionType of Value
Inbound/Outbound Multiple
C-27User Guide for Cisco Secure ACS for Windows Server
78-14696-01, Version 3.1

Appendix C RADIUS AttributesMicrosoft MPPE Dictionary of RADIUS VSAs
Table C-7 Microsoft MPPE RADIUS VSAs
Attribute NumberType of Value Description
Inbound/Outbound Multiple
MS-CHAP-Response
1 string — Inbound No
MS-CHAP-Error 2 string — Outbound No
MS-CHAP-CPW-1
3 string — Inbound No
MS-CHAP-CPW-2
4 string — Inbound No
MS-CHAP-LM-Enc-PW
5 string — Inbound No
MS-CHAP-NT-Enc-PW
6 string — Inbound No
MS-MPPE-Encryption-Policy
7 integer The MS-MPPE-Encryption-Policy attribute signifies whether the use of encryption is allowed or required. If the Policy field is equal to 1 (Encryption-Allowed), any or none of the encryption types specified in the MS-MPPE-Encryption-Types attribute can be used. If the Policy field is equal to 2 (Encryption-Required), any of the encryption types specified in the MS-MPPE-Encryption-Types attribute can be used, but at least one must be used.
Outbound No
MS-MPPE-Encryption-Types
8 integer The MS-MPPE-Encryption-Types attribute signifies the types of encryption available for use with MPPE. It is a four octet integer that is interpreted as a string of bits.
Outbound No
MS-CHAP-Domain
10 string — Inbound No
C-28User Guide for Cisco Secure ACS for Windows Server
78-14696-01, Version 3.1

Appendix C RADIUS AttributesMicrosoft MPPE Dictionary of RADIUS VSAs
MS-CHAP-Challenge
11 string — Inbound No
MS-CHAP-MPPE-Keys
12 string The MS-CHAP-MPPE-Keys attribute contains two session keys for use by the MPPE. This attribute is only included in Access-Accept packets.
Note The MS-CHAP-MPPE-Keys attribute value is generated by Cisco Secure ACS; there is no value to set in the HTML interface.
Outbound No
MS-MPPE-Send-Key
16 string (maximum length 240 characters)
The MS-MPPE-Send-Key attribute contains a session key for use by MPPE. As the name implies, this key is intended for encrypting packets sent from the AAA client to the remote host. This attribute is only included in Access-Accept packets.
Outbound No
MS-MPPE-Recv-Key
17 string (maximum length 240 characters)
The MS-MPPE-Recv-Key attribute contains a session key for use by MPPE. As the name implies, this key is intended for encrypting packets received by the AAA client from the remote host. This attribute is only included in Access-Accept packets.
Outbound No
MS-RAS-Version 18 string — Inbound No
MS-CHAP-NT-Enc-PW
25 string — Inbound No
MS-CHAP2-Response
26 string — Outbound No
MS-CHAP2-CPW 27 string — Inbound No
Table C-7 Microsoft MPPE RADIUS VSAs (continued)
Attribute NumberType of Value Description
Inbound/Outbound Multiple
C-29User Guide for Cisco Secure ACS for Windows Server
78-14696-01, Version 3.1
Appendix C RADIUS AttributesAscend Dictionary of RADIUS AV Pairs
Ascend Dictionary of RADIUS AV PairsCisco Secure ACS supports the Ascend RADIUS AV pairs. Table C-8 contains Ascend RADIUS dictionary translations for parsing requests and generating responses. All transactions are composed of AV pairs. The value of each attribute is specified as one of the following valid data types:
• string—0-253 octets.
• abinary—0-254 octets.
• ipaddr—4 octets in network byte order.
• integer—32-bit value in big endian order (high byte first).
• call filter—Defines a call filter for the profile.
Note RADIUS filters are retrieved only when a call is placed using a RADIUS outgoing profile or answered using a RADIUS incoming profile. Filter entries are applied in the order in which they are entered. If you make changes to a filter in an Ascend RADIUS profile, the changes do not take effect until a call uses that profile.
• date—32-bit value in big-endian order. For example, seconds since 00:00:00 universal time (UT), January 1, 1970.
• enum—Enumerated values are stored in the user file with dictionary value translations for easy administration.
Table C-8 Ascend RADIUS Attributes
Attribute Number Type of ValueInbound/Outbound Multiple
Dictionary of Ascend Attributes
User-Name 1 string Inbound No
User-Password 2 string Outbound No
CHAP-Password 3 string Outbound No
NAS-IP-Address 4 ipaddr Inbound No
NAS-Port 5 integer Inbound No
C-30User Guide for Cisco Secure ACS for Windows Server
78-14696-01, Version 3.1
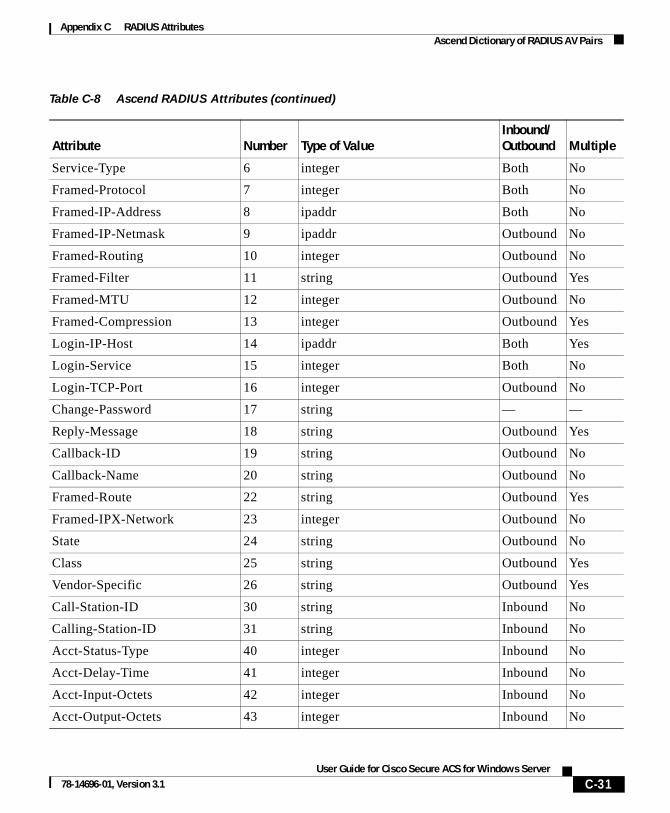
Appendix C RADIUS AttributesAscend Dictionary of RADIUS AV Pairs
Service-Type 6 integer Both No
Framed-Protocol 7 integer Both No
Framed-IP-Address 8 ipaddr Both No
Framed-IP-Netmask 9 ipaddr Outbound No
Framed-Routing 10 integer Outbound No
Framed-Filter 11 string Outbound Yes
Framed-MTU 12 integer Outbound No
Framed-Compression 13 integer Outbound Yes
Login-IP-Host 14 ipaddr Both Yes
Login-Service 15 integer Both No
Login-TCP-Port 16 integer Outbound No
Change-Password 17 string — —
Reply-Message 18 string Outbound Yes
Callback-ID 19 string Outbound No
Callback-Name 20 string Outbound No
Framed-Route 22 string Outbound Yes
Framed-IPX-Network 23 integer Outbound No
State 24 string Outbound No
Class 25 string Outbound Yes
Vendor-Specific 26 string Outbound Yes
Call-Station-ID 30 string Inbound No
Calling-Station-ID 31 string Inbound No
Acct-Status-Type 40 integer Inbound No
Acct-Delay-Time 41 integer Inbound No
Acct-Input-Octets 42 integer Inbound No
Acct-Output-Octets 43 integer Inbound No
Table C-8 Ascend RADIUS Attributes (continued)
Attribute Number Type of ValueInbound/Outbound Multiple
C-31User Guide for Cisco Secure ACS for Windows Server
78-14696-01, Version 3.1
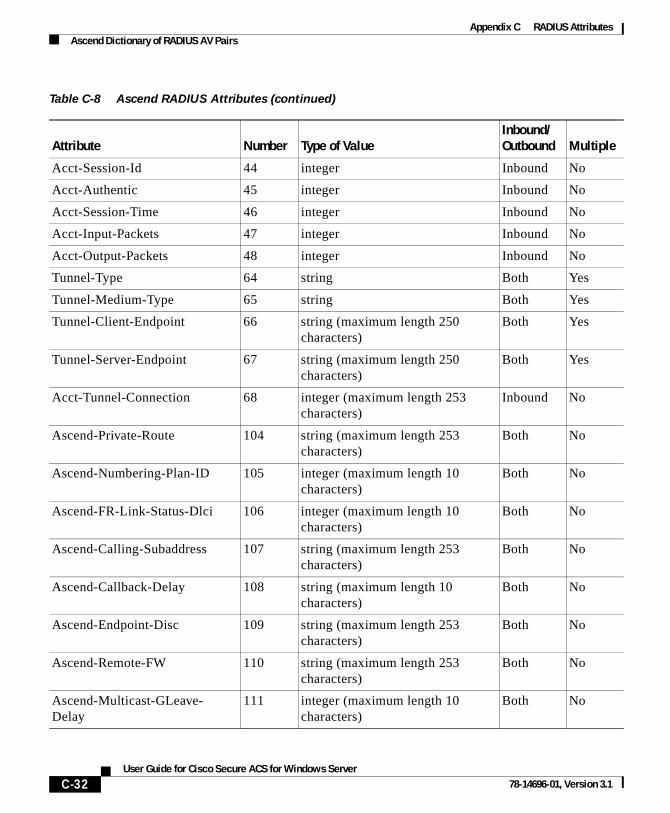
Appendix C RADIUS AttributesAscend Dictionary of RADIUS AV Pairs
Acct-Session-Id 44 integer Inbound No
Acct-Authentic 45 integer Inbound No
Acct-Session-Time 46 integer Inbound No
Acct-Input-Packets 47 integer Inbound No
Acct-Output-Packets 48 integer Inbound No
Tunnel-Type 64 string Both Yes
Tunnel-Medium-Type 65 string Both Yes
Tunnel-Client-Endpoint 66 string (maximum length 250 characters)
Both Yes
Tunnel-Server-Endpoint 67 string (maximum length 250 characters)
Both Yes
Acct-Tunnel-Connection 68 integer (maximum length 253 characters)
Inbound No
Ascend-Private-Route 104 string (maximum length 253 characters)
Both No
Ascend-Numbering-Plan-ID 105 integer (maximum length 10 characters)
Both No
Ascend-FR-Link-Status-Dlci 106 integer (maximum length 10 characters)
Both No
Ascend-Calling-Subaddress 107 string (maximum length 253 characters)
Both No
Ascend-Callback-Delay 108 string (maximum length 10 characters)
Both No
Ascend-Endpoint-Disc 109 string (maximum length 253 characters)
Both No
Ascend-Remote-FW 110 string (maximum length 253 characters)
Both No
Ascend-Multicast-GLeave-Delay
111 integer (maximum length 10 characters)
Both No
Table C-8 Ascend RADIUS Attributes (continued)
Attribute Number Type of ValueInbound/Outbound Multiple
C-32User Guide for Cisco Secure ACS for Windows Server
78-14696-01, Version 3.1

Appendix C RADIUS AttributesAscend Dictionary of RADIUS AV Pairs
Ascend-CBCP-Enable 112 string Both No
Ascend-CBCP-Mode 113 string Both No
Ascend-CBCP-Delay 114 string (maximum length 10 characters)
Both No
Ascend-CBCP-Trunk-Group 115 string (maximum length 10 characters)
Both No
Ascend-AppleTalk-Route 116 string (maximum length 253 characters)
Both No
Ascend-AppleTalk-Peer-Mode 117 string (maximum length 10 characters)
Both No
Ascend-Route-AppleTalk 118 string (maximum length 10 characters)
Both No
Ascend-FCP-Parameter 119 string (maximum length 253 characters)
Both No
Ascend-Modem-PortNo 120 integer (maximum length 10 characters)
Inbound No
Ascend-Modem-SlotNo 121 integer (maximum length 10 characters)
Inbound No
Ascend-Modem-ShelfNo 122 integer (maximum length 10 characters)
Inbound No
Ascend-Call-Attempt-Limit 123 integer (maximum length 10 characters)
Both No
Ascend-Call-Block_Duration 124 integer (maximum length 10 characters)
Both No
Ascend-Maximum-Call-Duration
125 integer (maximum length 10 characters)
Both No
Ascend-Router-Preference 126 string (maximum length 10 characters)
Both No
Ascend-Tunneling-Protocol 127 string (maximum length 10 characters)
Both No
Table C-8 Ascend RADIUS Attributes (continued)
Attribute Number Type of ValueInbound/Outbound Multiple
C-33User Guide for Cisco Secure ACS for Windows Server
78-14696-01, Version 3.1
Appendix C RADIUS AttributesAscend Dictionary of RADIUS AV Pairs
Ascend-Shared-Profile-Enable 128 integer Both No
Ascend-Primary-Home-Agent 129 string (maximum length 253 characters)
Both No
Ascend-Secondary-Home-Agent 130 string (maximum length 253 characters)
Both No
Ascend-Dialout-Allowed 131 integer Both No
Ascend-BACP-Enable 133 integer Both No
Ascend-DHCP-Maximum-Leases
134 integer (maximum length 10 characters)
Both No
Ascend-Client-Primary-DNS 135 address (maximum length 15 characters)
Both No
Ascend-Client-Secondary-DNS 136 address (maximum length 15 characters)
Both No
Ascend-Client-Assign-DNS 137 enum Both No
Ascend-User-Acct-Type 138 enum Both No
Ascend-User-Acct-Host 139 address (maximum length 15 characters)
Both No
Ascend-User-Acct-Port 140 integer (maximum length 10 characters)
Both No
Ascend-User-Acct-Key 141 string (maximum length 253 characters)
Both No
Ascend-User-Acct-Base 142 enum (maximum length 10 characters)
Both No
Ascend-User-Acct-Time 143 integer (maximum length 10 characters)
Both No
Support IP Address Allocation from Global Pools
Ascend-Assign-IP-Client 144 ipaddr (maximum length 15 characters)
Outbound No
Table C-8 Ascend RADIUS Attributes (continued)
Attribute Number Type of ValueInbound/Outbound Multiple
C-34User Guide for Cisco Secure ACS for Windows Server
78-14696-01, Version 3.1
Appendix C RADIUS AttributesAscend Dictionary of RADIUS AV Pairs
Ascend-Assign-IP-Server 145 ipaddr (maximum length 15 characters)
Outbound No
Ascend-Assign-IP-Global-Pool 146 string (maximum length 253 characters)
Outbound No
DHCP Server Functions
Ascend-DHCP-Reply 147 integer Outbound No
Ascend-DHCP-Pool-Number 148 integer (maximum length 10 characters)
Outbound No
Connection Profile/Telco Option
Ascend-Expect-Callback 149 integer Outbound No
Event Type for an Ascend-Event Packet
Ascend-Event-Type 150 integer (maximum length 10 characters)
Inbound No
RADIUS Server Session Key
Ascend-Session-Svr-Key 151 string (maximum length 253 characters)
Outbound No
Multicast Rate Limit Per Client
Ascend-Multicast-Rate-Limit 152 integer (maximum length 10 characters)
Outbound No
Connection Profile Fields to Support Interface-Based Routing
Ascend-IF-Netmask 153 ipaddr (maximum length 15 characters)
Outbound No
Ascend-Remote-Addr 154 ipaddr (maximum length 15 characters)
Outbound No
Multicast Support
Ascend-Multicast-Client 155 integer (maximum length 10 characters)
Outbound No
Frame Datalink Profiles
Table C-8 Ascend RADIUS Attributes (continued)
Attribute Number Type of ValueInbound/Outbound Multiple
C-35User Guide for Cisco Secure ACS for Windows Server
78-14696-01, Version 3.1
Appendix C RADIUS AttributesAscend Dictionary of RADIUS AV Pairs
Ascend-FR-Circuit-Name 156 string (maximum length 253 characters)
Outbound No
Ascend-FR-LinkUp 157 integer (maximum length 10 characters)
Outbound No
Ascend-FR-Nailed-Group 158 integer (maximum length 10 characters)
Outbound No
Ascend-FR-Type 159 integer (maximum length 10 characters)
Outbound No
Ascend-FR-Link-Mgt 160 integer (maximum length 10 characters)
Outbound No
Ascend-FR-N391 161 integer (maximum length 10 characters)
Outbound No
Ascend-FR-DCE-N392 162 integer (maximum length 10 characters)
Outbound No
Ascend-FR-DTE-N392 163 integer (maximum length 10 characters)
Outbound No
Ascend-FR-DCE-N393 164 integer (maximum length 10 characters)
Outbound No
Ascend-FR-DTE-N393 165 integer (maximum length 10 characters)
Outbound No
Ascend-FR-T391 166 integer (maximum length 10 characters)
Outbound No
Ascend-FR-T392 167 integer (maximum length 10 characters)
Outbound No
Ascend-Bridge-Address 168 string (maximum length 253 characters)
Outbound No
Ascend-TS-Idle-Limit 169 integer (maximum length 10 characters)
Outbound No
Ascend-TS-Idle-Mode 170 integer (maximum length 10 characters)
Outbound No
Table C-8 Ascend RADIUS Attributes (continued)
Attribute Number Type of ValueInbound/Outbound Multiple
C-36User Guide for Cisco Secure ACS for Windows Server
78-14696-01, Version 3.1
Appendix C RADIUS AttributesAscend Dictionary of RADIUS AV Pairs
Ascend-DBA-Monitor 171 integer (maximum length 10 characters)
Outbound No
Ascend-Base-Channel-Count 172 integer (maximum length 10 characters)
Outbound No
Ascend-Minimum-Channels 173 integer (maximum length 10 characters)
Outbound No
IPX Static Routes
Ascend-IPX-Route 174 string (maximum length 253 characters)
Inbound No
Ascend-FT1-Caller 175 integer (maximum length 10 characters)
Inbound No
Ascend-Backup 176 string (maximum length 253 characters)
Inbound No
Ascend-Call-Type 177 integer Inbound No
Ascend-Group 178 string (maximum length 253 characters)
Inbound No
Ascend-FR-DLCI 179 integer (maximum length 10 characters)
Inbound No
Ascend-FR-Profile-Name 180 string (maximum length 253 characters)
Inbound No
Ascend-Ara-PW 181 string (maximum length 253 characters)
Inbound No
Ascend-IPX-Node-Addr 182 string (maximum length 253 characters)
Both No
Ascend-Home-Agent-IP-Addr 183 ipaddr (maximum length 15 characters)
Outbound No
Ascend-Home-Agent-Password 184 string (maximum length 253 characters)
Outbound No
Ascend-Home-Network-Name 185 string (maximum length 253 characters)
Outbound No
Table C-8 Ascend RADIUS Attributes (continued)
Attribute Number Type of ValueInbound/Outbound Multiple
C-37User Guide for Cisco Secure ACS for Windows Server
78-14696-01, Version 3.1
Appendix C RADIUS AttributesAscend Dictionary of RADIUS AV Pairs
Ascend-Home-Agent-UDP-Port 186 integer (maximum length 10 characters)
Outbound No
Ascend-Multilink-ID 187 integer Inbound No
Ascend-Num-In-Multilink 188 integer Inbound No
Ascend-First-Dest 189 ipaddr Inbound No
Ascend-Pre-Input-Octets 190 integer Inbound No
Ascend-Pre-Output-Octets 191 integer Inbound No
Ascend-Pre-Input-Packets 192 integer Inbound No
Ascend-Pre-Output-Packets 193 integer Inbound No
Ascend-Maximum-Time 194 integer (maximum length 10 characters)
Both No
Ascend-Disconnect-Cause 195 integer Inbound No
Ascend-Connect-Progress 196 integer Inbound No
Ascend-Data-Rate 197 integer Inbound No
Ascend-PreSession-Time 198 integer Inbound No
Ascend-Token-Idle 199 integer (maximum length 10 characters)
Outbound No
Ascend-Token-Immediate 200 integer Outbound No
Ascend-Require-Auth 201 integer (maximum length 10 characters)
Outbound No
Ascend-Number-Sessions 202 string (maximum length 253 characters)
Outbound No
Ascend-Authen-Alias 203 string (maximum length 253 characters)
Outbound No
Ascend-Token-Expiry 204 integer (maximum length 10 characters)
Outbound No
Ascend-Menu-Selector 205 string (maximum length 253 characters)
Outbound No
Table C-8 Ascend RADIUS Attributes (continued)
Attribute Number Type of ValueInbound/Outbound Multiple
C-38User Guide for Cisco Secure ACS for Windows Server
78-14696-01, Version 3.1
Appendix C RADIUS AttributesAscend Dictionary of RADIUS AV Pairs
Ascend-Menu-Item 206 string Outbound Yes
RADIUS Password Expiration Options
Ascend-PW-Warntime 207 integer (maximum length 10 characters)
Outbound No
Ascend-PW-Lifetime 208 integer (maximum length 10 characters)
Outbound No
Ascend-IP-Direct 209 ipaddr (maximum length 15 characters)
Outbound No
Ascend-PPP-VJ-Slot-Comp 210 integer (maximum length 10 characters)
Outbound No
Ascend-PPP-VJ-1172 211 integer (maximum length 10 characters)
Outbound No
Ascend-PPP-Async-Map 212 integer (maximum length 10 characters)
Outbound No
Ascend-Third-Prompt 213 string (maximum length 253 characters)
Outbound No
Ascend-Send-Secret 214 string (maximum length 253 characters)
Outbound No
Ascend-Receive-Secret 215 string (maximum length 253 characters)
Outbound No
Ascend-IPX-Peer-Mode 216 integer Outbound No
Ascend-IP-Pool-Definition 217 string (maximum length 253 characters)
Outbound No
Ascend-Assign-IP-Pool 218 integer Outbound No
Ascend-FR-Direct 219 integer Outbound No
Ascend-FR-Direct-Profile 220 string (maximum length 253 characters)
Outbound No
Ascend-FR-Direct-DLCI 221 integer (maximum length 10 characters)
Outbound No
Table C-8 Ascend RADIUS Attributes (continued)
Attribute Number Type of ValueInbound/Outbound Multiple
C-39User Guide for Cisco Secure ACS for Windows Server
78-14696-01, Version 3.1

Appendix C RADIUS AttributesAscend Dictionary of RADIUS AV Pairs
Ascend-Handle-IPX 222 integer Outbound No
Ascend-Netware-Timeout 223 integer (maximum length 10 characters)
Outbound No
Ascend-IPX-Alias 224 string (maximum length 253 characters)
Outbound No
Ascend-Metric 225 integer (maximum length 10 characters)
Outbound No
Ascend-PRI-Number-Type 226 integer Outbound No
Ascend-Dial-Number 227 string (maximum length 253 characters)
Outbound No
Connection Profile/PPP Options
Ascend-Route-IP 228 integer Outbound No
Ascend-Route-IPX 229 integer Outbound No
Ascend-Bridge 230 integer Outbound No
Ascend-Send-Auth 231 integer Outbound No
Ascend-Send-Passwd 232 string (maximum length 253 characters)
Outbound No
Ascend-Link-Compression 233 integer Outbound No
Ascend-Target-Util 234 integer (maximum length 10 characters)
Outbound No
Ascend-Max-Channels 235 integer (maximum length 10 characters)
Outbound No
Ascend-Inc-Channel-Count 236 integer (maximum length 10 characters)
Outbound No
Ascend-Dec-Channel-Count 237 integer (maximum length 10 characters)
Outbound No
Ascend-Seconds-Of-History 238 integer (maximum length 10 characters)
Outbound No
Ascend-History-Weigh-Type 239 integer Outbound No
Table C-8 Ascend RADIUS Attributes (continued)
Attribute Number Type of ValueInbound/Outbound Multiple
C-40User Guide for Cisco Secure ACS for Windows Server
78-14696-01, Version 3.1
Appendix C RADIUS AttributesAscend Dictionary of RADIUS AV Pairs
Ascend-Add-Seconds 240 integer (maximum length 10 characters)
Outbound No
Ascend-Remove-Seconds 241 integer (maximum length 10 characters)
Outbound No
Connection Profile/Session Options
Ascend-Data-Filter 242 call filter Outbound Yes
Ascend-Call-Filter 243 call filter Outbound Yes
Ascend-Idle-Limit 244 integer (maximum length 10 characters)
Outbound No
Ascend-Preempt-Limit 245 integer (maximum length 10 characters)
Outbound No
Connection Profile/Telco Options
Ascend-Callback 246 integer Outbound No
Ascend-Data-Svc 247 integer Outbound No
Ascend-Force-56 248 integer Outbound No
Ascend-Billing-Number 249 string (maximum length 253 characters)
Outbound No
Ascend-Call-By-Call 250 integer (maximum length 10 characters)
Outbound No
Ascend-Transit-Number 251 string (maximum length 253 characters)
Outbound No
Terminal Server Attributes
Ascend-Host-Info 252 string (maximum length 253 characters)
Outbound No
PPP Local Address Attribute
Ascend-PPP-Address 253 ipaddr (maximum length 15 characters)
Outbound No
MPP Percent Idle Attribute
Table C-8 Ascend RADIUS Attributes (continued)
Attribute Number Type of ValueInbound/Outbound Multiple
C-41User Guide for Cisco Secure ACS for Windows Server
78-14696-01, Version 3.1
Appendix C RADIUS AttributesNortel Dictionary of RADIUS VSAs
Nortel Dictionary of RADIUS VSAsTable C-9 lists the Nortel RADIUS VSAs supported by Cisco Secure ACS. The Nortel vendor ID number is 1584.
Ascend-MPP-Idle-Percent 254 integer (maximum length 10 characters)
Outbound No
Ascend-Xmit-Rate 255 integer (maximum length 10 characters)
Outbound No
Table C-8 Ascend RADIUS Attributes (continued)
Attribute Number Type of ValueInbound/Outbound Multiple
Table C-9 Nortel RADIUS VSAs
Attribute Number Type of ValueInbound/Outbound Multiple
Bay-Local-IP-Address 035 ipaddr (maximum length 15 characters)
Outbound No
Bay-Primary-DNS-Server 054 ipaddr (maximum length 15 characters)
Outbound No
Bay-Secondary-DNS-Server 055 ipaddr (maximum length 15 characters)
Outbound No
Bay-Primary-NBNS-Server 056 ipaddr (maximum length 15 characters)
Outbound No
Bay-Secondary-NBNS-Server 057 ipaddr (maximum length 15 characters)
Outbound No
Bay-User-Level 100 integer Outbound No
Bay-Audit-Level 101 integer Outbound No
C-42User Guide for Cisco Secure ACS for Windows Server
78-14696-01, Version 3.1
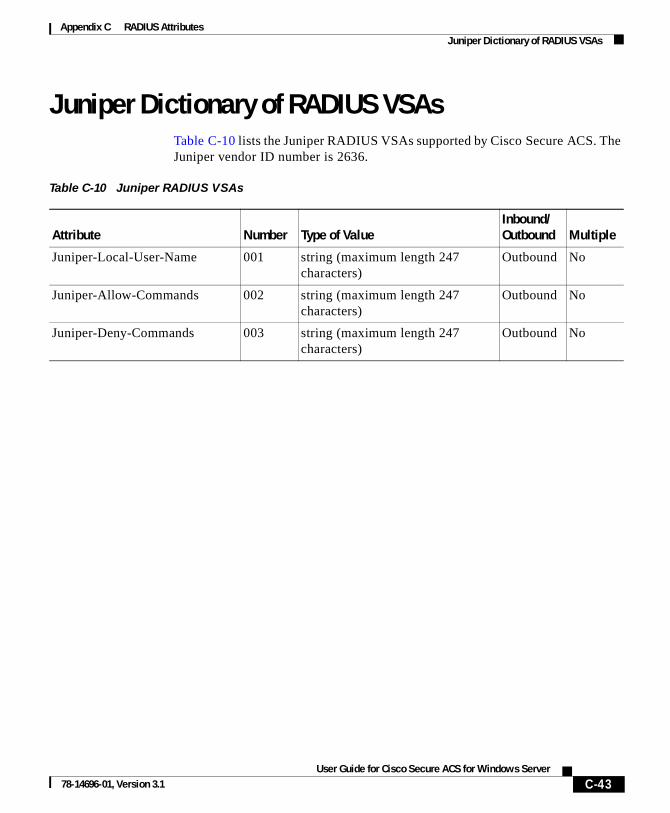
Appendix C RADIUS AttributesJuniper Dictionary of RADIUS VSAs
Juniper Dictionary of RADIUS VSAsTable C-10 lists the Juniper RADIUS VSAs supported by Cisco Secure ACS. The Juniper vendor ID number is 2636.
Table C-10 Juniper RADIUS VSAs
Attribute Number Type of ValueInbound/Outbound Multiple
Juniper-Local-User-Name 001 string (maximum length 247 characters)
Outbound No
Juniper-Allow-Commands 002 string (maximum length 247 characters)
Outbound No
Juniper-Deny-Commands 003 string (maximum length 247 characters)
Outbound No
C-43User Guide for Cisco Secure ACS for Windows Server
78-14696-01, Version 3.1

Appendix C RADIUS AttributesJuniper Dictionary of RADIUS VSAs
C-44User Guide for Cisco Secure ACS for Windows Server
78-14696-01, Version 3.1
User Guide for 78-14696-01, Version 3.1
A
P P E N D I X D Cisco Secure ACS Command-Line Database UtilityThis appendix details the Cisco Secure ACS command-line utility, CSUtil.exe. Among its several functions, CSUtil.exe enables you to add, change, and delete users from a colon-delimited text file. You can also use the utility to add and delete AAA client configurations.
Note You can accomplish similar tasks using the ACS System Backup, ACS System Restore, Database Replication, and RDBMS Synchronization features. For more information on these features, see Chapter 8, “Establishing Cisco Secure ACS System Configuration.”
This appendix contains the following topics:
• Location of CSUtil.exe and Related Files, page D-2
• CSUtil.exe Syntax, page D-2
• CSUtil.exe Options, page D-3
• Backing Up Cisco Secure ACS with CSUtil.exe, page D-4
• Restoring Cisco Secure ACS with CSUtil.exe, page D-5
• Creating a CiscoSecure User Database, page D-7
• Creating a Cisco Secure ACS Database Dump File, page D-8
• Loading the Cisco Secure ACS Database from a Dump File, page D-9
• Compacting the CiscoSecure User Database, page D-11
D-1Cisco Secure ACS for Windows Server
Appendix D Cisco Secure ACS Command-Line Database UtilityLocation of CSUtil.exe and Related Files
• User and AAA Client Import Option, page D-13
• Exporting User List to a Text File, page D-23
• Exporting Group Information to a Text File, page D-24
• Exporting Registry Information to a Text File, page D-25
• Decoding Error Numbers, page D-26
• Recalculating CRC Values, page D-27
• User-Defined RADIUS Vendors and VSA Sets, page D-27
Location of CSUtil.exe and Related FilesWhen you install Cisco Secure ACS in the default location, CSUtil.exe is located in the following directory:
C:\Program Files\CiscoSecure ACS vX.X\Utils
where X.X is the version of your Cisco Secure ACS software. Regardless of where you install Cisco Secure ACS, CSUtil.exe is located in the Utils directory.
Files generated by or accessed by CSUtil.exe are also located in the Utils directory.
CSUtil.exe SyntaxThe syntax for the CSUtil.exe command is as follows:
CSUtil.exe [-q] [-c] [-d] [-g] [-i filename] [[-p] -l filename] [-e -number] [-b filename] [-r filename] [-f] [-n] [-u] [-y] [-listUDV] [-addUDV slotfilename] [-delUDV slot]
Note Most CSUtil.exe options require that you stop the CSAuth service. While the CSAuth service is stopped, Cisco Secure ACS does not authenticate users. To determine if an option requires that you stop CSAuth, see CSUtil.exe Options, page D-3.
D-2User Guide for Cisco Secure ACS for Windows Server
78-14696-01, Version 3.1

Appendix D Cisco Secure ACS Command-Line Database UtilityCSUtil.exe Options
You can combine many of the options in a single use of CSUtil.exe. If you are new to using CSUtil.exe, we recommend performing only one option at a time, with the exception of those options, such as -p, that must be used in conjunction with other options.
Experienced CSUtil.exe users may find it useful to combine CSUtil.exe options, such as in the following example, which would first import AAA client configurations and then generate a dump of all Cisco Secure ACS internal data:
CSUtil.exe -i newnases.txt -d
CSUtil.exe OptionsCSUtil.exe can perform several actions. The options, listed below in alphabetical order, are detailed in later sections of this chapter.
• -b—Backup system to a specified filename. For more information about this option, see Backing Up Cisco Secure ACS with CSUtil.exe, page D-4.
• -c—Recalculate database CRC values. For more information about this option, see Recalculating CRC Values, page D-27.
• -d—Export all Cisco Secure ACS internal data to a file named dump.txt. Using this option requires that you stop the CSAuth service. For more information about this option, see Creating a Cisco Secure ACS Database Dump File, page D-8.
• -e—Decode internal Cisco Secure ACS error numbers to ASCII message. For more information about this option, see Decoding Error Numbers, page D-26.
• -g—Export group information to a file named groups.txt. Using this option requires that you stop the CSAuth service. For more information about this option, see Exporting Group Information to a Text File, page D-24.
• -i—Import user or AAA client information from a file named import.txt or a specified file. For more information about this option, see Importing User and AAA Client Information, page D-13.
• -l—Load all Cisco Secure ACS internal data from a file named dump.txt or named file. Using this option requires that you stop the CSAuth service. For more information about this option, see Loading the Cisco Secure ACS Database from a Dump File, page D-9.
D-3User Guide for Cisco Secure ACS for Windows Server
78-14696-01, Version 3.1
Appendix D Cisco Secure ACS Command-Line Database UtilityBacking Up Cisco Secure ACS with CSUtil.exe
• -n—Create CiscoSecure user database and index. Using this option requires that you stop the CSAuth service. For more information about this option, see Creating a CiscoSecure User Database, page D-7.
• -p—Reset password aging counters during database load, to be used only in conjunction with the -l option. For more information about this option, see Loading the Cisco Secure ACS Database from a Dump File, page D-9.
• -q—Run CSUtil.exe without confirmation prompts.
• -r—Restore system from a specified backup filename. For more information about this option, see Restoring Cisco Secure ACS with CSUtil.exe, page D-5.
• -u—Export user information, sorted by group membership, to a file named users.txt. Using this option requires that you stop the CSAuth service. For more information about this option, see Exporting User List to a Text File, page D-23.
• -y—Dump Windows Registry configuration information to a file named setup.txt. For more information about this option, see Exporting Registry Information to a Text File, page D-25.
• -addUDV—Add a user-defined RADIUS vendor-specific attribute (VSA). For more information about this option, see Adding a Custom RADIUS Vendor and VSA Set, page D-28.
• -delUDV—Delete a user-defined RADIUS VSA. For more information about this option, see Deleting a Custom RADIUS Vendor and VSA Set, page D-30.
• -listUDV—List all user-defined RADIUS VSAs currently defined in Cisco Secure ACS. For more information about this option, see Listing Custom RADIUS Vendors, page D-31.
Backing Up Cisco Secure ACS with CSUtil.exeYou can use the -b option to create a system backup of all Cisco Secure ACS internal data. The resulting backup file has the same data as the backup files produced by the ACS Backup feature found in the HTML interface. For more information about the ACS Backup feature, see Cisco Secure ACS Backup, page 8-47.
D-4User Guide for Cisco Secure ACS for Windows Server
78-14696-01, Version 3.1

Appendix D Cisco Secure ACS Command-Line Database UtilityRestoring Cisco Secure ACS with CSUtil.exe
Note During the backup, all services are automatically stopped and restarted. No users are authenticated while the backup is occurring.
To back up Cisco Secure ACS with CSUtil.exe, follow these steps:
Step 1 On the Cisco Secure ACS server, open an MS DOS command prompt and change directories to the directory containing CSUtil.exe. For more information about the location of CSUtil.exe, see Location of CSUtil.exe and Related Files, page D-2.
Step 2 Type:
CSUtil.exe -b filename
where filename is the name of the backup file. Press Enter.
Result: CSUtil.exe displays a confirmation prompt.
Step 3 To confirm that you want to perform a backup and to halt all Cisco Secure ACS services during the backup, type Y and press Enter.
Result: CSUtil.exe generates a complete backup of all Cisco Secure ACS internal data, including user accounts and system configuration. This process may take a few minutes.
Note CSUtil.exe displays the error message Backup Failed when it attempts to back up components of Cisco Secure ACS that are empty, such as when no administrator accounts exist. These apply only to components that are empty, not to the overall success or failure of the backup.
Restoring Cisco Secure ACS with CSUtil.exeYou can use the -r option to restore all Cisco Secure ACS internal data. The backup file from which you restore Cisco Secure ACS can be one generated by the CSUtil.exe -b option or by the ACS Backup feature in the HTML interface.
D-5User Guide for Cisco Secure ACS for Windows Server
78-14696-01, Version 3.1
Appendix D Cisco Secure ACS Command-Line Database UtilityRestoring Cisco Secure ACS with CSUtil.exe
Cisco Secure ACS backup files contain two types of data:
• User and group data
• System configuration
You can restore either user and group data or system configuration, or both. For more information about the ACS Backup feature, see Cisco Secure ACS Backup, page 8-47.
Note During the backup, all services are automatically stopped and restarted. No users are authenticated while the restoration is occurring.
To restore Cisco Secure ACS with CSUtil.exe, follow these steps:
Step 1 On the Cisco Secure ACS server, open an MS DOS command prompt and change directories to the directory containing CSUtil.exe. For more information about the location of CSUtil.exe, see Location of CSUtil.exe and Related Files, page D-2.
Step 2 Perform the applicable restoration command:
a. To restore all data (user and group data, and system configuration), type:
CSUtil.exe -r all filename
where filename is the name of the backup file. Press Enter.
b. To restore only user and group data, type:
CSUtil.exe -r users filename
where filename is the name of the backup file. Press Enter.
c. To restore only the system configuration, type:
CSUtil.exe -r config filename
where filename is the name of the backup file. Press Enter.
Result: CSUtil.exe displays a confirmation prompt.
D-6User Guide for Cisco Secure ACS for Windows Server
78-14696-01, Version 3.1
Appendix D Cisco Secure ACS Command-Line Database UtilityCreating a CiscoSecure User Database
Step 3 To confirm that you want to perform a restoration and to halt all Cisco Secure ACS services during the restoration, type Y and press Enter.
Result: CSUtil.exe restores the specified portions of your Cisco Secure ACS data. This process may take a few minutes.
Note If the backup file is missing a database component, CSUtil.exe displays an error message. Such an error message applies only to the restoration of the missing component. The absence of a database component in a backup is usually intentional and indicates that the component was empty in Cisco Secure ACS at the time the backup was created.
Creating a CiscoSecure User DatabaseYou can use the -n option to create a CiscoSecure user database.
Note Using the -n option requires that you stop the CSAuth service. While CSAuth is stopped, no users are authenticated.
Caution Using the -n option erases all user information in the CiscoSecure user database. Unless you have a current backup or dump of your CiscoSecure user database, all user accounts are lost when you use this option.
To create a CiscoSecure user database, follow these steps:
Step 1 If you have not performed a backup or dump of the CiscoSecure user database, do so now before proceeding. For more information about backing up the database, see Backing Up Cisco Secure ACS with CSUtil.exe, page D-4.
Step 2 On the Cisco Secure ACS server, open an MS DOS command prompt and change directories to the directory containing CSUtil.exe. For more information about the location of CSUtil.exe, see Location of CSUtil.exe and Related Files, page D-2.
D-7User Guide for Cisco Secure ACS for Windows Server
78-14696-01, Version 3.1
Appendix D Cisco Secure ACS Command-Line Database UtilityCreating a Cisco Secure ACS Database Dump File
Step 3 If the CSAuth service is running, type:
net stop csauth
and press Enter.
Result: The CSAuth service stops.
Step 4 Type:
CSUtil.exe -n
and press Enter.
Result: CSUtil.exe displays a confirmation prompt.
Step 5 To confirm that you want to initialize the CiscoSecure user database, type Y and press Enter.
Result: The CiscoSecure user database is initialized. This process may take a few minutes.
Step 6 To resume user authentication, type:
net start csauth
and press Enter.
Creating a Cisco Secure ACS Database Dump FileYou can use the -d option to dump all contents of the CiscoSecure user database into a text file. In addition to providing a thorough, eye-readable, and compressible backup of all Cisco Secure ACS internal data, a database dump can also be useful for the Cisco Technical Assistance Center (TAC) during troubleshooting.
Using the -l option, you can reload the Cisco Secure ACS internal data from a dump file created by the -d option. For more information about the -l option, see Loading the Cisco Secure ACS Database from a Dump File, page D-9.
Note Using the -d option requires that you stop the CSAuth service. While CSAuth is stopped, no users are authenticated.
D-8User Guide for Cisco Secure ACS for Windows Server
78-14696-01, Version 3.1
Appendix D Cisco Secure ACS Command-Line Database UtilityLoading the Cisco Secure ACS Database from a Dump File
To dump all Cisco Secure ACS internal data into a text file, follow these steps:
Step 1 On the Cisco Secure ACS server, open an MS DOS command prompt and change directories to the directory containing CSUtil.exe. For more information about the location of CSUtil.exe, see Location of CSUtil.exe and Related Files, page D-2.
Step 2 If the CSAuth service is running, type:
net stop csauth
and press Enter.
Result: The CSAuth service stops.
Step 3 Type:
CSUtil.exe -d
and press Enter.
Result: CSUtil.exe displays a confirmation prompt.
Step 4 To confirm that you want to dump all Cisco Secure ACS internal data into dump.txt, type Y and press Enter.
Result: CSUtil.exe creates the dump.txt file. This process may take a few minutes.
Step 5 To resume user authentication, type:
net start csauth
and press Enter.
Loading the Cisco Secure ACS Database from a Dump File
You can use the -l option to overwrite all Cisco Secure ACS internal data from a dump text file. This option replaces the existing all Cisco Secure ACS internal data with the data in the dump text file. In effect, the -l option initializes all Cisco Secure ACS internal data before loading it from the dump text file. Dump text files are created using the -d option. While the -d option only produces dump
D-9User Guide for Cisco Secure ACS for Windows Server
78-14696-01, Version 3.1

Appendix D Cisco Secure ACS Command-Line Database UtilityLoading the Cisco Secure ACS Database from a Dump File
text files that are named dump.txt, the -l option allows for loading renamed dump files. For more information about creating dump text files, see Creating a Cisco Secure ACS Database Dump File, page D-8.
You can use the -p option in conjunction with the -l option to reset password-aging counters.
Note Using the -l option requires that you stop the CSAuth service. While CSAuth is stopped, no users are authenticated.
To load all Cisco Secure ACS internal data from a text file, follow these steps:
Step 1 On the Cisco Secure ACS server, open an MS DOS command prompt and change directories to the directory containing CSUtil.exe. For more information about the location of CSUtil.exe, see Location of CSUtil.exe and Related Files, page D-2.
Step 2 If the CSAuth service is running, type:
net stop csauth
and press Enter.
Result: The CSAuth service stops.
Step 3 Type:
CSUtil.exe -l filename
where filename is the name of the dump file you want CSUtil.exe to use to load Cisco Secure ACS internal data. Press Enter.
Result: CSUtil.exe displays a confirmation prompt for overwriting all Cisco Secure ACS internal data with the data in the dump text file.
Note Overwriting the database does not preserve any data; instead, after the overwrite, the database contains only what is specified in the dump text file.
D-10User Guide for Cisco Secure ACS for Windows Server
78-14696-01, Version 3.1

Appendix D Cisco Secure ACS Command-Line Database UtilityCompacting the CiscoSecure User Database
Step 4 To confirm that you want to replace all Cisco Secure ACS internal data, type Y and press Enter.
Result: CSUtil.exe initializes all Cisco Secure ACS internal data, and then loads Cisco Secure ACS with the information in the dump file specified. This process may take a few minutes.
Step 5 To resume user authentication, type:
net start csauth
and press Enter.
Compacting the CiscoSecure User DatabaseLike many relational databases, the CiscoSecure user database handles the deletion of records by marking deleted records as deleted but not removing the record from the database. Over time, your CiscoSecure user database may be substantially larger than is required by the number of users it contains. To reduce the CiscoSecure user database size, you can compact it periodically.
Compacting the CiscoSecure user database consists of using in conjunction three CSUtil.exe options:
• -d—Export all Cisco Secure ACS internal data to a text file named dump.txt.
• -n—Create a CiscoSecure user database and index.
• -l—Load all Cisco Secure ACS internal data from a text file. If you do not specify the file name, CSUtil.exe uses the default file name dump.txt.
Additionally, if you want to automate this process, consider using the -q option to suppress the confirmation prompts that otherwise appear before CSUtil.exe performs the -n and -l options.
Note Compacting the CiscoSecure user database requires that you stop the CSAuth service. While CSAuth is stopped, no users are authenticated.
D-11User Guide for Cisco Secure ACS for Windows Server
78-14696-01, Version 3.1
Appendix D Cisco Secure ACS Command-Line Database UtilityCompacting the CiscoSecure User Database
To compact the CiscoSecure user database, follow these steps:
Step 1 On the Cisco Secure ACS server, open an MS DOS command prompt and change directories to the directory containing CSUtil.exe. For more information about the location of CSUtil.exe, see Location of CSUtil.exe and Related Files, page D-2.
Step 2 If the CSAuth service is running, type:
net stop csauth
and press Enter.
Result: The CSAuth service stops.
Step 3 Type:
CSUtil.exe -d -n -l
Press Enter.
Tip If you include the -q option in the command, CSUtil.exe does not prompt you for confirmation of initializing or loading the database.
Result: If you do not use the -q option, CSUtil.exe displays a confirmation prompt for initializing the database and then for loading the database. For more information about the effects of the -n option, see Creating a CiscoSecure User Database, page D-7. For more information about the effects of the -l option, see Loading the Cisco Secure ACS Database from a Dump File, page D-9.
Step 4 For each confirmation prompt that appears, type Y and press Enter.
Result: CSUtil.exe dumps all Cisco Secure ACS internal data to dump.txt, initializes the CiscoSecure user database, and reloads all Cisco Secure ACS internal data from dump.txt. This process may take a few minutes.
Step 5 To resume user authentication, type:
net start csauth
and press Enter.
D-12User Guide for Cisco Secure ACS for Windows Server
78-14696-01, Version 3.1
Appendix D Cisco Secure ACS Command-Line Database UtilityUser and AAA Client Import Option
User and AAA Client Import OptionThe -i option enables you to update Cisco Secure ACS with data from a colon-delimited text file. You can also update AAA client definitions.
For user accounts, you can add users, change user information such as passwords, or delete users. For AAA client definitions, you can add or delete AAA clients.
This section contains the following topics:
• Importing User and AAA Client Information, page D-13
• User and AAA Client Import File Format, page D-15
Importing User and AAA Client InformationTo import user or AAA client information, follow these steps:
Step 1 If you have not performed a backup or dump of Cisco Secure ACS, do so now before proceeding. For more information about backing up the database, see Backing Up Cisco Secure ACS with CSUtil.exe, page D-4.
Step 2 Create an import text file. For more information about what an import text file can or must contain, see User and AAA Client Import File Format, page D-15.
Step 3 Copy or move the import text file to the same directory as CSUtil.exe. For more information about the location of CSUtil.exe, see Location of CSUtil.exe and Related Files, page D-2.
Step 4 On the Cisco Secure ACS server, open an MS DOS command prompt and change directories to the directory containing CSUtil.exe.
Step 5 Type:
CSUtil.exe -i filename
where filename is the name of the import text file you want CSUtil.exe to use to update Cisco Secure ACS. Press Enter.
Result: CSUtil.exe displays a confirmation prompt for updating the database.
D-13User Guide for Cisco Secure ACS for Windows Server
78-14696-01, Version 3.1
Appendix D Cisco Secure ACS Command-Line Database UtilityUser and AAA Client Import Option
Step 6 To confirm that you want to update Cisco Secure ACS with the information from the import text file specified, type Y and press Enter.
Result: Cisco Secure ACS is updated with the information in the import text file specified. This process may take a few minutes.
If the import text file contained AAA client configuration data, CSUtil.exe warns you that you need to restart CSTacacs and CSRadius for these changes to take effect.
Step 7 To restart CSRadius, follow these steps:
a. Type:
net stop csradius
and press Enter.
Result: The CSRadius service stops.
b. To start CSRadius, type:
net start csradius
and press Enter.
Step 8 To restart CSTacacs, follow these steps:
a. Type:
net stop cstacacs
and press Enter.
Result: The CSTacacs service stops.
b. To start CSTacacs, type:
net start cstacacs
and press Enter.
D-14User Guide for Cisco Secure ACS for Windows Server
78-14696-01, Version 3.1
Appendix D Cisco Secure ACS Command-Line Database UtilityUser and AAA Client Import Option
User and AAA Client Import File FormatThe import file can contain six different line types. At least two are required. This section contains an overview topic, topics for each of the six line types, and an example section:
• About User and AAA Client Import File Format, page D-15
• ONLINE or OFFLINE Statement, page D-15
• ADD Statements, page D-16
• UPDATE Statements, page D-18
• DELETE Statements, page D-20
• ADD_NAS Statements, page D-21
• DEL_NAS Statements, page D-22
• Import File Example, page D-23
About User and AAA Client Import File Format
Each line of a CSUtil.exe import file is a series of colon-separated tokens. Some of the tokens are followed by values. Values, like tokens, are colon-delimited. For tokens that require values, CSUtil.exe expects the value of the token to be in the colon-delimited field immediately following the token.
ONLINE or OFFLINE Statement
CSUtil.exe requires an ONLINE or OFFLINE token in an import text file. The file must begin with a line that contains only an ONLINE or OFFLINE token. The ONLINE and OFFLINE tokens are described in Table D-1.
D-15User Guide for Cisco Secure ACS for Windows Server
78-14696-01, Version 3.1
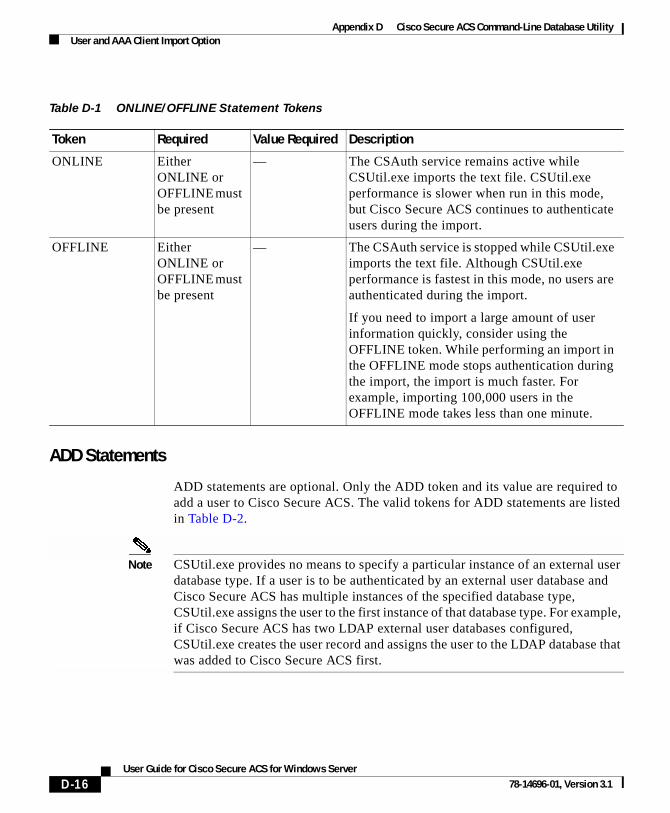
Appendix D Cisco Secure ACS Command-Line Database UtilityUser and AAA Client Import Option
ADD Statements
ADD statements are optional. Only the ADD token and its value are required to add a user to Cisco Secure ACS. The valid tokens for ADD statements are listed in Table D-2.
Note CSUtil.exe provides no means to specify a particular instance of an external user database type. If a user is to be authenticated by an external user database and Cisco Secure ACS has multiple instances of the specified database type, CSUtil.exe assigns the user to the first instance of that database type. For example, if Cisco Secure ACS has two LDAP external user databases configured, CSUtil.exe creates the user record and assigns the user to the LDAP database that was added to Cisco Secure ACS first.
Table D-1 ONLINE/OFFLINE Statement Tokens
Token Required Value Required Description
ONLINE Either ONLINE or OFFLINE must be present
— The CSAuth service remains active while CSUtil.exe imports the text file. CSUtil.exe performance is slower when run in this mode, but Cisco Secure ACS continues to authenticate users during the import.
OFFLINE Either ONLINE or OFFLINE must be present
— The CSAuth service is stopped while CSUtil.exe imports the text file. Although CSUtil.exe performance is fastest in this mode, no users are authenticated during the import.
If you need to import a large amount of user information quickly, consider using the OFFLINE token. While performing an import in the OFFLINE mode stops authentication during the import, the import is much faster. For example, importing 100,000 users in the OFFLINE mode takes less than one minute.
D-16User Guide for Cisco Secure ACS for Windows Server
78-14696-01, Version 3.1
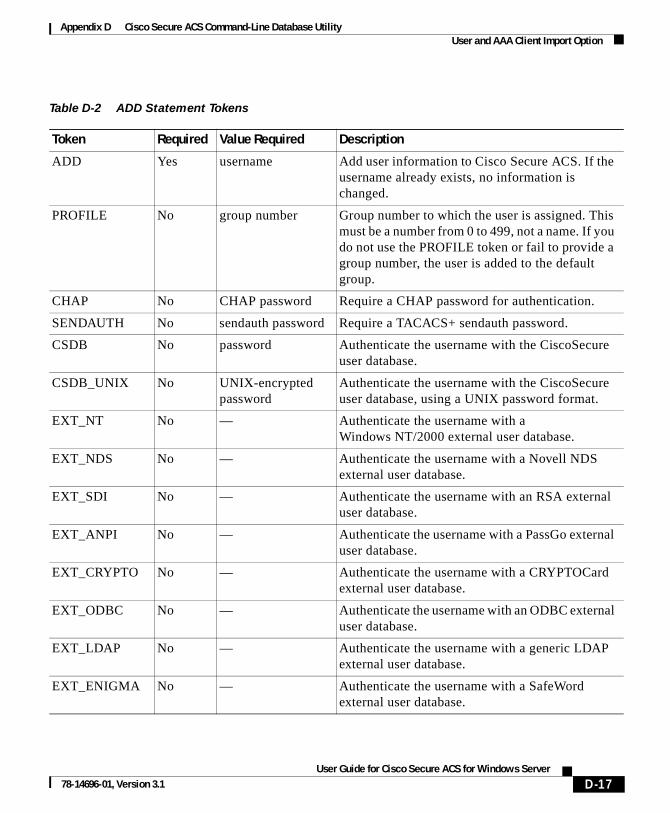
Appendix D Cisco Secure ACS Command-Line Database UtilityUser and AAA Client Import Option
Table D-2 ADD Statement Tokens
Token Required Value Required Description
ADD Yes username Add user information to Cisco Secure ACS. If the username already exists, no information is changed.
PROFILE No group number Group number to which the user is assigned. This must be a number from 0 to 499, not a name. If you do not use the PROFILE token or fail to provide a group number, the user is added to the default group.
CHAP No CHAP password Require a CHAP password for authentication.
SENDAUTH No sendauth password Require a TACACS+ sendauth password.
CSDB No password Authenticate the username with the CiscoSecure user database.
CSDB_UNIX No UNIX-encrypted password
Authenticate the username with the CiscoSecure user database, using a UNIX password format.
EXT_NT No — Authenticate the username with a Windows NT/2000 external user database.
EXT_NDS No — Authenticate the username with a Novell NDS external user database.
EXT_SDI No — Authenticate the username with an RSA external user database.
EXT_ANPI No — Authenticate the username with a PassGo external user database.
EXT_CRYPTO No — Authenticate the username with a CRYPTOCard external user database.
EXT_ODBC No — Authenticate the username with an ODBC external user database.
EXT_LDAP No — Authenticate the username with a generic LDAP external user database.
EXT_ENIGMA No — Authenticate the username with a SafeWord external user database.
D-17User Guide for Cisco Secure ACS for Windows Server
78-14696-01, Version 3.1
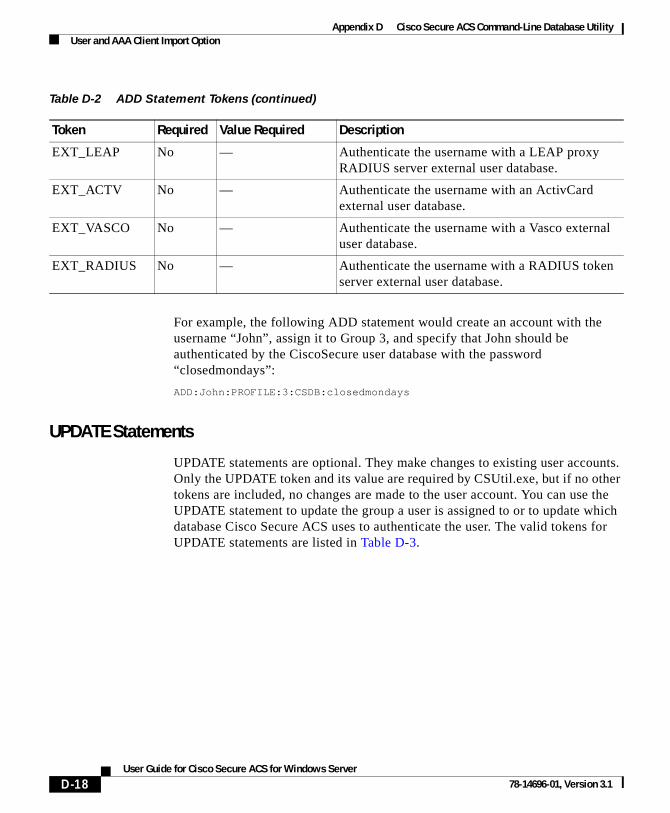
Appendix D Cisco Secure ACS Command-Line Database UtilityUser and AAA Client Import Option
For example, the following ADD statement would create an account with the username “John”, assign it to Group 3, and specify that John should be authenticated by the CiscoSecure user database with the password “closedmondays”:
ADD:John:PROFILE:3:CSDB:closedmondays
UPDATE Statements
UPDATE statements are optional. They make changes to existing user accounts. Only the UPDATE token and its value are required by CSUtil.exe, but if no other tokens are included, no changes are made to the user account. You can use the UPDATE statement to update the group a user is assigned to or to update which database Cisco Secure ACS uses to authenticate the user. The valid tokens for UPDATE statements are listed in Table D-3.
EXT_LEAP No — Authenticate the username with a LEAP proxy RADIUS server external user database.
EXT_ACTV No — Authenticate the username with an ActivCard external user database.
EXT_VASCO No — Authenticate the username with a Vasco external user database.
EXT_RADIUS No — Authenticate the username with a RADIUS token server external user database.
Table D-2 ADD Statement Tokens (continued)
Token Required Value Required Description
D-18User Guide for Cisco Secure ACS for Windows Server
78-14696-01, Version 3.1
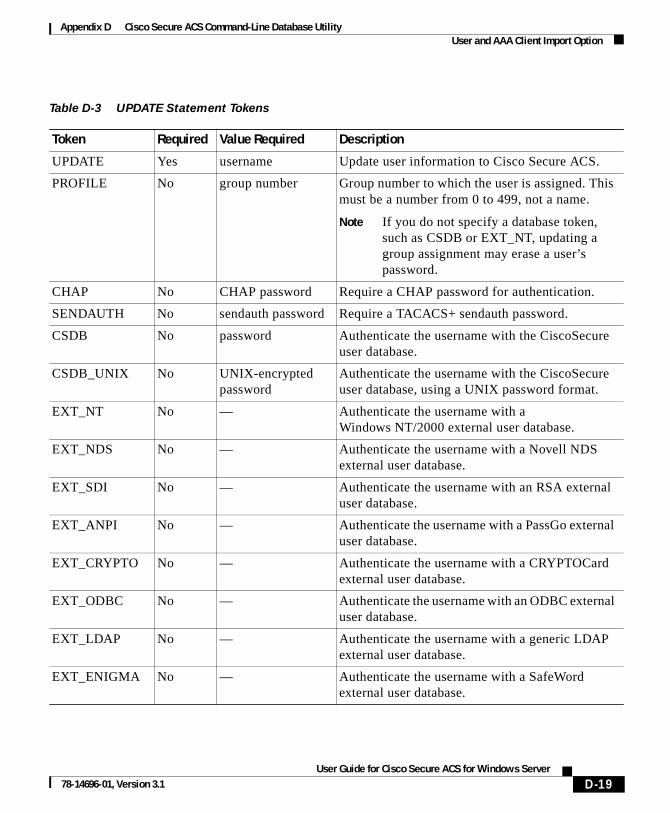
Appendix D Cisco Secure ACS Command-Line Database UtilityUser and AAA Client Import Option
Table D-3 UPDATE Statement Tokens
Token Required Value Required Description
UPDATE Yes username Update user information to Cisco Secure ACS.
PROFILE No group number Group number to which the user is assigned. This must be a number from 0 to 499, not a name.
Note If you do not specify a database token, such as CSDB or EXT_NT, updating a group assignment may erase a user’s password.
CHAP No CHAP password Require a CHAP password for authentication.
SENDAUTH No sendauth password Require a TACACS+ sendauth password.
CSDB No password Authenticate the username with the CiscoSecure user database.
CSDB_UNIX No UNIX-encrypted password
Authenticate the username with the CiscoSecure user database, using a UNIX password format.
EXT_NT No — Authenticate the username with a Windows NT/2000 external user database.
EXT_NDS No — Authenticate the username with a Novell NDS external user database.
EXT_SDI No — Authenticate the username with an RSA external user database.
EXT_ANPI No — Authenticate the username with a PassGo external user database.
EXT_CRYPTO No — Authenticate the username with a CRYPTOCard external user database.
EXT_ODBC No — Authenticate the username with an ODBC external user database.
EXT_LDAP No — Authenticate the username with a generic LDAP external user database.
EXT_ENIGMA No — Authenticate the username with a SafeWord external user database.
D-19User Guide for Cisco Secure ACS for Windows Server
78-14696-01, Version 3.1
Appendix D Cisco Secure ACS Command-Line Database UtilityUser and AAA Client Import Option
For example, the following UPDATE statement causes CSUtil.exe to update the account with username “John”, assign it to Group 50, specify that John should be authenticated by a UNIX-encrypted password, with a separate CHAP password “goodoldchap”:
UPDATE:John:PROFILE:50:CSDB_UNIX:3Al3qf9:CHAP:goodoldchap
DELETE Statements
DELETE statements are optional. The DELETE token and its value are required to delete a user account from Cisco Secure ACS. The DELETE token, detailed in Table D-4, is the only token in a DELETE statement.
For example, the following DELETE statement causes CSUtil.exe to permanently remove the account with username “John” from the CiscoSecure user database:
DELETE:John
EXT_LEAP No — Authenticate the username with a LEAP proxy RADIUS server external user database.
EXT_ACTV No — Authenticate the username with an ActivCard external user database.
EXT_VASCO No — Authenticate the username with a Vasco external user database.
EXT_RADIUS No — Authenticate the username with a RADIUS token server external user database.
Table D-3 UPDATE Statement Tokens (continued)
Token Required Value Required Description
Table D-4 UPDATE Statement Tokens
Token Required Value Required Description
DELETE Yes username The name of the user account that is to be deleted.
D-20User Guide for Cisco Secure ACS for Windows Server
78-14696-01, Version 3.1
Appendix D Cisco Secure ACS Command-Line Database UtilityUser and AAA Client Import Option
ADD_NAS Statements
ADD_NAS statements are optional. The ADD_NAS, IP, KEY, and VENDOR tokens and their values are required to add a AAA client definition to Cisco Secure ACS. The valid tokens for ADD_NAS statements are listed in Table D-5.
Table D-5 ADD_NAS Statement Tokens
Token Required Value Required Description
ADD_NAS Yes AAA client name The name of the AAA client that is to be added.
IP Yes IP address The IP address of the AAA client being added.
KEY Yes Shared secret The shared secret for the AAA client.
VENDOR Yes See Description The authentication protocol the AAA client uses. For RADIUS, this includes the VSA.
Note The valid values are listed below. Quotation marks are required due to the spaces in the protocol names.
• “TACACS+ (Cisco IOS)”
• “RADIUS (IETF)”
• “RADIUS (Cisco IOS/PIX)”
• “RADIUS (Ascend)”
• “RADIUS (Cisco VPN 3000)”
• “RADIUS (Cisco VPN 5000)”
• “RADIUS (Cisco Aironet)”
• “RADIUS (Cisco BBSM)”
• “RADIUS (Nortel)”
• “RADIUS (Juniper)”
NDG No NDG name The name of the Network Device Group to which the AAA client is to be added.
D-21User Guide for Cisco Secure ACS for Windows Server
78-14696-01, Version 3.1
Appendix D Cisco Secure ACS Command-Line Database UtilityUser and AAA Client Import Option
For example, the following ADD_NAS statement causes CSUtil.exe to add a AAA client with the name “SVR2-T+”, using TACACS+ with the single connection and keep alive packet options enabled:
ADD_NAS:SVR2-T+:IP:IP address:KEY:shared secret:VENDOR:"TACACS+ (Cisco IOS)":NDG:"East Coast":SINGLE_CON:Y:KEEPALIVE:Y
DEL_NAS Statements
DEL_NAS statements are optional. The DEL_NAS token, detailed in Table D-6, is the only token in a DEL_NAS statement. DEL_NAS statements delete AAA client definitions from Cisco Secure ACS.
For example, the following DEL_NAS statement causes CSUtil.exe to delete a AAA client with the name “SVR2-T+”:
DEL_NAS:SVR2-T+
SINGLE_CON No Y or N For AAA clients using TACACS+ only, the value set for this TOKEN specifies whether the Single Connect TACACS+ AAA Client option is enabled. For more information, see Adding a AAA Client, page 4-15.
KEEPALIVE No Y or N For AAA clients using TACACS+ only, the value set for this token specifies whether or not the Log Update/Watchdog Packets from this Access Server option is enabled. For more information, see Adding a AAA Client, page 4-15.
Table D-5 ADD_NAS Statement Tokens (continued)
Token Required Value Required Description
Table D-6 DEL_NAS Statement Tokens
Token Required Value Required Description
DEL_NAS Yes AAA client name The name of the AAA client that is to be deleted.
D-22User Guide for Cisco Secure ACS for Windows Server
78-14696-01, Version 3.1

Appendix D Cisco Secure ACS Command-Line Database UtilityExporting User List to a Text File
Import File Example
The following is an example import text file:
OFFLINEADD:user01:CSDB:userpassword:PROFILE:1 ADD:user02:EXT_NT:PROFILE:2 ADD:chapuser:CSDB:hello:CHAP:chappw:PROFILE:3 ADD:mary:EXT_NT:CHAP:achappassword ADD:joe:EXT_SDI ADD:vanessa:CSDB:vanessaspassword ADD:juan:CSDB_UNIX:unixpassword UPDATE:foobar:PROFILE:10 DELETE:paul ADD_NAS:SVR2-T+:IP:209.165.202.136:KEY:A87il032bzg:VENDOR:"TACACS+ (Cisco IOS)":NDG:"East Coast" DEL_NAS:SVR16-RAD
Exporting User List to a Text FileYou can use the -u option to export a list of all users in the CiscoSecure user database to a text file named users.txt. The users.txt file organizes users by group. Within each group, users are listed in the order that their user accounts were created in the CiscoSecure user database. For example, if accounts were created for Pat, Dana, and Lloyd, in that order, users.txt lists them in that order as well, rather than alphabetically.
Note Using the -u option requires that you stop the CSAuth service. While CSAuth is stopped, no users are authenticated.
To export user information from the CiscoSecure user database into a text file, follow these steps:
Step 1 On the Cisco Secure ACS server, open an MS DOS command prompt and change directories to the directory containing CSUtil.exe. For more information about the location of CSUtil.exe, see Location of CSUtil.exe and Related Files, page D-2.
D-23User Guide for Cisco Secure ACS for Windows Server
78-14696-01, Version 3.1
Appendix D Cisco Secure ACS Command-Line Database UtilityExporting Group Information to a Text File
Step 2 If the CSAuth service is running, type:
net stop csauth
and press Enter.
Result: The CSAuth service stops.
Step 3 Type:
CSUtil.exe -u
and press Enter.
Result: CSUtil.exe exports information for all users in the CiscoSecure user database to a file named users.txt.
Step 4 To resume user authentication, type:
net start csauth
and press Enter.
Exporting Group Information to a Text FileYou can use the -g option to export group configuration data, including device command sets, from the CiscoSecure user database to a text file named groups.txt. The groups.txt file is useful primarily for debugging purposes while working with the TAC.
Note Using the -g option requires that you stop the CSAuth service. While CSAuth is stopped, no users are authenticated.
To export group information from the CiscoSecure user database to a text file, follow these steps:
Step 1 On the Cisco Secure ACS server, open an MS DOS command prompt and change directories to the directory containing CSUtil.exe. For more information about the location of CSUtil.exe, see Location of CSUtil.exe and Related Files, page D-2.
D-24User Guide for Cisco Secure ACS for Windows Server
78-14696-01, Version 3.1
Appendix D Cisco Secure ACS Command-Line Database UtilityExporting Registry Information to a Text File
Step 2 If the CSAuth service is running, type:
net stop csauth
and press Enter.
Result: The CSAuth service stops.
Step 3 Type:
CSUtil.exe -g
and press Enter.
Result: CSUtil.exe exports information for all groups in the CiscoSecure user database to a file named groups.txt.
Step 4 To resume user authentication, type:
net start csauth
and press Enter.
Exporting Registry Information to a Text FileYou can use the -y option to export Windows Registry information for Cisco Secure ACS. CSUtil.exe exports the Registry information to a file named setup.txt. The setup.txt file is primarily useful for debugging purposes while working with the TAC.
To export Registry information from Cisco Secure ACS to a text file, follow these steps:
Step 1 On the Cisco Secure ACS server, open an MS DOS command prompt and change directories to the directory containing CSUtil.exe. For more information about the location of CSUtil.exe, see Location of CSUtil.exe and Related Files, page D-2.
D-25User Guide for Cisco Secure ACS for Windows Server
78-14696-01, Version 3.1
Appendix D Cisco Secure ACS Command-Line Database UtilityDecoding Error Numbers
Step 2 Type:
CSUtil.exe -y
and press Enter.
Result: CSUtil.exe exports Windows Registry information for Cisco Secure ACS to a file named setup.txt.
Decoding Error NumbersYou can use the -e option to decode error numbers found in Cisco Secure ACS service logs. These are error codes internal to Cisco Secure ACS. For example, the CSRadius log could contain a message similar to the following:
CSRadius/Logs/RDS.log:RDS 05/22/2001 10:09:02 E 2152 4756 Error -1087 authenticating geddy - no NAS response sent
In this example, the error code number that you could use CSUtil.exe to decode is “-1087”:
C:\Program Files\CiscoSecure ACS vx.x\Utils: CSUtil.exe -e -1087 CSUtil v3.0(1.14), Copyright 1997-2001, Cisco Systems Inc Code -1087 : External database reported error during authentication
Note The -e option applies to Cisco Secure ACS internal error codes only, not to Windows error codes sometimes captured in Cisco Secure ACS logs, such as when Windows NT/2000 authentication fails.
For more information about Cisco Secure ACS service logs, see Service Logs, page 9-28.
To decode an error number from a Cisco Secure ACS service log, follow these steps:
Step 1 On the Cisco Secure ACS server, open an MS DOS command prompt and change directories to the directory containing CSUtil.exe. For more information about the location of CSUtil.exe, see Location of CSUtil.exe and Related Files, page D-2.
D-26User Guide for Cisco Secure ACS for Windows Server
78-14696-01, Version 3.1
Appendix D Cisco Secure ACS Command-Line Database UtilityRecalculating CRC Values
Step 2 Type:
CSUtil.exe -e -number
where number is the error number found in the Cisco Secure ACS service log. Press Enter.
Note The hyphen (-) before number is required.
Result: CSUtil.exe displays the text message equivalent to the error number specified.
Recalculating CRC ValuesThe -c option is for use by the TAC. Its purpose is to resolve CRC (cyclical redundancy check) value conflicts between files manually copied into your Cisco Secure ACS directories and the values recorded in the Windows Registry.
Note Do not use the -c option unless a Cisco representative requests that you do.
User-Defined RADIUS Vendors and VSA SetsThis section provides information and procedures about user-defined RADIUS vendors and VSAs. It contains the following topics:
• About User-Defined RADIUS Vendors and VSA Sets, page D-28
• Adding a Custom RADIUS Vendor and VSA Set, page D-28
• Deleting a Custom RADIUS Vendor and VSA Set, page D-30
• Listing Custom RADIUS Vendors, page D-31
• Exporting Custom RADIUS Vendor and VSA Sets, page D-32
• RADIUS Vendor/VSA Import File, page D-33
D-27User Guide for Cisco Secure ACS for Windows Server
78-14696-01, Version 3.1

Appendix D Cisco Secure ACS Command-Line Database UtilityUser-Defined RADIUS Vendors and VSA Sets
About User-Defined RADIUS Vendors and VSA SetsIn addition to a set of predefined RADIUS vendors and vendor-specific attributes (VSAs), Cisco Secure ACS supports RADIUS vendors and VSAs that you define. We recommend that you use RDBMS Synchronization to add and configure custom RADIUS vendors; however, you can use CSUtil.exe to accomplish the same custom RADIUS vendor and VSA configurations that you can accomplish using RDBMS Synchronization. Custom RADIUS vendor and VSA configuration created by either of these two features—RDBMS Synchronization or CSUtil.exe—can be modified by the other feature. Choosing one feature for configuring custom RADIUS vendors and VSAs does not preclude using the other feature. For more information about RDMBS Synchronization, see RDBMS Synchronization, page 8-29.
Vendors you add must be IETF-compliant; therefore, all VSAs that you add must be sub-attributes of IETF RADIUS attribute number 26. You can define up to ten custom RADIUS vendors, numbered 0 (zero) through 9. CSUtil.exe allows only one instance of any given vendor, as defined by the unique vendor IETF ID number and by the vendor name.
Note If you intend to replicate user-defined RADIUS vendor and VSA configurations, user-defined RADIUS vendor and VSA definitions to be replicated must be identical on the primary and secondary Cisco Secure ACS servers, including the RADIUS vendor slots that the user-defined RADIUS vendors occupy. For more information about database replication, see CiscoSecure Database Replication, page 8-9.
Adding a Custom RADIUS Vendor and VSA SetYou can use the -addUDV option to add up to ten custom RADIUS vendors and VSA sets to Cisco Secure ACS. Each RADIUS vendor and VSA set is added to one of ten possible user-defined RADIUS vendor slots.
Note While CSUtil.exe adds a custom RADIUS vendor and VSA set to Cisco Secure ACS, all Cisco Secure ACS services are automatically stopped and restarted. No users are authenticated while this process is occurring.
D-28User Guide for Cisco Secure ACS for Windows Server
78-14696-01, Version 3.1
Appendix D Cisco Secure ACS Command-Line Database UtilityUser-Defined RADIUS Vendors and VSA Sets
Before You Begin
• Define a custom RADIUS vendor and VSA set in a RADIUS vendor/VSA import file. For more information, see RADIUS Vendor/VSA Import File, page D-33.
• Determine the RADIUS vendor slot to which you want to add the new RADIUS vendor and VSAs. For more information, see Listing Custom RADIUS Vendors, page D-31.
• Ensure that regedit is not running. If regedit is running on the Cisco Secure ACS Windows server, it can prevent Registry updates required for adding a custom RADIUS vendor and VSA set.
To add a custom RADIUS VSA to Cisco Secure ACS, follow these steps:
Step 1 On the Cisco Secure ACS server, open an MS DOS command prompt and change directories to the directory containing CSUtil.exe. For more information about the location of CSUtil.exe, see Location of CSUtil.exe and Related Files, page D-2.
Step 2 Type:
CSUtil.exe -addUDV slot-number filename
where slot-number is an unused Cisco Secure ACS RADIUS vendor slot and filename is the name of a RADIUS vendor/VSA import file. The filename can include a relative or absolute path to the RADIUS vendor/VSA import file. Press Enter.
For example, to add the RADIUS vendor defined in d:\acs\myvsa.ini to slot 5, the command would be:
CSUtil.exe -addUDV 5 d:\acs\myvsa.ini
Result: CSUtil.exe displays a confirmation prompt.
Step 3 To confirm that you want to add the RADIUS vendor and halt all Cisco Secure ACS services during the process, type Y and press Enter.
Result: CSUtil.exe halts Cisco Secure ACS services, parses the vendor/VSA input file, and adds the new RADIUS vendor and VSAs to Cisco Secure ACS. This process may take a few minutes. After it is complete, CSUtil.exe restarts Cisco Secure ACS services.
D-29User Guide for Cisco Secure ACS for Windows Server
78-14696-01, Version 3.1
Appendix D Cisco Secure ACS Command-Line Database UtilityUser-Defined RADIUS Vendors and VSA Sets
Note We recommend that you archive RADIUS vendor/VSA import files. During upgrades, the Utils directory, where CSUtil.exe is located, is replaced, including all its contents. Backing up RADIUS vendor/VSA import files ensures that you can recover your custom RADIUS vendors and VSAs after reinstallation or upgrading to a later release.
Deleting a Custom RADIUS Vendor and VSA SetYou can use the -delUDV option to delete a custom RADIUS vendor from Cisco Secure ACS.
Note While CSUtil.exe deletes a custom RADIUS vendor from Cisco Secure ACS, all Cisco Secure ACS services are automatically stopped and restarted. No users are authenticated while this process is occurring.
Before You Begin
Verify that, in the Network Configuration section of the Cisco Secure ACS HTML interface, no AAA client uses the RADIUS vendor. For more information about configuring AAA clients, see AAA Client Configuration, page 4-11.
Verify that your RADIUS accounting log does not contain attributes from the RADIUS vendor you want to delete. For more information about configuring your RADIUS accounting log, see Accounting Logs, page 9-5.
To delete a custom RADIUS vendor and VSA set from Cisco Secure ACS, follow these steps:
Step 1 On the Cisco Secure ACS server, open an MS DOS command prompt and change directories to the directory containing CSUtil.exe. For more information about the location of CSUtil.exe, see Location of CSUtil.exe and Related Files, page D-2.
D-30User Guide for Cisco Secure ACS for Windows Server
78-14696-01, Version 3.1
Appendix D Cisco Secure ACS Command-Line Database UtilityUser-Defined RADIUS Vendors and VSA Sets
Step 2 Type:
CSUtil.exe -delUDV slot-number
where slot-number is the slot containing the RADIUS vendor that you want to delete. Press Enter.
Note For more information about determining what RADIUS vendor a particular slot contains, see Listing Custom RADIUS Vendors, page D-31.
Result: CSUtil.exe displays a confirmation prompt.
Step 3 To confirm that you want to halt all Cisco Secure ACS services while deleting the custom RADIUS vendor and VSAs, type Y and press Enter.
Result: CSUtil.exe displays a second confirmation prompt.
Step 4 To confirm that you want to delete the RADIUS vendor, type Y and press Enter.
Result: CSUtil.exe halts Cisco Secure ACS services, deletes the specified RADIUS vendor from Cisco Secure ACS. This process may take a few minutes. After it is complete, CSUtil.exe restarts Cisco Secure ACS services.
Listing Custom RADIUS VendorsYou can use the -listUDV option to determine what custom RADIUS vendors are defined in Cisco Secure ACS. This option also enables you to determine which of the ten possible custom RADIUS vendor slots are in use and which RADIUS vendor occupies each used slot.
To list all custom RADIUS vendors defined in Cisco Secure ACS, follow these steps:
Step 1 On the Cisco Secure ACS server, open an MS DOS command prompt and change directories to the directory containing CSUtil.exe. For more information about the location of CSUtil.exe, see Location of CSUtil.exe and Related Files, page D-2.
D-31User Guide for Cisco Secure ACS for Windows Server
78-14696-01, Version 3.1
Appendix D Cisco Secure ACS Command-Line Database UtilityUser-Defined RADIUS Vendors and VSA Sets
Step 2 Type:
CSUtil.exe -listUDV
Press Enter.
Result: CSUtil.exe lists each user-defined RADIUS vendor slot in slot number order. CSUtil.exe lists slots that do not contain a custom RADIUS vendor as “Unassigned”. An unassigned slot is empty. You can add a custom RADIUS vendor to any slot listed as “Unassigned”.
Exporting Custom RADIUS Vendor and VSA SetsYou can export all custom RADIUS vendor and VSA sets to files. Each vendor and VSA set is saved to a separate file. The files created by this option are in the same format as RADIUS vendor/VSA import files. This option is particularly useful if you need to modify a custom RADIUS vendor and VSA set and you have misplaced the original file used to import the set.
Note Exporting a custom RADIUS vendor and VSA set does not remove the vendor and VSA set from Cisco Secure ACS.
Cisco Secure ACS places all exported vendor/VSA files in a subdirectory of the directory containing CSUtil.exe. The subdirectory is named System UDVs. For more information about the location of CSUtil.exe, see Location of CSUtil.exe and Related Files, page D-2.
Each exported vendor/VSA file is named UDV_n.ini, where n is the slot number currently occupied by the custom RADIUS vendor and VSA set. For example, if vendor Widget occupies slot 4, the exported file created by CSUtil.exe is UDV_4.ini.
To export custom RADIUS vendor and VSA sets to files, follow these steps:
Step 1 On the Cisco Secure ACS server, open an MS DOS command prompt and change directories to the directory containing CSUtil.exe. For more information about the location of CSUtil.exe, see Location of CSUtil.exe and Related Files, page D-2.
D-32User Guide for Cisco Secure ACS for Windows Server
78-14696-01, Version 3.1
Appendix D Cisco Secure ACS Command-Line Database UtilityUser-Defined RADIUS Vendors and VSA Sets
Step 2 Type:
CSUtil.exe -dumpUDV
Press Enter.
Result: For each custom RADIUS vendor and VSA set currently configured in Cisco Secure ACS, CSUtil.exe writes a file in the System UDVs subdirectory.
RADIUS Vendor/VSA Import FileTo import a custom RADIUS vendor and VSA set into Cisco Secure ACS, you must define the RADIUS vendor and VSA set in an import file.
We recommend that you archive RADIUS vendor/VSA import files. During upgrades, the Utils directory, where CSUtil.exe is located, is replaced, including all its contents. Backing up RADIUS vendor/VSA import files ensures that you can recover your custom RADIUS vendors and VSAs after reinstallation or upgrading to a later release.
This section details the format and content of RADIUS VSA import files. It includes the following topics:
• About the RADIUS Vendor/VSA Import File, page D-33
• Vendor and VSA Set Definition, page D-34
• Attribute Definition, page D-35
• Enumeration Definition, page D-37
• Example RADIUS Vendor/VSA Import File, page D-38
About the RADIUS Vendor/VSA Import File
RADIUS Vendor/VSA import files use a Windows .ini file format. Each RADIUS vendor/VSA import file comprises three types of sections, detailed in Table D-7. Each section comprises a section header and a set of keys and values. The order of the sections in the RADIUS vendor/VSA import file is irrelevant.
D-33User Guide for Cisco Secure ACS for Windows Server
78-14696-01, Version 3.1

Appendix D Cisco Secure ACS Command-Line Database UtilityUser-Defined RADIUS Vendors and VSA Sets
Vendor and VSA Set Definition
Each RADIUS vendor/VSA import file must have one vendor and VSA set section. The section header must be “[User Defined Vendor]”. Table D-8 lists valid keys for the vendor and VSA set section.
Table D-7 RADIUS VSA Import File Section Types
Section Required Number Description
Vendor and VSA set definition
Yes 1 Defines the RADIUS vendor and VSA set. For more information, see Vendor and VSA Set Definition, page D-34.
Attribute definition
Yes 1 to 255 Defines a single attribute of the VSA set. For more information, see Attribute Definition, page D-35.
Enumeration No 0 to 255 Defines enumerations for attributes with integer data types. For more information, see Enumeration Definition, page D-37.
Table D-8 Vendor and VSA Set Keys
Keys Required Value Required Description
Name Yes Vendor name The name of the RADIUS vendor.
IETF Code Yes An integer The IETF-assigned vendor number for this vendor.
VSA n (where n is the VSA number)
Yes—you can define 1 to 255 VSAs
Attribute name The name of a VSA. For each VSA named here, the file must contain a corresponding attribute definition section.
Note Attribute names must be unique within the RADIUS vendor/VSA import file, and within the set of all RADIUS attributes in Cisco Secure ACS. To facilitate this, we recommend that you prefix the vendor name to each attribute name, such as “widget-encryption” for an encryption-related attribute for the vendor Widget. This also makes accounting logs easier to understand.
D-34User Guide for Cisco Secure ACS for Windows Server
78-14696-01, Version 3.1
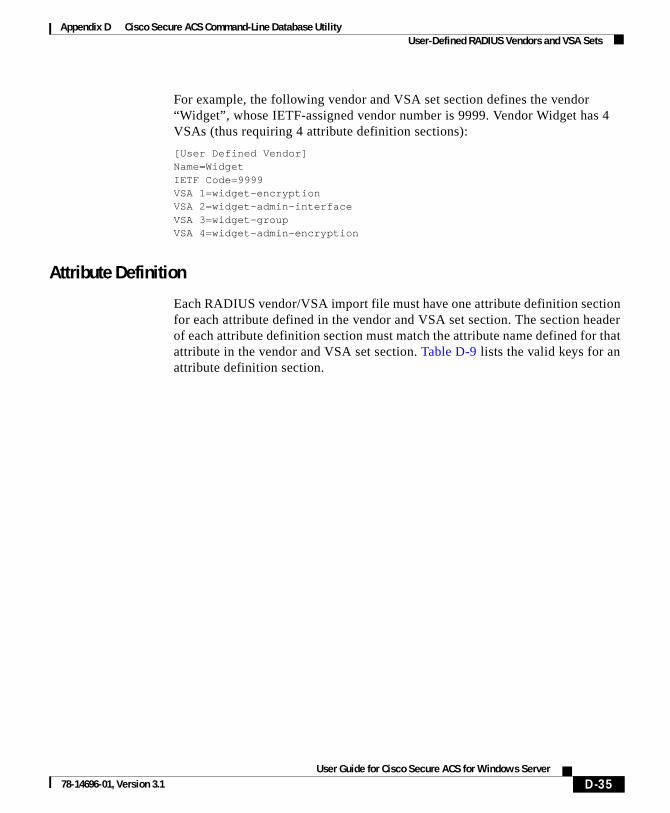
Appendix D Cisco Secure ACS Command-Line Database UtilityUser-Defined RADIUS Vendors and VSA Sets
For example, the following vendor and VSA set section defines the vendor “Widget”, whose IETF-assigned vendor number is 9999. Vendor Widget has 4 VSAs (thus requiring 4 attribute definition sections):
[User Defined Vendor] Name=Widget IETF Code=9999 VSA 1=widget-encryption VSA 2=widget-admin-interface VSA 3=widget-group VSA 4=widget-admin-encryption
Attribute Definition
Each RADIUS vendor/VSA import file must have one attribute definition section for each attribute defined in the vendor and VSA set section. The section header of each attribute definition section must match the attribute name defined for that attribute in the vendor and VSA set section. Table D-9 lists the valid keys for an attribute definition section.
D-35User Guide for Cisco Secure ACS for Windows Server
78-14696-01, Version 3.1
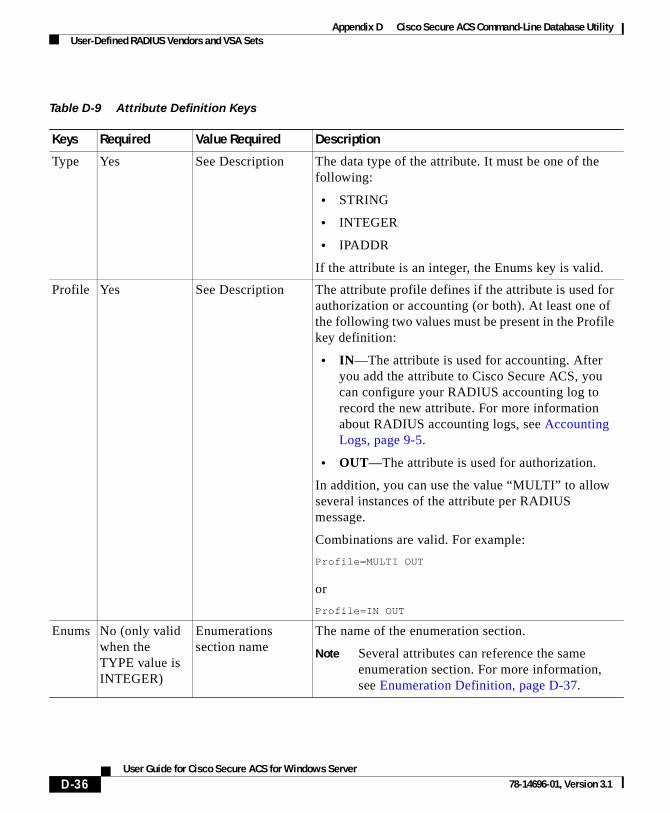
Appendix D Cisco Secure ACS Command-Line Database UtilityUser-Defined RADIUS Vendors and VSA Sets
Table D-9 Attribute Definition Keys
Keys Required Value Required Description
Type Yes See Description The data type of the attribute. It must be one of the following:
• STRING
• INTEGER
• IPADDR
If the attribute is an integer, the Enums key is valid.
Profile Yes See Description The attribute profile defines if the attribute is used for authorization or accounting (or both). At least one of the following two values must be present in the Profile key definition:
• IN—The attribute is used for accounting. After you add the attribute to Cisco Secure ACS, you can configure your RADIUS accounting log to record the new attribute. For more information about RADIUS accounting logs, see Accounting Logs, page 9-5.
• OUT—The attribute is used for authorization.
In addition, you can use the value “MULTI” to allow several instances of the attribute per RADIUS message.
Combinations are valid. For example:
Profile=MULTI OUT
or
Profile=IN OUT
Enums No (only valid when the TYPE value is INTEGER)
Enumerations section name
The name of the enumeration section.
Note Several attributes can reference the same enumeration section. For more information, see Enumeration Definition, page D-37.
D-36User Guide for Cisco Secure ACS for Windows Server
78-14696-01, Version 3.1
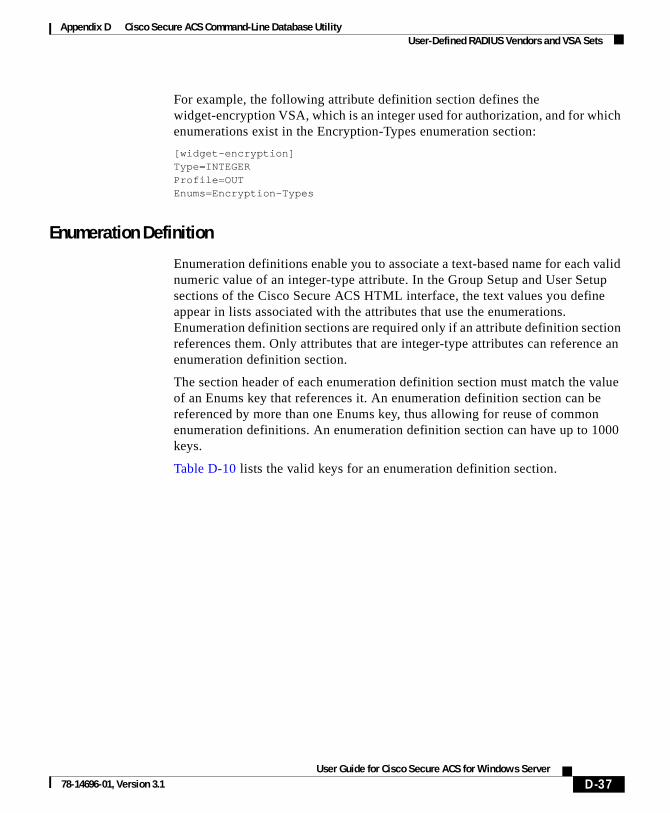
Appendix D Cisco Secure ACS Command-Line Database UtilityUser-Defined RADIUS Vendors and VSA Sets
For example, the following attribute definition section defines the widget-encryption VSA, which is an integer used for authorization, and for which enumerations exist in the Encryption-Types enumeration section:
[widget-encryption] Type=INTEGER Profile=OUT Enums=Encryption-Types
Enumeration Definition
Enumeration definitions enable you to associate a text-based name for each valid numeric value of an integer-type attribute. In the Group Setup and User Setup sections of the Cisco Secure ACS HTML interface, the text values you define appear in lists associated with the attributes that use the enumerations. Enumeration definition sections are required only if an attribute definition section references them. Only attributes that are integer-type attributes can reference an enumeration definition section.
The section header of each enumeration definition section must match the value of an Enums key that references it. An enumeration definition section can be referenced by more than one Enums key, thus allowing for reuse of common enumeration definitions. An enumeration definition section can have up to 1000 keys.
Table D-10 lists the valid keys for an enumeration definition section.
D-37User Guide for Cisco Secure ACS for Windows Server
78-14696-01, Version 3.1

Appendix D Cisco Secure ACS Command-Line Database UtilityUser-Defined RADIUS Vendors and VSA Sets
For example, the following enumerations definition section defines the Encryption-Types enumeration, which associates the string value 56-bit with the integer 0 and the string value 128-bit with the integer 1:
[Encryption-Types] 0=56-bit 1=128-bit
Example RADIUS Vendor/VSA Import File
The example RADIUS vendor/VSA import file, below, defines the vendor Widget, whose IETF number is 9999. The vendor Widget has 5 VSAs. Of those attributes, 4 are for authorization and one is for accounting. Only one attribute can have multiple instances in a single RADIUS message. Two attributes have enumerations for their valid integer values and they share the same enumeration definition section.
Table D-10 Enumerations Definition Keys
Keys Required Value Required Description
n
(See Description.)
Yes String For each valid integer value of the corresponding attribute, an enumerations section must have one key.
Each key defines a string value associated with an integer value. Cisco Secure ACS uses these string values in the HTML interface.
For example, if 0 through 4 are valid integer values for a given attribute, its enumeration definition would contain the following:
0=value0 1=value1 2=value2 3=value3 4=value4
D-38User Guide for Cisco Secure ACS for Windows Server
78-14696-01, Version 3.1
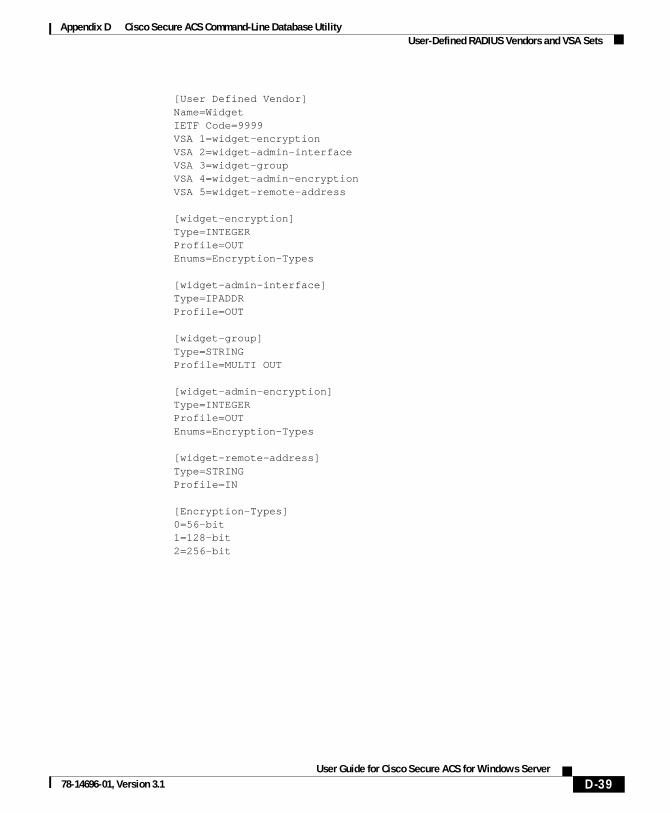
Appendix D Cisco Secure ACS Command-Line Database UtilityUser-Defined RADIUS Vendors and VSA Sets
[User Defined Vendor] Name=Widget IETF Code=9999 VSA 1=widget-encryption VSA 2=widget-admin-interface VSA 3=widget-group VSA 4=widget-admin-encryption VSA 5=widget-remote-address
[widget-encryption] Type=INTEGER Profile=OUT Enums=Encryption-Types
[widget-admin-interface] Type=IPADDR Profile=OUT
[widget-group] Type=STRING Profile=MULTI OUT
[widget-admin-encryption] Type=INTEGER Profile=OUT Enums=Encryption-Types
[widget-remote-address] Type=STRING Profile=IN
[Encryption-Types] 0=56-bit 1=128-bit 2=256-bit
D-39User Guide for Cisco Secure ACS for Windows Server
78-14696-01, Version 3.1

Appendix D Cisco Secure ACS Command-Line Database UtilityUser-Defined RADIUS Vendors and VSA Sets
D-40User Guide for Cisco Secure ACS for Windows Server
78-14696-01, Version 3.1
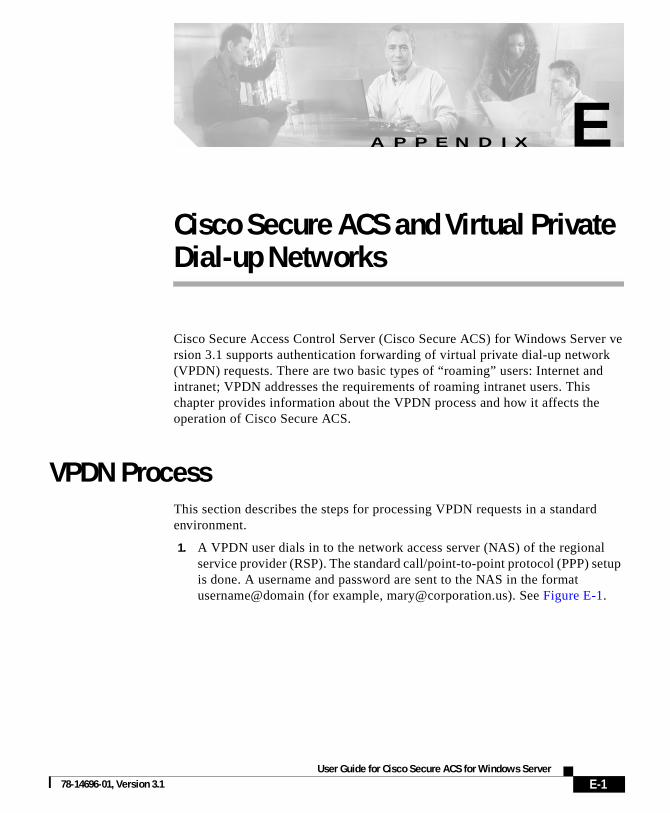
User Guide for 78-14696-01, Version 3.1
A
P P E N D I X E Cisco Secure ACS and Virtual Private Dial-up NetworksCisco Secure Access Control Server (Cisco Secure ACS) for Windows Server version 3.1 supports authentication forwarding of virtual private dial-up network (VPDN) requests. There are two basic types of “roaming” users: Internet and intranet; VPDN addresses the requirements of roaming intranet users. This chapter provides information about the VPDN process and how it affects the operation of Cisco Secure ACS.
VPDN ProcessThis section describes the steps for processing VPDN requests in a standard environment.
1. A VPDN user dials in to the network access server (NAS) of the regional service provider (RSP). The standard call/point-to-point protocol (PPP) setup is done. A username and password are sent to the NAS in the format username@domain (for example, [email protected]). See Figure E-1.
E-1Cisco Secure ACS for Windows Server
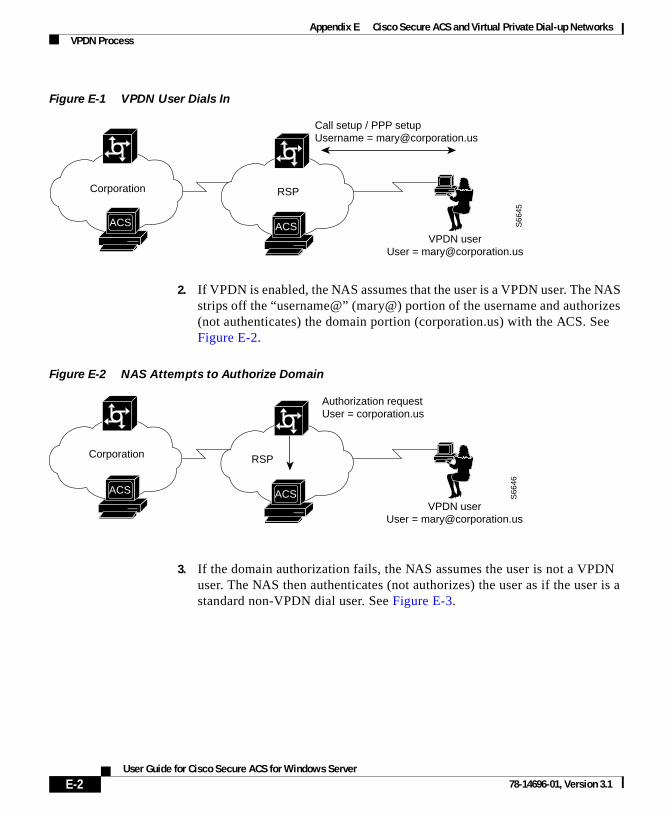
Appendix E Cisco Secure ACS and Virtual Private Dial-up NetworksVPDN Process
Figure E-1 VPDN User Dials In
2. If VPDN is enabled, the NAS assumes that the user is a VPDN user. The NAS strips off the “username@” (mary@) portion of the username and authorizes (not authenticates) the domain portion (corporation.us) with the ACS. See Figure E-2.
Figure E-2 NAS Attempts to Authorize Domain
3. If the domain authorization fails, the NAS assumes the user is not a VPDN user. The NAS then authenticates (not authorizes) the user as if the user is a standard non-VPDN dial user. See Figure E-3.
S66
45
Corporation
VPDN userUser = [email protected]
Call setup / PPP setupUsername = [email protected]
ACS
RSP
ACS
Authorization requestUser = corporation.us
S66
46
Corporation
VPDN userUser = [email protected]
ACS
RSP
ACS
E-2User Guide for Cisco Secure ACS for Windows Server
78-14696-01, Version 3.1
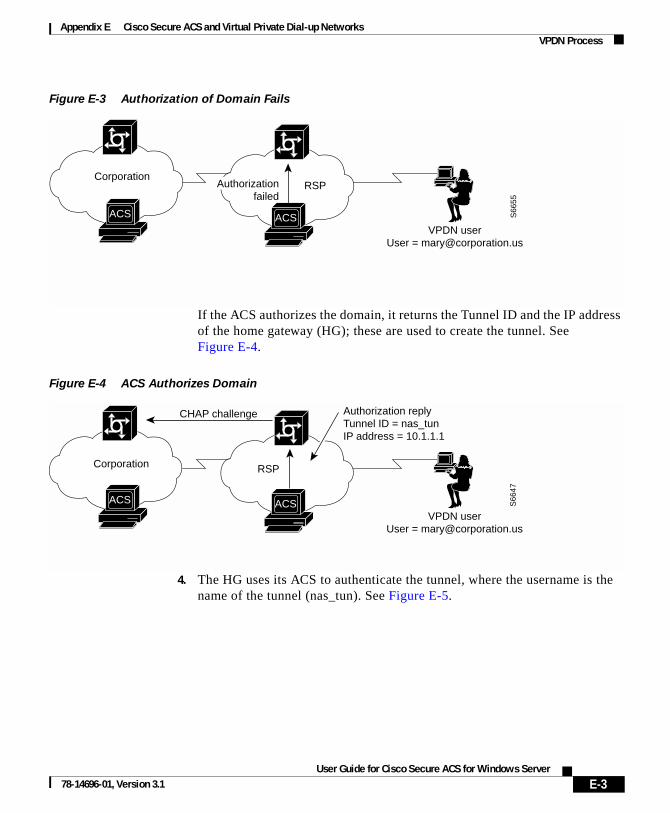
Appendix E Cisco Secure ACS and Virtual Private Dial-up NetworksVPDN Process
Figure E-3 Authorization of Domain Fails
If the ACS authorizes the domain, it returns the Tunnel ID and the IP address of the home gateway (HG); these are used to create the tunnel. See Figure E-4.
Figure E-4 ACS Authorizes Domain
4. The HG uses its ACS to authenticate the tunnel, where the username is the name of the tunnel (nas_tun). See Figure E-5.
S66
55
Corporation
VPDN userUser = [email protected]
ACS
RSP
ACS
Authorization failed
S66
47
Corporation
VPDN userUser = [email protected]
ACS
RSP
Authorization replyTunnel ID = nas_tunIP address = 10.1.1.1
ACS
CHAP challenge
E-3User Guide for Cisco Secure ACS for Windows Server
78-14696-01, Version 3.1
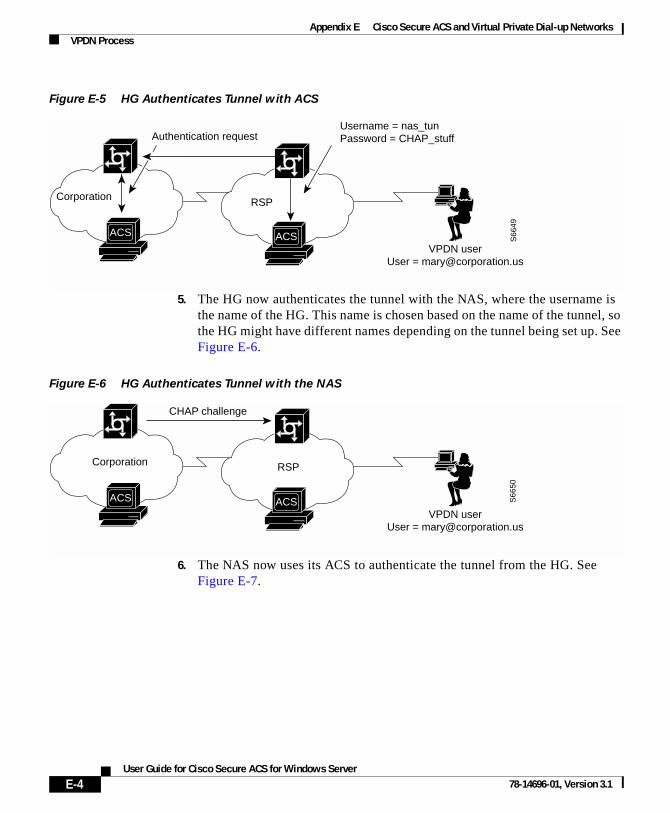
Appendix E Cisco Secure ACS and Virtual Private Dial-up NetworksVPDN Process
Figure E-5 HG Authenticates Tunnel with ACS
5. The HG now authenticates the tunnel with the NAS, where the username is the name of the HG. This name is chosen based on the name of the tunnel, so the HG might have different names depending on the tunnel being set up. See Figure E-6.
Figure E-6 HG Authenticates Tunnel with the NAS
6. The NAS now uses its ACS to authenticate the tunnel from the HG. See Figure E-7.
S66
49
Username = nas_tunPassword = CHAP_stuff
Corporation
VPDN userUser = [email protected]
ACS
RSP
Authentication request
ACS
S66
50
CHAP challenge
Corporation
VPDN userUser = [email protected]
ACS
RSP
ACS
E-4User Guide for Cisco Secure ACS for Windows Server
78-14696-01, Version 3.1
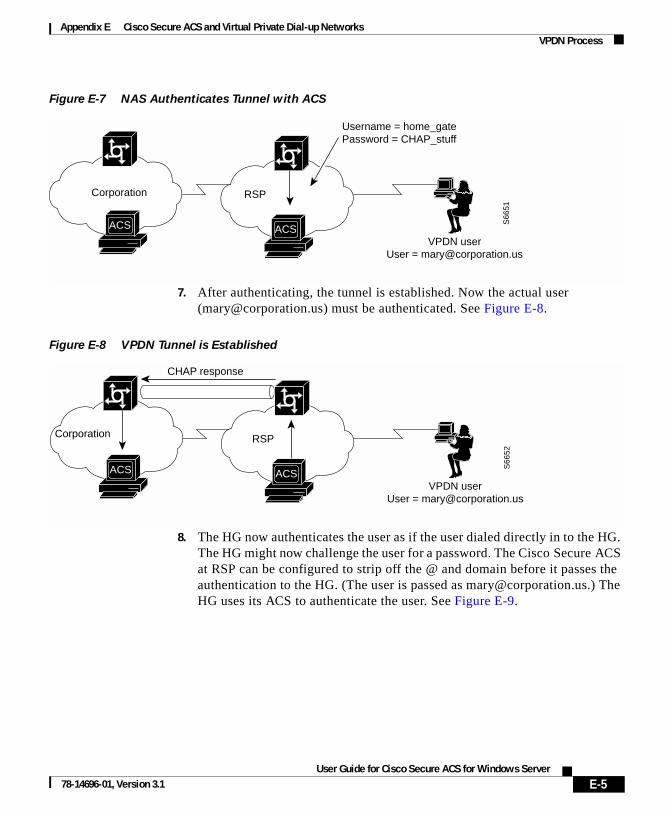
Appendix E Cisco Secure ACS and Virtual Private Dial-up NetworksVPDN Process
Figure E-7 NAS Authenticates Tunnel with ACS
7. After authenticating, the tunnel is established. Now the actual user ([email protected]) must be authenticated. See Figure E-8.
Figure E-8 VPDN Tunnel is Established
8. The HG now authenticates the user as if the user dialed directly in to the HG. The HG might now challenge the user for a password. The Cisco Secure ACS at RSP can be configured to strip off the @ and domain before it passes the authentication to the HG. (The user is passed as [email protected].) The HG uses its ACS to authenticate the user. See Figure E-9.
S66
51
Username = home_gatePassword = CHAP_stuff
Corporation
VPDN userUser = [email protected]
ACS
RSP
ACS
CHAP response
S66
52
Corporation
VPDN userUser = [email protected]
ACS
RSP
ACS
E-5User Guide for Cisco Secure ACS for Windows Server
78-14696-01, Version 3.1

Appendix E Cisco Secure ACS and Virtual Private Dial-up NetworksVPDN Process
Figure E-9 HG Uses ACS to Authenticate User
9. If another user ([email protected]) dials in to the NAS while the tunnel is up, the NAS does not repeat the entire authorization/authentication process. Instead, it passes the user through the existing tunnel to the HG. See Figure E-10.
Figure E-10 Another User Dials In While Tunnel is Up
Username = [email protected] = secret
S66
53
Corporation
VPDN userUser = [email protected]
ACS
RSP
ACS
Username = [email protected] = secret2
VPDN userUser = [email protected]
S66
54Corporation
VPDN userUser = [email protected]
ACS
RSP
ACS
VPDNcustomer
E-6User Guide for Cisco Secure ACS for Windows Server
78-14696-01, Version 3.1

User Guide for 78-14696-01, Version 3.1
A
P P E N D I X F RDBMS Synchronization Import DefinitionsRDBMS synchronization import definitions are a listing of the action codes allowable in an accountActions table. The RDBMS Synchronization feature of Cisco Secure Access Control Server (Cisco Secure ACS) for Windows Server version 3.1 uses a table named “accountActions” as input for automated or manual updates of the CiscoSecure user database. For more information about the RDBMS Synchronization feature and accountActions, see RDBMS Synchronization, page 8-29.
This appendix contains the following sections:
• accountActions Specification, page F-1
• Action Codes, page F-4
• Cisco Secure ACS Attributes and Action Codes, page F-33
• An Example of accountActions, page F-37
accountActions SpecificationWhether you create accountActions by hand in a text editor or through automation using a third-party system that writes to accountActions, you must adhere to the accountActions specification and must only use the action codes detailed in Action Codes, page F-4. Otherwise, RDBMS Synchronization may import incorrect information into the CiscoSecure user database or may fail to occur at all.
F-1Cisco Secure ACS for Windows Server
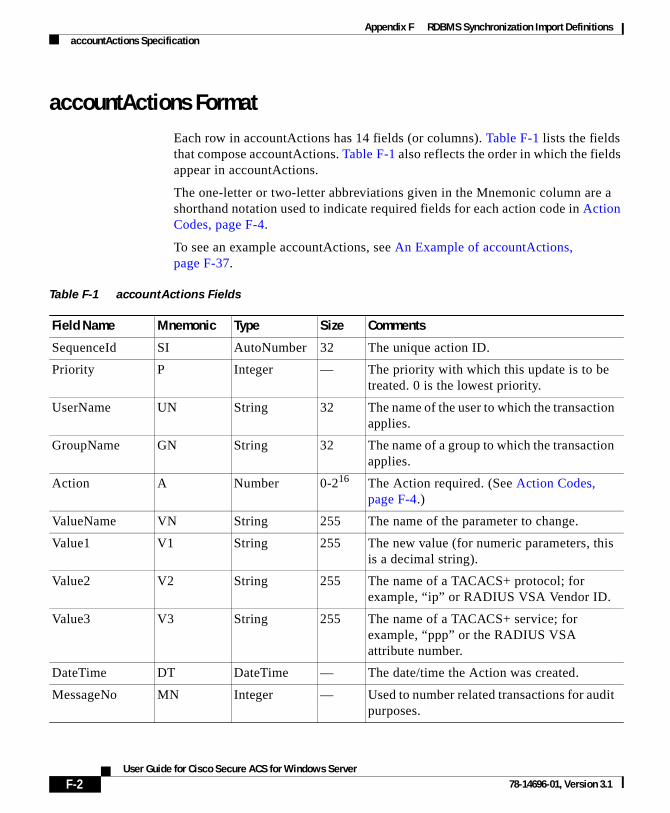
Appendix F RDBMS Synchronization Import DefinitionsaccountActions Specification
accountActions FormatEach row in accountActions has 14 fields (or columns). Table F-1 lists the fields that compose accountActions. Table F-1 also reflects the order in which the fields appear in accountActions.
The one-letter or two-letter abbreviations given in the Mnemonic column are a shorthand notation used to indicate required fields for each action code in Action Codes, page F-4.
To see an example accountActions, see An Example of accountActions, page F-37.
Table F-1 accountActions Fields
Field Name Mnemonic Type Size Comments
SequenceId SI AutoNumber 32 The unique action ID.
Priority P Integer — The priority with which this update is to be treated. 0 is the lowest priority.
UserName UN String 32 The name of the user to which the transaction applies.
GroupName GN String 32 The name of a group to which the transaction applies.
Action A Number 0-216 The Action required. (See Action Codes, page F-4.)
ValueName VN String 255 The name of the parameter to change.
Value1 V1 String 255 The new value (for numeric parameters, this is a decimal string).
Value2 V2 String 255 The name of a TACACS+ protocol; for example, “ip” or RADIUS VSA Vendor ID.
Value3 V3 String 255 The name of a TACACS+ service; for example, “ppp” or the RADIUS VSA attribute number.
DateTime DT DateTime — The date/time the Action was created.
MessageNo MN Integer — Used to number related transactions for audit purposes.
F-2User Guide for Cisco Secure ACS for Windows Server
78-14696-01, Version 3.1
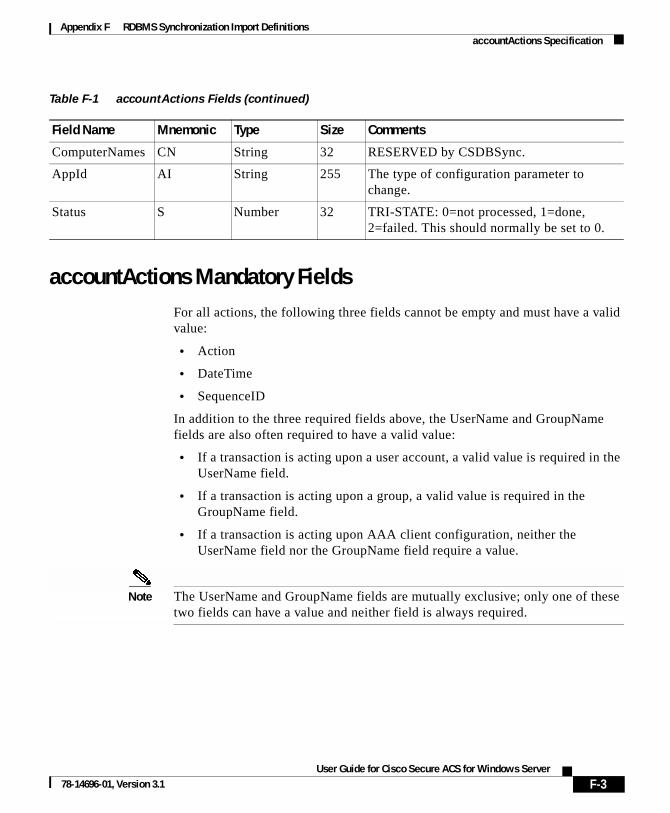
Appendix F RDBMS Synchronization Import DefinitionsaccountActions Specification
accountActions Mandatory FieldsFor all actions, the following three fields cannot be empty and must have a valid value:
• Action
• DateTime
• SequenceID
In addition to the three required fields above, the UserName and GroupName fields are also often required to have a valid value:
• If a transaction is acting upon a user account, a valid value is required in the UserName field.
• If a transaction is acting upon a group, a valid value is required in the GroupName field.
• If a transaction is acting upon AAA client configuration, neither the UserName field nor the GroupName field require a value.
Note The UserName and GroupName fields are mutually exclusive; only one of these two fields can have a value and neither field is always required.
ComputerNames CN String 32 RESERVED by CSDBSync.
AppId AI String 255 The type of configuration parameter to change.
Status S Number 32 TRI-STATE: 0=not processed, 1=done, 2=failed. This should normally be set to 0.
Table F-1 accountActions Fields (continued)
Field Name Mnemonic Type Size Comments
F-3User Guide for Cisco Secure ACS for Windows Server
78-14696-01, Version 3.1

Appendix F RDBMS Synchronization Import DefinitionsAction Codes
accountActions Processing OrderCisco Secure ACS reads rows from accountActions and processes them in a specific order. Cisco Secure ACS determines the order first by the values in the Priority fields (mnemonic: P) and then by the values in the Sequence ID fields (mnemonic: SI). Cisco Secure ACS processes the rows with the highest Priority field. The lower the number in the Priority field, the higher the priority. For example, if row A has the value 1 in its Priority field and row B has the value 2 in its Priority field, Cisco Secure ACS would process row A first, regardless of whether row B has a lower sequence ID or not. If rows have an equal priority, Cisco Secure ACS processes them by their sequence ID, with the lowest sequence ID processed first.
Thus, the Priority field (P) enables transactions of higher importance to occur first, such as deleting a user or changing a password. In the most common implementations of RDBMS Synchronization, a third-party system writes to accountActions in batch mode, with all actions (rows) assigned a priority of zero (0).
Note When changing transaction priorities, be careful that they are processed in the correct order; for example, a user account must be created before the user password is assigned.
You can use the MessageNo field (mnemonic: MN) to associate related transactions, such as the addition of a user and subsequent actions to set password values and status. You can use the MessageNo field to create an audit trail for a third-party system that writes to accountActions.
Action CodesThis section provides the action codes valid for use in the Action field (mnemonic: A) of accountActions. The Required column uses the field mnemonic names to indicate which fields should be completed, except for the mandatory fields, which are assumed. For more information about the mnemonic names of accountActions fields, see Table F-1. For more information about the mandatory fields, see accountActions Mandatory Fields, page F-3.
F-4User Guide for Cisco Secure ACS for Windows Server
78-14696-01, Version 3.1

Appendix F RDBMS Synchronization Import DefinitionsAction Codes
If an action can be applied to either a user or group, “UN|GN” appears, using the vertical bar to indicate that either one of the two fields is required. To make the action affect only the user, leave the group name empty; to make the action affect only the group, leave the user name empty.
This section contains the following topics about action codes:
• Action Codes for Setting and Deleting Values, page F-5
• Action Codes for Creating and Modifying User Accounts, page F-7
• Action Codes for Initializing and Modifying Access Filters, page F-15
• Action Codes for Modifying TACACS+ and RADIUS Group and User Settings, page F-19
• Action Codes for Modifying Network Configuration, page F-25
Action Codes for Setting and Deleting ValuesThe two most fundamental action codes are SET_VALUE (action code: 1) and DELETE_VALUE (action code: 2), described in Table F-2.
The SET_VALUE (action code: 1) and DELETE_VALUE (action code: 2) actions, described in Table F-2, instruct RDBMS Synchronization to assign a value to various internal attributes in Cisco Secure ACS. Unless asked to use these action codes for other purposes by a Cisco representative, you can only use these action codes for assigning values to user-defined fields (see User-Specific Attributes, page F-33).
F-5User Guide for Cisco Secure ACS for Windows Server
78-14696-01, Version 3.1
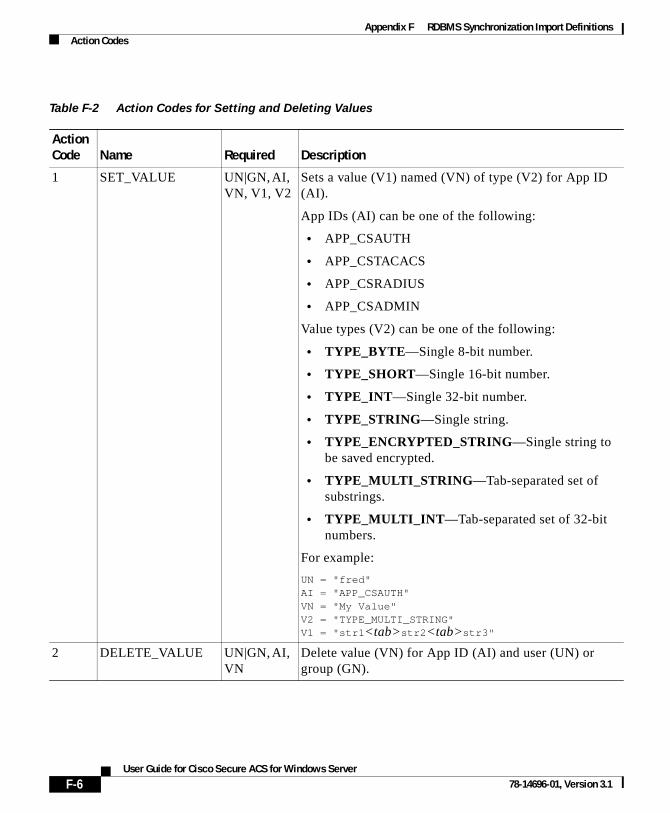
Appendix F RDBMS Synchronization Import DefinitionsAction Codes
Table F-2 Action Codes for Setting and Deleting Values
Action Code Name Required Description
1 SET_VALUE UN|GN, AI, VN, V1, V2
Sets a value (V1) named (VN) of type (V2) for App ID (AI).
App IDs (AI) can be one of the following:
• APP_CSAUTH
• APP_CSTACACS
• APP_CSRADIUS
• APP_CSADMIN
Value types (V2) can be one of the following:
• TYPE_BYTE—Single 8-bit number.
• TYPE_SHORT—Single 16-bit number.
• TYPE_INT—Single 32-bit number.
• TYPE_STRING—Single string.
• TYPE_ENCRYPTED_STRING—Single string to be saved encrypted.
• TYPE_MULTI_STRING—Tab-separated set of substrings.
• TYPE_MULTI_INT—Tab-separated set of 32-bit numbers.
For example:
UN = "fred" AI = "APP_CSAUTH" VN = "My Value" V2 = "TYPE_MULTI_STRING" V1 = "str1<tab>str2<tab>str3"
2 DELETE_VALUE UN|GN, AI, VN
Delete value (VN) for App ID (AI) and user (UN) or group (GN).
F-6User Guide for Cisco Secure ACS for Windows Server
78-14696-01, Version 3.1

Appendix F RDBMS Synchronization Import DefinitionsAction Codes
Action Codes for Creating and Modifying User AccountsTable F-3 lists the action codes for creating, modifying, and deleting user accounts.
Note Before you can modify a user account, such as assigning a password, you must create the user account, either in the HTML interface or by using the ADD_USER action (action code: 100).
Transactions using these codes affect the configuration displayed in the User Setup section of the HTML interface. For more information about the User Setup section, see Chapter 7, “Setting Up and Managing User Accounts.”
Table F-3 User Creation and Modification Action Codes
Action Code Name Required Description
100 ADD_USER UN|GN, V1 Create a user (32 characters maximum). V1 is used as the initial password. Optionally, the user can also be assigned to a group.
101 DELETE_USER UN Remove a user.
102 SET_PAP_PASS UN, V1 Set the PAP password for a user (64 ASCII characters maximum). CHAP/ARAP will also default to this.
103 SET_CHAP_PASS UN, V1 Set the CHAP/ARAP password for a user (64 characters maximum).
104 SET_OUTBOUND_CHAP_PASS
UN, V1 Sets the CHAP/ARAP password for a user (32 characters maximum).
F-7User Guide for Cisco Secure ACS for Windows Server
78-14696-01, Version 3.1
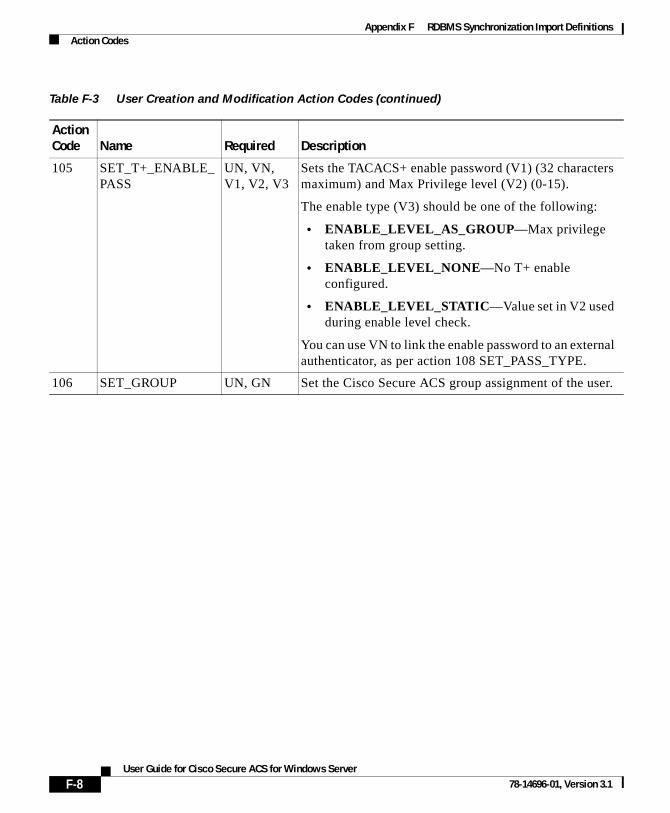
Appendix F RDBMS Synchronization Import DefinitionsAction Codes
105 SET_T+_ENABLE_PASS
UN, VN, V1, V2, V3
Sets the TACACS+ enable password (V1) (32 characters maximum) and Max Privilege level (V2) (0-15).
The enable type (V3) should be one of the following:
• ENABLE_LEVEL_AS_GROUP—Max privilege taken from group setting.
• ENABLE_LEVEL_NONE—No T+ enable configured.
• ENABLE_LEVEL_STATIC—Value set in V2 used during enable level check.
You can use VN to link the enable password to an external authenticator, as per action 108 SET_PASS_TYPE.
106 SET_GROUP UN, GN Set the Cisco Secure ACS group assignment of the user.
Table F-3 User Creation and Modification Action Codes (continued)
Action Code Name Required Description
F-8User Guide for Cisco Secure ACS for Windows Server
78-14696-01, Version 3.1

Appendix F RDBMS Synchronization Import DefinitionsAction Codes
108 SET_PASS_TYPE UN|GN, V1 Set the password type of the user. This can be one of the CiscoSecure user database password types or any of the external databases supported:
• PASS_TYPE_CSDB—CSDB internal password.
• PASS_ TYPE_CSDB_UNIX—CSDB internal password (UNIX encrypted).
• PASS_TYPE_NT—External Windows NT/2000 database password.
• PASS_TYPE_NDS—External Novell database password.
• PASS_TYPE_LDAP—External generic LDAP database password.
• PASS_TYPE_SDI—External RSA Security database password.
• PASS_TYPE_ANPI—External PassGo database password.
• PASS_TYPE_ENIGMA—External SafeWord database password.
• PASS_TYPE_CRYPTO—External CRYPTOCard database password.
• PASS_TYPE_ODBC—External ODBC database password.
• PASS_TYPE_LEAP—External LEAP proxy RADIUS server database password.
• PASS_TYPE_ACTIVCARD—External ActivCard database password.
• PASS_TYPE_VASCO—External Vasco database password.
• PASS_TYPE_RADIUS_TOKEN—External RADIUS token server database password.
Table F-3 User Creation and Modification Action Codes (continued)
Action Code Name Required Description
F-9User Guide for Cisco Secure ACS for Windows Server
78-14696-01, Version 3.1
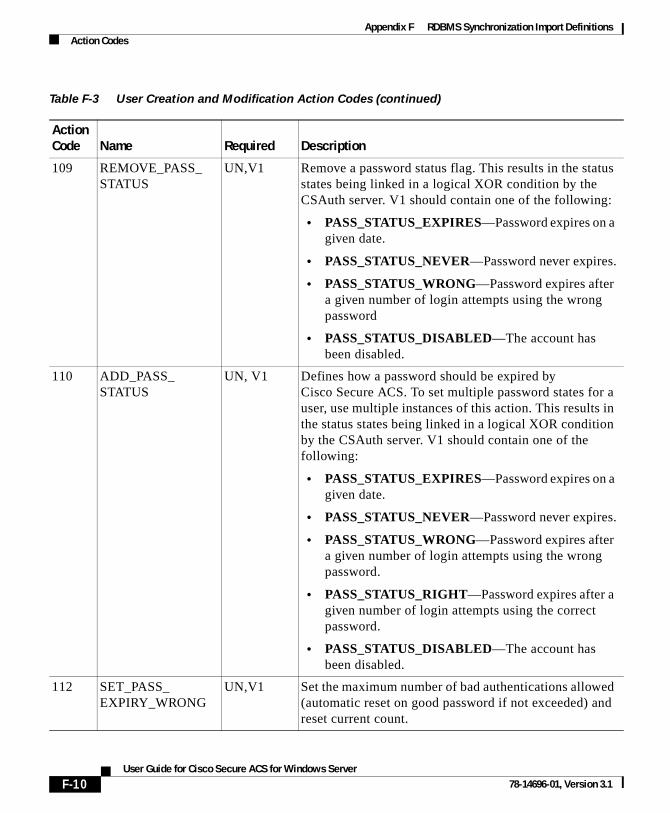
Appendix F RDBMS Synchronization Import DefinitionsAction Codes
109 REMOVE_PASS_STATUS
UN,V1 Remove a password status flag. This results in the status states being linked in a logical XOR condition by the CSAuth server. V1 should contain one of the following:
• PASS_STATUS_EXPIRES—Password expires on a given date.
• PASS_STATUS_NEVER—Password never expires.
• PASS_STATUS_WRONG—Password expires after a given number of login attempts using the wrong password
• PASS_STATUS_DISABLED—The account has been disabled.
110 ADD_PASS_STATUS
UN, V1 Defines how a password should be expired by Cisco Secure ACS. To set multiple password states for a user, use multiple instances of this action. This results in the status states being linked in a logical XOR condition by the CSAuth server. V1 should contain one of the following:
• PASS_STATUS_EXPIRES—Password expires on a given date.
• PASS_STATUS_NEVER—Password never expires.
• PASS_STATUS_WRONG—Password expires after a given number of login attempts using the wrong password.
• PASS_STATUS_RIGHT—Password expires after a given number of login attempts using the correct password.
• PASS_STATUS_DISABLED—The account has been disabled.
112 SET_PASS_EXPIRY_WRONG
UN,V1 Set the maximum number of bad authentications allowed (automatic reset on good password if not exceeded) and reset current count.
Table F-3 User Creation and Modification Action Codes (continued)
Action Code Name Required Description
F-10User Guide for Cisco Secure ACS for Windows Server
78-14696-01, Version 3.1
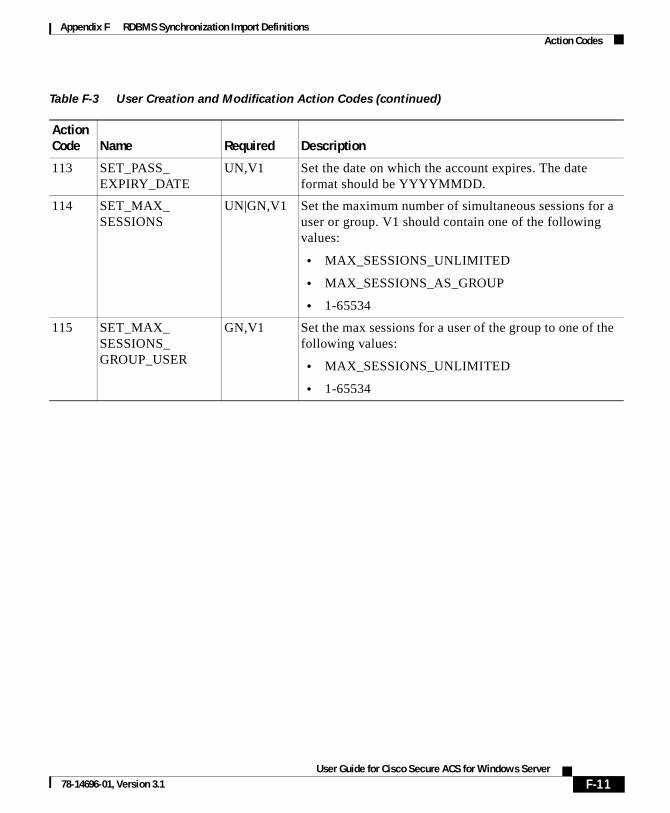
Appendix F RDBMS Synchronization Import DefinitionsAction Codes
113 SET_PASS_EXPIRY_DATE
UN,V1 Set the date on which the account expires. The date format should be YYYYMMDD.
114 SET_MAX_SESSIONS
UN|GN,V1 Set the maximum number of simultaneous sessions for a user or group. V1 should contain one of the following values:
• MAX_SESSIONS_UNLIMITED
• MAX_SESSIONS_AS_GROUP
• 1-65534
115 SET_MAX_SESSIONS_GROUP_USER
GN,V1 Set the max sessions for a user of the group to one of the following values:
• MAX_SESSIONS_UNLIMITED
• 1-65534
Table F-3 User Creation and Modification Action Codes (continued)
Action Code Name Required Description
F-11User Guide for Cisco Secure ACS for Windows Server
78-14696-01, Version 3.1
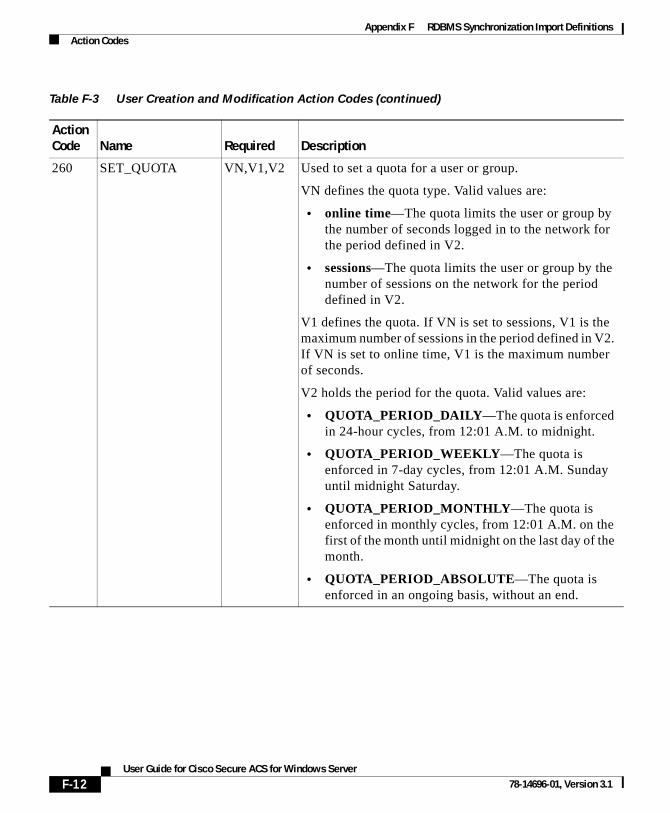
Appendix F RDBMS Synchronization Import DefinitionsAction Codes
260 SET_QUOTA VN,V1,V2 Used to set a quota for a user or group.
VN defines the quota type. Valid values are:
• online time—The quota limits the user or group by the number of seconds logged in to the network for the period defined in V2.
• sessions—The quota limits the user or group by the number of sessions on the network for the period defined in V2.
V1 defines the quota. If VN is set to sessions, V1 is the maximum number of sessions in the period defined in V2. If VN is set to online time, V1 is the maximum number of seconds.
V2 holds the period for the quota. Valid values are:
• QUOTA_PERIOD_DAILY—The quota is enforced in 24-hour cycles, from 12:01 A.M. to midnight.
• QUOTA_PERIOD_WEEKLY—The quota is enforced in 7-day cycles, from 12:01 A.M. Sunday until midnight Saturday.
• QUOTA_PERIOD_MONTHLY—The quota is enforced in monthly cycles, from 12:01 A.M. on the first of the month until midnight on the last day of the month.
• QUOTA_PERIOD_ABSOLUTE—The quota is enforced in an ongoing basis, without an end.
Table F-3 User Creation and Modification Action Codes (continued)
Action Code Name Required Description
F-12User Guide for Cisco Secure ACS for Windows Server
78-14696-01, Version 3.1

Appendix F RDBMS Synchronization Import DefinitionsAction Codes
261 DISABLE_QUOTA UN|GN,VN Disable a group or user usage quota.
VN defines the quota type. Valid values are:
• online time—The quota limits the user or group by the number of seconds logged in to the network for the period defined in V2.
• sessions—The quota limits the user or group by the number of sessions on the network for the period defined in V2.
262 RESET_COUNTERS
UN|GN Resets usage quota counters for a user or group.
263 SET_QUOTA_APPLY_TYPE
V1 Defines whether a user usage quota is determined by the user group quota or by a quota unique to the user. V1 makes this specification. Valid values for V1 are:
• ASSIGNMENT_FROM_USER
• ASSIGNMENT_FROM_GROUP
Table F-3 User Creation and Modification Action Codes (continued)
Action Code Name Required Description
F-13User Guide for Cisco Secure ACS for Windows Server
78-14696-01, Version 3.1

Appendix F RDBMS Synchronization Import DefinitionsAction Codes
270 SET_DCS_TYPE UN|GN,VN,V1, Optionally V2
Set the type of device command set (DCS) authorization for a group or user.
VN defines the service. Valid service types are:
• shell—Cisco IOS shell command authorization.
• pixshell—Cisco PIX command authorization.
Note If additional DCS types have been added to your Cisco Secure ACS, you can find the valid value in the Interface Configuration page for TACACS+ (Cisco IOS). The valid values appear in parentheses after the service title, such as PIX Shell (pixshell).
V1 defines the assignment type. The valid values for VN are:
• none—Sets no DCS for the user or group.
• as group—For users only, this value signifies that the user DCS settings for the service specified should be the same as the user group DCS settings.
• static—Sets a DCS for the user or group for all devices enabled to perform command authorization for the service specified.
If V1 is set to static, V2 is required and must contain the name of the DCS to assign to the user or group for the given service.
• ndg—Specifies that command authorization for the user or group is to be done on a per-NDG basis. Use action 271 to add DCS to NDG mappings for the user or group.
Note Changing a user or group assignment type (V1) results in clearing previous data, including NDG to DCS mappings (defined by action 271).
Table F-3 User Creation and Modification Action Codes (continued)
Action Code Name Required Description
F-14User Guide for Cisco Secure ACS for Windows Server
78-14696-01, Version 3.1

Appendix F RDBMS Synchronization Import DefinitionsAction Codes
Action Codes for Initializing and Modifying Access FiltersTable F-4 lists the action codes for initializing and modifying AAA client access filters. AAA client access filters control Telnet access to a AAA client. Dial access filters control access by dial-up users.
271 SET_DCS_NDG_MAP
UN|GN, VN,V1,V2
When the assignment type specified by a 270 action code is ndg, use this action code to map between the device command set and the NDG.
VN defines the service. Valid service types are:
• shell—Cisco IOS shell command authorization.
• pixshell—Cisco PIX command authorization.
Note If additional DCS types have been added to your Cisco Secure ACS, you can find the valid value in the Interface Configuration page for TACACS+ (Cisco IOS). The valid values appear in parentheses after the service title, such as PIX Shell (pixshell).
V1 defines the name of the NDG. Use the name of the NDG as it appears in the HTML interface. For example, if you have configured an NDG named “East Coast NASes” and want to use action 271 to apply a DCS to that NDG, V1 should be “East Coast NASes”.
V2 defines the name of the DCS. Use the name of the DCS as it appears in the HTML interface. For example, if you have configured a DCS named “Tier2 PIX Admin DCS” and want to use action 271 to apply it to an NDG, V2 should be “Tier2 PIX Admin DCS”.
Table F-3 User Creation and Modification Action Codes (continued)
Action Code Name Required Description
F-15User Guide for Cisco Secure ACS for Windows Server
78-14696-01, Version 3.1
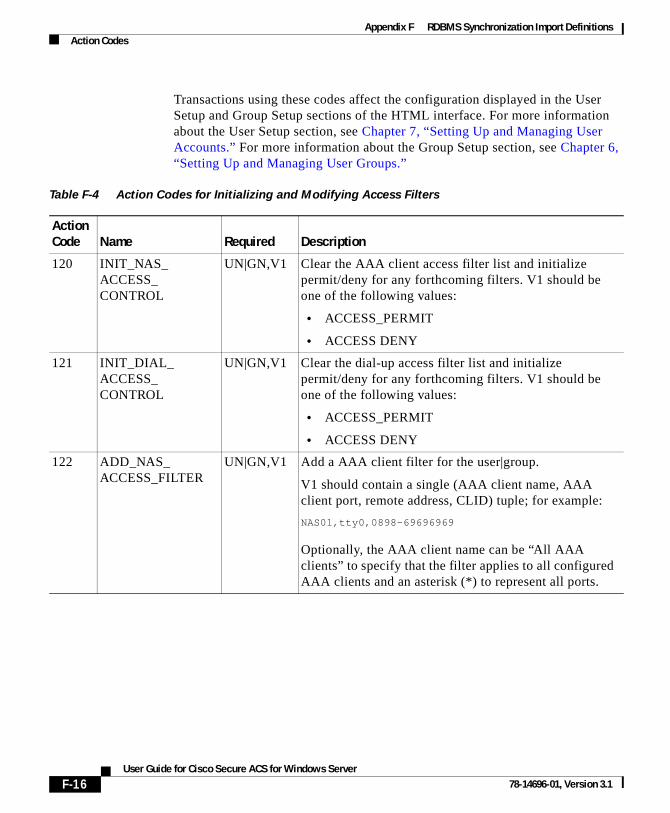
Appendix F RDBMS Synchronization Import DefinitionsAction Codes
Transactions using these codes affect the configuration displayed in the User Setup and Group Setup sections of the HTML interface. For more information about the User Setup section, see Chapter 7, “Setting Up and Managing User Accounts.” For more information about the Group Setup section, see Chapter 6, “Setting Up and Managing User Groups.”
Table F-4 Action Codes for Initializing and Modifying Access Filters
Action Code Name Required Description
120 INIT_NAS_ACCESS_CONTROL
UN|GN,V1 Clear the AAA client access filter list and initialize permit/deny for any forthcoming filters. V1 should be one of the following values:
• ACCESS_PERMIT
• ACCESS DENY
121 INIT_DIAL_ACCESS_CONTROL
UN|GN,V1 Clear the dial-up access filter list and initialize permit/deny for any forthcoming filters. V1 should be one of the following values:
• ACCESS_PERMIT
• ACCESS DENY
122 ADD_NAS_ACCESS_FILTER
UN|GN,V1 Add a AAA client filter for the user|group.
V1 should contain a single (AAA client name, AAA client port, remote address, CLID) tuple; for example:
NAS01,tty0,0898-69696969
Optionally, the AAA client name can be “All AAA clients” to specify that the filter applies to all configured AAA clients and an asterisk (*) to represent all ports.
F-16User Guide for Cisco Secure ACS for Windows Server
78-14696-01, Version 3.1
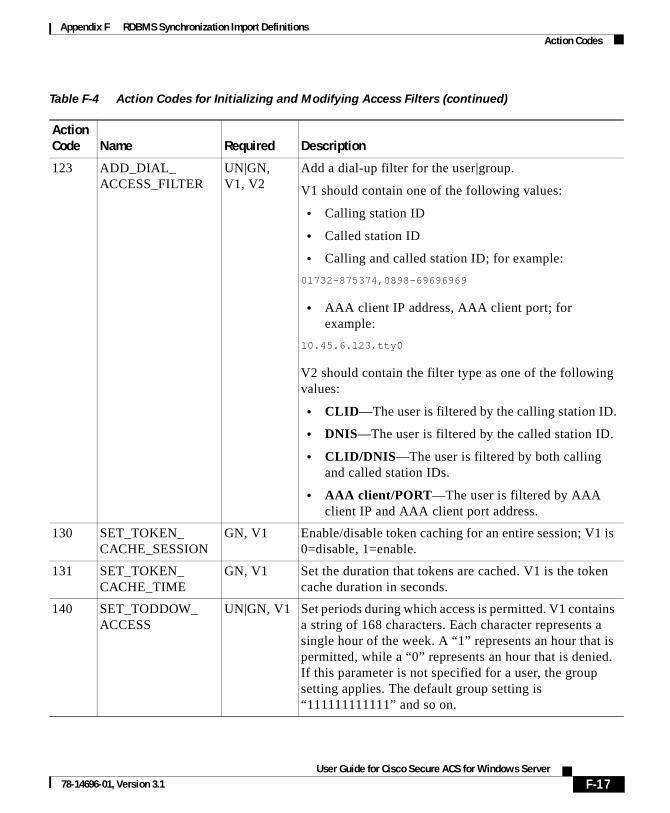
Appendix F RDBMS Synchronization Import DefinitionsAction Codes
123 ADD_DIAL_ACCESS_FILTER
UN|GN, V1, V2
Add a dial-up filter for the user|group.
V1 should contain one of the following values:
• Calling station ID
• Called station ID
• Calling and called station ID; for example:
01732-875374,0898-69696969
• AAA client IP address, AAA client port; for example:
10.45.6.123,tty0
V2 should contain the filter type as one of the following values:
• CLID—The user is filtered by the calling station ID.
• DNIS—The user is filtered by the called station ID.
• CLID/DNIS—The user is filtered by both calling and called station IDs.
• AAA client/PORT—The user is filtered by AAA client IP and AAA client port address.
130 SET_TOKEN_CACHE_SESSION
GN, V1 Enable/disable token caching for an entire session; V1 is 0=disable, 1=enable.
131 SET_TOKEN_CACHE_TIME
GN, V1 Set the duration that tokens are cached. V1 is the token cache duration in seconds.
140 SET_TODDOW_ACCESS
UN|GN, V1 Set periods during which access is permitted. V1 contains a string of 168 characters. Each character represents a single hour of the week. A “1” represents an hour that is permitted, while a “0” represents an hour that is denied. If this parameter is not specified for a user, the group setting applies. The default group setting is “111111111111” and so on.
Table F-4 Action Codes for Initializing and Modifying Access Filters (continued)
Action Code Name Required Description
F-17User Guide for Cisco Secure ACS for Windows Server
78-14696-01, Version 3.1
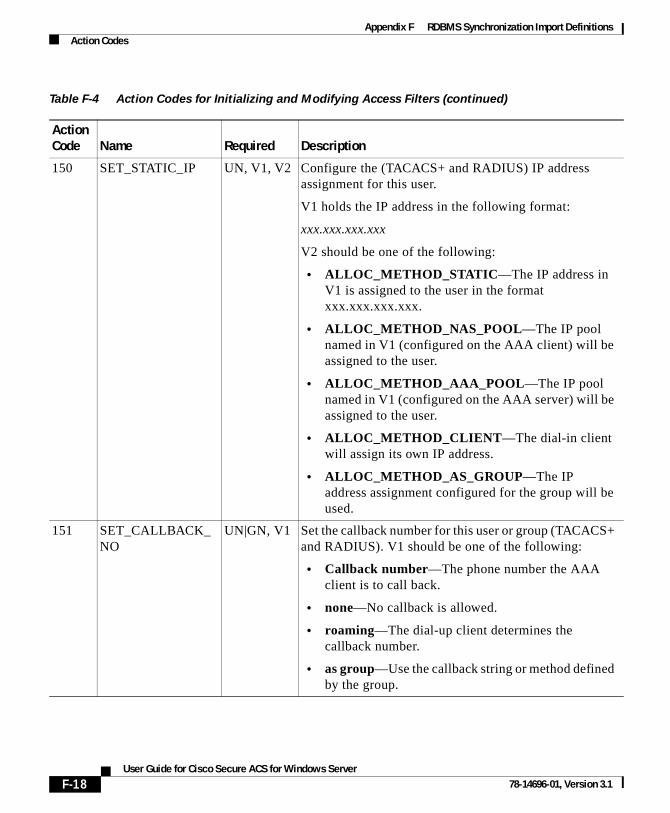
Appendix F RDBMS Synchronization Import DefinitionsAction Codes
150 SET_STATIC_IP UN, V1, V2 Configure the (TACACS+ and RADIUS) IP address assignment for this user.
V1 holds the IP address in the following format:
xxx.xxx.xxx.xxx
V2 should be one of the following:
• ALLOC_METHOD_STATIC—The IP address in V1 is assigned to the user in the format xxx.xxx.xxx.xxx.
• ALLOC_METHOD_NAS_POOL—The IP pool named in V1 (configured on the AAA client) will be assigned to the user.
• ALLOC_METHOD_AAA_POOL—The IP pool named in V1 (configured on the AAA server) will be assigned to the user.
• ALLOC_METHOD_CLIENT—The dial-in client will assign its own IP address.
• ALLOC_METHOD_AS_GROUP—The IP address assignment configured for the group will be used.
151 SET_CALLBACK_NO
UN|GN, V1 Set the callback number for this user or group (TACACS+ and RADIUS). V1 should be one of the following:
• Callback number—The phone number the AAA client is to call back.
• none—No callback is allowed.
• roaming—The dial-up client determines the callback number.
• as group—Use the callback string or method defined by the group.
Table F-4 Action Codes for Initializing and Modifying Access Filters (continued)
Action Code Name Required Description
F-18User Guide for Cisco Secure ACS for Windows Server
78-14696-01, Version 3.1
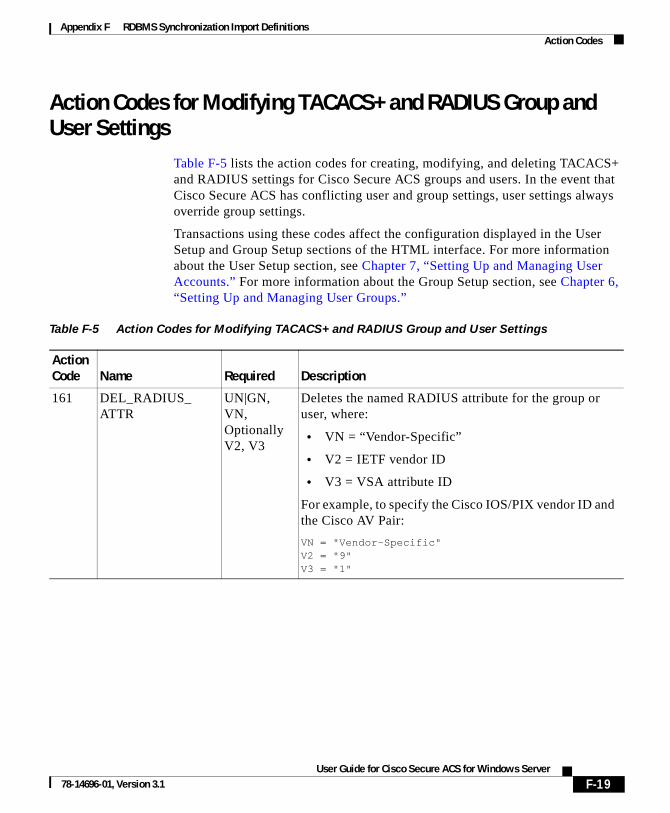
Appendix F RDBMS Synchronization Import DefinitionsAction Codes
Action Codes for Modifying TACACS+ and RADIUS Group and User Settings
Table F-5 lists the action codes for creating, modifying, and deleting TACACS+ and RADIUS settings for Cisco Secure ACS groups and users. In the event that Cisco Secure ACS has conflicting user and group settings, user settings always override group settings.
Transactions using these codes affect the configuration displayed in the User Setup and Group Setup sections of the HTML interface. For more information about the User Setup section, see Chapter 7, “Setting Up and Managing User Accounts.” For more information about the Group Setup section, see Chapter 6, “Setting Up and Managing User Groups.”
Table F-5 Action Codes for Modifying TACACS+ and RADIUS Group and User Settings
Action Code Name Required Description
161 DEL_RADIUS_ATTR
UN|GN, VN, Optionally V2, V3
Deletes the named RADIUS attribute for the group or user, where:
• VN = “Vendor-Specific”
• V2 = IETF vendor ID
• V3 = VSA attribute ID
For example, to specify the Cisco IOS/PIX vendor ID and the Cisco AV Pair:
VN = "Vendor-Specific" V2 = "9" V3 = "1"
F-19User Guide for Cisco Secure ACS for Windows Server
78-14696-01, Version 3.1
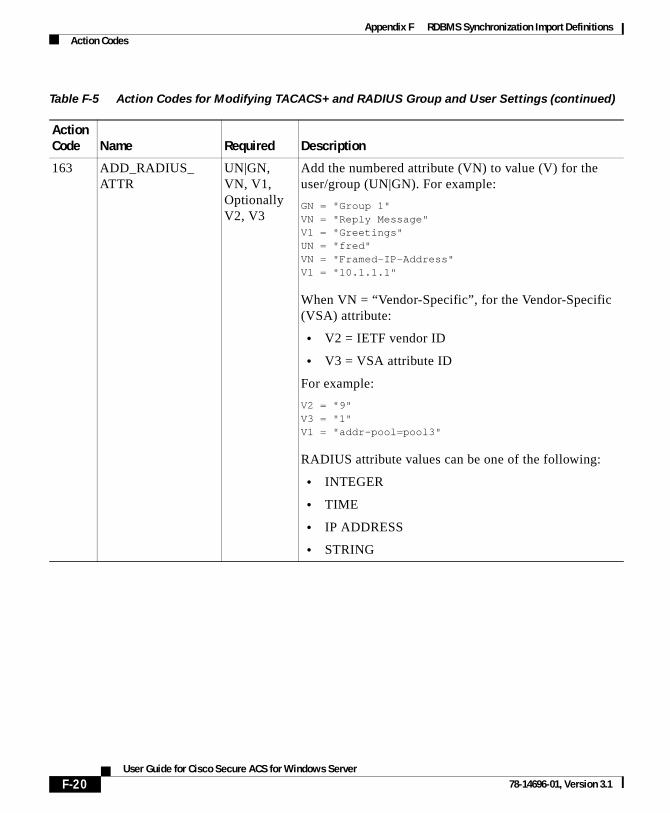
Appendix F RDBMS Synchronization Import DefinitionsAction Codes
163 ADD_RADIUS_ ATTR
UN|GN, VN, V1, Optionally V2, V3
Add the numbered attribute (VN) to value (V) for the user/group (UN|GN). For example:
GN = "Group 1" VN = "Reply Message" V1 = "Greetings" UN = "fred" VN = "Framed-IP-Address" V1 = "10.1.1.1"
When VN = “Vendor-Specific”, for the Vendor-Specific (VSA) attribute:
• V2 = IETF vendor ID
• V3 = VSA attribute ID
For example:
V2 = "9" V3 = "1" V1 = "addr-pool=pool3"
RADIUS attribute values can be one of the following:
• INTEGER
• TIME
• IP ADDRESS
• STRING
Table F-5 Action Codes for Modifying TACACS+ and RADIUS Group and User Settings (continued)
Action Code Name Required Description
F-20User Guide for Cisco Secure ACS for Windows Server
78-14696-01, Version 3.1
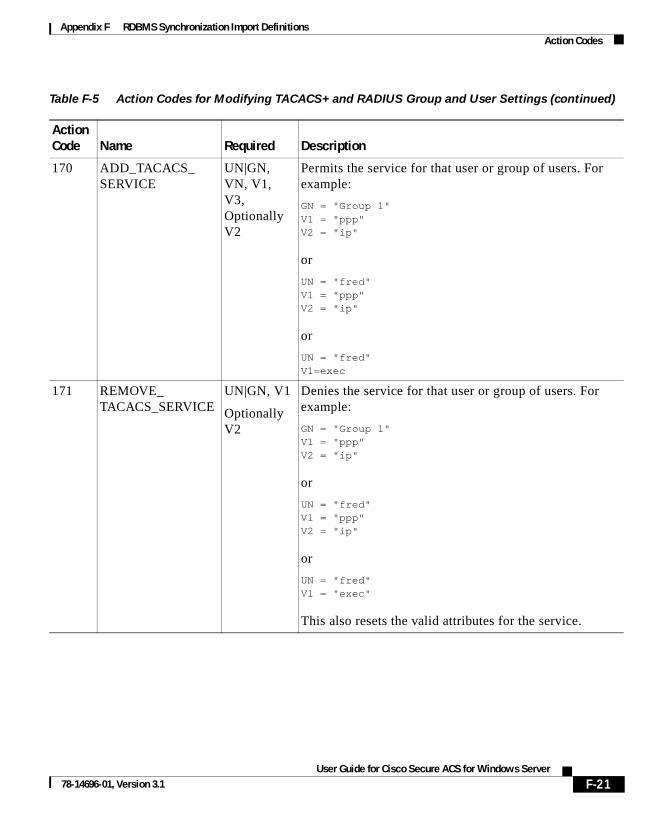
Appendix F RDBMS Synchronization Import DefinitionsAction Codes
170 ADD_TACACS_SERVICE
UN|GN, VN, V1, V3, Optionally V2
Permits the service for that user or group of users. For example:
GN = "Group 1" V1 = "ppp" V2 = "ip"
or
UN = "fred" V1 = "ppp" V2 = "ip"
or
UN = "fred" V1=exec
171 REMOVE_TACACS_SERVICE
UN|GN, V1
Optionally V2
Denies the service for that user or group of users. For example:
GN = "Group 1" V1 = "ppp" V2 = "ip"
or
UN = "fred" V1 = "ppp" V2 = "ip"
or
UN = "fred" V1 = "exec"
This also resets the valid attributes for the service.
Table F-5 Action Codes for Modifying TACACS+ and RADIUS Group and User Settings (continued)
Action Code Name Required Description
F-21User Guide for Cisco Secure ACS for Windows Server
78-14696-01, Version 3.1
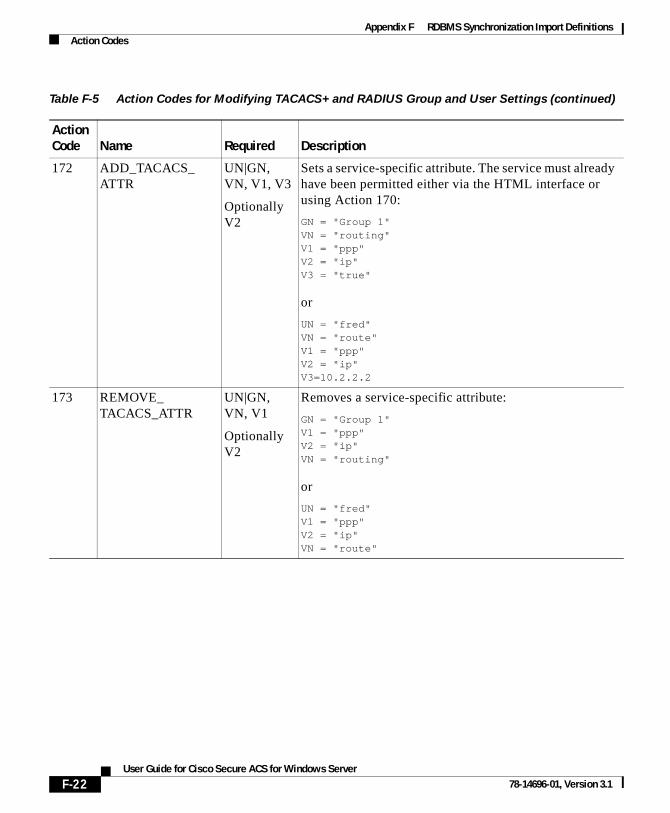
Appendix F RDBMS Synchronization Import DefinitionsAction Codes
172 ADD_TACACS_ATTR
UN|GN, VN, V1, V3
Optionally V2
Sets a service-specific attribute. The service must already have been permitted either via the HTML interface or using Action 170:
GN = "Group 1" VN = "routing" V1 = "ppp" V2 = "ip" V3 = "true"
or
UN = "fred" VN = "route" V1 = "ppp" V2 = "ip" V3=10.2.2.2
173 REMOVE_TACACS_ATTR
UN|GN, VN, V1
Optionally V2
Removes a service-specific attribute:
GN = "Group 1" V1 = "ppp" V2 = "ip" VN = "routing"
or
UN = "fred" V1 = "ppp" V2 = "ip" VN = "route"
Table F-5 Action Codes for Modifying TACACS+ and RADIUS Group and User Settings (continued)
Action Code Name Required Description
F-22User Guide for Cisco Secure ACS for Windows Server
78-14696-01, Version 3.1

Appendix F RDBMS Synchronization Import DefinitionsAction Codes
174 ADD_IOS_COMMAND
UN|GN, VN, V1
Authorizes the given Cisco IOS command and determines if any arguments given to the command are to be found in a defined set or are not to be found in a defined set. The defined set is created using Actions 176 and 177:
GN = "Group 1" VN = "telnet" V1 = "permit"
or
UN = "fred" VN = "configure" V1 = "deny"
The first example permits the Telnet command to be authorized for users of Group 1. Any arguments can be supplied to the Telnet command as long as they are not matched against any arguments defined via Action 176.
The second example permits the configure command to be authorized for user fred, but only if the arguments supplied are permitted by the filter defined by a series of Action 176.
175 REMOVE_IOS_COMMAND
UN|GN, VN
Removes command authorization for the user or group:
GN = "Group 1" VN = "telnet"
or
UN = "fred" VN = "configure"
Users of Group 1 can no longer use the Cisco IOS telnet command.
User fred can no longer use the configure command.
Table F-5 Action Codes for Modifying TACACS+ and RADIUS Group and User Settings (continued)
Action Code Name Required Description
F-23User Guide for Cisco Secure ACS for Windows Server
78-14696-01, Version 3.1
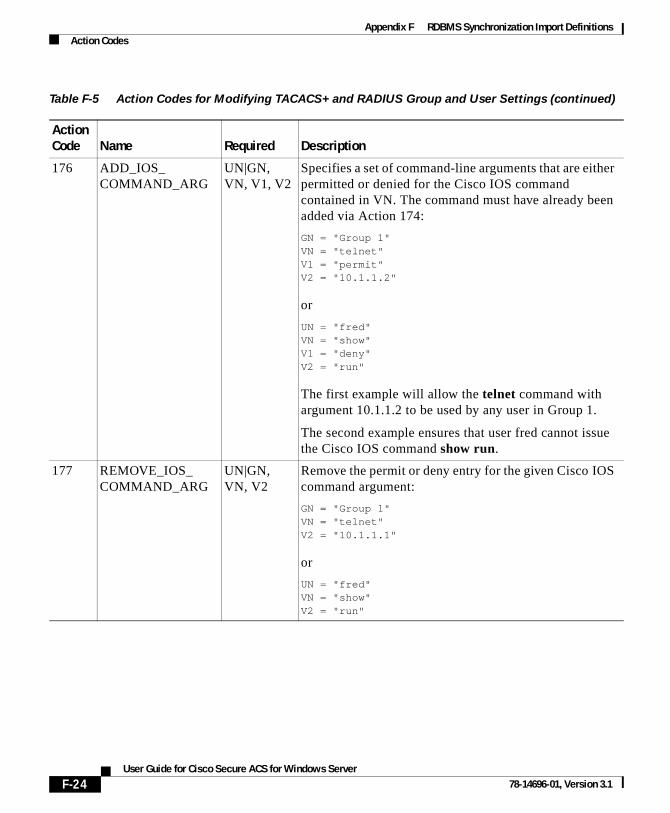
Appendix F RDBMS Synchronization Import DefinitionsAction Codes
176 ADD_IOS_COMMAND_ARG
UN|GN, VN, V1, V2
Specifies a set of command-line arguments that are either permitted or denied for the Cisco IOS command contained in VN. The command must have already been added via Action 174:
GN = "Group 1" VN = "telnet" V1 = "permit" V2 = "10.1.1.2"
or
UN = "fred" VN = "show" V1 = "deny" V2 = "run"
The first example will allow the telnet command with argument 10.1.1.2 to be used by any user in Group 1.
The second example ensures that user fred cannot issue the Cisco IOS command show run.
177 REMOVE_IOS_COMMAND_ARG
UN|GN, VN, V2
Remove the permit or deny entry for the given Cisco IOS command argument:
GN = "Group 1" VN = "telnet" V2 = "10.1.1.1"
or
UN = "fred" VN = "show" V2 = "run"
Table F-5 Action Codes for Modifying TACACS+ and RADIUS Group and User Settings (continued)
Action Code Name Required Description
F-24User Guide for Cisco Secure ACS for Windows Server
78-14696-01, Version 3.1

Appendix F RDBMS Synchronization Import DefinitionsAction Codes
Action Codes for Modifying Network ConfigurationTable F-6 lists the action codes for adding AAA clients, AAA servers, network device groups, and proxy table entries. Transactions using these codes affect the configuration displayed in the Network Configuration section of the HTML interface. For more information about the Network Configuration section, see Chapter 4, “Setting Up and Managing Network Configuration.”
178 SET_PERMIT_DENY_ UNMATCHED_IOS_COMMANDS
UN|GN, V1 The default is that any Cisco IOS commands not defined via a combination of Actions 174 and 175 will be denied. This behavior can be changed so that issued Cisco IOS commands that do not match any command/command argument pairs are authorized:
GN = "Group 1" V1 = "permit"
or
UN = "fred" V1 = "deny"
The first example will permit any command not defined by Action 174.
179 REMOVE_ALL_IOS_ COMMANDS
UN|GN This action removes all Cisco IOS commands defined for a particular user or group.
210 RENAME_GROUP GN,V1 Renames an existing group to the name supplied in V1.
211 RESET_GROUP GN Resets a group back to the factory default.
212 SET_VOIP GN, V1 Enables or disables Voice over IP (VoIP) support for the group named, as follows:
• GN = name of group
• V1 = ENABLE or DISABLE
Table F-5 Action Codes for Modifying TACACS+ and RADIUS Group and User Settings (continued)
Action Code Name Required Description
F-25User Guide for Cisco Secure ACS for Windows Server
78-14696-01, Version 3.1
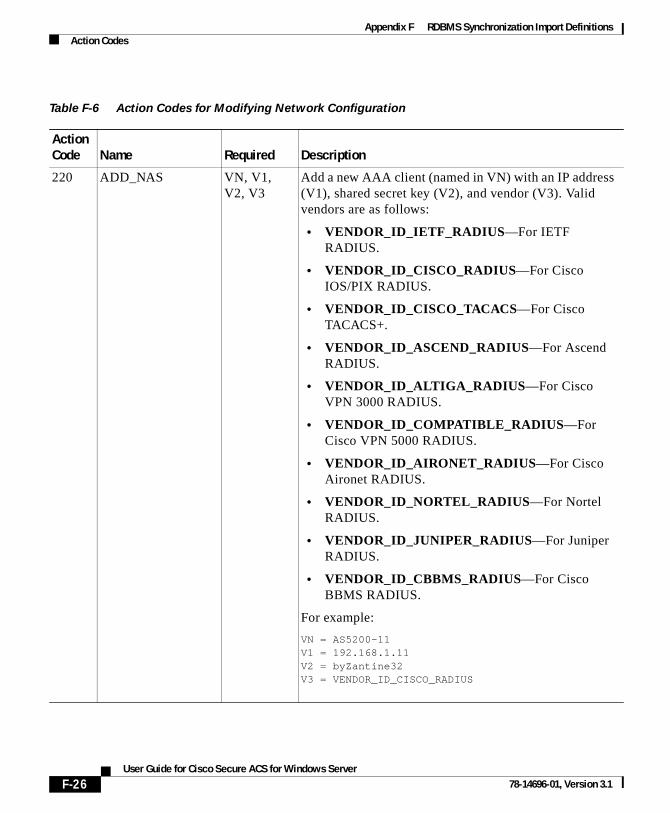
Appendix F RDBMS Synchronization Import DefinitionsAction Codes
Table F-6 Action Codes for Modifying Network Configuration
Action Code Name Required Description
220 ADD_NAS VN, V1, V2, V3
Add a new AAA client (named in VN) with an IP address (V1), shared secret key (V2), and vendor (V3). Valid vendors are as follows:
• VENDOR_ID_IETF_RADIUS—For IETF RADIUS.
• VENDOR_ID_CISCO_RADIUS—For Cisco IOS/PIX RADIUS.
• VENDOR_ID_CISCO_TACACS—For Cisco TACACS+.
• VENDOR_ID_ASCEND_RADIUS—For Ascend RADIUS.
• VENDOR_ID_ALTIGA_RADIUS—For Cisco VPN 3000 RADIUS.
• VENDOR_ID_COMPATIBLE_RADIUS—For Cisco VPN 5000 RADIUS.
• VENDOR_ID_AIRONET_RADIUS—For Cisco Aironet RADIUS.
• VENDOR_ID_NORTEL_RADIUS—For Nortel RADIUS.
• VENDOR_ID_JUNIPER_RADIUS—For Juniper RADIUS.
• VENDOR_ID_CBBMS_RADIUS—For Cisco BBMS RADIUS.
For example:
VN = AS5200-11V1 = 192.168.1.11V2 = byZantine32V3 = VENDOR_ID_CISCO_RADIUS
F-26User Guide for Cisco Secure ACS for Windows Server
78-14696-01, Version 3.1
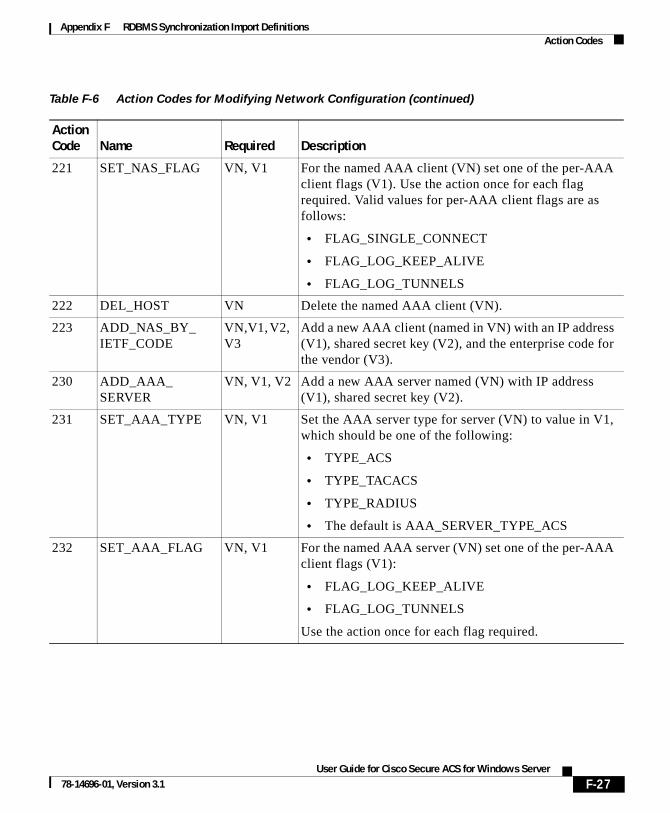
Appendix F RDBMS Synchronization Import DefinitionsAction Codes
221 SET_NAS_FLAG VN, V1 For the named AAA client (VN) set one of the per-AAA client flags (V1). Use the action once for each flag required. Valid values for per-AAA client flags are as follows:
• FLAG_SINGLE_CONNECT
• FLAG_LOG_KEEP_ALIVE
• FLAG_LOG_TUNNELS
222 DEL_HOST VN Delete the named AAA client (VN).
223 ADD_NAS_BY_IETF_CODE
VN,V1, V2, V3
Add a new AAA client (named in VN) with an IP address (V1), shared secret key (V2), and the enterprise code for the vendor (V3).
230 ADD_AAA_SERVER
VN, V1, V2 Add a new AAA server named (VN) with IP address (V1), shared secret key (V2).
231 SET_AAA_TYPE VN, V1 Set the AAA server type for server (VN) to value in V1, which should be one of the following:
• TYPE_ACS
• TYPE_TACACS
• TYPE_RADIUS
• The default is AAA_SERVER_TYPE_ACS
232 SET_AAA_FLAG VN, V1 For the named AAA server (VN) set one of the per-AAA client flags (V1):
• FLAG_LOG_KEEP_ALIVE
• FLAG_LOG_TUNNELS
Use the action once for each flag required.
Table F-6 Action Codes for Modifying Network Configuration (continued)
Action Code Name Required Description
F-27User Guide for Cisco Secure ACS for Windows Server
78-14696-01, Version 3.1
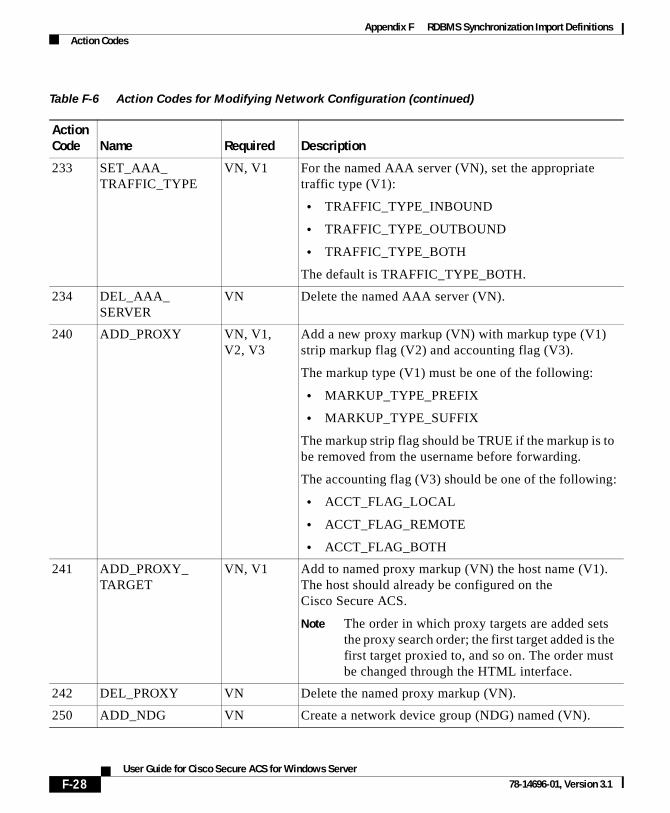
Appendix F RDBMS Synchronization Import DefinitionsAction Codes
233 SET_AAA_TRAFFIC_TYPE
VN, V1 For the named AAA server (VN), set the appropriate traffic type (V1):
• TRAFFIC_TYPE_INBOUND
• TRAFFIC_TYPE_OUTBOUND
• TRAFFIC_TYPE_BOTH
The default is TRAFFIC_TYPE_BOTH.
234 DEL_AAA_SERVER
VN Delete the named AAA server (VN).
240 ADD_PROXY VN, V1, V2, V3
Add a new proxy markup (VN) with markup type (V1) strip markup flag (V2) and accounting flag (V3).
The markup type (V1) must be one of the following:
• MARKUP_TYPE_PREFIX
• MARKUP_TYPE_SUFFIX
The markup strip flag should be TRUE if the markup is to be removed from the username before forwarding.
The accounting flag (V3) should be one of the following:
• ACCT_FLAG_LOCAL
• ACCT_FLAG_REMOTE
• ACCT_FLAG_BOTH
241 ADD_PROXY_TARGET
VN, V1 Add to named proxy markup (VN) the host name (V1). The host should already be configured on the Cisco Secure ACS.
Note The order in which proxy targets are added sets the proxy search order; the first target added is the first target proxied to, and so on. The order must be changed through the HTML interface.
242 DEL_PROXY VN Delete the named proxy markup (VN).
250 ADD_NDG VN Create a network device group (NDG) named (VN).
Table F-6 Action Codes for Modifying Network Configuration (continued)
Action Code Name Required Description
F-28User Guide for Cisco Secure ACS for Windows Server
78-14696-01, Version 3.1

Appendix F RDBMS Synchronization Import DefinitionsAction Codes
251 DEL_NDG VN Delete the named NDG.
252 ADD_HOST_TO_NDG
VN, V1 Add to the named AAA client/AAA server (VN) the NDG (V1).
270 SET_DCS_ASSIGNMENT
— —
271 ADD_NDG_TO_DCS_MAPPING
— —
300 RESTART_PROTO_MODULES
— Restart the CSRadius and CSTacacs services to apply new settings.
350 ADD_UDV VN, V1, V2 Adds a RADIUS vendor to the Cisco Secure ACS vendor database. Vendors added to Cisco Secure ACS by this method are know as User-Defined Vendors (UDV).
VN contains the name of the Vendor.
Note Cisco Secure ACS adds “RADIUS(...)” to the name entered in the Variable Name field. For example, if you enter the name “MyCo”, Cisco Secure ACS displays “RADIUS (MyCo)” in the HTML interface.
V1 contains the user-defined vendor slot number or AUTO_ASSIGN_SLOT. Cisco Secure ACS has ten vendor slots, numbered 0 through 9. If you specify AUTO_ASSIGN_SLOT, Cisco Secure ACS selects the next available slot for your vendor.
Note If you want to replicate UDVs between Cisco Secure ACSes, you must assign the UDV to the same slot number on both Cisco Secure ACSes.
V2 contains the IANA-assigned enterprise code for the vendor.
Table F-6 Action Codes for Modifying Network Configuration (continued)
Action Code Name Required Description
F-29User Guide for Cisco Secure ACS for Windows Server
78-14696-01, Version 3.1
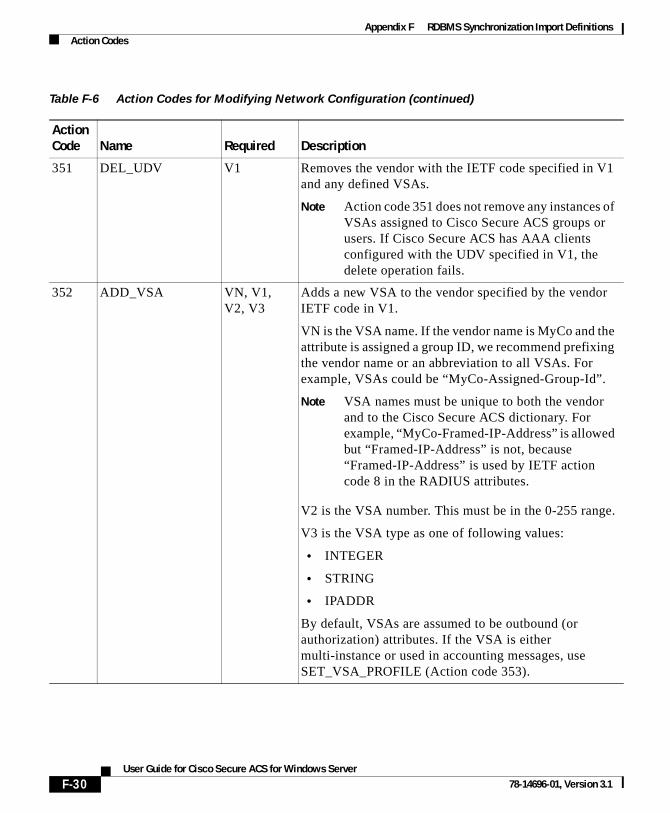
Appendix F RDBMS Synchronization Import DefinitionsAction Codes
351 DEL_UDV V1 Removes the vendor with the IETF code specified in V1 and any defined VSAs.
Note Action code 351 does not remove any instances of VSAs assigned to Cisco Secure ACS groups or users. If Cisco Secure ACS has AAA clients configured with the UDV specified in V1, the delete operation fails.
352 ADD_VSA VN, V1, V2, V3
Adds a new VSA to the vendor specified by the vendor IETF code in V1.
VN is the VSA name. If the vendor name is MyCo and the attribute is assigned a group ID, we recommend prefixing the vendor name or an abbreviation to all VSAs. For example, VSAs could be “MyCo-Assigned-Group-Id”.
Note VSA names must be unique to both the vendor and to the Cisco Secure ACS dictionary. For example, “MyCo-Framed-IP-Address” is allowed but “Framed-IP-Address” is not, because “Framed-IP-Address” is used by IETF action code 8 in the RADIUS attributes.
V2 is the VSA number. This must be in the 0-255 range.
V3 is the VSA type as one of following values:
• INTEGER
• STRING
• IPADDR
By default, VSAs are assumed to be outbound (or authorization) attributes. If the VSA is either multi-instance or used in accounting messages, use SET_VSA_PROFILE (Action code 353).
Table F-6 Action Codes for Modifying Network Configuration (continued)
Action Code Name Required Description
F-30User Guide for Cisco Secure ACS for Windows Server
78-14696-01, Version 3.1
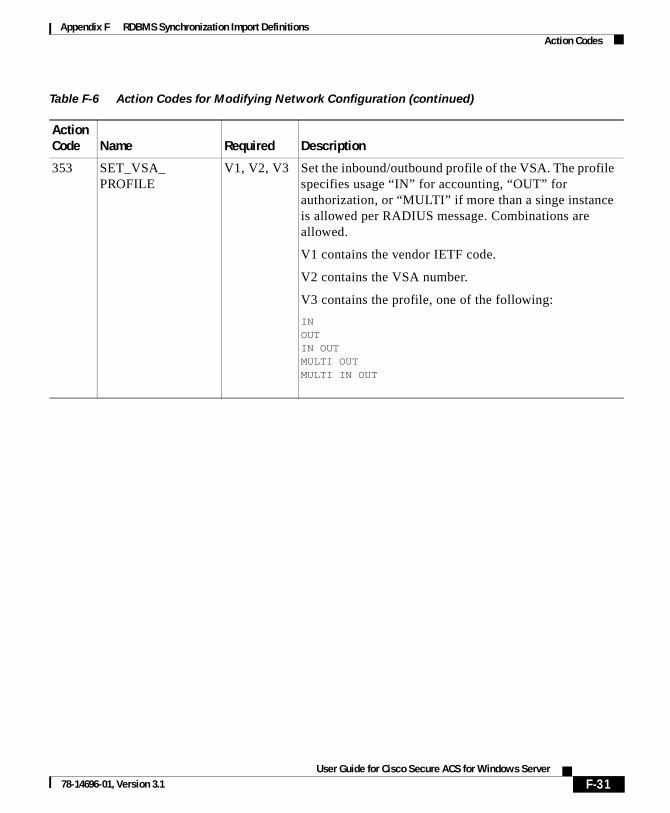
Appendix F RDBMS Synchronization Import DefinitionsAction Codes
353 SET_VSA_PROFILE
V1, V2, V3 Set the inbound/outbound profile of the VSA. The profile specifies usage “IN” for accounting, “OUT” for authorization, or “MULTI” if more than a singe instance is allowed per RADIUS message. Combinations are allowed.
V1 contains the vendor IETF code.
V2 contains the VSA number.
V3 contains the profile, one of the following:
INOUTIN OUTMULTI OUTMULTI IN OUT
Table F-6 Action Codes for Modifying Network Configuration (continued)
Action Code Name Required Description
F-31User Guide for Cisco Secure ACS for Windows Server
78-14696-01, Version 3.1
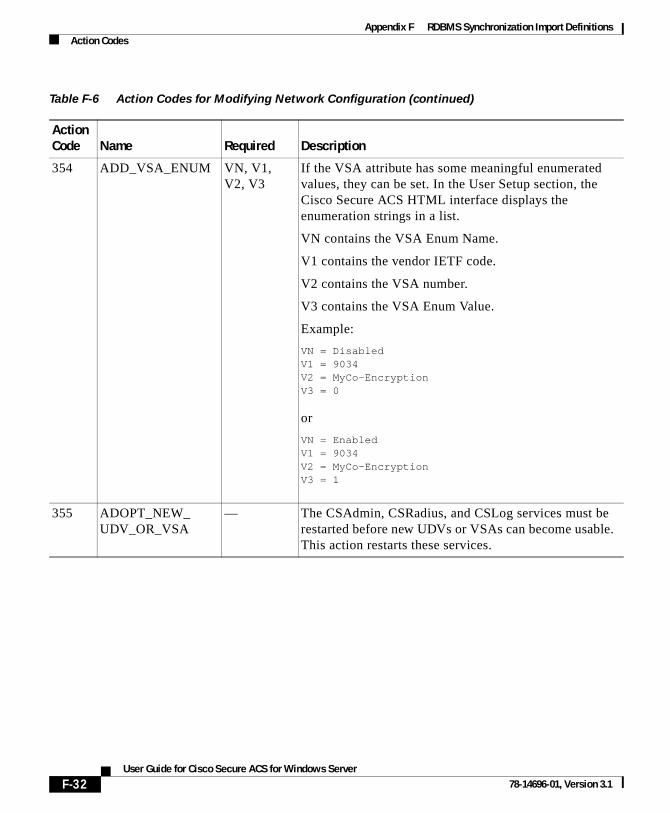
Appendix F RDBMS Synchronization Import DefinitionsAction Codes
354 ADD_VSA_ENUM VN, V1, V2, V3
If the VSA attribute has some meaningful enumerated values, they can be set. In the User Setup section, the Cisco Secure ACS HTML interface displays the enumeration strings in a list.
VN contains the VSA Enum Name.
V1 contains the vendor IETF code.
V2 contains the VSA number.
V3 contains the VSA Enum Value.
Example:
VN = DisabledV1 = 9034V2 = MyCo-EncryptionV3 = 0
or
VN = EnabledV1 = 9034V2 = MyCo-EncryptionV3 = 1
355 ADOPT_NEW_UDV_OR_VSA
— The CSAdmin, CSRadius, and CSLog services must be restarted before new UDVs or VSAs can become usable. This action restarts these services.
Table F-6 Action Codes for Modifying Network Configuration (continued)
Action Code Name Required Description
F-32User Guide for Cisco Secure ACS for Windows Server
78-14696-01, Version 3.1
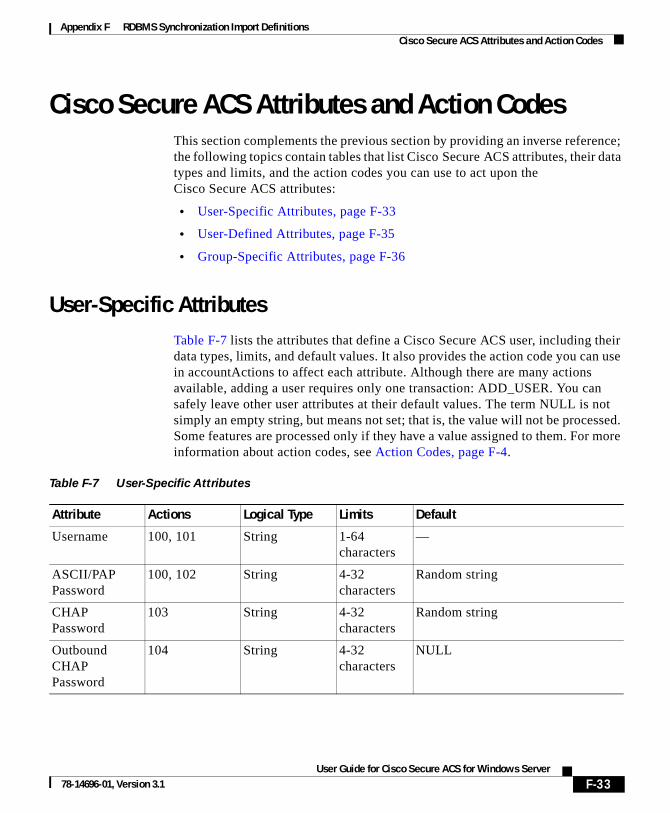
Appendix F RDBMS Synchronization Import DefinitionsCisco Secure ACS Attributes and Action Codes
Cisco Secure ACS Attributes and Action CodesThis section complements the previous section by providing an inverse reference; the following topics contain tables that list Cisco Secure ACS attributes, their data types and limits, and the action codes you can use to act upon the Cisco Secure ACS attributes:
• User-Specific Attributes, page F-33
• User-Defined Attributes, page F-35
• Group-Specific Attributes, page F-36
User-Specific AttributesTable F-7 lists the attributes that define a Cisco Secure ACS user, including their data types, limits, and default values. It also provides the action code you can use in accountActions to affect each attribute. Although there are many actions available, adding a user requires only one transaction: ADD_USER. You can safely leave other user attributes at their default values. The term NULL is not simply an empty string, but means not set; that is, the value will not be processed. Some features are processed only if they have a value assigned to them. For more information about action codes, see Action Codes, page F-4.
Table F-7 User-Specific Attributes
Attribute Actions Logical Type Limits Default
Username 100, 101 String 1-64 characters
—
ASCII/PAP Password
100, 102 String 4-32 characters
Random string
CHAP Password
103 String 4-32 characters
Random string
Outbound CHAP Password
104 String 4-32 characters
NULL
F-33User Guide for Cisco Secure ACS for Windows Server
78-14696-01, Version 3.1
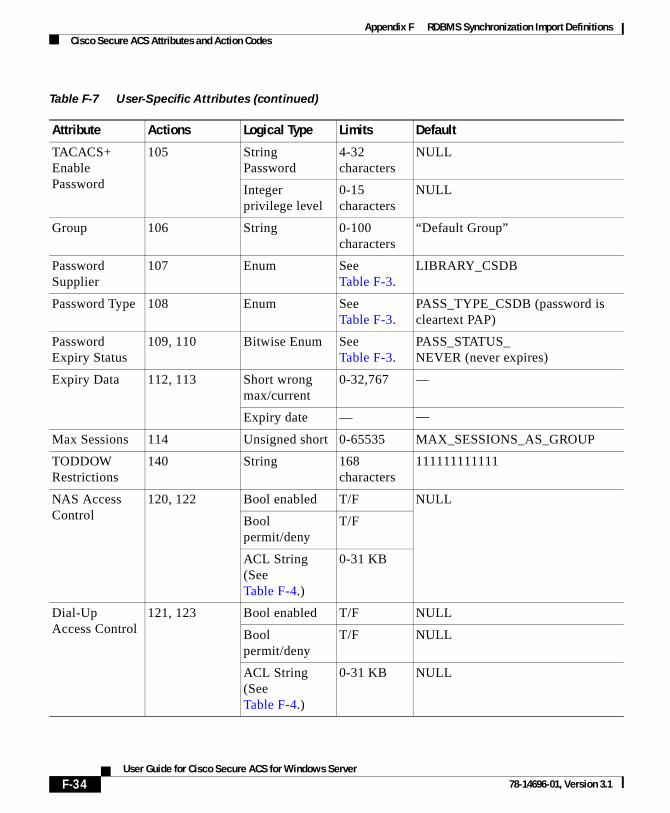
Appendix F RDBMS Synchronization Import DefinitionsCisco Secure ACS Attributes and Action Codes
TACACS+ Enable Password
105 String Password
4-32 characters
NULL
Integer privilege level
0-15 characters
NULL
Group 106 String 0-100 characters
“Default Group”
Password Supplier
107 Enum See Table F-3.
LIBRARY_CSDB
Password Type 108 Enum See Table F-3.
PASS_TYPE_CSDB (password is cleartext PAP)
Password Expiry Status
109, 110 Bitwise Enum See Table F-3.
PASS_STATUS_NEVER (never expires)
Expiry Data 112, 113 Short wrong max/current
0-32,767 —
Expiry date — —
Max Sessions 114 Unsigned short 0-65535 MAX_SESSIONS_AS_GROUP
TODDOW Restrictions
140 String 168 characters
111111111111
NAS Access Control
120, 122 Bool enabled T/F NULL
Bool permit/deny
T/F
ACL String (See Table F-4.)
0-31 KB
Dial-Up Access Control
121, 123 Bool enabled T/F NULL
Bool permit/deny
T/F NULL
ACL String (See Table F-4.)
0-31 KB NULL
Table F-7 User-Specific Attributes (continued)
Attribute Actions Logical Type Limits Default
F-34User Guide for Cisco Secure ACS for Windows Server
78-14696-01, Version 3.1

Appendix F RDBMS Synchronization Import DefinitionsCisco Secure ACS Attributes and Action Codes
User-Defined AttributesUser-defined attributes (UDAs) are string values that can contain any data, such as social security number, department name, telephone number, and so on. You can configure Cisco Secure ACS to include UDAs on accounting logs about user activity. For more information about configuring UDAs, see User Data Configuration Options, page 3-3.
RDBMS Synchronization can set UDAs by using the SET_VALUE action (code 1) to create a value called “USER_DEFINED_FIELD_0” or “USER_DEFINED_FIELD_1”. For accountActions rows defining a UDA value, the AppId (AI) field must contain “APP_ CSAUTH” and the Value2(V2) field must contain “TYPE_STRING”.
Static IP Address
150 Enum scheme (See Table F-4.)
Client
String IP/Pool name
0-31 KB NULL
Callback Number
151 String 0-31 KB NULL
TACACS Attributes
160, 162 Formatted String
0-31 KB NULL
RADIUS Attributes
170, 173 Formatted String
0-31 KB NULL
UDF 1 1, 2 String Real Name
0-31 KB NULL
UDF 2 1, 2 String Description
0-31 KB NULL
UDF 3 1, 2 String 0-31 KB NULL
UDF 4 1, 2 String 0-31 KB NULL
UDF 5 1, 2 String 0-31 KB NULL
Table F-7 User-Specific Attributes (continued)
Attribute Actions Logical Type Limits Default
F-35User Guide for Cisco Secure ACS for Windows Server
78-14696-01, Version 3.1

Appendix F RDBMS Synchronization Import DefinitionsCisco Secure ACS Attributes and Action Codes
Table F-8 lists the data fields that define UDAs. For more information about action codes, see Action Codes, page F-4.
Note If more than two UDAs are created, only the first two are passed to accounting logs.
Group-Specific AttributesTable F-9 lists the attributes that define a Cisco Secure ACS group, including their data types, limits, and default values. It also provides the action code you can use in your accountActions table to affect each field. For more information about action codes, see Action Codes, page F-4.
Table F-8 User-Defined Attributes
ActionUsername (UN) ValueName (VN) Value1 (V1) Value2 (V2) AppId (AI)
1 fred USER_DEFINED_FIELD_0 SS123456789 TYPE_STRING
APP_CSAUTH
1 fred USER_DEFINED_FIELD_1 Engineering TYPE_STRING
APP_CSAUTH
1 fred USER_DEFINED_FIELD_2 949-555-1111 TYPE_STRING
APP_CSAUTH
Table F-9 Group-Specific Attributes
Attribute Actions Logical Type Limits Default
Max Sessions 114 Unsigned short 0-65534 MAX_SESSIONS_UNLIMITED
Max Sessions for user of group
115 Unsigned short 0-65534 MAX_SESSIONS_UNLIMITED
Token caching for session
130 Bool T/F NULL
F-36User Guide for Cisco Secure ACS for Windows Server
78-14696-01, Version 3.1
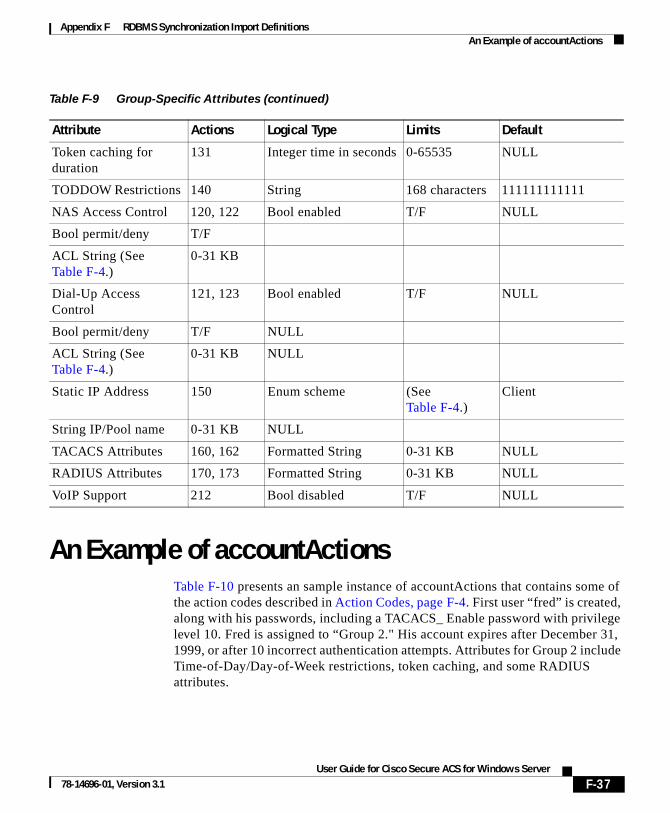
Appendix F RDBMS Synchronization Import DefinitionsAn Example of accountActions
An Example of accountActionsTable F-10 presents an sample instance of accountActions that contains some of the action codes described in Action Codes, page F-4. First user “fred” is created, along with his passwords, including a TACACS_ Enable password with privilege level 10. Fred is assigned to “Group 2." His account expires after December 31, 1999, or after 10 incorrect authentication attempts. Attributes for Group 2 include Time-of-Day/Day-of-Week restrictions, token caching, and some RADIUS attributes.
Token caching for duration
131 Integer time in seconds 0-65535 NULL
TODDOW Restrictions 140 String 168 characters 111111111111
NAS Access Control 120, 122 Bool enabled T/F NULL
Bool permit/deny T/F
ACL String (See Table F-4.)
0-31 KB
Dial-Up Access Control
121, 123 Bool enabled T/F NULL
Bool permit/deny T/F NULL
ACL String (See Table F-4.)
0-31 KB NULL
Static IP Address 150 Enum scheme (See Table F-4.)
Client
String IP/Pool name 0-31 KB NULL
TACACS Attributes 160, 162 Formatted String 0-31 KB NULL
RADIUS Attributes 170, 173 Formatted String 0-31 KB NULL
VoIP Support 212 Bool disabled T/F NULL
Table F-9 Group-Specific Attributes (continued)
Attribute Actions Logical Type Limits Default
F-37User Guide for Cisco Secure ACS for Windows Server
78-14696-01, Version 3.1
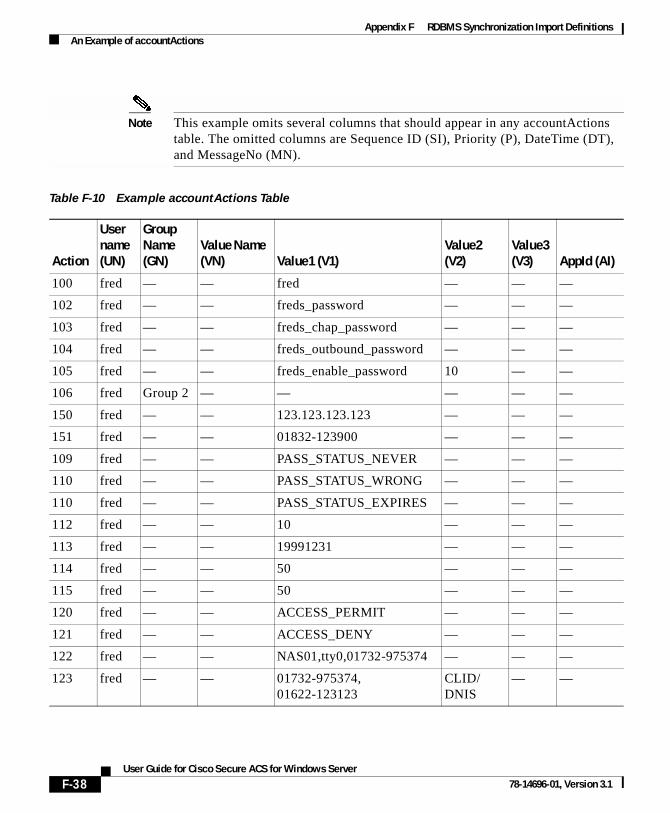
Appendix F RDBMS Synchronization Import DefinitionsAn Example of accountActions
Note This example omits several columns that should appear in any accountActions table. The omitted columns are Sequence ID (SI), Priority (P), DateTime (DT), and MessageNo (MN).
Table F-10 Example accountActions Table
Action
User name (UN)
Group Name (GN)
Value Name (VN) Value1 (V1)
Value2 (V2)
Value3 (V3) AppId (AI)
100 fred — — fred — — —
102 fred — — freds_password — — —
103 fred — — freds_chap_password — — —
104 fred — — freds_outbound_password — — —
105 fred — — freds_enable_password 10 — —
106 fred Group 2 — — — — —
150 fred — — 123.123.123.123 — — —
151 fred — — 01832-123900 — — —
109 fred — — PASS_STATUS_NEVER — — —
110 fred — — PASS_STATUS_WRONG — — —
110 fred — — PASS_STATUS_EXPIRES — — —
112 fred — — 10 — — —
113 fred — — 19991231 — — —
114 fred — — 50 — — —
115 fred — — 50 — — —
120 fred — — ACCESS_PERMIT — — —
121 fred — — ACCESS_DENY — — —
122 fred — — NAS01,tty0,01732-975374 — — —
123 fred — — 01732-975374,01622-123123
CLID/DNIS
— —
F-38User Guide for Cisco Secure ACS for Windows Server
78-14696-01, Version 3.1
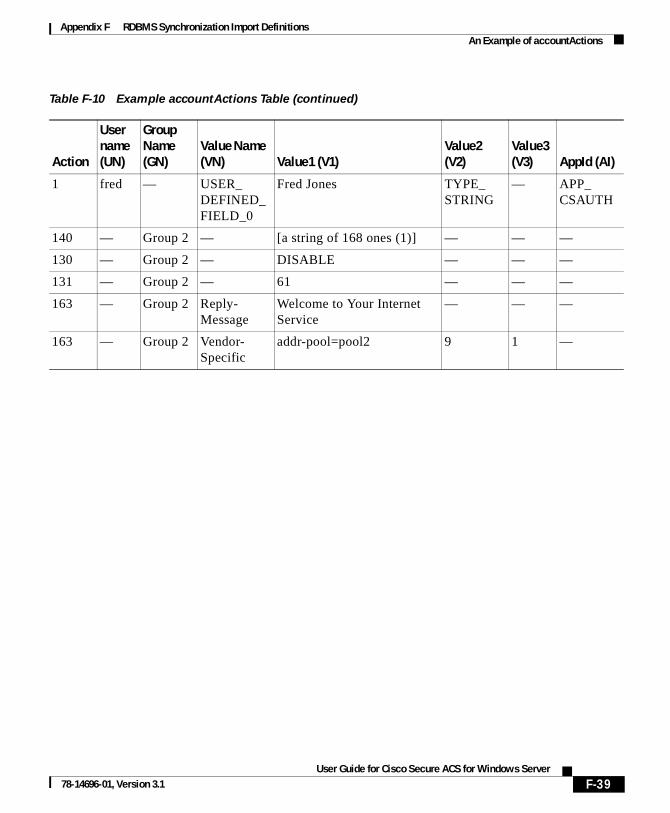
Appendix F RDBMS Synchronization Import DefinitionsAn Example of accountActions
1 fred — USER_DEFINED_FIELD_0
Fred Jones TYPE_STRING
— APP_CSAUTH
140 — Group 2 — [a string of 168 ones (1)] — — —
130 — Group 2 — DISABLE — — —
131 — Group 2 — 61 — — —
163 — Group 2 Reply-Message
Welcome to Your Internet Service
— — —
163 — Group 2 Vendor-Specific
addr-pool=pool2 9 1 —
Table F-10 Example accountActions Table (continued)
Action
User name (UN)
Group Name (GN)
Value Name (VN) Value1 (V1)
Value2 (V2)
Value3 (V3) AppId (AI)
F-39User Guide for Cisco Secure ACS for Windows Server
78-14696-01, Version 3.1

Appendix F RDBMS Synchronization Import DefinitionsAn Example of accountActions
F-40User Guide for Cisco Secure ACS for Windows Server
78-14696-01, Version 3.1
User Guide for 78-14696-01, Version 3.1
A
P P E N D I X G Cisco Secure ACS Internal ArchitectureThis chapter describes the Cisco Secure Access Control Server (Cisco Secure ACS) for Windows Server version 3.1 architectural components. It includes the following topics:
• Windows 2000 Services, page G-1
• Windows 2000 Registry, page G-2
• CSAdmin, page G-2
• CSAuth, page G-3
• CSDBSync, page G-4
• CSLog, page G-4
• CSMon, page G-4
• CSTacacs and CSRadius, page G-8
Windows 2000 ServicesCisco Secure ACS is modular and flexible to fit the needs of both simple and large networks. This appendix describes the Cisco Secure ACS architectural components. Cisco Secure ACS includes the following service modules:
• CSAdmin
• CSAuth
G-1Cisco Secure ACS for Windows Server
Appendix G Cisco Secure ACS Internal ArchitectureWindows 2000 Registry
• CSDBSync
• CSLog
• CSMon
• CSTacacs
• CSRadius
You can stop or restart Cisco Secure ACS services as a group, except for CSAdmin, using the Cisco Secure ACS HTML interface. For more information, see Service Control, page 8-2.
Individual Cisco Secure ACS services can be started, stopped, and restarted from the Services window, available within the Windows 2000 Control Panel.
Windows 2000 RegistryThe Cisco Secure ACS information is located in the following Windows Registry key:
HKEY_LOCAL_MACHINE\SOFTWARE\CISCO
Unless you are advised to do so by a Cisco representative, we strongly recommend that you do not modify Windows Registry settings pertaining to Cisco Secure ACS.
Warning Do not modify the Registry unless you have enough knowledge and experience to edit the file without destroying or corrupting crucial data.
CSAdminCSAdmin is the service that provides the web server for the Cisco Secure ACS HTML interface. After Cisco Secure ACS is installed, you must configure it from its HTML interface; therefore, CSAdmin must be running when you configure Cisco Secure ACS.
Because the Cisco Secure ACS web server uses port 2002 rather than the standard port 80 usually associated with HTTP traffic, you can use another web server on the same machine to provide other web services. We have not performed
G-2User Guide for Cisco Secure ACS for Windows Server
78-14696-01, Version 3.1
Appendix G Cisco Secure ACS Internal ArchitectureCSAuth
interoperability testing with other web servers, but unless a second web server is configured to use either port 2002 or one of the ports within the range specified in the HTTP Port Allocation feature, you should not encounter port conflicts for HTTP traffic. For more information about the HTTP Port Allocation feature, see Access Policy, page 10-11.
Note For more information about access to the HTML interface and network environments, see Network Environments and Remote Administrative Sessions, page 1-27.
Although you can start and stop services from within the Cisco Secure ACS HTML interface, this does not include starting or stopping CSAdmin. If CSAdmin stops abnormally because of an external action, you cannot access Cisco Secure ACS from any computer other than the Windows server on which it is running. You can start or stop CSAdmin from Windows Control Panel.
CSAdmin is multi-threaded, which enables several Cisco Secure ACS administrators to access it at the same time. Therefore, CSAdmin is well suited for distributed, multiprocessor environments.
CSAuthCSAuth is the authentication and authorization service. It permits or denies access to users by processing authentication and authorization requests. CSAuth determines if access should be granted and defines the privileges for a particular user. CSAuth is the Cisco Secure ACS database manager.
To authenticate users, Cisco Secure ACS can use the internal user database or one of many external databases. When a request for authentication arrives, Cisco Secure ACS checks the database that is configured for that user. If the user is unknown, Cisco Secure ACS checks the database(s) configured for unknown users. For more information about how Cisco Secure ACS handles authentication requests for unknown users, see Unknown User Processing, page 12-1.
For more information about the various database types supported by Cisco Secure ACS, see Chapter 11, “Working with User Databases.”
When a user has authenticated, Cisco Secure ACS obtains a set of authorizations from the user profile and the group to which the user is assigned. This information is stored with the username in the CiscoSecure user database. Some of the
G-3User Guide for Cisco Secure ACS for Windows Server
78-14696-01, Version 3.1
Appendix G Cisco Secure ACS Internal ArchitectureCSDBSync
authorizations included are the services to which the user is entitled, such as IP over PPP, IP pools from which to draw an IP address, access lists, and password-aging information. The authorizations, with the approval of authentication, are then passed to the CSTacacs or CSRadius modules to be forwarded to the requesting device.
CSDBSyncCSDBSync is the service used to synchronize the Cisco Secure ACS database with third-party relational database management system (RDBMS) systems. CSDBSync synchronizes AAA client, AAA server, network device groups (NDGs) and Proxy Table information with data from a table in an external relational database. For information on RDBMS Synchronization, see RDBMS Synchronization, page 8-29.
CSLogCSLog is the service used to capture and place logging information. CSLog gathers data from the TACACS+ or RADIUS packet and CSAuth, and then manipulates the data to be placed into the comma-separated value (CSV) files. CSV files can be imported into spreadsheets that support this format.
For information about the logs generated by Cisco Secure ACS, see Chapter 9, “Working with Logging and Reports.”
CSMonCSMon is a service that helps minimize downtime in a remote access network environment. CSMon works for both TACACS+ and RADIUS and automatically detects which protocols are in use.
You can use the Cisco Secure ACS HTML interface to configure the CSMon service. The Cisco Secure ACS Active Service Management feature provides the options for configuring CSMon behavior. For more information, see Cisco Secure ACS Active Service Management, page 8-55.
G-4User Guide for Cisco Secure ACS for Windows Server
78-14696-01, Version 3.1
Appendix G Cisco Secure ACS Internal ArchitectureCSMon
Note CSMon is not intended as a replacement for system, network, or application management applications but is provided as an application-specific utility that can be used with other, more generic system management tools.
CSMon performs four basic activities, outlined in the following topics:
• Monitoring, page G-5
• Recording, page G-6
• Notification, page G-7
• Response, page G-7
MonitoringCSMon monitors the overall status of Cisco Secure ACS and the system on which it is running. CSMon actively monitors three basic sets of system parameters:
• Generic host system state—CSMon monitors the following key system thresholds:
– Available hard disk space
– Processor utilization
– Physical memory utilization
All events related to generic host system state are categorized as “warning events”.
• Application-specific performance—
– Application viability—CSMon periodically performs a test login using a special built-in test account (the default period is one minute). Problems with this authentication can be used to determine if the service has been compromised.
– Application performance thresholds—CSMon monitors and records the latency of each test authentication request (the time it takes to receive a positive response). Each time this is performed, CSMon updates a variable containing the average response time value. Additionally, it records whether retries were necessary to achieve a successful response. By tracking the average time for each test authentication, CSMon can
G-5User Guide for Cisco Secure ACS for Windows Server
78-14696-01, Version 3.1

Appendix G Cisco Secure ACS Internal ArchitectureCSMon
build up a “picture” of expected response time on the system in question. CSMon can therefore detect whether excess re-tries are required for each authentication or if response times for a single authentication exceed a percentage threshold over the average.
• System resource consumption by Cisco Secure ACS—CSMon periodically monitors and records the usage by Cisco Secure ACS of a small set of key system resources and compares it against predetermined thresholds for indications of atypical behavior. The parameters monitored include the following:
– Handle counts
– Memory utilization
– Processor utilization
– Thread used
– Failed log-on attempts
CSMon cooperates with CSAuth to keep track of user accounts being disabled by exceeding their failed attempts count maximum. This feature is more oriented to security and user support than system viability. If configured, it provides immediate warning of “brute force” attacks by alerting the administrator to a large number of accounts becoming disabled. In addition, it helps support technicians anticipate problems with individual users gaining access.
RecordingCSMon records exception events in logs that you can use to diagnose problems.
• CSMon Log—Like the other Cisco Secure ACS services, CSMon maintains a CSV log of its own for diagnostic recording and error logging. Because this logging consumes relatively small amounts of resources, CSMon logging cannot be disabled.
• Windows Event Log—CSMon can log messages to the Windows Event Log. Logging to the Windows Event Log is enabled by default but can be disabled.
G-6User Guide for Cisco Secure ACS for Windows Server
78-14696-01, Version 3.1

Appendix G Cisco Secure ACS Internal ArchitectureCSMon
NotificationCSMon can be configured to notify system administrators in the following cases:
• Exception events
• Response
• Outcome of the response
Notification for exception events and outcomes includes the current state of Cisco Secure ACS at the time of the message. The default notification method is simple mail-transfer protocol (SMTP) e-mail, but you can create scripts to enable other methods.
ResponseCSMon detects exception events that affect the integrity of the service. For information about monitored events, see Monitoring, page G-5. These events are application-specific and hard-coded into Cisco Secure ACS. There are two types of responses:
• Warning events—Service is maintained but some monitored threshold is breached.
• Failure events—One or more Cisco Secure ACS components stop providing service.
CSMon responds to the event by logging the event, sending notifications (if configured) and, if the event is a failure, taking action. There are two types of actions:
• Predefined actions—These actions are hard-coded into the program and are always carried out when a triggering event is detected. Because these actions are hard-coded, they are integral to the application and do not need to be configured. These actions include running the CSSupport utility, which captures most of the parameters dealing with the state of the system at the time of the event.
G-7User Guide for Cisco Secure ACS for Windows Server
78-14696-01, Version 3.1
Appendix G Cisco Secure ACS Internal ArchitectureCSTacacs and CSRadius
If the event is a warning event, it is logged and the administrator is notified. No further action is taken. CSMon also attempts to fix the cause of the failure after a sequence of re-tries and individual service restarts.
• Customer-Definable Actions—If the predefined actions built into CSMon do not fix the problem, CSMon can execute an external program or script.
CSTacacs and CSRadiusThe CSTacacs and CSRadius services communicate between the CSAuth module and the access device that is requesting authentication and authorization services. For CSTacacs and CSRadius to work properly, the system must meet the following conditions:
• CSTacacs and CSRadius services must be configured from CSAdmin.
• CSTacacs and CSRadius services must communicate with access devices such as access servers, routers, switches, and firewalls.
• The identical shared secret (key) must be configured both in Cisco Secure ACS and on the access device.
• The access device IP address must be specified in Cisco Secure ACS.
• The type of security protocol being used must be specified in Cisco Secure ACS.
CSTacacs is used to communicate with TACACS+ devices and CSRadius to communicate with RADIUS devices. Both services can run at the same time. When only one security protocol is used, only the applicable service needs to be running; however, the other service will not interfere with normal operation and does not need to be disabled. For more information about TACACS+ AV pairs, see Appendix B, “TACACS+ Attribute-Value Pairs.” For more information about RADIUS+ AV pairs, see Appendix C, “RADIUS Attributes.”
G-8User Guide for Cisco Secure ACS for Windows Server
78-14696-01, Version 3.1
User Guide for Ci78-14696-01, Version 3.1
I N D E X
A
AAA
definition 1-1
pools for IP address assignment 7-12
See also AAA clients
See also AAA servers
AAA clients
adding and configuring 4-15
definition 1-5
deleting 4-19
editing 4-18
interaction with AAA servers 1-5
IP pools 7-12
searching for 4-8
supported Cisco AAA clients 1-2
table 4-2
timeout 12-8
timeout values 12-7
AAA servers
adding 4-23
configuring 4-23
deleting 4-27
editing 4-25
enabling in interface (table) 3-5
in distributed systems 4-3
master 8-11
overview 4-20
primary 8-11
replicating 8-11
searching for 4-8
secondary 8-11
troubleshooting A-1
access devices 1-5
accessing Cisco Secure ACS
how to 1-29
URL 1-26
access policies
See administrative access policies
accountActions table 8-34
account disablement
Account Disabled check box 7-5
manual 7-55
resetting 7-58
setting options for 7-20
accounting
overview 1-20
See also logging
See also user data configuration
IN-1sco Secure ACS for Windows Server
Index
ACLs
See downloadable PIX ACLs
ACS Backup and Restore log
CSV (comma-separated values) file directory 9-14
viewing 9-15
ACS backups
See backups
ACS service management
event logging configuration 8-58
overview 8-55
system monitoring
configuring 8-57
custom actions 8-57
ACS Service Monitoring log
CSV (comma-separated values) file directory 9-29
viewing 9-15
ACS system restore
See restore
action codes
for creating and modifying user accounts F-7
for initializing and modifying access filters F-15
for modifying network configuration F-25
for modifying TACACS+ and RADIUS settings F-19
for setting and deleting values F-5
in accountActions F-4
ActivCard user databases
configuring 11-60
IN-2User Guide for Cisco Secure ACS for Windows Serve
group mappings 12-12
RADIUS-based group specifications 12-22
Administration Audit log
configuring 9-12
CSV file directory 9-14
viewing 9-15
Administration Control
audit policy setup 10-18
session policies 10-16
administrative access policies
configuring 10-14
limits 10-11
options 10-12
overview 2-14
administrators
adding 10-6
deleting 10-11
editing 10-8
locked out 10-10
locking out 10-17
overview 10-2
privileges 10-3
See also Administration Audit log
See also Administration Control
See also administrative access policies
separation from general users 2-16
troubleshooting A-2
unlocking 10-10
age-by-date rules for groups 6-24
r78-14696-01, Version 3.1

Index
ARAP
compatible databases 1-9
in User Setup 7-6
protocol supported 1-10
ASCII/PAP
compatible databases 1-9
protocol supported 1-10
attributes
enabling in interface 3-2
group-specific (table) F-36
logging of user data 9-2
per-group 3-2
per-user 3-2
user-specific (table) F-35
attribute-value pairs
See AV (attribute value) pairs
audit policies
overview 10-18
See also Administration Audit log
authentication
configuration 8-81
overview 1-7
request handling 12-3
via external user databases 11-5
Windows 11-11
authorization 1-15
authorization sets
See command authorization sets
User Gu78-14696-01, Version 3.1
AV (attribute value) pairs
RADIUS
Cisco IOS C-2
IETF C-12
See also RADIUS VSAs (vendor specific attributes)
TACACS+
accounting B-4
general B-1
Axent user databases
See PassGo user databases
B
Backup and Restore log directory
See ACS Backup and Restore log
backups
components backed up 8-48
diabling scheduled 8-51
directory management 8-48
filenames 8-53
locations 8-48
manual 8-50
options 8-49
overview 8-47
reports 8-49
scheduled vs. manual 8-47
scheduling 8-50
vs. replication 8-16
with CSUtil.exe D-4
IN-3ide for Cisco Secure ACS for Windows Server

Index
browsers
See also HTML interface
troubleshooting A-3
C
callback options
in Group Setup 6-6
in User Setup 7-10
certification
adding certificate authority certificates 8-76
background 8-69
backups 8-48
certificate signing request generation 8-78
certificate trust list edit 8-77
replacing 8-80
server certificate installation 8-74
updating 8-80
CHAP
compatible databases 1-9
in User Setup 7-6
protocol supported 1-10
Cisco IOS
RADIUS
AV (attribute value) pairs C-2
group attributes 6-38
user attributes 7-39
TACACS+
AV (attribute value) pairs B-1
IN-4User Guide for Cisco Secure ACS for Windows Serve
troubleshooting A-3
CiscoSecure authentication agent 1-15, 6-20
CiscoSecure database replication
See replication
CiscoSecure user database
overview 11-2
See also databases
codes
See action codes
command authorization sets
adding 5-16
configuring 5-13, 5-16
deleting 5-20
editing 5-19
overview 5-14
PIX command authorization sets 5-14
command-line database utility
See CSUtil.exe
conventions xxviii
CRYPTOCard user databases
configuring 11-60
group mappings 12-12
RADIUS-based group specifications 12-22
CSAdmin G-2
CSAuth G-3
CSDBSync 8-33, G-4
CSLog G-4
CSMon
configuration G-4
r78-14696-01, Version 3.1
Index
failure events
customer-defined actions G-7
predefined actions G-7
functions G-4
log G-6
overview G-4
See also ACS service management
CSNTacctInfo 11-47, 11-49
CSNTAuthUserPap 11-45
CSNTerrorString 11-47, 11-49
CSNTExtractUserClearTextPw 11-46
CSNTgroup 11-47
CSNTgroups 11-48
CSNTpassword 11-49
CSNTpasswords 11-47
CSNTresults 11-47, 11-48
CSNTusername 11-48
CSNTusernames 11-47
CSRadius G-8
CSTacacs G-8
CSUtil.exe
decoding error numbers with D-26
import text file (example) D-23
overview D-1
CSV (comma-separated values) files
downloading 9-15
file name formats 9-13
logging 9-15
logging format 9-1
User Gu78-14696-01, Version 3.1
custom attributes
in group-level TACACS+ settings 6-29
in user-level TACACS+ settings 7-22
D
database group mappings
configuring
for token servers 12-13
for Windows NT/2000 domains 12-18
no access groups 12-16
order 12-21
deleting
group set mappings 12-20
Windows NT/2000 domain configurations 12-20
in external user databases 12-11
overview 12-11
Database Replication log
CSV (comma-separated values) file directory 9-14
viewing 9-15
databases
CiscoSecure user database 11-2
deleting 11-66
deployment considerations 2-17
dump files D-8
external
See external user databases
IN-5ide for Cisco Secure ACS for Windows Server
Index
group mappings
See database group mappings
performance 12-7
replication
See replication
search order 12-9
search process 12-8, 12-9
See also external user databases
selecting user databases 11-1
synchronization
See RDBMS synchronization
token cards
See token servers
troubleshooting A-5, A-13
types
See ActivCard user databases
See CRYPTOCard user databases
See generic LDAP user databases
See LEAP proxy RADIUS user databases
See Novell NDS user databases
See ODBC features
See PassGo user databases
See RADIUS user databases
See RSA user databases
See SafeWord user databases
unknown users 12-1
user
CiscoSecure user databases 8-2
Windows user databases 11-7
IN-6User Guide for Cisco Secure ACS for Windows Serve
data source names
for RDMBS synchronization 8-41
using with ODBC databases 11-39, 11-52
date format control 8-3
DbSync log directory 9-14
debug logs
detail levels 9-30
frequency 9-30
troubleshooting A-10
default group in Group Setup 6-2
default group mapping for windows 12-16
default time-of-day/day-of-week specification 3-4
default time-of-day access settings for groups 6-5
deleting logged-in users 9-9
deployment
overview 2-1
sequence 2-18
device command sets
See command authorization sets
device groups
See network device groups
device management applications support 1-18
DHCP with IP pools 8-61
dial-in permission to users in Windows 11-14
dial-in troubleshooting A-6
dial-up networking clients 11-10, 11-11
dial-up topologies 2-5
r78-14696-01, Version 3.1
Index
digital certificates
See certification
Disabled Accounts reports 9-10
discovered users 12-2
distributed systems
AAA servers in 4-3
overview 4-3
settings
configuring 4-32
default entry 4-4
enabling in interface 3-5
distribution table
See Proxy Distribution Table
documentation
objectives xxv
obtaining xxx
online 1-30
organization xxvi, xxvii
related xxix
domain lists
configuring 11-14
inadvertant user lockouts 11-13, 11-15
overview 11-12
domain names
Windows operating systems 11-11
downloadable PIX ACLs
adding 5-4
assigning to groups 6-28
assigning to users 7-21
User Gu78-14696-01, Version 3.1
configuring 5-4
deleting 5-5
enabling in interface
group-level 3-5
user-level 3-4
overview 5-2
draft-ietf-radius-tunnel-auth 1-6
dump files
creating database dump files D-8
loading a database from a dump file D-9
E
EAP (Extensible Authentication Protocol) overview 1-12
EAP-TLS
authentication configuration 8-81
compatible databases 1-9
limitations 8-72
overview 8-70
See also certification
enable password options for TACACS+ 7-35
error number decoding with CSUtil.exe D-26
Event log
configuring 8-58
exception events G-6
monitoring system health G-5
exception events G-7
exports
of user lists D-23
IN-7ide for Cisco Secure ACS for Windows Server
Index
with CSUtil.exe D-2
Extensible Authentication Protocol
See EAP (Extensible Authentication Protocol) overview
external token servers
See token servers
external user databases
administering 12-1
authentication via 11-5
configuring 11-4
latency factors 12-7
search order 12-7, 12-9
See also databases
supported 1-8
F
Failed Attempts log
configuring
CSV (comma-separated values) 9-16
ODBC 9-20
CSV (comma-separated values) file directory 9-14
enabling
CSV (comma-separated values) 9-14
ODBC 9-20
viewing 9-15
failed log-on attempts G-6
failure events
customer-defined actions G-7
IN-8User Guide for Cisco Secure ACS for Windows Serve
predefined actions G-7
fallbacks on failed connection 4-6
finding users 7-54
firewalls
administering AAA servers through 1-21
troubleshooting A-13
G
gateways E-3
generic LDAP user databases
authentication 11-16
configuring
options 11-22
procedure 11-28
directed authentications 11-18
domain filtering 11-18
failover 11-20
mapping database groups to AAA groups 12-14
organizational units and groups 11-18
supported protocols 1-10
Global Authentication Setup 8-81
grant dial-in permission to users 11-9, 11-14
greeting after login 6-23
group-level interface enabling
downloadable PIX ACLs 3-5
network access restrictions 3-5
network access restriction sets 3-5
password aging 3-5
r78-14696-01, Version 3.1
Index
group-level network access restrictions
See network access restrictions
groups
assigning users to 7-9
configuring RADIUS settings for
See RADIUS
Default Group 6-2, 12-16
enabling VoIP (Voice over IP) support for 6-4
listing all users in 6-52
mapping order 12-21
mappings 12-12, 12-14
multiple mappings 12-15
no access groups 12-15
overriding settings 3-2
relationship to users 3-2
renaming 6-53
resetting usage quota counters for 6-52
See also network device groups
settings for
callback options 6-6
configuration-specific 6-15
configuring common 6-3
device management command authorization sets 6-35
IP address assignment method 6-27
max sessions 6-11
network access restrictions 6-7
password aging rules 6-20
shell command authorization sets 6-31
User Gu78-14696-01, Version 3.1
TACACS+ 6-2, 6-29
time-of-day access 6-5
token cards 6-16
usage quotas 6-13
setting up and managing 6-1
sort order within group mappings 12-15
specification by ODBC authentication 11-47
specifications by ODBC authentications 11-48
H
handle counts G-6
hard disk space G-5
hardware requirements 2-2
Help 1-26
host system state G-5
HTML interface
encrypting 10-13
logging off 1-29
overview 1-23
security 1-23
See also Interface Configuration
SSL 1-23
web servers G-2
HTTP port allocation
configuring 10-14
overview 1-21
HTTPS 10-13
IN-9ide for Cisco Secure ACS for Windows Server
Index
I
IETF 802.1x
EAP (Extensible Authentication Protocol) overview 1-12
importing passwords D-13
imports with CSUtil.exe D-13
inbound authentication 1-13
inbound password configuration 1-13
installation
related documentation xxix
system requirements 2-2
troubleshooting A-11
Interface Configuration
advanced options 3-4
configuring 3-1
customized user data fields 3-3
security protocol options 3-9
IP addresses
in User Setup 7-11
requirement for CSTacacs and CSRadius G-8
setting assignment method for user groups 6-27
IP pools
address recovery 8-67
deleting 8-66
DHCP 8-61
enabling in interface 3-5
overlapping 8-61, 8-63
refreshing 8-62
IN-10User Guide for Cisco Secure ACS for Windows Serve
resetting 8-65
servers
adding IP pools 8-63
overview 8-60
replicating IP pools 8-60
user IP addresses 7-12
L
LAN manager 1-12
latency
networks 2-18
LDAP
See generic LDAP user databases
LDAP databases
See generic LDAP user databases
LEAP proxy RADIUS user databases
configuring external databases 11-55
group mappings 12-12
RADIUS-based group specifications 12-22
list all users
in Group Setup 6-52
in User Setup 7-54
Logged-In Users report
deleting logged-in users 9-9
viewing 9-8
logging
accounting logs 9-5
administration reports 9-7
r78-14696-01, Version 3.1
Index
configuring 9-17
CSV (comma-separated values) files 9-1
custom RADIUS dictionaries 8-10
debug logs
detail levels 9-30
frequency 9-30
Disabled Accounts reports 9-7
domain names 9-2
external user databases 9-2
Failed Attempts logs 9-5
formats 9-1
Logged-In Users reports 9-7
ODBC logs
enabling in interface 3-6
overview 9-1
working with 9-19
Passed Authentication logs 9-5
RADIUS logs 9-5
RDBMS Synchronization 8-10
remote logging
centralized 9-24
configuring 9-26
diabling 9-28
enabling in interface 3-5
logging hosts 9-23
options 9-25
overview 9-23
User Gu78-14696-01, Version 3.1
See also Reports and Activity
services
configuring service logs 9-30
list of logs generated 9-29
system logs 9-11
TACACS+ logs 9-5
troubleshooting A-12
user data attributes 9-2
VoIP logs 9-5
watchdog packets 9-4
login process test frequency 8-56
logins
greeting upon 6-23
password aging dependency 6-22
logs
See logging
See Reports and Activity
M
mappings
database groups to AAA groups 12-14
databases to AAA groups 12-12
master AAA servers 8-11
max sessions
enabling in interface 3-5
in Group Setup 6-11
in User Setup 7-16
overview 1-16
IN-11ide for Cisco Secure ACS for Windows Server
Index
troubleshooting A-12
memory utilization G-5, G-6
monitoring
configuring 8-57
CSMon G-5
overview 8-56
MS-CHAP
compatible databases 1-9
configuring 8-81
overview 1-12
protocol supported 1-10
multiple group mappings 12-15
N
NAR
See network access restrictions
NAS
See AAA clients
NDG
See network device groups
NDS
See Novell NDS user databases
network access filters
See network access restrictions
network access quotas 1-17
network access restrictions
adding 5-9
configuring 5-8
IN-12User Guide for Cisco Secure ACS for Windows Serve
deleting 5-13
editing 5-5, 5-11
enabling in interface
group-level 3-5
user-level 3-4
in Group Setup 6-7
interface configuration 3-5
in User Setup 6-7, 7-12
overview 5-6
network access servers
See AAA clients
network configuration 4-1
network device groups
adding 4-28
assigning AAA clients to 4-29
assigning AAA servers to 4-29
configuring 4-27
deleting 4-31
enabling in interface 3-6
overview 1-22
reassigning AAA clients to 4-30
reassigning AAA servers to 4-30
renaming 4-31
network devices
See AAA clients
network requirements 2-4
networks
latency 2-18
reliability 2-18
r78-14696-01, Version 3.1
Index
network topologies 2-5
notifications G-7
Novell NDS user databases
authentication 11-34
configuring 11-37
mapping database groups to AAA groups 12-14
Novell Requestor 11-34
options 11-36
supported protocols 1-10
supported versions 11-34
user contexts 11-35
O
ODBC features
accountActions table 8-36
authentication
CHAP 11-43
overview 11-39
PAP 11-43
result codes 11-49
case-sensitive passwords 11-44
CHAP authentication sample procedure 11-46
configuring 11-51
data source names 9-20, 11-39
DSN configuration 11-50
group mappings 12-12
User Gu78-14696-01, Version 3.1
group specifications
CHAP 11-48
PAP 11-47
vs. group mappings 12-13
PAP authentication sample procedures 11-45
password case sensitivity 11-44
stored procedures
CHAP authentication 11-48
implementing 11-43
PAP authentication 11-46
type definitions 11-44
supported protocols 1-10
user databases 11-39
ODBC logs
See logging
Online Documentation 1-31
online Help
location in HTML interface 1-26
using 1-30
operating system requirements 2-2
outbound password configuration 1-13
overview of Cisco Secure ACS 1-1
P
PAP
compared with ARAP 1-11
compared with CHAP 1-11
compatible databases 1-9
IN-13ide for Cisco Secure ACS for Windows Server
Index
in User Setup 7-6
Passed Authentications log
configuring CSV (comma-separated values) 9-16
CSV (comma-separated values) file directory 9-14
enabling CSV (comma-separated values) logging 9-14
viewing 9-15
PassGo user databases
configuring external databases 11-60
group mappings 12-12
RADIUS-based group specifications 12-22
password aging
age-by-uses rules 6-22
Cisco IOS release requirement for 6-21
interface configuration 3-5
overview 1-14
rules 6-20
passwords
case-sensitive 11-44
CHAP/MS-CHAP/ARAP 7-8
configurations
caching 1-13
inbound passwords 1-13
outbound passwords 1-13
separate passwords 1-13
single password 1-13
token caching 1-13
token cards 1-13
IN-14User Guide for Cisco Secure ACS for Windows Serve
expiration 6-22
import utility D-13
local management 8-5
post-login greeting 6-23
protocols and user database compatibility 1-9
protocols supported 1-10
remote change 8-5
See also password aging
user-changeable 1-15
validation options in System Configuration 8-5
PEAP
configuring 8-81
limitations 8-73
overview 8-72
See also certification
unknown user processing 8-73
performance monitoring G-5
performance specifications 1-3
per-group attributes
enabling in interface 3-2
See also groups
per-user attributes
enabling in interface 3-2
TACACS+/RADIUS in Interface Configuration 3-4
PIX ACLs
See downloadable PIX ACLs
PIX command authorization sets
See command authorization sets
r78-14696-01, Version 3.1

Index
PIX Firewall troubleshooting A-13
PKI (public key infastructure
certification) 8-69
port 2002
CSAdmin G-2
in HTTP port ranges 10-13
in URLs 1-26
port allocation
See HTTP port allocation
ports
RADIUS 1-6
See also HTTP port allocation
See also port 2002
TACACS+ 1-6
PPP password aging 6-21
processor utilization G-5, G-6
profile components
See shared profile components
proxy
character strings
defining 4-6
stripping 4-6
configuring 4-32
in enterprise settings 4-7
overview 4-4
See also Proxy Distribution Table
sending accounting packets 4-7
troubleshooting A-11
User Gu78-14696-01, Version 3.1
Proxy Distribution Table
adding entries 4-33
configuring 4-32
default entry 4-4, 4-33
deleting entries 4-36
editing entries 4-35
match order sorting 4-35
overview 4-32
See also proxy
Q
quotas
See network access quotas
See usage quotas
R
RADIUS
attributes
in User Setup 7-37
See also RADIUS VSAs (vendor specific attributes)
AV (attribute value) pairs
Cisco IOS C-2
IETF C-12
overview C-1
See also RADIUS VSAs (vendor specific attributes)
IN-15ide for Cisco Secure ACS for Windows Server

Index
Cisco Aironet
in Network Configuration 4-13
IETF
in Group Setup 6-37
interface configuration 3-15
in User Setup 7-38
interface configuration overview 3-10
ports 1-6
See also RADIUS VSAs (vendor specific attributes)
specifications 1-6
troubleshooting A-16
tunneling packets 4-17
vs. TACACS+ 1-6
RADIUS Accounting log
configuring
CSV (comma-separated values) 9-15, 9-16
ODBC 9-20
CSV (comma-separated values) file directory 9-14
enabling
CSV (comma-separated values) 9-14
ODBC 9-20
RADIUS user databases
configuring 11-60
group mappings 12-12
RADIUS-based group specifications 12-22
RADIUS VSAs (vendor specific attributes)
Ascend
in Group Setup 6-41
IN-16User Guide for Cisco Secure ACS for Windows Serve
in User Setup 7-42
supported attributes C-30
Cisco Aironet
in Group Setup 6-39
in User Setup 7-40
Cisco BBSM (Building Broadband Service Manager)
in Group Setup 6-49
in User Setup 7-51
supported attributes C-12
Cisco IOS/PIX
in Group Setup 6-38
interface configuration 3-16
in User Setup 7-39
supported attributes C-5
Cisco VPN 3000
in Group Setup 6-42
in User Setup 7-43
supported attributes C-7
Cisco VPN 5000
in Group Setup 6-43
in User Setup 7-45
supported attributes C-11
custom
about 8-33
in Group Setup 6-50
in User Setup 7-52
Juniper
in Group Setup 6-48
in User Setup 7-49
r78-14696-01, Version 3.1
Index
supported attributes C-43
Microsoft
in Group Setup 6-45
in User Setup 7-46
supported attributes C-27
Nortel
in Group Setup 6-46
in User Setup 7-48
supported attributes C-42
overview C-1
See also AV pairs
user-defined
about 8-33, D-27
adding D-28
deleting D-30
import files D-33
listing D-31
replicating D-28
RDBMS sychronization
group-related configuration 8-32
RDBMS synchronization
accountActions table as transaction queue 8-36
configuring 8-44
CSV-based 8-38
data source name configuration 8-41
disabling 8-46
enabling in interface 3-5
import definitions F-1
log
User Gu78-14696-01, Version 3.1
CSV (comma-separated values) file directory 9-14
viewing 9-15
manual initialization 8-43
network configuration 8-32
overview 8-30
partners 8-42
preparing to use 8-37
report and error handling 8-37
user-related configuration 8-31
README.TXT xxix
Registry G-2
rejection mode
general 12-3
Windows NT/2000 user databases 12-4
related documentation xxix
release notes xxix
reliability
networks 2-18
remote access policies 2-13
remote administrative sessions
firewalls 1-28
HTTP proxy 1-27
NAT (network address translation) 1-28
network environments 1-27
remote logging
See logging
replication
ACS Service Management page 8-10
backups recommended (Caution) 8-16
IN-17ide for Cisco Secure ACS for Windows Server
Index
cascading 8-18
certificates 8-10
client configuration 8-22
components
overwriting (Caution) 8-22
overwriting (Note) 8-17
selecting 8-18
configuring 8-26
corrupted backups (Caution) 8-16
custom RADIUS dictionaries 8-10
disabling 8-29
external user databases 8-10
frequency 8-14
group mappings 8-10
immediate 8-24
implementing primary and secondary setups 8-20
important considerations 8-15
in System Configuration 8-26
interface configuration 3-5
IP pools 8-10, 8-60
logging 8-17
manual initiation 8-24
master AAA servers 8-11
notifications 8-29
overview 8-9
partners
configuring 8-28
options 8-18
scheduling 8-26
IN-18User Guide for Cisco Secure ACS for Windows Serve
scheduling options 8-18
selecting data 8-18
unsupported 8-10
user-defined RADIUS vendors 8-16
vs. backup 8-16
reports
See logging
Reports and Activity
configuring 9-17
CSV (comma-separated values) logs 9-11
in interface 1-26
See also logging
request handling
general 12-3
Windows NT/2000 user databases 12-4
requirements
hardware 2-2
network 2-4
operating system 2-2
system 2-2
third-party software 2-3
resource consumption G-6
restarting services 8-2
restore
components restored
configuring 8-54
overview 8-54
filenames 8-53
in System Configuration 8-52
r78-14696-01, Version 3.1

Index
overview 8-52
performing 8-54
reports 8-54
with CSUtil.exe D-5
RFC2138 1-6
RFC2139 1-6
RSA user databases
configuring 11-65
group mappings 12-12
S
SafeWord user databases
configuring 11-60
group mappings 12-12
RADIUS-based group specifications 12-22
search order of external user databases 12-9
security policies 2-14
security protocols
Cisco AAA client devices 1-2
CSRadius G-8
CSTacacs G-8
interface options 3-9
RADIUS 1-6, C-1
TACACS+
custom commands 3-8
overview 1-6
time-of-day access 3-8
service control in System Configuration 9-30
User Gu78-14696-01, Version 3.1
Service Monitoring log
See ACS Service Monitoring log
services
determing status of 8-2
logs
configuring 9-30
list of logs generated 9-29
management 8-55
overview 1-4, G-1
starting 8-2
stopping 8-2
session policies
configuring 10-17
options 10-16
overview 10-16
shared profile components
downloadable PIX ACLs (access control lists) 5-2
overview 5-1
See also command authorization sets
See also network access restrictions
shared secret G-8
shell command authorization sets
in Group Setup 6-31
in User Setup 7-25
See also command authorization sets
single password configurations 1-13
SMTP (simple mail-transfer protocol) G-7
specifications
RADIUS
IN-19ide for Cisco Secure ACS for Windows Server
Index
RFC2138 1-6
RFC2139 1-6
system performance 1-3
TACACS+ 1-6
SSL (secure socket layer) 10-13
starting services 8-2
static IP addresses 7-11
stopping services 8-2
stored procedures
CHAP authentication
configuring 11-53
input values 11-48
output values 11-48
result codes 11-49
implementing 11-43
PAP authentication
configuring 11-53
input values 11-46
output values 11-47
result codes 11-49
sample procedures 11-45
type definitions
integer 11-44
string 11-44
supplementary user information
in User Setup 7-7
setting 7-7
synchronization
See RDBMS synchronization
IN-20User Guide for Cisco Secure ACS for Windows Serve
system
configuration 8-1
health G-5
messages in interface 1-26
monitoring
See monitoring
performance specifications 1-3
requirements 2-2
services
See services
T
TACACS+
advanced TACACS+ settings
in Group Setup 6-2
in User Setup 7-33
AV (attribute value) pairs
accounting B-4
general B-1
custom commands 3-8
enable password options for users 7-35
enable privilege options 7-33
interface configuration 3-7
interface options 3-9
outbound passwords for users 7-36
ports 1-6
See also TACACS+ Accounting Log
See also TACACS+ Administration Log
r78-14696-01, Version 3.1
Index
SENDAUTH 1-14
settings
in Group Setup 6-2, 6-29
in User Setup 7-22
specifications 1-6
time-of-day access 3-8
troubleshooting A-16
vs. RADIUS 1-6
TACACS+ Accounting log
configuring
CSV (comma-separated values) 9-16
ODBC 9-20
CSV (comma-separated values) file directory 9-14
enabling
CSV (comma-separated values) 9-14
ODBC 9-20
viewing 9-15
TACACS+ Administration log
configuring
CSV(comma-separated values) 9-16
ODBC 9-20
CSV (comma-separated values) file directory 9-14
enabling
CSV (comma-separated values) 9-14
ODBC 9-20
viewing 9-15
Telnet
password aging 6-20
User Gu78-14696-01, Version 3.1
See also command authorization sets
test login frequency internally 8-56
third-party software requirements 2-3
thread used G-6
time-of-day/day-of-week specification
enabling in interface 3-4
See also date format control
timeout 12-7
TLS (transport level security)
See certification
token caching 1-13, 11-58
token cards
password configuration 1-13
settings in Group Setup 6-16
token servers
ActivCard 11-59
CRYPTOCard 11-59
ISDN terminal adapters 11-58
overview 11-57
PassGo 11-59
RADIUS-enabled 11-59
RADIUS token servers 11-59
RSA 11-64
SafeWord 11-59
supported servers 1-8
token caching 11-58
Vasco 11-59
topologies
See network topologies
IN-21ide for Cisco Secure ACS for Windows Server
Index
troubleshooting
AAA servers A-1
administration issues A-2
browser issues A-3
Cisco IOS issues A-3
database issues A-5
debug logs 9-28, A-10
dial-in issues A-6
installation issues A-11
max sessions issues A-12
PIX Firewall issues A-13
proxy issues A-11
RADIUS issues A-16
report issues A-12
TACACS+ issues A-16
third-party server issues A-13
upgrade issues A-11
user issues A-14
trust lists
See certification
trust relationships 11-9
U
UNIX passwords D-17
unknown user policies
configuring 12-10
in external user databases 11-3, 12-9
overview 12-8
IN-22User Guide for Cisco Secure ACS for Windows Serve
See also unknown users
unknown users
handling methods 12-1
network access authorization 12-8
See also unknown user policies
upgrade troubleshooting A-11
usage quotas
in Group Setup 6-13
in Interface Configuration 3-5
in User Setup 7-18
overview 1-17
resetting
for groups 6-52
for single users 7-57
user-changeable passwords
overview 1-15
with Windows NT/2000 user database 11-13
User Data Configuration 3-3
user groups
See groups
user-level
downloadable ACLs interface 3-4
network access restrictions
enabling in interface 3-4
See also network access restrictions
User Password Changes log location 9-14
users
adding
methods 11-3
r78-14696-01, Version 3.1
Index
procedure for 7-5
assigning client IP addresses to 7-11
assigning to a group 7-9
callback options 7-10
configuring 7-2
configuring device management command authorization sets for 7-30
configuring shell command authorization sets for 7-25
customized data fields 3-3
data configuration
See User Data Configuration
deleting 9-9
deleting accounts 7-56
disabling accounts 7-5
finding 7-54
import methods 11-3
in multiple databases 12-5
in multiple domains 12-5
listing all users 7-54
number of 2-17
RDBMS synchronization 8-31
relationship to groups 3-2
resetting accounts 7-58
saving settings 7-59
See also User Setup
supplementary information 7-7
troubleshooting A-14
types
discovered 12-2
User Gu78-14696-01, Version 3.1
known 12-2
unknown 12-2
VPDN dialup E-2
User Setup
basic options 7-4
configuring 7-2
deleting user accounts 7-56
saving settings 7-59
Users in Group button 6-52
V
validation of passwords 8-5
Vasco user databases
group mappings 12-12
RADIUS-based group specifications 12-22
vendor-specific attributes
See RADIUS VSAs (vendor specific attributes)
viewing logs and reports
See logging
virtual private dialup networks
See VPDN
Voice-over-IP
See VoIP (Voice-over-IP)
VoIP (Voice over IP)
accounting configuration 3-6, 8-68
accounting configurations 8-68
enabling in interface 3-6
group settings in Interface Configuration 3-6
IN-23ide for Cisco Secure ACS for Windows Server

Index
in Group Setup 6-4
VoIP (Voice over IP) Accounting log
configuring
CSV (comma-separated values) 9-16
ODBC 9-20
CSV (comma-separated values) file directory 9-14
enabling
CSV (comma-separated values) 9-14
ODBC 9-20
viewing 9-15
VPDN
advantages 2-11
authentication process E-1
domain authorization E-2
home gateways E-3
IP addresses E-3
tunnel IDs E-3
VPDNs
users E-2
VSAs
See RADIUS VSAs (vendor specific attributes)
W
warning events G-5, G-7
watchdog packets
configuring on AAA clients 4-17
configuring on AAA servers 4-24
IN-24User Guide for Cisco Secure ACS for Windows Serve
web servers G-2
Windows operating systems
authentication order 12-6
Cisco Secure ACS-related services
services 8-2
dial-up networking 11-11
dial-up networking clients
domain field 11-10
password field 11-10
username field 11-10
Domain list
effect of 12-6
domains
domain names 11-11, 12-5
trusted 11-11
Event logs G-6
Registry G-2
Windows user databases
Active Directory 11-14
configuring 11-14
Domain list
inadvertant user lockouts 11-15
domains
mappings 12-18
trusted 11-9
grant dial-in permission to users 11-9, 11-14
group mappings
editing 12-18
no access groups 12-16
r78-14696-01, Version 3.1
Index
remapping 12-18
mapping database groups to AAA groups 12-14
overview 11-7
passwords 1-10
rejection mode 12-4
request handling 12-4
trust relationships 11-9
user-changeable passwords 11-13
user manager 11-14
wireless network topologies 2-8
User Gu78-14696-01, Version 3.1
IN-25ide for Cisco Secure ACS for Windows Server

Index
IN-26User Guide for Cisco Secure ACS for Windows Serve
r78-14696-01, Version 3.1