user guide - hue · assembling your webcam 3 assembling your webcam remember to connect the webcam...
TRANSCRIPT
USER GUIDE

CONGRATULATIONS
Thank you for purchasing your new HUE HD Webcam.
This user guide will provide you with all of the information you need to get the most from your system.
Before you make your first video call you will need to install and set up your webcam. Simple instructions are provided on the following pages.
Need help?
If you have any problems setting up or using your HUE HD Webcam please contact us by email at: [email protected]
Alternatively, solutions to common problems can be found in the FAQ section at the end of this manual.

3Assembling your webcam
ASSEMBLING YOUR WEBCAM
Remember to connect the webcam to your computer before installing any video software.
Insert the Webcam’s flexible neck into the opening at the top of the Base(Fig. 1.1). Make sure that the neck is pushed into the Base properly. Connect the Base to your computer with the included USB cable (Fig. 1.2).
Or just directly connect the HUE HD Webcam’s flexible neck to your computer’s USB port (Fig. 1.3).
On the reverse side of the Webcam is the Snapshot Button (Fig. 1.4). When the Base LED light is on, the HUE HD Webcam is connected. When the Camera LED light is on, the HUE HD Webcam is in use.
Fig 1.1 Fig 1.2 Fig 1.3 Fig 1.4
•
•

4Contents
CONTENTSWINDOWS 2000/XP/VISTAInstallationSetting up videoTaking photograps and using visual effectsRecording videoSetting up audio (Windows 2000/XP)Setting up audio (Windows Vista)
InstallationSetting up videoRecording videoSetting up audio
MAC OS X
FAQs - FREQUENTLY ASKED QUESTIONS
CHAT SOFTWARE CONFIGURATION
APPENDIX I Technical Specification
56789
10
11121314
151617181920202122242426
272930
31
AOL Instant Messanger (AIM)Google Mail (Gmail)Google TalkiChatPhoto BoothSkype
Windows setupMac OS X setup
Windows Live Messenger (MSN) Yahoo! Messenger
Windows setupMac OS X setup
Windows Mac OS XOther problems

5Windows 2000/XP/Vista Installation
WINDOWS 2000/XP/VISTA
Installation
The webcam will automatically be installed when you connect it to your computer. If you would like extra software for making videos, using special effects or testing the webcam, you can install it from the included CD or download the latest version here (www.huehd.com/drivers.html). If the CD doesn’t automatically run, browse to it in My Computer and double click Setup.exe to start it up. Follow the on-screen instructions to complete the installation.
The CD will install a program called AMCap on your computer.
Go to your Windows Start Menu and select All Programs, HUE HD Webcam Video Software, and then AMCap (Fig. 2.1); your picture will appear on the screen.If you have more than one webcam installed or the picture does not immediately appear, open the Devices menu in AMCap and choose the HUE HD Webcam (USB Video Device) from the list. Also make sure that Microphone (USBMicrophone) is ticked as shown (Fig.2.2).
Fig. 2.1 Fig. 2.2
•
•

6Windows 2000/XP/Vista Setting up video
Setting up video
Note: You can focus the picture by manually turning the focusing ring around the camera lens.
To configure your video settings, open AMCap and select Video Capture Pin… from the Options menu (Fig. 2.3). You can change the settings to match your personal preferences. To adjust the zoom or visual effects, select Video Capture Filter… from the same Options menu to open the Properties windows (Fig. 2.4). Hit OK after making any changes to store your new settings.
Fig. 2.3
Fig. 2.4
•
•
•
7Windows 2000/XP/Vista Taking photographs and using visual effects
Taking photographs and using visual effects
There is a Snapshot button on the back of the webcam for taking still pictures. Please make sure that all other video chat programs are closed before trying to take pictures.
To adjust the zoom or visual effects, select Video Capture Filter… from the same Options menu. Hit OK after making any changes to store your new settings (Fig. 2.3).
If you prefer, you can take pictures or change the visual effects using an icon in the Windows System Tray for quick access (Fig. 2.5); right click this icon to be able take snapshots and use the webcam’s special features whenever the webcam is in use (Fig. 2.7).
If you don’t see the icon in your System Tray, go to My Computer and find your Windows directory (usually, this is on your C drive). Double click the file inside called “tsnp2uvc.exe”. Alternatively open your Windows Start Menu and select Run… then type in “tsnp2uvc” without the quotes (Fig. 2.6). The icon will appear in your System Tray.
The special effects you set also work in Skype and some other video chat applications. Please make sure that AMCap is fully closed before starting other video chat software.
fig
Fig. 2.5
Fig. 2.6 Fig. 2.7

8Windows 2000/XP/Vista Recording video
Recording video
Before recording a video, select Set Capture File… from the File menu and choose a location on your computer where your recorded video will be saved (Fig. 2.8). Enter a file name and click Open to confirm. On the next window, if you are not sure, set the size to 0 to avoid setting limitations on what you can record.You can then record a video using the Capture menu in AMCap. If you would like sound in your video, make sure that the Capture Audio option is ticked as shown (Fig. 2.9).Click Start Capture to begin recording and Stop Capture to finish (Fig. 2.9).
Fig. 2.8 Fig. 2.9
•
•••••

9Windows 2000/XP/Vista Setting up the microphone
Setting up the microphone (Windows 2000/XP)
Open your Control Panel from the Start Menu and select the Sound and Audio Devices panel. Click the Voice tab along the top of the settings window which appears. Make sure that “HUE HD Webcam Audio” is selected as the default device under Voice Recording (Fig. 2.10), and then click OK to save your changes. If the microphone is too quiet or too loud, you can adjust it with the Volume… (Fig. 2.11) setting in the same Voice Recording panel.
You may also need to set up the default device for the individual applications you use.
Fig. 2.10 Fig. 2.11
•••
•
10Windows 2000/XP/Vista Setting up the microphone
Setting up the microphone (Windows Vista)
Open your Control Panel from the Start Menu and select the Hardware and Sound panel. Click Manage Audio Devices and then the Recording tab (Fig. 2.12) along the top of the settings window which appears. Make sure that “HUE HD Webcam Audio” is selected as the default device under Recording, and then click OK to save your changes. If the microphone is too quiet or too loud, you can adjust it with the Properties (Levels) (Fig. 2.12.1) setting in the same Recording panel.
You may also need to set up the default device for the individual applications you use.
Fig. 2.12 Fig. 2.12.1
••
•
•

11Mac OS X Installing
MAC OS X
Installing
The webcam will automatically be installed when you connect it to your computer. If you would like extra software for making videos or testing the webcam, you can install it from the included CD or download the latest version here (www.huehd.com/drivers.html).
Click the HUEWebcam.dmg [Fig. 3.1] to mount the file on your desktop, if it doesn’t appear automatically. Double click the HUE Webcam Software OSX icon [Fig. 3.2] and; Drag WebCam Monitor.app to the Applications folder as instructed.
You can then open WebCam Monitor from your Applications folder at any time to use the software [Fig. 3.3].
Fig. 3.1
Fig. 3.3
Fig. 3.2
•••
12Mac OS X Setting up video
Setting up video
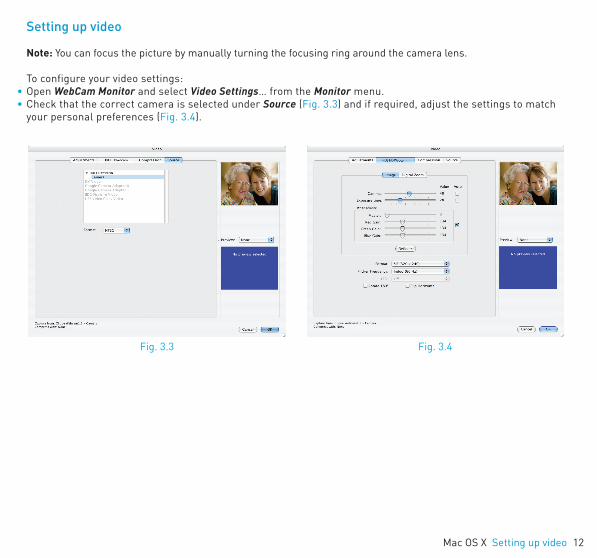
Note: You can focus the picture by manually turning the focusing ring around the camera lens.
To configure your video settings: Open WebCam Monitor and select Video Settings… from the Monitor menu. Check that the correct camera is selected under Source (Fig. 3.3) and if required, adjust the settings to match your personal preferences (Fig. 3.4).
Fig. 3.3 Fig. 3.4
••
13Mac OS X Recording video
Recording video
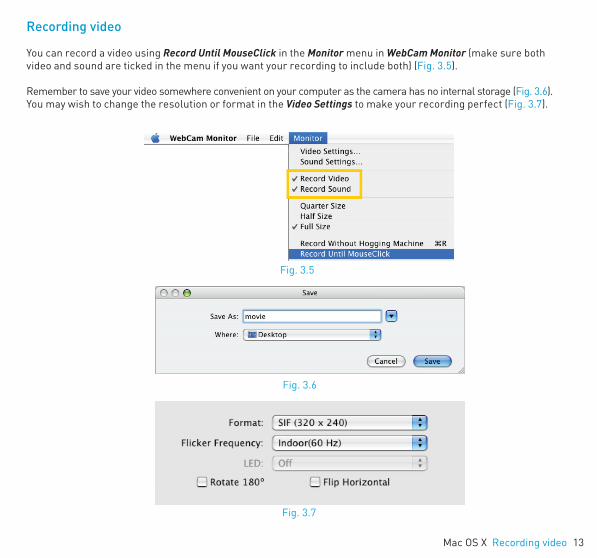
You can record a video using Record Until MouseClick in the Monitor menu in WebCam Monitor (make sure both video and sound are ticked in the menu if you want your recording to include both) (Fig. 3.5).
Remember to save your video somewhere convenient on your computer as the camera has no internal storage (Fig. 3.6).You may wish to change the resolution or format in the Video Settings to make your recording perfect (Fig. 3.7).
Fig. 3.5
Fig. 3.6
Fig. 3.7
14Mac OS X Setting up audio
Setting up audio
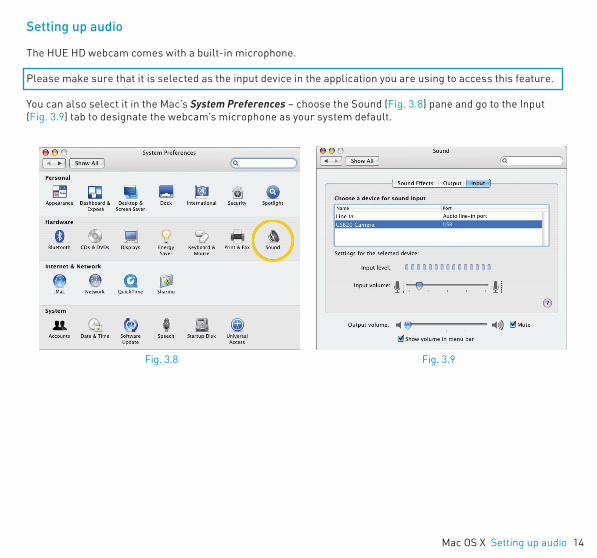
The HUE HD webcam comes with a built-in microphone.
Please make sure that it is selected as the input device in the application you are using to access this feature. You can also select it in the Mac’s System Preferences – choose the Sound (Fig. 3.8) pane and go to the Input (Fig. 3.9) tab to designate the webcam’s microphone as your system default.
Fig. 3.8 Fig. 3.9

15Chat software configuration AOL Instant Messenger
CHAT SOFTWARE CONFIGURATION
AOL Instant Messenger (AIM)
Note: AIM only supports video chat for Windows users. Mac users wishing to use the AIM network should follow the instructions for iChat.
If you do not have an AIM account, first download the software and register at: www.aim.com Before running AIM, make sure that the AMCap program is fully closed. Failure to do so will mean that AIM may not recognise the webcam. Open AIM and go to Settings… in the Edit menu (or press F7 to go directly to the settings). Under Enhanced IM, change the Microphone dropdown to the USB2.0 Camera and the Camera dropdown to the HUE HD Webcam. Speakers should be set to your default device or internal sound card (Fig. 4.1). Save your settings and double click the name of the person you want to start a video chat with in the AIM contacts window. At the bottom of the chat window there will be a Video button which will open the video chat (Fig. 4.1.1).
Fig. 4.1 Fig. 4.1.1
••
•
•
16Chat software configuration Google Mail
Google Mail (Gmail)
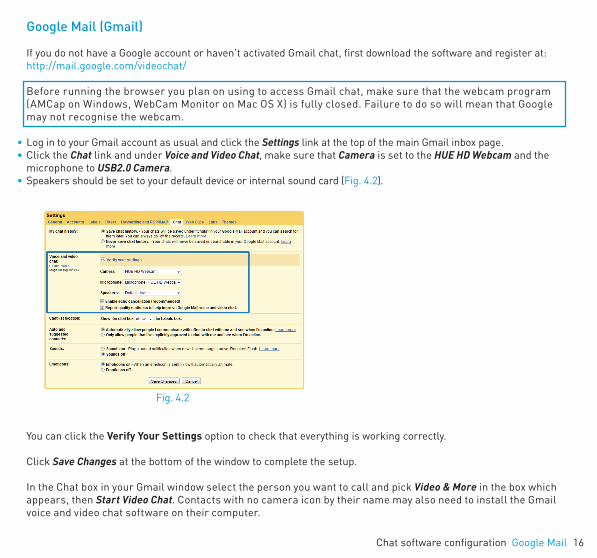
If you do not have a Google account or haven’t activated Gmail chat, first download the software and register at:http://mail.google.com/videochat/ Before running the browser you plan on using to access Gmail chat, make sure that the webcam program (AMCap on Windows, WebCam Monitor on Mac OS X) is fully closed. Failure to do so will mean that Google may not recognise the webcam. Log in to your Gmail account as usual and click the Settings link at the top of the main Gmail inbox page. Click the Chat link and under Voice and Video Chat, make sure that Camera is set to the HUE HD Webcam and the microphone to USB2.0 Camera. Speakers should be set to your default device or internal sound card (Fig. 4.2).
Fig. 4.2
You can click the Verify Your Settings option to check that everything is working correctly. Click Save Changes at the bottom of the window to complete the setup. In the Chat box in your Gmail window select the person you want to call and pick Video & More in the box which appears, then Start Video Chat. Contacts with no camera icon by their name may also need to install the Gmail voice and video chat software on their computer.
••
•

17Chat software configuration Google Talk
Google Talk
Note: Google Talk currently only works with Windows.Google Talk does not currently support video calls.
If you do not have a Google account, first download the software and register at: www.google.com/talk
Before running the Google Talk software, make sure that the AMCap program is fully closed. Failure to do so will mean that Google Talk may not recognise the webcam. Within the Google Talk application, Click Settings on the login screen (Fig. 4.3).Under Audio, make sure that the Input dropdown is set to the USB2.0 Camera and click OK to save your settings (Fig. 4.3.1).
Fig. 4.3 Fig. 4.3.1
••
18Chat software configuration iChat
iChat
Note: iChat is only available for Macs.
Before running iChat, make sure that the WebCam Monitor program is fully closed. Failure to do so will mean that iChat will not recognise the webcam. If you are not sure, open the application again and select Quit from the WebCam Monitor menu. For users running Mac OS X 10.4.9 or later, iChat should automatically detect the camera. Select Preferences from the iChat menu and go to the Video tab. Your preview will appear if you have only the HUE HD Webcam con-nected; if you have other webcams connected first use the Camera dropdown menu to choose the right one. Close the Preferences window when you can see the preview video.
To open a video chat, select the person you want to chat with and click the green camera icon on your buddy list.
If you are running an earlier version of Mac OS X, you will require extra software to use a USB webcam in iChat. One popular option is iUSBCam (www.ecamm.com/mac/iusbcam).
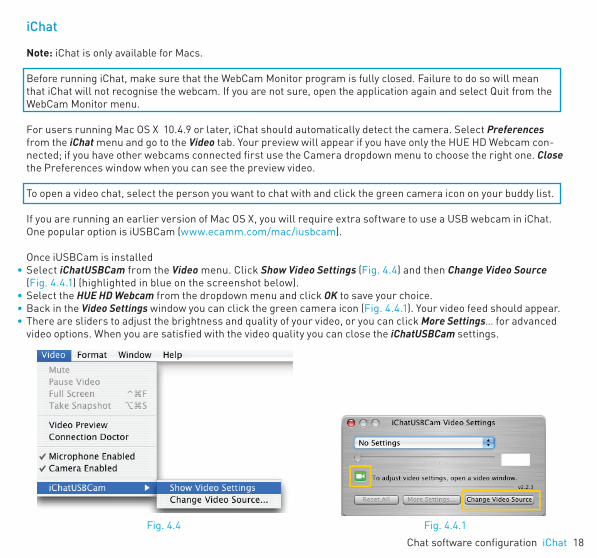
Once iUSBCam is installedSelect iChatUSBCam from the Video menu. Click Show Video Settings (Fig. 4.4) and then Change Video Source (Fig. 4.4.1) (highlighted in blue on the screenshot below). Select the HUE HD Webcam from the dropdown menu and click OK to save your choice.Back in the Video Settings window you can click the green camera icon (Fig. 4.4.1). Your video feed should appear. There are sliders to adjust the brightness and quality of your video, or you can click More Settings… for advanced video options. When you are satisfied with the video quality you can close the iChatUSBCam settings.
Fig. 4.4 Fig. 4.4.1
•
•••
19Chat software configuration Photo Booth
Photo Booth
Note: Photo Booth is only available for Macs.
So long as the Mac being used meets Apple’s guidelines for running Photo Booth (having either OS X v10.5 installed or, on a small number of models, a built-in iSight camera and OS X v10.4), simply follow the installation instructions for Macs. Your system should automatically detect the webcam in Photo Booth if it has no internal camera of its own. In rare cases where it does not, please try disconnecting the camera and reconnecting it once Photo Booth is already running.
If your Mac has a built-in camera already, Photo Booth will default to using that. As there is no way to change set-tings in the current version of Photo Booth you will have to open the built-in camera in another program, then try opening Photo Booth again. Because the built-in camera will be in use Photo Booth will instead select your HUE HD webcam.
You can put the built-in camera in use in this way with the HUE HD webcam’s own WebCam Monitor software; open WebCam Monitor and pick the Mac’s internal camera in Video Settings. You can then open Photo Booth as described above.
20Chat software configuration Skype
Skype™
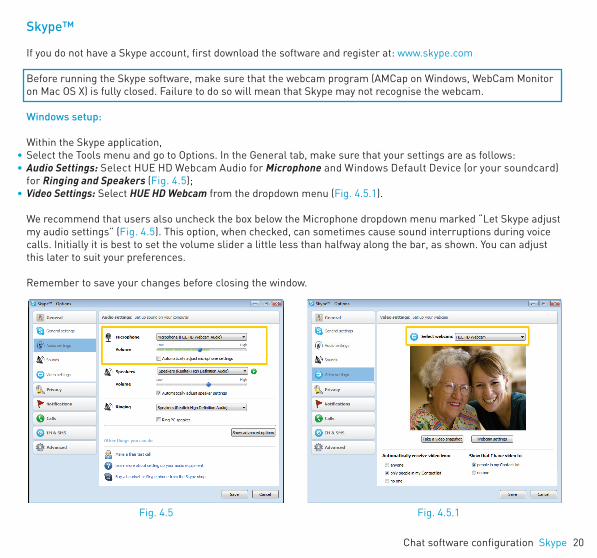
If you do not have a Skype account, first download the software and register at: www.skype.com Before running the Skype software, make sure that the webcam program (AMCap on Windows, WebCam Monitor on Mac OS X) is fully closed. Failure to do so will mean that Skype may not recognise the webcam. Windows setup:
Within the Skype application, Select the Tools menu and go to Options. In the General tab, make sure that your settings are as follows:Audio Settings: Select HUE HD Webcam Audio for Microphone and Windows Default Device (or your soundcard) for Ringing and Speakers (Fig. 4.5);Video Settings: Select HUE HD Webcam from the dropdown menu (Fig. 4.5.1).
We recommend that users also uncheck the box below the Microphone dropdown menu marked “Let Skype adjust my audio settings” (Fig. 4.5). This option, when checked, can sometimes cause sound interruptions during voice calls. Initially it is best to set the volume slider a little less than halfway along the bar, as shown. You can adjust this later to suit your preferences.
Remember to save your changes before closing the window.
••
•
Fig. 4.5 Fig. 4.5.1

21Chat software configuration Skype
Mac setup:
Once you have installed Skype and started it up, select Preferences from the Skype menu:Select Preferences… from the Skype menu. In the Video tab (Fig. 4.5.2), select the Camera in the dropdown menu. In the Audio tab (Fig. 4.5.3), select USB2.0 Camera in the Audio Input dropdown menu.
Fig. 4.5.3
Fig. 4.5.2
•••

22Chat software configuration Windows Live Messenger (MSN)
Windows Live Messenger (MSN)
Note: Windows Live Messenger (MSN) only supports video chat for Windows users.
If you do not have an MSN account, first download the software and register at: http://get.live.com/messenger
Before running the Messenger software, make sure that the AMCap program is fully closed. Failure to do so will mean that Messenger may not recognise the webcam.
Within Windows Live Messenger (MSN)Select Audio and video setup… from the Tools menu (Fig. 4.6). If the Tools menu is not visible, you may need to select Show the menu bar first as shown (Fig. 4.6.1).
Fig. 4.6 Fig. 4.6.1
•
23Chat software configuration Windows Live Messenger (MSN)
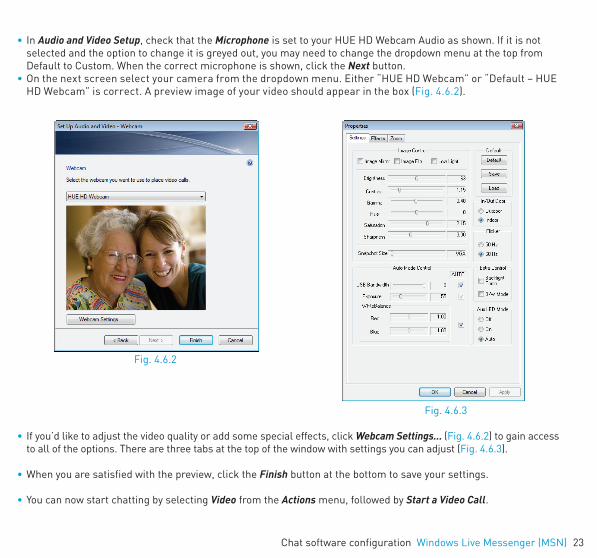
In Audio and Video Setup, check that the Microphone is set to your HUE HD Webcam Audio as shown. If it is not selected and the option to change it is greyed out, you may need to change the dropdown menu at the top from Default to Custom. When the correct microphone is shown, click the Next button.On the next screen select your camera from the dropdown menu. Either “HUE HD Webcam” or “Default – HUE HD Webcam” is correct. A preview image of your video should appear in the box (Fig. 4.6.2).
If you’d like to adjust the video quality or add some special effects, click Webcam Settings… (Fig. 4.6.2) to gain access to all of the options. There are three tabs at the top of the window with settings you can adjust (Fig. 4.6.3).
When you are satisfied with the preview, click the Finish button at the bottom to save your settings.
You can now start chatting by selecting Video from the Actions menu, followed by Start a Video Call.
Fig. 4.6.2
Fig. 4.6.3
•
•
•
•
•

24Chat software configuration Yahoo! Messenger
Yahoo! Messenger
If you do not have a Yahoo! Account, first download the software and register at: http://messenger.yahoo.com/ Before running the Yahoo! Messenger software, make sure that the webcam program (AMCap on Windows, WebCam Monitor on Mac OS X) is fully closed. Failure to do so will mean that Yahoo! Messenger may not recognise the webcam.
Windows setup:
First of all you have to activate your Webcam within Yahoo! Messenger. Select My Webcam from the Messenger menu (Fig. 4.7) and click through the advice pages. Once done, you should see a preview window with your video.Select Preferences from the File menu, just above your video preview (Fig. 4.7.1). Alternatively you can select Preferences from the Messenger menu in the contact list window (Fig. 4.7).
Fig. 4.7 Fig. 4.7.1
•
•
25Chat software configuration Yahoo! Messenger
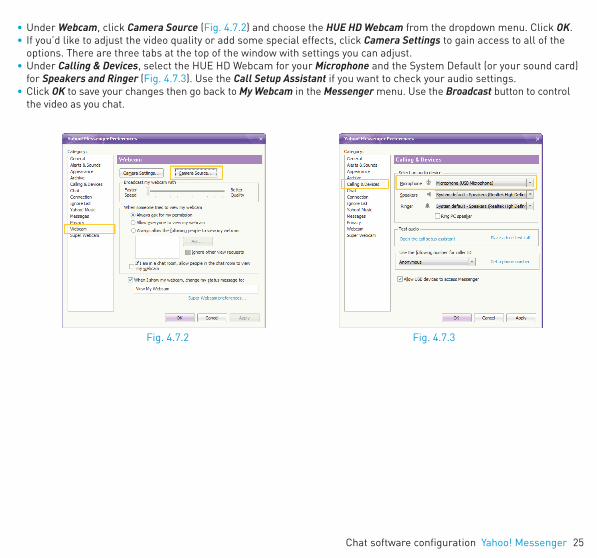
Under Webcam, click Camera Source (Fig. 4.7.2) and choose the HUE HD Webcam from the dropdown menu. Click OK. If you’d like to adjust the video quality or add some special effects, click Camera Settings to gain access to all of the options. There are three tabs at the top of the window with settings you can adjust.Under Calling & Devices, select the HUE HD Webcam for your Microphone and the System Default (or your sound card) for Speakers and Ringer (Fig. 4.7.3). Use the Call Setup Assistant if you want to check your audio settings.Click OK to save your changes then go back to My Webcam in the Messenger menu. Use the Broadcast button to control the video as you chat.
••
•
•
Fig. 4.7.2 Fig. 4.7.3

26Chat software configuration Yahoo! Messenger
Mac setup:
Within the Yahoo! Messenger application:Select Preferences… from the Yahoo! Messenger menu (Fig. 4.7.4).In the Webcam tab, change the Video Source to Camera (Fig. 4.7.5). In the Voice & Calls tab, change the Input Device to USB 20 Camera (Fig. 4.7.6). Close the Preferences window when you are satisfied with the settings.You can use the Webcam menu to control your video chats.
••
••
Fig. 4.7.4
Fig. 4.7.5 Fig. 4.7.6
27Faqs Windows
FAQs - FREQUENTLY ASKED QUESTIONS
WINDOWS
My system does not recognise the webcam:Go to Programs in the Start Menu and select HUE HD Webcam, then open AMCap. If any error messages appear, clear them with OK. In the Devices menu, look for “HUE HD Webcam” and “HUE HD Webcam Audio”. If both of these devices are present, then the system is recognising the camera.
If one or both of these devices is missing, please check that the camera is properly connected to the computer.
Try plugging the camera into a different USB port. If the camera is plugged into one of the ports in the front try one of the ports in the rear of the computer.
Note: Please try installing the software from the included CD .If during the installation you see a preview window with video from the camera, then the installation was successful. If you are still having problems when trying to use particular programs, please contact the vendor of the software you are attempting to use the camera with for support. The webcam works in AMCap but in Skype the screen is blank:Please make sure that AMCap is completely closed before starting up Skype.
The microphone cuts out when making Skype calls:Please check the Skype setup chapter of this manual for a solution to this problem.
The Snapshot button is not working:Please install the webcam software from the included CD. For the Snapshot button to work, the camera needs to be running. If no program or website is using the HUE HD Webcam pressing the Snapshot button on the back of the camera will do nothing. By default the first click of the Snapshot button will start AMCap so that you can take pictures.
If the Snapshot button is not functioning at all, make sure that the process “vsnp2std.exe” is running in the Windows Task Manager’s Processes tab. If that process is missing, another program must be blocking it or the webcam installation may have been unsuccessful.
To run this process, go to C:\Windows\ and double click the vsnp2std.exe file. If it still does not appear in the process list, another program - usually antivirus software - may be preventing the software from running. If you suspect that the problem is with the webcam software you can uninstall and reinstall the driver from the CD.

28Faqs Windows
Windows reports that no video device was recognised:Please open AMCap and check that the correct webcam is selected in the Devices menu. Windows reports a Code 39 error (Device Status) when the webcam is plugged in:If other cameras have been installed on the computer and you are receiving a Code 39 error when you plug in the HUE HD Webcam, do the following:Start Menu> Run and type in “regedit” (without quote marks).File->Export and save a copy of your current registry. Always save a copy before making changes to the registry settings.Find the key: HKEY_LOCAL_MACHINE\SYSTEM\CurrentControlSet\Control\Class\{6BDD1FC6-810F-11D0-BEC7-08002BE2092F}In the right hand panel, find and delete the UpperFilters and LowerFilters values.Disconnect and reconnect the camera from the computer.
The error should be gone.
I am using a SigmaTel sound card and there is no option to select a microphone in Windows.Please check with your computer’s manufacturer and make sure you are running the most up to date version of the SigmaTel drivers. You should be able to download the newest version from your computer or motherboard manufacturer directly. If the most recent ones still do not work, uninstalling and reinstalling the drivers might fix the problem. For further support with this issue please speak to your computer manufacturer.
I made a video but the file size is too large.Please note that the video will be in raw format (uncompressed) and can take up a lot of disk space; you may wish to change the resolution of the movie clip in AMCap by selecting Video Capture Pin… from the Options menu and adjusting Output Size. You can also edit and compress your movie clip using Windows software and video editing suites.
29Faqs Mac OS X
MAC OS X
The video settings menu is greyed out in WebCam Monitor:Please fully quit WebCam Monitor (Quit from the WebCam Monitor menu or press Command-Q on the keyboard) so that it does not show up in your Dock. Then try opening WebCam Monitor again.
Please also make sure that the camera is directly connected to your Mac; not to a USB hub or through the key-board. If you change the USB port the camera is connected to, please make sure that the WebCam Monitor applica-tion is fully quit as above and then reopen it after reconnecting the device. The webcam works in WebCam Monitor but in Skype the screen is blank:Please make sure that WebCam Monitor is completely closed before starting up Skype. Exit the application with Quit from the WebCam Monitor menu, not just by closing the window. The webcam works in WebCam Monitor but not in iChat:For users running Mac OS X 10.4.9 or later, iChat should automatically detect the camera, though it may initially need configuring with the setup instructions in this manual.
If you are running an earlier version of Mac OS X 10.4 you will need to run Software Update from the Apple menu and upgrade to the Mac OS X 10.4.9 patch. If that is not possible please see Page 18 of this manual for instructions on how to use the HUE HD Webcam in iChat with third party software.
The camera light does not come on. Please fully quit WebCam Monitor (Quit from the WebCam Monitor menu or press Command-Q on the keyboard) so that it does not show up in your Dock. Then try opening WebCam Monitor again.
Please also make sure that the camera is directly connected to your Mac; not to a USB hub or through the key-board. If you change the USB port the camera is connected to, please make sure that the WebCam Monitor applica-tion is fully quit as above and then reopen it after reconnecting the device. My camera is not recognised when I connect it to my computer. I am using OS X 10.4.2 or earlier.If you are using an early version of the OS X 10.4 software, please install the free Apple Software Update to 10.4.3 or later for the automatic webcam detection to work. We recommend updating to 10.4.9 if possible for full iChat webcam support to be available as well.
30Faqs Other problems
OTHER PROBLEMS
I have successfully installed the camera. How do I talk with my friends over the internet?You will need to install some video chat software. Please find out which network your friends are using and then follow the corresponding setup instructions in this manual to join them. Additional help on using a specific network can be found on each company’s website. I cannot install the software from CD:Please download the software from our website (www.huehd.com/drivers.html). I cannot install the software from CD or download it from the website:Please check that your antivirus software is not blocking access and that you have permission to install software on your computer. The preview image from the camera is blurry:Turn the focusing ring on the webcam’s lens until the picture appears sharp. I have installed the software but nothing happens when I plug the webcam into the USB port:Please try a different USB port. We recommend directly connecting webcams to a USB port on your computer, not through a USB hub. My video is choppy; the frame rate is worse than expected.Please note that in low light situations the frame rate of the capture will drop, making the video appear choppier. To obtain the highest possible frame rate, use HUE HD in a well lit area where the light source is behind the camera and out of the picture. If this is not possible, the quality may be improved by checking the Low Light option in the settings if available in your chosen software.
For an up to date list of Frequently Asked Questions please also check our website www.huehd.com/support.html

31Appendix I Technical Specification
APPENDIX I – TECHNICAL SPECIFICATION
Minimum System RequirementsCPU 1.5 GHz Processor
Memory 512 MB RAM
Operating System Windows 2000/XP/VistaRequires Mac OS X v.10.4 or later
Disk Space 50MB
Connection USB 1.1 port (USB 2.0 port required for megapixel image capture)
Resolution 800 x 600 Supported; 1024 x 768 or higher recommended
Video/Sound Card 16 bit or higher
VideoSensor True 2 Megapixel CMOS
Lens 5-layer antiglare optical
Video Resolution/Framerate 1600 x 1200 with 10 fps real time only; 1280 x 768, 800 x 600 with 15 fps; 640 x 480 to 160 x 120, with 30 fps; Support lower rates (0-30fps contiguous); Accurate (+/- 0.25 FPS) video frame rate even in low-light environments
Video Format I420, YUY2, RGB24
Viewing Angle 73 degrees
Focus Range 5cm ~ infinity. Low barrel/pincushion distortion at edges of visual field. Low focus variation atedges of visual field.
Adjustable Video Setting Brightness, Contrast, White balance, Auto exposure
Also Includes Still image capture (True 2 Megapixel; SW interpolated 5 megapixel); High color fidelity; Face tracking; Low-light sensitivity

32Appendix I Technical Specification
AudioIncludes Integrated Microphone; Noise Reduction/Cancellation; Acoustic Echo Cancellation
Sampling Rate 8000 / 16000 Hz
Sampling Accuracy < 5 PPM
Device CharacteristicsCharacteristics USB Powered; Still image capture button; Detachable Base
Dimensions 3“ x 2.5“ x 15“HUE HD Webcam
Package Contents HUE HD WebcamCamera Base6 ft USB to USB Mini CableInstall CDUser Guide
SoftwareHost Operating System
DriverWindows XP/Vista; Mac OS X;Standalone driver installation package (self-contained .EXE and an .MSI file;.DMG file for Mac OS X 10.4 and above);Silent install option;Driver WHDC certified for XP and Vista;Driver upgrade process detects previousinstallation and provides remove, maintenance, and upgrade option

© 2009 HUE. All rights reserved.All brand names are registered trademarks or trademarks of their respective owners.AIM and the AIM logo are registered trademarks of AOL LLC. Used with permission. Mac, Mac OS, iChat, iSight and Photo Booth are either registered trademarks or trademarks of Apple Inc., registered in the U.S. and other countries. Mac logo used with permission.Microsoft, Windows, MSN, and the MSN logo are either registered trademarks or trademarks of Microsoft Corporation in the United States and/or other countries.Specifications are subject to change without prior notice.Made in China for Ascent Information Technology Ltd.
P/N HueHD-v2
www.huehd.com