user guide - instadose · this section you can create new account administrators or wearers. ......
TRANSCRIPT
user guide
Presented by:
July 2015 - 2 - MAN4238_US
TABLE OF CONTENTS
Contents WELCOME ................................................................................................................................................. - 4 -
ACCESS ...................................................................................................................................................... - 5 -
HOME PAGE AT A GLANCE ........................................................................................................................ - 6 -
QUICKMENU: Preview ............................................................................................................................... - 7 -
QUICK MENU: ADD LOCATION .............................................................................................................. - 8 -
QUICK MENU: ADD WEARER ................................................................................................................ - 9 -
QUICK MENU: ADD BADGES ............................................................................................................... - 11 -
PREVIEW ................................................................................................................................................. - 12 -
ACCOUNT PROFILE .............................................................................................................................. - 13 -
LOCATIONS .............................................................................................................................................. - 14 -
MANAGE LOCATIONS .......................................................................................................................... - 15 -
LOCATION BADGE RETURN ................................................................................................................. - 16 -
LOCATION WEARERS ........................................................................................................................... - 17 -
CANCEL LOCATIONS ............................................................................................................................ - 18 -
ADD LOCATIONS .................................................................................................................................. - 19 -
REINSTATE LOCATIONS ....................................................................................................................... - 20 -
WEARER REQUIREMENTS ....................................................................................................................... - 22 -
MANAGE WEARERS ................................................................................................................................. - 23 -
ADD WEARER ...................................................................................................................................... - 25 -
EDIT WEARER ...................................................................................................................................... - 27 -
CANCEL WEARER ................................................................................................................................. - 28 -
REINSTATE WEARER ............................................................................................................................ - 29 -
DUPLICATE WEARER ........................................................................................................................... - 30 -
TRANSFER WEARER ............................................................................................................................. - 31 -
VIEW BADGES .......................................................................................................................................... - 33 -
EDIT/ CANCEL/ UPDATE BADGES ........................................................................................................ - 34 -
REASSIGN BADGES .............................................................................................................................. - 35 -
July 2015 - 3 - MAN4238_US
REPORTS .................................................................................................................................................. - 37 -
ON DEMAND- BADGETRAK ................................................................................................................. - 38 -
ON DEMAND- DOSE REVIEW .............................................................................................................. - 39 -
ON DEMAND- ALARA .......................................................................................................................... - 40 -
ON DEMAND- ANNUAL SUMMARY REPORT ....................................................................................... - 41 -
ON DEMAND- HISTORY DETAIL ........................................................................................................... - 42 -
ON DEMAND- AUDIT TRAIL ................................................................................................................. - 43 -
ON DEMAND- ALARA LIMIT EXCEEDED ............................................................................................... - 44 -
ON DEMAND- NON-RETURNED BADGES ............................................................................................ - 45 -
ON DEMAND- FORM 5 ........................................................................................................................ - 46 -
IN BOX- DOSE HISTORY ....................................................................................................................... - 47 -
IN BOX- ANNUAL SUMMARY .............................................................................................................. - 48 -
IN BOX- ALARA .................................................................................................................................... - 49 -
IN BOX- FORM 5 .................................................................................................................................. - 50 -
IN BOX- TERMINATION ....................................................................................................................... - 51 -
IN BOX- INVOICES ................................................................................................................................ - 52 -
LOG OUT/ CHANGE PASSWORD ............................................................................................................. - 53 -
QUESTIONS? ............................................................................................................................................ - 54 -
July 2015 - 4 - MAN4238_US
WELCOME Welcome to amp+ presented by Mirion Technologies Dosimetry Services Division. With amp+ you can efficiently and effectively manage the many elements of your monitoring program. From adding and deleting wearers to downloading and printing reports, it has become even easier to manage and navigate your program. We have done our best to minimize the learning curve. In this guide we are going to take you through the fundamentals of using amp+ and integrating it into radiation monitoring program. We hope you thoroughly enjoy our new account management program: amp+. If you have not been set-up with an online account or if you have any questions please contact your customer service representative or call us toll-free at: 800-251-3331 or 949-419-1000.
July 2015 - 5 - MAN4238_US
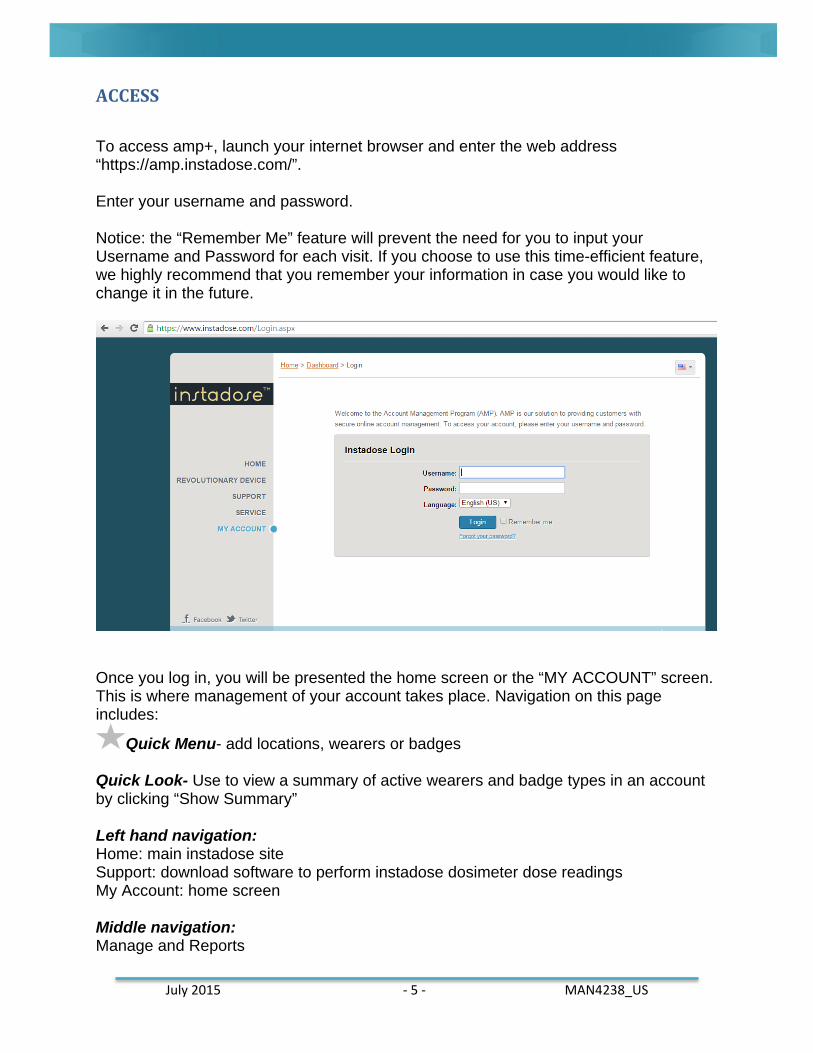
ACCESS To access amp+, launch your internet browser and enter the web address “https://amp.instadose.com/”. Enter your username and password. Notice: the “Remember Me” feature will prevent the need for you to input your Username and Password for each visit. If you choose to use this time-efficient feature, we highly recommend that you remember your information in case you would like to change it in the future.
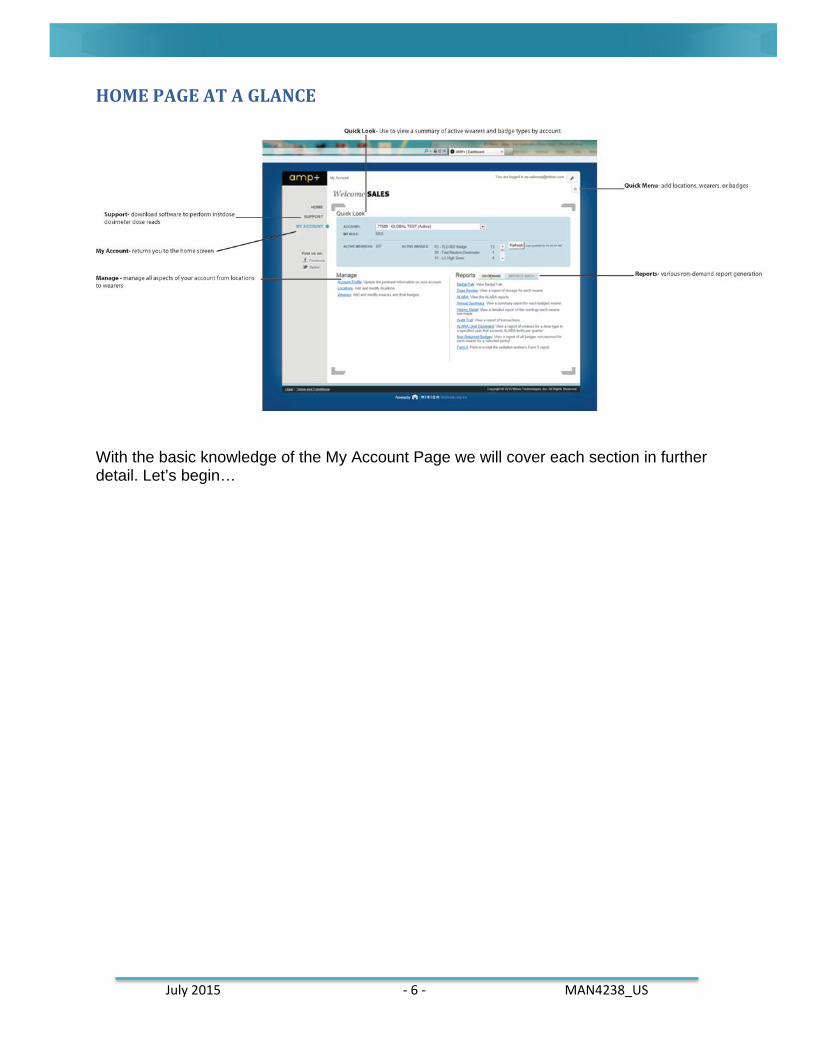
Once you log in, you will be presented the home screen or the “MY ACCOUNT” screen. This is where management of your account takes place. Navigation on this page includes:
Quick Menu- add locations, wearers or badges Quick Look- Use to view a summary of active wearers and badge types in an account by clicking “Show Summary” Left hand navigation: Home: main instadose site Support: download software to perform instadose dosimeter dose readings My Account: home screen Middle navigation: Manage and Reports
July 2015 - 6 - MAN4238_US
HOME PAGE AT A GLANCE
With the basic knowledge of the My Account Page we will cover each section in further detail. Let’s begin…
July 2015 - 7 - MAN4238_US
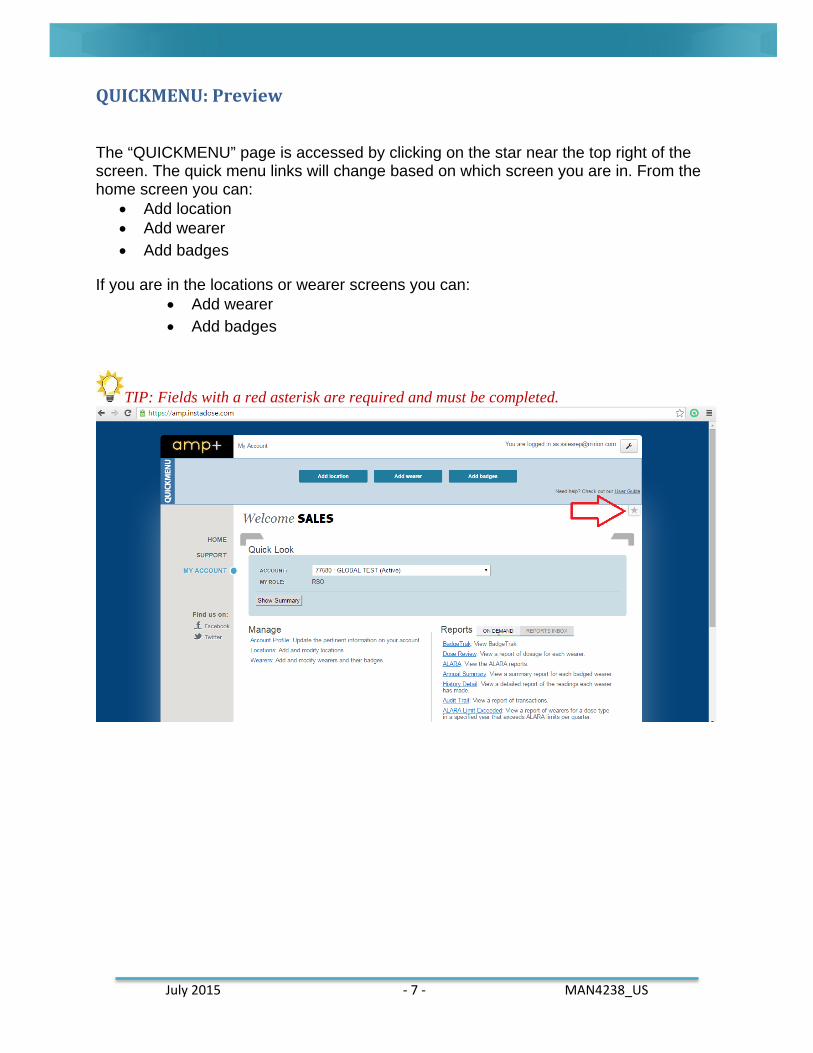
QUICKMENU: Preview
The “QUICKMENU” page is accessed by clicking on the star near the top right of the screen. The quick menu links will change based on which screen you are in. From the home screen you can:
• Add location • Add wearer • Add badges
If you are in the locations or wearer screens you can: • Add wearer • Add badges
TIP: Fields with a red asterisk are required and must be completed.
July 2015 - 8 - MAN4238_US
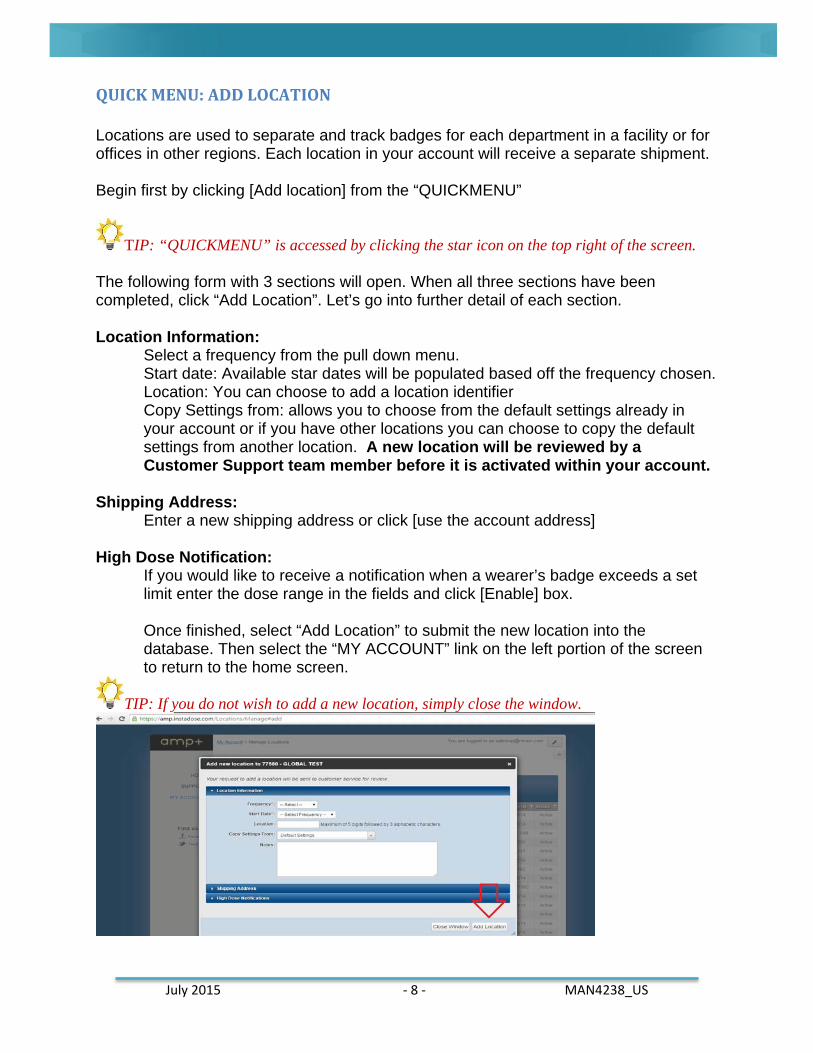
QUICK MENU: ADD LOCATION Locations are used to separate and track badges for each department in a facility or for offices in other regions. Each location in your account will receive a separate shipment. Begin first by clicking [Add location] from the “QUICKMENU”
TIP: “QUICKMENU” is accessed by clicking the star icon on the top right of the screen. The following form with 3 sections will open. When all three sections have been completed, click “Add Location”. Let’s go into further detail of each section. Location Information:
Select a frequency from the pull down menu. Start date: Available star dates will be populated based off the frequency chosen. Location: You can choose to add a location identifier Copy Settings from: allows you to choose from the default settings already in your account or if you have other locations you can choose to copy the default settings from another location. A new location will be reviewed by a Customer Support team member before it is activated within your account.
Shipping Address:
Enter a new shipping address or click [use the account address] High Dose Notification:
If you would like to receive a notification when a wearer’s badge exceeds a set limit enter the dose range in the fields and click [Enable] box. Once finished, select “Add Location” to submit the new location into the database. Then select the “MY ACCOUNT” link on the left portion of the screen to return to the home screen.
TIP: If you do not wish to add a new location, simply close the window.
July 2015 - 9 - MAN4238_US
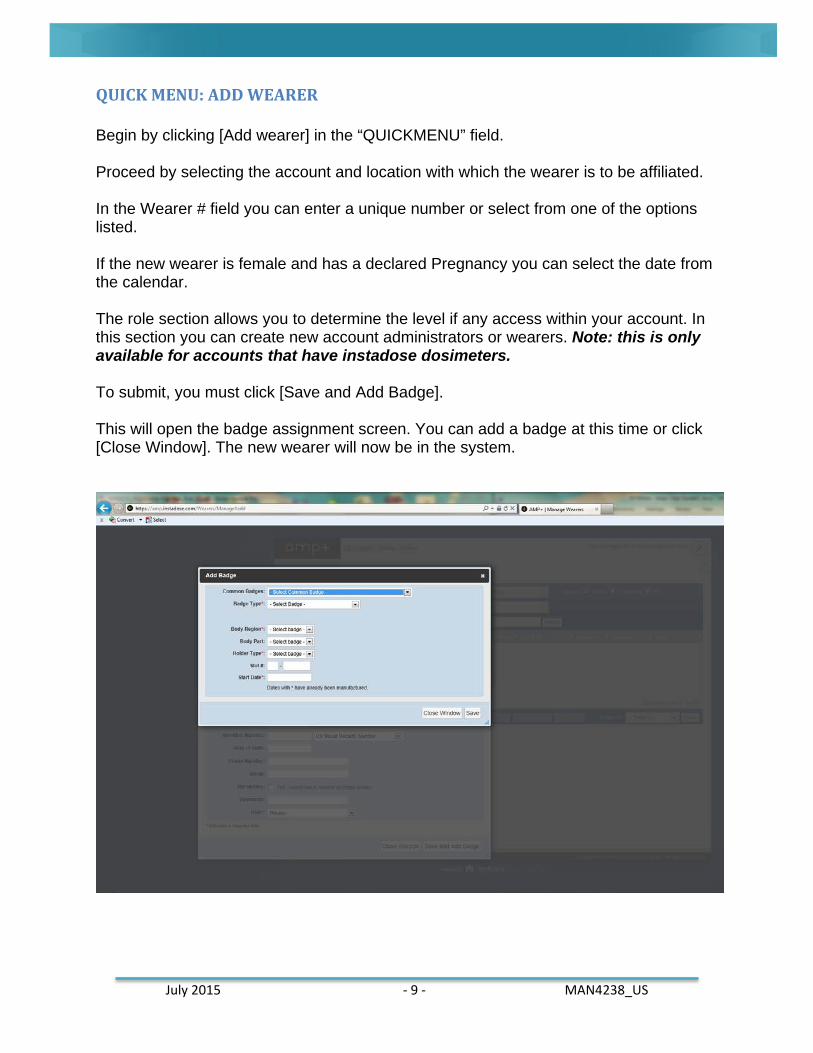
QUICK MENU: ADD WEARER Begin by clicking [Add wearer] in the “QUICKMENU” field. Proceed by selecting the account and location with which the wearer is to be affiliated. In the Wearer # field you can enter a unique number or select from one of the options listed. If the new wearer is female and has a declared Pregnancy you can select the date from the calendar. The role section allows you to determine the level if any access within your account. In this section you can create new account administrators or wearers. Note: this is only available for accounts that have instadose dosimeters. To submit, you must click [Save and Add Badge]. This will open the badge assignment screen. You can add a badge at this time or click [Close Window]. The new wearer will now be in the system.
July 2015 - 10 - MAN4238_US
Common badges are badge types that are the most popular in the account & location. You can use this to select the appropriate badge type or use the section “badge type” to select a different type of badge.
TIP: Under the badge type pull down, badge types are color coded to assist with your selection. blue= badges currently in your account green= accredited badges red= badges that ARE NOT accredited. Once complete click [Save]
July 2015 - 11 - MAN4238_US
QUICK MENU: ADD BADGES
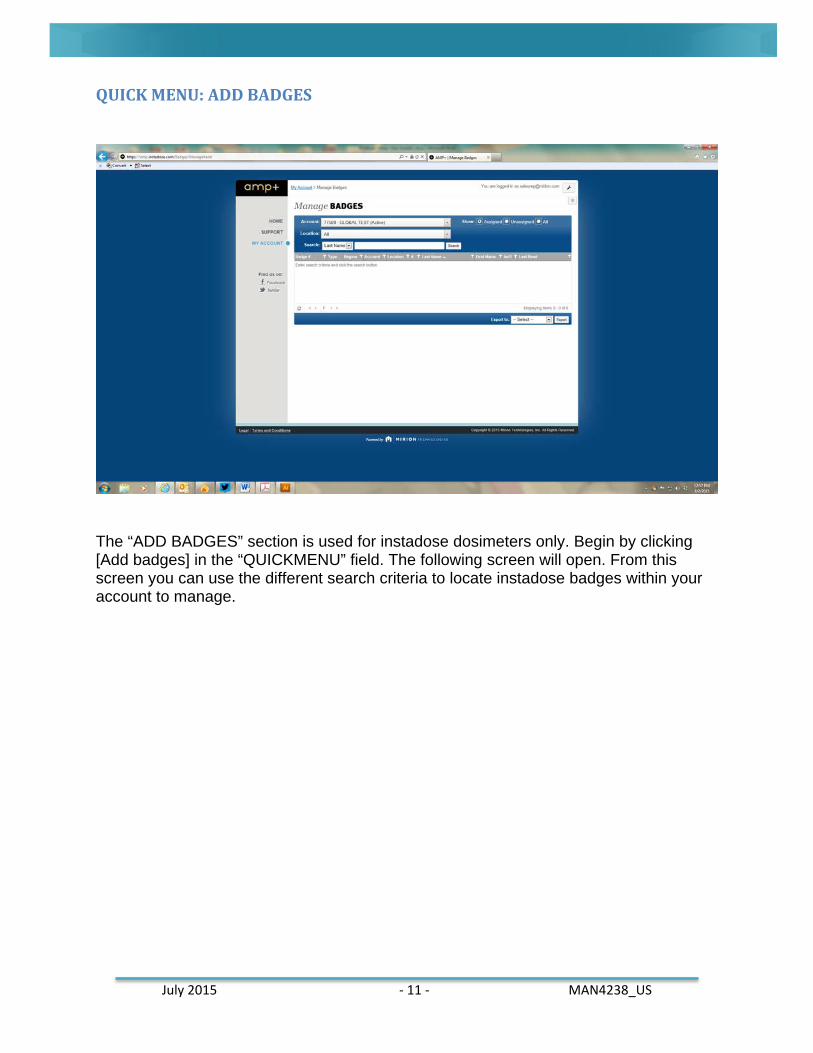
The “ADD BADGES” section is used for instadose dosimeters only. Begin by clicking [Add badges] in the “QUICKMENU” field. The following screen will open. From this screen you can use the different search criteria to locate instadose badges within your account to manage.
July 2015 - 12 - MAN4238_US
PREVIEW
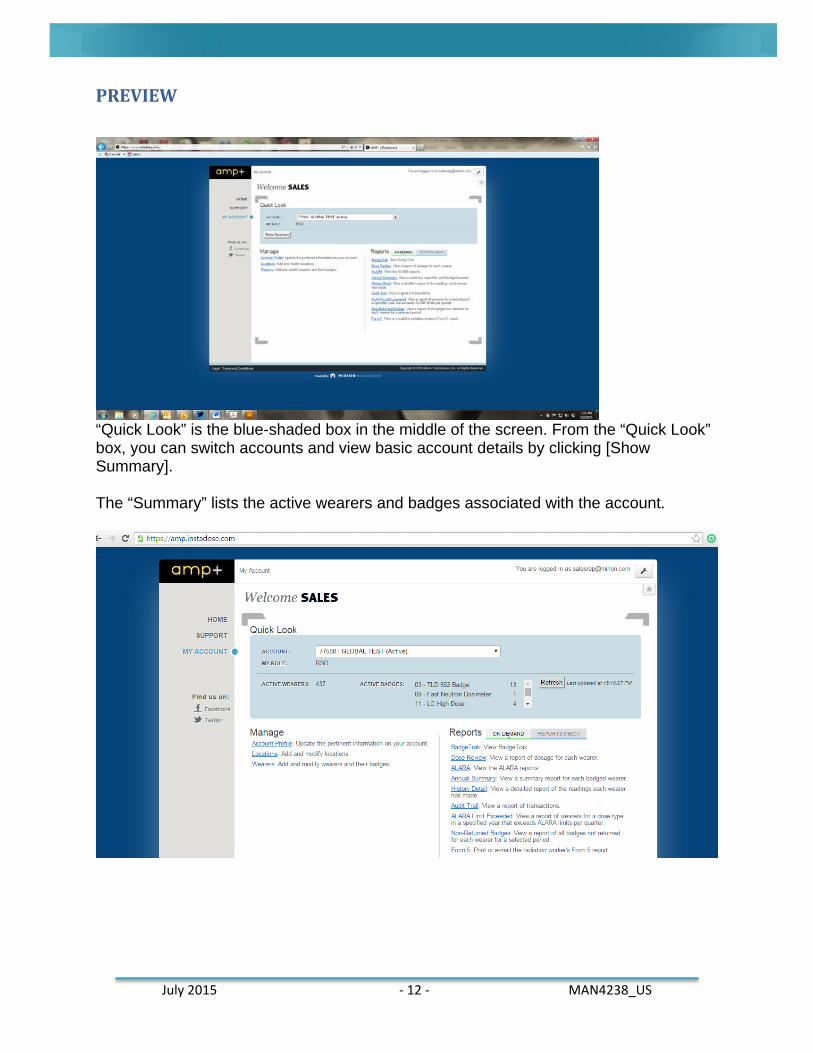
“Quick Look” is the blue-shaded box in the middle of the screen. From the “Quick Look” box, you can switch accounts and view basic account details by clicking [Show Summary]. The “Summary” lists the active wearers and badges associated with the account.
July 2015 - 13 - MAN4238_US
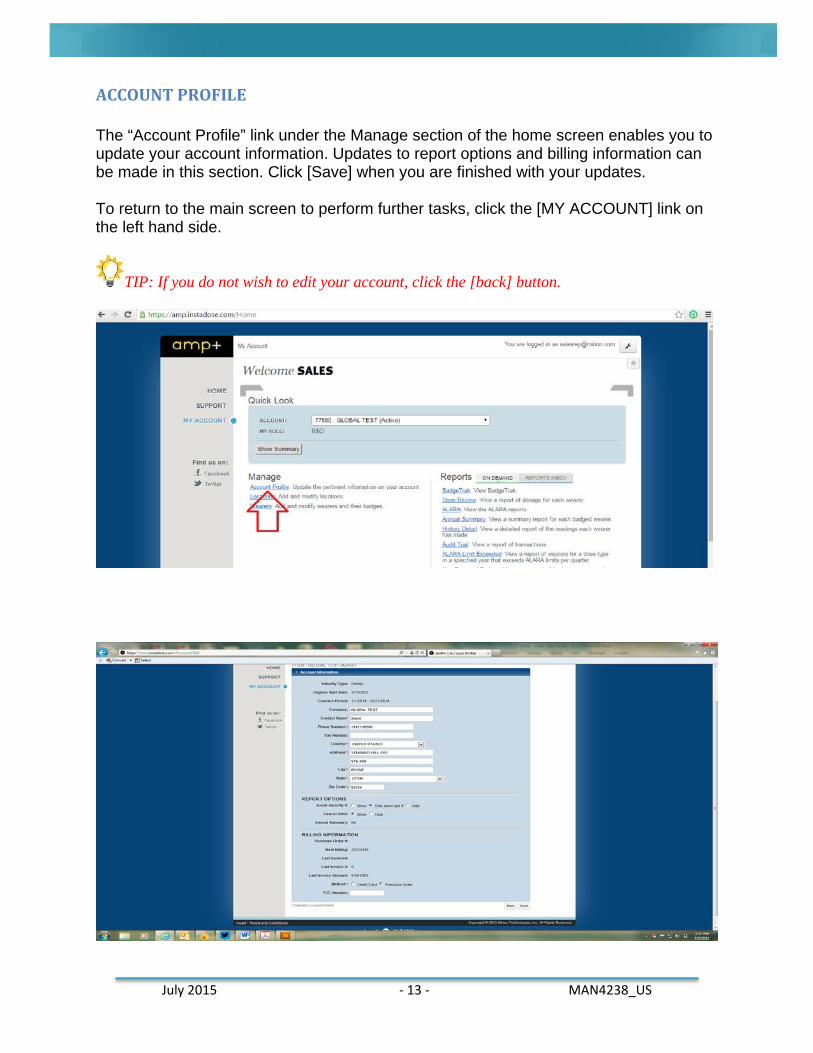
ACCOUNT PROFILE The “Account Profile” link under the Manage section of the home screen enables you to update your account information. Updates to report options and billing information can be made in this section. Click [Save] when you are finished with your updates. To return to the main screen to perform further tasks, click the [MY ACCOUNT] link on the left hand side.
TIP: If you do not wish to edit your account, click the [back] button.
July 2015 - 14 - MAN4238_US
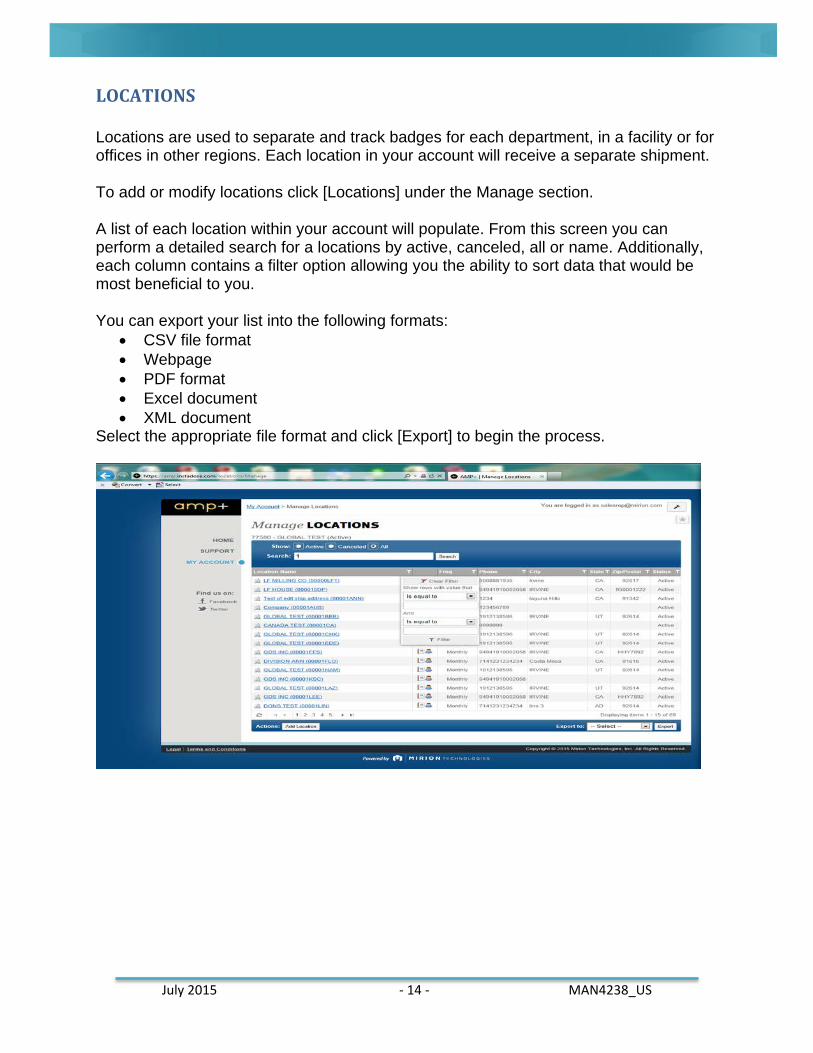
LOCATIONS Locations are used to separate and track badges for each department, in a facility or for offices in other regions. Each location in your account will receive a separate shipment. To add or modify locations click [Locations] under the Manage section. A list of each location within your account will populate. From this screen you can perform a detailed search for a locations by active, canceled, all or name. Additionally, each column contains a filter option allowing you the ability to sort data that would be most beneficial to you. You can export your list into the following formats:
• CSV file format • Webpage • PDF format • Excel document • XML document
Select the appropriate file format and click [Export] to begin the process.
July 2015 - 15 - MAN4238_US
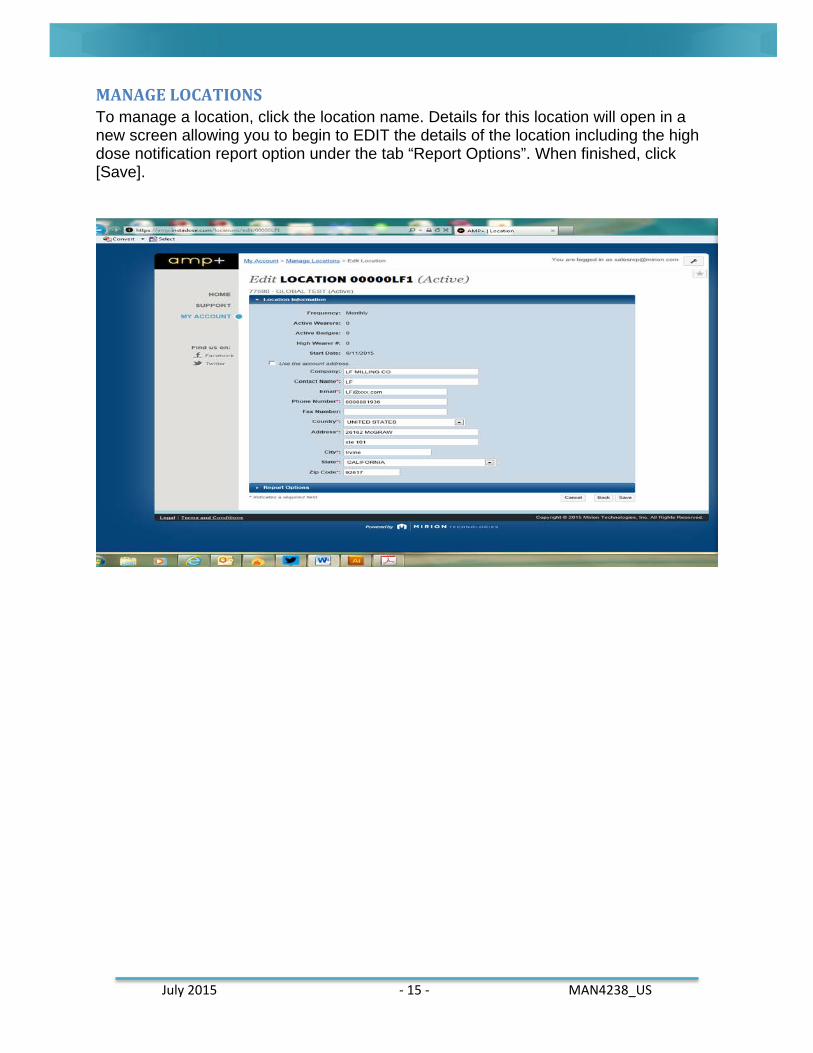
MANAGE LOCATIONS To manage a location, click the location name. Details for this location will open in a new screen allowing you to begin to EDIT the details of the location including the high dose notification report option under the tab “Report Options”. When finished, click [Save].
July 2015 - 16 - MAN4238_US
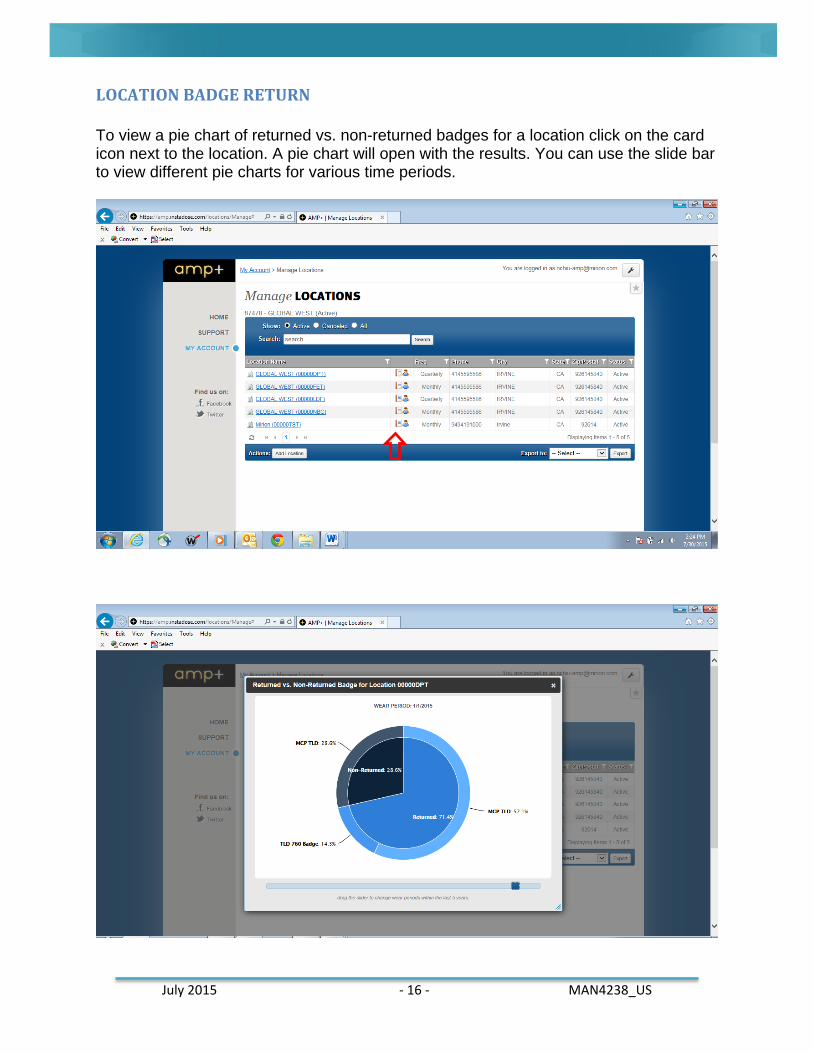
LOCATION BADGE RETURN To view a pie chart of returned vs. non-returned badges for a location click on the card icon next to the location. A pie chart will open with the results. You can use the slide bar to view different pie charts for various time periods.
July 2015 - 17 - MAN4238_US
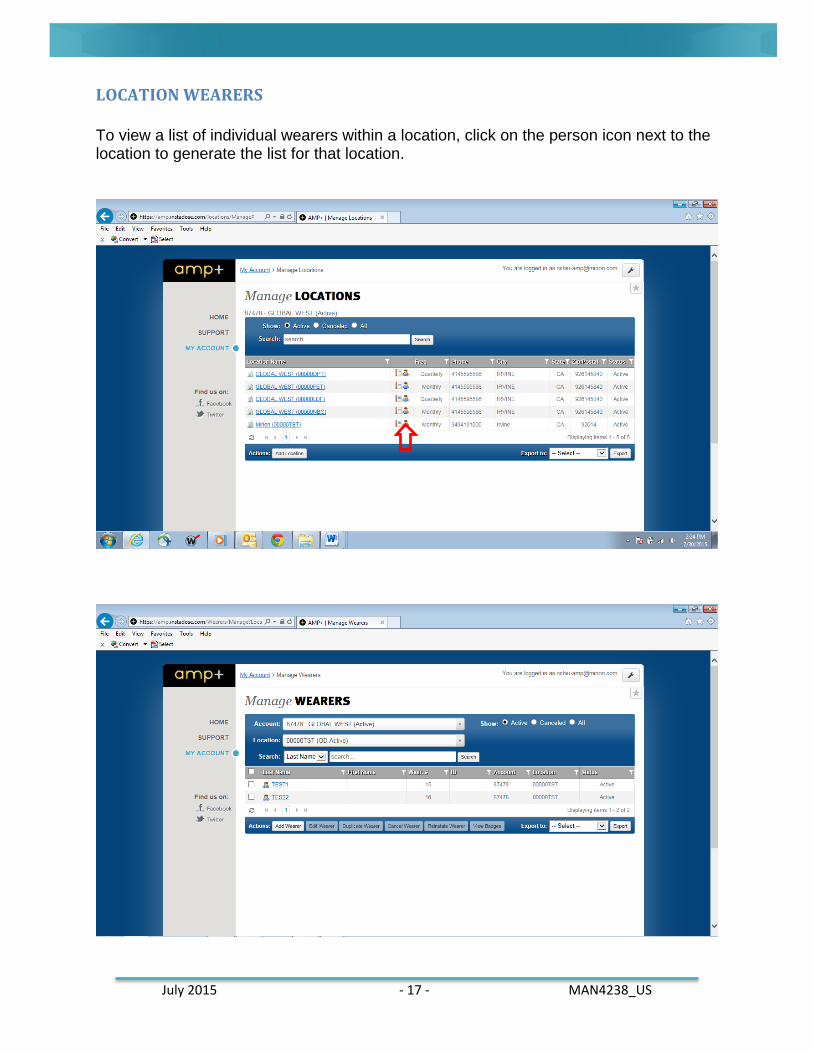
LOCATION WEARERS To view a list of individual wearers within a location, click on the person icon next to the location to generate the list for that location.
July 2015 - 18 - MAN4238_US
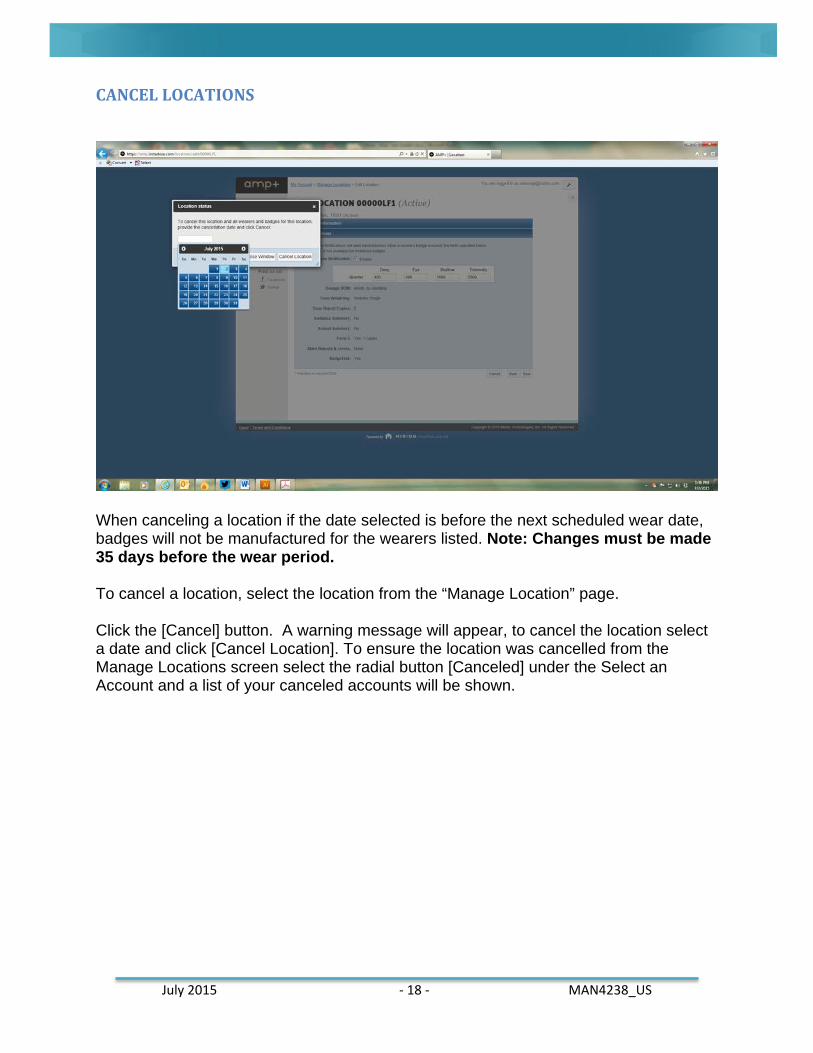
CANCEL LOCATIONS
When canceling a location if the date selected is before the next scheduled wear date, badges will not be manufactured for the wearers listed. Note: Changes must be made 35 days before the wear period. To cancel a location, select the location from the “Manage Location” page. Click the [Cancel] button. A warning message will appear, to cancel the location select a date and click [Cancel Location]. To ensure the location was cancelled from the Manage Locations screen select the radial button [Canceled] under the Select an Account and a list of your canceled accounts will be shown.
July 2015 - 19 - MAN4238_US
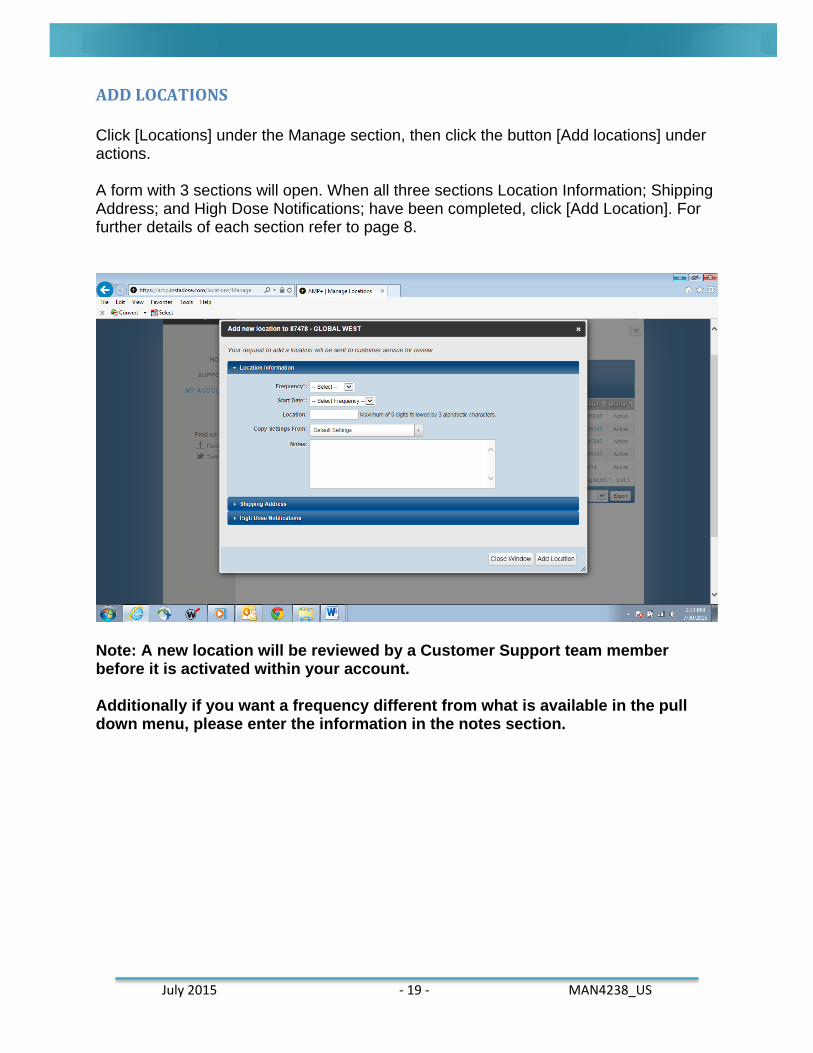
ADD LOCATIONS Click [Locations] under the Manage section, then click the button [Add locations] under actions. A form with 3 sections will open. When all three sections Location Information; Shipping Address; and High Dose Notifications; have been completed, click [Add Location]. For further details of each section refer to page 8.
Note: A new location will be reviewed by a Customer Support team member before it is activated within your account. Additionally if you want a frequency different from what is available in the pull down menu, please enter the information in the notes section.
July 2015 - 20 - MAN4238_US
REINSTATE LOCATIONS
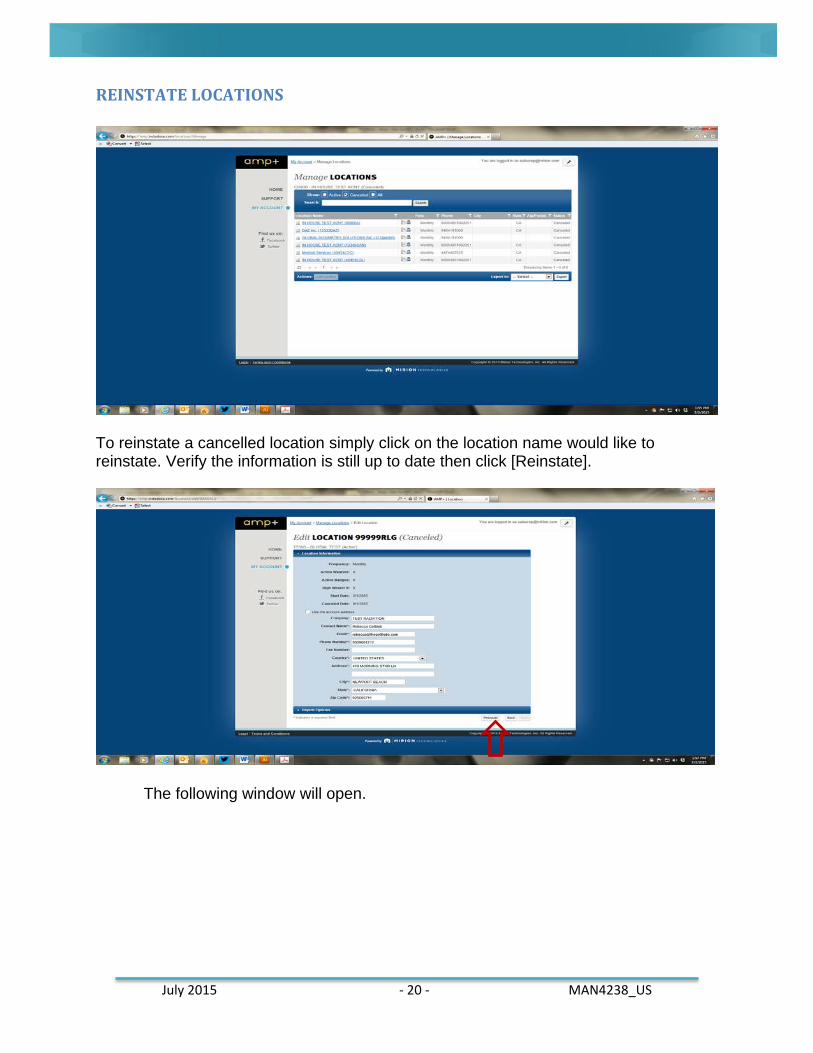
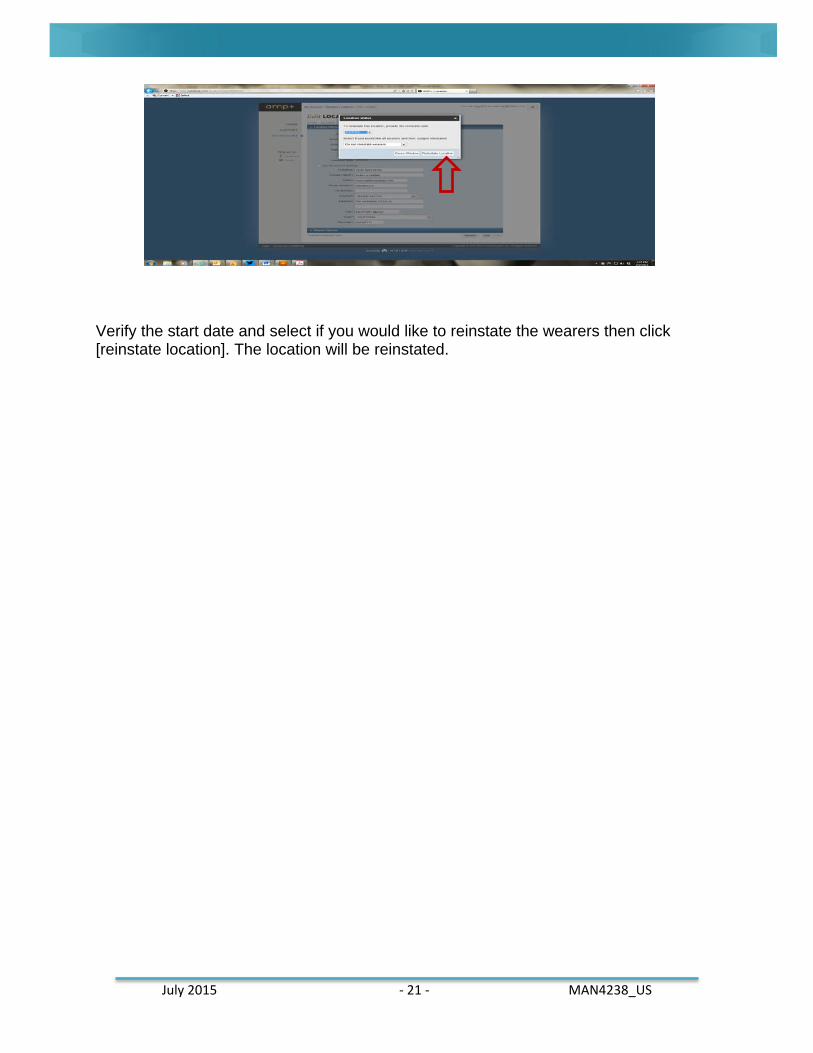
To reinstate a cancelled location simply click on the location name would like to reinstate. Verify the information is still up to date then click [Reinstate].
The following window will open.
July 2015 - 21 - MAN4238_US
Verify the start date and select if you would like to reinstate the wearers then click [reinstate location]. The location will be reinstated.
July 2015 - 22 - MAN4238_US
WEARER REQUIREMENTS Different countries have specific requirements for the dose account records for wearers. Canadian Accounts: The National Dose Registry requires you to provide the following information for each wearer:
- Previous surname - Country code of birth - Province of birth - Occupational category
You will not be able to setup a new user without this information United Kingdom Accounts: The UKRC requires you to provide the following information for each wearer:
- National insurance number You will not be able to setup a new user without this information.
July 2015 - 23 - MAN4238_US
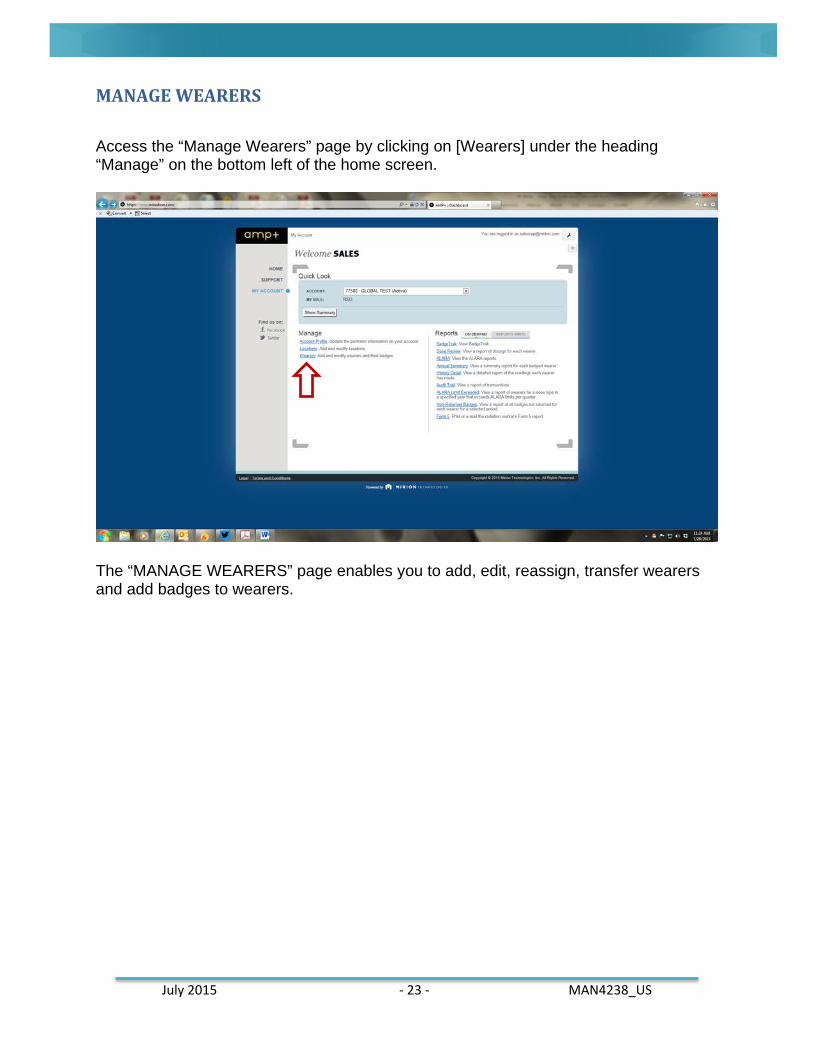
MANAGE WEARERS Access the “Manage Wearers” page by clicking on [Wearers] under the heading “Manage” on the bottom left of the home screen.
The “MANAGE WEARERS” page enables you to add, edit, reassign, transfer wearers and add badges to wearers.
July 2015 - 24 - MAN4238_US
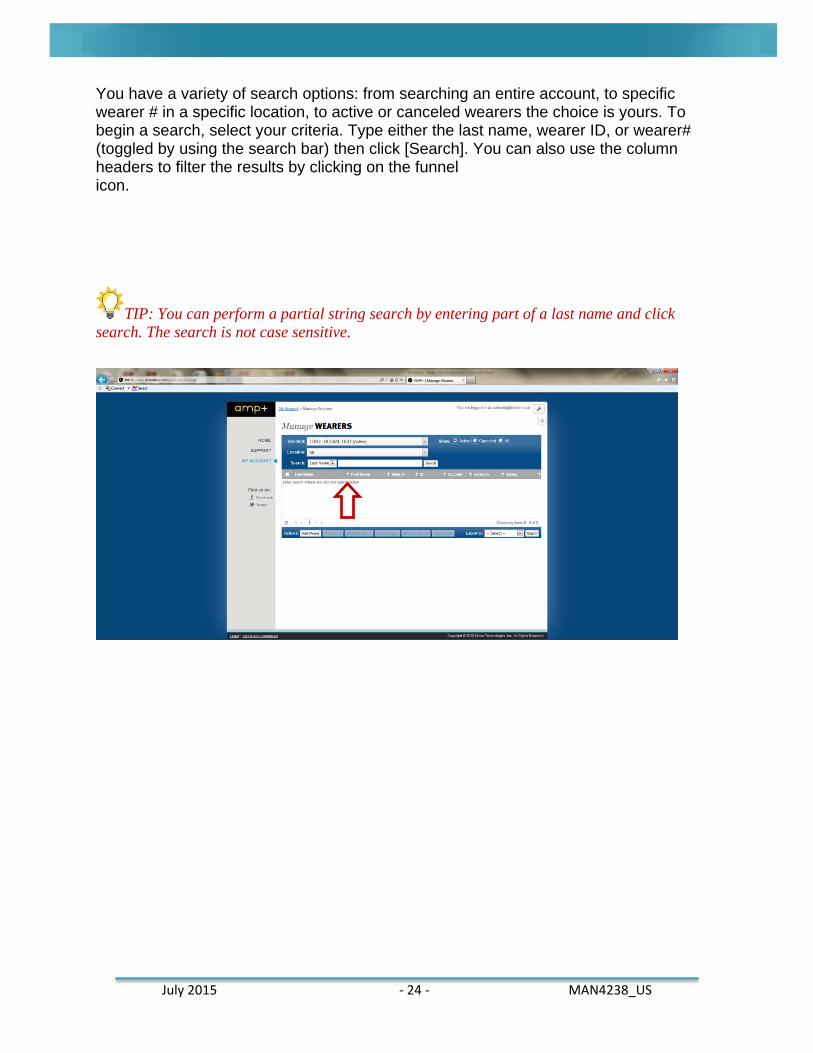
You have a variety of search options: from searching an entire account, to specific wearer # in a specific location, to active or canceled wearers the choice is yours. To begin a search, select your criteria. Type either the last name, wearer ID, or wearer# (toggled by using the search bar) then click [Search]. You can also use the column headers to filter the results by clicking on the funnel icon.
TIP: You can perform a partial string search by entering part of a last name and click search. The search is not case sensitive.
July 2015 - 25 - MAN4238_US
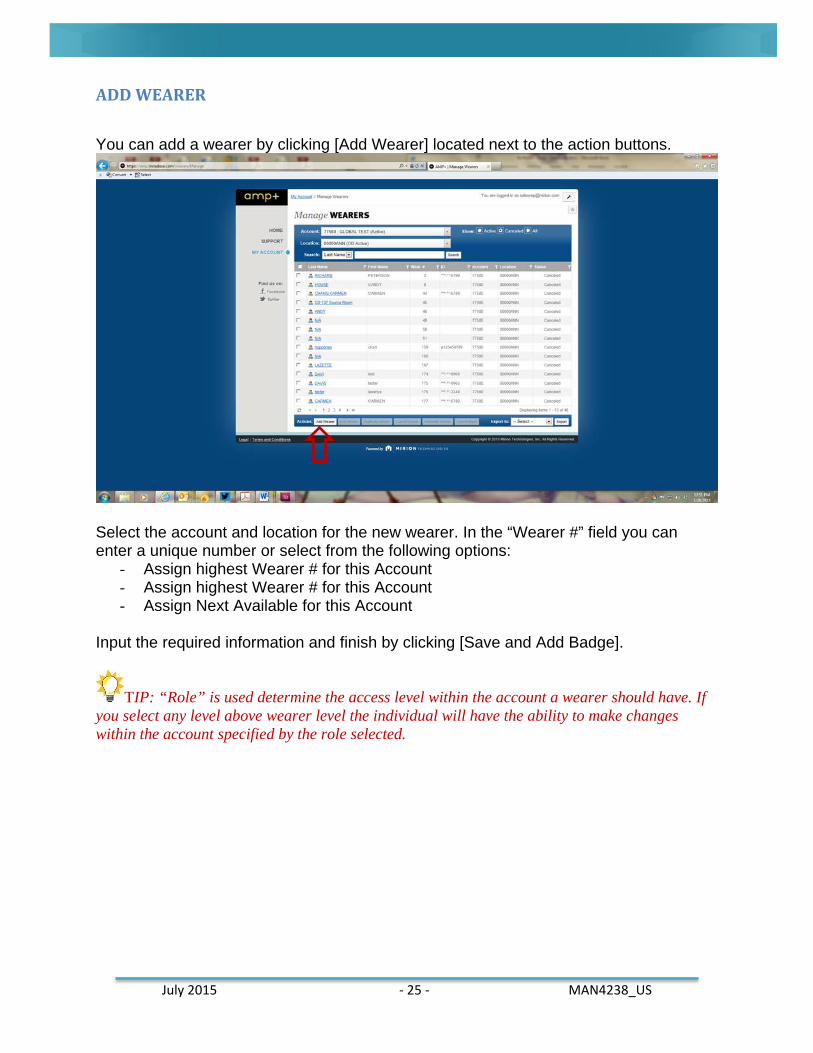
ADD WEARER
You can add a wearer by clicking [Add Wearer] located next to the action buttons.
Select the account and location for the new wearer. In the “Wearer #” field you can enter a unique number or select from the following options:
- Assign highest Wearer # for this Account - Assign highest Wearer # for this Account - Assign Next Available for this Account
Input the required information and finish by clicking [Save and Add Badge].
TIP: “Role” is used determine the access level within the account a wearer should have. If you select any level above wearer level the individual will have the ability to make changes within the account specified by the role selected.
July 2015 - 26 - MAN4238_US
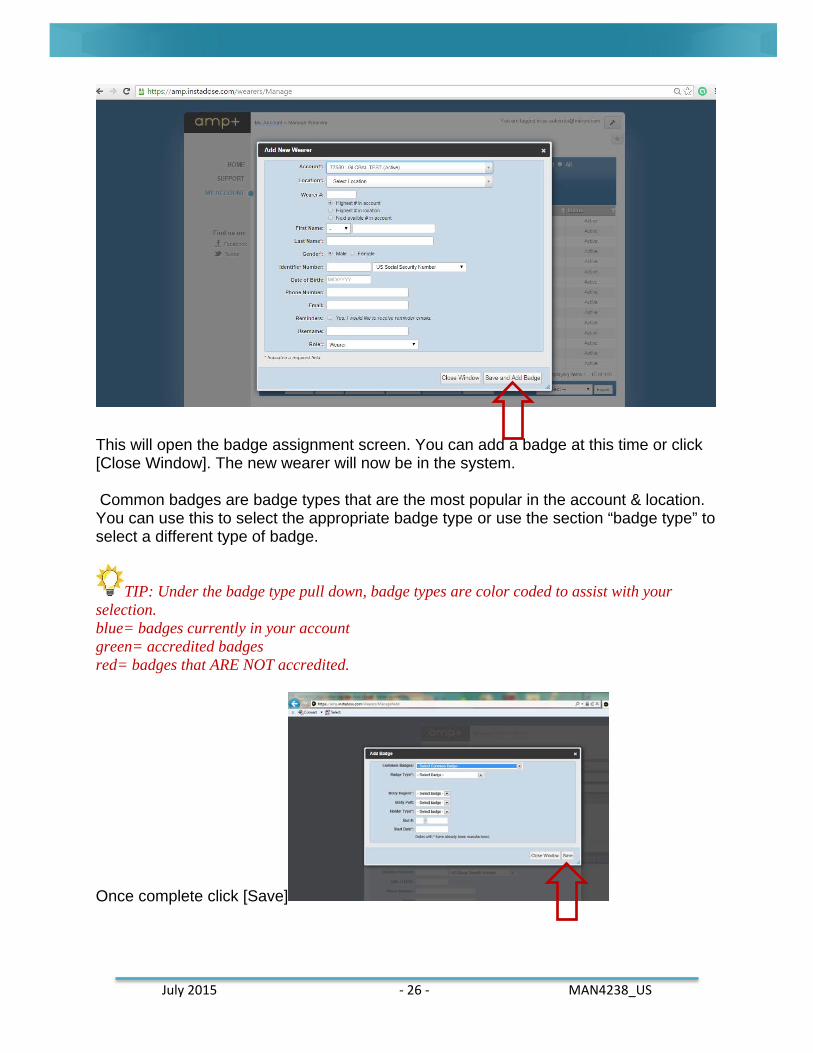
This will open the badge assignment screen. You can add a badge at this time or click [Close Window]. The new wearer will now be in the system. Common badges are badge types that are the most popular in the account & location. You can use this to select the appropriate badge type or use the section “badge type” to select a different type of badge.
TIP: Under the badge type pull down, badge types are color coded to assist with your selection. blue= badges currently in your account green= accredited badges red= badges that ARE NOT accredited.
Once complete click [Save]
July 2015 - 27 - MAN4238_US
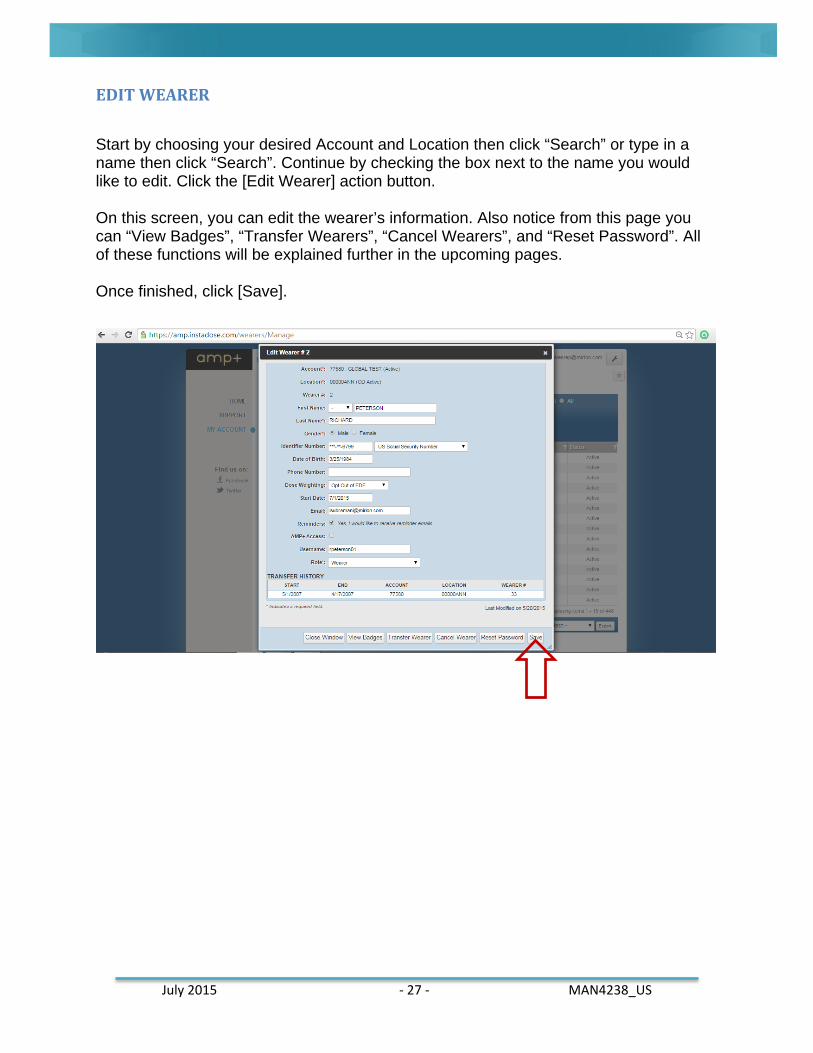
EDIT WEARER
Start by choosing your desired Account and Location then click “Search” or type in a name then click “Search”. Continue by checking the box next to the name you would like to edit. Click the [Edit Wearer] action button. On this screen, you can edit the wearer’s information. Also notice from this page you can “View Badges”, “Transfer Wearers”, “Cancel Wearers”, and “Reset Password”. All of these functions will be explained further in the upcoming pages. Once finished, click [Save].
July 2015 - 28 - MAN4238_US
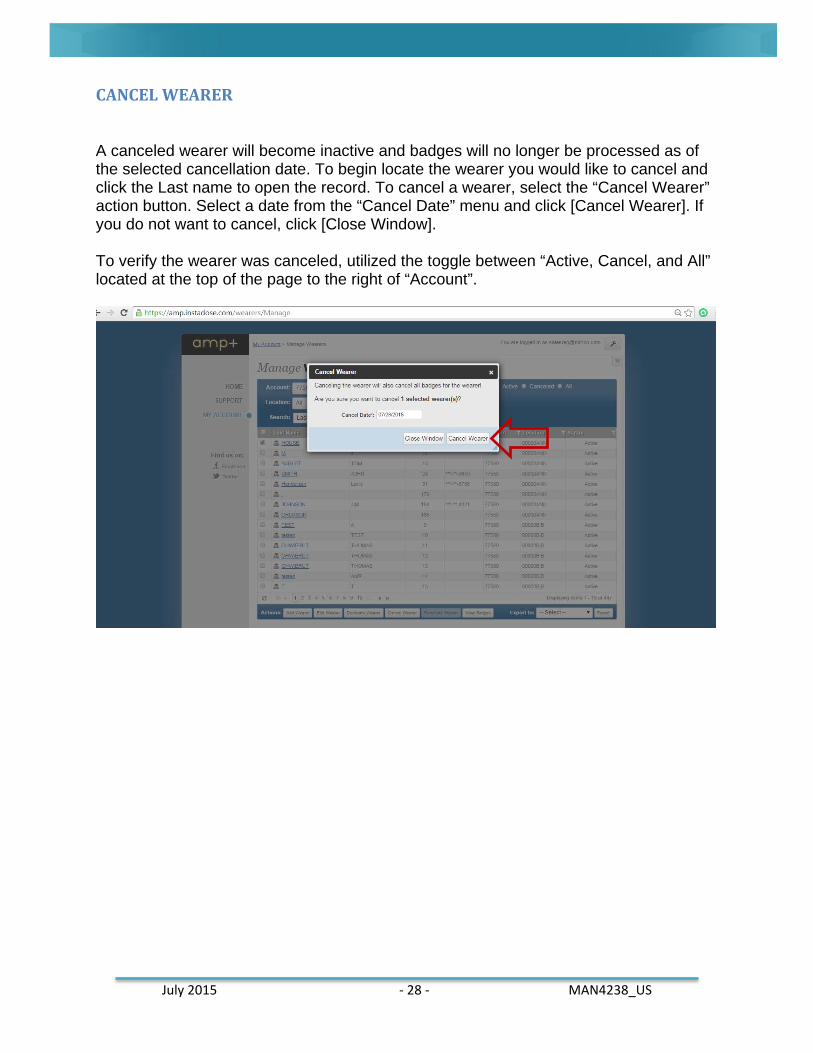
CANCEL WEARER
A canceled wearer will become inactive and badges will no longer be processed as of the selected cancellation date. To begin locate the wearer you would like to cancel and click the Last name to open the record. To cancel a wearer, select the “Cancel Wearer” action button. Select a date from the “Cancel Date” menu and click [Cancel Wearer]. If you do not want to cancel, click [Close Window]. To verify the wearer was canceled, utilized the toggle between “Active, Cancel, and All” located at the top of the page to the right of “Account”.
July 2015 - 29 - MAN4238_US
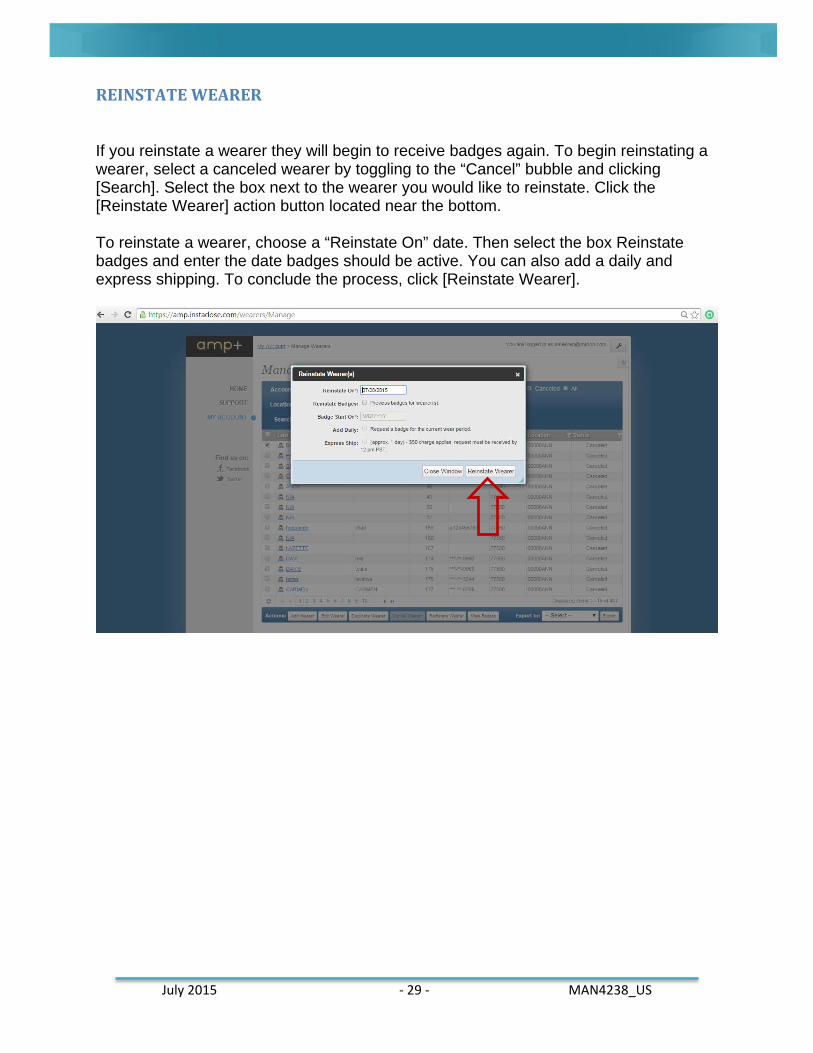
REINSTATE WEARER
If you reinstate a wearer they will begin to receive badges again. To begin reinstating a wearer, select a canceled wearer by toggling to the “Cancel” bubble and clicking [Search]. Select the box next to the wearer you would like to reinstate. Click the [Reinstate Wearer] action button located near the bottom. To reinstate a wearer, choose a “Reinstate On” date. Then select the box Reinstate badges and enter the date badges should be active. You can also add a daily and express shipping. To conclude the process, click [Reinstate Wearer].
July 2015 - 30 - MAN4238_US
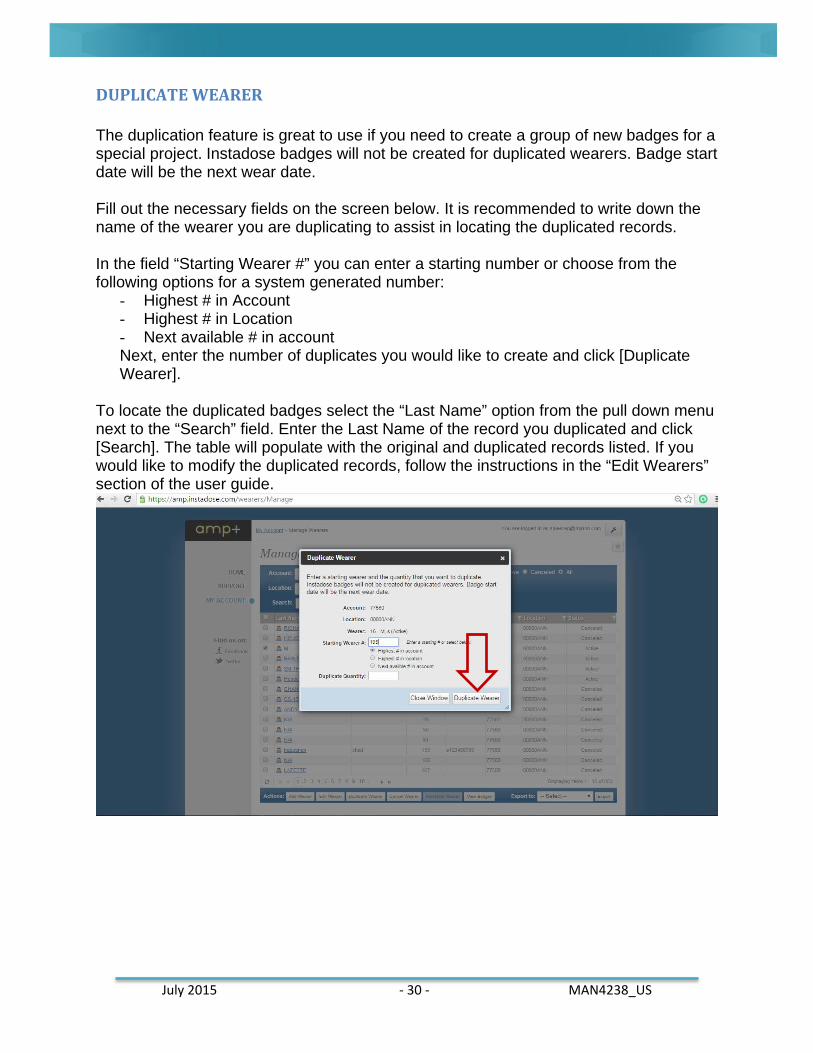
DUPLICATE WEARER The duplication feature is great to use if you need to create a group of new badges for a special project. Instadose badges will not be created for duplicated wearers. Badge start date will be the next wear date. Fill out the necessary fields on the screen below. It is recommended to write down the name of the wearer you are duplicating to assist in locating the duplicated records. In the field “Starting Wearer #” you can enter a starting number or choose from the following options for a system generated number:
- Highest # in Account - Highest # in Location - Next available # in account Next, enter the number of duplicates you would like to create and click [Duplicate Wearer].
To locate the duplicated badges select the “Last Name” option from the pull down menu next to the “Search” field. Enter the Last Name of the record you duplicated and click [Search]. The table will populate with the original and duplicated records listed. If you would like to modify the duplicated records, follow the instructions in the “Edit Wearers” section of the user guide.
July 2015 - 31 - MAN4238_US
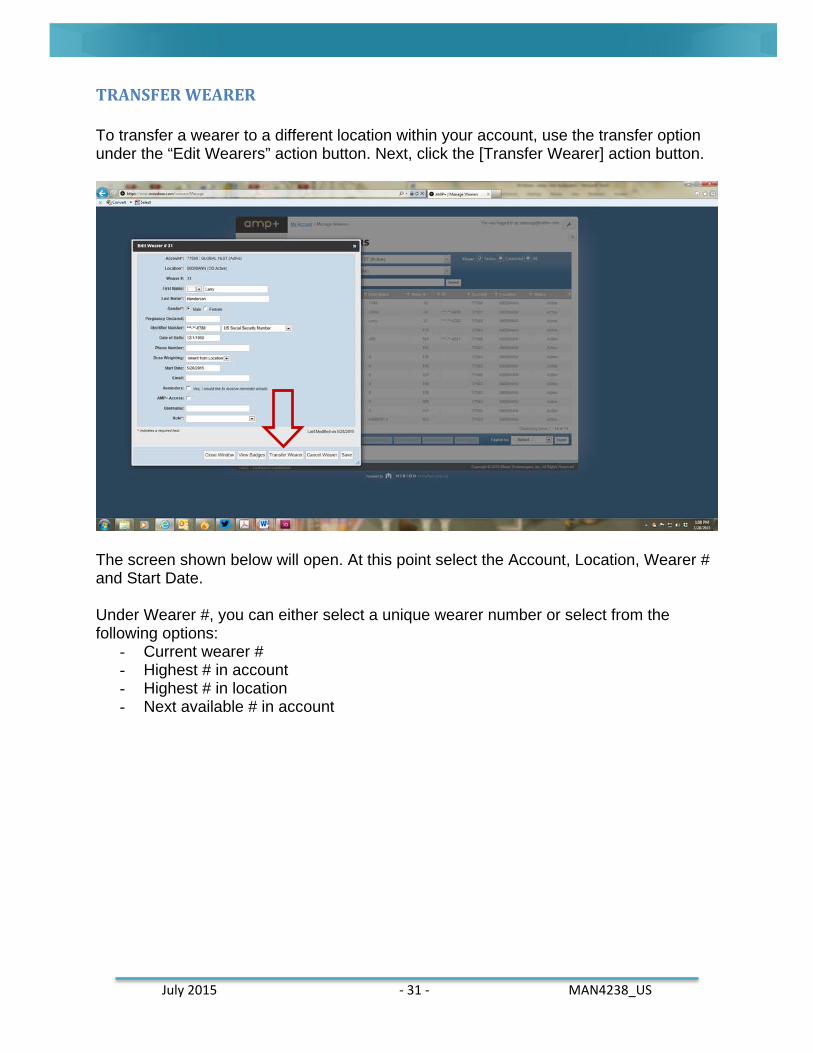
TRANSFER WEARER To transfer a wearer to a different location within your account, use the transfer option under the “Edit Wearers” action button. Next, click the [Transfer Wearer] action button.
The screen shown below will open. At this point select the Account, Location, Wearer # and Start Date. Under Wearer #, you can either select a unique wearer number or select from the following options:
- Current wearer # - Highest # in account - Highest # in location - Next available # in account
July 2015 - 32 - MAN4238_US
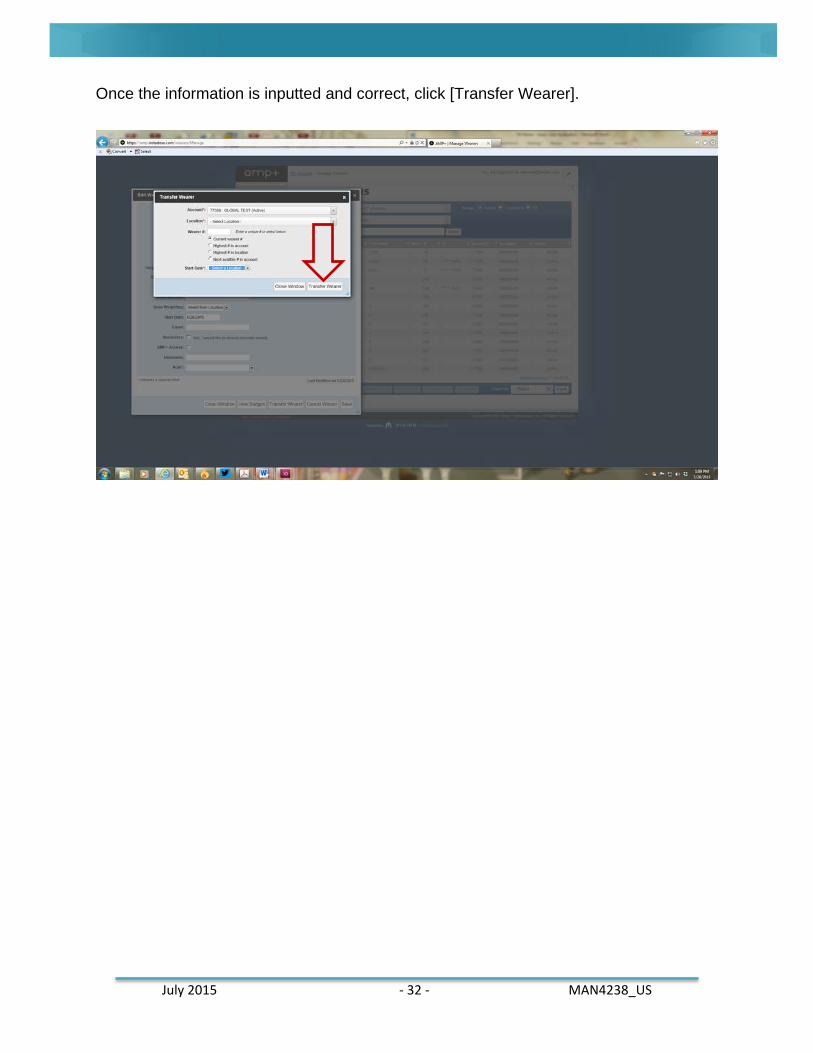
Once the information is inputted and correct, click [Transfer Wearer].
July 2015 - 33 - MAN4238_US
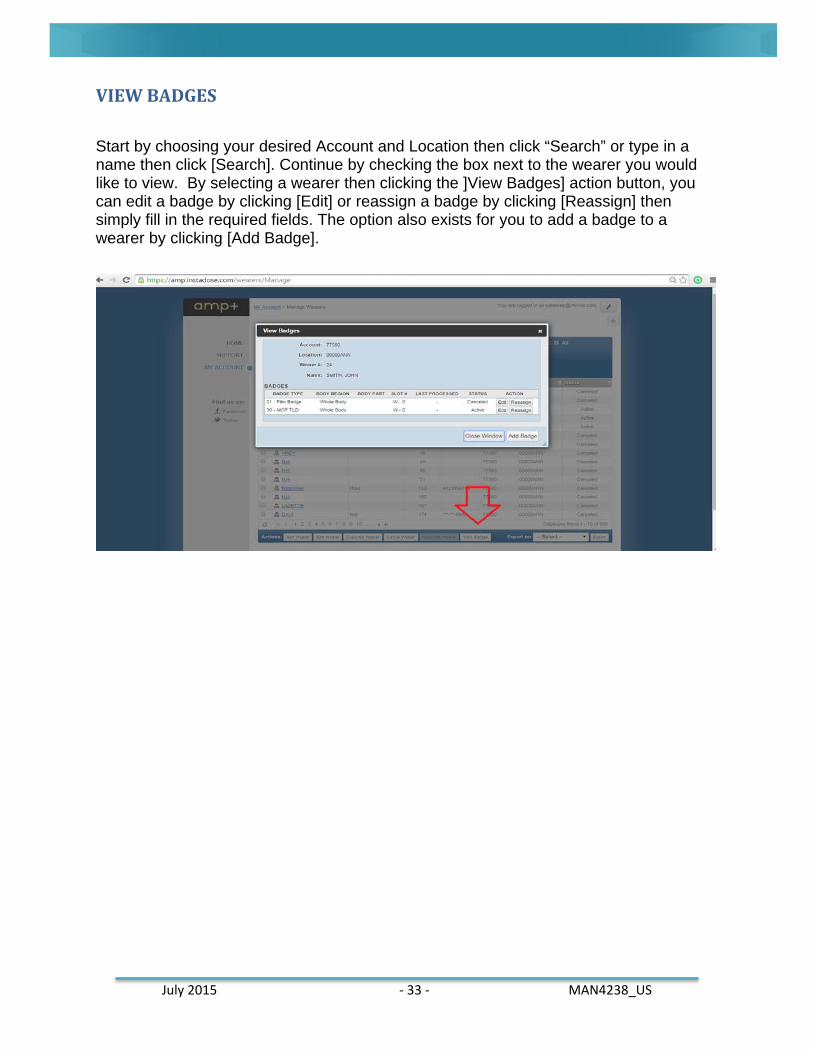
VIEW BADGES Start by choosing your desired Account and Location then click “Search” or type in a name then click [Search]. Continue by checking the box next to the wearer you would like to view. By selecting a wearer then clicking the ]View Badges] action button, you can edit a badge by clicking [Edit] or reassign a badge by clicking [Reassign] then simply fill in the required fields. The option also exists for you to add a badge to a wearer by clicking [Add Badge].
July 2015 - 34 - MAN4238_US
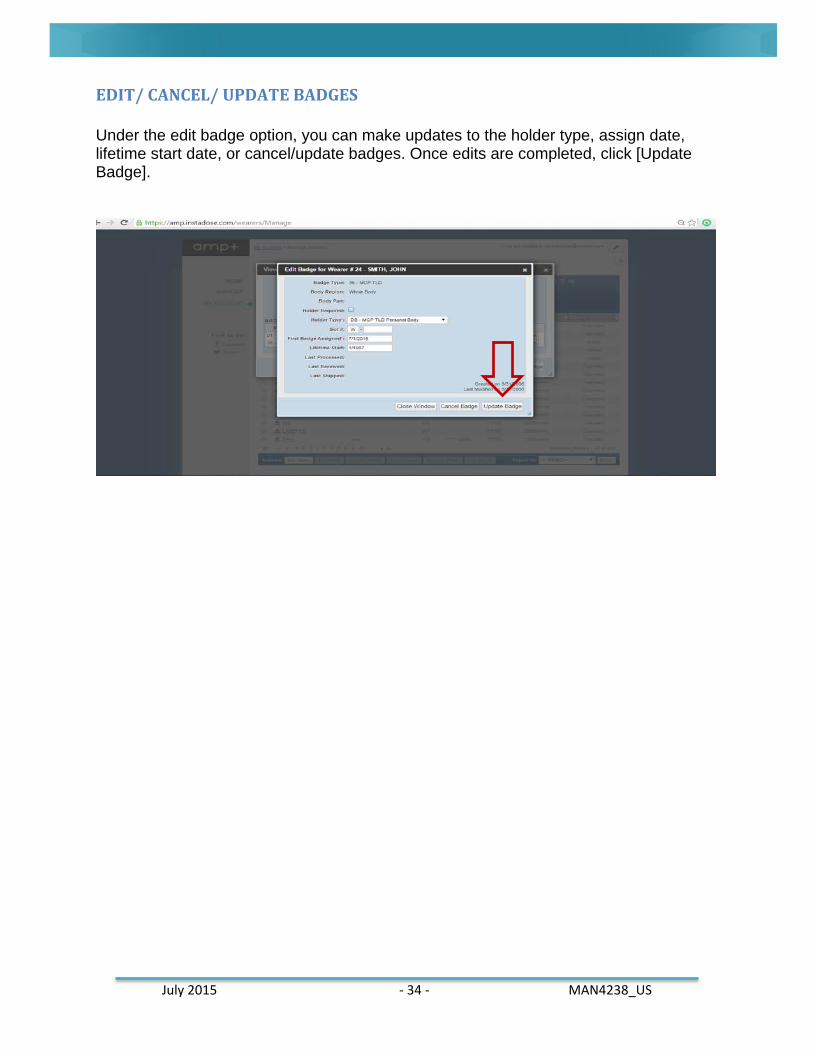
EDIT/ CANCEL/ UPDATE BADGES Under the edit badge option, you can make updates to the holder type, assign date, lifetime start date, or cancel/update badges. Once edits are completed, click [Update Badge].
July 2015 - 35 - MAN4238_US
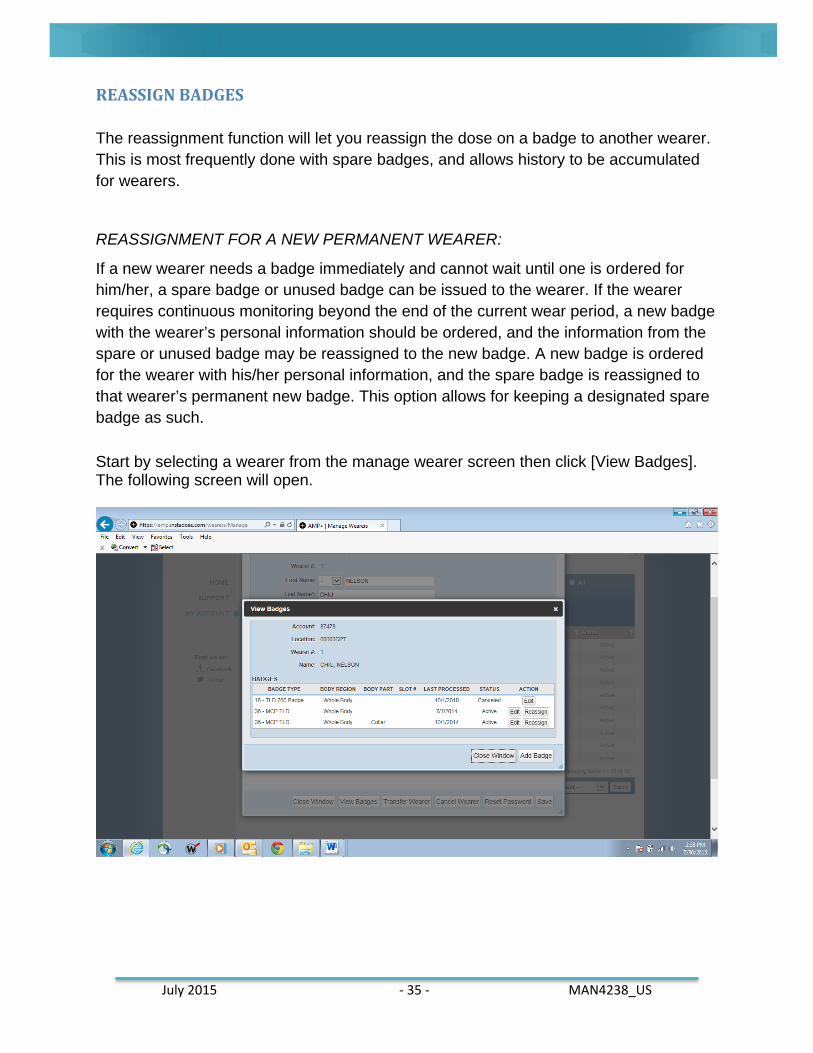
REASSIGN BADGES The reassignment function will let you reassign the dose on a badge to another wearer. This is most frequently done with spare badges, and allows history to be accumulated for wearers.
REASSIGNMENT FOR A NEW PERMANENT WEARER:
If a new wearer needs a badge immediately and cannot wait until one is ordered for him/her, a spare badge or unused badge can be issued to the wearer. If the wearer requires continuous monitoring beyond the end of the current wear period, a new badge with the wearer’s personal information should be ordered, and the information from the spare or unused badge may be reassigned to the new badge. A new badge is ordered for the wearer with his/her personal information, and the spare badge is reassigned to that wearer’s permanent new badge. This option allows for keeping a designated spare badge as such. Start by selecting a wearer from the manage wearer screen then click [View Badges]. The following screen will open.
July 2015 - 36 - MAN4238_US
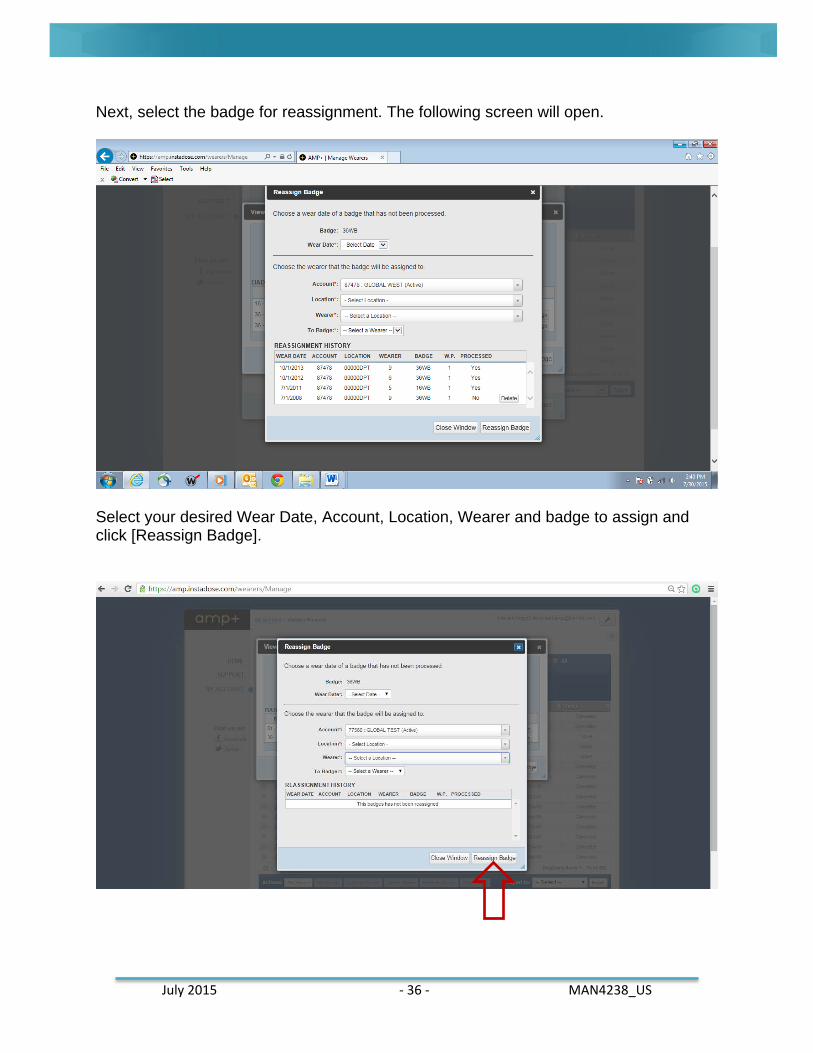
Next, select the badge for reassignment. The following screen will open.
Select your desired Wear Date, Account, Location, Wearer and badge to assign and click [Reassign Badge].
July 2015 - 37 - MAN4238_US
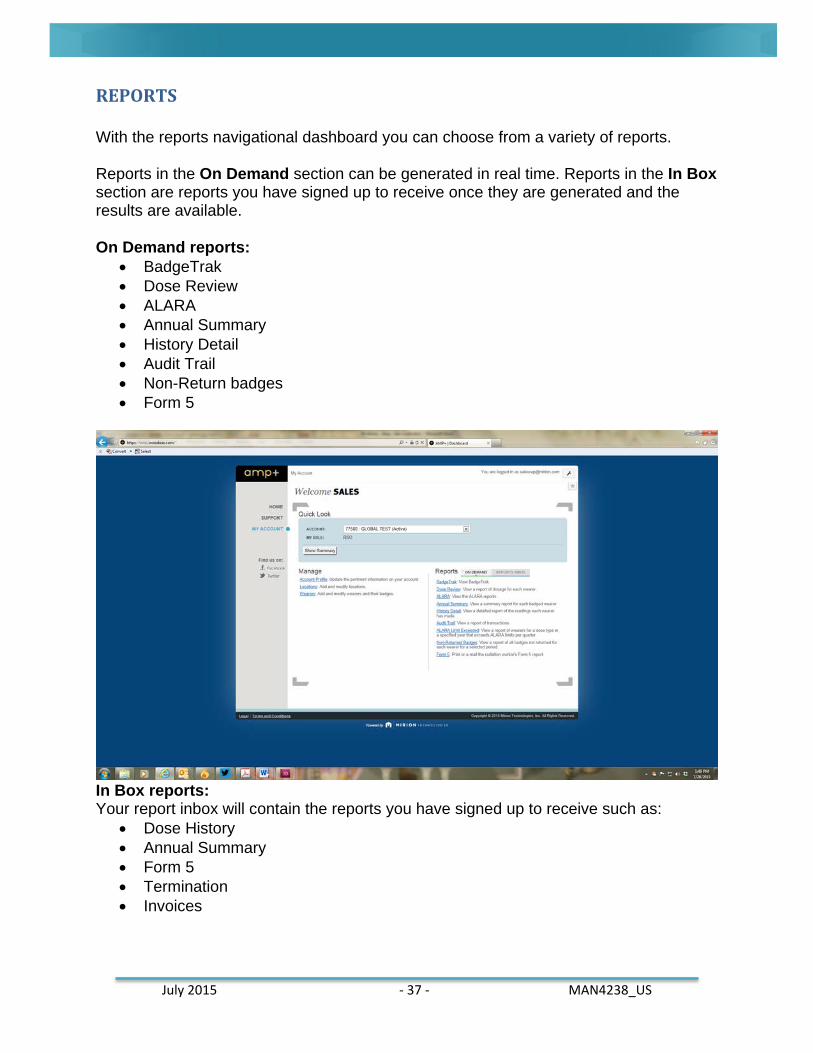
REPORTS With the reports navigational dashboard you can choose from a variety of reports. Reports in the On Demand section can be generated in real time. Reports in the In Box section are reports you have signed up to receive once they are generated and the results are available. On Demand reports:
• BadgeTrak • Dose Review • ALARA • Annual Summary • History Detail • Audit Trail • Non-Return badges • Form 5
In Box reports: Your report inbox will contain the reports you have signed up to receive such as:
• Dose History • Annual Summary • Form 5 • Termination • Invoices
July 2015 - 38 - MAN4238_US
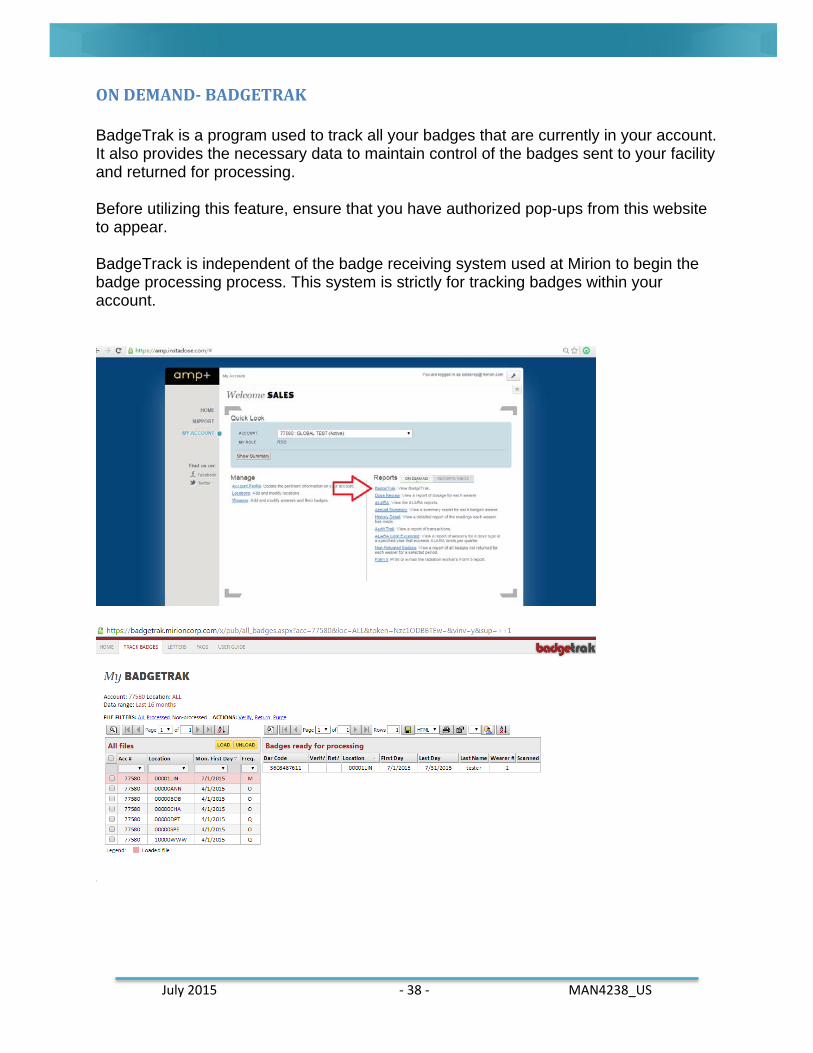
ON DEMAND- BADGETRAK BadgeTrak is a program used to track all your badges that are currently in your account. It also provides the necessary data to maintain control of the badges sent to your facility and returned for processing. Before utilizing this feature, ensure that you have authorized pop-ups from this website to appear. BadgeTrack is independent of the badge receiving system used at Mirion to begin the badge processing process. This system is strictly for tracking badges within your account.

July 2015 - 39 - MAN4238_US
ON DEMAND- DOSE REVIEW Dose Review enables you to quickly find and filter searches to receive accurate historical data of dosage. In order to review dosage, you must click on [Dose Review]. Proceed by selecting an account and location. Then input “Search by” criteria, period, dose types, dose, and UOM (unit of measure). To finish, click [Run Report].
July 2015 - 40 - MAN4238_US
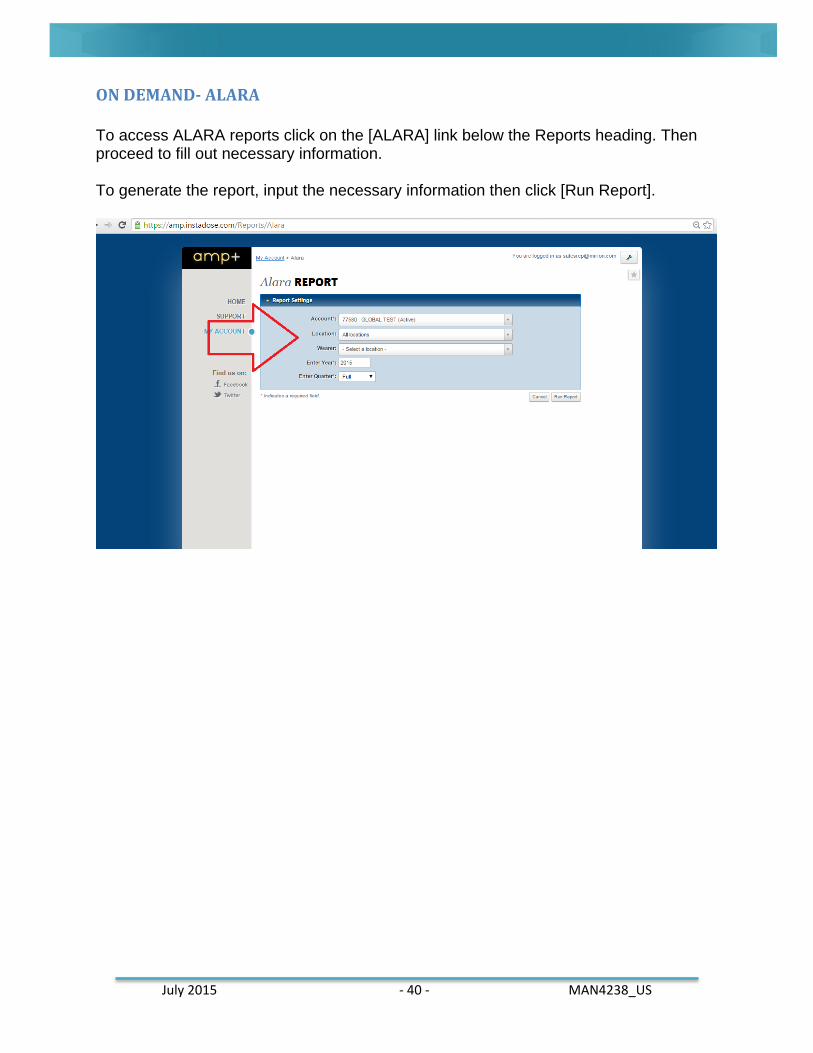
ON DEMAND- ALARA To access ALARA reports click on the [ALARA] link below the Reports heading. Then proceed to fill out necessary information. To generate the report, input the necessary information then click [Run Report].
July 2015 - 41 - MAN4238_US
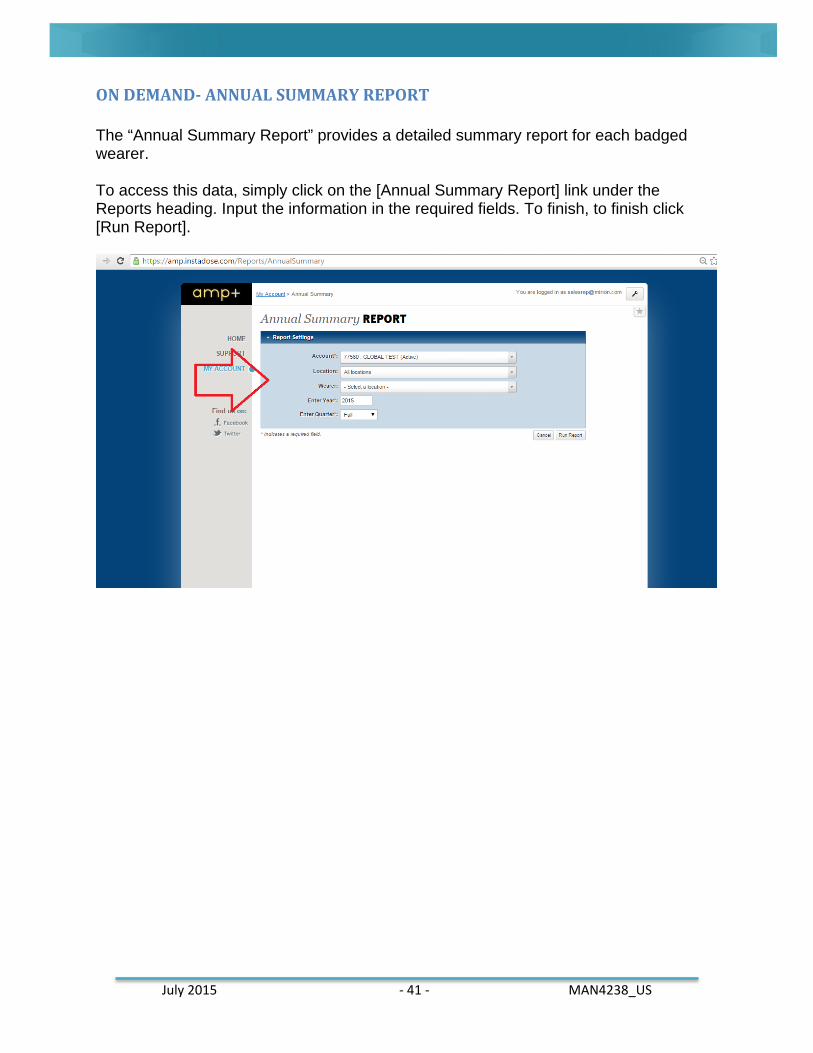
ON DEMAND- ANNUAL SUMMARY REPORT The “Annual Summary Report” provides a detailed summary report for each badged wearer. To access this data, simply click on the [Annual Summary Report] link under the Reports heading. Input the information in the required fields. To finish, to finish click [Run Report].
July 2015 - 42 - MAN4238_US
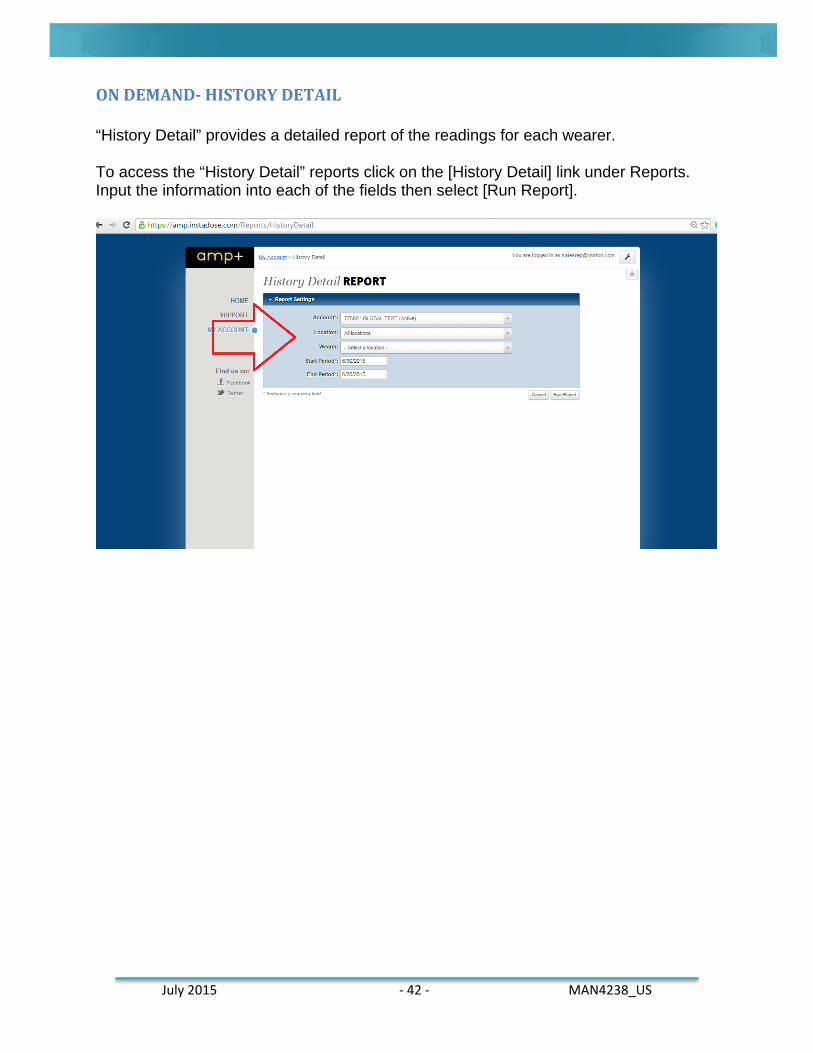
ON DEMAND- HISTORY DETAIL “History Detail” provides a detailed report of the readings for each wearer. To access the “History Detail” reports click on the [History Detail] link under Reports. Input the information into each of the fields then select [Run Report].
July 2015 - 43 - MAN4238_US
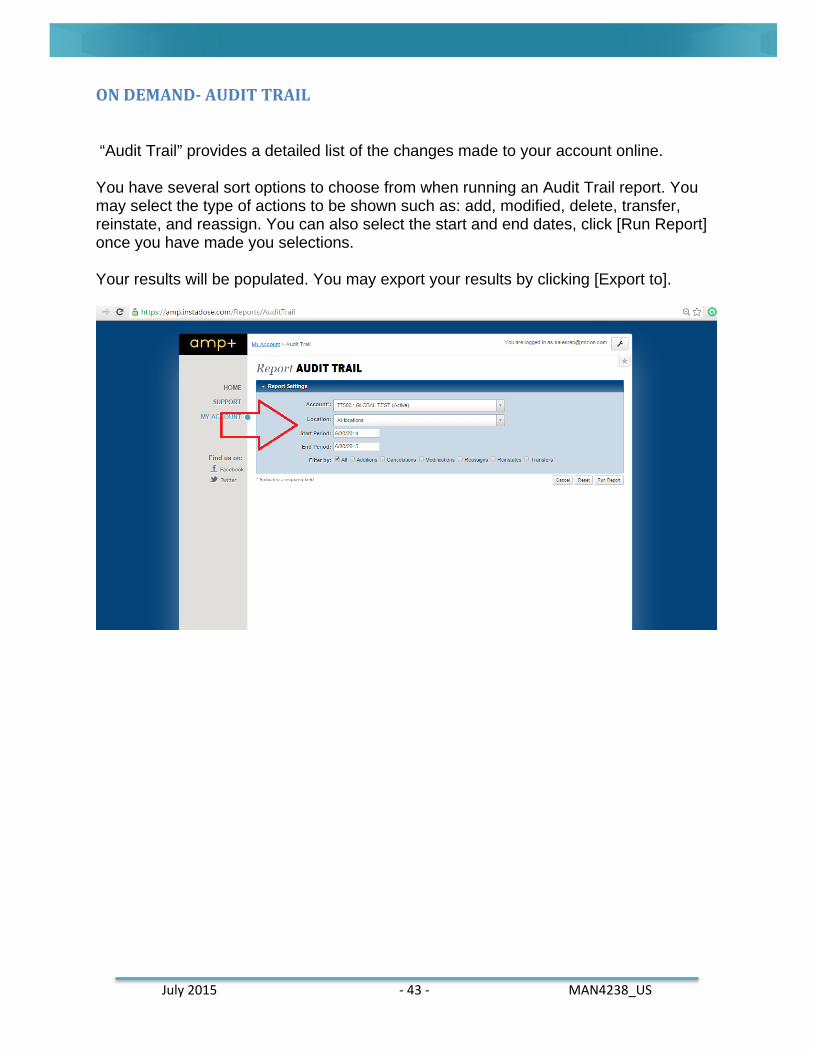
ON DEMAND- AUDIT TRAIL
“Audit Trail” provides a detailed list of the changes made to your account online. You have several sort options to choose from when running an Audit Trail report. You may select the type of actions to be shown such as: add, modified, delete, transfer, reinstate, and reassign. You can also select the start and end dates, click [Run Report] once you have made you selections. Your results will be populated. You may export your results by clicking [Export to].
July 2015 - 44 - MAN4238_US
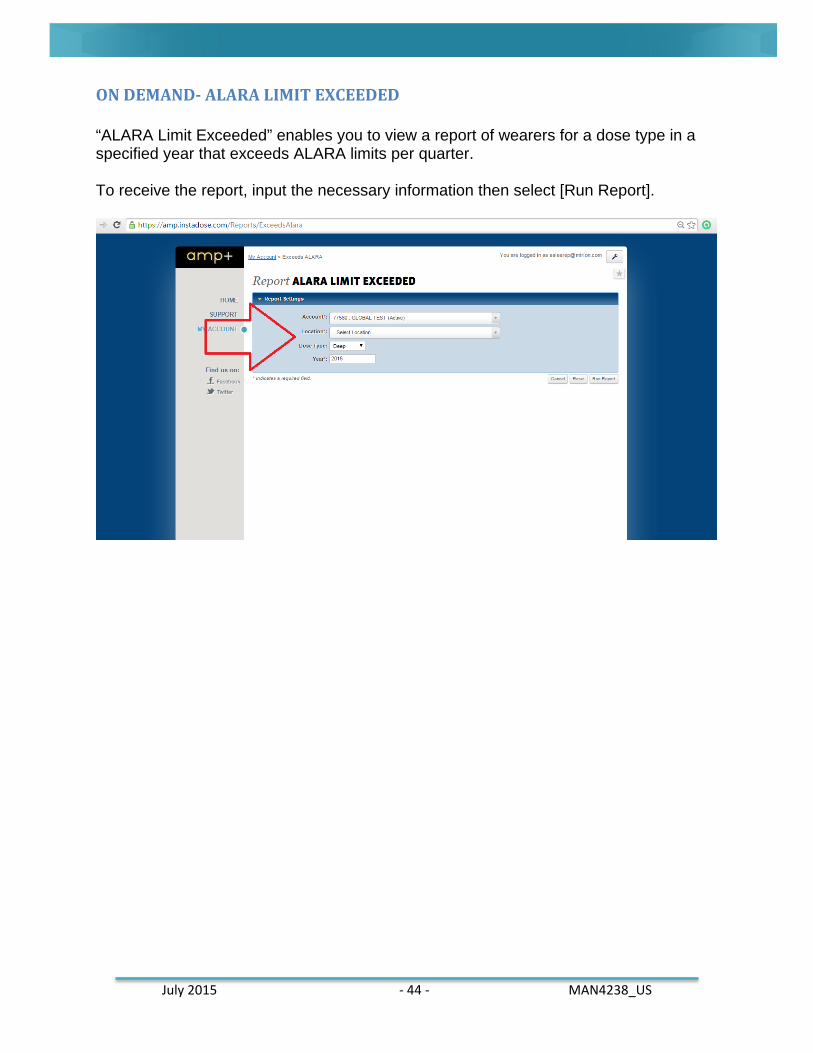
ON DEMAND- ALARA LIMIT EXCEEDED “ALARA Limit Exceeded” enables you to view a report of wearers for a dose type in a specified year that exceeds ALARA limits per quarter. To receive the report, input the necessary information then select [Run Report].

July 2015 - 45 - MAN4238_US
ON DEMAND- NON-RETURNED BADGES The “Non-Returned Badges” link provides detailed listings of badges not returned for processing. This report can be for a specific wear date or since the inception of service with Mirion Technologies Dosimetry Services. The “Non-Returned Badge Report” can be sorted by: wearer #, last name, or wear date by clicking on the radial button next to the preferred option. You must select the start and end dates. You can also choose to include the control badge by clicking in the box. Click [Run Report] once you have made you selections.
July 2015 - 46 - MAN4238_US
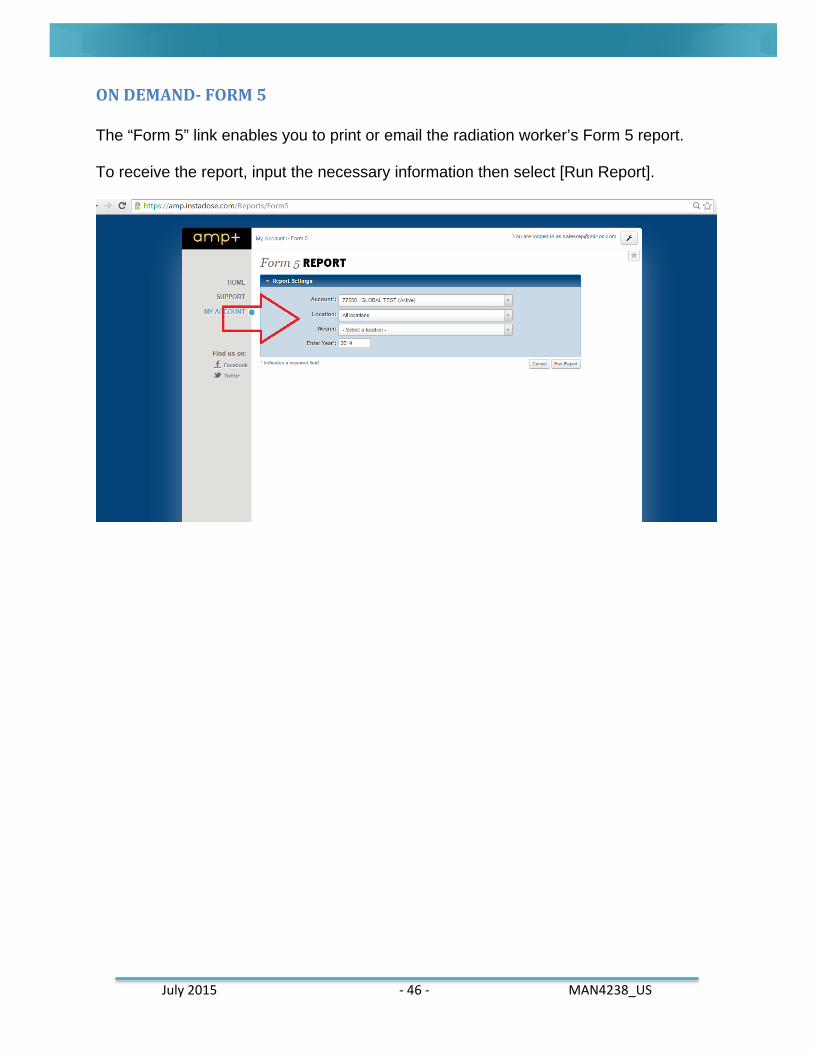
ON DEMAND- FORM 5 The “Form 5” link enables you to print or email the radiation worker’s Form 5 report. To receive the report, input the necessary information then select [Run Report].
July 2015 - 47 - MAN4238_US
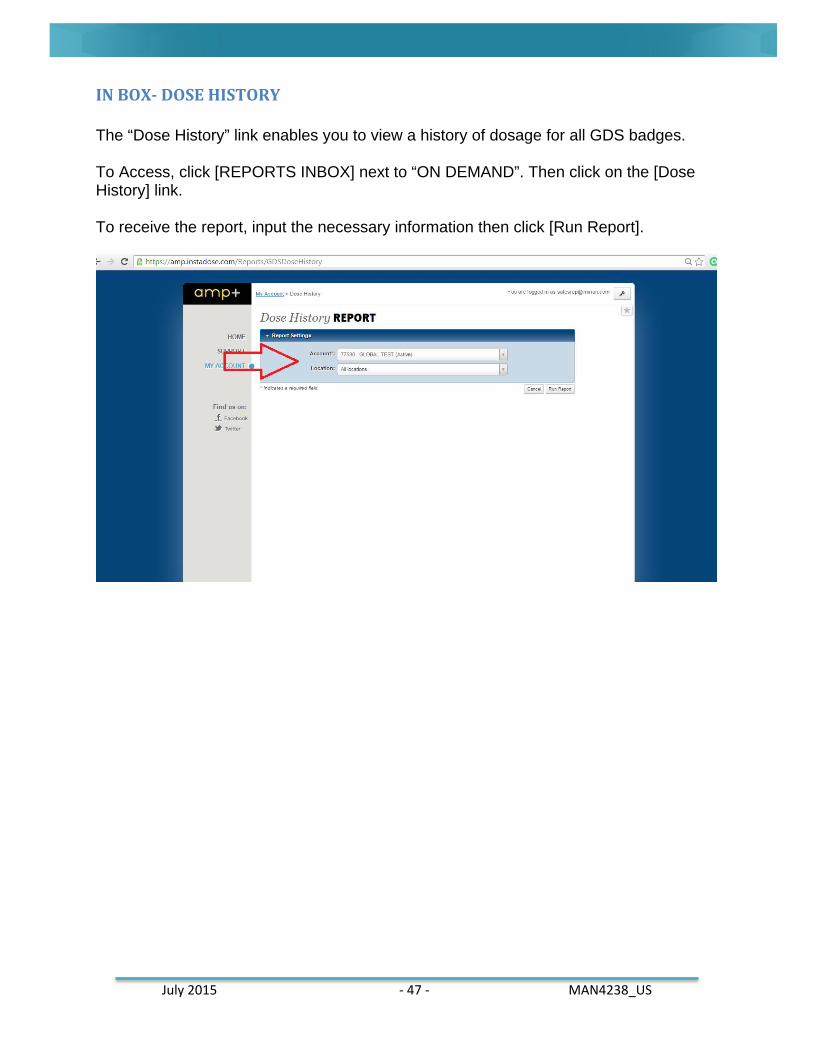
IN BOX- DOSE HISTORY The “Dose History” link enables you to view a history of dosage for all GDS badges. To Access, click [REPORTS INBOX] next to “ON DEMAND”. Then click on the [Dose History] link. To receive the report, input the necessary information then click [Run Report].
July 2015 - 48 - MAN4238_US
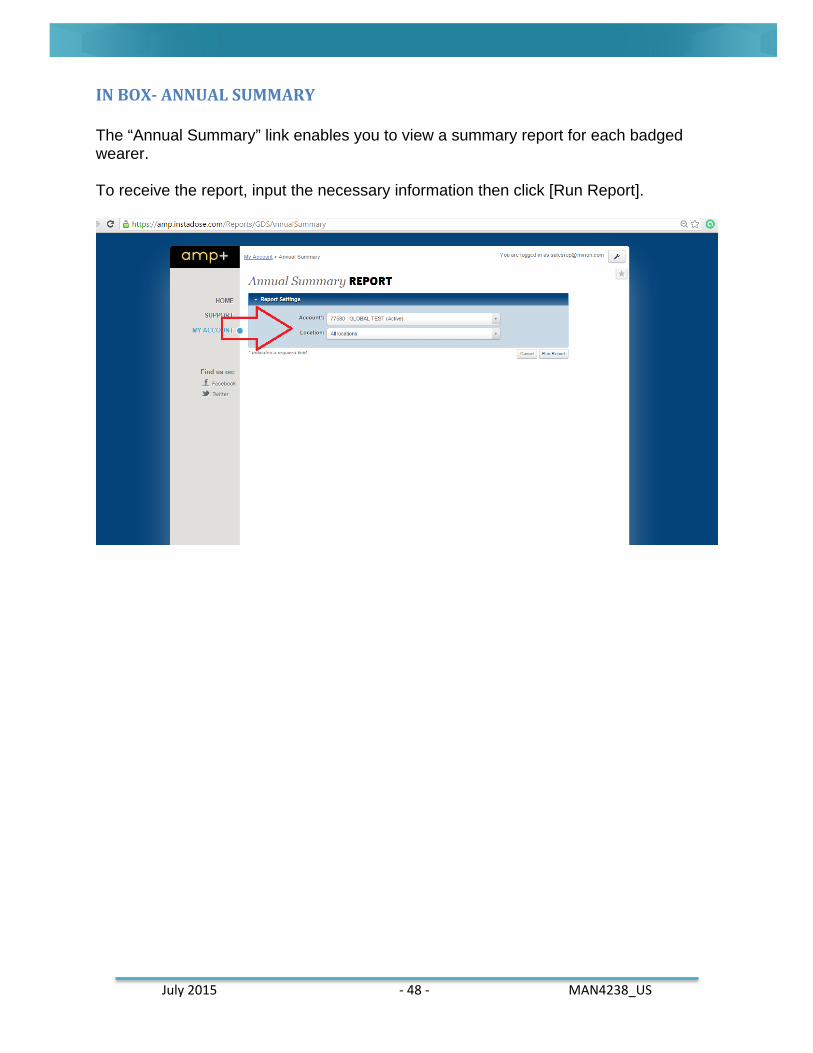
IN BOX- ANNUAL SUMMARY The “Annual Summary” link enables you to view a summary report for each badged wearer. To receive the report, input the necessary information then click [Run Report].
July 2015 - 49 - MAN4238_US
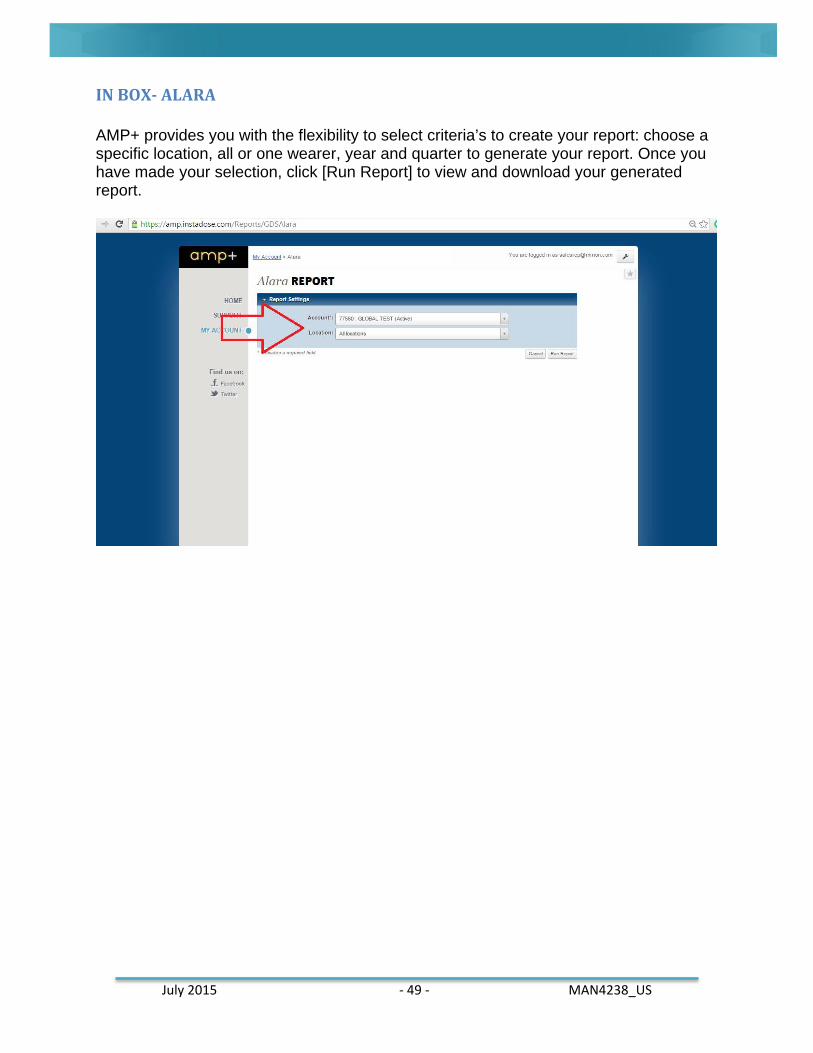
IN BOX- ALARA AMP+ provides you with the flexibility to select criteria’s to create your report: choose a specific location, all or one wearer, year and quarter to generate your report. Once you have made your selection, click [Run Report] to view and download your generated report.
July 2015 - 50 - MAN4238_US
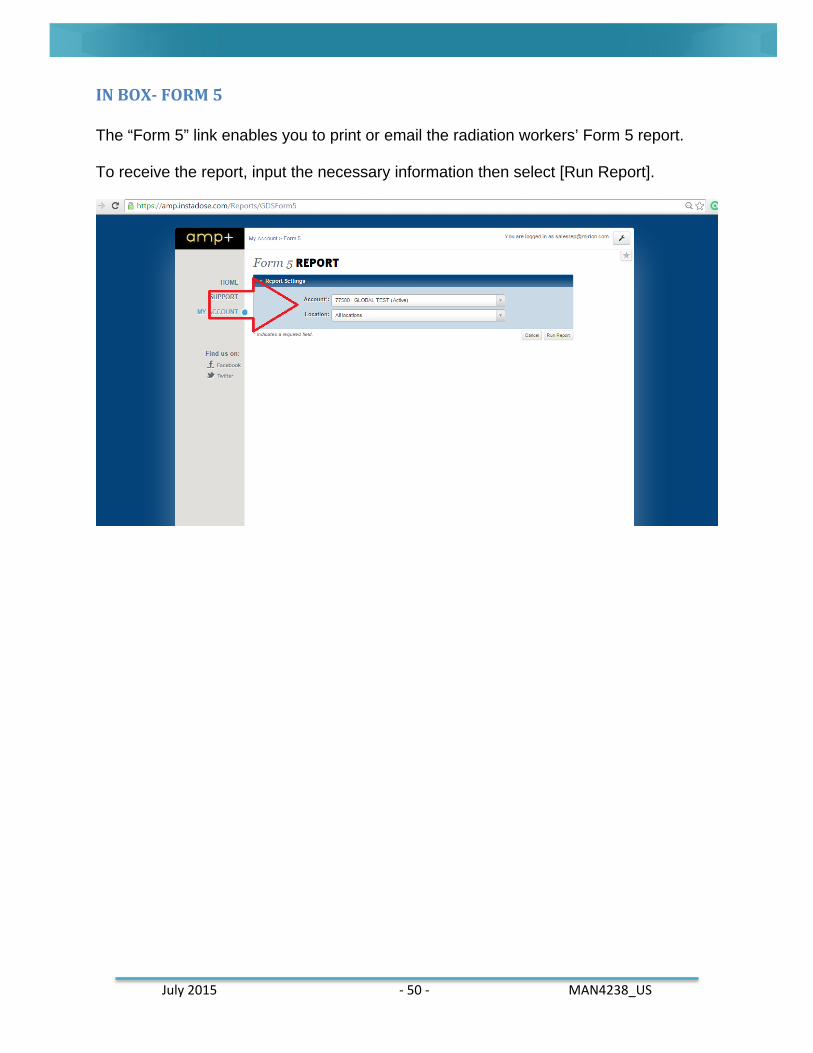
IN BOX- FORM 5 The “Form 5” link enables you to print or email the radiation workers’ Form 5 report. To receive the report, input the necessary information then select [Run Report].
July 2015 - 51 - MAN4238_US
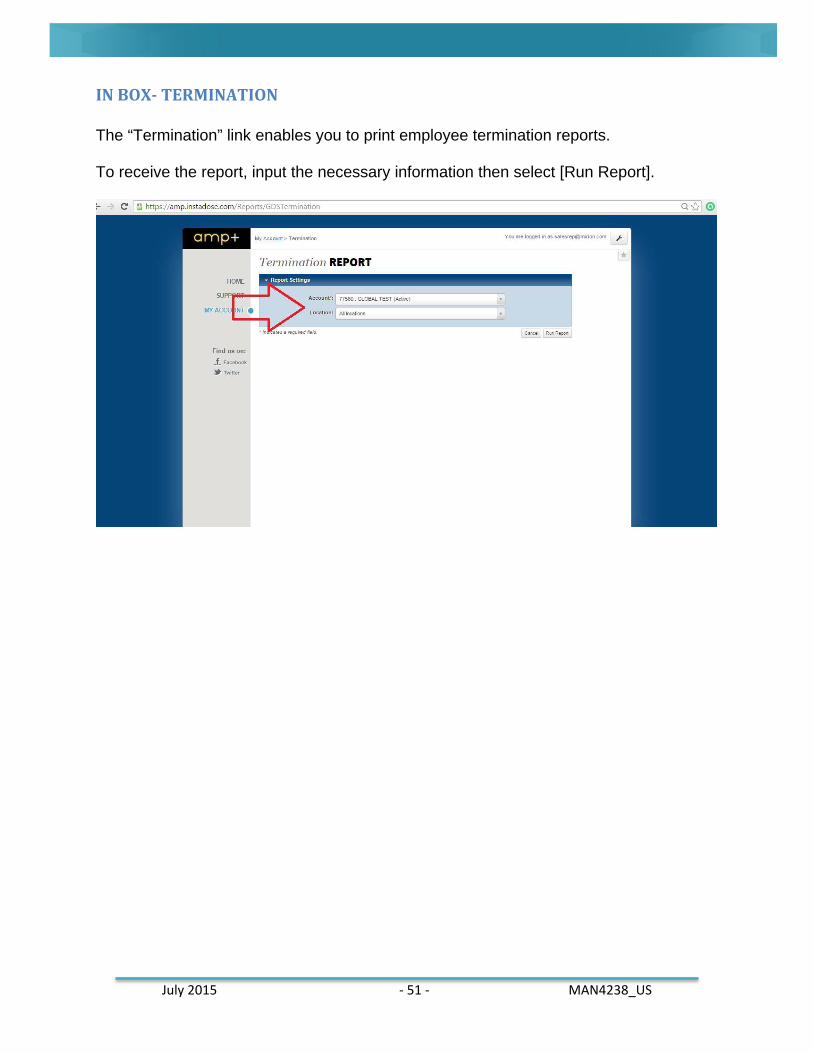
IN BOX- TERMINATION The “Termination” link enables you to print employee termination reports. To receive the report, input the necessary information then select [Run Report].
July 2015 - 52 - MAN4238_US
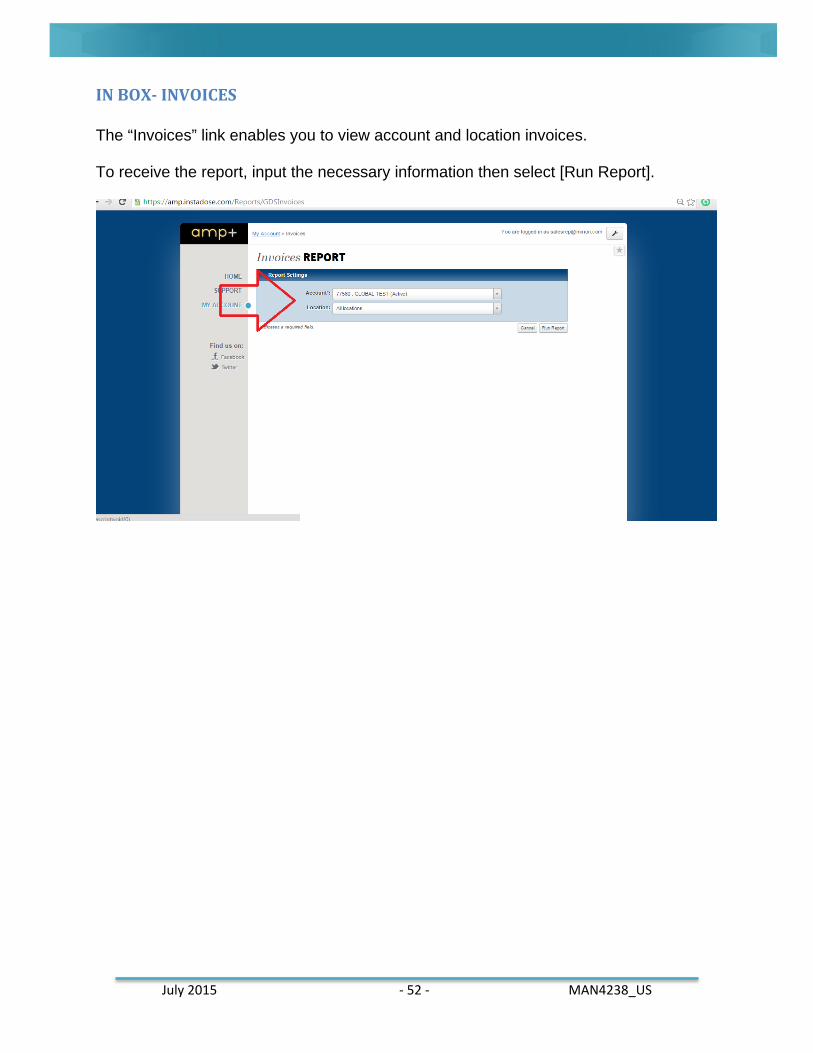
IN BOX- INVOICES The “Invoices” link enables you to view account and location invoices. To receive the report, input the necessary information then select [Run Report].
July 2015 - 53 - MAN4238_US
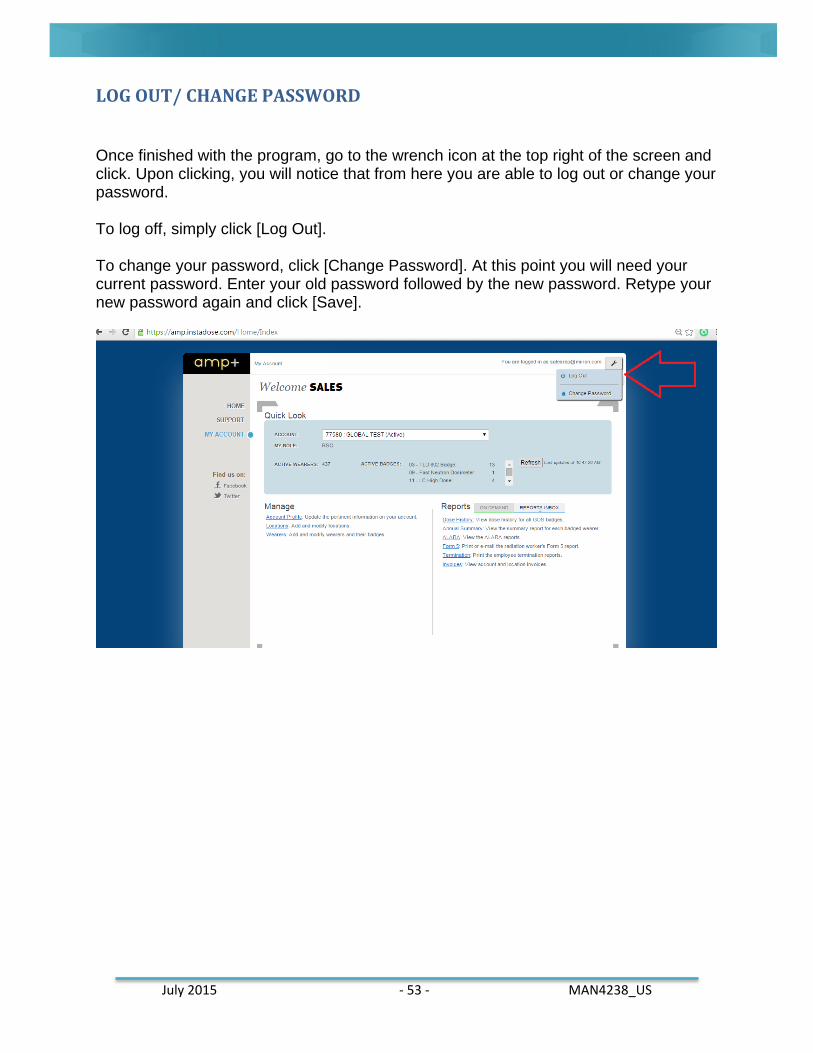
LOG OUT/ CHANGE PASSWORD Once finished with the program, go to the wrench icon at the top right of the screen and click. Upon clicking, you will notice that from here you are able to log out or change your password. To log off, simply click [Log Out]. To change your password, click [Change Password]. At this point you will need your current password. Enter your old password followed by the new password. Retype your new password again and click [Save].
July 2015 - 54 - MAN4238_US
QUESTIONS?
Our priority is you! Our Customer Care department is committed to providing outstanding support and delivering excellence in each and every interaction with our dosimetry customers.
Get in touch with us!
Customer Service Phone: 1.949.419.1000
Toll-Free: 1.800.251.3331
United Kingdom Customer Service Phone: 0845 601 7724