user guide - support.telefonicaopencloud.com · note ecs virtualization types are categorized into...
TRANSCRIPT

Elastic Volume Service
User Guide
Date 2018-10-30

Contents
1 Overview......................................................................................................................................... 11.1 What Is Elastic Volume Service?....................................................................................................................................11.2 Disk Types and Disk Performance................................................................................................................................. 31.3 Device Types and Usage Instructions.............................................................................................................................41.4 Shared EVS Disks and Usage Instructions.....................................................................................................................51.5 EVS Disk Encryption..................................................................................................................................................... 91.6 EVS Disk Backup.........................................................................................................................................................121.7 EVS Snapshot............................................................................................................................................................... 121.8 Differences Between EVS Disk Backup and EVS Snapshot....................................................................................... 131.9 EVS and Other Services............................................................................................................................................... 14
2 Getting Started............................................................................................................................. 162.1 EVS Operation Procedure............................................................................................................................................ 162.2 Creating an EVS Disk...................................................................................................................................................162.3 Attaching an EVS Disk.................................................................................................................................................222.3.1 Attaching a Non-shared EVS Disk............................................................................................................................222.3.2 Attaching a Shared EVS Disk................................................................................................................................... 232.4 Initializing an EVS Data Disk...................................................................................................................................... 242.4.1 Introduction to Data Disk Initialization Scenarios and Partition Styles....................................................................242.4.2 Initializing a Windows Data Disk (Windows Server 2008)...................................................................................... 262.4.3 Initializing a Windows Data Disk (Windows Server 2016)...................................................................................... 332.4.4 Initializing a Linux Data Disk (fdisk)........................................................................................................................452.4.5 Initializing a Linux Data Disk (parted)......................................................................................................................502.4.6 Initializing a Windows Data Disk Greater Than 2 TB (Windows Server 2008)....................................................... 542.4.7 Initializing a Windows Data Disk Greater Than 2 TB (Windows Server 2012)....................................................... 622.4.8 Initializing a Linux Data Disk Greater Than 2 TB (parted)...................................................................................... 70
3 Management................................................................................................................................. 763.1 Detaching an EVS Disk................................................................................................................................................763.1.1 Detaching a System Disk...........................................................................................................................................763.1.2 Detaching a Data Disk...............................................................................................................................................773.2 Deleting an EVS Disk...................................................................................................................................................793.3 Expanding the Capacity of an EVS Disk......................................................................................................................803.3.1 Introduction to Expansion Scenarios.........................................................................................................................80
Elastic Volume ServiceUser Guide Contents
2018-10-30 ii

3.3.2 Expanding an In-use EVS Disk................................................................................................................................. 803.3.3 Expanding an Available EVS Disk............................................................................................................................833.3.4 Performing Post-Expansion Operations for a Windows EVS Disk...........................................................................843.3.5 Performing Post-Expansion Operations for a Linux EVS Disk (fdisk).....................................................................903.3.6 Performing Post-Expansion Operations for a Linux EVS Disk (parted).................................................................1003.3.7 Performing Post-Expansion Operations for a Linux SCSI Data Disk (fdisk)......................................................... 1093.3.8 Performing Post-Expansion Operations for a Linux System Disk (fdisk)...............................................................1153.4 Managing an Encrypted EVS Disk.............................................................................................................................1193.5 Managing a Shared EVS Disk.................................................................................................................................... 1203.6 Managing EVS Backup.............................................................................................................................................. 1223.7 Managing an EVS Snapshot....................................................................................................................................... 1223.7.1 Creating a Snapshot................................................................................................................................................. 1233.7.2 Deleting a Snapshot................................................................................................................................................. 1243.7.3 Rolling Back Data from a Snapshot........................................................................................................................ 1253.7.4 Creating an EVS Disk Using a Snapshot.................................................................................................................1253.8 Managing a Tag.......................................................................................................................................................... 1263.8.1 Adding a Tag............................................................................................................................................................1263.8.2 Modifying a Tag...................................................................................................................................................... 1273.8.3 Deleting a Tag..........................................................................................................................................................1283.8.4 Searching EVS Resources by Tags..........................................................................................................................1283.9 Viewing EVS Monitoring Data.................................................................................................................................. 129
4 FAQs.............................................................................................................................................1314.1 Can I Attach an EVS Disk to Multiple Servers?........................................................................................................ 1314.2 Will Data in the EVS Disk Be Lost After the EVS Disk Is Detached?......................................................................1314.3 What Should I Do If an Error Occurs on My EVS Disk?.......................................................................................... 132
A Appendix....................................................................................................................................133A.1 EVS Disk Status........................................................................................................................................................ 133A.2 EVS Snapshot Status................................................................................................................................................. 135
B Change History..........................................................................................................................136
Elastic Volume ServiceUser Guide Contents
2018-10-30 iii

1 Overview
1.1 What Is Elastic Volume Service?
1.2 Disk Types and Disk Performance
1.3 Device Types and Usage Instructions
1.4 Shared EVS Disks and Usage Instructions
1.5 EVS Disk Encryption
1.6 EVS Disk Backup
1.7 EVS Snapshot
1.8 Differences Between EVS Disk Backup and EVS Snapshot
1.9 EVS and Other Services
1.1 What Is Elastic Volume Service?Elastic Volume Service (EVS) offers scalable block storage for servers. With high reliability,high performance, and rich specifications, EVS disks can be used for distributed file systems,development and testing environments, data warehouse applications, and high-performancecomputing (HPC) scenarios to meet diverse service requirements. Servers that EVS supportsinclude Elastic Cloud Servers (ECSs) and Bare Metal Servers (BMSs).
EVS disks are sometimes just referred to as disks.
Elastic Volume ServiceUser Guide 1 Overview
2018-10-30 1

Figure 1-1 EVS architecture
Function Characteristics
EVS provides disk resources for servers, and its function characteristics are as follows:
l Various disk typesEVS provides various disk types for your choice, and EVS disks can be used as datadisks and system disks for servers. You can select the disk type based on your budget andservice requirements.
l Elastic scalabilityThe capacity of an EVS disk you can create ranges from 10 GB to 32 TB. You canexpand the disk capacity if it fails to meet your service requirements. The minimumexpansion increment is 1 GB, and an EVS disk can be expanded to a maximum of 32TB. EVS also supports smooth expansion for disks without interrupting services.When you expand the capacity of a disk, the additional capacity is also affected by thecapacity quota. The system will prompt you with the remaining capacity, and theadditional capacity cannot exceed the remaining capacity. You can increase the quota tomeet service requirements.
l Security and reliability– Both system disks and data disks support data encryption, ensuring data security.– Data protection functions, such as backups and snapshots, can safeguard the EVS
disk data, preventing incorrect data caused by application exceptions or attacks.l Real-time monitoring
Working with Cloud Eye, EVS allows you to monitor the disk health and operatingstatus at any time.
User Permissions
When EVS is used, the public cloud system provides two types of user permissions bydefault: user management and resource management.l User management refers to the management of users, user groups, and user group rights.
Elastic Volume ServiceUser Guide 1 Overview
2018-10-30 2

l Users with resource management permissions can control the operations performed oncloud service resources.
For details about user permissions, see Permissions.
1.2 Disk Types and Disk PerformanceEVS disk types are classified based on the disk I/O performance. EVS disk types differ inperformance and price. You can choose the disk type based on your requirements. The detailsare described as follows:
Application Scenariosl Common I/O: EVS disks of this type deliver a maximum of 1,000 IOPS. This disk type
is suitable for application scenarios that require large capacity, a medium read/writespeed, and fewer transactions, such as enterprise office applications and small-scaletesting.
l Ultra-high I/O: EVS disks of this type deliver a maximum of 20,000 IOPS and aminimum of 1 ms read/write latency. This disk type is excellent for ultra-high I/O, ultra-high bandwidth, and read/write-intensive application scenarios, such as distributed filesystems in HPC scenarios or NoSQL/RDS in I/O-intensive scenarios.
l Ultra-high I/O (Latency optimized): EVS disks of this type deliver a maximum of 1GB/s throughput and a minimum of 1 ms read/write latency. They can be used forenterprise key services, such as SAP HANA.
EVS Disk Performance
The key indicators of EVS disk performance include read/write I/O latency, IOPS, andthroughput.
l IOPS: Number of read/write operations performed by an EVS disk per second
l Throughput: Amount of data successfully transmitted by an EVS disk per second, that is,the amount of data read from and written into an EVS disk
l Read/write I/O latency: Minimum interval between two consecutive read/writeoperations of an EVS disk
Single-queue access latencies of different types of EVS disks are as follows:
– Common I/O: 10 ms to 15 ms
– Ultra-high I/O: 1 ms to 3 ms
– Ultra-high I/O (Latency optimization): 1 ms
Table 1-1 EVS disk performance data
Parameter Common I/O Ultra-high I/O Ultra-high I/O(Latencyoptimized)
IOPS per GB/EVSdisk
1 50 50
Min. IOPS/EVS disk 100 100 100
Elastic Volume ServiceUser Guide 1 Overview
2018-10-30 3

Parameter Common I/O Ultra-high I/O Ultra-high I/O(Latencyoptimized)
Max. IOPS/EVS disk 1,000 20,000 30,000
IOPS Burst Limit/EVSdisk
1,000 10,000 15,000
Max. Throughput 40 MB/s 320 MB/s 1 GB/s
1.3 Device Types and Usage Instructions
What Are Device Types?
EVS device types are classified as Virtual Block Device (VBD) and Small Computer SystemInterface (SCSI) based on whether advanced SCSI commands are supported.
l VBD is the default EVS disk device type. VBD EVS disks support only basic SCSI read/write commands.
l SCSI EVS disks support transparent SCSI command transmission and allow the serverOS to directly access the underlying storage media. Besides basic read/write SCSIcommands, such EVS disks also support advanced SCSI commands.
Common Application Scenarios and Usage Instructions of SCSI EVS Disksl SCSI EVS disks: BMSs support only SCSI EVS disks, which can be used as either
system disks or data disks.
l Shared SCSI EVS disks: Shared SCSI EVS disks must be used together with adistributed file system or cluster software. Because most cluster applications, such asWindows MSCS, Veritas VCS, and Veritas CFS, require the usage of SCSI reservations,you are advised to use shared EVS disks with SCSI.
SCSI reservations take effect only when shared SCSI EVS disks are attached to ECSs inthe same ECS group. For more information about shared EVS disks, see 1.4 SharedEVS Disks and Usage Instructions.
Do I Need to Install a Driver for SCSI EVS Disks?
To use SCSI EVS disks, you need to install a driver for certain server OSs. The details are asfollows:
l BMS
Both the Windows and Linux images for BMSs are preinstalled with the required driver,that is, the SDI card driver. Therefore, no driver needs to be installed.
l KVM ECS
When using SCSI EVS disks, you are advised to use them with KVM ECSs. Linuximages for KVM ECSs already have the required driver built in the Linux kernel, andWindows images for KVM ECSs are also included with the driver. Therefore, no driverneeds to be installed for KVM ECSs.
Elastic Volume ServiceUser Guide 1 Overview
2018-10-30 4

NOTE
ECS virtualization types are categorized into KVM and Xen. For details, see ProductIntroduction > Instances and Application Scenarios in the Elastic Cloud Server User Guide.
l XEN ECSDue to limitations in the driver support, you are advised not to use SCSI EVS disk withXen ECSs.However, there are a few images available that support SCSI EVS disks on Xen ECSs.For the supported images, see Table 1-2.
NOTE
After confirming that the OS images of Xen ECSs support SCSI EVS disks, determine whether thedriver needs to be installed based on the following conditions:
l Public Windows images are preinstalled with the Paravirtual SCSI (PVSCSI) driver.Therefore, no driver needs to be installed.
l Private Windows images are not preinstalled with the PVSCSI driver so that you need todownload and install it explicitly.
For details, see (Optional) Optimizing Windows Private Images in the Image ManagementService User Guide.
l Linux images are not preinstalled with the PVSCSI driver. You need to obtain the source codeof the open source Linux driver at https://github.com/UVP-Tools/SAP-HANA-Tools.
Table 1-2 OSs supporting SCSI EVS disks
Virtualization Type
OS
XEN Windows See the Windows images listed on the Public Imagespage.For details about how to view the information: Log into the management console, choose Image MgmtService, click the Public Images tab, and select ECSsystem disk image and Windows from the drop-downlists, respectively.
Linux l SUSE Linux Enterprise Server 11 SP4 64bit (Thekernel version is 3.0.101-68-default or 3.0.101-80-default.)
l SUSE Linux Enterprise Server 12 64bit (The kernelversion is 3.12.51-52.31-default.)
l SUSE Linux Enterprise Server 12 SP1 64bit (Thekernel version is 3.12.67-60.64.24-default.)
l SUSE Linux Enterprise Server 12 SP2 64bit (Thekernel version is 4.4.74-92.35.1-default.)
1.4 Shared EVS Disks and Usage InstructionsEVS disks can be classified into non-shared EVS disks and shared EVS disks based onwhether the disks can be attached to multiple servers. A non-shared EVS disk can only beattached to one server, whereas a shared EVS disk can be attached to multiple servers.
Elastic Volume ServiceUser Guide 1 Overview
2018-10-30 5

What Are Shared EVS DisksShared EVS disks are block storage devices that support concurrent read/write operations andcan be attached to multiple servers. Shared EVS disks feature multiple attachments, high-concurrency, high-performance, and high-reliability. A shared EVS disk can be attached to amaximum of 16 servers. Figure 1-2 shows its application scenario.
Currently, shared EVS disks can be used as data disks only and cannot be used as systemdisks.
Figure 1-2 Application scenario of shared EVS disks
Application Scenarios and Precautions for Shared EVS DisksShared EVS disks are usually used for enterprise key applications that require clusterdeployment and high availability (HA). These applications demand concurrent access to anEVS disk from multiple servers. Before you attach a shared EVS disk to multiple servers, thedisk device type needs to be determined. The device type can be either VBD or SCSI. Mostcommon clusters, such as Windows MSCS and Veritas VCS and CFS, require the usage ofSCSI reservations. Therefore, you are advised to use shared SCSI EVS disks for clusters. Touse SCSI EVS disks, you may need to install a driver for certain servers. For details, see 1.3Device Types and Usage Instructions.
You can create shared VBD EVS disks or shared SCSI EVS disks.l Shared VBD EVS disks: The device type of a newly created shared EVS disk is VBD by
default. Such disks can be used as virtual block storage devices, but do not support SCSIreservations. If SCSI reservations are required for your applications, create shared SCSIEVS disks.
l Shared SCSI EVS disks: These EVS disks support SCSI reservations.If such disks are attached to ECSs, SCSI reservations take effect only when usedtogether with the anti-affinity policy of an ECS group.
Elastic Volume ServiceUser Guide 1 Overview
2018-10-30 6

l To improve data security, you are advised to use SCSI reservations together with theanti-affinity policy of an ECS group. That said, ensure that shared SCSI EVS disksare only attached to ECSs in the same anti-affinity ECS group.
l If an ECS does not belong to any anti-affinity ECS group, you are advised not toattach shared SCSI EVS disks to this ECS. Otherwise, SCSI reservations may notwork properly, which may put your data at risk.
Concepts of the anti-affinity ECS group and SCSI reservations:– The anti-affinity policy of an ECS group allows ECSs to be created on different
physical servers to improve service reliability. You can only select the ECS groupwhen creating an ECS. Existing ECSs cannot be added to an anti-affinity ECSgroup.For details about ECS groups, see (Optional) Creating an ECS Group in theElastic Cloud Server User Guide.
– The SCSI reservation mechanism uses a SCSI reservation command to performSCSI reservation operations. If an ECS sends such a command to an EVS disk, thedisk is displayed as locked to other ECSs, preventing the data damage that may becaused by simultaneous read/write operations to the disk from multiple ECSs.
– ECS groups and SCSI reservations have the following relationship: A SCSIreservation on a single EVS disk cannot differentiate multiple ECSs on the samephysical host. For that reason, if multiple ECSs that use the same shared EVS diskare running on the same physical host, SCSI reservations will not work properly.Therefore, you are advised to use SCSI reservations only on ECSs that are in thesame ECS group, thus having a working anti-affinity policy.
Advantages of Shared EVS Disksl Multiple attachments: A shared EVS disk can be attached to a maximum of 16 servers.l High-performance: When multiple servers concurrently access a shared ultra-high I/O
EVS disk, random read/write IOPS can reach up to 160,000.l High-reliability: Shared EVS disks support both manual and automatic backup,
delivering highly reliable data storage.l Wide application scenarios: Shared EVS disks can be used for Linux RHCS clusters
where only VBD EVS disks are needed. Whereas, they can also be used for WindowsMSCS and Veritas VCS clusters that require SCSI reservations.
Specifications of Shared EVS Disks
The key indicators of EVS disk performance include read/write I/O latency, IOPS, andthroughput.l IOPS: Number of read/write operations performed by an EVS disk per secondl Throughput: Amount of data successfully transmitted by an EVS disk per second, that is,
the amount of data read from and written into an EVS diskl Read/write I/O latency: Minimum interval between two consecutive read/write
operations of an EVS diskSingle-queue access latencies of different types of EVS disks are as follows:
Elastic Volume ServiceUser Guide 1 Overview
2018-10-30 7

– Common I/O: 10 ms to 15 ms– Ultra-high I/O: 1 ms to 3 ms– Ultra-high I/O (Latency optimization): 1 ms
Table 1-3 EVS disk performance data
Parameter Common I/O Ultra-high I/O Ultra-high I/O(Latencyoptimized)
IOPS per GB/EVS disk 1 50 50
Min. IOPS/EVS disk 100 100 100
Max. IOPS/EVS disk 1,000 20,000 30,000
IOPS Burst Limit/EVSdisk
1,000 10,000 15,000
Max. Throughput 40 MB/s 320 MB/s 1 GB/s
Number of servers thatcan be attached to
A shared EVS disk can be attached to a maximum of 16 servers.
NOTE
To test the performance of a shared EVS disk, the following requirements must be met:l The shared disk must be attached to multiple servers (ECSs or BMSs).l If the shared disk is attached to multiple ECSs, these ECSs must belong to the same anti-affinity
ECS group.
Data Sharing Principle and Common Usage Mistakes of Shared EVS DisksA shared EVS disk is essentially the disk that can be attached to multiple servers for use,which is similar to a physical disk in that the disk can be attached to multiple physical servers,and each server can read data from and write data into any space on the disk. If the data read/write rules, such as the read/write sequence and meaning, between these servers are notdefined, data read/write interference between servers or other unpredictable errors may occur.
Though shared EVS disks are block storage devices that provide shared access for servers,shared EVS disks do not have the cluster management capability. Therefore, you need todeploy a cluster system to manage shared EVS disks. Common cluster management systemsinclude Windows MSCS, Linux RHCS, Veritas VCS, and Veritas CFS.
If shared EVS disks are not managed by a cluster system, the following issues may occur:l Data inconsistency caused by read/write conflicts
When a shared EVS disk is attached to two servers (server A and server B), server Acannot recognize the disk spaces allocated to server B, vice versa. That said, a disk spaceallocated to server A may be already used by server B. In this case, repeated disk spaceallocation occurs, which leads to data errors.For example, a shared EVS disk has been formatted into the ext3 file system andattached to server A and server B. Server A has written metadata into the file system inspace R and space G. Then server B has written metadata into space E and space G. In
Elastic Volume ServiceUser Guide 1 Overview
2018-10-30 8

this case, the data written into space G by server A will be replaced. When the metadatain space G is read, an error will occur.
l Data inconsistency caused by data cachingWhen a shared EVS disk is attached to two servers (server A and server B), theapplication on server A has read the data in space R and space G, then cached the data.At that time, other processes and threads on server A would then read this data directlyfrom the cache. At the same time, if the application on server B has modified the data inspace R and space G, the application on server A cannot detect this data change and stillreads this data from the cache. As a result, the user cannot view the modified data onserver A.For example, a shared EVS disk has been formatted into the ext3 file system andattached to server A and server B. Both servers have cached the metadata in the filesystem. Then server A has created a new file (file F) on the shared disk, but server Bcannot detect this modification and still reads data from its cached data. As a result, theuser cannot view file F on server B.
Before you attach a shared EVS disk to multiple servers, the disk device type needs to bedetermined. The device type can be either VBD or SCSI. Shared SCSI EVS disks supportSCSI reservations. Before using SCSI reservations, you need to install a driver in the serverOS and ensure that the OS image is included in the compatibility list.
For details about the usages of shared EVS disks, see 3.5 Managing a Shared EVS Disk.
If you simply attach a shared EVS disk to multiple servers, files cannot be shared between theservers as shared EVS disks do not have the cluster capability. Therefore, build a shared filesystem or deploy a cluster management system if you need to share files between servers.
1.5 EVS Disk Encryption
What Is EVS Disk EncryptionIn case your services require encryption for the data stored on EVS disks, EVS provides youwith the encryption function. You can encrypt newly created EVS disks. Keys used byencrypted EVS disks are provided by the Key Management Service (KMS), which is secureand convenient. Therefore, you do not need to establish and maintain the key managementinfrastructure.
Keys Used for EVS Disk EncryptionThe keys provided by KMS for disk encryption include a Default Master Key and CustomerMaster Keys (CMKs).
l Default Master Key: A key that is automatically created by EVS through KMS andnamed evs/default.The Default Master Key cannot be disabled and does not support scheduled deletion.
l CMKs: Keys created by users. You may use existing CMKs or create new CMKs toencrypt disks. For details, see Management > Creating a CMK in the Key ManagementService User Guide.
Elastic Volume ServiceUser Guide 1 Overview
2018-10-30 9
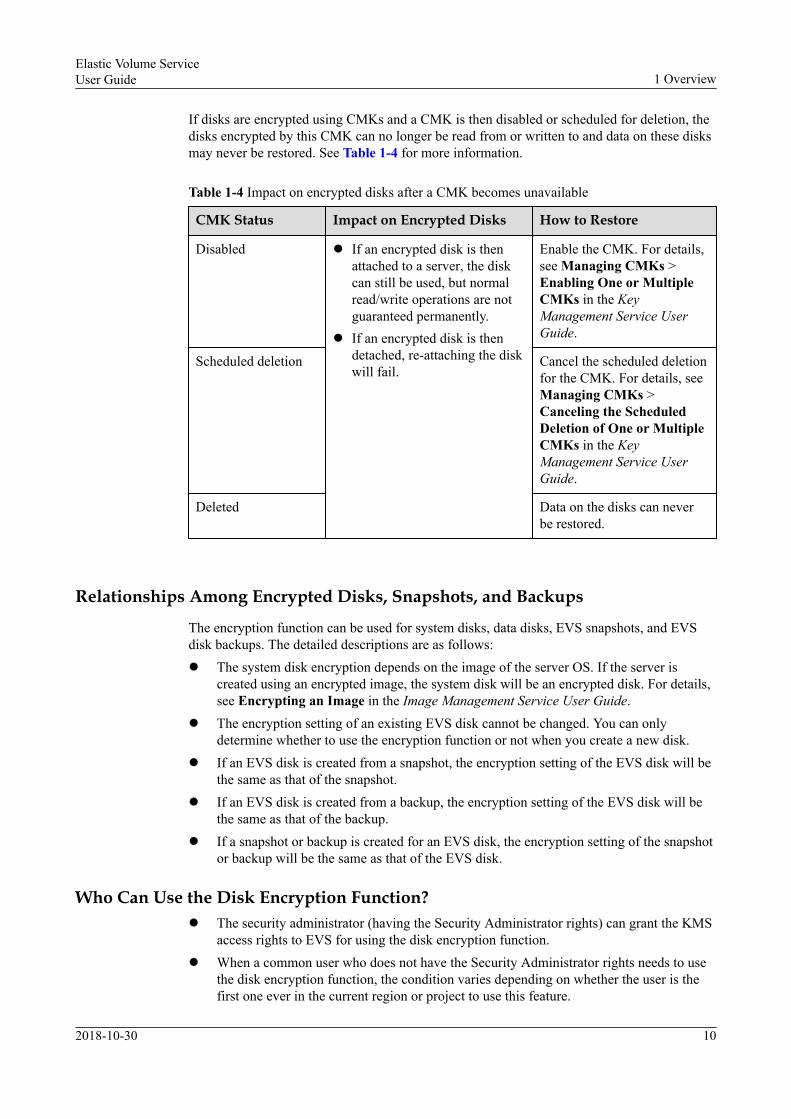
If disks are encrypted using CMKs and a CMK is then disabled or scheduled for deletion, thedisks encrypted by this CMK can no longer be read from or written to and data on these disksmay never be restored. See Table 1-4 for more information.
Table 1-4 Impact on encrypted disks after a CMK becomes unavailable
CMK Status Impact on Encrypted Disks How to Restore
Disabled l If an encrypted disk is thenattached to a server, the diskcan still be used, but normalread/write operations are notguaranteed permanently.
l If an encrypted disk is thendetached, re-attaching the diskwill fail.
Enable the CMK. For details,see Managing CMKs >Enabling One or MultipleCMKs in the KeyManagement Service UserGuide.
Scheduled deletion Cancel the scheduled deletionfor the CMK. For details, seeManaging CMKs >Canceling the ScheduledDeletion of One or MultipleCMKs in the KeyManagement Service UserGuide.
Deleted Data on the disks can neverbe restored.
Relationships Among Encrypted Disks, Snapshots, and Backups
The encryption function can be used for system disks, data disks, EVS snapshots, and EVSdisk backups. The detailed descriptions are as follows:l The system disk encryption depends on the image of the server OS. If the server is
created using an encrypted image, the system disk will be an encrypted disk. For details,see Encrypting an Image in the Image Management Service User Guide.
l The encryption setting of an existing EVS disk cannot be changed. You can onlydetermine whether to use the encryption function or not when you create a new disk.
l If an EVS disk is created from a snapshot, the encryption setting of the EVS disk will bethe same as that of the snapshot.
l If an EVS disk is created from a backup, the encryption setting of the EVS disk will bethe same as that of the backup.
l If a snapshot or backup is created for an EVS disk, the encryption setting of the snapshotor backup will be the same as that of the EVS disk.
Who Can Use the Disk Encryption Function?l The security administrator (having the Security Administrator rights) can grant the KMS
access rights to EVS for using the disk encryption function.l When a common user who does not have the Security Administrator rights needs to use
the disk encryption function, the condition varies depending on whether the user is thefirst one ever in the current region or project to use this feature.
Elastic Volume ServiceUser Guide 1 Overview
2018-10-30 10

– If the common user is the first one ever in the current region or project to use thefeature, the user must contact a user having the Security Administrator rights togrant the KMS access rights to EVS. Then, the common user can use the diskencryption function.
– If the common user is not the first one ever in the current region or project to usethe feature, the common user can use the disk encryption function directly.
From the perspective of a tenant, as long as the KMS access rights have been granted to EVSin a region, all the users in the same region can directly use the disk encryption function.
If there are multiple projects in the current region, the KMS access rights need to be grantedto each project in this region.
Application Scenarios of EVS Disk Encryption
Figure 1-3 shows the user relationships under regions and projects from the perspective of atenant. The following example uses region B to describe the two application scenarios of thedisk encryption function.
Figure 1-3 User relationships
l If the security administrator uses the encryption function for the first time ever, theoperation process is as follows:
a. Grant the KMS access rights to EVS.After the KMS access rights have been granted, the system automatically creates aDefault Master Key and names it evs/default. DMK can be used for diskencryption.
NOTE
The EVS disk encryption relies on KMS. When the encryption function is used for the firsttime ever, the KMS access rights need to be granted to EVS. After the KMS access rightshave been granted, all users in this region can use the encryption function, without requiringthe KMS access rights to be granted again.
b. Select a key.You can select one of the following keys:n DMK: evs/default
Elastic Volume ServiceUser Guide 1 Overview
2018-10-30 11

n CMKs: Existing or newly created CMKs. For details, see Creating a CMK inthe Key Management Service User Guide.
After the security administrator has used the disk encryption function, all users in RegionB can directly use the encryption function.
l If User E (common user) uses the encryption function for the first time ever, theoperation process is as follows:
a. When user E uses the encryption function, and the system prompts a messageindicating that the KMS access rights have not been granted to EVS.
b. Contact the security administrator to grant the KMS access rights to EVS.
After the KMS access rights have been granted to EVS, User E as well as all users inRegion B can directly use the disk encryption function and do not need to contact thesecurity administrator to grant the KMS access rights to EVS again.
1.6 EVS Disk Backup
What Is EVS Disk BackupEVS implements the backup function through the Volume Backup Service (VBS). VBSallows you to create backups for EVS disks on the management console without stopping theserver. When data loss or data damage occurred due to virus invasion, misoperations, orsoftware and hardware faults, you can use backups to restore the data, guaranteeing your datacorrectness and security.
For details about EVS disk backup, see the Volume Backup Service User Guide.
Application ScenariosAfter a backup policy has been set, the EVS disk data can be automatically backed up basedon the policy. You can use the backups created on a timely basis as the baseline data to createnew EVS disks or to restore the backup data to EVS disks.
Usage InstructionsFor details about the usage instructions of EVS disk backups, see 3.6 Managing EVSBackup or the Volume Backup Service User Guide.
1.7 EVS Snapshot
What Is EVS SnapshotEVS allows you to create snapshots for disks on the management console or by making APIcalls. An EVS snapshot is a complete copy or image of the disk data at a specific time point.As a major disaster recovery (DR) approach, you can use a snapshot to completely restore thedata to the time point when the snapshot was created.
EVS snapshots are sometimes referred to as snapshots in this document.
You can create snapshots to rapidly save the disk data at specified time points. In addition,you can use snapshots to create new disks so that the created disks will contain the snapshotdata in the beginning.
Elastic Volume ServiceUser Guide 1 Overview
2018-10-30 12

Differences Between Snapshots and Backupsl Both snapshots and backups are key approaches for data disaster recovery, but they use
different storage plans.– The snapshot data is stored with the disk data so that you can rapidly back up and
restore the disk data using snapshots.– The backup data is stored in the Object Storage Service (OBS). If the disk data is
damaged, you can restore the data using backups.l EVS snapshot does not support automatic creation, whereas backup does. You can set a
backup policy, and the system will automatically back up the disk data according to thispolicy.
Application Scenarios
The snapshot function helps address your following needs:
l Routine data backupYou can create snapshots for disks on a timely basis and use snapshots to recover yourdata in case that data loss or data inconsistency occurred due to misoperations, viruses,or attacks.
l Rapid data restorationYou can create a snapshot or multiple snapshots before an OS change, applicationsoftware upgrade, or a service data migration. If an exception occurs during the upgradeor migration, service data can be rapidly restored to the time point when the snapshotwas created.For example, a fault occurred on system disk A of server A, and therefore server Acannot be started. Because system disk A is already faulty, the data on system disk Acannot be restored by rolling back snapshots. However, you can create disk B using anexisting snapshot of system disk A and attach disk B to a properly running server, forexample server B. In this case, server B can read the data of system disk A from disk B.
NOTE
Currently, when rolling back data from snapshots, the snapshot data can be rolled back only to itssource EVS disk, and a rollback to another EVS disk is not possible.
l Multi-service quick deploymentYou can use a snapshot to create multiple disks containing the same initial data, andthese disks can be used as data resources for various services, for example data mining,report query, and development and testing. This method protects the initial data andcreates disks rapidly, meeting the diversified service data requirements.
Usage Instructions
For details about the usages of EVS snapshots, see 3.7 Managing an EVS Snapshot.
1.8 Differences Between EVS Disk Backup and EVSSnapshot
Both EVS disk backup and EVS snapshot provide redundancies for the EVS disk data toimprove reliability. Table 1-5 lists the differences between them.
Elastic Volume ServiceUser Guide 1 Overview
2018-10-30 13

Table 1-5 Differences between EVS disk backup and EVS snapshot
Metric Storage Solution DataSynchronization
DR Range ServiceRecovery
EVS diskbackup
The backup data isstored in the OBSservice, isolated fromthe EVS disk data.
Saving the EVSdisk data atspecific timepoints
The backupsand disksmust be inthe sameregion, butcan be indifferentAZs.
Data can beretrieved andservices can berestored byrestoring thebackup data tooriginal disks orcreating newdisks frombackups.
EVSsnapshot
The snapshot data isstored with the diskdata.NOTE
It requires a certainperiod of time tocreate a backupbecause data needs tobe transferred.Therefore, creating orrolling back asnapshot consumesless time than creatinga backup.
Saving the EVSdisk data atspecific timepoints
Same AZ asthe EVSdisks
Data can beretrieved andservices can berestored byrolling back thesnapshot data tooriginal disks orcreating newdisks fromsnapshots.
1.9 EVS and Other ServicesFigure 1-4 shows the relationships between EVS and other services.
Elastic Volume ServiceUser Guide 1 Overview
2018-10-30 14

Figure 1-4 Relationships between EVS and other services
l ECS: EVS disks can be attached to ECSs and used as scalable block storage devices.l BMS: SCSI EVS disks can be attached to BMSs and used as scalable block storage
devices.l VBS: The VBS service can back up EVS disk data to ensure the reliability and security
of the server data.l KMS: EVS disk encryption depends on the KMS service. You can use the keys provided
by KMS to encrypt EVS disks (including both system and data disks), thus improvingEVS disk data security.
l Cloud Eye: After enabling the EVS, you can view the status of monitored performancemetrics through Cloud Eye without installing any additional plug-in. The monitoredmetrics include Disk Read Rate, Disk Write Rate, Disk Read Requests, and Disk WriteRequests.
l Cloud Trace Service (CTS): CTS records operations of EVS resources, facilitating userquery, audit, and backtracking.
l Tag Management Service (TMS): Tags are used to identify the EVS resources forpurposes of easy categorization and quick search.
Elastic Volume ServiceUser Guide 1 Overview
2018-10-30 15

2 Getting Started
2.1 EVS Operation Procedure
2.2 Creating an EVS Disk
2.3 Attaching an EVS Disk
2.4 Initializing an EVS Data Disk
2.1 EVS Operation ProcedureFigure 2-1 shows the basic EVS operation procedure.
Figure 2-1 Operation procedure
2.2 Creating an EVS Disk
Scenarios
When a server is created, the system disk is automatically created and attached. You do notneed to create the system disk independently.
Data disks can be created during or after the server creation. If you create data disks duringthe server creation, the system will automatically attach the data disks to the server. If youcreate data disks after the server creation, you need to manually attach the created data disksto the server.
This topic describes how to independently create disks on the EVS console.
Elastic Volume ServiceUser Guide 2 Getting Started
2018-10-30 16

Procedure
Step 1 Log in to the management console.
Step 2 Click in the upper left corner and select the desired region and project.
Step 3 Under Storage, click Elastic Volume Service.
The disk list page is displayed.
Step 4 Click Create Disk.
Step 5 Configure the basic disk information according to Table 2-1.
Table 2-1 Parameter description
Parameter Description Example Value
Region MandatorySpecifies the region of the tenant. Select thecurrent region from the drop-down list in theupper left corner of the page.
-
AZ MandatorySpecifies the availability zone (AZ) where theEVS disk is to be created.NOTE
Disks can only be attached to servers in the same AZ.
Once a disk has been created, you cannot change theAZ of the disk.
-
Disk Type Mandatoryl Common I/Ol Ultra-high I/Ol Ultra-high I/O (Latency optimized)
Common I/O
Elastic Volume ServiceUser Guide 2 Getting Started
2018-10-30 17

Parameter Description Example Value
Capacity (GB) MandatorySpecifies the disk size. Only data disks can becreated on the current page, and the disk capacityranges from 10 GB to 32768 GB.NOTE
l When you use a backup to create a disk, the diskcapacity must be greater than or equal to the backupsize. In the condition that you do not specify thedisk capacity, if the backup size is smaller than 10GB, the default capacity 10 GB will be used as thedisk capacity; if the backup size is greater than 10GB, the disk capacity will be consistent with thebackup size.
l When you use a snapshot to create a disk, the diskcapacity must be greater than or equal to thesnapshot size. In the condition that you do notspecify the disk capacity, if the snapshot size issmaller than 10 GB, the default capacity 10 GB willbe used as the disk capacity; if the snapshot size isgreater than 10 GB, the disk capacity will beconsistent with the snapshot size.
20 GB
Create frombackup
OptionalSpecifies to create the disk from a backup.Click Select Data Source and choose Createfrom backup. On the displayed page, select thetarget backup and click OK.
autobackup-001
Create fromsnapshot
OptionalSpecifies to create the disk from a snapshot.Click Select Data Source and choose Createfrom snapshot. On the displayed page, select thetarget snapshot and click OK.
snapshot-001
Share Optionall If Share is not selected, a common disk is
created.l If Share is selected, a shared disk is created,
and the shared disk can be attached to multipleservers.
When both SCSI and Share are selected, a sharedSCSI disk is created.NOTE
For details about shared EVS disks, see 3.5 Managinga Shared EVS Disk.
-
Elastic Volume ServiceUser Guide 2 Getting Started
2018-10-30 18

Parameter Description Example Value
SCSI Optionall If SCSI is not selected, a VBD disk is created.
VBD is the default device type of EVS disks.l If SCSI is selected, a SCSI disk is created.
Such disks allow the server OS to directlyaccess the underlying storage media and sendSCSI commands to the disks.
NOTE
l When a disk is created from a snapshot, the devicetype of the newly created disk will be consistentwith that of the snapshot's source disk.
l For details about the ECS types, OSs, and ECSsoftware supported by SCSI EVS disks, see 1.3Device Types and Usage Instructions.
-
Elastic Volume ServiceUser Guide 2 Getting Started
2018-10-30 19

Parameter Description Example Value
Encryption OptionalDisk encryption is used for data disk encryptiononly. For system disk encryption, see the ImageManagement Service User Guide.To use the disk encryption function, selectEncryption. The displayed dialog box containsthe following parameters:l Create Agency
An agency is a trust relationship between twotenants or services. A tenant can create anagency to grant resource access rights toanother tenant or service. If the KMS accessrights are not granted to EVS, the CreateAgency dialog box will be displayed.Otherwise, it will not be displayed.Click OK to grant the KMS access rights toEVS. After the rights have been granted, EVScan obtain KMS keys to encrypt or decryptEVS disks.After the KMS access rights have beengranted, follow-up operations do not requirethe rights to be granted again.
l KMS Key NameNOTE
KMS Key Name is displayed only after the KMSaccess rights have been granted. For details, see"Create Agency" above.
KMS Key Name is the identifier of the key,and you can use KMS Key Name to specifythe KMS key that is to be used for encryption.One of the following keys can be used:– Default Master Key: After the KMS access
rights have been granted to EVS, thesystem automatically creates a DefaultMaster Key and names it evs/default.
– CMKs: Existing or newly created CMKs.For details, see Management > Creatinga CMK in the Key Management ServiceUser Guide.
NOTEBefore you use the EVS disk encryption function, KMSaccess rights need to be granted to EVS. If you have theright to grant the permission, grant the KMS accessrights to EVS directly. If you do not have thispermission, contact a user with the securityadministrator rights to grant the KMS access rights toEVS, then repeat the preceding operations.
-
Elastic Volume ServiceUser Guide 2 Getting Started
2018-10-30 20

Parameter Description Example Value
Tag OptionalDuring the EVS disk creation, you can tag theEVS resources. Tags identify cloud resources forpurposes of easy categorization and quick search.A tag is composed of a key-value pair.l Key: Mandatory if the disk is going to be
taggedA tag key can contain a maximum of 36characters but cannot contain the followingcharacters: asterisks (*), left angle brackets(<), right angle brackets (>), backslashes (\),equal signs (=), commas (,), vertical bars (|),and slashes (/). Its first character cannot be aspace.A tag key can contain a maximum of 36characters but cannot contain the followingcharacters: asterisks (*), left angle brackets(<), right angle brackets (>), backslashes (\),equal signs (=), commas (,), vertical bars (|),and slashes (/). Its first character cannot be aspace.
l Value: Mandatory if the disk is going to betaggedA tag value can contain a maximum of 43characters but cannot contain the followingcharacters: asterisks (*), left angle brackets(<), right angle brackets (>), backslashes (\),equal signs (=), commas (,), vertical bars (|),and slashes (/). Its first character cannot be aspace.For details about tags, see the TagManagement Service User Guide.NOTE
– A maximum of 10 tags can be added for anEVS disk.
– Tag keys of the same EVS disk must be unique.
– Except for tagging the disk during disk creation,you can also add, modify, or delete tags forexisting disks. For details, see 3.8 Managing aTag.
-
Elastic Volume ServiceUser Guide 2 Getting Started
2018-10-30 21

Parameter Description Example Value
Disk Name Mandatoryl If you create disks one by one, this parameter
value is used as the actual disk name.The name can contain a maximum of 64characters.
l If you create disks in a batch, this parametervalue is used as the prefix of disk names, andone disk name will be composed of thisparameter value and a four-digit number.The name can contain a maximum of 59characters.
For example, ifyou create twodisks and setvolume for DiskName, the EVSdisk names will bevolume-0001 andvolume-0002.
Quantity OptionalSpecifies the number of disks to be created. Thedefault value is set to 1, which means only onedisk is created. Currently, you can create up to100 disks at a time.NOTE
l If the disk is created from a backup, batch creationis not possible, and this parameter must be set to 1.
l If the disk is created from a snapshot, batch creationis not possible, and this parameter must be set to 1.
1
Step 6 Click Create Now.
Step 7 On the Details page, check the disk information again.l If you do not need to modify the specifications, click Submit to start the creation.l If you need to modify the specifications, click Previous to modify parameters.
Step 8 In the disk list, view the disk status.
If the disk status changes to Available, the disk is successfully created.
----End
2.3 Attaching an EVS Disk
2.3.1 Attaching a Non-shared EVS Disk
Scenarios
Independently created EVS disks are data disks. In the disk list, the function of such disks isdisplayed as Data disk, and the status is displayed as Available. In this case, you need toattach the data disks to servers for use.
This topic describes how to attach a non-shared EVS disk to a server. A non-shared EVS diskcan be attached to only one server.
Elastic Volume ServiceUser Guide 2 Getting Started
2018-10-30 22

Procedure
Step 1 Log in to the management console.
Step 2 Click in the upper left corner and select the desired region and project.
Step 3 Under Storage, click Elastic Volume Service.
The disk list page is displayed.
Step 4 Locate the target disk in the list and click Attach.
Step 5 Select the server and then select a device name from the drop-down list. Ensure that the EVSdisk and server are in the same AZ.
Return to the EVS disk list page. The status of the EVS disk is Attaching, indicating that thedisk is being attached to the server. When the disk status changes to In-use, the disk issuccessfully attached.
Step 6 Initialize the EVS disk.
After the disk has been attached to a server, the disk can be used only after you haveinitialized it. For details, see 2.4.1 Introduction to Data Disk Initialization Scenarios andPartition Styles.
----End
2.3.2 Attaching a Shared EVS Disk
Scenarios
Independently created EVS disks are data disks. In the disk list, the function of such disks isdisplayed as Data disk, and the status is displayed as Available. In this case, you need toattach the data disks to servers for use.
This topic describes how to attach a shared EVS disk to servers. Shared EVS disks can beattached to up to 16 servers.
Procedure
Step 1 Log in to the management console.
Step 2 Click in the upper left corner and select the desired region and project.
Step 3 Under Storage, click Elastic Volume Service.
The disk list page is displayed.
Step 4 Locate the target disk in the list and click Attach.
Shared EVS disks support batch attachment so that you can attach a shared EVS disk tomultiple servers at a time. The left area in the Attach Disk dialog box shows the server list.After you select the target servers, the selected servers will be displayed in the right area.
Step 5 Select the target servers and select the device name from the drop-down list for each serveryou selected. Ensure that the EVS disk and servers are in the same AZ.
Elastic Volume ServiceUser Guide 2 Getting Started
2018-10-30 23

Return to the EVS disk list page. The status of the EVS disk is Attaching, indicating that thedisk is being attached to the server. When the disk status changes to In-use, the disk issuccessfully attached.
If you simply attach a shared EVS disk to multiple servers, files cannot be shared between theservers as shared EVS disks do not have the cluster capability. Therefore, build a shared filesystem or deploy a cluster management system if you need to share files between servers.
----End
2.4 Initializing an EVS Data Disk
2.4.1 Introduction to Data Disk Initialization Scenarios andPartition Styles
ScenariosAfter an EVS disk is attached to a server, you need to log in to the server to initialize the disk,that is, format the disk. The disk can be used after being initialized.l System disk
A system disk does not need to be initialized because it is automatically created andinitialized upon the server creation. The default disk partition style is master boot record(MBR).
l Data disk– If a data disk is created upon the creation of a server, the data disk will be
automatically attached to the server.– If a data disk is created explicitly, you need to manually attach the data disk to a
server.In both cases, the data disk can only be used after being initialized. Choose a proper diskpartition style base on your service plans.
Disk Partition StyleTable 2-2 lists the common disk partition styles. For Linux OSs, different disk partition stylesrequire different partitioning tools.
Elastic Volume ServiceUser Guide 2 Getting Started
2018-10-30 24

Table 2-2 Disk partition styles
Disk PartitionStyle
MaximumDisk CapacitySupported
Maximum Number ofPartitions Supported
LinuxPartitioningTool
Master Boot Record(MBR)
2 TB l 4 primary partitionsl 3 primary partitions
and 1 extendedpartition
With the MBR partitionstyle, primary partitionsand an extended partitioncan be included, where theextended partition cancontain several logicalpartitions. For example, if6 partitions need to becreated, you can create thepartitions in the followingtwo ways:l 3 primary partitions
and 1 extendedpartition, with theextended partitioncontaining 3 logicalpartitions
l 1 primary partition and1 extended partition,with the extendedpartition containing 5logical partitions
l fdiskl parted
Guid Partition Table(GPT)
18 EB1 EB = 1048576TB
UnlimitedDisk partitions allocatedusing GPT are notcategorized.
parted
The maximum disk capacity supported by MBR is 2 TB, and that supported by GPT is 18 EB.Currently, an EVS data disk supports up to 32 TB. Therefore, use the GPT partition style ifyour disk capacity is greater than 2 TB.If you change the disk partition style after the disk has been used, the original data on the diskwill be cleared. Therefore, select a proper disk partition style when initializing the disk.
Partitioning Operation GuideFor a disk with less than 2 TB capacity, see one of the following topics:
Elastic Volume ServiceUser Guide 2 Getting Started
2018-10-30 25

l 2.4.2 Initializing a Windows Data Disk (Windows Server 2008)l 2.4.3 Initializing a Windows Data Disk (Windows Server 2016)l 2.4.4 Initializing a Linux Data Disk (fdisk)l 2.4.5 Initializing a Linux Data Disk (parted)
For a disk with greater than 2 TB capacity, see one of the following topics:l 2.4.6 Initializing a Windows Data Disk Greater Than 2 TB (Windows Server 2008)l 2.4.7 Initializing a Windows Data Disk Greater Than 2 TB (Windows Server 2012)l 2.4.8 Initializing a Linux Data Disk Greater Than 2 TB (parted)
2.4.2 Initializing a Windows Data Disk (Windows Server 2008)
ScenariosThis topic uses Windows Server 2008 R2 Enterprise 64bit to describe how to initialize a datadisk attached to a server running Windows.
The maximum disk capacity supported by MBR is 2 TB, and that supported by GPT is 18 EB.Therefore, use the GPT partition style if your disk capacity is greater than 2 TB. For detailsabout disk partition styles, see 2.4.1 Introduction to Data Disk Initialization Scenarios andPartition Styles.
The method for initializing an EVS disk varies depending on the OS running on the server.This document is used for reference only. For the detailed operations and differences, see theproduct documents of the OSs running on the corresponding servers.
Prerequisitesl You have logged in to the server.
– For how to log in to an ECS, see the Elastic Cloud Server User Guide.– For how to log in to a BMS, see the Bare Metal Server User Guide.
l A data disk has been attached to the server and has not been initialized.
Procedure
Step 1 On the desktop of the server, right-click Computer and choose Manage from the shortcutmenu.
The Server Manager window is displayed.
Step 2 In the navigation tree, choose Storage > Disk Management.
The Disk Management window is displayed.
Elastic Volume ServiceUser Guide 2 Getting Started
2018-10-30 26
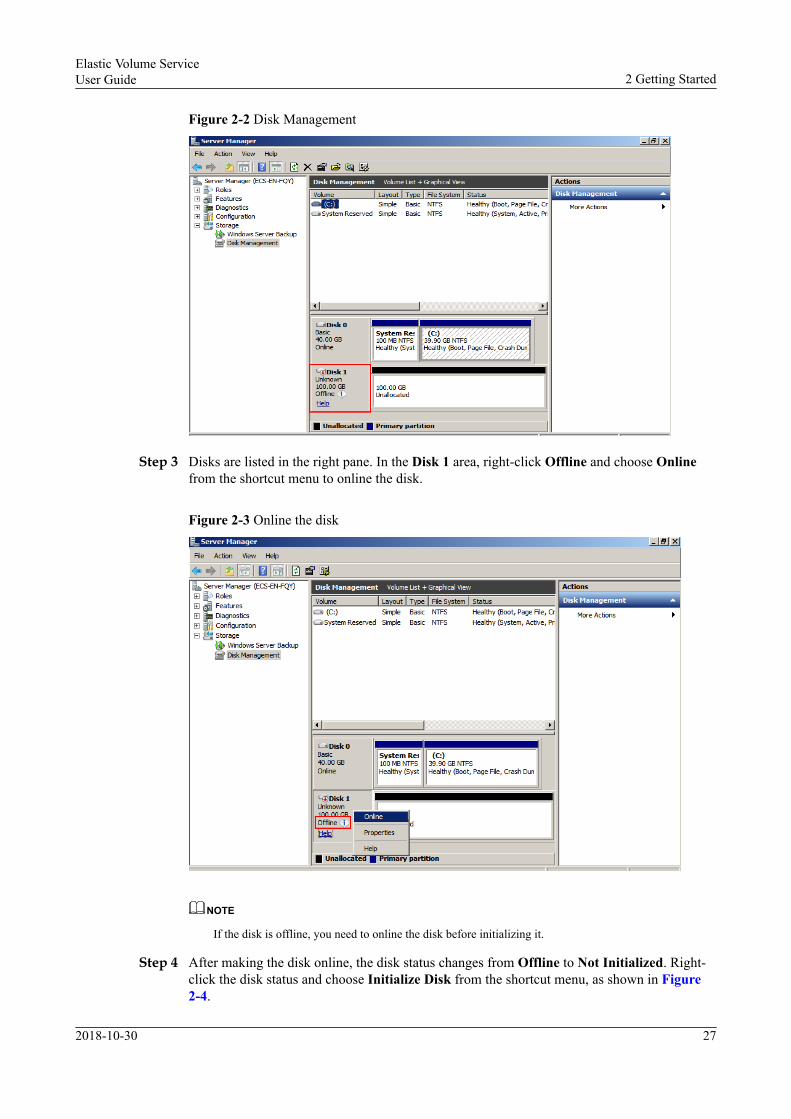
Figure 2-2 Disk Management
Step 3 Disks are listed in the right pane. In the Disk 1 area, right-click Offline and choose Onlinefrom the shortcut menu to online the disk.
Figure 2-3 Online the disk
NOTE
If the disk is offline, you need to online the disk before initializing it.
Step 4 After making the disk online, the disk status changes from Offline to Not Initialized. Right-click the disk status and choose Initialize Disk from the shortcut menu, as shown in Figure2-4.
Elastic Volume ServiceUser Guide 2 Getting Started
2018-10-30 27

Figure 2-4 Initialize Disk
Step 5 In the Initialize Disk dialog box, select the target disk, click MBR (Master Boot Record),and click OK, as shown in Figure 2-5.
Figure 2-5 Unallocated disk space
Elastic Volume ServiceUser Guide 2 Getting Started
2018-10-30 28

The maximum disk capacity supported by MBR is 2 TB, and that supported by GPT is 18 EB.Currently, an EVS data disk supports up to 32 TB. Therefore, use the GPT partition style ifyour disk capacity is greater than 2 TB.If you change the disk partition style after the disk has been used, the original data on the diskwill be cleared. Therefore, select a proper disk partition style when initializing the disk.
Step 6 Right-click at the unallocated disk space and choose New Simple Volume from the shortcutmenu, as shown in Figure 2-6.
Figure 2-6 Creating a simple volume
Step 7 On the displayed New Simple Volume Wizard window, click Next.
Elastic Volume ServiceUser Guide 2 Getting Started
2018-10-30 29

Figure 2-7 New Simple Volume Wizard
Step 8 Specify the simple volume size as required (the default value is the maximum) and clickNext.
Figure 2-8 Specify Volume Size
Step 9 Assign the driver letter and click Next.
Elastic Volume ServiceUser Guide 2 Getting Started
2018-10-30 30

Figure 2-9 Assigning Driver Letter or Path
Step 10 Select Format this volume with the following settings, set parameters based on the actualrequirements, and select Perform a quick format. Then click Next.
Figure 2-10 Format Partition
Elastic Volume ServiceUser Guide 2 Getting Started
2018-10-30 31

Figure 2-11 Completing the partition creation
The partition sizes supported by file systems vary. Therefore, you are advised to choose anappropriate file system based on your service requirements.
Step 11 Click Finish to complete the wizard. Wait for the initialization to complete. When the volumestatus changes to Healthy, the initialization has finished successfully, as shown in Figure2-12.
Elastic Volume ServiceUser Guide 2 Getting Started
2018-10-30 32

Figure 2-12 Disk initialization succeeded
----End
2.4.3 Initializing a Windows Data Disk (Windows Server 2016)
Scenarios
This section uses Windows Server 2016 Standard 64bit to describe how to initialize a datadisk attached to a server running Windows.
The maximum disk capacity supported by MBR is 2 TB, and that supported by GPT is 18 EB.Therefore, use the GPT partition style if your disk capacity is greater than 2 TB. For detailsabout disk partition styles, see 2.4.1 Introduction to Data Disk Initialization Scenarios andPartition Styles.
The method for initializing an EVS disk varies depending on the OS running on the server.This document is used for reference only. For the detailed operations and differences, see theproduct documents of the OSs running on the corresponding servers.
Prerequisitesl You have logged in to the server.
– For how to log in to an ECS, see the Elastic Cloud Server User Guide.– For how to log in to a BMS, see the Bare Metal Server User Guide.
l A data disk has been attached to the server and has not been initialized.
Procedure
Step 1 On the desktop of the server, click the start icon in the lower left corner.
Elastic Volume ServiceUser Guide 2 Getting Started
2018-10-30 33

The Windows Server window is displayed.
Step 2 Click Server Manager.
The Server Manager window is displayed.
Figure 2-13 Server Manager
Step 3 In the navigation tree on the left, choose File and Storage Services.
The Servers page is displayed.
Elastic Volume ServiceUser Guide 2 Getting Started
2018-10-30 34

Figure 2-14 Servers
Step 4 In the navigation tree on the left, choose Disks.
The Disks page is displayed.
Figure 2-15 Disks
Step 5 Disks are listed in the right pane. If the new disk is in the offline state, bring it online beforeinitialize it.
Elastic Volume ServiceUser Guide 2 Getting Started
2018-10-30 35

1. Right-click the new disk and choose Bring Online from the shortcut menu.The Bring Disk Online dialog box is displayed.
Figure 2-16 Bring Disk Online
2. Click Yes to confirm the operation.
3. Click in the upper area of the page to refresh the disk information.When the disk status changes from Offline to Online, the disk has been brought online.
Figure 2-17 Bring online succeeded
Elastic Volume ServiceUser Guide 2 Getting Started
2018-10-30 36
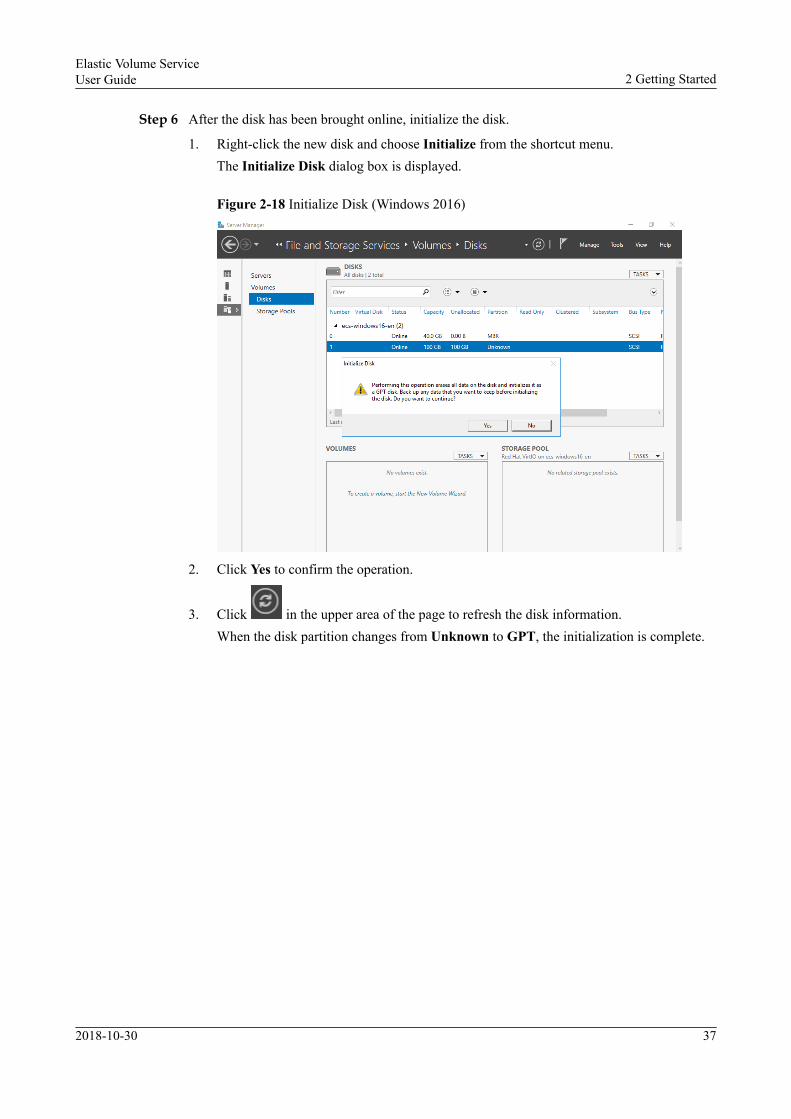
Step 6 After the disk has been brought online, initialize the disk.
1. Right-click the new disk and choose Initialize from the shortcut menu.The Initialize Disk dialog box is displayed.
Figure 2-18 Initialize Disk (Windows 2016)
2. Click Yes to confirm the operation.
3. Click in the upper area of the page to refresh the disk information.When the disk partition changes from Unknown to GPT, the initialization is complete.
Elastic Volume ServiceUser Guide 2 Getting Started
2018-10-30 37

Figure 2-19 Completing initialization
Step 7 In the lower left area of the page, click To create a volume, start the New Volume Wizard.to create a new volume.
The New Volume Wizard window is displayed.
Figure 2-20 New Volume Wizard
Step 8 Follow the prompts and click Next.
The Select the server and disk page is displayed.
Elastic Volume ServiceUser Guide 2 Getting Started
2018-10-30 38

Figure 2-21 Select the server and disk
Step 9 Select the server and disk, and then click Next. The system selects the server attached withthe disk by default. You can specify the server based on your requirements. In this example,the default setting is used.
The Specify the size of the volume page is displayed.
Figure 2-22 Specify the size of the volume (Windows 2016)
Elastic Volume ServiceUser Guide 2 Getting Started
2018-10-30 39
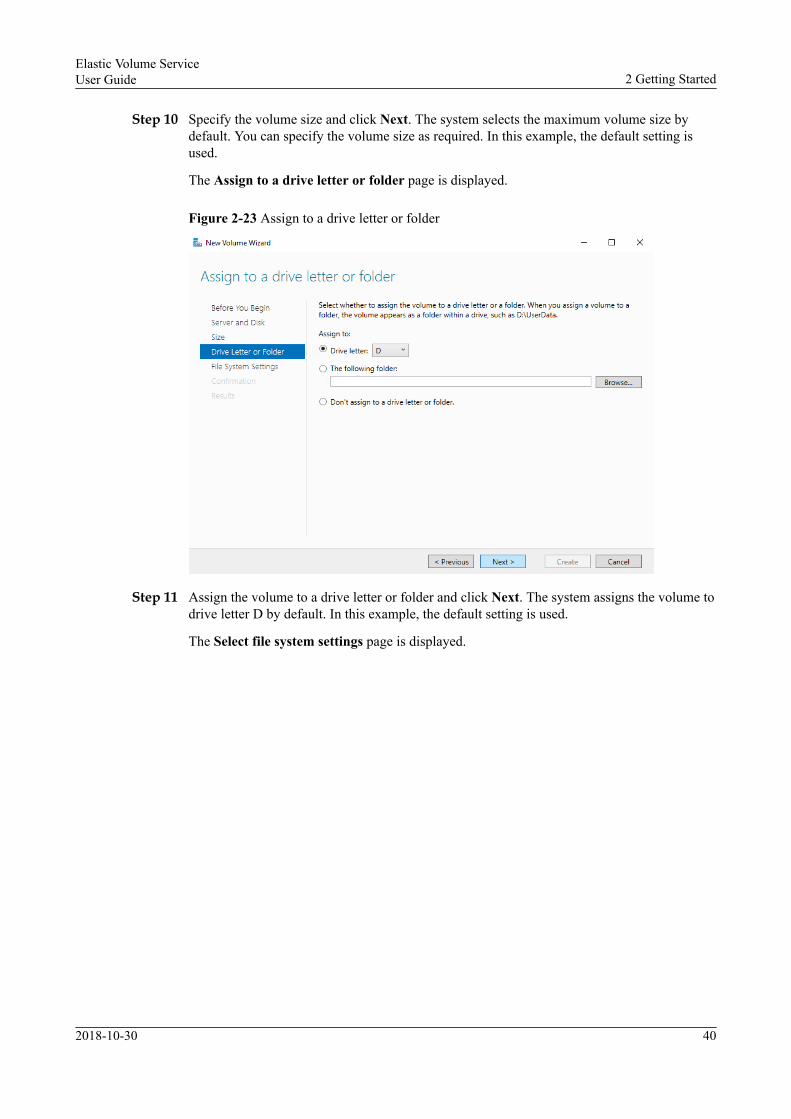
Step 10 Specify the volume size and click Next. The system selects the maximum volume size bydefault. You can specify the volume size as required. In this example, the default setting isused.
The Assign to a drive letter or folder page is displayed.
Figure 2-23 Assign to a drive letter or folder
Step 11 Assign the volume to a drive letter or folder and click Next. The system assigns the volume todrive letter D by default. In this example, the default setting is used.
The Select file system settings page is displayed.
Elastic Volume ServiceUser Guide 2 Getting Started
2018-10-30 40

Figure 2-24 Select file system settings
Step 12 Specify file system settings and click Next. The system selects the NTFS file system bydefault. You can specify the file system type based on the actual condition. In this example,the default setting is used.
The partition sizes supported by file systems vary. Therefore, you are advised to choose anappropriate file system based on your service requirements.
The Confirm selections page is displayed.
Elastic Volume ServiceUser Guide 2 Getting Started
2018-10-30 41

Figure 2-25 Confirm selections
Step 13 Confirm the volume location, volume properties, and file system settings. Then click Createto create a volume.
If the page shown in Figure 2-26 is displayed, the volume is successfully created.
Figure 2-26 Completion
Step 14 After the volume is created, click and check whether a new volume appears in FileExplorer. In this example, New Volume (D:) is the new volume.
Elastic Volume ServiceUser Guide 2 Getting Started
2018-10-30 42

l If New Volume (D:) appears, the disk is successfully initialized and no further action isrequired.
Figure 2-27 File Explorer
l If New Volume (D:) does not appear, perform the following operations to assign thevolume to another drive letter or folder:
a. Click , enter cmd, and press Enter.The Administrator: Command Prompt window is displayed.
b. Run the diskmgmt command.The Disk Management page is displayed.
Elastic Volume ServiceUser Guide 2 Getting Started
2018-10-30 43

Figure 2-28 Disk Management (Windows 2016)
c. In the right pane of Disk 1, right-click and choose Change Drive Letter andPaths.The Change Drive Letter and Paths for New Volume dialog box is displayed.
Figure 2-29 Change Drive Letter and Paths for New Volume
d. Click Add.The Add Drive Letter or Path dialog box is displayed.
Elastic Volume ServiceUser Guide 2 Getting Started
2018-10-30 44

Figure 2-30 Add Drive Letter or Path
e. Select Assign the following drive letter to re-assign the volume to a drive letter.Then, click OK. Drive letter D is used in this example.After assigning the drive letter, you can view New Volume (D:) in File Explorer.
NOTE
The drive letter selected here must be the same as that set in Step 11.
----End
2.4.4 Initializing a Linux Data Disk (fdisk)
ScenariosThis topic uses CentOS 7.0 64bit to describe how to initialize a data disk attached to a serverrunning Linux and use fdisk to partition the data disk.
The maximum disk capacity supported by MBR is 2 TB, and that supported by GPT is 18 EB.Therefore, use the GPT partition style if your disk capacity is greater than 2 TB. In LinuxOSs, if the GPT partition style is used, the fdisk partitioning tool cannot be used. The partedpartitioning tool must be used. For details about disk partition styles, see 2.4.1 Introductionto Data Disk Initialization Scenarios and Partition Styles.
The method for initializing an EVS disk varies depending on the OS running on the server.This document is used for reference only. For the detailed operations and differences, see theproduct documents of the OSs running on the corresponding servers.
Prerequisitesl You have logged in to the server.
– For how to log in to an ECS, see the Elastic Cloud Server User Guide.– For how to log in to a BMS, see the Bare Metal Server User Guide.
l A data disk has been attached to the server and has not been initialized.
Creating Partitions and Mounting a DiskThe following example shows you how a new primary partition can be created on a new datadisk that has been attached to a server. The primary partition will be created using fdisk, andMBR is the default partition style. Furthermore, the partition will be formatted using the ext3file system, mounted on /mnt/sdc, and configured automatic mounting upon system start.
Elastic Volume ServiceUser Guide 2 Getting Started
2018-10-30 45

Step 1 Run the following command to query information about the added data disk:
fdisk -l
Information similar to the following is displayed:
[root@ecs-b656 test]# fdisk -l
Disk /dev/xvda: 42.9 GB, 42949672960 bytes, 83886080 sectorsUnits = sectors of 1 * 512 = 512 bytesSector size (logical/physical): 512 bytes / 512 bytesI/O size (minimum/optimal): 512 bytes / 512 bytesDisk label type: dosDisk identifier: 0x000cc4ad
Device Boot Start End Blocks Id System/dev/xvda1 * 2048 2050047 1024000 83 Linux/dev/xvda2 2050048 22530047 10240000 83 Linux/dev/xvda3 22530048 24578047 1024000 83 Linux/dev/xvda4 24578048 83886079 29654016 5 Extended/dev/xvda5 24580096 26628095 1024000 82 Linux swap / Solaris
Disk /dev/xvdb: 10.7 GB, 10737418240 bytes, 20971520 sectorsUnits = sectors of 1 * 512 = 512 bytesSector size (logical/physical): 512 bytes / 512 bytesI/O size (minimum/optimal): 512 bytes / 512 bytes
In the command output, the server contains two disks. /dev/xvda is the system disk, and /dev/xvdb is the added data disk.
Step 2 Run the following command to enter fdisk to partition the added data:
fdisk Newly added data disk
In this example, /dev/xvdb is the added data disk.
fdisk /dev/xvdb
Information similar to the following is displayed:
[root@ecs-b656 test]# fdisk /dev/xvdbWelcome to fdisk (util-linux 2.23.2).Changes will remain in memory only, until you decide to write them.Be careful before using the write command.Device does not contain a recognized partition tableBuilding a new DOS disklabel with disk identifier 0xb00005bd.Command (m for help):
Step 3 Enter n and press Enter to create a new partition.
Information similar to the following is displayed:
Command (m for help): nPartition type: p primary (0 primary, 0 extended, 4 free) e extended
There are two types of disk partitions:l Choosing p creates a primary partition.l Choosing e creates an extended partition.
Step 4 Enter p and press Enter to create a primary partition.
Information similar to the following is displayed:
Select (default p): pPartition number (1-4, default 1):
Elastic Volume ServiceUser Guide 2 Getting Started
2018-10-30 46

Partition number indicates the serial number of the primary partition. The value can be 1 to4.
Step 5 Enter the serial number of the primary partition and press Enter. Primary partition number 1is used in this example. One usually starts with partition number 1 when partitioning an emptydisk.
Information similar to the following is displayed:
Partition number (1-4, default 1): 1First sector (2048-20971519, default 2048):
First sector indicates the first sector. The value can be 2048 to 20971519, and the defaultvalue is 2048.
Step 6 Select the default first sector 2048 and press Enter.
Information similar to the following is displayed:
First sector (2048-20971519, default 2048):Using default value 2048Last sector, +sectors or +size{K,M,G} (2048-20971519, default 20971519):
Last sector indicates the last sector. The value can be 2048 to 20971519, and the defaultvalue is 20971519.
Step 7 Select the default last sector 20971519 and press Enter.
Information similar to the following is displayed:
Last sector, +sectors or +size{K,M,G} (2048-20971519, default 20971519):Using default value 20971519Partition 1 of type Linux and of size 10 GiB is setCommand (m for help):
A primary partition has been created for a 10-GB data disk.
Step 8 Enter p and press Enter to view the details about the created partition.
Information similar to the following is displayed:
Command (m for help): p
Disk /dev/xvdb: 10.7 GB, 10737418240 bytes, 20971520 sectorsUnits = sectors of 1 * 512 = 512 bytesSector size (logical/physical): 512 bytes / 512 bytesI/O size (minimum/optimal): 512 bytes / 512 bytesDisk label type: dosDisk identifier: 0xb00005bd
Device Boot Start End Blocks Id System/dev/xvdb1 2048 20971519 10484736 83 Linux
Command (m for help):
Details about the /dev/xvdb1 partition are displayed.
Step 9 Enter w and press Enter to write the changes into the partition table.
Information similar to the following is displayed:
Command (m for help): wThe partition table has been altered!
Calling ioctl() to re-read partition table.Syncing disks.
Elastic Volume ServiceUser Guide 2 Getting Started
2018-10-30 47

The partition is successfully created.
NOTE
In case that you want to discard the changes made before, you can exit fdisk by entering q.
Step 10 Run the following command to synchronize the new partition table to the OS:
partprobe
Step 11 Run the following command to set the format for the file system of the newly createdpartition:
mkfs -t File system format /dev/xvdb1
For example, run the following command to set the ext3 file system for the /dev/xvdb1partition:
mkfs -t ext3 /dev/xvdb1
Information similar to the following is displayed:
[root@ecs-b656 test]# mkfs -t ext3 /dev/xvdb1mke2fs 1.42.9 (28-Dec-2013)Filesystem label=OS type: LinuxBlock size=4096 (log=2)Fragment size=4096 (log=2)Stride=0 blocks, Stripe width=0 blocks655360 inodes, 2621184 blocks131059 blocks (5.00%) reserved for the super userFirst data block=0Maximum filesystem blocks=215167795280 block groups32768 blocks per group, 32768 fragments per group8192 inodes per groupSuperblock backups stored on blocks: 32768, 98304, 163840, 229376, 294912, 819200, 884736, 1605632
Allocating group tables: doneWriting inode tables: doneCreating journal (32768 blocks): doneWriting superblocks and filesystem accounting information: done
The formatting takes a period of time. Observe the system running status and do not exit.
The partition sizes supported by file systems vary. Therefore, you are advised to choose anappropriate file system based on your service requirements.
Step 12 Run the following command to create a mount point:
mkdir Mount point
For example, run the following command to create the /mnt/sdc mount point:
mkdir /mnt/sdc
Step 13 Run the following command to mount the new partition on the created mount point:
mount /dev/xvdb1 Mount point
For example, run the following command to mount the newly created partition on /mnt/sdc:
Elastic Volume ServiceUser Guide 2 Getting Started
2018-10-30 48

mount /dev/xvdb1 /mnt/sdc
Step 14 Run the following command to view the mount result:
df -TH
Information similar to the following is displayed:
[root@ecs-b656 test]# df -THFilesystem Type Size Used Avail Use% Mounted on/dev/xvda2 xfs 11G 7.4G 3.2G 71% /devtmpfs devtmpfs 4.1G 0 4.1G 0% /devtmpfs tmpfs 4.1G 82k 4.1G 1% /dev/shmtmpfs tmpfs 4.1G 9.2M 4.1G 1% /runtmpfs tmpfs 4.1G 0 4.1G 0% /sys/fs/cgroup/dev/xvda3 xfs 1.1G 39M 1.1G 4% /home/dev/xvda1 xfs 1.1G 131M 915M 13% /boot/dev/xvdb1 ext3 11G 38M 9.9G 1% /mnt/sdc
The newly created /dev/xvdb1 is mounted on /mnt/sdc.
----End
Setting Automatic Disk Mounting at System Start
To automatically mount a disk when a server starts, you should not specify its partition, forexample /dev/xvdb1, in /etc/fstab. Because the sequence of cloud devices, and therefore theirnames may change during the server stop and start. You are advised to use the universallyunique identifier (UUID) in /etc/fstab to automatically mount a disk at system start.
NOTE
The UUID is the unique character string for disk partitions in a Linux system.
Step 1 Run the following command to query the partition UUID:
blkid Disk partition
For example, run the following command to query the UUID of /dev/xvdb1:
blkid /dev/xvdb1
Information similar to the following is displayed:
[root@ecs-b656 test]# blkid /dev/xvdb1/dev/xvdb1: UUID="1851e23f-1c57-40ab-86bb-5fc5fc606ffa" TYPE="ext3"
The UUID of /dev/xvdb1 is displayed.
Step 2 Run the following command to open the fstab file using the vi editor:
vi /etc/fstab
Step 3 Press i to enter the editing mode.
Step 4 Move the cursor to the end of the file and press Enter. Then add the following information:UUID=1851e23f-1c57-40ab-86bb-5fc5fc606ffa /mnt/sdc ext3 defaults 0 2
Step 5 Press Esc, enter :wq, and press Enter.
The system saves the configurations and exits the vi editor.
----End
Elastic Volume ServiceUser Guide 2 Getting Started
2018-10-30 49

2.4.5 Initializing a Linux Data Disk (parted)
ScenariosThis topic uses CentOS 7.0 64bit to describe how to initialize a data disk attached to a serverrunning Linux and use parted to partition the data disk.
The maximum disk capacity supported by MBR is 2 TB, and that supported by GPT is 18 EB.Therefore, use the GPT partition style if your disk capacity is greater than 2 TB. In LinuxOSs, if the GPT partition style is used, the fdisk partitioning tool cannot be used. The partedpartitioning tool must be used. For details about disk partition styles, see 2.4.1 Introductionto Data Disk Initialization Scenarios and Partition Styles.
The method for initializing an EVS disk varies depending on the OS running on the server.This document is used for reference only. For the detailed operations and differences, see theproduct documents of the OSs running on the corresponding servers.
Prerequisitesl You have logged in to the server.
– For how to log in to an ECS, see the Elastic Cloud Server User Guide.– For how to log in to a BMS, see the Bare Metal Server User Guide.
l A data disk has been attached to the server and has not been initialized.
Creating Partitions and Mounting a DiskThe following example shows you how new partitions can be created on a new data disk thathas been attached to a server. The partitions will be created using parted, and GPT is used asthe partition style. Furthermore, the partitions will be formatted using the ext3 file system,mounted on /mnt/sdc, and configured automatic mounting at system start.
Step 1 Run the following command to query information about the added data disk:
lsblk
Information similar to the following is displayed:
[root@ecs-centos-70 linux]# lsblkNAME MAJ:MIN RM SIZE RO TYPE MOUNTPOINTxvda 202:0 0 40G 0 disk ├─xvda1 202:1 0 4G 0 part [SWAP]└─xvda2 202:2 0 36G 0 part /xvdb 202:16 0 10G 0 disk
In the command output, the server contains two disks. /dev/xvda is the system disk, and /dev/xvdb is the added data disk.
Step 2 Run the following command to enter parted to partition the added data disk:
parted Added data disk
In this example, /dev/xvdb is the added data disk.
parted /dev/xvdb
Information similar to the following is displayed:
[root@ecs-centos-70 linux]# parted /dev/xvdbGNU Parted 3.1
Elastic Volume ServiceUser Guide 2 Getting Started
2018-10-30 50

Using /dev/xvdbWelcome to GNU Parted! Type 'help' to view a list of commands.
Step 3 Enter p and press Enter to view the current disk partition style.
Information similar to the following is displayed:
(parted) pError: /dev/xvdb: unrecognised disk labelModel: Xen Virtual Block Device (xvd) Disk /dev/xvdb: 10.7GBSector size (logical/physical): 512B/512BPartition Table: unknownDisk Flags:
In the command output, the Partition Table value is unknown, indicating that the diskpartition style is unknown.
Step 4 Run the following command to set the disk partition style:
mklabel Disk partition style
For example, run the following command to set the partition style to GPT: (Disk partitionstyles include MBR and GPT.)
mklabel gpt
The maximum disk capacity supported by MBR is 2 TB, and that supported by GPT is 18 EB.Currently, an EVS data disk supports up to 32 TB. Therefore, use the GPT partition style ifyour disk capacity is greater than 2 TB.If you change the disk partition style after the disk has been used, the original data on the diskwill be cleared. Therefore, select a proper disk partition style when initializing the disk.
Step 5 Enter p and press Enter to view the disk partition style.
Information similar to the following is displayed:
(parted) mklabel gpt (parted) p Model: Xen Virtual Block Device (xvd)Disk /dev/xvdb: 20971520sSector size (logical/physical): 512B/512BPartition Table: gptDisk Flags:
Number Start End Size File system Name Flags
Step 6 Enter unit s and press Enter to set the measurement unit of the disk to sector numbers.
Step 7 Enter mkpart opt 2048s 100% and press Enter.
In this example, one partition is created for the added data disk. Variable 2048s indicates thedisk start capacity, and variable 100% indicates the disk end capacity. The two values are usedfor reference only. You can determine the number of partitions and the partition capacitybased on your service requirements.
Information similar to the following is displayed:(parted) mkpart opt 2048s 100%Warning: The resulting partition is not properly aligned for best performance.Ignore/Cancel? Ignore
Elastic Volume ServiceUser Guide 2 Getting Started
2018-10-30 51

If the preceding warning message is displayed, enter Ignore to ignore the performancewarning.
Step 8 Enter p and press Enter to view the details about the created partition.
Information similar to the following is displayed:
(parted) p Model: Xen Virtual Block Device (xvd)Disk /dev/xvdb: 20971520sSector size (logical/physical): 512B/512BPartition Table: gptDisk Flags:
Number Start End Size File system Name Flags 1 2048s 20969471s 20967424s opt
Details about the /dev/xvdb1 partition are displayed.
Step 9 Enter q and press Enter to exit parted.
Step 10 Run the following command to view the disk partition information:
lsblk
Information similar to the following is displayed:
[root@ecs-centos-70 linux]# lsblk NAME MAJ:MIN RM SIZE RO TYPE MOUNTPOINTxvda 202:0 0 40G 0 disk ├─xvda1 202:1 0 4G 0 part [SWAP]└─xvda2 202:2 0 36G 0 part /xvdb 202:16 0 100G 0 disk └─xvdb1 202:17 0 100G 0 part
In the command output, /dev/xvdb1 is the partition you created.
Step 11 Run the following command to set the format for the file system of the newly createdpartition:
mkfs -t File system format /dev/xvdb1
For example, run the following command to set the ext3 file system for the /dev/xvdb1partition:
mkfs -t ext3 /dev/xvdb1
Information similar to the following is displayed:
[root@ecs-centos-70 linux]# mkfs -t ext3 /dev/xvdb1mke2fs 1.42.9 (28-Dec-2013)Filesystem label=OS type: LinuxBlock size=4096 (log=2)Fragment size=4096 (log=2)Stride=0 blocks, Stripe width=0 blocks6553600 inodes, 26214391 blocks1310719 blocks (5.00%) reserved for the super userFirst data block=0Maximum filesystem blocks=2174746624800 block groups32768 blocks per group, 32768 fragments per group8192 inodes per groupSuperblock backups stored on blocks: ?32768, 98304, 163840, 229376, 294912, 819200, 884736, 1605632, 2654208, ?4096000, 7962624, 11239424, 20480000, 23887872
Elastic Volume ServiceUser Guide 2 Getting Started
2018-10-30 52

Allocating group tables: done Writing inode tables: done Creating journal (32768 blocks): doneWriting superblocks and filesystem accounting information: done
The formatting takes a period of time. Observe the system running status and do not exit.
The partition sizes supported by file systems vary. Therefore, you are advised to choose anappropriate file system based on your service requirements.
Step 12 Run the following command to create a mount point:
mkdir Mount point
For example, run the following command to create the /mnt/sdc mount point:
mkdir /mnt/sdc
Step 13 Run the following command to mount the new partition on the created mount point:
mount /dev/xvdb1 Mount point
For example, run the following command to mount the newly created partition on /mnt/sdc:
mount /dev/xvdb1 /mnt/sdc
Step 14 Run the following command to view the mount result:
df -TH
Information similar to the following is displayed:
[root@ecs-centos-70 linux]# df -THFilesystem Type Size Used Avail Use% Mounted on/dev/xvda2 xfs 39G 4.0G 35G 11% /devtmpfs devtmpfs 946M 0 946M 0% /devtmpfs tmpfs 954M 0 954M 0% /dev/shmtmpfs tmpfs 954M 9.1M 945M 1% /runtmpfs tmpfs 954M 0 954M 0% /sys/fs/cgroup/dev/xvdb1 ext3 11G 38M 101G 1% /mnt/sdc
The newly created /dev/xvdb1 is mounted on /mnt/sdc.
----End
Setting Automatic Disk Mounting at System Start
To automatically mount a disk when a server starts, you should not specify its partition, forexample /dev/xvdb1, in /etc/fstab. Because the sequence of cloud devices, and therefore theirnames may change during the server stop and start. You are advised to use the universallyunique identifier (UUID) in /etc/fstab to automatically mount a disk at system start.
NOTE
The UUID is the unique character string for disk partitions in a Linux system.
Step 1 Run the following command to query the partition UUID:
blkid Disk partition
Elastic Volume ServiceUser Guide 2 Getting Started
2018-10-30 53

For example, run the following command to query the UUID of /dev/xvdb1:
blkid /dev/xvdb1
Information similar to the following is displayed:
[root@ecs-b656 test]# blkid /dev/xvdb1/dev/xvdb1: UUID="1851e23f-1c57-40ab-86bb-5fc5fc606ffa" TYPE="ext3"
The UUID of /dev/xvdb1 is displayed.
Step 2 Run the following command to open the fstab file using the vi editor:
vi /etc/fstab
Step 3 Press i to enter the editing mode.
Step 4 Move the cursor to the end of the file and press Enter. Then add the following information:UUID=1851e23f-1c57-40ab-86bb-5fc5fc606ffa /mnt/sdc ext3 defaults 0 2
Step 5 Press Esc, enter :wq, and press Enter.
The system saves the configurations and exits the vi editor.
----End
2.4.6 Initializing a Windows Data Disk Greater Than 2 TB(Windows Server 2008)
Scenarios
This topic uses Windows Server 2008 R2 Standard 64bit to describe how to initialize a datadisk whose capacity is greater than 2 TB. In the following operations, the capacity of theexample disk is 3 TB.
The maximum disk capacity supported by MBR is 2 TB, and that supported by GPT is 18 EB.Therefore, use the GPT partition style if your disk capacity is greater than 2 TB. For detailsabout disk partition styles, see 2.4.1 Introduction to Data Disk Initialization Scenarios andPartition Styles.
The method for initializing an EVS disk varies depending on the OS running on the server.This document is used for reference only. For the detailed operations and differences, see theproduct documents of the OSs running on the corresponding servers.
Prerequisitesl You have logged in to the server.
– For how to log in to an ECS, see the Elastic Cloud Server User Guide.– For how to log in to a BMS, see the Bare Metal Server User Guide.
l A data disk has been attached to the server and has not been initialized.
Procedure
Step 1 On the desktop of the server, click Start.
The Start window is displayed.
Elastic Volume ServiceUser Guide 2 Getting Started
2018-10-30 54

Step 2 Right-click Computer and choose Manage from the short-cut menu.
The Server Manager window is displayed.
Figure 2-31 Server Manager (Windows 2008)
Step 3 Disks are listed in the right pane. If the new disk is in the offline state, bring it online beforeinitialize it.
In the Disk 1 area, right-click and choose Online from the shortcut menu.
When the Disk 1 status changes from Offline to Not Initialized, the disk has been broughtonline.
Elastic Volume ServiceUser Guide 2 Getting Started
2018-10-30 55

Figure 2-32 Bring online succeeded (Windows 2008)
Step 4 In the Disk 1 area, right-click and choose Initialize Disk from the shortcut menu.
The Initialize Disk dialog box is displayed.
Figure 2-33 Initialize Disk (Windows 2008)
Step 5 The Initialize Disk dialog box displays the disk to be initialized. If the disk capacity is greaterthan 2 TB, select GPT (GUID Partition Table) and click OK.
The Server Manager window is displayed.
Elastic Volume ServiceUser Guide 2 Getting Started
2018-10-30 56

Figure 2-34 Server Manager (Windows 2008)
The maximum disk capacity supported by MBR is 2 TB, and that supported by GPT is 18 EB.Currently, an EVS data disk supports up to 32 TB. Therefore, use the GPT partition style ifyour disk capacity is greater than 2 TB.If you change the disk partition style after the disk has been used, the original data on the diskwill be cleared. Therefore, select a proper disk partition style when initializing the disk.
Step 6 Right-click at the unallocated disk space and choose New Simple Volume from the shortcutmenu.
The New Simple Volume Wizard window is displayed.
Elastic Volume ServiceUser Guide 2 Getting Started
2018-10-30 57

Figure 2-35 New Simple Volume Wizard (Windows 2008)
Step 7 Follow the prompts and click Next.
The Specify Volume Size page is displayed.
Figure 2-36 Specify Volume Size (Windows 2008)
Step 8 Specify the volume size and click Next. The system selects the maximum volume size bydefault. You can specify the volume size as required. In this example, the default setting isused.
The Assign Drive Letter or Path page is displayed.
Elastic Volume ServiceUser Guide 2 Getting Started
2018-10-30 58

Figure 2-37 Assign Driver Letter or Path (Windows 2008)
Step 9 Assign the volume to a drive letter or folder and click Next. The system assigns the volume todrive letter D by default. In this example, the default setting is used.
The Format Partition page is displayed.
Figure 2-38 Format Partition (Windows 2008)
Step 10 Specify format settings and click Next. The system selects the NTFS file system by default.You can specify the file system type based on the actual condition. In this example, the defaultsetting is used.
The Completing the New Simple Volume Wizard page is displayed.
Elastic Volume ServiceUser Guide 2 Getting Started
2018-10-30 59

Figure 2-39 Completing the New Simple Volume Wizard
The partition sizes supported by file systems vary. Therefore, you are advised to choose anappropriate file system based on your service requirements.
Step 11 Click Finish.
Wait for the initialization to complete. When the volume status changes to Healthy, theinitialization has finished successfully, as shown in Figure 2-40.
Elastic Volume ServiceUser Guide 2 Getting Started
2018-10-30 60

Figure 2-40 Disk initialization succeeded (Windows 2008)
Step 12 After the volume is created, click and check whether a new volume appears inComputer. In this example, New Volume (D:) is the new volume.
If New Volume (D:) appears, the disk is successfully initialized and no further action isrequired.
Figure 2-41 Computer (Windows 2008)
----End
Elastic Volume ServiceUser Guide 2 Getting Started
2018-10-30 61

2.4.7 Initializing a Windows Data Disk Greater Than 2 TB(Windows Server 2012)
ScenariosThis topic uses Windows Server 2012 R2 Standard 64bit to describe how to initialize a datadisk whose capacity is greater than 2 TB. In the following operations, the capacity of theexample disk is 3 TB.
The maximum disk capacity supported by MBR is 2 TB, and that supported by GPT is 18 EB.Therefore, use the GPT partition style if your disk capacity is greater than 2 TB. For detailsabout disk partition styles, see 2.4.1 Introduction to Data Disk Initialization Scenarios andPartition Styles.
The method for initializing an EVS disk varies depending on the OS running on the server.This document is used for reference only. For the detailed operations and differences, see theproduct documents of the OSs running on the corresponding servers.
Prerequisitesl You have logged in to the server.
– For how to log in to an ECS, see the Elastic Cloud Server User Guide.– For how to log in to a BMS, see the Bare Metal Server User Guide.
l A data disk has been attached to the server and has not been initialized.
Procedure
Step 1 On the desktop of the server, click in the lower area.
The Server Manager window is displayed.
Figure 2-42 Server Manager (Windows 2012)
Elastic Volume ServiceUser Guide 2 Getting Started
2018-10-30 62
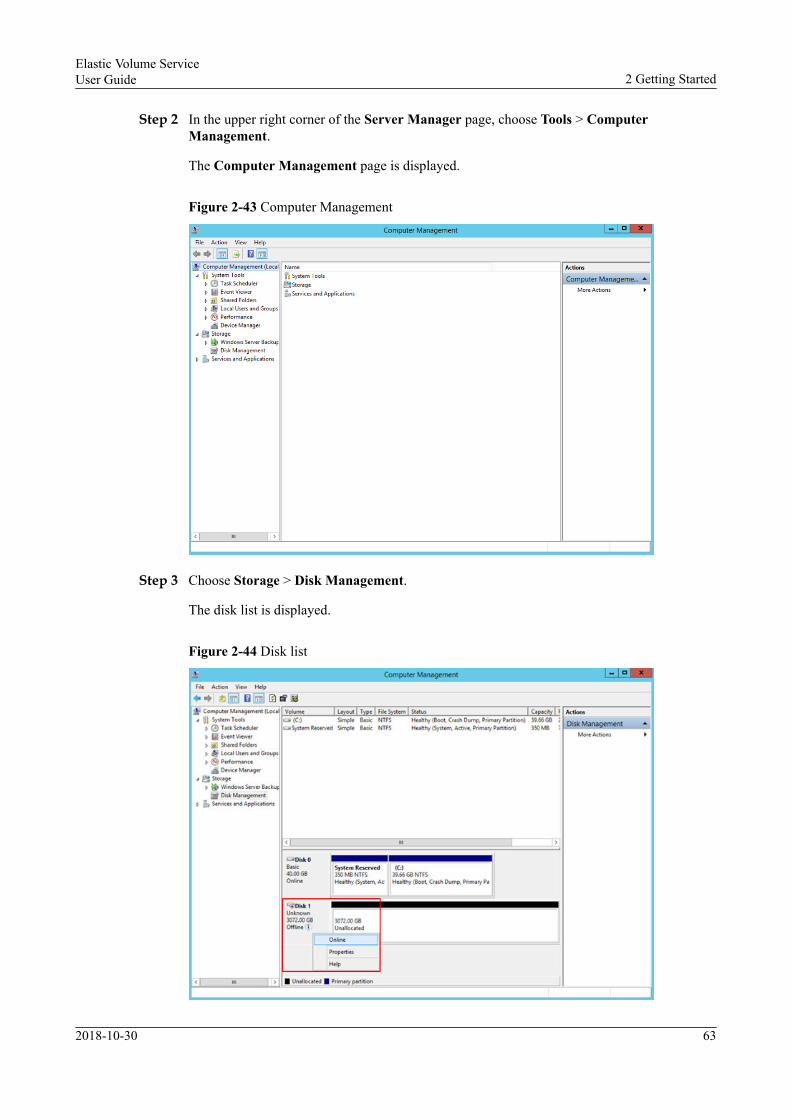
Step 2 In the upper right corner of the Server Manager page, choose Tools > ComputerManagement.
The Computer Management page is displayed.
Figure 2-43 Computer Management
Step 3 Choose Storage > Disk Management.
The disk list is displayed.
Figure 2-44 Disk list
Elastic Volume ServiceUser Guide 2 Getting Started
2018-10-30 63

Step 4 Disks are listed in the right pane. If the new disk is in the offline state, bring it online beforeinitialize it.
In the Disk 1 area, right-click and choose Online from the shortcut menu.
When the Disk 1 status changes from Offline to Not Initialized, the disk has been broughtonline.
Figure 2-45 Bring online succeeded (Windows 2012)
Step 5 In the Disk 1 area, right-click and choose Initialize Disk from the shortcut menu.
The Initialize Disk dialog box is displayed.
Elastic Volume ServiceUser Guide 2 Getting Started
2018-10-30 64

Figure 2-46 Initialize Disk (Windows 2012)
Step 6 The Initialize Disk dialog box displays the disk to be initialized. If the disk capacity is greaterthan 2 TB, select GPT (GUID Partition Table) and click OK.
The Computer Management page is displayed.
Figure 2-47 Computer Management (Windows 2012)
Elastic Volume ServiceUser Guide 2 Getting Started
2018-10-30 65

The maximum disk capacity supported by MBR is 2 TB, and that supported by GPT is 18 EB.Currently, an EVS data disk supports up to 32 TB. Therefore, use the GPT partition style ifyour disk capacity is greater than 2 TB.If you change the disk partition style after the disk has been used, the original data on the diskwill be cleared. Therefore, select a proper disk partition style when initializing the disk.
Step 7 Right-click at the unallocated disk space and choose New Simple Volume from the shortcutmenu.
The New Simple Volume Wizard window is displayed.
Figure 2-48 New Simple Volume Wizard (Windows 2012)
Step 8 Follow the prompts and click Next.
The Specify Volume Size page is displayed.
Elastic Volume ServiceUser Guide 2 Getting Started
2018-10-30 66

Figure 2-49 Specify Volume Size (Windows 2012)
Step 9 Specify the volume size and click Next. The system selects the maximum volume size bydefault. You can specify the volume size as required. In this example, the default setting isused.
The Assign Drive Letter or Path page is displayed.
Figure 2-50 Assign Driver Letter or Path (Windows 2012)
Step 10 Assign the volume to a drive letter or folder and click Next. The system assigns the volume todrive letter D by default. In this example, the default setting is used.
Elastic Volume ServiceUser Guide 2 Getting Started
2018-10-30 67

The Format Partition page is displayed.
Figure 2-51 Format Partition (Windows 2012)
Step 11 Specify format settings and click Next. The system selects the NTFS file system by default.You can specify the file system type based on the actual condition. In this example, the defaultsetting is used.
The Completing the New Simple Volume Wizard page is displayed.
Figure 2-52 Completing the New Simple Volume Wizard (Windows 2012)
Elastic Volume ServiceUser Guide 2 Getting Started
2018-10-30 68

The partition sizes supported by file systems vary. Therefore, you are advised to choose anappropriate file system based on your service requirements.
Step 12 Click Finish.
Wait for the initialization to complete. When the volume status changes to Healthy, theinitialization has finished successfully, as shown in Figure 2-53.
Figure 2-53 Disk initialization succeeded (Windows 2012)
Step 13 After the volume is created, click and check whether a new volume appears in ThisPC. In this example, New Volume (D:) is the new volume.
If New Volume (D:) appears, the disk is successfully initialized and no further action isrequired.
Elastic Volume ServiceUser Guide 2 Getting Started
2018-10-30 69

Figure 2-54 This PC (Windows 2012)
----End
2.4.8 Initializing a Linux Data Disk Greater Than 2 TB (parted)
ScenariosThis topic uses CentOS 7.4 64bit to describe how to use parted to initialize a data disk whosecapacity is greater than 2 TB. In the following operations, the capacity of the example disk is3 TB.
The maximum disk capacity supported by MBR is 2 TB, and that supported by GPT is 18 EB.Therefore, use the GPT partition style if your disk capacity is greater than 2 TB. In LinuxOSs, if the GPT partition style is used, the fdisk partitioning tool cannot be used. The partedpartitioning tool must be used. For details about disk partition styles, see 2.4.1 Introductionto Data Disk Initialization Scenarios and Partition Styles.
The method for initializing an EVS disk varies depending on the OS running on the server.This document is used for reference only. For the detailed operations and differences, see theproduct documents of the OSs running on the corresponding servers.
Prerequisitesl You have logged in to the server.
– For how to log in to an ECS, see the Elastic Cloud Server User Guide.– For how to log in to a BMS, see the Bare Metal Server User Guide.
l A data disk has been attached to the server and has not been initialized.
Creating Partitions and Mounting a DiskThe following example shows you how new partitions can be created on a new data disk thathas been attached to a server. The partitions will be created using parted, and GPT is used asthe partition style. Furthermore, the partitions will be formatted using the ext3 file system,mounted on /mnt/sdc, and configured automatic mounting at system start.
Elastic Volume ServiceUser Guide 2 Getting Started
2018-10-30 70

Step 1 Run the following command to query information about the added data disk:
lsblk
Information similar to the following is displayed:
[root@ecs-centos74 ~]# lsblkNAME MAJ:MIN RM SIZE RO TYPE MOUNTPOINTvda 253:0 0 40G 0 disk├─vda1 253:1 0 1G 0 part /boot└─vda2 253:2 0 39G 0 part /vdb 253:16 0 3T 0 disk
In the command output, the server contains two disks. /dev/vda is the system disk,and /dev/vdb is the added data disk.
Step 2 Run the following command to enter parted to partition the added data disk:
parted Added data disk
In this example, /dev/vdb is the newly added data disk.
parted /dev/vdb
Information similar to the following is displayed:
[root@ecs-centos74 ~]# parted /dev/vdbGNU Parted 3.1Using /dev/vdbWelcome to GNU Parted! Type 'help' to view a list of commands.(parted)
Step 3 Enter p and press Enter to view the current disk partition style.
Information similar to the following is displayed:
(parted) pError: /dev/vdb: unrecognised disk labelModel: Virtio Block Device (virtblk)Disk /dev/vdb: 3299GBSector size (logical/physical): 512B/512BPartition Table: unknownDisk Flags:(parted)
In the command output, the Partition Table value is unknown, indicating that the diskpartition style is unknown.
Step 4 Run the following command to set the disk partition style:
mklabel Disk partition style
The disk partition style can be MBR or GPT. If the disk capacity is greater than 2 TB, choosethe GPT partition style.
mklabel gpt
Elastic Volume ServiceUser Guide 2 Getting Started
2018-10-30 71

The maximum disk capacity supported by MBR is 2 TB, and that supported by GPT is 18 EB.Currently, an EVS data disk supports up to 32 TB. Therefore, use the GPT partition style ifyour disk capacity is greater than 2 TB.If you change the disk partition style after the disk has been used, the original data on the diskwill be cleared. Therefore, select a proper disk partition style when initializing the disk.
Step 5 Enter p and press Enter to view the disk partition style.
Information similar to the following is displayed:
(parted) mklabel gpt(parted) pModel: Virtio Block Device (virtblk)Disk /dev/vdb: 3299GBSector size (logical/physical): 512B/512BPartition Table: gptDisk Flags: Number Start End Size File system Name Flags(parted)
Step 6 Enter unit s and press Enter to set the measurement unit of the disk to sector numbers.
Step 7 Enter mkpart opt 2048s 100% and press Enter.
In this example, one partition is created for the added data disk. Variable 2048s indicates thedisk start capacity, and variable 100% indicates the disk end capacity. The two values are usedfor reference only. You can determine the number of partitions and the partition capacitybased on your service requirements.
Information similar to the following is displayed:(parted) mkpart opt 2048s 100%Warning: The resulting partition is not properly aligned for best performance.Ignore/Cancel? Cancel
If the preceding warning message is displayed, enter Cancel to stop the partitioning. Then,find the first sector with the best disk performance and use that value to partition the disk. Inthis example, the first sector with the best disk performance is 2048s. Therefore, the systemdoes not display the warning message.
Step 8 Enter p and press Enter to view the details about the created partition.
Information similar to the following is displayed:
(parted) pModel: Virtio Block Device (virtblk)Disk /dev/vdb: 6442450944sSector size (logical/physical): 512B/512BPartition Table: gptDisk Flags: Number Start End Size File system Name Flags 1 2048s 6442448895s 6442446848s opt
Details about the dev/vdb1 partition are displayed.
Step 9 Enter q and press Enter to exit parted.
Step 10 Run the following command to view the disk partition information:
lsblk
Elastic Volume ServiceUser Guide 2 Getting Started
2018-10-30 72

Information similar to the following is displayed:
[root@ecs-centos74 ~]# lsblkNAME MAJ:MIN RM SIZE RO TYPE MOUNTPOINTvda 253:0 0 40G 0 disk├─vda1 253:1 0 1G 0 part /boot└─vda2 253:2 0 39G 0 part /vdb 253:16 0 3T 0 disk└─vdb1 253:17 0 3T 0 part
In the command output, /dev/vdb1 is the partition you created.
Step 11 Run the following command to set the format for the file system of the newly createdpartition:
mkfs -t File system format /dev/vdb1
For example, run the following command to set the ext3 file system for the /dev/vdb1partition:
mkfs -t ext3 /dev/vdb1
Information similar to the following is displayed:
[root@ecs-centos74 ~]# mkfs -t ext3 /dev/vdb1mke2fs 1.42.9 (28-Dec-2013)Filesystem label=OS type: LinuxBlock size=4096 (log=2)Fragment size=4096 (log=2)Stride=0 blocks, Stripe width=0 blocks201326592 inodes, 805305856 blocks40265292 blocks (5.00%) reserved for the super userFirst data block=0Maximum filesystem blocks=295279001624576 block groups32768 blocks per group, 32768 fragments per group8192 inodes per groupSuperblock backups stored on blocks: 32768, 98304, 163840, 229376, 294912, 819200, 884736, 1605632, 2654208, 4096000, 7962624, 11239424, 20480000, 23887872, 71663616, 78675968, 102400000, 214990848, 512000000, 550731776, 644972544 Allocating group tables: doneWriting inode tables: doneCreating journal (32768 blocks): doneWriting superblocks and filesystem accounting information: done
The formatting takes a period of time. Observe the system running status and do not exit.
The partition sizes supported by file systems vary. Therefore, you are advised to choose anappropriate file system based on your service requirements.
Step 12 Run the following command to create a mount point:
mkdir Mount point
For example, run the following command to create the /mnt/sdc mount point:
mkdir /mnt/sdc
Elastic Volume ServiceUser Guide 2 Getting Started
2018-10-30 73

Step 13 Run the following command to mount the new partition on the created mount point:
mount /dev/vdb1 Mount point
For example, run the following command to mount the newly created partition on /mnt/sdc:
mount /dev/vdb1 /mnt/sdc
Step 14 Run the following command to view the mount result:
df -TH
Information similar to the following is displayed:
[root@ecs-centos74 ~]# df -THFilesystem Type Size Used Avail Use% Mounted on/dev/vda2 ext4 42G 1.5G 38G 4% /devtmpfs devtmpfs 2.0G 0 2.0G 0% /devtmpfs tmpfs 2.0G 0 2.0G 0% /dev/shmtmpfs tmpfs 2.0G 8.9M 2.0G 1% /runtmpfs tmpfs 2.0G 0 2.0G 0% /sys/fs/cgroup/dev/vda1 ext4 1.1G 153M 801M 17% /boottmpfs tmpfs 398M 0 398M 0% /run/user/0/dev/vdb1 ext3 3.3T 93M 3.1T 1% /mnt/sdc
In the command output, the newly created dev/vdb1 partition has been mounted on /mnt/sdc.
----End
Setting Automatic Disk Mounting at System Start
To automatically mount a disk when a server starts, you should not specify its partition, forexample /dev/vdb1, in /etc/fstab. Because the sequence of cloud devices, and therefore theirnames may change during the server stop and start. You are advised to use the UUID in /etc/fstab to automatically mount a disk at system start.
NOTE
The UUID is the unique character string for disk partitions in a Linux system.
Step 1 Run the following command to query the partition UUID:
blkid Disk partition
For example, run the following command to query the UUID of /dev/vdb1:
blkid /dev/vdb1
Information similar to the following is displayed:
[root@ecs-centos74 ~]# blkid /dev/vdb1/dev/vdb1: UUID="bdd29fe6-9cee-4d4f-a553-9faad281f89b" TYPE="ext3" PARTLABEL="opt" PARTUUID="c7122c92-ed14-430b-9ece-259920d5ee74"
In the command output, the UUID of /dev/vdb1 is displayed.
Step 2 Run the following command to open the fstab file using the vi editor:
vi /etc/fstab
Step 3 Press i to enter the editing mode.
Step 4 Move the cursor to the end of the file and press Enter. Then add the following information:UUID=bdd29fe6-9cee-4d4f-a553-9faad281f89b /mnt/sdc ext3 defaults 0 2
Elastic Volume ServiceUser Guide 2 Getting Started
2018-10-30 74
Step 5 Press Esc, enter :wq, and press Enter.
The system saves the configurations and exits the vi editor.
----End
Elastic Volume ServiceUser Guide 2 Getting Started
2018-10-30 75

3 Management
3.1 Detaching an EVS Disk
3.2 Deleting an EVS Disk
3.3 Expanding the Capacity of an EVS Disk
3.4 Managing an Encrypted EVS Disk
3.5 Managing a Shared EVS Disk
3.6 Managing EVS Backup
3.7 Managing an EVS Snapshot
3.8 Managing a Tag
3.9 Viewing EVS Monitoring Data
3.1 Detaching an EVS Disk
3.1.1 Detaching a System Disk
ScenariosSystem disks are the EVS disks attached on device name /dev/sda or /dev/vda. Currently,system disks can only be detached offline, which means that the server containing the to-be-detached system disk must be in the Stopped state. Therefore, you need to first stop the serverand then detach the system disk.
Procedure
Step 1 Log in to the management console.
Step 2 Click in the upper left corner and select the desired region and project.
Step 3 Under Computing, click Elastic Cloud Server.
The Elastic Cloud Server page is displayed.
Elastic Volume ServiceUser Guide 3 Management
2018-10-30 76

Step 4 In the server list, locate the row that contains the server whose system disk is to be detached,click More in the Operation column, and choose Stop.
When the server status changes to Stopped, the server has been stopped.
Step 5 Click the name of this server.
The server details page is displayed.
Step 6 Click the Disks tab to view the system disk attached to the server.
Step 7 Locate the row that contains the system disk and click Detach.
The Detach Disk dialog box is displayed.
Step 8 Click OK to detach the disk.
After the operation had succeeded, the detached system disk is no longer displayed under theDisks tab.
----End
3.1.2 Detaching a Data Disk
ScenariosData disks can be detached online or offline, which means that the server containing the to-be-detached data disk can either be in the Running or Stopped state.l ECS
Detach an EVS disk online. For details, see Storage > Detaching an EVS Disk from aRunning ECS in the Elastic Cloud Server User Guide.
l BMSCurrently, SCSI disks can be attached to BMSs and used as data disks. You can detach adata disk either from a running or stopped BMS.
For a data disk attached to a server, the disk function is displayed as Data disk, and the diskstatus is displayed as In-use in the disk list. After the data disk has been detached from theserver, the disk function remains unchanged, the disk status changes to Available for a non-shared data disk, and the disk status changes to Available for a shared data disk after it isdetached from all it servers.
Detaching a Non-shared EVS Disk
Step 1 Log in to the management console.
Step 2 Click in the upper left corner and select the desired region and project.
Step 3 Under Storage, click Elastic Volume Service.
The disk list page is displayed.
Step 4 Determine whether to view the server information before detaching the disk.l If you need to view the server information, perform the following procedure:
a. In the disk list, click the name of the to-be-detached disk.The disk details page is displayed.
Elastic Volume ServiceUser Guide 3 Management
2018-10-30 77

b. Click the Attachments tab to view the server where the target disk has beenattached.
c. Click to select the server and click Detach Disk.The Detach Disk dialog box is displayed.
d. Click OK to detach the disk.l If you do not need to view the server information, perform the following procedure:
a. In the disk list, locate the row that contains the target disk and click Detach in theOperation column.The Detach Disk dialog box is displayed.
b. Click OK to detach the disk.
The disk list is displayed. The disk status is Detaching, indicating that the disk is beingdetached from the server.
When the status changes to Available, the EVS disk is successfully detached.
----End
Detaching a Shared EVS Disk
Step 1 Log in to the management console.
Step 2 Click in the upper left corner and select the desired region and project.
Step 3 Under Storage, click Elastic Volume Service.
The disk list page is displayed.
Step 4 Determine whether to view the server information before detaching the EVS disk.l If you need to view the server information, perform the following procedure:
a. In the disk list, click the name of the to-be-detached disk.The disk details page is displayed.
b. Click the Attachments tab to view the servers where the target EVS disk has beenattached.
c. Click to select the server and click Detach Disk.Shared EVS disks support batch detachment so that you can select multiple serversat a time.The Detach Disk dialog box is displayed.
d. Click OK to detach the disk.l If you do not need to view the server information, perform the following procedure:
a. In the disk list, locate the row that contains the target disk and click Detach in theOperation column.The Detach Disk dialog box is displayed.
b. Click to select the server.
Elastic Volume ServiceUser Guide 3 Management
2018-10-30 78

Shared EVS disks support batch detachment so that you can select multiple serversat a time.
c. Click OK to detach the disk.
The disk list is displayed. The disk status is Detaching, indicating that the disk is beingdetached from the server.
If the shared EVS disk has been attached to multiple servers and needs to be detached fromonly some of its servers, the disk status will go back to In-use after the disk has beendetached from the target servers. The disk status changes to Available only when it has beendetached from all the servers.
----End
3.2 Deleting an EVS Disk
ScenariosIf an EVS disk is no longer used, you can release the virtual resources by deleting the EVSdisk from the system. After a disk was deleted, it will no longer be charged.
l Before deleting an EVS disk, ensure that the disk status is Available, Error, Expansionfailed, Restoration failed, or Rollback failed.
l Before deleting a shared EVS disk, ensure that the disk has been detached from all itsservers.
l When you delete an EVS disk, all the disk data including the snapshots created for thisdisk will be deleted. Exercise caution when performing this operation.
l A deleted disk cannot be restored.
Procedure
Step 1 Log in to the management console.
Step 2 Click in the upper left corner and select the desired region and project.
Step 3 Under Storage, click Elastic Volume Service.
The disk list page is displayed.
Step 4 In the EVS disk list, locate the row that contains the target disk, click More in the Operationcolumn, and choose Delete.
Step 5 (Optional) If multiple EVS disks are to be deleted, select in front of each EVS disk andclick Delete in the upper area of the list.
Step 6 In the displayed dialog box, confirm the information and click OK.
----End
Elastic Volume ServiceUser Guide 3 Management
2018-10-30 79

3.3 Expanding the Capacity of an EVS Disk
3.3.1 Introduction to Expansion ScenariosWhen the storage space of an EVS disk is insufficient, you can handle the insufficiency ineither of the following ways:l Create a new EVS disk and attach it to a server.l Expand the capacity of an existing EVS disk. The capacities of both system disks and
data disks can be expanded.You can expand the disk capacities when the disks are in the In-use or Available state.– Expanding an In-use EVS disk means that the to-be-expanded EVS disk has been
attached to a server. Currently, only some server OSs support the expansion of In-use EVS disks. Therefore, ensure that the server OS meets the requirements beforeyou expand an In-use EVS disk. For details, see 3.3.2 Expanding an In-use EVSDisk.
– Expanding an Available EVS disk means that the to-be-expanded EVS disk has notbeen attached to a server. For details, see 3.3.3 Expanding an Available EVSDisk.
When a disk has been put to use, you must check the disk partition style before expanding itscapacity. The details are as follows:l If the MBR partition style is used, the maximum disk capacity supported is 2 TB (2048
GB), and the disk space exceeding 2 TB cannot be allocated and used.l If the GPT partition style is used, the maximum disk capacity supported is 18 EB
(19327352832 GB). An EVS data disk supports a maximum of 32 TB (32768 GB),which means that you can expand the capacity of an EVS data disk to up to 32 TB whenthe GPT partition style is used.
If the in-use disk partition style is MBR and the disk capacity needs to be expanded to over 2TB later, change the disk partition style from MBR to GPT. Ensure that the disk data has beenbacked up before changing the partition style because services will be interrupted and data onthe disk will be cleared during the change.
3.3.2 Expanding an In-use EVS Disk
ScenariosCurrently, the capacities of EVS disks can only be expanded, but cannot be reduced.
Expanding an In-use EVS disk means that the to-be-expanded EVS disk has been attached toa server.
l During such an expansion, the server containing the to-be-expanded EVS disk must be inthe Running or Stopped state.
l Shared EVS disks must be expanded when they are in the Available state. For details,see 3.3.3 Expanding an Available EVS Disk.
Elastic Volume ServiceUser Guide 3 Management
2018-10-30 80

l Currently, only some server OSs support the expansion of In-use EVS disks. Therefore,ensure that the server OS meets the requirements before you expand an In-use EVS disk.Table 3-1 lists the supported server OSs, including the images listed on the PublicImages page of the IMS console and other OSs.If the server OS does not support capacity expansion of In-use disks, you need to detachthe disk and then expand the disk capacity. Otherwise, the server may need to be stoppedand then started after the expansion to make the expansion takes effect.
Table 3-1 Supported OSs
OS Version
OSs listed on the PublicImages pageNOTE
For details about how to viewthe information: Log in to themanagement console, chooseImage Mgmt Service, clickthe Public Images tab, andselect ECS system disk imagefrom the drop-down list.
N/A
CentOS 7.4 64bit
7.3 64bit
7.2 64bit
6.8 64bit
6.7 64bit
6.5 64bit
Debian 8.6.0 64bit
8.5.0 64bit
Fedora 25 64bit
24 64bit
SUSE SUSE Linux Enterprise Server 12 SP2 64bit
SUSE Linux Enterprise Server 12 SP1 64bit
SUSE Linux Enterprise Server 11 SP4 64bit
SUSE Linux Enterprise Server 12 64bit
OpenSUSE 42.2 64bit
42.1 64bit
Oracle Linux Server release 7.3 64bit
7.2 64bit
Elastic Volume ServiceUser Guide 3 Management
2018-10-30 81

OS Version
6.8 64bit
6.7 64bit
Ubuntu Server 16.04 64bit
14.04 64bit
14.04.4 64bit
Windows Windows Server 2008 R2 Enterprise 64bit
Windows Server 2012 R2 Standard 64bit
Windows Server 2016 R2 Standard 64bit
Redhat Linux Enterprise 7.3 64bit
6.8 64bit
Procedure
Step 1 Log in to the management console.
Step 2 Click in the upper left corner and select the desired region and project.
Step 3 Under Storage, click Elastic Volume Service.
The disk list page is displayed.
Step 4 Determine whether to view the server information before expanding the EVS disk.l If you need to view the server information, perform the following procedure:
a. In the EVS disk list, click the name of the to-be-expanded disk.The disk details page is displayed.
b. Click the Attachments tab to view the server where the target EVS disk has beenattached.
c. Click Expand Capacity in the upper right corner of the page.The expansion page is displayed.
l If you do not need to view the server information, perform the following procedure:
a. In the disk list, locate the row that contains the target disk and choose More >Expand Capacity in the Operation column.The expansion page is displayed.
Step 5 Set the Add Capacity (GB) parameter as prompted and click Next.
Step 6 On the Details page, check the disk information again.l If you do not need to modify the specifications, click Submit to start the creation.l If you need to modify the specifications, click Previous to modify parameters.
After the specifications are submitted, the disk list page is displayed.
Elastic Volume ServiceUser Guide 3 Management
2018-10-30 82

Step 7 In the EVS disk list, view the capacity of the expanded disk.
When the disk status changes from Expanding to In-use, the additional capacity has beenadded to the disk and the expansion succeeded.
NOTE
If the expansion fails, customer service personnel will contact you and help you handle this error. Do notperform any operations on the disk before the customer service personnel contact you. If you require thatthe error be handled as soon as possible, contact our customer service personnel. The disk will no longerbe charged once its status changes to Expansion failed.
Step 8 After the capacity expansion has succeeded, perform subsequent operations for the additionalspace.
The operation method varies depending on the server OS.
l For Windows OSs, see 3.3.4 Performing Post-Expansion Operations for a WindowsEVS Disk.
l For Linux OSs,– If the fdisk partitioning tool will be used, see 3.3.5 Performing Post-Expansion
Operations for a Linux EVS Disk (fdisk) or 3.3.7 Performing Post-ExpansionOperations for a Linux SCSI Data Disk (fdisk).
– If the parted partitioning tool will be used, see 3.3.6 Performing Post-ExpansionOperations for a Linux EVS Disk (parted).
----End
3.3.3 Expanding an Available EVS Disk
ScenariosCurrently, the capacities of EVS disks can only be expanded, but cannot be reduced.
Expanding an Available EVS disk means that the to-be-expanded EVS disk has not beenattached to a server.
Shared EVS disks cannot be expanded when they are in the In-use state. Therefore, you needto detach the disk from all its servers before expanding a shared disk. Once the disk status tochange to Available, you can perform the operations provided in this topic to expand the disk.
Procedure
Step 1 Log in to the management console.
Step 2 Click in the upper left corner and select the desired region and project.
Step 3 Under Storage, click Elastic Volume Service.
The disk list page is displayed.
Step 4 (Optional) If the to-be-expanded EVS disk has been attached to a server, detach it first. Fordetails, see 3.1 Detaching an EVS Disk.
When the disk status changes to Available, the disk is successfully detached.
Step 5 In the disk list, locate the row that contains the target disk and choose More > ExpandCapacity in the Operation column.
Elastic Volume ServiceUser Guide 3 Management
2018-10-30 83

The expansion page is displayed.
Step 6 Set the Add Capacity (GB) parameter as prompted and click Next.
Step 7 On the Details page, check the disk information again.
l If you do not need to modify the specifications, click Submit to start the creation.
l If you need to modify the specifications, click Previous to modify parameters.
After the specifications are submitted, the disk list page is displayed.
Step 8 In the EVS disk list, view the capacity of the expanded disk.
When the disk status changes from Expanding to Available, the additional capacity has beenadded to the disk and the expansion succeeded.
NOTE
If the expansion fails, customer service personnel will contact you and help you handle this error. Do notperform any operations on the disk before the customer service personnel contact you. If you require thatthe error be handled as soon as possible, contact our customer service personnel. The disk will no longerbe charged once its status changes to Expansion failed.
Step 9 Attach the expanded EVS disk to the server. For details, see 2.3 Attaching an EVS Disk.
Step 10 After the capacity expansion has succeeded, perform subsequent operations for the additionalspace.
The operation method varies depending on the server OS.
l For Windows OSs, see 3.3.4 Performing Post-Expansion Operations for a WindowsEVS Disk.
l For Linux OSs,
– If the fdisk partitioning tool will be used, see 3.3.5 Performing Post-ExpansionOperations for a Linux EVS Disk (fdisk) or 3.3.7 Performing Post-ExpansionOperations for a Linux SCSI Data Disk (fdisk).
– If the parted partitioning tool will be used, see 3.3.6 Performing Post-ExpansionOperations for a Linux EVS Disk (parted).
----End
3.3.4 Performing Post-Expansion Operations for a Windows EVSDisk
Scenarios
After the capacity expansion has succeeded, the additional EVS disk space needs to beallocated to an existing partition or a new partition.
This topic uses Windows Server 2008 R2 Enterprise as the sample OS.
The method for allocating the additional space varies depending on the server OS. Thisdocument is used for reference only. For the detailed operations and differences, see thecorresponding OS documents.
Elastic Volume ServiceUser Guide 3 Management
2018-10-30 84

Performing the expansion operations with caution. Misoperation may lead to data loss orexceptions. Therefore, you are advised to back up the disk data using backups or snapshotsbefore expansion. For details about backups and snapshots, see 3.6 Managing EVS Backupand 3.7.1 Creating a Snapshot, respectively.
Prerequisitesl You have logged in to the server.
– For how to log in to an ECS, see the Elastic Cloud Server User Guide.
– For how to log in to a BMS, see the Bare Metal Server User Guide.
l You have attached the EVS disk to the server, and the additional space has not beenallocated.
System Disk
Step 1 On the desktop of the server, right-click Computer and choose Manage from the shortcutmenu.
The Server Manager window is displayed.
Step 2 In the navigation tree, choose Storage > Disk Management.
The Disk Management window is displayed.
Figure 3-1 Disk Management (system disk)
Step 3 On the Disk Management page, select the disk and partition that needs to be extended. Thecurrent partition size and unallocated disk space are displayed.
Step 4 Right-click the selected disk and choose Extend Volume.
Elastic Volume ServiceUser Guide 3 Management
2018-10-30 85

Figure 3-2 Selecting Extend Volume
Step 5 On the displayed Extend Volume Wizard page, click Next.
Figure 3-3 Extend Volume Wizard
Step 6 In the text box to the right of Select the amount of space in MB shown in Figure 3-4, enterthe amount of the additional capacity and click Next.
Elastic Volume ServiceUser Guide 3 Management
2018-10-30 86

Figure 3-4 Selecting space
Step 7 Click Finish to complete the wizard.
After the expansion has succeeded, the disk capacity is greater than the original capacity.
Figure 3-5 Successful capacity expansion
----End
Data Disk
Step 1 On the desktop of the server, right-click Computer and choose Manage from the shortcutmenu.
The Server Manager window is displayed.
Elastic Volume ServiceUser Guide 3 Management
2018-10-30 87

Step 2 In the navigation tree, choose Storage > Disk Management.
The Disk Management window is displayed.
Figure 3-6 Disk Management (data disk)
Step 3 On the Disk Management page, select the disk and partition that needs to be extended. Thecurrent partition size and unallocated disk space are displayed.
Step 4 Right-click the selected disk and choose Extend Volume.
Figure 3-7 Choosing Extend Volume (Windows 2008)
Step 5 On the displayed Extend Volume Wizard page, click Next.
Elastic Volume ServiceUser Guide 3 Management
2018-10-30 88

Figure 3-8 Extend Volume Wizard (Windows 2008)
Step 6 In the text box to the right of Select the amount of space in MB shown in Figure 3-9, enterthe amount of the additional capacity and click Next.
Figure 3-9 Selecting space (Windows 2008)
Step 7 Click Finish to complete the wizard.
After the expansion has succeeded, the disk capacity is greater than the original capacity.
Elastic Volume ServiceUser Guide 3 Management
2018-10-30 89

Figure 3-10 Capacity expansion succeeded (Windows 2008)
----End
3.3.5 Performing Post-Expansion Operations for a Linux EVS Disk(fdisk)
Scenarios
After the capacity expansion has succeeded, the additional EVS disk space needs to beallocated to an existing partition or a new partition.
This topic uses CentOS 7.0 64bit to describe how to allocate the additional EVS disk space toa partition using fdisk.
The method for allocating the additional space varies depending on the server OS. Thisdocument is used for reference only. For the detailed operations and differences, see thecorresponding OS documents.
Based on your service requirements and actual disk condition, you can choose either of thefollowing ways to allocate the additional disk space:l Create a new partition (services will not be interrupted)
Creating a new partition for the expanded disk does not require the original partitions tobe unmounted. Therefore, the impacts on services are minor than expanding an existingpartition. This method is recommended for system disks or disks carrying services thatcannot be interrupted.If the MBR partition style is used, the disk capacity cannot exceed 2 TB and the numberof partitions cannot exceed the upper limit after the expansion completes.
l Expand an existing partition (services will be interrupted)If the MBR partition style is used and the number of partitions has reached the upperlimit, the existing partition needs to be expanded. Expanding an existing partition doesnot delete its data, but requires the partition to unmount. Therefore, services will beinterrupted.
Elastic Volume ServiceUser Guide 3 Management
2018-10-30 90

If the MBR partition style is used and the disk capacity after expansion has exceeded 2TB, the space exceeding 2 TB cannot be used. To use the excessive space, the diskpartition style must be changed from MBR to GPT. Data on the disk will be clearedduring such a change. Therefore, back up the disk data before changing the partitionstyle.
Performing the expansion operations with caution. Misoperation may lead to data loss orexceptions. Therefore, you are advised to back up the disk data using backups orsnapshots before expansion. For details about backups and snapshots, see 3.6 ManagingEVS Backup and 3.7.1 Creating a Snapshot, respectively.
Prerequisitesl You have logged in to the server.
– For how to log in to an ECS, see the Elastic Cloud Server User Guide.– For how to log in to a BMS, see the Bare Metal Server User Guide.
l You have attached the EVS disk to the server, and the additional space has not beenallocated.
Checking the File Systems on the To-be-expanded DiskBefore expanding the disk capacity, check whether the file systems on the disk can beproperly mounted.
Step 1 (Optional) If there is an unmounted partition, run the following command to mount thepartition to the specified directory:
mount Disk partition Mounting directory
For example, run the following command:
mount /dev/xvdb1 /mnt/sdc
If the system returns a mount error, check whether the corresponding file system is correctlycreated. For example, a user may create the file system for the /dev/xvdb disk instead ofthe /dev/xvdb1 partition, and what is mounted on the directory is actually the /dev/xvdb disk,but not the /dev/xvdb1 partition.
Step 2 Run the following command to view the disk mounting information:
df -TH
Information similar to the following is displayed:
[root@ecs-b656 test]# df -THFilesystem Type Size Used Avail Use% Mounted on/dev/xvda2 xfs 11G 7.4G 3.2G 71% /devtmpfs devtmpfs 4.1G 0 4.1G 0% /devtmpfs tmpfs 4.1G 82k 4.1G 1% /dev/shmtmpfs tmpfs 4.1G 9.2M 4.1G 1% /runtmpfs tmpfs 4.1G 0 4.1G 0% /sys/fs/cgroup/dev/xvda3 xfs 1.1G 39M 1.1G 4% /home/dev/xvda1 xfs 1.1G 131M 915M 13% /boot/dev/xvdb1 ext4 11G 38M 9.9G 1% /mnt/sdc
Elastic Volume ServiceUser Guide 3 Management
2018-10-30 91
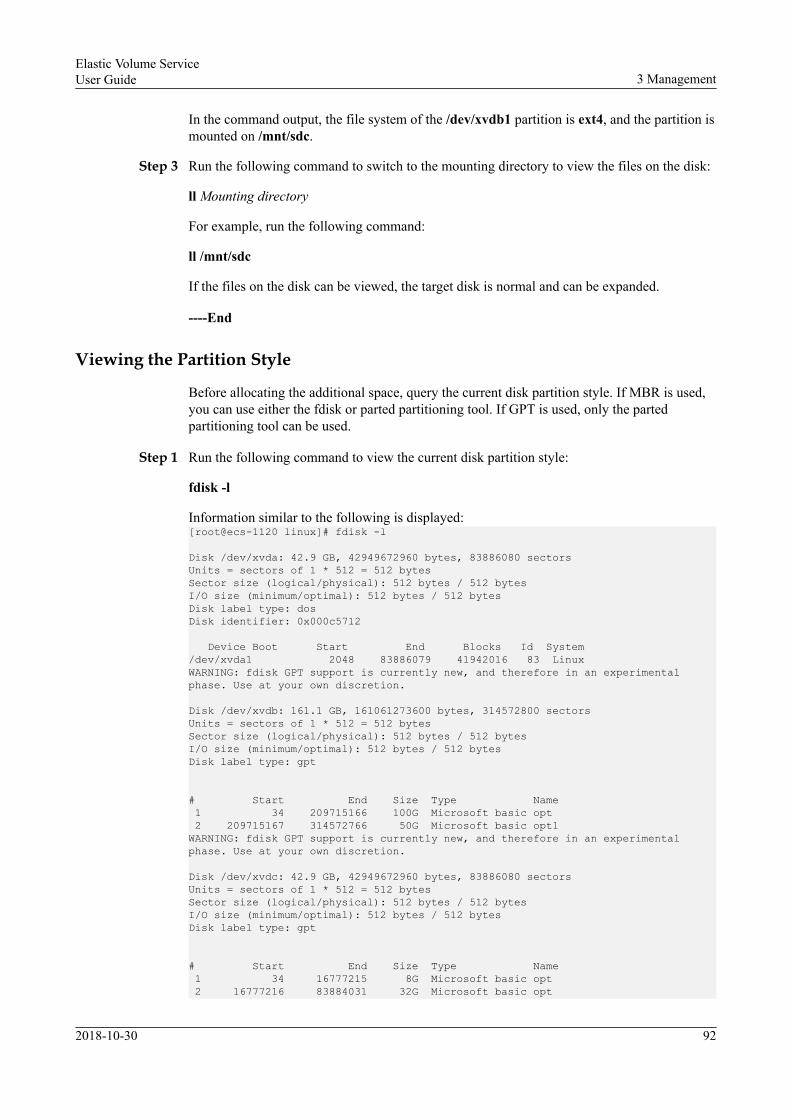
In the command output, the file system of the /dev/xvdb1 partition is ext4, and the partition ismounted on /mnt/sdc.
Step 3 Run the following command to switch to the mounting directory to view the files on the disk:
ll Mounting directory
For example, run the following command:
ll /mnt/sdc
If the files on the disk can be viewed, the target disk is normal and can be expanded.
----End
Viewing the Partition Style
Before allocating the additional space, query the current disk partition style. If MBR is used,you can use either the fdisk or parted partitioning tool. If GPT is used, only the partedpartitioning tool can be used.
Step 1 Run the following command to view the current disk partition style:
fdisk -l
Information similar to the following is displayed:[root@ecs-1120 linux]# fdisk -l
Disk /dev/xvda: 42.9 GB, 42949672960 bytes, 83886080 sectorsUnits = sectors of 1 * 512 = 512 bytesSector size (logical/physical): 512 bytes / 512 bytesI/O size (minimum/optimal): 512 bytes / 512 bytesDisk label type: dosDisk identifier: 0x000c5712
Device Boot Start End Blocks Id System/dev/xvda1 2048 83886079 41942016 83 LinuxWARNING: fdisk GPT support is currently new, and therefore in an experimental phase. Use at your own discretion.
Disk /dev/xvdb: 161.1 GB, 161061273600 bytes, 314572800 sectorsUnits = sectors of 1 * 512 = 512 bytesSector size (logical/physical): 512 bytes / 512 bytesI/O size (minimum/optimal): 512 bytes / 512 bytesDisk label type: gpt
# Start End Size Type Name 1 34 209715166 100G Microsoft basic opt 2 209715167 314572766 50G Microsoft basic opt1WARNING: fdisk GPT support is currently new, and therefore in an experimental phase. Use at your own discretion.
Disk /dev/xvdc: 42.9 GB, 42949672960 bytes, 83886080 sectorsUnits = sectors of 1 * 512 = 512 bytesSector size (logical/physical): 512 bytes / 512 bytesI/O size (minimum/optimal): 512 bytes / 512 bytesDisk label type: gpt
# Start End Size Type Name 1 34 16777215 8G Microsoft basic opt 2 16777216 83884031 32G Microsoft basic opt
Elastic Volume ServiceUser Guide 3 Management
2018-10-30 92

In the command output, parameter Disk label type indicates the disk partition style. Valuedos indicates the MBR partition style, and value gpt indicates the GPT partition style.
----End
Creating a New Partition
The following example shows you how to make use of the additional capacity of a systemdisk by creating a new partition and mount the partition on /opt without interrupting services.
Step 1 Run the following command to view the disk partition information:
fdisk -l
Information similar to the following is displayed: (/dev/xvda is the system disk.)[root@ecs-bab9 test]# fdisk -l
Disk /dev/xvda: 64.4 GB, 64424509440 bytes, 125829120 sectorsUnits = sectors of 1 * 512 = 512 bytesSector size (logical/physical): 512 bytes / 512 bytesI/O size (minimum/optimal): 512 bytes / 512 bytesDisk label type: dosDisk identifier: 0x000cc4ad
Device Boot Start End Blocks Id System/dev/xvda1 * 2048 2050047 1024000 83 Linux/dev/xvda2 2050048 22530047 10240000 83 Linux/dev/xvda3 22530048 24578047 1024000 83 Linux/dev/xvda4 24578048 83886079 29654016 5 Extended/dev/xvda5 24580096 26628095 1024000 82 Linux swap / Solaris
Step 2 Run the following command to enter fdisk (/dev/xvda is used in this example):
fdisk /dev/xvda
Information similar to the following is displayed:[root@ecs-bab9 test]# fdisk /dev/xvdaWelcome to fdisk (util-linux 2.23.2).
Changes will remain in memory only, until you decide to write them.Be careful before using the write command.
Command (m for help):
Step 3 Enter n and press Enter to create a new partition.
Information similar to the following is displayed:Command (m for help): nAll primary partitions are in useAdding logical partition 6First sector (26630144-83886079, default 26630144):
NOTE
If the MBR partition style is used, a maximum of 4 primary partitions, or 3 primary partitions and 1extended partition can be created. The extended partition cannot be used directly and must be dividedinto logical partitions before use.
In this example, the maximum number of the primary partitions has been reached for the system disk,and the disk already has 5 partitions (3 primary partitions and 2 logical partitions). Therefore, the systemautomatically creates a sixth logical partition in the extended partition.
To view the example operations in case that the maximum number of primary partitions is not reachedfor the system disk, see 3.3.8 Performing Post-Expansion Operations for a Linux System Disk(fdisk).
Elastic Volume ServiceUser Guide 3 Management
2018-10-30 93

Step 4 Enter the new partition's first sector, for example the default value, and press Enter.
The first sector must be greater than the last sector of the existing partition.
Information similar to the following is displayed:First sector (26630144-83886079, default 26630144):Using default value 26630144Last sector, +sectors or +size{K,M,G} (26630144-83886079, default 83886079):
Step 5 Enter the new partition's last sector and press Enter.
The default last sector is used in this example.
Information similar to the following is displayed:Last sector, +sectors or +size{K,M,G} (26630144-83886079, default 83886079):Using default value 83886079Partition 6 of type Linux and of size 27.3 GiB is set
Command (m for help):
Step 6 Enter p and press Enter to view the created partition.
Information similar to the following is displayed:Disk /dev/xvda: 64.4 GB, 64424509440 bytes, 125829120 sectorsUnits = sectors of 1 * 512 = 512 bytesSector size (logical/physical): 512 bytes / 512 bytesI/O size (minimum/optimal): 512 bytes / 512 bytesDisk label type: dosDisk identifier: 0x000cc4ad
Device Boot Start End Blocks Id System/dev/xvda1 * 2048 2050047 1024000 83 Linux/dev/xvda2 2050048 22530047 10240000 83 Linux/dev/xvda3 22530048 24578047 1024000 83 Linux/dev/xvda4 24578048 83886079 29654016 5 Extended/dev/xvda5 24580096 26628095 1024000 82 Linux swap / Solaris/dev/xvda6 26630144 83886079 28627968 83 Linux
Command (m for help):
Step 7 Enter w and press Enter to write the changes into the partition table.
Information similar to the following is displayed:Command (m for help): wThe partition table has been altered!
Calling ioctl() to re-read partition table.
WARNING: Re-reading the partition table failed with error 16: Device or resource busy.The kernel still uses the old table. The new table will be used atthe next reboot or after you run partprobe(8) or kpartx(8)Syncing disks.
The partition is successfully created.
NOTE
In case that you want to discard the changes made before, you can exit fdisk by entering q.
Step 8 Run the following command to synchronize the new partition table to the OS:
partprobe
Step 9 Run the following command to create a file system on the newly created partition:
In this example, the ext3 file system is created.
Elastic Volume ServiceUser Guide 3 Management
2018-10-30 94

mkfs -t ext3 /dev/xvda6
NOTE
The operation for setting the xfs file system is the same as that for setting the ext3 or ext4 file system.The command is mkfs -t xfs /dev/xvda6.
Information similar to the following is displayed:[root@ecs-bab9 test]# mkfs -t ext3 /dev/xvda6mke2fs 1.42.9 (28-Dec-2013)Filesystem label=OS type: LinuxBlock size=4096 (log=2)Fragment size=4096 (log=2)Stride=0 blocks, Stripe width=0 blocks1790544 inodes, 7156992 blocks357849 blocks (5.00%) reserved for the super userFirst data block=0Maximum filesystem blocks=2155872256219 block groups32768 blocks per group, 32768 fragments per group8176 inodes per groupSuperblock backups stored on blocks: 32768, 98304, 163840, 229376, 294912, 819200, 884736, 1605632, 2654208, 4096000
Allocating group tables: doneWriting inode tables: doneCreating journal (32768 blocks): doneWriting superblocks and filesystem accounting information: done
The formatting takes a while, and you need to observe the system running status. Once doneis displayed in the command output, the formatting is complete.
Step 10 Run the following command to mount the new partition on a space-demanding directory, forexample /opt:
mount /dev/xvda6 /opt
Information similar to the following is displayed:[root@ecs-bab9 test]# mount /dev/xvda6 /opt[root@ecs-bab9 test]#
NOTE
If the new partition is mounted on a directory that is not empty, the subdirectories and files in thedirectory will be hidden. Therefore, you are advised to mount the new partition on an empty directory ora newly created directory. If the new partition must be mounted on a directory that is not empty, movethe subdirectories and files in this directory to another directory temporarily. After the partition issuccessfully mounted, move the subdirectories and files back.
Step 11 Run the following command to view the mount result:
df -TH
Information similar to the following is displayed:[root@ecs-bab9 test]# df -THFilesystem Type Size Used Avail Use% Mounted on/dev/xvda2 xfs 11G 7.4G 3.2G 71% /devtmpfs devtmpfs 4.1G 0 4.1G 0% /devtmpfs tmpfs 4.1G 82k 4.1G 1% /dev/shmtmpfs tmpfs 4.1G 9.2M 4.1G 1% /runtmpfs tmpfs 4.1G 0 4.1G 0% /sys/fs/cgroup/dev/xvda3 xfs 1.1G 39M 1.1G 4% /home/dev/xvda1 xfs 1.1G 131M 915M 13% /boot/dev/xvda6 ext3 29G 47M 28G 1% /opt
----End
Elastic Volume ServiceUser Guide 3 Management
2018-10-30 95

Expanding an Existing Partition
The following example shows you how to make use of the additional capacity of a data diskattached to a server by recreating the /dev/xvdb1 partition and mounting the partitionon /mnt/sdc. During this process, the services will be interrupted.
After the disk capacity has been expanded, the additional space is added to the end of the disk.When the disk has multiple partitions, only the partition at the end of the disk can beexpanded.
Step 1 Run the following command to view the disk partition information:
fdisk -l
Information similar to the following is displayed:[root@ecs-b656 test]# fdisk -l
Disk /dev/xvda: 42.9 GB, 42949672960 bytes, 83886080 sectorsUnits = sectors of 1 * 512 = 512 bytesSector size (logical/physical): 512 bytes / 512 bytesI/O size (minimum/optimal): 512 bytes / 512 bytesDisk label type: dosDisk identifier: 0x000cc4ad
Device Boot Start End Blocks Id System/dev/xvda1 * 2048 2050047 1024000 83 Linux/dev/xvda2 2050048 22530047 10240000 83 Linux/dev/xvda3 22530048 24578047 1024000 83 Linux/dev/xvda4 24578048 83886079 29654016 5 Extended/dev/xvda5 24580096 26628095 1024000 82 Linux swap / Solaris
Disk /dev/xvdb: 21.5 GB, 21474836480 bytes, 41943040 sectorsUnits = sectors of 1 * 512 = 512 bytesSector size (logical/physical): 512 bytes / 512 bytesI/O size (minimum/optimal): 512 bytes / 512 bytesDisk label type: dosDisk identifier: 0xb00005bd
Device Boot Start End Blocks Id System/dev/xvdb1 2048 20971519 10484736 83 Linux
In the command output, the total capacity of the /dev/xvdb disk is 21.5 GB, and the disk hasonly one partition, dev/xvdb1. The partition's first sector is 2048, and its last sector is20971519.
View the /dev/xvdb capacity and check whether the additional space is included.l If the additional space is not included, refresh the capacity according to 3.3.7
Performing Post-Expansion Operations for a Linux SCSI Data Disk (fdisk).l If the additional space is included, take note of the first and last sectors of the dev/xvdb1
partition and then go to Step 2. These values will be used in the follow-up operations.
Step 2 Run the following command to unmount the disk partition:
umount /mnt/sdc
Step 3 Run the following command to enter fdisk and enter d to delete the existing /dev/xvdb1partition:
Elastic Volume ServiceUser Guide 3 Management
2018-10-30 96

fdisk /dev/xvdb
Information similar to the following is displayed:[root@ecs-b656 test]# fdisk /dev/xvdbWelcome to fdisk (util-linux 2.23.2).
Changes will remain in memory only, until you decide to write them.Be careful before using the write command.
Command (m for help): dSelected partition 1Partition 1 is deleted
Command (m for help):
NOTE
If the partitions are recreated according to the following steps, deleting partitions will not cause data losson the data disk.
Step 4 Enter n and press Enter to create a new partition.
Entering n creates a new partition.
Information similar to the following is displayed:Command (m for help): nPartition type: p primary (0 primary, 0 extended, 4 free) e extended
There are two types of disk partitions:l Choosing p creates a primary partition.l Choosing e creates an extended partition.
Step 5 Ensure that the entered partition type is the same as the partition had before. In this example, aprimary partition is used. Therefore, enter p and press Enter to create a primary partition.
Information similar to the following is displayed:Select (default p): pPartition number (1-4, default 1):
In the command output, Partition number specifies the primary partition number.
Step 6 Ensure that entered partition number is the same as the partition had before. In this example,the partition number 1 is used. Therefore, enter 1 and press Enter.
Information similar to the following is displayed:Partition number (1-4, default 1): 1First sector (2048-41943039, default 2048):
In the command output, First sector specifies the first sector.
NOTE
Data will be lost if the following operations are performed:l Select a first sector other than the partition had before.l Select a last sector smaller than the partition had before.
Step 7 Ensure that the entered first sector is the same as the partition had before. In this example,first sector 2048 is recorded in Step 1. Therefore, enter 2048 and press Enter.
Information similar to the following is displayed:First sector (2048-41943039, default 2048):Using default value 2048Last sector, +sectors or +size{K,M,G} (2048-41943039, default 41943039):
Elastic Volume ServiceUser Guide 3 Management
2018-10-30 97

In the command output, Last sector specifies the last sector.
Step 8 Ensure that the entered last sector is equal to or greater than the last sector recorded in Step 1.In this example, the recorded last sector is 20971519, and the default last sector is used.Therefore, enter 41943039 and press Enter.
Information similar to the following is displayed:Last sector, +sectors or +size{K,M,G} (2048-41943039, default 41943039):Using default value 41943039Partition 1 of type Linux and of size 20 GiB is setCommand (m for help):
The partition is successfully created.
Step 9 Enter p and press Enter to view the details about the created partition.
Information similar to the following is displayed:Command (m for help): p
Disk /dev/xvdb: 21.5 GB, 21474836480 bytes, 41943040 sectorsUnits = sectors of 1 * 512 = 512 bytesSector size (logical/physical): 512 bytes / 512 bytesI/O size (minimum/optimal): 512 bytes / 512 bytesDisk label type: dosDisk identifier: 0xb00005bd
Device Boot Start End Blocks Id System/dev/xvdb1 2048 41943039 20970496 83 Linux
Command (m for help):
Details about the /dev/xvdb1 partition are displayed.
Step 10 Enter w and press Enter to write the changes into the partition table.
Information similar to the following is displayed:Command (m for help): wThe partition table has been altered!
Calling ioctl() to re-read partition table.Syncing disks.
The partition is successfully created.
NOTE
In case that you want to discard the changes made before, you can exit fdisk by entering q.
Step 11 Perform the following operations based on the file system of the disk:l For the ext3 or ext4 file system
a. Run the following command to check the correctness of the file system on /dev/xvdb1:e2fsck -f /dev/xvdb1Information similar to the following is displayed:[root@ecs-b656 test]# e2fsck -f /dev/xvdb1e2fsck 1.42.9 (28-Dec-2013)Pass 1: Checking inodes, blocks, and sizesPass 2: Checking directory structurePass 3: Checking directory connectivityPass 4: Checking reference countsPass 5: Checking group summary information/dev/xvdb1: 11/655360 files (0.0% non-contiguous), 83137/2621184 blocks
b. Run the following command to expand the size of the file system on /dev/xvdb1:
Elastic Volume ServiceUser Guide 3 Management
2018-10-30 98

resize2fs /dev/xvdb1Information similar to the following is displayed:[root@ecs-b656 test]# resize2fs /dev/xvdb1resize2fs 1.42.9 (28-Dec-2013)Resizing the filesystem on /dev/xvdb1 to 5242624 (4k) blocks.The filesystem on /dev/xvdb1 is now 5242624 blocks long.
c. Run the following command to mount the created partition to the /mnt/sdcdirectory:mount /dev/xvdb1 /mnt/sdc
l For the xfs file system
a. Run the following command to mount the created partition to the /mnt/sdcdirectory:mount /dev/xvdb1 /mnt/sdc
b. Run the following command to expand the size of the file system on /dev/xvdb1:sudo xfs_growfs /dev/xvdb1
Step 12 Run the following command to view the mount result for /dev/xvdb1:
df -TH
----End
Setting Automatic Disk Mounting at System Start
To automatically mount a disk when a server starts, you should not specify its partition, forexample /dev/xvdb1, in /etc/fstab. Because the sequence of cloud devices, and therefore theirnames may change during the server stop and start. You are advised to use the universallyunique identifier (UUID) in /etc/fstab to automatically mount a disk at system start.
NOTE
The UUID is the unique character string for disk partitions in a Linux system.
Step 1 Run the following command to query the partition UUID:
blkid Disk partition
For example, run the following command to query the UUID of /dev/xvdb1:
blkid /dev/xvdb1
Information similar to the following is displayed:
[root@ecs-b656 test]# blkid /dev/xvdb1/dev/xvdb1: UUID="1851e23f-1c57-40ab-86bb-5fc5fc606ffa" TYPE="ext3"
The UUID of /dev/xvdb1 is displayed.
Step 2 Run the following command to open the fstab file using the vi editor:
vi /etc/fstab
Step 3 Press i to enter the editing mode.
Step 4 Move the cursor to the end of the file and press Enter. Then add the following information:UUID=1851e23f-1c57-40ab-86bb-5fc5fc606ffa /mnt/sdc ext3 defaults 0 2
Step 5 Press Esc, enter :wq, and press Enter.
Elastic Volume ServiceUser Guide 3 Management
2018-10-30 99

The system saves the configurations and exits the vi editor.
----End
3.3.6 Performing Post-Expansion Operations for a Linux EVS Disk(parted)
Scenarios
After the capacity expansion has succeeded, the additional EVS disk space needs to beallocated to an existing partition or a new partition.
This topic uses EulerOS 2.0 64bit to describe how to allocate the additional EVS disk space toa partition using parted.
The method for allocating the additional space varies depending on the server OS. Thisdocument is used for reference only. For the detailed operations and differences, see thecorresponding OS documents.
Based on your service requirements and actual disk condition, you can choose either of thefollowing ways to allocate the additional disk space:l Create a new partition (services will not be interrupted)
Creating a new partition for the expanded disk does not require the original partitions tobe unmounted. Therefore, the impacts on services are minor than expanding an existingpartition. This method is recommended for system disks or disks carrying services thatcannot be interrupted.If the MBR partition style is used, the disk capacity cannot exceed 2 TB and the numberof partitions cannot exceed the upper limit after the expansion completes.
l Expand an existing partition (services will be interrupted)If the MBR partition style is used and the number of partitions has reached the upperlimit, the existing partition needs to be expanded. Expanding an existing partition doesnot delete its data, but requires the partition to unmount. Therefore, services will beinterrupted.If the MBR partition style is used and the disk capacity after expansion has exceeded 2TB, the space exceeding 2 TB cannot be used. To use the excessive space, the diskpartition style must be changed from MBR to GPT. Data on the disk will be clearedduring such a change. Therefore, back up the disk data before changing the partitionstyle.
Performing the expansion operations with caution. Misoperation may lead to data loss orexceptions. Therefore, you are advised to back up the disk data using backups orsnapshots before expansion. For details about backups and snapshots, see 3.6 ManagingEVS Backup and 3.7.1 Creating a Snapshot, respectively.
Prerequisitesl You have logged in to the server.
Elastic Volume ServiceUser Guide 3 Management
2018-10-30 100

– For how to log in to an ECS, see the Elastic Cloud Server User Guide.
– For how to log in to a BMS, see the Bare Metal Server User Guide.
l You have attached the EVS disk to the server, and the additional space has not beenallocated.
Viewing the Partition Style
Before allocating the additional space, query the current disk partition style. If MBR is used,you can use either the fdisk or parted partitioning tool. If GPT is used, only the partedpartitioning tool can be used.
Step 1 Run the following command to view the disk information:
lsblk
Information similar to the following is displayed:[root@ecs-1120 linux]# lsblkNAME MAJ:MIN RM SIZE RO TYPE MOUNTPOINTxvda 202:0 0 40G 0 disk └─xvda1 202:1 0 40G 0 part /xvdb 202:16 0 150G 0 disk ├─xvdb1 202:17 0 100G 0 part /mnt/sdc└─xvdb2 202:18 0 50G 0 part /mnt/optxvdc 202:32 0 40G 0 disk ├─xvdc1 202:33 0 8G 0 part └─xvdc2 202:34 0 32G 0 part
Step 2 Run the following command and enter p to view the current disk partition style:
parted Disk
For example, run the following command to view the partition style of the /dev/xvdb disk:
parted /dev/xvdb
Information similar to the following is displayed:root@ecs-1120 linux]# parted /dev/xvdbGNU Parted 3.1Using /dev/xvdbWelcome to GNU Parted! Type 'help' to view a list of commands.(parted) p Model: Xen Virtual Block Device (xvd)Disk /dev/xvdb: 161GBSector size (logical/physical): 512B/512BPartition Table: gptDisk Flags:
Number Start End Size File system Name Flags 1 17.4kB 107GB 107GB ext4 opt 2 107GB 161GB 53.7GB ext4 opt1
In the command output, parameter Partition Table indicates the disk partition style. Valuemsdos indicates the MBR partition style, and value gpt indicates the GPT partition style.
Step 3 Enter q and press Enter to exit parted.
Step 4 Check the disk partition style of other disks. For details, see Step 2 to Step 3.
----End
Elastic Volume ServiceUser Guide 3 Management
2018-10-30 101

Creating a New PartitionThe following example shows you how to make use of the additional capacity of a systemdisk by creating a new partition and mount the partition on /opt without interrupting services.
Step 1 Run the following command to view the disk partition information:
lsblk
Information similar to the following is displayed:[root@ecs-1120 linux]# lsblkNAME MAJ:MIN RM SIZE RO TYPE MOUNTPOINTxvda 202:0 0 80G 0 disk └─xvda1 202:1 0 40G 0 part /xvdb 202:16 0 250G 0 disk ├─xvdb1 202:17 0 100G 0 part └─xvdb2 202:18 0 50G 0 part xvdc 202:32 0 40G 0 disk ├─xvdc1 202:33 0 8G 0 part └─xvdc2 202:34 0 32G 0 part
In the command output, the capacity of the dev/xvda system disk is 80 GB, in which the in-use dev/xvda1 partition takes 40 GB and the additional 40 GB has not been allocated.
Step 2 Run the following command to enter parted to allocate the additional space of the system diskto a partition:
parted System disk
In this example, /dev/xvda is the system disk.
parted /dev/xvda
Information similar to the following is displayed:
[root@ecs-1120 linux]# parted /dev/xvdaGNU Parted 3.1Using /dev/xvdaWelcome to GNU Parted! Type 'help' to view a list of commands.
Step 3 Enter unit s and press Enter to set the measurement unit of the disk to sector numbers.
Step 4 Enter p and press Enter to view the current disk partition style.
Information similar to the following is displayed:
(parted) unit s (parted) p Model: Xen Virtual Block Device (xvd)Disk /dev/xvda: 167772160sSector size (logical/physical): 512B/512BPartition Table: msdosDisk Flags:
Number Start End Size Type File system Flags 1 2048s 83886079s 83884032s primary ext4
Step 5 Enter mkpart and press Enter to create a new partition.
Step 6 In this example, a primary partition is created. Therefore, enter p and press Enter to create aprimary partition.
Information similar to the following is displayed:
(parted) mkpartPartition type? primary/extended? p
Elastic Volume ServiceUser Guide 3 Management
2018-10-30 102

File system type? [ext2]? ext4 Start? 83886080End? 1677722159
Step 7 Set the file system type and the size of the new partition.
Value 83886080 indicates the first sector of the dev/xvda2 partition you created, and value167772159 indicates the last sector. The two values are used for reference only. You candetermine the number of partitions and partition sizes based on your service requirements.
Information similar to the following is displayed:
(parted) mkpartPartition type? primary/extended? pFile system type? [ext2]? ext4 Start? 83886080End? 1677722159
NOTE
The file system type may fail to set in this step. Therefore, reconfigure the file system type according toStep 10 after the partition is created.
Step 8 Enter p and press Enter to view the created partition.
Information similar to the following is displayed:(parted) p Model: Xen Virtual Block Device (xvd)Disk /dev/xvda: 167772160sSector size (logical/physical): 512B/512BPartition Table: msdosDisk Flags:
Number Start End Size Type File system Flags 1 2048s 83886079s 83884032s primary ext4 2 83886080s 167772159s 83886080s primary
The dev/xvda2 partition is created.
Step 9 Enter q and press Enter to exit parted.
Step 10 Run the following command to create a file system on the newly created partition:
In this example, the ext3 file system is created.
mkfs -t ext3 /dev/xvda2
NOTE
The operation for setting the xfs file system is the same as that for setting the ext3 or ext4 file system.The command is mkfs -t xfs /dev/xvda2.
Information similar to the following is displayed:
[root@ecs-1120 linux]# mkfs -t ext3 /dev/xvda2mke2fs 1.42.9 (28-Dec-2013)Filesystem label=OS type: LinuxBlock size=4096 (log=2)Fragment size=4096 (log=2)Stride=0 blocks, Stripe width=0 blocks2621440 inodes, 10485760 blocks524288 blocks (5.00%) reserved for the super userFirst data block=0Maximum filesystem blocks=2157969408320 block groups32768 blocks per group, 32768 fragments per group8192 inodes per group
Elastic Volume ServiceUser Guide 3 Management
2018-10-30 103

Superblock backups stored on blocks: ?32768, 98304, 163840, 229376, 294912, 819200, 884736, 1605632, 2654208, ?4096000, 7962624
Allocating group tables: done Writing inode tables: done Creating journal (32768 blocks): doneWriting superblocks and filesystem accounting information: done
The formatting takes a while, and you need to observe the system running status. Once doneis displayed in the command output, the formatting is complete.
Step 11 Run the following command to mount the new partition on the space-demanding directory, forexample /opt:
mount /dev/xvda6 /opt
Information similar to the following is displayed:
[root@ecs-1120 linux]# mount /dev/xvda2 /opt[root@ecs-1120 linux]#
NOTE
If the new partition is mounted on a directory that is not empty, the subdirectories and files in thedirectory will be hidden. Therefore, you are advised to mount the new partition on an empty directory ora newly created directory. If the new partition must be mounted on a directory that is not empty, movethe subdirectories and files in this directory to another directory temporarily. After the partition issuccessfully mounted, move the subdirectories and files back.
Step 12 Run the following command to view the mount result:
df -TH
Information similar to the following is displayed:
[root@ecs-1120 linux]# df -THFilesystem Type Size Used Avail Use% Mounted on/dev/xvda1 ext3 43G 8.3G 33G 21% /devtmpfs devtmpfs 885M 0 885M 0% /devtmpfs tmpfs 894M 0 894M 0% /dev/shmtmpfs tmpfs 894M 18M 877M 2% /runtmpfs tmpfs 894M 0 894M 0% /sys/fs/cgrouptmpfs tmpfs 179M 0 179M 0% /run/user/2000tmpfs tmpfs 179M 0 179M 0% /run/user/0tmpfs tmpfs 179M 0 179M 0% /run/user/1001/dev/xvda2 ext3 43G 51M 40G 1% /opt
----End
Expanding an Existing PartitionThe following example shows you how to make use of the additional capacity of a diskattached to a server by recreating the /dev/xvdc1 partition mounted on /mnt/sdc. Becausethe /dev/xvdc disk only has one partition, this partition can be regarded as the partition at thedisk end. During the partition recreation, services will be interrupted.
After the disk capacity has been expanded, the additional space is added to the end of the disk.When the disk has multiple partitions, only the partition at the end of the disk can beexpanded.
Elastic Volume ServiceUser Guide 3 Management
2018-10-30 104

Step 1 Run the following command to view the disk partition information:
lsblk
Information similar to the following is displayed:[root@ecs-1120 sdc]# lsblkNAME MAJ:MIN RM SIZE RO TYPE MOUNTPOINTxvda 202:0 0 80G 0 disk ├─xvda1 202:1 0 40G 0 part /└─xvda2 202:2 0 40G 0 part /optxvdb 202:16 0 350G 0 disk ├─xvdb1 202:17 0 100G 0 part └─xvdb2 202:18 0 200G 0 partxvdc 202:32 0 60G 0 disk └─xvdc1 202:33 0 10G 0 part /mnt/sdc
In the command output, the total capacity of the /dev/xvdc disk is 60 GB, in which theexisting partition takes 10 GB. The /dev/xvdc1 partition is at the end of the disk and has beenmounted on /mnt/sdc.
View the /dev/xvdc capacity and check whether the additional space is included.l If the additional space is not included, refresh the capacity according to 3.3.7
Performing Post-Expansion Operations for a Linux SCSI Data Disk (fdisk).l If the additional space is included, go to Step 2.
Step 2 Run the following command to unmount the disk partition:
umount /mnt/sdc
Step 3 Run the following command to view the unmount result:
lsblk
Information similar to the following is displayed:[root@ecs-1120 linux]# umount /mnt/sdc[root@ecs-1120 linux]# lsblkNAME MAJ:MIN RM SIZE RO TYPE MOUNTPOINTxvda 202:0 0 80G 0 disk ├─xvda1 202:1 0 40G 0 part /└─xvda2 202:2 0 40G 0 part /optxvdb 202:16 0 350G 0 disk ├─xvdb1 202:17 0 100G 0 part └─xvdb2 202:18 0 200G 0 partxvdc 202:32 0 60G 0 disk └─xvdc1 202:33 0 10G 0 part
Step 4 Run the following command to enter parted to allocate the additional space of the data disk toa partition:
parted Data disk
In this example, /dev/xvdc is the data disk.
parted /dev/xvdc
Information similar to the following is displayed:[root@ecs-1120 linux]# parted /dev/xvdcGNU Parted 3.1Using /dev/xvdcWelcome to GNU Parted! Type 'help' to view a list of commands.
Step 5 Enter unit s and press Enter to set the measurement unit of the disk to sector numbers.
Step 6 Enter p and press Enter to view the current disk partition style.
Elastic Volume ServiceUser Guide 3 Management
2018-10-30 105

Information similar to the following is displayed:(parted) unit s (parted) p Error: The backup GPT table is not at the end of the disk, as it should be. This might mean that another operating system believes the disk is smaller. Fix, by moving the backup to the end (and removing the old backup)?Fix/Ignore/Cancel? Fix Warning: Not all of the space available to /dev/xvdb appears to be used, you can fix the GPT to use all of the space (an extra 104857600 blocks) or continue with the current setting? Fix/Ignore? Fix Model: Xen Virtual Block Device (xvd)Disk /dev/xvdc: 125829120sSector size (logical/physical): 512B/512BPartition Table: gptDisk Flags:
Number Start End Size File system Name Flags 1 2048s 20969471s 20967424s ext4 opt
If the preceding information is displayed, enter Fix to rectify the disk exception. Then takenote of the first and last sectors of the /dev/xvdc1 partition. These values will be used duringthe partition recreation. In this example, the partition's first sector is 2048, and its last sector is20969471.
Step 7 The /dev/xvdc1 partition number is 1. Therefore, enter rm 1 and press Enter to delete thepartition.
Step 8 Enter p and press Enter to check whether the /dev/xvdc1 partition has been deleted.
Information similar to the following is displayed:(parted) rm 1(parted) p Model: Xen Virtual Block Device (xvd)Disk /dev/xvdc: 125829120sSector size (logical/physical): 512B/512BPartition Table: gptDisk Flags:
Number Start End Size File system Name Flags
Step 9 Enter mkpart opt 2048s 125829119 and press Enter to recreate the partition.
2048 specifies the first sector recorded in Step 6, and 125829119 specifies the last sector,which must be greater than or equal to the last sector recorded in Step 6.
Information similar to the following is displayed:(parted) mkpart opt 2048s 125829119sWarning: You requested a partition from 2048s to 125829199s (sectors 2048..125829199).The closest location we can manage is 2048s to 125829036s (sectors 2048..125829036).Is this still acceptable to you?Yes/No? Yes
Enter Yes as prompted to set the last sector.
If the following warning message is displayed, enter Cancel to stop the partitioning. Then,find the first sector with the best disk performance and use that value to partition the disk. Thewarning message will not be displayed if the first sector with the best disk performance hasbeen entered. In this example, 2048s is one of such first sectors. Therefore, the system doesnot display the warning message.Warning: The resulting partition is not properly aligned for best performance.Ignore/Cancel? Cancel
Elastic Volume ServiceUser Guide 3 Management
2018-10-30 106

NOTE
Data will be lost if the following operations are performed:
l Select a first sector other than the partition had before.
l Select a last sector smaller than the partition had before.
Step 10 Enter p and press Enter to check whether the /dev/xvdc1 partition has been recreated.
Information similar to the following is displayed:(parted) p Model: Xen Virtual Block Device (xvd)Disk /dev/xvdb: 125829120sSector size (logical/physical): 512B/512BPartition Table: gptDisk Flags:
Number Start End Size File system Name Flags 1 2048s 125829086s 125827039s ext4 opt
The /dev/xvdc1 partition has been recreated.
Step 11 Enter q and press Enter to exit parted.
Step 12 Perform the following operations based on the file system of the disk:l For the ext3 or ext4 file system
a. Run the following command to check the correctness of the file system on /dev/xvdc1:e2fsck -f /dev/xvdc1Information similar to the following is displayed:[root@ecs-1120 linux]# e2fsck -f /dev/xvdb2e2fsck 1.42.9 (28-Dec-2013)Pass 1: Checking inodes, blocks, and sizesPass 2: Checking directory structurePass 3: Checking directory connectivityPass 4: Checking reference countsPass 5: Checking group summary information/dev/xvdc1: 11/655360 files (0.0% non-contiguous), 83137/2620928 blocks
b. Run the following command to expand the size of the file system on /dev/xvdc1:resize2fs /dev/xvdc1Information similar to the following is displayed:[root@ecs-1120 linux]# resize2fs /dev/xvdc1resize2fs 1.42.9 (28-Dec-2013)Resizing the filesystem on /dev/xvdc1 to 15728379 (4k) blocks.The filesystem on /dev/xvdc1 is now 15728379 blocks long.
c. Run the following command to view the disk partition information after thepartition expansion:lsblkInformation similar to the following is displayed:[root@ecs-1120 linux]# lsblkNAME MAJ:MIN RM SIZE RO TYPE MOUNTPOINTNAME MAJ:MIN RM SIZE RO TYPE MOUNTPOINTxvda 202:0 0 80G 0 disk ├─xvda1 202:1 0 40G 0 part /└─xvda2 202:2 0 40G 0 part /optxvdb 202:16 0 350G 0 disk ├─xvdb1 202:17 0 100G 0 part └─xvdb2 202:18 0 200G 0 partxvdc 202:32 0 60G 0 disk └─xvdc1 202:33 0 60G 0 part
Elastic Volume ServiceUser Guide 3 Management
2018-10-30 107

In the command output, the total capacity of the /dev/xvdc disk is 60 GB, in whichthe additional 50 GB has been allocated to the dev/xvdc1 partition.
d. Run the following command to mount the created partition to the /mnt/sdcdirectory:mount /dev/xvdc1 /mnt/sdc
l For the xfs file system
a. Run the following command to mount the created partition to the /mnt/sdcdirectory:mount /dev/xvdc1 /mnt/sdc
b. Run the following command to expand the size of the file system on /dev/xvdc1:sudo xfs_growfs /dev/xvdc1
c. Run the following command to view the disk partition information after thepartition expansion:lsblkInformation similar to the following is displayed:[root@ecs-1120 linux]# lsblkNAME MAJ:MIN RM SIZE RO TYPE MOUNTPOINTNAME MAJ:MIN RM SIZE RO TYPE MOUNTPOINTxvda 202:0 0 80G 0 disk ├─xvda1 202:1 0 40G 0 part /└─xvda2 202:2 0 40G 0 part /optxvdb 202:16 0 350G 0 disk ├─xvdb1 202:17 0 100G 0 part └─xvdb2 202:18 0 200G 0 partxvdc 202:32 0 60G 0 disk └─xvdc1 202:33 0 60G 0 partIn the command output, the total capacity of the /dev/xvdc disk is 60 GB, in whichthe additional 50 GB has been allocated to the dev/xvdc1 partition.
Step 13 Run the following command to view the mount result for /dev/xvdc1:
df -TH
Information similar to the following is displayed:[root@ecs-1120 linux]# mount /dev/xvdc1 /mnt/sdc[root@ecs-1120 linux]# df -THFilesystem Type Size Used Avail Use% Mounted on/dev/xvda1 ext4 43G 8.3G 33G 21% /devtmpfs devtmpfs 885M 0 885M 0% /devtmpfs tmpfs 894M 0 894M 0% /dev/shmtmpfs tmpfs 894M 18M 877M 2% /runtmpfs tmpfs 894M 0 894M 0% /sys/fs/cgrouptmpfs tmpfs 179M 0 179M 0% /run/user/2000tmpfs tmpfs 179M 0 179M 0% /run/user/0tmpfs tmpfs 179M 0 179M 0% /run/user/1001/dev/xvda2 ext4 43G 51M 40G 1% /opt/dev/xvdc1 ext4 64G 55M 60G 1% /mnt/sdc
The /dev/xvdc1 partition has been mounted on the /mnt/sdc directory.
----End
Setting Automatic Disk Mounting at System StartTo automatically mount a disk when a server starts, you should not specify its partition, forexample /dev/xvdb1, in /etc/fstab. Because the sequence of cloud devices, and therefore theirnames may change during the server stop and start. You are advised to use the universallyunique identifier (UUID) in /etc/fstab to automatically mount a disk at system start.
Elastic Volume ServiceUser Guide 3 Management
2018-10-30 108

NOTE
The UUID is the unique character string for disk partitions in a Linux system.
Step 1 Run the following command to query the partition UUID:
blkid Disk partition
For example, run the following command to query the UUID of /dev/xvdb1:
blkid /dev/xvdb1
Information similar to the following is displayed:
[root@ecs-b656 test]# blkid /dev/xvdb1/dev/xvdb1: UUID="1851e23f-1c57-40ab-86bb-5fc5fc606ffa" TYPE="ext3"
The UUID of /dev/xvdb1 is displayed.
Step 2 Run the following command to open the fstab file using the vi editor:
vi /etc/fstab
Step 3 Press i to enter the editing mode.
Step 4 Move the cursor to the end of the file and press Enter. Then add the following information:UUID=1851e23f-1c57-40ab-86bb-5fc5fc606ffa /mnt/sdc ext3 defaults 0 2
Step 5 Press Esc, enter :wq, and press Enter.
The system saves the configurations and exits the vi editor.
----End
3.3.7 Performing Post-Expansion Operations for a Linux SCSIData Disk (fdisk)
ScenariosAfter the capacity expansion has succeeded, the additional EVS disk space needs to beallocated to an existing partition or a new partition.
This topic uses SUSE Linux Enterprise Server 11 SP4 64bit to describe how to allocate theadditional space of an attached SCSI data disk to a partition using fdisk.
Currently, a disk has been attached to a server, the original disk capacity is 10 GB. Inaddition, a 10-GB space has been added to the disk through the management console, and thetotal disk capacity should be 20 GB. However, the additional space cannot be viewed on theserver. The following operations guide you to query the additional space and expand thepartition.
The method for allocating the additional space varies depending on the server OS. Thisdocument is used for reference only. For the detailed operations and differences, see thecorresponding OS documents.
Based on your service requirements and actual disk condition, you can choose either of thefollowing ways to allocate the additional disk space:l Create a new partition (services will not be interrupted)
Creating a new partition for the expanded disk does not require the original partitions tobe unmounted. Therefore, the impacts on services are minor than expanding an existing
Elastic Volume ServiceUser Guide 3 Management
2018-10-30 109

partition. This method is recommended for system disks or disks carrying services thatcannot be interrupted.If the MBR partition style is used, the disk capacity cannot exceed 2 TB and the numberof partitions cannot exceed the upper limit after the expansion completes.
l Expand an existing partition (services will be interrupted)If the MBR partition style is used and the number of partitions has reached the upperlimit, the existing partition needs to be expanded. Expanding an existing partition doesnot delete its data, but requires the partition to unmount. Therefore, services will beinterrupted.If the MBR partition style is used and the disk capacity after expansion has exceeded 2TB, the space exceeding 2 TB cannot be used. To use the excessive space, the diskpartition style must be changed from MBR to GPT. Data on the disk will be clearedduring such a change. Therefore, back up the disk data before changing the partitionstyle.
Performing the expansion operations with caution. Misoperation may lead to data loss orexceptions. Therefore, you are advised to back up the disk data using backups orsnapshots before expansion. For details about backups and snapshots, see 3.6 ManagingEVS Backup and 3.7.1 Creating a Snapshot, respectively.
Prerequisitesl You have logged in to the server.
– For how to log in to an ECS, see the Elastic Cloud Server User Guide.– For how to log in to a BMS, see the Bare Metal Server User Guide.
l You have attached the EVS disk to the server, and the additional space has not beenallocated.
Expanding the Existing PartitionThe following example shows you how to make use of the additional capacity of a diskattached to a server by recreating the /dev/sda1 partition and mounting the partition on /mnt/sdc. During this process, the services will be interrupted.
Step 1 Run the following command to view the disk partition information:
fdisk -l
Information similar to the following is displayed:ecs-xen-02:/home/linux # fdisk -l
Disk /dev/xvda: 107.4 GB, 107374182400 bytes255 heads, 63 sectors/track, 13054 cylinders, total 209715200 sectorsUnits = sectors of 1 * 512 = 512 bytesSector size (logical/physical): 512 bytes / 512 bytesI/O size (minimum/optimal): 512 bytes / 512 bytesDisk identifier: 0x00065c40
Device Boot Start End Blocks Id System/dev/xvda1 2048 41945087 20971520 82 Linux swap / Solaris/dev/xvda2 * 41945088 83892223 20973568 83 Linux
Elastic Volume ServiceUser Guide 3 Management
2018-10-30 110

/dev/xvda3 83892224 209715199 62911488 83 Linux
Disk /dev/sda: 10.7 GB, 10737418240 bytes64 heads, 32 sectors/track, 10240 cylinders, total 20971520 sectorsUnits = sectors of 1 * 512 = 512 bytesSector size (logical/physical): 512 bytes / 512 bytesI/O size (minimum/optimal): 512 bytes / 512 bytesDisk identifier: 0x2f1c057a
Device Boot Start End Blocks Id System/dev/sda1 2048 20971519 10484736 83 Linux
In the command output, the 10 GB has been added to the /dev/sda data disk on themanagement console, and the total capacity should be 20 GB. However, the additional spaceis not included in the command output. In this case, run the desired command to update thedisk capacity of the server.
Step 2 Run the following command to update the disk capacity of the server:
echo 1 > /sys/class/scsi_device/%d:%d:%d:%d/device/rescan &
In the command, %d:%d:%d:%d indicates a folder in the /sys/class/scsi_device/ directoryand can be obtained using ll /sys/class/scsi_device/.
Information similar to the following is displayed: (2:0:0:0 indicates the folder to be obtained.)cs-xen-02:/sys/class/scsi_device # ll /sys/class/scsi_device/total 0lrwxrwxrwx 1 root root 0 Sep 26 11:37 2:0:0:0 -> ../../devices/xen/vscsi-2064/host2/target2:0:0/2:0:0:0/scsi_device/2:0:0:0
For example, run the following command:
echo 1 > /sys/class/scsi_device/2:0:0:0/device/rescan &
Step 3 After the update is complete, run the following command to view the disk partitioninformation again:
fdisk -l
Information similar to the following is displayed:ecs-xen-02:/sys/class/scsi_device # fdisk -l
Disk /dev/xvda: 107.4 GB, 107374182400 bytes255 heads, 63 sectors/track, 13054 cylinders, total 209715200 sectorsUnits = sectors of 1 * 512 = 512 bytesSector size (logical/physical): 512 bytes / 512 bytesI/O size (minimum/optimal): 512 bytes / 512 bytesDisk identifier: 0x00065c40
Device Boot Start End Blocks Id System/dev/xvda1 2048 41945087 20971520 82 Linux swap / Solaris/dev/xvda2 * 41945088 83892223 20973568 83 Linux/dev/xvda3 83892224 209715199 62911488 83 Linux
Disk /dev/sda: 21.5 GB, 21474836480 bytes64 heads, 32 sectors/track, 20480 cylinders, total 41943040 sectorsUnits = sectors of 1 * 512 = 512 bytesSector size (logical/physical): 512 bytes / 512 bytesI/O size (minimum/optimal): 512 bytes / 512 bytesDisk identifier: 0x2f1c057a
Device Boot Start End Blocks Id System/dev/sda1 2048 20971519 10484736 83 Linux
In the command output, the additional space has been added to the /dev/sda data disk, and theupdate is successful. The /dev/sda disk has only one partition, /dev/sda1. Take note of first
Elastic Volume ServiceUser Guide 3 Management
2018-10-30 111

and last sectors of the /dev/sda1 partition. These values will be used during the partitionrecreation. The partition's first sector is 2048, and its last sector is 20971519.
Step 4 Run the following command to unmount the disk partition:
umount /mnt/sdc
Step 5 Run the following command to enter fdisk and enter d to delete the /dev/sda1 partition:
fdisk /dev/sda1
Information similar to the following is displayed:[ecs-xen-02:/sys/class/scsi_device # fdisk /dev/sda
Command (m for help): dSelected partition 1
Command (m for help):
Step 6 Enter n and press Enter to create a new partition.
Entering n creates a new partition.
Information similar to the following is displayed:Command (m for help): nCommand action e extended p primary partition (1-4)
There are two types of disk partitions:l Choosing p creates a primary partition.l Choosing e creates an extended partition.
Step 7 Ensure that the entered partition type is the same as the partition had before. In this example, aprimary partition is used. Therefore, enter p and press Enter to create a primary partition.
Information similar to the following is displayed:pPartition number (1-4, default 1):
In the command output, Partition number specifies the primary partition number.
Step 8 Ensure that entered partition number is the same as the partition had before. In this example,the partition number 1 is used. Therefore, enter 1 and press Enter.
Information similar to the following is displayed:Partition number (1-4, default 1): 1First sector (2048-41943039, default 2048):
In the command output, First sector specifies the first sector.
NOTE
Data will be lost if the following operations are performed:l Select a first sector other than the partition had before.l Select a last sector smaller than the partition had before.
Step 9 Ensure that the entered first sector is the same as the partition had before. In this example,first sector 2048 is recorded in Step 3. Therefore, enter 2048 and press Enter.
Information similar to the following is displayed:First sector (2048-41943039, default 2048): Using default value 2048Last sector, +sectors or +size{K,M,G} (2048-41943039, default 41943039):
Elastic Volume ServiceUser Guide 3 Management
2018-10-30 112

In the command output, Last sector specifies the last sector.
Step 10 Ensure that the entered last sector is equal to or greater than the last sector recorded in Step 3.In this example, the recorded last sector is 20971519, and the default last sector is used.Therefore, enter 41943039 and press Enter.
Information similar to the following is displayed:Last sector, +sectors or +size{K,M,G} (2048-41943039, default 41943039): Using default value 41943039
Command (m for help):
The primary partition is successfully created.
Step 11 Enter p and press Enter to view the details about the created partition.
Information similar to the following is displayed: (Details about the /dev/sda1 partition aredisplayed.)Command (m for help): p
Disk /dev/sda: 21.5 GB, 21474836480 bytes64 heads, 32 sectors/track, 20480 cylinders, total 41943040 sectorsUnits = sectors of 1 * 512 = 512 bytesSector size (logical/physical): 512 bytes / 512 bytesI/O size (minimum/optimal): 512 bytes / 512 bytesDisk identifier: 0x2f1c057a
Device Boot Start End Blocks Id System/dev/sda1 2048 41943039 20970496 83 LinuxCommand (m for help):
Step 12 Enter w and press Enter to write the changes into the partition table.
Information similar to the following is displayed: (The partition is successfully created.)Command (m for help): wThe partition table has been altered!
Calling ioctl() to re-read partition table.Syncing disks.
NOTE
In case that you want to discard the changes made before, you can exit fdisk by entering q.
Step 13 Perform the following operations based on the file system of the disk:l For the ext3 or ext4 file system
a. Run the following command to check the correctness of the file system on /dev/sda1:e2fsck -f /dev/sda1Information similar to the following is displayed:ecs-xen-02:/sys/class/scsi_device # e2fsck -f /dev/sda1e2fsck 1.41.9 (22-Aug-2009)Pass 1: Checking inodes, blocks, and sizesPass 2: Checking directory structurePass 3: Checking directory connectivityPass 4: Checking reference countsPass 5: Checking group summary information/dev/sda1: 11/655360 files (0.0% non-contiguous), 79663/2621184 blocks
b. Run the following command to expand the size of the file system on /dev/sda1:resize2fs /dev/sda1Information similar to the following is displayed:
Elastic Volume ServiceUser Guide 3 Management
2018-10-30 113

ecs-xen-02:/sys/class/scsi_device # resize2fs /dev/sda1resize2fs 1.41.9 (22-Aug-2009)Resizing the filesystem on /dev/sda1 to 5242624 (4k) blocks.The filesystem on /dev/sda1 is now 5242624 blocks long.
c. Run the following command to mount the created partition to the /mnt/sdcdirectory:mount /dev/sda1 /mnt/sdc
l For the xfs file system
a. Run the following command to mount the created partition to the /mnt/sdcdirectory:mount /dev/sda1 /mnt/sdc
b. Run the following command to expand the size of the file system on /dev/sda1:sudo xfs_growfs /dev/sda1
Step 14 Run the following command to view the mount result for /dev/sda1:
df -TH
----End
Setting Automatic Disk Mounting at System StartTo automatically mount a disk when a server starts, you should not specify its partition, forexample /dev/xvdb1, in /etc/fstab. Because the sequence of cloud devices, and therefore theirnames may change during the server stop and start. You are advised to use the universallyunique identifier (UUID) in /etc/fstab to automatically mount a disk at system start.
NOTE
The UUID is the unique character string for disk partitions in a Linux system.
Step 1 Run the following command to query the partition UUID:
blkid Disk partition
For example, run the following command to query the UUID of /dev/xvdb1:
blkid /dev/xvdb1
Information similar to the following is displayed:
[root@ecs-b656 test]# blkid /dev/xvdb1/dev/xvdb1: UUID="1851e23f-1c57-40ab-86bb-5fc5fc606ffa" TYPE="ext3"
The UUID of /dev/xvdb1 is displayed.
Step 2 Run the following command to open the fstab file using the vi editor:
vi /etc/fstab
Step 3 Press i to enter the editing mode.
Step 4 Move the cursor to the end of the file and press Enter. Then add the following information:UUID=1851e23f-1c57-40ab-86bb-5fc5fc606ffa /mnt/sdc ext3 defaults 0 2
Step 5 Press Esc, enter :wq, and press Enter.
The system saves the configurations and exits the vi editor.
----End
Elastic Volume ServiceUser Guide 3 Management
2018-10-30 114

3.3.8 Performing Post-Expansion Operations for a Linux SystemDisk (fdisk)
ScenariosAfter the capacity expansion has succeeded, the additional EVS disk space needs to beallocated to an existing partition or a new partition.
This topic uses CentOS 7.4 64bit to describe how to allocate the additional system disk spaceto a partition using fdisk.
This document also describes how to create new partitions for system disks. See the followingtopics for more information:l To create new partitions using fdisk in CentOS 7.0 64bit, see Creating a New Partition.l To create new partitions using parted in CentOS 7.0 64bit, see Creating a New
Partition.
In this example, the original capacity of the system disk attached to the server is 40 GB, andthe disk capacity has been expanded to 80 GB on the management console. The followingoperations describe how to create a new partition for the additional system disk space.
The method for allocating the additional space varies depending on the server OS. Thisdocument is used for reference only. For the detailed operations and differences, see thecorresponding OS documents.
Based on your service requirements and actual disk condition, you can choose either of thefollowing ways to allocate the additional disk space:l Create a new partition (services will not be interrupted)
Creating a new partition for the expanded disk does not require the original partitions tobe unmounted. Therefore, the impacts on services are minor than expanding an existingpartition. This method is recommended for system disks or disks carrying services thatcannot be interrupted.If the MBR partition style is used, the disk capacity cannot exceed 2 TB and the numberof partitions cannot exceed the upper limit after the expansion completes.
l Expand an existing partition (services will be interrupted)If the MBR partition style is used and the number of partitions has reached the upperlimit, the existing partition needs to be expanded. Expanding an existing partition doesnot delete its data, but requires the partition to unmount. Therefore, services will beinterrupted.If the MBR partition style is used and the disk capacity after expansion has exceeded 2TB, the space exceeding 2 TB cannot be used. To use the excessive space, the diskpartition style must be changed from MBR to GPT. Data on the disk will be clearedduring such a change. Therefore, back up the disk data before changing the partitionstyle.
Performing the expansion operations with caution. Misoperation may lead to data loss orexceptions. Therefore, you are advised to back up the disk data using backups orsnapshots before expansion. For details about backups and snapshots, see 3.6 ManagingEVS Backup and 3.7.1 Creating a Snapshot, respectively.
Elastic Volume ServiceUser Guide 3 Management
2018-10-30 115

Prerequisitesl You have logged in to the server.
– For how to log in to an ECS, see the Elastic Cloud Server User Guide.– For how to log in to a BMS, see the Bare Metal Server User Guide.
l You have attached the EVS disk to the server, and the additional space has not beenallocated.
Creating a New Partition
The following example shows you how to make use of the additional capacity of a systemdisk attached to a server by creating a new partition. The system disk already has the /dev/vda1 partition, which is mounted on /. In the following operations, new partition /dev/vda2will be created and mounted on /opt. During this process, the services are not interrupted.
Step 1 Run the following command to view the disk partition information:
fdisk -l
Information similar to the following is displayed:[root@ecs-2220 ~]# fdisk -l
Disk /dev/vda: 85.9 GB, 85899345920 bytes, 167772160 sectorsUnits = sectors of 1 * 512 = 512 bytesSector size (logical/physical): 512 bytes / 512 bytesI/O size (minimum/optimal): 512 bytes / 512 bytesDisk label type: dosDisk identifier: 0x0008d18f
Device Boot Start End Blocks Id System/dev/vda1 * 2048 83886079 41942016 83 Linux
In the command output, the capacity of the dev/vda system disk is 80 GB, in which the in-usedev/vda1 partition takes 40 GB and the additional 40 GB space has not been allocated.
Step 2 Run the following command to enter fdisk:
fdisk /dev/vda
Information similar to the following is displayed:[root@ecs-2220 ~]# fdisk /dev/vdaWelcome to fdisk (util-linux 2.23.2).
Changes will remain in memory only, until you decide to write them.Be careful before using the write command.
Command (m for help):
Step 3 Enter n and press Enter to create a new partition.
Information similar to the following is displayed:Command (m for help): nPartition type: p primary (1 primary, 0 extended, 3 free) e extended
There are two types of disk partitions:l Choosing p creates a primary partition.l Choosing e creates an extended partition.
Elastic Volume ServiceUser Guide 3 Management
2018-10-30 116

Step 4 Enter p and press Enter to create a primary partition.
Information similar to the following is displayed:Select (default p): pPartition number (2-4, default 2):
Step 5 Primary partition number 2 is used in this example. Therefore, enter 2 and press Enter.
Information similar to the following is displayed:Partition number (2-4, default 2): 2First sector (83886080-167772159, default 83886080):
Step 6 Enter the new partition's first sector, for example the default value, and press Enter.
The default first sector is used in this example.
Information similar to the following is displayed:First sector (83886080-167772159, default 83886080):Using default value 83886080Last sector, +sectors or +size{K,M,G} (83886080-167772159,default 167772159):
Step 7 Enter the new partition's last sector and press Enter.
The default last sector is used in this example.
Information similar to the following is displayed:Last sector, +sectors or +size{K,M,G} (83886080-167772159,default 167772159):Using default value 167772159Partition 2 of type Linux and of size 40 GiB is set
Command (m for help):
Step 8 Enter p and press Enter to view the created partition.
Information similar to the following is displayed:Command (m for help): p
Disk /dev/vda: 85.9 GB, 85899345920 bytes, 167772160 sectorsUnits = sectors of 1 * 512 = 512 bytesSector size (logical/physical): 512 bytes / 512 bytesI/O size (minimum/optimal): 512 bytes / 512 bytesDisk label type: dosDisk identifier: 0x0008d18f
Device Boot Start End Blocks Id System/dev/vda1 * 2048 83886079 41942016 83 Linux/dev/vda2 83886080 167772159 41943040 83 LinuxCommand (m for help):
Step 9 Enter w and press Enter to write the changes into the partition table.
Information similar to the following is displayed:Command (m for help): wThe partition table has been altered!
Calling ioctl() to re-read partition table.
WARNING: Re-reading the partition table failed with error 16: Device or resource busy.The kernel still uses the old table. The new table will be used atthe next reboot or after you run partprobe(8) or kpartx(8)Syncing disks.
The partition is successfully created.
Elastic Volume ServiceUser Guide 3 Management
2018-10-30 117

NOTE
In case that you want to discard the changes made before, you can exit fdisk by entering q.
Step 10 Run the following command to synchronize the new partition table to the OS:
partprobe
Step 11 Run the following command to create a file system on the newly created partition:
In this example, the ext3 file system is created.
mkfs -t ext3 /dev/vda2
NOTE
The operation for setting the xfs file system is the same as that for setting the ext3 or ext4 file system.The command is mkfs -t xfs /dev/vda2.
Information similar to the following is displayed:[root@ecs-2220 ~]# mkfs -t ext3 /dev/vda2mke2fs 1.42.9 (28-Dec-2013)Filesystem label=OS type: LinuxBlock size=4096 (log=2)Fragment size=4096 (log=2)Stride=0 blocks, Stripe width=0 blocks2621440 inodes, 10485760 blocks524288 blocks (5.00%) reserved for the super userFirst data block=0Maximum filesystem blocks=2157969408320 block groups32768 blocks per group, 32768 fragments per group8192 inodes per groupSuperblock backups stored on blocks: 32768, 98304, 163840, 229376, 294912, 819200, 884736, 1605632, 2654208, 4096000, 7962624
Allocating group tables: doneWriting inode tables: doneCreating journal (32768 blocks): doneWriting superblocks and filesystem accounting information: done
The formatting takes a while, and you need to observe the system running status. Once doneis displayed in the command output, the formatting is complete.
Step 12 Run the following command to mount the new partition on a space-demanding directory, forexample /opt:
mount /dev/vda2 /opt
Information similar to the following is displayed:[root@ecs-bab9 test]# mount /dev/vda2 /opt[root@ecs-bab9 test]#
NOTE
If the new partition is mounted on a directory that is not empty, the subdirectories and files in thedirectory will be hidden. Therefore, you are advised to mount the new partition on an empty directory ora newly created directory. If the new partition must be mounted on a directory that is not empty, movethe subdirectories and files in this directory to another directory temporarily. After the partition issuccessfully mounted, move the subdirectories and files back.
Step 13 Run the following command to view the mount result:
df -TH
Elastic Volume ServiceUser Guide 3 Management
2018-10-30 118
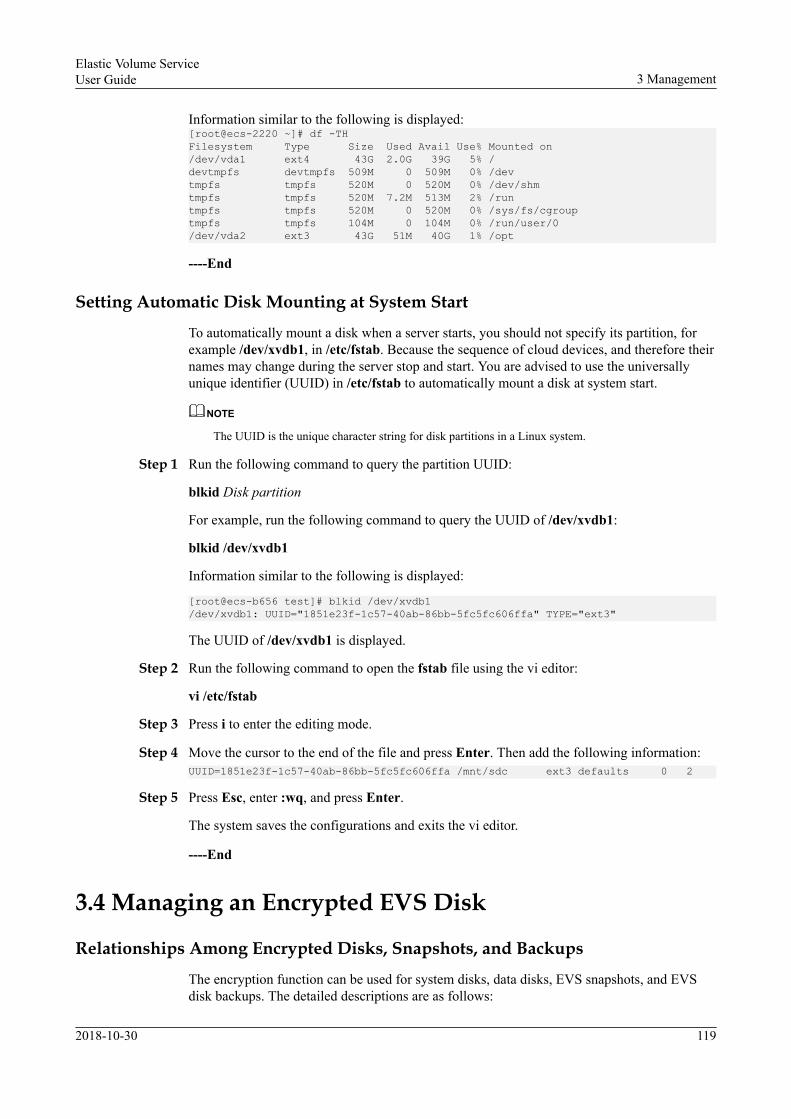
Information similar to the following is displayed:[root@ecs-2220 ~]# df -THFilesystem Type Size Used Avail Use% Mounted on/dev/vda1 ext4 43G 2.0G 39G 5% /devtmpfs devtmpfs 509M 0 509M 0% /devtmpfs tmpfs 520M 0 520M 0% /dev/shmtmpfs tmpfs 520M 7.2M 513M 2% /runtmpfs tmpfs 520M 0 520M 0% /sys/fs/cgrouptmpfs tmpfs 104M 0 104M 0% /run/user/0/dev/vda2 ext3 43G 51M 40G 1% /opt
----End
Setting Automatic Disk Mounting at System Start
To automatically mount a disk when a server starts, you should not specify its partition, forexample /dev/xvdb1, in /etc/fstab. Because the sequence of cloud devices, and therefore theirnames may change during the server stop and start. You are advised to use the universallyunique identifier (UUID) in /etc/fstab to automatically mount a disk at system start.
NOTE
The UUID is the unique character string for disk partitions in a Linux system.
Step 1 Run the following command to query the partition UUID:
blkid Disk partition
For example, run the following command to query the UUID of /dev/xvdb1:
blkid /dev/xvdb1
Information similar to the following is displayed:
[root@ecs-b656 test]# blkid /dev/xvdb1/dev/xvdb1: UUID="1851e23f-1c57-40ab-86bb-5fc5fc606ffa" TYPE="ext3"
The UUID of /dev/xvdb1 is displayed.
Step 2 Run the following command to open the fstab file using the vi editor:
vi /etc/fstab
Step 3 Press i to enter the editing mode.
Step 4 Move the cursor to the end of the file and press Enter. Then add the following information:UUID=1851e23f-1c57-40ab-86bb-5fc5fc606ffa /mnt/sdc ext3 defaults 0 2
Step 5 Press Esc, enter :wq, and press Enter.
The system saves the configurations and exits the vi editor.
----End
3.4 Managing an Encrypted EVS Disk
Relationships Among Encrypted Disks, Snapshots, and Backups
The encryption function can be used for system disks, data disks, EVS snapshots, and EVSdisk backups. The detailed descriptions are as follows:
Elastic Volume ServiceUser Guide 3 Management
2018-10-30 119

l The system disk encryption depends on the image of the server OS. If the server iscreated using an encrypted image, the system disk will be an encrypted disk. For details,see Encrypting an Image in the Image Management Service User Guide.
l The encryption setting of an existing EVS disk cannot be changed. You can onlydetermine whether to use the encryption function or not when you create a new disk.
l If an EVS disk is created from a snapshot, the encryption setting of the EVS disk will bethe same as that of the snapshot.
l If an EVS disk is created from a backup, the encryption setting of the EVS disk will bethe same as that of the backup.
l If a snapshot or backup is created for an EVS disk, the encryption setting of the snapshotor backup will be the same as that of the EVS disk.
Creating an Encrypted EVS Disk
Before you use the disk encryption function, KMS access rights need to be granted to EVS. Ifyou have the Security Administrator rights, grant the KMS access rights to EVS directly. Ifyou do not have this permission, contact a user with the security administrator rights to grantthe KMS access rights to EVS, then repeat the preceding operations.
For details about how to create an encrypted disk, see 2.2 Creating an EVS Disk.
Detaching an Encrypted EVS Disk
Before you detach an EVS disk encrypted by a CMK, check whether the CMK is disabled orscheduled for deletion. If the CMK is unavailable, the disk can still be used, but normal read/write operations are not guaranteed permanently. If the disk is detached and then re-attached,re-attaching this disk will fail. In this case, do not detach the disk and restore the CMK statusfirst.
The restoration method varies depending on the current CMK status. For details, see 1.5 EVSDisk Encryption.
If the CMK is available, the disk can be detached and re-attached, and data on the disk willnot be lost.
For details about how to detach an encrypted disk, see 3.1.2 Detaching a Data Disk.
3.5 Managing a Shared EVS Disk
How to Use Shared VBD and SCSI EVS Disks?
You can create shared VBD EVS disks or shared SCSI EVS disks.
l Shared VBD EVS disks: The device type of a newly created shared EVS disk is VBD bydefault. Such disks can be used as virtual block storage devices, but do not support SCSIreservations. If SCSI reservations are required for your applications, create shared SCSIEVS disks.
l Shared SCSI EVS disks: These EVS disks support SCSI reservations.
If such disks are attached to ECSs, SCSI reservations take effect only when usedtogether with the anti-affinity policy of an ECS group.
Elastic Volume ServiceUser Guide 3 Management
2018-10-30 120

l To improve data security, you are advised to use SCSI reservations together with theanti-affinity policy of an ECS group. That said, ensure that shared SCSI EVS disksare only attached to ECSs in the same anti-affinity ECS group.
l If an ECS does not belong to any anti-affinity ECS group, you are advised not toattach shared SCSI EVS disks to this ECS. Otherwise, SCSI reservations may notwork properly, which may put your data at risk.
Concepts of the anti-affinity ECS group and SCSI reservations:– The anti-affinity policy of an ECS group allows ECSs to be created on different
physical servers to improve service reliability. You can only select the ECS groupwhen creating an ECS. Existing ECSs cannot be added to an anti-affinity ECSgroup.For details about ECS groups, see (Optional) Creating an ECS Group in theElastic Cloud Server User Guide.
– The SCSI reservation mechanism uses a SCSI reservation command to performSCSI reservation operations. If an ECS sends such a command to an EVS disk, thedisk is displayed as locked to other ECSs, preventing the data damage that may becaused by simultaneous read/write operations to the disk from multiple ECSs.
– ECS groups and SCSI reservations have the following relationship: A SCSIreservation on a single EVS disk cannot differentiate multiple ECSs on the samephysical host. For that reason, if multiple ECSs that use the same shared EVS diskare running on the same physical host, SCSI reservations will not work properly.Therefore, you are advised to use SCSI reservations only on ECSs that are in thesame ECS group, thus having a working anti-affinity policy.
Attaching a Shared EVS DiskA common EVS disk can only be attached to one server, whereas a shared EVS disk can beattached to up to 16 servers.
For details about how to attach a shared EVS disk, see 2.3.2 Attaching a Shared EVS Disk.
Detaching a Shared EVS DiskBecause a shared EVS disk can be attached to multiple servers, ensure that the shared EVSdisk is detached from all the servers before deletion.
For details about how to detach a shared EVS disk, see 3.2 Deleting an EVS Disk.
Expanding a Shared EVS DiskShared EVS disks must be expanded when they are in the Available state. For details, see3.3.3 Expanding an Available EVS Disk.
Elastic Volume ServiceUser Guide 3 Management
2018-10-30 121

3.6 Managing EVS Backup
ScenariosYou can back up the EVS disk data using the VBS service. For details, see Creating a VBSBackup in the Volume Backup Service User Guide.
Configuring a Backup PolicyWith backup policies configured, data on EVS disks can be periodically backed up to improvethe data security.
Step 1 Log in to the management console.
Step 2 Click in the upper left corner and select the desired region and project.
Step 3 Under Storage, click Elastic Volume Service.
The disk list page is displayed.
Step 4 In the EVS disk list, locate the EVS disk whose data needs to be backed up and choose More> Configure Backup Policy in the Operation column.
The Configure Backup Policy dialog box is displayed.
Step 5 In the backup policy list, click Associate to select the target backup policy.
NOTE
If the EVS disk has been associated with a backup policy, you need to disassociate the disk with itsbackup policy and then associate it with the new policy. For details, see Data Backup Using a BackupPolicy in the Volume Backup Service User Guide.
Step 6 (Optional) To create a new backup policy, click Edit Backup Policy.
The Volume Backup Service page is displayed.
For details about how to create a backup policy, see Data Backup Using a Backup Policy inthe Volume Backup Service User Guide.
Step 7 In the displayed Associate Backup Policy dialog box, click OK.
After the association is complete, the system automatically backs up the data on the EVS diskaccording to the backup policy.
----End
3.7 Managing an EVS Snapshot
Elastic Volume ServiceUser Guide 3 Management
2018-10-30 122

3.7.1 Creating a Snapshot
ScenariosYou can create an EVS snapshot on the management console to save the EVS disk data at aspecific time point.
A maximum of 7 snapshots can be created for an EVS disk.
Procedure
Step 1 Log in to the management console.
Step 2 Click in the upper left corner and select the desired region and project.
Step 3 Under Storage, click Elastic Volume Service.
The disk list page is displayed.
Step 4 Switch to the Create Snapshot page in either of the following ways:l In the disk list, locate the row that contains the target disk, click More in the Operation
column, and choose Create Snapshot.l In the navigation tree on the left, choose Elastic Volume Service > Snapshots.
On the Snapshots page, click Create Snapshot.
Step 5 Configure the basic settings for the snapshot, as shown in Table 3-2.
Table 3-2 Parameter description
Parameter Description Example Value
Name MandatoryThe name can contain amaximum of 64 characters.
snapshot-01
Disk MandatoryClick Select. On thedisplayed page, select thedisk based on which thesnapshot is to be created,and click OK.
volume-01
Encryption You cannot set thisparameter when you create asnapshot.The encryption attribute of asnapshot is inherited fromits source EVS disk.
N/A
Elastic Volume ServiceUser Guide 3 Management
2018-10-30 123

Parameter Description Example Value
Description OptionalDescription of the createdsnapshot. The value cancontain a maximum of 255bytes.
N/A
Step 6 Click Create Now.
Step 7 On the displayed Details page, you can view the details of the snapshot.l If you do not need to modify the specifications, click Submit to start the snapshot
creation.l If you need to modify the specifications, click Previous to modify parameters.
Step 8 Return to the Snapshots page to view the snapshot creation information.
When the snapshot status changes to Available, the creation is successful.
----End
3.7.2 Deleting a Snapshot
Scenarios
If a snapshot is no longer used, you can release the virtual resources by deleting the snapshotfrom the system. Snapshot deletion has the following constraints:
l A snapshot can be deleted only when its status is Available or Error.l If a disk is deleted, all the snapshots created for this disk will also be deleted.
Procedure
Step 1 Log in to the management console.
Step 2 Click in the upper left corner and select the desired region and project.
Step 3 Under Storage, click Elastic Volume Service.
Step 4 In the navigation tree on the left, choose Elastic Volume Service > Snapshots.
The Snapshots page is displayed.
Step 5 In the snapshot list, locate the row that contains the target snapshot and click Delete in theOperation column.
Step 6 (Optional) If multiple snapshots are to be deleted, select in front of each snapshot andclick Delete in the upper area of the list.
Step 7 In the displayed dialog box, confirm the information and click OK.
----End
Elastic Volume ServiceUser Guide 3 Management
2018-10-30 124
3.7.3 Rolling Back Data from a Snapshot
Scenarios
If the data on an EVS disk is incorrect or damaged, you can roll back the data from a snapshotto the source disk to restore data. Snapshot rollback has the following constraints:
l A snapshot can be rolled back only to its source EVS disk. A rollback to another disk isnot possible.
l A snapshot can be rolled back only when the snapshot status is Available and the sourcedisk status is Available (not attached to any server) or Rollback failed.
Procedure
Step 1 Log in to the management console.
Step 2 Click in the upper left corner and select the desired region and project.
Step 3 Under Storage, click Elastic Volume Service.
Step 4 In the navigation tree on the left, choose Elastic Volume Service > Snapshots.
The Snapshots page is displayed.
Step 5 In the snapshot list, locate the row that contains the target snapshot and click Roll Back Diskin the Operation column.
Step 6 In the displayed dialog box, click OK to start the rollback only when the snapshot status isAvailable and the source EVS disk status is Available or Rollback failed.
Step 7 The snapshot list is displayed. After the snapshot status changes from Rolling back toAvailable, the data rollback is successful.
----End
3.7.4 Creating an EVS Disk Using a Snapshot
Scenarios
This topic describes how to create an EVS disk on the EVS snapshot page. Besides, you canalso create an EVS disk from a snapshot by specifying the Create from snapshot parameteron the disk creation page. For details, see 2.2 Creating an EVS Disk.
When a disk is created from a snapshot, the created disk has the following constraints:
l The disk type of the created disk will be consistent with that of the snapshot's sourcedisk.
l The device type of the created disk will be consistent with that of the snapshot's sourcedisk.
l A maximum of 128 disks can be created from this snapshot.
l Batch disk creation is not possible, and the quantity parameter must be set to 1.
Elastic Volume ServiceUser Guide 3 Management
2018-10-30 125

Procedure
Step 1 Log in to the management console.
Step 2 Click in the upper left corner and select the desired region and project.
Step 3 Under Storage, click Elastic Volume Service.
Step 4 In the navigation tree on the left, choose Elastic Volume Service > Snapshots.
The Snapshots page is displayed.
Step 5 In the snapshot list, locate the row that contains the target snapshot and click Create Disk inthe Operation column.
Step 6 Set the EVS disk parameters. For details, see parameter descriptions and operations providedin 2.2 Creating an EVS Disk.
NOTE
A maximum of 128 disks can be created from a snapshot.
If you create a disk from a snapshot, the disk capacity must be greater than or equal to the snapshot size.In the condition that you do not specify the disk capacity, if the snapshot size is smaller than 10 GB, thedefault capacity 10 GB will be used as the disk capacity; if the snapshot size is greater than 10 GB, thedisk capacity will be consistent with the snapshot size.
Step 7 Click Create Now.
Step 8 On the Details page, check the disk information again.l If you do not need to modify the specifications, click Submit to start the creation.l If you need to modify the specifications, click Previous to modify parameters.
Step 9 In the disk list, view the disk status.
If the disk status changes to Available, the disk is successfully created.
----End
3.8 Managing a Tag
3.8.1 Adding a Tag
Scenarios
This topic is used to guide users to add a tag for an existing EVS disk. You can also add tagsduring the EVS disk creation. For details, see 2.2 Creating an EVS Disk.
Tags are used to identify the cloud resources for purposes of easy categorization and quicksearch.
l A tag is composed of a key-value pair.– A tag key can contain a maximum of 36 characters but cannot contain the following
characters: asterisks (*), left angle brackets (<), right angle brackets (>),backslashes (\), equal signs (=), commas (,), vertical bars (|), and slashes (/). Its firstcharacter cannot be a space.
Elastic Volume ServiceUser Guide 3 Management
2018-10-30 126

– A tag value can contain a maximum of 43 characters but cannot contain thefollowing characters: asterisks (*), left angle brackets (<), right angle brackets (>),backslashes (\), equal signs (=), commas (,), vertical bars (|), and slashes (/). Its firstcharacter cannot be a space.
l A maximum of 10 tags can be added for an EVS disk.l Tag keys of the same EVS disk must be unique.
Procedure
Step 1 Log in to the management console.
Step 2 Click in the upper left corner and select the desired region and project.
Step 3 Under Storage, click Elastic Volume Service.
The disk list page is displayed.
Step 4 In the EVS disk list, locate the target disk and click the disk name.
The disk details page is displayed.
Step 5 Click the Tags tab.
Step 6 Click Add Tag.
The Add Tag page is displayed.
Step 7 Enter a key and a value for a tag and click OK.l Key: This parameter is mandatory.l Value: This parameter is optional.
The Tags tab is displayed, and you can view the newly added tag.
----End
3.8.2 Modifying a Tag
Scenarios
You can change the value of a tag for an existing disk, but cannot change the key of a tag.
Procedure
Step 1 Log in to the management console.
Step 2 Click in the upper left corner and select the desired region and project.
Step 3 Under Storage, click Elastic Volume Service.
The disk list page is displayed.
Step 4 In the EVS disk list, locate the target disk and click on the disk name.
The disk details page is displayed.
Elastic Volume ServiceUser Guide 3 Management
2018-10-30 127

Step 5 Click the Tags tab.
Step 6 Locate the target tag and click Edit in the Operation column.
The Edit Tag page is displayed.
Step 7 Change the value of the tag and click OK.
The Tags tab is displayed, and the modification is complete.
----End
3.8.3 Deleting a Tag
ScenariosIf an existing tag is no longer needed, you can delete it.
Procedure
Step 1 Log in to the management console.
Step 2 Click in the upper left corner and select the desired region and project.
Step 3 Under Storage, click Elastic Volume Service.
The disk list page is displayed.
Step 4 In the EVS disk list, locate the target disk and click on the disk name.
The disk details page is displayed.
Step 5 Click the Tags tab.
Step 6 Locate the target tag and click Delete in the Operation column.
The Delete Tag page is displayed.
Step 7 Confirm the information and click OK.
The Tags tab is displayed, and the deletion is complete.
----End
3.8.4 Searching EVS Resources by Tags
ScenariosTags can be used to categorize EVS resources, and users can quickly search for their desiredEVS resources by tags. This section is used to guide users to search for EVS resources byexisting tags.
Procedure
Step 1 Log in to the management console.
Step 2 Click in the upper left corner and select the desired region and project.
Elastic Volume ServiceUser Guide 3 Management
2018-10-30 128

Step 3 Under Storage, click Elastic Volume Service.
The disk list page is displayed.
Step 4 In the upper area of the disk list, click Search by Tag.
The Search by Tag page is displayed.
Step 5 Enter or select an existing tag in the text box under Search by Tag.
Step 6 (Optional) If EVS disks containing multiple tags need to be queried, click to add tags.
A maximum of 10 tags can be added at a time.
For the added tags, you can delete them one by one or click Reset to clear all of them.
Step 7 After the tags are added, click Search.
EVS resources owning the added tags are displayed in the list, and the search is complete.
----End
3.9 Viewing EVS Monitoring Data
Scenarios
You can view the actual EVS performance metrics through Cloud Eye. Table 3-3 shows themonitored metrics.
Table 3-3 EVS metrics
Metric Definition MonitoredObject
Disk Read Bandwidth Number of bytes read from the monitoreddisk per secondUnit: byte/s
EVS disk
Disk Write Bandwidth Number of bytes written to the monitoreddisk per secondUnit: byte/s
EVS disk
Disk Read IOPS Number of read requests sent to themonitored disk per secondUnit: Request/s
EVS disk
Disk Write IOPS Number of write requests sent to themonitored disk per secondUnit: Request/s
EVS disk
Elastic Volume ServiceUser Guide 3 Management
2018-10-30 129

Procedure
Step 1 Log in to the management console.
Step 2 Under Storage, click Elastic Volume Service.
The disk list page is displayed.
Step 3 In the EVS disk list, click the name of the disk you want to view the monitoring data.
The disk details page is displayed.
Step 4 On the Attachments tab, locate the row that contains the server and click View MonitoringData in the Operation column.
The monitoring graphs page is displayed.
Step 5 You can view the disk monitoring data by metric or monitored duration.
For more information about Cloud Eye, see the Cloud Eye User Guide.
----End
Elastic Volume ServiceUser Guide 3 Management
2018-10-30 130

4 FAQs
4.1 Can I Attach an EVS Disk to Multiple Servers?
4.2 Will Data in the EVS Disk Be Lost After the EVS Disk Is Detached?
4.3 What Should I Do If an Error Occurs on My EVS Disk?
4.1 Can I Attach an EVS Disk to Multiple Servers?A non-shared EVS disk can be attached to only one server.
A shared EVS disk can be attached to a maximum of 16 servers.
NOTE
Shared EVS disks are a type of EVS disks that can be attached to multiple servers.
4.2 Will Data in the EVS Disk Be Lost After the EVS DiskIs Detached?
Before you detach an EVS disk encrypted by a CMK, check whether the CMK is disabled orscheduled for deletion. If the CMK is unavailable, the disk can still be used, but normal read/write operations are not guaranteed permanently. If the disk is detached and then re-attached,re-attaching this disk will fail. In this case, do not detach the disk and restore the CMK statusfirst.
The restoration method varies depending on the current CMK status. For details, see 1.5 EVSDisk Encryption.
If the CMK used to encrypt the disk is available or the disk is a non-encrypted disk, the diskcan be detached and re-attached, and data on the disk will not be lost.
To prevent data loss when you detach an EVS disk, perform the following operations:l For EVS disks not supporting online detachment:
a. Stop the server where the target EVS disk has been attached.b. After the server has been stopped, detach the EVS disk.
l For EVS disks supporting online detachment:
Elastic Volume ServiceUser Guide 4 FAQs
2018-10-30 131

Detach the EVS disk from a running ECS. For details, see Management > Detachingan EVS Disk from a Running ECS in the Elastic Cloud Server User Guide.
4.3 What Should I Do If an Error Occurs on My EVS Disk?If an error occurs, the disk may show one of the states listed in the following table. Take thefollowing measures to handle the exceptions.
Table 4-1 Solutions for disk errors
ErrorStatus
Handling Suggestion
Error Delete the EVS disk in the Error state and create another one.The disk will no longer be charged once the error has occurred.
Deletionfailed
Contact customer service personnel.The disk will no longer be charged once its status changes to Deletionfailed.
Expansionfailed
Our customer service personnel will contact you and help you handle thiserror. Do not perform any operations on the disk before the customer servicepersonnel contact you. If you require that the error be handled as soon aspossible, contact our customer service personnel.The disk will no longer be charged once its status changes to Expansionfailed.
Restorationfailed
Our customer service personnel will contact you and help you handle thiserror. Do not perform any operations on the disk before the customer servicepersonnel contact you. If you require that the error be handled as soon aspossible, contact our customer service personnel.The disk will no longer be charged once its status changes to Restorationfailed.
Rollbackfailed
You can roll back the snapshot to the EVS disk again.The disk will no longer be charged once its status changes to Rollbackfailed.
Elastic Volume ServiceUser Guide 4 FAQs
2018-10-30 132

A Appendix
A.1 EVS Disk StatusAn EVS disk has several statuses. Table A-1 lists the EVS disk statuses, the meaning of eachstatus, and the operations a disk in each status allows.
Table A-1 Disk status details
EVS DiskStatus
Description Allowed Operation
In-use The EVS disk is attached to a server and is inuse.
l Detachingl Creating VBS
backupsl Expanding
NOTEIf a shared EVS diskis in the In-use state,the disk can beattached.
If a shared EVS diskis in the In-use state,the disk cannot beexpanded.
Available The EVS disk has not been attached to anyserver and can be attached.
l Attachingl Expandingl Deletingl Creating VBS
backupsl Rolling back
snapshots to EVSdisks
Creating The EVS disk is being created. None
Elastic Volume ServiceUser Guide A Appendix
2018-10-30 133

EVS DiskStatus
Description Allowed Operation
Attaching The EVS disk is being attached to a server. None
Detaching The EVS disk is being detached from a server. None
Deleting The EVS disk is being deleted. None
Restoring A VBS backup is being used to restore theEVS disk.
None
Expanding The capacity of the EVS disk is beingexpanded.
None
Uploading Data on the EVS disk is being uploaded to animage. This state occurs when you create animage from a server.
None
Downloading Data is being downloaded from an image tothe EVS disk. This state occurs when youcreate a server.
None
Error An error occurs when you try to create anEVS disk.
Deleting
Deletion failed An error occurs when you try to delete theEVS disk.
None
Expansionfailed
An error occurs when you try to expand thecapacity of the EVS disk.
Deleting
Restorationfailed
An error occurs when you try to restore theEVS disk from a backup.
Deleting
Rolling back Data on the EVS disk is being restored from asnapshot.NOTE
l When you roll back a snapshot to an EVS disk,you can only roll back the snapshot to thesource EVS disk. Rollback to a specified disk isnot supported.
l You can roll back an EVS disk from a snapshotonly when the disk is in the Available orRollback failed state.
None
Rollbackfailed
An error occurs when the EVS disk is rolledback from a snapshot.
l Deletingl Rolling back
snapshots to EVSdisks
NOTE
If an EVS disk status is Error, Deletion failed, Expansion failed, Restoration failed, or Rollbackfailed, you can rectify the error by following the steps provided in 4.3 What Should I Do If an ErrorOccurs on My EVS Disk?.
Elastic Volume ServiceUser Guide A Appendix
2018-10-30 134
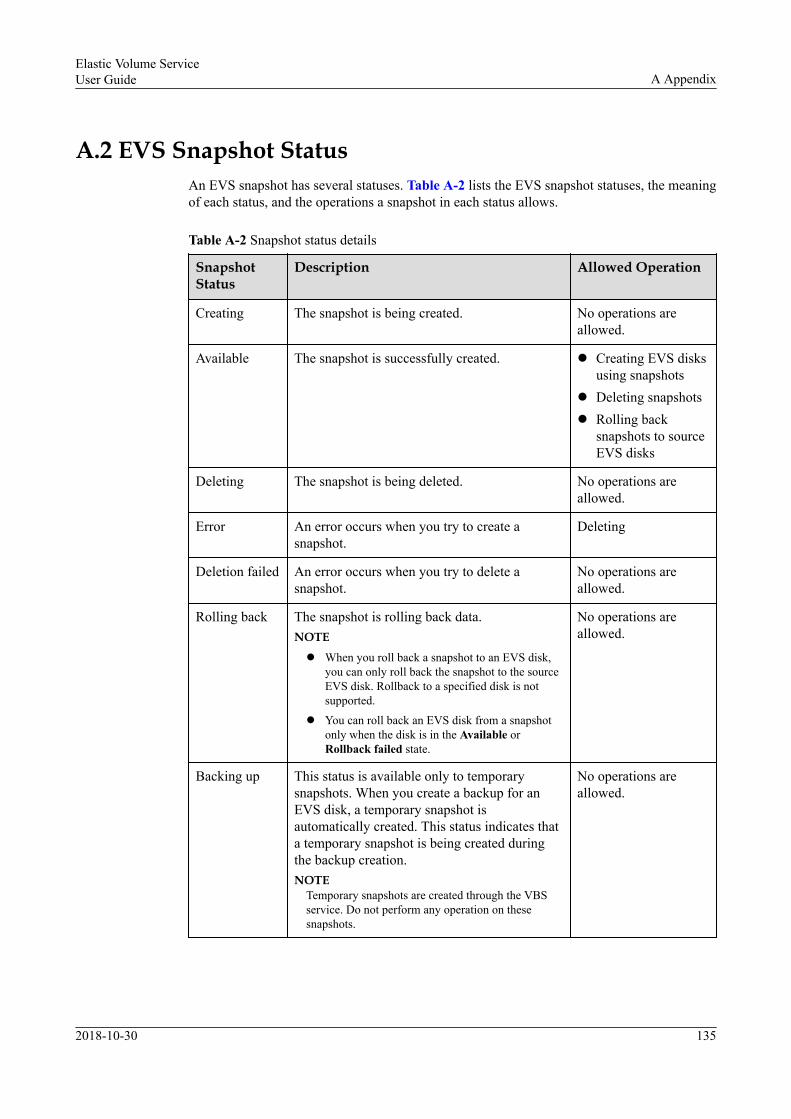
A.2 EVS Snapshot StatusAn EVS snapshot has several statuses. Table A-2 lists the EVS snapshot statuses, the meaningof each status, and the operations a snapshot in each status allows.
Table A-2 Snapshot status details
SnapshotStatus
Description Allowed Operation
Creating The snapshot is being created. No operations areallowed.
Available The snapshot is successfully created. l Creating EVS disksusing snapshots
l Deleting snapshotsl Rolling back
snapshots to sourceEVS disks
Deleting The snapshot is being deleted. No operations areallowed.
Error An error occurs when you try to create asnapshot.
Deleting
Deletion failed An error occurs when you try to delete asnapshot.
No operations areallowed.
Rolling back The snapshot is rolling back data.NOTE
l When you roll back a snapshot to an EVS disk,you can only roll back the snapshot to the sourceEVS disk. Rollback to a specified disk is notsupported.
l You can roll back an EVS disk from a snapshotonly when the disk is in the Available orRollback failed state.
No operations areallowed.
Backing up This status is available only to temporarysnapshots. When you create a backup for anEVS disk, a temporary snapshot isautomatically created. This status indicates thata temporary snapshot is being created duringthe backup creation.NOTE
Temporary snapshots are created through the VBSservice. Do not perform any operation on thesesnapshots.
No operations areallowed.
Elastic Volume ServiceUser Guide A Appendix
2018-10-30 135

B Change History
Release Date What's New
2018-10-30 This issue is the eleventh official release, which incorporates thefollowing changes:l Added Initializing a Windows Data Disk Greater Than 2 TB
(Windows Server 2008).l Added Initializing a Windows Data Disk Greater Than 2 TB
(Windows Server 2012).l Added Initializing a Linux Data Disk Greater Than 2 TB (parted).
2017-11-30 This issue is the tenth official release, which incorporates the followingchange:l Added the operation guidance on initializing disks and performing
post-expansion operations using the parted partitioning tool.
2017-09-30 This issue is the ninth official release, which incorporates the followingchanges:l Added support for the EVS disk encryption function.l Added support for the TMS tag function.l Added support for the Ultra-high I/O (Latency optimized) EVS disk
type.l Added support for expanding In-use EVS disks.
2017-08-30 This issue is the eighth official release, which incorporates the followingchange:l Added support for the multi-project function.
2017-07-30 This issue is the seventh official release, which incorporates thefollowing change:l Added support for the EVS snapshot function.
Elastic Volume ServiceUser Guide B Change History
2018-10-30 136

Release Date What's New
2017-07-15 This issue is the sixth official release, which incorporates the followingchanges:l Changed the minimum capacity of EVS disks to 10 GB.l Added support for SCSI EVS disks.l Added support for shared EVS disks.l Added descriptions for EVS disk performance parameters.
2017-03-30 This issue is the fifth official release, which incorporates the followingchange:l Added the Rolling back and Rollback failed states for EVS disks.
2016-11-24 This issue is the fourth official release, which incorporates the followingchanges:l Added 2 Getting Started.l Updated the command output information in 2.4.4 Initializing a
Linux Data Disk (fdisk) and 3.3.5 Performing Post-ExpansionOperations for a Linux EVS Disk (fdisk).
l Divided the previous section "EVS Disk Capacity Expansion" intotwo new sections, 3.3.4 Performing Post-Expansion Operations fora Windows EVS Disk and 3.3.5 Performing Post-ExpansionOperations for a Linux EVS Disk (fdisk).
2016-10-19 This issue is the third official release, which incorporates the followingchanges:l Modified the value of Number of Cloud Server Mount Points from
8 to 40 in 2.3.2 Attaching a Shared EVS Disk.l Deleted the description in 2.2 Creating an EVS Disk.
2016-07-15 This issue is the second official release, which incorporates the followingchanges:l Added shared disk mounting.l Modified the description in 2.2 Creating an EVS Disk.l Modified steps of attaching an EVS disk.
2016-03-14 This issue is the first official release.
Elastic Volume ServiceUser Guide B Change History
2018-10-30 137