user guide user guide - thane directmedia.thanedirect.com/manuals/total_flex_manual_eng.pdf · user...
TRANSCRIPT

US
ER
GU
IDE
US
ER
GU
IDE
TABLE OF CONTENTS
US
ER
’S G
UID
E
US
ER
’S G
UID
E
NOTES
A. Notice .......................................................................................... 1
B. Important Safety Notice ............................................................... 1 - 2
C. Total Flex™ Main Components .................................................... 3
D. Assembling the Total Flex™ ......................................................... 4
PowerRodAssembly................................................................... 4
LegExtenderAssembly............................................................... 4-6
E. Setting Up the Total Flex™ ........................................................... 7
OpeningtheTotalFlex™.............................................................. 7
InsertingtheFootPlate............................................................... 7
AdjustingtheSeats...................................................................... 8-9
F. Use Of Attachments ..................................................................... 10
1.PowerPods.............................................................................. 10
2.Handles.................................................................................... 11-12
3.AnkleCuffs............................................................................... 13
4.FootPlate................................................................................. 13
5.HeadRest................................................................................. 13-14
6.LegExtender............................................................................ 14-15
G. Exercise Resistance ..................................................................... 16
H. Storing the Total Flex™ ................................................................ 16 - 17
I. Maintaining the Total Flex™ .......................................................... 17
GeneralMaintenance................................................................... 17
ResistanceBands......................................................................... 18-19
J. Total Flex™ Tips and Suggestions ................................................ 20
US
ER
GU
IDE
US
ER
GU
IDE
US
ER
’S G
UID
E
A. Notice
B. IMPORTANT SAFETY NOTICE
Important: Do not start exercising before fully studying this User’s Guide and the accompanying Exercise Chart.
•ThisUser’sGuideprovidesinstructiononsettinguptheTotalFlex™,andproper use,storageandmaintenance.UsethismanualinconjunctionwiththeExercise Chart.•TheExerciseChartprovidesexerciseinstructionstoachieveyourdesiredresults.
PleasereadandfollowthisUser’sGuidecompletelybeforeusingyourTotalFlex™machine.KeepthisguideinasafeplaceandmakesureeveryonewhousestheTotalFlex™alsoreadsthisguide.Haveasafeandenjoyableworkout.
WARNING: Please consult with your doctor before you start using this equipment. Your doctor should help you ascertain your target heart rate, as determined by your age and physical fitness. Certain training programs and types of exercise equipment may not be suitable for everyone. This is particularly important for those individuals over 35, pregnant women and individuals with existing health problems or problems with balance. If you take medication which affects your heart rate, you must seek medical advice from your doctor before starting your exercise program with this machine.
1.ThisproducthasbeentestedinaccordancewiththerequirementsofEN957-1, classH–homeuseonly.THEMAXIMUMWEIGHTCAPACITYOFTHETOTAL FLEX™machineis300LBS(136kg).Personswhosebodyweightexceedsthis limitshouldNOTusethismachine.
2.CarefullyinspecttheequipmentpriortoEVERYuse.Neverusethedevice ifitisnotfunctioningcorrectly,orifitisdamaged.
3.UsethisdeviceEXCLUSIVELYforthepurposeintendedanddescribedin thisUser’sGuide.Donotaltertheequipmentandonlyusethose accessorieswhichhavebeenrecommendedbythemanufacturer.
4.Ensurethatatleast10-13feet(2-3meters)offreespaceisavailablesurrounding theentireunit.Itisimportantthatpets,furnitureandotherobjectsarekeptaway fromtheequipmentduringitsuse.Youshouldretainatleast10-13feet(2-3 meters)ofspacearoundtheunit.
120
US
ER
’S G
UID
E
J. Total Flex™ Tips and Suggestions
1.Decideonthemostconvenienttimetoexerciseandsticktoit,exercisingmust becomearoutine.2.Itmighttake1or2workoutsessionstobecomefamiliarwiththeTotalFlex™ settingsandadjustments.
3.Trytoexercise3to5timesaweekfor20to30minutesasession.Alternatively, thesessioncanbeaslongorasshortastimeandmotivationallow.
4.Allowforatleast1day’srestperweektoallowthebodytorecover.
5.Drinkadequatefluidsbefore,duringandafterexercising.
6.Keepingadailybalanceddietkeepsyourbodyproperlyfueledandreadyfor exercising.
7.Tostaymotivated,werecommend,thatyou: a.Changeexerciseprogramsfromtimetotime. b.Alternateyourexerciseprogramwithcardiovasculartraining,suchas walking,running,cyclingorswimming,toincreasetheeffectivenessofyour training.
8.Beforestartingtoexercise,itisimportanttostretchinordertowarmup yourmusclesandpreventinjury.TheTotalFlex™ExerciseCharthasastretching programthatyoushouldfollowbeforestartingtoexercise.
9.Whenyouexercise,breathedeeplyandrhythmically.Donotholdyourbreath while,asdoingsoraisesyourbloodpressure.
10.Donotgotoofast.Performtheexerciseswithproperformattherateof approximately2secondsperrepetition.
US
ER
GU
IDE
US
ER
GU
IDE
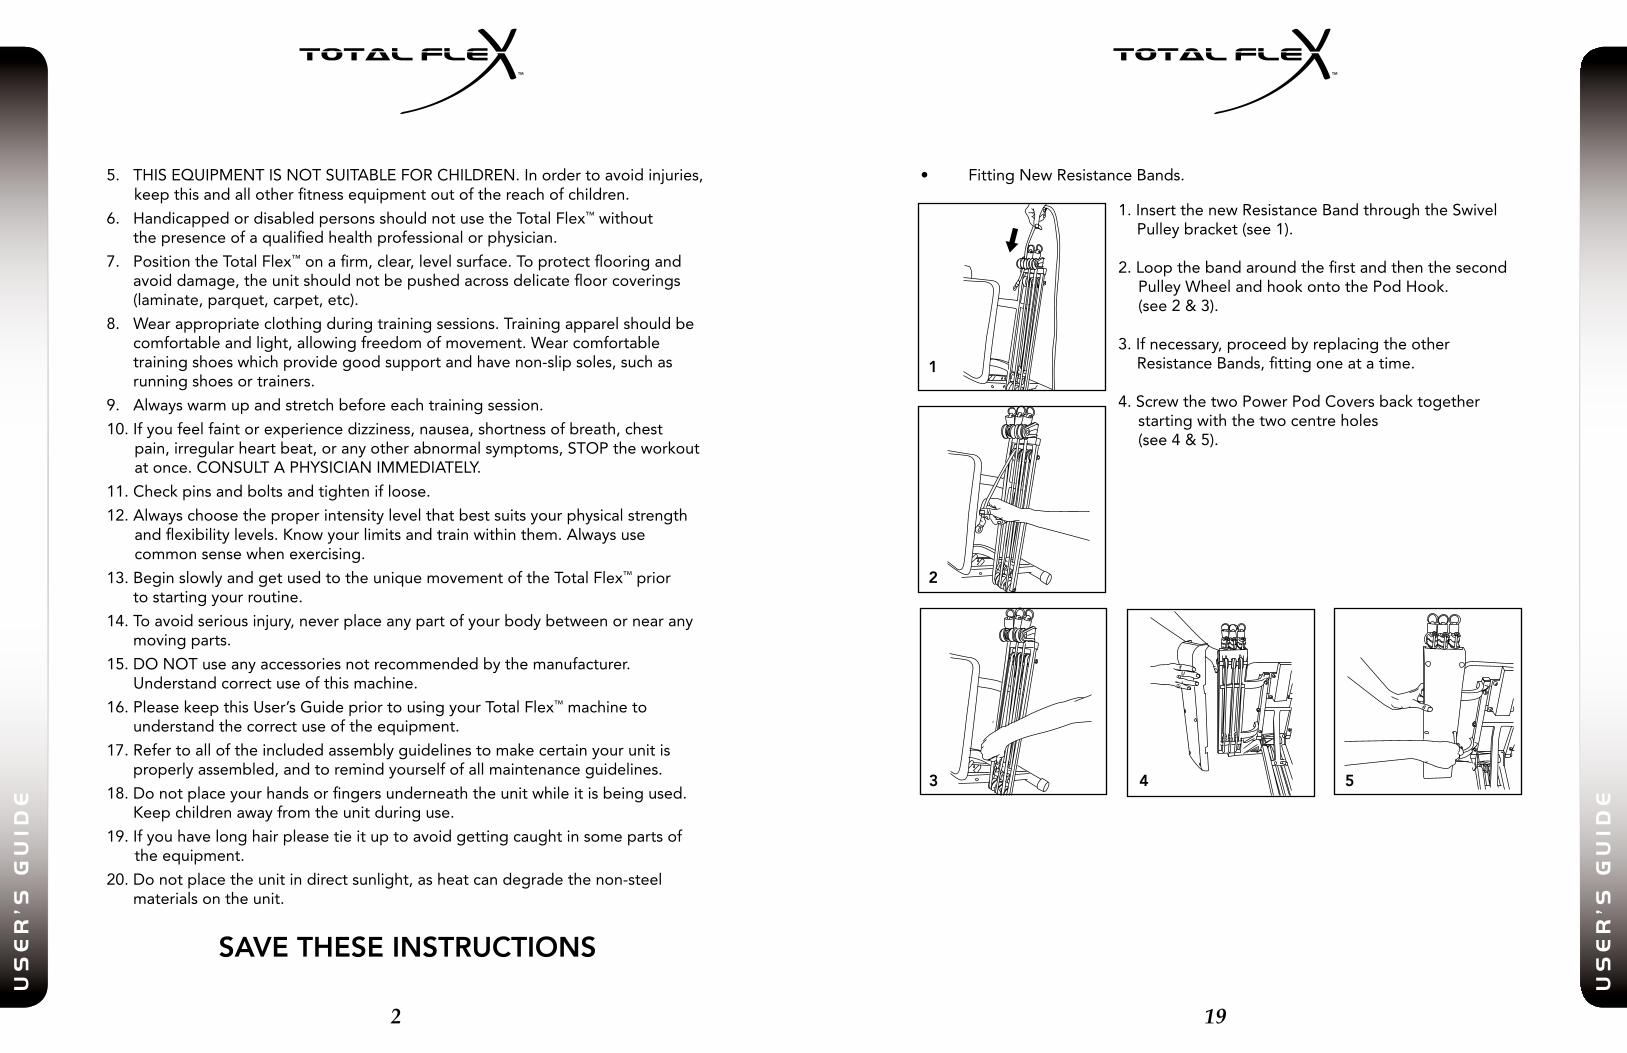
• FittingNewResistanceBands.
19
US
ER
’S G
UID
E
5.THISEQUIPMENTISNOTSUITABLEFORCHILDREN.Inordertoavoidinjuries, keepthisandallotherfitnessequipmentoutofthereachofchildren.
6.HandicappedordisabledpersonsshouldnotusetheTotalFlex™without thepresenceofaqualifiedhealthprofessionalorphysician.
7.PositiontheTotalFlex™onafirm,clear,levelsurface.Toprotectflooringand avoiddamage,theunitshouldnotbepushedacrossdelicatefloorcoverings (laminate,parquet,carpet,etc).
8.Wearappropriateclothingduringtrainingsessions.Trainingapparelshouldbe comfortableandlight,allowingfreedomofmovement.Wearcomfortable trainingshoeswhichprovidegoodsupportandhavenon-slipsoles,suchas runningshoesortrainers.
9.Alwayswarmupandstretchbeforeeachtrainingsession.
10.Ifyoufeelfaintorexperiencedizziness,nausea,shortnessofbreath,chest pain,irregularheartbeat,oranyotherabnormalsymptoms,STOPtheworkout atonce.CONSULTAPHYSICIANIMMEDIATELY.
11.Checkpinsandboltsandtightenifloose.
12.Alwayschoosetheproperintensitylevelthatbestsuitsyourphysicalstrength andflexibilitylevels.Knowyourlimitsandtrainwithinthem.Alwaysuse commonsensewhenexercising.
13.BeginslowlyandgetusedtotheuniquemovementoftheTotalFlex™prior tostartingyourroutine.
14.Toavoidseriousinjury,neverplaceanypartofyourbodybetweenornearany movingparts.
15.DONOTuseanyaccessoriesnotrecommendedbythemanufacturer. Understandcorrectuseofthismachine.
16.PleasekeepthisUser’sGuidepriortousingyourTotalFlex™machineto understandthecorrectuseoftheequipment.
17.Refertoalloftheincludedassemblyguidelinestomakecertainyourunitis properlyassembled,andtoremindyourselfofallmaintenanceguidelines.
18.Donotplaceyourhandsorfingersunderneaththeunitwhileitisbeingused. Keepchildrenawayfromtheunitduringuse.
19.Ifyouhavelonghairpleasetieituptoavoidgettingcaughtinsomepartsof theequipment.
20.Donotplacetheunitindirectsunlight,asheatcandegradethenon-steel materialsontheunit.
SAVE THESE INSTRUCTIONS
2
US
ER
’S G
UID
E
1.InsertthenewResistanceBandthroughtheSwivel Pulleybracket(see1).
2.Loopthebandaroundthefirstandthenthesecond PulleyWheelandhookontothePodHook. (see2&3).
3.Ifnecessary,proceedbyreplacingtheother ResistanceBands,fittingoneatatime.
4.ScrewthetwoPowerPodCoversbacktogether startingwiththetwocentreholes (see4&5).
3 4 5
1
2
US
ER
GU
IDE
US
ER
GU
IDE
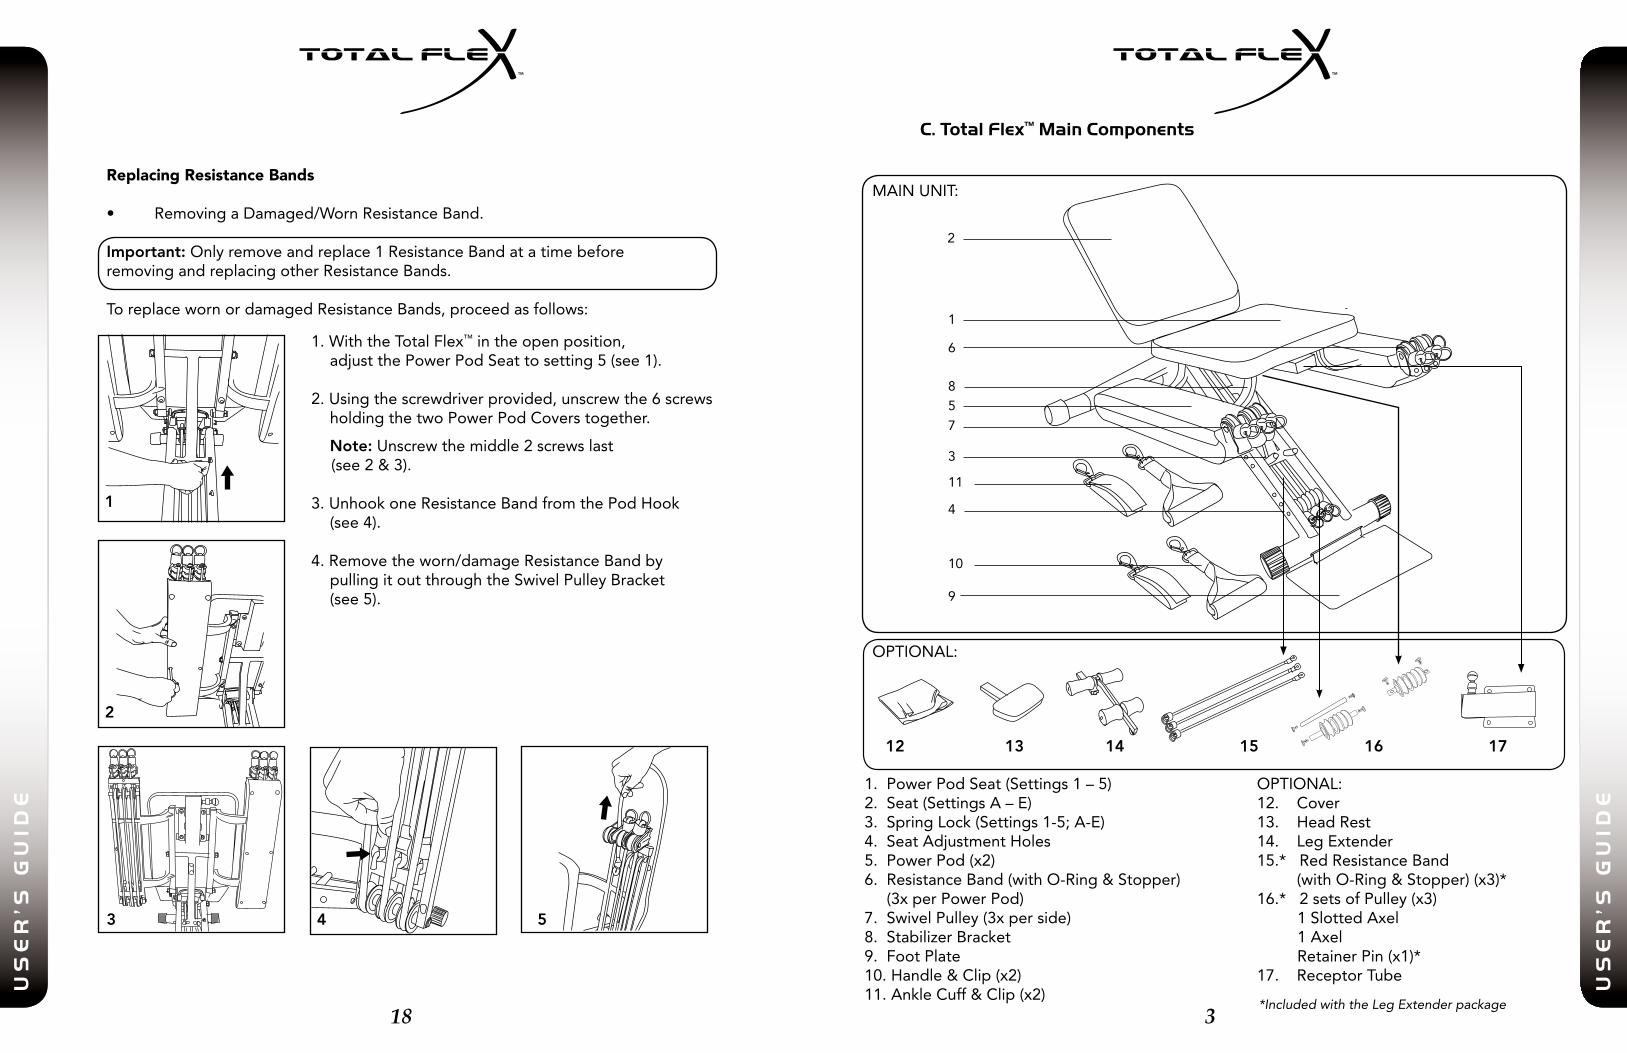
Replacing Resistance Bands
• RemovingaDamaged/WornResistanceBand.
Important:Onlyremoveandreplace1ResistanceBandatatimebeforeremovingandreplacingotherResistanceBands.
ToreplacewornordamagedResistanceBands,proceedasfollows:
1.PowerPodSeat(Settings1–5)2.Seat(SettingsA–E)3.SpringLock(Settings1-5;A-E)4.SeatAdjustmentHoles5.PowerPod(x2)6.ResistanceBand(withO-Ring&Stopper)(3xperPowerPod)7.SwivelPulley(3xperside)8.StabilizerBracket9.FootPlate10.Handle&Clip(x2)11.AnkleCuff&Clip(x2)
OPTIONAL:12.Cover13.HeadRest14.LegExtender15.*RedResistanceBand(withO-Ring&Stopper)(x3)*16.*2setsofPulley(x3) 1SlottedAxel 1Axel RetainerPin(x1)*17.ReceptorTube
18
US
ER
’S G
UID
E
C. Total Flex™ Main Components
3
US
ER
’S G
UID
E
2
1
8
6
5
7
3
4
10
11
9
OPTIONAL:
MAINUNIT:
12 13 14 15 16 17
3 4 5
1.WiththeTotalFlex™intheopenposition, adjustthePowerPodSeattosetting5(see1).
2.Usingthescrewdriverprovided,unscrewthe6screws holdingthetwoPowerPodCoverstogether.
Note:Unscrewthemiddle2screwslast (see2&3).
3.UnhookoneResistanceBandfromthePodHook (see4).
4.Removetheworn/damageResistanceBandby pullingitoutthroughtheSwivelPulleyBracket (see5).
1
2
*Included with the Leg Extender package
US
ER
GU
IDE
US
ER
GU
IDE
D. Assembling the Total Flex™
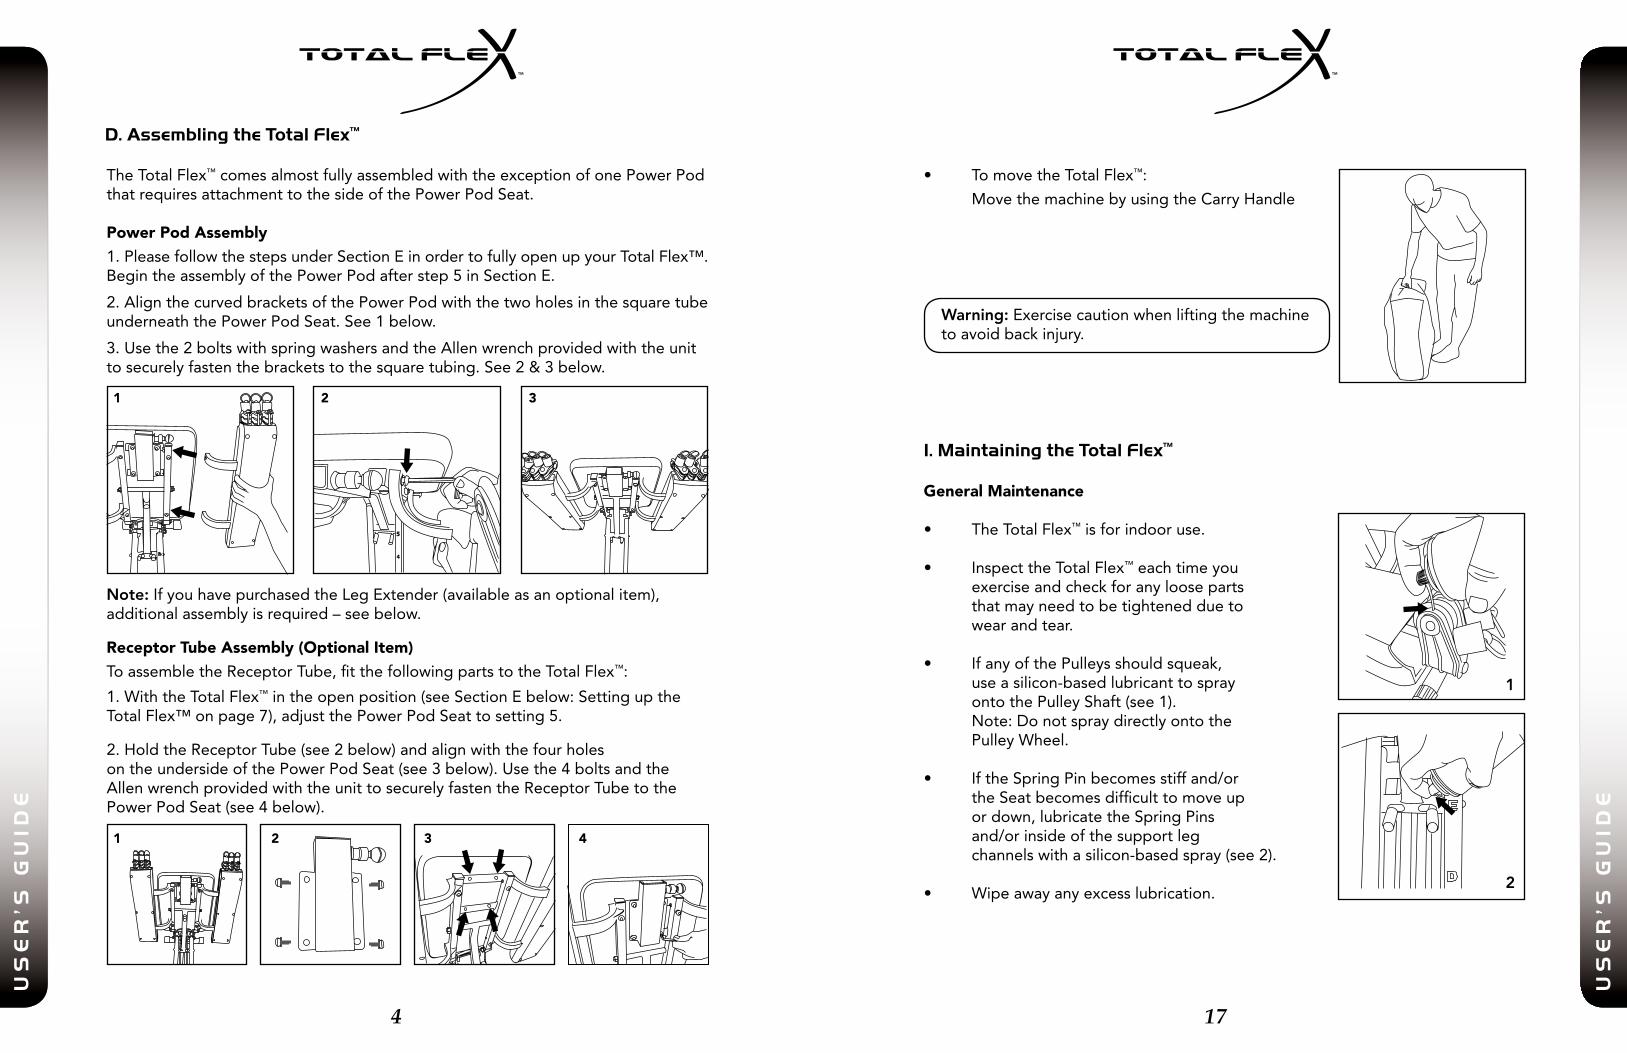
TheTotalFlex™comesalmostfullyassembledwiththeexceptionofonePowerPodthatrequiresattachmenttothesideofthePowerPodSeat.
Power Pod Assembly
1.PleasefollowthestepsunderSectionEinordertofullyopenupyourTotalFlex™.BegintheassemblyofthePowerPodafterstep5inSectionE.
2.AlignthecurvedbracketsofthePowerPodwiththetwoholesinthesquaretubeunderneaththePowerPodSeat.See1below.
3.Usethe2boltswithspringwashersandtheAllenwrenchprovidedwiththeunittosecurelyfastenthebracketstothesquaretubing.See2&3below.
Note:IfyouhavepurchasedtheLegExtender(availableasanoptionalitem),additionalassemblyisrequired–seebelow.
Receptor Tube Assembly (Optional Item)
ToassembletheReceptorTube,fitthefollowingpartstotheTotalFlex™:
1.WiththeTotalFlex™intheopenposition(seeSectionEbelow:SettinguptheTotalFlex™onpage7),adjustthePowerPodSeattosetting5.
2.HoldtheReceptorTube(see2below)andalignwiththefourholesontheundersideofthePowerPodSeat(see3below).Usethe4boltsandtheAllenwrenchprovidedwiththeunittosecurelyfastentheReceptorTubetothePowerPodSeat(see4below).
4
US
ER
’S G
UID
E
17
US
ER
’S G
UID
E
• TomovetheTotalFlex™:
MovethemachinebyusingtheCarryHandle
General Maintenance
• TheTotalFlex™isforindooruse.
• InspecttheTotalFlex™eachtimeyou exerciseandcheckforanylooseparts thatmayneedtobetighteneddueto wearandtear.
• IfanyofthePulleysshouldsqueak, useasilicon-basedlubricanttospray ontothePulleyShaft(see1). Note:Donotspraydirectlyontothe PulleyWheel.
• IftheSpringPinbecomesstiffand/or theSeatbecomesdifficulttomoveup ordown,lubricatetheSpringPins and/orinsideofthesupportleg channelswithasilicon-basedspray(see2).
• Wipeawayanyexcesslubrication.
I. Maintaining the Total Flex™
1 2 3
Warning:Exercisecautionwhenliftingthemachinetoavoidbackinjury.
1 2 3 4
1
2
US
ER
GU
IDE
US
ER
GU
IDE
16
US
ER
’S G
UID
E
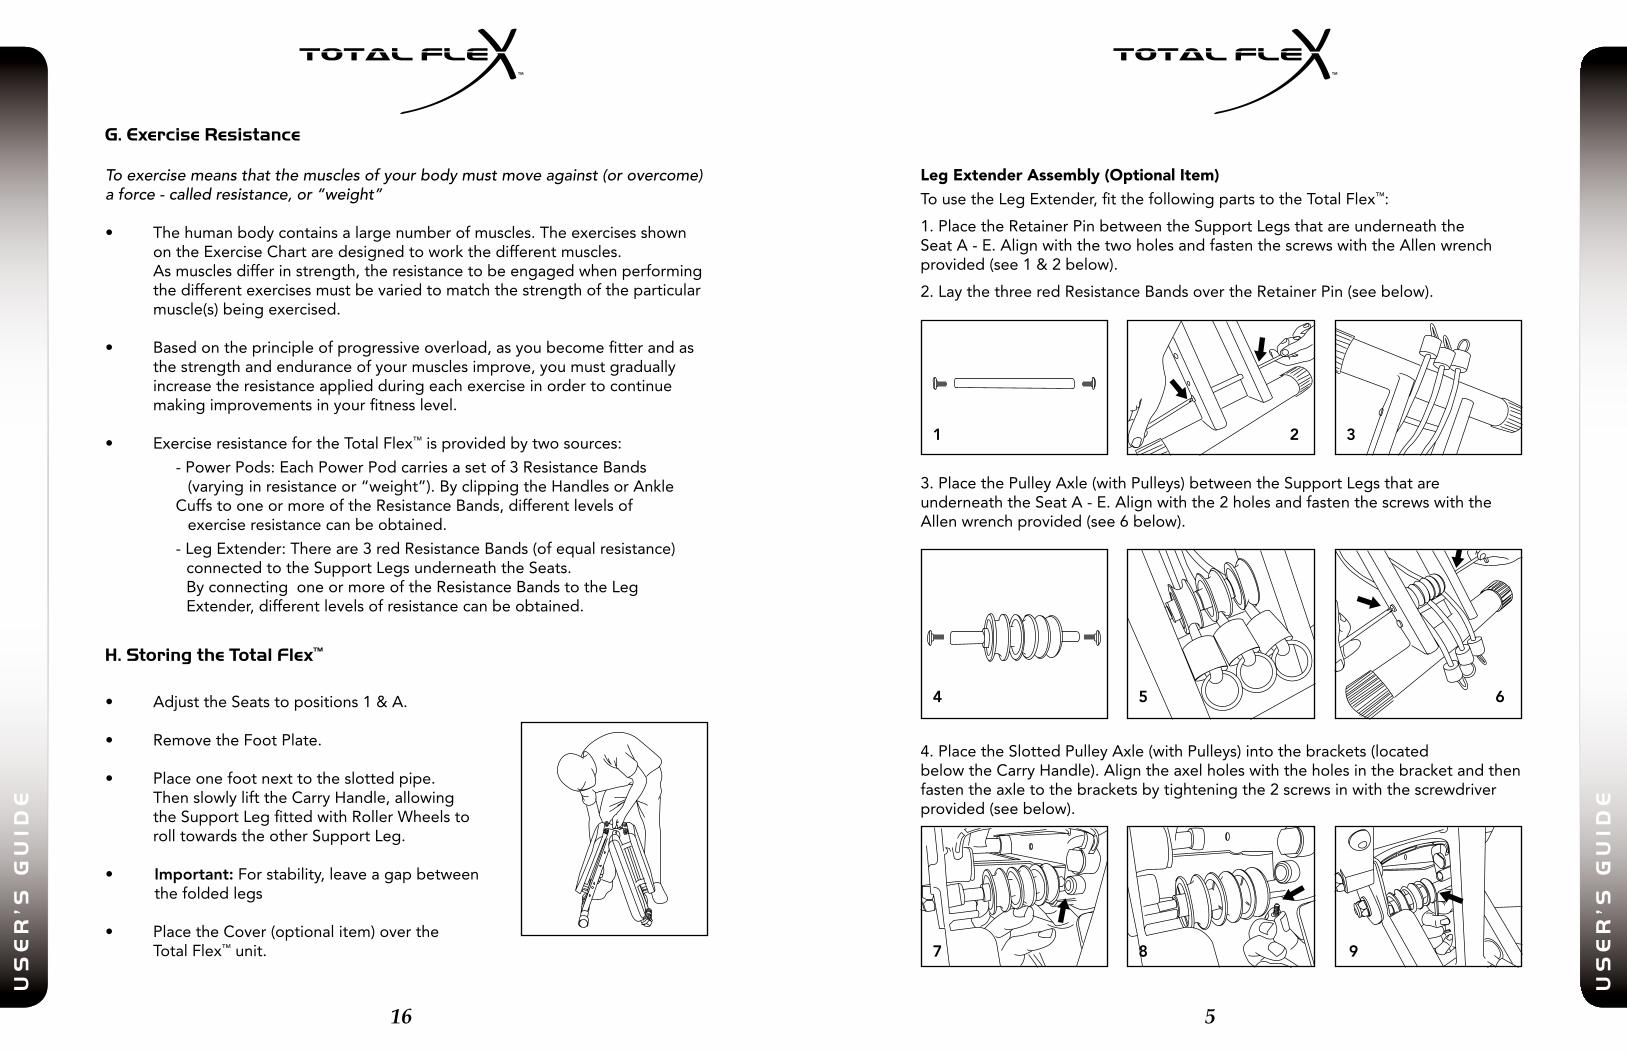
Leg Extender Assembly (Optional Item)
TousetheLegExtender,fitthefollowingpartstotheTotalFlex™:
1.PlacetheRetainerPinbetweentheSupportLegsthatareunderneaththeSeatA-E.AlignwiththetwoholesandfastenthescrewswiththeAllenwrenchprovided(see1&2below).
2.LaythethreeredResistanceBandsovertheRetainerPin(seebelow).
3.PlacethePulleyAxle(withPulleys)betweentheSupportLegsthatareunderneaththeSeatA-E.Alignwiththe2holesandfastenthescrewswiththeAllenwrenchprovided(see6below).
4.PlacetheSlottedPulleyAxle(withPulleys)intothebrackets(locatedbelowtheCarryHandle).Aligntheaxelholeswiththeholesinthebracketandthenfastentheaxletothebracketsbytighteningthe2screwsinwiththescrewdriverprovided(seebelow).
5
US
ER
’S G
UID
E
G. Exercise Resistance
H. Storing the Total Flex™
1 2 3
4 5 6
7 8 9
To exercise means that the muscles of your body must move against (or overcome) a force - called resistance, or “weight”
• Thehumanbodycontainsalargenumberofmuscles.Theexercisesshown ontheExerciseChartaredesignedtoworkthedifferentmuscles. Asmusclesdifferinstrength,theresistancetobeengagedwhenperforming thedifferentexercisesmustbevariedtomatchthestrengthoftheparticular muscle(s)beingexercised.
• Basedontheprincipleofprogressiveoverload,asyoubecomefitterandas thestrengthandenduranceofyourmusclesimprove,youmustgradually increasetheresistanceappliedduringeachexerciseinordertocontinue makingimprovementsinyourfitnesslevel.
• ExerciseresistancefortheTotalFlex™isprovidedbytwosources:
-PowerPods:EachPowerPodcarriesasetof3ResistanceBands (varyinginresistanceor“weight”).ByclippingtheHandlesorAnkle CuffstooneormoreoftheResistanceBands,differentlevelsof exerciseresistancecanbeobtained.
-LegExtender:Thereare3redResistanceBands(ofequalresistance) connectedtotheSupportLegsunderneaththeSeats. ByconnectingoneormoreoftheResistanceBandstotheLeg Extender,differentlevelsofresistancecanbeobtained.
• AdjusttheSeatstopositions1&A.
• RemovetheFootPlate.
• Placeonefootnexttotheslottedpipe. ThenslowlylifttheCarryHandle,allowing theSupportLegfittedwithRollerWheelsto rolltowardstheotherSupportLeg.
• Important:Forstability,leaveagapbetween thefoldedlegs
• PlacetheCover(optionalitem)overthe TotalFlex™unit.
US
ER
GU
IDE
US
ER
GU
IDE
15
US
ER
’S G
UID
E
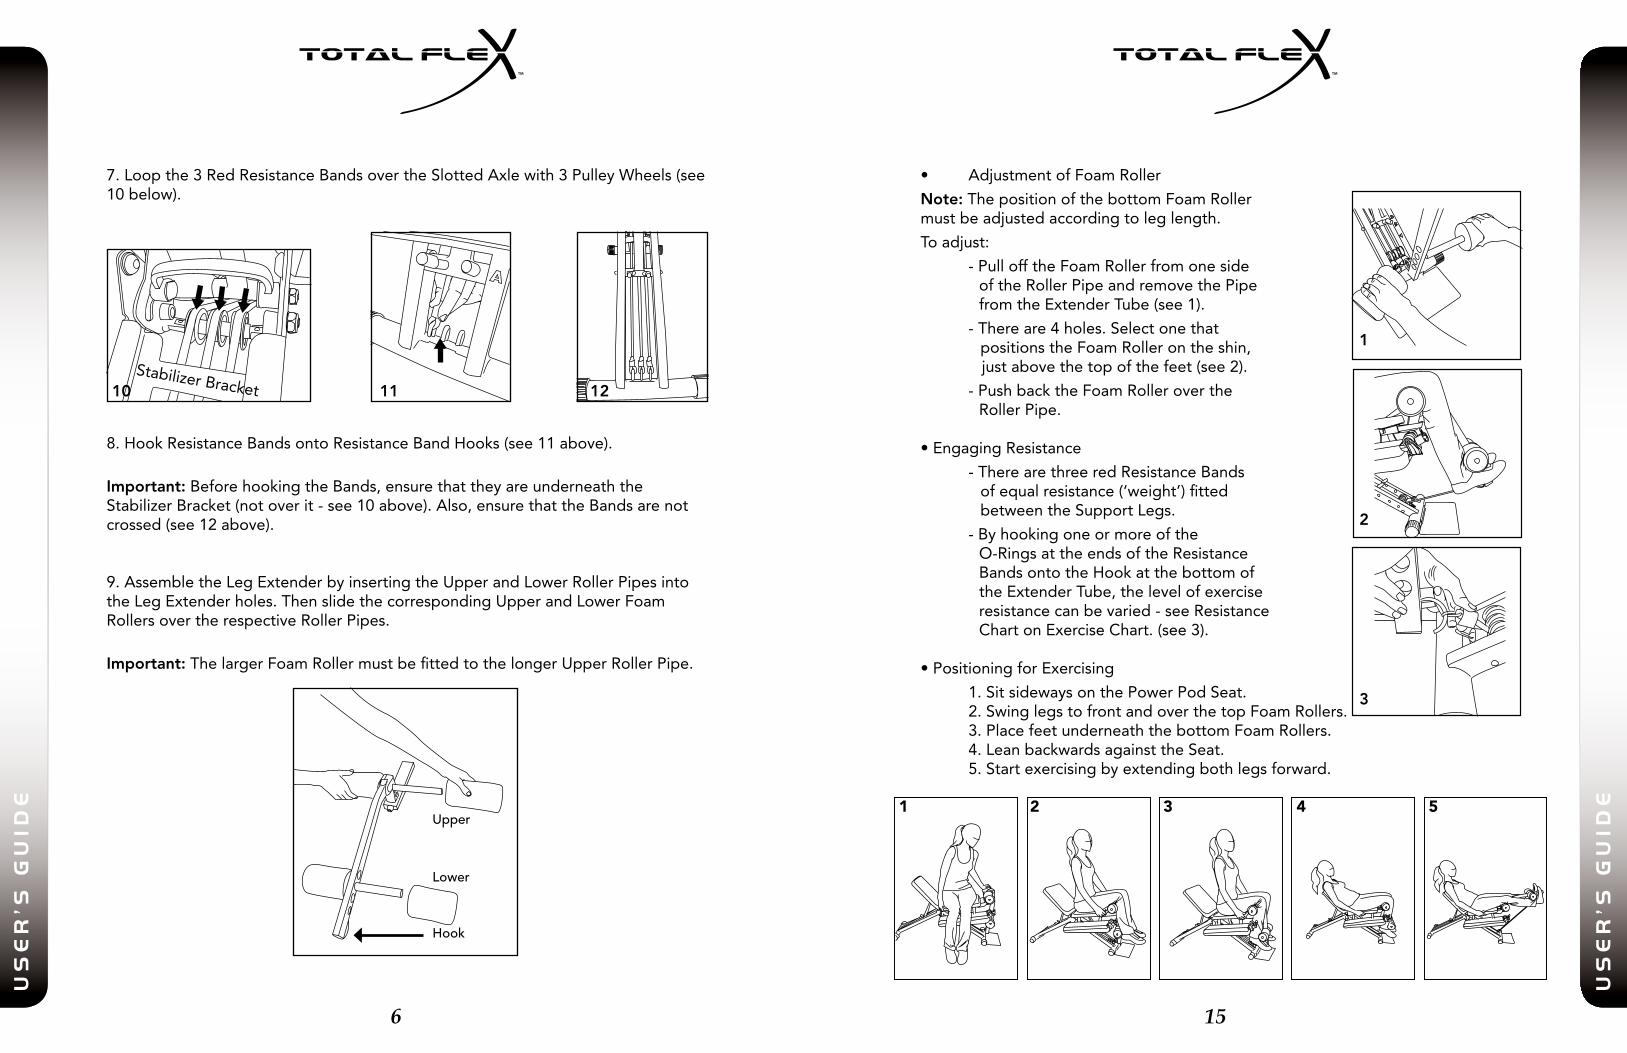
7.Loopthe3RedResistanceBandsovertheSlottedAxlewith3PulleyWheels(see10below).
8.HookResistanceBandsontoResistanceBandHooks(see11above).
Important:BeforehookingtheBands,ensurethattheyareunderneaththeStabilizerBracket(notoverit-see10above).Also,ensurethattheBandsarenotcrossed(see12above).
9.AssembletheLegExtenderbyinsertingtheUpperandLowerRollerPipesintotheLegExtenderholes.ThenslidethecorrespondingUpperandLowerFoamRollersovertherespectiveRollerPipes.
Important:ThelargerFoamRollermustbefittedtothelongerUpperRollerPipe.
6
US
ER
’S G
UID
E
StabilizerBracket
• AdjustmentofFoamRoller
Note:ThepositionofthebottomFoamRollermustbeadjustedaccordingtoleglength.
Toadjust:
-PullofftheFoamRollerfromoneside oftheRollerPipeandremovethePipe fromtheExtenderTube(see1).
-Thereare4holes.Selectonethat positionstheFoamRollerontheshin, justabovethetopofthefeet(see2).
-PushbacktheFoamRolleroverthe RollerPipe.
•EngagingResistance
-TherearethreeredResistanceBands ofequalresistance(‘weight’)fitted betweentheSupportLegs.
-Byhookingoneormoreofthe O-RingsattheendsoftheResistance BandsontotheHookatthebottomof theExtenderTube,thelevelofexercise resistancecanbevaried-seeResistance ChartonExerciseChart.(see3).
•PositioningforExercising
1.SitsidewaysonthePowerPodSeat. 2.SwinglegstofrontandoverthetopFoamRollers. 3.PlacefeetunderneaththebottomFoamRollers. 4.LeanbackwardsagainsttheSeat. 5.Startexercisingbyextendingbothlegsforward.
Upper
Lower
Hook
1 2 3 4 5
10 11 12
1
2
3
US
ER
GU
IDE
US
ER
GU
IDE
14
US
ER
’S G
UID
E
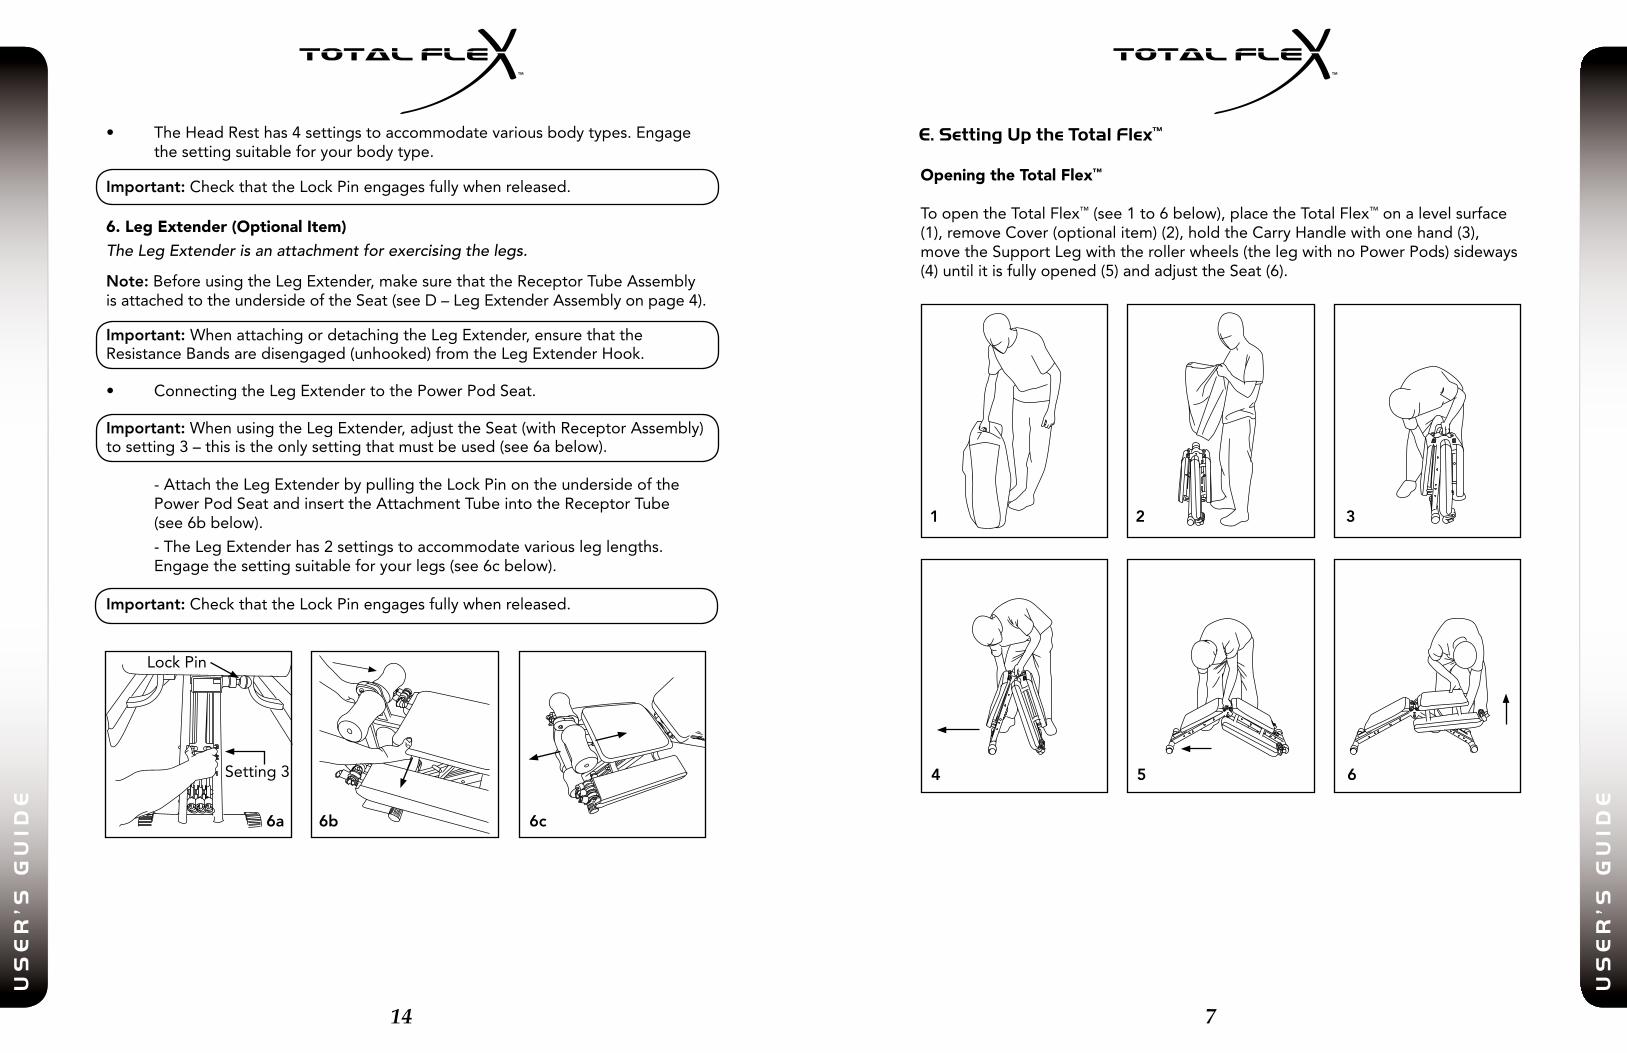
E. Setting Up the Total Flex™
Opening the Total Flex™
ToopentheTotalFlex™(see1to6below),placetheTotalFlex™onalevelsurface(1),removeCover(optionalitem)(2),holdtheCarryHandlewithonehand(3),movetheSupportLegwiththerollerwheels(thelegwithnoPowerPods)sideways(4)untilitisfullyopened(5)andadjusttheSeat(6).
7
US
ER
’S G
UID
E
• TheHeadResthas4settingstoaccommodatevariousbodytypes.Engage thesettingsuitableforyourbodytype.
Important:CheckthattheLockPinengagesfullywhenreleased.
6. Leg Extender (Optional Item)
The Leg Extender is an attachment for exercising the legs.
Note:BeforeusingtheLegExtender,makesurethattheReceptorTubeAssemblyisattachedtotheundersideoftheSeat(seeD–LegExtenderAssemblyonpage4).
Important: WhenattachingordetachingtheLegExtender,ensurethattheResistanceBandsaredisengaged(unhooked)fromtheLegExtenderHook.
• ConnectingtheLegExtendertothePowerPodSeat.
Important:WhenusingtheLegExtender,adjusttheSeat(withReceptorAssembly)tosetting3–thisistheonlysettingthatmustbeused(see6abelow).
-AttachtheLegExtenderbypullingtheLockPinontheundersideofthe PowerPodSeatandinserttheAttachmentTubeintotheReceptorTube (see6bbelow).
-TheLegExtenderhas2settingstoaccommodatevariousleglengths. Engagethesettingsuitableforyourlegs(see6cbelow).
Important:CheckthattheLockPinengagesfullywhenreleased.
Setting3
1 2 3
4 5 6
6a 6b 6c
LockPin
US
ER
GU
IDE
US
ER
GU
IDE
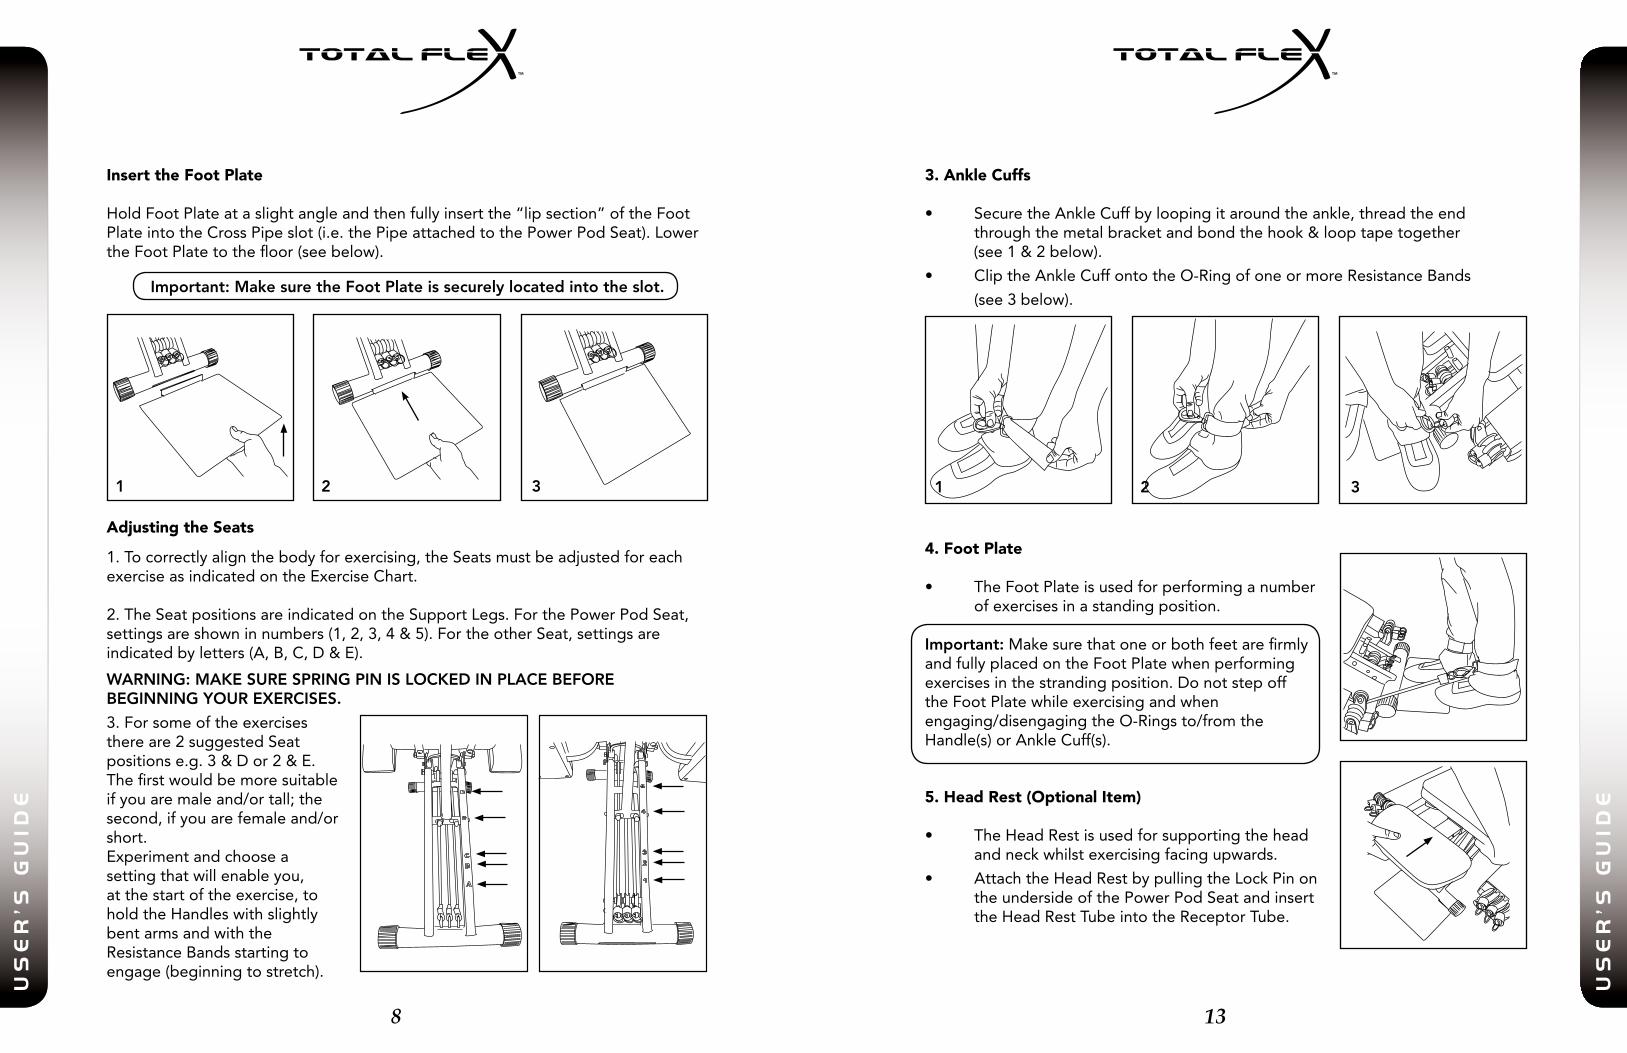
Insert the Foot Plate
HoldFootPlateataslightangleandthenfullyinsertthe“lipsection”oftheFootPlateintotheCrossPipeslot(i.e.thePipeattachedtothePowerPodSeat).LowertheFootPlatetothefloor(seebelow).
Important: Make sure the Foot Plate is securely located into the slot.
Adjusting the Seats
1.Tocorrectlyalignthebodyforexercising,theSeatsmustbeadjustedforeachexerciseasindicatedontheExerciseChart.
2.TheSeatpositionsareindicatedontheSupportLegs.ForthePowerPodSeat,settingsareshowninnumbers(1,2,3,4&5).FortheotherSeat,settingsareindicatedbyletters(A,B,C,D&E).
WARNING: MAKE SURE SPRING PIN IS LOCKED IN PLACE BEFORE BEGINNING YOUR EXERCISES.
3.Forsomeoftheexercisesthereare2suggestedSeatpositionse.g.3&Dor2&E.Thefirstwouldbemoresuitableifyouaremaleand/ortall;thesecond,ifyouarefemaleand/orshort.Experimentandchooseasettingthatwillenableyou,atthestartoftheexercise,toholdtheHandleswithslightlybentarmsandwiththeResistanceBandsstartingtoengage(beginningtostretch).
8
US
ER
’S G
UID
E
13
US
ER
’S G
UID
E
3. Ankle Cuffs
• SecuretheAnkleCuffbyloopingitaroundtheankle,threadtheend throughthemetalbracketandbondthehook&looptapetogether(see1&2below).
• CliptheAnkleCuffontotheO-RingofoneormoreResistanceBands
(see3below).
4. Foot Plate
• TheFootPlateisusedforperforminganumber ofexercisesinastandingposition.
Important:MakesurethatoneorbothfeetarefirmlyandfullyplacedontheFootPlatewhenperformingexercisesinthestrandingposition.DonotstepofftheFootPlatewhileexercisingandwhenengaging/disengagingtheO-Ringsto/fromtheHandle(s)orAnkleCuff(s).
5. Head Rest (Optional Item)
• TheHeadRestisusedforsupportingthehead andneckwhilstexercisingfacingupwards.
• AttachtheHeadRestbypullingtheLockPinon theundersideofthePowerPodSeatandinsert theHeadRestTubeintotheReceptorTube.
1 2 3 1 2 3
US
ER
GU
IDE
US
ER
GU
IDE
12
US
ER
’S G
UID
E
9
US
ER
’S G
UID
E
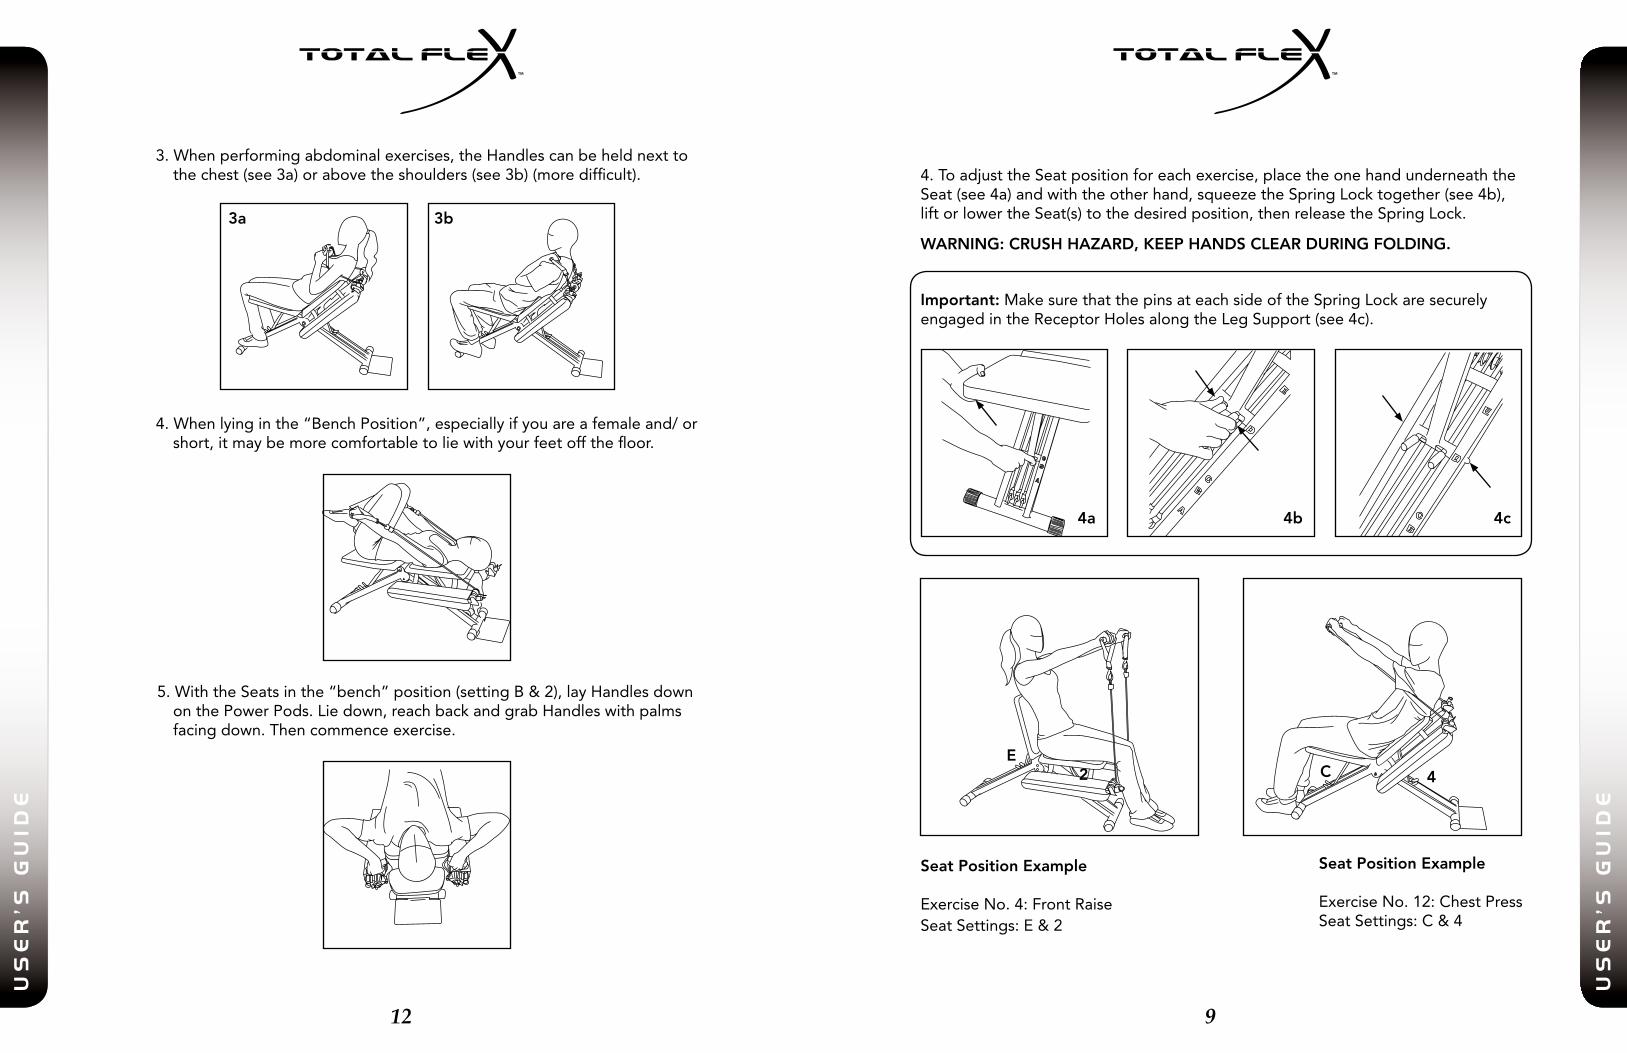
4.ToadjusttheSeatpositionforeachexercise,placetheonehandunderneaththeSeat(see4a)andwiththeotherhand,squeezetheSpringLocktogether(see4b),liftorlowertheSeat(s)tothedesiredposition,thenreleasetheSpringLock.
WARNING: CRUSH HAZARD, KEEP HANDS CLEAR DURING FOLDING.
Important:MakesurethatthepinsateachsideoftheSpringLockaresecurelyengagedintheReceptorHolesalongtheLegSupport(see4c).
Seat Position Example
ExerciseNo.4:FrontRaiseSeatSettings:E&2
Seat Position Example
ExerciseNo.12:ChestPressSeatSettings:C&4
EC
3a 3b
3.Whenperformingabdominalexercises,theHandlescanbeheldnextto thechest(see3a)orabovetheshoulders(see3b)(moredifficult).
4.Whenlyinginthe“BenchPosition”,especiallyifyouareafemaleand/or short,itmaybemorecomfortabletoliewithyourfeetoffthefloor.
5.WiththeSeatsinthe“bench”position(settingB&2),layHandlesdown onthePowerPods.Liedown,reachbackandgrabHandleswithpalms facingdown.Thencommenceexercise.
4a 4b 4c
42
US
ER
GU
IDE
US
ER
GU
IDE
10
US
ER
’S G
UID
E
11
US
ER
’S G
UID
E
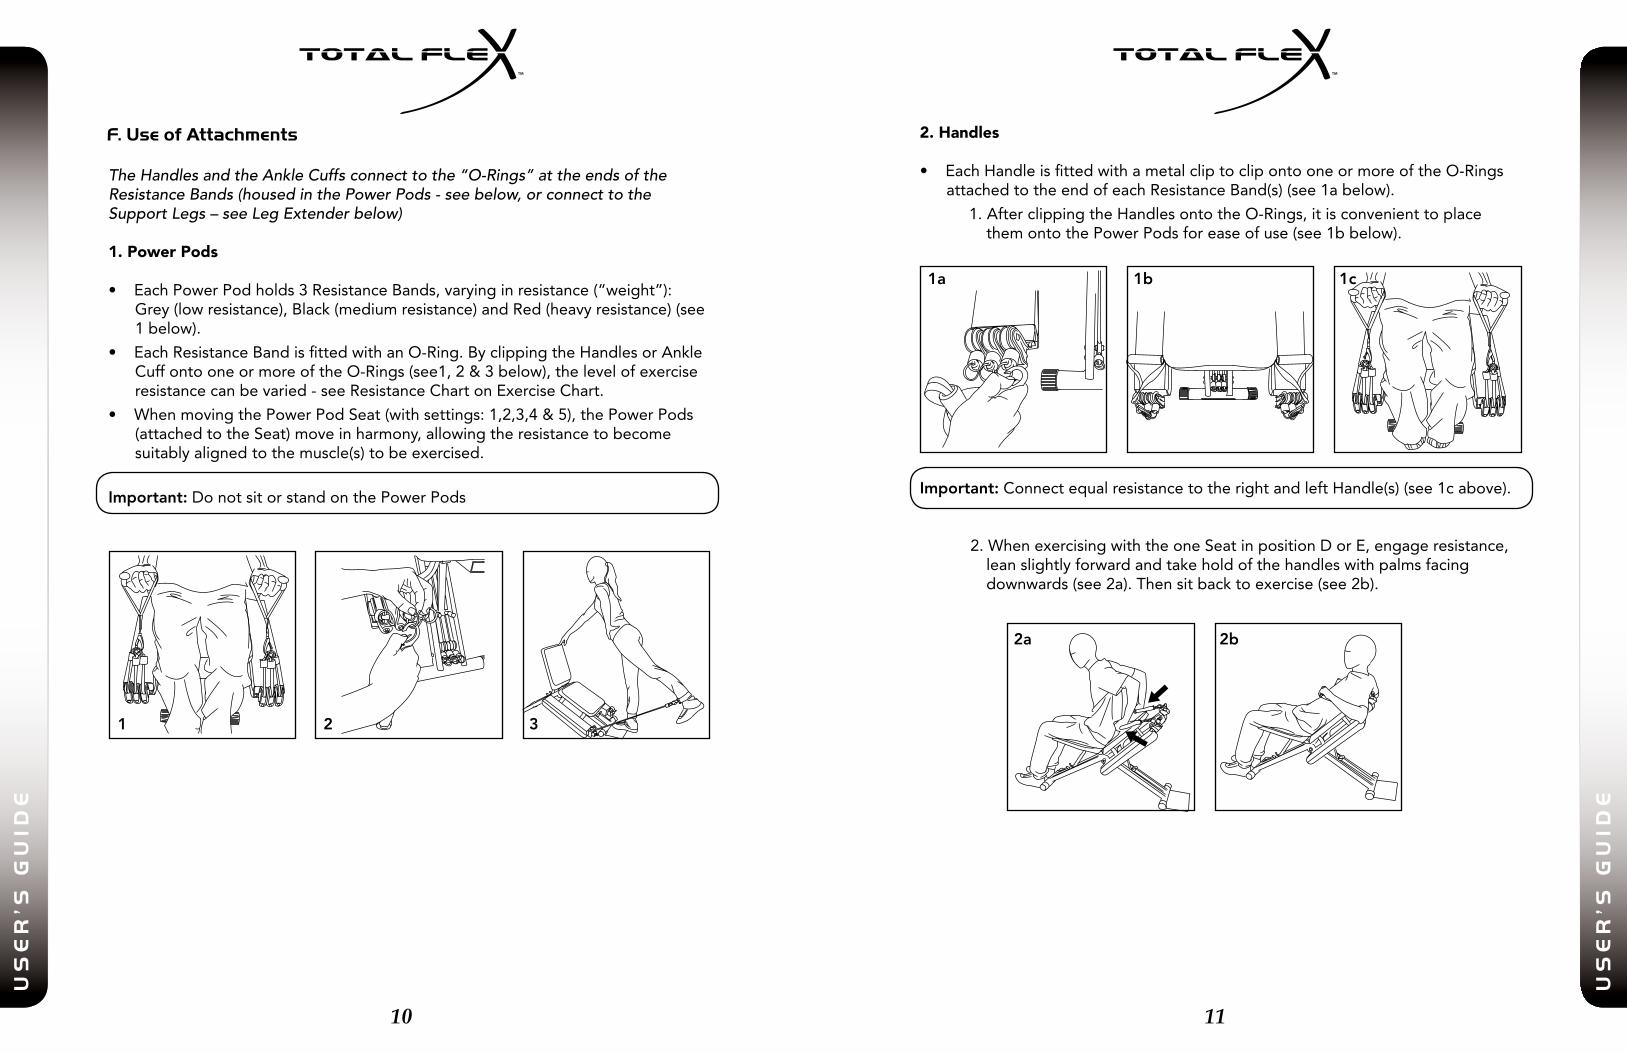
F. Use of Attachments
The Handles and the Ankle Cuffs connect to the “O-Rings” at the ends of theResistance Bands (housed in the Power Pods - see below, or connect to the Support Legs – see Leg Extender below)
1. Power Pods
•EachPowerPodholds3ResistanceBands,varyinginresistance(“weight”): Grey(lowresistance),Black(mediumresistance)andRed(heavyresistance)(see 1below).
•EachResistanceBandisfittedwithanO-Ring.ByclippingtheHandlesorAnkle CuffontooneormoreoftheO-Rings(see1,2&3below),thelevelofexercise resistancecanbevaried-seeResistanceChartonExerciseChart.
•WhenmovingthePowerPodSeat(withsettings:1,2,3,4&5),thePowerPods (attachedtotheSeat)moveinharmony,allowingtheresistancetobecome suitablyalignedtothemuscle(s)tobeexercised.
Important:DonotsitorstandonthePowerPods
2. Handles
•EachHandleisfittedwithametalcliptoclipontooneormoreoftheO-Rings attachedtotheendofeachResistanceBand(s)(see1abelow).
1.AfterclippingtheHandlesontotheO-Rings,itisconvenienttoplace themontothePowerPodsforeaseofuse(see1bbelow).
Important:ConnectequalresistancetotherightandleftHandle(s)(see1cabove).
2.WhenexercisingwiththeoneSeatinpositionDorE,engageresistance, leanslightlyforwardandtakeholdofthehandleswithpalmsfacing downwards(see2a).Thensitbacktoexercise(see2b).
1 2 3
1a 1b 1c
2a 2b

US
ER
GU
IDE
Thane International, Inc.,La Quinta, CA 92253 www.thane.com
Thane Direct Canada, Inc., Mississauga, ONwww.thane.ca
Thane Direct UK, Ltd.,Admail ADM3996, London, W1T 1ZUwww.thanedirect.co.uk
© 2010, Thane International, Inc.
TF-Eng.March 8, 2011