user guide v1 - hptmac.com 2. setting up rocketstor smart raid 2.1 connecting usb cables 2.2 power...
TRANSCRIPT

1
RocketStor SMART RAID
User Guide v1.0

2
Copyright © HighPoint Technologies Inc., 1995-2012. All rights reserved.
OS X and Macintosh are registered trademarks of Apple Corporation.
All other trademarks and copyrights referred to are the property of their respective owners.
Distribution of substantively modified versions of this document is prohibited without the explicit permission of the copyright holder.
Distribution of this work or derivative work in any standard (paper) book form for commercial purposes are prohibited unless prior permission is obtained from the copyright holder.
DOCUMENTATION IS PROVIDED "AS IS" AND ALL EXPRESS OR IMPLIED CONDITIONS, REPRESENTATIONS AND WARRANTIES, INCLUDING ANY IMPLIED WARRANTY OF MERCHANTABILITY, FITNESS FOR A PARTICULAR PURPOSE OR NON-INFRINGEMENT, ARE DISCLAIMED, EXCEPT TO THE EXTENT THAT SUCH DISCLAIMERS ARE HELD TO BE LEGALLY INVALID.

3
Table of Contents 1. Introduction to RocketStor SMART RAID………………………………………………………………………….4
1.1Kit Contents………………………………………………………………………………………….………….4
1.2 Power Adapter………………………………………………………...………………4
2. Setting Up RocketStor SMART RAID………………………………………………………………………………..5
2.1 Connecting USB cables………………………………………………………………………………………5
2.2 Power Adapter Installation……………………………………………………………………………………5
2.3 SATA Drives Installation and Device Ejection……………………………..…………………………6
2.4 Installing the RocketU Mac Card…………………………………………………..……………….………7
2.5 Connecting the 10Gb/s Dual USB cable…………………………………………………..……………8
3. Installing the RocketStor SMART RAID Interface……………………………………………………………….9
3.1 Installing the package…………………………………………………....……………………………………..9
3.2 Uninstalling the RAID Interface…………………………………………………………………………10
4. RocketStor SMART RAID Interface………………………………………………………………………………...11
4.1 Locate the RocketStor SMART RAID Icon on your desktop………………………… 11
4.2Array………………………………………………..……………………………………………………………….11
4.3Event………………………………………………………………………………………….……………..………12
5.Creating an Array……………………………………………………………………………………………………………14
5.1Disk Utility……………………………………………………………………………...16
6.RAID Recovery………………………………………………………………………………………………………………16
7.Tips and Troubleshooting………………………………………………………………………18
8.Customer Support…………………………………………………………………………………………………………...19
FCC Part 15 Class B Radio Frequency Interference Statement……………………………………20

4
1. Introduction to RocketStor SMART RAID RocketStor SMART RAID 2x USB 3.0 SuperSpeed External RAID Solution for Mac Pro Platforms HighPoint’s RocketStor SMART RAID is a high-performance, external RAID storage solution designed specifically for use with Mac Pro Workstations and the OS X operating system. The RocketStor SMART RAID includes a dual-bay SuperSpeed drive dock and 2-Port USB 3.0 PCI-E 2.0 RAID controller, and supports all generations of SATA hard drives and SSD’s. The intuitive web-based Management interface allows you to quickly and easily configure RAID 0, 1, and JBOD arrays using high-performance SATA 6Gb/s HDD’s and SSD’s.
1.1 Kit Contents The RocketStor SMART RAID includes the following items:
RocketStor SMART Backup device RocketU Mac PCI-E 2.0 x4 Controller Card USB 3.0 Dual cable Manual and CD Power adapter (Including the AC Power cord: CCC, EUR and US).
1.2 Power Adapter The RocketStor SMART Backup includes one of the following power adapters. The adapter should be compliant with your country/region:
Power adapter CCC Power adapter EUR Power adapter US

5
2. Setting Up RocketStor SMART RAID
2.1 Connecting USB cables
2.2 Power Adapter Installation Installing the DC Power Plug:
Connect the power adapter to the DC Port found on the back of the RocketStor SMART Backup device.
Installing the AC Power cord:
Connect the AC Power cord to the Power Adapter and connect the AC Power Plug to the Power Jack.
CCC is for Asia EUR is for Europe
UL is for the United States
Connect the Type B USB Connectors to the back of the RocketStor USB device

6
2.3 SATA Drives Installation and Ejecting
Installation - Simultaneously install two 3.5’’HDD or two 2.5’’HDD/SDD Ejecting - Hold the base of the RocketStor device and press the Eject Button. Gently remove the drive by pulling straight upwards.

7
2.4 Installing the RocketU Mac Card
Note: Make sure the Mac Pro system is powered-off before installing the RU series controller.
1. Open the system chassis and locate an unused PCI-Express (2.0 or 1.0) ×4 slot. The RocketU Mac card can also be installed into x8 and x16 slots.
2. Remove the PCI-Express slot cover.
3. Gently insert the RocketU Mac card into the PCI-Express slot, and secure the bracket to the system chassis.
4. Close and secure the system chassis.
Dual USB 3.0 SuperSpeed Ports
Dedicated 5Gb/s per-port performance
PCI-Express 2.0 x4

8
2.5 Connecting the 10Gb/s Dual USB cable
Connect the RocketStor SMART RAID device to the RocketU Mac card with the 10Gb/s dual USB 3.0 cable.
Pay close attention to the port number assignments of the RocketU controller card, and the RocketStor SMART RAID device. Make sure the cable connectors are properly installed for each device – port 1/2 of the RocketU card should always be connected to the corresponding port 1/2 of the RocketStor device.

9
3. Installing the RocketStor SMART RAID Interface
3.1 Installing the package 1) Double click the package to start the installer.
2) Click the “Continue” button.
3) Select the Install location. The default selection is the OS X system drive. Click “Install” to continue.
4) OS X will inform you that a reboot is required after installing the software. Click “Continue
Installation”.

10
5) Click “Restart” when prompted.
3.2 Uninstalling the RAID Interface
1) To uninstall the software, double-click the uninstall.command script in installation package (this is located on the software CD, or included with the download package).
2) OS X will display a terminal window. You will be prompted to enter the administrative password, and
press Enter.
3) If no password is required, simply press Enter. Once complete, you can close terminal.

11
4. RocketStor SMART RAID Interface
4.1 Locate the RocketStor SMART RAID Icon on your desktop. Double-click to start the RAID interface:
The interface will utilize your Mac’s default web-browser, and is comprised of two sections –Array and Event
4.2 Array Array – This section is used to manage and configure all hard drives and SSD’s installed into the RocketStor.
12
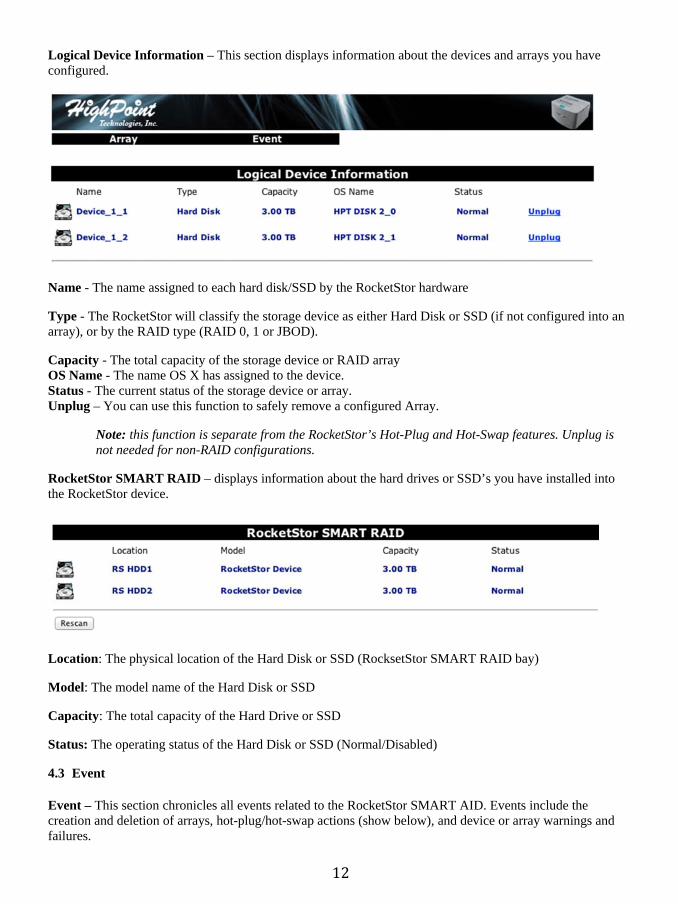
Logical Device Information – This section displays information about the devices and arrays you have configured.
Name - The name assigned to each hard disk/SSD by the RocketStor hardware
Type - The RocketStor will classify the storage device as either Hard Disk or SSD (if not configured into an array), or by the RAID type (RAID 0, 1 or JBOD).
Capacity - The total capacity of the storage device or RAID array OS Name - The name OS X has assigned to the device. Status - The current status of the storage device or array. Unplug – You can use this function to safely remove a configured Array.
Note: this function is separate from the RocketStor’s Hot-Plug and Hot-Swap features. Unplug is not needed for non-RAID configurations.
RocketStor SMART RAID – displays information about the hard drives or SSD’s you have installed into the RocketStor device.
Location: The physical location of the Hard Disk or SSD (RocksetStor SMART RAID bay)
Model: The model name of the Hard Disk or SSD
Capacity: The total capacity of the Hard Drive or SSD
Status: The operating status of the Hard Disk or SSD (Normal/Disabled)
4.3 Event
Event – This section chronicles all events related to the RocketStor SMART AID. Events include the creation and deletion of arrays, hot-plug/hot-swap actions (show below), and device or array warnings and failures.

13
Click “Clear” to delete all current event entries.
Note: deleted entries cannot be recovered

14
5. Creating an Array
You will need two separate hard disks or SSD’s to create a RAID array. To create an array, click Array, then
click the “Create Array” button. The following menu will be displayed:
Note: Creating an Array will destroy all data stored on the selected hard disks and/or SSD’s! Be sure to backup all important data before creating arrays. Any data stored on the selected devices will be lost during the creation process.
1) Click the “Array Type” drop-down menu and select the desired RAID level.
Array Type:
RAID Levels: RAID 0 (maximize performance) - Also known as a “stripe” array. This will combine both devices into a single, high-performance “drive”. Capacity is determined by the smallest drive, multiplied by two. For example, a RAID 0 array created using a 1 TB drive and a 2TB drive will result in 2TB of usable capacity. RAID 1 (security) – RAID 1 arrays are also known as a “mirror” arrays. Any data written to the source disk (Drive 1) is automatically written to the target device (Drive 2) – creating an exact physical copy.

15
OS X will recognize a RAID 1 array as a single “drive” (the second device is essentially “hidden” from the OS X). JBOD (capacity) – JBOD is an acronym for “Just a bunch of disks”. A JBOD array is used to maximize capacity when using devices of different sizes. Unlike RAID 0, capacity is cumulative. For example, a JBOD configured using the same 1TB + 2TB disks (from the RAID 0 description) would yield a usable capacity of 3TB. However, JBOD offers no performance benefit.
2) After selecting the RAID type or Level, name your array. Although this step is optional, it may provide
useful if you intend to configure more than one RAID level and remove these devices for safekeeping. If you decide to use the default naming scheme, the array will be labeled as follows:
RAID_RAID level_RAID # For example, a RAID 0 array would be displayed as RAID_0_0 The first zero represents the RAID type or level. The second refers to the array’s number (RocketStor will start from zero).
3) Once you have named the array, click the “Select All” button, or manually check the box before each device.
4) Once the devices have been selected, click the “Create” button.
5) The interface will notify you after the array has been successfully created. This information will also be
logged under “Event”. The new array will be displayed under Logical Devices:
6) OS X will recognize a freshly created RAID array as a new “disk”. You will need to use OS X’s Disk
Utility interface to prepare the array for use.
Disk Utility Alert Message:
7) Click “Initialize” – this will open Disk Utility.

16
5.1 Disk Utility
Arrays will be identified as “HPT DISKS”. Click erase to prepare the array for use. Once complete, OS X will mount it on the desktop.
6. RAID Recovery
The RocketStor SMART RAID interface provides recovery tools in the case of a RAID1 disk failure.
A “critical” status will be assigned to the array, and an error message will be displayed in the case of disk failure.
1) To recover the array, click “Maintenance”. A small pop-up window will be displayed:

17
2) Replace the failed device. The replacement hard disk/SSD must be equal to or larger than the failed device.
3) Once the disk is attached, allow the RocketStor a few moments to detect the replacement. You can also use the “Rescan” button to expedite this process.
4) Once the replacement disk is detected, it will be displayed under External Drive Information. Click “Add Disk”. This will open the Add Disk To Array menu.
5) Check the circle before the replacement disk and click “Submit”. The RocketStor will initiate the rebuild procedure.
6) The RocketStor interface will notify you when the rebuild procedure is complete. The status will be restored to “Normal”.

18
7. Tips and Troubleshooting
1) Detecting Devices If the RocketStor is unable to recognize a device, double check the cable connections, and make sure the hard disk or SSD has been securely inserted into the RocketStor device bay.
– Use the “Rescan” button – this will instruct the RocketStor interface to check for new devices. 2) Creating an Array will destroy all data stored on the selected hard disks and/or SSD’s! Be sure to backup all important data before creating arrays. Any data stored on the selected devices will be lost during the creation process. 3) RocketU and RocketStor port numbers Pay close attention to the port number assignments for the RocketU controller card, and the RocketStor unit. Make sure the cable connectors are properly installed for each device – port 1/2 of the RocketU card should always be connected to the corresponding port 1/2 of the RocketStor device. 4) Unplugging RAID arrays.
We strongly recommend using the Unplug function to safely power down and remove any devices configured as arrays. Hot-Plugging RAID devices may result in broken arrays and/or data loss.

19
8. Customer Support
If you encounter any problems while utilizing the RocketStor SMART RAID, or have any questions about this or any other HighPoint product, contact our Customer Support Department using our online Support Portal: http://www.highpoint-tech.com/websupport
Troubleshooting Checklist Before contacting our Customer Support department, via the Web Support Portal: Make sure the latest driver and RocketStor RAID Management software has been installed for the
RocketStor SMART RAID. The latest updates are available from http://www.hptmac.com Prepare a list of the computer system’s hardware and software (Mac Pro system model, memory, other
PCI-E devices/host adapters, OS X revision, applications)

20
FCC Part 15 Class B Radio Frequency Interference Statement This equipment has been tested and found to comply with the limits for a Class B digital device, pursuant to part 15 of the FCC Rules. These limits are designed to provide reasonable protection against harmful interference in a residential installation. This equipment generates uses and can radiate radio frequency energy and, if not installed and used in accordance with the instructions, may cause harmful interference to radio communications. However, there is no guarantee that interference will not occur in a particular installation. If this equipment does cause harmful interference to radio or television reception, which can be determined by turning the equipment off and on, the user is encouraged to try to correct the interference by one or more of the following measures: Reorient or relocate the receiving antenna. Increase the separation between the equipment and receiver. Connect the equipment into an outlet on a circuit different from that to which the receiver is connected. Consult the dealer or an experienced radio/TV technician for help. Modifications not expressly approved by the manufacturer could void the user’s authority to operate the
equipment under FCC rules.
This device complies with part 15 of the FCC Rules. Operation is subject to the following two conditions: (1) this device may not cause harmful interference, and (2) this device must accept any interference received, including interference that may cause undesired operation. European Union Compliance Statement This Information Technologies Equipment has been tested and found to comply with the following European directives: European Standard EN55022 (1998) Class B European Standard EN55024 (1998)