user guide version 9 - myautoclerkmyautoclerk.com/wp-content/uploads/2014/07/v9userguide... ·...
TRANSCRIPT

AutoClerk User Guide (Version 9:
Build 1009)
Module: Reservations

AutoClerk User Guide Version 9: Build 1009, Module: Reservations
April 2011 (Doc. Version 1.0) 2
Table of Contents TABLE OF CONTENTS ....................................................................................................................................... 2
COPYRIGHT INFORMATION ............................................................................................................................. 5
1. RESERVATIONS ........................................................................................................................................ 6
NEW RESERVATION FIELDS AND BUTTONS .................................................................................................................... 7 New Reservation Tool Bar .............................................................................................................................. 7
File ............................................................................................................................................................................... 7 Profiles ......................................................................................................................................................................... 7
Conf Button ..................................................................................................................................................... 7 Stay Total Button ............................................................................................................................................ 7 Arrival Pull-Down ............................................................................................................................................ 7 Departure Pull-Down ...................................................................................................................................... 7 Res Type Pull-Down ........................................................................................................................................ 7 Rooms Field .................................................................................................................................................... 8 Rm Type Pull-Down ......................................................................................................................................... 8 Smkr Field ....................................................................................................................................................... 8 Room Pull-Down ............................................................................................................................................. 8 Requested Checkbox ....................................................................................................................................... 8 People Fields ................................................................................................................................................... 8 Crib, Roll Checkboxes ...................................................................................................................................... 8 Rate Class Pull-Down ...................................................................................................................................... 8 Hide Rates Checkbox....................................................................................................................................... 9 Day Tiered Rates Pull-Down ........................................................................................................................... 9 ETA Pull-Down ................................................................................................................................................ 9 Last Name Field and Lookup ........................................................................................................................... 9 First Name Field and Lookup .......................................................................................................................... 9 Title Field and Lookup ..................................................................................................................................... 9 Tax Exempt Button ......................................................................................................................................... 9 Bill-To Button .................................................................................................................................................. 9 Address/Contact Buttons ................................................................................................................................ 9 Details Button ............................................................................................................................................... 10 Conf Letter Pull-Downs ................................................................................................................................. 10 Pay Type Pull-Down ...................................................................................................................................... 10 Pay Type Button ............................................................................................................................................ 10 Show Guarantee Info Button ........................................................................................................................ 10 Gtd/Cxl Type Button ..................................................................................................................................... 10 Gtd/Cxl Type Pull-Down ................................................................................................................................ 10 Gtd/Cxl Time Pull-Down ................................................................................................................................ 11 Sources Pull Downs ....................................................................................................................................... 11 Channel Field ................................................................................................................................................ 11 User Field 1 ................................................................................................................................................... 11 Specials Field ................................................................................................................................................. 11 Memo Button ................................................................................................................................................ 11 Memo Field ................................................................................................................................................... 11 CRS Type Pull Down ...................................................................................................................................... 11
AutoClerk User Guide Version 9: Build 1009, Module: Reservations
April 2011 (Doc. Version 1.0) 3
CRS Conf ........................................................................................................................................................ 12 User Field 2 ................................................................................................................................................... 12 Checkbox 1 .................................................................................................................................................... 12 Checkbox 2 .................................................................................................................................................... 12 Month of Birth Fill Fields (3) ......................................................................................................................... 12 Travel Agency Button and Lookup ................................................................................................................ 12 Function Buttons ........................................................................................................................................... 12
Esc .............................................................................................................................................................................. 12 F1-Help ...................................................................................................................................................................... 12 F2-Guest .................................................................................................................................................................... 13 F3-Room .................................................................................................................................................................... 13 F4-Availability ............................................................................................................................................................ 13 F6-Interfaces .............................................................................................................................................................. 13 F7-Maid ...................................................................................................................................................................... 13 F8-Note ...................................................................................................................................................................... 13 F9-Post ....................................................................................................................................................................... 13 F10-Save .................................................................................................................................................................... 13
NEW RESERVATION ................................................................................................................................................ 14 CREATE USING AN EXISTING RESERVATION ................................................................................................................. 15 CREATE USING A FOLIO........................................................................................................................................... 16 MODIFY/VIEW A RESERVATION ................................................................................................................................ 16 GROUPS .............................................................................................................................................................. 17
Create a New Group Master ......................................................................................................................... 17 Modify/View a Group Master ....................................................................................................................... 19 Modify Group Allocation Rates Only ............................................................................................................ 20 Group Room Management ........................................................................................................................... 21 Post an Advance Deposit to a Master........................................................................................................... 23 Cancel a Group ............................................................................................................................................. 23 Customer Rooming List ................................................................................................................................. 24 List Groups Due to Arrive .............................................................................................................................. 24 Future Inhouse Guest .................................................................................................................................... 25 Group Pickup Report ..................................................................................................................................... 25
CREATE A PERMANENT RESERVATION ........................................................................................................................ 25 CANCEL A RESERVATION ......................................................................................................................................... 26 UNCANCEL A RESERVATION ..................................................................................................................................... 26 CANCEL ALL HOLDS FOR A DAY ................................................................................................................................ 26 ADVANCE DEPOSITS ............................................................................................................................................... 27
Post an Advance Deposit or Refund .............................................................................................................. 27 Deposit Folio ................................................................................................................................................. 28 Advance Deposit Report ............................................................................................................................... 28 Cancelled Reservations with Deposits Report ............................................................................................... 28 Deposits Due Report ..................................................................................................................................... 28
LIST RESERVATIONS ................................................................................................................................................ 29 PRINT REGISTRATION SLIPS ...................................................................................................................................... 29 PRINT CONFIRMATION LETTERS ................................................................................................................................ 29
LIST OF FIGURES ............................................................................................................................................ 30
INDEX OF AUTOCLERK V9 ICONS, MENUS, AND COMMANDS FOR RESERVATIONS MODULE ........................ 31

AutoClerk User Guide Version 9: Build 1009, Module: Reservations
April 2011 (Doc. Version 1.0) 4
AutoClerk User Guide Version 9: Build 1009, Module: Reservations
April 2011 (Doc. Version 1.0) 5
Copyright Information
Copyright 2011
AutoClerk User Guide Version 9
All rights reserved. No part of this publication may be reproduced, stored in a retrieval
system, or transmitted, in any form or by any means, electronic, mechanical,
photocopying, or otherwise without prior written permission of AutoClerk.
AutoClerk, Inc.
Address: 936 Dewing Ave., Suite G, Lafayette, CA 94549
Phone: 925.284.1005
Fax: 925.284.3423
URL: www.autoclerk.com
AutoClerk User Guide Version 9: Build 1009, Module: Reservations
April 2011 (Doc. Version 1.0) 6
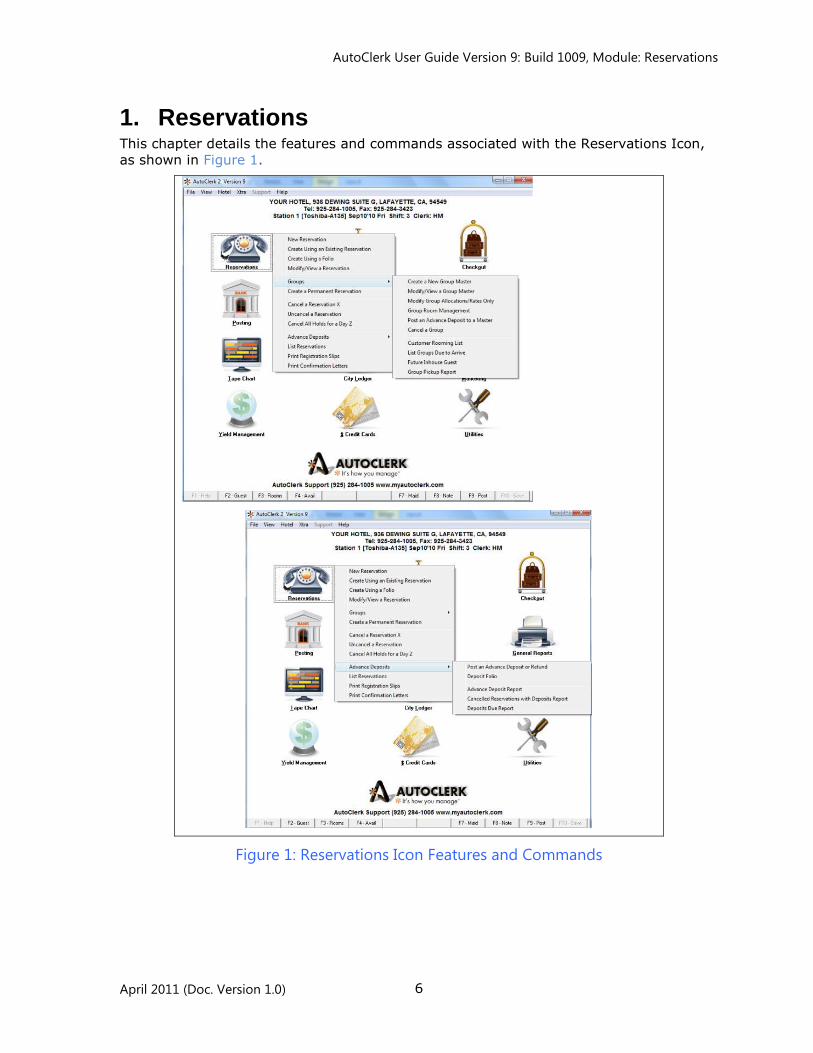
1. Reservations This chapter details the features and commands associated with the Reservations Icon,
as shown in Figure 1.
Figure 1: Reservations Icon Features and Commands
AutoClerk User Guide Version 9: Build 1009, Module: Reservations
April 2011 (Doc. Version 1.0) 7
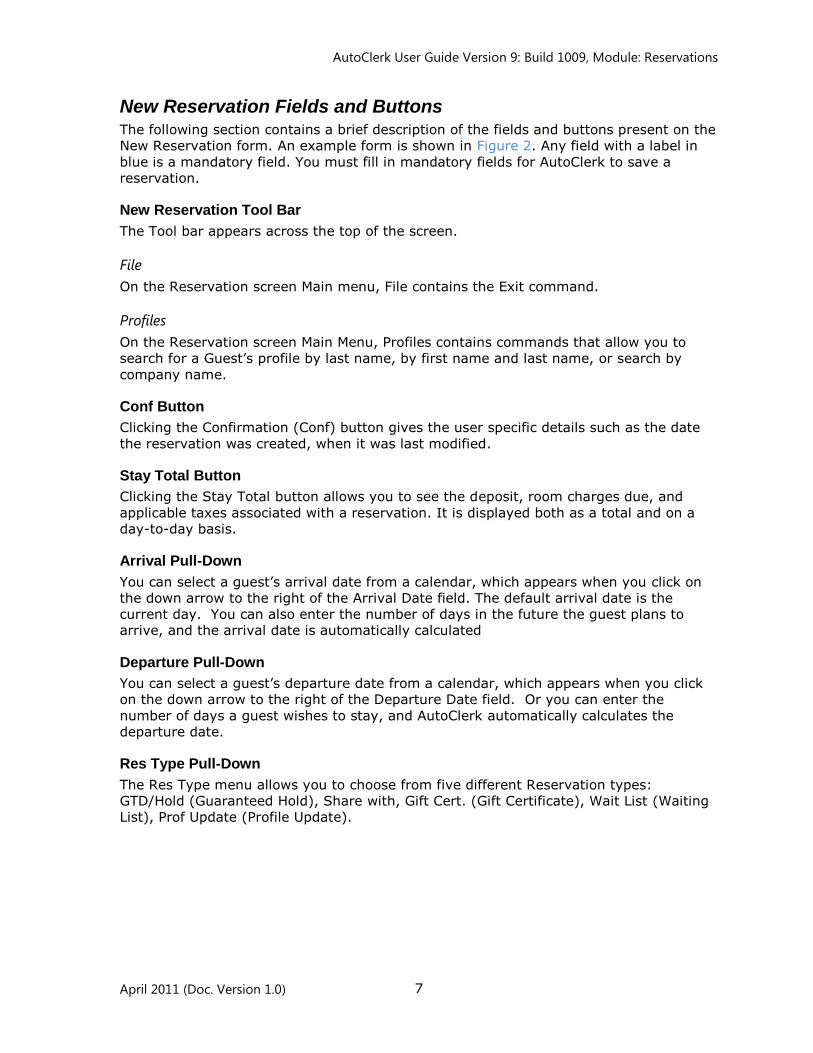
New Reservation Fields and Buttons The following section contains a brief description of the fields and buttons present on the
New Reservation form. An example form is shown in Figure 2. Any field with a label in
blue is a mandatory field. You must fill in mandatory fields for AutoClerk to save a
reservation.
New Reservation Tool Bar
The Tool bar appears across the top of the screen.
File
On the Reservation screen Main menu, File contains the Exit command.
Profiles
On the Reservation screen Main Menu, Profiles contains commands that allow you to
search for a Guest’s profile by last name, by first name and last name, or search by
company name.
Conf Button
Clicking the Confirmation (Conf) button gives the user specific details such as the date
the reservation was created, when it was last modified.
Stay Total Button
Clicking the Stay Total button allows you to see the deposit, room charges due, and
applicable taxes associated with a reservation. It is displayed both as a total and on a
day-to-day basis.
Arrival Pull-Down
You can select a guest’s arrival date from a calendar, which appears when you click on
the down arrow to the right of the Arrival Date field. The default arrival date is the
current day. You can also enter the number of days in the future the guest plans to
arrive, and the arrival date is automatically calculated
Departure Pull-Down
You can select a guest’s departure date from a calendar, which appears when you click
on the down arrow to the right of the Departure Date field. Or you can enter the
number of days a guest wishes to stay, and AutoClerk automatically calculates the
departure date.
Res Type Pull-Down
The Res Type menu allows you to choose from five different Reservation types:
GTD/Hold (Guaranteed Hold), Share with, Gift Cert. (Gift Certificate), Wait List (Waiting
List), Prof Update (Profile Update).
AutoClerk User Guide Version 9: Build 1009, Module: Reservations
April 2011 (Doc. Version 1.0) 8
Rooms Field
In this field, enter the number of rooms of the same room type that the guest wants to
reserve. You can enter up to 9 rooms. If you enter more than one, when you have
completed and saved the reservation, AutoClerk will automatically create clone
reservations with separate confirmation numbers.
Rm Type Pull-Down
Clicking on this menu opens a list of possible room types and their associated
abbreviations. Select a room type from the available list.
Smkr Field
Enter a Y for yes, if the guest requests a room in which he or she can smoke.
Room Pull-Down
Clicking on this menu allows you to select a specific room for the reservation. The screen
auto-fills in the room type, number of nights and arrival date based on the reservation.
You can also see a list of room features. Select all applicable room features from this
list. Click the OK button, and you are brought to a list of clean, unblocked rooms you can
assign. Select a room by clicking on it. You are brought back to the main New
Reservation form with that selected room number now displayed in the field.
Requested Checkbox
Check this checkbox if the guest has requested a certain room. This feature is used for
those guests who travel frequently, for example, and desire to stay in the same room
each time they visit.
People Fields
In the first field, enter the number of adults associated with this reservation. In the
second field, enter the number of children. In the third field, enter the number of babies
associated with the reservation.
Crib, Roll Checkboxes
Check the box if a baby crib is requested by the guest. Check the second box if a
rollaway bed is requested by the guest. Depending on how the property’s rates are
configured, the rate may change based on whether these boxes are checked.
Box 3 Checkboxes
Box 3 can be custom labeled, for example, to record whether a pet is traveling with a
guest.
Rate Class Pull-Down
Clicking on this menu opens a list of possible rate classes and their abbreviations. It
defaults to Rack. You can also select a rate associated with a guest’s affiliation or
membership privileges. For example, if a guest is an AAA member, select the AAA rate
class from the list.

AutoClerk User Guide Version 9: Build 1009, Module: Reservations
April 2011 (Doc. Version 1.0) 9
Hide Rates Checkbox
Check the checkbox if you do not want the guest to see the actual room rate on their
registration slip or folio. For example, if the room was reserved through an online travel
website, such as Orbitz, Expedia, Travelocity, or FIT. Depending on the rate class you
select, this box may already be checked.
Day Tiered Rates Pull-Down
When you select the arrival and departure dates, if a stay extends over a weekend, for
example, the weekday and weekend rates appear in these fields. You can modify any
day’s rates by clicking on the drop-down menu and adjusting the rate in the Quoted cell.
ETA Pull-Down
Click on this menu, and select the estimated time of arrival (ETA) for a guest.
Last Name Field and Lookup
Enter the last name of the guest in this field. When you click on the Magnifying Glass
icon, you can select the guest’s last name from a list of stored guest profiles. If a guest
has stayed in the hotel before, selecting the guest’s name from the Profile list, and
clicking the Copy/OK button, automatically fills in the new reservation form with that
guest’s contact information.
First Name Field and Lookup
Enter the first name of the guest in this field. When you click on the Magnifying Glass
icon, you can select the guest from a list of stored guest profiles. By entering the guest’s
last and first name, when you click on the Magnifying Glass icon, AutoClerk narrows the
search to start with the first name. If a guest has stayed in the hotel before, selecting
the guest’s name from the Profile list, and clicking on the Copy/Ok button, automatically
fills in the new reservation form with that guest’s contact information.
Title Field and Lookup
Click on this menu. From the list of titles select a title for the guest.
Tax Exempt Button
Click on the Tax Exempt button. On the list of applicable tax exempt types, check the
desired box. Also, you can enter a reason for tax exempt billing in the Reason field.
Bill-To Button
Click on this button to open a list of the property’s chargeable transactions, such as
Room or Parking. This is where you set up the guest’s charges to be billed to a different
reservation or inhouse folio. Check the applicable boxes, and then select the reservation
or inhouse folio to which you wish to bill the charges.
Address/Contact Buttons
Enter the guest’s home address information. If necessary, or if it your property’s policy,
click on the Company tab and enter the guest’s company contact information. Group
contact information appears if the reservation is part of a group.
AutoClerk User Guide Version 9: Build 1009, Module: Reservations
April 2011 (Doc. Version 1.0) 10
When entering U.S. addresses, you can leave the City/State fields blank and simply fill in
the Zip Code. AutoClerk auto fills the City/State.
Details Button
Clicking on the Details button opens a box in which you can enter additional guest
contact data. The label of the Details button appears in red if there are enhanced contact
details associated with a guest. The additional information varies based on whether you
enter Home, Company, or Group contact information.
Conf Letter Pull-Downs
The Confirmation (Conf) letter menu contains numbers associated with configured
confirmation letters. The Guest menu allows you to associate the letter with a guest by
selecting either a Guest, Company, TA (Travel Agent), or None (no affiliation).
Pay Type Pull-Down
Clicking on the Pay Type button opens a list from which you can select a desired
payment type to guarantee a reservation. If the pay type is cash, the status of the
reservation will be hold, until an advance deposit is posted. Other pay types listed are
the configured credit card types and City Ledger accounts.
If you select a City Ledger account, a popup appears asking if you want to use the CL
account address as the Company address. If you answer yes, then the Company
address fields will be auto-filled.
Pay Type Button
The text on the Pay Type button changes according to the pay type you select from the
Pay Type menu. For example, if you select Visa, clicking the Pay Type button opens a
form in which you can enter the credit card number, name of the card holder, expiration
date, and authorization code.
If you select a City Ledger account, the name of the account appears. If you click on the
button, you will see the City Ledger account contact information. If the name is flashing
in red, then the City Ledger account has an F8 note which should be viewed for any
additional information.
Show Guarantee Info Button
Clicking on this button opens a box in which you can view the default Deposit Due,
Amount Needed, and Cancel Deadline.
Gtd/Cxl Type Button
Clicking on this button resets the form of guarantee and cancellation that is pre-
configured based on the rate class and arrival date on the reservation.
Gtd/Cxl Type Pull-Down
Clicking on this menu allows you to choose from a list of guarantee policies. However,
when you enter the rate class and arrival date (above this menu), the form of guarantee
and cancellation policy automatically changes to the configured settings.

AutoClerk User Guide Version 9: Build 1009, Module: Reservations
April 2011 (Doc. Version 1.0) 11
Gtd/Cxl Time Pull-Down
Click on this menu to change the configured cancellation policy.
Sources Pull Downs
Clicking on the Sources menus allows you to select the source of a guest’s reservation
from a configured list. There are three menus associated with sources. Required source
fields, if any, are determined by your property.
Channel Field
The Channel field auto fills when reservations are made by third parties. For example,
reservations made through the property’s website using the ResOnWeb interface auto fill
with 5. A property may decide to assign staff their own numbers (1-49) to use for
commission purposes.
User Field 1
This is a customizable field through Configuration.
Specials Field
The Specials field is a field used for requests or details specific to the reservation. It can
also be used for specific confirmation letters to be sent. In addition, it can be used as a
filter when obtaining a list of arrivals.
Memo Button
Clicking on this button opens a form which has fields for the following: Housekeeping,
Telephone/F2, Checkin Slip, Checkouts Due, Group Report, Notes. Fill in the fields with
applicable information.
If you enter text in the field on the main Reservation form, the other memo fields are
auto fill. Or, you can click on the Memo button and select where you want the note to
appear.
If you enter text in the Notes portion of the Memo form, this text appears in the Memo
field on the New Reservation form. (You can also type directly into the Memo field on the
New Reservation form.)
If you enter text in the Checkin Slip field, it appears on the guest’s Registration Slip, and
therefore is visible to the guest.
Memo Field
Enter any information specific to a guest’s requests in the Memo field. Any text you
enter into the Notes portion of the Memo form, which you access via the Memo button,
also appears in the Memo field.
This information is also visible to the user on the Checkout screen but not to the guest.
CRS Type Pull Down
This field auto fills if a reservation comes into AutoClerk via a Centralized Reservation
Service (CRS), such as Best Western.
AutoClerk User Guide Version 9: Build 1009, Module: Reservations
April 2011 (Doc. Version 1.0) 12
CRS Conf
When a reservation comes into AutoClerk from a CRS, this field auto fills with that
specific CRS’ confirmation number associated with that service.
User Field 2
This is a customizable field.
Checkbox 1
This is a customizable checkbox.
Checkbox 2
This is a customizable checkbox.
Month of Birth Fill Fields (3)
In the First field, enter the month of birth for the first guest. In the Second field, enter
the month of birth for the second guest. In the Anniversary field, enter the month of a
guest’s anniversary. (This is a property specific configurable option.)
Travel Agency Button and Lookup
Clicking on the Travel Agency button opens a form in which you can enter travel agency
contact information. Clicking on the Magnifying Glass icon redirects you to profiles for
travel agents. If the travel agent has booked at the hotel before, selecting the agency’s
name from the Profile list, and clicking the Copy/OK button, automatically fills in the new
reservation form with that agency’s contact information.
If necessary, update any of the contact information, for example, a different agent
making the booking.
Function Buttons
The function buttons that run along the bottom of the screen, with the exception of Esc
and F10, allow you to interrupt what you are working on and either get information or
perform another task without losing what you are working on. Their functions are:
Esc
Escape allows you to leave the New Reservation form and not save any entries. If you
want to save the changes, click No when asked, Are you sure? If configured, selecting
Denial is a way to track why a customer decides to “deny” making a reservation. For
example, rates are too high, or you don’t accept pets. It needs to be set up in AutoClerk.
It is not a default feature.
F1-Help
This button opens a text box with applicable help or AutoClerk contact information.

AutoClerk User Guide Version 9: Build 1009, Module: Reservations
April 2011 (Doc. Version 1.0) 13
F2-Guest
This button opens a Guest Lookup box. You can search for inhouse guests, guests who
checked out today, or those who are due to arrive today. You can sort a column by
clicking on its header. You can also save a setup as your default.
By highlighting a guest and clicking on the More Info button, you can see more
information related to the guest’s stay, such as the Form of Payment and Balance.
You can record guest phone messages through the Phone Msg button. (This is a
property-specific configurable option.)
F3-Room
This button allows you to select a clean room into which you can check an arriving
guest. You can also associate room features with a guest’s request in your search.
F4-Availability
This button opens a chart of projected availability for rooms. The default is to show the
current day for the next 30 days along with the rates for the Rack rate class. You can
change the start date, the rate class, number of guests and whether or not to view the
rates and/or the property’s Length of Stay (LOS) rules for that viewing. In addition,
through ACConfig, you can change some of the defaults.
F6-Interfaces
This button lists installed interfaces.
F7-Maid
This button opens the room number and status of the room as related to housekeeping
service. You can use this to manually update the status of your rooms, such as marking
a room as clean or putting a room out of order.
F8-Note
This button opens a note in which you can enter information associated with a City
Ledger account. You can also use it to set up concierge notes such as the phone
numbers for taxi services.
F9-Post
This button opens a form which allows you to post a charge from a list of possible
charges to a room and a folio. For example, if two business travelers are sharing a
room, a restaurant charge can be posted to the folio of one guest and not the other.
F10-Save
This button allows you to save all of the details you entered in the New Reservation form
and creates the actual reservation. Clicking on the F10 button when you are in any form
saves the information you have entered and completes the task.
AutoClerk User Guide Version 9: Build 1009, Module: Reservations
April 2011 (Doc. Version 1.0) 14
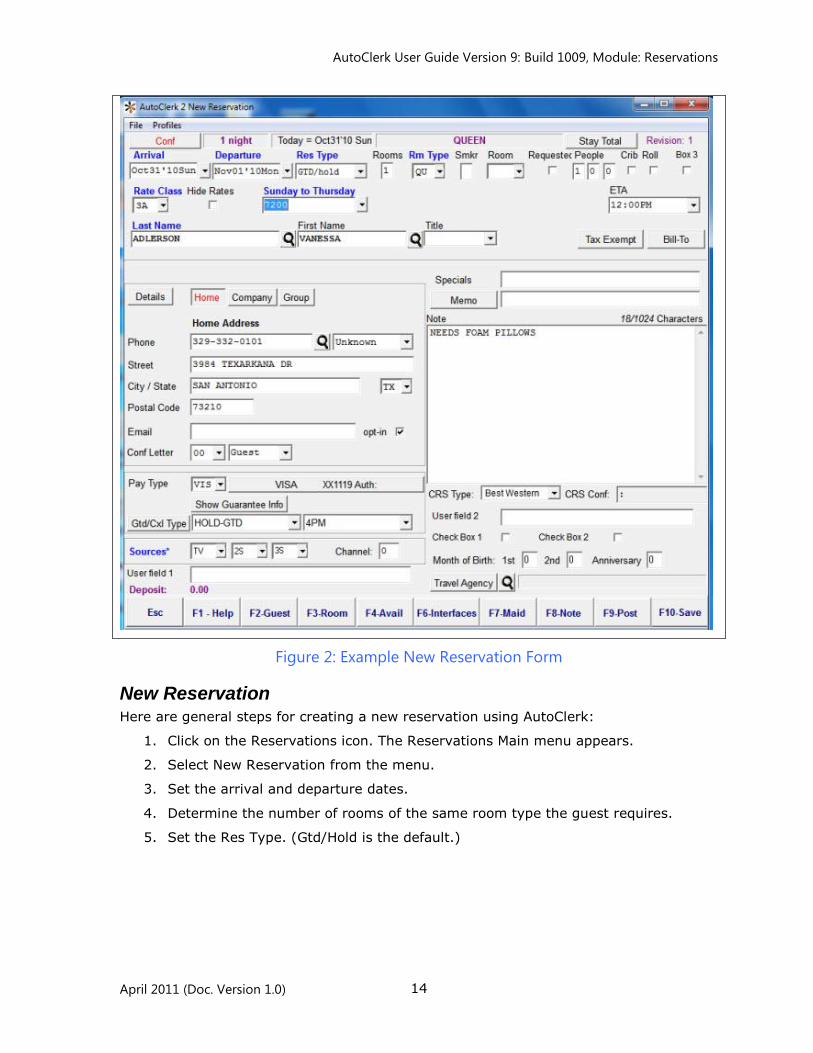
Figure 2: Example New Reservation Form
New Reservation Here are general steps for creating a new reservation using AutoClerk:
1. Click on the Reservations icon. The Reservations Main menu appears.
2. Select New Reservation from the menu.
3. Set the arrival and departure dates.
4. Determine the number of rooms of the same room type the guest requires.
5. Set the Res Type. (Gtd/Hold is the default.)

AutoClerk User Guide Version 9: Build 1009, Module: Reservations
April 2011 (Doc. Version 1.0) 15
6. Click F4 at the bottom of the screen to view available rooms. (Or tab through the
arrival and departure dates, and the Availability screen appears. This setting has
to be turned on in AutoClerk. It is not a default.)
7. Select the room type.
8. Enter the number of guests associated with the reservation.
9. Check the checkboxes for cribs or roll away beds, if applicable.
10. Select the rate class.
11. Quote the associated rate.
12. Enter the guest’s last name. If the guest has stayed in your hotel before, click the
Magnifying Glass icon, and look up the guest’s profile. The guest’s profile contact
information automatically fills in the Reservation form.
13. If applicable, set the tax exempt rules for those guests who are not required to
pay taxes. This way, taxes are not posted to their folio.
14. If applicable, set the bill-to. For example, this is when an inhouse guest or a
reservation due to arrive on the same day plans to pay for this reservation.
15. Set the pay type. Fill in the credit card information if applicable.
16. Confirm the guarantee type/cancel policy. (Usually this is set by default. If you
need to change the configured settings, use the drop-down menu to change
them.)
17. Set the source codes. The source codes are the ways that the guest found out
about your hotel. For example, the guest was a walk-in, or the guest saw a
newspaper advertisement.
18. Add information to the Specials field related to special instructions as applicable.
19. Add memo information as applicable or fill in the Note field. The client can see
information you have entered on the Checkin Slip field.
20. If there is travel agency information, enter it. If the travel agent has booked with
you before, use the Magnifying Glass icon to find their profile and copy that
information to the reservation.
21. Confirm the reservation information with the guest. If correct, click F10 at the
bottom of the form or the + key on your computer keyboard.
22. Once you save the reservation, the Reservation Saved screen opens. You must
see a confirmation number for a reservation to be in the system. Reservation
confirmation numbers always start with the year in which they were created. You
can now complete additional actions as necessary or if applicable, such as
sending a confirmation, posting an Advance Deposit or making additional
reservations.
Create Using an Existing Reservation You might choose to use this feature if you are making a reservation for a guest who
wants to reserve more than one room. For example, two sisters traveling together might

AutoClerk User Guide Version 9: Build 1009, Module: Reservations
April 2011 (Doc. Version 1.0) 16
want to reserve a room for themselves as well as a room for their parents. Note, if you
are copying a reservation, the system won’t allow you to copy a credit card number, for
financial safety reasons. You need to re-enter the credit card information for each
reservation.
1. Select Create Using an Existing Reservation from the Reservations Main menu.
The list of reservations opens.
2. Double-click on the reservation you wish to copy from. The selected reservation
opens.
3. Make any necessary changes to the new reservation you are creating.
4. Change the pay type information. You may have to re-enter this information,
since you cannot copy credit card information from one reservation to the next.
5. Click F10 to save this as a new reservation.
6. Once you save the reservation, the Reservation Saved screen opens. You must
see a confirmation number for a reservation to be in the system. You can now
complete additional actions as necessary or if applicable.
Create Using a Folio You might create a reservation using a folio if, for example, an inhouse guest needs a
reservation for next week.
1. Select Create Using a Folio from the Reservations Main menu. The Select Folio
box opens.
2. Select the inhouse guest’s current room number from the pull-down menu.
3. Enter a Folio letter.
4. Click OK. The Reservation form opens with the fields completed.
5. Change any parameters such as arrival or departure date and room type.
6. Change the pay type information. You may have to re-enter this information,
since you cannot copy credit card information from the folio to the new
reservation.
7. Click F10 to save this new reservation.
8. Once you save the reservation, the Reservation Saved screen opens. You must
see a confirmation number for a reservation to be in the system. You can now
complete additional actions as necessary or if applicable.
Modify/View a Reservation You will use this if you need to make changes to a reservation or if a guest calls and
wants to confirm their reservation.
1. Select Modify/View a Reservation from the Reservations Main menu. A list of
reservations opens. By default, only reservations with a Guaranteed, Hold,
Share-with, or Wait-list status appear. You can select or de-select to see other
AutoClerk User Guide Version 9: Build 1009, Module: Reservations
April 2011 (Doc. Version 1.0) 17
types of reservations by checking the appropriate boxes at the bottom of the
screen.
2. Enter the last name of the guest in Search Last Name For field.
3. Double-click on the reservation you wish to modify. The guest reservation opens
in the Mod Reservation form.
4. View or modify the reservation.
5. Click F10 Save to save your changes.
6. Once you save the reservation, an AutoClerk Confirmation window opens
confirming your changes. You must see this window to confirm that your changes
are in the system.
7. Click the OK button on the AutoClerk Confirmation window to return to the Icon
Main menu.
Groups The following section contains information about the features and functions under the
Groups command on the Reservation Main menu.
Create a New Group Master
1. Select Groups from the Reservations Main menu.
2. Select Create a New Group Master from the Groups menu. The New Group Master
form opens. Any field with a blue label is a mandatory field.
3. Set the arrival and departure dates.
4. Enter the number of guests per room associated with the group. You have the
ability to change this number when you make the individual reservations tied to
the group.
5. Check cribs or roll away beds, if applicable.
6. Select the group master rate class.
7. Select the guest class you want to book it under. For example, this is a corporate
group master; therefore, you set it up under a corporate group rate.
8. Decide if you want the group to release unbooked rooms once on a determined
date, or on a daily release basis.
A daily release is also known as a rolling cut-off and is used for allotment or FIT
reservations. The cut-off is determined by the number of days you enter in this
field. If you enter 7, AutoClerk, on the Night Audit, looks ahead 7 days and
releases any unbooked rooms for that 8th day. As allotments are usually for a
long period of time, say a 1 year contract, using a rolling cut-off lets AutoClerk
manage when rooms are released back into the property’s general availability
instead of manually managing the inventory.
9. Enter the deposit needed per the group’s contract. Once set it makes all
reservations need the same deposit amount when booked against the group.

AutoClerk User Guide Version 9: Build 1009, Module: Reservations
April 2011 (Doc. Version 1.0) 18
10. Set the cancel deadline. This is information that appears on reports only. (To cancel a group, you need to go to the Main menu ReservationsGroupsCancel
a Group.)
11. Enter a group name.
12. Enter group contact information. You can click on the Details button to enter
additional contact information.
13. If applicable set the tax exempt rules. This rule applies to the entire group. This
way, taxes are not posted to any group members’ folio.
14. Set the pay type. This will copy to all individual reservations as they are made.
However, you can change the information when making an individual reservation
off the group block.
15. Confirm the guarantee type/cancel policy. (Usually this is set by default. If you
need to change the settings, use the drop-down menu.)
16. Set the source codes. The source codes are the ways that the group found out
about your hotel. For example, the group saw a newspaper advertisement.
17. Add information to the Specials field related to special instructions. This will copy
to the individual group reservations as they are made.
18. Add memo information as applicable or fill in the Note field. This will copy to the
individual group reservation as they are made. If you enter information in the
Checkin Slip field, it appears on the guest’s Registration Slip, and therefore is
visible to the guest.
19. If there is travel agency information, enter it. If the travel agent has booked with
you before, use the Magnifying Glass icon to find the profile and add that
information to the reservation. This will copy to the individual group reservations
as they are made.
20. Click F10 at the bottom of the form or the + key on your computer keyboard to
save the group.
21. Once you save the group, an AutoClerk Confirmation window opens confirming
your group master. You must see this window to confirm that your group is in the
system. Group Master confirmation numbers always start with a letter.
22. Click the OK button. The Group Allocations screen opens.
23. Set the number of rooms and the rates for the group you just created. You can
do this manually, by entering applicable information into each cell.
24. For groups staying for multiple nights and using one or multiple room types, click
on Edit on the top menu bar.
25. Select Set Multi-Allocations. The Multi-Edit window appears.
26. In the Room Types column, select the checkboxes for the room types that apply
to the group. If you are unsure what is available, you can hit F4 on the keyboard
to see room availability for the dates of the group.
AutoClerk User Guide Version 9: Build 1009, Module: Reservations
April 2011 (Doc. Version 1.0) 19
27. In the Modify Dates column, the group’s dates are listed and pre-checked. Use
the All, None, Week Days, and Weekend buttons to set allocations for specific
days in the group. Otherwise, you can use the dates that are already checked off
by default.
28. Enter the number of rooms in the Set Allocations field.
29. Click the OK button. The Group Allocations screen reappears.
30. Select Edit from the top menu bar.
31. Select Set Multi-Rates.
32. Click the All button. (You can also click on a column heading to highlight all room
types and dates.)
33. The room types you set up under the Multi-edit now appear in the bottom right
corner of the screen. They are checked by default. You can set rates for all
checked room types or set them individually by checking only one room type and
setting a rate.
34. Enter a dollar amount in the 4 Adult fields, depending on how many adults are
occupying a room.
35. Click the Set Rates button.
36. Your new rates appear in the cells.
37. Click the OK button. The Group Allocations window reappears.
38. Click the OK button. The AutoClerk Confirm window appears confirming your
group allocations settings. Your settings are not in the system unless you see this
confirmation window.
39. Click the OK button.
Modify/View a Group Master
1. Select Groups from the Reservations Main menu.
2. Select Modify/View a Group Master from the Groups menu. The Modify a Group
Master window opens.
3. Enter the group name in the Search Group Name For field.
By default, only current Groups are listed. However, you can search Cancelled
and/or Expired Groups by checking the boxes at the bottom of the screen. In
addition, you can change the order of the list by clicking on Order on the Tool bar
and changing the order.
4. Double-click on the Group Master you wish to view or modify. The Mod Group
Master window opens.
5. Change the necessary or applicable information such as arrival and departure
dates or new contact info.

AutoClerk User Guide Version 9: Build 1009, Module: Reservations
April 2011 (Doc. Version 1.0) 20
6. Click the OK button. The AutoClerk Confirm window appears confirming your
group changes. Your settings are not in the system unless you see this
confirmation window.
7. Click the OK button. The Group Allocations screen opens. (If it does not appear,
and you are prompted for a groups overbooking password, ask your manager.)
8. If you do not need to make any changes, click on Esc to go back to the Main
Menu.
9. If you need to make changes to the room type allocations and/or rates, follow
Steps 23-39 in the previous “Create a New Group Master” section.
Modify Group Allocation Rates Only
1. Select Groups from the Reservations Main menu.
2. Select Modify Group Allocation Rates Only from the Groups menu. The Modify
Group Allocation window opens.
3. The Modify Group Master list appears. (If it does not appear, and you are
prompted for a groups overbooking password, ask your manager.)
4. Enter the group name in the Search Group Name For field.
By default, only current Groups are listed. However, you can search Cancelled
and/or Expired Groups by checking the boxes at the bottom. In addition, you can
change the order of the list by clicking on Order on the Tool bar and changing the
order.
5. Double-click on the Group Master to which you wish to make changes. The Group
Allocations screen opens.
6. If you do not need to make any changes, you can click on Esc and to go back to
the Main Menu.
7. Set the number of rooms and the rates for the group. You can do this manually
by entering applicable information into each cell.
8. For groups staying for multiple nights and using one or multiple room types, click
on Edit on the top menu bar.
9. Select Set Multi-Allocations. The Multi-Edit window appears.
10. In the Room Types column, select the checkboxes that apply to the group.
11. In the Modify Dates column, select the checkboxes that apply to the group or use
the All, None, Week Days, and Weekend buttons to set allocations for specific
days in the group. Otherwise, you can use the dates that are already checked off
by default.
12. Enter the number of rooms in the Set Allocations field.
13. Click the OK button. The Group Allocations window reappears.
14. Select Edit from the top menu bar.
15. Select Set Multi-Rates.
AutoClerk User Guide Version 9: Build 1009, Module: Reservations
April 2011 (Doc. Version 1.0) 21
16. Click the All button. (You can also click on a column heading to highlight all room
types and dates.)
17. The room types you set up under the Multi-edit now appear in the bottom right
corner of the screen. They are checked by default. You can set rates for all
checked room types, set them individually by checking only one room type and
setting a rate.
18. Enter a dollar amount in the 4 Adult fields, depending on how many adults are
occupying a room.
19. Click the Set Rates button.
20. Your new rates appear in the cells.
21. Click the OK button. You are returned to the Group Allocations window.
22. Click the OK button. The AutoClerk Confirm window appears confirming your
group allocations updates. Your updates are not in the system unless you see this
confirmation window.
23. Click the OK button to return to the Main menu.
Group Room Management
You will use this function to add in group reservations, view reservations attached to the
group, modify the group’s allocation, and/or view group statistics such as how many
rooms have been booked. You can add reservations either as a rooming list in a simple
method, or on a call in basis and enter in more contact information for each reservation.
1. Select Groups from the Reservations Main menu.
2. Select Group Room Management from the Groups menu. The Groups Selection
list opens.
3. Enter the group name in the Search Group Name For field.
By default, only current Groups are listed. However, you can search Cancelled
and/or Expired Groups by checking the boxes at the bottom. In addition, you can
change the order of the list by clicking on Order on the Tool bar and changing the
order.
4. Double-click on the group you wish to manage. The Group Room Management
screen opens. Most clerks use this feature to enter group member individual
reservations or create a reservations list populated from inputting individual
group reservations.
5. There are two ways to enter a reservation: simple form, shown at the bottom of
the screen, or a detailed form. You can use the simple form to enter reservations
from a rooming list. If you use the simple form, add the information at the
bottom of the screen: Arrival, Departure, Rm Type, Last Name, and First Name.
When you click on the down arrow in the Rm Type field, you get a list of allocated
room types from which you can choose. Select a room type. The arrival and
departure dates and number of people are taken from the Group Master. Change
them if necessary. When complete, click the Add Res button. The rooming list

AutoClerk User Guide Version 9: Build 1009, Module: Reservations
April 2011 (Doc. Version 1.0) 22
appears in the middle of the screen. (The reservations list is comprised of all of
the individual group reservations, regardless of status.)
6. If you need to enter in reservations with more information, such as individual
contact and/or guarantee information, use the detailed form. To use the detail
form, click on the Add Res Full button. A full reservation screen appears with the
Arrival date, Departure date, number of people and the group’s contact
information already filled in. Change them if necessary, and add in the guest’s
information. When complete, click the F10 (Save) button. You are brought back
to the main Group Room Management screen with the reservation you just made
in the rooming list in the middle of the screen. (The reservations list is comprised
of all of the individual group reservations, regardless of status.)
7. You can view the group grid by rooms Booked, Remaining, or Totals by clicking
on the appropriate button at the top of the screen, as shown in Figure 3.

AutoClerk User Guide Version 9: Build 1009, Module: Reservations
April 2011 (Doc. Version 1.0) 23
Figure 3: Group Room Management Form
8. The individual reservations remain in the Group Room Management screen until
the group is checked out. Note: You can’t checkout anyone with the Checkout
button unless there is a $ 0.00 balance associated with that guest’s folio. Also,
your Checkout All button will only check out those group members who have a
$0.00 balance on their folio(s).
9. Use the Attach and Detach buttons to move reservations around. For example,
detach a reservation from one group and attach it to another.
Post an Advance Deposit to a Master
1. Select Groups from the Reservations Main menu.
2. Select Post an Advance Deposit to a Master from the Groups menu. The Post
Deposit list of groups opens.
3. Enter the group name in the Search Group Name For field.
4. Double-click on a group. The Post Advance Deposit to Reservation form opens.
5. Note: Posting an Advance Deposit to a Group Master creates a Share-With
reservation for your group. Do not cancel this Share-with reservation unless you
have refunded the deposit and are cancelling the entire group.
6. At the bottom of the screen, confirm the Pay Type. It will default to the pay type
on the Group Master reservation.
7. In the Amount field, enter the amount of the deposit. If you entered a Deposit
Needed amount on the Group Master, that amount appears.
8. In the Discount field, enter an amount of the travel agent commission if the
deposit has deducted the commission.
9. Click the OK button. An AutoClerk Confirm window opens to confirm your deposit.
If you do not see this window, your deposit is not in the system.
10. Click the OK button. Another AutoClerk Confirm window appears confirming a
Share-With reservation has been made for this group and the deposit attached to
it.
11. Click the OK button. The Main menu reappears.
Cancel a Group
Before cancelling a Group, you should confirm that there are no Advance Deposits either
on the group Master or on any of the individual reservations. If there are any deposits,
they should be addressed before cancelling the Group.
1. Select Groups from the Reservations Main menu.
2. Select Cancel a Group from the Groups menu. The Cancel Group Master list of
groups appears.
3. Enter the group name in the Search Group Name For field.

AutoClerk User Guide Version 9: Build 1009, Module: Reservations
April 2011 (Doc. Version 1.0) 24
4. Double-click on a group master you wish to cancel. An AutoClerk Confirm box
opens to confirm that you are sure you want to cancel the group you selected.
5. Click Yes if you want to cancel that group and all associated reservations
attached to the group. An AutoClerk Confirm box opens confirming the group you
just canceled followed by a cancellation number.
6. Click the OK button. An AutoClerk Confirm box opens and prompts you to cancel
another if you wish.
7. Click No to return to the Main menu.
Customer Rooming List
1. Select Groups from the Reservations Main menu.
2. Select Customer Rooming List from the Groups menu. The Group Rooming List of
reservations opens.
3. Enter the group name in the Search Group Name For field.
4. Double-click on the group for which you want rooming details. The SendTo screen
opens.
5. Click the Display button to see the Reservation Confirmation letter.
6. Click the Esc button on your computer keyboard. A browser window containing
the rooming list opens on the screen.
7. If you want to print the Reservation Confirmation letter and the rooming list,
instead of displaying it on the screen, select the Print button (not the Display
button). The information is sent to a printer associated with this button.
List Groups Due to Arrive
1. Select Groups from the Reservations Main menu.
2. Select List Groups Due to Arrive from the Groups menu. The Group Report
Parameters box opens.
3. Enter the group date range parameters. The default is for the next 30 days.
4. You may choose to include the room type detail. This is a breakdown of the
individual room types allocated for a specific group. The default for this option is
unchecked.
5. Click the OK button. The Groups Due to Arrive screen opens with a list of groups
that fall within the date range you selected.
6. You can use the Print and Browse buttons to view or print the information or see
the information in html. If you want to change the date range, go to File in the
Top menu bar. Select Change Parameters, and enter a new date range. Then,
click the OK button.
7. Click the OK button on the Groups Due to Arrive screen.

AutoClerk User Guide Version 9: Build 1009, Module: Reservations
April 2011 (Doc. Version 1.0) 25
Future Inhouse Guest
This report can be used to view who is expected to be inhouse on a specific day. This is
useful for researching Unused Group Rooms on the Forecast Report.
1. Select Groups from the Reservations Main menu.
2. Select Future Inhouse Guest from the Groups menu. The Future Inhouse Guests
box opens.
3. Select the parameters you wish to appear in the report by checking the
associated checkbox.
4. Click the OK button. The SendTo menu opens.
5. Select the mode in which you wish to see the report.
Group Pickup Report
This report gives you information on rooms picked up and revenue for groups past and
future.
1. Select Groups from the Reservations Main menu.
2. Select Group Pickup Report from the Groups menu. The Group Pickup Report
Parameters box opens.
3. Set the parameters you wish to use to generate the report.
If you select a single group, you can enter the Group Confirmation number, if
you know it, or click on the Browse button and select the group from the list
of Group Masters.
Checking the Unused box produces a report, which includes picked up and
non-picked up rooms
Checking the Include Detail box produces a report, which includes information
on each reservation that is part of a group. If the guest has already checked
out, the Detail includes the room type, amount of tax, room number and the
daily room rate. If the guest has not yet checked in, the Detail includes the
room type, reservation status, confirmation number and daily room rate.
4. Click OK, and the SendTo screen appears.
5. Select the way you wish to view the report. If you click on the Display button, the
Group Pickup Report opens in a browser window.
Create a Permanent Reservation You can use this function if you want to set up a template reservation. This can be
useful for corporate accounts.
1. Select Create Permanent Reservation from the Reservations Main menu. The New
Permanent screen opens.
2. Complete the Permanent Reservation form as you would a New Reservation form
with the exception of selecting arrival and departure dates. (See the “New
Reservation” section in this document for more details.)
AutoClerk User Guide Version 9: Build 1009, Module: Reservations
April 2011 (Doc. Version 1.0) 26
3. When you need to make reservations using this Permanent Reservation, select
Create Using Existing from the Reservations icon.
Cancel a Reservation You can cancel any reservation with a future arrival date. (You cannot cancel a
reservation with a past arrival date.)
1. Select Cancel a Reservation from the Reservations Main menu. The Cancel
Reservation screen opens.
2. Enter the guest’s last name in the Search Group Name For field.
3. Double-click on the reservation you wish to cancel.
4. If the reservation has a deposit on it, an AutoClerk Confirm box opens: There is a
deposit on reservation <conf#>, cancel anyway? If you are not sure of the
answer, contact your manager. If you answer no, you are asked if you want to
cancel another reservation.
5. If you answer yes, or if there is no deposit on the reservation, the Cancel
Reservation box opens.
6. Enter a reason for cancellation in the Cancel Reason field, and click the OK
button. An AutoClerk Confirm box opens confirming your cancellation and
providing you with a cancellation number.
7. Click the OK button. An AutoClerk Confirm box opens asking you if you wish to
cancel another reservation.
8. Click No to return to the Main Menu.
Uncancel a Reservation 1. Select Uncancel a Reservation from the Reservations Main menu. The Canceled
Reservation screen opens. All cancelled reservations appear in red.
2. Enter the guest’s last name in the Search Group Name For field.
3. Double-click on the reservation you wish to uncancel. You can only uncancel
reservations with future arrival dates. An AutoClerk Confirm box appears
confirming the uncancelled reservation and provides you with the original
confirmation number.
4. Click the OK button to return to the Main menu.
Cancel All Holds for a Day You will use this function if you want to cancel all the non-guaranteed reservations on a
specific day. For example, your property has a 4pm cancellation policy. At 5 pm, the
clerk would use this to cancel the hold reservations to put them back into availability.
1. Select Cancel All Holds for a Day from the Reservations Main menu. The Cancel
Hold Reservations screen opens.

AutoClerk User Guide Version 9: Build 1009, Module: Reservations
April 2011 (Doc. Version 1.0) 27
2. Uncheck the box associated with any reservation(s) you do not wish to cancel. All
checked reservations are cancelled. The All or None buttons check or uncheck all
of the entries to save you time.
3. Click the OK button and the SendTo screen opens.
4. If you click the Display button, you will see an AutoClerk Confirm box for each
reservation you cancelled. Each AutoClerk Confirm box provides you with a
Cancellation number. After confirming each cancellation, a browser window
opens, and you can view on the screen a Cancel Holds Reservations report.
5. If you click the Print button, you will see an AutoClerk Confirm box for each
reservation you cancelled. Each AutoClerk Confirm box provides you with a
Cancellation number. After confirming each cancellation, the Cancel Holds
Reservations report is sent to the selected printer.
Advance Deposits This section details procedures for posting advance monies to reservations prior to a
guest’s arrival. Typically, you will post an advance deposit for the first night of a guest’s
stay, but you can collect any amount. A property can configure what parameters they
want the default amount to be: first night, full stay, half stay. In addition, a property
can configure if it wants taxes and an incidental fee to be added to the default amount.
Post an Advance Deposit or Refund
1. Select Advance Deposits from the Reservations Main menu.
2. Select Post an Advance Deposit or Refund from the Advanced Deposit menu. The
Post to Reservation list of reservations opens.
3. Enter the guest’s last name in the Search Group Name For field.
4. Double-click on the desired reservation.
5. The Post Advance Deposit to Reservation screen opens.
6. At the bottom of the screen, confirm the Pay Type. AutoClerk will auto-fill the
field with the pay type that is on the reservation.
7. The Amount field will default to the configured amount. You can change the
amount if necessary.
8. The Discount field is used for travel agent commission if it is deducted from the
deposit received. This is a rare occurrence. Do not enter an amount into this
field for any other reason.
9. If you select credit card as a pay type to post an advance deposit on a credit
card, the AutoClerk Data Capture box opens.
10. Swipe the credit card or click the Esc button to enter the credit card information
manually. If you are using the credit card from the reservation, and you have
View CC permission, click on the Use Existing Card button. AutoClerk pulls the
credit card number and expiration date from the reservation and auto fills the
appropriate fields on the form.

AutoClerk User Guide Version 9: Build 1009, Module: Reservations
April 2011 (Doc. Version 1.0) 28
11. Click the Transmit button to process the credit card transaction. An AutoClerk
confirm box opens confirming the deposit is credited to the reservation. If you
don’t see the confirm box, the credit is not applied to the reservation.
12. Click the OK button. A SendTo screen opens. Click the Print button to print the
receipt. An AutoClerk Confirm box opens asking you if you want to post another
deposit.
13. Click No to return to the Main menu.
Deposit Folio
Use this function if you needed to reprint a receipt (folio) for an advance deposit. Select
Advance Deposits from the Reservations Main menu.
1. Select Deposit Folio from the Advanced Deposit menu. The Choose Reservation
for Receipt window opens.
2. Enter the guest’s last name in the Search Group Name For field.
3. Double-click on the reservation for which you wish to print the receipt or folio.
The SendTo screen opens.
4. Select your desired option from the SendTo screen.
Advance Deposit Report
1. Select Advance Deposits from the Reservations Main menu.
2. Select Advance Deposit Report from the Advanced Deposit menu. The SendTo
screen appears.
3. Select your desired option from the SendTo screen. If you click the Display
button, the report opens in a browser window.
Cancelled Reservations with Deposits Report
This report gives you a list of all reservations that were cancelled with an Advance
Deposit. Management should run this report at least once a month if not weekly to see
if any reservations were cancelled that need to have the deposit refunded.
1. Select Advanced Deposits from the Reservations Main menu.
2. Select Cancelled Reservations with Deposits Reports from the Advanced Deposit
menu. The SendTo screen appears.
3. Select your desired option from the SendTo screen. If you click the Display
button, the report opens in a browser window.
Deposits Due Report
1. Select Advance Deposits from the Reservations Main menu.
2. Select Deposits Due Report from the Advance Deposit menu. The SendTo screen
appears.
3. Select your desired option from the SendTo screen. If you click the Display
button, the report opens in a browser window.

AutoClerk User Guide Version 9: Build 1009, Module: Reservations
April 2011 (Doc. Version 1.0) 29
List Reservations By default, this report gives you a list of the current day’s arrivals, with just basic
information such as room type, number of guests and rate. If you want to see a specific
date(s) and/or more detail, select Options.
1. Select List Reservations from the Reservations Main menu.
2. Click Options in the SendTo screen.
3. On the List Reservations Report Options screen, select your parameters.
Some of the parameters include a) Reservations taken on a particular day, b)
Reservations due to arrive on a certain day c) All reservation with a specific rate
class or wording in the Specials field, d) Reservations with certain source codes,
and e) Or generating the report in a variety of formats.
4. Click the OK button, and you will return to the SendTo screen.
5. Click the Display button from the SendTo screen to view all relevant reservations.
Or click the Print button to print a list of the reservations that meet your chosen
parameters.
Print Registration Slips 1. Select Print Registration Slips from the Reservations Main menu. The SendTo
screen opens.
2. Click the Print button to print the registration cards due to arrive today. The
default is to not include any group reservations due to arrive today.
3. If you wish to print registrations for a different date, a single registration slip, or
include group reservations, select the Options buttons, and select options as
needed.
4. After selecting your options, click OK. The SendTo screen opens.
5. Click the Print button to print the selected registration slips.
Print Confirmation Letters 1. Select Print Confirmation Letters from the Reservations Main menu.
2. Select the date range for the letters you wish to print.
3. Enter the number of days for mailing.
4. Check the boxes, if applicable, for letters related to modified or group
reservations.
5. Click the OK button. The SendTo screen appears.
6. Click the Print button. An AutoClerk Information box appears and confirms the
number of confirmation letters processed. This feature does not give the user the
option to email confirmation letters, only to print them for mailing,
7. Click the OK button to return to the Main menu.

AutoClerk User Guide Version 9: Build 1009, Module: Reservations
April 2011 (Doc. Version 1.0) 30
List of Figures Figure 1: Reservations Icon Features and Commands ................................................ 6
Figure 2: Example New Reservation Form .............................................................. 14
Figure 3: Group Room Management Form .............................................................. 23
AutoClerk User Guide Version 9: Build 1009, Module: Reservations
April 2011 (Doc. Version 1.0) 31
Index of AutoClerk V9 Icons, Menus, and Commands for Reservations Module
A Advance Deposits, 27
Advanced Deposit Report, 28
Arrival Pull-Down, 7
AutoClerk, 5
B Bill To Button, 9
C Cancel a Group, 23
Cancel a Reservation, 26
Cancel All Holds for a Day, 26
Cancelled Reservations with Deposits Report, 28
Channel Field, 11
Checkbox 1, 12
Checkbox 2, 12
Conf Button, 7
Conf Letter Pull-Downs, 10
Create a New Group Master, 17
Create a Permanent Reservation, 25
Create Using a Folio, 16
Create Using an Existing Reservation, 15
Crib, Roll, Box 3 Checkboxes, 8
CRS Conf, 12
CRS Type Pull Down, 11
Customer Rooming List, 24
D Day Tiered Rates Pull-Down, 9
Departure Pull-Down, 7
Deposit Due Report, 28
Deposit Folio, 28
Details Button, 9
E Esc, 12
ETA Pull-Down, 9
F F10-Save, 13
F1-Help, 12
F2-Guest, 13
F3-Room, 13
F4-Availability, 13
F6-Interfaces, 13
F7-Maid, 13
F8-Note, 13
F9-Post, 13
First Name Field and Lookup, 9
Function Buttons, 12
Future Inhouse Guest, 25
G Group Pickup Report, 25
Group Room Management, 21
Groups, 17
Gtd/Cxl Time Pull-Down, 11
Gtd/Cxl Type Button, 10
Gtd/Cxl Type Pull-Down, 10
H Hide Rates Checkbox, 9
L Last Name Field and Lookup, 9
List Groups Due to Arrive, 24
List Reservations, 29
M Memo Button, 11
Memo Field, 11
Modify Group Allocation Rates Only, 20
Modify/View a New Group Master, 19
Modify/View a Reservation, 16
Month of Birth Fill Fields (3), 12
N New Reservation, 14
New Reservation Fields and Buttons, 7
New Reservation Tool Bar, 7
P Pay Type Button, 10
Pay Type Pull-Down, 10
People Fields, 8
Post Advance Deposit to a Master, 23
Post an Advance Deposit or Refund, 27
AutoClerk User Guide Version 9: Build 1009, Module: Reservations
April 2011 (Doc. Version 1.0) 32
Print Confirmation Letters, 29
Print Registration Slips, 29
R Rate Class Pull-Down, 8
Requested Checkbox, 8
Res Type Pull-Down, 7
Reservations, 6
Rm Type Pull-Down, 8
Room Pull-Down, 8
Rooms Field, 8
S Show Guarantee Info Button, 10
Smker Field, 8
Sources Pull Downs, 11
Specials Field, 11
Stay Total Button, 7
T Tax Exempt Button, 9
Title Field and Lookup, 9
Travel Agency Button and Lookup, 12
U Uncancel a Reservation, 26
User Field 1, 11
User Field 2, 12