user manual 20mf251w series lcd tv need help fast?
TRANSCRIPT

S M A R T . V E R Y S M A R T .
User Manual
20MF251W SeriesLCD TV
Read your user Manual and/or Quick-Use Guide first for quick tips thatmake using your Magnavox product
more enjoyable.If you have read your instructions and
still need assistance,you may access our online help atwww.usasupport.magnavox.com
or call1-800-705-2000
while with your product(and Model / Serial number)
Thank you for choosing Magnavox.
Need help fast?
Model No:_____________
Serial No:_____________

2
Know these safety symbols
This “bolt of lightning” indicatesuninsulated material within your unit maycause an electrical shock. For the safety of
everyone in your household, please do not removeproduct covering.
The “exclamation point” calls attentionto features for which you should read theenclosed literature closely to prevent
operating and maintenance problems.
WARNING: To reduce the risk of fire orelectric shock, this apparatus should not beexposed to rain or moisture and objects filled withliquids, such as vases, should not be placed on thisapparatus.
CAUTION: To prevent electric shock, match wideblade of plug to wide slot, fully insert.
ATTENTION : Pour éviter les chocélectriques, introduire la lame la plus large de la fichedans la borne correspondante de la prise et pousserjusqu’au fond.
For Customer UseEnter below the Serial No. which is locatedon the rear of the cabinet. Retain thisinformation for future reference.Model No._______________________Serial No. _______________________
RETURN YOUR PRODUCT REGISTRATION CARD TODAYTO GET THE VERY MOST FROM YOUR PURCHASE.
Registering your model with MAGNAVOX makes you eligible for all of the valuable benefits listedbelow, so don’t miss out. Complete and return your Product Registration Card at once to ensure:
*Proof of PurchaseReturning the enclosed cardguarantees that your date ofpurchase will be on file, so noadditional paperwork will berequired from you to obtainwarranty service.
*Product SafetyNotificationBy registering your product, you’llreceive notification directly from themanufacturer - in the rare case of aproduct recall or safety defect.
*Additional Benefits ofProduct OwnershipRegistering your productguarantees that you’ll receive all ofthe privileges to which you’re entitled,including special money-saving offers.
Congratulations on your purchase,
and welcome to the “family!”
Dear MAGNAVOX product owner:Thank you for your confidence inMAGNAVOX.You’ve selected one of thebest-built, best-backed products available today.We’ll do everything in our power to keep youhappy with your purchase for many years tocome.As a member of the MAGNAVOX “family,”you’re entitled to protection by one of the mostcomprehensive warranties andoutstanding service networks in the industry.What’s more, your purchase guarantees you’llreceive all the information and special offers forwhich you qualify, plus easy access toaccessories from our convenient homeshopping network.Most importantly, you can count on ouruncompromising commitment to your totalsatisfaction.All of this is our way of saying welcome - andthanks for investing in a MAGNAVOX product.
P. S.To get themost fromyourMAGNAVOXpurchase, be sure to complete and returnyour Warranty Registration Card at once.
Visit our World Wide Web Site at http://www.usasupport.magnavox.com

IMPORTANT SAFETY INSTRUCTIONSREAD BEFORE OPERATING EQUIPMENT
Read these instructions.Keep these instructions.Heed all warnings.Follow all instructions.Do not use this apparatus near water.Clean only with a dry cloth.Do not block any of the ventilation openings.Install in accordance with the manufacturers instructions.Do not install near any heat sources such as radiators,heat registers, stoves, or other apparatus (includingamplifiers) that produce heat.Do not defeat the safety purpose of the polarized orgrounding-type plug.A polarized plug has two blades withone wider than the other. A grounding type plug has twoblades and third grounding prong. The wide blade or thirdprong are provided for your safety. When the providedplug does not fit into your outlet, consult an electricianfor replacement of the obsolete outlet.Protect the power cord from being walked on or pinchedparticularly at plugs, convenience receptacles, and thepoint where they exit from the apparatus.Only use attachments/accessories specified by themanufacturer.
Use only with a cart, stand, tripod, bracket, ortable specified by the manufacturer, or sold withthe apparatus. When a cart is used, use caution
when moving the cart/apparatus combination to avoidinjury from tip-over.Unplug this apparatus during lightning storms or whenunused for long periods of time.Refer all servicing to qualified service personnel. Servicingis required when the apparatus has been damaged in anyway, such as power-supply cord or plug is damaged, liquidhas been spilled or objects have fallen into apparatus, theapparatus has been exposed to rain or moisture, does notoperate normally, or has been dropped.This product may contain lead and mercury. Disposal ofthese materials may be regulated due to environmentalconsiderations. For disposal or recycling information,please contact your local authorities or the ElectronicIndustries Alliance: www.eiae.orgDamage Requiring Service - The appliance should beserviced by qualified service personnel when:A. The power supply cord or the plug has been damaged;B. Objects have fallen, or liquid has been spilled into theappliance;C. The appliance has been exposed to rain;D. The appliance does not appear to operate normally or
exhibits a marked change in performance;E. The appliance has been dropped, or the enclosuredamaged.Tilt/Stability - All televisions must comply withrecommended international global safety standards for tiltand stability properties of its cabinet design.• Do not compromise these design standards by applyingexcessive pull force to the front, or top, of the cabinetwhich could ultimately overturn the product.• Also, do not endanger yourself, or children, by placingelectronic equipment/toys on the top of the cabinet. Suchitems could unsuspectingly fall from the top of the set andcause product damage and/or personal injury.Wall or Ceiling Mounting - The appliance should bemounted to a wall or ceiling only as recommended by themanufacturer.Power Lines - An outdoor antenna should be locatedaway from power lines.Outdoor Antenna Grounding - If an outside antenna isconnected to the receiver, be sure the antenna system isgrounded so as to provide some protection against voltagesurges and built up static charges.Section 810 of the National Electric Code, ANSI/NFPANo. 70 -1984, provides information with respect to propergrounding of the mast and supporting structure, groundingof the lead-in wire to an antenna discharge unit, size ofgrounding connectors, location of antenna-discharge unit,connection to grounding electrodes, and requirements forthe grounding electrode. See Figure below.Object and Liquid Entry - Care should be taken sothat objects do not fall and liquids are not spilled into theenclosure through openings.Battery Usage CAUTION - To prevent battery leakagethat may result in bodily injury, property damage, ordamage to the unit:• Install all batteries correctly, with + and - aligned asmarked on the unit.• Do not mix batteries (old and new or carbon andalkaline, etc.).• Remove batteries when the unit is not used for a longtime.
17.
18.
19.
20.
21.
22.
Note to the CATV system installer: This reminder is provided to call the CATV system installer’s attention to Article820-40 of the NEC that provides guidelines for proper grounding and, in particular, specifies that the cable ground shall beconnected to the grounding system of the building, as close to the point of cable entry as practical.
Example of AntennaGrounding asperNEC -National Electric Code
ANTENNA LEAD IN WIRE
ANTENNA D ISCHARGE UNIT (NEC SECTION 810-20)
GROUNDING CONDUCTORS (NEC SECTION 810-21)
GROUND CLAMPS
POWER SERVICE GROUNDING ELECTRODE SYSTE M (NEC ART 250, PART H)
GROUND CLAM P
ELECTRIC SERVICE EQUIPMENT
3
1.2.3.4.5.6.7.
8.
9.
10.
11.
12
13.
14.
15.
16.

4
ADDITIONAL SAFETY PRECAUTIONS
• ENSURE that LCD TV stand is tightened properly to the set (See Quick Guide) on the right way of tightening ofthe screw of the stand to the set. Improper tightening of screw may render the set unsafe.• If LCD TV is installed on the wall, installation should be carried out by qualified servicemen. Improper or incorrectinstallation may render the set unsafe.• Disconnect main plug when :— cleaning the TV screen, never use abrasive cleaning agents.— there is a lightning storm.— the set is left unattended for a prolonged period of time.• Do not shift or move the LCD TV around when it is powered on.• Do not touch, push or rub the surface of the LCD screen with any sharp or hard objects.• When the surface of the LCD screen becomes dusty, wipe it gently with an absorbent cotton cloth or other softmaterial like chamois. DO NOT USE acetone, toluene or alcohol to clean the surface of the screen. These chemicalswill cause damage to the surface.• Wipe off water or saliva as soon as possible. These liquids can cause deformation and color fading of the LCDscreen when left exposed for some time.• Be careful of condensation when temperature changes occur. Condensation can cause damage to the LCD screenand electrically parts. After condensation fades, spots or blemishes will be present on the LCD screen.
POSITIONING THE LCD TELEVISION• Place the LCD TV on a solid, sturdy base or stand. Be sure the stand is strong enough to handle the weight of theLCD TV.• Tr y to leave at least 6” of space around each side of the LCD TV cabinet to allow for proper ventilation.• Do not place the LCD TV near a radiator or other sources of heat.• Do not place the LCD TV where it can be exposed to rain or excessive moisture.
RECYCLING PROCEDURE/END OF LIFE DISPOSAL• To minimize harm to the environment, the batteries supplied with the LCD TV do not contain mercury or nickelcadmium. If possible, when disposing of batteries, use recycling means available in your area.• The LCD TV uses materials that can be recycled. To minimize the amount of waste in the environment, check yourarea for companies that will recover used televisions for dismantling and collection of reusable materials, or contactyour dealer for TV recycling tips.• Please dispose of the carton and packing material through the proper waste disposal management in your area.
PRECAUTION

CONTENTS
IntroductionWelcome/Registration of Your TV . . . . . . . . . . . . . . . . . . . . . . . . 2IMPORTANT SAFETY INSTRUCTIONS . . . . . . . . . . . . . . . . . 3PRECAUTIONS . . . . . . . . . . . . . . . . . . . . . . . . . . . . . . . . . . . . . . . . . . . . 4CONTENTS . . . . . . . . . . . . . . . . . . . . . . . . . . . . . . . . . . . . . . . . . . . . . . .5
InstallationLanguage Settings . . . . . . . . . . . . . . . . . . . . . . . . . . . . . . . . . . 6
Tuner Mode Control . . . . . . . . . . . . . . . . . . . . . . . . . . . . . . . . . . . . . . . . 7Auto Program (Setting Up Channels ) . . . . . . . . . . . . . . . . . . . . .8Channel Edit Control (ToAdd or Delete channels ) . . . . . 9Factory Reset . . . . . . . . . . . . . . . . . . . . . . . . . . . . . . . . . . . . . . . . . . . . . . 10Basic TV and Remote Control Operations. . . . . . . . . . . . . . . .11Remote Control-ForTV Operations . . . . . . . . . . . . . . . . . . . . 12Remote Control-For DVD Operations . . . . . . . . . . . . . . . . . 13Timer Menu Controls . . . . . . . . . . . . . . . . . . . . . . . . . . . . . . . . . . . . . .14
Picture MenuTV Picture Menu Controls . . . . . . . . . . . . . . . . . . . . . . . .15Sound MenuTV Sound Menu Controls . . . . . . . . . . . . . . . . . . . . . . . . . 16
Features MenuSmart Picture Control . . . . . . . . . . . . . . . . . . . . . . . . . . . ..17
Smart Sound Control . . . . . . . . . . . . . . . . . . . . . . . . . . . . . . . . . . . . . 17Lock . . . . . . . . . . . . . . . . . . . . . . . . . . . . . . . . . . . . . . . . . . . . . . . . 18Lock Password. . . . . . . . . . . . . . . . . . . . . . . . . . . . . . . . . . . . . . 19Lock Program . . . . . . . . . . . . . . . . . . . . . . . . . . . . . . . . . . . . . . 20Lock - Movie Ratings. . . . . . . . . . . . . . . . . . . . . . . . . . . . . . . 21Lock - TV Ratings . . . . . . . . . . . . . . . . . . . . . . . . . . . . . . . . .22
Using The Picture Format . . . . . . . . . . . . . . . . . . . . . . . . . . . . . . . . ..23Closed Captions . . . . . . . . . . . . . . . . . . . . . . . . . . . . . . . . . . . . . . . . . . . 24
PCModePC Picture Controls . . . . . . . . . . . . . . . . . . . . . . . . . . . . . .45
PC Audio Controls . . . . . . . . . . . . . . . . . . . . . . . . . . . . . . . . . . . . . . . . 46Setting Up The PC Mode . . . . . . . . . . . . . . . . . . . . . . . . . . . . . . . . 47
General InformationTrouble Shooting Tips-TV. . . . . . . . . . . . . . . . . . . . . . . . .
Care And Cleaning . . . . . . . . . . . . . . . . . . . . . . . . . . . . . . . . . . . . . . . 51
Technical Specifications . . . . . . . . . . . . . . . . . . . . . . . . . . . . . . . . . . 50Trouble Shooting Tips-DVD. . . . . . . . . . . . . . . . . . . . . . . . . . . . . . . .49
Regulatory . . . . . . . . . . . . . . . . . . . . . . . . . . . . . . . . . . . . . . . . . . . . . . . . . 52Limited Warranty . . . . . . . . . . . . . . . . . . . . . . . . . . . . . . . . . . . . . . . . 53
DVD Mode ControlDVD Mode Control . . . . . . . . . . . . . . . . . . . . . . . . . . . . . .25
DVD Mode Control-Play Disc InVariousWays. . . . . . . . . . . .29
DVD Menu Setup . . . . . . . . . . . . . . . . . . . . . . . . . . . . . . . . . . . . . . . . . .36
If this instruction manual does not give an answer
or if ‘Trouble shooting tips’ does not solve your
TV problem, you can call your Local Magnavox
Customer or Service Center.
Please, have the Model and Serial number which
you can find at the back of your television set
or on the packaging, ready, before calling the
Magnavox helpline
1-800-705-2000
Model: 20MF 251W
Serial No:.............................................
Care of the screen See Tips, p. 50
Magnavox is paying a lot of attention to produc-ing environmentally-friendly in product.Your new TV contains materials which can berecycled and reused.At the end of its life specialized companies candismantle the discarded TV to concentrate thereusable materials and to minimize the amountof materials to be disposed of.Please ensure you dispose of your old TVaccording to local regulations.
Help
5
SmartSmartSmartSmartSmart
48

6
HELPFUL HINT
For English, French, or Spanish -speakingTV owners, an onscreen LANGUAGE
option is present. The LANGUAGE control enables
you to set the TV’s onscreen menu to be shown in
either English, French, or Spanish.
Press the MENU button on theremote control to open the onscreen menu.
Press the / button to highlight theINSTALL menu.
Press the / button to HighlightLANGUAGE.
Press the / button to select English, French,or Spanish.
Press the MENU button repeatedly to clear themenu from the screen.
1
2
3
4
5
6
Remember, the LANGUAGE control makesonly the TV’s onscreen MENU itemsappear in English, French, Spanish text.It does not change the other onscreen textfeatures, such as Closed Captioning (CC), withTV shows.
LANGUAGE SETTINGS
Press the OK button to return to the previousmenu. 1
625
43
LANGUAGE ENGLISH
TUNER MODE ANTENNA
AUTO PROGRAM
CHANNEL EDIT
FACTORY RESET
MOVE SELECT RETURN EXITOK MENU
INSTALL

7
TUNER MODE CONTROL
The Tuner Mode al lows you to change the LCDTV’s signal input to Cable or Air (antenna).It ’s impor tant for the LCD TV to know if you wantto receive channels from a cable TV signal or anantenna signal .
Press the MENU button to see the onscreen menu.
Press the / button to highlight the INSTALLmenu.
Press the / button to enter theINSTALL .
Press the / button to highlight the TUNERMODE .
Press the / button to select CABLE,ANTENNA, orAUTO.
Press the MENU button repeatedly to clear themenu from the screen.
1
2
3
4
5
6
7
• When CABLE is selected, channels 2-125 are available.• When ANTENNA is selected, channels 2-69 are available.• WhenAUTO is selected, your LCD TV will search automatically for antennaor cable channels.
• Immediately after unpacking and plugging in your new television, run the AUTOPROGRAM function to set up the TV for the broadcast or cable channelsavailable in your area. If you do not run the auto program function to set up thechannels, your television may not operate properly.
HELPFUL HINT
Press the OK button to return to the previousmenu.
17
6
3
5
2
4
LANGUAGE ENGLISH
TUNER MODE ANTENNA
AUTO PROGRAM
CHANNEL EDIT
FACTORY RESET
MOVE SELECT RETURN EXITOK MENU
INSTALL

8
AUTO PROGRAM (SETTING UP CHANNELS)
Your LCD TV can automatically set itself for local
area (or cable TV) channels. This makes it easy
for you to select only the TV stations in your area by
pressing the CH ( ) or CH ( ) button.
Press the MENU button on the remotecontrol to show the onscreen menu.
Press the / button tohighlight the INSTALL menu.
Press the / button toenter the INSTALL menu.
Press the / button tohighlight theAUTO PROGRAM control.
Press the / button tostart theAUTO PROGRAM scanningof channels.
Press the MENU button repeatedly toclear the menu from the screen, afterAUTO SEARCHhas finished.
12345
67
• Immediately after unpacking and plugging in your new television, run the autoprogram function to set up the TV for the broadcast or cable channels available inyour area. If you do not run the auto program function to set up the channels ,your television may not operate properly.
• After you’ve run Auto Program, check out the results. Press the (CH ) button and seewhich channels you can select.
• Remember, an antenna or cable TV signal must first be connected to your LCD TV.
HELPFUL HINT
Press the OK/MENU button to return to theprevious menu.
1
72345
6
6
LANGUAGE ENGLISH
TUNER MODE ANTENNA
AUTO PROGRAM
AUTO SEARCH
AIR 5
OK/MENU: Return
CHANNEL EDIT
FACTORY RESET
MOVE SELECT RETURN EXITOK MENU
INSTALL

Press the MENU button to open the
onscreen menu.
Press the / button to
highlight the INSTALL menu, thenpress the to enter.
Press the / button to highlight
th/ button to enter.
e CHANNEL EDIT
column
, then press
In CURRENT CHANNEL ,
press the / button to select thechannel you wish to add or remove.
In SKIPPED column, press the /
button to select ACTIVE (to add) or
SKIPPED (to delete) the channel you
selected.
Press the MENU button repeatedly to
clear the menu from the screen.
9
CHANNEL EDIT CONTROL
Channel Edit control lets you edit the channellisting. You can add or remove a channel in theLCD TV’s memory.
1
2
3
4
5
6
7
Repeat steps 4–5 to add or deleteadditional channels to or from theLCD TV’s memory.
HELPFUL HINT
Press the OK button to return to theprevious menu.
/
17
263
45
LANGUAGE ENGLISH
TUNER MODE ANTENNA
AUTO PROGRAM
CHANNEL EDIT
FACTORY RESET
MOVE SELECT RETURN EXITOK MENUMOVE SELECT RETURN EXITOK MENU
INSTALL
CHANNEL EDIT
CAT V 1
ACTIVESKIPPED
CURRENT CHANNEL
button
the

10
FACTORY RESET
Your TV can be reset to the originalfactory settings by performing thefollowing steps.
Press the MENU button on theremote control to see the onscreenmenu.
Press the / button tohighlight the INSTALL menu, then press
to enter.
Press the / button repeatedlyto highlight the FACTORY RESETcontrol, then press the / buttonto enter.
When FACTORY RESET Menu appeared,press the / button to select "Yes",and press the / button or the OKbutton to reset the original factorysettings.
Press the MENU button repeatedly toclear the menu from the screen.
1
2
3
4
5
If you reset the TV to the factory settings,all your present setting on picture, audio,Close Caption and other feature settingswill be erased and replaced by themanufacture’s default settings. However,your Smart Lock access code will not beerased. Please refer to page 19 for details.
HELPFUL HINT
/
152
34
4
LANGUAGE ENGLISH
TUNER MODE ANTENNA
AUTO PROGRAM
CHANNEL EDIT
FACTORY RESET FACTORY RESET
NOYES
MOVE SELECT RETURN EXITOK MENUMOVE SELECT SELECT EXITOK MENU
INSTALL
the button

Connect the power plug to the power socket.
Press POWER to turn on the LCD TV.
PressVOL to+
+
increase the sound level, orpressVOL to decrease the sound level.
Press CH or CH to select channels.
Point the remote control toward on the front ofthe LCD TV to operate.
Open the battery compartment on theback of the remote control.
Place AAA the remote control. Be surethe (+) and (-) ends of the batteries line up asmarked inside the battery compartment.
Close the battery compartment.
BASICTV AND REMOTE CONTROL OPERATIONS
BATTERY INSTALLATION
TELEVISIONAND REMOTE CONTROL
11
1234
67
8
5
5
6
2
3 4
8
--
+
+
7
–
–

12
REMOTE CONTROL -FOR TV OPERATIONS
Number buttonsPress to select TV channels.When selecting single-digitchannels, press the number of thedesired channel.The LCD TV will pause for a fewseconds then tune to the selectedchannel.Note: +10 button is for DVD use.
Mute buttonPress to eliminate or restore theLCD TV sound. Mute will appearon the screen when the sound ismuted.
Menu buttonPress to activate onscreen menu,also press to exit the onscreenmenu.
Volume buttonPress to increase or decrease thesound level.
Source buttonPress to select the video inputsource: AV1,AV2, DVD,PC,TV.
Direction buttonPress to navigate up/down/left/right
OK buttonPres
Press to return to the previouslayout in the OSD screen menu.
s to confirm the option youselected in the onscreen menu.
CC buttonPress the CC button to select OFF,CC1, CC2, CC3, CC4,TEXT1,TEXT2,TEXT3,TEXT4, CC MUTE, XDS.
Standby (Power) buttonPress to turn the LCD TV on oroff.
Sleep buttonPress to set the LCD TV to turnitself off within a certain time.
Picture Format buttonPress the FORMAT buttonrepeatedly to toggle among thesix screen format sizes:Wide Screen,4:3, Zoom14:9, Zoom16:9,Subtitle Zoom, Super Wide.
Previous Channel buttonPress to go to previously selectedchannel.
Channel buttonPress to adjust the channel upor down.
in onscreen menu.
Smart Picture buttonPress repeatedly to select eitherPersonal, Movie, Sports, Weaksignal, Multimedia , or Nightpicture setting.
Smart Sound buttonPress repeatedly to select amongthe 4 settings; Personal , News,Music, or Theatre.

13
REMOTE CONTROL -FOR DVD OPERATIONS
DVDTITLE buttonUse to bring up the DVD title menu.
PLAY buttonUse to begin the DVD playback.
PAUSE buttonUse to pause the DVD playback.
PREV/NEXT buttonUse to skip to the previous ornext chapter .
ZOOM buttonUse to zoom the DVDplayback picture.
SLOW buttonUse to slow the DVDplayback speed.
P. MODE buttonUse to shift DVD play mode.
REMAIN buttonUse to display the time of the DVDplayback.
A. MODE buttonUse to shift the DVD playback
audio mode.
AUDIO buttonUse to shift DVD audio language.
OPEN/CLOSE buttonUse to eject the disc being played
in the disc slot, the main unit must
be set to DVD status.
STOP buttonUse to stop the DVD playback.
FF/FR buttonUse to play DVD fast forward/backward.
RETURN buttonReturn to the previous menu screen.
DVD MENU buttonUse to bring up the DVD rootmenu.
REPEAT buttonUse to repeat the DVD playback.
WIDE buttonIn DVD mode, use to set TV displaymode.
SUBTITLE button
Use to shift DVD subtitle language.
ANGLE button
Use to shift DVD viewing angle.

Your LCD TV comes with an onscreen clock. TheTV can also be set to turn on or off at a specif ictime and tune to a specif ic channel when it powersitself on.
Press the SLEEP button on the remote controlto show the onscreen menu..
Press the SLEEP button repeatedly to select yourrequiring sleep timing.
1
2
240 M ins
15 M ins
30 M ins
60 M ins
90 M ins
120 M ins
180 M ins
OFF
12
IMPORTANTFor the Timer to function, the set must not beturned off. Once the set is turned off, the Timeris disabled.
HELPFUL HINT
TIMER MENU CONTROLS
14

15
Press the MENU button to see theonscreen menu.
When PICTURE menu is highlighted,press the / button to enter thePICTURE menu.
Press the / to choose the item
you want to adjust: Smart Picture,Brightness, Color, Contrast,Sharpness,Tint, ColorTemp,Noise Reduction.
Press the / button to adjust the item.
Press the / button to select and
adjust other picture controls.
Press MENU repeatedly to removeth
buttonthee menu from the screen.
Smart Picture: Please refer to page17, for details on Smart PictureSettings.Brightness:Adjust to brighten thedark parts of the picture. Thisappears to add white to the color.Color:Adjust to add or reducecolor.Contrast:Adjust to “sharpen” thePicture quality. The black portions ofthe picture become richer in darknessand the white become brighter.Shar
Color Temp: Allows you to adjustNormal, Cool,Warm.Noise Reduction: Allows you toadjustWeak,OFF, Strong.
pness:Adjust to improve detail.Tint:Adjust to obtain natural skintones.
TV PICTURE MENU CONTROLS
To adjust your LCD TV picture, selecta channel and follow these steps.
1
2
3
45
6
7
HELPFUL HINT
Any adjustment of Brightness, Color,Contrast or Sharpness will be stored intoPERSONAL at Smart Picture section.
Press the OK button to return to theprevious menu.
172
6
345
SMART PICTURE PERSONAL
BRIGHTNESS
COLOR
CONTRAST
SHARPNESS
TINT
COLOR TEMP NORMAL
NOISE REDUCTION WEAK
MOVE SELECT RETURN EXITOK MENU
PICTURE
button

16
TV SOUND MENU CONTROLS
To adjust your LCD TV Sound, select a channel andfollow these steps.
Press the MENU button to see the menu.
Press the / button tohighlight the AUDIO menu.
Press the / button to enter the AUDIOmenu.
Press the / button to choose the item youwant to adjust: Smart Sound, 120HZ~10KHZ,
Balance,Stereo , Virtual Surround, AVL.Smart Sound: Please refer to page 17 fordetails on Smart Sound Settings.120HZ~10KHZ: Allows you to adjust120HZ, 500HZ, 1K5HZ, 5KHZ, 10KHZ.Balance: Adjust the balance of the sound.Stereo:Adjust to select between Stereo,Mono, or SAP.Virtual Surround :Adds greater depth anddimension to TV sound. Select from VirtualSurround or OFF.AVL (Auto Vo lume Leveler): When On, AVLwill level out the sound being heard whensudden changes in volume occur duringcommercial breaks or channel changes.
Press the / button to adjust the item.
Press the / button to select and adjustother sound controls.
Press the MENU button repeatedly to removethe menu from the screen.
12
3
4
5
6
8
•If Stereo is not presented on aselected show and the TV is placed inStereo mode, the sound coming fromTV will remain in Mono mode.
HELPFUL HINT
7 Press the OK button to return to theprevious menu.
17
82
6
345
SMART SOUND PERSONAL
120HZ
500HZ
1K5HZ
5KHZ
10KHZ
BALANCE
VIRTUAL SURROUND OFF
AVL OFF
STEREO STEREO
MOVE SELECT RETURN EXITOK MENU
AUDIO

17
Press the PICTURE button on the remote control.The current Smart Picture setting will appear on thescreen.Press the PICTURE button repeatedly toseSports,Weak-Signal.lect either Personal,Movie,Night,Multimedia,
SMART PICTURE CONTROL
Whether you’re watching a movie or a video game,your LCD TV has video control preset that will
match with your current program source or content.Smart Picture quickly resets your TV’s video controls fora number of different types of programs and viewingconditions that you may have in your home. TheMovie, Sports, Weak Signal, Multimedia, and Night,Smart Picture controls have been preset at the factoryto easily adjust the TV’s brightness, color, picture,sharpness, tint, and color temperature levels. In thePersonal smart picture mode you can create your ownpreferred video settings.
Note:The settings of the Personal smart picture modecan be adjusted in picture options within the onscreenmenu. The Personal mode is the only mode whichcan be adjusted by the user via the onscreen picturecontrol menu.
Smart Sound allows you to select from three userpresets and a personal mode that you setaccording to you own preferences through the onscreenSound menu. The four user presets(Personal, News,Music , and Theatre) enable you to tailor the TV soundso as to enhance the par ticular program you arewatching. Fo llowing these steps to select any of theoptions.
1
2Note: The settings of the Personal smart sound mode can
be adjusted in sound control within the onscreenmenu. The Personal mode is the only mode whichcan be adjusted by the user via the onscreen soundcontrol menu.
PERSONAL
MOVIE
MULTIMEDIA
NIGHT
PERSONAL
NEWS
MUSIC
THEATRE
Press the SOUND button on the remote control.The current Smart Sound setting will appears on thescreen.
Press the SOUND button repeatedly to toggleamong the four setting: Personal, News, Music, orTheatre.
SMART SOUND CONTROL
12 SPORTS
WEAK-SIGNAL
12
12

18
SMART LOCK
The SMART Lock feature is an
integrated circuit that receives and
processes data sent by
broadcasters, or other program
providers, that contain program
content advisories.When programmed
by the viewer, a TV with SMART Lock
can respond to the content
advisories and block program content
that may be found objectionable (such
as offensive language, violence, sexual
situations, etc.). This is a great feature
to censor the type of viewing children
may watch.
MOVIE RATINGS
G: General Audience - All agesadmitted.Most parents would find this programsuitable for all ages. This type ofprogramming contains little or noviolence, no strong language, and littleor no sexual dialog or situations.PG: Parental Guidance Suggested -This programming contains materialthat parents may find unsuitable foryounger children. It may contain oneor more of the following:moderate violence, some sexualsituations, infrequent coarselanguage, or some suggestive dialog.PG-13: Parents StronglyCautioned -This programming containsmaterial that parents may findunsuitable for children under the ageof 13. It contains one or more of thefollowing: violence, sexual situations,coarse language, or suggestive dialog.R: Restricted -This programmingis specifically designed for adults.Anyone under the age of 17 shouldonly view this programming with anaccompanyingparent or adult guardian. It containsone or more of the following: intenseviolence, intense sexual situations,strong coarse language, or intenselysuggestive dialog.NC-17: No children under the ageof 17 will be admitted. - This typeof programming should be viewed byadults only. It contains graphicviolence, explicit sex, or crude,indecent language.X: Adults Only - This type ofprogramming contains one or more ofthe following: very graphic violence,very graphic and explicit or indecentsexual acts, and very coarse andintensely suggestive language
TV RATINGS
TV-Y All children - Appropriate forall children. Designed for a very youngaudience, including children ages 2-6.This type of programming is notexpected to frighten younger children.TV-Y7 Directed to Older Children -Designed for children age 7 and above.It may be more appropriate forchildren who can distinguish betweenmake-believe and reality. Thisprogramming may include mild fantasyand comic violence (FV or fantasyviolence).TV-G General Audience - Mostparents would find this programmingsuitable for all ages. This type ofprogramming contains little or noviolence, no strong language, and littleor no sexual dialog or situations.TV-PG Parental GuidanceSuggested -Contains material that parents mayfind unsuitable for younger children.This type of programming contains oneor more of the following: Moderateviolence (V), some sexual situations(S), infrequent coarse language (L), orsome suggestive dialog (D).TV-14 Parents Strongly Cautioned -Contains some material that manyparents would find unsuitable forchildren under age 14. This type ofprogramming contains one or more ofthe following: intense violence (V),intense sexual situations (S), strongcoarse language (L), or intenselysuggestive dialog (D).TV-MA Mature Audience Only -Specifically designed to be viewedby adults and may be unsuitablefor children under 17. This type ofprogramming contains one or moreof the following: graphic violence (V),explicit sexual situations (S), or crude,indecent language (L)
SMART Lock offers various BLOCKINGcontrols from which to choose:Password - A password must beset to prevent children from unblockingquestionable or censored programming setby their parents.Block Enable - After a password code hasbeen programmed, you can blockprogramming depending on the receivedrating and user setting.Movie Ratings - Certain blocking optionsexist which will block programming basedon ratings patterned by the Motion PicturesAssociation of America.TV Ratings - Just like the Movie Ratings,programs can be blocked from viewing usingstandard TV ratings set by TV broadcasters.
Remember that 0711 is thedefault Smart Lock code. If youraccess code has been changed bysomeone other than you (a child,for example) or you have forgottenthe code, you can always get in byinputting the default code.
HELPFUL HINT
G
PG
PG-13
R
NC-17
X
MOVE MOVE SELECT RETURNOK MENU
FEATURES
OFF
OFF
OFF
OFF
OFF
OFF
MOVE MOVE
ALL FV V S L D
SELECT RETURNOK
OFF OFFOFF
OFF OFF OFF OFF OFFOFF OFF OFF OFF
MENU
FEATURES
YY7G OFFPG OFF OFF OFF OFF OFF14MA

19
SMART LOCK PASSWORD
Over the next few pages you’ll learn how
to block programs and understand the rating
terms for cer tain broadcasts. First, set password.
Press the MENU button to see theonscreen menu.
Press the / button to highlightthe FEATURES menu, then pressthe / button to enter.
Press the / button to selectSMART LOCK.
Press the / buttonINPUT PASSWORD will appear on the screen.
Enter a four-digit code using the Numberbuttons.
Press the MENU button repeatedly to removethe menu from the screen.
Remember that 0711 is the default Smart Lockcode. If your access code has been changed bysomeone other than you (a child, for example)or you have forgotten the code, you can alwaysget in by inputting the default code.
1
2
34
5
6
HELPFUL HINT
NOTE TO PARENTS:It is not possible for your child to unblock a channelwithout knowing your access code or changing it to anew one. If your code has been changed without yourknowledge, then you will become aware that blockedchannels may have been viewed.
162
34
5
SOURCE T V
PICTURE FORMAT WIDE SCREEN
SMART LOCK
CLOSED CAPTION OFF
SLEEP TIME OFF
MOVE SELECT RETURN EXIT Input Password:
Password
OK MENU
FEATURES

20
SMART LOCK PROGRAM
After your personal password has been
set (see the previous page), you are ready to
select the channels or inputs you want to block out
or censor.
Press the MENU button to see theonscreen menu.
Press the / button to highlight theFEATURES menu, then press the /button to enter.
Press the / button to selectSMART LOCK, then press the /button to enter.
Use the Number buttons to enteryour access code.
When LOCK PROGRAM is highlighted,press the / button to enter.
In CURRENT CHANNEL column, press the/ button to select the current channel
you want to block.
12
3
4
5
6In LOCKED column, press the / buttonto select LOCKED(block current selectedchannel) or ACTIVE(unblock a channel).
7Press the OK button to return to the previousmenu.8Press the MENU button repeatedly to removethe menu from the screen.9
Password
19
23567
4
8
Input Password
LOCK PROGRAM
OFF
CHANGE CODE
OFF
CLEAR ALL
BLOCK OPTION
MOVIE RATING
T V RATING
MOVE
LOCK PROGRAM
CURRENT CHANNEL
LOCKED
CAT V1
ACTIVE
SELECT RETURN EXITOK MENU
MOVE SELECT RETURN EXITOK MENU
FEATURES
SOURCE T V
PICTURE FORMAT WIDE SCREEN
SMART LOCK
CLOSED CAPTION OFF
SLEEP TIME OFF
MOVE SELECT RETURN EXITOK MENU
FEATURES

21
SMART LOCK - MOVIE RATINGS
The Smart Lock feature can block programm-ing based on the Movie Industr y ratings.Once you’ve entered your access code and the
SMART Lock features are displayed on thescreen:
Press the MENU button to see theonscreen menu.
Press the / button to highlight theFEATURES menu, then press the /button to enter.
Press the / button to select SMARTLOCK, then press the / button to enter.Input Password will appear on the screen.
Please use the Number buttons to enteryour 4 digits password.
Press the / button to selectMOVIE RATING, then press the /button to enter.
Press the / button to highlight anyof the Mo
repeatedly and
vie Rating options. Whenhighlighted, press the OK button
all these optionsbe (ON) blocked or (OFF) unblocked.
Press the MENU button to return to theprevious menu.
1
2
3
4
5
6
7
When a rating is chosen to be blocked, anyhigher level rating will also be blocked fromviewing. (i.e.: If “R” is selected to be blocked,NC-17 and X will automatically be blocked.)When a rating is set to unblock, only the selectedrating will be unblocked (Ratings lower will notautomatically be unblocked.)
HELPFUL HINT
Password
17
2356
6
4
Input Password:
LOCK PROGRAM
OFF
CHANGE CODE
OFF
CLEAR ALL
BLOCK OPTION
MOVIE RATING
T V RATING
MOVE SELECT RETURN EXITOK MENU
FEATURES
G
PG
PG-13
R
NC-17
X
MOVE MOVE RETURNOK SELECT MENU
FEATURES
OFF
OFF
OFF
OFF
OFF
OFF
SOURCE T V
PICTURE FORMAT WIDE SCREEN
SMART LOCK
CLOSED CAPTION OFF
SLEEP TIME OFF
MOVE SELECT RETURN EXITOK MENU
FEATURES
can

22
LOCK -TV RATINGS
The SMART Lock feature can blockprogramming based on the TV Industr yratings.Once you’ve entered your accesscode and the SMART Lock features aredisplayed on the screen.
Press the MENU button to see theonscreen menu.
Press the / button tohighlight the FEATURES menu, thenpress the / button to enter.
Press the / button tohighlight SMART LOCK, then presthe
sbutton to enter.
Input Password will appear on the screen.
Use the Number buttons to enter your4 digits access code.
Pres
to enter.
s the / button to select TVRATING, press the / button
Press the direction buttons tohighlight any of the TV Rating options.When highlighted, press OK repeatedlyand all these options can be (ON)blocked or (OFF) unblocked.
12
3
4
5
6
7
When a rating is chosen to be blocked, anyhigher level rating will also be blocked fromviewing. (i.e.: If “PG” is selected to be blocked,14 and MA will automatically be blocked.)When a rating is set to unblock, only the selectedrating will be unblocked (Ratings lower will notautomatically be unblocked.)
HELPFUL HINT
Press the MENU button to return to theprevious menu.
SMART
/
Password
Remember that 0711 is the default Smart Lockcode.
17
2356
6
4
Input Password:
LOCK PROGRAM
OFF
CHANGE CODE
OFF
CLEAR ALL
BLOCK OPTION
MOVIE RATING
T V RATING
MOVE SELECT RETURN EXITOK MENU
FEATURES
MOVE
ALL FV V S L D
MOVE SELECT RETURNOK
OFF OFFOFF
OFF OFF OFF OFF OFFOFF OFF OFF OFF
MENU
FEATURES
SOURCE T V
PICTURE FORMAT WIDE SCREEN
SMART LOCK
CLOSED CAPTION OFF
SLEEP TIME OFF
MOVE SELECT RETURN EXITOK MENU
FEATURES
YY7G OFFPG OFF OFF OFF OFF OFF14MA

23
You can change the picture format size to matchthe type of program you are watching. Select theWide Screen, 4:3, Zoom14:9, Zoom16:9, SubtitleZoom, SuperWide.
Wide Screen, 4:3, Zoom14:9, Zoom16:9,Subtitle Zoom, SuperWide.
USINGTHE PICTURE FORMAT
Press the MENU button to see theonscreen menu.
Press the / button tohighlight the FEATURES menu, thenpress the / button to enter.
Press the / button tohighlight the PICTURE FORMAT,then press the / button toselect your choice.
12
3
4
5
Note: Press the FORMAT button repeatedlyto toggle among the six screen format
Press the MENU button repeatedly toremove the menu from the screen.
Press the OK button to return to theprevious menu.
152
3
4
SOURCE T V
PICTURE FORMAT WIDE SCREEN
SMART LOCK
CLOSED CAPTION OFF
SLEEP TIME OFF
MOVE SELECT RETURN EXITOK MENU
FEATURES

24
CLOSED CAPTIONS
Closed Captioning (CC) allows you toread the voice content of television programs onthe TV screen. Designed to help the hearing impaired,this feature uses onscreen “text boxes” to showdialogue and conversations while the TV program is inprogress.
Press the MENU button to see the onscreenmenu.
Press the / button to highlight the FEATURESmenu, then press the / button to enter.
Press the / button to select CLOSEDCAPTION.
Press the / button to select the closedcaption you want:OFF,CC1,CC2,CC3,CC4,TEXT1,TEXT2,TEXT3,TEXT4,CC MUTE,XDS.
12
34
5Press the MENU button repeatedly to removethe menu from the screen.6
Note:Closed Caption can also be activated by pressingCC button on your remote control.
Not all TV programs and productcommercials are broadcast with ClosedCaptioning (CC). Nor are all ClosedCaptioning MODES (CAPTION 1–4 or TEXT 1–4)necessarily being used by broadcaststations during the transmission of a programoffering Closed Captioning.Refer to your area’s TVprogram listings for the stations and times of showsbeing broadcast with Closed Captioning.
HELPFUL HINT
Press the OK button to return to theprevious menu. 1
623
5
4
SOURCE T V
PICTURE FORMAT WIDE SCREEN
SMART LOCK
CLOSED CAPTION OFF
SLEEP TIME OFF
MOVE SELECT RETURN EXITOK MENU
FEATURES

Press POWER to turn on the unit.
Press the SOURCE button repeatedlyto select DVD. Press OK button to confirm.
Insert a disc into the disc slot, with the labelside facing to yourself.
The unit begins to read the disc.
Press PLAY( ) to play the disc.
Press STOP( ) to stop playback.
Press the open button ( ) on the remotecontrol to remove the disc and turn offthe unit.
Play Discs
25
DVD MODE CONTROL
If playing a DVD, the TV screen shows DVDmenu or title menu.If playing a CD, press PLAY ( ), and the unitplays the disc according to the track numbers.You have to press STOP( ) button twice time tostop playback of a DVD disc.
HELPFUL HINT
12
34567
1
56
27

Pause (DVD)
Press PAUSE ( ) to pause playback of DVDwhile it is playing.
Press PLAY( ) to resume playback.
Pause (CD)
26
Each time you press PAUSE ( ) , the pictureadvances one frame while a DVD discbeing played.
HELPFUL HINT
DVD MODE CONTROL
Press PLAY( ) to resume playback.
1
Press PAUSE ( ) to pause playback of CDwhile it is playing.1
2
2
12

DVD Menu Play
Some DVDs have title menusand chapter menus.
Press PLAY( ) , the screen shows themenu.
Press or to skip to the next orprevious page.
Select the item you want with numberbuttons or direction buttons.
Press DVD TITLE button once to return tothe title menu.
Press DVD MENU button once to return tothe root menu; press it again to resumeto play.
1.2.Root
Menu
11.
27
DVD MODE CONTROL
1
2
3
4
5
1 52
4 3
3

Load a disc . Press number buttons to select tracksafter the unit f inishes reading the disc .
To select track number smaller than 10
Press 1-10/0 number buttons to selectdesired track.
To select track number greater than 10
Press +10 number buttons once.
And press 1-10/0 number buttons to selectdesired track.
Select with Number Buttons
TRACK08/20 00:00 TRACK12/20 00:00
28
DVD MODE CONTROL
1
2
31
23

29
Audio Language
While playing a DVD disc with multiple audiolanguages , you can change the audio language.
Press AUDIO button repeatedly to selectthe desired audio language.
Audio Channel
You can also change the audio channel outputfrom a multi-channel DVD or CD disc .
Press A.MODE button repeatedly toselect the desired audio channel output.The audio channel output options as follows:MONO LEFT, MONO RIGHT,MIXED MONO and STEREO.
Different discs may differ in the audiolanguages available.Different discs may differ in the audiochannels available .
HELPFUL HINT
DVD MODE CONTROL - PLAY DISCS IN VARIOUS WAYS
1
2
1
2

While disc is playing, press to play infast-forward mode. Each time youpress the button, the speed changesas follows: 2X 4X 8X16X 32X Normal Playback.
While disc is playing, press to play infast-reverse mode. Each time youpress the button, the speed changesas follows: 2X 4X 8X16X 32X Normal Playback.
Press PLAY ( ) to switch to normal playwhile in fast-forward or fast- reverseplaying mode.
Fast Play
When playing a disc , you can play it in fast- forwardor fast-reverse mode to f ind what you want to view.
30
Slow Play
Enjoy slow motion by the following the stepsbelow.
Press SLOW button to play in slow motion.Each time SLOW button is pressed,the speed changes as follows: 1/21/4 1/8 1/16 1/21/4 1/8 1/16 Normal
Playback
Press PLAY( ) to resume play at normalspeed.
DVD MODE CONTROL - PLAY DISCS IN VARIOUS WAYS
1
2
3
4
5
15
2
4
3
Repeat Play
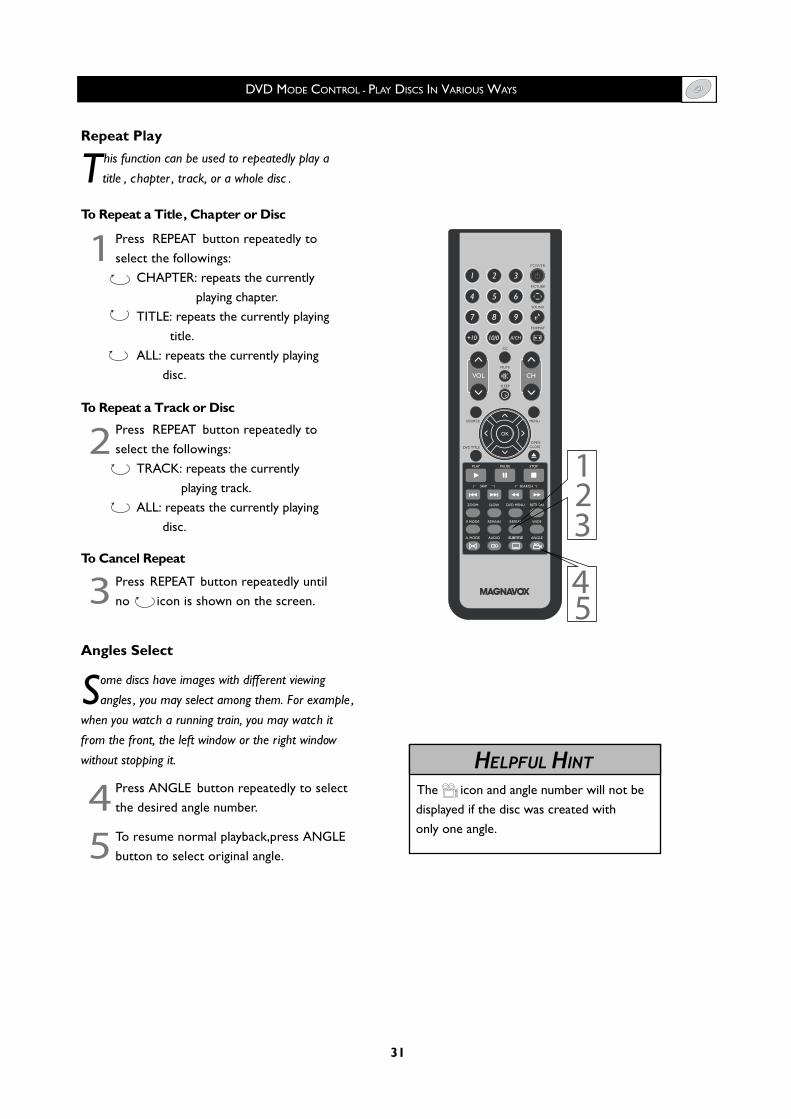
This function can be used to repeatedly play atitle , chapter , track, or a whole disc .
To Repeat a Title, Chapter or Disc
Press REPEAT button repeatedly toselect the followings:CHAPTER: repeats the currently
playing chapter.TITLE: repeats the currently playing
title.ALL: repeats the currently playingdisc.
To Repeat a Track or Disc
Press REPEAT button repeatedly toselect the followings:TRACK: repeats the currently
playing track.ALL: repeats the currently playingdisc.
To Cancel Repeat
Press REPEAT button repeatedly untilno icon is shown on the screen.
31
Angles Select
Some discs have images with different viewingangles , you may select among them. For example ,when you watch a running train, you may watch itfrom the front, the left window or the right windowwithout stopping it.
Press ANGLE button repeatedly to selectthe desired angle number.
To resume normal playback,press ANGLEbutton to select original angle.
The icon and angle number will not bedisplayed if the disc was created withonly one angle.
HELPFUL HINT
DVD MODE CONTROL - PLAY DISCS IN VARIOUS WAYS
1
2
3
45
1
5
2
4
3

Select Subtitles
This operation works only with discs with multiplesubtitle languages recorded.
Press SUBTITLE button repeatedly until thedesired language is selected.
Press SUBTITLE button until the screen shows"TURN OFF SUBTITLES".
32
Zoom Play
This function can be used to watch motionor motionless picture.
Press ZOOM button repeatedly toselect the followings: 2X, 3X, 4X,1/2 , 1/3 , and 1/4 .
Press , , , to move the enlargedpicture.
To resume the picture, press ZOOMbutton until the picture is in normal size..
For some discs, subtitles cannot beremoved.Different discs differ in the language ofsubtitles.If the subtitles of discs cannot be selected,the screen shows " " when you pressSUBTITLE button.
HELPFUL HINT
DVD MODE CONTROL - PLAY DISCS IN VARIOUS WAYS
1
2
3
4
5
1
5
2
43

33
Press P.MODE button to select shuffle orrandom play mode when a disc is playing.
To cancel shuffle or random playback, press
button twice.
Shuffle (Random) Play
The unit can play DVD chapters or audio tracks inrandom order .
The order is different each time.
The playback order is different each time.
HELPFULHINT
DVD MODE CONTROL - PLAY DISCS IN VARIOUS WAYS
STOP ( )
1
2
12

34
Program Play
To use the program playback feature, you mustenter the order in which you want the titles (andchapters) on the DVD or the tracks on the CD to playby creating a program.
Press P.MODE button until the screen shows:
Use the number buttons on the remote to
enter the title (and chapter) you want
to play first. The title (and chapter)
number you entered appears in the
box. For example: Enter Chapter 1 in
Title 8, the screen shows:
Continue adding title (and chapter) until
your program is complete. You can
play your program by highlighting
START and press PLAY button.
To remove program playback, press the
STOP button twice during the program
play .
PROGRAM: TT(20)/CH (--)01 TT :_ _ CH:_ _ 06 TT:_ _ CH:_ _02 TT :_ _ CH:_ _ 07 TT:_ _ CH:_ _03 TT :_ _ CH:_ _ 08 TT:_ _ CH:_ _04 TT :_ _ CH:_ _ 09 TT:_ _ CH:_ _05 TT :_ _ CH:_ _ 10 TT:_ _ CH:_ _
EXIT NEXT
PROGRAM: TT(20)/CH (--)01 TT :0 8 CH:0 1 06 TT:_ _ CH:_ _02 TT :_ _ CH:_ _ 07 TT:_ _ CH:_ _03 TT :_ _ CH:_ _ 08 TT:_ _ CH:_ _04 TT :_ _ CH:_ _ 09 TT:_ _ CH:_ _05 TT :_ _ CH:_ _ 10 TT:_ _ CH:_ _
EXIT START NEXT
DVD
If you want to program more than 10 titles(and chapters), highlight NEXT and pressPLAY to go to the next page. Proceed toprogram 11-20 in the same way titles 1-10were programmed.
HELPFUL HINT
DVD MODE CONTROL - PLAY DISCS IN VARIOUS WAYS
1
2
3
4
1
2
43

35
Press P.MODE button until the screen shows:
Use the number buttons on the remote
to enter the track number you want to
play first. The track number entered
appears in the box. The example: To
program track 8 of a CD to play first,
enter 8, and the screen shows:
Continue adding tracks until your
program is complete . You can play
your program by highlighting START
and press PLAY button.
To remove program playback, press the
STOP button during the program play.
PROGRAM: TRACK (01-20)01 _ _ 06 _ _02 _ _ 07 _ _03 _ _ 08 _ _04 _ _ 09 _ _05 _ _ 10 _ _
EXIT NEXT
PROGRAM: TRACK (01-20)01 08 06 _ _02 _ _ 07 _ _03 _ _ 08 _ _04 _ _ 09 _ _05 _ _ 10 _ _
EXIT START NEXT
CD
Program Play
If you want to program more than 10tracks, highlight NEXT and press PLAYto go to next page . Program 11-20 in thesame way 1-10 w ere programmed.
HELPFUL HINT
DVD MODE CONTROL -PLAYDISCS IN VARIOUS WAYS
1
2
3
4
1
2
43

36
HELPFUL HINT
F
A
or English, French, or Spanish -speaking
TV owners, an onscreen OSD LANGUAGE
option is present. The OSD LANGUAGE control enables
you to set the DVD’s onscreen menu to be shown in
either English, French, or Spanish.
Press the MENU button on theremote control to open the onscreen menu.
When GENERAL SETUP is highlighted,press the button to enter.
When the OSD LANG is highlighted,press the button to enter theOSD LANG menu.
Press the / button to select English, Frenchor Spanish, then press the OK button to confirm.
Press the MENU button repeatedly to clear themenu from the screen.
1
2
3
4
5
6
Remember, the OSD LANG control makesonly the DVD's OSD SETUP menu itemsappear in English, French, Spanish text.
LANGUOSD AGE SETTINGS
DVDMENU SETUP
Press the button to return to the previous menu.
ccording to the disc information, set the following functions for the player to obtain the best playing status.
-- GENERAL SETUP PAGE--
OSD LANG
CAPTIONS
PASSWORD
PARENTAL
DEFAULT
GENERAL SETUP
AUDIO SETUP
VIDEO SETUP
EXIT-- GENERAL SETUP PAGE--
ENGLISH
ESPA OL
OSD LANG
CAPTIONS
PASSWORD
PARENTAL
DEFAULT
16
45 4
23

37
HELPFUL HINT
Press the MENU button on theremote control to open the onscreen menu.
When GENERAL SETUP is highlighted,press the button to enter.
Press the / button to select ON or OFF,then press OK to confirm.
Press the / button to select CAPTIONS,then press the button to enter.
Press the MENU button repeatedly to clear themenu from the screen.
1
2
3
4
5
6
CAPTIONS SETUP is available when the discrecord the captions.
CAPTIONS SETUP
Press the button to return to theprevious menu.
-- GENERAL SETUP PAGE--
OSD LANG
CAPTIONS
PASSWORD
PARENTAL
DEFAULT
GENERAL SETUP
AUDIO SETUP
VIDEO SETUP
EXIT
-- GENERAL SETUP PAGE--
ON
OFF
OSD LANG
CAPTIONS
PASSWORD
PARENTAL
DEFAULT
1345
64
2

38
Press the MENU button on theremote control to open the onscreen menu.
When GENERAL SETUP is highlighted,press the button to enter.
Press the / button to select PASSWORD,then press the button to enter.
Press the MENU button repeatedly toclear the menu from the screen.
1
2
3
4
7
8
PASSWORD SETUP-PWMODE
Press the button to return to theprevious menu.
When PW MODE is highlighted, press thebutton to enter.
5 Press the / button to select ON or OFF,then press the OK button to confirm.
6 Use the Number buttons to enter yourpassword, press the OK button to confirm.
-- GENERAL SETUP PAGE--
PW MODE
PASSWORD
OSD LANG
CAPTIONS
PASSWORD
PARENTAL
DEFAULT-- PASSWORD SETUP PAGE--
ON
OFF
PW MODE
PASSWORD
-- PASSWORD SETUP PAGE--
OK
PASSWORD
Remember that 0711 is the default code.
HELPFUL HINT
1
56
8
57
34
2
6

39
Press the MENU button on theremote control to open the onscreen menu.
When GENERAL SETUP is highlighted,press the button to enter.
Press the / button to select PASSWORD,then press the button to enter.
Press the MENU button repeatedly toclear the menu from the screen.
1
2
3
4
7
8
PASSWORD SETUP-PASSWORD
Press the button to return to theprevious menu.
Press the / button to select PASSWORD,then press the button to enter.
5
6 Use the Number buttons to change thepassword, then press the OK button toconfirm.
When CHANGE is highlighted, press the OKbutton to confirm. The password change menuwill appear on the screen.
ReBut if the old password is changed, the newpassword will be available, and the oldpassword is disabled.
member that 0711 is the default code.
HELPFUL HINT
-- GENERAL SETUP PAGE--
PW MODE
PASSWORD
OSD LANG
CAPTIONS
PASSWORD
PARENTAL
DEFAULT -- PASSWORD SETUP PAGE--
CHANGE
PW MODE
PASSWORD
-- PASSWORD SETUP PAGE--
OK
OLD PASSWORD
NEW PASSWORD
CONFIRM PWD
1
56
847
32
6

40
Press the MENU button on theremote control to open the onscreen menu.
When GENERAL SETUP is highlighted,press the button to enter.
Press the / button to select PARENTAL,then press the button to enter.
Press the MENU button repeatedly toclear the menu from the screen.
1
2
3
4
PARENTAL SETUP
Press the button to return to theprevious menu.
Press the / button to select the items.press the OK button to confirm.
Note:If the PW MODE is set to ON, it will enableyou to enter the current new password afterfollwing the step 4.
56
-- GENERAL SETUP PAGE--
GPGPG-13RNC-17ADULT
OSD LANG
CAPTIONS
PASSWORD
PARENTAL
DEFAULT
1
46
432
5
-- GENERAL SETUP PAGE--
OK
PASSWORD

41
Press the MENU button on theremote control to open the onscreen menu.
When GENERAL SETUP is highlighted,press the button to enter.
Press the / button to select DEFAULT,then press the button to enter.
Press the MENU button repeatedly toclear the menu from the screen.
1
2
3
4Press the button to return to theprevious menu.
When RESET is highlighted,press the OK button to reset theoriginal factory settings.
56
HELPFUL HINT
-- GENERAL SETUP PAGE--
RESET
OSD LANG
CAPTIONS
PASSWORD
PARENTAL
DEFAULT
1
46
32
5
DEFAULT SETUP
If you reset the DVD to the factory settings,all your present setting on GENERAL SETUP,AUDIO SETUP andVIDEO SETUP will beerased and replaced by the manufacture'sdefault settings.However, your recent passwordwill not be erased. And the PARENTAL inGENERAL SETUP will not be reset when PWMODE is set to ON.

42
Press the MENU button on theremote control to open the onscreen menu.
When CHANNEL EQ is highlighted,press the button to enter.
Press the / button to select AUDIOSETUP, then press the button to enter.
Press the MENU button repeatedly toclear the menu from the screen.
1
2
3
4
Press the button to return to theprevious menu.
Press the / button to select the items underEQTYPE.5
67
Press the OK button to confirm.
-- AUDIO SETUP PAGE--
CHANNEL EQGENERAL SETUP
AUDIO SETUP
VIDEO SETUP
EXIT
-- AUDIO SETUP PAGE--
EQ TYPECHANNEL EQ
-- CHANNEL EQUALLZER--
NONEROCKPOPLIVEDANCETECHNOCLASSICSOFT
EQ TYPE
1
56
7432
5
AUDIO SETUP
When EQTYPE is highlighted,press the button to enter.

43
Press the MENU button on theremote control to open the onscreen menu.
When SHARPNESS is highlighted,press the button to enter.
Press the / button to selectVIDEOSETUP, then press the button to enter.
Press the MENU button repeatedly toclear the menu from the screen.
1
2
3
4Press the button to return to theprevious menu. 1
5
6
Press the / button to select either High,Medium, Low.
56
Press the OK button to confirm.
-- VIDEO SETUP PAGE--
SHARPNESS
BRIGHTNESS
CONTRAST
GENERAL SETUP
AUDIO SETUP
VIDEO SETUP
EXIT
-- VIDEO SETUP PAGE--
SHARPNESS
BRIGHTNESS
CONTRAST
HIGH
MEDIUM
LOW
432
4
VIDEO SETUP-SHARPNESS

44
Press the MENU button on theremote control to open the onscreen menu.
Press the / button to selectBRIGHTNESS/CONTRAST and press thebutton to enter.
Press the / button to selectVIDEOSETUP, then press the button to enter.
Press the MENU button repeatedly toclear the menu from the screen.
1
2
3
4Press the button to return to theprevious menu.
1
5
6
Press the / button to adjust the BRIGHTNESS/CONTRAST.
56
Press the OK button to confirm.
-- VIDEO SETUP PAGE--
SHARPNESS
BRIGHTNESS
CONTRAST
-- VIDEO SETUP PAGE--
SHARPNESS
BRIGHTNESS
CONTRAST
BRIGHTNESS 0
-- VIDEO SETUP PAGE--
CONTRAST
-- VIDEO SETUP PAGE--
0
432
4
VIDEO SETUP-BRIGHTNESS/CONTRAST

45
This TV can also be used as a PC Monitor. A PCvideo signal must be present or the TV will go intostandby mode. The PC Picture controls allow you toadjust the picture.
Press the MENU button on the remotecontrol to see the onscreen menu.
When the PICTURE menu is highlighted, Pressthe / button to enter thePICTURE menu.
Press the / button to highlight the item thatyou would like to adjust.Brightness: It is disabled in PC mode.Contrast:Adjust to “sharpen” the Picturequality. The black portions of the picturebecome richer in darkness and the whitebecome brighter.
AutoColorTemp:Adjust the color temperature.
Adjust: The LCD Monitor willautomatically adjust to the best imageposition, phase, and clock setting.Manual Adjust: The ManualAdjust controlallow you to manually fine tune the image as itappears on the screen.Phase-eliminates the horizontalinterfering lines.Clock-eliminates the vertical interfering lines.Horizontal-adjust the horizontalplacement of the picture.Vertical-adjust the vertical placement of thepicture.
Press MENU repeatedly to removethe menu from the screen.
1
2
3
456
Note: Make sure you are in PCmode.
1. To adjust other items repeat steps 3 and 4.2. ColorTemp can also be activated by pressingAuto Picture button your remote control.
If you are wanting to reset adjustment back tooriginal value, please enter to Factory Reset inInstall menu.
HELPFUL HINT
Press the OK button to return to theprevious menu.
CONTRAST
BRIGHTNESS
PHASE
CLOCK
HORIZONTAL
VERTICAL
MOVE SELECT RETURN EXITOK MENU
COLOR TEMP
AUTO ADJUST
MANUAL ADJUST
NORMAL
162
5
34
Press the / button to adjust the item.
PC PICTURE CONTROLS
PICTURE

46
This TV can also be used as a PC Monitor. A PCvideo signal must be present or the TV will gointo standby mode. The AUDIO controls allow youto adjust the sound.
Press the MENU button on theremote control to show theonscreen menu.
Press the / button to highlight theAUDIO menu, then press to enter.
Press the / button to highlight the itemthat you would like to adjust :
Smart Sound: Allows you to select from 3factory-set controls and a personal control.The 3 factory-set controls (News, Music,Theatre) enhance the particular programyou are watching.
Virtual Surround :Adds greater depth anddimension to PC sound.AVL (Auto Volume Leveler)- When ON,AVL will level out the sound being heardwhen sudden changes in volume occurduring commercial breaks or channelchanges.
Press MENU repeatedly to remove themenu from the screen.
1
2
3
4
6
To adjust other items repeat steps 3 and 4.
Note : Make sure you are in PC mode .
HELPFUL HINT
/
120HZ~10KHZ: Allows you to adjust120HZ, 500HZ, 1K5HZ, 5KHZ, 10KHZ.Balance: Adjust the balance of the sound.
5 Press the OK button to return to theprevious menu.
15
6234
Press the / button to adjust the item.
PCAUDIO CONTROLS
SMART SOUND PERSONAL
120HZ
500HZ
1K5HZ
5KHZ
10KHZ
BALANCEVIRTUAL SURROUND OFF
AVL OFF
MOVE SELECT RETURN EXITOK MENU
AUDIO

47
20MF Series (20” LCD TV)
No Resolution Frequency
1
2
3
640
60 HZ
70 HZ
75 HZ
x 480
4
5
6
800
60 HZ
70 HZ
75 HZ
x 600
720 x 400
7
8
9
10
1024
60 HZ
70 HZ
75 HZ
DOS Mode
x 768
SETTING UPTHE PC MODE (PERSONAL COMPUTER MONITOR)

48
TROUBLE SHOOTINGTIPS-TV
Symptoms Items to Check and Actions to follow
“Ghost” ordouble images
• This may be caused by obstruction to the antenna due to high rise buildings or hills.Using a highly directional antenna may improve the picture.
No power• Check that the TV’s AC power cord is plugged into the mains socket.• Unplug the television, wait for 60 seconds. Then re-insert plug into the mains socket and turn on thetelevision again.
No picture
• Check antenna connections at the bottom of the TV to see if they are properly connected to the TV.• Possible broadcast station trouble. Try another channel.• Adjust the contrast and brightness settings. Try another auto picture setting.• Check the Closed Captions control. Some TEXT modes could block the screen.• Check if you selected the correct AV source.
No picture andpower switchedon
• Your TV has a protective mode in case there is too much heat build-up. Check the clearance aroundthe vents of the device to be certain there are no blocking walls or cabinets which would limit the airflow.
Picture positionadjustment
When displaying a High Definition signal from the YPbPr inputs or HDMI input, if necessary, you canadjust the picture position to the center of the screen with the cursor left/right or up/down buttons onthe remote control. This may be needed due to slight differences in output signals from different brandsand types of HD sources boxes.Notes: Most High Definition receiver boxes also have picture-positioning controls in their menusystems. If the TV cursor controls run out of range before the picture is correctly positoned, thereceiver box controls will need to be adjusted.
No photo, musicor video play or inpoor quality only
• Check if the source complies with a supported code.
No sound
• Increase theVOLUME.• Check that the TV is not muted, press the MUTE button on the remote control.• When no signal is detected, the TV automatically switches off the sound. This is proper operation anddoes not indicate a malfunction.
Good sound butpoor color or nopicture
• Adjust the contrast, color, tint and brightness setting. Try another auto picture setting.
Snowish pictureand noise
• Check the antenna connection.
Te levision notresponding toremote control
• Check whether the batteries are working. Replace if necessary.• Clean the remote control sensor lens on the monitor.• Operating range between TV and the remote control should not be more than approximately twenty feet.• You can still use the buttons on the right side of your TV.• Check if the remote control is in the correct mode.
Control ofaccessory devices
• The infrared signals of the screen may infiuence the reception sensibility of other peripherals Solution:replace the batteries of the remote control of other devices. E.g. keep away a wireless headphonefrom within a radius of approximately four feet.
The software willnot install
Possibly the operating system is wrong. Go to www.usasupport.magnavox.com to see which operatingsystems are supported.
Standby Your TV consumes energy less than 1w in the standby mode.Energy consumption contributes to air and water pollution.
After impropershutdown
If your TV has been shutdown in an improper way (e.g. power drop, power cord plug out), starting upthe TV again will take a longer time than usual.
Miscellaneous See Extras, Specifications on this user’s manual.

49
No sound Check if the unit is connected securely.Make sure the TV or amplifier is working properly .Make sure the amplifier is set to receive DVDsignal output.
Bad sound quality Make sure the audio output mode is set correctly.Make sure the audio connection between theunit and amplifier is in place.
No image Check if the unit is connected securely .Make sure the TV is working properly.Make sure the color system is set correctly.
This product incorporates copyright protection technology that is protected by method claims of cer tain
U.S. patents and other intellectual property rights owned by Macrovision Corporation and other rightsowners. Use of this copyright protection technology must be authorized by Macrovision Corporation, andis intended for home and other limited viewing uses only unless otherwise authorized by MacrovisionCorporation. Reverse engineering or disassembly is prohibited.
Remove barriers between the remote controland the unit.Point the remote control at the remote controlsensor of the unit.Replace the batteries with new ones.
Remote control does not work
Disconnect the power plug and insert it into thewall outlet again.
The unit doesn't operatenormally
There is no disc in the unit.Put the disc on the disc tray properly with thelabel side up.Clean the disc .Moisture has condensed in the unit. Removethe disc and leave the unit on for about anhour.
Disc cannot be played
If you experience the following problems while using the unit, this trouble shooting tips can help you.TROUBLE SHOOTING TIPS-DVD

50
1. This manual is only f
2. It's not supported DTS function in DVD mode.
Note:or your reference, any change to the design and specifications will not be advised.
TECHNICAL SPECIFICATIONS
LCD
PANEL 20'' TFT LCDRESOLUTION 1366 X 768VIEWING ANGLE ( L/R/U/D) 80/80/80/60
DIMENSION
WITH STAND 20.6 X 16.5 X 8.3 (inch)WITHOUT STAND 20.6 X 14.8 X 3.6 (inch)
WEIGHT (WITHOUT ACCESSORIES) 20.5 Pound
TV-FUNCTION
TV STANDARD NTSCTUNING SYSTEM ELECTRIC TUNING SYSTEMFREQUENCY RANGE VHF/UHFSTEREO MTS + SAPCHANNEL 181 CHANNELS
SOUND
MAX SOUND OUTPUT 3W X 2
TERMINALS
AVAV2 IN1 IN VIDEO, S-VIDEO, AUDIO L&R
Y, Pb (Cb), Pr (Cr), AUDIO L/RPC IN D-SUB 15PIN RGB IN, AUDIOANTENNA IN F-TYPE
DVD
APPLICABLE DISC DVD, DVD+R/RW, DVD-R/RW, CD,CD-RW, Picture CD, MP3 or HDCD
POWER
INPUT 100~240Volt
POWER CONSUMPTION
POWER CONSUMPTION(TV) 62W (typ)POWER CONSUMPTION(TVWITH DVD) 68W (typ)
<<
51
CAREAND CLEANING
WARNING concerning stationary images on the TVScreen: Do not leave fixed images on the screen for extended periods of time. This can cause uneven aging of the LCDpanel. Normal use of the TV should involve viewing of programs that have constantly moving or changing images. Donot leave moving images on screen for extended periods of time. Do not display the same images too frequently; if youdo, subtle “ghost” images can be left on the LCD screen. Sources of stationary images may be Laser discs, video games,Compact Discs Interactive (CD-i), paused Digital Video Discs (DVDs) or video tapes.
Here are some common examples of stationary images:• DVD menus list DVD content.• Letter box black bars that appear at the top and bottom of the TV screen when a wide screen (16:9) movie is viewedon a TV with standard (4:3) aspect ratio.This occurs with some DVDs.• Video game images and scoreboards• Te levision station logos cause a problem if they are bright and stationary. Moving or low-contrast graphics areless likely to damage the picture tube.• Stock market tickers may appear at the bottom of the TV screen if the TV programming covers this news.• Shopping channel logos, pricing displays may be bright and may appear constantly during the show.
These are usually appear in the same location on the TV screen.
TV Location• To avoid cabinet warping, cabinet color changes, and an increased chance of TV failure, do not place the TV
where temperatures can become excessively hot -- for example, in direct sunlight or near a heating appliance.
• Allow a free flow of air around the TV.
Cleaning• To avoid possible shock hazard, remove the TV’s power cord from the electrical outlet before cleaning.
• Regularly dust the TV with a dry, non-scratching duster.
• When cleaning the TV, take care not to scratch or damage the screen surface.Avoid wearing jewelry or using
anything abrasive. Do not use household cleaners. Wipe the screen with a clean cloth dampened with water.
Use even, easy, vertical strokes when cleaning.• Occasionally vacuum the vents on the rear of the TV.• Never use thinners, insecticide sprays, or other chemicals on or near the cabinet. They may permanently blemish
the cabinet.

52
REGULATORY
FEDERAL COMMUNICATIONS COMMISSION (FCC) NOTICE (U.S. ONLY)
This equipment has been tested and found to comply with the limits for a Class B digitaldevice, pursuant to Part 15 of the FCC Rules. These limits are designed to provide reasonableprotection against harmful interference in a residential installation. This equipment generates,uses and can radiate radio frequency energy and, if not installed and used in accordance withthe instructions, may cause harmful interference to radio communications. However, thereis no guarantee that interference will not occur in a particular installation. If this equipmentdoes cause harmful interference to radio or television reception, which can be determined byturning the equipment off and on, the user is encouraged to try to correct the interference byone or more of the following measures:
Use only RF shielded cable with ferrite core when connecting this monitor to a computer device.
• Reorient or relocate the receiving antenna.• Increase the separation between the equipment and receiver.• Connect the equipment into an outlet on a circuit different from that to which the receiver is connected.• Consult the dealer or an experienced radio/TV technician for help.
To prevent damage which may result in fire or shock hazard, do not expose this appliance to rain or excessive moisture.THIS CLASS B DIGITAL APPARATUS MEETS ALL REQUIREMENTS OF THE CANADIANINTERFERENCE-CAUSING EQUIPMENT REGULATIONS.
• RF shield cable with ferrite core can be obtain from multiple retail outlets or Philips Factory Service Center.• The RF shield cable with ferrite core part number is 3138 198 71441.• If your RF shield cable without ferrite core, you can obtain the ferrite core from Philips Factory Service
Center, installation as following.
1. Open the ferrite core .
2. Locate the video connector that goes to the computer andplugs into the unit. Place the ferrite core as close to thevideo connector as possible, as shown in the figure below.
3. Lock the ferrite core.4. Place two cable tie wrap on either side of the ferrite core
to prevent it from sliding down the cable, as shown in thefigure below.
5. Draw the tie wraps tight and cut off the excess leads.
Cable tie
Ferrite CoreInstallation
To ensure compliance of this unit to theClass B limits of the FCC Rules, Part 15,Subpart B.
This kit must be utilized when“non-ferrited” video cables are usedwith this unit.This instruction sheetgives the details for proper installation.
Additional FCC information may befound in the radio frequency interferencestatement located in the user’s manual.
Interface cable
Video connector
Ferrite Core
Changes or modifications not expressly approved by the party responsible for compliancecould void the user’s authority to operate the equipment.

53
This warranty gives you specific legal rights. You may have other rights which vary from state/province to state/province.
Magnavox, P.O. Box 671539, Marietta, Ga. 30006-0026
LIMITED WARRANTY
Ninety (90) Days Labor & One (1) Year Parts & One (1) Year Display
MAGNAVOX warrants this product against defect inmaterial or workmanship, subject to any conditions set forthas follows:PROOF OF PURCHASE: You must have proof of the dateof purchase to receive repair on the product. A sales receiptor other document showing the product and the date thatyou purchased the product as well as the authorized retailerincluded, is considered such proof.
COVERAGE:(If product is determined to be defective)
LABOR: For a period of ninety (90) days from the date ofpurchase, Magnavox will repair or replace the product, at itsoption, at no charge, or pay the labor charges to any Magnavoxauthorized repair facility. After the period of ninety (90) days,Magnavox will no longer be responsible for charges incurred.
PARTS: For a period of one (1) year from date of purchase,Magnavox will supply, at no charge, new or rebuilt replacmentparts in exchange for defective parts. Magnavox authorizedservice centers will provide removal and installation of theparts under the specified labor warranty.
DISPLAY: For a period of One (1) year from the date ofpurchase, Magnavox will supply, at no charge, a new or rebuiltactive display device in exchange for the defective display.Magnavox authorized service centers will provide removal andinstallation of the parts under the specified labor warranty.(PTV screens carry a thirty (30) day replacement warranty.)
EXCLUDED FROMWARRANTY COVERAGEYour warranty does not cover:• Labor charges for installation or setup of the product,adjust-ment of customer controls on the product, andinstallation or repair of antenna systems outside of theproduct.• Product repair and/or part replacement because ofimproper installation, connections to improper voltagesupply, abuse, neglect, misuse, accident, unauthorized repairor other cause not within the control of Magnavox.• A product that requires modification or adaptation to enableit to operate in any country other than the country for whichit was designed, manufactured, approved and/or authorized,or repair of products damaged by these modifications.• Damage occurring to product during shipping whenimproperly packaged or costs associated with packaging.• Product lost in shipment and no signature verification ofreceipt can be provided.• A product used for commercial or institutional purposes(including but not limited to rental purposes).• Products sold AS IS or RENEWED.
TO OBTAIN WARRANTY SERVICE IN THE U.S.A.,PUERTO RICO, OR U.S. VIRGIN ISLANDS…Contact Magnavox Customer Care Center at:1-800-705-2000
TO OBTAIN WARRANTY SERVICE IN CANADA…1-800-661-6162 (French Speaking)1-800-705-2000 (English or Spanish Speaking)
REPAIR OR REPLACEMENT AS PROVIDED UNDER THISWARRANTY IS THE EXCLUSIVE REMEDY FOR THECONSUMER. MAGNAVOX SHALL NOT BE LIABLE FORANY INCIDENTAL OR CONSEQUENTIAL DAMAGES FORBREACH OF ANY EXPRESS OR IMPLIED WARRANTY ONTHIS PRODUCT. EXCEPT TO THE EXTENT PROHIBITEDBY APPLICABLE LAW, ANY IMPLIED WARRANTY OFMERCHANTABILITY OR FITNESS FOR A PARTICULARPURPOSE ON THIS PRODUCT IS LIMITED IN DURATIONTOTHE DURATION OF THIS WARRANTY.
Some states do not allow the exclusions or limitation ofincidental or consequential damages, or allow limitations onhow long an implied warranty lasts, so the above limitations orexclusions may not apply to you. In addition, if you enter into aservice contract agreement with the MAGNAVOX partnershipwithin ninety (90) days of the date of sale, the limitation onhow long an implied warranty lasts does not apply.