user manual administrator manual developer manual first ... · method calls and complex data. it...
TRANSCRIPT

User, Administrator & First problem solving manual Last updated: 14/07/2007 v1.4Exposé RC3 – RC4 for Joomla!
A BETTER KIND OF MEDIA GALLERY
User manual
Administrator manual
Developer manual
First problem solving
Official release
Flash core:Ivan Dramaliev (www.slooz.com)
Joomla! Framework:Josh Brien (www.gotgtek.com)
RC3: Victor Drover (www.anything-digital.com)
Documentation:CORE: Ivan DramalievRC4: Bruno Marchant
RC3: Victor Drover
Forum:Josh Brien
Bruno Marchant
1 www.gotgtek.com

User, Administrator & First problem solving manual Last updated: 14/07/2007 v1.4Exposé RC3 – RC4 for Joomla!
Table of Contents Table of Contents ............................................................................................................................... 2 1 Preface ............................................................................................................................................ 5
1.1 Description ................................................................................................................................ 5 1.2 License & Copyright .................................................................................................................. 5 1.3 Features ................................................................................................................................... 6 1.4 System requirements ................................................................................................................ 6
1.4.1 Front-end ........................................................................................................................... 6 1.4.2 Back-end ............................................................................................................................ 6
1.5 Disclaimer ................................................................................................................................. 7 1.6 Credits ....................................................................................................................................... 7
2 Installation and Customization ........................................................................................................ 9 2.1 Quick install ............................................................................................................................... 9 2.2 RC3 <-> RC4 ............................................................................................................................ 9 2.3 Downloading ............................................................................................................................. 9 2.4 Update and re-install ............................................................................................................... 10 2.5 Install ....................................................................................................................................... 10 2.6 File & directory permissions .................................................................................................... 10
2.6.1 Changing settings ............................................................................................................ 11 2.6.2 Changing Gallery contents ............................................................................................... 11
2.7 Uninstall .................................................................................................................................. 11 2.8 Backup .................................................................................................................................... 11 2.9 Activating missing libs ............................................................................................................. 12
2.9.1 Check current PHP settings ............................................................................................. 12 2.9.2 DOM or DOMXML extension ........................................................................................... 12 2.9.3 GD extension ................................................................................................................... 12 2.9.4 Freetype subextension ..................................................................................................... 13 2.9.5 ICONV extension ............................................................................................................. 13
2.10 Security issues ...................................................................................................................... 14 2.11 Displaying in front-end .......................................................................................................... 14 2.12 Linking Directly to Collections and Albums ........................................................................... 14
3 Configuration .................................................................................................................................. 16 3.1 General ................................................................................................................................... 16
3.1.1 RC3 release ..................................................................................................................... 16 3.1.2 RC4 release ..................................................................................................................... 16
3.2 Login password ....................................................................................................................... 16 3.3 Customizing configuration ....................................................................................................... 17 3.4 Customizing the Layout ........................................................................................................... 17
3.4.1 RC3 release ..................................................................................................................... 18 3.4.2 RC4 release ..................................................................................................................... 18
3.5 Language ................................................................................................................................ 18 3.5.1 RC2 release ..................................................................................................................... 18 3.5.2 RC3 & RC4 release .......................................................................................................... 19
4 Managing Your Media Collection .................................................................................................. 20 4.1 Quick overview ........................................................................................................................ 20 4.2 Settings of the Album Manager ............................................................................................... 21
4.2.1 Photo settings .................................................................................................................. 21
2 www.gotgtek.com

User, Administrator & First problem solving manual Last updated: 14/07/2007 v1.4Exposé RC3 – RC4 for Joomla!
4.2.2 Photo overlay ................................................................................................................... 22 4.2.3 Video settings ................................................................................................................... 23
4.3 Creating Collections and Albums ............................................................................................ 24 4.4 Uploading Media ..................................................................................................................... 24 4.5 Editing Titles, Dates, Locations & Descriptions ....................................................................... 25 4.6 Creating Thumbnails ............................................................................................................... 25 4.7 Moving and Deleting Collections, Albums and files ................................................................. 26 4.8 Linking to URL ........................................................................................................................ 26 4.9 Album Manager for Windows® and Mac OS X ....................................................................... 26 4.10 Switching between Managers ............................................................................................... 27
5 Developer information .................................................................................................................... 28 5.1 File organization ...................................................................................................................... 28 5.2 XML structure .......................................................................................................................... 29 5.3 SpeedSense ........................................................................................................................... 32 5.4 Internationalization .................................................................................................................. 32 5.5 Customization ......................................................................................................................... 32
5.5.1 Interface icons .................................................................................................................. 32 5.5.2 Size of Flash movie and posititions of interface elements ................................................ 33 5.5.3 Colors ............................................................................................................................... 33 5.5.4 Text formats and fonts ..................................................................................................... 33 5.5.5 Default file locations ......................................................................................................... 34 5.6 Other 'hidden' settings ......................................................................................................... 34
6 More Exposé (plugins/tools/…) ...................................................................................................... 35 6.1 Windows® / Mac Os X Manager ............................................................................................. 35 6.2 Exposé small edition ............................................................................................................... 35 6.3 More at slooz.com! .................................................................................................................. 35 6.4 2nd install of Exposé component ............................................................................................ 35 6.5 Expose Shopping Cart ............................................................................................................ 35 6.6 Expose Scroller ....................................................................................................................... 36
7 Problem solving ............................................................................................................................. 37 7.1 Installation ............................................................................................................................... 37
7.1.1 Can’t install ...................................................................................................................... 37 7.1.2 Add Exposé on the frontpage ........................................................................................... 37 7.1.3 Why does Expose uses AC_RunActiveContent.js ........................................................... 37
7.2 Gallery (front-end) ................................................................................................................... 38 7.2.1 I activated large fitting box, but they don’t show up .......................................................... 38 7.2.2 FLV movies don’t play ...................................................................................................... 38 7.2.3 Front-end doesn’t show .................................................................................................... 38 7.2.4 Not all buttons are shown on the gallery .......................................................................... 39 7.2.5 I always need to click on the gallery to activate it ............................................................. 39 7.2.6 Can't select the same album again .................................................................................. 39 7.2.7 Expose not loading with ARTIO JoomSEF: ...................................................................... 39
7.3 Manager (back-end) ............................................................................................................... 39 7.3.1 Back-end login hangs during authentication .................................................................... 39 7.3.2 I can’t upload photo’s from my PC to the site -”Could not connect with the server” error message .................................................................. 39 7.3.3 Can't delete collections, albums or pictures ..................................................................... 40 7.3.4 FLV movies aren’t uploaded ............................................................................................ 40 7.3.5 The descriptions aren’t saved .......................................................................................... 40
3 www.gotgtek.com

User, Administrator & First problem solving manual Last updated: 14/07/2007 v1.4Exposé RC3 – RC4 for Joomla!
7.3.6 Upload is slow - Upload doesn’t finish with success ........................................................................................... 41 7.3.7 Problems when changing the password ........................................................................... 41 7.3.8 Help! Password lost! ........................................................................................................ 41 7.3.9 The ‘upload’ button is grayed-out ..................................................................................... 41 7.3.10 I don't want an extra login for the Manager .................................................................... 41 7.3.11 Add a link to an image .................................................................................................... 41 7.3.12 Configuration isn't saved ................................................................................................ 42 7.3.13 Can't use Chinese or Japanese characters .................................................................... 42
4 www.gotgtek.com

User, Administrator & First problem solving manual Last updated: 14/07/2007 v1.4Exposé RC3 – RC4 for Joomla!
1 Preface
1.1 DescriptionExposé is a Flash-based component for Joomla! 1.0.x which allows you to create eye-catching slide shows of your pictures and videos on the web. It is based on the stand-alone gallery software Exposé by Ivan Dramaliev which is available at http://www.slooz.com. The small footprint of the flash clips and an intelligent loading of resources allow even dialup users to have a seamless experience viewing your photos.
1.2 License & CopyrightThe core comes with the following license:
Exposé is FREE for personal use. You can purchase a one-site license for $50 USD if you'd like to use it in a commercial setting, such as selling or advertising goods and services. To do so, click on the PayPal button found at url: http://www.slooz.com/trinkets.php?proj=expose. The license only permits you to use expose on a commercial website, and also includes a license for Album Manager for Windows® and for Mac OS X (see below). It does not include source code or additional software. This license also allows you to register Album Manager. Custom modifications are also negotiable for a fee. Payments are non-refundable, so TEST THOROUGHLY before buying a license. Other licensing options and customization of the Flash interface are also possible. Mail Ivan at [email protected] for a discount. You may not sell Exposé, and you may not redistribute Exposé without prior permission from Ivan.
Please also support the Joomla-bridge team. You can donate on the http://www.gotgtek.com site to encourage us, keep this free project alive and our servers and forum running.
This software includes a few subcomponents:
• the AMFPHP component from http://amfphp.sourceforge.net, an RPC (Remote Procedure Call) plugin. It's a way to communicate data between a client and a server. You call a method on a local object with various parameters, set a callback, and receive a result. You don't have to worry about how you're going to send and receive the data. The server and the client, say php and Flash, agree on a common way of describing method calls and complex data. It allows seamless communication between Php and Flash and Flex with Remoting, JavaScript and Ajax with JSON, XML clients with XML-RPC.
• an JPEG encoder, courtesy of Uro Tinic and Cristi Cuturicu. This package also comes with the Medrano font, courtesy of Tepid Monkey (see the readme.txt file in the fonts folder for more information).
5 www.gotgtek.com

User, Administrator & First problem solving manual Last updated: 14/07/2007 v1.4Exposé RC3 – RC4 for Joomla!
• DOMXML (php4) conversion to DOM (php5) by Alexandre Alapetite. Documentation for this plugin can be found on http://alexandre.alapetite.net/doc-alex/domxml-php4-php5
1.3 Features • Standard installation via the Joomla! component installer• Nesting of albums, and assigning thumbnails to albums and album collections• Online picture upload, resize and managing• Offline gallery managing (for Windows® and Mac OS-X)• Flash video (.FLV files) upload• Copyright and watermark addition during upload and resizing• Assigning a description to each collection, album & image• Image strip view for previewing all images in an album• Customization of the interface layout, resizing and the button icons• Playing slide shows• Linking directly from content to collection, album, photo or slideshow• Smart image pre-loading: the small footprint of the Flash clips and an intelligent loading
of resources allow even dialup users to have a seamless experience viewing your photos.
• Multiple streams per video• SpeedSense mechanism for automatic stream assignment based on the user's
bandwidth.•
1.4 System requirementsExposé consists of a front-end application to display your photos to your visitors, and a back-end application to upload and manage your gallery photos. Both need some additional libs to be activated on the server. After installing the component, you can check your server's config settings by running a little check-script: <joomla_root>/components/com_expose/expose/manager/check_system.php. See 2.9 for more information about all these libs.
1.4.1 Front-end The front-end application simply requires the Joomla! content management system (version 1.0.x) and the DOM (since PHP v5) or DOMXML library (since Exposé RC4) activated for PHP. End users (i.e. your site visitors) will need at least Flash Player 7 installed for their particular browser.
1.4.2 Back-end The album manager, in contrast, has strict system requirements which allow the administrator(s) to upload and resize the images and flash videos. Ensure that PHP version 4 or higher, the GD library, DOM or DOMXML library and the ICONV library
6 www.gotgtek.com

User, Administrator & First problem solving manual Last updated: 14/07/2007 v1.4Exposé RC3 – RC4 for Joomla!
extensions are installed and activated on your web server. In the Joomla! back-end SYSTEM > SYSTEM INFO > PHP INFO you can verify this.
You also need to check some php.ini settings:
• safe_mode must be Off in order for Exposè to work correctly• disable_functions directive must not include the functions exec and set_time_limit• file_uploads must be set to On to be able to upload files from your computer• upload_max_filesize and post_max_size parameters control the maximum file size
that can be uploaded. Increase the value (default is 2M) if you have problems uploading pictures from higher resolution cameras. See 4.4 for more information.
TIP:If your host does not support these requirements, you may still use the Exposé to display your photos/flash movies in Jooma!. However, you will have to use the Album Manager desktop application as alternative to upload and manage your collections, albums and files. See 4.9 for more details.
1.5 DisclaimerThis software is provided ‘as-is’ and no warranty is offered or implied. Your use of Exposé signifies that you will hold harmless and protect any and all contributors to this project if harm in any shape or form results from that use.
1.6 CreditsExposé for Joomla! (com_expose) was born from the popular gallery software Exposé by Ivan Dramaliev at www.slooz.com who maintains the Flash source code. The port of Exposé to the Joomla! application framework was performed primarily by Josh Brien at www.gotgtek.com with help from Victor Drover from www.anything-digital.com (RC3 and previous) and Bruno Marchant (since RC4). Josh and Bruno maintain the forums and codebase. Victor created the project documentation for RC3, Bruno has revisioned this manual to fit closer to the RC4 version, and some typical problem solving and developer information has been added.
This software includes the AMFPHP component (http://amfphp.sourceforge.net), DOMXML to DOM conversion plugin (http://alexandre.alapetite.net/doc-alex/domxml-php4-php5) and a JPEG encoder, courtesy of Uro Tinic and Cristi Cuturicu. It also comes with the Medrano font, courtesy of Tepid Monkey. See the readme.txt file in <joomla_root>/components/Exposé/expose/manager/fonts/ for more information. All credits of these components goes to them!
7 www.gotgtek.com

User, Administrator & First problem solving manual Last updated: 14/07/2007 v1.4Exposé RC3 – RC4 for Joomla!
Finally, mad props to all the friends of Exposé who took the time to post their issues on the forum and keep this project going forward at www.gotgtek.com/forum.
8 www.gotgtek.com
User, Administrator & First problem solving manual Last updated: 14/07/2007 v1.4Exposé RC3 – RC4 for Joomla!
2 Installation and Customization
2.1 Quick installSince the manual has increased in size, I've added a quick install overview for the component. For more information, you'll need to read the large chapters. It looks quite a job, but this is an overview for a safe installation/update. Good luck!
• Verify if your host has the requirements (see 1.4)• Download the latest release (see 2.3)• When updating, backup your /img + /xml folders, so you can restore it later (see 2.4)• Make a safety backup of Joomla! (see 2.8)• If updating, uninstall the old component (see 2.7)• Install the component using the Joomla! backend installer (see 2.5)• Create a component menu link (see 2.11)• Check frontend functionality with the default images from installation• Change default password (see 2.5)• Change configuration (see 3.4)• Upload your images, or restore previous gallery contents (see 2.8)
2.2 RC3 <-> RC4RC3 uses Joomla! authentication to access the manager. In RC4 you’ll need to login in the manager with a password (=manager) after logging into the back-end. But in RC4 you can login into the manager without accessing the back-end at <joomla!_root>/components/com_expose/expose/manager/manager.html, so, everyone who has the password can manage the photos from there.
RC3 front-end doesn’t use the DOMXML library. RC4 does use it to get the gallery size settings.
In RC4, the interface language is now specified in a FlashVars parameter named language in the expose.html.php file instead of the Language parameter in config.xml, which was removed.
The magnifying glass button is removed in RC4 and the medium-sized image was made clickable instead, making it possible to popup a 'large image' or redirect to a specified URL.
2.3 DownloadingThe latest Exposé packages are available as zip archives on the JoomlaCode site at url http://joomlacode.org/gf/project/expose
9 www.gotgtek.com

User, Administrator & First problem solving manual Last updated: 14/07/2007 v1.4Exposé RC3 – RC4 for Joomla!
2.4 Update and re-installBefore installing a new version of Expose, make a backup of the /img and /xml directory to preserve the actual contents (see 2.8). Then uninstall the old version an install the new one. Try the functions of the new version before restoring your original /img and /xml directory.
2.5 InstallBefore applying (big) changes to your site, always make a backup (see 2.8). For Joomla! you need to have a FTP-copy and an sql-dump of your database to restore it in times of trouble. If you want to be really sure, try this copy out from time to time on a testserver to verify if the backup isn’t corrupt…
Exposé is installed using the Joomla! component installer. Login to the administrative back-end of your Joomla! installation. From the main toolbar, select INSTALLERS > COMPONENTS. Browse to the com_expsose.zip file you downloaded above and click the UPLOAD FILE & INSTALL button.
If everything goes well, you will see the Exposé ‘Upload component - Success’ screen. Click CONTINUE to complete the installation.
Now, continue by adding a menu to the Exposé component and test the default installation without changing any settings. If the gallery shows in the front-end, the first thing you need to change is the default password, which is manager. Log into the back-end, select COMPONENTS > EXPOSE > MANAGE ALBUMS and click on the CHANGE PASSWORD button. Enter the new password. Now use your new one to log in.
Change the configuration properties as your taste to fit the template design, and finally start uploading your own photos. Have fun! (but keep reading this manual for further information!)
2.6 File & directory permissionsDepending on the changes you're gonna apply, some files or directories have to be writable by the PHP engine. The package contains a little check script to verify this for you.
10 www.gotgtek.com
User, Administrator & First problem solving manual Last updated: 14/07/2007 v1.4Exposé RC3 – RC4 for Joomla!
Just run <joomla_root>/components/com_expose/expose/manager/check_system.php and see the result of it. If errors occur, you need to change the config of your server (most probably ask your host). If warnings occur, you need to verify the pointed files / paths permissions (make them writable). To maintain the maximum security, only change these file / directory permissions:
2.6.1 Changing settings Make following files writable when changing some settings. After changing, it's advisable to chmod these files back to 644.
Settings: <joomla_root>/components/com_expose/expose/config/config.xmlLettertypes: <joomla_root>/components/com_expose/expose/config/strings.xmlPassword: <joomla_root>/components/com_expose/expose/manager/amfphp/extra/passhash.inc.phpManager Properties: <joomla_root>/components/com_expose/expose/manager/amfphp/extra/settings.xml
2.6.2 Changing Gallery contents Make following directories and files writable when changing the contents of the gallery:
Images: <joomla_root>/components/com_expose/expose/img/Contents: <joomla_root>/components/com_expose/expose/xml
2.7 UninstallBefore updating, you need to uninstall the actual installation of the component. Having trouble with the component? Let us know by posting a topic on the forum at http://www.gotgtek.com/forum. Sure to uninstall? Always make a backup
and use the uninstaller in the Joomla! backend to remove the component. Go to the INSTALLER > COMPONENTS section, select Expose from the list and hit the UNINSTALL button. It’s gone.
TIP:If something goes wrong during uninstall, then try again. If the component isn't listed anymore, check and remove any existing traces of the component:
• Remove /components/com_expose folder• Remove /administrator/components/com_expose folder
2.8 BackupExposé doesn’t use the Joomla! database to preserve its information (except menu and component links). All settings, data, movies and photos are stored in the <joomla_root> /components/com_expose/expose/xml and /img directory. You only need to backup these two and your gallery can be restored at any time. It could be usefull to write all your settings (configuration and picture sizes) down too, so you can restore them easily
11 www.gotgtek.com

User, Administrator & First problem solving manual Last updated: 14/07/2007 v1.4Exposé RC3 – RC4 for Joomla!
later, together with a copy of the /config folder. After reinstalling the gallery and testing it without modifying the default installation, you can restore the /img and /xml folders to restore your previous content again.
2.9 Activating missing libsLike mentioned in 1.4 your (hosts) server needs some extensions to be activated. Most of them only need to be uncommented in the php.ini configuration file, but mostly they can only be changed by your host himselve, so you'll probably will have to mail him to change this setting. After changing the configuration, you need to restart the webserver service to apply the new settings.
2.9.1 Check current PHP settings If you want to know your current configuration of your PHP engine, the Joomla! back-end SYSTEM > SYSTEM INFO > PHP INFO, gives you a full overview of all settings and extensions. You can also become the same overview if you create a small script with this line in it:
<?php phpinfo(); ?>
Save it e.g. as phpconfig.php and place it on your server. Then call this file with a browser.
2.9.2 DOM or DOMXML extension The DOM extension allows you to operate on XML documents through the DOM API with PHP 5. For PHP v4 you need to use the DOMXML extension. By default, this library should be installed and activated. See http://php.net/domxml for more information about this plugin.
Since PHP v5, the XML lib functions are stored in the DOM extension. There is no installation needed to use these functions anymore; they are part of the PHP core now. More information about this extension can be found at http://php.net/dom.
2.9.3 GD extension PHP can also be used to create and manipulate image files in a variety of different image formats, including gif, png, jpg, wbmp, and xpm. Even more convenient, PHP can output image streams directly to a browser. The GD library (available at http://www.libgd.org) and PHP engine may also require other libraries, depending on which image formats you want to work with (e.g. for reading meta data of pictures you need the exif extension). Since PHP 4.3 there is a bundled version of the GD lib. More information at http://php.net/gd.
12 www.gotgtek.com

User, Administrator & First problem solving manual Last updated: 14/07/2007 v1.4Exposé RC3 – RC4 for Joomla!
For linux, to enable GD-support configure PHP --with-gd[=DIR], where DIR is the GD base install directory. To use the recommended bundled version of the GD library (which was first bundled in PHP 4.3.0), use the configure option --with-gd. GD library requires libpng™ and libjpeg™ to compile. To disable GD support in PHP add --without-gd to your configure line.
In Windows®, you'll include the GD2 DLL php_gd2.dll as an extension in php.ini. The line extension=php_gd2.dll should already be in your php.ini, you only need to uncomment it (remove the ; at front of the line) to activate it. Restart your webserver service after changing to apply the new setting.
2.9.4 Freetype subextension To embed copyright text on your uploaded images, you need the Freetype font libraries. Like you can see on this picture, Freetype is listed as a component in the GD extension section.
In Linux, to enable support for FreeType 2 add –with-freetype-dir=DIR to your configure line.
2.9.5 ICONV extension With this module, you can turn a string represented by a local character set into the one represented by another character set, which may be the Unicode character set.
In order to enable this module on a Windows® environment, you need to put a DLL file named iconv.dll or iconv-1.3.dll (prior to 4.2.1) which is bundled with the PHP/Win32 binary package into a directory specified by the PATH environment variable or one of the system directories of your Windows® installation.
This module is part of PHP as of PHP 5 thus iconv.dll and php_iconv.dll is not needed anymore. More information at http://www.php.net/iconv.
13 www.gotgtek.com

User, Administrator & First problem solving manual Last updated: 14/07/2007 v1.4Exposé RC3 – RC4 for Joomla!
2.10Security issuesSome of the users seem to neglect the security issues for the Exposé component (and others plugins for Joomla!) after installation (usually by not reading the documentary). A quick overview to tighten it:
• Before updating, always make a backup (see 2.8)• Before installing, check if the required settings and libraries are installed (see 1.4)• After installation, change the Manager’s default password (see 3.2).• Remove the <joomla_root>/components/com_expose/expose/manager/check_system.php or
any other file (e.g. phpinfo.php) giving info about your server’s config. It gives hackers all info to access your server.
• Never leave php files chmodded to 777. This enables edition of the file by all visitors (...and hackers). The Joomla! standard chmod of 466 for files and 755 for directories should be just fine if all requirements (see 1.4) are fulfilled.
• General Joomla! Security overview can be found on http://forum.joomla.org/index.php/topic,81058.0.html
2.11Displaying in front-endExposé is added to the front-end of your Joomla! installation by simply adding a 'Component' type menu item and pointing it to the Exposé component. Login to the administrative back-end of your Joomla! installation. From the main toolbar, select the menu to which you wish
to add your gallery link. Select NEW from the Menu Manager page that is currently displayed. On the ‘New Menu Item’ page, select COMPONENT, and then choose EXPOSÉ from the list of installed components.
To view your gallery, browse to the front-end of your site and select the new menu item you created. The sample albums should be visible.
2.12Linking Directly to Collections and AlbumsYou may link directly to your collections, albums and images using standard Joomla! Syntax from within your content text. First, identify the necessary collection, album and/or image ID’s from the backend album manager by selecting the required one. The ID is shown on top.
14 www.gotgtek.com

User, Administrator & First problem solving manual Last updated: 14/07/2007 v1.4Exposé RC3 – RC4 for Joomla!
Link to a collection: (this collection will be displayed as top collection) e.g. open expose and use the collection with ID 234 as the top-level collection.index.php?option=com_expose&Itemid=26&topcoll=234Link to an album: e.g. open expose and automatically load the album with ID 123.index.php?option=com_expose&Itemid=456&album=123Link to an image: e.g. open expose, and automatically load the photo with ID 456 that is part of the album with ID 123.index.php?option=com_expose&Itemid=26&album=7&photo=7Auto start a slideshow from a specified album: e.g. open expose, automatically load the photo with ID 456 that is part of the album with ID 123, and start a slide show.index.php?option=com_expose&Itemid=26&album=123&photo=456&playslideshow=yes
Don’t forget to change the Joomla! itemid, Exposé albumid and photoid…
15 www.gotgtek.com
User, Administrator & First problem solving manual Last updated: 14/07/2007 v1.4Exposé RC3 – RC4 for Joomla!
3 Configuration
3.1 General
3.1.1 RC3 release Exposé has lot of things for you to customize. Most settings can be changed in the <joomla!_root>/components/com_expose/expose/config/config.xml file. Just edit the values to fit your needs, but use a decent editor. Some editors destroy your xml file structure and make it unusable.
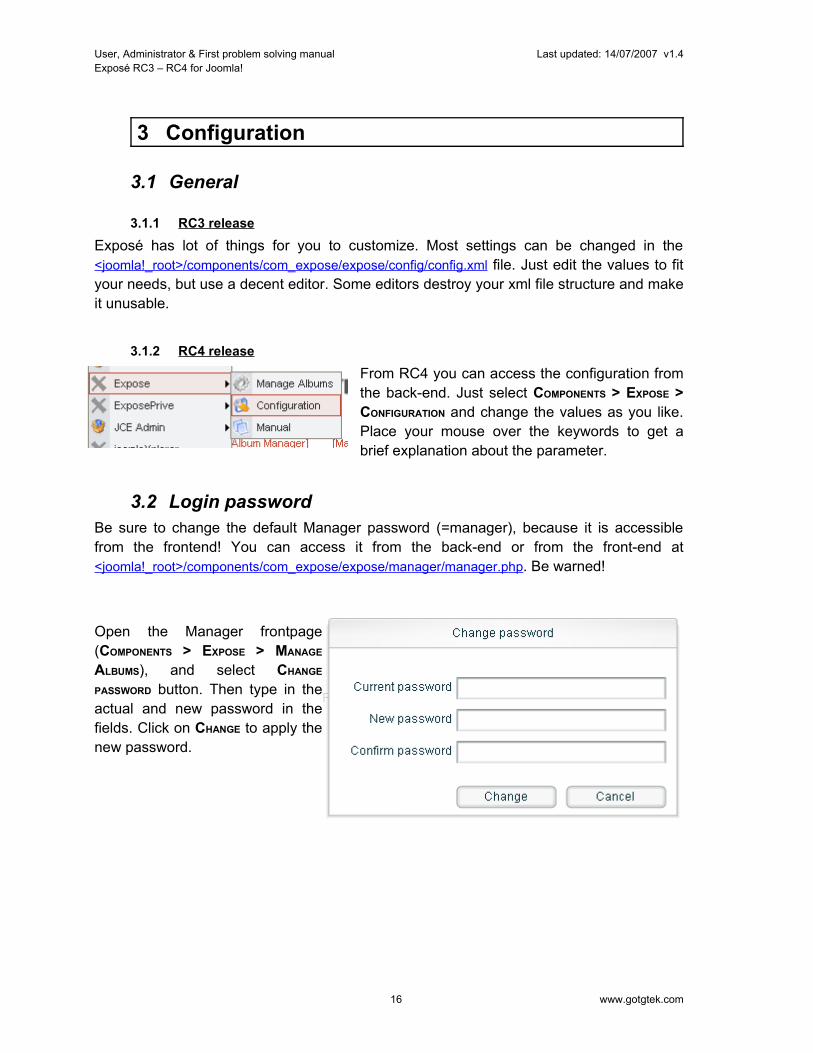
3.1.2 RC4 release From RC4 you can access the configuration from the back-end. Just select COMPONENTS > EXPOSE > CONFIGURATION and change the values as you like. Place your mouse over the keywords to get a brief explanation about the parameter.
3.2 Login passwordBe sure to change the default Manager password (=manager), because it is accessible from the frontend! You can access it from the back-end or from the front-end at <joomla!_root>/components/com_expose/expose/manager/manager.php. Be warned!
Open the Manager frontpage (COMPONENTS > EXPOSE > MANAGE ALBUMS), and select CHANGE PASSWORD button. Then type in the actual and new password in the fields. Click on CHANGE to apply the new password.
16 www.gotgtek.com
User, Administrator & First problem solving manual Last updated: 14/07/2007 v1.4Exposé RC3 – RC4 for Joomla!
3.3 Customizing configurationThe position of the button strip tooltip text can be set to be below or above the strip with the Main Panel Tooltip Text Position parameter in config.xml.
The position of the album description can be set to be below or above the button strip with the Album Info Text Position parameter in config.xml.
The X-position of the help button can be set with the Main Panel Help Button X parameter in config.xml. Should the value lie outside the exposé frame it will be reset to appear inside the frame.
The color alpha of the image strip scrollbar during a mouse rollover can be set with the Image Strip Scroll Color Alpha parameter in config.xml.
The gradient in the image strip can be turned off by setting the Image Strip Gradient Enabled parameter in config.xml to "no".
The Y-position of the image counter can be set with the Main Panel Image Counter Y parameter in config.xml.
The X-position of the Cancel text button in the album list can be set with the Album List Cancel Button X parameter in config.xml.
3.4 Customizing the LayoutCustomizing Exposé for your particular Joomla! template is critical to creating an appealing and elegant implementation of Exposé. Before you begin, consider the following:
• How wide is your current template? • How wide is the space in which Exposé will be displayed (i.e. your template width less
any space occupied by menus, CSS padding or other modules). • What size do you want your images to be displayed at?
Consider that you will have small fitting images (thumbnails), normal fitting images (images displayed within your Joomla! template) and large fitting images (images that pop-up in new browser windows when you zoom in on a normal fitting image).
For example, let’s assume that your template is 900 pixels wide with a 200 pixel wide module (such as a menu) on the left. This leaves 700 pixels in which to display your photos. Thus, you will want your regular sized images to be no larger than 700 pixels, and 650 pixels is a good choice as the extra 50 pixels will be available for white space and such around the images.
Since every template is different, some trial and error is required to see what works best for you. At http://joomlacode.org/gf/project/expose a ‘small version’ of Exposé has been
17 www.gotgtek.com

User, Administrator & First problem solving manual Last updated: 14/07/2007 v1.4Exposé RC3 – RC4 for Joomla!
created for use with typical Joomla! templates. At www.slooz.com you can find more predefined configuration files for special settings.
3.4.1 RC3 release For the RC3 release, based on the above example, you will now need to manually modify 2 files using a good text editor (such as TextPad for Windows® or Text Wrangler for OS X) and update your server with these files via FTP.
In <joomla!_root>/components/com_expose/expose.html.php, you need to edit lines 95 and 96 such that the height and width match the space available in the template. This file contains the iframe which specifies the main container for Exposé. This should be set to the maximum space available, in our example, 700 pixels.
<joomla!_root>/components/com_expose/expose/config/config.xml is the main configuration file for Exposé. Here you can adjust almost every parameter of expose. The most common parameters that you will need to modify are the MAIN PANEL options. Remember to backup all files you’re gone change!
3.4.2 RC4 release Since the RC4 release, you don’t need to edit some php or xml files anymore (but you still can edit the config.xml directly). All can be done directly from the backend menu COMPONENTS > EXPOSE > CONFIGURATION’. Like in RC3, you probably only need to change the MAIN PANEL options to fit the gallery size and button positions. A brief explanation of the setting is shown when moving the mouse over every setting.
3.5 LanguageAll the language settings are stored in strings.xml found at the same location as the other configuration files (<joomla!_root>/components/com_expose/expose/config/strings.xml). On Joomlacode.org you can find a languagepack with all available languages and installation instructions included.
If you want to have a translated backend too, you'll need to translate /components/com_expose/expose/manager/misc/strings.php file.
3.5.1 RC2 release You can edit it like this:
• Default: <string id="albumlistcancel"> <english>Cancel</english>• New item: <string id="albumlistcancel"> <icelandic>Hetta vic</icelandic>
After you done that you just have to add this line to your config.xml to change the default language:
18 www.gotgtek.com

User, Administrator & First problem solving manual Last updated: 14/07/2007 v1.4Exposé RC3 – RC4 for Joomla!
<param name="Language" value="icelandic" type="string" />
3.5.2 RC3 & RC4 release In RC3 and RC4, the language setting isn’t supported here yet. You’ll need to translate the strings.xml as is, so, manually switch the english strings with the appropriate translations WITHOUT creating new languages (put your translation directly between the <english></english> tags). Check the JoomlaCode website (http://joomlacode.org/gf/project/expose/scmsvn) if your language doesn’t already exist. If not in the list, please send us yours so we can add it in the pack.
19 www.gotgtek.com

User, Administrator & First problem solving manual Last updated: 14/07/2007 v1.4Exposé RC3 – RC4 for Joomla!
4 Managing Your Media Collection Once Exposé is installed and customized, you can get to work creating your collections / albums and populating them with images and movies. This is performed entirely with the Album Manager. The rest of this section will describe the use of the Album Manager built into this component. However, applications for managing your collections/albums are available for Windows® and Mac OS X (see below). Very large collections may be more efficiently managed using the stand-alone applications.
4.1 Quick overview
20 www.gotgtek.com

User, Administrator & First problem solving manual Last updated: 14/07/2007 v1.4Exposé RC3 – RC4 for Joomla!
4.2 Settings of the Album ManagerThe layout of the Album Manager is shown below. In general, Collections and Albums are managed on the left and Media is managed on the right. The sections below will refer to these sections.
Before you start using Exposé, you must make some decisions regarding the size and quality of the images and videos for your site. In addition, Exposé displays pictures in 3 sizes:
• Small fitting: thumbnails displayed in the image strip • Normal Fitting: the image displayed when you click on a thumbnail in the image strip • Large fitting: the pop-up image displayed when you click the magnifying glass icon on
the Exposé toolbar. By default, this function is disabled.•
Since the small and normal fitting boxes are displayed within the template, determining the most appropriate sizes will certainly affected by the template you are using as well as the available server space and bandwidth.
4.2.1 Photo settings To adjust the photo settings, open the Exposé album manager from the component menu of the Administrative back-end (or use the album manager for Windows®/OS X, see below). Click the SETTINGS button to display the Exposé settings dialog. In the example below, we have chosen settings to fit a space 700 pixels wide in our template.
21 www.gotgtek.com

User, Administrator & First problem solving manual Last updated: 14/07/2007 v1.4Exposé RC3 – RC4 for Joomla!
If some of your original images will be smaller than the ‘Large fitting box’, you may choose whether these images will be expanded to the indicated size by selecting ‘Create large image’.
4.2.2 Photo overlay Previous screen also provides options for embedding copyright information (or other text) including the text size, color and opacity. There are two possibilities to embed this on your photos:
If you decide you want to embed your own watermark on ‘normal fitting’ and ‘large fitting’ images at the bottom right corner of each image, you will need to create a transparent PNG image that contains the picture you want to use. Replace <joomla!_root>/components/com_expose/expose/manager/amfphp/extra/watermark.png with it. There is no restriction on the dimensions of the watermark.
Or embed a copyright text of your own. You can select the size and the color of the text by changing the values in the settings windows. The color values are in RGB color. You can also change the font but then you have to replace the font file embedcopy.ttf located in <joomla!_root>/components/com_expose/expose/manager/fonts with yours.
22 www.gotgtek.com

User, Administrator & First problem solving manual Last updated: 14/07/2007 v1.4Exposé RC3 – RC4 for Joomla!
Currently, the gallery uses a font from Tepid Monkey Fonts, freeware fonts for a freeware world, at http://www.fontframe.com/tepidmonkey. Every Sunday he presents a brand new original font for your downloading pleasure. More help about installing these fonts on your computer can be found on http://www.fontframe.com/tepidmonkey and go to the Help section. If you have any comments or questions, you can e-mail him at [email protected]. You may use this font(s) for non-commercial and commercial purposes. You are not allowed to sell this font for any fee at all. You are allowed to redistribute it as long as you don't charge ANYTHING for it (at all). The full set of terms of use (which override what is listed here), go to http://www.fontframe.com/tepidmonkey and visit the Terms Of Use section.
As an example, we desired a copyright symbol in the center of my 800x600 image (which is the large fitting size in my expose settings). To achieve this, we created a transparent 800x600 png with my watermark in the middle, saved it as watermark.png and replaced it with the original file referenced above.
You will also notice that on the normal image (600x400), the copyright symbol is the same size as in the large fitting image and it is in the upper-left corner. How does this happen? While the normal fitting image is being processed, the bottom and right borders are aligned with the 800x600 watermark.png. Since the medium-sized image is smaller, the watermark appears full-size but in the upper-left corner.
If we had used a 600x400 watermark file with the centered copyright symbol, the copyright would be in the center of the normal fitting image, but shifted down and right in the large fitting image. In short, choose which image most people will look at, and optimize your workflow accordingly. Putting the watermark in the bottom-right corner of watermark.png will give consistency between the normal and large fitting images, but may be less useful as a deterrent to copying.
4.2.3 Video settings Exposé supports flash video files that have a .FLV file extension. Existing videos must be appropriately sized (as Exposé does not resize video) and converted to FLV format prior to uploading. Flash videos can be created from AVI, MPEG, Quicktime and WMV files using the free FLV encoder from RIVA at the following url:
http://www.rivavx.com/index.php?encoder&L=3
Video settings are found on the ‘Video’ tab of the same settings screen for the photo settings (see below). Adjust the fields to modify the parameters of thumbnails generated from video files (see ‘Creating Thumbnails’, below).
23 www.gotgtek.com

User, Administrator & First problem solving manual Last updated: 14/07/2007 v1.4Exposé RC3 – RC4 for Joomla!
Make sure that your web server has the correct MIME type for FLV streaming (flv-application/octet-stream).
When uploading larger FLV files it is better to upload them using ftp and then add them using the bucket, because php is not ideal and limited in filesize (see 7.3.6) for uploading large files.
4.3 Creating Collections and AlbumsExposé arranges photos/videos into collections and albums. Collections consist of albums and/or other collections. You could see collections as folders for grouping your images in themes, containing albums with pictures of one theme.
Importantly, each nested collection increases the amount of horizontal space required to display the entire gallery. For most Joomla! templates, you will not have enough horizontal space to accommodate more than one nested collection.
Use the buttons in the Create Albums and Manage Albums areas of the Album Manager to organize your collections/albums.
4.4 Uploading MediaBefore uploading any files, create at least one album and select it from the Album List. Media can now be added to your album in three ways: using the ‘Upload photos’ button, the ‘Upload videos’ button or the ‘Add from bucket’ button. All three upload buttons are found in the Upload Buttons area of the Album Manager.
It’s also advisable to resize your photos locally before uploading with the manager because they are resized on the server after upload. This saves bandwidth and increases the speed. On the net, you can find many tools that can do this in batch.
Upload photos: Choose image files from your computer and follow the instructions to upload. Files will be resized, copyrighted and watermarked depending on the settings.
Upload videos: Choose flash video files from your computer and follow the instructions to upload. Files will NOT BE resized, copyrighted or watermarked. Files must also be flash videos with a .FLV file extension. Convert them before uploading.
Add from bucket: This allows adding photos and videos from a "bucket". The bucket is a folder on the web server where you can upload the source images and videos for later adding to your media collection. You might find it easier to FTP your files instead of using the uploading features in Album Manager (or bypass upload problems), which is where the bucket would come in handy. Files (photos and .FLV flash videos) must be manually transferred to the ‘bucket’ (i.e. via FTP). The bucket location is at
24 www.gotgtek.com

User, Administrator & First problem solving manual Last updated: 14/07/2007 v1.4Exposé RC3 – RC4 for Joomla!
<joomla!_root>/components/com_expose/expose/manager/bucket/ Once the files are transferred to this location, click the ADD FROM BUCKET button, select the appropriate files from the list (use SHIFT or CONTROL button to select multiple files at once) and follow the instructions.
In the window for adding media from the bucket you can filter the list of files by entering the bits of file name to look for into the filter text input and pressing Enter. For example, if you upload some images in to a vacation folder inside the bucket, and some other images into a wedding folder in the bucket, you can shrink the list to see only the images in the vacation folder by entering vacation/ into the filter text input and pressing Enter. The filter applies simultaneously to the list of photos and videos.
4.5 Editing Titles, Dates, Locations & DescriptionsTo create / edit the description associated with collections / albums or photos / videos, browse to and select the appropriate item. Enter the item description in either the Album Description text area or the Media Description text area as appropriate. Once you have completed the description, place your mouse over the text and right-click (or ctrl-click on Mac OS X). Choose APPLY DESCRIPTION CHANGES from the menu.
To change the Titles of your albums, select the album of interest and then click the RENAME button below the collections/album list. To change the Titles of your media, simply double-click the Title itself.
Adding dates and locations to your media can be a nice addition to your collection. Create / edit Dates and Locations by double-clicking the appropriate textareas for the desired media file. In many cases, the same Location, Date, Description and Title may apply to an entire album. Expose makes it easy to propagate this data from one file to all the files in the same album. Simply right-click the file which already has the desired Location, Date, Description and/or Title and select the appropriate “Apply to rest’ option.
4.6 Creating ThumbnailsThumbnails for photos are automatically created so no further action is required once the images have been successfully uploaded. To preview the thumbnails, select the media item of interest, the thumbnail should appear in the Media Thumb Preview area.
For videos, thumbnails are manually generated from a frame of the movie. Start by browsing to the video of interest and selecting the video file in the Media List. The Media Thumb Previews will be blank, but click this area to open the ’Video Preview’ window.
Play the video until an appropriate frame is located and pause the video. Click the
25 www.gotgtek.com

User, Administrator & First problem solving manual Last updated: 14/07/2007 v1.4Exposé RC3 – RC4 for Joomla!
‘Capture to thumbnail’ button to save the frame as the video thumbnail. Repeat this process as necessary to achieve the desired results.
Every time you create an album or a collection a default thumbnail image gets assigned to them. You can create your own custom thumbnail images (64x48 pixels recommended) and replace albthumb.jpg and collthumb.jpg located in manager/amfphp/extra/ with your own copies.
To give your collection a most impressive appearance, you should create different collection and album thumbnails. These will be displayed when visitors to your site browse your albums. The only limitation is that collection/album thumbnails must already exist as photo or video thumbnails. To create a collection/album thumbnail, browse to the photo or video which has the thumbnail you desire. Select the photo/video and ensure the thumbnail is displayed in the Media Thumb Preview area. Next, click the CREATE ALBUM THUMB button and select the desired collection/album. To confirm that the thumbnail is being used for the collection/album, select the collection/album from the Album List. The thumbnail should appear in the Album Thumb Preview area. Repeat this process for any remaining albums or to replace existing collection/album thumbs.
4.7 Moving and Deleting Collections, Albums and filesReorganizing or destroying existing albums and media is self-explanatory. Use the buttons in the Manage Albums and Manage Media areas to manage your collection.
4.8 Linking to URLThe <picture> element of an album XML data file (e.g. <joomla_root>/components/com_expose/expose/xml/album_5.xml) can contain a link URL parameter (e.g. <picture _mngid="17" link=" http://www.server.com "> ). If present, the URL will be opened instead of the large image of a photo. A new JavaScript function is used to open the URL causing the link to open in the new window by default.
4.9 Album Manager for Windows® and Mac OS XIf your host does not support the strict server requirements for the album manager contained within this component, or if you have a very large media collection, you may still use the Exposé component to display your pictures. Simply install your component, create the appropriate menu item as described above and customize the component to suit your Joomla! template. However, all album management will be performed using the stand-alone Album Manager application (available for Windows® or Mac OS X operating systems). The use of these applications is beyond the scope of this documentation, but the basic behavior is similar to that described above.
26 www.gotgtek.com

User, Administrator & First problem solving manual Last updated: 14/07/2007 v1.4Exposé RC3 – RC4 for Joomla!
Note that, when using the offline Manager, the albums don't get an ID. Linking from content to the albums won't be possible at this point. When opening the online Manager for the first time after uploading some pictures, it will automatically assign an ID to all the albums again causing albums having an ID to change from ID!
The applications may be downloaded directly from slooz.com:
Windows®: http://www.slooz.com/trinkets.php?proj=expmngwin Mac OS X: http://www.slooz.com/trinkets.php?proj=expmngmac
A tutorial for the Windows® version of Album Manager is available here: http://www.slooz.com/article.php?article=intro_win
These applications are limited to managing 3 movies but are otherwise completely functional. Users requiring unlimited movies will need to purchase a license (a license for the Windows® and Mac OS X Album Managers is included with the commercial Exposé licensing fee as described in the copyright section.
4.10Switching between ManagersUsing more than one manager is not currently supported so choose carefully what album manager method you will be using or risk losing all your media and albums when switching between them. YOU HAVE BEEN WARNED… ALWAYS BACKUP BEFORE EXPERIMENTING. Dough, it is possible to use both local and the web based manager if you manually copy the online contents of the /xml directory BEFORE changing anything in the local manager, because, if you did change anything with the online manager, it needs to reprocess the contents in order to assign ID’s to the collections, albums and images.
Also note that the generated code for the xml data files is much cleaner and structured with the Windows® based Manager as with the online one. The online manager writes all tags in one line. So when managing a big portfolio, it’s advisable to use the Windows® or Mac manager.
27 www.gotgtek.com
User, Administrator & First problem solving manual Last updated: 14/07/2007 v1.4Exposé RC3 – RC4 for Joomla!
5 Developer information
5.1 File organizationThe files are organized as follows:
• the Flash movie files (main movie, button icons, and font assets) reside in the /swf subfolder inside the expose folder; this structure is necessary for the proper loading of these files, and can only be changed by recompiling the main movie SWF file
• all images, videos and audio commentary MP3s go by default into the /img subfolder inside the expose folder, where you can further categorize them by placing them into separate folders
• the album and description data go into the /xml subfolder inside the expose folder• the configuration, text formatting, and strings XML files reside in the /config subfolder
inside the expose folder
Each picture consists of two files -- one thumb-sized used in the image strip, and a larger one used in the full-size display mode -- which reside in the same folder. The general naming convention for the smaller image file is to use the file name of the larger image and prepend it with _sm_. For example if your full-size image file is chicago.jpg the thumb image would be named _sm_chicago.jpg. This nomenclature is not required, but helps when you view your files in a file manager on your operating system (e.g. Windows® Explorer, Mac OS X Finder). An audio commentary MP3 file can also be bundled with a picture, and its file name is prepended with _au_, e.g. _au_chicago.mp3 for the chicago.jpg image. These naming conventions are only required if you are going to edit your albums using one of the provided Windows® or MAC manager applications. The PHP manager doesn't support audio at this time, and uses a slightly different naming system.
The default setup that comes with the Exposé package is suitable for thumb-size images not taller than 200 pixels, and full-size images not taller than 400 pixels. Check the Customization section to find out how to resize the movie and reposition the interface elements within it to be able to accommodate other image sizes. The album and album collection thumbnail images should be no larger than 64x48 pixels if you use the default configuration.
It is prudent, but not required, to use all lower-case file extensions, e.g. jpg instead of JPG, and in some cases even lower-case file names, e.g. chicago.jpg instead of Chicago.jpg.
Videos consist of one or more streams, and thumbnail image representative of the video. It is easier to manage the different streams by giving them similar names, e.g. wedding_100k.flv, wedding_500k.flv, etc., and a similarly for the thumbnail file, _th_wedding.jpg. The 100k and 500k in the example denote the bitrate of each stream.
28 www.gotgtek.com

User, Administrator & First problem solving manual Last updated: 14/07/2007 v1.4Exposé RC3 – RC4 for Joomla!
Refer to the Customization section to see how you can modify the default locations if you want to serve dynamic content, or use a folder structure that you prefer.
5.2 XML structureRead this section if you will use a text editor to modify your albums, or if you want to serve dynamic content.
Your albums are defined succinctly in albums.xml. Only basic information such as titles and locations of the content XML files, etc. is specified there. Here's a simple example, and a discussion of its structure:
<?xml version="1.0" encoding="UTF-8"?><expose version="2.1"> <collection> <collection _mngid="1"> <title>A collection</title> <album _mngid="2"> <title>An album</title> <thumb> <url>thumb.jpg</url> </thumb> <contentnumber>10</contentnumber> <contentxmlurl>album_somealbum.xml</contentxmlurl> </album> </collection> <album _mngid="3"> <title>Another album</title> <description>Pictures of my vacation</description> <contentnumber>20</contentnumber> <contentxmlurl>album_myotheralbum.xml</contentxmlurl> </album> </collection></expose>
As you can see the XML file is enclosed in an expose element with a version attribute. This convention is used for all XML files used by exposé. The version attribute is used to determine the structure of the XML file.
Following the expose element is a collection element enclosing the remainder of the XML elements in albums.xml. The collection element is used to nest albums. It acts much like a folder, but it holds albums instead of files. You can place other collection elements in a collection element, or you can place one or more album elements. Each collection contains a title element used to display the collection inside exposé. An optional thumb element may indicate that the collection has a thumbnail image associated with it; this element is
29 www.gotgtek.com

User, Administrator & First problem solving manual Last updated: 14/07/2007 v1.4Exposé RC3 – RC4 for Joomla!
described in the next paragraph. You can see from the example above that there is a 'A collection' collection inside your root collection. This collection in turn contains one album.
The album element similarly has a title element. In addition it may have a description element where you put a detailed description of the photos inside that album. The thumb element in the first album in the example indicates that the album has a thumbnail image and an url subelement points to the location and file name of that image, in this case thumb.jpg. A contentnumber element specifies the number of photos in the album, and a contentxmlurl specifies the URL of the XML file containing the descriptions of each photo in the album. This URL can either be absolute (using an http:// modifier) or relative, as is the case in the example above where the file name is used as the URL. More on the contentxmlurl element in the Customization section.
Additionally, each album and collection may have a _mngid attribute, which is a unique ID string that can be used to auto-launch albums, photos, and set root collections.
The descriptions of each photo or video in an album are stored in a separate XML file, such as album_somealbum.xml as in the example above. Let's look at a simple case of such a file:
<?xml version="1.0" encoding="utf-8"?><expose version="2.1"> <picture _mngid="1"> <title>Downtown Chicago</title> <date>October 2004</date> <location>Chicago, Illinois</location> <description>A skyscape shot of Chicago. \n Sears tower is in the left corner</description> <image> <url>cities/chicago.jpg</url> </image> <smallimage> <url>cities/_sm_chicago.jpg</url> </smallimage> <audio> <url>cities/_au_chicago.jpg</url> </audio> </picture> <picture _mngid="2"> <title>Times Square in NYC</title> <image> <url>cities/nyc_timessquare.jpg</url> </image> <smallimage> <url>cities/_sm_nyc_timessquare.jpg</url> </smallimage>
30 www.gotgtek.com

User, Administrator & First problem solving manual Last updated: 14/07/2007 v1.4Exposé RC3 – RC4 for Joomla!
</picture> <video _mngid="3"> <title>Jack's wedding</title> <thumb> <url>videos/_th_wedding.jpg</url> </thumb> <video> <stream bitrate="1000"> <url>videos/wedding_1000k.flv</url> </stream> <stream bitrate="500"> <url>videos/wedding_500k.flv</url> </stream> </video> </video></expose>
Again all elements in the photo and video list are enclosed in an expose element with a version attribute.
Each picture is defined in a picture element. The picture has a title, specified in a title element. A date, a location, and a description can also be specified in elements with the same name, but they are optional. To insert new lines in a description use " \n " (without the quotes and with spaces surrounding the \n). This is necessary because the XML file is stripped of all whitespace.
The image files are defined in two elements - image and smallimage. An url subelement specifies the location of each file.
You can also specify an audio commentary MP3 file using an audio element, with a url subelement containing the location of the file.
Videos are enclosed in a video element. It contains title, date, and location elements similar to a picture element. A thumb element points to the thumbnail image for the video with a url subelement in it. A video element inside the video element lists the streams. Each stream is enclosed in a stream element. The stream element contains one attribute called bitrate, which indicates, in kilobits, the bitrate of that particular stream (this value is used by SpeedSense to select an appropriate stream for each visitor, dependingn their estimated bandwidth). A url element containing the URL of the stream goes inside the stream element.
Both picture and video elements can be identified with a _mngid attribute similarly to albums and collections.
31 www.gotgtek.com
User, Administrator & First problem solving manual Last updated: 14/07/2007 v1.4Exposé RC3 – RC4 for Joomla!
The example above indicates that the album contains two pictures, the first of Chicago with audio commentary, and the second of Times Square in NYC without. It also contains a video of Jack's wedding.
For information about the XML structure of the configuration, formats, and strings XML files see the Customization and Internationalization sections.
5.3 SpeedSenseSpeedSense is the mechanism that exposé uses to determine a visitor's bandwidth and select an appropriate video stream that will make uninterrupted playback more likely.
This feature is turned off by default, and you can turn it on by editing the SpeedSense Emabled coniguration parameter in config.xml. SpeedSense works by loading a dummy JPG file, located in expose/img/dummy.jpg, and measuring how much the user can download in roughly 3 seconds. The default dummy file is 200KB which should be enough to obtain a good estimate of the user's bandwidth.
If all your videos consist of a single stream each, you do not need to enable SpeedStream; that will only waste bandwidth.
5.4 InternationalizationExposé includes support for using your won language in the text (frontend) interface. The strings.xml file in the /config folder contains the list of strings used in the Flash movie. Each string has an identifier and text placed in one or more language elements. By default strings.xml comes with an English string list. The easiest way to use your own text instead is to replace the text in the english elements in strings.xml file.
In RC2, alternatively, you can add your own language elements for each string, and change the language parameter value in config.xml (more about parameters in Customization) to your language element name. For example if you use <german>...</german> elements, you will have to change the language parameter to german.
Also, you may want to check the exposé web site for downloadable language translations.
5.5 CustomizationIn this section you will learn how to modify the look & feel of exposé, including the artwork, and the layout and the positioning of interface elements in the movie.
5.5.1 Interface icons The icons used in the Flash movie are imported at runtime from artwork.swf found in the swf subfolder inside the expose folder. If you have Flash MX 2004 installed, you can open
32 www.gotgtek.com

User, Administrator & First problem solving manual Last updated: 14/07/2007 v1.4Exposé RC3 – RC4 for Joomla!
artwork.fla in the /fla folder to edit the icon graphics. Each button icon has several states labeled on the timeframe, and you will have to keep that organization. When done modifying the icons, simply publish the movie to export to artwork.swf. You can also check on the exposé web site for downloadable icon sets.
5.5.2 Size of Flash movie and posititions of interface elements The default configuration of Exposé defines the Flash movie as 900 pixels wide by 510 pixels high, which makes it suitable for images up to 400 pixels tall. You can change the movie size by opening the configuration page. Then change the width and height parameters from the list. This panel contains also several parameters for the vertical position of the main panel, the image, the image strip, etc. Edit their values to reposition these interface elements.
5.5.3 Colors The stock background color used by Exposé is white. You can change it by opening expose.html and editing the values of bgcolor in four places - the two bgcolor parameters in the object and embed elements, and inside the FlashVars string in those elements (so you end up changing it in 4 places). The hexadecimal value in the FlashVars string has to be stripped of the # symbol normally used in HTML for specifying colors.
To change the colors used in the Flash movie, open config.xml in an XML editor and change the values of those parameters which identify color and transparency (alpha) values.
5.5.4 Text formats and fonts Exposé comes prepackaged with a set of two fonts. You can use your own fonts if you have Flash MX 2004 installed. You do that by opening the fonts.fla file in the fla folder, then specifying your own fonts for runtime sharing (the fonts used in that file are Verdana and Arial), and finally publishing to fonts.swf.
To change the formatting of the text in Exposé, open formats.xml found in the xml subfolder of the expose folder. Each format element specifies in a subelement the font used, the size of the text, its color, etc. Enter your preferred values to format the text your way.
You can enable/disable the use of embedded fonts from fonts.swf with the useEmbeddedFonts FlashVars parameter. Set this parameter to "no" in the expose.html.php file if you are going to use characters from Chinese or Japanese, otherwise the embedded fonts file would become too large to be practical.
33 www.gotgtek.com

User, Administrator & First problem solving manual Last updated: 14/07/2007 v1.4Exposé RC3 – RC4 for Joomla!
5.5.5 Default file locations By default Exposé will look in the /xml subfolder of the expose folder for all data XML files, and in the /img subfolder for all images and audio.
You can change the default file names and locations for albums.xml, strings.xml, formats.xml, and config.xml by modifying the corresponding xyzXMLURL parameters in expose.html.php You can also change the base URL for the rest of the XML files, the image files, and the audio files by changing the baseXMLURL, baseImageURL, and baseAudioURL parameters in expose.html.
Note that you will have to change each parameter in two places in expose.html in order to make it work in all web browsers.
5.5.6 Other 'hidden' settings Most of the 'hidden' settings of the standalone version of Expose, are used dynamically by the Expose-bridge, depending on the settings and URL string properties that you use. But if you want, you can hardcode them in the expose.html.php file you can add some extra functionality to the gallery:
An album can be automatically opened by setting the value of the autoLoadAlbumID FlashVars parameter with the album's ID (used by direct album linking; see 2.12).
A photo can be automatically opened by setting the value of the autoLoadAlbumID and autoLoadPhotoID FlashVars parameters with the respective Ids (used by direct image linking; see 2.12).
A slide show can be set to automatically start by setting the autoStartSlideShow FlashVars parameter to "yes" (used by URL linking; see 2.12).
A background image and a foreground image can be loaded by setting the bgImageURL and fgImageURL FlashVars parameters. The foreground image will appear in a layer directly above the image strip and can be used as a gradient mask for the image strip. The image can also be a SWF file that contains animation or a transparent PNG image. (Can be set in backend properties)
You can enable/disable the use of embedded fonts (fonts.swf) with the useEmbeddedFonts FlashVars parameter. Set this parameter to "no" if you are going to use characters from Chinese or Japanese, otherwise the embedded fonts file would become too large to be practical.
34 www.gotgtek.com

User, Administrator & First problem solving manual Last updated: 14/07/2007 v1.4Exposé RC3 – RC4 for Joomla!
6 More Exposé (plugins/tools/…)
6.1 Windows® / Mac Os X ManagerWhen the server doesn’t fit all the requirements to use the Manager (verify 1.4), you still can use Expose, but you’ll need to create the contents locally and upload it to your server. More info above.
6.2 Exposé small editionIf you don’t have much space left on your template, consider this version. You don’t need to change the configuration settings anymore to fit in a small area. Make sure you set the Medium Sized pictures to no larger than 500 (width) x 400 (height), otherwise they will cut off in the gallery. Downloadable on http://joomlacode.org/gf/project/expose/scmsvn
6.3 More at slooz.com!At www.slooz.com you can find more tools and special versions of the stand-alone gallery. But since the Joomla! Expose component is actually a bridge between Joomla! and the gallery, it must be possible to implement a special version into the Joomla! environment, just by replacing the /expose directory. You can always link to an extra standalone version using a wrapper.
6.4 2nd install of Exposé componentA component can only be installed once. But if you want to create a gallery for your visitors and one for registered users, you’ll need to install a second one. So we modified one and called it Exposeprive. Same component, just renamed. You can download it on
JoomlaCode site at http://joomlacode.org/gf/project/expose/scmsvn (alpha components). As alternative, you can open the gallery with a collection link. Then only this collection will be shown in the gallery. The other collections will be hidden at that time.
6.5 Expose Shopping CartSome users want to use Expose as a shopping cart. This is PRE-ALHPA software and no support is given yet. If this turns into an actual project we will notify people at the forums here: http://www.gotgtek.com/forum/index.php?topic=1024.0
If you want to try it out, download it from http://www.gotgtek.com/cms/downloads/cat_view-5.html.
35 www.gotgtek.com

User, Administrator & First problem solving manual Last updated: 14/07/2007 v1.4Exposé RC3 – RC4 for Joomla!
6.6 Expose ScrollerDo you want some pictures from the Exposé gallery scrolling over your frontpage? Then you’ll need this module. It picks photo’s from the whole gallery, just a defined album, or the last added pictures. Static or scrolling in horizontal (left or right) or vertical (up or down) direction is possible, Linking to the collection, album, photo or slideshow too. The alpha is out.
36 www.gotgtek.com

User, Administrator & First problem solving manual Last updated: 14/07/2007 v1.4Exposé RC3 – RC4 for Joomla!
7 Problem solvingSome of the common problems when installing, managing and using Exposé can be found here. If this doesn’t solve your problem, try to search in the forum. Please verify them before posting a new topic on the forum at http://www.gotgtek.com/forum. Good luck, and please let us know, when opening a post, if your problem got solved !
7.1 Installation
7.1.1 Can’t install Check if all Joomla! settings are green in System > System info. Especially SAFE_MODE needs to be off. This will disable the unique owner issue when trying to access php files.
7.1.2 Add Exposé on the frontpage This trick applies to other components as well. All you need to do is to make the component the first published item in your mainmenu.
1. Login to the Administrator backend2. Goto: Menu -> Main Menu3. Select the "Expose"-component-link, or create one:
1. Click on the "New" icon2. Select Component and click Next on top3. You will reach the page called Add Menu Item :: Component. Fill the following
values to the form:Name: ExposeComponent: Exposeand leave the other options to default value
4. Click the Save iconOnce that is done, move the "Expose" item all the way to the top, replacing the "Home" menu.
7.1.3 Why does Expose uses AC_RunActiveContent.js Expose.html.php requires the code in AC_RunActiveContent.js to run. Using this Javascript file prevents the Flash movie from requiring a click before it becomes active in Internet Explorer. This script has been prepared by Adobe itselves. See http://www.adobe.com/devnet/activecontent/articles/devletter.html for more information about this script.
37 www.gotgtek.com

User, Administrator & First problem solving manual Last updated: 14/07/2007 v1.4Exposé RC3 – RC4 for Joomla!
7.2 Gallery (front-end)
7.2.1 I activated large fitting box, but they don’t show up All pictures, uploaded before activating the ‘Create large image’ box don’t have a large picture stored on the server because they are only created during upload. After updating this setting, you’ll need to remove and re-upload the old pictures to create them.
7.2.2 FLV movies don’t play With IIS 6.0, Microsoft changed the way streaming media is handled. Previous versions of IIS did not require any modification to stream Flash Video. Microsoft IIS 6.0, the default web server that ships with Windows® 2003, requires a MIME type to recognize that FLV files are streamed media.
1. On the Windows® 2003 server, open the Internet Information Services Manager.2. Expand the Local Computer Server.3. Right-click the local computer server and select Properties.4. Select the MIME Types tab.5. Click the New... button6. Enter the following information:
Associated Extension box: .FLVMIME Type box: flv-application/octet-stream
7. Click Ok.8. Restart the World Wide Web Publishing service.9.(Issue solved thanks to Knutklo)
7.2.3 Front-end doesn’t show Some known conflicts on your webpage can cause this:
• Clear your browsers cache: Private Data (Firefox) or delete temp internet files (IE) or you can try hard refresh (Ctrl + F5).
• If everything fails. Restore your exposé with your backup.• Try the unchanged default Joomla! template. Some <difs> or <iframes> constructions
are in conflict with the gallery.• Deactivate all other flash-based components and reactivate them one by one to isolate
the conflict.• Exposé uses mootools.js script. If other components are using this script too, this will
cause conflicts…
38 www.gotgtek.com

User, Administrator & First problem solving manual Last updated: 14/07/2007 v1.4Exposé RC3 – RC4 for Joomla!
7.2.4 Not all buttons are shown on the gallery You’ll need to change the configuration file. More specific, the Main Panel button settings to adjust their location.
7.2.5 I always need to click on the gallery to activate it A Flash object needs a little script to auto-run it on page-load. It's provided by Adobe as AC_RunActiveContent.js. For security issues, some browsers or antivirus software deactivate Javascript, so the gallery won't run automatically, and you'll need to activate it with a click on the component. Check the settings / properties to allow javascript on this site.
7.2.6 Can't select the same album again When you re-select the same album, after returning from the strip to the albumlist, you need to select another album before you can select the same again. This is a core Flash issue and can't be changed by us.
7.2.7 Expose not loading with ARTIO JoomSEF: You probably need to change the URL config for Artio SEF as follows:
1. Goto The Artio Component from the components menu2. Select: ARTIO JoomSEF Configuration (Make sure its writeable)3. Set the Component Configuration for com_expose (at the bottom) to SKIP
7.3 Manager (back-end)
7.3.1 Back-end login hangs during authentication Of particular note is the DOM or DOMXML library; if this is not installed, the back-end login will not be successful and will ‘hang’ during authentication.
Recently, a bug in the AMFPHP plugin caused the same problem with PHP 5.2.x. You need to update <joomla_root>/components/com_expose/expose/manager/amfphp/amf-core/app/Gateway.php to fix this from our downloadsite.
7.3.2 I can’t upload photo’s from my PC to the site - ”Could not connect with the server” error message
This is a long issue..
First, check if your server has the minimum requirements for Joomla!:
39 www.gotgtek.com

User, Administrator & First problem solving manual Last updated: 14/07/2007 v1.4Exposé RC3 – RC4 for Joomla!
Check if the server has the minimum requirements for Exposé:
• PHP version 4 or higher• DOM or DOMXML library (in RC4, this is used in frontend and backend)• GD library and the ICONV library extensions (only if backend Manager used)• Verify http://www.gotgtek.com/cms/expose-php-settings.html for additional info• Run <joomla_root>/components/com_expose/expose/manager/check_system.php and check
section 2.9 if errors are shown on this page.
Restart the server service to apply the new settings.
Did you try to change the .htaccess file ? By default, in the root of your Joomla! site, you can find a htaccess.txt file which you need to rename. You can add the following lines to it, or create a new one in the <joomla_root>/components/com_expose/expose/manager/ folder:
# Config for Exposé component: upload errorsSecFilterEngine OffSecFilterScanPOST Off# End config Exposé
Note: Your host can restrict some or all functions that you write in this file. If you get an Apache error after renaming/creating this file. If so, you’ll need to contact your host. (more info on http://httpd.apache.org/docs/2.0/mod/core.html#allowoverride)
Perhaps your pictures/movies are to big (usually > 2M). Check 7.3.6 on how to increase the upload file size value.
Or your drive space is low!
Picture folder isn't writable (see 2.6).
7.3.3 Can't delete collections, albums or pictures Again, check file and folder permissions as described in 2.6
7.3.4 FLV movies aren’t uploaded This could be a server configuration problem: see 7.2.2
40 www.gotgtek.com

User, Administrator & First problem solving manual Last updated: 14/07/2007 v1.4Exposé RC3 – RC4 for Joomla!
7.3.5 The descriptions aren’t saved Once you have completed the description, place your mouse over the text and right-click (or ctrl-click on Mac OS X). Choose “Apply description changes” from the menu.
7.3.6 Upload is slow - Upload doesn’t finish with success
Perhaps your pictures are too big. It’s advisable to resize your photos locally before uploading with the manager because they are resized on the server after upload. This saves bandwidth and increases the speed. On the net, you can find many tools that can do this in batch.
By default, the maximum upload filesize is set at 2M in the php.ini. Ask your host to increase this value, or try to add this line in the .htaccess file:
# Config for Exposé component: increase filesizephp_value upload_max_filesize 10M# End config Exposé
7.3.7 Problems when changing the password When you try to change the password, but it isn't accepted or it returns an error, the encrypted password file is probably unwritable. Check and change the attributes of <joomla_root>/components/com_expose/expose/manager/amfphp/extra/passhash.inc.php to make it writable. Don't leave the rights at 777, but chmod it back to 644!
7.3.8 Help! Password lost! Only one thing left todo; change it back to the default one! The password is stored in <joomla_root>/components/com_expose/expose/manager/amfphp/extra/passhash.inc.php Just replace the contents of this file with following line, and the password will be reseted to 'manager':
<?php $GLOBALS["passhash"] = "3e892e9edc898cf713ecd6ef06a116a7"; ?>
7.3.9 The ‘upload’ button is grayed-out Did you select the album where you want to upload the pictures too?
7.3.10 I don't want an extra login for the Manager If you are using RC4 but you don't want the extra Manager authentication in the backend, you only need to copy the manager folder from RC3 and replace the one on your server. We removed this from RC4 because it seemed to cause issues for some users and not others. You will not need to modify anything else.
41 www.gotgtek.com

User, Administrator & First problem solving manual Last updated: 14/07/2007 v1.4Exposé RC3 – RC4 for Joomla!
7.3.11 Add a link to an image A <picture> element in the XML of an album can contain a link URL parameter (e.g. <picture link="http://www.server.com">); if present, the that URL will be opened instead of the large image of a photo. A new JavaScript function is used to open the URL; the link opens in a new window by default.
7.3.12 Configuration isn't saved See 2.6 which files need to be writable for this.
7.3.13 Can't use Chinese or Japanese characters You can enable/disable the use of embedded fonts from fonts.swf with the useEmbeddedFonts FlashVars parameter. Set this parameter in the expose.html.php file to "no" if you are going to use characters from Chinese or Japanese, otherwise the embedded fonts file would become too large to be practical.
42 www.gotgtek.com