user manual for cla-2000 content library...
TRANSCRIPT

USER MANUAL FOR
CLA-2000 CONTENT LIBRARY ADAPTER
December 15, 2014

TABLE OF CONTENTS
CLA-2000 User Manual 2 15 December 2014
TABLE OF CONTENTS
1. INTRODUCTION ................................................................................................................ 7
1.1 About This Manual ....................................................................................................... 7
1.2 Safety Instructions ....................................................................................................... 7
2. INSTALLATION OF CLA-2000 .......................................................................................... 9
2.1 Packing List .................................................................................................................. 9
2.2 Product Specifications .................................................................................................10
2.3 Front Panel ..................................................................................................................10
2.4 Back Panel ..................................................................................................................10
2.5 Cable Connection to Different Devices ........................................................................11
2.5.1 Ethernet Connection between CLA-2000 and Network Switch ................................11
2.5.2 eSATA/USB Connection between CLA-2000 and Storage Devices .........................12
2.5.2.1 Connection to CRU ..............................................................................................12
2.5.2.2 Connection to Portable Storage ...........................................................................13
2.5.2.3 Connection to Enterprise Storage .........................................................................14
2.6 First Time Setup of CLA-2000 .....................................................................................15
2.6.1 Physical Power Connection .......................................................................................15
2.6.2 Network Connection ..................................................................................................15
2.6.3 Power Up CLA-2000 .................................................................................................15
2.6.4 Configure CLA-2000 via CLA Manager on Windows PC ...........................................15
2.6.5 Operate CLA-2000 ....................................................................................................16
3. OPERATION OF CLA-2000 ..............................................................................................17
3.1 About CLA Manager ....................................................................................................17
3.2 Access CLA Manager ..................................................................................................17
3.3 CLA-2000 Content Management .................................................................................22
3.3.1 Content Transfer between Two Storage Devices ....................................................22
3.3.2 Content Transfer from CRU to Storage Device........................................................24
3.3.3 Content Transfer through LAN to Multiple Screens Simultaneously .........................24
3.3.3.1 Operation on CLA Manager ..................................................................................24
3.3.3.2 Operation on GDC Server ....................................................................................26

TABLE OF CONTENTS
15 December 2014 3 CLA-2000 User Manual
3.4 Remote Access CLA-2000 ...........................................................................................27
3.4.1 Access CLA-2000 on the Linux or MAC Operating System .....................................27
3.4.2 Access CLA-2000 on the Windows Operating System ............................................27
3.5 Eject External Devices from CLA Manager ..................................................................27
3.6 Shut Down the CLA Manager ......................................................................................28
3.7 RESET CLA-2000 .......................................................................................................29

CLA-2000 User Manual 4 15 December 2014
Thank you for purchasing a CLA-2000 Content Library Adapter from GDC
Technology Limited.
To ensure proper operation and to maximize value of CLA-2000, please review this User Manual. It will guide
you through all the features and benefits.
COPYRIGHT NOTICE
Copyright© 2014 by GDC Technology Limited
All rights reserved. No part of this manual may be copied or distributed, transmitted, transcribed, stored in a retrieval
system, or translated into any human or computer language, in a form or by any means, electronic, mechanical,
photocopying, recording, magnetic, optical, manual or otherwise, or disclosed to third parties without prior written
permission of GDC Technology Limited.
MANUAL DISCLAIMER
The manual is made with CLA-2000 Firmware (2.0-build 7) and CLA Manager (V2.0) and there might be slight
differences depending on the software version. The contents, features and specifications stated in this manual are
subject to change without notice due to continuous product development and improvements. In no other event shall
GDC Technology Limited be liable for any loss of profit or any other commercial damages, including but not limited to
CONTACTS AND OFFICES
15 December 2014 5 CLA-2000 User Manual
CONTACTS AND OFFICES
Website: www.gdc-tech.com Email: [email protected] 24/7 Engineering Support Hotline:
Hong Kong (Headquarters)
China (Beijing)
China (Shenzhen)
Spain (Barcelona)
Unit 1-7, 20th Floor, Kodak House II, 39 Healthy Street East, North Point, Hong Kong Tel: +852 2507 9555
Rm. 609-618, Office Building,20# Xinde Street, Xicheng District, Beijing, P.R. China 100088
Tel: +86 10 6205 7040
Room A701, 7/F, Languang Technology Building, No.7 Xinxi Road, North Zone, HighTech Park, Nanshan District, Shenzhen, China Tel: +86 755 8608 6000
Edificio Mercurio Vía Augusta, 59, desp. 607 08006 Barcelona, Spain
Tel: +34 93 159 51 75
Peru (Lima)
USA (Los Angeles, CA)
Mexico (Mexico City)
India (Mumbai)
Calle Rey Bahamonde N°111 Santiago de Surco Lima 33 - Peru Tel: +51 1 677 6708
1016 West Magnolia Boulevard Burbank, CA 91506, USA Tel: +1 818 972 4370 / +1 877 743 2872 (Toll Free)
Ave. Santa Fe 94, Torre A Piso 8 Col. Zedec Santa Fe, Alvaro Obregon, Mexico, D.F., C.P. 01210 Mexico Tel: +52 55 8851 1198 / +52 55 8851 1165
Office No. B-207/208, Everest Chamber, Andheri Kurla Road, Marol, Andheri (East), Mumbai-400 059, India
Tel: +91 22 4044 0500
North America +1 877 743 2872 (Toll Free) Latin America +52 55 8851 1198 Europe +34 928 912 295 China +86 400 886 0996 (Toll Free) North Asia +852 3520 0920 (Toll Free) India +91 022 4044 0500 South East Asia +65 6100 4328 Australia/ New
Zealand +61 407 040 744
CONTACTS AND OFFICES
CLA-2000 User Manual 6 15 December 2014
Brazil (São Paulo)
Singapore
Japan (Tokyo)
Indonesia (Jakarta)
Avenida Paulista, 807 conjs. 701/703 01311-100, São Paulo – Brasil Tel: +55 11 32058100
10 Ubi Crescent, Ubi Tech Park, Lobby B, #06-25 Singapore 408564 Tel: +65 6222 1082
3F, Kyobashi-Chuo Bldg, 1-14-7 Kyobashi Chuo-ku Tokyo 104-0031, Japan
Tel: +81 3 5524 3607
Total Building Lantai 4 Suite 0401, Jl. Letjen S. Parman Kav. 106A, Kel. Tomang, Kec. Grogol Petamburan, Jakarta 11440

1. INTRODUCTION
15 December 2014 7 CLA-2000 User Manual
1. INTRODUCTION
1.1 About This Manual
This manual provides instructions on how to use and manage CLA-2000 Content Library
Adapter for content transfer and storage backup with or without Theatre Management
System (TMS).
1.2 Safety Instructions The CLA-2000 is intended for installation in a restricted access location.
The operating environment temperature range is 0°C - 70°C
CAUTION: RISK OF EXPLOSION IF BATTERY IS REPLACED BY AN INCORRECT TYPE.
DISPOSE OF USED BATTERIES ACCORDING TO THE INSTRUCTIONS.
NOTE: This equipment has been tested and found to comply with the limits for a Class A
digital device, pursuant to part 15 of the FCC Rules. These limits are designed to provide
reasonable protection against harmful interference when the equipment is operated in a
commercial environment. This equipment generates, uses, and can radiate radio
frequency energy and, if not installed and used in accordance with the instruction manual,
may cause harmful interference to radio communications. Operation of this equipment in
a residential area is likely to cause harmful interference in which case the user will be
required to correct the interference at his own expense.
WARNING: This is a Class A product. In a domestic environment this product may cause
radio interference in which case the user may be required to take adequate measures.
For PLUGGABLE EQUIPMENT, the socket-outlet shall be installed near the equipment
and shall be easily accessible.
Before operating your CLA-2000, please read this manual thoroughly, and retain it for future
reference.
Installation and preliminary adjustments should be performed by qualified GDC Technology
personnel. All warnings on the CLA-2000 and in this manual should be adhered to.
All operation and maintenance instructions of CLA-2000 must be followed closely.
To prevent fire or electrical shock hazard, do not expose the CLA-2000 to rain or moisture.
Clean with a dry cloth only.
Do not block any ventilation openings.
Do not install near any heat sources (e.g. radiators, stove or other apparatus that produce
heat).
Consult GDC Technology Service team for servicing or maintaining CLA-2000.
1. INTRODUCTION
CLA-2000 User Manual 8 15 December 2014
You are cautioned that any changes or modifications not expressly approved in this manual
or approved in writing by an authorized representative of GDC Technology could void your
warranty and/or authority to operate CLA-2000.
2. INSTALLATION OF CLA-2000
15 December 2014 9 CLA-2000 User Manual
2. INSTALLATION OF CLA-2000
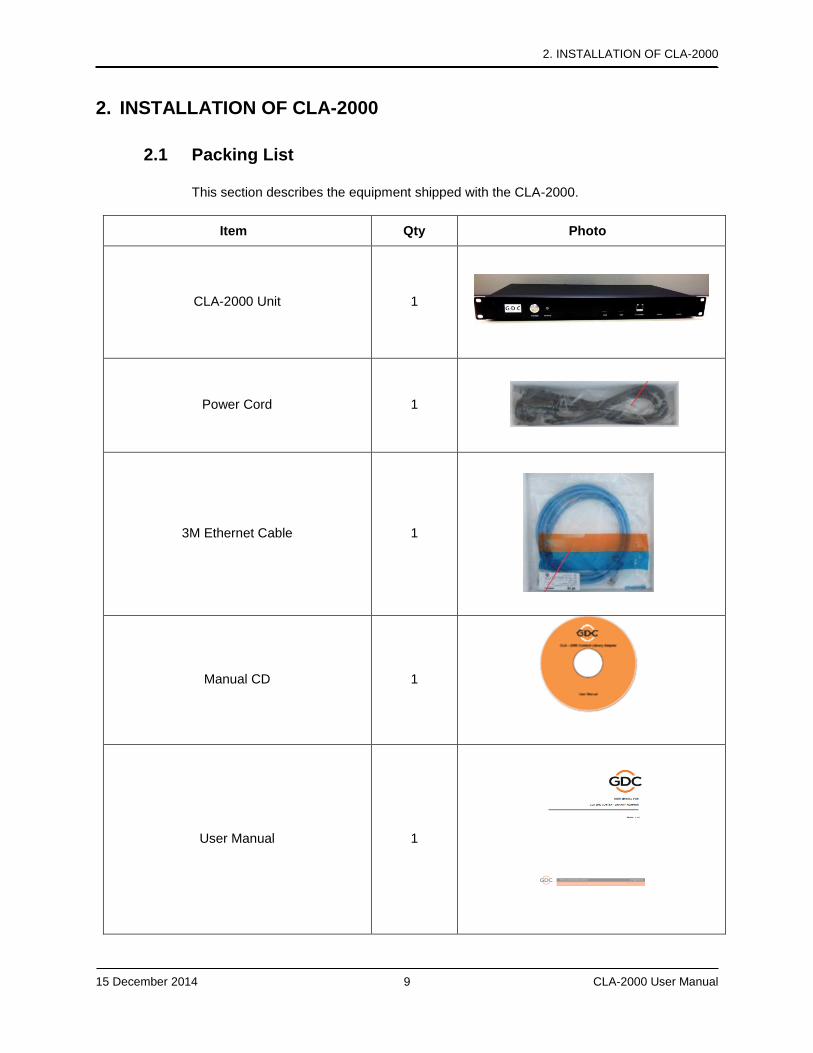
2.1 Packing List
This section describes the equipment shipped with the CLA-2000.
Item Qty Photo
CLA-2000 Unit 1
Power Cord 1
3M Ethernet Cable 1
Manual CD 1
User Manual 1

2. INSTALLATION OF CLA-2000
CLA-2000 User Manual 10 15 December 2014
2.2 Product Specifications
Dimensions: 440(W) x 252.4(D) x 44.4(H) mm
Weight: 4kg
2.3 Front Panel
1 Power Button
2 Power LED
3 USB Connector
4 Ethernet Connector
5 eSATA Connector
2.4 Back Panel
1 VGA Port
2 Reset Button
3 DC Power Jack
2 3 4 5 1
1 2 3

2. INSTALLATION OF CLA-2000
15 December 2014 11 CLA-2000 User Manual
2.5 Cable Connection to Different Devices
2.5.1 Ethernet Connection between CLA-2000 and Network Switch This section shows you how to connect the CLA-2000 to a network switch using an Ethernet
cable.
1 Connect one end of the Ethernet cable to the network switch.
2 Connect another end of the Ethernet cable to the Ethernet port on the front panel of CLA-2000.
1
2

2. INSTALLATION OF CLA-2000
CLA-2000 User Manual 12 15 December 2014
2.5.2 eSATA/USB Connection between CLA-2000 and Storage Devices This section shows you how to connect the CLA-2000 to different storage devices using an
eSATA/USB cable.
2.5.2.1 Connection to CRU
1 Power on the CRU.
2 Connect one end of the USB or eSATA cable to the corresponding port on CRU.
3 Connect another end of the cable to the corresponding USB or eSATA port on the front panel of CLA-2000.
1
2
3
2. INSTALLATION OF CLA-2000
15 December 2014 13 CLA-2000 User Manual
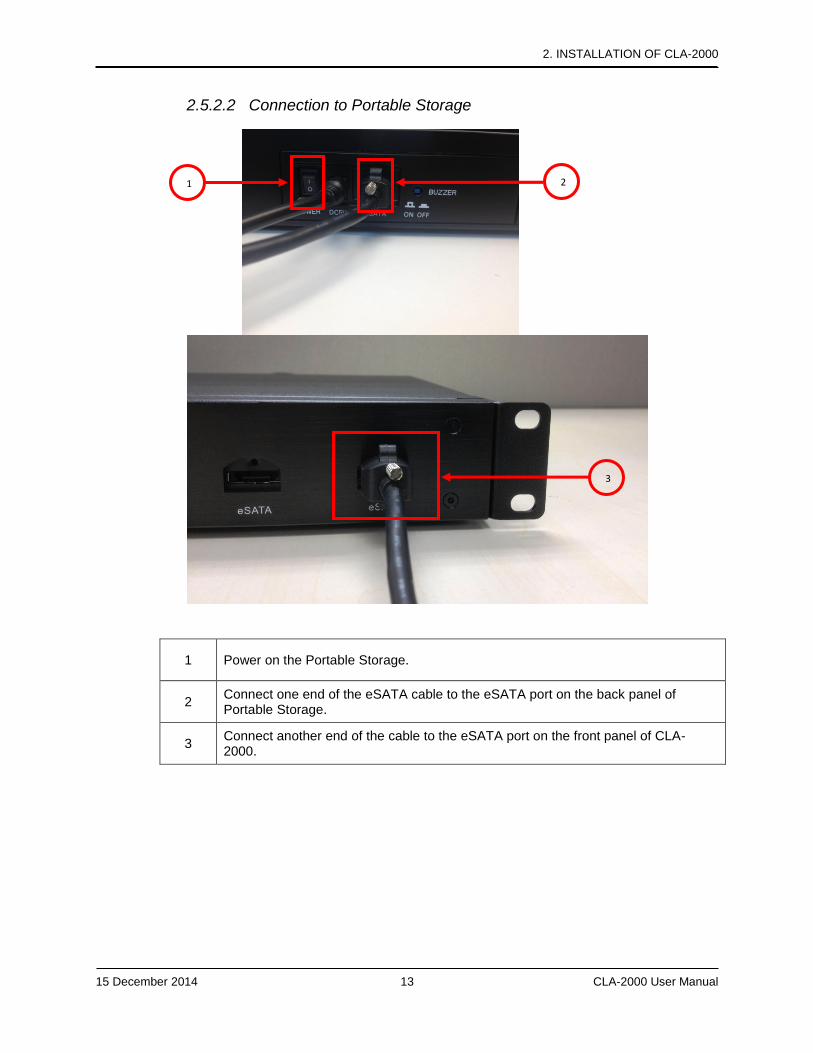
2.5.2.2 Connection to Portable Storage
1 Power on the Portable Storage.
2 Connect one end of the eSATA cable to the eSATA port on the back panel of Portable Storage.
3 Connect another end of the cable to the eSATA port on the front panel of CLA-2000.
1 2
3

2. INSTALLATION OF CLA-2000
CLA-2000 User Manual 14 15 December 2014
2.5.2.3 Connection to Enterprise Storage
1 Power on the Enterprise Storage.
2 Connect one end of the eSATA cable to the eSATA port on the back panel of the device.
3 Connect another end of the cable to the eSATA port on the front panel of CLA-2000.
1
2
3

2. INSTALLATION OF CLA-2000
15 December 2014 15 CLA-2000 User Manual
2.6 First Time Setup of CLA-2000
This section covers the steps for the first time setup of CLA-2000 including power and
network connection and the initial configuration.
2.6.1 Physical Power Connection
Connect the power adapter provided to the DC power jack at the back of CLA-2000 (please
refer to Section 2.4).
2.6.2 Network Connection
Connect CLA-2000 to a network which has a DHCP server running (please refer to Section
2.5.1).
First time setup of CLA-2000 must be done on a DHCP server. If DHCP server is not
available, CLA-2000 can be set up by either one of the methods listed below:
1/ User may configure CLA-2000 with a home use broadband router (with DHCP function
for the first time). User can then assign a fixed IP to the CLA-2000.
2/ Place special order with GDC sales for a customized fixed IP for your device at the order
stage. With the customized fixed IP, user does not need a DHCP server for configuration
and CLA-2000 can be accessed directly with that IP.
3/ Advanced user can connect the CLA-2000 to a VGA monitor and USB keyboard to
configure the device. For details, please contact GDC Service team.
2.6.3 Power Up CLA-2000
Connect the power adapter to a wall socket. Power on the CLA-2000 by pressing the
ON/OFF button (please refer to Section 2.3). When the CLA-2000 is powered on, the Power
LED on the front panel lights up (please refer to Section 2.3).
2.6.4 Configure CLA-2000 via CLA Manager on Windows PC Step 1: Connect a Windows PC (with CLA Manager installed) to the same Ethernet network
of CLA-2000.
Step 2: Search the CLA-2000 on the network via CLA Manager menu (please refer to
Section 3.2, step 2-6).
Step 3: If the CLA-2000 is detected, you could change the IP address as needed. *
2. INSTALLATION OF CLA-2000
CLA-2000 User Manual 16 15 December 2014
2.6.5 Operate CLA-2000
Attach USB / eSATA storage to the CLA-2000 (please refer to Section 2.5) and follow the
instructions in Section 3 to operate the CLA-2000 via CLA Manager.
Note
*User may use the reset button (Section 2.4) to reset the IP address to default as DHCP setting (please
refer to Section 3.7).
3. OPERATION OF CLA-2000
15 December 2014 17 CLA-2000 User Manual
3. OPERATION OF CLA-2000
3.1 About CLA Manager
CLA Manager is the software essential for the operation of CLA-2000. CLA Manager can
be either installed from the CD Rom provided or downloaded online (to download online,
please consult GDC Service team for details).
3.2 Access CLA Manager
Step 1: Install CLA Manager
Step 2: Open CLA Manager
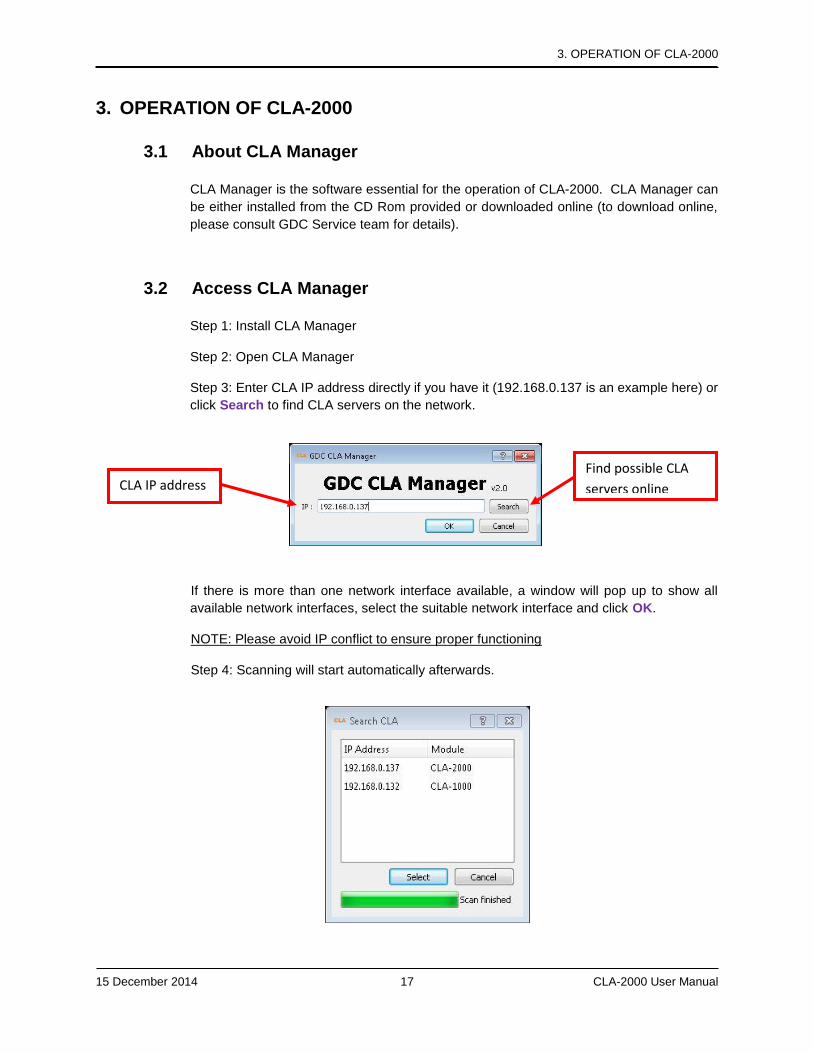
Step 3: Enter CLA IP address directly if you have it (192.168.0.137 is an example here) or
click Search to find CLA servers on the network.
If there is more than one network interface available, a window will pop up to show all
available network interfaces, select the suitable network interface and click OK.
NOTE: Please avoid IP conflict to ensure proper functioning
Step 4: Scanning will start automatically afterwards.
CLA IP address Find possible CLA
servers online

3. OPERATION OF CLA-2000
CLA-2000 User Manual 18 15 December 2014
Step 5: When the scanning finishes, click on the IP address of the appropriate module and
then click Select.
Step 6: You have successfully entered the CLA Manager.
7
3. OPERATION OF CLA-2000
15 December 2014 19 CLA-2000 User Manual
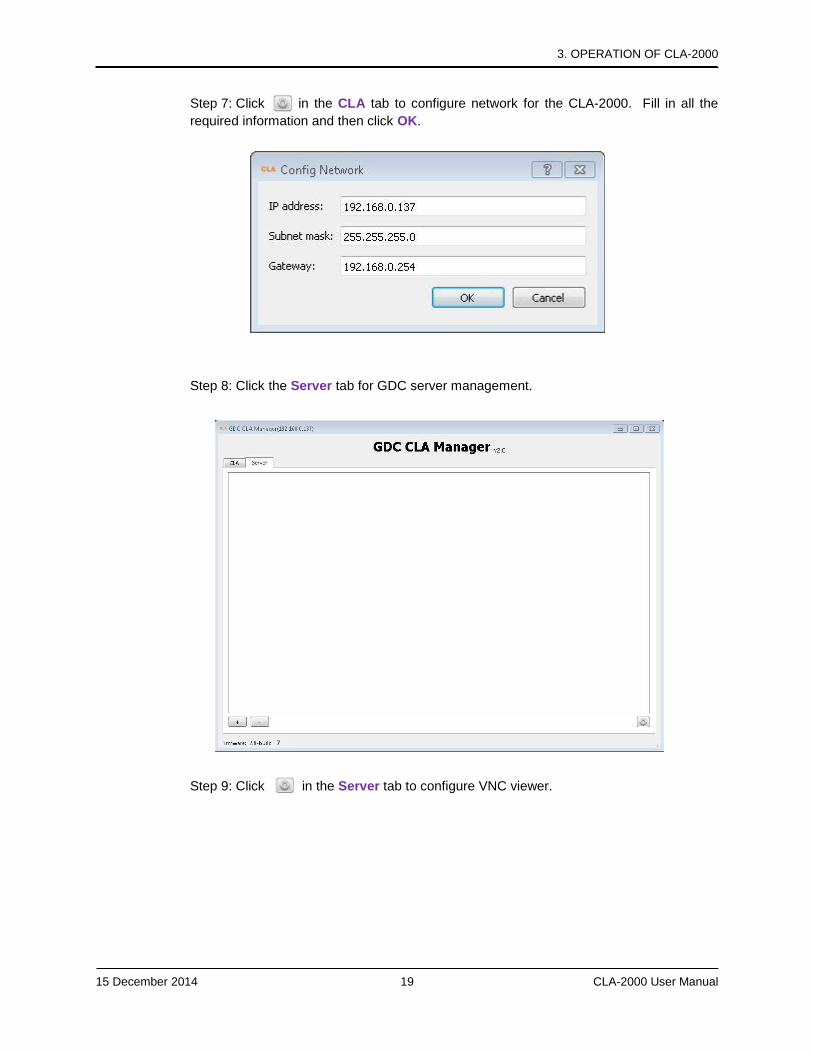
Step 7: Click in the CLA tab to configure network for the CLA-2000. Fill in all the
required information and then click OK.
Step 8: Click the Server tab for GDC server management.
Step 9: Click in the Server tab to configure VNC viewer.
7

3. OPERATION OF CLA-2000
CLA-2000 User Manual 20 15 December 2014
Step 10: Click to select tvnviewer.exe downloaded from the link provided.
Step 11: Select tvnviewer.exe and then click Open.
Step 12: Click button in the Server tab to add a server.

3. OPERATION OF CLA-2000
15 December 2014 21 CLA-2000 User Manual
Step 13: Click OK and the server is added
Step 14: If you want to delete a server, click that server and then click to delete.
7
3. OPERATION OF CLA-2000
CLA-2000 User Manual 22 15 December 2014
3.3 CLA-2000 Content Management
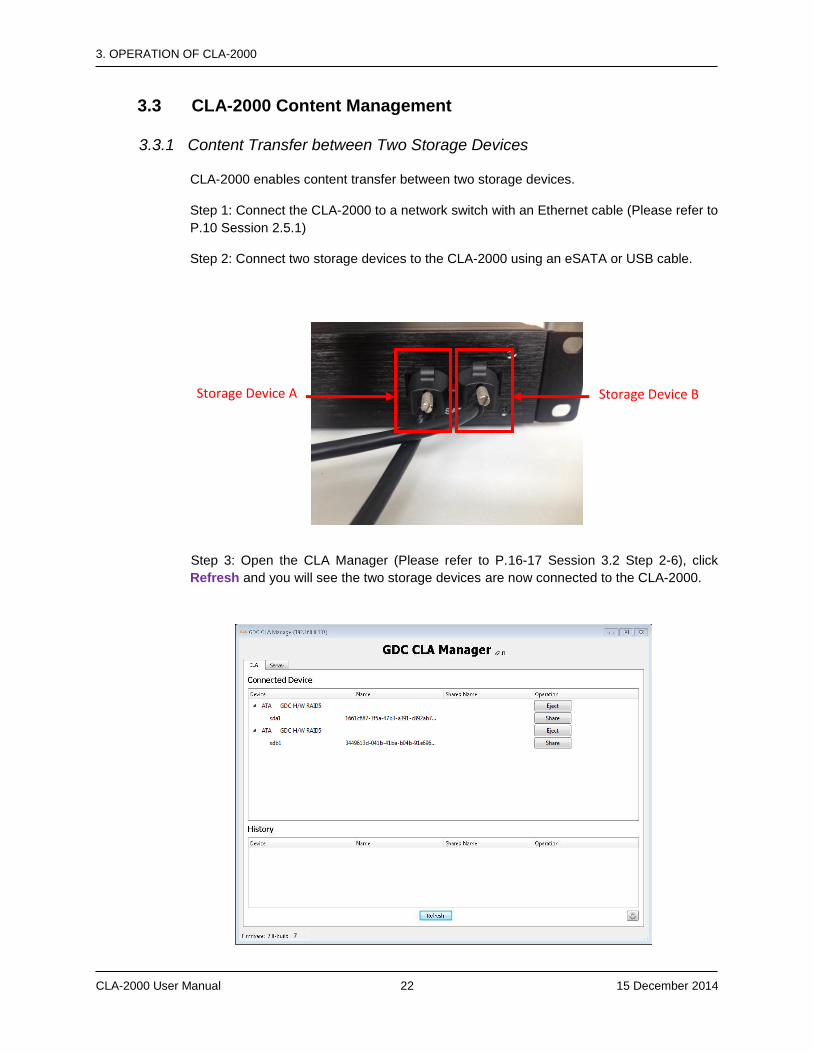
3.3.1 Content Transfer between Two Storage Devices CLA-2000 enables content transfer between two storage devices.
Step 1: Connect the CLA-2000 to a network switch with an Ethernet cable (Please refer to
P.10 Session 2.5.1)
Step 2: Connect two storage devices to the CLA-2000 using an eSATA or USB cable.
Step 3: Open the CLA Manager (Please refer to P.16-17 Session 3.2 Step 2-6), click
Refresh and you will see the two storage devices are now connected to the CLA-2000.
Storage Device B Storage Device A
7

3. OPERATION OF CLA-2000
15 December 2014 23 CLA-2000 User Manual
Step 4: Click Share, input Share Name and click OK.
Step 5: Click the super link under the column ‘Shared Name’ to browse the shared device.
7
3. OPERATION OF CLA-2000
CLA-2000 User Manual 24 15 December 2014
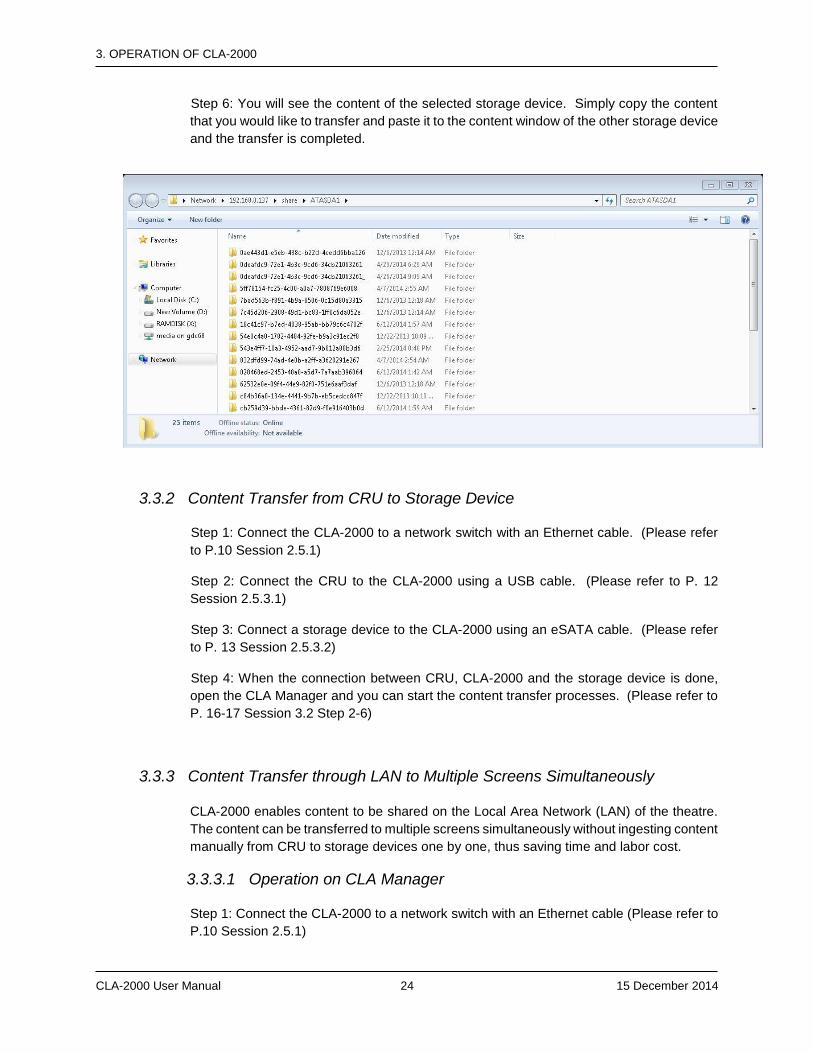
Step 6: You will see the content of the selected storage device. Simply copy the content
that you would like to transfer and paste it to the content window of the other storage device
and the transfer is completed.
3.3.2 Content Transfer from CRU to Storage Device
Step 1: Connect the CLA-2000 to a network switch with an Ethernet cable. (Please refer
to P.10 Session 2.5.1)
Step 2: Connect the CRU to the CLA-2000 using a USB cable. (Please refer to P. 12
Session 2.5.3.1)
Step 3: Connect a storage device to the CLA-2000 using an eSATA cable. (Please refer
to P. 13 Session 2.5.3.2)
Step 4: When the connection between CRU, CLA-2000 and the storage device is done,
open the CLA Manager and you can start the content transfer processes. (Please refer to
P. 16-17 Session 3.2 Step 2-6)
3.3.3 Content Transfer through LAN to Multiple Screens Simultaneously
CLA-2000 enables content to be shared on the Local Area Network (LAN) of the theatre.
The content can be transferred to multiple screens simultaneously without ingesting content
manually from CRU to storage devices one by one, thus saving time and labor cost.
3.3.3.1 Operation on CLA Manager Step 1: Connect the CLA-2000 to a network switch with an Ethernet cable (Please refer to
P.10 Session 2.5.1)
3. OPERATION OF CLA-2000
15 December 2014 25 CLA-2000 User Manual
Step 2: Connect the CRU and storage device to the CLA-2000 with eSATA cables (Please
refer to P.11-13 Session 2.5.2). Make the connected drive (CRU or storage device) to be
a shared drive.
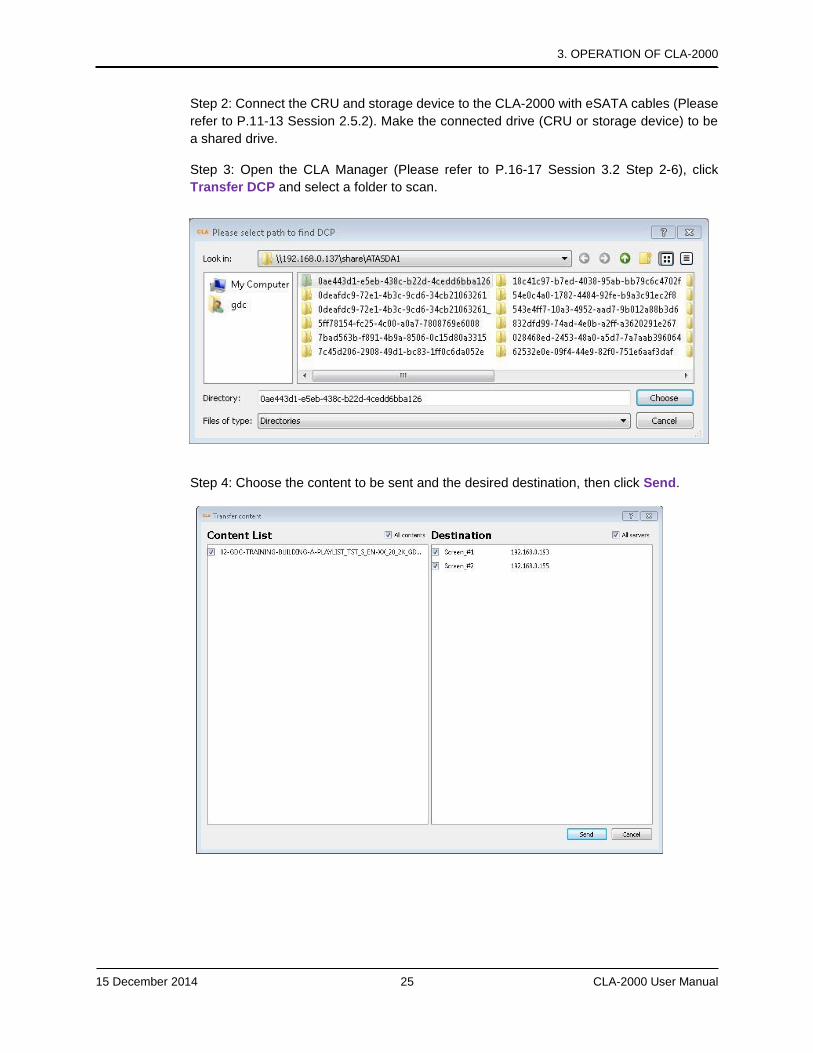
Step 3: Open the CLA Manager (Please refer to P.16-17 Session 3.2 Step 2-6), click
Transfer DCP and select a folder to scan.
Step 4: Choose the content to be sent and the desired destination, then click Send.

3. OPERATION OF CLA-2000
CLA-2000 User Manual 26 15 December 2014
Step 5: Click Asset Manager in the Server tab to check transfer progress.
3.3.3.2 Operation on GDC Server
Step 1: Connect the CLA-2000 to a network switcher with an Ethernet cable (Please refer
to P.10 Session 2.5.1)
Step 2: Connect the CRU and storage device to the CLA-2000 using eSATA cables (Please
refer to P. 13 Session 2.5.3.2). Make the connected drive (CRU or storage device) to be a
shared drive.
Step 3: Go to Content Manager on Control Panel, create a new content source, fill in CLA-
2000 IP, and select source CIFS (path:/share, username: guest, password: leave it blank),
and then you can ingest content from CLA-2000.

3. OPERATION OF CLA-2000
15 December 2014 27 CLA-2000 User Manual
3.4 Remote Access CLA-2000
3.4.1 Access CLA-2000 on the Linux or MAC Operating System Connect to the CLA-2000 by running 'ssh -l <username> <hostname>’ on your computer.
Please contact GDC Service team for username and password.
3.4.2 Access CLA-2000 on the Windows Operating System Download any SSH client for Windows, such as PuTTY.
3.5 Eject External Devices from CLA Manager
Step 1: Select the device you want to eject from the CLA Manager, and then click Eject.
7
3. OPERATION OF CLA-2000
CLA-2000 User Manual 28 15 December 2014
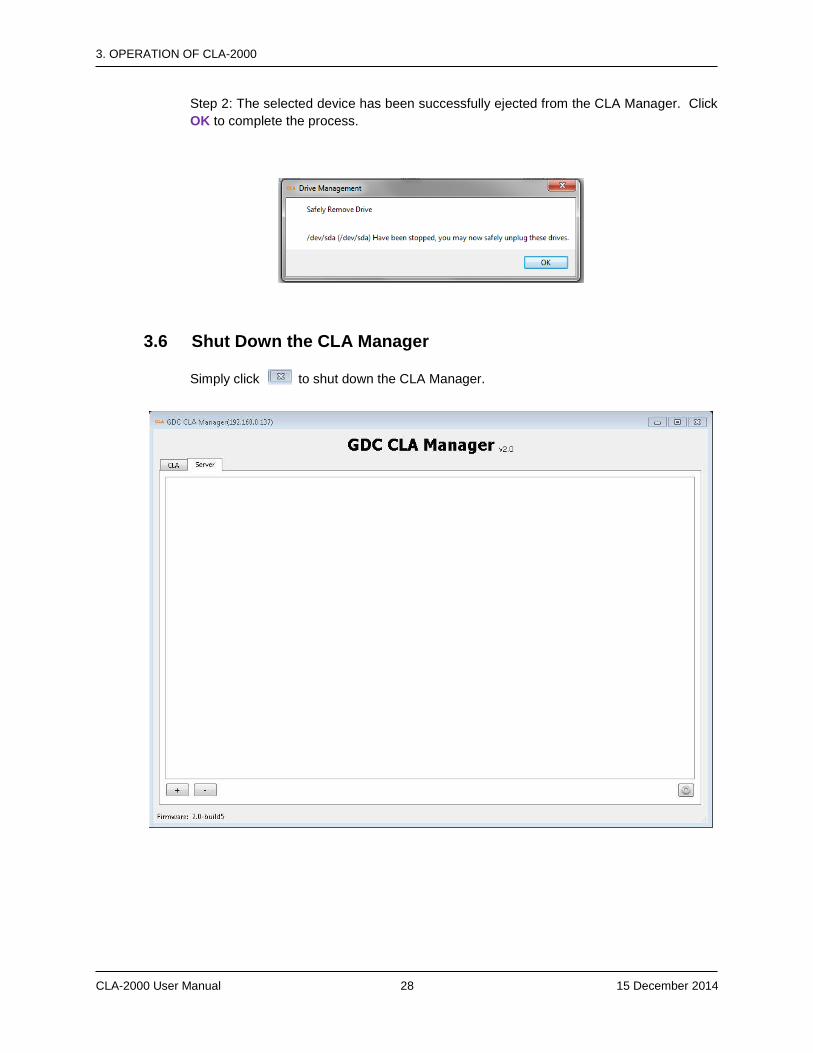
Step 2: The selected device has been successfully ejected from the CLA Manager. Click
OK to complete the process.
3.6 Shut Down the CLA Manager
Simply click to shut down the CLA Manager.
3. OPERATION OF CLA-2000
15 December 2014 29 CLA-2000 User Manual
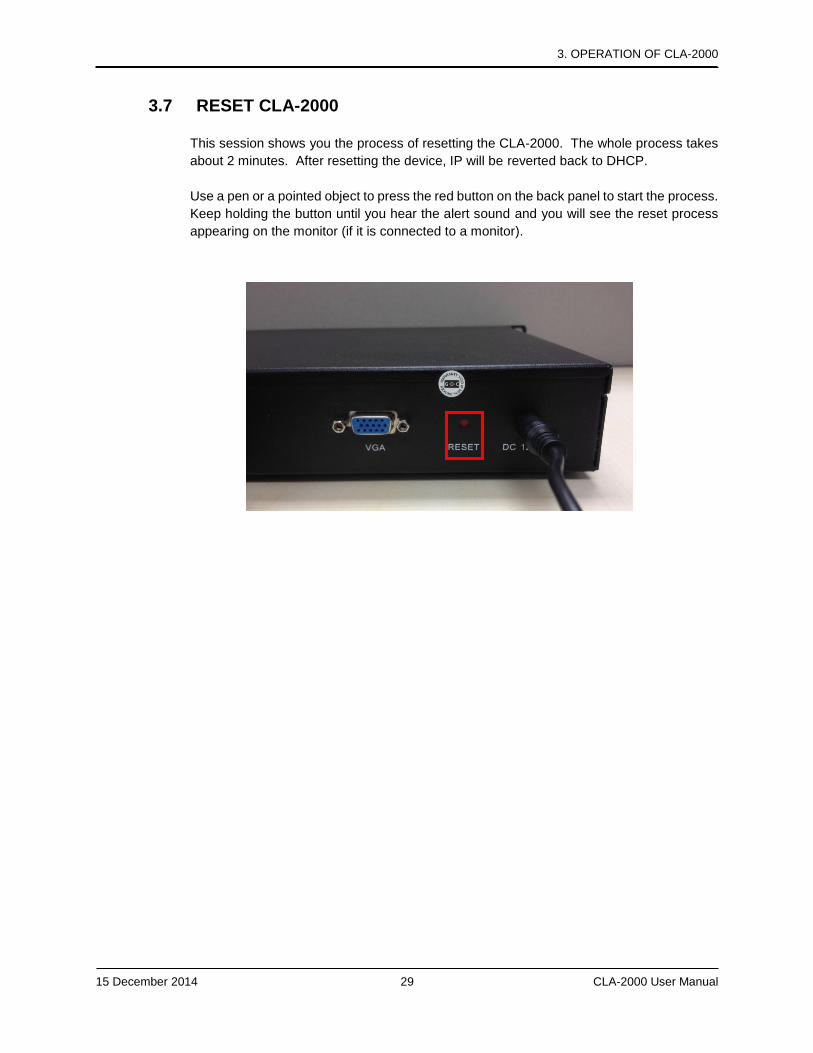
3.7 RESET CLA-2000
This session shows you the process of resetting the CLA-2000. The whole process takes
about 2 minutes. After resetting the device, IP will be reverted back to DHCP.
Use a pen or a pointed object to press the red button on the back panel to start the process.
Keep holding the button until you hear the alert sound and you will see the reset process
appearing on the monitor (if it is connected to a monitor).

CLA-2000 User Manual 30 15 December 2014
GDC Technology Offices
Hong Kong (Headquarters) India (Mumbai) Unit 1-7, 20th Floor, Office No. B-207/208, Kodak House II, Everest Chamber, Andheri Kurla Road, Marol, 39 Healthy Street East, Andheri (East), Mumbai-400 059, India North Point, Hong Kong. Tel: +91 22 4044 0500 Tel: +852 2507 9555
China (Beijing) Brazil (São Paulo) Rm. 609-618, Office Building, Avenida Paulista, 807 conjs. 701/703 20# Xinde Street, Xicheng District, 01311-100, São Paulo – Brasil Beijing, P.R. China 100088 Tel: +55 11 32058100 Tel: +86 10 6205 7040
China (Shenzhen) Singapore Room A701, 7/F, 10 Ubi Crescent, Ubi Tech Park, Languang Technology Building, Lobby B, #06-25 No.7 Xinxi Road, North Zone, Singapore 408564 High-Tech Park, Nanshan District, Tel: +65 6222 1082 Shenzhen, China Tel: +86 755 8608 6000
Spain (Barcelona) Japan (Tokyo) Edificio Mercurio 3F, Kyobashi-Chuo Bldg, Vía Augusta, 59, desp. 607 1-14-7 Kyobashi Chuo-ku 08006 Barcelona, Spain Tokyo 104-0031, Japan Tel: +34 93 159 51 75 Tel: +81 3 5524 3607
Peru (Lima) Indonesia (Jakarta) Calle Rey Bahamonde N°111 Total Building Lantai 4 Suite 0401, Santiago de Surco Jl. Letjen S. Parman Kav. 106A, Lima 33 – Peru Kel. Tomang, Kec. Grogol Petamburan, Tel: +51 1 677 6708 Jakarta Barat 11440
USA (Los Angeles, CA) 1016 West Magnolia Boulevard Burbank, CA 91506, USA Tel: +1 818 972 4370 / +1 877 743 2872 (Toll Free)
Mexico (Mexico City) Ave. Santa Fe 94, Torre A Piso 8 Col. Zedec Santa Fe, Alvaro Obregon, Mexico, D.F., C.P. 01210 Mexico Tel: +52 55 8851 1198 / +52 55 8851 1165 Email: [email protected] Website: www.gdc-tech.com ISO 9001 QMS
Cert. No. CN09/32221
GDC Technology manufacturing facility is ISO 9001:2008 certified. Copyright © 2014 GDC Technology Limited. All rights reserved. All trademarks listed in this manual are properties of their respective owners. Specifications are subject to change without notice due to ongoing product development and improvement. UM-0218-1409-V1E