user manual - microsoft
TRANSCRIPT

User Manual
2 User Manual
Introduction Non-UE WarrantyUE WarrantyConformity Specifications Idex / Fff Technology Safety Safety Signage
Setting Up Your Printer Unpacking Contents Preparing Your Printer
* Switching On Your Printer For The First Time Loading The Filament Calibrating Your Printer First Printing
Starting Out With Cura-Bcn3d Downloading And Installing Cura First Idex Printing Cura Updates
Functionalities
Filament
Maintenance Plan
Bcn3d Technologies Technical Assistance Services
Diagram Of The Bcn3d Sigma
Return Policy
Terms And Conditions Of Service
Open Source
Contents
33589101012
13131415
20202223
24242627
30
32
34
35
36
38
39
40
*You can see Switching On Your Printer For The First Time Section on our youtube channel:https://www.youtube.com/playlist?list=PL8iOVmTsyvGRYhiB4ykxxzcl1gnakOReg

User Manual 3
33589101012
13131415
20202223
24242627
30
32
34
35
36
38
39
40
Fundació Privada Centre CIM (“Fundació CIM”) grants this Warranty to the BCN3D brand Product users.
This Warranty is only valid in the country where the Product has been purchased originally, as long as it is member of the European Union, Iceland, Norway, Switzerland, Liechtenstein or Turkey. Otherwise, review the Warranty for non EU countries.
Fundació CIM guarantees that, within the Warranty Period, Fundació CIM or an authorized service company will correct, in a reasonable commercial time, the claims related with the non-conforming Product according to the following clauses.
Warranty Period
The Warranty Period starts when the Product is first delivered to the end-user.
The Warranty period lasts twenty-four (24) months. Both the parts that suffer wear and tear due to the normal operation of the Product and the “Consumable” elements are not covered by this Warranty.
The present Warranty is invalidated in case of incurring in any of the cases exposed in the Exclusions chapter.
In case of resale, repair or substitution of the Products the Warranty is not extended. The repaired or substituted parts are covered until the end of the Warranty Period or during six (6) months, depending on which date is later.
EU Warranty
Introduction
List of Consumable components
This document lists the Consumable components that, for its natural deterioration, are excluded from the Warranty: BCNozzle (Hotend), Bowden Tube, Hotbed Glass, Filament Spools, 3DLAC, Printed Parts.
Technical Support
For any questions or problems with BCN3D Products, please contact us at:
c/ Esteve Terrades, 1Edifici RDIT del PMT, 2a Planta 21608860 Castelldefels, Barcelona (España)email: [email protected]: +34 934137088
Fundació Privada Centre CIMc/ Llorens i Artigas, 1208028 Barcelona (España)Tel. +34 934017171

4 User Manual
How to get Warranty Service
In case of non-conformity with the Product:
1 Notify the seller before the end of the Warranty Period
2 Supply all the information to Fundació CIM or to the authorized service company about the nature of the claim in the period of two (2) months since its detection and never after the end of the Warranty Period.
3 Supply the original proof of purchase, which includes the Product serial number
In case of doubt, contact the Fundacio CIM Technical Assistant Service (“TAS”) ([email protected]) or the authorized service company
Claim handling
1 The remedy of the non-conforming Product is solely determined by Fundació CIM or the authorized service company within a reasonable commercial time.
2 The amendment may consist in the repair, part replacements or total substitution of the Product, depending on each situation and disposed by Fundació CIM or the authorized service company (unless the current legislation states it otherwise).
3 The client takes responsibility for the transport of the machine to the facilities of BCN3D (going and return).
4 Fundacio CIM or the authorized service company, depending on which handles the claim, bears the repair, parts replacement or Product substitution costs.
5 All damaged, defective or replaced parts or Products become the property of Fundació CIM or the authorized service company.
Exclusions
This Warranty does not cover:
1 Physical damage caused by an inappropriate transport (not using the official packaging) or handling (including unlimitedly the damages caused by sharp or cutting elements, bending or compressing parts or fall of the Product).
2 The normal wear and tear occurred for the product normal use, including unlimitedly the wear of moving parts, control panels or elements interacting with the product operation.
3 The damages inflicted by the non-compliance of the Maintenance Plan specified in the Product User Manual.
4 Malfunctions or damage caused by modifications, alterations or repairs by any individual or company not authorized by Fundació CIM. The Consumable replacements are excluded of this point.
5 Damage caused by power grid failures
6 Damage caused by abuse, misuse, accidents or neglect using the Product.
7 Resulting damages of exposing the Product to floods, fire, humidity, spillage of food or chemicals, corrosion, oxidation, extreme weather conditions or any other external agent.
8 Damages caused by the use of software non recommended by Fundació CIM.
9 Damages caused by the use of printing materials non recommended by Fundació CIM .
10 The components considered as Consumables,
EU Warranty

User Manual 5
Fundació Privada Centre CIM (“Fundació CIM”) grants this Warranty to the BCN3D Technologies brand Product users.
This Warranty is only valid in the country where the Product has been purchased originally, as long as it is not member of the European Union, Iceland, Norway, Switzerland, Liechtenstein or Turkey. Otherwise, check the Warranty for EU countries.
Warranty Period
The Warranty Period starts when the Product is first delivered to the end-user.
The Warranty period lasts twelve (12) months. Both the parts that suffer wear and tear due to the normal operation of the Product and the “Consumable” elements are not covered by this Warranty.
The present Warranty is invalidated in case of incurring in any of the cases exposed in the Exclusions chapter.
In case of resale, repair or substitution of the Products the Warranty is not extended. The repaired or substi-tuted parts are covered until the end of the Warranty Period or during six (6) months, depending on which date is later.
Some states do not allow limitations on how long an implied warranty lasts, so the above limitation may not apply to you.
How to get Warranty Service
In case of non-conformity with the Product:
1 Notify the seller before the end of the Warranty Period
Non-EU Warranty
EU Warranty
However, this Warranty does not limit either the consu-mer user rights specified in the legislation nor the the rights against the seller, also defined in the legislation.
Fundació CIM waives all liability for any loss of busines-ses, loss of contracts, loss of benefits, loss of savings, increase of costs or expenses due to the use of any of its Products. Likewise, Fundació CIM refuses any indirect, incidental, collateral damage by the use of its Products.
numbered in the annexed document.
Limitations and Disclaimers
This Warranty is the end user’s sole and exclusive remedy against Fundació CIM and the sole and exclu-sive responsibility of Fundació CIM to defects in their Products. Therefore, this Warranty supersedes any other warranties issued by Fundació CIM, either oral or written in any form.

6 User Manual
Claim handling
1 The remedy of the non-conforming Product is solely determined by Fundació CIM or the authorized service company within a reasonable commercial time.
2 The amendment may consist in the repair, part replacements or total substitution of the Product, depending on each situation and disposed by Fundació CIM or the authorized service company (unless the current legislation states it otherwise).
3 The client takes responsibility for the transport of the machine to the facilities of BCN3D (going and return).
4 Fundacio CIM or the authorized service company, depending on which handles the claim, bears the repair, parts replacement or Product substitution costs.
5 All damaged, defective or replaced parts or Products become the property of Fundació CIM or the authorized service company.
2 Supply all the information to Fundació CIM or to the authorized service company about the nature of the claim in the period of two (2) months since its detection and never after the end of the Warranty Period.
3 Supply the original proof of purchase, which includes the Product serial number
In case of doubt, contact the Fundacio CIM Technical Assistant Service (“TAS”) ([email protected]) or the authorized service company.
Exclusions
This Warranty does not cover:
1 Physical damage caused by an inappropriate transport (not using the official packaging) or handling (including unlimitedly the damages caused by sharp or cutting elements, bending or compressing parts or fall of the Product).
2 The normal wear and tear occurred for the product normal use, including unlimitedly the wear of moving parts, control panels or elements interacting with the product operation.
3 The damages inflicted by the non-compliance of the Maintenance Plan specified in the Product User Manual.
4 Malfunctions or damage caused by modifications, alterations or repairs by any individual or company not authorized by Fundació CIM. The Consumable replacements are excluded of this point.
5 Damage caused by power grid failures
6 Damage caused by abuse, misuse, accidents or neglect using the Product.
7 Resulting damages of exposing the Product to floods, fire, humidity, spillage of food or chemicals, corrosion, oxidation, extreme weather conditions or any other external agent.
8 Damages caused by the use of software non recommended by Fundació CIM.
9 Damages caused by the use of printing materials non recommended by Fundació CIM .
Non-EU Warranty

User Manual 7
10 The components considered as Consumables, numbered in the annexed document. Some states do not allow the exclusion of incidental or consequential damages, so the above limitation or exclusion may not apply to you.
Limitations and Disclaimers
This Warranty is the end user’s sole and exclusive remedy against Fundació CIM and the sole and exclusive responsibility of Fundació CIM to defects in their Products. Therefore, this Warranty supersedes any other warranties issued by Fundació CIM, either oral or written in any form.
However, this Warranty does not limit either the consumer user rights specified in the legislation nor the the rights against the seller, also defined in the legislation.
Fundació CIM waives all liability for any loss of businesses, loss of contracts, loss of benefits, loss of savings, increase of costs or expenses due to the use of any of its Products. Likewise, Fundació CIM refuses any indirect, incidental, collateral damage by the use of its Products.
Non-EU Warranty

8 User Manual
2006/42/EEC Machinery Directive2006/95/EEC Low Voltage Directive 2004/108/EEC Electromagnetic Compatibility Directive (EMC)2011/65/EU Restrictions on the use of hazardous substances in electrical and elec-tronic equipment (RoHS)
The BCN3DSigma printer has been manufactured in compliance with the following harmonised standards, and con-sequently conforms to the essential requirements established by the Directives:
2006/42/EEC UNE-EN ISO 12100:2012; UNE-EN ISO13732-1 :2008; EN ISO 7010:20122006/95/EEC UNE-EN 60204-1;UNE-EN 60947-3:20092004/108/EEC UNE-EN 55022:2011; UNE-EN 55024:2011; UNE-EN 61000-4-3-2:2007
Changes / modifications not approved by the responsible party could void the user’s authority to operate the equipment.
This equipment has been tested and found to comply with the limits for a Class B digital device, pursuant to part 15 of the FCC Rules. These limits are designed to provide reasonable protection against harmful interference in a residential installation. This equipment generates, uses and can radiate radio frequency energy and, if not installed and used in accordance with the instructions, may cause harmful interference to radio communications.
However, there is no guarantee that interference will not occur in a particular installation. If this equipment does cause harmful interference to radio or television reception, which can be determined by turning the equipment off and on, the user is encouraged to try to correct the interference by one or more of the following measures:• Reorient or relocate the receiving antenna.• Increase the separation between the equipment and receiver.• Connect the equipment into an outlet on a circuit different from that to which the receiver is connected.• Consult the dealer or an experienced radio/TV technician for help.
The CIM Private Foundation Centre declares that the BCN3DSigma printer complies with the essential require-ments and any other applicable or mandatory provisions of the Directives.
It complies with the essential requirements of the European Directives:
Conformity
Fundació Privada Centre CIM Llorens i Artigas, 12 08028 Barcelona. Tel: +34 934017171 www.fundaciocim.org
REI-RAEE: 6107
User Manual 9
Technology
Manufacturing technology
General dimensions
Weight
Printing volume
Number of extruders
Nozzle diameter (mm)
Layer height
Positioning resolution
Operating temperature
Maximum extruder temperature
Max. temperature of heated bed
Filament diameter (mm)
Compatible material
Electronics
Connectivity
Firmware:
Operating sound (dBA)
Compatible files
Software preparation files
Power supply
Electrical energy consumption
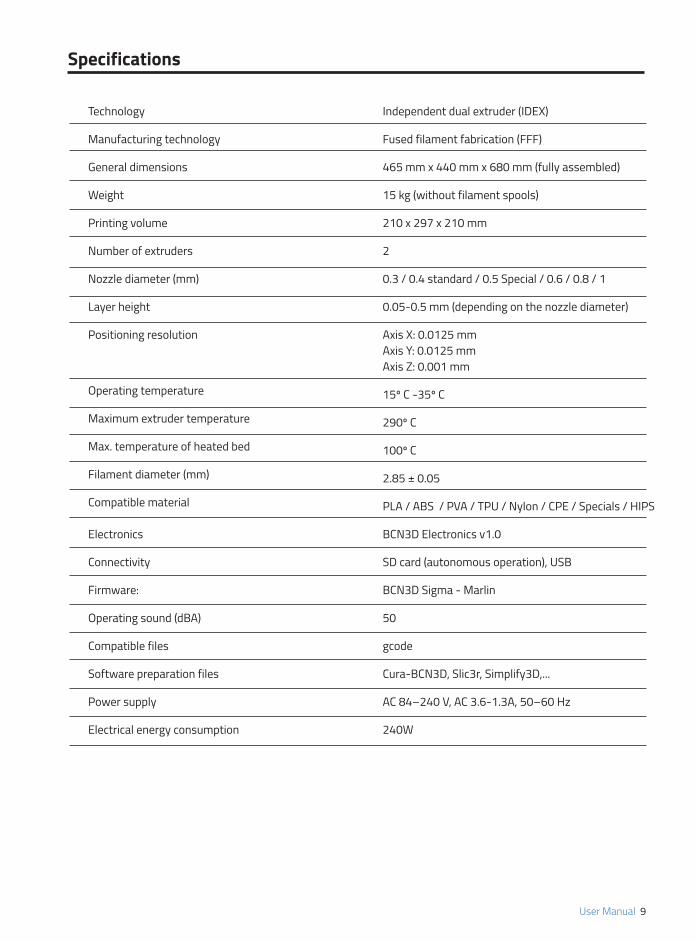
Independent dual extruder (IDEX)
Fused filament fabrication (FFF)
465 mm x 440 mm x 680 mm (fully assembled)
15 kg (without filament spools)
210 x 297 x 210 mm
2
0.3 / 0.4 standard / 0.5 Special / 0.6 / 0.8 / 1
0.05-0.5 mm (depending on the nozzle diameter)
Axis X: 0.0125 mm Axis Y: 0.0125 mm Axis Z: 0.001 mm
15º C -35º C
290º C
100º C
2.85 ± 0.05
PLA / ABS / PVA / TPU / Nylon / CPE / Specials / HIPS
BCN3D Electronics v1.0
SD card (autonomous operation), USB
BCN3D Sigma - Marlin
50
gcode
Cura-BCN3D, Slic3r, Simplify3D,...
AC 84–240 V, AC 3.6-1.3A, 50–60 Hz
240W
Specifications
To avoid potential residual risks the user should read and understand the following safety measures (you are strongly advised to read this before using the machine).
To highlight the areas where extra care should be taken, safety alert stickers have been affixed to the relevant parts of the machine to warn the user of potential hazards.Any modifications made to the machine without the manufacturer´s approval will invalidate the product´s Declaration of Conformity (CE) and warranty.
Consequently, the Fundació CIM and BCN3D Technologies ARE EXEMPT FROM ANY LIABILITY IF THE USER DOES NOT FOLLOW THE INSTRUCTIONS FOR USE:
IDEX / FFF technology
Safety
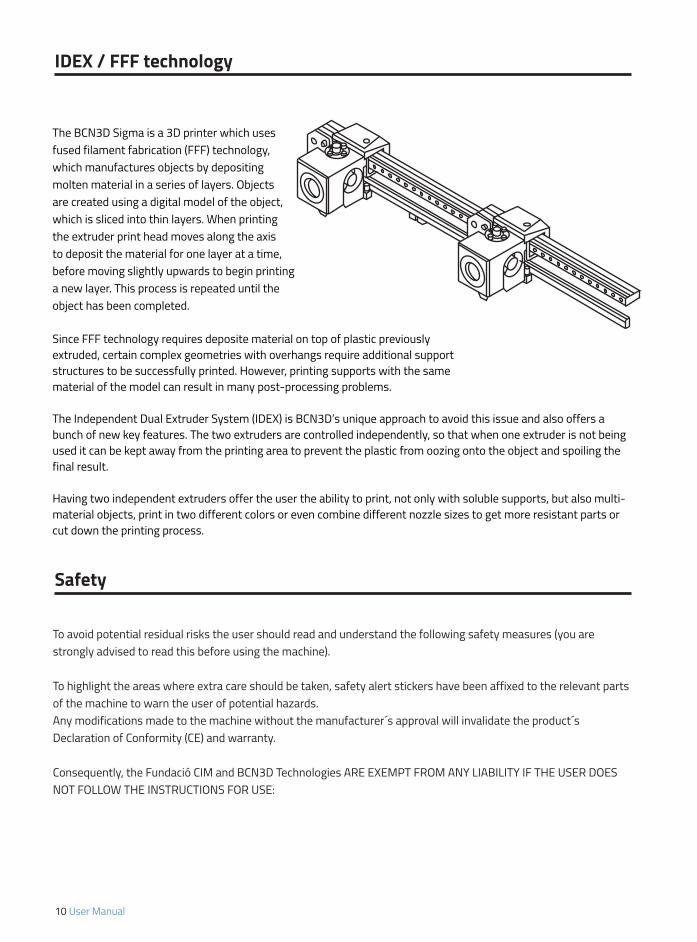
The BCN3D Sigma is a 3D printer which uses fused filament fabrication (FFF) technology, which manufactures objects by depositing molten material in a series of layers. Objects are created using a digital model of the object, which is sliced into thin layers. When printing the extruder print head moves along the axis to deposit the material for one layer at a time, before moving slightly upwards to begin printing a new layer. This process is repeated until the object has been completed.
Since FFF technology requires deposite material on top of plastic previously extruded, certain complex geometries with overhangs require additional support structures to be successfully printed. However, printing supports with the same material of the model can result in many post-processing problems.
The Independent Dual Extruder System (IDEX) is BCN3D’s unique approach to avoid this issue and also offers a bunch of new key features. The two extruders are controlled independently, so that when one extruder is not being used it can be kept away from the printing area to prevent the plastic from oozing onto the object and spoiling the final result.
Having two independent extruders offer the user the ability to print, not only with soluble supports, but also multi-material objects, print in two different colors or even combine different nozzle sizes to get more resistant parts or cut down the printing process.
10 User Manual

User Manual 11
Safety
Very important. As with any other appliance, do not touch the terminals of the mains, the switch, or the power supply. There is a risk of electrocution. The other cables of the machine operate at 24V and there is no risk whatsoever.
Connect the machine to an electrical outlet according to the current legislation.
Do not connect or disconnect any device and/or electrical connector when the machine is connected to the power supply.
Keep all of your body and all objects away from the moving parts of the machine when they are moving.
Do not touch the hot parts (heated bed and hot-ends) when the machine is switched on, and wait 15 minutes after it has been switched off before touching them.
Handle the glass printing surface with care. Make sure it is not dropped or hit with anything as this could seriously damage it.
The printing materials are not innocuous and emit toxic fumes. Always print in open or well-ventilated spaces and use a protective mask.
Do not breathe closer than 25 cm from the extruder head when printing.
Supervise the printer while it is printing to make sure it is working properly.
In the event of emergency, stop the machine immediately by pressing the ON button, and disconnect the power supply.
This device is not a toy. It should only be used by minors under 16 under the supervision of an adult.
The spatula is a dangerous tool that can cause injuries. Use it only to remove plastic rests when running the calibration assistant.
Safety signage
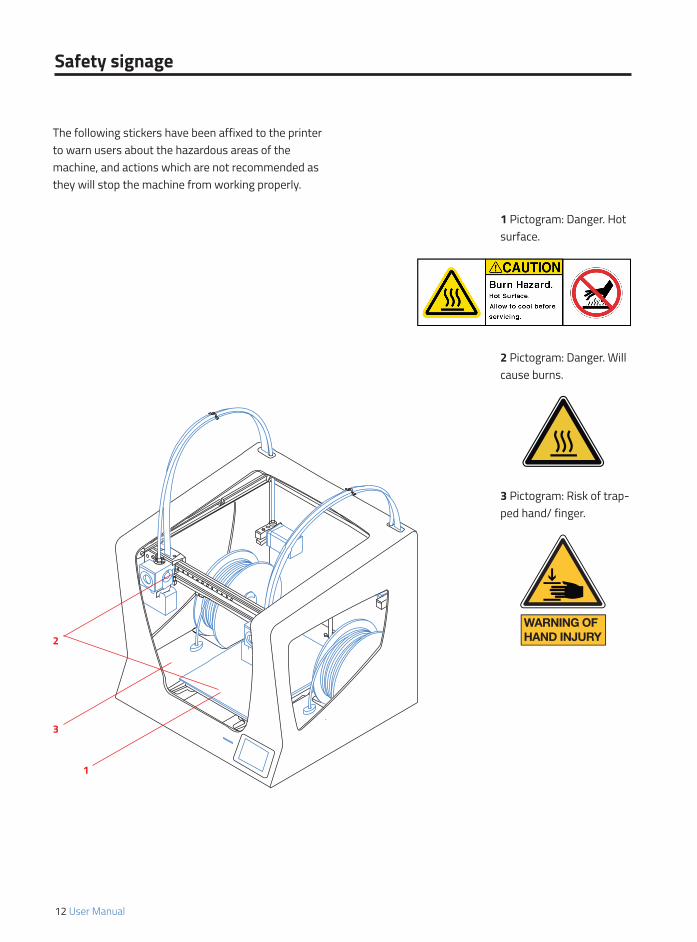
The following stickers have been affixed to the printer to warn users about the hazardous areas of the machine, and actions which are not recommended as they will stop the machine from working properly.
1 Pictogram: Danger. Hot surface.
2 Pictogram: Danger. Will cause burns.
3 Pictogram: Risk of trap-ped hand/ finger.
12 User Manual
1
3
2
User Manual 13
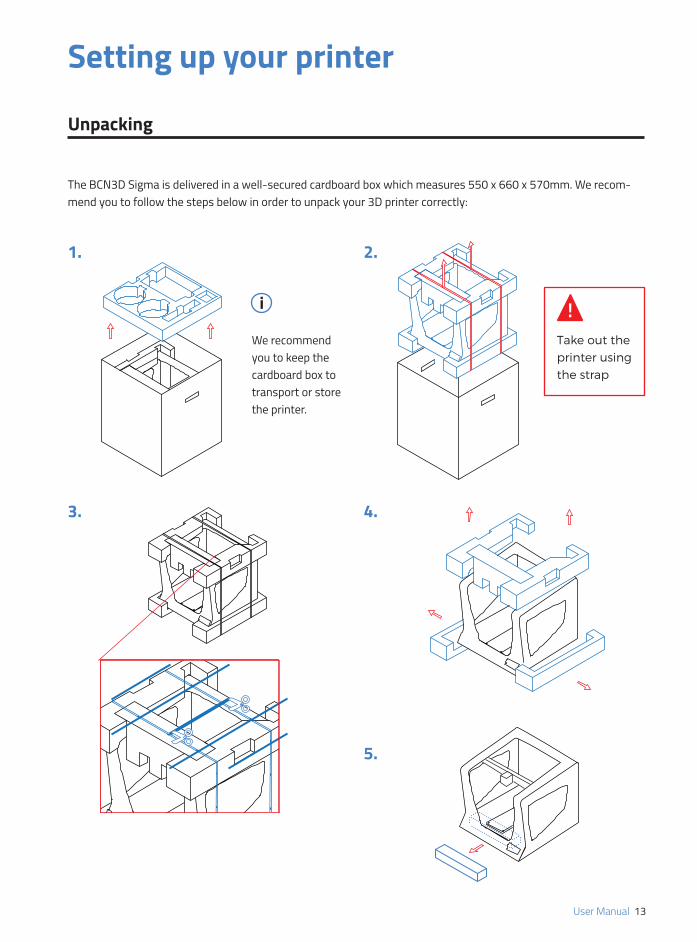
Unpacking
Setting up your printer
The BCN3D Sigma is delivered in a well-secured cardboard box which measures 550 x 660 x 570mm. We recom-mend you to follow the steps below in order to unpack your 3D printer correctly:
1. 2.
3. 4.
5.
We recommend you to keep the cardboard box to transport or store the printer.
i
Take out the printer using the strap
14 User Manual
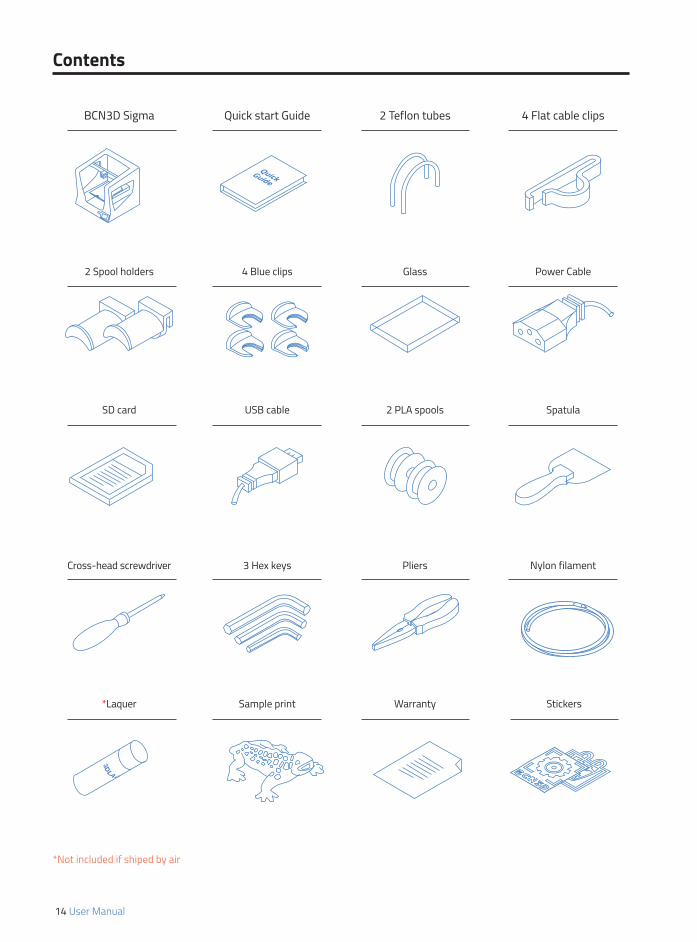
Contents
BCN3D Sigma
2 Spool holders
SD card
Cross-head screwdriver
*Laquer
Quick start Guide
4 Blue clips
USB cable
3 Hex keys
Sample print
2 Teflon tubes
Glass
2 PLA spools
Pliers
Warranty
4 Flat cable clips
Power Cable
Spatula
Nylon filament
Stickers
*Not included if shiped by air
User Manual 15
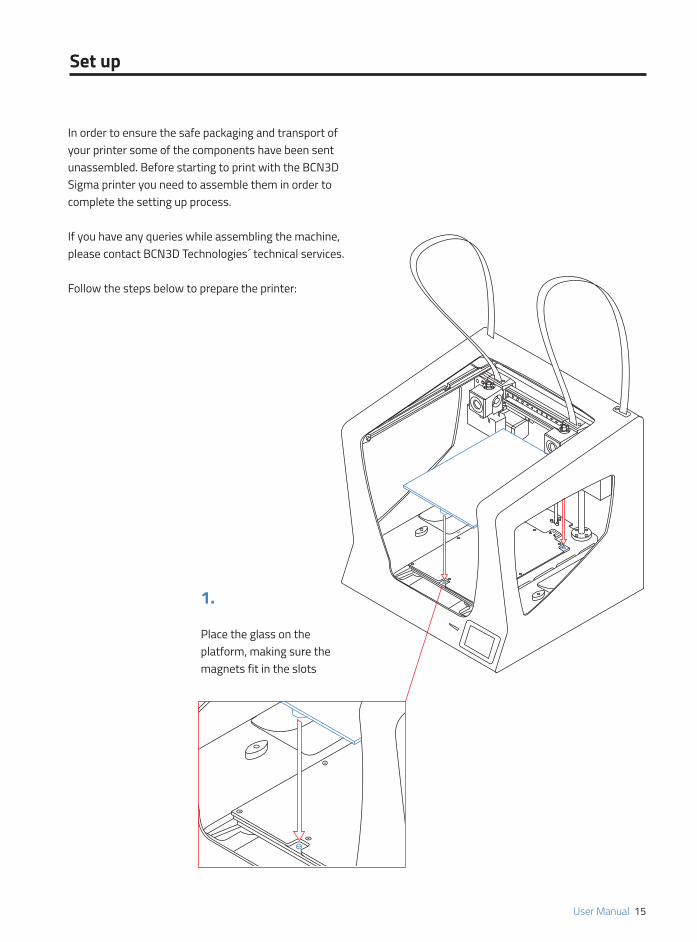
Set up
In order to ensure the safe packaging and transport of your printer some of the components have been sent unassembled. Before starting to print with the BCN3D Sigma printer you need to assemble them in order to complete the setting up process.
If you have any queries while assembling the machine, please contact BCN3D Technologies´ technical services.
Follow the steps below to prepare the printer:
1.
Place the glass on the platform, making sure the magnets fit in the slots
16 User Manual
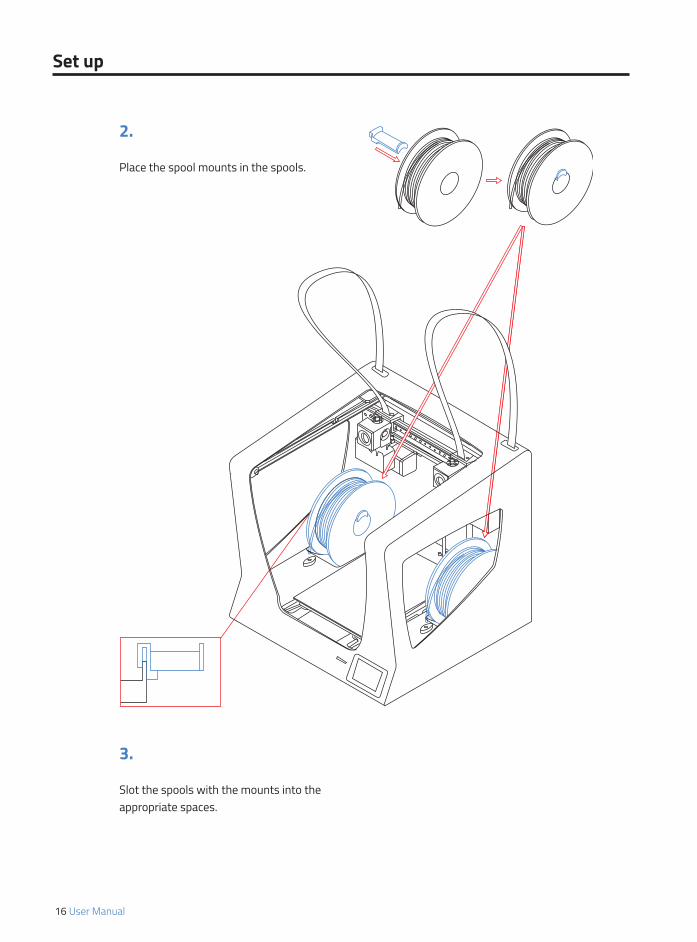
Set up
2.
Place the spool mounts in the spools.
3.
Slot the spools with the mounts into the appropriate spaces.

User Manual 17
Set up
4.
Pull the guide rails of the hot-ends forwards by hand.
5.
Insert the teflon tube as far as it can.
6.
Insert the other end into the hot-end hole.
18 User Manual
Set up
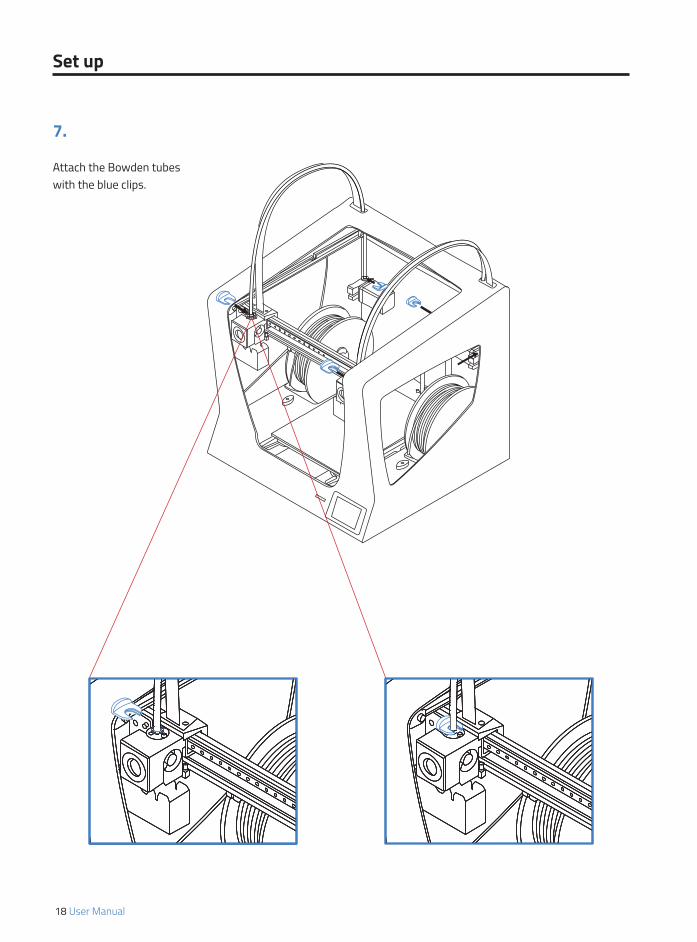
7.
Attach the Bowden tubes with the blue clips.
User Manual 19
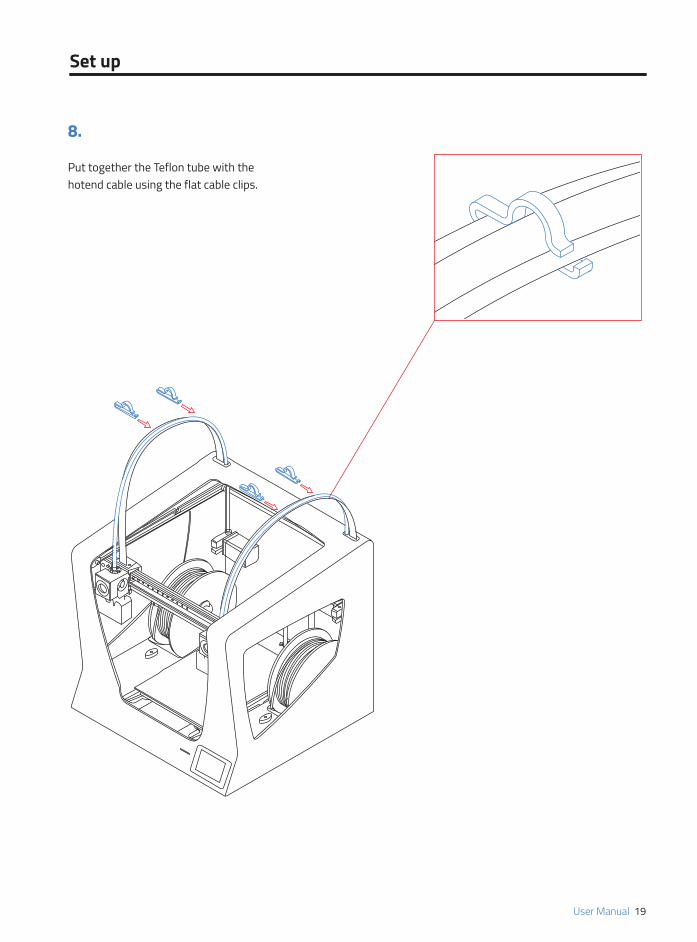
8.
Put together the Teflon tube with the hotend cable using the flat cable clips.
Set up

20 User Manual
Set up
9.
Connect the power supply cable. The plug is located at the rear of the machine.
10.
Insert the SD card into the reader.
User Manual 21
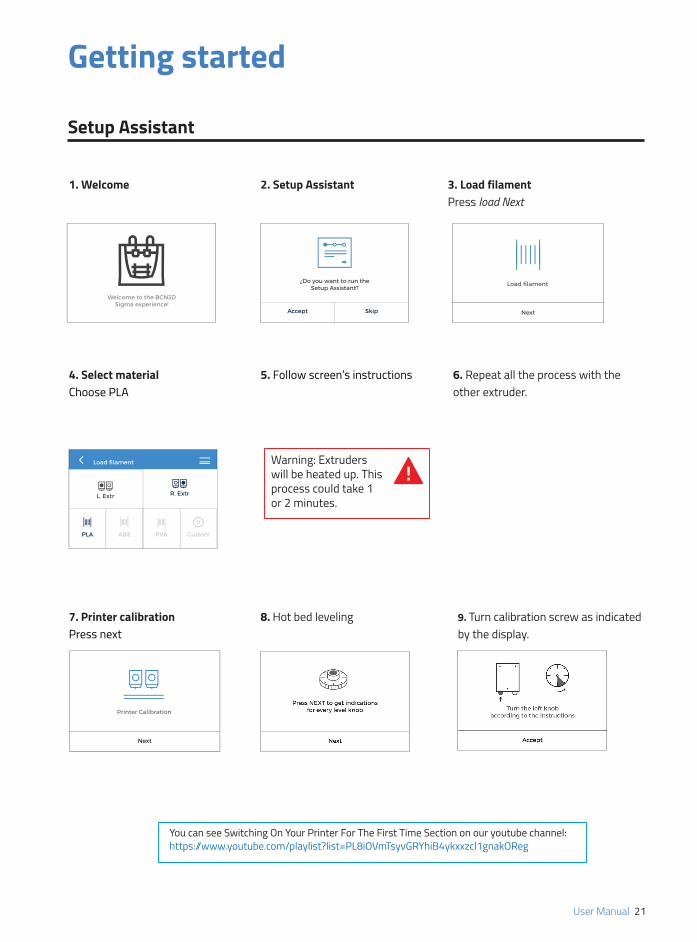
Getting started
1. Welcome
4. Select materialChoose PLA
7. Printer calibrationPress next
8. Hot bed leveling
6. Repeat all the process with the other extruder.
Setup Assistant
You can see Switching On Your Printer For The First Time Section on our youtube channel:https://www.youtube.com/playlist?list=PL8iOVmTsyvGRYhiB4ykxxzcl1gnakOReg
Warning: Extruders will be heated up. This process could take 1 or 2 minutes.
9. Turn calibration screw as indicated by the display.
2. Setup Assistant 3. Load filamentPress load Next
5. Follow screen’s instructions
22 User Manual
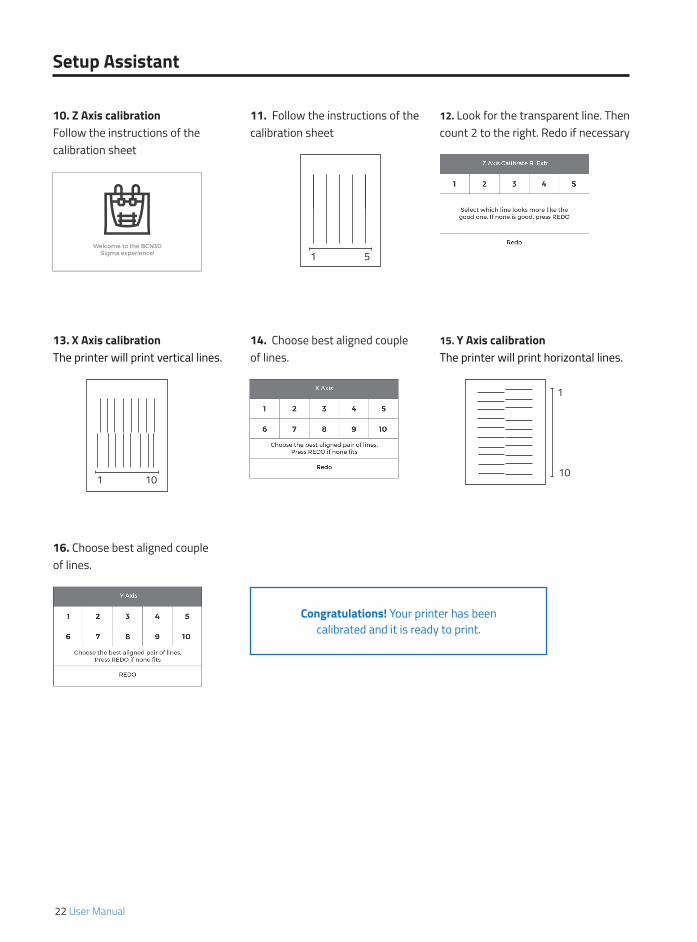
Setup Assistant
10. Z Axis calibrationFollow the instructions of the calibration sheet
13. X Axis calibrationThe printer will print vertical lines.
16. Choose best aligned couple of lines.
15. Y Axis calibrationThe printer will print horizontal lines.
12. Look for the transparent line. Then count 2 to the right. Redo if necessary
11. Follow the instructions of the calibration sheet
1 5
14. Choose best aligned couple of lines.
Congratulations! Your printer has been calibrated and it is ready to print.
1 10
1
10

User Manual 23
First print
After the calibration process has been completed, you can access the printing menu. The first object you will print with the BCN3D Sigma is the Draudi figure, as it will allow you to check that everything is working properly and you are now ready to start printing your own objects. Make sure that the glass is clean, and apply a small amount of adhesive lacquer to get the best results.
24 User Manual
Starting out with Cura-BCN3D
Downloading and installing Cura
Although BCN3D Technologies printers are compatible with many different G-Code software generators, we re-commend using the Cura version that has been developed by BCN3D Technologies.
Cura is open source software that adapts to the new IDEX system very well. Like other G-Code software genera-tors, Cura slices 3D models into layers, where the perimeters and infill of the object are clearly defined.
To provide a better printing experience, BCN3D Technologies´s version of Cura includes some changes which have been made to Cura´s interface and functionalities. These changes to the software have enabled us to achieve a better performance.
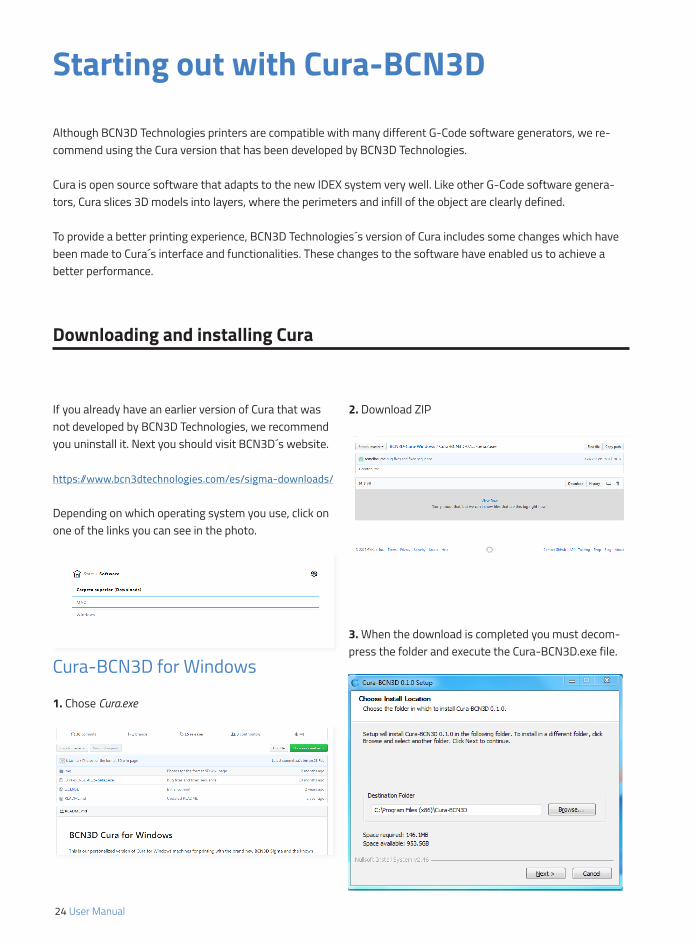
If you already have an earlier version of Cura that was not developed by BCN3D Technologies, we recommend you uninstall it. Next you should visit BCN3D´s website.
https://www.bcn3dtechnologies.com/es/sigma-downloads/
Depending on which operating system you use, click on one of the links you can see in the photo.
2. Download ZIP
3. When the download is completed you must decom-press the folder and execute the Cura-BCN3D.exe file.
Cura-BCN3D for Windows
1. Chose Cura.exe

User Manual 25
Downloading and installing Cura
5. If it is the first time you have installed the Cura soft-ware, the First-time-run Wizard will appear onscreen:
2. When the download is completed you must decom-press the folder and execute the Cura-BCN3D.dmg file.
3. When the file is opened a new window will appear, asking for the programme to be installed in the applications.
4. Next follow the instructions of the Setup Wizard.
6. Select BCN3D Sigma from the list of printers, and close the Wizard.
Cura-BCN3D for Mac
1. Chose Cura.dmg

26 User Manual
Downloading and installing Cura
First IDEX printing
4. If it is the first time you have installed the Cura soft-ware, the First-time-run Wizard will appear onscreen:
1. Open the Cura-BCN3D programme after downloa-ding and installing it.
3. Right-click on one of the two objects of the model. Click on the Dual Extrusion Merge option.
4. The figure should now appear as a single model in two different colours. This process may take a few seconds.
2. Click on File. Load Draudi profile and select the *.STL format files to be printed. After you have done this, the Draudi object will appear in two parts.
5. Select BCN3D Sigma from the list of printers, and close the Wizard.

User Manual 27
Cura Updates
First IDEX printing
5. You must now select the settings, depending on the materials to be used and the desired quality. To do this click on File > Open Profile, or on the icon, and choose the settings. IDEX folder contains dual extruder configurations while MEX foldercontains mono extruder configurations.
6. When you want to start printing insert an SD card into the computer. The programme will detect the card when it is inserted, and the Disc icon will be replaced by an SD card with the Toolpath to SD option. After saving the file in the SD card, the Eject Card option will appear.
7. You must insert the SD card into the printer in order to print. After inserting the card you should select Print in the main menu, as well as the file you want to print.
At BCN3D Technologies we want you to have a great printing experience, and to achieve this we are con-tinually working to create new software and firmware versions for our printers. These updates are made available at BCN3D´s GitHub once our developers think that they are ready for release to the general public. The new versions can either be manually downloaded or downloaded from Cura-BCN3D.
Software updates
The first time you install Cura-BCN3D you must go to the GitHub repository and download the most recent version. After the programme has been installed it will
automatically look for updates, and notify you if a new version of the programme is available.
If you decide to update the software, a page will open showing the GitHub repository where you can see the changes made to the programme, and download the new version.

Cura Updates
Firmware updates
1. Make sure your BCN3D Sigma is connected to the computer
2. Click on Machine > Check for firmware updates.
3. Next an automatic updater will appear, where you should select BCN3D Sigma from the list of printers. Although all BCN3D Technologies´ printers appear in the list, at the moment only BCN3D Sigma firmware updates are available.
4. Click on Upgrade Firmware.
5. If you want to check whether the printer´s firmware is up-to-date you should connect the printer to the computer with the USB cable, and then click on Connect Printer.
28 User Manual
User Manual 29
Cura Updates
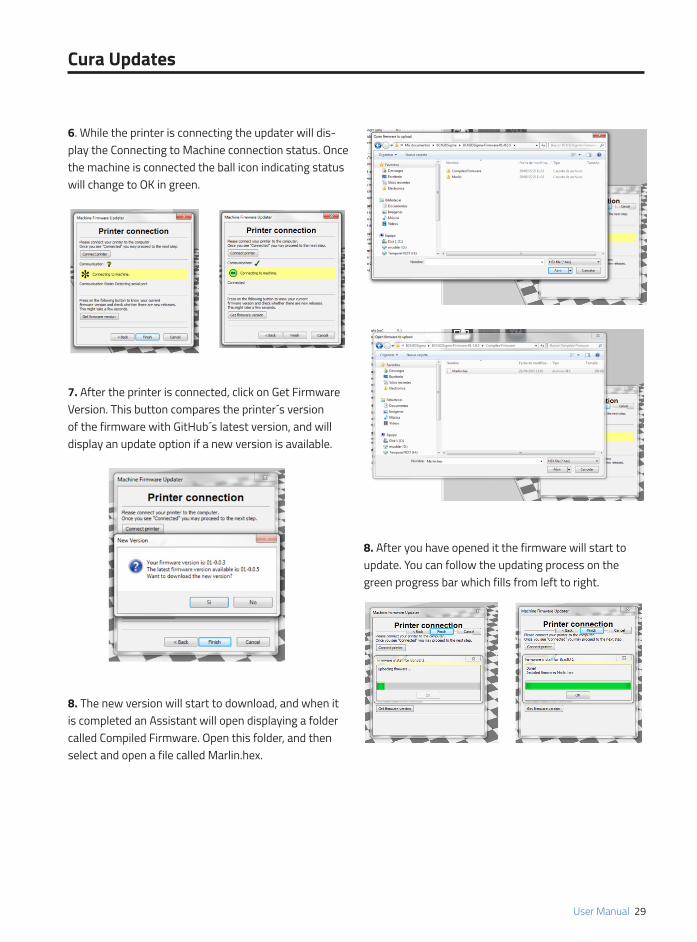
6. While the printer is connecting the updater will dis-play the Connecting to Machine connection status. Once the machine is connected the ball icon indicating status will change to OK in green.
7. After the printer is connected, click on Get Firmware Version. This button compares the printer´s version of the firmware with GitHub´s latest version, and will display an update option if a new version is available.
8. After you have opened it the firmware will start to update. You can follow the updating process on the green progress bar which fills from left to right.
8. The new version will start to download, and when it is completed an Assistant will open displaying a folder called Compiled Firmware. Open this folder, and then select and open a file called Marlin.hex.
Functionalities
This section contains a description of BCN3D Sigma functionalities. The main menu is divided into two large groups: printing and utilities. The first covers all the standard printing functions, while the second includes functions such as calibration, maintenance, settings, etc.
Printing
Located on the left-hand side of the main menu, this starts the printing process. You can control some of the parameters of the settings while the object is being printed from here.
Select object: When you access the printing function a screen appears with a list of files and folders. Use theonscreen arrows to navigate and then click on the selected file to confirm your selection.
Print: This screen displays the progress of the printingprocess. Press the Pause button to move the extrudersaway from the object and stop the printing process. When the printjob is paused it is possible to load/unload or purge filament, as well as cancel or resume the print.
The Stop button let’s you whether cancel the printing process and take you back to the main menu or save the printjob.
Settings: This option allows you to modify the printing speed and temperatures. When you select the element that you want to adjust, the objective temperature/ speed value appears, and you can adjust them by using the arrows. The Back button in the top left-hand corner will take you back to the printing screen.
Utilities
Situated at the center of the main menu, allows you to operate and maintain your printer.
Filament: this menu allows you to manage the fila-ments of the printer. The menu functions are:
–Load: This is for loading filament into one of the extruders. You should first select the side where you want to load the filament. Next, you should insert the filament into the extruder following the onscreen instructions (the extruder should first reach the right temperature, which may take a few minutes). Once you have inserted the filament the extruder can be adjusted slightly to allow you to load the rest of the filament. When purging we recommend you pull out a generous amount of filament to ensure the extruder is purged correctly.
PLA, ABS and PVA presets are offered, but it’s possible to load different materials. Just select “Custom” and set the 4 temperatures demanded. The “Load Temperature” is recommended to be 10ºC higher than the Printing Temperature. The “Unload Temperature” is recom-mended to be 30ºC below the Printing Temperature. Follow the manufacturer indications to set the “Printing Temperature” and the “Bed Temperature”.
–Unload: This operation is the opposite of the operation described above, although it is performed in a similar way. After you have selected which side you want to remove the filament from, wait until the hot-end has reached the right temperature and then remove the filament.
–Purge: This menu allows you to control the temperature of the two hot-ends, and extract or dislodge clogged filament. In order to be able to move the filament, the temperature difference between the objective temperature (under the thermometer) and the actual temperature (under the extruder icon) should be less than 10º C.
30 User Manual

Calibrate: This menu allows you to calibrate the BCN3D Sigma printer´s surface and extruders. This process should be performed when components are replaced, and during standard printer maintenance (described in this manual).
–Bed alibration: This option allows you to level the printing surface. The process is performed by an ons-creen self-test run by the printer, followed by instruc-tions to correct the position. The screen displays how many turns (in eighths of a turn) each of the levelling wheels should be turned, and in which direction.
–Full Calibration: This option allows you to perform a full calibration, where the heated bed and the relative positions of the extruders are calibrated. You will be guided by onscreen instructions, and the aim is to select the best of the different test prints performed by the printer.
–Manual Fine Calibration: This option lets you to manually modify the calibration values found in the Full Calibration process. On the left menu, select the axis to adjust and press the arrows to correct the calibration value.
Maintenance
–Move Z Axis: This option lets you to move the platform up and down.
–Nylon Cleaning: Perform this operation to clean the hotend. Just follow the instructions of the screen. This operation is recommended when you notice any sign of underextrusion, when switching materials and after printing with soluble or special materials.
–Autotune hotends: Select this operation every time you change the hotend. The internal routine will check the thermal behaviour of the hotends installed and will allow the printer to have a better temperature control.
Temperature
Placed on the right-hand side of the main menu, lets you to preheat or cooldown the hotends and the heated bed. The preheat temperatures will be set depending on the filaments loaded.
User Manual 31
Functionalities
Filament
The BCN3D Sigma printer gives the best printing results with PLA and ABS from Colorfila in a 3 mm plastic fila-ment format, although it accepts many other materials.
A brief description of the materials currently used by the printer is given below:
PLA
PLA (polylactic acid) is by far and away the best material for 3D printing, since it is easy to shape using FFF. This is the recommended option when you first start 3D printing, and is suitable for the printing requirements of the majority of applications in most cases. It comes in a wide range of colours, and will allow you to print complex shapes easily. The finish is slightly glossy or semi-matte.
When printing the operating temperature oscillates from between 195º C to 220º C, depending on the supplier and printing speed. Printing overhangs is easier if a layer fan is used. It has a very high adhesion to the printing surface, and if the temperature of the heating bed is 45º C - 55º C no other adhesion product is requi-red, although it’s recomended.
It has average mechanical properties, although it be-comes slightly brittle when printing irregularly-shaped objects. At operating temperatures of 50º C or more, the mechanical properties and rigidity of the objects may decrease. It dissolves in caustic soda.
ABS
ABS (acrylonitrile butadiene styrene) is one of the most widely used materials in 3D printing, and is more sui-table for some types of printing than PLA. Printing with ABS is more complex, and requires a certain amount of care: it is not recommended for non-experienced users. It comes in a very wide range of colours, and the finish is semi-matte or matte.
32 User Manual

ABS is printed at temperatures of between 210º C and 240º C, depending on the supplier and the printing spe-ed. ABS performs better with overhangs than PLA and needs less air from the layer fan (too much air is usually harmful). Its base does not adhere to the surface as well as those of PLA objects, as it contracts when cooling down, which means it usually requires an adhesive lac-quer even when the temperature of the printing surface is 70º C.
It has higher mechanical properties than PLA, and is more stable at high temperatures. If the object has a very large base, the adhesion problems become worse, in particular with the edges of the object.
PVA
PVA (polyvinyl alcohol) is a material which is only used to print support structures for overhangs. It is a linen white colour and soluble in water, which means it can be removed easily and safely, and prints at around 190º C, which is a lower temperature than PLA. Problems may occur when printing the supports due to oozing issues.
The material is highly sensitive to ambient moisture, and must be removed from the printer after use and stored in a dry place.
HIPS
HIPS is a material with properties similar to those of ABS, but which reacts with and dissolves in Limonene. It is usually used to create support structures when printing with ABS.
CPE
Co-Polyesters are chemically resistant, tough and dimensional stable. Depending on the formulation, CPE can withstand temperatures up to 90ºC and has a great impact resistance. CPE is the best alternative to ABS material for its good thermal and mechanical properties while it’s much easier to print.
NYLON
Nylon (Poly-amide) is well-known for its impressive durability, high strength-to-weight ratio flexibility, low friction and corrosion resistance. Ideal for tools, functio-nal prototypes and end-use parts.
TPE
TPE (thermoplastic elastomer) is a flexible material which is available in a range of colours. Printing with TPE is more complex, and requires a certain amount of care. It is not recommended for non-experienced users. The recommended nozzle size is 0.6 mm. It is a plastic which is highly sensitive to ambient moisture, and should be stored in a dry place when not being used.
SPECIALS
Plastic-based materials with wood or metal particles or fibres. It is recommended to use bigger nozzle sizes (starting at 0.5mm) to get good results
User Manual 33
Filament

Maintenance Plan
We recommend you carry out the maintenance procedures described in the table below in order to keep your prin-ter running optimally. The procedures are grouped depending on frequency they should be performed is shown on the right.
Daily
ACTION TO PERFORMFREQUENCY
Weekly
Monthly
Quarterly
Keep the printer free of dust and in a dry, cool place
Storage the spools in a dry, cool place
Remove the filament inside the Purge Tank
Remove the filament leftovers spread inside the printer
Clean the Printing Surface
Clean the nozzles
Level the Printing Surface (also after a transportation)
Clean fans dust
Full calibration (also after a transportation or replacing a hotend)
Clean X/Y linear guides using a cloth
Clean Z bars using a cloth
Lubricate X/Y linear guides using sewing machine oil
Grease Z leadscrew using industrial multipurpose grease.
Check firmware updates
Check bolted and threaded joints
Check tension of extruder springs
Check X/Y belt tension
Check connections of moving cables
34 User Manual

BCN3D Technologies Technical Assistance Services
If you do not find a solution to your problem in this manual, please contact the BCN3D Technologies team through any of the following channels:
You can find all of this information in the Contact Section of our website:
www.bcn3dtechnologies.com/es/contact
Be sure to include the serial number of your computer whenever you send us a query to help us provide the best possible services.
Forum
We recommend that you visit our forum before taking any other action. It is very likely that another user has had the same problem as you, and the forum is where most of them are solved.www.bcn3dtechnologies.com/es/forum
Technical Assistance
You can contact the technical assistance services by email, and we will answer you as quickly as possible. Please remember to include your phone number so we can contact [email protected]
If you have a question that is not related to technical assistance, please send us an email to the address below. A BCN3D Technologies expert will contact you as quickly as [email protected]
Telephone
We have a helpline for situations that cannot be dealt with through the other channels:93 413 70 88
User Manual 35

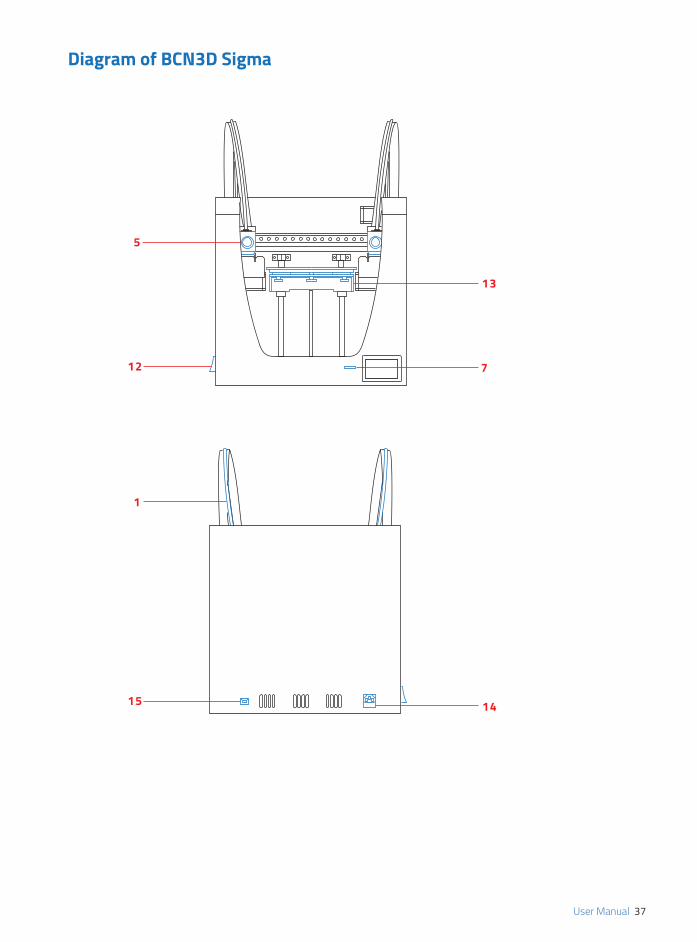
Diagram of BCN3D Sigma
1 Teflon tube 2 Extruder 3 Hot-end cable4 Spool mount 5 Hot-end6 Purge chamber7 Printing surface 8 SD reader 9 Touchscreen10 Filament input hole11 Plastic Spool12 Switch13 Platform14 Power supply socket15 USB port
2
3
5
6
7
8
9
10
11
1
4
36 User Manual
5
12
13
7
1415
1
User Manual 37
Diagram of BCN3D Sigma

38 User Manual
Return Policy
Returns will only accepted for products that have not been used within a period of 14 business days, starting from when the printer was delivered. Once this period has expired, all sales with be conside-red to be final. “Not used” is understood to mean products that have never been assembled, switched on, programmed or altered in any other way.
User Manual 38

Terms and conditions of service
The information in this manual is subject to change at any time without notice, and is provided solely for informational purposes. BCN3D Technologies reserves the right to change or modify the manual at any time at its sole discretion, and you agree to be bound by any such changes and/or modifications. If you would like to get the most up-to-date information, please contact BCN3D Technologies´ technical team or visit the www.bcn3dtechnologies.com/es/forum on our website.
The design of this manual and all the text, graphics, information, content and other materials are protected by copyright and other laws. Some of the trademarks, trade names, service marks and logotypes (the “Trademarks”) used are registered and unregistered trademarks, trade names and services marks that are the property of BCN3D Technologies and its partners. Nothing contained in this manual grants or should be construed as granting, by implication, estoppel, or otherwise, any license or right to use any Trademark without the written permission of BCN3D Technologies. Any un-authorised use of the information, materials or trademarks may breach the laws regulating copyright, registered trademarks, privacy and publicity and/or other laws and regulations.
User Manual 39

40 User Manual
Open source
Open source is a development model that promotes universal access by granting software licenses free of charge, and also universal distribution, including subsequent improvements.
We believe that adopting an open source philosophy offers many advantages:
• More control: We can see everything that is happening with the source code, designs etc., and modify them to suit our needs.
• It helps us learn: We can see and read the software designs that other people have made, which helps us to become better programmers and engineers.
• SafetY: Since the designs are open designs, a lot more people can modify and/or correct any errors that the original programmer may have made.
• Making improvements quickly: The open source community provides a lot of information about how to im-prove the product. This helps us to fix errors and update programmes much more quickly.
Using open source licenses for the products we develop is a way of expressing our willingness to share, to colla-borate with other people in a transparent way (so that others can see what we are doing and join in), to embrace failure as a means of improving, and to expect, even encourage, everyone else to do the same.
BCN3D Technologies and its products would not be where they are today without the RepRap project and its open source community. The RepRap project started out as an initiative whose objective was to develop a 3D printer which could print most of its own components and be a low-cost printer. As an open source project, all of the de-signs produced by the project have been released under a free software General Public License (GPL).
This project does not only include hardware, but has been conceived as a complete ecosystem of tools for printing, from the CAD/CAM software to the code read by the machine to print physical objects.
BCN3D Sigma printers use many open source tools and technologies, such as Marlin software and the Cura pre-processed software. The first controls all the printer´s components, while the second converts the 3D file into G-code, a language the machine is able to understand.
Marlin firmware is published under a GPL license. This means that we must keep Marlin open, and must provide our source code to end users. For this reason we have our repository on the Github platform, where we post all the changes we make.
Cura software is published under an AGPLv3 license. This is the same as the GPLv3 general license but a paragraph has been added to Section 13 which makes it obligatory to provide source code to those who use software through a network. We therefore have repositories for each operating system so that users can access the source code.
Open Source is not only used for code, but also covers hardware. In our case all the mechanical and electronic parts are published under a GPLv3 license.
BCN3D Technologies is firmly committed to open source initiatives, and we believe that with the help of the com-munity we will be able to make better products.
User Manual 40
MS-2015-3