user manual - seth baumsethbaum.com/research/nufdtd/usermanual.pdf · user manual fdtd & code...
TRANSCRIPT

User Manual FDTD & Code Basics The code is a three-dimensional finite difference time domain (FDTD) electromagnetics simulation. It discretizes the Maxwell equations within a three dimensional rectangular prism of space (the “computational domain”) and a finite period of time. The material distribution within the computational domain is static: it is the same at all points in time. Each simulation requires as input the distribution of materials within the computational domain as well as values for an electric field excitation during the time period. It also requires that the electric and magnetic field values within the computational domain be zero at the beginning of the time period. The code then calculates electric and magnetic field component values (i.e. values of electric and magnetic fields in the x, y, and z directions) at each point in the computational domain for each point in time. As specified by the user, field component values and parts of the material distribution can be printed to data files (“output files”) on the computer’s hard drive. The code consists of two separate Fortran files: nufdtd.f and nufdtd_params.f. The first file, nufdtd.f, contains the main program. It never needs to be modified by the user. The second file, nufdtd_params.f, contains definitions of parameters and other variables used in the main code. Certain parts of it may occasionally need to be modified by the user. Any time the parameters file is changed, the main code must be recompiled, built, and executed. Otherwise, the same executable file can be used for any simulation. A suite of companion MatLab codes is also included: • fc_read.m: Reads in field component slice sequences, i.e. the data files for a 2D slice of
specific field component at various points in time. • fc_animate.m: Animates a field component slice sequence already read into MatLab. • fc_animate2.m: Similar to fc_animate.m but adjusted to work with fc_mv.m. • fc_mv.m: Reads in, animates, and creates .avi movie files for a collection of field
component slice sequences. • fc_jpg: Plots and prints a .jpeg image file of a field component slice already read into
MatLab. • mt_readplot.m: Reads and plots a material slice. • pulse_plot: Plots pulses of various shapes given pulse parameters.

Finite Difference Discretization In all FD simulations (including both FDTD and FDFD), a 2D or 3D region of space is approximated as a uniformly-spaced 2D or 3D grid of “grid cells” or “grid points”. The grid need only be uniform within the same direction: the number and spacing of grid points in different directions need not be the same. For example, a simple discretization of a 2D region containing four materials could be:
(a) shows the original material distribution, with each color representing some different material. (b) shows an FD grid superimposed on (a). The number and spacing of the grid points in the two directions (vertical and horizontal) were intentionally made different to demonstrate that they need not be the same. (c) shows an FD discretization of the material distribution based on this FD grid. It simply fills in each rectangle with the color that is predominant within the rectangle in (b). (d) adds a material numbering scheme. FD computer codes generally represent materials with number labels as seen here.

Coordinate Systems z is the vertical direction; x and y are arbitrary horizontal directions. In the code, z counts upwards, i.e. z=1 is closer to the center of the Earth, and z=nz is closer to the sky. For this document, we will have x pointing to the right and y pointing towards the reader:
The Fortran code and the MatLab companion codes all make extensive use of 2D slices of the 3D grid. For all of these, standard Cartesian coordinates (as opposed to i-j matrix coordinates) are used:

Text Editor Coordinate Systems Care must be taken to ensure consistency in coordinate systems when converting matrices between data types. All Fortran matrices use the standard Cartesian coordinate systems explained below. When matrices are printed to data files, they are written so that they follow this convention when viewed with a text editor. For example, the following x-direction field component slice has the coordinate system shown here:
However, text editors typically use i-j coordinate systems in their (line, column) or (row, column) designations, as seen here in the bottom-right corner of this screenshot from Microsoft Developer Studio:
As text editors can be a useful means of analyzing files, such as for determining where to place excitation points for antennae built from material input files, understanding text editor coordinate systems can be important.

MatLab Coordinate Systems The MatLab companion codes produce images oriented in the same fashion:
The companion codes use MatLab commands to rearrange the data (“flipud”) and image (“axis xy”) to achieve this. Plotting the above image without these commands gives an image with the same appearance but with a different coordinate system:
The bottom image’s coordinates, printed without altering the data, match those of the actual matrix, as long as i-j matrix coordinates (vertical, horizontal) are used, as seen in the following lines. (Here, gold is positive and blue is negative.)

Field Component Locations In FDTD, electric and magnetic field vectors are broken up into components in the x, y, and z directions. These field components are all defined at each grid point. Thus, there are a total of seven separate 3D grids: Ex, Ey, Ez, Hx, Hy, Hz, and the material distribution. The field component grids are actually 4D because they also vary with time. This FDTD code does not handle time-varying material distributions, although such a scheme is possible with FDTD. For subtle reasons not discussed here, field component points are not located at the same places as each other or the material points. The electric field components are shifted half of a grid cell in one direction: the same direction as the field component is oriented. Thus, Ex is shifted half of a grid cell in the x direction. The magnetic field components are shifted half of a grid cell in two directions: the directions that the field component is not oriented in. Thus, Hx is shifted half a grid cell in the y and z directions. For both electric and magnetic fields, the shifts are in the positive direction, i.e. away from the origin (1,1,1). A common representation of this is the Yee cube, named for Kane S. Yee, FDTD’s main creator:
In this diagram, the black dots represent locations of material points, blue arrows represent electric field components, and red arrows represent magnetic field components.

Field Component Coordinates The same Yee cube can be redrawn with material points’ and field components’ coordinates, assuming that the cube runs from point (i,j,k) to point (i+1,j+1,k+1):
Clearly, the electric and magnetic field components’ coordinates contain non-integer values. However, code matrices (and indeed, matrices in general) require integer indices. Thus, a scheme is required to convert the non-integer values to integer values. We simply subtract ½ from all non-integer matrices, giving the shifted Yee cube:

Field Components – Material Point Relationships Using the previous Yee cube images, the location of a field component can be determined from its grid coordinate. For example, Ex(11,23,4) is between the material points (11,23,4) and (12,23,4); Hx(11,23,4) is between the material points (11,23,4), (11,23,5), (11,24,4), and (11,24,5). While field components are located between multiple material points, for the code’s calculations, each field component is linked to a single material point: the grid point in the direction of the origin, i.e. the grid point found by subtracting ½ from all of the shifted coordinates:
Thus, the code behaves as if the field components linked to a material point are in regions composed of that point’s material. This is done to avoid the memory-inefficient measure of creating separate matrices of material points for each field component.

Overview Of How To Perform A Simulation There are several steps necessary for performing a successful simulation. These are: 1. Run the code. This starts the simulation and opens the command window. How to run
the code is explained below. 2. Input the simulation parameters into the command window. Once the parameters have
been inputted, the simulation will run automatically. How to input is explained in the “Using The Command Window” section; the input parameters are explained in the “Input Parameters” section.
3. View the output files. Output files are the simulation’s results. How to view the results is explained in the “Viewing Output Files” section.
How To Run The Code The code was developed using the software application Microsoft Developer Studio Fortran PowerStation 4.0. If further work is done using different software, then instructions for running the code through the software may vary. No matter what software is used, the code can be run by double-clicking on its executable file (nufdtd.exe). If the code was previously ran through PowerStation, then the executable file may appear in the “Debug” folder. If changes to the code have been made since the previous time it was run, then the code needs to be recompiled. The code is automatically recompiled if it is executed from PowerStation. To execute the code from PowerStation, choose “Execute nufdtd.exe” from the Build menu at the top of the screen or hit Ctrl+F5.

Using The Command Window Command Window Basics Input in the code is entered via a text-based command window interface. This interface asks the user a series of questions, which the user types in and then hits Enter to progress to the next question. Answers to previous questions cannot be changed. Instead, to correct earlier errors, the command window must be closed, the program must be re-run, and all of the data must be re-entered from the beginning. Input must also be in a certain format. For example, if a question asks for an integer, no letters can be included in the answer. If the question asks for a real number, letters cannot be included in the answer, except for an optional “e” for “exponent”. For example, 2e1 = 2x10^1 = 20. Input can be copied and pasted from a text file into the command window. The paste command is found by choosing Edit after clicking on the icon in the top-left corner of the command window:

Command Window Basics Continued Alternatively, if QuickEdit Mode is checked from the Properties box, a paste can be performed by clicking the right mouse button. (Checking insert mode causes inserted text to be inserted between characters instead of overwriting them.)

Input Files A good way to streamline the process of re-entering the same or similar sets of input is to create and use an “input file” containing some or all of the input which, if properly formatted, can then be copied and pasted in its entirety into the command window. Properly formatted input files include line breaks between lines of input and can include comments after an exclamation mark. (Using an exclamation mark for commenting comes from Fortran syntax.) For example, the input file text
can be inserted into a command window producing
The code creates an input file automatically as input is being entered by the user. Thus, if the user stops entering input after 5 questions, then it will contain exactly those 5 lines of input. This feature is particularly useful when data is initially entered manually, i.e. by typing input in directly instead of copying and pasting it. The input file created appears on the hard drive, in the same directory as the simulation, with the file name “input.txt”. Because the code automatically overwrites any pre-existing files named input.txt, it is a good idea to avoid using this file name for other purposes. Note that the E is for “exponential”. Here, aEb = a * 10b, so, for example, .1000E-11 = 10-12.

Input Parameters The code groups its input into several sections. For example, the previous image shows part of the “Time Dimensions” input section. The following user manual parts describe each of these input sections in the order in which they appear in the command window:
1) Space Dimensions 2) Time Dimension 3) Create New Materials 4) Background Layers 5) Foreground Objects 6) Material Output 7) Excitation 8) Field Component Output
Sections 1 and 2 define the FDTD discretization. Sections 3, 4, and 5 define the material distribution. Section 7 defines the electric field excitation. Sections 6 and 8 define the portions of the material and field component distributions to save to the hard disk for analysis.

Space Dimensions Input Two sets of numbers are required to define the FD grid:
• grid size in each direction (nx, ny, nz) • grid cell size in each direction (Δx, Δz, Δz; dx, dy, dz; or delx, dely, delz)
The grid size variables represent the number of grid points in each direction and are unitless quantities. The grid cell size variables represent the size in each direction of one grid cell, i.e. how far apart the grid points are, and are measured in this code in centimeters. (Other FDTD codes may use other units of distance.) In FDTD, the amount of computer memory (RAM) required to run a simulation is roughly proportional to the grid size. If the grid size is too large for a computer’s RAM, then the simulation will use paging file and run extremely slowly. If the grid size is too large for a computer’s RAM + paging file, then the simulation will not run. The code allocates a fixed grid size in each direction, and the grid size cannot be set to anything larger without changing this allocation and recompiling the code. (Smaller grid sizes can be run without changing this and recompiling.) The grid size allocation is changed by changing the grid size numbers at the top of the code’s parameters file:

Time Dimension Input The input for the time dimension is similar to that for the space dimensions because, similar to how it handles space, FDTD discretizes time in uniform intervals or “time steps”. There are two values to input:
• Number of time steps to run the code (nts) • Time step size (dt or Δt)
nts is unitless; dt is measured in seconds. nts * dt = time (in seconds) the code will simulate. The code runs one time step at a time, scanning through the spatial grid, calculating electric and magnetic field values. Thus, the larger the number of time steps is, the longer the code will take to run. However, the number of time steps has no effect on a simulation’s memory consumption, so any computer can run any number of time steps. In order for an FDTD simulation to run properly, input must satisfy the “Courant condition”:
Here, c0 is the speed of light in free space (vacuum); Δt is time step size; Δx, Δy, & Δz are space step (grid cell) sizes. Using c0 gives an upper bound for Δt or, alternatively, a lower bound for Δx, Δy, & Δz. If the material distribution does not include free space, then this bound is not tight. It is used to guarantee that the Courant condition will not be violated, no matter what the eventual material distribution is. In the code, Δx, Δy, & Δz are inputted before Δt, so if the value for Δt entered does not satisfy the Courant condition, the user is prompted to enter a new value for Δt. If instead, the user prefers changing Δx, Δy, & Δz, then that command window must be closed and input entry must be restarted.

Create New Materials Input Our code comes with several built-in material types, each with a pre-set number label, as well as several pre-set number labels reserved for user-defined materials:
When creating new materials, the first input needed is
• number of new materials Then, for each material, the relevant physical properties must be entered:
• relative permittivity • If the material is not frequency dispersive (i.e. its properties do not vary as a function
of the frequency of electromagnetic radiation passing through it), then electric conductivity must be entered.
o If the material is a lossless dielectric, then the conductivity should be set to 0. • If the material is frequency dispersive, then four special “dispersion variables”, a1,
b0, b1, & b2 must be entered. o b0 is the same as the conductivity in the non-dispersive case.

Building Material Distributions A big advantage of FD techniques is that any grid point can contain any material, which allows arbitrary material distributions to be modeled. This does mean that one could build material distributions that are completely unrealistic, such as a layer of air between two soil layers. It is up to the user to ensure that the simulated material distribution is accurate. While FDTD makes field calculations with arbitrary material distributions routine, building those distributions can be challenging. This code features two techniques for building material distributions: background layers and foreground objects. One important point to remember when building material distributions is that FDTD treats features diagonally adjacent as being separate pieces; for a feature to be treated as one continuous piece, it must be connected horizontally/vertically. (i.e., one must be able to move a chess rook along it.) Thus, in the figures below, the green feature on the left will be treated as two separate pieces, whereas the red feature on the right will be treated as one continuous piece:
This point is particularly important when designing antennae because fields can get through metal antenna pieces that are not connected horizontally/vertically, even though this is not physically realistic.

Background Layers Input The first means of building material distributions is through “background layers”. This feature was initially developed for the code’s ground penetrating radar application, as to simulate stratified regions of ground. Background layers are homogenous rectangular prisms that span the entire the x-y plane:
The first input needed is
• number of background layers. There must be at least one layer and there cannot be more layers than there are grid points in the z direction.
Then, for each background layer, the following input is needed:
• layer thickness (in grid cells). Layers must be at least one grid cell thick and must be small enough that all remaining layers can be at least one grid cell thick.
o For the top background layer, no thickness input is taken because its thickness is automatically set to the number of remaining grid cells in the z direction.
• material type A homogenous background can be created by making one layer; this is equivalent to making all layers with the same material.

Foreground Objects Input Once the layer(s) have been defined, the user can place any number (at least zero) of foreground objects in the material distribution. They are called “foreground” objects because their material values overwrite those of the background layers. Objects come in various shapes and sizes, can be placed anywhere in the grid, and can be of any available material. Each object type is labeled in the code by a number, similar to material type numbers. Available object types include:
Each object type has its own set of input to be entered. Rectangular Prism Input Creates a solid rectangular prism of uniform material. Making a rectangular prism of width (1,1,1) is an easy way to define the material in a single grid point.
• Starting coordinates: coordinates (in grid points) of the corner of the prism closest to the grid point (1,1,1)
• Width in each direction, in grid points • Material type

Cylinder Input Creates a solid cylinder oriented with its parallel planes oriented along the x-y plane. A cylinder made with the TNT material type reasonably approximates some landmines.
• Starting coordinates: coordinates (in grid points) of the circle’s center at it’s lowest point (closest to z=1)
• Circle radius and vertical height, in grid points • Material type
Sphere Input Creates a solid sphere.
• Starting coordinates: coordinates (in grid points) of the sphere’s center • Sphere radius • Material type
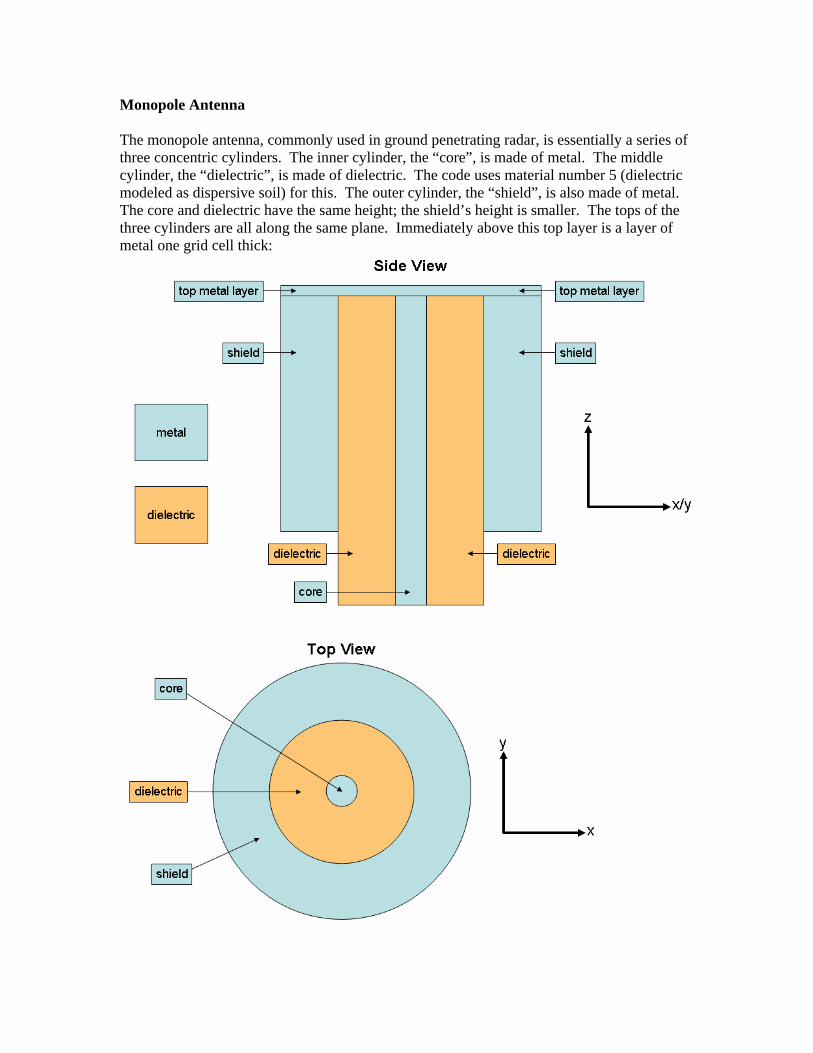
Monopole Antenna The monopole antenna, commonly used in ground penetrating radar, is essentially a series of three concentric cylinders. The inner cylinder, the “core”, is made of metal. The middle cylinder, the “dielectric”, is made of dielectric. The code uses material number 5 (dielectric modeled as dispersive soil) for this. The outer cylinder, the “shield”, is also made of metal. The core and dielectric have the same height; the shield’s height is smaller. The tops of the three cylinders are all along the same plane. Immediately above this top layer is a layer of metal one grid cell thick:

Monopole Antenna Input To build a monopole antenna, the following input is required:
• coordinates (in grid points) of antenna top-center o z-direction coordinate is of top metal layer
• core radius, dielectric thickness, and shield thickness, in grid points • dielectric/core length and shield length, in grid points
Monopole antennae objects can be used in the excitation. Only one monopole antenna can be used in the excitation for any given simulation. When building multiple monopole antenna objects, the last one to be built is the one that can be used in the excitation. If a monopole excitation is selected, that last monopole antenna is automatically excited in the appropriate fashion.

Material Input File The material input file is a special object type that allows the user to easily define arbitrary material distributions. A material input file is a text file containing a 2D grid of numbers, located in the same directory as the simulation. The numbers must be separated by spaces. The grid must be rectangular, i.e. all rows and all columns must have the same size. (Rows need not have the same size as columns.) The numbers in the file must correspond to material type numbers. However, the code does not check this. It is up to the user to make sure that the correct numbers have been entered.
The above file, “sample.txt”, could be a 4x3 material file containing two rows of material number 2 (metal) below one row of material number 1 (free space). Material input files have the following specifications:
• Filename: the name of the file, including its extension (e.g., sample.txt) • Orientation: direction (x, y, or z) for the file to be placed. • Height: the coordinate for the file to be placed in its direction of orientation. • Starting point: the two coordinates in the non-height directions of the bottom corner
of where the material input file should be placed, i.e. the corner closest to (1,1,1) • Width: the number of points in the two non-height directions to read. The width
cannot be larger than the number of the points in the computer file, but it can be fewer. If it is fewer, the code will start from the beginning of the file and stop reading before reaching the end. The width also cannot be so big that it will not fit in the simulation grid, given the grid size and the material file starting point.

Material Output Files Input Once the material distribution has been built, parts or all of it can be checked by printing “material output files”. These files contain slices of the final material distribution appear in the same directory as the simulation. For example, one could print out the materials at x=19 or z=1. The numbers in the files correspond to the material number labels at the grid points along the slice. The first input needed is
• number of material output files to print Then, for each material output file, the following input is needed:
• the direction and location of the slice (i.e., x=23, etc) The material distribution then gets printed to a text file in the same directory as the simulation. The file name begins with the letters “mt” (for “material”), followed by an underscore, followed by a letter (x, y, or z) representing the slice direction, followed by a three-digit number representing the slice location, followed by the extension “.dat”. Thus, the slice at x=23 will have the file name “mt_x023.dat”.

Excitation Input The code initializes all electric and magnetic field to zero, and without any non-zero field values added, its calculations will produce all zero values. These added values are the “excitation”. The first input needed is
• source type. The options are
In a hard source, the field values at the excitation points are fixed to the values given by the pulse. In a soft source, the field values are the sum of the pulse values and the values previously calculated at the excitation points. Either one may give better results in different circumstances. User-defined sources are generally chosen when the antenna used for the excitation is built with material input files. In order for a monopole sources to function properly, a monopole antenna must have already been built using the monopole antenna option in the “foreground objects” section. If more than one monopole antenna was built, the last one to be built will be the one used for the excitation. If a user-defined source (options 1 or 2) is chosen, then the following input is needed:
• number of excitation points For each excitation point, the following input is needed:
• coordinates. The grid location (i,j,k) of the excitation point. • directional excitation strengths. The magnitude of the excitation in each direction (x,
y, z). These define the magnitude of the x, y, and z components of the excitation’s electric field. Generally, numbers in the interval [-1,1] are chosen, although this need not be the case.

Excitation Input: Pulse Shape Then, for all source types, the following input is needed:
• pulse shape. The options are
For each pulse shape, the following input is needed:
• pulse width, in time steps • pulse peak time, in time steps
For the cosine-modulated pulse shapes, the following input is also needed:
• pulse frequency, in Hertz

Excitation Input: Pulse Shape Continued The narrow-width Gaussian is a discretized version of the standard Gaussian pulse:
where n is time step number, e≈2.7183, p is the pulse peak time, and w is the pulse width. The cosine-modulated Gaussian is a discretized version of the standard Gaussian multiplied by a cosine:
where f is the pulse frequency and Δt is the time step size. The half-Gaussian pulses are equivalent to their regular Gaussian counterparts until the pulse peak time is reached. At that point, the narrow-width half-Gaussian’s value is fixed to one and the cosine-modulated half-Gaussian’s values are fixed to the values produced by the cosine term.
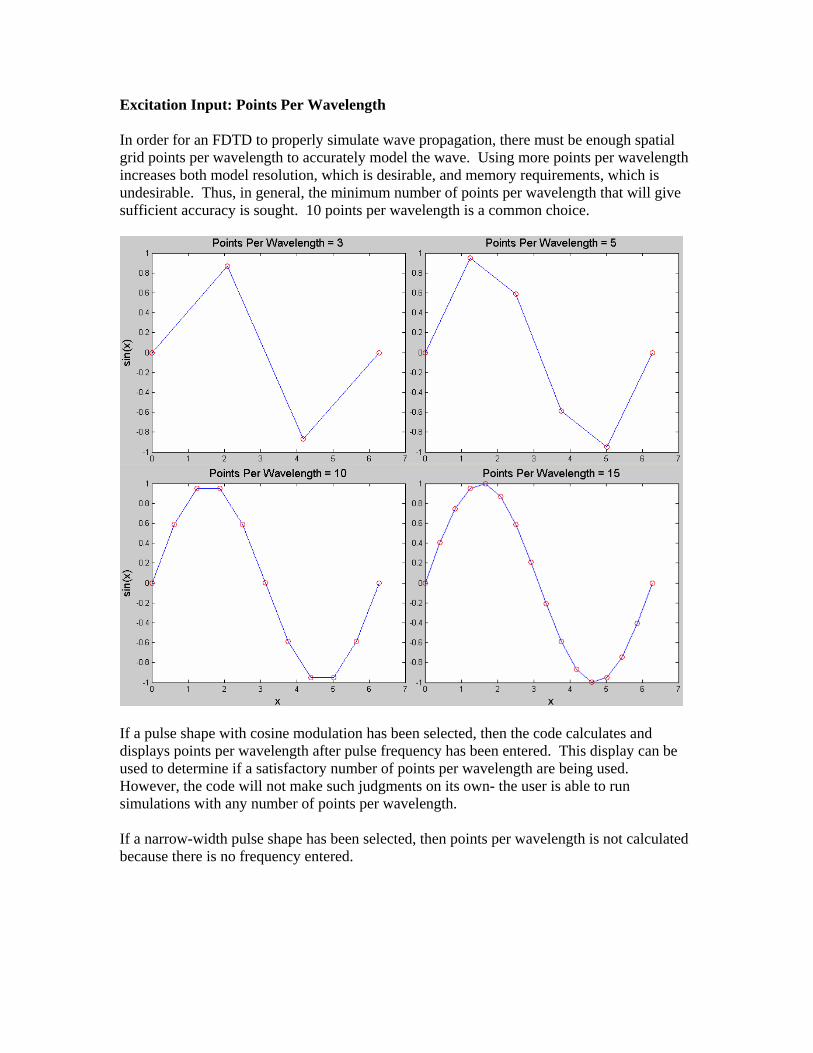
Excitation Input: Points Per Wavelength In order for an FDTD to properly simulate wave propagation, there must be enough spatial grid points per wavelength to accurately model the wave. Using more points per wavelength increases both model resolution, which is desirable, and memory requirements, which is undesirable. Thus, in general, the minimum number of points per wavelength that will give sufficient accuracy is sought. 10 points per wavelength is a common choice.
If a pulse shape with cosine modulation has been selected, then the code calculates and displays points per wavelength after pulse frequency has been entered. This display can be used to determine if a satisfactory number of points per wavelength are being used. However, the code will not make such judgments on its own- the user is able to run simulations with any number of points per wavelength. If a narrow-width pulse shape has been selected, then points per wavelength is not calculated because there is no frequency entered.

Field Component Output Input Electric and magnetic field values can be printed to “field output files” on the computer’s hard drive. Field output files are text files containing the field values of a particular field component (Ex, Ey, Ez, Hx, Hy, or Hz) along a particular slice through the computational domain and at a specific time step. In order to avoid clogging hard disks with excessive amounts of field component output files, users can choose to write field component output files at regular intervals of time steps. The time steps in which field component files are written are called “output time steps”. Simulations then produce series of field component output files, each containing the same field component slice at successive output time steps. For one simulation, all field component slices will be printed at all output time steps. Thus, the following input is needed:
• number of time steps between outputs • number of output files per output time step: the number of field component slices to
print at each output time step For each field component slice, the following input is needed:
• field component slice variables (field, direction, location) o field: field to output. Uses the labels
(1 - Hx; 2- Hy; 3 - Hz; 4 - Ex; 5 - Ey; 6 - Ez) o direction: direction of slice. Uses the labels (1 - x; 2 - y; 3 - z) o location: location (coordinate) of slice
Field output files will appear in the same directory as the simulation. The file name begins with two letters representing the field component, followed by an underscore, followed by a letter (x, y, or z) representing the slice direction, followed by a three-digit number representing the slice location, followed by a second underscore, followed by the letter “t” and a three-digit number representing the output time step number, followed by the extension “.dat”. Thus, the Ex field component at the slice x=23 and at output time step 5 will have the file name “ex_x023_t005.dat”.

Viewing Output Files Viewing Output Files Directly Material or field component output files can be viewed directly by opening them up in a text editor, word processor, spreadsheet, or other program. The material or field component points will be oriented in the scheme described in the “Coordinate Systems” section, with the origin in the bottom-left corner. If the program includes a system for assigning coordinates to points in the file, it may be possible to use these coordinates to determine what grid points values in the file are from. However, there may be several complications to this procedure. First, many programs place the origin in the top-left corner, in which case the values it gives for the y/z (vertical) direction will be wrong. Also, while spreadsheets will typically place each value in a cell, word processors generally count in the x/y (horizontal) direction by column, character by character, meaning that column number will not correspond to grid coordinate. At best, the column number may be a multiple of the grid coordinate. Finally, line wrapping will occur if there are more points in the x/y (horizontal) direction than can fit on one line in the text editor, further complicating the relationship between grid points and points in the program in use. Here is a screenshot of part of a material file viewed in Microsoft Notepad:
The astute observer may recognize this as being from a vertical slice through a monopole antenna.

Viewing Output Files In MatLab Loading material or field component output files into a program that can effectively plot them offers significant advantages over viewing the files directly. All data in a file can be interpreted by observing the plots’ colors, which is generally easier and more effective than reading the underlying numbers in a direct viewing. Some programs can even create animations to view all or parts of a field component slice series or some other sequence of output files. Images can be saved for use in papers and other reports. A collection of MatLab files designed to read and plot the code’s output files has been included with the main Fortran code to help users visualize output files. Use of these MatLab files is explained here and should be fairly easy, even for those with limited MatLab expertise. These files include:
• fc_read.m: read in field components output files • fc_animate.m: animate field component matrices • mt_readplot.m: read in & plot material files • mx_getval.m: get Cartesian coordinate value of a 2D matrix
Further information about these files is available in the files themselves or through MatLab’s help command. (For example, to view information about fc_read.m, first go to the file’s directory using the cd (change directory), then type “help fc_read”).

Sample Simulation 1 – Monopole Antenna Here, we’ll walk through the simulation of a simple monopole antenna, from the input through visualization of the results. The first thing to do is run the simulation- either double-click on the executable file (nufdtd.exe) or execute it from the code development software (such as Microsoft Developer Studio Fortran PowerStation). The input file contains the text:
50 50 90 ! grid size .089 .089 .089 ! grid cell size in cm 1000 ! number of time steps .1000E-11 ! Time step size (sec) 0 ! Number of new materials 1 ! Number of background layers 1 ! Material type of layer 1 1 ! Number of objects (built-in objects & material files) 4 ! Object type 25 25 70 ! (i,j,k) of antenna top-center 1 5 3 ! Core radius, dielectric thickness & shield thickness 50 45 ! Dielectric/core length, shield length 2 ! Number of material output files printed 2 25 ! direction, location of material output file 3 30 ! direction, location of material output file 3 ! Source type 2 ! Pulse shape 50.0 ! Gaussian pulse width (time steps) 200.0 ! Gaussian peak time (time steps) .1500E+10 ! Pulse frequency 10 ! Number of time steps between outputs 6 ! # field component slice series 4 2 25 ! Specs, field component slice # 1 5 2 25 ! Specs, field component slice # 2 6 2 25 ! Specs, field component slice # 3 4 3 30 ! Specs, field component slice # 4 5 3 30 ! Specs, field component slice # 5 6 3 30 ! Specs, field component slice # 6
This text can be copied and pasted directly into the command window. If, while pasting it in, the command window closes, check the parameters file to make sure that the grid size allocation (npx,npy,npz) is large enough.

Sample Simulation 1 – Monopole Antenna (Continued) This is what the command window will look like just after the input has been entered:
This is what the command window will look like just after the simulation finishes:
If the messages “Output time step ##” appear on separate lines instead of on the same lines as seen here, that is fine. The messages are simply a convenience for the user to monitor simulation progress and do not affect the simulation.

Sample Simulation 1 – Monopole Antenna (Continued) This is an image of the part of the project folder after the simulation ran, showing some of the field component output files, the input file, the two material output files, and the code and project files:
This is an image of part of the file ex_z030_t040.dat, which contains the x-direction component of the electric field at the slice z=30 and at the 40th output time step (or the 400th total time step, because the simulation used 10 time steps between outputs, or 4x10⁻¹⁰ seconds after the start of the simulation, because the time step size was .1000E-11 seconds):
This is an image of a series of MatLab commands used to create a movie file of the series of field component output files containing the z-direction component of the electric field at the slice y=25:

Sample Simulation 1 – Monopole Antenna (Continued) This is an image of a series of MatLab commands used to print jpeg image files of the field component output files containing the x-direction component of the electric field at the slice y=25 at the output time steps 15 and 30:
This creates the files ‘ex_y25_t15.jpg’ & ‘ex_y25_t30.jpg’. The ‘.jpg’ is automatically added to the file name when the image file is created. Here are the images:
(To save space on the page, the colorbar was cropped from the Output Time Step 30 image.) Because the slice is at y=25, the horizontal axis corresponds to the x-direction and the vertical axis corresponds to the z-direction.

Sample Simulation 2 – Spiral Antenna The spiral antenna simulation uses a material input file “psi_spiral.dat” for the antenna. It also uses a user-defined source, which requires the user to define excitation points and directions. Here we will show how to determine what the excitation should be. The input file contains the text:
165 165 61 ! grid size .089 .089 .089 ! grid cell size in cm 6000 ! number of time steps .1000E-11 ! Time step size (sec) 0 ! Number of new materials 1 ! Number of background layers 1 ! Material type of layer 1 1 ! Number of objects (built-in objects & material files) 0 ! Object type psi_spiral_frsp.dat ! Material input filename 3 ! Orientation 31 ! Height 5 5 ! Starting point (x,y) 157 157 ! Width (x,y) 2 ! Number of material output files printed 3 31 ! direction, location of material output file 1 79 ! direction, location of material output file 2 ! Source type 4 ! Number of excitation points 82 80 31 ! Excitation point coords # 1 .00 1.00 .00 ! Directional exn strengths 82 79 31 ! Excitation point coords # 2 .00 1.00 .00 ! Directional exn strengths 83 80 31 ! Excitation point coords # 3 .00 1.00 .00 ! Directional exn strengths 83 79 31 ! Excitation point coords # 4 .00 1.00 .00 ! Directional exn strengths 2 ! Pulse shape 50.0 ! Gaussian pulse width (time steps) 200.0 ! Gaussian peak time (time steps) .1500E+10 ! Pulse frequency 20 ! Number of time steps between outputs 4 ! # field component slice series 5 1 78 ! Specs, field component slice # 4 5 3 31 ! Specs, field component slice # 2 5 3 29 ! Specs, field component slice # 6 5 3 15 ! Specs, field component slice # 5

Sample Simulation 2 – Spiral Antenna (Continued) If we didn’t know the coordinates of the excitation points, we could figure this out from a plot of the antenna. To do this, first run the code and paste the input through the material output files section:
Then, from MatLab, plot the material output file. Note that the file is of the slice that the material input file (which contains the antenna) was placed. To do this, use the program mt_readplot.m. Then, zoom in on the center, where the excitation is supposed to go:
Using the material i.d. number system, we can tell that blue is free space and red is metal. The excitation goes in the free space between the bottom and top pieces of metal. Because the image shows a z-direction slice, we know that the horizontal axis corresponds to the x-direction and the vertical axis corresponds to the y-direction. Because the slice is at z=31, it’s clear that the excitation coordinates are (78,79,31), (78,80,31), (79,79,31), and (79,80,31). Also, we can see that the path between the two pieces of metal is in the y-direction, so the excitation points should all have the directional excitation strengths are all (0,1,0). (0,-1,0) would also work. The rest of the simulation follows from the previous Sample Simulation and will not be discussed further.