user manual table of contents - suiteretaildownload.suiteretail.com/sr-spos-classic help...
TRANSCRIPT

SuitePOS for NetSuite (Classic) User Manual
Cashiers
User Manual Table of Contents Recommended Support Procedures Cashiers Function Keys Logging In and Signing Out Using the Time Clock Opening the Register Performing a standard POS Sale (POS Invoice + Payment) Transaction Performing a POS Return (POS Credit Memo + Refund) Transaction Performing a POS Special Order (POS Sales Order + POS Order Deposit) Transaction Closing the Register
Back-Office Administrators Funding a Register Daily/Recurring Back Office Activities
Batch Confirmation of Credit/Debit Transactions Making Deposits
Reporting
Using the Open Close Shift Record Summary Using the POS CC Payments/Refunds Report Using the POS Transaction Summary
System Administrators Recommended NetSuite Settings for POS NetSuite Configuration Overview
Locations (Stores) POS Transaction and Entry Forms POS Roles POS Users Terminals Currency Denomination records Open Close Shift records POS Receipt records Transaction Body Fields Transaction Column Fields
Entity Fields Item Fields Other Custom Fields Server Script Gift Card Setup Enabling and Adding a Gift Card item for sale via POS System Pre-loading Gift Cards Process Overview for Selling Gift Cards Online
POS Terminal Settings Store Info Terminal Hardware Payment Gateway NetSuite Payment Methods Credit Cards
SuitePOS for NetSuite (Classic) User Manual
Cashiers
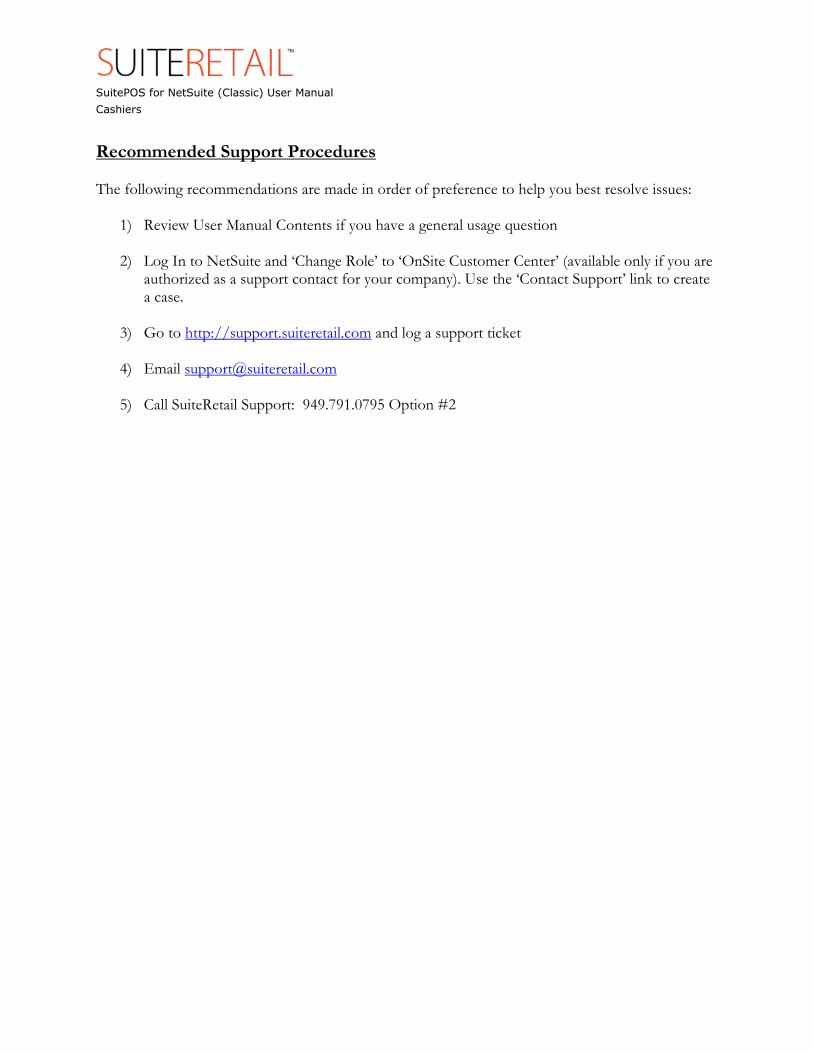
Recommended Support Procedures The following recommendations are made in order of preference to help you best resolve issues:
1) Review User Manual Contents if you have a general usage question
2) Log In to NetSuite and ‘Change Role’ to ‘OnSite Customer Center’ (available only if you are authorized as a support contact for your company). Use the ‘Contact Support’ link to create a case.
3) Go to http://support.suiteretail.com and log a support ticket
4) Email [email protected]
5) Call SuiteRetail Support: 949.791.0795 Option #2

SuitePOS for NetSuite (Classic) User Manual
Cashiers
Cashiers This section of the manual is for in-store users of the POS system. Function Keys
1. ‘F1 – F12’: Dynamic Focus/Action shortcuts The ‘F’ keys provide an alternate option to use of the mouse or touchpad when using the POS system. The ‘F’ keys change dynamically depending on the area of NetSuite displayed at any given time. If a user is familiar with use of the ‘F’ keys, operation of the POS will typically be faster than using a mouse or touchpad for equivalent field selections or actions.
2. ‘CTRL-click’: Open New Window for a NetSuite link Holding down the ‘CTRL’ key and clicking the left mouse button at the same time on a link within NetSuite will open the target page in a new (pop-up) window. The ‘CTRL’ key can also be used in conjunction with the ‘F’ keys to open Sales Orders, Invoices or Estimates in a new window (if applicable).
3. ‘Backspace’: Navigate to previous NetSuite page Clicking the ‘Backspace’ key when not focused on a form-field will simulate the back arrow in a standard web browser and will attempt to navigate the user to the previous NetSuite page.
Logging In and Signing Out You must log in prior to using any part of the POS system and sign out when abandoning your terminal. Important notes:
• Failing to sign out when leaving the terminal could result in unauthorized use of your terminal.
• In the event you fail to sign out, or, no activity has occurred for some time, you will be automatically signed out after a specific period.
• Signing out WILL NOT automatically cause a punch-out; make sure to punch-out if your shift is over or if an unpaid break is to occur.
To Log In:
1. Enter or select your E-mail Address 2. Enter your Password 3. Click Log In
You should now be logged in and have access to one or more areas of the POS system. If you cannot log in, or, if you do not have access to an area you think you should have access to, contact your administrator. To Sign Out:
1. Click Sign Out You should now be signed out.

SuitePOS for NetSuite (Classic) User Manual
Cashiers
Using the Time Clock The Time Clock is used to keep track of when you start (Punch-In) and stop (Punch-Out) your work activities. Important notes:
• Most companies use the Punch-In to Punch-Out duration to calculate your pay; make sure your use of the Time Clock coincides with your employment contract.
• Remember to Punch-Out when your shift has ended. Signing out WILL NOT cause a punch-out to occur.
To Punch-In:
1. Click Punch-In You should now be Punched-In. To Punch-Out:
2. Click Punch-Out You should now be Punched-Out.

SuitePOS for NetSuite (Classic) User Manual
Cashiers
Opening the Register Opening the Register is the process of counting the currency in the physical cash drawer prior to the start of a new business day or shift. Important notes:
• The employee who opens the register shares responsibility (along with the person who closes) for the closing register balance at the end of the day or shift. For this reason, a Shift Manager, or, a single employee, may be responsible for both the opening and closing of each register.
• The system will prevent you from processing transactions until the register has been properly opened.
To Open Register:
1. Count each currency type in, or to be placed in the drawer, starting with the lowest denomination. Enter the quantity counted of each type in the corresponding input box on the Open Register screen.
2. Enter in any notes as indicated. Common notes might include who funded the drawer prior to opening and/or discrepancy versus normal opening amounts; use of notes will vary depending on company policy.
3. Click ‘Amount in Drawer is Confirmed’.
The Register should now be opened and you should be redirected to the POS area where you will be ready to begin Point of Sale transactions.
SuitePOS for NetSuite (Classic) User Manual
Cashiers
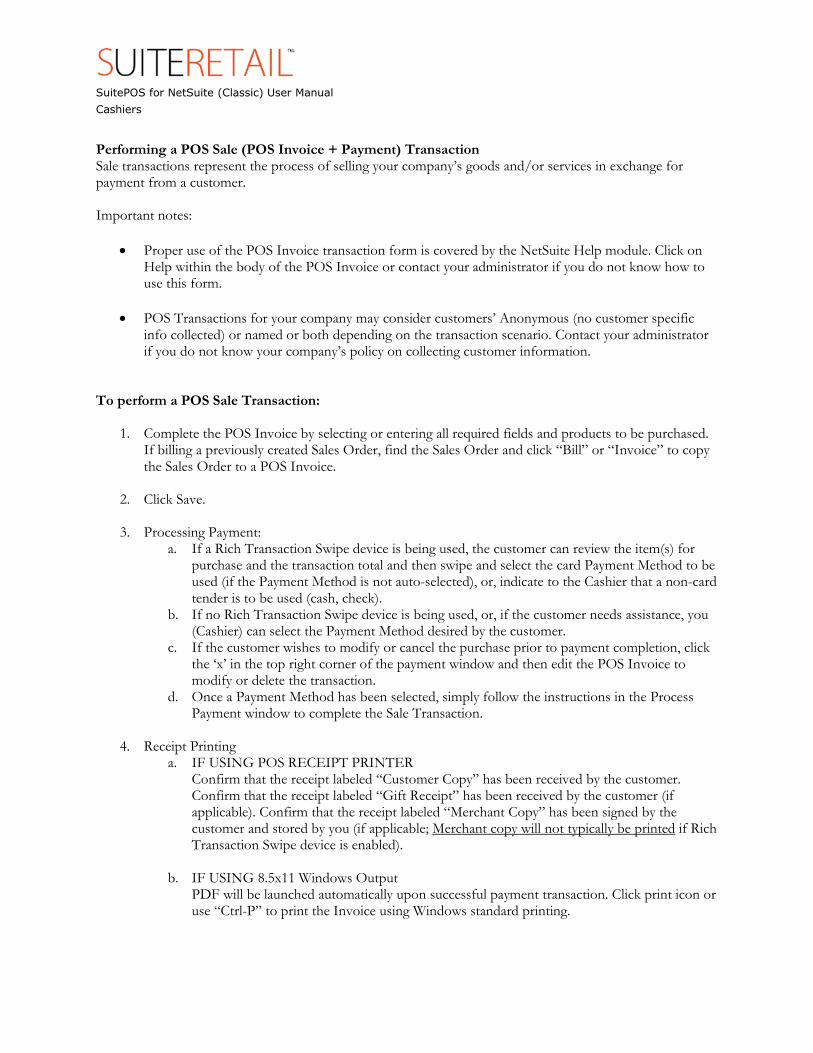
Performing a POS Sale (POS Invoice + Payment) Transaction Sale transactions represent the process of selling your company’s goods and/or services in exchange for payment from a customer. Important notes:
• Proper use of the POS Invoice transaction form is covered by the NetSuite Help module. Click on Help within the body of the POS Invoice or contact your administrator if you do not know how to use this form.
• POS Transactions for your company may consider customers’ Anonymous (no customer specific info collected) or named or both depending on the transaction scenario. Contact your administrator if you do not know your company’s policy on collecting customer information.
To perform a POS Sale Transaction:
1. Complete the POS Invoice by selecting or entering all required fields and products to be purchased. If billing a previously created Sales Order, find the Sales Order and click “Bill” or “Invoice” to copy the Sales Order to a POS Invoice.
2. Click Save.
3. Processing Payment: a. If a Rich Transaction Swipe device is being used, the customer can review the item(s) for
purchase and the transaction total and then swipe and select the card Payment Method to be used (if the Payment Method is not auto-selected), or, indicate to the Cashier that a non-card tender is to be used (cash, check).
b. If no Rich Transaction Swipe device is being used, or, if the customer needs assistance, you (Cashier) can select the Payment Method desired by the customer.
c. If the customer wishes to modify or cancel the purchase prior to payment completion, click the ‘x’ in the top right corner of the payment window and then edit the POS Invoice to modify or delete the transaction.
d. Once a Payment Method has been selected, simply follow the instructions in the Process Payment window to complete the Sale Transaction.
4. Receipt Printing a. IF USING POS RECEIPT PRINTER
Confirm that the receipt labeled “Customer Copy” has been received by the customer. Confirm that the receipt labeled “Gift Receipt” has been received by the customer (if applicable). Confirm that the receipt labeled “Merchant Copy” has been signed by the customer and stored by you (if applicable; Merchant copy will not typically be printed if Rich Transaction Swipe device is enabled).
b. IF USING 8.5x11 Windows Output
PDF will be launched automatically upon successful payment transaction. Click print icon or use “Ctrl-P” to print the Invoice using Windows standard printing.

SuitePOS for NetSuite (Classic) User Manual
Cashiers
Performing a POS Return (POS Credit Memo + Refund) Transaction Return transactions represent the process of accepting returns of your company’s goods and/or services in exchange for a refund to a customer. Important notes:
• Proper use of the POS Credit Memo transaction form is covered by the NetSuite Help module. Click on Help within the body of the POS Credit Memo or contact your administrator if you do not know how to use this form.
To perform a Return Transaction:
1. Use the NetSuite Global Search to find the original POS Invoice by searching for the Transaction ID or by scanning the bar code (both printed on the Customer Copy receipt) or by the customer name (if your company supports named customers).
2. Click Credit on the POS Invoice.
3. Complete the POS Credit Memo by removing any products that are not being returned.
4. Click Save.
5. Processing Refund: c. If a Rich Transaction Swipe device is being used, the customer can review the item(s) being
returned and the return transaction total and then select the Refund Method to be used; Store Credit is the default method and maybe the only method available depending on your company’s policy.
d. If no Rich Transaction Swipe device is being used, or, if the customer needs assistance, you (Cashier) can select the Refund Method desired by the customer.
e. If the customer wishes to modify or cancel the return prior to payment completion, click the ‘x’ in the top right corner of the payment window and then edit the POS Credit Memo to modify or delete the transaction.
f. Once a Refund Method has been selected, simply follow the instructions in the Process Refund window to complete the Return Transaction.
6. Receipt Printing a. IF USING POS RECEIPT PRINTER
Confirm that the receipt labeled “Customer Copy” has been received by the customer. Confirm that the receipt labeled “Merchant Copy” has been signed by the customer and stored by you (if applicable; Merchant copy will not typically be printed if Rich Transaction Swipe device is enabled).
b. IF USING 8.5x11 Windows Output PDF will be launched automatically upon successful payment transaction. Click print icon or use “Ctrl-P” to print the Credit Memo using Windows standard printing.
SuitePOS for NetSuite (Classic) User Manual
Cashiers
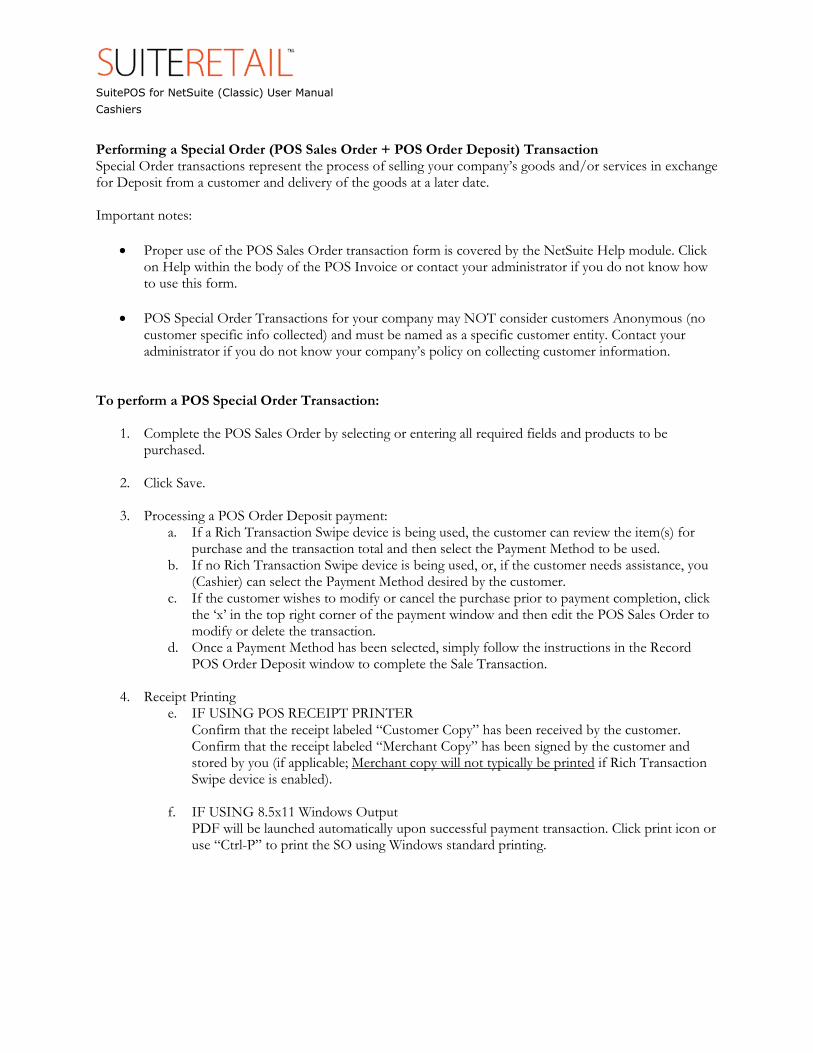
Performing a Special Order (POS Sales Order + POS Order Deposit) Transaction Special Order transactions represent the process of selling your company’s goods and/or services in exchange for Deposit from a customer and delivery of the goods at a later date. Important notes:
• Proper use of the POS Sales Order transaction form is covered by the NetSuite Help module. Click on Help within the body of the POS Invoice or contact your administrator if you do not know how to use this form.
• POS Special Order Transactions for your company may NOT consider customers Anonymous (no customer specific info collected) and must be named as a specific customer entity. Contact your administrator if you do not know your company’s policy on collecting customer information.
To perform a POS Special Order Transaction:
1. Complete the POS Sales Order by selecting or entering all required fields and products to be purchased.
2. Click Save.
3. Processing a POS Order Deposit payment: a. If a Rich Transaction Swipe device is being used, the customer can review the item(s) for
purchase and the transaction total and then select the Payment Method to be used. b. If no Rich Transaction Swipe device is being used, or, if the customer needs assistance, you
(Cashier) can select the Payment Method desired by the customer. c. If the customer wishes to modify or cancel the purchase prior to payment completion, click
the ‘x’ in the top right corner of the payment window and then edit the POS Sales Order to modify or delete the transaction.
d. Once a Payment Method has been selected, simply follow the instructions in the Record POS Order Deposit window to complete the Sale Transaction.
4. Receipt Printing e. IF USING POS RECEIPT PRINTER
Confirm that the receipt labeled “Customer Copy” has been received by the customer. Confirm that the receipt labeled “Merchant Copy” has been signed by the customer and stored by you (if applicable; Merchant copy will not typically be printed if Rich Transaction Swipe device is enabled).
f. IF USING 8.5x11 Windows Output PDF will be launched automatically upon successful payment transaction. Click print icon or use “Ctrl-P” to print the SO using Windows standard printing.

SuitePOS for NetSuite (Classic) User Manual
Cashiers
Closing the Register Closing the Register is the process of counting the currency in the physical cash drawer at the end of a new business day or shift. Important notes:
• The employee who closes the register shares responsibility (along with the person who opens) for the closing register balance at the end of the day or shift. For this reason, a Shift Manager, or, a single employee, may be responsible for both the opening and closing of each register.
• The system will prevent you from exiting the entire application until the register has been properly closed. However, the system will not prevent you from signing or punching out; remember to close the register if it is your responsibility before leaving for the day.
To Close Register:
1. Count each currency type in the drawer, starting with the lowest denomination. Enter the quantity counted of each type in the corresponding input box on the Close Register screen. You may also need to record each Merchant Copy receipt and/or hard-copy checks depending on the settings for your company.
2. Enter in any notes as indicated. Common notes might include what envelop/box/safe the funds were put in and/or actual amounts to be deposited; use of notes will vary depending on company policy.
3. Click Drawer Count is Confirmed.
The Register should now be closed and you will be redirected to the Time Clock where you should Punch-Out if your shift has ended.

SuitePOS for NetSuite (Classic) User Manual
Back Office Administrators
Back-Office Administrators This section of the manual is for Back-Office Administrators who are responsible for the day-to-day accounting and reporting impact of the POS system. Funding a Register Funding the Register is the process of adjusting your accounting records to reflect the amount of currency that a register will be opened with. Important notes:
• Proper use of the Journal Entry form and chart of account assignments is covered by the NetSuite Help module and should also be discussed with your accounting staff. Contact your administrator if you do not know how to use any of the NetSuite functions referenced below.
• There is no set rule on how frequently accounting records should be adjusted to reflect daily funding. It is most convenient to fund the register initially, deposit only the difference, and then open each register with the same amount every day or shift; when the Open Register amount is consistent, it is not necessary to record funding on a daily basis. However, if deposited funds are to be added to a register, an additional Journal Entry would be indicated to reflect the additional funds added to the Register.
To Fund a Register:
1. Go to the Transactions � Other � Make Journal Entries 2. Create a Journal entry to move funds from the Company checking account (or other appropriate
account) to the Cash on Hand (or other appropriate account). Depending on your company’s policy, you may be required to select a specific Store and/or Cash Register for notation on the Journal entry.
3. Click Save

SuitePOS for NetSuite (Classic) User Manual
Back Office Administrators
Daily/Recurring Back Office (Accounting) Activities Activities described here can be done on a daily, weekly, monthly or irregular frequency. If personnel resources permit, a daily end of day frequency is ideal, as this will result in the smallest set of data to review, limit the possibility of human error, and provide the most up-to-date visibility of cash flow. The activities described here follow typical best practice for the majority of NetSuite/POS customers. However, these processes are not set in stone and some customers choose to alter or completely substitute different back-office activities to match specific banking or accounting needs.
Batch Confirmation of Credit/Debit Transactions It is a good practice to confirm that all credit and debit card (if applicable) transactions reported by NetSuite match the transactions reported and pending settlement in Shift4 for a given period. Catching any issues at this stage may eliminate charge-backs/refunds that could result in additional costs. Performing this confirmation may also identify transactions that did not complete successfully allowing a re-charge to the customer in a timely manner.
To Confirm a Batch prior to Settlement:
1. Login to Shift4 $$ on the Net and view all transactions pending settlement Shift4 provides the daily totals for each type of credit card. At the end of each day, you should look at the totals, and either write them down, or leave the browser window open. We will use this later to verify records within NetSuite
2. Use the POS Payments/Refunds Summary and filter by date to show all records since last Shift4 Settlement. For the day selected, this saved search will show you the total amounts for each type of credit card you accept through your POS system. These should exactly match the amounts reported by Shift4. If not, see the section below Catching and fixing errors. NOTE: If you have different Locations (Stores) using different Shift4 Merchant IDs, you will likely have a different version of this report for each Location. See Reporting: Using the POS Payments/Refunds Summary for more information.
3. If the batch total of the report equals the batch pending settlement in Shift4, settle the batch. You can then go forward with moving the credit card funds into their appropriate account. See Making Deposits below.
4. If the total batch amount reported by NetSuite does not match the batch reported by Shift4, this indicates that certain credit card transactions were not recorded correctly, and you will need to determine which transactions actually occurred. If you peruse each transaction in the POS Payments/Refunds Summary against each transaction in the Shift4 batch, you will typically find one of two Error Scenarios:
a. Payment appears in Shift4, but not NetSuite In this scenario, while the card was charged, a proper record of it within NetSuite did not occur. To correct this, view the payment details within Shift4 and keep this data handy. Within NetSuite, locate the invoice that was unpaid and choose to apply payment. In the payment screen, copy the card information from Shift4, making sure to check “Card Approved”.
SuitePOS for NetSuite (Classic) User Manual
Back Office Administrators
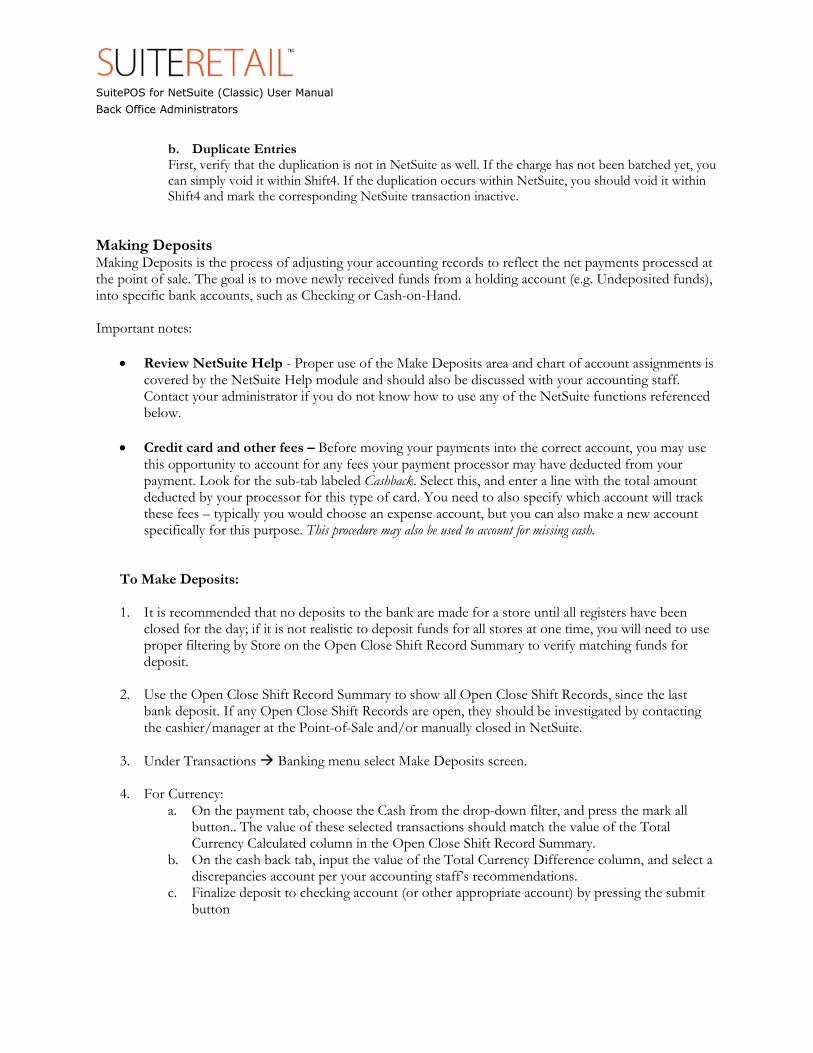
b. Duplicate Entries First, verify that the duplication is not in NetSuite as well. If the charge has not been batched yet, you can simply void it within Shift4. If the duplication occurs within NetSuite, you should void it within Shift4 and mark the corresponding NetSuite transaction inactive.
Making Deposits Making Deposits is the process of adjusting your accounting records to reflect the net payments processed at the point of sale. The goal is to move newly received funds from a holding account (e.g. Undeposited funds), into specific bank accounts, such as Checking or Cash-on-Hand. Important notes:
• Review NetSuite Help - Proper use of the Make Deposits area and chart of account assignments is covered by the NetSuite Help module and should also be discussed with your accounting staff. Contact your administrator if you do not know how to use any of the NetSuite functions referenced below.
• Credit card and other fees – Before moving your payments into the correct account, you may use this opportunity to account for any fees your payment processor may have deducted from your payment. Look for the sub-tab labeled Cashback. Select this, and enter a line with the total amount deducted by your processor for this type of card. You need to also specify which account will track these fees – typically you would choose an expense account, but you can also make a new account specifically for this purpose. This procedure may also be used to account for missing cash.
To Make Deposits: 1. It is recommended that no deposits to the bank are made for a store until all registers have been
closed for the day; if it is not realistic to deposit funds for all stores at one time, you will need to use proper filtering by Store on the Open Close Shift Record Summary to verify matching funds for deposit.
2. Use the Open Close Shift Record Summary to show all Open Close Shift Records, since the last bank deposit. If any Open Close Shift Records are open, they should be investigated by contacting the cashier/manager at the Point-of-Sale and/or manually closed in NetSuite.
3. Under Transactions � Banking menu select Make Deposits screen.
4. For Currency: a. On the payment tab, choose the Cash from the drop-down filter, and press the mark all
button.. The value of these selected transactions should match the value of the Total Currency Calculated column in the Open Close Shift Record Summary.
b. On the cash back tab, input the value of the Total Currency Difference column, and select a discrepancies account per your accounting staff’s recommendations.
c. Finalize deposit to checking account (or other appropriate account) by pressing the submit button

SuitePOS for NetSuite (Classic) User Manual
Back Office Administrators
5. For Checks: a. Same as 4 above; however, choose “Check” as payment method instead of cash “Cash”
6. For Credit Cards:
a. Same as 4 above; but, substitute “Credit Card” for “Cash”. Cash back tab should reflect merchant fees subtracted form deposit amounts.
b. Amex and Discover are often deposited separately from Visa/MC.

SuitePOS for NetSuite (Classic) User Manual
Back Office Administrators
Reporting NOTE: Proper use of Saved Searches and Reports is covered by the NetSuite Help module. Click on Help within the body of the Saved Search or Report or contact your administrator if you do not know how to use this search or if you wish to make modifications to show different or enhanced detail. Use of these reports is optional; your company’s policies and procedures and need to use these reports may vary. Using the Open Close Shift Record Summary The Open Close Shift Record Summary is a customizable saved search in NetSuite used to audit specific daily/shift transaction discrepancies and used to verify proper funding and deposit activities. Using the POS Payments/Refunds Summary The POS Payments/Refunds Summary is a customizable saved search in NetSuite used to audit specific credit card and other payment method transactions or refunds against gateway, merchant and bank statements. This summary will show you the sum of each type of payment you receive, for each day. It is recommended that a separate copy of this report is generated for any additional Shift4 Merchant IDs assigned to your company. This can be done by choosing a location filter, found near the footer of the screen. Using the POS Transaction Summary The POS Transaction Summary is a customizable saved search in NetSuite used to audit specific daily/shift transaction totals and can be rolled into quota, forecasting and budgeting analysis.

SuitePOS for NetSuite (Classic) User Manual
System Administrators
System Administrators This section of the manual is for System Administrators who are responsible for IT and/or NetSuite technical administration tasks. Recommended NetSuite Settings for POS Most of the settings recommended here do not directly affect the POS system but will likely improve efficiency and ease of use for users in a POS environment. For all Settings not mentioned below, default setting or personal preference is recommended.
1. User Preferences (Cannot be set globally; must be set by each logged in User)
a. Home � Set Preferences � Optimizing NetSuite i. Maximize Entries in Dropdowns: Set to “10”
b. Home � Set Preferences � Reporting/Search
i. Popup Search Uses Keywords = TRUE (checked)
2. Global Setup a. Setup � Company � Auto-Generated Numbers
i. A unique Prefix or Suffix for Invoice, Credit Memo and Sales Order is recommended
ii. 5 or Minimum Digits is recommended iii. Use Location is recommended if more than one Location exists where transactions
will take place (Prefix must be set on Location record) iv. Allow Override should be FALSE (not checked)
b. Setup � Company � General Preferences
i. Default Customer Type = Individual (unless majority of customers are corporate)

SuitePOS for NetSuite (Classic) User Manual
System Administrators
NetSuite Configuration Overview Locations (Stores) View/Edit: List � Accounting � Locations A standard Location should exist for each retail store. Custom fields have been added to the Location form to provide data necessary for proper POS system operation. It is required that the “Time Zone” field be populated with a proper label (e.g. “EST”). The other custom and standard fields found on the Location form are recommended (but not required). POS Transaction and Entry Forms View/Edit: Setup � Customization � Transaction Forms There are 3 Types of custom Transaction forms and 1 custom Entry form specified for POS use in NetSuite. For the 4 forms, there are two versions created: 1 for Cashier use and one for Web Service communication. The 4 forms setup for POS users is: POS Sales Order – Inv (optional), POS Invoice, POS Credit Memo and POS Time Clock.
1. Modifying POS Forms Any fields desired can be added or removed. However, it is recommended (but not required) that the “Location”, “Cashier”, “Terminal” and “Shift” fields are left on the 3 Transaction forms. It is recommended (but not required) that “Location”, “Punch-In Timestamp”, “Punch-Out Timestamp”, “Punch in Register”, “Punch-Out Register” and “Time Zone” are left on the POS Time Clock entry form.
2. Custom Code
There are 2 scripts we load in to help facilitate POS workflow when using the 3 Transaction forms: transaction_client.js and library_client.js. Use of these scripts is recommended (but not required) for the most efficient POS workflow. There may be a need to disable, modify or add to these scripts. This should only be done by OnSite Pro Services as an add-on engagement, or, by a trained coder (and at your company’s own risk).
3. POSWS Form Versions
There is a POSWS versions labeled “Do not Touch” and used exclusively for Web Services communications. There is no need to alter these forms unless a Support rep specifically asks you to. Altering this form may interfere with proper functioning of the POS system.
POS Roles View/Edit: Setup � Users/Roles � Manage Roles
SuitePOS for NetSuite (Classic) User Manual
System Administrators
There are 2 roles created through initial implementation efforts: the “Cashier” role and the “POSWS” role.
1. Modifying/Copying the Cashier role It is recommended (but not required), that you do not remove any base permissions applied to this role. However, you may add to and/or copy to (for example, save as “Cashier Manager”) in order to expand abilities of this or versions of this role.
2. POSWS role There is no need to alter this role unless a Support rep specifically asks you to. Altering this role may interfere with proper functioning of the POS system.
POS Users View/Edit: Setup � Users/Roles � Manage Users POS Users are managed through the same employee form used for standard NetSuite user management.
1. Access and Role Assignments Each POS User must be given “Access” to NetSuite in order to use the POS system. They must be assigned at least one role (typically the “Cashier” role or a permutation of this role) in addition to the “POSWS” role.
2. “Point of Sale” sub-tab For each employee form in NetSuite, there is a sub-tab labeled “Point of Sale”. On this tab are POS-specific permissions that will apply globally for each NetSuite User.
Terminals View/Edit: Setup � Customization � Record Types � (Terminal) List Terminals are used to identify the physical POS Terminal and the store location of that Terminal.
1. Editing Existing Terminal info You may edit any fields on a Terminal record including the Terminal ID name, Store (Location) or Misc. Info. However, deleting the terminal record will void the license authentication. If for some reason you want to rename the Terminal, please contact OnSite support for assistance.
2. Adding a new Terminal If you purchase an additional license, you will need to add a new Terminal record to support the license. Installation and Registration of the Terminal will fail if a matching Terminal record cannot be found.
Currency Denomination records (use OPTIONAL) View/Edit: Setup � Customization � Record Types � (Currency Denomination) List The Currency Denomination records are used for Back-Office administrative tasks. There may be an

SuitePOS for NetSuite (Classic) User Manual
System Administrators
administrative reason to access these records if attempting to modify currencies to be tracked in the POS Open/Close management. Accounts deployed prior to POS v1.7 may not have this record in their NetSuite account and use of this record is optional. However, to enable non-USA or multiple currency management, it will be necessary to upgrade your bundle to include this record. Contact OnSite Support for more information. Open Close Shift records View/Edit: Setup � Customization � Record Types � (Open Close Shift) List Open Close Shift Records are used for Back-Office administrative tasks. There is no technical administrative reason to access these records. POS Receipt records View/Edit: Setup � Customization � Record Types � (POS Receipt) List
1. POS Receipt Records are used to customize POS Receipt output as an option to the default, legacy receipt used by the POS system.
2. A POS Receipt Record is created and assigned at the Store (Location) level. If no active POS Receipt is found for a specific Location, the POS system will use the default legacy receipt output.
3. There are 3 POS Receipt templates setup for your consideration and/or customization. It is recommended you use the ‘Make Copy’ function if you wish to customize any one of the 3 templates. The fields available on the POS Receipt Records are labeled and are self-explanatory.
4. There are various settings to choose from when editing a POS Receipt Record:
Store Choose the Store (Location) that this Receipt applies to. All child terminals under this locations will use this Receipt template.
Logo Select a logo for display on the POS receipt. For most Epson receipt printers, a Bitmap file at the maximum resolution of 180dpi is recommended. For most Star receipt printers, a Bitmap file at the maximum resolution of 203dpi is recommended. Default Font Number O is the default value. May correspond to different font style depending on printer model. Default Wrap Length 42 is the standard width of most POS Receipt Printers. 56 is an optional width size for some Epson printers. Changing this value will cause a wrap at the # of characters set. Left Margin Width
SuitePOS for NetSuite (Classic) User Manual
System Administrators
Sets the # of characters to pad the left column by. Store Name (bold) This input field is the store name to display on the POS Receipt. Store Name 2 This input field is the sub-store name to display on the POS Receipt. Use location data for Address/Info If checked, this will source the Address/Info from the NetSuite Location record. Show Customer Info If checked, this will source the Bill To Customer Information from the Customer record. Show Ship To If checked, this will source the Ship To information from the Customer record. Body Field 1, 2, 3 These input fields can be used to source standard or custom Transaction Body fields to be displayed on the receipt as per data on the Transaction processed. SO/Deposit, Invoice/Payment, Credit/Refund, Gift Receipt Labels These input fields are used to display the label for each of the respective types of POS receipts. Item info Header This input field can be used to display a flat header row label that precedes the line Item info content. Item info 1, 2, 3, 4, 5, 6 These input fields can be used to source standard or customer Transaction Column fields to be displayed on the receipt as per item data on the Transaction processed. Footer Message This input filed can be used to display a flat footer message on the POS receipts. Show Bar Code If checked, this will display a cose-128 format bar code on the POS receipts equivalent to the external Transaction ID of the Transaction processed. Show Sig Section on Customer Copy If checked, this will display a digitized bitmap of the electronic signature captured, or, a blank sign-line on the Customer Copy of the receipt. This is typically only used when

SuitePOS for NetSuite (Classic) User Manual
System Administrators
electronic signature is enabled. Line cut before footer If checked, this will cut the physical paper receipt (if printer has line cut function) before outputting a Footer Image
Footer Image Select a Footer Image for display on the POS receipt. For most Epson receipt printers, a Bitmap file at the maximum resolution of 180dpi is recommended. For most Star receipt printers, a Bitmap file at the maximum resolution of 203dpi is recommended. This is typically used to output images (with barcode) equivalent to Coupons or Promotion codes that have been created in NetSuite.
Show footer for Invoices, Credit Memos, Sales Orders If checked, this will result in an output of the Footer Image on each respective Transaction type.
5. Formatting options for all input fields on the POS Receipt is as follows:
Character Style Formatting Markup token Meaning Example Output
<b> Bold Island Surf and Sport <u> Underline Sale Receipt <i> Italic You must pay all charges… <v> Reverse (light on dark) TOTAL <a> Alternate Color (red) Discount <w> Double wide Sale Receipt <h> Double high Sale Receipt <g> Double wide & double high Sale Receipt <w#> Scale horizontal text size by #
times. <w3> Sale Receipt
<h#> Scale vertical text size by # times.
<h3>
Sale Receipt Markup token Meaning Example Output
<p#> Decimal point precision Field value: 23.546778 <p2>: 23.55 <p5>: 23.54678
<d> Date only Field value: 2/4/2008 14:58:05 <d>: 2/4/2008

SuitePOS for NetSuite (Classic) User Manual
System Administrators
Field Formatting (applies to NetSuite Field References of matching type only)
Item Info Column Formatting Markup token Meaning Notes
<R#> Right align, width=# chars
If # is greater than the remaining characters on the receipt, the field text will wrap to the next line; wrapped text will be left-aligned. If length of field text is greater than #, field text will be truncated to # characters.
<L#> Left align, width=# chars
If # is greater than the remaining characters on the receipt, the field text will wrap to the next line. If length of field text is greater than #, field text will be truncated to # characters.
Other Tokens Markup token Meaning Notes
<gh> Hide on gift receipts
If this token is present, the field value will be hidden on gift receipts.
<N> New line Insert a line break in the receipt _ (underscore) Whitespace Insert whitespace into the receipt <C> Align Center <L> Align Left Default <R> Right Align Formatting Notes Location of tokens within fields
Markup tokens can appear anywhere in the fields specified in NetSuite, but will always be applied to the entire field. For example, if the following is the data in the Address/Info field in the Receipt record in NetSuite
<b>2 William St<u> White Plains, NY 10601
<t> Time only Field value: 2/4/2008 14:58:05 <t>: 14:58:05
<dt> Date and time Field value: 2/4/2008 14:58:05 <dt>: 2/4/2008 14:58:05
<?a:b> Boolean (checkbox) format
Field value: Yes (checked) <?Affirmative:Negatory>: Affirmative Field value: No (unchecked) <?Applied:Unapplied>: Unapplied Field value: Yes (checked) <?T:_>: T Field value: No (unchecked) <?T:_>: (blank)
{fullItemName} Shows Full Item Path Field value: Cherry Cake 1 {fullItemName}: Cakes : Cherry Cake 1

SuitePOS for NetSuite (Classic) User Manual
System Administrators
the field would appear as follows on the receipt
2 William St White Plains, NY 10601
Sourcing transaction field values on the custom receipt
In the fields that support transaction sourcing (Body Field 1 – 3, Item Info 1 – 6) you can include both literal text and transaction field tokens. Literal text will appear the same for all receipts printed using the template, but transaction field tokens will be replaced by values from the Invoice, Credit Memo or Sales Order that is generating the receipt. All text entered in a custom receipt field is assumed to be literal text unless it is enclosed in square brackets. For example, if you wanted Body Field 1 to appear as -
Due Date: 2/7/2009 (no later than)
- you would set Body Field 1 in your custom receipt record to
<d>Due Date: [duedate] (no later than)
In the above example, “duedate” is NetSuite’s internal ID for the Due Date transaction field. To find a NetSuite internal ID for a given transaction body field, first go to Home � Set Preferences, check off “Show Internal IDs” in the “Defaults” group, and save the preferences. Then go to the transaction form you are working with and click on the label of the field in question. In the help window that appears, the internal ID of the field will be shown in the bottom right-hand corner of the window.
To find NetSuite internal IDs for transaction column fields (fields that are shown as line item columns in a transaction), you will need to consult an external resource. For builtin transaction column fields, see the NetSuite Help Center reference under SuiteFlex � SuiteScript � SuiteScript Reference Guide � Supported Sublists � Items Sublist. For custom transaction column fields go to Setup � Customization � Transaction Column Fields; use the list shown to lookup the internal ID for the field in question.

SuitePOS for NetSuite (Classic) User Manual
System Administrators
Sample Item Info Formatting Custom Receipt Record
Item Info 1: <L15>[custcol_pos_displayname] Item Info 2: <L4>[quantity] Item Info 3: <R8>@[rate] each Item Info 4: <N><L100>[description] Item Info 5: <N>LINE TOTAL: Item Info 6: <R15>[amount]
Invoice Values
custcol_pos_displayname = “Big red plastic bat” quantity = 42 rate = 4.99 description = “Highly durable. Great for repeatedly hitting objects of annoyance, including: siblings, roommates, bosses, coworkers, people listening to nuMetal on their cellphones on the train, and more!” amount = 209.58
Receipt Output
Big red plastic 42 @4.99 each Highly durable. Great for repeatedly hitting objects of annoyance, including: siblings, roommates, bo LINE TOTAL: 209.58

SuitePOS for NetSuite (Classic) User Manual
System Administrators
Transaction Body Fields View/Edit: Setup � Customization � Transaction Body Fields Certain Transaction Body Fields are essential to proper functioning of the POS system. You may change the Label of these fields if you wish them to read differently on any cross-referencing reports or forms. Editing anything other than the “Label” field or deleting any of these fields (those with an ID containing “_pos”) may result in POS system complications. Transaction Column Fields View/Edit: Setup � Customization � Transaction Column Fields Certain Transaction Column Fields are essential to proper functioning of the POS system. You may change the Label of these fields if you wish them to read differently on any cross-referencing reports or forms. Editing anything other than the “Label” field or deleting any of these fields (those with an ID containing “_pos”) may result in POS system complications. Entity Fields View/Edit: Setup � Customization � Entity Fields Certain Entity Fields are essential for proper functioning of the POS system. You may change the Label of these fields if you wish them to read differently on any cross-referencing reports or forms. Editing anything other than the “Label” field or deleting any of these fields (those with an ID containing “_pos”) may result in POS system complications. Item Fields View/Edit: Setup � Customization � Item Fields Custom Item Fields are currently essential for proper functioning of the Gift Card Module only. You may change the Label of these fields if you wish them to read differently on any cross-referencing reports or forms. Editing anything other than the “Label” field or deleting any of these fields (those with an ID containing “_pos”) may result in Gift Card Module complications. Other Custom Fields View/Edit: Setup � Customization � Entity Fields Certain Other Custom Fields are essential to proper functioning of the POS system. You may change the Label of these fields if you wish them to read differently on any cross-referencing reports or forms. Editing anything other than the “Label” field or deleting any of these fields (those with an ID containing “_pos”) may result in POS system complications. Server Script There is a Server Script loaded to help facilitate POS workflow. Use of this script is recommended (but not required) for the most efficient POS workflow. There may be a need to disable, modify or add to this script. This should only be done by OnSite Pro Services as an add-on engagement, or, by a trained coder (and at the customer’s risk). Gift Card Setup

SuitePOS for NetSuite (Classic) User Manual
System Administrators
These settings and instructions only apply to POS accounts who have purchased the optional Gift Card Module. Enabling and Adding a Gift Card item for sale via POS System You can add one or more Gift Card items for sale via the POS. The simplest option is to have only one item without a default price; the price can be set at the Point-of-Sale to match the desired Gift Card amount of the retail customer for each transaction.
1. Setup � Accounting � Accounting Preferences � Items/Transactions (tab) a. Under ‘Other Item Preferences’, you MUST use the setting “Enter on Order” for the Gift
Card Module to function properly
2. Lists � Accounting � Gift Certificates � New (button) a. Create a Gift certificate using standard fields (refer to the NetSuite Help center for more
information on Gift Certificate setup). b. It is not necessary to check the box “Is Gift Card” or to enter a “Gift Certificate NS Internal
ID” 3. Lists � Accounting � Items � New
a. Select an Inventory Item if you wish to track the amount of Gift cards you have in stock, or, another type of Item (Non-inventory, etc.)
b. In addition to standard Item fields you may choose to populate, you must check the box “Is Gift Card” for the POS system to recognize this as a Gift Card Item for sale.
c. You must enter the “Gift Certificate NS Internal ID” to associate this Gift Card with a NetSuite Gift Certificate.
Pre-loading Gift Cards 1. Within NetSuite, Create a New Invoice 2. Add the desired Gift Certificate Item (not the Gift Card Item) 3. Set the Amount field to the amount you are loading onto the Gift Card. 4. Click on the Gift Certificate field under Options and fill in the following fields that appear in the
popup: - From: [string of your choosing] - Recipient Name: [string of your choosing] - Recipient Email: [string of your choosing] - Code: [the numeric code on the top-left on the back of the physical Gift Card]
5. Repeat steps 2-4 for all the Gift Cards you wish to load. 6. Use a Transaction or Line Item Discount to zero out the Invoice if a particular customer is not
being charged for the pre-loaded Card(s) 7. Save the invoice.
Process Overview for Selling Gift Cards Online
1. To sell Gift Cards, sell the standard Gift Certificate(s) referenced by the Gift Card item(s) in your NetSuite account
2. When a Gift Certificate is purchased online, the order processor will need to enter the Auth Code (which is the numeric code on the top-left on the back of a Gift Card). Once done, the Card is loaded and can be sent to shopper.
3. To facilitate the use of Gift Cards online by shoppers at Checkout, it is recommended that you instruct the shopper to locate the numeric code on the top-left on the back of their Gift Card. You

SuitePOS for NetSuite (Classic) User Manual
System Administrators
may want to show an image of the back of a Gift Card with the numeric Auth code highlighted for their ease of entry.
POS Terminal Settings These settings are accessed by clicking the “Settings” button within the POS system itself. The Administrator Key chosen during POS installation is required to access and cannot be reset without

SuitePOS for NetSuite (Classic) User Manual
System Administrators
contacting OnSite Support. POS Terminal Settings affect only the Terminal the settings are changed on. If you desire to affect more than one terminal with modified settings, modifications will have to be performed on each individual terminal. Store Info The information displayed here is read-only and contains part of the content that will be displayed on a POS receipt (if applicable) and on a Rich Transaction Device (if applicable). This information is managed on the Location record by going to Lists � Accounting � Locations in NetSuite and selecting the Location this Terminal is associated with. Terminal
The information and settings here control certain POS-specific workflow functionality. Terminal ID This field matches the Terminal ID name within NetSuite Terminal Timeout Value controls the idle time allowed for the Terminal Auto Credit Card Submit Enabling this option will bypass the manual electronic signature review (if applicable) and submit a credit card for processing as soon as a customer signature has been collected. If no Rich Device is present (necessary for electronic signature collection), enabling this option will submit a credit card for processing as soon as it is swiped by the customer. Cashier Keeps Receipt Enabling this option will result in a force print of a “Merchant Receipt” which contains a place for a customer signature (if a POS Receipt Printer is being used) and will present a reconciliation confirmation upon “Close Register” for each credit card transaction made. This feature is recommended if electronic signatures are not being collected via a Rich Transaction Device. Print Gift Receipts This setting controls the options for POS Gift Receipt output:
- “No” will hide any abilities for the Cashier to print out Gift Receipts - “Optional” will give the Cashier a choice to print out Gift Receipts for every completed POS
transaction - “Always” will result in print out of Gift Receipts for every completed POS transaction
Auto-Print SO, INV or CM upon successful Payment/Refund Enabling this option will result in an automatic action of ‘Print’ as if the print function for the form in NetSuite was clicked. This option is for companies who wish to generate NetSuite Adobe Acrobat output either instead of our along with faster POS receipt output.

SuitePOS for NetSuite (Classic) User Manual
System Administrators
Default POS Trans. Form This setting controls which form or area the POS user is redirected to after a transaction is completed and closed. Enforce Matched Refunds/Store Credit Only Enabling this option (highly recommended) will allow a POS Refund to only be issued that either matches the tender type (and in CC case, the actual card used) or as a Store Credit. This helps prevent improper refund actions and may reduce instances of fraudulent refunds. Refund Default This setting controls the default selection for a POS Refund when using the POS. Sales Tax Region This setting controls the type of tax data expected for proper output to a Rich Device and/or receipt printout. Write Payment Info to Transaction Forms Enabling this option (highly recommended) will result in the POS application attempting to write payment and refund info directly to the NetSuite transaction form used. The info written is of text type and does not have any transactional impact.
Delay Application until Payment info write completed Enabling this option will result in a processing delay necessary to ensure that payment or refund info has been written to the transaction form used. This is recommended only when the setting ‘Auto-Print SO, INV or CM upon successful Payment/Refund’ is enabled.
Anonymous Customer Exception nsKey(s) Entering one or more NetSuite Customer Internal IDs will enable the POS system to handle each of these Customers as ‘Anonymous’. A Cashier will not be able to do the following for Anonymous Customers:
- Use a Payment Method of ‘Terms’ - Record a POS Order Deposit - Use the Credits/Deposits List to apply Store Credits (receipt will be needed) or Deposits to a
new transaction
Allow POS Order Deposits upon SO Submission Enabling this option will allow Cashiers to process Customer Deposits after submission of a Sales Order-Invoice type through the POS system. Error Notify Email Recipients Entering one or more email recipients will enable the POS system to auto-email out reports of any critical errors that may occur at the POS. Included in each report are steps to manually correct and the error that occurred if necessary. POS is default browser when in use Enabling this option will launch any web pages that may be accessed via POS for NetSuite in a new POS window instead of the computer’s default browser. Display Currency Code for Base Currency
SuitePOS for NetSuite (Classic) User Manual
System Administrators
Enabling this option will display the Symbol for the NetSuite base currency on POS Receipts. Hardware The settings here control hardware options and related content. Enable Mag Stripe Reader Device Enabling this option is required to use a Track 1, 2,3 mag stripe device, or, Rich Transaction device. Use Rich Device Enabling this option is required to use a Rich Transaction device for signature capture. Enable Signature Capture Enable Pin Pad Enabling this option is required to use a Rich Transaction device for PIN Debit customer payment method. If enabled, entry via a Processor-injected Rich Transaction Device is required for proper PIN authentication. Enable Customer Payment Method Selection Enabling this option will provide the customer a choice, if the Card Swipe type is not automatically determined, between Credit, Debit or Gift Card payment method on the Rich Transaction device (provided Debit and/or Gift Card payment method and Rich Transaction device are enabled). Device Splash Screen Use the ‘Browse’ button to select an image for display on the Rich Transaction device. The required image specifications are 320 pixels width x 240 pixels height, JPEG format. Transaction Completed Text The text entered here will result in message display on the Rich Transaction device upon completion of any POS transaction. Use Receipt Printer Enabling this option will allow an OPOS 1.8 or later compatible POS receipt printer to be used by the POS system. Receipt Printer Mode Enabling this option is required to use a POS Receipt Printer. If enabled, the type of Receipt Printer needs to be selected for proper functioning. Print Barcodes on Receipts Enabling this option (recommended) will result in a barcode equivalent to the NetSuite external Transaction number to be printed on the bottom of the POS receipt. Payment Gateway The settings here reflect information provided by Shift4 and functions that affect credit/debit card processing. TEST mode (default) can be used to safely test POS credit/debit card functionality without the risk of live cc transactions occurring.

SuitePOS for NetSuite (Classic) User Manual
System Administrators
Mode The ‘Standalone (HTTPS POST)’ is the default mode. Do not use the ‘Server (UTG2)’ mode unless specifically instructed by OnSite and Shift4. Shift4 Server URL Only used if ‘Server (UTG2) mode is active. This typically contains a local IP address and port number. Shift4 Merchant ID TEST value: 65235 LIVE value: As per your Shift4 account; more than one Merchant IDs may be assigned for each unique retail location within your organization. Shift4 User Name TEST value: OnSite LIVE value: As per your Shift4 account Shift4 Serial Number TEST value: 265 LIVE value: As per your Shift4 account; same as Shift4 API Serial Number below Shift4 Password TEST value: Shift4 LIVE value: As per your Shift4 account Shift4 API Serial Number TEST value: 265 LIVE value: As per your Shift4 account; same as Shift4 Serial Number above Shift4 API Password TEST value: certifymega LIVE value: As per your Shift4 account Allow Credit/Debit Card Approved This setting controls the options for allowing a Cashier to mark a Credit/Debit Card Approved. Marking a Card Approved assumes the card has been processed external to the POS system. When a Card is marked ‘Approved’, the Card will NOT BE PROCESSED through the POS system:
- “No” will not provide any option for the Cashier to mark Approved - “Always-Forced” will enable this option for every transaction - “Optional-Warning” will allow the Cashier to mark Approved, but will warn them prior to submission
that the Card will not be processed - “Optional-No Warning” will allow the Cashier to mark Approved and will not provide any warning.
Disable Card Swipe if Card Approved is checked Enabling this option will not ask (on the Rich Device) or accept a card swipe if ‘Card Approved’ is checked. Allow Save Card on File in NetSuite Enabling this option will provide the Cashier the ability to save a credit card on file for future use either through the POS system or directly in NetSuite. Enabling this option without a valid PCI DSS waiver form on file with NetSuite for your account will cause attempts of save card on file to fail. Enforce AVS match on CC-Manual

SuitePOS for NetSuite (Classic) User Manual
System Administrators
Enabling this option will require the Cashier to ask for and then enter a zip or postal code that matches the billing zip or postal code of the card attempting to be used for the CC-Manual Payment Method.
Enforce when using Card on File Enabling this option will require the Cashier to ask for and then enter a zip or postal code that matches the billing zip or postal code of the card attempting to be used for the Card on File Payment Method.
Enforce Sec. Code match on CC-Manual Enabling this option will require the Cashier to ask for and then enter a Security code (CVV2) that matches the Security code of the card attempting to be used for the CC-Manual Payment Method.
Enforce when using Card on File Enabling this option will require the Cashier to ask for and then enter a Security code (CVV2) that matches the Security code of the card attempting to be used for the Card on File Payment Method.
NetSuite The settings here reflect the POS system’s integration values as it relates to the NetSuite Account. Account Number This read-only field will contain the Account Number assigned to you by NetSuite. If this needs to change for some reason, you will need to contact OnSite Support. To view your account number in NetSuite: Support � Customer Service � Contact Support by Phone Web Service Role nsKey The NetSuite internal ID assigned to the POSWS role must be entered here. View in NetSuite: Setup � Users/Roles � Manage Roles Open/Close Record nsKey The NetSuite internal ID assigned to the core Open/Close custom record must be entered here. This same value will be entered into each Terminal used by your organization. View in NetSuite: Setup � Customization � Record Types � (under the ‘Edit’ column, hover over ‘Open Close Shift Record’ to get the core record ID) Cash Register (Terminal) Record nsKey The NetSuite internal ID assigned to the core Cash Register (Terminal) custom record must be entered here. View in NetSuite: Setup � Customization � Record Types � (under the ‘Edit’ column, hover over ‘Terminal’ to get the core record ID) Customer Payment Credit Account nsKey The NetSuite internal ID assigned to the Customer Payment credit account desired for impact as a result of a POS Payment must be entered here. View in NetSuite: Lists � Accounting � Accounts Customer Deposit Credit Account nsKey

SuitePOS for NetSuite (Classic) User Manual
System Administrators
The NetSuite internal ID assigned to the Customer Deposit credit account desired for impact as a result of POS Deposit must be entered here. View in NetSuite: Lists � Accounting � Accounts Customer Refund Credit Account nsKey The NetSuite internal ID assigned to the Customer Refund credit account desired for impact as a result of POS Refund must be entered here. View in NetSuite: Lists � Accounting � Accounts Receipt Record nsKey The NetSuite internal ID assigned to the core POS Receipt record must be entered here. View in NetSuite: Setup � Customization � Record Types � (under the ‘Edit’ column, hover over ‘POS Receipt’ to get the core record ID) Currency Denomination Record nsKey (OPTIONAL) The NetSuite internal ID assigned to the core Currency Denomination record must be entered here if you wish to enable non-USA or multiple currency management. View in NetSuite: Setup � Customization � Record Types � (under the ‘Edit’ column, hover over ‘Currency Denomination’ to get the core record ID) Specify Time Entry Payroll Item nsKey If enabled, the NetSuite internal ID assigned to the ‘Payroll Item’ desired for POS Time Clock entry forms must be entered here. View in NetSuite (if feature is enabled in NetSuite): Lists � Employees � Payroll Items Specify Time Entry as Paid Externally If enabled, Paid External will equal ‘True’ for the POS Time Clock entries made via the POS. Specify Time Entry Service Item nskey If enabled, the NetSuite internal ID assigned to the ‘Service Item’ desired for POS Time Clock entry forms must be entered here. View in NetSuite: Lists � Accounting � Items; Type = Service Specify Time Entry Department nsKey If enabled, the NetSuite internal ID assigned to the ‘Department’ desired for POS Time Clock entry forms must be entered here. View in NetSuite (if feature is enabled in NetSuite): Lists � Accounting � Departments Specify Time Entry Class nsKey If enabled, the NetSuite internal ID assigned to the ‘Class’ desired for POS Time Clock entry forms must be entered here. View in NetSuite (if feature is enabled in NetSuite): Lists � Accounting � Classes Set Time Entry as Approved If enabled, POS Time Clock entry forms will be marked as ‘Approved’. Use Enhanced Open/Close Record Enabled by default for new POS accounts deployed on POS v1.6 or later, this feature allows additional fields to be utilized on the Open/Close Shift records.
SuitePOS for NetSuite (Classic) User Manual
System Administrators
Set Location on Payment, Deposit and Refund If enabled, the POS terminal’s Location will be written to Payments, Deposits and Refunds within NetSuite when created via POS system. Save Merchant Copy to NetSuite Transaction If enabled, a PDF copy of the POS Receipt outputted (including digitized electronic signature if enabeled) will be attached as a file to the Transaction within NetSuite. The POSWS role must be given the Permissions � Lists � Documents and Files = Full permission in order for this function to process. Payment Methods The grid here specifies which Payment Methods will be available within the POS system, whether the drawer will be kicked if a transaction uses the payment method and the NetSuite internal ID the payment method maps to. View in NetSuite: Lists � Accounting � Other Lists; Type = Payment Method Store Credit, Terms (Credit Account), Customer Credit/Deposits, Card on File and Gift Cards do not have a NetSuite Internal ID (nsKey) associated with them. Credit Card Payment Method IDs are set under the Credit Cards tab referenced below. All other Payment Methods enabled must have an nsKey entered for the POS system to function properly. Credit Cards The grid here specifies which Credit Cards will be available within the POS system, the order of presentation rank and the NetSuite internal ID the payment method (credit card) maps to. View in NetSuite: Lists � Accounting � Other Lists; Type = Payment Method