user guide specifications.....122 environmental specifications..... .....123 additional...
TRANSCRIPT

HP PSC 1600 All-in-One seriesUser Guide

HP PSC 1600 All-in-One series
User Guide

© Copyright 2004 Hewlett-PackardDevelopment Company, L.P.The information contained herein issubject to change without notice.Reproduction, adaptation ortranslation without prior writtenpermission is prohibited, except asallowed under copyright laws.
Adobe and the Acrobat logo are eitherregistered trademarks or trademarksof Adobe Systems Incorporated in theUnited States and/or other countries.Windows®, Windows NT®, WindowsMe®, Windows XP®, and Windows2000® are U.S. registeredtrademarks of Microsoft Corporation.Intel® and Pentium® are registeredtrademarks of Intel Corporation.SD™ Card is a trademark of the SDCard Association.Energy Star® and Energy Star logo®are US registered marks of the UnitedStates Environmental ProtectionAgency.Publication number: Q5584-90245
First edition: November 2004
NoticeThe only warranties for HP productsand services are set forth in theexpress warranty statementsaccompanying such products andservices. Nothing herein should beconstrued as constituting anadditional warranty. HP shall not beliable for technical or editorial errorsor omissions contained herein.The Hewlett-Packard Company shallnot be liable for incidental orconsequential damages in connectionwith, or arising out of the furnishing,performance, or use of this documentand the program material which itdescribes.Note: Regulatory information can befound in Technical information.
It is not lawful in many places to makecopies of the following items. When indoubt, check with a legalrepresentative first.
● Governmental paper ordocuments:– Passports– Immigration papers– Selective service papers– Identification badges,
cards, or insignias● Governmental stamps:
Postage stampsFood stamps
● Checks or drafts drawn onGovernmental agencies
● Paper currency, traveler’schecks, or money orders
● Certificates of deposit● Copyrighted works
Safety information
Warning To prevent fire orshock hazard, do not exposethis product to rain or anytype of moisture.
Always follow basic safetyprecautions when using this productto reduce risk of injury from fire orelectric shock.
Warning Potential shockhazard.
1. Read and understand allinstructions in the Setup Guide.
2. Use only a grounded electricaloutlet when connecting thedevice to a power source. If youdo not know whether the outletis grounded, check with aqualified electrician.
3. Observe all warnings andinstructions marked on theproduct.
4. Unplug this product from walloutlets before cleaning.
5. Do not install or use this productnear water or when you are wet.
6. Install the product securely on astable surface.
7. Install the product in a protectedlocation where no one can stepon or trip over the power cord,and where the power cord willnot be damaged.
8. If the product does not operatenormally, see the onscreenTroubleshooting help.
9. No operator-serviceable partsinside. Refer servicing toqualified service personnel.
10. Use in a well-ventilated area.
Warning This equipmentwill be inoperable whenmain power fails.

Contents
1 HP All-in-One overview........................................................................................5The HP All-in-One at a glance................................................................................5Control panel overview...........................................................................................6Menu overview.......................................................................................................7Use the HP Image Zone to do more with your HP All-in-One.................................9
2 Find more information........................................................................................ 153 Connection information.....................................................................................17
Supported connection types.................................................................................17Connect using a USB cable..................................................................................18Use Windows printer sharing................................................................................18Use printer sharing (Macintosh OS X)..................................................................18Set up the HP JetDirect 175x...............................................................................19Use Webscan.......................................................................................................20
4 Load originals and load paper...........................................................................21Load an original....................................................................................................21Choose papers for printing and copying...............................................................22Load paper...........................................................................................................23Avoid paper jams..................................................................................................28
5 Work with photos...............................................................................................29Transfer photos....................................................................................................29Edit photos............................................................................................................30Share photos........................................................................................................31Print photos..........................................................................................................32
6 Use a memory card or PictBridge camera........................................................35The memory card slots and camera port..............................................................35Transfer photos to your computer.........................................................................37Print photos from a proof sheet............................................................................37Set photo print options..........................................................................................40Print photos directly from a memory card.............................................................42Print photos from a PictBridge-compatible digital camera....................................43Print the current photo..........................................................................................44Print a DPOF file...................................................................................................44
7 Use the copy features........................................................................................47Set the copy paper size........................................................................................47Set the copy paper type........................................................................................48Increase copy speed or quality.............................................................................49Make multiple copies of the same original............................................................50Copy a two-page black-and-white document........................................................50Make a 10 x 15 cm (4 x 6 inch) borderless copy of a photo..................................51Copy a 10 x 15 cm (4 x 6 inch) photo onto a full-size page..................................51Copy a photo several times on one page.............................................................53Resize an original using custom settings..............................................................53Resize an original to fit onto letter or A4 paper.....................................................54Copy a faded original............................................................................................54Copy a document that has been faxed several times...........................................55
User Guide 1
Enhance light areas of your copy.........................................................................55Make a poster.......................................................................................................56Prepare a color iron-on transfer............................................................................57Change default copy settings...............................................................................57Stop copying.........................................................................................................57
8 Use the scan features......................................................................................... 59Scan to an application..........................................................................................59Send a scan to a memory card.............................................................................60Stop scanning.......................................................................................................60
9 Print from your computer..................................................................................61Print from a software application..........................................................................61Change the print settings......................................................................................62Stop a print job.....................................................................................................63
10 Use HP Instant Share.........................................................................................65Overview...............................................................................................................65Get started............................................................................................................66Send images using your HP All-in-One................................................................66Send images using your computer.......................................................................67
11 Order supplies....................................................................................................73Order paper, transparency film, or other media....................................................73Order print cartridges............................................................................................73Order other supplies.............................................................................................74
12 Maintain your HP All-in-One..............................................................................75Clean the HP All-in-One.......................................................................................75Check the estimated ink levels.............................................................................76Print a self-test report...........................................................................................76Work with print cartridges.....................................................................................77Change the device settings..................................................................................87
13 Troubleshooting information.............................................................................89Before you call HP Support..................................................................................89View the Readme file............................................................................................90Setup troubleshooting...........................................................................................90Operational troubleshooting................................................................................101Device update.....................................................................................................104
14 Get HP support.................................................................................................107Get support and other information from the Internet...........................................107Warranty support................................................................................................107HP customer support..........................................................................................108Access your serial number and service ID..........................................................108Call in North America during warranty................................................................108Call elsewhere in the world.................................................................................109Call in Australia under warranty and post-warranty............................................111Call HP Korea customer support........................................................................111Call HP Japan support........................................................................................112Prepare your HP All-in-One for shipment...........................................................112
15 Hewlett-Packard LIMITED WARRANTY STATEMENT....................................115Duration of limited warranty................................................................................115Extent of limited warranty...................................................................................115Limitation of warranty.......................................................................................... 116Limitation of liability............................................................................................116
2 HP PSC 1600 All-in-One series

Local law.............................................................................................................116Limited warranty information for EU countries/regions.......................................116
16 Technical information......................................................................................119System requirements..........................................................................................119Paper specifications...........................................................................................119Print specifications..............................................................................................121Copy specifications.............................................................................................121Memory card specifications................................................................................122Scan specifications.............................................................................................122Physical specifications........................................................................................122Power specifications...........................................................................................122Environmental specifications..............................................................................123Additional specifications.....................................................................................123Environmental product stewardship program.....................................................123Regulatory notices..............................................................................................124Declaration of conformity (European Economic Area)........................................126Declaration of conformity....................................................................................126
Index.........................................................................................................................127
Contents
User Guide 3

4 HP PSC 1600 All-in-One series

1 HP All-in-One overviewMany HP All-in-One functions can be accessed directly, without turning on yourcomputer. Tasks such as making a copy or printing photos from a memory card canbe accomplished quickly and easily from your HP All-in-One.
This chapter describes the HP All-in-One hardware features, control panel functions,and how to access the HP Image Zone software.
Tip You can do more with your HP All-in-One by using the HP Image Zonesoftware installed on your computer. The software provides enhanced copy,scan, and photo functionality. For more information, see the onscreen HPImage Zone Help and Use the HP Image Zone to do more with your HP All-in-One.
The HP All-in-One at a glance
Label Description
1 Lid
2 Glass
3 Memory card slots and camera port
4 Paper-width guide
5 Paper tray extender
6 Paper tray
7 Control panel
8 Control panel display
9 Rear clean-out door
User Guide 5
HP A
ll-in-One overview

Label Description
10 Rear USB port
11 Power connection
Control panel overview
Label Name and Description
1 Control panel display: View menus, photo filenames, and messages. The controlpanel display can be pulled up and angled for better viewing.
2 On: Turn the HP All-in-One on or off. When the HP All-in-One is off, a minimalamount of power is still supplied to the device. To completely disconnect thepower supply to the HP All-in-One, turn the device off, and then unplug the powercord.
3 Setup: Access the menu system for reports, maintenance, and help.
4 Left arrow: Decrease values, or go back when viewing file names on the controlpanel display.
5 OK: Select a menu, setting, or value displayed on the control panel display.
Chapter 1(continued)
6 HP PSC 1600 All-in-One series
HP
All-
in-O
ne o
verv
iew

Label Name and Description
6 Photo Menu: Select photos to print, copy photos, change the image size, changepaper size and type, change layout, or adjust your photos.
7 Select Photos: Select photos to print from a memory card.
8 Print Photos: Print selected photos from a memory card.
9 Scan To: Select a scan destination.
10 Copy Menu: Select copy options, such as number of copies, paper size, andpaper type.
11 Reduce/Enlarge: Reduce or enlarge an original to the specific size of the paperloaded in the paper tray.
12 Start Copy Black: Start a black copy job.
13 Start Copy Color: Start a color copy job.
14 No. of Copies: Specify the desired number of copies.
15 Start Scan: Start a scan job and send it to the destination you selected using theScan To button.
16 Proof Sheet: Print a proof sheet when a memory card has been inserted in amemory card slot. A proof sheet shows thumbnail views of all the photos on thememory card. You can select photos on the proof sheet, then print those photosby scanning the proof sheet.
17 Right arrow: Increase values, or go forward when viewing file names on thecontrol panel display.
18 Cancel: Stop a job, exit a menu, or exit settings.
Menu overviewThe following tables provide a quick reference to top-level menus that appear on theHP All-in-One control panel display.
Copy Menu Copy Paper Size
Paper Type
Copy Quality
Lighter/Darker
Enhancements
Color Intensity
Set New Defaults
(continued)
User Guide 7
HP A
ll-in-One overview

Scan To menu HP Image Zone
Microsoft Word
Adobe Photoshop
HP Instant Share
The Scan To menu lists scan destinations, including applications installed on yourcomputer. Therefore, your Scan To menu might list scan destinations different thanthe destinations shown here.
Photo Menu Select PhotosNumber of Copies
Image Size
Paper Size
Paper Type
Layout Style
Smart Focus
Digital Flash
Set New Defaults
Proof Sheet Menu Print
Scan
Setup Menu 1. Help Menu
2. Print Report
3. Tools
4. Preferences
The Help Menu selection on the Setup Menu provides quick access to key helptopics. Most of the information is presented on a connected computer screen.
Chapter 1
8 HP PSC 1600 All-in-One series
HP
All-
in-O
ne o
verv
iew

Use the HP Image Zone to do more with your HP All-in-One
The HP Image Zone software is installed on your computer when you set up yourHP All-in-One. For further information, see the Setup Guide that came with your device.
Access to the HP Image Zone software differs by operating system (OS):
● If you have a PC and are running Windows, the HP Image Zone software entrypoint is the HP Director window.
● If you have a Macintosh and are running OS 10.1.5 or later, the HP Image Zonesoftware entry point is the HP Image Zone window.
● If you have a Macintosh and are running OS 9.2.6 or earlier, the HP Image Zonesoftware entry point is the HP Director window.
The entry point gets you started with the HP Image Zone software and services.
You can quickly and easily expand the functionality of your HP All-in-One by using theHP Image Zone software. Look for boxes like this throughout the guide that providetopic-specific tips and helpful information for your projects.
Access the HP Image Zone software (Windows) Open the HP Director from the desktop icon, system tray icon, or the Start menu.The HP Image Zone software features appear in the HP Director.
To open the HP Director1. Do one of the following:
– On the Windows desktop, double-click the HP Director icon.– In the system tray at the far right of the Windows taskbar, double-click the
Hewlett-Packard Digital Imaging Monitor icon.– On the taskbar, click Start, point to Programs or All Programs, select HP,
and then click Director.2. In the Select Device box, click to see a list of installed devices.3. Select the HP All-in-One.
Note The icons in the HP Director graphic below might appear differently onyour computer. The HP Director is customized to display icons associatedwith the device that is selected. If the selected device is not equipped with aparticular feature or function, then the icon for that feature or function does notdisplay in the HP Director.
Tip If the HP Director on your computer does not contain any icons, an errormight have occurred during the software installation. To correct this, uninstallthe software using one of the methods in Uninstall and reinstall the software.
Button Name and Purpose
Scan Picture: Scans a photo, picture, or drawing and displays it in theHP Image Zone.
User Guide 9
HP A
ll-in-One overview

Button Name and Purpose
Scan Document: Scans a document that contains text or both text andgraphics, and displays it in your selected program.
Make Copies: Displays the Copy dialog box for the selected device, fromwhich you can make a printed copy of your image or document. You can selectthe copy quality, number of copies, color, and size.
HP Image Zone: Displays the HP Image Zone, where you can:
● View and edit images● Print photos in multiple sizes● Make and print a photo album, postcard, or flyer● Make a multimedia CD● Share images through e-mail or a website
Transfer Images: Displays the HP Image Transfer software, which allows youto transfer images from the HP All-in-One, and save them on your computer.
Document viewer: Import, find, edit, view, process, print, and senddocuments.
Note For information on additional features and menu items such as SoftwareUpdate, Creative Ideas, and HP Shopping, see the onscreen HP Image ZoneHelp.
Menus and list items are also available to help you select the device you want to use,check its status, adjust a variety of software settings, and access the onscreen help.The following table explains these items.
Feature Purpose
Help Use this feature to access the HP Image Zone Help, which provides softwarehelp and troubleshooting information for your HP All-in-One.
Select Device Use this feature to select the device you want to use from a list of installeddevices.
Settings Use this feature to view or change various settings for your HP All-in-One,such as print, scan, or copy.
Status Use this feature to display the current status of your HP All-in-One.
Access the HP Image Zone software (Macintosh OS 10.1.5 or later)
Note Macintosh OS 10.0.0 - 10.1.4 are not supported.
Chapter 1(continued)
10 HP PSC 1600 All-in-One series
HP
All-
in-O
ne o
verv
iew

When you install the HP Image Zone software, the HP Image Zone icon is placed inthe Dock.
You can access the HP Image Zone software in one of two ways:● Through the HP Image Zone window● Through the HP Image Zone Dock menu
Use the HP Image Zone windowThe HP Image Zone window has two main elements:
● The display area for the Products/Services tabs– The Products tab gives you access to many of the features of your
HP imaging products, such as an installed products pop-up menu and a listof tasks available for the current product. The list might include tasks such ascopy, scan, or transfer images. Clicking on a task opens an application toassist you with that task.
– The Services tab gives you access to digital imaging applications that canhelp you view, edit, manage, and share you images.
● The Search HP Image Zone Help text boxThe Search HP Image Zone Help text box lets you search the HP Image ZoneHelp for keywords or phrases.
To open the HP Image Zone window➔ Click the HP Image Zone icon in the Dock.
The HP Image Zone window appears.The HP Image Zone window displays only the HP Image Zone features that areappropriate for the selected device.
Note The icons in the table below might appear differently on your computer.The HP Image Zone window is customized to display feature icons associatedwith the device that is selected. If the selected device is not equipped with aparticular feature or function, then that feature or function does not display inthe HP Image Zone window.
Products
Icon Feature and Purpose
Unload Images: Use this feature to transfer images from a memory card toyour computer.
Scan Picture: Use this feature to scan an image and display it in theHP Gallery.
Scan to OCR: Use this feature to scan text and display it in the selecteddestination text editing software program.
Note Availability of this feature varies by country/region.
User Guide 11
HP A
ll-in-One overview

Products
Icon Feature and Purpose
Make Copies: Use this feature to make a copy in black and white or color.
Services
Icon Feature and Purpose
HP Image Edit: Use this feature to edit images. (10.2 and later)
Use this feature to view and edit images. (10.1.5 only)
HP Gallery: Use this feature to view images. (10.2 and later)
HP Image Print: Use this feature to print images from an album using one ofseveral templates available.
HP Instant Share: Use this feature to open the HP Instant Share softwareclient application. (10.2 and later only)
HP Email Portal: Use this feature to easily send photos through e-mail.
In addition to the feature icons, several menu and list items allow you to select thedevice you want to use, check its status, adjust a variety of software settings, andaccess the onscreen help. The following table explains these items.
Feature Purpose
Select Device Use this feature to select the device you want to use from a list of installeddevices.
Settings Use this feature to view or change various settings for your HP All-in-One,such as print, scan, or copy.
Search HPImage ZoneHelp
Use this feature to search the HP Image Zone Help, which provides softwarehelp and troubleshooting information for your HP All-in-One.
Chapter 1(continued)
12 HP PSC 1600 All-in-One series
HP
All-
in-O
ne o
verv
iew

Use the HP Image Zone Dock menuThe HP Image Zone Dock menu provides a shortcut to HP Image Zone services. TheDock menu automatically contains all of the applications available in the HP ImageZone window Services tab list. You can also set HP Image Zone preferences to addother items to the menu, such as tasks from the Products tab list or HP Image ZoneHelp. For more information, see the HP Image Zone Help.
To display the HP Image Zone Dock menu➔ Press and hold the mouse on the HP Image Zone Dock icon.
Access the HP Image Zone software (Macintosh OS 9.2.6 or earlier) The HP Director is the entry point to the HP Image Zone software. Depending on thecapabilities of your HP All-in-One, the HP Director lets you initiate device functionssuch as scanning, copying, or unloading images from a digital camera or memorycard. You can also use the HP Director to open the HP Gallery to view, modify, andmanage the images on your computer.
To open the HP Director1. You can access the HP Image Zone software in one of two ways:
– Double-click the HP Director alias on the desktop.– Double-click the HP Director alias in the Applications:Hewlett-Packard:HP
Photo and Imaging Software folder.
Note If you install several HP devices of different kinds (for example, anHP All-in-One, a camera, and an HP scanner), an HP Director icon foreach kind of device is displayed on the desktop. However, if you installtwo of the same kind of device (for example, you might have a laptop thatyou connect to two different HP All-in-One devices -- one at work and oneat home) only one HP Director icon is displayed on the desktop.
2. The HP Director window appears.The HP Director displays only the task buttons that pertain to the selected device.
Note The icons in the table below might appear differently on your computer.The HP Director menu is customized to display feature icons associated withthe device that is selected. If the selected device is not equipped with aparticular feature or function, then the icon for that feature or function does notdisplay.
Device Tasks
Icon Purpose
Unload Images: Use this feature to transfer images from a memory card toyour computer.
User Guide 13
HP A
ll-in-One overview

Device Tasks
Icon Purpose
Scan Picture: Use this feature to scan an image and display it in theHP Gallery.
Scan Document: Use this feature to scan text and display it in the selecteddestination text editing software program.
Note Availability of this feature varies by country/region.
Make Copies: Use this feature to make a copy in black and white or color.
Manage and Share
Icon Purpose
HP Gallery: Use this feature to display the HP Gallery to view and editimages.
In addition to the HP Gallery feature, several menu items without icons allow you toselect other applications on your computer, change feature settings on your HP All-in-One, and access the onscreen help. The following table explains these items.
Manage and Share
Feature Purpose
MoreApplications
Use this feature to select other applications on your computer.
HP on theWeb
Use this feature to select an HP website.
HP Help Use this feature to select a source for help with your HP All-in-One.
Settings Use this feature to view or change various settings for your HP All-in-One,such as print, scan, or copy.
Chapter 1(continued)
14 HP PSC 1600 All-in-One series
HP
All-
in-O
ne o
verv
iew

2 Find more informationA variety of resources, both printed and onscreen, provide information about settingup and using your HP All-in-One.
Setup GuideThe Setup Guide provides instructions for setting up yourHP All-in-One and installing software. Make sure you followthe steps in order.
If you have problems during setup, see Troubleshooting inthe last section of the Setup Guide, Troubleshootinginformation, or visit www.hp.com/support.
HP PSC 1600 seriesUser Guide User Guide
The User Guide contains information on how to use yourHP All-in-One, including troubleshooting tips and step-by-step instructions.
HP Image Zone TourThe HP Image Zone tour is a fun, interactive way to get abrief overview of the software included with your HP All-in-One. You'll learn how HP Image Zone can help you edit,organize, and print your photos.
HP DirectorThe HP Director provides easy access to the softwareapplications, default settings, status, and onscreen Help foryour HP device. To start the HP Director, double-click theHP Director icon from your desktop.
HP Image Zone HelpThe HP Image Zone Help provides detailed information onusing the software for your HP All-in-One.
● The Get step-by-step instructions topic providesinformation on using the HP Image Zone software withHP devices.
● The Explore what you can do topic provides moreinformation about the practical and creative things you
User Guide 15
Find more inform
ation

can do with the HP Image Zone software and your HPdevices.
● If you need further assistance or want to check for HPsoftware updates, see the Troubleshooting andsupport topic.
Onscreen help from your deviceOnscreen help is available from your device and containsadditional information on select topics. You can access theOnscreen help from the control panel.
1. Press Setup on the control panel.The Help menu appears on the control panel display.
2. Press OK.3. Press or to scroll through the available help
options.4. Press OK to view the selected topic on your computer
screen.
ReadmeThe Readme file contains the most recent informationwhich might not be found in other publications.
Install the software to access the Readme file.
www.hp.com/support If you have Internet access, you can get help and supportfrom the HP website. This website offers technical support,drivers, supplies, and ordering information.
Chapter 2(continued)
16 HP PSC 1600 All-in-One series
Find
mor
e in
form
atio
n

3 Connection informationYour HP All-in-One comes equipped with a USB port so you can connect directly to acomputer using a USB cable. It also has networking capability which can be accessedby using an external print server (HP JetDirect 175x). The HP JetDirect can bepurchased as an accessory for your HP All-in-One and lets you easily andinexpensively share your device through an existing Ethernet network.
Supported connection types
Description Recommendednumber ofconnectedcomputers for bestperformance
Supported softwarefeatures
Setup instructions
USB connection One computerconnected to anHP All-in-One using aUSB cable.
The USB port islocated on the rear ofthe device.
All features aresupported.
Follow the SetupGuide for detailedinstructions.
Windows printersharing
Five.
The host computermust be turned on atall times, or the othercomputers will not beable to print to theHP All-in-One.
All features residenton the host computerare supported. Onlyprint is supportedfrom the othercomputers.
For setupinstructions, see UseWindows printersharing.
Printer sharing(Macintosh)
Five.
The host computermust be turned on atall times, or the othercomputers will not beable to print to theHP All-in-One.
All features residenton the host computerare supported. Onlyprint is supportedfrom the othercomputers.
For setupinstructions, see Useprinter sharing(Macintosh OS X).
Network connectionthrough theHP JetDirect 175x(J6035C)
Availability of theHP JetDirect product
Five network-connected computers.
Only print andWebscan aresupported. For moreinformation on
For setupinstructions, see Setup the HP JetDirect175x.
User Guide 17
Connection inform
ation

Description Recommendednumber ofconnectedcomputers for bestperformance
Supported softwarefeatures
Setup instructions
varies by country/region.
Webscan, see UseWebscan.
Copy and printing aresupported from thecontrol panel of yourHP All-in-One.
Connect using a USB cable Detailed instructions for connecting a computer to your HP All-in-One using a USBcable are included in the Setup Guide that came with your device.
Use Windows printer sharing If your computer is on a network, and another computer on the network is connectedto the HP All-in-One by using a USB cable, you can use that device as your printerusing Windows printer sharing. The computer connected directly to the HP All-in-Oneacts as the host for the printer and has full feature functionality. Your computer, whichis referred to as a client, has access only to the print features. All other functions mustbe performed on the host computer.
To enable Windows printer sharing➔ Refer to the user guide that came with your computer or the Windows onscreen
Help.
Use printer sharing (Macintosh OS X) If your computer is on a network, and another computer on the network is connectedto the HP All-in-One by using a USB cable, you can use that device as your printerusing printer sharing. The computer connected directly to the HP All-in-One acts asthe host for the printer and has full feature functionality. Your computer, which isreferred to as a client, has access only to the print features. All other functions mustbe performed on the host computer.
To enable printer sharing1. On the host computer, select System Preferences in the Dock.
The System Preferences window appears.2. Select Sharing.3. From the Services tab, click Printer Sharing.
Chapter 3(continued)
18 HP PSC 1600 All-in-One series
Con
nect
ion
info
rmat
ion

Set up the HP JetDirect 175x Your HP All-in-One can be shared by up to five computers on a local area network(LAN) by using the HP JetDirect 175x as a print server for all computers on thenetwork. Simply connect your HP JetDirect to your HP All-in-One and router or hub,and then run the HP JetDirect installation CD. The required printer drivers (INF file)are located on the installation CD for your HP All-in-One.
Note Using the HP JetDirect 175x, you can print and send a scan usingWebscan from your computer. You can also make copies and print from thecontrol panel of your HP All-in-One.
To network connect your HP All-in-One using the HP JetDirect 175x (Windows)1. Do one of the following:
– If you are setting up the HP All-in-One and HP JetDirect 175x for the firsttime, use the Setup Guide for your HP All-in-One and follow the hardwaresetup instructions.
– If your HP All-in-One has been connected to a computer with a USB cableand you now want to connect it to a network using an HP JetDirect 175x,uninstall the HP Image Zone software from your computer. For moreinformation, see Uninstall and reinstall the software.
2. Follow the HP JetDirect 175x setup instructions to connect the print server to aLAN.
3. Connect the HP JetDirect to the USB port on the rear of your HP All-in-One.4. Insert the HP JetDirect installation CD.
You will use this CD to locate the HP JetDirect on the network.5. Select Install to run the HP JetDirect installer.6. When prompted, insert the HP All-in-One installation CD.
Note If you are performing an initial installation of your HP All-in-One andHP JetDirect 175x, do not run the HP All-in-One setup wizard. Just installthe drivers following the instructions below.
7. Follow the steps appropriate for your operating system:
If you are using Windows XP or 2000:➔ Browse to the root directory of the CD and select the printer driver file,
hpoprn08.inf.
If you are using Windows 98 or ME:a. Browse the CD for the "Drivers" folder and find the correct language subfolder.
For example, for English speaking customers, navigate to the \enu\drivers\win9x_me directory, where enu is the English language directory andwin9x_me is for Windows ME. The printer driver file is hpoupdrx.inf.
b. If prompted, repeat for each of the files required.8. Complete the installation following the screens on your computer.
Note If at some later time you want to connect to your computer using a USBcable, disconnect the HP JetDirect from your HP All-in-One, uninstall the
User Guide 19
Connection inform
ation

HP printer driver from your computer, and follow the instructions provided inthe Setup Guide that came with your HP All-in-One.
To network connect your HP All-in-One using the HP JetDirect 175x (Macintosh)1. Follow the HP JetDirect 175x setup instructions to connect the print server to a
LAN.2. Connect the HP JetDirect to the USB port on the rear of your HP All-in-One.3. Do one of the following:
– If you are setting up your HP All-in-One for the first time, make sure youinsert the HP All-in-One installation CD into the CD-ROM drive on yourcomputer and run the HP All-in-One setup wizard.The network support software for your computer is installed at this time.When the installation is finished, the HP All-in-One Setup Assistantappears on your computer.
– From the Disk Drive, open the HP All-in-One Setup Assistant from thefollowing location: Applications:Hewlett-Packard:HP Photo & ImagingSoftware:HP AiO SoftwareThe HP All-in-One Setup Assistant appears on your computer.
4. Follow the onscreen prompts and provide the information requested.
Note Make sure you click TCP/IP Network on the connection screen.
Use WebscanWebscan lets you perform a basic scan through the HP JetDirect 175x using just aWeb browser. It also lets you perform the scan from your HP All-in-One without thedevice software installed on your computer. Just enter the IP address of theHP JetDirect in a Web browser and access the HP JetDirect embedded Web serverand Webscan.The user interface for Webscan is unique to using the HP JetDirect and does notsupport scan-to destinations like the HP Image Zone scanning software. The e-mailfunctionality of Webscan is limited, so it is recommended you use the HP Image Zonescanning software if you are not connected using the HP JetDirect.
To use Webscan1. Briefly press and release the test button on the rear of the HP JetDirect 175x.
The HP JetDirect network configuration page prints on the HP All-in-One.2. Enter the IP address of the HP JetDirect (obtained from the network configuration
page) in a Web browser on your computer.The HP JetDirect Web server opens in the browser window.
3. Select Scan.4. Follow the onscreen instructions.
Chapter 3
20 HP PSC 1600 All-in-One series
Con
nect
ion
info
rmat
ion

4 Load originals and load paperThis chapter provides instructions for loading originals on the glass to copy, scan, orfax; choosing the best paper type for your job; loading paper in the paper tray; andavoiding paper jams.
Load an original You can copy or scan up to letter- or A4-size originals by loading them on the glass,as described here. You should also follow these instructions when loading a proofsheet on the glass for photo printing.
Note Many of the special features will not work correctly if the glass and lidbacking are not clean. For more information, see Clean the HP All-in-One.
To load an original on the glass1. Lift the lid and place your original face down on the right front corner of the glass.
If you are loading a proof sheet, make sure the top of the proof sheet is lined upagainst the right edge of the glass.
Tip For more help on loading an original, refer to the guides along thefront and right edges of the glass.
2. Close the lid.
Tip You can copy or scan oversized originals by completely removing thelid from your HP All-in-One. To remove the lid, lift the lid to the openposition, grasp the sides of the lid, and then pull the lid upward. YourHP All-in-One functions normally with the lid removed. Replace the lid byinserting the hinges back into the appropriate slots.
User Guide 21
Load originals and load paper

Choose papers for printing and copyingYou can use many types and sizes of paper in your HP All-in-One. Review thefollowing recommendations to get the best printing and copying quality. Whenever youchange paper types or sizes, remember to change those settings.
Recommended papers If you want the best print quality, HP recommends using HP papers that arespecifically designed for the type of project you are printing. If you are printing photos,for example, load glossy or matte photo paper in the paper tray. If you are printing abrochure or presentation, use a type of paper specifically designed for that purpose.
For more information about HP papers, see the onscreen HP Image Zone Help, orsee the HP website:
www.hp.com/support/inkjet_media
Note At this time, this portion of the site is available in English only.
Papers to avoid Using paper that is too thin, paper that has a slick texture, or paper that stretcheseasily can cause paper jams. Using paper that has a heavy texture or does not acceptink can cause printed images to smear, bleed, or not fill in completely.
We do not recommend printing to the following papers:● Paper with cutouts or perforations (unless specifically designed for use with
HP inkjet devices).● Highly textured stock, such as linen. It might not print evenly, and the ink can
bleed into these papers.● Extremely smooth, shiny, or coated papers not specifically designed for your
HP All-in-One. They can jam the HP All-in-One or repel the ink.● Multi-part forms (such as duplicate and triplicate forms). They can wrinkle or get
stuck, and the ink is more likely to smear.
Chapter 4
22 HP PSC 1600 All-in-One series
Load
orig
inal
s an
d lo
ad p
aper
● Envelopes with clasps or windows. They can get stuck in the rollers and causepaper jams).
● Banner paper.
Depending on your country/region, some of these papers might not be available.
We do not recommend copying to the following papers:● Any size paper other than letter, A4, 10 x 15 cm (4 x 6 inch), 13 x 18 cm (5 x 7
inch), Hagaki (Japan only), or L (Japan only). Depending on your country/region,some of these papers might not be available to you.
● Panoramic papers.● Paper with cutouts or perforations (unless specifically designed for use with
HP inkjet devices).● Envelopes.● Banner paper.● Transparency film (other than HP Premium Inkjet Transparency Film or
HP Premium Plus Inkjet Transparency Film).● Multiple-part forms or label stock.
Load paper This section describes the procedure for loading different types and sizes of paperinto your HP All-in-One for your copies or printouts.
Caution To help prevent rips, wrinkles, and curled or bent edges, store allpaper flat in a resealable bag. If the paper is not stored properly, extremechanges in temperature and humidity might result in curled paper that does notwork well in the HP All-in-One.
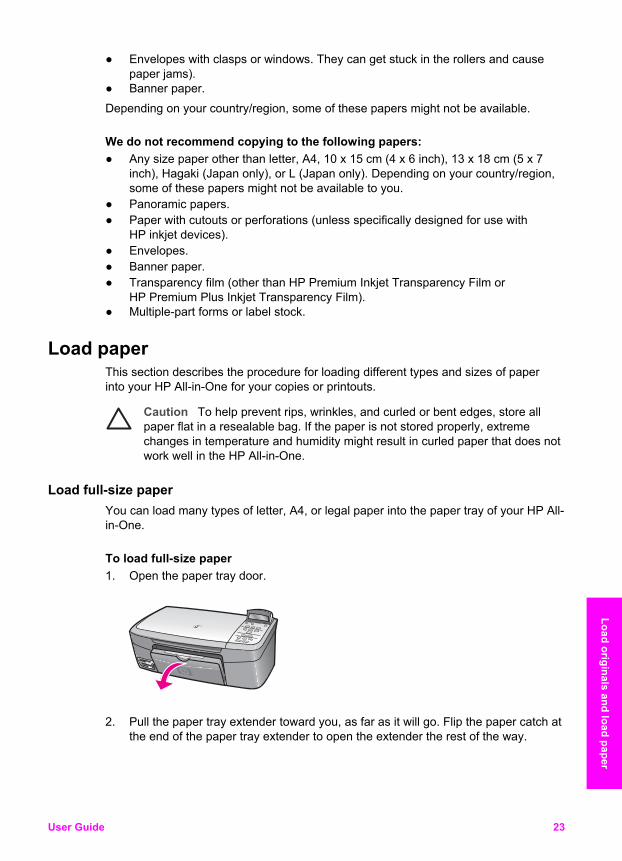
Load full-size paper You can load many types of letter, A4, or legal paper into the paper tray of your HP All-in-One.
To load full-size paper1. Open the paper tray door.
2. Pull the paper tray extender toward you, as far as it will go. Flip the paper catch atthe end of the paper tray extender to open the extender the rest of the way.
User Guide 23
Load originals and load paper

Warning Legal paper might get caught on the paper tray extender if it isfully extended when you print onto legal paper. To avoid a paper jamwhen using legal-size paper, do not flip open the paper tray extender.
3. Squeeze and hold the tab on the top of the paper-width guide, then slide thepaper-width guide to its outermost position.
4. Tap a stack of paper on a flat surface to align the edges, and then check thepaper for the following:– Make sure it is free of rips, dust, wrinkles, and curled or bent edges.– Make sure all the paper in the stack is the same size and type.
5. Insert the stack of paper into the paper tray with the short edge forward and theprint side down. Slide the stack of paper forward until it stops.
Tip If you are using letterhead, insert the top of the page first with theprint side down. For more help on loading full-size paper and letterhead,refer to the diagram engraved in the base of the paper tray.
6. Squeeze and hold the tab on the top of the paper-width guide, then slide thepaper-width guide inward until it stops at the edge of the paper.Do not overload the paper tray; make sure the stack of paper fits within the papertray and is no higher than the top of the paper-width guide.
Chapter 4
24 HP PSC 1600 All-in-One series
Load
orig
inal
s an
d lo
ad p
aper

Load 10 x 15 cm (4 x 6 inch) photo paper You can load 10 x 15 cm (4 x 6 inch) photo paper into the paper tray of your HP All-in-One. For best results, use 10 x 15 cm (4 x 6 inch) HP Premium Photo Paper orHP Premium Plus Photo Paper. For more information, see Recommended papers.For best results, set the paper type and paper size before copying or printing. Forinformation on changing paper settings, see the onscreen HP Image Zone Help.
Tip To help prevent rips, wrinkles, and curled or bent edges, store all paperflat in a resealable bag. If the paper is not stored properly, extreme changes intemperature and humidity might result in curled paper that does not work wellin the HP All-in-One.
To load 10 x 15 cm (4 x 6 inch) photo paper1. Remove all paper from the paper tray.2. Insert the stack of photo paper into the far right side of the paper tray with the
short edge forward and the glossy side down. Slide the stack of photo paperforward until it stops.If the photo paper you are using has perforated tabs, load the photo paper so thatthe tabs are closest to you.
3. Squeeze and hold the tab on the top of the paper-width guide, then slide thepaper-width guide inward against the stack of photo paper until it stops.Do not overload the paper tray; make sure the stack of photo paper fits within thepaper tray and is no higher than the top of the paper-width guide.
Load postcards or Hagaki cards You can load postcards or Hagaki cards into the paper tray of your HP All-in-One.
For the best results, set the paper type and size before printing or copying. For moreinformation, see the onscreen HP Image Zone Help.
To load postcards or Hagaki cards1. Remove all paper from the paper tray.
User Guide 25
Load originals and load paper

2. Insert the stack of cards into the far right side of the paper tray with the shortedge forward and the print side down. Slide the stack of cards forward until itstops.
3. Squeeze and hold the tab on the top of the paper-width guide, then slide thepaper-width guide inward against the stack of cards until it stops.Do not overload the paper tray; make sure the stack of cards fits within the papertray and is no higher than the top of the paper-width guide.
Load envelopes You can load one or more envelopes into the paper tray of your HP All-in-One. Do notuse shiny or embossed envelopes or envelopes that have clasps or windows.
Note For specific details on how to format text for printing on envelopes,consult the help files in your word processing software. For best results,consider using a label for the return address on envelopes.
To load envelopes1. Remove all paper from the paper tray.2. Insert one or more envelopes into the far right side of the paper tray with the
envelope flaps up and to the left. Slide the stack of envelopes forward until it stops.
Tip For more help on loading envelopes, refer to the diagram engravedin the base of the paper tray.
3. Squeeze and hold the tab on the top of the paper-width guide, then slide thepaper-width guide inward against the stack of envelopes until it stops.Do not overload the paper tray; make sure the stack of envelopes fits within thepaper tray and is no higher than the top of the paper-width guide.
Chapter 4
26 HP PSC 1600 All-in-One series
Load
orig
inal
s an
d lo
ad p
aper

Load other types of paper The following table provides guidelines for loading certain types of paper. For bestresults, adjust the paper settings each time you change paper sizes or paper types.For information on changing paper settings, see the onscreen HP Image Zone Help.
Note Not all paper sizes and paper types are available with all the functionson the HP All-in-One. Some paper sizes and paper types can only be used ifyou are starting a print job from the Print dialog box in a software application.They are not available for copying or printing photos from a memory card ordigital camera. Papers that are only available for printing from a softwareapplication are indicated as such.
Paper Tips
HP papers ● HP Premium Paper: Locate the gray arrow on the nonprinting sideof the paper, and then slide the paper into the paper tray with thearrow side facing up.
● HP Premium Inkjet Transparency Film: Insert the film so that thewhite transparency strip (with arrows and the HP logo) is on topand is going into the paper tray first. For printing from a softwareapplication only.
Note The HP All-in-One cannot automatically detect transparencyfilm. For best results, set the paper type to transparency filmbefore printing or copying onto transparency film.
● HP Iron-On Transfers: Flatten the transfer sheet completely beforeusing it; do not load curled sheets. (To prevent curling, keeptransfer sheets sealed in the original package until you are readyto use them.) Locate the blue stripe on the nonprinting side of thetransfer paper and then manually feed one sheet at a time into thepaper tray with the blue stripe facing up. For printing from asoftware application only.
● HP Greeting Cards, HP Photo Greeting Cards, or HP TexturedGreeting Cards: Insert a small stack of HP greeting card paper intothe paper tray with the print side down; slide the stack of cardsforward until it stops. For printing from a software application only.
Labels Always use letter or A4 label sheets designed for use with HP inkjetdevices (such as Avery inkjet labels), and make sure that the labels areno more than two years old. Labels on older sheets might peel offwhen the HP All-in-One, causing paper jams. For printing from asoftware application only.
1. Fan the stack of labels to make sure none of the pages aresticking together.
2. Place a stack of label sheets on top of full-size plain paper in thepaper tray, label side down. Do not insert labels one sheet at a time.
User Guide 27
Load originals and load paper

Avoid paper jams To help avoid paper jams, follow these guidelines:
● Prevent curled or wrinkled paper by storing all unused paper flat in a resealablebag.
● Remove printed papers from the paper tray frequently.● Ensure that paper loaded in the paper tray lies flat and the edges are not bent or
torn.● Do not combine different paper types and paper sizes in the paper tray; the entire
stack of paper in the paper tray must be the same size and type.● Adjust the paper-width guide in the paper tray to fit snugly against all paper. Make
sure the paper guide does not bend the paper in the paper tray.● Do not force paper too far forward in the paper tray.● Use paper types that are recommended for your HP All-in-One. For more
information, see Choose papers for printing and copying.
For more information about clearing paper jams, see Paper troubleshooting.
Chapter 4
28 HP PSC 1600 All-in-One series
Load
orig
inal
s an
d lo
ad p
aper

5 Work with photosYour HP All-in-One allows you to transfer, edit, share, and print photos in severaldifferent ways. This chapter contains a brief overview of the wide range of options forperforming each of these tasks, depending on your preferences and computer setup.More detailed information for each task is available in other chapters within this guide,or in the onscreen HP Image Zone Help that came with your software.
Transfer photosYou have several different options for transferring photos. You can transfer photos toyour computer or to a memory card. For more information, see the section belowspecific to your operating system.
Transfer photos using a Windows computerThe graphics below show methods for transferring photos to your Windows computeror a memory card.
You can transfer a photo from a memory card inserted into your HP All-in-One to yourWindows computer.
You can transfer a photo from your HP digital camera to your Windows computer.
You can transfer a photo by scanning a photo directly onto a memory card insertedinto your HP All-in-One.
User Guide 29
Work w
ith photos

Transfer photos using a MacintoshThe graphics below show methods for transferring photos to your Macintosh or amemory card. For more information, see the list below the graphic.
You can transfer a photo from a memory card inserted into your HP All-in-One to yourMacintosh.
You can transfer a photo from your HP digital camera to your Macintosh.
You can transfer a photo by scanning a photo directly onto a memory card insertedinto your HP All-in-One.
Edit photosYou have several different options for editing photos. For more information, see thesection below specific to your operating system.
Edit photos using a Windows computerThe graphics below show methods for editing photos using a Windows computer.
You can edit a photo on your Windows computer using the HP Image Zone software.
You can edit a photo using the control panel on your HP All-in-One.
Chapter 5
30 HP PSC 1600 All-in-One series
Wor
k w
ith p
hoto
s

Edit photos using a MacintoshThe graphics below show methods for editing photos using a Macintosh.
You can edit a photo on your Macintosh using the HP Image Zone software.
You can edit a photo on your Macintosh using the iPhoto software.
You can edit a photo using the control panel on your HP All-in-One.
Share photosYou have several different options for sharing photos with friends and family. Formore information, see the section below specific to your operating system.
Share photos using a Windows computerThe graphic below shows a method for sharing photos using a Windows computer.
You can share photos from your USB-connected HP All-in-One using the HP InstantShare server. Transfer photos from your USB-connected HP All-in-One to yourcomputer, where you use the HP Image Zone software to send the photos throughthe HP Instant Share server as an e-mail to your friends or family.
User Guide 31
Work w
ith photos

Share photos using a MacintoshThe graphic below shows a method for sharing photos using a Macintosh.
You can share photos from your USB-connected HP All-in-One using the HP InstantShare server. Transfer photos from your USB-connected HP All-in-One to yourcomputer, where you use the HP Image Zone software to send the photos throughthe HP Instant Share server as an e-mail to your friends or family.
Print photosYou have several different options for printing photos. For more information, see thesection below specific to your operating system.
Print photos using a Windows computerThe graphics below show methods for printing photos using a Windows computer.
You can print photos from your HP digital camera using PictBridge.
You can print photos from your camera using a software application (such asHP Image Zone) on your computer.
You can print photos from a memory card using the control panel on the HP All-in-One.
Chapter 5
32 HP PSC 1600 All-in-One series
Wor
k w
ith p
hoto
s

You can print photos from a memory card by transferring photos to your Windowscomputer and printing them using the HP Image Zone software.
Print photos using a MacintoshThe graphics below show methods for printing photos using a Macintosh.
You can print photos from your HP digital camera using PictBridge.
You can print photos from your camera using a software application (such asHP Image Zone) on your computer.
You can print photos from a memory card using the control panel on the HP All-in-One.
User Guide 33
Work w
ith photos

You can print photos from a memory card by transferring photos to your Macintoshand printing them using the HP Image Zone or iPhoto software.
Chapter 5
34 HP PSC 1600 All-in-One series
Wor
k w
ith p
hoto
s
6 Use a memory card orPictBridge cameraThe HP All-in-One can access the memory cards used in most digital cameras so youcan print, store, and manage your photos. You can insert the memory card into theHP All-in-One, or connect your camera directly, letting the HP All-in-One read thecontents of the memory card while it is still in the camera.
This chapter contains information on using memory cards or a PictBridge camera withyour HP All-in-One. Read this chapter for information on transferring photos to yourcomputer, setting photo print options, printing photos, and editing photos.
The memory card slots and camera port If your digital camera uses a memory card to store photos, you can insert the memorycard in your HP All-in-One to print or save your photos. You can also connect a digitalcamera that supports PictBridge to the HP All-in-One through the camera port andprint directly from the camera.
Tip You can print a proof sheet, which might be several pages long andshows thumbnail views of photos stored on the memory card, to print photosfrom the memory card, even if your HP All-in-One is not connected to acomputer.
Your HP All-in-One can read the following memory cards: CompactFlash (I, II),Memory Sticks, MultiMediaCard (MMC), Secure Digital, SmartMedia, and xD-PictureCard.
The following illustration shows the corresponding memory card slot for eachsupported memory card.
User Guide 35
Mem
ory Card and PictB
ridge
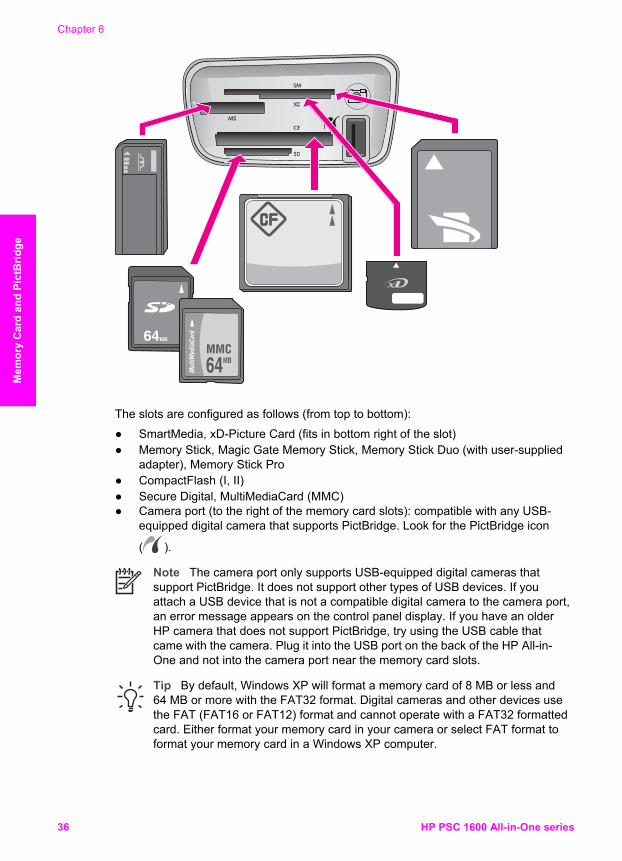
The slots are configured as follows (from top to bottom):
● SmartMedia, xD-Picture Card (fits in bottom right of the slot)● Memory Stick, Magic Gate Memory Stick, Memory Stick Duo (with user-supplied
adapter), Memory Stick Pro● CompactFlash (I, II)● Secure Digital, MultiMediaCard (MMC)● Camera port (to the right of the memory card slots): compatible with any USB-
equipped digital camera that supports PictBridge. Look for the PictBridge icon
( ).
Note The camera port only supports USB-equipped digital cameras thatsupport PictBridge. It does not support other types of USB devices. If youattach a USB device that is not a compatible digital camera to the camera port,an error message appears on the control panel display. If you have an olderHP camera that does not support PictBridge, try using the USB cable thatcame with the camera. Plug it into the USB port on the back of the HP All-in-One and not into the camera port near the memory card slots.
Tip By default, Windows XP will format a memory card of 8 MB or less and64 MB or more with the FAT32 format. Digital cameras and other devices usethe FAT (FAT16 or FAT12) format and cannot operate with a FAT32 formattedcard. Either format your memory card in your camera or select FAT format toformat your memory card in a Windows XP computer.
Chapter 6
36 HP PSC 1600 All-in-One series
Mem
ory
Car
d an
d Pi
ctB
ridge

Transfer photos to your computer After you take photos with your digital camera, you can print them immediately orsave them directly to your computer. To save them to your computer, you need toremove the memory card from the camera and insert it in the appropriate memorycard slot on the HP All-in-One.
Note You can only use one memory card at a time in your HP All-in-One.
To use a memory card1. Insert the memory card into the appropriate slot on your HP All-in-One.
When the memory card is inserted correctly, the status light next to the memorycard slots begins to blink. Reading card... appears on the control panel display.The status light next to the memory card slots blinks green when the card is beingaccessed.If you insert a memory card incorrectly, the status light next to the memory cardslots blinks amber and the control panel display shows an error message such asCard is in backwards or Card is not fully inserted.
Caution Never attempt to remove a memory card while it is beingaccessed. Doing so can damage files on the card. You can safely removea card only when the status light next to the slots is not blinking.
2. If there are photo files on the memory card that have never been transferredbefore, a dialog box on your computer asks whether you want to save the photofiles to your computer.
3. Click the option to save.This saves all the new photos from the memory card to your computer.For Windows: by default, photo files are saved in month and year folders fromwhen you extracted the files from your camera. The folders are created in a C:\Documents and Settings\username\My Documents\My Pictures folder inWindows XP and Windows 2000.For Macintosh: by default, files are saved to the computer at HardDrive:Documents:HP All-in-One Data:Photos (OS 9) or HardDrive:Users:User Name:Pictures:HP Photos (OS X).When the HP All-in-One finishes reading the memory card, the status light next tothe memory card slots stops blinking and stays lit. The name of the first file on thememory card appears on the control panel display.To navigate through the files on the memory card, press or to movebackward or forward through the files, one file at a time. Press and hold or to move rapidly backward or forward through the files.
Print photos from a proof sheet A proof sheet is a simple and convenient way to select photos and make printsdirectly from a memory card without the need for a computer. A proof sheet, whichmight be several pages long, shows thumbnail views of photos stored on the memorycard. The file name, index number, and date appear under each thumbnail. Proofsheets are also a quick way to create a printed catalog of your photos. In order to print
User Guide 37
Mem
ory Card and PictB
ridge

photos using a proof sheet, you need to print the proof sheet, complete it, and thenscan it.
Printing photos from a proof sheet is done in three steps: printing a proof sheet,completing the proof sheet, and scanning the proof sheet. This section containsdetailed information on all three steps.
Leave your memory card in the slot until after you have completed all three steps(printed, completed, and scanned your proof sheet) and your photos have printed. Ifyou remove the memory card or insert a different memory card, the photos you selectwill not print.
Print a proof sheetThe first step in using a proof sheet is to print it from the HP All-in-One.
1. Insert the memory card into the appropriate slot on your HP All-in-One.
Note Leave the memory card in the slot until after you have printed,completed, and scanned your proof sheet and your photos have printed. Ifyou remove the memory card or insert a different memory card, thephotos you select will not print.
2. Press Proof Sheet, and then press OK.This displays the Proof Sheet menu and then selects Print.
Note Depending on how many photos are on the memory card, the timeit takes to print a proof sheet can vary greatly.
3. If there are more than 20 photos on the card, the Select Photos menu appears.Press to scroll to the option you want to select, and then press OK.– All– Last 20– Custom Range
4. If you choose Custom Range, you must enter the photo index numbers for thefirst and last photos you want to print. When the First Photo prompt displays,press until the number for the first photo in the range displays, and then pressOK.
Note If you enter the wrong number, press Cancel to cancel the processand then start over.
5. When the Last Photo prompt displays, press until the number for the lastphoto in the range displays, and then press OK.
Complete the proof sheet After you have printed a proof sheet, you can use it to select the photos you want toprint.
Note You might want to use a photo print cartridge for superior print quality.With the tri-color and photo print cartridges installed, you have a six-inksystem. For more information, see Use a photo print cartridge.
Chapter 6
38 HP PSC 1600 All-in-One series
Mem
ory
Car
d an
d Pi
ctB
ridge

To complete a proof sheet1. Select the photos to print by using a dark pen or pencil to fill in the circles located
under the thumbnail images on the proof sheet.2. Select one layout style by filling in a circle in step 2 of the proof sheet.
Note If you need more control over print settings than the proof sheetprovides, you can print photos directly from the control panel. For moreinformation, see Print photos directly from a memory card.
Scan a proof sheet The final step in using a proof sheet is to scan the completed sheet to begin printingyour photos.
Tip Make sure the glass of the HP All-in-One is completely clean or the proofsheet might not scan properly. For more information, see Clean the glass.
1. Load the proof sheet face down on the right front corner of the glass. Make surethe sides of the proof sheet touch the right and front edges. Close the lid.
User Guide 39
Mem
ory Card and PictB
ridge
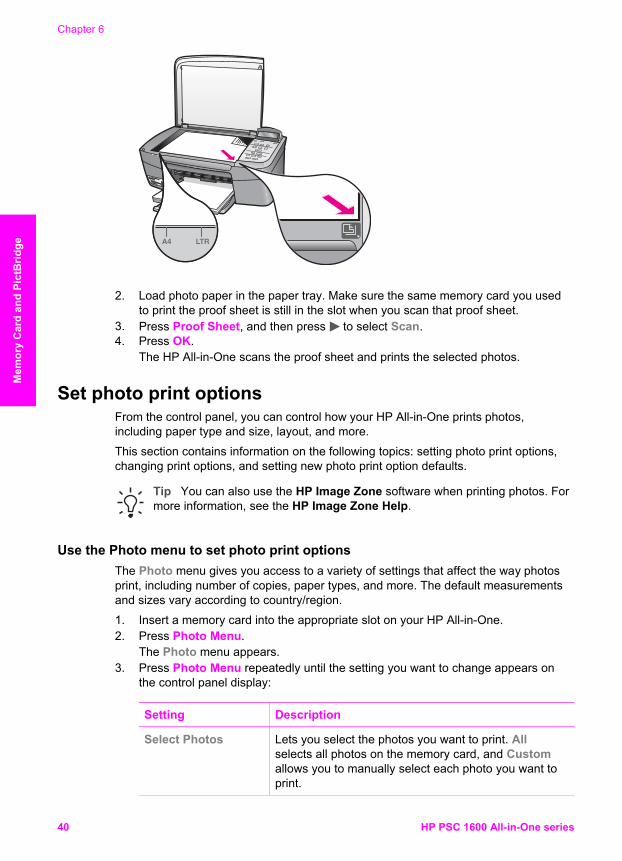
2. Load photo paper in the paper tray. Make sure the same memory card you usedto print the proof sheet is still in the slot when you scan that proof sheet.
3. Press Proof Sheet, and then press to select Scan.4. Press OK.
The HP All-in-One scans the proof sheet and prints the selected photos.
Set photo print optionsFrom the control panel, you can control how your HP All-in-One prints photos,including paper type and size, layout, and more.
This section contains information on the following topics: setting photo print options,changing print options, and setting new photo print option defaults.
Tip You can also use the HP Image Zone software when printing photos. Formore information, see the HP Image Zone Help.
Use the Photo menu to set photo print optionsThe Photo menu gives you access to a variety of settings that affect the way photosprint, including number of copies, paper types, and more. The default measurementsand sizes vary according to country/region.
1. Insert a memory card into the appropriate slot on your HP All-in-One.2. Press Photo Menu.
The Photo menu appears.3. Press Photo Menu repeatedly until the setting you want to change appears on
the control panel display:
Setting Description
Select Photos Lets you select the photos you want to print. Allselects all photos on the memory card, and Customallows you to manually select each photo you want toprint.
Chapter 6
40 HP PSC 1600 All-in-One series
Mem
ory
Car
d an
d Pi
ctB
ridge

Setting Description
Number of Copies Lets you set the number of copies to be printed.
Image Size Lets you set the size at which you want the imageprinted. Most choices are self-explanatory, but tworequire some explanation: Fill Entire Page and Fit toPage.
– Fill Entire Page scales the image to cover all ofthe output paper without any white border area.Some cropping might occur.
– Fit to Page scales the image to cover as much ofthe page as possible while keeping the originalaspect ratio without cropping. The image iscentered on the page and is surrounded by awhite border.
Paper Size Lets you select the paper size for the current print job.The Automatic setting defaults to a large (letter or A4)and small 10 x 15 cm (4 x 6 inch) paper size thatvaries by country/region. When Paper Size and PaperType are both set to Automatic, the HP All-in-Oneselects the best print options for the current print job.The other Paper Size settings let you override theautomatic settings.
Paper Type Lets you select the paper type for the current print job.The Automatic setting lets the HP All-in-One detectand set the paper type automatically. When PaperSize and Paper Type are both set to Automatic, theHP All-in-One selects the best options for the currentprint job. The other Paper Type settings let youoverride the automatic settings.
Layout Style Lets you select one of two layout styles for the currentprint job.
The Paper Saver layout fits as many photos on thepaper as possible, rotating and cropping photos ifnecessary.
The Album layouts keep the orientation of the originalphotos. Album refers to the orientation of the page,not the photos themselves. Some cropping might occur.
Smart Focus Lets you enable or disable automatic digitalsharpening of photos. Smart Focus affects onlyprinted photos. It does not change the actual image fileon the memory card. Smart Focus is enabled bydefault.
Digital Flash Lets you make dark photos appear lighter. DigitalFlash affects only printed photos. It does not change
User Guide 41
Mem
ory Card and PictB
ridge

Setting Description
the actual image file on the memory card. DigitalFlash is turned off by default.
Set New Defaults Lets you save the current photo print options settingsas the new defaults.
Change print optionsYou change each of the Print Options menu settings in the same general way.
1. Press Photo Menu repeatedly to see all the options.The currently selected option is highlighted, and its default setting (if any)appears in the second line of the control panel display.
2. Make the change to the setting, and then press OK.
For information on setting default photo print options, see Set new photo print optionsdefaults.
Set new photo print options defaultsYou can change the photo print options defaults from the control panel.
1. Press Photo Menu until the option you want to change appears.2. Make changes to any options as needed. When you have finished changing an
option, press OK.3. Press Photo Menu until Set New Defaults appears on the control panel display.4. Press to select Yes, and then press OK.
All the current settings become the new defaults.
Print photos directly from a memory card You can insert a memory card in your HP All-in-One and use the control panel to printphotos. For information on printing photos on your HP All-in-One from a PictBridge-compatible camera, see Print photos from a PictBridge-compatible digital camera.
This section contains information on the following topics: printing individual photos,creating borderless photos, and deselecting photos.
Note Before printing photos, you should select options for photoenhancement and set the paper type. For more information, see Set photoprint options. You might also want to use the photo print cartridge for superiorprint quality. For more information, see Use a photo print cartridge.
You can do more than print your photos if you use the HP Image Zone software. Thissoftware lets you use photos for iron-on transfers, posters, banners, stickers, andother creative projects. For more information, see the onscreen HP Image Zone Helpfile that came with your software.
Chapter 6
42 HP PSC 1600 All-in-One series
Mem
ory
Car
d an
d Pi
ctB
ridge
Print individual photosYou can print photos directly from the control panel without using a proof sheet.
1. Insert the memory card into the appropriate slot on your HP All-in-One.The status light next to the memory card slots lights up.
2. Load photo paper in the paper tray. Make sure you load the correct size of paperfor the photo size you want to print.
3. Press or to move backward or forward through the file names on thememory card. When the file name of the photo you want to print appears on thecontrol panel display, press Select Photos. A check mark appears next to theselected file name.
4. Press Photo Menu to display the Photo menu, and then modify the photo printoptions as desired. The print option settings revert back to the default settingsafter the print job is completed.
5. Press Print Photos to print the selected photos.
Create borderless prints An exceptional feature of your HP All-in-One is its ability to turn photos on a memorycard into professional, borderless prints.
1. Insert the memory card into the appropriate slot on your HP All-in-One.The status light next to the memory card slots lights up.
2. Use or to move backward or forward through the file names on the memorycard. When the file name of the photo you want to print appears on the controlpanel display, press Select Photos. A check mark appears next to the selectedfile name.
3. Load 10 x 15 cm (4 x 6 inch) photo paper in the paper tray.
Tip If the photo paper you are using has perforated tabs, load the photopaper so that the tabs are closest to you.
4. Press Print Photos to print the selected photos as borderless prints.
Deselect photos You can deselect photos from the control panel.➔ Do one of the following:
– Press Select Photos to deselect the currently selected file on the display.– Press Cancel to deselect all files and return to the idle screen.
Print photos from a PictBridge-compatible digital camera The HP All-in-One supports the PictBridge standard, which lets you connect anyPictBridge-compatible camera to the camera port and print JPEG photos contained onthe memory card in the camera.
Note Your HP All-in-One only supports JPEG file formats when printing fromthe PictBridge port. For more information about changing the file format on
User Guide 43
Mem
ory Card and PictB
ridge

your PictBridge-compatible digital camera, see the documentation that camewith your camera.
1. Make sure the HP All-in-One is turned on and that the initialization process isfinished.
2. Connect your PictBridge-compatible digital camera to the camera port on thefront of your HP All-in-One using the USB cable supplied with your camera.
3. Turn on your camera and make sure it is in PictBridge mode.
Note When the camera is connected correctly, the status light next to thememory card slots is illuminated. The status light blinks green when printingfrom the camera.
For more information about printing from a PictBridge-compatible digitalcamera, see the documentation that came with your camera.
If the camera is not PictBridge-compliant or is not in PictBridge mode, thestatus light blinks amber and an error message appears on your computermonitor (if you have the HP All-in-One software installed). Disconnect thecamera, correct the problem on the camera and reconnect. For moreinformation about PictBridge camera port troubleshooting, see theTroubleshooting Help that came with your HP Image Zone software.
After you successfully connect your PictBridge-compliant camera to the HP All-in-One, you can print your photos. Make sure the size of the paper loaded in the HP All-in-One matches the setting on your camera. If the paper size setting on your camerais set to the default, the HP All-in-One uses the paper that is currently loaded in thepaper tray. Refer to the user guide that came with your camera for detailedinformation on printing from the camera.
Tip If your digital camera is an HP model that does not support PictBridge,you can still print directly to the HP All-in-One. Connect the camera to the USBport on the back of the HP All-in-One instead of to the camera port. This workswith HP digital cameras only.
Print the current photo You can use the Print Photos button to print the file currently displayed on the controlpanel display.
1. Insert the memory card into the appropriate slot on your HP All-in-One.2. Navigate to the photo file name you want to print.3. Press Print Photos to print the photo using the current settings.
Print a DPOF file The Digital Print Order Format (DPOF) is an industry-standard file that can be createdby some digital cameras. When you select photos with your camera, the cameracreates a DPOF file that identifies which photos have been tagged for printing. Your
Chapter 6
44 HP PSC 1600 All-in-One series
Mem
ory
Car
d an
d Pi
ctB
ridge

HP All-in-One can read the DPOF file from the memory card so you do not have toreselect the photos to print.
Note Not all digital cameras allow you to tag your photos for printing. Seeyour digital camera documentation to see if it supports DPOF. Your HP All-in-One supports DPOF file format 1.1.
When you print camera-selected photos, the HP All-in-One print settings do not apply;the settings in the DPOF file for photo layout and number of copies override those ofyour HP All-in-One.
The DPOF file is stored by the digital camera on a memory card and specifies thefollowing information:
● Which photos to print● The quantity of each photo to print● Rotation applied to a photo● Cropping applied to a photo● Index printing (thumbnails of selected photos)
To print camera-selected photos1. Insert the memory card into the appropriate slot on your HP All-in-One. If there
are DPOF-tagged photos, the Print DPOF? prompt appears on the control paneldisplay.
2. Do one of the following:– Press OK to print all DPOF-tagged photos on the memory card. This selects
Yes and prints the photos using the DPOF settings.– Press and then press OK. This selects NO and bypasses DPOF printing.
User Guide 45
Mem
ory Card and PictB
ridge

Chapter 6
46 HP PSC 1600 All-in-One series
Mem
ory
Car
d an
d Pi
ctB
ridge

7 Use the copy featuresThe HP All-in-One allows you to produce high-quality color and black-and-whitecopies on a variety of paper types, including transparencies. You can enlarge orreduce the size of an original to fit a specific paper size, adjust the darkness and colorintensity of the copy, and use special features to make high-quality copies of photos,including 10 x 15 cm (4 x 6 inch) borderless copies.
This chapter provides instructions for increasing copy speed, enhancing copy quality,setting the number of copies to print, guidelines for choosing the best paper type andsize for your job, making posters, and making iron-on transfers.
Tip For the best copy performance on standard copy projects, set the papersize to Letter or A4, the paper type to Plain Paper, and the copy quality to Fast.
● For information on setting the paper size, see Set the copy paper size.● For information on setting the paper type, see Set the copy paper type.● For information on setting the copy quality, see Increase copy speed or quality.
You can learn how to perform photo copy projects, such as making borderless copiesof photos, enlarging and reducing the copies of photos to suit your preference, makingmultiple copies of photos on a page, and making quality enhancements to copies offaded photos.
Make a 10 x 15 cm (4 x 6 inch) borderless copy of a photo.
Copy a 10 x 15 cm (4 x 6 inch) photo onto a full-size page.
Copy a photo several times on one page.
Enhance light areas of your copy.
Set the copy paper size You can set the paper size on your HP All-in-One. The paper size you select shouldmatch what is loaded in your paper tray. The default paper size setting for copying isAutomatic, which causes the HP All-in-One to detect the size of paper in the papertray.
1. Make sure you have paper loaded in the paper tray.2. Load your original face down on the right front corner of the glass.3. Press Copy Menu until Copy Paper Size appears.4. Press until the appropriate paper size appears.5. Press OK to choose the displayed paper size.6. Press Start Copy Black or Start Copy Color.
User Guide 47
Use the copy features

Paper type Suggested paper size settings
Copier, multi-purpose, or plain papers Letter or A4
Inkjet papers Letter or A4
Iron-on transfers Letter or A4
Letterhead Letter or A4
Photo papers 10 x 15 cm or 10 x 15 cm Borderless13 x 18 cm or 13 x 18 cm Borderless4 x 6 inches or 4 x 6 Borderless5 x 7 inches or 5 x 7 BorderlessLetter or Letter BorderlessA4 or A4 BorderlessL-size or L-size Borderless (Japan only)
Hagaki cards Hagaki or Hagaki Borderless (Japanonly)
Transparency films Letter or A4
Set the copy paper type You can set the paper type on your HP All-in-One. The default paper type setting forcopying is Automatic, which causes the HP All-in-One to detect the type of paper inthe paper tray.
If you copy onto special papers, or if you experience poor print quality by using theAutomatic setting, you can set the paper type manually from the Copy Menu.
Note The HP All-in-One cannot automatically detect transparency film. Forbest results, set the paper type to Transparency before copying ontotransparency film.
1. Make sure you have paper loaded in the paper tray.2. Load your original face down on the right front corner of the glass.3. Press Copy Menu until Copy Paper Type appears.4. Press until the appropriate paper type appears, and then press OK.5. Press Start Copy Black or Start Copy Color.Refer to the following table to determine which paper type setting to choose based onthe paper loaded in the paper tray.
Paper type Control panel setting
Copier paper or letterhead Plain Paper
HP Bright White Paper Plain Paper
HP Premium Plus Photo Paper, Glossy Premium Photo
Chapter 7
48 HP PSC 1600 All-in-One series
Use
the
copy
feat
ures

Paper type Control panel setting
HP Premium Plus Photo Paper, Matte Premium Photo
HP Premium Plus 4 x 6 inch Photo Paper Premium Photo
HP Photo Paper Photo Paper
HP Everyday Photo Paper Everyday Photo
HP Everyday Photo Paper, Semi Gloss Everyday Matte
Other photo paper Other Photo
HP Iron-On Transfer (for color fabrics) Iron-On
HP Iron-On Transfer (for light or white fabrics) Iron-On Mirrored
HP Premium Paper Premium Inkjet
Other inkjet paper Premium Inkjet
HP Professional Brochure & Flyer Paper (Glossy) Brochure Glossy
HP Professional Brochure & Flyer Paper (Matte) Brochure Matte
HP Premium or Premium Plus InkjetTransparency Film
Transparency
Other transparency film Transparency
Plain Hagaki (Japan only) Plain Paper
Glossy Hagaki (Japan only) Premium Photo
L (Japan only) Premium Photo
Increase copy speed or quality The HP All-in-One provides three options that affect copy speed and quality.
● Normal delivers high-quality output and is the recommended setting for most ofyour copying. Normal copies faster than Best.
● Best produces the highest quality for all paper and eliminates the banding(striping) effect that sometimes occurs in solid areas. Best copies more slowlythan the other quality settings.
● Fast copies faster than the Normal setting. The text is comparable to the qualityof the Normal setting, but the graphics might be lower quality. The Fast settinguses less ink and extends the life of your print cartridges.
To change the copy quality from the control panel1. Make sure you have paper loaded in the paper tray.2. Load your original face down on the right front corner of the glass.3. Press Copy Menu until Copy Quality appears.4. Press until the appropriate quality setting appears, and then press OK.
(continued)
User Guide 49
Use the copy features

5. Press Start Copy Black or Start Copy Color.
Make multiple copies of the same originalYou can set the number of copies from the control panel or from the HP Image Zonesoftware.
1. Make sure you have paper loaded in the paper tray.2. Load your original face down on the right front corner of the glass.3. Press No. of Copies.4. Press or to enter the number of copies, up to the maximum, and then press
OK.(The maximum number of copies varies by model.)
Tip If you hold down either of the arrow buttons, the number of copieschanges by increments of 5 to make it easier to set a large number ofcopies.
5. Press Start Copy Black or Start Copy Color.In this example, the HP All-in-One makes six copies of the original 10 x 15 cm (4x 6 inch) photo.
Copy a two-page black-and-white document You can use the HP All-in-One to copy a single- or multiple-page document in color orblack and white. In this example, the HP All-in-One is used to copy a two-page black-and-white original.
1. Make sure you have paper loaded in the paper tray.2. Load the first page of your original face down on the right front corner of the glass.3. Press Start Copy Black.4. Remove the first page from the glass and load the second page.5. Press Start Copy Black.
Chapter 7
50 HP PSC 1600 All-in-One series
Use
the
copy
feat
ures

Make a 10 x 15 cm (4 x 6 inch) borderless copy of a photo You can use the Fill Entire Page setting to create a borderless copy of a photo. Inorder to achieve a borderless print without changing the proportions of the original, theHP All-in-One might crop some of the image around the margins. In most cases, thiscropping will not be noticeable.For the best quality when copying a photo, load photo paper in the paper tray andchange your copy settings for the correct paper type and photo enhancement. Youmight also want to use the photo print cartridge for superior print quality. With the tri-color and photo print cartridges installed, you have a six-ink system. For moreinformation, see Use a photo print cartridge.
To copy a photo from the control panel1. Load 10 x 15 cm (4 x 6 inch) photo paper in the paper tray.
Note In order to make a borderless copy, you must have photo paper (orother specialty paper) loaded. If the HP All-in-One detects plain paper inthe paper tray, it will not make a borderless copy. Instead, your copy willhave borders.
2. Load your original photo face down on the right front corner of the glass.Position the photo on the glass so the long edge of the photo is along the frontedge of the glass.
3. Press Reduce/Enlarge.The Reduce/Enlarge menu appears.
4. Press until Fill Entire Page appears, and then press OK.5. Press Start Copy Color.
The HP All-in-One makes a 10 x 15 cm (4 x 6 inch) borderless copy of youroriginal photo, as shown below.
Tip If the output is not borderless, then set the paper size to theappropriate Borderless menu selection, set the paper type to PhotoPaper, set the Photo enhancement, and then try again.
– For more information on how to set the paper size, see Set the copy paper size.– For information on how to set the paper type, see Set the copy paper type.– For information on how to set the Photo enhancement, see Enhance light
areas of your copy.
Copy a 10 x 15 cm (4 x 6 inch) photo onto a full-sizepage
You can use the Fill Entire Page setting to enlarge or reduce your original to fill theprintable area of the paper size loaded in the paper tray. In this example, Fill Entire
User Guide 51
Use the copy features

Page is used to enlarge a 10 x 15 cm (4 x 6 inch) photo to create a full-sizeborderless copy. When copying a photo, you might want to use the photo printcartridge for superior print quality. With the tri-color and photo print cartridgesinstalled, you have a six-ink system. For more information, see Use a photo printcartridge.
Note In order to achieve a borderless print without changing the proportionsof the original, the HP All-in-One might crop some of the image around themargins. In most cases, this cropping will not be noticeable.
To copy a photo onto a full-size page from the control panel
Note This feature will not work correctly if the glass and lid backing are notclean. For more information, see Clean the HP All-in-One.
1. Load letter or A4 photo paper in the paper tray.
Note In order to make a borderless copy, you must have photo paper (orother specialty paper) loaded. If the HP All-in-One detects plain paper inthe paper tray, it will not make a borderless copy. Instead, your copy willhave borders.
2. Load your original photo face down on the right front corner of the glass.Position the photo on the glass so the long edge of the photo is along the frontedge of the glass.
3. Press Reduce/Enlarge.4. Press until Fill Entire Page appears, and then press OK.5. Press Start Copy Color.
Tip If the output is not borderless, set the paper size to LetterBorderless or A4 Borderless, set the paper type to Photo Paper, set thePhoto enhancement, and then try again.
– For more information on how to set the paper size, see Set the copy paper size.– For information on how to set the paper type, see Set the copy paper type.– For information on how to set the Photo enhancement, see Enhance light
areas of your copy.
Chapter 7
52 HP PSC 1600 All-in-One series
Use
the
copy
feat
ures

Copy a photo several times on one page You can print multiple copies of an original on one page by selecting an image sizefrom the Reduce/Enlarge menu.
After you select one of the available sizes, you might be prompted whether you wantto print multiple copies of the photo to fill the paper you have loaded in the paper tray.
To copy a photo several times on one page from the control panel1. Make sure you have paper loaded in the paper tray.
Tip For the best quality when copying a photo, load photo paper in thepaper tray.
2. Load your original photo face down on the right front corner of the glass.Position the photo on the glass so the long edge of the photo is along the frontedge of the glass.
3. Press Reduce/Enlarge.4. Press until Image Size appears, and then press OK.5. Press to highlight the size in which you want to copy the photo, and then press
OK.Depending on the image size you select, the Many on Page? prompt mightappear to determine whether you want to print multiple copies of the photo to fillthe paper in the paper tray, or just one copy.Some larger sizes do not prompt you for a number of images. In this case, onlyone image is copied to the page.
6. If the Many on Page? prompt appears, press to select Yes or No, and thenpress OK.
7. Press Start Copy Color.
Resize an original using custom settingsYou can use your own custom settings to reduce or enlarge a copy of an original.
1. Make sure you have paper loaded in the paper tray.2. Load your original face down on the right front corner of the glass.3. Press Reduce/Enlarge.4. Press until Custom 100% appears, and then press OK.5. Press the or to change the reduce/enlarge percentage, and then press OK.
User Guide 53
Use the copy features

Tip If you hold down either of the arrow buttons, the reduce/enlargepercentage changes by increments of 5.
6. Press Start Copy Black or Start Copy Color.
Resize an original to fit onto letter or A4 paper If the image or text on your original fills the entire sheet with no margins, use the Fit toPage feature to reduce your original and prevent unwanted cropping of the text orimages at the edges of the sheet.
Tip You can also use Fit to Page to enlarge a small photo to fit within theprintable area of a full-size page. In order to do this without changing theproportions of the original or cropping the edges, the HP All-in-One mightleave an uneven amount of white space around the edges of the paper.
To resize a document from the control panel1. Make sure you have paper loaded in the paper tray.2. Load your original face down on the right front corner of the glass.3. Press Copy Menu until Copy Paper Size appears.4. Press until Letter or A4 appears, as appropriate, and then press OK.5. Press Reduce/Enlarge.6. Press until Fit to Page appears, and then press OK.7. Press Start Copy Black or Start Copy Color.
Copy a faded original You can use the Lighter/Darker option to adjust the lightness and darkness of thecopies you make. You can also adjust the color intensity to make colors on your copymore vivid or more subtle.
1. Make sure you have paper loaded in the paper tray.2. Load your original face down on the right front corner of the glass.3. Press Copy Menu until Lighter/Darker appears.4. Press to darken the copy, and then press OK.
Note You can also press to lighten the copy.
5. Press Copy Menu until Color Intensity appears.6. Press to make the image more vivid, and then press OK.
Chapter 7
54 HP PSC 1600 All-in-One series
Use
the
copy
feat
ures

Note You can also press to make the image more pale.
7. Press Start Copy Black or Start Copy Color.
Copy a document that has been faxed several times You can use the Enhancements feature to adjust the quality of text documents bysharpening edges of black text or adjust photographs by enhancing light colors thatmight otherwise appear white.
The Mixed enhancement is the default option. Use the Mixed enhancement tosharpen edges of most originals.
To copy a blurred document from the control panel1. Make sure you have paper loaded in the paper tray.2. Load your original face down on the right front corner of the glass.3. Press Copy Menu until Enhancements appears.4. Press until Text appears, and then press OK.5. Press Start Copy Black or Start Copy Color.
Tip If any of the following occur, turn off Text enhancement by selectingPhoto or None:
● Stray dots of color surround some text on your copies● Large, black typefaces look splotchy (not smooth)● Thin, colored objects or lines contain black sections● Horizontal grainy or white bands appear in light- to medium-gray areas
Enhance light areas of your copy You can use Photo enhancements to enhance light colors that might otherwiseappear white. You can also use Photo enhancements to eliminate or reduce any ofthe following that might occur when copying with Text enhancements:
● Stray dots of color surround some text on your copies● Large, black typefaces look splotchy (not smooth)● Thin, colored objects or lines contain black sections● Horizontal grainy or white bands appear in light- to medium-gray areas
To copy an overexposed photo from the control panel1. Make sure you have paper loaded in the paper tray.
Tip For the best quality when copying a photo, load photo paper in thepaper tray.
2. Load your original photo face down on the right front corner of the glass.Position the photo on the glass so the long edge of the photo is along the frontedge of the glass.
User Guide 55
Use the copy features

3. Press Copy Menu until Enhancements appears.4. Press until Photo appears, and then press OK.5. Press Start Copy Color.
It is easy to set Enhancement settings for photos and other documents you copy byusing the HP Image Zone software that came with your HP All-in-One. With one clickof your mouse button, you can set a photo to copy with Photo enhancements, a textdocument to copy with Text enhancements, or a document that contains both imagesand text to copy with both Photo and Text enhancements turned on. For moreinformation, see the onscreen HP Image Zone Help.
Make a poster You can use the Poster feature to create an enlarged copy of your original in sectionsand assemble them into a poster.
1. Make sure you have paper loaded in the paper tray.
Tip If you are copying a photo into a poster, use full-size photo paper toachieve the highest quality copy.
2. Load your original face down on the right front corner of the glass.If you are copying a photo, position the photo on the glass so the long edge of thephoto is along the front edge of the glass.
3. Press Reduce/Enlarge.4. Press until Poster appears, and then press OK.
The default poster size is two pages wide.5. Press to change the poster width.6. Press Start Copy Black or Start Copy Color.
After you select the poster width, the HP All-in-One adjusts the lengthautomatically to maintain the proportions of the original.
Tip If the original cannot be enlarged to the selected poster size becauseit exceeds the maximum zoom percentage, an error message appearsthat tells you to try a smaller width. Select a smaller poster size and makethe copy again.
7. After the poster has printed, trim the edges of the sheets and tape the sheetstogether.
Chapter 7
56 HP PSC 1600 All-in-One series
Use
the
copy
feat
ures
You can be even more creative with your photos by using the HP Image Zonesoftware that came with your HP All-in-One. For more information, see the onscreenHP Image Zone Help.
Prepare a color iron-on transfer You can copy an image or text onto an iron-on transfer, then iron it onto a T-shirt,pillow cover, place mat, or other piece of fabric.
Tip Practice applying a T-shirt transfer on an old garment first.
1. Load the iron-on transfer paper in the paper tray.2. Load your original face down on the right front corner of the glass.
If you are copying a photo, position the photo on the glass so the long edge of thephoto is along the front edge of the glass.
3. Press Copy Menu until Copy Paper Type appears.4. Press until Iron-On or Iron-On Mirrored appears, and then press OK.
– Select Iron-On as the paper type if you are using HP Iron-On Transfers forcolor fabrics. If you are using HP Iron-On Transfers for color fabrics theimage does not need to be reversed to appear properly on the fabric.
– Select Iron-On Mirrored if you are using HP Iron-On Transfers for light orwhite fabrics. The HP All-in-One automatically copies a mirror image of youroriginal so that it will appear properly when you iron it onto light or white fabric.
5. Press Start Copy Black or Start Copy Color.
Change default copy settings 1. Make sure you have paper loaded in the paper tray.2. Load your original face down on the right front corner of the glass.3. Make any needed changes to the settings in the Copy Menu.4. Press Copy Menu until Set New Defaults appears.5. Press until Yes appears.6. Press OK to accept the settings as the new default settings.7. Press Start Copy Black or Start Copy Color.
The settings you specify here are only saved on the HP All-in-One. They do not adjustthe settings in the software. You can save your most frequently used settings by usingthe HP Image Zone software that came with your HP All-in-One. For moreinformation, see the onscreen HP Image Zone Help.
Stop copying ➔ To stop copying, press Cancel on the control panel.
User Guide 57
Use the copy features

Chapter 7
58 HP PSC 1600 All-in-One series
Use
the
copy
feat
ures

8 Use the scan featuresScanning is the process of converting text and pictures into an electronic format foryour computer. You can scan just about anything: photos, magazine articles, and textdocuments, as long as you are careful not to scratch the glass on your HP All-in-One.Scanning to a memory card makes your scanned images even more portable.
You can use the scanning features of your HP All-in-One to do the following:
● Scan text from an article into your word processor and quote it in a report.● Print business cards and brochures by scanning a logo and using it in your
publishing software.● Send photos to friends and relatives by scanning your favorite prints and
including them in e-mail messages.● Create a photographic inventory of your house or office, or archive treasured
photos in an electronic scrapbook.
Note Scanning text (also known as optical character recognition or OCR) letsyou bring the content of magazine articles, books, and other printed matter intoyour favorite word processor (and many other programs) as fully editable text.Learning to do OCR right is important if you want to obtain the best results. Donot expect scanned text documents to be perfect the first time you use yourOCR software. Using OCR software is an art that takes time and practice tomaster. For more information about scanning documents, especiallydocuments containing both text and graphics, see the documentation thatcame with your OCR software.
To use the scan features, your HP All-in-One and computer must be connected andturned on. The HP All-in-One software must also be installed and running on yourcomputer prior to scanning. To verify that the HP All-in-One software is running on aWindows computer, look for the HP All-in-One icon in the system tray at the lowerright side of the screen, near the time. On a Macintosh, the HP All-in-One software isalways running.
Note Closing the Hewlett-Packard Digital Imaging Monitor icon in theWindows system tray can cause your HP All-in-One to lose some of its scanfunctionality and result in the No Connection error message. If this happens,you can restore full functionality by restarting your computer or by starting theHP Image Zone software.
For information about how to scan from the computer, and how to adjust, resize,rotate, crop, and sharpen your scans, see the onscreen HP Image Zone Help thatcame with your software.
This chapter contains information on sending a scan to and from differentdestinations, and adjusting the preview image.
Scan to an application You can scan originals placed on the glass directly from the control panel.
1. Load the original face down on the right front corner of the glass.
User Guide 59
Use the scan features

2. In the Scan area, press Scan To.The Scan To menu appears. The Scan To menu lists destinations, includingapplications, for anything you scan. The default destination is the one youselected the last time you used this menu.The Scan To menu can be configured. You can designate which applications andother destinations appear on the Scan To menu by using the HP Image Zonesoftware on your computer.
3. To select an application to receive the scan, press until the destination youwant appears on the control panel display, and then press Start Scan.A preview image of the scan appears in the HP Scan window on the computer,where you can edit it.For more information about editing a preview image, see the onscreen HP ImageZone Help that came with your software.
4. Make any edits to the preview image in the HP Scan window. When you havefinished, click Accept.For more information on editing a scan in the HP Scan window, see the onscreenHP Image Zone Help.The HP All-in-One sends the scan to the selected application. For example, if youchose the HP Image Zone, it automatically opens and displays the image.
The HP Image Zone has many tools that you can use to edit your scanned image.You can improve the overall image quality by adjusting the brightness, sharpness,color tone, or saturation. You can also crop, straighten, rotate, or resize the image.When the scanned image looks just the way you want it, you can open it in anotherapplication, send it through e-mail, save it to a file, or print it. For more informationabout using the HP Image Zone, see the HP Gallery section in the onscreenHP Image Zone Help.
Send a scan to a memory card You can send the scanned image as a JPEG image to the memory card that iscurrently inserted in one of the memory card slots on the HP All-in-One. This enablesyou to use the memory card features to generate borderless prints and album pagesfrom the scanned image. It also enables you to access the scanned image from otherdevices that support the memory card.
1. Load the original face down on the right front corner of the glass.2. In the Scan area, press Scan To.
A Scan To menu appears, listing various options or destinations. The defaultdestination is whichever one you selected the last time you used this menu.
3. Press Scan To until Memory Card appears on the control panel display.4. Press Start Scan.The HP All-in-One scans the image and saves the file to the memory card in theJPEG format.
Stop scanning ➔ To stop scanning, press Cancel on the control panel, or in the HP Image Zone
software, click Cancel.
Chapter 8
60 HP PSC 1600 All-in-One series
Use
the
scan
feat
ures

9 Print from your computer The HP All-in-One can be used with any software application that allows printing. Theinstructions vary slightly depending on whether you are printing from a Windows PCor a Macintosh. Make sure you follow the instructions for your operating system in thischapter.
In addition to the printing capabilities described in this chapter, you can print specialprint jobs such as borderless prints and newsletters; print images directly from amemory card or from a digital camera that supports PictBridge; and use scannedimages in printing projects in the HP Image Zone.
● For more information on printing from a memory card or digital camera, see Usea memory card or PictBridge camera.
● For more information on performing special print jobs or printing images in theHP Image Zone, see the onscreen HP Image Zone Help.
Print from a software application Most print settings are automatically handled by the software application you areprinting from or by HP ColorSmart technology. You need to change the settingsmanually only when you change print quality, print on specific types of paper ortransparency film, or use special features.
To print from the software application you used to create your document(Windows users)1. Make sure you have paper loaded in the paper tray.2. On the File menu in your software application, click Print.3. Select the HP All-in-One as the printer.4. If you need to change settings, click the button that opens the Properties dialog
box.Depending on your software application, this button might be called Properties,Options, Printer Setup, Printer, or Preferences.
5. Select the appropriate options for your print job by using the features available inthe Paper/Quality, Finishing, Effects, Basics, and Color tabs.
Tip You can easily select the appropriate options for your print job bychoosing one of the predefined print tasks on the Printing Shortcuts tab.Click a print task in the What do you want to do? list. The defaultsettings for that print task are set and summarized on the PrintingShortcuts tab. If necessary, you can adjust the settings here, or you canmake your changes on the other tabs in the Properties dialog box.
6. Click OK to close the Properties dialog box.7. Click Print or OK to begin printing.
To print from the software application you used to create your document(Macintosh users)1. Make sure you have paper loaded in the paper tray.
User Guide 61
Print from your com
puter

2. Select the HP All-in-One in the Chooser (OS 9), Print Center (OS 10.2 orearlier), or Printer Setup Utility (OS 10.3 or later) before you begin printing.
3. From the File menu in your software application, choose Page Setup.The Page Setup dialog box appears, allowing you to specify the paper size,orientation, and scaling.
4. Specify the page attributes:– Choose the paper size.– Select the orientation.– Enter the scaling percentage.
Note For OS 9, the Page Setup dialog box also includes options to printa mirrored (or reversed) version of the image, and to adjust the pagemargins for two-sided printing.
5. Click OK.6. From the File menu in your software application, choose Print.
The Print dialog box appears. If you are using OS 9, the General panel opens. Ifyou are using OS X, the Copies & Pages panel opens.
7. Change the print settings for each option in the pop-up menu, as appropriate foryour project.
8. Click Print to begin printing.
Change the print settings You can customize the print settings of the HP All-in-One to handle nearly any printtask.
Windows usersBefore you change print settings, you should decide if you want to change the settingsfor the current print job only, or if you want to make the settings the defaults for allfuture print jobs. How you display print settings depends on whether or not you wantto apply the change to all future print jobs or just to the current print job.
To change the print settings for all future jobs1. In the HP Director, click Settings, point to Print Settings, and then click Printer
Settings.2. Make changes to the print settings, and click OK.
To change the print settings for the current job1. On the File menu in your software application, click Print.2. Make sure the HP All-in-One is the selected printer.3. Click the button that opens the Properties dialog box.
Depending on your software application, this button might be called Properties,Options, Printer Setup, Printer, or Preferences.
4. Make changes to the print settings, and click OK.5. Click Print or OK in the Print dialog box to print the job.
Chapter 9
62 HP PSC 1600 All-in-One series
Prin
t fro
m y
our c
ompu
ter

Macintosh usersUse the Page Setup and Print dialog boxes to change the settings for your print job.Which dialog box you use depends on which setting you want to change.
To change the paper size, orientation, or scaling percentage1. Select the HP All-in-One in the Chooser (OS 9), Print Center (OS 10.2 or
earlier), or Printer Setup Utility (OS 10.3 or later) before you begin printing.2. From the File menu in your software application, choose Page Setup.3. Make changes to the paper size, orientation, and scaling percentage settings,
and click OK.
To change all other print settings1. Select the HP All-in-One in the Chooser (OS 9), Print Center (OS 10.2 or
earlier), or Printer Setup Utility (OS 10.3 or later) before you begin printing.2. From the File menu in your software application, choose Print.3. Make changes to the print settings, and click Print to print the job.
Stop a print job Although you can stop a print job from either the HP All-in-One or the computer, werecommend you stop it from the HP All-in-One for best results.
To stop a print job from the HP All-in-One➔ Press Cancel on the control panel. Look for the Print Cancelled message on the
control panel display. If the message does not appear, press Cancel again.
User Guide 63
Print from your com
puter

Chapter 9
64 HP PSC 1600 All-in-One series
Prin
t fro
m y
our c
ompu
ter

10 Use HP Instant ShareHP Instant Share makes it easy to share photos with family and friends. Using theHP Image Zone software installed on your computer, you can select one or morephotos to share, select a destination for your photos, and then send the photos ontheir way. You can even upload your photos to an online photo album or an onlinephoto finishing service. Availability of services varies by country/region.
With HP Instant Share E-mail, family and friends always get photos they can view --no more large downloads or images that are too big to open. An e-mail message withthumbnail images of your photos is sent with a link to a secure Web page wherefamily and friends can easily view, share, print, and save the photos.
Overview If your HP All-in-One is USB-connected, you can share photos with friends andrelatives using your device and the HP Image Zone software installed on yourcomputer. A USB-connected device is an HP All-in-One that is connected to acomputer with a USB cable. The HP All-in-One relies on the computer for access tothe Internet.
Use HP Instant Share to send images from your HP All-in-One to a destination of yourchoice. The destination, for example, can be an e-mail address, an online photoalbum, or an online photo finishing service. Availability of services varies by country/region.
Note You can also send images to a friend or relative's network-connectedHP All-in-One or photo printer. To send to a device, you must have an HPPassport user ID and password. The receiving device must be set up andregistered with HP Instant Share. You will also need to obtain the name therecipient assigned to the receiving device. Further instructions are provided instep 6 in Send images using your HP All-in-One.
User Guide 65
Use H
P Instant Share

Get started You must have the following to use HP Instant Share with your HP All-in-One:
● An HP All-in-One connected to a computer with a USB cable.● Internet access through the computer to which the HP All-in-One is connected.● HP Image Zone software installed on your computer. Macintosh users will find
that the HP Instant Share client application software is also installed.
Once you have set up your HP All-in-One and installed the HP Image Zone software,you are ready to start sharing photos using HP Instant Share. For more information onsetting up your HP All-in-One, see the Setup Guide that came with your device.
Send images using your HP All-in-One Images can be photos or scanned documents. Either can be shared with friends andrelatives using your HP All-in-One and HP Instant Share. Simply transfer photos toyour computer from a memory card or scan an image, select one or more images toshare, and send your images to the destination of your choice.
Send photos from a memory card Photos from a memory card are transferred to your computer using HP photo transfersoftware. Once the photos are transferred, use the HP Image Zone software to shareyour photos using HP Instant Share.● For more information on transferring photos from a memory card, see Transfer
photos to your computer.● For more information on using the HP Image Zone software to share your
photos, see Send images using your computer.
Send a scanned image You can share a scanned image by pressing Scan To on the control panel. To useScan To, place an image face down on the glass, select a destination to which youwant to send the image, and start the scan.
Note For more information on scanning an image, see Use the scan features.
To send a scanned image from your HP All-in-One1. Load your original face down on the right front corner of the glass.2. Press Scan To on the control panel of your HP All-in-One.
The Scan To menu appears on the control panel display.3. Use the and arrows to highlight HP Instant Share.4. Press OK or Start Scan to select the destination.
The image is scanned and uploaded to your computer.For Windows users, the HP Image Zone software opens on your computer. TheHP Instant Share tab appears. A thumbnail of the scanned image appears in theSelection Tray.
Chapter 10
66 HP PSC 1600 All-in-One series
Use
HP
Inst
ant S
hare

For Macintosh users, the HP Instant Share client application software opens onyour computer. A thumbnail of the scanned image appears in the HP InstantShare window.
Note If you are using a Macintosh OS earlier than X v10.2 (including OS9 v9.1.5), your photos are uploaded to the HP Gallery on your Macintosh.Click E-mail. Send the scanned image as an e-mail attachment byfollowing the prompts on your computer screen.
5. Follow the steps appropriate for your operating system:
If you are using a Windows-based computer:a. From either the Control or Work areas of the HP Instant Share tab, click
the link or icon of the service you want to use to send your scanned image.
Note If you click See All Services, you can choose from among allof the services available in your country/region, for example:HP Instant Share E-mail and Create Online Albums. Follow theonscreen instructions.
The Go Online screen appears in the Work area.b. Click Next and follow the onscreen instructions.
If you are using a Macintosh:a. Make sure the scanned image you want to share displays in the HP Instant
Share window.Use the - button to remove photos, or the + button to add photos to thewindow.
b. Click Continue and follow the onscreen instructions.c. From the HP Instant Share services list, select the service you want to use to
send your scanned image.d. Follow the onscreen instructions.
6. From the HP Instant Share E-mail service, you can:– Send an e-mail message with thumbnail images of your photos which can be
viewed, printed, and saved over the Web.– Open and maintain an e-mail address book. Click Address Book, register
with HP Instant Share, and create an HP Passport account.– Send your e-mail message to multiple addresses. Click the related link.– Send a collection of images to a friend or relative's network-connected
device. Enter the name assigned to the device by the recipient in the E-mailaddress text box followed by @send.hp.com. You will be prompted to sign into HP Instant Share with your HP Passport userid and password.
Note If you have not previously set up HP Instant Share, click I needan HP Passport account on the Sign in with HP Passport screen.Obtain an HP Passport user ID and password.
Send images using your computer In addition to using your HP All-in-One to send images through HP Instant Share, youcan use the HP Image Zone software installed on your computer to send images. The
User Guide 67
Use H
P Instant Share

HP Image Zone software lets you select and edit one or more images, and thenaccess HP Instant Share to select a service (for example, HP Instant Share E-mail)and send your images. At a minimum, you can share images through the following:
● HP Instant Share E-mail (send to an e-mail address)● HP Instant Share E-mail (send to a device)● Online Albums● Online photo finishing (availability varies by country/region)
Send images using the HP Image Zone software (Windows) You can use the HP Image Zone software to share images with friends and relatives.Simply open the HP Image Zone, select the images you want to share, and forwardthe images using the HP Instant Share E-mail service.
1. Double-click the HP Image Zone icon on your desktop.The HP Image Zone window opens on your computer. The My Images tabappears in the window.
2. Select one or more images from the folder(s) in which they are stored.For more information, see the onscreen HP Image Zone Help.
Note Use the HP Image Zone image editing tools to edit your imagesand achieve the results you want. For more information, see the onscreenHP Image Zone Help.
3. Click the HP Instant Share tab.The HP Instant Share tab appears in the HP Image Zone window.
4. From either the Control or Work areas of the HP Instant Share tab, click the linkor icon of the service you want to use to send your scanned image.
Note If you click See All Services, you can choose from among all of theservices available in your country/region, for example: HP Instant ShareE-mail and Create Online Albums. Follow the onscreen instructions.
The Go Online screen appears in the Work area of the HP Instant Share tab.5. Click Next and follow the onscreen instructions.6. From the HP Instant Share E-mail service, you can:
– Send an e-mail message with thumbnail images of your photos which can beviewed, printed, and saved over the Web.
– Open and maintain an e-mail address book. Click Address Book, registerwith HP Instant Share, and create an HP Passport account.
– Send your e-mail message to multiple addresses. Click the related link.– Send a collection of images to a friend or relative's network-connected
device. Enter the name assigned to the device by the recipient in the E-mailaddress text box followed by @send.hp.com. You will be prompted to sign into HP Instant Share with your HP Passport userid and password.
Note If you have not previously set up HP Instant Share, click I needan HP Passport account on the Sign in with HP Passport screen.Obtain an HP Passport user ID and password.
Chapter 10
68 HP PSC 1600 All-in-One series
Use
HP
Inst
ant S
hare

Send images using the HP Instant Share client application software (MacintoshOS X v10.2 and later)
Note Macintosh OS X v10.2.1 and v10.2.2 are not supported.
You can use the HP Instant Share client application to share images with friends andrelatives. Simply open the HP Instant Share window, select the images you want toshare, and forward the images using the HP Instant Share E-mail service.
Note For more information on using the HP Instant Share client applicationsoftware, see the onscreen HP Image Zone Help.
To use the HP Instant Share client application1. Select the HP Image Zone icon from the Dock.
The HP Image Zone opens on your desktop.2. In the HP Image Zone, click the Services button at the top of the window.
A list of applications appears in the lower part of the HP Image Zone.3. Choose HP Instant Share from the list of applications.
The HP Instant Share client application software opens on your computer.4. Use the + button to add an image to the window, or the - button to remove an
image.
Note For more information on using the HP Instant Share clientapplication software, see the onscreen HP Image Zone Help.
5. Make sure the images you want to share display in the HP Instant Share window.6. Click Continue and follow the onscreen instructions.7. From the HP Instant Share services list, select the service you want to use to
send your scanned image.8. Follow the onscreen instructions.9. From the HP Instant Share E-mail service, you can:
– Send an e-mail message with thumbnail images of your photos which can beviewed, printed, and saved over the Web.
– Open and maintain an e-mail address book. Click Address Book, registerwith HP Instant Share, and create an HP Passport account.
– Send your e-mail message to multiple addresses. Click the related link.– Send a collection of images to a friend or relative's network-connected
device. Enter the name assigned to the device by the recipient in the E-mailaddress text box followed by @send.hp.com. You will be prompted to sign into HP Instant Share with your HP Passport userid and password.
Note If you have not previously set up HP Instant Share, click I needan HP Passport account on the Sign in with HP Passport screen.Obtain an HP Passport user ID and password.
User Guide 69
Use H
P Instant Share

Share images using the HP Image Zone (Macintosh OS X earlier than v10.2)
Note Macintosh OS X v10.0 and v10.0.4 are not supported.
You can share images with anyone who has an e-mail account. Simply start theHP Image Zone and open the HP Gallery. Then create a new e-mail message usingan e-mail application installed on your computer.
Note For more information, see the HP Gallery section in the onscreenHP Image Zone Help.
To use the e-mail option within the HP Image Zone1. Select the HP Image Zone icon from the Dock.
The HP Image Zone opens on your desktop.2. In the HP Image Zone, click the Services button at the top of the window.
A list of applications appears in the lower part of the HP Image Zone.3. Choose HP Gallery from the list of applications.
The HP Gallery opens on your computer.4. Select one or more images to share.
For more information, see the onscreen HP Image Zone Help.5. Click E-mail.
The e-mail program on your Macintosh opens.Send the images as an e-mail attachment by following the prompts on yourcomputer screen.
Share images using the HP Director (Macintosh OS 9)
Note Macintosh OS 9 v9.1.5 and later and v9.2.6 and later are supported.
You can share images with anyone who has an e-mail account. Simply start theHP Director and open the HP Gallery. Then create a new e-mail message using an e-mail application installed on your computer.
Note For more information, see the HP Gallery section in the onscreenHP Image Zone Help.
To use the e-mail option within the HP Director1. Double-click the HP Director shortcut on your desktop.
The HP Director menu opens on your desktop.2. Double-click HP Gallery.
The HP Gallery opens on your desktop.3.
Chapter 10
70 HP PSC 1600 All-in-One series
Use
HP
Inst
ant S
hare

Select one or more images to share.For more information, see the onscreen HP Image Zone Help.
4. Click E-mail.The e-mail program on your Macintosh opens.Send the images as an e-mail attachment by following the prompts on yourcomputer screen.
User Guide 71
Use H
P Instant Share

Chapter 10
72 HP PSC 1600 All-in-One series
Use
HP
Inst
ant S
hare

11 Order suppliesYou can order recommended types of HP paper and print cartridges online from theHP website.
Order paper, transparency film, or other media To order media such as HP Premium Paper, HP Premium Plus Photo Paper,HP Premium Inkjet Transparency Film, or HP Iron-On Transfers, go to www.hp.com. Ifprompted, choose your country/region, follow the prompts to select your product, andthen click one of the shopping links on the page.
Order print cartridges Print cartridge reorder numbers vary by country/region. If the reorder numbers listed inthis guide do not match the numbers on the print cartridges currently installed in yourHP All-in-One, order new print cartridges with the same numbers as those youcurrently have installed. Your HP All-in-One supports the following print cartridges.
Print cartridges HP reorder number
HP black inkjet print cartridge #94 16 ml black print cartridge
HP tri-color inkjet print cartridge #97 16 ml color print cartridge
#95 11 ml color print cartridge
HP photo inkjet print cartridge #99 15 ml color photo print cartridge
You can also find out the reorder numbers for all the print cartridges your devicesupports by doing the following:
● For Windows users: In the HP Director, click Settings, point to Print Settings,and then click Printer Toolbox. Click the Estimated Ink Levels tab, and thenclick Print Cartridge Ordering Information.
● For Mac users: In the HP Director (OS 9) or HP Image Zone (OS X), chooseSettings, and then choose Maintain Printer.If prompted, select your HP All-in-One, and then click Utilities. From the pop-upmenu, choose Supplies.
Additionally, you can contact a local HP reseller or go to www.hp.com/support toconfirm the correct print cartridge reorder numbers for your country/region.
To order print cartridges for your HP All-in-One, go to www.hp.com. If prompted,choose your country/region, follow the prompts to select your product, and then clickone of the shopping links on the page.
User Guide 73
Order supplies

Order other supplies To order other supplies, such as HP All-in-One software, a copy of the printed UserGuide, a Setup Guide, or other customer-replaceable parts, call the appropriatenumber below:
● In the U.S. or Canada, dial 1-800-474-6836 (1-800-HP invent).● In Europe, dial +49 180 5 290220 (Germany) or +44 870 606 9081 (U.K.).
To order HP All-in-One software in other countries/regions, call the phone number foryour country/region. The numbers listed below are current as of the publication date ofthis guide. For a list of current ordering numbers, go to www.hp.com. If prompted,choose your country/region, and then click Contact HP for information on calling fortechnical support.
Country/region Number for ordering
Asia Pacific (except for Japan) 65 272 5300
Australia 1300 721 147
Europe +49 180 5 290220 (Germany)+44 870 606 9081 (U.K.)
New Zealand 0800 441 147
South Africa +27 (0)11 8061030
U.S. and Canada 1-800-HP-INVENT (1-800-474-6836)
Chapter 11
74 HP PSC 1600 All-in-One series
Ord
er s
uppl
ies

12 Maintain your HP All-in-OneThe HP All-in-One requires little maintenance. Sometimes you might want to clean theglass and lid backing to remove surface dust and ensure that your copies and scansremain clear. You will also need to replace, align, or clean your print cartridgesoccasionally. This chapter provides instructions for keeping your HP All-in-One in topworking condition. Perform these simple maintenance procedures as necessary.
Clean the HP All-in-OneFingerprints, smudges, hair, and other debris on the glass or lid backing slow downperformance and affect the accuracy of special features such as Fit to Page. Toensure that your copies and scans remain clear, you might need to clean the glassand lid backing. You might also want to dust the exterior of the HP All-in-One.
Clean the glass Dirty glass from fingerprints, smudges, hair, and dust slows down performance andaffects the accuracy of features such as Fit to Page.
1. Turn off the HP All-in-One, unplug the power cord, and raise the lid.2. Clean the glass with a soft cloth or sponge slightly moistened with a nonabrasive
glass cleaner.
Warning Do not use abrasives, acetone, benzene, or carbontetrachloride on the glass; they can damage it. Do not place or spray liquiddirectly on the glass; the liquid might seep under the glass and damagethe device.
3. Dry the glass with a chamois or cellulose sponge to prevent spotting.
Clean the lid backing Minor debris can accumulate on the white document backing located underneath thelid of the HP All-in-One.
1. Turn off the HP All-in-One, unplug the power cord, and raise the lid.2. Clean the white document backing with a soft cloth or sponge slightly moistened
with a mild soap and warm water.3. Wash the backing gently to loosen debris. Do not scrub the backing.4. Dry the backing with a chamois or soft cloth.
Warning Do not use paper-based wipes, as these might scratch thebacking.
5. If further cleaning is needed, repeat the previous steps using isopropyl (rubbing)alcohol, and wipe the backing thoroughly with a damp cloth to remove anyresidual alcohol.
Warning Be careful not to spill alcohol on the glass or painted parts ofthe HP All-in-One, as this might damage the device.
User Guide 75
Maintain your H
P All-in-O
ne

Clean the exterior Use a soft cloth or slightly moistened sponge to wipe dust, smudges, and stains offthe case. The interior of the HP All-in-One does not require cleaning. Keep fluidsaway from the control panel and the interior of the HP All-in-One.
Warning To avoid damage to painted parts of the HP All-in-One, do not usealcohol or alcohol-based cleaning products on the control panel, lid, or otherpainted parts of the device.
Check the estimated ink levels You can easily check the ink supply level to determine how soon you might need toreplace a print cartridge. The ink supply level shows an estimate of the amount of inkremaining in the print cartridges.
Tip You can also print a self-test report to see if your print cartridges mightneed to be replaced. For more information, see Print a self-test report.
To check the ink levels from the HP Director (Windows)1. In the HP Director, click Settings, point to Print Settings, and then click Printer
Toolbox.
Note You can also open the Printer Toolbox from the Print Propertiesdialog box. In the Print Properties dialog box, click the Services tab, andthen click Service this device.
2. Click the Estimated Ink Level tab.The estimated ink levels for the print cartridges appear.
To check the ink levels from the HP Image Zone software (Macintosh)1. In the HP Director (OS 9) or HP Image Zone (OS X), choose Settings, and then
choose Maintain Printer.2. If the Select Printer dialog box appears, select your HP All-in-One, and then click
Utilities.3. From the pop-up menu, choose Ink Level.
The estimated ink levels for the print cartridges appear.
Print a self-test report If you are experiencing problems with printing, print a self-test report before youreplace the print cartridges. This report provides useful information on several aspectsof your device, including your print cartridges.
1. Load letter, A4, or legal unused plain white paper into the paper tray.2. Press Setup until Print Report appears, and then press OK.
Self-Test Report appears.3. Press OK.4. The HP All-in-One prints a self-test report, which might indicate the source of the
printing problem. A sample of the ink test area of the report is shown below.
Chapter 12
76 HP PSC 1600 All-in-One series
Mai
ntai
n yo
ur H
P A
ll-in
-One

5. Make sure the test patterns are even and show a complete grid.If more than a few lines in a pattern are broken, this might indicate a problem withthe nozzles. You might need to clean the print cartridges. For more information,see Clean the print cartridges.
6. Make sure the lines of color extend across the page.If the black line is missing, faded, streaked, or shows lines, this might indicate aproblem with the black or photo print cartridge in the right slot.If any of the remaining three lines are missing, faded, streaked, or show lines, thismight indicate a problem with the tri-color print cartridge in the left slot.
7. Make sure the color blocks have even consistency and are representative of thecolors listed below.You should see cyan, magenta, yellow, violet, green, and red color blocks.If color blocks are missing, or if a block of color is muddy or does not match thelabel indicated below the block, this might indicate that the tri-color print cartridgeis out of ink. You might need to replace the print cartridge. For more informationon replacing print cartridges, see Replace the print cartridges.
8. Check the color blocks and lines of color for streaking or white lines.Streaks might indicate clogged nozzles or dirty contacts. You might need to cleanthe print cartridges. For more information on cleaning the print cartridges, seeClean the print cartridges. Do not clean with alcohol.
Note For examples of test patterns, lines of color, and color blocks fromnormal and malfunctioning print cartridges, see the onscreen HP Image ZoneHelp that came with your software.
Work with print cartridges To ensure the best print quality from your HP All-in-One, you will need to performsome simple maintenance procedures. This section provides guidelines for handlingthe print cartridges and instructions for replacing, aligning, and cleaning the printcartridges.
User Guide 77
Maintain your H
P All-in-O
ne

Handle the print cartridges Before you replace or clean a print cartridge, you should know the part names andhow to handle the print cartridges.
1 Copper-colored contacts2 Plastic tape with pink pull tab (must be removed before installing)3 Ink nozzles under tape
Hold the print cartridges by their black plastic sides, with the label on top. Do nottouch the copper-colored contacts or the ink nozzles.
Warning Be careful not to drop the print cartridges. This can damage them,making them unusable.
Replace the print cartridges When the ink level for the print cartridge is low, a message appears on the controlpanel display.
Note You can also check the estimated amount of ink remaining in yourcartridges by using the HP Image Zone software that came with your HP All-in-One. For information, see Check the estimated ink levels.
When you receive a low-ink warning message on the control panel display, make sureyou have a replacement print cartridge available. You should also replace the printcartridges when you see faded text or if you experience print quality issues related tothe print cartridges.
Tip You can also use these instructions to replace the black print cartridgewith a photo print cartridge for printing high-quality color photos.
Chapter 12
78 HP PSC 1600 All-in-One series
Mai
ntai
n yo
ur H
P A
ll-in
-One

To find out the reorder number for all the print cartridges that your HP All-in-Onesupports, see Order print cartridges. To order print cartridges for your HP All-in-One,go to www.hp.com. If prompted, choose your country/region, follow the prompts toselect your product, and then click one of the shopping links on the page.
To replace the print cartridges1. Make sure the HP All-in-One is on.
Warning If the HP All-in-One is off when you lift the print-carriage accessdoor to access the print cartridges, the HP All-in-One will not release thecartridges for changing. You might damage the HP All-in-One if the printcartridges are not docked safely on the right side when you try to removethem.
2. Open the print-carriage access door by lifting from the front center of the device,until the door locks into place.The print carriage moves to the far right side of the HP All-in-One.
1 Print-carriage access door2 Print carriage
3. Wait until the print carriage is idle and silent, and then lightly press down on aprint cartridge to release it.If you are replacing the tri-color print cartridge, remove the print cartridge from theslot on the left.If you are replacing the black or photo print cartridge, remove the print cartridgefrom the slot on the right.
User Guide 79
Maintain your H
P All-in-O
ne

1 Print cartridge slot for the tri-color print cartridge2 Print cartridge slot for the black and photo print cartridges
4. Pull the print cartridge toward you out of its slot.5. If you are removing the black print cartridge in order to install the photo print
cartridge, store the black print cartridge in the print cartridge protector. For moreinformation, see Use the print cartridge protector.If you are removing the print cartridge because it is low or out of ink, recycle theprint cartridge. The HP Inkjet Supplies Recycling Program is available in manycountries/regions, and lets you recycle used print cartridges free of charge. Formore information, go to the following website:www.hp.com/hpinfo/globalcitizenship/environment/recycle/inkjet.html
6. Remove the new print cartridge from its packaging and, being careful to touchonly the black plastic, gently remove the plastic tape by using the pink pull tab.
1 Copper-colored contacts2 Plastic tape with pink pull tab (must be removed before installing)3 Ink nozzles under tape
Caution Do not touch the copper-colored contacts or ink nozzles.Touching these parts can result in clogs, ink failure, and bad electricalconnections.
Chapter 12
80 HP PSC 1600 All-in-One series
Mai
ntai
n yo
ur H
P A
ll-in
-One

7. Slide the new print cartridge forward into the empty slot. Push the print cartridgeforward until it clicks into place.If the print cartridge you are installing has a white triangle on its label, slide theprint cartridge into the slot on the left. The label for the slot is green with a solidwhite triangle.If the print cartridge you are installing has a white square or a white pentagon onits label, slide the print cartridge into the slot on the right. The label for the slot isblack with a solid white square and a solid white pentagon.
8. Close the print-carriage access door.
Use a photo print cartridge You can optimize the quality of the color photos you print and copy with your HP All-in-One by purchasing a photo print cartridge. Remove the black print cartridge and insertthe photo print cartridge in its place. With the tri-color print cartridge and photo print
User Guide 81
Maintain your H
P All-in-O
ne

cartridge installed, you have a six-ink system, which provides enhanced quality colorphotos.
When you want to print regular text documents, swap the black print cartridge back in.Use a print cartridge protector to keep your print cartridge secure when it is not beingused.
● For more information on purchasing a photo print cartridge, see Order printcartridges.
● For more information on replacing print cartridges, see Replace the print cartridges.● For more information on using the print cartridge protector, see Use the print
cartridge protector.
Use the print cartridge protector In some countries/regions, when you purchase a photo print cartridge, you might alsoreceive a print cartridge protector. In other countries/regions, a print cartridgeprotector comes in the box with your HP All-in-One. If neither your print cartridge noryour HP All-in-One came with a print cartridge protector, you can order one from HPSupport. Go to www.hp.com/support.The print cartridge protector is designed to keep a print cartridge secure and prevent itfrom drying out when it is not being used. Whenever you remove a print cartridge fromthe HP All-in-One with the intention of using it again later, store it in the print cartridgeprotector. For example, store the black print cartridge in a print cartridge protector ifyou are removing it so you can print high-quality photos with the photo and tri-colorprint cartridges.
To insert a print cartridge into the print cartridge protector1. Slide the print cartridge into the print cartridge protector at a slight angle and snap
it securely into place.
2. Store the print cartridge protector in the print cartridge storage area of the HP All-in-One for safe keeping. Open the print-carriage access door and place the printcartridge protector in the device, as shown below.
Chapter 12
82 HP PSC 1600 All-in-One series
Mai
ntai
n yo
ur H
P A
ll-in
-One

1 Print-carriage access door2 Print cartridge storage area of the HP All-in-One
3. Close the print-carriage access door.
To remove the print cartridge from the print cartridge protector➔ Press down and back on the top of the print cartridge protector to release the
print cartridge, then slide the print cartridge out of the print cartridge protector.
Align the print cartridges The HP All-in-One prompts you to align cartridges every time you install or replace aprint cartridge. You can also align the print cartridges at any time from the controlpanel or by using the HP Image Zone software on your computer. Aligning the printcartridges ensures high-quality output.
Note If you remove and reinstall the same print cartridge, the HP All-in-Onewill not prompt you to align the print cartridges. The HP All-in-One remembersthe alignment values for that print cartridge, so you do not need to realign theprint cartridges.
To align the print cartridges from the control panel when prompted1. Make sure you have letter or A4 unused plain white paper loaded in the paper
tray, and then press OK.The HP All-in-One prints a print cartridge alignment sheet and aligns the printcartridges. Recycle or discard the page.
User Guide 83
Maintain your H
P All-in-O
ne

Note If you have colored paper loaded in the paper tray when you alignthe print cartridges, the alignment will fail. Load unused plain white paperinto the paper tray, and then try the alignment again.
If the alignment fails again, you might have a defective sensor or printcartridge. Contact HP Support. Go to: www.hp.com/support. If prompted,choose your country/region, and then click Contact HP for information oncalling for technical support.
2. Press OK.
To align the cartridges from the control panel at any other time1. Load letter or A4 unused plain white paper into the paper tray.2. Press Setup until Tools appears, and then press OK.3. Press until Align Print Cartridge appears, and then press OK.
The HP All-in-One prints a print cartridge alignment sheet and aligns the printcartridges. Recycle or discard the page.
4. Press OK.
For information on aligning the print cartridges by using the HP Image Zone softwarethat came with your HP All-in-One, see the onscreen HP Image Zone Help that camewith your software.
Clean the print cartridges Use this feature when the self-test report shows streaking or white lines through anyof the lines of color. Do not clean print cartridges unnecessarily, as this wastes inkand shortens the life of the print cartridges.
To clean the print cartridges from the control panel1. Load letter or A4 unused plain white paper into the paper tray.2. Press Setup until Tools appears, and then press OK.
Clean Print Cartridge appears.3. Press OK.
The HP All-in-One prints a page that you can recycle or discard.If copy or print quality still seem poor after you clean the print cartridges, trycleaning the print cartridge contacts before replacing the affected print cartridge.For information on cleaning the print cartridge contacts, see Clean the print
Chapter 12
84 HP PSC 1600 All-in-One series
Mai
ntai
n yo
ur H
P A
ll-in
-One

cartridge contacts. For information on replacing the print cartridges, see Replacethe print cartridges.
For information on cleaning the print cartridges by using the HP Image Zone softwarethat came with your HP All-in-One, see the onscreen HP Image Zone Help that camewith your software.
Clean the print cartridge contacts Clean the print cartridge contacts only if you get repeated messages on the controlpanel display prompting you to check a print cartridge after you already have cleanedor aligned the print cartridges.
Before cleaning the print cartridge contacts, remove the print cartridge and verify thatnothing is covering the print cartridge contacts, then reinstall the print cartridge. If youcontinue to get messages to check the print cartridges, clean the print cartridgecontacts.
Make sure you have the following materials available:
● Dry foam rubber swabs, lint-free cloth, or any soft material that will not comeapart or leave fibers.
Tip Coffee filters are lint-free and work well for cleaning print cartridges.
● Distilled, filtered, or bottled water (tap water might contain contaminants that candamage the print cartridges).
Warning Do not use platen cleaners or alcohol to clean the print cartridgecontacts. These can damage the print cartridge or the HP All-in-One.
To clean the print cartridge contacts1. Turn on the HP All-in-One and open the print-carriage access door.
The print carriage moves to the far right side of the HP All-in-One.2. Wait until the print carriage is idle and silent, and then unplug the power cord
from the back of the HP All-in-One.3. Lightly press down on the print cartridge to release it, and then pull it toward you
out of the slot.
Note Do not remove both print cartridges at the same time. Remove andclean each print cartridge one at a time. Do not leave a print cartridgeoutside the HP All-in-One for more than 30 minutes.
4. Inspect the print cartridge contacts for ink and debris buildup.5. Dip a clean foam rubber swab or lint-free cloth into distilled water, and squeeze
any excess water from it.6. Hold the print cartridge by its sides.7. Clean only the copper-colored contacts. For information on cleaning the ink
nozzle area, see Clean the area around the ink nozzles.
User Guide 85
Maintain your H
P All-in-O
ne

1 Copper-colored contacts2 Ink nozzles (do not clean)
8. Allow the print cartridge to dry for approximately ten minutes.9. Slide the print cartridge back into the slot. Push the print cartridge forward until it
clicks into place.10. Repeat if necessary for the other print cartridge.11. Gently close the print-carriage access door and plug the power cord into the back
of the HP All-in-One.
Clean the area around the ink nozzles If the HP All-in-One is used in a dusty environment, a small amount of debris mightaccumulate inside the device. This debris can include dust, hair, carpet, or clothingfibers. When debris gets on the print cartridges, it can cause ink streaks and smudgeson printed pages. Ink streaking can be corrected by cleaning around the ink nozzlesas described here.
Note Clean the area around the ink nozzles only if you continue to seestreaks and smudges on your printed pages after you have already cleanedthe print cartridges by using the control panel or the HP Image Zone software.For more information, see Clean the print cartridges.
Make sure you have the following materials available:
● Dry foam rubber swabs, lint-free cloth, or any soft material that will not comeapart or leave fibers.
Tip Coffee filters are lint-free and work well for cleaning print cartridges.
● Distilled, filtered, or bottled water (tap water might contain contaminants that candamage the print cartridges).
Warning Do not touch the copper-colored contacts or ink nozzles. Touchingthese parts can result in clogs, ink failure, and bad electrical connections.
Chapter 12
86 HP PSC 1600 All-in-One series
Mai
ntai
n yo
ur H
P A
ll-in
-One

To clean the area around the ink nozzles1. Turn on the HP All-in-One and open the print-carriage access door.
The print carriage moves to the far right side of the HP All-in-One.2. Wait until the print carriage is idle and silent, and then unplug the power cord
from the back of the HP All-in-One.3. Lightly press down on the print cartridge to release it, and then pull it toward you
out of the slot.
Note Do not remove both print cartridges at the same time. Remove andclean each print cartridge one at a time. Do not leave a print cartridgeoutside the HP All-in-One for more than 30 minutes.
4. Place the print cartridge on a piece of paper with the ink nozzles facing up.5. Lightly moisten a clean foam rubber swab with distilled water.6. Clean the face and edges around the ink nozzle area with the swab, as shown
below.
1 Nozzle plate (do not clean)2 Face and edges around the ink nozzle area
Warning Do not clean the nozzle plate.
7. Allow the ink nozzle area to dry for approximately ten minutes.8. Slide the print cartridge back into the slot. Push the print cartridge forward until it
clicks into place.9. Repeat if necessary for the other print cartridge.10. Gently close the print-carriage access door and plug the power cord into the back
of the HP All-in-One.
Change the device settingsYou can change the scroll speed and prompt delay time settings on your HP All-in-One so that it behaves according to your preference. You can also restore the devicesettings to what they were when you purchased your device. This will erase any newdefaults you have set.
Set the scroll speed The Scroll Speed option lets you control the rate that text messages scroll in thecontrol panel display. For example, if the message is "Load paper, then press OK.",
User Guide 87
Maintain your H
P All-in-O
ne

it will not completely fit in the control panel display and will need to scroll. This is sothat you can read the entire message. You can choose the rate at which it will scroll:Normal, Fast, or Slow. The default is Normal.1. Press Setup until Preferences appears, and then press OK.2. Press until Set Scroll Speed appears, and then press OK.3. Press to select a scroll speed, then press OK.
Set the prompt delay time The Prompt Delay Time option allows you to control the amount of time that passesbefore a message prompts you to take further action. For example, if you press CopyMenu and the prompt delay time passes without you pressing another button, themessage "Press Copy Menu for more options." appears in the control paneldisplay. You can choose Fast, Normal, Slow, or Off. If you select Off, hints will notappear on the control panel display but other messages, such as low ink warningsand error messages, will still appear.
1. Press Setup until Preferences appears, and then press OK.2. Press until Set Prompt Delay Time appears, and then press OK.3. Press to select a delay time, then press OK.
Restore the factory defaults You can restore the current settings to what they were when you purchased yourHP All-in-One.
Note Restoring the factory defaults will not affect any changes you made toscan settings and the language and country/region settings.
You can perform this process from the control panel only.
1. Press Setup until Tools appears, and then press OK.2. Press until Restore Factory Defaults appears, and then press OK.
The factory default settings are restored.
Chapter 12
88 HP PSC 1600 All-in-One series
Mai
ntai
n yo
ur H
P A
ll-in
-One

13 Troubleshooting information This chapter contains troubleshooting information for the HP All-in-One. Specificinformation is provided for installation and configuration issues, and some operationaltopics. For more troubleshooting information, see the onscreen HP Image Zone Helpthat came with your software.
Many issues are caused when the HP All-in-One is connected to the computer using aUSB cable before the HP All-in-One software is installed on the computer. If youconnect the HP All-in-One to your computer before the software installation screenprompts you to do so, you must follow these steps to fix the installation:
1. Disconnect the USB cable from the computer.2. Uninstall the software (if you have already installed it).3. Restart your computer.4. Turn off the HP All-in-One, wait one minute, then restart it.5. Reinstall the HP All-in-One software. Do not connect the USB cable to the
computer until prompted by the software installation screen.
For information about uninstalling and reinstalling the software, see Uninstall andreinstall the software.
This section contains the following topics:
● Setup troubleshooting: Contains information on hardware setup, softwareinstallation, and HP Instant Share setup troubleshooting information.
● Operational troubleshooting: Contains information on issues that might occurduring normal tasks when using the HP All-in-One features.
● Device update: Based on advice from HP customer support or a message on thecontrol panel display, you might access the HP support website to retrieve anupgrade for your device. This section contains information about updating yourdevice.
Before you call HP Support If you have a problem, follow these steps:
1. Check the documentation that came with the HP All-in-One.– Setup Guide: The Setup Guide explains how to set up the HP All-in-One.– User Guide: The User Guide is the book you are reading. This book
describes the basic features of the HP All-in-One, explains how to use theHP All-in-One without connecting it to a computer, and contains setup andoperational troubleshooting information.
User Guide 89
Troubleshooting information

– HP Image Zone Help: The onscreen HP Image Zone Help describes how touse the HP All-in-One with a computer and contains additionaltroubleshooting information not covered in the User Guide.
– Readme file: The Readme file contains information on possible installationproblems. For more information, see View the Readme file.
2. If you are unable to solve the problem using the information in the documentation,visit www.hp.com/support to do the following:– Access online support pages– Send HP an e-mail message for answers to your questions– Connect with an HP technician by using online chat– Check for software updatesSupport options and availability vary by product, country/region, and language.
3. Contact your local point of purchase. If the HP All-in-One has a hardware failure,you will be asked to bring the HP All-in-One to where you purchased it. Service isfree during the HP All-in-One limited warranty period. After the warranty period,you will be quoted a service charge.
4. If you are unable to solve the problem using the onscreen Help or HP websites,call HP Support using the number for your country/region. For more information,see Get HP support.
View the Readme fileYou might want to refer to the Readme file for more information on possibleinstallation problems and for system requirements.
● In Windows, you can access the Readme file from the Windows taskbar byclicking Start, pointing to Programs or All Programs, pointing to Hewlett-Packard, pointing to HP PSC 1600 All-in-One series, and then clicking View theReadme File.
● In Macintosh OS 9 or OS X, you can access the Readme file by double-clickingthe icon located in the top-level folder of the HP All-in-One software CD-ROM.
Setup troubleshooting This section includes installation and configuration troubleshooting tips for some of themost common issues associated with software installation and hardware setup.
Hardware setup troubleshooting Use this section to solve any problems you might encounter while setting up theHP All-in-One hardware.
My HP All-in-One does not turn onSolution Try the following:● Make sure the power cable is firmly connected to both the HP All-in-One and
the power adaptor, as shown below.
Chapter 13
90 HP PSC 1600 All-in-One series
Trou
bles
hoot
ing
info
rmat
ion

● Plug the power cable into a grounded power outlet, surge protector, or powerstrip. If you are using a power strip, make sure the power strip is on.
● Test the power outlet to make sure it is working. Plug in an appliance thatyou know works, and see if the appliance has power. If not, then there mightbe a problem with the power outlet.
● If you plugged the HP All-in-One into a switched outlet, make sure the switchis on.
● When you press the On button, wait a few seconds for the HP All-in-One toturn on.
My USB cable is not connectedSolution You must first install the software that came with your HP All-in-Onebefore connecting the USB cable. During installation, do not plug in the USBcable until prompted by the onscreen instructions. Connecting the USB cablebefore prompted can cause errors.Connecting your computer to your HP All-in-One with a USB cable isstraightforward. Simply plug one end of the USB cable into the back of yourcomputer and the other into the back of the HP All-in-One. You can connect toany USB port on the back of your computer.
Note Do not plug the USB cable into the USB port on your keyboard.
User Guide 91
Troubleshooting information

I received a message on the control panel display to attach the control paneloverlay
Solution This might mean the control panel overlay is not attached, or it isattached incorrectly. Make sure to align the overlay over the buttons on the top ofthe HP All-in-One and snap it firmly into place.
Chapter 13
92 HP PSC 1600 All-in-One series
Trou
bles
hoot
ing
info
rmat
ion

The control panel display shows the wrong language Solution Usually, you set the language and country/region when you first setup the HP All-in-One. However, you can change these settings at any time byusing the following procedure:1. Press Setup until Preferences appears, and then press OK.2. Press until Set Language & Country/Region appears, and then press OK.
You are prompted with a list of languages. You can scroll through the list oflanguages by pressing or .
3. Press OK on the appropriate language.4. When prompted, press OK to select Yes or Cancel to select No.
You are prompted with a list of countries/regions for the selected language.5. Press to select the appropriate country/region, and then press OK.6. When prompted, press to select Yes or No, and then press OK.You can confirm the language and country/region by printing a Self-Test Report,as follows:
1. Press Setup until Print Report appears, and then press OK.2. Press until Self-Test Report appears, and then press OK.
The wrong measurements are showing in menus on the control panel display Solution You might have selected the incorrect country/region when setting upyour HP All-in-One. The country/region you select determines the paper sizesshown on the control panel display.
To change the country/region, you must first set the default language again.Usually, you set the language and country/region when you first set up the HP All-in-One. However, you can change these settings at any time by using thefollowing procedure:
1. Press Setup until Preferences appears, and then press OK.2. Press until Set Language & Country/Region appears, and then press OK.
You are prompted with a list of languages. You can scroll through the list oflanguages by pressing or .
3. Press OK on the appropriate language.4. When prompted, press OK to select Yes or Cancel to select No.
You are prompted with all the countries/regions for the selected language.5. Press to select the appropriate country/region, and then press OK.6. When prompted, press to select Yes or No, and then press OK.Print a Self-Test Report to confirm the language and country/region:
1. Press Setup until Print Report appears, and then press OK.2. Press until Self-Test Report appears, and then press OK.
I received a message on the control panel display to align the print cartridgesCause The HP All-in-One prompts you to align cartridges every time you installa new print cartridge.
User Guide 93
Troubleshooting information

Note If you remove and reinstall the same print cartridge, the HP All-in-One will not prompt you to align the print cartridges. The HP All-in-Oneremembers the alignment values for that print cartridge, so you do notneed to realign the print cartridges.
Solution Align the print cartridges.1. Make sure you have letter or A4 unused plain white paper loaded in the
paper tray, and then press OK.The HP All-in-One prints a print cartridge alignment sheet and aligns the printcartridges. Recycle or discard the page.
2. Press OK.For more information on aligning the print cartridges, see Align the printcartridges.
I received a message on the control panel display that the print cartridgealignment failed
Cause The incorrect type of paper is loaded in the paper tray.
Solution If you have colored paper loaded in the paper tray when you align theprint cartridges, the alignment fails. Load unused plain white letter or A4 paperinto the paper tray, and then try the alignment again. For more information, seeAlign the print cartridges.
If the alignment fails again, you might have a defective sensor or print cartridge.Contact HP Support. Go to www.hp.com/support. If prompted, choose yourcountry/region, and then click Contact HP for information on calling for technicalsupport.
Cause Protective tape is covering the print cartridges.
Solution Check each print cartridge. If the plastic tape is still covering the inknozzles, gently remove the plastic tape by using the pink pull tab. Do not touchthe ink nozzles or the copper-colored contacts.
1 Copper-colored contacts2 Plastic tape with pink pull tab (must be removed before installing)3 Ink nozzles under tape
Chapter 13
94 HP PSC 1600 All-in-One series
Trou
bles
hoot
ing
info
rmat
ion

Reinsert the print cartridges and verify that they are fully inserted and locked inplace, and then try the alignment again. For more information, see Align the printcartridges.
Cause The contacts on the print cartridge are not touching the contacts in theprint carriage.
Solution Remove and then reinsert the print cartridges. Verify that they arefully inserted and locked in place, and then try the alignment again. For moreinformation, see Align the print cartridges.
Cause You are not using HP print cartridges or you are using print cartridgesthat have been refilled.
Solution The alignment process might fail if you are not using HP printcartridges. It might also fail if you are using refilled print cartridges. Replace theprint cartridges with genuine HP print cartridges that have not been refilled, andthen try the alignment again. For more information on replacing the printcartridges, see Replace the print cartridges. For more information on aligning theprint cartridges, see Align the print cartridges.
Cause The print cartridge or sensor is defective.
Solution Contact HP Support. Go to www.hp.com/support. If prompted,choose your country/region, and then click Contact HP for information on callingfor technical support.
The HP All-in-One does not printSolution If your HP All-in-One and computer are not communicating with eachother, try the following:● Look at the control panel display on the HP All-in-One. If the control panel
display is blank and the light next to the On button is not lit, the HP All-in-One is turned off. Make sure the power cable is firmly connected to theHP All-in-One and plugged into a power outlet. Press the On button to turnon the HP All-in-One.
● Check the USB cable. If you are using an older cable, it might not be workingproperly. Try connecting it to another product to see if the USB cable works.If you experience problems, the USB cable might need to be replaced. Alsoverify that the cable does not exceed 3 meters (9.8 feet) in length.
User Guide 95
Troubleshooting information

● Make sure your computer is USB ready. Some operating systems, such asWindows 95 and Windows NT, do not support USB connections. Check thedocumentation that came with your operating system for more information.
● Check the connection from your HP All-in-One to your computer. Verify thatthe USB cable is securely plugged into the USB port on the back of yourHP All-in-One. Make sure the other end of the USB cable is plugged into aUSB port on your computer. After the cable is connected properly, turn yourHP All-in-One off and then on again.
● If you are using a Macintosh: Check the Apple System Profiler (OS 9) or theSystem Profiler (OS X) to verify your USB connection. If the HP All-in-Oneshows up in the USB window, then the USB connection between yourcomputer and HP All-in-One is working. If it is working, there might be aproblem with the software. Try to run the HP All-in-One Setup Assistant tosee if it can detect the HP All-in-One. (You can access the HP All-in-OneSetup Assistant through the HP Image Zone software.)
● Check other printers or scanners. You might need to disconnect olderproducts from your computer.
● Try connecting the USB cable to another USB port on your computer. Afteryou check the connections, try restarting your computer. Turn your HP All-in-One off and then on again.
● After you check the connections, try restarting your computer. Turn yourHP All-in-One off and then on again.
For more information on setting up your HP All-in-One and connecting it to yourcomputer, see the Setup Guide that came with your HP All-in-One.
I received a message on the control panel display about a paper jam or ablocked carriage
Cause There might be some packing material inside the HP All-in-One or apaper jam.
Solution Lift open the print-carriage access door to expose the print cartridgesand remove any packing material, tape, or other foreign objects. Turn off the
Chapter 13
96 HP PSC 1600 All-in-One series
Trou
bles
hoot
ing
info
rmat
ion

HP All-in-One, wait one minute, and then press the On button to turn the HP All-in-One back on.
For more information about clearing paper jams, see Paper has jammed theHP All-in-One.
Software installation troubleshooting If you encounter a software problem during installation, see the topics below for apossible solution. If you encounter a hardware problem during installation, seeHardware setup troubleshooting.
During a normal installation of the HP All-in-One software, the following things occur:
● The HP All-in-One CD-ROM runs automatically● The software installs● Files are copied to your hard drive● You are requested to plug in the HP All-in-One● A green OK and check mark appear on an installation wizard screen● You are requested to restart your computer● The registration process runs
If any of these things did not occur, there might be a problem with the installation. Tocheck the installation on a PC, verify the following:
● Start the HP Director and check to make sure the following icons appear: ScanPicture and Scan Document. For information on starting HP Director, see theonscreen HP Image Zone Help that came with your software. If the icons do notappear immediately, you might need to wait a few minutes for the HP All-in-Oneto connect to your computer. Otherwise, see Some of the icons are missing in theHP Director.
● Open the Printers dialog box and check to see that the HP All-in-One is listed.● Look in the system tray at the far right of the Windows taskbar for an HP All-in-
One icon. This indicates that the HP All-in-One is ready.
When I insert the CD-ROM into my computer’s CD-ROM drive, nothing happensSolution Do the following:1. From the Windows Start menu, click Run.2. In the Run dialog box, enter d:\setup.exe (if your CD-ROM drive is not
assigned to drive letter D, enter the appropriate drive letter), and then click OK.
The minimum system checks screen appearsSolution Your system does not meet the minimum requirements to install thesoftware. Click Details to see what the specific problem is, and then correct theproblem before attempting to install the software.
User Guide 97
Troubleshooting information

A red X appears on the USB connect promptSolution Normally, a green check appears indicating that the plug and play issuccessful. A red X indicates that the plug and play failed.Do the following:
1. Verify that the control panel overlay is firmly attached, and then unplug theHP All-in-One and then plug it in again.
2. Verify that the USB and power cables are plugged in.
3. Verify that the USB cable is set up properly as follows:– Unplug the USB cable and plug it in again.– Do not attach the USB cable to a keyboard or non-powered hub.– Verify that the USB cable is 3 meters or less in length.– If you have several USB devices attached to your computer, you might
want to unplug the other devices during the installation.4. Continue with the installation and restart the computer when prompted. Then
open HP Director and check for the essential icons (Scan Picture and ScanDocument).
5. If the essential icons do not appear, remove the software and then reinstall it.For more information, see Uninstall and reinstall the software.
I received a message that an unknown error has occurredSolution Try to continue with the installation. If that doesn’t work, stop andthen restart the installation, and follow the directions on the screen. If an erroroccurs, you might need to uninstall and then reinstall the software. Forinformation , see Uninstall and reinstall the software.
Some of the icons are missing in the HP Director If the essential icons (Scan Picture and Scan Document) do not appear, yourinstallation might not be complete.
Chapter 13
98 HP PSC 1600 All-in-One series
Trou
bles
hoot
ing
info
rmat
ion

Solution If your installation is incomplete, you might need to uninstall and thenreinstall the software. Do not simply delete the HP All-in-One program files fromyour hard drive. Make sure to remove them properly using the uninstall utilityprovided in the HP All-in-One program group. For more information, see Uninstalland reinstall the software.
The registration screen does not appearSolution In Windows, you can access the registration screen from theWindows taskbar by clicking Start, pointing to Programs or All Programs (XP),Hewlett-Packard, HP PSC 1600 All-in-One series, and then clicking Sign up now.
The Digital Imaging Monitor does not appear in the system traySolution If the Digital Imaging Monitor does not appear in the system traylocated in the far right of the Windows taskbar, start the HP Director to checkwhether or not essential icons (Scan Picture and Scan Document) are there.For more information, see the Use the HP Director section of the HP ImageZone Help that came with your software.
The system tray normally appears at the bottom of the Windows desktop.
Uninstall and reinstall the softwareIf your installation is incomplete, or if you connected the USB cable to the computerbefore prompted by the software installation screen, you might need to uninstall andthen reinstall the software. Do not simply delete the HP All-in-One program files fromyour hard drive. Make sure to remove them properly using the uninstall utility providedin the HP All-in-One program group.
A reinstall can take from 20 to 40 minutes for both Windows and Macintoshcomputers. There are three methods to uninstall the software on a Windows computer.
To uninstall from a Windows computer, method 11. Disconnect your HP All-in-One from your computer. Do not connect the HP All-in-
One to your computer until after you have reinstalled the software.2. On the Windows taskbar, click Start, Start Programs or All Programs (XP),
Hewlett-Packard, HP PSC 1600 All-in-One series, uninstall software.3. Follow the onscreen instructions.4. If you are asked whether you would like to remove shared files, click No.
Other programs that use these files might not work properly if the files are deleted.5. Restart your computer.
Note It is important that you disconnect your HP All-in-One beforerestarting your computer. Do not connect the HP All-in-One to yourcomputer until after you have reinstalled the software.
User Guide 99
Troubleshooting information

6. To reinstall the software, insert the HP All-in-One CD-ROM into your computer’sCD-ROM drive, and follow the onscreen instructions and the instructions providedin the Setup Guide that came with your HP All-in-One.
7. After the software is installed, connect the HP All-in-One to your computer.8. Press the On button to turn the HP All-in-One on.
After connecting and turning on your HP All-in-One, you might have to waitseveral minutes for all of the Plug and Play events to complete.
9. Follow the onscreen instructions.
When the software installation is complete, the Digital Imaging Monitor icon appearsin the Windows system tray located in the far right of the Windows taskbar.
To verify that the software is properly installed, double-click the HP Director icon onthe desktop. If the HP Director shows the essential icons (Scan Picture and ScanDocument), the software has been properly installed.
To uninstall from a Windows computer, method 2
Note Use this method if Uninstall Software is not available in the WindowsStart menu.
1. On the Windows taskbar, click Start, Settings, Control Panel.2. Double-click Add/Remove Programs.3. Select HP All-in-One & Officejet & OfficeJet 4.0, and then click Change/Remove.
Follow the onscreen instructions.4. Disconnect your HP All-in-One from your computer.5. Restart your computer.
Note It is important that you disconnect your HP All-in-One beforerestarting your computer. Do not connect the HP All-in-One to yourcomputer until after you have reinstalled the software.
6. Launch setup.7. Follow the onscreen instructions and the instructions provided in the Setup Guide
that came with your HP All-in-One.
To uninstall from a Windows computer, method 3
Note This is an alternate method if Uninstall Software is not available in theWindows Start menu.
1. Run the HP PSC 1600 All-in-One series software Setup program.2. Select Uninstall and follow the onscreen directions.3. Disconnect your HP All-in-One from your computer.4. Restart your computer.
Note It is important that you disconnect your HP All-in-One beforerestarting your computer. Do not connect the HP All-in-One to yourcomputer until after you have reinstalled the software.
5. Run the HP PSC 1600 All-in-One series software Setup program again.6. Launch Reinstall.
Chapter 13
100 HP PSC 1600 All-in-One series
Trou
bles
hoot
ing
info
rmat
ion
7. Follow the onscreen instructions and the instructions provided in the Setup Guidethat came with your HP All-in-One.
To uninstall from a Macintosh computer1. Disconnect the HP All-in-One from your Macintosh.2. Double-click the Applications: HP All-in-One Software folder.3. Double-click HP Uninstaller.
Follow the onscreen instructions.4. After the software is uninstalled, disconnect your HP All-in-One, and then restart
your computer.
Note It is important that you disconnect your HP All-in-One beforerestarting your computer. Do not connect the HP All-in-One to yourcomputer until after you have reinstalled the software.
5. To reinstall the software, insert the HP All-in-One CD-ROM into your computer’sCD-ROM drive.
6. Double-click the CD-ROM icon on the desktop, and then double-click HP All-in-One installer.
7. Follow the onscreen instructions and the instructions provided in the Setup Guidethat came with your HP All-in-One.
Operational troubleshooting The HP PSC 1600 All-in-One series troubleshooting section in the HP Image ZoneHelp contains troubleshooting tips for some of the most common issues associatedwith your HP All-in-One.
To access the troubleshooting information from a Windows computer, go to theHP Director, click Help, and then choose Troubleshooting and Support.Troubleshooting is also available through the Help button that appears on some errormessages.
To access troubleshooting information from Macintosh OS X, click the HP ImageZone icon in the Dock, select Help from the menu bar, choose HP Image Zone Helpfrom the Help menu, and then choose 1600 series Troubleshooting in the HelpViewer.
If you have Internet access, you can get help from the HP website at www.hp.com/support.
The website also provides answers to frequently asked questions.
Paper troubleshootingTo help avoid paper jams, only use paper types that are recommended for your HP All-in-One. For a list of recommended papers, see the onscreen HP Image Zone Help, orgo to www.hp.com/support.
Do not load curled or wrinkled paper, or paper with bent or torn edges, into the papertray. For more information, see Avoid paper jams.
If paper does become jammed in your device, follow these instructions to clear thepaper jam.
User Guide 101
Troubleshooting information

Paper has jammed the HP All-in-One
Solution1. Press in the tab on the left side of the rear clean-out door to release the door.
Remove the door by pulling it away from the HP All-in-One.
Caution Trying to clear a paper jam from the front of the HP All-in-One can damage the print mechanism. Always access and clearpaper jams through the rear clean-out door.
2. Gently pull the paper out of the rollers.
Warning If the paper tears when you are removing it from therollers, check the rollers and wheels for torn pieces of paper thatmight be remaining inside the device. If you do not remove all thepieces of paper from the HP All-in-One, more paper jams are likely tooccur.
3. Replace the rear clean-out door. Gently push the door forward until it snapsinto place.
4. Press OK to continue the current job.
Print cartridge troubleshooting If you are experiencing problems with printing, you might have a problem with one ofthe print cartridges. Try the following:
1. Remove the print cartridge on the right side to make sure the plastic tape hasbeen removed. If it is still covering the ink nozzles, gently remove the plastic tapeby using the pink pull tab. Do not touch the ink nozzles or the copper-coloredcontacts.
Chapter 13
102 HP PSC 1600 All-in-One series
Trou
bles
hoot
ing
info
rmat
ion

1 Copper-colored contacts2 Plastic tape with pink pull tab (must be removed before installing)3 Ink nozzles under tape
2. Reinsert the print cartridge.
3. Repeat steps 1 and 2 for the print cartridge on the left side.4. If the problem persists, print a self-test report to determine if there is a problem
with the print cartridges.This report provides useful information about your print cartridges, includingstatus information. For more information, see Print a self-test report.
5. If the self-test report shows a problem, clean the print cartridges.For more information, see Clean the print cartridges.
6. If the problem persists, clean the copper-colored contacts of the print cartridges.For more information, see Clean the print cartridge contacts.
7. If you are still experiencing problems with printing, determine which print cartridgeis experiencing the problem and replace it.
Print troubleshooting
My document did not printSolution If you have multiple printers installed, make sure you select theHP PSC 1600 All-in-One series in your software application for the print job.
Note You can set the HP All-in-One as the default printer to ensure thatthe printer is automatically selected when you print from your software
User Guide 103
Troubleshooting information

applications. For information, see the onscreen Troubleshooting Help thatcame with your HP Image Zone software.
Solution Check the status of your HP All-in-One to make sure it does not havean error, such as a paper jam or out of paper message. Try the following:● Check the HP All-in-One control panel display to see if there are any error
messages.● Windows users: Check the status of the HP All-in-One from your computer.
In the HP Director, click Status.
Resolve any errors found. For information on error messages, see the onscreenTroubleshooting Help that came with your HP Image Zone software.
Memory card troubleshooting The following troubleshooting tip relates only to Macintosh users of iPhoto.
You have video clips on a memory card, but they do not appear in iPhoto afteryou import the memory card’s contents
Solution iPhoto handles still photos only. To manage both video clips and stillimages, use Unload Images from the HP Director instead.
Device update If directed by HP customer support or prompted by a message on your computer,update your HP All-in-One. Several update methods are available; each involvesdownloading a file to your computer to start the Device Update Wizard.
Device update (Windows) Use one of the following to retrieve an update for your device:
● If directed by HP customer support, use your Web browser to download anupdate for your HP All-in-One from www.hp.com/support. The file will be a self-extracting executable with the extension .exe. When you double-click the .exefile, the Device Update Wizard opens on your computer.
● Use the Software Update utility, provided with the HP Image Zone software, toautomatically search the HP support website for device updates at predeterminedintervals. For more information on the Software Update utility, see the onscreenHP Image Zone Help.
Note After the Software Update utility is installed on your computer, itsearches for device updates. If you do not have the latest version of theSoftware Update utility at the time of install, a dialog appears on yourcomputer prompting you to upgrade. Accept the upgrade. Once theupgrade is finished, restart the Software Update utility to locate updatesfor your HP All-in-One.
Chapter 13
104 HP PSC 1600 All-in-One series
Trou
bles
hoot
ing
info
rmat
ion

To use device update1. Do one of the following:
– Double-click the update .exe file you downloaded from www.hp.com/support.– When prompted, accept the device update found by the Software Update
utility.The Device Update Wizard opens on your computer.
2. At the Welcome screen, click Next.The Select a Device screen appears.
3. Select your HP All-in-One from the list, and then click Next.The Important Information screen appears.
4. Make sure your computer and device meet the requirements listed.5. If you meet the requirements, click Update.
A progress bar or other such designator appears on the device display.6. Do not disconnect, shut down, or otherwise disturb your device while the update
is occurring.
Note If you disrupt the update, or an error message indicates the updatefailed, call HP support for assistance.
After your HP All-in-One restarts, the Update Complete screen appears on yourcomputer and a test page prints from your device.
7. Your device is updated. It is now safe to use your HP All-in-One.
Device update (Macintosh) If directed by HP customer support or prompted by an error message, use the deviceupdate installer to apply updates to your HP All-in-One as follows:1. Use your Web browser to download an update for your HP All-in-One from
www.hp.com/support.2. Double-click the downloaded file.
The installer opens on your computer.3. Follow the onscreen prompts to install the update to your HP All-in-One.4. Restart the HP All-in-One to complete the process.
User Guide 105
Troubleshooting information

Chapter 13
106 HP PSC 1600 All-in-One series
Trou
bles
hoot
ing
info
rmat
ion

14 Get HP supportHewlett-Packard provides Internet and phone support for your HP All-in-One.This chapter provides information on how to get support from the Internet, contact HP customersupport, access your serial number and service ID, call in North America during warranty, call HPJapan customer support, call HP Korea customer support, call elsewhere in the world, callAustralia post-warranty, and prepare your HP All-in-One for shipment.If you are unable to find the answer you need in the printed or onscreen documentation suppliedwith your product, you can contact one of the HP support services listed in the following pages.Some support services are available only in the U.S. and Canada, while others are available inmany countries/regions worldwide. If a support service number is not listed for your country/region, contact your nearest authorized HP dealer for help.
Get support and other information from the Internet If you have Internet access, you can get help from www.hp.com/support. This website offerstechnical support, drivers, supplies, and ordering information.
Warranty supportTo obtain HP repair service, you must first contact an HP service office or an HP CustomerSupport Center for basic troubleshooting. See HP customer support for steps to take beforecalling Customer Support.
Note This information does not apply to customers in Japan. For information on serviceoptions in Japan, see HP Quick Exchange Service (Japan).
Warranty upgrades Depending on your country/region, HP might offer, for an additional fee, a warranty upgradeoption that extends or enhances your standard product warranty. Available options might includepriority phone support, return service, or next business day exchange. Typically, servicecoverage begins on product purchase date and must be purchased within a limited time ofproduct purchase.For more information:● In the U.S., dial 1-866-234-1377 to speak to an HP advisor.● Outside the U.S., please call your local HP Customer Support office. See Call elsewhere in
the world for a list of international Customer Support numbers.● Go to the HP website:
www.hp.com/supportIf prompted, choose your country/region, and then find warranty information.
Returning your HP All-in-One for serviceBefore returning your HP All-in-One for service, you must call HP Customer Support. SeeHP customer support for steps to take before calling Customer Support.
Note This information does not apply to customers in Japan. For information on serviceoptions in Japan, see HP Quick Exchange Service (Japan).
User Guide 107
Get H
P support

HP customer support Software programs from other companies might be included with your HP All-in-One. If youexperience problems with any of those programs, you will receive the best technical assistanceby calling the experts at that company.If you need to contact HP Customer Support, do the following before you call.1. Make sure that:
a. Your HP All-in-One is plugged in and turned on.b. The specified print cartridges are installed correctly.c. The recommended paper is properly loaded in the paper tray.
2. Reset your HP All-in-One:a. Turn off the HP All-in-One by pressing the On button.b. Unplug the power cord from the back of the HP All-in-One.c. Plug the power cord back into the HP All-in-One.d. Turn on the HP All-in-One by pressing the On button.
3. For more information, go to www.hp.com/support.This website offers technical support, drivers, supplies, and ordering information.
4. If you are still experiencing problems and need to speak with an HP Customer SupportRepresentative, do the following:a. Have the specific name of your HP All-in-One, as it appears on the control panel,
available.b. Print a self-test report. For information on printing a self-test report, see Print a self-test
report.c. Make a color copy to have available as a sample printout.d. Be prepared to describe your problem in detail.e. Have your serial number and service ID ready. For information on how to access your
serial number and service ID, see Access your serial number and service ID.5. Call HP Customer Support. Be near your HP All-in-One when you call.
Access your serial number and service ID You can access important information by using the Information Menu of your HP All-in-One.
Note If your HP All-in-One is not turning on, you can view the serial number by lookingat the sticker above the rear cleanout door. The serial number is the 10-character codein the upper left corner of the sticker.
To access your serial number and service ID1. Press and hold OK. While holding OK, press Copy Menu.
This displays the Information Menu.2. Press until Model Number appears, and then press OK.
This displays the service ID. Write down the complete service ID.3. Press Cancel, and then press until Serial Number appears.4. Press OK.
This displays the serial number. Write down the complete serial number.5. Press Cancel to exit the Information Menu.
Call in North America during warranty Call 1-800-474-6836 (1-800-HP invent). US phone support is available in both English andSpanish languages 24 hours a day, 7 days a week (days and hours of support may change
Appendix 14
108 HP PSC 1600 All-in-One series
Get
HP
supp
ort

without notice). This service is free during the warranty period. A fee may apply outside thewarranty period.
Call elsewhere in the world The numbers listed below are current as of the publication date of this guide. For a list of currentinternational HP Support Service numbers, go to www.hp.com/support and choose your owncountry/region or language.You can call the HP support center in the following countries/regions. If your country/region is notlisted, contact your local dealer or nearest HP Sales and Support Office to find out how to obtainservices.Support service is free during the warranty period; however, your standard long-distance phonecharges will apply. In some cases, a flat fee per single incident will also apply.
Note Per call and per minute rates quoted in this section are approximate.
For phone support in Europe, please check for the details and conditions of phone support inyour country/region by going to www.hp.com/support.Alternatively, you can ask your dealer or call HP at the phone number provided in this guide.As part of our constant efforts to improve our phone support service, we advise you to check ourwebsite on a regular basis for new information regarding service features and delivery.
Country/Region HP technical support Country/Region HP technical support
Algeria1 +213 61 56 45 43 Luxembourg (French) 900 40 006
Argentina (54)11-4778-8380,0-810-555-5520
Luxembourg (German) 900 40 007
Australia during warranty 1300 721 147 Malaysia 1-800-805405
Australia once warrantyhas ended (per-callcharge)
1902 910 910 Mexico 01-800-472-6684
Austria +43 1 86332 1000 Mexico (Mexico City) (55) 5258-9922
Bahrain 800 171 Middle East(international)
+971 4 366 2020
Bangladesh fax to: +65-6275-6707 Morocco1 +212 22 404747
Belgium (Dutch) +32 070 300 005 Netherlands (0.10 Euro/min.)
0900 2020 165
Belgium (French) +32 070 300 004 New Zealand 0800 441 147
Bolivia 800-100247 Nigeria +234 1 3204 999
Brazil (DemaisLocalidades)
0800 157751 Norway2 +47 815 62 070
Brazil (Grande SãoPaulo)
(11) 3747 7799 Oman +971 4 366 2020
Brunei fax to: +65-6275-6707 Pakistan fax to: +65-6275-6707
User Guide 109
Get H
P support

Country/Region HP technical support Country/Region HP technical support
Cambodia fax to: +65-6275-6707 Palestine +971 4 366 2020
Canada during warranty (905) 206 4663 Panama 001-800-711-2884
Canada once warrantyhas ended (per-callcharge)
1-877-621-4722 Peru 0-800-10111
Caribbean & CentralAmerica
1-800-711-2884 Philippines 632-867-3551
Chile 800-360-999 Poland +48 22 5666 000
China 021-38814518,8008103888
Portugal +351 808 201 492
Colombia 01-800-51-474-6836(01-800-51-HP invent)
Puerto Rico 1-877-232-0589
Costa Rica 0-800-011-4114,1-800-711-2884
Qatar +971 4 366 2020
Czech Republic +420 261307310 Romania +40 (21) 315 4442
Denmark +45 70 202 845 Russian Federation,Moscow
+7 095 7973520
Dominican Republic 1-800-711-2884 Russian Federation, St.Petersburg
+7 812 3467997
Ecuador (Andinatel) 999119+1-800-7112884 Saudi Arabia 800 897 1444
Ecuador (Pacifitel) 1-800-225528+1-800-7112884
Singapore 65 - 62725300
Egypt +20 2 532 5222 Slovakia +421 2 50222444
English International +44 (0) 207 512 5202 South Africa (RSA) 086 0001030
Finland +358 (0) 203 66 767 South Africa, OutsideRepublic
+27 11 2589301
France (0.34 Euro/min.) +33 (0)892 69 60 22 Spain +34 902 010 059
Germany (0.12 Euro/min.)
+49 (0) 180 5652 180 Sri Lanka fax to: +65-6275-6707
Greece (Cyprus toAthens toll free)
800 9 2649 Sweden +46 (0)77 120 4765
Greece, inside country/region
801 11 22 55 47 Switzerland 3 +41 0848 672 672
Greece, international +30 210 6073603 Syria +971 4 366 2020
Guatemala 1800-999-5105 Taiwan +886 (2) 8722-8000,0800 010 055
Hong Kong SAR +(852) 2802 4098 Thailand 0-2353-9000
Appendix 14(continued)
110 HP PSC 1600 All-in-One series
Get
HP
supp
ort

Country/Region HP technical support Country/Region HP technical support
Hungary +36 1 382 1111 Trinidad & Tobago 1-800-711-2884
India 91-80-8526900 Tunisia1 +216 71 89 12 22
India (toll free) 1600-4477 37 Turkey +90 216 579 71 71
Indonesia 62-21-350-3408 Ukraine, Kiev +7 (380 44) 4903520
Ireland +353 1890 923 902 United Arab Emirates +971 4 366 2020
Israel +972 (0) 9 830 4848 United Kingdom +44 (0) 870 010 4320
Italy +39 848 800 871 United States 1-800-474-6836 (1-800-HP invent)
Jamaica 1-800-711-2884 Venezuela 0-800-474-6836 (0-800-HP invent)
Japan +81-3-3335-9800 Venezuela (Caracas) (502) 207-8488
Jordan +971 4 366 2020 Vietnam 84-8-823-4530
Korea +82 1588 3003 W. Africa +351 213 17 63 80
Kuwait +971 4 366 2020 Yemen +971 4 366 2020
Lebanon +971 4 366 20201 This Call Center supports French-speaking customers from the following countries: Morocco, Tunisia,
and Algeria.2 Setup price per call: 0.55 Norway kroner (0.08 Euro); customer price per minute: 0.39 Norway kroner
(0.05 Euro).3 This Call Center supports German-, French-, and Italian-speaking customers in Switzerland (0.08 CHF/
min. during peak hours, 0.04 CHF/min. during off-peak hours).
Call in Australia under warranty and post-warranty If your product is under warranty, call 1300 721 147.If your product is not under warranty, call 1902 910 910. A per-incident, out-of-warranty supportfee will be charged to your phone bill.
Call HP Korea customer support
(continued)
User Guide 111
Get H
P support

Call HP Japan support
TEL : 0570-000-511
03-3335-9800
FAX : 03-3335-8338
9:00 17:00
10:00 17:00 1/1 3
FAX
HP Quick Exchange Service (Japan)
HP Quick Exchange Service
0570-000511 :03-3335 -9800
: 9:00 5:00 10:00 5:00
1 1 3
:
Prepare your HP All-in-One for shipment If after contacting HP Customer Support or returning to the point of purchase, you are requestedto send your HP All-in-One in for service, please follow the steps below to avoid further damageto the HP product.
Note This information does not apply to customers in Japan. For information on serviceoptions in Japan, see HP Quick Exchange Service (Japan).
1. Turn on the HP All-in-One. If your HP All-in-One will not turn on, skip this step and go tostep 2.
2. Open the print-carriage access door.
Appendix 14
112 HP PSC 1600 All-in-One series
Get
HP
supp
ort

3. Wait until the print carriage is idle and silent, and then remove the print cartridges from theirslots. For information on removing the print cartridges, see Replace the print cartridges.
Note If your HP All-in-One does not turn on, you can unplug the power cord andthen manually slide the print carriage to the far right to remove the print cartridges.When finished, manually move the print carriage to the home position (on the leftside), then proceed to step 6.
4. Close the print-carriage access door and wait a few minutes for the print carriage to moveback to its home position (on the left side).
Note Make sure the scanner has returned to its parked position before turning offthe HP All-in-One.
5. Press the On button to turn off the HP All-in-One, and then unplug the power cord.6. Place the print cartridges in print cartridge protectors or an airtight plastic container so they
will not dry out, and put them aside. Do not send them with the HP All-in-One unless theHP customer support call agent instructs you to.
7. Disconnect the power cord from the HP All-in-One.
Note Do not return the power cord and power supply with the HP All-in-One. Thereplacement HP All-in-One will not be shipped with these items. Store the powercord and power supply in a safe place until the replacement HP All-in-One arrives.
8. Remove the control panel overlay as follows:a. Make sure the control panel display is lying flat against the HP All-in-One.b. Raise the lid.c. Place your thumb along the groove on the left side of the control panel overlay. Gently
remove the control panel overlay from the device as shown below.
9. Retain the control panel overlay. Do not return the control panel overlay with the HP All-in-One.
Note The replacement HP All-in-One might not come with a control panel overlay.Store your control panel overlay in a safe place, and when the replacement HP All-in-One arrives, reattach your control panel overlay. You must attach your controlpanel overlay to use the control panel functions on the replacement HP All-in-One.
User Guide 113
Get H
P support

Tip See the Setup Guide that came with your HP All-in-One for instructions onhow to attach your control panel overlay.
10. If available, pack the HP All-in-One for shipment by using the original packing materials orthe packaging materials that came with your exchange device.
If you do not have the original packaging materials, please use other adequate packagingmaterials. Shipping damage caused by improper packaging and/or improper transportationis not covered under the warranty.
11. Place the return shipping label on the outside of the box.12. Include the following items in the box:
– A complete description of symptoms for service personnel (samples of print qualityproblems are helpful).
– A copy of the sales slip or other proof of purchase to establish the warranty coverageperiod.
– Your name, address, and a phone number where you can be reached during the day.
Appendix 14
114 HP PSC 1600 All-in-One series
Get
HP
supp
ort

15 Hewlett-Packard LIMITEDWARRANTY STATEMENT
Duration of limited warranty
HP product Duration of limited warranty
Software 90 Days
Printer 1 Year
Print cartridges Until the HP ink is depleted or the “end of warranty” date printedon the cartridge has been reached, whichever occurs first. Thiswarranty does not cover HP ink products that have been refilled,remanufactured, refurbished, misused, or tampered with.
Accessories 90 days
Extent of limited warrantyHewlett-Packard (HP) warrants to the end-user customer that the HP products specified abovewill be free from defects in materials and workmanship for the duration specified above, whichduration begins on the date of purchase by the customer.For software products, HP’s limited warranty applies only to a failure to execute programminginstructions. HP does not warrant that the operation of any product will be uninterrupted or errorfree.HP’s limited warranty covers only those defects that arise as a result of normal use of theproduct, and does not cover any other problems, including those that arise as a result of: a.Improper maintenance or modification; b. Software, media, parts, or supplies not provided orsupported by HP; c. Operation outside the product’s specifications; d. Unauthorized modificationor misuse.For HP printer products, the use of a non-HP ink cartridge or a refilled ink cartridge does notaffect either the warranty to the customer or any HP support contract with the customer.However, if printer failure or damage is attributable to the use of a non-HP or refilled inkcartridge, HP will charge its standard time and materials charges to service the printer for theparticular failure or damage.If HP receives, during the applicable warranty period, notice of a defect in any product which iscovered by HP’s warranty, HP shall either repair or replace the product, at HP’s option.If HP is unable to repair or replace, as applicable, a defective product which is covered by HP’swarranty, HP shall, within a reasonable time after being notified of the defect, refund thepurchase price for the product.HP shall have no obligation to repair, replace, or refund until the customer returns the defectiveproduct to HP.Any replacement product may be either new or like-new, provided that it has functionality at leastequal to that of the product being replaced.HP products may contain remanufactured parts, components, or materials equivalent to new inperformance.HP’s Limited Warranty Statement is valid in any country/region where the covered HP product isdistributed by HP. Contracts for additional warranty services, such as on-site service, may beavailable from any authorized HP service facility in countries where the product is distributed byHP or by an authorized importer.
User Guide 115
Warranty inform
ation

Limitation of warrantyTO THE EXTENT ALLOWED BY LOCAL LAW, NEITHER HP NOR ITS THIRD PARTYSUPPLIERS MAKES ANY OTHER WARRANTY OR CONDITION OF ANY KIND, WHETHEREXPRESS OR IMPLIED WARRANTIES OR CONDITIONS OF MERCHANTABILITY,SATISFACTORY QUALITY, AND FITNESS FOR A PARTICULAR PURPOSE.
Limitation of liabilityTo the extent allowed by local law, the remedies provided in this Warranty Statement are thecustomer’s sole and exclusive remedies.TO THE EXTENT ALLOWED BY LOCAL LAW, EXCEPT FOR THE OBLIGATIONSSPECIFICALLY SET FORTH IN THIS WARRANTY STATEMENT, IN NO EVENT SHALL HPOR ITS THIRD PARTY SUPPLIERS BE LIABLE FOR DIRECT, INDIRECT, SPECIAL,INCIDENTAL, OR CONSEQUENTIAL DAMAGES, WHETHER BASED ON CONTRACT, TORT,OR ANY OTHER LEGAL THEORY AND WHETHER ADVISED OF THE POSSIBILITY OFSUCH DAMAGES.
Local lawThis Warranty Statement gives the customer specific legal rights. The customer may also haveother rights which vary from state to state in the United States, from province to province inCanada, and from country to country elsewhere in the world.To the extent that this Warranty Statement is inconsistent with local law, this Warranty Statementshall be deemed modified to be consistent with such local law. Under such local law, certaindisclaimers and limitations of this Warranty Statement may not apply to the customer. Forexample, some states in the United States, as well as some governments outside the UnitedStates (including provinces in Canada), may:Preclude the disclaimers and limitations in this Warranty Statement from limiting the statutoryrights of a consumer (e.g., the United Kingdom);Otherwise restrict the ability of a manufacturer to enforce such disclaimers or limitations; orGrant the customer additional warranty rights, specify the duration of implied warranties whichthe manufacturer cannot disclaim, or allow limitations on the duration of implied warranties.THE TERMS IN THIS WARRANTY STATEMENT, EXCEPT TO THE EXTENT LAWFULLYPERMITTED, DO NOT EXCLUDE, RESTRICT, OR MODIFY, AND ARE IN ADDITION TO, THEMANDATORY STATUTORY RIGHTS APPLICABLE TO THE SALE OF THE HP PRODUCTSTO SUCH CUSTOMERS.
Limited warranty information for EU countries/regionsListed below are the names and addresses of the HP entities which grant HP’s Limited Warranty(manufacturer’s warranty) in your country.You may also have statutory legal rights against the seller on the basis of the purchaseagreement in addition to the manufacturer’s warranty, which are not restricted by thismanufacturer’s warranty.
Belgique/Luxembourg
Hewlett-Packard Belgium BVBA/SPRL
Luchtschipstraat 1
Rue de l'aeronef
B-1140 Bruxelles
Ireland
Hewlett-Packard Ireland Ltd.
30 Herbert Street
IRL-Dublin 2
Danmark
Hewlett-Packard A/S
Kongevejen 25
DK-3460 Birkeroed
Appendix 15
116 HP PSC 1600 All-in-One series
War
rant
y in
form
atio
n

Nederland
Hewlett-Packard Nederland BV
Startbaan 16
1187 XR Amstelveen NL
France
Hewlett-Packard France
1 Avenue du Canada
Zone d'Activite de Courtaboeuf
F-91947 Les Ulis Cedex
Portugal
Hewlett-Packard Portugal -Sistemas de
Informática e de Medida S.A.
Edificio D. Sancho I
Quinta da Fonte
Porto Salvo
2780-730 Paco de Arcos
P-Oeiras
Deutschland
Hewlett-Packard GmbH
Herrenberger Straße 110-140
D-71034 Böblingen
Österreich
Hewlett-Packard Ges.m.b.H.
Lieblgasse 1
A-1222 Wien
España
Hewlett-Packard Española S.L.
C/ Vicente Aleixandre 1
Parque Empresarial Madrid - LasRozas
28230 Las Rozas
E-Madrid
Suomi
Hewlett-Packard Oy
Piispankalliontie 17
FIN-02200 Espoo
Greece
Hewlett-Packard Hellas E.Π.E.
Voriou Epirou 76
151 25 Maroussi
Athens
Sverige
Hewlett-Packard Sverige AB
Skalholtsgatan 9
S-164 97 Kista
Italia
Hewlett-Packard Italiana S.p.A
Via G. Di Vittorio 9
20063 Cernusco sul Naviglio
I-Milano
United Kingdom
Hewlett-Packard Ltd
Cain Road
Bracknell
GB-Berks RG12 1HN
Polska
Hewlett-Packard Polska Sp. z o.o.
ul. Szturmowa 2A
02–678 Warszawa
Wpisana do rejstruprzedsiebiorcow w SadzieRejonowym dla m.st. Warszawy,XX Wydzial Gospodarczy podnumerem KRS 0000016370
Hungary
Hewlett-Packard MagyarországKft.
1117 Budapest
Neumann J. u. 1.
Lietuva
UAB “Hewlett-Packard”
Šeimyniškių g. 21B
09200 Vilnius
Latvia
Hewlett-Packard SIA
Palasta iela 7
Riga, LV-1050
(continued)
User Guide 117
Warranty inform
ation
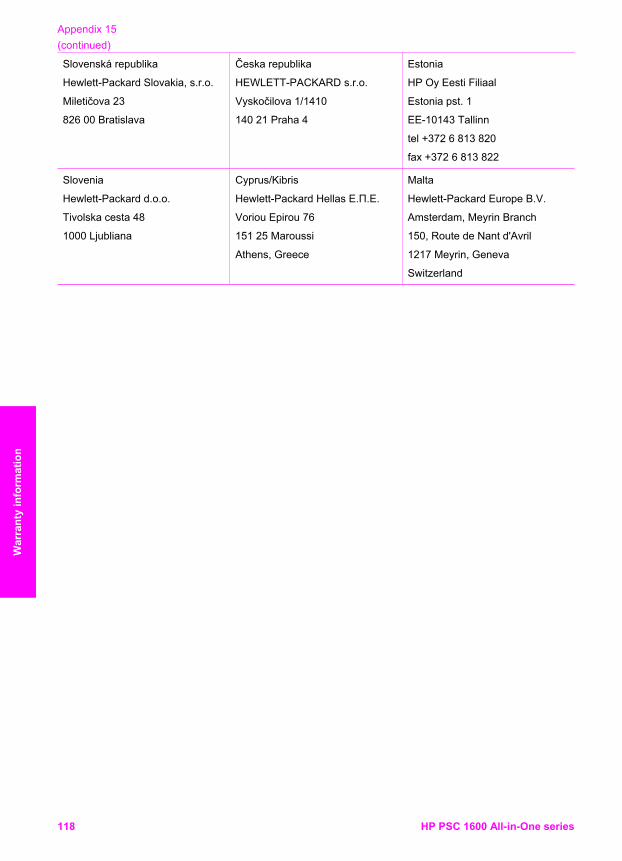
Slovenská republika
Hewlett-Packard Slovakia, s.r.o.
Miletičova 23
826 00 Bratislava
Česka republika
HEWLETT-PACKARD s.r.o.
Vyskočilova 1/1410
140 21 Praha 4
Estonia
HP Oy Eesti Filiaal
Estonia pst. 1
EE-10143 Tallinn
tel +372 6 813 820
fax +372 6 813 822
Slovenia
Hewlett-Packard d.o.o.
Tivolska cesta 48
1000 Ljubliana
Cyprus/Kibris
Hewlett-Packard Hellas E.Π.E.
Voriou Epirou 76
151 25 Maroussi
Athens, Greece
Malta
Hewlett-Packard Europe B.V.
Amsterdam, Meyrin Branch
150, Route de Nant d'Avril
1217 Meyrin, Geneva
Switzerland
Appendix 15(continued)
118 HP PSC 1600 All-in-One series
War
rant
y in
form
atio
n
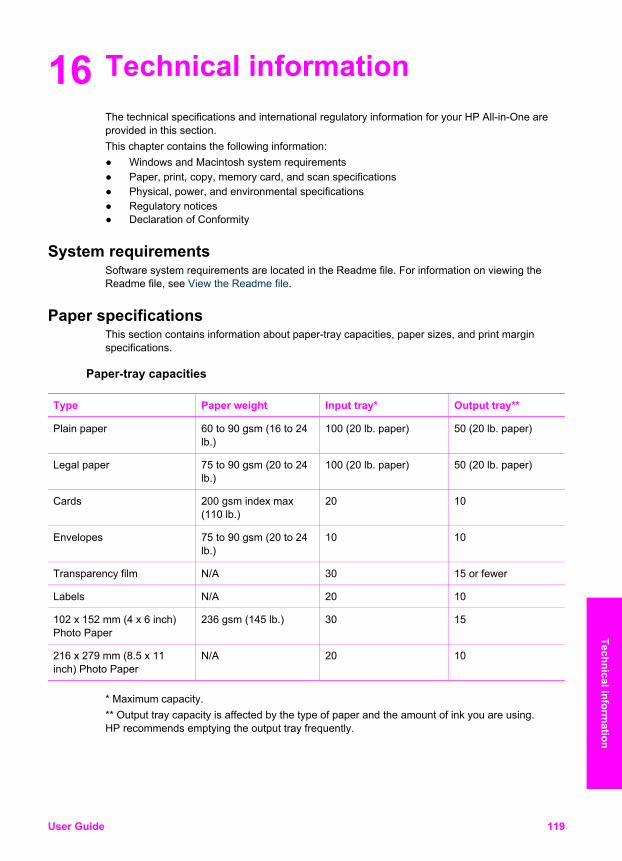
16 Technical informationThe technical specifications and international regulatory information for your HP All-in-One areprovided in this section.This chapter contains the following information:● Windows and Macintosh system requirements● Paper, print, copy, memory card, and scan specifications● Physical, power, and environmental specifications● Regulatory notices● Declaration of Conformity
System requirements Software system requirements are located in the Readme file. For information on viewing theReadme file, see View the Readme file.
Paper specifications This section contains information about paper-tray capacities, paper sizes, and print marginspecifications.
Paper-tray capacities
Type Paper weight Input tray* Output tray**
Plain paper 60 to 90 gsm (16 to 24lb.)
100 (20 lb. paper) 50 (20 lb. paper)
Legal paper 75 to 90 gsm (20 to 24lb.)
100 (20 lb. paper) 50 (20 lb. paper)
Cards 200 gsm index max(110 lb.)
20 10
Envelopes 75 to 90 gsm (20 to 24lb.)
10 10
Transparency film N/A 30 15 or fewer
Labels N/A 20 10
102 x 152 mm (4 x 6 inch)Photo Paper
236 gsm (145 lb.) 30 15
216 x 279 mm (8.5 x 11inch) Photo Paper
N/A 20 10
* Maximum capacity.** Output tray capacity is affected by the type of paper and the amount of ink you are using.HP recommends emptying the output tray frequently.
User Guide 119
Technical information

Paper sizes
Type Size
Paper Letter: 216 x 279 mm (8.5 x 11 inches)
A4: 210 x 297 mm
A5: 148 x 210 mm
Executive: 184 x 267 mm (7.25 x 10.5 inches)
Legal: 216 x 356 mm (8.5 x 14 inches)
B5: 176 x 250 mm
Envelopes U.S. #10: 105 x 241 mm (4.125 x 9.5 inches)
U.S. #9: 99 x 226 mm (3.9 x 8.9 inches)
A2: 111 x 146 mm (4.4 x 5.8 inches)
DL: 110 x 220 mm (4.3 x 8.7 inches)
C6: 114 x 162 mm (4.5 x 6.4 inches)
Transparency film Letter: 216 x 279 mm (8.5 x 11 inches)
A4: 210 x 297 mm
Photo paper 102 x 152 mm (4 x 6 inches)
127 x 178 mm (5 x 7 inches)
Letter: 216 x 280 mm (8.5 x 11 inches)
A4: 210 x 297 mm
102 x 305 mm (4 x 12 inch) panoramic
127 x 305 mm (5 x 12 inch) panoramic
Cards 76 x 127 mm (3 x 5 inches)
Index card: 101 x 152 mm (4 x 6 inches)
127 x 178 mm (5 x 7 inches)
A6: 105 x 149 mm
Hagaki card: 100 x 148 mm (3.94 x 5.83 inches)
Labels Letter: 216 x 279 mm (8.5 x 11 inches)
A4: 210 x 297 mm
Custom 76 x 127 mm up to 216 x 356 mm (3 x 5 inches up to 8.5 x 14 inches)
Print margin specifications
Top (leading edge) Bottom (trailing edge)*
Paper or transparency film
U.S. (Letter, Legal, Executive) 1.8 mm (0.07 inches) 6.7 mm (0.3 inches)
ISO (A4, A5) and JIS (B5) 1.8 mm (0.07 inches) 6.7 mm (0.3 inches)
Envelopes
Appendix 16
120 HP PSC 1600 All-in-One series
Tech
nica
l inf
orm
atio
n

Top (leading edge) Bottom (trailing edge)*
3.2 mm (0.13 inches) 6.7 mm (0.3 inches)
Cards
1.8 mm (0.07 inches) 6.7 mm (0.3 inches)
* This margin is not compatible with the HP All-in-One; however, the total writing area iscompatible. The writing area is offset from center by 5.4 mm (0.21 inches), which causesasymmetric top and bottom margins.
Print specifications ● 1200 x 1200 dpi black● 1200 x 1200 dpi color with HP PhotoREt III● Method: drop-on-demand thermal inkjet● Language: HP PCL Level 3, PCL3 GUI or PCL 10● Print speeds vary according to the complexity of the document● Duty cycle per month: 500 printed pages (average), 5000 printed pages (maximum)● Panorama-size printing
Mode Resolution (dpi) Speed** (ppm)
Best Black 1200 x 1200 2
Color 1200 x 1200 up to 4800 dpi optimized* 0.5
Normal Black 600 x 600 7
Color 600 x 600 4
Fast Black 300 x 300 23
Color 300 x 300 18
* Up to 4800 x 1200 optimized dpi color printing on premium photo papers, 1200 x 1200 input dpi.** Maximum, varies by model and paper type.
Copy specifications ● Digital image processing● Up to 99 copies from original (varies by model)● Digital zoom from 25 to 400% (varies by model)● Fit to page, Poster, Many on page● Up to 23 copies per minute black; 18 copies per minute color (varies by model)● Copy speeds vary according to the complexity of the document
Mode Speed (ppm) Print resolution (dpi) Scan resolution (dpi)*
Best Black up to 0.8 1200 x 1200 1200 x 2400
Color up to 0.8 1200 x 1200** 1200 x 2400
Normal Black up to 7 600 x 600 1200 x 2400
(continued)
User Guide 121
Technical information

Mode Speed (ppm) Print resolution (dpi) Scan resolution (dpi)*
Color up to 4 600 x 600 1200 x 2400
Fast Black up to 23 300 x 300 600 x 1200
Color up to 18 300 x 300 600 x 1200
* Maximum at 400% scaling.** Up to 4800 x 1200 optimized dpi color printing on premium photo papers, 1200 x 1200 input dpi.
Memory card specifications ● Maximum recommended number of files on a memory card: 1,000● Maximum recommended individual file size: 12 megapixel maximum, 8 MB maximum● Maximum recommended memory card size: 1 GB (solid state only)
Note Approaching any of the recommended maximums on a memory card might causethe performance of the HP All-in-One to be slower than expected.
Supported memory card types● CompactFlash● SmartMedia● Memory Stick● Memory Stick Duo● Memory Stick Pro● Magic Gate Memory Stick● Secure Digital● MultiMediaCard (MMC)● xD-Picture Card
Scan specifications ● Image editor included● Integrated OCR software automatically converts scanned text to editable text● Scan speeds vary according to the complexity of the document● Twain-compliant interface● Resolution: up to 1200 x 4800 dpi optical; 19200 dpi enhanced (software)● Color: 48-bit color, 8-bit grayscale (256 levels of gray)● Maximum scan size from glass: 216 x 297 mm (8.5 x 11.7 inches)
Physical specifications ● Height: 171 mm (6.7 inches) (control panel display in the down position)● Width: 438 mm (17.2 inches)● Depth: 283 mm (11.1 inches)● Weight: 5.5 kg (12.2 pounds)
Power specifications ● Power consumption: 40 W maximum● Input voltage: AC 90 to 240 V ~ 1 A 47–63 Hz, grounded● Output voltage: DC 32 Vdc===940 mA, 16 Vdc===625 mA
Appendix 16(continued)
122 HP PSC 1600 All-in-One series
Tech
nica
l inf
orm
atio
n

Environmental specifications ● Recommended operating temperature range: 15º to 32º C (59º to 90º F)● Allowable operating temperature range: 15º to 35º C (59º to 95º F)● Humidity: 15% to 85% RH non-condensing● Non-operating (Storage) temperature range: -40º to 60º C (-40º to 140º F)
Note In the presence of high electromagnetic fields it is possible the output from theHP All-in-One might be slightly distorted.HP recommends using a USB cable less than or equal to 3 m (10 feet) in length tominimize injected noise due to potential high electromagnetic fields.
Additional specificationsMemory: 8 MB ROM, 32 MB DRAMIf you have Internet access, you can get acoustic information from the HP website. Go to:www.hp.com/support.
Environmental product stewardship programThis section provides information on protecting the environment; ozone production; energyconsumption; paper use; plastics; material safety data sheets; and recycling programs.
Protecting the environmentHewlett-Packard is committed to providing quality products in an environmentally sound manner.This product has been designed with several attributes to minimize impacts on our environment.For more information, visit HP’s Commitment to the Environment website at:www.hp.com/hpinfo/globalcitizenship/environment/index.html
Ozone productionThis product generates no appreciable ozone gas (O3).
Energy consumptionEnergy usage drops significantly while in ENERGY STAR® mode, which saves naturalresources, and saves money without affecting the high performance of this product. This productqualifies for ENERGY STAR, which is a voluntary program established to encourage thedevelopment of energy-efficient office products.
ENERGY STAR is a U.S. registered service mark of the U.S. EPA. As an ENERGY STARpartner, HP has determined that this product meets ENERGY STAR guidelines for energyefficiency.For more information on ENERGY STAR guidelines, go to the following website:www.energystar.gov
User Guide 123
Technical information

Paper useThis product is suited for the use of recycled paper according to DIN 19309.
PlasticsPlastic parts over 25 grams are marked according to international standards that enhance theability to identify plastics for recycling purposes at the end of the product’s life.
Material safety data sheetsMaterial safety data sheets (MSDS) can be obtained from the HP website at:www.hp.com/go/msdsCustomers without Internet access should contact their local HP Customer Care Center.
Recycling program HP offers an increasing number of product return and recycling programs in many countries/regions, and has partnerships with some of the largest electronic recycling centers throughoutthe world. HP also conserves resources by refurbishing and reselling some of its most popularproducts.This HP product contains the following materials that might require special handling at end-of-life:● Mercury in the fluorescent lamp in the scanner (< 2 mg)● Lead in the solder
HP inkjet supplies recycling program HP is committed to protecting the environment. The HP Inkjet Supplies Recycling Program isavailable in many countries/regions, and lets you recycle used print cartridges free of charge. Formore information, go to the following website:www.hp.com/hpinfo/globalcitizenship/environment/recycle/inkjet.html
Regulatory noticesThe HP All-in-One meets product requirements from regulatory agencies in your country/region.This section provides information on the regulatory model identification number for your HP All-in-One; an FCC statement; and separate notices to users in Australia, Japan, and Korea.
Regulatory model identification number For regulatory identification purposes, your product is assigned a Regulatory Model Number. TheRegulatory Model Number for your product is SDGOB-0401-01. This regulatory number shouldnot be confused with the marketing name (HP PSC 1600 All-in-One series) or product number.
FCC statement The United States Federal Communications Commission (in 47 CFR 15.105) has specified thatthe following notice be brought to the attention of users of this product.Declaration of Conformity: This equipment has been tested and found to comply with the limitsfor a Class B digital device, pursuant to part 15 of the FCC Rules. Operation is subject to thefollowing two conditions: (1) this device may not cause harmful interference, and (2) this devicemust accept any interference received, including interference that may cause undesiredoperation. Class B limits are designed to provide reasonable protection against harmfulinterference in a residential installation. This equipment generates, uses, and can radiate radiofrequency energy, and, if not installed and used in accordance with the instructions, may causeharmful interference to radio communications. However, there is no guarantee that interferencewill not occur in a particular installation. If this equipment does cause harmful interference to
Appendix 16
124 HP PSC 1600 All-in-One series
Tech
nica
l inf
orm
atio
n

radio or television reception, which can be determined by turning the equipment off and on, theuser is encouraged to try to correct the interference by one or more of the following measures:● Reorient the receiving antenna.● Increase the separation between the equipment and the receiver.● Connect the equipment into an outlet on a circuit different from that to which the receiver is
connected.● Consult the dealer or an experienced radio/TV technician for help.For more information, contact the Product Regulations Manager, Hewlett-Packard Company,San Diego, (858) 655-4100.The user may find the following booklet prepared by the Federal Communications Commissionhelpful: How to Identify and Resolve Radio-TV Interference Problems. This booklet is availablefrom the U.S. Government Printing Office, Washington DC, 20402. Stock No. 004-000-00345-4.
Caution Pursuant to Part 15.21 of the FCC Rules, any changes or modifications to thisequipment not expressly approved by the Hewlett-Packard Company may cause harmfulinterference and void the FCC authorization to operate this equipment.
Note à l’attention des utilisateurs Canadien/notice to users in Canada Le présent appareil numérique n‘émet pas de bruit radioélectrique dépassant les limitesapplicables aux appareils numériques de la classe B prescrites dans le Règlement sur lebrouillage radioélectrique édicté par le ministère des Communications du Canada.This digital apparatus does not exceed the Class B limits for radio noise emissions from thedigital apparatus set out in the Radio Interference Regulations of the Canadian Department ofCommunications.
Notice to users in Australia
This equipment complies with Australian EMC requirements.
Notice to users in Japan (VCCI-2)
Notice to users in Korea
User Guide 125
Technical information

Declaration of conformity (European Economic Area) The Declaration of Conformity in this document complies with ISO/IEC Guide 22 and EN 45014.It identifies the product, manufacturer’s name and address, and applicable specificationsrecognized in the European community.
Declaration of conformity
DECLARATION OF CONFORMITY according to ISO/IEC Guide 22 and EN 45014
__________________________________________________________________________
Manufacturer's Name: Hewlett-Packard Company Manufacturer's Address: 16399 West Bernardo Drive San Diego CA 92127, USA Regulatory Model Number: SDGOB-0401-01 Declares, that the product: Product Name: HP PSC 1600 All-in-One series Power Adapters HP part#: 0950-4491, 0957-2144, 0950-4466 RoHS Compliant Adapters: 0957-2146, 0957-2152, 0957-2153, 0957-2151 Conforms to the following Product Specifications: Safety: IEC 60950: 1999 3rd edition EN 60950: 1999 IEC 60825-1 Edition 1.2: 2001 / EN 60825-1+A11+A2+A1: 2002 Class 1(Laser/Led) UL 60950: 1999 CAN/CSA-22.2 No. 60950-1-03 NOM 019-SFCI-1993, AS/NZS 60950: 2000, GB4943: 2001 NOM 019-SFCI-1993, AS/NZS 60950: 2000, GB4943: 2001 EMC: CISPR 22:1997 / EN 55022:1998 Class B EMC: CISPR 22:1997 / EN 55022:1998 Class B CISPR 24:1997 / EN 55024:1998 CISPR 24:1997 / EN 55024:1998 IEC 61000-3-2: 2000 / EN 61000-3-2: 2000 IEC 61000-3-2: 2000 / EN 61000-3-2: 2000 IEC 61000-3-3/A1: 2001 / EN 61000-3-3/ A1: 2001 IEC 61000-3-3/A1: 2001 / EN 61000-3-3/ A1: 2001 CNS13438:1998, VCCI-2 CNS13438:1998, VCCI-2 FCC Part 15-Class B/ICES-003, Issue 2 FCC Part 15-Class B/ICES-003, Issue 2 GB9254: 1998 GB9254: 1998
y Information: Supplementary Information: The product herewith complies with the requirements of the Low Voltage Directive 73/23/EC, the
EMC Directive 89/336/EC and carries the CE-marking accordingly. The product herewith complies with the requirements of the Low Voltage Directive 73/23/EC, the
EMC Directive 89/336/EC and carries the CE-marking accordingly. 1) The product was tested in a typical configuration. 1) The product was tested in a typical configuration.
05 Nov 2004 05 Nov 2004
Date Muthya S. Guha, Hardware Test & Regs
MGR. European Contact for regulatory topics only: Hewlett Packard GmbH, HQ-TRE, Herrenberger Strasse 140, D-71034 Böblingen Germany. (FAX +49-7031-14-3143
Appendix 16
126 HP PSC 1600 All-in-One series
Tech
nica
l inf
orm
atio
n

Index
Symbols/Numerics10 x 15 cm photo paper
load 254 x 6 inch photo paper
load 25
AA4 paper
load 23align print cartridges 83
Bbest copy quality 49borderless copies
10 x 15 cm (4 x 6 inch)photo 51fill entire page 51
borderless photosprint from memory card 43
Ccancel
copy 57print job 63scan 60
cancel button 7cartridges. See print cartridgesclean
exterior 76glass 75lid backing 75print cartridge contacts 85print cartridge ink nozzlearea 86print cartridges 84
colorcopies 55intensity 54
CompactFlash memory card 35connection types supported
networked 19printer sharing 18USB 18
control paneloverview 6prompt delay time 88
scroll speed 87control panel display
change language 93change measurements 93
copyblack-and-whitedocuments 50cancel 57color intensity 54copy specifications 121default settings 57enhance light areas 55enlarge into poster 56iron-on transfer 57menu 7paper size 47paper types,recommended 48photos onto letter or A4paper 51photos, enhance 55quality 49several on one page 53speed 49text, enhance 55
customer supportAustralia 111contact 108HP Quick ExchangeService (Japan) 112Japan 112Korea 111North America 108outside U.S. 109serial number 108service ID 108website 107
Ddarken
copies 54declaration of conformity
European Economic Area126United States 126
defaultsrestore 88
device updateMacintosh 105overview 104Windows 104
digital cameraPictBridge 43
Document viewerHP Director (Windows) 10
DPOF file 44
Eenvelopes
load 26Environmental productstewardship program 123environmental specifications123
Ffactory defaults, restore 88fast copy quality 49FCC statement 124fill entire page 51fit to page 54
Gglass
clean 75load original 21
greeting cardsload 27
HHagaki cards
load 25HP All-in-One
overview 5prepare to ship 112
HP DirectorHP Instant Share 70missing icons 98start 9
HP email portalHP Image Zone (OS X) 12
HP GalleryHP Director (OS 9) 14
User Guide 127

HP Image Zone (OS X) 12HP help
HP Director (OS 9) 14HP Image Edit
HP Image Zone (OS X) 12HP Image Print
HP Image Zone (OS X) 12HP Image Zone
HP Director (Windows) 10HP Instant Share 68, 69,70Macintosh 69, 70Macintosh (OS 9) 13Macintosh (OS X) 10overview 9Windows 9, 68
HP Instant Shareabout 65e-mail photos from 67HP Image Zone 67HP Image Zone (OS X) 12send images 66send images from 67send photos from amemory card (USB) 66send scanned images 66send to a device 66, 67setup (USB) 66
HP JetDirect 17, 19HP on the Web
HP Director (OS 9) 14HP Support
before you call 89
Iink cartridges. See printcartridgesink levels, check 76inkjet supplies recycling 124Instant Share. See HP InstantShareiron-on transfers
copy 57load 27
Jjams, paper 28, 102
Llabels
load 27left arrow 6
legal paperload 23
letter paperload 23
lid backing, clean 75lighten
copies 54load
10 x 15 cm photo paper 254 x 6 inch photo paper 25A4 paper 23envelopes 26full-size paper 23greeting cards 27Hagaki cards 25iron-on transfers 27labels 27legal paper 23letter paper 23original 21postcards 25transparencies 27
Mmaintenance
align print cartridges 83check ink levels 76clean exterior 76clean glass 75clean lid backing 75clean print cartridges 84,85, 86prompt delay time 88replace print cartridges 78restore factory defaults 88self-test report 76set scroll speed 87
make copiesHP Director (OS 9) 14HP Director (Windows) 10HP Image Zone (OS X) 12
media. See papermemory card specifications122memory cards
insert a card 37overview 35print DPOF file 44print photos 42proof sheet 37save files to computer 37send photos 66
Memory Stick memory card 35
more applicationsHP Director (OS 9) 14
MultiMediaCard (MMC)memory card 35
Nnormal copy quality 49
OOK button 6on button 6order
paper 73print cartridges 73Setup Guide 74software 74User Guide 74
Ppaper
incompatible types 22jams 28, 102load 23order 73paper sizes 120recommended copy types48recommended types 22
paper specifications 119paper-tray capacities 119phone numbers, customersupport 108photo
menu 8menu button 7
photo paperload 25
photosborderless 43deselect 43enhance copies 55HP Image Zone 67photo print cartridge 81print from DPOF file 44Quick Print 44send from a memory card66send scanned images 66
physical specifications 122PictBridge 43postcards
load 25
128 HP PSC 1600 All-in-One series

posterscopy 56
power specifications 122print
cancel job 63from computer 61from software application61photos from DPOF file 44photos from memory card42print options 62print specifications 121proof sheet 37Quick Print 44self-test report 76
print cartridgerecycling 124
print cartridge protector 82print cartridges
align 83check ink levels 76clean 84clean contacts 85clean ink nozzle area 86handle 78order 73part names 78photo print cartridge 81replace 78store 82troubleshoot 102
print margin specifications 120printer sharing
Macintosh 18Windows 18
prompt delay time 88proof sheet
fill in 38menu 8print 37scan 39
Qquality
copy 49Quick Print 44
Rrecycling
device 124supplies 124
reduce/enlarge copiesfit several on one page 53poster 56resize to fit letter or A4 54
regulatory noticesdeclaration of conformity126declaration of conformity(European EconomicArea) 126FCC statement 124note à l’attention desutilisateurs Canadien 125notice to users inAustralia 125notice to users in Canada125notice to users in Japan125notice to users in Korea125regulatory modelidentification number 124
replace print cartridges 78reports, self-test 76restore factory settings 88return your HP All-in-One 112right arrow 7
Ssave
photos to computer 37scan
button 7from control panel 59HP Instant Share 66proof sheet 39scan specifications 122stop 60to memory card 60
scan documentHP Director (OS 9) 14HP Director (Windows) 10
scan glassclean 75load original 21
scan pictureHP Director (OS 9) 14HP Director (Windows) 9HP Image Zone (OS X) 11
scan to menuWindows 8
scan to OCR
HP Image Zone (OS X) 11scroll speed 87Secure Digital memory card 35self-test report 76send to a device
HP Image Zone(Macintosh) 69HP Image Zone(Windows) 68scanned images 66
serial number 108service 107
see also customer supportservice ID 108Settings
HP Director (OS 9) 14settings
print options 62setup
button 6menu 8
SmartMedia memory card 35software application, printfrom 61software update.. See deviceupdatespecifications
10 x 15 cm photo paper119envelopes 119labels 119legal paper 119letter paper 119photo paper 119print 121transparencies 119
speedcontrol panel scroll 87copy 49
start black 7start color 7stop
copy 57print job 63scan 60
supportbefore you call 89resources 89
system requirements 119
Ttechnical information
copy specifications 121
Index
User Guide 129
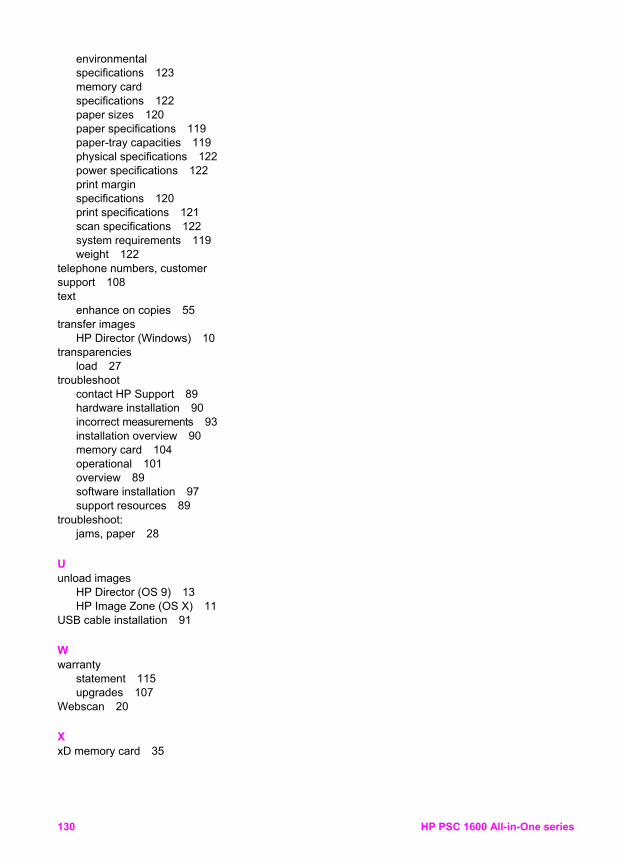
environmentalspecifications 123memory cardspecifications 122paper sizes 120paper specifications 119paper-tray capacities 119physical specifications 122power specifications 122print marginspecifications 120print specifications 121scan specifications 122system requirements 119weight 122
telephone numbers, customersupport 108text
enhance on copies 55transfer images
HP Director (Windows) 10transparencies
load 27troubleshoot
contact HP Support 89hardware installation 90incorrect measurements 93installation overview 90memory card 104operational 101overview 89software installation 97support resources 89
troubleshoot:jams, paper 28
Uunload images
HP Director (OS 9) 13HP Image Zone (OS X) 11
USB cable installation 91
Wwarranty
statement 115upgrades 107
Webscan 20
XxD memory card 35
130 HP PSC 1600 All-in-One series

© 2004 Hewlett-Packard Development Company, L.P.
www.hp.com
*Q5584-90245**Q5584-90245*Q5584-90245
Electronic Edition