usermanualgp 25 32 cs v9 en - greenecotherm.bg€¦ · automatic pellet burner of series “gp”...
TRANSCRIPT

p. 1/61
Instruction manual for installation and operation of
Automatic pellet burner of series
“GP cs”
http:// www.greenecotherm.eu

p. 2/61
Thank You for buying our product – automatic pellet burner of series „GP”. This manual will help You to use and maintain the unit properly. NOTE : in this manual is used the symbol “GP” for the entire range of pellet burner, which includes the models “GP25 cs” and “GP32 cs”. The automatic pellet burners of series “GP cs” are modification of the well-known pellet burners of series “GP”, but they are equipped with color synchronization scale , used to synchronize the thermal capacity of the burner and the air flow rate, in order to achieve optimal operating parameters in wide operating regimes of the burner. In the manual, however will be used a common symbol “GP”.
ATTENTION!
IN INTEREST OF YOUR PERSONAL SECURITY IT IS
NECESSARY TO READ THOROUGHLY AND CAREFULLY THIS
INSTRUCTION MANUAL BEFORE PROCEEDING WITH ANY
ACTIONS WITH THE BURNER – INSTALLATING, CONNECTING,
OPERATING, ETC. IN CASE THAT REQUIREMENTS, DEPICTED IN
THIS MANUAL ARE NOT SATISFIED, FAILURE OF THE UNIT
COULD BE EXPECTED, OR EVEN FATAL CONSEQUENCES, FOR
WHICH THE PRODUCER COMPANY DOES NOT TAKE
RESPONSIBILITY.
Producer ZMM Haskovo Plc.
Address Bulgaria, Haskovo 6300, “Saedinenie” 67 blvd.
Phone +359 800 15 145
Fax +359 38 603070
e-mail [email protected]
home page www.greenecotherm.eu
Instruction manual for installation and operation of automatic pellet burner of series “GP cs”
(Version : 27.02.2012 17:01)

p. 3/61
Table of contents Page
1. Automatic pellet burner of series “GP” – description and advantages .. 5 2. Automatic pellet burner of series “GP” technical data ............................ 8 3. Description of the construction of automatic pellet burner of series “GP”.................................................................................................................... 12
3.1. Main properties.................................................................................... 12 3.2. Specific design measures in order to increase the safety operation of the burner ....................................................................................................... 16
4. Installation of automatic pellet burner..................................................... 18 4.1. Some basic requirements for correct installation of automatic pellet burner of series “GP” :.................................................................................. 18 4.2. Installation of the burner .................................................................... 19 4.3. Overall and attachment dimensions of the burner’s main unit ...... 19 4.4. Arrangement and installation of the pellet burner’s modules ........ 21 4.5. Information, considering the installation of the automatic pellet burner of series “GP” and its operation with hot water boilers. .............. 24
5. Initial steps and starting of pellet burner of series “GP” ....................... 25 5.1. Basic fuel requirements....................................................................... 25 5.2. Staring automatic pellet burner of series “GP” ............................... 25
5.2.1. Interface control board of automatic pellet burner of series “GP cs” ........................................................................................................ 26 5.2.2. Color scale for synchronization of the air flow rate with the thermal capacity of the burner.................................................................. 27 5.2.3. Automatic pellet burner power supply....................................... 27 5.2.4. Switching ON the burner of series “GP” ................................... 28 5.2.5. Burner’s operating algorithm...................................................... 30 5.2.6. Operating control parameters of the burner of series “GP” ... 32 ● Description of LED indication (positioned on the control board of the unit): ...................................................................................................... 32 5.2.7. Adjustment process of the burner, according to the heat demand of a consumer ............................................................................... 38 5.2.8. Nominal thermal load of the burner of series “GP” ................. 39
5.3. Adjustment of the thermal capacity of the burner........................... 39 5.3.1. Decreasing thermal capacity of the burner................................ 40 5.3.2. Increasing thermal capacity of the burner................................. 40
5.4. Stopping the pellet burner of series “GP”......................................... 41 5.5. Turning OFF the automatic pellet burner of series “GP” .............. 42
� Emergency burner stop....................................................................... 42 5.6. Restarting the operation of a pellet burner of series “GP” ............. 43
p. 4/61
5.7. Description of the active thermo stickers, showing the condition of the system........................................................................................................ 43 5.8. Removal and attachment of the burner’s grate at maintenance and cleaning procedure of the pellet burner of series “GP” ............................. 45 5.9. Showing and teaching the end user about the maintenance and adjustment procedures of the burner .......................................................... 48 5.10. Safety and unexpected risks ............................................................ 50 5.11. Operation faults and repairing procedures ................................... 51 5.12. Automatic pellet burner of series “GP” warranty form completion....................................................................................................... 59 5.13. Actions, after the burner is not in exploitation anymore (recycling). ...................................................................................................... 59
6. Electrical scheme of automatic pellet burner of series “GP”................. 60 WARRANTY CONDITIONS .......................................................................... 61

p. 5/61
1. Automatic pellet burner of series “GP” – description and advantages
“GP” is automatic pellet burner, which utilizes wood pellets. The burner is designed to be installed on already operating heating boilers or other equipment, thus allowing fuel switch procedure to a renewable energy sources - biomass. The installed burner operates on wood pellets and the thermal energy, resulting from the intensive combustion process is directed to the heat exchange surfaces of a boiler or another thermal consumer.
The kit of the pellet burner of series “GP” consists of: Main module with detachable grate – 1 sp.; Fuel transport auger – 1 sp.; Flexible hose– 1sp. with fixing brackets – 2sp.; Pair of working gloves – 1sp.; User manual – 1sp.; Transport package of the main module – 1sp.; Transport package of the transport auger – 1sp.;
The burner could utilize following types of fuel Wood pellets, class ENplus-A1; Wood pellets, having diameter 6 and 8 mm, categorized in the range of: A, AB, B (according to the methodology, developed for pellets properties estimation in pellet burner producer company); Pre-dried pits (from cherries for example); Fuel mixture – pellets and pits (for example mixture ratio could be 50% - 50%); Other solid biomass based pellets, but these fuels need testing and approval in pellet burner producer company laboratory; The unit is equipped with adjustable operating module, which controls the functions of the unit and is adjustable to the specific needs of a heating system; auger, which transports fuel from a bunker to the main unit; fresh air supplying fan, equipped with a Hall sensor, which returns information to the control unit; electric heater, which ignites the fuel; combustion chamber, which gives environment for efficient combustion process;

p. 6/61
removable grate of the combustion chamber, allowing easy access and ash cleaning; photosensor, which gives information for the status of the combustion process to the control unit and allows dynamic operation of the burner; interface panel, equipped with light indicators; the control board is equipped with led indicator for indicating the status of adjustable parameters index value; a variable potentiometer, which allows easy thermal capacity adjustment; color scale, used for manual synchronization of the air flow rate, according to the thermal capacity of the burner; reversible thermo sticker, indicating the operating mode of the system and the requirement of ash deposition cleaning of the appliance and/or the flue stack;
The burner is equipped with
automatic fuel ignition system; automatic fuel transport system – from bunker to the combustion chamber
of the main unit; safety system, which blocks its operation in case that at any circumstances
the fuel delivery pipe is preheated above certain temperature safety level; photosensor, which allows dynamic monitoring of the combustion process
status; transition system, which modulated the air supply fan operation at ignition
process; color scale for easy manual adjustment of the air low control flap,
according to the thermal capacity of the burner; Advantages of the burner
the burner automatically utilizes renewable energy source – biomass, which makes it environmental friendly and does not contribute to the global warming and pollution;
the burner is installed in order to apply the so called “fuel switch process” for appliances, utilizing fossil fuels – diesel, natural gas, LPG, coal;
the burner’s design allows easy installation on manual fed boilers – such as those, designed for coal, wood logs. The heating system and the boiler/equipment however need minor redesign and reconstruction in order to allow such fuel switch process;
p. 7/61
the resulting heat energy, based on organized combustion process of renewable energy source - biomass, is less influenced by the global trend of the energy sources and as result the price is competitive, compared to price of the popular energy sources;
the burner operates automatically and achieves operation comfort, delivered by operating of fossil fuel burners – working with liquid and gaseous fuel, which permits remote control by programmable room thermostat;
the burner’s control module performs automatic fuel ignition procedure;
automatic operation of the burner allows variable thermal load adjustment and economic operation of the heating system, which guarantees optimal thermal comfort and reduced fuel consumption;
simplified adjustment procedure of the thermal capacity of the burner as well as the air flow rate, which allows easy adjustment, without need to be serviced by specialized technician, and allows optimal operating conditions and high efficiency of the unit;
simplified installation procedure and initial adjustment, which guarantees faster assembly and unified approach;
opportunity to utilize biomass, pellet shaped as well as other dried nuts, according the appropriate fuel table;
high efficiency;
low pollutant emissions;
automatic fuel transport from a bunker, built according to the local units arrangement and need of the client (the bunker is not part of the burner equipment delivery);
simplified maintenance and service;
minimal operating costs;

p. 8/61
2. Automatic pellet burner of series “GP” technical data
2.1. Thermal and technical data of automatic pellet burner of series “GP”, utilizing wood pellets are given in Table 2.1;
2.2. Dimensions and technical data of automatic pellet burner of series “GP” are given in Table 2.2;
2.3. Recommended solid biomass fuel properties – wood pellets, are given in Table 2.3;
2.4. Pellets classification, considering their physical properties (based on fuel proximate analysis) are shown in Table 2.4;
2.5. The European standard for wood pellets ENplus is shown on Table 2.5;
Parameter Dimension Value
Model - GP 25 GP 32 Nominal thermal capacity kW 25 32 Thermal capacity operation range kW 5 – 25 5 – 32 Utilized solid fuel Wood pellets;
Pre-dried cherry nuts; Other dried nuts;
Utilized wood pellets, complying ENplus ENplus-A1* Utilized pellets, complying pellet burner producer classification methodology
A,AB,B*
Wood pellets fuel consumption rate at nominal thermal capacity
kg/h 5.3 6.8
kg/h 45 – 50 57 – 64 Fresh air flow rate, required for effective combustion process and boiler operation
m3/h 39 – 44 50 – 56
Averaged wood pellets consumption rate (the unit is operating in a popular heating system)
kg/h 3.6 4.7
Air excess ratio λ 1.5 – 1.6 Solid fuel residue ash The quantity
depends on the ash contents in the raw
fuel, as well as operating conditions
Table 2.1 Thermal and technical data of automatic pellet burner “GP”, utilizing wood pellets;

p. 9/61
* EXPLANATION : the automatic pellet burner of series “GP” is designed to utilize wood pellets, which have properties, defined in the referred ENplus norm. As an temporal exception (for several hours) it is allowed to utilize pellets, which are not covering the required class of the fuel, practically in such cases the fuel has low quality and high ash content, which leads to more frequent ash residue cleaning of the burner’s grate, as well as the heat exchanger’s walls;
Parameter Dimension Value
Type - GP 25 cs GP 32 cs main module
kg 18 18.1
Weight fuel transport auger
kg 12 12
main module
mm 250 х 572 х 485 250 х 630 х 485Overall dimension of the unit (WxDxH)
fuel transport auger
mm 220x1520x110 220x1520x110
Power supply - 1PEN ; 50Hz; 230V; at nominal load
A 0.2 0.2 Power consumption rate
at ignition A 4.5 4.5 Electrical capacity VA <100 + 1100 (at ignition process)Electric protection - IP20
Table 2.2 Dimensions and technical data of automatic pellet burner “GP cs”
Parameter Dimension Value Pellet’s characteristic size mm 6 – 8
MJ/kg >17.2 Recommended fuel net calorific value kWh/kg >4.7
Class of wood pellets (ENplus) ENplus-A1 Wood pellets category A, AB, B Ash content % See Table 2.4. Moisture content % Max. 8 – 10%
Table 2.3 Recommended solid biomass fuel properties – wood pellets

p. 10/61
Classification of wood pellets, considering their physical properties (based on fuel proximate analysis) – according to fuel evaluation method, developed and applied in pellet burner producer company is show on the following table.
Pellet’s category Ad DU A %6.0dA %0.97DU
AB %6.0dA %0.97DU B %0.16.0 dA %0.97DU
BC %0.16.0 dA %0.97DU C %0.2%0.1 dA %0.97DU
CD %0.2%0.1 dA %0.97DU D %0.3%0.2 dA %0.97DU
DE %0.3%0.2 dA %0.97DU E %0.3dA %0.97DU
EF %0.3dA %0.97DU
Table 2.4. Pellets classification, considering their physical properties
where :
Ad – ash contents, dry basis, [%];
DU – mechanical durability, [%];

p. 11/61
The approval of the new EU standard for wood pellets (EN 14961-2) was at mid 2010 and introduces new certificates ENplus for pellets, utilized in domestic heating appliances, the certificate EN-B is applied for industrial boilers. The standard ENplus defines classes of the wood pellets, which could be considered as qualifications: А1 and А2. The class А1 introduces the most stringent limits for the ash content in
the wood pellets. The class А2 defines ash content up to 1.5%. For industrial applications the wood pellets should cover the requirements of the certificate EN-B, which is less stringent, that the previous and the generally the quality of the pellets is lower. Parameter Dimension ENplus-A1 ENplus-A2 Diameter mm 6 (± 1) 6 (± 1) Length mm 3,15 ≤ L ≤ 40 1) 3,15 ≤ L ≤ 40 1)
Bulk density kg/m³ ≥ 600 ≥ 600 Calorific value MJ/kg ≥ 16.5 ≥ 16.5 Moisture % ≤ 10 ≤ 10 Dust % ≤ 13) ≤ 1 3)
Mechanical durability % ≥ 97.5 4) ≥ 97.5 4)
Ash % 2) ≤ 0,7 ≤ 1.5 Ash melting temperature °C ≥ 1200 ≥ 1100 Chlorine % 2) ≤ 0.02 ≤ 0.03 Sulphur % 2) ≤ 0.05 ≤ 0.05 Nitrogen % 2) ≤ 0.3 ≤ 0.5 Copper mg/kg 2) ≤ 10 ≤ 10 Chromium mg/kg 2) ≤ 10 ≤ 10 Arsenic mg/kg 2) ≤ 1 ≤ 1 Cadmium mg/kg 2) ≤ 0.5 ≤ 0.5 Mercury mg/kg 2) ≤ 0.1 ≤ 0.1 Lead mg/kg 2) ≤ 10 ≤ 10 Nickel mg/kg 2) ≤ 10 ≤ 10 Zink mg/kg 2) ≤ 100 ≤ 100 1) no more that 1% of the wood pellets could be longer that 40 mm, the max. length is 45mm; 2) determined on dry basis; 3) particles <3.15 mm, fine dust particles, before fuel delivery; 4) for measurements, performed with Lignotester the limit value ≥ 97.7 weight based %;
Table 2.5 European standard for wood pellets ENplus;

p. 12/61
3. Description of the construction of automatic pellet burner of series “GP”
3.1. Main properties The pellet burner of series “GP” consists of the following elements/modules:
The basis part of the pellet burner is the main unit, which consists of:
Combustion chamber, which forms combustion domain and optimal environment for solid biomass combustion, is designed of high quality stainless steel;
Grate of the combustion chamber, which could be easily detached and reveals access for ash removal;
Air duct, which uniformly distributes the airflow and ensures safe cooling of the elements of the burner;
Electric heater, which heats and ignites the fuel. The heater is positioned beneath the inclined plate of the grate in the combustion chamber;
Air supply fan, equipped with Hall sensor for rotation speed monitoring;
Photosensor, which monitors the intensity/presence of the combustion process, installed aside of the combustion chamber for easy access and cleaning;
Alarm thermo-probe, which stops and blocks burner operation in case of “back fire” process in the fuel delivery pipe;
Control board, which monitors and controls the operation of the burner and indicates its status;
Transport auger connector, which realizes power supply to the electric motor of the auger;
Interface panel, which is equipped with light indicators and thermal capacity control gauge;
Lever for manual adjustment of the air flow rate, which is color synchronized with the position of the potentiometer, which defines the thermal capacity of the burner;
Transparent window, though which the operation of the control board could be checked without removing the cover and any interventions;

p. 13/61
Reversible liquid crystal thermo sticker, which indicates the operating temperature of the burner’s main body at the spot of the sticker. This thermometer should be used to estimate the real condition of the appliance as well as the flue stack draught and the requirement for ash deposition cleaning;
Electrically driven (external for the main unit) fuel transport auger, which extracts the solid fuel from the bunker and delivers pellets to the main unit, according to the operating mode of the burner. The transport auger consists of electric gear-motor, a transport pipe with one end in the fuel hopper and the other end is side opened and delivers fuel to the main unit though a aperture;
Flexible hose, which is made of specific semitransparent thermal resistant material (in case of combustion it does not emit toxic substances and does not sustain combustion process), which connects the transport auger and the main module;
The main modules of the pellet burner and their arrangement are shown of the following figure.
Figure 3.1 Arrangement of the modules of the pellet burner (side view);
Elements and modules of the main unit are shown on figure 3.2 and figure 3.3.
Main unit
Fuel transport auger (from the
bunker to the main unit) Flexible
pipe

p. 14/61
Figure 3.2 Section view of the elements of the main unit of the burner;
Figure 3.3 Side view of the main unit of the burner;
Combustion chamber
Photosensor
Power supply cable
Auger power supply plug
Control board of the burner
Interface panel
Flap and air supply fan
Fuel delivery pipe and “back fire” safety
thermo-probe
Grate of the combustion chamber
Installation flange for attaching the main module
to a consumer unit
Control board monitoring transparent window
“Back fire” safety alarm thermo-probe
p. 15/61
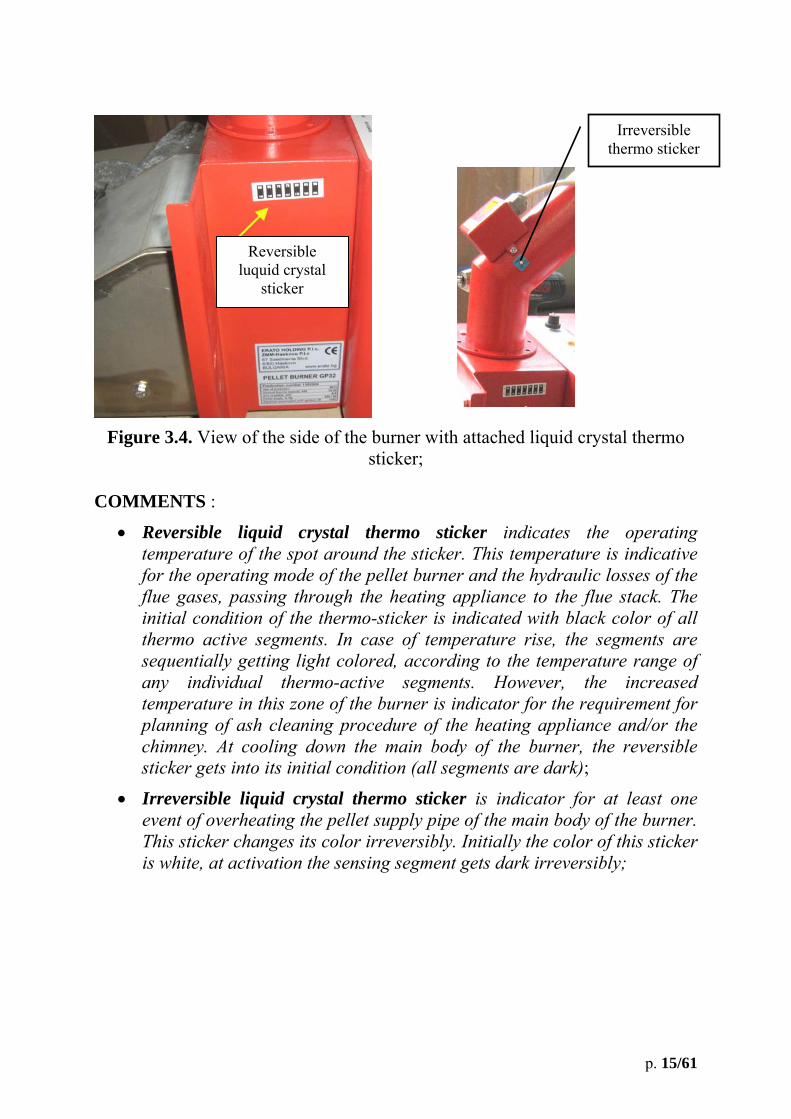
Figure 3.4. View of the side of the burner with attached liquid crystal thermo
sticker; COMMENTS :
Reversible liquid crystal thermo sticker indicates the operating temperature of the spot around the sticker. This temperature is indicative for the operating mode of the pellet burner and the hydraulic losses of the flue gases, passing through the heating appliance to the flue stack. The initial condition of the thermo-sticker is indicated with black color of all thermo active segments. In case of temperature rise, the segments are sequentially getting light colored, according to the temperature range of any individual thermo-active segments. However, the increased temperature in this zone of the burner is indicator for the requirement for planning of ash cleaning procedure of the heating appliance and/or the chimney. At cooling down the main body of the burner, the reversible sticker gets into its initial condition (all segments are dark);
Irreversible liquid crystal thermo sticker is indicator for at least one event of overheating the pellet supply pipe of the main body of the burner. This sticker changes its color irreversibly. Initially the color of this sticker is white, at activation the sensing segment gets dark irreversibly;
Reversible luquid crystal
sticker
Irreversible thermo sticker

p. 16/61
In case the fuel transport auger should be supported, the an option should be utilized – a telescopic support, which could support the weight of the auger and the length could be adjusted in order to achieve the required installation angle and the overall stability of the auger;
Figure 3.5. Side view of the auger support telescopic element – option of the kit of the pellet burner of series “GP”;
3.2. Specific design measures in order to increase the safety operation of the burner
The ignition and the combustion process is monitored by microprocessor
control board; The ignition process is monitored and in case that the fuel is not ignited
for some reason, after certain number of ignition trials, the operation of the burner is stopped and alarm mode is indicated;
In case that fuel is consumed from the hopper, than after the defined number of ignition trials the burner will go out in stop mode and alarm is indicated as well;
The flexible hose, which connects the fuel transport auger with the main unit, is transparent and is made of specific heat resistant material;
Information stickers are applied, indicating certain precautions measures and correct operation of the unit;
The burner is equipped with safety elements, which are involved in „back fire” protection system:
o Free falling duct, which practically interrupts the fuel flow between the transport auger and the main module. This duct is approximately 250mm long. Beside that, the fuel auger is connected to the main unit by a flexible hose, which does not contain fuel. The grate of the burner is however charged with

p. 17/61
controlled amount of fuel, which is utilized at the combustion process and possibility of back fire is strongly reduced;
o Sensor of “back fire” alarm thermo-probe, which is positioned on the fuel delivery pipe of the main unit, activates at surface temperature levels above 90 – 95oC. In case of alarm thermo-probe activation, the main unit and the fuel transport auger are stopped and switched to alarm mode. This mode is indicated by appropriate signals of the LEDs on the control board of the main unit. The alarm mode is not automatically deactivated and needs manual restarting. The cause of the alarm situation should be clarified and precaution measures should be taken before restarting the burner (performed by switching OFF and back ON the main power supply of the burner);
o Reversible liquid crystal thermo sticker, which shows the operating temperature in the zone around the sticker, considered as characteristic for the condition of the burner and the heating system in total. In indirectly indicates the need for ash deposition cleaning of the heating appliance as well as the chimney;
p. 18/61
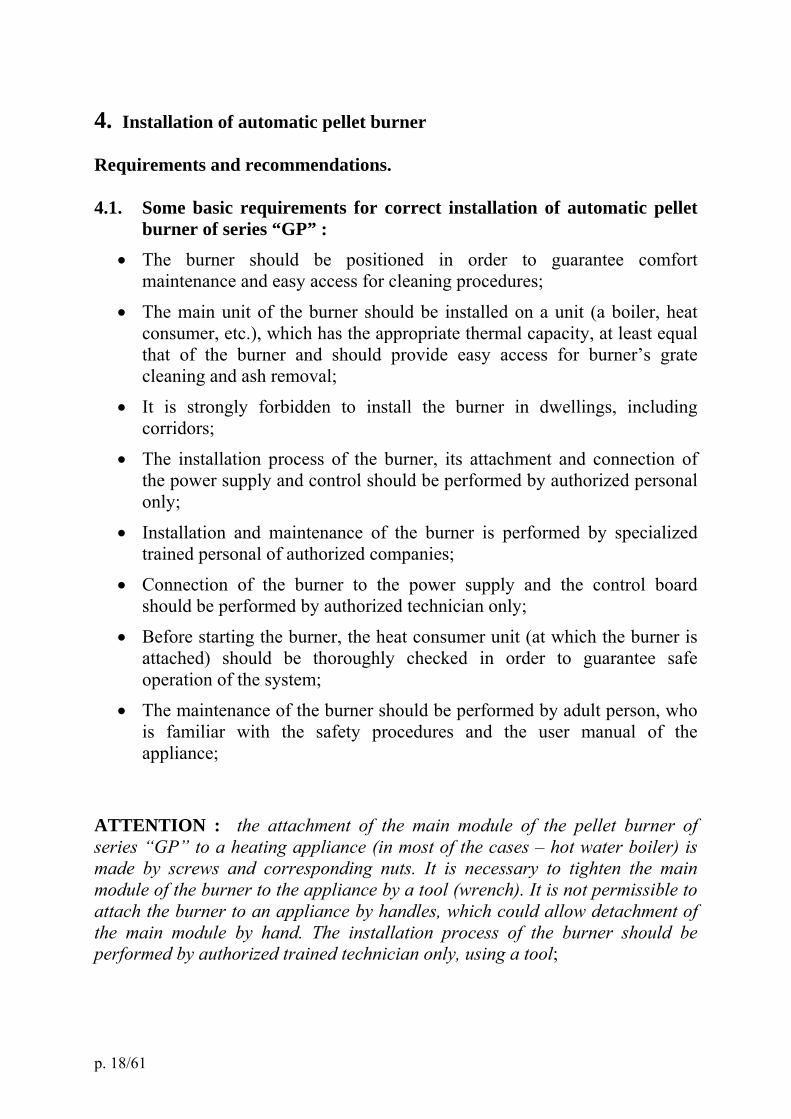
4. Installation of automatic pellet burner Requirements and recommendations. 4.1. Some basic requirements for correct installation of automatic pellet
burner of series “GP” :
The burner should be positioned in order to guarantee comfort maintenance and easy access for cleaning procedures;
The main unit of the burner should be installed on a unit (a boiler, heat consumer, etc.), which has the appropriate thermal capacity, at least equal that of the burner and should provide easy access for burner’s grate cleaning and ash removal;
It is strongly forbidden to install the burner in dwellings, including corridors;
The installation process of the burner, its attachment and connection of the power supply and control should be performed by authorized personal only;
Installation and maintenance of the burner is performed by specialized trained personal of authorized companies;
Connection of the burner to the power supply and the control board should be performed by authorized technician only;
Before starting the burner, the heat consumer unit (at which the burner is attached) should be thoroughly checked in order to guarantee safe operation of the system;
The maintenance of the burner should be performed by adult person, who is familiar with the safety procedures and the user manual of the appliance;
ATTENTION : the attachment of the main module of the pellet burner of series “GP” to a heating appliance (in most of the cases – hot water boiler) is made by screws and corresponding nuts. It is necessary to tighten the main module of the burner to the appliance by a tool (wrench). It is not permissible to attach the burner to an appliance by handles, which could allow detachment of the main module by hand. The installation process of the burner should be performed by authorized trained technician only, using a tool;

p. 19/61
4.2. Installation of the burner
The installation process of the burner should be based on authorized project, which governs the requirements of acting norms and recommendations.
In case that the heat consumer unit is solid fuel hot water boiler, that the requirements are depicted in norm EN 303-5/2000 - „Heating boilers. Part 5 : Heating boilers for solid fuels, hand and automatically fired, nominal heat output of up to 300 kW. Terminology, requirements, testing and marking”;
In case that the heat consumer is not hot water boiler, than appropriate norm and requirements should be governed at preparing the installation project;
Fire safety requirements;
To the power supply - EN 60335-1/1997 - “Household and similar electrical appliances – safety. Part 1. General requirements”;
4.3. Overall and attachment dimensions of the burner’s main unit
The installation process of the burner should consider the requirements, described above, as well the dimensions of the unit, shown on the following figures.
Figure 4.1. Isometric view of the main unit of the pellet burner of series “GP cs”– side views;
p. 20/61
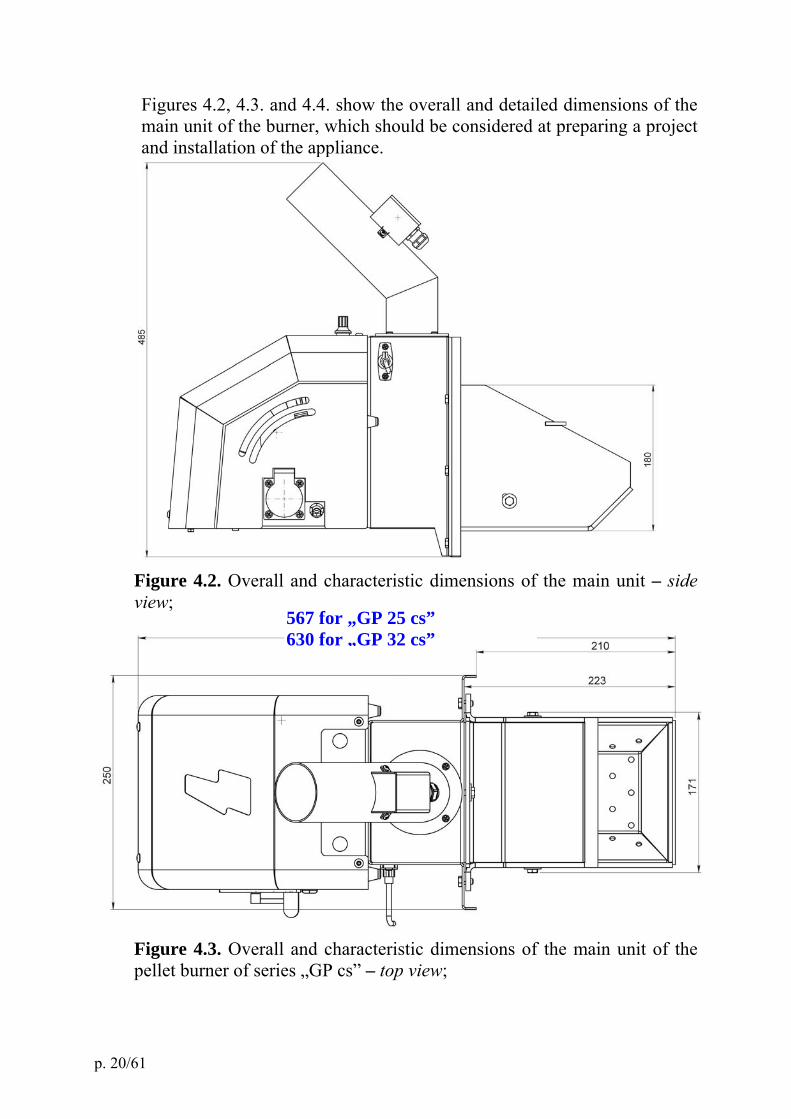
Figures 4.2, 4.3. and 4.4. show the overall and detailed dimensions of the main unit of the burner, which should be considered at preparing a project and installation of the appliance.
Figure 4.2. Overall and characteristic dimensions of the main unit – side view;
Figure 4.3. Overall and characteristic dimensions of the main unit of the pellet burner of series „GP cs” – top view;
567 for „GP 25 cs” 630 for „GP 32 cs”
p. 21/61
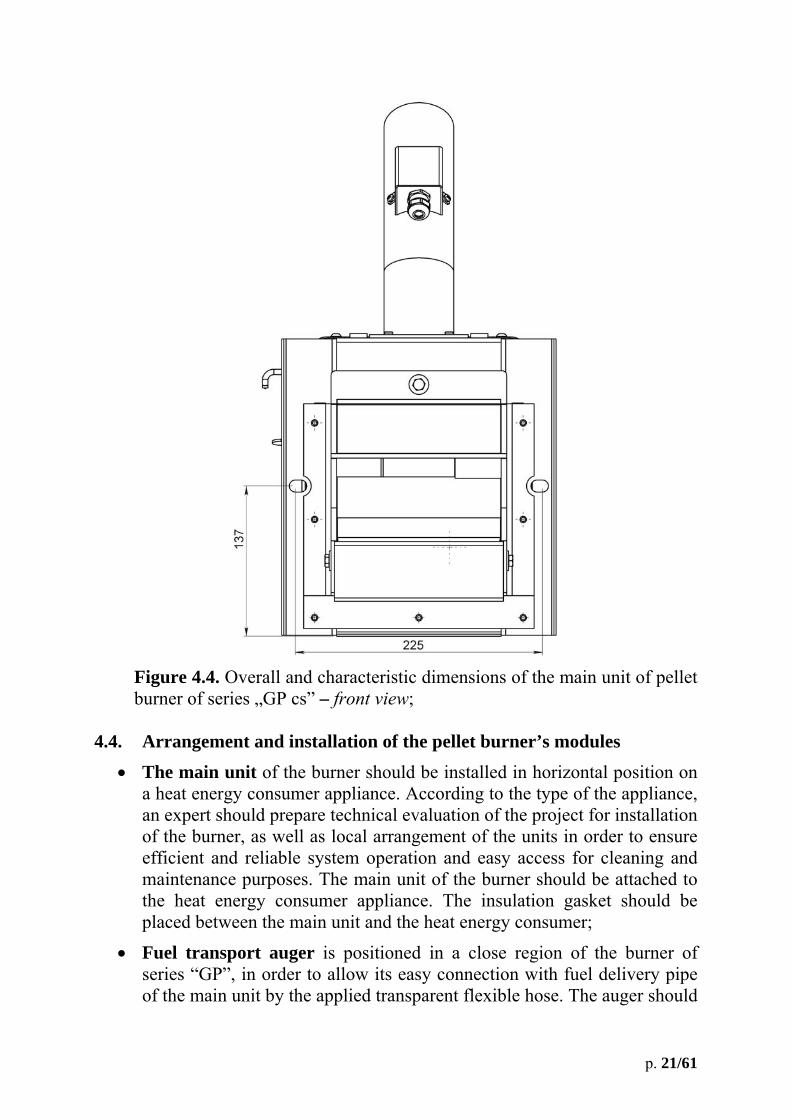
Figure 4.4. Overall and characteristic dimensions of the main unit of pellet burner of series „GP cs” – front view;
4.4. Arrangement and installation of the pellet burner’s modules
The main unit of the burner should be installed in horizontal position on a heat energy consumer appliance. According to the type of the appliance, an expert should prepare technical evaluation of the project for installation of the burner, as well as local arrangement of the units in order to ensure efficient and reliable system operation and easy access for cleaning and maintenance purposes. The main unit of the burner should be attached to the heat energy consumer appliance. The insulation gasket should be placed between the main unit and the heat energy consumer;
Fuel transport auger is positioned in a close region of the burner of series “GP”, in order to allow its easy connection with fuel delivery pipe of the main unit by the applied transparent flexible hose. The auger should

p. 22/61
be positioned at 45o – the angle between the axis of the auger and the horizontal plane, in order to provide optimal operating conditions for the electric motor and efficient combustion process in the combustion chamber of the main unit. The lower section of the auger should be positioned in the fuel bunker and appropriate measures should be taken in order to prevent fuel discharge through gaps between the auger’s pipe and the wall of the bunker. Additionally the lower section of the transport auger should be positioned in the lowest part of the hoper in order to ensure reliable fuel charging of the auger’s pipe entrance. The final position of the transport auger should be fixed. The fuel transport auger and the hoper should properly be arranged in order to ensure safe operation of the units and easy access and maintenance. The installation of the flexible hose should be considered as well – it could be bended and eventually its length could be decreased if necessary;
In order to achieve optimal operation of the fuel transport auger, it is recommended to install a pellet hopper of series “BP” – produced by pellet burner producer company as well.
ATTENTION: any change of the position (i.e. angle between the auger’s axis and the horizontal plane) practically influences/changes the fuel flow rate and the thermal capacity of the burner as follows:
o decrease of the angle between the axis of the transport auger and horizontal plane leads to increased fuel flow rate and respectively higher thermal capacity of the burner;
o increase of the angle between the axis of the transport auger and horizontal plane leads to decreased fuel flow rate and respectively lower thermal capacity of the burner;
Flexible hose should be installed – it connects the exit pipe of the fuel transport auger and the fuel delivery pipe of the main unit. The flexible hose should be straight (no visible hose slacking is allowed as such regions could accumulate dust and small fuel particles) and finally its ends should be tightened to the pipes by applied adjustable braces;

p. 23/61
Figure 4.5. A principal scheme for installation of fuel transport auger (the axis of the auger should be inclined at 45o by the horizontal plane);
EXPLANATION : the auger is installed with additional supporting telescopic element, which is an option for the kit of the pellet burner of series “GP”;
45о
Pellet hopper „BP”
Figure 4.6. Isometric viewof the fuel transport auger, installed on pellet hopperwith attached additional elements, which increase its capacity up to 650kg of wood pellets;

p. 24/61
4.5. Information, considering the installation of the automatic pellet burner of series “GP” and its operation with hot water boilers.
The automatic pellet burner of series “GP” is a separate module (which requires electrical power supply and a signal for operation), which could be installed on an appliance – a heat energy consumer. The practice shows, that the consumer in most of the cases is a hot water boiler, which is installed in local heating systems. The producer has made thorough tests for compatibility, reliability and efficiency of the pellet burner of series “GP” with most of the popular hot water boilers, known on the market. However, considering the design of the boiler, the system could require additional elements (like flanges, transition kits, etc), which allow efficient operation of the burner and the system in general, thus increasing the reliability as well. In ANNEX 1 of this user manual is shown information for the operating parameters of a system, consisting of : automatic pellet burner of series “GP” and a hot water boiler, at their nominal operation as complete system. The producer strongly advices to check the applied information prior to perform any installation procedures as well as adjustment of the burner, in order to achieve high efficiency and reliability of the system : pellet burner – hot water boiler;

p. 25/61
5. Initial steps and starting of pellet burner of series “GP” Attention : The burner should be installed, adjusted and verified ONLY by trained staff of an authorized company. 5.1. Basic fuel requirements
The fuel should be dry. The unit producer recommends that the fuel should be stored in dry and well ventilated rooms;
It is strongly forbidden to store the fuel in close region of the unit, on which the pellet burner is installed, the minimal safety distance between the fuel and the appliance is 400 mm;
The burner producer recommends an optimal distance between the unit, on which the pellet burner is installed, and the fuel bunker to be at least 1000mm. It is recommended to store the fuel in room, next to that, where the system is installed;
At the installation procedure of the burner, as well as the fuel storage one, fire prevention recommendation should be considered. It is also recommended to install a fire-extinguisher in a safe and easy accessible place;
5.2. Staring automatic pellet burner of series “GP”
Basic requirements : Any maintenance procedures should be performed in accordance with the
described in this manual; The operating mode of a system : automatic pellet burner of series “GP”
and a heat-consumer, should also cover the following requirement : the operating pressure in the combustion chamber should be below the atmosphere pressure within the following range: 5 - 20 Pa. The incompleteness of this requirement could lead to alarm modes of the burner and/or ineffective operation regime of the burner. The operating pressure in the combustion chamber of the
heat-consumer strongly depends on the draught of the flue stack as well as the hydraulic loses in the gas duct of the system (as well as the operation of induced draught flue gas fan module installed);
Any intervention in the working process of the unit, which could lead to unit’s failure and/or dangerous and health threatening situations, are strongly prohibited;
The unit should be checked by the maintenance staff or any trained personal/end user regularly;

p. 26/61
The end-user should not perform any interventions, repairs, etc. of the unit. In case that warning and failures arise, check the failures table (applied at the end of this manual) and call the service support if the case is not described there;
Any adjustments of thermal capacity higher than the nominal thermal load of the unit is not allowed;
The ash residue should be collected in fireproof containers and cooled down to ambient temperature. The cooled ash should be disposed in appropriate waste containers. Please take into account that the mineral ash, result of wood biomass pellets could be considered/utilized as soil fertilizer and dispersed for agricultural purposes for example;
5.2.1. Interface control board of automatic pellet burner of series “GP cs”
Figure 5.1. Interface board, equipped with indicator lamps and control elements of automatic pellet burner of series “GP cs”.
Interface board devices description:
“POWER” indicator – shows presence of power supply to the main unit;
“START” indicator – shows presence of operation signal, supplied by external control module;
Thermal capacity adjustment potentiometer– sets the operating thermal capacity (i.e. the fuel flow rate) of the burner;
“START” indicator
“POWER” indicator
Potentiometer for thermal capacity
adjustment

p. 27/61
5.2.2. Color scale for synchronization of the air flow rate with the thermal capacity of the burner
Figure 5.2. Color scale for synchronization of the air flow rate according to the thermal capacity of the pellet burner of series “GP cs”. The color scale is positioned on the cover of the pellet burner. Use this color scale in order to set the position of the air control flap, driven by the lever, in order to adjust the air flow rate. The lever passes though a small opening of the burner’s cover. The position of the lever should correspond to the position of the thermal capacity control potentiometer, in order to sustain the high combustion efficiency and reliability if the pellet burner of series “GP cs”.
5.2.3. Automatic pellet burner power supply ATTENTION : all installation and servicing procedure, which are made on the electrical system of the pellet burner, by removing the cover and/or other protecting elements, should be performed by authorized technician only.
The burner should be connected to the power supply of the unit, at which it is attached and the appropriate safety rules should be satisfied. Use the attached to the main unit power supply cable and connect it to the control and power supply box of the heat consumer. If the heat consumer is a hot
Lever to adjust the position of the air control flap
Color scale, which is used to adjust the position of the air control flap
p. 28/61
water boiler, than the control device is practically the operating thermostat of the boiler. Description of the power supply cable is as follows:
o black – (single phase 220-230 VAC, 50/60 Hz) – this wire should be connected to appropriate connection point of the heat energy consumer and has power supply through the main switch of the appliance of 220V. ATTENTION: the power supply should be serially connected through alarm thermostat or any other safety device in case of emergency situations, thus the power supply of the burner should be totally switched off in case of emergency;
o brown – (single phase 220-230 VAC, 50/60 Hz) – this wire should be connected to the control module of the heat energy consumer. In most cases this is the operating thermostat of a hot water boiler. When this module interrupts the control signal (phase line), then this signal stops the operation of the burner and the control board performs predefined algorithm for combustion process interruption and cooling down the combustion chamber of the burner;
o blue – “zero” – this wire should be connected to the zero line of the main power supply;
o green-yellow– (so called “protective earth”) – this wire should be reliably earthed;
The lower section of the fuel transport auger is positioned in the bunker, appropriately positioned and charged with fuel;
5.2.4. Switching ON the burner of series “GP”
Switching the burner ON is performed by supply electrical power through the power supply box of the heat energy consumer, where the burner is installed. If the burner has been in operation mode (or in so called “hot state”), then if the power supply is restored, it starts/continues its operation automatically. ATTENTION : During the operation of burner and the heat consumer unit, when there are certain incompact sections, there could be smoke leakages, eventually through the flexible hose, which connects the fuel transport auger and the main unit of the burner. It is strongly recommended to make appropriate steps for stopping these leakages. Air flow rate adjustment is (adjust the position of the flap of the air fan) also recommended in order to decrease the pressure in the combustion chamber. Same process could be observed at transition periods (autumn and spring) and especially in summer, when the ambient temperature is relative higher that the operating temperature of the unit, as well as the chimney’s draught is decreased.

p. 29/61
COMMENTS :
At operation of the burner, the air control flap position should be adjusted to the position of the potentiometer, which controls the thermal capacity of the burner, use the color scale to synchronize the positions of the control elements, in order to ensure optimal operating conditions and high efficiency;
At the period of fuel ignition an electric heater, positioned below the inclined grate’s plate, is activated. Both the heater and the plate above are heated to high temperature levels and certain precautions should be taken in order avoid any contact with and get skin burned in case of combustion chamber manual manipulation. In case that manual operation is required (for example for ash cleaning or fuel management)- self protective measures and appropriate instruments should be used;
During the start-up operation of the burner, the fuel transport auger should be charged (filled) with fuel – this is long lasting, time consuming period. In such case it is recommended to plug the auger power supply cord into a common power supply wall-plug and do the auger charge until fuel starts to drop from its outlet. After this charge operation the auger’s plug should be connected to the operating plug of the main unit;
ATTENTION: the control board of the burner monitors the presence and adequate operation of the transport auger and if the auger is not plugged in the main unit of the burner, then the control board goes in alarm mode and the burner will not function. In order to go in nominal operation mode it is necessary to plug the auger power supply in the contact point on the main module and restart the burner – switch off and back on the power supply;
EXPLANATION : if the auger’s power supply cable has been disconnected from the main unit of the burner (this situation is considered as alarm mode of the control board of the burner)– i.e. the electric motor is malfunctioning or wiring problems) and the burner has been switched on, then the control board indicates this mode by simultaneous lighting the yellow and green LEDs (light emitting diodes), positioned on its surface (observed though the transparent windows of the main unit). The reset process should be performed : the auger should be correctly plugged in the operating connect point on the main unit, the power should be switched off and back on;
The burner operates by predefined working algorithm, programmed in the inerasable memory chip on the control board. Optimal values of the parameters are defined by default at production and in principal no change is required in order to run the unit;

p. 30/61
5.2.5. Burner’s operating algorithm The burner starts its nominal operation if the following conditions are fulfilled:
The main unit of the burner is installed at the heat energy consumer appliance;
Available power supply;
Start signal is available (the “START” indicator is lit);
No alarm signals are available;
The fuel transport auger is charged and filled with fuel and bunker is charged with fuel as well;
If the above described conditions are satisfied, then the control board performs operations as follows:
The fuel transport auger is activated, the electric heater is activated and air fan are running simultaneously;
After a factory set (predefined) period of time has ran out, (during this period the so called “initial fuel” mass has been charged to the combustion chamber), the electric motor of the fuel transport auger will be stopped (the ignition heater is active however);
After certain period of time the photosensor of the burner should recognize stable combustion process by the emitted visible light and the electrical ignition element will be switched off. This is followed by graduate increment of the thermal capacity (i.e. the fuel flow rate) of the burner and after certain period of time the nominal thermal capacity will be reached. In case that the photosensor does not sense intensive light, i.e. there is no combustion process, or it is rather lean, than the control board of the burner will initiate new attempt to start the burner, the above described cycle will be repeated. The total number of ignition start trials is however limited. In case that this limit has been passed, then burner will go into alarm mode and will not function until manual assistance is performed (for example bunker’s charge with fuel, solving a problem, etc.) and the burner is restarted;
In case that the fuel has been ignited, the burner goes into nominal operation mode, which is performed by periodic fuel transport to the combustion chamber of the burner, followed by a certain interval, utilized for fuel combustion. The periods for fuel charge and

p. 31/61
combustion are connected and only the charge period is changed by the position of thermal capacity potentiometer position.
ATTENTION : The thermal capacity potentiometer should not be in any case positioned at the maximal value (i.e. in the red zone of the scale) as this will result in set-point of thermal capacity of the burner, exceeding its nominal load. The air flow rate, supplied by the fan, is controlled by the adjustment of the position of the air control flap and its lever, the position of the flap corresponds to the position of the thermal capacity control potentiometer, considering its color scale;
When the set-point has been reached, defined by the external control unit, the control signal will be set off and the START signal will go off for nominal operation of the burner. The air supply fan will continue to run for a certain (factory preset) period of time and the remaining fuel will be incinerated and the remaining ash will be blown away by the air flow;
When a new START signal has been sent to the burner, the above described algorithm will be performed in a so called operation cycle;
In case that the START signal goes off (for any reason – room thermostat for example, etc.) the burner will go into stand-by mode, following the algorithm, described above;
In case that in stand-by mode the burner receives a START signal, the control board will perform the above described algorithm in order to initiate ignition and continue into nominal thermal capacity mode;
In case the first fuel dose is not ignited due to any reason, the control board of the unit will automatically start new ignition procedure. The total number of ignition trials is limited to 2 (factory preset value);
In case that during nominal operation the photosensor does not recognize active combustion process, the initial fuel ignition procedure is started automatically;
In case the total number of ignition trials has been exceeded, for example when the fuel in the bunker has been consumed, the burner will go into alarm mode and the green LED will light, indicating that manual assistance and restart of the unit is required as well. After the reason for alarm mode has been clarified and overcome, the burner should be restarted by switching it OFF and back ON from the main power supply. One can use the power supply of the main unit, which supplies electrical power to the burner, however

p. 32/61
ATTENTION : before starting up the burner of series “GP” it is necessary to check if the grate of the burner contains unburned/raw fuel and ash, if available these residues should be cleared away;
In case that the power supply has been interrupted, at its renewal the burner will continue its operation automatically;
5.2.6. Operating control parameters of the burner of series “GP”
The control board of the burner has factory preset operating parameters
values, which in common case are satisfying the requirements of a system and does not require any intervention and variation. The optimal operating conditions, however are achieved by adjustment of the thermal capacity (by adjustment of the thermal capacity potentiometer) and adjustment of the air flow rate control flap, its position should correspond to the position of the thermal capacity potentiometer position, determined according to its own color scale.
The control board is equipped with various LEDs (with different colors), which indicate the operating mode of the unit and its adjustment indexes values. The adjustment of the operating parameters of the burner should be performed by a trained authorized technician; ATTENTION : any adjustment actions, which require detachment of the burner’s cover and any possibility of contact with high voltage elements, should be performed by authorized technician only;
● Description of LED indication (positioned on the control board of the unit):
Green and yellow LEDs are blinking in series mode – they are indicating operating information for the status of the burner. This information could be utilized in order to analyze the operating mode of the unit. For example the number of blinking signals of the green LED, indicates the index of the potentiometer number (P1 … P5), which are positioned on the control board. The number of the following yellow LED blinking signals indicates the value of the position of the appropriate potentiometer. The correspondence between the number yellow LED blinking and parameter’s value are given in Table 5.1 and Table 5.2. The red LED is active when the photosensor senses presence of the combustion process.
EXPLANATION : the emitted visible light from the above mentioned LEDs could be monitored through the transparent window, positioned above the control board of the burner, installed on its top cover.

p. 33/61
Tables 5.1 and 5.2 give detailed information about the number of LED blinking signals and the corresponding values of the operating parameters of the burner’s control board (according to the type of the burner) :
Symbols:
P1 – potentiometer, which defines the operating period for transporting initial fuel doze to the combustion chamber of the burner;
P2 – potentiometer, which defines operating period for supplying fuel at nominal load;
P3 – potentiometer, which defines operating period for running the air fan after a STOP signal (at absence of START signal) has been received by the burner;
P4 – potentiometer, which defines operating period for ignition of the initial fuel doze;
P5 – potentiometer, which defines operating value of the photosensor sensitivity;
EXPLANATION : A common criteria for the quality of a combustion process is its natural color. In case that this color is rather dark yellow and smoke eddies are observed, this indicates that the fuel flow rate exceeds the optimal one for the current air flow rate and should be decreased by setting the potentiometer on the interface board to a lower position. The air flow control flap could be opened as well. The objective of the adjustment is to achieve stable intensive and turbulent combustion process and minimal char/unburned residue. In practice however, the factory preset values of the operating parameters do not require any adjustment, even when the fuel has been changed.

p. 34/61
Pellet burner „GP 25”
Potentiometer number Number of LED blinking
P1 P2 P3 P4 P5
[-] Operating period
[seconds] Index
0 30 1.50 30 45 0
1 45 1.65 60 90 1
2 60* 1.82 90 135 2
3 75 2.18 120 180 3
4 90 2.83 150* 225 4
5 105 3.68 180 270 5
6 120 4.79 210 315 6
7 135 6.22 240 360 7*
8 150 --- 270 405 8
9 165 --- 300 450* 9
Table 5.1. Description of the operating parameters of the burner’s control board of pellet burner type “GP 25”.
NOTE: The maximal index value of LED blinking of parameter P2 is 7;

p. 35/61
Pellet burner „GP 32”
Potentiometer number Number of LED blinking
P1 P2 P3 P4 P5
[-] Operating period
[seconds] Index
0 30 1.50 30 45 0
1 45 1.65 60 90 1
2 60* 1.82 90 135 2
3 75 2.18 120 180 3
4 90 2.83 150* 225 4
5 105 3.68 180 270 5
6 120 4.79 210 315 6
7 135 6.22 240 360 7*
8 150 7.46 270 405 8
9 165 8.21 300 450* 9
Table 5.2. Description of the operating parameters of the burner’s control board of pellet burner type “GP 32” (the nominal thermal capacity is 32kW).
NOTES :
● the values, indicated with this symbol “ * ” show the default (factory preset) values of the operating parameters, which in most cases will guarantee reliable and effective operation of the burner;
● A good criteria for the efficient operation of the burner is the color of the flame. When the flame’s color is dark yellow, some smoke is visible as well, then in most of the cases the fuel rate is higher that optimal and it should be decreased by changing the position of the thermal capacity potentiometer. The increase of the air flow rate also influences the

p. 36/61
combustion process, the optimal combustion process should be stable, no unburned char particles should be observed as well. The practice shows, that the factory set values do not need any onsite adjustment, regardless the difference of the fuels utilized;
The producer reserves the right to change the specification and/or the default values of the operating parameters of the unit without prior notice; NOTES:
The default values of the operating parameters of the pellet burner of series “GP” are derived at the following conditions:
o The fuel is wood pellets, with diameter d=8 mm, A category (see table of wood pellets categories);
o The axial inclination of the fuel transport auger (the angle between the auger axis and horizontal plane) is 45o;
The ash content (mineral, incombustible content in the fuel) does not influence significantly the gross calorific value of the fuel, but requires specialized design of the burner in order to achieve optimal and efficient combustion process. Following this, one should test the applicability of a fuel for combustion process in the current design of the burner and if positive result is achieved to be massively utilized as fuel material. However, many aspects of the unit operation should be considered;
The producer preserves its right to change any factory preset value of the operating parameters of the burner, without a without prior notice;
Tables 5.1. and 5.2. contain values of the operating parameters of the control board and the default values are indicated;
The above shown values of operating parameter P2 define the thermal capacity of the burner;
Adjustment of the burner’s thermal capacity could be achieved by detecting the fuel flow rate at nominal operating mode – the amount of fuel transported by the auger for certain period of time at nominal operating mode, considering the gross calorific value of the fuel and the overall efficiency of the system: burner-heat energy consumer unit.
An approach to determine the fuel flow rate is as follows :
o The flexible hose, which connects the fuel transport auger and the main unit of the burner should be disconnected at the main unit’s side and is directed to a fuel container (for example a plastic bag or somewhat appropriate) and the transported fuel will be accumulated in this container;

p. 37/61
o Switch ON the burner and set START signal (by the control unit of the energy consumer) ON as well;
o Unplug the photosensor by drawing until it is out of the sensor’s handler and the control board of the burner will analyze this mode as nominal operation one (i.e. presence of combustion process);
o In this mode the control board will power the transport auger’s electric motor and fuel will be transported regularly. The fuel, which goes off the exhaust side of the flexible hose should be collected with no scattering in a container for a measured period of time. For example: the measuring period is 15 minutes (which is ¼ of an hour) and the container’s accumulated fuel mass is 1.0 kg. The calculation shows that the fuel flow rate is 4 kg/h (practically the fuel flow rate is determined by dividing the accumulated fuel mass on the period of time, during which the fuel is transported and accumulated);
Here is a sample for application of such an approach: o Determine the fuel flow rate ( for an hour or less, for example a
shorter period of time – 15 minutes=1/4 hour)- mfuel=5.3 kg/h. Calculate the instant fuel flow rate (m’fuel), (divide fuel flow rate per hour on 3600 , where 1 hour = 3600 seconds) and achieve m’fuel = 0.001472 kg/s;
o Determine/consider the gross calorific value of the fuel– for example wood pellets have calorific value Hpellets = 17.2 MJ/kg = 17200 kJ/kg. In case other dimension of the calorific value is more convenient to apply, for example – kWh/kg, then the calculation is as follows : common wood pellets have gross calorific value of 4.77 kWh/kg (which is equal to 17.2 MJ/kg);
o Determine/consider the net efficiency of the system: pellet burner-heat consumer unit at nominal thermal capacity mode – ηsystem=89%=0.89. If the net efficiency is not know a priory, a good initial guess is ηsystem=85%=0.85.
o Calculate the thermal capacity of the heat consumer unit - 5.22001472.0*17200*89.0'**_ fuelfuelsystemconsumerheat mHP kW if the
calorific value of the fuel is applied in dimension – MJ/kg. In case that the calorific value of the fuel is applied in other dimension, for example kWh/kg, then the calculation is as follows
5.223.5*77.4*89.0**_ fuelfuelsystemconsumerheat mHP kW;
o The same algorithm should be followed for calculating thermal capacity of the heat consumer in case that the fuel calorific value differs that cited above or the required thermal capacity of the unit is lower that the nominal one;

p. 38/61
The producer reserves the right to change the default (factory defined) values of operating parameters of the burner without prior notice;
5.2.7. Adjustment process of the burner, according to the heat
demand of a consumer
It is recommended to make appropriate adjustments of operating parameters of the burner of series “GP” in order to obtain high efficiency and reliable performance of the unit, considering the thermal load. This is achieved by appropriate adjustment of the position of the thermal capacity potentiometer, as well as the position of the air flow rate control flap, color synchronized with the position of the thermal capacity control potentiometer.
It is highly recommended to adjust the initial quantity (so called “initial doze”) of the fuel in order to ensure efficient and safe ignition process and reliable operation of the pellet burner.
It is highly recommended to perform adjustment of the air flow rate by adjusting the position of the air control flap in order to achieve optimal combustion process, i.e. low pollutant concentrations (pollutants are CO, unburned hydrocarbons, NOx) in the flue gases and low air excess ratio. The adjustment process should be performed by a adjustment of the lever, which positions the air flow rate control flap and should be color synchronized with the position of the thermal capacity potentiometer position, in order to sustain optimal operating conditions and high efficiency of the burner.
Figure 5.3. Side view of the color scale and the lever for air flow rate control flap, synchronized with the thermal capacity potentiometer of the pellet burner of series “GP cs”.
Direction of closing the air flow rate control flap
Direction of opening the air flow rate control flap

p. 39/61
5.2.8. Nominal thermal load of the burner of series “GP”
After the pellet burner has been started successfully (the fuel in the combustion chamber is ignited) and the heat consumer unit, which demands heat energy is heated up and tempered, one could assume that the system: burner-heat consumer unit are in steady-state mode and thermally tempered. The adjustment process should be performed in such steady conditions, followed by appropriate air control flap adjustment. In this mode an installer should perform so called “warm test” of the system, following the active norms and requirements. Also adjust the position of the lever, which controls the air flow rate, color synchronized according to the position of the thermal capacity potentiometer of the burner, in order to achieve high efficiency combustion process. NOTE : It is not recommended to operate the burner at thermal load lower than minimal thermal capacity, indicated in its technical information, as such conditions are characterized with decreased efficiency. If the unit should operate at thermal capacity, lower than nominal operation mode, one should perform local adjustment of the operating parameters of the burner – both the thermal capacity and the air flow rate, in order to ensure high efficiency and high reliability of the system;
ATTENTION: Air flow rate considerably influence the operating mode of the burner and the overall system performance and efficiency – if the air flow rate is less than required, than the fuel is partially unburned due to low mixing intensity and decreased combustion efficiency. In case that the air flow rate exceeds the optimal air flow rate (for the operating thermal capacity of the burner) the result will be also a sensible decrease of the combustion efficiency due to intensive cooling of the combustion process and respectively increased amount of unburned fuel as well. The above mentioned characteristics should be carefully considered and appropriate adjustment of the combustion process properties should be done in order to achieve high efficiency and economic performance of the system. The air flow rate adjustment is made by adjustment of the position of the lever, synchronized to the position of the thermal capacity control potentiometer, which allows to achieve optimal operating conditions and high efficiency of the burner. 5.3. Adjustment of the thermal capacity of the burner
Adjustment of the thermal capacity of the burner is performed by simultaneous adjustment of the position of the thermal capacity potentiometer (i.e. the fuel flow rate) and the air flow rate, controlled by the flap of the burner’s air fan. Adjust the air control flap position according to the position of the thermal capacity potentiometer (the so called color synchronization).

p. 40/61
Information about the thermal capacity of the pellet burner of series “GP” at different values of the thermal capacity parameter P2 is shown in the following table.
Thermal capacity of the pellet burner , [kW]
Type GP 25 GP 32
P2 [number of LED blinking]
- -
0 5.0 5.0 1 6.0 6.0 2 8.0 8.0 3 11.0 11.0 4 14.0 14.0 5 18.0 18.0 6 21.0 21.0 7 25.0 25.0 8 - 28.0 9 - 32.0
Table 5.3. Thermal capacity of a system: pellet burner of series “GP” – heat consumer unit, according to the value of thermal capacity parameter P2 (and the burner’s type);
ATTENTION : In case of change of the fuel type (for example changing the pellets category) an appropriate adjustment of the operating parameters requirement could arise in order to achieve thermal capacity and high efficiency of the system (i.e. the thermal capacity by the potentiometer and the air flow rate by the flap).
5.3.1. Decreasing thermal capacity of the burner Thermal capacity of the burner is decreased by turning the position of the potentiometer, positioned on the interface panel of the burner, in direction to lower set-point – turn the potentiometer in direction anticlockwise, which will result in decreased fuel consumption rate;
5.3.2. Increasing thermal capacity of the burner
Thermal capacity of the burner is increased by turning the position of the potentiometer, positioned on the interface panel of the burner, in direction to upper set-point – turn the potentiometer in direction clockwise, which will result in increased fuel consumption rate;

p. 41/61
EXPLANATION : In case of changing the thermal capacity of the burner it is required to adjust the air flow rate as well, by adjusting the position of air flow control flap. In principal a decrease of the thermal capacity will require lower air flow rate and vice versa. Decreasing the air flow rate is performed by closing the air flow control flap, respectively – the increase of the air flow rate is realized by opening that flap; 5.4. Stopping the pellet burner of series “GP”
Stopping the operation of the burner should be performed by turning OFF the “START” signal from the control module of the heat consumer unit. Respectively, the starting process should be invoked by turning ON the “START” signal of that control module. In case that the heat consumer is a hot water boiler this “START” signal is actually the status of the operating thermostat of the boiler. In case that the burner will not operate for a relatively long period of time, it is recommended to shut down the central power supply of the unit and clean the ash deposited in the combustion chamber, beneath it, as well as other surfaces of the combustion chamber, the photosensor should be checked/cleaned as well. ATTENTION:
● In case that the burner will not operate for a long period of time, then thorough ash deposit cleaning procedure should be performed. The ash layer acts corrosively on the carbon steel surfaces, which will lead to a decrease of the lifetime of the burner’s main module. It is obligatory to perform service procedures and preventive observations of the unit by trained service personal only as well as thorough cleaning at the end of the heating season. Completing these requirements will ensure long exploitation duration of the burner and its high efficiency and reliability;
● In case there is signal to stop the operation of the burner, the fuel delivery stops, but its air fan continues to run. That’s why at stop signal the burner continues to operate and the combustion process will continue to release heat energy, which makes the system quite inert. This particular feature should be concerned, especially when a local heating system is equipped with radiators with thermostatic control valves (or any other control elements), which stop the flow of the circulating fluid and thus the released in the combustion process heat energy could not be transferred (dissipated) and thus the hot water boiler could be overheated. That’s why in case the pellet burner of series “GP” operates in a local heating system, which have heating elements with thermostatic valves, these valves should not should be cutting the heating fluid flow rate, but should allow a minimal flow rate in order to allow heat dissipation in any way. It
p. 42/61
is recommended to install a heat accumulating tank parallel to the circuits of the heating system in order to achieve a buffer effect and to decrease any variations of the consumption of heat energy by the heating system;
5.5. Turning OFF the automatic pellet burner of series “GP”
The pellet burner is turned off by changing the “START” signal status into OFF, supplied by the control module of the heat consumer unit. During the working process in OFF state, the control module of the burner performs so called “controlled turning off procedure” in which the air fan is working (and the burner is cooled down) and operating parameters are simultaneously monitored, in case of emergency appropriate actions will be taken. After the burner has been cooled down (to ambient temperature), it should be switched off by turning off the main power supply of the heat consumer unit. It is recommended to clean the deposited ash thoroughly both of the burner as well as heat energy consumer surfaces.
Emergency burner stop
In operating process of the burner emergency situations could arise and the unit will go into alarm/failure mode. Such situations are detected by the process control board and it will go into automatic protective mode in order to be protected as well as the heat consumer unit. These modes are operated by appropriate preventive measures, automatically taken by the control board of the main module and the alarm mode is indicated by the LEDs of the control board and eventually will identify it. Please check the status of the LEDs and refer this manual before taking any actions. After the cause of the alarm situation is clarified, take adequate actions for bringing back the burner into normal operating conditions and restart it by switching off the power supply OFF the main module and back into ON. ATTENTION :
in case of emergency situation – heat consumer overheating, the emergency thermostat (which is not part of the burner’s equipment and is obligatory – it should be installed on the control module of the unit) is activated. In this case the system (burner-heat consumer) should be cooled down and the reason for such emergency situation should be investigated and preventive measures should be performed. The emergency thermostat should be manually reset by unscrewing its preventive cap and its stem should be pressed until the thermostat switches back on (a “click” sound is heard in this process), then screw back its cap. After the system (burner-

p. 43/61
heat consumer) boiler is checked and the cause for overheating is determined and repaired, restart the burner by turning off its power supply and then back on in order to run the burner in normal mode;
in case of alarm mode – fuel delivery pipe overheating, the alarm thermo-probe of the burner’s main module is activated and the control board switches into alarm mode. This thermo-probe senses the temperature on the surface of fuel pipe and prevents so called “back fire” process. After the unit is cooled down and the reason for such kind of emergency situation are clarified and special preventive measures have been taken, then the burner should be restarted into nominal operating mode. This is done by manual switch OFF and back ON of the power supply of the burner. In some situations this thermo-probe could be thermally damaged and will need renewal, in such situation please refer to service assistance. In some cases it is possible to achieve high temperature levels in the region of the pellet supply pipe, which will result in sensor failure and it should be replaced by authorized technician;
5.6. Restarting the operation of a pellet burner of series “GP”
The restarting of the burner is required in case of failure modes, for example the burner has a start signal (and the “START” indicator is lit ), but the control module of the burner is operating in safe mode, which is not allowing nominal operation of the burner. The LEDs on the control module of the burner show information for the current state of the burner. It is necessary to take precaution measures in order to solve the problem and to remove the cause for the failure. After that the burner should be restarted – this is performed by switching off and back on the electrical power supply of the main module of the pellet burner (performed for example by switching off the power supply by an automatic circuit breaker). It is recommended to check and eventually clean the grate of the burner before starting the burner again. 5.7. Description of the active thermo stickers, showing the condition of the system
The thermosticker is used to measure the operating temperature of the burner’s body in a characteristic zone of the burner. The temperature measurement could indirectly determine the condition of the heating system and the need for preventive and service actions of the burner and the entire system, as well as the flue gases duct.

p. 44/61
Figure 5.4. View of the reversible thermosticker, used to measure the spot temperature – initial condition, at normal room temperature;
Figure 5.5. View of the reversible thermosticker, used to measure the spot temperature –condition at increased burner’s body temperature – in the range of 60 – 65oC;
Figure 5.6. View of the reversible thermosticker, used to measure the spot temperature –condition at increased burner’s body temperature – in the range of 70 – 75oC.
Figure 5.7. View of the reversible thermosticker, used to measure the spot temperature –condition at increased burner’s body temperature – in the range of 80 – 85oC. EXPLANATION – the reversible thermosticker should be checked on regular basis, recommended at any maintenance procedure of the heating appliance and/or the pellet burner. It indicates the current temperature at operation of the burner and gives indirect information for the ash deposition and the need of

p. 45/61
cleaning of the residue, also the ash deposits on the internal surfaces of the chimney.
Figure 5.8. View of the irreversible thermosticker, used to mark an alarm overheating of the pellet’s delivery pipe – initial condition, the active segment is white, the temperature has not reached activation level of 104oC;
Figure 5.9. View of the irreversible thermosticker, used to mark an alarm overheating of the pellet’s delivery pipe – activated condition, the active segment is dark, the temperature has exceeded activation level of 104oC; EXPLANATION – the activation of the irreversible thermosticker is indicator for an overheating event of the pellet delivery pipe. The condition of this sticker is not reversed to its initial condition at cooling down of the burner’s body. It is necessary to check and make the appropriate maintenance/service actions prior to start the burner again. This thermosticker should be changed after the successful operation of the burner has been achieved – the check and service of the burner is performed by authorized technician only. The activation of this thermosticker could happen in cases like flowing hot flue gases though the pellet’s pipe, due to increased resistance of the flue gases duct and/or decreased draught of the chimney. In such situations the flexible hose, connecting the pellet transport auger and the main body of the burner could be damaged as well and could also need replacement. Such situations are abnormal and are not covered by the warranty for the burner. 5.8. Removal and attachment of the burner’s grate at maintenance and cleaning procedure of the pellet burner of series “GP” At the cleaning process, the removable grate should be taken out of the burner’s head, as shown on the following figure.

p. 46/61
Figure 5.10. Side view of the burner’s main module with detached grate;
NOTE : the grate of the burner should be taken out of the burner’s head after the burner has been cooled down to safe temperature levels, in order to be cleaned thoroughly. It is highly recommended to use self protecting means and to use tool (for example pincers or any appropriate tool) in order to handle the grate safely. At the grate cleaning process, it is necessary to pay attention to clean thoroughly the holes, which conduct the air though the grate, which will allow efficient combustion process and optimal air cooling of the grate. After thorough cleaning of the ash residue out of the burner’s grate, as well as other unburned fuel particles and/or slagging material, the grate should be carefully installed back on its initial position. The grate’s installation is made in two steps : first : incline the grate in order to direct its extension below the inclined grate of the burner’s main module, second : slide the grate until the gap between the grate and the inclined detail is diminished;
Combustion head of the burner’s main module
Grate of the burner
Inclined grate of the burner’s main module

p. 47/61
Figure 5.11. Cross-section of the burner, showing the position of the grate at the attachment process; NOTE : The burner’s grate positioning is made in two steps:
1. position the burner’s grate, so that its legs touch the bottom of the burner’s combustion chamber;
2. slide the grate until it fits below the inclined grate of the burner and there is no gap between the grate and the inclined detail of the burner;
Combustion chamber of the main module of the burner
Legs of the burner’s grate
Inclined grate of the burner’s main module
1. Initial positioning of the burner’s grate
2. Final positioning of the burner’s grate
p. 48/61
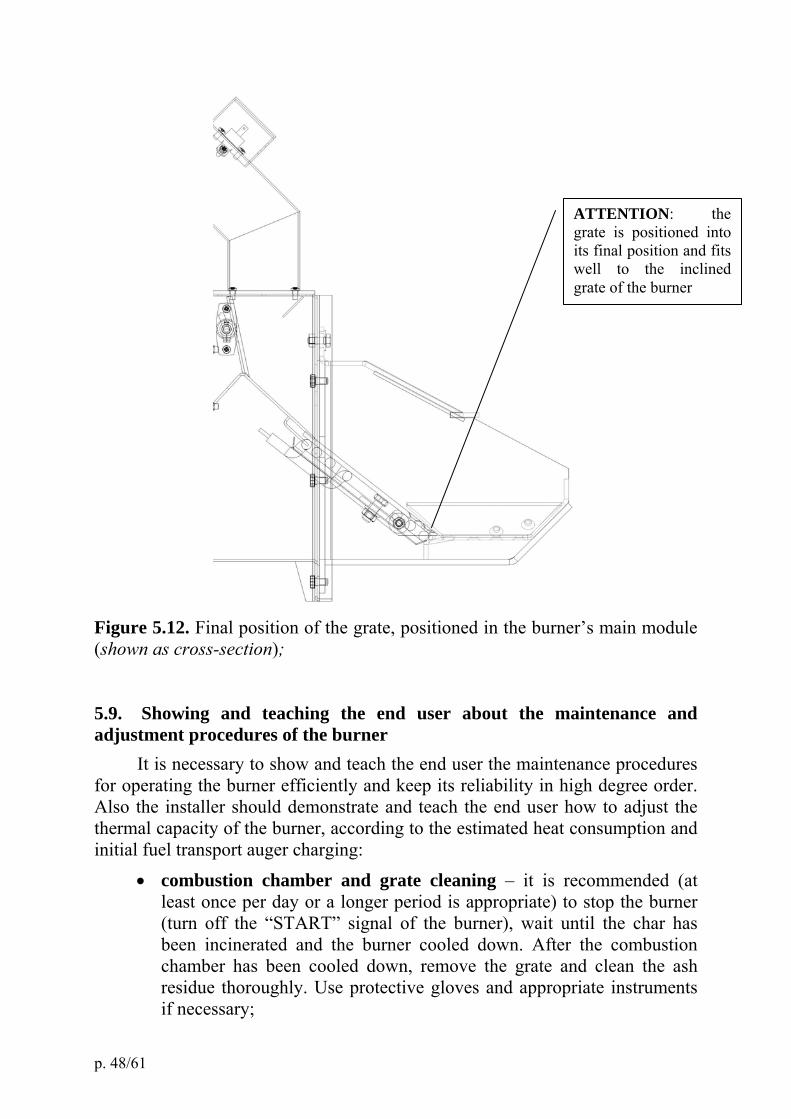
Figure 5.12. Final position of the grate, positioned in the burner’s main module (shown as cross-section); 5.9. Showing and teaching the end user about the maintenance and adjustment procedures of the burner
It is necessary to show and teach the end user the maintenance procedures for operating the burner efficiently and keep its reliability in high degree order. Also the installer should demonstrate and teach the end user how to adjust the thermal capacity of the burner, according to the estimated heat consumption and initial fuel transport auger charging:
combustion chamber and grate cleaning – it is recommended (at least once per day or a longer period is appropriate) to stop the burner (turn off the “START” signal of the burner), wait until the char has been incinerated and the burner cooled down. After the combustion chamber has been cooled down, remove the grate and clean the ash residue thoroughly. Use protective gloves and appropriate instruments if necessary;
ATTENTION: the grate is positioned into its final position and fits well to the inclined grate of the burner

p. 49/61
Figure 5.13. Pair of working gloves, committed in order to perform easy and safe cleaning procedure of the pellet burner’s main module;
cleaning procedure of the flexible hose, connecting the fuel transport auger and the main unit of the burner– it is recommended to clean periodically this hose, as during the fuel transport fine particles are deposited on the internal surface of the hose, which eventually could impede the fuel transport though it. Furthermore, the deposited layer of fine fuel particles could be ignited in case that hot flue gases are exhausted though this hose in case of emergency;
the way to restart the burner – after the cause for malfunctioning/failure of the burner has been determined and the problem has been solved, the starting of the burner should be performed by restarting the power supply of the main module of the pellet burner;
ATTENTION : regular cleaning of burner will ensure long-life reliable exploitation period, economic and efficient performance of the unit;

p. 50/61
5.10. Safety and unexpected risks
Risks could arise at the exploitation of the burner of series “GP”:
The automatic pellet burner “GP” is designed according to the safety requirements of the operating European standards and norms. However safety and unexpected risks could arise in situations like following:
The pellet burner of series “GP” is operating incorrectly/abnormally;
The unit is installed by unauthorized/unqualified personal;
The safety instructions, described in this manual are not followed and fulfilled;
Unexpected risks:
The pellet burner of series „GP” is designed and produced according to the requirements of the operating EU safety norms. However, in spite of that possible risks are considered as a result of the operating process of the pellet burner, it is possible to arise risks as follows:
Cauterization risks, caused by high temperatures, as a result of the combustion process in the combustion chamber, at manual cleaning processes of the surfaces of the burner (i.e. its combustion chamber), or ash residue cleaning, or any unburned fuel material, smoldering on the grate of the combustion chamber;
Electrical shock risks at indirect contact. The burner is connected to the power supply and its operating modules are separated in a section of its main module, equipped with required protective and short-circuit preventive elements. It is obligatory to perform by authorized personal/technician the burner ground connection. It is forbidden to remove the cover of the main unit of the burner, as well as the protective cover of the electric motor of the fuel transport auger, by unauthorized person;
Fingers injuring risks at operating mode or at maintenance and cleaning process of the burner. It is recommended to use appropriate individual resources for self-protection;
Suffocation risks due to flue gas uncontrolled emissions, in case when the chimney draught is insufficient, in case that the flue gas duct (of the heat consumer unit) is clogged, or in case that the flue gas duct is not fully tightened and gas leaks are possible;

p. 51/61
5.11. Operation faults and repairing procedures
No Operation fault Cause Method of repairing
Insufficient heat capacity of the burner
Adjustment of operating parameters is required – this should be performed by authorized technician
Low set-pointtemperature of theboiler’s operatingthermostat
It is necessary to increase the set-point of the boiler’s operatingthermostat (up to 90oC)
1. In case that the burner is installed on a hot water boiler and there is low temperatures in the heat energy supplied rooms Low set-point
temperature of theremote roomthermostat (ifconnected)
It is necessary to increase the set-point of the room thermostat
High set-pointtemperature of theboiler’s operatingthermostat
It is necessary to decrease the set-point of the boiler’s operatingthermostat (it is recommended to keep it above 60oC)
2. In case that the burner is installed on a hot water boiler and there is high temperatures in the heat energy supplied rooms
High set-pointtemperature of theremote roomthermostat (ifconnected)
It is necessary to decrease the set-point of the room thermostat
3. The burner is active, but no combustion process
“START” signal is not available
It is necessary to check the status ofthe “START” signal of burner : check control module of the heatconsumer unit
4. Difficult fuel ignition
Low quality fuel It is necessary to replace the fuel, most probably due to its high moisture content, which could be above the required value for nominal operation of the burner
5. The ignition process is accompanied with improper noise
Insufficient draught of the chimney
It is required to check the conditionof the flue stack, as well as the heating appliance – it is recommended to stop the burner and clean the ash deposits thoroughly. In some situation adjustment of the operating parameters is requires as well – this should be performed by authorized technician;

p. 52/61
6. Heat consumer unit emergency overheating
Absence of heat consumption orincorrect adjustment of the parameters of the burner or imbalanced operation of the system : burner-heat consumer
It is necessary to check the correct operation process of the system: burner-heat consumer unit and eventually appropriate adjustment of the operating parameters of the burner– this should be performed by authorized technician only. After the system is cooled down to ambient temperature and the reason for overheating is serviced out/resolved, the protective cap of the emergency overheating thermostat (if activated) should be unscrewed, its rod should be pressed until the thermostat is reset and its cap should be screwed back. Then restart the burner (switch off the power supply and back on)
Absence of fuel in the hopper
The fuel hopper should be charged. Then manually charge the fuel transport auger until new fuel comes out of the exit side of the auger and back plug its cable onto the burner’s main unit.
Absence of fuel in the burner’s combustion chamber
It is possible by manually restarting to achieve nominal operation process of the burner. If this approach results in stable ignition, then it is necessary to increase the transported initial fuel mass - the adjustment should be performed by authorized technician;
7. No fuel ignition
Fuel is present in the burner’s grate, but it’s not ignited or it is fully incinerated and the combustion process has extinguished, i.e. not present;
Clean the fuel particles, laying on the burner’s grate; In case that the electric heater is outof order or not operating, then itshould be replaced (or checked for proper functioning). In case that the electric heater is working, then it is necessary to adjust the operating parameters and/or the air flow rate -the adjustment should be performed by authorized technician;

p. 53/61
Abnormal operation or malfunctioning of the photosensor
The photosensor should be checked, cleared if necessary adjusted or replaced in case it is out of order;
No power supply Check the status of “POWER” indicator, positioned on the interface panel of the burner. Check the connection and electricity parameters of the burner’s main unit and the heat consumer power supply – the parameters should be as follows 220 V, 50 Hz – it should be performed by authorized technician only; Check the correctness of the power supply connection, according to the applied electrical scheme – it should be performed by authorized technician only; Check for tightness of electrical joints of the control board – it should be performed by authorized technician only;
8. The burner is not running or it stops
Absence of “START” signal to the burner’s main unit
Check the status of “START” indicator – it should be lit. Check the wiring and connection of the burner’s main unit and the power supply box of the heat consumer’s power supply - – it should be performed by authorized technician only; Check for tightness of electrical joints of the control board – it should be performed by authorized technician only; Check the operation and functioning of the control module, which gives operating signal to the burner –check the parameters of the power supply – it should be as follows : 220 V, 50 Hz – it should be performed by authorized technician only;

p. 54/61
The main module is in alarm mode, due to alarm thermo-probe activation (overheating of the main module’s fuel delivery pipe)
After the main unit is cooled down to ambient temperature, the reason for this emergency situation should be clarified and necessary steps should be taken in order to sustain operating conditions for the burner. The burner should be restarted;
The burner does not run and a “START” signal is present (the “START” indicator is active
Check if the control board is in alarm mode – see following table with operating and alarm indication
Safety fuses are broken due to emergency short circuit
This check-up operation should be performed by authorized technician only : check each fuse status and replace if necessary with appropriate one (Attention: safety fuses F3 and F4 are fast reacting);
Low quality fuel Fuel replacement is recommended, most probably the moisture contentis higher than required for nominal operation of the burner – see the requirements in the fuel properties table;
9. The flame looks “opaque” and smoke is observed at the exit of the chimney
Inappropriate operating parameters adjustment
It is necessary to perform operatingparameters adjustment and achieveefficient combustion process – this operation should be performed by trained authorized personal only;
Incorrect photosensor positioning
Change (i.e. slightly rotate or even axially move) the position of the photosensor
The external surface of the photosensor is dirty
Clean the transparent section of the photosensor by careful cleaning – do not use solvents
10. The ignition process of the fuel is successful, but the unit could not reach stable operating mode
The photosensor is gone – its working surface is damaged and overheating zones are observed
It is necessary to replace the photosensor – it should be performed by authorized technician only

p. 55/61
Photosensor malfunctioning
Check the condition and functionality of the photosensor Check the position of the heat capacity potentiometer
The operating parameters of the control board have been changed
Check the operating parameters of the burner’s control board – it should be performed by authorized technician only;
11. The operation of the burner is not stable
The position of air flow control flap has been changed
Adjust the position of the air flowcontrol flap by positioning itaccording to the position of thethermal capacity potentiometer andcorresponding their positionsaccording to the color scales
12. Heating-up of the pellet delivery pipe
Insufficient draught or ash deposition of the appliance
It is necessary to clean the ash deposition of the appliance, eventually clean the ash in the chimney. A possible solution is toinstall an additional flue gas fan and/or change of the chimney *
13. Heating-up of the pellet delivery pipe and activation of the pipe’s alarm thermostat
Low draught or high ash deposition of the appliance
It is necessary to make thorough cleanup of the ash, deposited on the appliance, eventually the chimney. It is necessary to restart the burner. A possible problem solution is to install an additional flue gas fan serially to the heating appliance and/or change of the chimney * -performed by authorized technician;
14. Increased temperature, indicated by the reversible liquid crystal thermosticker
Increased resistance of the flue gases duct or insufficient draught of the chimney
It is necessary to make thorough cleanup of the ash, eventually the chimney. It is necessary to restart the burner. A possible problem solution is to install an additional flue gas fan serially to the heating appliance and/or change of the chimney * - performed by authorized technician;
15. Activation of the irreversible thermosticker, attached to the fuel delivery
Excessive operating temperature levelsin the pellet delivery pipe, in
It is necessary to make thorough cleanup of the ash, deposited on the appliance, eventually the chimney. It is necessary to restart the burner. Check the pellet burner and clean if

p. 56/61
pipe of the main module of the burner
most of the cases it is a result of the passage of hot flue gases
necessary * - performed by authorized technician;
16. Blurred/melted photosensor
Incorrect stoppingprocedure of theburner
It is required to clean the external surface of the photosensor or eventually to replace it. It isobligatory to follow the stoppingprocedure, described in this manual;
17. Presence of unburned fuel in the ash tray of the heat consumer unit
Ineffective fuel combustion process
It is necessary to perform adjustment of the operating parameters and the air flow rate – it should be performed by trained authorized technician;
The fuels’ ash content is higher than recommended
It is necessary to replace the fuel with appropriate one – see the table with properties of the recommended fuel
18. Ash slagging and deposition is observed in the region of the combustion chamber of the burner (especially on the grate)
The burner is operating at thermal capacity higher than the nominal one
Decrease the thermal capacity of the burner by changing the set-point of the heat capacity potentiometer
19. Alarm mode of the burner’s control board
Alarm mode of the operating conditions of the burner
Check LED indications, depicted in the following table. Get help by authorizer technician if necessary
20. The burner has stopped and after a manual restart it works properly
The photosensor is malfunctioning and the gives improper signal to the control board
Check the quantity of the fuel at nominal mode, delivered on the burner’s grate: In case that this quantity is less
than required, than increase the thermal capacity of the burner or decrease the air flow rate by repositioning the control flap of the air fan;
In case that this quantity is higher than required, than decrease the thermal capacity of the unit or increase the air flow rate by repositioning the control flap of the air fan;
21. High The heat It is necessary to clean thoroughly
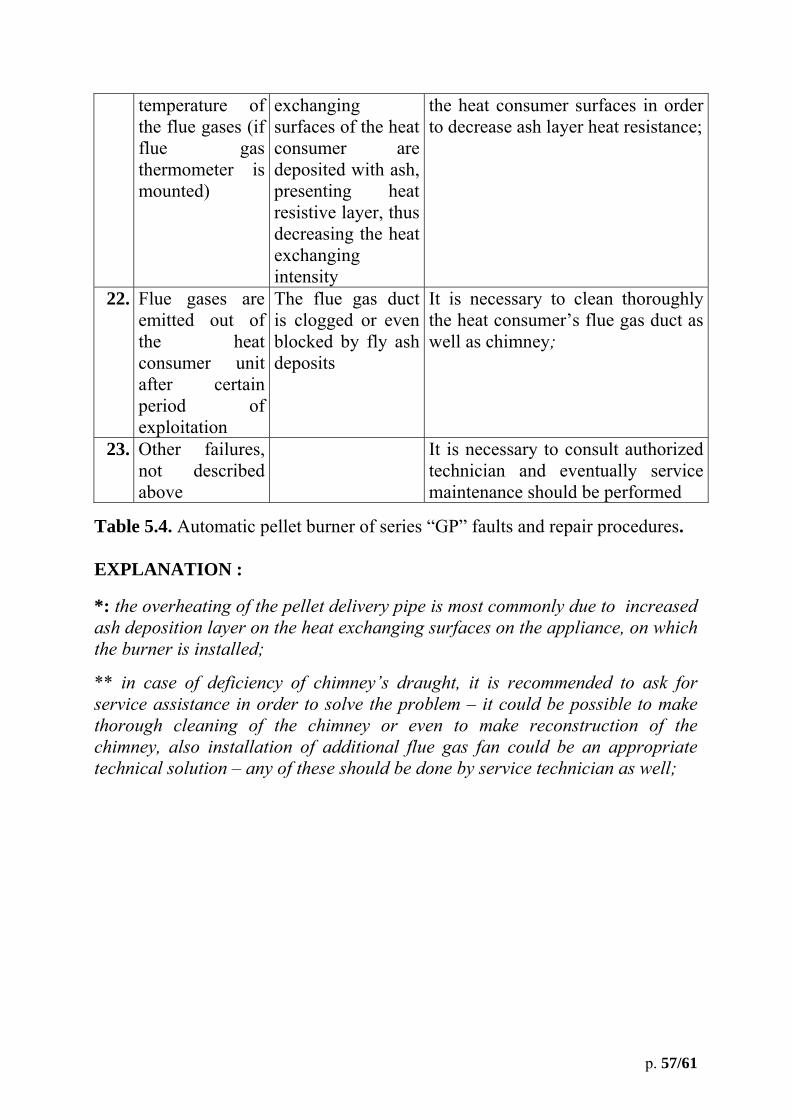
p. 57/61
temperature of the flue gases (if flue gas thermometer is mounted)
exchanging surfaces of the heat consumer are deposited with ash, presenting heat resistive layer, thus decreasing the heat exchanging intensity
the heat consumer surfaces in order to decrease ash layer heat resistance;
22. Flue gases are emitted out of the heat consumer unit after certain period of exploitation
The flue gas duct is clogged or evenblocked by fly ashdeposits
It is necessary to clean thoroughlythe heat consumer’s flue gas duct as well as chimney;
23. Other failures, not described above
It is necessary to consult authorized technician and eventually service maintenance should be performed
Table 5.4. Automatic pellet burner of series “GP” faults and repair procedures. EXPLANATION :
*: the overheating of the pellet delivery pipe is most commonly due to increased ash deposition layer on the heat exchanging surfaces on the appliance, on which the burner is installed;
** in case of deficiency of chimney’s draught, it is recommended to ask for service assistance in order to solve the problem – it could be possible to make thorough cleaning of the chimney or even to make reconstruction of the chimney, also installation of additional flue gas fan could be an appropriate technical solution – any of these should be done by service technician as well;

p. 58/61
No Indication
status Meaning Method of repairing
1. Yellow LED is permanently active
The number of ignition trials has been reached and now fuel ignition has been achieved
Check the causes for lack of fuel ignition – see Table 5.4 Check the reason for failed ignition attempts – see Tables 5.1 and 5.2
2. Fast blinking yellow LED
The combustion process intensity is exceeding nominal levels or the photosensor has been short circuited
Check the potentiometer, which controls the adjustment of the sensitivity of the photosensor - this operation should be performed by authorizer technician only
The operating signal of the photosensor for the combustion process has been lost during nominal operation mode
Check the status of the photosensor, ask for help of a service if necessary;
3. Green LED is permanently active
Unsuccessful fuel ignition
Check the reasons – see Table 5.4.
4. Fast blinking red LED
The rotation sensor(Hall sensor) is not properly connected or the air fan is not working
Service assistance by authorized technician is required
The fuel transport auger’s electric motor is disconnected or malfunctioning
Check if the power supply cable of the fuel transport auger has been disconnected from the burner’s main unit. Check the status and functioning of the auger itself;
5. The yellow and green LEDs are permanently active
The operating relay on the control board is malfunctioning
Service assistance by authorized technician is required
Table 5.5. Detailed description of control board’s alarm mode indications.
p. 59/61
5.12. Automatic pellet burner of series “GP” warranty form completion.
The applied WARRANTY FORM should be completed, by filling the
required information in the appropriate fields. The assigned field for
signatures and stamp should be completed as well in order to VALIDATE
the WARRANY FORM of the automatic pellet burner of series “GP”.
5.13. Actions, after the burner is not in exploitation anymore (recycling).
When the lifetime period of the unit has been completed, then it should be
treated properly in order to preserve environment contamination. The unit
should be dismounted and disassembled by environmentally safe methods. This
requirement is most commonly completed by appropriate components recycling,
considering separate waste disposal and utilization methods.

p. 60/61
6. Electrical scheme of automatic pellet burner of series “GP”
Figure 6.1 shows the principal electrical scheme of automatic pellet burner of
series “GP”.
Figure 6.1. shows the principal electrical scheme of automatic pellet burner of series “GP”;
K1
K2
K3
K4
K5
K6
T 0 operating BOILER
N 220 V Neutral
L 220 V Phase
PE
PELLET BURNER CONTROL BOARD
Fotosensor
T 0 alarm
APPLIANCE (BOILER)
POWER START
Yellow-green
Gray or blue
Black
Brown
F2 F3 F4
F2- T6,3A – Heater F3- FF 800mAH – Fan F4- FF1,0 AH – Auger
Cable “GP” (Version December 2010)
R = 220 Ohms C = 100nF, 500VAC
K7
K8
K9
K10
K11
K12
Heater Fan Auger
Thermosensor
R = 220 Ohms C = 100nF, 500VAC
min
max
C
1
C 1

p. 61/61
WARRANTY CONDITIONS The producer guarantees correct and reliable operation of the pellet burner of series “GP” ONLY when installation and maintenance requirements are completed. The warranty period of the pellet burner starts from date, when the warranty form is filled and stamped by the authorized organization. The warranty period of the pellet burner starts from date when it is started for very first time, but no longer than 18 months of the day of delivery. The warranty period of the automatic pellet burner “GP” is 24 (twenty four) months. The warranty of the unit is valid when the original invoice document and the original warranty form are presented only. THE WARRANTY OF THE AUTOMATIC PELLET BURNER IS NOT VALID in case one of the following is fulfilled:
Unit damages, caused by incorrect handling, transport and/or loading/unloading, which are not organized by the producer;
Failures, caused by natural disasters (Earth quakes, fires, floods, etc.); Unsatisfied installation, maintenance and service requirements, which are
described in this manual; Repairing of any failure of the unit, performed by unauthorized
technicians or the end user; Any changes in the design of the burner; Incorrect installation and/or improper functioning due to operator/client
influence; Failures, caused by factors, for which the producer could not be blamed
and/or has no control over them; Any malfunctions or damages, which are not caused by the operation of
the pellet burner itself, but result in unit damages and its functionality; At color change of the irreversible thermosticker or in case this
thermosticker is removed, torn , detached or destroyed;
Every warranty service operation should be noticed in its warranty service procedures list.
The warranty period of the unit is interrupted by the period, during which the unit is warranty serviced by authorized technicians (the period between failure notification and its repairing).