users guide for estimation - new jersey · mobile inspector is a trademark and proprietary product...
TRANSCRIPT

Users Guide for Estimation
AASHTOWare Project Estimation™
Version 3.00/3.01
October 2017
[Type here]

Phone: (352) 381-4400 • Fax: (352) 381-4444 • [email protected] • www.infotechfl.com
AASHTOWare is a registered trademark and service mark of AASHTO.
The AASHTOWare logo, Trns•port Estimator, the Trns•port Estimator logo, Trns•port Expedite, the Trns•port Expedite logo, AASHTO Trns•port, the AASHTO Trns•port logo, CES, the Trns•port CES logo, CAS, the Trns•port CAS logo, PES, the Trns•port PES logo, LAS, the Trns•port LAS logo, BAMS/DSS, the Trns•port BAMS/DSS logo, Trns•port SiteManager, the Trns•port SiteManager logo, SiteManager, Trns•port SiteXchange, the Trns•port SiteXchange logo, Trns•port FieldManager, the Trns•port FieldManager logo, Trns•port FieldBook, the Trns•port FieldBook logo, Trns•port FieldBuilder, the Trns•port FieldBuilder logo, Trns•port Preconstruction, the Trns•port Preconstruction logo, Trns•port CRLMS, the Trns•port CRLMS logo, AASHTOWare Project logo and AASHTOWare Project BAMS/DSS logo are registered trademarks of AASHTO.
AASHTOWare Project Bids, AASHTOWare Project Bids logo, AASHTOWare Project Civil Rights & Labor, AASHTOWare Project Civil Rights & Labor logo, AASHTOWare Project Construction Administration, AASHTOWare Project Construction Administration logo, AASHTOWare Project Construction & Materials, AASHTOWare Project Construction & Materials logo, AASHTOWare Project Decision Support, AASHTOWare Project Decision Support logo, AASHTOWare Project Payroll XML (AASHTOWare Project Payroll XML Resource Kit), Payroll XML (AASHTOWare Project Payroll Spreadsheet and Conversion Utility), AASHTOWare Project Worksheet, AASHTOWare Project Estimation, AASHTOWare Project Estimation logo, AASHTOWare Project Estimator, AASHTOWare Project Estimator logo, AASHTOWare Project Expedite, AASHTOWare Project Expedite logo, AASHTOWare Project FieldBook, AASHTOWare Project FieldBook logo, AASHTOWare Project FieldBuilder, AASHTOWare Project FieldBuilder logo, AASHTOWare Project FieldManager, AASHTOWare Project FieldManager logo, AASHTOWare Project FieldNet, AASHTOWare Project FieldNet logo, AASHTOWare Project, AASHTOWare Project logo, AASHTOWare Project Preconstruction, AASHTOWare Project Preconstruction logo, AASHTOWare Project Worksheet, AASHTOWare Project Worksheet logo, AASHTOWare Project SiteManager, AASHTOWare Project SiteManager logo, AASHTOWare Project SiteXchange, AASHTOWare Project SiteXchange logo, AASHTOWare Project SYNC Service, AASHTOWare Project SYNC Service logo, AASHTOWare Project TRACER, and AASHTOWare Project TRACER logo are trademarks of AASHTO.
AASHTO Trns•port, Trns•port CES, Trns•port PES, Trns•port Expedite, Trns•port LAS, Trns•port CAS, Trns•port SiteManager, Trns•port BAMS/DSS, Trns•port SiteXchange, Trns•port Preconstruction, Trns•port CRLMS, AASHTOWare Project BAMS/DSS, AASHTOWare, AASHTOWare Project Bids, AASHTOWare Project Civil Rights & Labor, AASHTOWare Project Cost Estimation, AASHTOWare Project Decision Support, AASHTOWare Project Estimation, AASHTOWare Project Expedite, AASHTOWare Project Preconstruction, AASHTOWare Project, AASHTOWare Project SiteManager, and AASHTOWare Project SiteXchange are proprietary software products of AASHTO.
Other product names are trademarks or registered trademarks of their respective owners.
FieldManager, FieldBook, and FieldBuilder represent one or more proprietary products jointly owned by Info Tech, Inc., and the State of Michigan.
FieldNet represents a proprietary product of Info Tech, Inc.
Mobile Inspector is a trademark and proprietary product of Info Tech, Inc.
© Copyright 2015 by the American Association of State Highway and Transportation Officials, Inc. All rights reserved. This document or parts thereof may not be reproduced in any form without written permission of the publisher. Printed in the United States of America.
ii

iii

Contents Getting Started .......................................................................................... 8
Introduction ........................................................................................ 8 Submittal/PD Preparation ................................................................... 9 Table 1 Project/Job/Proposal Construction Classifications .............. 10 Overview of Getting Started ............................................................. 13 Setting Up Your Browser ................................................................. 13
Using the Correct Browser ....................................................... 13 Setting the Browser Mode in Internet Explorer ....................... 13 Setting Internet Options in Internet Explorer ........................... 13
Logging On ....................................................................................... 14 Using Online Help ............................................................................ 15
Search ....................................................................................... 15 Navigating in Web-Based AASHTOWare Project .......................... 16 Logging Off ...................................................................................... 17 Understanding Your Role ................................................................. 17 Viewing Recent Activity .................................................................. 18 Viewing My Pages............................................................................ 18 Using Components ........................................................................... 18 Working with Fields ......................................................................... 19
Entering Data in a Range of Fields .......................................... 20 Working with Lists ........................................................................... 21
Sorting and Filtering Lists ........................................................ 21 Using Operators with the Advanced Filter ............................... 24
Using Actions Menus ....................................................................... 24 Reviewing Action Menus ......................................................... 25 Duplicating and Inserting Rows ............................................... 25
Selecting Data in Modal Windows ................................................... 25 Global Actions ......................................................................................... 27
Overview of Global Actions ............................................................. 27 Executing Processes ................................................................. 27 Scheduling a Process ................................................................ 27 Viewing Process History .......................................................... 28 Viewing System Process History ............................................. 28 Viewing Scheduled Processes .................................................. 29 Viewing and Saving Process Output Files ............................... 29
Using Reports ................................................................................... 29 Accessing and Running Reports ....................................................... 30 Managing Tracked Issues ................................................................. 31
Creating a Tracked Issue .......................................................... 31 Maintaining a Tracked Issue .................................................... 32 Maintaining Tracked Issue Communication ............................ 32 Maintaining Tracked Issue Owners ......................................... 33
iv
Maintaining Tracked Issue Messages ...................................... 33 Maintaining Tracked Issue Steps ............................................. 33
Using Cases ...................................................................................... 34 Adding a Case .......................................................................... 34 Adding Tracked Issues to a Case ............................................. 35
Working with Attachments ............................................................... 35 Attaching a File to a Row ......................................................... 35 Granting Security Access to an Attached File ......................... 36 Removing Security Access to an Attached File ....................... 36 Using Global Attachments ....................................................... 36
Working with Links .......................................................................... 37 Attaching a Link to an Entity ................................................... 38 Granting Security Access to a Link.......................................... 38 Removing Security Access to a Link ....................................... 38 Using Global Links .................................................................. 39
Managing My Settings ...................................................................... 40 Changing Your Email Address ................................................ 40
Managing My Outbox ...................................................................... 41 Working with Email Messages ................................................ 41 Creating an Email Message ...................................................... 41 Creating Dynamic Mailing Groups .......................................... 42
Working with Projects and Estimates................................................... 43 Adding a New Project....................................................................... 43
Table 2 NJDOT Project and Contract Work Types ................. 44 Table 3 NJDOT Highway Types ............................................. 47 Creating a Cost Estimate ......................................................... 51
Maintaining Categories for a Cost Estimate .................................... 54 Table 4 Categories for Federal Projects .................................. 54
Non-Participating Item Details ........................................................ 56 NJDOT Policies and Procedures ...................................................... 58 Line Item Numbering ....................................................................... 59 No Item ............................................................................................ 59 Non Bid Items .................................................................................. 59 Alternate Items ................................................................................. 59 Fixed Price Items ............................................................................. 59 Newly Assigned Standard Items ...................................................... 60 Lump Sum/DOLL Items .................................................................. 60 Table 5-1 Performance and Payment Bond ..................................... 61 Table 5-2 Final Clean Up ................................................................. 61 Table 5-3 Owner's and Contractor's Protective Liability Ins ........... 62 Maintenance and Operations Only Items ......................................... 63 Adding Items to a Cost Estimate ..................................................... 63 Maintaining Items for a Cost Estimate ............................................. 67
Cost Estimate Item Pricing Worksheet .................................... 67 Calculating Bid Based Prices for Cost Estimate Items..................... 68
v
Preliminary Estimates ............................................................................ 71 Building Project Items ...................................................................... 71 Maintaining Cost Estimates for a Project ......................................... 72
Cost Estimate Features ........................................................................... 73 Maintaining a Cost Estimate............................................................. 73
Adding a Bid History Profile to a Cost Estimate ..................... 74 Selecting Data for a User Bid History Profile .......................... 74 Setting Basic Parameters for a User Bid History Profile ......... 76 Setting Advanced Parameters for a User Bid History Profile.. 77 Setting Advanced Filters for a User Bid History Profile ......... 79
Viewing Cost Summary Information ............................................... 80 Using the Expression Builder ........................................................... 80 Working with Reports ...................................................................... 82
Cost Estimate Summary Report ............................................... 82 Creating a Snapshot of a Cost Estimate ........................................... 82 Importing a Snapshot ........................................................................ 83
Pricing Items ............................................................................................ 85 Viewing Item Price Details .............................................................. 85 Bid-Based Pricing ............................................................................. 86
Adding a Bid-Based Task ........................................................ 86 Fine-Tuning the Bid-Based Task ............................................. 87
Reference Price Tasks ...................................................................... 88 Reference Price Task Using an Ad Hoc Price or Formula ....... 88 Reference Price Task Using a Percent of the Total .................. 89 Reference Price Task Using a Percent on Top ......................... 90
Cost Estimate Item Pricing Worksheet ............................................. 91 Item Bid History ...................................................................................... 93
Calculating an Item Bid History ....................................................... 93 Viewing Source Data for an Item Bid History ................................. 94 Viewing Item Price Details .............................................................. 95 Price vs Quantity Analysis ............................................................... 95
Analyzing Price vs Quantity .................................................... 95 Understanding the Analysis Window ...................................... 96 Switching Between Regression and Average .......................... 98 Identifying Data Points ............................................................ 98 Using the Analysis Panels ....................................................... 99 Filtering Data ........................................................................... 99 Highlighting Data .................................................................. 100 Including and Excluding Data Points .................................... 100 Include/Exclude Mode ........................................................... 101 Alternate Methods ................................................................. 101 Showing and Hiding Points and Lines .................................. 102 Modifying Variables used in the Calculation ........................ 103 Regression Price .................................................................... 103
vi

Average Price ........................................................................ 104 Analyzing Bid History Source Data ............................................... 105
Find Bid Data ........................................................................................ 107 Appendix A Classification Worksheets .................................. A1-A63
Appendix B Item Number Request Form ......................................A64
Appendix C Utility Worksheets.................................................C1-C3
vii
Getting Started
Introduction
AASHTOWare Project™ is the complete, enterprise-wide software solution developed by the American Association of State Highway and Transportation Officials (AASHTO) for managing an agency’s construction program. It utilizes web-based information systems technology and is based on the experience and needs of AASHTO’s member agencies. AASHTOWare Project capabilities encompass the full functionality of a construction contract management system. Beginning with cost estimation, AASHTOWare Project carries through with proposal preparation, bid-letting, construction and materials management, civil rights and labor compliance activities, and historical data collection and analysis. The system creates a consistent and integrated view of the construction contract process during each of the phases.
AASHTOWare Project Estimation™ is a web-based estimation application designed to deliver accurate, reliable cost estimates for your construction program. Cost estimates enable you to estimate the anticipated costs of an improvement as it progresses through different stages of planning, from a conceptual estimate when minimal scope exists, to a preliminary estimate when detail items can be determined for the project, and finally to a letting estimate associated with a proposal. Each concept, project, and proposal can be associated with multiple cost estimates, enabling you to evaluate different methodologies and pricing scenarios as needed.
AASHTOWare Project Preconstruction™ manages the project life cycle from project design, through producing an estimate, to preparing a proposal for prospective bidders, to contract award. It also manages notifying contractors, maintaining planholder information, managing bid lettings, analyzing bids, and producing letting summary reports. AASHTOWare Project Construction & Materials™ is a web-based module that covers the complete construction and materials management process, managing contract information through the entire construction cycle, including contract status reporting, progress payments, DBE reporting, subcontractor authorization, funding participation allocation, laboratory information management functionality, and project finalization management.
For Use by the Designer’s Cost Estimators in developing Construction Cost Estimates for NJDOT Capital Program Projects at Preliminary Engineering (PD). PD estimates are based on the project’s type, length, pavement type, and types of bridges, and are used for the 5-year Program which involve the Metropolitan Planning Organizations, and the Transportation Improvement Program. The Cost Estimating Unit has been placed outside of the rest of the production units in order to provide independent estimates used in the financial programming.
This guide details the functionality of AASHTOWare Project Estimation™ and how to use the application for the creation of long-range estimates and detailed estimates according to NJDOT policy. This manual is not intended to provide estimating guidance but rather software guidance.
8
For estimating guidance refer to the Cost Estimating Guideline by the Program Management Office (PMO). This guide provides detailed information about using AASHTOWare Project Estimation™ along with general information about the web-based AASHTOWare Project™ system.
Submittal
The PD Submission shall include preliminary plans, a preliminary design cost estimate and a transmittal letter with a date for review completion.
PD Preparation
• Determine which of the thirteen classifications from Table 1, Project/Job/Proposal
Construction Classifications (pages 6-8) most nearly represents the type of work to be performed.
• Use the Contingencies and Escalation Calculations forms (Appendix A) for that classification to estimate construction costs.
• For projects that do not fit into any of the seven classifications, the best results are usually obtained by searching out a previously completed project of a similar nature and adjusting its cost to reflect scope difference and price escalation.
Documents Generated
• Preliminary Design Engineer’s Estimate • Appendix A cost preparation sheets • Non-Standard Item List and Calculations • Standard Item List • Attachment List • Bid Tabulations • Final Engineer’s Estimate • Fuel and Asphalt Price Indices • Lump Sum Bid History Charts/Calculations • Summary Sheet
Security
The Engineer’s Estimate is a confidential document and is only to be given out to Department personnel on a need to know basis. The file drawers containing the Engineer’s Estimates are locked.
9
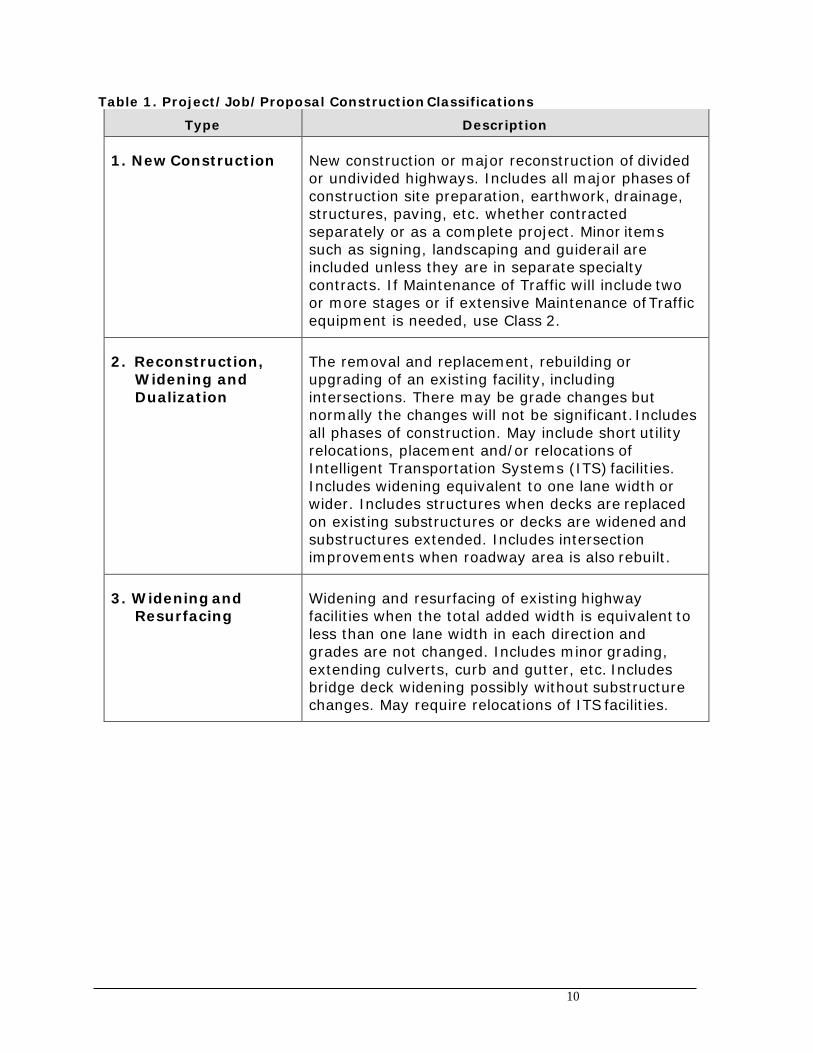
Table 1. Project/Job/Proposal Construction Classifications
Type Description 1. New Construction
New construction or major reconstruction of divided or undivided highways. Includes all major phases of construction site preparation, earthwork, drainage, structures, paving, etc. whether contracted separately or as a complete project. Minor items such as signing, landscaping and guiderail are included unless they are in separate specialty contracts. If Maintenance of Traffic will include two or more stages or if extensive Maintenance of Traffic equipment is needed, use Class 2.
2. Reconstruction,
Widening and Dualization
The removal and replacement, rebuilding or upgrading of an existing facility, including intersections. There may be grade changes but normally the changes will not be significant. Includes all phases of construction. May include short utility relocations, placement and/or relocations of Intelligent Transportation Systems (ITS) facilities. Includes widening equivalent to one lane width or wider. Includes structures when decks are replaced on existing substructures or decks are widened and substructures extended. Includes intersection improvements when roadway area is also rebuilt.
3. Widening and
Resurfacing
Widening and resurfacing of existing highway facilities when the total added width is equivalent to less than one lane width in each direction and grades are not changed. Includes minor grading, extending culverts, curb and gutter, etc. Includes bridge deck widening possibly without substructure changes. May require relocations of ITS facilities.
10

Type
Description
4. Resurfacing
Overlaying existing highways, and surfacing or overlaying existing shoulders with asphaltic material. Includes joint repair, minor widening with asphaltic materials, some base corrections or asphaltic base, curb and gutter replacement, and adjustments at structures, drives and street returns. Does not include extensive reconstruction, pavement replacement or construction of new pavements, excavation, utility or sewer work. Projects with milling operations may involve reconstruction of ITS device pavement sensors.
5. Bridge Repair
Repair of bridges, includes repairs to decks, curbs, rails, beams and structures. If total deck removal and replacement is required, the contract should be classified as reconstruction. Bridge Repair also includes bridge painting, which consists of the removal of lead based paint and the application of a high performance coating system.
6. Intersection
Improvements
Minor construction or reconstruction of street or highway intersections. Normally includes some removal, grading, drainage and paving. May include curb and sidewalk along with traffic signals installed at the intersection. If intersection pavement is to be rebuilt, the contract should be classified as reconstruction.
7. Electrical, Safety,
and Traffic Control
Placement, replacement and betterment of guiderail, signs, striping, traffic signals, highway lighting, sign lighting, electrical signs, movable bridge electrical systems and other safety and traffic control devices, along streets and highways, when let on a specialty contract basis. If electrical, safety and traffic control devices are included as part of a major contract type, they should be included under the miscellaneous activities for that type.
AASHTOWare Project Estimation™ Users Guide 11

8. Miscellaneous
Construction activities, let on a specialty contract basis, not assignable to other work classes. Includes demolition of buildings, removal of asbestos, and railroad pavement painting.
9. Unique
Construction activities of a distinctive nature, which is let on a specialty contract basis. Includes wetland replacement and restoration.
10. Intelligent Transportation Systems (ITS)
Construction of ITS devices and communication networks. Systems include computerized traffic signal control, dynamic message signs, closed circuit television, highway advisory radio, fiber optics and wireless technologies, traffic detection, weather station and data development traffic monitoring. Includes the integration of proposed devices with Traffic Operation Centers central control systems and interagency resource sharing through the regional and statewide ITS Architectures. If ITS systems are included as part of a major contract type, they should be included under the miscellaneous activities for that type.
11. Landscape
Design and installation of landscape architectural elements to enhance transportation facilities or to mitigate environmental and negative effects caused by transportation facility improvements. Work includes functional, aesthetic and safety plantings, reforestation, wetland mitigation, urban streetscapes, bicycle and pedestrian improvements, and structures aesthetics. This work may be part of other contracts or as independent contracts.
12. Demolition
Advanced Demolition of Buildings - the demolition and removal of buildings and appurtenances within acquired ROW, in advance of the main construction contract. Clearing Site, Underground Storage Tank Removal, Sealing of Abandoned Wells, and Asbestos Remediation could be included in this type of project.
13. Drainage
Includes cleaning, inspecting, capacity restoration and in-kind repairs to highway drainage facilities.
AASHTOWare Project Estimation™ Users Guide 12

Overview of Getting Started
The Getting Started section describes how to use features in web-based AASHTOWare Project to complete basic tasks. Carefully review these topics to make your first experiences with the software easier and more intuitive.
Setting Up Your Browser
Because web-based AASHTOWare Project is a web application, correct browser settings are an important part of making sure the application performs as it should. The information in this topic will help you to set your web browser options correctly.
Using the Correct Browser
Web-based AASHTOWare Project is designed to run on Google Chrome or Internet Explorer, versions 10 and 11 (IE10 and IE11). If you are using Internet Explorer, make sure you update your browser to one of these versions.
Setting the Browser Mode in Internet Explorer
If you will use Internet Explorer set your browser mode.
Instructions
To ensure the browser mode is properly set:
1. Open the Internet Explorer browser.
2. Press the Alt key to display the toolbar.
3. From the Tools menu, select Compatibility View Settings.
The browser opens a Compatibility View Settings dialog window.
4. In the Compatibility View Settings window, clear the Display intranet sites in Compatibility View check box.
5. Click the Close button. Setting Internet Options in Internet Explorer
Set your internet options and enable your Data Object Model (DOM) storage.
AASHTOWare Project Estimation™ Users Guide 13
Note: If the AASHTOWare Project website is hosted on a server outside of the agency’s local intranet, ensure that the Internet Explorer option for Font Download is set to Enable for the Internet security zone. If enabling font downloads is undesirable or prohibited by group policy settings for the domain, add the AASHTOWare Project website to the list of Trusted Sites. This enables the system to properly display icons.
Instructions
To ensure the browser internet options are properly set and that the DOM storage is enabled:
1. Open the Internet Explorer browser.
2. Navigate to the Tools menu, and select Internet Options.
The browser displays the Internet Options dialog box.
3. Under Browsing History, click the Settings button.
The browser displays the Temporary Internet Files and History Settings dialog box.
4. For the Check for newer versions of stored pages setting, click the Every time I visit the webpage option.
5. Click the OK button.
6. In the Internet Options dialog box, click the Advanced tab.
7. In the Settings box, scroll down to the Security section, and ensure the Enable DOM Storage option is selected.
8. 8. Click the OK button. Logging On
AASHTOWare Project is a web-based application. Start AASHTOWare Project by opening a web browser and entering the address of the program.
Note: You will receive your agency’s website link and your username and password from your agency.
Instructions
To log on to AASHTOWare Project:
AASHTOWare Project Estimation™ Users Guide 14

1. In Internet Explorer, navigate to the AASHTOWare Project web address supplied by your agency.
An Internet Explorer web browser displays the AASHTOWare Project logon page.
2. In the Username field, type your username.
3. In the Password field, type your password.
4. In the Domain field, click the drop-down arrow and select the appropriate domain.
5. Click the Log on button.
Using Online Help
The AASHTOWare Project Help system provides a wealth of information immediately available to you while you work. Understanding how the Help system works makes it easier to find the information you need.
When you access the context sensitive Help, the system displays information for the current component, with no further searching needed.
Search
The Search pane provides a rapid full-text search of all the topics in the Help system.
Note: If your search phrase includes words that can be mistaken for the operators Or, And, or Not, place your search terms in quotation marks. For example, if you want to search for information on the tab “Bids Not On Proposal”, place the tab name in quotation marks. Otherwise the search will not return the desired results.
Instructions
To view the online help:
1. On the Menu bar, click the system Help button.
2. Click the Search button.
3. In the Type in the word(s) to search for field, type a search term.
4. Click the GO button.
5. Click on the appropriate link.
6. View the information.
AASHTOWare Project Estimation™ Users Guide 15

7. Click the Close button to close the help window.
8. To access the context sensitive help for any component, on the Menu bar click the Help button.
9. View the information on the help window. 10. Close the Help window.
Navigating in Web-Based AASHTOWare Project Web-based AASHTOWare Project components and webpages include a variety of features to help you navigate more easily through the system. The features described in this section are standard throughout the system.
Dashboard When you log on to the system, the software opens on the dashboard. You can also go to the dashboard at any time by clicking the Home button on the Menu bar. The dashboard contains one or more components. Each component is identified by a title set within a blue header bar. Each component provides access to the information and processes required for a specific area of your agency's work.
Menu bar The system displays the Menu bar at the top of every webpage in the system. The buttons and menus on this bar help you to move quickly through the system to visit the pages and components you use most often.
Quick Links Quick links are displayed in blue text below the Menu bar and above the webpage title. These links allow you to quickly jump to application pages related to the current page.
Hypertext Links
Hypertext links can be located anywhere on an application component or webpage and are identified by blue underlined text. When clicked, a link takes you to another component or page, usually one containing more detailed information than what is available in the current component.
Icons Icons are small images throughout the system that either convey information or can be clicked to perform an action. For example, a red asterisk icon indicates a required field. An eraser icon in a Quick Find search box can be clicked to reset search criteria.
AASHTOWare Project Estimation™ Users Guide 16
Alternate Paths
Keep in mind that all of the various navigational elements, such as hypertext links, quick links, recent pages, and Actions menus, can all provide different ways of accomplishing the same task. The same command might be accessible from an Actions menu or as a link.
Bookmarks You can bookmark specific pages in the software just as you would for any other website.
Logging Off You can log off the system at any time by clicking the Log off button on the Menu bar on any page in the application. When you log off, the system ends your session and takes you to the logon page.
Instructions
To log off AASHTOWare Project:
1. On the Menu bar, click the Log off button.
Understanding Your Role
A user role is a name associated with a collection of security access rights to the information contained in system components. Roles combine the permissions needed for several related tasks and allow you more efficient access to the parts of the system you need. Roles are designed by your agency and assigned to you by your system administrator.
Depending on your agency options, you may have one or more roles. You can switch your role at any time while working in the application.
Instructions
To view and change your active role:
1. From within AASHTOWare Project, on the Home button, click the drop-down arrow.
2. Select the appropriate role.
The system will update the functionality you have access to based on the selected role.
AASHTOWare Project Estimation™ Users Guide 17

Viewing Recent Activity
The Previous Activity Overview component contains a list of the most recent pages and components you have visited in your currently active role.
Instructions
To view and maintain recent activity:
1. On the Previous button, click the drop-down arrow.
2. From the list of recent windows, select the entry for the appropriate window to which to navigate.
Viewing My Pages
The My Page Overview component contains a list of all the pages you have added to your My Pages list for your active role. This component functions similarly to a list of favorites in a browser.
Instructions
To view and maintain My Pages:
1. Click the My Pages button, and select the appropriate page.
2. To maintain My Pages, on the My Pages button, click the dropdown arrow.
3. Click Remember this Page.
4. Click the Close button in the My Pages pop-up window. Using Components
The web-based AASHTOWare Project system displays information in application components. A component is a container for the information and business functions on an application webpage. Components are made up of elements such as fields, lists, and links. Some components contain a list of tabs along the left side, each of which corresponds to a subset of information related to the component entity.
Note: To protect the information contained in your agency's system, components and webpages only display the information and action features for which your active role has been assigned access.
AASHTOWare Project Estimation™ Users Guide 18
Component features include:
Component header with Save, Actions, and Help button
Vertical Scroll Bar
Fields
Lists
Filters
Actions menus
Modal windows
Tabs Working with Fields
Fields are the most common element found on components. Information can be recorded in fields. You can move from one field to another by pressing the Tab key or moving your pointer to the field and clicking the left mouse button. The system has several different types of fields, as described below.
Text Boxes Directly type or delete information.
Numeric Fields
Numeric fields allow only numeric characters.
Autocomplete Fields
Auto-complete fields are similar to text boxes except that they automatically display a filtered list of field values based on the first few characters typed into the field.
Date Fields Date fields include a calendar button next to the field. Click the calendar button to display a calendar and select a date to populate the field.
Drop-down List Boxes
Drop-down list boxes include a down arrow next to the field. Click the drop-down arrow to display a list of possible field values.
Non-editable Fields
Non-editable fields display information without a text box. The information cannot be changed.
AASHTOWare Project Estimation™ Users Guide 19

Check Boxes Check boxes are square boxes that can be selected or cleared by positioning the mouse pointer over them and clicking the left mouse button. Check boxes are used to turn an option on or off.
Agency Fields
Agency fields look and behave like any other field, but have been customized for purposes specific to an agency.
Entering Data in a Range of Fields
The Range Fill feature provides a quick way to copy the same value to the same field on multiple rows of a list. For example, if you are granting contract authority to a number of people on a contract, you can add each person and then use range fill to enter the same role or effective date for all of them at one time. Fields that allow range fill are determined by your agency and are identified by a gray down arrow beside the field's label.
Note: Rows with fields that are read-only are included in the count but skipped in the range fill.
Instructions
To use the range fill feature:
1. Navigate to the appropriate overview or summary window.
2. Select a row and field containing the value you want to copy to a range of fields.
3. Click the Range Fill button (gray down arrow) on the field containing the value you want copy.
The system opens the Range Fill overlay. You can also open the Range Fill overlay by clicking in or tabbing to the field and then pressing ALT+1.
4. In the Rows field, type the number of rows you want in the range that will be filled.
5. If the range you want filled extends downward from the selected field, select the Down
option, or if the range extends upward, select the Up option.
6. Alternatively, you can select a check box to copy the value to the field in all of the rows displayed in the component or all of the rows in the list.
7. Click the Fill button to fill the range of fields with the copied value.
8. To close the overlay without filling the range of fields, click the Close button.
AASHTOWare Project Estimation™ Users Guide 20

The system copies the value to the specified range of fields and displays an Undo button beside each field populated with the range fill. Click the Undo button on any range filled field to revert to its previous value.
Working with Lists
Many system components contain lists of rows for a type of data, such as projects or proposals. You can browse list information using the scroll bar on the right side of the component. The system has several different types of lists, as described below.
Simple Lists These are read-only lists of information. If the rows in a simple list contain enough information, they may be collapsed or expanded.
Rolling Lists These typically contain only a few fields, and no more than two lines of information per row. Rolling lists are used for quick entry, maintenance, or view.
Accordion Lists
Used to manage rows that require input into more fields than allowed in a rolling list. A row in an accordion list can be expanded or collapsed by clicking the expand/collapse button.
Grouped Lists
Some components allow data in lists to be grouped relative to a field from that list.
Grouped Associations
Grouped associations are similar to grouped lists, except that the data is grouped according to an association between multiple entities, not a field contained in the list.
Selection Lists
To select a single data row, click anywhere inside the row. The system adds a green check mark beside each row you select and shades the row blue. To cancel a selection, click the selected row again.
Sorting and Filtering Lists
System components with lists allow you to sort and filter the list to make it easier to find specific rows. You can create advanced sorts and filters that search on multiple criteria.
Using the Quick Find Search Box
A Quick Find search box is standard on each component that contains a list. It searches all rows in the list for a string of text and then displays only rows with fields containing that string.
AASHTOWare Project Estimation™ Users Guide 21

Note: The Quick Find search is not case sensitive.
Note: The word Temporary appears next to the Quick Find search field when a sort or filter is
applied to the results list.
Instructions
To use the Quick Find search box:
1. Navigate to the appropriate overview window.
2. In the Quick Find search box, type the appropriate search term. Using Advanced Sorting and Filters
Every system component that contains a Quick Find search box provides an Advanced filter link that allows you to create and save custom sorts and filters that search on multiple criteria.
Filtering
Instructions
To create and save a filter using the Advanced Filter/Sort window:
1. Next to the Quick Find search box, click the drop-down arrow.
2. Scroll to and click the Advanced link.
3. In the Filters field, click the drop-down arrow to display a list of all the columns in the component (including hidden columns).
4. Select the column by which to filter.
The system displays a list of operators appropriate for the chosen column and a field for entering the value you want to match (depending on the column you are filtering, this may be a text box, a check box, or a tool for selecting a date).
5. Click the drop-down arrow and select the operator you want to use to narrow your filter.
6. Enter the value you are trying to match or want to use as a delimiter (if a text box, the
filter is not case-sensitive).
7. In the Apply Setting section, in the Save as box, enter the name for which to save your search criteria for future use.
AASHTOWare Project Estimation™ Users Guide 22

8. Click the Save and Apply button.
Note that to perform a search without saving the search criteria, simply click the Apply without saving button and do not enter a Save as name.
Sorting
Instructions To create a sort:
1. Next to the Quick Find search box, click the drop-down arrow.
2. Scroll to and click the Advanced link.
3. In the Sort field, click the drop-down arrow to display a list of all the columns in the component (including hidden columns).
4. Select the column by which to sort.
The component information will sort in ascending order.
5. To sort the selected column in descending order, click in the Sort descending check box.
6. Click the Apply without saving button.
Note that to save your sort criteria, in the Save as field, enter a name for your sort and click the Save and Apply button.
Modifying Saved Settings
You can modify the filter and sort settings that you save.
Instructions
To modify a saved filter or sort setting:
1. Next to the Quick Find search box, click the drop-down arrow.
2. Scroll to and click the Advanced link.
3. In the Editing section, click the drop-down arrow and select the saved filter or sort to modify.
AASHTOWare Project Estimation™ Users Guide 23
4. Change information in columns, operators, and values as needed. Deleting Saved Settings
You can delete saved filter and sort settings.
Instructions
To delete a saved filter or sort setting:
1. Next to the Quick Find search box, click the drop-down arrow.
2. Scroll to and click the Advanced link.
3. In the Editing section, click the drop-down arrow and select the filter or sort to delete.
4. Click the Delete this setting link.
5. Click the Close button. Using Operators with the Advanced Filter
The user’s guide contains a table showing which operators can be used with the Advanced Filter to filter different kinds of data.
Using Actions Menus
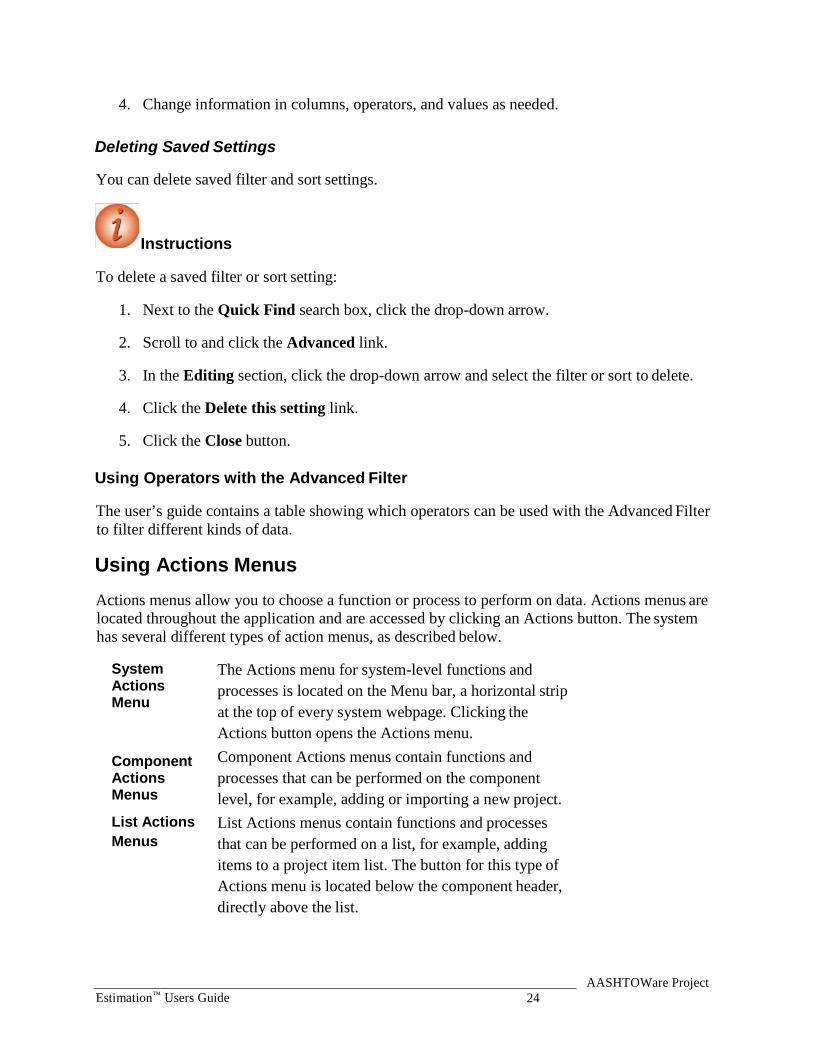
Actions menus allow you to choose a function or process to perform on data. Actions menus are located throughout the application and are accessed by clicking an Actions button. The system has several different types of action menus, as described below.
System Actions Menu
The Actions menu for system-level functions and processes is located on the Menu bar, a horizontal strip at the top of every system webpage. Clicking the Actions button opens the Actions menu.
Component Actions Menus
Component Actions menus contain functions and processes that can be performed on the component level, for example, adding or importing a new project.
List Actions Menus
List Actions menus contain functions and processes that can be performed on a list, for example, adding items to a project item list. The button for this type of Actions menu is located below the component header, directly above the list.
AASHTOWare Project Estimation™ Users Guide 24

Row Actions Menus
Row Actions menus contain functions and processes that are performed on an individual data row in a list, for example, adding or deleting an item. The Actions button is located on the right side of each row.
Row Actions menus on a worksheet list are different from those on other types of lists.
Reviewing Action Menus
Instructions
To review component and row actions:
1. Navigate to the appropriate window.
2. Click the component Actions button to view the available actions, tasks, or views for the component.
3. In the component Actions menu, click the Close button.
4. For any row in a list, click the row Actions button to view the available actions, tasks, or
views for the row.
5. In the row Actions menu, click the Close button. Duplicating and Inserting Rows
In rolling lists and accordion lists, when you click the New button, the system automatically adds the new row as the last row in the list, or you can insert a new row in a specific location within the list.
If you are adding a row that is similar to an existing row, you can save the time it would take to enter all the identical information by copying the existing row and assigning it a new identifier. You can then make any minor changes required for the new row.
Selecting Data in Modal Windows
A modal window is a secondary pop-up window associated with a component. While a modal window is open, you cannot work in the associated component, but you can reposition the modal window to view information behind it.
AASHTOWare Project Estimation™ Users Guide 25

Modal windows are used when you add one or more rows of data to an entity, to select the records you want to add. Each modal window includes a Quick Find search box to help you find the data you want to add. To select data to add, click anywhere inside its row. The system adds a green check mark beside each row you select and shades the row blue. When you have selected all the data you want to add in a selection modal window, click the Add button.
AASHTOWare Project Estimation™ Users Guide 26

Global Actions
Overview of Global Actions
The Global Actions section describes how to use features that are available in all business areas of the AASHTOWare Project system. You can access these features from any webpage in the system by clicking the Actions menu on the Menu bar.
Using Processes
Executing Processes
You can execute several different types of processes in the system, including importing and exporting information and running custom processes.
Instructions
To execute a process:
1. Click the global Actions button.
2. Click the Execute Process action.
3. Select the process to execute.
The system displays a list of all the data in the system that match your search criteria.
4. Select the data to include in the process, if applicable.
5. To schedule the process to run at a later time, in the Settings field on the component subheader, click the drop-down arrow and select Schedule Process.
6. To set parameters for the process, in the Settings field on the component subheader, click
the drop-down arrow and select Set Parameters.
7. Click the Execute button. Scheduling a Process
By scheduling a process, you can set the system to automatically execute that process on a daily, weekly, monthly or a one-time basis. You can create a schedule for any process in the system.
AASHTOWare Project Estimation™ Users Guide 27

Instructions
To schedule a process:
1. From the Execute Process component, in the Settings field on the component subheader, click the drop-down arrow and select Schedule Process.
2. Click the Enable Scheduling check box.
3. In the Schedule Frequency field, click the drop-down arrow and select how often you
want the process to run.
Note that the fields that appear will vary depending on the chosen frequency.
4. Enter values into the fields as appropriate for the chosen frequency.
5. Click the Schedule button to save the new process schedule and continue to define the process to execute.
Viewing Process History
The Process History Overview component allows you to check on the status of all processes you are running at any time, including system and scheduled processes.
Instructions
To view the status of a process:
1. Click the global Actions menu.
2. Select the Open Process History action.
3. In the Quick Find search box, search for and select the process to view.
4. View the process history. Viewing System Process History
The System Process History tab on the Process History Overview component allows you to view the status and output of system processes (processes executed automatically by the system).
Instructions
To view the status of system processes:
AASHTOWare Project Estimation™ Users Guide 28
1. From the Process History Overview component, click the System Process History tab.
2. View the system process history. Viewing Scheduled Processes
Instructions
To view the status of scheduled processes:
1. Click the Scheduled tab.
2. View the scheduled process history. Viewing and Saving Process Output Files
Instructions
To view and save an output file for a completed process:
1. Click the Process History tab.
2. For the appropriate process, click the Output Files link to view the output file.
3. Click the Save button. 4. Follow browser instructions to save the file.
Using Reports
The AASHTOWare Project applications contain a number of standard reports. For more information about how to generate reports, as well as information about the standard reports for this application, see page 78 this manual, Help and below.
The reports that were previously obtained via Citrix/Crystal Reports are now available within the AASHTOWare Project software. The following reports are now in this software:
• Item List by Specification Year • Job Estimate by Category with Alternate Items • Job Estimate by Job ID and Category • Obsolete Item List by Specification Year • Ratable Category Report
AASHTOWare Project Estimation™ Users Guide 29
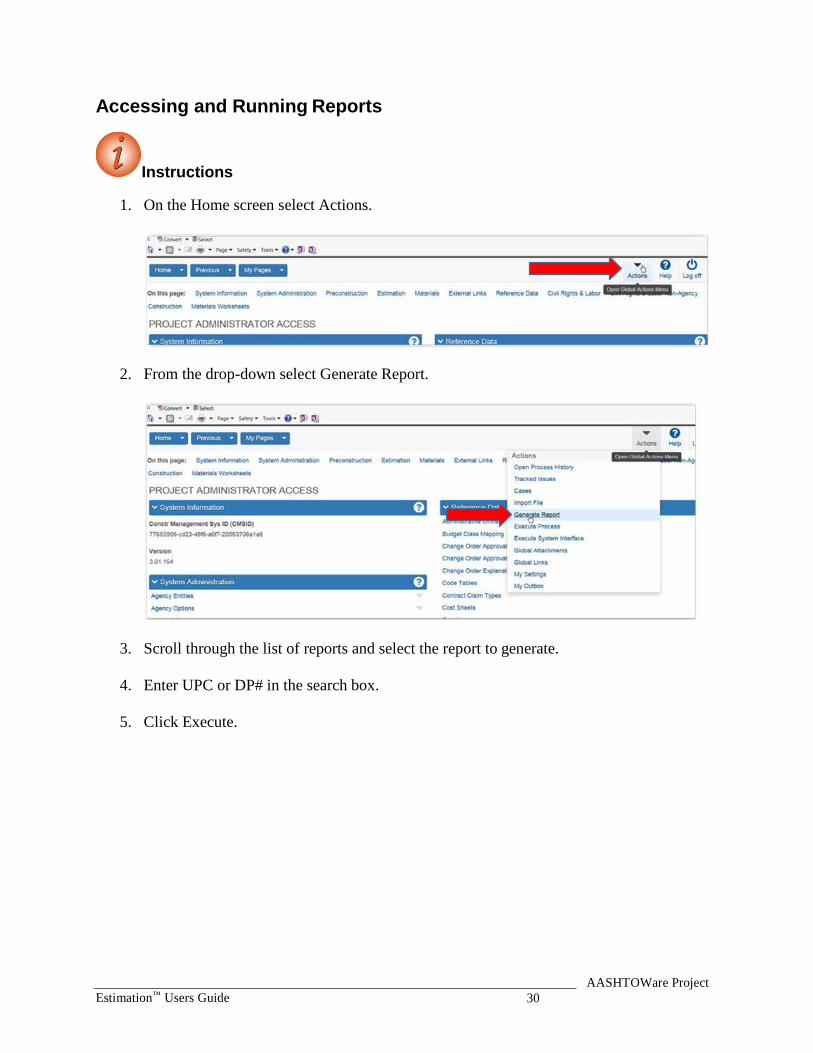
Accessing and Running Reports
Instructions
1. On the Home screen select Actions.
2. From the drop-down select Generate Report.
3. Scroll through the list of reports and select the report to generate.
4. Enter UPC or DP# in the search box.
5. Click Execute.
AASHTOWare Project Estimation™ Users Guide 30
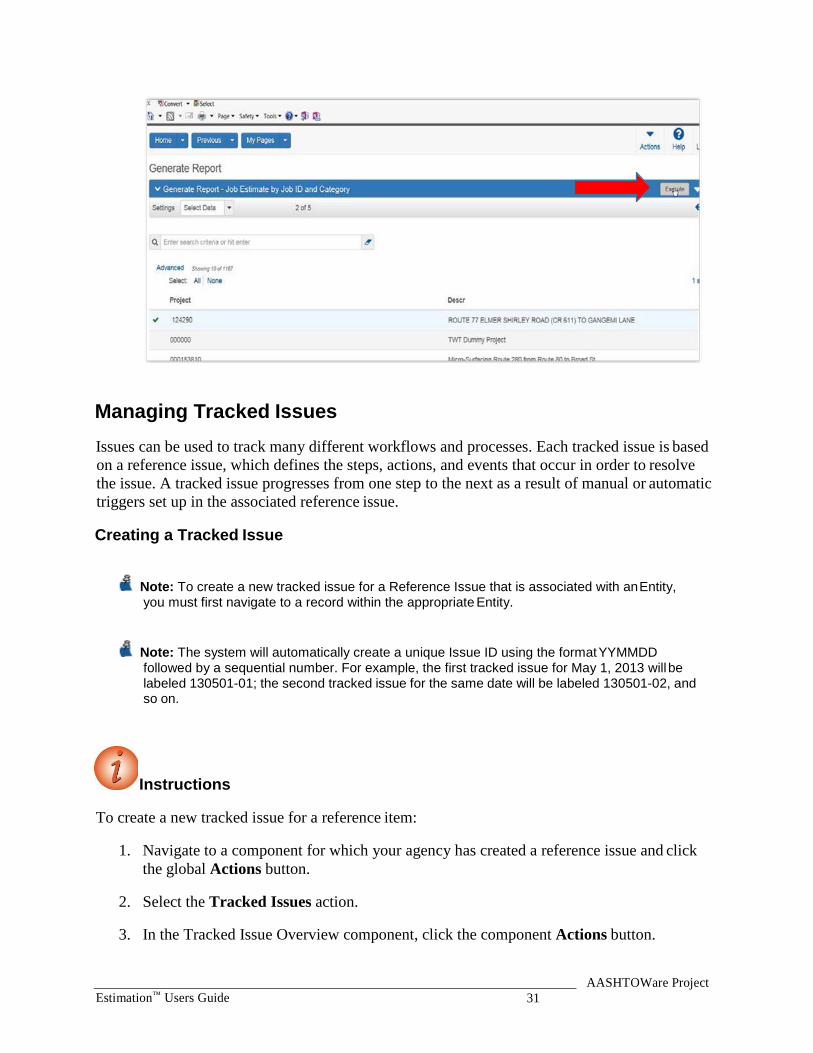
Managing Tracked Issues
Issues can be used to track many different workflows and processes. Each tracked issue is based on a reference issue, which defines the steps, actions, and events that occur in order to resolve the issue. A tracked issue progresses from one step to the next as a result of manual or automatic triggers set up in the associated reference issue.
Creating a Tracked Issue
Note: To create a new tracked issue for a Reference Issue that is associated with an Entity, you must first navigate to a record within the appropriate Entity.
Note: The system will automatically create a unique Issue ID using the format YYMMDD followed by a sequential number. For example, the first tracked issue for May 1, 2013 will be labeled 130501-01; the second tracked issue for the same date will be labeled 130501-02, and so on.
Instructions
To create a new tracked issue for a reference item:
1. Navigate to a component for which your agency has created a reference issue and click the global Actions button.
2. Select the Tracked Issues action.
3. In the Tracked Issue Overview component, click the component Actions button.
AASHTOWare Project Estimation™ Users Guide 31

4. Click the Create Tracked Issue action.
5. In the Quick-Find search box, type criteria to locate the reference issue you want to use as a basis for the tracked issue.
6. Click the row for the appropriate reference issue.
7. Click the Create Tracked Issue button. Maintaining a Tracked Issue
The Tracked Issue Summary contains all the information recorded for the tracked issue.
Instructions
1. Click the Issue ID for the issue.
The system displays the Tracked Issue Summary component.
2. On the General tab, modify the information as necessary.
3. Click the Save button. Maintaining Tracked Issue Communication
The Tracked Issue Communication Summary enables you to record a log of communication activities related to the tracked issue.
Instructions
To maintain tracked issue communication:
1. Click the Communication quick link.
2. In the Remarks section, modify the information as necessary.
3. In the Journal section, modify the information as necessary. 4. In the Email section, modify the information as necessary.
5. In the Phone section, modify the information as necessary.
6. Click the Save button.
AASHTOWare Project Estimation™ Users Guide 32

Maintaining Tracked Issue Owners
By default, the owners of a new tracked issue are the owners specified on the associated reference issue.
Instructions
To view tracked issue owners:
1. Click the Tracked Issue quick link.
2. Click the Owners tab.
3. View the information in the Current Step Owners and Issue Owners sections. Maintaining Tracked Issue Messages
The Messages tab is displayed on the Tracked Issue Summary component only when the current user account is the issue manager or the primary owner of the tracked issue. The tab is not available to other users. The Messages tab lists error messages that occurred during events performed by the system as part of the tracked issue. This log enables you to review error messages and delete them as needed.
Instructions
To view tracked issue messages:
1. Click the Messages tab.
2. View the messages. Maintaining Tracked Issue Steps
The Tracked Issue Steps component provides you with access to information recorded about each step in the tracked issue. At the top of the Tracked Issue Steps component, a diagram provides a visual representation of each step in the process. When you click a step in the diagram, the system shades the step in blue, and the component is updated to display information about the selected step. You can continue clicking different steps in the diagram to view information about that step in the tracked issue.
AASHTOWare Project Estimation™ Users Guide 33

Instructions
To view the Tracked Issue Steps component.
1. Click the Tracked Issue Steps quick link.
2. View the information within the Actions, Remarks, Attachments, and Links sections. Using Cases
A case is a collection of tracked issues. Each tracked issue is based on a reference issue, which determines the actions, events, and steps that are performed in order to resolve the issue.
Instructions
To view a case:
1. Click the global Actions button.
2. Select the Cases action.
3. In the Quick Find search box, search for and select the appropriate case.
4. View the tracked issues associated to the case. Adding a Case
The Add Case component enables you to enter a name and description for a new case.
Instructions To add a new case:
1. Click the Overview quick link.
2. Click the component Actions button and select the Add action.
3. In the Name field, type the name of the case to add.
4. In the Description field, type the description of the case.
5. Click the Save button.
AASHTOWare Project Estimation™ Users Guide 34

Note that the system opens the Case Summary window. Adding Tracked Issues to a Case
Instructions
To add a tracked issue to a case:
1. In the Case Summary component, click the Select Tracked Issues button.
2. Search for and select the row for each tracked issue to add. 3. Click the Add to
Case and Save button.
Working with Attachments
Attachments provide an easy way to integrate outside information of various kinds into your project, proposal or any other system entity. Examples of the types of files you might attach include Microsoft® Word documents, Excel spreadsheets, PDFs, URLs, digital photographs and other types of graphic files.
Attachments are accessed on any component by clicking the Actions button on a row or component header.
The Attachments Overview component contains a list of rows for all the files that have been attached to the entity by you or another user with your active role.
Attaching a File to a Row
Instructions
To add an attachment:
1. Navigate to the component that contains the row to which you want to attach the file.
2. Click the component or row Actions button and select the Attachments view.
3. Click the Select File button.
4. In the Choose File to Upload window, navigate to the directory where the file is located and click the file to attach.
5. Click the Open button.
AASHTOWare Project Estimation™ Users Guide 35

6. In the Description field, type a description for the attachment.
7. Click the Save button. Granting Security Access to an Attached File
You can allow users with other roles to have access to attachments.
Instructions
To grant users with other roles access to the attachment:
1. On the attachment’s row, click the row Actions button and click Select Roles.
2. In the Quick Find search box, search for and select the roles to add.
3. Click the Add to Attachment button.
4. Click the Save button. Removing Security Access to an Attached File
Instructions
To remove access to the attachment for users with a specific role:
1. Click the expand arrow for the attachment from which to remove a role.
The system displays a list of the roles that are assigned access to the attachment.
2. Select the role to remove.
3. Click the Mark for Deletion button.
4. Click the Save button. Using Global Attachments
The Global Attachments Overview component allows you to view and change two types of global attachments: Attachments are attached files that you have permission to view, but are attached to
entities you do not have permission to access. System Attachments are files not attached to a specific entity.
AASHTOWare Project Estimation™ Users Guide 36

You can access the Global Attachments Overview from any page in the application. For the system attachments that you create, you can also grant and remove security access to roles, as shown in the sections above.
Instructions
To view global attachments:
1. On the Menu bar, click the system Actions button.
2. Click the Global Attachments action.
The Attachments tab lists any attached files that you have permission to view, but that are attached to entities you do not have permission to access.
3. Click the attachments name link to open the attachment in the attached file’s application.
4. Close the attached file’s application when you have finished reviewing the attachment.
5. Click the System Attachments tab.
The System Attachments tab lists any attached files that you have permission to view that are not attached to a specific entity.
6. Click the attachments name link to open the attachment in the attached file’s application.
7. Close the attached file to return application when you have finished reviewing the
attachment. Working with Links
You can attach a link to an outside website address (also known as a URL) to your project, proposal, or any other entity in the system. Any user with your active role who has permission to access the entity will be able to access the attached link. You can also give users whose role does not allow them access to the entity permission to access the attached link.
You can access links on any component by clicking the Actions menu on a row or component header, and then clicking the link you want to follow.
Use caution when granting role access rights that allow users to create links (Assign Role Access Rights component, Resources tab, URLAttachments) and assign access to those links (Assign Role Access Rights component, Resources tab, URLAttachmentRoles). Users granted access to creating links could potentially create a link to malware or a malicious resource. If that occurred, any user with authority to access the link could click it, which may lead to undesired consequences.
AASHTOWare Project Estimation™ Users Guide 37
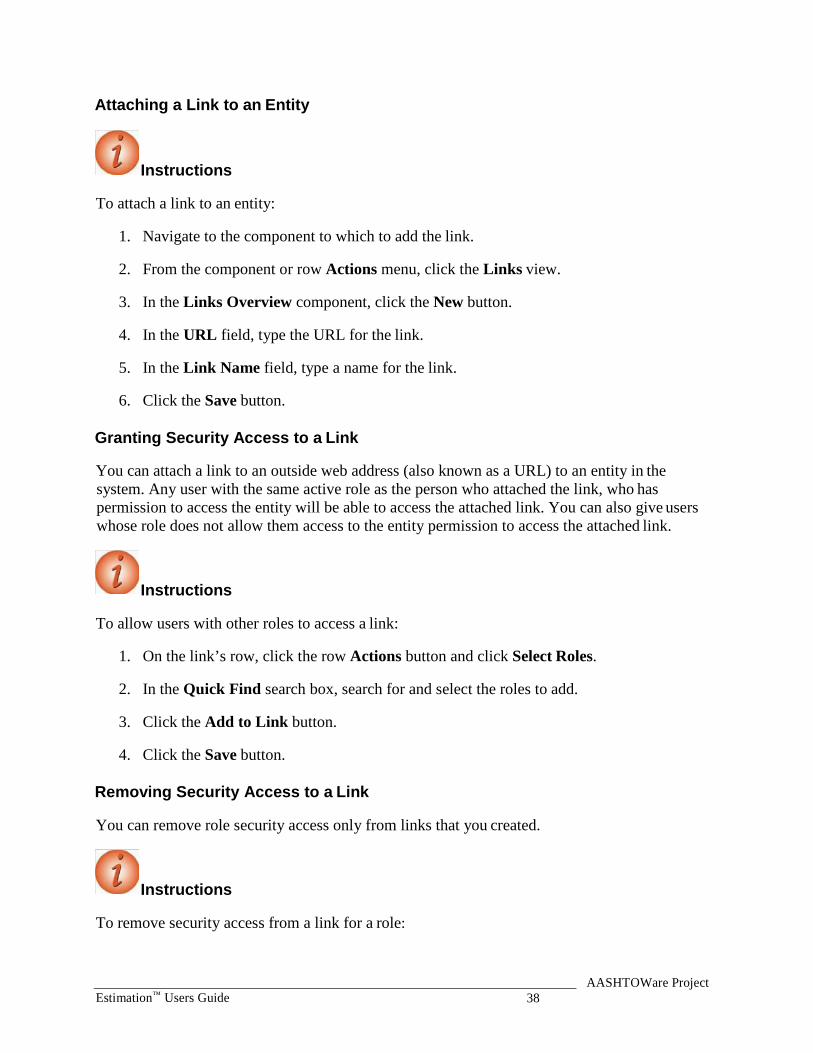
Attaching a Link to an Entity
Instructions
To attach a link to an entity:
1. Navigate to the component to which to add the link.
2. From the component or row Actions menu, click the Links view.
3. In the Links Overview component, click the New button.
4. In the URL field, type the URL for the link.
5. In the Link Name field, type a name for the link.
6. Click the Save button. Granting Security Access to a Link
You can attach a link to an outside web address (also known as a URL) to an entity in the system. Any user with the same active role as the person who attached the link, who has permission to access the entity will be able to access the attached link. You can also give users whose role does not allow them access to the entity permission to access the attached link.
Instructions
To allow users with other roles to access a link:
1. On the link’s row, click the row Actions button and click Select Roles.
2. In the Quick Find search box, search for and select the roles to add.
3. Click the Add to Link button.
4. Click the Save button. Removing Security Access to a Link
You can remove role security access only from links that you created.
Instructions
To remove security access from a link for a role:
AASHTOWare Project Estimation™ Users Guide 38

1. Click the expand arrow for the link from which to remove a role.
The system displays a list of the roles that are assigned access to the link.
2. Click the Mark for Deletion button at the end of each row from which you want to remove access.
3. Click the Save button. Using Global Links
Links provide a convenient way to access an outside website while working in the system. The Global Links Overview component allows you to view and change two types of global links: Links are links that you have permission to access, regardless of whether you have
permission to access the entities associated with the links. System Links are links that are not attached to a specific entity.
You can access the Global Links Overview from any page in the application. You can also grant and remove security access to roles, as shown in the sections above.
Instructions
To view system links:
1. On the Menu bar, click the global Actions button.
2. Click the Global Links action.
The Links tab lists the links that you have permission to access, but that are linked to entities you do not have permission to access.
3. Click the Link name to open the web page.
4. Close the web browser when you have finished reviewing the link.
5. Click the System Links tab.
The System Links tab lists any links that you have permission to view that are not attached to a specific entity.
6. Click the Link name to open the web page.
7. Close the web browser when you have finished reviewing the link.
AASHTOWare Project Estimation™ Users Guide 39

Managing My Settings
The My Settings component contains information about your user account and your email address. For new users, agencies may choose to set the New User Help option to open to the Role-Based Workflows help topic when you click the Help button on the Menu Bar.
Instructions
To view information on the User Information tab and clear the New User Help check box:
1. On the Menu bar, click the system Actions button.
2. Click the My Settings action.
3. Review your user information.
4. Click the New User Help check box to check or clear the check box.
5. Click the Save button. Changing Your Email Address
The Email tab on the My Settings component contains the email address currently recorded for your user account, and allows the address to be changed when needed.
Note: If an email address has been entered for your user account, the Email tab is displayed. If the Email tab is not displayed and you want to enter your email address, contact your system administrator. After your system administrator has granted you permission to enter your email address, the next time you log on to the system, you will be prompted to enter and confirm your current email address.
Instructions To view the Email tab:
1. Click the Email tab.
2. Review your current email address.
3. In the New Email Address field, enter your new email address.
4. In the Confirm Email Address field, enter your new email address again. 5. Click the Save button.
AASHTOWare Project Estimation™ Users Guide 40

Managing My Outbox Working with Email Messages
The Outbox Overview component enables you to view and delete email messages sent within the system from the current user account. It also enables you to send new messages to other system users. In order to send a message, an email address must be recorded in the system for both the sender and the recipient user accounts.
Instructions
To view the Outbox Overview component:
1. On the Menu bar, click the global Actions button.
2. Click the My Outbox action.
A list of email messages you sent from within the system is displayed. Creating an Email Message
You may send an email message to another user in the system. In order to send a message, an email address must be recorded in the system for both the sender and the recipient user accounts.
Instructions
To create a new message:
1. Click the Create Message button.
2. To select an individual email address, in the Recipient field, begin typing an email address or click in the field and press the Enter key to see all email addresses.
3. Click on the appropriate email address from the list.
4. To select multiple email addresses, click the list Actions button next to the New button.
5. Click the Select Recipients action.
6. In the Quick Find search box, type the name of the recipient or click in the field and
press the Enter key to see all email addresses.
7. Click the rows for the recipients to add to the email.
8. Click the Add to Message button.
AASHTOWare Project Estimation™ Users Guide 41

9. In the Subject field, type a subject for the email.
10. In the Message Text field, type a message.
11. Click the Send button. Creating Dynamic Mailing Groups
A mailing group is a collection of names and email addresses that can be selected as the recipient of an email message. A mailing group can include email addresses for a person, vendor, administrative office, or other entity that has an email address entered in the system.
Instructions
To create a new dynamic mailing group:
1. Click the Dynamic Mailing Groups quick link.
2. Click the New button.
3. In the Name field, enter a descriptive name for the mailing group.
4. In the Filter section, click the drop-down arrow and select the appropriate filter criteria.
Note that additional criteria fields are now available. Depending on the filter criteria selected, different options are available in the additional fields.
5. In the middle field, click the drop-down arrow and select the operator for the filter.
6. In the third criteria field, select or enter the values by which to filter.
7. You may select additional filter criteria in the second Filter row.
8. Click the Test Filter Results button.
This allows you to preview the user names and email addresses that will be included in the mailing group as a result of the filter criteria statement.
9. Click the Save button.
AASHTOWare Project Estimation™ Users Guide 42

Working with Concepts and Estimates Adding a Concept Frequently, highway construction projects and contracts are classified into general classifications such as new construction, rehabilitation, widening, preventative maintenance, etc. While these improvement type classifications are important for program budgeting and reporting purposes, they are limited for the purpose of classifying contracts based on task functionality. For example, some widening jobs are heavy on asphalt items while others are heavy on earthwork, drainage and/or concrete items. Better functional classification of contracts allows more accurate market determination, which will improve the State’s ability to examine competition and bidding issues using the AASHTOWare Project BAMS/DSS system. From an estimating perspective, work type (and major item) classifications can be used effectively to improve project cost estimation using AASHTOWare Project Estimation.
A recommended list of contract work types is provided in the following table. Using these functional work types allows for better identification and grouping of like contracts for the purpose of determining and analyzing the markets where like contractors interact for various contracting functions (e.g. asphalt, earthwork, structures). Also, since AASHTOWare Project BAMS/DSS is the source for historical bid prices, consistent use of work type and item classifications across all AASHTOWare Project modules facilitates enhanced bid-based pricing for cost estimating.
The Job Work Type variable in AASHTOWare Project Estimation, which corresponds to the Contract Work Type variable in BAMS/DSS, can be used to store the functional classification.
The general construction classifications (new construction, widening and resurfacing, etc.) should also be entered for each project. For example, the Job Type variable Estimation can be used to store these improvement type classifications.
To a large extent, the functional classification of contracts is a subjective process that requires the exercise of judgment. Generally, we can classify the contracts according to what functions are likely to control the award of the job as measured by the major item dollar percentages. Absent special circumstances, such as a high degree of specialty work or lump sum items, a major item concentration of 35 percent or greater is usually considered as determinative of work type classification. Many contracts will not fall neatly into any particular category, with the dollars evenly divided across more than one major item. In such cases, a General Construction work type code may be appropriate.
In practice, contract work types initially assigned in Estimation can be reviewed and revised later when the detailed line items have been fully specified for the project. For example, when the data is finally passed to BAMS/DSS, work type coding can be re-evaluated for data analysis purposes using the Contract Profile Ad Hoc program that summarizes the contract dollar percentages by item classification.
AASHTOWare Project Estimation™ Users Guide 43

Table 2. NJDOT Project and Contract Work Types
Work Type
Work Type Classification Description Examples
ASPH Primarily asphalt work. Typically over 35 percent asphalt item dollars.
NEW CONSTRUCTION RESURFACING RECONSTRUCTION BITUMINOUS PAVEMENT
BRPT Bridge painting and cleaning BRIDGE PAINTING BRIDGE CLEANING
CONC Primarily Portland cement concrete work CONCRETE PAVEMENT CURB Curbs, sidewalks, and gutters CURB & GUTTER DRNG Drainage work and Erosion control
Drainage projects are those involving primarily the non-incidental improvement to drainage or erosion control. Drainage projects may include the installation/rebuilding of box culverts, ditches, inlets, gutters, and/or piping structures. Erosion control may include the installation of rip rap, wire mesh netting, construction of sediment ponds, slope stabilization, retaining walls, etc.
CULVERTSDITCHES DRAINAGE EROSION CONTROL
ERTH Earthwork EARTHWORK EXCAVATION GRADING
FENC Fencing FENCES GATES
GDRL Guiderail
Guiderail refers to the non-incidental installation of guiderail/guardrail upon an existing facility.
Installation of guiderail/guardrail should be the primary activity related to contracts of this classification
GUIDERAIL/GUARDRAIL
MEDIAN CROSSOVER PROTECTION
AASHTOWare Project Estimation™ Users Guide 44

GENC General construction
Typically 20 percent or more individually allocated to paving (asphalt or concrete), earthwork (and/or drainage), and structures.
INTC Interchange
Interchange work includes new interchange construction and the reconstruction or widening of an existing interchange. New interchange projects involve the construction of a new facility or structure that allows the junction of highways, usually on different levels – thereby permitting traffic to move from one to another without crossing traffic streams. The facility construction includes the connected entrance and exit ramps. Interchange projects will be of varying complexity and widely varying cost depending on the nature and location of the conjoining roadways and the nature of the improvement. Typical interchange projects include improvements made to “diamond” and “at-grade” interchanges, while complex interchange projects include improvements made to cloverleaf interchanges and interchanges at the junction of two interstate highways, and the like.
INTERCHANGE
ITS Intelligent Transportation Systems ITS FACILITIES CCTV TRAFFIC MONITORING
JNTS Joints PAVEMENT CRACK SEAL
JOINT REPAIR LAND Landscaping LANDSCAPING
MOWING LTNG Lighting LIGHTING, RELAMPING MISC Miscellaneous
Includes non-incidental specialty work in separate contracts not covered by another work type classification.
EMERGENCY STANDBY MACHINE SWEEPING NOISE BARRIERS PAVEMENT CLEANING REST AREAS
PVMK Pavement marking PAVEMENT MARKING
AASHTOWare Project Estimation™ Users Guide 45
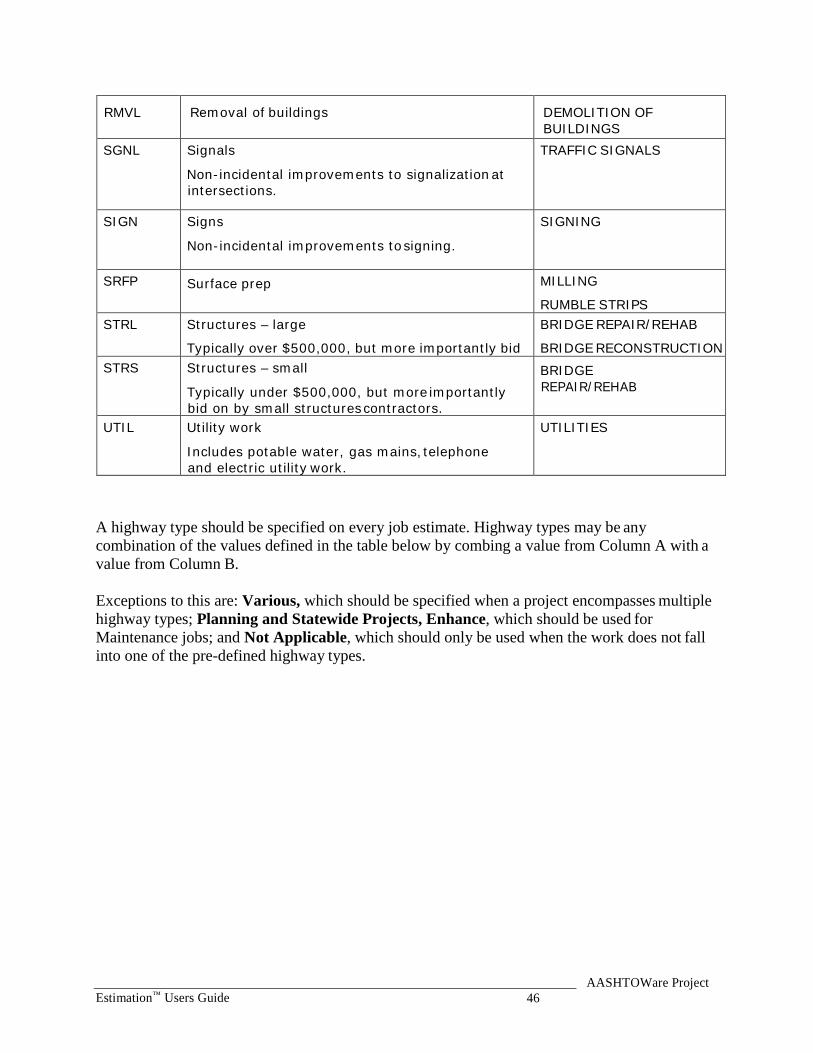
RMVL Removal of buildings DEMOLITION OF BUILDINGS
SGNL Signals
Non-incidental improvements to signalization at intersections.
TRAFFIC SIGNALS
SIGN Signs
Non-incidental improvements to signing. SIGNING
SRFP Surface prep MILLING
RUMBLE STRIPS STRL Structures – large
Typically over $500,000, but more importantly bid BRIDGE REPAIR/REHAB
BRIDGE RECONSTRUCTION STRS Structures – small
Typically under $500,000, but more importantly bid on by small structures contractors.
BRIDGE REPAIR/REHAB
UTIL Utility work
Includes potable water, gas mains, telephone and electric utility work.
UTILITIES
A highway type should be specified on every job estimate. Highway types may be any combination of the values defined in the table below by combing a value from Column A with a value from Column B.
Exceptions to this are: Various, which should be specified when a project encompasses multiple highway types; Planning and Statewide Projects, Enhance, which should be used for Maintenance jobs; and Not Applicable, which should only be used when the work does not fall into one of the pre-defined highway types.
AASHTOWare Project Estimation™ Users Guide 46

Table 3. NJDOT Highway Types
Column A Column B
Expressway A divided multi-lane arterial highway for through traffic with full or partial control of access and generally with grade separations at major intersections. On rare occasions expressways may also include two lane roadways.
Freeway An expressway with full control of access and grade separations at all intersections.
Divided A highway, street or road with opposing directions of traffic separated by a median.
Undivided A highway, street or road with opposing directions of traffic.
Principal Arterial Forms an interconnected network of continuous routes serving corridor movements having the highest traffic volumes and the longest trip lengths including substantial statewide or interstate travel.
Minor Arterial Interconnect with and augment the principal highway system. Service trips of moderate length at somewhat lower level of travel mobility. Provide relatively high overall travel speeds with minimum interference to through movements.
Major Collector Serve important intra-county traffic corridors and provide service to major county traffic generators. Minor Collector Serve smaller places and towns and connect locally important traffic generators.
Local All roads not included in the higher classifications. These streets and roads provide direct access to abutting land and permit access to the roads of higher classification. They offer the lowest mobility.
AASHTOWare Project Estimation™ Users Guide 47

**Prior to creating the Cost Estimate a Concept must first be added to Estimation.
Instructions
Navigation: Estimation> Concepts
To add a new concepts:
1. Open component actions and click Add.
2. Fill in the General Tab: a. Concept ID b. Concept Description c. Spec Book d. Vendor Access (zero for in-house) e. Unit System f. Primary County ID g. Primary District ID (1 is CPM, 4 is M&O) h. Highway Type (See Table 3) i. Season j. Terrain k. Urban/Rural l. Work Type
Save.
AASHTOWare Project Estimation™ Users Guide 48

3. Locations: a. New b. Type – Midpoint c. Latitude (D:M:S) d. Longitude (D:M:S) e. Description
Save
AASHTOWare Project Estimation™ Users Guide 49

Creating a Cost Estimate
The cost estimate must first be created by adding a cost estimate to the concept, and then adding Items and Categories. Once the Items and Categories are assigned the Items must be priced.
Instructions
Navigation: From the concept you created in the previous section, click the quick link for Cost Estimate.
4. Cost Estimate Tab:
a. Add b. Cost Estimate Name c. Cost Estimate Description d. Vendor Access (zero for in-house)
Save
AASHTOWare Project Estimation™ Users Guide 50

5. After saving click your Estimate and open. a. This opens the Cost Estimate Summary Screen
6. From component level actions, choose “Select Item Bid History Profile”
7. Select E9ALL7 and click “Copy Profile to Cost Estimate” (Choose the Profile that you
want to use, this can be changed at a later date)
AASHTOWare Project Estimation™ Users Guide 51

Maintaining Categories for a Cost Estimate
Categories are used to separate items of work into specific funding sources or functional work classifications.
Federal Categories – NJDOT Policy
For Federal Projects, the following General Detail Categories should be used. Not all of the categories below may be required on every project; however, the order in which they are listed shall be followed. Categories should be numbered sequentially.
Table 4. Categories for Federal Projects Category Category Examples
Roadway Category for roadway items not assigned in one of the other listed categories
Construction Engineering
Curing & Storing Items Field Office Items Materials Lab Items Nuclear Density Gauge
AASHTOWare Project Estimation™ Users Guide 52

Non-Participating (Roadway)
Clean Existing Drainage Structure Clean Existing Pipe Railroad Protective Liability Insurance Owner’s & Contractor’s Protective Liability Ins. Pollution Liability Insurance Proprietary Items not approved by FHWA Mowing Selective Trimming Selective Clearing Maintenance Items
Erosion Control Construction Driveway Dewatering Basins Embankment, Temporary Erosion Control Floating Turbidity Barrier Geotextile Haybale Items Inlet Filters Inlet Sediment Traps Roadway Excavation, Temporary Erosion Control Silt Fence Items Temporary Riprap Temporary Slope Drain Temporary Stone Check Dam Temp. Stone Outlet Sediment Traps Concrete Washout System Oil Only Emergency Spill Kit Type F Fertilizing & Seeding
General Landscape Any non-Latin or Wildflower landscape item
Latin Landscape Any landscape item with a Latin name
Wildflowers
Wildflower seeding
Third Party
Separate category for each party
Utility Betterments
Separate category for each company
Bridge
Separate category for each structure
AASHTOWare Project Estimation™ Users Guide 53

Non-Participating (Federal) Item Details
Owner’s & Contractor’s Protective Liability Insurance – 152004P This is a DOLL Item.
Pollution Liability Insurance – 152015P
Use 5 percent of the cost of the cleanup items. Some of the cleanup items are as follows:
Standard Pay Item No. Description
201012P Clearing Site, Tank Removal 201003M Disposing of Contaminated Soil 201015M Recycling of Contaminated Soil 201021M Post Excavation Soil Sampling and Analyses 201024M Composite Soil Sampling and Analyses 201027M Ground Water Sampling and Analyses 201028M Roadway Excavation, Regulated Waste 202028M Off-Site Management of Regulated Waste
Approach slabs – 507051P with any of the following conditions: if one-way traffic loading is less than 500 80-kN equivalent single axle load applications per day;
posted speed limit is less than 35 MPH;
the abutments are not supported on pile foundations.
Maintenance Operations such as cleaning existing pipes, drainage structures, ditches, repairing impact attenuators, mowing etc. FHWA sometimes participates in this work. Contact the Project Manager for guidance. All projects that include cleaning of existing pipe shall utilize pay items for this work based on a range of pipe sizes. Cleaning of existing pipe will be measured and payment made by the linear foot or meter based on a range of 2 foot (600 mm) increments in diameter up to 8 feet (2 400 mm) and then on individual sizes beyond that. Some of the items to be used for this work are as follows:
Standard Pay Item No. Description
601668M Clean Existing Pipe, 10” diameter 601670M Clean Existing Pipe, 12”to 24” diameter 601672M Clean Existing Pipe, over 24” to 48” diameter 601674M Clean Existing Pipe, over 48” to 72” diameter 601676M Clean Existing Pipe, over 72” to 96” diameter 601678M Clean Existing Pipe, 102” diameter 602216M Cleaning Existing Drainage Structures
AASHTOWare Project Estimation™ Users Guide 54

White Concrete Curbing, Barrier Curb, and Island, but could be participating for 100 feet or less to match existing white material.
BR/BH funds for approach work past the touchdown points for new / rehabilitated structures.
Fishing piers (or bridges) and pedestrian walkways for recreational access.
Maintenance dredging if the dredged material is not used as a fill.
Items of work paid for by other agencies or private developers.
Type II Noise Barriers
Waterway openings and net fill requirements mandated by NJDEP when they differ from FHWA requirements.
Structures less than 20 feet in span if BR/BH funds are being utilized for the project.
Greater than 2:1 mitigation of wetland sites. FHWA sometimes participates in greater than 2:1 replacement if FHWA considers the impact significant. Contact the Project Manager for guidance.
Sometimes the use of liners for Wetland Mitigation Sites as they do not permit ground water recharge. Contact the Project Manager for guidance.
Sidewalks on bridges when there are no sidewalks on the approaches for pedestrians. Contact Project Manager for guidance.
Sometimes Memorial and/or Vanity Plaques on structures.
Proprietary items not approved by FHWA. Complete the “Request for Approval of Patented/Proprietary Items on Federally Funded Projects” form.
Instructions
Navigation: Estimation > Cost Estimates > Cost Estimate Summary > Categories tab
To add a category to a cost estimate:
1. Click the Categories tab.
2. Click the New button.
AASHTOWare Project Estimation™ Users Guide 55

3. In the Category field, enter the category number for the cost estimate, typically a numeric value such as 0001.
4. In the Category Descr field, enter a description for the category.
5. Click the Save button.
NJDOT Policies and Procedures
When adding items to the detailed estimate, NJDOT policies and procedures noted below should be followed.
The best use of the Bid Price Report is to find projects listed in the Report which are similar in work type, location and quantities to the project being estimated. If such projects are found, the prices for these projects will be indicators of what to use in the estimate. When “not too similar” projects are the best that can be found in the Report, the prices for those projects can still be utilized if the following “rules of thumb” are taken into account:
Quantity – the larger the quantity the lower the cost except very large quantities may not cost less. Very small quantities are usually disproportionately expensive.
Restrictions on the Contractor: Working hours – most construction workers get paid for an 8-hour day even if they work less. Therefore, costs will be more on a project that requires the work to be carried out in less than 8- hour shifts.
Access to the work site – the more access is restricted, the higher the cost of doing the work.
Stage Construction – the more complicated the construction staging the higher the cost. Maintenance of Traffic – working in close proximity to traffic costs more. The closer the proximity and the higher the traffic volume, the higher the cost.
Night Work – work done at night usually costs about 30% more than the same work done during the day.
Completion Date. Costs will be higher if a contractor must work overtime in order to meet the completion date. Work done on overtime costs about 30% extra. In lieu of overtime a contractor may increase his prices to cover anticipated liquidated damages.
Some materials require significant lead times for fabrication or manufacture. Costs will be higher if the completion date does not allow sufficient lead time for such items since the contractor will have to pay a premium for getting early delivery or may increase his prices to cover anticipated liquidated damages.
AASHTOWare Project Estimation™ Users Guide 56
Availability of some materials is seasonal and requiring work to be done “out of season” will significantly increase the cost. For example, hot mix asphalt is not readily available in the winter because most plants are shut down.
Location – work in urban areas costs more than work in rural areas.
When adding items to the detailed estimate, NJDOT policies and procedures noted below should be followed along with those mentioned in the Cost Estimating Guideline by the PMO.
Line Item Numbering
NJDOT policy is that line items be numbered in increments of one. Items that need to be inserted into the estimate should be added using the next incremental line number in the estimate and assigned to the appropriate item category. (See ‘No Item’ below.)
‘No Item’ Item With the implementation of CES and now AASHTOWare Project Estimation, the item 99Z99 – ‘No Item’ will no longer be used.
Items that need to be inserted into the estimate should be added using the next incremental line number in the estimate and assigned to the appropriate item category.
Non-Bid Items Non-bid items, items that are not to be included in the proposal, shall be grouped in a category of their own called “NON-BID ITEMS,” and should be flagged as “State Furnished.” An example is Utilities Work.
Alternate Items Different items can be alternates for each other and a bidder can choose to bid on either item but not both. Numbering of alternates will be the same as in the past, the alternate must contain 2 letter and 1 number. For further explanation, from the Alt. Code column header, choose Help.
Alternate Groups of Items are groups of items that are bid together (regardless of how many are in each group). These groups will carry the SAME first two letters for the entire group with one number while the second group of items will carry the SAME two letters as the first group with a different number. As an example, if group number 1 has 6 items they will all carry the designation AA1, and the second group of items that is an alternate to bidding the first group actually has 7 items it will carry the designation AA2 (even though the number of items to be bid is different, the entire group of items must be bid so the same letter designation will force the system to choose all of the items).
Fixed Price Items Training Reimbursement(100% State funded projects), Fuel Price Adjustment http://www.state.nj.us/transportation/business/aashtoware/PriceIndex.shtm section 160.03.01and Asphalt Price Adjustment (same site)section 160.03.02 and telephone service are not negotiated
AASHTOWare Project Estimation™ Users Guide 57

items and should be marked as “Fixed Price” (i.e. Carry Items) by clicking in the box marked “Fixed” for that item.
Newly Assigned standard Items (previously called Non-Standard) Every item, including non-standard items, requires a unique Item Number on the plans and on the Construction Cost Estimate. Newly Assigned Standard Items are now included in the Master Item List. If an Item Number for a Newly Assigned Standard Item is not on the Master Item list, complete the New Item Number Request Form (Appendix B) and submit it to the Trns*port Team at [email protected] along with the required specification and, if needed, a detail.
For Newly Assigned Standard Pay Items, the Estimator should contact suppliers, manufacturers and other agencies that may have used the item or similar items.
Include all backup information on how the price was calculated with the submission. If an in-place cost is not available, develop it assuming that the in-place cost is comprised of 30% labor, 20% equipment, 25% materials and 25% overhead and profit.
Lump Sum/DOLL Items Lump Sum/DOLL items including Performance and Payment Bond, Final Cleanup, Construction Layout, Owner’s and Contractor’s Protective Liability Insurance, Progress Schedule, and Clearing Site may be priced according to the charts in Appendix A and as shown in the Tables below.
If the consultant determines that special project needs require adjustment to the suggested amount, they may price accordingly, with an explanation attached to the job in AASHTOWare Project Estimation.
Mobilization must be calculated using the percentages in Tables in Appendix A.
AASHTOWare Project Estimation™ Users Guide 58

Table 5-1. Performance and Payment Bond - 151003M
Project Costs (Mil.)
Class 1, 2, 6 Class 3, 4, 7 Class 5
North
South
North
South
North
South
Less Than 1.0
7,500
6,500
9,000
8,000
5,000
5,500
1.0 to 5.0
27,000
24,500
25,000
20,000
15,000
15,000
5.0 to 10.0
50,000
48,000
42,500
35,000
20,000
25,000
10.0 to 20.0
105,000
75,000
70,000
65,000
40,000
35,000
20.0 to 30.0
152,000
120,000
200,000
30.0 to 40.0
200,000
175,000
255,000
40.0+
500,000
350,000
265,000
Table 5-2. Final Cleanup - 161003P
Project Costs (Mil.)
Class 1, 2, 6 Class 3, 4, 7 Class 5
North
South
North
South
North
South
Less Than 1.0
5,000
5,000
4,000
4,000
5,000
5,000
1.0 to 5.0
7,500
7,500
5,000
5,000
7,500
7,500
5.0 to 10.0
15,000
15,000
10,000
10,000
8,000
8,000
10.0 to 20.0
17,500
17,500
12,500
12,500
10,000
10,000
20.0 to 30.0
20,000
20,000
15,000
15,000
AASHTOWare Project Estimation™ Users Guide 59

30.0 to 40.0
22,000
22,000
20,000
20,000
40.0+
35,000
35,000
25,000
25,000
Table 5-3. Owner's & Contractor's Protective Liability Insurance - 152003P
Project Costs (Mil.)
Class 1, 2, 6 Class 3, 4, 7 Class 5
North
South
North
South
North
South
Less Than 1.0
5,000
5,000
5,000
3,500
5,000
5,000
1.0 to 5.0
10,000
9,000
6,000
6,000
10,000
10,000
5.0 to 10.0
17,500
13,500
10,000
10,000
12,500
12,500
10.0 to 20.0
30,000
20,000
15,000
20,000
15,000
15,000
20.0 to 30.0
50,000
30,000
40,000
30.0 to 40.0
55,000
35,000
50,000
40.0+
100,000
70,000
60,000
The following items should be calculated with the following information in mind:
Field Office-Add 1 month to project duration; If project cost is over $25 million add 2 months to duration.
Field Office Maintenance-Add 3 months to project duration per 2007 Standard Specifications for Road and Bridge Construction, Section 155.03.03.
Materials Field Laboratory-Add 1 month to project duration.
Curing and Storage facility-Add 1 month to project duration.
Trainees-1000 hours/$1 million at a rate of $1.00/hr.
AASHTOWare Project Estimation™ Users Guide 60

Railroad Protective Liability Insurance-Use only if specified by the Special Provisions, per section 152.03.02 of the 2007 Standard Specifications for Road and Bridge Construction. Use one-half of one percent of the total project cost and paid as a DOLL Item.
Pollution Liability Insurance-This is required for ALL projects as specified under section 152.3.3 of the 2007 Standard Specifications for Road and Bridge Construction.
For Construction Engineering (CE) Amount , Contingencies and Escalation Amount, and Change Order Contingencies use the Classification from pages 6 - 8 of this manual to determine which Payment Charts to use from the Classification Calculation Packages in Appendix A.
Maintenance and Operations Only Items
Certain items are designated for use by Maintenance and Operations only. This includes all item numbers beginning with "MM;” for example, MME001M.
These items will not be in the spec book, but are considered to be standard items.
They require specifications in the bid proposal, but do not require an entry in the Item Supplemental Description field.
Adding Items to a Cost Estimate
Detail items are added to a cost estimate in the same way. A cost estimate can include a combination of parametric and detailed items, depending on how much information you have when working on the estimate.
There are a few different ways to add items to a cost estimate. The most efficient is by means of the Item Pricing Worksheet.
Instructions
Navigation: Estimation > Cost Estimates > Cost Estimate Summary Click the quick link to Item Pricing Worksheet
To add an item to a cost estimate:
1. In the Estimation component, click the Cost Estimates link.
2. Search for and select the cost estimate.
3. Click the Item Pricing Worksheet quicklink.
AASHTOWare Project Estimation™ Users Guide 61
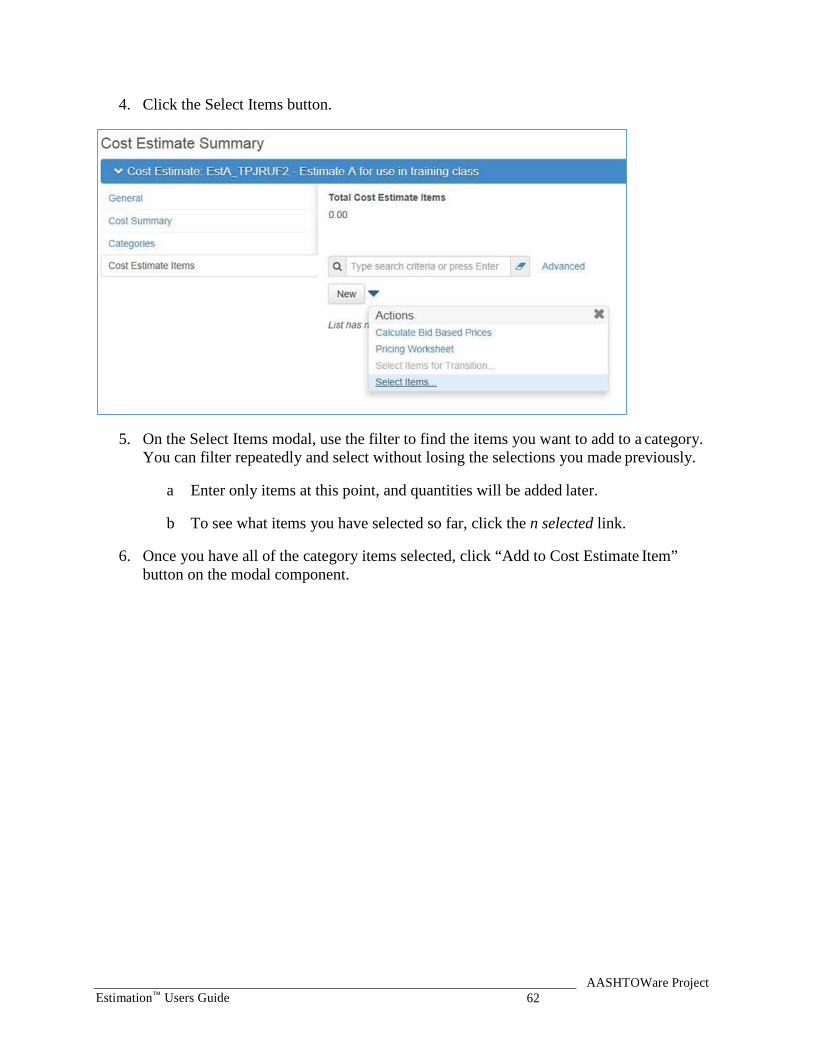
4. Click the Select Items button.
5. On the Select Items modal, use the filter to find the items you want to add to a category. You can filter repeatedly and select without losing the selections you made previously.
a Enter only items at this point, and quantities will be added later.
b To see what items you have selected so far, click the n selected link.
6. Once you have all of the category items selected, click “Add to Cost Estimate Item”
button on the modal component.
AASHTOWare Project Estimation™ Users Guide 62

7. Save
8. Enter the category field for the first item in the list.
9. Use range-fill to fill the remaining x rows with items with the same value and save.
10. Repeat for all categories.
11. In the Supplemental Description field, enter an additional description for the item, if appropriate.
12. The remaining fields discussed in this section are not accessible via the Item Pricing Worksheet. Navigate to the Cost Estimate Items tab via the quick link on the worksheet called “Cost Estimate Items”.
13. Items have the Contribute to Total Construction Cost check box checked by default. If
there are items that will not contribute to total construction, you will need to uncheck that box on the cost estimate summary, cost estimate items tab.
14. Click the Exclude from Reference Price Calculation check box if the item’s unit price
will be excluded from price calculations based upon the percentage of total estimate.
15. Do not use the Nonbid check box for NJDOT estimates.
16. Click the Preliminary Engineering check box if the item is related to preliminary engineering efforts.
AASHTOWare Project Estimation™ Users Guide 63

17. In the Budget Class field, click the drop-down arrow and select the budget grouping to which the item belongs, if appropriate.
18. In the Prequalification Work Type field, click the drop-down arrow and select the type of work for the item for calculating prequalification requirements.
19. In the Item Alternate Set field, enter the alternate set for the item, if appropriate.
20. In the Type field, click the drop-down arrow and select the type of remark to enter, if appropriate.
21. In the Remarks field, enter a remark for the record, if appropriate.
22. Click the Save button.
Instructions
Alternative method to add items: Navigation: Estimation > Cost Estimates > Cost Estimate Summary > Cost Estimate Items tab
To select one or more items to add to a cost estimate:
1. Click the list Actions button, and choose the Select Items action.
2. Search for a list of items.
3. Click on each item you wish to add, then click the Add to Cost Estimate Item button.
AASHTOWare Project Estimation™ Users Guide 64
4. Enter values as shown in the previous instructions.
5. 5. Click the Save button.
Alternative method to add items: Navigation: Estimation > Cost Estimates > Cost Estimate
Summary > Cost Estimate Items tab
1. Click the “New” Button.
2. Populate appropriate fields and save.
Maintaining Items for a Cost Estimate
The Cost Estimate Items tab contains an accordion list of items recorded for the estimate. The Cost Estimate Total is displayed at the top of the list.
If the estimate is associated with a project or proposal, you can only modify prices on the cost estimate items.
Cost Estimate Item Pricing Worksheet
To enter quantities and/or prices for multiple items at one time, you may use the Cost Estimate Item Pricing Worksheet, which brings up the list of items in a grid view. Refer to the lists above for the quantities to be added to your cost estimate items.
Each field in a row is displayed in a read-only format until it is activated. You can focus on a field by clicking on it, tabbing to it, or using the arrow keys, then click again to activate it.
From the worksheet you can also add or select items in the same way as on the Cost Estimate Items tab, using the buttons at the bottom of the page.
Instructions
Navigation: Estimation > Cost Estimates > Cost Estimate Summary > Cost Estimate Item Pricing Worksheet link
To change information for an item on the Cost Estimate Item Pricing Worksheet:
1. Click the Cost Estimate Item Pricing Worksheet quick link.
2. Double-click in the Quantity field for an item to change a value.
3. Double-click in the Unit Price field for an item to change a value.
AASHTOWare Project Estimation™ Users Guide 65

4. Use the down arrow key to access the Unit Price field for the next item.
5. Click the Details button in the Unit Price field to access the price tasks.
6. To sort the rows by Cost Estimate Category, Line Number, Item, Description, Unit, Quantity, Unit Price, Extended Amount, Supplemental Description, or Active status, click the column header drop-down arrow and click the Ascending or Descending button.
7. Click the Save button.
8. To reorder the columns, click the “Advanced” link next to the standard filter box.
9. To move Supplemental Description adjacent to Description, place 4.1 in the Supp Des
box.
10. For other columns, give them a number to represent something in between the two columns where you wish it to display.
11. Determine if you want to save these settings, and if so give it a name. Otherwise, click “Apply without saving”.
Calculating Bid Based Prices for Cost Estimate Items
Many of the items in the item list have a default bid-based task associated in reference item. Your agency has done this in order for you to quickly calculate bid based pricing on eligible items concurrently. Bid based pricing requires a bid history profile be associated to the cost estimate, which you did previously.
AASHTOWare Project Estimation™ Users Guide 66

Instructions
Navigation: Estimation > Cost Estimates > Cost Estimate Summary > Cost Estimate Items tab
1. Select List Level Actions menu.
2. Select “Calculate Bid Based Prices” from the menu. Note, this is an asynchronous process and will result with a banner “Calculated Bid-Based Prices” Process
AASHTOWare Project Estimation™ Users Guide 67
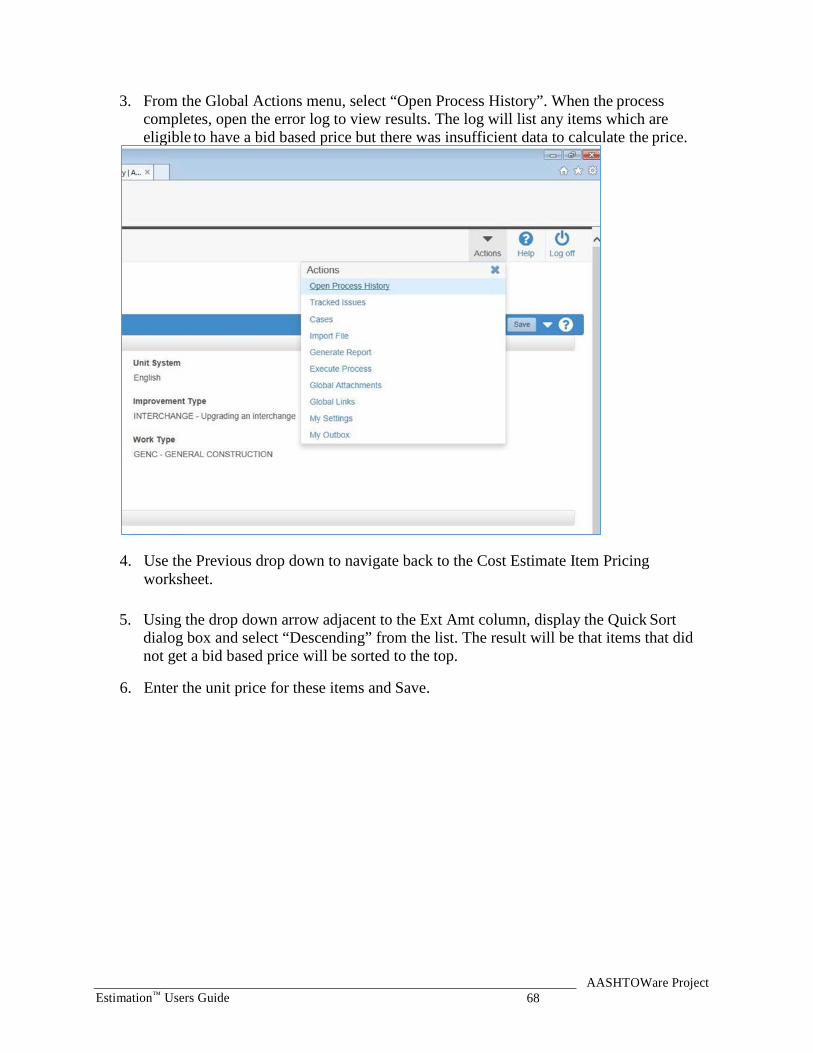
3. From the Global Actions menu, select “Open Process History”. When the process completes, open the error log to view results. The log will list any items which are eligible to have a bid based price but there was insufficient data to calculate the price.
4. Use the Previous drop down to navigate back to the Cost Estimate Item Pricing worksheet.
5. Using the drop down arrow adjacent to the Ext Amt column, display the Quick Sort
dialog box and select “Descending” from the list. The result will be that items that did not get a bid based price will be sorted to the top.
6. Enter the unit price for these items and Save.
AASHTOWare Project Estimation™ Users Guide 68

Preliminary Estimates
An estimate may be designated a preliminary estimate, also referred to as a design estimate, after all transitions are complete and the scope is solidified. A cost estimate can be transitioned from a concept to a project, and all of its parametric items and typical sections transitioned to detail items in the estimate.
Project items are then built for the transitioned cost estimate. Control of all aspects of item editing except pricing is then shifted to the project in AASHTOWare Project Preconstruction. Prices continue to be maintained within the estimate, and the system automatically applies prices to the project items.
Alternately, agencies may choose to initiate their AASHTOWare Project cost estimates in a project, instead of beginning with a concept and transitioning to a project. You can create a new cost estimate based on the items in a new project or a project imported into AASHTOWare Project Preconstruction from another system.
Please note that depending on the policies, system configurations, and roles at your agency, you may not have access to all of the AASHTOWare Project Estimation functionality shown in this training guide.
Building Project Items Because items originate in the cost estimate, the project does not physically contain items until you build the list of project items from associated cost estimate items. The system copies all items, categories, alternate sets and members, and pricing tasks to the project. This function is performed when the plans are 100% complete and the package is ready for submittal to the agency.
After you build project items, you can only add or change items on the project in AASHTOWare Project Preconstruction. Any changes to project items and categories are automatically applied to the associated cost estimate. If you have more than one cost estimate associated to the project, only one will be active, with the Price Control check box populated; this will be the only cost estimate to have items and categories updated by the system. After you build project items, you can no longer change the price control from one cost estimate to another.
Instructions
Navigation: Estimation > Cost Estimates > Cost Estimate Summary
To build project items from a cost estimate:
1. In the Estimation component, click the Cost Estimates link.
AASHTOWare Project Estimation™ Users Guide 69
2. Search for the cost estimate from which to build project items, and click the Cost Estimate Name link.
3. Click the component Actions button, and select the Build Project Items task. Maintaining Cost Estimates for a Project The Cost Estimates tab on the Project Cost Estimate Summary lists all of the cost estimates associated with the project.
After you have built project items, or edited items or categories in a project with cost estimates, you can only maintain prices for the active cost estimate. If you have inactive cost estimates, at this stage they are for informational or archival purposes only.
For more information, see the chapters Cost Estimate Features and Pricing Items in this guide.
Note: If a cost estimate has been added to a proposal associated with the project, all cost estimates for the project are automatically set to inactive.
Instructions
Navigation: Preconstruction > Projects > Project Summary > Cost Estimate quick link > Cost Estimates tab
To review cost estimates or update prices for a project:
1. Click the Show All check box to control whether inactive estimates are displayed.
Note that the cost estimate with the Price Control check box selected has an Active value of Yes; and any cost estimates where the Price Control check box is empty will have an Active value of No.
AASHTOWare Project Estimation™ Users Guide 70
Cost Estimate Features
This chapter includes information about features of the cost estimate that are available throughout the life cycle of the estimate.
Maintaining a Cost Estimate
The Cost Estimate Summary includes the settings, pricing, and cost information recorded for the selected cost estimate. The Cost Estimate Summary opens on the General tab, which includes three collapsible sections. The Parent Attributes section contains view-only information about the associated project. In the Estimate Information section, you can enter various attributes and descriptors for the current estimate. If project items exist, only pricing fields are editable. In the Additional Information area, you can enter Bid Based information.
Please note that depending on the policies, system configurations, and roles at your agency, you may not have access to all of the AASHTOWare Project Estimation functionality shown in this training guide.
Instructions
Navigation: Estimation > Cost Estimates > Cost Estimate Summary
To view general information for a cost estimate:
1. In the Estimation component, click the Cost Estimates link.
2. Search for and select a cost estimate.
3. In the Parent Attributes section of the General tab, view the read-only information about the concept, project, or proposal to which the cost estimate is associated.
4. In the Estimate Information section, view the information about this cost estimate.
AASHTOWare Project Estimation™ Users Guide 73
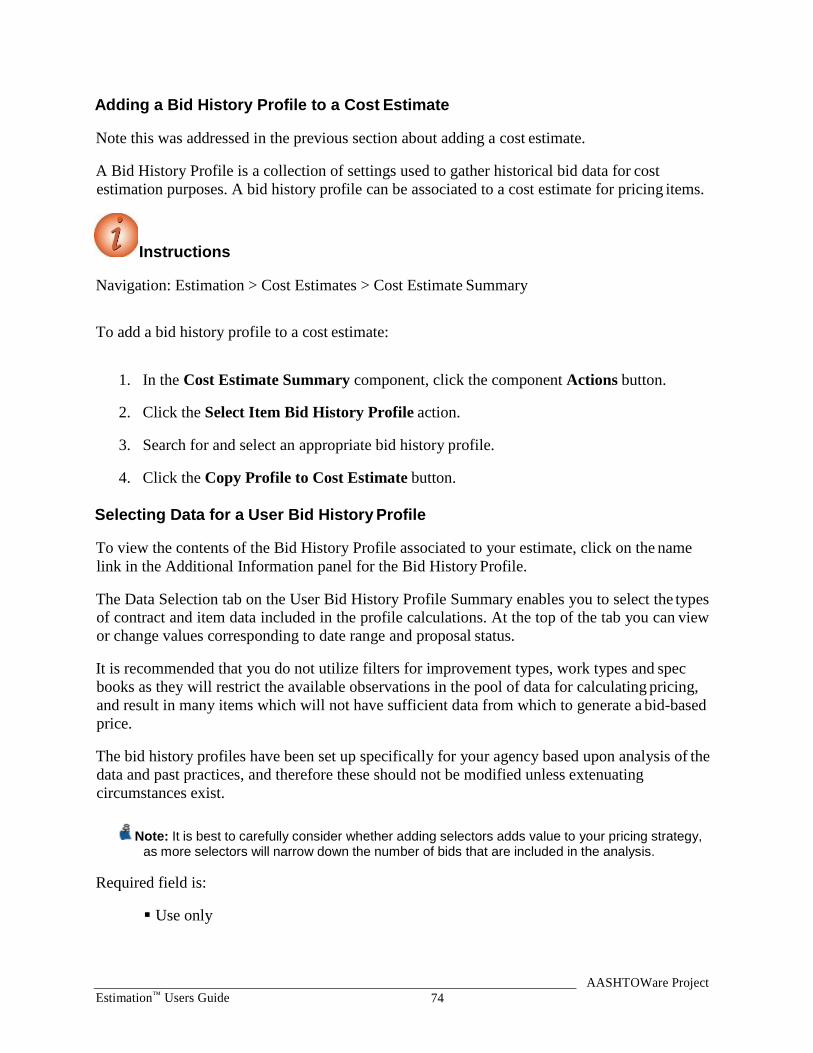
Adding a Bid History Profile to a Cost Estimate
Note this was addressed in the previous section about adding a cost estimate.
A Bid History Profile is a collection of settings used to gather historical bid data for cost estimation purposes. A bid history profile can be associated to a cost estimate for pricing items.
Instructions
Navigation: Estimation > Cost Estimates > Cost Estimate Summary
To add a bid history profile to a cost estimate:
1. In the Cost Estimate Summary component, click the component Actions button.
2. Click the Select Item Bid History Profile action.
3. Search for and select an appropriate bid history profile.
4. Click the Copy Profile to Cost Estimate button. Selecting Data for a User Bid History Profile
To view the contents of the Bid History Profile associated to your estimate, click on the name link in the Additional Information panel for the Bid History Profile.
The Data Selection tab on the User Bid History Profile Summary enables you to select the types of contract and item data included in the profile calculations. At the top of the tab you can view or change values corresponding to date range and proposal status.
It is recommended that you do not utilize filters for improvement types, work types and spec books as they will restrict the available observations in the pool of data for calculating pricing, and result in many items which will not have sufficient data from which to generate a bid-based price.
The bid history profiles have been set up specifically for your agency based upon analysis of the data and past practices, and therefore these should not be modified unless extenuating circumstances exist.
Note: It is best to carefully consider whether adding selectors adds value to your pricing strategy, as more selectors will narrow down the number of bids that are included in the analysis.
Required field is:
Use only
AASHTOWare Project Estimation™ Users Guide 74
There is a conditional requirement for either a date range (Start Letting Date and End Letting Date); or a rolling date range using the “Number of Months” fields. Using “Number of Months” counts backwards from today and will capture the most recent available bid data for the calculations.
Instructions
Navigation: Estimation > Cost Estimates > Cost Estimate Summary > General tab > Additional Information > Bid-Based > Bid History Profile link > Data Selection tab
Note: Not all users will have access to edit the bid history profile, dependent upon the assigned rights to this area. Changes made to the bid history profile described herein relate only to the bid history profile that is associated to your cost estimate, and do not impact the reference (i.e., “Standard”) bid history profile records setup and maintained by the system administrators. Users without edit privileges can still view the settings and criteria in the bid history profile that is associated to their cost estimate.
To make changes to user bid history profile data selections:
1. In the Cost Estimate Summary component Additional Information Bid-Based section,
click the Bid History Profile link.
2. Click the Data Selection tab.
3. Change the values in the Start Letting Date and End Letting Date fields to represent an appropriate time period for data selection for bid-based price calculations for cost estimate items.
4. Alternately, if you leave the Start Letting Date and End Letting Date fields blank, you
can enter a value in the Number of Months field so the bid history profile will always include that number of months’ history prior to the current date.
5. If you wish to limit the type of proposals for inclusion in the bid history profile, in the Use only field, click the drop-down arrow and select a different value.
6. If you wish to further limit the number of proposals for inclusion in the bid history
profile, in the Improvement Type field, click the drop-down arrow to select a new or different code.
7. If you wish to further limit the number of proposals for inclusion in the bid history
profile, in the Work Type field, click the dropdown arrow to select a new or different code.
8. If you wish to further limit the number of proposals for inclusion in the bid history
profile, in the Spec Book field, click the drop-down arrow to indicate which Spec Year proposals should be included.
AASHTOWare Project Estimation™ Users Guide 75

9. Click the Save button. Setting Basic Parameters for a User Bid History Profile
The Basic Parameters tab on the User Bid History Profile Summary enables you to specify parameters that are used to gather historical bid data.
Note: In order to use Item Group Sets or to Convert Opposite Units, reference data must be set up in advance.
Required fields are:
Source of Item Prices
Date to Use for item prices
Letting Date Adjustment
Date Rule when date is not available
If the Source of Item Prices is set to Exclude High/Low Bids, then the Minimum
Number of Bids before Excluding is required. Because this field is conditionally required, it is not marked with a red asterisk.
Instructions
Navigation: Estimation > Cost Estimates > Cost Estimate Summary > General tab > Additional Information > Bid-Based > Bid History Profile link > Basic Parameters tab
To make changes to user bid history profile basic parameters:
1. Click the Basic Parameters tab.
2. In the Source of Item Prices field, click the drop-down arrow to change the price source, if appropriate.
3. If the Source of Item Prices is set to Low Bids, in the Number of Low Bidders per Proposal field, enter or change the number of low bidders on each proposal to be included in the analysis.
4. If you wish to limit the number of proposals for inclusion in the bid history profile by
area, in the Market Area field, click the drop-down arrow to select a code.
5. In the Date to Use for Item Prices field, click the drop-down arrow to change the type of date, if appropriate.
AASHTOWare Project Estimation™ Users Guide 76

6. In the Letting Date Adjustment field, change the value for the number of days to be added to letting date, if appropriate.
7. If the Source of Item Prices is set to Exclude High/Low Bids, in the Minimum Number of Bids before Excluding field, enter or change the number of bids required before excluding bids from the analysis.
8. If the Source of Item Prices is set to Select Bidder, in the Vendor Number field, enter or
change the vendor whose bids should be included in the analysis.
9. In the Item Group Set field, search for and select the profile to analyze groups of items collectively for pricing, if appropriate.
10. Click the Convert Opposite Units check box to convert between English and metric units, if appropriate.
11. In the Date Rule when date is not available field, click the dropdown arrow to change the type of rule, if appropriate.
12. Click the Save button. Setting Advanced Parameters for a User Bid History Profile
The Advanced Parameters tab on the User Bid History Profile Summary enables you to specify additional parameters, such as whether to generate averages and regressions, and which variables to include in the price calculation.
Note that selecting more than 2 or 3 variables to include in the analysis can severely limit the number of observations available to the pricing engine. It is recommended that you consider the 2 most important variables that impact price at your agency and only select those for inclusion in the analysis.
Note: It is best to carefully consider whether adding variables to include in analysis will add value to your pricing strategy, as more variables will narrow down the number of bids that are included.
Required fields if Generate Averages is selected are:
Minimum Number of Observations
Percent of Date Range to Select
Percent of Quantity Outliers to exclude
Percent of Price Outliers to exclude
Required fields if Generate Regressions is selected are:
Minimum Number of Observations
AASHTOWare Project Estimation™ Users Guide 77

Percent of Regression Model Outliers to exclude
Level of Improvement to Add Required fields for Date Parameters are:
Minimum month range of history needed
Minimum Number of Observations
Maximum inflation/deflation rate allowed
Instructions
Navigation: Estimation > Cost Estimates > Cost Estimate Summary > General tab > Additional Information > Bid-Based > Bid History Profile link > Advanced Parameters tab
To make changes to user bid history profile advanced parameters:
1. Click the Advanced Parameters tab.
2. In the Variables to include in analysis section, click appropriate check boxes to include only proposals with the selected attribute, including Market Area, Season, Work Type, Improvement Type, Urban/Rural, Terrain, and Highway Type.
3. In the Averages section, click the Generate Averages check box to indicate whether to
calculate average bid prices.
4. In the Minimum Number of Observations field, enter the minimum number of bids required to calculate an average price.
5. In the Percent of Date Range to select field, enter a number less than 100 if you wish the date range for averages to be less than the date range for regressions.
6. In the Percent of Quantity Outliers to exclude field, enter a number indicating the percent of quantity outliers to exclude from price calculations.
7. In the Percent of Price Outliers to exclude field, enter a number indicating the percent of price outliers to exclude from price calculations.
8. In the Regressions section, click the Generate Regressions check box to indicate whether to calculate regression bid prices.
9. In the Minimum Number of Observations field, enter the minimum number of bids required to calculate a regression price.
10. Click the Exclude models that are out of range compared to the average check box to exclude those models, if appropriate.
AASHTOWare Project Estimation™ Users Guide 78
11. Click the Include Date variable in analysis check box to consider date parameters when generating the regression, if appropriate.
12. In the Percent of Regression Model Outliers to exclude field, enter a number indicating the percent of model outliers to exclude from regression calculations.
13. In the Level of Improvement to add field, enter a number indicating the level of improvement required to add a regression parameter to the model.
14. Click the Exclude regression with positive quantity coefficients check box to exclude models with an inverse relationship between quantity and price, if appropriate.
15. In the Date Parameters section, in the Minimum month range of history needed check box, enter the minimum number of months required to consider the date range variable in the regression price calculation.
16. In the Minimum Number of Observations field, enter the minimum number of bids
required to utilize the date parameters in regression calculations.
17. In the Maximum inflation/deflation rate allowed field, enter a number indicating the maximum rate allowed in order to include the date parameter in the regression analysis.
18. Click the Save button. Setting Advanced Filters for a User Bid History Profile
The Advanced Filters tab on the User Bid History Profile Summary enables you to create filter statements that narrow the historical bid data included in analysis for cost estimation.
It is recommended that you not create advanced filters unless extraneous circumstances exist. This can result in dilution of the data pool used to calculating pricing.
Instructions
Navigation: Estimation > Cost Estimates > Cost Estimate Summary > General tab > Additional Information > Bid-Based > Bid History Profile link > Advanced Filters tab
To add a user bid history profile advanced filter:
1. Click the Advanced Filters tab.
2. In the blank filter row at the bottom of the list, click in the first field, and select And or Or to indicate how the new statement will be joined to existing statements. This field is not available for the first filter row.
3. Click in the next field, and select the proposal field that will be used to narrow the data.
AASHTOWare Project Estimation™ Users Guide 79

4. Click in the next field, and select an operator to determine how the system compares the data in the field to the specified value.
5. Click in the next field, and type or select a value. 6. Click the Save button.
Viewing Cost Summary Information
The Cost Summary tab on the Cost Estimate Summary displays totals calculated for the estimate. When you change information on any of the tabs in the Cost Estimate Summary, the system updates the totals on the Cost Summary tab.
Instructions
Navigation: Estimation > Cost Estimates > Cost Estimate Summary > Cost Summary tab
To view cost summary information for a cost estimate:
1. In the Estimation component, click the Cost Estimates link.
2. Search for and select a cost estimate.
3. Click the Cost Summary tab.
4. Notice the Cost Estimate Total at the top.
5. View the subtotals displayed in three sections: Base Cost Estimate, Other Costs, and Cost Category Breakdown.
Using the Expression Builder The Expression Builder enables you to calculate a numeric field value by using a formula. The Expression Builder is available in any field that includes a Formula button (Σ). When a field includes a formula that was created and saved with the Expression Builder, an asterisk is displayed next to the Formula button. The system recalculates the formula and displays an updated value in the field each time the underlying data is changed and saved.
At your agency, a lead estimator or other user may create pre-defined reference formulas for you to use. If creating formulas from scratch, there are examples of the syntax required in the on-line help.
Required fields are:
Expression
AASHTOWare Project Estimation™ Users Guide 80

Instructions
Navigation: Estimation > Cost Estimates > Cost Estimate Summary > Cost Estimate Items tab
To use the expression builder in a cost estimate:
1. In the Estimation component, click the Cost Estimates link.
2. Search for and select a cost estimate.
3. Click the Cost Estimate Items tab.
4. Click the Expand/Collapse arrow to expand an item.
5. Click the Formula button (Σ) to the right of the Price field.
6. In the Expression Builder window, click the Predefined Formulas field and press the Enter key to display reference formulas.
7. Click a predefined formula to display in the Expression field.
8. Click the Evaluate button to check the syntax.
9. View the product of the calculation in the Result field.
10. Click the Save button.
11. View the formula result in the item Price field.
Alternative Navigation: Estimation > Cost Estimates > Cost Estimate Summary > Item Pricing Worksheet quicklink
1. Click into the Unit Price field for the Mobilization item, then click to active edit.
2. Click the Formula button (Σ) to the right of the field.
3. In the Expression Builder window, click the Predefined Formulas field and press the Enter key to display reference formulas.
4. Select a predefined formula to display in the Expression field.
5. Click the Evaluate button to check the syntax.
6. View the product of the calculation in the Result field.
7. Click the Save button
AASHTOWare Project Estimation™ Users Guide 81

8. View the formula result in the item Price field.
Working with Reports
There are a number of reports you can run regarding cost estimates and other estimation information. You can generate reports from the global-level Actions menu on any page in the system. You can also generate reports from the row-level Actions menu on Overview components and component-level Actions on Summary component headers for reports. See pages 26 and 27 this guide for NJ specific reports.
Cost Estimate Summary Report
The Cost Estimate Summary Report lists all of the information included in the selected estimate, including construction and non-construction costs, adjustments, markups, contingencies, and remarks.
Instructions
Navigation: Estimation> Cost Estimate Overview > Cost Estimate Summary
To run the Cost Estimate Summary report:
1. In the Cost Estimate Summary, click the component Actions button, and select the Cost Estimate Summary report.
2. From the Settings field, click the drop-down arrow select Output Options and review the choices.
3. Click the Execute button.
4. When the report displays, move your mouse over the bottom to display a menu from which you could save, print or view the report.
5. Close the browser tab to close the report. Creating a Snapshot of a Cost Estimate
Snapshots enable you to save a read-only copy of a cost estimate at any point in time to allow for later review. Each cost estimate can have multiple snapshots taken at different stages of the estimation process. The system can automatically create snapshots as a result of system events and agency option settings, and you can manually create a snapshot at any time.
AASHTOWare Project Estimation™ Users Guide 82
A snapshot includes all of the information contained in a cost estimate, including all of its associated child records.
Required fields are:
Description
Instructions
Navigation: Estimation > Cost Estimate Overview > Cost Estimate Summary
To create a snapshot of a cost estimate:
1. In the Estimation component, click the Cost Estimates link.
2. Search for and select a cost estimate.
3. Click the component Actions button, and select the Create Snapshot task.
4. In the Description field, enter text describing the snapshot.
5. In the Snapshot Reason field, click the drop-down arrow and select the reason for the snapshot.
6. In the Remarks section, in the Type field, click the drop-down arrow and select the type of remark, if appropriate.
7. In the Remark field, enter remarks, if appropriate.
8. Click the Save button. Importing a Snapshot If you wish to return to a previous iteration of a cost estimate, you can import the saved cost estimate information from a snapshot into the current cost estimate. When you import a snapshot, all of the existing information for the cost estimate and its associated child records is overwritten by the imported snapshot
Note: You cannot import a snapshot to a cost estimate profile, a cost estimate associated with a
proposal, or a cost estimate associated with a project that has project items.
AASHTOWare Project Estimation™ Users Guide 83

Instructions
Navigation: Estimation > Cost Estimates > Cost Estimate Summary To import a snapshot to
return to a previous iteration of a cost estimate:
1. In the Estimation component, click the Cost Estimates link.
2. Search for and select a cost estimate.
3. Click the component Actions button, and select the Import Snapshot task.
4. On the Import to Cost Estimate modal window, search for and select the row for the
snapshot to import.
5. Click the Import to Cost Estimate button.
AASHTOWare Project Estimation™ Users Guide 84

Pricing Items
As described in previous chapters of this guide, there are various ways of adding items to a cost estimate, transitioning items from parametric items or typical sections, and building items in a project. Once a cost estimate is associated with a project and the build project items process has been executed, items and quantities must be maintained within the project.
Items in a cost estimate can be priced regardless of whether the estimate is associated with a concept, project or proposal. You can enter an ad hoc price just by typing a value in an estimate item’s unit price field, but most of the time, items will be priced using price tasks. A price task is a method of calculating the price of an item.
For convenience and consistency, your agency may have associated default price tasks with commonly used reference items. In these cases, the price task is automatically associated to the cost estimate item. You can also attach price tasks to items manually. Any price task can be set to inactive status if you wish to retain the pricing information but do not wish to use the price in the estimate.
Please note that depending on the policies, system configurations, and roles at your agency, you may not have access to all of the AASHTOWare Project Estimation functionality shown in this users guide.
Viewing Item Price Details
On the Cost Estimate Items tab of the Cost Estimate Summary, you can expand any item to see more information. You can drill down to see detailed price task information. You can also access the price task details from the Item Pricing Worksheet component.
Instructions
Navigation: Estimation > Cost Estimates > Cost Estimate Summary > Cost Estimate Items tab
To access item price details on a cost estimate:
1. In the Estimation component, click the Cost Estimates link.
2. Search for and select a cost estimate.
3. Click the Cost Estimate Items tab.
4. Click the Expand/Collapse arrow to expand an item.
5. Click the Details button to the right of the Price field.
AASHTOWare Project Estimation™ Users Guide 85

6. Note whether any of the price tasks are activated. If a task is active, you can de-activate it by clicking to remove the check box in the “active” field. In order to activate a task, you must drill in one level by selecting the price task and clicking the “Active” check box.
7. 7. Click the Save button.
Bid-Based Pricing Bid-based pricing utilizes prepared or user-edited bid history profiles to determine an estimated price for an item. In a previous chapter of this guide on Cost Estimate Features, you learned how to associate a bid history profile with the cost estimate, and how to edit the bid history if appropriate.
Adding a Bid-Based Task
If no default pricing task is attached to an item in your cost estimate, you may wish to add one. Keep in mind that items that are not used repeatedly may not have enough bid history to produce a bid-based price. If there is a similar item that may have more bid occurrences, you can base the price on that item.
It is also not advisable to attempt to generate a bid-based price on lump sum items, as the scope of the item can vary greatly based on job conditions.
Note: An item must have a quantity to produce a bid-based price.
Note: If the task is active and you modify values in the Task Bid
History Profile, Alternate Item, Rolled Up Quantity, or Alternate Quantity fields, the system does not display a value in the Task Price field until you calculate the price.
Note: If you modify values in the Task Bid History Profile, Alternate Item, Rolled Up Quantity, or Alternate Quantity fields for an active task and you save the changes without calculating the price, the system automatically recalculates the price for you. The price is also automatically recalculated if you set a task to active and save the changes without calculating the price. As a result, the save process might require additional time to complete.
Required fields are:
Task Description
AASHTOWare Project Estimation™ Users Guide 86

Instructions
Navigation: Estimation > Cost Estimates > Cost Estimate Summary > Cost Estimate Items tab > Cost Estimate Item
To add a bid-based task to a cost estimate item:
1. On the Cost Estimate Items tab, click the Expand/Collapse arrow to expand an item.
2. Click the Details button to the right of the Price field.
3. Click the Bid-Based link in the Details window.
4. Click the component Actions button, and select the Add action.
5. In the Task Description field, enter a brief description for the bidbased task.
6. In the Alternate Item field, enter a value if you would like to base the price on the bid history of a different item.
7. In the Task Group ID field, search for and select the name of the task group to which the bid-based task belongs.
8. Click the Active check box to include this price in the estimate total, if appropriate.
9. Click the Rolled Up Quantity check box if you would like to base the price on the total quantity of all occurrences of this item in the cost estimate.
10. In the Alternate Quantity field, enter a value if you would like to base the price on the bid history for a different quantity.
11. Click the Save button.
12. Click the link for the Task you just added.
13. Click the component Actions button and select the Calculate Price action.
14. The system will assign a price to the item, or generate a warning that there is insufficient
data to calculate a bid-based price. Fine-Tuning the Bid-Based Task
As noted in the previous instruction, if you have insufficient bid data you can base your bid- based task on a different item, and/or a different quantity. You can also associate a different bid history profile for a particular item; for example, if you wanted to include bids from a greater length of time, or focus on bids from proposals with a particular work type code.
AASHTOWare Project Estimation™ Users Guide 87
Instructions
Navigation: Estimation > Cost Estimates > Cost Estimate Summary > Cost Estimate Items tab > Cost Estimate Item
To associate a bid history profile to a cost estimate item:
1. Click the Expand/Collapse arrow to expand an item.
2. Click the Details button.
3. In the Details window, click the Bid-Based link.
4. Click the Task link.
5. Click the component Actions button and choose the Select Task Bid History Profile action.
6. Search for and select a Bid History Profile.
7. Click the Copy Profile to Cost Estimate Item Bid Based Task button. Reference Price Tasks
Your agency may have associated default reference price tasks with certain reference items; for example, lump sum items where bid-based pricing cannot be used. You can also add a reference price task to an item in a cost estimate, either by choosing an existing task or by creating a new one.
Reference price tasks may use an ad hoc price, a formula, a specified percent of the total estimate, a percent on top of the estimate, or a pre-set historical price from the reference item.
Required fields are:
Reference Price
Description
Amount, or Percent of, or Percent on Top
Reference Price Task Using an Ad Hoc Price or Formula
You may price an item by entering a price or calculating a price using a formula.
AASHTOWare Project Estimation™ Users Guide 88

Instructions
Navigation: Estimation > Cost Estimates > Cost Estimate Summary > Cost Estimate Items tab > Cost Estimate Item
To add a reference price task to a cost estimate item using an ad hoc price or formula:
1. Click the Expand/Collapse arrow to expand an item.
2. Click the Details button.
3. In the Details window, click the Reference link.
4. Click the New button.
5. In the Reference Price field, enter a name for the task.
6. In the Description field, enter a brief description for the bid-based task.
7. In the Cost Estimate Task Group Id field, search for and select a task group number if you wish to associate this task with a task group.
8. The Use Historical Price check box would be populated by the system if there is a default historical price associated with the item.
9. In the Amount field, enter the dollar amount of the price; or click the Expression Builder button to select a Predefined Formula or create a new expression to calculate the value.
10. Click the Active check box to include this price in the estimate total, if appropriate.
11. Click the Save button.
12. View the Task Unit Price calculated by the system. Reference Price Task Using a Percent of the Total
You may price an item by using a percent of the total estimate.
Note: You can only use a percent field if the item quantity equals 1.
AASHTOWare Project Estimation™ Users Guide 89

Instructions
Navigation: Estimation > Cost Estimates > Cost Estimate Summary > Cost Estimate Items tab > Cost Estimate Item
To add a reference price task to a cost estimate item using a percent of the total estimate:
1. Click the New button.
2. In the Reference Price field, enter a name for the task.
3. In the Description field, enter a brief description for the reference price task.
4. In the Cost Estimate Task Group Id field, search for and select a task group number if you wish to associate this task with a task group.
5. The Use Historical Price check box would be populated by the system if there is a default historical price associated with the item.
6. In the Percent of field, enter a number representing the percent of the total estimate that the system will use to calculate the item price.
7. Click the Active check box to include this price in the estimate total, if appropriate.
8. Click the Save button.
9. View the Task Unit Price calculated by the system.
Reference Price Task Using a Percent on Top
You may price an item by using a percent of a portion of an estimate.
Note: You can only use a percent field if the item quantity equals 1.
AASHTOWare Project Estimation™ Users Guide 90
Instructions
Navigation: Estimation > Cost Estimates > Cost Estimate Summary > Cost Estimate Items tab > Cost Estimate Item
To add a reference price task to a cost estimate item using a percent of a portion of the estimate:
1. Click the New button.
2. In the Reference Price field you may optionally enter a name for the task.
3. In the Description field, enter a brief description for the reference price task.
4. In the Cost Estimate Task Group Id field, search for and select a task group number if you wish to associate this task with a task group.
5. The Use Historical Price check box would be populated by the system if there is a default historical price associated with the item.
6. In the Percent on Top field, enter a number representing the percent of a portion of the total estimate that the system will use to calculate the item price.
7. Click the Active check box to include this price in the estimate total, if appropriate.
8. Click the Save button. 9. View the Task Unit Price calculated by the system.
Cost Estimate Item Pricing Worksheet If you wish to enter prices for multiple items in a grid view, you can use the Cost Estimate Item Pricing Worksheet.
Each field in a row is displayed in a read-only format until it is activated. You can focus on a field by clicking on it, tabbing to it, or using the arrow keys, then click again to activate it.
Instructions
Navigation: Estimation > Cost Estimates > Cost Estimate Summary > Cost Estimate Item Pricing Worksheet quick link
To add or change a price for an item on the Cost Estimate Item Pricing Worksheet:
1. In the Estimation component, click the Cost Estimates link.
2. Search for and select a cost estimate.
3. Click the Cost Estimate Item Pricing Worksheet quick link.
AASHTOWare Project Estimation™ Users Guide 91

4. Double-click in the Unit Price field for an item to change a value.
5. Use the down arrow key to access the Unit Price field for the next item.
6. Click the Details button in the Unit Price field to access the price tasks.
7. To sort the rows by Cost Estimate Category, Line, Item, Description, Unit, Quantity, Unit Price, Extended Amount, Supplemental Description, or Active status, click the column header drop-down arrow and click the Ascending or Descending button.
8. Click the Save button.
AASHTOWare Project Estimation™ Users Guide 92

Item Bid History
The Item Bid History Summary enables you to calculate a bid-based price for an individual reference item separate from a cost estimate. You can also lists rows of historical bid data for the reference item and bid history profile, and view the data on an interactive scatter plot.
Please note that depending on the policies, system configurations, and roles at your agency, you may not have access to all of the AASHTOWare Project Estimation functionality shown in this training guide.
Calculating an Item Bid History
From the Item Bid History Summary you can select the bid history profile to use, select additional parameters for the price calculation as needed, and then calculate the item price. The calculated price is displayed for your information only and is not retained in the system.
Note: It is best to carefully consider adding selectors unless they add value to your pricing strategy, as more selectors will narrow down the number of bids that are included in the calculation.
Note: When you access the Item Bid History component from the Previous menu, the data you entered previously is cleared.
Required fields are:
Item
Quantity
Bid History Profile
Instructions
Navigation: Estimation > Item Bid History
To calculate a price on the Item Bid History Summary:
1. In the Estimation component, click the Item Bid History link.
2. On the Item Bid History Summary Criteria window, search for and select an Item Number in the Item field.
3. In the Quantity field, enter a numeric value.
AASHTOWare Project Estimation™ Users Guide 93

4. In the Bid History Profile field, search for and select a bid history profile.
5. In the Let Date field, enter the anticipated letting date for the estimated work, if appropriate.
6. If you wish to limit the number of proposals for inclusion in the bid history profile, in the Work Type field, click the drop-down arrow to select a code.
7. If you wish to further limit the number of proposals for inclusion in the bid history
profile, in the Improvement Type field, click the drop-down arrow to select a code.
8. If you wish to further limit the number of proposals for inclusion in the bid history profile, in the Terrain field, click the drop-down arrow to select a code.
9. If you wish to further limit the number of proposals for inclusion in the bid history profile, in the Urban/Rural field, click the dropdown arrow to select a code.
10. If you wish to further limit the number of proposals for inclusion in the bid history profile, in the Highway Type field, click the dropdown arrow to select a code.
11. If you wish to further limit the number of proposals for inclusion in field.
12. Click the Calculate Price button.
13. You can modify the criteria if you wish, and click the Calculate Price button again to re- evaluate the item price.
Viewing Source Data for an Item Bid History
The Item Bid History Source Data component lists rows of historical bid data for the reference item and bid history profile selected on the Item Bid History Summary. You can use this information to compare and analyze the cost of the item at different quantities and variable conditions.
Each row can be expanded to view information about the source of the item bid price, including variables for the item, and information about the proposal and vendor.
Note: The Source Data component is not available from the Previous menu.
Instructions
Navigation: Estimation > Item Bid History > Bid History Summary > Source Data quick link
To view source data for the Item Bid History price you just calculated:
1. On the Bid History Summary component, click the Source Data quick link.
AASHTOWare Project Estimation™ Users Guide 94

2. Click the Expand/Collapse arrow for a bid to view additional information.
3. In the Include/Exclude field, click the drop-down arrow to change which items are displayed on the list.
Viewing Item Price Details
When you click the Details button to the right of the Price field, the system displays an overlay with different prices for the cost estimate item. Each row displays the method used to calculate the price, the price amount, and a check box indicating whether one or more price tasks for that method are active. Each method name is a link to the component where settings are established for the calculation method.
Links, prices, and Active check boxes are displayed for these calculation methods:
Bid Based Reference
The Active check box is selected for a calculation method by default if any price tasks for that method that are associated with the item are marked active. If you clear the Active check box in the details overlay, the system changes the status of the associated price tasks for that method to inactive.
If the cost estimate item is set to inactive so that its price is not included in the cost estimate, the Active settings in the details overlay and the price tasks associated with the cost estimate item are still retained. This enables you to choose whether or not to include the item in the cost estimate without losing the saved information about associated task groups and price tasks.
Price Versus Quantity Analysis
Analyzing Price Versus Quantity
The Price Versus Quantity analysis tool enables you to compare prices for an item at different quantities based on an item bid history as defined by a bid history profile. Data is displayed on an interactive scatter plot. You can modify settings to include or exclude data points, compare calculated prices according to different criteria, and highlight different types of data as needed. You can continue modifying settings and recalculating the price to analyze the data from different perspectives.
There are two ways to access the interactive analysis tool. If you want to perform a quick analysis for a reference item, navigate to the Item Bid History component, enter values in the required fields, and then select Price vs Quantity Analysis from the Actions menu on the component header. The system displays the interactive analysis tool in a new browser window.
If you want to perform an analysis for a cost estimate item and have the option to save your changes to the associated bid-based task, navigate to the Cost Estimate Item Bid Based Task
AASHTOWare Project Estimation™ Users Guide 95

Summary, and select Price vs Quantity Analysis from the Actions menu on the component header. The system displays the interactive analysis tool. After you modify settings and reprice, the Apply button becomes available, enabling you to save the changes to the bid-based task associated with the cost estimate item.
Understanding the Analysis Window
The Price Versus Quantity Analysis is displayed in a new browser window. The title of the window indicates whether the graph is based on a regression or average.
If you accessed the analysis tool from the Item Bid History component, the window displays the analysis based on the values from fields on the Item Bid History component. If you accessed the analysis tool from the Cost Estimate Item Bid Based Task Summary, the window displays the analysis based on the values from the concept, cost estimate item, and the bid-based task (for additional information about the calculations, see the Bid-Based Pricing Methodology Guide).
Item The Item link in the upper left corner displays the ID and description of the
reference item used for the analysis. You can click the Item link to select an alternate reference item and update the analysis automatically.
Reprice Clicking the Reprice button applies modified settings to the information displayed in the analysis tool, updates the data points, and calculates the modeled price. The Reprice button is available only when settings have been changed but not yet updated on the graph.
Reset Clicking the Reset button reverses all of the setting modifications since the last time the Reprice button was clicked.
Price The Price link shows the modeled price as calculated by the settings in place the last time the Reprice button was clicked. Clicking the Price link displays the Price overlay where you can modify the variables specified in the bid history profile that are used to calculate the modeled price.
Profile The Profile link in the upper right corner displays the name and description of the bid history profile used for the analysis. You can click the Profile link to select a different bid history profile and update the analysis automatically.
Apply Clicking the Apply button updates the bid-based task for the cost estimate item with all the changes made in the analysis tool. If you select a different reference item, it is entered as an alternate item in the cost estimate item bid-based task. The Apply button is available only after settings are modified and repriced, and only if the tool was accessed from the Cost Estimate Item Bid Based Task Summary.
Actions The Actions menu provides access to the Reload command and either the Average or Regression commands, as appropriate. Selecting the Reload command removes all of the repriced changes made to settings and displays the analysis in its initial state. Selecting Average or Regression changes the calculation and scatter plot displayed.
Help Clicking the Help button displays this Help topic.
AASHTOWare Project Estimation™ Users Guide 96

Zoom The Zoom, Identify, and Include/Exclude buttons change the effect of clicking the scatter plot. One of these buttons is always selected. You can click a different button to change from one mode to another. If you are using keyboard controls rather than a mouse, you can perform identical functions on the Source Data component (click the Source Data quick link on this component).
Clicking the Zoom button and then clicking the scatter plot enables you to get a closer look at a section of data points. You can also drag to select an area of the plot to enlarge. The current zoom percentage is displayed above the Zoom button. You can zoom out to 100% by clicking the current zoom percentage link.
Identify Clicking the Identify button and then clicking a data point displays information about the point, including the work type, season, terrain, and other information. You can also access proposal vendor information.
Include/Exclude Clicking the Include/Exclude button and then clicking a data point toggles the point from included in the modeled price to excluded from the modeled price, and vice versa.
Analysis You can change settings for the graph or the calculation by using the analysis panels on the right. To expand an analysis panel, click the name of the panel you want to view, either Filter, Highlight, or Show.
Collapse When the analysis panel is expanded, clicking the Collapse button collapses the panel.
Different symbols are used for data points to indicate whether the point is included or excluded in the price calculation, and whether the inclusion or exclusion was determined by user selection on the plot or the model calculations. The following symbols are used for data points on the scatter plot:
Plus Modeled point
Circle Included by model
Circle with slash Included by selection
Square Excluded by model
Square with slash
Excluded by selection
Diamond Excluded by filter
Point to a data point to display a tooltip with the dollar amount and quantity of the item, and whether it is included or excluded in the modeled price. You can view additional information about a data point by clicking the Identify button and then clicking the point.
AASHTOWare Project Estimation™ Users Guide 97

Switching Between Regression and Average
To display the scatter plot with an average instead of a regression, select Average from the Actions menu on the component header. If an average is displayed because a regression could not be calculated using the settings in the selected bid history profile, you can still use the analysis tool to calculate a regression. To display the scatter plot with a regression price instead of an average price, select Regression from the Actions menu on the component header.
Identifying Data Points
Pointing to a data point on the graph displays a tooltip with the dollar amount and quantity for the point. For bid history price points, the tooltip also indicates whether the point is excluded or included in the modeled price, and whether the point was excluded or included by the model calculation or by the user's selection on the plot. For the modeled price, the tooltip includes the count and variability.
To access additional information about a data point, click the Identify button, and then click the data point. The system displays an overlay with the following bid information:
D Date
H Highway Type
I Improvement Type
M Market Area
S Season
T Terrain
U Urban/Rural
W Work Type
For bid history price points, the overlay includes a Proposal and Vendor link. When you click the link, the overlay displays the proposal ID, description, and county. It also displays the bid vendor name, ID, bidding rank, and bid total. You can click the Pricing Info link to return to the pricing information overlay.
To exclude the data point from the calculation of the modeled price, click the Exclude link on the overlay. When you exclude the data point, the link changes to Include. For excluded data points, you can click the Include link to include the data point in the calculation of the modeled price. When you include the data point, the link changes to Exclude.
To close the overlay, click the Close button in the upper right corner of the overlay. You can continue clicking different data points to display identifying information about that point.
AASHTOWare Project Estimation™ Users Guide 98

Using the Analysis Panels
You can change settings for the graph or the calculation by using the analysis panels on the right side of the analysis window. To expand an analysis panel, click the name of the panel you want to view, either Filter, Highlight, or Show (see Filtering Data, Highlighting Data, and Showing and Hiding Points and Lines). You can switch between panels as needed. To collapse an expanded panel, click the Collapse button or the panel name.
Filtering Data
The Filter panel enables you to filter the data included in the modeled price according to a range of quantities or by any combination of variables used for analysis in a bid history. To expand the Filter panel, click Filter on the right edge of the analysis tool window. You can collapse the Filter panel at any time by clicking the Collapse button.
The top of the panel displays two fields where you can enter the minimum and maximum item bid quantities to be used in the analysis. You can change the quantity by entering values in these fields, or by dragging the slider.
The Filter panel includes expandable sections for each variable from the selected bid history profile. If a variable is not selected for inclusion on the bid history profile, it is not included on the Filter panel. If all variables are selected for inclusion, the Filter panel includes expandable sections for each of these variables:
Highway Type Improvement Type Market Area Season Terrain Urban/Rural Work Type
Each expandable section contains check boxes for the values your agency has defined for that variable, but only if a data point captured by the analysis uses that value. For example, if your agency has defined Spring, Summer, Fall, and Winter as seasons, but the item you are pricing only has historical bid data for Spring and Summer, the system displays check boxes only for Spring and Summer.
Select or clear each check box to include or exclude bid prices that match each value. To view the effects of changing filter settings, click the Reprice button. The modeled price is recalculated, and the indicators for excluded data points are updated to identify them as excluded by filter.
To remove all of the repriced changes made to settings and display the analysis in its initial state, select Reload from the Actions menu on the component header.
AASHTOWare Project Estimation™ Users Guide 99

If you choose to save the filter settings and apply them to the associated cost estimate item bid- based task, you can click the Apply button. The Apply button is available only if the analysis tool was accessed from the Cost Estimate Item Bid Based Task Summary.
Highlighting Data
The Highlight panel enables you to view values for Count, Price, and Variability for each data attribute. You can also apply a visual indicator to points on the graph that meet selected criteria. To expand the Highlight panel, click Highlight on the right edge of the analysis tool window. You can collapse the Highlight panel at any time by clicking the Collapse button.
To specify the variable you want to use to highlight data, select a value in the drop-down box at the top of the Highlight panel. The panel displays different attribute check boxes depending on your selection. For example, if you select Season from the drop-down menu, the panel displays check boxes for the seasons defined by your agency, but only if a data point captured by the analysis uses that value. For example, if your agency has defined Spring, Summer, Fall, and Winter as seasons, but the item you are pricing only has historical bid data for Spring and Summer, the system only displays check boxes for Spring and Summer.
To highlight data on the scatter plot, select a check box for the data attribute you want to highlight. To remove the highlighting, clear the check box.
For each check box, a row of data is displayed with values for Count, Price, and Variability. The price for each row of data is marked on the scatter plot by a short horizontal line at the same quantity as the modeled point. By default, the rows are displayed in descending order by price. You can click the Count, Price, or Variability links to sort the rows by that value.
Count The number of data points included in the calculation of the row price. A count of zero on
a single row indicates that the row's attribute does not occur in the gathered data set. A count of zero in all rows for the selected variable indicates that the variable is not included in the price calculation.
Price The price for included data points for the row.
Variability Regression: The dollar amount of 94.5% confidence interval for the row price. Average: The dollar amount of one standard deviation for the row price.
Including and Excluding Data Points
While you are including and excluding data points from the pricing analysis, it helps to keep the totals of included and excluded points in view. These totals are listed on the Show panel. To display the Show panel, click Show on the right edge of the analysis tool window. You can collapse the Show panel at any time by clicking the Collapse button.
AASHTOWare Project Estimation™ Users Guide 100

The Show panel lists separate totals for points included by the model and points included by user selection. For excluded points, separate totals are listed for points excluded by the model, by filter settings, and by user selection.
Include/Exclude Mode
To include or exclude an individual data point from the modeled price calculation, click the Include/Exclude button in the analysis window, and then click a data point on the graph. If you click an included point, it will be excluded. If you click an excluded point, it will be included. The totals of included and excluded points listed in the Show panel are updated to reflect your selection.
As long as the Include/Exclude button appears pressed, clicking any point on the graph will change the point's status. You can continue clicking points and changing their status as needed. To exit Include/Exclude mode, click either the Zoom or Identify button.
To view the effects of including or excluding data points, click the Reprice button. The modeled price is recalculated, and the indicators for the data points you included and excluded are updated to identify them as included or excluded by selection.
To remove all of the repriced changes and display the analysis in its initial state, select Reload from the Actions menu on the component header.
If you choose to save the included or excluded data point settings and apply them to the associated cost estimate item bid-based task, you can click the Apply button. The Apply button is available only if the analysis tool was accessed from the Cost Estimate Item Bid Based Task Summary.
Alternate Methods
You can also drag to select multiple data points on the graph. If the points you select all have the same status of either included or excluded, the status is toggled to the opposite value. For example, if you drag to select three excluded data points, all three points will then be included.
If you drag to select multiple points that have different statuses, only the points with the majority status within the selection are toggled. For example, if you drag to select two excluded points and one included point, the two excluded points will change to be included, but the status of the third point will not change. As a result, all three points will be included in the analysis.
If you drag to select multiple points that have different statuses, and there is an equal number of included and excluded points, the excluded status takes precedence. For example, if you drag to select two excluded points and two included points, the included points will be changed to excluded, and the status of the excluded points will remain unchanged. This results in four excluded points.
You can also include or exclude a data point by clicking the Identify button, and then clicking either the Include or Exclude link, as appropriate, in the identification overlay.

Showing and Hiding Points and Lines
You can choose to show or hide data points and lines on the graph to better identify key details or pieces of information. To show or hide elements on the graph, first display the Show panel by clicking Show on the right edge of the analysis tool window. You can collapse the Show panel at any time by clicking the Collapse button.
The upper portion of the panel displays settings for data points, and the lower portion of the panel displays settings for lines.
Points
You can show or hide data points based on whether or not the point is included or excluded from the calculation of the modeled price. The Points section of the Show panel lists check boxes and totals for the following criteria: Included by Model, Included by Selection, Excluded by Model, Excluded by Selection, Excluded by Filter.
To hide data points with a specific status, clear the check box for that status. To show data points with a specific status, select the check box for that status.
Lines
You can hide or show different lines as needed. The Lines section of the Show panel lists check boxes for these line types: Modeled Price, Base, Variability Level, and Reference.
To show a line, select the check box for that line type. To hide a line, clear the check box for that line type.
Modeled Price
A regression shows a curved line that intersects with the modeled price. An average shows a horizontal line at the modeled price that extends through the quantity range used for the average.
Base The base line represents the price versus quantity regression without any of the other variables that can be incorporated in the modeled price. There is no base line for an average.
Variability Level
Two lines drawn representing the upper and lower deviation for the modeled price.
Regression: The lines are a 94.5% confidence interval above and below the modeled price.
Average: The lines are two standard deviations above and below the modeled price.
Reference Two lines drawn from the modeled price point to the price axis and quantity axis.

Modifying Variables Used in the Calculation
You can modify the variables used in the calculation and evaluate the effects on the modeled price. To access the settings, click the Price link. The options available in the Price overlay vary depending on whether the modeled price is an average or regression.
Regression Price
For a regression price, the Use in Regression Calculation field is displayed at the top of the overlay. Selecting the check box enables you to modify the settings for individual variables to indicate whether they should be used in the regression price calculation.
The Price overlay lists parameter rows for quantity, date, and for each of the variables selected for inclusion on the bid history profile. If a variable is not selected for inclusion on the bid history profile, it is not included on the Price overlay. If all variables are selected for inclusion, these parameter rows are displayed:
Quantity Date Highway Type Improvement Type Market Area Season Terrain Urban/Rural Work Type
Each parameter row includes a Modeled field that indicates whether or not the variable was used to calculate the initial modeled price, and a Use check box that enables you to change whether or not the variable is used. Each row also displays the Current Value for the parameter and an Alternate Value field.
To add or remove a variable from the regression equation, select or clear the Use check box on the parameter row.
To specify a different date or quantity, click in the Alternate Value field and enter a new date or quantity as needed. To specify a different value for a variable, click the drop-down arrow, and select a new value from the list.
To view the effects of your changes, click the Reprice button. The modeled price is recalculated, the Price overlay is closed, and the scatter plot is refreshed with updated data points.
To remove all of the repriced changes made to settings and display the analysis in its initial state, select Reload from the Actions menu on the component header.

If you choose to save the settings and apply them to the associated cost estimate item bid-based task, you can click the Apply button. The Apply button is available only if the analysis tool was accessed from the Cost Estimate Item Bid Based Task Summary.
Average Price
For an average price, these fields are displayed at the top of the Price overlay: Filter to Match Model Used Quantity Level Model Matched All Parameters
The Model Used Quantity Level indicates whether the model used the range displayed in the Quantity Level field to filter the data. The Model Matched All Parameters field indicates whether the model filtered the data to match all of the variables. Selecting the Filter to Match check box enables you to modify the settings for individual variables used to filter the data.
The average Price overlay displays a row with these fields for quantity:
Quantity Level Match Quantity Alternate Quantity
To require the model to filter the data to include only bids for item quantities within the Quantity Level range, first select the Filter to Match check box, and then select the Match check box for quantity level.
To specify a different item quantity to use for the average calculation, click in the Alternate Quantity field and enter a new quantity as needed.
After the fields for quantity, the overlay lists parameter rows for each of the variables selected for inclusion on the bid history profile. If a variable is not selected for inclusion on the bid history profile, it is not included on the Price overlay. If all variables are selected for inclusion, these parameter rows are displayed:
Highway Type Improvement Type Market Area Season Terrain Urban/Rural Work Type
Each parameter row includes a Match check box that indicates whether or not the data must match the value selected for the variable. To modify the Match settings for individual variables,

first select the Filter to Match check box, and then select or clear the Match check boxes for the variables you want to use to filter the data.
To specify a different value for a variable, click the drop-down arrow, and select a new value from the list.
To view the effects of the changes you made in the Price overlay, click the Reprice button. The modeled price is recalculated, the Price overlay is closed, and the scatter plot is refreshed with updated data points.
To remove all of the repriced changes and display the analysis in its initial state, select Reload from the Actions menu on the component header.
If you choose to save the settings and apply them to the associated cost estimate item bid-based task, you can click the Apply button. The Apply button is available only if the analysis tool was accessed from the Cost Estimate Item Bid Based Task Summary.
Analyzing Bid History Source Data
The Source Data component lists rows of historical bid data for an item. You can use this information to compare and analyze the cost of the item at different quantities and variable conditions. Each row can be expanded to view information about the source of the item bid price, including variables from the cost estimate, and information about the proposal and vendor. You can include or exclude each item bid in the calculation of the regression or average price. If you are working with a cost estimate item rather than a reference item, you can also choose to apply the settings and save them as part of the associated cost estimate item bid-based task.
Note: You can analyze the same data in the form of an interactive scatter plot by using the Price Versus Quantity Analysis tool (see Analyzing Price Versus Quantity).
You can access the Source Data component by navigating to the Cost Estimate Item Bid Based Task Summary or the Item Bid History component, calculating the price, and then clicking the Source Data quick link. The Source Data quick link is available only after the item price has been calculated.
Note: The Source Data component is not available from the Previous menu.
At the top of the component, the Price field displays either the Average Price or Regression Price calculated by the model. The Regression field indicates whether the price displayed is a regression or an average.
You can enter criteria in the Quick Find search box to locate a specific item bid. You can also select a value in the Include/Exclude field to filter the list to show only bids that meet one of the following criteria: Excluded by Filter, Excluded by Model, Excluded by Selection, Included by Model, Included by Selection.
Each item bid history row displays values in these fields:

Quantity Price Include/Exclude
You can expand a row to display additional information in these fields:
Reason excluded by model
Pricing Information: Date Highway Type Improvement Type Market Area Season Terrain Urban/Rural Work Type
Proposal and Vendor:
Proposal ID Description Vendor Rank Primary County Bid Total
To include or exclude an item bid in the price calculation, choose either Include by Selection or Exclude by Selection in the Include/Exclude field in the item bid row. Click the Reprice button. The model recalculates the value in the Price field. You can continue including or excluding item bids in the list as needed. Click the Reprice button to view the effects of each change.
If you accessed the Source Data component from the Cost Estimate Item Bid Based Task Summary, you can apply the changes to the associated bid-based task. The Apply button is available only after changes are made and repriced. To save the changes to the bid-based task associated with the cost estimate item, click the Apply button. The system takes you to the Cost Estimate Item Bid Based Task Summary with an updated value in the Task Price field. See Maintaining a Bid-Based Task for more information.

Find Bid Data
The Find Bid Data component enables you to gather historical bid data from proposals stored in the system and determine the average bid price and estimated unit price of a bid item for each proposal. The average bid price is calculated as the sum of all bid prices for the proposal divided by the number of bidders.
Required fields are:
Bid Item
Instructions
Navigation: Estimation > Find Bid Data
To find bid data related to a specific item:
1. In the Estimation component, click the Find Bid Data link.
2. In the Bid Item field, search for and select an item number.
3. In the Quick Find search box, enter proposal search criteria (for example, asph) to narrow down the number of proposals containing the selected item.
4. Click the Expand/Collapse arrow for a row to view further information about the proposal and bids.
5. Enter a new value in the Bid Item field to view bid information for a different item.

Appendix A: Procedures for Sub-Contracting an Estimate
Appendix A A - 1 AASHTOWare Project Cost Estimation System (CES) Manual

Procedures for Sub-Contracting an Estimate
Sometimes consulting firms will sub-contract part of an estimate to another consulting firm. Because of how security works in CES, a consulting firm cannot see the job estimates of other consulting firms. This appendix outlines the procedures for sharing a job estimate when more than one consulting firm is involved in its creation.
Step 1: Prime Makes a Copy of “Prime” Estimate for Sub-contracting Firm
1. In the Job list window highlight the job to be copied.
Select Copy Special from the Edit menu and choose All.
Specify a new project name. The recommended format is <Current Job Number>-SUB. For example, project 12345 would be named 12345-SUB when copied.
The copied job is the “sub” estimate. The original job is the “prime” estimate.
Step 2: Prime Assigns “Sub” Estimate to Sub-contracting Firm
1. Right-click on the copied job and select Change from the menu.
Navigate to Page 2 of the GENERAL tab of the Job window.
Use the drop-down list in the Control Group field to select the sub- contracting firm that will be working on the estimate.
Save the change.
Notify the Sub-contracting firm that the “sub” estimate is now assigned to their firm in CES. The Prime consulting firm may still work on its part of the estimate using the “prime” estimate.
Step 3: Sub-contracting Firm Creates Estimate
1. Based on the procedures outline in this manual, the sub-contracting firm should create an estimate as it normally would using the “sub” estimate assigned by the prime firm.
Once the sub-contracting firm completes the “sub” estimate, it should be assigned back to the prime consulting firm.
Step 4: Sub-contracting Firm Assigns Completed “Sub” Estimate to Prime
1. In the Job list window, select the “sub” estimate.
Right-click on the job and select Change from the menu.
Navigate to Page 2 of the GENERAL tab of the Job window.
Use the drop-down list in the Control Group field to select the prime contracting firm.
Save the change.
Notify the prime contracting firm that the “sub” estimate is now assigned to their firm in CES.
Step 5: Prime Imports Items from “Sub” Estimate to “Prime” Estimate
Appendix A A - 2 AASHTOWare Project Cost Estimation System (CES) Manual
Note: Only items will be imported by this process – categories or other changes will not be imported.
1. In the Job list window, select the “prime” estimate.
Select Import from the File menu and choose Job Items from CES Job.
Select the “sub” estimate from the list.
Click OK.
For the Combine Jobs Option select “Do Not Combine Item Quantities.”
Receive message that “Import Completed Successfully.”
Note: A snapshot of the “prime” job was automatically created before the import.
Open the job estimate and verify the items imported as expected.
Make adjustments as needed.
Do not delete the “sub” estimate. It should be retained as a point of reference.
Appendix A A - 3 AASHTOWare Project Cost Estimation System (CES) Manual

Appendix B: Federal Non‐Participating Construction Cost
Estimation Work Sheet
Appendix B B - 1 AASHTOWare Project Cost Estimation System (CES) Manual

Federal Non‐Participating Construction Cost Estimation Work Sheet
Items of Work Amount
Approach slabs with any of the following conditions:
(a) if one‐way traffic loading is less than 500 80‐kN equivalent single axle load applications per day;
(b) posted speed limit is less than 35 m.p.h.; =
(c) the abutments are not supported on pile foundations.
Fishing piers (or bridges) and pedestrian walkways for recreational access. =
Greater than a 2 to 1 ratio of mitigation for wetland sites. FHWA sometimes participates in greater than 2 to 1 replacement if the impact is significant. Contact Project Manager for guidance. =
Sometimes the use of liners for Wetland Mitigation Sites as they do not permit ground water recharge. Contact Project Manager for guidance. =
Waterway openings and net fill requirements mandated by NJDEP when they differ from FHWA requirements. =
Structures less than 20 feet in span if BR/BH funds are being utilized for the project. =
Sidewalks on bridges when there are no sidewalks on the approaches for pedestrians. Contact Project Manager for guidance. =
Maintenance dredging if the dredged material is not used as a fill. =
Maintenance operations such as cleaning existing pipes, drainage structures, ditches, repairing impact attenuators, mowing etc. FHWA sometimes participates in this work. Contact Project Manager for guidance. = Items of work paid for by other agencies or private developers. = Sometimes Memorial and/or Vanity Plaques on structures. = Type II Noise Barriers =
BR/BH funds for approach work past the touchdown points for new / rehabilitated structures. =
Proprietary items without proper justification. Contact Project Manager for guidance. = Additional items not listed above. (see next page) =

=
=
=
=
=
=
=
=
=
=
=
=
=
=
=
=
=
=
=
Total Federal Non‐Participating Items =

Appendix C: NJDOT New Item Number Request Form
Appendix C C - 1 AASHTOWare Project Cost Estimation System (CES) Manual
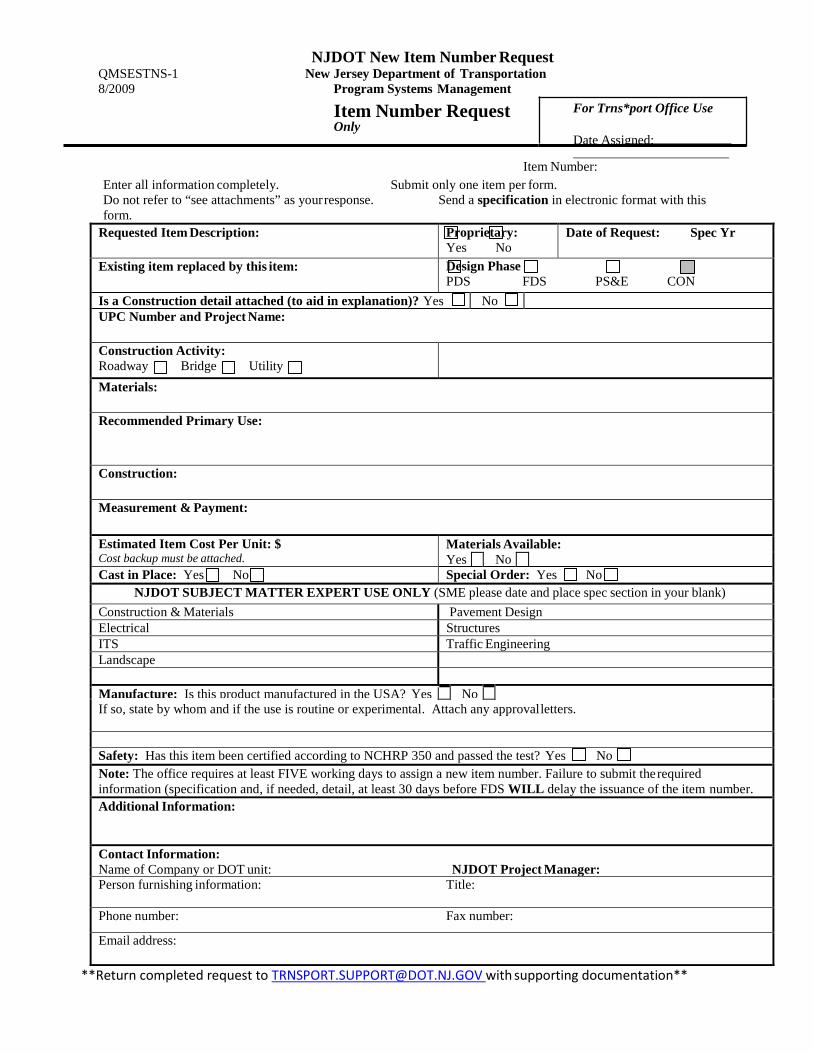
NJDOT New Item Number Request QMSESTNS-1 New Jersey Department of Transportation 8/2009 Program Systems Management
Item Number Request For Trns*port Office Use Only
Date Assigned:
Item Number: Enter all information completely. Submit only one item per form. Do not refer to “see attachments” as your response. Send a specification in electronic format with this form.
Requested Item Description: Proprietary: Yes No
Date of Request: Spec Yr
Existing item replaced by this item: Design Phase PDS FDS PS&E CON
Is a Construction detail attached (to aid in explanation)? Yes No UPC Number and Project Name:
Construction Activity: Roadway Bridge Utility
Materials:
Recommended Primary Use:
Construction:
Measurement & Payment:
Estimated Item Cost Per Unit: $ Cost backup must be attached.
Materials Available: Yes No
Cast in Place: Yes No Special Order: Yes No NJDOT SUBJECT MATTER EXPERT USE ONLY (SME please date and place spec section in your blank)
Construction & Materials Pavement Design Electrical Structures ITS Traffic Engineering Landscape
Manufacture: Is this product manufactured in the USA? Yes No If so, state by whom and if the use is routine or experimental. Attach any approval letters.
Safety: Has this item been certified according to NCHRP 350 and passed the test? Yes No Note: The office requires at least FIVE working days to assign a new item number. Failure to submit the required information (specification and, if needed, detail, at least 30 days before FDS WILL delay the issuance of the item number. Additional Information:
Contact Information: Name of Company or DOT unit: NJDOT Project Manager: Person furnishing information: Title:
Phone number: Fax number:
Email address:
**Return completed request to [email protected] with supporting documentation**