user’s guide - oddcast - the participation marketing company
TRANSCRIPT

User’s Guide Version 6.0
Last Updated 12/28/2009

Information in this document is subject to change without notice. Companies, names and data used in examples herein are fictitious unless otherwise noted. No part of this document may be reproduced or transmitted in any form or by any means, electronic or mechanical, for any purpose, without the express written permission of Oddcast, Inc.
Copyright 2009 © Oddcast, Inc.
Oddcast Media Technologies 2

Table of Contents
Table of Contents
Table of Contents.............................................................................................iii Preface: How to Use This Manual ................................................................... vi System Requirements.....................................................................................vii
Part I - Getting Started .................................................................... 8 Chapter 1 - Introduction to SitePal.................................................................... 9
1.1 The SitePal Process ................................................................................9 1.2 Additional Documentation and Resources .............................................10 1.3 Advanced Features................................................................................10 1.4 Pricing Levels and Associated Features ................................................10 1.5 The SitePal User Interface (UI) for Platinum Users vs. Other User Types (Gold, Silver, and Bronze)............................................................................11 1.6 SitePal Forums ......................................................................................12 1.7 The SitePal Store...................................................................................13
Part II - Creating Scenes............................................................... 15 Chapter 2 - Working with Scenes ................................................................... 16
2.1 Log In to Your Account...........................................................................16 2.2 Use the Scene List.................................................................................18 2.3 Edit a Scene ..........................................................................................21 2.4 Save a Scene.........................................................................................24 2.5 Set Options for a Scene.........................................................................24 2.6 Link a Scene to a Web Resource...........................................................26 2.7 Monitor the Number of Scene Views......................................................27 2.8 Monitor the Freshness of Your Scenes..................................................27
Chapter 3 - Working with SitePal Characters.................................................. 28 3.1 Select/Create a Model ...........................................................................28 3.2 Accessorize Your Model ........................................................................39 3.3 Position the Character in a Scene..........................................................44 3.4 About SitePal Custom Models ...............................................................44 3.5 About SitePal Specialty Models .............................................................46 3.5 About SitePal Specialty Models .............................................................46
Chapter 4 - Working with Backgrounds .......................................................... 47 4.1 Change the Scene Background .............................................................48 4.2 Upload Your Own Background Image....................................................50 4.3 Advanced Asset Management (Backgrounds) for Platinum Customers.51
Chapter 5 - Working with Audio...................................................................... 53 5.1 Use a Saved Audio Message For Your Scene.......................................54 5.2 Record Your Own Audio Message With a Microphone ..........................56 5.3 Upload Audio Files.................................................................................57 5.4 Use a Phone to Record Audio................................................................59
Oddcast Media Technologies 3

Table of Contents
5.5 About Creating Text-to-Speech Audio ...................................................60 5.6 Use Voice Talent to Record Audio .........................................................62 5.7 Play Multiple Audio Messages ...............................................................64 5.8 Monitor the Number of Audio Plays .......................................................65 5.9 Advanced Asset Management (Audio) for Platinum Customers ............65
Chapter 6 - Working with Players ................................................................... 68 6.1 Select a Player.......................................................................................68 6.2 Customize Your Player's Display Options..............................................71 6.3 FAQ Player ............................................................................................72 6.4 Lead Generator Player...........................................................................73 6.5 AI Player ................................................................................................75
Chapter 7 - Publishing and Embedding a Scene ............................................ 77 7.1 Use the Publish Wizard..........................................................................77 7.2 About SitePal Publishing Targets ..........................................................79 7.3 Properties For Embedded Code ............................................................80 7.4 Generate An Example HTML Page From Embed Code.........................81 7.5 Embed a Scene in a Web Page .............................................................81 7.6 Embed a Scene in a Flash movie ..........................................................82 7.7 Embed a Scene in a Facebook page .....................................................82 7.8 Embed a Scene in a MySpace Page......................................................82 7.9 Publish a Scene to an eBay Auction ......................................................83 7.10 Email Your Scene to Anyone ...............................................................83 7.11 Embed a Scene in an HTML Email Message.......................................87 7.12 Embed a Scene in a PowerPoint Presentation ....................................88 7.13 Limit Audio Playback............................................................................88
Part III - Managing Accounts ......................................................... 92 Chapter 8 - Working with Your SitePal Account.............................................. 93
8.1 Extend Your SitePal Account Manually..................................................93 8.2 Extend Your Account with Automatic Billing ..........................................94 8.3 Update Your Billing Information .............................................................95 8.4 Edit Contact Information For Your Account............................................96 8.5 Change Your Account Password ...........................................................97 8.6 Upgrade Your SitePal Account ..............................................................97 8.7 Add Scenes and Audio Streams to Your Account ..................................99 8.8 About Audio Playback Limits ...............................................................100 8.9 Prevent Unauthorized Playback of Your SitePal Scenes .....................100 8.10 Reactivate Your SitePal Account .......................................................103 8.11 Deactivate a SitePal Account.............................................................103 8.12 Remove Oddcast Branding from Loaders and Upload a Customized Loader .......................................................................................................103 8.13 View a Report of Activities on Your SitePal Account..........................106 8.14 Receive Email Notifications of Your Daily/Monthly Account Usage ...109 8.15 Open a New Account .........................................................................110
Chapter 9 - Profiting With SitePal................................................................. 111 9.1 About the Affiliate Program ..................................................................111 9.2 About the Authorized Reseller Program...............................................112 9.3 Add Advertising Banners to a Web Page.............................................112
Oddcast Media Technologies 4
Table of Contents
9.4 Shop at the Reseller Store ...................................................................113 Chapter 10 - Managing Reseller Accounts ................................................... 114
10.1 Manage Accounts ..............................................................................114 10.2 Manage Users ...................................................................................117
Chapter 11 - Artificial Intelligence and the AI Knowledge Base.................... 121 11.1 Set Up the AI Management Center ....................................................122 11.2 Define Concepts for Your AI Knowledge Base...................................123 11.3 Edit the AIML File System..................................................................125 11.4 Compile your AI Knowledge Base......................................................126 11.5 Implement your AI Knowledge Base ..................................................127 11.6 Deploy your AI Knowledge Base........................................................128 11.7 Access AI Management Center Report Logs .....................................128
Appendix B - SitePal Glossary ..................................................................... 130 Index......................................................................................................... cxxxii
Oddcast Media Technologies 5

Preface: How to Use This Manual
Preface: How to Use This Manual
This manual is designed for users of SitePal virtual host software. No programming knowledge is needed to use SitePal to create your own talking character and embed it in a Web page. Part 4 of this manual is designed for advanced users.
This manual contains the following parts:
Part 1 – Getting Started This chapter leads you through the essential steps of creating your SitePal Scene and embedding it in a Web page.
Part 2 – Creating Scenes Provides all the instructions for using SitePal to create and embed SitePal Scenes. This part includes chapters about working with SitePal models, Characters, backgrounds, audio, and Players, and shows how to publish and embed Scenes in various Web environments and email.
Part 3 – Managing Accounts Describes how to manage all types of SitePal accounts. This part also includes information about how you can profit from SitePal by participating in the Affiliate Program and the Reseller Program.
Part 4 – Advanced Techniques Provides information about advanced techniques and how to use the Client API and JavaScript to extend the functionality, flexibility and capabilities of SitePal.
Appendices Includes a SitePal Glossary and a guide to SitePal Best Practices that explains the concepts of Oddcast’s VHost technology and how to maximize the effectiveness of your Web enterprise.
Conventions The following graphical alerts are used is this manual to draw your attention to a tip, note, warning, or item that you can skip over.
Tip
Note
! Warning

System Requirements
System Requirements
PC • OS: Windows 95, 98, ME, NT, 2000 or XP
• Browsers: Internet Explorer 5.5, Internet Explorer 6, Firefox, Mozilla, Opera, Chrome, etc.
• CPU: 400Mhz or faster
• Other: Flash Player 9 or better
Macintosh • OS: OS X 10.2 or better or Mac OS 8.1or newer
• Browsers: Safari, Internet Explorer, Firefox, Mozilla, Chrome, etc.
• CPU: 400Mhz or faster
• Other: Flash Player 9 or better
Linux Although SitePal is not officially supported on Linux at this time, Oddcast is not aware of any of problems or issues with any of the system configurations that we have reviewed.
Note: Some older or non-standard browsers, usually those released before 2001, may not be compatible. Specifically, Netscape browser versions prior to 4.7 and Internet Explorer versions prior to 5.0 are not officially supported.
Oddcast Media Technologies 7

Part I - Getting Started
Working with Scenes
Chapter 1 - Introduction to SitePal
SitePal is an Avatar creation software developed by Oddcast for small businesses and consumers. Avatars are sophisticated animated speaking characters that you can add to Web pages, email messages, Flash movies, and eBay auctions.
SitePal is an easy-to-use and affordable solution that can deliver amazing business results. A SitePal Character
• adds a personalized touch to your Web site
• enhances a customer’s experience
• increases the profile of your brand
1.1 The SitePal Process Using SitePal's online interface, you can create and deploy your own virtual salesperson in just minutes. No programming knowledge is required to use SitePal.
The following describes the simple process of creating and deploying your own SitePal Character on your Web site:
1. Edit a Scene In the Scene Editor, you design your Character, choose a background, and add the audio that you want your Character to speak.
2. Create your Character Design your SitePal Characters to fit your Web site design and style. Change its looks, position, features and accessories, and then save the character in your Character Library.
3. Audio in your Scene Add audio for your Character to speak by recording the message with a microphone or the telephone, uploading an audio file, or by converting text that you type into synthesized speech.
4. Personalize your Scene Choose a background image, choose and configure the Player Skin in which your Character appears, and position your Character in the Scene.
5. Publish your Scene Use the Publish Wizard to embed your finished Scene in a Web page, Facebook, MySpace, or explore one of the many other available publish locations.
Oddcast Media Technologies 9

Working with Scenes
1.2 Additional Documentation and Resources You can find additional documentation and reference information on the SitePal Support page. Included on this page are the following resources:
• SitePal User’s Guide
• SitePal Quick Start Guide
• SitePal Online Help
• Quick Start Tutorial Movie (Video)
• SitePal Best Practices (PDF)
• API Reference & Examples
• Tech Notes
1.3 Advanced Features If you’re an advanced user, you’ll be interested in SitePal’s advanced features and capabilities:
• Use the VHost API and JavaScript to extend the functionality and flexibility of SitePal Scenes.
• Use Dynamic Text-to-Speech (TTS) to determine the text that your Character speaks dynamically when your Scene plays.
• Use the AI Knowledge Base to bring your SitePal Character to life with the power of artificial intelligence (AI).
1.4 Pricing Levels and Associated Features Different pricing levels and features are available for SitePal customers at each level: Bronze, Silver, Gold, and Platinum. For more information on pricing and available features for each customer level, please visit http://www.sitepal.com/packages.
Platinum users have advanced asset management capabilities which allow them to manage hundreds or even thousands of audios and backgrounds (hence the two additional pages). Platinum users can perform audio and background searches, sort and filter, bulk upload and make bulk changes to these assets.
For more information on working with these advanced asset management features and the corresponding, Platinum-only SitePal pages, see:
• 4.3 Advanced Asset Management (Backgrounds) for Platinum Customers • 5.9 Advanced Asset Management (Audio) for Platinum Customers Platinum users also have access to the robust SitePal Server API, which allows comprehensive programming access to your SitePal account via secure API calls. This functionality can be used to seamlessly integrate SitePal speaking characters into your web applications. For more information on the SitePail Server API for Platinum customers, see http://www.sitepal.com/serverapi. Last but not least, Platinum users have access to an unlimited number of models.
Oddcast Media Technologies 10

Working with Scenes
Features included in all packages
• Editor to customize the design of a base Model • Adding voice by recording via microphone or telephone • Upload your own audio or background • Embed Scenes in a Web page, Flash, Facebook, MySpace, Ebay, or email • Client API • Reporting functionality • Unlimited email support.
1.5 The SitePal User Interface (UI) for Platinum Users vs. Other User Types (Gold, Silver, and Bronze) The SitePal UI differs slightly depending on your account level. There are several minor differences (which are explained in notes throughout this guide), but there is one ma or difference. The major difference is this: Platinum users will see two additional navigation bar links on every SitePal page: Backgrounds and Audio. These links don’t display for SitePal users with Gold, Silver, and Platinum accounts.
j
The navigation bar for a Platinum user is shown below. Note the Background or Account links that display on the navigation bar for this user type.
Figure 1 – Navigation bar for a Platinum account
By contrast, the navigation bar for a non-Platinum user (Gold, in this case) is shown below. Note the absence of Background or Account links on the navigation bar for this user type.
Figure 2 – Navigation bar for a non-Platinum (Gold) account The reason for this difference is simple: Platinum users have advanced asset management capabilities which allow them to manage hundreds or even thousands of audios and backgrounds (hence the two additional pages). Platinum users can perform audio and background searches, sort and filter, bulk upload and make bulk changes to these assets. In addition, Platium users can access an unlimited number of models.
For more information on working with these advanced asset management features and the corresponding, Platinum-only SitePal pages, see:
• 4.3 Advanced Asset Management (Backgrounds) for Platinum Customers • 5.9 Advanced Asset Management (Audio) for Platinum Customers
Oddcast Media Technologies 11

Working with Scenes
1.6 SitePal Forums You can click the Forums link on the navigation bar (of any account type) to display the SitePal forums. Forums are a great place to share ideas, find out answers to frequently asked questions from your peers, provide feedback, and more.
There are three different forums:
• General Discussion. Topics typically include SitePal packages, features, functionality, best practices, and more.
• Feedback and Suggestions. Topics typically include site feedback, product and support issues, and more.
• Programming with SitePal. Topics typically include discussion about using the SitePal API.
Figure 3 – SitePal Forums
Oddcast Media Technologies 12

Working with Scenes
1.7 The SitePal Store You can click the Store link from any account type to display the SitePal Store.
Figure 4 – SitePal Store welcome page
Oddcast Media Technologies 13

Working with Scenes
The following table provides an overview of everything you can do in the SitePal Store.
SitePal Store link For more information, see:
Get a New Account 8.15 Open a New Account
Upgrade My Account 8.6 Upgrade Your SitePal Account
Extend My Account 8.1 Extend Your SitePal Account Manually
Additional Streams 8.7 Add Scenes and Audio Streams to Your Account
Additional Models 3.4 About SitePal Custom Models, 3.5 About SitePal Specialty Models, and 3.6 About SitePal 3D Photoface Models.
Professional Voice Recording 5.6 Use Voice Talent to Record Audio
Additional TTS Domains 7.13 Limit Audio Playback and 8.9 Prevent Unauthorized Playback of Your SitePal Scenes
Become a Reseller
Extend My Reseller License
9.2 About the Authorized Reseller Program and 9.4 Shop at the Reseller Store
Oddcast Media Technologies 14

Working with Scenes
Part II - Creating Scenes
Oddcast Media Technologies 15
Working with Scenes
Chapter 2 - Working with Scenes
In SitePal, you generate Scenes that contain animated, speaking characters. A Scene is a composition of a customized character, an audio message, background, and a Player. You use the SitePal Publish Wizard to embed your Scenes in Web pages, eBay auctions, and email messages.
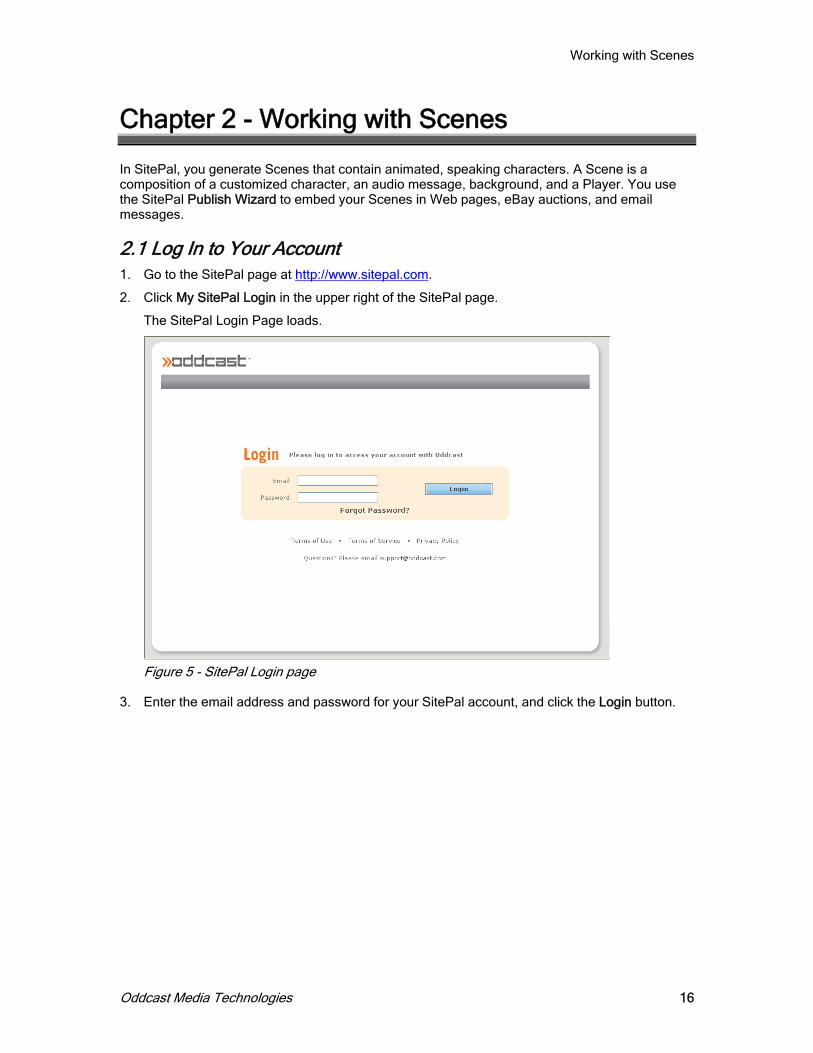
2.1 Log In to Your Account 1. Go to the SitePal page at http://www.sitepal.com.
2. Click My SitePal Login in the upper right of the SitePal page.
The SitePal Login Page loads.
Figure 5 - SitePal Login page
3. Enter the email address and password for your SitePal account, and click the Login button.
Oddcast Media Technologies 16

Working with Scenes
The home page for your SitePal account loads. Your account home page may contain different content than is shown here.
Figure 6 - Account home page
At the top of your Scene List page, click Log Out to log off of your account and return to the Welcome page.
Figure 7 – Welcome page
Note: The Welcome page also displays the date and time of your Last Session.
4. If you have more than one SitePal account, you can log in to a different account by selecting
the account from the Select Account: drop-down.
5. After you have selected an account, click the Enter button. The Edit Scenes page appears (which displays your Scene list). The next section provides Scene list details.
Oddcast Media Technologies 17

Working with Scenes
2.2 Use the Scene List The Edit Scenes page displays your Scene list. The number of Scenes in your Scene list depends on the number of Scenes included with your SitePal package and the number of additional Scenes that you have purchased. If there are multiple pages of Scenes in your list, use the navigation controls directly above and below the list to view other pages of your list.
• To select a specific Scene page, use the Page drop-down (for example, Page 2 of 3 available Scene pages.
• To view the next page of Scenes, click the right arrow. .
• To view more Scenes on a page, select the number of Scenes that you want to view per page on the drop-down menu.
Figure 8 - Edit Scenes page
Oddcast Media Technologies 18

Working with Scenes
From your list of Scenes, you can do any of the following:
To Do this
Preview a Scene Click the Preview icon.
Edit a Scene
Click a Scene thumbnail under the Edit column.
Rename a Scene In the Title column, change the name of the Scene in the text box and then click the Save All Changes button.
Scene Usage
Quick statistics per scene. Use the drop-down to switch between current month, last day, last 7 days and last 30 days.
Freshness Meter
Quickly gage the freshness of your scene since it was last edited. When the needle reaches stale it is recommended that you update your scene.
Change the settings and options for a Scene
Click the Scene Options icon.
Publish or embed a Scene Click the Publish icon.
Delete a Scene Click the Delete icon.
Oddcast Media Technologies 19
Working with Scenes
To Do this
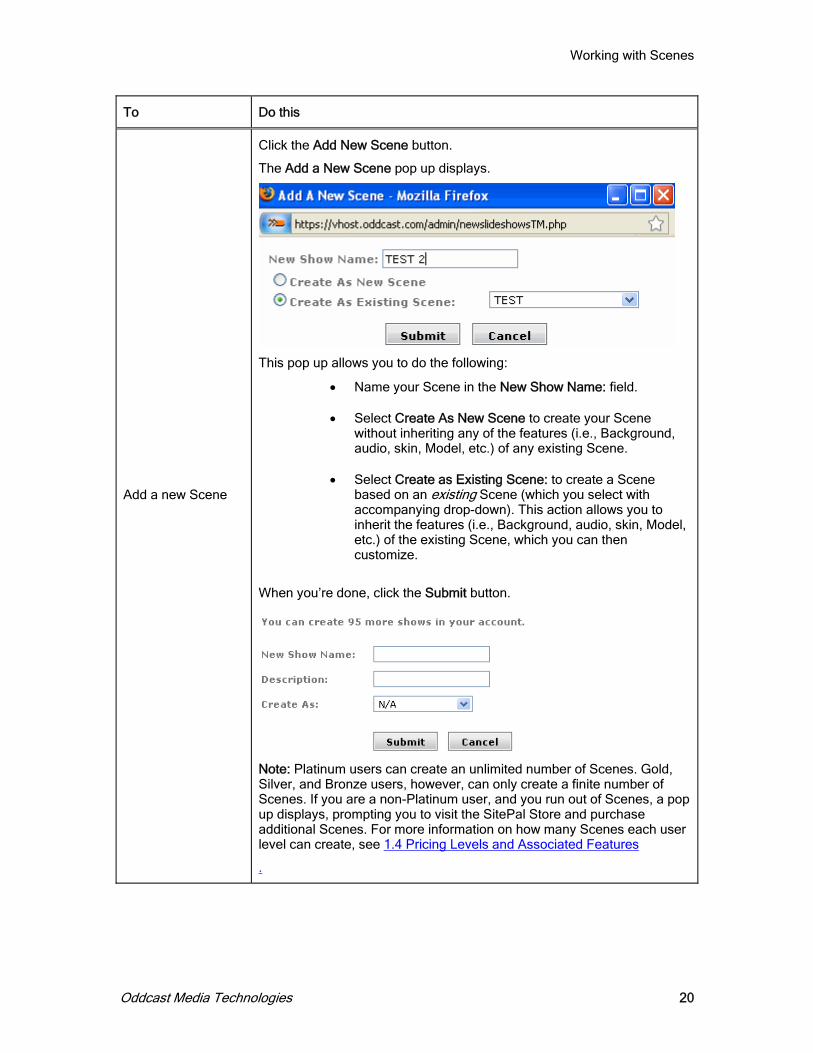
Add a new Scene
Click the Add New Scene button.
The Add a New Scene pop up displays.
This pop up allows you to do the following:
• Name your Scene in the New Show Name: field.
• Select Create As New Scene to create your Scene without inheriting any of the features (i.e., Background, audio, skin, Model, etc.) of any existing Scene.
• Select Create as Existing Scene: to create a Scene based on an existing Scene (which you select with accompanying drop-down). This action allows you to inherit the features (i.e., Background, audio, skin, Model, etc.) of the existing Scene, which you can then customize.
When you’re done, click the Submit button.
Note: Platinum users can create an unlimited number of Scenes. Gold, Silver, and Bronze users, however, can only create a finite number of Scenes. If you are a non-Platinum user, and you run out of Scenes, a pop up displays, prompting you to visit the SitePal Store and purchase additional Scenes. For more information on how many Scenes each user level can create, see 1.4 Pricing Levels and Associated Features
.
Oddcast Media Technologies 20

Working with Scenes
To Do this
Copy a Scene
Click the Copy Scene button.
The Copy Scene pop up displays.
This pop up allows you to do the following:
• Use the Select Scene to copy: drop-down that you want to copy and save as a new Scene, which you can modify.
• Enter the name of your new Scene (i.e., your copied Scene which you may modify) in the Enter name for new Scene: field.
When you’re done, click the Submit button.
Save changes to titles when you rename a Scene
Click the Save All Changes button.
To reorder your list of Scenes in the Edit Scenes window, click the Title heading above the column of your Scene names.
2.3 Edit a Scene The Scene Editor is a user-friendly wizard that allows you to customize a SitePal Scene and make it your own. You can select a model for your Character, accessorize the Character, change the Scene background, add audio, and choose a Player (i.e., the window where your Scene plays).
Oddcast Media Technologies 21

Working with Scenes
To display the Scene Editor:
1. From the Edit Scenes window, click a Scene thumbnail under the Edit column to display the Scene you want to edit.
The Welcome page of the Scene Editor appears by default.
Figure 9 - Welcome page o the Scene Ed orf it
2. Click the button to display the Models page of the Scene Editor.
You can check the Do Not Show This Message Again checkbox to disable the Welcome page of the Scene Editor. If you do so, the next time you launch the Scene Editor, the Models page of the Scene Editor displays by default instead of the Welcome page.
Oddcast Media Technologies 22

Working with Scenes
The Scene Editor displays the default Model Gallery page.
Figure 10 - Model Gallery page of the Scene Editor Five icons appear at the bottom of the Scene Editor. You can click an icon to display the relevant page of the Scene Editor.
Figure 11 - Scene Editor cons i
Icon Click to:
1. Models Select a model for your Character.
2. Accessories Accessorize your Character.
3. Backgrounds Change the Scene background.
4. Audios Add audio.
5. Players Choose a Player (i.e., the window where your Scene plays).
Oddcast Media Technologies 23

Working with Scenes
2.4 Save a Scene To save all changes to your Scene and return to the Scene List:
• In the Scene Editor, click Save Scene.
To save all changes to your Scene and continue to work in the Scene Editor:
• In the Scene Editor, click Apply.
To discard changes to your Scene and return to the Scene List:
• In the Scene Editor, click Cancel.
! If you do not save your Scene, the changes that you have made since opening the Scene in the Scene Editor are not retained. The next time you edit the Scene, it will appear as you last saved it.
! Saving your Scene has an immediate effect on any published SitePal content. For example, if you save changes to a Scene that you have already published to a Web page, the Scene is automatically updated on the Web page and will reflect your saved changes.
2.5 Set Options for a Scene To set options for Scene:
1. In the Edit Scenes window, click Scene Options for a Scene.
The Scene Options window appears.
Figure 12 - Scene Options window
Oddcast Media Technologies 24

Working with Scenes
2. Set the options that you want for your Scene.
3. Click Save to save your changes and close the Scene Options window.
You can set the following playback options for a Scene:
Playback setting Description
Play On Load
When the Play On Load check box is selected, the audio for your Scene is played as soon as the Scene is loaded.
On the first drop-down menu, set a playback limit. Select Unlimited play the Scene each time the page loads. On the second drop-down menu, specify the period of time for the playback limit. Learn more about playback limits.
Play On Rollover Play the Scene when a user moves the mouse cursor over the Scene. The Scene plays only once on rollover for each user visit.
Play/Pause On Click Play or pause the Scene when the user clicks within the Scene.
You can set the following link options for a Scene:
Link setting Description
URL
The Uniform Resource Locator, or Internet address, of the target Web page or Web resource for the link. You can also use the URL setting to call a JavaScript function. For example: http://www.oddcast.com
Clicking on the Scene opens the link
Open the linked Web page when a user clicks anywhere in the Scene. Learn more about link settings.
Link is automatically opened
Open the linked Web page automatically after the audio message starts or stops. In the first text box, type the elapsed time in seconds. On the seconds after drop-down menu, select audio starts or audio stops.
For example, to set the link to open just before the end of a 30-second audio message, in the Link is automatically opened text box, type 25, and then select audio starts on the seconds after drop-down menu.
Open Link in
Open the linked Web page in:
• the same frame of the current browser window
• a new browser window
• a named frameset
Oddcast Media Technologies 25

Working with Scenes
You can set the following Follow Cursor options for a Scene:
Follow Cursor setting Description
Do not follow cursor The Character's eyes do not follow mouse cursor.
Follow cursor in Scene The Character's eyes follow mouse cursor when the pointer is inside the frame of the SitePal Player.
Follow cursor in whole page
The Character's eyes follow the mouse cursor when the pointer is anywhere in the host HTML page. If you select this option, enable the JavaScript API property for your Scene when you publish it.
Note: Enabling this feature adds JavaScript to the Scene code that you copy to a Web page. To use this feature, the Web page or environment where you embed your Scene must allow JavaScript code.
2.6 Link a Scene to a Web Resource You can set up an interactive link to a Web resource from your SitePal Scene. You can link your Scene to a Web page, a frame, or a JavaScript function. The link is triggered by the events you select. These events can be invoked manually, automatically timed, or by a user clicking a button or clicking anywhere on the Scene.
You can specify the target of a link to any of the following:
Target value Link behavior
_self The browser loads the Web page in the same frame that contains the link. Setting this value has the same effect as selecting same window in the Scene Options window.
_blank The browser loads the link target in a new window. Setting this value has the same effect as selecting same window in the Scene Options window.
_parent The browser loads the link target in the immediate frameset parent of the current frame. This value is equivalent to _self if the current frame has no parent.
_top The browser loads the page into the full, original window and cancels all other frames. This value is equivalent to _self if the current frame has no parent.
_framename The browser loads the page into the frame that you specify.
If you set the option for opening a link automatically, make sure that the link triggers at the right time by trimming your audio message properly. A properly trimmed audio message contains less than one second of silence at its beginning and end.
Oddcast Media Technologies 26

Working with Scenes
2.7 Monitor the Number of Scene Views The Usage column of the Edit Scenes page allows you to monitor the number of Scene views during a selected period of time.
Figure 13 - Views and streams
The Usage drop-down allows you to display the number of Scene Views: on your site for the Current Month (default), the Last Day, the Last 7 Days, or the Last 30 Days.
2.8 Monitor the Freshness of Your Scenes The Freshness Meter column of the Edit Scenes page allows you to monitor the "freshness" of your individual Scenes.
Figure 14 - Freshness Meter
The Freshness Meter column graphically depicts the "freshness" of your Scene. Scene "freshness" decreases every day it's not updated. Oddcast recommends your keep your site interesting by frequently updating your Scene and keeping it "fresh". A Scene which has not been modified for 60 days displays as "stale".
Oddcast Media Technologies 27

Working with Audio
Chapter 3 - Working with SitePal Characters
The Scene Editor allows you to create and modify the Characters that you use in your Scenes. As you modify your Character, the Preview Pane in the Scene Editor shows these changes.
After you create a Character that you want to keep or use, you can save the Character in the Saved Models gallery of the Scene Editor.
Note: It is important to understand the difference between a SitePal model and a SitePal Character. Models are pre-defined and serve as the basis for the Characters that you create. Characters are models that you have modified to use in a Scene.
3.1 Select/Create a Model The Models page of the Scene Editor allows you to choose a base model for your Scene. You can also create your own photorealistic 3D Photoface model, based on an actual photograph (and, if you are a Silver, Gold, or Platinum user, save a 3D Photoface model to a Scene).
1. To display the Models page of the Scene Editor, do any of the following on the Welcome page:
• Click the LET'S START button.
You can check the Do Not Show This Message Again checkbox to disable the Welcome page of the Scene Editor. If you do so, the next time you launch the Scene Editor, the Models page of the Scene Editor displays by default instead of the Welcome page.
• Click the 1. Choose your base model link in the middle of the Welcome page.
• Click the 1. Models icon at the bottom of the Welcome page (or any Scene Editor page).
Oddcast Media Technologies 28

Working with Audio
The Model Gallery page of the Scene Editor displays.
Figure 15 - Model Gallery page of the Scene Editor (2D Illustrated tab selected)
2. The Model Gallery allows you to view thumbnails of available models, filter models (by Category, Models you own, and gender), and display//adjust/preview models in the Preview Pane. The following table explains your options:
If you want to: Then do the following:
Filter model thumbnails by category
Use the Categories: drop-down to select a Model Gallery category.
In the 2D Illustrated model category, your Categories: drop-down choices include: 3D & Photo Realistic, Animals, Anime, Edgy, Political Figures, Popular (default), and many more.
The Scene Editor filters your model thumbnails to display only models in the selected category; for example, only Popular models.
Filter model thumbnails by only models you own
Check the Show only the models I own checkbox.
The Scene Editor filters your model thumbnails to display only models you own.
Oddcast Media Technologies 29

Working with Audio
If you want to: Then do the following:
Filter model thumbnails by gender
Use the Gender: drop-down to select a model gender. Your gender choices are: All, Male, and Female.
The Scene Editor filters your model thumbnails to display only models of a specific gender (Male or Female) or both genders (All); for example, only female models.
1. Click the thumbnail image of the model that you want to use.
Figure 16 - Model Gallery
The model you select appears dynamically in the Preview Pane.
If you do not own a model, or if the model is not free with your Oddcast account, then a $ icon displays on the model thumbnail.
When you click a thumbnail with a $ icon, the Scene Editor prompts you to buy the thumbnail.
Purchased models are added to your gallery of Saved Models..
Oddcast Media Technologies 30

Working with Audio
Select a 2D illustrated model
You can select a pre-defined 2D illustrated model for your Character.
1. Click the 2D Illustrated tab. Your 2D Illustrated model gallery displays. You can view thumbnails of available 2D illustrated models (which vary depending on your account level).
Figure 17 - 2D Illustrated Models gallery
2. Click the thumbnail image of the 2D illustrated model that you want to use. The 2D illustrated model you select appears dynamically in the Preview Pane.
Select/create a 3D Photoface model
You can select a saved 3D Photoface model for your Character, and/or create your own photorealistic 3D Photoface model based on an actual photograph.
Note: Free Oddcast account users can create 3D Photoface models but are not allowed to save Scenes -- either with pre-defined 2D illustrated models, or with 3D Photoface models. Bronze Oddcast account users can also create 3D Photoface models, but cannot save Scenes with these models. However, Bronze users can save Scenes with 2D illustrated models. Silver, Gold, and Platinum users, on the other hand, are allowed to create 2D illustrated models as well as 3D Photoface models, and these users can save both types of models to Scenes.
Oddcast Media Technologies 31
Working with Audio
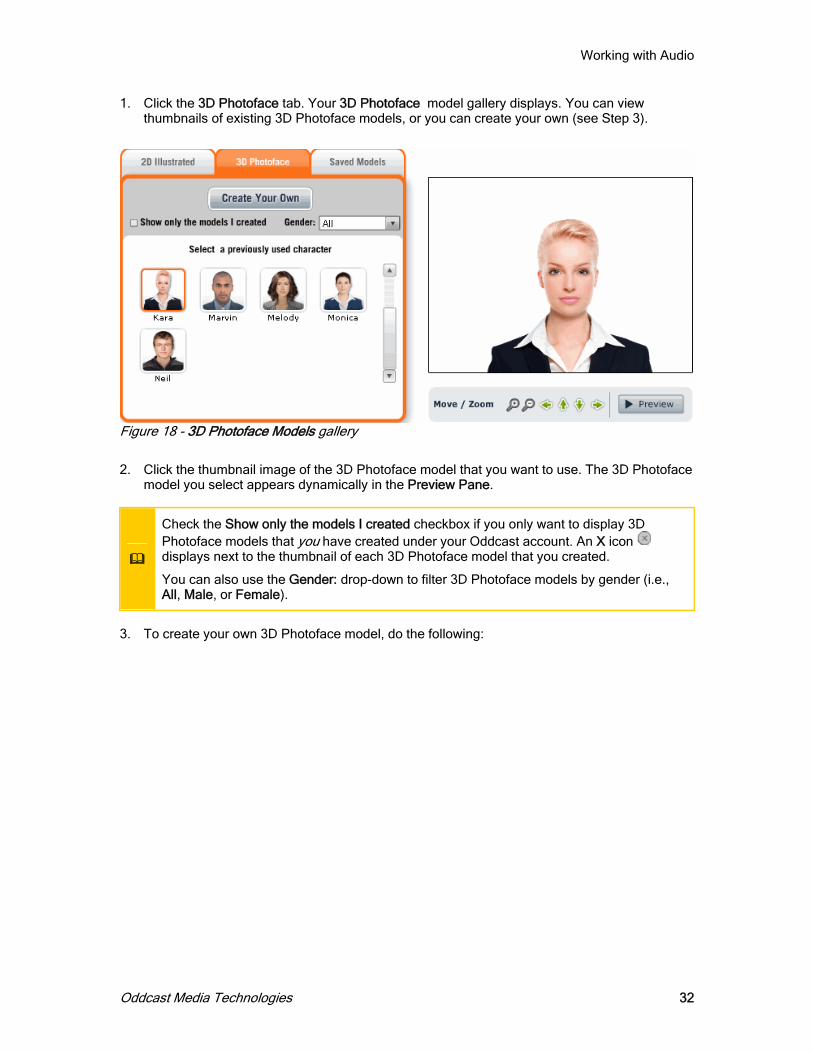
1. Click the 3D Photoface tab. Your 3D Photoface model gallery displays. You can view thumbnails of existing 3D Photoface models, or you can create your own (see Step 3).
Figure 18 - 3D Photoface Models galle y r
2. Click the thumbnail image of the 3D Photoface model that you want to use. The 3D Photoface
model you select appears dynamically in the Preview Pane.
Check the Show only the models I created checkbox if you only want to display 3D Photoface models that you have created under your Oddcast account. An X icon displays next to the thumbnail of each 3D Photoface model that you created.
You can also use the Gender: drop-down to filter 3D Photoface models by gender (i.e., All, Male, or Female).
3. To create your own 3D Photoface model, do the following:
Oddcast Media Technologies 32

Working with Audio
• Click the Create Your Own button to display the Upload Your Photo page.
Figure 19 - Upload Your Photo page
For best results, follow these technical guidelines:
• Face forward, including head and shoulders
• Face evenly lit. No strong shadows.
• Eyes open, and mouth closed.
• No hair on the face. No sunglasses.
• Click the Browse button to select a photograph from your hard drive or network. This is the photograph you will use for your 3D Photoface model (supported file types: JPEG, GIF, and PNG).
• Once you have reviewed and accepted the terms and conditions (which you can display and review by clicking the terms and conditions link), check the I agree to the terms and conditions checkbox.
Figure 20 - Browse button and I agree to the terms and conditions link
Oddcast Media Technologies 33

Working with Audio
• Click the Next button to upload your photo and display the Adjust Your Picture page.
Figure 21 - Ad ust Your Picture page j
• Use the Zoom, Rotate, and Move buttons to adjust your photo so it resembles the photo
in the right pane. The Zoom buttons allow you to zoom in and out. The Rotate buttons allow you to rotate your photo clockwise or counter-clockwise. The Move buttons allow you to move your photo up, down, right, and left. You can also click on your photo and drag it up, down, left, and right manually.
Starting on the Adjust Your Picture page, you can click the Start Over button at any point in the 3D Photoface creation process to go back to the Upload Your Photo page.
Oddcast Media Technologies 34

Working with Audio
• Click the Next button to save your photo adjustments and display the Point Placement page.
Figure 22 - Point Placement page
• Use your mouse to click and drag the colored anchor points on your 3D Photoface model's face to resemble the placement of the anchor points in the right pane. The blue anchor points should go over your model's eyes. The green anchor points should go over your model's ears. The red anchor points should touch either side of your model's mouth. The pink anchor point should go on your model's chin.
You can click the Zoom In and Zoom Out buttons to zoom in and out, respectively, from your model's photo.
Oddcast Media Technologies 35
Working with Audio
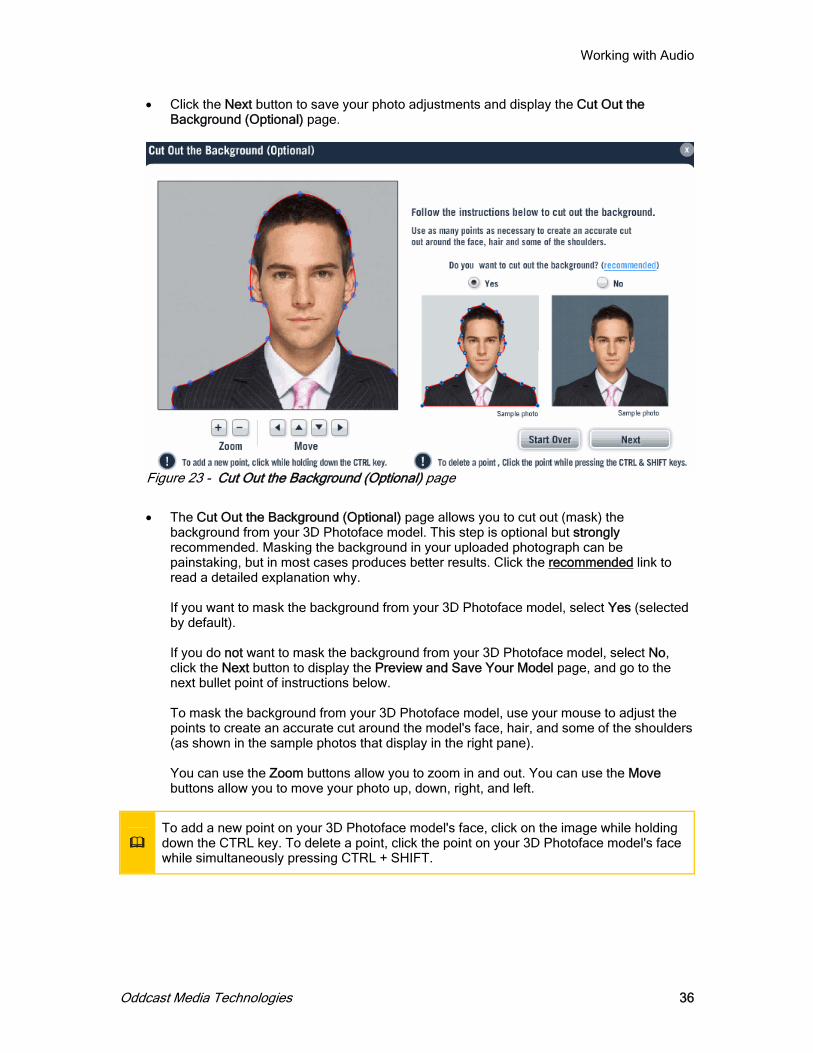
• Click the Next button to save your photo adjustments and display the Cut Out the Background (Optional) page.
Figure 23 - Cut Out the Background (Optiona page l)
• The Cut Out the Background (Optional) page allows you to cut out (mask) the
background from your 3D Photoface model. This step is optional but strongly recommended. Masking the background in your uploaded photograph can be painstaking, but in most cases produces better results. Click the recommended link to read a detailed explanation why. If you want to mask the background from your 3D Photoface model, select Yes (selected by default). If you do not want to mask the background from your 3D Photoface model, select No, click the Next button to display the Preview and Save Your Model page, and go to the next bullet point of instructions below. To mask the background from your 3D Photoface model, use your mouse to adjust the points to create an accurate cut around the model's face, hair, and some of the shoulders (as shown in the sample photos that display in the right pane). You can use the Zoom buttons allow you to zoom in and out. You can use the Move buttons allow you to move your photo up, down, right, and left.
To add a new point on your 3D Photoface model's face, click on the image while holding down the CTRL key. To delete a point, click the point on your 3D Photoface model's face while simultaneously pressing CTRL + SHIFT.
Oddcast Media Technologies 36

Working with Audio
When you finish masking the background from your 3D Photoface model, click the Next button to display the Preview and Save Your Model page.
• Click the Next button to save your photo adjustments and display the Preview and Save Your Model page.
Figure 24 - Preview and Save Your Mode page l
The Preview and Save Your Model page allows you to preview how your 3D Photoface model will appear and sound in a Scene. The Preview and Save Your Model page also allows you to click the Facial Expression buttons to experiment with some of the pre-configured facial expressions, i.e., no expression, surprised, sad, and happy. (You can adjust these expressions in the next section of this chapter, i.e., 3.2 Accessorize Your Model. Additional expressions are also avaialble.)
Note: As 3.2 Accessorize Your Model will further explain, you can only accessorize your 3D Photoface models with Facial Expressions. The Style, Color, and Attributes options are not available (as they are with 2D Illustrated models). By contrast, you cannot assign Facial Expressions to 2D Illustrated models. This accessory is only available for 3D Photoface models.
Select a gender for your 3D Photoface model, i.e., Male or Female. Doing so will allow you to filter your 3D Photoface models by gender (as explained in Step 1). Finally, enter a unique name for your 3D Photoface model in the Give your model a unique name: field.
� You can click the Back button to return to the Cut Out the Background (Optional) page.
Oddcast Media Technologies 37

Working with Audio
When you're done, click the Save button to save your 3D Photoface model to your 3D Photoface model gallery.
Select a saved model
You can select a saved model (from a saved Scene) for your Character.
1. Click the Saved Models tab. Your Saved Models gallery displays. You can view thumbnails of models from your saved Scenes.
Figure 25 - Saved Models galle y r
2. Click the thumbnail image of the saved model that you want to use. The saved model you select appears dynamically in the Preview Pane.
! You can store a maximum of 100 Characters in the Saved Models gallery. If you reach this limit you are prevented from saving new Characters.
Oddcast Media Technologies 38

Working with Audio
3.2 Accessorize Your ModelThe Accessories page of the Scene Editor allows you to customize the "look and feel" of your model by adding and altering accessories, like hair, sunglasses, eye and mouth attributes, etc.
You can only accessorize Photoface models with Expressions. The Style, Color, and Attributes options are not available (as they are with 2D Illustrated models). By contrast, you cannot assign Expressions to 2D Illustrated models. This accessory is only available for 3D Photoface models.
To display the Accessories page of the Scene Editor, click the 2. Accessories icon at the bottom of the Scene Editor page.
The Accessories page of the Scene Editor displays. The Style tab is selected by default.
Figure 26 - Accessories page of the Scene Editor Sty e ab selected)
( l t
Oddcast Media Technologies 39

Working with Audio
Accessorize your Character's style. If you click the Style tab on the Accessories page to customize a model's hair, sunglasses, clothing, jewelry, hat, facial hair, and facial expressions.
Note: You can only accessorize the style of your 2D Animated models. This options is not available for 3D Photoface models.
Figure 27 - Accessories page of the Scene Editor (Sty e tab selected) Click a style attribute icon to customize a specific style accessory; for example, hat style.
l
Figure 28 - Style attribute icons
You can customize the following style accessories for your Character:
• Hair • Glasses • Costume • Necklaces • Hat • Facial hair • Mouth.
Oddcast Media Technologies 40

Working with Audio
If applicable, you can also select a style attribute sub-category. For example, if you click the Glasses style attribute icon for a given model, you can scroll through the sub-categories of Glasses (for example, View All, All Purpose, Color Lens, etc.).
Figure 29 - Available Glasses (All Purpose sub-category)
Note: If a particular style attribute is not available for a model, then the style attribute icon is grayed-out. For example, since female models do not have a facial hair, the facial hair style attribute icon is grayed-out for all female models.
Accessorize your Character's color.
If you click the Color tab on the Accessories page, you can customize your model's skin, eye, and mouth colors.
Note: You can only accessorize the color of your 2D Animated models. This options is not available for 3D Photoface models.
Figure 30 - Accessories page of the Scene Editor (Color tab selected) Accessorize your Character's physical attributes.
Oddcast Media Technologies 41

Working with Audio
If you click the Attributes tab on the Accessories page, you can customize your model's physical attributes, including the appearance of the model's mouth, nose, shoulders, as well as the model's head height and head width.
Note: You can only accessorize the color of your 2D Animated models. This options is not available for 3D Photoface models.
Figure 31 - Accessories page of the Scene Editor (Attr butes tab selected) i
Oddcast Media Technologies 42

Working with Audio
Accessorize your 3D Photoface Character's facial expressions. If you click the Expressions tab on the Accessories page, you can customize your 3D Photoface model's facial expressions.
Note: You can only accessorize the style of your 3D Photoface models. This options is not available for 2D Animated models.
The following expressions are available:
• None • Thinking • Surprise • Sad • Disgust • Happy • Smile • Angry
When you select an expression, your 3D Photoface model in the right pane displays the expression.
Figure 32 - Accessories page of the Scene Editor (Attr butes tab selected) i
Oddcast Media Technologies 43

Working with Audio
3.3 Position the Character in a Scene The Preview Pane allows you to adjust and preview the appearance of a Scene before you publish it and embed it on a Web page. Your Scene represents a combination of your accessorized Character, the Background, audio, and the Player.
If you want to: Then do this:
Adjust a Scene in the Preview Pane
You can adjust the appearance of a Scene in the Preview Pane by clicking the Move / Zoom icons.
If you want to:
• move the Scene in the Preview Pane left, right, up, or down, then click the appropriate arrow icon
• zoom in or out on the Scene in the Preview Pane, then click the + magnifying glass icon or - magnifying glass icon, respectively.
Preview a Scene with a Model in the Preview Pane
To preview a Scene, click the Preview button.
The Scene plays in the Preview Pane.
3.4 About SitePal Custom Models A SitePal Custom Model is a talking, animated character that Oddcast designs to your exact specifications. For example, you can create a SitePal model that looks exactly like you, or you can create a SitePal model from your company logo or mascot.
Here are some of the benefits of using Custom models in your SitePal scenes:
• Provide your customers with a unique and truly memorable online experience.
• Increase the profile of your brand and make it stand out in a crowd.
• Maximize the value and flexibility of your marketing efforts by using a SitePal character customized just for you and your business.
Oddcast Media Technologies 44

Working with Audio
The following are examples of the variety of SitePal Custom models that you can create:
Illustrated
Stylized
Wireframe
Anime
Animal
3D Photoface
To create a Custom model, email Oddcast a photograph that you want to convert to a SitePal character.
Platinum users can create an unlimited number of 3D Photoface Characters. Silver and Gold users can create a limited number of 3D Photoface Characters. Free and Bronze users can create 3D Photoface Characters, but cannot save them to Scenes.
For more information about ordering a Custom model, visit the SitePal Web site, contact [email protected], or call 877-300-6030.
You own any Custom models that you purchase. Custom models are not re-sold and are not used by Oddcast for SitePal or any other Oddcast product.
Oddcast Media Technologies 45

Working with Audio
3.5 About SitePal Specialty Models SitePal Specialty models are premium models that you can purchase individually or as part of a collection. Specialty models are organized into collections that span a variety of genres, from Anime to religious and political figures.
Specialty models are functionally identical to standard SitePal models. Like other great SitePal models, you can customize the Specialty models, add them to your existing SitePal Scenes, and control them with the VHost API.
The following are examples of the variety of SitePal Specialty models that you can purchase by going to the SitePal Store:
Teens: Teen Kevin
Japanese Animation: Kai
Fun: Flower
Animal Kingdom: Pixie
3D Photoface Character: Angela
Anime: Nari
The Specialty models that you purchase are added automatically to your Bronze, Silver , Gold, or Platinum account. Purchasing Specialty models is a one-time expense. The models that you buy remain part of your SitePal account as long as you are a SitePal customer.
Oddcast is actively expanding the selection and diversity of Specialty model offerings. Visit the SitePal Store at the SitePal Web site regularly to see new package offerings and announcements.
Note: Some Specialty models cannot be colored or aged.
Oddcast Media Technologies 46

Working with Audio
Chapter 4 - Working with Backgrounds
A background is a graphic image, in the JPEG format, that you incorporate in a SitePal Scene. Backgrounds give your SitePal Scenes context and atmosphere. For example, if you add a SitePal Scene to a real estate Web site, you could use a picture of a house for sale as a background. Using an appropriate background gives your Web site a polished, professional look and reinforces the relevancy of your SitePal Scene.
You can use the pre-defined backgrounds that are included with SitePal, or you can upload your own images to use in your Scenes. You can store a maximum of 100 images in your Private Background Library.
The backgrounds included with your SitePal account are organized into diverse categories to help you find the right image for your purpose.
Note: The backgrounds included in these categories, vary depending on your SitePal account package. The Private category stores the background images that you upload to your SitePal account.
! The backgrounds included with your SitePal account are yours to use, with perpetual rights, anywhere online. However, you must have the legal rights to use any background images that you upload.
Oddcast Media Technologies 47

Working with Audio
4.1 Change the Scene Background The Backgrounds page of the Scene Editor allows you to select a background for your Scene.
1. To display the Background page, click the 3. Backgrounds icon.
The Backgrounds page displays. The Background Gallery tab is selected by default. You can select a pre-configured SitePal background.
Figure 33 - Backgrounds page of the Scene Ed tor Background Gallery tab selectedi ( )
You can view thumbnails of available backgrounds, and use the Category: drop-down to filter backgrounds by category (e.g., Nightlife, Technology, Sports, Popular, and more).
Oddcast Media Technologies 48

Working with Audio
The following table explains your options:
If you want to: Then do the following:
Filter SitePal gallery Backgrounds
Use the Category: drop-down to select a SitePal gallery Background category. Your category choices include: Nightlife, Technology, Sports, Popular (default), and many more.
The Site Editor filters your SitePal gallery Backgrounds in the selected category; for example, only Popular Backgrounds.
Select a SitePal gallery Background
Click a Background icon (for example, Downtown).
Your Scene's Background changes dynamically in the Preview Pane, allowing you to preview the Scene's appearance.
Upload your own Background image
Click the Upload button. The Site Editor automatically switches your view to the My Background tab. The Image Upload Info pop-up prompts you to name and upload your own Background image.
Oddcast Media Technologies 49

Working with Audio
2. Click the thumbnail image of the background you want to use.
Figure 34 - Background Gallery
The background you select appears dynamically in the Preview Pane.
If you want to upload your own background image, click the Upload button. The Scene Editor automatically switches your view to the My Background tab. The Image Upload Info pop-up prompts you to name and upload your own background image (explained below in Upload Your Own Background).
4.2 Upload Your Own Background Image You can upload images from your computer to use as backgrounds for Scenes. All the images that you upload are stored in the Private category of the Background Library. You can use the images that you upload in any of your Scenes.
1. Click the My Background tab on the Background page of the Site Editor. Your My Background gallery displays. You can view thumbnails of saved backgrounds.
Figure 35 - My Background galle y r
Oddcast Media Technologies 50

Working with Audio
Click the thumbnail image of the saved background that you want to use. The saved background you select appears dynamically in the Preview Pane.
Note: You can store a maximum of 100 images in the Background Library. If you exceed this limit, you cannot add new images. To free up capacity in your Background Library, delete existing images.
4.3 Advanced Asset Management (Backgrounds) for Platinum Customers The Background Management page allows Platinum users to upload multiple background images and manage their library of backgrounds.
To access the Background Management page:
1. On the SitePal main menu, click Backgrounds. The Background Management page loads. The Online column indicates the availability status of a background, and the Used column shows the number of Scenes that use a particular background.
Figure 36 - Background Management page
The following describes the actions that you can perform on the Background Management page:
To Do this
Preview a background Under the Preview column for the background, click the background icon.
Rename a background Under the Background Name column, type a new name in the text box for the background, and then click Save All Changes.
Note: You can rename only backgrounds in your Private category. You can rename multiple backgrounds before you click Save All Changes.
Upload a background image Click Add New Background.
Background images that you upload are added to the Private category of backgrounds. See below for more information about uploading background images.
Oddcast Media Technologies 51

Working with Audio
To Do this
Search for a background In the Search text box, type the name of a background that you want to find, and then click Search.
Filter the list of backgrounds by category of background
From the Filter by Category drop-down menu, select a category of backgrounds to list.
Change the online status of a background
Under the Online column, select or clear the check box.
Note: You can change the online status of backgrounds in your Private category only. An offline background is a background that is not available for a Scene. An offline background does not display when the Scene is embedded in a Web site.
Filter the list backgrounds by the online status of backgrounds
From the Filter by Status drop-down menu, select Online or Offline.
Clear the Search text and reset the Category to All
Click Reset.
Delete a background Under the Delete column for the background, click the delete icon.
Note: You can delete backgrounds only from your Private category. You cannot delete a background if it’s used in any of your Scenes.
Oddcast Media Technologies 52

Working with Audio
Chapter 5 - Working with Audio
SitePal uses advanced technology to synchronize audio with your Character's lip movements. This effect is known as lip-syncing and it enhances the overall realism and impact of your SitePal Characters.
You can use the following methods to add audio to your SitePal account:
Use a saved audio file View and listen to your saved audios files, select multiple audios (which randomizes the audio files that play every time your Scene plays), rename audio files, and delete audio files.
Record by microphone Use a computer microphone to record your own audio messages for your Characters.
Upload audio file Use audio files that you upload as audio messages for your Characters.
Record by phone Use a phone to record audio messages for your characters.
Text-to-Speech
Use Text-to-Speech (TTS) technology to convert any written text into synthesized audio messages for your Characters.
Note: The Text-to-Speech feature is available with Platinum, Gold, and Silver SitePal accounts.
Voice talent Use professional voice talent artists to record audio messages for your characters.
! You can store a maximum of 100 audio messages in your Private Audio Library. If you reach this limit you cannot add new audio messages. To free up capacity in your Audio Library, delete existing audio messages.
Oddcast Media Technologies 53
Working with Audio
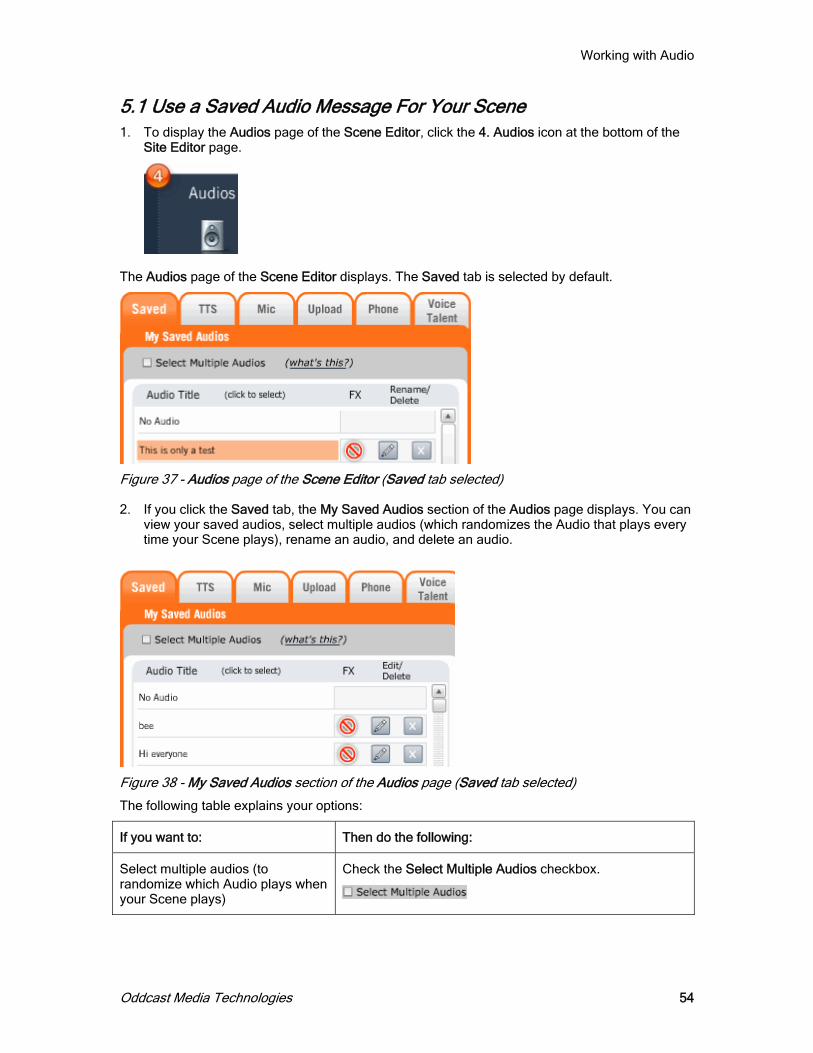
5.1 Use a Saved Audio Message For Your Scene 1. To display the Audios page of the Scene Editor, click the 4. Audios icon at the bottom of the
Site Editor page.
The Audios page of the Scene Editor displays. The Saved tab is selected by default.
Figure 37 - Aud os page of the Scene Editor (Saved tab selected)
i
2. If you click the Saved tab, the My Saved Audios section of the Audios page displays. You can view your saved audios, select multiple audios (which randomizes the Audio that plays every time your Scene plays), rename an audio, and delete an audio.
Figure 38 - My Saved Audios section of the Audios page (Saved tab selected)
The following table explains your options:
If you want to: Then do the following:
Select multiple audios (to randomize which Audio plays when your Scene plays)
Check the Select Multiple Audios checkbox.
Oddcast Media Technologies 54

Working with Audio
If you want to: Then do the following:
Add (or modify) audio effects (and effects do not already exist) Click the icon under the FX column.
The Add Audio Effect page displays.
You can add (or modify) any of the following audio effects: Speed, Echo, Flanger, Bullhorn, Pitch, Duration, Reverb, and Phase.
Click the icon to play the audio (with effects). When you're done, click the Accept button.
Add (or modify) Audio effects (and effects already exist) Click the icon under the FX column.
The Add Audio Effect page displays.
You can add (or modify) any of the following audio effects: Speed, Echo, Flanger, Bullhorn, Pitch, Duration, Reverb, and Phase.
You must first play (at least a few second of) the audio (with effects). When you're done, click the Accept button.
Oddcast Media Technologies 55
Working with Audio
If you want to: Then do the following:
Rename an audio Click the icon under the Rename/Delete column.
The Rename Audio pop-up prompts you to rename your audio.
When you're done, click the OK button.
Delete an audio Click the icon under the Rename/Delete column.
The Confirm pop-up prompts you to confirm the delete.
Click the OK button to confirm.
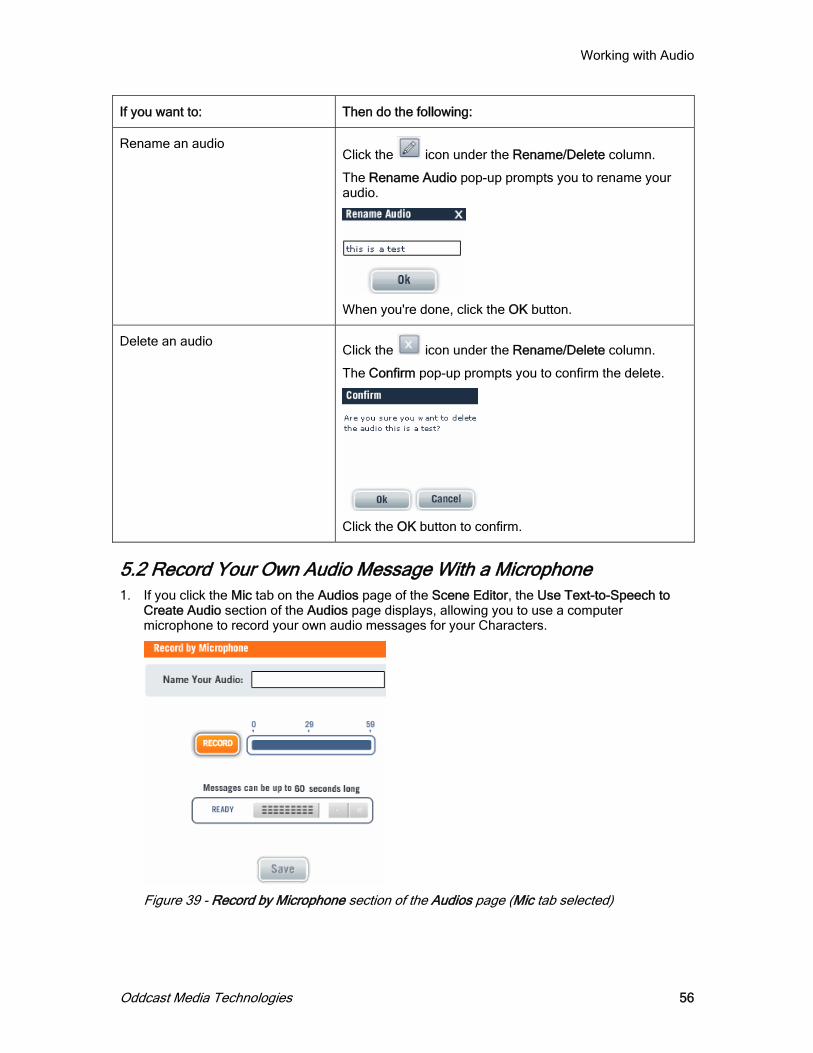
5.2 Record Your Own Audio Message With a Microphone 1. If you click the Mic tab on the Audios page of the Scene Editor, the Use Text-to-Speech to
Create Audio section of the Audios page displays, allowing you to use a computer microphone to record your own audio messages for your Characters.
Figure 39 - Record by Microphone section of the Audios page Mic tab selected)
(
Oddcast Media Technologies 56

Working with Audio
1. Do the following:
• Enter the name of your microphone-recorded audio in the Name Your Audio: field.
• Plug a microphone into your computer.
• Click the Record button.
• Record your message by speaking slowly and clearly into your microphone, then click the Stop button. You can record for up to 60 seconds. While you record your message, monitor the recording time progress bar.
Click the icon to play your microphone-recorded audio. When you're done, click the Save button. As soon as SitePal saves your microphone-recorded audio file successfully, the My Saved Audios section of the Audios page displays, allowing you to view all your saved audios, select multiple audios, add audio effects, rename an audio, and delete an audio.
• Click the Save Scene button.
5.3 Upload Audio Files You can upload your own audio files from your computer to the Private Audio Library. You can then use the uploaded audio in any of your scenes. The maximum length of an audio recording that you can upload is 60 seconds. However, you can concatenate, or chain together, multiple audio files together to produce messages longer than 60 seconds. Learn how to concatenate audio messages.
The following are requirements for uploading audio files:
Channels 1
Sampling Rate 22.050 KHz or 44.100 KHz (22.050 KHz recommended for best results)
Audio sample size 16 bit
Supported audio formats WAV (PCM), MP3 (16, 32, 48, 64kbs), WMA (Windows Media Audio)
Maximum Audio Length 60 Seconds.
Maximum Text-to-Speech Length
600 characters
Oddcast Media Technologies 57

Working with Audio
Upload audio to your SitePal account.
1. If you click the Upload tab on the Audios page of the Scene Editor, the Upload an Audio File section of the Audios page displays, allowing you to upload pre-recorded Audio files as audio messages for your Characters.
Note: Please review the requirements for supported Audio formats, mono/stereo, sampling rate, Audio sampling size, and maximum length (60 seconds).
Figure 40 - Up oad an Audio F e section of the Audios page (Upload ab selected) l il t
3. Do the following:
• Enter the name of the pre-recorded Audio file you want to upload in the Name Your Audio: field.
• Click Browse and locate your Audio file.
• Check the Enhance Audio Quality checkbox if you want to enhance Audio quality. This option analyzes your Audio file, then modifies it to improve its overall quality. Audio enhancement is primarily designed for Audio files originally recorded at a low volume. However, for higher-quality Audio files, this enhancement is unnecessary, and in some instances, may even degrade the quality of an Audio message.
4. When you're done, click the Upload button.
As soon as SitePal uploads your pre-recorded Audio file successfully, the My Saved Audios section of the Audios page displays, allowing you to view all your saved Audios, select multiple Audios, add Audio effects, rename an Audio, and delete an Audio.
5. Click the Save Scene button.
! If the upload is unsuccessful, an error message that specifies the problem appears in the Add New Audio window. Make sure that the audio file you are attempting to upload conforms to the requirements for SitePal audio.
Oddcast Media Technologies 58

Working with Audio
Note: Although SitePal audio messages are stored and played in mono, the Audio Upload feature can accept WAV, WMA and MP3 files recorded in stereo.
If your site includes more than one Scene, the Enhance Audio Quality option can insure that multiple recordings are normalized to the same volume level. This can help you achieve a consistent user experience, especially if the recordings originate from different sources and individuals.
5.4 Use a Phone to Record Audio You can record and update your audio messages for your SitePal scenes over the telephone. Due to varying quality of many phone lines, the quality of audio recorded over the telephone is lower than audio that you record with a microphone or audio files that you upload.
To maximize the quality of the audio that you record over the phone, make your recording in a closed space with a minimum amount of background noise.
To record an audio message by using a phone:
1. If you click the Phone tab on the Audios page of the Scene Editor, the Record by Phone section of the Audios page displays, allowing you to use a phone to record Audio messages for your Character.
Figure 41 - Record by Phone section of the Audios page (Phone ab selected)
t
Oddcast Media Technologies 59

Working with Audio
2. Do the following:
• Enter the name of the Audio you want to record by phone in the Name Your Audio: field.
• Call the US (toll free) or international phone number listed, enter your account ID and PIN when prompted, and record your message (up to 60 seconds).
Click the print these instructions link to display a print-friendly version of the "record by phone" instructions.
3. When you're done, click the Save button.
As soon as SitePal saves your phone-recorded Audio file successfully, the My Saved Audios section of the Audios page displays, allowing you to view all your saved Audios, select multiple Audios, add Audio effects, rename an Audio, and delete an Audio.
4. Click the Save Scene button.
5.5 About Creating Text-to-Speech Audio You can use the Text-to-Speech (TTS) feature to convert any text into synthesized audio that is spoken by your character. There are two types of TTS that you can use with SitePal:
Static TTS Type in your text through the TTS user interface.
Dynamic TTS Use JavaScript to call the API sayText function.
Static TTS is the simpler of the two, especially for non-programmers. Dynamic TTS is needed only when your text must be determined while your Scene is played. For example, you can use Dynamic TTS if you want your character to say a particular phrase based on a user's interaction with your Web site. Both TTS methods support the full range of SitePal languages and voices.
You can also influence your TTS results by using SSML tags. These are commands that you embed in your text to direct the TTS engine to interpret the text in a particular way. SSML tags provide support for the following effects:
• Inserting pauses in the text.
• Altering volume in mid-sentence, or for part of a sentence, for emphasis.
• Changing language in mid-sentence, or for part of a sentence, which is useful for multi-lingual audiences and applications.
• Changing pitch or rate of speech.
Oddcast Media Technologies 60

Working with Audio
1. If you click the TTS tab on the Audios page of the Scene Editor, the Use Text-to-Speech to Create Audio section of the Audios page displays, allowing you to use Text-to-Speech (TTS) technology to convert any written text into synthesized Audio messages for your Characters.
Figure 42 - Use Text-to-Speech to Create Audio section of the Audios page (TTS tab selected)
2. Do the following:
• Enter the name of your TTS Audio in the Name Your Audio: field. • Enter your TTS Audio message in the text box.
The following table explains your options:
If you want: Then do the following:
Your Character to say your TTS Audio message in a different language
Use the Language: drop-down to select one of the following available languages: English, Catalan, Chinese, and Dutch.
Hint: You can click the Sample button to listen to some sample Audio in the selected language.
To assign a different voice to your Character
Use the Voice: drop-down to select a built-in voice (representing both genders and a variety of accents).
Note: Not all voices are available in every language.
• Click the icon, or the Preview button, to play the TTS Audio. When you're done,
click the Accept button. As soon as SitePal saves your TTS Audio file successfully, the My Saved Audios section of the Audios page displays, allowing you to view all your saved Audios, select multiple Audios, add Audio effects, rename an Audio, and delete an Audio.
• Click the Save Scene button.
Oddcast Media Technologies 61

Working with Audio
Due to differences in the technology, some voices generate higher quality spoken audio than others. We recommend that you experiment with changing the punctuation and spelling of certain voices to achieve the best results.
For example, to make your character say the word VHost correctly with some TTS voices, you can try spelling it as “Vee Host”. This is known as phonetic pronunciation. Most dictionaries provide phonetic pronunciations of words. Use phonetic pronunciation to help you adjust certain TTS voices to pronounce specific words or phrases more accurately.
5.6 Use Voice Talent to Record Audio SitePal offers you the option of using professional voice talent artists to record audio messages for your Characters. Audio messages recorded by professional voice over specialists are typically more effective than those you record yourself or that you create using the Text-to-Speech feature. Oddcast recommends that you take advantage of this service if you are using your SitePal characters for commercial purposes. You can order these recordings through the Voice Talent Store at Oddcast.com.
Note: Oddcast charges a separate fee for each voice talent recording. Any audio files you purchase from the Voice Talent Store are yours to use, with perpetual rights, anywhere online.
Oddcast Media Technologies 62

Working with Audio
Use voice talent to record your audio.
1. If you click the Voice Talent tab, the Order Professional Voice Talent Audio section of the Audios page displays use professional voice talent artists to record Audio messages for your Characters.
Figure 43 - Order Professional Voice Talent Audio section of the Audios page (Voice Talent tab selected)
2. Do the following:
• Click the Pick Your Professional Voice! button.
• The Voice Talent Store opens in a new browser window. The store lists a variety of voices that you can sample.
• Select a voice talent.
• Complete the order form by following the instructions.
o When you are finished, click Add to Shopping Cart at the bottom of the form and proceed to checkout.
o Click the Save Scene button. Professional voice talent recordings are typically available for download within 2 to 3 business days, although some recordings require up to 5 days. You are informed by email as soon as your order is ready. The email includes a secure link for retrieving the recording. You can check the status of the order by visiting your My Orders page. Click the Store link that appears at the top of your Home Page or Scene List page after you log in to your account. As soon as SitePal saves your professionally-recorded Audio file successfully, the My Saved Audios section of the Audios page displays, allowing you to view all your saved Audios, select multiple Audios, add Audio effects, rename an Audio, and delete an Audio.
o Click the Save Scene button.
Oddcast Media Technologies 63

Working with Audio
5.7 Play Multiple Audio Messages You can use the Multiple Audio Files feature to associate up to 20 audio messages with a single Scene. When you turn this feature on, the Scene will randomly play the audio messages that you select.
1. Display the Audios page of the Scene Editor by clicking the 1. Saved icon at the bottom of the Site Editor page.
The Audios page of the Scene Editor displays. The Saved tab is selected by default.
Figure 44 - Aud os page of the Scene Editor (Saved tab selected)
i
2. Check the Select Multiple Audios checkbox to select multiple Audios to randomize which audio plays when your Scene plays.
Click the Save Scene button. The Character will speak these audio messages randomly.
Note: To stop playing multiple audio files, uncheck the Multiple Audio Files check box.
Oddcast Media Technologies 64

Working with Audio
5.8 Monitor the Number of Audio Plays The Usage column of the Edit Scenes page allows you to monitor the number of audio streams during a selected period of time.
Figure 45 - Views and streams
The Usage drop-down allows you to display the number of audio Streams: on your site for the Current Month (default), the Last Day, the Last 7 Days, or the Last 30 Days.
5.9 Advanced Asset Management (Audio) for Platinum Customers The Audio Management page allows Platinum users to manage you audio and add audio to their SitePal accounts. The Audio Library includes a Public category and a Private category of audio messages.
Public This category includes pre-defined sample audio messages. Use these messages to test and demonstrate scenes. The Public category is read-only; you cannot add or delete audio messages in this category.
Private This category is provided exclusively to store the audio messages that you add to your SitePal account.
To access the Audio Management page:
1. On the SitePal main menu, click Audio. The Audio Management page loads.
Figure 46 - Aud o Management page i
Oddcast Media Technologies 65

Working with Audio
The following describes the actions that you can perform in the Audio Management page:
To Do this
Reorder list of audio Click on the heading for the Audio Name column.
Search for an audio In the Search text box, type the name of an audio that you want to find, and then click Search.
Filter the list of audios by category
From the Filter by Category drop-down menu, select a category of audios to filter by.
Filter the list of audios by the status
From the Filter by Status drop-down menu, select Online or Offline.
Offline audios are audios will not play when the scene loads on a Web page.
Clear the Search text and reset the Category to All
Click Reset.
Add a new audio to your Studio account
Click Add New Audio.
Preview an audio Under the Preview column for an audio,
For uploaded audio Preview Audio (upload) .
For Text-to-Speech audio, click Preview Audio (tts) .
For recorded audio, click Preview Audio (record) .
For phone recorded audio, click Preview Audio (phone)
Edit a TTS audio Under the Delete column for the audio, click Replace.
Note: You can edit only TTS audio in your Private category.
Rename an audio Under the Audio Name column, type a new name in the text box for the audio, and then click Save All Changes.
Note: You can rename audio only in your Private category.
Replace an audio Under the Edit column for the audio, click Edit Audio .
Note: You can replace audio only that you have uploaded or recorded to your SitePal account.
Change the online status of an audio
Under the Online column, select or clear the check box.
An offline audio is an audio that is not available for a Scene. An offline audio does not play when the Scene is embedded in a Web site.
Note: You can change the online status of audio in your Private category only.
Oddcast Media Technologies 66
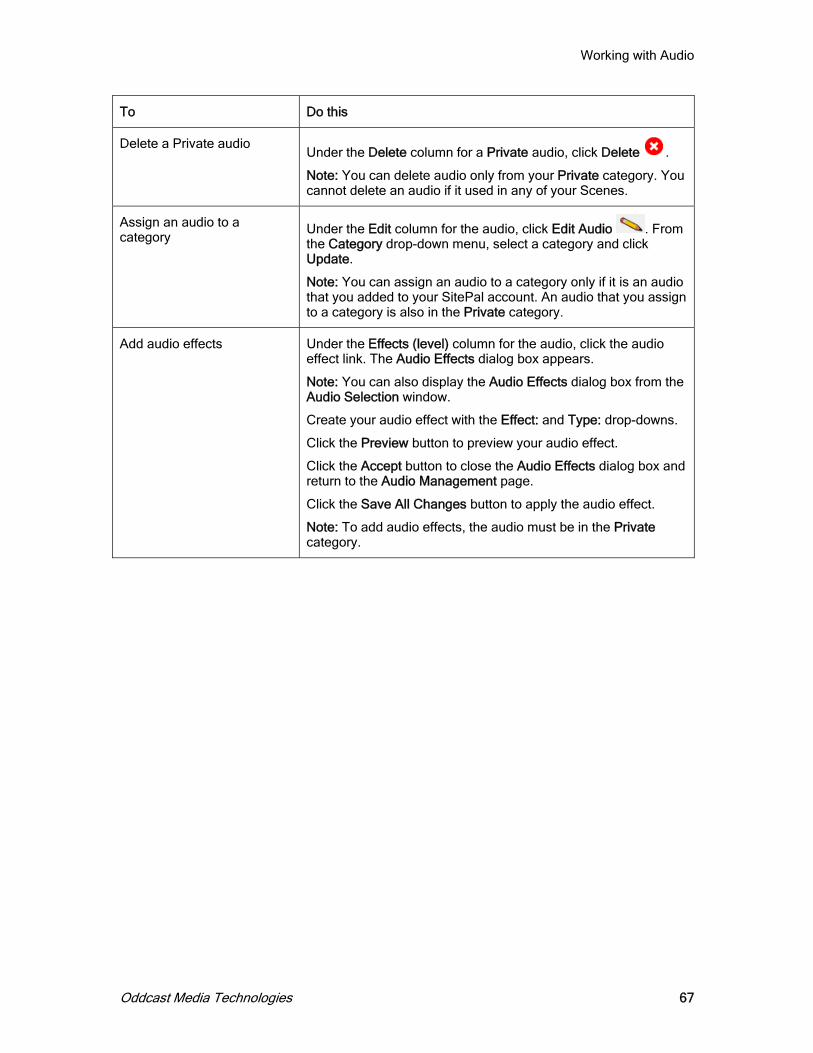
Working with Audio
To Do this
Delete a Private audio Under the Delete column for a Private audio, click Delete .
Note: You can delete audio only from your Private category. You cannot delete an audio if it used in any of your Scenes.
Assign an audio to a category
Under the Edit column for the audio, click Edit Audio . From the Category drop-down menu, select a category and click Update.
Note: You can assign an audio to a category only if it is an audio that you added to your SitePal account. An audio that you assign to a category is also in the Private category.
Add audio effects Under the Effects (level) column for the audio, click the audio effect link. The Audio Effects dialog box appears.
Note: You can also display the Audio Effects dialog box from the Audio Selection window.
Create your audio effect with the Effect: and Type: drop-downs.
Click the Preview button to preview your audio effect.
Click the Accept button to close the Audio Effects dialog box and return to the Audio Management page.
Click the Save All Changes button to apply the audio effect.
Note: To add audio effects, the audio must be in the Private category.
Oddcast Media Technologies 67
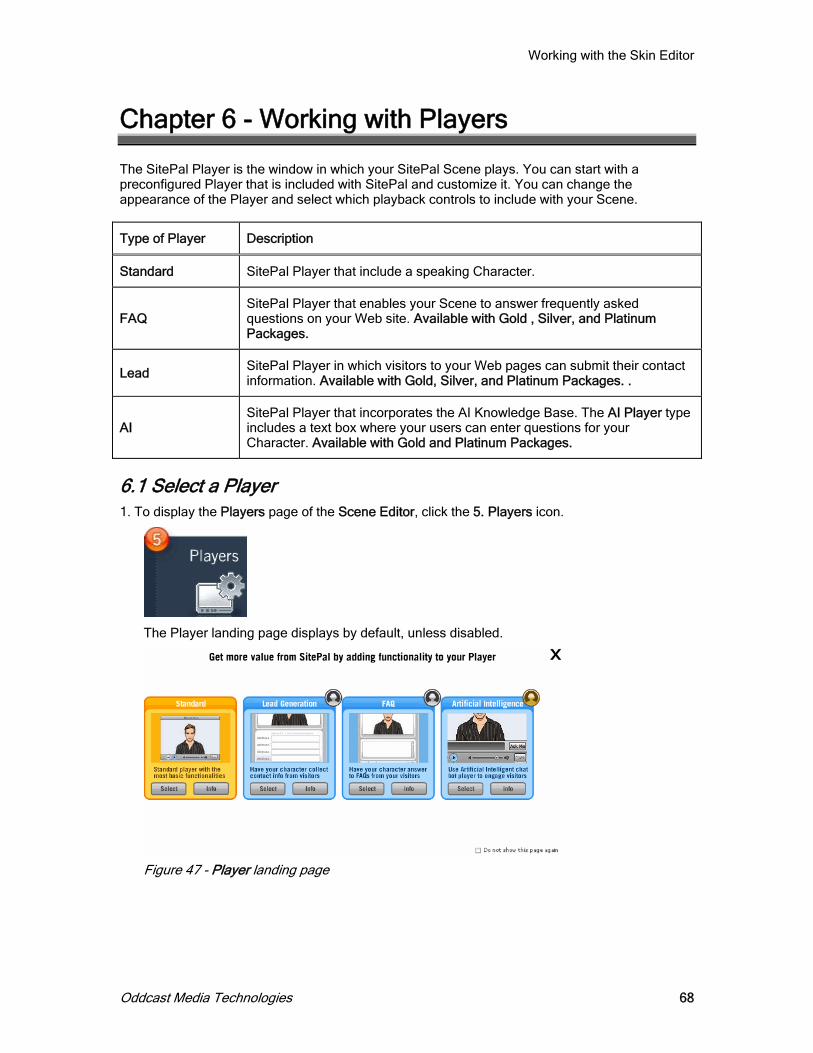
Working with the Skin Editor
Chapter 6 - Working with Players
The SitePal Player is the window in which your SitePal Scene plays. You can start with a preconfigured Player that is included with SitePal and customize it. You can change the appearance of the Player and select which playback controls to include with your Scene.
Type of Player Description
Standard SitePal Player that include a speaking Character.
FAQ SitePal Player that enables your Scene to answer frequently asked questions on your Web site. Available with Gold , Silver, and Platinum Packages.
Lead SitePal Player in which visitors to your Web pages can submit their contact information. Available with Gold, Silver, and Platinum Packages. .
AI SitePal Player that incorporates the AI Knowledge Base. The AI Player type includes a text box where your users can enter questions for your Character. Available with Gold and Platinum Packages.
6.1 Select a Player 1. To display the Players page of the Scene Editor, click the 5. Players icon.
The Player landing page displays by default, unless disabled.
Figure 47 - Player landing page
Oddcast Media Technologies 68
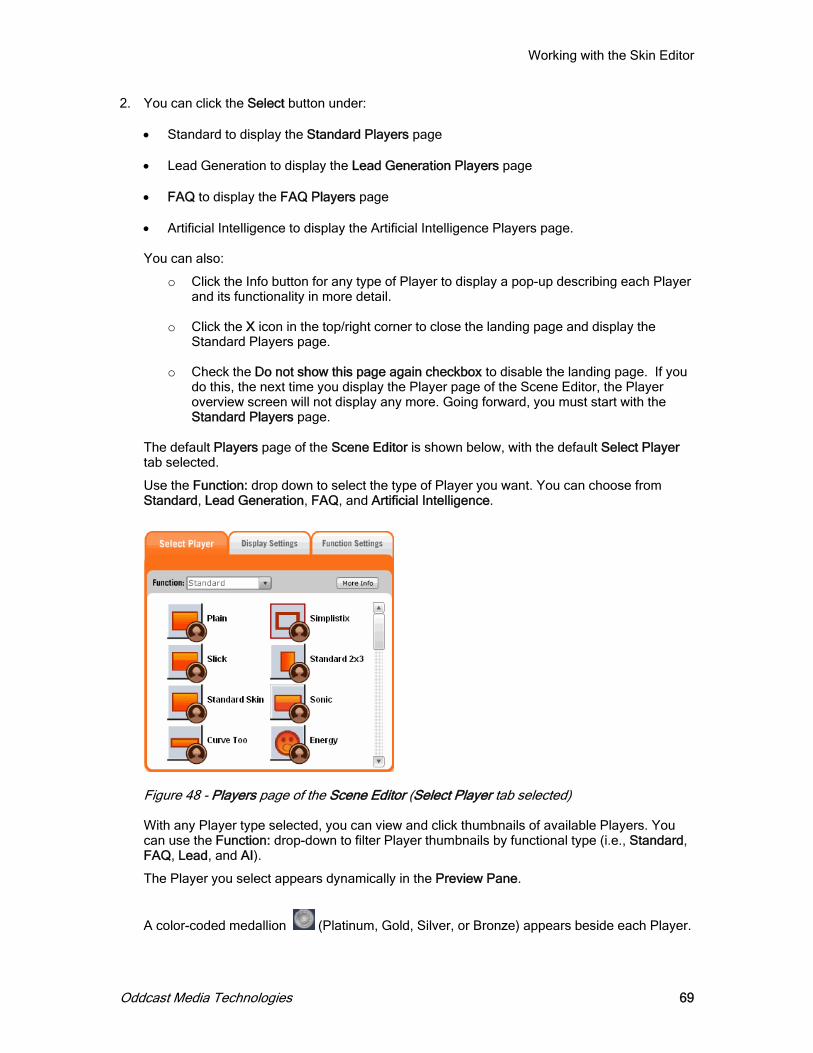
Working with the Skin Editor
2. You can click the Select button under: • Standard to display the Standard Players page
• Lead Generation to display the Lead Generation Players page
• FAQ to display the FAQ Players page
• Artificial Intelligence to display the Artificial Intelligence Players page.
You can also:
o Click the Info button for any type of Player to display a pop-up describing each Player and its functionality in more detail.
o Click the X icon in the top/right corner to close the landing page and display the Standard Players page.
o Check the Do not show this page again checkbox to disable the landing page. If you do this, the next time you display the Player page of the Scene Editor, the Player overview screen will not display any more. Going forward, you must start with the Standard Players page.
The default Players page of the Scene Editor is shown below, with the default Select Player tab selected.
Use the Function: drop down to select the type of Player you want. You can choose from Standard, Lead Generation, FAQ, and Artificial Intelligence.
Figure 48 - Players page of the Scene Ed tor Select Player ab selected) With any Player type selected, you can view and click thumbnails of available Players. You can use the Function: drop-down to filter Player thumbnails by functional type (i.e., Standard, FAQ, Lead, and AI).
i ( t
The Player you select appears dynamically in the Preview Pane.
A color-coded medallion (Platinum, Gold, Silver, or Bronze) appears beside each Player.
Oddcast Media Technologies 69

Working with the Skin Editor
Note: Your account automatically inherits all Players which belong to any level(s) below. For example, a Silver package automatically includes all Bronze Players.
Each medallion indicates the type of account package you must have in order to apply the Player. Depending on your account package, may have to upgrade your SitePal account in order to apply the Player. For example, if you have a Bronze package, and you want to apply a Player with a Silver medallion, you will need to upgrade to a Silver account package. An Upgrade button automatically appears on the Players page of the Scene Editor if you select a Player that requires you to upgrade your account. Your Player changes dynamically in the Preview Pane (even if you must upgrade your account to publish the Scene with the selected Player).
! A warning message will appear if you try to click Apply or Save without first upgrading your account (if necessary).
You can customize the following color attributes for your Player:
• frame • buttons • font • extras (e.g., Player's text entry box), if applicable to your Player type.
Roll your mouse over the color palette to fine-tune the Player attribute (i.e., frame, button, font, or extra) to the color to the shade you want. Or, if you know the exact hex code for a desired color, you can enter it manually in the hex code field.
Figure 49 - Color adjustment tools
You can click Reset to reset the colors back to the last-saved settings.
Your Player's colors change dynamically in the Preview Pane as you make adjustments.
Oddcast Media Technologies 70

Working with the Skin Editor
6.2 Customize Your Player's Display Options The Display Settings section of the Players page allows you to specify a Scene title, hide/display Player features (i.e., Scene title, volume bar, pause/play buttons, and mute button), and adjust the color of the Player's frame, buttons, font, and, if applicable to the Player type, extras such as a Player's text entry box.
1. Click the Display Settings tab. The display settings section of the Players page displays.
Figure 50 - Display set ngs section of the Players page (Display Settings tab selected)
ti
2. You can perform any of the following actions:
• Enter a Scene title in the Scene Title field. Click justify left, center, or justify right icon to justify the Scene title on your Player, accordingly.
• Hide/display your Player features -- specifically the Scene title, volume bar, pause/play buttons, and mute button -- by checking or un-checking the appropriate checkbox.
• Click a color attribute icon to customize the color of a specific color attribute for a specific Player feature; for example, button color.
Oddcast Media Technologies 71

Working with the Skin Editor
6.3 FAQ Player 1. Click the Functions (FAQ) tab. (You must select FAQ from the Functions: drop-down on the
Select Player tab.) The FAQ functions section of the Players page displays.
Figure 51 - FAQ Player 2. Click the Add button to display the FAQ dialog box.
3. Under Edit Question Text, enter a question. Your Player changes dynamically in the Preview Pane (even if you must upgrade your account to publish the Scene with the selected Player).
4. Click the Select Audio button.
The Audio Selection window appears.
5. Select the audio message that you want to use to answer the question you entered.
6. Click Select Audio.
The audio you selected is associated with the question and Audio Selection window closes.
7. Repeat steps 2 through 7 to add more questions to your FAQ.
8. Click the Save Scene button.
Note: To remove a question from the FAQ Player, click the X icon in the question window.
To change the order of appearance of your questions, click the Order pull down menu and select a number.
Oddcast Media Technologies 72
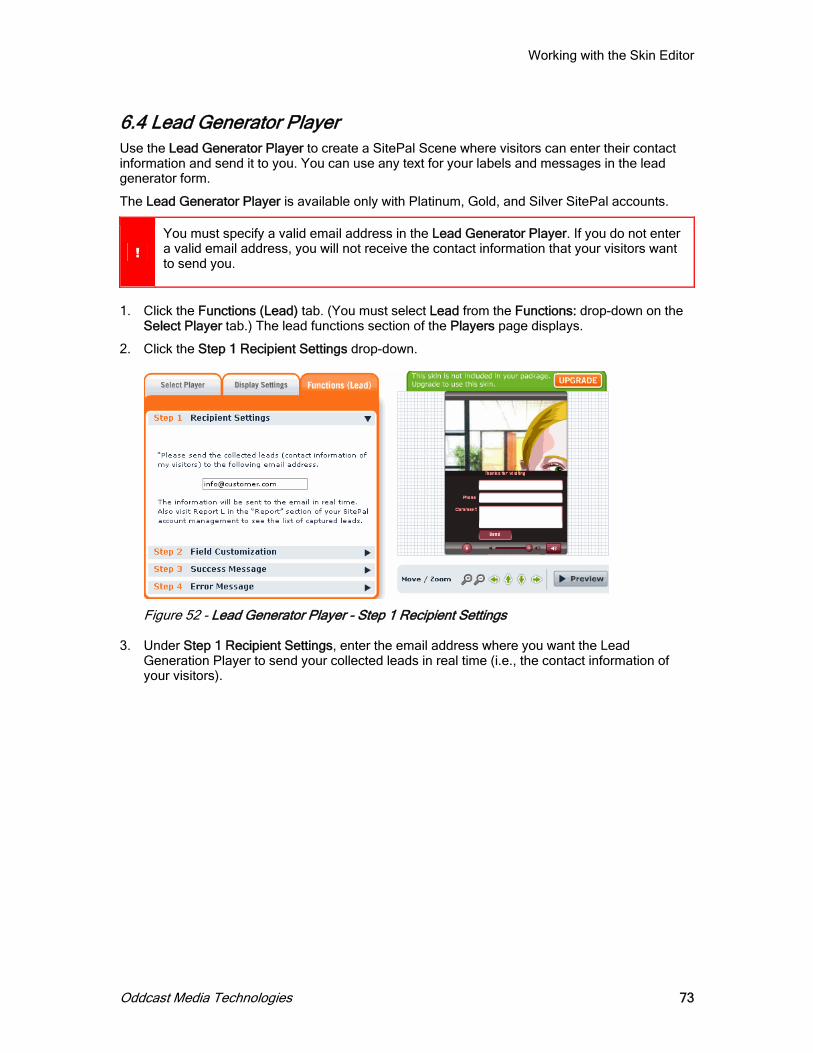
Working with the Skin Editor
6.4 Lead Generator Player Use the Lead Generator Player to create a SitePal Scene where visitors can enter their contact information and send it to you. You can use any text for your labels and messages in the lead generator form.
The Lead Generator Player is available only with Platinum, Gold, and Silver SitePal accounts.
! You must specify a valid email address in the Lead Generator Player. If you do not enter a valid email address, you will not receive the contact information that your visitors want to send you.
1. Click the Functions (Lead) tab. (You must select Lead from the Functions: drop-down on the
Select Player tab.) The lead functions section of the Players page displays.
2. Click the Step 1 Recipient Settings drop-down.
Figure 52 - Lead Generator Player - Step 1 Recip ent Settingsi 3. Under Step 1 Recipient Settings, enter the email address where you want the Lead
Generation Player to send your collected leads in real time (i.e., the contact information of your visitors).
Oddcast Media Technologies 73

Working with the Skin Editor
4. Click the Step 2 Field Customization drop-down.
Figure 53 - Lead Generator Player - Step 2 Field Customization
5. You can customize the following Lead Generation Player fields:
• Form Caption Text: • Sender's Email Field: (required) • Additional Field 1:, Additional Field: 2, and Additional Field: 3 • Send Button Text: • Processing Text:
Your Player changes dynamically in the Preview Pane (even if you must upgrade your account to publish the Scene with the selected Player).
6. Click the Step 3 Success Message drop-down.
Figure 54 - Lead Generator Player - Step 3 Success Message
Enter success message text in the Success Message: field. Click Select Audio button if you want an audio message to play when the contact information is sent.
Oddcast Media Technologies 74

Working with the Skin Editor
7. Click the Step 4 Error Message drop-down.
Figure 55 - Lead Generator Player - Step 4 Error Message
Enter error message text in the Error Message: field. Click Select Audio button if you want an audio message to play when an error occurs.
8. Click the Save Scene button.
6.5 AI Player Use the AI Player to create a SitePal Scene that incorporates the AI Knowledge Base. The AI Player includes a text box where users can type questions for your Character. Your Character responds to user questions with context-sensitive, spoken answers.
The AI Player is available only with Platinum and Gold SitePal accounts.
1. Click the Functions (AI) tab. (You must select AI from the Functions: drop-down on the Select Player tab.) The FAQ functions section of the Players page displays.
Figure 56 - AI Player 2. In the Enter Custom Button Label field, enter the button text you want to use.
3. Uncheck the Show Response Text check box if you do not want the response text to appear.
4. Use the Language: drop-down to select an available language.
5. Use the Voice: drop-down to select a built-in voice (representing both genders and a variety of accents).
Oddcast Media Technologies 75

Working with the Skin Editor
6. Click the Preview Voice button to listen to the selected AI voice speaking your response text in your selected language.
7. Click the Save Scene button.
Oddcast Media Technologies 76

Chapter 7 - Publishing and Embedding a Scene
Publishing a Scene means to embed, or insert, the code for a SitePal Scene in a Web page or a Web environment. The embedded code generates a link to your Scene, which is hosted on an Oddcast server. When you use the Scene Editor to modify your Scene, any changes you make are automatically reflected in all of the Web pages in which the Scene is embedded. Re-embed the code only if you change the properties that you set in the Publish Wizard.
Use the SitePal Publish Wizard to set the properties for your embedded code and copy the code into a Web environment.
7.1 Use the Publish Wizard
1. On the Edit Scene page, click Publish for a Scene.
The Publish Wizard window appears.
Figure 48 - Publish Wizard window 2. Choose a publish option for your SitePal Scene.

Working with the Skin Editor
3. Follow the instructions in the Publish Wizard to complete the process.
Note: SitePal displays a pop up when you try to publish your Scene, prompting you to customize your Scene options (if you have not already done so). You can check the Don't show me this notice again checkbox to "opt out" permanently if you do not want this pop up to display.
Oddcast Media Technologies 78
Working with the Skin Editor
7.2 About SitePal Publishing Targets You can use the SitePal Publish Wizard to publish a Scene to the following environments:
Embed in a Web Page
Use the Publish Wizard to embed a SitePal Scene in most types of Web pages. Learn more about embedding a Scene in a Web page.
Use this Publish Wizard option to publish to a variety of sites. The following are a few of those sites:
• Blogger
• FrontPage
• Homestead
• Macromedia Contribute
• Microsoft PowerPoint
• Register.com WebSiteNOW!
• SwishMax
• Yahoo! SiteBuilder
Note: If your target environment does not allow the use of JavaScript, use the Web Page (No JavaScript) option for publishing your Scene.
Embed in Flash
Use the SitePal Publish Wizard to embed your SitePal Character in a Macromedia Flash movie (requires a SitePal Platinum or Gold account package). Learn more about embedding a Scene in a Flash movie.
Embed in Facebook Inform and entertain your Facebook friends with a SitePal Scene. Learn more about embedding a Scene in your Facebook page.
Embed in MySpace Add flair to your MySpace profile with a SitePal Character. Learn more about embedding a Scene in your MySpace profile.
Publish to eBay Use the SitePal Publish Wizard to include a SitePal Scene in your eBay auction and dramatically enhance its effectiveness. Learn more about publishing a Scene to an eBay auction.
Use the SitePal Publish Wizard to send an email message that includes a link to your Scene. Learn more about emailing a link to your Scene. You can also embed a SitePal Scene in an HTML email message.
Oddcast Media Technologies 79

Working with the Skin Editor
7.3 Properties For Embedded Code Use the SitePal Publish Wizard to set the properties for the code that you embed. The properties that you can set when you publish a Scene do not modify your Scene in any way. These properties affect only how your Scene appears inside the host Web page. By setting different embed-code properties your Scene can appear different across multiple Web pages.
Figure 57 - Properties for Scene code
Property Description
Scene Dimensions
The contents of your entire Scene, including your background image, are re-sized to the dimensions you specify.
The suggested dimensions are 400 x 300 pixels. To use different dimensions, as you type a different width, the height is automatically calculated so that it appears proportionally to the specified width.
Background Color
Select a color from the palette by first checking select color and then clicking on a color box Alternatively, you can enter the hexadecimal value for a color in the box centered below the palette. Chose Transparent if you whish not to have a color set for your embedded scene.
Note: The color you select here also becomes the background color if you selected No Background from the Background Library in the Scene Editor.
Secure Protocol (HTTPS)
Select this check box if you want the embedded code for your Scene to work with the HTTPS (secure) protocol. This protocol is used by most Web-based e-commerce applications as well as private areas of Web sites.
Note: Although this format of HTTPS embed code works for both HTTP and HTTPS, it does not work in an HTML page launched from the desktop. The Web page must reside on a Web server.
JavaScript API
Select this check box if you make VHost API calls from the Web page or if you have set the Follow cursor in whole page option in the Scene Options window. Learn about the options that you can set for a Scene.
Oddcast Media Technologies 80

Working with the Skin Editor
7.4 Generate An Example HTML Page From Embed Code If you do not have a Web page where you can embed your Scene code, you can embed your Scene in a sample Web page. In the Publish Wizard, click Generate Example HTML Page from this embed code link.
7.5 Embed a Scene in a Web Page
Publishing a Scene means to embed, or insert, the code for a SitePal Scene in a Web page or a Web environment. The embedded code generates a link to your Scene which is hosted on an Oddcast server. You use the SitePal Publish Wizard to set the properties for your embedded code and copy the code into a Web environment. You can embed a Scene using one of the following methods:
• In-page embedding • Overlay embedding.
In-page embedding allows you to insert a Scene or Show into your Web page at a specific location in the page. The Scene becomes a static part of the page until you manually removed the code. In addition, you must place in the embed code at a specific location within the HTML.
Note: If your target environment does not allow the use of JavaScript, use the Web Page (No JavaScript) option for publishing your Scene. For example, eBay does not support JavaScript. The Web Page (No JavaScript) option does not support VHost API calls from the Web page or the Follow cursor in whole page option.
Overlay embedding allows you to add a Scene or Show on top of your page as a floating item. With overlay embedding you do not need to change your Web page's layout to include a Scene or Show. In addition, with overlay embedding:
• You can configure a Scene to disappear after speaking, and reappear when initiated by viewer.
• Your viewers can drag and position the Scene themselves.
• You can paste your embed code (almost) anywhere in the HTML.
Note: Overlay embedding requires JavaScript support. The overlay embedding Publish Wizard also requires Internet Explorer 6 or 7 or Firefox for Windows, or Firefox for Mac OS.
1. From your Scene List page, click Publish Icon for your Scene. 2. Click the Embed in Web Page publish option. The next page of the Publish Wizard loads. 3. Determine whether you want to publish your Scene using in-page embedding or overlay
embedding, as explained in the table below.
Oddcast Media Technologies 81

Working with the Skin Editor
If you want to publish your Scene using In-page embedding, then click the Click Here to Embed publish option in the In-Page Embedding section of the Publish Wizard (on the left side of the page). Follow the instructions in the Publish Your Scene window for copying your Scene code into an HTML Web page. Learn about the properties that you can set for the Scene code. If you want to publish your Scene using overlay embedding, then click the Click Here to Embed publish option in the Overlay Embedding section of the Publish Wizard (on the right side of the page). Follow the five steps for embedding/overlaying your Scene, and then copy your Scene code into an HTML Web page.
7.6 Embed a Scene in a Flash movie Use the Embed in Flash option of the Publish Wizard to embed your SitePal Scene in a Flash movie.
Note: The Embed in Flash option is available in SitePal Platinum and Gold account packages only.
To embed a Scene in a Flash movie:
1. On the Edit Scene page, click Publish for a Scene.
2. Click the Embed in Flash option.
3. Follow the instructions in the Publish Your Scene window for copying your Scene code into your Flash movie.
Learn about the properties that you can set for the Scene code.
Note: To embed a SitePal Scene in a Flash movie, you should be familiar with using Flash and its scripting language, ActionScript.
7.7 Embed a Scene in a Facebook page Use the Embed in Facebook option of the Publish Wizard to embed your SitePal Scene in a Facebook page.
To embed a Scene in a Facebook page:
1. On the Edit Scene page, click Publish for a Scene. 2. Click the Embed in Facebook option. 3. Follow the instructions in the Publish Your Scene window for embedding your Scene in a
Facebook page.
7.8 Embed a Scene in a MySpace Page Use the Embed in MySpace option of the Publish Wizard to embed a SitePal Scene in your profile on MySpace page.
1. Log in to your MySpace account.
2. On the Edit Scene page, click Publish for a Scene.
3. Click the Embed in MySpace option.
Oddcast Media Technologies 82

Working with the Skin Editor
4. Follow the instructions in the Publish Your Scene window for copying your Scene code into your MySpace profile.
Learn about the properties that you can set for the Scene code.
7.9 Publish a Scene to an eBay Auction Use the Publish to eBay option of the Publish Wizard to include a SitePal Scene in your eBay auction. The Publish to eBay option is available only with the SitePal Platinum and Gold account package.
To publish a Scene to an eBay auction:
1. On the Edit Scene page, click Publish for a Scene.
2. Click Publish to eBay.
3. Sign in to eBay using the Web page that appears.
4. Follow the instructions in the Publish Your Scene window to embed a SitePal Scene in an eBay auction.
Learn about the properties that you can set for the Scene code.
Be aware of the following when publishing your Scenes to eBay:
• Your auction's description cannot be modified after the auction is bid on.
• The auction cannot be modified within the last 12 hours of bidding.
• Do not modify your Scene by using the Scene Editor through the life of the auction unless the change is specific to the auction. This is because changes made to a Scene through the Scene Editor are instantaneously reflected in the Scene.
• If you are using the same Scene across multiple auctions, your audio message should be generic.
7.10 Email Your Scene to Anyone Use the Email option of the Publish Wizard to send an email message that includes a link to your Scene. You can also embed a SitePal Scene in an HTML email message.
1. On the Edit Scene page, click Publish for a Scene.
2. Click the Email option to display the Publish Your Scene page.
3. Locate the 1. Email Information portion of the page.
•
Figure 58 - 1. Email Information portion of the Publish Your Scene page
Oddcast Media Technologies 83

Working with the Skin Editor
4. Do the following:
• In the Message Title: text box, enter the title of your email message.
• In the Recipient(s) text box, enter the email addresses for the recipients of the message.
Check the Send me a copy checkbox to send a copy of the email to yourself (i.e., to the non-modifiable email address that displays in the Sender: field).
5. Locate the 2. Settings portion of the page.
Figure 59 - 2. Settings portion of the Publish Your Scene page
6. Do the following:
• Specify the Scene Dimensions: of your email message. Enter the Width and Height in pixels.
• Specify the Scene Background Color:
Oddcast Media Technologies 84

Working with the Skin Editor
7. Locate the 3. Template Settings portion of the page.
F gure 60 - 3. Template Settings portion of the Pub sh Your Scene page (HTML Ema l tab selected)
i li i
i
9. If you want to create:
• an HTML email message, click the HTML Email tab (selected by default) and go to Step 9
• a text-based email message, click the Text Email tab and go to Step 10.
10. If you select the HTML Email tab in Step 8, do the following:
• Select a pre-defined HTML email template in the Choose Template portion of the page. • Enter your HTML email message header, body, and footer in the Message Header,
Message Body, and Message Footer portions of the page, respectively. You can use the available icons and drop-downs to:
o specify the font format (i.e., Heading 1), font family (i.e., Arial), font size (i.e., 10), and font color of your HTML email message header
o highlight your HTML email message header o add bold, talics, underline, or strikethrough to your HTML email message header o create a numbered or bulleted list for your HTML email message header o align your HTML email message header to the left, center, or right o add a hyperlink to your HTML email message header
Oddcast Media Technologies 85

Working with the Skin Editor
o add a graphic to your HTML email message header o Go to Step 11.
11. If you select the Text Email tab in Step 8, the text email fields display.
Figure 61 - 3. Template Settings portion of the Publish Your Scene page Text Email tab selected) (
In the Edit Your Text Message Below: text box, type the message that you want to include with the link to your Scene.
Go to Step 12.
12. Locate the 4. Preview and 5. Send portions of the page.
Figure 62 - 4. Preview and Send portion of the Publish Your Scene page
13. Click the:
• Preview button to preview your email message
• Send button to send your email message.
The message is sent and the Publish Your Scene window closes.
Oddcast Media Technologies 86
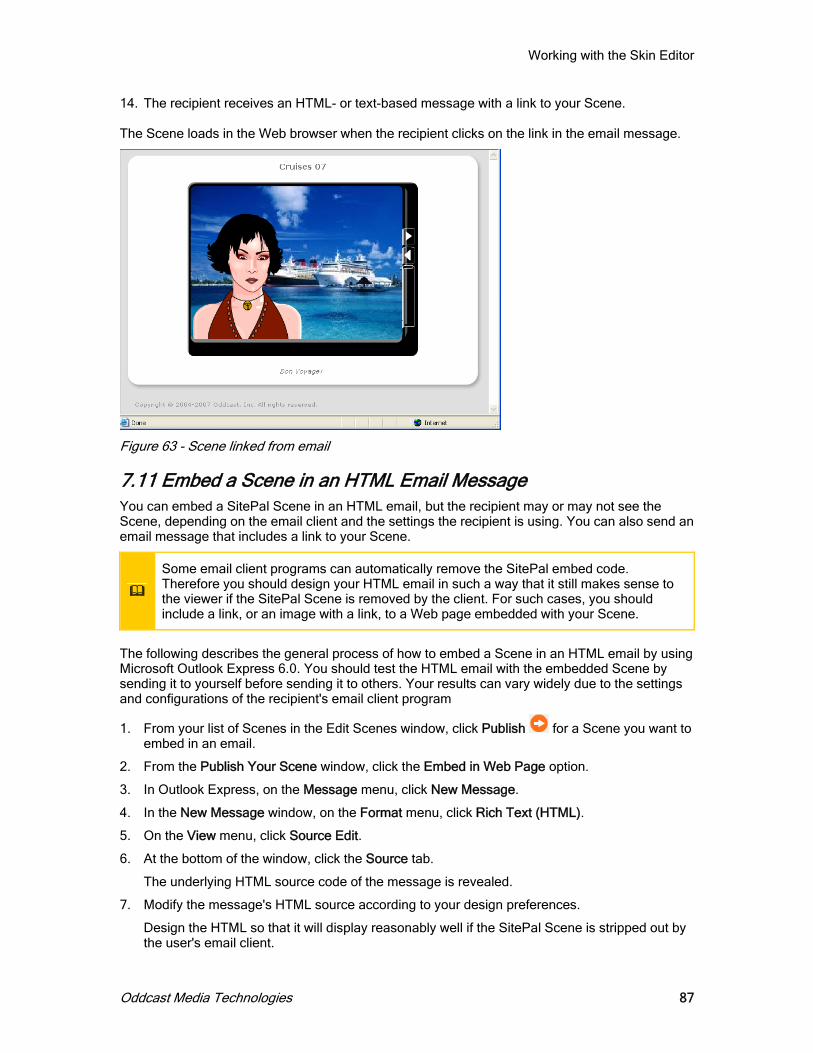
Working with the Skin Editor
14. The recipient receives an HTML- or text-based message with a link to your Scene. The Scene loads in the Web browser when the recipient clicks on the link in the email message.
Figure 63 - Scene linked from email
7.11 Embed a Scene in an HTML Email Message You can embed a SitePal Scene in an HTML email, but the recipient may or may not see the Scene, depending on the email client and the settings the recipient is using. You can also send an email message that includes a link to your Scene.
Some email client programs can automatically remove the SitePal embed code. Therefore you should design your HTML email in such a way that it still makes sense to the viewer if the SitePal Scene is removed by the client. For such cases, you should include a link, or an image with a link, to a Web page embedded with your Scene.
The following describes the general process of how to embed a Scene in an HTML email by using Microsoft Outlook Express 6.0. You should test the HTML email with the embedded Scene by sending it to yourself before sending it to others. Your results can vary widely due to the settings and configurations of the recipient's email client program
1. From your list of Scenes in the Edit Scenes window, click Publish for a Scene you want to embed in an email.
2. From the Publish Your Scene window, click the Embed in Web Page option.
3. In Outlook Express, on the Message menu, click New Message.
4. In the New Message window, on the Format menu, click Rich Text (HTML).
5. On the View menu, click Source Edit.
6. At the bottom of the window, click the Source tab.
The underlying HTML source code of the message is revealed.
7. Modify the message's HTML source according to your design preferences.
Design the HTML so that it will display reasonably well if the SitePal Scene is stripped out by the user's email client.
Oddcast Media Technologies 87

Working with the Skin Editor
8. From the SitePal Publish Your Scene window, copy the code.
9. Paste the code between the <BODY> and </BODY> tags.
10. Add a link to the Web page where your SitePal Scene is embedded.
Recipients of the message who cannot see the Scene in the email message can go to your Web site to view the Scene.
11. Click the Edit tab.
12. Enter email addresses in the To field, enter a subject in the Subject field, and then send the message.
7.12 Embed a Scene in a PowerPoint Presentation Use the Microsoft PowerPoint option of the Publish Wizard to embed a SitePal Scene in a PowerPoint presentation.
To play a Scene in PowerPoint, you must be connected to the Internet during the presentation. Alternatively, you can load the Scene into the presentation while you're connected and then save it. You can then give the presentation without an Internet connection as long as you do not exit the PowerPoint program.
Note: You must have Flash version 6 or higher installed on your computer and a SitePal Platinum and Gold account package to perform this operation.
Embed a Scene in a PowerPoint presentation
1. On the Edit Scene page, click Publish for a Scene.
2. Click the Embed in Web Page option.
3. Under Publish To, click Microsoft PowerPoint.
4. Follow the instructions in the Publish Your Scene window for embedding your Scene code in a PowerPoint presentation.
Learn about the properties that you can set for the Scene code.
Note: If you view the Scene before you save the PowerPoint presentation, the Playing property reverts to False, and you must reset it to True.
7.13 Limit Audio Playback Conserving your available Audio Streams is important since there are a pre-defined number of Audio Streams allotted to each SitePal account package. The size of this allotment depends on the SitePal account package that you have. The number of Audio Streams that are available in your account is shown on your Account Info page. Learn more about audio playback limits.
In the Scene Options window you can limit the number of times an audio message is played and repeated to a user within a specified period of time.
Limit audio playback
1. Your SitePal Scene List page, click Scene Options for a Scene.
The Scene Options window appears.
Oddcast Media Technologies 88

Working with the Skin Editor
2. Under Playback Settings, on the first drop-down menu, select a playback limit.
3. On the second drop-down menu, select the period of time for the playback limit.
For example, if you select Limit to 2 for the playback limit and per Day for the period of time, your Scene plays twice to each viewer in a day. You can select Unlimited to play the Scene every time the page loads. The viewer can click the Play button any time to play the Scene.
You can use the Secure Playback feature prevents unauthorized use of your SitePal Scenes on Web sites other than your own. When you activate Secure Playback option, the domain requesting the Scene is verified before the Scene is played.
To activate Secure Playback
1. Click Account Info in the menu bar at the top of the SitePal Home Page.
2. Scroll down to the Licensed Domains pane, which displays how many domains you have defined.
Figure 64 – Licensed Domains pane
Note: Bronze, Silver, and Gold packages come with two licensed domains, which allow you to prevent unauthorized playbacks of Audio streams. Optionally, Bronze, Silver, and Gold users can purchase additional licensed domains from the SitePal Store. Platinum packages come with 1,000 licensed domains. In the unlikely event Platinum users run out of licensed domains, they, too, can order additional ones.
Oddcast Media Technologies 89

Working with the Skin Editor
3. Click the Manage Additional Domains button.
The licensed domain dialog box displays. The top portion of the dialog box lists the Additional Domains Available.
Figure 65 – Licensed domains dialog box
The following table explains your options:
If you want to: Then do this:
Add a new licensed domain.
Click the Add a New Domain button. If you have enough licensed domains available, a pop up displays, prompting you to enter your licensed domain name.
Enter the name of the domain in which your SitePal Scenes are embedded, and then click the OK button. For example: www.my_domain.com. If your Scenes are embedded in Web pages in another domain, click the other Define Domain link and enter that name of the additional domain.
SitePal adds the domain to your list of registered licensed domains. Go to Step 4.
Oddcast Media Technologies 90

Working with the Skin Editor
If you want to: Then do this:
Delete a licensed domain.
Locate the licensed domain(s) that you want to delete (in the licensed domains dialog box), and check the corresponding checkbox(es).
Tip: You can check the Select All link to select all licensed domains, or the Uncheck All link to uncheck all licensed domains.
Click the Delete Selected Domain button to delete the licensed domain(s). The number of Additional Domains Available increases by the number of licensed domains you have deleted.
Purchase a new licensed domain.
If you click the Add a New Domain button, and you don't have enough licensed domains available in your account, a pop up informs you to purchase additional licensed domains at the SitePal Store (go to https://www.oddcast.com/store and click the Additional TTS Domains link).
Or, you can upgrade to a Platinum account, which comes with 1,000 licensed domains.
4. In the Account Settings pane, select the Secure Playback check box.
Note: Secure Playback is not compatible with the Publish to eBay and the Web Page (No JavaScript) publish option.
Oddcast Media Technologies 91

Working with the Skin Editor
Part III - Managing Accounts
Oddcast Media Technologies 92

Profiting from SitePal
Chapter 8 - Working with Your SitePal Account
When you are logged in to your SitePal account, you can view, change, or edit any aspect of your SitePal account.
To go to your Account Info page:
• Click Account Info in the menu bar at the top of your Scene List page.
To return to your Scene List page from your Account Info page:
• Click My Scenes in the menu bar at the top of your Account Info page.
8.1 Extend Your SitePal Account Manually Extend the duration of your account to prevent it from expiring. You also have the option of extending your account automatically by turning on Automatic Billing. Learn more about extending your account with Automatic Billing..
1. Log in to your SitePal account.
2. Click Account Info in the menu bar at the top of the SitePal Home Page.
3. In the General Account Information pane, click Extend.
The Extend Your Account page appears
Figure 66 - Extend Your Account page 4. In the Extend Your Account window, select the account that you want to extend.
5. Click Continue and follow the instruction on your screen.
Oddcast Media Technologies 93

Profiting from SitePal
8.2 Extend Your Account with Automatic Billing You can authorize Oddcast to bill your credit card automatically to extend your account. Use the Automatic Billing option to make sure that your SitePal Scenes are not deactivated if your account license expires. Oddcast interfaces with VeriSign at the appropriate time to perform a repeat transaction, your credit card information is sent only once at the time you sign up for your account. Oddcast automatically generates an electronic invoice and emails it to you when your credit card is billed.
Note: Oddcast does not store your credit card information on its servers. However, Oddcast does store a reference to your partial credit card information (i.e., the last five digits of your card, and your expiration date). Again, this is only a reference. Optionally, you can clear this reference to your credit card, explained in Step 4, below. Clearing the reference, however, does not clear your credit card information from VeriSign's servers. If you want to change your credit card information, you need to go to the VHost Store. Learn more about updating your billing information.
Set up Automatic Billing
1. Log in to your SitePal account.
2. On the top menu bar, click Account Info.
3. In the Automatic Billing pane, check the Automatic Billing check box (unchecked by default) if you want Oddcast to charge your credit card automatically, once per month.
Figure 67 - Automatic Billing pane
Tip: If you want to receive an email reminder every month before you are automatically billed, you can check the Send advance notice before auto-billing checkbox in the Account Settings pane of the Account Info page. As long as this checkbox is checked, Oddcast will automatically send you an email a few days before your credit card is billed every month.
4. You can click the:
• Update Credit Card Information link to go to the SitePal Store and update your credit card information (which Oddcast does not store on its servers). Learn more about updating your billing information.
Oddcast Media Technologies 94

Profiting from SitePal
• Clear Credit Card Information link to clear the internal reference to your partial credit card information (i.e., the last five digits of your card, and your expiration date). Again, Oddcast does not store your credit card information on its servers. Your credit card information is stored securely on VeriSign's servers. If you want to change your credit card information, click the Update Credit Card Information link, which takes you to the SitePal Store.
Note: Any special promotions offered in the VHost Store that apply to your account extension at the time of rebilling are automatically applied.
Note: Turning off Automatic Billing does not deactivate your account. If you do not use the Automatic Billing option, visit the VHost Store and purchase an extension before your account expires. If you extend your SitePal account manually, you will receive a reminder from Oddcast in the mail that your account will soon expire.
8.3 Update Your Billing Information You can add or update your credit card information for your SitePal account.
1. Log in to your SitePal account.
2. On the top menu bar, click Account Info.
3. In the Automatic Billing pane, click Edit Credit Card Information.
The VHost Store appears in a new browser window.
Figure 68 - Your Billing Info page 4. Under Billing Information, enter the billing information for your account.
5. Under Credit Card Information, enter the number, ID code, and the expiration date for your credit card.
Oddcast Media Technologies 95

Profiting from SitePal
6. Click Update.
Note: Oddcast does not store your credit card information on its servers. Instead, your credit card information is used only when performing an authorized transaction with our secure billing service at VeriSign, an industry leader in secure online transactions.
8.4 Edit Contact Information For Your Account 1. Log in to your SitePal account.
2. On the top menu bar, click Account Info.
3. Scroll down to the Contact Information pane.
4. Click Edit Contact Info.
The User Details window appears.
Figure 69 - Contact Information window 5. Change your personal and company contact information or your password.
6. Click Update.
Oddcast Media Technologies 96

Profiting from SitePal
8.5 Change Your Account Password 1. Log in to your SitePal account.
2. On the top menu bar, click Account Info.
3. Scroll down to the Contact Information pane.
4. Click Edit Contact Info.
The User Details window appears.
5. In the Old Password box, type your current password.
6. In the New Password box, type a new password.
7. In the New Password Verification box, type your new password again.
8. Click Update.
8.6 Upgrade Your SitePal Account If you have a Bronze, Silver, or Gold SitePal account, you can upgrade your account package.
For example, when you upgrade from a Bronze to a Silver account, you can use the Text-to-Speech feature to create audio messages. If you upgrade to a Platinum or Gold account, you can add the power of an artificial intelligence (AI) to a Scene by using the SitePal AI Knowledge Base feature.
Upgrade your SitePal account
1. Log in to your SitePal account.
2. Click Account Info on the navigation bar of any SitePal page to display the Account Info page.
3. You have two options if you want to upgrade your account to a higher level package (unless you are already at the highest level account: Platinum). Option 1
• Click the Upgrade button in the General Account information pane.
Figure 70 – General Account Information pane
Oddcast Media Technologies 97

Profiting from SitePal
The Upgrades: page displays, allowing to select any available higher level package (for example, if you have a Bronze account, you can upgrade to Silver, Gold, or Platinum from this page).
Figure 71 – Upgrades: page (all available levels)
Option 2
• Click the Upgrade to <Account Level> button (e.g., Upgrade to Gold) in the Account Features information pane.
Figure 72 – Account Features information pane
Oddcast Media Technologies 98

Profiting from SitePal
The Upgrades: page displays, allowing to upgrade to the specific package you selected (i.e., Gold).
Figure 73 – Upgrades: page (selected level)
4. Use the VHost Store to find the upgrades you want, add them to your shopping cart, and proceed to checkout.
8.7 Add Scenes and Audio Streams to Your Account Your SitePal account includes a predetermined number of Scenes and Audio Streams. The exact number of each item varies depending on your type of account package. You can check the current inventory of Scenes and Audio Streams for your account on the Account Info page.
1. Log in to your SitePal account.
2. Click Account Info in the menu bar at the top of the SitePal page.
3. In the General Account pane, click the Buy More button for Streams or Scenes.
The SitePal Account Additions page of the SitePal Store appears in a new browser window.
Figure 74 - Account Additions window 4. Enter the quantity of Scenes or stream bundles that you want to add to your account.
5. Click Continue and then either continue to shop or proceed to checkout.
Oddcast Media Technologies 99

Profiting from SitePal
To purchase additional Scenes and audio streams from the SitePal Store:
1. Log in to your SitePal account.
2. Click Store in the menu bar at the top of the SitePal page.
3. Under Accessorize My Account, click Additional Streams or Scenes.
4. Click Select for your account.
5. Enter the quantity of Scenes or stream bundles that you want to add to your account.
6. Click Continue and either continue to shop or proceed to checkout.
You can see the number of Audio Streams that have played in a given period of time by viewing a report of your SitePal account activities. Learn more about SitePal reporting.
8.8 About Audio Playback Limits Audio Streams are audio messages delivered over the Internet by the Oddcast server. Audio Streams are counted each time one plays in a Scene. For example, if you place a single Scene that plays one audio message on a Web page with an average of 1,000 page views a day, expect to use an average of 1,000 Audio Streams a day.
Conserving your available Audio Streams is important since there are a pre-defined number of Audio Streams allotted to each SitePal account package. The size of this allotment depends on the SitePal account package that you have.
In the Scene Options window you can limit the number of times an audio message is played and repeated to a user within a specified period of time. Learn how to economize your use of streams by limiting playback.
Figure 75 - Playback Settings pane The number of Audio Streams that are available in your account is shown on your Account Info page.
The playback limit is implemented independently for each page in which the Scene is embedded. If a Scene is embedded in more than one page, there is an individual limit count for each one of the pages, and it is the limit that is set at the time the Scene is published.
8.9 Prevent Unauthorized Playback of Your SitePal Scenes The Secure Playback feature prevents unauthorized use of your SitePal Scenes on Web sites other than your own. When you activate Secure Playback option, the domain requesting the Scene is verified before the Scene is played. This helps insure that your Scenes are shown only in Web pages located in a domain that you specify. The Secure Playback feature prevents someone from illegally hijacking your SitePal Scenes and audio streams.
When Secure Playback is not activated, domain verification is ignored for all Scene playbacks except for Scenes that contain Dynamic Text-to-Speech.
Oddcast Media Technologies 100

Profiting from SitePal
Activate Secure Playback
1. Log in to your SitePal account.
2. Scroll down to the Licensed Domains pane, which displays how many domains you have defined.
Figure 76 – Licensed Domains pane
Note: Bronze, Silver, and Gold packages come with two licensed domains, which allow you to prevent unauthorized playbacks of Audio streams. Optionally, Bronze, Silver, and Gold users can purchase additional licensed domains from the SitePal Store. Platinum packages come with 1,000 licensed domains. In the unlikely event Platinum users run out of licensed domains, they, too, can order additional ones.
3. Click the Manage Additional Domains button.
The licensed domain dialog box displays. The top portion of the dialog box lists the Additional Domains Available.
Figure 77 – Licensed domains dialog box
Oddcast Media Technologies 101

Profiting from SitePal
The following table explains your options:
If you want to: Then do this:
Add a new licensed domain.
Click the Add a New Domain button. If you have enough licensed domains available, a pop up displays, prompting you to enter your licensed domain name.
Enter the name of the domain in which your SitePal Scenes are embedded, and then click the OK button. For example: www.my_domain.com. If your Scenes are embedded in Web pages in another domain, click the other Define Domain link and enter that name of the additional domain.
SitePal adds the domain to your list of registered licensed domains. Go to Step 4.
Delete a licensed domain.
Locate the licensed domain(s) that you want to delete (in the licensed domains dialog box), and check the corresponding checkbox(es).
Tip: You can check the Select All link to select all licensed domains, or the Uncheck All link to uncheck all licensed domains.
Click the Delete Selected Domain button to delete the licensed domain(s). The number of Additional Domains Available increases by the number of licensed domains you have deleted.
Purchase a new licensed domain.
If you click the Add a New Domain button, and you don't have enough licensed domains available in your account, a pop up informs you to purchase additional licensed domains at the SitePal Store (go to https://www.oddcast.com/store and click the Additional TTS Domains link).
Or, you can upgrade to a Platinum account, which comes with 1,000 licensed domains.
4. In the Account Settings pane, select the Secure Playback check box.
Note: Secure Playback is not compatible with the Publish to eBay and the Web Page (No JavaScript) publish option.
Oddcast Media Technologies 102

Profiting from SitePal
8.10 Reactivate Your SitePal Account If your SitePal account has not expired, you can extend your account or set up recurring billing to extend your account automatically. If your SitePal account is deactivated, you can still log into your Account Info page and activate the account.
Reactivate a SitePal account
1. Log in to your SitePal and click Enter under My Account Info.
2. Click Account Info in the menu bar at the top of the SitePal page.
3. Under General Account Information, click Activate Account.
4. Select an Extension package and click Continue.
5. Click Continue and either continue to shop or proceed to checkout.
8.11 Deactivate a SitePal Account 1. Log in to your SitePal account.
2. Click Account Info in the menu bar at the top of the SitePal Home Page.
3. Under General Account Information, click Deactivate Account.
The Account Deactivation window appears. Please note the information in this window about deactivating your account.
Figure 78 - Account Deactivation dialog box 4. Select a reason why you are deactivating your account (optional).
Your response will help us improve SitePal and our services.
5. Click Deactivate my account, and then close the Account Deactivation window.
You will receive an email message from Oddcast confirming that your account is deactivated.
8.12 Remove Oddcast Branding from Loaders and Upload a Customized Loader Depending on your user level (Platinum, Gold, Silver, or Bronze) the Account Info page may (or may not) allow you to remove Oddcast branding from your loader (i.e., the window where your Scene loads) . Bronze and Silver users cannot remove Oddcast branding from their loader, unless they upgrade to a Gold or Platinum account. Gold users can remove Oddcast branding from their loaders, but they cannot upload their own customized, branded loader. Platinum users, however, can not only remove Oddcast branding from their loaders -- they can also upload their own customized, branded loaders.
Oddcast Media Technologies 103

Profiting from SitePal
Remove Oddcast branding from loaders and upload a customized loader
1. Log in to your SitePal account.
2. Click Account Info on the navigation bar of any SitePal page to display the Account Info page.
3. In the Account Settings pane, click the Loader Settings button if you want to remove Oddcast brading from your loader.
Figure 79 - Account Settings pane
Tip: If you want to receive an email reminder every month before you are automatically billed, you can check the Send advance notice before auto-billing checkbox. As long as this checkbox is checked, Oddcast will automatically send you an email a few days before your credit card is billed every month. Learn more about automatic billing.
The following table explains whether you may (or may not) remove Oddcast branding from your loader. The table also explains which user levels may not only remove branding -- but also add their own branded, customized loaders.
Oddcast Media Technologies 104

Profiting from SitePal
User level: Options:
Bronze or Silver
Bronze and Silver users must have a SitePal-branded loader. If you are a Bronze or Silver user and you click the Loader Settings button on the Account Info page, the following pop up displays:
Your only option at this level is Use SitePal Default Loader. You can, however, always upgrade to a higher level account in order to enable the following options:
• Remove Loader Branding (Gold and Platinum) • Use My Own Loader (Platinum).
Gold Gold users can have a SitePal-branded loader or they can remove loader branding, but they cannot use their own loader. If you are a Gold user and you click the Loader Settings button on the Account Info page, the following pop up displays:
You have two options at this level. You can select:
• Use SitePal Default Loader to keep SitePal branding intact on your loader
• Remove Loader Branding to remove SitePal branding from your loader.
Click the Submit button to make any changes.
You can upgrade to a higher level account in order to enable the Use My Own Loader option (Platinum).
Oddcast Media Technologies 105

Profiting from SitePal
User level: Options:
Platinum Platinum users can have a SitePal-branded loader, they can remove loader branding, and they can use their own loader (.swf file).
If you are a Platinum user and you click the Loader Settings button on the Account Info page, the following pop up displays:
You have three options at this level. You can select:
• Use SitePal Default Loader to keep SitePal branding intact on your loader
• Remove Loader Branding to remove SitePal branding from your loader.
• Use My Own Loader to and click the Browse... button to upload your own loader as an .swf file.
• Note: If you want to upload your own loader, your .swf file must meet certain criteria. Contact [email protected] for more information.
• Click the Submit button to make any changes.
8.13 View a Report of Activities on Your SitePal Account All SitePal accounts including a reporting feature that generates detailed statistics about your SitePal Scenes. There are four different types of reports available:
• 1- Overview. This report provides general information on user Sessions, unique Sessions, total number of unique visitors, average Session length, and more.
• 2 - Visitor Locations. This report provides geographical information on the countries where your visitors originated from, how many visitors (total, first time, and returning) from a given country visited your site, the average time spent on your site (per country), and more.
• 3 – Lead Generation. This report provides lead information, such as the date and time a lead played your Scene, the skin used, the lead's email address, and more.
• 4 – Invoice List. This report provides invoice information, such as invoice numbers, payment type, item purchased, and amount.
Oddcast Media Technologies 106

Profiting from SitePal
View a report of activities on your SitePal account
1. Log in to your SitePal account.
2. On the top menu bar, click Reports.
Figure 80 - Account Reports window 3. From the Report drop-down menu, select the report type that you want to view (i.e., Overview,
Visitor Locations, Lead Generation, or Invoice List).
4. From the Period drop-down menus, select the time frame for the report (Monthly, Daily, Yearly, etc.). The time frame options that are available vary by report type.
5. If you are generating:
• an Overview report, you can filter your report by a specific Scene or Show, and click the Apply button
• a Visitor Location report, you can filter your report by a specific Scene or location, and click the Apply button
• a Lead Generation report, you can search for a specific lead by entering search criteria in the text box, and click the Search button.
6. Click the Apply button. SitePal generates your report.
Oddcast Media Technologies 107

Profiting from SitePal
You can view the following report types for your SitePal account:
Report type Description
1- Overview
• User Sessions.Total number of visitors. • Unique Sessions.Total number of unique visitors. • Avg Session length (min). The average visit length in
minutes for all visitors. • Scene Views.The total number of scene views for the
given period. • Views/Sessions.The average number of scene views
per visitor for the given period of time. • Streams.The total number of audio streams played. • Streams/Sessions.The average number audio plays per
visitor session for the given period of time.
2 - Visitor Locations
• Name. Country name. • Total Visitors. Number of total visitors (first time and
returning) from a country, in the specified time frame. • First Time Visitor. Number of returning visitors (from a
country) who have visited your site, in the specified time frame. This column also shows what percentage of visitors were first time visitors.
• Returning Visitor.Total number of returning visitors (from a country) who have visited your site, in the specified time frame. This column also shows what percentages of visitors were returning visitors.
• Avg. Time on Page. The average amount of time a visitor (from a country) spent on your site, in the specified time frame.
• Avg. Number of Concurrent Visitors.The average number of concurrent visitors (from a country) you had on your site, at any given time, during the specified time frame.
• Tip: If you have visitors from the United States, you can click the United States link to drill-down to a U.S. sub-report. This report shows how many visitors you had on your site from each U.S. state. The U.S. sub-report also displays a color-coded U.S. map that visually depicts how many visitors originated from each state.
3 – Lead Generation
• Date & Time. Date and time lead played your Scene. • Scene Name. The same of the Scene played by your
lead. • Skin. Name of the skin used on the Scene played by
your lead. • Email. Email address of your lead. • Field 1, Field 2, Field 3. Unique, customizable fields.
4 – Invoice List
• Invoice #. Unique invoice number. • Payment type. Type of payment (e.g., Recurring Monthly
Membership). • Item. Item purchased (e.g., Men’s M t-shirt, yellow). • Amount. Amount of invoiced purchase.
Oddcast Media Technologies 108

Profiting from SitePal
8.14 Receive Email Notifications of Your Daily/Monthly Account Usage Regardless of your account level, you can receive optional email notifications of your daily or monthly account usage.
1. Log in to your SitePal account.
2. Click Account Info on the navigation bar of any SitePal page to display the Account Info page.
3. In the Send me a usage report: portion of the Account Settings pane, check either (or both, of neither) of the following checkboxes:
• Monthly to receive monthly email notifications of your account usage
• Daily to receive daily email notifications of your account usage.
Figure 81 - Account Settings pane
Tip: If you want to receive an email reminder every month before you are automatically billed, you can check the Send advance notice before auto-billing checkbox. As long as this checkbox is checked, Oddcast will automatically send you an email a few days before your credit card is billed every month. Learn more about automatic billing.
Oddcast Media Technologies 109
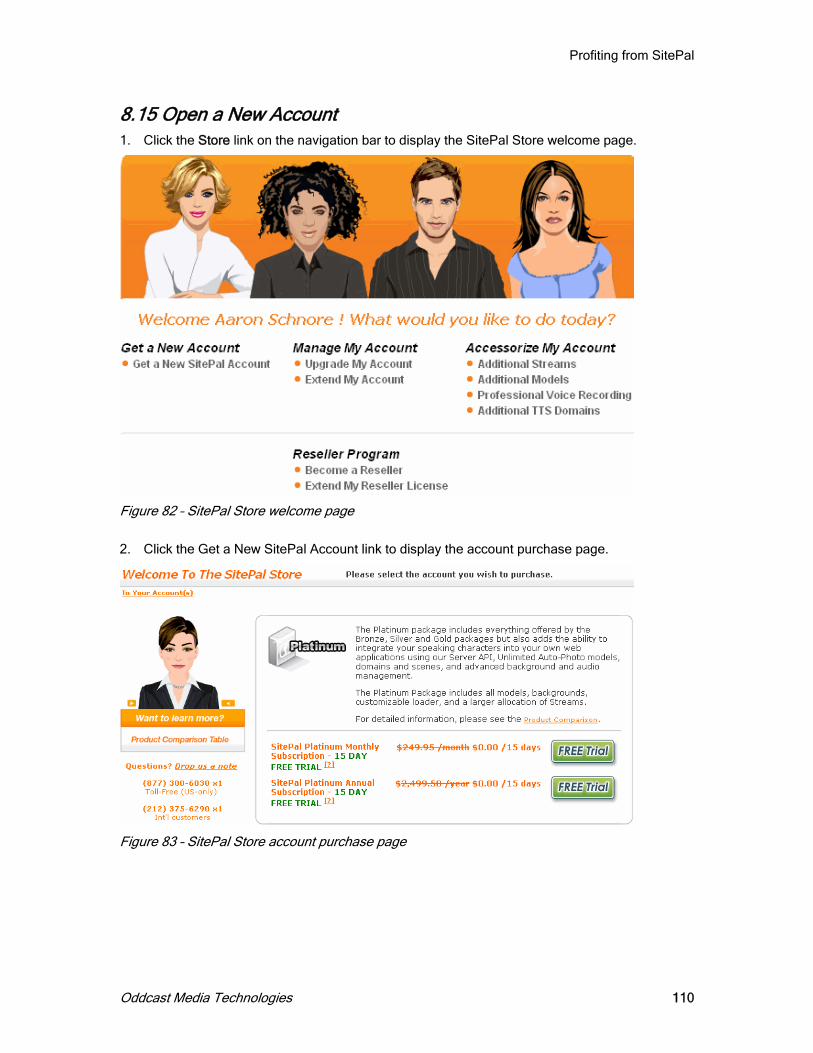
Profiting from SitePal
8.15 Open a New Account 1. Click the Store link on the navigation bar to display the SitePal Store welcome page.
Figure 82 – SitePal Store welcome page
2. Click the Get a New SitePal Account link to display the account purchase page.
Figure 83 – SitePal Store account purchase page
Oddcast Media Technologies 110

Profiting from SitePal
Chapter 9 - Profiting With SitePal
You can profit by referring customers to Oddcast or by selling Oddcast products to your clients. The SitePal Affiliate Program and Authorized Reseller Program offer you lucrative business opportunities.
9.1 About the Affiliate Program The Oddcast Affiliate Program rewards you with commissions when new users buy SitePal through promotions placed on your Web site. Oddcast offers several advertising banners that make it easy for you to place promotions on your site, and you do not need to have a SitePal account to join the Affiliate Program.
Become an affiliate
1. Visit the SitePal Affiliate Program Web site at http://www.sitepal.com/affiliates.
Figure 84 - SitePal Affiliate page 2. Click the Sign Up Now button.
3. Follow the instructions to complete the signup form.
You will receive an email confirming your enrollment in the program. To activate your affiliate account, you must click the link included in the email.
Oddcast Media Technologies 111

Profiting from SitePal
Note: Before Oddcast can pay you for commissions, you must update your taxpayer ID information on the Affiliate Program Account Info page. Click the Edit button, and then follow the instructions in the Payment Options section for downloading the appropriate form and faxing it to Oddcast.
Once your affiliate account has been activated, you can log into it using the email address and password you supplied in the signup form for the affiliate program. Once logged in, click the Banners link to choose from an assortment of banner advertisements that you can use on your Web pages. On the Affiliate Web site Reports page you can track impressions, clicks, purchases, and earnings.
Note: An impression is when a visitor to your site views a page containing a banner ad.
You can opt to extend the analytical functionality of your reports through Campaigns. Campaigns can help you sort results based on banners ads and the Web pages containing them. By assigning different campaigns to ad banners in different pages or sites, you can analyze the results for each. Then you can use the Reports page to view combined results or sort them by campaign.
9.2 About the Authorized Reseller Program The SitePal Authorized Reseller program is a way for Web designers and developers to generate income by selling SitePal account packages and related services to customers.
• As a SitePal Authorized Reseller, you receive the following benefits:
• A 30% store discount on all SitePal account package purchases, account extensions, and account upgrades.
• The ability to manage multiple SitePal accounts on behalf of your clients.
• Resellers with five or more SitePal licenses will be featured in our reseller's directory.
To sign up as a SitePal Authorized Reseller:
1. Visit the SitePal page at http://www.sitepal.com/resellers.
2. Click the Sign Up Now button.
Please email [email protected] if you have any questions about this program.
Note: The SitePal Authorized Reseller license fee is $795.50/Year which includes one gold yearly account.
9.3 Add Advertising Banners to a Web Page You can view the available banner advertisements for your Web page on the affiliate program Web site at http://www.sitepal.com/affiliates.
The page displays a list of all available banners. Use the drop-down menus at the top of the page to display banners based on size, type, and audio. Scroll through the available banner types until you find one that suits your needs. Click the Preview button to see how it looks in a Web page.
Oddcast Media Technologies 112

Profiting from SitePal
Embed a banner in your web page
1. Log in to your SitePal Affiliate account.
2. Click the Banners link.
3. Click the Get HTML snippet button above the advertisement of your choice.
4. In the Snippet pane, select a campaign or Untitled from the Campaign drop-down menu.
Select the Open in a new page when clicked check box if you want the Oddcast page to open in a new browser window when a user clicks the banner ad.
5. Click Generate HTML Code.
The HTML code for the chosen banner ad is generated and appears in the text field.
6. Copy and paste the code into your Web page.
9.4 Shop at the Reseller Store All Reseller Accounts and Reseller products are purchased through the SitePal Reseller Store. The reseller price discount is available to you automatically as soon as you sign up to be a reseller. As a SitePal Authorized Reseller, you will make all of your discounted purchases from the Reseller Store.
If you already own one or more SitePal accounts, the reseller discount applies to any further extensions or upgrades to these accounts. The reseller discount applies to account extensions whether you extend your accounts manually or by using the automatic re-billing option.
Oddcast Media Technologies 113

Managing Reseller Accounts
Chapter 10 - Managing Reseller Accounts
SitePal Authorized Resellers can manage their accounts by using a special management interface online at the SitePal Web site. As a SitePal reseller, you can use this facility to purchase additional accounts, extend your own account, add more Scenes, add more Audio Streams and even transfer the various accounts that you manage as a reseller to other parties.
SitePal resellers gain access to their reseller account information by logging into their accounts. The interface is nearly identical to the standard SitePal Account Information area with the following differences:
• There are two additional menus: Accounts and Users. These menus allow resellers to manage specific SitePal accounts and manage the users allowed to access each account.
• The SitePal Scene List is replaced with an Accounts List. This page gives resellers direct access to the various properties of each account
Figure 85 - Reseller Accounts page
10.1 Manage Accounts The Accounts menu is the first page shown when you log in to your SitePal Authorized Reseller account. The Accounts menu includes options for managing properties associated with the account that you select.
Click the Account, Exp. Date, Streams Left, Scenes, Status and Level column headings to sort the list of accounts in ascending or descending order.
The following describes how to use these options.
Current Account If you have multiple SitePal accounts, use this drop-down menu at the top of the page to switch between different SitePal accounts.
Oddcast Media Technologies 114

Managing Reseller Accounts
Buy New Account
Click this button to go to the SitePal Reseller Store and purchase additional SitePal accounts at a 30% discount.
Show Users Use this option to view and remove users associated with the current SitePal account. To remove a user, select the Delete check box and then click Delete.
Note: There are no Administrators or Users listed when you first log in to the Reseller management page because you have not defined any users.
Select Account Use this option to enter the account you are managing. This option takes you to the standard SitePal Scene List.
Account Name
The Account text box shows the name of the account you are managing. To change the name of the account, type a new name and click the Update button at the top of the page.
Note: Reseller Account names can include only alpha-numeric characters: A-Z, a-z, 0-9 and spaces. Account names cannot include symbols and special characters such as dashes or underscores.
Exp. Date
This column shows the expiration date for the account you are managing. Click Extend to extend the subscription for the account.
Streams Left
This column shows the number of audio streams that remain for the account you are managing. Click Buy More to purchase more audio streams for the account.
Oddcast Media Technologies 115

Managing Reseller Accounts
Scenes
This column shows the number of Scenes that are available in the account you are managing. The number of Scenes in an account varies depending on the type of SitePal and whether additional Scenes were purchased. Click Buy More to purchase additional Scenes.
Status
This column shows the current status of an account. The status for accounts is typically Active unless the account expires.
Level
This column shows the level, or the account package classification, of the account you are managing.
Transfer Account
Use this option to transfer the management of a SitePal account to another user. Transferring an account effectively detaches you from using and managing the account.
To transfer an account, click Transfer Account and follow the instruction in the window. You must have at least one user assigned to an account to transfer it.
Figure 86 - T ansfer Account window r
Please note the following when you transfer an account:
• Once you transfer the account to another user, you cannot administer the account or change the account.
Oddcast Media Technologies 116
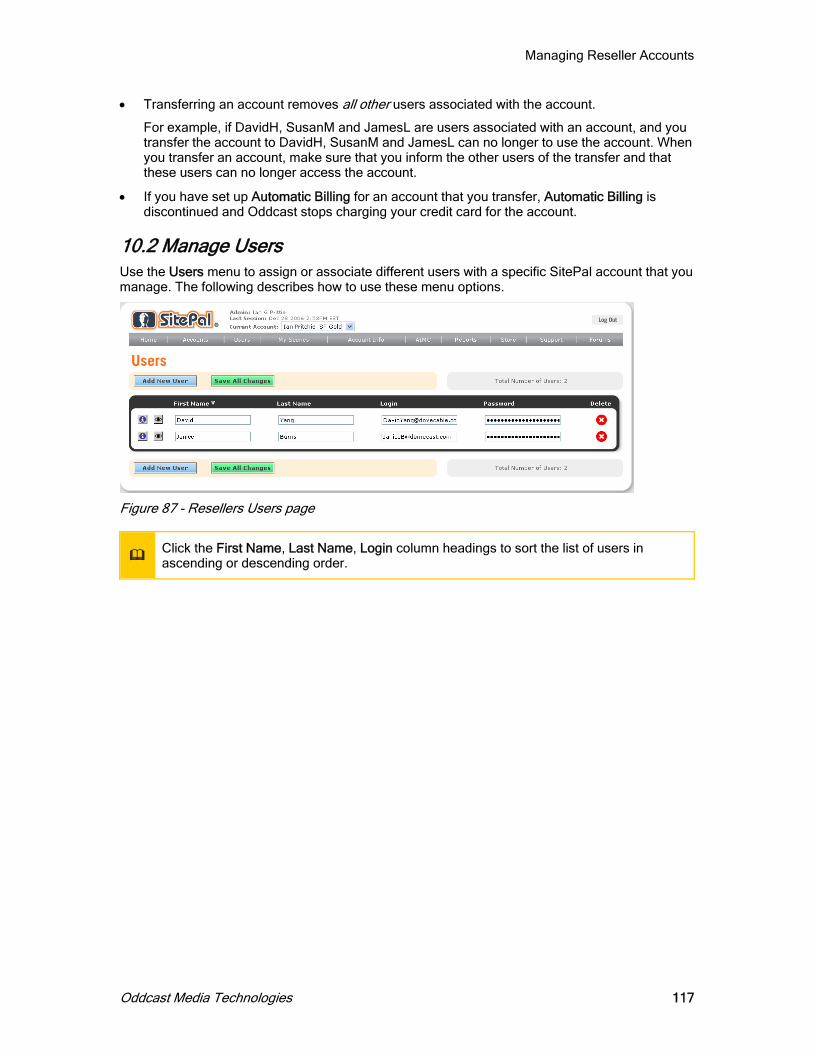
Managing Reseller Accounts
• Transferring an account removes all o her users associated with the account. t
For example, if DavidH, SusanM and JamesL are users associated with an account, and you transfer the account to DavidH, SusanM and JamesL can no longer to use the account. When you transfer an account, make sure that you inform the other users of the transfer and that these users can no longer access the account.
• If you have set up Automatic Billing for an account that you transfer, Automatic Billing is discontinued and Oddcast stops charging your credit card for the account.
10.2 Manage Users Use the Users menu to assign or associate different users with a specific SitePal account that you manage. The following describes how to use these menu options.
Figure 87 - Resellers Use s page r
Click the First Name, Last Name, Login column headings to sort the list of users in ascending or descending order.
Oddcast Media Technologies 117

Managing Reseller Accounts
Add New
Click the Add New button to create and assign a new user to the account you are managing. In the Users window you enter the personal information of the user and assign the user a password. Click Update to create the new user and return to the Users page.
Figure 88 - Create New User window
Update user information
To change the First Name, Last Name, Login or Password for a user, edit the information in any
of these text boxes and then click the Save All Changes button .
Oddcast Media Technologies 118

Managing Reseller Accounts
Edit User Info
Click this icon to view a summary of a user’s personal information. Click Update to save any changes to the user’s information.
Figure 89 - Edit User Information Show Accounts
Click this icon to view a list of the SitePal accounts that a user is associated with. Click Delete in this window to remove a user from an account.
Figure 90 - Accounts for user
Oddcast Media Technologies 119

Managing Reseller Accounts
Delete
Click this button to remove a user from an account that you manage, click the Delete button for a listed, and then confirm that you want to delete the user. You can also remove a user from an account by clicking Delete in the Show Accounts option
Figure 91 - Delete User
Oddcast Media Technologies 120

Artificial Intelligence and the AI Knowledge Base
Chapter 11 - Artificial Intelligence and the AI Knowledge Base
Bring your SitePal Characters to life with the power of artificial intelligence (AI) by using the AI Knowledge Base. You can think of the AI Knowledge Base as the personality and brain of your SitePal Character, enabling the Character to respond to user questions with context-sensitive, spoken answers. The AI Knowledge Base is also referred to as a Bot.
For example, a user who is visiting an art Web site can type a question for a Bot, such as:
"How much a e these prints?" r
The SitePal AI engine retrieves the relevant information from your AI Knowledge Base, and then your SitePal Character speaks the answer:
"The price of the prints featured on this page is 45 dollars framed or 25 dollars unframed. These prints are available for immediate shipping.”
To use the AI Knowledge Base, you need to:
1. Design and embed your SitePal Scene in a Web page.
2. Edit your Bot's characteristics.
3. Teach your Bot concepts, which is the detailed knowledge for responding to keywords.
4. Use the API function sayA ResponseI to route visitors' questions to your SitePal character. Your character will automatically respond to these questions. (you must add a text field to your Web page so your visitors can type in their questions).
5. Use the vh_a Response API callbacki to capture and display the text response (optional).
6. Deploy your Bot on a Web site.
You use the Artificial Intelligence Management Center (AIMC) to edit the AI Knowledge Base. Your SitePal Platinum or Gold account includes a Bot which has defined characteristics including name, age, and gender. This built-in Bot contains over 23,000 unique pieces of information. Using the AIMC is optional. If you do not edit your Bot, your character will respond based on the built-in information and pre-configured characteristics.
Note: The AI Knowledge Base is available only with the SitePal Platinum or Gold package.
Note: The AI Knowledge Base is setup for English only. However, other languages are now supported. Please contact SitePal Support to learn how to add French, German or Italian AIML sets.
Oddcast Media Technologies 121

Artificial Intelligence and the AI Knowledge Base
11.1 Set Up the AI Management Center You use the SitePal Artificial Intelligence Management Center (AIMC) to edit and maintain your Bot. In the AIMC properties window, you can change your Bot's characteristics. In the AIMC's concepts window, you can teach your Bot detailed knowledge about a specific subject matter.
Note: The changes and additions you make to your Bot through the AIMC are reflected in its Artificial Intelligence Markup Language (AIML) File System. AIML is a derivative of the Extensible Markup Language (XML) and is used to create pattern-based, stimulus-response knowledge content. AIML serves this content over the Internet with HTML, XHTML, and XML. Knowledge of AIML is not required for you to use the AIMC or to use the AI Knowledge Base.
To set up the AIMC for your Bot:
1. Log in to your SitePal account and go to your Scene List page.
2. On the top menu bar, click AIMC.
The AIMC Home page appears.
3. On the top menu bar, click Edit, and then click the Edit Bot Properties link.
4. Under Base Properties, enter the characteristics of your Bot.
Figure 92 - Base Properties for Bot
Oddcast Media Technologies 122

Artificial Intelligence and the AI Knowledge Base
5. Under Custom Properties, enter knowledge about specific subject matter for your Bot.
Figure 93 – Custom Properties
6. Click the Update Properties button.
Note: To create a new custom property for your Bot, you must first write the corresponding code in the AIML file system. To learn more about AIML, see the AIML Primer.
11.2 Define Concepts for Your AI Knowledge Base Concepts are responses for a Bot to use when it encounters specific keywords or phrases that are entered by users.
To define a concept for your Bot:
1. Log in to your SitePal account and go to your Scene List page.
2. On the top menu bar, click AIMC.
The AIMC Home page appears.
3. On the top menu bar, click Edit, and then click the Edit Concepts link.
Oddcast Media Technologies 123

Artificial Intelligence and the AI Knowledge Base
4. On the Edit Concepts page, click Add.
The Add a New Concept page appears.
Figure 94 - Add a New Concept page 5. In the Keywords box, type a keyword or a list of keywords.
Separate each keyword with a comma.
6. In the Response box, type the responses for the keywords.
You must enclose each response in quotes.
You can enter multiple short responses in one Response box. Each discrete response in a Response box must be on a separate line.
You can enter one longer response in one Response box and then add additional Response boxes. Click Add Response to add an another Response box
7. Click Done when you are finished adding responses for the keyword or keywords.
To save your keywords and responses for a concept and continue to work on the concept, click Update.
To edit your keywords or responses for a concept, or to add more responses to a concept, on the Edit Concepts page, click the concept and then click Edit.
Oddcast Media Technologies 124

Artificial Intelligence and the AI Knowledge Base
11.3 Edit the AIML File System AIML code contains the underlying logic and Knowledge Base which governs your Bot’s responses. In the AIML File System, you can create new AIML files, edit existing files, or upload AIML files from your computer.
!
Editing AIML Code is optional! In most cases teaching your Bot by adding and editing Concepts is sufficient for achieving the desired result. Only in cases where detailed control and fine-tuning of your Bot’s responses is required is editing the AIML source code necessary. To learn more about AIML, see the AIML Primer.
To edit the AIML file system:
1. Log in to your SitePal account and go to your Scene List page.
2. On the top menu bar, click AIMC.
The AIMC Home page appears.
3. On the top menu bar, click Edit, and then click the [Advanced] Edit AIML File System link.
The AIMC Home page appears.
Figure 95 - AIML File System 4. In the AIML File System window, do any of the following:
To Do this
Create a new AIML file Click the Create a file button .
Refresh the list of AIML files Click the Refresh button .
Upload an AIML file from your computer
Click the Upload file button .
Perform an action on an AIML file
Click on one of the buttons for the file in the Action column. Hold the mouse pointer over a button to show the button name.
Oddcast Media Technologies 125

Artificial Intelligence and the AI Knowledge Base
! It is important that you backup AIML files before you modify them. The AIML files that are included with your account cannot be restored should you accidentally damage these files.
11.4 Compile your AI Knowledge Base When you change Bot’s properties or add new concepts, you create new AIML code. You need to compile this new code for these changes and additions to be activated and recognized by your Bot. The AIMC automatically generates a Staging Bot when you compile the AIML for your Bot. The Staging Bot is created so that you can test your changes before deploying your Bot on a live Web page.
To compile the AIML for your Bot:
1. Log in to your SitePal account and go to your Scene List page.
2. On the top menu bar, click AIMC.
The AIMC Home page appears.
3. On the top menu bar, click Edit, and then click the Compile AIML - Generate Staging Bot link.
A window appears displaying the AIML files that are being compiled. Depending on the extent of the changes or additions being compiled, this process can take up to 30 minutes.
The AIML files are compiled to the Staging AI Engine; the live AI Engine is not affected.
Figure 96 - Compi ing AIML Files l 4. Click the Test your Bot link.
5. Click Test Staging Bot.
The testing environment does not include your SitePal Character since just the Bot or personality is necessary to test your changes and additions in its behavior.
Oddcast Media Technologies 126
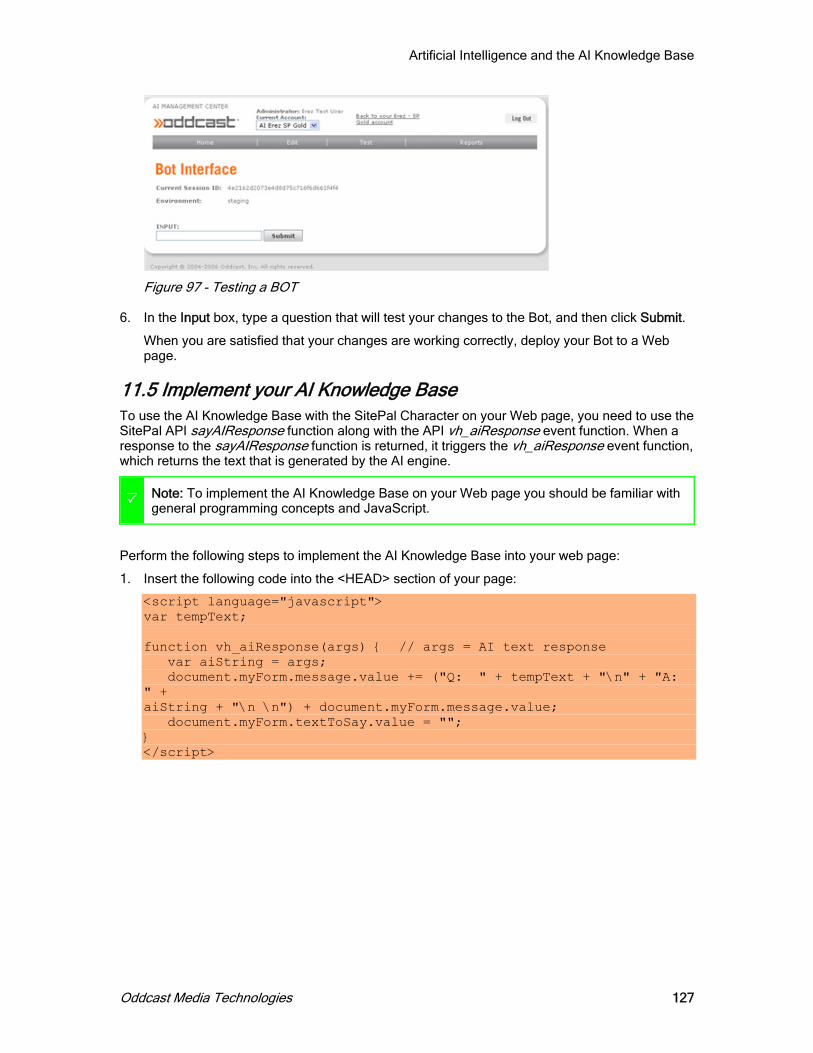
Artificial Intelligence and the AI Knowledge Base
Figure 97 - Testing a BOT 6. In the Input box, type a question that will test your changes to the Bot, and then click Submit.
When you are satisfied that your changes are working correctly, deploy your Bot to a Web page.
11.5 Implement your AI Knowledge Base To use the AI Knowledge Base with the SitePal Character on your Web page, you need to use the SitePal API sayAIResponse function along with the API vh_aiResponse event function. When a response to the sayA Response function is returned, it triggers the vh_aiResponse event function, which returns the text that is generated by the AI engine.
I
Note: To implement the AI Knowledge Base on your Web page you should be familiar with general programming concepts and JavaScript.
Perform the following steps to implement the AI Knowledge Base into your web page:
1. Insert the following code into the <HEAD> section of your page:
<script language="javascript"> var tempText; function vh_aiResponse(args) { // args = AI text response var aiString = args; document.myForm.message.value += ("Q: " + tempText + "\n" + "A: " + aiString + "\n \n") + document.myForm.message.value; document.myForm.textToSay.value = ""; } </script>
Oddcast Media Technologies 127

Artificial Intelligence and the AI Knowledge Base
2. Insert the following code into the <BODY> of your page under the code that calls your SitePal Character:
<form name="myForm" onSubmit="javascript:tempText=textToSay.value;sayAIResponse(textToSay.value, 5, 1, 1); textToSay.value=''; return false"> <input name="textToSay" value=""> <input type="button" value="Ask AI Engine" onClick="javascript:tempText=textToSay.value;sayAIResponse(textToSay.value, 5, 1, 1); textToSay.value=''; return false"> <br><br> <textarea name="message" value="" rows=6 cols=55 readonly vscroll="true"></textarea> </form>
Note: The above sayA Response function has a female voice (the second parameter is 5 – the voice value). To see a list of possible values for the voice parameter, see VHost API Reference.
I
3. Go to your Account Info page and define your domain under the Licensed Domains section.
! The Licensed Domain must match the URL of the Web site which is hosting the AI implementation. This step is required for your security so that malicious users can’t steal your Audio streams.
Note: Bronze, Silver, and Gold packages come with two licensed domains, which allow you to prevent unauthorized playbacks of Audio streams. Optionally, Bronze, Silver, and Gold users can purchase additional licensed domains from the SitePal Store. Platinum packages come with 1,000 licensed domains. In the unlikely event Platinum users run out of licensed domains, they, too, can order additional ones.
11.6 Deploy your AI Knowledge Base You must implement your AI Knowledge Base on a Web site before you can deploy your Bot to a live environment.
1. Log in to your SitePal account and go to your Scene List page.
2. On the top menu bar, click AIMC.
The AIMC Home page appears.
3. On the top menu bar, click Edit, and then click the Deploy Bot from Staging to Live link.
A window appears that informs you that that the AI Engine is being transferred to the live database.
11.7 Access AI Management Center Report Logs You can view logs of the conversations visitors on your Web site have with your Bot. You can also view the logs of test conversations that you have with the Staging Bot.
Oddcast Media Technologies 128

Artificial Intelligence and the AI Knowledge Base
1. Log in to your SitePal account and go to your Scene List page.
2. On the top menu bar, click AIMC.
The AIMC Home page appears.
3. On the top menu bar, click Reports.
The Reports page appears.
Figure 98 - AIMC Reports 4. Select Live Bot or Staging Bot.
5. Select the dates for which you want to view conversation logs.
6. Click Get Log File. The File Download dialog box appears.
7. Click Open or Save.
Extract the files from the WinZip file or save file. The log file is a CSV file that you can open in spreadsheet.
Oddcast Media Technologies 129
Glossary
Appendix B - SitePal Glossary
The following are definitions of the names and terms that are used in SitePal and Oddcast’s VHost technology.
AI Knowledge Base
The artificial intelligence (AI) that enables a SitePal Character to respond to user questions with context-sensitive, spoken answers.
AIMC
Artificial Intelligence Management Center. You use the AIMC to edit the AI Knowledge Base (Bot).
AIML
Artificial Intelligence Markup Language. AIML is used to create pattern-based, stimulus-response knowledge content.
Audio
The message which your Character speaks in a SitePal Scene.
Audio Stream
One playing of an audio message is one audio stream.
Avatar
An animated graphical representation of a person, animal, or object. SitePal Characters are sophisticated speaking avatars.
Background
An image that appears as the background of a SitePal Scene.
Bot
A SitePal Character that uses the AI Knowledge Base.
Character
A SitePal avatar. A SitePal Character is based on a SitePal model, or a model that Oddcast creates for you from an image that you provide.
Concept
Responses for a Bot to use when it encounters specific keywords or phrases that are entered by users
Lip-synching
The synchronization of an audio message with your Character’s lip movements.
Message
An audio message that your SitePal Character speaks.
Model
A pre-configured SitePal Character. You create your SitePal Character by starting with a Model.
Oddcast Media Technologies 130

Glossary
Player
The window in which your SitePal Scene plays.
Scene
The presentation of a speaking SitePal Character in front of a background. A Scene is played in the SitePal Player.
Scene Editor
The tool that you use to edit and customize your SitePal Scene.
Text-to-Speech (TTS)
The process that SitePal uses to synthesize typed text into an audio message that a SitePal Character speaks.
Oddcast Media Technologies 131
Index
Index
A account activites ......................................108 Account Additions page...........................101 Account Info page......................................95 Add a New Concept page........................126 Add advertising........................................114 add audio ...................................................55 add Audio Streams ..................................101 add Scenes..............................................101 advertising banners .................................114 aeactivate account...................................105 Affiliate Program ......................................113 AI Knowledge Base .................................123
compile ..............................................128 define concepts for ............................125 deploy ................................................130 edit AIML file system .........................127 set up AIMC.......................................124
AI Player skin.............................................77 AIMC................................................123, 124 AIMCreport logs.......................................130 AIML File System.....................................127 AIML Primer.............................................127 artificial intelligence ...........................10, 123 assign a new user....................................120 audio
add streams.......................................101 delete...................................................69 enhance quality .............................60, 62 manage................................................67 play multiple.........................................66 record by microphone..........................55 record by phone...................................55 rename ................................................68 save all changes..................................68 search..................................................68 select ...................................................56 Text-to-Speech ....................................55 upload requirements............................59 voice talent ....................................55, 64
audio playback limits ...............................102 audio usage report...................................110 Authorized Reseller Program ..................114 Automatic Billing ........................................96 automatic link.............................................25 available Audio Streams....................90, 102 background
change.................................................49 delete...................................................54 online ...................................................54
preview ............................................... 53 rename................................................ 53 upload ......................... 10, 11, 52, 53, 67
Background Color setting ......................... 82 backgrounds
manage............................................... 53 banners ................................................... 114 billing automatically................................... 96 Bot........................................................... 123 category
audio ................................................... 67 backgrounds ....................................... 54
Change account password ....................... 99 Characters
miximum ............................................. 38 Clicking on the Scene opens the link........ 25 Compile AI Knowledge Base .................. 128 contact information.................................... 98 create Characters ..................................... 28 Credit Card Information ............................ 97 current account menu ............................... 17 Custom Models ......................................... 44 Define concepts for AI............................. 125 define domain ................................... 93, 104 delete
audio ................................................... 69 background ......................................... 54
Deploy AI Knowledge Base .................... 130 Dimensions ............................................... 82 Do not follow cursor .................................. 26 documentation .......................................... 10 domain verification.................................. 102 Dynamic Text-to-Speech .......................... 10 Dynamic TTS ............................................ 62 eBay.......................................................... 85 edit
TTS audio ........................................... 68 Edit contact information ............................ 98 Edit Credit Card Information ..................... 97 edit Player skin.................................... 70, 73 edit Scene ................................................. 19 Edit the AIML file system ........................ 127 edit user info ........................................... 121 Email ......................................................... 81 Email link to Scene ................................... 85 embed a banner...................................... 115 Embed a Scene in a Flash movie ............. 84 Embed a Scene in a Web page ................ 83 Embed in a Web Page .............................. 81
Oddcast Media Technologies 132

Index
Embed in Flash....................................81, 84 Embed in MySpace..............................81, 84 embed in PowerPoint.................................90 Embed Scene in HTML email ....................89 Enhance Audio Quality ..............................60 example HTML page .................................83 Extend SitePal account .............................95 FAQ Player skin.........................................74 filter
list of audio ..........................................68 list of backgrounds...............................54
Flash movie ...............................................84 Follow cursor in Scene ..............................26 Follow cursor in whole page ......................26 Follow Cursor setting.................................26 General Account Information panel ...........95 Generate an example HTML page ............83 glossary ...................................................132 HTML email message................................89 HTML example page .................................83 Implement AI Knowledge Base ...............129 introduction to SitePal..................................9 JavaScript API setting................................82 Lead Generator Player skin.......................75 Licensed Domains .............................91, 103 limit audio playback ...................................90 link a Scene ...............................................26 Link is automatically opened .....................25 Link setting.................................................25 link triggered ..............................................26 list of Scenes .............................................18 log out ........................................................17 manage account ........................................95 manage Reseller accounts ......................116 Manage users ..........................................119 maximum audio messages........................55 maximum Characters ................................38 Microsoft PowerPoint.................................90 Models
Custom ................................................44 Specialty ..............................................46
multiple audio messages .....................66, 67 MySpace....................................................84 offline audio ...............................................68 offline background .....................................54 online
audio....................................................68 backgrounds ........................................54
Open Link in...............................................25 options
Play On Load.......................................25 Play On Rollover..................................25 Play/Pause On Click............................25
options for Scene.......................................24 panels in Scene Editor...............................23 password ...................................................99 phone recording.........................................61
Play multiple audio.............................. 66, 67 Play On Load ............................................ 25 Play On Rollover ....................................... 25 Play/Pause On Click ................................. 25 playback limits......................................... 102 Playback setting........................................ 25 position the Character............................... 44 PowerPoint................................................ 90 prevent playback..................................... 102 preview
audio ................................................... 68 background ......................................... 53
preview Scene .......................................... 19 private audio ............................................. 67 Private category ........................................ 52 process for SitePal...................................... 9 professional voice talent ........................... 65 Profiting from SitePal .............................. 113 Properties for embedded code ................. 82 public audio............................................... 67 Publish to eBay ................................... 81, 85 Publish Wizard.......................................... 79 Publishing a Scene ................................... 79 purchase additional Scenes.................... 102 reactivate SitePal account ...................... 105 Record by microphone.............................. 55 Record by phone....................................... 55 Record your own audio message ............. 58 recording quality........................................ 64 remove Oddcast branding....................... 105 remove user ............................................ 122 rename
audio ................................................... 68 background ......................................... 53
rename Scene........................................... 19 replace audio ............................................ 68 report logs ............................................... 130 report of activities.................................... 108 Reseller Program.................................... 114 Reseller Store ......................................... 115 responses for a Bot................................. 125 Save All Changes button .......................... 21 save Scenes ............................................. 24 Scene Dimensions setting ........................ 82 Scene List ................................................. 18 Scenes
audio ................................................... 55 editing ................................................. 19 email link to......................................... 85 linking.................................................. 26 options for ........................................... 24 previewing........................................... 19 renaming............................................. 19 saving ................................................. 24 working with ........................................ 16
search audio ................................................... 68
Oddcast Media Technologies 133

Index
Secure Protocol (HTTPS) setting ..............82 select a model............................................28 Select an audio message ..........................56 settings
playback ..............................................90 Publish Wizard.....................................82
Shop at the Reseller Store ......................115 show accounts .........................................121 SitePal account..........................................95 SitePal glossary.......................................132 SitePal process............................................9 SitePal Publish Wizard ..............................81 SitePal publishing targets ..........................81 Specialty Models ...........................46, 47, 48 Staging Bot ..............................................128 target of link ...............................................26 test AI Knowledge Base...........................128 Test Staging Bot ......................................128 Text-to-Speech ..........................................55 Text-to-Speech audio ................................62 transfer account .......................................118
triggered link ............................................. 26 TTS audio
edit ...................................................... 68 unauthorized playback............................ 102 unlimited play ............................................ 25 update billing information.......................... 97 update user information .......................... 120 upgrade SitePal account........................... 99 Upload audio file ....................................... 55 Upload audio files ..................................... 59 Upload background image 10, 11, 52, 53, 67 upload requirements for audio upload ...... 59 URL........................................................... 25 Use a phone to record audio..................... 61 user sessions report................................ 110 voice talent................................................ 64 Voice talent ............................................... 55 Wizard....................................................... 79 Working with audio.................................... 55 Working with backgrounds........................ 49 Working with the Player skin..................... 70
Oddcast Media Technologies 134