user's guide: sahara netslate™ a230t 12.1' tablet pc€¦ · · 2009-06-29preface iii...
TRANSCRIPT

User’s Guide
Sahara NetSlate™ a230T
12.1” Tablet PC

Preface
Preface i
This manual will help you get the most out of your new Sahara NetSlate™. If you are a new computer user, or just new to Tablet PCs, read through this manual carefully before first using your Sahara NetSlate. If after reading this manual you still have questions, visit us online at www.tabletkiosk.com for additional resources and information on using your Sahara NetSlate a230T Tablet PC.
Copyright
©2009 Sand Dune Ventures, Inc. All Rights Reserved. All product information is subject to change without notice. Sahara NetSlate, NetSlate, Sahara Slate PC, TabletKiosk and the TabletKiosk logo are registered trademarks or trademarks of Sand Dune Ventures, Inc. in the United States and/or other countries. Microsoft Windows, Windows XP, Windows Vista, and the Windows logo are either registered trademarks or trademarks of Microsoft Corporation in the United States and/or other countries. Intel, the Intel logo, Intel Atom, and Atom inside are trademarks of Intel Corporation in the U.S. and other countries. The Bluetooth® word mark and logos are owned by the Bluetooth SIG, Inc. and any use of such marks by TabletKiosk is under license. openSUSE and SUSE are trademarks of Novell, Inc. in the United States and other countries. Linux is a registered trademark of Linus Torvalds.
ii Preface
Disclaimer
The specifications and information in this manual are subject to change without prior notice in order to improve reliability, design and/or function. In no way does this represent a com-mitment on the part of the manufacturer. The manufacturer assumes no responsibility for errors or omissions in this document.
In no event will the manufacturer be liable for direct, indirect, special, incidental, or consequential damages arising from the use, or inability to use, the Tablet PC or this documentation, even if advised of the possibility of such damages.
This document contains proprietary information protected by copyright laws. All rights are reserved. No part of this manual may be reproduced by any mechanical, electronic, or other means in any form without prior written permission of TabletKiosk.
If you have any questions regarding the Sahara NetSlate, or the information contained within this manual, please contact TabletKiosk at [email protected].
Important Safety InstructionsFor your own safety and the safety of your equipment, please follow these rules for the handling and care of your Sahara NetSlate. Keep this User’s Manual for future reference by you and other users.
Never use sprays, liquids or cleaning detergents to clean the Sahara NetSlate. Use a micro fiber cloth to clean the touch screen. Avoid the use of tissue paper since tissue fibers can easily lodge between the touch screen and the top cover of the tablet.
Never pour liquids into any opening or directly on the Sahara NetSlate. This could result in fire or electrical shock.
Check that the voltage range of the power outlet is between 100V and 240V before connecting the Sahara NetSlate. Exceed-

Preface iii
ing the maximum rated voltage may cause damage to the AC adapter or to the Sahara NetSlate. This could result in fire or electrical shock.
When the AC adapter is plugged into an electrical outlet, place the power cord so it will not be stepped on or walked on. Do not place objects over or on the power cord.
Use the Sahara NetSlate in a clean, dry, temperature controlled environment. Do not use the Sahara NetSlate in areas of high humidity, around water (for example: near a bathtub, washbowl, kitchen sink or laundry tub, in a wet basement or near a swim-ming pool) or outdoors while it is raining.
Never open or disassemble the Sahara NetSlate. For safety reasons, and to prevent permanent damage, the equipment should only be repaired by qualified service personnel.
Contact a qualified service center if any of the following issues should arise:
1. AC adapter, power cord or plug is damaged;
2. Liquid has been spilled into the Sahara NetSlate;
3. The Sahara NetSlate has been exposed to excessive mois-ture;
4. The Sahara NetSlate exhibits errors and/or does not function according to specifications;
5. The Sahara NetSlate has been dropped or otherwise physi-cally damaged.
CautionLithium-Ion batteries can be dangerous. There is a danger of explosion if the battery is incorrectly replaced. Replace only with the same or equivalent type recommended by the manufacturer. Dispose of used batteries according to state or local hazardous waste requirements.

iv Preface
Under no circumstances should the user attempt to disassemble the power supply. The power supply has no user-replaceable parts and its insides contain components that are electrically-charged with hazardous voltage levels that can cause serious personal injury. A defective power supply must be returned to your dealer.
Safety Notices for the Power Cord
This equipment has a 2 or 3-wire power cord. Replace the power cord if it becomes damaged. Contact your dealer for an exact replacement.
In the U.S.A. and Canada, the power cord must be a UL-listed detachable power cord (in Canada, CSA-certified).
2-wire cord SPT-2 18AWG
3-wire cord SVT or SJT, 18 AWG, 3-conductor
The cord should be provided with a molded-on cord connec-tor body at the other end. The cord length must not exceed 3 meters (9.8 feet).
Outside the U.S.A. and Canada, the plug must be rated for 250 VAC, 2.5 amp minimum, and must display an international agency approval marking. The cord must be suitable for use in the end-user’s country. Consult your dealer or the local electrical authorities if you are unsure of the type of power cord to use in your country. Voltage changes occur automatically in the power supply.
Notice of FCC Compliance
a. Federal Communications Commission (FCC) Requirements, Part 15:
This device complies with Part 15 of the FCC rules.
Operation is subject to the following two conditions:

Preface v
1. this device may not cause harmful interference,and
2. this device must accept any interference received,including interference that may cause undesired operation.
This equipment has been tested and found to comply with the limits for a Class B digital device, pursuant to Part 15 of the FCC Rules. These limits are designed to provide reasonable protection against harmful interference in a residential instal-lation. This equipment generates, uses, and can radiate radio frequency energy and if not installed and used in accordance with the instruction manual may cause harmful interference to radio communications. However, there is no guarantee that interference will not occur in a particular installation. If this equipment does cause harmful interference to radio or television reception, which can be determined by turning the equipment off and on, the user is encouraged to try to correct the interference by one or more of the following measures:
� Reorient or relocate the receiving antenna.
� Increase the separation between the equipment and the receiver.
� Connect the equipment into an outlet on a circuit different from that to which the receiver is connected.
� Consult the dealer or an experienced technician for help.
� Use only shielded I/O cables to connect I/O devices to this equipment.
You are cautioned that any changes or modifications not expressly approved by TabletKiosk could void your authority to use the equipment.
b. Regulatory information / Disclaimers
This device must be installed and used in strict accordance with the instructions included in the user documentation provided with the product. Any changes or modifications (including the antennas) made to this device that are not

vi Preface
expressly approved by the manufacturer may void the user’s authority to operate the equipment. The manufacturer is not responsible for any radio or television interference caused by unauthorized modification of this device, or the substitution of the connecting cables and equipment other than the ones specified by manufacturer. It is the responsibility of the user to correct any interference caused by such unauthorized modifi-cation, substitution or attachment. The manufacturer and its authorized resellers or distributors will assume no liability for any damage or violation of government regulations arising from the failure to comply with these guidelines.
c. For portable devices without a co-location condition (eg. notebook pc)
FCC RF Radiation Exposure Statement:
1. This Transmitter must not be co-located or operating in conjunction with any other antenna or transmitter.
2. This equipment complies with FCC RF radiation exposure limits set forth for an uncontrolled environment. This device was tested for typical lap-held operations with the device contacted directly to the human body to the back side of the Tablet PC. To maintain compliance with FCC RF exposure compliance requirements, please follow opera-tion instruction as documented in this manual.
The availability of some specific channels and/or operational frequency bands are country dependent and are firmware programmed at the factory to match the intended destination. The firmware setting is not accessible by the end user.
d. SAR Exposure
This device has been tested for compliance with FCC RF Exposure (SAR) limits in typical flat configurations.
In order to comply with SAR limits established in the ANSI C95.1 standards, it is recommended that the integrated antenna is positioned more than 1.5cm from your body or

Preface vii
from nearby persons during extended periods of operation. If the antenna is positioned less than 1.5 cm (0.6 inches) from the user, it is recommended that the user limit the exposure time.
FCC Statement to Users for the Fax/Modem
Notice of FCC Compliance for the Fax/Modem
This equipment complies with Part 68 of the FCC rules. The FCC Registration Number and Ringer Equivalence Number for this equipment are located on a label at the bottom of this equip-ment. IF REQUESTED, THIS INFORMATION MUST BE GIVEN TO THE TELEPHONE COMPANY.
The REN helps to determine the number of devices you may con-nect to your telephone line while allowing all of those devices to ring when your telephone number is called. In most, but not all areas, the amount of devices connected to one line should not exceed five (5).
To know precisely how many devices you may connect to your line, as determined by the REN, you should contact your local telephone company to determine the maximum REN for your calling area.
If your telephone equipment causes harm to the telephone network, the telephone company may disconnect your service temporarily. They may notify you in advance, but if advance notice is not practical, you will be informed of your right to file a complaint with the FCC.
Your telephone company may make changes in its facilities, equipment, operations or procedures that could affect the proper functioning of your equipment. If they do, you will be notified in advance and given the opportunity to maintain uninterrupted telephone service.
The telephone company may ask you to disconnect this equip-ment from the network until the problem has been corrected or until you are sure that the equipment is not malfunctioning.
viii Preface
This equipment may not be used on coin service provided by the telephone company.
The Telephone Consumer Protection Act of 1991 makes it unlaw-ful for any person to use a computer or an electronic device to send any message via a telephone facsimile machine unless such message clearly contains in a margin at the top or bottom of each transmitted page or on the first page of the transmission the following information:
� The date and time of transmission
� Identification of either business, business entity or individual sending the message;
� Telephone number of either the sending machine, business entity or individual.
In order to program this information into your fax/modem, please refer to the appropriate instructions in your fax/modem manual.
Note-TNV Safety Caution:
To reduce the risk of fire, use only No. 26 AWG or larger UL Listed or CSA Certified Telecommunication line cord. Avoid using a telephone (other than a cordless type) during an electrical storm. There may be a remote risk of electric shock from lightning. Do not use the telephone to report a gas leak in the vicinity of the leak.
Canadian EMI Compliance Statement
This Class B digital apparatus meets all requirements of the Canadian Interference - Causing Equipment Regulations.
IC Warning statement:
a. WLAN
“To prevent radio interference to the licensed service, this device is intended to be operated indoors and away from

Preface ix
windows to provide maximum shielding. Equipment (or its transmit antenna) that is installed outdoors is subject to licensing.”
b. For LPD
“Operation is subject to the following two conditions: (1) this device may not cause interference, and (2) this device must accept any interference, including interference that may cause undesired operation of the device.”
This Class B digital apparatus complies with Canada RSS-210.
The abbreviation, IC, before the registration number signifies that registration was performed based on a Declaration of Conformity (DoC) indicating that Industry Canada technical specifications were met. It does not imply that Industry Canada approved the equipment.
European Union CE Marking Declaration
This product has been tested and found to comply with the EMC requirement subject to the EU directive for CE marking.


Table of Contents
Table of Contents xi
Preface iCopyright iDisclaimer iiImportant Safety Instructions iiCaution iiiSafety Notices for the Power Cord ivNotice of FCC Compliance ivFCC Statement to Users for the Fax/Modem viiEuropean Union CE Marking Declaration ix
Getting Started 1What’s in the Box 1Setting Up Your Sahara NetSlate 2
Step 1: Inserting the Battery Pack 2To Remove the Battery Pack 3
Step 2: Connecting the Tablet PC to an External Power Source 3Step 3: Connecting Applicable Peripherals and Networking Cables 4Step 4: Powering on the Sahara NetSlate 4Step 5: Completing the Operating System Installation 5Step 6: Navigating with the Touch Screen 5
Touring Your Sahara NetSlate 7Front View 8Top View 10Left Side View 12Right Side View 13Back View 14
Battery Usage and Care 17Using the Battery for the First Time 17Charging the Battery Under Typical Conditions 18Problems Charging the Battery 19Battery Status 19Low Battery Warnings 19About Battery Pack Usage 20Real Time Clock Battery 20Storing a Battery 21

xii Table of Contents
Using Your Sahara NetSlate with Windows XP 23Navigating with the Stylus Pen 23Touch Screen Settings and Calibration 24
Calibrating the Touch Screen 24Calibrating the Touch Screen from the Command Prompt 26Touch Mode 27Audible Beeps 28
Sound Type 28Beep Mode 29
Right-Click Emulation 29Touch Screen Test and Features 29
Draw 30Right Button Icon 30Gesture Enable 30Gesture Setting 31
Programming the Function Buttons 32Setting the Screen Brightness 33Changing Screen Resolution, Color and Rotation 33
Display Settings 33Color Correction 34Launch Zoom 35
Entering Text with Windows XP’s On-Screen Keyboard 36Entering Text with the Eyesboard™ Virtual Keyboard 36Connecting to the Internet 37
Using a Wireless LAN 37Connecting to a WWAN with the optional 3G/3.5G Module 39Using a Wired LAN (requires optional Docking Cradle) 41
Using Both DHCP and a Static IP Address 42Bluetooth® Wireless Connectivity 43
Automatic Device Registration 44Manual Device Registration 44
Securing Your Sahara NetSlate 49BIOS Settings 49Creating a Windows Login Password 50
Creating the Password In Windows XP 51Creating the Password In Windows Vista 51
Setting Ownership of the TPM 52Windows XP Professional 53Windows Vista 53

Table of Contents xiii
Upgrading Your Sahara NetSlate 57Before you Begin ANY Upgrade Procedure 57Upgrading Memory (RAM) 58Upgrading the Hard Disk Drive (HDD) 60
Troubleshooting 65Recovering Your System Using the System Restore DVD 72
What you will need before you begin 72Recovering with the Windows Vista® System Restore Disc 72Recovering with the Windows® XP Professional System Restore Disc 74
What to do After You Have Restored Your System 75
Specifications 77Processor 77Chipsets 77Power Management 78Memory 78Battery 78Hard Drive 78Video 78Display 79Audio 79WiFi Wireless 80Bluetooth® Wireless 813G/3.5G WWAN Data Module (optional) 81TPM Security 81I/O Ports 81Weight 82Measurements 82Case Color 82LED Indicators 82Function Buttons (Left Front) 82Function Buttons (Right Front) 82Control Switches (Top) 83AC Adapter 83Operating Environment 83Storage Environment 83

Chapter 01: Getting Started 1
Chapter 01Getting Started
Your Sahara NetSlate was designed to allow you to be up and running as quickly as possible. Because the Sahara NetSlate ships to various countries around the world, set-up may vary slightly depending on where you are located.
If you have any questions after reading this manual, please visit our website at www.tabletkiosk.com for more information or to submit a support request.
What’s in the Box
Your Sahara NetSlate should come securely packaged in its ship-ping carton along with the items listed below1. Please contact your dealer immediately if you find that anything is missing or damaged.
1. Power Cord and AC Adapter
2. Microfiber Cleaning Cloth
3. Neoprene Slip Case
4. Simple Stand
5. Quick Start Guide
6. Applicable Operating System Getting Started Guide2
1 Contents of the packaging may change without prior notice. Please check our website at www.tabletkiosk.com for the most up-to-date list if your package contents vary.
2 Please be sure to check that the Getting Started Guide matches the Operating System (OS) preloaded on your Sahara NetSlate. There will not be a Getting Started Guide included if you ordered your Tablet PC with openSUSE Linux.
2 Chapter 01: Getting Started
7. System Restore Disc1
8. Standard Lithium-Ion Battery Pack
9. Stylus Pen
Setting Up Your Sahara NetSlate
Please read the following steps to begin using your new Tablet PC as quickly and easily as possible.
1. Inserting the Battery Pack if your Tablet PC shipped from the dealer without a pre-inserted battery.
2. Connecting the Sahara NetSlate to an external power source.
3. Connecting applicable peripherals and networking cables.
4. Powering on the Sahara NetSlate
5. Completing the Operating System Installation
6. Navigating with the Touch Screen
Step 1: Inserting the Battery Pack
Turn the tablet over and place it, screen down on a solid, clean, flat surface.
CAUTION: When turning over the Sahara NetSlate, be careful not to place it on a surface that could scratch or damage the screen. You can place the included slip case on the surface before carefully setting the computer down to protect the screen.
Align the battery into the battery compartment and then slide it into the computer until it clicks securely into place.
Slide the battery-locking tab (the tab closest to the top of the tablet) in the opposite direction of the unlocking arrow en-graved on the tab itself. Once the locking tab clicks into position, the battery should be securely seated.
1 Please be sure to check that the System Restore Disc matches the Operating System (OS) installed on your Sahara NetSlate. There will not be a System Restore Disc included if you ordered your Tablet PC without an OS option. Some units may include a restore image on the internal hard drive in addition to, or in lieu of, a restore disc.
Chapter 01: Getting Started 3
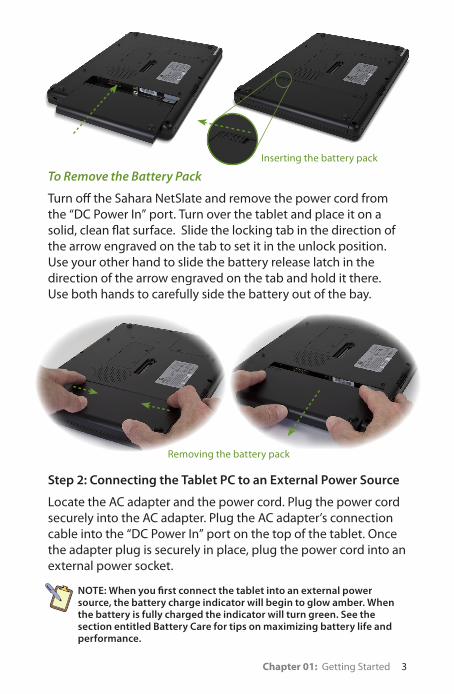
To Remove the Battery Pack
Turn off the Sahara NetSlate and remove the power cord from the “DC Power In” port. Turn over the tablet and place it on a solid, clean flat surface. Slide the locking tab in the direction of the arrow engraved on the tab to set it in the unlock position. Use your other hand to slide the battery release latch in the direction of the arrow engraved on the tab and hold it there. Use both hands to carefully side the battery out of the bay.
Step 2: Connecting the Tablet PC to an External Power Source
Locate the AC adapter and the power cord. Plug the power cord securely into the AC adapter. Plug the AC adapter’s connection cable into the “DC Power In” port on the top of the tablet. Once the adapter plug is securely in place, plug the power cord into an external power socket.
NOTE: When you first connect the tablet into an external power source, the battery charge indicator will begin to glow amber. When the battery is fully charged the indicator will turn green. See the section entitled Battery Care for tips on maximizing battery life and performance.
Removing the battery pack
Inserting the battery pack

4 Chapter 01: Getting Started
Step 3: Connecting Applicable Peripherals and Networking Cables
If you would like to use any external peripheral with the tablet (i.e. USB mouse, USB keyboard, etc.) or are planning to connect to the Internet and/or a corporate LAN using a wired connection (requires optional docking cradle) as opposed to wirelessly, connect the external peripheral now. See the chapter entitled Touring Your Sahara NetSlate, to identify which ports to use.
IMPORTANT: When you power on the tablet for the first time, you will need to have an external USB keyboard connected in order to complete the Windows XP Professional installation routine.
Step 4: Powering on the Sahara NetSlate
Locate the three power switches on the top on the tablet. The switch is the computer’s main power toggle. Slide it to the
right and hold it there until it emits a blue glow (approximately 1-2 seconds) and then release it. The Sahara NetSlate will now boot up.
Plugging into an external power source.
Powering on the Sahara NetSlateSlide and hold the toggle switch until it lights up blue

Chapter 01: Getting Started 5
Step 5: Completing the Operating System Installation
When your system powers on for the first time, Windows will have a few questions for you to answer in order to localize your installation.
NOTE: You’ll need a USB keyboard connected to your system in order to answer some of the questions that require text input.
Refer to your operating system’s manual for information on any of the questions you are unsure how to answer.
Step 6: Navigating with the Touch Screen
Unlike a standard laptop or desktop PC, standard navigational activities on a Tablet PC are completed using the stylus pen, or even your fingers. Navigating with a touch screen is different from navigating with a mouse. The pen will interact with the computer whenever you touch it to the screen.
Hold the stylus pen as if you were writing with a standard pen. Instead of sliding the pen around the screen, just tap on what you want to interact with. Sliding the pen while lightly touching the tip to the screen will move the on-screen pointer around as if you were using a mouse and holding down the left mouse button. In other words, you would be performing what is known as a drag operation.
Also, remember that since the screen is sensitive to the touch, resting your hand on the screen while using the pen might make the pointer react unpredictably.
TIP: When trying to select or activate something on the screen with the stylus pen, pay attention to the position of the pointer icon instead of the tip of the pen.
Tapping lightly on the screen will perform a standard left mouse button click. Holding the tip of the pen against the screen with-out moving it for about a second or so will perform a standard right mouse button click.


Chapter 02: Touring Your Sahara NetSlate 7
Chapter 02Touring Your Sahara NetSlate
The Sahara NetSlate features a number of physical characteristics designed to help you work as efficiently as possible. Take a moment to familiarize yourself with the controls and Input/ Output (I/O) ports on the faces and sides of the computer. Understanding the layout of the system will help you use your Sahara NetSlate more effectively while in the field or on the go.

8 Chapter 02: Touring Your Sahara NetSlate
Front View
1. Battery Charge IndicatorGlows amber when the battery is charging and changes to green when the battery is fully charged. Glows Orange when charge drops below 10% and blinks when below 2%.
2. Hard Disk Drive Activity LightGlows blue when the hard drive is being accessed
3. Built-in Stereo Speakers To listen to music, movies, games and more.
4. Secure Attention Sequence (SAS) A computer without an attached keyboard must support a hardware mechanism to generate the SAS which is also known as “CTRL+ALT+DEL” or “CAD”.
5. Screen RotationThis button will rotate the screen counter-clockwise 90º to a portrait orientation and then back to the original landscape orientation.
!@#
$%^&
#
*(BLBM
BN

Chapter 02: Touring Your Sahara NetSlate 9
6. Volume UpThis button will increase the volume of sound emitted from the computer’s internal speakers and headphone port.
7. Volume DownThis button will increase the volume of sound emitted from the computer’s internal speakers and headphone port.
8. User Programmable Function ButtonThis button can be programmed by the user.
9. Wireless Mode Toggle Button (with 3G option only) This button will toggle the wireless networking modes between WiFi, 3G, or both, if the optional 3G data module is installed.
9. User Programmable Function Button (without 3G option) This button can be programmed by the user.
10. User Programmable Function ButtonThis button can be programmed by the user.
11. User Programmable Function ButtonThis button can be programmed by the user.
12. Dual Digital Microphone ArrayMicrophone array records audio with higher fidelity for more accurate voice recognition. Recording input source can be toggled between the internal array and an external audio source plugged into the Audio In port (see # in the Left Side View section later in this chapter) via the Realtek Audio Control Applet.
10 Chapter 02: Touring Your Sahara NetSlate
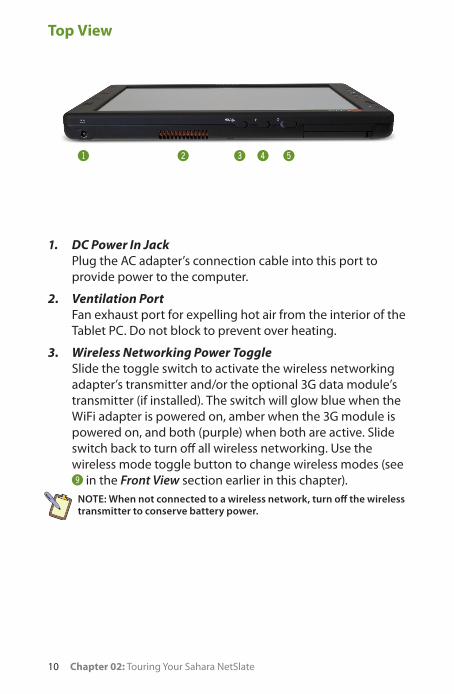
Top View
1. DC Power In JackPlug the AC adapter’s connection cable into this port to provide power to the computer.
2. Ventilation PortFan exhaust port for expelling hot air from the interior of the Tablet PC. Do not block to prevent over heating.
3. Wireless Networking Power ToggleSlide the toggle switch to activate the wireless networking adapter’s transmitter and/or the optional 3G data module’s transmitter (if installed). The switch will glow blue when the WiFi adapter is powered on, amber when the 3G module is powered on, and both (purple) when both are active. Slide switch back to turn off all wireless networking. Use the wireless mode toggle button to change wireless modes (see ( in the Front View section earlier in this chapter).
NOTE: When not connected to a wireless network, turn off the wireless transmitter to conserve battery power.
! @ # $ %
Chapter 02: Touring Your Sahara NetSlate 11
4. Bluetooth Power Toggle Slide the toggle switch to activate the Bluetooth wireless transmitter. The switch will glow blue when powered on. Slide switch back to turn off Bluetooth.
NOTE: When not actively using a Bluetooth peripheral, turn the Bluetooth transmitter off to conserve battery power.
5. System Power/Resume Toggle Slide this switch and hold for 1-2 seconds to power on the computer or to resume normal operation if the computer is in Suspend Mode. Slide and holding for 4-6 seconds to immediately turn off the computer.
NOTE: Using this switch to power off the computer is not recom-mended unless the computer has stopped responding to user input as there is no time for the OS to shut down normally, and as a result, data loss may occur.

12 Chapter 02: Touring Your Sahara NetSlate
Left Side View
1. Two USB 2.0 Ports High speed (480 Mbps) Universal Serial Bus 2.0 ports for connecting peripherals such as a mouse, keyboard, wedge reader, CD/DVD drive, printer, digital camera and more. Backward compatible with USB 1.1 devices.
2. Headphone / Audio Out Stereo audio port for connecting headphones, external speakers or other audio devices.
3. Audio In Used to input stereo audio from external devices such as a microphone, radio or tape player.
4. Stylus Pen and Holder Secures the stylus pen to the Sahara NetSlate.
! @ # $

Chapter 02: Touring Your Sahara NetSlate 13
Right Side View
1. Battery PackThe Sahara NetSlate comes equipped with a standard 6-cell lithium-ion battery pack that can be removed by the user and replaced.
2. Anti-Theft Kensington Lock Use with the locking device (sold separately) to attach the Sahara NetSlate to a desk, table, kiosk, or other stationary apparatus to help prevent the computer from being stolen.
! @

14 Chapter 02: Touring Your Sahara NetSlate
Back View
1. Wireless Networking Compartment Allows access to the WiFi networking adapter, SIM card slot and 3G Data Module. User upgradable.
2. Docking Connector This connector will allow the use of an optional VESA mounting plate, docking cradle and other optional expan-sion devices. Power pass-thru is supported.
3. RAM (Memory) Compartment Allows access to the user upgradable memory slot. Primary RAM module resides on the other side of the motherboard
and is NOT user upgradable.
4. VESA Mounting Screw Holders Used to allow mounting with 75mm – 100mm VESA compat-ible attachments.
5. Battery Pack The Sahara NetSlate comes equipped with a standard 6-cell lithium-ion battery pack that can be removed by the user and replaced.
!
@
#
$
*
$
%
^
&
Chapter 02: Touring Your Sahara NetSlate 15
6. Battery Release Latch Used along with the battery locking tab to release the battery pack from its bay for removal.
7. Battery Locking Tab Allows the battery pack to be locked into place during use to prevent accidental removal and subsequent power loss.
8. Stylus Pen in Stylus Garage Secures the stylus pen to the Sahara NetSlate.


Chapter 03: Battery Usage and Care 17
Chapter 03Battery Usage and Care
Depending on your system’s configuration and your application usage, a fully charged battery should allow you to run your Sahara NetSlate PC for 4 ~ 5 hours.
Operations that will significantly reduce battery life include, but are not limited to, the following:
1. Using external bus-powered USB optical, floppy and hard disk drives
2. Using wireless communications devices, including the internal wireless networking card, optional 3G data module Bluetooth adapter, or bus powered USB devices.
3. Using high-brightness display settings, 3D screen savers, or other computationally intensive programs such as games, media players and 3D graphics applications.
4. Running the computer in maximum performance mode.
5. Using the computer in overly-hot environmental conditions.
Using the Battery for the First Time
Before using the computer on battery power for the first time, the battery should be charged for at least four hours. Also, the Smart Battery IC within the battery pack should be calibrated in order to get an accurate reporting of the remaining battery life.

18 Chapter Name 03: Battery Usage and Care
To calibrate the battery pack, follow these steps:
1. Turn the computer off. Connect the AC adapter and let the battery fully recharge.
2. Disconnect the AC adapter and power on the computer. Let the battery run down until it is so low that the battery charge light turns red and the system automatically enters the Suspend mode.
3. Reconnect the AC adapter, let the battery fully recharge and then run the computer with the external power still con-nected for at least five (5) continuous hours.
The battery pack should now be properly calibrated. If you find that battery life doesn’t correspond to the battery status as reported by your operating system, repeat steps 2 -3 again.
If after performing a calibration for a second time you still find you are having a problem with the battery life, contact your dealer and arrange for a replacement. The battery may be defective.
In general, using the battery until the “Battery Low” warning indicator appears and then fully recharging the battery (full discharge/charge cycle) will ensure the accuracy of the battery status gauge.
If you find you are using the computer almost exclusively attached to an external power source, calibrating at least once a month is recommended.
Charging the Battery Under Typical Conditions
When you connect the computer to an electrical outlet, the Smart Battery IC in the battery pack checks the battery’s charge and temperature. If charging is necessary, the battery indicator on the front of the Sahara NetSlate will glow amber and the AC adapter will automatically charge the battery.

Chapter Name 03: Battery Usage and Care 19
When fully charged, the battery indicator will change to green and the battery’s charge will be maintained while connected to the external power source. When the computer is disconnected from the electrical outlet, the battery indicator will turn off.
NOTE: The time to fully recharge the battery is approximately 90 ~ 100 minutes when the computer is powered off. The time to fully recharge the battery when the computer is in use varies according to the power requirements of the operations that the computer is performing while charging.
Problems Charging the Battery
Environmental conditions can affect the ability of the computer to charge the battery. If the battery is too hot from either being used in your computer or being exposed to an overly hot environment, the battery may not charge when you connect the computer to an electrical outlet.
If this occurs, disconnect the computer from the electrical outlet and allow it and the battery to cool to room temperature. Then reconnect the computer to an electrical outlet to continue charging the battery.
Battery Status
Both Windows XP and Windows Vista have an applet in the Control Panel that will display an icon in the Windows taskbar indicating when the computer is running on battery power or is attached to the AC adapter.
This applet also displays a meter that indicates approximately how much of a charge is remaining in the battery.
Low Battery Warnings
A beeping sound will be heard once to alert you to a “Battery Low” status. The Battery LED indicator will begin to flash red.
When the battery’s power level drops to a “Battery Very Low” status the beeping sound will be heard every second.

20 Chapter Name 03: Battery Usage and Care
When this continuous beeping occurs, your battery has only approximately one to two minutes of charge left. You should save what you are working on and plug in the AC power adapter to avoid potential data loss.
When there is only one minute of battery charge remaining, the computer will suspend its current state to the hard drive and power off. Plug in the AC adapter and turn the computer back on to resume your work.
About Battery Pack Usage
Over time, even with proper care, battery performance (the time the battery can operate the computer before needing to be recharged) will decrease. Depending on how often the battery is used, how many times it has been charged and the conditions under which it is used, you may need to purchase a new battery during the life of your computer.
IMPORTANT: To avoid damage, only use replacement batteries recom-mended by TabletKiosk. To prevent the loss of data when the system loses power, do not remove the battery pack while the power is on unless attached to an external power source.
NOTE: Do not dispose of batteries with household waste. When your battery no longer holds a charge, call your local waste disposal or environmental agency for advice on disposing of a lithium-ion battery.
Real Time Clock Battery
In order to maintain certain system information while the power is off, the motherboard contains a small built-in battery pack that constantly supplies power to the system.
If the computer is left without a power source for long periods of time, this battery can be exhausted and system information will be lost. This will not affect any of your data stored on the computer’s hard drive, but rather the settings in the BIOS that tell the computer how to operate. It is recommended, therefore, that if you plan to store the computer for a long time you periodically attach the battery pack, plug in the computer to an external power source and allow the battery to recharge.

Chapter Name 03: Battery Usage and Care 21
If you find out, after removing the computer from storage, that you have lost this system information, by receiving a BIOS error when you boot up for the first time, contact your dealer or visit TabletKiosk’s website at www.tabletkiosk.com to obtain the proper BIOS settings.
Storing a Battery
When storing your computer for an extended period of time, it is recommended that you remove the battery pack and store it in a dry, cool location. Since a battery discharges during prolonged storage, you should fully recharge the battery before you use it again.

Chapter 04: Using Your Sahara NetSlate with Windows XP 23
Chapter 04Using Your Sahara NetSlate
with Windows XP
While your Sahara NetSlate is a versatile, mobile thin client capable of accomplishing all the same tasks as a netbook, and running most all the same applications as standard laptops and desktop PCs, there are some differences in the way that you interact with Windows using a stylus pen as opposed to a mouse and keyboard. This chapter contains tips and details to get the most from your Sahara NetSlate while using Windows XP.
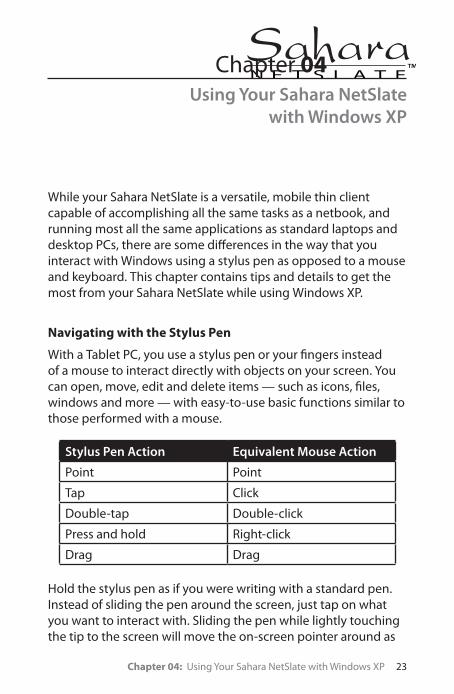
Navigating with the Stylus Pen
With a Tablet PC, you use a stylus pen or your fingers instead of a mouse to interact directly with objects on your screen. You can open, move, edit and delete items — such as icons, files, windows and more — with easy-to-use basic functions similar to those performed with a mouse.
Stylus Pen Action Equivalent Mouse Action
Point Point
Tap Click
Double-tap Double-click
Press and hold Right-click
Drag Drag
Hold the stylus pen as if you were writing with a standard pen. Instead of sliding the pen around the screen, just tap on what you want to interact with. Sliding the pen while lightly touching the tip to the screen will move the on-screen pointer around as
24 Chapter 04: Using Your Sahara NetSlate with Windows XP
if you were using a mouse and holding down the left mouse button. In other words, you would be performing what is known as a drag operation.
Also, remember that since the screen is sensitive to the touch, resting your hand on the screen while using the pen might make the pointer react unpredictably.
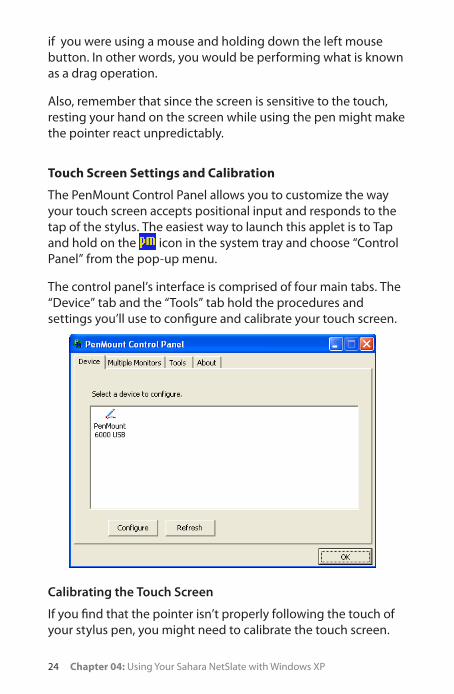
Touch Screen Settings and Calibration
The PenMount Control Panel allows you to customize the way your touch screen accepts positional input and responds to the tap of the stylus. The easiest way to launch this applet is to Tap and hold on the icon in the system tray and choose “Control Panel” from the pop-up menu.
The control panel’s interface is comprised of four main tabs. The “Device” tab and the “Tools” tab hold the procedures and settings you’ll use to configure and calibrate your touch screen.
Calibrating the Touch Screen
If you find that the pointer isn’t properly following the touch of your stylus pen, you might need to calibrate the touch screen.
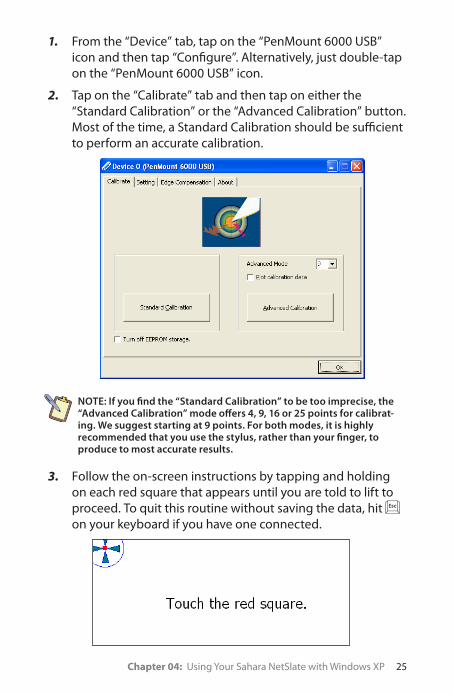
Chapter 04: Using Your Sahara NetSlate with Windows XP 25
1. From the “Device” tab, tap on the “PenMount 6000 USB” icon and then tap “Configure”. Alternatively, just double-tap on the “PenMount 6000 USB” icon.
2. Tap on the “Calibrate” tab and then tap on either the “Standard Calibration” or the “Advanced Calibration” button. Most of the time, a Standard Calibration should be sufficient to perform an accurate calibration.
NOTE: If you find the “Standard Calibration” to be too imprecise, the “Advanced Calibration” mode offers 4, 9, 16 or 25 points for calibrat-ing. We suggest starting at 9 points. For both modes, it is highly recommended that you use the stylus, rather than your finger, to produce to most accurate results.
3. Follow the on-screen instructions by tapping and holding on each red square that appears until you are told to lift to proceed. To quit this routine without saving the data, hit on your keyboard if you have one connected.

26 Chapter 04: Using Your Sahara NetSlate with Windows XP
4. When the calibration is complete, you can test the screen accuracy by either tapping around the screen, or using the “Draw” test in the “Tools” tab in the main window of the PenMount Control Panel.
If you check the Plot Calibration Data option in the “Advanced Calibration” mode, a linearity comparison graph will be dis-played after the “Advanced Calibration” is complete. The black lines reflect the ideal linearity assumed by the PenMount control panel, while the blue lines represent the approximate linearity calculated by the calibration.
There may be circumstances where you don’t want the calibra-tion data to be stored in the controller. Perhaps you are only run-ning a test, or you want the pre-calibrated state to be restored when you restart the system. In these cases, checking Turn off EEPROM storage will disable the write-in of calibration data.
Calibrating the Touch Screen from the Command Prompt
The calibration function can be called from the Windows com-mand prompt, in case you’d like to include it in a script, batch

Chapter 04: Using Your Sahara NetSlate with Windows XP 27
file, or map it to one of the Sahara NetSlate’s user programmable function buttons.
1. To open a command prompt window, go to START > All Programs > Accessories and tap on Command Prompt.
2. Enter, all on one line: c:\Program Files\PenMount Universal Driver\DMCCtrl.exe -calibration (0) to execute a Standard Calibration.
NOTE: Calibration options available are 0=Standard, 4=Advanced 4pt, 9=Advanced 9pt, 16=Advanced 16pt, and 25=Advanced 25pt.
Touch Mode
The Touch mode affects how the touch screen accepts and processes input. There are two basic modes of operation: Stream Mode and Point Mode.
In Mouse Emulation (Stream Mode), positional information is relayed to the operating system continuously. In this mode you can place the stylus or your finger on the screen and drag items around. This is the mode you’ll probably want to use for standard usage.
Click on Touch (Point Mode) only accepts and relays one posi-tional coordinate each time the stylus or a finger touches the screen. In order to relay a new positional coordinate to Windows, you must retouch the screen with your finger or stylus. This mode is useful for menu or button-driven touch applications — such as kiosks, P.O.S. or hospitality order taking — that do not involve tasks that require continuous data input like signature capture, item dragging or handwriting recognition.
To set the Touch Mode:
1. From the “Device” tab, tap on the “PenMount 6000 USB” icon and then tap “Configure”. Alternatively, just double-tap on the “PenMount 6000 USB” icon.
2. Tap on the “Setting” tab and then tap on either option box in the “Touch Mode” section at the top of the tab.
28 Chapter 04: Using Your Sahara NetSlate with Windows XP
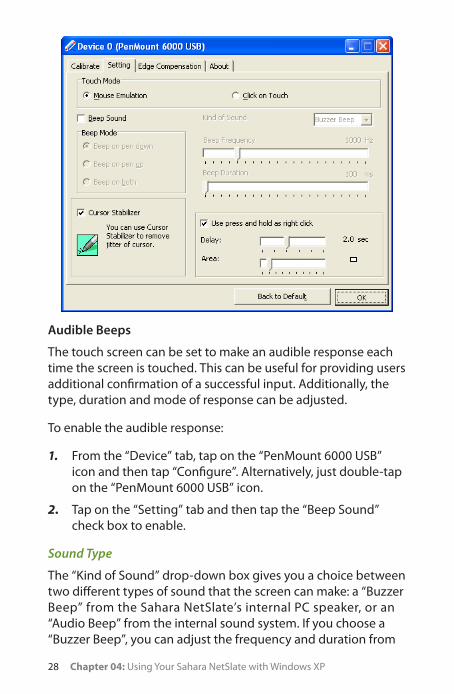
Audible Beeps
The touch screen can be set to make an audible response each time the screen is touched. This can be useful for providing users additional confirmation of a successful input. Additionally, the type, duration and mode of response can be adjusted.
To enable the audible response:
1. From the “Device” tab, tap on the “PenMount 6000 USB” icon and then tap “Configure”. Alternatively, just double-tap on the “PenMount 6000 USB” icon.
2. Tap on the “Setting” tab and then tap the “Beep Sound” check box to enable.
Sound Type
The “Kind of Sound” drop-down box gives you a choice between two different types of sound that the screen can make: a “Buzzer Beep” from the Sahara NetSlate’s internal PC speaker, or an “Audio Beep” from the internal sound system. If you choose a “Buzzer Beep”, you can adjust the frequency and duration from

Chapter 04: Using Your Sahara NetSlate with Windows XP 29
the two sliders located directly below the sound type selection drop-down box.
Beep Mode
Using the “Beep Mode” option boxes on the “Setting” tab, the touch action(s) that will trigger the sound can also be specified. You can set the screen to beep when the screen is pressed (Beep on Pen Down), when the press is released (Beep on pen up), or both (Beep on both).
Right-Click Emulation
The touch screen can be set so that when you tap and hold the pen to the screen, a right button mouse click is perform (this option is on by default).
To enable or disable the right-click emulation function:
1. From the “Device” tab, tap on the “PenMount 6000 USB” icon and then tap “Configure”. Alternatively, just double-tap on the “PenMount 6000 USB” icon.
2. Tap on the “Setting” tab and then tap the “Use press and hold as right click” check box to enable/disable.
You can adjust the amount of time you must press on the screen before the right-click is performed (Delay), as well as the size of the Area that will register the right-click.
NOTE: To enable a right-click function to be activated by the touch of a finger, set the area larger. To prevent a right-click by anything but the stylus pen, make the area smaller.
Touch Screen Test and Features
The “Tools” tab in the main TouchMount Control Panel window contains a few useful features for managing and testing the touch screen.

30 Chapter 04: Using Your Sahara NetSlate with Windows XP
Draw
Opens the “Draw Test” window where you can test the accuracy of your screen’s calibration by drawing on the screen. Using the “Menu” button in the upper left corner of the test window, you can hide or show a visual grid, display the pixel coordinate screen location of the pen’s touch, display the screen registers’ touch active (press and release) as well as clear the screen and exit the test.
Right Button Icon
Enables a visual mouse icon that allows you to set which mouse button press will be registered for the following tap on the screen (left-click or right-click). Useful for when “Right-Click Emulation” is disabled, or when pressing and holding on the screen is impractical or cumbersome. You can choose to display the icon in the System Tray or on the Desktop.
Gesture Enable
Gestures are short-cuts that you can perform with a simple flick of your finger or pen on the screen, or by drawing a simple, predetermined shape. For example, with Gestures enabled,

Chapter 04: Using Your Sahara NetSlate with Windows XP 31
simply dragging in a straight line down the screen can invoke a page down command, or a “Save File” command, or even launch a program of your choosing.
Gestures are simple to use, easy to customize, and provide a tremendous amount of convenience when working on your Sahara NetSlate. To enable Gestures, simply tap on the “Gesture Enable” button so that the square in the center of the button turns yellow. To disable Gestures, simply tap the button again to change the square to grey.
Gesture Setting
Allows you to customize the built-in Gesture shapes, tap on the button to open the “Gesture Setting” panel.
The “Enable” check box at the top of the panel simply does the same thing as the “Gesture Enable” button in the “Tools” tab.
The “Sensing Time” slider determines the amount of time to sense the completion of a Gesture action. The longer the time set by the slider, the longer you can take to draw out the Gesture on screen.
In the Gesture Settings section, tapping on the Gesture icon button pops open a window that allows you to choose from all of the predetermined Gesture motions. With a motion selected, you can:
Using Gestures, you can invoke any keyboard combination or open any application with the flick of your finger or stylus pen.
32 Chapter 04: Using Your Sahara NetSlate with Windows XP
� disable it by tapping on the “Disable” option box
� assign a single key press or keyboard combination to it by tapping on the “Hot Key” option box, selecting an optional modifier key check box and then choosing the key from the drop down list box
� choose to launch an application installed on your computer by tapping on the “Application” option box and then tap-ping on the “Browse” button to navigate to the application you wish to launch on your hard drive
� or even perform a preset action, such as shutting down your Sahara NetSlate, by tapping on the “Action” option box and selecting an action from the drop down box.
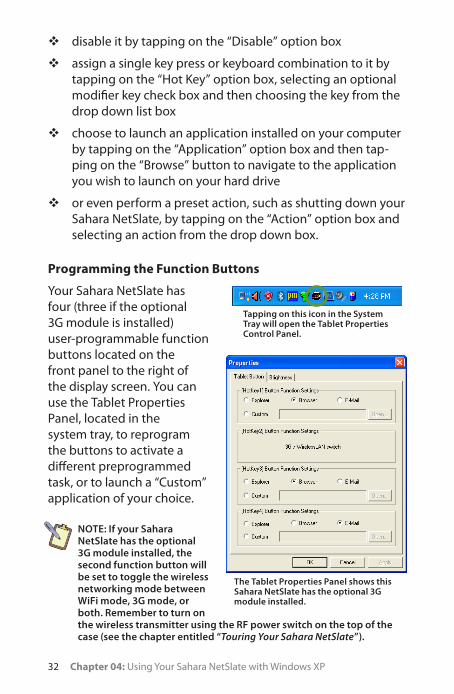
Programming the Function Buttons
Your Sahara NetSlate has four (three if the optional 3G module is installed) user-programmable function buttons located on the front panel to the right of the display screen. You can use the Tablet Properties Panel, located in the system tray, to reprogram the buttons to activate a different preprogrammed task, or to launch a “Custom” application of your choice.
NOTE: If your Sahara NetSlate has the optional 3G module installed, the second function button will be set to toggle the wireless networking mode between WiFi mode, 3G mode, or both. Remember to turn on the wireless transmitter using the RF power switch on the top of the case (see the chapter entitled “Touring Your Sahara NetSlate”).
Tapping on this icon in the System Tray will open the Tablet Properties Control Panel.
The Tablet Properties Panel shows this Sahara NetSlate has the optional 3G module installed.
Chapter 04: Using Your Sahara NetSlate with Windows XP 33
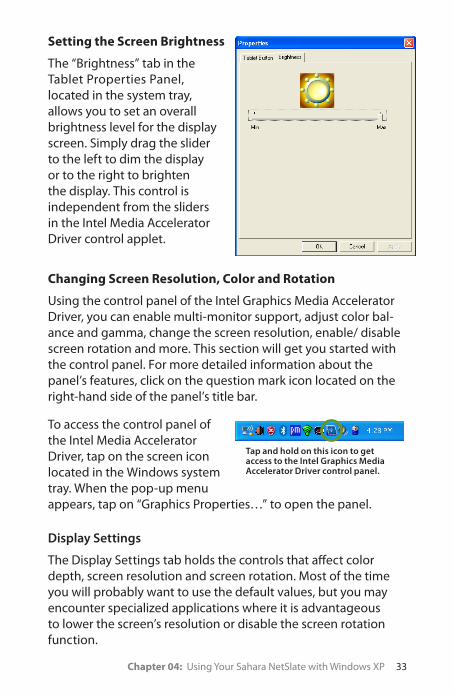
Setting the Screen Brightness
The “Brightness” tab in the Tablet Properties Panel, located in the system tray, allows you to set an overall brightness level for the display screen. Simply drag the slider to the left to dim the display or to the right to brighten the display. This control is independent from the sliders in the Intel Media Accelerator Driver control applet.
Changing Screen Resolution, Color and Rotation
Using the control panel of the Intel Graphics Media Accelerator Driver, you can enable multi-monitor support, adjust color bal-ance and gamma, change the screen resolution, enable/ disable screen rotation and more. This section will get you started with the control panel. For more detailed information about the panel’s features, click on the question mark icon located on the right-hand side of the panel’s title bar.
To access the control panel of the Intel Media Accelerator Driver, tap on the screen icon located in the Windows system tray. When the pop-up menu appears, tap on “Graphics Properties…” to open the panel.
Display Settings
The Display Settings tab holds the controls that affect color depth, screen resolution and screen rotation. Most of the time you will probably want to use the default values, but you may encounter specialized applications where it is advantageous to lower the screen’s resolution or disable the screen rotation function.
Tap and hold on this icon to get access to the Intel Graphics Media Accelerator Driver control panel.

34 Chapter 04: Using Your Sahara NetSlate with Windows XP
Color Correction
The Color Correction tab is where you will find the controls that affect the color balance, brightness and contrast of the display screen. Use the control sliders to adjust the screen values. Moving a slider to the left decreases the corresponding value, moving a slider to the right increases it.
By using the color channel option buttons at the top of the panel, you can change the RGB color values equally or individu-ally. The Gamma control will adjust the screen’s brightness without affecting the white point or the black point of the display.
Tap on the “Restore Defaults” button to return the control settings to their default values. This is useful if you are experi-menting with the sliders and are unhappy with the results, or if you decide to make additional changes at a later time and want to discard your previously-applied settings. Tap on the “Apply” button to accept your changes, the “Cancel” button to reject the changes, or the “OK” button to accept the changes and exit the control panel.

Chapter 04: Using Your Sahara NetSlate with Windows XP 35
Launch Zoom
The Intel Zoom Utility is an interesting feature of the Intel Media Accelerator Driver. Tap on the “Launch Zoom” button to open the utility. Then tap anywhere on the screen and the utility will zoom in on the surrounding area of the screen where you tapped. The zoom is live, so if you tap your pen around the screen, the zoomed image will update.
The Zoom Utility window will stay open and active even when you exit the Intel Media Accelerator control panel. You can close the utility like any other standard Windows ap-plication; either by choosing “Exit” from the “Action” Menu, or by clicking on the “Close” button in the program’s title bar.
36 Chapter 04: Using Your Sahara NetSlate with Windows XP
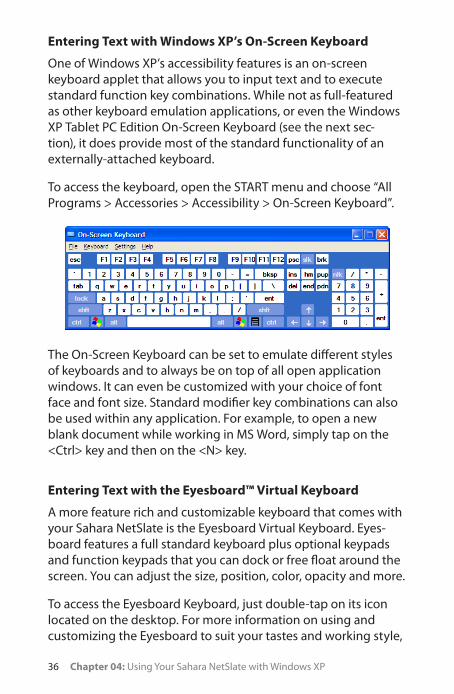
Entering Text with Windows XP’s On-Screen Keyboard
One of Windows XP’s accessibility features is an on-screen keyboard applet that allows you to input text and to execute standard function key combinations. While not as full-featured as other keyboard emulation applications, or even the Windows XP Tablet PC Edition On-Screen Keyboard (see the next sec-tion), it does provide most of the standard functionality of an externally-attached keyboard.
To access the keyboard, open the START menu and choose “All Programs > Accessories > Accessibility > On-Screen Keyboard”.
The On-Screen Keyboard can be set to emulate different styles of keyboards and to always be on top of all open application windows. It can even be customized with your choice of font face and font size. Standard modifier key combinations can also be used within any application. For example, to open a new blank document while working in MS Word, simply tap on the <Ctrl> key and then on the <N> key.
Entering Text with the Eyesboard™ Virtual Keyboard
A more feature rich and customizable keyboard that comes with your Sahara NetSlate is the Eyesboard Virtual Keyboard. Eyes-board features a full standard keyboard plus optional keypads and function keypads that you can dock or free float around the screen. You can adjust the size, position, color, opacity and more.
To access the Eyesboard Keyboard, just double-tap on its icon located on the desktop. For more information on using and customizing the Eyesboard to suit your tastes and working style,

Chapter 04: Using Your Sahara NetSlate with Windows XP 37
you can access the help file by tapping on the “?” button in the upper right hand corner of the keyboard.
Connecting to the Internet
Your Sahara NetSlate allows you to connect to the Internet in a few different ways. The ways vary depending on your network-ing environment as well as personal preference and available equipment.
Using a Wireless LAN
The WiFi wireless networking adapter built into your Sahara NetSlate is compatible with 802.11a/b/g/n (Draft 2.0) wireless networks, and can therefore connect to wireless routers or access points that support any of these standards.
1. Turn on the WiFi transmitter using the toggle switch on the top of your tablet. Make sure the switch lights up blue. If the light is amber, your Sahara NetSlate is in WWAN mode. Press the wireless mode button on the front of the tablet again to place it into WiFi mode (see the section Font View in the chapter “Touring Your Sahara NetSlate” for the location of the Wireless Mode button).
NOTE: If the switch lights up both Blue and Amber it is in dual mode and both transmitters are active. You may wish to press it again until it only lights blue to use just the WiFi transmitter to save battery life.
The Eyesboard Virtual Keyboard includes a standard keyboard (shown here), Numeric keypad, and Function keypad.
Slide this toggle switch to the left to turn on the Sahara NetSlate’s wireless transmitter

38 Chapter 04: Using Your Sahara NetSlate with Windows XP
2. In the System Tray, tap onthe Intel PROSet icon and choose “Configure WiFi” from the pop-up menu that appears.
3. When the Intel® PROSet/Wireless WiFi Connection Utility opens, choose the network from the list that you wish to connect to and tap the “Connect” button. If no wireless networks appear after a few moments, tap on the “Refresh” button located just below the list.
4. If the wireless network you are attempting to connect to is security-enabled, you will see a dialog box requesting either a network key or, if the wireless network supports WiFi Protected Setup (WPS), a PIN.
After successfully connecting to the network, this pop-up should appear above the System Tray icon.
Tap on the Intel PROSet Wireless icon to open a menu that will let you choose to configure your WiFi connection.

Chapter 04: Using Your Sahara NetSlate with Windows XP 39
Most failures to connect to a wireless network occur because the network key has been improperly entered. Be very careful when entering this key. If you do not know the correct key to enter, or still can’t connect after entering the key properly, contact your network administrator or the technical support line of your ISP.
NOTE: If your network access point or router uses WiFi Protected Set-up, the WPS Wizard will appear on the screen. Choose your access point from the drop-down list, enter your PIN when prompted. Unless you need to configure your access point/router for the first time, just tap on the “No” button when asked. If you entered your PIN properly, you should see the same pop-up window informing you that you are connected. Check with your Network Administrator or the instructions that came with your access point/router for locating the PIN.
Connecting to a WWAN with the optional 3G/3.5G Module
In order to connect to a Wireless Wide Area Network (WWAN), you will need to have a Broadband Access account already set-up with your cellular carrier of choice. The WWAN card that comes in the Sahara NetSlate is compatible with carriers that use UMTS/HSPA or quad-band GSM/GPRS/EDGE data networks.
NOTE: For more information regarding the capabilities and specifications of the 3G/3.5G Data module, please visit our website at www.tabletkiosk.com.
Your wireless provider should supply you with a SIM card and the software necessary to access their cellular network. Please refer to their instructions for the proper procedures for installing their software and configuring your WWAN access account.
To insert the SIM card into your Sahara NetSlate a230T:
1. Power off your Sahara NetSlate and place it face down on a surface that will not damage the LCD screen so that you can access the back of the system.
2. Locate the Wireless Networking Compartment near the right side of the system and just above the stylus garage (see the section Back View in the chapter “Touring Your Sahara NetSlate” for the location). Remove the two screws that secure the access cover (use a #0 Philips screw driver).

40 Chapter 04: Using Your Sahara NetSlate with Windows XP
3. Lift the cover from the edge where the screw holes are located to remove it and set it aside. The wireless network-ing adapter, Bluetooth adapter and WWAN data module are inside. The SIM card holder is located toward the top left of the compartment, closest to the docking connector and is metallic silver.
4. Unlock the cover by placing your fingernail or another small flat object into the wide oval shaped opening near the top of the SIM holder and slide it down toward the bottom of the compartment until you feel it “click”. Care-fully, lift the cover open toward you. It should swivel like a door.
5. Slip the SIM card face up onto the slot so the clipped corner of the card matches the clipped corner of the slot and then close it and slide it back up until you feel it “click” to lock it into place.
6. You can now replace the cover and secure it with the screws.

Chapter 04: Using Your Sahara NetSlate with Windows XP 41
Using a Wired LAN (requires optional Docking Cradle)
Another way to connect to the Internet with your Sahara NetSlate is by a wired LAN environment accessed via the RJ45 port located on the Sahara Slate PC i400 series Docking Cradle (available separately). Using this method, an Ethernet jack or a broadband modem must be within the reach of the networking cable you are using.
1. Connect the Sahara NetSlate to the Docking Cradle.
2. Connect an Ethernet networking cable into the LAN port of your Sahara NetSlate’s Docking Cradle and then connect the other end into your broadband modem or the appropriate LAN port as instructed by your network administrator. Most of the time, you will probably find that you are now con-nected to the Internet. If not, continue on with step 3.
3. From the START menu, select “Connect To” and tap on “Show all connections”.
4. In the “Network Connections” window, look at the “Local Area Connection” item and make sure it reads as “Connected”. If not, recheck that your networking cable is properly connected, or contact your network administrator.
5. Press and hold the “Local Area Connection” item and select “Properties” from the pop-up menu that appears, or if the Status window appears, tap the “Properties” button.
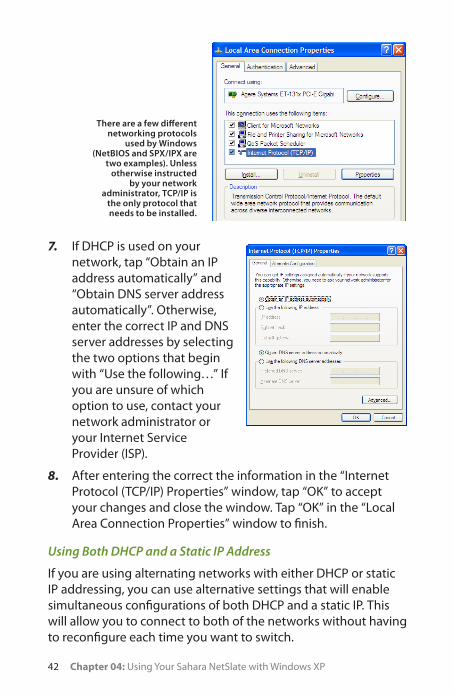
6. Under the General Tab, you’ll see a list box called “This connection uses the following items:”. Select “Internet Protocol (TCP/IP)”, and tap the “Properties” button to open the “Internet Protocol (TCP/IP) Properties” window.
Once the Sahara NetSlate a230T is attached to the docking cradle, a Local Area Connection item should appear in the connections panel.
42 Chapter 04: Using Your Sahara NetSlate with Windows XP
7. If DHCP is used on yournetwork, tap “Obtain an IP address automatically” and “Obtain DNS server address automatically”. Otherwise, enter the correct IP and DNS server addresses by selecting the two options that begin with “Use the following…” If you are unsure of which option to use, contact your network administrator or your Internet Service Provider (ISP).
8. After entering the correct the information in the “Internet Protocol (TCP/IP) Properties” window, tap “OK” to accept your changes and close the window. Tap “OK” in the “Local Area Connection Properties” window to finish.
Using Both DHCP and a Static IP Address
If you are using alternating networks with either DHCP or static IP addressing, you can use alternative settings that will enable simultaneous configurations of both DHCP and a static IP. This will allow you to connect to both of the networks without having to reconfigure each time you want to switch.
There are a few different networking protocols
used by Windows (NetBIOS and SPX/IPX are
two examples). Unless otherwise instructed
by your network administrator, TCP/IP is
the only protocol that needs to be installed.

Chapter 04: Using Your Sahara NetSlate with Windows XP 43
1. Follow steps 1 through 7 above when using a wired LAN connection.
2. Tap on the “Alternate Configuration” tab and select the “User configured” option. Enter the correct values in the appropriate fields. If you are unsure of which values or options to use, contact your network administrator or the technical support line of your ISP.
When you have completed the entire configuration, tap “OK” to accept the settings and close the panel.
Bluetooth® Wireless Connectivity
Bluetooth® is a short-range wireless technology you can use to transfer data between your Sahara NetSlate and other wireless devices that use Bluetooth, such as wireless keyboards and mice, cell phones, PDAs and even printers. Bluetooth-enabled devices can communicate with each other, without cables, up to a distance of approximately 30 feet.
NOTE: The wireless range can be shortened from interference caused by other wireless devices and/or by walls made of dense building materials.
Some of the activities available with Bluetooth wireless con-nectivity are:
� Using a wireless keyboard, such as TabletKiosk’s Bluetooth Folding Keyboard, to enter data on your Sahara NetSlate.
� Connecting to your Bluetooth-capable cell phone to access the Internet and surf the web or download your e-mail.

44 Chapter 04: Using Your Sahara NetSlate with Windows XP
� Setting up a Personal Area Network (PAN) to transfer files between your Sahara NetSlate and that of a colleague, or even an eo UMPC, without the need of using Ethernet cables or even an existing wireless network.
� Print to a Bluetooth-enabled printer from across the room without connecting any cables.
Automatic Device Registration
When you first turn on your Sahara NetSlate, the Bluetooth Automatic Registration Wizard will launch. This allows you to quickly set-up Bluetooth enabled input devices such as a keyboard or mouse. If you decide to register a device, the “Add New Connection Wizard” will launch. Follow the instructions that follow to complete the process.
NOTE: Once a device has been registered, you usually won’t need to register it again. You will, however, have to pair it. When you see this window upon system start-up, just place your device into pairing mode and it should connect automatically. If you do not wish to automatically connect a Bluetooth device at start-up, you can check the “Don’t show this windows next time” check box and tap the “Cancel” button.
Manual Device Registration
Generally, to connect to a Bluetooth enabled device:
1. Turn on the Bluetooth transmitter using the toggle switch on the top of your tablet.
2. Locate the icon in the System Tray and double-tap on the icon to open the Bluetooth Settings Manager. Alternatively, you can just double-tap on the icon to open the Bluetooth Settings Manager.
Chapter 04: Using Your Sahara NetSlate with Windows XP 45
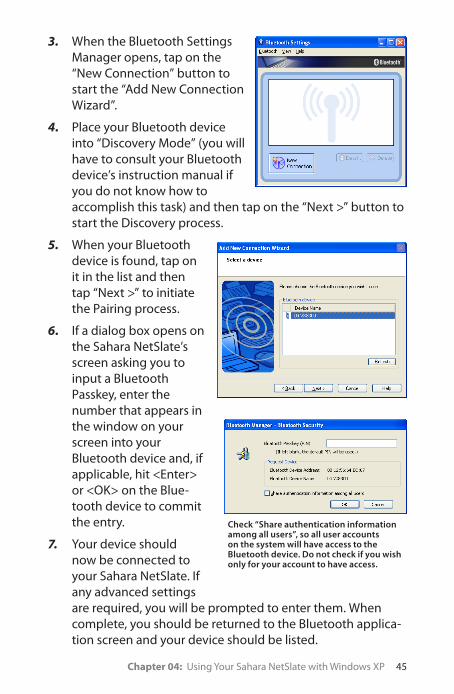
3. When the Bluetooth SettingsManager opens, tap on the “New Connection” button to start the “Add New Connection Wizard”.
4. Place your Bluetooth device into “Discovery Mode” (you will have to consult your Bluetooth device’s instruction manual if you do not know how to accomplish this task) and then tap on the “Next >” button to start the Discovery process.
5. When your Bluetooth device is found, tap on it in the list and then tap “Next >” to initiate the Pairing process.
6. If a dialog box opens on the Sahara NetSlate’s screen asking you to input a Bluetooth Passkey, enter the number that appears in the window on your screen into your Bluetooth device and, if applicable, hit <Enter> or <OK> on the Blue-tooth device to commit the entry.
7. Your device should now be connected to your Sahara NetSlate. If any advanced settings are required, you will be prompted to enter them. When complete, you should be returned to the Bluetooth applica-tion screen and your device should be listed.
Check “Share authentication information among all users”, so all user accounts on the system will have access to the Bluetooth device. Do not check if you wish only for your account to have access.

46 Chapter 04: Using Your Sahara NetSlate with Windows XP
If you have trouble connecting, make sure you completed the above steps in the time period that your Bluetooth device is in pairing mode. If your device exits pairing mode before you can connect, re-enable it and, depending on the state of the connec-tion process, redo any applicable steps.
For more information about configuring and using the Bluetooth application, check out the online help system by either tapping
on your keyboard or choosing “Help” from the Bluetooth application menu.

Chapter 04: Using Your Sahara NetSlate with Windows XP 47
This Page Left Blank Intentionally

Chapter 05: Securing Your Sahara NetSlate 49
Chapter 05Securing Your Sahara NetSlate
Your Sahara NetSlate is equipped with a Trusted Platform Module (TPM) that, when used in conjunction with specialized software, can help you better secure your data from intruders.
Used in conjunction with specialized security management software, a TPM offers facilities for generating cryptographic keys—as well as the ability to limit the use of such keys for authentication or encryption/decryption— and also random numbers. Typical use for such encryption would be to prevent unauthorized access to the data stored on your hard drive.
The TPM can also be used to authenticate a specific hardware device for use in platform authentication. For example, the TPM can be used to verify the authenticity of a specific hardware system for secured access.
This chapter will get you started by enabling the TPM for use with your security software management system.
BIOS Settings
To take advantage of the enhanced security features of the Trusted Computing Platform, you must first enable it in the tablet’s BIOS.
IMPORTANT: A USB keyboard must be attached to the Sahara NetSlate prior to powering on the system in order to navigate the tablet’s BIOS.

50 Chapter Name 05: Securing Your Sahara NetSlate
1. Power on or restart the Sahara NetSlate. When the TabletKiosk logo screen appears, hit the key on the keyboard to enter the BIOS.
NOTE: If you are having trouble getting into the BIOS, you can press <Delete> multiple times after the TabletKiosk logo screen appears until you finally see the BIOS Menu appear. Alternatively, you can also press the “Rotate Screen” function button on the front of the tablet to enter the BIOS.
2. When the BIOS Menu appears, press the right arrow key to navigate to the “Advanced” menu screen. Use the down arrow key to highlight the “Trusted Computing” option and press .
3. In the Trusted Computing screen, press and select “Yes” to enable TCG/TPM Support.
4. Hit the down arrow key to highlight the “Execute TPM Command” and press the key to open the Options menu. From the menu, use the down arrow key to highlight “Enabled” and press to enable the TPM module.
5. Press the key to save changes to the BIOS and restart the computer.
NOTE: If at any point you wish to clear the TPM module’s information and return the Sahara NetSlate to its original “unowned” state, use the arrow key to highlight “Clearing the TPM” and press . This will open a menu confirming that you wish to return the TPM to its factory defaults. Press to clear the TPM, or press to cancel without clearing the TPM.
VERY IMPORTANT: If you lose your password and decide to clear the TPM, know that you will forever lose access to any data on the hard drive that is encrypted using the TPM’s current encryption key. Make sure that any data you wish to access in the future has been backed up in an unencrypted form before clearing the TPM.
Creating a Windows Login Password
If you didn’t choose to do so during the initial setup procedure, the first step in securing your sensitive information is creating a Windows login password.

Chapter Name 05: Securing Your Sahara NetSlate 51
Creating the Password In Windows XP
1. Go to the START Menu and tap on “Control Panel”.
2. In the Control Panel window that appears, tap on “User Accounts” under “Pick a category”.
3. Look under “or pick an account to change” and select your user account by tapping on it.
4. Tap on “Create a password”. Enter a password and then confirm it. Enter a password hint if you wish and then tap on “Create Password” to accept your password.
Creating the Password In Windows Vista
1. Go to the START Menu and tap on “Control Panel”.
2. In the Control Panel window that appears, tap on the “User Accounts” category title.
3. Under the User Accounts category, tap on “Change your Windows password”.
4. From the “Make changes to your user account” screen, tap on “Create a password for your account”.
Tap on “Create a Password” to enter a new password. This is an important step in securing your data.
Make sure to keep your password in a safe location
and do not lose it.
52 Chapter Name 05: Securing Your Sahara NetSlate
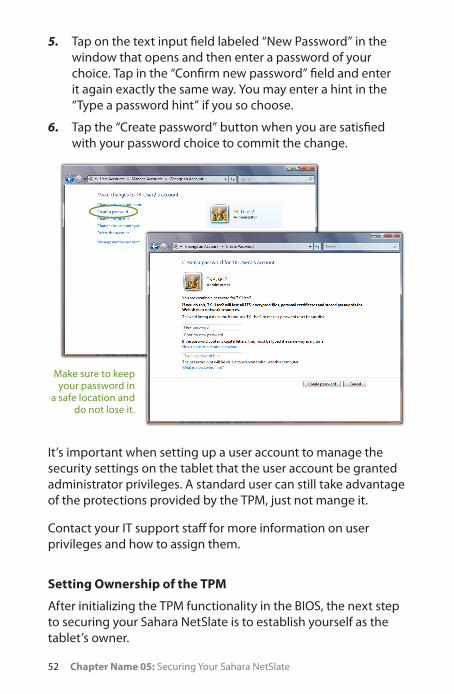
5. Tap on the text input field labeled “New Password” in the window that opens and then enter a password of your choice. Tap in the “Confirm new password” field and enter it again exactly the same way. You may enter a hint in the “Type a password hint” if you so choose.
6. Tap the “Create password” button when you are satisfied with your password choice to commit the change.
It’s important when setting up a user account to manage the security settings on the tablet that the user account be granted administrator privileges. A standard user can still take advantage of the protections provided by the TPM, just not mange it.
Contact your IT support staff for more information on user privileges and how to assign them.
Setting Ownership of the TPM
After initializing the TPM functionality in the BIOS, the next step to securing your Sahara NetSlate is to establish yourself as the tablet’s owner.
Make sure to keep your password in
a safe location and do not lose it.

Chapter Name 05: Securing Your Sahara NetSlate 53
IMPORTANT: Once you have set ownership of the TPM, it is vital that you store your password in a secure location and take care never to lose it. If you do, you will not be able to access the data you protected/encrypted using your security management software.
Windows XP Professional
As Windows XP lacks native support for TPM management, you will need to acquire a third party TPM security management application to take advantage of its capabilities.
Install and configure the TPM security management software package of your choice and then refer to the user manual that accompanied the software for information on how to accom-plish this important task.
Windows Vista
To set ownership of the TPM:
NOTE: To perform the following procedure, you must be logged on to your Sahara NetSlate with administrator privileges.
1. Go to the START Menu and tap on “All Programs > Acces-sories > Run” to open the “Run” dialog box.
2. In the “Open” field, enter “tpm.msc” (without the quotes) and tap “OK” to open the TPM Management Console (TPM MC). Tap to proceed if the Windows UA prompt appears.
The TPM Management Console is where you initialize the TPM to set the ownership, turn on and off the TPM as well as clear the TPM.
54 Chapter Name 05: Securing Your Sahara NetSlate
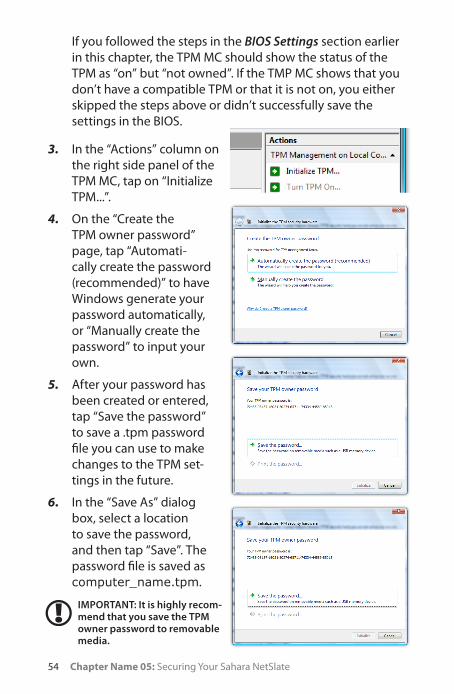
If you followed the steps in the BIOS Settings section earlier in this chapter, the TPM MC should show the status of the TPM as “on” but “not owned”. If the TMP MC shows that you don’t have a compatible TPM or that it is not on, you either skipped the steps above or didn’t successfully save the settings in the BIOS.
3. In the “Actions” column on the right side panel of the TPM MC, tap on “Initialize TPM...”.
4. On the “Create the TPM owner password” page, tap “Automati-cally create the password (recommended)” to have Windows generate your password automatically, or “Manually create the password” to input your own.
5. After your password has been created or entered, tap “Save the password” to save a .tpm password file you can use to make changes to the TPM set-tings in the future.
6. In the “Save As” dialog box, select a location to save the password, and then tap “Save”. The password file is saved as computer_name.tpm.
IMPORTANT: It is highly recom-mend that you save the TPM owner password to removable media.

Chapter Name 05: Securing Your Sahara NetSlate 55
7. Click “Print the password” if you want to print a hard copy of your password.
IMPORTANT: It is highly recommend that you print a hard copy of your TPM owner password and store it in a safe location.
8. Click “Initialize” to confirm and set the ownership.
NOTE: The process of initial-izing the TPM might take a few minutes to complete, so be patient. You will be informed when the process is complete.
9. Click “Close” to return back to the TPM MC main screen.
CAUTION: Do not lose your password. If you do, you will be unable to make changes to your TPM that require the owner password unless you first clear the TPM. Once cleared, all data protected by the original password will become unavailable.
To learn more about using the TPM, including turning off the TPM and clearing the TPM, see the Help articles in the “Links & Resources” section at the bottom of the main pane of the TPM Management Console.

Chapter 06: Upgrading Your Sahara NetSlate 57
Chapter 06Upgrading Your Sahara NetSlate
Out of the box, your new Sahara NetSlate is a versatile, mobile companion capable of accomplishing a wide variety of tasks with speed and precision. Depending on your system’s configu-ration, there are still ways to make your Tablet PC do more and do it faster. Especially with new bigger, faster and cheaper hard drives and solid state drives always just around the corner.
This chapter covers the procedures for upgrading, and/or replac-ing, your computer’s memory (RAM) and storage capacity (hard disk drive).
Before you Begin ANY Upgrade Procedure
Before attempting to add or remove any components within the Sahara NetSlate it is important that you always observe the following conditions/procedures:
1. Power off your computer, remove the power cable from the computer and remove the battery. Refer to the section entitled Removing the Battery Pack in chapter Battery Care and Usage.
2. Disconnect any networking cables, modem cables and cables connected to other powered devices.
3. When disconnecting a cable from the computer, always pull on its connector, not on the cable itself. When reconnecting a cable, make sure that both the connector and the cor-responding pins are aligned properly with the cable before attempting to secure it in place.
58 Chapter 06: Upgrading Your Sahara NetSlate
4. Handle all components with care. Do not touch the compo-nents or contacts on the cards or on the underside of the drives. Always hold such components by the edges or sides.
5. All electronic components inside a computer are sensitive to electrostatic discharges. It is therefore important that you properly ground yourself before attempting any of the following procedures either by using a wrist grounding strap or by periodically touching an exposed, unpainted metal surface.
6. You should only attempt upgrades and/or component replacements on a solid, clean, flat surface.
CAUTION: Damage resulting from the servicing of your computer that is not authorized by TabletKiosk is not covered by your computer’s standard or optional extended warranty.
Upgrading Memory (RAM)
You can increase your tablet’s memory by installing a RAM (Random Access Memory) module on the computer’s system board. Typically, the more RAM your computer has, the better it will perform, especially when running multiple tasks or applica-tions simultaneously.
Your Sahara NetSlate can accommodate two RAM modules. The primary module is factory installed on the motherboard underneath the display screen and cannot be upgraded by the user without voiding your computer’s warranty. If you would like to upgrade this module, contact your dealer for instructions on sending your system in for service. The secondary module is located in the RAM compartment that is accessible on the back panel of the computer.
Refer to the following instructions and illustrations for informa-tion on how to upgrade your computer’s secondary memory module. Be sure to follow the procedures in the previous section, Before you Begin ANY Upgrade Procedure.

Chapter 06: Upgrading Your Sahara NetSlate 59
1. Turn off your computer, turn it over and place it face down on a solid, flat surface. Be careful not to place it on something rough that could damage the display screen.
2. Locate the RAM module compartment near the center of the back panel of the system, just above the docking connector. Remove the two screws that secure the RAM module compartment cover (use a #0 Philips head screw driver).
3. Lift the cover from the edge where the screw holes are located to remove it and set it aside. Inside is the RAM slot. Depending upon your system’s configuration, it will either be empty or populated with an existing module.
4. If it is empty, proceed to step 6. Otherwise, using your fingers or a small screwdriver, press the two metal restrain-ing clips on both sides of the RAM module outward and away from the module. The top edge of the RAM module should pop up slightly when freed from the restraining clips.

60 Chapter 06: Upgrading Your Sahara NetSlate
5. Gently pull out the RAM module. Try not to touch the module’s connector pins to keep them clean in case you’d like to use this module again.
6. To insert a new RAM module, align the connector pins on the bottom of the RAM module with the RAM module socket and slide the module into the socket at the same angle as when you removed it.
7. Once properly inserted in the socket, press the RAM module down flat until it clicks into place. Make sure that you have seated the module completely into it’s slot before pressing it down. When the module is properly seated, it should click right into place when you press it down. Many memory errors or boot up failures after a RAM upgrade are due to an improperly seated module.
8. Replace the cover on this compartment and then replace and tighten the screws.
Upgrading the Hard Disk Drive (HDD)
The computer’s HDD is the storage facility that holds all the files on your computer. If you find you are running out of space, you might consider upgrading to a larger drive.
Typically, when a computer’s HDD fills up, its access time begins to increase and your system seems to slow down. When this occurs, upgrading to a larger drive often will equate to better performance.

Chapter 06: Upgrading Your Sahara NetSlate 61
Your Sahara NetSlate comes pre-configured with a HDD that is easy to upgrade. Before installing a new hard drive, however, be sure to back up all of the files on your existing drive.
Refer to the following instructions and illustrations for informa-tion on how to upgrade your computer’s HDD. Be sure to follow the procedures in the previous section entitled Before you Begin ANY Upgrade Procedure.
1. Turn off your computer, turn it over and place it face down on a solid, flat surface. Be careful not to place it on something rough that could damage the display screen.
2. With the battery removed, look inside the battery compartment and you will see a black plastic strip sitting next to a metal tab held in place by a single screw. Remove the screw from the metal tab and place it somewhere safe.
3. Take hold of the plastic HDD release strip and gently pull the HDD out of its compartment as shown in the illustration. You might have to gently move the drive slightly side to side at first to work it out of the SATA and power ports.

62 Chapter 06: Upgrading Your Sahara NetSlate
4. Unscrew the existing drive from its cage and replace it with the new HDD. Once you have secured the new drive into the cage with the screws, slide it back into the HDD compartment. Be careful when sliding the drive back in to not force it. If you are properly aligned with the compartment, it should slide back in very smoothly.
5. Replace the screw into the metal tab that holds the drive cage in place. You’ll know the drive is in properly as the screw holes should align up properly. Don’t worry about getting the screw in really tight. You just want to make sure that the screw is securely in enough that the battery can safely pass over it.
6. After the HDD is securely inserted, you can insert the battery back into the battery compartment.
NOTE: Remember, if you are installing a brand new drive and are plan-ning to restore your system using the Windows XP System Restore disc that came with your Sahara NetSlate, you will need to partition the drive before attempting to restore or the procedure will fail. (See the section entitled Recovering Your System Using the System Restore DVD in the Troubleshooting chapter.)

Chapter 06: Upgrading Your Sahara NetSlate 63
This Page Left Blank Intentionally


Chapter 07: Troubleshooting 65
Chapter 07Troubleshooting
This chapter describes how to locate information and solve some of the problems you may encounter while using your Sahara NetSlate. If after reading this section, you are still unable to solve a problem, please check out more online resources at www.tabletkiosk.com/support or contact the TabletKiosk Authorized Dealer where you purchased your Sahara NetSlate Tablet PC.
See the section later in this chapter entitled Contacting Your Dealer for a list of the information you will need to supply in order to receive the proper support.
Some common hardware problems, possible causes and sug-gested solutions are presented in the following tables.
Audio Problems/Solutions
Problem Possible Cause Solution
There is no sound. The volume is either muted or turned down.
Use the Windows Volume control icon in the System Tray (lower right corner of the Task Bar near the clock) to ad-just the volume and disable muting.
No sound is audible through externally attached speakers or headphones connected to the Audio Out port on the left side of the Sahara NetSlate.
The speakers or the headphones are either connected to the wrong jack or are not securely plugged in.
Make sure to check that the speakers’ or headphone’s audio plug is securely connected to the Audio Out ( ) port on the left side of the Sahara NetSlate.
Speakers are not powered on.
Make sure the speakers are plugged in and turned on.

66 Chapter Name 07: Troubleshooting
Battery Problems/Solutions
Problem Possible Cause Solution
Beeping sound. The tablet’s battery is low and Hibernation mode is disabled.
Connect the computer to an external power source immediately.
The battery pack is warm after charging.
This is a normal condition.
No action is required.
The battery LED indicator does not light up whether the battery is charging or not.
No power is connect-ed to the computer.
Check the power source and make sure the AC adapter is securely plugged into both the Sahara NetSlate and the power outlet.
The battery is above 10% charged.
Check the battery indicator icon in the System Tray of the Windows’ Taskbar. When not attached to a power source, the LED indicator will only light up if battery power is very low.
The battery pack is nearing the end of its life.
Replace the battery pack. Use only bat-teries recommended for use with the Sahara NetSlate a230T (includes batter-ies compatible with the Sahara Slate PC i400 series Tablet PCs).
Battery charge icon is not accurately displaying the remaining charge.
Battery Pack requires calibration.
Calibrate the battery pack as specified in the chapter entitled Battery Care and Usage.
The battery pack is nearing the end of its life.
Replace the battery pack. Use only bat-teries recommended for use with the Sahara NetSlate a230T (includes batter-ies compatible with the Sahara Slate PC i400 series Tablet PCs).
Battery pack will not charge when attached to power source.
Power source voltage exceeds battery specifications.
The smart battery pack in your Sahara NetSlate will shutdown and refuse to charge is power amperage or voltage exceeds its specifications. Check to make sure the power source is within range of the power specifications listed on the AC adapter that came with your Sahara NetSlate a230T Tablet PC.
Battery pack has overheated.
Shutdown the Sahara NetSlate and allow the battery to cool down before restarting.
AC adapter is not compatible with Sahara NetSlate.
Check to make sure that the AC adapter used to charge the batteries is the unit that came with your Sahara NetSlate.

Chapter Name 07: Troubleshooting 67
Internet Problems/Solutions
Problem Possible Cause Solution
Unable to connect to the Internet.
Account for Internet Service Provider (ISP) is not properly configured.
Contact your ISP for assistance.
No valid network connection detected.
Check the network status icon in the System Tray to make sure you are con-nected to a valid network. If not, rerun the Network Set-Up Wizard or contact your Network Administrator.
Wireless transmitter is turned off.
Check the wireless power toggle on the top of the Tablet to make sure it is switched on.
Wireless security set-tings are not correct.
Make sure that the wireless security set-tings of your tablet match the settings of the wireless access point you are trying to connect to, and that the access Password (WPA), PIN (Protected Set-up), or Key (WEP) is correct.
SIM card not inserted (3G mode only)
Make sure that the SIM card provided by your wireless ISP is correctly installed in the tablet’s SIM port located in the Wireless Compartment (see the section Back View in the chapter Touring Your Sahara NetSlate for its location).
Wireless networking mode not correct. (only when optional 3G Data Module is installed)
Check the wireless power toggle on the top of the Tablet to make sure it is in the proper mode (blue = WiFi only, orange=3G only, both or purple=both active). Use the wireless mode button to place the tablet into the proper mode (see see the section Front View in the chapter Touring Your Sahara NetSlate for its location).

68 Chapter Name 07: Troubleshooting
Networking Problems/Solutions
Problem Possible Cause Solution
Cannot see the network.
Wireless transmitter is turned off.
Check the wireless power toggle on the top of the Tablet to make sure it is switched on.
Wireless networking mode not correct. (only when optional 3G Data Module is installed)
Check the wireless power toggle on the top of the Tablet to make sure it is in the proper mode (blue = WiFi only, orange=3G only, both or purple=both active). Use the wireless mode button to place the tablet into the proper mode (see the section Front View in the chapter Touring Your Sahara NetSlate for its location).
Cannot connect to network.
Wireless security set-tings are incorrect.
Make sure that the wireless security set-tings of your tablet match the settings of the wireless access point you are trying to connect to, and that the access Password (WPA), PIN (Protected Set-up), or Key (WEP) is correct.
The computer seems to connect, but doesn’t see any other computers.
Correct workgroup or domain name is not set in computer’s system properties.
Enter workgroup or domain name in “Computer Name” tab of the System Properties panel. Contact your network administrator if you don’t know the proper name to use.
Power Problems/Solutions
Problem Possible Cause Solution
The computer is connected to an external power source but does not turn on even though the battery pack is connected.
The battery pack may be defective.
Replace the battery pack. Use only bat-teries recommended for use with the Sahara NetSlate a230T (includes batter-ies compatible with the Sahara Slate PC i400 series Tablet PCs).
The Power/Standby light is off and the system turns off when it is left unat-tended.
The system has gone into Hibernation mode.
Slide the Power toggle switch to the right and hold for a second to resume.
The system will not turn on after it turns off when left unat-tended.
The system has gone into Hibernation mode because it is in a critical low-battery condition.
Connect the tablet to an external power source.
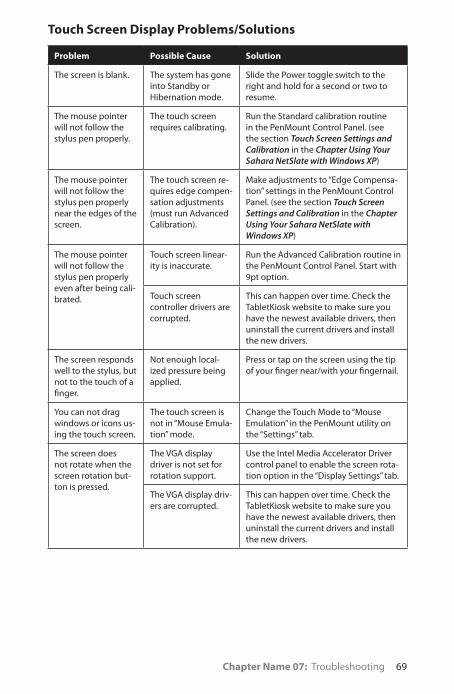
Chapter Name 07: Troubleshooting 69
Touch Screen Display Problems/Solutions
Problem Possible Cause Solution
The screen is blank. The system has gone into Standby or Hibernation mode.
Slide the Power toggle switch to the right and hold for a second or two to resume.
The mouse pointer will not follow the stylus pen properly.
The touch screen requires calibrating.
Run the Standard calibration routine in the PenMount Control Panel. (see the section Touch Screen Settings and Calibration in the Chapter Using Your Sahara NetSlate with Windows XP)
The mouse pointer will not follow the stylus pen properly near the edges of the screen.
The touch screen re-quires edge compen-sation adjustments (must run Advanced Calibration).
Make adjustments to “Edge Compensa-tion” settings in the PenMount Control Panel. (see the section Touch Screen Settings and Calibration in the Chapter Using Your Sahara NetSlate with Windows XP)
The mouse pointer will not follow the stylus pen properly even after being cali-brated.
Touch screen linear-ity is inaccurate.
Run the Advanced Calibration routine in the PenMount Control Panel. Start with 9pt option.
Touch screen controller drivers are corrupted.
This can happen over time. Check the TabletKiosk website to make sure you have the newest available drivers, then uninstall the current drivers and install the new drivers.
The screen responds well to the stylus, but not to the touch of a finger.
Not enough local-ized pressure being applied.
Press or tap on the screen using the tip of your finger near/with your fingernail.
You can not drag windows or icons us-ing the touch screen.
The touch screen is not in “Mouse Emula-tion” mode.
Change the Touch Mode to “Mouse Emulation” in the PenMount utility on the “Settings” tab.
The screen does not rotate when the screen rotation but-ton is pressed.
The VGA display driver is not set for rotation support.
Use the Intel Media Accelerator Driver control panel to enable the screen rota-tion option in the “Display Settings” tab.
The VGA display driv-ers are corrupted.
This can happen over time. Check the TabletKiosk website to make sure you have the newest available drivers, then uninstall the current drivers and install the new drivers.

70 Chapter Name 07: Troubleshooting
Upgrade Problems/Solutions
Problem Possible Cause Solution
After upgrading the computer’s RAM, the system does not boot up properly
The RAM module is not seated properly.
Following the instructions in the section entitled Upgrading Your Memory, try re-moving and reseating the RAM module.
The RAM module is the wrong specifica-tion.
If reseating the module from the above step does not solve the problem, the RAM module could be the wrong type. Contact your dealer for assistance.
The RAM module is defective.
If reseating the module from the above step does not solve the problem, the RAM module could be defective. Con-tact your dealer for assistance.
After upgrading the computer’s RAM the system begins to crash, seemingly at random intervals.
The RAM module is not seated properly.
Following the instructions in the section entitled Upgrading Your Memory, try re-moving and reseating the RAM module.
The RAM module is the wrong specifica-tion.
The RAM module could be the wrong type. Contact your dealer for assistance.
The RAM module is defective.
The RAM module could be defective. Contact your dealer for assistance.
After replacing the HDD the system can-not boot into your Operating System.
The drive is not formatted.
Restart the system with an external CD/DVD drive attached and insert the System Installation or Restore Disc that came with your computer into the drive.
The drive is not con-nected properly.
Following the instructions in the section entitled Upgrading the Hard Disk Drive (HDD), try reseating the HDD in the bay.

Chapter Name 07: Troubleshooting 71
USB Problems/Solutions
Problem Possible Cause Solution
An external device does not work when it is connected to one of the USB ports.
The external device is not receiving power.
Make sure that the external device is plugged into an electrical outlet.
The external device is defective.
Try connecting the external device to another computer to determine if it operates properly.
Windows is not rec-ognizing the device properly.
Disconnect the device, power it off, re-connect the device and then turn it on.
Disconnect the device, power it off, power it back on and then plug it back into the computer.
Try the above two solutions, but plug the device back in to the other USB port.
Disconnect the device and power it off. Shut off the Sahara NetSlate normally. Power on the device and plug it in. Power on the Sahara NetSlate.
Contacting Your Dealer
If you still have a problem, the next step is to contact the dealer where you purchased your Sahara NetSlate.
Your dealer can determine if the problem will require that the computer be taken to a service center for repair. Before you call your dealer, please have the following information available:
1. Which model do you have?
2. What is the serial number?
3. How is your computer configured? What peripheral devices are you using?
4. What messages, if any, appear on the screen?
5. What software were you running at the time of the problem?
6. What have you done already to try to solve the problem? If you have overlooked a step, your dealer may be able to solve the problem over the phone.
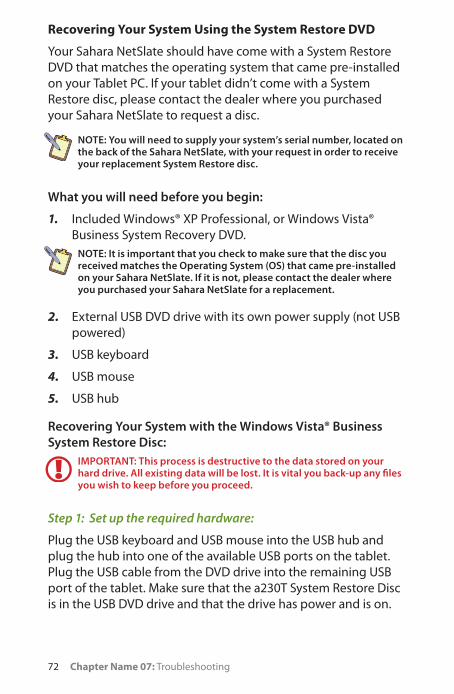
72 Chapter Name 07: Troubleshooting
Recovering Your System Using the System Restore DVD
Your Sahara NetSlate should have come with a System Restore DVD that matches the operating system that came pre-installed on your Tablet PC. If your tablet didn’t come with a System Restore disc, please contact the dealer where you purchased your Sahara NetSlate to request a disc.
NOTE: You will need to supply your system’s serial number, located on the back of the Sahara NetSlate, with your request in order to receive your replacement System Restore disc.
What you will need before you begin:
1. Included Windows® XP Professional, or Windows Vista® Business System Recovery DVD.
NOTE: It is important that you check to make sure that the disc you received matches the Operating System (OS) that came pre-installed on your Sahara NetSlate. If it is not, please contact the dealer where you purchased your Sahara NetSlate for a replacement.
2. External USB DVD drive with its own power supply (not USB powered)
3. USB keyboard
4. USB mouse
5. USB hub
Recovering Your System with the Windows Vista® Business System Restore Disc:
IMPORTANT: This process is destructive to the data stored on your hard drive. All existing data will be lost. It is vital you back-up any files you wish to keep before you proceed.
Step 1: Set up the required hardware:
Plug the USB keyboard and USB mouse into the USB hub and plug the hub into one of the available USB ports on the tablet. Plug the USB cable from the DVD drive into the remaining USB port of the tablet. Make sure that the a230T System Restore Disc is in the USB DVD drive and that the drive has power and is on.

Chapter Name 07: Troubleshooting 73
Step 2: Booting the Sahara NetSlate to the Recovery Application on the System Restore Disc:
1. Power up your Sahara NetSlate Tablet PC.
2. If your drive has an existing partition (overwriting existing OS): When prompted, press any key to boot to the recovery DVD.
If your drive doesn’t have an existing partition (new drive no OS): It will automatically load the recovery application.
3. Select the “Tools” Button and then the “Reset Partition” Button to continue.
4. Enter the partition size you wish to create for your OS. In general, you should use the number from the “Free Space” box as this will provide you with the largest system partition possible.
5. Select the File System desired: FAT32 or NTFS. Click “Next” to continue. (We recommend NTFS unless you require Windows 95/98/ME compatibility.)
6. Select “OK” to proceed with partition creation.
7. Select “OK” if you understand that this process will PERMANENTLY DELETE ALL OF THE EXISTING DATA ON THE HARD DRIVE.
8. Select “OK” once the drive has been partitioned and then “Cancel” to return to the main menu.
9. Select the “Restore Now!” Button.
10. Select “OK” to prepare the partition you created above, and then select “OK” again to restore the operating system.
11. Select “Quit” once the restore process completes to reboot your Sahara NetSlate.
12. Immediately eject the DVD or unplug the USB DVD drive from your Sahara NetSlate so the system will reboot from the restored hard drive.
74 Chapter Name 07: Troubleshooting
Recovering Your System with the Windows® XP Professional System Restore Disc:
IMPORTANT: This process is destructive to the data stored on your hard drive. All existing data will be lost. It is vital you back-up any files you wish to keep before you proceed.
Step 1: Set up the required hardware:
Plug the USB keyboard and USB mouse into the USB hub and plug the hub into one of the available USB ports on the tablet. Plug the USB cable from the DVD drive into the remaining USB port of the tablet. Make sure that the a230T System Restore Disc is in the USB DVD drive and that the drive has power and is on.
Step 2: Partitioning the Hard Drive (required for a new Hard Drive only):
If you are simply attempting to restore your Sahara NetSlate using the hard drive that came with your system, you can skip this step and proceed to Step 3.
You will need to use the software that came with your new hard drive—or another third party program of your choosing that is designed to partition hard drives—in order to create a primary system partition to house the restored OS.
NOTE: At a minimum, any bootable disc containing Microsoft’s “FDISK.EXE” utility should be sufficient. If you attempt to start the restore utility before successfully partitioning the drive, the Windows installer will crash with a B.S.O.D. displaying a “STOP: 0x07” error.
Step 3: Booting the Sahara NetSlate to the Recovery Application:
1. Power up your Sahara NetSlate Tablet PC.
2. It will start from the DVD and automatically load the recov-ery application.
3. Select “OK” to proceed with partition creation.
4. Select “OK” if you understand that this process will PERMANENTLY DELETE ALL OF THE EXISTING DATA ON THE HARD DRIVE.

Chapter Name 07: Troubleshooting 75
5. Select “Quit” once the restore process completes to reboot your Sahara NetSlate.
6. Immediately eject the DVD or unplug the USB DVD drive from your Sahara NetSlate so the system will reboot from the restored hard drive.
NOTE: If you do not, or cannot, remove the external drive from your tablet, make sure to go back into the BIOS upon restart to change the “1st BOOT” option back to the internal hard drive.
What to do After You Have Restored Your System
When your Sahara NetSlate first boots up after a successful sys-tem restoration, it will behave exactly as it did the very first time you turned it on. You will need to finish the Windows localization procedure, customize the installation (including the networking settings) and then reinstall of your applications.
Before reinstalling your applications, we recommend that you check the Downloads section of the TabletKiosk website for any drivers or applications that might have been updated after the installation disc was created.
Lastly, make sure to check the Windows Update site for any new Important or Critical patches.

Chapter 08: Specifications 77
Chapter 08Specifications
Processor
� Intel® Atom™ N270 (1.60 GHz)
� 45-nanometer process technology
� On-die, primary 32-KB instructions cache and 24-KB write-back data cache
� 533 MHz Source Synchronous Front Side Bus (FSB)
� On-die 512-KB, 8-way L2 cache
� Intel® Streaming SIMD Extensions-2 and -3 (Intel® SSE2 and Intel® SSE3) support and Supplemental Streaming SIMD Extension 3 (SSSE3) support
� Intel® Hyper Threading Technology (2 Threads)
� Intel® Enhanced SpeedStep® Technology
� Execute Disable Bit support for enhanced security
� VCCA 1.5V
� VCCP 1.05V
Chipsets
� Intel® 945 GSE Express North Bridge with 533 MHz and 667 MHz FSB support
� Intel® ICH7-M South Bridge with 2.0 GB/s full duplex DMI, PCI Express 1.0a
� ACPI 1.0b and 2.0 Compliant, supports C0-C4, S0, S3-S5 power states, Intel® SpeedStep® Technology

78 Chapter Name 08: Specifications
Power Management
� ACPI 1.0b and 2.0 compliant
� ACPI S0, S3, S4, S5
� CPU states C0, C1, C2, C3, C4 states
� PCI Express Link states: L0, L0s, L1, L2, L3
� Rapid Power Management
� HSLPCPU# output
� DPWR# support
Memory
� 2x SODIMM DDR2 (Unbuffered, 64-bits/channel) slots with configurations of 1.0 GB - 2.0 GB
� Supports Single Channel, 533 MHz DDR2 SDRAM
Battery
� Rechargeable 6-Cell Lithium-Ion (3S2P) Smart Battery Pack (3800 mAh @ 11.1 V, 42W/hr)
� Over Charge Protection, Over Discharge Protection, Over Current and Output Short Protection, Over Thermal Protec-tion
Hard Drive
� 2.5” 9.5 mm, Ultra DMA SATA 150 MB/s
� Configurations from 80 GB @ 5,400 rpm (standard)
� Configurations from 80 GB @ 7,200 rpm (optional)
� Configurations from 16 GB Solid State Drives (SSD optional)
Video
� Intel® GMA 950 PCI Express, 250 MHz core render clock at 1.05V core
� DirectX 9.1 compatible
� Intel® Dual Frequency Graphics Technology

Chapter Name 08: Specifications 79
� Intel® Dynamic Video Memory Technology 3.0
� Intel® Smart 2D Display Technology
� High performance MPEG-2 decoding
� VLD/iDCT hardware acceleration
� Windows® Aero (Glass) Technology capable
� Screen rotates 0°, 90°
� 1024 x 768 Landscape, 768 x 1024 Portrait
� Dual display support
� External Display up to UXGA (1600x1200) with CRT Hot Plug support (when paired with optional Docking Cradle)
Display
� Toshiba LTD121KCAV 12.1” TFT XGA LCD Wide Angle Display
� TransTouch Technology Passive Resistive Touch Screen
� PenMount 6000 USB Controller Chipset (PM6300)
� 160 points per second sample rate
� 1024 x 1024 resolution
Audio
� Intel® High Definition Audio Interface (ICH7-M)
� Independent Bus Master Logic for eight (8) general purpose streams: 4 in / 4 out
� ALC262-VC2-GR HD Codec
� AC ‘97 Compatible
� Multichannel 32-bit / 44.1KHz/48KHz/96KHz/192KHz sampling rate output (DAC)
� Multichannel 32-bit / 44.1KHz/48KHz/96KHz sampling rate input (ADC)
� Built-in Stereo Speakers and Dual Digital Microphone Array for added fidelity and accuracy
� 3.5 mm Headphone & Microphone Plug ‘n Play Jacks

80 Chapter Name 08: Specifications
WiFi Wireless
� Intel® WiFi Link 5100 PCIe Half Mini Card with Power ON/OFF Switch
� MIMO (Multiple Input, Multiple Output) support 802.11n with 1x2 MIMO
� Dual-Band/Quad-Mode support (IEEE 802.11a/b/g/n), compatible with IEEE 802.11d /e (Quality of Service [QoS]), 802.11h, and European Telecommunication Standards Institute [ETSI] specifications), and IEEE 802.11i (pre-authen-tication)
� Reduced power consumption in idle associated (25mW)
� EIT v4.0 support
� Automatic switching between the two bands (2.4 GHz and 5.0 GHz)
� Uses the 5.170 to 5.825-GHz Industrial, Scientific, and Medical (ISM) frequency band as defined by the IEEE 802.11a specification
� Uses the 2.412- to 2.497-GHz ISM frequency band defined by the IEEE 802.11b/g specifications
� Can operate on a 40MHz wide channel
� Provides 128- and 64-bit WEP encryption, hardware AES (support for key sizes of 128 bits, 192 bits, and 256 bits)
� Hardware capability to support Cisco* Compatible Exten-sions v1/2/3/4
� Supports IEEE 802.11 Power Save Protocol (PSP)
� Supports Basic Service Set (BSS) (AP) and Independent Basic Service Set (IBSS) (peer-to-peer) modes (in legacy 802.11b/g only)
� Supports Intel® Wireless Coexistence System (WCS) Phase II for Bluetooth® devices
� Supports WiFi-WiMAX coordination
� Wake on WLAN (WoWLAN) support
Chapter Name 08: Specifications 81
Bluetooth® Wireless
� Billionton GUBTCR42M Bluetooth® 2.1+EDR built-in USB module with Power ON/OFF Switch
3G/3.5G WWAN Data Module (optional)
� Sierra Wireless MC8790 HSUPA PCI Express Mini Card
� Qualcomm MSM6290™ chipset
� Supports tri-band UMTS(HSPA): 850, 1900, and 2100 MHz
� Supports quad-band EDGE/GPRS/GSM: 850/900/1800/1900 MHz
TPM Security
� Infineon Single-Chip SLB 9635 TT 1.2 Trusted Platform Module (TPM)
� Trusted Group Computing (TCG) v1.1B / v1.2 compliant
� Security architecture based on Infineon security controller family
� ROM for TCG firmware
� EEPROM for TCG firmware and data
� Hardware hash accelerator for SHA-1 algorithm
� Advanced Crypto Engine (ACE) for asymmetric key opera-tions (up to 2048-bit key length)
� Power saving sleep mode
I/O Ports
� 2x USB 2.0
� 1x DC-In
� 1x 3.5mm Audio Out, 1x 3.5mm Audio In
� 1x Cradle Connector (Optional Docking Cradle adds 4x USB 2.0 ports, 1x IEEE1394a port, 1x 15-pin D-Sub connector (VGA), 1x RJ45 jack for 10/100 Mbps Ethernet LAN, 1x DC-In with power pass-thru)
82 Chapter Name 08: Specifications
Weight
� 1.62 kg (3.57 lbs.) with standard battery pack
Measurements
� 300 mm x 220 mm x 26 mm (11.81 in x 8.66 in x 1.02 in)
Case Color
� Black
LED Indicators
� Power (ON: blue, Standby: blinking)
� Battery (Charging: orange, Low (<10%): orange blinking, Fully charged with DC connected: green)
� Hard Drive (Activity: blue blinking)
� Wireless Networking (WiFi ON: blue, 3G ON (optional): amber, Both WiFi & 3G ON: both or purple)
� Bluetooth® (ON: blue)
Function Buttons (Left Front)
� SAS (Ctrl+Alt+Del)
� Screen Rotation
� Volume Up
� Volume Down
Function Buttons (Right Front)
� User Programmable
� Wireless Mode Toggle (when optional 3G Data Module installed) and User Programmable (without optional 3G)
� User Programmable
� User Programmable

Chapter Name 08: Specifications 83
Control Switches (Top)
� Power Switch
� Wireless Networking Transmitter On/Off
� Bluetooth® Transmitter On/Off
AC Adapter
� Input voltage (nominal): 100 ~ 240 Vac
� Input voltage (maximum): 90 ~ 265 Vac
� Input Frequency: 47 ~ 63Hz
� Input current: 1.7A maximum at 90 Vac
� Output voltage: 20V ~ 21.4V DC
� Output current: 3.25A maximum
� Output power: 65W maximum
� SCP: Short Circuit Protection plus Auto-Recovery Function
� OVP: Over-Voltage Protection, Latch Mode, up to 27.0Vdc maximum
� OCP: Over-Current Protection, Auto-Recovery, up to 5.5A maximum
� OTP: Over-Temperature Protection to prevent catastrophic failure from overheating.
Operating Environment
� Temperature: +5°C ~ +35°C (+41°F ~ +95°F)
� Humidity: 20% ~ 80% (without condensation)
Storage Environment
� Temperature: -20°C ~ +65°C (4°F ~ 149°F)
� Humidity: 20% ~ 80% (without condensation)


310 782.1201 tel310 782 1205 fax
www.tabletkiosk.com
UG.a230.rev.06.24.09