user’s guide - freestyleserver.com · user’s guide diabetes management ... • patients can...
TRANSCRIPT

User’s Guide
Diabetes Management SoftwareFor use with FreeStyle Optium Neo and FreeStyle Precision Neo

Table of Contents
Important Information about the FreeStyle Auto-Assist Neo Software. . . . . . 1Purpose . . . . . . . . . . . . . . . . . . . . . . . . . . . . . . . . . . . . . . . . . . . . . . . . . . . . . . . . . . . . . . . . . . . . . . .1Intended Use. . . . . . . . . . . . . . . . . . . . . . . . . . . . . . . . . . . . . . . . . . . . . . . . . . . . . . . . . . . . . . . . . .2System Requirements . . . . . . . . . . . . . . . . . . . . . . . . . . . . . . . . . . . . . . . . . . . . . . . . . . . . . . . . .2
Connecting the Meter . . . . . . . . . . . . . . . . . . . . . . . . . . . . . . . . . . . . . . . . . . . . . . . . . . . . . . . 3Setting Time and Date . . . . . . . . . . . . . . . . . . . . . . . . . . . . . . . . . . . . . . . . . . . . . . . . . . . . . . . . .3
Getting to Know the FreeStyle Auto-Assist Neo Software . . . . . . . . . . . . . . . . . . . 4
Creating Reports. . . . . . . . . . . . . . . . . . . . . . . . . . . . . . . . . . . . . . . . . . . . . . . . . . . . . . . . . . . . . 6Types of Reports. . . . . . . . . . . . . . . . . . . . . . . . . . . . . . . . . . . . . . . . . . . . . . . . . . . . . . . . . . . . . . .7Setting Report Parameters . . . . . . . . . . . . . . . . . . . . . . . . . . . . . . . . . . . . . . . . . . . . . . . . . . . . .9Print, View and Save Reports . . . . . . . . . . . . . . . . . . . . . . . . . . . . . . . . . . . . . . . . . . . . . . . . . 11
Insulin Settings (for Healthcare Professionals Only) . . . . . . . . . . . . . . . . . . . . . . . . 12Overview. . . . . . . . . . . . . . . . . . . . . . . . . . . . . . . . . . . . . . . . . . . . . . . . . . . . . . . . . . . . . . . . . . . . 13Setting Up Long-Acting Insulin Base Doses . . . . . . . . . . . . . . . . . . . . . . . . . . . . . . . . . . . 16Setting Up Meal Insulin Base Doses . . . . . . . . . . . . . . . . . . . . . . . . . . . . . . . . . . . . . . . . . . 17Setting Up Basal Titration . . . . . . . . . . . . . . . . . . . . . . . . . . . . . . . . . . . . . . . . . . . . . . . . . . . . 18Setting Up Mealtime Correction (Using a Table). . . . . . . . . . . . . . . . . . . . . . . . . . . . . . . 22Setting Up Mealtime Insulin Correction (Using a Correction Factor). . . . . . . . . . . . 24
Printing and Saving Insulin Settings. . . . . . . . . . . . . . . . . . . . . . . . . . . . . . . . . . . . . . . . 26
Creating Insulin Settings Templates (for Healthcare Professionals Only) . . . 26Saving a New Template . . . . . . . . . . . . . . . . . . . . . . . . . . . . . . . . . . . . . . . . . . . . . . . . . . . . . . 27Using an Existing Template . . . . . . . . . . . . . . . . . . . . . . . . . . . . . . . . . . . . . . . . . . . . . . . . . . 28
Other Meter Settings . . . . . . . . . . . . . . . . . . . . . . . . . . . . . . . . . . . . . . . . . . . . . . . . . . . . . . . 29Setting Time & Date . . . . . . . . . . . . . . . . . . . . . . . . . . . . . . . . . . . . . . . . . . . . . . . . . . . . . . . . . 29User Profile . . . . . . . . . . . . . . . . . . . . . . . . . . . . . . . . . . . . . . . . . . . . . . . . . . . . . . . . . . . . . . . . . . 29
Additional Features. . . . . . . . . . . . . . . . . . . . . . . . . . . . . . . . . . . . . . . . . . . . . . . . . . . . . . . . . 31Troubleshooting. . . . . . . . . . . . . . . . . . . . . . . . . . . . . . . . . . . . . . . . . . . . . . . . . . . . . . . . . . . . . 33Getting More Help. . . . . . . . . . . . . . . . . . . . . . . . . . . . . . . . . . . . . . . . . . . . . . . . . . . . . . . . . . . 34
Customer Services . . . . . . . . . . . . . . . . . . . . . . . . . . . . . . . . . . . . . . . . . . . . . . . . . . . . . . . . . . 35

1
Important Information about the FreeStyle Auto-Assist Neo Software
PurposeFreeStyle Auto-Assist Neo software is designed to help you get the most out of the FreeStyle Optium Neo and FreeStyle Precision Neo Blood Glucose and Ketone Monitoring Systems.
• Patients can generate, view and print reports and change their meter settings.
• Healthcare professionals can generate, view and print reports and configure the insulin settings that the patient will see on the meter.
This user’s guide will explain how to perform these tasks on the software. Additional information is
available in the software when you see this symbol:
CAUTION: Do not use FreeStyle Auto-Assist Neo software to upload data from any device that has stored data for more than one person. FreeStyle Auto-Assist Neo software assumes that the data on the device is from one individual.
IMPORTANT: Patients should always consult their healthcare professional if they have any questions or concerns about their diabetes management or results.

2
Intended UseFreeStyle Auto-Assist Neo software is intended for use by patients and their healthcare professionals to aid in the review, analysis and evaluation of information such as blood glucose test results, blood ketone test results and other data uploaded from a meter, such as insulin doses, in support of an effective diabetes health management programme. The software is not intended for the diagnosis of or screening for diabetes mellitus.
The software can configure the meter to provide the user with suggested recommendations for insulin doses based on healthcare professional entered data.
System RequirementsA computer running one of the following operating systems:
• Microsoft® Windows 7 (32 or 64 bit)
• Microsoft® Windows 8 (32 or 64 bit)
• Microsoft® Windows XP (Service Pack 3)
At a minimum, a computer with a USB 2.0 compliant hub with a dual-core 2.4 GHz processor, 2 GB RAM are required. Adobe® Reader is recommended to view PDF-formatted reports.

3
Connecting the MeterIn order to create reports or change meter settings, the meter must be connected to the computer. A USB cable is provided in the system kit. Plug one end into the USB port on the meter and the other end into the USB port on the computer. Use only the USB cable included with the system kit. If you have connected the meter but the software does not recognise it, go to the Troubleshooting section of this user’s guide.
Setting Time and DateThe correct time and date are required on the meter, as this affects the data in reports.
You may be asked to update the time on the meter when it is connected to FreeStyle Auto-Assist Neo software. When you click Update, the meter time will change to match the current time on the computer.
WARNING: To avoid the possibility of electric shock, never perform a blood glucose test while the meter is connected to the computer.

4
Getting to Know the FreeStyle Auto-Assist Neo Software
The Home Screen allows you to access the different features of the software for generating reports and changing meter settings. Once the meter is connected and recognised by the software, the following buttons will appear on the Home Screen:
Other Meter SettingsModify settings including date, time, and target glucose range.
Insulin SettingsModify insulin settings for long-acting insulin and mealtime insulin.
Welcome to FreeStyle Auto-Assist Neo
PATIENT ID#:
METER TIME:
METER DATE:
99999
10:30
5/7/2012
12345678-ABCDESERIAL:
Rosemary S. Hampton
Meter Connected
Create ReportsCreate, view, save and print a variety of reports.

5
Create Reports
Patients and their healthcare professionals go here to create and print a variety of blood glucose reports. Reports may also be saved to the computer as a PDF.
Insulin Settings
Healthcare professionals may set up this section using an access code. Patients may view and print but not edit insulin settings if they were previously configured on the meter.
Once the correct code is entered, the insulin settings may be edited and then saved to the meter. Insulin settings may include one or more of the following:
• Long-acting insulin base doses
• Meal insulin base doses
• Mealtime insulin corrections
• Basal titration feature
Other Meter Settings
This is the place to edit the following:
• Name or patient ID
• Time and date
• Hyper/hypoglycaemic trend indicators
IMPORTANT: Work with your healthcare professional to understand your report data.

6
Creating Reports
The Create Reports screen lets you select reports and set report parameters. Selected reports can be viewed, printed and saved as a PDF. The most recent parameters will be saved.
Home
Create ReportsSelect Reports
Snapshot
Daily Log
Dose Plan
Modal Day
BasalTitration
Mealtime Patterns

7
Types of Reports
Report What It Does
The Snapshot report is a general summary of data for the specified date range. It also includes notes to inform patients and their healthcare professionals about important trends in blood glucose data by putting the data into words. Up to 6 notes are displayed at any one time.
The Modal Day report shows the daily pattern of blood glucose results over the specified date range.
The Daily Log report is a table of blood glucose results and other values, such as ketone test results and insulin doses, for each day in the specified date range.
NOTE: Insulin doses are only available if logged in the meter.

8
Report What It Does
The Basal Titration report compares fasting blood glucose levels with long-acting insulin doses over a 12-week period. The report also shows when long-acting insulin doses have been adjusted based on fasting blood glucose trends.
The Mealtime Patterns report compares the before-meal and after-meal blood glucose levels for breakfast, lunch and dinner, over the specified date range. This report also shows before- and after-meal averages and logged insulin.
The Dose Plan report shows all current insulin settings on the meter.

9
Setting Report ParametersThese parameters are used in the software reports and are not saved on the meter. They are set within the Set Report Parameters window.
Timeframe The timeframe selects the date range that will be used for all reports. You can select the last 1 to 4 weeks or you can select a custom start and end date. The timeframe defaults to the one previously used to generate a report, unless it was previously selected using a custom start and end date.
Target Glucose Range
The target glucose range is displayed on some glucose graphs and is used to calculate your time in target. You can select a range within70 to 200 mg/dL (3.9 to 11.1 mmol/L).
NOTE: Your blood glucose target range and hyperglycaemic or hypoglycaemic threshold preferences will only be used in the reports and will not change any meter settings.

10
Low-Glucose Threshold
Blood glucose levels that are below the low-glucose threshold will be specifically marked on the reports by either a red down arrow or the glucose value will be outlined in red.
Pre-Meal Target This is the target blood glucose level for readings immediately before a meal. The mealtime patterns report uses this for comparing readings with the desired range.
Post-Meal Target This is the target blood glucose level for readings 1, 2 or 3 hours after a meal. The mealtime patterns report uses this for comparing readings with the desired range.

11
Print, View and Save Reports
When the report parameters are set, you can choose to Print or View the reports.
NOTE: A name or patient ID must be added to the User Profile in order to Print or View reports.
The software will display a print window. Confirm the printer settings, then select Print.
The software will display the selected reports. Navigate through these reports to view them on screen either by selecting the report name from the dropdown menu or by clicking through the pages (for example, 1/6)
• The , and buttons can be used to fit the report within the window, zoom out and zoom into the report on the screen.
• The Back button goes back to the Create Reports screen. Report parameters can then be changed and the reports can be viewed again.
• The Save button prompts you to save the reports to the computer as a PDF.
• The Print All button opens the standard print window to allow printing.

12
Insulin Settings (for Healthcare Professionals Only)To use the insulin features, healthcare professionals must first set up Insulin Settings with an access code.
To set up the insulin settings feature, follow these steps:
Step Action
1 Click Insulin Settings on the Home Screen.
2 Click Set Up Insulin.If insulin settings have already been configured on the meter, the button will say Edit Insulin.
3 Enter the access code when prompted.
CAUTION: Abbott Diabetes Care provides the access code to healthcare professionals only. The set up of this feature is intended for healthcare professionals only who have an understanding of insulin use. Misuse or misunderstanding of this feature may lead to inappropriate insulin dosing.

13
OverviewOnce the access code has been entered, a healthcare professional may begin to configure Insulin Settings. When complete, click Save to Meter.
Home
Insulin SettingsInsulin setting templates
Load saved file | Save as new file
Long-Acting Insulin Base Doses
UNITS UNITS
OffBasal Titration (optional)
Meal Insulin Base Doses
UNITS UNITS UNITS
OffCorrection (optional)
Dose Logging Reset Time: 04:00
Insulin Name (optional) Insulin Name (optional)
Save to MeterCancel
10Morning Evening Breakfast Lunch Dinner
1 3
4
5
2

14
1 Long-Acting Insulin Base Doses
Long-acting insulin may also be called “basal” or “background” insulin. It refers to insulin that works throughout the day and night to provide a steady level of insulin in the body.
2 Basal Titration
Click Basal Titration On. Once On, you will be able to set parameters for how the patient should titrate to the optimal dose, based on the patient’s fasting blood glucose readings.
This feature will only work if:
• One long-acting insulin base dose is entered (morning or evening) and
• No meal insulin doses are entered
3 Meal Insulin Base Doses
Meal insulin may also be called “rapid-acting”, “short-acting” or “bolus” insulin. It refers to the insulin taken at meal times to cover food the patient eats and this feature is only associated with meals not different times of day.
15
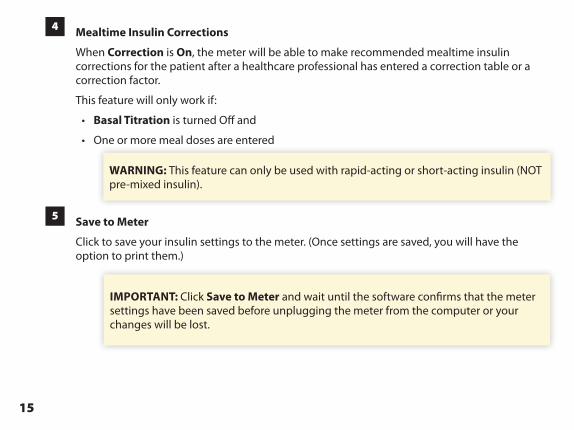
4 Mealtime Insulin Corrections
When Correction is On, the meter will be able to make recommended mealtime insulin corrections for the patient after a healthcare professional has entered a correction table or a correction factor.
This feature will only work if:
• Basal Titration is turned Off and
• One or more meal doses are entered
5 Save to Meter
Click to save your insulin settings to the meter. (Once settings are saved, you will have the option to print them.)
WARNING: This feature can only be used with rapid-acting or short-acting insulin (NOT pre-mixed insulin).
IMPORTANT: Click Save to Meter and wait until the software confirms that the meter settings have been saved before unplugging the meter from the computer or your changes will be lost.

16
Setting Up Long-Acting Insulin Base Doses“Long-acting insulin base doses” refers to doses that the patient takes each day, not including any corrections made for basal titration (those will be entered separately).
Step Action
1 Enter the number of long-acting insulin units the patient takes in the appropriate field(s).
2 When all units are entered, click Save to Meter.

17
Setting Up Meal Insulin Base Doses“Meal insulin base doses” refers to doses that the patient takes specifically for breakfast, lunch or dinner, not including any corrections made for mealtime insulin corrections (those will be entered separately).
Step Action
1 Enter the number of meal insulin units the patient takes in the appropriate box(es).
• If the patient does not take a base dose, but does adjust at mealtime, enter a ‘0’ (zero) for base dose.
• If the patient does not take any insulin for a particular meal, leave the base dose field(s) blank.
2 When all units are entered, click Save to Meter.
What about pre-mixed insulin? If the patient takes pre-mixed insulin (a mix of intermediate-acting and rapid-acting or short-acting insulin combined in one dose) the pre-mixed doses may be entered under Meal Insulin Base Doses. However, the basal titration and mealtime insulin corrections feature cannot be used with pre-mixed insulin.

18
Setting Up Basal TitrationThe meter includes the capability to increase or decrease a patient’s base dose of long-acting insulin based on fasting glucose trends.
Step Action
1 Enter the number of long-acting insulin units the patient takes in either the Morning or the Evening entry field.
2 Click the Basal Titration On.
Basal Titration (optional) On
This feature can only be turned On when
• One long-acting insulin base dose is entered (morning or evening) and
• No meal insulin doses are entered

19
Step Action
3 Enter a blood glucose target range. If the patient’s average fasting blood glucose is within this target range, the dose will not change.
• If the average is above the target range, the dose will titrate up by the number of units you enter in Step 5.
• If the average is below the target range , the dose will titrate down by the number of units you enter in Step 5.
• To enter a single target (instead of a range), set the “low” and “high” fields to the same number.
4 Enter the number of days to average for titration.
Example: If you enter a ‘3,’ the dose will titrate to the next increment after three fasting blood glucose have been logged by the patient and the average fasting blood glucose is above or below the target range in Step 3.

20
Step Action
5 Enter the units of insulin to add or subtract when titration occurs.
Example: If you enter ‘2’ here, the next scheduled long-acting dose will be adjusted up or down by two units when titration occurs.
6 Enter the maximum titrated dose. This is the maximum dose the meter will suggest for long-acting insulin.
7 Set Auto Shut-Off. If left in the default position On, titration will stop once the average fasting glucose is within range for three consecutive titration periods. If the toggle is switched to Off, the meter will continue to monitor for results above or below the blood glucose target and adjust the base dose on an ongoing basis.

21
Step Action
8 Set Night-time Hypoglycaemic Check. The default position is Off. When On, the patient will be required to perform a blood glucose test within the three hours preceding the Dose Logging Reset time.
Example: If Dose Logging Reset time is set for 04:00, the Night-time Hypoglycaemic Check test window would be 01:00 to 04:00.
Step 8a. If Night-time Hypoglycaemic Check is On, you must enter a Night-time Hypo Limit. The patient will be required to perform one overnight blood glucose test during each titration period before a new long-acting dose will be given. If the patient’s blood glucose is below the night-time hypoglycaemic limit, then the next scheduled long-acting dose will automatically titrate down by the number of units you entered in Step 5.
9 Click Save to Meter.

22
Setting Up Mealtime Correction (Using a Table)
Step Action
1 Enter the number of rapid-acting or short-acting insulin units the patient takes at each meal.
2 Click Correction On.
Correction (optional) On
Having trouble turning the Basal Titration feature On? Make sure that one long-acting insulin base dose is entered. Make sure Correction is Off and no values are entered in the Rapid-Acting Base Doses. Basal titration will not work if there are any rapid-acting doses entered or if the patient is on a split long-acting dose.

23
Step Action
3 When setting up the meter for the first time, a correction table will appear at the bottom of the page. (You may need to scroll down.) Fill out the table with the desired values for blood glucose ranges and their corresponding insulin correction values.
NOTE: If the meter has been configured previously for a correction factor, click By Table to complete this step.
By Table By Factor
4 When the table is complete, click Save to Meter.

24
Correction Table: Helpful Tips
• Click Different correction for each meal On if you would like to enter unique correction values for each meal. (If left Off, the single correction will apply to all meals for which there is a base dose entered.)
• Click Add Range at the bottom of the table to add new rows. (The table can have between 3 and 20 rows.)
• Place the cursor anywhere over a row and click on that appears on the left to delete that row.
• To enter a negative correction, enter a - (minus) and a number in the insulin unit field.
Setting Up Mealtime Insulin Correction (Using a Correction Factor)
Step Action
1 Enter the number of rapid-acting or short-acting insulin units the patient takes at each meal.
2 Click Correction On.
Correction (optional) On

25
Step Action
3 A correction table will appear at the bottom of the page. (You may need to scroll down.) Click By Factor.
By Table By Factor
NOTE: If the meter has been configured previously for a correction factor, the screen will automatically show the By Factor view.
4 Enter the patient’s target blood glucose range. If the patient’s blood glucose is within this range, the meter will not suggest a correction dose.
5 Enter a correction factor. A correction factor may also be referred to as an “insulin correction factor” (ICF) or “sensitivity factor.” It determines how many points the patient’s blood sugar will drop with one unit of rapid-acting or short-acting insulin.
Example:
A correction factor of 50 means one unit of insulin drops the blood glucose by 50 mg/dL.
A correction factor of 2.8 means one unit of insulin drops the blood glucose by 2.8 mmol/L.
6 Click Save to Meter.

26
Printing and Saving Insulin Settings
There are two times when you will have the option to print your insulin settings. In both cases, the meter must still be connected to the software.
• After configuring insulin settings and clicking Save to Meter, you will see the option to Print or Save as PDF.
• When re-connecting a meter that has already been set up, you should see a button on the lower left of the Insulin Settings page that says Print. You may print the settings or save them as a PDF, even if you do not have an access code.
Creating Insulin Settings Templates (for Healthcare Professionals Only)
An Insulin Settings Template is a group of settings that you create and then save as a document on the computer. Later, you may import that group of insulin settings back into the software when setting up a new meter.
Healthcare professionals who frequently set up meters can use these templates to save time. For example, if you use the same correction table for certain types of patients, you may save those settings as a template. When setting up a new meter for the same type of patient, you can import or load a saved template instead of re-entering the table. Settings can be edited before saving them to each meter.

27
Saving a New Template
Step Action
1 Fill out the insulin settings form in the software.
2 Prior to saving the insulin settings to the meter, click the Save as a new file link in the upper right corner of the screen.
NOTE: To save the insulin settings to the meter, click Save to Meter.
3 Follow the on-screen instructions for saving your document to the computer. Make sure to give the file a name that will be easy to recognise later, especially if you plan to save different templates for different types of patients.Examples: “Male Type2” or “New Basal Patient”

28
Using an Existing Template
Step Action
1 Connect your patient’s meter and go to Insulin Settings.
2 Click the Load saved file link in the upper right corner of the screen.
3 Follow the on-screen instructions for selecting your saved file and importing it into the software.
4 You will see your previously saved values on the Insulin Settings page.
5 Make any needed changes to the settings on the screen. These changes will only be applied to the meter that is connected, not the template.
6 When the settings on your screen are complete, click Save to Meter.

29
Other Meter Settings
Setting Time & DateIt’s important that the time and date are accurate. If you would like to update, go to the Home Screen, click on Other Meter Settings and go to the meter time and date area. Click Update to sync the meter time and date to the computer.
User Profile
User Profile
Patient ID (optional)
Name Rosemary S Hampton
94768572
The patient’s name and ID can be saved to the connected meter, but are not visible anywhere on the meter itself. The profile information is only visible within the software when the meter is connected.

30
Step Action
1 Click Other Meter Settings.
2 Enter the patient’s name and/or ID number (optional).
3 Click Save to Meter.
Hypo | Hyperglycaemic Trend Indicators
Hypo | Hyperglycaemic Trend Indicators
Hypo | Hyperglycaemic Trend IndicatorsOff
–
When the Hypo | Hyperglycaemic Trend Indicators is On, the meter will notify the patient with a if the patient’s blood glucose is below the set low glucose threshold or a if the patient’s blood
glucose is above the set high glucose threshold. The meter will also use these ranges to determine patterns. Click Save to Meter.

31
Additional Features
Software Update If a software update is available, a message will appear on the Home Screen. Follow the on-screen instructions to perform the update.
Uninstall Uninstall the software using the uninstall procedure on the computer’s operating system. Uninstalling the software will erase the installation files. Any reports that were saved on the computer can still be viewed as a PDF even if the software is uninstalled.

32
Auto-Launch From the menu bar at the top of the screen, click File. From the drop down, click on Auto-Launch to check and uncheck.
When Auto-Launch is checked, FreeStyle Auto-Assist Neo software will automatically start and upload data when a compatible meter is connected to your computer.
When Auto-Launch is unchecked, FreeStyle Auto-Assist Neo software must be started manually. Once started, data will upload automatically when a meter is connected.
NOTE: If you are using any other software programme or application that communicates with Abbott Diabetes Care meters, the Auto-Launch feature must be unchecked and the FreeStyle Auto-Assist Neo software closed before the other application can communicate with the connected meter.
Auto-Save Auto-Save is accessible through the File menu on the top menu bar. If Auto-Save is enabled, the software will automatically save your reports whenever you print or view them.

33
TroubleshootingIf the computer does not recognise the meter, check the following:
• Using a supported meter? The software only supports the FreeStyle Optium Neo and FreeStyle Precision Neo meters.
• Only one meter connected? The software may not work when multiple meters are connected. Make sure only one meter is connected to the computer at any given time.
• Secure connection? Ensure that the cable is securely connected to both the meter and the computer.
• Exit and restart the software. If the meter is still not recognised, exit the software and try again.
If you continue to have difficulty, contact Customer Care.

34
Getting More HelpAdditional information is available within the software when you see:
Symbol What It Does
Gives general help information about specific features or functionality.
Describes specific errors that must be corrected before saving settings to the meter.
Highlights settings in the correction table that may have been created in error.

35
Customer Services
For a printed copy of this User’s Guide, contact Customer Services.Contact the Abbott Diabetes Care Customer Services for your country (www.AbbottDiabetesCare.com).

FreeStyle Auto-Assist Neo Software User’s GuideDisclaimers and Limitations of LiabilityThe information contained in this Guide, including but not limited to any product specifications, is subject to change without notice. For the most up-to-date information, please visit our website, www.AbbottDiabetesCare.com.Abbott Diabetes Care makes no representations or warranties of any kind concerning the contents of this Guide. To the maximum extent permissible under applicable law, under no circumstances will Abbott Diabetes Care be liable for any loss or other damages pertaining to the use of this Guide.
Copyright and TrademarksThis document is the property of Abbott Diabetes Care Inc. and shall not be reproduced, distributed, disclosed, or used for manufacture or sale of Systems without the express written consent of Abbott Diabetes Care Inc.Permission is granted to print copies of this document for use solely by the FreeStyle Auto-Assist Neo software user.FreeStyle and related brand marks are trademarks of Abbott Diabetes Care Inc. in various jurisdictions.Other trademarks are the property of their respective owners.Patents: www.abbott.us/patents
Description of Symbols
Manufacturer
CE Mark
In vitro diagnostic medical device
Catalogue Numberwww.AbbottDiabetesCare.com©2014 Abbott. All rights reserved. Published in USAART30252-001 Rev. B 03/14
Abbott Diabetes Care Ltd.Range RoadWitney, OxonOX29 0YL, UK