user’s manual -...
TRANSCRIPT
. . . . . . . . .
. . . . . .. . . .
. . . . . . . . . .
CoPilot
User’s Manual
Flight Planning Software for Palm OS® Handhelds
Laurie J. Davis
Version 5.3
CoPilot User’s Manual
1
. . . . . . .. . .
CoPilot User’s Manual
Flight Planning Software for Palm OS® Handhelds
General Description................................................................................................................................................... 1 Component Overview ............................................................................................................................................... 2 Menus......................................................................................................................................................................... 3 Measurement Units.................................................................................................................................................... 3 Database Entry........................................................................................................................................................... 4
Edit Aircraft Form ........................................................................................................................................... 4 Edit Pilot Form ................................................................................................................................................ 7 Edit Waypoint Form......................................................................................................................................... 7
Trip Planning ............................................................................................................................................................. 9 Flight Description Form.................................................................................................................................. 9 Route Form..................................................................................................................................................... 10 Weight & Balance Form................................................................................................................................ 14 Flight Plan Form ........................................................................................................................................... 15
IFR Operations ........................................................................................................................................................ 16 Flight Segments ....................................................................................................................................................... 17 E6B Functions ......................................................................................................................................................... 19 Cost Estimates ......................................................................................................................................................... 20 Printing..................................................................................................................................................................... 21 Map Intersections .................................................................................................................................................... 22 External Memory..................................................................................................................................................... 23 Appendix A: Tips & Tricks .................................................................................................................................... 24
General ........................................................................................................................................................... 24 Flight Description Form................................................................................................................................ 24 Route Form..................................................................................................................................................... 25 Edit Leg Form ................................................................................................................................................ 25 Edit Waypoint Form....................................................................................................................................... 26 Edit Aircraft Form ......................................................................................................................................... 26
Appendix B: Weight & Balance Database Entry .................................................................................................. 27 Appendix C: Sample Aircraft Data ........................................................................................................................ 28
General Description
CoPilot is an application program for Palm OS® handhelds that performs flight-planning calculations – the
calculations that are normally performed with a ruler, a protractor and an E6B calculator. CoPilot does time,
distance, heading, fuel, and weight & balance calculations. It prepares flight plans (Canadian, American, and
ICAO formats) with all the information required when calling the FSS. It also has utilities to aid in plotting
routes on a map. CoPilot stores the data for all flights in the flight database.
Install CoPilot by double clicking on the CoPilot.prc file and then perform a HotSync. CoPilot requires that
MathLib be installed on the Palm OS® handheld to support trigonometric functions. Install MathLib by
double clicking on the MathLib.prc file and then perform a HotSync. Some devices (such as the Handspring
Visor) have MathLib built in; therefore it does not need to be installed. CoPilot requires Palm OS® 3.5 or higher in order to operate, and occupies approximately 325K of memory (excluding MathLib). CoPilot also
requires HotSync version 2.1 or higher.
CoPilot User’s Manual
2
Component Overview
Before planning a flight, basic information must be entered into three databases: an aircraft database which
stores information about the aircraft, a pilot database which stores information about the pilot, and a waypoint
database which stores information about points along the route. Details on database entry and editing are
available in the “Database Entry” section on page 4.
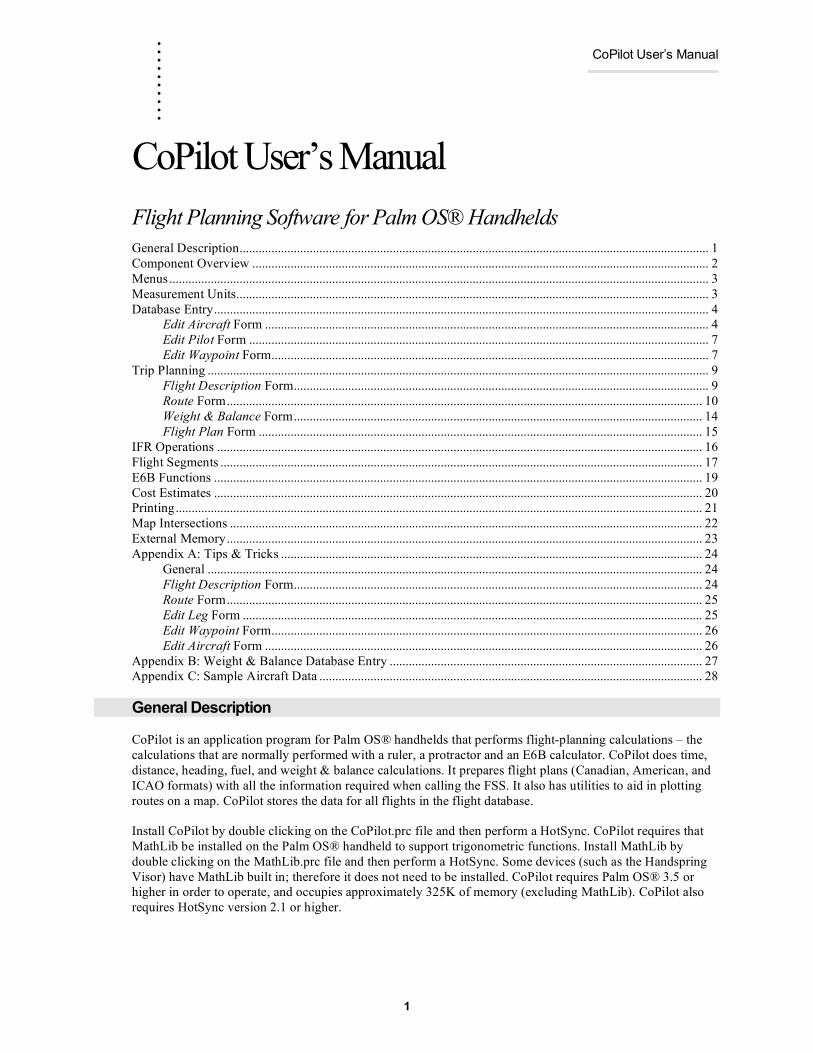
CoPilot is based on the concept of a flight. A flight consists of four components – a flight description, a route,
a weight and balance calculation, and a flight plan. Each of these components has an associated form. The
information entered on these forms is automatically stored in the flight database.
The Flight Description form is used to enter basic information about
the flight. Aircraft and pilot information must have been previously
entered into their respective databases in order to have them available for
selection on this form (see page 4 – “Database Entry”). This form also
contains buttons to create a new flight, display an existing flight in the
database, or delete the currently displayed flight from the database.
Detail on the use of this form is provided in the “Trip Planning” section on
page 8.
The Route form is used to specify the legs of the flight. A leg is a
section of the route between two waypoints. For each leg, the distance,
the magnetic track, the magnetic heading, and the estimated time enroute are
displayed. The waypoints must have been previously entered into the
waypoint database in order to make then available for selection on this form
(see page 4 – “Database Entry”).
Detail on the use of this form is provided in the “Trip Planning” section on
page 8.
The Weight & Balance form is used to calculate and plot the aircraft
weight and balance. The aircraft specific data must have been
previously entered into the aircraft database (see page 4 – “Database Entry”).
The weight and balance is calculated for various phases of the route (e.g.
takeoff, landing). The route is defined on the Route form.
Detail on the use of this form is provided in the “Trip Planning” section on
page 8.
The Flight Plan form is used to collect the data required when calling
the FSS to file a flight plan. It supports the standard ICAO flight plan format as well as the Canadian and American formats. Most of the form is
automatically generated using information from the aircraft database, the
pilot database, the Flight Description form, the Route form, and the Weight &
Balance form.
Detail on the use of this form is provided in the “Trip Planning” section on
page 8.
CoPilot User’s Manual
3
Menus
There are several menus used by CoPilot. The key one is the Record menu.
The Record menu has items to add/edit aircraft, pilots, and waypoints. These
menu items open the associated database entry forms. The database entry
forms are described in detail in the ”Database Entry” section on page 4.
The edit items open forms with a list of the items in the database. For
example, the Edit Aircraft… item opens a form with a list of all the aircraft in
the aircraft database. When an aircraft is selected, the data entry form for the specified aircraft opens.
The Record menu also has items to send an aircraft, pilot, or waypoint to
another Palm handheld. The method of sending depends on the configuration of the Palm handheld, but
beaming via the infrared port is usually available.
The Edit menu provides the basic Palm edit commands (Cut, Copy, Paste, Undo, and Select All). It also
provides items to display the keyboard and the Graffiti help screen.
A simple calculator is also provided on the Edit menu. If a number is highlighted when the calculator is
opened, the calculator is initialized with that number. If the cursor is in a data field when the calculator is
opened, the result of the calculation can be entered into the field with the Paste button.
The Flight Description form has a special Flight menu with an item to duplicate the entire flight, an item to
estimate the cost of the flight (see “Cost Estimates” on page 20), and an item to print the flight information
(see “Printing” on page 21). The Route form has a special Route menu with an item to reverse the route. The
Edit Aircraft form has a special Aircraft menu with an item to duplicate the entire aircraft entry. The Weight
& Balance form has a special W&B menu with an item to show the fuel summary for the route.
The Options menu contains an About CoPilot item that shows the CoPilot version number, a Database Info
item that shows the size of all the CoPilot databases, and a System Waypoint Info item that displays
information about the system waypoint database.
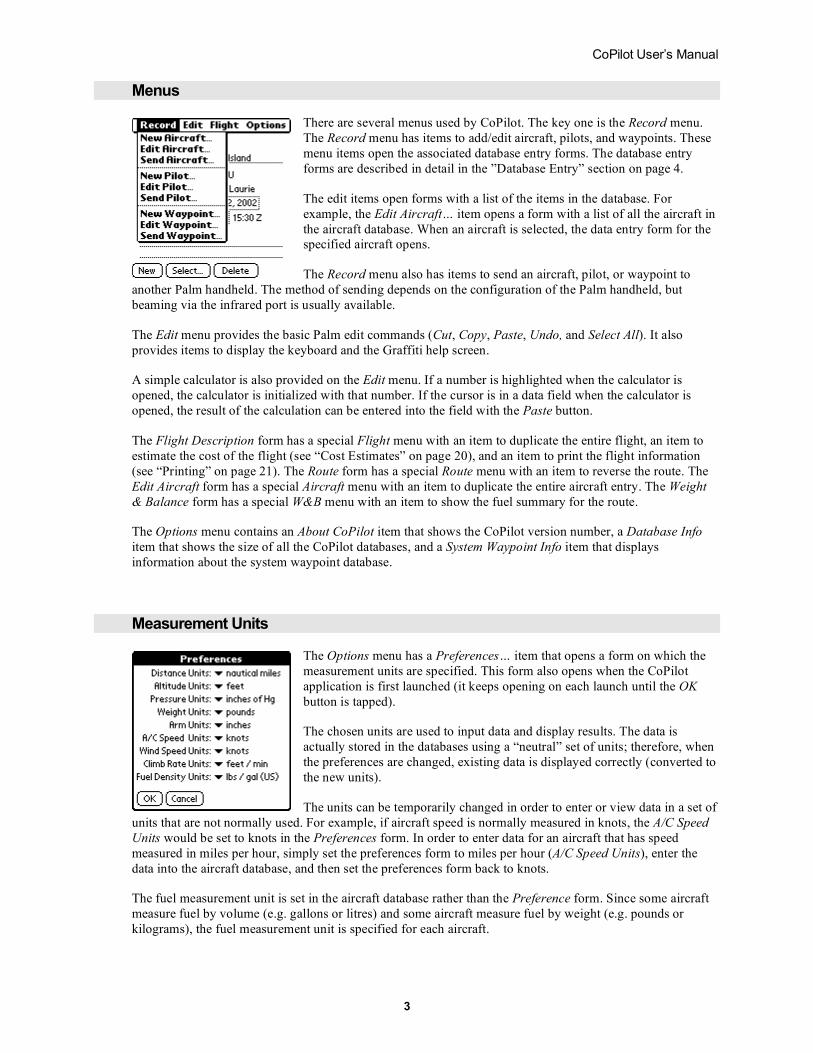
Measurement Units
The Options menu has a Preferences… item that opens a form on which the
measurement units are specified. This form also opens when the CoPilot
application is first launched (it keeps opening on each launch until the OK
button is tapped).
The chosen units are used to input data and display results. The data is
actually stored in the databases using a “neutral” set of units; therefore, when
the preferences are changed, existing data is displayed correctly (converted to
the new units).
The units can be temporarily changed in order to enter or view data in a set of
units that are not normally used. For example, if aircraft speed is normally measured in knots, the A/C Speed
Units would be set to knots in the Preferences form. In order to enter data for an aircraft that has speed
measured in miles per hour, simply set the preferences form to miles per hour (A/C Speed Units), enter the
data into the aircraft database, and then set the preferences form back to knots.
The fuel measurement unit is set in the aircraft database rather than the Preference form. Since some aircraft
measure fuel by volume (e.g. gallons or litres) and some aircraft measure fuel by weight (e.g. pounds or
kilograms), the fuel measurement unit is specified for each aircraft.
CoPilot User’s Manual
4
Database Entry
Note: required entries are indicated on the database entry forms in bold.
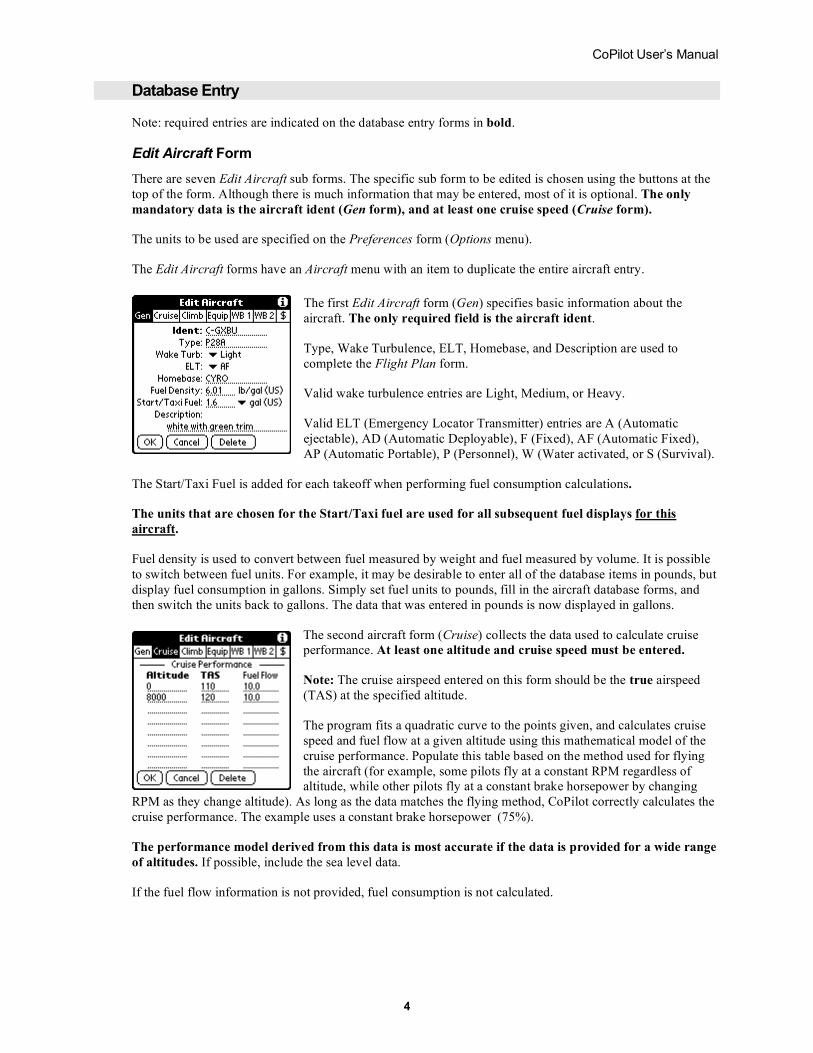
Edit Aircraft Form
There are seven Edit Aircraft sub forms. The specific sub form to be edited is chosen using the buttons at the
top of the form. Although there is much information that may be entered, most of it is optional. The only
mandatory data is the aircraft ident (Gen form), and at least one cruise speed (Cruise form).
The units to be used are specified on the Preferences form (Options menu).
The Edit Aircraft forms have an Aircraft menu with an item to duplicate the entire aircraft entry.
The first Edit Aircraft form (Gen) specifies basic information about the
aircraft. The only required field is the aircraft ident.
Type, Wake Turbulence, ELT, Homebase, and Description are used to
complete the Flight Plan form.
Valid wake turbulence entries are Light, Medium, or Heavy.
Valid ELT (Emergency Locator Transmitter) entries are A (Automatic
ejectable), AD (Automatic Deployable), F (Fixed), AF (Automatic Fixed),
AP (Automatic Portable), P (Personnel), W (Water activated, or S (Survival).
The Start/Taxi Fuel is added for each takeoff when performing fuel consumption calculations.
The units that are chosen for the Start/Taxi fuel are used for all subsequent fuel displays for this
aircraft.
Fuel density is used to convert between fuel measured by weight and fuel measured by volume. It is possible
to switch between fuel units. For example, it may be desirable to enter all of the database items in pounds, but
display fuel consumption in gallons. Simply set fuel units to pounds, fill in the aircraft database forms, and
then switch the units back to gallons. The data that was entered in pounds is now displayed in gallons.
The second aircraft form (Cruise) collects the data used to calculate cruise performance. At least one altitude and cruise speed must be entered.
Note: The cruise airspeed entered on this form should be the true airspeed
(TAS) at the specified altitude.
The program fits a quadratic curve to the points given, and calculates cruise
speed and fuel flow at a given altitude using this mathematical model of the
cruise performance. Populate this table based on the method used for flying
the aircraft (for example, some pilots fly at a constant RPM regardless of altitude, while other pilots fly at a constant brake horsepower by changing
RPM as they change altitude). As long as the data matches the flying method, CoPilot correctly calculates the
cruise performance. The example uses a constant brake horsepower (75%).
The performance model derived from this data is most accurate if the data is provided for a wide range
of altitudes. If possible, include the sea level data.
If the fuel flow information is not provided, fuel consumption is not calculated.
CoPilot User’s Manual
5
The third aircraft form (Climb) collects the data used to calculate climb
performance and climb fuel consumption. Climb performance (time to climb,
distance to climb, etc.) is used to estimate flight times. In most cases, the two
easiest altitudes to enter are zero (sea level) and the service ceiling. Note: the
service ceiling is defined as the altitude at which the climb speed drops to
100 ft/min. If two altitudes are entered, it is assumed that the values change linearly between sea level and the service ceiling. If more than two altitudes
are entered, the program fits a quadratic curve to the points given, and
performs the calculations by integrating the appropriate curves.
Note: The climb airspeed entered on this form should be the indicated
airspeed (IAS) at the specified altitude.
It is very important to include a wide range of altitudes. The time to climb and the fuel to climb are
calculated by integrating the equations that are derived from the data. It is important that the data is provided
for a full range of altitudes from sea level to the service ceiling. A wide range of altitudes results in the most accurate mathematical model of the aircraft performance.
There is an option for entering fuel as Fuel Flow, which is the flow rate (e.g.
in gallons per hour) when climbing through the specified altitude, or Fuel
Used which is the amount of fuel (e.g. in gallons) required to climb to the
specified altitude. Most light aircraft manuals specify the amount of fuel
required to climb to various altitudes. The C172 manual provides climb fuel
as a measure of fuel required to climb to a specified altitude. In the example
shown, the column header has been changed to Fuel Used and the number of
gallons required to climb to the specified altitude is entered.
If this climb data is not provided, the leg times assume that the aircraft is already at the cruising altitude (i.e.
no extra time is added for the climb). In practice, this is not a big problem since it is easy to add an estimate
of climb time.
The additional fuel used for climbing is calculated. If the information is not supplied, the cruise fuel flow is
used for the climb.
CoPilot does not perform descent calculations -- it assumes that descent is at cruise speed.
There are cases when there is a different climb profile for different parts of
the climb. For example, high power for the first part of the climb, and then a
lower power for the remainder of the climb. CoPilot can accommodate two
climb profiles. If an altitude is repeated, two equations are calculated. The
first equation is used when climbing below the repeated altitude, and the
second equation is used when climbing above the repeated altitude.
In the example shown, a linear equation is calculated for climbs below
10,000 feet (linear since two data points are given), and a quadratic equation
is calculated for climbs above 10,000 feet (quadratic since more than two
data points are given).
CoPilot User’s Manual
6
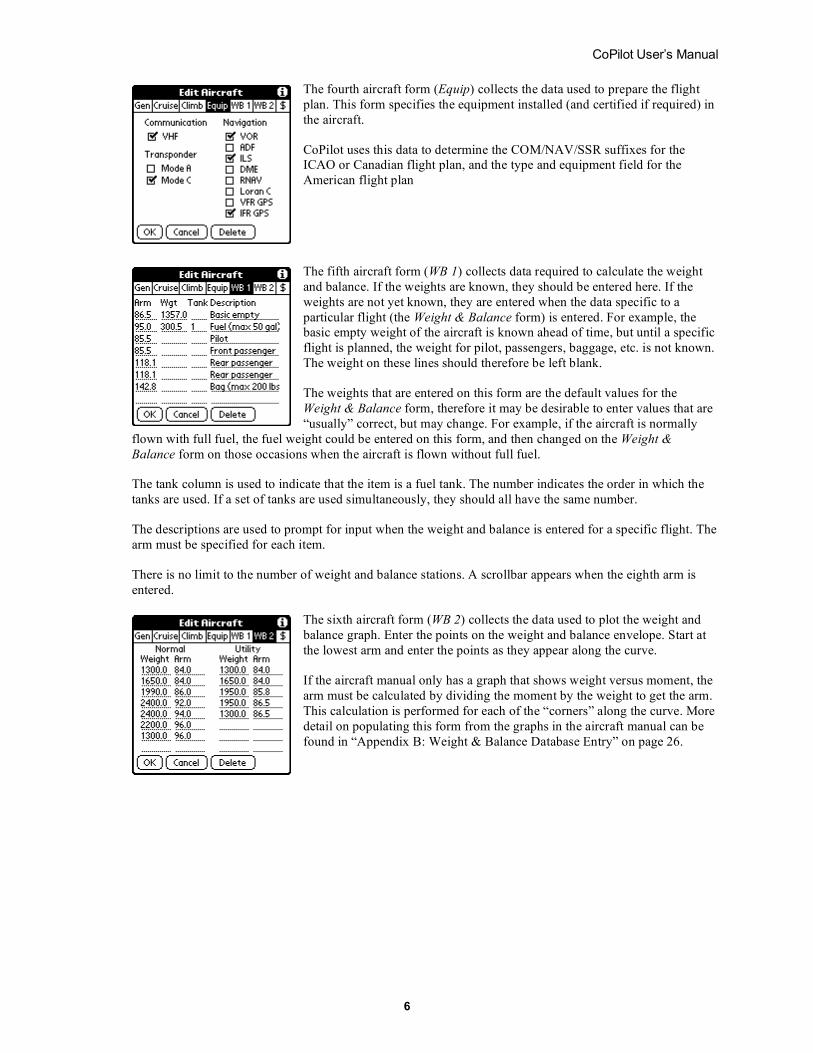
The fourth aircraft form (Equip) collects the data used to prepare the flight
plan. This form specifies the equipment installed (and certified if required) in
the aircraft.
CoPilot uses this data to determine the COM/NAV/SSR suffixes for the ICAO or Canadian flight plan, and the type and equipment field for the
American flight plan
The fifth aircraft form (WB 1) collects data required to calculate the weight
and balance. If the weights are known, they should be entered here. If the
weights are not yet known, they are entered when the data specific to a
particular flight (the Weight & Balance form) is entered. For example, the basic empty weight of the aircraft is known ahead of time, but until a specific
flight is planned, the weight for pilot, passengers, baggage, etc. is not known.
The weight on these lines should therefore be left blank.
The weights that are entered on this form are the default values for the
Weight & Balance form, therefore it may be desirable to enter values that are
“usually” correct, but may change. For example, if the aircraft is normally
flown with full fuel, the fuel weight could be entered on this form, and then changed on the Weight &
Balance form on those occasions when the aircraft is flown without full fuel.
The tank column is used to indicate that the item is a fuel tank. The number indicates the order in which the
tanks are used. If a set of tanks are used simultaneously, they should all have the same number.
The descriptions are used to prompt for input when the weight and balance is entered for a specific flight. The
arm must be specified for each item.
There is no limit to the number of weight and balance stations. A scrollbar appears when the eighth arm is
entered.
The sixth aircraft form (WB 2) collects the data used to plot the weight and
balance graph. Enter the points on the weight and balance envelope. Start at
the lowest arm and enter the points as they appear along the curve.
If the aircraft manual only has a graph that shows weight versus moment, the
arm must be calculated by dividing the moment by the weight to get the arm.
This calculation is performed for each of the “corners” along the curve. More
detail on populating this form from the graphs in the aircraft manual can be
found in “Appendix B: Weight & Balance Database Entry” on page 26.
CoPilot User’s Manual
7
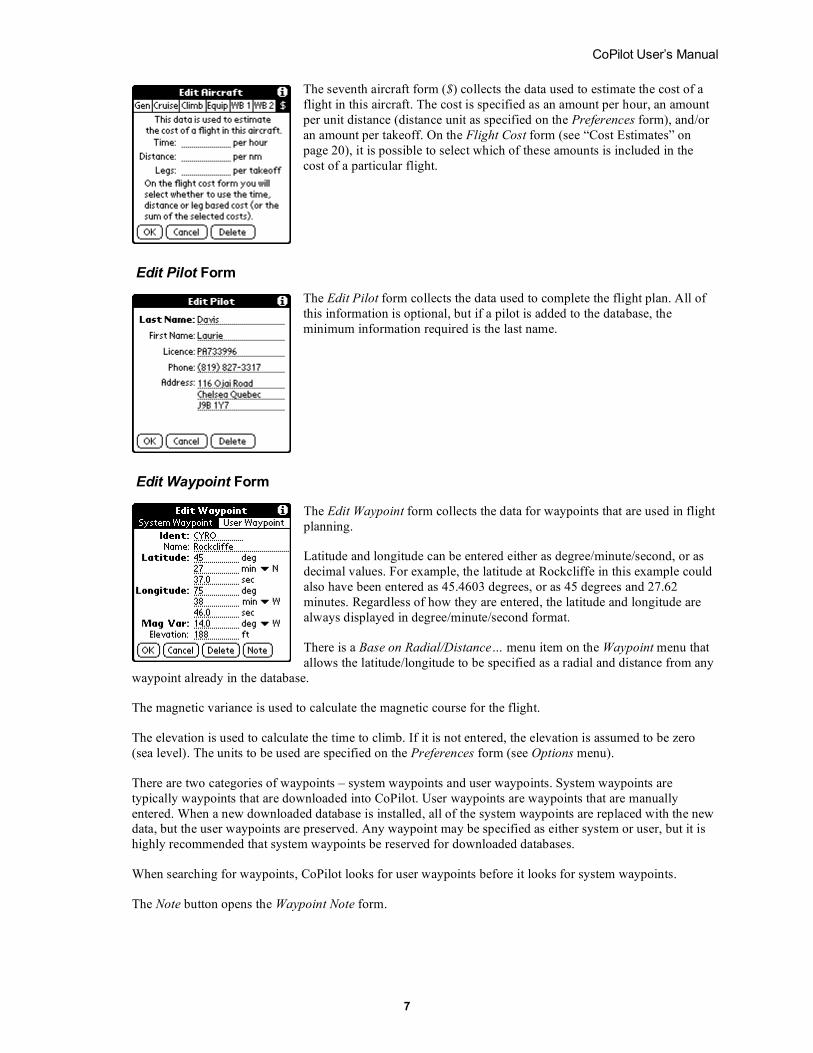
The seventh aircraft form ($) collects the data used to estimate the cost of a
flight in this aircraft. The cost is specified as an amount per hour, an amount
per unit distance (distance unit as specified on the Preferences form), and/or
an amount per takeoff. On the Flight Cost form (see “Cost Estimates” on
page 20), it is possible to select which of these amounts is included in the
cost of a particular flight.
Edit Pilot Form
The Edit Pilot form collects the data used to complete the flight plan. All of
this information is optional, but if a pilot is added to the database, the
minimum information required is the last name.
Edit Waypoint Form
The Edit Waypoint form collects the data for waypoints that are used in flight
planning.
Latitude and longitude can be entered either as degree/minute/second, or as
decimal values. For example, the latitude at Rockcliffe in this example could
also have been entered as 45.4603 degrees, or as 45 degrees and 27.62
minutes. Regardless of how they are entered, the latitude and longitude are
always displayed in degree/minute/second format.
There is a Base on Radial/Distance… menu item on the Waypoint menu that
allows the latitude/longitude to be specified as a radial and distance from any
waypoint already in the database.
The magnetic variance is used to calculate the magnetic course for the flight.
The elevation is used to calculate the time to climb. If it is not entered, the elevation is assumed to be zero
(sea level). The units to be used are specified on the Preferences form (see Options menu).
There are two categories of waypoints – system waypoints and user waypoints. System waypoints are
typically waypoints that are downloaded into CoPilot. User waypoints are waypoints that are manually
entered. When a new downloaded database is installed, all of the system waypoints are replaced with the new data, but the user waypoints are preserved. Any waypoint may be specified as either system or user, but it is
highly recommended that system waypoints be reserved for downloaded databases.
When searching for waypoints, CoPilot looks for user waypoints before it looks for system waypoints.
The Note button opens the Waypoint Note form.
CoPilot User’s Manual
8
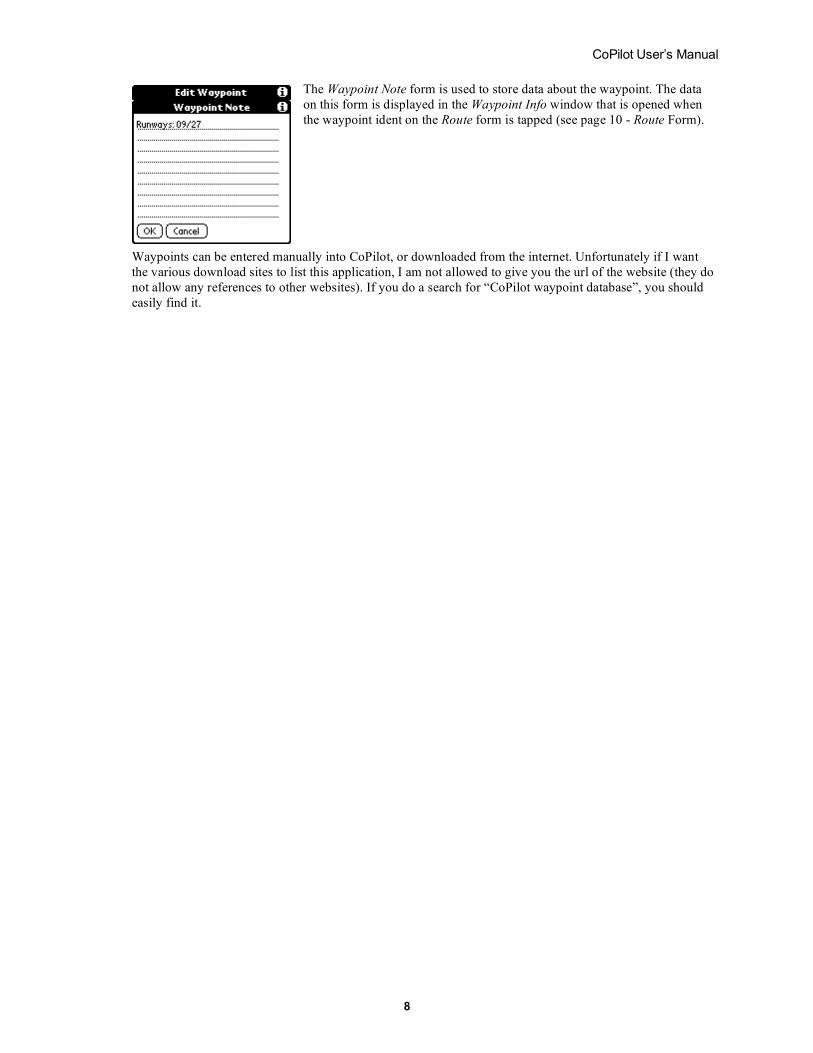
The Waypoint Note form is used to store data about the waypoint. The data
on this form is displayed in the Waypoint Info window that is opened when
the waypoint ident on the Route form is tapped (see page 10 - Route Form).
Waypoints can be entered manually into CoPilot, or downloaded from the internet. Unfortunately if I want
the various download sites to list this application, I am not allowed to give you the url of the website (they do
not allow any references to other websites). If you do a search for “CoPilot waypoint database”, you should
easily find it.

CoPilot User’s Manual
9
Trip Planning
CoPilot is structured around the concept of a flight. A flight consists of four components – a flight
description, a route, a weight and balance calculation, and a flight plan. The information is stored in the flight
database.
The navigation buttons at the top of the screen are used to navigate among the four components of the flight.
Flight Description Form
Copilot opens to the Flight Description form. This form is used to specify
some of the basic elements of a flight.
Description: Enter text to identify this particular flight. When the Select… button is tapped in order to retrieve an existing flight from the flight database,
the list of descriptions is displayed. Since this field is used to identify flights
in the database, it is a required field (all required fields are shown in bold).
Aircraft: Use this popup menu to select an aircraft for the flight. CoPilot maintains a database of information specific to particular aircraft in order to
calculate performance, weight and balance, etc. Aircraft data must be entered
into the database before flight planning can begin (see ”Database Entry” section on page 4). This is also a
required field. The default value is the last aircraft that was selected.
Pilot: Use this popup menu to select a pilot. This field is optional. The information is used to prepare the flight plan. The default value is the last pilot that was selected.
Date: Specify the date and time using the selector buttons. The date is used to calculate the beginning and end of the aviation day. The default is today’s date. The time is used to set the departure time in the flight
plan. It is assumed that this is local time. The time is converted to Zulu time for the flight plan.
For OS versions prior to 4.0, the zulu offset is set via the Zulu Time menu item in the Options menu. For OS
version 4.0 and later, the time zone must be set in the system preferences.
Note: Enter any other information about the flight.
To create a new flight, use the New button to clear the form in preparation for entering the
information for a new flight. The flight that was previously displayed is saved in the flight database
(assuming that the required fields are filled in).
To view or change an existing flight, use the Select… button to retrieve the information from the
database. This button opens a form with a list of all the flights that are stored in the database (a list
of the flight descriptions). The selected flight is displayed. The flight that was previously displayed is saved
in the flight database (assuming that the required fields are filled in).
To delete the flight that is currently displayed, use the Delete button. This button clears the form
and removes the displayed flight from the database.
The Flight Description form has a Flight menu with an item to duplicate the entire flight.

CoPilot User’s Manual
10
Route Form
The next step is to plan the route. A route is a set of legs. A leg is a section of
the flight from one waypoint to another.
Each blank button on the left side of the form corresponds to a leg of the flight. To add a new leg to a flight, tap on one of the blank buttons to open
the Edit Leg form.
The Edit Leg form is used to enter the start and end waypoints for the leg.
The waypoints are the only required entries on this form. The cruising altitude, wind, atmospheric pressure, and temperature (the expected
temperature at the cruising altitude) can also be specified. These items are
used to calculate climb and cruise performance.
If the ident of the waypoint is not known, the Find… button opens a dialog
box that facilitates a search of the waypoint database for any text within the
waypoint description or waypoint ident. For example, “Rockcliffe” could
have been found by searching for “rock”, or “cliffe”, or “ck” or “yro”. The
New… button opens the Edit Waypoint form in order to add a new waypoint
to the database. The small triangle button opens a dialog box with a list of the most recently used waypoints.
This button is used to interchange the From and To waypoints (if one of the waypoints is shared with
the previous or next leg, the waypoint cannot be changed, therefore this button is not visible).
This button is used to copy data from the last leg that was edited (the last leg for which the OK button
was tapped). The Airway data is only copied if it is blank on the current leg.
The units to be used are specified on the Preferences form (see Options menu).
If the altitude is not entered, it is assumed to be zero (sea level cruise performance is used, and there is no
time and fuel calculations performed for the climb phase). If the wind is not entered, it is assumed to be zero.
If the pressure is not entered, it is assumed to be 29.92126 (the pressure altitude is the same as the specified
altitude). If the temperature is not entered, it is assumed to be the ICAO standard temperature for the specified
altitude (the density altitude is the same as the pressure altitude).
If this leg of the route is on a published airway, the airway can be entered (e.g. “V123”). This information is
used to prepare the route description in the flight plan. See “IFR Operations” on page 16 for more
information.
The page up/down buttons can be used to display the previous/next leg of a route. The page up/down buttons
are the built in buttons below the screen of the Palm handheld. When a page up/down button is pressed, the
data for the currently visible leg is saved (if both waypoints were specified) before the new leg is displayed.
CoPilot User’s Manual
11
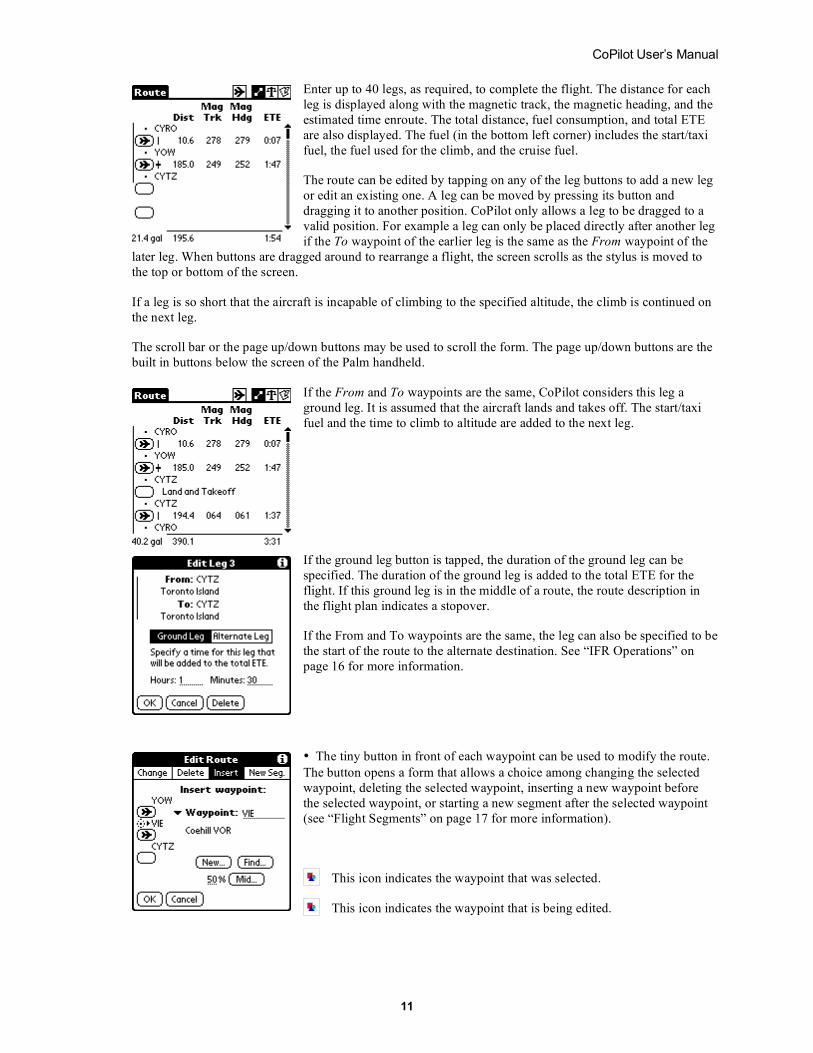
Enter up to 40 legs, as required, to complete the flight. The distance for each
leg is displayed along with the magnetic track, the magnetic heading, and the
estimated time enroute. The total distance, fuel consumption, and total ETE
are also displayed. The fuel (in the bottom left corner) includes the start/taxi
fuel, the fuel used for the climb, and the cruise fuel.
The route can be edited by tapping on any of the leg buttons to add a new leg
or edit an existing one. A leg can be moved by pressing its button and
dragging it to another position. CoPilot only allows a leg to be dragged to a
valid position. For example a leg can only be placed directly after another leg
if the To waypoint of the earlier leg is the same as the From waypoint of the
later leg. When buttons are dragged around to rearrange a flight, the screen scrolls as the stylus is moved to
the top or bottom of the screen.
If a leg is so short that the aircraft is incapable of climbing to the specified altitude, the climb is continued on
the next leg.
The scroll bar or the page up/down buttons may be used to scroll the form. The page up/down buttons are the
built in buttons below the screen of the Palm handheld.
If the From and To waypoints are the same, CoPilot considers this leg a
ground leg. It is assumed that the aircraft lands and takes off. The start/taxi
fuel and the time to climb to altitude are added to the next leg.
If the ground leg button is tapped, the duration of the ground leg can be
specified. The duration of the ground leg is added to the total ETE for the
flight. If this ground leg is in the middle of a route, the route description in
the flight plan indicates a stopover.
If the From and To waypoints are the same, the leg can also be specified to be
the start of the route to the alternate destination. See “IFR Operations” on
page 16 for more information.
• The tiny button in front of each waypoint can be used to modify the route.
The button opens a form that allows a choice among changing the selected
waypoint, deleting the selected waypoint, inserting a new waypoint before
the selected waypoint, or starting a new segment after the selected waypoint
(see “Flight Segments” on page 17 for more information).
This icon indicates the waypoint that was selected.
This icon indicates the waypoint that is being edited.
CoPilot User’s Manual
12
When inserting a new waypoint, the Mid… button displays the twenty waypoints that are nearest a midpoint
of the leg. The midpoint is the specified percentage of the way from the previous waypoint to the selected
waypoint. In order to split a leg into two, simply specify a 50% midpoint and then select a new waypoint to
be inserted into the route. In order to split a leg into three, first select a 33% midpoint to find the first
intermediate waypoint, and then select a 50% midpoint of the remaining portion to find the second
intermediate waypoint.
If the ident of the new waypoint is not known, the Find… button opens a dialog box that facilitates a search
of the waypoint database for any text within the waypoint description or waypoint ident. The New…button
opens the Edit Waypoint form in order to add a new waypoint to the database. The small triangle button opens
a dialog box with a list of the most recently used waypoints.
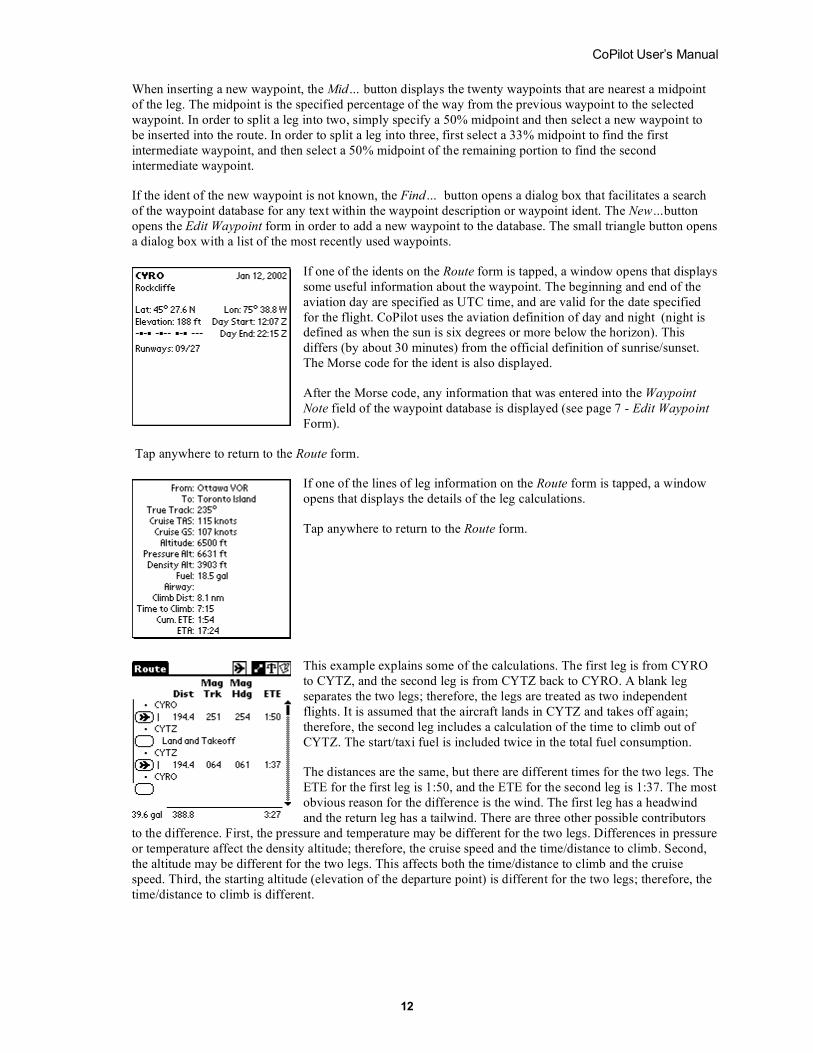
If one of the idents on the Route form is tapped, a window opens that displays
some useful information about the waypoint. The beginning and end of the
aviation day are specified as UTC time, and are valid for the date specified
for the flight. CoPilot uses the aviation definition of day and night (night is defined as when the sun is six degrees or more below the horizon). This
differs (by about 30 minutes) from the official definition of sunrise/sunset.
The Morse code for the ident is also displayed.
After the Morse code, any information that was entered into the Waypoint
Note field of the waypoint database is displayed (see page 7 - Edit Waypoint
Form).
Tap anywhere to return to the Route form.
If one of the lines of leg information on the Route form is tapped, a window
opens that displays the details of the leg calculations.
Tap anywhere to return to the Route form.
This example explains some of the calculations. The first leg is from CYRO
to CYTZ, and the second leg is from CYTZ back to CYRO. A blank leg
separates the two legs; therefore, the legs are treated as two independent
flights. It is assumed that the aircraft lands in CYTZ and takes off again;
therefore, the second leg includes a calculation of the time to climb out of
CYTZ. The start/taxi fuel is included twice in the total fuel consumption.
The distances are the same, but there are different times for the two legs. The
ETE for the first leg is 1:50, and the ETE for the second leg is 1:37. The most
obvious reason for the difference is the wind. The first leg has a headwind
and the return leg has a tailwind. There are three other possible contributors
to the difference. First, the pressure and temperature may be different for the two legs. Differences in pressure
or temperature affect the density altitude; therefore, the cruise speed and the time/distance to climb. Second,
the altitude may be different for the two legs. This affects both the time/distance to climb and the cruise
speed. Third, the starting altitude (elevation of the departure point) is different for the two legs; therefore, the
time/distance to climb is different.
CoPilot User’s Manual
13
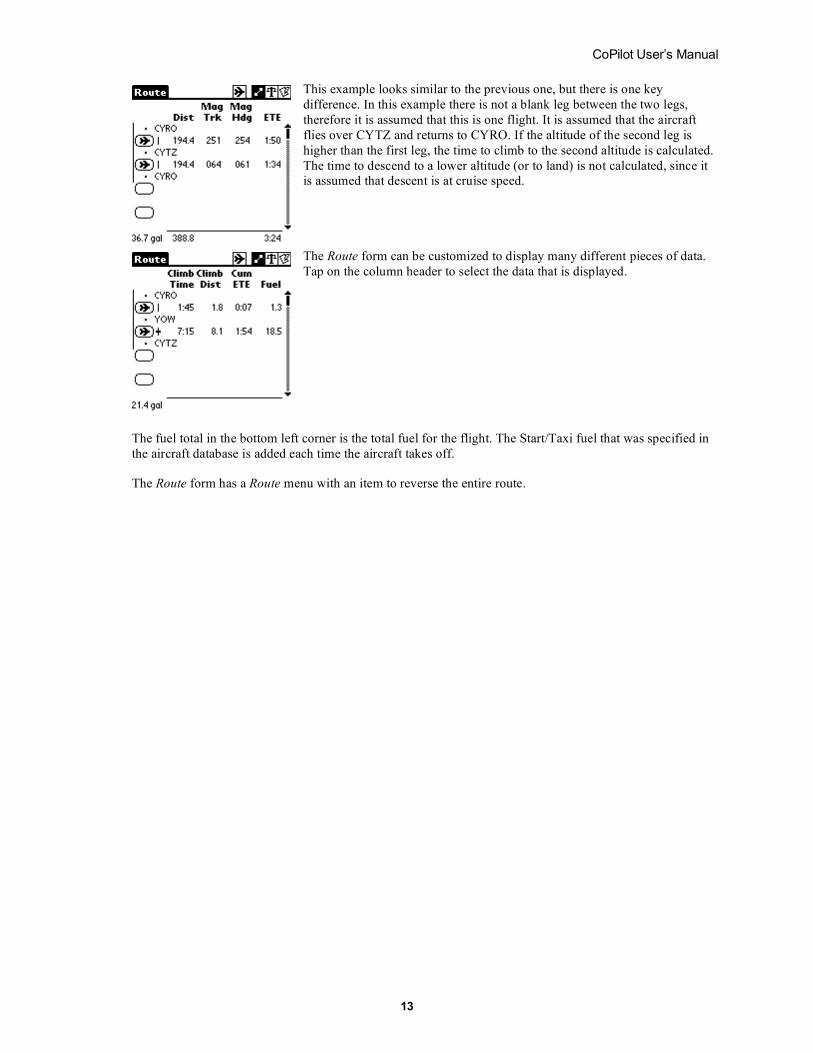
This example looks similar to the previous one, but there is one key
difference. In this example there is not a blank leg between the two legs,
therefore it is assumed that this is one flight. It is assumed that the aircraft
flies over CYTZ and returns to CYRO. If the altitude of the second leg is
higher than the first leg, the time to climb to the second altitude is calculated.
The time to descend to a lower altitude (or to land) is not calculated, since it is assumed that descent is at cruise speed.
The Route form can be customized to display many different pieces of data.
Tap on the column header to select the data that is displayed.
The fuel total in the bottom left corner is the total fuel for the flight. The Start/Taxi fuel that was specified in
the aircraft database is added each time the aircraft takes off.
The Route form has a Route menu with an item to reverse the entire route.

CoPilot User’s Manual
14
Weight & Balance Form
Once the flight route has been planned, the weight and balance can be
checked. Enter the weight of the various items, and the total weight and arm are displayed at the bottom of the form.
The units are specified on the Preferences form (see Options menu). If the
station was specified in the aircraft database as a fuel tank, the units for the
station are fuel units as specified in the aircraft database (Gen form).
If a weight was entered in the aircraft database, it is displayed here as a
default value. These default weights can be changed for a particular flight.
The takeoff w&b is adjusted by subtracting the start/taxi fuel as defined in the aircraft database (Gen form).
The landing weight is adjusted by subtracting the enroute fuel. The zero fuel weight is adjusted by subtracting
Swap
From and
To
Paste data
from last
leg that
was “OK”ed
Find
waypoints
n % of the way to
this
waypoint
Scroll to
previous
or next leg
CoPilot User’s Manual
15
the total fuel load. Fuel is subtracted from the tanks in the order specified in the aircraft database (WB 1
form).
The fuel reserve is based on the amount of fuel remaining at the destination. It is based on the average cruise
altitude of the flight. A warning message is displayed if there is not enough fuel available to reach the destination.
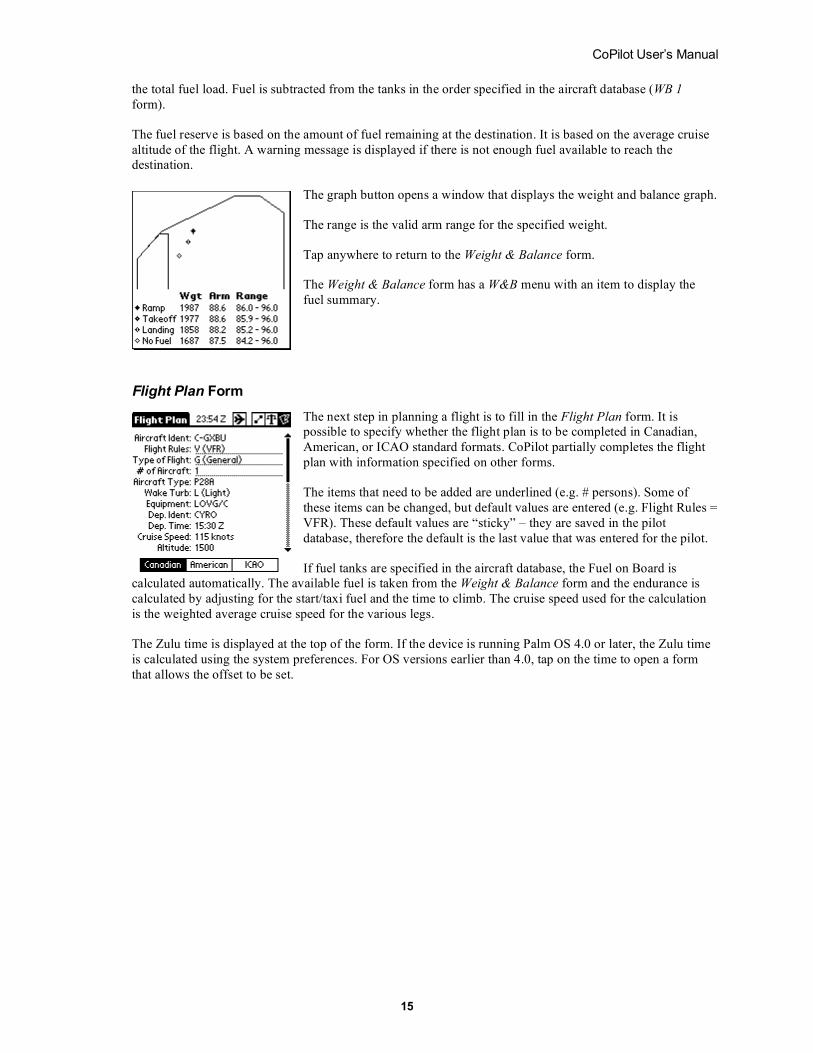
The graph button opens a window that displays the weight and balance graph.
The range is the valid arm range for the specified weight.
Tap anywhere to return to the Weight & Balance form.
The Weight & Balance form has a W&B menu with an item to display the
fuel summary.
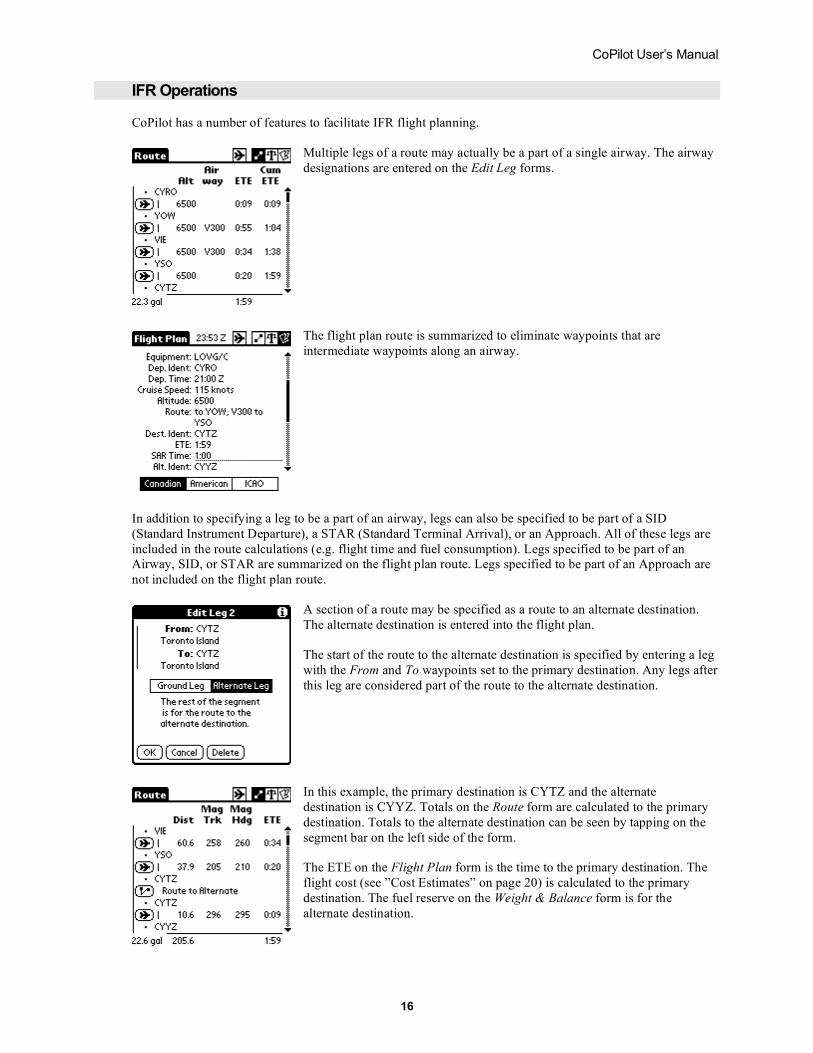
Flight Plan Form
The next step in planning a flight is to fill in the Flight Plan form. It is possible to specify whether the flight plan is to be completed in Canadian,
American, or ICAO standard formats. CoPilot partially completes the flight
plan with information specified on other forms.
The items that need to be added are underlined (e.g. # persons). Some of
these items can be changed, but default values are entered (e.g. Flight Rules =
VFR). These default values are “sticky” – they are saved in the pilot
database, therefore the default is the last value that was entered for the pilot.
If fuel tanks are specified in the aircraft database, the Fuel on Board is calculated automatically. The available fuel is taken from the Weight & Balance form and the endurance is
calculated by adjusting for the start/taxi fuel and the time to climb. The cruise speed used for the calculation
is the weighted average cruise speed for the various legs.
The Zulu time is displayed at the top of the form. If the device is running Palm OS 4.0 or later, the Zulu time
is calculated using the system preferences. For OS versions earlier than 4.0, tap on the time to open a form
that allows the offset to be set.
CoPilot User’s Manual
16
IFR Operations
CoPilot has a number of features to facilitate IFR flight planning.
Multiple legs of a route may actually be a part of a single airway. The airway
designations are entered on the Edit Leg forms.
The flight plan route is summarized to eliminate waypoints that are
intermediate waypoints along an airway.
In addition to specifying a leg to be a part of an airway, legs can also be specified to be part of a SID
(Standard Instrument Departure), a STAR (Standard Terminal Arrival), or an Approach. All of these legs are
included in the route calculations (e.g. flight time and fuel consumption). Legs specified to be part of an Airway, SID, or STAR are summarized on the flight plan route. Legs specified to be part of an Approach are
not included on the flight plan route.
A section of a route may be specified as a route to an alternate destination.
The alternate destination is entered into the flight plan.
The start of the route to the alternate destination is specified by entering a leg
with the From and To waypoints set to the primary destination. Any legs after
this leg are considered part of the route to the alternate destination.
In this example, the primary destination is CYTZ and the alternate
destination is CYYZ. Totals on the Route form are calculated to the primary
destination. Totals to the alternate destination can be seen by tapping on the
segment bar on the left side of the form.
The ETE on the Flight Plan form is the time to the primary destination. The
flight cost (see ”Cost Estimates” on page 20) is calculated to the primary
destination. The fuel reserve on the Weight & Balance form is for the
alternate destination.

CoPilot User’s Manual
17
Flight Segments
A route can be split into multiple segments. A segment is defined as a set of legs that specify a subset of the
total route for which separate calculations are desired. For each segment, a new weight and balance
calculation is performed and a new flight plan is created.
The example shows a return trip from Toronto Island. The route is considered
one segment, as indicated by the segment bar on the left side of the form.
Since the weight & balance is different for the return trip, and a new flight
plan must be filed, the route is split into two segments.
There are two ways to split an existing segment. The tiny dot before the
waypoint identifiers opens an Edit Route dialog box. This form allows the
insertion of a new segment and the specification of the waypoint that will
start the new segment. This waypoint defaults to the primary destination of
the previous segment.
The Edit Leg form also has an option to start a new segment. There is a
segment bar on the left side of the waypoints. Tapping on this bar changes the
leg into a “new segment” leg.
When the route is split into multiple segments, the segment bar on the left
side of the form indicates how the route has been split.
CoPilot User’s Manual
18
Tapping on a segment bar opens a window that displays a summary of the
data for that segment. If an alternate destination is defined, a summary of the
route to the alternate is also displayed (see “IFR Operations” on page “16”).
The Weight & Balance and Flight Plan forms display separate subforms for each segment.
Display the next segment.
Display the previous segment.
Copy data from the previous segment.
Copy data from the next segment.
The Fuel Summary form displays the fuel summary for the currently
displayed segment.
There is a button on the top left of the Weight & Balance form that specifies
if the aircraft is refueled for this segment. If the button is set to “no refuel”
(as shown here), the fuel stations are set to the fuel remaining from the
previous segment(s). Tapping the button sets it to “refuel", and the fuel for
the segment is entered. Setting the button to “refuel” will set the fuel to the
default value from the aircraft database.
CoPilot User’s Manual
19
E6B Functions
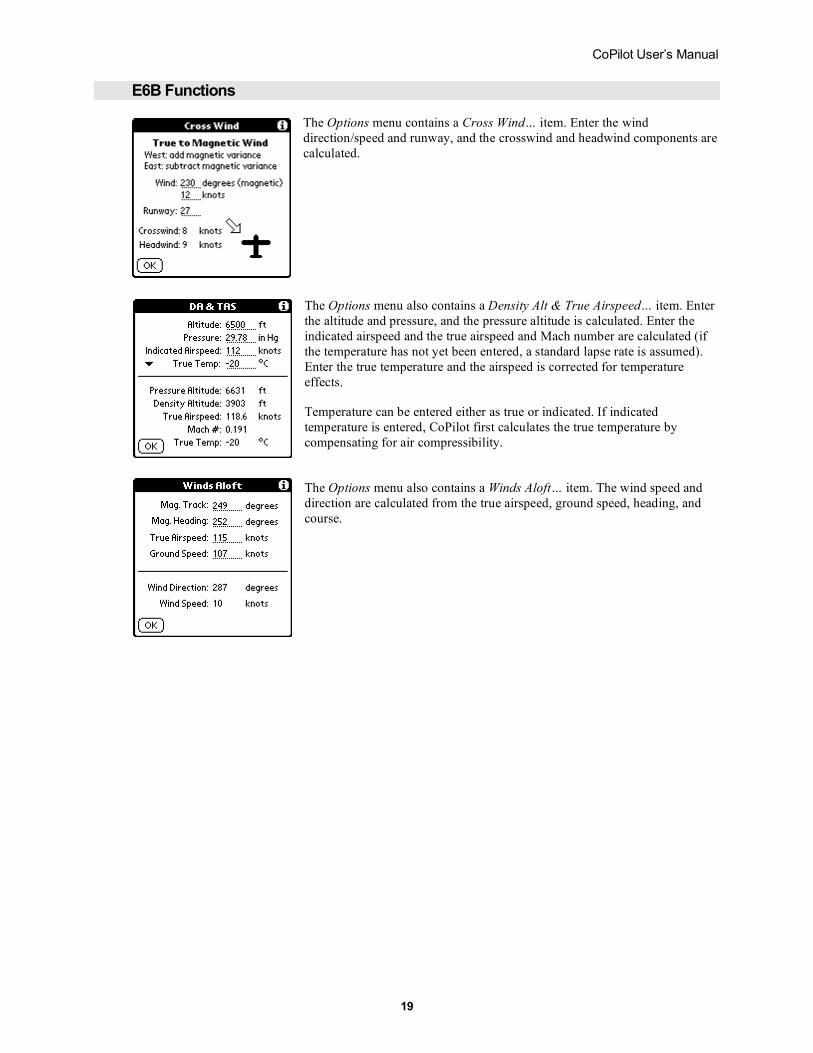
The Options menu contains a Cross Wind… item. Enter the wind
direction/speed and runway, and the crosswind and headwind components are
calculated.
The Options menu also contains a Density Alt & True Airspeed… item. Enter
the altitude and pressure, and the pressure altitude is calculated. Enter the
indicated airspeed and the true airspeed and Mach number are calculated (if
the temperature has not yet been entered, a standard lapse rate is assumed).
Enter the true temperature and the airspeed is corrected for temperature
effects.
Temperature can be entered either as true or indicated. If indicated
temperature is entered, CoPilot first calculates the true temperature by
compensating for air compressibility.
The Options menu also contains a Winds Aloft… item. The wind speed and
direction are calculated from the true airspeed, ground speed, heading, and
course.
CoPilot User’s Manual
20
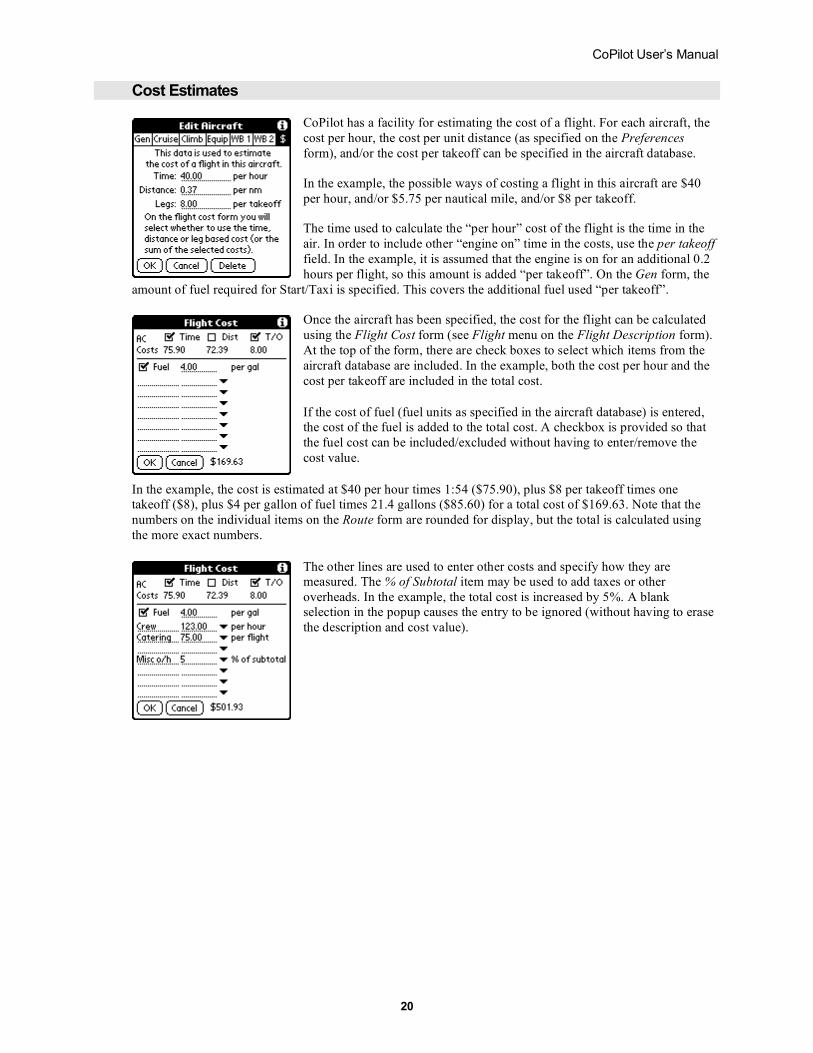
Cost Estimates
CoPilot has a facility for estimating the cost of a flight. For each aircraft, the
cost per hour, the cost per unit distance (as specified on the Preferences
form), and/or the cost per takeoff can be specified in the aircraft database.
In the example, the possible ways of costing a flight in this aircraft are $40
per hour, and/or $5.75 per nautical mile, and/or $8 per takeoff.
The time used to calculate the “per hour” cost of the flight is the time in the
air. In order to include other “engine on” time in the costs, use the per takeoff
field. In the example, it is assumed that the engine is on for an additional 0.2
hours per flight, so this amount is added “per takeoff”. On the Gen form, the
amount of fuel required for Start/Taxi is specified. This covers the additional fuel used “per takeoff”.
Once the aircraft has been specified, the cost for the flight can be calculated
using the Flight Cost form (see Flight menu on the Flight Description form).
At the top of the form, there are check boxes to select which items from the
aircraft database are included. In the example, both the cost per hour and the
cost per takeoff are included in the total cost.
If the cost of fuel (fuel units as specified in the aircraft database) is entered, the cost of the fuel is added to the total cost. A checkbox is provided so that
the fuel cost can be included/excluded without having to enter/remove the
cost value.
In the example, the cost is estimated at $40 per hour times 1:54 ($75.90), plus $8 per takeoff times one takeoff ($8), plus $4 per gallon of fuel times 21.4 gallons ($85.60) for a total cost of $169.63. Note that the
numbers on the individual items on the Route form are rounded for display, but the total is calculated using
the more exact numbers.
The other lines are used to enter other costs and specify how they are measured. The % of Subtotal item may be used to add taxes or other
overheads. In the example, the total cost is increased by 5%. A blank selection in the popup causes the entry to be ignored (without having to erase
the description and cost value).
CoPilot User’s Manual
21
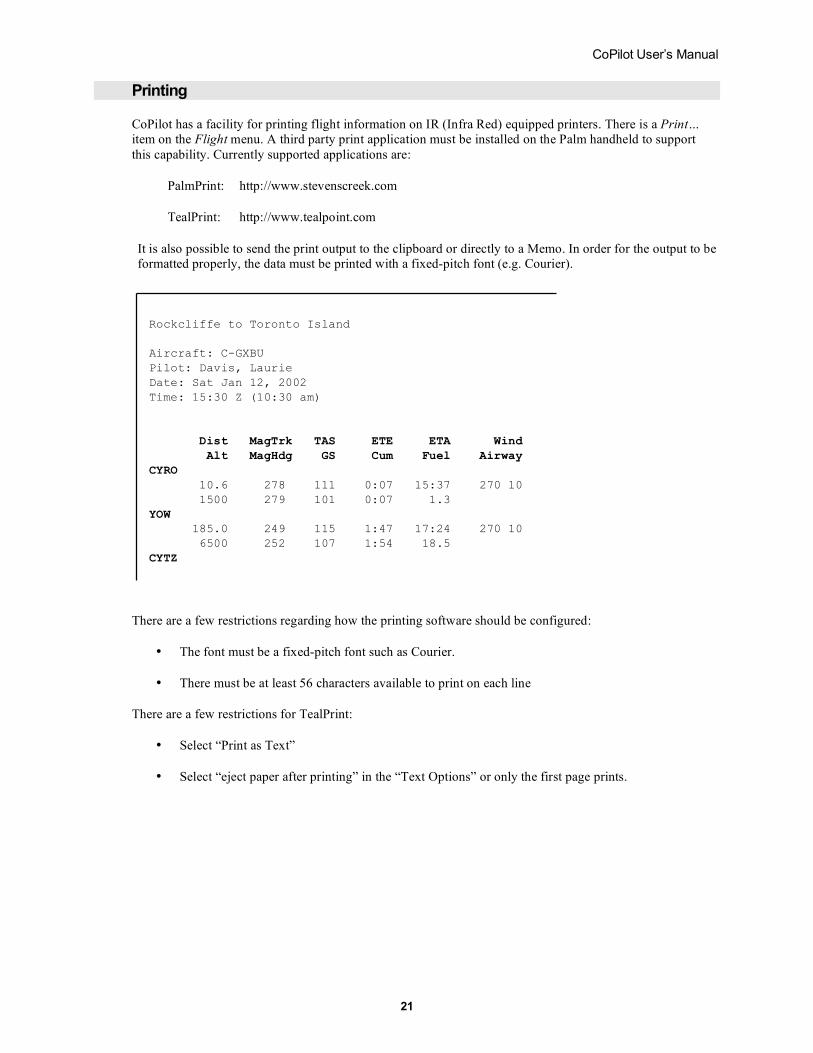
Printing
CoPilot has a facility for printing flight information on IR (Infra Red) equipped printers. There is a Print… item on the Flight menu. A third party print application must be installed on the Palm handheld to support
this capability. Currently supported applications are:
PalmPrint: http://www.stevenscreek.com
TealPrint: http://www.tealpoint.com
It is also possible to send the print output to the clipboard or directly to a Memo. In order for the output to be formatted properly, the data must be printed with a fixed-pitch font (e.g. Courier).
Rockcliffe to Toronto Island
Aircraft: C-GXBU
Pilot: Davis, Laurie
Date: Sat Jan 12, 2002
Time: 15:30 Z (10:30 am)
Dist MagTrk TAS ETE ETA Wind
Alt MagHdg GS Cum Fuel Airway
CYRO
10.6 278 111 0:07 15:37 270 10
1500 279 101 0:07 1.3
YOW
185.0 249 115 1:47 17:24 270 10
6500 252 107 1:54 18.5
CYTZ
There are a few restrictions regarding how the printing software should be configured:
• The font must be a fixed-pitch font such as Courier.
• There must be at least 56 characters available to print on each line
There are a few restrictions for TealPrint:
• Select “Print as Text”
• Select “eject paper after printing” in the “Text Options” or only the first page prints.

CoPilot User’s Manual
22
Map Intersections
When plotting a trip route on a map, a leg may cross from one map to another. CoPilot provides an
intersection function that makes plotting across maps very simple.
The first step is to find a longitude or latitude common to both maps. In the
example shown, latitude A is common to both maps. When this latitude is
entered into the intersection function for this leg, the corresponding longitude
for point x is calculated. It is then a simple matter to plot point x on both
maps and draw the two lines independently.
This button on the Route form opens the Intersection dialog box. It appears between the two idents on a
leg.
If an intersection is defined, the button looks like this. Tapping this button opens the Intersection dialog
box.
The intersection function calculates all of the intersections along the entire
great circle path defined by the leg.
In the case when latitude is specified, there are actually two intersections
calculated. In the example shown, the great circle defined by the path
between Rockcliffe and Toronto intersects latitude 44 degrees 30 minutes once between Rockcliffe and Toronto (77 degrees, 46.0 minutes), and once
again at 14 degrees, 31.5 minutes (which is somewhere over the Adriatic
Sea). In this case, it is obvious which is the correct one. Unfortunately, there
are some cases (legs that are almost exactly east or west) where the two
points are relatively close together, and it is not obvious which one is correct.
A A x
CoPilot User’s Manual
23
External Memory
CoPilot has the ability to move the system waypoint database to an external memory card. There is a new
Move to External Memory button on the System Waypoint Database form (open with the System Waypoint
Database menu item on the Options menu). If there is a database on the external memory card, the button
changes to Move to Internal Memory.
Most operations should work properly with the database in external memory. The two exceptions are the Find
buttons (e.g. on the Edit Leg form), and the Mid button on the Delete, Change or Insert form. Both of these
operations are exceedingly slow when the waypoint database is in external memory. In both cases, the Cancel button can be used to stop the search.
Rather than transfer an internal database to the card, it is possible to HotSync a database directly to the
external card. Any file with a file type of .way (e.g. xyz.way) is placed in the correct directory on the memory
card. The Palm Install Tool must be used to select the file. In order for this facility to work, at least one
HotSync must have been performed with a version of CoPilot that supports this feature. This is so that
CoPilot can tell HotSync where to place the file.
The third way to get a waypoint database onto the card is to write it directly to the card via a card reader
attached to a pc. The file should be a .way file (e.g. xyz.way), and it should be placed in the /Palm/Programs/CoPilot directory. CoPilot renames the file to CoPilot_Waypoint.pdb the next time that it
runs.
Rather than use this facility, it may be more beneficial to use an external utility to place CoPilot and/or the
waypoint database into external memory. Most of these utilities work by copying the application and/or
database to main memory when the application is launched. This has the disadvantage that it takes a long time
to launch the application, but the advantage that the application runs at full speed once it has been launched.
CoPilot User’s Manual
24
Appendix A: Tips & Tricks
General
1. Online help is available by tapping the Tips button that is displayed in the upper right corner of dialog
boxes.
2. Whenever scroll bars or scroll buttons are shown, use the page up/down buttons to scroll by one page.
The page up/down buttons are the built in buttons below the screen of the Palm handheld.
3. If the Palm has a 5-way navigator, it may be used within CoPilot. If there is a cursor showing, the 5-way
navigator is used for field navigation. If there is no cursor showing, the 5-way navigator is used for page
navigation. Press the select button to put the cursor in the first field. If the cursor is in the top/left field,
the left button removes the cursor from the form.
4. It is possible to put a number into any field using the calculator (Edit menu). The Paste button puts the
result of the calculation into the field that was active when the calculator was opened.
5. If a number is highlighted when the calculator (Edit menu) is opened, the calculator is initialized with that number.
6. A number of menu items (e.g. Calculator, Flight Cost…, Duplicate Flight, Reverse Route) have
command toolbar items that can be invoked.
7. Most units are specified on the Preferences form (see Options menu).
8. Fuel units are defined for each aircraft, and are specified in the aircraft database (Gen form).
9. For convenience, it is possible to switch between units. CoPilot only uses the units to collect and display
data; therefore, changing the units does not affect the database content or the calculations. There may be
minor rounding errors introduced when switching back and forth between units. A common application
for this feature is to enter the weight and balance information into the aircraft database with the units set
to pounds and inches since this matches the data in many aircraft manuals. Switch the preferences to
back to kilograms if weights on the Weight & Balance form are entered in kilograms
10. Aircraft, pilots, and waypoints can be sent to another Palm handheld. See the send menu items in the
Record menu.
11. Whenever a waypoint ident is required, the tiny triangle button opens a dialog box with a list of the most
recently used waypoints. Tap on one of the waypoint descriptions to select the waypoint.
Flight Description Form
12. In the Flight Description form, the page up/down buttons can be used to switch to other flights.
13. An entire flight can be duplicated using the Duplicate Flight menu item on the Flight menu.
14. The cost of a flight is calculated using the Flight Cost menu item on the Flight menu.
15. Flight data can be printed to a printer that is IR (Infra Red) equipped, or connected via a serial link. The
Print… menu item is on the Flight menu. Print software must be installed on the Palm handheld.
CoPilot User’s Manual
25
Route Form
16. If a blank leg separates two legs on the Route form, the calculations assume that there are two flights.
The time and fuel to climb, and the start/taxi fuel, is added for the second leg.
17. Any leg can be dragged to a new location on the Route form by dragging the button with the stylus. The new leg position must be consistent with any adjacent legs.
18. A waypoint can be deleted by tapping on the tiny button before the waypoint.
19. A waypoint may be changed by tapping on the tiny button before the waypoint.
20. A new waypoint may be inserted before an existing waypoint by tapping on the tiny button before the
existing waypoint.
21. Tap on an ident on the Route form to see more information about the waypoint. If the waypoint
information has scrollbars, the page up/down buttons can be used to scroll by one page.
22. Tap on a line of leg information on the Route form to see more information about the leg. The page
up/down buttons scroll to the previous/next leg.
23. The columns on the Route form can be configured by tapping on the column header and choosing what to
display
24. The direction of an entire route can be reversed using the Reverse Route menu item on the Route menu.
Edit Leg Form
25. When entering an ident on the Edit Leg form, it is possible to stop when enough letters have been entered
to uniquely identify the waypoint. The waypoint has been uniquely identified when the correct waypoint
description appears.
26. The page up/down buttons can be used to switch to the next or previous leg.
27. When the OK button in the Edit Leg form is tapped (or the leg is scrolled to the another leg with the
scroll buttons), the information about the leg (altitude, wind, pressure, temperature) is saved. This data
can be applied to a new leg using the Previous button. This button is only visible if information has been
saved.
28. A combination of the last two tips can be used to quickly change the leg information (altitude, wind,
pressure, and temperature) for an entire trip. Open the first leg and enter the data. Use the page down
button to go to the next leg. Tap the Previous button to update the second leg with the data from the first leg. Keep doing this until all of the legs have been updated.
29. The leg-scrolling feature can be used to quickly enter an initial route. After entering the first leg, instead
of tapping the OK button, use the page down button to scroll to the next leg and enter the next waypoint
(and leg data with the Previous button). Continue in this manner until the entire route is entered.
30. Swap the To and From waypoints in the Edit Leg form using the Swap button. This button is only visible
if the waypoints can be swapped without affecting the adjacent legs.
31. If the From and To waypoints are the same, the leg is considered a ground leg and the duration of the
stop can be entered.
CoPilot User’s Manual
26
Edit Waypoint Form
32. Latitude and longitude on the Waypoint Edit form can be entered in several ways. For example 45
degrees, 27 minutes, 35 seconds could also have been entered as 45 degrees, 27.62 minutes, or as
45.4603 degrees.
33. There is a Base on Radial/Distance… menu item on the Waypoint menu of the Edit Waypoint form that
allows the waypoint to be specified as a radial and distance from any waypoint already in the database.
Edit Aircraft Form
34. An aircraft can be duplicated using the Duplicate Aircraft menu item on the Aircraft menu of the Edit
Aircraft form.
35. Climb fuel consumption data can be entered as either the fuel flow at the specified altitude, or the fuel
used to the specified altitude. Tap on the column header to select the appropriate method.
CoPilot User’s Manual
27
Wei
gh
t (p
ou
nd
s)
Arm (inches)
B
C D
F G
A EH
Wei
gh
t (p
ou
nd
s)
Arm (inches)
B
C D
F G
A EH
Wei
gh
t (p
ou
nd
s)
Moment (pound -inches)
A
B
C D
E
F
H
G
Wei
gh
t (p
ou
nd
s)
Moment (pound -inches)
A
B
C D
E
F
H
G
Appendix B: Weight & Balance Database Entry
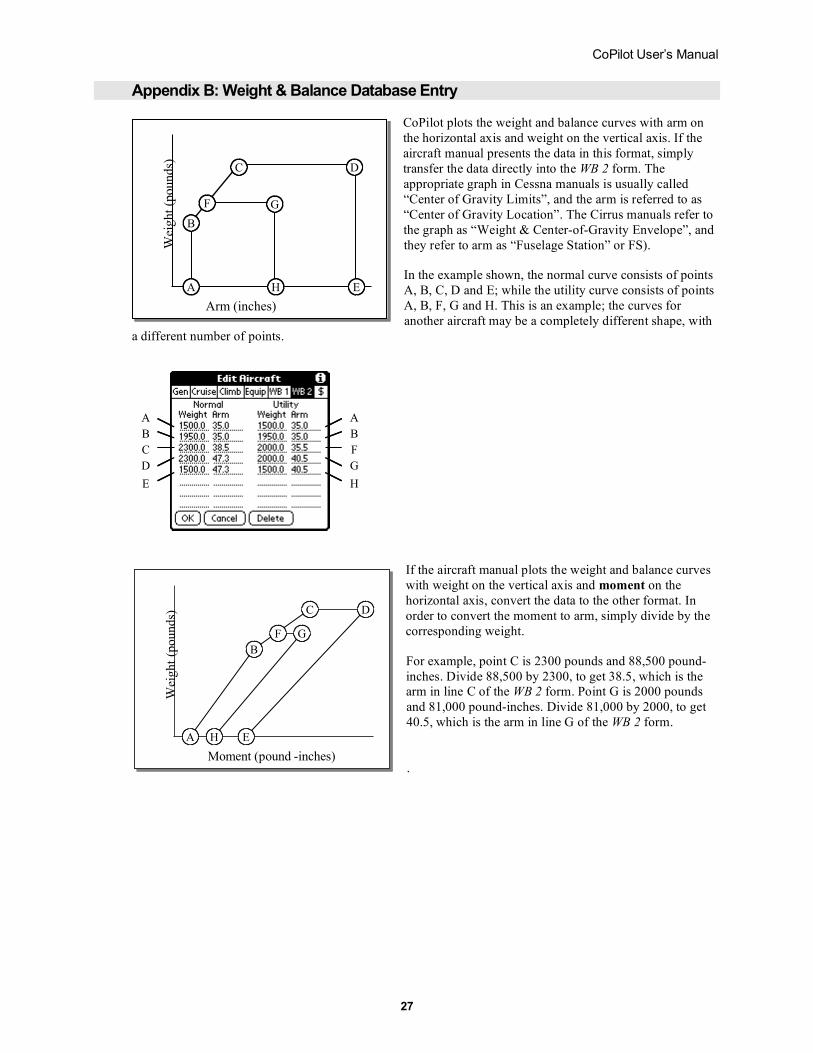
CoPilot plots the weight and balance curves with arm on
the horizontal axis and weight on the vertical axis. If the
aircraft manual presents the data in this format, simply
transfer the data directly into the WB 2 form. The
appropriate graph in Cessna manuals is usually called
“Center of Gravity Limits”, and the arm is referred to as
“Center of Gravity Location”. The Cirrus manuals refer to
the graph as “Weight & Center-of-Gravity Envelope”, and
they refer to arm as “Fuselage Station” or FS).
In the example shown, the normal curve consists of points
A, B, C, D and E; while the utility curve consists of points
A, B, F, G and H. This is an example; the curves for
another aircraft may be a completely different shape, with
a different number of points.
If the aircraft manual plots the weight and balance curves
with weight on the vertical axis and moment on the
horizontal axis, convert the data to the other format. In
order to convert the moment to arm, simply divide by the
corresponding weight.
For example, point C is 2300 pounds and 88,500 pound-
inches. Divide 88,500 by 2300, to get 38.5, which is the arm in line C of the WB 2 form. Point G is 2000 pounds
and 81,000 pound-inches. Divide 81,000 by 2000, to get
40.5, which is the arm in line G of the WB 2 form.
.
A
B
C
D
E
A
B
F
G
H
A
B
C
D
E
A
B
F
G
H
CoPilot User’s Manual
28
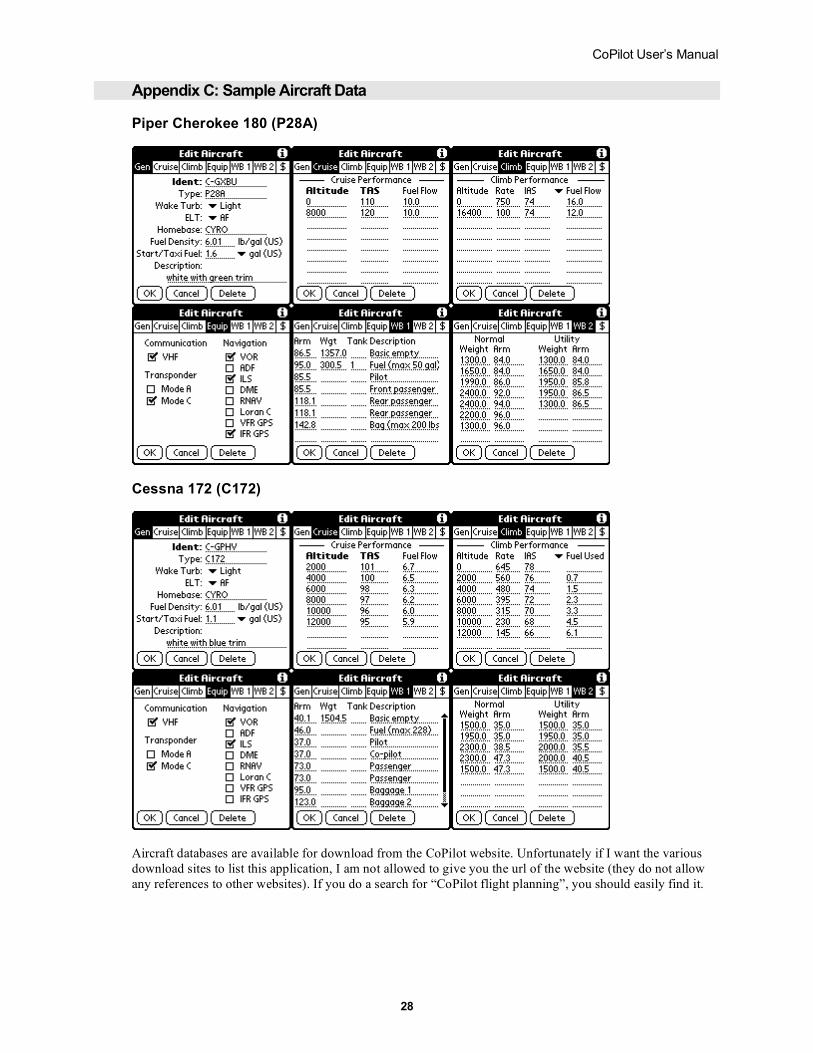
Appendix C: Sample Aircraft Data
Piper Cherokee 180 (P28A)
Cessna 172 (C172)
Aircraft databases are available for download from the CoPilot website. Unfortunately if I want the various
download sites to list this application, I am not allowed to give you the url of the website (they do not allow
any references to other websites). If you do a search for “CoPilot flight planning”, you should easily find it.