user’s manual hydraulic 4 rolls plate bending · pdf file ·...
TRANSCRIPT

MACHINE CODE : 4R HSS 320 DATE : MARCH 2006 PAGE - 1 -
USER’S MANUAL
HYDRAULIC 4 ROLLS PLATE BENDING MACHINE
4R HSS 320

MACHINE CODE : 4R HSS 320 DATE : MARCH 2006 PAGE - 2 -
CE DECLARATION We as
confirm that the machine
HYDRAULIC 4 ROLLS PLATE BENDING MACHINE
4R HSS 320
Serial Number : Production Year :
complies with
and the machine also harmonized with the standards .
TS EN 60204 Part 1
NAME : MUSTAFA PINARBAŞI POSITION : PRODUCTION MANAGER
BURSA, ..............................
EEECCC MMMAAACCCHHHIIINNNEEESSS DDDIIIRRREEECCCTTTIIIVVVEEE 999888 /// 333777 /// EEEWWWGGG /// CCCEEEEEE
REPLACED WITH EC – DIRECTIVES 91 / 368 / EWG ; 93 / 44 EWG ; 93 / 68 CEE
EC – LOW VOLTAGE 73 / 23 / EWG EC – NOISE LEVEL DIRECTIVES 86 / 188 / EWG

MACHINE CODE : 4R HSS 320 DATE : MARCH 2006 PAGE - 3 -
DANGER OF ELECTRIC EMERGENCY STOP
GROUNDING SYSTEM WORKING VOLTAGE
ATTENTION
BEFORE OPERATING MACHINE

MACHINE CODE : 4R HSS 320 DATE : MARCH 2006 PAGE - 4 -
YOU MUST FOLLOW THESE IMPORTANT STEPS
1. Open the cover and check the direction of motor rotation.
2. If motor rotation direction is wrong , then change L1 – L2 cables with each other.
RIGHT
WRONG

MACHINE CODE : 4R HSS 320 DATE : MARCH 2006 PAGE - 5 -
İNDEX PAGE NO
1 . GENERAL NOTES 6
2 . IMPORTANT SAFETY TERMS 7
3 . GENERAL DRAWING OF THE MACHINE 8
4 . TRANPORTATION 9
5 . SETUP INSTRUCTIONS 10
6 . TECHNICAL PROPERTIES 10
6 . 1 TECHNICAL SPECIFICATIONS and STANDARD EQUIPMENTS 11
7 . OPERATING INSTRUCTIONS 12
7 . 1 EXPLANATION OF FOUNDATION PLAN 13
7 . 2 EMERGENCY STOP 14
7 . 3 THERMAL OVERLOAD or OIL TEMPRATURE 14
7 . 4 ELECTRIC CONNECTION 14
8 . SAFETY DIRECTIVES
8 . 1 DANGER ZONES 15
8 . 2 INVERSE ELECTRIC PROTECTION 15
8 . 3 EXPLANATION FOR SAFETY SWITCH 16
8 . 4 DROP - END 17
8 . 5 IMPORTANT POINTS ON WELDING OPERATION 18
9 . BENDING OPERATIONS
9 . 1 PRE - BENDING 19
9 . 2 BENDING 20 - 21
9 . 3 CONICAL BENDING 22 - 23
10 . PERIODIC CONTROLS
10 . 1 PERIODIC CONTROLS and SCHEME 24
10 . 2 LUBRICATION 25
11 . HYDRAULIC MAINTENANCE
11 . 1 PERIODICALLY CONTROL THE FILTER 26
12 . HYDRAULIC PLAN and LIST 27 - 28
13 . GENERAL WARRANTY TERMS 29

MACHINE CODE : 4R HSS 320 DATE : MARCH 2006 PAGE - 6 -
1. GENERAL NOTES Thank you for choosing a Şahinler sheet / Metal Working Machine. We are proud to have you in
our long list of satisfied customers all over the world.
In this manual you can find instructions and information about ;
Correct installations of the machine
Description of the functional parts of the machine
Set – up and start – up adjustments
Correct standard and schedules maintenance
Simple safety regulations and accident prevention
Attention : Showing the risks of accident , if instructions are not followed.
Warring : Showing the probable damages to the machine or equipment , if the
instructions are not strictly followed
Note : It gives useful information
It is certainly necessary that the operator should read and understand all the attention , warring ,
note specified in this manual before starting with operation of the machine and before any lubrication
or maintenance intervertion.
Remove any protective crates around the machine and read the intructions on related chapters of
this manual carefully to set up the machine. If the machine is damaged while transport , immediately
take some photographs for insurance claims.
All necessary connection procedure can be found on this manual. Have the machine connected
by a qualified electric technician. Our factory is not responsible for damages because of electricity
connections.
Your machine is designed and produced to work efficiently and smoothly. To achieve this you
should also take care while operating the machine. Regard maintenance sections to have the longest
live from your machine. Try and use original spare parts where necessary and most importantly do not
overload the machine or do not make any unauthorized modifications.
Take all precautions possible to avoid any personnel injury while using the machine. Keep in mind
to Project the third party people around the machine. Refer to safety directives

MACHINE CODE : 4R HSS 320 DATE : MARCH 2006 PAGE - 7 -
2. IMPORTANT SAFETY TERMS
Following instructions are meant for the operator of the machine and it is the end user’s
responsibility to make sure that the operator reads and understands the following.
Machine must be used by a trained operator who can notice working risks.
Use the machine according to the factory working rules and directions in catalogue.
Machine is designed for working only in technical capacities which are shown in catalogue.
Machine must not be used out of it’s technical capacities. Manufacturer is not responsible for
damages that can happen.
Manufacturer is not responsible for the damages that can happen for wrong electricity
connections.
Never touch rotating or moving parts.
Keep your working dress or long hair or necklace etc away from rotation parts.
Make sure you know the position of emergency stop buttons on the machine.
In any emergency situation please push the emergency button and follow the emergency rules.
Work with necessary safety clothes if necessary ( safety shoes , glasses , earplugs etc ).
See and understand safety labels on the machine.
Be careful of other people around the machine during operation.
Never modify electric units and table
Do not remove any electronic or mechanical parts of the machine.
Do not make any modifications on the machine without manufacturer’s acceptance. These
modifications can effect the machine safety specifications and CE regulations.
Do not overload the machine
Switch off the machine when not working.
Be extremely careful during transport or replacement of the machine and follow transport
instructions in the manual to safely handle the machine.
During the bending operation do not touch and approach the material.
Do not operate the machine in rusty places and do not use rust materials.

MACHINE CODE : 4R HSS 320 DATE : MARCH 2006 PAGE - 8 -
3. GENERAL DRAWING OF THE MACHINE

MACHINE CODE : 4R HSS 320 DATE : MARCH 2006 PAGE - 9 -
4. TRANSPORTATION Machine must be carried with crane and must be lift up from the centre of gravity. Keep away from
sudden actions that damage the machine.
Customer must control the machine functions after transportation to see if everything is O.K.
Always carry and lift up the machine following Shown points. Take precaution on the carrying
and lifting situations.
If the machine’s balance position is not suitable set it to the suitable position.
Lift up the machine carefully keep away from sudden speed and sudden side changing’s.
In the mounting place move slowly when the machine touch with the floor.
Machine Type Weight
4R HSS 20 - 320 9 Ton
4R HSS 25 - 320 11 Ton
4R HSS 30 - 320 13 Ton
4R HSS 40 - 320 16 Ton

MACHINE CODE : 4R HSS 320 DATE : MARCH 2006 PAGE - 10 -
5. SETUP INSTRUCTIONS
Control the electricity Lines before the machine arrives.
For machine place consider your best and easy production area
Machine mounting floor must be flat , strong and without holes. Defective and insecure places
can spoil machine balance.
Provide a suitable and enough lightened place
Make sure that your machine is balanced on the ground.
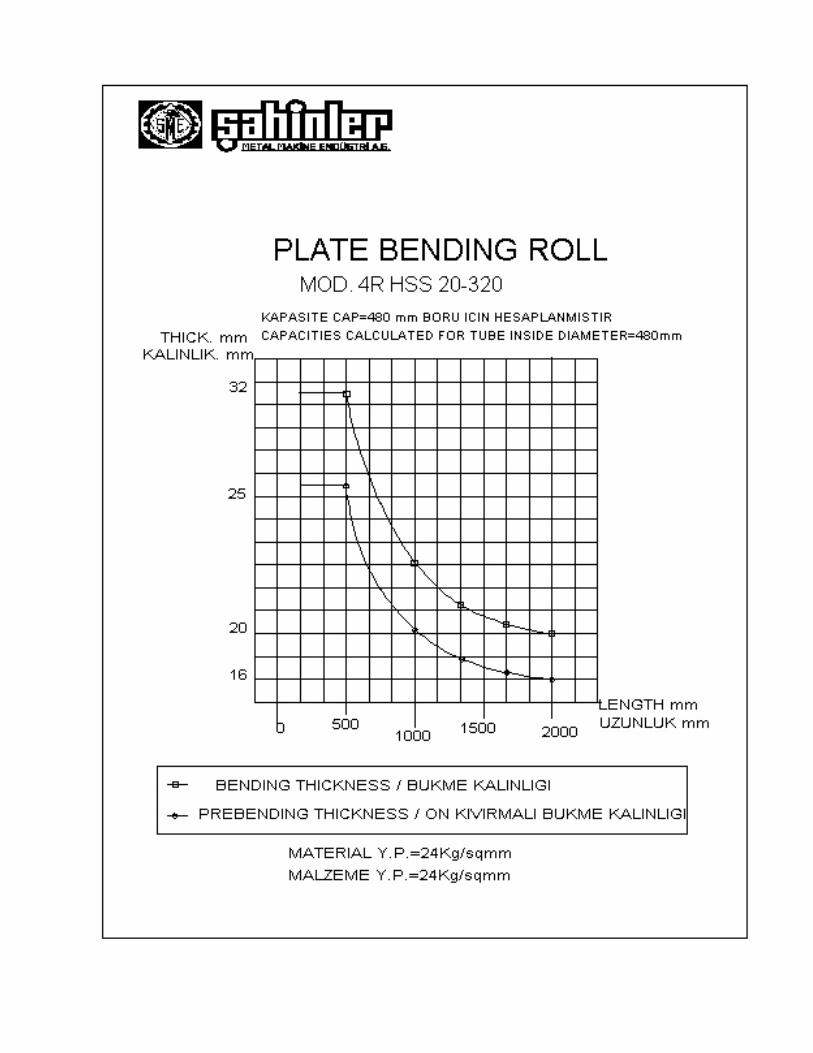
6. TECHNICAL PROPERTIES
Note : Machine dimensions are approximate.
Model Unit4R HSS 20
3204R HSS 25
3204R HSS 30
3204R HSS 40
320Without Prebending Ø x 5Diameter
mm 25 20 16 10
With Prebending Ø x 5
Without Prebending Ø x 1,5 With Prebending Ø x 1,5Diameter
mm 16 12 10 6
Bottom Roll Diameter Ø mm 320 320 320 320
Side Rolls Diameter Ø mm 240 240 240 240
Motor Power Kw 18 , 5 18 , 5 18 , 5 18 , 5
Working Speed m/Min 1,5 - 5 1,5 - 5 1,5 - 5 1,5 - 5
Machine Dimensions mm 4700x1800x1900 5200x1800x1900 5700x1800x1900 6700x1800x1900
Roll Lenght mm 2050 2550 3100 4100
Useful Lenght mm 2000 2500 3000 4000
Weight Kg 9000 11000 13000 16000
8mm 20 16 12

MACHINE CODE : 4R HSS 320 DATE : MARCH 2006 PAGE - 11 -
6 . 1 TECHNICAL SPECIFICATIONS AND STANDARD EQUIPMENT’S
The machine is particularly suitable for medium plate for the production of ferrules in
automatic cycle with or without cnc system varying radiused parts with or without axis
interpolation.
Bottom pinching roll with hydraulic positioning.
Two lateral rolls with double pinch pyramid action ( Bottom pinching and lateral rolls
with balancing system to guarantee perfect parallelism and high quality production ).
Top roll is driven by hydraulic motor coupled to the planetary speed reducer.
Movement of the lateral rolls is carried out by means of pistons.
Digital displays are provided for locating setting of roll positions.
Hydraulic drop end for ease of cylinder removal.
All control operations are conveniently located on an independent control console.
Steel welded heavy frame construction , thermally stress relieved
Induction hardened rolls are of high tensile carbon steel forging , heat treated and
submitted ton on destructive structure controls.
Conical bending device.
Hydraulic elements ; motor and pump group , pressure valves , solenoid valves , oil
display and etc. Bosch , Rexroth or Duplomatic used.
Emergency system ; safety string barrier around the machine and emergency push
button
Electric equipment’s ; Siemens or Telemecanique
Machine equipped with two speed working system which is controlled from independent
control console.
Built according to EC safety directives ( CE Mark )
User’s manual
Roll material is SAE 1050 and it is hardened

MACHINE CODE : 4R HSS 320 DATE : MARCH 2006 PAGE - 12 -
7. OPERATING INSTRUCTIONS Your machine is equipped with a phase sequencer. If the electric connection is wrong the
machine will not start up . Reverse the main electric cables and try again.
When you see the power on indicator press the start button. The motor should start up and after a
few seconds you should hear the machine running.
Test the movements of the machine by pressing rotation and piston buttons.
No Button Name No Button Name
1 Switch On / Off 12 Pinching Roll Conical Up - Down
2 Start Button 13 Pinching Roll Up - Down
3 Stop Button 14 Oil Temperature Indicator
4 Rolls Clock Wise Rotation Button 15 Right Support Up - Down
5 Digital Read - Outs 16 Right Roll Conical
6 Power On 17 Right Roll Up - Down
7 Left Support Up - Down 18 Reset
8 Left Roll Conical Up - Down 19 Fast - Slow Rotation Swich
9 Left Roll Up - Down 20 Bracket Open - Close Swich
10 Emergency Stop 21 Rolls Counter Clock Wise Rotation Button
11 Lift Up - Down

MACHINE CODE : 4R HSS 320 DATE : MARCH 2006 PAGE - 13 -
7 . 1 EXPLANATION OF FOUNDATION PLAN
Before proceeding to the bending operation in the machine, open the bracket on the front part and
verify if the upper roll enters the bracket in a symmetrical manner. If there is any deviation, first of all
adjust such deviation through the balancing bolts in the safe and then start to work.
WRONG RIGHT

MACHINE CODE : 4R HSS 320 DATE : MARCH 2006 PAGE - 14 -
7 . 2 EMERGENCY STOP
The machine has one emergency stop and emergency stop wire around the machine If the
machine is stopped by pushing one of these the PLC must be Reset before starting
Release the emergency stop button or switch on the emergency wire
Push Reset button
Push start button.
7 . 3 THERMAL OVERLOAD OR OIL TEMPERATURE If the thermal overload indicator is on it means the motor is disabled by the system to protect it
from burning. The motor is overheated due to a problem and must cool down before restarting. Do not
restart the motor at least 10 minutes. Let it cool down and try to find the problem. Do not restart the
machine until the problem is solved.
7 . 4 ELECTRIC CONNECTION
Please bring the plug near the machine and connect like as shown below.

MACHINE CODE : 4R HSS 320 DATE : MARCH 2006 PAGE - 15 -
8. SAFETY DIRECTIVES The ŞAHİNLER A.Ş. four – roll plate bending machine is supplied with necessary guards to
protect from injuries by worm – type gearbox and other gears. The only other area which needs to
carefully monitored during use is the rotational area of the rolls.
8 . 1 DANGER ZONES The below shown danger zones must be kept clear during operation
8 . 2 INVERSE ELECTRIC PROTECTION If the electrical connection of the machine is
wrong the phase protection device activates and
cuts off any electric supply to protect the hydraulic
pumps from inverse rotating and burning out. Only
when its connected Correct the relay light will light
up and the machine will operate
YELLOW - OK

MACHINE CODE : 4R HSS 320 DATE : MARCH 2006 PAGE - 16 -
8 . 3 EXPLANATION FOR SAFETY SWITCH
The machine has been equipped with a security switch and wire for the operators safety when the
safety wire is pushed it pulls the below shown ring this act as emergency stop and stops all machine
activity.
To restart the blue knob ( fig. 1 )
While pulling the safety wire when
engaged you should see green
( fig. 2 )line under the blue knob
Now you can restart the machine from
control panel.
Safety switch’s on and off positions as given below
Switch on position.
Switch off position
GREEN LINE
BLUE BUTTON

MACHINE CODE : 4R HSS 320 DATE : MARCH 2006 PAGE - 17 -
The safety wire comes unassembled for packing reasons and must be assembled by the
customer as shown above to completely surround the machine
8 . 4 DROP - END If for any reason emergency button is used during opening and closing of the drop end arm , it will
stop instantly
After the emergency button is released and Reset button is pushed you must use the start button
to restart the machine.
Emergency stop pushed
Emergency stop released
Reset pushed
Start pushed

MACHINE CODE : 4R HSS 320 DATE : MARCH 2006 PAGE - 18 -
8 . 5 IMPORTANT POINTS ON WELDING OPERATIONS
You must disconnect the machine from electric before welding operationo
MACHINE CODE : 4R HSS 320 DATE : MARCH 2006 PAGE - 19 -
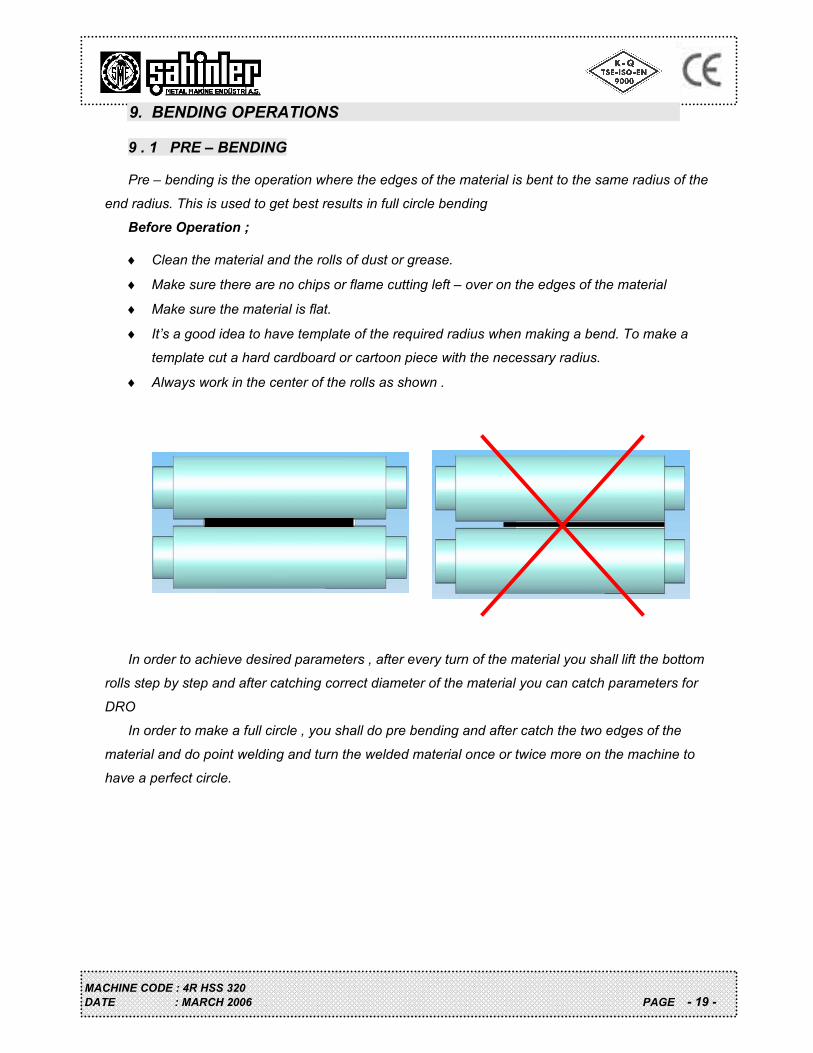
9. BENDING OPERATIONS 9 . 1 PRE – BENDING Pre – bending is the operation where the edges of the material is bent to the same radius of the
end radius. This is used to get best results in full circle bending
Before Operation ;
Clean the material and the rolls of dust or grease.
Make sure there are no chips or flame cutting left – over on the edges of the material
Make sure the material is flat.
It’s a good idea to have template of the required radius when making a bend. To make a
template cut a hard cardboard or cartoon piece with the necessary radius.
Always work in the center of the rolls as shown .
In order to achieve desired parameters , after every turn of the material you shall lift the bottom
rolls step by step and after catching correct diameter of the material you can catch parameters for
DRO
In order to make a full circle , you shall do pre bending and after catch the two edges of the
material and do point welding and turn the welded material once or twice more on the machine to
have a perfect circle.

MACHINE CODE : 4R HSS 320 DATE : MARCH 2006 PAGE - 20 -
First of all , as shown in the Figure centre the
B roll and the material axis.
Lift roll D and pinch the material
Use control panel and move the material to the
center of top roll. Now your plate is ready to
bend
9 . 2 BENDING OPERATIONS
FIGURE 1
FIGURE 2
FIGURE 3
Pre – Bending lift roll C to start pre-bending.
Bend the edge of the material according to
final diameter.
FIGURE 4

MACHINE CODE : 4R HSS 320 DATE : MARCH 2006 PAGE - 21 -
NOTE : If you are working with stainless steel it is important to finish the job in a few passes.
Because the work hardens and it becomes progressively harder after each pass.
Start rolling the material until you get the required radius. It is normal to make several passes
before getting the job done but remember that with less passes you get better finished material.
FIGURE 7 FIGURE 6
Lower roll C and pass the material to the
other side
Repeat pre-bending on other and
FIGURE 5

MACHINE CODE : 4R HSS 320 DATE : MARCH 2006 PAGE - 22 -
9 . 3 CONICAL BENDING
Although the bending procedure is the same as above , while making the conical bend the small
side of the material must be against by the conical bending device and the pinching roll must be
adjusted in a tilted way as shown in figure.
Be sure to clean any oil or grease put on the rolls before operation.
When cone bending , the thickness and width capacities of the machine are reduced.
Check with the distributor or manufacturer for your requirements.
The part indicated by no.1 has been designed and hardened for supporting the part of the plate held aganist it during the conical bending operation. Note the zoom position and detail parts as below.

MACHINE CODE : 4R HSS 320 DATE : MARCH 2006 PAGE - 23 -
10. PERIODIC MAINTENANCE
Machine general maintenance and cleaning must be carefully done. Because of this machine
must be turned off before starting the maintenance.
Control types and times ;
10 . 1 PERIODIC CONTROLS and SCHEME
The bushings shown as ( 1 ) on the drawing are lubricated by the lubrication system. However
they must be greased manually once every two weeks by hand also.
The bushings shown as ( 2 ) on the drawing must be greased manually once a month.
The reducers shown as ( 3 ) must be controlled periodically. Refer to manufactured instruction
manual for maintenance of the reducers.
Control Time Responsible
Grease oil control Daily Operator
Hydraulic oil lever control Daily Operator
Mobile control cable control Weekly Operator
Machine working control Weekly Operator
Controling the cables and hose against damage Weekly Operator
Cleaning the machine Weekly Operator
Checking the oil filter Mounthly Approve
Checking the oil recuder bolts Mounthly Operator
Checking hydraulic circuit Yearly Approve
Clean and empty hydraulic tank Yearly Operator

MACHINE CODE : 4R HSS 320 DATE : MARCH 2006 PAGE - 24 -
10 . 2 LUBRICATION
As all mechanical machines this machine also needs to be lubricated periodically. Check the
lubrication plan for reference to lubrication points.
Central greasing system ;
Your machine is equipped with a centralized greasing system. It Works manually but very simple
to use. All you have to do is to pull the lever on the greasing unit. times everyday before you start
working the machine the system lubricates all mechanical moving parts and slides.
To Avoid Damage To Bushings
Sometimes the central lubrication hoses can be broken or clogged. If the bushings are not
lubricated they will be worn out very quickly. To avoid damage to bushings. CHECK VISUALLY ALL
BRONZE BUSHINGS THAT THEY HAVE GREASE ON THEM if the are dry inspect the central
lubrication hoses and manually grease the dry bushings.

MACHINE CODE : 4R HSS 320 DATE : MARCH 2006 PAGE - 25 -
11. HYDRAULIC MAINTENANCE
Generally we recommend the use of Shell Tellus Nr.46 and BP Energol Nr.46 for hydraulic
systems. We recommend to change hydraulic oil once every two years.
11 . 1 PERIODICALLY CONTROL THE FILTER
To change the filter
Open the cover ( 1 ) by turning it to counter -
clockwise
Change the filter element
Close the cover by turning it to clockwise
Filter must be changed , when filter’s pointer
got red zone. Also you shall check filter frequently.
Brand Work temperature >20°C Work temperature < 20°C
Agip OSO 32 OSO 46
BP Energol HLP 32 Energol HLP 46
Castro Hyspin AWS 32 Hyspin AWS 46
Elf Elfolna 32 Elfolna 46
Esso Nuto H 32 Nuto H 46
Fina Hydran 32 Hydran 46
IP Hydrus 32 Hydrus 46
Mobil DTE 24 DTE 25
Q8 Haydn 32 Haydn 46
Shell Tellus 32 Tellus 46
Texaco Rando HD 32 Rando HD 46
Total Azolla ZS 32 Azolla ZS 46
Red Zone
Green Zone

MACHINE CODE : 4R HSS 320 DATE : MARCH 2006 PAGE - 26 -
12. HYDRAULIC PLAN and LİST
Hidrolik sistem 22 kw’ lik trifaze motor tahriki ile dişli pompanın depodan yağı emilip silindire
basması prensibi ile çalışır.

MACHINE CODE : 4R HSS 320 DATE : MARCH 2006 PAGE - 27 -
HİDROLİK PLAN LİSTESİ

MACHINE CODE : 4R HSS 320 DATE : MARCH 2006 PAGE - 28 -
13. GENERAL WARRANTY TERMS
All the machines are tested and quality checked before leaving the factory. Foundation and
montage of the machine is on customers responsibility.
the customer may request foundation , training and commissioning of the machine from Şahinler
by technicians an a service cost
Your machine is covered by manufacturer’s guarantee for a period of 12 months from the
date of purchase against manufacture defects. The warranty period does not exceed 12
months from the date of delivery from the manufacturer’s factory.
Warranty covers only manufacture defective parts and / or components that are reported as “
defective “ by a Şahinler technician or the agent technician and must be reported to Şahinler
in writing by fax or e-mail.
The manufacturer is responsible for the supply of free of charge spares only and cannot be
held responsible for loss of work.
Shipping and customs fees for the spare part must be paid by the end - user.
If a technician travel is necessary Şahinler will not charge for labor and workmanship costs
but the customer must pay traveling and accommodation charges.
A warranty claim does not relieve the customer from payment obligations.
The customer can not ask or demand any reimbursement of damage nor the customer will
have the right to extend or delay payment obligations nor the cancellation of order and the
refunding of damages as the guarantee is given for the defective parts of the machine and
not for the job.


A A
q
mm² A A
q
mm² A A
q
mm² A A
q
mm² A A
q
mm²
3 4 16 11.5 1.5 10 7 1.5 10 6.5 1.5 10 6 1.5 6 3.5 1.5
4 5,5 25 14.5 1.5 16 8.5 1.5 16 8 1.5 16 8 1.5 10 5 1.5
5,5 7,5 25 20 2.5 16 11.5 1.5 16 11 1.5 16 10 1.5 16 8 1.5
7,5 10 32 27 6 25 15.5 2.5 25 14 2.5 20 14 2.5 16 10 1.5
11 15 50 39 10 32 22 4 32 21 4 32 20 4 25 16.5 2.5
15 20 63 52 16 40 30 6 40 28 6 32 26.5 6 24 20.5 4
18,5 25 80 64 16 50 37 10 50 35 10 40 33 10 40 21 4
22 30 80 75 25 63 44 10 50 40 10 50 39 10 40 26 6
30 40 125 103 35 80 60 16 63 55 16 63 51.5 16 50 32 10
37 50 150 126 50 100 72 25 80 66 25 80 64 25 63 50 16
55 75 200 182 95 125 105 35 125 100 35 100 90 35 80 70 25
440 V (50Hz/60Hz) 575 V (50Hz/60Hz)
MOTOR VOLTAGE - CURRENT CABLE VALUES
KW
HP
220-240 V (50Hz/60Hz) 380-400 V (50Hz/60Hz) 415 V (50Hz/60Hz)

NO AÇIKLAMA / DESCRIPTIONKOD NO
CODE NOADETPIECE
MARKAMODEL
1 YAĞ TANKI / HYDRAULIC TANK 350 LT 1 ŞAHİNLER
2 YAĞ SEVİYE ŞALTERİ/LEVEL POWER SWITCH FSK254-2X/C-12 1 HYDAC
3 YAĞ DOLDURMA KAPAĞI/ OIL TANK CAP FT8-C40/1 1 FILTREC
4 DÖNÜŞ FİLTRESİ/RETURN FILTER TEF 320 1 INTERNORMEN
5 DİŞLİ POMPA/GEAR PUMP 3Mb39+2Mb14,5+2Mb10 1 SALAMI
6 ELASTİK KAPLİN/COUPLING DK55 1 HASEL
7 ELEKTRİK MOTORU/ELEC. MOTOR 22KW 1 GAMAK
8 GLİSERİNLİ MANOMETRE/MANOMETER 0-320 bar 4 PAKKENS
9BASINÇ KONTROL VALFİPRESSURE CONTROL VALVE
RQ4M6-SP 1 DUPLOMATIC
10 YÖN VALFİ NG10/DIRECTION VALVE DS5-S4/11N-K1 1 DUPLOMATIC
11 YÖN VALFİ NG6/DIRECTION VALVE DS3-S2/11N 1 DUPLOMATIC
12BASINÇ EMNİYET VALFİPRESSURE CONTROL VALVE
MCD6 - SAT/ 51N 3 DUPLOMATIC
13 YÖN VALFİ NG6/DIRECTION VALVE DS3-RK/10N 2 DUPLOMATIC
14 YÖN VALFİ NG6/DIRECTION VALVE DS3-S3/10N 10 DUPLOMATIC
15TEK BOBİN YÖN VALFİSINGLE COIL DIRECTION VALVE
DS3-SA2/10N 1 DUPLOMATIC
16 İKİZ KİLİTLEME VALFİ/TWIN LOCK VALVE VBPDL38 9 DUPLOMATIC
17 HIZ AYAR VALFİ/SPEED ADJUSTMENT VALVE Z2FSK-6-2-1X/2QV 3 REXROTH
18 HIZ AYAR VALFİ/SPEED ADJUSTMENT VALVE 1 REXROTH
19HAT TİPİ İKİZ KİLİTLEME VALFİH TYPE TWIN LOCK VALVE
VBPDL38 1 OLEOSTAR
20 HIZ AYAR VALFİ/SPEED ADJUSTMENT VALVE 1 REXROTH
21 HİDROLİK ÜNİTE/HYDRAULIC UNIT - 1 ŞAHİNLER
22 HİDROLİK ÜNİTE/HYDRAULIC UNIT - 1 ŞAHİNLER
23 HİDROLİK ÜNİTE/HYDRAULIC UNIT - 1 ŞAHİNLER
24 HİDROLİK ÜNİTE/HYDRAULIC UNIT - 1 ŞAHİNLER
25 HİDROLİK ÜNİTE/HYDRAULIC UNIT - 1 ŞAHİNLER
26 ELEKTRİK MOTORU/ELEC. MOTOR 2,1KW-1750 1 WAT
27 ELASTİK KAPLİN/COUPLING DK28 1 HASEL
28 DİŞLİ POMPA/GEAR PUMP 3.5 1 SALAMI
29 TERMOSTAT/THERMOSTAT NT-177-DO TS5 (30°-90°) 1 TEKOSA
HSS 4R HSS 25x320 HYDRAULIC PART LISTHİDROLİK PARÇA LİSTESİ

NO AÇIKLAMA / DESCRIPTIONKOD NO
CODE NOADETPIECE
1 YAĞ TANKI / HYDRAULIC TANK 450 LT 1
2 YAĞ SEVİYE ŞALTERİ/LEVEL POWER SWITCH FSK254-2X/C-12 1
3 YAĞ DOLDURMA KAPAĞI/ OIL TANK CAP FT8-C40/1 1
4 DÖNÜŞ FİLTRESİ/RETURN FILTER TEF 320 2
5 DİŞLİ POMPA/GEAR PUMP 3Mb55+2Mb16+2Mb6,2 1
6 ELASTİK KAPLİN/COUPLING DK55 1
7 ELEKTRİK MOTORU/ELEC. MOTOR 30KW-1750 1
8BASINÇ KONTROL VALFİPRESSURE CONTROL VALVE
RQ4M6-SP 6
9 GLİSERİNLİ MANOMETRE/MANOMETER 0-320 bar 6
10 YÖN VALFİ NG10/DIRECTION VALVE DS5-S4/11N-K1 3
11 YÖN VALFİ NG6/DIRECTION VALVE DS3-S2/11N 3
12 YÖN VALFİ / DİRECTİON VALVE DS3-RK/10N 1
13 YÖN VALFİ / DİRECTİON VALVE DS3-S3/10N 5
14HAT TİPİ İKİZ KİLİTLEME VALFİH TYPE TWIN LOCK VALVE
VBPDL38 4
15 İKİZ KİLİTLEME VALFİ/TWIN LOCK VALVE VBPDL38 1
16 TERMOSTAT/THERMOSTAT NT-177-DO TS5 (30°-90°) 1
17 HİDROLİK ÜNİTE/HYDRAULIC UNIT - 1
18 HİDROLİK ÜNİTE/HYDRAULIC UNIT - 1
19 HİDROLİK ÜNİTE/HYDRAULIC UNIT - 1
20 HİDROLİK ÜNİTE/HYDRAULIC UNIT - 1
21 ELEKTRİK MOTORU/ELEC. MOTOR 18,5KW-1750 1
22 ELASTİK KAPLİN/COUPLING DK55 1
23 DİŞLİ POMPA/GEAR PUMP 3Mb55+2Mb16+2Mb2 1
24ELEKTRİK MOTORLU SOĞUTUCU/ELECTRIC MOTOR FAN 2050 K
1
HSS 3R HSSx420 HYDRAULIC PART LISTHİDROLİK PARÇA LİSTESİ

MARKAMODEL
ŞAHİNLER
HYDAC
FILTREC
INTERNORMEN
SALAMI
HASEL
GAMAK
DUPLOMATIC
PAKKENS
DUPLOMATIC
DUPLOMATIC
DUPLOMATIC
DUPLOMATIC
OLEOSTAR
DUPLOMATIC
TEKOSA
ŞAHİNLER
ŞAHİNLER
ŞAHİNLER
ŞAHİNLER
WAT
HASEL
SALAMI
EMMEGI

NO DESCRIPTION CODE NO PIECE MODEL
1 HYDRAULIC TANK 500 lt 1 ŞAHİNLER
2 LEVEL POWER SWITCH FSK254-2X/C-12 1 HYDAC
3 OIL TANK CAP FT8-C40/1 1 FILTREC
4 RETURN FILTER TEF 320 1 INTERNORMEN
5 GEAR PUMP 3Pb22.5+2Pb8,3+2Pb6,2 1 SALAMI
6 COUPLING DK55 1 HASEL
7 ELECTRIC MOTOR 18.5KW 1 GAMAK
8 MANOMETER 0-320 bar 4 PAKKENS
9 PRESSURE CONTROL VALVE RQ4M6-SP 1 DUPLOMATIC
10 NG10 DIRECTION VALVE DS5-S4/11N-K1 1 DUPLOMATIC
11 NG6 DIRECTION VALVE DS3-S2/11N 1 DUPLOMATIC
12 PRESSURE CONTROL VALVE MCD6 - SAT/ 51N 3 DUPLOMATIC
13 NG6 DIRECTION VALVE DS3-RK/10N 2 DUPLOMATIC
14 NG6 DIRECTION VALVE DS3-S3/10N 7 DUPLOMATIC
15 SINGLE COIL DIRECTION VALVE DS3-SA2/10N 1 DUPLOMATIC
16 TWIN LOCK VALVE VBPDL38 7 DUPLOMATIC
17 PRESSURE CONTROL VALVE MCD6 - SAT 1 DUPLOMATIC
18 SPEED ADJUSTMENT VALVE Z2FSK-6-2-1X/2QV 2 REXROTH
19 H TYPE TWIN LOCK VALVE VBPDL38 1 OLEOSTAR
20 SPEED ADJUSTMENT VALVE Z2FSK-6-2-1X/2QV 2 REXROTH
21 HYDRAULIC UNIT - 1 ŞAHİNLER
22 HYDRAULIC UNIT - 1 ŞAHİNLER
23 HYDRAULIC UNIT - 1 ŞAHİNLER
24 ELECTRIC MOTOR 2HP 1 WAT
25 COUPLING DK28 1 HASEL
26 GEAR PUMP 3 1 SALAMI
27 THERMOSTAT NT-177-DO TS5 (30°-90°) 1 TEKOSA
HSS 4R HSSx320 HYDRAULIC PART LIST

1
4R HSS 320 NC
NC–4X-E 508T v1.4

2
General Characteristics Input 21-30 VDC @ 700mA CE Suitable for EN50081-2 and EN50082-2 standards EMI FCC Class « A » Isolation At 500VDC 50 Mohm Vibration Stamina 10 between 25 Hz (X,Y,Z ways 2G 30 minutes) Protection NEMA 4 / IP65 front panel(O ring stamp) Temperature 32 between 113 F (0 between 45 C) Factory Moisture 10 between 90% RH keeps clean Hardware Specifications
MT-510S / 510T MT-508S MT-509L MT-506S / 506L Display 10.4” STN, 256
color LCD /10.4” TFT, 256 color LCD
7.7” STN, 256 color LCD
9.4” blue mod LCD
5.7” blue mod LCD / 5.7” STN colorLCD
Resolution 640(G) x 480(Y) nokta
640(G) x 480(Y) nokta
640(G) x 480(Y) nokta
320(G) x 240(Y)
Display 215(G) x 162(Y) mm
196(G) x 150(Y) mm
120(G) x 90(Y) mm
Pixel 0.33(G) x 0.33 (Y) mm
Back Light CCFT (MTBF 15 000hour, automatic shut down, changeable) Touch Screen 8 wire resistance
type, voice alert on touch
8 wire resistance type, voice alert on touch
Touch Sensitivity
2mm parallel
Surface Hardness
4H
Serial Ports 1 RS-232 (controller port) and 1 RS-232 / RS-485 (PC & controller port)Memory 4MB DRAM ve 1 M byte flash ROM, upgradable to 2MB

3
Parallel port Standard parallel printer port No printer port
Real Time clock EPSON 72421B option, Y2K compatible None
System Adjustment
Watch dog timer, power error recognize
Dimensions H x W x D
Bezel: 9.37 x 12.40 x 2.44 inches (238 x 315 x 62 mm) Cutout: 8.86 x 11.89 inches(225 x 302 mm)
Bezel: 6.93 x 9.09 x 2.16 inches (176 x 231 x 55 mm) Cutout: 6.57 x 8.75 inches (167 x 222 mm)
Bezel: 9.06 x 11.69 x 1.57 inches (230 x 297 x 40 mm) Cutout: 8.39 x 11.10 inches (213 x 282 mm)
Bezel: 5.90 x 8.00 x 2.95 inches (150 x 204 x 75 mm) Cutout: 5.43 x 7.56 inches (138 x 192 mm)
Weight Approx.. 2.0 kg Approx.. 1.3 kg Approx.. 1.8 kg Approx.1.0 kg

4
RUNNING:
NC screen, helps control one axis manual, automatic and semi - automatic modes. You can move the axis with control buttons. Programme memory of the NC unit is 256Kb. 1000 programme memory. AXIS: X AXIS: Top roll left and right rotation Y AXIS: Left Roll Up & Down Movement. (looking from the bracket side). Z AXIS: Right Roll Up & Down movement (looking from the bracket side). S AXIS: Bottom Roll up & down movement.

5
NC unit has 5 different modes. These modes are; manual, automatic, semi automatic, teaching and programme modes.
MANUAL MODE: You can go to manual mode from th Main Page pressing manual button. You can watch the movement of all axis animated in manual mode and move the axis.
RESET BUTTON:
Y and Z axis, is decreased until the piston is at the most bottom and S axis is brought to the top. If you want to reset all axis, press the green reset button during 3 seconds on the left bottom corner on the manual screen. When the button is pressed all axis are reset. Axis can be reset up on request at any position of the piston.
Automatic Button:
This button runs “automatic” mode.

6
Teach Button:
This button runs “teach” mode Semi Automatic button:
This button runs “semi automatic” mode.
Programme Button:
This button runs “programme” mode and we can modify the programme.
Main Page Button:
This button goes to the Main Page.

7
SEMI AUTOMATIC MODE: You can go to this mode by pressing semi – automatic buton in the main menu. This mode tests the movement of the axis and adjusts the parameters

8
Axis test: Pres the red buton on the bottom left. Axis and numbers are shown on the screen now..Choose the axis and its position values and pres “ENTER”. Entered value is shown on the red button. Then pres “start” buton to move the axis.

9
Adjusting Parameters:
When the “parameter” buton on the bottom left of the screen is pressed you see the password. Touch the number on the screen to enter the password.If the password is correct it is shown “PASSWORD IS OK”. Press ”OK” to go to the parameter screen. If you want to quit pres X on the top right.
Password =1953

10
Parameter page:
Parameter screen is used to make, adjustment of the sensitivity of the axis, language options, time, date adjustments. AXIS SETTINGS : Axis settings screen is used to make adjustment of the sensitivity of the axis. If the MANUAL/AUTO button on the screen is MANUAL mode manual parameters woulb be active. If the switch is AUTO mode NC Unit calculates and updates the parameters.

11
X (+) : provides movement of X Axis right. X (-) : provides movement of X Axis left Y (+) : provides movement of Y Axis upwards. Y (-) : provides movement of Y Axis down Z (+) : provides movement of Z Axis upwards. Z (-) : provides movement of Z Axis down. S (+) : provides movement of S Axis down.. S (-) : provides movement of S Axis upwards. Lang. : NC Unit language slection parameter 0 : Turkish 1 : English 2 : German 3 : Russian

12
TIME : Adjustment of clock
DATE : Adjustment of date
FACTORY SETTINGS: If the password is correct all the parameters change to factory settings. ( Password : 2005 ) Buzzer : NC Unit souds if the any buton on the screen pressed. To activate: ‘ 1 ‘ , To Deactivate: ‘ 0 ‘ Screensaver : NC unite stand by the screen to save lifetime of the screen. Screensaver activation time is entered as minute ( 0 – 255 min. ) by this parameter. To deactivate the screensaver : ‘ 0 ‘ After making necessary changes pres “SAVE” buton to go to the main menu

13
TEACHING MODE:
Converts all manual movements to a programme on the NC Unit
First pres “Program No” button to give a number to our programme.
After each axis movement pres “New Line” button to add the current linet o the programme.After each movement pres “New line” button. After all movements are done pres “SAVE” button and our programme is saved.

14
AUTOMATIC MODE: We can run the stored programmes from automatic mode.
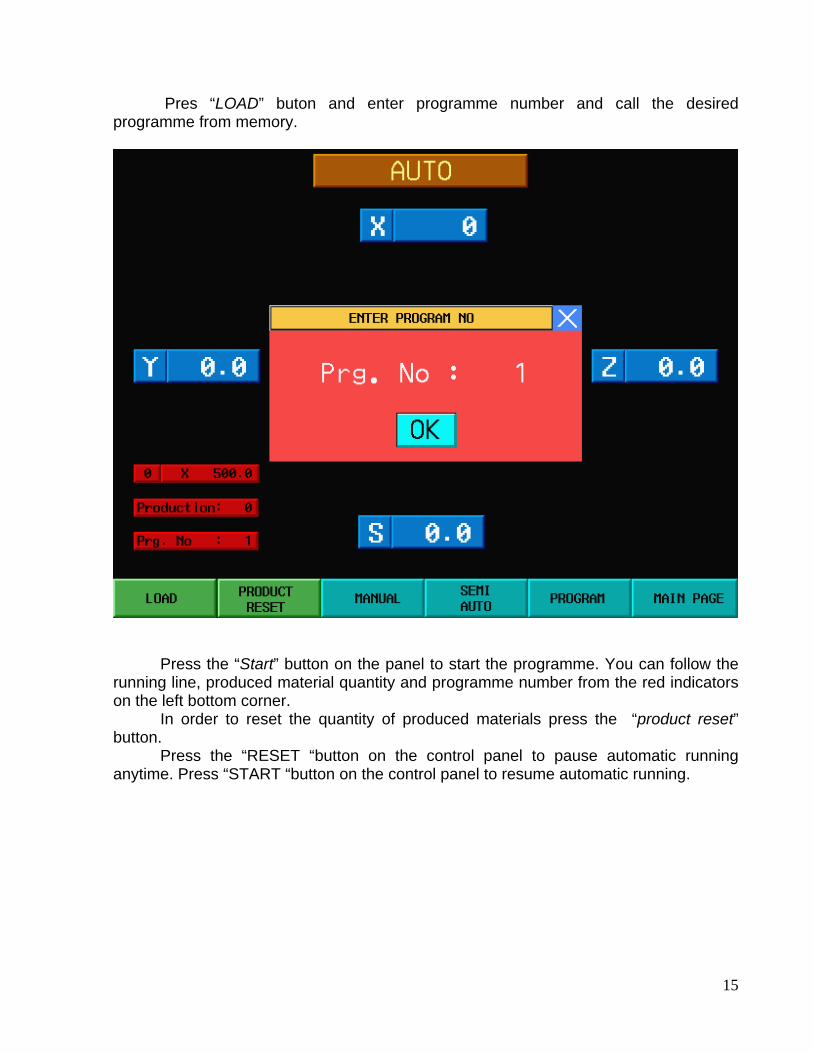
15
Pres “LOAD” buton and enter programme number and call the desired programme from memory.
Press the “Start” button on the panel to start the programme. You can follow the running line, produced material quantity and programme number from the red indicators on the left bottom corner.
In order to reset the quantity of produced materials press the “product reset” button.
Press the “RESET “button on the control panel to pause automatic running anytime. Press “START “button on the control panel to resume automatic running.

16
PROGRAMME MODE :
1. ADDING NEW PROGRAMME: Pres “New” button. On the screen enter “program number” and press “OK”.

17
Programme writing screen: This screen is 48 lines long and 1000 programmes
writable.
Programme writing : press “WRITE.” Button, enter the axis and position values on
the upcoming screen and press “Enter” button. To go to the next line press “New Line” button. X axis has 3 mode in automatic mode. X Mode : Rotation speed of the roll can be changed manually using “Slow/Fast” switch on the control panel. X > Mode : Rotation speed of the roll is SLOW . The speed can not be changed manually. X >> Mode : Rotation speed of the roll is SLOW . The speed can not be changed manually.
Saving a Programme: After writing the last line press “New Line” button and then press “SAVE”.button
Editing Line: Pres the “edit Line buton to change a stored programme line, Enter
the line number, Choose the Axis and position on the screen and press “OK” button.

18
2. EDITING PROGRAMME: Press “EDIT” in the Program menu. Enter the programme number to be edited press
“OK “ button. Programme Edit screen is shown on the screen.
Editing a line: Touch and choose the linet o be edited from the touch screen.
Pres “OK” button after editing.

19
Deleting a line: Press “DELETE LINE” and enter the line number to be deleted and press “OK” button.
Inserting a Line: Press “INSERT LINE” button enter line number and press “OK”
button.
SAVING: Press “SAVE” button after making changes to store them on the NC Unit.
3. COPYING:
Pres “COPY” button on the screen SOURCE: Choose the file to be copied. TARGET: Choose the place to be copied. Press “OK” button.

20
4.DELETING A PROGRAMME Pres the “DELETE” buton on the screen and enter the programme number and pres “OK”

21
ABOUT
ERROR MESSAGES All error messages appear on the center of the screen .When the error is solved the error message disappears.