user's manual phr-200 magnetic digital rockwell hardness ... · it thoroughly follows the...
TRANSCRIPT

TX
TX TESTING INSTRUMENTS CO.,LTD.
No.17-1 Wensu Street, Hunnan District Shenyang City 110168 Te l :+86-24-24238668 Fax:+86-24-24230008 http://www.txinstruments.com E-mai l : export@t ianxing.com.cn
USER'S MANUAL
PHR-200
MAGNETIC DIGITAL ROCKWELL HARDNESS TESTER
www .tx in strum ents.com
C o n t e n t s
1. Sa fe ty 1
1.1 Prevent D ropp ing of the Tes te r 1
1.2 On St rong Magne t i c Field 1
1.3 On Recharger 1
2. Genera l Descr ip t ions 2
3. W o r k i n g Pr inciple and s t ructure 3
4. M a i n Technica l P a r a m e t e r s 3
5. But tons I l lus t ra t ion 3
6. O p e r a t i o n Prepara t ion 7
7. Inspect ion and Ca l ibra t ion of Tes ter 9
7.1 Accep tab le Ind ica t ion Error and Repea tab i l i t y Error 9
7.2 Ind ica t ion Va lues Inspec t ion 10
7.3 Inspec t ion W a y s of Ha rdness Block (e.g. HRC) 10
7.4 Ca l ib ra t ion 10
8. Ca l ib ra t ion of Force V a l u e s 11
8.1 Cond i t i on for S tar t ing Force Va lues Ca l ib ra t ion 11
8.2 W a y s of Force Va lues Ca l ib ra t ion 11
9. M i s o p e r a t i o n , Faul ts and S o l u t i o n 12
9.1 M isopera t i on 12
9.2 Faul ts and So lu t ion 12
10. Factors Af fec t ing Test Accuracy 12
11. Parts I n t r o d u c t i o n 13
12. Other Ins t ruct ions 15
13. S t a n d a r d A s s e m b l y 17
PHR-200 Magnetic Digital Rockwell Hardness Tester 1
1. S a f e t y Before operating the instruments, please read and make a thorough understanding of the instruction on safety.
1.1 Prevent Dropping of the Tester The tester is made of iron and steel, leading to a heavy weight, therefore if dropped by accident; it could cause injuries to persons and severe damage to the instruments. Thus, please follow the safety precautions below strictly: 1.1.1 Place it in a plain and steady location when it is unused, in case of falling. 1.1.2 Move the tester cautiously, in case of falling down from hands. 1.1.3 Hold the tester f irmly when test ing a part with curved or tilt surface, especia l ly
when the magnetic switch is off, in case of potential injuries to persons. 1.1.4 Fix the iron seat of the tester in a steady place, in case of falling. 1.2 On Strong Magnetic Field It could cause strong magnetic field in using. When the magnetic switch is on the position "OFF", magnet is a closed circle inside of the tester, showing no magnet to outside. When the magnetic switch is on the position "ON", tester affects magnet to outside. It equals to a strong magnet at this time. If by carelessness, tester would dash to the surrounded iron and steel products, and in this process it would cause possible injuries to persons or damage to tester. Thus in the stocking and operating of tester, please follow the regulations below strictly: 1.2.1 Only when the tester placed plainly and steadily, push the magnet ic switch to
"ON". On any other occasion, the magnetic switch is "OFF". 1.2.2 In the process of loading force, if the suction is not strong enough, tester may
leave the testing part, at this time the magnetic switch should be "OFF". 1.2.3 It is easy to push the magnet ic swi tch to "ON", when it is placed in iron seat
or suitable iron and steel test parts, so when the operator feel hard to do this operation, DO NOT do it by force. The operator should investigate the reasons and secure the safety of operation.
1.3 On Recharger The tester supplies recharger which should be used following the instruction. Furthermore, one should also follow the below instructions: 1.3.1 The recharger could only be applied to regulated power on the body of tester. 1.3.2 Keep away from water or other liquids when recharging. 1.3.3 Do not touch the connector plugs by wet hands. 1.3.4 Do not disassemble the recharger, avoiding of electric shock. 1.3.5 Pull off the connector plugs immediately when wire of the power damaged or
torn, liquids splashed into the recharger or recharger left or damaged.
www.tx instruments.com

2 PHR-200 Magnetic Digital Rockwell Hardness Tester
2. General Descriptions PHR-200 Magnetic Digital Rockwell hardness tester applies computer, electric and sensor technology, realizing the high-accuracy and intelligence of portable tester, as well as the possibility of fast and accurate testing the body hardness of the large parts. It is a patent product. It is designed uniquely and operated well with the following features: 2.1 Advanced Test Methods. It is fixed onto the surface of a iron and steel part smartly with magnetic chucks to start a test intelligently. Simply reached to one side of the part, the test could be accomplished. Only if the surface is available, an iron and steel part could be tested, no matter what shapes and sizes are. 2.2 Easy and Fast Operation It simplifies the operation steps of Rockwell Hardness Test: directly load total test force; maintain it for a few seconds; release the total test force and then the test is finished, with no step of maintaining the preliminary test force of 10Kg. 2.3 High Reliability It thoroughly follows the Rockwell Hardness Test Principle, and complies with relevant regulation of IS06508, and ASTM E18. 2.4 High Accuracy It is a world leading product with patent. It achieves higher test accuracy than other portable hardness testers, the same accuracy as desk testers and complies with the regulations of indicator error and repeatability error on ISO and ASTM standards. 2.5 Error Calibration It permits customer to calibrate the tester with a standard block at any time, ensuring the relatively high accuracy in long-term operation. 2.6 Wide Operation Temperature Range It could be operated under a temperature range of 0°C to 50°C either inside of workshop or outdoor. When the temperature changes is 20°C, most of the test results are in the acceptable error range. The tester could be applied to test body hardness of too large or heavy iron and steel parts. It could test the hardness of steel plates, steel pipes, bearings, moulds; large and medium-sized heating parts with available surface, boilers, pressure vessels, and weld bead on pressure pipes. In a wide range of manufacture industry, it could replace Leeb hardness tester which is not accurate or reliable enough.
www.tx instruments.com
PHR-200 Magnetic Digital Rockwell Hardness Tester 3
3. Working Principle and Structure The tester consists of 2 magnetic chucks and 1 intelligent hardness test unit. In testing the magnetic chucks fixes the instrument to iron and steel part. The operator load test force by hand wheel, and the force sensor detects the force simultaneously and display it on screen, at the same time the distance sensor detects the depth which consists of fine screw and spiral encoder, then after the load force released and indenter uplifted for a suitable distance, the micro-processor will calculate the hardness and display it on screen. Physical appearance and names of parts refer to Figure 1. Operation screen refer to Figure 2. Display screen refer to Figure 3.
4. Main Technical Parameters Preliminary Test Force: 10kg (98.07N ) Total Test Force : 60kg (588.4N ), 100kg (980.7N)
150kg (1471N) Test Range: 20 -88 HRA 20 -100 HRB 20 -70 HRC Test Resolution: 0.1 HR Indicator Error: Complies with ISO 6508,ASTM E18 Repeatability Error: Complies with ISO 6508,ASTM E18 Operation Temperature Range: 0~50°C Weight: 5.3kg Dimension: 250mm ( L) x 105mm(W) x 136mm(H) Min. Measurement Surface: Flat: A r e a ^ 195mm x 60mm Th i ckness^5mm
Cylinder: D iame te r^60mm Th i ckness^8mm
5. Buttons Illustration "Power" It is to turn on and off the power. After 3 minuets the ins t ruments wi thout using, the power will be off automatically. "Menu" It is to set the functions of the instruments. After pressing "Manu", the instrument is on status setting and the menu displaying, then press "Manu" again, it would be on next level menu. "Statistics/A" It is a multi-functional button. On status of test, press it realizing the function of counting; on status of set -up, it could move the arrow upward; on the status of calibration, it could increase values.
"Exchange/ V" It is a multi-functional button. On status of test, press it realizing the function of exchanging; on status of set -up, it could move the arrow downward; on
www.tx instruments.com

4 PHR-200 Magnetic Digital Rockwell Hardness Tester
G CD
c o
o P -C Q) O
C bO CO S CD +J CD -p c +-> a i +-> tuo ' <H cd
O cd ^ 0) T3 CO CQ S C/3 p—] <
www.tx instruments.com
PHR-200 Magnetic Digital Rockwell Hardness Tester 5
+ - >
G CD a
cn c I—I
o
CD
a o +->
o CQ
c\i CD ?H 3 bJD
• r-H
[X
www.txinstruments.com

6 PHR-200 Magnetic Digital Rockwell Hardness Tester
G CD CD 5H O
C O
c cd
cd o
CD
C O
CD 5H =5 bJD
•i—i
[X
www.tx instruments.com
PHR-200 Magnetic Digital Rockwell Hardness Tester 7
the status of calibration, it could decrease values. "Delete/Enter" It is a double functional button. On status of test, it could delete current values; on status of set -up, it could enter the set result and end up the set status.
6. Operation Preparation 6.1 Preparation before Test. Sand the test part until it is flat and smooth. It is forbidden to have scale, decarburized layer, steel pit or dust on the surface of the part.
Caution: Please check the position the indenter before testing. The pointed end of the indenter must be higher the bottom surface of the tester to ensure there would be no touch wi th the test part. Otherwise, the indenter would be damaged.
6.2 The tester's attachment to Test Part The tester should be attached to test part flatly and steadily with the indenter erected to the surface of test part. Turn the magnetic switch to "On", keeping the tester fixed onto the test part. 6.3 Start Pressing "Power". After displaying the company info, it would display "0.0kg" and then be on test status. At this moment, it could directly test or run into se t -up status. 6.4 Scales Selection The current scale displays on the left corner of the screen. The default scale is HRC setting by factory, if the customer needs to change it into other scales, please refer to the steps as follows:
• Press "Menu" into setup status, menu displays on screen.
• Arrow points at "Scales selection", press "Menu" again into next level menu.
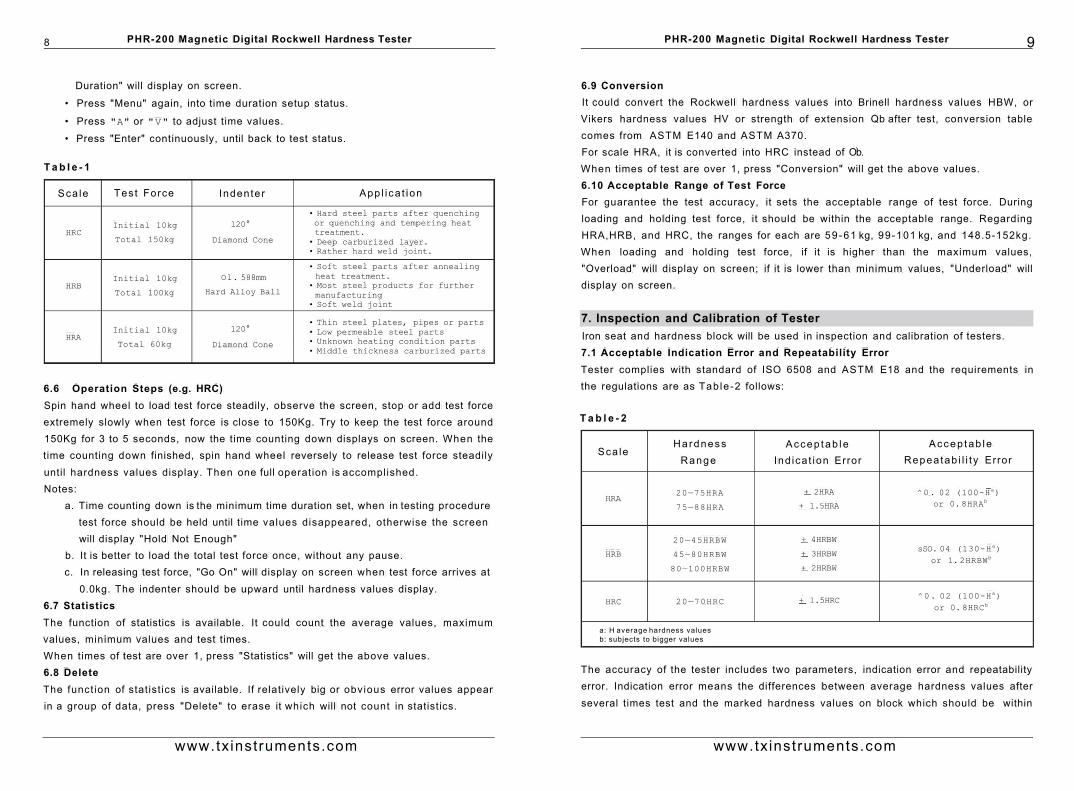
• Press "A" or "V" to move the arrow to select specific scale.
• Press "Enter" continuously until back to test status. Three scales-HRA, HRB, and H R C - are available for this tester. Test conditions and applications of each scale is as table-1 follows: 6.5 Time Duration Setup Time duration of test force will affect test accuracy and efficiency. When calibrate with standard hardness block, time duration of test force should be longer than 5 seconds. In test parts, it could be 2 to 3 seconds so as to improve the efficiency without affecting test accuracy for the short holding time. The steps of setup are as follows:
• Press "Menu" into setup status, menu displays on screen.
• Press "A" or "V" to move the arrow at "Setup", then press "Menu", "Time
www.txinstruments.com
8 PHR-200 Magnetic Digital Rockwell Hardness Tester
Duration" will display on screen.
• Press "Menu" again, into time duration setup status.
• Press "A" or "V" to adjust time values.
• Press "Enter" continuously, until back to test status.
T a b l e - 1
Sca le Tes t Force Indenter App l i ca t ion
HRC Initial 10kg
Total 150kg
120°
Diamond Cone
• Hard steel parts after quenching or quenching and tempering heat treatment.
• Deep carburized layer. • Rather hard weld joint.
HRB Initial 10kg
Total 100kg
Ol. 588mm
Hard Alloy Ball
• Soft steel parts after annealing heat treatment.
• Most steel products for further manufacturing
• Soft weld joint
HRA Initial 10kg
Total 60kg
120°
Diamond Cone
• Thin steel plates, pipes or parts • Low permeable steel parts • Unknown heating condition parts • Middle thickness carburized parts
6.6 Operation Steps (e.g. HRC) Spin hand wheel to load test force steadily, observe the screen, stop or add test force extremely slowly when test force is close to 150Kg. Try to keep the test force around 150Kg for 3 to 5 seconds, now the time counting down displays on screen. When the time counting down finished, spin hand wheel reversely to release test force steadily until hardness values display. Then one full operation is accomplished. Notes:
a. Time counting down is the minimum time duration set, when in testing procedure test force should be held until time values disappeared, otherwise the screen will display "Hold Not Enough"
b. It is better to load the total test force once, without any pause. c. In releasing test force, "Go On" will display on screen when test force arrives at
0.0kg. The indenter should be upward until hardness values display. 6.7 Statistics The function of statistics is available. It could count the average values, maximum values, minimum values and test times. When times of test are over 1, press "Statistics" will get the above values. 6.8 Delete The funct ion of statist ics is available. If relatively big or obvious error values appear in a group of data, press "Delete" to erase it which will not count in statistics.
www.tx instruments.com
PHR-200 Magnetic Digital Rockwell Hardness Tester 9
6.9 Conversion It could convert the Rockwell hardness values into Brinell hardness values HBW, or Vikers hardness values HV or strength of extension Qb after test, conversion table comes from ASTM E140 and ASTM A370. For scale HRA, it is converted into HRC instead of Ob. When times of test are over 1, press "Conversion" will get the above values. 6.10 Acceptable Range of Test Force For guarantee the test accuracy, it sets the acceptable range of test force. During loading and holding test force, it should be within the acceptable range. Regarding HRA,HRB, and HRC, the ranges for each are 59 -61 kg, 99-101 kg, and 148.5-152kg. When loading and holding test force, if it is higher than the maximum values, "Overload" will display on screen; if it is lower than minimum values, "Underload" will display on screen.
7. Inspection and Calibration of Tester Iron seat and hardness block will be used in inspection and calibration of testers. 7.1 Acceptable Indication Error and Repeatability Error Tester complies with standard of ISO 6508 and ASTM E18 and the requirements in the regulations are as Tab le-2 follows:
T a b l e - 2
Sca le Ha rdness
Range A c c e p t a b l e
Ind ica t ion Error A c c e p t a b l e
Repea tab i l i t y Error
HRA 20—75HRA
75—88HRA
+ 2HRA
+ 1.5HRA
^0. 02 (100-Ha) or 0. 8HRAb
HRB
20—45HRBW
45—80HRBW
80—100HRBW
+ 4HRBW
+ 3HRBW
+ 2HRBW
sSO. 04 (130-Ha) or 1. 2HRBWb
HRC 20—70HRC + 1.5HRC ^0. 02 (100-Ha) or 0. 8HRCb
a: H average hardness values b: subjects to bigger values
The accuracy of the tester includes two parameters, indication error and repeatability error. Indication error means the differences between average hardness values after several times test and the marked hardness values on block which should be within
www.tx instruments.com

10 PHR-200 Magnetic Digital Rockwell Hardness Tester
the acceptable range. Repeatability error means the differences between maximum and minimum values which should be within the acceptable range. If the error is not in acceptable range, the operator should inspect whether the operations are as required first. Try to make the same test force loading condition each time, that is, make the same loading process, peak of test force, force holding time duration, and releasing process as much as possible. Due to manual test force loading, it is hard to make the same process each time, and the man-made error is inevitable. It is important to operate carefully and skillfully to minimize the man-made error. 7.2 Indication Values Inspection The indication values should be inspected frequently. A thorough inspection should be taken at regular intervals like 1 month; and a daily inspection should be taken every day before operation or when the accuracy is unsure. All the blocks with tester will be inspected at regular intervals inspection. The error should comply with the relevant standards. Only the blocks wi th similar hardness values to tes t -p iece will be inspected in daily inspection. The error should comply with the relevant standards. 7. 3 Inspection Ways of Hardness Block (e.g. HRC) Iron seat is required in inspection. Hardness blocks and iron seat should be clean and any dust or contaminant will cause additional error to measurement. Fix the iron seat on horizontal desk with concave upwards; put the block into the groove; put tester onto the iron seat aiming the indenter at the center of iron seat; turn magnetic chuck switches to open, so as to attach tester to iron seat. At this time, indenter should be apart from indenter. Spin hand wheel steadily to load test force, when it appears 150Kg on screen, hold the test force until time counting down finished or even longer. Reverse hand wheel steadily to release test force until hardness values display on screen. Note: Time duration of test force should be kept at least 5 seconds when inspecting hardness block. 7.4 Calibration When indication hardness values of block is beyond acceptable range, refer to Item.10 of the manual to identify seasons. When the reason is found out, calibrate as following steps:
• Press "Menu", move the arrow to "Calibration", and press "Menu".
• Test hardness of block carefully in the ways aforementioned 3 times and get 3 effective values.
www.tx instruments.com
PHR-200 Magnetic Digital Rockwell Hardness Tester 11
• When "Average" appears on screen, press "A" or "V" to adjust the test values to marked values on block, then press "Enter" continuously until back to test status. Calibration process is finished.
Calibrate other blocks in the same way.
8. Calibration of Force Values Force values calibration function is available. Normally force calibration is done by tester manufacturer. Every time when tester is sent back to factory for maintenance, engineers will inspect and calibrate the force values. 8.1 Condition for Starting Force Values Calibration Normally the function of force value calibration is not authorized to common users. The required condition for the functions is as follows: 8.1.1 A qual i f ied mechan i cs labora to ry w i th ce r t i f i ca ted mechan i cs laboratory
technicians is a must. 8.1.2 It requires a dynamometer with measuring scope of 200Kg, accuracy not lower
than 0.2% and in period of validity. The force t ransducer of the dynamometer should be a strain gauge type (you can purchase it from manufacturer)
8.1.3 Special iron seat is required, which can be purchased from manufacturer or DIY 8.1.4 Special flat indenter is required, which can be purchased from manufacturer.
I f the above cond i t i ons are sat is f ied, you can requ i re the au tho r i t y f rom manu fac tu re r t o use the f u n c t i o n and ca l i b ra te t he f o r c e v a l u e s by t he instructions from technical engineers of manufacturer.
8.2 Ways of Force Values Calibration Assemble the special flat indenter to tester. Put force transducer into groove of special iron seat. Put tester onto iron seat, aiming indenter at pressure point. At the time, indenter is apart from transducer. Turn the magnetic chuck switch to "Open", attaching the tester to iron seat. Turn on the power of tester. Follow the instruction from technical engineer of manufacturer. When arrow points at 10kg, "10Kg,60Kg,100Kg,155kg" displays on screen. Spin hand wheel, and observe displayed force values. When dynamometer shows 10.0Kg, press "Enter" to accomplish calibration of 10kg. Arrow points at 60kg at this time. Repeat the steps above, and accomplish the calibration of 60Kg, 100Kg, and 150Kg. When these all finish, tester backs to previous menu. Press "Enter" continuously until back to test status.
www.tx instruments.com

12 PHR-200 Magnetic Digital Rockwell Hardness Tester
9. Misoperation, Faults and Solution 9.1 Misoperation If misoperation occurred during force loading, it would display "Overload", "Underload", "Hold Not Enough" on screen. This test is invalid, and a new test should be taken in another spot. When hardness value is beyond measuring range of relevant scope, it will display "Too hard" or "Too Soft" . This test is invalid as well, and a new test should be taken in another spot. If the new test result is the same as before, it indicates the selection of scope is wrong. It should be tested again in other scopes. 9.2 Faults and Solution If it displays apparently wrong test force values or disorder, it indicates some faults occurred to tester. Press "Reset" to recover tester to state as delivered.
"Reset" operation steps are as follows: • Press "Menu" into functional menu.
• Press "A" or "V" to move arrow at "Other", press "Menu" into next level menu.
• Press "A" or "V" to "Reset", press "Enter" continuoulsy until back to test status. If the operation above does not function, please contact manufacturer to get help.
10. Factors Affecting Test Accuracy 10.1 Surface of part: It will affect test accuracy if the surface of part is rough with
scale, decarburized layer, rust and contaminant. 10.2 Operation: It will affect test accuracy if it is not operated skillfully or carefully, or
force loading, time duration of test force and force releasing are not the same among several tests.
10.3 Total test force: The inaccurate loading total test force in test ing will affect result accuracy.
10.4 Test force measuring: After long time using, t ransducer or electr ic parts may drift, which may cause test force inaccurate measuring.
10.5 Time duration: T ime durat ion of test force shou ld be longer than 5 seconds when cal ibrat ing tester. In test parts, it could be 2 to 3 seconds which will not affect test accuracy despite of short holding time.
10.6 Hardness block: It wil l af fect test accuracy if b lock is in fo l lowing condi t ion: uniformity out of tolerance; bad stability; beyond inspecting valid time; distance between indentation too close; indentation existed in supporting surface; block or iron steel dirty.
10.7 Calibration: It will affect test accuracy if hardness or test force calibration is not correct.
10.8 Environment: It will affect test accuracy if temperature changes in a large range; temperature difference between test and calibration is too big; vibration exists
www.tx instruments.com
PHR-200 Magnetic Digital Rockwell Hardness Tester 13
on site; dust exists. 10.9 Scale: Error in HRA is bigger than in HRC when test. 10.10 Conversion: When convert ing the test hardness values into HBW or HV, error
may occur.
11. Parts Introduction 11.1 Adapter 11.1.1 General adapter is delivered with tester. This adapter is fit for flat and
cylinder work piece. It should not be disassembled. 11.1.2 If tester could not be attached to irregular parts or at taching force is not big
enough, please contact Tianxing which will help to design special adapter and extension indenter. In principle, specia l adapter and indenter are only for irregular parts in f ixed size. For different sizes, there should be allocated by different special adapter and indenter.
11.2 Iron Seat 11.2.1 Iron seat is made of high magnetic permeability material. 11.2.2 Its function is to test block or small parts. Put block or small parts into
the groove for test and the groove should be upward. 11.2.3 DO NOT try to test the hardness of the iron seat. 11.2.4 It is easy to rust, so keep it dry and clean. Dust on it can enlarge the possibility
of measuring error. 11.3 Hardness Block 11.3.1 It is the standard material for calibrating tester. Qualif ied Rockwell hardness
block is cal ibrated by standard Rockwel l hardness tester with its hardness va lues marked on the edge and s igned on the cer t i f i ca te . The s tandard Rockwel l hardness tester is t raceable to China's Nat ional Secondary Benchmark Rockwell Hardness Tester through hardness values transfer by blocks.
11.3.2 The valid time of block is 2 years. Expiry blocks should not be used because its hardness is possible inaccurate. It should be reca l ib ra ted by cer t i f i ca te center. Only the front side of it is permitted to use. Block wi th indentat ion on back side will cause error in test.
11.3.3 It should keep dry and clean. Rusted blocks will cause relatively big test error. 11.4 Magnetic Chucks 11.4.1 When not test ing, handles of magnet ic chucks shou ld be a lways on f ront
horizontal position of "OFF", if not horizontal, magnetic chuck switches will not close completely.
11.4.2 When test ing, put it onto steel parts or iron seat and turn the handles to the
www.tx instruments.com
14 PHR-200 Magnetic Digital Rockwell Hardness Tester
back horizontal position of "ON", if not horizontal, magnetic chuck switches will not open completely, which causes magnet ic force not arriving at maximum values.
11.5 Battery 11.5.1 Common Sense of Battery 11.5.1.1 Please use dry or rechargeable battery required by this tester. 11.5.1.2 Do not drop battery into fire, in case of possible explosion. 11.5.1.3 Do not disassemble battery, for its electrolyte is corrosive and would hurt
eyes or skin. 11.5.1.4 Dry battery is not rechargeable. 11.5.1.5 Keep battery away from conductive materials. 11.5.2 Specification of Battery 11.5.2.1 Power of the tester is supplied from 3 pieces of AA/5# battery, with voltage
1.2-1.5V. It could be alkaline or rechargeable N i -MH battery. 11.5.2.2 Due to safety restrict ion of t ranspor ta t ion, bat tery is not included in the
parts list. Please purchase it at local. 11.5.2.3 5# alkaline battery is easy to purchase and cheap. 11.5.2.4 N i - M H battery is relat ively expens i ve but rechargeab le . It could provide
longer cont inuous using time. 11.5.3 Electricity Consumption of Tester
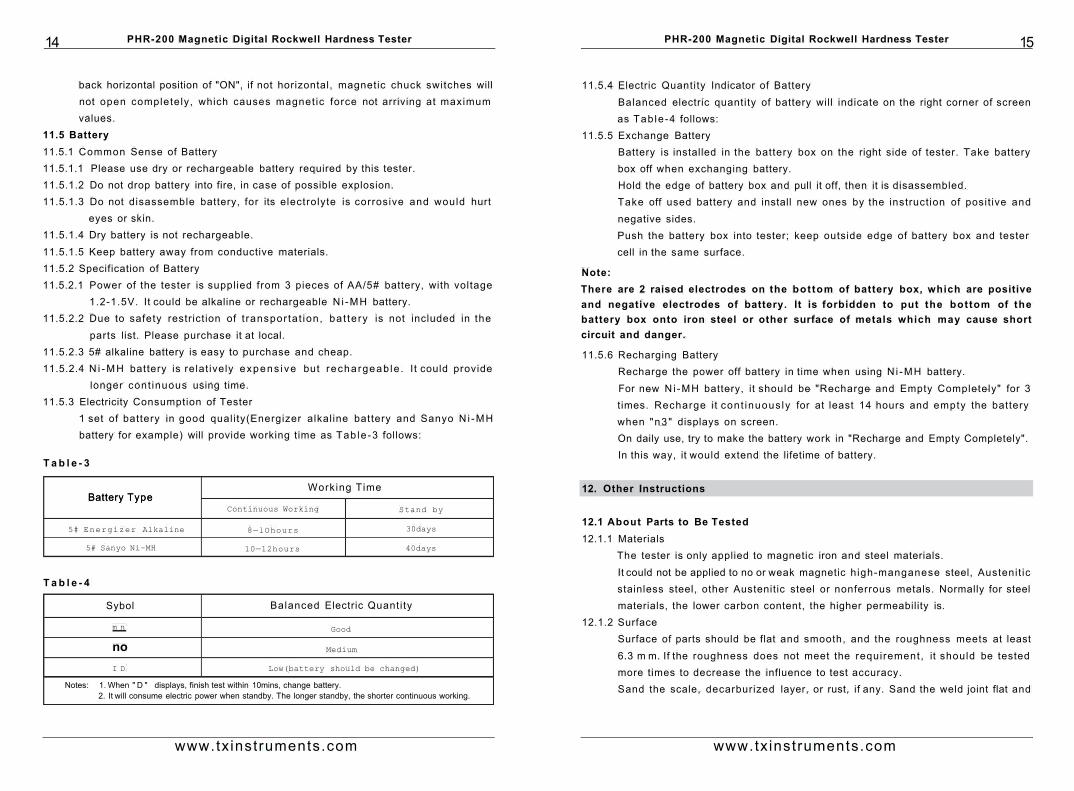
1 set of battery in good quali ty(Energizer alkal ine battery and Sanyo N i -MH battery for example) will provide working time as Tab le -3 follows:
T a b l e - 3
Battery Type Working Time
Battery Type Continuous Working Stand by
5# Energizer Alkaline 8—lOhours 30days
5# Sanyo Ni-MH 10—12hours 40days
T a b l e - 4
Sybol Balanced Electric Quanti ty
m n Good
no Medium
I D Low(battery should be changed)
Notes: 1. When " D " displays, finish test within 10mins, change battery. 2. It will consume electric power when standby. The longer standby, the shorter continuous working.
www.tx instruments.com
PHR-200 Magnetic Digital Rockwell Hardness Tester 15
11.5.4 Electric Quantity Indicator of Battery Balanced electric quantity of battery will indicate on the right corner of screen as Tab le -4 follows:
11.5.5 Exchange Battery Battery is installed in the battery box on the right side of tester. Take battery box off when exchanging battery. Hold the edge of battery box and pull it off, then it is disassembled. Take off used battery and install new ones by the instruct ion of posit ive and negative sides. Push the battery box into tester; keep outside edge of battery box and tester cell in the same surface.
Note: There are 2 raised electrodes on the bot tom of battery box, which are positive and negative electrodes of battery. It is forbidden to put the bottom of the battery box onto iron steel or other surface of metals which may cause short circuit and danger.
11.5.6 Recharging Battery Recharge the power off battery in time when using N i -MH battery. For new N i -MH battery, it should be "Recharge and Empty Completely" for 3 times. Recharge it cont inuous ly for at least 14 hours and empty the battery when "n3" displays on screen. On daily use, try to make the battery work in "Recharge and Empty Completely". In this way, it would extend the lifetime of battery.
12. Other Instructions
12.1 About Parts to Be Tested 12.1.1 Materials
The tester is only applied to magnetic iron and steel materials. It could not be applied to no or weak magnetic h igh-manganese steel, Austenit ic stainless steel, other Austenitic steel or nonferrous metals. Normally for steel materials, the lower carbon content, the higher permeability is.
12.1.2 Surface Surface of parts should be flat and smooth, and the roughness meets at least 6.3 m m. If the roughness does not meet the requirement, it should be tested more times to decrease the influence to test accuracy. Sand the scale, decarburized layer, or rust, if any. Sand the weld joint flat and
www.tx instruments.com

16 PHR-200 Magnetic Digital Rockwell Hardness Tester
polishing, if test. 12.1.3 Shapes and Sizes
Parts to be tested could be in any shapes, but there must be a big enough test area, which could be flat or cylinder. The specific requirements are: f la t - area > 1 9 5 m m x 6 0 m m , t h i c k n s s > 5 m m ; c y l i n d e r - d i a m e t e r > 6 0 m m , l e n g t h > 200mm,thickness > 8mm. For special shapes, small test area, thin and low permeability parts, for instance thin track guide rail, minor axis, short pipes, thin axis, thin pipes, stepped shaft, non-cyl indr ical surface and other irregular shapes, some of them could test in scale HRA and then converted into HRC or HRB; for some others could test by adding special adapter and indenter if the specifications are not too many.
12.2 About Remanence When magnetic chuck switch is off, there will be a little remanence in tested parts, which will keep tester still attached to the parts. It can not move the tester by pull the hoop handle. At the time, do not try to use larger force to pull it, otherwise tester will be damaged. The solution is: push the tester on left or right front side backward horizontally until it slips. Attention: do not take hand wheel, encoder or operation panel as point of strength. 12.3 About Operation Environment 12.3.1 It should be operated under required environment. 12.3.2 It should be avoid of operating in environment of salt mist, high humidity, high
temperature, rain, insolation, dust, vibration, strong magnetic field. 12.3.3 It cold not be operated in the temperature of lower than 0°C or higher than
50°C. It could not test hot parts with a temperature of higher than 60°C. Try to avoid of operating in the environment in a wide temperature change range.
12.4 Maintenance and Stock 12.4.1 Tester should NOT be stocked in carry case for a long time. 12.4.2 The bottom of adapter and iron seat should keep dry and clean, resistance of
rust. Paint a little grease on the surface of adapter and iron seat if not operating for a long time.
12.4.3 Do not forerake the tester, in case of damage to the screen. 12.4.4 Pull out the battery from box in case of contaminating the tester by its weeping
if it is predicted not to use for some time. 12.4.5 It could be stocked outdoors in long time. 12.4.6 Do not use water or detergent to clean it. 12.4.7 Adapter is restricted to disassemble, except special adapters needed. Other
parts are forbidden to disassemble without instruction and authority. 12.5 Transportation
www.tx instruments.com
PHR-200 Magnetic Digital Rockwell Hardness Tester 17
The tester's bulk density is rather big, and it consists of precision machinery and precision electronic circuit, therefore it should be very cautious during transportation. When repaired back to factory, it is very important to pack it in original package. Therefore, the original package should be kept in good condition, including carrying case, vibration-proof materials, and carton box. We are not responsible for the damage in transportation if not packed in original package.
13. Standard Assembly Tester Iron Seat Diamond Cone Indenter 1.588mm Test Ball Rockwell Hardness Block (3pieces) Recharger Battery Box
www.tx instruments.com