using 2006 census data and arcmap 10.x - the map & gis website!
TRANSCRIPT

Using 2006 Census Data and ArcMap 10.x
Map and Data Library, University of Toronto Page 1 of 13 mdl.library.utoronto.ca November 2012
Using 2006 Census Data and ArcMap 10.x
This guide covers how to:
Step 1. Download census data and boundary files.
Step 2. Import census and boundary files into ArcMap.
Step 3. Join data.
Step 4. Create a thematic map through two different methods.
Step 1. Downloading Census Data and Boundary Files

Using 2006 Census Data and ArcMap 10.x
Map and Data Library, University of Toronto Page 2 of 13 mdl.library.utoronto.ca November 2012
Click here for to access the CHASS Census Analyzer
Click here to access the CHASS Data Centre, from where you can download census data

Using 2006 Census Data and ArcMap 10.x
Map and Data Library, University of Toronto Page 3 of 13 mdl.library.utoronto.ca November 2012
Under Profile of Census Tracts (cumulative), click on Age and Sex.
You will then be brought to a page like this:
Click here for age and sex profile data at a census tract level
Click here for data from the 2006 census

Using 2006 Census Data and ArcMap 10.x
Map and Data Library, University of Toronto Page 4 of 13 mdl.library.utoronto.ca November 2012
In the top box, you can choose your Census Metropolitan Area (CMA). In this example, we are
using Toronto.
Under Census Category, you can select the variables you need. Make sure you select Land area
in square kilometers, 2006. Hold Crtl. and select the other variables you wish to map out.
In the next section, “Include in the result”, be sure to check CTUID. This will be used later in
ArcMap. Select dBASE as the output format. This format works best when used with ArcMap.
Hit Submit Query.
Select your variables here. Hold the Shift key and click to select multiple variables
Select ‘CTUID’
Select ‘dBASE’
Select your ‘CMA’
Hit ‘Submit Query’

Using 2006 Census Data and ArcMap 10.x
Map and Data Library, University of Toronto Page 5 of 13 mdl.library.utoronto.ca November 2012
Once the processing is completed, you should be given two links as shown below. The first link
has the dbf file and the second link is for a text file containing column descriptions for the dbf
file. Save both files.
(Note: the above image is an example, the lines processed will vary as will the time it takes to
generate your file)
Refer to the “columns description of dbf file,” to recall the meaning of your values. ex. "COL2","Land area in square kilometres, 2006"
Now that your census data is saved, you will need to download the census geography files.
You can download these files from the Statistics Canada website:
http://www.statcan.gc.ca/start-debut-eng.html
The two links…
Click on ‘Census’
Using 2006 Census Data and ArcMap 10.x
Map and Data Library, University of Toronto Page 6 of 13 mdl.library.utoronto.ca November 2012
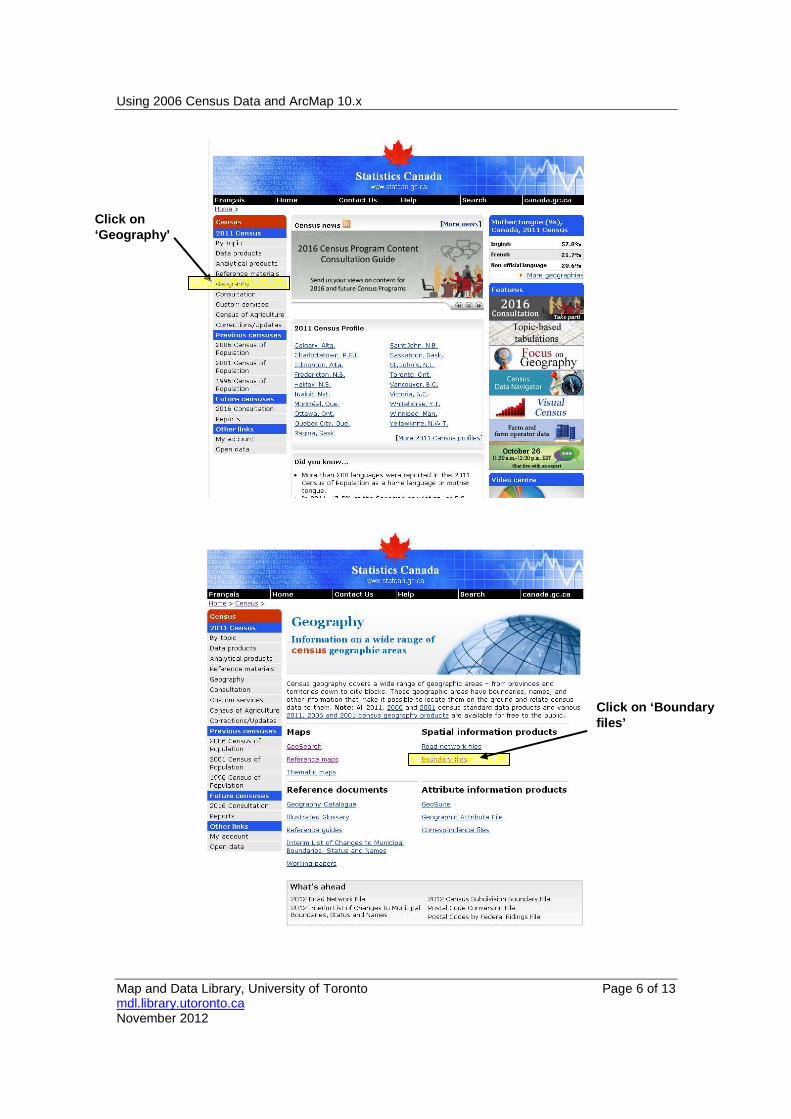
Click on ‘Geography’
Click on ‘Boundary files’

Using 2006 Census Data and ArcMap 10.x
Map and Data Library, University of Toronto Page 7 of 13 mdl.library.utoronto.ca November 2012
Note: The difference between Cartographic Boundary Files – generalized boundary files
depicting geographical areas using only the major land mass of Canada and its coastal
islands – Digital Boundary depict the full extent of the geographical areas, including the
coastal water area.
Select the appropriate census year, in this instance we’ll click on 2006

Using 2006 Census Data and ArcMap 10.x
Map and Data Library, University of Toronto Page 8 of 13 mdl.library.utoronto.ca November 2012
Because you previously downloaded census data at the census tract level, you will need to
download the census tract boundary file. To find the census tract files enter “census tract” in
the box to filter your results (see below). Download CANADA DIGITAL BOUNDARY FILE- Census
Tract.
Select the language or preference, ArcGIS format and Census Tract. Then download the .zip file and save in on your computer

Using 2006 Census Data and ArcMap 10.x
Map and Data Library, University of Toronto Page 9 of 13 mdl.library.utoronto.ca November 2012
Step 2. Loading Census Data and Boundary Files into ArcMap
Unzip the Canada Digital Boundary File before opening it in ArcMap.
Open ArcMap. Click on the Add Data button to add the Toronto census dbf file and the Canada
Digital Boundary file.
After bringing these two files in, you should have something that looks like this:
This is a map of all the census tracts in Canada.
The ‘Add Data’ icon…

Using 2006 Census Data and ArcMap 10.x
Map and Data Library, University of Toronto Page 10 of 13 mdl.library.utoronto.ca November 2012
Step 3. Joining the data
We need to join these two tables but in order to join them, a common field containing the same
values must be identified.
To identify a common field for joining the two tables, open the attribute table for both the
boundary file and the census data table by right clicking on each file and selecting Open
Attribute Table.
You will notice that CTUID from the boundary file is common to COL1 in the census table. We
will use these two fields highlighted below for our join.

Using 2006 Census Data and ArcMap 10.x
Map and Data Library, University of Toronto Page 11 of 13 mdl.library.utoronto.ca November 2012
To join the census data to the boundary file, right click on the boundary file and click on
Join and Relates. Select Join.
Note: Do not join starting with the dbf file to the boundary file.
In the Join window, choose the fields that the join will be based on. In this example, we use
CTUID for as the field to base the join on and the census table to join. We are basing this join on
COL0 from the census table. Since you only want to visualize census data for Toronto, you want
to tell the software to keep only matching records. Click OK.

Using 2006 Census Data and ArcMap 10.x
Map and Data Library, University of Toronto Page 12 of 13 mdl.library.utoronto.ca November 2012
After joining the two tables, you will see that your map only displays census tracts in Toronto.
Some rows may have null values. It is possible that no census data are available for certain
tracts because they are suppressed. For example, if a tract is very small in area, data may be
suppressed to protect the privacy of its residents. A link to the list of all the suppressed tracts
can be found on the Data Library webpage
(http://www.chass.utoronto.ca/datalib/cc06/cc06.htm).
Changing the column headings
The census table was downloaded with very generic column names like COL0. Although we
cannot change the name of the columns of the dbf file, we can add aliases to each column to
make it easier to work with the data. Open the attribute table, and right-click on the column
that you want to add an alias. Click Properties.
Under Alias, type in the appropriate name. Remember to refer back to the text file that you
saved when you downloaded the census table.

Using 2006 Census Data and ArcMap 10.x
Map and Data Library, University of Toronto Page 13 of 13 mdl.library.utoronto.ca November 2012
Step 4. Making a Thematic Map
Right click on the boundary file and click Properties. In the Symbology tab, click Quantities, then
click Graduated colors. Under Fields, choose the population field and then choose the land area
field as the Normalization field. Click OK.
You have now created a thematic map using census data. If you have any questions or
comments, please contact us at [email protected].