using computer drawing tools to produce tactile graphics...using computer drawing tools to produce...
TRANSCRIPT

1/12/2010
1
Using Computer Drawing Tools to
Produce Tactile GraphicsMicrosoft Word 2007
Patrick Van Geem, TVIOutreach DepartmentTSBVI
The Ribbon Menu of Microsoft Office Applications
Office Button Quick Access Toolbar File Name and Type of Document
Ribbon TabsRibbon
Document Window Settings

1/12/2010
2
Repositioning the Quick Access Toolbar
Drawing Tools for the Quick Access Toolbar
• Grid Settings
• View Gridlines
• Shapes
• Ungroup
• Group
• Dashes
• More Lines
• Arrows
• More Arrows
• Outline Weight
• Draw Text Box
• Shape Fill
• Shape Outline
• Rotate
• Send to Back
• Bring Forward
• Bring to Front

1/12/2010
3
Adding Tool Quick Access Toolbar Menu
• Select the launcher
arrow to the right of the
Quick Access Toolbar
• Select “More
Commands...”
Quick Access Tool Bar Tool Selections
The “More Commands” selection will activate
the Word Option dialog box.

1/12/2010
4
Selecting The Drawing Tools List
• Select the
customize selection
in the Word Option
listing.
• Select “Drawing
Tools…” in the
commands listing.
• The Drawing Tools
listing is activated.
Categories of Tools Menu
• Tools are categorized in groups.
• The “Drawing Tools” category
contain the Word drawing tools.
• Text boxes are located in the
“Text Box Tools”

1/12/2010
5
Uploading Tools on to the Quick Access Toolbar
• Press “Add” to
upload a selection
from the left side
tool list.
• All tool you want
uploaded on the
Quick Access
Toolbar should be
listed in this right
side listing.
Tools on Quick Access Toolbar
• Tools added to the Quick
Access Toolbar will appear
in this right side tool listing.
• Be sure to press “OK” after
uploading is complete.
• Tools in this list will now
appear in the Quick Access
Toolbar on the Ribbon.

1/12/2010
6
11
--“Zoom” tool
--“Group” (mending objects together)
-- Grid Line Display
--“Undo” keystroke (Ctrl+z)
--Duplicate keystroke (Ctrl+d)
--Copy keystroke (Ctrl+c)
--Paste keystroke (Ctrl+v)
--Cut keystroke (Ctrl+x)
--Drawing Area (only in MS Word )
--Order (arranging object from front to back)
Things to Know About Graphic Design
Location of Tools for Production
1. Paste and Paste
Special
2. Font Type and Size
3. Drawing Tools on the
Quick Access Toolbar
4. Object Select Arrow
5. Zoom
1 2
34
5

1/12/2010
7
Opening the Drawing Grid
• Select the “Grid
Setting” tool in the
Quick Access Toolbar.
• A “Drawing Grid” dialog
window is activated.
Configuring the Drawing Grid
1. Uncheck “Snap objects to……”
2. Set Grid setting to 0.5” on
both spacing's
3. Uncheck “Use margins”and
set margins to about 0.2”
4. Check “Display gridlines on…..
5. Set Vertical and Horizontal
every set to 1
6. Press OK
1
2
3
4
5
6

1/12/2010
8
Grid Guidelines Work Space
The grid guidelines
will not print out on
the final document.
Selecting a Tool(Arrow Line)
• In the Quick Access
Toolbar select the
“Shapes” icon.
• Select the arrow line
tool icon.

1/12/2010
9
Drawing An Arrow Line
• Place the Drawing
cursor at a guideline
intersection (1).
• Hold the left mouse
button down.
• Drag mouse cursor
moving from bottom to
top (2).
• Release at the preferred
end point.
Duplicating An Object
• Select the original
object.
• Press the key
combination command
Ctrl+D to duplicate the
arrow.

1/12/2010
10
Rotating An Object
• Make sure the object is
highlighted (selected).
• Select the “Rotate” icon
in the Quick Access
Toolbar.
• Select “Rotate Right 90
degrees”
Moving An Object
Objects are moved in
two possible ways.
1. Mouse (left button
and dragging).
2. Keys (directional
arrow keys).

1/12/2010
11
Using The Object Select Arrow
• On the Home tab on the
Ribbon go to the Editing
section.
• Select the “Select
Arrow” icon.
• This turns the cursor
into a “select object”
cursor.
Selecting More Then One Object
• Place the Select arrow
cursor above all objects
included in the selection.
• Hold the left mouse button
down.
• Drag across all objects that
you want selected.
• The selection marquee
(dashed lined rectangle)
should include all objects in
the selection.
1/12/2010
12
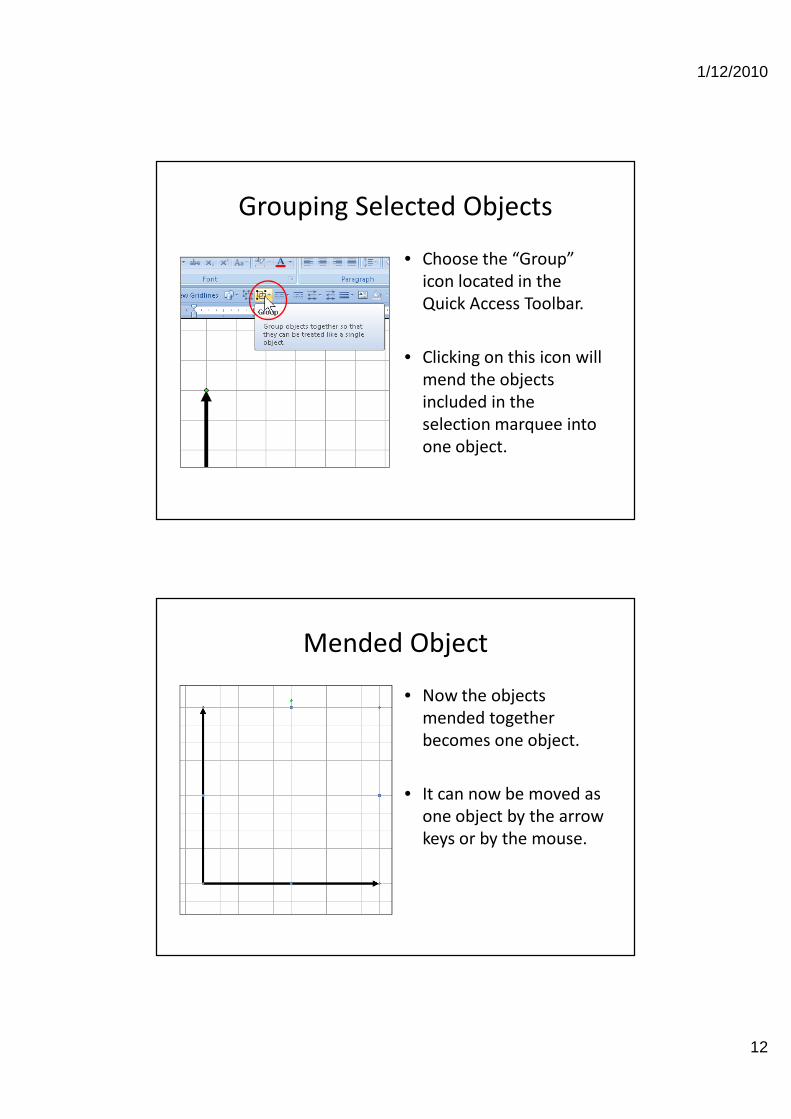
Grouping Selected Objects
• Choose the “Group”
icon located in the
Quick Access Toolbar.
• Clicking on this icon will
mend the objects
included in the
selection marquee into
one object.
Mended Object
• Now the objects
mended together
becomes one object.
• It can now be moved as
one object by the arrow
keys or by the mouse.

1/12/2010
13
Selecting the Mended Object
• Select the “Select
Arrow” in the Editing
section of the Home
tab.
• Position the cursor over
the mended object.
• With the left mouse
button press it to select
the object.
Object Selected (Highlighted)
• The blue dots indicates
that object is selection.
• Selection of object can
only occur when the
cursor is changed to the
“Select Arrow” cursor.
1/12/2010
14
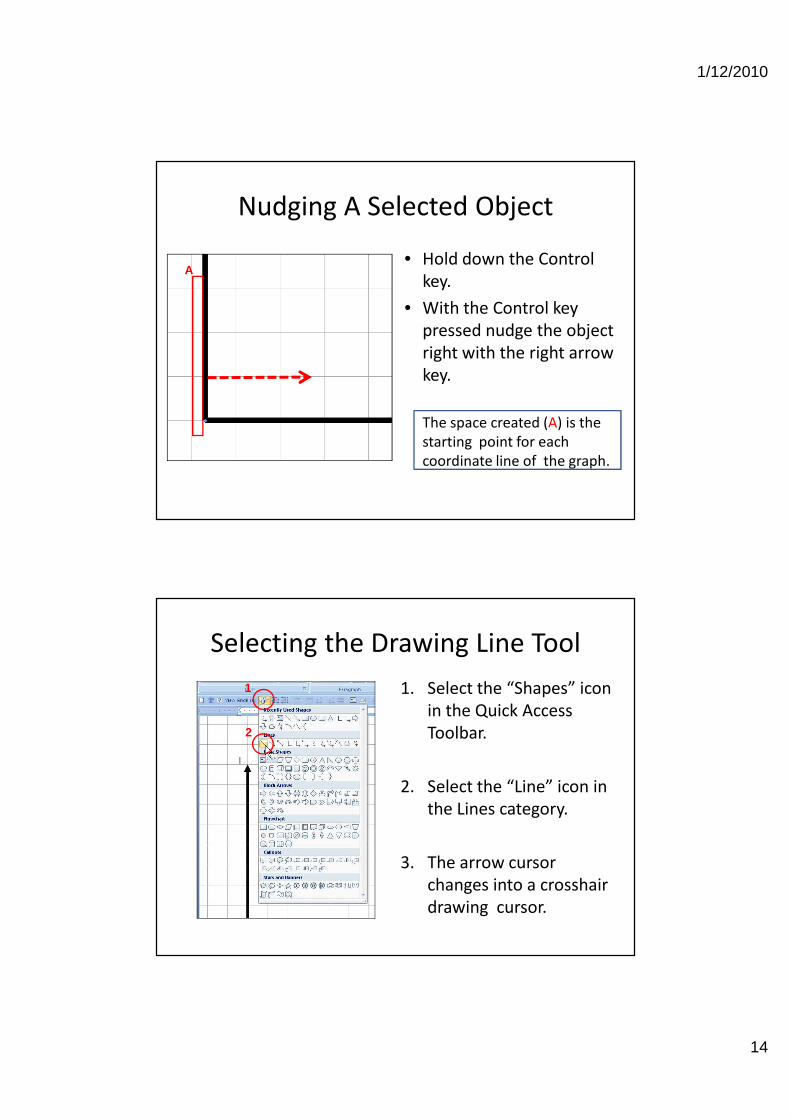
Nudging A Selected Object
• Hold down the Control
key.
• With the Control key
pressed nudge the object
right with the right arrow
key.
The space created (A) is the
starting point for each
coordinate line of the graph.
A
Selecting the Drawing Line Tool
1. Select the “Shapes” icon
in the Quick Access
Toolbar.
2. Select the “Line” icon in
the Lines category.
3. The arrow cursor
changes into a crosshair
drawing cursor.
1
2

1/12/2010
15
Drawing Lines
• Place the drawing cursor on
a guideline intersection just
to the left of the vertical (y-
axis) arrow line (1).
• Press and hold down the
left mouse button.
• Drag the mouse from left to
right (2).
• Release the left mouse
button at the preferred end
point (3).
(1)
(2)(3)
Duplicating Objects
• Press the key combination
command: Ctrl+D to
duplicate.
• Duplicate once then nudge
object into the appropriate
position.
• Further duplication will
produce objects into place
automatically (not always
accurate).

1/12/2010
16
Hiding the Grid Guidelines
Uncheck “View
Gridline” to hide the
grid guidelines.
Objects without the Grid
Guidelines
• The object(s) can clearly
be examined without
the guidelines.
• This is visually easier
when needing to select
and group objects.

1/12/2010
17
Selecting All Objects
for Grouping
1. Choose the Select Arrow in the
“Editing” section in the “Home”
tab on the Ribbon menu.
2. Place the Select Arrow just above
and to the left of all objects need
to be selected (1).
3. Press and hold down the left
mouse button.
4. Drag mouse cursor (Select Arrow)
diagonally down to the right lower
corner (2).
5. Be sure to include all object within
the selection marquee (3).
(1)
(2)
(3)
All Objects Selected
• Releasing the mouse
button will reveal all
objects included in the
selection.
• The green dots or blue
square markers indicate
that objects have been
selected.

1/12/2010
18
Grouping
• Select the “Group” icon
on the Quick Access
toolbar.
• Select “Group” from the
menu.
• Objects are mended
together as one object.
Mended Object
• The objects mended
together now is one
object.
• It can move in the
document as one
object.

1/12/2010
19
Revealing the Grid Guidelines
• Check the “View
Gridlines” to reveal the
grid guidelines.
• Object will snap to the
gridlines.
Repositioning the Object
• Nudge the object back
to the grid guidelines by
using the arrow keys.
• Coordinate lines and
axis lines are now
realigned to the grid
guidelines.

1/12/2010
20
Nudging the Object
• By pressing the key
combination command:
Ctrl + Up Arrow, nudge
the object to reveal a
space between the
horizontal arrow line
and a grid guideline.
The space created (A) is the
starting point for each
coordinate line of the graph.
(A)
Selecting the Line Drawing Tool
• Select the “Shapes” icon on
the Quick Access Toolbar.
• Select “Line” in the “Lines”
category.
• The arrow cursor will
change into a drawing
crosshair cursor.

1/12/2010
21
Position the Drawing Cursor
Set the cursor on an
intersection of grid
guidelines below the x
axis line.
Drawing A Line
• Press and hold the shift
key down.
• Press and hold the left
mouse button down.
• Drag the mouse from
bottom to top to draw a
line.

1/12/2010
22
Duplicating A Line
• Select an object to be
duplicated.
• Press the key
combination command:
Ctrl + D to duplicate an
object that has been
selected
Snapping an Object to the Grid Guidelines
• Be sure that the object
for repositioning is
selected.
• Use the arrow keys to
reposition a selected
object to snap it to the
grid guidelines.

1/12/2010
23
Repeat Duplication
Repeat pressing Ctrl +D to
continue duplicating the
object.
Once the first duplicated
object is trained to the grid
line, repeat duplication of the
object will try to “guess” the
next position.
Sometimes its guess is
correct.
Selecting All Objects
1. Choose the Select Arrow in the
“Editing” section in the “Home”
tab on the Ribbon menu.
2. Place the Select Arrow just
above and to the left of all
objects need to be selected (1).
3. Press and hold down the left
mouse button.
4. Drag mouse cursor (Select
Arrow) diagonally down to the
right lower corner (2).
5. Be sure to include all object
within the selection marquee
(3).
(1)
(2)
(3)

1/12/2010
24
Grouping
• Select the “Group” icon
on the Quick Access
toolbar.
• Select “Group” from the
menu.
• Objects are mended
together as one object.
Completed Object
• Objects are now one
object (Cartesian
coordinate plane).
• It can be moved to any
area of the document
easily as one object.

1/12/2010
25
Labeling the Tactile Graphic
• Use the BANA standards as much as possible.
• Do not clutter with too many graphics.
• Titles are always above graphics.
• Legends need to be on separate pages.
• Use only graphics and labels that best represent
the answers to questions.
Direct Input Translation
• Text is typed in using computer Braille or ASCII for contracted Braille characters.
• Doing it this way does not require extra software.
• Braille fonts need to be uploaded on your computer.
TSBVI: Download Braille and ASL Specialty Fonts
www.tsbvi.edu/Eduction/fonts.html

1/12/2010
26
Getting Braille Fontswww.tsbvi.edu/Education/fonts.html
1. Zip files downloaded
from TSBVI website
2. File extracted from
the zip file
3. Text information
about files when
extracted from the
zip file
1 2 3
Where to Upload Braille Fonts1. Open “My Computer”
• Open the “Start” menu.
• Select “My Computer”

1/12/2010
27
Where to Upload Braille Fonts2. Open “Local Disk (C:)
• Locate in the “Hard Disk Drives”
• Double click to open or select icon and press “Enter”
Where to Upload Braille Fonts3. Open “Windows” folder
• Locate the “Windows”
folder
• Open by double clicking
on it or select and press
“Enter”

1/12/2010
28
Where to Upload Braille Fonts4. Open “Fonts” folder
• Locate the “Fonts”
folder
• Open by double clicking
or select it and press
“Enter”
Where to Upload Braille Fonts5. Drag and Drop in “Fonts” folder
• Folder will open up to
many font files.
• Drag and drop Braille
files in this folder.
• Close the folder.

1/12/2010
29
Labeling: ASCII Input
• A character represents a
contracted Braille symbol.
• Computer Braille.
• No translation is needed.
• Commonly used by Braille
production specialist.
Textbox Translated Into ASCII
• Text written in ASCII includes
contracted Braille characters.
• A Braille font uploaded in
Word will translate this
document in contracted
Braille.

1/12/2010
30
Repositioning The Graphic
• Select the graphic.
• Nudge the graphic off the
grid guidelines by pressing
the key combination
command: Ctrl+ Arrow
Key(s).
• The tick lines should have a
space between them and
the nearest grid guidelines
Creating A Text Box
• Select the “Draw Text Box”
icon on the Quick Access
Toolbar.
• Move the cursor anywhere
on the document.
• Press down the left mouse
button.
• A text box will appear with a
blinking cursor.

1/12/2010
31
Font Setting (If not using Braille direct input)
• Courier New
• Regular style
• 24point (for encapsulated
paper production)
• 28 point (for Tiger embossing)
No Fill Text Box
• Be sure the textbox is
selected (highlighted).
• Select the “Shape Fill”
icon in the Quick Access
Toolbar.
• Select “Now Fill.

1/12/2010
32
Text Boxes(Transparent -No Fill Background)
The textbox becomes transparent within the document.
Any object or grid guideline is visible behind the textbox.
Methods for Labeling the Graphics
• Math Graphs
• Charts
• Maps
• Scientific Graphics

1/12/2010
33
Adding Graphics Labels
• Check “View Gridlines”
• Position graphic in the
preferred location.
• Select the “Text Box” icon.
• Press the left mouse button
down when the cursor on
the document.
• Nudge in position using the
arrow keys.
Fill Setting for Graphic Labels
• Select the text box label
(highlight text box)
• Select “Fill Shapes” pull
down arrow (to the
right of the Fill icon),.
• Select “No Fill”

1/12/2010
34
Duplicating Text Boxes
• Make sure “View
Gridline” is activated.
• Select the text box label
• Press Ctrl + D to
duplicate the text box
• Nudge in position by
using the arrow keys.
Repeat Duplication
• Nudging a duplicated
text box into a preferred
position will train Word
to predict the next
preferred location.
• If prediction is correct
then keep pressing Ctrl
+ D until labeling is
complete.
1/12/2010
35
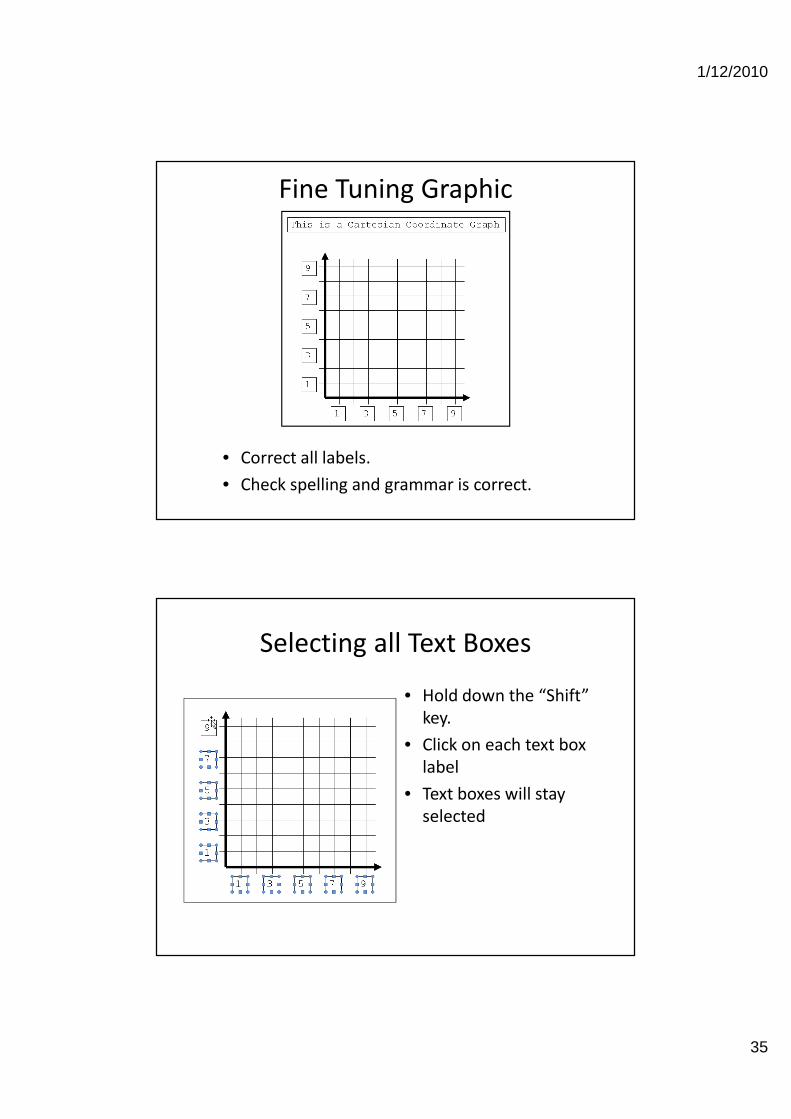
Fine Tuning Graphic
• Correct all labels.
• Check spelling and grammar is correct.
Selecting all Text Boxes
• Hold down the “Shift”
key.
• Click on each text box
label
• Text boxes will stay
selected
1/12/2010
36
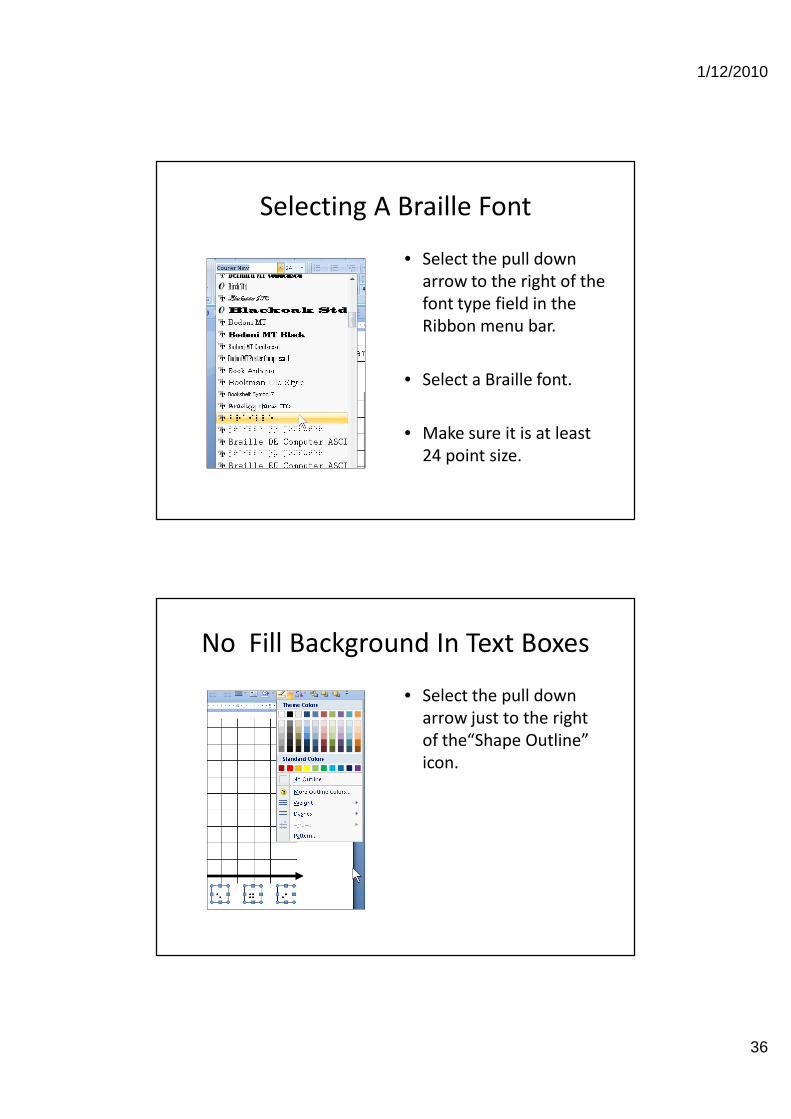
Selecting A Braille Font
• Select the pull down
arrow to the right of the
font type field in the
Ribbon menu bar.
• Select a Braille font.
• Make sure it is at least
24 point size.
No Fill Background In Text Boxes
• Select the pull down
arrow just to the right
of the“Shape Outline”
icon.

1/12/2010
37
Ready Labels
• Text box borders
removed.
• Fills are set at “No
Fills”
• Font size is at 24
point.
• Type font: Braille or
Braille Kiama
Labels Involving Contracted Braille
• Text can be entered in directly by using ASCII text
• Text can be entered in by cutting, translating and
pasting using either Duxbury or Braille 2000.

1/12/2010
38
Selecting and Copying Text in Text Box
• Select the text in the text box.
• Copy text to clipboard: Ctrl + C.
• Open a blank “print” document in Duxbury or
Braille 2000.
Pasting, Translating and Copying from Braille
Translation Software
• Paste into a “Print” new
document in Duxbury or
Braille 2000.
• Translate the document into
Braille (contracted).
• Select the translated Braille
document.
• Copy to clipboard (Ctrl +C)

1/12/2010
39
Pasting New Text into Text Box
• Make sure the original text in text box is selected.
• Replace the old text with the translated text by
pasting from clipboard: Ctrl + P.
• New text will appear in ASCII or computer Braille.
• Text can now be changed to a Braille font.
512-206-9464
www.tsbvi.edu
Patrick Van Geem, TVIOutreach Department
Texas School for the Blind and Visually Impaired