using mac os x, eclipse, and gnu tools with the … ·...
TRANSCRIPT

USING MAC OS X, ECLIPSE, AND GNU TOOLS WITH THE ENERGY
MICRO EFM32
APPLICATION NOTE AN103
REVISION 2.0 (UPDATED JAN 2014) COPYRIGHT © 2012-2014, CARLSON-MINOT INC.
ALL RIGHTS RESERVED

Application Note AN103
USING MAC OS X, ECLIPSE, AND GNU TOOLS WITH THE ENERGY MICRO EFM32 2-‐36 www.carlson-minot.com
Table of Contents
1.0 Introduction ...................................................................................................................... 4
2.0 Hardware Tool Prerequisites .......................................................................................... 4
3.0 Software Tool Prerequisites ............................................................................................ 5
4.0 Toolchain Fundamentals ................................................................................................. 5 4.1 Carlson-Minot ARM EABI Toolchain Installation ....................................................... 6 4.2 Mentor Graphics Sourcery CS3 Library Issue ........................................................... 6 4.3 Apple Developer Tools Installation ............................................................................. 7
5.0 J-Link Driver Installation for Mac OS X .......................................................................... 8
6.0 Energy Micro Simplicity Studio Installation for Mac OS X ........................................... 9
7.0 Eclipse C/C++ IDE Installation and Configuration. ..................................................... 10 7.1 Remote Hardware GDB Debug Plugin Installation .................................................. 10 7.2 Embedded Systems Register Plugin Installation .................................................... 11
8.0 Eclipse Workspace and Initial Project Setup .............................................................. 12 8.1 Importing the EMLCD Sample Project into Eclipse ................................................. 12 8.2 Configuring the Makefile ............................................................................................ 14 8.3 Adding Project Symbolic File Links for External Resources ................................. 15 8.4 Configuring Eclipse Build Options ........................................................................... 17 8.5 Configuring Eclipse Debug Options ......................................................................... 24
9.0 Building and Debugging the Project ............................................................................ 30 9.1 Project Compilation .................................................................................................... 30 9.2 Starting the J-Link GDB Server ................................................................................. 33 9.3 Commencing the GDB Debug Session .................................................................... 34
10.0 Summary ....................................................................................................................... 35

Application Note AN103
USING MAC OS X, ECLIPSE, AND GNU TOOLS WITH THE ENERGY MICRO EFM32 3-‐36 www.carlson-minot.com
List of Figures
FIGURE 1 – Simplicity Studio Startup Window .......................................................................... 9 FIGURE 2 – New Software Installation Window ....................................................................... 11 FIGURE 3 – Security Warning Window .................................................................................... 12 FIGURE 4 – Initial Eclipse Workspace Window ....................................................................... 13 FIGURE 5 – Import Project Window ......................................................................................... 14 FIGURE 6 – Import Existing Code Window .............................................................................. 15 FIGURE 7 – Post-Import Makefile Modifications Window ........................................................ 16 FIGURE 8 – Post-Import Symbolic Link Additions Window ...................................................... 17 FIGURE 9 – Project Builder Settings Window .......................................................................... 18 FIGURE 10 – Project Behavior Settings Window ..................................................................... 19 FIGURE 11 – Project Parser Settings Window ......................................................................... 20 FIGURE 12 – Project Discovery Built-In Settings Window ....................................................... 21 FIGURE 13 – Project Discovery Build Output Parser Settings Window ................................... 22 FIGURE 14 – Project Indexer Settings Window ....................................................................... 23 FIGURE 15 – Project Configuration Selection Window ............................................................ 24 FIGURE 16 – GDB Debugger Selection Window ..................................................................... 25 FIGURE 17 – GDB Main Configuration Window ...................................................................... 26 FIGURE 18 – GDB Debugger Configuration Window .............................................................. 27 FIGURE 19 – GDB Startup Configuration Window ................................................................... 28 FIGURE 20 – GDB Startup Configuration Window ................................................................... 29 FIGURE 21 – Main Window After Project Compilation ............................................................. 31 FIGURE 22 – Sample Indexer Parser Output After Project Compilation .................................. 32 FIGURE 23 – Active Debug Session with Remote EFM32 Target ........................................... 35

Application Note AN103
USING MAC OS X, ECLIPSE, AND GNU TOOLS WITH THE ENERGY MICRO EFM32 4-‐36 www.carlson-minot.com
1.0 Introduction This application note describes the general process of using the Energy Micro EFM32 Gecko development board with Mac OS X, GNU tools, a Segger J-Link debugger, and the Eclipse IDE. The important steps covered within the document are:
! Installing the Carlson-Minot Mac OS X toolchain for ARM EABI targets ! Installing Segger J-Link drivers for Mac OS X ! Installing and configuring the Eclipse IDE ! Installing Energy Micro Simplicity Studio ! Compiling and debugging the sample project
Please keep in mind that the paper targets a general audience that includes everyone from seasoned engineers to students just starting out in embedded work. For this reason a more advanced reader may find it necessary to skip over some information presented in this document.
2.0 Hardware Tool Prerequisites Not surprisingly from the title of the document, this exercise revolves around a Mac computer to support the host tools. You don’t need a top-of-the line or even the latest model, but you will need something. For the ultimate flexibility and portability, MacBook Pro laptops make great systems for embedded development work, but other models will work fine also. Also to avoid future grief, your Mac must be Intel-based and running at least the Leopard OS X operating system. If you are hoping to use a much older Mac with a PPC processor inside – you are unfortunately out of luck. Starting with the Lion OS X release, Apple officially dropped all support for the PPC. As a result, the process of building support toolchains for this architecture is simply no longer practical. Apart from the host computer, you also obviously won’t get very far if you don’t have appropriate Energy Micro EFM32 target hardware on hand. For a very reasonable price, distributors worldwide sale Energy Micro demonstration boards like the “Gecko Starter Kit” (STK) and “Gecko Development Kit” (DK). For the purposes of this paper, the Energy Micro Gecko STK was assumed, but the overall process adapts easily to other targets – including proprietary products designed with the EFM32 processor.

Application Note AN103
USING MAC OS X, ECLIPSE, AND GNU TOOLS WITH THE ENERGY MICRO EFM32 5-‐36 www.carlson-minot.com
3.0 Software Tool Prerequisites To work with the EFM32, you will also need several key software tools:
o Apple Developer Tools (Version 5.0.2) o Carlson-‐Minot ARM EABI G++ Lite GNU Toolchain for Mac OS X (Version ARM-‐2013.11-‐24) o Eclipse C/C++ IDE for Mac OS X (Version “Kepler Service Release 1”) o Embedded System Viewer Plugin for Eclipse (Version 0.2.3) o Energy Micro Simplicity Studio (Version 1.22) o Segger J-‐Link USB Driver for Mac OS X (Version 4.80)
Since application notes have a tendency to stick around for extended periods of time, knowing the applicable tool versions used are quite useful for future efforts. While other tool versions in many cases will also work perfectly fine, you may need to make certain adjustments and adaptations to this process if the tool versions you elect to employ are different then those specified above. This point is particularly important to keep in mind with one particular tool – the Eclipse IDE. Working with Eclipse has revealed that major version updates often break scripts, plugins, and generally cause other headaches and grief. Eclipse has strengths, but it also has weaknesses. Seamless upgradability unfortunately seems to be one of its weaknesses. Like so many things in life, nothing is perfect and a person often has to accept the bad with the good to make any progress.
4.0 Toolchain Fundamentals In embedded processor development work, the processor family used in the target hardware often differs significantly from that of the host platform. The Energy Micro EFM32 microcontroller belongs to the ARM Cortex-M3 family – rather different than the Intel processor used in the Mac. The next hurdle therefore is compiling code under OS X that will run on the Energy Micro ARM. Clearly using the GCC compiler that comes with Apple Developer Tools will generate a compatible binary for the Mac, but hardly one for the EFM32. A specialty, cross-GCC toolchain fulfills this role. This type of compiler solves this problem by executing its own instructions native to the host platform, but emitting and linking object code for the given source to the particulars of the desired target processor.

Application Note AN103
USING MAC OS X, ECLIPSE, AND GNU TOOLS WITH THE ENERGY MICRO EFM32 6-‐36 www.carlson-minot.com
4.1 Carlson-Minot ARM EABI Toolchain Installation
Traditionally support for Mac cross tools has been weak. This is too bad since the Mac is a great system for embedded development. Given that Mac OS X under the hood incorporates a refined BSD UNIX flavor, this environment in many ways has numerous advantages over Windows. In the interest of increasing the visibility of Mac as a viable development platform, Carlson-Minot had made internally built toolchains (based on Mentor Graphic’s Sourcery distributions) available for download to the general public. If you are a novice and new to embedded development work, a trip to the download section of the Carlson-Minot website will reveal not one, but rather two different toolchain types for the ARM architecture. Without delving into detailed discussion about differences, a “bare metal” compiler (the ARM EABI version in this case) compiles source code designed to interface directly with target hardware. The other compiler (GNU/Linux) has a different purpose in that it builds executable binaries that are abstracted from the low-level hardware. These binaries run as ordinary applications under the Linux operating system. Since working with the EFM32 Gecko will not involve an operating system, you need only download the EABI toolchain version. Most users can quickly download and run the Easy Installer package provided on the website to satisfy this need. The installer will unpack and copy all necessary executable and support libraries on your Mac under the root folder /usr/local/carlson-minot/crosscompilers and be ready for use with minimal effort on your part. To find all available bare-metal toolchain versions for Mac OS X, visit: http://www.carlson-minot.com/download/mac-cross-toolchains/arm-eabi-lite-builds
4.2 Mentor Graphics Sourcery CS3 Library Issue
As indicated earlier, Carlson-Minot builds its toolchains directly from Mentor Graphic’s source tarballs. Mentor Graphics uses these same tarballs to create their equivalent toolchain builds for Linux and Window-based hosts. While we attempt to make the Mac OS X toolchains track the native Sourcery builds as close as possible, there is one minor difference that you need to be aware.

Application Note AN103
USING MAC OS X, ECLIPSE, AND GNU TOOLS WITH THE ENERGY MICRO EFM32 7-‐36 www.carlson-minot.com
Mentor Graphics distributes their proprietary CS3 libraries and certain other files for free with their Sourcery Lite toolchains. Unfortunately their license agreement prohibits other third-parties from doing the same. For a precise definition of file differences between the two builds, look for a difference text file located in the root directory of the Carlson-Minot toolchain installation for more information. With the exception of the CS3 libraries, the remaining differences are largely inconsequential. The existing EMLCD example assumes the continued use of the CS3 libraries. With this in mind, you have two options: 1) If you have a mixed development environment where you have a native
Mentor Graphic toolchain already installed for a Linux host, you will have to decide for yourself whether to copy the missing libraries over to your Mac host. Alternatively if both toolchains are installed on a common internal network, another possibility to consider is simply creating symbolic links to the missing CS3 library files instead.
2) Create your own interrupt vector table/stub functions for the EFM32 processor and not use the CS3 libraries at all. This is a little more challenging then simply using the existing CS3 libraries but not by much. With some quick datasheet reading, creating the table can be accomplished in a couple hours or less. After doing this, you will also need to make a few changes to the project makefile to use the alternative solution instead.
4.3 Apple Developer Tools Installation
You might be wondering why the Apple Developer Tool suite is needed at all if the standard GCC compiler that comes with it won’t build a suitable binary for the EFM32. While this is most certainly true, there are other platform agnostic support tools that still have utility and applicability to cross target work. In this situation, the Apple make utility is the most important additional tool needed to build and execute the sample EMLCD project. Technically you can obtain and install the few utilities required independently rather then installing the entire Apple Developer Tool suite. No practical advantage will result by taking this path, however. Given that the Apple tools are free and will likely have been previously installed on host systems user for other development work, the tool suite provides the path of least resistance for most people.

Application Note AN103
USING MAC OS X, ECLIPSE, AND GNU TOOLS WITH THE ENERGY MICRO EFM32 8-‐36 www.carlson-minot.com
As a secondary note for those users unfamiliar with Apple Developer Tools, the installation process will vary depending on the version of OS X found on the host. Prior to the Lion OS X release, the development tools can be found on the same DVD as the general operating system installer – under optional packages. With Apple electing to distribute the Lion OS X release and beyond exclusively online, the tools for later versions must be obtained and downloaded using the Apple App Store. Another important development starting with Xcode shipped with Mountain Lion and later relates to the command line tools. Unlike prior versions where gcc and associated compiler tools shipped with Xcode, these now need to be installed separately. To accomplish this for Mountain Lion start Xcode and select “Preferences… " Downloads”, locate the option for command line tools, and then install this particular feature. Apple changed the process to an even more obscure process under Mavericks. If you are using Mavericks OS X, open a command shell and execute “/usr/bin/xcode-select --install" instead.
5.0 J-Link Driver Installation for Mac OS X A J-Link debugger becomes indispensable for working with any EFM32 target. When the first version of this application note was written, Segger only supported their J-Link products on Linux and Windows-hosted systems. Fortunately starting in early 2012, Segger began to offer native drivers for Mac OS X – making it much easier for Mac users to deploy them without the virtual client workarounds outlined in an earlier version of this application note. If you have not previously installed or used a J-Link dongle on the desired Mac host download and install the latest driver version from the Segger website: http://www.segger.com/jlink-software.html
Prior to version 4.80, the Segger driver did not provide necessary supporting USB drivers. Therefore if you elect to use any of these earlier versions, you may need to install the additional USB drivers manually.

Application Note AN103
USING MAC OS X, ECLIPSE, AND GNU TOOLS WITH THE ENERGY MICRO EFM32 9-‐36 www.carlson-minot.com
6.0 Energy Micro Simplicity Studio Installation for Mac OS X On August 2013, Energy Micro finally released a native version of Simplicity Studio for Mac OS X. This effectively removed the last barrier to a completely native experience with Mac OS X and means the VirtualBox appliance outlined in the earliest application note version is no longer needed either. Currently Simplicity Studio for Mac OS X is a beta release. First obtain the beta installer version from the following forum website: http://energymicrofiles.s3.amazonaws.com/dl/packages/Simplicity_Studio_Installer.dmg
After the installer runs, start Simplicity Studio and allow it to perform updates if it requested. Once this is done the host will show a windows similar to FIGURE 1.
FIGURE 1 – Simplicity Studio Startup Window

Application Note AN103
USING MAC OS X, ECLIPSE, AND GNU TOOLS WITH THE ENERGY MICRO EFM32 10-‐36 www.carlson-minot.com
7.0 Eclipse C/C++ IDE Installation and Configuration. The next step of the process will download and install the base Eclipse IDE distribution. If you visit the Eclipse website, you will find a variety of distributions that target different types of development activities. Given that the sample source code for the EMLCD project and other EFM32 projects will be C-based, the C/C++ distribution is the natural, logical choice to select for download. To view and download a suitable version visit: http://www.eclipse.org/downloads
After installing the appropriate distribution, start the IDE. One of the first things you will be asked to select is a workspace location. You can set this to be any location that you desire. For the purposes of illustrating the overall process, the application note assumes a path /Users/shared/Silabs. Whatever path you select, Eclipse will follow with a welcome screen (first time only) that you can electively peruse or simply close and proceed with the additional configuration activities outlined in this section.
7.1 Remote Hardware GDB Debug Plugin Installation
The Eclipse IDE distribution by itself does not have any means to directly interface to a remote J-Link GDB server session handling actual contact with target EFM32 hardware. To allow Eclipse to communicate with a running J-Link GDB server session, you will need an additional plugin distributed by Eclipse. To install this plugin, go to the Eclipse top menu bar and click “Help " Install New Software”. From the “Work with” pull-down option select the Eclipse downloads web link and then in the list of plugins associated with that web link select the “Mobile and Device Development” next. Expand this option and then check the suboption “C/C++ GDB Hardware Debugging” as shown in FIGURE 2. Click “Next” a couple of times until the installer reaches the license acceptance. After accepting the license agreement click “Finish” to complete the installation. When the plugin installation finishes you will then see a new window indicating that Eclipse needs to restart for the CDT to take effect. At this point you can click on the “Not Now” button since an additional plugin still needs to be installed.

Application Note AN103
USING MAC OS X, ECLIPSE, AND GNU TOOLS WITH THE ENERGY MICRO EFM32 11-‐36 www.carlson-minot.com
7.2 Embedded Systems Register Plugin Installation
Another useful tool in Eclipse is the embedded register viewer plugin. Looking at cryptic hexadecimal system register addresses during debug sessions using the base IDE can lead to unnecessary eyestrain. Installing this plugin provides another good feature investment for working with EFM32 target hardware.
FIGURE 2 – New Software Installation Window As was done for the previous step, visit the Eclipse top menu bar and click “Help " Install New Software” again. This should bring up the now familiar “Install” window where you can click the “Add” button. For the name field enter “Embedded System Register Viewer” and the location as “http://embsysregview.sourceforge.net/update” followed by a click to the “OK” button afterwards.

Application Note AN103
USING MAC OS X, ECLIPSE, AND GNU TOOLS WITH THE ENERGY MICRO EFM32 12-‐36 www.carlson-minot.com
The remaining steps for installing the register viewer are similar to those used before with a few exceptions. First depending on security settings, the popup illustrated in FIGURE 3 may appear. If this is the case click “OK”. Finally since no other plugins will need to be installed, you will want to restart Eclipse at this point to allow all the plugin updates to take effect.
FIGURE 3 – Security Warning Window
8.0 Eclipse Workspace and Initial Project Setup After the IDE restarts, you will be asked to confirm the workspace selected earlier again. With the workspace location specified, the main IDE window will appear similar to that illustrated in FIGURE 4.
8.1 Importing the EMLCD Sample Project into Eclipse
With the workspace established, go to the menu bar and select “File " Import…”. Expand the category listed as “C/C++”, and then proceed to select the option “Existing Code as Makefile Project” as shown as in FIGURE 5. With that complete proceed to click “Next”. Eclipse will then open another popup window to collect the name of the project and the location of the existing code. For the project name use “MacEMLCD” then proceed to set the location to /Users/shared/Silabs/kits/EFM32_Gxxx_STK/examples/emlcd as FIGURE 6 illustrates. With the correct information set, click “Finish” to complete the importation process. This will cause Eclipse to close the popup windows and return to the main project window.

Application Note AN103
USING MAC OS X, ECLIPSE, AND GNU TOOLS WITH THE ENERGY MICRO EFM32 13-‐36 www.carlson-minot.com
FIGURE 4 – Initial Eclipse Workspace Window

Application Note AN103
USING MAC OS X, ECLIPSE, AND GNU TOOLS WITH THE ENERGY MICRO EFM32 14-‐36 www.carlson-minot.com
FIGURE 5 – Import Project Window
8.2 Configuring the Makefile
In the Eclipse project explorer pane, expand the MacEMLCD project folder and copy and paste the “codesourcery” folder into a new “carlson-minot” folder. Next expand the new folder and rename the “makefile.emlcd” file to “makefile”. Now open the renamed makefile. First locate the next two lines and add the third line immediately after:
WINDOWSCS ?= CodeSourcery/Sourcery_CodeBench_Lite_for_ARM_EABI LINUXCS ?= /cad/codesourcery/arm-none-eabi/cs-lite MACCS ?= /usr/local/carlson-minot/crosscompilers
Then locate and modify the next two lines as shown in boldface italic:
# Assume we are making on a Mac OS X platform TOOLDIR := $(MACCS)
The combined changes of everything discussed here to the overall project will ideally now appear similar to the illustration in FIGURE 7.

Application Note AN103
USING MAC OS X, ECLIPSE, AND GNU TOOLS WITH THE ENERGY MICRO EFM32 15-‐36 www.carlson-minot.com
FIGURE 6 – Import Existing Code Window
8.3 Adding Project Symbolic File Links for External Resources
The EFM32 example projects installed as part of the Simplicity Studio suite utilize a number of resources outside each example project. The makefile for each project then references the necessary resources with relative file links to insure the project builds correctly. This works fine for the build process, but will cause the Eclipse indexer to exclude those resources since they are outside the project directory. By simply adding symbolic links in the project directory to the common external resources, Eclipse will include them while performing indexing activities. From a command shell, take the following actions to add the following links to the project directory: bash-3.2$ cd /Users/shared/Silabs/kits/EFM32_Gxxx_STK/examples/emlcd bash-3.2$ ln -s ../../../../CMSIS .

Application Note AN103
USING MAC OS X, ECLIPSE, AND GNU TOOLS WITH THE ENERGY MICRO EFM32 16-‐36 www.carlson-minot.com
bash-3.2$ ln -s ../../../../Device . bash-3.2$ ln -s ../../../common . bash-3.2$ ln -s ../../../../emlib .
Now in the Eclipse Project Explorer right click on the top project folder and select the “Refresh” option. The project window shown in will now update to show the additional folders – with downward arrows in their icons indicating link status – as indicated in FIGURE 8.
FIGURE 7 – Post-Import Makefile Modifications Window

Application Note AN103
USING MAC OS X, ECLIPSE, AND GNU TOOLS WITH THE ENERGY MICRO EFM32 17-‐36 www.carlson-minot.com
FIGURE 8 – Post-Import Symbolic Link Additions Window
8.4 Configuring Eclipse Build Options
Getting Eclipse to build and index this project properly will require a few more optimizations. This section will cover the necessary project configurations to the example project to make this possible. In the Eclipse Project Explorer pane right-click on the top project folder and then select the “Properties” option. After the popup window opens, select the option “C/C++ Build” in the left pane. For the build directory field, append “carlson-minot” to the project name as illustrated in FIGURE 9.

Application Note AN103
USING MAC OS X, ECLIPSE, AND GNU TOOLS WITH THE ENERGY MICRO EFM32 18-‐36 www.carlson-minot.com
Now click the “Behavior” tab and set the field “Build (Incremental build)” from “all” to “debug”. FIGURE 10 illustrates this step.
FIGURE 9 – Project Builder Settings Window
This leaves one remaining option to change under the current category. Click on the “Settings” option. Under the binary parsers tab, uncheck the default “Elf Parser” and in its place check “GNU Elf Parser” as shown in FIGURE 11. This will insure that additional GNU extensions are available to Eclipse. The final project configuration changes relate to how Eclipse will handle discovery for the sample project. Normally Eclipse will use host configuration information to perform path discovery. For a cross-compiled application the default behavior is not ideal. With that said, expand the “C/C++ General” category and then click the “Preprocessor Include Paths, Macros etc.” sub-category and select the “Providers” tab next. Uncheck the option “CDT Managed Build Setting Entries” and in its place first check “GCC Built-in Compiler Settings”.

Application Note AN103
USING MAC OS X, ECLIPSE, AND GNU TOOLS WITH THE ENERGY MICRO EFM32 19-‐36 www.carlson-minot.com
FIGURE 10 – Project Behavior Settings Window Under the provider options related to language, additionally uncheck the option to share entries between projects. In the field directly below substitute “${COMMAND}” with “/usr/local/carlson-minot/crosscompilers/bin/arm-none-eabi-gcc” while leaving the remaining default options the same. When completed the configuration window should appear similar to that shown in FIGURE 12. Additionally under the providers window, check the box “CDT GCC Build Output Parser”. The default regex field below would work fine for a host toolchain, but not a cross toolchain. Simply changing the default regex pattern from “(gcc)|([gc]\+\+)|(clang)” to “(.*gcc)|(.*[gc]\+\+)|(clang)” will allow it to properly parse the build output using a cross toolchain. Thus the configuration window should then look similar to FIGURE 13.

Application Note AN103
USING MAC OS X, ECLIPSE, AND GNU TOOLS WITH THE ENERGY MICRO EFM32 20-‐36 www.carlson-minot.com
FIGURE 11 – Project Parser Settings Window

Application Note AN103
USING MAC OS X, ECLIPSE, AND GNU TOOLS WITH THE ENERGY MICRO EFM32 21-‐36 www.carlson-minot.com
FIGURE 12 – Project Discovery Built-In Settings Window

Application Note AN103
USING MAC OS X, ECLIPSE, AND GNU TOOLS WITH THE ENERGY MICRO EFM32 22-‐36 www.carlson-minot.com
FIGURE 13 – Project Discovery Build Output Parser Settings Window

Application Note AN103
USING MAC OS X, ECLIPSE, AND GNU TOOLS WITH THE ENERGY MICRO EFM32 23-‐36 www.carlson-minot.com
The final configuration change related to indexer performance will tell Eclipse what types of files need to be indexed. Under the “C/C++ General” category select the “Indexer” option. Check the options “Enable project specific settings”, “Allow heuristic resolution of includes”, and “Enable Indexer” demonstrated in FIGURE 14.
FIGURE 14 – Project Indexer Settings Window
Up to this point the Eclipse project has a single default configuration. With the other settings now in place, cloning the default configuration into a separate debug and release configuration will cover the final steps of this process. To accomplish this, reselect the “C/C++ Build” category in the project properties window. Next click the “Manage Configurations…” button which will cause a small popup window to open. In the popup window, click the “Rename…” button that appears. In the additional popup window that appears rename “Default” to “Debug” and then click “OK”. With the default configuration renamed, then click

Application Note AN103
USING MAC OS X, ECLIPSE, AND GNU TOOLS WITH THE ENERGY MICRO EFM32 24-‐36 www.carlson-minot.com
on “New…”. This will open a secondary popup window. For the name of the new configuration use “Release”, make sure the option to clone the debug configuration is checked and then click “OK” again. FIGURE 15 illustrates the final results of these steps. The EFM32 makefiles have both a debug and release option available. The final step will be to make a final modification in the clone release configuration to couple to the makefiles behavior. In the properties window under the “C/C++ Build” category, click on the “Behavior” tab again. Select the release configuration from the pull-down list and then change the field “Build (Incremental build)” from “debug” to “release” similar to that of FIGURE 10 earlier.
FIGURE 15 – Project Configuration Selection Window
8.5 Configuring Eclipse Debug Options
The primary reason people naturally want to use the Eclipse IDE is for its debugging capabilities. Let’s face it – using GDB from the command line is not the most intuitive experience and Eclipse most certainly helps abstract the fine details. To configure Eclipse to debug a remote EFM32 hardware target, go to the top menu bar and click “Run " Debug Configurations…”. This will open a new window shown in FIGURE 16. Once the window opens, double click on the item “GDB Hardware Debugging” and make sure the “Main” tab is selected.

Application Note AN103
USING MAC OS X, ECLIPSE, AND GNU TOOLS WITH THE ENERGY MICRO EFM32 25-‐36 www.carlson-minot.com
FIGURE 16 – GDB Debugger Selection Window

Application Note AN103
USING MAC OS X, ECLIPSE, AND GNU TOOLS WITH THE ENERGY MICRO EFM32 26-‐36 www.carlson-minot.com
FIGURE 17 – GDB Main Configuration Window

Application Note AN103
USING MAC OS X, ECLIPSE, AND GNU TOOLS WITH THE ENERGY MICRO EFM32 27-‐36 www.carlson-minot.com
Under this tab several important changes are necessary. First type “MacEMLCD Flash Debug” into the name field. Next enter the relative path of the ELF executable “carlson-minot/exe/emlcd.out” into the field “C/C++ Application”. The ELF file provides Eclipse with critical symbol information necessary to synchronize the code window during breakpoint hits and additionally view the memory locations of local and global variables. Finally for the “Project” field, use “MacEMLCD”. Once this window appears similar to FIGURE 17, click on the “Debugger” tab to proceed to the next configuration step. As a general rule, Segger J-Link debugger chips and dongles typically use TCP port 2331 to communicate with the GDB client. Therefore tell Eclipse to use “/usr/local/carlson-minot/crosscompilers/bin/arm-none-eabi-gdb” for the GDB command and “2331” for the port as illustrated in FIGURE 18.
FIGURE 18 – GDB Debugger Configuration Window
Application Note AN103
USING MAC OS X, ECLIPSE, AND GNU TOOLS WITH THE ENERGY MICRO EFM32 28-‐36 www.carlson-minot.com
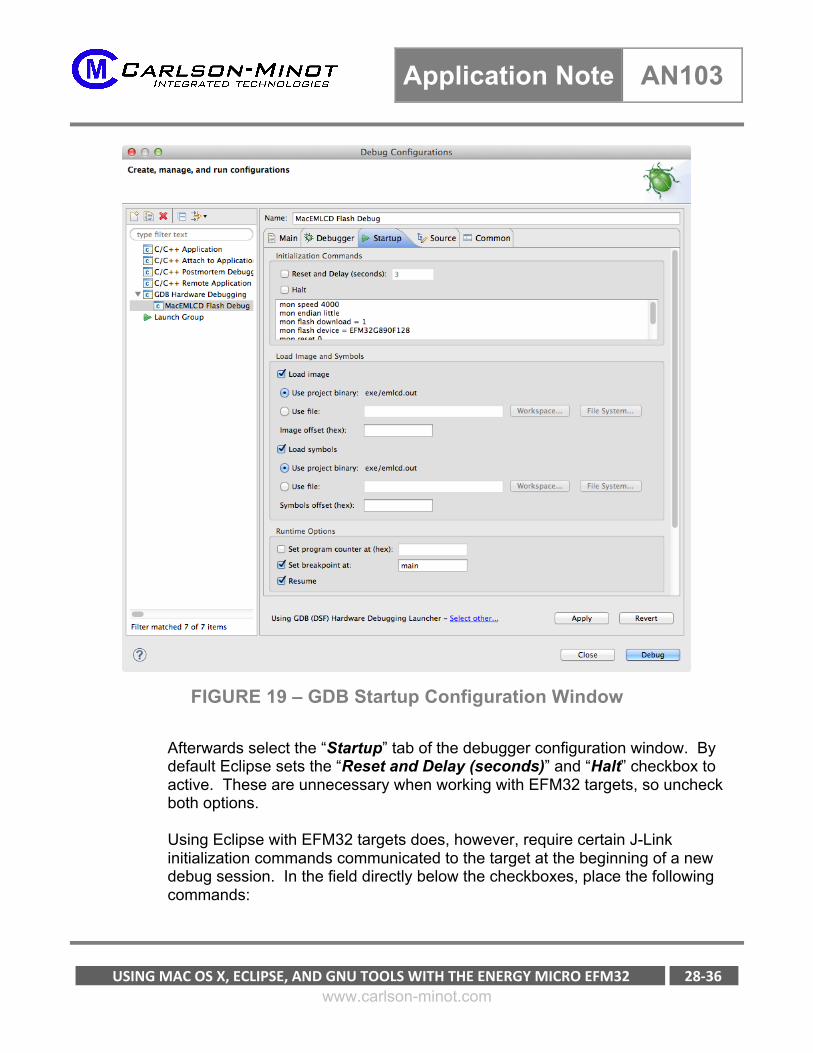
FIGURE 19 – GDB Startup Configuration Window
Afterwards select the “Startup” tab of the debugger configuration window. By default Eclipse sets the “Reset and Delay (seconds)” and “Halt” checkbox to active. These are unnecessary when working with EFM32 targets, so uncheck both options. Using Eclipse with EFM32 targets does, however, require certain J-Link initialization commands communicated to the target at the beginning of a new debug session. In the field directly below the checkboxes, place the following commands:

Application Note AN103
USING MAC OS X, ECLIPSE, AND GNU TOOLS WITH THE ENERGY MICRO EFM32 29-‐36 www.carlson-minot.com
mon speed 4000 mon endian little mon flash download = 1 mon flash device = EFM32G890F128 mon reset 0
The processor listed presumes an EFM32 Gecko Starter Kit. If you are using a different target, change this to reflect the correct processor in use. The combination of this plus the line before are essential to insuring the J-Link can properly access and program the internal flash of the target EFM32 device.
FIGURE 20 – GDB Startup Configuration Window

Application Note AN103
USING MAC OS X, ECLIPSE, AND GNU TOOLS WITH THE ENERGY MICRO EFM32 30-‐36 www.carlson-minot.com
To complete the startup tab, enable the “Resume” and “Set Breakpoint at” checkboxes. For the associated text field of the latter checkbox, enter “main”. This and other cumulative modifications made earlier will give the appearance of FIGURE 19 afterwards. Finally when debugging any embedded target, there are occasions where it will need to be restarted, but with any code changes. As it stands now, the present settings will flash the EFM32 target memory each time a new debug session starts – without any consideration as to whether it is actually necessary. To address this issue, right-click on the target name “MacEMLCD Flash Debug”. This will open a very small popup window with a “Duplicate” option. Select it, rename the target name to “MacEMLCD Debug”, and then proceed to remove the following two lines: mon flash download = 1 mon flash device = EFM32G890F128
FIGURE 20 gives an indication of the window appearance to expect afterwards.
9.0 Building and Debugging the Project Everything described in this application note up to this point has been the preliminary work needed to get everything ready to use Eclipse. The time has now come to do something useful with those earlier efforts.
9.1 Project Compilation
To be able to use GDB and step through high-level source code, you will first need to build a binary target with embedded symbolic debugger information included. To insure the compiler builds the correct debug target, from the top menu bar click “Project " Build Configurations " Set Active”. In all likelihood the debug option likely will already be checked, but if not the case do so now. Next click on “Project " Build Project” to kick off the project compilation process. Once the compiler has finished its work, the Eclipse project window will look similar to that shown in FIGURE 21 (after expanding the console view). Note that the compiler has finished its work as evidence by the message “**** Build Finished ****”. Had there been any project build errors they would be noted where they occurred during the build process in addition to Eclipse’s problem viewer.

Application Note AN103
USING MAC OS X, ECLIPSE, AND GNU TOOLS WITH THE ENERGY MICRO EFM32 31-‐36 www.carlson-minot.com
FIGURE 21 – Main Window After Project Compilation
The “carlson-minot” folder visible in the project explorer now contains not only the original makefile but new folders “build”, “exe”, and “lst”. The build folder obviously contains intermediate compilation products. The executable folder contains both an ELF file with symbolic information necessary for debugging exercises and the stripped binary normally used for production programming operations. Finally the last folder contains a map file. This file indicates exactly where the linker physically placed variable and code in target memory during the build process.
Application Note AN103
USING MAC OS X, ECLIPSE, AND GNU TOOLS WITH THE ENERGY MICRO EFM32 32-‐36 www.carlson-minot.com
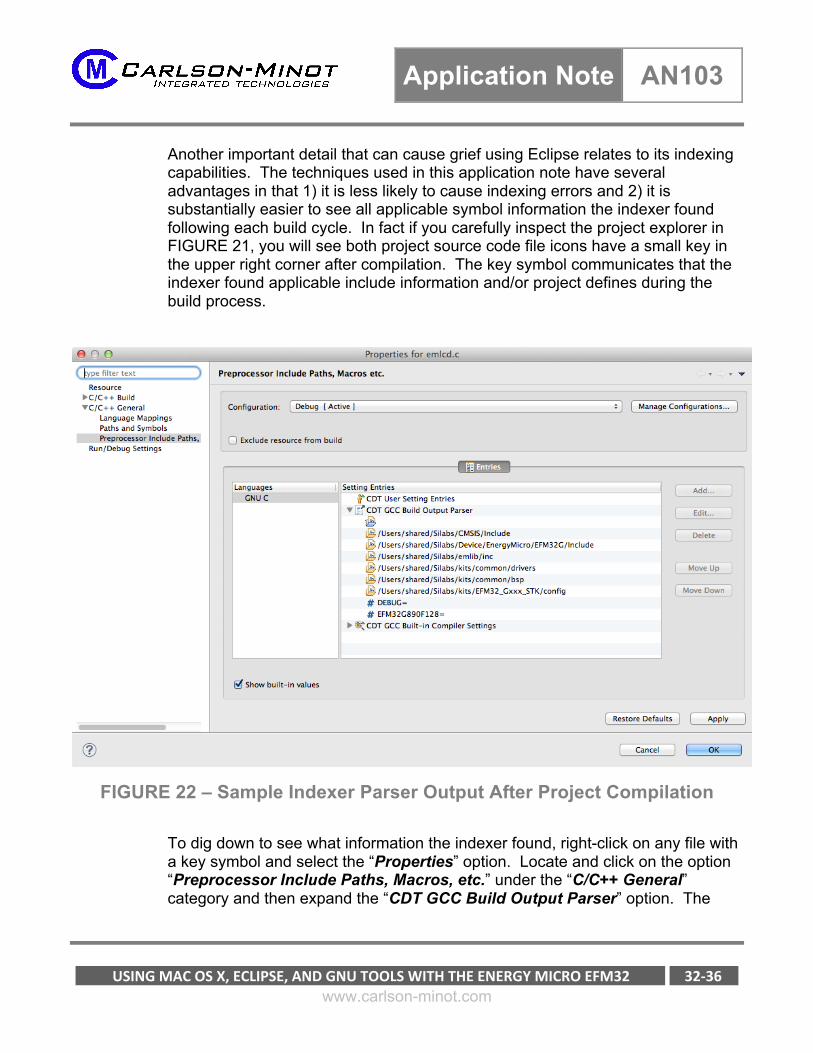
Another important detail that can cause grief using Eclipse relates to its indexing capabilities. The techniques used in this application note have several advantages in that 1) it is less likely to cause indexing errors and 2) it is substantially easier to see all applicable symbol information the indexer found following each build cycle. In fact if you carefully inspect the project explorer in FIGURE 21, you will see both project source code file icons have a small key in the upper right corner after compilation. The key symbol communicates that the indexer found applicable include information and/or project defines during the build process.
FIGURE 22 – Sample Indexer Parser Output After Project Compilation
To dig down to see what information the indexer found, right-click on any file with a key symbol and select the “Properties” option. Locate and click on the option “Preprocessor Include Paths, Macros, etc.” under the “C/C++ General” category and then expand the “CDT GCC Build Output Parser” option. The

Application Note AN103
USING MAC OS X, ECLIPSE, AND GNU TOOLS WITH THE ENERGY MICRO EFM32 33-‐36 www.carlson-minot.com
sample illustration in FIGURE 22 demonstrates the output of one indexed source file in the project.
9.2 Starting the J-Link GDB Server
To be able to use the Eclipse IDE to debug a EFM32 hardware target it will be necessary to start the J-Link GDB Server first. Unlike Windows, Segger doesn’t have a high-level application for Mac OS X, so this has to be accomplished from the command shell. First open a command shell as an ordinary user. Connect either the EFM32 starter kit or external J-Link debugger dongle to an unused port of the Mac host. Then start the server as follows: bash-3.2$ JLinkGDBServer -if SWD
Once the GDB server starts, the shell window will indicate messages similar to the following: SEGGER J-Link GDB Server V4.80 Command Line Version JLinkARM.dll V4.80 (DLL compiled Dec 20 2013 19:44:31) -----GDB Server start settings----- GDBInit file: none GDB Server Listening port: 2331 SWO raw output listening port: 2332 Terminal I/O port: 2333 Accept remote connection: yes Generate logfile: off Verify download: off Init regs on start: on Silent mode: off Single run mode: off ------J-Link related settings------ J-Link script: none Target interface: SWD Host interface: USB Target endian: little Target interface speed: 1000kHz Connecting to J-Link... J-Link is connected. Firmware: Energy Micro EFM32 compiled Aug 27 2010 16:12:09 Hardware: V7.00 S/N: 123456789 Feature(s): GDB Checking target voltage... Listening on TCP/IP port 2331 Connecting to target...Connected to target

Application Note AN103
USING MAC OS X, ECLIPSE, AND GNU TOOLS WITH THE ENERGY MICRO EFM32 34-‐36 www.carlson-minot.com
Waiting for GDB connection...
The last three lines of output are the most important. If these messages do not appear and errors are reported, troubleshoot these first before proceeding to subsequent sections. On a final note, while in theory the server should not need to be exited and restarted between Eclipse GDB debug sessions, past experience has identified strange anomalies that occasionally impact the behavior of the J-Link device if this is not done under Mac OS X. Consequently it is a recommendation to restart the server before each new debugging session with Eclipse.
9.3 Commencing the GDB Debug Session
With the J-Link GDB server operational using Eclipse to its full capability now requires only a few additional steps. This section covers everything needed to start a new GDB session with the EFM32 target. From the top menu bar click “Run " Debug Configurations…”. If the underlying code has changed since the last flash memory update, select the option “MacEMLCD Flash Debug” otherwise select the “MacEMLCD Debug” option. Clicking on the “Debug” button will then proceed to initiate a new session using the appropriate profile.
And this brings the entire process to a pinnacle. Once the perspective switch window closes, Eclipse will automatically switch to the debug perspective illustrated in FIGURE 23. Note that the target will execute initial configuration code as far as the main function and automatically stop. The default Eclipse debug perspective that follows will have all the necessary ingredients for a successful debugging session: stack trace, variable state, register state, breakpoint/watch status, and the current position of the program counter relative to the source code listing. At this operational level of the Eclipse IDE, the remote EFM32 target can be single-stepped, breakpoints set/cleared, variables inspected/modified, and just about anything else that human imagination allows. Rather then going into a lengthy discussion about the Eclipse buttons that control these features, a new user unfamiliar with the Eclipse IDE can discover just about as much by hovering the mouse over each button and observing the tooltip tag that appears. The tooltips for each button provide a reasonably self-explanatory description of each button’s purpose.

Application Note AN103
USING MAC OS X, ECLIPSE, AND GNU TOOLS WITH THE ENERGY MICRO EFM32 35-‐36 www.carlson-minot.com
FIGURE 23 – Active Debug Session with Remote EFM32 Target
10.0 Summary This application note conclusively demonstrates that Mac OS X in conjunction with high-level integrated development environments like Eclipse can provide a very desirable development platform for embedded development work. As an added benefit, this exercise showcases the Energy Micro EFM32 product line. By using the Mac and the EFM32 together, the application possibilities become nearly endless!

Application Note AN103
USING MAC OS X, ECLIPSE, AND GNU TOOLS WITH THE ENERGY MICRO EFM32 36-‐36 www.carlson-minot.com
About Us
Carlson-Minot Integrated Technologies is a consulting firm providing engineering design services to the defense, medical, consumer, and energy markets. For more information about our services and capabilities, visit our website at:
http://www.carlson-minot.com