using motionvfx templates · using motionvfx templates installing templates 2 motion 5 overview 4...
TRANSCRIPT

Using MotionVFX templates
Installing templates 2
Motion 5
Overview 4
Replacing Drop Zones and Texts 5
Sharing 6
FCPX
Finding projects 7
Replacing Drop Zones and Texts 8
Cutting 9
Sharing 11

The easiest and the most efficient way of installing our templates & plugins is through our desktop app mInstaller.
Download mInstaller from our website motionvfx.com/minstaller and drag & drop it to the Applications folder. After the installation you can find it in the menu bar in the upper right corner. Log into it using your MotionVFX Login and password - after that the app will allow you to access all of your purchases.
Installing templates
2

All of our products require the latest versions of their supported host software (FCPX/Motion 5/Adobe's After E�ects/etc.) as well as the latest version of OS X (if appliable).
Now you can download, install, repair and also convert Apple Motion projects’ FPS right inside mInstaller.
3
Remember

Motion 5
All Motion templates can be and fully edited in Motion 5. In Final Cut Pro X you can access the specifically marked (published) parameters such as texts and Drop Zones.
Every MotionVFX project can be opened in Motion 5 from mInstaller.
To easily customize a project in Motion 5, open the project’s properties (by selecting the Project layer and going to the Inspector > Project ) and pick the Publishing tab.
4

Replacing Drop Zones and Texts
5
The easiest way to replace a Drop Zone is to drag and drop your footage from Finder onto the proper Drop Zone visible in the viewport.
You can also use Search Bar to find Drop Zone layers, and then drag & drop your footage exactly on the desired one.

Sharing
6
You can also drag and drop your footage from Finder into the Media Tab.
After that you can use it by click-ing TO next to Source Media Drop Zone on the publish list.
Here you can also change all project’s texts.
To access additional settings, right-click on the desired parameter and select Reveal Original Parameter.
To export your project, go to Share and choose Export Movie... option. Set your rendering properties and you are done!

Final Cut Pro X
To find your product in FCPX, pick the desired browser and search for the template you want to use. mInstaller installs all our templates into motionvfx folder.
To use the product - drag and drop in onto the timeline.
1 Project Generator
2 Titles and Lower3rds
7
4
3
1
2
3 Transitions
4 E�ects
Replacing Drop Zones and Texts
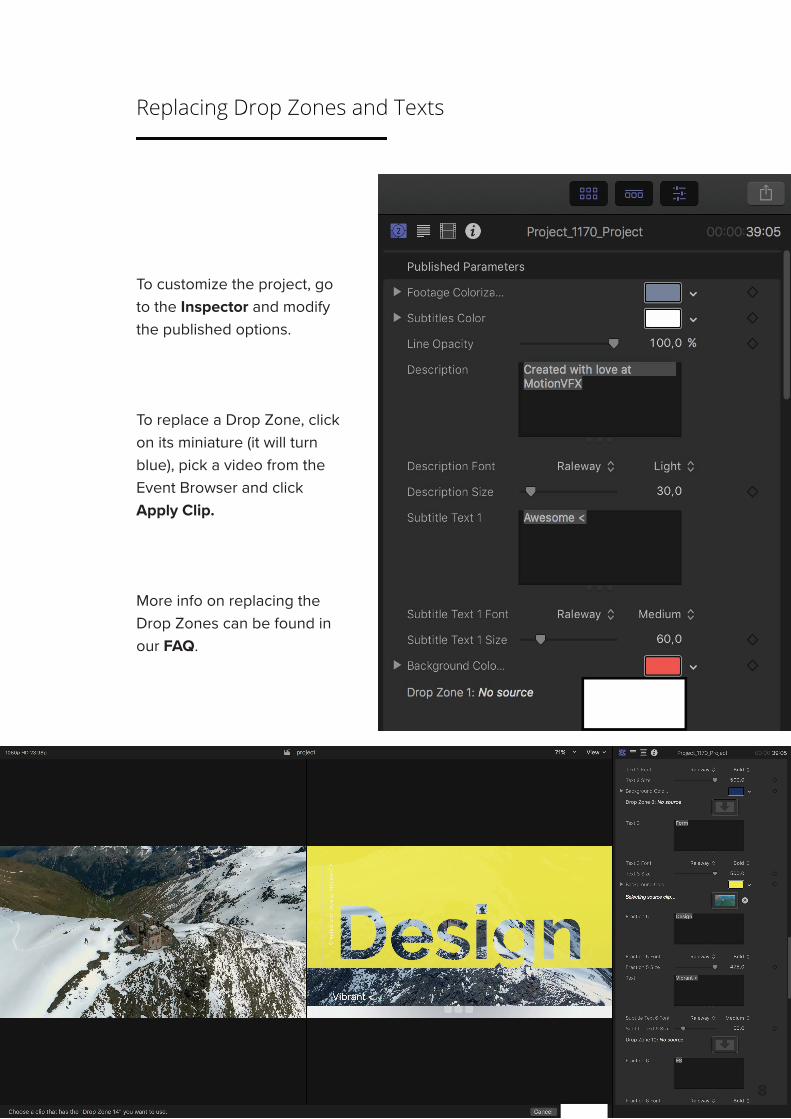
8
To customize the project, go to the Inspector and modify the published options.
To replace a Drop Zone, click on its miniature (it will turn blue), pick a video from the Event Browser and click Apply Clip.
More info on replacing the Drop Zones can be found in our FAQ.

Cutting
FCPX provides advanced text controls. To access them, hover your mouse cursor over the desired text in the viewport and select it once a white frame shows up around it. You can customize its properties in the Text Tab.
To shorten or split a template into sections, you have to put it into a Com-pound Clip by right clicking on it on the timeline and choosing New Com-pound Clip.
9
To export your project, go to Share and choose Export Movie... option. Set your rendering properties and you are done!

10
You can shu�e the resulting parts and mix them with video clips or other templates.
Now you can use the Blade tool to divide the project. If you want to edit the project’s properties, you have to go inside the Compound Clip by double clicking it.

11
Sharing
To export your project, go to File > Share and choose the desired export format. Set your export settings and you are ready to share your outcome!
You can also render individual parts of your timeline by marking them with the Range Selection tool.
For more detailed information check our tutorial site, or contact us at [email protected]
Visit us at motionVFX.com