using oracle database cloud service
TRANSCRIPT

Oracle® CloudAdministering Oracle Database Cloud Service
E48368-49December 2017

Oracle Cloud Administering Oracle Database Cloud Service,
E48368-49
Copyright © 2014, 2017, Oracle and/or its affiliates. All rights reserved.
This software and related documentation are provided under a license agreement containing restrictions onuse and disclosure and are protected by intellectual property laws. Except as expressly permitted in yourlicense agreement or allowed by law, you may not use, copy, reproduce, translate, broadcast, modify,license, transmit, distribute, exhibit, perform, publish, or display any part, in any form, or by any means.Reverse engineering, disassembly, or decompilation of this software, unless required by law forinteroperability, is prohibited.
The information contained herein is subject to change without notice and is not warranted to be error-free. Ifyou find any errors, please report them to us in writing.
If this is software or related documentation that is delivered to the U.S. Government or anyone licensing it onbehalf of the U.S. Government, then the following notice is applicable:
U.S. GOVERNMENT END USERS: Oracle programs, including any operating system, integrated software,any programs installed on the hardware, and/or documentation, delivered to U.S. Government end users are"commercial computer software" pursuant to the applicable Federal Acquisition Regulation and agency-specific supplemental regulations. As such, use, duplication, disclosure, modification, and adaptation of theprograms, including any operating system, integrated software, any programs installed on the hardware,and/or documentation, shall be subject to license terms and license restrictions applicable to the programs.No other rights are granted to the U.S. Government.
This software or hardware is developed for general use in a variety of information management applications.It is not developed or intended for use in any inherently dangerous applications, including applications thatmay create a risk of personal injury. If you use this software or hardware in dangerous applications, then youshall be responsible to take all appropriate fail-safe, backup, redundancy, and other measures to ensure itssafe use. Oracle Corporation and its affiliates disclaim any liability for any damages caused by use of thissoftware or hardware in dangerous applications.
Oracle and Java are registered trademarks of Oracle and/or its affiliates. Other names may be trademarks oftheir respective owners.
Intel and Intel Xeon are trademarks or registered trademarks of Intel Corporation. All SPARC trademarks areused under license and are trademarks or registered trademarks of SPARC International, Inc. AMD, Opteron,the AMD logo, and the AMD Opteron logo are trademarks or registered trademarks of Advanced MicroDevices. UNIX is a registered trademark of The Open Group.
This software or hardware and documentation may provide access to or information about content, products,and services from third parties. Oracle Corporation and its affiliates are not responsible for and expresslydisclaim all warranties of any kind with respect to third-party content, products, and services unless otherwiseset forth in an applicable agreement between you and Oracle. Oracle Corporation and its affiliates will not beresponsible for any loss, costs, or damages incurred due to your access to or use of third-party content,products, or services, except as set forth in an applicable agreement between you and Oracle.

Contents
Preface
Audience xiv
Documentation Accessibility xiv
Related Documents xiv
Conventions xiv
1 Getting Started with Database Cloud Service
About Oracle Database Cloud Service 1-1
About Database Cloud Service Database Deployments 1-2
Service Level 1-2
Metering Frequency 1-3
Oracle Database Software Release 1-4
Oracle Database Software Edition 1-4
Oracle Database Type 1-5
Computing Power 1-6
Database Storage 1-6
Automatic Backup Configuration 1-7
Before You Begin with Database Cloud Service 1-7
How to Begin with Database Cloud Service Subscriptions 1-8
About Database Cloud Service Roles and Users 1-9
Accessing the Oracle Database Cloud Service Console 1-9
Using the Database Cloud Service REST APIs 1-10
Typical Workflow for Using Database Cloud Service 1-10
About Database Deployments in Oracle Cloud Infrastructure 1-10
2 Managing the Database Cloud Service Life Cycle
Creating a Database Deployment 2-1
Creating a QuickStart Database Deployment 2-2
Standard Edition 2-3
Enterprise Edition 2-3
Extreme Performance 2-4
iii

Creating a Customized Database Deployment 2-4
Creating a Database Deployment Using a Cloud Backup 2-15
Replacing the Database by Using the Oracle Database Cloud Service Console 2-18
Replacing the Database by Using ibkup Actions 2-20
Creating a Clone Database Deployment from a Snapshot 2-27
Creating a Hybrid DR Deployment 2-28
Viewing All Database Deployments 2-33
Viewing Detailed Information for a Database Deployment 2-34
Viewing Activities for Database Deployments in an Identity Domain 2-34
Stopping, Starting and Restarting a Database Deployment 2-35
Rebooting a Compute Node 2-39
Scaling a Database Deployment 2-39
Creating and Managing IP Reservations 2-42
Creating an IP Reservation 2-43
Using an IP Reservation when Creating a Database Deployment 2-44
Deleting an IP Reservation 2-44
Creating and Managing Snapshots of a Database Deployment 2-45
Deleting a Database Deployment 2-47
Tracking the Number of Database Deployments in an Account 2-47
3 Managing Network Access to Database Cloud Service
About Network Access to Database Cloud Service 3-1
Generating a Secure Shell (SSH) Public/Private Key Pair 3-2
Generating an SSH Key Pair on UNIX and UNIX-Like Platforms Using the ssh-keygen Utility 3-2
Generating an SSH Key Pair on Windows Using the PuTTYgen Program 3-3
Creating an SSH Tunnel to a Compute Node Port 3-4
Creating an SSH Tunnel Using the ssh Utility on Linux 3-5
Creating an SSH Tunnel Using the PuTTY Program on Windows 3-5
Enabling Access to a Compute Node Port 3-7
Enabling IPSec VPN Access to Database Cloud Service 3-9
Defining a Custom Host Name or Domain Name for Database Cloud Service 3-10
Using Network Encryption and Integrity 3-10
4 Administering Database Cloud Service
Adding Temporary Storage to a Database Deployment 4-1
Adding an SSH Public Key 4-5
Updating the Cloud Tooling on Database Cloud Service 4-6
Updating the Cloud Tooling by Using the dbpatchm Subcommand 4-6
Updating the Cloud Tooling by Using the raccli Utility 4-7
iv

Administering a Data Guard Configuration 4-8
Checking the Status of the Oracle Data Guard Configuration 4-8
Performing a Switchover Operation 4-9
Performing a Switchover Operation by Using the dbaascli Utility 4-10
Performing a Manual Failover Operation 4-11
Performing a Manual Failover Operation by Using the dbaascli Utility 4-12
Reinstating a Failed Primary Database 4-12
Reinstating a Failed Primary Database by Using the dbaascli Utility 4-13
Changing the SYS Password 4-14
Configuring Clients for Automatic Failover 4-14
Preparing 12.2 Database Deployments for Patching 4-15
Preparing 12.2 Database Deployments Hosting Single-Instance Databases forPatching 4-15
Preparing 12.2 Database Deployments Hosting Oracle RAC Databases forPatching 4-16
Applying Linux OS Security Patches 4-17
Applying Linux OS Security Patches by Using the dbpatchmsm Utility 4-19
Manually Applying Linux OS Security Patches 4-21
Maintaining the Manageability of Database Cloud Service 4-22
Administering Oracle REST Data Services (ORDS) 4-23
Adding a Signed SSL Certificate to Oracle REST Data Services 4-23
Stopping Oracle REST Data Services 4-24
Starting Oracle REST Data Services 4-25
Loading Data into the Oracle Database on Database Cloud Service 4-25
Tuning Oracle Database Performance on Database Cloud Service 4-27
Monitoring and Managing Oracle Database on Database Cloud Service 4-27
Managing the Log and Diagnostic Files on Database Cloud Service 4-28
Creating a Database using the Virtual Image Service Level 4-29
Creating a Database on a Virtual Image Database Deployment: Example 4-30
5 Accessing Database Cloud Service
Connecting to a Compute Node Through Secure Shell (SSH) 5-1
Connecting to a Compute Node Using the ssh Utility on UNIX and UNIX-LikePlatforms 5-1
Connecting to a Compute Node Using the PuTTY Program on Windows 5-2
Accessing Enterprise Manager Database Express 12c 5-3
Accessing Enterprise Manager 11g Database Control 5-6
Connecting Remotely to the Database by Using Oracle SQL Developer 5-8
Connecting Remotely to the Database by Using Oracle Net Services 5-10
Copying Files to or from a Database Cloud Service Database Deployment 5-12
v
6 Backing Up and Restoring Databases on Database Cloud Service
About Backing Up Database Deployments on Database Cloud Service 6-1
Viewing Backup Configuration Information 6-3
Creating an On-Demand Backup 6-4
Creating an On-Demand Backup by Using the bkup_api Utility 6-5
Creating an On-Demand Backup by Using the raccli Utility 6-6
Deleting a Backup 6-6
Updating the Password for Backing Up to the Storage Cloud 6-7
Updating the Password by Using the bkup_api Utility 6-8
Updating the Password by Using the raccli Utility 6-8
Customizing the Current Backup Configuration 6-9
Customizing the Current Backup Configuration on Database DeploymentsHosting Single-Instance Databases 6-9
Customizing the Current Backup Configuration on Database DeploymentsHosting Oracle RAC Databases 6-13
Changing the Backup Configuration to a Different Backup Destination 6-16
Changing the Backup Configuration on Database Deployments Hosting Single-Instance Databases 6-18
Changing the Backup Configuration on Database Deployments Hosting OracleRAC Databases 6-20
Increasing Local Storage for Backups on Older Database Deployments 6-20
Disabling and Re-enabling Scheduled Backups 6-23
Restoring from the Most Recent Backup 6-25
Restoring from the Most Recent Backup by Using the dbaascli Utility 6-26
Restoring from the Most Recent Backup by Using the raccli Utility 6-26
Restoring from a Specific Backup 6-27
Restoring from a Specific Backup by Using the dbaascli Utility 6-28
Restoring to a Specific Point in Time 6-29
Restoring to a Specific Point in Time by Using the dbaascli Utility 6-30
Restoring to a Specific Point in Time by Using the raccli Utility 6-31
Recreating an Unrecoverable Database Deployment From a Backup to CloudStorage 6-32
7 Patching Database Cloud Service
Viewing Available Patches 7-1
Viewing Available Patches by Using the dbpatchm Subcommand 7-2
Viewing Available Patches by Using the dbpatchmdg Utility 7-2
Checking Prerequisites Before Applying a Patch 7-3
Checking Patch Prerequisites by Using the dbpatchm Subcommand 7-4
Checking Patch Prerequisites by Using the dbpatchmdg Utility 7-5
Checking Patch Prerequisites by Using the raccli Utility 7-5
vi

Applying a Patch 7-6
Applying a Patch by Using the dbpatchm Subcommand 7-7
Applying a Patch by Using the dbpatchmdg Utility 7-8
Applying a Patch by Using the raccli Utility 7-9
Rolling Back a Patch or Failed Patch 7-10
Rolling Back a Patch or Failed Patch by Using the dbpatchm Subcommand 7-11
Rolling Back a Patch or Failed Patch by Using the dbpatchmdg Utility 7-12
Applying a Patch to a Test Deployment 7-12
Patching a Hybrid DR Deployment 7-13
The dbpatchm.cfg Configuration File 7-14
8 Configuring Database Features, Database Options, and CompanionProducts
Using Oracle Real Application Clusters (RAC) in Database Cloud Service 8-1
Using Oracle Data Guard in Database Cloud Service 8-3
More About Oracle Data Guard 8-5
Using Oracle Real Application Clusters (RAC) and Oracle Data Guard Together inDatabase Cloud Service 8-5
Using Oracle Multitenant in Database Cloud Service 8-7
Creating and Activating a Master Encryption Key for a PDB 8-7
Exporting and Importing a Master Encryption Key for a PDB 8-9
Using Oracle Database Vault in Database Cloud Service 8-10
Configuring and Enabling Oracle Database Vault 8-10
Disabling Oracle Database Vault 8-11
Using Oracle Application Express in Database Cloud Service 8-12
Accessing the Oracle Application Express Console 8-13
Upgrading from Oracle Application Express 4.2 or 5.0 to 5.1 for OracleDatabase 11g 8-15
Upgrading from Oracle Application Express 4.2 to 5.1 for Oracle Database 12c 8-17
Upgrading from Oracle Application Express 5.0 to 5.1 for Oracle Database 12c 8-24
Moving Oracle Application Express 5.1 from CDB$ROOT to PDBs 8-29
Using the Demos PDB 8-33
Using Oracle Enterprise Manager Cloud Control with Database Cloud Service 8-34
Using Oracle GoldenGate Cloud Service with Database Cloud Service 8-36
Manually Configuring a Deployment’s Database for Oracle GoldenGate CloudService Replication 8-37
9 Migrating Oracle Databases to Database Cloud Service
Choosing a Migration Method 9-1
Migrating from Oracle Database 11g to Oracle Database 11g in the Cloud 9-2
vii

Migrating from Oracle Database 11g to Oracle Database 12c in the Cloud 9-3
Migrating from Oracle Database 12c CDB to Oracle Database 12c in the Cloud 9-4
Migrating from Oracle Database 12c Non-CDB to Oracle Database 12c in the Cloud 9-6
Migration Methods 9-8
Data Pump Conventional Export/Import 9-8
Data Pump Conventional Export/Import: Example 9-9
Data Pump Full Transportable 9-10
Data Pump Full Transportable: Example 9-11
Data Pump Transportable Tablespace 9-13
Data Pump Transportable Tablespace: Example 9-14
Remote Cloning a PDB 9-16
Remote Cloning Non-CDB 9-17
RMAN Cross-Platform Transportable PDB 9-17
RMAN Cross-Platform Transportable Tablespace Backup Sets 9-18
RMAN Cross-Platform Transportable Tablespace Backup Sets: Example 9-19
RMAN Transportable Tablespace with Data Pump 9-21
RMAN Transportable Tablespace with Data Pump: Example 9-21
RMAN CONVERT Transportable Tablespace with Data Pump 9-23
RMAN CONVERT Transportable Tablespace with Data Pump: Example 9-24
SQL Developer and INSERT Statements to Migrate Selected Objects 9-26
SQL Developer and SQL*Loader to Migrate Selected Objects 9-27
Unplugging/Plugging a PDB 9-27
Unplugging/Plugging Non-CDB 9-28
10
Using Oracle DBaaS Monitor
About Oracle DBaaS Monitor 10-1
Accessing Oracle DBaaS Monitor 10-2
Filtering the Display on DBaaS Monitor Pages 10-4
Administering the Listener 10-5
Viewing Listener Status Information 10-5
Starting the Listener 10-6
Stopping the Listener 10-6
Verifying that the Listener Knows of a Service 10-6
Starting and Stopping the Database Instance 10-7
Starting the Database Instance 10-7
Stopping the Database Instance 10-7
Viewing and Modifying Initialization Parameters 10-7
Viewing User Account and Expiring Password Information 10-8
Viewing Tablespace and Segment Space Usage 10-9
Changing the TDE Keystore Password 10-9
viii
Viewing Alert Log Entries and Checking for Errors 10-10
Viewing Real Time SQL Monitor 10-10
Administering Pluggable Databases 10-12
Cloning a Pluggable Database 10-13
Closing a Pluggable Database 10-13
Creating a Pluggable Database 10-13
Dropping a Pluggable Database 10-14
Opening a Pluggable Database 10-14
Plugging In a Pluggable Database 10-14
Unplugging a Pluggable Database 10-15
11
Frequently Asked Questions for Database Cloud Service
12
Troubleshooting Database Cloud Service
Problems Creating Deployments 12-2
I cannot create a deployment when I have many database deployments 12-2
I cannot create a deployment, even after waiting for an hour 12-2
I get a "SCRIPT execution errors" message when I try to create an deploymentwith backups to cloud storage 12-2
Problems Administering Deployments 12-3
I am required to change the password for the oracle user when I try to connectto a compute node 12-3
I get a Linux error 30, Read-only file system, when trying to connect to or workin my environment 12-4
I can’t use dbaascli to update my cloud tooling 12-4
Problems with Scaling 12-5
My scaling operation does not start 12-5
My deployment is too busy to allow scaling 12-5
After scaling the shape of my Data Guard configuration, I get an ORA-16792warning when I check the status of the configuration 12-5
Problems with Patching and Rollback 12-6
I receive a message stating that the virtual machines are unhealthy 12-6
I receive a message stating that the instance is busy with another operation 12-7
I cannot apply a patch due to a lack of storage space 12-7
My attempt to roll back the January 2015 Patch Set Update (Jan 2015 PSU)fails 12-8
My attempt to roll back the April 2015 Patch Set Update (Apr 2015 PSU) fails 12-9
Problems with Backing Up and Restoring 12-9
There is not enough space for my backup 12-10
ix

I receive a message stating that there was an unexpected error during theduplicate command (ORA messages) 12-10
I receive a message stating that there was an unexpected error during theduplicate command (RMAN messages) 12-10
A backup fails with an ORA-19914 and ORA-28361 12-11
Problems with Oracle Data Guard Role Transitions 12-11
A message in the Activity area indicates that the reinstate operation failed 12-12
A message indicates a problem with the SYS password on the standbydatabase 12-12
After a role transition operation, I get an ORA-16792 warning when I check thestatus of the configuration 12-12
A Characteristics of a Newly Created Deployment
Characteristics Common Across Database Deployment Types A-1
Data Security A-1
Security of Data at Rest A-2
Security of Data in Transit A-2
Hybrid Columnar Compression (HCC) A-3
Tablespace Encryption A-3
Creating Encrypted Tablespaces A-3
Managing Tablespace Encryption A-4
Characteristics of a Single Instance Database Deployment A-5
Linux User Accounts A-6
Storage Volumes and File System Layout A-7
Locations of Installed Software A-8
Network Access A-8
Oracle Database Characteristics A-10
Location of Diagnostic and Log Files A-10
Characteristics of a Single Instance with Data Guard Standby Database DeploymentA-10
Linux User Accounts A-11
Storage Volumes and File System Layout A-12
Network Access A-13
Oracle Data Guard Configuration A-14
Characteristics of a Database Clustering with RAC Database Deployment A-15
Linux User Accounts A-16
Storage Volumes and File System Layout A-18
Network Access A-19
Characteristics of a Database Clustering with RAC and Data Guard StandbyDatabase Deployment A-20
Linux User Accounts A-21
Storage Volumes and File System Layout A-23
x

Network Access A-24
Oracle Data Guard Configuration A-26
Characteristics of an Oracle Database Cloud Service - Virtual Image DatabaseDeployment A-26
Linux User Accounts A-27
Storage Volumes and File System Layout A-28
Location of Installed Software A-29
Network Access A-29
B Oracle Cloud Pages for Administering Database Cloud Service
Services Page B-1
Activity Page B-3
SSH Access Page B-5
IP Reservations Page B-6
QuickStarts Page B-7
Overview Page B-7
Access Rules Page B-11
Backup Page B-12
Patching Page B-13
Snapshots Page B-13
Create Service: Service Page B-14
Create Service: Service Details Page B-17
Create Service: Confirmation Page B-23
C The oracle-dbcs-cli Utility
Downloading and Installing the oracle-dbcs-cli Utility C-1
Running the oracle-dbcs-cli Utility C-2
The Configuration File for oracle-dbcs-cli Subcommands C-6
The Data File for the oracle-dbcs-cli create Subcommand C-7
D The dbaascli Utility
dbaascli database bounce D-2
dbaascli database changepassword D-3
dbaascli database start D-3
dbaascli database status D-3
dbaascli database stop D-3
dbaascli dataguard failover D-4
dbaascli dataguard reinstate D-4
dbaascli dataguard status D-4
xi

dbaascli dataguard switchover D-5
dbaascli dbpatchm apply D-5
dbaascli dbpatchm clonedb D-5
dbaascli dbpatchm list_patches D-5
dbaascli dbpatchm list_tools D-6
dbaascli dbpatchm prereq D-6
dbaascli dbpatchm rollback D-6
dbaascli dbpatchm switchback D-6
dbaascli dbpatchm toolsinst D-7
dbaascli dv off D-7
dbaascli dv on D-8
dbaascli gg setup D-8
dbaascli gg status D-9
dbaascli listener bounce D-9
dbaascli listener start D-9
dbaascli listener status D-9
dbaascli listener stop D-10
dbaascli netsec config D-10
dbaascli netsec config encryption D-12
dbaascli netsec config integrity D-14
dbaascli netsec status D-15
dbaascli orec duplicate D-16
dbaascli orec keep list D-16
dbaascli orec keep tag D-16
dbaascli orec latest D-16
dbaascli orec list D-17
dbaascli orec pitr D-17
dbaascli orec scn D-17
dbaascli tde rotate masterkey D-17
dbaascli tde status D-18
E The raccli Utility
raccli apply patch E-2
raccli clean backup E-3
raccli create backup E-3
raccli create recovery E-4
raccli describe job E-5
raccli describe system E-6
raccli failover dataguard E-7
raccli list backup E-8
xii

raccli list backupconfig E-9
raccli list jobs E-10
raccli list recovery E-11
raccli reinstate dataguard E-12
raccli status dataguard E-12
raccli switchover dataguard E-13
raccli update backupconfig E-14
raccli update databasepassword E-15
raccli update netsec E-16
raccli update rdk E-19
raccli update server E-20
raccli update tde E-21
F The dbpatchmdg Utility
Running the dbpatchmdg Utility F-1
dbpatchmdg apply_async F-2
dbpatchmdg precheck_async F-2
dbpatchmdg rollback_async F-3
xiii

Preface
This document describes how to manage and monitor Oracle Database Cloud Serviceand provides references to related documentation.
Topics
• Audience
• Documentation Accessibility
• Related Documents
• Conventions
AudienceThis document is intended for Oracle Cloud users who want to manage and monitorOracle Database Cloud Service.
Documentation AccessibilityFor information about Oracle's commitment to accessibility, visit the OracleAccessibility Program website at http://www.oracle.com/pls/topic/lookup?ctx=acc&id=docacc.
Access to Oracle Support
Oracle customers that have purchased support have access to electronic supportthrough My Oracle Support. For information, visit http://www.oracle.com/pls/topic/lookup?ctx=acc&id=info or visit http://www.oracle.com/pls/topic/lookup?ctx=acc&id=trsif you are hearing impaired.
Related DocumentsFor more information, see these Oracle resources:
• Getting Started with Oracle Cloud
• Using Oracle Cloud Infrastructure Object Storage Classic
• Using Oracle Cloud Infrastructure Compute Classic
ConventionsThe following text conventions are used in this document:
Preface
xiv

Convention Meaning
boldface Boldface type indicates graphical user interface elements associated with anaction, or terms defined in text or the glossary.
italic Italic type indicates book titles, emphasis, or placeholder variables for which yousupply particular values.
monospace Monospace type indicates commands within a paragraph, URLs, code inexamples, text that appears on the screen, or text that you enter.
Preface
xv

1Getting Started with Database CloudService
This section describes how to get started with Oracle Database Cloud Service foradministrators and application owners.
Topics
• About Oracle Database Cloud Service
• About Database Cloud Service Database Deployments
• Before You Begin with Database Cloud Service
• How to Begin with Database Cloud Service Subscriptions
• About Database Cloud Service Roles and Users
• Accessing the Oracle Database Cloud Service Console
• Using the Database Cloud Service REST APIs
• Typical Workflow for Using Database Cloud Service
• About Database Deployments in Oracle Cloud Infrastructure
About Oracle Database Cloud ServiceOracle Database Cloud Service provides you the ability to deploy Oracle databases inthe Cloud, with each database deployment containing a single Oracle database. Youhave full access to the features and operations available with Oracle Database, butwith Oracle providing the computing power, physical storage and (optionally) tooling tosimplify routine database maintenance and management operations.
When you create a database deployment, Database Cloud Service creates computenodes to host the database, using computing, storage and networking resourcesprovided by various Oracle Cloud infrastructure services.
Two service levels are available:
• The Oracle Database Cloud Service - Virtual Image—This level includes OracleDatabase and supporting software. You have to install this software yourself, andyou are responsible for all maintenance operations for this software. You have rootprivilege, so you can load and run software in the compute environment. You havefull administrative privileges for the Oracle database.
• The Oracle Database Cloud Service—This level also includes Oracle Databaseand supporting software. However, the software is installed for you, an Oracledatabase is created using values you provide when creating the databasedeployment, and the database is started. Additionally, you can direct DatabaseCloud Service to set up automatic backups. Finally, the deployment includes cloudtooling that simplifies backup, recovery, patching and upgrade operations. Youhave root privilege, so you can load and run software in the compute environment.You have full administrative privileges for the Oracle database. You are
1-1

responsible for making any changes to the automated maintenance setup, andyou are responsible for recovery operations in the event of a failure.
Like many Oracle Cloud platform services, Database Cloud Service relies on anunderlying component of Oracle Cloud named Platform Service Manager (PSM) toprovide its service console and its REST API. As a result, you will find that the OracleDatabase Cloud Service console has the same “look and feel” as the service consolesfor other platform services like Oracle GoldenGate Cloud Service and Oracle JavaCloud Service, and you will find that the endpoint structure and feature set of theDatabase Cloud Service REST API is very similar to those of the REST APIs for otherplatform services.
The Platform Service Manager (PSM) component of Oracle Cloud uses SSH to accessthe compute nodes that comprise your database deployments, in order to performpredefined Platform Service actions like backup and patching. You initiate thesePlatform Service actions from the web console or REST API. A separate SSH key pairis used for each database deployment to perform this internal communication. ThisSSH key is not available for ad hoc usage. You cannot delete this key from computenodes or it will cause these Platform Service actions to fail. The key is only used underprogrammatic control and cannot be directly accessed by Oracle employees. All SSHactions performed by the Platform Service Manager (PSM) component on yourcompute nodes are logged and can be audited. The Oracle Cloud Operations teamdoes not have access to any SSH keys residing on your compute nodes and has noway to access your compute nodes, unless you explicitly provide access to the keysfor troubleshooting purposes.
About Database Cloud Service Database DeploymentsWhen you create a new database deployment on Oracle Database Cloud Service, youuse the Create Service wizard, which steps you through the process of making thechoices that produce a database deployment tailored to your needs. These choicesinclude:
• Service Level
• Metering Frequency
• Oracle Database Software Release
• Oracle Database Software Edition
• Oracle Database Type
• Computing Power
• Database Storage
• Automatic Backup Configuration
Service LevelWhen creating a database deployment on Oracle Database Cloud Service, youchoose one of the following service levels:
• Oracle Database Cloud Service - Virtual Image—a compute environment withpre-installed virtual machine images that include all software needed to create andrun an Oracle Database. You connect to the virtual machine and run the OracleDatabase Configuration Assistant (DBCA) to create your database. All subsequent
Chapter 1About Database Cloud Service Database Deployments
1-2

maintenance operations, including backup, patching and upgrades, are performedby you.
(Not available on Oracle Cloud Infrastructure)
Note:
Oracle Database 12c Release 2 (12.2) is not available at the OracleDatabase Cloud Service - Virtual Image service level.
• Oracle Database Cloud Service—everything in Virtual Image, plus a databasecreated according to specifications you provide in the Create Service wizard, pluscloud tooling that provides automatic and on-demand backups, patching andupgrading, and point-in-time recovery for your Oracle Databases.
Cloud Tooling for Database Cloud Service
In addition to the capabilities of the web-based Oracle Database Cloud Serviceconsole, Database Cloud Service offers the following tools on the compute nodesassociated with the Oracle Database Cloud Service service level:
• Simple Automated Backups: use the bkup_api utility (raccli on deployments thatuse Oracle Real Application Clusters) to perform on-demand backups and tochange how automatic backups are configured. See Backing Up and RestoringDatabases on Database Cloud Service.
• Simple Automated Recovery: use the orec subcommand of the dbaascli utility(raccli on deployments that use Oracle Real Application Clusters) to restore frombackups. See Backing Up and Restoring Databases on Database Cloud Service.
• Simple Automated Patching: use the dbpatchm subcommand of the dbaascli utility(raccli on deployments that use Oracle Real Application Clusters) to applypatches. See Patching Database Cloud Service.
• New DBaaS Monitor: use the Oracle DBaaS Monitor web application to monitorthe Oracle database and computing resources. See Accessing Oracle DBaaSMonitor. Oracle DBaaS Monitor is not available on deployments that use OracleReal Application Clusters.
Metering FrequencyWhen creating a database deployment on Oracle Database Cloud Service, youchoose one of the following metering frequencies:
• Hourly—Pay only for the number of hours used during your billing period.
You cannot switch a deployment from hourly to monthly metering frequency after itis created.
• Monthly—Pay one price for the full month irrespective of the number of hoursused.
For deployments that are started in the middle of a month, the price is pro-rated;you pay only for the partial month from the start date.
You cannot switch a deployment from monthly to hourly metering frequency after itis created.
Chapter 1About Database Cloud Service Database Deployments
1-3

Oracle Database Software ReleaseWhen creating a database deployment on Oracle Database Cloud Service, youchoose one of the following Oracle Database software releases:
• Oracle Database 11g Release 2
• Oracle Database 12c Release 1
• Oracle Database 12c Release 2
Note:
Oracle Database 12c Release 2 (12.2) is not available at the OracleDatabase Cloud Service - Virtual Image service level.
Note:
The Oracle Database Cloud Service supports several database versions aspart of the service provisioning process. The 12c database version as licensedperpetually or by term is under normal support and maintenance and these 12cversions selected for provisioning included in the Oracle Database CloudService are fully supported as part of the service subscription. OracleDatabase 11.2.0.4 as licensed perpetually or by term is also selectable forprovisioning in the Oracle Database Cloud Service and Oracle will continue tosupport this release version as part of the service subscription for the durationof the Extended Support period for 11.2 as defined in Oracle's Lifetime SupportPolicy.
Consumers of the Oracle Database Cloud Service who are using an instance ofthe service to support an Oracle Cloud deployment of an Oracle ApplicationsUnlimited application (JD Edwards, PeopleSoft, Siebel, E-Business Suite,Value Chain Planning) are granted a restricted "right of use" for the databaseoptions Partitioning, OLAP and Spatial when used within the Oracle DatabaseCloud Service - Enterprise Edition services.
Oracle Database Software EditionWhen creating a database deployment on Oracle Database Cloud Service, youchoose one of the following Oracle Database software editions. For detailedinformation about the included Oracle Database features, options and packs, see the Permitted Features section of Oracle Database Licensing Information User Manual.
• Standard Edition—Oracle Database Standard Edition, which deliversunprecedented ease of use, power, and performance for workgroup, department-level, and Web applications. It includes all the facilities necessary to buildbusiness-critical applications.
• Enterprise Edition—Oracle Database Enterprise Edition, which provides theperformance, availability, scalability, and security required for mission-criticalapplications such as high-volume online transaction processing (OLTP)
Chapter 1About Database Cloud Service Database Deployments
1-4

applications, query-intensive data warehouses, and demanding Internetapplications.
• Enterprise Edition - High Performance—provides all the features of EnterpriseEdition, plus many of the available Oracle Database options and managementpacks.
• Enterprise Edition - Extreme Performance—provides all the features ofEnterprise Edition, plus all of the Oracle Database options and management packsappropriate for use in Oracle Database Cloud Service.
Note:
If you choose Enterprise Edition or Enterprise Edition - High Performance, allavailable database enterprise management packs and Enterprise Editionoptions are included in the database deployment. The packs and options thatare not part of the software edition you chose are available to you for use on atrial basis.
Oracle Database TypeWhen creating a database deployment on Oracle Database Cloud Service, youchoose one of the following database types:
• Single Instance—A single Oracle Database instance and database data storehosted on one compute node. For more information about this type, see Characteristics of a Single Instance Database Deployment.
• Database Clustering with RAC—A two-node clustered database using OracleReal Application Clusters technology; two compute nodes each host an OracleDatabase instance, and the two instances access the same shared database datastore. For more information about this type, see Characteristics of a DatabaseClustering with RAC Database Deployment.
(Not available on Oracle Cloud Infrastructure)
• Single Instance with Data Guard Standby—Two single-instance databases, oneacting as the primary database and one acting as the standby database in anOracle Data Guard configuration. For more information about this type, see Characteristics of a Single Instance with Data Guard Standby DatabaseDeployment.
• Database Clustering with RAC and Data Guard Standby—Two two-nodeOracle RAC databases, one acting as the primary database and one acting as thestandby database in an Oracle Data Guard configuration. For more informationabout this type, see Characteristics of a Database Clustering with RAC and DataGuard Standby Database Deployment.
(Not available on Oracle Cloud Infrastructure)
• Data Guard Standby for Hybrid DR — Single-instance database acting as thestandby database in an Oracle Data Guard configuration. The primary database ison your own system.
(Not available on Oracle Cloud at Customer)
(Not available on Oracle Cloud Infrastructure)
Chapter 1About Database Cloud Service Database Deployments
1-5

Not all types are available with all combinations of service level and software edition:
• Single Instance is the only type supported by the Oracle Database Cloud Service -Virtual Image service level.
• Single Instance is the only type supported by the Standard Edition softwareedition.
• The two types that use Oracle RAC are available only with Enterprise Edition -Extreme Performance software edition.
Computing PowerWhen creating a database deployment on Oracle Database Cloud Service, youchoose the computing power for the associated compute node or nodes from a list ofsupported OCPU (Oracle CPU) and processor RAM combinations. The combinationsyou can choose from depends on the infrastructure you are creating the deploymentin:
• In Oracle Cloud Infrastructure:
– VM.Standard1.1 - 1.0 OCPU, 7.0 GB RAM
– VM.Standard1.2 - 2.0 OCPU, 14.0 GB RAM
– VM.Standard1.4 - 4.0 OCPU, 28.0 GB RAM
– VM.Standard1.8 - 8.0 OCPU, 56.0 GB RAM
– VM.Standard1.16 - 16.0 OCPU, 112.0 GB RAM
– BM.Standard1.32 - 36.0 OCPU, 256.0 GB RAM
• In Oracle Cloud Infrastructure Classic:
– General Purpose:
* OC3 - 1 OCPU, 7.5 GB RAM
* OC4 - 2 OCPU, 15 GB RAM
* OC5 - 4 OCPU, 30 GB RAM
* OC6 - 8 OCPU, 60 GB RAM
* OC7 - 16 OCPU, 120 GB RAM
– High Memory:
* OC1M - 1 OCPU, 15 GB RAM
* OC2M - 2 OCPU, 30 GB RAM
* OC3M - 4 OCPU, 60 GB RAM
* OC4M - 8 OCPU, 120 GB RAM
* OC5M - 16 OCPU, 240 GB RAM
Database StorageWhen creating a database deployment on Oracle Database Cloud Service, youchoose the amount of usable data storage you want for your database. You can createa database of up to 1200 GB with backups to both cloud and local storage or up to2048 GB (2 TB) with backups to cloud storage only or no backups.
Chapter 1About Database Cloud Service Database Deployments
1-6

After you create the database deployment, you can add more data storage as needed.For information, see Scaling Up the Storage for a Database Deployment.
By adding more storage, you can create much larger databases:
• In Oracle Cloud Infrastructure Classic, which supports 5 scale-up operations, youcan create a database of up to 4.7 TB with backups to both cloud and localstorage or up to 10 TB (7.7 TB in Oracle RAC deployments) with backups to cloudstorage only or no backups.
• In Oracle Cloud Infrastructure, which supports 26 scale-up operations, you cancreate a database of up to 19 TB with backups to both cloud and local storage orup to 48 TB with backups to cloud storage only or no backups. However, if youneed databases of such large sizes, you should consider using Oracle DatabaseExadata Cloud Service instead of Oracle Database Cloud Service.
Automatic Backup ConfigurationWhen creating a new database deployment on Oracle Database Cloud Service, youchoose whether you want automatic backups to be configured for the database. Yourchoices are:
• Both Cloud Storage and Local Storage—30 days' worth of backups are kept,with the 7 most recent days' worth available directly on the compute node’s localstorage.
• Cloud Storage Only—30 days' worth of backups are kept, with all backups oncloud storage.
Note:
This choice is not currently available for database deployments that useOracle Real Application Clusters (Oracle RAC).
• None—automatic backups are not configured.
If you choose either of the cloud storage options, you must specify a cloud storagelocation:
• For deployments in Oracle Cloud Infrastructure, specify an existing Oracle CloudInfrastructure Object Storage bucket.
• For deployments in Oracle Cloud Infrastructure Classic, specify an existing OracleCloud Infrastructure Object Storage Classic container or create one as part of thedatabase deployment creation.
Before You Begin with Database Cloud ServiceBefore you begin using Oracle Database Cloud Service, you should be familiar withthe following technologies:
• Oracle Cloud
See Getting Started with Oracle Cloud.
Before you create a Database Cloud Service database deployment:
Chapter 1Before You Begin with Database Cloud Service
1-7

• On Oracle Cloud, sign up for a free credit promotion or purchase a subscription.You cannot create a Database Cloud Service database deployment until you doso.
• If your Cloud account supports Oracle Cloud Infrastructure, perform the steps in Prerequisites for Oracle Platform Services on Oracle Cloud Infrastructure in theOracle Cloud Infrastructure documentation.
• If your Cloud account supports Oracle Cloud Infrastructure Classic, set thereplication policy in Oracle Cloud Infrastructure Object Storage Classic, asdescribed in Selecting a Replication Policy for Your Service Instance in UsingOracle Cloud Infrastructure Object Storage Classic.
• (Optional) Create a Secure Shell (SSH) public/private key pair to provide. TheSSH keys are used to facilitate secure access to the compute nodes that supportyour database deployments. See Generating a Secure Shell (SSH) Public/PrivateKey Pair.
• (Optional) Create a cloud storage backup location
If you want to automatically back up your database to cloud storage, you mustassociate it with a cloud storage backup location. The type of location you specifydepends on the infrastructure the deployment is built on:
– Oracle Cloud Infrastructure: cloud backups are stored in an Oracle CloudInfrastructure Object Storage bucket. You must create a storage bucket beforeyou create database deployments configured to back up to cloud storage.
– Oracle Cloud Infrastructure Classic: cloud backups are stored in an OracleCloud Infrastructure Object Storage Classic container. You can create thecontainer beforehand and provide the wizard with information about it, or youcan have the wizard create the container for you.
How to Begin with Database Cloud Service Subscriptions
This topic does not apply to Oracle Cloud at Customer.
Here’s how to get started with Oracle Database Cloud Service freepromotions and subscriptions:
1. Sign up for a free credit promotion or purchase a subscription.
See Requesting and Managing Free Oracle Cloud Promotions or Buying anOracle Cloud Subscription in Getting Started with Oracle Cloud.
2. Open the Oracle Database Cloud Service console.
See Accessing the Oracle Database Cloud Service Console.
Note:
Be sure to review the prerequisites described in Before You Begin withDatabase Cloud Service before you create your first database deployment onDatabase Cloud Service . Depending on which Oracle Cloud infrastuctureservices are available in your account, you may have to perform some set-upsteps before you create your first database deployment.
Chapter 1How to Begin with Database Cloud Service Subscriptions
1-8

If you want to grant others access to Database Cloud Service, start by reviewing AboutDatabase Cloud Service Roles and Users. Then, create accounts for users and assignthem appropriate privileges and roles. For instructions, see Adding Users andAssigning Roles in Getting Started with Oracle Cloud.
About Database Cloud Service Roles and UsersIn addition to the roles and privileges described in Oracle Cloud User Roles andPrivileges in Getting Started with Oracle Cloud, the DBaaS Database Administratorrole is created for Oracle Database Cloud Service.
When the Database Cloud Service account is first set up, the service administrator isgiven this role. User accounts with this role must be added before anyone else canaccess and use Database Cloud Service.
The identity domain administrator can create more Database Cloud Serviceadministrators by creating user accounts and assigning them the DBaaS DatabaseAdministrator role. See Managing User Accounts in Managing and Monitoring OracleCloud.
The following table summarizes the privileges given to the DBaaS DatabaseAdministrator role.
Description of Privilege More Information
Can create and delete database deployments Creating a Customized Database Deployment
Deleting a Database Deployment
Can scale, patch, and back up or restoredatabase deployments
Scaling a Database Deployment
Patching Database Cloud Service
Backing Up and Restoring Databases onDatabase Cloud Service
Can monitor and manage service usage inOracle Cloud
Managing and Monitoring Oracle CloudServices in Managing and Monitoring OracleCloud
Accessing the Oracle Database Cloud Service ConsoleTo access the Oracle Database Cloud Service console:
1. Sign in to your Cloud Account and go to the My Services Dashboard.
See Signing in to Your Cloud Account in Getting Started with Oracle Cloud.
2. Click the navigation menu in the top corner of the My Services Dashboard andthen click Database.
The Oracle Database Cloud Service console opens.
3. If a Welcome page is displayed, go to the Services page by clicking Services nextto “Database Cloud Service”.
Chapter 1About Database Cloud Service Roles and Users
1-9

Using the Database Cloud Service REST APIsYou can programmatically provision and manage Oracle Database Cloud Serviceinstances and associated database deployments by using REST (REpresentationalState Transfer) application programming interfaces (APIs).
Each REST API call maps to a HTTP request: getting an object (GET), adding an object(POST), updating an object (PUT), and deleting an object (DELETE). The HTTP responsecode indicates whether the request was successful. Each object for which you canperform the GET, POST, PUT, and DELETE requests is identified uniquely by its URI.
To access Database Cloud Service by using the REST API you must use the RESTendpoint URL that is associated with your service instance. For details, see REST APIfor Oracle Database Cloud Service.
Typical Workflow for Using Database Cloud ServiceTo start using Oracle Database Cloud Service, refer to the following tasks as a guide:
Task Description More Information
Sign up for a free creditpromotion or purchase asubscription
(Does not apply to OracleCloud at Customer)
Provide your information, and sign upfor a free credit promotion or purchase asubscription to Oracle Database CloudService.
How to Begin with Database Cloud ServiceSubscriptions
Add and manage usersand roles
Create accounts for your users andassign them appropriate privileges.Assign the necessary Database CloudService roles.
Adding Users and Assigning Roles inGetting Started with Oracle Cloud, and About Database Cloud Service Roles andUsers
Create a databasedeployment
Use a wizard to create a new databasedeployment.
Creating a Customized DatabaseDeployment
Enable network access Permit access to network servicesassociated with your databasedeployments.
About Network Access to Database CloudService
Load data into thedatabase
Use standard Oracle Database tools toload data into your databases.
Loading Data into the Oracle Database onDatabase Cloud Service
Monitor databasedeployments
Check on the health and performance ofindividual database deployments.
Monitoring and Managing Oracle Databaseon Database Cloud Service
Monitor the service Check on the day-to-day operation ofyour service, monitor performance, andreview important notifications.
Managing and Monitoring Oracle CloudServices in Managing and MonitoringOracle Cloud
Patch a databasedeployment
Apply a patch or roll back a patch. Patching Database Cloud Service
Back up a databasedeployment
Back up a database or restore adatabase from a backup.
Backing Up and Restoring Databases onDatabase Cloud Service
About Database Deployments in Oracle Cloud InfrastructureYou can create Oracle Database Cloud Service database deployments in OracleCloud Infrastructure and in Oracle Cloud Infrastructure Classic.
Chapter 1Using the Database Cloud Service REST APIs
1-10

The Oracle Database environment that your database deployment provides in eithertype of infrastructure is substantially the same. A few differences exist in theunderlying infrastructure components and in the supported capabilities. Awareness ofthese differences will help you choose an appropriate infrastructure when creating adatabase deployment.
• Prerequisite steps before creating your first database deployment: In OracleCloud Infrastructure, you must perform the steps described in Prerequisites forOracle Platform Services on Oracle Cloud Infrastructure in the Oracle CloudInfrastructure documentation. In Oracle Cloud Infrastructure Classic, you must setthe replication policy in Oracle Cloud Infrastructure Object Storage Classic beforeyou create database deployments with backups to cloud storage, as described in Selecting a Replication Policy for Your Service Instance in Using Oracle CloudInfrastructure Object Storage Classic.
• Regions and availability domains: While creating a database deployment, youselect a region in Oracle Cloud Infrastructure Classic or Oracle CloudInfrastructure. If you select a region in Oracle Cloud Infrastructure, then you alsoselect an Availability Domain. A region in Oracle Cloud Infrastructure has multipleisolated availability domains, each with separate power and cooling. Theavailability domains within a region are interconnected using a low-latencynetwork.
• Subnets and IP networks: In Oracle Cloud Infrastructure Classic, you canoptionally attach a database deployment to an IP network that you definebeforehand. In Oracle Cloud Infrastructure, you must attach each databasedeployment to a subnet, which is a part of a virtual cloud network that you createin Oracle Cloud Infrastructure.
• Service levels: Currently, Oracle Cloud Infrastructure supports only the OracleDatabase Cloud Service service level.
• Database types: Currently, Oracle Cloud Infrastructure supports only the SingleInstance and Single Instance with Data Guard Standby database types.
• Compute shapes: The range of compute shapes that you can select from whencreating a database deployment is different for Oracle Cloud Infrastructure andOracle Cloud Infrastructure Classic. For more information, see Computing Power.
• Backups to cloud storage: In Oracle Cloud Infrastructure, an Oracle CloudInfrastructure Object Storage bucket is used to store backups to cloud storage.You must create a storage bucket before you create database deploymentsconfigured to back up to cloud storage. In Oracle Cloud Infrastructure Classic, anOracle Cloud Infrastructure Object Storage Classic container is used to storebackups to cloud storage. You can create a storage container before you createdatabase deployments configured to back up to cloud storage, or you can have astorage container created at the same time as a database deployment.
• IP reservations: Currently, Oracle Cloud Infrastructure does not support IPreservations.
• Network access to database deployments: Regardless of the infrastructure thatyou create your database deployment in, the rules to provide network access tothe deployment are preconfigured for you. The interfaces that you use to managethese rules depend on the infrastructure that the deployment is created in:
– For deployments in Oracle Cloud Infrastructure, you configure the rules, calledsecurity rules, in the Oracle Cloud Infrastructure interfaces.
Chapter 1About Database Deployments in Oracle Cloud Infrastructure
1-11

– For deployments in Oracle Cloud Infrastructure Classic, you configure therules, called access rules, in the Oracle Database Cloud Service interfaces.Note that these access rules prohibit access by default (with the exception ofSSH access on port 22), and you must enable them to provide access to otherports.
• Scaling database deployments: In Oracle Cloud Infrastructure, you cannot scalethe shape of a database deployment’s compute nodes; you can scale only thestorage. You can create new storage volumes of 50 GB to 2048 GB in 50 GBincrements. You can scale up storage 26 times, for a total of 30 storage volumesattached to the deployment.
• Snapshots and deployments cloned from snapshots: Currently, Oracle CloudInfrastructure does not support creating storage snapshots of single-instancedatabase deployments and then creating cloned deployments from the snapshots.
Chapter 1About Database Deployments in Oracle Cloud Infrastructure
1-12

2Managing the Database Cloud Service LifeCycle
This section describes tasks to manage the life cycle of Oracle Database CloudService.
Topics
• Creating a Database Deployment
• Creating a QuickStart Database Deployment
• Creating a Customized Database Deployment
• Creating a Database Deployment Using a Cloud Backup
• Creating a Clone Database Deployment from a Snapshot
• Creating a Hybrid DR Deployment
• Viewing All Database Deployments
• Viewing Detailed Information for a Database Deployment
• Viewing Activities for Database Deployments in an Identity Domain
• Stopping, Starting and Restarting a Database Deployment
• Rebooting a Compute Node
• Scaling a Database Deployment
• Creating and Managing IP Reservations
• Creating and Managing Snapshots of a Database Deployment
• Deleting a Database Deployment
• Tracking the Number of Database Deployments in an Account
Creating a Database DeploymentThere are several ways in which you can create a database deployment on OracleDatabase Cloud Service, depending on your requirements and experience level.
Choose from one of the following deployment creation methods:
Create Method More Information
The fastest and easiest way to create a databasedeployment is to use a QuickStart template.
Creating a QuickStart Database Deployment
The way to create a database deployment where you cancustomize all options is to use the Create Service wizard.
Creating a Customized Database Deployment
2-1

Create Method More Information
The way to create a clone of an existing databasedeployment is to use snapshots.
Creating and Managing Snapshots of a DatabaseDeployment to create the snapshot, and then Creatinga Clone Database Deployment from a Snapshot tocreate the clone
The way to create an Oracle Data Guard standbydatabase for an on-premises primary database is to useHybrid DR.
Creating a Hybrid DR Deployment
Creating a QuickStart Database Deployment
This topic does not apply to Oracle Cloud Infrastructure.
For accounts that use the Universal Credits payment model, OracleDatabase Cloud Service provides QuickStart templates that createdatabase deployments of commonly used configurations. You simplypick a template and, if desired, change the default deployment name.Database Cloud Service then uses an Oracle Cloud Stack Managertemplate to provide all the other configuration information.
Procedure
1. Go to the QuickStarts page:
a. Open the Oracle Database Cloud Service console.
For detailed instructions, see Accessing the Oracle Database Cloud ServiceConsole.
b. Click the QuickStarts link.
The QuickStarts page is displayed.
2. If desired, change the Instance Name from the default one that’s provided. Thename must start with a letter, and can contain up to 25 letters or numbers.
3. Review the information about the available templates and decide which one youwant to use.
For more information about the database deployments these templates create,see Standard Edition, Enterprise Edition, and Extreme Performance.
4. Click the Create button below the template you want to use.
The Confirmation window is displayed. Note that the Create button is disabled.
5. Click the Download link and save the zip file containing the SSH key pair andadministrator password that will be used to create your deployment. You will needthis information to access your database deployment after it is created.
The Create button is now enabled.
6. Click Create.
The Confirmation window closes, Database Cloud Service begins creating thedeployment using theOracle Cloud Stack Manager template, and the Servicespage is displayed.
Chapter 2Creating a QuickStart Database Deployment
2-2

7. Periodically refresh the Services page to monitor the creation of your newdatabase deployment.
Standard EditionWhen you use the Standard Edition Quickstart option, Database Cloud Service usesan Oracle Cloud Stack Manager template to create a database deployment consistingof a single-instance Oracle Database 12.2 Standard Edition database housed on asingle compute node. In brief, the template performs these actions:
• Creates a compute node of 1 OCPU with 7.5 GB RAM and its own public IPaddress.
• Installs Oracle Linux, Oracle Database 12.2.0.1 Standard Edition, and cloudtooling software on the compute node.
• Creates storage for 15 GB of database data and storage for the fast recovery areaand redo logs needed for the database.
• Creates Oracle Cloud Infrastructure Compute Classic networking resources toprovide access to the compute node, setting all except SSH access on port 22 to adisabled status.
• Creates an Oracle database with the SID (System ID) ORCL and a single PDB(pluggable database) named PDB1.
• Configures Oracle Net Services to listen for database connections on port 1521.
• Starts the database and starts the Oracle Net Services listener.
Note that the template does not configure automatic backups for the databasedeployment. To set up automatic backups, see Changing the Backup Configuration onDatabase Deployments Hosting Single-Instance Databases.
Enterprise EditionWhen you use the Enterprise Edition Quickstart option, Database Cloud Service usesan Oracle Cloud Stack Manager template to create a database deployment consistingof a single-instance Oracle Database 12.2 Enterprise Edition database housed on asingle compute node. In brief, the template performs these actions:
• Creates a compute node of 2 OCPUs with 15 GB RAM and its own public IPaddress.
• Installs Oracle Linux, Oracle Database 12.2.0.1 Enterprise Edition, and cloudtooling software on the compute node.
• Creates storage for 512 GB of database data and storage for the fast recoveryarea and redo logs needed for the database.
• Creates Oracle Cloud Infrastructure Compute Classic networking resources toprovide access to the compute node, setting all except SSH access on port 22 to adisabled status.
• Creates an Oracle database with the SID (System ID) ORCL and a single PDB(pluggable database) named PDB1.
• Configures Oracle Net Services to listen for database connections on port 1521.
• Starts the database and starts the Oracle Net Services listener.
Chapter 2Creating a QuickStart Database Deployment
2-3

Note that the template does not configure automatic backups for the databasedeployment. To set up automatic backups, see Changing the Backup Configuration onDatabase Deployments Hosting Single-Instance Databases.
Extreme PerformanceWhen you use the Extreme Performance Quickstart option, Database Cloud Serviceuses an Oracle Cloud Stack Manager template to create a database deploymentconsisting of an Oracle Database 12.2 Enterprise Edition clustered database usingOracle Real Application Clusters (Oracle RAC), housed on two compute nodes. Inbrief, the template performs these actions:
• Creates two compute nodes, each with 2 OCPUs and 15 GB RAM and its ownpublic IP address.
• Installs Oracle Linux, Oracle Grid Infrastructure 12.2.0.1, Oracle Database12.2.0.1 Enterprise Edition, and cloud tooling software on each compute node.
• Creates three Oracle Automatic Storage Management (ASM) disk groups toprovide shared storage for database data, the fast recovery area, and the redologs, and mounts the disk groups as shared file systems on the two computenodes using Oracle ASM Cluster File System (ACFS). The capacity of the diskgroup for database data is 1 TB.
• Creates Oracle Cloud Infrastructure Compute Classic networking resources toprovide access to the compute nodes, setting all except SSH access on port 22 toa disabled status.
• Creates a two-node Oracle RAC database named ORCL with a single PDB(pluggable database) named PDB1 on the compute nodes. The database SID(System ID) on one node is ORCL1 and is ORCL2 on the other node..
• Starts the database and starts the Oracle Net Services listener on the computenodes.
Note that the template does not configure automatic backups for the databasedeployment. To set up automatic backups, see Changing the Backup Configuration onDatabase Deployments Hosting Oracle RAC Databases.
Creating a Customized Database DeploymentTo create a customized database deployment on Oracle Database Cloud Service, usethe Create Service wizard as described in the following procedure.
However, before using the Create Service wizard, you need to make sure that youhave all of the necessary information, as described in Before You Begin. Additionally,after your database deployment is created you need to perform a few follow-on tasksto make sure your deployment is accessible and up-to-date, as described in After YourDatabase Deployment Is Created.
Before You Begin
When you create a database deployment, you provide information used to create thedeployment itself and the Oracle database it hosts. In addition, you may need toprovide information about other resources:
• An SSH public/private key pair (Optional)
Chapter 2Creating a Customized Database Deployment
2-4

You must associate an SSH public key with the compute infrastructure supportingthe deployment. An SSH public key is used for authentication when you use anSSH client to connect to a compute node associated with the deployment. Whenyou connect, you must provide the private key that matches the public key.
You can have the wizard create a public/private key pair for you, or you can createone beforehand and upload or paste its private key value. If you want to create akey pair beforehand, you can use a standard SSH key generation tool. See Generating a Secure Shell (SSH) Public/Private Key Pair.
• A cloud storage backup location (Optional)
If you want to automatically back up your database to cloud storage, you mustassociate it with a cloud storage backup location. The type of location you specifydepends on the infrastructure the deployment is built on:
– Oracle Cloud Infrastructure: cloud backups are stored in an Oracle CloudInfrastructure Object Storage bucket. You must create a storage bucket beforeyou create database deployments configured to back up to cloud storage.
– Oracle Cloud Infrastructure Classic: cloud backups are stored in an OracleCloud Infrastructure Object Storage Classic container. You can create thecontainer beforehand and provide the wizard with information about it, or youcan have the wizard create the container for you.
The container becomes associated with Oracle Database Backup CloudService, which Database Cloud Service uses to perform backups to cloudstorage. Once associated with Oracle Database Backup Cloud Service, thecontainer becomes part of your Oracle Database Public Cloud Servicessubscription (or trial) rather than part of an Oracle IaaS Public Cloud Servicessubscription (or trial).
Whether you create the container beforehand or have the wizard do it for you,you are prompted for the following information about the container:
* The name of the container
* The user name and password of a user who has read/write access to thecontainer
• A existing cloud backup created using Oracle Database Backup Cloud Service(Optional)
If you are creating a database deployment hosting a single-instance database, youcan have the new database populated, or “instantiated”, from the data stored inthe Database Backup Cloud Service backup of a 12.2.0.1, 12.1.0.2 or 11.2.0.4Oracle database. You can use this instantiate-from-backup technique if:
– The backed-up database is version 12.2.0.1, 12.1.0.2 or 11.2.0.4 with thelatest PSU (patch set update) applied.
– If the backed-up database is an Oracle 12c database, it must be multitenant(CDB). Database Cloud Service does not support non-CDB Oracle 12cdatabases.
– The backed-up database uses File System or ASM as its storage method fordata files.
– The database recovered from the backup will be smaller than 2 TB (1.2 TB ifyou plan to back up the new deployment to both cloud and local storage).
If you use this instantiate-from-backup technique, you are prompted for thefollowing information:
Chapter 2Creating a Customized Database Deployment
2-5

– The database ID of the backed-up database
– The password used when creating the backup (for backups that use passwordencryption)
– A zip file containing the source database’s TDE wallet directory (for backupsthat use TDE encryption)
– The name of the Oracle Cloud Infrastructure Object Storage Classic containerwhere the backup is stored
– The user name and password of an Oracle Cloud user who has read accessto the container
Note that after using this instantiate-from-backup technique, Oracle ApplicationExpress, DBaaS Monitor and ORDS (Oracle REST Data Services) may not beaccessible. To restore accessibility, see Application Express, DBaaS Monitor andORDS inaccessible after creating a database deployment using a cloud backup inKnown Issues for Oracle Database Cloud Service.
Procedure
To create a database deployment on Database Cloud Service:
1. Open the Oracle Database Cloud Service console.
For detailed instructions, see Accessing the Oracle Database Cloud ServiceConsole.
2. Click Create Service.
The Create Service wizard starts and the Service page is displayed.
3. On the Service page, provide a name and description for the databasedeployment, and provide information about its high-level characteristics. When youare finished, click Next to advance to the Service Details page.
Element Description
Service Name The name for the new database deployment. The name:
• Must not exceed 50 characters.• Must start with a letter.• Must contain only letters, numbers, or hyphens.• Must not contain any other special characters.• Must be unique within the identity domain.
Description (Optional) A description for the new database deployment.
Notification Email (Optional) An email address where you would like updatesabout the deployment-creation operation to be sent.
Chapter 2Creating a Customized Database Deployment
2-6

Element Description
Region (Available only if your identity domain is enabled for regions.)
The region for the database deployment. If you choose aregion that supports Oracle Cloud Infrastructure, theAvailability Domain and Subnet fields are displayed, and thedeployment will be created on Oracle Cloud Infrastructure.Otherwise, the deployment will be created on Oracle CloudInfrastructure Classic.
Choose No Preference to let Database Cloud Service choosean Oracle Cloud Infrastructure Classic region for you.
Note: If you are creating a database deployment that usesOracle Data Guard on Oracle Cloud Infrastructure Classic,choose the value No Preference. Currently, regionspecification is not supported for deployments that use OracleData Guard on Oracle Cloud Infrastructure Classic.
Availability Domain (Available only on Oracle Cloud Infrastructure)
The availability domain (within the region) where the databasedeployment will be placed.
Subnet (Available only on Oracle Cloud Infrastructure)
The subnet (within the availability domain) that will determinenetwork access to the database deployment.
IP Network (Not available on Oracle Cloud Infrastructure)
(Available only if you have selected a region and you havedefined one or more IP networks created in that region usingOracle Cloud Infrastructure Compute Classic.)
Select the IP network where you want the databasedeployment placed. Choose No Preference to use the defaultshared network provided by Oracle Cloud InfrastructureCompute Classic.
Note: Currently, the following limitations apply to IP networks:
• Only database deployments hosting a single-instancedatabase support IP networks.
• Database deployments that use Oracle Data Guard do notsupport IP networks.
• Database deployments that use Oracle RAC do notsupport IP networks.
For more information about IP networks, see these topics inUsing Oracle Cloud Infrastructure Compute Classic:
• About IP Networks• Creating an IP Network
Bring Your Own License (Available only in accounts that use the Universal Creditspayment model.)
Controls how the right to use Oracle Database on the newdeployment is established.
Leave this option unselected to use your Oracle Cloudaccount. Your account will be charged for the new deploymentaccording to your Oracle Database Cloud Service agreement.
Select this option to use an existing perpetual license to OracleDatabase. Your Oracle Cloud account will be charged a lesseramount for the new deployment because the right to useOracle Database is covered by your perpetual licenseagreement.
Chapter 2Creating a Customized Database Deployment
2-7

Element Description
Service Level The service level for the new deployment:
• Oracle Database Cloud Service• Oracle Database Cloud Service - Virtual Image (Not
available on Oracle Cloud Infrastructure)See Service Level.
Note: Oracle Database 12c Release 2 (12.2) is not available atthe Oracle Database Cloud Service - Virtual Image servicelevel.
Metering Frequency The metering frequency for the new deployment:
• Hourly• MonthlySee Metering Frequency.
Software Release The release version of Oracle Database for the newdeployment:
• Oracle Database 11g Release 2• Oracle Database 12c Release 1• Oracle Database 12c Release 2See Oracle Database Software Release.
Note: Oracle Database 12c Release 2 (12.2) is not available atthe Oracle Database Cloud Service - Virtual Image servicelevel.
Software Edition The Oracle Database software package for the newdeployment:
• Standard Edition• Enterprise Edition• Enterprise Edition - High Performance• Enterprise Edition - Extreme PerformanceSee Oracle Database Software Edition.
Chapter 2Creating a Customized Database Deployment
2-8

Element Description
Database Type The type of deployment to create:
• Single Instance—A single Oracle Database instance anddatabase data store hosted on one compute node. Formore information about this type, see Characteristics of aSingle Instance Database Deployment.
• Database Clustering with RAC—A two-node clustereddatabase using Oracle Real Application Clusterstechnology; two compute nodes each host an OracleDatabase instance, and the two instances access thesame shared database data store. For more informationabout this type, see Characteristics of a DatabaseClustering with RAC Database Deployment.
(Not available on Oracle Cloud Infrastructure)• Single Instance with Data Guard Standby—Two single-
instance databases, one acting as the primary databaseand one acting as the standby database in an Oracle DataGuard configuration. For more information about this type,see Characteristics of a Single Instance with Data GuardStandby Database Deployment.
• Database Clustering with RAC and Data GuardStandby—Two two-node Oracle RAC databases, oneacting as the primary database and one acting as thestandby database in an Oracle Data Guard configuration.For more information about this type, see Characteristicsof a Database Clustering with RAC and Data GuardStandby Database Deployment.
(Not available on Oracle Cloud Infrastructure)• Data Guard Standby for Hybrid DR — Single-instance
database acting as the standby database in an OracleData Guard configuration. The primary database is onyour own system.
(Not available on Oracle Cloud at Customer)
(Not available on Oracle Cloud Infrastructure)Not all types are available with all combinations of service leveland software edition:
• Single Instance is the only type supported by the OracleDatabase Cloud Service - Virtual Image service level.
• Single Instance is the only type supported by the StandardEdition software edition.
• The two types that use Oracle RAC are available only withEnterprise Edition - Extreme Performance softwareedition.
4. On the Service Details page, complete the Database Configuration section byproviding information about the Oracle Database you want to create.
Element Description
DB Name (SID) The name for the database instance. The name:
• Must not exceed 8 characters.• Must start with a letter.• Must contain only letters, numbers, or these symbols: _
(underscore), # (hash sign), or $ (dollar sign).
Chapter 2Creating a Customized Database Deployment
2-9

Element Description
PDB Name (Available only for Oracle Database 12c.)
The name for the default pluggable database (PDB). Thename:
• Must not exceed 8 characters.• Must start with a letter.• Must contain only letters, numbers, or these symbols: _
(underscore), # (hash sign), or $ (dollar sign).This option is not available if Create Instance from ExistingBackup is set to Yes.
AdministrationPasswordConfirm Password
The password for the following administrative users:
• Oracle Database administrative users• Oracle Application Express admin userThe password:
• Must be 8 to 30 characters in length.• Must contain at least one lowercase letter• Must contain at least one uppercase letter• Must contain at least one number• Must contain at least one of these symbols: _
(underscore), # (hash sign), or $ (dollar sign).• Must not contain the word “oracle”.
Usable DatabaseStorage (GB)
The amount of storage in GB for actual database data.
Note that up to 8% of this storage will be used for file systemconstructs and other overhead.
Total Data File Storage(GB)
The computed amount of storage in GB that will be allocated tothe deployment, including space for operating system andproduct binaries, supporting files, database data andconfiguration files, and so on.
Compute Shape The number of Oracle Compute Units (OCPUs) and amount ofmemory (RAM) for each compute node of the new databasedeployment. Database Cloud Service offers severalOCPU/RAM combinations, as described in Computing Power.
SSH Public KeyEdit
The SSH public key to be used for authentication when usingan SSH client to connect to a compute node that is associatedwith your database deployment.
Click Edit to specify the public key. You can upload a filecontaining the public key value, paste in the value of a publickey, or create a system-generated key pair.
If you paste in the value, make sure the value does not containline breaks or end with a line break.
Use High PerformanceStorage
(Available only if you have a metered subscription and youchose an Oracle Cloud Infrastructure Classic region on thewizard’s Service page.)
Controls the device type to be used for database blockstorage. By default, block storage is allocated on spinningdevices. If you select this option, then block storage will beallocated on solid state devices, at an increased cost. Forpricing details, refer to the Block Storage information at https://cloud.oracle.com/compute/compute/pricing.
Advanced Settings:Listener Port
The port number for the Oracle Net Listener.
The port number must be between 1521 and 5499 (inclusive).
Chapter 2Creating a Customized Database Deployment
2-10

Element Description
Advanced Settings:Timezone
The time zone for the new database deployment. The defaultis Coordinated Universal Time (UTC).
Advanced Settings:Character Set
The database character set for the database. The databasecharacter set is used for:
• Data stored in SQL CHAR data types (CHAR, VARCHAR2,CLOB, and LONG)
• Identifiers such as table names, column names, andPL/SQL variables
• Entering and storing SQL and PL/SQL source codeThis option is not available if Create Instance from ExistingBackup is set to Yes.
Advanced Settings:National Character Set
The national character set for the database. The nationalcharacter set is used for data stored in SQL NCHAR data types(NCHAR, NCLOB, and NVARCHAR2).
This option is not available if Create Instance from ExistingBackup is set to Yes.
Advanced Settings:Enable Oracle GoldenGate
(Not available on Oracle Cloud at Customer)
Configures the database for use as the replication database ofan Oracle GoldenGate Cloud Service instance. See UsingOracle GoldenGate Cloud Service with Database CloudService.
Advanced Settings:Include "Demos" PDB
(Available only for Oracle Database 12c Release 1.)
Controls whether the "Demos" PDB is to be included in thedatabase. This PDB contains demos for many new features ofOracle Database 12c such as in-memory and multitenant.Usable Data File Storage must to be at least 25 GB to includethis PDB.
Advanced Settings: IPReservations
(Not available on Oracle Cloud Infrastructure)
(Available only if you chose an Oracle Cloud InfrastructureClassic region on the wizard’s Service page.)
Specifies whether to use an IP reservation for this deployment.If you choose Assign Automatically, an IP reservation is notused and Database Cloud Service acquires a new IP addressfor use by the deployment. Otherwise, Database Cloud Serviceuses the IP reservation you choose.
5. On the Service Details page, complete the Backup and Recovery Configurationsection, choosing a backup option for the database deployment and, depending onyour choice, providing information about the Oracle Storage Cloud Servicecontainer where cloud backups are to be stored.
Chapter 2Creating a Customized Database Deployment
2-11

Element Description
Backup Destination Controls how backups for the deployment are to be configured:
• Both Cloud Storage and Local Storage—backups areconfigured to be created automatically and stored both onlocal storage and on cloud storage.
If this choice is selected, the Cloud Storage Container,User Name and Password fields are displayed.
• Cloud Storage Only — backups are configured to becreated automatically and stored on cloud storage.
If this choice is selected, the Cloud Storage Container,User Name and Password fields are displayed.
Note: This choice is not currently available for databasedeployments that use Oracle Real Application Clusters(Oracle RAC).
• None—Backups are not configured for the deployment.For more information about backups and backupconfigurations, see About Backing Up Database Deploymentson Database Cloud Service.
Cloud StorageContainer
The location where backups to cloud storage are to be stored:
• For database deployments in Oracle Cloud Infrastructure,enter the URL of an existing Oracle Cloud InfrastructureObject Storage bucket. The URL is of the form:
https://swiftobjectstorage.region.oraclecloud.com/v1/account/bucket
For example:
https://swiftobjectstorage.us-phoenix-1.oraclecloud.com/v1/mycompany/mybucket
You must create this storage bucket before you begincreating the database deployment. See Object StorageAPI in Oracle Cloud Infrastructure documentation.
• For database deployments in Oracle Cloud InfrastructureClassic, enter the location of an Oracle CloudInfrastructure Object Storage Classic container using thisform:
Storage-identity_domain/container
where identity_domain is the id of the identity domain,and container is the name of the container. If thiscontainer doesn’t exist, use the Create Cloud StorageContainer checkbox to create it.
Note: In some Oracle Cloud Infrastructure Classicaccounts, you cannot use the above form. If you get anerror when you try to use this form, you must insteadprovide a full URL for the container using this form:
rest-endpoint-url/container
To determine the rest-endpoint-url value for youraccount, see Finding the REST Endpoint URL for YourService Instance in Using Oracle Cloud InfrastructureObject Storage Classic.
Chapter 2Creating a Customized Database Deployment
2-12

Element Description
Cloud Storage UserName
A user with read/write (and creation, if necessary) access tothe location specified in Cloud Storage Container:• For database deployments in Oracle Cloud Infrastructure,
enter the user name you use to sign in to the Oracle CloudInfrastructure console.
• For database deployments in Oracle Cloud InfrastructureClassic, enter the Oracle Cloud user name of theadministrator of the Oracle Cloud Infrastructure ObjectStorage Classic container specified in Cloud StorageContainer. Usually, this is your Oracle Cloud user name.
Cloud StoragePassword
The password necessary to access the location specified inCloud Storage Container:• For database deployments in Oracle Cloud Infrastructure,
enter your Swift password.• For database deployments in Oracle Cloud Infrastructure
Classic, enter the password of the Oracle Cloud userspecified in Cloud Storage User Name.
Create Cloud StorageContainer
(Not available on Oracle Cloud Infrastructure)
Create a new Oracle Cloud Infrastructure Object StorageClassic container as part of the database deployment creation.Specify the container name and the Cloud Storage user nameand password in the preceding fields.
Total Estimated MonthlyStorage
Storage for data files and backups.
6. On the Service Details page, complete the Initialize Data From Backup section ifyou are having the new database populated, or “instantiated”, from the data storedin the Database Backup Cloud Service backup.
Element Description
Create Instance fromExisting Backup
Create a database deployment whose database is derivedfrom a cloud backup created using Oracle Database BackupCloud Service.
The other fields and options in the Initialize Data From Backupsection only display if Create Instance from Existing Backup isset to Yes.
On-Premises Backup Indicates the origin of the source database backup.
Select this option if the source database backup is not fromanother Database Cloud Service database deployment in thesame identify domain. In this case, the following fields andoptions are displayed except for Source Service Name.
Deselect this option if the source database backup is fromanother Database Cloud Service database deployment in thesame identify domain. In this case, only the Source ServiceName field is displayed.
Database ID The database identifier of the database from which the existingbackup was created. You can get this value by using thefollowing SQL query:
SQL> SELECT dbid FROM v$database;
Chapter 2Creating a Customized Database Deployment
2-13

Element Description
Decryption MethodEdit
Specifies the information necessary to decrypt the sourcedatabase backup. Click Edit to specify the necessaryinformation.
In the resulting dialog:
• For a backup that uses Transparent Database Encryption(TDE), select Upload Wallet File then click Browse andspecify a zip file containing the source database’s TDEwallet directory, and the contents of that directory.
Note:
If the source database is from another DatabaseCloud Service database deployment, its TDEwallet directory is /u01/app/oracle/admin/dbname/tde_wallet.
• For a backup that uses password encryption, select PasteRMAN Key Value and paste the password (key value)used to encrypt the backup.
Cloud StorageContainer
The URL where the existing backup is stored:
• The URL of an Oracle Cloud Infrastructure Object Storagebucket. The URL is of the form:
https://swiftobjectstorage.region.oraclecloud.com/v1/account/bucket
For example:
https://swiftobjectstorage.us-phoenix-1.oraclecloud.com/v1/mycompany/mybucket
• The URL of an Oracle Cloud Infrastructure Object StorageClassic container. The URL is of the general form:
rest-endpoint-url/container
To determine the rest-endpoint-url value for youraccount, see Finding the REST Endpoint URL for YourService Instance in Using Oracle Cloud InfrastructureObject Storage Classic. If this container doesn’t exist, usethe Create Cloud Storage Container checkbox to createit.
Username The Oracle Cloud user name of the administrator of the OracleCloud Infrastructure Object Storage Classic container specifiedin Cloud Storage Container.
Password The password of the user specified in Username.
Source Service Name From the list of possible alternatives, specify the databasedeployment that is associated with the source databasebackup that you want to use.
7. On the Service Details page, complete the Standby Database Configurationsection. When you are finished, click Next to advance to the Confirmation page.
Chapter 2Creating a Customized Database Deployment
2-14

Element Description
Standby DatabaseConfiguration
Controls where the standby database is placed in relation tothe primary database:
• High Availability—The standby database is placed in adifferent availability domain from the primary database,thus providing isolation at the infrastructure level.
• Disaster Recovery—The standby database is placed in adifferent data center from the primary database, thusproviding isolation at the infrastructure level andgeographical separation to support availability despitecatastrophic events.
See Using Oracle Data Guard in Database Cloud Service formore information.
If you choose this option, the Enable Oracle GoldenGateoption is disabled.
8. On the Confirmation page, review the information listed. If you are satisfied withthe information, click Create.
If you need to change the information, use the navigation bar or Back button at thetop of the wizard to step back through the pages in the wizard. Click Cancel tocancel out of the wizard without creating a new database deployment.
After Your Database Deployment Is Created
After your database deployment is created, you should perform the following actions:
• Enable network access to the deployment
By default, strict security restrictions limit network access to databasedeployments. To open access to applications and management tools, you need toenable predefined network security rules or create and enable your own networksecurity rules. See Enabling Access to a Compute Node Port.
• Update cloud tooling
While the base images used to create Database Cloud Service databasedeployments are updated regularly, it is possible that even more recent updates tothe cloud tooling are available. Therefore, you should check for and apply anyupdates to the cloud tooling. See Updating the Cloud Tooling on Database CloudService.
• Apply database patches
While the base images used to create Database Cloud Service databasedeployments are updated regularly, it is possible that a newer patch set update(PSU) or bundle patch (BP) is available. Therefore, you should check for andapply any database patches that are available. See Applying a Patch.
Creating a Database Deployment Using a Cloud BackupYou can create an Oracle Database Cloud Service database deployment whosedatabase is instantiated from a cloud backup created using Oracle Database BackupCloud Service.In brief, you create a Database Cloud Service database deployment hosting a single-instance database and then you replace the newly created database using anotherdatabase’s backup to Oracle Database Backup Cloud Service. This technique is often
Chapter 2Creating a Database Deployment Using a Cloud Backup
2-15

called “instantiate from backup” and the database from which the backup was made iscalled the “source database”.
Note:
The backup you use must meet certain requirements, as described in Requirements and Results.
You can use the Oracle Database Cloud Service creation wizard to perform aninstantiate-from-backup operation as it creates a database deployment, provided thatdatabase recovered from the backup will be smaller than 2 TB (1.2 TB if you plan toback up the new deployment to both cloud and local storage). For instructions, see Creating a Customized Database Deployment.
Otherwise, you perform an instantiate-from-backup operation by following these steps:
1. Create a Database Cloud Service database deployment hosting a single-instancedatabase.
For information about choosing characteristics for the database deployment, see Creating the Database Cloud Service Database Deployment.
2. If necessary, scale up the deployment’s storage to accommodate the sourcedatabase.
For instructions, see Scaling a Database Deployment.
3. Replace the database on the deployment using a cloud backup.
You can perform this step by using the Oracle Database Cloud Service console orby using the dbaasapi utility on the deployment’s compute node to perform ibkupactions to start and then monitor the replacement. For instructions, see Replacingthe Database by Using the Oracle Database Cloud Service Console and Replacing the Database by Using ibkup Actions.
Note:
After performing an instantiate-from-backup operation, Oracle ApplicationExpress, DBaaS Monitor and ORDS (Oracle REST Data Services) may not beaccessible. To restore accessibility, see Application Express, DBaaS Monitorand ORDS inaccessible after creating a database deployment using a cloudbackup in Known Issues for Oracle Database Cloud Service.
Requirements and Results
The database contained by the cloud backup that you are going to use must meetcertain requirements:
• It must be at version 12.2.0.1, 12.1.0.2 or 11.2.0.4 with the latest PSU (patch setupdate) applied.
• If it is an Oracle 12c database, it must be multitenant (CDB). Database CloudService does not support non-CDB Oracle 12c databases.
Chapter 2Creating a Database Deployment Using a Cloud Backup
2-16

• The database from which the backup was made uses File System or ASM as itsstorage method for data files.
After completing the instantiate-from-backup tasks, you will have a Database CloudService database deployment with the following characteristics:
• A single-instance database with the SID you specified when creating thedeployment, but containing the data from the backup. Additionally, the database IDwill be different from the original database’s database ID.
• Data files in /u02/app/oracle/oradata/SID.
• Redo logs in /u04/app/oracle/redo.
• Fast recovery area (FRA) at /u03/app/oracle/fast_recovery_area.
• Memory parameters set based on the Compute Shape (OCPUs and RAM) youspecified when creating the deployment.
• Oracle Net Listener configured with services for the database (and PDBs if anOracle 12c database).
Creating the Database Cloud Service Database Deployment
Create the Database Cloud Service database deployment whose database you willreplace using the backup on Oracle Database Backup Cloud Service. Here are somenotes about choosing characteristics for the database deployment:
• Service Level. You must choose Oracle Database Cloud Service, not OracleDatabase Cloud Service - Virtual Image.
• Software Release. Choose the Oracle Database release corresponding to thesource database.
• Software Edition. Choose at the minimum a software edition that supports theoptions used by the source database.
• Database Type. Choose Single Instance.
• DB Name (SID) (on the Service Details page). You can specify any SID you want,but if you want to use the same SID as the database from which the existingbackup was made, you must make sure the SID you provide matches exactly,including the case of letters. For example, if the existing backup’s database SID isOrcl, you must use Orcl, not orcl or ORCL.
• Usable Database Storage (GB) (on the Service Details page). Specify at theminimum the amount of storage needed to accommodate the source database. Ifthe source database is bigger than you can specify when creating the databasedeployment, create the deployment and then scale up the data storage as requiredby following the instructions in Scaling Up the Storage for a Database Deployment.
• Enable Oracle GoldenGate and Include “Demos” PDB (both on the ServiceDetails page). Do not choose either of these options, as the database is going tobe replaced.
• Backup Destination (on the Service Details page). Choose the option you want,even None. The instantiate-from-backup technique works even if the deploymentis not being backed up.
• Create Instance from Existing Backup (on the Service Details page). ChooseNo. You will be replacing the database after the deployment is created.
Chapter 2Creating a Database Deployment Using a Cloud Backup
2-17

Replacing the Database by Using the Oracle Database Cloud ServiceConsole
You can use the Oracle Database Cloud Service console to replace the database for aDatabase Cloud Service database deployment using an instantiate from backupoperation.
Before You Begin
If you wish to replace your database using a backup from another currently operationalDatabase Cloud Service database deployment in the same identity domain, then youmust specify the source database deployment by selecting from a list of the availabledeployments.
If you wish to replace your database using any other backup, you are prompted for thefollowing information:
• The database ID of the backed-up database.
• The decryption method for the backup, which is the password associated with thebackup for backups that use password encryption, or a zip file containing thesource database’s wallet directory and contents for backups that use TransparentData Encryption (TDE).
• The name of the Oracle Cloud Infrastructure Object Storage Classic containerwhere the backup is stored.
• The user name and password of an Oracle Cloud user who has read access to thecontainer.
Procedure
1. Open the Services page of the Oracle Database Cloud Service console.
For detailed instructions, see Accessing the Oracle Database Cloud ServiceConsole.
2. Click the database deployment whose database you wish to replace.
The Oracle Database Cloud Service Overview page is displayed.
3. From the
menu next to the deployment’s name, choose Replace Database using Backup.
The Replace Database using Backup window is displayed.
4. Specify attributes in the Replace Database using Backup window:
On-Premises Backup? — use this option to indicate the origin of the sourcedatabase backup.
If you select this option you are indicating that the source database backup is notfrom another currently operational Database Cloud Service database deploymentin the same identify domain. In this case, the following fields and options aredisplayed:
• Database ID — enter the database id of the database from which the existingbackup was created. You can get this value by querying the backup sourcedatabase as follows:
Chapter 2Creating a Database Deployment Using a Cloud Backup
2-18

SQL> SELECT dbid FROM v$database;
• Decryption Method — provide the information necessary to decrypt theexisting backup:
– For a backup that uses Transparent Database Encryption (TDE), selectUpload Wallet File then click Browse and specify a zip file containing thesource database’s TDE wallet directory, and the contents of that directory.
Note:
If the source database is from another Database Cloud Servicedatabase deployment, its TDE wallet directory is /u01/app/oracle/admin/dbname/tde_wallet.
– For a backup that uses password encryption, select Paste RMAN KeyValue and paste the password (key value) used to encrypt the backup.
Note:
For database deployments using Oracle Database 12.2, only backupsusing TDE are supported.
• Cloud Storage Container — enter the name of the Oracle CloudInfrastructure Object Storage Classic container where the existing backup isstored; use this format:
instance-id_domain/container
where instance is the name of the Oracle Cloud Infrastructure Object StorageClassic instance, id_domain is the id of the identity domain, and container isthe name of the container.
• Username — enter the user name of an Oracle Cloud user who has readaccess to the container specified in Cloud Storage Container.
• Password — enter the password of the user specified in Username.
• Administration Password and Confirm Password — enter and then re-enter a password for the Oracle Database SYS and SYSTEM users in thenewly replaced database.
If you deselect On-Premises Backup? you are indicating that the sourcedatabase backup is from another currently operational Database Cloud Servicedatabase deployment in the same identity domain. In this case, the following fieldsare displayed:
• Source Service Name — specify the database deployment that is associatedwith the source database backup that you want to use.
• Administration Password and Confirm Password — enter and then re-enter a password for the Oracle Database SYS and SYSTEM users in thenewly replaced database.
5. Click Replace Database and confirm that you want to replace the database whenprompted.
Chapter 2Creating a Database Deployment Using a Cloud Backup
2-19

The database deployment is put into Maintenance status and the operationbegins. The process is fully automated and takes some time to complete. Youshould not access or manipulate the database deployment until the process iscompleted.
Replacing the Database by Using ibkup ActionsYou can use ibkup actions of the dbaasapi utility to replace the database on aDatabase Cloud Service database deployment as part of an instantiate-from-backupoperation.
The dbaasapi utility operates by reading a json file containing instructions and otherinformation and writing its results to a json file specified in the input file. In essence, itis a command-line utility that operates like a REST API endpoint, accepting a json"request body" and producing a json "response body". The dbaasapi utility checks thatthe operation being requested does not conflict with any operation already in progressand then runs the operation asynchronously: that is, it starts the requested operationand then returns terminal control to you.
Here are the tasks you perform to replace the database by using ibkup actions:
1. Copy the TDE wallet from the source database to the Database Cloud Servicedeployment, if necessary.
2. Create dbaasapi input files for ibkup begin and ibkup status actions.
3. Run the ibkup begin action.
4. Run the ibkup status action to monitor progress of the ibkup operation.
5. Upon completion of the ibkup operation, confirm that the source database nowresides on the Database Cloud Service deployment.
Task 1. Copy the TDE Wallet If Necessary
If the cloud backup you are going to use was created using Transparent DataEncryption (TDE) or dual-mode encryption, you need to copy the TDE wallet from thesource database to the database deployment.
Note:
If the source database is from another Database Cloud Service databasedeployment, its backup was created using Transparent Data Encryption (TDE)because all cloud backups from Database Cloud Service use TDE as thebackup encryption mode.
Here are high-level instructions:
1. Zip (or tar) up the source database's tde_wallet directory. (If the source databaseis from another Database Cloud Service database deployment, its tde_walletdirectory is /u01/app/oracle/admin/dbname/tde_wallet.)
2. On the database deployment you created, make a directory where you'll store thevarious files you'll create and use in the coming steps. For example:
# mkdir –p /home/oracle/ibkup
Chapter 2Creating a Database Deployment Using a Cloud Backup
2-20

3. Use a secure copy utility like scp or WinSCP to copy the zip file to this directory.
4. Unzip (or untar) the file into the tde_wallet subdirectory.
Task 2. Create dbaasapi Input Files
Use a secure shell utility like ssh or PuTTY to connect as the opc user to the databasedeployment’s compute node. For instructions, see Connecting to a Compute NodeThrough Secure Shell (SSH).
Start a root-user shell:
$ sudo -s #
(You start a root-user shell because the dbaasapi utility must be run as the root user.)
Make a directory where you'll store the various files you'll create and use in the comingsteps, and then navigate to it:
# mkdir –p /home/oracle/ibkup# cd /home/oracle/ibkup
(If you had to copy the source database's tde_wallet directory, you have alreadycreated the directory, so all you need to do is navigate to it.)
Create a begin-request.json file to pass to dbaasapi to perform the ibkup begin action.
Here is a sample that uses a password-encrypted backup:
# vim begin-request.json { "object": "db", "action": "begin", "operation": "ibkup", "params": { "dbname": "crmdb", "dbid": "1428538966", "oss_url": "https://storage.oraclecorp.com/v1/Storage-dbcsdev/IBKUP", "oss_user": "Storageadmin", "oss_passwd": "welcome1", "decrypt_key": "backup", "passwd": "Welcome-1", "dbsize": "30GB" }, "outputfile": "/home/oracle/ibkup/begin-response.json", "FLAGS": ""}
The json object for the ibkup begin action supports the following parameters. Allparameters are required except those whose descriptions begin with “(Optional)”.
Parameter Description
object The value "db".
action The value "begin".
operation The value "ibkup".
Chapter 2Creating a Database Deployment Using a Cloud Backup
2-21

Parameter Description
params An object containing parameters that provide details for the ibkupbegin action. This object has the following parameters:
• dbname: The name of the database on the databasedeployment you created. You can get this value by using theSELECT name FROM v$database; command in SQL*Plus.
• dbid: The database id of the source database. You can getthis value by using the SELECT dbid FROM v$database;command in SQL*Plus.
• oss_url: The URL of the container where the sourcedatabase's backup is stored.
• oss_user: The user name of an Oracle Cloud user who hasread privileges for the container where the source database'sbackup is stored.
• oss_passwd: The password of the oss_user user.• rman_handle: (Optional) The RMAN handle of a targeted
backup that contains controlfile and spfile backups. Theibkup begin action will use the controlfile and spfile in thisbackup.
Use the rman_tag parameter to specify the RMAN tag of abackup supported by this controlfile and spfile. If you do notspecify an RMAN tag, the latest backup supported by thiscontrolfile and spfile will be used.
Oracle recommends that you provide both a handle and a tagto use a specific backup or provide neither a handle nor a tagto use the latest backup.
You can view RMAN handles and tags by using the RMANLIST BACKUP command.
• rman_tag: (Optional) The RMAN tag of a targeted full backup.The ibkup begin action will use this backup.
Use the rman_handle parameter to specify the RMAN handleof a backup containing controlfile and spfile backups thatsupport this RMAN tag. If you do not specify an RMANhandle, the latest controlfile and spfile will be used. If they donot support the specified RMAN tag, a “datafile not found”error will occur.
Oracle recommends that you provide both a handle and a tagto use a specific backup or provide neither a handle nor a tagto use the latest backup.
You can view RMAN handles and tags by using the RMANLIST BACKUP command.
• decrypt_key: (Optional) The key (password) used to encryptthe backup.
Provide this parameter if you created the backup usingpassword encryption or dual-mode encryption.
Note: you cannot use this option when replacing thedatabase on a database deployment using Oracle Database12.2 because only backups using TDE are supported forsuch deployments.
• decrypt_wallet: (Optional) The fully qualified path of thewallet directory you copied from the source database to theDBCS deployment you created; for example: "/home/oracle/ibkup/tde_wallet".
Chapter 2Creating a Database Deployment Using a Cloud Backup
2-22

Parameter Description
Provide this parameter if you created the backup usingTransparent Data Encryption (TDE) or dual-mode encryption.
• passwd: The administrator (SYS and SYSTEM) password touse for the database that will be created on the databasedeployment from the backup.
• dbsize: The size of the source database.
outputfile The fully qualified name of the output file for dbaasapi to use; forexample: "/home/oracle/ibkup/begin-response.json".
FLAGS The value "" (an empty string).
Next, create a status-request.json file to pass to dbaasapi to perform the ibkup statusaction. Here is a sample:
# vim status-request.json{ "object": "db", "action": "status", "operation": "ibkup", "id": "TBD", "params": { "dbname": "crmdb" }, "outputfile": "/home/oracle/ibkup/status-response.json", "FLAGS": ""}
In this example, the value of the id parameter is "TBD" because the ibkup begin actionwhose status this action will check has not been run yet.
The json object for the ibkup status action supports the following parameters. Allparameters are required.
Parameter Description
object The value "db".
action The value "status".
operation The value "ibkup".
id The ID number of the action you want status for.
params An object containing parameters that provide details for the ibkupstatus action. This object has the following parameters:
• dbname: The name of the database on the databasedeployment you created.
outputfile The fully qualified name of the output file for dbaasapi to use; forexample: "/home/oracle/ibkup/status-response.json".
FLAGS The value "" (an empty string).
Task 3. Run the ibkup begin Action
Use dbaasapi to run the ibkup begin action:
# /var/opt/oracle/dbaasapi/dbaasapi -i begin-request.json
Chapter 2Creating a Database Deployment Using a Cloud Backup
2-23

Note:
The begin action deletes the input json file because it contains sensitivepassword information. If you are testing and want to save the file for debuggingpurposes, make a copy of it before you run the ibkup begin action; for example:
# cp begin-request.json begin-request.json.keep
After running the ibkup begin action, view the action's output file to confirm that theaction has started and to note the id of the action; for example:
# cat /home/oracle/ibkup/begin-response.json { "msg" : "", "object" : "db", "status" : "Starting", "errmsg" : "", "outputfile" : "", "action" : "begin", "id" : "19", "operation" : "ibkup", "logfile" : "/var/opt/oracle/log/crmdb/dbaasapi/db/ibkup/19.log"}
The key parameters in this response are as follows:
Parameter Description
status The status of the operation; one of: "Error", "Starting","InProgress" or "Success".
action The value "begin". (The ibkup action you requested.)
id The ID number assigned to this action. Use this number insubsequent ibkup status actions to check the status of theoverall ibkup operation.
operation The value "ibkup". (The operation you requested.)
logfile The log file of the ibkup operation.
Task 4. Run the ibkup status Action to Monitor Progress
While you can poll the log file of the ibkup operation to monitor progress of theoperation, you should instead run the ibkup status action to monitor progress.
Before you run the ibkup status action, however, you need to update the status-request.json input file with id value of the ibkup operation that you have started. Editthe status-request.json file, replacing the "TBD" value for its id parameter with the IDnumber reported in the begin-response.json file.
Then, use dbaasapi to run the ibkup status action and view the response; for example:
# /var/opt/oracle/dbaasapi/dbaasapi -i status-request.json# cat status-response.json{ "msg" : " -> 15 03 * * 6 oracle /var/opt/oracle/cleandb/cleandblogs.pl\\n\\n#### Completed OCDE Successfully ####", "object" : "db",
Chapter 2Creating a Database Deployment Using a Cloud Backup
2-24

"status" : "Success", "errmsg" : "", "outputfile" : "", "action" : "begin", "id" : "19", "operation" : "ibkup", "logfile" : "/var/opt/oracle/log/crmdb/dbaasapi/db/ibkup/19.log"}
Rerun the ibkup status action regularly until the response indicates that the operationsucceeded or failed.
Task 5. Confirm Successful Completion
1. Connect as the oracle user to the database deployment’s compute node.
See Connecting to a Compute Node Through Secure Shell (SSH).
2. Connect as SYSDBA to the database:
$ sqlplus / as sysdba
3. Check the database status:
SQL> select status from v$instance;STATUS------------OPEN
4. Check the name and id of the database; for example:
SQL> select name,dbid from v$database;
NAME DBID--------- ----------CRMDB 4023093732
5. If the database is an Oracle 12c database, view information about its PDBs; forexample:
SQL> select name,open_mode,restricted from v$pdbs;
NAME OPEN_MODE RES------------------------------ ---------- ---PDB$SEED READ ONLY NOPDBDBNOASM READ WRITE NO
6. Exit SQL*Plus:
SQL> exit$
7. Check that services provided by Oracle Net Listener include those from the sourcedatabase; for example:
$ lsnrctl statusServices Summary...Service "crmdb.localdomain" has 1 instance(s). Instance "crmdb", status READY, has 1 handler(s) for this service...Service "dbnoasm.localdomain" has 1 instance(s). Instance "crmdb", status READY, has 1 handler(s) for this service...Service "dbnoasm.localdomainXDB" has 1 instance(s). Instance "crmdb", status READY, has 1 handler(s) for this service...Service "pdbdbnoasm.localdomain" has 1 instance(s).
Chapter 2Creating a Database Deployment Using a Cloud Backup
2-25

Instance "crmdb", status READY, has 1 handler(s) for this service...The command completed successfully
8. Disconnect from the compute node:
$ exit
More About ibkup Actions
The instantiate-from-backup tasks showed the use of two ibkup actions, begin andstatus. Here is more information about what these two actions do and informationabout two other ibkup actions, prereqs and restore.
The begin Action
The begin action does as follows:
1. Validates the format and completeness of the input file.
2. Creates the output file, which includes an ID number for use in subsequent statusactions.
3. Releases terminal control.
4. Performs the same value-validation checks that the prereqs action performs.
5. Takes a backup of the current database deployment environment, should the needarise to restore the environment after a failed ibkup operation.
6. Replaces the current database using the backup of the source database.
The status Action
The status action does as follows:
1. Validates the format and completeness of the input file.
2. Retrieves the current status of operation whose ID number was provided in theinput file.
3. Creates the output file, which contains the retrieved status information.
The prereqs Action
The prereqs action takes an input file of the same format as the begin and restoreactions, except that the value of its action parameter must be "prereqs".
You can use the prereqs action to test whether the input file you intend to use for eitherthe begin action or the restore action is valid and that the backup specified in the file isavailable.
The prereqs action does as follows:
1. Validates the format and completeness of the input file.
2. Creates the output file, which includes an ID number for use in subsequent statusactions.
3. Releases terminal control.
4. Checks that the values provided in the input file would be valid if used in the inputfile for a begin or restore action. It confirms access to the backup (including use ofthe decryption key and wallet as necessary) and that the backup's database IDmatches the provided dbid.
The restore Action
Chapter 2Creating a Database Deployment Using a Cloud Backup
2-26

The restore action takes an input file of the same format as the begin action, exceptthat the value of its action parameter must be "restore".
If a begin operation fails, you can use the restore action to “reset” the databasedeployment's environment so that you can attempt the begin operation again (afterdetermining the cause of the failure and correcting the problem, of course).
After you use the restore action, you need to reboot the database deployment'scompute node to ensure that the environment is completely reset. For instructions, see Rebooting a Compute Node.
The restore action does as follows:
1. Validates the format and completeness of the input file.
2. Creates the output file, which includes an ID number for use in subsequent statusactions.
3. Releases terminal control.
4. Terminates any begin action that is in progress.
5. Kills all processes related to the begin action. If it cannot kill one or moreprocesses, it exits with an error status.
6. Restores the database deployment environment to its state before the first beginaction.
Creating a Clone Database Deployment from a Snapshot
This topic does not apply to Oracle Cloud Infrastructure.
You can create an Oracle Database Cloud Service databasedeployment from a snapshot you have taken of another databasedeployment in the same identity domain. The resulting deployment isknown as a linked clone because its storage is linked to thesnapshot’s storage.
Note:
Currently, you can only create snapshots of database deployments that host asingle-instance database. Therefore, you can only create linked-clone databasedeployments that host a single-instance database.
When you create a linked clone deployment, Database Cloud Service creates a newdatabase deployment whose storage volumes are cloned from the snapshot.
Using the “copy on write” technology that Oracle Compute Cloud Service supports forstorage volume snapshots, the file data on the linked-clone deployment can changewithout changing the snapshot itself. Thus, you can create several linked clones fromthe same snapshot to use for application testing or branched application developmentwork.
Chapter 2Creating a Clone Database Deployment from a Snapshot
2-27

Procedure
1. Open the Snapshots page of the deployment you want to create a snapshot of:
a. Open the Oracle Database Cloud Service console.
For detailed instructions, see Accessing the Oracle Database Cloud ServiceConsole.
b. Click the name of the database deployment whose snapshot you want to useas the basis for a linked clone deployment.
The Oracle Database Cloud Service Overview page is displayed.
c. Click the Administration tile and then click the Snapshots tab.
The Oracle Database Cloud Service Snapshots page is displayed. Anysnapshots already created for the deployment are shown in the AvailableStorage Snapshots list.
2. In the Available Storage Snapshots list, locate the snapshot you want to create alinked-clone deployment from and choose Create Database Clone from thatsnapshot’s
menu.
The Subscription Type page of the Create Service wizard is displayed.
3. Step through the pages of the wizard to provide information about the linked-clonedeployment.
As you step through, you will note that several options are not selectable; forexample, Service Level, Software Release and Software Edition. Such options arenot selectable because their values are determined from the snapshot upon whichthe linked-clone is based.
Also note that some options are required: you must provide a new service name,specify an SSH public key, and provide an administrator password. You canchange the other selectable from their defaults if you want to; for example, Shapeand Backup Destination.
4. After completing the wizard by clicking Create on the Confirmation page, theServices page is displayed, including notice that creation of the databasedeployment has begun.
Creating a Hybrid DR Deployment
This topic does not apply to Oracle Cloud at Customer.
This topic does not apply to Oracle Cloud Infrastructure.
You can create a Hybrid Disaster Recovery (DR) Oracle DatabaseCloud Service database deployment with a primary database on yourown host system and a standby database in the cloud.
You can use the Oracle Database Cloud Service creation wizard to create the HybridDR deployment which uses Oracle Data Guard.
Chapter 2Creating a Hybrid DR Deployment
2-28

See Using Oracle Data Guard in Database Cloud Service for general informationabout using Oracle Data Guard in Oracle Database Cloud Service.
The on-premises database on your own system will be the primary database in theHybrid DR deployment, which uses Oracle Data Guard. Your system and the primarydatabase must meet certain requirements as follows:
• The owner of the Oracle Database software (dbowner) must be the oracle user.
• The database must be at version 11.2.0.4.0 or version 12.1.0.2.0 with the latestPSU (patch set update) applied.
• The database must use a file system as its storage method for database files.Oracle Automatic Storage Management (ASM) is not supported.
• The database cannot be an Oracle Real Application Clusters (RAC) database.
• The database must be smaller than 2 TB (1.2 TB if you plan to back up thedatabase to both cloud and local storage when the database on the compute nodeis in the primary role).
• If it is an Oracle 12c database, it must be a multitenant container database (CDB).Database Cloud Service does not support non-CDB Oracle 12c databases.
• All pluggable databases (PDBs) in the Oracle 12c multitenant environment mustbe open in read/write mode.
• The database must be in ARCHIVELOG mode. See “Changing the Database ArchivingMode” in Oracle Database Administrator’s Guide for Release 12.1 or Release 11.2.
• The tablespaces of the database must be encrypted using Transparent DataEncryption (TDE), a feature of Oracle Advanced Security. See "ConfiguringTransparent Data Encryption" in Oracle Database Advanced Security Guide forRelease 12.1 or "Securing Stored Data Using Transparent Data Encryption" inOracle Database Advanced Security Administrator's Guide for Release 11.2
• The database on your own system cannot be part of another Oracle Data Guardconfiguration.
• Enable Oracle Flashback Database for easy reinstatement of the primarydatabase after a failover operation. See “Using Flashback Database” in OracleDatabase Backup and Recovery User’s Guide for Release 12.1 or Release 11.2 .
• Enable FORCE LOGGING mode to prevent the loss of data when statements inNOLOGGING mode are executed on the primary database. See “Specifying FORCELOGGING Mode” in Oracle Database Administrator’s Guide for Release 12.1 orRelease 11.2.
• Ensure the listener.ora file is configured for static service registration, arequirement of Oracle Data Guard.
• To protect plaintext from being visible on the WAN, enable Oracle Net encryption.Set parameters in the $ORACLE_HOME/network/admin/sqlnet.ora file:
– SQLNET.ENCRYPTION_SERVER = requested
– SQLNET.ENCRYPTION_TYPES_SERVER = (RC4_256, AES256)
– SQLNET.ENCRYPTION_CLIENT = requested
– SQLNET.ENCRYPTION_TYPES_CLIENT = (RC4_256, AES256)
After editing the sqlnet.ora file, reload the listener.
Chapter 2Creating a Hybrid DR Deployment
2-29

• Ensure one of the following RPMs is installed, based on the Oracle Databaserelease of your system:
– Oracle Database 11g Release 2: oracle-rdbms-server-11gR2-preinstall
– Oracle Database 12c Release 1: oracle-rdbms-server-12cR1-preinstall
You can use this command as the root user to verify that the RPM is installed:
# rpm -qa|grep oracle-rdbms-server
• Ensure the Netcat RPM is installed: nc-1.84-24.el6.x86_64 or higher.
• Ensure that the /etc/hosts file contains the IP address for your on-premisessystem, the host name with a fully qualified domain name, and a short host name.
• Ensure all TCP socket size maximum kernel parameters are set to 10 MB(10485760) for optimal transport performance:
– net.core.rmem_max = 10485760
– net.core.wmem_max = 10485760
As the root user, execute these commands:
# sysctl -w net.core.rmem_max=10485760# sysctl -w net.core.wmem_max=10485760
• The Oracle listener port and the Secure Shell (SSH) port must be open for remoteaccess from the compute node.
It is important that you secure port connectivity on the on-premises system. Toenable SSH tunneling and also to make sure that only specific cloud IP addressescan access the listener port in the on-premises system, appropriate security rulesneed to be configured on the on-premises system. The on-premises firewall needsto have properly configured Access Control Lists to allow SSH and Oracle Net tobe accessed from the on-premises system by the Oracle Cloud compute node.Because Oracle Data Guard in a Hybrid DR deployment requires access to the on-premises database from the cloud compute node, the primary database listenerport must be opened with restricted access from the cloud IP address.
• Ensure that the non-Oracle software meets the following minimum releaserequirements
– Java: Release 1.7 or higher. Java must be in the default path.
– Perl: 5.10.1 or higher.
– Python: 2.6.6 or higher.
You must have a valid Oracle Storage Cloud Service account and ensure that it isaccessible from your on-premises system. You will create a container and then specifyits name in the setupdg.cfg file and in the Oracle Database Cloud Service creationwizard.
Perform these steps to create the Hybrid DR configuration:
1. Create a container in Oracle Storage Cloud Service to be used only during thedeployment creation. See Creating Containers in Using Oracle CloudInfrastructure Object Storage Classic. You should delete this container after thedatabase deployment is created.
2. Create an IP reservation that will be used for the standby database. See Creatingan IP Reservation for detailed instructions.
Chapter 2Creating a Hybrid DR Deployment
2-30

3. If you have previously used the same on-premises system to set up a Hybrid DRconfiguration, perform these commands on the system to prepare it for reuse inthis Hybrid DR configuration:
% cd /var/opt/oracle/hdg/% rm -rf db_wallet% rm -rf hdgonpreminfo*
4. Using wget, download the OracleCloud_HybridDR_Setup.zip file from Oracle StorageCloud Service to your own system and expand the zip file.
% wget https://storage.us2.oraclecloud.com/v1/dbcsswlibp-usoracle29538/hdg/DBCS_version/OracleCloud_HybridDR_Setup.zip
where DBCS_version is the Database Cloud Service version, such as 17.3.1.
5. Follow the instructions in the README file from the OracleCloud_HybridDR_Setup.zipfile to update the setupdg.cfg configuration file and back up your on-premisesdatabase.
6. Create the Hybrid DR deployment by using the Oracle Database Cloud Servicecreation wizard.
See Creating a Customized Database Deployment for instructions on using thewizard.Be sure to specify the following values when using the wizard:
• Service page:
– Service Level. You must choose Oracle Database Cloud Service, notOracle Database Cloud Service - Virtual Image.
– Region. Select a region. Your identity domain must be enabled for regionsto create a Hybrid DR deployment.
– IP Network. If your region has IP networks, this field appears. You mustselect No Preference because Hybrid DR does not support IP networks.
– Software Release. Choose the Oracle Database release correspondingto the primary database.
– Software Edition. Choose at the minimum a software edition thatsupports the options used by the source database.
– Database Type. Choose Data Guard Standby with Hybrid DR.
• Service Details page:
– DB Name (SID) (on the Service Details page). Specify the same SID asused by the database on your on-premises system. You must make surethe SID you provide matches exactly, including the case of letters.
– Administration Password. Specify the same password that you use forthe SYS user on your on-premises database.
– Usable Database Storage (GB) (on the Service Details page). Specifythe minimum the amount of storage needed to accommodate the sourcedatabase.
– Advanced Settings: Listener Port. Specify the same port number thatyou use for the database on your own system.
– Advanced Settings: IP Reservations. Select the IP reservation youcreated in a previous step.
Chapter 2Creating a Hybrid DR Deployment
2-31
– Backup Destination. The chosen destination is only applicable when thedatabase on the compute node is the primary database. If you selectNone when you create the deployment, you can change the backupconfiguration as described in Changing the Backup Configuration to aDifferent Backup Destination. Be aware that if you change the backupdestination, the Database Cloud Service Console is unaware of thischange.
– Hybrid DR: Cloud Storage Container. The name of the Oracle StorageCloud Service container that contains the configuration information andbackup of your on-premises database. This name should match the nameyou set in the setupdg.cfg file.
– Hybrid DR: Username. The name of a user who has read/write access tothe specified Oracle Storage Cloud Service container.
– Hybrid DR: Password. The password of the user specified in Username.
7. After the database deployment creation is complete, change the permissions onthe /home/oracle/bkup directory.
a. Log in to the compute node as the opc user.
b. Start a root-user command shell:
$ sudo -s#
c. Change the permissions on the /home/oracle/bkup directory:
# chmod 755 /home/oracle/bkup
d. Exit the root-user command shell.
8. After the database deployment creation is complete, create operating systemdirectories required for the standby database on the compute node.
a. Log in to the compute node as the oracle user.
b. Connect to the standby database as SYSDBA:
$ sqlplus / as sysdba
c. Query V$DATAFILE to see a list of files and identify the directory for each, asshown in the example:
SQL> SELECT name FROM v$datafile;NAME------------------------------------------------------------------------------/u02/app/oracle/oradata/orcl/system01.dbf/u02/app/oracle/oradata/orcl/sysaux01.dbf/u02/app/oracle/oradata/orcl/undotbs01.dbf/u02/app/oracle/oradata/orcl/pdbseed/system01.dbf/u02/app/oracle/oradata/orcl/users01.dbf/u02/app/oracle/oradata/orcl/pdbseed/sysaux01.dbf/u02/app/oracle/oradata/orcl/PDB1/system01.dbf/u02/app/oracle/oradata/orcl/PDB1/sysaux01.dbf.8 rows selected.
d. Exit from SQL*Plus.
e. Create the directories that you identified when you queried V$DATAFILE. Forexample:
Chapter 2Creating a Hybrid DR Deployment
2-32

$ mkdir -p /u02/app/oracle/oradata/orcl$ mkdir -p /u02/app/oracle/oradata/orcl/pdbseed$ mkdir -p /u02/app/oracle/oradata/orcl/PDB1
9. Make a copy of /home/oracle/.ssh/ on your own system after the database backupis completed successfully.
When the Hybrid DR deployment is created, a new set of private and public keysis created in /home/oracle/.ssh. The original .ssh directory is stored as /home/oracle/.ssh.bak. Only the private and public keys generated during thedeployment creation process are copied to the compute node. By making an extracopy of /home/oracle/.ssh, you can append the public keys from your on-premiseshost to the newly created /home/oracle/.ssh directory.
10. Delete the Oracle Storage Cloud Service container that you created in the firststep.
The following limitations apply to a Hybrid DR deployment:
• You must use the dataguard subcommands of the dbaascli utility to performoperations on your Hybrid DR Data Guard configuration. You cannot use theOracle Database Cloud Service console to perform operations on the on-premisesprimary database. See The dbaascli Utility for detail on the dataguardsubcommands of the dbaascli utility.
• You cannot use the Oracle Database Cloud Service console or the bkup_api utilityto take backups of your on-premises primary database. If the standby database onthe compute node becomes the primary database in the Hybrid DR configuration,backups may be taken by using the Oracle Database Cloud Service console or thebkup_api utility depending on the backup configuration selected when the databasedeployment was created.
• You cannot use the Oracle Database Cloud Service console or the dbpatchmsubcommand of the dbaascli utility to patch your on-premises primary database.See Patching a Hybrid DR Deployment for additional information on patching thedatabases in a Hybrid DR deployment.
Viewing All Database DeploymentsFrom the Oracle Database Cloud Service Console, you can:
• View the total resources allocated across all Oracle Database Cloud Servicedatabase deployments.
• View the details for each deployment.
• Use the search field to filter the list to include only the deployments that contain agiven string in their name.
To view all database deployments:
1. Open the Oracle Database Cloud Service console.
For detailed instructions, see Accessing the Oracle Database Cloud ServiceConsole.
The Oracle Database Cloud Service console opens and displays the ServicesPage, which contains a list of database deployments.
Chapter 2Viewing All Database Deployments
2-33

Note:
If a Welcome page is displayed, click Services next to Database CloudService to display the Services Page.
Viewing Detailed Information for a Database DeploymentFrom the Oracle Database Cloud Service Overview page, you can:
• View a summary of details for a database deployment on Oracle Database CloudService, such as description, subscription mode, and so on.
• View the total resources allocated to the deployment.
• View the details and status information for each node associated with thedeployment.
To view detailed information for a database deployment:
1. Open the Oracle Database Cloud Service console.
For detailed instructions, see Accessing the Oracle Database Cloud ServiceConsole.
2. Click on the name of the database deployment for which you want to view moreinformation.
The Oracle Database Cloud Service Overview Page is displayed.
Viewing Activities for Database Deployments in an IdentityDomain
Use the Activity page to view activities for database deployments on Oracle DatabaseCloud Service in your identity domain. You can restrict the list of activities displayedusing search filters.
To view activities for your database deployments:
1. Open the Activity page:
a. Open the Oracle Database Cloud Service console.
For detailed instructions, see Accessing the Oracle Database Cloud ServiceConsole.
b. Click Activity.
The Activity Page is displayed, showing the list of all activities started withinthe past 24 hours. You can use the Start Time Range field to specify a starttime range other than the default of the previous 24 hours.
2. Use the options in the Search Activity Log section to filter the results to meet yourneeds. You can search on start time range, full or partial service name, activitystatus, and operation type. Click Search. View the results in the table that follows.
Chapter 2Viewing Detailed Information for a Database Deployment
2-34

Stopping, Starting and Restarting a Database DeploymentFrom the Oracle Database Cloud Service console, you can stop, start and restart thecompute nodes associated with a database deployment on Oracle Database CloudService.
Topics
• About Stopping, Starting and Restarting a Database Deployment
• Stopping a Database Deployment
• Starting a Stopped Database Deployment
• Restarting a Database Deployment
• Viewing Past Stop, Start and Restart Activity
About Stopping, Starting and Restarting a Database Deployment
About Stopping a Database Deployment
When you stop a Database Cloud Service database deployment, no access to it ispossible and you can perform no management operations on it except to start it or todelete it.
Stopping a database deployment is similar to turning off your personal computer: it hasno computing capabilities because the CPU and RAM have no power, but all its otherresources—disk drives and the data they contain, static IP reservations, and so on—remain and are ready to be put back into use when power is restored.
When database deployment is stopped, its CPU and RAM (an Oracle Compute CloudService instance) are stopped. As a consequence, it consumes no OCPU or memoryresources and so metering and billing of these resources stop. However, all the otherresources of the database deployment continue to exist and so continue to be meteredand billed, including:
• Oracle Compute Cloud Service resources such as storage volumes and IPaddress reservations
• Oracle Storage Cloud Service storage space used by the database deployment’sbackups to the Oracle Cloud (if the database deployment was being backed up tocloud storage)
Additionally, when database deployment is stopped, backups of it are not performed.
About Starting a Stopped Database Deployment
When you start a stopped Database Cloud Service database deployment, access to itbecomes possible again and you can perform management operations on it such asscaling and patching.
Starting a stopped database deployment is similar to turning your personal computerback on: its computing capabilities are restored because the CPU and RAM againhave power, and all its other resources are put back into use.
When database deployment is started:
1. An Oracle Compute Cloud Service instance of the appropriate compute shape(OCPU and memory) is allocated to it.
Chapter 2Stopping, Starting and Restarting a Database Deployment
2-35

2. All other Compute Cloud Service resources associated with it when it was createdor as the result of a scaling operation are reattached to it.
3. The allocated Oracle Compute Cloud Service instance is started.
After these steps complete, the database deployment is running and available.
Because the started database deployment again consumes OCPU and memoryresources, metering and billing of these resources resume.
Note:
Compute Cloud Service resources that were associated with the databasedeployment using the Oracle Compute Cloud Service console are notreattached when it is started. As a result, you must manually reattach thefollowing kinds of Compute Cloud Service resources:
• Storage volumes you created and attached using the Oracle ComputeCloud Service console.
You must attach such storage volumes to the new Oracle Compute CloudService instance once the database deployment is started, and thenconnect to the compute node and mount them.
• Security lists to which you added the database deployment’s previousOracle Compute Cloud Service instance.
You must add such security lists to the new Oracle Compute Cloud Serviceinstance once the database deployment is started.
To manage custom network access to your service instance, you can usemanually created security rules that refer to the database deployment’sdefault security list instead of using manually created and added securitylists. If you do so, you can avoid the need to add the manually createdsecurity lists to the new Oracle Compute Cloud Service instance once thedatabase deployment is started. For more information, see Enabling orRestricting Port Access by Creating an Access Rule.
About Restarting a Database Deployment
When you restart a Database Cloud Service database deployment, it is stopped andthen immediately started again. Thus, the information about what happens whenstopping and starting a database deployment applies to restarting a databasedeployment as well, just in immediate succession.
Note:
Restarting a database deployment is different from rebooting a compute nodeof a database deployment. Rebooting a compute node, as described in Rebooting a Compute Node, does not restart the database deployment. Itsimply reboots the compute node.
Chapter 2Stopping, Starting and Restarting a Database Deployment
2-36
Stopping a Database Deployment
In general, you stop a Database Cloud Service database deployment for one of thesereasons:
• To prohibit access to it.
• To reduce its cost of operation, especially if its billing frequency is hourly.
Before You Begin
To learn what happens when you stop a Database Cloud Service databasedeployment, review About Stopping, Starting and Restarting a Database Deployment.
Procedure
To stop a database deployment:
1. View the Overview page for the database deployment:
a. Open the Oracle Database Cloud Service console.
For detailed instructions, see Accessing the Oracle Database Cloud ServiceConsole.
b. In the list of deployments, click the name of the database deployment youwant to stop.
The Oracle Database Cloud Service Overview page is displayed.
2. From the menu for the database deployment’s compute node, select Stop, andthen confirm the action.
The deployment first has a status of Maintenance and then Stopped in the OracleDatabase Cloud Service console. Note that you cannot scale a stoppeddeployment.
Starting a Stopped Database Deployment
Before You Begin
To learn what happens when you start a stopped Database Cloud Service databasedeployment, review About Stopping, Starting and Restarting a Database Deployment.
Procedure
To start a stopped database deployment:
1. View the Overview page for the database deployment:
a. Open the Oracle Database Cloud Service console.
For detailed instructions, see Accessing the Oracle Database Cloud ServiceConsole.
b. In the list of deployments, click the name of the database deployment youwant to start.
The Oracle Database Cloud Service Overview page is displayed.
2. From the menu for the database deployment’s compute node, select Start, andthen confirm the action.
Chapter 2Stopping, Starting and Restarting a Database Deployment
2-37

The deployment has a status of Maintenance in the Oracle Database CloudService console until it is fully started.
Restarting a Database Deployment
Note:
Restarting a database deployment is different from rebooting a compute nodeof a database deployment. Rebooting a compute node, as described in Rebooting a Compute Node, does not restart the database deployment. Itsimply reboots the compute node.
Before You Begin
To learn what happens when you restart a Database Cloud Service databasedeployment, review About Stopping, Starting and Restarting a Database Deployment.
Procedure
To restart a database deployment:
1. View the Overview page for the database deployment:
a. Open the Oracle Database Cloud Service console.
For detailed instructions, see Accessing the Oracle Database Cloud ServiceConsole.
b. In the list of deployments, click the name of the database deployment youwant to restart.
The Oracle Database Cloud Service Overview page is displayed.
2. From the menu for the database deployment’s compute node, select Restart,and then confirm the action.
The deployment has a status of Maintenance in the Oracle Database CloudService console until it is fully restarted.
Viewing Past Stop, Start and Restart Activity
You can see information about past stop, start and restart activity for a DatabaseCloud Service database deployment by viewing the activity log:
1. View the Overview page for the database deployment:
a. Open the Oracle Database Cloud Service console.
For detailed instructions, see Accessing the Oracle Database Cloud ServiceConsole.
b. In the list of deployments, click the name of the database deployment whosepast activity you want to view.
The Oracle Database Cloud Service Overview page is displayed.
2. Click the triangle icon beside the Activity title to expand the activity log.
The activity log shows information about past operations performed on thedatabase deployment, with the most recent activity first.
Chapter 2Stopping, Starting and Restarting a Database Deployment
2-38

3. Click the triangle icon beside an operation to see details about that operation.
If an operation failed, the details include information about why it failed.
Rebooting a Compute NodeOn occasion, you might find it necessary to reboot a compute node associated withOracle Database Cloud Service. Follow these steps to perform the operation.
Note:
Rebooting a compute node is different from restarting a compute node.Restarting a compute node, as described in Restarting a DatabaseDeployment, stops and removes the Compute Cloud Service instance on whichthe compute node is running and then creates and starts a new Compute CloudService instance for the compute node. Rebooting a compute node uses aLinux command to restart the Compute Cloud Service instance on which thecompute node is running.
1. Connect as the opc user to the compute node.
For detailed instructions, see Connecting to a Compute Node Through SecureShell (SSH).
2. Start a root-user command shell:
$ sudo -s#
3. Enter the command to reboot the compute node:
# reboot
Caution:
Do not use the halt, shutdown or shutdown —h commands to shut down thecompute node. Doing so will stop the compute node indefinitely and willrequire manual intervention by Oracle Cloud system administrators torestart the compute node.
Your connection to the compute node is closed and the compute node reboots.
Scaling a Database DeploymentIf a database deployment on Oracle Database Cloud Service is performing poorly or isrunning out of storage, you can scale up the environment supporting the databasedeployment.
Usually, the need to scale arises as the result of analyzing database performance, asdescribed in Tuning Oracle Database Performance on Database Cloud Service.
Chapter 2Rebooting a Compute Node
2-39

Occasionally, the need to scale arises from some change made to the database orbackup configuration after it was created. For example, if the decision to use the In-Memory Database option was made after database creation, you might need to scaleup the compute shape to one of the high-memory options, such as scaling from "OC4 -2 OCPU, 15 GB RAM" to "OC2M - 2 OCPU, 30 GB RAM".
Scaling the Compute Shape for a Database Deployment
This topic does not apply to Oracle Cloud Infrastructure.
Note:
When you scale the compute shape of a database deployment on DatabaseCloud Service, the deployment is put into Maintenance status during theoperation and it is restarted. As a result of the restarting, any resources you’vemanually added using the Compute Classic console become detached from thedatabase deployment. For more information and for instructions on reattachingsuch resources, see About Stopping, Starting and Restarting a DatabaseDeployment.
To scale the compute shape for a database deployment:
1. View the Overview page for the database deployment:
a. Open the Oracle Database Cloud Service console.
For detailed instructions, see Accessing the Oracle Database Cloud ServiceConsole.
b. Click the name of the deployment you want to scale.
The Oracle Database Cloud Service Overview page is displayed.
2. Choose the scaling command:
• For database deployments that use Oracle RAC, click the next to thedeployment name and choose Scale Up/Down.
• For other deployments, click the menu in the box for the compute node andchoose Scale Up/Down.
The Scale Up/Down Service overlay is displayed. Note that the overlay includesinformation about the current compute shape.
3. Select a new compute shape.
4. Click Yes, Scale Up/Down Service to scale the database deployment.
The scaling operation begins. The database deployment is in Maintenance statusand unavailable while the scaling operation is in progress.
Scaling Up the Storage for a Database Deployment
When you scale up the storage for a database deployment, a storage volume iscreated and attached to the deployment.
Chapter 2Scaling a Database Deployment
2-40

This storage volume remains attached and available to the deployment even after it isrestarted or is stopped and then started. Also, the storage volume exists until youdelete the database deployment, at which time the storage volume is also deleted.
Scale-up limits and constraints differ depending on the infrastructure underlying thedeployment:
• Oracle Cloud Infrastructure supports 30 block storage volumes attached to acompute node, of which 4 are used when the database deployment is created.Thus, you have 26 opportunities to scale up storage.
In each scale-up operation, you can create a storage volume of 50 GB to 2048 GBin 50 GB increments. The deployment is put into Maintenance status during theoperation.
• Oracle Cloud Infrastructure Classic supports 10 block storage volumesattached to a compute node, of which 5 are used when the database deploymentis created. Thus, you have only 5 opportunities to scale up storage. Consequently,each scale-up operation you perform can dramatically affect the maximum sizeyour database can grow to.
In each scale-up operation, you can create a storage volume of 1 GB to 2048 GBin 1 GB increments. The deployment is put into Maintenance status and restartedduring the operation. As a result of the restarting, any resources you’ve manuallyadded to the database deployment by using the Compute Classic console becomedetached from the deployment. For more information and for instructions onreattaching such resources, see About Stopping, Starting and Restarting aDatabase Deployment.
To scale up the storage for a database deployment:
1. View the Overview page for the database deployment:
a. Open the Oracle Database Cloud Service console.
For detailed instructions, see Accessing the Oracle Database Cloud ServiceConsole.
b. Click the name of the database deployment you want to scale.
The Oracle Database Cloud Service Overview page is displayed.
2. Choose the scaling command:
• For database deployments in Oracle Cloud Infrastructure, click the next tothe deployment name and choose Add Storage.
• For database deployments in Oracle Cloud Infrastructure Classic that use
Oracle RAC, click the next to the deployment name and choose Scale Up/Down.
• For other deployments in Oracle Cloud Infrastructure Classic, click the menu in the box for the compute node and choose Scale Up/Down.
The Scale Up/Down Service overlay is displayed.
3. In the Additional Storage (GB) box, enter an amount raw storage to add to thedatabase deployment.
Note that up to 8% of this raw storage will be used for file system constructs andother overhead.
Chapter 2Scaling a Database Deployment
2-41

Also note that, when adding storage to a database deployment that uses OracleRAC, you should specify the same size as the other storage volume or volumesalready in the Oracle ASM disk group you want to scale up: Data or Backup.
4. Specify how the additional storage should be allocated in the Add Storage to list:
• Create New Storage Volume: adds a new storage volume to the databasedeployment and mounts it as the next available /u0n mount point. This optionis not available for deployments that use Oracle RAC.
• Extend Data Storage Volume: adds the storage volume to the existing LinuxLVM disk group (or Oracle ASM disk group on deployments that use OracleRAC) for database data storage.
• Extend Backup Storage Volume: adds the storage volume to the existingLinux LVM disk group (or Oracle ASM disk group on deployments that useOracle RAC) for backup and FRA storage.
Note:
The Add Storage to list is not available for deployments created using theOracle Database Cloud Service - Virtual Image service level. In this case,the Oracle Compute Cloud Service storage volume is added as a raw blockdevice. You need to format it, mount it, and update the /etc/fstab file tomake it usable.
5. Click Yes, Scale Up/Down Service to scale the database deployment.
The scaling operation begins. The deployment is in Maintenance status while thescaling operation is in progress.
Creating and Managing IP Reservations
This topic does not apply to Oracle Cloud at Customer.
This topic does not apply to Oracle Cloud Infrastructure.
If your identity domain is enabled for regions, you can reserve IPaddresses by using the IP Reservations tab on Oracle DatabaseCloud Service console. After you have created an IP reservation, youcan use it when creating a Database Cloud Service databasedeployment, in which case Database Cloud Service does not createand assign an IP address for you.
Note:
Currently, IP reservations are not supported for database deployments that useOracle Data Guard.
Here are the tasks for creating and managing IP reservations:
Chapter 2Creating and Managing IP Reservations
2-42

• Creating an IP Reservation
• Using an IP Reservation when Creating a Database Deployment
• Deleting an IP Reservation
Creating an IP ReservationIf your identity domain is enabled for regions, you can create IP reservations for lateruse when creating Database Cloud Service database deployments.
If there are no Database Cloud Service IP Reservations in your identity domain, the IPReservations link does not appear in the Oracle Database Cloud Service console. Inthis case, see Creating the First IP Reservation to create an IP reservation. Otherwise,use the following instructions.
1. Go to the IP Reservations Page.
a. Open the Oracle Database Cloud Service console.
For detailed instructions, see Accessing the Oracle Database Cloud ServiceConsole.
b. Click IP Reservations.
2. Click Create.
The Create IP Reservation window displays.
3. Enter a name for the IP reservation and choose the region where the reservationwill be available from.
4. Click OK.
Creating the First IP Reservation
To create the first IP Reservation, use the Create Service wizard.
1. Start the Create Service wizard.
a. Open the Oracle Database Cloud Service console.
For detailed instructions, see Accessing the Oracle Database Cloud ServiceConsole.
b. Click Create Service.
2. Enter the text “temp” in the Service Name field, select a region in the Region list,and click Next.
3. In the Database Configuration section, expand Advanced Settings.
4. Click the gear icon beside the IP Reservations field.
The Create Service wizard closes and the IP Reservations page displays.
5. Click Create.
The Create IP Reservation window displays.
6. Enter a name for the IP reservation and choose the region where the reservationwill be available from.
7. Click OK.
Chapter 2Creating and Managing IP Reservations
2-43
Using an IP Reservation when Creating a Database DeploymentNormally, Database Cloud Service automatically assigns new IP addresses todatabase deployments you create. If your identity domain is enabled for regions, youcan direct it to use specific IP Reservations instead and so gain control over the IPaddresses of your database deployments.
After creating an IP reservation, as described in Creating an IP Reservation, use thatreservation when creating a database deployment by making the following choices inthe Create Service wizard:
1. On the Service page:
• For Region, choose a value other than No Preference.
• For Service Level, choose Oracle Database Cloud Service.
• For Database Type, choose a value that does not use Oracle Data Guard.(Currently, IP reservations are not supported for deployments that use OracleData Guard.)
2. On the Service Details page, expand Advanced Settings in the DatabaseConfiguration section. Then, choose the IP reservation in the IP Reservations list.
Note:
If you are creating a database deployment that uses Oracle RAC, create two IPreservations before starting the Create Service wizard, and then choose both ofthem in the IP Reservations list.
Deleting an IP ReservationWhen you no longer require an unused IP reservation, you can delete it.
1. Go to the IP Reservations Page.
a. Open the Oracle Database Cloud Service console.
For detailed instructions, see Accessing the Oracle Database Cloud ServiceConsole.
b. Click IP Reservations.
2. Locate the unused IP reservation you want to delete and then click the X icon inthe row for that reservation.
You are prompted to confirm the deletion.
3. Click OK to confirm deletion of the IP reservation.
Chapter 2Creating and Managing IP Reservations
2-44
Creating and Managing Snapshots of a DatabaseDeployment
This topic does not apply to Oracle Cloud Infrastructure.
On database deployments hosting a single-instance database,Oracle Database Cloud Service supports the creation of storagesnapshots, which you can then use to create new databasedeployments called linked clones.
When you create a storage snapshot, the database deployment is put intomaintenance status and a snapshot of all the storage volumes for the deployment istaken. Then, when you create a linked clone deployment, Database Cloud Servicecreates a new database deployment whose storage volumes are from the snapshot.
Using the “copy on write” technology that Oracle Compute Cloud Service supports forstorage volume snapshots, the file data on the linked clone deployment can changewithout changing the snapshot itself. Thus, you can create several linked clones fromthe same snapshot to use for application testing or branched application developmentwork.
Here are the tasks for creating and managing snapshots:
• Creating a Snapshot
• Creating a Clone Database Deployment from a Snapshot
• Listing Linked Clone Database Deployments Created from a Snapshot
• Deleting a Snapshot
Creating a Snapshot
1. Go to the Snapshots page of the deployment you want to create a snapshot of:
a. Open the Oracle Database Cloud Service console.
For detailed instructions, see Accessing the Oracle Database Cloud ServiceConsole.
b. Click the name of the deployment you want to create a snapshot of.
The Oracle Database Cloud Service Overview page is displayed.
c. Click the Administration tile and then click the Snapshots tab.
The Oracle Database Cloud Service Snapshots page is displayed. Anysnapshots already created for the deployment are shown in the AvailableStorage Snapshots list.
2. Click Create Storage Snapshot. In the Create Storage Snapshot window that isdisplayed, enter a name (and, optionally, a description) for the snapshot and thenclick Create.
In the next window that is displayed, confirm that you want to put the databasedeployment into maintenance mode and create the snapshot by clicking Create.
Chapter 2Creating and Managing Snapshots of a Database Deployment
2-45

Listing Linked Clone Database Deployments Created from a Snapshot
1. Go to the Snapshots page of the deployment whose snapshot you want to seelinked clone deployments of:
a. Open the Oracle Database Cloud Service console.
For detailed instructions, see Accessing the Oracle Database Cloud ServiceConsole.
b. Click the name of the deployment whose snapshot you want to see linkedclone deployments of.
The Oracle Database Cloud Service Overview page is displayed.
c. Click the Administration tile and then click the Snapshots tab.
The Oracle Database Cloud Service Snapshots page is displayed.
2. In the Available Storage Snapshots list, locate the snapshot you’re interested inand check the value displayed next to Linked Clones.
If the value is zero, no linked clone deployments have been created from thesnapshot. Otherwise, click
before Linked Clones to view the list of linked clone deployments.
When viewing the list of linked clone deployments, you can click the name of adeployment to go directly to that deployment’s Overview page.
Deleting a Snapshot
Note:
You cannot delete a snapshot that has linked clone database deploymentscreated from it. You must first delete the linked clone deployments, asdescribed in Deleting a Database Deployment.
1. Go to the Snapshots page of the deployment whose snapshot you want to delete:
a. Open the Oracle Database Cloud Service console.
For detailed instructions, see Accessing the Oracle Database Cloud ServiceConsole.
b. Click the name of the deployment whose snapshot you want to delete.
The Oracle Database Cloud Service Overview page is displayed.
c. Click the Administration tile and then click the Snapshots tab.
The Oracle Database Cloud Service Snapshots page is displayed.
2. In the Available Storage Snapshots list, locate the snapshot you want to deleteand choose Delete from that snapshot’s
menu.
Chapter 2Creating and Managing Snapshots of a Database Deployment
2-46

3. In the Delete Storage Snapshot window, confirm that you want to delete thesnapshot by clicking Delete.
If the window warns you that you cannot delete the snapshot because there aredatabase deployments cloned from it, click Close and then delete the linked clonedeployments before trying to delete the snapshot.
Deleting a Database DeploymentWhen you no longer require a database deployment on Oracle Database CloudService, you can delete it.
Note:
You cannot delete a database deployment that has any linked-clonedeployments created from any of its snapshots. Before you can delete thedeployment you must first delete all linked-clone deployments derived from it.
To delete a database deployment:
1. Open the Services page of the Oracle Database Cloud Service console.
For detailed instructions, see Accessing the Oracle Database Cloud ServiceConsole.
2. Select Delete from the menu corresponding to the database deployment thatyou want to delete.
You are prompted to confirm the deletion.
3. Use the confirmation dialog to confirm that you want to delete the databasedeployment. Optionally, you can also select the option to delete the backupsassociated with the database deployment.
Note:
The option to delete the backups associated with the database deploymentonly exists for deployments that are created using Database Cloud Servicerelease 17.1.5 or later.
Once deleted, the entry is removed from the list of database deploymentsdisplayed on the Oracle Database Cloud Service console.
Tracking the Number of Database Deployments in anAccount
This topic does not apply to Oracle Cloud at Customer.
Chapter 2Deleting a Database Deployment
2-47
You can track the number of database deployments on Oracle Database CloudService across all identity domains using the My Account Dashboard page. Note thatthe My Account Dashboard page is different from the My Services Dashboard page:My Account Dashboard shows information for your entire account, while My ServicesDashboard shows information limited to one identity domain in your account.
To open the My Account Dashboard page, sign in to My Account. By default, theDashboard page is in focus. You can also click Dashboard at any time to display thepage.
The list of services is displayed using the following naming convention: service-name(service-type). Click the service name to go to the details page, which displays statushistory, availability history, usage metrics, and additional information for the selectedservice.
For information about the details provided on the Dashboard page, see Exploring theMy Account Dashboard Page in Getting Started with Oracle Cloud.
Chapter 2Tracking the Number of Database Deployments in an Account
2-48

3Managing Network Access to DatabaseCloud Service
When you create an Oracle Database Cloud Service database deployment in OracleCloud Infrastructure, network access to the deployment is provided and managed bythe Oracle Cloud Infrastructure network components according to rules specified whenyou followed the instructions in Prerequisites for Oracle Platform Services on OracleCloud Infrastructure in the Oracle Cloud Infrastructure documentation.
When you create an Oracle Database Cloud Service database deployment in OracleCloud Infrastructure Classic, network access to the deployment is provided andmanaged using access rules in the Oracle Database Cloud Service console. With theexception of SSH access on port 22, the access rules created for a databasedeployment are disabled to ensure the deployment is secure by default. To openaccess to applications and management tools, you need to enable one of theseaccess rules or create a custom access rule of your own.
Topics
• About Network Access to Database Cloud Service
• Generating a Secure Shell (SSH) Public/Private Key Pair
• Creating an SSH Tunnel to a Compute Node Port
• Enabling Access to a Compute Node Port
• Enabling IPSec VPN Access to Database Cloud Service
• Defining a Custom Host Name or Domain Name for Database Cloud Service
• Using Network Encryption and Integrity
About Network Access to Database Cloud ServiceNetwork access to the compute nodes associated with Oracle Database Cloud Serviceis primarily provided by Secure Shell (SSH) connections on port 22. To access othernetwork protocols and services may require additional configuration.
SSH Access on Port 22
SSH is a cryptographic network protocol that uses two keys, one public and oneprivate, to provide secure communication between two networked computers. Port 22is the standard TCP/IP port that is assigned to SSH servers, and on Database CloudService instances this port is accessible to external clients by default.
When creating a database deployment, you specify the public key on the Service pageof the Create Service wizard by:
• Uploading a public key file.
You can specify a file on your local system that contains the public key value.
3-1

• Pasting the public key value.
You can paste the public key value into a box provided by the wizard. If you do so,make sure the value does not contain line breaks or end with a line break.
• Having the wizard generate a key pair for you.
You can have the wizard create an SSH key pair and use the generated public keyvalue. You download a zip file containing both the public key file and the privatekey file.
When you access a compute node using SSH, you must provide the private key thatmatches the public key specified when the database deployment was created.
To generate the SSH public/private key pairs needed to access Database CloudService, see Generating a Secure Shell (SSH) Public/Private Key Pair.
Access to Other Ports
This topic does not apply to Oracle Cloud Infrastructure.
Additional configuration may be required to access network protocols and services ona compute node by using a port other than port 22. You may:
• Enable network access to the port
You can use the Oracle Database Cloud Service console to enable access to aport on a compute node. See Enabling Access to a Compute Node Port
• Create an SSH tunnel to the port
Creating an SSH tunnel enables you to access a specific compute node port byusing an SSH connection as the transport mechanism. To create the tunnel, youmust have the SSH private key file that matches the public key specified duringthe database deployment creation process. See Creating an SSH Tunnel to aCompute Node Port.
Generating a Secure Shell (SSH) Public/Private Key PairSeveral tools exist to generate SSH public/private key pairs. The following sectionsshow how to generate an SSH key pair on UNIX, UNIX-like and Windows platforms.
Generating an SSH Key Pair on UNIX and UNIX-Like Platforms Usingthe ssh-keygen Utility
UNIX and UNIX-like platforms (including Solaris and Linux) include the ssh-keygenutility to generate SSH key pairs.
To generate an SSH key pair on UNIX and UNIX-like platforms using the ssh-keygenutility:
1. Navigate to your home directory:
$ cd $HOME
2. Run the ssh-keygen utility, providing as filename your choice of file name for theprivate key:
$ ssh-keygen -b 2048 -t rsa -f filename
Chapter 3Generating a Secure Shell (SSH) Public/Private Key Pair
3-2

The ssh-keygen utility prompts you for a passphrase for the private key.
3. Enter a passphrase for the private key, or press Enter to create a private keywithout a passphrase:
Enter passphrase (empty for no passphrase): passphrase
Note:
While a passphrase is not required, you should specify one as a securitymeasure to protect the private key from unauthorized use. When youspecify a passphrase, a user must enter the passphrase every time theprivate key is used.
The ssh-keygen utility prompts you to enter the passphrase again.
4. Enter the passphrase again, or press Enter again to continue creating a privatekey without a passphrase:
Enter the same passphrase again: passphrase
5. The ssh-keygen utility displays a message indicating that the private key has beensaved as filename and the public key has been saved as filename.pub. It alsodisplays information about the key fingerprint and randomart image.
Generating an SSH Key Pair on Windows Using the PuTTYgenProgram
The PuTTYgen program is part of PuTTY, an open source networking client for theWindows platform.
To generate an SSH key pair on Windows using the PuTTYgen program:
1. Download and install PuTTY or PuTTYgen.
To download PuTTY or PuTTYgen, go to http://www.putty.org/ and click the Youcan download PuTTY here link.
2. Run the PuTTYgen program.
The PuTTY Key Generator window is displayed.
3. Set the Type of key to generate option to SSH-2 RSA.
4. In the Number of bits in a generated key box, enter 2048.
5. Click Generate to generate a public/private key pair.
As the key is being generated, move the mouse around the blank area as directed.
6. (Optional) Enter a passphrase for the private key in the Key passphrase box andreenter it in the Confirm passphrase box.
Chapter 3Generating a Secure Shell (SSH) Public/Private Key Pair
3-3

Note:
While a passphrase is not required, you should specify one as a securitymeasure to protect the private key from unauthorized use. When youspecify a passphrase, a user must enter the passphrase every time theprivate key is used.
7. Click Save private key to save the private key to a file. To adhere to file-namingconventions, you should give the private key file an extension of .ppk (PuTTYprivate key).
Note:
The .ppk file extension indicates that the private key is in PuTTY'sproprietary format. You must use a key of this format when using PuTTY asyour SSH client. It cannot be used with other SSH client tools. Refer to thePuTTY documentation to convert a private key in this format to a differentformat.
8. Select all of the characters in the Public key for pasting into OpenSSHauthorized_keys file box.
Make sure you select all the characters, not just the ones you can see in thenarrow window. If a scroll bar is next to the characters, you aren't seeing all thecharacters.
9. Right-click somewhere in the selected text and select Copy from the menu.
10. Open a text editor and paste the characters, just as you copied them. Start at thefirst character in the text editor, and do not insert any line breaks.
11. Save the text file in the same folder where you saved the private key, usingthe .pub extension to indicate that the file contains a public key.
12. If you or others are going to use an SSH client that requires the OpenSSH formatfor private keys (such as the ssh utility on Linux), export the private key:
a. On the Conversions menu, choose Export OpenSSH key.
b. Save the private key in OpenSSH format in the same folder where you savedthe private key in .ppk format, using an extension such as .openssh to indicatethe file's content.
Creating an SSH Tunnel to a Compute Node PortTo create an SSH tunnel to a port on a compute node associated with OracleDatabase Cloud Service, you use Secure Shell (SSH) client software that supportstunneling.
Several SSH clients that support tunneling are freely available. The following sectionsshow how to use SSH clients on the Linux and Windows platforms to connect to acompute node using an SSH tunnel.
Chapter 3Creating an SSH Tunnel to a Compute Node Port
3-4
Creating an SSH Tunnel Using the ssh Utility on LinuxThe Linux platform includes the ssh utility, an SSH client that supports SSH tunneling.
Before you use the ssh utility to create an SSH tunnel, you need the following:
• The IP address of the target compute node.
The IP addresses associated with a database deployment on Oracle DatabaseCloud Service are listed on the details page associated with the databasedeployment. See Viewing Detailed Information for a Database Deployment.
• The SSH private key file that pairs with the public key used during the databasedeployment creation process.
• The port number for which you want to create an SSH tunnel.
To create an SSH tunnel for a port using the ssh utility on Linux:
1. In a command shell, set the file permissions of the private key file so that only youhave access to it:
$ chmod 600 private-key-file
private-key-file is the path to the SSH private key file that matches the public keyused during the database deployment creation process.
2. Run the ssh utility:
$ ssh -i private-key-file -L local-port:target-ip-address:target-port opc@target-ip-address
where:
• private-key-file is the path to the SSH private key file.
• local-port is the number of an available port on your Linux system. Specify aport number greater than 1023 and less than 49152 to avoid conflicts withports that are reserved for the system. As a good practice, and for the sake ofsimplicity, you should specify the same port number as the one to which youare creating a tunnel.
• target-ip-address is the IP address of the target compute node in x.x.x.xformat.
• target-port is the port number to which you want to create a tunnel.
3. If this is the first time you are connecting to the target compute node, the ssh utilityprompts you to confirm the public key. In response to the prompt, enter yes.
After the SSH tunnel is created, you can access the port on the target compute nodeby specifying localhost:local-port on your Linux system.
Creating an SSH Tunnel Using the PuTTY Program on WindowsPuTTY is a freely available SSH client program for Windows that supports SSHtunneling.
Before you use the ssh utility to create an SSH tunnel, you need the following:
• The IP address of the target compute node.
Chapter 3Creating an SSH Tunnel to a Compute Node Port
3-5

The IP addresses associated with a database deployment on Oracle DatabaseCloud Service are listed on the details page associated with the databasedeployment. See Viewing Detailed Information for a Database Deployment.
• The SSH private key file that pairs with the public key used during the databasedeployment creation process.
• The port number for which you want to create an SSH tunnel.
To create an SSH tunnel for a port using the PuTTY program on Windows:
1. Download and install PuTTY.
To download PuTTY, go to http://www.putty.org/ and click the You can downloadPuTTY here link.
2. Run the PuTTY program.
The PuTTY Configuration window is displayed, showing the Session panel.
3. Configure SSH connectivity:
a. In Host Name (or IP address) box, enter the IP address of the target computenode.
b. Confirm that the Connection type option is set to SSH.
c. In the Category tree, expand Connection if necessary and then click Data.
The Data panel is displayed.
d. In Auto-login username box, enter oracle.
e. Confirm that the When username is not specified option is set to Prompt.
f. In the Category tree, expand SSH and then click Auth.
The Auth panel is displayed.
g. Click the Browse button next to the Private key file for authentication box.Then, in the Select private key file window, navigate to and open the privatekey file that matches the public key used during the database deploymentcreation process.
4. Add a forwarded port:
a. In the Category tree, click Tunnels.
The Tunnels panel is displayed.
b. In the Source Port box, enter the number of an available port on your system.Specify a port number greater than 1023 and less than 49152 to avoidconflicts with ports that are reserved for the system. As a good practice, andfor the sake of simplicity, you should specify the same port number as the oneto which you are creating a tunnel.
c. In the Destination box, enter the IP address of the target compute node, acolon, and the port number to which you want to create a tunnel; for example,192.0.2.100:1521.
d. Confirm that the Local and Auto options are set.
e. Click Add to add the forwarded port.
The new forwarded port appears in the Forwarded ports list.
5. In the Category tree, click Session.
The Session panel is displayed.
Chapter 3Creating an SSH Tunnel to a Compute Node Port
3-6

6. In the Saved Sessions box, enter a name for this connection configuration. Then,click Save.
7. Click Open to open the connection.
The PuTTY Configuration window is closed and the PuTTY window is displayed.
8. If this is the first time you are connecting to the target compute node, the PuTTYSecurity Alert window is displayed, prompting you to confirm the public key. ClickYes to continue connecting.
After the SSH tunnel is created, you can access the port on the target compute nodeby specifying localhost:local-port on your system, where local-port is the sourceport that you specified when creating the tunnel.
Enabling Access to a Compute Node Port
This topic does not apply to Oracle Cloud Infrastructure.
For database deployments created in Oracle Cloud Infrastructure Classic, OracleDatabase Cloud Service uses access rules to provide secure network access todatabase deployments. You can use the Oracle Database Cloud Service console toperform network access operations such as enabling and disabling access rules andcreating new access rules.
When a database deployment is created, the following access rules are created, butset to a disabled status.
• ora_p2_dbconsole, which controls access to port 1158, the port used byEnterprise Manager 11g Database Control.
• ora_p2_dbexpress, which controls access to port 5500, the port used byEnterprise Manager Database Express 12c.
• ora_p2_dblistener, which controls access to the port used by SQL*Net.
• ora_p2_http, which controls access to port 80, the port used for HTTPconnections.
• ora_p2_httpssl, which controls access to port 443, the port used for HTTPSconnections, including Oracle REST Data Services, Oracle Application Express,and Oracle DBaaS Monitor.
To enable access to a compute node port, you enable the appropriate access rule.When you enable one of the predefined access rules, the given port on the computenode is opened to the public internet. To enable access to a different port, or restrictaccess to a port, you must create an access rule.
Enabling Port Access by Enabling an Automatically Created Access Rule
You can use the Oracle Database Cloud Service console to enable one of theautomatically created access rules:
1. Open the Access Rules page for the database deployment for which you want toenable an access rule:
a. Open the Oracle Database Cloud Service console.
For detailed instructions, see Accessing the Oracle Database Cloud ServiceConsole.
Chapter 3Enabling Access to a Compute Node Port
3-7

b. From the menu for the database deployment, select Access Rules.
The Access Rules page is displayed.
2. Locate the rule you want to enable.
3. From the menu for the located rule, select Enable.
The Enable Access Rule window is displayed.
4. Select Enable.
The Enable Access Rule window closes and the rule is displayed as enabled inthe list of rules. The given port on the compute node is opened to the publicinternet.
Enabling or Restricting Port Access by Creating an Access Rule
You can create an access rule to enable ports not associated with a predefined rule, orto restrict access to ports to only permit connections from specific IP addresses:
1. Open the Access Rules page for the database deployment for which you want tocreate an access rule:
a. Open the Oracle Database Cloud Service console.
For detailed instructions, see Accessing the Oracle Database Cloud ServiceConsole.
b. From the menu for the database deployment, select Access Rules.
The Access Rules page is displayed. For information about the detailsprovided on this page, see Access Rules Page.
2. Click Create Rule. In the Create Access Rule dialog, enter the followinginformation.
• Rule Name: Any name to identify this rule. Must start with a letter, followed byletters, numbers, hyphens, or underscores. Cannot start with ora_ or sys_.
• Description: Any description of your choice (optional).
• Source: The hosts from which traffic should be allowed. Choices are:
– DB: The ora_db security list for the deployment.
– PUBLIC-INTERNET: The public-internet Security IP List.
– custom: A custom list of addresses from which traffic should be allowed.In the field that displays below when you select this option, enter acomma-separated list of the subnets (in CIDR format) or IPv4 addressesfor which you want to permit access.
• Destination: The security list to which traffic should be allowed. The onlyoption is DB.
• Destination Port(s): The port or range of ports you want to open. Specify asingle port, such as 5001, or a range of ports separated by a hyphen, such as5001-5010.
3. Click Create.
The Create Access Rule dialog closes and the rule is displayed in the list of rules.New rules are enabled by default.
Chapter 3Enabling Access to a Compute Node Port
3-8

Tip:
If necessary, adjust the number of results displayed on the Access Rulespage so you can see the newly created rule.
Enabling IPSec VPN Access to Database Cloud Service
This topic does not apply to Oracle Cloud at Customer.
This topic does not apply to Oracle Cloud Infrastructure.
Oracle Cloud can provide add-on VPN services, which are available for an additionalsubscription fee. Using these services, you can create a secure virtual private network(VPN) tunnel over the Internet that connects your corporate network to Oracle Cloudservices, such as Oracle Database Cloud Service. Oracle Cloud VPN services useIPsec, which is a suite of protocols designed to authenticate and encrypt all IP trafficbetween two locations.
To use this facility, you must have a VPN gateway device that uses current IPSecstandards to establish a secure tunnel between your network and Oracle Cloud.Specifically, the device must support:
• IPv4 traffic with support for ICMP, TCP and UDP. Multicast traffic is not supported.
• Tunnel mode sessions: Tunnel mode is used to create a virtual private networkbetween your network and Oracle Cloud, rather than between a specific set ofhosts. It is used to protect all communications between both networks.
• Pre-shared key authentication: The supported authentication method for enablingIPSec VPN access to Database Cloud Service uses pre-shared keys. With pre-shared keys, the same pre-shared key is configured on each IPSec VPN gatewaydevice.
• Dynamic rekeying: IPsec uses a method called dynamic rekeying to control howoften a new key is generated during communication. Communication is sent inblocks and each block of data is secured with a different key.
Note:
For information on IPSec standards, see the Internet Engineering Task Force(IETF) Request for Comments (RFC) 6071: IP Security (IPsec) and InternetKey Exchange (IKE) Document Roadmap.
In order to avoid any IP address conflict with your client network, Oracle Cloudimplements a registered public but non-routable network segment dedicated to act asthe destination subnet. This ensures a unique routing target for your clients.Additionally, Oracle requires that you mask your internal systems with a public or non-RFC 1918 address range, which makes an IP address conflict practically impossible inthe end-to-end network.
Chapter 3Enabling IPSec VPN Access to Database Cloud Service
3-9

The VPN provisioning process is a collaborative effort between Oracle Cloud networkengineers and your corporate network administrators. Key steps in the provisioningprocess include:
1. An order for Oracle Cloud VPN services is placed. This can be a separate order,or it can be in conjunction with an order for Database Cloud Service.
2. You are sent an Oracle Cloud Network VPN Form. This is a pre-filled form basedon the service type and hosting location of your Oracle Cloud services. The formrequests information required to provision the VPN connection.
3. Oracle receives the completed form and checks that all the prerequisites are met.
4. Oracle provisions the VPN service in conjunction with your network engineersduring an agreed maintenance window.
5. Oracle runs through a post-configuration checklist with you to ensure that the VPNis working and that the setup is completed.
Defining a Custom Host Name or Domain Name forDatabase Cloud Service
This topic does not apply to Oracle Cloud Infrastructure.
You can associate a custom host name or domain name to the public IP address of acompute node associated with your Oracle Database Cloud Service environment.
To associate a custom host name to the public IP address of a compute node, contactthe administrator of your DNS (Domain Name Service) and request a custom DNSrecord for the compute node’s public IP address. For example, if your domain isexample.com and you wanted to use clouddb1 as the custom host name for a computenode, you would request a DNS record that associates clouddb1.example.com to yourcompute node's public IP address.
To associate a custom domain name to the public IP address of a compute node:
1. Register your domain name through a third-party domain registration vendor, suchas Register.com, Namecheap, and so on. For example, example.com.
2. Resolve your domain name to the IP address of the Database Cloud Servicecompute node, using the third-party domain registration vendor console. For moreinformation, refer to the third-party domain registration documentation.
You can obtain the public IP address of a compute node by viewing details asdescribed in Viewing Detailed Information for a Database Deployment.
Using Network Encryption and IntegrityTo secure connections to your Oracle Database Cloud Service databases, you canuse native Oracle Net encryption and integrity capabilities.
Encryption of network data provides data privacy so that unauthorized parties are notable to view data as it passes over the network. In addition, integrity algorithms protectagainst data modification and illegitimate replay.
Chapter 3Defining a Custom Host Name or Domain Name for Database Cloud Service
3-10

Oracle Database provides the Advanced Encryption Standard (AES), DES, 3DES, andRC4 symmetric cryptosystems for protecting the confidentiality of Oracle Net traffic. Italso provides a keyed, sequenced implementation of the Message Digest 5 (MD5)algorithm or the Secure Hash Algorithm (SHA-1 and SHA-2) to protect against integrityattacks.
By default, database deployments on Database Cloud Service are configured toenable native Oracle Net encryption and integrity. Also, by default, Oracle Net clientsare configured to enable native encryption and integrity when they connect to anappropriately configured server. If your Oracle Net client is configured to explicitlyreject the use of native encryption and integrity then connection attempts will fail.
You can check your configuration and verify the use of native Oracle Net encryptionand integrity as follows. For more general information about configuring native OracleNet encryption and integrity, see "Configuring Network Data Encryption and Integrity"in Oracle Database Security Guide for Release 12.2 or 12.1 or in Database AdvancedSecurity Administrator's Guide for Release 11.2.
Checking your Database Cloud Service environment
The following procedure outlines the basic steps required to confirm that native OracleNet encryption and integrity are enabled in your Database Cloud Service environment.
1. In a command shell, connect to the compute node as the oracle user. See Connecting to a Compute Node Through Secure Shell (SSH).
2. Change directories to the location of the sqlnet.ora Oracle Net configurationfile. For example:
$ cd $ORACLE_HOME/network/admin$ ls sqlnet.orasqlnet.ora
3. View the sqlnet.ora file and confirm that it contains the following parametersettings:
SQLNET.ENCRYPTION_SERVER = requiredSQLNET.CRYPTO_CHECKSUM_SERVER = required
The required setting enables the encryption or integrity service and disallows theconnection if the client side is not enabled for the security service. This is thedefault setting for database deployments on Database Cloud Service.
Checking your Oracle Net Client Configuration
The following procedure outlines the basic steps required to confirm that nativeencryption and integrity are enabled in your Oracle Net client configuration.
1. In a command shell, connect to the Oracle Net client.
2. Change directories to the location of the Oracle Net configuration filestnsnames.ora and sqlnet.ora, for example:
$ cd $ORACLE_HOME/network/admin$ ls *.orasqlnet.ora tnsnames.ora
3. View the sqlnet.ora file and confirm that it does not contain the followingparameter settings:
SQLNET.ENCRYPTION_CLIENT = rejectedSQLNET.CRYPTO_CHECKSUM_CLIENT = rejected
Chapter 3Using Network Encryption and Integrity
3-11

The rejected setting explicitly disables the encryption or integrity service, even ifthe server requires it. When a client with an encryption or integrity service settingof rejected connects to a server with the required setting, the connection fails withthe following error: ORA-12660: Encryption or crypto-checksumming parametersincompatible.
Because native Oracle Net encryption and integrity are enabled in your DatabaseCloud Service environment by default, any parameter setting other than rejected,or no setting at all, would result in the use of native encryption and integrity.
Verifying the use of Native Encryption and Integrity
You can verify the use of native Oracle Net encryption and integrity by connecting toyour Oracle database and examining the network service banner entries associatedwith each connection. This information is contained in the NETWORK_SERVICE_BANNERcolumn of the V$SESSION_CONNECT_INFO view. The following example shows the SQLcommand used to display the network service banner entries associated with currentconnection:
SQL> select network_service_banner from v$session_connect_info where sid in (select distinct sid from v$mystat);
The following example output shows banner information for the available encryptionservice and the crypto-checksumming (integrity) service, including the algorithms inuse:
NETWORK_SERVICE_BANNER-------------------------------------------------------------------------------------TCP/IP NT Protocol Adapter for Linux: Version 12.1.0.2.0 - ProductionEncryption service for Linux: Version 12.1.0.2.0 - ProductionAES256 Encryption service adapter for Linux: Version 12.1.0.2.0 - ProductionCrypto-checksumming service for Linux: Version 12.1.0.2.0 - ProductionSHA1 Crypto-checksumming service adapter for Linux: Version 12.1.0.2.0 - Production
If native Oracle Net encryption and integrity was not in use, the banner entries wouldstill include entries for the available security services; that is, the services linked intothe Oracle Database software. However, there would be no entries indicating thespecific algorithms in use for the connection. The following output shows an example:
NETWORK_SERVICE_BANNER-------------------------------------------------------------------------------------TCP/IP NT Protocol Adapter for Linux: Version 12.1.0.2.0 - ProductionEncryption service for Linux: Version 12.1.0.2.0 - ProductionCrypto-checksumming service for Linux: Version 12.1.0.2.0 - Production
Chapter 3Using Network Encryption and Integrity
3-12

4Administering Database Cloud Service
This section describes tasks for administering your Oracle Database Cloud Serviceenvironment and the Oracle databases contained therein.
Topics
• Adding Temporary Storage to a Database Deployment
• Adding an SSH Public Key
• Updating the Cloud Tooling on Database Cloud Service
• Administering a Data Guard Configuration
• Preparing 12.2 Database Deployments for Patching
• Applying Linux OS Security Patches
• Maintaining the Manageability of Database Cloud Service
• Administering Oracle REST Data Services (ORDS)
• Loading Data into the Oracle Database on Database Cloud Service
• Tuning Oracle Database Performance on Database Cloud Service
• Monitoring and Managing Oracle Database on Database Cloud Service
• Managing the Log and Diagnostic Files on Database Cloud Service
• Creating a Database using the Virtual Image Service Level
Adding Temporary Storage to a Database Deployment
This topic does not apply to Oracle Cloud Infrastructure.
In general, when you add storage to a database deployment on Oracle DatabaseCloud Service, you want the storage to be permanent; that is, to remain attached andavailable until the deployment is deleted. To add this kind of permanent storage, scaleup the storage as described in Scaling a Database Deployment.
However, you may sometimes want to add storage to a database deploymenttemporarily for a short period of time, after which you want to detach and delete thestorage.
Topics
• Adding Temporary Storage to a Database Deployment
• Deleting Temporary Storage from a Database Deployment
Adding Temporary Storage to a Database Deployment
To add temporary storage to a database deployment, you add a storage volume to acompute node. First, you create a Compute Cloud Service storage volume and attach
4-1
it to the compute node. Then, while logged into the compute node you use Linuxcommands to partition, format and mount the storage volume.
The storage you add by following these steps is “temporary” in that you can laterunmount it from the compute node and delete it. In all other ways it is “permanent”: itremains in existence, even if you delete the database deployment to which it isattached, until you delete it.
Note:
If the database deployment to which you attach this temporary storage isrestarted or is stopped and then started, the storage volume becomesdetached from the compute node and you must reattach it. For instructions, see Attaching a Storage Volume to an Instance in Using Oracle Cloud InfrastructureCompute Classic. After reattaching the storage volume, you must then connectto the compute node and remount it.
If the compute node is rebooted, such as when following the instructions in Rebooting a Compute Node, the temporary storage becomes unmounted andyou must remount it.
When adding a Compute Cloud Service storage volume as temporary storage, keepthese points in mind:
• A compute node can have a maximum of ten storage volumes attached to it.
• You can create a storage volume from 1 GB to 2048 GB in size, in increments of 1GB.
To add temporary storage to a database deployment:
1. Use the Create Storage Volume wizard in the Compute Cloud Service console tocreate a storage volume.
Follow the instructions provided in Creating a Storage Volume in Using OracleCloud Infrastructure Compute Classic, choosing storage/default as the value forStorage Property.
2. Attach the storage volume to the Compute Cloud Service instance on which thecompute node is running by following the instructions in Attaching a StorageVolume to an Instance in Using Oracle Cloud Infrastructure Compute Classic.
When you attach the storage volume, it is assigned a disk number. Note down thisdisk number for later use.
3. Connect as the opc user to the compute node.
For detailed instructions, see Connecting to a Compute Node Through SecureShell (SSH).
4. Start a root-user command shell:
$ sudo -s#
5. Confirm the addition of the storage volume by using the ls command:
# ls /dev/xvd*
Chapter 4Adding Temporary Storage to a Database Deployment
4-2

In the listing that is displayed, look for an entry of the form /dev/xvdLETTER, whereLETTER is the letter that is alphabetically one higher than the storage volume’s disknumber.
For example, if the storage volume’s disk number is 6, you should look for theentry /dev/xvdg because the letter “g” is the seventh letter of the alphabet.
6. Create a single, primary partition that occupies the entire storage volume by usingthe fdisk command. For example:
# fdisk /dev/xvdgDevice contains neither a valid DOS partition table, nor Sun, SGI or OSF disklabelBuilding a new DOS disklabel with disk identifier 0xaa660f6f.Changes will remain in memory only, until you decide to write them.After that, of course, the previous content won't be recoverable.
Warning: invalid flag 0x0000 of partition table 4 will be corrected by w(rite)
WARNING: DOS-compatible mode is deprecated. It's strongly recommended to switch off the mode (command 'c') and change display units to sectors (command 'u').
Command (m for help): cDOS Compatibility flag is not set
Command (m for help): uChanging display/entry units to sectors
Command (m for help): nCommand action e extended p primary partition (1-4)pPartition number (1-4): 1First sector (2048-20971519, default 2048): [press Enter]Using default value 2048Last sector, +sectors or +size{K,M,G} (2048-20971519, default 20971519): [press Enter]Using default value 20971519
Command (m for help): p
Disk /dev/xvdg: 10.7 GB, 10737418240 bytes255 heads, 63 sectors/track, 1305 cylinders, total 20971520 sectorsUnits = sectors of 1 * 512 = 512 bytesSector size (logical/physical): 512 bytes / 512 bytesI/O size (minimum/optimal): 512 bytes / 512 bytesDisk identifier: 0xaa660f6f
Device Boot Start End Blocks Id System/dev/xvdg1 2048 20971519 10484736 83 Linux
Command (m for help): wThe partition table has been altered!
Calling ioctl() to re-read partition table.Syncing disks.
Chapter 4Adding Temporary Storage to a Database Deployment
4-3

In this example, note the use of the p command to print the partition table beforewriting the table and exiting. Use this command and note down the name of thenew partition as displayed in the Device column.
7. Create a file system on the partition by using the mkfs command. For example:
# mkfs -t ext4 /dev/xvdg1mke2fs 1.41.12 (17-May-2010)Filesystem label=OS type: LinuxBlock size=4096 (log=2)Fragment size=4096 (log=2)Stride=0 blocks, Stripe width=0 blocks655360 inodes, 2621184 blocks131059 blocks (5.00%) reserved for the super userFirst data block=0Maximum filesystem blocks=268435456080 block groups32768 blocks per group, 32768 fragments per group8192 inodes per groupSuperblock backups stored on blocks: 32768, 98304, 163840, 229376, 294912, 819200, 884736, 1605632
Writing inode tables: doneCreating journal (32768 blocks): doneWriting superblocks and filesystem accounting information: done
This filesystem will be automatically checked every 32 mounts or180 days, whichever comes first. Use tune2fs -c or -i to override.
8. Create a directory to use as the mount point for the partition by using the mkdircommand. For example:
# mkdir /u05
9. Mount the partition on the directory you just created by using the mount command.For example:
# mount /dev/xvdg1 /u05
10. Set the ownership and permissions of the mount-point directory appropriately byusing the chown and chmod commands. For example:
# chown oracle:oinstall /u05# chmod 755 /u05
11. Exit the root-user command shell:
# exit$
Deleting Temporary Storage from a Database Deployment
To delete temporary storage, you unmount the storage on the compute node and thendetach the storage volume from the Compute Cloud Service instance and delete it.
To delete temporary storage from a database deployment:
1. Connect as the opc user to the compute node.
For detailed instructions, see Connecting to a Compute Node Through SecureShell (SSH).
2. Start a root-user command shell:
Chapter 4Adding Temporary Storage to a Database Deployment
4-4

$ sudo -s#
3. Display mounted filesystems and confirm the mount point of your temporarystorage volume:
# df -hT
4. Unmount your temporary storage volume; for example:
# umount /u05
Note:
The Linux command to unmount a volume is umount (with no n).
5. Exit the root-user command shell and disconnect from the compute node:
# exitexit$ exit
6. Open the Oracle Compute Cloud Service console.
For instructions, see Accessing Oracle Compute Cloud Service in Using OracleCloud Infrastructure Compute Classic.
When you open the Oracle Compute Cloud Service console, the Instances page isdisplayed .
7. Click Storage to display a list of storage volumes.
8. In the list of storage volumes, click the menu in the row for your temporarystorage volume and choose Detach from Instance and then confirm the action.
9. Refresh the page occasionally until the row for your temporary storage no longershows that it is attached.
10. From the menu in the row for your temporary storage volume, choose Deleteand then confirm the action.
The Oracle Compute Cloud service sets the status of the storage volume toDeleting and begins deleting it.
Adding an SSH Public KeyShould the need arise, you can add an SSH public key to your Oracle Database CloudService environment. After you add the public key, you can provide the matchingprivate key to connect to a compute node associated with the Database Cloud Serviceinstance as either the opc or the oracle user.
To add an SSH public key:
1. Go to the SSH Access page of the deployment you want to add a public key to:
a. Open the Oracle Database Cloud Service console.
For detailed instructions, see Accessing the Oracle Database Cloud ServiceConsole.
Chapter 4Adding an SSH Public Key
4-5

b. From the menu for a database deployment, select SSH Access.
The Add New Key overlay is displayed with its Key value field displaying themost recent SSH public key.
2. Click Add New Key.
You can also add SSH public keys to one or more deployments on the SSH AccessPage.
Updating the Cloud Tooling on Database Cloud ServiceHow you update the cloud tooling on Oracle Database Cloud Service depends on thetype of database deployment you are using:
• For database deployments hosting single-instance databases, see Updating theCloud Tooling by Using the dbpatchm Subcommand.
• For database deployments hosting Oracle Real Application Clusters (RAC)databases, see Updating the Cloud Tooling by Using the raccli Utility.
Updating the Cloud Tooling by Using the dbpatchm SubcommandYou use the dbpatchm subcommand of the dbaascli utility to update the cloud tooling ondatabase deployments hosting a single-instance database or an Oracle Data Guardconfiguration of single-instance databases.
Note:
When updating the cloud tooling on database deployments hosting a DataGuard configuration, you must perform the following steps on both nodes; thatis, on the one hosting the primary database and on the one hosting the standbydatabase.
1. Connect as the opc user to the compute node.
See Connecting to a Compute Node Through Secure Shell (SSH).
2. Start a root-user command shell:
$ sudo -s#
3. Check whether any cloud tooling updates are available:
# dbaascli dbpatchm --run -list_tools
If you receive an error message stating that the -list_tools option is notsupported, the cloud tooling on the compute node is too old to support this methodof updating cloud tooling. In this case, follow the instructions in I can’t use dbaasclito update my cloud tooling.
4. In the command response, locate the patch ID of the cloud tooling update.
The patch ID is listed as the "Patchid" value. If multiple patches are listed, choosethe latest one.
5. Check your current version of cloud tooling:
Chapter 4Updating the Cloud Tooling on Database Cloud Service
4-6

# rpm -qa|grep -i dbaastoolsdbaastools-version_number-release_number
6. After confirming that the latest update is newer than your current version,download and apply the patch containing the cloud tooling update:
# dbaascli dbpatchm --run -toolsinst -rpmversion=patch-id
where patch-id is the patch ID you located earlier.
Note: if you get a warning message indicating that the toolsinst parameter isinvalid, you can ignore the message.
7. Reset the backup configuration:
# /var/opt/oracle/ocde/assistants/bkup/bkup
8. Exit the root-user command shell and disconnect from the compute node:
# exit$ exit
9. If you are updating cloud tooling on a database deployment hosting a Data Guardconfiguration, repeat the preceding steps on the other compute node of thedeployment.
Updating the Cloud Tooling by Using the raccli Utility
This topic does not apply to Oracle Cloud Infrastructure.
You use the raccli utility to update the cloud tooling on database deployments hostingan Oracle RAC database.
Note:
If you are updating the cloud tooling on a database deployment that also usesOracle Data Guard, you must also execute the update databasepasswordcommand to store the password in the keystore (wallet) if you are updatingfrom release 17.2.1 or earlier.
1. Connect as the opc user to the compute node.
See Connecting to a Compute Node Through Secure Shell (SSH).
2. Execute the raccli update rdk subcommand:
$ raccli update rdk -tag tag-number
where tag-number is the version of tooling you want to update to, without the dotsin the version number. For example, to update to 17.2.5 tooling you would enter1725.
To find out the tag number for the latest available tooling update, see What's Newfor Oracle Database Cloud Service.
Chapter 4Updating the Cloud Tooling on Database Cloud Service
4-7

Administering a Data Guard ConfigurationOracle Database Cloud Service provides several commands and features to simplifythe administration of database deployments you create that host an Oracle DataGuard configuration.
Note:
Oracle Database Cloud Service does not currently include the fast-start failover(FSFO) feature of Oracle Data Guard. In Database Cloud Service, you performfailover operations manually, as described in Performing a Manual FailoverOperation.
Topics
• Checking the Status of the Oracle Data Guard Configuration
• Performing a Switchover Operation
• Performing a Manual Failover Operation
• Reinstating a Failed Primary Database
• Changing the SYS Password
• Configuring Clients for Automatic Failover
Checking the Status of the Oracle Data Guard Configuration
Note:
This topic does not apply to database deployments using both Oracle RACand Oracle Data Guard. For such deployments, use the raccli statusdataguard command to check the status of the deployment.
You can use the dataguard status subcommand of the dbaascli utility to check thestatus of your Oracle Data Guard configuration.
Before performing certain operations, you may want to check the status of your OracleData Guard configuration.
To check the status of the Oracle Data Guard configuration by using the dataguardstatus subcommand:
1. Connect to either compute node in the Data Guard configuration as the oracleuser.
For detailed instructions, see Connecting to a Compute Node Through SecureShell (SSH).
2. Check the status of the configuration:
$ dbaascli dataguard status [--details yes|no] [--password password]
Chapter 4Administering a Data Guard Configuration
4-8

Use the details option to generate a detailed listing including data protectionmode, redo transport services mode, maximum data loss potential, andapproximate database role transition time.
Use the password option to supply the SYS user password if you changed it sincecreating the Data Guard configuration.
Performing a Switchover OperationYou can perform a switchover to the standby database in your Oracle Data Guardconfiguration by using the Oracle Database Cloud Service console or, if desired, byusing one of the ways listed in Other Ways to Perform a Switchover Operation at theend of this topic.
A switchover operation enables the primary database to switch roles with a standbydatabase. There is no data loss during a switchover. After a switchover, eachdatabase continues to participate in the Oracle Data Guard configuration in its newrole. A switchover is typically used to reduce primary database downtime duringplanned outages, such as operating system or hardware upgrades, or rolling upgradesof the Oracle Database software and patch sets. See "Switchovers" in Oracle DataGuard Concepts and Administration for Release 12.2, 12.1 or 11.2 for moreinformation.
Performing a Switchover Operation by Using the Oracle Database Cloud ServiceConsole
1. Go to the Overview page for the database deployment you want to perform aswitchover on:
a. Open the Oracle Database Cloud Service console.
For detailed instructions, see Accessing the Oracle Database Cloud ServiceConsole.
b. In the list of deployments, click the name of the database deployment youwant to perform the switchover on.
The Oracle Database Cloud Service Overview page is displayed.
2. To ensure the Overview page reflects the current role of each database, click theRefresh Configuration icon.
3. From the menu located beside the deployment name or beside any of thecompute nodes, select Switchover, and then confirm the action.
The deployment shows a status of Maintenance in the Oracle Database CloudService console until the switchover is complete.
4. Refresh the page occasionally.
Database Role will be updated to reflect the new role for each database.
Chapter 4Administering a Data Guard Configuration
4-9
Note:
For Data Guard configurations of two Oracle RAC databases, you mustmanually configure backups after the switchover operation completes. Forinstructions, see Manual backup configuration required after switchover orfailover on Oracle RAC plus Data Guard deployments in Known Issues forOracle Database Cloud Service.
Other Ways to Perform a Switchover Operation
• For Data Guard configurations of two single-instance databases, you can use thedataguard switchover subcommand of the dbaascli utility. See Performing aSwitchover Operation by Using the dbaascli Utility.
• For Data Guard configurations of two Oracle RAC databases, you can use the raccli switchover dataguard command.
Performing a Switchover Operation by Using the dbaascli UtilityYou can use the dataguard switchover subcommand of the dbaascli utility to perform aswitchover to the standby database in your Oracle Data Guard configuration.
To perform a switchover by using the dataguard switchover subcommand:
1. Connect to the compute node in the Oracle Data Guard configuration that will hostthe new primary database as the opc user.
For detailed instructions, see Connecting to a Compute Node Through SecureShell (SSH).
2. Start a root-user command shell and then switch to the oracle user:
$ sudo -s# su - oracle$
3. Initiate the switchover to the standby database:
$ dbaascli dataguard switchover [--password password]
Use the password option to supply the SYS user password if you changed it sincecreating the Data Guard configuration.
4. Return to being the root user:
$ exit#
5. Restart the ORDS server:
# /etc/init.d/ords restart
6. Exit the root-user command shell and disconnect from the compute node:
# exit$ exit
Chapter 4Administering a Data Guard Configuration
4-10

Performing a Manual Failover OperationYou can perform a manual failover to the standby database in your Oracle Data Guardconfiguration by using the Oracle Database Cloud Service console or, if desired, byusing one of the ways listed in Other Ways to Perform a Manual Failover Operation atthe end of this topic.
A failover operation changes a standby database to the primary role in response to aprimary database failure. If the primary database was not operating in either maximumprotection mode or maximum availability mode before the failure, some data loss mayoccur. If Flashback Database is enabled on the primary database, it can be reinstatedas a standby for the new primary database once the reason for the failure is corrected.A failover is typically used only when the primary database becomes unavailable, andthere is no possibility of restoring it to service within a reasonable period of time. See"Failovers" in Oracle Data Guard Concepts and Administration for Release 12.2, 12.1or 11.2 for more information.
Performing a Manual Failover Operation by Using the Oracle Database CloudService Console
1. Go to the Overview page for the database deployment you want to perform thefailover on:
a. Open the Oracle Database Cloud Service console.
For detailed instructions, see Accessing the Oracle Database Cloud ServiceConsole.
b. In the list of deployments, click the name of the database deployment youwant to perform the failover on.
The Oracle Database Cloud Service Overview page is displayed.
2. To ensure the Overview page reflects the current role of each database, click theRefresh Configuration icon.
3. From the menu located beside the deployment name or beside any of thecompute nodes, select Failover, and then confirm the action.
The deployment shows a status of Maintenance in the Oracle Database CloudService console until the operation is complete.
4. Refresh the page occasionally.
Database Role will be updated to reflect the new role for each database.
Note:
For Data Guard configurations of two Oracle RAC databases, you mustmanually configure backups after the failover operation completes. Forinstructions, see Manual backup configuration required after switchover orfailover on Oracle RAC plus Data Guard deployments in Known Issues forOracle Database Cloud Service.
Chapter 4Administering a Data Guard Configuration
4-11
Other Ways to Perform a Manual Failover Operation
• For Data Guard configurations of two single-instance databases, you can use thedataguard failover subcommand of the dbaascli utility. See Performing a ManualFailover Operation by Using the dbaascli Utility.
• For Data Guard configurations of two Oracle RAC databases, you can use the raccli failover dataguard command.
Performing a Manual Failover Operation by Using the dbaascli UtilityYou can use the dataguard failover subcommand of the dbaascli utility to perform amanual failover to the standby database in your Oracle Data Guard configuration.
To perform a failover by using the dataguard failover subcommand:
1. Connect to the compute node in the Oracle Data Guard configuration that will hostthe new primary database as the opc user.
For detailed instructions, see Connecting to a Compute Node Through SecureShell (SSH).
2. Start a root-user command shell and then switch to the oracle user:
$ sudo -s# su - oracle$
3. Initiate the failover to the standby database:
$ dbaascli dataguard failover [--force yes|no] [--password password]
Use the force option if the status subcommand shows that the Data Guardconfiguration is in a warning or error state.
Use the password option to supply the SYS user password if you changed it sincecreating the Data Guard configuration.
4. Return to being the root user:
$ exit#
5. Restart the ORDS server:
# /etc/init.d/ords restart
6. Exit the root-user command shell and disconnect from the compute node:
# exit$ exit
Reinstating a Failed Primary DatabaseYou can reinstate a failed primary database after a failover by using the OracleDatabase Cloud Service console or, if desired, by using one of the ways listed in OtherWays to Reinstate a Failed Primary Database at the end of this topic.
After performing a failover to the standby database, you may be able to restore youroriginal disaster-recovery solution by reinstating the failed primary database. You canuse the Data Guard broker's reinstate capability to make the failed primary database aviable standby database for the new primary. See "Reenabling Disabled Databases
Chapter 4Administering a Data Guard Configuration
4-12
After a Role Change" in Oracle Data Guard Broker for Release 12.2, 12.1 or 11.2 formore information.
Reinstating a Failed Primary Database by Using the Oracle Database CloudService Console
1. Go to the Overview page for the database deployment you want to perform thereinstate on:
a. Open the Oracle Database Cloud Service console.
For detailed instructions, see Accessing the Oracle Database Cloud ServiceConsole.
b. In the list of deployments, click the name of the database deployment youwant to perform the reinstate on.
The Oracle Database Cloud Service Overview page is displayed.
2. To ensure the Overview page reflects the current role of each database, click theRefresh Configuration icon.
3. From the menu located beside the deployment name , select Reinstate, andthen confirm the action.
The deployment has a status of Maintenance in the Oracle Database CloudService console until the operation is complete.
4. Refresh the page occasionally.
Database Role will be updated to reflect the new role for each database.
Other Ways to Reinstate a Failed Primary Database
• For Data Guard configurations of two single-instance databases, you can use thedataguard reinstate subcommand of the dbaascli utility. See Reinstating a FailedPrimary Database by Using the dbaascli Utility.
• For Data Guard configurations of two Oracle RAC databases, you can use the raccli reinstate dataguard command.
Reinstating a Failed Primary Database by Using the dbaascli UtilityYou can use the dataguard reinstate subcommand of the dbaascli utility to reinstate afailed primary database after a failover.
To determine whether the database can be reinstated, use the dataguard statussubcommand as described in Checking the Status of the Oracle Data GuardConfiguration. A status of ORA-16661: the standby database needs to be reinstatedindicates the standby database can be reinstated.
To reinstate a failed primary database by using the dataguard reinstate subcommand:
1. Connect to one of the compute nodes in the Oracle Data Guard configuration asthe oracle user.
For detailed instructions, see Connecting to a Compute Node Through SecureShell (SSH).
2. Initiate the reinstatement of the failed primary database:
$ dbaascli dataguard reinstate [--password password]
Chapter 4Administering a Data Guard Configuration
4-13

Use the password option to supply the SYS user password if you changed it sincecreating the Data Guard configuration.
3. Disconnect from the compute node.
$ exit
Changing the SYS Password
Note:
This topic does not apply to database deployments using both Oracle RACand Oracle Data Guard. Such deployments do not include the dbaascli utility.
You can use the database changepassword subcommand of the dbaascli utility tochange the password of the SYS user in your Oracle Data Guard configuration.
To use the database changepassword subcommand of the dbaascli utility:
1. Connect as the oracle user to the compute node hosting the primary database.
For detailed instructions, see Connecting to a Compute Node Through SecureShell (SSH).
2. Execute the dbaascli database changepassword command.
$ dbaascli database changepassword
Enter the SYS user name and new password when prompted.
3. Disconnect from the compute node.
$ exit
Configuring Clients for Automatic Failover
Note:
This topic does not apply to database deployments using both Oracle RACand Oracle Data Guard.
By using pre-defined network service names, application clients can automaticallyreconnect to a new primary database following a role transition.
Your Data Guard configuration on Oracle Database Cloud Service is pre-configured toprovide automatic transition of application connections from a failed primary databaseto a new primary database after a Data Guard role transition has taken place.
The following network service names are pre-defined:
• SID_dg: This service is used to connect to the primary database. For OracleDatabase 12c, this service connects to the root container.
Chapter 4Administering a Data Guard Configuration
4-14

• SID_dg_ro: If the Data Guard configuration includes a standby database with real-time query (Active Data Guard), this service is defined and is used to connect tothe standby database. For Oracle Database 12c, this service connects to the rootcontainer.
• PDBname_dg: In an Oracle Database 12c Data Guard configuration, this serviceis defined and is used to connect to the default PDB of the primary database.
• PDBname_dg_ro: In an Oracle Database 12c Data Guard configuration thatincludes a standby database with real-time query (Active Data Guard), this serviceis defined and is used to connect to the default PDB of the standby database.
The services are managed on each database through the use of pre-defined triggers.Following a role transition, the trigger is fired to start the services on the new primarydatabase. By using the pre-defined network service names in your applicationconnections, your application clients will be automatically directed to the new primarydatabase following a role transition.
See Client Failover Best Practices for Highly Available Oracle Databases: OracleDatabase 11g Release 2 or Client Failover Best Practices for Highly Available OracleDatabases Oracle Database 12c for detailed information.
Preparing 12.2 Database Deployments for PatchingSeveral enhancements and bug fixes have been made to Oracle Database Release12.2 since its release on Oracle Cloud in November 2016. However, theseimprovements have not yet been gathered into a PSU. Database Cloud Service ismaking available a “sync-up” patch that includes these many improvements andprepares your database deployment for patching when the first PSU becomesavailable for Release 12.2. You must apply this patch to bring Database Cloud Servicedatabase deployments running Release 12.2 up-to-date and to permit PSUs to beapplied later.
The following sections describe how to apply the “sync-up” patch to your databasedeployment. The procedure for applying the patch depends on the type of databaserunning in the deployment.
Topics
• Preparing 12.2 Database Deployments Hosting Single-Instance Databases forPatching
• Preparing 12.2 Database Deployments Hosting Oracle RAC Databases forPatching
Preparing 12.2 Database Deployments Hosting Single-InstanceDatabases for Patching
You can bring a 12.2 database deployment hosting a single-instance database up-to-date and prepare it for patching when the first PSU becomes available for Release12.2.
Apply a “sync-up” patch (ID 24824889-EE) to your 12.2 database deployment. Thispatch is available only through command-line tools. To apply it, refer to the procedurefor your database type:
• Single Instance: Applying a Patch by Using the dbpatchm Subcommand
Chapter 4Preparing 12.2 Database Deployments for Patching
4-15

• Single Instance with Data Guard Standby: Applying a Patch by Using thedbpatchmdg Utility
Preparing 12.2 Database Deployments Hosting Oracle RACDatabases for Patching
This topic does not apply to Oracle Cloud Infrastructure.
You can bring a 12.2 database deployment hosting an Oracle RACdatabase up-to-date and prepare it for patching when the first PSUbecomes available for Release 12.2.
Note:
The following procedure is required only for 12.2 database deployments usingDatabase Cloud Service release 17.2.1 or earlier.
Before you begin
• Make sure the database deployment has cloud tooling version 17.2.5.1 or later.For more information, see Updating the Cloud Tooling by Using the raccli Utility.
• Before starting the procedure, you should back up the deployment. Forinstructions, see Creating an On-Demand Backup.
• Plan for the following downtime while performing the procedure:
– Database Clustering with RAC—Both Oracle RAC nodes will be shut downsimultaneously while you apply a patch to the database.
– Database Clustering with RAC and Data Guard Standby—First, bothOracle RAC nodes of the standby database will be shut down simultaneouslywhile you apply a patch to the standby, and then both Oracle RAC nodes ofthe primary database will be shut down simultaneously while you apply apatch to the primary.
Procedure
Apply a “sync-up” patch to your 12.2 database deployment.
• For Database Clustering with RAC databases, perform the steps in thisprocedure once.
• For Database Clustering with RAC and Data Guard Standby databases,perform the steps in this procedure twice: first on your standby database and thenon your primary database.
1. Connect as the opc user to compute node 1.
For detailed instructions, see Connecting to a Compute Node Through SecureShell (SSH).
2. Apply patch 24976125 to your database:
$ raccli apply patch -db -tag 24976125
Chapter 4Preparing 12.2 Database Deployments for Patching
4-16

The Oracle Database home is updated on both compute nodes. Both nodes areshut down at the same time, patched, and brought back online.
3. Check your database for invalid objects.
The patch application may have invalidated some database objects. You cancheck for invalid objects and validate them as follows:
a. Invoke SQL*Plus and log in as the SYS user with SYSDBA privileges.
b. Make sure you are connected to the CDB root and run the following query:
SQL> select count(*) from cdb_objects where status='INVALID';
c. Exit SQL*Plus:
SQL> exit$
d. If the preceding query returns a count value of 1 or greater, then the databasecontains invalid objects. You can validate them by running the followingcommand. Enter the command on one line with no line breaks.
$ $ORACLE_HOME/perl/bin/perl $ORACLE_HOME/rdbms/admin/catcon.pl -b utlrp_output $ORACLE_HOME/rdbms/admin/utlrp.sql
Applying Linux OS Security PatchesYou can apply Linux OS security patches to compute nodes hosting Oracle DatabaseCloud Service database deployments. How you apply OS patches depends on thedatabase type used to create the database deployment:
• Single Instance
• Database Clustering with RAC
• Single Instance with Data Guard Standby
• Database Clustering with RAC and Data Guard Standby
• Data Guard Standby for Hybrid DR
Single Instance
You can apply OS patches to the compute node for a deployment hosting a single-instance database by using the dbpatchmsm utility, or you can manually apply OSpatches.
• To apply OS patches by using the dbpatchmsm utility, see Using the dbpatchmsmUtility on Deployments Hosting a Single-Instance Database.
• To manually apply OS patches, follow the instructions in Manually Applying LinuxOS Security Patches.
Database Clustering with RAC
You manually apply OS patches to the two compute nodes for a deployment hostingan Oracle RAC database. For each compute node, follow the instructions in ManuallyApplying Linux OS Security Patches.
Chapter 4Applying Linux OS Security Patches
4-17

Single Instance with Data Guard Standby
You can apply OS patches to the two compute nodes for a deployment hosting anOracle Data Guard configuration of single-instance databases by using the dbpatchmsmutility, or you can manually apply OS patches.
• To apply OS patches by using the dbpatchmsm utility, see Using the dbpatchmsmUtility on Deployments Hosting an Oracle Data Guard Configuration of Single-Instance Databases.
• To manually apply OS patches:
1. For the compute node associated with the standby database, follow theinstructions in Manually Applying Linux OS Security Patches.
2. After the compute node and standby database have rebooted, allow a fewminutes for redo data to be applied to the standby database.
To monitor the progress, connect as the opc user to the standby computenode, and run the following command:
$ dgmgrl show configuration verbose;
The operation is complete when the preceding command returns no errors.
3. Perform a switchover from the primary database to the standby database inyour Oracle Data Guard configuration. See Performing a SwitchoverOperation.
4. For the compute node associated with the new standby database (this wasthe primary database before you performed the switchover), follow theinstructions in Manually Applying Linux OS Security Patches.
5. After the compute node and new standby database have rebooted, allow afew minutes for redo data to be applied to the new standby database.
To monitor the progress, connect as the opc user to the new standby computenode, and run the following command:
$ dgmgrl show configuration verbose;
The operation is complete when the preceding command returns no errors.
6. Perform a switchover back to the original primary database in your OracleData Guard configuration. See Performing a Switchover Operation.
Database Clustering with RAC and Data Guard Standby
You manually apply patches to the four compute nodes for a deployment hosting anOracle Data Guard configuration of Oracle RAC databases:
1. For each of the two compute nodes associated with the standby Oracle RACdatabase, follow the instructions in Manually Applying Linux OS Security Patches.
2. After the compute nodes and standby database have rebooted, allow a fewminutes for redo data to be applied to the standby database.
To monitor the progress, connect as the opc user to one of the standby computenodes, and run the following command:
$ dgmgrl show configuration verbose;
The operation is complete when the preceding command returns no errors.
Chapter 4Applying Linux OS Security Patches
4-18

3. Perform a switchover from the primary database to the standby database in yourOracle Data Guard configuration. See Performing a Switchover Operation.
4. For each of the two compute nodes associated with the new standby OracleRAC database (this was the primary database before you performed theswitchover), follow the instructions in Manually Applying Linux OS SecurityPatches.
5. After the compute nodes and new standby database have rebooted, allow a fewminutes for redo data to be applied to the new standby database.
To monitor the progress, connect as the opc user to one of the new standbycompute nodes, and run the following command:
$ dgmgrl show configuration verbose;
The operation is complete when the preceding command returns no errors.
6. Perform a switchover back to the original primary database in your Oracle DataGuard configuration. See Performing a Switchover Operation.
Data Guard Standby for Hybrid DR
To manually apply OS patches to the compute node for the cloud standby database ina Hybrid DR deployment, follow the instructions in Manually Applying Linux OSSecurity Patches.
For information on applying OS patches to the compute node for the on-premisesprimary database in a Hybrid DR deployment, refer to the documentation for theappropriate Oracle Database version.
Applying Linux OS Security Patches by Using the dbpatchmsm UtilityYou can use the dbpatchmsm utility to apply Linux OS security patches to computenodes associated with database deployments hosting a single-instance database oran Oracle Data Guard configuration of single-instance databases.
Topics
• Using the dbpatchmsm Utility on Deployments Hosting a Single-InstanceDatabase
• Using the dbpatchmsm Utility on Deployments Hosting an Oracle Data GuardConfiguration of Single-Instance Databases
Using the dbpatchmsm Utility on Deployments Hosting a Single-InstanceDatabase
You can use the dbpatchmsm utility to apply Linux OS security patches to a computenode associated with a database deployment hosting a single-instance database.
Note:
Before you begin, review all steps in the procedure to understand how thecompute node is rebooted at the end of the patching process.
1. Connect as the opc user to the compute node.
Chapter 4Applying Linux OS Security Patches
4-19

See Connecting to a Compute Node Through Secure Shell (SSH).
2. Start a root-user command shell:
$ sudo -s#
3. Check whether any Linux OS security patches are available:
# /var/opt/oracle/patch/dbpatchmsm -list_ospatches
If the command response indicates that patches are available, continue at the nextstep.
Otherwise, the latest patches are already installed on the compute node, and youcan exit the root-user command shell and disconnect from the compute node.
4. Apply the latest Linux OS security patches:
# /var/opt/oracle/patch/dbpatchmsm -apply_ospatch_async
5. The dbpatchmsm utility automatically reboots the compute node at the end of thepatch installation, if necessary.
If the utility does not reboot the compute node, then exit the root-user commandshell and disconnect from the compute node.
Using the dbpatchmsm Utility on Deployments Hosting an Oracle Data GuardConfiguration of Single-Instance Databases
You can use the dbpatchmsm utility to apply Linux OS security patches to the twocompute nodes associated with a database deployment hosting an Oracle Data Guardconfiguration of single-instance databases. This procedure uses the Data Guardswitchover operation to reduce database downtime.
Note:
Before you begin, review all steps in the procedure to understand how thecompute nodes are rebooted during the patching process.
1. Perform the following steps on the compute node hosting the standby database:
a. Connect as the opc user to the compute node.
See Connecting to a Compute Node Through Secure Shell (SSH).
b. Start a root-user command shell:
$ sudo -s#
c. Check whether any Linux OS security patches are available:
# /var/opt/oracle/patch/dbpatchmsm -list_ospatches
If the command response indicates that patches are available, continuefollowing this procedure.
Otherwise, the latest patches are already installed on the compute node. Exitthe root-user command shell, disconnect from the compute node, and skip toStep 2 of this procedure.
Chapter 4Applying Linux OS Security Patches
4-20

d. Apply the latest Linux OS security patches:
# /var/opt/oracle/patch/dbpatchmsm -apply_ospatch_async
e. switch to the oracle user and shut down the database:
# su - oracle$ sqlplus '/ as sysdba'...SQL> shutdown...SQL> exit
f. Return to being the root user and reboot the compute node:
$ exit# reboot...The system is going down for reboot NOW!
g. After the compute node and standby database have rebooted, allow a fewminutes for redo data to be applied to the standby database.
To monitor the progress, connect as the opc user to the standby computenode, and run the following command:
$ dgmgrl show configuration verbose;
The operation is complete when the preceding command returns no errors.
2. Perform a switchover from the primary database to the standby database in yourOracle Data Guard configuration.
See Performing a Switchover Operation.
3. Perform step 1 on the compute node hosting the new standby database (this wasthe primary database before you performed the switchover).
4. Perform a switchover back to the original primary database in your Oracle DataGuard configuration.
See Performing a Switchover Operation.
Manually Applying Linux OS Security PatchesYou can manually apply Linux OS security patches to compute nodes hosting OracleDatabase Cloud Service database deployments.
Note:
Before you begin, review all steps in the procedure to understand that thecompute node is rebooted at the end of the patching process.
1. Connect as the opc user to the compute node.
See Connecting to a Compute Node Through Secure Shell (SSH).
2. Start a root-user command shell:
$ sudo -s#
Chapter 4Applying Linux OS Security Patches
4-21

3. Shut down the database.
• If the compute node is associated with a database deployment hosting a DataGuard configuration, then enter the following command to shut down thedatabase and the grid infrastructure:
# crsctl stop crs -f
• Otherwise, shut down the database as follows:
Switch to the oracle user:
# su - oracle$
Shut down the database:
$ sqlplus '/ as sysdba'...SQL> shutdown...SQL> exit
Return to being the root user:
$ exit#
4. Install the yum-plugin-security package:
# yum install yum-plugin-security
5. Update all packages to the latest versions that contain security patches:
# yum --security update-minimal
6. Reboot the compute node:
# reboot...The system is going down for reboot NOW!
Maintaining the Manageability of Database Cloud ServiceThe following best practices will ensure that your Oracle Database Cloud Serviceinstances stay manageable.
To keep your Database Cloud Service instances manageable, follow these guidelines:
• Do not disable or close access to the SSH port (port 22).
You can open other ports and protocols. See About Network Access to DatabaseCloud Service for information about the available options.
• Do not detach, change file access permissions for, or change the mount point ofany storage volume attached to a compute node during the creation of yourdatabase deployment. In particular, do not unmount or change the file accesspermissions of /u01 through /u05.
For details about these volumes, see Storage Volumes and File System Layout.
• Do not change the compute node OS users or manually manipulate SSH keysettings associated with your Database Cloud Service instance.
Chapter 4Maintaining the Manageability of Database Cloud Service
4-22

• Apply only patches that are available through Database Cloud Service. Do notapply patches from any other source unless directed to by Oracle Support.
• Apply the quarterly Patch Set Updates (PSUs) regularly, every quarter if possible.
• Do not change the ports for the Oracle Cloud DBaaS Monitor, Oracle ApplicationExpress, Oracle Net Listener, Enterprise Manager Database Express 12c, orEnterprise Manager 11g Database Control.
Administering Oracle REST Data Services (ORDS)When a database deployment is created on Oracle Database Cloud Service, OracleREST Data Services (formerly known as Oracle APEX Listener) is started.
Note:
This section does not apply to database deployments that use Oracle RealApplication Clusters. Such deployments do not include Oracle REST DataServices.
Topics
• Adding a Signed SSL Certificate to Oracle REST Data Services
• Stopping Oracle REST Data Services
• Starting Oracle REST Data Services
Adding a Signed SSL Certificate to Oracle REST Data ServicesYou can add a signed SSL certificate to the ORDS environment on a Database CloudService database deployment running ORDS 3.0.5 or later.
Deployments created after early October 2016 (version 16.4.1) already have thenecessary version of ORDS installed. To check your version of ORDS, connect to thedeployment’s compute node and enter this command:
$ java -jar /u01/app/oracle/product/ords/ords.war version
If you need to upgrade your version of ORDS, see Updating the Cloud Tooling byUsing the dbpatchm Subcommand.
Before You Begin
To add a signed SSL certificate, you must have the following:
• The SSL certificate file from the certificate provider. This is a .crt file.
• The private key file you gave to the certificate provider as part of your CertificateSigning Request (CSR). This is a .der or .pem file.
Procedure
1. Copy the certificate and private key files to the database deployment’s computenode.
Chapter 4Administering Oracle REST Data Services (ORDS)
4-23
Copy these files as the oracle user to the following locations:
• Certificate file: /u01/app/oracle/product/ords/certificate.crt
• Private key file: /u01/app/oracle/product/ords/privkey.der or /u01/app/oracle/product/ords/privkey.pem, depending on format.
For instructions on copying files to the compute node, see Copying Files to or froma Database Cloud Service Database Deployment.
2. Connect as the oracle user to the compute node.
For detailed instructions, see Connecting to a Compute Node Through SecureShell (SSH).
3. If your key file is in .pem format, convert it to .der format:
$ cd /u01/app/oracle/product/ords$ /usr/bin/openssl pkcs8 -topk8 -inform PEM -outform DER -in privkey.pem -out privkey.der -nocrypt$ rm -f privkey.pem
4. Edit the standalone.properties file of your ORDS environment, adding these linesif missing:
ssl.cert=/u01/app/oracle/product/ords/certificate.crtssl.cert.key=/u01/app/oracle/product/ords/privkey.der
This file is located at /u01/app/oracle/product/ords/conf/ords/standalone/standalone.properties.
5. Set the permissions on the certificate and private key files:
$ chown oracle:oinstall /u01/app/oracle/product/ords/certificate.crt$ chown oracle:oinstall /u01/app/oracle/product/ords/privkey.der$ chmod 400 /u01/app/oracle/product/ords/certificate.crt$ chmod 400 /u01/app/oracle/product/ords/privkey.der
6. Restart ORDS:
$ /etc/init.d/ords restart
7. Close your connection to the compute node:
$ exit
Stopping Oracle REST Data Services1. Connect as the opc user to the compute node.
See Connecting to a Compute Node Through Secure Shell (SSH).
2. Start a root-user command shell:
$ sudo -s#
3. Stop ORDS:
# /u01/app/oracle/product/ords/ords stopINFO: Stopping Oracle REST Data Services...INFO: Oracle REST Data Services stopped
4. Exit the root-user command shell and close your connection to the compute node:
# exit$ exit
Chapter 4Administering Oracle REST Data Services (ORDS)
4-24
Starting Oracle REST Data Services1. Connect as the opc user to the compute node.
See Connecting to a Compute Node Through Secure Shell (SSH).
2. Start a root-user command shell:
$ sudo -s#
3. Start ORDS:
# /u01/app/oracle/product/ords/ords startINFO: Starting Oracle REST Data Services...INFO: Oracle REST Data Services started with PID pid
4. Exit the root-user command shell and close your connection to the compute node:
# exit$ exit
Loading Data into the Oracle Database on Database CloudService
You load data into an Oracle database on Oracle Database Cloud Service using thesame tools you would use for an Oracle database on another system.
If you are using Database Cloud Service on Oracle Cloud in Oracle data centers, thefact that the database is hosted by Oracle does not place any restrictions on data-loading. However, transmission speeds across the Internet tend to be slower,sometimes much slower, than on internal networks, and you should factor this in whenchoosing any data loading approach.
The following sections outline several common tools and techniques used to load datainto an Oracle database. Also, see Migrating Oracle Databases to Database CloudService for additional techniques and more specific information about migratingexisting Oracle databases to Database Cloud Service.
Using SQL*Loader to Load Data into the Database
SQL*Loader is a high-speed data loading utility that loads data from external files intotables in an Oracle database. SQL*Loader accepts input data in a variety of formats,can perform filtering, and can load data into multiple Oracle database tables during thesame load session. SQL*Loader provides three methods for loading data:Conventional Path Load, Direct Path Load, and External Table Load.
For information, see "SQL Loader" in Oracle Database Utilities for Release 12.2, 12.1or 11.2.
Using Oracle Data Pump Import to Load Data into the Database
Oracle Data Pump is an Oracle Database feature that offers very fast bulk data andmetadata movement between Oracle databases. Oracle Data Pump provides twohigh-speed, parallel utilities: Export (expdp) and Import (impdp). Data Pumpautomatically manages multiple, parallel streams for maximum throughput of unloadand load operations. The degree of parallelism can be adjusted on-the-fly.
Chapter 4Loading Data into the Oracle Database on Database Cloud Service
4-25

For information, see "Data Pump Import" in Oracle Database Utilities for Release 12.2, 12.1 or 11.2.
Using Transportable Tablespaces to Load Data into the Database
Transportable Tablespaces is an Oracle Database feature that copies a set oftablespaces from one Oracle database to another. Moving data using transportabletablespaces can be much more efficient than performing either an export/import orunload/load of the same data. This is because the tablespace datafiles are copied tothe destination location, which avoids the cost of formatting the data into Oracleblocks. Also, in some circumstances, your Transportable Tablespace can containpreviously encrypted or compressed data, which avoids the cost of decrypting and re-encrypting, or expanding and re-compressing the data.
For information, see "Transporting Tablespaces Between Databases" in OracleDatabase Administrator's Guide for Release 12.2, 12.1 or 11.2.
Using Pluggable Databases (PDBs) to Load Data into the Database
The multitenant architecture of Oracle Database 12c supports the moving of apluggable database (PDB) from one container database (CDB) to another. Thiscapability makes it easy to load data into Database Cloud Service, provided that thesource data is already inside a PDB on Oracle Database 12c.
For information about PDBs and how to unplug, move, and plug them, see "Overviewof Managing a Multitenant Environment" in Oracle Database Administrator's Guide forRelease 12.2 or 12.1.
Using Oracle Public Cloud Data Transfer Services to Move Large Data Sets
This topic does not apply to Oracle Cloud at Customer.
Regardless of how you load data into your databases, it typically makes sense to usea bulk data transfer mechanism to move data close to your Database Cloud Serviceinstance before performing a data-loading operation.
For smaller data sets, the data can easily be copied over the Internet. However, whenthe data set is large this may not be feasible. To accommodate these situations, youcan use Oracle Public Cloud Data Transfer Services to physically send large data setsto Oracle Public Cloud.
When you engage Oracle Public Cloud Data Transfer Services:
1. Oracle sends a ZS4-4 Storage Appliance to your data center.
2. You install and configure the appliance into your environment and copy data to theappliance using NFS.
3. Before shipping the appliance back to Oracle, you remove and retain theencryption key from the appliance to ensure in-transit data security.
4. Oracle picks up the appliance and ships it back to the Oracle Public Cloud datacenter.
5. You transmit the appliance encryption key to Oracle using a securecommunication channel.
6. Oracle copies your data to an Oracle Storage Cloud Service container andprovides you with logs to verify the data transfer.
Chapter 4Loading Data into the Oracle Database on Database Cloud Service
4-26
7. You load the data into a Database Cloud Service database.
8. Oracle scrubs the storage appliance to remove all traces of the data.
Oracle can provide additional consulting and advanced support services to assist with:
• Installing and configuring the storage appliance in your data center.
• Copying data to the storage appliance.
• Loading data into a Database Cloud Service database.
Tuning Oracle Database Performance on Database CloudService
You tune the performance of Oracle Database on Oracle Database Cloud Serviceusing the same tools you would use for an Oracle database running on any system inyour data center. The fact that the database is housed in the Oracle Cloud does notplace any restrictions on performance tuning.
The Oracle Database Performance Tuning Guide for Release 12.2, 12.1 or 11.2provides extensive information about how to use Oracle Database performance toolsto optimize database performance. It also describes performance best practices andincludes performance-related reference information.
Additionally, the Enterprise Manager Tuning and Performance option packs areincluded in database deployments created using the High Performance and ExtremePerformance software editions. These option packs provide several utilities to assist inmaintaining performance and identifying and correcting performance issues.
If your performance tuning activities indicate that you need more computing power ormore storage, you can scale Database Cloud Service to satisfy the need. See Scalinga Database Deployment.
Monitoring and Managing Oracle Database on DatabaseCloud Service
To monitor and manage the Oracle database deployed on Oracle Database CloudService, you can use the standard management tool provided with the version of thedatabase:
• For Oracle Database 12c, use Enterprise Manager Database Express 12c. See Accessing Enterprise Manager Database Express 12c.
• For Oracle Database 11g, use Enterprise Manager 11g Database Control. See Accessing Enterprise Manager 11g Database Control.
Beyond these standard tools, Database Cloud Service provides Oracle DBaaSMonitor. This monitor, unique to Database Cloud Service deployments hosting single-instance databases, supports monitoring and management both of Oracle Databaseand of computing resources. For more information, see Using Oracle DBaaS Monitor.
Chapter 4Tuning Oracle Database Performance on Database Cloud Service
4-27

Managing the Log and Diagnostic Files on Database CloudService
The software components in Oracle Database Cloud Service generate a variety of logand diagnostic files, and not all these files are automatically archived and purged.Thus, managing the identification and removal of these files to avoid running out of filestorage space is an important administrative task.
Database deployments that host single-instance databases include the cleandblogsscript to simplify this administrative task. This script runs weekly as a crontab job toarchive key files and remove old log and diagnostic files. It uses a configuration filenamed cleandblogs.cfg to determine how long to retain each kind of log or diagnosticfile. You can edit this file to change the default retention periods. This file is locatedat /var/opt/oracle/cleandb/cleandblogs.cfg.
The following table lists the parameters that appear in the cleandblogs.cfg file,providing a description and the default retention period in days for each file type.
Parameter Description and Default Value
AlertRetention Alert log (alert_instance.log) retention value in days.
Default value in file: 14
ListenerRetention Listener log (listener.log) retention value in days.
Default value in file: 14
AuditRetentionDB Database audit (*.aud) retention value in days.
Default value in file: 14
CoreRetention Core dump/files (*.cmdp*) retention value in days.
Default value in file: 7
TraceRetention Trace file (*.tr* and *.prf) retention value in days.
Default value in file: 7
longpRetention Data designated in the Automatic Diagnostic Repository (ADR) ashaving a long life (the LONGP_POLICY attribute). For informationabout ADR, see "Automatic Diagnostic Repository (ADR)" inOracle Database Administrator's Guide for Release 12.2, 12.1 or 11.2.
Default value in file: 14
shortpRetention Data designated in the Automatic Diagnostic Repository (ADR) ashaving a short life (the SHORTP_POLICY attribute). For informationabout ADR, see "Automatic Diagnostic Repository (ADR)" inOracle Database Administrator's Guide for Release 12.2, 12.1 or 11.2.
Default value in file: 7
obkupLogRetention obkup log file retention in days.
Default value in file: 30
LogDirRetention cleandblogs log file retention in days.
Default value in file: 14
Chapter 4Managing the Log and Diagnostic Files on Database Cloud Service
4-28

Archiving Alert Logs and Listener Logs
When cleaning up alert and listener logs, cleandblogs first archives and compressesthe logs, operating as follows:
1. The current log file is copied to an archive file that ends with a date stamp.
2. The current log file is emptied.
3. The archive file is compressed using gzip.
4. Any existing compressed archive files older than the retention period are deleted.
Running the cleandblogs Script Manually
The cleandblogs script automatically runs weekly, but you can also run the scriptmanually if the need arises.
1. Connect as the oracle user to the compute node.
For detailed instructions, see Connecting to a Compute Node Through SecureShell (SSH).
2. Change to the directory containing the cleandblogs script:
$ cd /var/opt/oracle/cleandb
3. Run the cleandblogs script:
$ ./cleandblogs.pl
When running the script manually, you can specify an alternate configuration file touse instead of cleandblogs.cfg by using the --pfile option:
$ ./cleandblogs.pl --pfile config-file-name
4. Close your connection to the compute node:
$ exit
Creating a Database using the Virtual Image Service Level
This topic does not apply to Oracle Cloud Infrastructure.
When you create a database deployment on Oracle Database CloudService using the Virtual Image service level, Oracle Database is notautomatically installed, nor is a database created. You must performthese steps manually after the deployment is created.
The Virtual Image service level is provided for experienced Oracle Databaseadministrators to create custom database configurations. Consequently, thecharacteristics of the database and the specific method used to create the databasecan vary widely. The following procedure lists the general tasks you need to perform.For a worked example that presents a simple case of performing the procedure, see Creating a Database on a Virtual Image Database Deployment: Example.
Procedure
To create a database on a deployment using the Virtual Image service level, youperform these tasks:
Chapter 4Creating a Database using the Virtual Image Service Level
4-29

1. Create storage volumes for the Oracle Database software and for the databasefiles, and then format and mount them.
2. Stage the Oracle Database software on the mount point you created for it.
3. Create a database and start the database instance.
4. Start the listener for the database instance.
5. Create Oracle Compute Cloud Service security rules to permit access to servicesof the database from outside the Oracle Cloud.
Creating a Database on a Virtual Image Database Deployment:Example
This topic does not apply to Oracle Cloud Infrastructure.
This example provides a step-by-step demonstration of the tasksrequired to create a database on a Virtual Image databasedeployment.
Because this example shows only the most simplistic techniques for many of thesteps, you should not use it exactly as it is presented. Instead, consider it a “recipe”that you adapt and extend to suit your needs.
This example uses an Oracle Database Cloud Service database deployment namedexample-vi, created using the Virtual Image service level and specifying OracleDatabase 12c Enterprise Edition.
This example performs the following tasks:
1. Create one storage volume for the Oracle Database software and one storagevolume for all database files, and prepare them for use.
2. Expand the Oracle Database software to the storage prepared for it.
3. Create a database and start the database instance using the DatabaseConfiguration Assistant (DBCA) silent mode.
4. Start the listener for the database instance.
5. Confirm local access to the database.
6. Create a security rule to enable remote access to the database.
7. Confirm remote access to the database.
Create storage volumes and prepare them for use
1. Create a 30 GB storage volume for the Oracle Database software.
Use the scaling feature of the Oracle Database Cloud Service console to add a 30GB volume to the example-vi database deployment. For instructions, see Scalinga Database Deployment
2. Create a 50 GB storage volume for all database files.
This example creates a single volume for all database-related files: data files, fastrecovery and backup files, and redo logs. (In actual usage, you would createseparate volumes for database data, for the fast recovery area and for the redologs.)
Chapter 4Creating a Database using the Virtual Image Service Level
4-30

Use the scaling feature of the Oracle Database Cloud Service console to add a 50GB volume to the example-vi database deployment. For instructions, see Scalinga Database Deployment
3. Start a root user command shell on the Virtual Image database deployment’scompute node:
a. Connect as the opc user to the compute node.
For detailed instructions, see Connecting to a Compute Node Through SecureShell (SSH).
b. Start a root user command shell:
$ sudo -s#
4. Display the list of block devices, noting the presence of the two volumes youcreated, xvdc and xvdd:
# lsblkNAME MAJ:MIN RM SIZE RO TYPE MOUNTPOINTxvdb 202:16 0 21G 0 disk��xvdb1 202:17 0 200M 0 part /boot��xvdb2 202:18 0 15.8G 0 part /��xvdb3 202:19 0 4G 0 part [SWAP]xvdc 202:32 0 30G 0 diskxvdd 202:48 0 50G 0 disk
5. Format the volume for the Oracle Database software and mount it as /u01:
a. Use the fdisk command to create a single, primary partition that occupies theentire volume.
In the following use of fdisk, the responses you enter are highlighted. Theseresponses are:
• c and then u to switch off DOS-compatible mode and change display unitsto sectors, respectively.
• n and then p and then 1 to create a new partition, make it the primarypartition, and make it partition number 1, respectively.
• Pressing Enter twice to accept the first available sector as the start of thepartition and then to accept the last available sector as the end of thepartition.
• p to print the partition table. (Note the name of the new partition asdisplayed in the Device column.)
• w to write the partition table to disk and exit fdisk.
# fdisk /dev/xvdcDevice contains neither a valid DOS partition table, nor Sun, SGI or OSF disklabelBuilding a new DOS disklabel with disk identifier 0xf770fc66.Changes will remain in memory only, until you decide to write them.After that, of course, the previous content won't be recoverable.
Warning: invalid flag 0x0000 of partition table 4 will be corrected by w(rite)
WARNING: DOS-compatible mode is deprecated. It's strongly recommended to switch off the mode (command 'c') and change display units to sectors (command 'u').
Chapter 4Creating a Database using the Virtual Image Service Level
4-31

Command (m for help): cDOS Compatibility flag is not set
Command (m for help): u
Changing display/entry units to sectors
Command (m for help): Command (m for help): nCommand action e extended p primary partition (1-4)pPartition number (1-4): 1First sector (2048-20971519, default 2048): (Press Enter)Using default value 2048Last sector, +sectors or +size{K,M,G} (2048-20971519, default 20971519): (Press Enter)Using default value 20971519
Command (m for help): p
Disk /dev/xvdc: 10.7 GB, 10737418240 bytes255 heads, 63 sectors/track, 1305 cylinders, total 20971520 sectorsUnits = sectors of 1 * 512 = 512 bytesSector size (logical/physical): 512 bytes / 512 bytesI/O size (minimum/optimal): 512 bytes / 512 bytesDisk identifier: 0xf770fc66
Device Boot Start End Blocks Id System/dev/xvdc1 2048 20971519 10484736 83 Linux
Command (m for help): wThe partition table has been altered!
Calling ioctl() to re-read partition table.Syncing disks.
b. Use the mkfs command to make a filesystem of type ext4 on the partition:
# mkfs -t ext4 /dev/xvdc1mke2fs 1.41.12 (17-May-2010)Filesystem label=OS type: LinuxBlock size=4096 (log=2)Fragment size=4096 (log=2)Stride=0 blocks, Stripe width=0 blocks655360 inodes, 2621184 blocks131059 blocks (5.00%) reserved for the super userFirst data block=0Maximum filesystem blocks=268435456080 block groups32768 blocks per group, 32768 fragments per group8192 inodes per groupSuperblock backups stored on blocks: 32768, 98304, 163840, 229376, 294912, 819200, 884736, 1605632
Writing inode tables: doneCreating journal (32768 blocks): doneWriting superblocks and filesystem accounting information: done
Chapter 4Creating a Database using the Virtual Image Service Level
4-32

This filesystem will be automatically checked every 29 mounts or180 days, whichever comes first. Use tune2fs -c or -i to override.
c. Create a directory to use as the mount point:
# mkdir /u01
d. Use the mount command to mount the partition to the directory:
# mount /dev/xvdc1 /u01
e. Use the chown and chmod commands to set the ownership and permissions of /u01:
# chown oracle:oinstall /u01# chmod 755 /u01
6. Format the volume for the database and its related files, and mount it as /u02:
a. Use the fdisk command to create a single, primary partition that occupies theentire volume.
# fdisk /dev/xvddDevice contains neither a valid DOS partition table, nor Sun, SGI or OSF disklabelBuilding a new DOS disklabel with disk identifier 0xa0e1ae04.Changes will remain in memory only, until you decide to write them.After that, of course, the previous content won't be recoverable.
Warning: invalid flag 0x0000 of partition table 4 will be corrected by w(rite)
WARNING: DOS-compatible mode is deprecated. It's strongly recommended to switch off the mode (command 'c') and change display units to sectors (command 'u').
Command (m for help): cDOS Compatibility flag is not set
Command (m for help): uChanging display/entry units to sectors
Command (m for help): nCommand action e extended p primary partition (1-4)pPartition number (1-4): 1First sector (2048-31457279, default 2048): (Press Enter)Using default value 2048Last sector, +sectors or +size{K,M,G} (2048-31457279, default 31457279): (Press Enter)Using default value 31457279
Command (m for help): p
Disk /dev/xvdd: 16.1 GB, 16106127360 bytes255 heads, 63 sectors/track, 1958 cylinders, total 31457280 sectorsUnits = sectors of 1 * 512 = 512 bytesSector size (logical/physical): 512 bytes / 512 bytesI/O size (minimum/optimal): 512 bytes / 512 bytesDisk identifier: 0xa0e1ae04
Device Boot Start End Blocks Id System
Chapter 4Creating a Database using the Virtual Image Service Level
4-33

/dev/xvdd1 2048 31457279 15727616 83 Linux
Command (m for help): wThe partition table has been altered!
Calling ioctl() to re-read partition table.Syncing disks.
b. Use the mkfs command to make a filesystem of type ext4 on the partition:
# mkfs -t ext4 /dev/xvdd1mke2fs 1.41.12 (17-May-2010)Filesystem label=OS type: LinuxBlock size=4096 (log=2)Fragment size=4096 (log=2)Stride=0 blocks, Stripe width=0 blocks983040 inodes, 3931904 blocks196595 blocks (5.00%) reserved for the super userFirst data block=0Maximum filesystem blocks=4026531840120 block groups32768 blocks per group, 32768 fragments per group8192 inodes per groupSuperblock backups stored on blocks: 32768, 98304, 163840, 229376, 294912, 819200, 884736, 1605632, 2654208
Writing inode tables: doneCreating journal (32768 blocks): doneWriting superblocks and filesystem accounting information: done
This filesystem will be automatically checked every 26 mounts or180 days, whichever comes first. Use tune2fs -c or -i to override.
c. Create a directory to use as the mount point:
# mkdir /u02
d. Use the mount command to mount the partition to the directory:
# mount /dev/xvdd1 /u02
e. Use the chown and chmod commands to set the ownership and permissions of /u02:
# chown oracle:oinstall /u02# chmod 755 /u02
7. Display the list of block devices again, this time displaying the UUID, mount point,and filesystem for each device :
# lsblk -o NAME,UUID,MOUNTPOINT,FSTYPENAME UUID MOUNTPOINT FSTYPExvdb��xvdb1 5950368c-7bf0-45f6-a2b7-d53d3f3bcfa7 /boot ext4��xvdb2 d69d8e28-fbdf-4e98-93cf-1f8d4bf52ae3 / ext4��xvdb3 f913a5e3-8bc7-4022-bdc8-a3266b0a609f [SWAP] swapxvdc��xvdc1 6843a9df-fc64-4c9e-9890-2b7c2bd8b75f /u01 ext4xvdd��xvdd1 cc5340a8-2b72-4bed-920d-5a4ac5e9193c /u02 ext4
Note the addition and mounting of the two partitions you created, xvdc1 and xvdd1.
Chapter 4Creating a Database using the Virtual Image Service Level
4-34

8. Add entries for the two new partitions to the /etc/fstab file so that they getmounted whenever the VM is rebooted.
To add the entries, use an editor such as vim and the UUID, mount point andfilesystem information from the lsblk command you just ran. Here is an exampleof the /etc/fstab file with entries for the new partitions highlighted at the end:
## /etc/fstab# Created by anaconda on Mon Jun 10 07:01:06 2013## Accessible filesystems, by reference, are maintained under '/dev/disk'# See man pages fstab(5), findfs(8), mount(8) and/or blkid(8) for more info#UUID=d69d8e28-fbdf-4e98-93cf-1f8d4bf52ae3 / ext4 defaults,barrier=0 1 1UUID=5950368c-7bf0-45f6-a2b7-d53d3f3bcfa7 /boot ext4 defaults 1 2UUID=f913a5e3-8bc7-4022-bdc8-a3266b0a609f swap swap defaults 0 0/tmp /var/tmp none bind 0 0tmpfs /dev/shm tmpfs defaults 0 0devpts /dev/pts devpts gid=5,mode=620 0 0sysfs /sys sysfs defaults 0 0proc /proc proc defaults 0 0UUID=6843a9df-fc64-4c9e-9890-2b7c2bd8b75f /u01 ext4 defaults 0 0UUID=cc5340a8-2b72-4bed-920d-5a4ac5e9193c /u02 ext4 defaults 0 0
9. End the root user command shell and close your connection to the compute node:
# exit$ exit
Expand the Oracle Database software
1. Expand the zip file into the /u01 directory:
a. Connect as the oracle user to the compute node.
For detailed instructions, see Connecting to a Compute Node Through SecureShell (SSH).
b. Change to the /u01 directory:
$ cd /u01
c. Determine the name of the zip file containing the Oracle Database software bydisplaying the contents of the /scratch/db directory:
$ ls /scratch/dbdb12102_bits.tar.gz
d. Expand the zip file into the current directory (/u01):
$ tar -vxzf /scratch/db/db12102_bits.tar.gz
e. Close your connection to the compute node:
$ exit
2. Run the set-up scripts as the root user:
a. Connect as the opc user to the compute node.
Chapter 4Creating a Database using the Virtual Image Service Level
4-35

For detailed instructions, see Connecting to a Compute Node Through SecureShell (SSH).
b. Start the root user command shell:
$ sudo -s#
c. Run the orainstRoot.sh script:
# /u01/app/oraInventory/orainstRoot.shChanging permissions of /u01/app/oraInventory.Adding read,write permissions for group.Removing read,write,execute permissions for world.
Changing groupname of /u01/app/oraInventory to oinstall.The execution of the script is complete.
d. Run the root.sh script:
# /u01/app/oracle/product/12.1.0/dbhome_1/root.shCheck /u01/app/oracle/product/12.1.0/dbhome_1/install/root_example-vi_timestamp.log for the output of root script
e. End the root user command shell and close your connection to the computenode:
# exit$ exit
Create a database
1. Connect as the oracle user to the compute node.
For detailed instructions, see Connecting to a Compute Node Through SecureShell (SSH).
2. Define and export the environment variables necessary to run DBCA:
$ export ORACLE_HOME=/u01/app/oracle/product/12.1.0/dbhome_1$ export PATH=$ORACLE_HOME/OPatch:$ORACLE_HOME/bin:$PATH$ export ORACLE_BASE=/u02/app/oracle
Note that ORACLE_BASE is set to /u02/app/oracle instead of the morecommon /u01/app/oracle. This deviation from common practice causes all of thecreated database’s files to reside under /u02/app/oracle.
3. Run the DBCA utility in silent mode to create the database and start the databaseinstance:
$ dbca -silent -createDatabase -templateName General_Purpose.dbc \> -gdbName ORCL -sid ORCL -sysPassword Pa55_WoRd \> -systemPassword Pa55_WoRd -createAsContainerDatabase true \> -numberOfPDBs 1 -pdbName PDB1 -pdbAdminPassword Pa55_WoRd \> -emConfiguration NONE -storageType FS \> -memoryPercentage 40 -automaticMemoryManagement trueCopying database files1% complete2% complete27% completeCreating and starting Oracle instance29% complete32% complete33% complete34% complete
Chapter 4Creating a Database using the Virtual Image Service Level
4-36

38% complete42% complete43% complete45% completeCompleting Database Creation48% complete51% complete53% complete62% complete70% complete72% completeCreating Pluggable Databases78% complete100% completeLook at the log file "/u02/app/oracle/cfgtoollogs/dbca/ORCL/ORCL.log" for further details.
Start the listener
While still connected to the compute node as the oracle user, use the lsnrctlcommand to start the database listener:
$ lsnrctl START
Confirm local access
1. While still connected to the compute node as the oracle user, set and export theORACLE_SID environment variable:
$ export ORACLE_SID=ORCL
2. Use SQL*Plus to connect to the database and confirm local access:
$ sqlplus
SQL*Plus: Release 12.1.0.2.0 Production on timestamp
Copyright (c) 1982, 2014, Oracle. All rights reserved.
Enter user-name: SYSTEMEnter password: (Type Pa55_WoRd and then press Enter)
Connected to:Oracle Database 12c Enterprise Edition Release 12.1.0.2.0 - 64bit ProductionWith the Partitioning, OLAP, Advanced Analytics and Real Application Testing options
SQL> select * from dual;
D-X
SQL> exit;Disconnected from Oracle Database 12c Enterprise Edition Release 12.1.0.2.0 - 64bit ProductionWith the Partitioning, OLAP, Advanced Analytics and Real Application Testing options
Chapter 4Creating a Database using the Virtual Image Service Level
4-37

Create a security rule for remote access
Create a security rule, following the instructions in Enabling or Restricting Port Accessby Creating an Access Rule. When creating the rule, fill out the fields as follows:
• Rule Name: enter example-vi-sqlnet-1521.
• Source: select PUBLIC-INTERNET.
• Destination: select DB.
• Destination Port(s): enter 1521.
Confirm remote access
To confirm remote access to the database through the SQL*Net security rule, create aconnection to the database in Oracle SQL Developer. When creating the connection,fill out the fields as follows:
• Username: enter SYSTEM.
• Password: enter Pa55_WoRd.
• Hostname: enter the Public IP address of the compute node associated with thedatabase deployment. To find out this address, display details of the service asdescribed in Viewing Detailed Information for a Database Deployment
• Port: enter 1521.
• SID: enter ORCL.
After entering values, click Test to test the connection.
Chapter 4Creating a Database using the Virtual Image Service Level
4-38

5Accessing Database Cloud Service
This section describes how to access tools, utilities and interfaces available in OracleDatabase Cloud Service.
Topics
• Connecting to a Compute Node Through Secure Shell (SSH)
• Accessing Enterprise Manager Database Express 12c
• Accessing Enterprise Manager 11g Database Control
• Connecting Remotely to the Database by Using Oracle SQL Developer
• Connecting Remotely to the Database by Using Oracle Net Services
• Copying Files to or from a Database Cloud Service Database Deployment
Connecting to a Compute Node Through Secure Shell(SSH)
To gain local access the tools, utilities and other resources on a compute nodeassociated with Oracle Database Cloud Service, you use Secure Shell (SSH) clientsoftware to establish a secure connection and log in as the user oracle or the user opc.
Several SSH clients are freely available. The following sections show how to use SSHclients on UNIX, UNIX-like and Windows platforms to connect to a compute nodeassociated with Database Cloud Service.
Connecting to a Compute Node Using the ssh Utility on UNIX andUNIX-Like Platforms
UNIX and UNIX-like platforms (including Solaris and Linux) include the ssh utility, anSSH client.
Before You Begin
Before you use the ssh utility to connect to a compute node, you need the following:
• The IP address of the compute node
The IP address of a compute node associated with a database deployment onOracle Database Cloud Service is listed on the Oracle Database Cloud ServiceOverview page. See Viewing Detailed Information for a Database Deployment.
• The SSH private key file that matches the public key associated with thedeployment.
Procedure
To connect to a compute node using the ssh utility on UNIX and UNIX-like platforms:
5-1

1. In a command shell, set the file permissions of the private key file so that only youhave access to it:
$ chmod 600 private-key-file
private-key-file is the path to the SSH private key file that matches the public keythat is associated with the deployment.
2. Run the ssh utility:
$ ssh -i private-key-file user-name@node-ip-address
where:
• private-key-file is the path to the SSH private key file.
• user-name is the operating system user you want to connect as:
– Connect as the user oracle to perform most operations; this user does nothave root access to the compute node. On database deployments thatuse Oracle RAC, you cannot by default connect as the oracle user. Youmust add the public key to the oracle user’s $HOME/.ssh/authorized_keysfile to grant SSH access.
– Connect as the user opc to perform operations that require root access tothe compute node, such as backing up or patching; this user can use thesudo command to gain root access to the compute node.
• node-ip-address is the IP address of the compute node in x.x.x.x format.
3. If this is the first time you are connecting to the compute node, the ssh utilityprompts you to confirm the public key. In response to the prompt, enter yes.
Connecting to a Compute Node Using the PuTTY Program onWindows
PuTTY is a freely available SSH client program for Windows.
Before You Begin
Before you use the PuTTY program to connect to a compute node, you need thefollowing:
• The IP address of the compute node
The IP address of a compute node associated with a database deployment onOracle Database Cloud Service is listed on the Oracle Database Cloud ServiceOverview page. See Viewing Detailed Information for a Database Deployment.
• The SSH private key file that matches the public key associated with thedeployment. This private key file must be in the PuTTY .ppk format. If the privatekey file was originally created on the Linux platform, you can use the PuTTYgenprogram to convert it to the .ppk format.
Procedure
To connect to a compute node using the PuTTY program on Windows:
1. Download and install PuTTY.
Chapter 5Connecting to a Compute Node Through Secure Shell (SSH)
5-2
To download PuTTY, go to http://www.putty.org/ and click the You can downloadPuTTY here link.
2. Run the PuTTY program.
The PuTTY Configuration window is displayed, showing the Session panel.
3. In Host Name (or IP address) box, enter the IP address of the compute node.
4. Confirm that the Connection type option is set to SSH.
5. In the Category tree, expand Connection if necessary and then click Data.
The Data panel is displayed.
6. In Auto-login username box, enter the user you want to connect as:
• Connect as the user oracle to perform most operations; this user does nothave root access to the compute node. On database deployments that useOracle RAC, you cannot by default connect as the oracle user. You must addthe public key to the oracle user’s $HOME/.ssh/authorized_keys file to grant SSHaccess.
• Connect as the user opc to perform operations that require root access to thecompute node, such as backing up or patching; this user can use the sudocommand to gain root access to the compute node.
7. Confirm that the When username is not specified option is set to Prompt.
8. In the Category tree, expand SSH and then click Auth.
The Auth panel is displayed.
9. Click the Browse button next to the Private key file for authentication box.Then, in the Select private key file window, navigate to and open the private keyfile that matches the public key that is associated with the deployment.
10. In the Category tree, click Session.
The Session panel is displayed.
11. In the Saved Sessions box, enter a name for this connection configuration. Then,click Save.
12. Click Open to open the connection.
The PuTTY Configuration window is closed and the PuTTY window is displayed.
13. If this is the first time you are connecting to the VM, the PuTTY Security Alertwindow is displayed, prompting you to confirm the public key. Click Yes tocontinue connecting.
Accessing Enterprise Manager Database Express 12cEnterprise Manager Database Express 12c (EM Express), a web-based tool formanaging Oracle Database 12c, is available on Oracle Database Cloud Servicedatabase deployments created using Oracle Database 12c Release 1 (12.1) or OracleDatabase 12c Release 2 (12.2).
Before you access EM Express to manage your database you must determine, and insome cases configure, the network port that is used to access EM Express as follows:
• To manage the CDB. When a database deployment is created, Database CloudService automatically sets port 5500 on the deployment’s compute nodes for EM
Chapter 5Accessing Enterprise Manager Database Express 12c
5-3

Express access to the CDB. You do not need to perform any manual configurationsteps.
• To manage a PDB with Oracle Database 12c Release 1 (version 12.1). For aversion 12.1 database deployment, you must manually set a port for each PDByou want to manage using EM Express. See Setting the Port for EM Express toManage a PDB.
• To manage a PDB with Oracle Database 12c Release 2 (version 12.2). WithOracle Database 12c Release 2, EM Express can be configured to access theCDB and all PDBs on a single port, which is known as the global port. For version12.2 database deployments created after early December 2016, the global port isset by default. For deployments created prior to December 2016, see Setting theGlobal Port for EM Express to Manage a CDB and the PDBs (Oracle Database12.2 Only).
Note:
To confirm the port that is in use for a specific database, connect to thedatabase as a database administrator and execute the query shown in thefollowing example:
SQL> select dbms_xdb_config.getHttpsPort() from dual;
DBMS_XDB_CONFIG.GETHTTPSPORT()------------------------------ 5502
After you determine the EM Express port for the CDB or PDB that you want tomanage, you must choose one of the following two options to access EM Express onthat port:
• Unblock the port. You can unblock the port by Enabling Access to a ComputeNode Port.
After unblocking the port, you can access EM Express on that port as described in Accessing EM Express Using the EM Express Port.
• Leave the port blocked. If your security requirements demand that you leave theport blocked, you can still access EM Express by connecting to it through an SSHtunnel, as described in Accessing EM Express Using an SSH Tunnel.
Setting the Port for EM Express to Manage a PDB
In Oracle Database 12c Release 1, a unique HTTPS port must be configured for theroot container (CDB) and each PDB that you manage using EM Express.
To configure a HTTPS port so that you can manage a PDB with EM Express:
1. Invoke SQL*Plus and log in to the PDB as the SYS user with SYSDBA privileges.
2. Execute the DBMS_XDB_CONFIG.SETHTTPSPORT procedure.
SQL> exec dbms_xdb_config.sethttpsport(port-number)
Chapter 5Accessing Enterprise Manager Database Express 12c
5-4

Setting the Global Port for EM Express to Manage a CDB and the PDBs (OracleDatabase 12.2 Only)
In Oracle Database 12c Release 2, you can configure a single port (known as theglobal port), which enables you to use EM Express to connect to all of the PDBs in theCDB using the HTTPS port for the CDB.
In database deployments created after early December 2016, the global port is set bydefault.
To configure the global port in deployments created before December 2016:
1. Invoke SQL*Plus and log in to the root container (CDB) as the SYS user with SYSDBAprivileges.
2. Execute the DBMS_XDB_CONFIG.SETGLOBALPORTENABLED procedure.
SQL> exec dbms_xdb_config.SetGlobalPortEnabled(TRUE)
Accessing EM Express Using the EM Express Port
If the EM Express port is not blocked, you can access EM Express by directing yourbrowser to the URL https://node-ip-address:EM-Express-port/em, where node-ip-address is the public IP address of the compute node hosting EM Express, and EM-Express-port is the EM Express port used by the database.
You can also access EM Express to manage the CDB in 12.1 or the root container andPDBs through the global port in 12.2 through the Oracle Database Cloud Serviceconsole:
1. Open the Services page of the Oracle Database Cloud Service console.
For detailed instructions, see Accessing the Oracle Database Cloud ServiceConsole.
2. From the menu for the deployment, select Open EM Console.
The EM Express login page is displayed.
3. Enter SYSTEM as the user name, enter the password specified when thedatabase deployment was created, and then click Login. To connect withSYSDBA privileges, select the checkbox next to as sysdba, enter SYS as theuser name, enter the password specified when the database deployment wascreated, and then click Login.
This option is also available from the menu on the Oracle Database Cloud ServiceInstance Overview page.
Note:
On a database deployment hosting an Oracle RAC database, the link OpenEM Console opens EM Express on node 1. To open EM Express on node 2,direct your browser to the URL https://node2-ip-address:EM-Express-port/em,where node2-ip-address is the public IP address of node 2, and EM-Express-portis the EM Express port used by the database.
Chapter 5Accessing Enterprise Manager Database Express 12c
5-5

Accessing EM Express Using an SSH Tunnel
To access EM Express when its port is blocked, you must create an SSH tunnel to theEM Express port on the compute node hosting EM Express. See Creating an SSHTunnel to a Compute Node Port.
After the SSH tunnel is created, you can access EM Express by directing your browserto the URL https://localhost:EM-Express-port/em.
After the EM Express login page is displayed, enter SYSTEM as the user name, enterthe password specified when the database deployment was created, and then clickLogin. To connect with SYSDBA privileges, select the checkbox next to as sysdba,enter SYS as the user name, enter the password specified when the deployment wascreated, and then click Login.
Accessing Enterprise Manager 11g Database ControlEnterprise Manager 11g Database Control (Database Control), a web-based tool formanaging Oracle Database 11g, is available on Oracle Database Cloud Servicedatabase deployments created using Oracle Database 11g Release 2.
You can access Database Control in the following ways:
• Using the “Open EM Console” menu item
• Using a direct URL
• Using an SSH tunnel
Using the “Open EM Console” Menu Item to Access Database Control
Note:
For database deployments built on Oracle Cloud Infrastructure Classic, thenetwork port to access Database Control is blocked by default. To use theOpen EM Console menu item, you must unblock port 1158, either by enablingthe deployment’s ora_p2_dbconsole predefined access rule or by creatingyour own access rule that opens port 1158. For instructions, see EnablingAccess to a Compute Node Port.
1. Open the Services page of the Oracle Database Cloud Service console.
For detailed instructions, see Accessing the Oracle Database Cloud ServiceConsole.
2. From the menu for the deployment, select Open EM Console.
3. If your browser displays a warning that your connection is not secure or notprivate, use the browser’s advanced option to continue.
You get this warning because Database Cloud Service database deployments usea self-signed certificate to provide HTTPS (secure HTTP) connectivity, and suchcertificates are considered suspicious by many web browsers.
Chapter 5Accessing Enterprise Manager 11g Database Control
5-6

4. When prompted for a user name and password, enter SYSTEM as the user nameand the password specified during the database deployment creation process, andthen click Login.
If you want to connect with SYSDBA privileges, select SYSDBA from the drop-down list and enter SYS as the user name instead of SYSTEM.
Note: if the database deployment was created using a QuickStart template, thepassword is available in the zip file downloaded when the deployment wascreated.
The Open EM Console menu item is also available on the Overview page in the menu next to the deployment’s name.
Note:
On database deployments hosting an Oracle RAC database, the Open EMConsole menu item opens Database Control on node 1. To open DatabaseControl on node 2, you must use a direct URL.
Using a Direct URL to Access Database Control
Note:
For database deployments built on Oracle Cloud Infrastructure Classic, thenetwork port to access Oracle DBaaS Monitor is blocked by default. To use adirect URL, you must unblock port 1158, either by enabling the deployment’sora_p2_dbconsole predefined access rule or by creating your own access rulethat opens port 1158. For instructions, see Enabling Access to a ComputeNode Port.
1. In your web browser, go to the following URL:
https://node-ip-address:1158/em
where node-ip-address is the IP address of the compute node as listed on thedeployment’s Overview page.
2. If your browser displays a warning that your connection is not secure or notprivate, use the browser’s advanced option to continue.
You get this warning because Database Cloud Service database deployments usea self-signed certificate to provide HTTPS (secure HTTP) connectivity, and suchcertificates are considered suspicious by many web browsers.
3. When prompted for a user name and password, enter SYSTEM as the user nameand the password specified during the database deployment creation process, andthen click Login.
If you want to connect with SYSDBA privileges, select SYSDBA from the drop-down list and enter SYS as the user name instead of SYSTEM.
Chapter 5Accessing Enterprise Manager 11g Database Control
5-7

Note: if the database deployment was created using a QuickStart template, thepassword is available in the zip file downloaded when the deployment wascreated.
Using an SSH Tunnel to Access Database Control
1. Create an SSH tunnel to port 1158 on the compute node hosting DatabaseControl. For information about creating an SSH tunnel, see Creating an SSHTunnel to a Compute Node Port.
2. After creating the SSH tunnel, direct your browser to the URL https://localhost:1158/em.
3. When prompted for a user name and password, enter SYSTEM as the user nameand the password specified during the database deployment creation process, andthen click Login.
If you want to connect with SYSDBA privileges, select SYSDBA from the drop-down list and enter SYS as the user name instead of SYSTEM.
Note: if the database deployment was created using a QuickStart template, thepassword is available in the zip file downloaded when the deployment wascreated.
Connecting Remotely to the Database by Using Oracle SQLDeveloper
You can define an Oracle SQL Developer connection to your database in the cloud toperform operations as you would with an on-premises database.
How you make a SQL Developer connection to the Oracle Database depends onwhether the Oracle Net Listener port has been unblocked. When a Database CloudService database deployment is created on Oracle Cloud Infrastructure Classic, theOracle Net Listener port is blocked to ensure network security. For information aboutunblocking a port, see Enabling Access to a Compute Node Port.
Before You Begin
Before you use Oracle SQL Developer to connect to a database deployment, youneed the following:
• The IP address of the compute node
The IP address of a compute node associated with a database deployment onOracle Database Cloud Service is listed on the Oracle Database Cloud ServiceOverview page. For instructions to display this page, see Viewing DetailedInformation for a Database Deployment.
• The SSH private key file that matches the public key associated with thedeployment.
Creating a SQL Developer Connection When the Listener Port Is Unblocked
To create a SQL Developer connection to a database deployment when the OracleNet Listener port is unblocked:
1. Open SQL Developer. Right-click Connections and select New Connection.
Chapter 5Connecting Remotely to the Database by Using Oracle SQL Developer
5-8

Note:
If you are using a version of SQL Developer in which the Connectionspanel shows both "Connections" and "Cloud Connections", right-clickConnections. Do not right-click Cloud Connections, which is for OracleDatabase Exadata Express Cloud Service.
The New / Select Database Connection dialog appears.
2. Provide the following information and then click Test.
• Connection Name: Create a name for this connection.
• Username: Name of the database user for the connection. This user musthave sufficient privileges to perform the tasks that you want to perform whileconnected to the database, such as creating, editing, and deleting tables,views, and other objects.
• Password: Provide the "Administration" password that you specified whenyou created the database deployment.
• Hostname: Provide the Public IP address for the database deploymentcompute node you are connecting to.
• Port: Provide the listener port number that you specified when you created thedatabase deployment.
• SID or Service Name: If you are connecting to an Oracle 11g database or anOracle 12c container database, provide the SID. If you are connecting to anOracle 12c pluggable database (PDB), provide the service name instead ofthe SID.
3. If your test results show success, click Connect. You have connected SQLDeveloper to your database deployment in Oracle Database Enterprise CloudService. Now you can use SQL Developer as you normally would with an on-premises database.
Creating a SQL Developer Connection When the Listener Port Is Blocked
If the listener port has not been unblocked by enabling the ora_p2_dblistener accessrule, you can define an SSH connection in Oracle SQL Developer 4.0.3 or later, withfunctionality to connect to a database through port forwarding. In that case, you will notneed to follow the instructions in Enabling Access to a Compute Node Port.
1. From the View menu, select SSH.
2. In the SSH Hosts navigation panel, right click SSH Hosts and select New SSHHost.
3. In the New SSH Host dialog:
• Enter a name for the SSH Host.
• In the Host field, enter the IP address of your database deployment.
• In the Username field, enter oracle or opc.
• Check Use key file, and browse for your private SSH key file.
• Select Add a Local Port Forward.
Chapter 5Connecting Remotely to the Database by Using Oracle SQL Developer
5-9

• Leave the Name field as Default. Leave the Host field as localhost. Set thePort field to the listener port number that you specified when you created thedatabase deployment. Keep the default of Automatically assign local port.
• Click OK.
Connecting Remotely to the Database by Using Oracle NetServices
Note:
How you connect to an Oracle RAC database on Database Cloud Servicediffers from how you connect to a non-clustered database. For information, see Creating an Oracle Net Connection to an Oracle RAC Database.
Oracle Database Cloud Service support access to Oracle Database on the standardOracle Net Listener port.
How you make a Oracle Net connection to the Oracle Database depends on whetherthe Oracle Net Listener port has been unblocked. When a Database Cloud Servicedatabase deployment is created on Oracle Cloud Infrastructure Classic, the Oracle NetListener port is blocked to ensure network security. For information about unblocking aport, see Enabling Access to a Compute Node Port.
Before You Can Connect
In order to make a remote database connection by using Oracle Net Services, yourequire pieces of information:
• The IP address for the compute node that you wish to connect to. You can obtainthis information by viewing details as described in Viewing Detailed Information fora Database Deployment.
• The database identifier, either the database SID or service name. For databasedeployments running Oracle Database 11g, you can identify the database by usingthe SID. For deployments running Oracle Database 12c, connecting to thedatabase by specifying the database SID connects you to the CDB (containerdatabase). To connect to a PDB (pluggable database), specify the service name ofthe pluggable database. In Database Cloud Service, the format of a databaseservice name is:
pdb.identity-domain.oraclecloud.internal
where pdb is the name of the PDB and identity-domain is the name of the identitydomain housing your Database Cloud Service subscription; for example:
PDB1.usexample5822.oraclecloud.internal
You can obtain the required information by viewing details as described in ViewingDetailed Information for a Database Deployment.
Chapter 5Connecting Remotely to the Database by Using Oracle Net Services
5-10

Creating an Oracle Net Connection When the Listener Port Is Unblocked
To create an Oracle Net connection when the listener port is unblocked, you can usethe easy connect method to specify a connect identifier with the following format:
node-ip-address:listener-port-number/sid-or-service-name
For example:
198.51.100.101:1521/ORCL
or
198.51.100.102:1521/PDB1.usexample5822.oraclecloud.internal
Creating an Oracle Net Connection When the Listener Port Is Blocked
To create an Oracle Net connection when the listener port is blocked, you must createan SSH tunnel from your client (localhost) to the port of the compute node hosting theOracle Net Listener. For information about creating an SSH tunnel, see Creating anSSH Tunnel to a Compute Node Port.
To create an Oracle Net connection that uses the SSH tunnel, you can use the easyconnect method to specify a connect identifier with the following format:
localhost:listener-port-number/sid-or-service-name
For example:
localhost:1521/ORCL
or
localhost:1521/PDB1.usexample5822.oraclecloud.internal
Note:
Some database access products, such as Oracle SQL Developer 4.0.3 or later,include functionality to connect to a database through an SSH tunnel. Whenusing these products, you create the SSH tunnel to the listener port within theproduct and do not need to follow the instructions in Creating an SSH Tunnel toa Compute Node Port.
Creating an Oracle Net Connection to an Oracle RAC Database
On an Oracle RAC database on Database Cloud Service, the SCAN listeners on eachcompute node listen on the Oracle Net Services port. By default, this port and the portfor the DB listener are blocked on the compute nodes. Therefore, you must first openaccess to these ports by enabling the ora_p2_scan_listener andora_p2_db_listener security rules using the instructions Enabling Port Access byEnabling an Automatically Created Access Rule. Then, on the client, specify a connectdescriptor that references the SCAN listeners on both compute nodes; for example:
alias-name = (DESCRIPTION = (ENABLE = BROKEN) (ADDRESS_LIST =
Chapter 5Connecting Remotely to the Database by Using Oracle Net Services
5-11

(ADDRESS = (PROTOCOL = TCP)(HOST = node1-ip-address)(PORT = 1521)) (ADDRESS = (PROTOCOL = TCP)(HOST = node2-ip-address)(PORT = 1521)) ) (CONNECT_DATA = (SERVICE_NAME = service-name) ))
where:
• alias-name is the name you use to identify the alias.
• node1-ip-address and node2-ip-address are the public IP addresses of the twocompute nodes associated with the database deployment.
• service-name is the service name in the form:
pdb.identity-domain.oraclecloud.internal
For example:
PDB1.usexample5822.oraclecloud.internal
Copying Files to or from a Database Cloud ServiceDatabase Deployment
To copy files to or from a database deployment, connect to a compute node of thedeployment using a secure copy utility that supports key-based, passwordlessauthentication. Examples of such utilities are scp and sftp on Linux and WinSCP andFileZilla on Windows.
When connecting, provide the private key file that matches the public key providedwhen the database deployment was created, and specify the user as opc or oracle. Donot attempt to connect as an Oracle Cloud SFTP user. The compute nodes ofDatabase Cloud Service database deployments are not accessible to Oracle CloudSFTP users.
Chapter 5Copying Files to or from a Database Cloud Service Database Deployment
5-12

6Backing Up and Restoring Databases onDatabase Cloud Service
This section explains how to back up and restore Oracle databases on OracleDatabase Cloud Service.
Note:
This section does not apply to database deployments created using theDatabase Cloud Service - Virtual Image service level. Such deployments do notinclude the cloud tooling described in this section. To back up and restoredatabases in such deployments, use the Oracle Database utilities andtechniques described in Oracle Database Backup and Recovery User's Guidefor Release 12.2, 12.1 or 11.2. To back up data in such deployments to theOracle Cloud, use Oracle Database Backup Cloud Service, as described in Using Oracle Database Backup Cloud Service .
Topics
• About Backing Up Database Deployments on Database Cloud Service
• Viewing Backup Configuration Information
• Creating an On-Demand Backup
• Deleting a Backup
• Updating the Password for Backing Up to the Storage Cloud
• Customizing the Current Backup Configuration
• Changing the Backup Configuration to a Different Backup Destination
• Disabling and Re-enabling Scheduled Backups
• Restoring from the Most Recent Backup
• Restoring from a Specific Backup
• Restoring to a Specific Point in Time
• Recreating an Unrecoverable Database Deployment From a Backup to CloudStorage
About Backing Up Database Deployments on DatabaseCloud Service
By backing up your Oracle Database Cloud Service database deployments, you canprotect the software, configuration and database against loss if a failure occurs. By
6-1

restoring from a backup, you can restore the deployment's software, configuration, anddatabase to their state at the time of the backup.
Database Cloud Service provides a backup feature that backs up:
• The database
• Database configuration files
• Grid Infrastructure configuration files (on deployments hosting an Oracle RACdatabase)
• Important system and cloud tooling files
To provide this backup feature, Database Cloud Service relies on system utilities,Oracle Database utilities, and Oracle Database Backup Cloud Service, all of which areinstalled in the database deployment.
Default Backup Configuration
When you create a database deployment, you choose one of the following backupdestinations:
• Both Cloud Storage and Local Storage. Backups are configured to be createdautomatically and stored both on local compute node storage and on an OracleStorage Cloud Service container.
• Cloud Storage Only. Backups are configured to be created automatically andstored on an Oracle Storage Cloud Service container.
Note:
This choice is not currently available for database deployments that useOracle Real Application Clusters (Oracle RAC).
• None. No backup configuration is created.
The backup configuration created when you choose a destination other than Nonefollows a set of Oracle best-practice guidelines:
• Full (level 0) backup of the database followed by rolling incremental (level 1)backups on a seven-day cycle (a 30-day cycle for the Cloud Storage Onlydestination)
• Full backup of selected database configuration files
• Full backup of selected system files
• Automatic backups daily at a time between 11 PM (23:00) and 3 AM (03:00), withthe specific time set during the database deployment creation process
• Retention period:
– Both Cloud Storage and Local Storage: 30 days, with the 7 most recentdays' backups available on local storage
– Cloud Storage Only: 30 days
• Encryption:
– Both Cloud Storage and Local Storage: All backups to cloud storage areencrypted; backups of Enterprise Edition databases to local storage are
Chapter 6About Backing Up Database Deployments on Database Cloud Service
6-2
encrypted; backups of Standard Edition databases to local storage are notencrypted.
– Cloud Storage Only: All backups to cloud storage are encrypted.
If the defaults do not suit your needs, you can customize the backup configuration foryour database deployment. For information, see Customizing the Current BackupConfiguration.
You can also change the entire backup configuration from the one used when yourdeployment was created. For information, see Changing the Backup Configuration to aDifferent Backup Destination.
About Local Storage for Backups
When a database deployment is created on Database Cloud Service, Oracle ComputeCloud Service storage volumes are created and associated with the compute nodes.The storage volume reserved for backups is named fra. On deployments hostingOracle RAC databases, this storage volume is shared by the compute nodes.
You can see details about fra (as well as other storage volumes) in the ComputeCloud Service console. See Viewing Details of a Storage Volume in Using OracleCloud Infrastructure Compute Classic.
The space allocated for the local storage used for backups on fra is 1.7 times thespace allocated for data storage. For example, if you chose 100 GB for UsableDatabase Storage when creating the database deployment, 170 GB are allocated forbackups.
Viewing Backup Configuration Information
This topic does not apply to Oracle Cloud at Customer.
You can use the get_config_info command of the bkup_api utility to view backupconfiguration settings for database deployments hosting single-instance databases.Optionally, the output can be used to create a file containing JSON syntax.
1. Connect to the compute node as the opc user.
For detailed instructions, see Connecting to a Compute Node Through SecureShell (SSH).
2. Start a root-user command shell:
$ sudo -s#
3. List the value of a backup configuration setting:
# /var/opt/oracle/bkup_api/bkup_api get_config_info -e configuration --dbname dbname [--json json_destination]
where:
• configuration is one of these backup configuration settings: bkup_cfg_db_spec,bkup_cfg_files, bkup_cfg_os_spec, bkup_cfg_recovery_window,
bkup_daily_time, bkup_disk, bkup_disk_recovery_window, bkup_nfs_mount_dir,
bkup_oss, bkup_oss_recovery_window, bkup_oss_url, bkup_oss_user,
Chapter 6Viewing Backup Configuration Information
6-3
bkup_rman_retention, bkup_script_loc, bkup_type, fra_loc, opc_oss_url,
oss_auth_url, oss_base, oss_sname, oss_tid, oss_url, oss_user.
• dbname is the database name.
• json_destination is the name of a file to be generated containing JSONsyntax. This is an optional parameter.
The specified configuration setting and its value are displayed, and the JSON fileis optionally created.
4. Exit the root-user command shell:
# exit$
Creating an On-Demand BackupYou can create an on-demand backup of an Oracle Database Cloud Service databasedeployment by using the Oracle Database Cloud Service console or, if desired, byusing one of the ways listed in Other Ways to Create an On-Demand Backup at theend of this topic.
Creating an On-Demand Backup by Using the Oracle Database Cloud ServiceConsole
1. Open the Services page of the Oracle Database Cloud Service console.
For detailed instructions, see Accessing the Oracle Database Cloud ServiceConsole.
2. Click the database deployment for which you want to create a backup.
The Oracle Database Cloud Service Overview page is displayed.
3. Click the Administration tile.
The Oracle Database Cloud Service Backup page is displayed.
4. Click Backup Now.
The Backup Now dialog is displayed.
5. Make a selection for the Keep Forever option and then click Backup.
The Keep Forever option controls the backup retention policy, as follows:
• No — specifies that the backup is produced and maintained in accordancewith the automatic backup retention policy that is associated with the databasedeployment.
• Yes — specifies that the backup is a long-term backup, which is produced andmaintained independently of the automatic backup retention policy that isassociated with the database deployment. Long-term backups remain until youexplicitly remove them from the system.
Other Ways to Create an On-Demand Backup
• For database deployments hosting single-instance databases, you can use thebkup_api utility. See Creating an On-Demand Backup by Using the bkup_api Utility.
• For database deployments hosting Oracle Real Application Clusters (RAC)databases, you can use the raccli utility. SeeCreating an On-Demand Backup by Using the raccli Utility.
Chapter 6Creating an On-Demand Backup
6-4

Creating an On-Demand Backup by Using the bkup_api UtilityYou can use the bkup_api utility to create an on-demand backup of a databasedeployment hosting a single-instance database or an Oracle Data Guard configurationof two single-instance databases.
1. Connect as the opc user to the compute node. In a Data Guard configuration,connect to the compute node hosting the primary database.
For detailed instructions, see Connecting to a Compute Node Through SecureShell (SSH).
2. Start a root-user command shell:
$ sudo -s#
3. Enter the bkup_api command:
• To create a backup that follows the current retention policy, enter the followingbkup_api command:
# /var/opt/oracle/bkup_api/bkup_api bkup_start
• To create a long-term backup that persists until you delete it, enter thefollowing bkup_api command:
# /var/opt/oracle/bkup_api/bkup_api bkup_start --keep
Note:
By default, the backup is given a timestamp-based tag. To specify acustom backup tag, add the --tag option to the bkup_api command. Forexample, to create a long-term backup with the tag monthly, enter thefollowing command:
# /var/opt/oracle/bkup_api/bkup_api bkup_start --keep --tag=monthly
Note:
After you enter a bkup_api bkup_start command, the bkup_api utility startsthe backup process, which runs in the background. To check the progressof the backup process, enter the following bkup_api command:
# /var/opt/oracle/bkup_api/bkup_api bkup_status
4. Exit the root-user command shell and disconnect from the compute node:
# exit$ exit
Chapter 6Creating an On-Demand Backup
6-5

Creating an On-Demand Backup by Using the raccli Utility
This topic does not apply to Oracle Cloud Infrastructure.
You can use the raccli utility to create an on-demand backup of a databasedeployment hosting an Oracle Real Application Clusters (RAC) database:
1. Connect to the compute node as the opc user.
For detailed instructions, see Connecting to a Compute Node Through SecureShell (SSH).
2. Enter the raccli create backup subcommand:
$ raccli create backup$
By default, the backup is given a timestamp-based tag. To specify a custom backuptag, add the -tag option to the raccli command; for example, to create a long-termbackup with the tag "monthly", enter the following command:
$ raccli create backup -tag monthly
After you enter a raccli create backup command, the raccli utility starts the backupprocess, which runs in the background. To check the progress of the backup process,enter the following raccli command:
$ raccli describe job
Deleting a BackupYou cannot delete backups that are part of the automatic backup configuration,whether they were created using the bkup_api utility, the raccli utility, or the OracleDatabase Cloud Service console. These backups are deleted automatically based onthe retention period of the automatic backup configuration.
You can, however, delete long-term backups created using the bkup_api utility with the--keep option.
1. Connect to the compute node as the opc user.
For detailed instructions, see Connecting to a Compute Node Through SecureShell (SSH).
2. Start a root-user command shell:
$ sudo -s#
3. List the available long-term backups:
# /var/opt/oracle/bkup_api/bkup_api list --keep
A list of available backups is displayed.
4. Delete the backup you want:
# /var/opt/oracle/bkup_api/bkup_api bkup_delete --bkup=backup-tag
where backup-tag is the tag of the backup you want to delete.
Chapter 6Deleting a Backup
6-6

5. Exit the root-user command shell:
# exit$
Updating the Password for Backing Up to the Storage CloudWhenever the password is changed for an Oracle Cloud user whose credentials areused for backing up to an Oracle Storage Cloud container, you need to update theuser’s password in the Oracle Wallet file that maintains the credentials.
Because Oracle Cloud requires users to change their passwords on a regular basis,you need to perform this task regularly.
You can update the password by using the Oracle Database Cloud Service console or,if desired, by using one of the ways listed in Other Ways to Update the Password atthe end of this topic.
Updating the Password by Using the Oracle Database Cloud Service Console
Note:
Currently, you cannot use the Oracle Database Cloud Service console toupdate the password on database deployments hosting an Oracle RealApplication Clusters (RAC) database. Instead you must use the raccli utility.See Updating the Password by Using the raccli Utility.
1. Go to the Backup page of the deployment whose backup credentials you want toupdate:
a. Open the Oracle Database Cloud Service console.
For detailed instructions, see Accessing the Oracle Database Cloud ServiceConsole.
b. Click the name of the database deployment whose backup credentials youwant to update.
The Overview page for the deployment is displayed.
c. Click the Administration tile.
The Backup page for the deployment is displayed.
2. Click Configure Backups.
The Configure Backups window is displayed.
3. Enter the Cloud user name and new password.
4. Click Save and then confirm the operation.
Other Ways to Update the Password
• For database deployments hosting single-instance databases, you can use thebkup_api utility. See Updating the Password by Using the bkup_api Utility.
Chapter 6Updating the Password for Backing Up to the Storage Cloud
6-7

• For database deployments hosting Oracle Real Application Clusters (RAC)databases, you can use the raccli utility. See Updating the Password by Usingthe raccli Utility.
Updating the Password by Using the bkup_api UtilityYou use the bkup_api utility to update the Oracle Wallet file containing the backupuser’s password:
1. Connect to the compute node as the opc user.
For detailed instructions, see Connecting to a Compute Node Through SecureShell (SSH).
2. Start a root-user command shell:
$ sudo -s#
3. Create a file that contains the updated password.
The file must contain only the following entry:
password=new-password
where new-password is the backup user’s updated password.
Also, the file permissions must be set as follows:
# chmod 600 password-file
where password-file is the name of the file that contains the updated password.
4. Update the password.
# /var/opt/oracle/bkup_api/bkup_api update_wallet --cfg=password-file
where password-file is the name of the file that contains the updated password.
If the update succeeds, the output from the command indicates that the wallet wassuccessfully created and the credentials are valid. If the command fails with anauthentication error, you supplied the wrong password and need to try again withthe correct credentials. In both cases, the file containing the updated password isdeleted.
If you see ERROR Please provide the new password for the cloud storage (OSS),the bkup_api utility is out of date. Update it by following the instructions in Updatingthe Cloud Tooling on Database Cloud Service, and then try the bkup_api commandagain.
5. Exit the root-user command shell:
# exit$
Updating the Password by Using the raccli Utility
This topic does not apply to Oracle Cloud Infrastructure.
Chapter 6Updating the Password for Backing Up to the Storage Cloud
6-8

On database deployments hosting an Oracle Real Application Clusters (RAC)database you use the raccli utility to update the Oracle Wallet file containing thebackup user’s password:
Note:
If you have used the update rdk subcommand of the raccli utility to update thecloud tooling to 16.4.5 or later, you must manually update the opc installer forthe Oracle Database Cloud Backup Module before you use the updatebackupconfig subcommand. For instructions, see in Updating the cloud toolingon a deployment hosting Oracle RAC requires manual update of the OracleDatabase Cloud Backup Module in Known Issues for Oracle Database CloudService.
1. Connect to the compute node as the opc user.
For detailed instructions, see Connecting to a Compute Node Through SecureShell (SSH).
2. Update the password:
$ raccli update backupconfig -params '{"cloudStorageUser":"user-name","cloudStoragePwd":"new-password"}'
where user-name is the user name of the Oracle Cloud user whose credentials areused to access the Storage Cloud Service container and new-password is this user'snew password.
If the update succeeds, output from the command indicates that the wallet wassuccessfully created and the credentials are valid. If you could not authenticate,you entered the wrong password and need to try again with the correctcredentials.
Customizing the Current Backup ConfigurationHow you customize the current backup configuration depends on the type of databaserunning in the database deployment.
Topics
• Customizing the Current Backup Configuration on Database Deployments HostingSingle-Instance Databases
• Customizing the Current Backup Configuration on Database Deployments HostingOracle RAC Databases
Customizing the Current Backup Configuration on DatabaseDeployments Hosting Single-Instance Databases
You can customize many of the characteristics of the automatic backup configuration.
Topics
• Customizing How the Database Is Backed Up
Chapter 6Customizing the Current Backup Configuration
6-9

• Customizing Which System Files Are Backed Up
• Customizing Which Database Configuration Files Are Backed Up
• Customizing the Retention Period for Backups
• Customizing the Cycle Period for Backups
• Customizing the Frequency of Automatic Backups
Customizing How the Database Is Backed Up
To change how the Oracle database is backed up, you use the RMAN utility. Forinformation about using RMAN, see Oracle Database Backup and Recovery User'sGuide for Release 12.2, 12.1 or 11.2.
Caution:
Do not use the RMAN utility to change the retention period.
To view the current RMAN configuration, use the RMAN command SHOW ALL:
1. Connect as the oracle user to the compute node.
For detailed instructions, see Connecting to a Compute Node Through SecureShell (SSH).
2. Start an RMAN session:
$ rman target=/...RMAN>
3. Enter the SHOW ALL command:
RMAN> show all;...
A listing of your configuration is displayed.
4. Use RMAN commands to make any changes to your configuration.
5. Exit the RMAN session:
RMAN> exit;$
Customizing Which System Files Are Backed Up
To change which system files and directories are backed up:
1. Connect as the oracle user to the compute node.
For detailed instructions, see Connecting to a Compute Node Through SecureShell (SSH).
2. Edit the contents of the /home/oracle/bkup/oscfg.spec file.
The backup feature provided by Oracle Database Cloud Service backs up the filesand folders listed in this specification file.
An example of an oscfg.spec file with a default configuration is as follows:
Chapter 6Customizing the Current Backup Configuration
6-10

## OS Configuration Files## Doc Specoscfg.spec## Directories/etc/rc.d/home/oracle/bkup## Single files/home/oracle/.bashrc/etc/crontab/etc/sysctl.conf/etc/passwd/etc/group/etc/oraInst.loc/etc/oratab/etc/fstab
Customizing Which Database Configuration Files Are Backed Up
To change which database configuration files are backed up:
1. Connect as the oracle user to the compute node.
For detailed instructions, see Connecting to a Compute Node Through SecureShell (SSH).
2. Edit the contents of the /home/oracle/bkup/dbcfg.spec file:
The backup feature provided by Oracle Database Cloud Service backs up the filesand folders listed in this specification file.
An example of a dbcfg.spec file with a default configuration is as follows:
### Oracle_Home configuration files.## Doc Specdbcfg.spec# DB iddbid## Directories/u01/app/oracle/product/12.1.0/dbhome_1/admin/ORCL/xdb_wallet/u01/app/oracle/admin/ORCL/xdb_wallet/u01/app/oracle/admin/ORCL/opc_wallet# Note: tde_wallet must be backed up in a different location than DATA bkup./u01/app/oracle/admin/ORCL/tde_wallet/u01/app/oracle/admin/ORCL/cat_wallet#/u01/app/oracle/product/12.1.0/dbhome_1/dbs#/u01/app/oracle/product/12.1.0/dbhome_1/network/admin#/u01/app/oraInventory## Single files/u01/app/oracle/product/12.1.0/dbhome_1/dbs/opcORCL.ora/u01/app/oracle/product/12.1.0/dbhome_1/dbs/orapworcl/u01/app/oracle/product/12.1.0/dbhome_1/network/admin/listener.ora/u01/app/oracle/product/12.1.0/dbhome_1/network/admin/sqlnet.ora/u01/app/oracle/product/12.1.0/dbhome_1/network/admin/tnsnames.ora/u01/app/oracle/product/12.1.0/dbhome_1/rdbms/lib/env_rdbms.mk/u01/app/oracle/product/12.1.0/dbhome_1/rdbms/lib/ins_rdbms.mk
Chapter 6Customizing the Current Backup Configuration
6-11

Customizing the Retention Period for Backups
To change the retention period for backups, use the bkup_api utility:
1. Connect as the opc user to the compute node.
For detailed instructions, see Connecting to a Compute Node Through SecureShell (SSH).
2. Start a root-user command shell:
$ sudo -s#
3. Enter this bkup_api command.
# /var/opt/oracle/bkup_api/bkup_api bkup_chgcfg --retention=days
where days is the number of days for which you want to retain backups.
4. Exit the root-user command shell:
# exit$
Customizing the Cycle Period for Backups
To change the cycle period for backups, use the bkup_api utility:
1. Connect as the opc user to the compute node.
For detailed instructions, see Connecting to a Compute Node Through SecureShell (SSH).
2. Start a root-user command shell:
$ sudo -s#
3. Enter this bkup_api command.
# /var/opt/oracle/bkup_api/bkup_api bkup_chgcfg --cycle=days
where days is the number of days you want for the cycle period.
4. Exit the root-user command shell:
# exit$
Customizing the Frequency of Automatic Backups
The backup feature provided by Oracle Database Cloud Service uses the Linux cronjob scheduler to perform automatic backups.
If automatic backups are enabled, the following job entry is defined in the system-widescheduler file, /etc/crontab, which is located on the first compute node that isassociated with the database deployment:
MM HH * * * root /var/opt/oracle/bkup_api/bkup_api bkup_start --dbname=dbname
The /etc/crontab entry causes the bkup_api script to be run daily at HH:MM (on a 24-hour clock) by the root user. The bkup_api script sends log messages to the file /home/oracle/bkup/log/obkup.log.
Chapter 6Customizing the Current Backup Configuration
6-12

To change this frequency, or to add the entry if automatic backups were not enabledwhen the database deployment was created, edit the /etc/crontab file. You must haveroot-user access to edit this file, so you must connect as the opc user and then run thecommand sudo -s to start a root-user shell.
Customizing the Current Backup Configuration on DatabaseDeployments Hosting Oracle RAC Databases
This topic does not apply to Oracle Cloud Infrastructure.
You can customize many of the characteristics of the backupconfiguration.
Topics
• Customizing How the Database Is Backed Up
• Customizing Which System Files Are Backed Up
• Customizing Which Database Configuration Files Are Backed Up
• Customizing Which Grid Infrastructure Configuration Files Are Backed Up
• Customizing the Recovery Window for Backups to Local Storage
• Customizing the Recovery Window for Backups to Cloud Storage
• Customizing the Time of Automatic Daily Backups
Customizing How the Database Is Backed Up
To change how the Oracle database is backed up, you use the RMAN utility. Forinformation about using RMAN, see Oracle Database Backup and Recovery User'sGuide for Release 12.2, 12.1 or 11.2.
Caution:
Do not use the RMAN utility to change the retention period.
To view the current RMAN configuration, use the RMAN command SHOW ALL:
1. Connect as the opc user to the compute node.
For detailed instructions, see Connecting to a Compute Node Through SecureShell (SSH).
2. Change to the oracle user:
$ sudo -s# su - oracle
3. Start an RMAN session:
$ rman target=/...RMAN>
Chapter 6Customizing the Current Backup Configuration
6-13
4. Enter the SHOW ALL command:
RMAN> show all;...
A listing of your configuration is displayed.
5. Use RMAN commands to make any changes to your configuration.
6. Exit the RMAN session:
RMAN> exit;$
Customizing Which System Files Are Backed Up
To change which system files and directories are backed up:
1. Connect as the opc user to the compute node.
For detailed instructions, see Connecting to a Compute Node Through SecureShell (SSH).
2. Edit the contents of the /opt/oracle/dcs/rdbaas/config/oscfg.spec file.
The backup feature provided by Oracle Database Cloud Service backs up the filesand folders listed in this specification file.
Customizing Which Database Configuration Files Are Backed Up
To change which database configuration files are backed up:
1. Connect as the opc user to the compute node.
For detailed instructions, see Connecting to a Compute Node Through SecureShell (SSH).
2. Edit the contents of the /opt/oracle/dcs/rdbaas/config/dbcfg.spec file.
The backup feature provided by Oracle Database Cloud Service backs up the filesand folders listed in this specification file.
Customizing Which Grid Infrastructure Configuration Files Are Backed Up
To change which grid infrastructure configuration files are backed up:
1. Connect as the opc user to the compute node.
For detailed instructions, see Connecting to a Compute Node Through SecureShell (SSH).
2. Edit the contents of the /opt/oracle/dcs/rdbaas/config/gicfg.spec file.
The backup feature provided by Oracle Database Cloud Service backs up the filesand folders listed in this specification file.
Chapter 6Customizing the Current Backup Configuration
6-14

Customizing the Recovery Window for Backups to Local Storage
Note:
If you have used the update rdk subcommand of the raccli utility to update thecloud tooling to 16.4.5 or later, you must manually update the opc installer forthe Oracle Database Cloud Backup Module before you use the updatebackupconfig subcommand. For instructions, see in Updating the cloud toolingon a deployment hosting Oracle RAC requires manual update of the OracleDatabase Cloud Backup Module in Known Issues for Oracle Database CloudService.
To change the recovery window for backups to local storage:
1. Connect as the opc user to the compute node.
For detailed instructions, see Connecting to a Compute Node Through SecureShell (SSH).
2. Enter this raccli command:
$ raccli update backupconfig -params '{"diskRecoveryWindow" : days}'
where days is the number of days for which you want to retain backups.
Customizing the Recovery Window for Backups to Cloud Storage
Note:
If you have used the update rdk subcommand of the raccli utility to update thecloud tooling to 16.4.5 or later, you must manually update the opc installer forthe Oracle Database Cloud Backup Module before you use the updatebackupconfig subcommand. For instructions, see in Updating the cloud toolingon a deployment hosting Oracle RAC requires manual update of the OracleDatabase Cloud Backup Module in Known Issues for Oracle Database CloudService.
To change the recovery window for backups to the Oracle Storage Cloud container:
1. Connect as the opc user to the compute node.
For detailed instructions, see Connecting to a Compute Node Through SecureShell (SSH).
2. Enter this raccli command:
$ raccli update backupconfig -params '{"ossRecoveryWindow" : days}'
where days is the number of days for which you want to retain backups.
Chapter 6Customizing the Current Backup Configuration
6-15

Customizing the Time of Automatic Daily Backups
Note:
If you have used the update rdk subcommand of the raccli utility to update thecloud tooling to 16.4.5 or later, you must manually update the opc installer forthe Oracle Database Cloud Backup Module before you use the updatebackupconfig subcommand. For instructions, see in Updating the cloud toolingon a deployment hosting Oracle RAC requires manual update of the OracleDatabase Cloud Backup Module in Known Issues for Oracle Database CloudService.
To change the time of day when daily automatic backups are performed:
1. Connect as the opc user to the compute node.
For detailed instructions, see Connecting to a Compute Node Through SecureShell (SSH).
2. Enter this raccli command:
$ raccli update backupconfig -params '{"cronDate" : "time"}'
where time is the time (using 24-hour, HH:MM format) when daily backups are tooccur. For example, "02:45" is 2:45 AM, and "14:45" is 2:45 PM.
Changing the Backup Configuration to a Different BackupDestination
With Oracle Database Cloud Service, you can change the backup destination for yourdatabase deployment after creating it.
When a database deployment is created, it is configured with one of the followingbackup destinations:
• Both Cloud Storage and Local Storage
• Cloud Storage Only (not currently available for database deployments that useOracle RAC)
• None
The instructions in this topic describe how to switch from one of these destinations toanother in an existing database deployment. For background information on thedestinations, see About Backing Up Database Deployments on Database CloudService.
Chapter 6Changing the Backup Configuration to a Different Backup Destination
6-16

Note:
The Oracle Database Cloud Service console does not currently recognizechanges to the backup destination made by using the bkup.cfg file with thebackup assistant. Therefore, the console will not reflect the new backupdestination and may not display any backups taken, depending on what backupdestination change you have made. If the backups are not displayed, you willnot be able to use the Oracle Database Cloud Service console to performrecovery.
Prerequisites
• If you are switching to the backup destination Both Cloud Storage and LocalStorage, you must increase the size of the local storage used for backups. Use theExtend Backup Storage Volume option of the Oracle Database Cloud Serviceconsole’s scaling feature to add storage such that the backup storage is 1.7 timesthe size of your database storage. For instructions, see Scaling a DatabaseDeployment.
Note:
Older deployments do not support the Extend Backup Storage Volumeoption, and an error is displayed when you try to use it. In this case, youmust manually add backup storage. For instructions, see Increasing LocalStorage for Backups on Older Database Deployments.
• If you are switching to the backup destination Both Cloud Storage and LocalStorage or Cloud Storage Only, you must have an Oracle Storage Cloud Servicecontainer in your account that is reserved for backups. If you don’t have one, youmust create one. See Creating Containers in Using Oracle Storage Cloud Service,or see the tutorial Oracle Storage Cloud Service: Creating Containers Using theREST API.
The commands you use to change the backup destination depend on the type ofdatabase running in the database deployment.
Topics
• Changing the Backup Configuration on Database Deployments Hosting Single-Instance Databases
• Changing the Backup Configuration on Database Deployments Hosting OracleRAC Databases
Chapter 6Changing the Backup Configuration to a Different Backup Destination
6-17

Changing the Backup Configuration on Database DeploymentsHosting Single-Instance Databases
Oracle Database Cloud Service allows you to change the backup destination for yourdatabase deployments after creating them.
Before changing the backup destination, make sure you have performed applicable Prerequisites.
1. Connect as the oracle user to the compute node.
For detailed instructions, see Connecting to a Compute Node Through SecureShell (SSH).
2. Start an RMAN session:
$ rman target=/...RMAN>
3. Delete any existing backups.
RMAN> delete backup;
All backups for this database recorded in the RMAN repository are deleted. (Thisprocess may take several minutes.)
4. Exit the RMAN session:
RMAN> exit;
5. If you are switching from the None destination, and this is the first time you havedone so, you must configure Transparent Data Encryption (TDE). Run thefollowing command:
$ /var/opt/oracle/dbaascli/dbaascli tde config --ks_login auto
TDE provides encryption of database files at the file level. For information aboutTDE, including auto login, see Oracle Database Advanced Security Guide forRelease 12.2, 12.1, or 11.2.
6. Close your connection to the compute node as the oracle user.
7. Connect as the opc user to the compute node.
For detailed instructions, see Connecting to a Compute Node Through SecureShell (SSH).
8. Start a root-user command shell:
$ sudo -s#
9. Change to the location for the backup configuration file:
# cd /var/opt/oracle/ocde/assistants/bkup/
10. If a bkup.cfg file already exists and contains configuration details, rename the fileto make it a backup in case you want to recover that configuration later, forexample:
# ls bkup*.cfgbkup.cfg
Chapter 6Changing the Backup Configuration to a Different Backup Destination
6-18

# mv bkup.cfg bkup_bak.cfg# ls bkup*.cfgbkup_bak.cfg
11. Open bkup.cfg in an editor, for example:
# vim bkup.cfg
12. Enter configuration information for the new backup destination you want to use:
For the Both Cloud Storage and Local Storage destination, enter:
# The bkup.cfg file will hold all the config info for BKUPbkup_cfg_files=yesbkup_disk=yesbkup_disk_recovery_window=disk-daysbkup_oss=yesbkup_oss_url=oss-urlbkup_oss_user=usernamebkup_oss_passwd=passwordbkup_oss_recovery_window=oss-days
For the Cloud Storage Only destination, enter:
# The bkup.cfg file will hold all the config info for BKUPbkup_cfg_files=yesbkup_disk=nobkup_oss=yesbkup_oss_url=oss-urlbkup_oss_user=usernamebkup_oss_passwd=passwordbkup_oss_recovery_window=oss-days
where
• disk-days is the number of days for which backups and archived redo logs aremaintained on local storage. The interval always ends with the current timeand extends back in time for the specified number of days.
• oss-url is the REST endpoint of the cloud storage container.
• username is the username for accessing the cloud storage container.
• password is the password for accessing the cloud storage container.
• oss-days is the number of days for which backups and archived redo logs aremaintained on cloud storage. The interval always ends with the current timeand extends back in time for the specified number of days.
13. Prepare bkup.cfg to be used as follows.
# chown root bkup.cfg # chmod 0600 bkup.cfg
14. Run the backup assistant with the bkup.cfg file:
# ./bkup -cfg bkup.cfg
15. As a security measure, delete the bkup.cfg file after the backup assistantcompletes:
# rm bkup.cfg
Chapter 6Changing the Backup Configuration to a Different Backup Destination
6-19

Changing the Backup Configuration on Database DeploymentsHosting Oracle RAC Databases
This topic does not apply to Oracle Cloud Infrastructure.
Oracle Database Cloud Service allows you to change the backupdestination for your database deployments after creating them.
Before changing the backup destination, make sure you have performed applicable Prerequisites.
Note:
If you have used the update rdk subcommand of the raccli utility to update thecloud tooling to 16.4.5 or later, you must manually update the opc installer forthe Oracle Database Cloud Backup Module before you use the updatebackupconfig subcommand. For instructions, see in Updating the cloud toolingon a deployment hosting Oracle RAC requires manual update of the OracleDatabase Cloud Backup Module in Known Issues for Oracle Database CloudService.
1. Connect as the opc user to compute node 1.
For detailed instructions, see Connecting to a Compute Node Through SecureShell (SSH).
2. Use the raccli update backupconfig command to update the configuration.
To change the backup destination to Both Cloud Storage and Local Storage,enter the following command. Line breaks have been added for clarity; you mustenter the command on a single line.
$ raccli update backupconfig -params '{"diskEnabled" : true, "ossEnabled" : true, "cloudStorageUser" : "username", "cloudStoragePwd" : "password", "cloudStorageContainerUrl" : "container-URL"}'
where:
• username is the user name of an Oracle Cloud user who has read/write accessto the container.
• password is the password of the user specified in cloudStorageUser.
• container-URL is the URL of the Oracle Storage Cloud container.
Increasing Local Storage for Backups on Older DatabaseDeployments
This topic does not apply to Oracle Cloud Infrastructure.
Chapter 6Changing the Backup Configuration to a Different Backup Destination
6-20

Older database deployments on Oracle Database Cloud Service donot support the Extend Backup Storage Volume feature, so you mustmanually add backup storage.
To create a larger storage volume and use it for backups:
1. Create a storage volume for backups. Its size should be 1.7 times the spaceallocated for data storage.
Use the Create New Storage Volume option of the Oracle Database CloudService console’s scaling feature to add a storage volume of the appropriate size.For instructions, see Scaling a Database Deployment.
2. Connect as the opc user to the compute node.
For detailed instructions, see Connecting to a Compute Node Through SecureShell (SSH).
3. Confirm the addition of the storage volume by listing the devices:
$ lsblkNAME MAJ:MIN RM SIZE RO TYPE MOUNTPOINTxvdb 202:16 0 21G 0 disk��xvdb1 202:17 0 200M 0 part /boot��xvdb2 202:18 0 15.8G 0 part /��xvdb3 202:19 0 4G 0 part [SWAP]xvdc 202:32 0 10G 0 disk��xvdc1 202:33 0 10G 0 part /u04xvdd 202:48 0 7G 0 disk��xvdd1 202:49 0 7G 0 part /u03xvde 202:64 0 30G 0 disk��xvde1 202:65 0 30G 0 part /u01xvdf 202:80 0 11G 0 disk��xvdf1 202:81 0 11G 0 part /u02xvdg 202:96 0 17G 0 disk��xvdg1 202:97 0 17G 0 part /u05
4. Change from the opc user to the oracle user:
$ sudo su - oracle
5. As the oracle user, use RMAN to shut down the database instance:
$ rman target=/...RMAN> shutdown immediate;
using target database control file instead of recovery catalogdatabase closeddatabase dismountedOracle instance shut down
Quit RMAN and exit the oracle user session:
RMAN> quit;
Recovery Manager complete.$ exit
6. As the root user, copy the content from /u03 (which you have been using forbackup storage) to /u05:
# cp -R /u03/* /u05/
7. Unmount the /u05 and /u03 mount points:
Chapter 6Changing the Backup Configuration to a Different Backup Destination
6-21

# umount /u05/# umount /u03/
Note:
The Linux unmount command is umount (with no n).
8. Mount the partition of new storage volume you just created to /u03, which OracleDatabase Cloud Service uses for backups. For example:
# mount /dev/xvdg1 /u03
9. Look at the results:
# lsblkNAME MAJ:MIN RM SIZE RO TYPE MOUNTPOINTxvdb 202:16 0 21G 0 disk��xvdb1 202:17 0 200M 0 part /boot��xvdb2 202:18 0 15.8G 0 part /��xvdb3 202:19 0 4G 0 part [SWAP]xvdc 202:32 0 10G 0 disk��xvdc1 202:33 0 10G 0 part /u04xvdd 202:48 0 7G 0 disk��xvdd1 202:49 0 7G 0 partxvde 202:64 0 30G 0 disk��xvde1 202:65 0 30G 0 part /u01xvdf 202:80 0 11G 0 disk��xvdf1 202:81 0 11G 0 part /u02xvdg 202:96 0 17G 0 disk��xvdg1 202:97 0 17G 0 part /u03
The old 7 GB partition xvdd1, which was previously mounted to /u03, is no longermounted at all. The new 17 GB partition xvdg1 is now mounted to /u03 and willtherefore be used for backups. Note that the space used for xvdd1 is now no longeravailable for any use.
10. Set the ownership and permissions of the mount-point directory /u03. For example:
# chown -R oracle:oinstall /u03# chmod 755 /u03
11. As the oracle user, start SQL*Plus, connect to the database as SYSDBA, and startit. For example:
$ sqlplus /nolog
SQL*Plus: Release 12.1.0.2.0 Production on Sat Feb 21 13:19:51 2015
Copyright (c) 1982, 2014, Oracle. All rights reserved.
SQL> connect sys/password as sysdbaConnected to an idle instance.SQL> startupORACLE instance started.
Total System Global Area 3170893824 bytesFixed Size 2929400 bytesVariable Size 1845497096 bytesDatabase Buffers 1308622848 bytesRedo Buffers 13844480 bytes
Chapter 6Changing the Backup Configuration to a Different Backup Destination
6-22

Database mounted.Database opened.
12. If you want to see the current setting for the limit on the total space to be used bytarget database recovery files, show the values of the parameterDB_RECOVERY_FILE_DEST, for example:
SQL> show parameter db_recovery_file_dest NAME TYPE VALUE---------------------------- ----------- ------------------------------db_recovery_file_dest string /u03/app/oracle/fast_recovery_ areadb_recovery_file_dest_size big integer 7G
13. Increase the parameter DB_RECOVERY_FILE_DEST_SIZE to use the new extra spacein /u03, for example:
SQL> alter system set db_recovery_file_dest_size=17G;
System altered.
14. Show the new value:
SQL> show parameter db_recovery_file_dest; NAME TYPE VALUE---------------------------- ----------- ------------------------------db_recovery_file_dest string /u03/app/oracle/fast_recovery_ areadb_recovery_file_dest_size big integer 17G
15. Quit SQL*Plus and log out:
SQL> quit;Disconnected from Oracle Database 12c Enterprise Edition Release 12.1.0.2.0 - 64bit Production$ exit
Disabling and Re-enabling Scheduled BackupsIf some activity you want to perform requires you to temporarily disable regularlyscheduled backups of a database deployment, you can do so by removing thescheduling information from the system-wide /etc/crontab file.
Note:
Currently, disabling and re-enabling scheduled backups is not supported forDatabase Cloud Service database deployments that use Oracle RealApplication Clusters (RAC).
Disabling Scheduled Backups
To disable scheduled backups:
1. Connect as the opc user to the compute node.
For detailed instructions, see Connecting to a Compute Node Through SecureShell (SSH).
2. Start a root-user command shell:
Chapter 6Disabling and Re-enabling Scheduled Backups
6-23

$ sudo -s#
3. Navigate to the /etc directory, which contains the system-wide crontab file:
# cd /etc
4. Make a copy of the crontab file to preserve the configuration, for example:
# cp crontab crontab.bak
5. Edit the original crontab file and remove the following lines from the file:
• The line for database backups. This line has the following format:
MM HH * * * root /var/opt/oracle/bkup_api/bkup_api bkup_start --dbname=dbname
• The line for archivelog backups. This line has one of the following formats,depending on the age of your database deployment:
0,30 * * * * root /var/opt/oracle/bkup_api/bkup_api bkup_archlogs --dbname=dbname
or
0,30 * * * * root /home/oracle/bkup/dbname/obkup -dbname=dbname -archivelog
In all lines, dbname is the name of the database that you wish to act on.
Note:
You cannot comment out these lines, you must delete them.
6. Save the file and exit from the editor.
7. Exit the root-user command shell and disconnect from the compute node:
# exit$ exit
Re-Enabling Scheduled Backups
To re-enable scheduled backups:
1. Connect to the compute node as the opc user.
For detailed instructions, see Connecting to a Compute Node Through SecureShell (SSH).
2. Start a root-user command shell:
$ sudo -s#
3. Copy the crontab.bak file you created when disabling scheduled backups to itsoriginal name, crontab:
# cp /etc/crontab.bak /etc/crontab
4. Exit the root-user command shell and disconnect from the compute node:
# exit$ exit
Chapter 6Disabling and Re-enabling Scheduled Backups
6-24

Restoring from the Most Recent BackupYou can restore the most recent backup and perform complete recovery on an OracleDatabase Cloud Service database deployment by using the Oracle Database CloudService console or, if desired, by using one of the ways listed in Other Ways toRestore from the Most Recent Backup at the end of this topic.
Restoring from the Most Recent Backup by Using the Oracle Database CloudService Console
Note:
Currently, using the console to restore from the most recent backup is notsupported for database deployments hosting an Oracle Data Guardconfiguration.
1. Go to the Backup page of the deployment you want to restore and recover:
a. Open the Oracle Database Cloud Service console.
For detailed instructions, see Accessing the Oracle Database Cloud ServiceConsole.
b. Click the database deployment you want to restore and recover.
The Oracle Database Cloud Service Overview page is displayed.
c. Click the Administration tile.
The Oracle Database Cloud Service Backup page is displayed.
2. Click Recover.
The Database Recovery overlay is displayed.
3. In the list of recovery options, select Latest. Then, click Recover.
The restore and recover process performs these steps:
• Shuts down the database
• Extracts and restores configuration files
• Prepares for recovery
• Performs the recovery
• Restarts the database after recovery
Other Ways to Restore from the Most Recent Backup
• You can use the dbaascli utility on database deployments hosting a single-instance database. See Restoring from the Most Recent Backup by Using thedbaascli Utility.
• You can use the raccli utility on database deployments hosting an Oracle RealApplication Clusters (RAC) database. See Restoring from the Most RecentBackup by Using the raccli Utility.
Chapter 6Restoring from the Most Recent Backup
6-25

Restoring from the Most Recent Backup by Using the dbaascli UtilityYou can use the dbaascli utility to restore from the most recent backup and performcomplete recovery on a database deployment hosting a single-instance database:
1. Connect as the opc user to the compute node.
For detailed instructions, see Connecting to a Compute Node Through SecureShell (SSH).
2. Start a root-user command shell:
$ sudo -s#
3. Restore the most recent backup and perform complete recovery using the orecsubcommand of the dbaascli utility:
# dbaascli orec --args -latest
The restore and recover process performs these steps:
• Shuts down the database
• Extracts and restores configuration files
• Prepares for recovery
• Performs the recovery
• Restarts the database instance after recovery
4. Exit the root-user command shell:
# exit$
Restoring from the Most Recent Backup by Using the raccli Utility
This topic does not apply to Oracle Cloud Infrastructure.
You can use the raccli utility to restore from the most recent backup and performcomplete recovery on a database deployment hosting an Oracle Real ApplicationClusters (RAC) database:
1. Connect as the opc user to the compute node.
For detailed instructions, see Connecting to a Compute Node Through SecureShell (SSH).
2. Restore the most recent backup and perform complete recovery using the createrecovery subcommand of the raccli utility:
$ raccli create recovery -latest
The restore and recover process performs these steps:
• Shuts down the database
• Extracts and restores configuration files
• Prepares for recovery
Chapter 6Restoring from the Most Recent Backup
6-26

• Performs the recovery
• Restarts the database instances after recovery
Restoring from a Specific Backup
Note:
Currently, restoring from a specific backup is not supported for databasedeployments that use Oracle Real Application Clusters (RAC).
You can restore a specific backup and perform recovery to that backup on an OracleDatabase Cloud Service database deployment by using the Oracle Database CloudService console or, if desired, by using one of the ways listed in Other Ways toRestore from a Specific Backup at the end of this topic.
Restoring from a Specific Backup by Using the Oracle Database Cloud ServiceConsole
Note:
Currently, using the console to restore from a specific backup is not supportedfor database deployments hosting an Oracle Data Guard configuration.
1. Go to the Backup page of the deployment you want to restore and recover:
a. Open the Oracle Database Cloud Service console.
For detailed instructions, see Accessing the Oracle Database Cloud ServiceConsole.
b. Click the database deployment you want to restore and recover.
The Oracle Database Cloud Service Overview page is displayed.
c. Click the Administration tile.
The Oracle Database Cloud Service Backup page is displayed.
2. In the list of backups, locate the backup you want to restore from.
3. In the entry for the backup you want to restore from, click the menu, chooseRecover and then confirm the action.
The restore and recover process performs these steps:
• Shuts down the database
• Extracts and restores configuration files
• Prepares for recovery
• Performs the recovery
• Restarts the database after recovery
Chapter 6Restoring from a Specific Backup
6-27

Other Ways to Restore from a Specific Backup
• For database deployments hosting single-instance databases, you can use thedbaascli utility. See Restoring from a Specific Backup by Using the dbaascli Utility.
Restoring from a Specific Backup by Using the dbaascli UtilityYou can use the dbaascli utility to restore from a specific backup and perform recoveryto that backup on a database deployment hosting a single-instance database or aData Guard configuration of single-instance databases.
1. Connect as the opc user to the compute node. In a Data Guard configuration,connect to the compute node hosting the primary database.
For detailed instructions, see Connecting to a Compute Node Through SecureShell (SSH).
2. Start a root-user command shell:
$ sudo -s#
3. List the available backups using the orec subcommand of the dbaascli utility.
• For normal backups:
# dbaascli orec --args -list
A list of available backups displays; for example:
Backup Tag Completion Tag Config File Location--------------------------------------------------------------------TAG20140626T191645 06/26/2014 19:16:45
TAG20140626T195118 06/26/2014 19:51:18 .../ORCL/oscfgfiles/2014_06_26/oscfgfiles_20140626_1951.tar.gz .../ORCL/ohcfgfiles/2014_06_26/ohcfgfiles_20140626_1951.tar.gz
Config files relative path to: /u03/app/oracle/fast_recovery_area
• For long-term backups:
# dbaascli orec --args -keep -list
A list of available long-term backups displays; for example:
TAG20120117T065489TAG20110117T077324TAG20100117T023955
4. Restore the specific backup you want using the orec subcommand:
• For normal backups:
# dbaascli orec --args -pitr backup-tag
• For long-term backups:
# dbaascli orec --args -keep -tag backup-tag
where backup-tag is the tag of the backup you want to restore.
The restore and recover process performs these steps:
Chapter 6Restoring from a Specific Backup
6-28

• Shuts down the database
• Extracts and restores configuration files
• Prepares for recovery
• Performs the recovery
• Restarts the database instance after recovery
In a Data Guard configuration, after the restore and recovery operation iscomplete, a message indicating that you need to run the duplicate command onthe standby instance is displayed. Perform all of the following steps to completethe operation on the standby database. In a single-instance database you onlyneed to perform the next step.
5. Exit the root-user command shell and disconnect from the compute node:
# exit$ exit
6. In the Data Guard configuration, connect to the standby instance's compute nodeas the opc user.
For detailed instructions, see Connecting to a Compute Node Through SecureShell (SSH).
7. Start a root-user command shell:
$ sudo -s#
8. Run the duplicate option of orec.
# dbaascli orec --args -duplicate
9. Exit the root-user command shell and disconnect from the compute node:
# exit$ exit
Restoring to a Specific Point in TimeYou can restore from a backup and perform recovery to a specific point in time on anOracle Database Cloud Service database deployment by using the Oracle DatabaseCloud Service console or, if desired, by using one of the ways listed in Other Ways toRestore to a Specific Point in Time at the end of this topic.
Restoring to a Specific Point in Time by Using the Oracle Database CloudService Console
Note:
Currently, using the console to restore to a specific point in time is notsupported for database deployments hosting an Oracle Data Guardconfiguration.
1. Go to the Backup page of the deployment you want to restore and recover:
a. Open the Oracle Database Cloud Service console.
Chapter 6Restoring to a Specific Point in Time
6-29

For detailed instructions, see Accessing the Oracle Database Cloud ServiceConsole.
b. Click the database deployment you want to restore and recover.
The Oracle Database Cloud Service Overview page is displayed.
c. Click the Administration tile.
The Oracle Database Cloud Service Backup page is displayed.
2. Click Recover.
The Database Recovery overlay is displayed.
3. In the list of recovery options, select Date and Time or System Change Number(SCN) to indicate how you want to specify the end point of the recovery operation.Then, enter the appropriate value.
Note:
If specified, the recovery date and time values are subject to the UTC timezone.
4. Click Recover.
The restore and recover process performs these steps:
• Shuts down the database
• Extracts and restores configuration files
• Prepares for recovery
• Performs the recovery
• Restarts the database after recovery
Other Ways to Restore to a Specific Point in Time
• For database deployments hosting single-instance databases, you can use thedbaascli utility. See Restoring to a Specific Point in Time by Using the dbaascliUtility.
• For database deployments hosting Oracle Real Application Clusters (RAC)databases, you can use the raccli utility. See Restoring to a Specific Point in Timeby Using the raccli Utility.
Restoring to a Specific Point in Time by Using the dbaascli UtilityYou can use the dbaascli utility to restore from a backup and perform recovery to aspecific point in time on a database deployment hosting a single-instance database ora Data Guard configuration.
1. Connect as the opc user to the compute node. In a Data Guard configuration,connect to the compute node hosting the primary database.
For detailed instructions, see Connecting to a Compute Node Through SecureShell (SSH).
2. Start a root-user command shell:
Chapter 6Restoring to a Specific Point in Time
6-30

$ sudo -s#
3. Restore the most recent backup and perform complete recovery using the orecsubcommand of the dbaascli utility:
# dbaascli orec --args -scn SCN
where SCN is the system change number (SCN) for the end point of the recovery.
The restore and recover process performs these steps:
• Shuts down the database
• Extracts and restores configuration files
• Prepares for recovery
• Performs the recovery
• Restarts the database instance after recovery
In a Data Guard configuration, after the restore and recovery operation iscomplete, a message indicating that you need to run the duplicate command onthe standby instance is displayed. Perform all of the following steps to completethe operation on the standby database. In a single-instance database you onlyneed to perform the next step.
4. Exit the root-user command shell and disconnect from the compute node:
# exit$ exit
5. In the Data Guard configuration, connect to the standby instance's compute nodeas the opc user.
For detailed instructions, see Connecting to a Compute Node Through SecureShell (SSH).
6. Start a root-user command shell:
$ sudo -s#
7. Run the duplicate option of orec.
# dbaascli orec --args -duplicate
8. Exit the root-user command shell and disconnect from the compute node:
# exit$ exit
Restoring to a Specific Point in Time by Using the raccli Utility
This topic does not apply to Oracle Cloud Infrastructure.
You can use the raccli utility to restore from a backup and perform recovery to aspecific point in time on a database deployment hosting an Oracle Real ApplicationClusters (RAC) database:
1. Connect as the opc user to the compute node.
Chapter 6Restoring to a Specific Point in Time
6-31

For detailed instructions, see Connecting to a Compute Node Through SecureShell (SSH).
2. Perform recovery to a specific point in time using the create recoverysubcommand of the raccli utility:
$ raccli create recovery -pitr -scn SCN
or
$ raccli create recovery -pitr -timestamp time
where SCN is the system change number (SCN) for the end point of the recoveryand time is time (in the format MM/DD/YYYY HH24:MI:SS) for the end point of therecovery.
The restore and recover process performs these steps:
• Shuts down the database
• Extracts and restores configuration files
• Prepares for recovery
• Performs the recovery
• Restarts the database instances after recovery
Recreating an Unrecoverable Database Deployment From aBackup to Cloud Storage
For a database deployment on Oracle Database Cloud Service that hosts a single-instance database or a Data Guard configuration of single-instance databases, youcan use the mrec media recovery utility to recreate the deployment if it cannot berestored and recovered using the orec command or RMAN. This situation could occurif you've deleted critical configuration files or data files (such as the database redo logfiles, for example), or if something else has happened that caused the deployment tobe lost.
The mrec utility restores the database deployment to the point of the last backup. Thisis equivalent to restoring the database and configuration from an external tape device.The mrec utility should be considered a last resource and used only when a databasedeployment cannot be restored in any other way.
Before You Begin
To recreate a deployment using the mrec utility, the following conditions must be met:
• The deployment that you want to recreate (referred to as the original deployment)must have been created using the Oracle Database Cloud Service service level,not the Oracle Database Cloud Service - Virtual Image service level.
• A backup of the original deployment, including configuration files, must exist incloud storage. The recreated deployment will be restored up to the latest backupavailable in cloud storage (data files and configuration files). If such a backupdoesn’t exist, you can't use mrec to restore the deployment.
You must also know the following:
• The settings used to create the original deployment.
Chapter 6Recreating an Unrecoverable Database Deployment From a Backup to Cloud Storage
6-32

• The credentials and URL of the Oracle Storage Cloud Service instance to whichthe original deployment is backed up.
• The database system identifier (SID) associated with the original deployment.
Procedure
Perform the following steps to recreate a database deployment using mrec. If you arerecreating a deployment hosting a Data Guard configuration, perform steps on thecompute node hosting the primary database unless you are directed otherwise.
1. Use the Create Service wizard to create a new database deployment of the sametype as the original deployment. See Creating a Customized DatabaseDeployment. The backup of the original deployment will be restored to this newdeployment.
Make sure you specify the following:
• The Oracle Database Cloud Service service level.
• The same Oracle Database version and software edition as the originaldeployment.
• On the Service Details page, the same settings as the original deployment. Ata minimum, the compute shape, storage capacity, database SID, Data Guardconfiguration, and backup and recovery configuration settings must beidentical to those of the original deployment. If the compute node associatedwith the original deployment still exists, a different deployment name can beused.
2. Reduce the newly created database deployment to a minimal configuration:
a. Connect as the opc user to the compute node associated with the newlycreated database deployment.
For detailed instructions, see Connecting to a Compute Node Through SecureShell (SSH).
b. Start a root-user command shell:
$ sudo -s#
c. Run the deinstall script:
# /var/opt/oracle/misc/deinstall.pl...INFO : PLEASE REBOOT the VM before re-running ocde/dbsetup.sh
d. Reboot the compute node:
# reboot...The system is going down for reboot NOW!
e. Close your connection to compute node if it is not automatically closed due tothe reboot.
3. If you are recreating a Data Guard configuration, repeat the preceding step on thecompute node hosting the standby database.
4. Prepare the newly created deployment so mrec can be used:
a. After giving the compute node associated with the newly created deploymenttime to reboot, connect to it as the opc user.
Chapter 6Recreating an Unrecoverable Database Deployment From a Backup to Cloud Storage
6-33
b. Start a root-user command shell:
$ sudo -s#
c. Edit (or create, if necessary) the file /var/opt/oracle/ocde/sm_params.cfg,giving it the following content:
adminPassword=passwordcloudStorageContainer=backup-containercloudStorageUser=storage-usernamecloudStoragePwd=storage-password
Where:
• password is the administrator password specified when the new databasedeployment was created.
• backup-container is the fully qualified name of the storage container wherebackups are stored. For example, https://exampledomain.storage.oraclecloud.com/v1/Storage-exampledomain/
dbcsbackups. Do not enclose this value in quotation marks.
• storage-username is the user name of the Oracle Cloud user to use whenaccessing the storage container.
• storage-password is the password of the user specified in cloudStorageUser.
Note:
As a security measure, this file will be deleted when you run the ocdescript later.
d. Update the timestamp on the sm_params.lk file:
# touch /var/opt/oracle/ocde/sm_params.lk
e. Run the ocde script to execute the prep and sda assistants:
# /var/opt/oracle/ocde/ocde -alist='prep sda' -firstrunStarting OCDE...#### Completed OCDE Successfully ####
This configuration will take some time to complete.
f. Keep this connection open for later use.
5. If you are recreating a Data Guard configuration, repeat the preceding step on thecompute node hosting the standby database. Close the connection to the computenode that hosts the standby database after the last step completes.
6. Create a new oss.cfg configuration file with the exact same parameters andvalues as those in the oss.cfg file of the original deployment:
a. Connect to the original deployment as opc user and start a root-user commandshell. If the original deployment is a Data Guard configuration, connect to thecompute node hosting the primary database.
b. View the contents of the original deployment’s oss.cfg file:
# cat /home/oracle/bkup/SID/oss.cfg
Chapter 6Recreating an Unrecoverable Database Deployment From a Backup to Cloud Storage
6-34

(On older database deployments the file is located at /home/oracle/bkup/oss.cfg.)
Copy the parameters in the file. The same parameters and values must beused in the oss.cfg file for the new deployment.
If you can’t access the oss.cfg file for the original deployment, these are theparameters you’ll need to specify:
oss_tid=storage-service-identity-domainoss_sname=storage-service-nameoss_user=storage-service-admin-user-nameoss_passwd=storage-service-admin-user-passwordoss_url=storage-service-container-URLoss_auth_url=storage-service-authentication-URL
For example:
oss_tid=usoracle04791oss_sname=dbaasossoss_user=admin-user-nameoss_passwd=admin-user-passwordoss_url="https://storage.us2.oraclecloud.com/v1/dbaasoss-usoracle04791/mycontainer"oss_auth_url="https://storage.us2.oraclecloud.com/auth/v1.0"
c. Switch back to your connection to the new deployment. If the deploymenthosts a Data Guard configuration, switch back to the connection to thecompute node hosting the primary database.
d. Create an oss.cfg file that contains the parameters used in the oss.cfg file ofthe original deployment:
# cd /var/opt/oracle/mrec# vim oss.cfg
e. Change ownership of the new oss.cfg file from the root user to the oracleuser. Also change permissions:
# chown oracle:oinstall oss.cfg# chmod 0600 oss.cfg
7. While still in the root-user command shell connection to the new deployment, runthe mrec utility:
# cd /var/opt/oracle/mrec# ./mrec -oss_cfgfile ./oss.cfg-old_hostname hostname-of-node-to-restore -sid SID-of-instance-to-restore
where:
• hostname-of-node-to-restore is the simple name of the compute node torestore (doesn't need to be fully qualified). For example, prod01.
• SID-of-instance-to-restore is the database system identifier (SID) of thedatabase instance to restore. For example, orcl.
The mrec utility pulls files over from the original deployment, installs the moduleused for cloud backups, and attempts recovery. Information about progress andstatus is displayed in the terminal window as the utility runs. If recovery issuccessful, you’ll see a message indicating that the deployment has beenrecovered and is in an open state. The amount of time this takes depends on thesize of the deployment that you’re recovering.
Chapter 6Recreating an Unrecoverable Database Deployment From a Backup to Cloud Storage
6-35

8. If you are recreating a database deployment hosting a Data Guard configuration,you need to close and open each PDB.
a. Switch to the oracle user:
# su - oracle$
b. Invoke SQL*Plus.
$ sqlplus '/ as sysdba'
c. Alter your session to connect to each PDB, and then close and reopen eachPDB.
SQL> ALTER SESSION SET CONTAINER = pdb-name;SQL> ALTER PLUGGABLE DATABASE CLOSE IMMEDIATE;SQL> ALTER PLUGGABLE DATABASE OPEN;
d. Log out of SQL*Plus.
SQL> exit;
e. Return to being the root user.
$ exit#
9. If you are recreating a database deployment hosting a Data Guard configuration,perform this step to recreate the standby database.
$ export HOSTNAME=`hostname -s`$ /var/opt/oracle/ocde/assistants/dg/dgcc -out /var/opt/oracle/ocde/res/dg_mrec.out
10. Close your connection to the compute node.
Chapter 6Recreating an Unrecoverable Database Deployment From a Backup to Cloud Storage
6-36

7Patching Database Cloud Service
This section explains how to apply a patch to Oracle Database Cloud Service, and rollback the patch as necessary.
Note:
This section does not apply to database deployments created using theDatabase Cloud Service - Virtual Image service level. Such deployments do notinclude the cloud tooling described in this section. Patching is not supported byOracle with the Database Cloud Service - Virtual Image service level.
Topics
• Viewing Available Patches
• Checking Prerequisites Before Applying a Patch
• Applying a Patch
• Rolling Back a Patch or Failed Patch
• Applying a Patch to a Test Deployment
• Patching a Hybrid DR Deployment
• The dbpatchm.cfg Configuration File
For general information about patching Oracle Database, see "Patch Set Updates andRequirements for Upgrading Oracle Database" in the Oracle Database Upgrade Guidefor Release 12.2, 12.1 or 11.2.
Viewing Available PatchesYou can view a list of patches you can apply to a Database Cloud Service databasedeployment by using the Oracle Database Cloud Service console or, if desired, byusing one of the ways listed in Other Ways to View Available Patches at the end of thistopic.
Viewing Available Patches by Using the Oracle Database Cloud Service Console
1. Go to the Patching page for the database deployment on which you want to checkpatching:
a. Open the Oracle Database Cloud Service console.
For detailed instructions, see Accessing the Oracle Database Cloud ServiceConsole.
b. Click the database deployment on which you want to check patching.
The Oracle Database Cloud Service Overview page is displayed.
7-1

c. Click the Administration tile and then click the Patching tab.
The Oracle Database Cloud Service Patching page is displayed.
2. A list of patches you can apply appears in the Available Patches section.
Other Ways to View Available Patches
• For database deployments hosting a single-instance database, you can use thedbpatchm subcommand of the dbaascli utility. See Viewing Available Patches byUsing the dbpatchm Subcommand.
• For database deployments hosting an Oracle Data Guard configuration of single-instance databases, you can use the dbpatchmdg utility. See Viewing AvailablePatches by Using the dbpatchmdg Utility.
Viewing Available Patches by Using the dbpatchm SubcommandYou can use the dbpatchm subcommand of the dbaascli command to check whetherany patches are available.
1. Connect as the opc user to the compute node.
For detailed instructions, see Connecting to a Compute Node Through SecureShell (SSH).
2. Start a root-user command shell:
$ sudo -s#
3. View available patches:
# dbaascli dbpatchm --run -list_patches
A patch update is available if the command response includes the "INFO: imagesavailable for patching" message. The patch ID will be displayed as part of thecommand response. This patch ID can be used to download and apply the patch.
4. Exit the root-user command shell:
# exit$
Viewing Available Patches by Using the dbpatchmdg UtilityYou can use the list_patches option of the dbpatchmdg utility to view available patchesin a database deployment hosting an Oracle Data Guard configuration of single-instance databases.
1. Connect as the opc user to the compute node.
For detailed instructions, see Connecting to a Compute Node Through SecureShell (SSH).
2. Start a root-user command shell:
$ sudo -s#
3. View available patches:
# dbpatchmdg -list_patches
Chapter 7Viewing Available Patches
7-2

The patch ID will be displayed as part of the command response. This patch IDcan be used to download and apply the patch.
4. Exit the root-user command shell:
# exit$
Checking Prerequisites Before Applying a PatchBefore you apply a patch, you can check its prerequisites to make sure that it can besuccessfully applied by using the Oracle Database Cloud Service console or, ifdesired, by using one of the ways listed in Other Ways to Check Prerequisites BeforeApplying a Patch at the end of this topic.
The prerequisites-checking operation:
• Confirms that the patch is available for download.
• Verifies that there is enough space in the /u01 directory to apply the patch.
• Compares the patch’s prerequisites to the database deployment by running opatchprereq commands.
Checking Prerequisites Before Applying a Patch by Using the Oracle DatabaseCloud Service Console
Before You Begin
Before checking patch prerequisites, make sure the database deployment has thelatest cloud tooling because some patches require a certain minimum level of cloudtooling. For more information, see Updating the Cloud Tooling on Database CloudService.
Procedure
1. Go to the Patching page for the database deployment on which you want to checkpatching:
a. Open the Oracle Database Cloud Service console.
For detailed instructions, see Accessing the Oracle Database Cloud ServiceConsole.
b. Click the database deployment on which you want to check patching.
The Oracle Database Cloud Service Overview page is displayed.
c. Click the Administration tile and then click the Patching tab.
The Oracle Database Cloud Service Patching page is displayed. A list ofpatches you can apply appears in the Available Patches section.
2. In the entry for the patch whose prerequisites you want to check, click the menu and then select Precheck.
If you have previously checked prerequisites for the selected patch, the PatchPrecheck Service window displays, showing the results of the previous check andasking you to perform another set of prerequisite checks. In this case, clickPrecheck to continue.
Chapter 7Checking Prerequisites Before Applying a Patch
7-3

The Patching page redisplays, showing a status message indicating thatprerequisite checks are in progress.
3. Refresh the Patching page occasionally to update the status message.
Note that prerequisite checking can take several minutes to complete.
4. When the prerequisite checks are completed, the Precheck results link isdisplayed.
Click Precheck results to display the results of the prerequisite checks.
Other Ways to Check Prerequisites Before Applying a Patch
• For database deployments hosting a single-instance database, you can use thedbpatchm subcommand of the dbaascli utility. See Checking Patch Prerequisites byUsing the dbpatchm Subcommand.
• For database deployments hosting an Oracle Data Guard configuration of single-instance databases, you can use the dbpatchmdg utility. See Checking PatchPrerequisites by Using the dbpatchmdg Utility.
• For database deployments hosting Oracle Real Application Clusters (RAC)databases, you can use the prechecks option of the raccli apply patch command.See Checking Patch Prerequisites by Using the raccli Utility.
Checking Patch Prerequisites by Using the dbpatchm SubcommandYou can use the dbpatchm subcommand of the dbaascli command to the check theprerequisites of a patch before you apply it to a database deployment hosting a single-instance database.
Before You Begin
Before checking patch prerequisites, make sure the database deployment has thelatest cloud tooling because some patches require a certain minimum level of cloudtooling. For more information, see Updating the Cloud Tooling on Database CloudService.
Procedure
1. Connect as the opc user to the compute node.
For detailed instructions, see Connecting to a Compute Node Through SecureShell (SSH).
2. Start a root-user command shell:
$ sudo -s#
3. Edit the /var/opt/oracle/patch/dbpatchm.cfg patching configuration file, setting thekeys to apply the desired patch. For more information about this file and its keys,see The dbpatchm.cfg Configuration File.
4. Check the the prerequisites of a patch:
# dbaascli dbpatchm --run -prereq
The prerequisites report displays.
5. Exit the root-user command shell:
Chapter 7Checking Prerequisites Before Applying a Patch
7-4

# exit$
Checking Patch Prerequisites by Using the dbpatchmdg UtilityYou can use the precheck_async option of the dbpatchmdg utility to check theprerequisites of a patch before you apply it to a database deployment hosting anOracle Data Guard configuration of single-instance databases.
Before You Begin
Before checking patch prerequisites, make sure the database deployment has thelatest cloud tooling because some patches require a certain minimum level of cloudtooling. For more information, see Updating the Cloud Tooling on Database CloudService.
Procedure
1. Connect as the opc user to the compute node.
For detailed instructions, see Connecting to a Compute Node Through SecureShell (SSH).
2. Start a root-user command shell:
$ sudo -s#
3. Check the prerequisites of a patch:
# dbpatchmdg -precheck_async patch_id
Additional options can be specified. See dbpatchmdg precheck_async
The prerequisites report displays.
4. Exit the root-user command shell:
# exit$
Checking Patch Prerequisites by Using the raccli Utility
This topic does not apply to Oracle Cloud Infrastructure.
You can use the prechecks option of the raccli apply patchsubcommand to check the prerequisites of a patch before you applyit to a database deployment hosting an Oracle Real ApplicationClusters (RAC) database.
Before you begin
Before you precheck a patch, make sure the database deployment has the latest cloudtooling. For more information, see Updating the Cloud Tooling by Using the raccliUtility.
Procedure
1. Connect to the compute node as the opc user.
Chapter 7Checking Prerequisites Before Applying a Patch
7-5

For detailed instructions, see Connecting to a Compute Node Through SecureShell (SSH).
2. Precheck the patch using the apply patch subcommand with the -prechecks option:
$ raccli apply patch -db -tag tag-name -prechecks
Where tag-name is the name of the patch.
3. Track the progress of the precheck job to its completion by using the raccli describejob command.
Applying a PatchYou can apply a patch to a database deployment by using the Oracle Database CloudService console or, if desired, by using one of the ways listed in Other Ways to Apply aPatch at the end of this topic.
Note:
The Oracle Database Cloud Service console does not currently reflect patchinginformation if you apply a patch by using a command-line utility on a databasedeployment’s compute nodes.
Applying a Patch by Using the Oracle Database Cloud Service Console
Before You Begin
• Before you apply a patch, make sure the database deployment has the latestcloud tooling because some patches require a certain minimum level of cloudtooling. For more information, see Updating the Cloud Tooling on Database CloudService.
• Before you apply a patch, you should back up the deployment. For instructions,see Creating an On-Demand Backup.
Procedure
1. Go to the Patching page of the database deployment to which you want to apply apatch:
a. Open the Oracle Database Cloud Service console.
For detailed instructions, see Accessing the Oracle Database Cloud ServiceConsole.
b. Click the database deployment to which you want to apply a patch.
The Oracle Database Cloud Service Overview page is displayed.
c. Click the Administration tile and then click the Patching tab.
The Oracle Database Cloud Service Patching page is displayed. A list ofpatches you can apply appears in the Available Patches section.
2. In the entry for the patch you want to apply, click the menu and then selectPatch.
The Patch Service window displays.
Chapter 7Applying a Patch
7-6
3. If you want errors to be ignored during the patching operation, select the Forceapply patch option. Then, click Patch.
If the Force apply patch option is selected, patch conflicts or errors discoveredduring the precheck stage of the patching operation are ignored and the patch willbe applied (space permitting). If the option is not selected and conflicts or errorsare discovered, the patch will not be applied.
The Patch Service window closes and the patching operation begins.
The Administration tile shows the starting time of the patching operation and aPatching... message replaces the Patch button.
When the patching operation completes, the Patching page shows the completiontime of the patching operation, and a log of the operation’s activities appears in theDetails of Last Patching Activity section. If the operation was successful, the patchis removed from the list of patches in the Available Patches. If the operation failed,the patch remains in the list. In this case, check the Details of Last PatchingActivity section for information about the failure.
Note:
Patching operations are performed with a minimum of impact on thefunctioning of the database. For database deployments that includemultiple compute nodes, patching operations are performed in a rollingmanner, one compute node at a time, in order to minimize impact on thedatabase.
Other Ways to Apply a Patch
• For database deployments hosting a single-instance database, you can use thedbpatchm subcommand of the dbaascli utility. See Applying a Patch by Using thedbpatchm Subcommand.
• For database deployments hosting an Oracle Data Guard configuration of single-instance databases, you can use the dbpatchmdg utility. See Applying a Patch byUsing the dbpatchmdg Utility.
• For database deployments hosting an Oracle Real Application Clusters (RAC)database, you can use the raccli utility. See Applying a Patch by Using the raccliUtility.
Applying a Patch by Using the dbpatchm SubcommandYou can use the dbpatchm subcommand of the dbaascli utility to apply a patch to adatabase deployment hosting a single-instance database.
Before you begin
• Before you apply a patch, make sure the database deployment has the latestcloud tooling because some patches require a certain minimum level of cloudtooling. For more information, see Updating the Cloud Tooling by Using thedbpatchm Subcommand.
• Before you apply a patch, you should back up the deployment. For instructions,see Creating an On-Demand Backup.
Chapter 7Applying a Patch
7-7

Procedure
To apply a patch to a database deployment by using the dbpatchm subcommand:
1. Connect to the compute node as the opc user.
For detailed instructions, see Connecting to a Compute Node Through SecureShell (SSH).
2. Start a root-user command shell:
$ sudo -s#
3. If you have not already done so, edit the /var/opt/oracle/patch/dbpatchm.cfgpatching configuration file, setting the keys to apply the desired patch. For moreinformation about this file and its keys, see The dbpatchm.cfg Configuration File.
4. Apply the patch to the deployment using the dbpatchm subcommand of dbaascli:
# dbaascli dbpatchm --run -apply
The dbpatchm subcommand displays progress as the patch is applied.
Note:
Patching operations are performed with a minimum of impact on thefunctioning of the database. However, during part of the operation thedatabase is shut down for a period of time, thus making it inaccessible.
5. Exit the root-user command shell:
# exit$
Applying a Patch by Using the dbpatchmdg UtilityYou can use the apply_async option of the dbpatchmdg utility to apply a patch to adatabase deployment hosting an Oracle Data Guard configuration of single-instancedatabases.
Before you begin
• Before you apply a patch, make sure the database deployment has the latestcloud tooling because some patches require a certain minimum level of cloudtooling. For more information, see Updating the Cloud Tooling on Database CloudService.
• Before you apply a patch, you should back up the deployment. For instructions,see Creating an On-Demand Backup.
Procedure
To apply a patch to a database deployment by using the apply_async option:
1. Connect to the compute node as the opc user.
Chapter 7Applying a Patch
7-8
For detailed instructions, see Connecting to a Compute Node Through SecureShell (SSH).
2. Start a root-user command shell:
$ sudo -s#
3. Apply the patch to the deployment using the apply_async option of dbpatchmdg:
# dbpatchmdg -apply_async patch_id
Additional options can be specified. See dbpatchmdg apply_async
4. Exit the root-user command shell:
# exit$
Applying a Patch by Using the raccli Utility
This topic does not apply to Oracle Cloud Infrastructure.
You can use the apply patch subcommand of the raccli utility toapply a patch to a database deployment hosting an Oracle RealApplication Clusters (RAC) database.
Before you begin
• Before you apply a patch, make sure the database deployment has the latestcloud tooling because some patches require a certain minimum level of cloudtooling. For more information, see Updating the Cloud Tooling by Using the raccliUtility.
• Before you apply a patch, you should back up the deployment. For instructions,see Creating an On-Demand Backup.
Procedure
To apply a patch to a database deployment by using the apply patch subcommand:
1. Connect to the compute node as the opc user.
For detailed instructions, see Connecting to a Compute Node Through SecureShell (SSH).
2. Apply a patch to the Oracle Database home using the apply patch subcommandwith the -db option:
$ raccli apply patch -db -tag tag-name
Where tag-name is the name of the patch. To find out the tag name for the latestavailable patch, see What's New for Oracle Database Cloud Service.
The Oracle Database home and Grid Infrastructure home are updated on bothcompute nodes of the deployment. The node from which you run the command istaken offline, patched, and then brought back online. Then the second node istaken offline, patched, and brought back online.
Chapter 7Applying a Patch
7-9

Rolling Back a Patch or Failed Patch
Note:
Currently, rolling back a patch is not supported for database deploymentshosting an Oracle Real Application Clusters (RAC) database.
You can roll back a patch or failed patch attempt on a database deployment by usingthe Oracle Database Cloud Service console or, if desired, by using one of the wayslisted in Other Ways to Roll Back a Patch or Failed Patch at the end of this topic.
Note:
Oracle strongly recommends against performing the rollback operation on adatabase deployment that has never had patches applied to it. You should onlyuse the rollback operation on patches that you have applied to a databasedeployment.
Note:
Beginning with the April 2015 Patch Set Update (Apr 2015 PSU), Oracleadopted a “composite” approach to patch set updates. With this compositeapproach, a rollback operation restores the software release level to theprevious patch set level instead of to the base software release level. Forexample, if you roll back the April 2015 Patch Set Update, the software isrestored to the January 2015 Patch Set Update release level, not the baserelease level.
Rolling Back a Patch or Failed Patch by Using the Oracle Database CloudService Console
To roll back the last patch or failed patch attempt by using the Oracle Database CloudService console:
1. Go to the Patching page of the database deployment on which you want to rollback a patch:
a. Open the Oracle Database Cloud Service console.
For detailed instructions, see Accessing the Oracle Database Cloud ServiceConsole.
b. Click the database deployment on which you want to roll back a patch.
The Oracle Database Cloud Service Overview page is displayed.
c. Click the Administration tile and then click the Patching tab.
The Oracle Database Cloud Service Patching page is displayed.
Chapter 7Rolling Back a Patch or Failed Patch
7-10
2. Click Rollback.
The Patching page redisplays, showing a status message that your request hasbeen submitted, the Administration tile shows the starting time of the rollbackoperation, and a Rolling back... message replaces the Rollback button.
Note:
Rollback operations are performed with a minimum of impact on thefunctioning of the database. However, during a patch rollback operation thedatabase may be shut down for a short period of time, thus making itinaccessible.
Other Ways to Roll Back a Patch or Failed Patch
• For database deployments hosting a single-instance database, you can use thedbpatchm subcommand of the dbaascli utility. See Rolling Back a Patch or FailedPatch by Using the dbpatchm Subcommand.
• For database deployments hosting an Oracle Data Guard configuration of single-instance databases, you can use the dbpatchmdg utility. See Rolling Back a Patchor Failed Patch by Using the dbpatchmdg Utility.
Rolling Back a Patch or Failed Patch by Using the dbpatchmSubcommand
You can use the dbpatchm subcommand of the dbaascli utility to roll back the last patchor failed patch attempt to a database deployment hosting a single-instance database.
1. Connect as the opc user to the compute node.
For detailed instructions, see Connecting to a Compute Node Through SecureShell (SSH).
2. Start a root-user command shell:
$ sudo -s#
3. Roll back the last patch in the deployment using the dbpatchm subcommand ofdbaascli:
# dbaascli dbpatchm --run -rollback
The patch is removed and the database instance reverts to its previous state.
Note:
Rollback operations are performed with a minimum of impact on thefunctioning of the database. However, during part of the operation thedatabase instance is shut down, thus making it inaccessible.
4. Exit the root-user command shell:
Chapter 7Rolling Back a Patch or Failed Patch
7-11

# exit$
Rolling Back a Patch or Failed Patch by Using the dbpatchmdg UtilityYou can use the rollback_async option of the dbpatchmdg utility to roll back the lastpatch or failed patch attempt to a database deployment hosting an Oracle Data Guardconfiguration of single-instance databases.
1. Connect as the opc user to the compute node.
For detailed instructions, see Connecting to a Compute Node Through SecureShell (SSH).
2. Start a root-user command shell:
$ sudo -s#
3. Roll back the last patch in the deployment using the rollback_async option ofdbpatchmdg:
# dbpatchmdg -rollback_async patch_id
Additional options can be specified. See dbpatchmdg rollback_async
The patch is removed and the database instance reverts to its previous state.
4. Exit the root-user command shell:
# exit$
Applying a Patch to a Test DeploymentYou can use the clonedb option of the dbpatchm subcommand to apply a patch to a testdeployment of Oracle Database Cloud Service before you apply it to a live, productiondatabase deployment.
Note:
Currently, applying a patch to a test deployment is not supported for databasedeployments that use Oracle Real Application Clusters (RAC).
To apply a patch to a test deployment:
1. Using the Create Service wizard, create a test deployment on Database CloudService, providing the same information as you did when creating the livedeployment.
2. Connect as the opc user to the test deployment and then perform these steps:
a. Start a root-user command shell:
$ sudo -s#
b. Run the following commands:
Chapter 7Applying a Patch to a Test Deployment
7-12

# cd /home/oracle# ./deinstall.pl...# /var/opt/oracle/ocde/ocde -dump -alist=prep sda...#
c. Exit the root-user command shell and disconnect from the test deployment.
3. Copy the SSH private key file for the SSH key used when creating the testdeployment to the live deployment.
4. Connect as the opc user to the live deployment and then start a root-usercommand shell:
$ sudo -s#
5. Edit the /var/opt/oracle/patch/dbpatchm.cfg patching configuration file, setting thenormal keys to perform a patching operation. In addition, set the following keys:
• cloning: set this key to yes
• remotenode: set this key to the IP address of the test deployment
• sshkey_fl: set this key to value of the SSH private key file you copied to thelive deployment
• upg: set this key to upg
6. Apply the patch to the test deployment using the dbpatchm subcommand ofdbaascli:
# dbaascli dbpatchm --run -clonedb
The dbpatchm subcommand displays progress as it copies information from the livedeployment to the test deployment and then applies the patch to the testdeployment.
7. Exit the root-user command shell and disconnect from the test deployment.
After applying the patch to the test deployment, confirm appropriate application of thepatch on the test deployment. When satisfied, you can delete the test deployment andapply the patch to the live deployment.
Patching a Hybrid DR Deployment
This topic does not apply to Oracle Cloud at Customer.
This topic does not apply to Oracle Cloud Infrastructure.
You cannot use the Oracle Database Cloud Service console or the dbpatchmsubcommand of the dbaascli utility to patch the on-premises database in your HybridDR deployment. However, you can use the tools to patch the database on the cloudcompute node in your Hybrid DR deployment.
To apply quarterly patches to the databases in your Hybrid DR deployment:
1. Ensure that the on-premises database is up-to-date with patches:
a. For the April PSU, download one of the following files:
Chapter 7Patching a Hybrid DR Deployment
7-13

• From Chicago: https://storage.us2.oraclecloud.com/v1/dbcsswlibp-usoracle29538/dbaas_patch/dbcs_hdg_onprem/apr2017/hdg_patches.zip
• From Slough: https://a88717.storage.oraclecloud.com/v1/Storage-a88717/dbaas_patch/dbcs_hdg_onprem/apr2017/hdg_patches.zip
b. For the July PSU, download one of the following files:
• From Chicago: https://storage.us2.oraclecloud.com/v1/dbcsswlibp-usoracle29538/dbaas_patch/dbcs_hdg_onprem/jul2017/hdg_patches.zip
• From Slough: https://a88717.storage.oraclecloud.com/v1/Storage-a88717/dbaas_patch/dbcs_hdg_onprem/jul2017/hdg_patches.zip
c. Unzip the downloaded PSU file and follow the instructions in the README fileto install the patch and execute any required scripts.
2. Patch the database on the cloud compute node and then run the post-install script:
a. Use the Oracle Database Cloud Service console or the dbpatchm subcommandof the dbaascli utility. See Applying a Patch for details.
b. Connect as the oracle user to the compute node.
c. Run the post-install script:
• For Oracle Database 12c:
$ datapatch -verbose
• For Oracle Database 11g:
$ cd $OH/rdbms/admin$ sqlplus / as sysdbaSQL> @@catbundle.sql psu applySQL> exit;
d. Disconnect from the compute node.
After applying the patch to the databases in the Hybrid DR deployment, confirmappropriate application of the patch .
The dbpatchm.cfg Configuration FileTo perform a patching operation, the dbpatchm subcommand reads and acts on thecontent of the /var/opt/oracle/patch/dbpatchm.cfg patching configuration file. This file,which is created when the database deployment is created, provides information aboutthe locations of various files that may be used in patching operations.
Before using dbpatchm to perform a patching operation, set the value of the psunum keyin the dbpatchm.cfg file to the patch ID of the patch to apply. To find out what patchesare available, see Viewing Available Patches.
The dbpatchm.cfg file contains additional keys you can edit to customize the patchingoperation, and comment lines describing the purpose of each key and how to set itsvalue. Here is a sample dbpatchm.cfg file showing these keys and comments.
# sample config file
# oss storage container url with public access, normally should not be changed# there is a default for this now, that is set to production containeross_container_url=""
# change this following golden image zip/psu zip file to be used in patching
Chapter 7The dbpatchm.cfg Configuration File
7-14

# this will be used only if you run dbaascli/dbpatchm directly# keep these files in different location from temporary_space given below & /u01/psugold_img_loc="</tmp/db11.2.0.4.0_EE_PSU.tar.gz>"psu_zip_loc="</tmp/p19121551_112040_Linux-x86-64.zip>"
# location where the temporary files will be kept - should have 15GB space minimum# change this location if needed but do not use /u01/psu - used for conflict checktemporary_space="/u01/download";
# turn this ignore_patch_conflict to 1 to let patching ignore conflictsignore_patch_conflict=0
# turn this ignore_space_less_than_15g to 1 to let patching proceed if discspace < 15g ignore_space_less_than_15g=0
# create /var/opt/oracle/patch/files_to_save.ora with full path of directory or # files to preserve any special files you may have in your /u01/app directory. # set this to yes, if you have files_to_save.oraspecial_files="no"
# type could be "psu", "upg"type="psu"# psunum is the bugid for PSU's - needed to rollback the psu patchespsunum=
# patching method could be cloning (for temporary instance validation) or psu way# when cloning is yes, remote node IP needs to be provided and also sys passwordcloning="no"remotenode=""syspasswd=""
# ssh private key needed for cloning that needs a 2nd VM connectivity# "/root/.ssh/pat.key"sshkey_fl=""
# oracle recovery manager catalog connect string - if configuredrcatconnect=""
# data guard patching - need to provide primary and standby ip's and # private sshkeys to connect to the same# if dg_inst="yes", then all dg_ parameters need to be provideddg_inst="no"dg_primary=""dg_primary_sshkey_fl=""dg_standby=""dg_standby_sshkey_fl=""
Chapter 7The dbpatchm.cfg Configuration File
7-15

8Configuring Database Features, DatabaseOptions, and Companion Products
Oracle Database Cloud Service provides special capabilities for certain OracleDatabase features and options and for certain companion products.
Topics
• Using Oracle Real Application Clusters (RAC) in Database Cloud Service
• Using Oracle Data Guard in Database Cloud Service
• Using Oracle Real Application Clusters (RAC) and Oracle Data Guard Together inDatabase Cloud Service
• Using Oracle Multitenant in Database Cloud Service
• Using Oracle Database Vault in Database Cloud Service
• Using Oracle Application Express in Database Cloud Service
• Using the Demos PDB
• Using Oracle Enterprise Manager Cloud Control with Database Cloud Service
• Using Oracle GoldenGate Cloud Service with Database Cloud Service
Using Oracle Real Application Clusters (RAC) in DatabaseCloud Service
This topic does not apply to Oracle Cloud Infrastructure.
You can create an Oracle RAC database when creating a databasedeployment on Oracle Database Cloud Service using the OracleDatabase Cloud Service service level.
Oracle RAC enhances Oracle Database capabilities so that you can concurrently usemultiple database instances on different compute nodes. This allows you to scaleworkload across multiple database instances in order to efficiently store, update, andretrieve data.
Oracle RAC provides the software that manages multiple servers and databaseinstances as a single set of servers, called a cluster. The data files that comprise thedatabase reside on shared storage that is accessible from all servers that are part ofthe cluster. Each server in the cluster runs the Oracle RAC software.
Unlike a single-instance Oracle database, which has a one-to-one relationshipbetween data files and the database instance, Oracle RAC databases have a one-to-many relationship between data files and database instances. This means that in anOracle RAC database multiple database instances access a single set of database
8-1

files concurrently, allowing you to access the data from any database instance in thedatabase cluster.
This allows you to use horizontal scalability beyond the scope of one compute node, incase this compute node is insufficient to run the desired workload. It also increasesavailability of the database and the data in case a database instance or compute nodefails. The remaining database instance can be used to continue operations while thefailed database instance or compute node is being restarted. Having more than onedatabase instance also allows you to perform rolling patch upgrades.
Note:
To learn about using Oracle Real Application Clusters and Oracle Data Guardtogether, see Using Oracle Real Application Clusters (RAC) and Oracle DataGuard Together in Database Cloud Service.
To create an Oracle RAC database in Database Cloud Service, make the followingchoices in the Create Service wizard:
• For Service Level, choose Oracle Database Cloud Service.
• For Software Edition, choose Enterprise Edition - Extreme Performance.
• For Database Type, choose Database Clustering with RAC.
• For Compute Shape (on the Service Details page), choose a shape with two ormore OCPUs.
When you make these choices, Database Cloud Service creates a two-node OracleRAC database, hosting the database on two independent compute nodes that sharedata, fast recovery area, and redo log storage. It creates these compute nodes usingcomputing, storage and networking resources provided by Oracle Cloud InfrastructureCompute Classic.
Managing a Deployment that Uses Oracle RAC Compared to a Deployment thatDoesn’t
Because a Database Cloud Service deployment that uses Oracle RAC comprises twocompute nodes that each host a RAC database instance, you manage the deploymentin slightly different ways:
• Cloud tooling: you use raccli instead of bkup_api or dbaascli. For moreinformation, see The raccli Utility.
• You can stop and start the database instances and even the compute nodesindependently of each other. Thus, the database can remain available even whenyou need to perform maintenance that requires you to stop a database instance orcompute node.
More About the Oracle RAC Configuration on Database Cloud Service
• Cluster size: currently, the Oracle RAC database on a Database Cloud Servicedeployment is limited to a two-node cluster.
• Cloud tooling: Oracle Cloud tooling is provided for the common administrativetasks of scaling, backing up and recovering, and patching. For more information,see Scaling a Database Deployment and The raccli Utility.
Chapter 8Using Oracle Real Application Clusters (RAC) in Database Cloud Service
8-2

• Network access: on the compute nodes, access to all ports except port 22 isdisabled. Port 22 is open for passwordless, key-based SSH access by the opcuser. To enable access to other ports, see Enabling Access to a Compute NodePort.
• Networking for client access: to make client connections to the Oracle RACdatabase, you include particular options in the connection’s entry in the client’stnsnames.ora file. For more information, see Connecting Remotely to the Databaseby Using Oracle Net Services.
• Database file storage: storage for database data files, the fast recovery area, andthe redo logs is created and managed using Oracle Automatic StorageManagement (ASM) and Oracle Automatic Storage Management Cluster FileSystem (ACFS) instead of Linux LVM.
• Included software: Oracle Grid Infrastructure, Oracle ASM and Oracle ACFS areincluded; Oracle Application Express, Oracle REST Data Services, and OracleDBaaS Monitor are not currently included.
Using Oracle Data Guard in Database Cloud ServiceWhen creating an Oracle Database Cloud Service database deployment at the OracleDatabase Cloud Service service level, you can create an Oracle Data Guardconfiguration.Oracle Data Guard enables Oracle databases to survive disasters and datacorruptions by providing a comprehensive set of services that create, maintain,manage, and monitor a standby database. Oracle Data Guard maintains the standbydatabase as a copy of the primary database. If the primary database becomesunavailable because of a planned or an unplanned outage, you can switch the standbydatabase to the primary role, minimizing the downtime associated with the outage.
Note:
To learn about using Oracle Data Guard and Oracle Real Application Clusterstogether, see Using Oracle Real Application Clusters (RAC) and Oracle DataGuard Together in Database Cloud Service.
Creating an Oracle Data Guard Configuration
Note:
To learn about creating an Oracle Data Guard configuration with a primarydatabase on your own system and a standby database in the cloud, see Creating a Hybrid DR Deployment.
To create an Oracle Data Guard configuration in Database Cloud Service, make thefollowing choices in the Create Service wizard:
• For Service Level, choose Oracle Database Cloud Service.
Chapter 8Using Oracle Data Guard in Database Cloud Service
8-3

• For Software Edition, choose Enterprise Edition, Enterprise Edition - HighPerformance, or Enterprise Edition - Extreme Performance.
• For Database Type, choose Single Instance with Data Guard Standby.
• For Standby Database Configuration (on the Service Details page), choose whereyou want the standby database placed in relation to the primary database:
– High Availability—The standby database is placed in a different availabilitydomain from the primary database, thus providing isolation at theinfrastructure level.
– Disaster Recovery—The standby database is placed in a different datacenter from the primary database, thus providing isolation at the infrastructurelevel and geographical separation to support availability despite catastrophicevents.
For further details, see Creating a Customized Database Deployment.
When you make these choices, Database Cloud Service creates an Oracle DataGuard configuration with a primary database and a single standby database, hostingthe databases on two independent compute nodes. It creates these compute nodesusing computing, storage and networking resources provided by Oracle CloudInfrastructure Compute Classic or Oracle Cloud Infrastructure.
If you selected Enterprise Edition - Extreme Performance, the configuration includesOracle Active Data Guard. See "Opening a Physical Standby Database" in OracleData Guard Concepts and Administration for Release 12.2, 12.1 or 11.2 for moreinformation on the real-time query and the automatic block media recovery features ofOracle Active Data Guard.
Note:
Oracle Database Cloud Service does not currently include the fast-start failover(FSFO) feature of Oracle Data Guard. In Database Cloud Service, you performfailover operations manually, as described in Performing a Manual FailoverOperation.
In a Database Cloud Service database deployment, you can use the Oracle DatabaseCloud Service console or the dataguard subcommand of the dbaascli utility to performmany Data Guard operations. For more information, see Administering a Data GuardConfiguration.
You can also manage primary and standby databases by using the SQL command-line interface or the Oracle Data Guard broker interfaces. The broker provides acommand-line interface (DGMGRL) and a graphical user interface through OracleEnterprise Manager Cloud Control.
Chapter 8Using Oracle Data Guard in Database Cloud Service
8-4

Note:
You must use the database changepassword subcommand of the dbaascli utilityto change the password of the SYS user in your Oracle Data Guardconfiguration to ensure that the password file on the standby database node isupdated and cloud tooling works correctly. See Changing the SYS Passwordfor details.
More About Oracle Data GuardOracle Data Guard provides a comprehensive set of services that create, maintain,manage, and monitor a standby database to enable Oracle databases to survivedisasters and data corruptions.
An Oracle Data Guard configuration contains one primary database, which is thedatabase that is accessed by most of your applications. An Oracle Data Guardconfiguration also contains up to thirty standby destinations, connected by Oracle Net.However, the Oracle Data Guard configuration in Database Cloud Service includesone primary database and one standby database.
A standby database is a transactionally consistent copy of the primary database. Oncecreated, Oracle Data Guard automatically maintains each standby database bytransmitting redo data from the primary database and then applying the redo to thestandby database. In an Oracle Data Guard configuration on Database Cloud Service,the standby database is a physical standby database. A physical standby databaseprovides a physically identical copy of the primary database, with on-disk databasestructures that are identical to the primary database on a block-for-block basis. Aphysical standby database is kept synchronized with the primary database, throughRedo Apply, which recovers the redo data received from the primary database andapplies the redo to the physical standby database.
See "Oracle Data Guard Configurations" in Oracle Data Guard Concepts andAdministration for Release 12.2, 12.1 or 11.2 for additional information.
Enterprise Edition - Extreme Performance includes Oracle Active Data Guard. OracleActive Data Guard provides read-only access to the physical standby database while itis synchronized with the primary database, enabling minimal latency betweenreporting and transactional data. With the Oracle Active Data Guard feature known asreal-time query, Redo Apply can be active while the physical standby database isopen, thus allowing queries to return results that are identical to what would bereturned from the primary database. See "Opening a Physical Standby Database" inOracle Data Guard Concepts and Administration for Release 12.2, 12.1 or 11.2 foradditional information about real-time query.
Using Oracle Real Application Clusters (RAC) and OracleData Guard Together in Database Cloud Service
This topic does not apply to Oracle Cloud Infrastructure.
When creating a database deployment on Oracle Database CloudService using the Oracle Database Cloud Service service level, you
Chapter 8Using Oracle Real Application Clusters (RAC) and Oracle Data Guard Together in Database Cloud Service
8-5

can create a pair of Oracle RAC databases linked together as theprimary and standby databases of an Oracle Data Guardconfiguration.
Note:
Oracle Database Cloud Service does not currently include the fast-start failover(FSFO) feature of Oracle Data Guard. In Database Cloud Service, you performfailover operations manually, as described in Performing a Manual FailoverOperation.
To create a Database Cloud Service database deployment that uses Oracle RealApplication Clusters (Oracle RAC) and Oracle Data Guard, make the following choicesin the Create Service wizard:
• For Service Level, choose Oracle Database Cloud Service.
• For Software Edition, choose Enterprise Edition - Extreme Performance.
• For Database Type, choose Database Clustering with RAC and Data GuardStandby.
• For Compute Shape (on the Service Details page), choose a shape with two ormore OCPUs.
• For Standby Database Configuration (on the Service Details page), choose whereyou want the standby database placed in relation to the primary database:
– High Availability—The standby database is placed in a different availabilitydomain from the primary database, thus providing isolation at theinfrastructure level.
– Disaster Recovery—The standby database is placed in a different datacenter from the primary database, thus providing isolation at the infrastructurelevel and geographical separation to support availability despite catastrophicevents.
When you make these choices, Database Cloud Service creates two two-node clusterdatabases using Oracle RAC, one acting as the primary database and one acting as aphysical standby database in an Oracle Data Guard configuration. In each clusterdatabase, the two cluster nodes share data, fast recovery area, and redo log storage.Database Cloud Service creates these compute nodes using computing, storage andnetworking resources provided by Oracle Cloud Infrastructure Compute Classic.
Because the Software Edition is Enterprise Edition - Extreme Performance, thedeployment includes Oracle Active Data Guard. For information on the real-time queryand the automatic block media recovery features of Oracle Active Data Guard, see"Opening a Physical Standby Database" in Oracle Data Guard Concepts andAdministration for Release 12.2, 12.1 or 11.2.
More About a Deployment that Uses Oracle RAC and Oracle Data GuardTogether
• Cluster size: currently, the Oracle RAC database on a Database Cloud Servicedeployment is limited to a two-node cluster.
Chapter 8Using Oracle Real Application Clusters (RAC) and Oracle Data Guard Together in Database Cloud Service
8-6

• Cloud tooling: Oracle Cloud tooling is provided for the common administrativetasks of scaling, backing up and recovering, and patching. For more information,see The raccli Utility.
• Data Guard operations: to perform operations such as switchover, failover andreinstate, you can use the Oracle Database Cloud Service console or you can usesubcommands of the raccli utility. For information, see Administering a DataGuard Configuration and The raccli Utility.
• Updating passwords: use the raccli update databasepassword command toupdate the password in the keystore (wallet) and to update the password fordatabase users.
• Network access: on the compute nodes, access to all ports except port 22 isdisabled. Port 22 is open for passwordless, key-based SSH access by the opcuser. To enable access to other ports, see Enabling Access to a Compute NodePort.
• Networking for client access: to make client connections to one of the Oracle RACdatabases, you include particular options in the connection’s entry in the client’stnsnames.ora file. For more information, see Connecting Remotely to the Databaseby Using Oracle Net Services.
• Database file storage: for each Oracle RAC database, storage for database datafiles, the fast recovery area, and the redo logs is created and managed usingOracle Automatic Storage Management (ASM) and Oracle Automatic StorageManagement Cluster File System (ACFS) instead of Linux LVM.
• Included software: Oracle Application Express, Oracle REST Data Services, andOracle DBaaS Monitor are not currently included.
For more detailed information, see Characteristics of a Database Clustering with RACand Data Guard Standby Database Deployment.
Using Oracle Multitenant in Database Cloud ServiceWhen you create an Oracle Database Cloud Service database deployment at theOracle Database Cloud Service service level that uses Oracle Database 12c, anOracle Multitenant environment is created.
The multitenant architecture enables an Oracle database to function as a multitenantcontainer database (CDB) that includes zero, one, or many pluggable databases(PDBs). A PDB is a portable collection of schemas, schema objects, and non-schemaobjects that appears to an Oracle Net client as a non-CDB. All Oracle databasesbefore Oracle Database 12c were non-CDBs.
Topics
• Creating and Activating a Master Encryption Key for a PDB
• Exporting and Importing a Master Encryption Key for a PDB
Creating and Activating a Master Encryption Key for a PDBYou must create and activate a master encryption key for any PDBs you create.
After creating or plugging in a new PDB, you must create and activate a masterencryption key for the PDB. In a multitenant environment, each PDB has its ownmaster encryption key which is stored in a single keystore used by all containers.
Chapter 8Using Oracle Multitenant in Database Cloud Service
8-7

To determine whether you need to create and activate an encryption key for the PDB,perform the following steps:
1. Invoke SQL*Plus and log in to the database as the SYS user with SYSDBA privileges.
2. Set the container to the PDB:
SQL> ALTER SESSION SET CONTAINER = pdb;
3. Query V$ENCRYPTION_WALLET as follows:
SQL> SELECT wrl_parameter, status, wallet_type FROM v$encryption_wallet;
If the STATUS column contains a value of OPEN_NO_MASTER_KEY you need to create andactivate the master encryption key.
To create and activate the master encryption key in a PDB perform the following steps:
1. Set the container to the root container (CDB):
SQL> ALTER SESSION SET CONTAINER = CDB$ROOT;
2. In the root container, query V$ENCRYPTION_WALLET and take note of the current valueof the WALLET_TYPE column. Also, take note of the keystore location contained in theWRL_PARAMETER column:
SQL> SELECT wrl_parameter, status, wallet_type FROM v$encryption_wallet;
3. Close the keystore. How you close the keystore depends on the current wallettype observed in the previous step:
• If the current wallet type is AUTOLOGIN, use the following command:
SQL> ADMINISTER KEY MANAGEMENT SET KEYSTORE close;
• If the current wallet type is PASSWORD, use the following command:
SQL> ADMINISTER KEY MANAGEMENT SET KEYSTORE close IDENTIFIED BY keystore-password;
where keystore-password is the keystore password. By default, the keystorepassword is set to the value of the administration password that is specifiedwhen the database deployment is first created.
4. Open the password-based keystore:
SQL> ADMINISTER KEY MANAGEMENT SET KEYSTORE open IDENTIFIED BY keystore-password CONTAINER=all;
where keystore-password is the keystore password. By default, the keystorepassword is set to the value of the administration password that is specified whenthe database deployment is first created.
Specifying CONTAINER=all opens the keystore in the root and in all PDBs. See"ADMINISTER KEY MANAGEMENT" in Oracle Database SQL LanguageReference for Release 12.2 or 12.1.
If the command generates an ORA-28354 error, see TDE Wallet Problem in 12c:Cannot do a Set Key operation when an auto-login wallet is present.
5. Set the container to the PDB:
SQL> ALTER SESSION SET CONTAINER = pdb;
6. Create and activate a master encryption key in the PDB by executing the followingcommand:
Chapter 8Using Oracle Multitenant in Database Cloud Service
8-8

SQL> ADMINISTER KEY MANAGEMENT SET KEY USING TAG 'tag' IDENTIFIED BY keystore-password WITH BACKUP USING 'backup_identifier';
where keystore-password is the keystore password. By default, the keystorepassword is set to the value of the administration password that is specified whenthe database deployment is first created.
You can use the optional USING TAG clause to associate a tag with the new masterencryption key. Specify the WITH BACKUP clause, and optionally the USING'backup_identifier' clause, to create a backup of the keystore before the newmaster encryption key is created. See "ADMINISTER KEY MANAGEMENT" inOracle Database SQL Language Reference for Release 12.2 or 12.1.
If the command generates an ORA-28354 error, see TDE Wallet Problem in 12c:Cannot do a Set Key operation when an auto-login wallet is present.
7. Update the auto-login keystore by executing the following command:
SQL> ADMINISTER KEY MANAGEMENT CREATE AUTO_LOGIN KEYSTORE FROM KEYSTORE 'keystore-location' IDENTIFIED BY keystore-password;
where keystore-location is the location of the directory that contains the keystorefile, which you observed earlier when querying V$ENCRYPTION_WALLET, and keystore-password is the keystore password.
By default, the keystore password is set to the value of the administrationpassword that is specified when the database deployment is first created.
8. Query V$ENCRYPTION_WALLET again to verify that the STATUS column is set to OPEN:
SQL> SELECT wrl_parameter, status, wallet_type FROM v$encryption_wallet;
Exporting and Importing a Master Encryption Key for a PDBYou must export and import the master encryption key for any encrypted PDBs youplug in to your database deployment.
If your source PDB is encrypted, you must export the master encryption key and thenimport it. In a multitenant environment, each PDB has its own master encryption keywhich is stored in a single keystore used by all containers.
You can export and import all of the TDE master encryption keys that belong to thePDB by exporting and importing the TDE master encryption keys from within a PDB.Export and import of TDE master encryption keys support the PDB unplug and plugoperations. During a PDB unplug and plug, all of the TDE master encryption keys thatbelong to a PDB, as well as the metadata, are involved.
See "Exporting and Importing TDE Master Encryption Keys for a PDB" in OracleDatabase Advanced Security Guide for Release 12.1 or 12.2.
See "ADMINISTER KEY MANAGEMENT" in Oracle Database SQL LanguageReference for Release 12.2 or 12.1.
To export the master encryption keys, perform the following steps:
1. Invoke SQL*Plus and log in to the PDB.
2. Export the master encryption key by executing the following command:
SQL> ADMINISTER KEY MANAGEMENT EXPORT ENCRYPTION KEYS WITH SECRET "secret" TO 'filename' IDENTIFIED BY keystore-password;
Chapter 8Using Oracle Multitenant in Database Cloud Service
8-9

To import the master encryption key perform the following steps:
1. Invoke SQL*Plus and log in to the PDB.
2. Export the master encryption key by executing the following command:
SQL> ADMINISTER KEY MANAGEMENT IMPORT ENCRYPTION KEYS WITH SECRET "secret" FROM 'filename' IDENTIFIED BY keystore-password;
Using Oracle Database Vault in Database Cloud ServiceYou can use Oracle Database Vault in an Oracle Database Cloud Service databasedeployment.
Oracle Database Vault provides powerful security controls to help protect applicationdata from unauthorized access, and comply with privacy and regulatory requirements.
You can deploy controls to block privileged account access to application data andcontrol sensitive operations inside the database. Trusted paths can be used to addadditional security controls to authorized data access and database changes. Throughthe runtime analysis of privileges and roles, you can increase the security of existingapplications by implementing least privileges and reducing the attack profile of yourdatabase accounts. Oracle Database Vault secures existing database environmentstransparently, eliminating costly and time consuming application changes.
The information in this document tells you about enabling and disabling OracleDatabase Vault in an Oracle Database Cloud Service database deployment, but doesnot provide detail on using the features of Oracle Database Vault. Be sure to refer toOracle Database Vault Administrator’s Guide for Release 12.2, 12.1 or 11.2 fordetailed information on implementing Oracle Database Vault features.
Topics
• Configuring and Enabling Oracle Database Vault
• Disabling Oracle Database Vault
Configuring and Enabling Oracle Database VaultYou can use the dv on subcommand of the dbaascli utility to configure and enableDatabase Vault with your database.
Oracle Database includes Database Vault, but you must configure and enable it beforeyou can use it.
The dbaascli utility provides an easy-to-use interface for configuring and enablingDatabase Vault. As an alternative to using dbaascli, you can follow the steps in"Getting Started with Oracle Database Vault" in Oracle Database Vault Administrator'sGuide for Release 12.2, 12.1 or 11.2.
Be sure to review "What to Expect After You Enable Oracle Database Vault" in OracleDatabase Vault Administrator’s Guide for Release 12.2, 12.1 or 11.2 to gain anunderstanding of the impact of enabling and configuring Database Vault.
As part of the configuration process, Database Vault administrative accounts arecreated. Oracle strongly recommends that you create two accounts for each role. Oneaccount, the primary account, will be used on a day-to-day basis and the other
Chapter 8Using Oracle Database Vault in Database Cloud Service
8-10

account will be used as a backup account in case the password of the primary accountis lost and must be reset.
Refer to dbaascli dv on for additional information about the dv on subcommand,including options that can be used to enable Database Vault only for the root container(CDB) or a specified pluggable database (PDB) in an Oracle Database 12c databasedeployment.
To enable and configure Database Vault by using the dv on subcommand:
1. Connect to the compute node as the oracle user.
For detailed instructions, see Connecting to a Compute Node Through SecureShell (SSH).
2. Enable and configure Database Vault:
$ dbaascli dv on...Enter DV owner username: DVownerusernameEnter DV owner password: DVownerpasswordRe-enter DV owner password: DVownerpasswordEnter DV manager username: DVmanagerusernameEnter DV manager password: DVmanagerpasswordRe-enter DV manager password: DVmanagerpassword...Successfully configured DV$
Enter a user name and password for the Database Vault Owner and DatabaseVault Account Manager when prompted. In an Oracle Database 12c databasedeployment, the Database Vault Owner and Account Manager user names mustbegin with c##.
3. Disconnect from the compute node.
Disabling Oracle Database VaultYou can use the dv off subcommand of the dbaascli utility to disable Database Vaultin your database.
The dbaascli utility provides an easy-to-use interface for disabling Database Vault. Asan alternative to using dbaascli, you can follow the steps in "Disabling and EnablingOracle Database Vault" in Oracle Database Vault Administrator's Guide for Release 12.2, 12.1 or 11.2.
When you install Oracle Database Vault, it revokes a set of privileges from severalOracle Database-supplied users and roles. Be aware that if you disable OracleDatabase Vault, these privileges remain revoked. See "Privileges That Are Revokedfrom Existing Users and Roles" in Oracle Database Vault Administrator’s Guide forRelease 12.2, 12.1 or 11.2 for additional information.
Refer to dbaascli dv off for additional information about the dv off subcommand,including options to disable Database Vault for only the root container (CDB) or aspecific pluggable database (PDB) in an Oracle Database 12c database deployment.
To enable and configure Database Vault by using the dv off subcommand:
1. Connect to the compute node as the oracle user.
Chapter 8Using Oracle Database Vault in Database Cloud Service
8-11

For detailed instructions, see Connecting to a Compute Node Through SecureShell (SSH).
2. Disable Database Vault:
$ dbaascli dv off...Enter DV owner username: DVownerusernameEnter DV owner password: DVownerpassword...Successfully configured DV$
Enter the user name and password for the Database Vault Owner when prompted.
3. Disconnect from the compute node.
Using Oracle Application Express in Database CloudService
Database deployments on Oracle Database Cloud Service include Oracle ApplicationExpress.
Note:
This section does not apply to database deployments that use Oracle RealApplication Clusters. Such deployments do not currently include OracleApplication Express.
Oracle Application Express enables you to design, develop and deploy responsive,database-driven applications using only your web browser. If you are new to OracleApplication Express, see its Overview and Getting Started pages on OracleTechnology Network to learn about its features and get started using it.
This section provides guidance on how to navigate to Oracle Application Express fromOracle Database Cloud Service and how to upgrade Oracle Application Expressreleases residing in Database Cloud Service.
Topics
• Accessing the Oracle Application Express Console
• Upgrading from Oracle Application Express 4.2 or 5.0 to 5.1 for Oracle Database11g
• Upgrading from Oracle Application Express 4.2 to 5.1 for Oracle Database 12c
• Upgrading from Oracle Application Express 5.0 to 5.1 for Oracle Database 12c
• Moving Oracle Application Express 5.1 from CDB$ROOT to PDBs
Chapter 8Using Oracle Application Express in Database Cloud Service
8-12

Accessing the Oracle Application Express ConsoleDatabase deployments of single-instance databases on Oracle Database CloudService include Oracle Application Express, which you manage using the OracleApplication Express Instance Administration console.
If you are new to Oracle Application Express, see its Overview and Getting Startedpages on Oracle Technology Network to learn about its features and get started usingit.
You can access the Oracle Application Express Instance Administration console in thefollowing ways:
• Using the “Open Application Express Console” menu item
• Using a direct URL
• Using an SSH tunnel
Using the “Open Application Express Console” Menu Item to Access theConsole
Note:
For database deployments built on Oracle Cloud Infrastructure Classic, thenetwork port to access the Oracle Application Express Instance Administrationconsole is blocked by default. To use the Open Application Express Consolemenu item, you must unblock port 443, either by enabling the deployment’sora_p2_httpssl predefined access rule or by creating your own access rulethat opens port 443. For instructions, see Enabling Access to a Compute NodePort.
1. Open the Services page of the Oracle Database Cloud Service console.
For detailed instructions, see Accessing the Oracle Database Cloud ServiceConsole.
2. From the menu for the deployment, select Open Application ExpressConsole.
3. If your browser displays a warning that your connection is not secure or notprivate, use the browser’s advanced option to continue.
You get this warning because Database Cloud Service database deployments usea self-signed certificate to provide HTTPS (secure HTTP) connectivity, and suchcertificates are considered suspicious by many web browsers.
4. When prompted for a workspace, username and password, enter the followinginformation. Then click Sign In.
• In the workspace box, enter INTERNAL.
• In the username box, enter ADMIN.
• In the password box, enter the password specified during the databasedeployment creation process.
Chapter 8Using Oracle Application Express in Database Cloud Service
8-13

Note: if the database deployment was created using a QuickStart template,the password is available in the zip file downloaded when the deployment wascreated.
The Open Application Express Console menu item is also available on the
Overview page in the menu next to the deployment’s name.
Using a Direct URL to Access the Console
Note:
For database deployments built on Oracle Cloud Infrastructure Classic, thenetwork port to access Oracle DBaaS Monitor is blocked by default. To use adirect URL, you must unblock port 443, either by enabling the deployment’sora_p2_httpssl predefined access rule or by creating your own access rulethat opens port 443. For instructions, see Enabling Access to a Compute NodePort.
1. In your web browser, go to the URL appropriate to the Oracle Database version onthe database deployment:
• For a PDB in an Oracle Database 12c database: https://node-ip-address/ords/lowercase-pdb-name/
• For an Oracle Database 11g Release 2 database: https://node-ip-address/apex/
where compute-node-ip-address is the IP address of the deployment’s computenode as listed on the deployment’s Overview page, and lowercase-pdb-name is thename of the PDB, with all letters in lowercase.
2. If your browser displays a warning that your connection is not secure or notprivate, use the browser’s advanced option to continue.
You get this warning because Database Cloud Service database deployments usea self-signed certificate to provide HTTPS (secure HTTP) connectivity, and suchcertificates are considered suspicious by many web browsers.
3. When prompted for a workspace, username and password, enter the followinginformation. Then click Sign In.
• In the workspace box, enter INTERNAL.
• In the username box, enter ADMIN.
• In the password box, enter the password specified during the databasedeployment creation process.
Note: if the database deployment was created using a QuickStart template,the password is available in the zip file downloaded when the deployment wascreated.
Using an SSH Tunnel to Access the Console
1. Create an SSH tunnel to port 443 on the compute node hosting Oracle ApplicationExpress. For information about creating an SSH tunnel, see Creating an SSHTunnel to a Compute Node Port.
Chapter 8Using Oracle Application Express in Database Cloud Service
8-14

2. After creating the SSH tunnel, direct your browser to the URL appropriate to theOracle Database version on the database deployment:
• For a PDB in an Oracle Database 12c database: https://localhost/ords/lowercase-pdb-name/
• For an Oracle Database 11g Release 2 database: https://localhost/apex/
where lowercase-pdb-name is the name of the PDB, with all letters in lowercase.
3. When prompted for a workspace, username and password, enter the followinginformation. Then click Sign In.
• In the workspace box, enter INTERNAL.
• In the username box, enter ADMIN.
• In the password box, enter the password specified during the databasedeployment creation process.
Note: if the database deployment was created using a QuickStart template,the password is available in the zip file downloaded when the deployment wascreated.
Upgrading from Oracle Application Express 4.2 or 5.0 to 5.1 for OracleDatabase 11g
These instructions are applicable if you have an Oracle Database 11g databasedeployment and want to upgrade Oracle Application Express 4.2 or Oracle ApplicationExpress 5.0 to Oracle Application Express 5.1.
To upgrade from Oracle Application Express 4.2 or Oracle Application Express 5.0 to5.1:
1. Determine the version of your current Oracle Application Express installation:
a. Log in to the compute node as the oracle user.
b. Log in to SQL*Plus as the SYS user and query DBA_REGISTRY:
$ sqlplus / as sysdba
SQL> SELECT VERSION FROM DBA_REGISTRY WHERE COMP_ID = 'APEX';
c. Log out of SQL*Plus.
d. Log out of the compute node.
2. Ensure that you have the required version of the cloud tooling:
a. Log in to the compute node as the opc user.
b. Check the version of the cloud tooling:
rpm -q dbaastools
You should see something similar to this:dbaastools-1.0-1+17.3.1.0.0_170605.2102.x86_64. Check the value betweenthe + and _ for the version number. The tooling version must be 17.2.5.0.0 orhigher. If your cloud tooling is at a lower version, see Updating the CloudTooling on Database Cloud Service for the steps to update to a later version.
3. Upload Oracle Application Express 5.1 to the compute node:
a. Download Oracle Application Express 5.1.0.00.45 from Oracle TechnologyNetwork.
Chapter 8Using Oracle Application Express in Database Cloud Service
8-15

b. Log in to the compute node as the oracle user.
c. Use scp or sftp to upload the Oracle Application Express 5.1 zip file to the /tmpdirectory on the compute node.
4. Unzip the Oracle Application Express 5.1 zip file:
a. Create the directory required for Oracle Application Express:
mkdir -p /u01/app/oracle/product/apex/
b. Change to the /tmp directory where you uploaded the Oracle ApplicationExpress zip file.
c. Unzip the uploaded Oracle Application Express zip file into the apex directory:
unzip apex_5.1.zip -d /u01/app/oracle/product/apex/
5. Install Oracle Application Express 5.1:
a. Move the Oracle Application Express files to the /u01/app/oracle/product/apex/5.1.0.00.45/ directory:
mv /u01/app/oracle/product/apex/apex/ /u01/app/oracle/product/apex/
5.1.0.00.45/
b. Change to the new 5.1.0.00.45 directory:
cd /u01/app/oracle/product/apex/5.1.0.00.45
c. Log in to SQL*Plus as the SYS user and execute the installation script:
sqlplus / as SYSDBA @apexins.sql SYSAUX SYSAUX TEMP /i/
d. Log out of the compute node.
6. Configure Oracle Application Express by executing the Oracle REST DataServices (ORDS) assistant:
a. Log in to the compute node as the opc user.
b. Start a root-user shell:
$ sudo -s
c. Change to the ords directory:
cd /var/opt/oracle/ocde/assistants/ords
d. Execute the ORDS assistant:
./ords -out="/var/opt/oracle/ocde/res/ords.out" -
ords_action="configure_apex"
e. Restart ORDS:
/etc/init.d/ords restart
f. Exit the root-user shell and log out of the compute node.
7. If you upgraded from Oracle Application Express version 4.2, perform the followingsteps:
a. Open the Oracle Database Cloud Service console.
b. From the menu for the deployment, select Open Application ExpressConsole.
The Oracle Application Express login page is displayed.
Chapter 8Using Oracle Application Express in Database Cloud Service
8-16

c. Enter the following information to log in. Then click Sign In.
• In the Workspace box, enter INTERNAL.
• In the Username box, enter ADMIN.
• In the Password box, enter the password specified during the databasedeployment creation process.
The Oracle Application Express Instance Administration page is displayed.
d. Locate Instance Settings and click on the pencil icon to edit the settings.
e. Select Report Printing.
f. In the Print Server field, select Oracle REST Data Services from the menu.
g. Click Apply Changes.
h. Log out of the Oracle Application Express Administration Services application.
Upgrading from Oracle Application Express 4.2 to 5.1 for OracleDatabase 12c
These instructions are applicable if you have an Oracle Database 12c Release 1 orRelease 2 database deployment and want to upgrade Oracle Application Express 4.2in the root container (CDB$ROOT) to Oracle Application Express 5.1 in the pluggabledatabases (PDBs).
To upgrade from Oracle Application Express 4.2 in the root container (CDB$ROOT) toOracle Application Express 5.1 in the PDBs:
1. Determine the version of Oracle Application Express installed in the root container(CDB$ROOT):
a. Log in to the compute node as the oracle user.
b. Log in to SQL*Plus as the SYS user and query DBA_REGISTRY:
$ sqlplus / as sysdba
SQL> SELECT VERSION FROM DBA_REGISTRY WHERE COMP_ID = 'APEX';
The version should be 4.2.5.00.08. If the version is 5.0.0.00.31 or 5.0.4.00.12,see Upgrading from Oracle Application Express 5.0 to 5.1 for Oracle Database12c.
c. Log out of SQL*Plus.
d. Log out of the compute node.
2. Ensure that you have the required version of the cloud tooling:
a. Log in to the compute node as the opc user.
b. Check the version of the cloud tooling:
rpm -q dbaastools
You should see something similar to this:dbaastools-1.0-1+17.3.1.0.0_170605.2102.x86_64. Check the value betweenthe + and _ for the version number. The tooling version must be 17.2.5.0.0 orhigher. If your cloud tooling is at a lower version, see Updating the CloudTooling on Database Cloud Service for the steps to update to a later version.
3. Upload Oracle Application Express 5.1 to the compute node:
Chapter 8Using Oracle Application Express in Database Cloud Service
8-17

a. Download Oracle Application Express 5.1.0.00.45 from Oracle TechnologyNetwork.
b. Log in to the compute node as the oracle user.
c. Use scp or sftp to upload the Oracle Application Express 5.1 zip file to the /tmpdirectory on the compute node.
4. Unzip the Oracle Application Express 5.1 zip file:
a. Create the directory required for Oracle Application Express:
mkdir -p /u01/app/oracle/product/apex/
b. Change to the /tmp directory where you uploaded the Oracle ApplicationExpress zip file.
c. Unzip the uploaded Oracle Application Express zip file into the apex directory:
unzip apex_5.1.zip -d /u01/app/oracle/product/apex/
d. Move the Oracle Application Express files to the /u01/app/oracle/product/apex/5.1.0.00.45/ directory:
mv /u01/app/oracle/product/apex/apex/ /u01/app/oracle/product/apex/
5.1.0.00.45/
5. Determine which PDBs have an APEX instance:
a. Log in to the compute node as the oracle user.
b. Log in to SQL*Plus as the SYS user.
$ sqlplus / as sysdba
c. Execute the query to determine which PDBs have an APEX instance:
SQL> SELECT P.PDB_NAME, R.VERSION, R.STATUS
2 FROM SYS.DBA_PDBS P, SYS.CDB_REGISTRY R
3 WHERE P.PDB_ID = R.CON_ID AND R.COMP_ID = 'APEX'
4 ORDER BY 1;
6. In each PDB, identify the APEX workspaces. Be sure to make note of whichworkspaces belong to which PDBs. You will need this information in a later step.
a. While still logged in to SQL*Plus, connect to each PDB by using the ALTERSESSION command:
SQL> ALTER SESSION SET CONTAINER = PDB_name;
b. Query APEX_WORKSPACES to determine the APEX workspace names:
SQL> SELECT WORKSPACE_ID FROM APEX_WORKSPACES WHERE WORKSPACE_ID > 100;
c. After connecting to each PDB and compiling a list of workspace IDs, log out ofSQL*Plus.
7. Download a script that will be used to export the artifacts of the workspacesidentified in the previous step into zip files:
a. Create a directory for the workspace zip files:
$ mkdir -p /home/oracle/workspaces
b. Using wget, download the workspace_export_4.2.sh file from Oracle StorageCloud Service.
Chapter 8Using Oracle Application Express in Database Cloud Service
8-18

wget https://storage.us2.oraclecloud.com/v1/dbcsswlibp-usoracle29538/
dbaas_patch/apex_upg5_1/workspace_export_4.2.sh or
wget https://a88717.storage.oraclecloud.com/v1/Storage-a88717/dbaas_patch/
apex_upg5_1/workspace_export_4.2.sh
c. Move the script to the /home/oracle/workspaces directory.
d. Change to the workspaces directory:
$ cd /home/oracle/workspaces
e. Assign permissions to the workspace_export_4.2.sh file:
$ chmod 755 /home/oracle/workspaces/workspace_export_4.2.sh
$ chown oracle:oinstall /home/oracle/workspaces/workspace_export_4.2.sh
8. Temporarily unlock the APEX_040200 user in the CDB and temporarily set the user’spassword to oracle or a password of your choice. The script that you execute in alater step will reset the password.
a. Log in to SQL*Plus as the SYS user:
$ sqlplus / as sysdba
b. Unlock the user and set the password:
SQL> ALTER USER APEX_040200 ACCOUNT UNLOCK IDENTIFIED BY password
CONTAINER = ALL;
c. Log out of SQL*Plus.
9. Use Listener Control to determine the service name for each PDB
$ lsnrctl status
You should see output similar to:Service "pdb1.opcdbaas.oraclecloud.internal" has 1 instance(s).
Instance "orcl", status READY, has 1 handler(s) for this service...
10. For each workspace you identified in step 6, execute the workspace_export_4.2.shscript.
./workspace_export_5.0.sh //localhost:port_number/PDB_service_name APEX_040200
password workspace_id
where:
• port_number is the listener port number you specified when you created thedatabase deployment (default is 1521).
• PDB_service_name is one of the service names you identified in step 9.
• password is the password you set for the APEX_040200 user in step 8b.
• workspace_id is one of the APEX workspaces for the PDB that you identified instep 6b.
One zip file will be created for each workspace.
11. Remove APEX 4.2 from the root container (CDB$ROOT).
a. Change to the directory that contains the APEX 4.2.5.00.08 files.
cd $ORACLE_HOME/apex/
b. Log in to SQL*Plus as the SYS user:
Chapter 8Using Oracle Application Express in Database Cloud Service
8-19
$ sqlplus / as sysdba
c. Set the _oracle_script parameter to TRUE.
SQL> ALTER SESSION SET "_oracle_script"=true;
d. Uninstall APEX from the root container (CDB$ROOT).
SQL> @apxremov.sql
e. Log out of SQL*Plus.
12. Uninstall APEX 4.2 from the CDB seed (PDB$SEED).
a. Change to the directory that contains the APEX 4.2.5.00.08 files.
cd $ORACLE_HOME/apex/
b. Log in to SQL*Plus as the SYS user:
$ sqlplus / as sysdba
c. Set the _oracle_script parameter to TRUE.
SQL> ALTER SESSION SET "_oracle_script"=true;
d. Close the PDB.
SQL> ALTER PLUGGABLE DATABASE PDB$SEED CLOSE IMMEDIATE;
e. Open the PDB in READ WRITE mode.
SQL> ALTER PLUGGABLE DATABASE PDB$SEED OPEN READ WRITE;
f. Uninstall APEX from the PDB.
SQL> @apxremov.sql
g. Set the container to the root container (CDB$ROOT).
SQL> ALTER SESSION SET CONTAINER = CDB$ROOT;
h. Close the PDB.
SQL> ALTER PLUGGABLE DATABASE PDB$SEED CLOSE IMMEDIATE;
i. Open the PDB in READ ONLY mode.
SQL> ALTER PLUGGABLE DATABASE PDB$SEED OPEN READ ONLY;
j. Log out of SQL*Plus.
13. Uninstall APEX 4.2 from the PDBs identified in step 5.
a. Change to the directory that contains the APEX 4.2.5.00.08 files.
cd $ORACLE_HOME/apex/
b. Log in to SQL*Plus as the SYS user:
$ sqlplus / as sysdba
c. Set the _oracle_script parameter to TRUE.
SQL> ALTER SESSION SET "_oracle_script"=true;
d. Set the container to the PDB.
SQL> ALTER SESSION SET CONTAINER = PDB_name;
e. Uninstall APEX from the PDB.
SQL> @apxremov.sql
Chapter 8Using Oracle Application Express in Database Cloud Service
8-20

f. After repeating steps 13d and 13e for each identified PDB, log out ofSQL*Plus.
14. Stop ORDS.
/etc/init.d/ords stop
15. Delete the APEX users for the previous version of APEX installed in the rootcontainer (CDB$ROOT).
a. Log in to SQL*Plus as the SYS user:
$ sqlplus / as sysdba
b. Query DBA_USERS.
SQL> select username from dba_users where username like '%APEX_0%';
c. Exit from SQL*Plus.
d. Drop the users identified in step 13b.
$ORACLE_HOME/perl/bin/perl $ORACLE_HOME/rdbms/admin/catcon.pl -b
drop_apex_user -- --x'drop user apex_user cascade'
where apex_user is the value in the USERNAME column from step 15b.
16. Remove the APEX users from all containers.
$ORACLE_HOME/perl/bin/perl $ORACLE_HOME/rdbms/admin/catcon.pl -b
drop_apex_listener -- --x'drop user apex_listener cascade'
$ORACLE_HOME/perl/bin/perl $ORACLE_HOME/rdbms/admin/catcon.pl -b
drop_apex_rest_public_user -- --x'drop user apex_rest_public_user cascade'
$ORACLE_HOME/perl/bin/perl $ORACLE_HOME/rdbms/admin/catcon.pl -b
drop_apex_public_user -- --x'drop user apex_public_user cascade'
17. Change to the new 5.1.0.00.45 directory
cd /u01/app/oracle/product/apex/5.1.0.00.45
18. Install APEX in the CDB seed (PDB$SEED).
a. Log in to SQL*Plus as the SYS user.
$ sqlplus / as sysdba
b. Set the mode of PDB$SEED to OPEN READ WRITE.
SQL> ALTER SESSION SET "_oracle_script"=true;
SQL> ALTER PLUGGABLE DATABASE PDB$SEED CLOSE IMMEDIATE;
SQL> ALTER PLUGGABLE DATABASE PDB$SEED OPEN READ WRITE;
c. Connect to PDB$SEED.
SQL> ALTER SESSION SET CONTAINER = PDB$SEED;
d. Install APEX 5.1 in the PDB$SEED container
SQL> @apexins.sql SYSAUX SYSAUX TEMP /i/
SQL> exit
e. Again, log in to SQL*Plus as the SYS user.
$ sqlplus / as sysdba
f. Set the mode of PDB$SEED back to OPEN READ ONLY.
Chapter 8Using Oracle Application Express in Database Cloud Service
8-21

SQL> ALTER SESSION SET "_oracle_script"=true;
SQL> ALTER PLUGGABLE DATABASE PDB$SEED CLOSE IMMEDIATE;
SQL> ALTER PLUGGABLE DATABASE PDB$SEED OPEN READ ONLY;
g. Exit from SQL*Plus.
19. Install APEX in each PDB you identified in step 5c.
a. Log in to SQL*Plus as the SYS user.
$ sqlplus / as sysdba
b. Connect to the PDB.
SQL> ALTER SESSION SET CONTAINER = PDB_name;
c. Install APEX 5.1 in the PDB.
SQL> @apexins.sql SYSAUX SYSAUX TEMP /i/
d. After repeating steps 19b and 19c for each PDB you identified in step 5c, exitfrom SQL*Plus.
e. Log out of the compute node.
20. Reconstruct public synonyms in the CDB seed (PDB$SEED).
a. Log in to SQL*Plus as the SYS user:
$ sqlplus / as sysdba
b. Set the _oracle_script parameter to TRUE.
SQL> ALTER SESSION SET "_oracle_script"=true;
c. Close the PDB.
SQL> ALTER PLUGGABLE DATABASE PDB$SEED CLOSE IMMEDIATE;
d. Open the PDB in READ WRITE mode.
SQL> ALTER PLUGGABLE DATABASE PDB$SEED OPEN READ WRITE;
e. Set the container to PDB$SEED.
SQL> ALTER SESSION SET CONTAINER = PDB$SEED;
f. Set CURRENT_SCHEMA to APEX_050100.
SQL> alter session set current_schema = APEX_050100;
g. Execute the procedure to drop the public synonyms.
SQL> exec wwv_flow_upgrade.drop_public_synonyms(p_drop_all => true);
h. Execute the procedure to re-create the public synonyms.
SQL> exec wwv_flow_upgrade.recreate_public_synonyms('APEX_050100');
i. Set the container to the root container (CDB$ROOT).
SQL> ALTER SESSION SET CONTAINER = CDB$ROOT;
j. Close the PDB.
SQL> ALTER PLUGGABLE DATABASE PDB$SEED CLOSE IMMEDIATE;
k. Open the PDB in READ ONLY mode.
SQL> ALTER PLUGGABLE DATABASE PDB$SEED OPEN READ ONLY;
Chapter 8Using Oracle Application Express in Database Cloud Service
8-22

l. Log out of SQL*Plus.
21. Reconstruct public synonyms for each PDB you identified in step 5
a. Log in to SQL*Plus as the SYS user:
$ sqlplus / as sysdba
b. Set the container to the PDB.
SQL> ALTER SESSION SET CONTAINER = PDB_name;
c. Set CURRENT_SCHEMA to APEX_050100.
SQL> alter session set current_schema = APEX_050100;
d. Execute the procedure to drop the public synonyms.
SQL> exec wwv_flow_upgrade.drop_public_synonyms(p_drop_all => true);
e. Execute the procedure to re-create the public synonyms.
SQL> exec wwv_flow_upgrade.recreate_public_synonyms('APEX_050100');
f. Log out of SQL*Plus.
22. Configure Oracle Application Express by executing the Oracle REST DataServices (ORDS) assistant:
a. Log in to the compute node as the opc user.
b. Start a root-user shell:
$ sudo -s
c. Change to the ords directory:
cd /var/opt/oracle/ocde/assistants/ords
d. Execute the ORDS assistant:
./ords -out="/var/opt/oracle/ocde/res/ords.out" -ords_action="install"
e. Exit the root-user shell and log out of the compute node.
23. Install each APEX workspace into a PDB.
a. Log in to the compute node as the oracle user.
b. Change to the workspaces directory where the zip files from step 10 arelocated.
cd /home/oracle/workspaces
c. Unzip each of the workspace zip files into its corresponding directory.
unzip install_workspace_id_date.zip -d workspace_id
d. Change to one of the newly created /home/oracle/workspaces/workspace_iddirectories.
e. Log in to SQL*Plus as the SYS user.
$ sqlplus / as sysdba
f. Connect to the PDB where the workspace should be installed. Refer to the listyou compiled in step 6 to ensure you install each workspace in the correctPDB.
SQL> ALTER SESSION SET CONTAINER = PDB_name;
Chapter 8Using Oracle Application Express in Database Cloud Service
8-23

g. Execute the installation script to install the APEX workspace in the PDB.
@install_workspace_id.sql
h. After executing steps 23d through 23g for each APEX workspace, exitSQL*Plus.
i. Log out of the compute node.
Upgrading from Oracle Application Express 5.0 to 5.1 for OracleDatabase 12c
These instructions are applicable if you have an Oracle Database 12c Release 1 orRelease 2 database deployment and want to upgrade Oracle Application Express 5.0in the root container (CDB$ROOT) to Oracle Application Express 5.1 in the pluggabledatabases (PDBs).
To upgrade from Oracle Application Express 5.0 in the root container (CDB$ROOT) toOracle Application Express 5.1 in the PDBs:
1. Determine the version of Oracle Application Express installed in the root container(CDB$ROOT):
a. Log in to the compute node as the oracle user.
b. Log in to SQL*Plus as the SYS user and query DBA_REGISTRY:
$ sqlplus / as sysdba
SQL> SELECT VERSION FROM DBA_REGISTRY WHERE COMP_ID = 'APEX';
The version should be 5.0.0.00.31 or 5.0.4.00.12. If the version is 4.2.5.00.08,see Upgrading from Oracle Application Express 4.2 to 5.1 for Oracle Database12c.
c. Log out of SQL*Plus.
d. Log out of the compute node.
2. Ensure that you have the required version of the cloud tooling:
a. Log in to the compute node as the opc user.
b. Check the version of the cloud tooling:
rpm -q dbaastools
You should see something similar to this:dbaastools-1.0-1+17.3.1.0.0_170605.2102.x86_64. Check the value betweenthe + and _ for the version number. The tooling version must be 17.2.5.0.0 orhigher. If your cloud tooling is at a lower version, see Updating the CloudTooling on Database Cloud Service for the steps to update to a later version.
3. Upload Oracle Application Express 5.1 to the compute node:
a. Download Oracle Application Express 5.1.0.00.45 from Oracle TechnologyNetwork.
b. Log in to the compute node as the oracle user.
c. Use scp or sftp to upload the Oracle Application Express 5.1 zip file to the /tmpdirectory on the compute node.
4. Unzip the Oracle Application Express 5.1 zip file:
Chapter 8Using Oracle Application Express in Database Cloud Service
8-24

a. Create the directory required for Oracle Application Express:
mkdir -p /u01/app/oracle/product/apex/
b. Change to the /tmp directory where you uploaded the Oracle ApplicationExpress zip file.
c. Unzip the uploaded Oracle Application Express zip file into the apex directory:
unzip apex_5.1.zip -d /u01/app/oracle/product/apex/
d. Move the Oracle Application Express files to the /u01/app/oracle/product/apex/5.1.0.00.45/ directory:
mv /u01/app/oracle/product/apex/apex/ /u01/app/oracle/product/apex/
5.1.0.00.45/
5. Determine which PDBs have an APEX instance:
a. Log in to the compute node as the oracle user.
b. Log in to SQL*Plus as the SYS user.
$ sqlplus / as sysdba
c. Execute the query to determine which PDBs have an APEX instance:
SQL> SELECT P.PDB_NAME, R.VERSION, R.STATUS
2 FROM SYS.DBA_PDBS P, SYS.CDB_REGISTRY R
3 WHERE P.PDB_ID = R.CON_ID AND R.COMP_ID = 'APEX'
4 ORDER BY 1;
6. In each PDB, identify the APEX workspaces. Be sure to make note of whichworkspaces belong to which PDBs. You will need this information in a later step.
a. While still logged in to SQL*Plus, connect to each PDB by using the ALTERSESSION command:
SQL> ALTER SESSION SET CONTAINER = PDB_name;
b. Query APEX_WORKSPACES to determine the APEX workspace names:
SQL> SELECT WORKSPACE_ID FROM APEX_WORKSPACES WHERE WORKSPACE_ID > 100;
c. After connecting to each PDB and compiling a list of workspace IDs, log out ofSQL*Plus.
7. Download a script that will be used to export the artifacts of the workspacesidentified in the previous step into zip files:
a. Create a directory for the workspace zip files:
$ mkdir -p /home/oracle/workspaces
b. Using wget, download the workspace_export_5.0.sh file from Oracle StorageCloud Service.
wget https://storage.us2.oraclecloud.com/v1/dbcsswlibp-usoracle29538/
dbaas_patch/apex_upg5_1/workspace_export_5.0.sh or
wget https://a88717.storage.oraclecloud.com/v1/Storage-a88717/dbaas_patch/
apex_upg5_1/workspace_export_5.0.sh
c. Move the script to the /home/oracle/workspaces directory.
d. Change to the workspaces directory:
Chapter 8Using Oracle Application Express in Database Cloud Service
8-25

$ cd /home/oracle/workspaces
e. Assign permissions to the workspace_export_5.0.sh file:
$ chmod 755 /home/oracle/workspaces/workspace_export_5.0.sh
$ chown oracle:oinstall /home/oracle/workspaces/workspace_export_5.0.sh
8. Temporarily unlock the APEX_050000 user and temporarily set the user’s passwordto oracle or a password of your choice. The script that you execute in a later stepwill reset the password.
a. Log in to SQL*Plus as the SYS user:
$ sqlplus / as sysdba
b. Unlock the user and set the password:
SQL> ALTER USER APEX_050000 ACCOUNT UNLOCK IDENTIFIED BY password
CONTAINER = ALL;
c. Log out of SQL*Plus.
9. Use Listener Control to determine the service name for each PDB
$ lsnrctl status
You should see output similar to:Service "pdb1.opcdbaas.oraclecloud.internal" has 1 instance(s).
Instance "orcl", status READY, has 1 handler(s) for this service...
10. For each workspace you identified in step 6, execute the workspace_export_5.0.shscript.
./workspace_export_5.0.sh //localhost:port_number/PDB_service_name APEX_050000
password workspace_id
where:
• port_number is the listener port number you specified when you created thedatabase deployment (default is 1521).
• PDB_service_name is one of the service names you identified in step 9.
• password is the password you set for the APEX_050000 user in step 8b.
• workspace_id is one of the APEX workspaces for the PDB that you identified instep 6b.
One zip file will be created for each workspace.
11. Remove APEX 5.0 from the root container (CDB$ROOT).
a. Change to the directory that contains the APEX 5.0.0.00.31 or 5.0.4.00.12files.
cd $ORACLE_HOME/apex/
b. Uninstall APEX.
sqlplus / as SYSDBA @apxremov.sql
12. Stop ORDS.
/etc/init.d/ords stop
13. Delete the APEX users for the previous version of APEX installed in the rootcontainer (CDB$ROOT).
Chapter 8Using Oracle Application Express in Database Cloud Service
8-26

a. Log in to SQL*Plus as the SYS user:
$ sqlplus / as sysdba
b. Query DBA_USERS.
SQL> select username from dba_users where username like '%APEX_0%';
c. Exit from SQL*Plus.
d. Drop the users identified in step 13b.
$ORACLE_HOME/perl/bin/perl $ORACLE_HOME/rdbms/admin/catcon.pl -b
drop_apex_user -- --x'drop user apex_user cascade'
where apex_user is the value in the USERNAME column from step 13b.
14. Remove the APEX users from all containers.
$ORACLE_HOME/perl/bin/perl $ORACLE_HOME/rdbms/admin/catcon.pl -b
drop_apex_listener -- --x'drop user apex_listener cascade'
$ORACLE_HOME/perl/bin/perl $ORACLE_HOME/rdbms/admin/catcon.pl -b
drop_apex_rest_public_user -- --x'drop user apex_rest_public_user cascade'
$ORACLE_HOME/perl/bin/perl $ORACLE_HOME/rdbms/admin/catcon.pl -b
drop_apex_public_user -- --x'drop user apex_public_user cascade'
15. Change to the new 5.1.0.00.45 directory
cd /u01/app/oracle/product/apex/5.1.0.00.45
16. Install APEX in the CDB seed (PDB$SEED).
a. Log in to SQL*Plus as the SYS user.
$ sqlplus / as sysdba
b. Set the mode of the CDB seed (PDB$SEED) to OPEN READ WRITE.
SQL> ALTER SESSION SET "_oracle_script"=true;
SQL> ALTER PLUGGABLE DATABASE PDB$SEED CLOSE IMMEDIATE;
SQL> ALTER PLUGGABLE DATABASE PDB$SEED OPEN READ WRITE;
c. Connect to PDB$SEED.
SQL> ALTER SESSION SET CONTAINER = PDB$SEED;
d. Install APEX 5.1 in the CDB seed (PDB$SEED) container
SQL> @apexins.sql SYSAUX SYSAUX TEMP /i/
SQL> exit
e. Again, log in to SQL*Plus as the SYS user.
$ sqlplus / as sysdba
f. Set the mode of the CDB seed (PDB$SEED) back to OPEN READ ONLY.
SQL> ALTER SESSION SET "_oracle_script"=true;
SQL> ALTER PLUGGABLE DATABASE PDB$SEED CLOSE IMMEDIATE;
SQL> ALTER PLUGGABLE DATABASE PDB$SEED OPEN READ ONLY;
g. Exit from SQL*Plus.
17. Install APEX in each PDB you identified in step 5c.
Chapter 8Using Oracle Application Express in Database Cloud Service
8-27

a. Log in to SQL*Plus as the SYS user.
$ sqlplus / as sysdba
b. Connect to the PDB.
SQL> ALTER SESSION SET CONTAINER = PDB_name;
c. Install APEX 5.1 in the PDB.
SQL> @apexins.sql SYSAUX SYSAUX TEMP /i/
d. After repeating steps 17b and 17c for each PDB you identified in step 5c, exitfrom SQL*Plus.
e. Log out of the compute node.
18. Configure Oracle Application Express by executing the Oracle REST DataServices (ORDS) assistant:
a. Log in to the compute node as the opc user.
b. Start a root-user shell:
$ sudo -s
c. Change to the ords directory:
cd /var/opt/oracle/ocde/assistants/ords
d. Execute the ORDS assistant:
./ords -out="/var/opt/oracle/ocde/res/ords.out" -ords_action="install"
e. Exit the root-user shell and log out of the compute node.
19. Install each APEX workspace into a PDB.
a. Log in to the compute node as the oracle user.
b. Change to the workspaces directory where the zip files from step 10 arelocated.
cd /home/oracle/workspaces
c. Unzip each of the workspace zip files into its corresponding directory.
unzip install_workspace_id_date.zip -d workspace_id
d. Change to one of the newly created /home/oracle/workspaces/workspace_iddirectories.
e. Log in to SQL*Plus as the SYS user.
$ sqlplus / as sysdba
f. Connect to the PDB where the workspace should be installed. Refer to the listyou compiled in step 6 to ensure you install each workspace in the correctPDB.
SQL> ALTER SESSION SET CONTAINER = PDB_name;
g. Execute the installation script to install the APEX workspace in the PDB.
@install_workspace_id.sql
h. After executing steps 19d through 19g for each APEX workspace, exitSQL*Plus.
i. Log out of the compute node.
Chapter 8Using Oracle Application Express in Database Cloud Service
8-28

Moving Oracle Application Express 5.1 from CDB$ROOT to PDBsThese instructions are applicable if you have an Oracle Database 12c Release 1 orRelease 2 database deployment and you have previously upgraded to OracleApplication Express 5.1 in the root container (CDB$ROOT). These instructions tell youhow to move Oracle Application Express to the pluggable databases (PDBs).
To move Oracle Application Express 5.1 from the root container (CDB$ROOT) to thepluggable databases (PDBs):
1. Determine the version of Oracle Application Express installed in the root container(CDB$ROOT):
a. Log in to the compute node as the oracle user.
b. Log in to SQL*Plus as the SYS user and query DBA_REGISTRY:
$ sqlplus / as sysdba
SQL> SELECT VERSION FROM DBA_REGISTRY WHERE COMP_ID = 'APEX';
The version should be 5.1.0.00.45. If the version is 5.0.0.00.31 or 5.0.4.00.12,see Upgrading from Oracle Application Express 5.0 to 5.1 for Oracle Database12c. If the version is 4.2.5.00.08, see Upgrading from Oracle ApplicationExpress 4.2 to 5.1 for Oracle Database 12c.
c. Log out of SQL*Plus.
d. Log out of the compute node.
2. Ensure that you have the required version of the cloud tooling:
a. Log in to the compute node as the opc user.
b. Check the version of the cloud tooling:
rpm -q dbaastools
You should see something similar to this:dbaastools-1.0-1+17.3.1.0.0_170605.2102.x86_64. Check the value betweenthe + and _ for the version number. The tooling version must be 17.2.5.0.0 orhigher. If your cloud tooling is at a lower version, see Updating the CloudTooling on Database Cloud Service for the steps to update to a later version.
3. Ensure the APEX 5.1.0.00.45 files are located in either the $ORACLE_HOME/apexdirectory or in the /u01/app/oracle/product/apex/5.1.0.00.45 directory.
$ cat $ORACLE_HOME/apex/images/apex_version.txt
$ cat /u01/app/oracle/product/apex/5.1.0.00.45/images/apex_version.txt
The output from one of the commands should be Application Express Version:5.1.
4. Determine which PDBs have an APEX instance:
a. Log in to SQL*Plus as the SYS user.
$ sqlplus / as sysdba
b. Execute the query to determine which PDBs have an APEX instance:
SQL> SELECT P.PDB_NAME, R.VERSION, R.STATUS
2 FROM SYS.DBA_PDBS P, SYS.CDB_REGISTRY R
Chapter 8Using Oracle Application Express in Database Cloud Service
8-29

3 WHERE P.PDB_ID = R.CON_ID AND R.COMP_ID = 'APEX'
4 ORDER BY 1;
5. In each PDB, identify the APEX workspaces. Be sure to make note of whichworkspaces belong to which PDBs. You will need this information in a later step.
a. While still logged in to SQL*Plus, connect to each PDB by using the ALTERSESSION command:
SQL> ALTER SESSION SET CONTAINER = PDB_name;
b. Query APEX_WORKSPACES to determine the APEX workspace names:
SQL> SELECT WORKSPACE_ID FROM APEX_WORKSPACES WHERE WORKSPACE_ID > 100;
c. After connecting to each PDB and compiling a list of workspace IDs, log out ofSQL*Plus.
6. Download a script that will be used to export the artifacts of the workspacesidentified in the previous step into zip files:
a. Create a directory for the workspace zip files:
$ mkdir -p /home/oracle/workspaces
b. Using wget, download the workspace_export_5.1.sh file from Oracle StorageCloud Service.
wget https://storage.us2.oraclecloud.com/v1/dbcsswlibp-usoracle29538/
dbaas_patch/apex_upg5_1/workspace_export_5.1.sh or
wget https://a88717.storage.oraclecloud.com/v1/Storage-a88717/dbaas_patch/
apex_upg5_1/workspace_export_5.1.sh
c. Move the script to the /home/oracle/workspaces directory.
d. Change to the workspaces directory:
$ cd /home/oracle/workspaces
e. Assign permissions to the workspace_export_5.1.sh file:
$ chmod 755 /home/oracle/workspaces/workspace_export_5.1.sh
$ chown oracle:oinstall /home/oracle/workspaces/workspace_export_5.1.sh
7. Temporarily unlock the APEX_050100 user and temporarily set the user’s passwordto oracle or a password of your choice. The script that you execute in a later stepwill reset the password.
a. Log in to SQL*Plus as the SYS user:
$ sqlplus / as sysdba
b. Unlock the user and set the password:
SQL> ALTER USER APEX_050100 ACCOUNT UNLOCK IDENTIFIED BY password
CONTAINER = ALL;
c. Log out of SQL*Plus.
8. Use Listener Control to determine the service name for each PDB
$ lsnrctl status
You should see output similar to:Service "pdb1.opcdbaas.oraclecloud.internal" has 1 instance(s).
Instance "orcl", status READY, has 1 handler(s) for this service...
Chapter 8Using Oracle Application Express in Database Cloud Service
8-30

9. For each workspace you identified in step 5, execute the workspace_export_5.1.shscript.
./workspace_export_5.1.sh //localhost:port_number/PDB_service_name APEX_050000
password workspace_id
where:
• port_number is the listener port number you specified when you created thedatabase deployment (default is 1521).
• PDB_service_name is one of the service names you identified in step 8.
• password is the password you set for the APEX_050100 user in step 7b.
• workspace_id is one of the APEX workspaces for the PDB that you identified instep 5b.
One zip file will be created for each workspace.
10. Change to the directory where the APEX 5.1.0.00.45 files are located, as youdetermined in step 3.
• If the files are located in $ORACLE_HOME/apex/: cd $ORACLE_HOME/apex/
• If the files are located in /u01/app/oracle/product/apex/5.1.0.00.45/:cd /u01/app/oracle/product/apex/5.1.0.00.45/
11. Delete the APEX users for the previous version of APEX installed in the rootcontainer (CDB$ROOT).
a. Log in to SQL*Plus as the SYS user:
$ sqlplus / as sysdba
b. Query DBA_USERS.
SQL> select username from dba_users where username like '%APEX_0%';
c. Exit from SQL*Plus.
d. Drop all of the users identified in step 11b except for the APEX_050100 user.
$ORACLE_HOME/perl/bin/perl $ORACLE_HOME/rdbms/admin/catcon.pl -b
drop_apex_user -- --x'drop user apex_user cascade'
where apex_user is the value in the USERNAME column from step 11b. Do notdrop the APEX_050100 user.
12. Remove APEX from the root container (CDB$ROOT).
a. Execute the script to uninstall APEX.
sqlplus / as SYSDBA @apxremov.sql
13. Stop ORDS.
/etc/init.d/ords stop
14. Remove the APEX users from all containers.
$ORACLE_HOME/perl/bin/perl $ORACLE_HOME/rdbms/admin/catcon.pl -b
drop_apex_listener -- --x'drop user apex_listener cascade'
$ORACLE_HOME/perl/bin/perl $ORACLE_HOME/rdbms/admin/catcon.pl -b
drop_apex_rest_public_user -- --x'drop user apex_rest_public_user cascade'
$ORACLE_HOME/perl/bin/perl $ORACLE_HOME/rdbms/admin/catcon.pl -b
drop_apex_public_user -- --x'drop user apex_public_user cascade'
Chapter 8Using Oracle Application Express in Database Cloud Service
8-31

15. Install APEX in the CDB seed (PDB$SEED).
a. Log in to SQL*Plus as the SYS user.
$ sqlplus / as sysdba
b. Set the mode of the CDB seed (PDB$SEED) to OPEN READ WRITE.
SQL> ALTER SESSION SET "_oracle_script"=true;
SQL> ALTER PLUGGABLE DATABASE PDB$SEED CLOSE IMMEDIATE;
SQL> ALTER PLUGGABLE DATABASE PDB$SEED OPEN READ WRITE;
c. Connect to PDB$SEED.
SQL> ALTER SESSION SET CONTAINER = PDB$SEED;
d. Install APEX 5.1 in the CDB seed (PDB$SEED) container
SQL> @apexins.sql SYSAUX SYSAUX TEMP /i/
SQL> exit
e. Again, log in to SQL*Plus as the SYS user.
$ sqlplus / as sysdba
f. Set the mode of the CDB seed (PDB$SEED) back to OPEN READ ONLY.
SQL> ALTER SESSION SET "_oracle_script"=true;
SQL> ALTER PLUGGABLE DATABASE PDB$SEED CLOSE IMMEDIATE;
SQL> ALTER PLUGGABLE DATABASE PDB$SEED OPEN READ ONLY;
g. Exit from SQL*Plus.
16. Install APEX in each PDB you identified in step 4c.
a. Log in to SQL*Plus as the SYS user.
$ sqlplus / as sysdba
b. Connect to the PDB.
SQL> ALTER SESSION SET CONTAINER = PDB_name;
c. Install APEX 5.1 in the PDB.
SQL> @apexins.sql SYSAUX SYSAUX TEMP /i/
d. After repeating steps 16b and 16c for each PDB you identified in step 4b, exitfrom SQL*Plus.
e. Log out of the compute node.
17. Configure Oracle Application Express by executing the Oracle REST DataServices (ORDS) assistant:
a. Log in to the compute node as the opc user.
b. Start a root-user shell:
$ sudo -s
c. Change to the ords directory:
cd /var/opt/oracle/ocde/assistants/ords
d. Execute the ORDS assistant:
./ords -out="/var/opt/oracle/ocde/res/ords.out" -ords_action="install"
Chapter 8Using Oracle Application Express in Database Cloud Service
8-32

e. Exit the root-user shell and log out of the compute node.
18. Install each APEX workspace into a PDB.
a. Log in to the compute node as the oracle user.
b. Change to the workspaces directory where the zip files from step 9 are located.
cd /home/oracle/workspaces
c. Unzip each of the workspace zip files into its corresponding directory.
unzip install_workspace_id_date.zip -d workspace_id
d. Change to one of the newly created /home/oracle/workspaces/workspace_iddirectories.
e. Log in to SQL*Plus as the SYS user.
$ sqlplus / as sysdba
f. Connect to the PDB where the workspace should be installed. Refer to the listyou compiled in step 5 to ensure you install each workspace in the correctPDB.
SQL> ALTER SESSION SET CONTAINER = PDB_name;
g. Execute the installation script to install the APEX workspace in the PDB.
@install_workspace_id.sql
h. After executing steps 19d through 19g for each APEX workspace, exitSQL*Plus.
i. Log out of the compute node.
Using the Demos PDBThe Demos PDB (pluggable database) contains demos that highlight some of themore popular features of Oracle Database 12c. You can have this PDB included whenyou create a Database Cloud Service database deployment hosting an OracleDatabase 12c single-instance database or Oracle Data Guard configuration.
Some of these popular features include JSON in the database, XMLDB, APEXdevelopment, the In-Memory option and Data Mining. There is also a web pageinstalled for you that provides access to labs and tutorials to be used with this PDB.
To install the Demos PDB, simply check the Include "Demos" PDB option on theDetails page of the Create Service wizard when creating a database deployment.
Note:
DEMOS PDB is only available for Oracle Database 12c Release 1 databasedeployments.
Accessing the Labs and Tutorials
You can access the web page to the Demos PDB’s labs and tutorials by directing yourbrowser to the URL https://node-ip-address/jet/home.html. In this URL node-ip-address is the public IP address of the deployment’s compute node; it is listed on the
Chapter 8Using the Demos PDB
8-33
deployment’s Oracle Database Cloud Service Overview page. To display this page,see Viewing Detailed Information for a Database Deployment.
If access to web pages is blocked on the deployment, you need to enable access toHTTPS port 443 before you can view this page. For instructions, see Enabling Accessto a Compute Node Port.
Adding the Demos PDB to an Existing Database Deployment
Note:
DEMOS PDB is only available for Oracle Database 12c Release 1 databasedeployments.
If you didn’t install the Demos PDB during the creation of your database deployment,you can add it later by following these steps:
1. Connect to the deployment’s compute node as the oracle user.
For detailed instructions, see Connecting to a Compute Node Through SecureShell (SSH).
2. Download the script to create and enable the Demos PDB:
$ wget https://storage.us2.oraclecloud.com/v1/dbcsswlibp-usoracle29538/pdb_demo/demo.pl
3. Set the file permissions on the script to make it executable:
$ chmod a+x demo.pl
4. Execute the patching script:
$ ./demo.pl
5. Disconnect from the compute node:
$ exit
Using Oracle Enterprise Manager Cloud Control withDatabase Cloud Service
Oracle Enterprise Manager Cloud Control 12c Release 5 (12.1.0.5) includes HybridCloud Management, which you can use to manage the Oracle Databases on OracleDatabase Cloud Service from the same management console that you use for youron-premises databases.
Oracle Enterprise Manager is Oracle’s integrated enterprise IT management productline, which provides the industry’s only complete, integrated and business-drivenenterprise cloud management solution. Oracle Enterprise Manager 12c deliverscomprehensive capabilities to manage, migrate, test, and deploy applications andworkloads across hybrid clouds. See EM Hybrid Cloud Management for informationabout its hybrid cloud features.
To use the Hybrid Cloud Management feature to manage the Oracle Databases onDatabase Cloud Service, you perform these high-level tasks:
Chapter 8Using Oracle Enterprise Manager Cloud Control with Database Cloud Service
8-34

1. Ensure that your on-premises Enterprise Manager Cloud Control OracleManagement Service (OMS) is of version 12.1.0.5, and that at least one 12.1.0.5Management Agent exists in your enterprise.
2. Configure one or more version 12.1.0.5 Management Agents within yourenterprise to act as Hybrid Cloud Gateway Agents, which provide an SSH-basedcommunication channel between Database Cloud Service compute nodes and theon-premises OMS.
3. Ensure that the Hybrid Cloud Gateway Agents and the on-premises OMS cancommunicate with the Database Cloud Service compute nodes.
4. Deploy Management Agents to Database Cloud Service compute nodes using theAdd Host Targets Wizard or Enterprise Manager Command Line Interface.
For the detailed steps to perform these tasks, see Enabling Hybrid Cloud Managementin Oracle Enterprise Manager Cloud Control Administrator's Guide, 12c Release 5(12.1.0.5).
Preserving the Hybrid Cloud Agent Home When Patching a Database CloudService Deployment
If you installed the Oracle Enterprise Manager Cloud Control agent under /u01/app/oracle (the Oracle Base directory) the agent home will be moved to /u01/app.ORG/oracle when a database patch is applied to the database deployment using the cloudtooling.
If the agent home has already been moved to /u01/app.ORG/oracle, you can copy itback to /u01/app/oracle to restore it.
Perform the following steps to configure the patching tools so that they do not movethe agent home to /u01/app.ORG/oracle:
1. Connect to the compute node as the oracle user.
For detailed instructions, see Connecting to a Compute Node Through SecureShell (SSH).
2. Create a file named /var/opt/oracle/patch/files_to_save.ora.
3. Add the full path of the agent directory to the /var/opt/oracle/patch/files_to_save.ora file.
4. Disconnect from the compute node, and then reconnect as the opc user.
5. Start a root-user command shell:
$ sudo -s#
6. Edit the patching configuration file, /var/opt/oracle/patch/dbpatchm.cfg, andsearch for the following lines:
# create /var/opt/oracle/patch/files_to_save.ora with full path of directory or# files to preserve any special files you may have in your /u01/app directory.# set this to yes, if you have files_to_save.oraspecial_files="no"
7. Change special_files="no" to special_files="yes".
8. Save and close the file.
9. Exit the root-user command shell and disconnect from the compute node.
Chapter 8Using Oracle Enterprise Manager Cloud Control with Database Cloud Service
8-35

After performing these steps, the agent home will be preserved in its original locationwhenever the database deployment is patched.
Using Oracle GoldenGate Cloud Service with DatabaseCloud Service
This topic does not apply to Oracle Cloud Infrastructure.
Oracle GoldenGate Cloud Service is a high performance, securepublic cloud data integration and replication solution that canreplicate data in real time from on-premises databases to single-instance databases in Oracle Database Cloud Service.
You must create a Database Cloud Service database deployment that is properlyconfigured for use as a GoldenGate Cloud Service replication target before you createa GoldenGate Cloud Service instance.
To properly configure a Database Cloud Service database deployment for use as areplication target:
• You must configure the database deployment to use characteristics (like servicelevel, database release, database edition and so on) that are supported by OracleGoldenGate Cloud Service.
See Before You Begin with Oracle GoldenGate Cloud Service in Using OracleGoldenGate Cloud Service for information about the Database Cloud Servicecharacteristics that Oracle GoldenGate Cloud Service supports.
• You must configure the database deployment for use as a replication database.
You can configure the database deployment for use as a replication database bysetting the Enable Oracle GoldenGate option on the Service Details page of theCreate Service wizard, or you can configure it manually after the databasedeployment is created by using the dbaascli utility. See Manually Configuring aDeployment’s Database for Oracle GoldenGate Cloud Service Replication forinstructions on configuring it manually.
• The target database must be network accessible on the listener port.
To enable access on the listener port, you need to enable the ora_p2_dblistenersecurity rule automatically created for the Database Cloud Service databasedeployment when the deployment was created. See Enabling Port Access byEnabling an Automatically Created Access Rule for instructions.
Once you have created and properly configured a Database Cloud Service databasedeployment for use as a replication target, you can create an Oracle GoldenGateCloud Service instance that uses it. See Provision an Oracle GoldenGate CloudService Instance in Using Oracle GoldenGate Cloud Service.
Chapter 8Using Oracle GoldenGate Cloud Service with Database Cloud Service
8-36

Manually Configuring a Deployment’s Database for OracleGoldenGate Cloud Service Replication
Before you can use an Oracle Database Cloud Service database deployment as areplication target in Oracle GoldenGate Cloud Service, you must configure itsdatabase as a valid replication database.
You can configure the database during database deployment creation by setting theEnable Oracle GoldenGate option on the Service Details page of the wizard. If youdo not, you can configure it manually after the database deployment is created byusing the dbaascli utility.
To configure the database manually after the database deployment is created:
1. Connect as the oracle user to the database deployment’s compute node.
For detailed instructions, see Connecting to a Compute Node Through SecureShell (SSH).
2. Confirm that the database is not yet configured as a valid replication database:
$ dbaascli gg statusDBAAS CLI version 1.0.0Executing command gg status
Golden Gate status: disabled.
If the status is listed as disabled, you need to configure the database; if it is listedas enabled, you do not.
3. Configure the database as a valid replication database by using the dbaascli ggsetup command:
$ dbaascli gg setupDBAAS CLI version 1.0.0Executing command gg setupEnter Golden Gate admin username: admin-usernameEnter Golden Gate admin password: admin-passwordRe-enter Golden Gate admin password: admin-passwordSetting up Golden GateUpdating the registrySuccessfully setup GG
Where:
• admin-username is the database user name for Oracle GoldenGate CloudService access to the database:
– For Oracle Database 11g, specify ggadmin.
– For Oracle Database 12c, specify c##ggadmin.
• admin-password is the password to use for the database user. You can use theadministrator password provided when the database deployment was created,or you can use a different password that conforms to password requirementsfor Oracle Database users.
4. Close your connection to the compute node.
Chapter 8Using Oracle GoldenGate Cloud Service with Database Cloud Service
8-37

9Migrating Oracle Databases to DatabaseCloud Service
You can migrate your on-premises Oracle databases to Oracle Database CloudService using various different approaches based on different tools and technologies.
Topics
• Choosing a Migration Method
• Migrating from Oracle Database 11g to Oracle Database 11g in the Cloud
• Migrating from Oracle Database 11g to Oracle Database 12c in the Cloud
• Migrating from Oracle Database 12c CDB to Oracle Database 12c in the Cloud
• Migrating from Oracle Database 12c Non-CDB to Oracle Database 12c in theCloud
• Migration Methods
Choosing a Migration MethodYou can migrate your on-premises Oracle Database database to an Oracle DatabaseCloud database using a number of different methods that use several different tools.
Not all migration methods apply to all migration scenarios. Many of the migrationmethods apply only if specific characteristics of the source and destination databasesmatch or are compatible. Moreover, additional factors can affect which method youchoose for your migration from among the methods that are technically applicable toyour migration scenario.
Some of the characteristics and factors to consider when choosing a migration methodare:
• On-premises database version
• Oracle Database Cloud database version
• On-premises host operating system and version
• On-premises database character set
• Quantity of data, including indexes
• Data types used in the on-premises database
• Storage for data staging
• Acceptable length of system outage
• Network bandwidth
To determine which migration methods are applicable to your migration scenario,gather the following information.
9-1

1. Database version of your on-premises database:
• Oracle Database 11g Release 2 version lower than 11.2.0.3
• Oracle Database 11g Release 2 version 11.2.0.3 or higher
• Oracle Database 12c Release 1 version lower than 12.1.0.2
• Oracle Database 12c Release 1 version 12.1.0.2 or higher
2. For on-premises Oracle Database 12c Release 1 databases, the architecture ofthe database:
• Multitenant container database (CDB)
• Non-CDB
3. Endian format (byte ordering) of your on-premises database’s host platform
Some platforms are little endian and others are big endian. QueryV$TRANSPORTABLE_PLATFORM to identify the endian format, and to determine whethercross-platform tablespace transport is supported.
Oracle Database Cloud uses the Linux platform, which is little endian.
4. Database character set of your on-premises database and Oracle Database CloudService database
Some migration methods require that the source and target databases usecompatible database character sets.
5. Database version of the Oracle Database Cloud database you are migrating to
• Oracle Database 11g Release 2
• Oracle Database 12c Release 1
Oracle Database 12c Release 1 databases created on Oracle Database Clouduse CDB architecture. Databases created using the Enterprise Edition softwareedition are single-tenant, and databases created using the High Performance orExtreme Performance software editions are multitenant.
After gathering this information, use the “source” and “destination” database versionsas your guide to see which migration methods apply to your migration scenario:
• Migrating from Oracle Database 11g to Oracle Database 11g in the Cloud
• Migrating from Oracle Database 11g to Oracle Database 12c in the Cloud
• Migrating from Oracle Database 12c CDB to Oracle Database 12c in the Cloud
• Migrating from Oracle Database 12c Non-CDB to Oracle Database 12c in theCloud
Migrating from Oracle Database 11g to Oracle Database11g in the Cloud
You can migrate Oracle Database 11g databases from on-premises to OracleDatabase 11g databases in Oracle Database Cloud using several different methods.
The applicability of some of the migration methods depends on the on-premisesdatabase’s database character set and platform endian format.
Chapter 9Migrating from Oracle Database 11g to Oracle Database 11g in the Cloud
9-2

If you have not already done so, determine the database character set of your on-premises database, and determine the endian format of the platform your on-premisesdatabase resides on. Use this information to help you choose an appropriate method.
• Data Pump Conventional Export/Import
This method can be used regardless of the endian format and database characterset of the on-premises database.
For the steps this method entails, see Data Pump Conventional Export/Import.
• Data Pump Transportable Tablespace
This method can be used only if the on-premises platform is little endian, and thedatabase character sets of your on-premises database and Oracle DatabaseCloud Service database are compatible.
For the steps this method entails, see Data Pump Transportable Tablespace.
• RMAN Transportable Tablespace with Data Pump
This method can be used only if the on-premises platform is little endian, and thedatabase character sets of your on-premises database and Oracle DatabaseCloud Service database are compatible.
For the steps this method entails, see RMAN Transportable Tablespace with DataPump.
• RMAN CONVERT Transportable Tablespace with Data Pump
This method can be used only if the database character sets of your on-premisesdatabase and Oracle Database Cloud Service database are compatible.
This method is similar to the Data Pump Transportable Tablespace method, withthe addition of the RMAN CONVERT command to enable transport between platformswith different endianness. Query V$TRANSPORTABLE_PLATFORM to determine if the on-premises database platform supports cross-platform tablespace transport and todetermine the endian format of the platform. The Oracle Database Cloud platformis little-endian format.
For the steps this method entails, see RMAN CONVERT TransportableTablespace with Data Pump.
Migrating from Oracle Database 11g to Oracle Database12c in the Cloud
You can migrate Oracle Database 11g databases from on-premises to OracleDatabase 12c databases in Oracle Database Cloud using several different methods.
The applicability of some of the migration methods depends on the on-premisesdatabase’s database version, database character set and platform endian format.
If you have not already done so, determine the database version and databasecharacter set of your on-premises database, and determine the endian format of theplatform your on-premises database resides on. Use this information to help youchoose an appropriate method.
• Data Pump Conventional Export/Import
This method can be used regardless of the endian format and database characterset of the on-premises database.
Chapter 9Migrating from Oracle Database 11g to Oracle Database 12c in the Cloud
9-3

For the steps this method entails, see Data Pump Conventional Export/Import.
• Data Pump Transportable Tablespace
This method can be used only if the on-premises platform is little endian, and thedatabase character sets of your on-premises database and Oracle DatabaseCloud Service database are compatible.
For the steps this method entails, see Data Pump Transportable Tablespace.
• RMAN Transportable Tablespace with Data Pump
This method can be used only if the on-premises platform is little endian, and thedatabase character sets of your on-premises database and Oracle DatabaseCloud Service database are compatible.
For the steps this method entails, see RMAN Transportable Tablespace with DataPump.
• RMAN CONVERT Transportable Tablespace with Data Pump
This method can be used only if the database character sets of your on-premisesdatabase and Oracle Database Cloud Service database are compatible.
This method is similar to the Data Pump Transportable Tablespace method, withthe addition of the RMAN CONVERT command to enable transport between platformswith different endianness. Query V$TRANSPORTABLE_PLATFORM to determine if the on-premises database platform supports cross-platform tablespace transport and todetermine the endian format of the platform. The Oracle Database Cloud platformis little-endian format.
For the steps this method entails, see RMAN CONVERT TransportableTablespace with Data Pump.
• Data Pump Full Transportable
This method can be used only if the source database release version is 11.2.0.3 orlater, and the database character sets of your on-premises database and OracleDatabase Cloud Service database are compatible.
For the steps this method entails, see Data Pump Full Transportable.
Migrating from Oracle Database 12c CDB to OracleDatabase 12c in the Cloud
You can migrate Oracle Database 12c CDB databases from on-premises to OracleDatabase 12c databases in Oracle Database Cloud using several different methods.
The applicability of some of the migration methods depends on the on-premisesdatabase’s database character set and platform endian format.
If you have not already done so, determine the database character set of your on-premises database, and determine the endian format of the platform your on-premisesdatabase resides on. Use this information to help you choose an appropriate method.
• Data Pump Conventional Export/Import
This method can be used regardless of the endian format and database characterset of the on-premises database.
For the steps this method entails, see Data Pump Conventional Export/Import.
Chapter 9Migrating from Oracle Database 12c CDB to Oracle Database 12c in the Cloud
9-4

• Data Pump Transportable Tablespace
This method can be used only if the on-premises platform is little endian, and thedatabase character sets of your on-premises database and Oracle DatabaseCloud Service database are compatible.
For the steps this method entails, see Data Pump Transportable Tablespace.
• RMAN Transportable Tablespace with Data Pump
This method can be used only if the on-premises platform is little endian, and thedatabase character sets of your on-premises database and Oracle DatabaseCloud Service database are compatible.
For the steps this method entails, see RMAN Transportable Tablespace with DataPump.
• RMAN CONVERT Transportable Tablespace with Data Pump
This method can be used only if the database character sets of your on-premisesdatabase and Oracle Database Cloud Service database are compatible.
This method is similar to the Data Pump Transportable Tablespace method, withthe addition of the RMAN CONVERT command to enable transport between platformswith different endianness. Query V$TRANSPORTABLE_PLATFORM to determine if the on-premises database platform supports cross-platform tablespace transport and todetermine the endian format of the platform. The Oracle Database Cloud platformis little-endian format.
For the steps this method entails, see RMAN CONVERT TransportableTablespace with Data Pump.
• RMAN Cross-Platform Transportable Tablespace Backup Sets
This method can be used only if the database character sets of your on-premisesdatabase and Oracle Database Cloud Service database are compatible.
For the steps this method entails, see RMAN Cross-Platform TransportableTablespace Backup Sets.
• Data Pump Full Transportable
This method can be used only if the database character sets of your on-premisesdatabase and Oracle Database Cloud Service database are compatible.
For the steps this method entails, see Data Pump Full Transportable.
• Unplugging/Plugging (CDB)
This method can be used only if the on-premises platform is little endian, and theon-premises database and Database Cloud Service database have compatibledatabase character sets and national character sets.
For the steps this method entails, see Unplugging/Plugging a PDB.
• Remote Cloning (CDB)
This method can be used only if the on-premises platform is little endian, the on-premises database release is 12.1.0.2 or higher, and the on-premises databaseand Database Cloud Service database have compatible database character setsand national character sets.
For the steps this method entails, see Remote Cloning a PDB.
• RMAN Cross-Platform Transportable PDB
Chapter 9Migrating from Oracle Database 12c CDB to Oracle Database 12c in the Cloud
9-5

This method can be used only if the on-premises platform is little endian, and thedatabase character sets of your on-premises database and Oracle DatabaseCloud Service database are compatible.
For the steps this method entails, see RMAN Cross-Platform Transportable PDB.
• SQL Developer and SQL*Loader to Migrate Selected Objects
You can use SQL Developer to create a cart into which you add selected objectsto be loaded into your Oracle Database 12c database on the cloud. In this method,you use SQL*Loader to load the data into your cloud database.
For the steps this method entails, see SQL Developer and SQL*Loader to MigrateSelected Objects.
• SQL Developer and INSERT Statements to Migrate Selected Objects
You can use SQL Developer to create a cart into which you add selected objectsto be loaded into your Oracle Database 12c database on the cloud. In this method,you use SQL INSERT statements to load the data into your cloud database.
For the steps this method entails, see SQL Developer and INSERT Statements toMigrate Selected Objects.
Migrating from Oracle Database 12c Non-CDB to OracleDatabase 12c in the Cloud
You can migrate Oracle Database 12c non-CDB databases from on-premises toOracle Database 12c databases in Oracle Database Cloud using several differentmethods.
The applicability of some of the migration methods depends on the on-premisesdatabase’s database character set and platform endian format.
If you have not already done so, determine the database character set of your on-premises database, and determine the endian format of the platform your on-premisesdatabase resides on. Use this information to help you choose an appropriate method.
• Data Pump Conventional Export/Import
This method can be used regardless of the endian format and database characterset of the on-premises database.
For the steps this method entails, see Data Pump Conventional Export/Import.
• Data Pump Transportable Tablespace
This method can be used only if the on-premises platform is little endian, and thedatabase character sets of your on-premises database and Oracle DatabaseCloud Service database are compatible.
For the steps this method entails, see Data Pump Transportable Tablespace.
• RMAN Transportable Tablespace with Data Pump
This method can be used only if the on-premises platform is little endian, and thedatabase character sets of your on-premises database and Oracle DatabaseCloud Service database are compatible.
For the steps this method entails, see RMAN Transportable Tablespace with DataPump.
Chapter 9Migrating from Oracle Database 12c Non-CDB to Oracle Database 12c in the Cloud
9-6
• RMAN CONVERT Transportable Tablespace with Data Pump
This method can be used only if the database character sets of your on-premisesdatabase and Oracle Database Cloud Service database are compatible.
This method is similar to the Data Pump Transportable Tablespace method, withthe addition of the RMAN CONVERT command to enable transport between platformswith different endianness. Query V$TRANSPORTABLE_PLATFORM to determine if the on-premises database platform supports cross-platform tablespace transport and todetermine the endian format of the platform. The Oracle Database Cloud platformis little-endian format.
For the steps this method entails, see RMAN CONVERT TransportableTablespace with Data Pump.
• RMAN Cross-Platform Transportable Tablespace Backup Sets
This method can be used only if the database character sets of your on-premisesdatabase and Oracle Database Cloud Service database are compatible.
For the steps this method entails, see RMAN Cross-Platform TransportableTablespace Backup Sets.
• Data Pump Full Transportable
This method can be used only if the database character sets of your on-premisesdatabase and Oracle Database Cloud Service database are compatible.
For the steps this method entails, see Data Pump Full Transportable.
• Unplugging/Plugging (non-CDB)
This method can be used only if the on-premises platform is little endian, and theon-premises database and Database Cloud Service database have compatibledatabase character sets and national character sets.
You can use the unplug/plug method to migrate an Oracle Database 12c non-CDBdatabase to Oracle Database 12c in the cloud. This method provides a way toconsolidate several non-CDB databases into a single Oracle Database 12c CDBon the cloud.
For the steps this method entails, see Unplugging/Plugging Non-CDB.
• Remote Cloning (non-CDB)
This method can be used only if the on-premises platform is little endian, the on-premises database release is 12.1.0.2 or higher, and the on-premises databaseand Database Cloud Service database have compatible database character setsand national character sets.
You can use the remote cloning method to copy an Oracle Database 12c non-CDB on-premises database to your Oracle Database 12c database in the cloud.
For the steps this method entails, see Remote Cloning Non-CDB.
• SQL Developer and SQL*Loader to Migrate Selected Objects
You can use SQL Developer to create a cart into which you add selected objectsto be loaded into your Oracle Database 12c database on the cloud. In this method,you use SQL*Loader to load the data into your cloud database.
For the steps this method entails, see SQL Developer and SQL*Loader to MigrateSelected Objects.
• SQL Developer and INSERT Statements to Migrate Selected Objects
Chapter 9Migrating from Oracle Database 12c Non-CDB to Oracle Database 12c in the Cloud
9-7

You can use SQL Developer to create a cart into which you add selected objectsto be loaded into your Oracle Database 12c database on the cloud. In this method,you use SQL INSERT statements to load the data into your cloud database.
For the steps this method entails, see SQL Developer and INSERT Statements toMigrate Selected Objects.
Migration MethodsMany methods exist to migrate Oracle databases to Oracle Database Cloud Service.
Which of these methods apply to a given migration scenario depends on severalfactors, including the version, character set, and platform endian format of the sourceand target databases.
Topics
• Data Pump Conventional Export/Import
• Data Pump Full Transportable
• Data Pump Transportable Tablespace
• Remote Cloning a PDB
• Remote Cloning Non-CDB
• RMAN Cross-Platform Transportable PDB
• RMAN Cross-Platform Transportable Tablespace Backup Sets
• RMAN Transportable Tablespace with Data Pump
• RMAN CONVERT Transportable Tablespace with Data Pump
• SQL Developer and INSERT Statements to Migrate Selected Objects
• SQL Developer and SQL*Loader to Migrate Selected Objects
• Unplugging/Plugging a PDB
• Unplugging/Plugging Non-CDB
Data Pump Conventional Export/ImportYou can use this method regardless of the endian format and database character setof the on-premises database.
To migrate an on-premises source database, tablespace, schema, or table to thedatabase on an Oracle Database Cloud Service database deployment using DataPump Export and Import, you perform these tasks:
1. On the on-premises database host, invoke Data Pump Export and export the on-premises database.
2. Use a secure copy utility to transfer the dump file to the Database Cloud Servicecompute node.
3. On the Database Cloud Service compute node, invoke Data Pump Import andimport the data into the database.
4. After verifying that the data has been imported successfully, you can delete thedump file.
Chapter 9Migration Methods
9-8

For information about Data Pump Import and Export, see these topics:
• "Data Pump Export Modes" in Oracle Database Utilities for Release 12.2, 12.1 or 11.2.
• "Data Pump Import Modes" in Oracle Database Utilities for Release 12.2, 12.1 or 11.2.
Data Pump Conventional Export/Import: ExampleThis example provides a step-by-step demonstration of the tasks required to migrate aschema from an on-premises Oracle database to an Oracle Database Cloud Servicedatabase.
This example illustrates a schema mode export and import. The same generalprocedure applies for a full database, tablespace, or table export and import.
In this example, the on-premises database is on a Linux host.
1. On the on-premises database host, invoke Data Pump Export to export theschemas.
a. On the on-premises database host, create an operating system directory touse for the on-premises database export files.
$ mkdir /u01/app/oracle/admin/orcl/dpdump/for_cloud
b. On the on-premises database host, invoke SQL*Plus and log in to the on-premises database as the SYSTEM user.
$ sqlplus systemEnter password: <enter the password for the SYSTEM user>
c. Create a directory object in the on-premises database to reference theoperating system directory.
SQL> CREATE DIRECTORY dp_for_cloud AS '/u01/app/oracle/admin/orcl/dpdump/for_cloud';
d. Exit from SQL*Plus.
e. On the on-premises database host, invoke Data Pump Export as the SYSTEMuser or another user with the DATAPUMP_EXP_FULL_DATABASE role and export theon-premises schemas. Provide the password for the user when prompted.
$ expdp system SCHEMAS=fsowner DIRECTORY=dp_for_cloud
2. Use a secure copy utility to transfer the dump file to the Database Cloud Servicecompute node.
In this example the dump file is copied to the /u01 directory. Choose theappropriate location based on the size of the file that will be transferred.
a. On the Database Cloud Service compute node, create a directory for thedump file.
$ mkdir /u01/app/oracle/admin/ORCL/dpdump/from_onprem
b. Before using the scp command to copy the export dump file, make sure theSSH private key that provides access to the Database Cloud Service computenode is available on your on-premises host. For more information about SSHkeys, see About Network Access to Database Cloud Service.
Chapter 9Migration Methods
9-9

c. On the on-premises database host, use the SCP utility to transfer the dumpfile to the Database Cloud Service compute node.
$ scp –i private_key_file \/u01/app/oracle/admin/orcl/dpdump/for_cloud/expdat.dmp \oracle@IP_address_DBaaS_VM:/u01/app/oracle/admin/ORCL/dpdump/from_onprem
3. On the Database Cloud Service compute node, invoke Data Pump Import andimport the data into the database.
a. On the Database Cloud Service compute node, invoke SQL*Plus and log in tothe database as the SYSTEM user.
$ sqlplus systemEnter password: <enter the password for the SYSTEM user>
b. Create a directory object in the Database Cloud Service database.
SQL> CREATE DIRECTORY dp_from_onprem AS '/u01/app/oracle/admin/ORCL/dpdump/from_onprem';
c. If they do not exist, create the tablespace(s) for the objects that will beimported.
d. Exit from SQL*Plus.
e. On the Database Cloud Service compute node, invoke Data Pump Import andconnect to the database. Import the data into the database.
$ impdp system SCHEMAS=fsowner DIRECTORY=dp_from_onprem
4. After verifying that the data has been imported successfully, you can delete theexpdat.dmp file.
Data Pump Full TransportableYou can use this method only if the source database release version is 11.2.0.3 orlater, and the database character sets of your on-premises database and OracleDatabase Cloud Service database are compatible.
You can use the Data Pump full transportable method to copy an entire database fromyour on-premises host to the database on an Oracle Database Cloud Servicedatabase deployment.
To migrate an Oracle Database 11g on-premises database to the Oracle Database12c database on a Database Cloud Service database deployment using the DataPump full transportable method, you perform these tasks:
1. On the on-premises database host, prepare the database for the Data Pump fulltransportable export by placing the user-defined tablespaces in READ ONLY mode.
2. On the on-premises database host, invoke Data Pump Export to perform the fulltransportable export.
3. Use a secure copy utility to transfer the Data Pump Export dump file and thedatafiles for all of the user-defined tablespaces to the Database Cloud Servicecompute node.
4. Set the on-premises tablespaces back to READ WRITE.
5. On the Database Cloud Service compute node, prepare the database for thetablespace import.
Chapter 9Migration Methods
9-10

6. On the Database Cloud Service compute node, invoke Data Pump Import andconnect to the database.
7. After verifying that the data has been imported successfully, you can delete thedump file.
Data Pump Full Transportable: ExampleThis example provides a step-by-step demonstration of the tasks required to migratean Oracle Database 11g database to an Oracle Database Cloud Service 12cdatabase.
In this example, the source database is on a Linux host.
1. On the source database host, prepare the database for the Data Pump fulltransportable export.
a. On the source database host, create a directory in the operating system to usefor the source export.
$ mkdir /u01/app/oracle/admin/orcl/dpdump/for_cloud
b. On the source database host, invoke SQL*Plus and log in to the sourcedatabase as the SYSTEM user.
$ sqlplus systemEnter password: <enter the password for the SYSTEM user>
c. Create a directory object in the source database to reference the operatingsystem directory.
SQL> CREATE DIRECTORY dp_for_cloud AS '/u01/app/oracle/admin/orcl/dpdump/for_cloud';
d. Determine the name(s) of the tablespaces and data files that belong to theuser-defined tablespaces by querying DBA_DATA_FILES. These files will also belisted in the export output.
SQL> SELECT tablespace_name, file_name FROM dba_data_files; TABLESPACE_NAME FILE_NAME--------------- --------------------------------------------------USERS /u01/app/oracle/oradata/orcl/users01.dbfUNDOTBS1 /u01/app/oracle/oradata/orcl/undotbs01.dbfSYSAUX /u01/app/oracle/oradata/orcl/sysaux01.dbfSYSTEM /u01/app/oracle/oradata/orcl/system01.dbfEXAMPLE /u01/app/oracle/oradata/orcl/example01.dbfFSDATA /u01/app/oracle/oradata/orcl/fsdata01.dbfFSINDEX /u01/app/oracle/oradata/orcl/fsindex01.dbfSQL>
e. On the source database host, set all tablespaces that will be transported (thetransportable set) to READ ONLY mode.
SQL> ALTER TABLESPACE example READ ONLY;Tablespace altered.SQL> ALTER TABLESPACE fsindex READ ONLY;Tablespace altered.SQL> ALTER TABLESPACE fsdata READ ONLY;Tablespace altered.SQL> ALTER TABLESPACE users READ ONLY;Tablespace altered.SQL>
Chapter 9Migration Methods
9-11

f. Exit from SQL*Plus.
2. On the source database host, invoke Data Pump Export to perform the fulltransportable export. Specify FULL=y and TRANSPORTABLE=always. Because this is anOracle Database 11g database and full transportable is an Oracle Database 12cfeature, specify VERSION=12. Provide the password for the SYSTEM user whenprompted.
$ expdp system FULL=y TRANSPORTABLE=always VERSION=12 DUMPFILE=expdat.dmp DIRECTORY=dp_for_cloud
3. Use a secure copy utility to transfer the Data Pump Export dump file and thedatafiles for all of the user-defined tablespaces to the Database Cloud Servicecompute node.
In this example the dump file is copied to the /u01 directory. Choose theappropriate location based on the size of the file that will be transferred.
a. On the Database Cloud Service compute node, create a directory for thedump file.
$ mkdir /u01/app/oracle/admin/ORCL/dpdump/from_source
b. Before using the scp utility to copy files, make sure the SSH private key thatprovides access to the Database Cloud Service compute node is available onyour source host. For more information about SSH keys, see About NetworkAccess to Database Cloud Service.
c. On the source database host, use the scp utility to transfer the dump file andall datafiles of the transportable set to the Database Cloud Service computenode.
$ scp -i private_key_file \/u01/app/oracle/admin/orcl/dpdump/for_cloud/expdat.dmp \oracle@compute_node_IP_address:/u01/app/oracle/admin/ORCL/dpdump/from_source
$ scp -i private_key_file \/u01/app/oracle/oradata/orcl/example01.dbf \oracle@compute_node_IP_address:/u02/app/oracle/oradata/ORCL/PDB2
$ scp -i private_key_file \/u01/app/oracle/oradata/orcl/fsdata01.dbf \oracle@compute_node_IP_address:/u02/app/oracle/oradata/ORCL/PDB2
$ scp -i private_key_file \/u01/app/oracle/oradata/orcl/fsindex01.dbf \oracle@compute_node_IP_address:/u02/app/oracle/oradata/ORCL/PDB2
$ scp -i private_key_file \/u01/app/oracle/oradata/orcl/users01.dbf \oracle@compute_node_IP_address:/u02/app/oracle/oradata/ORCL/PDB2
4. Set the source tablespaces back to READ WRITE.
a. Invoke SQL*Plus and log in as the SYSTEM user.
b. Set the user-defined tablespaces back to READ WRITE mode.
SQL> ALTER TABLESPACE example READ WRITE;Tablespace altered.SQL> ALTER TABLESPACE fsdata READ WRITE;Tablespace altered.SQL> ALTER TABLESPACE fsindex READ WRITE;Tablespace altered.
Chapter 9Migration Methods
9-12

SQL> ALTER TABLESPACE users READ WRITE;Tablespace altered.
c. Exit from SQL*Plus.
5. On the Database Cloud Service compute node, prepare the PDB for thetablespace import.
a. On the Database Cloud Service compute node, invoke SQL*Plus and log in tothe PDB as the SYSTEM user.
b. Create a directory object in the PDB.
SQL> CREATE DIRECTORY dp_from_source AS '/u01/app/oracle/admin/ORCL/dpdump/from_source';
6. On the Database Cloud Service compute node, invoke Data Pump Import andconnect to the PDB.
Import the data into the database using the TRANSPORT_DATAFILES option.
$ impdp system@PDB2 FULL=y DIRECTORY=dp_from_source \TRANSPORT_DATAFILES='/u02/app/oracle/oradata/ORCL/PDB2/example01.dbf', \'/u02/app/oracle/oradata/ORCL/PDB2/fsdata01.dbf',\'/u02/app/oracle/oradata/ORCL/PDB2/fsindex01.dbf,'\'/u02/app/oracle/oradata/ORCL/PDB2/users01.dbf'
7. After verifying that the data has been imported successfully, you can delete theexpdat.dmp dump file.
Data Pump Transportable TablespaceYou can use this method only if the on-premises platform is little endian, and thedatabase character sets of your on-premises database and Oracle Database CloudService database are compatible.
The Transportable Tablespace method is generally much faster than a conventionalexport/import of the same data because the data files containing all of the actual dataare simply copied to the destination location. You use Data Pump to transfer only themetadata of the tablespace objects to the new database.
To migrate an on-premises source database to the database deployment on OracleDatabase Cloud Service using the Data Pump Transportable Tablespace method, youperform these tasks:
1. On the on-premises database host, prepare the database for the Data Pumptransportable tablespace export.
2. On the on-premises database host, invoke Data Pump Export to perform thetransportable tablespace export.
3. Use a secure copy utility to transfer the Data Pump Export dump file and thetablespace datafiles to the Database Cloud Service compute node.
4. Set the on-premises tablespaces back to READ WRITE.
5. On the Database Cloud Service compute node, prepare the database for thetablespace import.
6. On the Database Cloud Service compute node, invoke Data Pump Import andconnect to the database.
7. Set the tablespaces on the Database Cloud Service database to READ WRITE mode.
Chapter 9Migration Methods
9-13

8. After verifying that the data has been imported successfully, you can delete thedump file.
Data Pump Transportable Tablespace: ExampleThis example provides a step-by-step demonstration of the tasks required to migratetablespaces in an on-premises Oracle database to an Oracle Database Cloud Servicedatabase.
This example performs a migration of the FSDATA and FSINDEX tablespaces.
In this example, the on-premises database is on a Linux host.
1. On the on-premises database host, prepare the database for the Data Pumptransportable tablespace export.
a. On the on-premises database host, create a directory in the operating systemto use for the on-premises export.
$ mkdir /u01/app/oracle/admin/orcl/dpdump/for_cloud
b. On the on-premises database host, invoke SQL*Plus and log in to the on-premises database as the SYSTEM user.
$ sqlplus systemEnter password: <enter the password for the SYSTEM user>
c. Create a directory object in the on-premises database to reference theoperating system directory.
SQL> CREATE DIRECTORY dp_for_cloud AS '/u01/app/oracle/admin/orcl/dpdump/for_cloud';
d. Determine the name(s) of the datafiles that belong to the FSDATA and FSINDEXtablespaces by querying DBA_DATA_FILES. These files will also be listed inthe export output.
SQL> SELECT file_name FROM dba_data_files 2 WHERE tablespace_name = 'FSDATA';
FILE_NAME-----------------------------------------------------------------/u01/app/oracle/oradata/orcl/fsdata01.dbf
SQL> SELECT file_name FROM dba_data_files 2 WHERE tablespace_name = 'FSINDEX';
FILE_NAME-----------------------------------------------------------------/u01/app/oracle/oradata/orcl/fsindex01.dbf
e. On the on-premises database host, set all tablespaces that will be transported(the transportable set) to READ ONLY mode.
SQL> ALTER TABLESPACE fsindex READ ONLY;Tablespace altered.SQL> ALTER TABLESPACE fsdata READ ONLY;Tablespace altered.
f. Exit from SQL*Plus.
2. On the on-premises database host, invoke Data Pump Export to perform thetransportable tablespace export.
Chapter 9Migration Methods
9-14

On the on-premises database host, invoke Data Pump Export and connect to theon-premises database. Export the on-premises tablespaces using theTRANSPORT_TABLESPACES option. Provide the password for the SYSTEM user whenprompted.
$ expdp system TRANSPORT_TABLESPACES=fsdata,fsindex TRANSPORT_FULL_CHECK=YES DIRECTORY=dp_for_cloud
3. Use a secure copy utility to transfer the Data Pump Export dump file and thetablespace datafiles to the Database Cloud Service compute node.
In this example the dump file is copied to the /u01 directory. Choose theappropriate location based on the size of the file that will be transferred.
a. On the Database Cloud Service compute node, create a directory for thedump file.
$ mkdir /u01/app/oracle/admin/ORCL/dpdump/from_onprem
b. Before using the scp utility to copy files, make sure the SSH private key thatprovides access to the Database Cloud Service compute node is available onyour on-premises host. For more information about SSH keys, see AboutNetwork Access to Database Cloud Service.
c. On the on-premises database host, use the scp utility to transfer the dump fileand all datafiles of the transportable set to the Database Cloud Servicecompute node.
$ scp -i private_key_file \/u01/app/oracle/admin/orcl/dpdump/for_cloud/expdat.dmp \oracle@IP_address_DBaaS_VM:/u01/app/oracle/admin/ORCL/dpdump/from_onprem
$ scp -i private_key_file \/u01/app/oracle/oradata/orcl/fsdata01.dbf \oracle@IP_address_DBaaS_VM:/u02/app/oracle/oradata/ORCL
$ scp -i private_key_file \/u01/app/oracle/oradata/orcl/fsindex01.dbf \oracle@IP_address_DBaaS_VM:/u02/app/oracle/oradata/ORCL
4. Set the on-premises tablespaces back to READ WRITE.
a. Invoke SQL*Plus and log in as the SYSTEM user.
b. Set the FSDATA and FSINDEX tablespaces back to READ WRITE mode.
SQL> ALTER TABLESPACE fsdata READ WRITE;Tablespace altered.SQL> ALTER TABLESPACE fsindex READ WRITE;Tablespace altered.
c. Exit from SQL*Plus.
5. On the Database Cloud Service compute node, prepare the database for thetablespace import.
a. On the Database Cloud Service compute node, invoke SQL*Plus and log in tothe database as the SYSTEM user.
b. Create a directory object in the Database Cloud Service database.
SQL> CREATE DIRECTORY dp_from_onprem AS '/u01/app/oracle/admin/ORCL/dpdump/from_onprem';
Chapter 9Migration Methods
9-15

c. If the owners of the objects that will be imported do not exist in the database,create them before performing the import. The transportable tablespace modeof import does not create the users.
SQL> CREATE USER fsowner 2 PROFILE default 3 IDENTIFIED BY fspass 4 TEMPORARY TABLESPACE temp 5 ACCOUNT UNLOCK;
6. On the Database Cloud Service compute node, invoke Data Pump Import andconnect to the database.
Import the data into the database using the TRANSPORT_DATAFILES option.
$ impdp system DIRECTORY=dp_from_onprem \TRANSPORT_DATAFILES='/u02/app/oracle/oradata/ORCL/fsdata01.dbf', \'/u02/app/oracle/oradata/ORCL/fsindex01.dbf'
7. Set the tablespaces on the Database Cloud Service database to READ WRITE mode.
a. Invoke SQL*Plus and log in as the SYSTEM user.
b. Set the FSDATA and FSINDEX tablespaces to READ WRITE mode.
SQL> ALTER TABLESPACE fsdata READ WRITE;Tablespace altered.SQL> ALTER TABLESPACE fsindex READ WRITE;Tablespace altered.
c. Exit from SQL*Plus.
8. After verifying that the data has been imported successfully, you can delete theexpdat.dmp dump file.
Remote Cloning a PDBYou can use this method only if the on-premises platform is little endian, the on-premises database release is 12.1.0.2 or higher, and the on-premises database andDatabase Cloud Service database have compatible database character sets andnational character sets.
You can use the remote cloning method to copy a PDB from your on-premises OracleDatabase 12c database to a PDB in an Oracle Database 12c database on OracleDatabase Cloud Service.
To migrate an Oracle Database 12c PDB to a PDB in a Database Cloud Servicedatabase deployment using the remote cloning method, you perform these tasks:
1. On the on-premises database host, invoke SQL*Plus and close the on-premisesPDB and then reopen it in READ ONLY mode.
2. On the Database Cloud Service compute node, invoke SQL*Plus and create adatabase link that enables a connection to the on-premises database.
3. On the Database Cloud Service compute node, execute the CREATE PLUGGABLEDATABASE command to clone the on-premises PDB.
4. On the Database Cloud Service compute node, open the new PDB by executingthe ALTER PLUGGABLE DATABASE OPEN command.
5. Optionally, on the on-premises database host invoke SQL*Plus and set the on-premises PDB back to READ WRITE mode.
Chapter 9Migration Methods
9-16

For more information, see "Cloning a Remote PDB or Non-CDB" in Oracle DatabaseAdministrator's Guide for Release 12.2 or 12.1.
Remote Cloning Non-CDBYou can use this method only if the on-premises platform is little endian, the on-premises database release is 12.1.0.2 or higher, and the on-premises database andDatabase Cloud Service database have compatible database character sets andnational character sets.
You can use the remote cloning method to copy an Oracle Database 12c non-CDB on-premises database to a PDB in an Oracle Database 12c database on OracleDatabase Cloud Service.
To migrate an Oracle Database 12c non-CDB database to a Database Cloud Servicedatabase deployment using the remote cloning method, you perform these tasks:
1. On the on-premises database host, invoke SQL*Plus and set the on-premisesdatabase to READ ONLY mode.
2. On the Database Cloud Service compute node, invoke SQL*Plus and create adatabase link that enables a connection to the on-premises database.
3. On the Database Cloud Service compute node, execute the CREATE PLUGGABLEDATABASE command to clone the on-premises non-CDB database.
4. On the Database Cloud Service compute node, execute the $ORACLE_HOME/rdbms/admin/noncdb_to_pdb.sql script.
5. On the Database Cloud Service compute node, open the new PDB by executingthe ALTER PLUGGABLE DATABASE OPEN command.
6. Optionally, on the on-premises database host invoke SQL*Plus and set the on-premises database back to READ WRITE mode.
For more information, see "Cloning a Remote PDB or Non-CDB" in Oracle DatabaseAdministrator's Guide for Release 12.2 or 12.1.
RMAN Cross-Platform Transportable PDBThis method can be used only if the on-premises platform is little endian, and thedatabase character sets of your on-premises database and Oracle Database CloudService database are compatible.
To migrate an Oracle Database 12c PDB to a PDB in an Oracle Database 12cdatabase on an Oracle Database Cloud Service deployment using the RMAN cross-platform transportable PDB method, you perform these tasks:
1. On the on-premises database host, invoke SQL*Plus and close the on-premisesPDB.
2. On the on-premises database host, execute the ALTER PLUGGABLE DATABASE UNPLUGcommand to generate an XML file containing the list of datafiles that will beplugged in on the cloud database.
3. On the on-premises database host, invoke RMAN and connect to the root.Execute the BACKUP FOR TRANSPORT PLUGGABLE DATABASE command.
4. Use a secure copy utility to transfer the XML file and the backup set to theDatabase Cloud Service compute node.
Chapter 9Migration Methods
9-17

5. On the Database Cloud Service compute node, invoke RMAN and connect to theroot. Execute the RESTORE ALL FOREIGN DATAFILES command.
6. the Database Cloud Service compute node, invoke SQL*Plus and connect to theroot. Execute the CREATE PLUGGABLE DATABASE command.
7. the Database Cloud Service compute node, execute the ALTER PLUGGABLE DATABASEOPEN command.
For more information, see " Performing Cross-Platform Data Transport in CDBs andPDBs" in Oracle Database Backup and Recovery User's Guide for Release 12.2 or 12.1.
RMAN Cross-Platform Transportable Tablespace Backup SetsYou can use this method only if the database character sets of your on-premisesdatabase and Oracle Database Cloud Service database are compatible.
Note:
See Oracle Database 12c Backup and Recovery User's Guide for Release 12.2or 12.1 for detailed information on a similar method that enables you to performa cross-platform transport of an entire database. When you transport an entiredatabase to a different platform, the source platform and the destinationplatform must use the same endian format.
To migrate Oracle Database 12c on-premises tablespaces to an Oracle Database 12cdatabase on an Oracle Database Cloud Service deployment using the RMAN cross-platform transportable backup sets method, you perform these tasks:
1. On the on-premises database host, prepare the database by placing the user-defined tablespaces that you intend to transport in READ ONLY mode.
2. On the on-premises database host, invoke RMAN and use the BACKUP commandwith the TO PLATFORM or FOR TRANSPORT clause and the DATAPUMP clause to create abackup set for cross-platform transport. See in "BACKUP" in Oracle DatabaseBackup and Recovery Reference for Release 12.2 or 12.1 for more information onthe BACKUP command.
3. Use a secure copy utility to transfer the backup sets, including the Data Pumpexport dump file, to the Database Cloud Service compute node.
4. Set the on-premises tablespaces back to READ WRITE.
5. On the Database Cloud Service compute node, prepare the database by creatingthe required schemas.
6. On the Database Cloud Service compute node, invoke RMAN and use the RESTOREcommand with the foreignFileSpec subclause to restore the cross-platformbackup.
7. On the Database Cloud Service compute node, set the tablespaces on thedatabase to READ WRITE mode.
For more information, see "Overview of Cross-Platform Data Transport Using BackupSets" in Oracle Database Backup and Recovery User’s Guide for Release 12.2 or 12.1.
Chapter 9Migration Methods
9-18

RMAN Cross-Platform Transportable Tablespace Backup Sets: ExampleThis example provides a step-by-step demonstration of the tasks required to migratetablespaces in an Oracle Database PDB to an Oracle Database Cloud Servicedatabase.
This example performs a migration of the FSDATA and FSINDEX tablespaces.
In this example, the on-premises database is on a Linux host.
1. On the on-premises database host, prepare the database by creating a directoryfor the export dump file and placing the user-defined tablespaces that you intendto transport in READ ONLY mode..
a. On the on-premises database host, create a directory in the operating systemto use for the export dump.
$ mkdir /u01/app/oracle/admin/orcl/dpdump/for_cloud
b. On the on-premises data host, invoke SQL*Plus and log in to the PDB as theSYSTEM user..
$ sqlplus system@pdb_servicenameEnter password: enter the password for the SYSTEM user
c. Create a directory object in the on-premises database to reference theoperating system directory.
SQL> CREATE DIRECTORY dp_for_cloud AS '/u01/app/oracle/admin/orcl/dpdump/for_cloud';
d. On the on-premises database host, set all tablespaces that will be transported(the transportable set) to READ ONLY mode.
SQL> ALTER TABLESPACE fsindex READ ONLY;SQL> ALTER TABLESPACE fsdata READ ONLY;
e. Exit from SQL*Plus.
2. On the on-premises database host, invoke RMAN and use the BACKUP commandwith the TO PLATFORM or FOR TRANSPORT clause and the DATAPUMP clause to create abackup set for cross-platform transport.
a. On the on-premises database host, create an operating system directory forthe datafiles.
$ mkdir /u01/app/oracle/admin/orcl/rman_transdest
b. Invoke RMAN and log in as a user that has been granted the SYSDBA orSYSBACKUP privilege.
$ rman target username@pdb_servicename
c. Execute the BACKUP command.
RMAN> BACKUP FOR TRANSPORT2> FORMAT '/u01/app/oracle/admin/orcl/rman_transdest/fs_tbs.bck'3> TABLESPACE fsdata,fsindex4> DATAPUMP FORMAT '/u01/app/oracle/admin/orcl/rman_transdest/fs_tbs.dmp';
d. Log out of RMAN.
e. Optionally, navigate to the directory you specified in the BACKUP command toview the files that were created.
Chapter 9Migration Methods
9-19

$ cd /u01/app/oracle/admin/orcl/rman_transdest$ lsfs_tbs.bck fs_tbs.dmp
3. Use a secure copy utility to transfer the backup set, including the Data Pumpexport dump file, to the Database Cloud Service compute node.
a. On the Database Cloud Service compute node, create a directory for thebackup set and dump file.
$ mkdir /tmp/from_onprem
b. Before using the scp command to copy files, make sure the SSH private keythat provides access to the Database Cloud Service compute node is availableon your on-premises host. For more information about SSH keys, see AboutNetwork Access to Database Cloud Service.
c. On the on-premises database host, use the SCP utility to transfer the backupset and the dump file to the Database Cloud Service compute node.
$ scp -i private_key_file \/u01/app/oracle/admin/orcl/rman_transdest/fs_tbs.bck \oracle@IP_address_DBaaS_VM:/tmp/from_onprem
$ scp -i private_key_file \/u01/app/oracle/admin/orcl/rman_transdest/fs_tbs.dmp \oracle@IP_address_DBaaS_VM:/tmp/from_onprem
$
4. Set the on-premises tablespaces back to READ WRITE.
a. Invoke SQL*Plus and log in to the PDB as the SYSTEM user.
b. Set the FSDATA and FSINDEX tablespaces back to READ WRITE mode.
SQL> ALTER TABLESPACE fsdata READ WRITE;SQL> ALTER TABLESPACE fsindex READ WRITE;
c. Exit from SQL*Plus.
5. On the Database Cloud Service compute node, prepare the database by creatingthe required schemas.
a. On the Database Cloud Service compute node, invoke SQL*Plus and log in tothe PDB as the SYSTEM user.
b. If the owners of the objects that will be imported do not exist in the database,create them before performing the RESTORE.
SQL> CREATE USER fsowner 2 PROFILE default 3 IDENTIFIED BY fspass 4 TEMPORARY TABLESPACE temp 5 ACCOUNT UNLOCK;
6. On the Database Cloud Service compute node, invoke RMAN and use the RESTOREcommand with the foreignFileSpec subclause to restore the cross-platformbackup.
a. Create an operating system directory for the Data Pump Dump file.
$ mkdir /tmp/from_onprem
b. Invoke RMAN and log in to the PDB as a user that has been granted theSYSDBA or SYSBACKUP privilege.
Chapter 9Migration Methods
9-20

$ rman target username@pdb_servicename
c. Execute the RESTORE command.
RMAN> RESTORE FOREIGN TABLESPACE fsdata,fsindex TO NEW2> FROM BACKUPSET '/tmp/from_onprem/fs_tbs.bck'3> DUMP FILE DATAPUMP DESTINATION '/tmp/datapump'4> FROM BACKUPSET '/tmp/from_onprem/fs_tbs.dmp';
d. Exit from RMAN.
7. On the Database Cloud Service compute node, set the tablespaces to READWRITE mode.
a. Invoke SQL*Plus and log in to the PDB as the SYSTEM user.
b. Set the FSDATA and FSINDEX tablespaces to READ WRITE.
SQL> ALTER TABLESPACE fsdata READ WRITE;SQL> ALTER TABLESPACE fsindex READ WRITE;
c. Exit from SQL*Plus.
8. After verifying that the data has been imported successfully, you can delete thebackup set files that were transported from the on-premises host.
RMAN Transportable Tablespace with Data PumpYou can use this method only if the on-premises platform is little endian, and thedatabase character sets of your on-premises database and Oracle Database CloudService database are compatible.
You can use this method to eliminate placing the tablespaces in READ ONLY mode, asrequired by the Data Pump Transportable Tablespace method.
To migrate an on-premises source database to a database deployment on OracleDatabase Cloud Service using the RMAN Transportable Tablespace with Data Pumpmethod, you perform these tasks:
1. On the on-premises database host, invoke RMAN and create the transportabletablespace set.
2. Use a secure copy utility to transfer the Data Pump Export dump file and thetablespace datafiles to the Database Cloud Service compute node.
3. On the Database Cloud Service compute node, prepare the database for thetablespace import.
4. On the Database Cloud Service compute node, invoke Data Pump Import andconnect to the database. Import the data into the database using theTRANSPORT_DATAFILES option.
5. After verifying that the data has been imported successfully, you can delete thedump file.
RMAN Transportable Tablespace with Data Pump: ExampleThis example provides a step-by-step demonstration of the tasks required to migratetablespaces in an on-premises Oracle database to an Oracle Database Cloud Servicedatabase.
This example performs a migration of the FSDATA and FSINDEX tablespaces.
Chapter 9Migration Methods
9-21

In this example, the on-premises database is on a Linux host.
1. On the on-premises database host, invoke RMAN and create the transportabletablespace set.
a. On the on-premises database host, create an operating system directory forthe datafiles.
$ mkdir /u01/app/oracle/admin/orcl/rman_transdest
b. On the on-premises data host, create an operating system directory for theRMAN auxiliary instance files.
$ mkdir /u01/app/oracle/admin/orcl/rman_auxdest
c. Invoke RMAN and log in as the SYSTEM user. Enter the password for the SYSTEMuser when prompted.
$ rman target system
d. Execute the TRANSPORT TABLESPACE command.
RMAN> TRANSPORT TABLESPACE fsdata, fsindex2> TABLESPACE DESTINATION '/u01/app/oracle/admin/orcl/rman_transdest'3> AUXILIARY DESTINATION '/u01/app/oracle/admin/orcl/rman_auxdest';
e. Log out of RMAN.
f. Optionally, navigate to the directory you specified for the TABLESPACEDESTINATION and view the files that were created by the TRANSPORT TABLESPACEoperation.
$ cd /u01/app/oracle/admin/orcl/rman_transdest$ lsdmpfile.dmp fsdata01.dbf fsindex01.dbf impscrpt.sql
2. Use a secure copy utility to transfer the Data Pump Export dump file and thetablespace datafiles to the Database Cloud Service compute node.
In this example the dump file is copied to the /u01 directory. Choose theappropriate location based on the size of the file that will be transferred.
a. On the Database Cloud Service compute node, create a directory for thedump file.
$ mkdir /u01/app/oracle/admin/ORCL/dpdump/from_onprem
b. Before using the scp command to copy files, make sure the SSH private keythat provides access to the Database Cloud Service compute node is availableon your on-premises host. For more information about SSH keys, see AboutNetwork Access to Database Cloud Service.
c. On the on-premises database host, use the SCP utility to transfer the dumpfile and all datafiles of the transportable set to the Database Cloud Servicecompute node.
$ scp -i private_key_file \/u01/app/oracle/admin/orcl/rman_transdest/dmpfile.dmp \oracle@IP_address_DBaaS_VM:/u01/app/oracle/admin/ORCL/dpdump/from_onprem
$ scp -i private_key_file \/u01/app/oracle/admin/orcl/rman_transdest/fsdata01.dbf \oracle@IP_address_DBaaS_VM:/u02/app/oracle/oradata/ORCL
$ scp -i private_key_file \
Chapter 9Migration Methods
9-22
/u01/app/oracle/admin/orcl/rman_transdest/fsindex01.dbf \oracle@IP_address_DBaaS_VM:/u02/app/oracle/oradata/ORCL
3. On the Database Cloud Service compute node, prepare the database for thetablespace import.
a. On the Database Cloud Service compute node, invoke SQL*Plus and log in tothe database as the SYSTEM user.
b. Create a directory object in the Database Cloud Service database.
SQL> CREATE DIRECTORY dp_from_onprem AS '/u01/app/oracle/admin/ORCL/dpdump/from_onprem';
c. If the owners of the objects that will be imported do not exist in the database,create them before performing the import. The transportable tablespace modeof import does not create the users.
SQL> CREATE USER fsowner 2 PROFILE default 3 IDENTIFIED BY fspass 4 TEMPORARY TABLESPACE temp 5 ACCOUNT UNLOCK;
4. On the Database Cloud Service compute node, invoke Data Pump Import andconnect to the database.
Import the data into the database using the TRANSPORT_DATAFILES option.
$ impdp system DIRECTORY=dp_from_onprem DUMPFILE='dmpfile.dmp' \TRANSPORT_DATAFILES='/u02/app/oracle/oradata/ORCL/fsdata01.dbf', \'/u02/app/oracle/oradata/ORCL/fsindex01.dbf'
5. After verifying that the data has been imported successfully, you can delete thedmpfile.dmp dump file.
RMAN CONVERT Transportable Tablespace with Data PumpYou can use this method only if the database character sets of your on-premisesdatabase and Oracle Database Cloud Service database are compatible.
This method is similar to the Data Pump Transportable Tablespace method, with theaddition of the RMAN CONVERT command to enable transport between platforms withdifferent endianness. Query V$TRANSPORTABLE_PLATFORM to determine if the on-premisesdatabase platform supports cross-platform tablespace transport and to determine theendian format of the platform. The Oracle Database Cloud Service platform is little-endian format.
To migrate tablespaces from your on-premises Oracle database to a databasedeployment on Database Cloud Service using RMAN, you perform these tasks:
1. On the on-premises database host, prepare the database for the Data Pumptransportable tablespace export.
2. On the on-premises database host, invoke Data Pump Export to perform thetransportable tablespace export.
3. On the on-premises database host, invoke RMAN and use the CONVERT TABLESPACEcommand to convert the tablespace datafile to the Oracle Database Cloudplatform format. Refer to the Oracle Database Backup and Recovery Referencefor more information on the CONVERT command.
Chapter 9Migration Methods
9-23

4. Use a secure copy utility to transfer the Data Pump Export dump file and theconverted tablespace datafiles to the Database Cloud Service compute node.
5. Set the on-premises tablespaces back to READ WRITE.
6. On the Database Cloud Service compute node, prepare the database for thetablespace import.
7. On the Database Cloud Service compute node, invoke Data Pump Import andconnect to the database.
8. On the Database Cloud Service compute node, set the tablespaces in thedatabase to READ WRITE mode.
9. After verifying that the data has been imported successfully, you can delete thedump file.
RMAN CONVERT Transportable Tablespace with Data Pump: ExampleThis example provides a step-by-step demonstration of the tasks required to migratetablespaces in an on-premises Oracle database to an Oracle Database Cloud Servicedatabase.
In this example, the on-premises database is on a Linux host.
1. On the on-premises database host, prepare the database for the Data Pumptransportable tablespace export.
a. On the on-premises database host, create a directory in the operating systemto use for the on-premises export.
$ mkdir /u01/app/oracle/admin/orcl/dpdump/for_cloud
b. On the on-premises database host, invoke SQL*Plus and log in to the on-premises database as the SYSTEM user.
$ sqlplus systemEnter password: <enter the password for the SYSTEM user>
c. Create a directory object in the on-premises database to reference theoperating system directory.
SQL> CREATE DIRECTORY dp_for_cloud AS '/u01/app/oracle/admin/orcl/dpdump/for_cloud';
d. On the on-premises database host, set all tablespaces that will be transported(the transportable set) to READ ONLY mode.
SQL> ALTER TABLESPACE fsindex READ ONLY;Tablespace altered.SQL> ALTER TABLESPACE fsdata READ ONLY;Tablespace altered.
e. Exit from SQL*Plus.
2. On the on-premises database host, invoke Data Pump Export to perform thetransportable tablespace export.
On the on-premises database host, invoke Data Pump Export and connect to theon-premises database. Export the on-premises tablespaces using theTRANSPORT_TABLESPACES option. Provide the password for the SYSTEM user whenprompted.
$ expdp system TRANSPORT_TABLESPACES=fsdata,fsindex TRANSPORT_FULL_CHECK=YES DIRECTORY=dp_for_cloud
Chapter 9Migration Methods
9-24

3. On the on-premises database host, invoke RMAN and use the CONVERT TABLESPACEcommand to convert the tablespace datafile to the Oracle Database Cloudplatform format.
a. Invoke RMAN.
$ rman target /
b. Execute the RMAN CONVERT TABLESPACE command to convert the datafiles andstore the converted files in a temporary location on the on-premises databasehost.
RMAN> CONVERT TABLESPACE fsdata, fsindex 2> TO PLATFORM 'Linux x86 64-bit' 3> FORMAT '/tmp/%U ';…input datafile file number=00006 name=/u01/app/oracle/oradata/orcl/fsdata01.dbfconverted datafile=/tmp/data_D-ORCL_I-1410251631_TS-FSDATA_FNO-6_0aqc9un3…input datafile file number=00007 name=/u01/app/oracle/oradata/orcl/fsindex01.dbfconverted datafile=/tmp/data_D-ORCL_I-1410251631_TS-FSINDEX_FNO-7_0bqc9un6…
c. Take note of the names of the converted files. You will copy these files to theDatabase Cloud Service compute node in the next step.
d. Exit RMAN.
4. Use a secure copy utility to transfer the Data Pump Export dump file and theconverted tablespace datafiles to the Database Cloud Service compute node.
In this example the dump file is copied to the /u01 directory. Choose theappropriate location based on the size of the file that will be transferred.
a. On the Database Cloud Service compute node, create a directory for thedump file.
$ mkdir /u01/app/oracle/admin/ORCL/dpdump/from_onprem
b. Before using the scp command to copy files, make sure the SSH private keythat provides access to the Database Cloud Service compute node is availableon your on-premises host. For more information about SSH keys, see AboutNetwork Access to Database Cloud Service.
c. On the on-premises database host, use the scp utility to transfer the dump fileand all datafiles of the transportable set to the Database Cloud Servicecompute node.
$ scp -i private_key_file \/u01/app/oracle/admin/orcl/dpdump/for_cloud/expdat.dmp \oracle@IP_address_DBaaS_VM:/u01/app/oracle/admin/ORCL/dpdump/from_onprem
$ scp -i private_key_file \/tmp/data_D-ORCL_I-1410251631_TS-FSDATA_FNO-6_0aqc9un3 \oracle@IP_address_DBaaS_VM:/u02/app/oracle/oradata/ORCL/fsdata01.dbf
$ scp -i private_key_file \/tmp/data_D-ORCL_I-1410251631_TS-FSINDEX_FNO-7_0bqc9un6 \oracle@IP_address_DBaaS_VM:/u02/app/oracle/oradata/ORCL/fsindex01.dbf
5. Set the on-premises tablespaces back to READ WRITE.
a. Invoke SQL*Plus and log in as the SYSTEM user.
Chapter 9Migration Methods
9-25

b. Set the FSDATA and FSINDEX tablespaces back to READ WRITE mode.
SQL> ALTER TABLESPACE fsdata READ WRITE;Tablespace altered.SQL> ALTER TABLESPACE fsindex READ WRITE;Tablespace altered.
c. Exit from SQL*Plus.
6. On the Database Cloud Service compute node, prepare the database for thetablespace import.
a. On the Database Cloud Service compute node, invoke SQL*Plus and log in tothe database as the SYSTEM user.
b. Create a directory object in the Database Cloud Service database.
SQL> CREATE DIRECTORY dp_from_onprem AS '/u01/app/oracle/admin/ORCL/dpdump/from_onprem';
c. If the owners of the objects that will be imported do not exist in the database,create them before performing the import. The transportable tablespace modeof import does not create the users.
SQL> CREATE USER fsowner 2 PROFILE default 3 IDENTIFIED BY fspass 4 TEMPORARY TABLESPACE temp 5 ACCOUNT UNLOCK;
7. On the Database Cloud Service compute node, invoke Data Pump Import andconnect to the database.
Import the data into the DBaaS database using the TRANSPORT_DATAFILES option
$ impdp system DIRECTORY=dp_from_onprem \TRANSPORT_DATAFILES='/u02/app/oracle/oradata/ORCL/fsdata01.dbf', \'/u02/app/oracle/oradata/ORCL/fsindex01.dbf'
8. On the Database Cloud Service compute node, set the tablespaces in thedatabase to READ WRITE mode.
a. Invoke SQL*Plus and log in as the SYSTEM user.
b. Set the FSDATA and FSINDEX tablespaces to READ WRITE mode.
SQL> ALTER TABLESPACE fsdata READ WRITE;Tablespace altered.SQL> ALTER TABLESPACE fsindex READ WRITE;Tablespace altered.
c. Exit from SQL*Plus.
9. After verifying that the data has been imported successfully, you can delete theexpdat.dmp dump file.
SQL Developer and INSERT Statements to Migrate Selected ObjectsYou can use SQL Developer to create a cart into which you add selected objects to beloaded into an Oracle Database 12c database on Oracle Database Cloud Service.
In this method, you use SQL INSERT statements to load the data into your clouddatabase.
Chapter 9Migration Methods
9-26

To migrate selected objects to an Oracle Database 12c database on a DatabaseCloud Service deployment using SQL Developer and INSERT statements, you performthese tasks:
1. Launch SQL Developer, connect to your on-premises database and create a cartcontaining the objects you want to migrate.
2. In SQL Developer, click the Export Cart icon and select “Insert” in the Formatmenu.
3. In SQL Developer, open a connection to the Oracle Database 12c database onDatabase Cloud Service and execute the generated script to create the databaseobjects.
4. In SQL Developer, open a connection to the Oracle Database 12c database onDatabase Cloud Service and run the generated script to create the objects andload the data.
SQL Developer and SQL*Loader to Migrate Selected ObjectsYou can use SQL Developer to create a cart into which you add selected objects to beloaded into an Oracle Database 12c database on Oracle Database Cloud Service.
In this method, you use SQL*Loader to load the data into your cloud database.
To migrate selected objects to an Oracle Database 12c database on a DatabaseCloud Service deployment using SQL Developer and SQL*Loader, you perform thesetasks:
1. Launch SQL Developer, connect to your on-premises database and create a cartcontaining the objects you want to load into your cloud database.
2. In SQL Developer, click the Export Cart icon and select “loader” in the Formatmenu.
3. In SQL Developer, open a connection to the Oracle Database 12c database onDatabase Cloud Service and execute the generated script to create the databaseobjects.
4. Use a secure copy utility to transfer the SQL*Loader control files and theSQL*Loader data files to the Database Cloud Service compute node.
5. On the Database Cloud Service compute node, invoke SQL*Loader to load thedata using the SQL*Loader control files and data files for each object.
Unplugging/Plugging a PDBYou can use this method only if the on-premises platform is little endian, and the on-premises database and Database Cloud Service database have compatible databasecharacter sets and national character sets.
You can use the unplug/plug method to migrate an Oracle Database 12c PDB to aPDB in an Oracle Database 12c database on an Oracle Database Cloud Servicedatabase deployment.
If your source PDB is encrypted, you must export the master encryption key and thenimport it on the database deployment. See Exporting and Importing a MasterEncryption Key for a PDB for details.
Chapter 9Migration Methods
9-27

To migrate an Oracle Database 12c PDB to a PDB in the Oracle Database 12cdatabase on a Database Cloud Service database deployment using the plug/unplugmethod, you perform these tasks:
1. On the on-premises database host, invoke SQL*Plus and close the on-premisesPDB.
2. On the on-premises database host, execute the ALTER PLUGGABLE DATABASE UNPLUGcommand to generate an XML file containing the list of datafiles that will beplugged in to the database on Database Cloud Service.
3. Use a secure copy utility to transfer the XML file and the datafiles to the DatabaseCloud Service compute node.
4. On the Database Cloud Service compute node, invoke SQL*Plus and execute theCREATE PLUGGABLE DATABASE command to plug the database into the CDB.
5. On the Database Cloud Service compute node, open the new PDB by executingthe ALTER PLUGGABLE DATABASE OPEN command.
For more information, see "Creating a PDB by Plugging an Unplugged PDB into aCDB" in Oracle Database Administrator's Guide for Release 12.2 or 12.1.
Unplugging/Plugging Non-CDBYou can use this method only if the on-premises platform is little endian, and the on-premises database and Database Cloud Service database have compatible databasecharacter sets and national character sets.
You can use the unplug/plug method to migrate an Oracle Database 12c non-CDBdatabase to a PDB in an Oracle Database 12c database on an Oracle Database CloudService database deployment. This method provides a way to consolidate severalnon-CDB databases into a single Oracle Database 12c multitenant database onDatabase Cloud Service.
To migrate an Oracle Database 12c non-CDB database to the Oracle Database 12cdatabase on a Database Cloud Service database deployment using the plug/unplugmethod, you perform these tasks:
1. On the on-premises database host, invoke SQL*Plus and set the on-premisesdatabase to READ ONLY mode.
2. On the on-premises database host, execute the DBMS_PDB.DESCRIBE procedure togenerate an XML file containing the list of datafiles that will be plugged in on thecloud database.
3. Use a secure copy utility to transfer the XML file and the datafiles to the DatabaseCloud Service compute node.
4. On the Database Cloud Service compute node, invoke SQL*Plus and execute theCREATE PLUGGABLE DATABASE command to plug the database into the CDB.
5. On the Database Cloud Service compute node, execute the $ORACLE_HOME/rdbms/admin/noncdb_to_pdb.sql script to delete unnecessary metadata from the SYSTEMtablespace of the new PDB.
6. On the Database Cloud Service compute node, open the new PDB by executingthe ALTER PLUGGABLE DATABASE OPEN command.
7. Optionally, on the on-premises database host invoke SQL*Plus and set the on-premises database back to READ WRITE mode.
Chapter 9Migration Methods
9-28

For more information, see "Creating a PDB Using a Non-CDB" in Oracle DatabaseAdministrator's Guide for Release 12.2 or 12.1.
Chapter 9Migration Methods
9-29

10Using Oracle DBaaS Monitor
Oracle DBaaS Monitor provides monitoring and management of the Oracle databaseand listener on Oracle Database Cloud Service.
Note:
This section does not apply to database deployments that use Oracle RealApplication Clusters. Such deployments do not currently include Oracle DBaaSMonitor.
Topics
• About Oracle DBaaS Monitor
• Accessing Oracle DBaaS Monitor
• Filtering the Display on DBaaS Monitor Pages
• Administering the Listener
• Starting and Stopping the Database Instance
• Viewing and Modifying Initialization Parameters
• Viewing User Account and Expiring Password Information
• Viewing Tablespace and Segment Space Usage
• Changing the TDE Keystore Password
• Viewing Alert Log Entries and Checking for Errors
• Viewing Real Time SQL Monitor
• Administering Pluggable Databases
About Oracle DBaaS MonitorOracle DBaaS Monitor provides monitoring and management of the Oracle databaseand listener on Oracle Database Cloud Service.
DBaaS Monitor provides quick and easy access to a variety of information about thedatabase instance running on a database deployment:
• Overall, how much storage is allocated to tablespaces, and how much of thatstorage is used
• For each tablespace, how much storage is allocated and how much of that storageis used, with additional drill-down capabilities to view segments
• A real-time graph showing wait events across several selectable categories
• The alert log, with log searching capabilities
10-1

• A list of open user sessions, with drill-down capabilities to view session detailssuch as the last SQL statement, explain plan, waits, contention, and so on
• A list of initialization parameters, with the ability to change parameter values, bothin memory and in the SPFILE.
• Indication of whether certain database options are enabled
• Monitoring of current and past SQL Developer PDB uploads
• A list of the SQL statements that are being monitored in the database, with realtime display of details such as the status, duration, degree of parallelism, and soon
You can use DBaaS Monitor to view information about the compute node:
• CPU utilization information in an interactive table format, with automatic refreshintervals
• OS process information, with filtering and automatic refresh capabilities
DBaaS Monitor also provides the following management capabilities:
• Start up and shut down the database instance
• Open and close a pluggable database
• Create and drop a pluggable database
• Plug in and unplug a pluggable database
• Clone a pluggable database
• Start and stop the listener
Accessing Oracle DBaaS MonitorDatabase deployments of single-instance databases on Oracle Database CloudService include Oracle DBaaS Monitor, a built-in monitor that provides a widespectrum of information about Oracle Database and operating system status andresource usage.
You can access Oracle DBaaS Monitor in the following ways:
• Using the “Open DBaaS Monitor Console” menu item
• Using a direct URL
• Using an SSH tunnel
Chapter 10Accessing Oracle DBaaS Monitor
10-2

Using the “Open DBaaS Monitor Console” Menu Item to Access Oracle DBaaSMonitor
Note:
For database deployments built on Oracle Cloud Infrastructure Classic, thenetwork port to access Oracle DBaaS Monitor is blocked by default. To use theOpen DBaaS Monitor Console menu item, you must unblock port 443, eitherby enabling the deployment’s ora_p2_httpssl predefined access rule or bycreating your own access rule that opens port 443. For instructions, see Enabling Access to a Compute Node Port.
1. Open the Services page of the Oracle Database Cloud Service console.
For detailed instructions, see Accessing the Oracle Database Cloud ServiceConsole.
2. From the menu for the deployment, select Open DBaaS Monitor Console.
3. If your browser displays a warning that your connection is not secure or notprivate, use the browser’s advanced option to continue.
You get this warning because Database Cloud Service database deployments usea self-signed certificate to provide HTTPS (secure HTTP) connectivity, and suchcertificates are considered suspicious by many web browsers.
4. When prompted for a user name and password, enter dbaas_monitor as the username and the password specified during the database deployment creationprocess, and then click OK.
Note: if the database deployment was created using a QuickStart template, thepassword is available in the zip file downloaded when the deployment wascreated.
The Open DBaaS Monitor Console menu item is also available on the Overview
page in the menu next to the deployment’s name.
Using a Direct URL to Access Oracle DBaaS Monitor
Note:
For database deployments built on Oracle Cloud Infrastructure Classic, thenetwork port to access Oracle DBaaS Monitor is blocked by default. To use adirect URL, you must unblock port 443, either by enabling the deployment’sora_p2_httpssl predefined access rule or by creating your own access rulethat opens port 443. For instructions, see Enabling Access to a Compute NodePort.
1. In your web browser, go to the following URL:
https://node-ip-address/dbaas_monitor
Chapter 10Accessing Oracle DBaaS Monitor
10-3

where node-ip-address is the IP address of the deployment’s compute node aslisted on the deployment’s Overview page.
2. If your browser displays a warning that your connection is not secure or notprivate, use the browser’s advanced option to continue.
You get this warning because Database Cloud Service database deployments usea self-signed certificate to provide HTTPS (secure HTTP) connectivity, and suchcertificates are considered suspicious by many web browsers.
3. When prompted for a user name and password, enter dbaas_monitor as the username and the password specified during the database deployment creationprocess, and then click OK.
Note: if the database deployment was created using a QuickStart template, thepassword is available in the zip file downloaded when the deployment wascreated.
Using an SSH Tunnel to Access Oracle DBaaS Monitor
1. Create an SSH tunnel to port 443 on the compute node hosting Oracle DBaaSMonitor. For information about creating an SSH tunnel, see Creating an SSHTunnel to a Compute Node Port.
2. After creating the SSH tunnel, direct your browser to the URL https://localhost/dbaas_monitor.
3. When prompted for a user name and password, enter dbaas_monitor as the username and the password specified during the database deployment creationprocess, and then click OK.
Note: if the database deployment was created using a QuickStart template, thepassword is available in the zip file downloaded when the deployment wascreated.
Filtering the Display on DBaaS Monitor PagesOn DBaaS Monitor pages, the PDB selector enables you to limit the display ofinformation in Oracle 12c databases. You can also filter what items display in tabularlists.
For Oracle 12c databases, you can use the PDB selector to limit displayedinformation. The default selection, Overall, results in no filtering; information for thecontainer database and all PDBs is shown. The CDB$ROOT selection shows onlytablespace information for the tablespaces in the container database root. ThePDB$SEED selection shows only tablespace information for the tablespaces in thepluggable database seed. The PDB selector also lets you limit displayed information toa specific pluggable database.
On DBaaS Monitor pages that show tabular lists, you can filter what items the tabledisplays.
1. Expand the first drop-down menu and select the column you want to use as thefilter.
Chapter 10Filtering the Display on DBaaS Monitor Pages
10-4

2. In the second drop-down menu, select the operator.
3. In the box, enter the value and click the search icon.
Administering the ListenerYou can use DBaaS Monitor to administer the listener, including troubleshootingunknown service name errors.
Topics
• Viewing Listener Status Information
• Starting the Listener
• Stopping the Listener
• Verifying that the Listener Knows of a Service
Viewing Listener Status InformationThe Oracle Net Listener (the listener) is a process that resides on the server. It listensfor incoming client connection requests and manages traffic to the server.
Chapter 10Administering the Listener
10-5

To review listener status information:
• On the DBaaS Monitor home page, click Listener. Or in the Database drop-downmenu, click Listener.
The RDBMS Listener page displays.
The RDBMS Listener page shows the following information:
• Status of the listener, including start time
• Protocol addresses the listener is configured to listen on
• Summary of the database services registered with the listener and the servicehandlers allocated to each service
• Registered database services (service name), database instance associated withthe service, and connection status
Starting the ListenerBy default, an Oracle Net listener is automatically started in your databasedeployment. If you have shut it down or it has crashed, you can use DBaaS Monitor tostart the listener by performing the following steps:
1. On the DBaaS Monitor home page, click Listener. Or in the Database drop-downmenu, click Listener.
2. In the Listener page menu, click Turn on to start the listener.
Stopping the ListenerTo stop the listener:
1. On the DBaaS Monitor home page, click Listener. Or in the Database drop-downmenu, click Listener.
2. Click Turn off to stop the listener.
Verifying that the Listener Knows of a ServiceAn "ORA-12514: Listener Does Not Currently Know of Service Requested in ConnectDescriptor" error indicates that the specified service name is unknown by the OracleNet Listener process. You can verify that the specified service name is configured withthe listener by performing the following steps:
1. On the DBaaS Monitor home page, click Listener. Or in the Database drop-downmenu, click Listener.
The RDBMS Listener page displays.
2. Review the information displayed to determine whether the requested servicename is listed.
Chapter 10Administering the Listener
10-6

Starting and Stopping the Database InstanceYou can use DBaaS Monitor to start up and shut down your database instance.
Topics
• Starting the Database Instance
• Stopping the Database Instance
Starting the Database InstanceYou can use DBaaS Monitor to start the database instance in OPEN mode. In thismode the instance is started, the database is mounted and then opened.
If you need to start the database instance in any other mode (NOMOUNT, MOUNT, orFORCE), use SQL*Plus instead of DBaaS Monitor. For more information, see "StartingUp and Shutting Down" in Oracle Database Administrator's Guide for Release 12.2, 12.1 or 11.2.
To start the database instance in OPEN mode:
1. On the DBaaS Monitor home page, click Database Status. Or, in the Databasepull-down menu, click Manage.
2. In the menu for your database, click Start database.
The database instance is started.
Stopping the Database InstanceYou can use DBaaS Monitor to shut down the database instance in IMMEDIATEmode. In this mode, no new connections are allowed. No new transactions are allowedto be started and any uncommitted transactions are rolled back.
If you need to shut down the database instance in any other mode (ABORT,NORMAL, or TRANSACTIONAL), use SQL*Plus instead of DBaaS Monitor. For moreinformation, see "Starting Up and Shutting Down" in Oracle Database Administrator'sGuide for Release 12.2, 12.1 or 11.2.
To shut down the database instance in IMMEDIATE mode:
1. On the DBaaS Monitor home page, click Database Status. Or, in the Databasepull-down menu, click Manage.
2. In the menu for your database, click Stop database.
The database instance is shut down.
Viewing and Modifying Initialization ParametersInitialization parameters configure the database instance, including memory structures,and define locations for database files.
Values for initialization parameters are stored in a text-based initialization parameterfile (PFILE) or binary server parameter file (SPFILE). The initialization parameter file is
Chapter 10Starting and Stopping the Database Instance
10-7

read at database instance startup. For more information, see "InitializationParameters" in Oracle Database Reference for Release 12.2, 12.1 or 11.2.
To view and modify the value of an initialization parameter:
1. From any DBaaS Monitor page, click Parameters from the Database drop-downmenu.
2. On the Parameters page, use the arrow buttons in the lower right corner tonavigate the multiple pages of parameters, or use the search fields at the top ofthe page.
3. To perform a search, enter values in the search criteria columns and click thesearch icon to locate the initialization parameter.
4. Enter the new value in the Value field.
5. Expand the Save changes menu and select the appropriate value:
• To Memory: Updates the value for the existing database instance, but doesnot save it to the SPFILE.
• To SPFILE: Updates the value in the SPFILE, but does not change it in theexisting instance. The new value will take effect when the instance isrestarted.
• To both: Updates the values for the existing database instance and updatesthe value in the SPFILE.
6. Click Yes to confirm your change.
7. Click OK to close the Results page.
Viewing User Account and Expiring Password InformationYou can use DBaaS Monitor to view information about the status of user accounts andpasswords.
You can use the DBaaS Monitor to view how many user accounts are in the followingstates:
• Open—This status indicates that the user’s account is unlocked and access to thedatabase is enabled.
• Locked—This status indicates that the user’s account is locked and access to thedatabase is disabled. The account must be unlocked to enable access to thedatabase.
• Expired—This status indicates that the user’s password has expired and must bechanged before the user can log in to the database.
You can view this information for the entire database or for a specific PDB.
In the Expiring Accounts Password box on the DBaaS Monitor home page, you cansee a list of user accounts and whether a user account password has expired or thenumber of days before it will expire. You can view this information for the entiredatabase or for a specific PDB.
Chapter 10Viewing User Account and Expiring Password Information
10-8

Viewing Tablespace and Segment Space UsageYou can use DBaaS Monitor to view tablespace and segment space usage.
A tablespace is a database storage unit that groups related logical structures together.A tablespace is comprised of datafiles. A segment is a set of extents allocated from atablespace for a specific database object such as a table or index.
To view space usage information
1. On the DBaaS Monitor home page, click Online Database Storage. Alternatively,from any DBaaS Monitor page, click Storage from the Database drop-down menu.
The Storage page displays. For an Oracle Database 12c database, the Storagepage shows the used and allocated storage space for all tablespaces in thecontainer in the root, and the used and allocated storage space for tablespaces inany pluggable databases. For an Oracle Database 11g database, the Storagepage shows the used and allocated space for the entire database.
2. For an Oracle Database 12c database, you can click show tablespaces for thecontainer database, or click show tablespaces for each pluggable database.
3. When you click show tablespaces, a list of tablespaces appears. You can click atablespace to view its storage information. An interactive report appears, showingthe segments that exist within the tablespace. Most segments are user objects,and they include tables, LOBs, and indexes.
4. On the Segments page, you can refine the list of segments shown by using thefilter feature.
For example, you can search for all the segments for a specific owner (schema) byselecting OWNER from the first drop-down list, entering the owner (schema) namein the box, and clicking the search icon.
Changing the TDE Keystore PasswordYou can use DBaaS Monitor to change the password of the TDE keystore.
When the database deployment is created on Database Cloud Service, a localautologin software keystore is created. The keystore is local to the compute node andis protected by a system-generated password. The keystore is part of the key-basedarchitecture that is used to transparently encrypt (and decrypt) tablespaces.
Note:
This feature is only available on Oracle Database 12c database deployments.
To change the TDE keystore password:
1. On the DBaaS Monitor home page, click Database Status. Or, in the Databasepulldown menu, click Manage.
2. In the menu for your database, click Change TDE Keystore Password.
Chapter 10Viewing Tablespace and Segment Space Usage
10-9

3. In the Change TDE Keystore Password dialog box, enter the current keystorepassword and the new keystore password.
4. Click OK.
5. Click OK on the confirmation message.
Viewing Alert Log Entries and Checking for ErrorsYou can use DBaaS Monitor to review the alert log periodically to verify that yourdatabase system is operating normally.
The alert log is a chronological log of messages including the following:
• Nondefault initialization parameters used at startup
• Administrative operations, such as STARTUP, SHUTDOWN, ARCHIVE LOG,RECOVER, and CREATE/ALTER/ DROP DATABASE/TABLESPACE
• Messages and errors relating to the functions of certain background processes,such as LGWR
• Internal errors (ORA-600), block corruption errors (ORA-1578), and deadlockerrors (ORA-60)
To view alert log entries:
1. On any DBaaS Monitor page, click Alerts from the Database drop-down menu.
2. Search for a specific value by selecting the display column in the first drop-downlist, selecting the condition in the second drop-down list, and entering your searchvalue in the box. Then, click the search icon.
The Alerts box on the DBaaS Monitor Home page has two sections, each of which canbe clicked for further detail. One section indicates the total number of all messages.The other section indicates how many errors have been recorded in the alert log in thelast 7 days. To view errors in the alert log:
1. On the DBaaS Monitor home page, click ERRORS in the Alerts box.
2. On the Alerts page select Type from the first drop-down list and enter your searchcriteria in the third field. Then, click the search icon.
Errors recorded in the alert log are displayed.
Viewing Real Time SQL MonitorThis page shows, in real time, the SQL statements that are being monitored in thedatabase.
To review the SQL statements being monitored:
• On the DBaaS Monitor home page, in the Database drop-down menu, click RealTime SQL Monitor.
The Real Time SQL Monitor page displays.
This tool helps identify run-time issues for SQL statements and monitor their behavior,by providing two major functions:
• General view of monitored statements
Chapter 10Viewing Alert Log Entries and Checking for Errors
10-10

• View of SQL execution details
General View of Monitored Statements
The page contains a table of SQL statements currently running. This table shows thefollowing information:
• Status — Current state of the SQL statement execution. For example, a SQLstatement that has already finished its execution will show a status of "DONE".
• Duration — This is the amount of time a SQL statement is taking, or has taken, toexecute.
• SQL ID — SQL identifier of the statement being monitored.
• Session ID — Session identifier that is executing, or has executed, the SQLstatement.
• Session Serial Number — Used to uniquely identify a session's objects.
• Instance Degree of Parallelism — This Degree of Parallelism (DOP) columnshows how many instances and parallel execution servers are allocated. It isshown in the form of “number of instances” | “number of parallel servers”
• CPU Time — This is the CPU time consumed by the execution of the query.
• I/O Time — This is the I/O time consumed by the execution of the query.
• Start Time — This is the time in which the execution of the SQL statementstarted.
• SQL Statement — This is the SQL statement being monitored.
For more information, see "Monitoring the Database" in Oracle DatabaseAdministrator's Guide for Release 12.2, 12.1 or 11.2.
View of SQL Execution Details
When a SQL statement is drilled down from the main monitor table, a detailed view isshown. The SQL ID, Start Time and the SQL Execution ID represent the execution keythat uniquely identify this SQL statement. A detail view consists of the generalcharacteristics that integrate the execution of a SQL statement.
General information about the query execution is provided:
• Execution Plan — Degree of Parallelism of the SQL statement
• Execution Started — Time that the SQL statement execution started
• Last Refresh Time: — Last update time of the SQL monitor registry for the SQLstatement
• Execution ID — Execution identifier
• User — User in the format USER@CONTAINER
• Fetch Calls — Number of fetch calls done by the SQL statement
General statistics of the SQL statement are provided: total duration of execution, thenumber of buffered gets, number of Input/Output requests and bytes.
A duration breakdown shows the percentage of the total duration of the execution ofthe SQL statement, divided into two types of times:
Chapter 10Viewing Real Time SQL Monitor
10-11

• Database Time — Any time of execution related to the database needs; forexample, CPU Time
• Wait Time — The waiting time that the statement goes through to complete anexecution
Each duration time can be drilled down by clicking on the "Show Detail" element,where a gauge graph shows the percentage of time that integrates each type ofduration time.
PLSQL and Java Time are provided. These time measurements are outside of theduration of the SQL statement.
Detailed information of the statement — This space holds the informationcorresponding to the explain plan, parallel behaviour and CPU activity involved in theexecution of the statement:
• SQL Text — SQL statement that was or is being executed.
• Plan Statistics — Explain plan of the execution of the SQL statement in the formof a table. Each row is a different operation involved in the execution of the SQLstatement and it shows hierarchy dependency by adding a space at the beginningof the text in the Operation column.
– Operation, Name, Estimated Rows, Cost, Actual Rows, Memory, Temp(Max),IO Requests, IO Bytes
• Graphic view of the Plan Statistics — The plan statistics table in a graphicrepresentation; the hierarchy is presented as a collapsible tree map in which eachnode represent an operation.
• Parallelism Details for the SQL statement — Each execution consists of aparallel coordinator and one or more parallel sets. Each set can have one or moreprocesses. When a row has dependents, each of its columns will be the sum ofthe values of its dependants. When this happens, a sigma symbol will appear toshow that a value consists of the sum of others. The columns shown are thefollowing:
– Process Name, Buffer Gets, CPU Time, Elapsed Time, Other Wait Time,Server Set, Read Requests, Read Bytes
• Activity Line Chart for the CPU Usage — Line chart showing the number ofdifferent types of CPU activities registered in the execution of the SQL statement.The Y axis represents the number of CPU activities and the X axis represents thetime registered for that activity. Each activity is represented by a custom set ofcolors depending on the activity.
Administering Pluggable DatabasesYou can use DBaaS Monitor to create and drop a pluggable database, open and closea pluggable database, plug in and unplug a pluggable database, and clone apluggable database.
Topics
• Cloning a Pluggable Database
• Closing a Pluggable Database
• Creating a Pluggable Database
Chapter 10Administering Pluggable Databases
10-12

• Dropping a Pluggable Database
• Opening a Pluggable Database
• Plugging In a Pluggable Database
• Unplugging a Pluggable Database
Cloning a Pluggable DatabaseYou can use DBaaS Monitor to clone a pluggable database.
1. On the DBaaS Monitor home page, click Database Status. Or, in the Databasepull-down menu, click Manage.
2. In the menu for your pluggable database, click Clone.
3. Complete the Clone PDB dialog and click OK.
• New PDB Name—Provide a name for the new PDB.
• Source PDB—This field is pre-filled with the name of the PDB you chose asthe source for cloning.
• Sparse Clone—(Not available on Oracle Cloud at Customer) By default, a fullclone is created. Select this option to instead create a sparse clone (alsocalled a snap clone).
• File Destination—If Sparse Clone is selected, the File Destination field ismade visible. Specify the base file system directory for the cloned PDB's files.
• File Name Conversions— You can optionally provide custom names andexpressions for the PDB datafiles.
• Unlimited Storage and Reuse Temp File— By default, unlimited storage andreuse temp file are selected for the PDB.
• Clone TDE Key—TDE Key cloning is selected by default.
• Keystore Password—If Clone TDE Key is selected, the Keystore Passwordfield is made visible. Use the password that was specified during the databasedeployment creation process.
Closing a Pluggable DatabaseYou can use DBaaS Monitor to close a pluggable database.
1. On the DBaaS Monitor home page, click Database Status. Or, in the Databasepull-down menu, click Manage.
2. In the menu for your pluggable database, click Modify state.
3. The Modify PDB dialog appears. In the State field, click CLOSE.
4. In the Option field, the default is IMMEDIATE. Choose IMMEDIATE or NORMAL.
5. Click OK.
Creating a Pluggable DatabaseYou can use DBaaS Monitor to create a pluggable database.
Chapter 10Administering Pluggable Databases
10-13

1. On the DBaaS Monitor home page, click Database Status. Or, in the Databasepull-down menu, click Manage.
2. Click Create PDB.
3. Complete the Create PDB dialog and click OK.
• New PDB Name—Provide a name for the new pluggable database.
• Admin Username and Admin Password—Provide a user name andpassword for the PDB administrator. You need not use the same adminpassword that you used during the database deployment creation process,unless you wish.
• File Name Conversions—You can optionally provide custom names andexpressions for the PDB datafiles.
• Unlimited Storage and Reuse Temp File—By default, unlimited storage andreuse temp file are selected for the PDB.
• Create TDE Key—TDE Key creation is selected by default.
• Keystore Password—If Create TDE Key is selected, the Keystore Passwordfield is made visible. Use the password that was specified during the databasedeployment creation process.
Dropping a Pluggable DatabaseYou can use DBaaS Monitor to drop a pluggable database.
1. On the DBaaS Monitor home page, click Database Status. Or, in the Databasepull-down menu, click Manage.
2. In the menu for your PDB, click Drop.
3. In the Drop PDB dialog, choose whether you want to keep or delete the PDB’sdatafiles. Then click OK.
Opening a Pluggable DatabaseYou can use DBaaS Monitor to open a pluggable database.
1. On the DBaaS Monitor home page, click Database Status. Or, in the Databasepull-down menu, click Manage.
2. In the menu for your pluggable database, click Modify state.
3. The Modify PDB dialog appears. In the State field, click OPEN.
4. In the Option field, the default is READ WRITE. Choose READ WRITE, READONLY or RESTRICTED.
5. Click OK.
Plugging In a Pluggable DatabaseYou can use DBaaS Monitor to plug in a pluggable database.
1. On the DBaaS Monitor home page, click Database Status. Or, in the Databasepull-down menu, click Manage.
2. Click Plug in PDB.
Chapter 10Administering Pluggable Databases
10-14

3. Complete the Plug PDB dialog and click OK.
• New PDB Name—Provide a name for the pluggable database.
• Plug as Clone —This field is selected by default. If you are plugging in a PDBas a clone, fill the XML Filename field.
• Source File Name Conversion—You can optionally provide customexpressions for the PDB datafiles.
• Copy Action—The default value is Don’t Copy. Choose Don’t Copy, Copy,or Move.
• Unlimited Storage and Reuse Temp File—By default, unlimited storage andreuse temp file are selected for the PDB.
• Import TDE Key—TDE Key import is selected by default.
• Keystore Password, Import From, Key Secret—If Import TDE Key isselected, the Keystore Password, Import From, and Key Secret fields aremade visible. For Keystore Password, use the password that was specifiedduring the database deployment creation process.
Unplugging a Pluggable DatabaseYou can use DBaaS Monitor to unplug a pluggable database.
1. On the DBaaS Monitor home page, click Database Status. Or, in the Databasepull-down menu, click Manage.
2. In the menu for your pluggable database, click Unplug.
3. Complete the Unplug PDB dialog and click OK.
• PDB —This field is pre-filled with the name of the pluggable database youselected.
• XML Filename —This field is pre-filled with the path to the PDB’s XML file.
• Export TDE Key—This field isselected by default.
• Keystore Password, Export To, Key Secret—If Export TDE Key is selected,the Keystore Password, Export To, and Key Secret fields are made visible. ForKeystore Password, use the password that was specified during the databasedeployment creation process.
Chapter 10Administering Pluggable Databases
10-15
11Frequently Asked Questions for DatabaseCloud Service
To see a list of frequently asked questions for Oracle Database Cloud Service, see the FAQ page for Oracle Database Cloud at cloud.oracle.com.
11-1

12Troubleshooting Database Cloud Service
This section describes common problems that you might encounter when using OracleDatabase Cloud Service and explains how to solve them.
Topics
• Problems Creating Deployments
– I cannot create a deployment when I have many database deployments
– I cannot create a deployment, even after waiting for an hour
– I get a "SCRIPT execution errors" message when I try to create andeployment with backups to cloud storage
• Problems Administering Deployments
– I am required to change the password for the oracle user when I try to connectto a compute node
– I get a Linux error 30, Read-only file system, when trying to connect to or workin my environment
– I can’t use dbaascli to update my cloud tooling
• Problems with Scaling
– My scaling operation does not start
– My deployment is too busy to allow scaling
– After scaling the shape of my Data Guard configuration, I get an ORA-16792warning when I check the status of the configuration
• Problems with Patching and Rollback
– I receive a message stating that the virtual machines are unhealthy
– I receive a message stating that the instance is busy with another operation
– I cannot apply a patch due to a lack of storage space
– My attempt to roll back the January 2015 Patch Set Update (Jan 2015 PSU)fails
– My attempt to roll back the April 2015 Patch Set Update (Apr 2015 PSU) fails
• Problems with Backing Up and Restoring
– There is not enough space for my backup
– I receive a message stating that there was an unexpected error during theduplicate command (ORA messages)
– I receive a message stating that there was an unexpected error during theduplicate command (RMAN messages)
– A backup fails with an ORA-19914 and ORA-28361
• Problems with Oracle Data Guard Role Transitions
12-1

– A message in the Activity area indicates that the reinstate operation failed
– A message indicates a problem with the SYS password on the standbydatabase
– After a role transition operation, I get an ORA-16792 warning when I check thestatus of the configuration
Problems Creating DeploymentsThe following solutions apply to problems with creating database deployments onOracle Database Cloud Service.
• I cannot create a deployment when I have many database deployments
• I cannot create a deployment, even after waiting for an hour
• I get a "SCRIPT execution errors" message when I try to create an deploymentwith backups to cloud storage
I cannot create a deployment when I have many databasedeployments
Your account might not have enough compute quota to create the deployment.
If you have database deployments you do not need, delete them. If you need all yourdatabase deployments, contact Oracle Sales and Services to buy more quota for youraccount.
I cannot create a deployment, even after waiting for an hourIf deployment creation fails after one hour, the system might be experiencing a heavyload, and resources are not yet available.
Wait before you try again to create the deployment. If this doesn't work, contact OracleSupport.
I get a "SCRIPT execution errors" message when I try to create andeployment with backups to cloud storage
If the password you specify for Cloud Storage Password when attempting to create aDatabase Cloud Service deployment contains certain special characters, the creationattempt fails. Such failures occur after the “SSH access to VM(s)” phase, during the“Configuring Oracle Database Server” phase when configuring bkup assistant. The logfor these failures includes an error message that begins with the text “SCRIPTexecution errors”.
To circumvent this problem, follow these steps:
1. Create a database deployment and specify Block Store Only as the BackupDestination.
2. After the deployment is created, connect as the oracle user to the compute nodeand patch the bkup assistant:
Chapter 12Problems Creating Deployments
12-2

$ curl -O https://storage.us2.oraclecloud.com/v1/dbcsswlibp-usoracle29538/dbaas_patch/bkup/dbaas_patch-21866900.sh$ chmod +x dbaas_patch-21866900.sh$ ./dbaas_patch-21866900.shPatching /var/opt/oracle/perl_lib/DBAAS/opc_installer.pmPatch applied successfully.$
3. Change the deployment’s backup destination to Both Cloud Storage and BlockStorage by following the instructions in Changing the Backup Configuration to aDifferent Backup Destination.
Problems Administering DeploymentsThe following solutions apply to problems with administering database deployments onOracle Database Cloud Service.
• I am required to change the password for the oracle user when I try to connect to acompute node
• I get a Linux error 30, Read-only file system, when trying to connect to or work inmy environment
• I can’t use dbaascli to update my cloud tooling
I am required to change the password for the oracle user when I try toconnect to a compute node
You cannot change the password as required because the oracle user does not havea password. Instead, change the properties of the oracle user so that its passworddoes not expire:
1. Connect to the compute node as the opc user.
For detailed instructions, see Connecting to a Compute Node Through SecureShell (SSH).
2. Start a root-user command shell:
$ sudo -s#
3. Change the expiration properties of the oracle user by using the chage command:
# /usr/bin/chage -I -1 -m 0 -M 99999 -E -1 oracle
4. Confirm that the expiration properties have been changed by using the chagecommand again:
# /usr/bin/chage -l oracleLast password change : datePassword expires : neverPassword inactive : neverAccount expires : neverMinimum number of days between password change : 0Maximum number of days between password change : 99999Number of days of warning before password expires : 7
5. Close your connection to the compute node.
Chapter 12Problems Administering Deployments
12-3

I get a Linux error 30, Read-only file system, when trying to connect toor work in my environment
In certain rare cases, Oracle Compute Cloud Service sets the access of storagevolumes attached to a Database Cloud Service deployment to read-only. When thissituation arises, you can restore read-write access by restarting the compute node, asdescribed in Rebooting a Compute Node.
I can’t use dbaascli to update my cloud toolingNormally, you use the dbaascli utility to update the cloud tooling on Database CloudService database deployments hosting a single-instance database or Oracle DataGuard configuration, as described in Updating the Cloud Tooling by Using thedbpatchm Subcommand. However, older deployments don’t support the two dbaasclisubcommands you use:
dbaascli dbpatchm --run -list_toolsdbaascli dbpatchm --run -toolsinst
If you get an error when you run the first of these commands, you must use thefollowing method to update the cloud tooling. After using this method one time, you willbe able to use the dbaascli utility the next time you want to update the cloud tooling.
1. Connect as the opc user to the compute node.
See Connecting to a Compute Node Through Secure Shell (SSH).
2. Start a root-user command shell:
$ sudo -s#
3. Navigate to the /tmp directory:
# cd /tmp
4. Download the RPM file containing the latest version of the cloud tooling:
# wget https://storage.us2.oraclecloud.com/v1/dbcsswlibp-usoracle29538/dbaas_patch/dbaastools.rpm
5. Get information about the cloud tooling in the downloaded RPM file:
# rpm -qpi ./dbaastools.rpmName : dbaastools Relocations: (not relocatable)Version : version_number Vendor: OracleRelease : release_number Build Date: ......
6. Get information about the installed cloud tooling:
# rpm -qa|grep -i dbaastoolsdbaastools-version_number-release_number
7. Compare the version and release values of the downloaded cloud tooling and theinstalled cloud tooling. If the downloaded tooling is newer than the installed tooling,remove the installed tooling and then install the downloaded tooling:
a. Remove the installed cloud tooling:
# rpm -ev installed-info
Chapter 12Problems Administering Deployments
12-4

where installed-info is the information you noted down about the installedcloud tooling; that is, the output from the rpm -qa|grep -i dbaastoolscommand you entered earlier.
b. Install the cloud tooling in the downloaded RPM file:
# rpm -ivh ./dbaastools.rpm
8. Reset the backup configuration:
# /var/opt/oracle/ocde/assistants/bkup/bkup
9. Exit the root-user command shell and disconnect from the compute node:
# exit$ exit
Problems with ScalingThe following solutions apply to problems with scaling an Oracle Database CloudService environment.
• My scaling operation does not start
• My deployment is too busy to allow scaling
• After scaling the shape of my Data Guard configuration, I get an ORA-16792warning when I check the status of the configuration
My scaling operation does not startThe system is overloaded with requests.
Wait before you try to scale again. If that doesn't work, contact Oracle Support.
My deployment is too busy to allow scalingYour database deployment has a pending maintenance operation such as backup orpatching.
Wait until maintenance has completed before you try scaling again.
After scaling the shape of my Data Guard configuration, I get anORA-16792 warning when I check the status of the configuration
After scaling the shape of a Data Guard configuration, both the DGMGRL SHOWCONFIGURATION command and the dbaascli dataguard status command report thewarning: "ORA-16792: configurable property value is inconsistent with databasesetting."
Perform the following steps to resolve the inconsistent setting warning:
1. Connect as the oracle user to the compute node hosting the primary database.For detailed instructions, see Connecting to a Compute Node Through SecureShell (SSH).
2. Invoke DGMGRL.
$ dgmgrl /
Chapter 12Problems with Scaling
12-5

3. Use the DGMGRL SHOW DATABASE command to determine which Data Guard brokerproperty is inconsistent with the database setting.
DGMGRL> SHOW DATABASE 'database-name' 'InconsistentProperties';
Where database-name is the name of the primary database (SID).
For example:
DGMGRL> SHOW DATABASE 'ORCL' 'InconsistentProperties';INCONSISTENT PROPERTIESINSTANCE_NAME PROPERTY_NAME MEMORY_VALUE SPFILE_VALUE BROKER_VALUE ORCL ArchiveLagTarget 0 0
4. Use the DGMGRL EDIT DATABASE command to reset the Data Guard brokerproperty value, which in turn sets the value in the server parameter file (SPFILE).
DGMGRL> EDIT DATABASE 'database-name' SET PROPERTY 'property-name'=value;
Where:
• database-name is the name of the database (SID)
• property-name is the name of the Data Guard broker property displayed in theoutput from the SHOW DATABASE command
• value is the value displayed in MEMORY_VALUE in the output from the SHOWDATABASE command.
For example:
DGMGRL> EDIT DATABASE 'ORCL' SET PROPERTY 'ArchiveLagTarget'=0;Property "ArchiveLagTarget" updated
5. Exit from DGMGRL and close your connection to the compute node.
Problems with Patching and RollbackThe following solutions apply to problems with patching and rollback operations onOracle Database Cloud Service.
• I receive a message stating that the virtual machines are unhealthy
• I receive a message stating that the instance is busy with another operation
• I cannot apply a patch due to a lack of storage space
• My attempt to roll back the January 2015 Patch Set Update (Jan 2015 PSU) fails
• My attempt to roll back the April 2015 Patch Set Update (Apr 2015 PSU) fails
I receive a message stating that the virtual machines are unhealthyYou cannot apply a patch if the compute nodes are not in a healthy state.
Restore the deployment using a backup and try patching again.
Chapter 12Problems with Patching and Rollback
12-6

I receive a message stating that the instance is busy with anotheroperation
You cannot apply a patch when the deployment is under maintenance, for example,scaling or backup.
Wait until the deployment is no longer under maintenance and try patching again.
I cannot apply a patch due to a lack of storage spaceWhen you apply a patch, storage space is required for temporary files that are createdand used during the patching operation. If you receive a message indicating that youdon’t have sufficient space to patch, either when applying the patch or checking itsprerequisites, take these steps:
1. Check whether you might actually have enough space.
The patching tools check whether you have 15 GB free space on /u01, but thespace actually required for temporary use during patching is somewhat less than15 GB. To check whether you might have enough space:
a. Connect as the opc user to the compute node .
For detailed instructions, see Connecting to a Compute Node Through SecureShell (SSH).
b. Display the mounted filesystems:
$ df -hT
c. Locate the row for /u01 and check its space available, as reported in the Availcolumn.
d. If the space available is 13 GB or greater, you have enough space to patchand you can continue to Step e. If you do not have enough space, close yourconnection and go to Step 2.
e. Start a root-user command shell:
$ sudo -s#
f. Navigate to the /var/opt/oracle/patch directory:
# cd /var/opt/oracle/patch
g. Use an editor such as vim to change the value of theignore_space_less_than_15g key in the dbpatchm.cfg file from 0 (zero) to 1 (one):
ignore_space_less_than_15g=1
h. Apply the patch according to the instructions in Applying a Patch.
2. Add temporary storage for the temporary files.
If you do not have enough space on /u01, you can add temporary storage to thecompute node, apply the patch, and then remove the temporary storage:
a. Add 20 GB of temporary storage to the compute node by following theseinstructions: Adding Temporary Storage to a Database Deployment. Whenfollowing these instructions, use /patchtemp as the mount point directory.
Chapter 12Problems with Patching and Rollback
12-7

b. Connect to the compute node as the opc user.
For detailed instructions, see Connecting to a Compute Node Through SecureShell (SSH).
c. Start a root-user command shell:
$ sudo -s#
d. Navigate to the /var/opt/oracle/patch directory:
# cd /var/opt/oracle/patch
e. Use an editor such as vim to edit the dbpatchm.cfg file:
• Change the value of the temporary_space key from "/u01/download" to "/patchtemp/download"
• Change the value of the ignore_space_less_than_15g key from 0 (zero) to 1(one)
For example:
temporary_space="/patchtemp/download";...ignore_space_less_than_15g=1
f. Apply the patch according to the instructions in Applying a Patch.
g. Remove the 20 GB of temporary storage you added to the compute node byfollowing these instructions: Deleting Temporary Storage from a DatabaseDeployment
My attempt to roll back the January 2015 Patch Set Update (Jan 2015PSU) fails
The January 2015 Patch Set Update includes overlay patches and so you need toinclude the update’s overlay patch numbers in the rollback operation. To do so, youmust add the overlay patch numbers to the rollbackpatches.txt file before rolling backthe patch.
1. Connect as the oracle user to the compute node.
For detailed instructions, see Connecting to a Compute Node Through SecureShell (SSH).
2. Navigate to the /var/opt/oracle/patch directory:
$ cd /var/opt/oracle/patch
3. Change permissions on the rollbackpatches.txt file to make it editable:
$ chmod +w rollbackpatches.txt
4. Use an editor such as vim to add the following lines to the end of therollbackpatches.txt file, making sure to include the colons:
• For the Jan 2015 PSU on Oracle Database 12.1.0.2:
20281121:19877336:datapatch
• For the Jan 2015 PSU on Oracle Database 11.2.0.4:
Chapter 12Problems with Patching and Rollback
12-8

19770063:19877440:../../sqlpatch/19877440/postdeinstall.sql
5. Disconnect from the compute node:
$ exit
My attempt to roll back the April 2015 Patch Set Update (Apr 2015PSU) fails
The April 2015 Patch Set Update includes overlay patches and so you need to includethe update’s overlay patch numbers in the rollback operation. To do so, you must addthe overlay patch numbers to the rollbackpatches.txt file before rolling back the patch.
1. Connect as the oracle user to the compute node.
For detailed instructions, see Connecting to a Compute Node Through SecureShell (SSH).
2. Navigate to the /var/opt/oracle/patch directory:
$ cd /var/opt/oracle/patch
3. Change permissions on the rollbackpatches.txt file to make it editable:
$ chmod +w rollbackpatches.txt
4. Use an editor such as vim to add the following lines to the end of therollbackpatches.txt file, making sure to include the colons:
• For the Apr 2015 PSU on Oracle Database 12.1.0.2:
20281121:20415564:datapatch
• For the Apr 2015 PSU on Oracle Database 11.2.0.4, Standard Edition:
19665921:20406239:../../sqlpatch/20406239/postdeinstall.sql
• For the Apr 2015 PSU on Oracle Database 11.2.0.4, all Enterprise Editions:
19665921:20406239:../../sqlpatch/20406239/postdeinstall.sql19770063:../../sqlpatch/19770063/postdeinstall.sql
5. Disconnect from the compute node:
$ exit
Problems with Backing Up and RestoringThe following solutions apply to problems with backup and restore operations onOracle Database Cloud Service.
• There is not enough space for my backup
• I receive a message stating that there was an unexpected error during theduplicate command (ORA messages)
• I receive a message stating that there was an unexpected error during theduplicate command (RMAN messages)
• A backup fails with an ORA-19914 and ORA-28361
Chapter 12Problems with Backing Up and Restoring
12-9

There is not enough space for my backupThe backup storage area does not have enough space for the backup operation tocreate the archive.
Do one of the following:
• Delete any unwanted backups.
• Archive one or more backups to another location.
I receive a message stating that there was an unexpected error duringthe duplicate command (ORA messages)
There may have been a restart of the database instance while the duplicate operationwas running. A datafile may be marked ONLINE or being recovered.
Perform the following steps:
1. Review the /var/opt/oracle/log/orec/orec.log file, checking for the following errormessages:
ORA-01121: cannot rename database file string - file is in use or recovery
ORA-01110: data file string
If you see those messages, complete the remaining steps in this section. If not,see I receive a message stating that there was an unexpected error during theduplicate command (RMAN messages).
2. Connect to the node hosting the standby database as the opc user.
3. Start a root-user command shell and then switch to the oracle user:
$ sudo -s# su - oracle$
4. Delete the data file name specified in string in the error message:
$ $ rm -rf filename
5. Return to being the root user:
$ exit#
6. Run the duplicate option of orec
# dbaascli orec --args -duplicate -dbrole standby
7. Exit the root-user command shell and disconnect from the compute node:
# exit$ exit
I receive a message stating that there was an unexpected error duringthe duplicate command (RMAN messages)
The orec tool may have had a problem identifying the target instance.
Chapter 12Problems with Backing Up and Restoring
12-10

Perform the following steps:
1. Review the orec.log file, checking for the following error messages:
RMAN-05501: aborting duplication of target database
RMAN-05502: the target database must be mounted when issuing a DUPLICATE
If you see those messages, complete the remaining steps in this section. If not,see I receive a message stating that there was an unexpected error during theduplicate command (ORA messages).
2. Connect to the node hosting the standby database as the opc user.
3. Start a root-user command shell and then switch to the oracle user:
$ sudo -s# su - oracle$
4. Invoke SQL*Plus, connecting as the SYSDBA user:
$ sqlplus / as sysdba
5. Shut down the database instance using the ABORT option:
SQL> shutdown abort;
6. Exit from SQL*Plus.
SQL> exit
7. Return to being the root user:
$ exit#
8. Run the duplicate option of orec:
# dbaascli orec --args -duplicate -dbrole standby
9. Exit the root-user command shell and disconnect from the compute node:
# exit$ exit
A backup fails with an ORA-19914 and ORA-28361The ORA-19914: unable to encrypt backup and ORA-28361: master key not yet seterrors indicate that the master encryption keys of a new PDB are not yet set. If youplugged in an encrypted PDB from another CDB and did not import the keys, see Exporting and Importing a Master Encryption Key for a PDB. If you created a new PDBand did not create and activate the master encryption key, see Creating and Activatinga Master Encryption Key for a PDB.
Problems with Oracle Data Guard Role TransitionsThe following solutions apply to problems with role transitions (failover, reinstate, andswitchover) in an Oracle Database Cloud Service deployment hosting an Oracle DataGuard configuration.
• A message in the Activity area indicates that the reinstate operation failed
• A message indicates a problem with the SYS password on the standby database
Chapter 12Problems with Oracle Data Guard Role Transitions
12-11

• After a role transition operation, I get an ORA-16792 warning when I check thestatus of the configuration
A message in the Activity area indicates that the reinstate operationfailed
"Successfully Reinstated" is displayed after the reinstate, but the Activity area on theOverview page indicates that the reinstate operation failed.
Perform the following steps to resolve this discrepancy:
1. On the Database Service console Overview page, click the Refresh Configurationicon.
2. Refresh the Overview page.
3. Click the Refresh Configuration icon again and observe that the Database Rolehas changed from Reinstate to Standby.
You can ignore the message in the Activity area indicating that the reinstate failed.
A message indicates a problem with the SYS password on thestandby database
If you did not use the database changepassword subcommand of the dbaascli utility tochange the password of the SYS user in your Oracle Data Guard configuration, thepassword file on the standby database may not have been updated correctly. See Changing the SYS Password for detailed information on changing the SYS user’spassword.
After a role transition operation, I get an ORA-16792 warning when Icheck the status of the configuration
After attempting a role transition, both the DGMGRL SHOW CONFIGURATION command andthe dbaascli dataguard status command report the warning: "ORA-16792: configurableproperty value is inconsistent with database setting."
Perform the following steps to resolve the inconsistent setting warning:
1. Connect as the oracle user to the compute node hosting the primary database.For detailed instructions, see Connecting to a Compute Node Through SecureShell (SSH).
2. Invoke DGMGRL.
$ dgmgrl /
3. Use the DGMGRL SHOW DATABASE command to determine which Data Guard brokerproperty is inconsistent with the database setting.
DGMGRL> SHOW DATABASE 'database-name' 'InconsistentProperties';
Where database-name is the name of the primary database (SID).
For example:
Chapter 12Problems with Oracle Data Guard Role Transitions
12-12

DGMGRL> SHOW DATABASE 'ORCL' 'InconsistentProperties';INCONSISTENT PROPERTIESINSTANCE_NAME PROPERTY_NAME MEMORY_VALUE SPFILE_VALUE BROKER_VALUE ORCL ArchiveLagTarget 0 0
4. Use the DGMGRL EDIT DATABASE command to reset the Data Guard brokerproperty value, which in turn sets the value in the server parameter file (SPFILE).
DGMGRL> EDIT DATABASE 'database-name' SET PROPERTY 'property-name'=value;
Where:
• database-name is the name of the database (SID)
• property-name is the name of the Data Guard broker property displayed in theoutput from the SHOW DATABASE command
• value is the value displayed in MEMORY_VALUE in the output from the SHOWDATABASE command.
For example:
DGMGRL> EDIT DATABASE 'ORCL' SET PROPERTY 'ArchiveLagTarget'=0;Property "ArchiveLagTarget" updated
5. Exit from DGMGRL and close your connection to the compute node.
Chapter 12Problems with Oracle Data Guard Role Transitions
12-13

ACharacteristics of a Newly CreatedDeployment
This section provides information about the content and configuration of a newlycreated database deployment on Oracle Database Cloud Service. It providesinformation for the various types of database deployments, beginning with informationabout features common to most or all types of database deployments.
Topics
• Characteristics Common Across Database Deployment Types
• Characteristics of a Single Instance Database Deployment
• Characteristics of a Single Instance with Data Guard Standby DatabaseDeployment
• Characteristics of a Database Clustering with RAC Database Deployment
• Characteristics of a Database Clustering with RAC and Data Guard StandbyDatabase Deployment
• Characteristics of an Oracle Database Cloud Service - Virtual Image DatabaseDeployment
Characteristics Common Across Database DeploymentTypes
While many characteristics of an Oracle Database Cloud Service databasedeployment depend on the service level and database type of the deployment, somecharacteristics apply across most or all types of database deployments.
Topics
• Data Security
• Hybrid Columnar Compression (HCC)
• Tablespace Encryption
Data SecurityIn Oracle Database Cloud Service databases, data security is provided for data intransit and data at rest. Security of data in transit is achieved through networkencryption. Data at rest security is achieved through encryption of data stored indatabase data files and backups.
Data in Oracle Database files, including backups, is secured by the use of encryptionimplemented through a key management framework. Security of data across thenetwork is provided by native Oracle Net encryption and integrity capabilities.
A-1
Topics
• Security of Data at Rest
• Security of Data in Transit
Security of Data at RestOracle Database Cloud Service databases include a key management framework thatstores and manages keys and credentials used to encrypt data in the database datafiles and in backups.
The key management framework includes the keystore (referred to as a wallet inOracle Database 11g and previous releases) to securely store Transparent DataEncryption (TDE) master encryption keys, and the management framework to securelyand efficiently manage keystore and key operations for various database components.TDE is the underlying mechanism used for default tablespace encryption andencrypted backups.
TDE uses a two-tiered, key-based architecture to transparently encrypt and decryptdata. The master encryption key is stored in the software keystore. For tablespaceencryption, this master encryption key is used to encrypt the tablespace encryptionkey, which in turn is used to encrypt and decrypt data in the tablespace. Refer to Tablespace Encryption for details on the implementation of tablespace encryption bydefault in Oracle Database Cloud Service
When a database deployment is created on Oracle Database Cloud Service, a localauto-login software keystore is created. The keystore is local to the compute node andis protected by a system-generated password. The auto-login software keystore isautomatically opened when accessed.
The keystore location is specified in the ENCRYPTION_WALLET_LOCATION parameter inthe $ORACLE_HOME/network/admin/sqlnet.ora file.
The Oracle keystore stores a history of retired TDE master encryption keys, whichenables you to change them and still be able to decrypt data that was encrypted underan earlier TDE master encryption key.
For additional information on TDE and the keystore, refer to "Introduction toTransparent Data Encryption" in Oracle Database Advanced Security Guide forRelease 12.2 or 12.1 or "Securing Stored Data Using Transparent Data Encryption" inOracle Database Advanced Security Administrator’s Guide for Release 11.2.
By default, backups to Cloud Storage for Enterprise Edition databases are encrypted.Recovery Manager (RMAN) performs transparent encryption using the auto-loginsoftware keystore. Refer to "Configuring Backup Encryption" in Oracle DatabaseBackup and Recovery User's Guide for Release 12.2 or 12.1 or "Encrypting RMANBackups" in Oracle Database Backup and Recovery User's Guide for Release 11.2.
Security of Data in TransitOracle Database Cloud Service uses native Oracle Net encryption and integritycapabilities to secure connections to the database.
Refer to Using Network Encryption and Integrity for details on how to check yourconfiguration and verify the use of native Oracle Net encryption and integrity.
Appendix ACharacteristics Common Across Database Deployment Types
A-2

Hybrid Columnar Compression (HCC)Hybrid Columnar Compression (HCC) is a storage-related Oracle Database featurethat causes the database to store the same column for a group of rows together.
Storing column data together in this way can dramatically increase the storage savingsachieved from compression. Because database operations work transparently againstcompressed objects, no application changes are required.
The HCC feature is available on database deployments created on Oracle DatabaseCloud Service using the Oracle Database Cloud Service service level and theEnterprise Edition - High Performance or Enterprise Edition - Extreme Performancesoftware edition.
For more information about HCC, see:
• "Hybrid Columnar Compression" in Oracle Database Concepts for Release 12.2 or 12.1
• "Consider Using Table Compression" in Oracle Database Administrator's Guide forRelease 12.2 or 12.1
• "table_compression" in "CREATE TABLE" in Oracle Database SQL LanguageReference for Release 12.2 or 12.1
Tablespace EncryptionAll new tablespaces that you create in a Database Cloud Service database areencrypted by default.
However, not all of the tablespaces created when you create a database deploymentare encrypted:
• In an Oracle Database 11g database, none of the tablespaces created when youcreate a database deployment are encrypted.
• In an Oracle Database 12c Release 1 database, none of the tablespaces createdwhen you create a database deployment are encrypted. This includes thetablespaces in the root (CDB$ROOT), the seed (PDB$SEED), and the PDB created whenyou create a database deployment.
• In an Oracle Database 12c Release 2 database, only the USERS tablespacescreated when you create a database deployment are encrypted. None of the othertablespaces are encrypted. This includes the tablespaces in the root (CDB$ROOT),the seed (PDB$SEED), and the PDB created when you create a databasedeployment.
Topics
• Creating Encrypted Tablespaces
• Managing Tablespace Encryption
Creating Encrypted TablespacesUser-created tablespaces are encrypted by default.
Appendix ACharacteristics Common Across Database Deployment Types
A-3
By default, any new tablespaces created by using the SQL CREATE TABLESPACEcommand are encrypted with the AES128 encryption algorithm. You do not need toinclude the USING 'encrypt_algorithm' clause to use the default encryption.
You can specify another supported algorithm by including the USING'encrypt_algorithm' clause in the CREATE TABLESPACE command. Supported algorithmsfor Oracle Database 11g and Oracle Database 12c are AES256, AES192, AES128,and 3DES168.
Managing Tablespace EncryptionYou can manage the software keystore (known as an Oracle wallet in OracleDatabase 11g), the master encryption key, and control whether encryption is enabledby default.
Managing the Software Keystore and Master Encryption Key
Tablespace encryption uses a two-tiered, key-based architecture to transparentlyencrypt (and decrypt) tablespaces. The master encryption key is stored in an externalsecurity module (software keystore). This master encryption key is used to encrypt thetablespace encryption key, which in turn is used to encrypt and decrypt data in thetablespace.
When the database deployment is created on Database Cloud Service, a local auto-login software keystore is created. The keystore is local to the compute node and isprotected by a system-generated password. The auto-login software keystore isautomatically opened when accessed.
You can change (rotate) the master encryption key by using the tde rotate masterkeysubcommand of the dbaascli utility. When you execute this subcommand you will beprompted for the keystore password. Enter the password specified during thedatabase deployment creation process. For example:
DBAAS>tde rotate masterkeyExecuting command tde rotate masterkeyEnter keystore password:Successfully rotated TDE masterkey
For more information about changing the master encryption key, see "Managing theTDE Master Encryption Key" in Oracle Database Advanced Security Guide forRelease 12.2 or 12.1 or "Setting and Resetting the Master Encryption Key" in OracleDatabase Advanced Security Administrator's Guide for Release 11.2.
Controlling Default Tablespace Encryption
The ENCRYPT_NEW_TABLESPACES initialization parameter controls default encryption of newtablespaces. In Database Cloud Service databases, this parameter is set to CLOUD_ONLYby default. See Viewing and Modifying Initialization Parameters for additionalinformation.
Values of this parameter are as follows.
Value Description
ALWAYS During creation, tablespaces are transparently encrypted with theAES128 algorithm unless a different algorithm is specified in theENCRYPTION clause.
Appendix ACharacteristics Common Across Database Deployment Types
A-4

Value Description
CLOUD_ONLY Tablespaces created in a Database Cloud Service database aretransparently encrypted with the AES128 algorithm unless adifferent algorithm is specified in the ENCRYPTION clause. For non-cloud databases, tablespaces are only encrypted if theENCRYPTION clause is specified. This is the default value.
DDL During creation, tablespaces are not transparently encrypted bydefault, and are only encrypted if the ENCRYPTION clause isspecified.
Note:
With Oracle Database Release 12.2 on Database Cloud Service, you can nolonger create a new unencrypted tablespace. An error message is returned ifyou set ENCRYPT_NEW_TABLESPACES to DDL and issue a CREATE TABLESPACE commandwithout specifying an ENCRYPTION clause.
Characteristics of a Single Instance Database DeploymentThis section provides information about the content and configuration of a newlycreated Oracle Database Cloud Service database deployment that uses the OracleDatabase Cloud Service service level and the Single Instance database type.
When you create a database deployment using the Oracle Database Cloud Serviceservice level and choose the Single Instance database type, Database Cloud Servicecreates a single-instance Oracle database. The database is housed on a computenode that Database Cloud Service creates using Oracle Compute Cloud Serviceresources. In brief, Database Cloud Service:
• Creates a compute node that has its own public IP address with a name of thisform:
deployment-name db 1
This Compute Cloud Service instance uses the compute shape specified duringthe database deployment creation process.
• Installs Oracle Linux 6.6, Oracle Database 12.2.0.1, 12.1.0.2 or 11.2.0.4(depending on which version was selected), and cloud tooling software on thecompute node.
• Creates storage for database data, the fast recovery area, and the redo logs.
• Creates Oracle Compute Cloud Service networking resources to provide access tothe compute node, setting all except SSH access on port 22 to a disabled status.
• Creates and starts an Oracle database on the compute node and starts thenetwork listener for the node.
Topics
• Linux User Accounts
• Storage Volumes and File System Layout
Appendix ACharacteristics of a Single Instance Database Deployment
A-5

• Locations of Installed Software
• Network Access
• Oracle Database Characteristics
• Location of Diagnostic and Log Files
Linux User AccountsThis section provides information about Linux user accounts that are provisioned onOracle Database Cloud Service.
Every Database Cloud Service compute node is provisioned with the followingoperating system user accounts.
User Description
opc The system administrator account you use with the sudo command to performoperations that require root-user access.
oracle The Oracle Database administrator account you use to access the system andperform non-root database administration tasks. A home directory, /home/oracle, is created for this user. This user cannot use the sudo command toperform operations that require root-user access.
root The root administrator for the system. You do not have direct access to thisaccount. To perform operations that require root-user access, use the sudocommand as the opc user.
The following environment variables are created for the opc and oracle users.
Variable Description
HOME The home directory of the user, either /home/opc or /home/oracle.
HOSTNAME The host name of the compute node.
LANG The system language, en_US.UTF-8.
OH Short form for ORACLE_HOME.
ORACLE_HOME The Oracle Database home directory:
• Oracle Database 12c Release 2: /u01/app/oracle/product/12.2.0/dbhome_1
• Oracle Database 12c Release 1: /u01/app/oracle/product/12.1.0/dbhome_1
• Oracle Database 11g Release 2: /u01/app/oracle/product/11.2.0/dbhome_1
ORACLE_SID The database system identifier (SID) provided during the database deploymentcreation process.
PATH The paths to search for executables; set to include:
• /sbin
• /usr/sbin
• /bin
• /usr/bin
• $ORACLE_HOME/bin
• $ORACLE_HOME/OPatch
• $HOME
Appendix ACharacteristics of a Single Instance Database Deployment
A-6

Variable Description
SHELL The default shell, /bin/bash.
USER The user name, either opc or oracle.
Storage Volumes and File System Layout
This topic does not apply to Oracle Cloud Infrastructure.
This section provides information about the storage volumes and filesystem layout of a newly created database deployment on OracleDatabase Cloud Service.
Compute Cloud Service Storage Volumes
When a Database Cloud Service deployment is created using the Oracle DatabaseCloud Service service level, the following storage volumes are created.
Storage Volume Description
bits 60 GB volume completely allocated to /u01 on the virtual machine.
boot 32 GB volume allocated to the following file system mounts on the virtualmachine:
• / (root)• /boot
• swap space
data GB size equal to the value provided in the Usable Data Storage fieldduring the database deployment creation process, with a minimum of 15GB. This volume is completely allocated to /u02 on the virtual machine.
fra GB size depends on the choice of Backup Destination during thedatabase deployment creation process:
• Both Cloud Storage and Local Storage: GB size equal to 1.7 timesthe size of the data volume.
• Cloud Storage Only or None: GB size equal to 0.1 times the size ofthe data volume, with a minimum of 7 GB
.This volume is completely allocated to /u03 on the virtual machine.
redo 25 GB volume completely allocated to /u04 on the virtual machine. (If thedata volume is 25 GB, then the redo volume is allocated 26 DB instead.)
File System Layout
When a database deployment is created using the Oracle Database Cloud Serviceservice level, Oracle Cloud Service storage volumes are created and allocated asfollows.
File System Mount Description
swap Swap space; 4 GB allocated from the boot Compute Cloud storagevolume.
Appendix ACharacteristics of a Single Instance Database Deployment
A-7

File System Mount Description
/ (root) Operating system files; 25.5 GB allocated from the boot ComputeCloud storage volume.
/boot Operating system kernel; 500 MB allocated from the boot ComputeCloud storage volume.
/u01 Oracle product software; the entire bits Compute Cloud storagevolume.
/u02 Oracle Database data storage; the entire data Compute Cloud storagevolume.
/u03 Database backup storage; the entire fra Compute Cloud storagevolume.
/u04 Database redo logs; the entire redo Compute Cloud storage volume.
Locations of Installed SoftwareThis section provides information about the locations of installed software on a newlycreated Oracle Database Cloud Service database deployment.
When a database deployment is created using the Oracle Database Cloud Serviceservice level, software is installed in the following locations.
Software Installation Location
Oracle Database $ORACLE_HOME:
• Oracle Database 12c Release 2: /u01/app/oracle/product/12.2.0/dbhome_1
• Oracle Database 12c Release 1: /u01/app/oracle/product/12.1.0/dbhome_1
• Oracle Database 11g Release 2: /u01/app/oracle/product/11.2.0/dbhome_1
Oracle REST DataServices
/u01/app/oracle/product/apex_listener
dbaascli utility /var/opt/oracle/dbaascli
bkup_api utility /var/opt/oracle/bkup_api
Network Access
This topic does not apply to Oracle Cloud Infrastructure.
This section provides information about network access to OracleDatabase Cloud Service.
By default, compute node network access on Database Cloud Service is limited toSecure Shell (SSH) connections on port 22. This access restriction ensures that thedeployment is secure by default. To access other ports, you can create an SSH tunnelto the port or you can enable access to the port using the Oracle Database CloudService console. For more information, see:
• Creating an SSH Tunnel to a Compute Node Port
Appendix ACharacteristics of a Single Instance Database Deployment
A-8

• Enabling Access to a Compute Node Port
Additionally, the NAT prerouting rules are configured to redirect TCP and UDP on port80 to port 8080 so that Oracle REST Data Services (ORDS) can service HTTPcommunication.
To provide network access to the compute node, the following Oracle Compute CloudService networking resources are created:
• A permanent IP reservation named ipreservation is created and associated withthe Compute Cloud Service instance (VM).
• A security list named ora_db is created and associated with the compute node.This security list is used in security rules to enable access to specific securityapplications (port specifications) on the compute node. It is configured with itsinbound policy set to DENY and its outbound policy set to PERMIT.
• The following security applications (port specifications) are created so that theycan be used in security rules to enable access to specific ports on the computenode:
– ora_dbconsole provides TCP access using port 1158
– ora_dbexpress provides TCP access using port 5500
– ora_dblistener provides TCP access using the listener port that you specifiedwhen you created the database deployment
– ora_http provides TCP access using port 80
– ora_httpssl provides TCP access using port 443
• The following security rules are created to enable access to specific ports on thecompute node. With the exception of ora_p2_ssh, all these security rules aredisabled by default to ensure network security of a newly created deployment. Forinformation about enabling one of these security rules, see Enabling Access to aCompute Node Port.
– ora_p2_dbconsole controls access from the public internet to the ora_dbsecurity list on the ora_dbconsole security application (port 1158 TCP).
– ora_p2_dbexpress controls access from the public internet to the ora_dbsecurity list on the ora_dbexpress security application (port 5500 TCP).
– ora_p2_dblistener controls access from the public internet to the ora_dbsecurity list on the ora_dblistener security application.
– ora_p2_http controls access from the public internet to the ora_db securitylist on the ora_http security application (port 80 TCP).
– ora_p2_httpssl controls access from the public internet to the ora_dbsecurity list on the ora_httpssl security application (port 443 TCP).
– ora_p2_ssh controls access from the public internet to the ora_db security liston the ssh security application (port 22 TCP).
• In addition to the SSH key at the Oracle Database Cloud Service service level,which is referred to or uploaded during the database deployment creation process,a second key is created to permit access to the deployment by Oracle Cloud tools.This key has a name of the form:
domain-name.dbaas.deployment-name.db.tresources.sshkey.ora_tools
Appendix ACharacteristics of a Single Instance Database Deployment
A-9

Oracle Database CharacteristicsWhen a database deployment is created on Oracle Database Cloud Service, anOracle database is created using information provided in the Create Service wizard:
Wizard Page and Field How Used When Creating the Database
Software Release on theService page
Determines which version of Oracle Database is used, 12cRelease 2, 12c Release 1 or 11g Release 2.
Software Edition on theService page
Determines which database edition is used. The editiondetermines what database features and options are available. Formore information, see Oracle Database Edition.
Usable Data Storage (GB)on the Service Details page
The amount of data storage for the database data files. A storagevolume of this size is created and mounted on /u02.
Administrator Password onthe Service Details page
The password used for the SYS and SYSTEM database users.
DB Name (SID) on theService Details page
The database system identifier (SID) of the database.
PDB Name on the ServiceDetails page
(Oracle Database 12c only) The name of the default pluggabledatabase (PDB) created in the database.
Location of Diagnostic and Log FilesWhen a database deployment is created on Oracle Database Cloud Service, log filesfrom the creation operation are stored in subdirectories of /var/opt/oracle/log.
By default, Oracle Database trace files and log files are stored in subdirectoriesof /u01/app/oracle/diag.
Characteristics of a Single Instance with Data GuardStandby Database Deployment
This section provides information about the content and configuration of a newlycreated Oracle Database Cloud Service database deployment that uses the OracleDatabase Cloud Service service level and the Single Instance with Data GuardStandby database type.
When you create a database deployment using the Oracle Database Cloud Serviceservice level and choose the Single Instance with Data Guard Standby database type,Database Cloud Service creates an Oracle Data Guard configuration with a primarydatabase and one physical standby database. Each database is a single-instanceOracle database housed on a compute node that Database Cloud Service createsusing Oracle Compute Cloud Service resources. In brief, Database Cloud Service:
• Creates two compute nodes that are alike in all respects except that each one hasits own public IP address.
• Installs Oracle Linux 6.6, Oracle Database 12.2.0.1, 12.1.0.2 or 11.2.0.4(depending on which version was selected), and cloud tooling software on each ofthe compute nodes.
• Creates storage for database data, the fast recovery area, and the redo logs.
Appendix ACharacteristics of a Single Instance with Data Guard Standby Database Deployment
A-10

• Creates Oracle Compute Cloud Service networking resources to provide access tothe compute nodes, setting all except SSH access on port 22 to a disabled status.
• Creates and starts an Oracle database on each compute node and starts thenetwork listener for each node.
The following topics provide more detail about this configuration:
Topics
• Linux User Accounts
• Storage Volumes and File System Layout
• Network Access
• Oracle Data Guard Configuration
Linux User AccountsThis section provides information about Linux user accounts that are provisioned onan Oracle Database Cloud Service database deployment that uses Oracle DataGuard.
Every Database Cloud Service compute node is provisioned with the followingoperating system user accounts.
User Description
opc The system administrator account you use with the sudo command to performoperations that require root-user access.
oracle The Oracle Database administrator account you use to access the system andperform non-root database administration tasks. A home directory, /home/oracle, is created for this user. This user cannot use the sudo command toperform operations that require root-user access.
root The root administrator for the system. You do not have direct access to thisaccount. To perform operations that require root-user access, use the sudocommand as the opc user.
The following environment variables are created for the opc and oracle users.
Variable Description
HOME The home directory of the user, either /home/opc or /home/oracle.
HOSTNAME The host name of the compute node.
LANG The system language, en_US.UTF-8.
OH Short form for ORACLE_HOME.
ORACLE_HOME The Oracle Database home directory:
• For Oracle Database 12c, /u01/app/oracle/product/12.1.0/dbhome_1• For Oracle Database 11g, /u01/app/oracle/product/11.2.0/dbhome_1
ORACLE_SID The database system identifier (SID) provided when the deployment wascreated.
Appendix ACharacteristics of a Single Instance with Data Guard Standby Database Deployment
A-11

Variable Description
PATH The paths to search for executables; set to include:
• /sbin
• /usr/sbin
• /bin
• /usr/bin
• $ORACLE_HOME/bin
• $ORACLE_HOME/OPatch
• $HOME
SHELL The default shell, /bin/bash.
USER The user name, either opc or oracle.
Storage Volumes and File System Layout
This topic does not apply to Oracle Cloud Infrastructure.
This section provides information about the storage volumes and filesystem layout of a newly created Oracle Database Cloud Servicedatabase deployment that uses Oracle Data Guard.
Compute Cloud Service Storage Volumes
When a Database Cloud Service database deployment is created at the OracleDatabase Cloud Service service level, the following storage volumes are created.
Storage Volume Description
bits 60 GB volume completely allocated to /u01 on the virtual machine.
boot 32 GB volume allocated to the following file system mounts on the virtualmachine:
• / (root)• /boot
• swap space
data GB size equal to the value provided in the Usable Data Storage fieldduring the database deployment creation process, with a minimum of 15GB. This volume is completely allocated to /u02 on the virtual machine.
fra GB size depends on the choice of Backup Destination during thedatabase deployment creation process:
• Both Cloud Storage and Local Storage: GB size equal to 1.7 timesthe size of the data volume.
• Cloud Storage Only or None: GB size equal to 0.1 times the size ofthe data volume, with a minimum of 7 GB
.This volume is completely allocated to /u03 on the virtual machine.
redo 25 GB volume completely allocated to /u04 on the virtual machine.
Appendix ACharacteristics of a Single Instance with Data Guard Standby Database Deployment
A-12

File System Layout
When a database deployment is created using the Oracle Database Cloud Serviceservice level, Oracle Cloud Service storage volumes are created and allocated asfollows.
File System Mount Description
swap Swap space; 4 GB allocated from the boot Compute Cloud storagevolume.
/ (root) Operating system files; 25.5 GB allocated from the boot ComputeCloud storage volume.
/boot Operating system kernel; 500 MB allocated from the boot ComputeCloud storage volume.
/u01 Oracle product software; the entire bits Compute Cloud storagevolume.
/u02 Oracle Database data storage; the entire data Compute Cloud storagevolume.
/u03 Database backup storage; the entire fra Compute Cloud storagevolume.
/u04 Database redo logs; the entire redo Compute Cloud storage volume.
Network Access
This topic does not apply to Oracle Cloud Infrastructure.
This section provides information about network access to a newlycreated Oracle Database Cloud Service database deployment thatuses Oracle Data Guard.
When a Database Cloud Service database deployment is created, compute nodenetwork access is limited to Secure Shell (SSH) connections on port 22 by default.This access restriction ensures that the deployment is secure by default. To accessother ports, you can create an SSH tunnel to the port or you can enable access to theport using the Oracle Database Cloud Service console. For more information, see:
• Creating an SSH Tunnel to a Compute Node Port
• Enabling Access to a Compute Node Port
Additionally, the NAT prerouting rules are configured to redirect TCP and UDP on port80 to port 8080 so that Oracle REST Data Services (ORDS) can service HTTPcommunication.
To provide network access to the compute node, the following Oracle Compute CloudService networking resources are created:
• A permanent IP reservation named ipreservation is created and associated withthe Compute Cloud Service instance (VM).
• A security list named ora_db is created and associated with the compute node.This security list is used in security rules to enable access to specific securityapplications (port specifications) on the compute node. It is configured with itsinbound policy set to DENY and its outbound policy set to PERMIT.
Appendix ACharacteristics of a Single Instance with Data Guard Standby Database Deployment
A-13

• The following security applications (port specifications) are created so that theycan be used in security rules to enable access to specific ports on the computenode:
– ora_dbconsole provides TCP access using port 1158
– ora_dbexpress provides TCP access using port 5500
– ora_dblistener provides TCP access using the listener port that you specifiedwhen you created the database deployment
– ora_http provides TCP access using port 80
– ora_httpssl provides TCP access using port 443
• The following security rules are created to enable access to specific ports on thecomputer node. With the exception of ora_p2_ssh, all these security rules aredisabled by default to ensure network security of a newly created deployment. Forinformation about enabling one of these security rules, see Enabling Access to aCompute Node Port.
– ora_p2_dbconsole controls access from the public internet to the ora_dbsecurity list on the ora_dbconsole security application (port 1158 TCP).
– ora_p2_dbexpress controls access from the public internet to the ora_dbsecurity list on the ora_dbexpress security application (port 5500 TCP).
– ora_p2_dblistener controls access from the public internet to the ora_dbsecurity list on the ora_dblistener security application.
– ora_p2_http controls access from the public internet to the ora_db securitylist on the ora_http security application (port 80 TCP).
– ora_p2_httpssl controls access from the public internet to the ora_dbsecurity list on the ora_httpssl security application (port 443 TCP).
– ora_p2_ssh controls access from the public internet to the ora_db security liston the ssh security application (port 22 TCP).
• In addition to the SSH key at the Oracle Database Cloud Service service level,which is referred to or uploaded during the database deployment creation process,a second key is created to permit access to the deployment by Oracle Cloud tools.This key has a name of the form:
domain-name.dbaas.deployment-name.db.tresources.sshkey.ora_tools
Oracle Data Guard ConfigurationThe Oracle Data Guard configuration in an Oracle Database Cloud Servicedeployment includes a primary database and a single physical standby database.The Oracle Data Guard configuration in an Oracle Database Cloud Service databasedeployment has the following characteristics:
• Standby Database Type: Physical. The Oracle Data Guard configuration includesa physical standby database. A physical standby database provides a physicallyidentical copy of the primary database, with on-disk database structures that areidentical to the primary database on a block-for-block basis.
• Data Protection Mode: Maximum Performance. The Oracle Data Guardconfiguration uses maximum performance protection mode. This protection modeprovides the highest level of data protection that is possible without affecting theperformance of a primary database. This is accomplished by allowing transactions
Appendix ACharacteristics of a Single Instance with Data Guard Standby Database Deployment
A-14

to commit as soon as all redo data generated by those transactions has beenwritten to the online log. See "Oracle Data Guard Protection Modes" in OracleData Guard Concepts and Administration for Release 12.2, 12.1 or 11.2 for moreinformation on data protection modes.
• Redo Transport Services Mode: Asynchronous (ASYNC). Redo transport servicescontrol the automated transfer of redo data from the primary database to one ormore archival destinations in an Oracle Data Guard configuration. The OracleData Guard configuration is set to asynchronous (ASYNC attribute of theLOG_ARCHIVE_DEST_n initialization parameter). The asynchronous redo transportmode transmits redo data asynchronously with respect to transaction commitment.A transaction can commit without waiting for the redo generated by thattransaction to be successfully sent to any redo transport destination that uses theasynchronous redo transport mode. See "Introduction to Redo Transport Services"in Oracle Data Guard Concepts and Administration for Release 12.2, 12.1 or 11.2for more information on redo transport services modes.
Characteristics of a Database Clustering with RACDatabase Deployment
This topic does not apply to Oracle Cloud Infrastructure.
This section provides information about the content and configurationof a newly created Oracle Database Cloud Service databasedeployment that uses the Oracle Database Cloud Service servicelevel and the Database Clustering with RAC database type.
When you create a database deployment using the Oracle Database Cloud Serviceservice level and choose the Database Clustering with RAC database type, DatabaseCloud Service creates a two-node cluster database using Oracle RAC. Each node ofthe database is housed on a compute node that Database Cloud Service createsusing Oracle Compute Cloud Service resources. In brief, Database Cloud Service:
• Creates two compute nodes that are alike in all respects except that each one hasits own public IP address.
• Installs Oracle Linux 6.6, Oracle Grid Infrastructure 12.2.0.1 or 12.1.0.2(depending on which database version was selected), Oracle Database 12.2.0.1,12.1.0.2 or 11.2.0.4 (depending on which version was selected), and cloud toolingsoftware on each of the compute nodes.
• Creates three Oracle Automatic Storage Management (ASM) disk groups toprovide shared storage for database data, the fast recovery area, and the redologs, and mounts the disk groups as shared file systems on the two computenodes using Oracle ASM Cluster File System (ACFS).
• Creates Oracle Compute Cloud Service networking resources to provide access tothe compute nodes, setting all except SSH access on port 22 to a disabled status.
• Creates and starts a two-node Oracle RAC database on the compute nodes andstarts the network listeners for the nodes.
The following topics provide more detail about this configuration:
Appendix ACharacteristics of a Database Clustering with RAC Database Deployment
A-15

Topics
• Linux User Accounts
• Storage Volumes and File System Layout
• Network Access
Linux User Accounts
This topic does not apply to Oracle Cloud Infrastructure.
This section provides information about Linux user accounts that areprovisioned on an Oracle Database Cloud Service deployment thathosts an Oracle Real Application Clusters (Oracle RAC) database.
Both compute nodes are provisioned with the following operating system useraccounts.
User Description
opc The system administrator account you use to connect to the compute nodeusing SSH. This user can use the sudo command to perform operations thatrequire root-user access.
oracle The Oracle Database administrator account you use to access the system andperform non-root database administration tasks. A home directory, /home/oracle, is created for this user. This user cannot use the sudo command toperform operations that require root-user access. Additionally, by default youcannot connect as this user to the compute node using SSH. You can add thepublic key to the user’s $HOME/.ssh/authorized_keys file to grant persistentSSH access, or you can connect as the opc user and then use the sudo -scommand to start a root-user command shell, followed by an su - oraclecommand to switch to the oracle user.
grid The Oracle Grid Infrastructure administrator account you use to perform ASM,ACFS, and clusterware administration tasks. A home directory, /home/grid, iscreated for this user. This user cannot use the sudo command to performoperations that require root-user access. Additionally, by default you cannotconnect as this user to the compute node using SSH. You can add the publickey to the user’s $HOME/.ssh/authorized_keys file to grant persistent SSHaccess, or you can connect as the opc user and then use the sudo -s commandto start a root-user command shell, followed by an su - grid command toswitch to the grid user.
root The root administrator for the system. You do not have direct access to thisaccount. To perform operations that require root-user access, use the sudocommand as the opc user.
The following environment variable settings are created for the opc, oracle and gridusers.
Variable Description
HOME The home directory of the user, either /home/opc, /home/oracle or /home/grid.
Appendix ACharacteristics of a Database Clustering with RAC Database Deployment
A-16

Variable Description
HOSTNAME The host name of the compute node:
• deployment-name1 for the first compute node• deployment-name2 for the second compute node
LANG The system language, en_US.UTF-8.
SHELL The default shell, /bin/bash.
USER The user name, either opc, oracle or grid.
In addition, the PATH variable is also created for all three users, but its value differs (linebreaks added to improve clarity):
• For the opc user:
/opt/oracle/dcs/client/bin:/usr/java/jdk1.7.0_72/bin:/usr/lib64/qt-3.3/bin:/usr/local/bin:/bin:/usr/bin:/usr/local/sbin:/usr/sbin:/sbin:/home/opc/bin
• For the oracle user:
/usr/lib64/qt-3.3/bin:/usr/local/bin:/bin:/usr/bin:/usr/local/sbin:/usr/sbin:/sbin:/u01/app/oracle/product/db-version/dbhome_1/bin:/home/oracle/bin
where db-version is either 12.1.0.2 or 11.2.0.4, depending on which version ofOracle Database was installed.
• For the grid user:
/usr/lib64/qt-3.3/bin:/usr/local/bin:/bin:/usr/bin:/usr/local/sbin:/usr/sbin:/sbin:/u01/app/12.1.0.2/grid/bin:/home/grid/bin
In addition, the following environment variable settings are created for the oracle user.
Variable Description
LD_LIBRARY_PATH
The Oracle Database library directory:
• For Oracle Database 12c, /u01/app/oracle/product/12.1.0.2/dbhome_1/lib
• For Oracle Database 11g, /u01/app/oracle/product/11.2.0.4/dbhome_1/lib
ORACLE_HOME The Oracle Database home directory:
• For Oracle Database 12c, /u01/app/oracle/product/12.1.0.2/dbhome_1• For Oracle Database 11g, /u01/app/oracle/product/11.2.0.4/dbhome_1
Appendix ACharacteristics of a Database Clustering with RAC Database Deployment
A-17

Variable Description
ORACLE_SID The database system identifier (SID) for the database instance on the computenode:
• db-sid1 for the first compute node• db-sid2 for the second compute nodewhere db-sid is the database system identifer (SID) provided as the DB Name(SID) value during the database deployment creation process.
ORACLE_UNQNAME
The database system identifer (SID) provided as the DB Name (SID) valueduring the database deployment creation process.
In addition, the following environment variable settings are created for the grid user.
Variable Description
LD_LIBRARY_PATH
Set to /u01/app/12.1.0.2/grid/lib.
ORACLE_HOME The Oracle Grid Infrastructure home directory: /u01/app/12.1.0.2/grid.
Storage Volumes and File System Layout
This topic does not apply to Oracle Cloud Infrastructure.
This section provides information about the storage volumes and filesystem layout of a newly created database deployment on OracleDatabase Cloud Service that hosts an Oracle Real ApplicationClusters (Oracle RAC) database.
When the database deployment is created, the following Oracle Compute CloudService storage volumes are created and attached to the two compute nodes.
Storage Volume Description
boot (two volumes,one for eachcompute node)
25 GB volume for operating system files, user directories and swapspace. This volume appears as the /dev/xvdb block device on eachcompute node.
bits (two volumes,one for eachcompute node)
70 GB volume for Oracle Database and Oracle Grid Infrastructuresoftware. This volume appears as the /dev/xvdc block device on eachcompute node.
data (one volumeaccessed by bothcompute nodes)
Shared storage for database files. GB size equal to the value provided inthe Usable Data Storage field during the database deployment creationprocess, with a minimum of 15 GB. This volume appears as the /dev/xvdd block device on each compute node.
fra (one volumeaccessed by bothcompute nodes)
Shared storage for the fast recovery area. GB size depends on the choiceof Backup Destination during the database deployment creationprocess:
• Both Cloud Storage and Local Storage: GB size equal to 1.7 timesthe size of the data volume.
• None: GB size equal to 0.7 times the size of the data volume, with aminimum of 7 GB
This volume appears as the /dev/xvde block device on each computenode.
Appendix ACharacteristics of a Database Clustering with RAC Database Deployment
A-18

Storage Volume Description
redo (one volumeaccessed by bothcompute nodes)
20 GB shared storage volume for redo logs. This volume appears asthe /dev/xvdf block device on each compute node.
These storage volumes are mounted on the compute nodes as follows.
File System Mount Description
swap Swap space; 4 GB allocated from the boot Compute Cloud storagevolume.
/ (root) Operating system files; 16 GB allocated from the boot Compute Cloudstorage volume.
/boot Operating system kernel; 500 MB allocated from the boot ComputeCloud storage volume.
/u01 Oracle product software; the entire bits Compute Cloud storagevolume.
/u02 Oracle Database data storage; the entire data Compute Cloud storagevolume. An Oracle ASM diskgroup named DATA is created on thestorage volume and Oracle ACFS is used to mount it.
/u03 Database backup storage; the entire fra Compute Cloud storagevolume. An Oracle ASM diskgroup named FRA is created on thestorage volume and Oracle ACFS is used to mount it.
/u04 Database redo logs; the entire redo Compute Cloud storage volume.An Oracle ASM diskgroup named REDO is created on the storagevolume and Oracle ACFS is used to mount it.
Network Access
This topic does not apply to Oracle Cloud Infrastructure.
This section provides information about network access to a newlycreated database deployment on Oracle Database Cloud Servicethat hosts an Oracle Real Application Clusters (Oracle RAC)database.
By default, compute node network access is limited to Secure Shell (SSH) connectionsby the opc user on port 22. This access restriction ensures that the deployment issecure by default. To access other ports, you can create an SSH tunnel to the port oryou can enable access to the port using the Oracle Database Cloud Service console.To provide SSH access to the oracle and grid users, you can add the public key to theuser’s $HOME/.ssh/authorized_keys file.
To provide network access to the compute nodes, the following Oracle Compute CloudService networking resources are created:
• A permanent IP reservation named ipreservation is created and associated withthe Compute Cloud Service instance (VM).
• A security list named ora_db is created and associated with both the computenodes. This security list permits the two compute nodes to communicate with eachother inside the Oracle Cloud, and it is used in security rules to enable access to
Appendix ACharacteristics of a Database Clustering with RAC Database Deployment
A-19

specific security applications (port specifications) on the compute nodes. It isconfigured with its inbound policy set to DENY and its outbound policy set toPERMIT.
• The following security applications (port specifications) are created so that theycan be used in security rules to enable access to specific ports on the computenodes:
– ora_dbconsole provides TCP access using port 1158
– ora_dbexpress provides TCP access using port 5500
– ora_dblistener provides TCP access using the listener port that you specifiedwhen you created the database deployment
• The following security rules are created to enable access to specific ports on thecompute nodes. With the exception of ora_p2_ssh, all these security rules aredisabled by default to ensure network security of a newly created deployment. Forinformation about enabling one of these security rules, see Enabling Access to aCompute Node Port.
– ora_p2_dbconsole controls access from the public internet to the ora_dbsecurity list on the ora_dbconsole security application (port 1158 TCP).
– ora_p2_dbexpress controls access from the public internet to the ora_dbsecurity list on the ora_dbexpress security application (port 5500 TCP).
– ora_p2_dblistener controls access from the public internet to the ora_dbsecurity list on the ora_dblistener security application.
– ora_p2_ssh controls access from the public internet to the ora_db security liston the ssh security application (port 22 TCP).
• In addition to the SSH key maintained at the Oracle Database Cloud Serviceservice level, which is referred to or uploaded during the database deploymentcreation process, a second key is created to permit access to the deployment byOracle Cloud tools. This key has a name of the form:
domain-name.dbaas.deployment-name.db.tresources.sshkey.ora_tools
Characteristics of a Database Clustering with RAC and DataGuard Standby Database Deployment
This topic does not apply to Oracle Cloud Infrastructure.
This section provides information about the content and configurationof a newly created Oracle Database Cloud Service databasedeployment that the Oracle Database Cloud Service service leveland the Database Clustering with RAC and Data Guard Standbydatabase type.
When you create a database deployment using the Oracle Database Cloud Serviceservice level and choose the Database Clustering with RAC and Data Guard Standby,Database Cloud Service creates two two-node cluster databases using Oracle RAC,one acting as the primary database and one acting as a physical standby database inan Oracle Data Guard configuration. Each node of each cluster database is housed ona compute node that Database Cloud Service creates using Oracle Compute CloudService resources. In brief, Database Cloud Service:
Appendix ACharacteristics of a Database Clustering with RAC and Data Guard Standby Database Deployment
A-20

• Creates four compute nodes that are alike in all respects except that each one hasits own public IP address.
• Installs Oracle Linux 6.6, Oracle Grid Infrastructure 12.2.0.1 or 12.1.0.2(depending on which database version was selected), Oracle Database 12.2.0.1,12.1.0.2 or 11.2.0.4 (depending on which version was selected), and cloud toolingsoftware on each of the compute nodes.
• For each cluster database, creates three Oracle Automatic Storage Management(ASM) disk groups to provide shared storage for database data, the fast recoveryarea, and the redo logs, and mounts the disk groups as shared file systems on thetwo compute nodes of the cluster using Oracle ASM Cluster File System (ACFS).
• Creates Oracle Compute Cloud Service networking resources to provide access tothe compute nodes, setting all except SSH access on port 22 to a disabled status.
• Creates two two-node Oracle RAC databases on the compute nodes and startsthe network listeners for the nodes.
• Configures one cluster database as an Oracle Data Guard primary database.
• Configures the other cluster as an Oracle Data Guard physical standby database.
• Starts the databases and the network listeners for the nodes.
The following topics provide more detail about this configuration:
Topics
• Linux User Accounts
• Storage Volumes and File System Layout
• Network Access
• Oracle Data Guard Configuration
Linux User Accounts
This topic does not apply to Oracle Cloud Infrastructure.
This section provides information about Linux user accounts that areprovisioned on an Oracle Database Cloud Service deployment thatuses Oracle Real Application Clusters (Oracle RAC) and OracleData Guard.
All four compute nodes are provisioned with the following operating system useraccounts.
User Description
opc The system administrator account you use to connect to the compute nodeusing SSH. This user can use the sudo command to perform operations thatrequire root-user access.
Appendix ACharacteristics of a Database Clustering with RAC and Data Guard Standby Database Deployment
A-21

User Description
oracle The Oracle Database administrator account you use to access the system andperform non-root database administration tasks. A home directory, /home/oracle, is created for this user. This user cannot use the sudo command toperform operations that require root-user access. Additionally, by default youcannot connect as this user to the compute node using SSH. You can add thepublic key to the user’s $HOME/.ssh/authorized_keys file to grant persistentSSH access, or you can connect as the opc user and then use the sudo -scommand to start a root-user command shell, followed by an su - oraclecommand to switch to the oracle user.
grid The Oracle Grid Infrastructure administrator account you use to perform ASM,ACFS, and clusterware administration tasks. A home directory, /home/grid, iscreated for this user. This user cannot use the sudo command to performoperations that require root-user access. Additionally, by default you cannotconnect as this user to the compute node using SSH. You can add the publickey to the user’s $HOME/.ssh/authorized_keys file to grant persistent SSHaccess, or you can connect as the opc user and then use the sudo -s commandto start a root-user command shell, followed by an su - grid command toswitch to the grid user.
root The root administrator for the system. You do not have direct access to thisaccount. To perform operations that require root-user access, use the sudocommand as the opc user.
The following environment variable settings are created for the opc, oracle and gridusers.
Variable Description
HOME The home directory of the user, either /home/opc, /home/oracle or /home/grid.
HOSTNAME The host name of the compute node:
• deployment-name1 for the first compute node• deployment-name2 for the second compute node
LANG The system language, en_US.UTF-8.
SHELL The default shell, /bin/bash.
USER The user name, either opc, oracle or grid.
In addition, the PATH variable is also created for all three users, but its value differs (linebreaks added to improve clarity):
• For the opc user:
/opt/oracle/dcs/client/bin:/usr/java/jdk1.7.0_72/bin:/usr/lib64/qt-3.3/bin:/usr/local/bin:/bin:/usr/bin:/usr/local/sbin:/usr/sbin:/sbin:/home/opc/bin
• For the oracle user:
/usr/lib64/qt-3.3/bin:/usr/local/bin:/bin:/usr/bin:/usr/local/sbin:/usr/sbin:/sbin:/u01/app/oracle/product/db-version/dbhome_1/bin:/home/oracle/bin
Appendix ACharacteristics of a Database Clustering with RAC and Data Guard Standby Database Deployment
A-22

where db-version is either 12.1.0.2 or 11.2.0.4, depending on which version ofOracle Database was installed.
• For the grid user:
/usr/lib64/qt-3.3/bin:/usr/local/bin:/bin:/usr/bin:/usr/local/sbin:/usr/sbin:/sbin:/u01/app/12.1.0.2/grid/bin:/home/grid/bin
In addition, the following environment variable settings are created for the oracle user.
Variable Description
LD_LIBRARY_PATH
The Oracle Database library directory:
• For Oracle Database 12c, /u01/app/oracle/product/12.1.0.2/dbhome_1/lib
• For Oracle Database 11g, /u01/app/oracle/product/11.2.0.4/dbhome_1/lib
ORACLE_HOME The Oracle Database home directory:
• For Oracle Database 12c, /u01/app/oracle/product/12.1.0.2/dbhome_1• For Oracle Database 11g, /u01/app/oracle/product/11.2.0.4/dbhome_1
ORACLE_SID The database system identifier (SID) for the database instance on the computenode:
• db-sid1 for the first compute node• db-sid2 for the second compute nodewhere db-sid is the database system identifer (SID) provided as the DB Name(SID) value during the database deployment creation process.
ORACLE_UNQNAME
The database system identifer (SID) provided as the DB Name (SID) valueduring the database deployment creation process.
In addition, the following environment variable settings are created for the grid user.
Variable Description
LD_LIBRARY_PATH
Set to /u01/app/12.1.0.2/grid/lib.
ORACLE_HOME The Oracle Grid Infrastructure home directory: /u01/app/12.1.0.2/grid.
Storage Volumes and File System Layout
This topic does not apply to Oracle Cloud Infrastructure.
This section provides information about the storage volumes and filesystem layout of a newly created Oracle Database Cloud Servicedeployment that uses Oracle Real Application Clusters (Oracle RAC)and Oracle Data Guard.
When the database deployment is created, the following Oracle Compute CloudService storage volumes are created and attached to the four compute nodes.
Appendix ACharacteristics of a Database Clustering with RAC and Data Guard Standby Database Deployment
A-23

Storage Volume Description
boot (four volumes,one for eachcompute node)
25 GB volume for operating system files, user directories and swapspace. This volume appears as the /dev/xvdb block device on eachcompute node.
bits (four volumes,one for eachcompute node)
70 GB volume for Oracle Database and Oracle Grid Infrastructuresoftware. This volume appears as the /dev/xvdc block device on eachcompute node.
data (two volumes,one for each clusterdatabase)
Shared storage for database files. GB size equal to the value provided inthe Usable Data Storage field during the database deployment creationprocess, with a minimum of 15 GB. This volume appears as the /dev/xvdd block device on each compute node.
fra (two volumes,one for each clusterdatabase)
Shared storage for the fast recovery area. GB size depends on the choiceof Backup Destination during the database deployment creationprocess:
• Both Cloud Storage and Local Storage: GB size equal to 1.7 timesthe size of the data volume.
• None: GB size equal to 0.7 times the size of the data volume, with aminimum of 7 GB
This volume appears as the /dev/xvde block device on each computenode.
redo (two volumes,one for each clusterdatabase)
20 GB shared storage volume for redo logs. This volume appears asthe /dev/xvdf block device on each compute node.
These storage volumes are mounted on the compute nodes as follows.
File System Mount Description
swap Swap space; 4 GB allocated from the boot Compute Cloud storagevolume.
/ (root) Operating system files; 16 GB allocated from the boot Compute Cloudstorage volume.
/boot Operating system kernel; 500 MB allocated from the boot ComputeCloud storage volume.
/u01 Oracle product software; the entire bits Compute Cloud storagevolume.
/u02 Oracle Database data storage; the entire data Compute Cloud storagevolume. An Oracle ASM diskgroup named DATA is created on thestorage volume and Oracle ACFS is used to mount it.
/u03 Database backup storage; the entire fra Compute Cloud storagevolume. An Oracle ASM diskgroup named FRA is created on thestorage volume and Oracle ACFS is used to mount it.
/u04 Database redo logs; the entire redo Compute Cloud storage volume.An Oracle ASM diskgroup named REDO is created on the storagevolume and Oracle ACFS is used to mount it.
Network Access
This topic does not apply to Oracle Cloud Infrastructure.
Appendix ACharacteristics of a Database Clustering with RAC and Data Guard Standby Database Deployment
A-24

This section provides information about network access to a newlycreated Oracle Database Cloud Service deployment that usesOracle Real Application Clusters (Oracle RAC) and Oracle DataGuard.
By default, compute node network access is limited to Secure Shell (SSH) connectionsby the opc user on port 22. This access restriction ensures that the deployment issecure by default. To access other ports, you can create an SSH tunnel to the port oryou can enable access to the port using the Oracle Database Cloud Service console.To provide SSH access to the oracle and grid users, you can add the public key to theuser’s $HOME/.ssh/authorized_keys file.
To provide network access to the compute nodes, the following Oracle Compute CloudService networking resources are created:
• A permanent IP reservation named ipreservation is created and associated witheach Compute Cloud Service instance (VM).
• A security list named ora_db is created and associated with all the computenodes. This security list permits the compute nodes to communicate with eachother inside the Oracle Cloud, and it is used in security rules to enable access tospecific security applications (port specifications) on the compute nodes. It isconfigured with its inbound policy set to DENY and its outbound policy set toPERMIT.
• The following security applications (port specifications) are created so that theycan be used in security rules to enable access to specific ports on the computenodes:
– ora_dbconsole provides TCP access using port 1158
– ora_dbexpress provides TCP access using port 5500
– ora_dblistener provides TCP access using the listener port that you specifiedwhen you created the database deployment
• The following security rules are created to enable access to specific ports on thecompute nodes. With the exception of ora_p2_ssh, all these security rules aredisabled by default to ensure network security of a newly created deployment. Forinformation about enabling one of these security rules, see Enabling Access to aCompute Node Port.
– ora_p2_dbconsole controls access from the public internet to the ora_dbsecurity list on the ora_dbconsole security application (port 1158 TCP).
– ora_p2_dbexpress controls access from the public internet to the ora_dbsecurity list on the ora_dbexpress security application (port 5500 TCP).
– ora_p2_dblistener controls access from the public internet to the ora_dbsecurity list on the ora_dblistener security application.
– ora_p2_ssh controls access from the public internet to the ora_db security liston the ssh security application (port 22 TCP).
• In addition to the SSH key maintained at the Oracle Database Cloud Serviceservice level, which is referred to or uploaded during the database deploymentcreation process, a second key is created to permit access to the deployment byOracle Cloud tools. This key has a name of the form:
domain-name.dbaas.deployment-name.db.tresources.sshkey.ora_tools
Appendix ACharacteristics of a Database Clustering with RAC and Data Guard Standby Database Deployment
A-25

Oracle Data Guard Configuration
This topic does not apply to Oracle Cloud Infrastructure.
The Oracle Data Guard configuration in an Oracle Database CloudService deployment that uses Oracle Real Application Clusters(Oracle RAC) and Oracle Data Guard has the followingcharacteristics.
• Standby Database Type: Physical. The Oracle Data Guard configuration includesa physical standby database. A physical standby database provides a physicallyidentical copy of the primary database, with on disk database structures that areidentical to the primary database on a block-for-block basis.
• Data Protection Mode: Maximum Performance. The Oracle Data Guardconfiguration uses maximum performance protection mode. This protection modeprovides the highest level of data protection that is possible without affecting theperformance of a primary database. This is accomplished by allowing transactionsto commit as soon as all redo data generated by those transactions has beenwritten to the online log. See "Oracle Data Guard Protection Modes" in OracleData Guard Concepts and Administration for Release 12.2, 12.1 or 11.2 for moreinformation on data protection modes.
• Redo Transport Services Mode: Asynchronous (ASYNC). Redo transport servicescontrol the automated transfer of redo data from the production database to one ormore archival destinations in an Oracle Data Guard configuration. The OracleData Guard configuration is set to asynchronous (ASYNC attribute of theLOG_ARCHIVE_DEST_n initialization parameter). The asynchronous redo transportmode transmits redo data asynchronously with respect to transaction commitment.A transaction can commit without waiting for the redo generated by thattransaction to be successfully sent to any redo transport destination that uses theasynchronous redo transport mode. See "Introduction to Redo Transport Services"in Oracle Data Guard Concepts and Administration for Release 12.2, 12.1 or 11.2for more information on redo transport services modes.
Characteristics of an Oracle Database Cloud Service -Virtual Image Database Deployment
This topic does not apply to Oracle Cloud Infrastructure.
This section provides information about the content and configurationof a newly created Oracle Database Cloud Service deployment thatuses the Oracle Database Cloud Service - Virtual Image servicelevel.
When a deployment is created using the Oracle Database Cloud Service - VirtualImage service level, a Compute Cloud Service instance (virtual machine) is createdwith a name of this form:
deployment-name db 1
Appendix ACharacteristics of an Oracle Database Cloud Service - Virtual Image Database Deployment
A-26

This Compute Cloud Service instance uses the compute shape specified during thedeployment creation process.
Topics
• Linux User Accounts
• Storage Volumes and File System Layout
• Location of Installed Software
• Network Access
Linux User Accounts
This topic does not apply to Oracle Cloud Infrastructure.
This section provides information about Linux user accounts that areprovisioned on an Oracle Database Cloud Service Virtual Imagedeployment.
The Database Cloud Service compute node is provisioned with the following operatingsystem user accounts.
User Description
opc The system administrator account you use with the sudo command to performoperations that require root-user access.
oracle The Oracle Database administrator account you use to access the system andperform non-root database administration tasks. A home directory, /home/oracle, is created for this user. This user cannot use the sudo command toperform operations that require root-user access.
root The root administrator for the system. You do not have direct access to thisaccount. To perform operations that require root-user access, use the sudocommand as the opc user.
The following environment variables are created for the opc and oracle users.
Variable Description
HOME The home directory of the user, either /home/opc or /home/oracle.
HOSTNAME The host name of the compute node.
LANG The system language, en_US.UTF-8.
OH Short form for ORACLE_HOME.
ORACLE_HOME The Oracle Database home directory:
• For Oracle Database 12c, /u01/app/oracle/product/12.1.0/dbhome_1• For Oracle Database 11g, /u01/app/oracle/product/11.2.0/dbhome_1
ORACLE_SID The database system identifier (SID) provided when the deployment wascreated.
Appendix ACharacteristics of an Oracle Database Cloud Service - Virtual Image Database Deployment
A-27

Variable Description
PATH The paths to search for executables; set to include:
• /sbin
• /usr/sbin
• /bin
• /usr/bin
• $ORACLE_HOME/bin
• $ORACLE_HOME/OPatch
• $HOME
SHELL The default shell, /bin/bash.
USER The user name, either opc or oracle.
Storage Volumes and File System Layout
This topic does not apply to Oracle Cloud Infrastructure.
This section provides information about the storage volumes and filesystem layout of a newly created Oracle Database Cloud ServiceVirtual Image deployment.
Compute Cloud Service Storage Volumes
When a Database Cloud Service deployment is created using the Oracle DatabaseCloud Service - Virtual Image service level, the following storage volume is created.
Storage Volume Description
boot 32 GB volume allocated to the following file system mounts on the virtualmachine:
• / (root)• /boot
• swap space
File System Layout
When a deployment is created using the Oracle Database Cloud Service - VirtualImage service level, Oracle Cloud Service storage volumes are created and allocatedas follows.
File System Mount Description
swap Swap space; 4 GB allocated from the boot Compute Cloud storagevolume.
/ (root) Operating system files; 25.5 GB allocated from the boot ComputeCloud storage volume.
/boot Operating system kernel; 500 MB allocated from the boot ComputeCloud storage volume.
Appendix ACharacteristics of an Oracle Database Cloud Service - Virtual Image Database Deployment
A-28

Location of Installed Software
This topic does not apply to Oracle Cloud Infrastructure.
This section provides information about the locations of installedsoftware of a newly created Oracle Database Cloud Service VirtualImage deployment.
When a deployment is created using the Oracle Database Cloud Service - VirtualImage service level, a GZIP file containing the version of the Oracle Databasesoftware chosen when the deployment was created is stored in /scratch/db.
Network Access
This topic does not apply to Oracle Cloud Infrastructure.
This section provides information about network access to a newlycreated Oracle Database Cloud Service Virtual Image deployment.
By default, compute node network access is limited to Secure Shell (SSH) connectionson port 22. This access restriction ensures that the deployment is secure by default.To access other ports, you can create an SSH tunnel to the port or you can enableaccess to the port using the Oracle Database Cloud Service console. For moreinformation, see:
• Creating an SSH Tunnel to a Compute Node Port
• Enabling Access to a Compute Node Port
To provide network access to the compute node, the following Oracle Compute CloudService networking resources are created:
• A permanent IP reservation named ipreservation is created and associated withthe Compute Cloud Service instance (VM).
• A security list named ora_db is created and associated with the compute node.This security list is configured with its inbound policy set to DENY and its outboundpolicy set to PERMIT.
• No security applications are created.
• The ora_p2_ssh security rule is created. This rule controls access from the publicinternet to the ora_db security list for the Compute Cloud Service instance (VM)on the ssh security application (port 22 TCP). This security rule is enabled so thatSecure Shell (SSH) connections to the compute node on port 22 are permitted.
• In addition to the SSH key maintained at the Oracle Database Cloud Service -Virtual Image service level, which is referred to or uploaded during the deploymentcreation process, a second key is created to permit access to the deployment byOracle Cloud tools. This key has a name of the form:
domain-name.dbaas.deployment-name.db.tresources.sshkey.ora_tools
Appendix ACharacteristics of an Oracle Database Cloud Service - Virtual Image Database Deployment
A-29

BOracle Cloud Pages for AdministeringDatabase Cloud Service
This section provides information about what you can do and what you see on each ofthe Oracle Cloud pages for administering Oracle Database Cloud Service.
Topics
• Services Page
• Activity Page
• SSH Access Page
• IP Reservations Page
• QuickStarts Page
• Overview Page
• Access Rules Page
• Backup Page
• Patching Page
• Snapshots Page
• Create Service: Service Page
• Create Service: Service Details Page
• Create Service: Confirmation Page
Services PageThe Oracle Database Cloud Service Services page displays all deployments on OracleDatabase Cloud Service.
Topics
• What You Can Do From the Oracle Database Cloud Service Services Page
• What You See on the Oracle Database Cloud Service Services Page
What You Can Do From the Oracle Database Cloud Service Services Page
Use the Oracle Database Cloud Service Services page to perform the tasks describedin the following topics:
• Viewing All Database Deployments
• Creating a Customized Database Deployment
• Viewing Detailed Information for a Database Deployment
• Deleting a Database Deployment
B-1

What You See on the Oracle Database Cloud Service Services Page
The following table describes the key information shown on the Oracle DatabaseCloud Service Services page.
Element Description
navigation menu
Navigation menu providing access to My Services and other OracleCloud services in the identity domain.
User menu providing access to help, accessibility options, consoleversion information and sign-out.
Click to go to the My Services Dashboard page.
Click to go to the My Services Users page.
Click to go to the My Services Notifications page.
menu next to “OracleDatabase CloudService”
Menu that provides access to Platform Services.
Activity Click to go to the Activity Page.
SSH Access Click to go to the SSH Access Page.
Welcome! Click to go to the Oracle Database Cloud Service console Welcomepage.
REST APIs Click to go to the API Catalog Cloud Service.
Services, OCPUs,Memory, Storage andPublic IPs
Summary of resources being used:
• Services — Total number of configured deployments.• OCPUs — Total number of Oracle CPUs allocated across all
deployments.• Memory — Total amount of compute node memory allocated
across all deployments.• Storage — Total amount of Oracle Compute Cloud Service
storage allocated across all deployments.• Public IPs — Number of public IP addresses allocated across all
deployments.
Enter a full or partial deployment name to filter the list of deploymentsto include only those that contain the string in their name.
Create Service Click to create a new database deployment on Database CloudService. See Creating a Customized Database Deployment.
Click to view details for the deployment.
Status Status of the deployment if it is not running. Status values include “InProgress”, “Maintenance”, “Stopped”, and “Terminating”.
Version Version of Oracle Database configured on the deployment. Forexample: 12.1.0.2 or 11.2.0.4.
Edition Software edition of Oracle Database configured on the deployment.For example: Enterprise Edition or Standard Edition.
Created On orSubmitted On
Date when the deployment was created. During the creation process,the date when the creation request was submitted.
OCPUs Number of Oracle CPUs associated with the deployment.
Appendix BServices Page
B-2

Element Description
Memory Amount of compute node memory in GBs associated with thedeployment.
Storage Amount of storage in GBs associated with the deployment.
menu for eachdeployment
Menu that provides the following options:
• Open DBaaS Monitor Console — Open the Oracle CloudDatabase Monitor for the deployment.
• Open Application Express Console — Open the OracleApplication Express home page for the deployment.
• Open EM Console — Open the database console, eitherEnterprise Manager Database Express 12c or Enterprise Manager11g Database Control.
• SSH Access — Add an SSH public key. See Adding an SSHPublic Key.
• Access Rules — Manage access rules that control networkaccess to service components.
• Delete — Delete the deployment. See Deleting a DatabaseDeployment.
Note:
To ensure security by default, the portsrequired to access these consoles areinitially blocked. To use any of the consoles,you must first enable network access to theconsole’s port or create an SSH tunnel tothe console’s port. See Accessing DatabaseCloud Service
Service create anddelete history
Listing of attempts to create or delete a deployment. Click the triangleicon next to the title to view the history listing.
Activity PageThe Activity page displays activities for all Oracle Database Cloud Servicedeployments in your identity domain. You can restrict the list of activities displayedusing search filters.
Topics
• What You Can Do From the Activity Page
• What You See on the Activity Page
What You Can Do From the Activity Page
Use the Activity page to view operations for all Database Cloud Service deploymentsin your identity domain.
You can use the page’s Search Activity Log section to filter the list of displayedoperations based on:
Appendix BActivity Page
B-3

• The time the operation was started
• The status of the operation
• The name of the deployment on which the operation was performed
• The type of the operation
In the table of results, you can:
• Click any column heading to sort the table by that column.
• Click the triangle at the start of an operation’s row to see more details about thatoperation.
What You See on the Activity Page
The following table describes the key information shown on the Activity page.
Element Description
Start Time Range Filters activity results to include only operations started within a specified timerange. The range defaults to the previous 24 hours.
Status Filters operations by status of the operation:
• All• Scheduled• Running• Succeeded• FailedYou can select any subset of status types. The default value is All.
Service Name Filters the activity results to include operations only for the specified serviceinstance. You can enter a full or partial service instance name.
Service Type Filters the activity results to include operations only for instances of thespecified service type. The default value is the current cloud service.
Operation Filters the activity results to include selected types of operations. You can selectany subset of the given operations. The default value is All.
Search Searches for activities by applying the filters specified by the Start Time Range,Status, Service Name, Service Type and Operation fields, and displays activityresults in the table.
Reset Clears the Start Time Range and Service Name fields, and returns the Statusand Operation fields to their default values.
Results per page Specifies the number of results you want to view per page. The default value is10.
Displays status messages for the given operation. Clicking on the resultingdownward arrow hides the status messages.
Service Name Shows the name of the service instance and its identity domain:
service_instance:identity_domain
You can sort the column in ascending or descending order.
Service Type Shows the type of cloud service for this instance.
You can sort the column in ascending or descending order.
Operation Shows the type of operation performed on the service instance.
You can sort the column in ascending or descending order.
Appendix BActivity Page
B-4

Element Description
Status Shows the status of the operation performed on the service instance.
You can sort the column in ascending or descending order.
Start Time Shows the time the operation started.
You can sort the column in ascending or descending order.
End Time Shows the time the operation ended, if the operation is complete.
You can sort the column in ascending or descending order.
Initiated By Shows the user that initiated the operation. The user can be any user in theidentity domain who initiated the operation or, for certain operations such asautomated backup, System.
You can sort the column in ascending or descending order.
SSH Access PageThe SSH Access page enables you to view and add SSH public keys to OracleDatabase Cloud Service deployments in your identity domain. You can restrict the listof deployments displayed using search filters.
Topics
• What You Can Do From the Activity Page
• What You See on the Activity Page
What You Can Do From the SSH Access Page
Use the SSH Access page to view and add SSH public keys to Database CloudService deployments in your identity domain.
You can use the page’s Search section to filter the list of displayed deployments basedon deployment name.
In the table of results, you can:
• Click any column heading to sort the table by that column.
• Click the triangle at the start of a deployment’s row to see more details.
What You See on the SSH Access Page
The following table describes the key information shown on the SSH Access page.
Element Description
Service Name Filters the results to include SSH keys only for the specified deployment. Youcan enter a full or partial deployment name.
Service Type Filters the results to include SSH keys only for deployments of the specifiedservice type. The default value is the current cloud service.
Search Searches for SSH keys by applying the filters specified by the Service Nameand Service Type fields, and displays the results in the table.
Results per page Specifies the number of results you want to view per page. The default value is10.
Appendix BSSH Access Page
B-5

Element Description
Displays a description of an item in the results table. Clicking on the resultingdownward arrow hides the description.
Service Name Shows the name of the deployment.
Service Type Shows the type of cloud service for this deployment.
Last Update Shows the most recent time the SSH keys for this deployment were updated.
Actions Click the Add New Key button to add a new SSH public key to this deployment.
The Add New Key overlay is displayed with its Key value field displaying thedeployment’s most recent SSH public key.
Specify the new public key using one of the following methods:
• Select Upload a new SSH Public Key value and click Choose File toselect a file that contains the public key.
• Select Key value. Delete the current key value and paste the new publickey into the text area. Make sure the value does not contain line breaks orend with a line break.
IP Reservations Page
This topic does not apply to Oracle Cloud at Customer.
This topic does not apply to Oracle Cloud Infrastructure.
The Oracle Database Cloud Service IP Reservations page displaysthe IP reservations you have created. You use the page to view,manage, and create Oracle Compute Cloud Service security rules.
What You Can Do From the Oracle Database Cloud Service IP ReservationsPage
Use the IP Reservations page to perform the tasks described in the following topics:
• Creating an IP Reservation
• Deleting an IP Reservation
What You See on the Oracle Database Cloud Service IP Reservations Page
The following table describes the key information shown on the Oracle DatabaseCloud Service IP Reservations page.
Element Description
Launches the IP reservation creation process. Clicking this buttonwill open the Create dialog box wherein you can create an IPreservation and allocate it to a region.
Search Searches for IP reservations either by name or by region. You canenter a full or partial name and search will return all IPreservations that meet the specified criteria.
Appendix BIP Reservations Page
B-6

Element Description
IP Reservation list Lists, by name, all IP reservations created for your serviceinstance and specific details about each reservation. Thesedetails are:• Region• Status• IP address• Date the IP reservation was created.
Clicking this icon deletes the IP Reservation. If the icon isdisabled (grayed-out), the reservation is in use and you cannotdelete it.
QuickStarts Page
This topic does not apply to Oracle Cloud Infrastructure.
What You See on the Oracle Database Cloud Service QuickStarts Page
The following table describes the key information shown on the Oracle DatabaseCloud Service QuickStarts page.
Element Description
Cancel Goes to the My Services Dashboard page.
Custom Goes to the first page of the Create Service wizard, where you cancreate a customized database deployment instead of using one of theQuickStart templates.
Instance Name The name for the new database deployment. The name:
• Must start with a letter.• Must not exceed 25 characters in length.• Must contain only letters and numbers.• Must be unique with the identity domain.
Create (below eachtemplate)
Displays the Confirmation window, where you download a zip filecontaining information needed to access the database deployment andthen click Create to begin creation of the deployment.
Overview PageThe Oracle Database Cloud Service Overview page displays overview information foran Oracle Database Cloud Service database deployment.
The following tables describe the elements and options available in the various areasof the Overview page:
• What You See in the Banner Area
• What You See in the Tiles Area
• What You See in the Page Content Area
Appendix BQuickStarts Page
B-7

What You See in the Banner Area
The following table describes the elements and options available in the banner area atthe top of the page.
Element Description
menu
Navigation menu providing access to My Services and other OracleCloud services in the identity domain.
User menu providing access to help, accessibility options, consoleversion information and sign-out.
Click to go to the My Services Dashboard page.
Click to go to the My Services Users page.
Click to go to the My Services Notifications page.
(next to the “OracleDatabase CloudService” link)
Click to see details about the database deployment: description,identity domain, subscription type, user who created the deployment,and when the deployment was created.
Oracle DatabaseCloud Service link
Click to return to the Services Page.
Appendix BOverview Page
B-8

Element Description
(next to thedeployment’s name)
Deployment menu that provides the following options:
• Open DBaaS Monitor Console — Open the Oracle CloudDatabase Monitor for the deployment.
• Open Application Express Console — Open the OracleApplication Express home page for the deployment.
• Open EM Console — Open the database console for thedeployment, either Enterprise Manager Database Express 12c orEnterprise Manager 11g Database Control.
• Start — Start a stopped deployment. See Stopping, Starting andRestarting a Database Deployment.
• Stop — Stop a deployment. See Stopping, Starting andRestarting a Database Deployment.
• Restart — Restart a deployment. See Stopping, Starting andRestarting a Database Deployment.
• Switchover — Start a switchover operation. (Available only fordeployments with a Data Guard configuration.)
• Failover — Start a manual failover operation. (Available only fordeployments with a Data Guard configuration.)
• Reinstate — Start an operation to reinstate a failed primary as thestandby. (Available only for deployments with a Data Guardconfiguration.)
• Scale Up/Down — Scale the compute shape or storage of thedeployment. For information, see Scaling a DatabaseDeployment. (Not available on Oracle Cloud Infrastructure)
• Add Storage — Add storage to the deployment. For information,see Scaling Up the Storage for a Database Deployment.(Available only on Oracle Cloud Infrastructure)
• Access Rules — Go to the Access Rules Page to manage theaccess rules that control network access to the deployment. (Notavailable on Oracle Cloud Infrastructure)
• SSH Access — Add an SSH public key to the deployment. See Adding an SSH Public Key.
• Replace Database using Backup — Replace the database onthe deployment using an existing backup stored by DatabaseBackup Cloud Service. See Creating a Database DeploymentUsing a Cloud Backup.
• View Activity — Go to the Activity Page to view activitiesperformed on this deployment.
Note:
To ensure security by default, the portsrequired to access these consoles areinitially blocked. To use any of theseconsoles, you must first enable networkaccess to the console’s port or create anSSH tunnel to the console’s port. See Accessing Database Cloud Service
Click to start a stopped deployment.
Appendix BOverview Page
B-9

Element Description
Click to stop a running deployment.
Click to restart a running deployment.
Click to poll the status of the deployment’s compute nodes and displaythe results on this page.
What You See in the Tiles Area
The following table describes the elements and options available in the tiles area atthe side of the page.
Element Description
Overview tile The current tile, highlighted to indicate that you are viewing theOverview page.
Administration tile Click to access these pages for the deployment:
• Backup Page• Patching Page• Snapshots Page
What You See in the Page Content Area
The following table describes the elements and options available in the main contentarea of the page.
Element Description
Click to refresh the page.
Service Overviewsection
Displays a summary box followed by information about thedeployment.
The summary box shows high-level information about the thedeployment: compute nodes, OCPUs, memory, and local storage.
Following the summary box is a listing of information about thedeployment, including Oracle Database version, Software edition,backup destination, overall status, and so on. Click the Show more...link to see even more information about the deployment.
Resources section Contains an entry for each compute node of the deployment. Eachentry displays information about the compute node and provides amenu to perform actions on the compute node.
(Available only for deployments with a Data Guard configuration.)
Click to poll the status of the Data Guard configuration on thedeployment’s compute nodes and refresh the information on this page.
Appendix BOverview Page
B-10
Element Description
(for each computenode)
Compute node menu that provides the following options:
• Start — Start a stopped compute node. See Stopping, Startingand Restarting a Database Deployment
.• Stop — Stop a compute node. See Stopping, Starting and
Restarting a Database Deployment
.• Restart — Restart a compute node. See Stopping, Starting and
Restarting a Database Deployment
.• Switchover — Start a switchover operation. (Available only for
deployments with a Data Guard configuration.)• Failover — Start a manual failover operation. (Available only for
deployments with a Data Guard configuration.)• Reinstate — Start an operation to reinstate a failed primary as the
standby. (Available only for deployments with a Data Guardconfiguration.)
• Scale Up/Down — Scale the compute shape or storage of acompute node. For information, see Scaling a DatabaseDeployment. (Not available on Oracle Cloud Infrastructure)
• Add Storage — Add storage to the deployment. For information,see Scaling Up the Storage for a Database Deployment.(Available only on Oracle Cloud Infrastructure)
• Access Rules — Go to the Access Rules Page to manage theaccess rules that control network access to the deployment. (Notavailable on Oracle Cloud Infrastructure)
Data Guard Metrics (Available only for deployments with a Data Guard configuration.)
Displays metrics about the Data Guard configuration.
Access Rules Page
This topic does not apply to Oracle Cloud Infrastructure.
The Oracle Database Cloud Service Access Rules page displaysrules used to control network access to Oracle Database CloudService deployments. You use the page to view, manage, and createOracle Compute Cloud Service security rules.
Topics
• What You Can Do From the Oracle Database Cloud Service Access Rules Page
• What You See on the Oracle Database Cloud Service Access Rules Page
What You Can Do From the Oracle Database Cloud Service Access Rules Page
Use the Access Rules page to perform the tasks described in the following topics:
• Enabling Port Access by Enabling an Automatically Created Access Rule
• Enabling or Restricting Port Access by Creating an Access Rule
Appendix BAccess Rules Page
B-11

What You See on the Oracle Database Cloud Service Access Rules Page
The following table describes the key information shown on the Oracle DatabaseCloud Service Access Rules page.
Element Description
Results per page Specifies the number of results you want to view per page. The default value is10.
Create Rule Click to create a new rule. See Enabling or Restricting Port Access by Creatingan Access Rule.
Status Displays an icon that indicates whether a rule is enabled or disabled.
Indicates the rule is enabled.
Indicates the rule is disabled.
Rule Name Name of the rule. When creating a rule, this must start with a letter, followed byletters, numbers, hyphens, or underscores. The name cannot start with ora_ orsys_.
Source Hosts from which traffic is allowed. Possible values are DB, PUBLIC-INTERNET, ora custom value in the form of an IP address.
Destination Security list to which traffic is allowed. This will be DB, the ora_db security list forthe deployment.
Ports Port or range of ports for the rule.
Description Description of the rule (optional).
Rule Type Type of rule. Rule types are:
• DEFAULT—Rules created automatically when the database deployment wascreated. Can be enabled or disabled, but not deleted. See Enabling PortAccess by Enabling an Automatically Created Access Rule.
• SYSTEM—Rules created by the system. Cannot be enabled, disabled, ordeleted.
• USER—Rules created by you or another user. Can be enabled, disabled, ordeleted.
(for rule)Menu that provides the following options:
• Enable—Enable the rule.• Disable—Disable the rule.• Delete—Delete the rule (USER rules only).
Backup PageYou use the Backup page to manage backup and recovery of a particular databasedeployment.
What You See on the Oracle Database Cloud Service Backup Page
The following table describes the key information shown on the Oracle DatabaseCloud Service Backup page.
Element Description
Backup Now Click to create a full backup of the database deployment.
Appendix BBackup Page
B-12

Element Description
Recover Click to recover the database deployment to the latest backup or to aspecific point in time.
Configure Backups Click to update the credentials for backing up to cloud storage.
(for each availablebackup)
Menu that provides the Recover option. Choose this option to recoverto the given backup.
Recovery History Listing of recovery operations on the database deployment. Click thetriangle icon next to the title to view the listing.
Patching PageYou use the Patching page to view available patches, initiate a patching process, andview details of the last patching process for a particular database deployment.
What You See on the Oracle Database Cloud Service Patching Page
The following table describes the key information shown on the Oracle DatabaseCloud Service Patching page.
Element Description
Available Patches A list of patches you can apply to the deployment.
(for each listedpatch)
Menu icon provides the following options for the patch:
• Precheck — Check whether the patch can be successfullyapplied to the deployment.
• Patch — Apply the patch to the deployment.
Details of LastPatching Activity
Expand to see a description of the actions taken during the lastpatching operation.
Rollback Click to roll back the last patching operation. See Rolling Back a Patchor Failed Patch by Using the Oracle Database Cloud Service Console.
Snapshots Page
This topic does not apply to Oracle Cloud Infrastructure.
You use the Snapshots page to create snapshots of the OracleCompute Cloud Service storage volumes that support a databasedeployment hosting a single-instance database. You can then usethese snapshots to create database deployments quickly becausetheir storage is linked to the snapshot’s storage using “copy on write”technology provided by Oracle Compute Cloud Service.
What You See on the Oracle Database Cloud Service Snapshots Page
The following table describes the key information shown on the Oracle DatabaseCloud Service Snapshots page.
Appendix BPatching Page
B-13

Element Description
Create StorageSnapshot
Click to create a storage snapshot, which can be used to create a newdatabase deployment called a linked clone.
(for each availablesnapshot)
Menu that provides the following options:• Create Database Clone — Create a linked-clone deployment.• Delete — Delete a snapshot .
Create Service: Service PageCreate Service: Service is the first page in the wizard you use to create a newdatabase deployment, as described in Creating a Customized Database Deployment.
What You See in the Navigation Area
Element Description
Cancel Click to cancel the Create Service wizard without creating a newdatabase deployment.
Next> Click to advance to the Create Service: Service Details page.
What You See in the Page Content Area
The following table describes the key information shown on the Create Service:Service page.
Element Description
Service Name The name for the new database deployment. The name:
• Must not exceed 50 characters.• Must start with a letter.• Must contain only letters, numbers, or hyphens.• Must not contain any other special characters.• Must be unique within the identity domain.
Description (Optional) A description for the new database deployment.
Notification Email (Optional) An email address where you would like updates aboutthe deployment-creation operation to be sent.
Region (Available only if your identity domain is enabled for regions.)
The region for the database deployment. If you choose a regionthat supports Oracle Cloud Infrastructure, the AvailabilityDomain and Subnet fields are displayed, and the deployment willbe created on Oracle Cloud Infrastructure. Otherwise, thedeployment will be created on Oracle Cloud Infrastructure Classic.
Choose No Preference to let Database Cloud Service choose anOracle Cloud Infrastructure Classic region for you.
Note: If you are creating a database deployment that uses OracleData Guard on Oracle Cloud Infrastructure Classic, choose thevalue No Preference. Currently, region specification is notsupported for deployments that use Oracle Data Guard on OracleCloud Infrastructure Classic.
Appendix BCreate Service: Service Page
B-14

Element Description
Availability Domain (Available only on Oracle Cloud Infrastructure)
The availability domain (within the region) where the databasedeployment will be placed.
Subnet (Available only on Oracle Cloud Infrastructure)
The subnet (within the availability domain) that will determinenetwork access to the database deployment.
IP Network (Not available on Oracle Cloud Infrastructure)
(Available only if you have selected a region and you havedefined one or more IP networks created in that region usingOracle Cloud Infrastructure Compute Classic.)
Select the IP network where you want the database deploymentplaced. Choose No Preference to use the default shared networkprovided by Oracle Cloud Infrastructure Compute Classic.
Note: Currently, the following limitations apply to IP networks:
• Only database deployments hosting a single-instancedatabase support IP networks.
• Database deployments that use Oracle Data Guard do notsupport IP networks.
• Database deployments that use Oracle RAC do not supportIP networks.
For more information about IP networks, see these topics in UsingOracle Cloud Infrastructure Compute Classic:
• About IP Networks• Creating an IP Network
Bring Your Own License (Available only in accounts that use the Universal Creditspayment model.)
Controls how the right to use Oracle Database on the newdeployment is established.
Leave this option unselected to use your Oracle Cloud account.Your account will be charged for the new deployment according toyour Oracle Database Cloud Service agreement.
Select this option to use an existing perpetual license to OracleDatabase. Your Oracle Cloud account will be charged a lesseramount for the new deployment because the right to use OracleDatabase is covered by your perpetual license agreement.
Service Level The service level for the new deployment:
• Oracle Database Cloud Service• Oracle Database Cloud Service - Virtual Image (Not
available on Oracle Cloud Infrastructure)See Service Level.
Note: Oracle Database 12c Release 2 (12.2) is not available atthe Oracle Database Cloud Service - Virtual Image service level.
Metering Frequency The metering frequency for the new deployment:
• Hourly• MonthlySee Metering Frequency.
Appendix BCreate Service: Service Page
B-15
Element Description
Software Release The release version of Oracle Database for the new deployment:
• Oracle Database 11g Release 2• Oracle Database 12c Release 1• Oracle Database 12c Release 2See Oracle Database Software Release.
Note: Oracle Database 12c Release 2 (12.2) is not available atthe Oracle Database Cloud Service - Virtual Image service level.
Software Edition The Oracle Database software package for the new deployment:
• Standard Edition• Enterprise Edition• Enterprise Edition - High Performance• Enterprise Edition - Extreme PerformanceSee Oracle Database Software Edition.
Appendix BCreate Service: Service Page
B-16

Element Description
Database Type The type of deployment to create:
• Single Instance—A single Oracle Database instance anddatabase data store hosted on one compute node. For moreinformation about this type, see Characteristics of a SingleInstance Database Deployment.
• Database Clustering with RAC—A two-node clustereddatabase using Oracle Real Application Clusters technology;two compute nodes each host an Oracle Database instance,and the two instances access the same shared databasedata store. For more information about this type, see Characteristics of a Database Clustering with RAC DatabaseDeployment.
(Not available on Oracle Cloud Infrastructure)• Single Instance with Data Guard Standby—Two single-
instance databases, one acting as the primary database andone acting as the standby database in an Oracle Data Guardconfiguration. For more information about this type, see Characteristics of a Single Instance with Data Guard StandbyDatabase Deployment.
• Database Clustering with RAC and Data Guard Standby—Two two-node Oracle RAC databases, one acting as theprimary database and one acting as the standby database inan Oracle Data Guard configuration. For more informationabout this type, see Characteristics of a Database Clusteringwith RAC and Data Guard Standby Database Deployment.
(Not available on Oracle Cloud Infrastructure)• Data Guard Standby for Hybrid DR — Single-instance
database acting as the standby database in an Oracle DataGuard configuration. The primary database is on your ownsystem.
(Not available on Oracle Cloud at Customer)
(Not available on Oracle Cloud Infrastructure)Not all types are available with all combinations of service leveland software edition:
• Single Instance is the only type supported by the OracleDatabase Cloud Service - Virtual Image service level.
• Single Instance is the only type supported by the StandardEdition software edition.
• The two types that use Oracle RAC are available only withEnterprise Edition - Extreme Performance software edition.
Create Service: Service Details PageCreate Service: Service Details is a page in the Create Service wizard you use tocreate a new database deployment. For more information, see Creating a CustomizedDatabase Deployment.
The following tables describe the key information shown on the Create Service:Service Details page:
• What You See in the Navigation Area
• What You See in the Database Configuration Section
Appendix BCreate Service: Service Details Page
B-17

• What You See in the Backup and Recovery Configuration Section
• What You See in the Initialize Data From Backup Section
• What You See in the Standby Database Section
What You See in the Navigation Area
Element Description
<Previous Click to return to the Create Service: Service page.
Cancel Click to cancel the Create Service wizard without creating a newdatabase deployment.
Next> Click to advance to the Create Service: Confirmation page.
What You See in the Database Configuration Section
Element Description
DB Name (SID) The name for the database instance. The name:
• Must not exceed 8 characters.• Must start with a letter.• Must contain only letters, numbers, or these symbols: _
(underscore), # (hash sign), or $ (dollar sign).
PDB Name (Available only for Oracle Database 12c.)
The name for the default pluggable database (PDB). The name:
• Must not exceed 8 characters.• Must start with a letter.• Must contain only letters, numbers, or these symbols: _
(underscore), # (hash sign), or $ (dollar sign).This option is not available if Create Instance from ExistingBackup is set to Yes.
Administration PasswordConfirm Password
The password for the following administrative users:
• Oracle Database administrative users• Oracle Application Express admin userThe password:
• Must be 8 to 30 characters in length.• Must contain at least one lowercase letter• Must contain at least one uppercase letter• Must contain at least one number• Must contain at least one of these symbols: _ (underscore), #
(hash sign), or $ (dollar sign).• Must not contain the word “oracle”.
Usable Database Storage(GB)
The amount of storage in GB for actual database data.
Note that up to 8% of this storage will be used for file systemconstructs and other overhead.
Total Data File Storage(GB)
The computed amount of storage in GB that will be allocated tothe deployment, including space for operating system and productbinaries, supporting files, database data and configuration files,and so on.
Appendix BCreate Service: Service Details Page
B-18

Element Description
Compute Shape The number of Oracle Compute Units (OCPUs) and amount ofmemory (RAM) for each compute node of the new databasedeployment. Database Cloud Service offers several OCPU/RAMcombinations, as described in Computing Power.
SSH Public KeyEdit
The SSH public key to be used for authentication when using anSSH client to connect to a compute node that is associated withyour database deployment.
Click Edit to specify the public key. You can upload a filecontaining the public key value, paste in the value of a public key,or create a system-generated key pair.
If you paste in the value, make sure the value does not containline breaks or end with a line break.
Use High PerformanceStorage
(Available only if you have a metered subscription and you chosean Oracle Cloud Infrastructure Classic region on the wizard’sService page.)
Controls the device type to be used for database block storage.By default, block storage is allocated on spinning devices. If youselect this option, then block storage will be allocated on solidstate devices, at an increased cost. For pricing details, refer to theBlock Storage information at https://cloud.oracle.com/compute/compute/pricing.
Advanced Settings:Listener Port
The port number for the Oracle Net Listener.
The port number must be between 1521 and 5499 (inclusive).
Advanced Settings:Timezone
The time zone for the new database deployment. The default isCoordinated Universal Time (UTC).
Advanced Settings:Character Set
The database character set for the database. The databasecharacter set is used for:
• Data stored in SQL CHAR data types (CHAR, VARCHAR2, CLOB,and LONG)
• Identifiers such as table names, column names, and PL/SQLvariables
• Entering and storing SQL and PL/SQL source codeThis option is not available if Create Instance from ExistingBackup is set to Yes.
Advanced Settings:National Character Set
The national character set for the database. The nationalcharacter set is used for data stored in SQL NCHAR data types(NCHAR, NCLOB, and NVARCHAR2).
This option is not available if Create Instance from ExistingBackup is set to Yes.
Advanced Settings:Enable Oracle GoldenGate
(Not available on Oracle Cloud at Customer)
Configures the database for use as the replication database of anOracle GoldenGate Cloud Service instance. See Using OracleGoldenGate Cloud Service with Database Cloud Service.
Advanced Settings:Include "Demos" PDB
(Available only for Oracle Database 12c Release 1.)
Controls whether the "Demos" PDB is to be included in thedatabase. This PDB contains demos for many new features ofOracle Database 12c such as in-memory and multitenant. UsableData File Storage must to be at least 25 GB to include this PDB.
Appendix BCreate Service: Service Details Page
B-19

Element Description
Advanced Settings: IPReservations
(Not available on Oracle Cloud Infrastructure)
(Available only if you chose an Oracle Cloud Infrastructure Classicregion on the wizard’s Service page.)
Specifies whether to use an IP reservation for this deployment. Ifyou choose Assign Automatically, an IP reservation is not usedand Database Cloud Service acquires a new IP address for useby the deployment. Otherwise, Database Cloud Service uses theIP reservation you choose.
What You See in the Backup and Recovery Configuration Section
Element Description
Backup Destination Controls how backups for the deployment are to be configured:
• Both Cloud Storage and Local Storage—backups areconfigured to be created automatically and stored both onlocal storage and on cloud storage.
If this choice is selected, the Cloud Storage Container, UserName and Password fields are displayed.
• Cloud Storage Only — backups are configured to becreated automatically and stored on cloud storage.
If this choice is selected, the Cloud Storage Container, UserName and Password fields are displayed.
Note: This choice is not currently available for databasedeployments that use Oracle Real Application Clusters(Oracle RAC).
• None—Backups are not configured for the deployment.For more information about backups and backup configurations,see About Backing Up Database Deployments on DatabaseCloud Service.
Appendix BCreate Service: Service Details Page
B-20
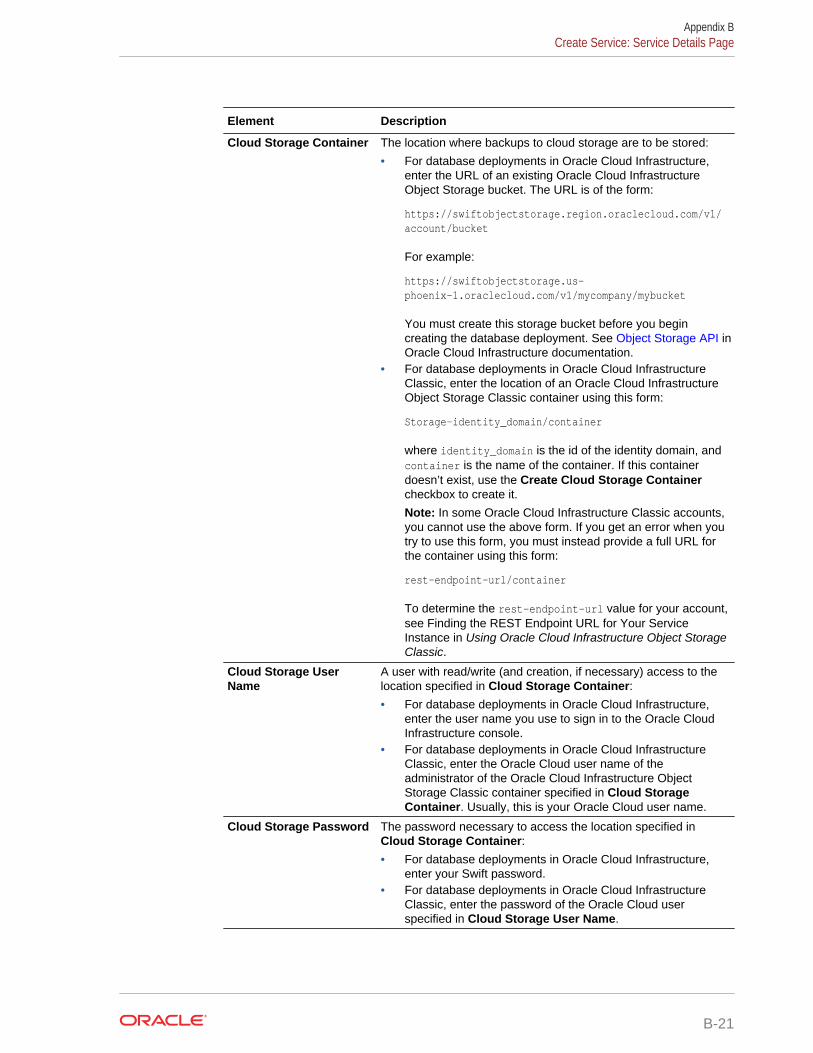
Element Description
Cloud Storage Container The location where backups to cloud storage are to be stored:
• For database deployments in Oracle Cloud Infrastructure,enter the URL of an existing Oracle Cloud InfrastructureObject Storage bucket. The URL is of the form:
https://swiftobjectstorage.region.oraclecloud.com/v1/account/bucket
For example:
https://swiftobjectstorage.us-phoenix-1.oraclecloud.com/v1/mycompany/mybucket
You must create this storage bucket before you begincreating the database deployment. See Object Storage API inOracle Cloud Infrastructure documentation.
• For database deployments in Oracle Cloud InfrastructureClassic, enter the location of an Oracle Cloud InfrastructureObject Storage Classic container using this form:
Storage-identity_domain/container
where identity_domain is the id of the identity domain, andcontainer is the name of the container. If this containerdoesn’t exist, use the Create Cloud Storage Containercheckbox to create it.
Note: In some Oracle Cloud Infrastructure Classic accounts,you cannot use the above form. If you get an error when youtry to use this form, you must instead provide a full URL forthe container using this form:
rest-endpoint-url/container
To determine the rest-endpoint-url value for your account,see Finding the REST Endpoint URL for Your ServiceInstance in Using Oracle Cloud Infrastructure Object StorageClassic.
Cloud Storage UserName
A user with read/write (and creation, if necessary) access to thelocation specified in Cloud Storage Container:• For database deployments in Oracle Cloud Infrastructure,
enter the user name you use to sign in to the Oracle CloudInfrastructure console.
• For database deployments in Oracle Cloud InfrastructureClassic, enter the Oracle Cloud user name of theadministrator of the Oracle Cloud Infrastructure ObjectStorage Classic container specified in Cloud StorageContainer. Usually, this is your Oracle Cloud user name.
Cloud Storage Password The password necessary to access the location specified inCloud Storage Container:• For database deployments in Oracle Cloud Infrastructure,
enter your Swift password.• For database deployments in Oracle Cloud Infrastructure
Classic, enter the password of the Oracle Cloud userspecified in Cloud Storage User Name.
Appendix BCreate Service: Service Details Page
B-21

Element Description
Create Cloud StorageContainer
(Not available on Oracle Cloud Infrastructure)
Create a new Oracle Cloud Infrastructure Object Storage Classiccontainer as part of the database deployment creation. Specifythe container name and the Cloud Storage user name andpassword in the preceding fields.
Total Estimated MonthlyStorage
Storage for data files and backups.
What You See in the Initialize Data From Backup Section
Element Description
Create Instance fromExisting Backup
Create a database deployment whose database is derived from acloud backup created using Oracle Database Backup CloudService.
The other fields and options in the Initialize Data From Backupsection only display if Create Instance from Existing Backup is setto Yes.
On-Premises Backup Indicates the origin of the source database backup.
Select this option if the source database backup is not fromanother Database Cloud Service database deployment in thesame identify domain. In this case, the following fields and optionsare displayed except for Source Service Name.
Deselect this option if the source database backup is from anotherDatabase Cloud Service database deployment in the sameidentify domain. In this case, only the Source Service Name fieldis displayed.
Database ID The database identifier of the database from which the existingbackup was created. You can get this value by using the followingSQL query:
SQL> SELECT dbid FROM v$database;
Decryption MethodEdit
Specifies the information necessary to decrypt the sourcedatabase backup. Click Edit to specify the necessary information.
In the resulting dialog:
• For a backup that uses Transparent Database Encryption(TDE), select Upload Wallet File then click Browse andspecify a zip file containing the source database’s TDE walletdirectory, and the contents of that directory.
Note:
If the source database is from another DatabaseCloud Service database deployment, its TDE walletdirectory is /u01/app/oracle/admin/dbname/tde_wallet.
• For a backup that uses password encryption, select PasteRMAN Key Value and paste the password (key value) usedto encrypt the backup.
Appendix BCreate Service: Service Details Page
B-22

Element Description
Cloud Storage Container The URL where the existing backup is stored:
• The URL of an Oracle Cloud Infrastructure Object Storagebucket. The URL is of the form:
https://swiftobjectstorage.region.oraclecloud.com/v1/account/bucket
For example:
https://swiftobjectstorage.us-phoenix-1.oraclecloud.com/v1/mycompany/mybucket
• The URL of an Oracle Cloud Infrastructure Object StorageClassic container. The URL is of the general form:
rest-endpoint-url/container
To determine the rest-endpoint-url value for your account,see Finding the REST Endpoint URL for Your ServiceInstance in Using Oracle Cloud Infrastructure Object StorageClassic. If this container doesn’t exist, use the Create CloudStorage Container checkbox to create it.
Username The Oracle Cloud user name of the administrator of the OracleCloud Infrastructure Object Storage Classic container specified inCloud Storage Container.
Password The password of the user specified in Username.
Source Service Name From the list of possible alternatives, specify the databasedeployment that is associated with the source database backupthat you want to use.
What You See in the Standby Database Section
Element Description
Standby DatabaseConfiguration
Controls where the standby database is placed in relation to theprimary database:
• High Availability—The standby database is placed in adifferent availability domain from the primary database, thusproviding isolation at the infrastructure level.
• Disaster Recovery—The standby database is placed in adifferent data center from the primary database, thusproviding isolation at the infrastructure level and geographicalseparation to support availability despite catastrophic events.
See Using Oracle Data Guard in Database Cloud Service formore information.
If you choose this option, the Enable Oracle GoldenGate option isdisabled.
Create Service: Confirmation PageCreate Service: Confirmation is the final page in the Create Service wizard you use tocreate a new database deployment. For more information, see Creating a CustomizedDatabase Deployment.
Appendix BCreate Service: Confirmation Page
B-23

What You See on the Create Service: Confirmation Page
The Create Service: Confirmation page presents a summary list of all the choices youmade on the preceding pages of the Create Service wizard. In addition, it provides thecontrols described in the following table.
Element Description
<Previous Click to return to the Create Service: Details page.
Cancel Click to cancel the Create Service wizard without creating a newdeployment.
Create> Click to begin the process of creating a Database Cloud Servicedeployment.
The Create Service wizard closes and the Oracle Database CloudService console is displayed, showing the new deployment with astatus of In progress.
Appendix BCreate Service: Confirmation Page
B-24

CThe oracle-dbcs-cli Utility
You can use the oracle-dbcs-cli utility on your Linux computer to connect to OracleCloud and perform a variety of life-cycle and administration operations on OracleDatabase Cloud Service deployments.
Note:
The oracle-dbcs-cli utility does not currently support database deploymentsthat use Oracle Real Application Clusters.
Topics
• Downloading and Installing the oracle-dbcs-cli Utility
• Running the oracle-dbcs-cli Utility
• The Configuration File for oracle-dbcs-cli Subcommands
• The Data File for the oracle-dbcs-cli create Subcommand
Downloading and Installing the oracle-dbcs-cli UtilityBefore you can use the oracle-dbcs-cli utility, you must download it to your Linuxcomputer and install it.
1. On your Linux computer, create a directory to contain the installed oracle-dbcs-cliutility.
2. Download the installation zip file to the directory you created.
The installation zip file is available at the Oracle Technology Network on the PublicDatabase Cloud Downloads page.
3. In a terminal window, navigate to the directory you created and where youdownloaded the installation zip file.
4. Expand the installation zip file:
$ tar -vxzf ./oracle-dbcs-cli.tar.gz
C-1

Note:
For the oracle-dbcs-cli utility to operate correctly, make sure:
• You are using Java 1.7 on your computer. Enter java -version in a terminalwindow to discover what version you are using.
• You run the oracle-dbcs-cli utility from the installation directory, or set yourPATH environment variable to include the dborch.jar file in the installationdirectory.
Running the oracle-dbcs-cli UtilityThe oracle-dbcs-cli utility provides a number of subcommands to perform various life-cycle and administration operations on Oracle Database Cloud Service databasedeployments.
To run the oracle-dbcs-cli utility, first navigate to the directory where you installed theutility. Then, run a command of the form:
./oracle-dbcs-cli -help | -ver | subcommand subcommmand-options
Use the -help option to display help information for the oracle-dbcs-cli utility.
Use the -ver option to display version information for the oracle-dbcs-cli utility.
Use subcommand subcommmand-options to perform one of the life-cycle or administrationoperations that for the oracle-dbcs-cli utility supports:
• create: create a new deployment.
• delete: delete a deployment.
• list: list deployments in an identity domain or list detailed information for onedeployment.
• patch apply: apply a patch to a deployment .
• patch check: check whether a deployment meets the prerequisites of a patch.
• patch rollback: roll back a patch on a deployment.
• patch status: display the status of a patch’s application to a deployment.
• patch list: list the patches available for a deployment.
• scaleup: scale up the Compute shape of a deployment’s compute node.
The create Subcommand
The create subcommand creates a new Database Cloud Service deployment.
oracle-dbcs-cli create -dat data-file
Options of this subcommand are as follows.
Appendix CRunning the oracle-dbcs-cli Utility
C-2

Option Description
-dat data-file The name of the data file containing information to connect toOracle Cloud and information describing how to configure the newdeployment. For information about the content of the data file, see The Data File for the oracle-dbcs-cli create Subcommand.
The delete Subcommand
The delete subcommand deletes an existing Database Cloud Service deployment.
oracle-dbcs-cli delete -cfg config-file -vmname node-name
Options of this subcommand are as follows.
Option Description
-cfg config-file The name of the configuration file containing information toconnect to Oracle Cloud. For information about the content of theconfiguration file, see The Configuration File for oracle-dbcs-cliSubcommands.
-vmname node-name The name of the deployment’s compute node virtual machine todelete.
The list Subcommand
The list subcommand displays a list of deployments in an identity domain or displaysdetailed information for one deployment, depending on whether you specify the -vmname option.
oracle-dbcs-cli list -cfg config-file [-vmname node-name]
Options of this subcommand are as follows.
Option Description
-cfg config-file The name of the configuration file containing information toconnect to Oracle Cloud. For information about the content of theconfiguration file, see The Configuration File for oracle-dbcs-cliSubcommands.
-vmname node-name The name of the deployment’s compute node virtual machineabout which to display detailed information. When omitted, a list ofdeployments in the identity domain is displayed.
The patch apply Subcommand
The patch apply subcommand applies a patch to the virtual machine of a DatabaseCloud Service deployment.
oracle-dbcs-cli patch apply -key ssh-private-key-file -host node-ip-address -id patch-id [-secret ssh-passphrase] [-force]
Options of this subcommand are as follows.
Appendix CRunning the oracle-dbcs-cli Utility
C-3
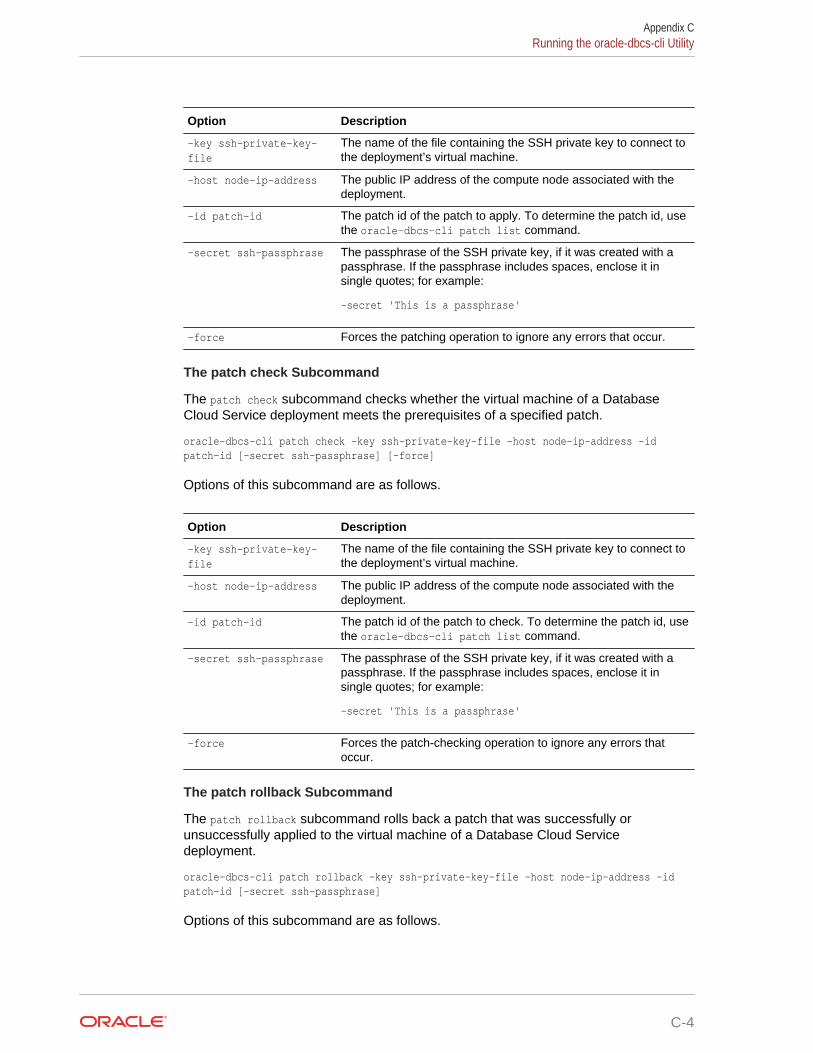
Option Description
-key ssh-private-key-file
The name of the file containing the SSH private key to connect tothe deployment’s virtual machine.
-host node-ip-address The public IP address of the compute node associated with thedeployment.
-id patch-id The patch id of the patch to apply. To determine the patch id, usethe oracle-dbcs-cli patch list command.
-secret ssh-passphrase The passphrase of the SSH private key, if it was created with apassphrase. If the passphrase includes spaces, enclose it insingle quotes; for example:
-secret 'This is a passphrase'
-force Forces the patching operation to ignore any errors that occur.
The patch check Subcommand
The patch check subcommand checks whether the virtual machine of a DatabaseCloud Service deployment meets the prerequisites of a specified patch.
oracle-dbcs-cli patch check -key ssh-private-key-file -host node-ip-address -id patch-id [-secret ssh-passphrase] [-force]
Options of this subcommand are as follows.
Option Description
-key ssh-private-key-file
The name of the file containing the SSH private key to connect tothe deployment’s virtual machine.
-host node-ip-address The public IP address of the compute node associated with thedeployment.
-id patch-id The patch id of the patch to check. To determine the patch id, usethe oracle-dbcs-cli patch list command.
-secret ssh-passphrase The passphrase of the SSH private key, if it was created with apassphrase. If the passphrase includes spaces, enclose it insingle quotes; for example:
-secret 'This is a passphrase'
-force Forces the patch-checking operation to ignore any errors thatoccur.
The patch rollback Subcommand
The patch rollback subcommand rolls back a patch that was successfully orunsuccessfully applied to the virtual machine of a Database Cloud Servicedeployment.
oracle-dbcs-cli patch rollback -key ssh-private-key-file -host node-ip-address -id patch-id [-secret ssh-passphrase]
Options of this subcommand are as follows.
Appendix CRunning the oracle-dbcs-cli Utility
C-4

Option Description
-key ssh-private-key-file
The name of the file containing the SSH private key to connect tothe deployment’s virtual machine.
-host node-ip-address The public IP address of the compute node associated with thedeployment.
-id patch-id The patch id of the patch to roll back. To determine the patch id,use the oracle-dbcs-cli patch list command.
-secret ssh-passphrase The passphrase of the SSH private key, if it was created with apassphrase. If the passphrase includes spaces, enclose it insingle quotes; for example:
-secret 'This is a passphrase'
The patch status Subcommand
The patch status subcommand display the status of a patching operation on the virtualmachine of a Database Cloud Service deployment.
oracle-dbcs-cli patch status -key ssh-private-key-file -host node-ip-address -id transaction-id [-secret ssh-passphrase]
Options of this subcommand are as follows.
Option Description
-key ssh-private-key-file
The name of the file containing the SSH private key to connect tothe deployment’s virtual machine.
-host node-ip-address The public IP address of the compute node associated with thedeployment.
-id transaction-id The transaction id of the patching operation. To determine thetransaction id, use the oracle-dbcs-cli patch list command.
-secret ssh-passphrase The passphrase of the SSH private key, if it was created with apassphrase. If the passphrase includes spaces, enclose it insingle quotes; for example:
-secret 'This is a passphrase'
The patch list Subcommand
The patch list subcommand displays a list of the patches available for the virtualmachine of a Database Cloud Service deployment.
oracle-dbcs-cli patch list -key ssh-private-key-file -host node-ip-address [-secret ssh-passphrase]
Options of this subcommand are as follows.
Option Description
-key ssh-private-key-file
The name of the file containing the SSH private key to connect tothe deployment’s virtual machine.
Appendix CRunning the oracle-dbcs-cli Utility
C-5

Option Description
-host node-ip-address The public IP address of the compute node associated with thedeployment.
-secret ssh-passphrase The passphrase of the SSH private key, if it was created with apassphrase. If the passphrase includes spaces, enclose it insingle quotes; for example:
-secret 'This is a passphrase'
The scaleup Subcommand
The scaleup subcommand scales up the Compute shape of the compute nodeassociated with a Database Cloud Service deployment.
oracle-dbcs-cli scaleup -cfg config-file -vmname node-name -shape shape-name
Options of this subcommand are as follows.
Option Description
-cfg config-file The name of the configuration file containing information toconnect to Oracle Cloud. For information about the content of theconfiguration file, see The Configuration File for oracle-dbcs-cliSubcommands.
-vmname node-name The name of the deployment’s compute node virtual machine.
-shape shape-name The shape to scale the virtual machine up to. Specify one of thesevalues for shape-name:
• oc3 — 1 OCPU with 7.5 GB RAM• oc4 — 2 OCPUs with 15 GB RAM• oc5 — 4 OCPUs with 30 GB RAM• oc6 — 8 OCPUs with 60 GB RAM• oc7 — 16 OCPUs with 120 GB RAM• oc1m — 1 OCPU with 15 GB RAM• oc2m — 2 OCPUs with 30 GB RAM• oc3m — 4 OCPUs with 60 GB RAM• oc4m — 8 OCPUs with 120 GB RAM• oc5m — 16 OCPUs with 240 GB RAM
The Configuration File for oracle-dbcs-cli SubcommandsMany of the subcommands that the oracle-dbcs-cli utility supports require aconfiguration file that specifies information to connect to the correct Oracle DatabaseCloud Service identity domain.
Contents of the Configuration File
The configuration file you specify in many oracle-dbcs-cli subcommands is a text filecontaining lines of the format:
name=value
Appendix CThe Configuration File for oracle-dbcs-cli Subcommands
C-6

where name is the predefined name for a piece of data and value is the value of thatpiece of data in your context. The following table shows the names and valuesrequired in the configuration file.
Name Description
sm_url The url to the Database Cloud Service REST interface:
https://dbaas.oraclecloud.com/paas/service/dbcs/api/v1.1/instances
identity_domain Name of the identity domain to connect to.
user_name User name of an Oracle Cloud user authorized as anadministrator in the given identity domain.
password Password of the given Oracle Cloud user.
Example of a Configuration File
Here is an example of a configuration file for use with oracle-dbcs-cli subcommands.
sm_url=https://dbaas.oraclecloud.com/paas/service/dbcs/api/v1.1/instancesidentity_domain=usoracle99999user_name=dbcsadminpassword=Pa55_WoRd
The Data File for the oracle-dbcs-cli create SubcommandThe create subcommand of the oracle-dbcs-cli utility requires a data file that specifiesinformation to connect to the correct Oracle Database Cloud Service identity domainand information about how to configure the new database deployment.
Template Data File
Included in the download for the oracle-dbcs-cli utility is a template data file you canuse as a starting point for creating a data file of your own. This template data file isnamed dboplan.dat.external.tmpl and is located in the same directory as the oracle-dbcs-cli utility.
Contents of the Data File
The data file you specify in the oracle-dbcs-cli create subcommand is a text filecontaining lines of the format:
name=value
where name is the predefined name for a piece of data and value is the value of thatpiece of data in your context. The following table shows the names and valuesrequired in the configuration file.
Appendix CThe Data File for the oracle-dbcs-cli create Subcommand
C-7

Name Description
sm_url The url to the Database Cloud Service REST interface. Enter thisvalue:
https://dbaas.oraclecloud.com/paas/service/dbcs/api/v1.1/instances
Value in template data file: Blank
user_name User name of an Oracle Cloud user authorized as anadministrator in the given identity domain.
Value in template data file: Blank
password Password of the given Oracle Cloud user.
Value in template data file: Blank
identity_domain Name of the identity domain to connect to.
Value in template data file: Blank
subscriptionType The billing period for the deployment. Enter monthly or hourly.
Value in template data file: Blank
vm_name The name for the deployment. The service name:• Must not exceed 50 characters.• Must start with a letter.• Must contain only letters, numbers, or hyphens.• Must not contain any other special characters.• Must be unique within the identity domain.
Value in template data file: Blank
vm_shape The Oracle Compute Cloud Service shape of the compute nodevirtual machine. Enter one of the following:
• oc3 — 1 OCPU with 7.5 GB RAM• oc4 — 2 OCPUs with 15 GB RAM• oc5 — 4 OCPUs with 30 GB RAM• oc6 — 8 OCPUs with 60 GB RAM• oc7 — 16 OCPUs with 120 GB RAM• oc1m — 1 OCPU with 15 GB RAM• oc2m — 2 OCPUs with 30 GB RAM• oc3m — 4 OCPUs with 60 GB RAM• oc4m — 8 OCPUs with 120 GB RAM• oc5m — 16 OCPUs with 240 GB RAMValue in template data file: ot1 (an invalid value)
vm_seclist The name of the Oracle Compute Cloud Service security list to becreated for the new deployment. Leave this value blank to use adefault name.
Value in template data file: Blank
Appendix CThe Data File for the oracle-dbcs-cli create Subcommand
C-8
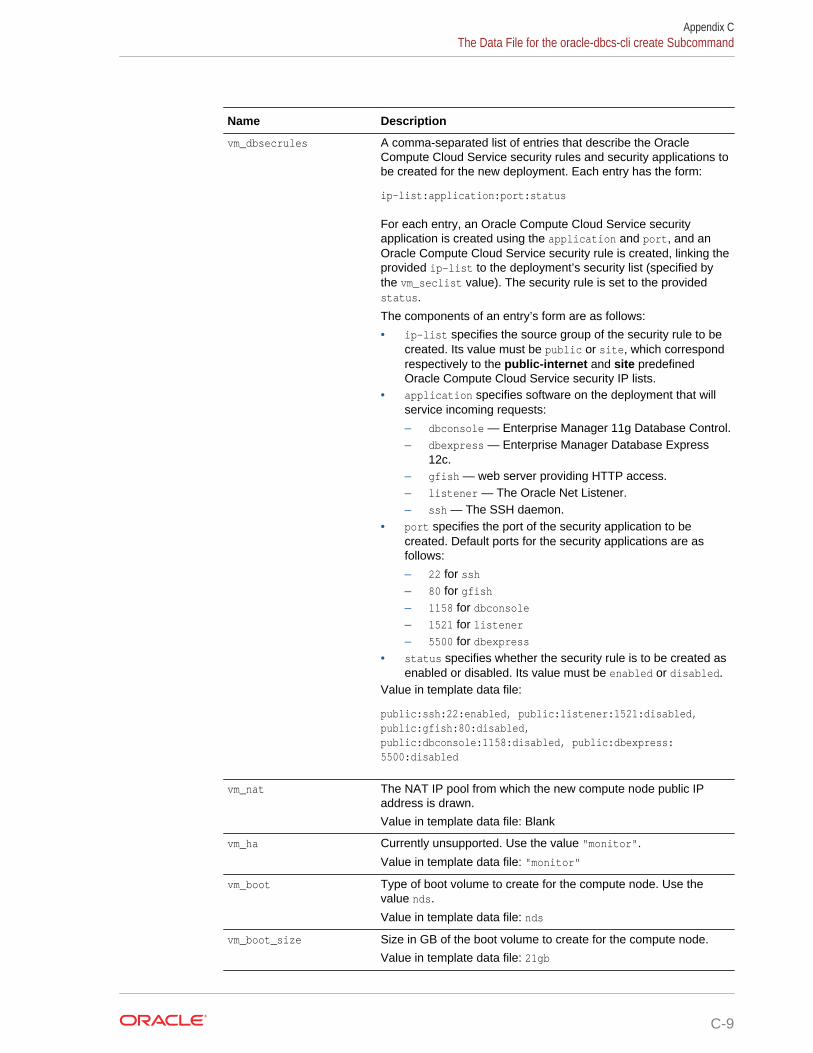
Name Description
vm_dbsecrules A comma-separated list of entries that describe the OracleCompute Cloud Service security rules and security applications tobe created for the new deployment. Each entry has the form:
ip-list:application:port:status
For each entry, an Oracle Compute Cloud Service securityapplication is created using the application and port, and anOracle Compute Cloud Service security rule is created, linking theprovided ip-list to the deployment’s security list (specified bythe vm_seclist value). The security rule is set to the providedstatus.
The components of an entry’s form are as follows:
• ip-list specifies the source group of the security rule to becreated. Its value must be public or site, which correspondrespectively to the public-internet and site predefinedOracle Compute Cloud Service security IP lists.
• application specifies software on the deployment that willservice incoming requests:
– dbconsole — Enterprise Manager 11g Database Control.– dbexpress — Enterprise Manager Database Express
12c.– gfish — web server providing HTTP access.– listener — The Oracle Net Listener.– ssh — The SSH daemon.
• port specifies the port of the security application to becreated. Default ports for the security applications are asfollows:
– 22 for ssh– 80 for gfish– 1158 for dbconsole– 1521 for listener– 5500 for dbexpress
• status specifies whether the security rule is to be created asenabled or disabled. Its value must be enabled or disabled.
Value in template data file:
public:ssh:22:enabled, public:listener:1521:disabled, public:gfish:80:disabled,public:dbconsole:1158:disabled, public:dbexpress:5500:disabled
vm_nat The NAT IP pool from which the new compute node public IPaddress is drawn.
Value in template data file: Blank
vm_ha Currently unsupported. Use the value "monitor".
Value in template data file: "monitor"
vm_boot Type of boot volume to create for the compute node. Use thevalue nds.
Value in template data file: nds
vm_boot_size Size in GB of the boot volume to create for the compute node.
Value in template data file: 21gb
Appendix CThe Data File for the oracle-dbcs-cli create Subcommand
C-9

Name Description
vm_sshkeys A string containing the text of an SSH public key. This key isadded to Oracle Compute Cloud Service and associated with thedeployment as part of the creation operation.
Value in template data file: Blank
db_version Version of Oracle Database to install on the compute node. Enter12102 or 11204.
Value in template data file: 12102
db_edition Edition of Oracle Database to install on the compute node. Enterenterprise or standard. If you specify standard, a StandardEdition 2 database is created if you specify 12102 for db_versionand a Standard Edition database is created if you specify 11204for db_version.
Value in template data file: enterprise
db_bundle Level of Oracle Database Enterprise Edition to install on thecompute node; valid on if you entered enterprise for db_edition.Enter "basic" or "high-perf".
Value in template data file: "high-perf"
db_lvm Controls whether the database storage uses Linux LVM (logicalvolume manager). Enter yes or no.
Value in template data file: no
db_nat_ip The fully qualified name of an existing Oracle Compute CloudService IP reservation to use as the public IP address for theservice. Leave this value blank to have Database Cloud Servicecreate an IP reservation as part of the creation process.
The name you provide must have this form:
/Compute-domain/user/reservation
where domain name the identity domain, user is the name of theuser who created the IP reservation, and user is the name of theIP reservation; for example: /Compute-usoracle99999/dbaasadmin/custom-ip
Value in template data file: Blank
Appendix CThe Data File for the oracle-dbcs-cli create Subcommand
C-10
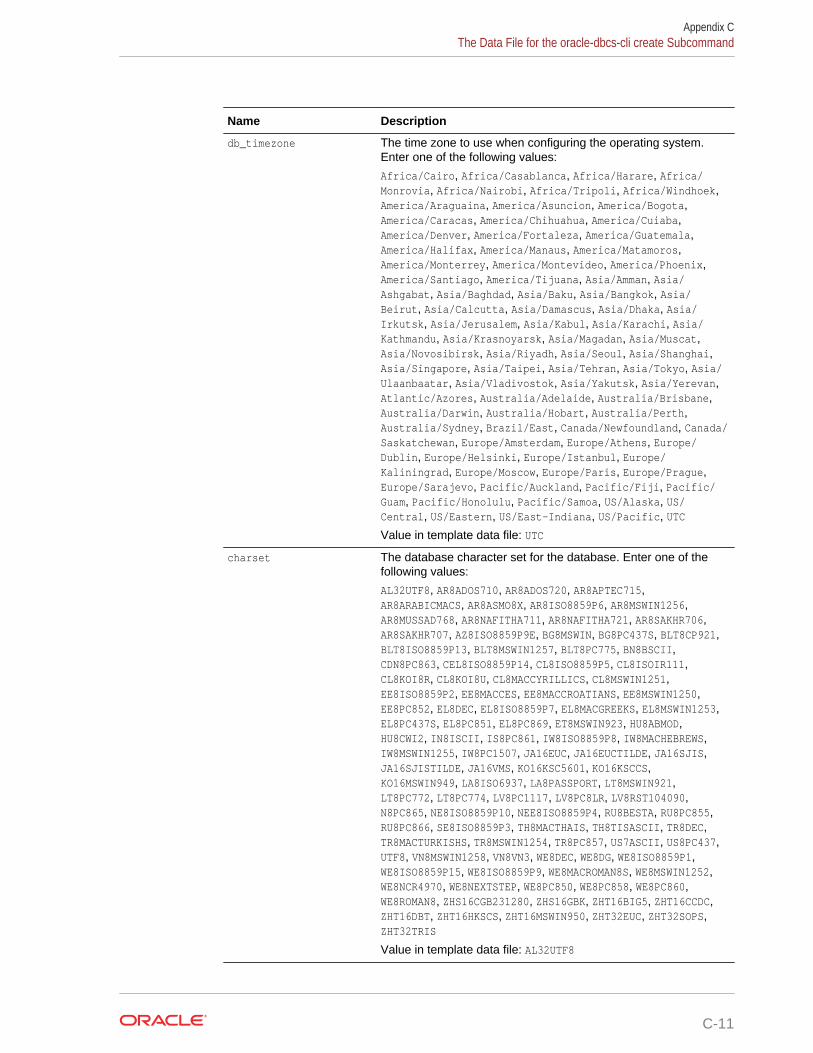
Name Description
db_timezone The time zone to use when configuring the operating system.Enter one of the following values:
Africa/Cairo, Africa/Casablanca, Africa/Harare, Africa/Monrovia, Africa/Nairobi, Africa/Tripoli, Africa/Windhoek,America/Araguaina, America/Asuncion, America/Bogota,America/Caracas, America/Chihuahua, America/Cuiaba,America/Denver, America/Fortaleza, America/Guatemala,America/Halifax, America/Manaus, America/Matamoros,America/Monterrey, America/Montevideo, America/Phoenix,America/Santiago, America/Tijuana, Asia/Amman, Asia/Ashgabat, Asia/Baghdad, Asia/Baku, Asia/Bangkok, Asia/Beirut, Asia/Calcutta, Asia/Damascus, Asia/Dhaka, Asia/Irkutsk, Asia/Jerusalem, Asia/Kabul, Asia/Karachi, Asia/Kathmandu, Asia/Krasnoyarsk, Asia/Magadan, Asia/Muscat,Asia/Novosibirsk, Asia/Riyadh, Asia/Seoul, Asia/Shanghai,Asia/Singapore, Asia/Taipei, Asia/Tehran, Asia/Tokyo, Asia/Ulaanbaatar, Asia/Vladivostok, Asia/Yakutsk, Asia/Yerevan,Atlantic/Azores, Australia/Adelaide, Australia/Brisbane,Australia/Darwin, Australia/Hobart, Australia/Perth,Australia/Sydney, Brazil/East, Canada/Newfoundland, Canada/Saskatchewan, Europe/Amsterdam, Europe/Athens, Europe/Dublin, Europe/Helsinki, Europe/Istanbul, Europe/Kaliningrad, Europe/Moscow, Europe/Paris, Europe/Prague,Europe/Sarajevo, Pacific/Auckland, Pacific/Fiji, Pacific/Guam, Pacific/Honolulu, Pacific/Samoa, US/Alaska, US/Central, US/Eastern, US/East-Indiana, US/Pacific, UTC
Value in template data file: UTC
charset The database character set for the database. Enter one of thefollowing values:
AL32UTF8, AR8ADOS710, AR8ADOS720, AR8APTEC715,AR8ARABICMACS, AR8ASMO8X, AR8ISO8859P6, AR8MSWIN1256,AR8MUSSAD768, AR8NAFITHA711, AR8NAFITHA721, AR8SAKHR706,AR8SAKHR707, AZ8ISO8859P9E, BG8MSWIN, BG8PC437S, BLT8CP921,BLT8ISO8859P13, BLT8MSWIN1257, BLT8PC775, BN8BSCII,CDN8PC863, CEL8ISO8859P14, CL8ISO8859P5, CL8ISOIR111,CL8KOI8R, CL8KOI8U, CL8MACCYRILLICS, CL8MSWIN1251,EE8ISO8859P2, EE8MACCES, EE8MACCROATIANS, EE8MSWIN1250,EE8PC852, EL8DEC, EL8ISO8859P7, EL8MACGREEKS, EL8MSWIN1253,EL8PC437S, EL8PC851, EL8PC869, ET8MSWIN923, HU8ABMOD,HU8CWI2, IN8ISCII, IS8PC861, IW8ISO8859P8, IW8MACHEBREWS,IW8MSWIN1255, IW8PC1507, JA16EUC, JA16EUCTILDE, JA16SJIS,JA16SJISTILDE, JA16VMS, KO16KSC5601, KO16KSCCS,KO16MSWIN949, LA8ISO6937, LA8PASSPORT, LT8MSWIN921,LT8PC772, LT8PC774, LV8PC1117, LV8PC8LR, LV8RST104090,N8PC865, NE8ISO8859P10, NEE8ISO8859P4, RU8BESTA, RU8PC855,RU8PC866, SE8ISO8859P3, TH8MACTHAIS, TH8TISASCII, TR8DEC,TR8MACTURKISHS, TR8MSWIN1254, TR8PC857, US7ASCII, US8PC437,UTF8, VN8MSWIN1258, VN8VN3, WE8DEC, WE8DG, WE8ISO8859P1,WE8ISO8859P15, WE8ISO8859P9, WE8MACROMAN8S, WE8MSWIN1252,WE8NCR4970, WE8NEXTSTEP, WE8PC850, WE8PC858, WE8PC860,WE8ROMAN8, ZHS16CGB231280, ZHS16GBK, ZHT16BIG5, ZHT16CCDC,ZHT16DBT, ZHT16HKSCS, ZHT16MSWIN950, ZHT32EUC, ZHT32SOPS,ZHT32TRIS
Value in template data file: AL32UTF8
Appendix CThe Data File for the oracle-dbcs-cli create Subcommand
C-11

Name Description
ncharset The national character set for the database. Enter one of thefollowing values:
AL16UTF16, UTF8
Value in template data file: AL16UTF16
db_vols A space-separated, parenthesized list of the sizes of the fourOracle Compute Cloud Service storage volumes in addition to theboot volume to be created for the compute node. Each of the fourentries in the list has the form:
name:size
where:
• name is the name of one of the four volumes: bits, data, fraor redo.
• size is the size in GB for the named volume; for example,25gb.
Value in template data file:
(bits:30gb data:10gb fra:10gb redo:10gb)
db_redo_log_size The size in MB for each of the three redo logs created in thedatabase. Use the abbreviation M instead of MB or mb; for example,150M.
Value in template data file: 100M
db_sid The name for the database. The name your enter:
• Must not exceed 8 characters.• Must start with a letter.• Must contain only letters, numbers, or these symbols: _
(underscore), # (hash sign), or $ (dollar sign).Value in template data file: orcl
db_passwd The password for the following administrative users:
• Oracle Database administrative users SYS and SYSTEM• Oracle Application Express ADMIN user• Oracle DBaaS Monitor dbaas_monitor userThe password you enter:
• Must be 8 to 30 characters in length.• Must contain at least one lowercase letter• Must contain at least one uppercase letter• Must contain at least one number• Must contain at least one of these symbols: _ (underscore), #
(hash sign), or $ (dollar sign).Value in template data file: Blank
db_automem Controls whether the database created on the deployment isconfigured for automatic memory management. Enter yes or no.
Value in template data file: yes
db_cdb Value in template data file: yes
Appendix CThe Data File for the oracle-dbcs-cli create Subcommand
C-12

Name Description
db_pdb_name (Applicable only for Oracle Database 12c Release 1.)
The name for the default PDB (Pluggable Database). The nameyou enter:
• Must not exceed 8 characters.• Must start with a letter.• Must contain only letters, numbers, or these symbols: _
(underscore), # (hash sign), or $ (dollar sign).Value in template data file: pdb1
db_em Controls whether the Enterprise Manager tool (EnterpriseManager Database Express 12c for Oracle Database 12c orEnterprise Manager 11g Database Control for Oracle Database11g) is configured. Enter yes or no.
Value in template data file: yes
db_archlog Controls whether archive logs are enabled. Enter yes or no.
Value in template data file: yes
Note:
If backups are configured(db_bkup_disk is set to yes), archivelogs are enabled regardless of thevalue you specify for db_archlog.
db_flashback Controls whether flashback logs are enabled. Enter yes or no.
Value in template data file: yes
db_flashback_days The minimum time in days to retain flashback logs in the recoveryarea.
Value in template data file: "1"
db_bkup_disk Controls whether backups to local storage on the compute nodeare configured. Enter yes or no.
When taken together, the values of db_bkup_disk anddb_bkup_oss determine the backup destination:
• db_bkup_disk=yes and db_bkup_oss=yes — the Both CloudStorage and Local Storage destination
• db_bkup_disk=no and db_bkup_oss=yes — the CloudStorage Only destination
• db_bkup_disk=no and db_bkup_oss=no — the Nonedestination
Value in template data file: yes
db_bkup_cron_entry Controls whether an entry is added to the /etc/crontab file toenable daily backups. Enter yes or no.
Value in template data file: yes
db_bkup_daily_time Specifies the time (using 24-hour, HH:MM format) when dailybackups are to occur. For example, 02:45 is 2:45 AM, and 14:45is 2:45 PM. Leave this value blank to have Database CloudService pick a random time from 11 PM (23:00) to 3 AM (03:00).
Value in template data file: Blank
Appendix CThe Data File for the oracle-dbcs-cli create Subcommand
C-13

Name Description
db_bkup_disk_recovery_window
The number of days for which backups and archived redo logs onlocal storage are maintained. The interval always ends with thecurrent time and extends back in time for the number of daysspecified.
Value in template data file: 7
db_bkup_oss Controls whether backups to an Oracle Cloud InfrastructureObject Storage Classic container using Oracle Database BackupCloud Service are to be configured. Enter yes or no.
When taken together, the values of db_bkup_disk anddb_bkup_oss determine the backup destination:
• db_bkup_disk=yes and db_bkup_oss=yes — the Both CloudStorage and Local Storage destination
• db_bkup_disk=no and db_bkup_oss=yes — the CloudStorage Only destination
• db_bkup_disk=no and db_bkup_oss=no — the Nonedestination
Value in template data file: no
db_bkup_oss_url The REST endpoint of the Oracle Cloud Infrastructure ObjectStorage Classic container to use for backups. For information onthe value to provide, see See "About REST URLs for OracleStorage Cloud Service Resources" in Using Oracle CloudInfrastructure Object Storage Classic.
Value in template data file: Blank
db_bkup_oss_user The user name of an Oracle Cloud user who has read/writeaccess to the container specified in db_bkup_oss_url.
Value in template data file: Blank
db_bkup_oss_passwd The password of the user specified in db_bkup_oss_user.
Value in template data file: Blank
db_bkup_oss_recovery_window
The number of days for which backups on cloud storage aremaintained. The interval always ends with the current time andextends back in time for the number of days specified.
Value in template data file: 14
db_bkup_cfg_files Controls whether backups are to include the files listed in /home/oracle/bkup/dbcfg.spec and /home/oracle/bkup/oscfg.spec.Enter yes or no.
Value in template data file: yes
db_bkup_cfg_recovery_window
The number of days for which backups of configuration files aremaintained. The interval always ends with the current time andextends back in time for the number of days specified.
Value in template data file: Blank
db_tde_action Controls whether TDE is configured. Enter config or none.
Value in template data file: none
Appendix CThe Data File for the oracle-dbcs-cli create Subcommand
C-14

Name Description
db_tde_ks_login Controls how the database is to access keys in the keystorewallet. Enter one of these values:
• manual—Every time the database is started the administratormust log into the database and open the keystore walletmanually.
• local—Every time the database is started the Local AutoLogin TDE feature is used to open the keystore walletautomatically.
• auto—Every time the database is started the Auto Login TDEfeature is used to open the keystore wallet automatically.
Value in template data file: auto
db_net_security_enable Controls whether Oracle Net Services data encryption andintegrity are configured. Enter yes or no.
Value in template data file: no
db_net_security_encryption_enable
Controls whether Oracle Net Services data encryption isconfigured. Enter yes or no.
Value in template data file: yes
db_net_security_encryption_target
Specifies whether the Oracle Net Services data encryptionconfiguration is for the server or the client. Use the value server.
Value in template data file: server
Appendix CThe Data File for the oracle-dbcs-cli create Subcommand
C-15

Name Description
db_net_security_encryption_type
Specifies how Oracle Net Services data encryption is negotiatedwith clients. Enter one of these values:
• rejected—Enter this value if you do not elect to enable dataencryption, even if required by the client.
In this scenario, this side of the connection specifies that dataencryption is not permitted. If the client side is set torequired, the connection terminates with error messageORA-12650. If the client side is set to requested, accepted orrejected, the connection continues without error and withoutdata encryption enabled.
• accepted—Select this value to enable data encryption ifrequired or requested by the client.
In this scenario, this side of the connection does not requiredata encryption, but it is enabled if the client side is set torequired or requested. If the client side is set to required orrequested, and an encryption algorithm match is found, theconnection continues without error and with data encryptionenabled. If the client side is set to required and no algorithmmatch is found, the connection terminates with error messageORA-12650.
If the client side is set to requested and no algorithm matchis found, or if the client side is set to accepted or rejected,the connection continues without error and without dataencryption enabled.
• requested—Select this value to enable data encryption if theclient permits it.
In this scenario, this side of the connection specifies that dataencryption is desired but not required. Data encryption isenabled if the client side specifies accepted, requested, orrequired. There must be a matching algorithm available,otherwise data encryption is not enabled. If the client sidespecifies required and there is no matching algorithm, theconnection fails.
• required—Select this value to enable data encryption orpreclude the connection.
In this scenario, this side of the connection specifies that dataencryption must be enabled. The connection fails if the clientside specifies rejected or if there is no compatible algorithm.
Value in template data file: required
db_net_security_encryption_methods
Specifies a list of algorithms that can be used for data encryption.Separate the algorithms with commas and do not include spaces.Here is a list of valid encryption algorithms:
AES128 AES192 AES256
Value in template data file: AES256,AES192,AES128
db_net_security_integrity_enable
Controls whether Oracle Net Services data integrity is configured.Enter yes or no.
Value in template data file: yes
db_net_security_integrity_target
Specifies whether the Oracle Net Services data integrityconfiguration is for the server or the client. Use the value server.
Value in template data file: server
Appendix CThe Data File for the oracle-dbcs-cli create Subcommand
C-16

Name Description
db_net_security_integrity_checksum_level
Specifies how Oracle Net Services data integrity is negotiatedwith clients. Enter one of these values:• rejected—Enter this value if you do not elect to enable data
integrity, even if required by the client.
In this scenario, this side of the connection specifies that dataintegrity is not permitted. If the client side is set to required,the connection terminates with error message ORA-12650. Ifthe client side is set to requested, accepted or rejected, theconnection continues without error and without data integrityenabled.
• accepted—Select this value to enable data integrity ifrequired or requested by the client.
In this scenario, this side of the connection does not requiredata integrity, but it is enabled if the client side is set torequired or requested. If the client side is set to required orrequested, and an integrity algorithm match is found, theconnection continues without error and with data integrityenabled. If the client side is set to required and no algorithmmatch is found, the connection terminates with error messageORA-12650.
If the client side is set to requested and no algorithm matchis found, or if the client side is set to accepted or rejected,the connection continues without error and without dataintegrity enabled.
• requested—Select this value to enable data integrity if theclient permits it.
In this scenario, this side of the connection specifies that dataintegrity is desired but not required. Data integrity is enabledif the client side specifies accepted, requested, or required.There must be a matching algorithm available, otherwise dataintegrity is not enabled. If the client side specifies requiredand there is no matching algorithm, the connection fails.
• required—Select this value to enable data integrity orpreclude the connection.
In this scenario, this side of the connection specifies that dataintegrity must be enabled. The connection fails if the clientside specifies rejected or if there is no compatible algorithm.
Value in template data file: required
db_net_security_integrity_methods
Specifies a list of algorithms that can be used for data integrity.Separate the algorithms with commas and do not include spaces.Here is a list of valid integrity algorithms:
SHA1 SHA256 SHA384 SHA512
Note that of these four algorithms, SHA1 is the only one supportedby Oracle Database 11g.
Value in template data file: SHA1
Appendix CThe Data File for the oracle-dbcs-cli create Subcommand
C-17

DThe dbaascli Utility
The dbaascli utility is provided on Oracle Database Cloud Service deployments toperform a variety of life-cycle and administration operations.
Using the dbaascli utility, you can perform operations like:
• Changing the password of the SYS user
• Checking the status of the Oracle Data Guard configuration
• Switchover and failover in an Oracle Data Guard configuration
• Patching the database deployment
• Database recovery
• Rotating the master encryption key
To use the dbaascli utility:
1. Connect to a compute node associated with the Database Cloud Servicedeployment. For most dbaascli subcommands, connect as the oracle user. For thedbpatchm and orec subcommands, connect as the opc user.
For instructions, see Connecting to a Compute Node Through Secure Shell (SSH).
2. If you connected as the opc user, start a root-user command shell:
$ sudo -s#
3. Run the dbaascli utility using a command of the form:
# dbaascli subcommand subcommand-options
4. When you are finished using the dbaascli utility, exit the root-user command shellif necessary and disconnect from the compute node:
# exit$ exit
The dbaascli utility supports these subcommands:
Subcommand Subcommand Options
database bounce – shuts down and then restarts the database instance.
changepassword – changes the password of the specified user.
start– starts the database instance and opens the database.
status – displays the open mode of the database and additionalinformation about the database deployment.
stop – shuts down the database instance.
dataguard failover – performs a manual failover.
reinstate – reinstates a failed primary database.
status – checks the status of the configuration.
switchover – performs a switchover operation.
D-1
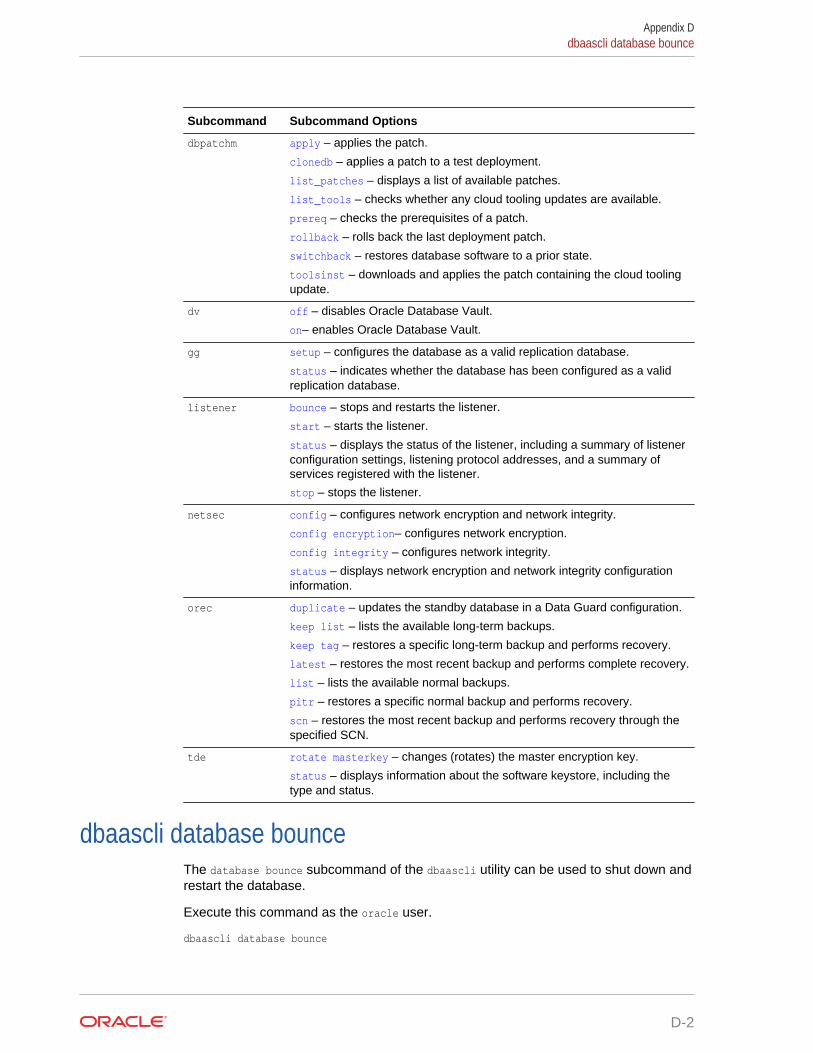
Subcommand Subcommand Options
dbpatchm apply – applies the patch.
clonedb – applies a patch to a test deployment.
list_patches – displays a list of available patches.
list_tools – checks whether any cloud tooling updates are available.
prereq – checks the prerequisites of a patch.
rollback – rolls back the last deployment patch.
switchback – restores database software to a prior state.
toolsinst – downloads and applies the patch containing the cloud toolingupdate.
dv off – disables Oracle Database Vault.
on– enables Oracle Database Vault.
gg setup – configures the database as a valid replication database.
status – indicates whether the database has been configured as a validreplication database.
listener bounce – stops and restarts the listener.
start – starts the listener.
status – displays the status of the listener, including a summary of listenerconfiguration settings, listening protocol addresses, and a summary ofservices registered with the listener.
stop – stops the listener.
netsec config – configures network encryption and network integrity.
config encryption– configures network encryption.
config integrity – configures network integrity.
status – displays network encryption and network integrity configurationinformation.
orec duplicate – updates the standby database in a Data Guard configuration.
keep list – lists the available long-term backups.
keep tag – restores a specific long-term backup and performs recovery.
latest – restores the most recent backup and performs complete recovery.
list – lists the available normal backups.
pitr – restores a specific normal backup and performs recovery.
scn – restores the most recent backup and performs recovery through thespecified SCN.
tde rotate masterkey – changes (rotates) the master encryption key.
status – displays information about the software keystore, including thetype and status.
dbaascli database bounceThe database bounce subcommand of the dbaascli utility can be used to shut down andrestart the database.
Execute this command as the oracle user.
dbaascli database bounce
Appendix Ddbaascli database bounce
D-2
When this subcommand is executed the database is shut down in immediate mode.The database instance is then restarted and the database is opened. In an OracleDatabase 12c database, all PDBs are opened.
dbaascli database changepasswordThe database changepassword subcommand of the dbaascli utility is used to change thepassword of a database user.
Execute this command as the oracle user.
dbaascli database changepassword
Enter the user name and new password when prompted.
dbaascli database startThe database start subcommand of the dbaascli utility can be used to start thedatabase instance and open the database.
Execute this command as the oracle user.
dbaascli database start
When this subcommand is executed the database instance is started and thedatabase is opened. In an Oracle Database 12c database, all PDBs are opened.
dbaascli database statusThe database status subcommand of the dbaascli utility can be used to check thestatus of the database in your database deployment.
Execute this command as the oracle user.
dbaascli database status
Output from the command includes the open mode of the database, the softwarerelease and edition of the database deployment, and release version of other softwarecomponents.
dbaascli database stopThe database stop subcommand of the dbaascli utility can be used to shut down thedatabase.
Execute this command as the oracle user.
dbaascli database stop
When this subcommand is executed the database is shut down in immediate mode.No new connections or new transactions are permitted. Active transactions are rolledback and all connected users are disconnected.
Appendix Ddbaascli database changepassword
D-3

dbaascli dataguard failoverThe dataguard failover subcommand of the dbaascli utility is used to perform amanual failover to the standby database in your Oracle Data Guard configuration.
Execute this command as the oracle user.
dbaascli dataguard failover [--force yes|no] [--password password]
Options of this subcommand are as follows.
Option Description
--force yes|no The force option can be used if the dataguard statussubcommand shows that the Data Guard configuration is in awarning or error state.
--password password The password option is used to supply the SYS user password if ithas changed since the Data Guard configuration was created.
dbaascli dataguard reinstateThe dataguard reinstate subcommand of the dbaascli utility is used to reinstate afailed primary database as a standby database after a failover.
Execute this command as the oracle user.
dbaascli dataguard reinstate [--password password]
Options of this subcommand are as follows.
Option Description
--password password The password option is used to supply the SYS user password if ithas changed since the Data Guard configuration was created.
dbaascli dataguard statusThe dataguard status subcommand of the dbaascli utility is used to check the status ofthe Oracle Data Guard configuration.
Execute this command as the oracle user.
dbaascli dataguard status [--details yes|no]
Options of this subcommand are as follows.
Option Description
--details yes|no The details option is used to request a more detailed listing ofthe status of the Data Guard configuration.
Appendix Ddbaascli dataguard failover
D-4

dbaascli dataguard switchoverThe dataguard switchover subcommand of the dbaascli utility is used to perform aswitchover to the standby database in your Oracle Data Guard configuration.
Execute this command as the oracle user.
dbaascli dataguard switchover [--password password]
Options of this subcommand are as follows.
Option Description
–password password The password option is used to supply the SYS user password if ithas changed since the Data Guard configuration was created.
dbaascli dbpatchm applyThe dbpatchm apply subcommand of the dbaascli utility is used to apply a patch.
Connect to the compute node as the opc user and execute this command as the rootuser.
dbaascli dbpatchm --run -apply
Before executing the apply subcommand you must edit the /var/opt/oracle/patch/dbpatchm.cfg patching configuration file, setting the keys for the desired patch. Formore information about this file and its keys, see The dbpatchm.cfg Configuration File.
The dbpatchm apply subcommand displays progress as the patch is applied.
dbaascli dbpatchm clonedbThe dbpatchm clonedb subcommand of the dbaascli utility is used to apply a patch to atest deployment before you apply it to a live, production database deployment.
Connect to the compute node as the opc user and execute this command as the rootuser.
dbaascli dbpatchm --run -clonedb
The dbpatchm clonedb subcommand displays progress information as it copiesinformation from the live deployment to the test deployment and then applies the patchto the test deployment.
dbaascli dbpatchm list_patchesThe dbpatchm list_patches subcommand of the dbaascli utility is used to checkwhether any patches are available.
Connect to the compute node as the opc user and execute this command as the rootuser.
dbaascli dbpatchm --run -list_patches
Appendix Ddbaascli dataguard switchover
D-5

A patch update is available if the command response includes the "INFO: imagesavailable for patching" message. The patch ID will be displayed as part of thecommand response. This patch ID can be used to download and apply the patch. See dbaascli dbpatchm apply for detail on applying a patch.
dbaascli dbpatchm list_toolsThe dbpatchm list_tools subcommand of the dbaascli utility is used to check whetherany cloud tooling updates are available.
Connect to the compute node as the opc user and execute this command as the rootuser.
dbaascli dbpatchm --run -list_tools
A cloud tooling update is available if the command response includes the "INFO: toolsimages available for patching" message. The patch ID of the cloud tooling update willbe displayed as part of the command response. This patch ID can be used todownload and apply the patch.
dbaascli dbpatchm prereqThe dbpatchm prereq subcommand of the dbaascli utility is used to check theprerequisites of a patch.
Connect to the compute node as the opc user and execute this command as the rootuser.
dbaascli dbpatchm --run -prereq
Before executing the prereq subcommand you must edit the /var/opt/oracle/patch/dbpatchm.cfg patching configuration file, setting the keys for the desired patch. Formore information about this file and its keys, see The dbpatchm.cfg Configuration File.
dbaascli dbpatchm rollbackThe dbpatchm rollback subcommand of the dbaascli utility is used to roll back the lastpatch applied to a database deployment.
Connect to the compute node as the opc user and execute this command as the rootuser.
dbaascli dbpatchm --run -rollback
dbaascli dbpatchm switchbackThe dbpatchm switchback subcommand of the dbaascli utility is used to revert back tothe state of the database deployment before a patch was applied.
Connect to the compute node as the opc user and execute this command as the rootuser.
dbaascli dbpatchm --run -switchback
Appendix Ddbaascli dbpatchm list_tools
D-6

dbaascli dbpatchm toolsinstThe dbpatchm toolsinst subcommand of the dbaascli utility is used to download andapply a patch containing the cloud tooling update.
Connect to the compute node as the opc user and execute this command as the rootuser.
dbaascli dbpatchm --run -toolsinst -rpmversion=patch-id|LATEST
Options of this subcommand are as follows.
Option Description
-rpmversion=patch-id|LATEST
The rpmversion option is used to specify the patch to bedownloaded and applied. Specify the ID of the patch, or specifyLATEST to download and apply the latest available patch.
dbaascli dv offThe dv off subcommand of the dbaascli utility is used to disable Oracle DatabaseVault in a database deployment.
Note: this command shuts down and then restarts the database. Therefore, youshould make sure all database connections are closed before you use this command.
dbaascli dv off [cdb|pdb]
The utility prompts the user for the following:
• Database Vault Owner user name
• Database Vault Owner password
If no options are specified, the utility will disable Database Vault on the root container(CDB) and all existing pluggable databases (PDBs) in an Oracle Database 12cdatabase deployment. The utility assumes that Database Vault credentials are thesame in the CDB and all of the PDBs.
When you install Oracle Database Vault, it revokes a set of privileges from severalOracle Database-supplied users and roles. Be aware that if you disable OracleDatabase Vault, these privileges remain revoked. See "Privileges That Are Revokedfrom Existing Users and Roles" in Oracle Database Vault Administrator’s Guide forRelease 12.2, 12.1 or 11.2 for additional information.
Options of this subcommand are as follows.
Option Description
cdb The cdb option is used to disable Database Vault on the rootcontainer (CDB) only in an Oracle Database 12c databasedeployment.
pdb The pdb option is used to disable Database Vault on a specificPDB in an Oracle Database 12c database deployment. When thisoption is used, the utility also prompts the user for the PDB name.
Appendix Ddbaascli dbpatchm toolsinst
D-7

dbaascli dv onThe dv on subcommand of the dbaascli utility is used to configure and enable OracleDatabase Vault in a database deployment.
dbaascli dv on [cdb|pdb]
The utility prompts the user for the following:
• Database Vault Owner user name
• Database Vault Owner password
• Database Vault Account Manager user name
• Database Vault Account Manager password
• PDB name, if the pdb option is specified
If no options are specified, the utility will configure and enable Database Vault on theroot container (CDB) and all existing PDBs of an Oracle Database 12c databasedeployment. It will set the same Database Vault credentials in the root container andthe PDBs.
If you want to enable Database Vault on PDBs separately, you must first enableDatabase Vault on the CDB.
In an Oracle Database 12c database deployment, the Database Vault Owner andAccount Manager user names must begin with c##.
Review "What to Expect After You Enable Oracle Database Vault" in Oracle DatabaseVault Administrator’s Guide for Release 12.2, 12.1 or 11.2 to gain an understanding ofthe impact of enabling and configuring Database Vault.
Options of this subcommand are as follows.
Option Description
cdb The cdb option is used to configure and enable Database Vault onthe root container (CDB) only in an Oracle Database 12cdatabase deployment.
pdb The pdb option is used to configure and enable Database Vault ona specific PDB in an Oracle Database 12c database deployment.When this option is used, the utility also prompts the user for thePDB name. Database Vault must be enabled on the CDB beforeyou can enable it on any PDBs. Provide the same credentials forthe PDB as you provided for the CDB.
dbaascli gg setupThe gg setup subcommand of the dbaascli utility is used to configure a deployment’sdatabase for Oracle GoldenGate Cloud Service replication.
Execute this command as the oracle user.
dbaascli gg setup
Appendix Ddbaascli dv on
D-8

Enter the Oracle GoldenGate Cloud Service database user name when prompted forthe GoldenGate admin username:
• For Oracle Database 11g, specify ggadm
.
• For Oracle Database 12c, specify c##ggadm.
Enter the password specified during the database deployment creation process whenprompted for the GoldenGate admin password.
dbaascli gg statusThe gg status subcommand of the dbaascli utility is used to check whether adeployment’s database is configured for Oracle GoldenGate Cloud Service replication.
Execute this command as the oracle user.
dbaascli gg status
A status of enabled indicates that the database is a valid replication database. If it hasnot been configured as a replication database, the status is disabled.
dbaascli listener bounceThe listener bounce subcommand of the dbaascli utility is used to stop and restart thelistener.
Execute this command as the oracle user.
dbaascli listener bounce
This command causes the listener to be stopped and then restarted.
dbaascli listener startThe listener start subcommand of the dbaascli utility is used to start the listener.
Execute this command as the oracle user.
dbaascli listener start
dbaascli listener statusThe listener status subcommand of the dbaascli utility is used to obtain informationabout the status of the listener.
Execute this command as the oracle user.
dbaascli listener status
Basic status information about the listener, including a summary of listenerconfiguration settings, listening protocol addresses, and a summary of servicesregistered with the listener is displayed.
Appendix Ddbaascli gg status
D-9

dbaascli listener stopThe listener stop subcommand of the dbaascli utility is used to stop the listener.
Execute this command as the oracle user.
dbaascli listener stop
dbaascli netsec configThe netsec config subcommand of the dbaascli utility is used to configure Oracle Netencryption and integrity settings.
By default, database deployments on Database Cloud Service are configured toenable native Oracle Net encryption and integrity. You can use the netsec configsubcommand to change Oracle Net encryption and integrity settings. For detailedinformation on Oracle Net encryption and integrity, see "Configuring Network DataEncryption and Integrity" in Oracle Database Security Guide for Release 12.2, 12.1 or 11.2.
If you only want to configure encryption settings, see dbaascli netsec configencryption. If you only to configure integrity settings, see dbaascli netsec configintegrity.
Execute this command as the oracle user.
dbaascli netsec config --encryption_methods algorithm[,algorithm]... --encryption_target client|server --encryption_type accepted|rejected|requested|required --integrity_clevel accepted|rejected|requested|required --integrity_methods algorithm[,algorithm]... --integrity_target client|server
Options of this subcommand are as follows.
Option Description
encryption_methodsalgorithm[,algorithm]...
The encryption_methods option is used to specify the encryptionalgorithm(s). Valid values are: AES128, AES192, and AES256.
encryption_targetclient|server
The encryption_target option is used to specify whether theencryption setting applies to the client or server. Use server.
Appendix Ddbaascli listener stop
D-10
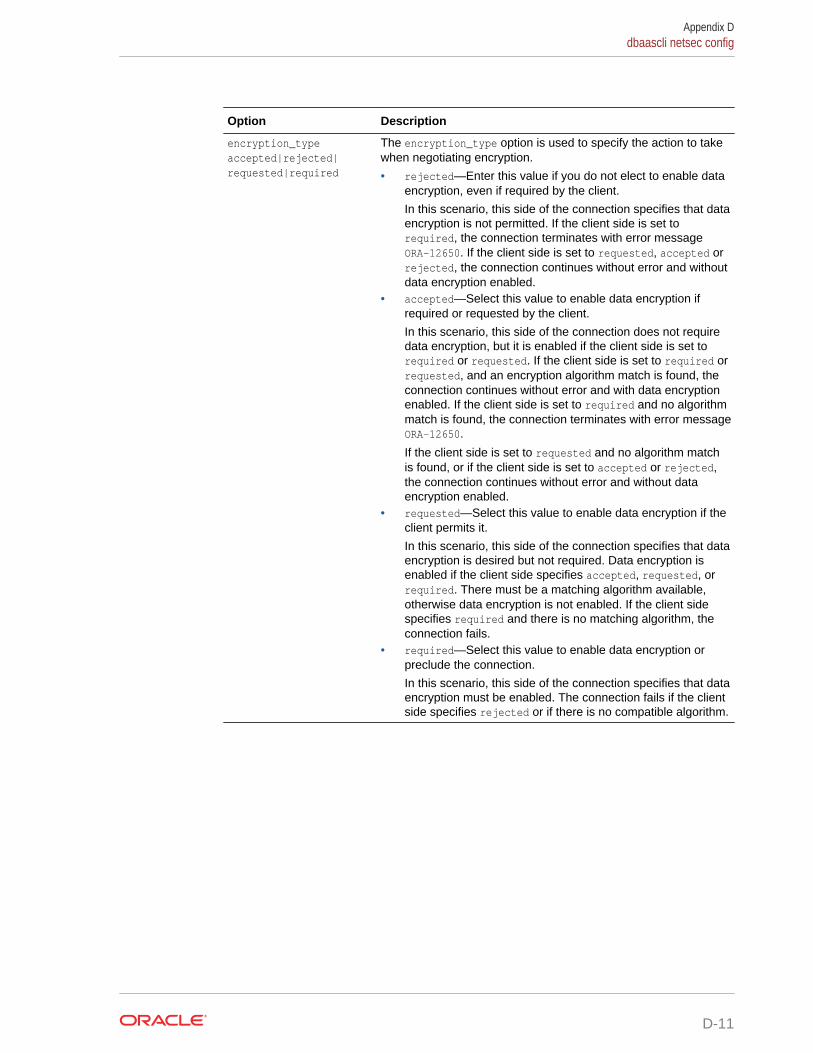
Option Description
encryption_typeaccepted|rejected|requested|required
The encryption_type option is used to specify the action to takewhen negotiating encryption.
• rejected—Enter this value if you do not elect to enable dataencryption, even if required by the client.
In this scenario, this side of the connection specifies that dataencryption is not permitted. If the client side is set torequired, the connection terminates with error messageORA-12650. If the client side is set to requested, accepted orrejected, the connection continues without error and withoutdata encryption enabled.
• accepted—Select this value to enable data encryption ifrequired or requested by the client.
In this scenario, this side of the connection does not requiredata encryption, but it is enabled if the client side is set torequired or requested. If the client side is set to required orrequested, and an encryption algorithm match is found, theconnection continues without error and with data encryptionenabled. If the client side is set to required and no algorithmmatch is found, the connection terminates with error messageORA-12650.
If the client side is set to requested and no algorithm matchis found, or if the client side is set to accepted or rejected,the connection continues without error and without dataencryption enabled.
• requested—Select this value to enable data encryption if theclient permits it.
In this scenario, this side of the connection specifies that dataencryption is desired but not required. Data encryption isenabled if the client side specifies accepted, requested, orrequired. There must be a matching algorithm available,otherwise data encryption is not enabled. If the client sidespecifies required and there is no matching algorithm, theconnection fails.
• required—Select this value to enable data encryption orpreclude the connection.
In this scenario, this side of the connection specifies that dataencryption must be enabled. The connection fails if the clientside specifies rejected or if there is no compatible algorithm.
Appendix Ddbaascli netsec config
D-11

Option Description
integrity_clevelaccepted|rejected|requested|required
The integrity_clevel option is used to specify the checksumlevel.
• rejected—Enter this value if you do not elect to enable dataintegrity, even if required by the client.
In this scenario, this side of the connection specifies that dataintegrity is not permitted. If the client side is set to required,the connection terminates with error message ORA-12650. Ifthe client side is set to requested, accepted or rejected, theconnection continues without error and without data integrityenabled.
• accepted—Select this value to enable data integrity ifrequired or requested by the client.
In this scenario, this side of the connection does not requiredata integrity, but it is enabled if the client side is set torequired or requested. If the client side is set to required orrequested, and an integrity algorithm match is found, theconnection continues without error and with data integrityenabled. If the client side is set to required and no algorithmmatch is found, the connection terminates with error messageORA-12650.
If the client side is set to requested and no algorithm matchis found, or if the client side is set to accepted or rejected,the connection continues without error and without dataintegrity enabled.
• requested—Select this value to enable data integrity if theclient permits it.
In this scenario, this side of the connection specifies that dataintegrity is desired but not required. Data integrity is enabledif the client side specifies accepted, requested, or required.There must be a matching algorithm available, otherwise dataintegrity is not enabled. If the client side specifies requiredand there is no matching algorithm, the connection fails.
• required—Select this value to enable data integrity orpreclude the connection.
In this scenario, this side of the connection specifies that dataintegrity must be enabled. The connection fails if the clientside specifies rejected or if there is no compatible algorithm.
integrity_methodsalgorithm[,algorithm]...
The integrity_methods option is used to specify the integrityalgorithm. Valid values are: SHA1, SHA256, SHA384, andSHA512.SHA1 is the only algorithm supported by Oracle Database11g.
integrity_targetclient|server
The integrity_target option is used to specify whether theintegrity setting applies to the client or server. Use server.
dbaascli netsec config encryptionThe netsec config encryption subcommand of the dbaascli utility is used to configureOracle Net encryption settings.
By default, database deployments on Database Cloud Service are configured toenable native Oracle Net encryption and integrity. You can use the netsec configencryption subcommand to change Oracle Net encryption settings. See "Configuring
Appendix Ddbaascli netsec config encryption
D-12

Network Data Encryption and Integrity" in Oracle Database Security Guide for Release 12.2, 12.1 or 11.2 for detailed information on Oracle Net encryption.
Execute this command as the oracle user.
dbaascli netsec config encryption --methods algorithm[,algorithm]... --target client|server --type accepted|rejected|requested|required
Options of this subcommand are as follows.
Option Description
methodsalgorithm[,algorithm]...
The methods option is used to specify the encryption algorithm(s).Valid values are: AES128, AES192, and AES256.
target client|server The target option is used to specify whether the encryptionsetting applies to the client or server. Use server.
type accepted|rejected|requested|required
The type option is used to specify the action to take whennegotiating encryption.
• rejected—Enter this value if you do not elect to enable dataencryption, even if required by the client.
In this scenario, this side of the connection specifies that dataencryption is not permitted. If the client side is set torequired, the connection terminates with error messageORA-12650. If the client side is set to requested, accepted orrejected, the connection continues without error and withoutdata encryption enabled.
• accepted—Select this value to enable data encryption ifrequired or requested by the client.
In this scenario, this side of the connection does not requiredata encryption, but it is enabled if the client side is set torequired or requested. If the client side is set to required orrequested, and an encryption algorithm match is found, theconnection continues without error and with data encryptionenabled. If the client side is set to required and no algorithmmatch is found, the connection terminates with error messageORA-12650.
If the client side is set to requested and no algorithm matchis found, or if the client side is set to accepted or rejected,the connection continues without error and without dataencryption enabled.
• requested—Select this value to enable data encryption if theclient permits it.
In this scenario, this side of the connection specifies that dataencryption is desired but not required. Data encryption isenabled if the client side specifies accepted, requested, orrequired. There must be a matching algorithm available,otherwise data encryption is not enabled. If the client sidespecifies required and there is no matching algorithm, theconnection fails.
• required—Select this value to enable data encryption orpreclude the connection.
In this scenario, this side of the connection specifies that dataencryption must be enabled. The connection fails if the clientside specifies rejected or if there is no compatible algorithm.
Appendix Ddbaascli netsec config encryption
D-13

dbaascli netsec config integrityThe netsec config integrity subcommand of the dbaascli utility is used to configureOracle Net integrity settings.
By default, database deployments on Database Cloud Service are configured toenable native Oracle Net integrity. You can use the netsec config integritysubcommand to change Oracle Net integrity settings. See "Configuring Network DataEncryption and Integrity" in Oracle Database Security Guide for Release 12.2, 12.1 or 11.2 for detailed information on Oracle Net encryption and integrity.
Execute this command as the oracle user.
dbaascli netsec config integrity --clevel accepted|rejected|requested|required --methods algorithm[,algorithm]... --target client|server
Options of this subcommand are as follows.
Appendix Ddbaascli netsec config integrity
D-14

Option Description
clevel accepted|rejected|requested|required
The clevel option is used to specify the checksum level.
• rejected—Enter this value if you do not elect to enable dataintegrity, even if required by the client.
In this scenario, this side of the connection specifies that dataintegrity is not permitted. If the client side is set to required,the connection terminates with error message ORA-12650. Ifthe client side is set to requested, accepted or rejected, theconnection continues without error and without data integrityenabled.
• accepted—Select this value to enable data integrity ifrequired or requested by the client.
In this scenario, this side of the connection does not requiredata integrity, but it is enabled if the client side is set torequired or requested. If the client side is set to required orrequested, and an integrity algorithm match is found, theconnection continues without error and with data integrityenabled. If the client side is set to required and no algorithmmatch is found, the connection terminates with error messageORA-12650.
If the client side is set to requested and no algorithm matchis found, or if the client side is set to accepted or rejected,the connection continues without error and without dataintegrity enabled.
• requested—Select this value to enable data integrity if theclient permits it.
In this scenario, this side of the connection specifies that dataintegrity is desired but not required. Data integrity is enabledif the client side specifies accepted, requested, or required.There must be a matching algorithm available, otherwise dataintegrity is not enabled. If the client side specifies requiredand there is no matching algorithm, the connection fails.
• required—Select this value to enable data integrity orpreclude the connection.
In this scenario, this side of the connection specifies that dataintegrity must be enabled. The connection fails if the clientside specifies rejected or if there is no compatible algorithm.
methodsalgorithm[,algorithm]...
The methods option is used to specify the integrity algorithm. Validvalues are: SHA1, SHA256, SHA384, and SHA512.SHA1 is the onlyalgorithm supported by Oracle Database 11g.
target client|server The target option is used to specify whether the integrity settingapplies to the client or server. Use server.
dbaascli netsec statusThe netsec status subcommand of the dbaascli utility is used to display informationabout network encryption and network integrity configuration.
Execute this command as the oracle user.
dbaascli netsec status [encryption|integrity]
If no options are specified, the utility will display information about network encryptionand network integrity configuration.
Appendix Ddbaascli netsec status
D-15

Options of this subcommand are as follows.
Option Description
encryption The encryption option is used to display information aboutnetwork encryption configuration.
integrity The integrity option is used to display information aboutnetwork integrity configuration.
dbaascli orec duplicateThe orec duplicate subcommand of the dbaascli utility is used to xxx in an OracleDatabase Guard configuration.
You must execute this command on the standby instance's compute node as the rootuser.
dbaascli orec --args -duplicate
dbaascli orec keep listThe orec latest subcommand of the dbaascli utility is used to list the available long-term backups.
You must execute this command as the root user.
dbaascli orec --args -keep -list
dbaascli orec keep tagThe orec keep tag subcommand of the dbaascli utility is used to restore a specificlong-term backup and perform recovery.
Connect to the compute node as the opc user and execute this command as the rootuser.
dbaascli orec --args -keep -tag backup-tag
Options of this subcommand are as follows.
Option Description
–tag backup-tag The tag option is used to supply the backup tag of the long-termbackup that should be restored for the recovery operation.
dbaascli orec latestThe orec latest subcommand of the dbaascli utility is used to restore the most recentbackup and perform complete recovery.
You must execute this command as the root user.
dbaascli orec --args -latest
Appendix Ddbaascli orec duplicate
D-16

dbaascli orec listThe orec latest subcommand of the dbaascli utility is used to list the available normalbackups.
You must execute this command as the root user.
dbaascli orec --args -list
dbaascli orec pitrThe orec pitr subcommand of the dbaascli utility is used to restore a specific normalbackup and perform recovery.
Connect to the compute node as the opc user and execute this command as the rootuser.
dbaascli orec --args -pitr backup-tag
Options of this subcommand are as follows.
Option Description
-pitr backup-tag The pitr option is used to supply the backup tag of the backupthat should be restored for the recovery operation.
dbaascli orec scnThe orec scn subcommand of the dbaascli utility is used to restore the most recentbackup and perform recovery through the specified system change number (SCN).
Connect to the compute node as the opc user and execute this command as the rootuser.
dbaascli orec --args -scn SCN
Options of this subcommand are as follows.
Option Description
-scn SCN The scn option is used to supply the system change number(SCN) for the end point of the recovery operation.
dbaascli tde rotate masterkeyThe tde rotate masterkey subcommand of the dbaascli utility is used to change(rotate) the master encryption key.
Execute this command as the oracle user.
dbaascli tde rotate masterkey
Enter the password specified during the database deployment creation process whenprompted for the keystore password.
Appendix Ddbaascli orec list
D-17

dbaascli tde statusThe tde status subcommand of the dbaascli utility is used to view information aboutthe software keystore used in tablespace encryption.
Execute this command as the oracle user.
dbaascli tde status
Output from the command includes the type of keystore and the status of the keystore.
Appendix Ddbaascli tde status
D-18

EThe raccli Utility
This topic does not apply to Oracle Cloud Infrastructure.
The raccli utility is provided on Oracle Database Cloud Servicedeployments that use Oracle Real Application Clusters (RAC) toperform a variety of life-cycle and administration operations.
Using the raccli utility, you can perform operations like:
• Backing up the database
• Recovering the database from a backup
• Changing configuration of automatic backups
• Patching the Oracle Database, Grid Infrastructure and cloud tooling software
• Changing the configuration of security features
• Tracking the progress and completion of long-running operations performed asasynchronous jobs
To use the raccli utility:
1. Connect as the opc user to a compute node associated with the Database CloudService deployment.
For instructions, see Connecting to a Compute Node Through Secure Shell (SSH).
2. Run the raccli utility using a command of the form:
$ raccli subcommand subcommand-options
3. When you are finished using the raccli utility, disconnect from the compute node:
$ exit
The raccli utility supports these subcommands:
apply patch: applies a patch to the Grid Infrastructure or Oracle Database home.
clean backup: deletes any unnecessary backups or backup pieces as determined bythe backup configuration’s recovery windows for local and cloud backups.
create backup: creates a backup of the configuration files, inventory configuration files,Grid Infrastructure and Oracle Database homes, database, and tooling metadata.
create recovery: initiates database recovery.
describe job: provides information about the progress and status of a long-runningoperation.
describe system: provides information about the installation of Grid Infrastructure,Oracle Database, and the RDK cloud tooling.
failover dataguard: performs a manual failover to the standby database in your DataGuard configuration.
E-1

list backup: provides a list and status of all the backup jobs that have been submittedthrough the raccli utility.
list backupconfig: provides a list of the backup configuration settings.
list jobs: provides a list of all the jobs that have been submitted through the raccliutility.
list recovery: provides information about recovery jobs.
reinstate dataguard: reinstates a failed primary database as a standby database aftera failover.
status dataguard: displays status information about the Data Guard configuration.
switchover dataguard: performs a switchover to the standby database in your DataGuard configuration.
update backupconfig: updates the backup configuration.
update databasepassword: updates the password in the keystore (wallet) and optionallyupdates the password for the SYS and SYSTEM users.
update netsec: updates the Oracle Net security configuration.
update rdk: updates the cloud tooling on the Database Cloud Service deployment.
update server: checks for and corrects any configuration issues related to the LinuxOS on a compute node of the deployment.
update tde: enables transparent data encryption (TDE) and rotates the TDE key.
raccli apply patch
This topic does not apply to Oracle Cloud Infrastructure.
The apply patch subcommand of the raccli utility is used to apply apatch to the Oracle Database or Grid Infrastructure home on anOracle Database Cloud Service database deployment that usesOracle Real Application Clusters (RAC).
raccli apply patch {-db|-gi} -tag tag-name [-prechecks]
This subcommand runs asynchronously. That is, it creates a job to apply the patch,reports the job ID of the created job, and then exits. To track the progress of the job toits completion, use the raccli describe job command.
If the subcommand fails, it reports a FAILURE status and provides a messagedescribing the reason for the failure.
Options of this subcommand are as follows.
Appendix Eraccli apply patch
E-2
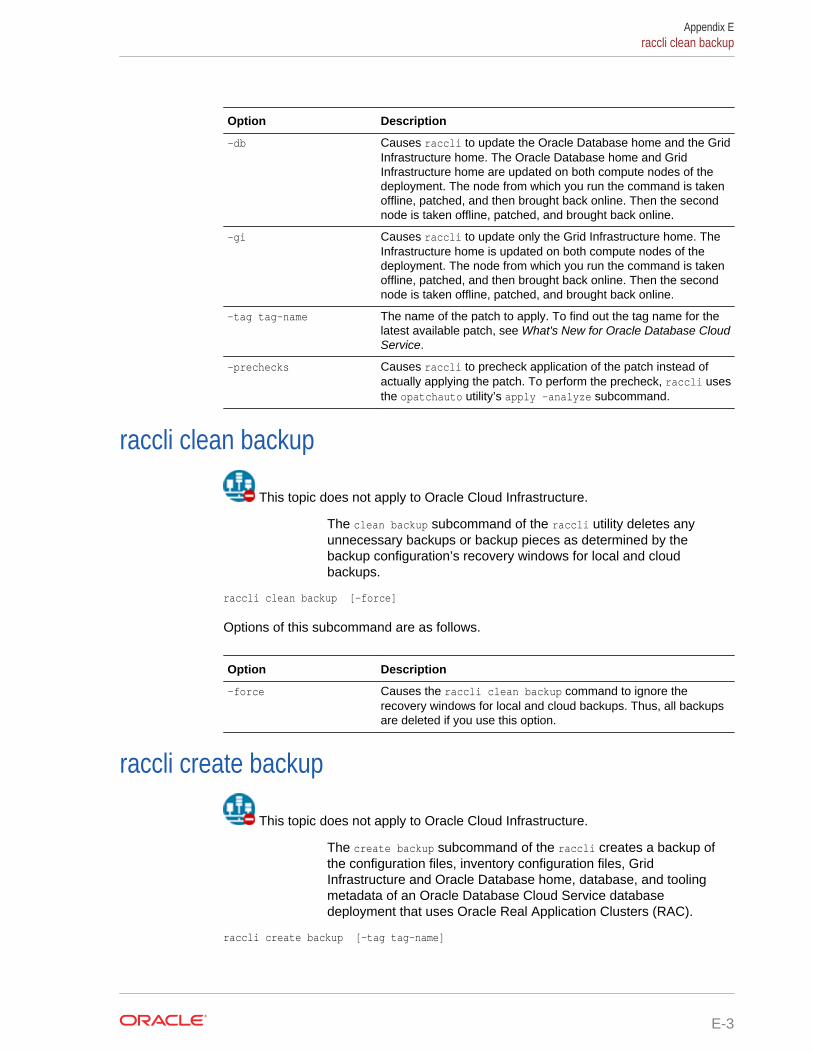
Option Description
-db Causes raccli to update the Oracle Database home and the GridInfrastructure home. The Oracle Database home and GridInfrastructure home are updated on both compute nodes of thedeployment. The node from which you run the command is takenoffline, patched, and then brought back online. Then the secondnode is taken offline, patched, and brought back online.
-gi Causes raccli to update only the Grid Infrastructure home. TheInfrastructure home is updated on both compute nodes of thedeployment. The node from which you run the command is takenoffline, patched, and then brought back online. Then the secondnode is taken offline, patched, and brought back online.
-tag tag-name The name of the patch to apply. To find out the tag name for thelatest available patch, see What's New for Oracle Database CloudService.
-prechecks Causes raccli to precheck application of the patch instead ofactually applying the patch. To perform the precheck, raccli usesthe opatchauto utility’s apply -analyze subcommand.
raccli clean backup
This topic does not apply to Oracle Cloud Infrastructure.
The clean backup subcommand of the raccli utility deletes anyunnecessary backups or backup pieces as determined by thebackup configuration’s recovery windows for local and cloudbackups.
raccli clean backup [-force]
Options of this subcommand are as follows.
Option Description
-force Causes the raccli clean backup command to ignore therecovery windows for local and cloud backups. Thus, all backupsare deleted if you use this option.
raccli create backup
This topic does not apply to Oracle Cloud Infrastructure.
The create backup subcommand of the raccli creates a backup ofthe configuration files, inventory configuration files, GridInfrastructure and Oracle Database home, database, and toolingmetadata of an Oracle Database Cloud Service databasedeployment that uses Oracle Real Application Clusters (RAC).
raccli create backup [-tag tag-name]
Appendix Eraccli clean backup
E-3

This subcommand runs asynchronously. That is, it creates a job to perform thebackup, reports the job ID of the created job, and then exits. To track the progress ofthe job to its completion, use the raccli describe job command.
If the subcommand fails, it reports a FAILURE status and provides a messagedescribing the reason for the failure.
Options of this subcommand are as follows.
Option Description
-tag tag-name The name of the backup job. This is not an RMAN tag.
Example
Here is an example of the create backup subcommand. The name of the backup in thisexample is backuptest. You can view details of the backup job by using the racclidescribe job subcommand. You can view details of the backup by using the raccli listbackup subcommand.
[opc@example1 ~]$ raccli create backup -tag backuptest
{ "joburi" : "http://localhost:7070/dcs/7/responses", "requestStatus" : "SUCCESS", "jobid" : "7"}[opc@example1 ~]$
raccli create recovery
This topic does not apply to Oracle Cloud Infrastructure.
The create recovery subcommand of the raccli initiates databaserecovery of an Oracle Database Cloud Service database deploymentthat uses Oracle Real Application Clusters (RAC).
raccli create recovery [-tag tag-name][-latest]|[-pitr][-scn SCN]|[-timestamp time]
This subcommand runs asynchronously. That is, it creates a job to perform therecovery, reports the job ID of the created job, and then exits. To track the progress ofthe job to its completion, use the raccli describe job command.
If the subcommand fails, it reports a FAILURE status and provides a messagedescribing the reason for the failure.
Options of this subcommand are as follows.
Option Description
-tag tag-name The name of the recovery job. This is not an RMAN tag.
If this option is omitted, a default name of “auto” is given.
-latest Indicates that a complete database recovery should beperformed.
Appendix Eraccli create recovery
E-4

Option Description
-pitr Indicates that a database point-in-time (incomplete) recoveryshould be performed.
The recovery end point is specified by the —scn or —timestampoption.
-scn SCN The system change number (SCN) for the end point of therecovery.
-timestamp time The time for the end point of the recovery.
The format is MM/DD/YYYY HH24:MI:SS.
Example
Here is an example of the create recovery subcommand. The name of the recoveryjob in this example is recovertest. This is an example of a request for a completedatabase recovery operation. You can use the job ID displayed in the output as inputto the raccli describe job command to track the job’s progress.
[opc@example1 ~]$ raccli create recovery -tag recovertest -latest
{ "joburi" : "http://localhost:7070/dcs/8/responses", "requestStatus" : "SUCCESS", "jobid" : "8"}[opc@example1 ~]$
raccli describe job
This topic does not apply to Oracle Cloud Infrastructure.
The describe job subcommand of the raccli utility providesinformation about the progress and status of a long-runningoperation.
raccli describe job job-id
The output of this subcommand depends on the kind of operation that the given job is.
Options of this subcommand are as follows.
Option Description
job-id The ID of the job you want to view detailed information about.
Example
Here is an example of the describe job subcommand. This example shows detailsabout the backup job in the raccli create backup example.
opc@example1 ~]$ raccli describe job 7
{ "requestStatus" : "SUCCESS", "jobStatus" : "SUCCESS",
Appendix Eraccli describe job
E-5

"message" : null, "response" : [ { "startTime" : "Thu Oct 15 18:37:38 UTC 2015", "endTime" : "Thu Oct 15 18:37:39 UTC 2015", "status" : "SUCCESS", "taskId" : "TaskZJsonRpcExt_6939", "taskResult" : "Resource { id: 1444934258987, name: null, description: null }", "taskName" : "DB Config files backup", "taskDescription" : null }, { "startTime" : "Thu Oct 15 18:37:39 UTC 2015", "endTime" : "Thu Oct 15 18:38:10 UTC 2015", "status" : "SUCCESS", "taskId" : "TaskZJsonRpcExt_6941", "taskResult" : "Resource { id: 1444934260034, name: null, description: null }", "taskName" : "Database Backup", "taskDescription" : null }, { "startTime" : "Thu Oct 15 18:38:11 UTC 2015", "endTime" : "Thu Oct 15 18:38:11 UTC 2015", "status" : "SUCCESS", "taskId" : "TaskZJsonRpcExt_6943", "taskResult" : "Resource { id: 1444934291029, name: null, description: null }", "taskName" : "Persisting Backup metadata", "taskDescription" : null } ]}[opc@example1 ~]$
raccli describe system
This topic does not apply to Oracle Cloud Infrastructure.
The describe system subcommand of the raccli utility providesinformation about the installation of Grid Infrastructure, OracleDatabase, and the RDK cloud tooling on an Oracle Database CloudService database deployment that uses Oracle Real ApplicationClusters (RAC).
raccli describe system
Example
Here is an example of the describe system subcommand.
[opc@example1 ~]$ raccli describe system
"serviceName": "example"{ "NodeName": "example1" { "componentType": "GridHome" "componentName": "OraGrid12102" "componentVersion": "12.1.0.2.0(21297657, 20299018)" } { "componentType": "DatabaseHome" "componentName": "OraDB12102_home1" "componentVersion": "12.1.0.2.10 (21125181)"
Appendix Eraccli describe system
E-6

} { "componentType": "RDK" "componentName": "RDK" "componentVersion": "15.4.1.0.0" }}{ "NodeName": "example2" { "componentType": "GridHome" "componentName": "OraGrid12102" "componentVersion": "12.1.0.2.0(21297657, 20299018)" } { "componentType": "DatabaseHome" "componentName": "OraDB12102_home1" "componentVersion": "12.1.0.2.10 (21125181)" } { "componentType": "RDK" "componentName": "RDK" "componentVersion": "15.4.1.0.0" }}
[opc@example1 ~]$
raccli failover dataguard
This topic does not apply to Oracle Cloud Infrastructure.
The failover dataguard subcommand of the raccli utility is used toperform a manual failover to the standby database in your DataGuard configuration. Run this subcommand on a compute node ofthe standby database you are failing over to.
raccli failover dataguard [-dbname database-name] -passwd database-password
When the failover operation completes successfully, the once-primary database is nolonger a member of the Data Guard configuration, and the once-standby database hasthe role of primary database.
This subcommand runs asynchronously. That is, it creates a job to perform the failoveroperation, reports the job ID of the created job, and then exits. To track the progress ofthe job to its completion, use the raccli describe job command.
If the subcommand fails, it reports a FAILURE status and provides a messagedescribing the reason for the failure.
Appendix Eraccli failover dataguard
E-7

Note:
You must manually configure backups after the failover operation completes.For instructions, see Manual backup configuration required after switchover orfailover on Oracle RAC plus Data Guard deployments in Known Issues forOracle Database Cloud Service.
Options of this subcommand are as follows.
Option Description
-dbname database-name (Optional) The database unique name of the standby databasethat you are failing over to.
-passwd database-password
The password of the database’s SYS user.
raccli list backup
This topic does not apply to Oracle Cloud Infrastructure.
The list backup subcommand of the raccli utility provides a list andstatus of all the backup jobs on an Oracle Database Cloud Servicedatabase deployment that uses Oracle Real Application Clusters(RAC).
raccli list backup
Example
Here is an example of the list backup subcommand. The output in this exampleshows the detail of the backup taken in the raccli create backup example.
[opc@example1 ~]$ raccli list backup
[ { "updatedTimestamp" : "2015-10-11, 01:03:01", "id" : 1444525202870, "name" : "rdbaas_backup", "description" : null,... "location" : "DISK", "info" : "Location /u03/app/oracle" } ] } ], "jobId" : "6"}, { "updatedTimestamp" : "2015-10-15, 18:38:11", "id" : 1444934257459, "name" : "rdbaas_backup", "description" : null, "createTimeStamp" : "2015-10-15, 18:37:37", "type" : "Backup", "tagName" : "backuptest", "endTime" : null,
Appendix Eraccli list backup
E-8

"backupComponents" : [ { "updatedTimestamp" : "2015-10-15, 18:37:39", "id" : 1444934258987, "name" : null, "description" : null, "createTimeStamp" : "2015-10-15, 18:37:38", "type" : null, "component_name" : "DBConfig", "backupLocations" : [ { "updatedTimestamp" : "2015-10-15, 18:37:39", "id" : 1444934259945, "name" : null, "description" : null, "createTimeStamp" : "2015-10-15, 18:37:39", "type" : null, "location" : "DISK", "info" : "Location /u03/app/oracle" } ] }, { "updatedTimestamp" : "2015-10-15, 18:38:11", "id" : 1444934260034, "name" : null, "description" : null, "createTimeStamp" : "2015-10-15, 18:37:40", "type" : null, "component_name" : "Database", "backupLocations" : [ { "updatedTimestamp" : "2015-10-15, 18:38:10", "id" : 1444934290955, "name" : null, "description" : null, "createTimeStamp" : "2015-10-15, 18:38:10", "type" : null, "location" : "DISK", "info" : "Location /u03/app/oracle" } ] } ], "jobId" : "7"} ][opc@example1 ~]$
raccli list backupconfig
This topic does not apply to Oracle Cloud Infrastructure.
The list backupconfig subcommand of the raccli utility provides alist of the backup configuration settings for an Oracle DatabaseCloud Service database deployment that uses Oracle RealApplication Clusters (RAC).
raccli list backupconfig
Example
Here is an example of the list backupconfig subcommand.
[opc@example1 ~]$ raccli list backupconfig
{
Appendix Eraccli list backupconfig
E-9

"updatedTimestamp" : "2015-10-10, 01:41:20", "id" : 1444441280176, "name" : "rdbaas_backup_config", "description" : null, "createTimeStamp" : "2015-10-10, 01:41:20", "type" : "BackupConfig", "dbHomeBackup" : false, "giHomeBackup" : false, "backupOsConfigFiles" : true, "backupGiConfigFiles" : true, "diskEnabled" : true, "ossEnabled" : false, "diskRecoveryWindow" : 7, "ossRecoveryWindow" : 30, "cronDate" : "01:00", "backupConfigFiles" : true, "osConfigFilesRef" : "/opt/oracle/dcs/rdbaas/config/oscfg.spec", "giConfigFilesRef" : "/opt/oracle/dcs/rdbaas/config/gicfg.spec", "dbConfigFilesRef" : "/opt/oracle/dcs/rdbaas/config/dbcfg.spec", "cloudStorageServiceName" : null, "cloudStorageIdentityDomain" : null, "cloudStorageUser" : null, "cloudStorageHost" : null, "cloudStoreContainer" : null}[opc@example1 ~]$
raccli list jobs
This topic does not apply to Oracle Cloud Infrastructure.
The list jobs subcommand of the raccli utility provides a list of allthe jobs on an Oracle Database Cloud Service database deploymentthat uses Oracle Real Application Clusters (RAC).
raccli list jobs
Example
Here is an example of the list jobs subcommand.
[opc@example1 ~]$ raccli list jobs
Job Id Job Name Status Message1 service creation Success null2 backup creation Success null3 backup creation Success null4 backup creation Success null5 backup creation Success null6 backup creation Success null7 backup creation Success null8 Create recovery Running null
[opc@example1 ~]$
Appendix Eraccli list jobs
E-10

raccli list recovery
This topic does not apply to Oracle Cloud Infrastructure.
The list recovery subcommand of the raccli utility providesinformation about recovery jobs.
raccli list recovery [-id recovery-id][-tag recovery-tagname]
Options of this subcommand are as follows.
Option Description
-id recovery-id The system-generated ID of the recovery job. Use this option todisplay information about a specific recovery job.
-tag recovery-tagname The name supplied when the recovery job was submitted. Usethis option to display information about a specific recovery job.
Example
Here is an example of the list recovery subcommand. The output in this exampleshows the detail of the recovery performed in the raccli create recovery example.
[opc@example1 ~]$ raccli list recovery
[ { "updatedTimestamp" : "2015-10-15, 18:47:17", "id" : 1444934529920, "name" : "rdbaas_recovery", "description" : null, "createTimeStamp" : "2015-10-15, 18:42:09", "type" : "Recovery", "recoveryComponents" : [ { "updatedTimestamp" : "2015-10-15, 18:47:17", "id" : 1444934530186, "name" : "rdbaas_recovery_database", "description" : null, "createTimeStamp" : "2015-10-15, 18:42:10", "type" : null, "component_type" : "Database", "recoveryParams" : [ { "updatedTimestamp" : "2015-10-15, 18:42:10", "id" : 1444934530485, "name" : "rdbaas_recovery_database_parameters", "description" : null, "createTimeStamp" : "2015-10-15, 18:42:10", "type" : null, "parameter" : "latest", "value" : "true" } ] } ], "recoveryTag" : "backuptest", "endTime" : null, "jobId" : "8"} ][opc@example1 ~]$
Appendix Eraccli list recovery
E-11

raccli reinstate dataguard
This topic does not apply to Oracle Cloud Infrastructure.
The reinstate dataguard subcommand of the raccli utility is used toreinstate a failed primary database as a standby database after afailover. Run this subcommand on a compute node of the currentprimary database.
raccli reinstate dataguard [-dbname database-name] -passwd database-password
When the reinstate operation completes successfully, the once-primary database isreinstated as a member of the Data Guard configuration in the role of standbydatabase.
Note:
If your database deployment is running Oracle Database Release 12.2, thenbefore you run the raccli reinstate dataguard command you must make surethe database you are reinstating is stopped or is started in MOUNT mode. To startthe database in MOUNT mode, enter these commands:
srvctl stop database -d db-unique-name -o abortsrvctl start database -d db-unique-name -o mount
The raccli reinstate dataguard subcommand runs asynchronously. That is, it createsa job to perform the reinstate operation, reports the job ID of the created job, and thenexits. To track the progress of the job to its completion, use the raccli describe jobcommand.
If the subcommand fails, it reports a FAILURE status and provides a messagedescribing the reason for the failure.
Options of this subcommand are as follows.
Option Description
-dbname database-name (Optional) The database unique name of the database that youare reinstating.
-passwd database-password
The password of the database’s SYS user.
raccli status dataguard
This topic does not apply to Oracle Cloud Infrastructure.
The status dataguard subcommand of the raccli utility displaysstatus information about the Data Guard configuration. You can run
Appendix Eraccli reinstate dataguard
E-12

this subcommand on a compute node of either the primary orstandby database.
raccli status dataguard -passwd database-password
This subcommand provides information about the Data Guard configuration, includingits primary and standby databases and the Oracle RAC nodes hosting each of thedatabases.
Options of this subcommand are as follows.
Option Description
-passwd database-password
The password of the database’s SYS user.
raccli switchover dataguard
This topic does not apply to Oracle Cloud Infrastructure.
The switchover dataguard subcommand of the raccli utility is used toperform a switchover to the standby database in your Data Guardconfiguration. You can run this subcommand on a compute node ofeither the primary or standby database.
raccli switchover dataguard [-dbname database-name] -passwd database-password
When the switchover operation completes successfully, the roles of the two databasesare reversed: what was the primary database is now the standby database, and whatwas the standby database is now the primary database. Both remain as members ofthe Data Guard configuration.
This subcommand runs asynchronously. That is, it creates a job to perform theswitchover, reports the job ID of the created job, and then exits. To track the progressof the job to its completion, use the raccli describe job command.
If the subcommand fails, it reports a FAILURE status and provides a messagedescribing the reason for the failure.
Note:
You must manually configure backups after the switchover operationcompletes. For instructions, see Manual backup configuration required afterswitchover or failover on Oracle RAC plus Data Guard deployments in KnownIssues for Oracle Database Cloud Service.
Options of this subcommand are as follows.
Option Description
-dbname database-name (Optional) The database unique name of the standby databasethat will be the primary database after the switchover completes.
Appendix Eraccli switchover dataguard
E-13

Option Description
-passwd database-password
The password of the database’s SYS user.
raccli update backupconfig
This topic does not apply to Oracle Cloud Infrastructure.
The update backupconfig subcommand of the raccli utility updatesthe backup configuration on an Oracle Database Cloud Servicedatabase deployment that uses Oracle Real Application Clusters(RAC).
Note:
If you have used the update rdk subcommand of the raccli utility to update thecloud tooling to 16.4.5 or later, you must manually update the opc installer forthe Oracle Database Cloud Backup Module before you use the updatebackupconfig subcommand. For instructions, see in Updating the cloud toolingon a deployment hosting Oracle RAC requires manual update of the OracleDatabase Cloud Backup Module in Known Issues for Oracle Database CloudService.
raccli update backupconfig -params parameter-string
This subcommand runs synchronously.
Options of this subcommand are as follows.
Option Description
-params parameter-string
The parameters to update.
Parameters
The parameter string is a single JSON object that specifies the backup configurationsettings to be updated.
The following table describes the parameters that can be specified in this JSON string.
Parameter Description
backupDerby Controls whether a backup of the metadata store for each RACcompute node is taken. Enter true (default) or false.
backupGiConfigFiles Controls whether a backup of the Grid Infrastructure configurationfiles is taken. Enter true (default) or false .
backupOsConfigFiles Controls whether a backup of operating system configuration filesis taken. Enter true (default) or false .
Appendix Eraccli update backupconfig
E-14

Parameter Description
dbHomeBackup Controls whether a backup of the Oracle Database home is taken.Enter true or false (default).
cloudStorageContainerUrl
The URL of the Oracle Storage Cloud Service container.
cloudStoragePwd The password of the user specified in cloudStorageUser. Youmust also provide the user name in cloudStorageUser.
cloudStorageUser The user name of an Oracle Cloud user who has read/writeaccess to the container. You must also provide the password ofthe user in cloudStoragePwd.
cronDate Specifies the time (using 24-hour, HH:MM format) when dailybackups are to occur. For example, 02:45 is 2:45 AM, and 14:45is 2:45 PM. The default value is 01:00.
diskEnabled Controls whether backups to local storage on the compute nodeare configured. Enter true or false. You must enter the samevalue in ossEnabled.
diskRecoveryWindow The number of days for which backups and archived redo logs onlocal storage are maintained. The interval always ends with thecurrent time and extends back in time for the number of daysspecified. The default value is 7.
giHomeBackup Controls whether a backup of the Grid Infrastructure home istaken. Enter true or false (default).
ossEnabled Controls whether backups to an Oracle Storage Cloud Servicecontainer using Oracle Database Backup Cloud Service are to beconfigured. Enter true or false. You must enter the same valuein diskEnabled.
ossRecoveryWindow The number of days for which backups on cloud storage aremaintained. The interval always ends with the current time andextends back in time for the number of days specified. The defaultvalue is 30.
Example
Here is an example of the update backupconfig subcommand. You can use the racclilist backupconfig subcommand to view your changes.
[opc@example1 ~]$ raccli update backupconfig -params '{"cronDate" : "02:45"}'
{ "requestStatus" : "SUCCESS", "jobStatus" : "SUCCESS", "message" : null, "response" : [ ]} [opc@example1 ~]$
raccli update databasepassword
This topic does not apply to Oracle Cloud Infrastructure.
Appendix Eraccli update databasepassword
E-15

The update databasepassword subcommand of the raccli utilityupdates the password in the keystore (wallet) and optionally updatesthe password of the SYS and SYSTEM users.
Note:
This command is only applicable if your database deployment uses OracleReal Application Clusters (RAC) and Oracle Data Guard together.
You must execute this command if you have used the update rdk command toupdate the cloud tooling from release 17.2.1 or an earlier release.
raccli update databasepassword -password password [-saveonly]
If you are executing this command following an update to the cloud tooling fromrelease 17.2.1 or earlier, you must execute the command with the –saveonly option onboth the primary and standby database to update the password in the keystore.
If you are executing this command to update the password in the keystore and toupdate the password for the SYS and SYSTEM users, you must also copy the passwordfile from the primary database to the standby database after executing the commandon the primary database for Oracle Database 11g and Oracle Database 12c Release1. You do not need to copy the password file for Oracle Database 12c Release 2.
This subcommand runs synchronously.
If the subcommand fails, it reports a FAILURE status and provides a messagedescribing the reason for the failure.
Options of this subcommand are as follows.
Option Description
—password password The password specified when the database deployment wascreated, unless you have changed the wallet password since thedeployment was created.
—saveonly This option indicates the password should be updated only in thekeystore (wallet). If you omit this option when executing thecommand on the primary database, the password is updated inthe keystore (wallet) and for the SYS and SYSTEM users. If you omitthis option when executing the command on the standbydatabase, the password is updated only in the keystore (wallet).
raccli update netsec
This topic does not apply to Oracle Cloud Infrastructure.
The update netsec subcommand of the raccli utility updates theOracle Net security configuration on an Oracle Database Cloud
Appendix Eraccli update netsec
E-16

Service database deployment that uses Oracle Real ApplicationClusters (RAC).
raccli update netsec {-encryption|-integrity} {-server|-client} -type type -algorithm algorithm
This subcommand runs synchronously.
If the subcommand fails, it reports a FAILURE status and provides a messagedescribing the reason for the failure.
Options of this subcommand are as follows.
Option Description
-encryption Controls whether Oracle Net Services data encryption isconfigured.
-integrity Controls whether Oracle Net Services data integrity is configured.
-server Specifies that the Oracle Net Services data encryption or dataintegrity configuration is for the server. Use this value.
-client Specifies that the Oracle Net Services data encryption or dataintegrity configuration is for the client.
Appendix Eraccli update netsec
E-17

Option Description
-type type Specifies how Oracle Net Services data encryption or dataintegrity is negotiated with clients.
For data encryption enter one of these values:
• rejected—Enter this value if you do not elect to enable dataencryption, even if required by the client.
In this scenario, this side of the connection specifies that dataencryption is not permitted. If the client side is set torequired, the connection terminates with error messageORA-12650. If the client side is set to requested, accepted orrejected, the connection continues without error and withoutdata encryption enabled.
• accepted—Select this value to enable data encryption ifrequired or requested by the client.
In this scenario, this side of the connection does not requiredata encryption, but it is enabled if the client side is set torequired or requested. If the client side is set to required orrequested, and an encryption algorithm match is found, theconnection continues without error and with data encryptionenabled. If the client side is set to required and no algorithmmatch is found, the connection terminates with error messageORA-12650.
If the client side is set to requested and no algorithm matchis found, or if the client side is set to accepted or rejected,the connection continues without error and without dataencryption enabled.
• requested—Select this value to enable data encryption if theclient permits it.
In this scenario, this side of the connection specifies that dataencryption is desired but not required. Data encryption isenabled if the client side specifies accepted, requested, orrequired. There must be a matching algorithm available,otherwise data encryption is not enabled. If the client sidespecifies required and there is no matching algorithm, theconnection fails.
• required—Select this value to enable data encryption orpreclude the connection.
In this scenario, this side of the connection specifies that dataencryption must be enabled. The connection fails if the clientside specifies rejected or if there is no compatible algorithm.
For data integrity enter one of these values:• rejected—Enter this value if you do not elect to enable data
integrity, even if required by the client.
In this scenario, this side of the connection specifies that dataintegrity is not permitted. If the client side is set to required,the connection terminates with error message ORA-12650. Ifthe client side is set to requested, accepted or rejected, theconnection continues without error and without data integrityenabled.
• accepted—Select this value to enable data integrity ifrequired or requested by the client.
In this scenario, this side of the connection does not requiredata integrity, but it is enabled if the client side is set torequired or requested. If the client side is set to required or
Appendix Eraccli update netsec
E-18

Option Description
requested, and an integrity algorithm match is found, theconnection continues without error and with data integrityenabled. If the client side is set to required and no algorithmmatch is found, the connection terminates with error messageORA-12650.
If the client side is set to requested and no algorithm matchis found, or if the client side is set to accepted or rejected,the connection continues without error and without dataintegrity enabled.
• requested—Select this value to enable data integrity if theclient permits it.
In this scenario, this side of the connection specifies that dataintegrity is desired but not required. Data integrity is enabledif the client side specifies accepted, requested, or required.There must be a matching algorithm available, otherwise dataintegrity is not enabled. If the client side specifies requiredand there is no matching algorithm, the connection fails.
• required—Select this value to enable data integrity orpreclude the connection.
In this scenario, this side of the connection specifies that dataintegrity must be enabled. The connection fails if the clientside specifies rejected or if there is no compatible algorithm.
-algorithm algorithm The algorithm to be used for data encryption or data integrity. Forencryption, the choices are AES128, AES192, and AE256. Forintegrity with Oracle Database 12c, the choices are SHA1,SHA512, SHA384, and SHA25. For integrity with Oracle Database11g, the only accepted value is SHA1.
raccli update rdk
This topic does not apply to Oracle Cloud Infrastructure.
The update rdk subcommand of the raccli utility updates the cloudtooling on an Oracle Database Cloud Service database deploymentthat uses Oracle Real Application Clusters (RAC).
Note:
If you are updating a database deployment that also uses Oracle Data Guardand are updating from release 17.2.1 or earlier, you must also execute the update databasepassword command to store the password in the keystore(wallet).
raccli update rdk -tag tag-number
This subcommand runs asynchronously. That is, it creates a job to update the cloudtooling, reports the job ID of the created job, and then exits. To track the progress ofthe job to its completion, use the raccli describe job command.
Appendix Eraccli update rdk
E-19
If the subcommand fails, it reports a FAILURE status and provides a messagedescribing the reason for the failure.
Options of this subcommand are as follows.
Option Description
-tag tag-number The tag of the cloud tooling to update to. For tag-number enterthe version of tooling you want to update to without the dots in theversion number. For example, to update to 17.2.3 tooling youwould enter 1723.
To find out the tag number for the latest available tooling update,see What's New for Oracle Database Cloud Service.
Example
Here is an example of the update rdk subcommand. You can use the raccli describejob subcommand to view details about the job that is started when you execute thissubcommand.
[opc@example1 ~]$ raccli update rdk -tag 1723
{ "jobId" : "10", "requestStatus" : "SUCCESS"} [opc@example1 ~]$
raccli update server
This topic does not apply to Oracle Cloud Infrastructure.
The update server subcommand of the raccli utility checks for andcorrects any configuration issues related to the Linux OS running ona compute node of an Oracle Database Cloud Service databasedeployment that uses Oracle Real Application Clusters (RAC).
raccli update server -tag tag-number [-no-reboot] [-allnodes]
Options of this subcommand are as follows.
Option Description
-tag tag-number The tag of the server update to run. In general, you specify thevalue of your current RDK version, as reported by the racclidescribe system command, but without the dots or trailing zeros. Forexample, if raccli describe system reports an RDK version of18.1.1.0.0, you would specify 1811 as the tag number in araccli update server command.
-no-reboot When specified, the update server subcommand does not rebootthe compute node after correcting any configuration issues. Youmust manually reboot it, as described in Rebooting a ComputeNode. If -allnodes is also specified, neither compute node isrebooted and you must manually reboot each of them.
Appendix Eraccli update server
E-20

Option Description
-allnodes When specified, the update server subcommand checks for andcorrects any configuration issues on the current compute nodeand then performs the same operation on the other compute nodeof the cluster.
raccli update tde
This topic does not apply to Oracle Cloud Infrastructure.
The update tde subcommand of the raccli utility provides a way toenable transparent data encryption (TDE) and rotate the TDE key.
raccli update tde {-enable|-rotatekey} -passwd password
This subcommand runs synchronously.
If the subcommand fails, it reports a FAILURE status and provides a messagedescribing the reason for the failure.
Options of this subcommand are as follows.
Option Description
—enable Used to enable the TDE configuration.
—rotatekey Used to rotate the key.
—passwd password The password specified when the database deployment wascreated, unless you have changed the wallet password since thedeployment was created.
Example
Here is an example of the update tde subcommand. This example rotates (changes)the value of the master key.
[opc@example1 ~]$ raccli update tde -rotatekey -passwd Welcome_1
{ "requestStatus" : "SUCCESS", "jobStatus" : "SUCCESS", "message" : null, "response" : [ ]}[opc@example1 ~]$
Appendix Eraccli update tde
E-21

FThe dbpatchmdg Utility
The dbpatchmdg utility is provided on Oracle Database Cloud Service deployments thatare configured with Oracle Data Guard to perform a variety of patching operations.
Using the dbpatchmdg utility, you can perform operations like:
• List available patches
• Check if nodes are ready for patching
• Apply patches
• Roll back patches
Topics
• Running the dbpatchmdg Utility
• dbpatchmdg apply_async
• dbpatchmdg precheck_async
• dbpatchmdg rollback_async
Running the dbpatchmdg UtilityThe dbpatchmdg utility is provided on Oracle Database Cloud Service deployments thatare configured with Oracle Data Guard to perform a variety of patching operations.
This is the start of your topic.
To use the dbpatchmdg utility:
1. Connect as the opc user to a compute node associated with the Database CloudService deployment.
For instructions, see Connecting to a Compute Node Through Secure Shell (SSH).
2. Run the dbpatchmdg utility using a command of the form:
# dbpatchmdg -option option-options
3. When you are finished using the dbpatchmdg utility, exit the root-user commandshell and disconnect from the compute node:
# exit$ exit
F-1

dbpatchmdg apply_asyncThe apply_async option of the dbpatchmdg utility is used to apply a patch to the OracleDatabase home on an Oracle Database Cloud Service database deployment hostingan Oracle Data Guard configuration.
dbpatchmdg -apply_async patch_id [-sshkey=/root/sshkey] [-txn_fl=/var/opt/oracle/log/dbpatchmdg/file_name] [-exclude_node=ip address] [-no_switchover]
The apply_async option of the dbpatchmdg utility applies the patch on all nodes in theOracle Data Guard configuration, one after another. The node hosting the standbydatabase is patched first. A switchover operation is performed after patching iscomplete on the standby and then the patch is applied to the node hosting the newstandby.
Options of dbpatchmdg apply_async are as follows.
Option Description
patch_id The ID of the patch to be applied.
-sshkey=/root/sshkey The SSH key. Provide this if the SSH key has changed.
-txn_fl=/var/opt/oracle/log/dbpatchmdg/file_name
The file that the master transaction record will be written to.
-exclude_node=ipaddress
The IP address of a node that should be excluded from patching.If you want to specify this option, you must patch the standbydatabase before patching the primary database.
-no_switchover Indicates that no switchover should take place during patching.With this option, the primary database will incur downtime. If youwant to specify this option, you must patch the standby databasebefore patching the primary database.
dbpatchmdg precheck_asyncThe precheck_async option of the dbpatchmdg utility is used to check the prerequisites ofa patch before you apply it to an Oracle Database Cloud Service database deploymenthosting an Oracle Data Guard configuration.
dbpatchmdg -precheck_async patch_id [-sshkey=ssh_file] [-txn_fl=/var/opt/oracle/log/dbpatchmdg/file_name] [-exclude_node=ip address]
Options of dbpatchmdg precheck_async are as follows.
Option Description
patch_id The ID of the patch to be checked.
-sshkey=ssh_file The SSH key file name. Provide this if the SSH key has changed.
-txn_fl=/var/opt/oracle/log/dbpatchmdg/file_name
The file that the master transaction record will be written to.
-exclude_node=ipaddress
The IP address of a node that should be excluded from the check.
Appendix Fdbpatchmdg apply_async
F-2

dbpatchmdg rollback_asyncThe rollback_async option of the dbpatchmdg utility is used to roll back a patch that hasbeen applied on a Oracle Database Cloud Service database deployment hosting anOracle Data Guard configuration.
dbpatchmdg -rollback_async patch_id [-sshkey=ssh_file] [-txn_fl=/var/opt/oracle/log/dbpatchmdg/file_name] [-exclude_node=ip address] [-no_switchover]
Options of dbpatchmdg rollback_async are as follows.
Option Description
patch_id The ID of the patch to be rolled back.
-sshkey=ssh_file The SSH key file name. Provide this if the SSH key has changed.
-txn_fl=/var/opt/oracle/log/dbpatchmdg/file_name
The file that the master transaction record will be written to.
-exclude_node=ipaddress
The IP address of a node that should be excluded from the rollback.
-no_switchover Indicates that no switchover should take place during theoperation. With this option, the primary database will incurdowntime.
Appendix Fdbpatchmdg rollback_async
F-3